Embed Size (px)
Citation preview
Moodle 2.X Guide
Distance Learning Instructional Technology Administrator Page 2 of 27
About this manual . . .
This manual has been created as a basic guide to assist students in understanding Moodle. Instructions provided may vary somewhat according to versions. It is a work in progress.
Learning Management System Support:
Melissa Grill Instructional Technology Administrator [email protected] (828) 448-6097
Online form for technical assistance (web link: https://apollo.wpcc.edu/forms/bbform2.htm)
Chris Smith Director, Distance Learning [email protected]
Moodle 2.X Guide
Distance Learning Instructional Technology Administrator Page 3 of 27
Table of Contents
Introduction
Logging in to Moodle ........................................................................................................................ 4
Accessing your course ..................................................................................................................... 5
Navigating Moodle ........................................................................................................................................ 6
Navigation Block .............................................................................................................................. 6 Administration Block ......................................................................................................................... 6
Docking/Undocking a Block ............................................................................................................. 6
Expanding/Collapsing Blocks ........................................................................................................... 7
Enabling Pop-up Windows ............................................................................................................................ 9
Mozilla Firefox .................................................................................................................................. 9
Google Chrome ................................................................................................................................ 9
Internet Explorer ............................................................................................................................. 10
Editing your Profile ...................................................................................................................................... 10
Using the Calendar ..................................................................................................................................... 12
Viewing Grades ........................................................................................................................................... 12
Course Icons ............................................................................................................................................... 13
Course Resources ...................................................................................................................................... 13
Book ............................................................................................................................................... 14
Course Activities ......................................................................................................................................... 15
Assignment .................................................................................................................................... 15
Forum ............................................................................................................................................. 16
Posting to a Forum ............................................................................................................... 16
Editing a Post ....................................................................................................................... 18
Replying to a Post ................................................................................................................ 18
Submitting Assignments .............................................................................................................................. 19
File submissions ............................................................................................................................. 19
Online text ...................................................................................................................................... 21
Offline assignment ......................................................................................................................... 22
Testing in Moodle ........................................................................................................................................ 23
Index ............................................................................................................................................................ 27
Moodle 2.X Guide
Distance Learning Instructional Technology Administrator Page 4 of 27
Introduction
This guide assumes that you have at least a basic knowledge of using a computer including input devices like a mouse and keyboard. In addition, it is assumed that you are familiar with your web browser and navigating between pages on the internet. In this guide, you will be introduced to the basics of using Moodle as part of your studies. It is by no means a comprehensive document, so please contact your instructor immediately if you have questions or concerns about the course.
Logging into Moodle 1. Open your web browser.
a. Minimum browser requirement: Google Chrome 11, Firefox 10, Safari 5, Internet Explorer 8 (IE
10 required for drag and drop of files from outside the browser into Moodle)
2. Moodle URL:
• Type http://moodle.wpcc.edu in the browser’s address bar, and then press the Enter key.
Or • Go to the Western Piedmont Home page at http://www.wpcc.edu and click the Moodle link under
Western Piedmont Online.
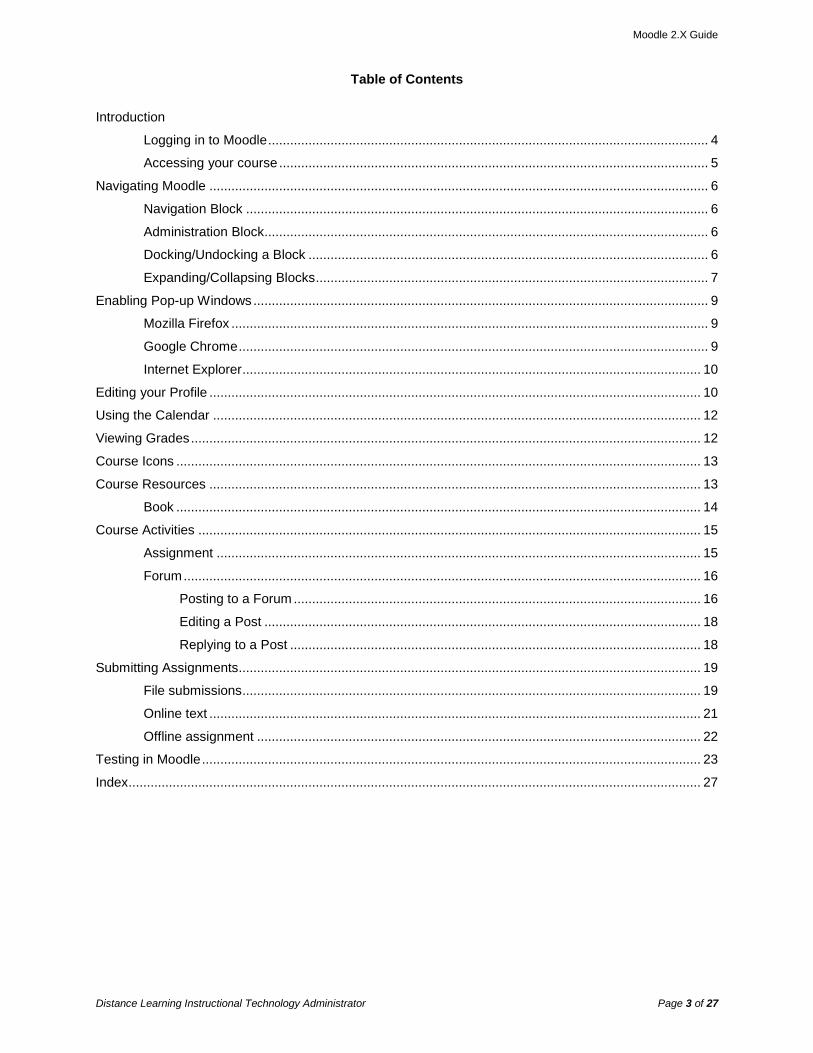
3. You should be at the Moodle login page.
4. Enter your Username and Password in the Login box and click the ‘Login’ button.
• Student Username format: last name+first initial+middle initial (leave off the + sign and no spaces) Example: John R Doe 0098765 would have a userid of doejr. Some duplicate usernames may include the last two digits of your student ID number.
• Password format: first initial+ last name +7 digit student ID Number. Example: John Doe, whose student ID Number is 012345 would have a password of jd0012345.
Moodle 2.X Guide
Distance Learning Instructional Technology Administrator Page 5 of 27
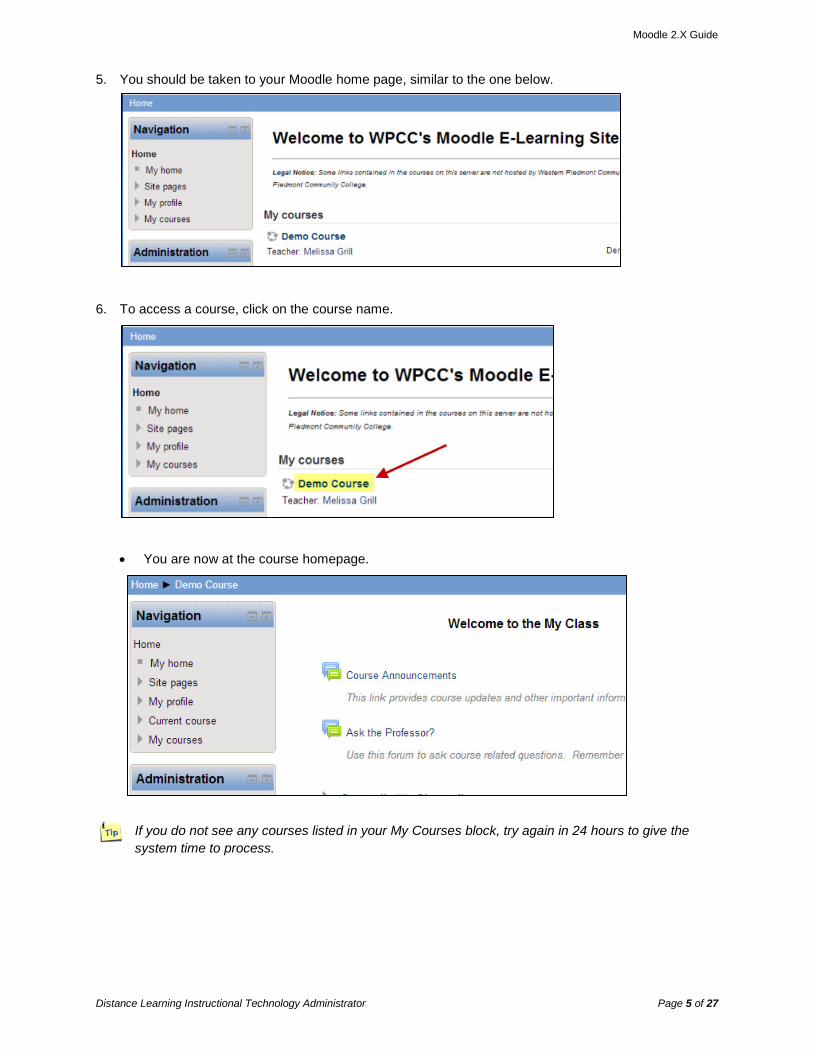
5. You should be taken to your Moodle home page, similar to the one below.
6. To access a course, click on the course name.
• You are now at the course homepage.
If you do not see any courses listed in your My Courses block, try again in 24 hours to give the system time to process.
Moodle 2.X Guide
Distance Learning Instructional Technology Administrator Page 6 of 27
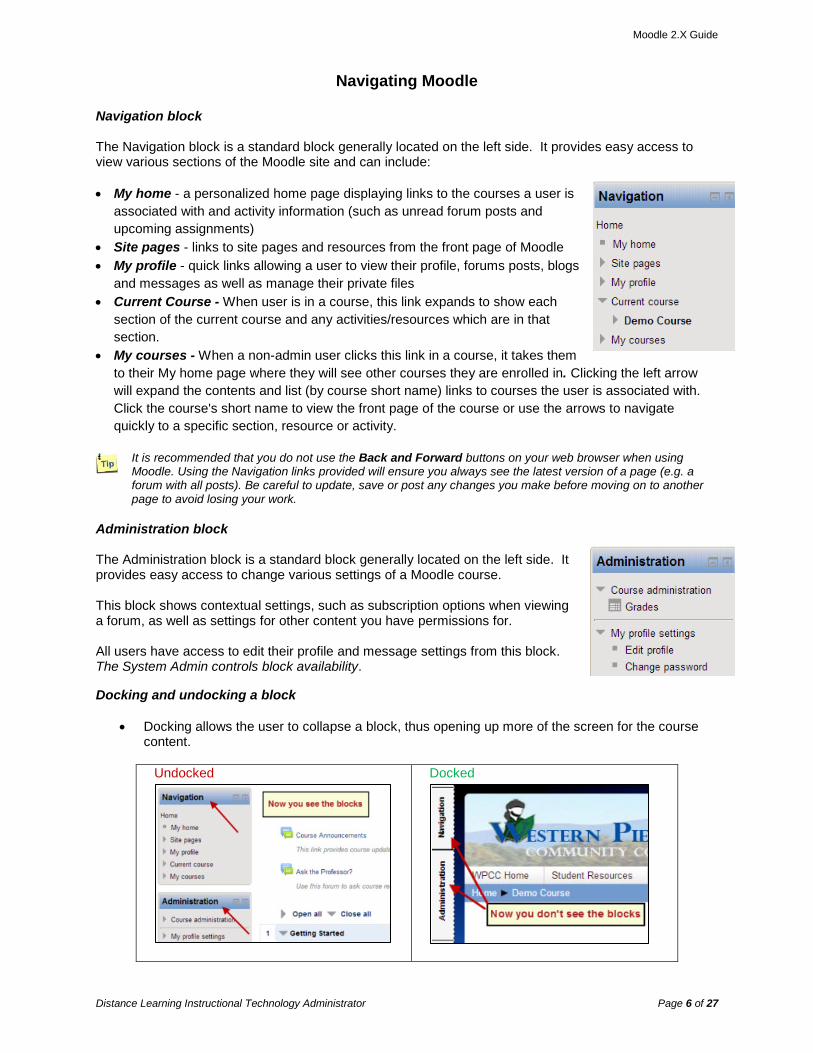
Navigating Moodle Navigation block The Navigation block is a standard block generally located on the left side. It provides easy access to view various sections of the Moodle site and can include: • My home - a personalized home page displaying links to the courses a user is
associated with and activity information (such as unread forum posts and upcoming assignments)
• Site pages - links to site pages and resources from the front page of Moodle • My profile - quick links allowing a user to view their profile, forums posts, blogs
and messages as well as manage their private files • Current Course - When user is in a course, this link expands to show each
section of the current course and any activities/resources which are in that section.
• My courses - When a non-admin user clicks this link in a course, it takes them to their My home page where they will see other courses they are enrolled in. Clicking the left arrow will expand the contents and list (by course short name) links to courses the user is associated with. Click the course's short name to view the front page of the course or use the arrows to navigate quickly to a specific section, resource or activity.
It is recommended that you do not use the Back and Forward buttons on your web browser when using Moodle. Using the Navigation links provided will ensure you always see the latest version of a page (e.g. a forum with all posts). Be careful to update, save or post any changes you make before moving on to another page to avoid losing your work.
Administration block The Administration block is a standard block generally located on the left side. It provides easy access to change various settings of a Moodle course. This block shows contextual settings, such as subscription options when viewing a forum, as well as settings for other content you have permissions for. All users have access to edit their profile and message settings from this block. The System Admin controls block availability.
Docking and undocking a block
• Docking allows the user to collapse a block, thus opening up more of the screen for the course content.
Undocked
Docked
Moodle 2.X Guide
Distance Learning Instructional Technology Administrator Page 7 of 27
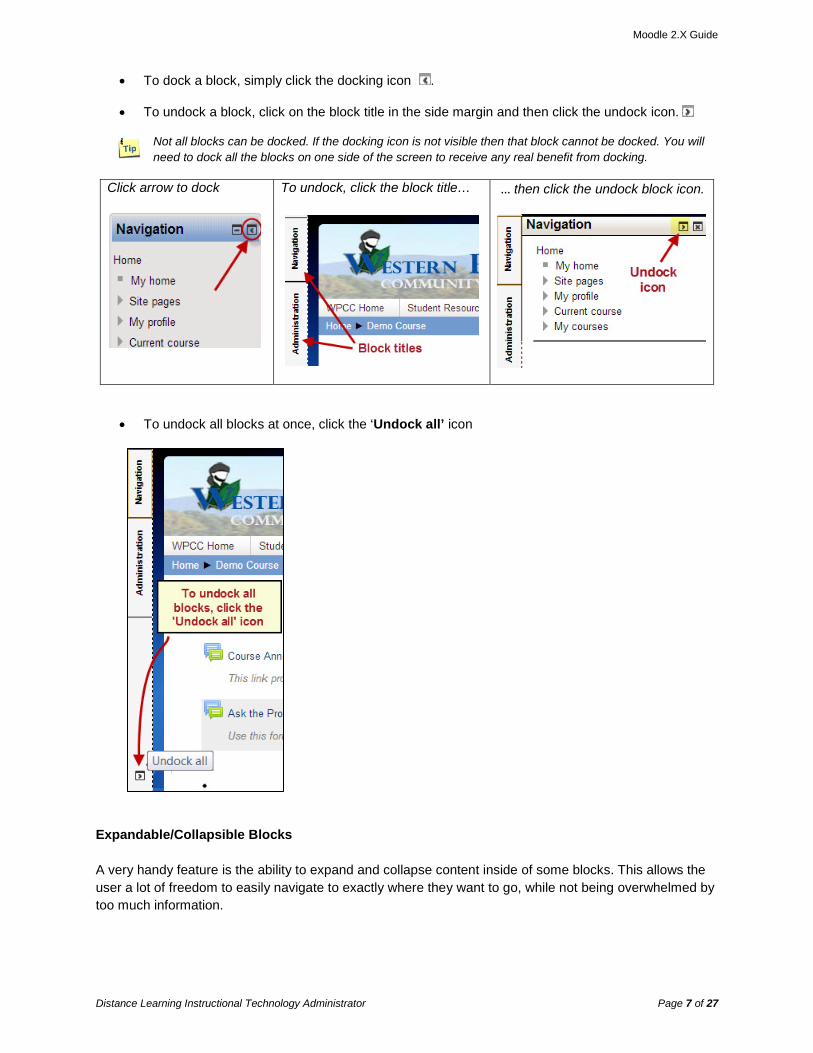
• To dock a block, simply click the docking icon .
• To undock a block, click on the block title in the side margin and then click the undock icon.
Not all blocks can be docked. If the docking icon is not visible then that block cannot be docked. You will need to dock all the blocks on one side of the screen to receive any real benefit from docking.
Click arrow to dock
To undock, click the block title…
… then click the undock block icon.
• To undock all blocks at once, click the ‘Undock all’ icon
Expandable/Collapsible Blocks A very handy feature is the ability to expand and collapse content inside of some blocks. This allows the user a lot of freedom to easily navigate to exactly where they want to go, while not being overwhelmed by too much information.
Moodle 2.X Guide
Distance Learning Instructional Technology Administrator Page 8 of 27
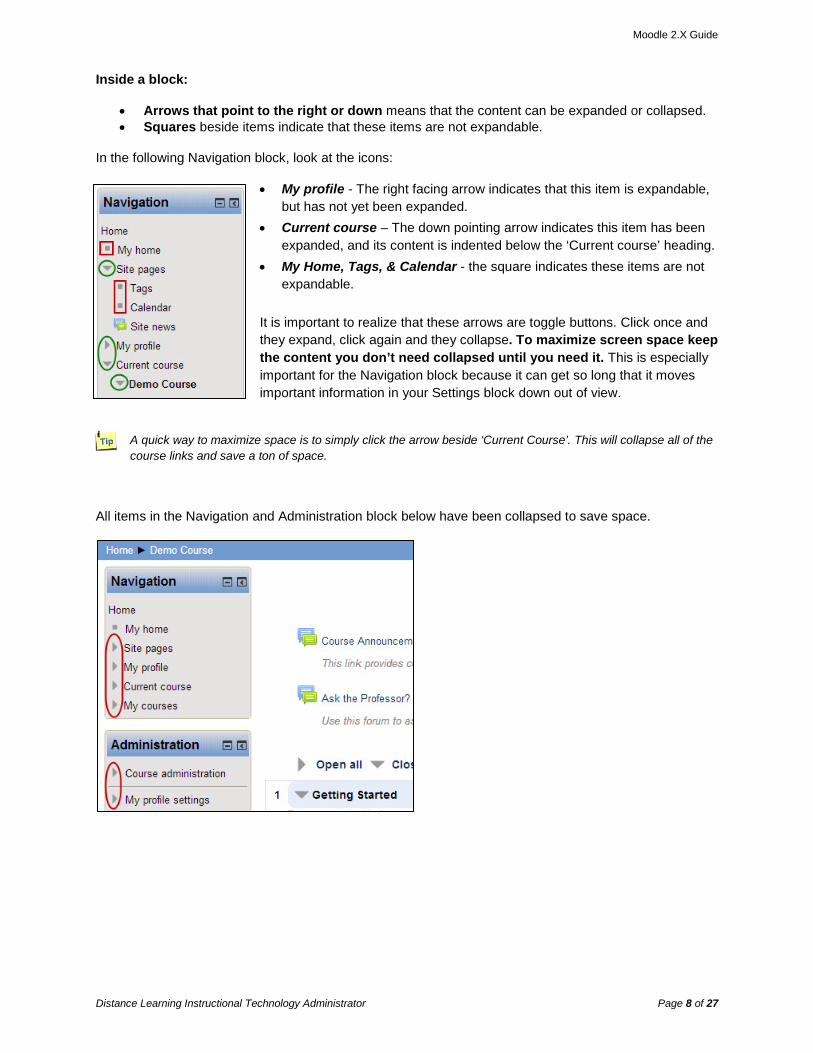
Inside a block:
• Arrows that point to the right or down means that the content can be expanded or collapsed. • Squares beside items indicate that these items are not expandable.
In the following Navigation block, look at the icons:
• My profile - The right facing arrow indicates that this item is expandable, but has not yet been expanded.
• Current course – The down pointing arrow indicates this item has been expanded, and its content is indented below the ‘Current course’ heading.
• My Home, Tags, & Calendar - the square indicates these items are not expandable.
It is important to realize that these arrows are toggle buttons. Click once and they expand, click again and they collapse. To maximize screen space keep the content you don’t need collapsed until you need it. This is especially important for the Navigation block because it can get so long that it moves important information in your Settings block down out of view.
A quick way to maximize space is to simply click the arrow beside ‘Current Course’. This will collapse all of the course links and save a ton of space.
All items in the Navigation and Administration block below have been collapsed to save space.
Moodle 2.X Guide
Distance Learning Instructional Technology Administrator Page 9 of 27
Enabling Pop-ups In order to take some tests, and to make full use of the Moodle Messaging system you should enable Pop-Ups for the WPCC Moodle site. Most browsers will have an automatic pop-up blocker, and there
may be additional ones built into add-ons like the Google or Yahoo toolbars. You may need to enable
popups in more than one place to ensure you receive your messages instantly. You may need to look
around a bit to locate the Popup controls for other browsers or add-ins, though the process should be
similar. Basic information is provided below for Mozilla Firefox, Google Chrome, and Internet Explorer;
however, instructions may vary depending on browser version and/or operating system.
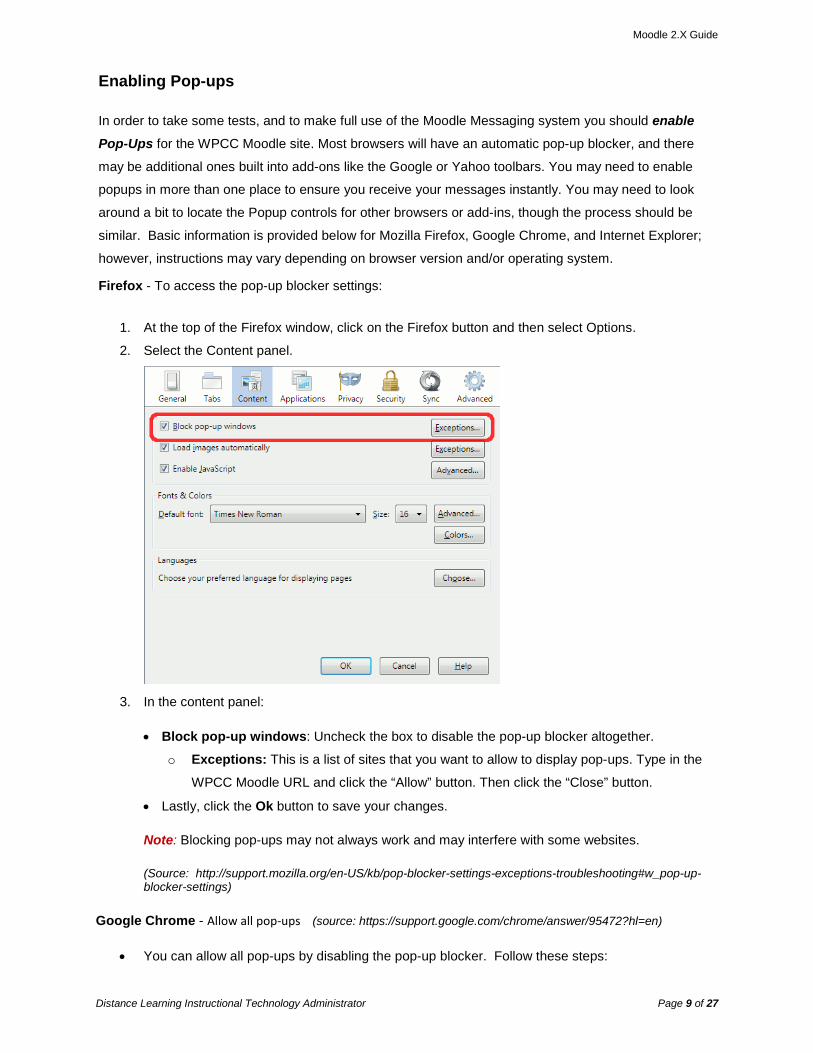
Firefox - To access the pop-up blocker settings:
1. At the top of the Firefox window, click on the Firefox button and then select Options.
2. Select the Content panel.
3. In the content panel:
• Block pop-up windows: Uncheck the box to disable the pop-up blocker altogether.
o Exceptions: This is a list of sites that you want to allow to display pop-ups. Type in the
WPCC Moodle URL and click the “Allow” button. Then click the “Close” button.
• Lastly, click the Ok button to save your changes.
Note: Blocking pop-ups may not always work and may interfere with some websites.
(Source: http://support.mozilla.org/en-US/kb/pop-blocker-settings-exceptions-troubleshooting#w_pop-up-blocker-settings)
Google Chrome - Allow all pop-ups (source: https://support.google.com/chrome/answer/95472?hl=en)
• You can allow all pop-ups by disabling the pop-up blocker. Follow these steps:
Moodle 2.X Guide
Distance Learning Instructional Technology Administrator Page 10 of 27
1. Click the Chrome menu on the browser toolbar.
2. Select Settings.
3. Click Show advanced settings.
4. In the "Privacy" section, click the Content settings button.
5. In the "Pop-ups" section, select "Allow all sites to show pop-ups." Customize permissions for
specific websites by clicking Manage exceptions.
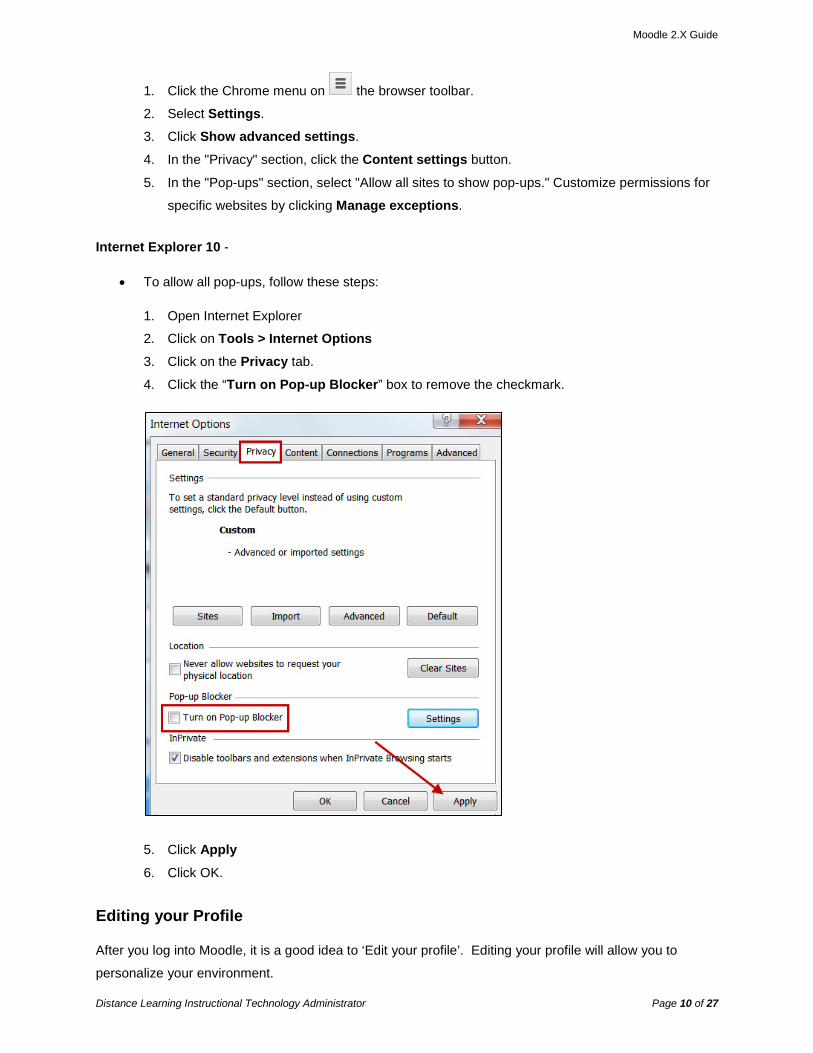
Internet Explorer 10 -
• To allow all pop-ups, follow these steps:
1. Open Internet Explorer
2. Click on Tools > Internet Options
3. Click on the Privacy tab.
4. Click the “Turn on Pop-up Blocker” box to remove the checkmark.
5. Click Apply
6. Click OK.
Editing your Profile After you log into Moodle, it is a good idea to ‘Edit your profile’. Editing your profile will allow you to
personalize your environment.
Moodle 2.X Guide
Distance Learning Instructional Technology Administrator Page 11 of 27
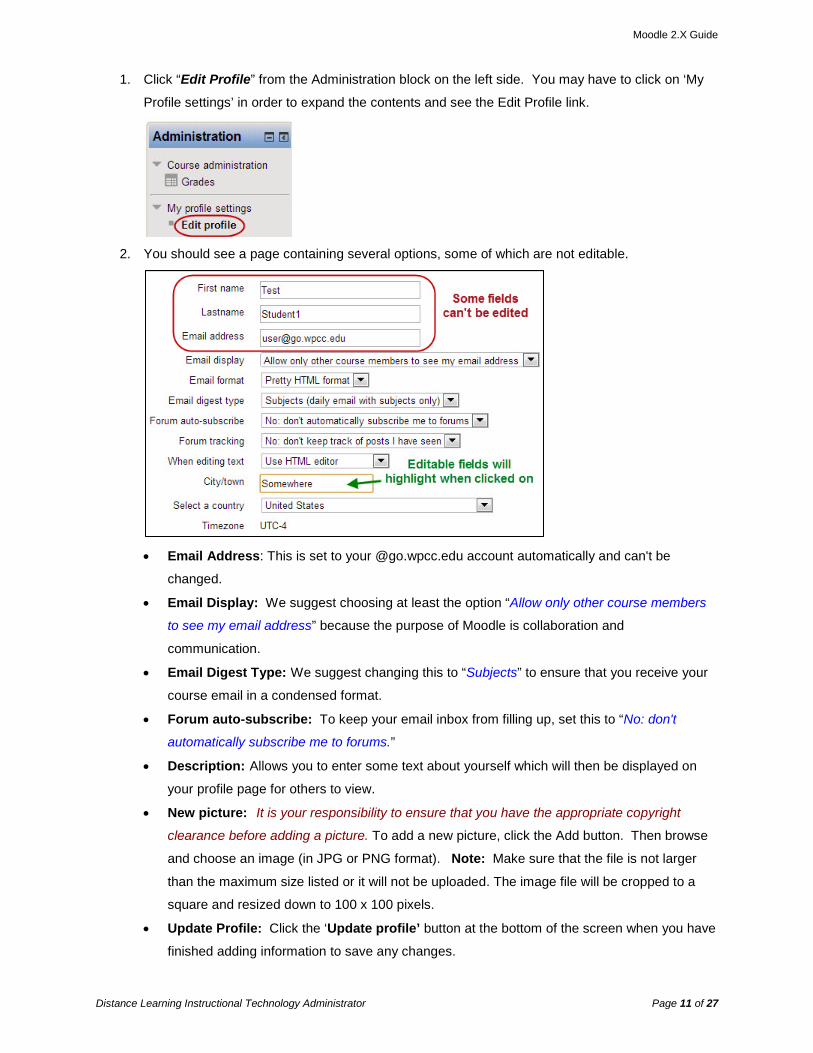
1. Click “Edit Profile” from the Administration block on the left side. You may have to click on ‘My
Profile settings’ in order to expand the contents and see the Edit Profile link.
2. You should see a page containing several options, some of which are not editable.
• Email Address: This is set to your @go.wpcc.edu account automatically and can't be
changed.
• Email Display: We suggest choosing at least the option “Allow only other course members
to see my email address” because the purpose of Moodle is collaboration and
communication.
• Email Digest Type: We suggest changing this to “Subjects” to ensure that you receive your
course email in a condensed format.
• Forum auto-subscribe: To keep your email inbox from filling up, set this to “No: don't
automatically subscribe me to forums.” • Description: Allows you to enter some text about yourself which will then be displayed on
your profile page for others to view. • New picture: It is your responsibility to ensure that you have the appropriate copyright
clearance before adding a picture. To add a new picture, click the Add button. Then browse
and choose an image (in JPG or PNG format). Note: Make sure that the file is not larger
than the maximum size listed or it will not be uploaded. The image file will be cropped to a
square and resized down to 100 x 100 pixels.
• Update Profile: Click the ‘Update profile’ button at the bottom of the screen when you have
finished adding information to save any changes.
Moodle 2.X Guide
Distance Learning Instructional Technology Administrator Page 12 of 27
Using the Calendar
The Moodle calendar is a very useful feature. The calendar is customized for
each student. When you are on the main Moodle page, the calendar will
contain notices about all of your different classes. Then once you go into a
particular class, you'll only see information about that one course. You should
use the calendar to stay up to date with your assignments and tests.
Viewing Grades
In Moodle, students can view their own grades at any time.
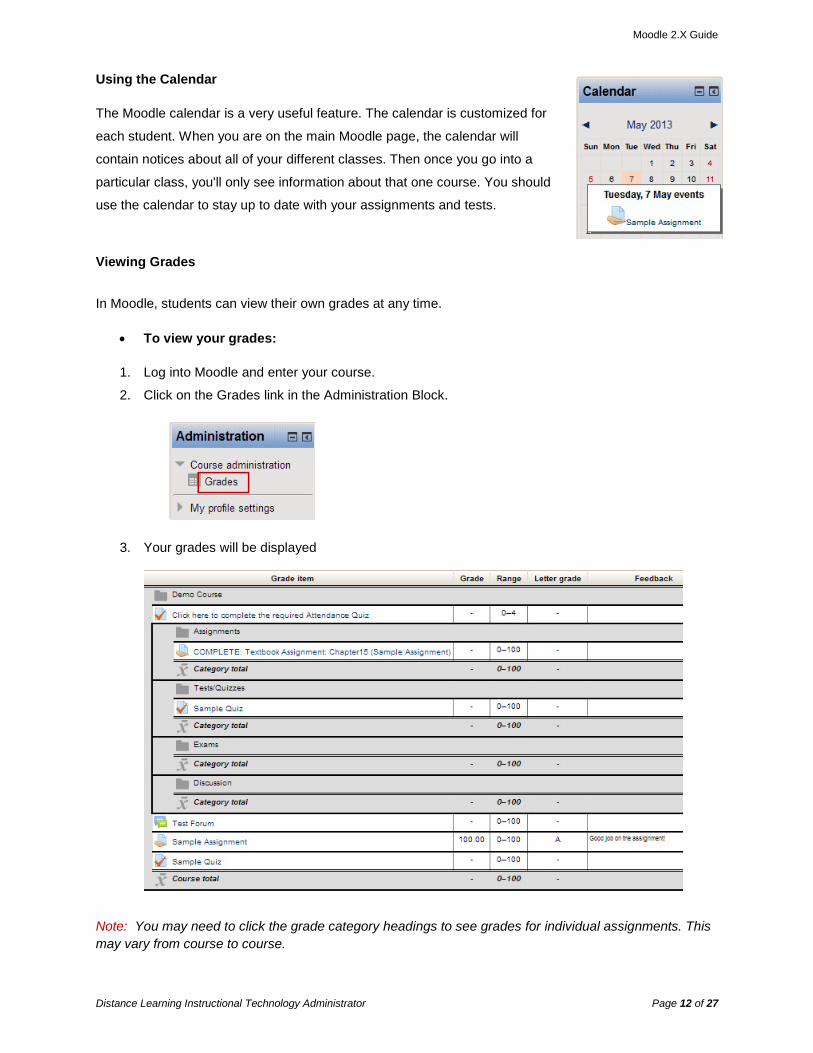
• To view your grades:
1. Log into Moodle and enter your course.
2. Click on the Grades link in the Administration Block.
3. Your grades will be displayed
Note: You may need to click the grade category headings to see grades for individual assignments. This may vary from course to course.

Moodle 2.X Guide
Distance Learning Instructional Technology Administrator Page 13 of 27
Course Icons Activity Icons Resource Icons
Course Resources “A resource is an item that a teacher can use to support learning, such as a file or link. Moodle supports a
range of resource types which teachers can add to their courses. Resources appear as a single link with
an icon in front of it that represents the type of resource.”
The most common Moodle resources include:
• Book - Multi-page resources with a book-like format
• File - A picture, a PDF document, a spreadsheet, a sound file, a video file
• Folder - For helping organize files and one folder may contain other folders
• Label - Can be a few displayed words or an image used to separate resources and activities in a
topic section, or can be a lengthy description or instructions
• Page - A single, scrollable screen that a teacher creates
• URL – Links to any place students can reach on their web browser, for example Wikipedia
Moodle 2.X Guide
Distance Learning Instructional Technology Administrator Page 14 of 27
Book
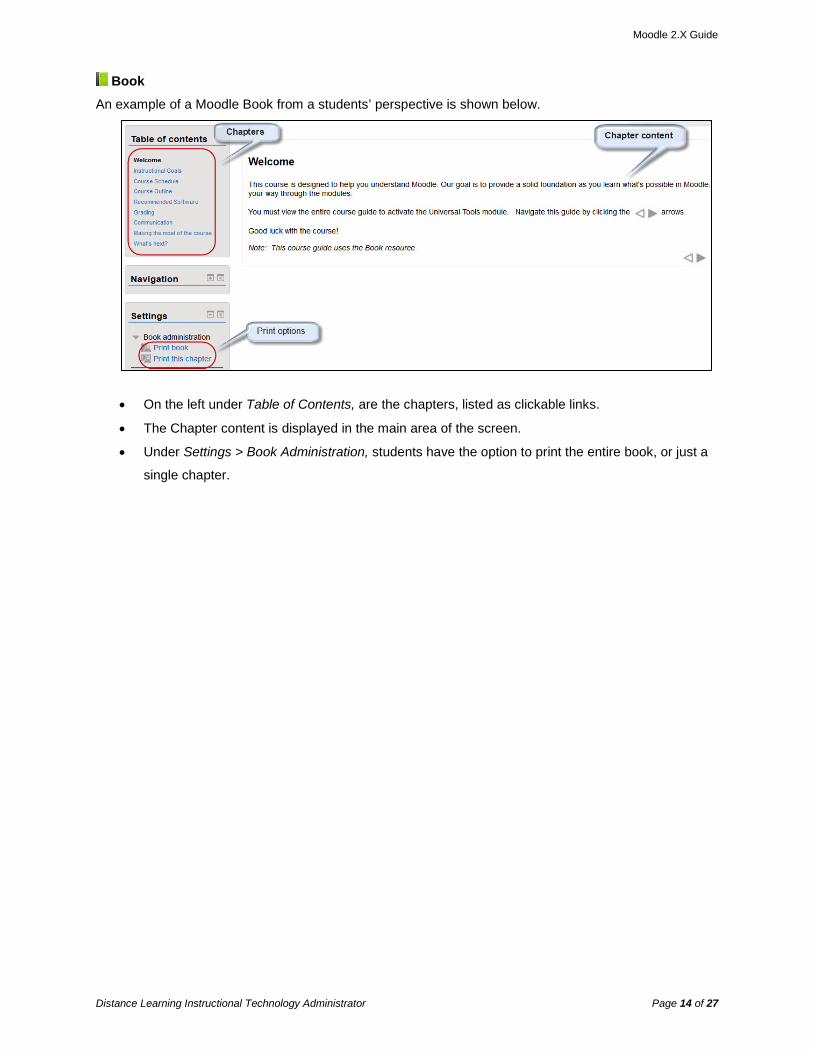
An example of a Moodle Book from a students’ perspective is shown below.
• On the left under Table of Contents, are the chapters, listed as clickable links.
• The Chapter content is displayed in the main area of the screen.
• Under Settings > Book Administration, students have the option to print the entire book, or just a
single chapter.
Moodle 2.X Guide
Distance Learning Instructional Technology Administrator Page 15 of 27
Course Activities
An activity is something allows a student to interact with other students and/or the teacher. There are
several different types of activities that can be found in Moodle. Your instructor may not use all of the
available activities.
Below is a list of some common course activities:
• Assignments - Enables teachers to grade and give comments on uploaded files and assignments.
• Chat - Allows participants to have a real-time synchronous discussion • Choice - A teacher asks a question and specifies a choice of multiple responses • Feedback - For creating and conducting surveys to collect feedback • Forum - Allows participants to have asynchronous discussions • Glossary - Enables participants to create and maintain a list of definitions, like a dictionary • Lesson - For delivering content in flexible ways • Quiz – To Allows the teacher to design and set quiz tests, which may be automatically marked
and feedback and/or to correct answers shown • Wiki - A collection of web pages that anyone can add to or edit
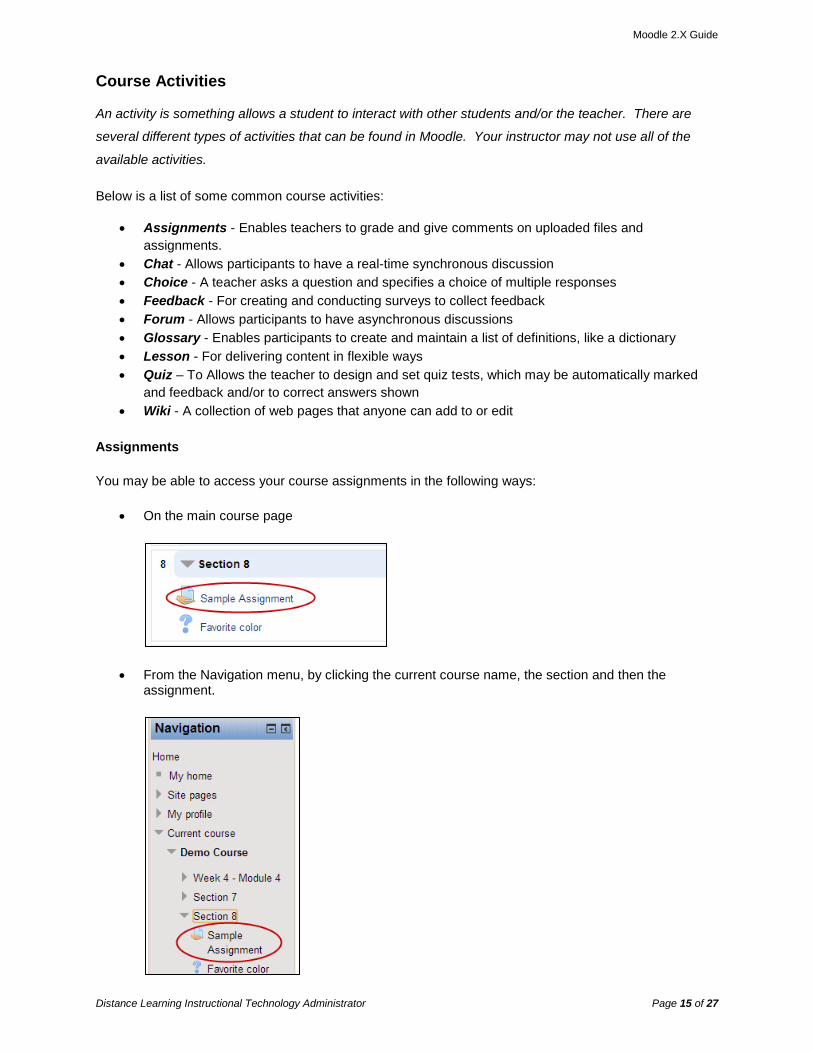
Assignments
You may be able to access your course assignments in the following ways:
• On the main course page
• From the Navigation menu, by clicking the current course name, the section and then the assignment.
Moodle 2.X Guide
Distance Learning Instructional Technology Administrator Page 16 of 27
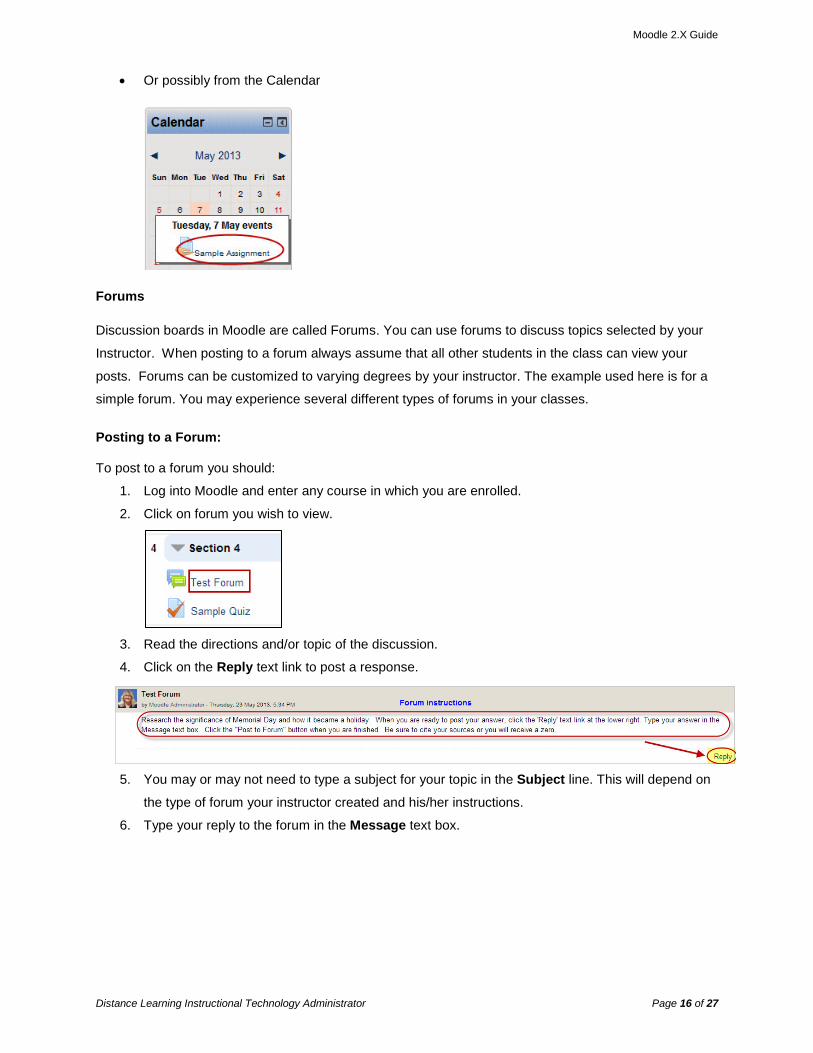
• Or possibly from the Calendar
Forums
Discussion boards in Moodle are called Forums. You can use forums to discuss topics selected by your
Instructor. When posting to a forum always assume that all other students in the class can view your
posts. Forums can be customized to varying degrees by your instructor. The example used here is for a
simple forum. You may experience several different types of forums in your classes. Posting to a Forum: To post to a forum you should:
1. Log into Moodle and enter any course in which you are enrolled.
2. Click on forum you wish to view.
3. Read the directions and/or topic of the discussion.
4. Click on the Reply text link to post a response.
5. You may or may not need to type a subject for your topic in the Subject line. This will depend on
the type of forum your instructor created and his/her instructions.
6. Type your reply to the forum in the Message text box.
Moodle 2.X Guide
Distance Learning Instructional Technology Administrator Page 17 of 27
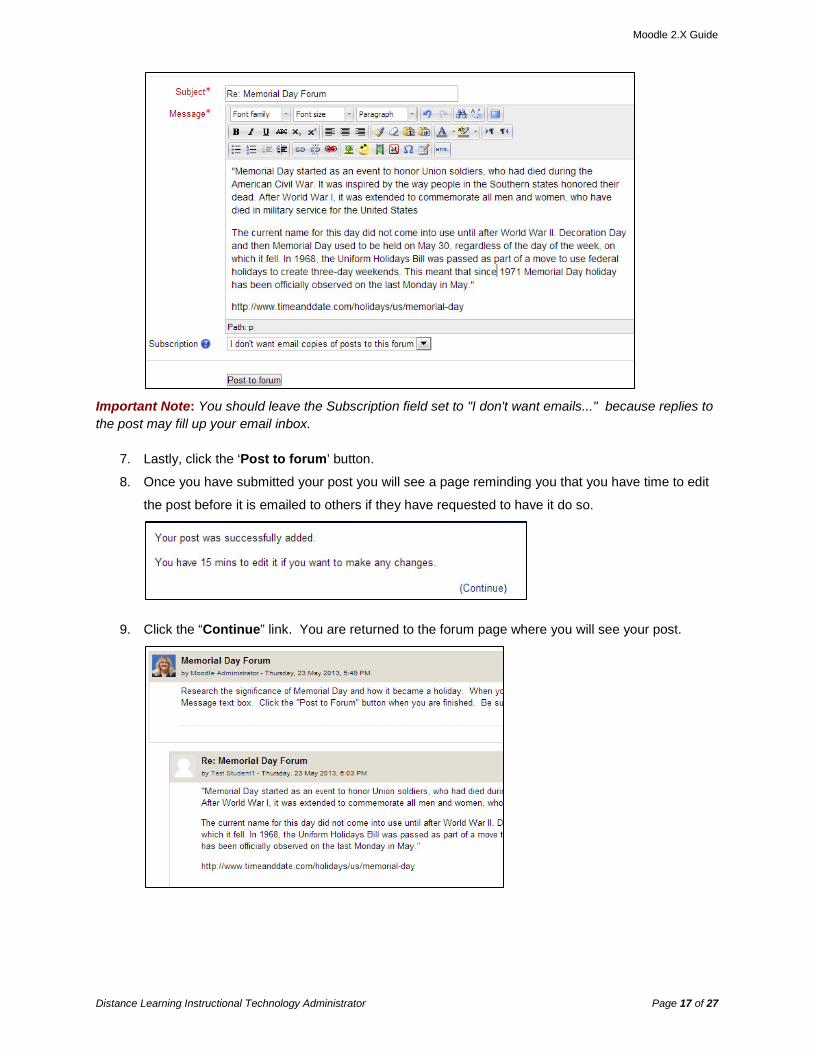
Important Note: You should leave the Subscription field set to "I don't want emails..." because replies to the post may fill up your email inbox.
7. Lastly, click the ‘Post to forum’ button.
8. Once you have submitted your post you will see a page reminding you that you have time to edit
the post before it is emailed to others if they have requested to have it do so.
9. Click the “Continue” link. You are returned to the forum page where you will see your post.
Moodle 2.X Guide
Distance Learning Instructional Technology Administrator Page 18 of 27
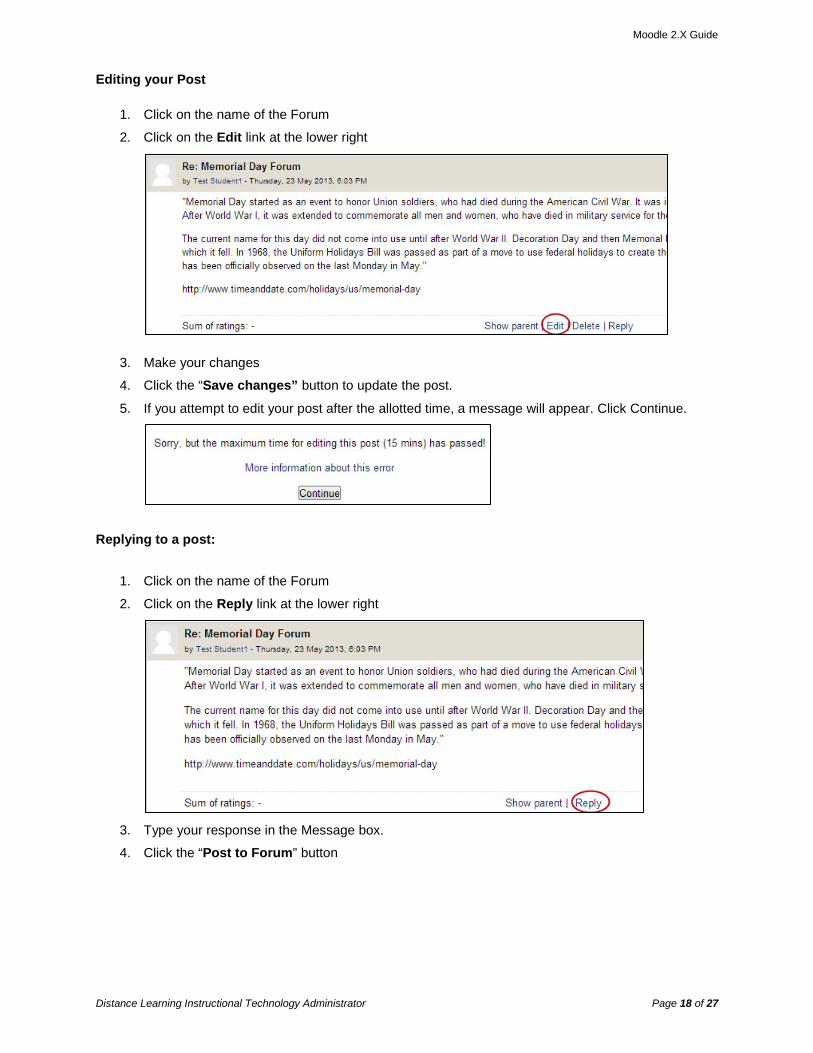
Editing your Post
1. Click on the name of the Forum
2. Click on the Edit link at the lower right
3. Make your changes
4. Click the “Save changes” button to update the post.
5. If you attempt to edit your post after the allotted time, a message will appear. Click Continue.
Replying to a post:
1. Click on the name of the Forum
2. Click on the Reply link at the lower right
3. Type your response in the Message box.
4. Click the “Post to Forum” button
Moodle 2.X Guide
Distance Learning Instructional Technology Administrator Page 19 of 27
Submitting Assignments Students can submit any digital content (files), including, for example, word-processed documents,
spreadsheets, images, audio and video clips. Assignments don't necessarily have to consist of file
uploads. Alternatively, teachers can ask students to type directly into a text field in Moodle. Or they can
ask student to do both, upload a file or files and type text directly into Moodle. An assignment activity can
also be set up to not accept any student submissions and serve as a reminder to students of a 'real-world'
assignment they need to complete and to record grades in Moodle for activities that don't have an online
component.
There are three standard assignment types:
• File submissions (students submit a file for assessment)
• Online text (students can type their responses directly in Moodle)
• Offline assignment (no Moodle component; provides instructions)
It is possible for an instructor to create an 'offline' assignment, i.e. one that is not submitted in Moodle
component, but rather provides instructions for course work outside of Moodle.
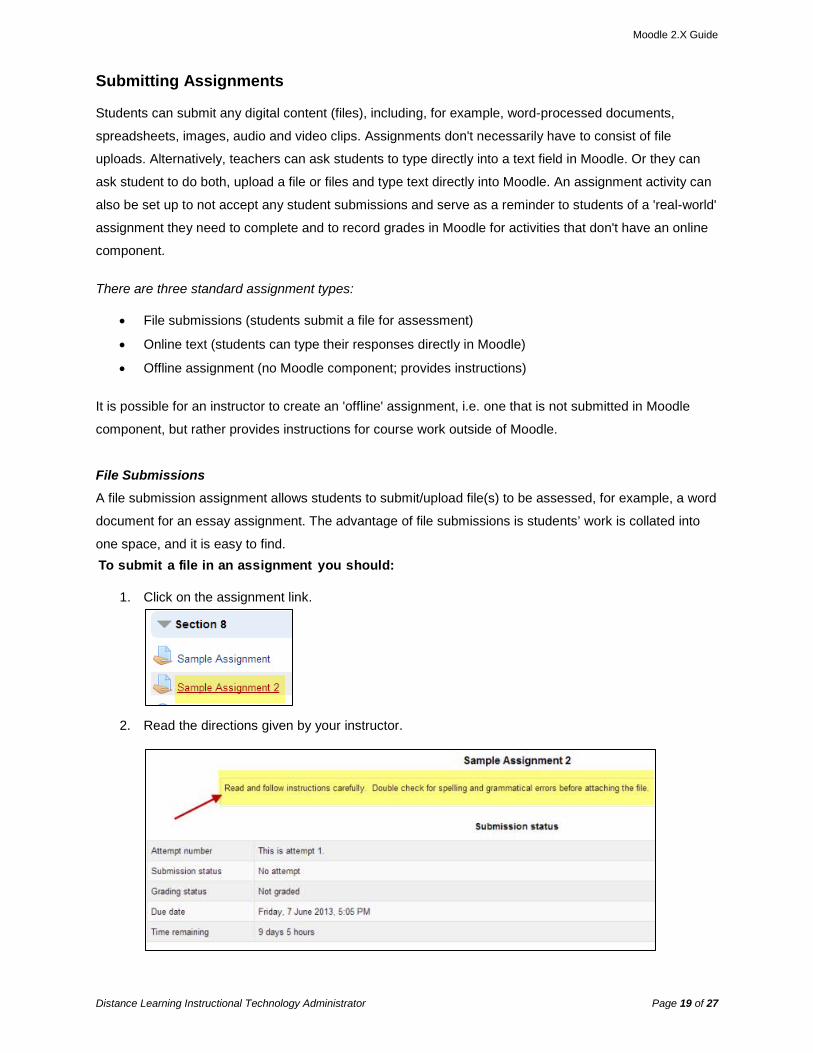
File Submissions A file submission assignment allows students to submit/upload file(s) to be assessed, for example, a word
document for an essay assignment. The advantage of file submissions is students’ work is collated into
one space, and it is easy to find. To submit a file in an assignment you should:
1. Click on the assignment link.
2. Read the directions given by your instructor.
Moodle 2.X Guide
Distance Learning Instructional Technology Administrator Page 20 of 27
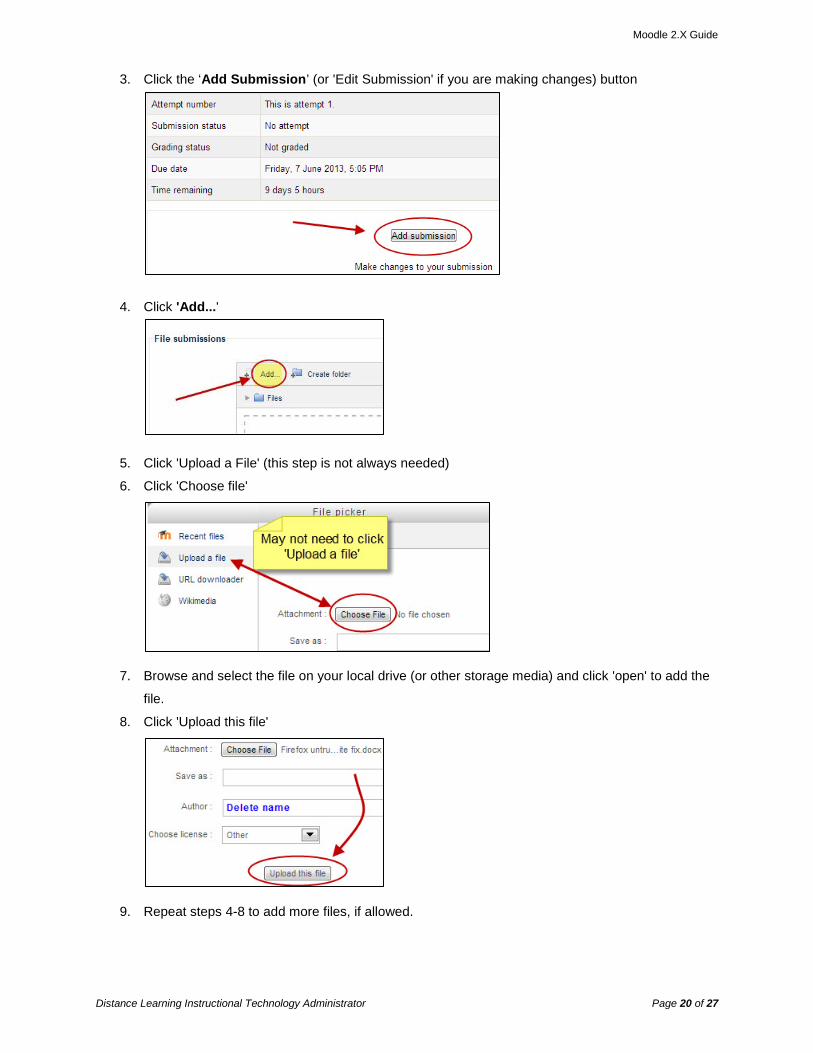
3. Click the ‘Add Submission’ (or 'Edit Submission' if you are making changes) button
4. Click 'Add...'
5. Click 'Upload a File' (this step is not always needed)
6. Click 'Choose file'
7. Browse and select the file on your local drive (or other storage media) and click 'open' to add the
file.
8. Click 'Upload this file'
9. Repeat steps 4-8 to add more files, if allowed.
Moodle 2.X Guide
Distance Learning Instructional Technology Administrator Page 21 of 27
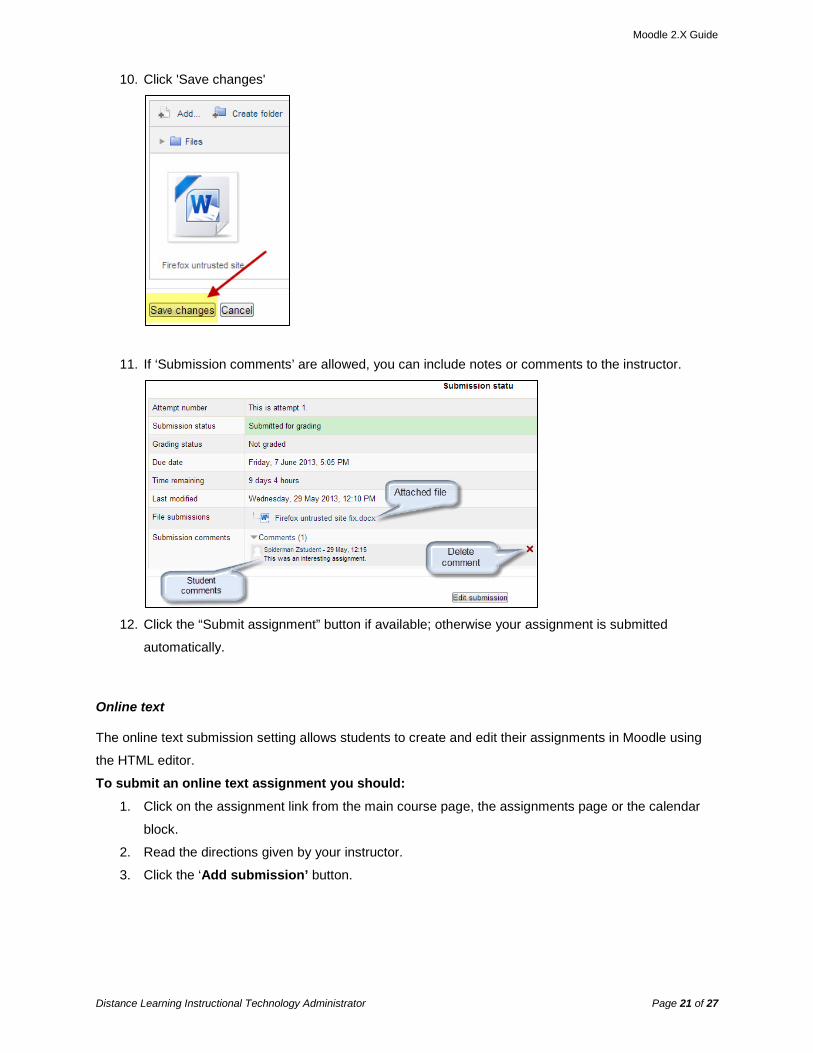
10. Click 'Save changes'
11. If ‘Submission comments’ are allowed, you can include notes or comments to the instructor.
12. Click the “Submit assignment” button if available; otherwise your assignment is submitted
automatically.
Online text The online text submission setting allows students to create and edit their assignments in Moodle using
the HTML editor.
To submit an online text assignment you should:
1. Click on the assignment link from the main course page, the assignments page or the calendar
block.
2. Read the directions given by your instructor.
3. Click the ‘Add submission’ button.

Moodle 2.X Guide
Distance Learning Instructional Technology Administrator Page 22 of 27
4. In the text box, type the information requested per the instructions.
5. Lastly, click the ‘Save changes’ button at the bottom of the Submission page.
Offline Assignments An offline assignment looks similar to the other assignment types; however, the assignment is performed
outside of Moodle. Students will not submit a file or type text into Moodle. An offline assignment is
basically a tool used by an instructor for communicating assignment details.

Moodle 2.X Guide
Distance Learning Instructional Technology Administrator Page 23 of 27
To view an offline assignment you should:
1. Click on the assignment link from the main course page, the assignments page or the calendar
block.
2. Read the directions given by your instructor.
3. Complete the assignment as given.
Testing in Moodle In many instances, Moodle tests are computer graded. This allows students to receive their grade
immediately. However, some tests may include essay type questions which must be manually graded by
the instructor. This may cause a delay in students receiving their grade.
There are a few important things you need to know before taking your first test in Moodle.
• When your instructor is ready for you to take a test typically a link will appear. Be sure you've
read any information provided by your instructor as to when you should take the test. Never enter
a test unless you are prepared to complete it.
• It is important to plan when you take your test. Once you start a test there is no "turning back".
You should take your test at a time when you will have few distractions.
• When you click on the link to a test you'll be taken to an overview screen where you can learn a
little about the quiz. Information provided may display the due or close date for the quiz and/or the
time limit, if applicable.
• Occasionally, your instructor may password a test. If you are asked for a password when
attempting a test, you'll need to obtain the password from the instructor. Be very careful of
capitalization when typing passwords.
• When you are ready to attempt the quiz click the ‘Attempt quiz now’ button.
Moodle 2.X Guide
Distance Learning Instructional Technology Administrator Page 24 of 27
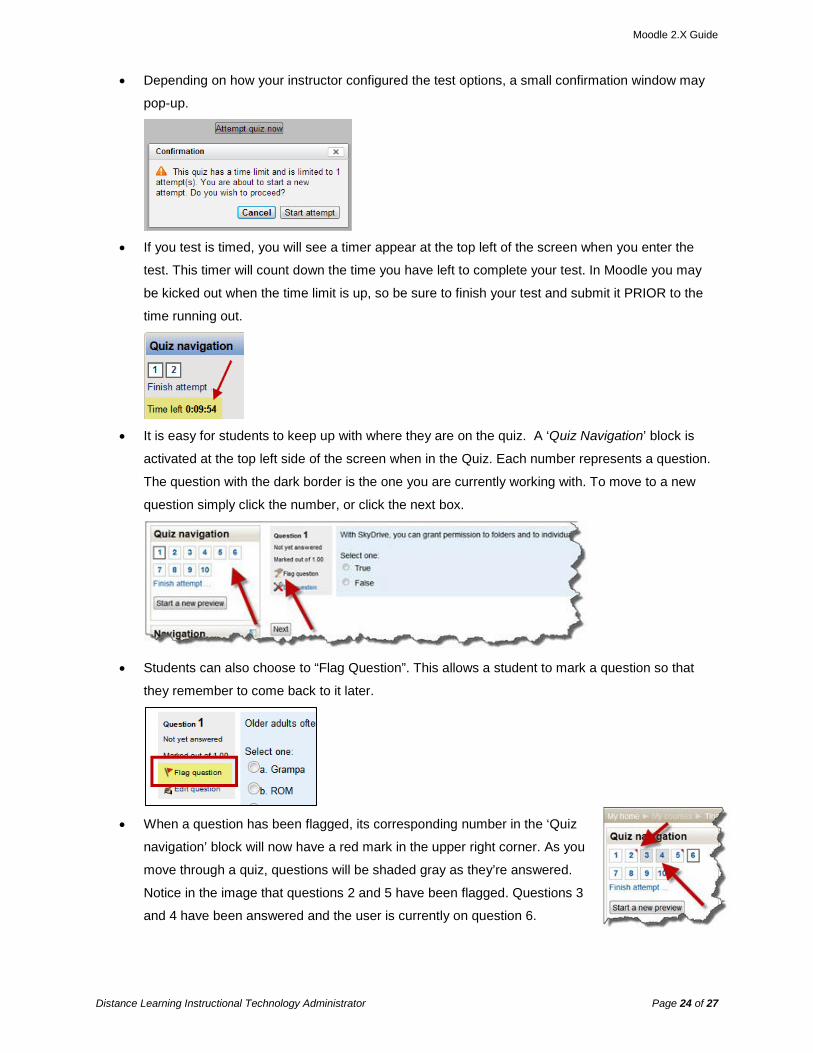
• Depending on how your instructor configured the test options, a small confirmation window may
pop-up.
• If you test is timed, you will see a timer appear at the top left of the screen when you enter the
test. This timer will count down the time you have left to complete your test. In Moodle you may
be kicked out when the time limit is up, so be sure to finish your test and submit it PRIOR to the
time running out.
• It is easy for students to keep up with where they are on the quiz. A ‘Quiz Navigation’ block is
activated at the top left side of the screen when in the Quiz. Each number represents a question.
The question with the dark border is the one you are currently working with. To move to a new
question simply click the number, or click the next box.
• Students can also choose to “Flag Question”. This allows a student to mark a question so that
they remember to come back to it later.
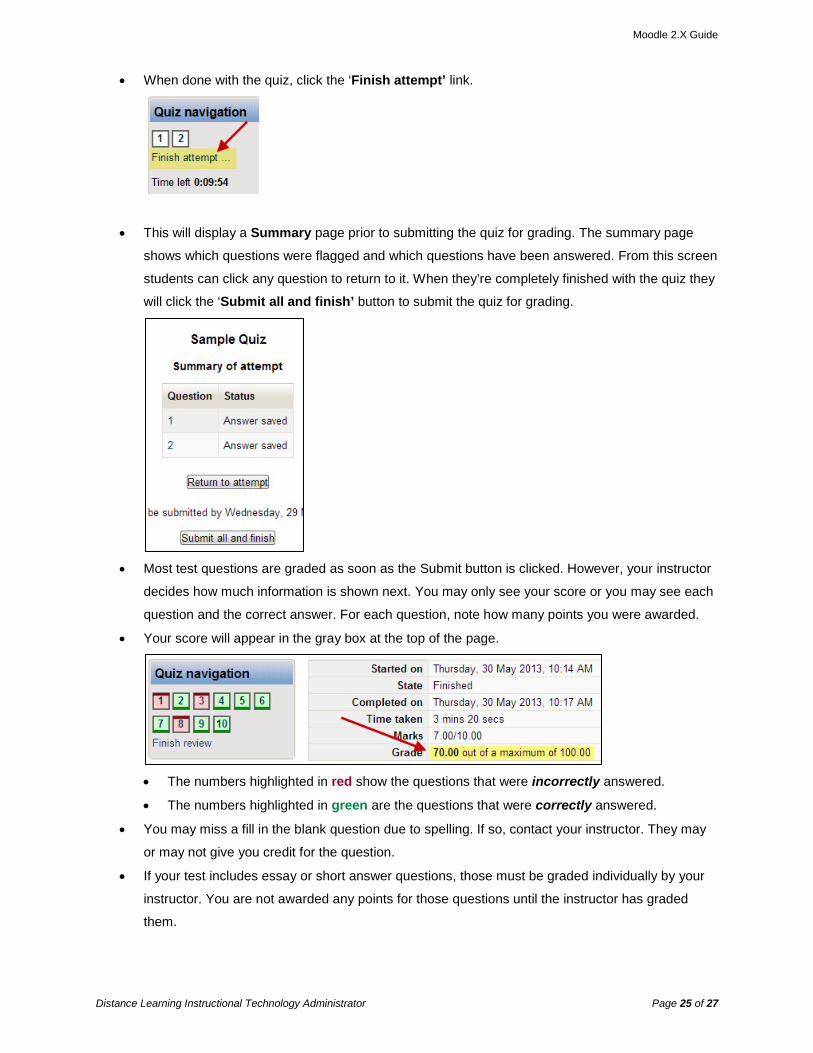
• When a question has been flagged, its corresponding number in the ‘Quiz
navigation’ block will now have a red mark in the upper right corner. As you
move through a quiz, questions will be shaded gray as they’re answered.
Notice in the image that questions 2 and 5 have been flagged. Questions 3
and 4 have been answered and the user is currently on question 6.
Moodle 2.X Guide
Distance Learning Instructional Technology Administrator Page 25 of 27
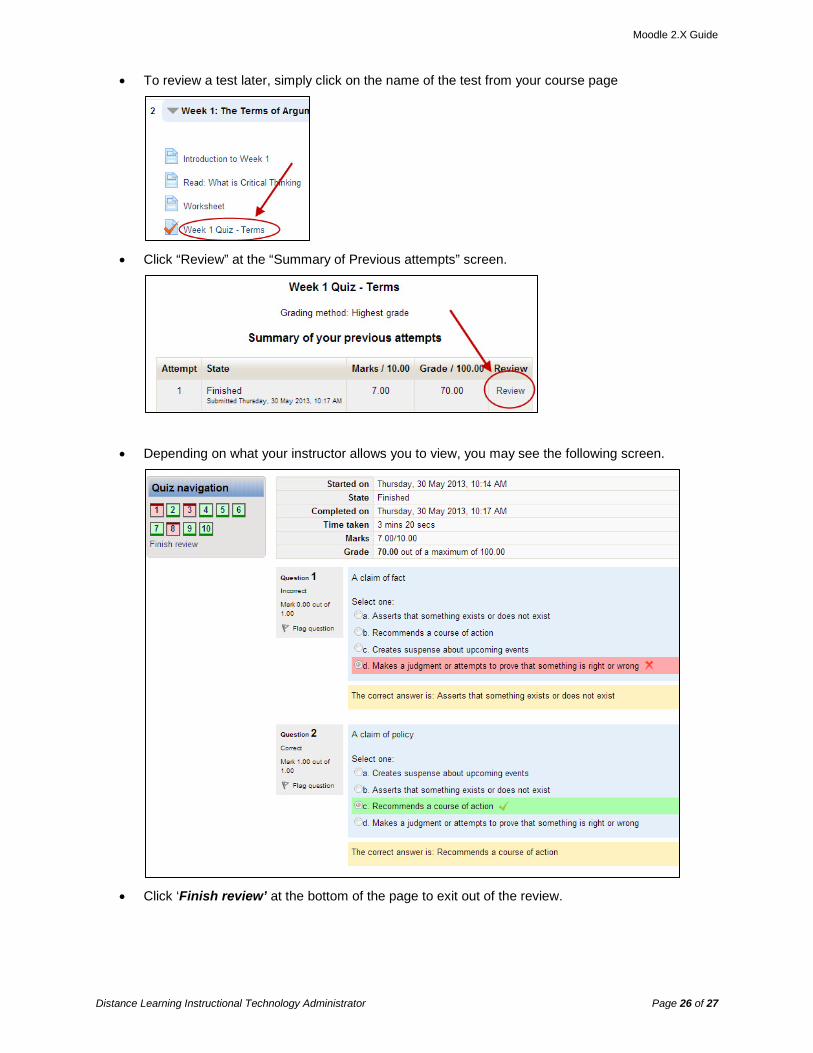
• When done with the quiz, click the ‘Finish attempt’ link.
• This will display a Summary page prior to submitting the quiz for grading. The summary page
shows which questions were flagged and which questions have been answered. From this screen
students can click any question to return to it. When they’re completely finished with the quiz they
will click the ‘Submit all and finish’ button to submit the quiz for grading.
• Most test questions are graded as soon as the Submit button is clicked. However, your instructor
decides how much information is shown next. You may only see your score or you may see each
question and the correct answer. For each question, note how many points you were awarded.
• Your score will appear in the gray box at the top of the page.
• The numbers highlighted in red show the questions that were incorrectly answered.
• The numbers highlighted in green are the questions that were correctly answered.
• You may miss a fill in the blank question due to spelling. If so, contact your instructor. They may
or may not give you credit for the question.
• If your test includes essay or short answer questions, those must be graded individually by your
instructor. You are not awarded any points for those questions until the instructor has graded
them.
Moodle 2.X Guide
Distance Learning Instructional Technology Administrator Page 26 of 27
• To review a test later, simply click on the name of the test from your course page
• Click “Review” at the “Summary of Previous attempts” screen.
• Depending on what your instructor allows you to view, you may see the following screen.
• Click ‘Finish review’ at the bottom of the page to exit out of the review.
A assignments, 15, 19
file submissions, 19 offline, 22 online text, 21
B blocks
administration, 6 docking, 6 expandable/collapsible, 7 inside a block, 8 navigation, 6, 8, 15, 24 undock, 7
browsers enable pop-ups, 9 Google Chrome, 9 Internet Explorer, 10 Mozilla Firefox, 9
C calendar, 8, 12, 16 chat, 15 choice activity, 15 course access, 5 course activities, 15 course homepage, 5 course icons, 13 course resource, 13
book, 13, 14 file, 13 folder, 13 label, 13 page, 13 url, 13
E edit profile, 10
F feedback activity, 15 forum, 15, 16
auto-subscribe, 11 editing a Post, 18
posting to a forum, 16 replying to a post, 18
G glossary, 15 grades, 12, 19
H home page, 5
L lesson, 15 login, 4
P password, 4 profile, 6, 8, 11
Q quiz, 15 quiz results screen, 26 quiz score, 25
S submission comments, 21 support, 2
T table of contents, 3 testing, 23 timed test, 24
U upload a file, 20 username, 4
W wiki, 15

![Moodle...X X X X Moodle 2 22:47 2.8.3+ (Build: 20150305) [2014111003.06] 2.8 [2014111000] X x MoodleJt—Y a X x -EYa—Jb QA7](https://img.pdfslide.us/doc/110x75/5ed5c09ab81c373d543299d4/moodle-x-x-x-x-moodle-2-2247-283-build-20150305-201411100306-28-2014111000.jpg)