Embed Size (px)
Citation preview

The large area below the lettering boxes is for entering names and is labeled as such. You can enter two lines of lettering in the names box, simply hit return to start the second line. At any time you wish to see what the letters you have entered look like on screen, click the Draw Now button next to the initial windows. Entering a Color Change - You can enter a color change on you Monogram design at the beginning of words or letters. To do this, simply enter a “^” (shift + 6) before the letter or word you wish to be a different color and a color change will be inserted.
Monogram Wizard Plus The Monogram Wizard Plus is the follow up to needleheads ground breaking software The Monogram Wizard. While maintaining the ease of use offered by the Monogram Wizard, the Monogram Wizard Plus has many expanded features making it extremely versatile and powerful.
New Features of the Monogram Wizard Plus
Layers - This new feature allows designs to be built up in “Layers”, giving way for the use of multiple motifs, different fonts and lettering styles all in the same design.
Styles - The user can save their favorite “styles” to open later for use or editing.
Letter Movement - In 3 letter Monogramming mode, letters can be moved individually to the user’s taste
Printing - Designs created in the Monogram Wizard Plus can be printed at full size.
Vertical Lettering - A vertical monogramming style has been added which can be applied to booth 3 letter monograms and names.
Satin/Fill choice - Allows the user to choose whether the letters are satin or fill stitches.
PES/SEW format - The Monogram Wizard Plus will save in PES and SEW formats.
Using the Monogram Wizard PlusEntering Letters
In the bottom left corner of the window, two places exist where you enter letters. The top place is to enter initials used in a monogram. The second place is to enter letters used for names. The indicator button the right of each space lets you know which field is active. Notice that the boxes for the initials are labeled Letter 1, Letter 2, and Letter 3. These letters will correspond with the position numbers on the mono-gram styles buttons. In general, Letter 1 corresponds to the first initial, Letter 2 corresponds to the middle initial and Letter 3 corresponds to the last initial.
Moving Individual Letters - Each letter in the 3 letter monogram mode can be moved individually using the 4 directional buttons next to corresponding Letter Box. The amount of letter movement can be adjusted using the “Movement Factor” box in the Design Adjustments section of the working screen. (See the section called “Moving Parts of a Design”.)
Font Selection On the left side of the window near the top is the font selection pull-down menu. The name in the window indicates the font that is currently being used on the screen. To change the font of the letters on the screen, all you need to do is
click on the arrow to the right of the name. A drop-down menu will appear listing all the fonts that are available for you to use. To change fonts, simply select the new font you wish to use.
revised 06/2004

Monogramming Style Selection
In the upper left corner of the working window are the monogram style selection buttons. Each style is graphically depicted on its corresponding button. The numbers on each depiction correspond with the number of the initial boxes at the bottom of the window. Look at the example below.
Step 1: Letters entered in the initial boxes.
Step 2: Select the desired Monogram Style.
Step 3: The results. Notice how the numbers from the initials boxes correspond with the numbers on the style buttons.
NOTE: Some fonts may not be applicable to the letters you have on the screen. For example, some fonts are Capital Letters only, and if you have a combination of upper and lower case letters on the screen, then a font with only Caps could not be used. If you try to use a font where it is not applicable, you will receive an error message informing you that the font you selected does not have characters on the screen. To see what characters are contained in each font, as well as what each font looks like, view the Font printout accessible from the Splash Screen which appears when the Wiz Plus CD is inserted into the computer.
For example, if the letters entered were: The result on the screen would be:
The Monogramming Styles will only work on the Initials section and not the names section, with the exception of the three styles highlighted in the figure below.
The three styles that will work with the names section as well as the initials section.
The Natural Circle and Natural Diamond fonts in the Monogram Wizard Plus do not require a Monogram Style to be selected as they are position dependent. Position dependant means that when the font is displayed on the screen, the letters will be in the 1,3,2 style automatically when the letters are entered. Also, these two fonts require that 3 letters are used for a monogram. See the example below.

Adding a Motif Under the font selection drop down menu is the motif selection drop down menu. The pull-down menu on the left lists the motif packs that are available for you to use. The pull-down menu on the right lists the motifs that are available
in the selected motif pack. To add a motif to your custom monogram, select the pack you want to use from the left hand menu. Then select the number of the motif from the selected pack from the pull-down menu on the right. To see what motifs are available to you, consult the motif file that came with your download by clicking on the button that says View Motifs on the Wiz Plus slash screen which appears when you insert the CD.
Moving Parts of the Design Moving different parts of the on-screen design can be achieved using the controls in the Design Adjustment area of the working interface. The large arrow buttons are used to move the objects around. The box in the middle of the arrows contains the “factor” of movement and the small arrows are used to adjust this factor.. The factors of movement range from 1 to 5 with 1 being the least amount of movement and 5 being the most. To the right of the arrows, you select which part of the design you wish to move; the motif, the initials/first line of a name, or the second line of a name.
Just above the place where you enter letters is another set of buttons labeled Lettering Styles. The Lettering Styles are available to be used on either Monograms or Names (whereas most the monogramming styles are only available on initials). Each effect is graphically depicted on the buttons, along with arrows on the right side of each button. The arrows determine the “amount” of each
effect that is inflicted on the letters. For example, the first six boxes represent curved type effects. You would increase or decrease the amount of curvature using the arrows on the right of each box. Only one lettering effect can be used at a time per layer.
Lettering Effects
NOTE: The “movement factor” in this section will also effect the movement of the individual letters in the initials section.
The next control to the right is Grid Size. This controls the size of the squares that make up the on screen grid. Like lettering size, in English this value is in inches and in metric this value is in millimeters. Continuing to the right the next control is Boldness. This control increases or decreases the width of all the satin stitches in the design. The value in the box is a percentage of the default satin stitches in a motif or font. Use the arrows to increase or decrease the percentage. Over 100 increases the boldness and under 100 decreases the boldness. The next control to the right is Lettering Width. This changes the overall width of the letters and again is a represented by a percentage. Use the arrows to increase the percentage up or down. Values over 100 increase the overall width of each letter and under 100 decreases the overall width of each letter. The first control on the bottom to the far left is labeled Kerning. Kerning is the space between letters in a word (or initials). If you want to move the letters closer to each other, click on the up arrow to tighten the kerning. To make more space between letters, click on the down button and loosen the kerning. A positive
On the left hand side underneath the motif selection area is a section called Style Control. The first control is Letter Size. Letter Size will refer to the size of the Upper Case letters of a font on the screen. Use the arrows to the right of the box to increase or decrease the size. In English this factor is in inches and in Metric this factor is in millimeters.
Moving Parts of the Design
value in this box indicates that kerning has been tightened and a negative value indicates the kerning has been loosened. The next control is labeled Density Percentage. The density on the letters and motifs are computed automatically depending on the size of the letters/motif. If after an initial sew out, or you know you want to bump the density up some before you start, simply click on the up button to increase the density. The value in this box will be a percentage of the original density. The next control to the right is labeled Motif Size. Use these arrows to increase or decrease the size of the motif. The final control is labeled Motif Width. The motif width works in the same way that lettering width does in that is changes the overall width of the motif. The value in the box is again a percentage of the original motif width. The pull-down menu above these controls is used for recalling saved styles (see section below titled “Saving Styles”).
Building Designs Using Layers
One of the powerful new features in the Monogram Wizard Plus is the Layers feature. Using layers allows you to use more than one font style, motif, and/or lettering style on the same design. Layers can be thought of as having 5 working Monogram Wizard windows instead of 1.
When the Monogram Wizard opens the default working layer is Layer 1. The tabs at the top of the working window let you know which layer you are currently working on and are also used to change from one layer to another.
Let’s build a design with two different fonts and motifs as and example of using the Layers.
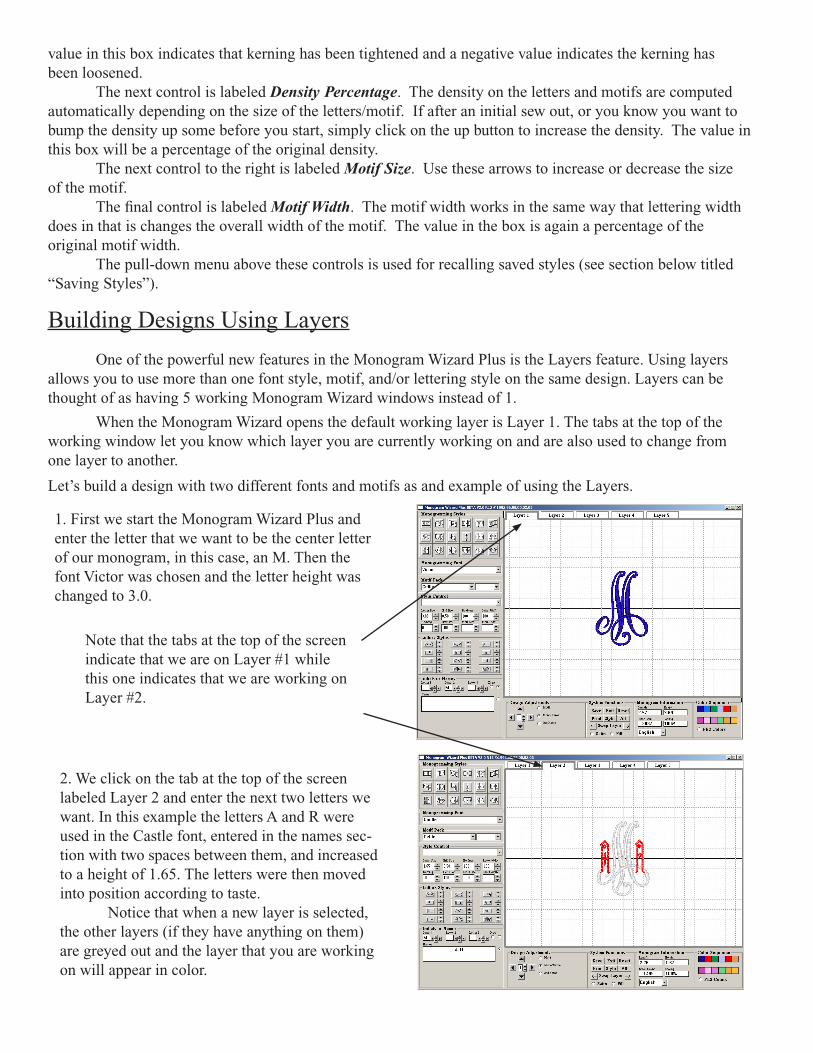
1. First we start the Monogram Wizard Plus and enter the letter that we want to be the center letter of our monogram, in this case, an M. Then the font Victor was chosen and the letter height was changed to 3.0.
Note that the tabs at the top of the screen indicate that we are on Layer #1 while this one indicates that we are working on Layer #2.
2. We click on the tab at the top of the screen labeled Layer 2 and enter the next two letters we want. In this example the letters A and R were used in the Castle font, entered in the names sec-tion with two spaces between them, and increased to a height of 1.65. The letters were then moved into position according to taste. Notice that when a new layer is selected, the other layers (if they have anything on them) are greyed out and the layer that you are working on will appear in color.

4. Next we move to Layer #3 to place the left side motif on the design. We use motif #2 in the Ends Plus Motif pack and change the size of the motif to 2.5, then move to the desired position. We then move to Layer #4 and do the same thing for the right side motif, using motif #12 from the Ends Plus Motif pack.
Layer 3 Layer 4
5. When you are finished putting your design together, you can click on the button marked All in the System Functions section of the Monogram Wizard to display all the layers together in color. When showing all layers, no further editing is capable to the design. The colors for each part can be set here, but no other changes can be made to the design. When the All button is clicked to show all the layers, it will change and say One on it as all layers are displayed on the screen. To exit All Layer mode, click on the button that says One.
****Notice how NO layers are selected when showing all layers.
Sewing Order when using Layers When using layers to create a design, the sewing order will start with Layer #1 sewing first, then layers 2, 3, 4 and 5. That is to say that layer #1 will be the bottom layer, and subsequent layers will sew on top of one another.
Layer 1
Layer 2
Layer 3
Layer 4
Layer 5

If you wish to change the sewing order, you can use the Swap Layer arrows in the System Functions section of the Monogram Wizard Plus working window.
To change layer order in the Monogram Wizard Plus:
1. Select the layer that you wish to change. In the screen shot below, we have selected Layer 1. We want to change the position of layer 1 so that it stitches out in the position of layer 2.
2. Use the Layer Swap arrow buttons to move the layer up or down in the design. Clicking the layer swap button with the arrow pointing right moves the layer up in the design ( 1 to 2, 2 to 3, 3 to 4, etc.) while clicking the layer swap button facing left moves the layer down in the design (5 to 4, 4 to 3, 3 to 2, etc.). In this instance, since we want to move layer 1 to sew in layer 2 position, we click on the right hand Layer Swap button.
3. After you click the Layer Swap button, the layer will be moved to its new location.

Using Monogram Styles
The Monogram Wizard Plus allows you to save to your favorite monogram styles for quick recall. This feature also allows the user to save designs created using the Wizard to be recalled for future editing.
Saving a Monogram Style:
1. Click on the Style button in the System Function. You will then be prompted to either A) Select a previous style that you opened for editing and are saving over or B) Name the new style that you are wanting to save.
***IMPORTANT**** When saving a Monogram Style that has more than one layer, you must save each layer individually. For example, if you had a style or design which uses multiple layers you wanted to save, you would need to save each layer individually. With layer 1 selected, you would save the layer as Design Name - layer 1 or something to that effect. (Where [Design Name] is whatever you choose to name the design.)
This is also important for opening Styles that have multiple layers to them. When you open a style, be sure that you have the layer selected which corresponds to the saved layer that you are trying to open. For example, if you are trying to open the file that is the second layer of the design, make sure that you have layer 2 selected on the screen when you open that particular style.
2. Select whichever option applies to your applica-tion and then click the button that says save.
Opening a Monogram Style:
To open and load a saved Monogram Style, simply select the name of the style from the Style Control drop down menu on the left hand side of the Monogram Wizard working window.
Other System Functions
Adding Underlayment to a Design
When creating designs using the Monogram Wizard Plus, herringbone style under-layment is automatically added when the widths of the satin stitches reach a certain threshold (average width > 0.20 inches). However, there are times where you may wish to have underlayment on your design even though it did not automatically kick in. To do this, you use the UnderL radio button found in the System Functions section of the Monogram Wizard Plus. Just click on the button next to UnderL and herringbone style underlayment will be added to your design.
You create a stitch file using the button found in the System Functions area. The three buttons in this area are Save, Exit and Reset. Save - The save button allows you to save your design as a stitch file in Tajima (*.dst), Brother (*.pes) or Janome (*.sew).
Creating a Stitch File/Using the Info Area Before creating a stitch file, you will want to check the info box to make sure you are creating a design the size that you want it be. The Info Area will tell you the length and width of the design on the screen, the stitch count of the stitch file to be created, and the scaling of the design on the screen. The length and width will be in inches if English mode, and in millimeters in Metric mode. The scaling will be at 100% when the
design on the screen is at actual size (or as close as your computer’s resolution setting allows). If you create a design that is bigger than the screen, the Wizard will automatically fit the design to the screen, and the change will be reflected in the scaling box.
Selecting Between Satin and Fill Stitches
Printing a Design
To print the design that you have on the screen, just click on the Print button in the System Functions section of the Monogram Wizard Plus working screen. Due to the nature of the large graphic files which are printing, some computers and/or printers may take a few minutes to print the design.
The Monogram Wizard will automatically convert a design you create to fill stitches when the average size of the design reaches a certain threshold value. However, there may be times when you wish to choose whether or not a design sews out in satin or fill stitches. This is done by selecting either the satin or fill button that is found in the System Functions section of the Monogram Wizard working window.
Setting Colors In the bottom right hand corner of the screen is the color selection area. The colors depicted in the boxes correspond to the colors of objects depicted on the screen. To change the color(s) on screen:1) Click on the box with the color that you want to change.2) The color selection window will come appear. 3) Select your new color and click OK.
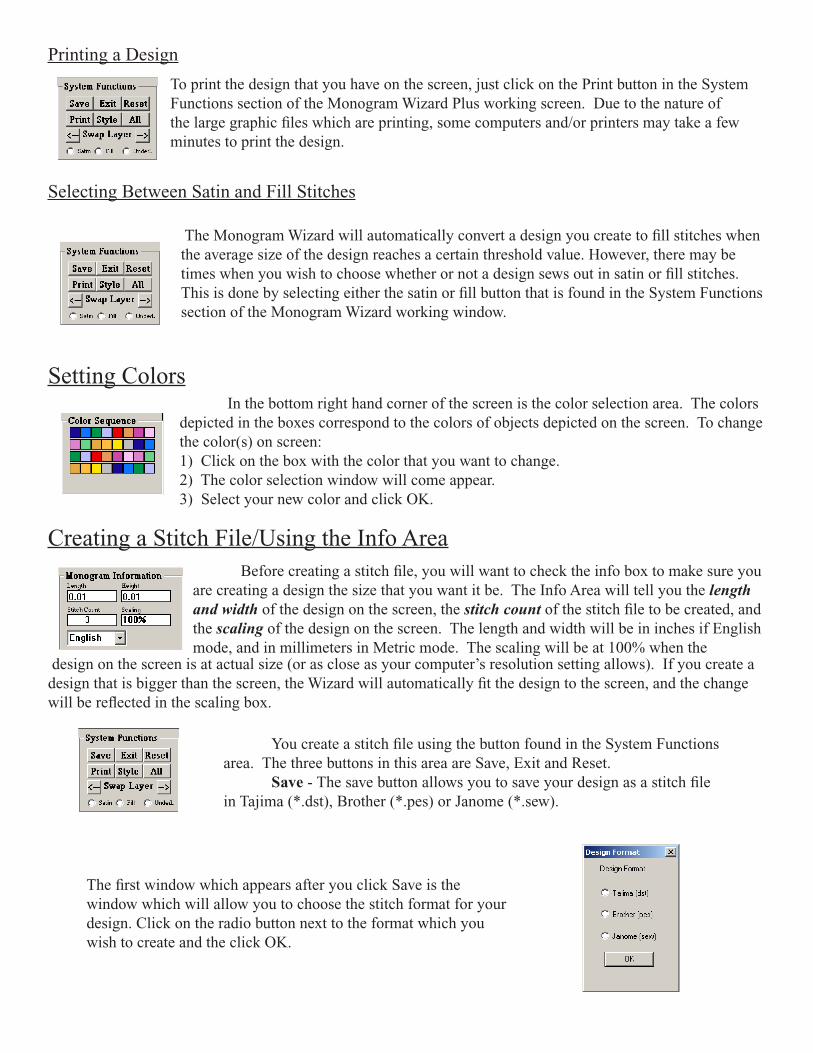
The first window which appears after you click Save is the window which will allow you to choose the stitch format for your design. Click on the radio button next to the format which you wish to create and the click OK.

Exit - This button is used to quit out of the Monogram Wizard.Reset - This button is used to reset the screen. The motif and the letters will be moved back to the center of the screen, and any effects (monogram or lettering styles) will be removed from the letters.
The final window to appear in the Save process is a typical save window Navigate to the location you want to save your file, type in a file name, and click save. The Mono-gram Wizard will default to the last folder that you saved a file in for ease of use. If you don’t have a favorite place where you save you embroidery files, you may want to make a folder inside the wizard folder to store your files.
After selecting your stitch format, the next window that will appear will tell you the current design size and ask you if you wish to keep this size. You can change the size at this window before continuing. Just click on the button next to the attribute you want to change and enter the desired size you wish for the design to be. When you change one parameter (width or height) the other parameter will change proportionally. Also, you just need to change the value in English or Metric (not both), whichever you prefer. It is at this step where you can also rotate your design if it needs to be rotated to fit in certain large hoops. Just click next to the button indicating whether you want to rotate the design to the left or rotate the design to the right.
Notes on Suggested Minimum Sizes Sometimes, when changing the size of a Motif or Letters on the screen, you may receive message saying that the size you have chosen is below the Suggested Minimum Size for this alphabet/motif. That is all that these are, suggested minimum sizes. That was put in the Wizard to let you know when parts of the design are approaching the minimum size for quality stitching, which is 1 mm. When you get this message applying to fonts, it applies to capital letters. In a motif, the Suggested Minimum size is the same for the entire motif, and as you have probably noticed, the motifs in each pack come in a variety of sizes. This message is just a reminder and you will have to look at your design and determine if you have made something too small to sew properly.