Embed Size (px)
Citation preview

Mohawk TrailDesigned by Natalie Crabtree
Featuring Horizon by Grant Haffnersize: 40” x 40”
windhamfabrics.comRevised 04.06.20
e: [email protected] p: 201-659-0444 • f: 201-659-9719
this is a digital representation of the quilt top, fabric may vary.
FREEPROJECT
please note: before making your project, check for any pattern updates at windhamfabrics.com’s free projects section.
Mohawk Trail
1
windhamfabrics.com
Revi
sed
04.0
6.20
KEY FABRIC SKU YD CUTTING INSTRUCTIONS
A 51706D-X Multi ½
Cut the following templates LOF from yardage. __(Arrange before cutting to ensure they will fit onto __yards).• Landscape Template G• Landscape Template J• Landscape Template Z
B 51711D-X Multi 1
Cut the following templates LOF from yardage. __(Arrange before cutting to ensure they will fit onto __yards).• Sky Template OO• Landscape Template EE• Landscape Template KK• Landscape Template RR
C 51704D-X Multi ¼
Cut the following templates LOF from yardage. __(Arrange before cutting to ensure they will fit onto __yards).• Landscape Template PPUse the remaining yardage to fuse Road Lines 1 & 2__onto the wrong side of fabric. Place fusible web __templates LOF, and fuse into place with an iron. Cut __out Road Lines 1 & 2 on the traced line and set aside.
D 51712D-X Multi 1
Cut the following templates LOF from yardage. __(Arrange before cutting to ensure they will fit onto __yards).• Landscape Template AA• Landscape Template D• Landscape Template LL• Landscape Template K• Landscape Template QQ• Landscape Template Y
Cutting Notes: Be sure to read the entire pattern before you begin. This pattern requires appliqué techniques. Use ¼” seams unless otherwise directed. Measurements listed throughout the piecing instructions are approximate and may vary slightly.
(Designer Note: The quilt is assembled in (4) Sections – Sky Section, Landscape Section 1, Landscape Section 2 and Road Section. Please note: Some templates labeled as “Sky” or “Landscape” may be included in the Landscape or Road Sections of the quilt assembly. Sky, Landscape and Road Template names only refer to how they are featured in the quilt and how they contribute to the overall appearance of the quilt, not what pieced section they belong to.)
LOF = Length of Fabric WOF = Width of Fabric
PROJECT DISCLAIMER: Every effort has been made to ensure that all projects are error free. All the information is presented in good
faith, however, no warranty can be given nor results guaranteed. Therefore, we assume no responsibility nor damages that may occur when
referring to this pattern. When errors are brought to our attention, we make every effort to correct and post a revision as soon as
possible. We suggest you check windhamfabrics.com for pattern updates and to test the pattern prior to making the project.
Test templates first, before cutting all the pieces. Free projects are not for resale.
Mohawk Trail
2
windhamfabrics.com
Revi
sed
04.0
6.20
KEY FABRIC SKU YD CUTTING INSTRUCTIONS
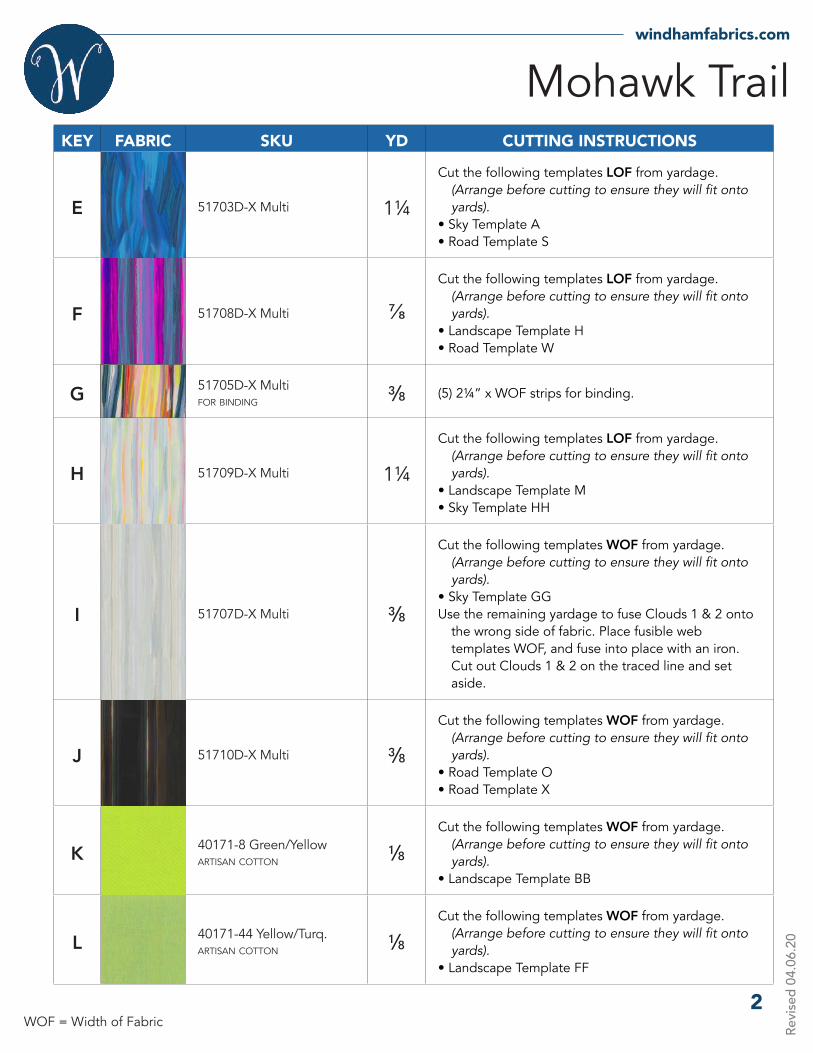
E 51703D-X Multi 1¼
Cut the following templates LOF from yardage. __(Arrange before cutting to ensure they will fit onto __yards).• Sky Template A• Road Template S
F 51708D-X Multi ⅞
Cut the following templates LOF from yardage. __(Arrange before cutting to ensure they will fit onto __yards).• Landscape Template H• Road Template W
G 51705D-X Multifor binding ⅜ (5) 2¼” x WOF strips for binding.
H 51709D-X Multi 1¼
Cut the following templates LOF from yardage. __(Arrange before cutting to ensure they will fit onto __yards).• Landscape Template M• Sky Template HH
I 51707D-X Multi ⅜
Cut the following templates WOF from yardage. __(Arrange before cutting to ensure they will fit onto __yards).• Sky Template GGUse the remaining yardage to fuse Clouds 1 & 2 onto __the wrong side of fabric. Place fusible web __templates WOF, and fuse into place with an iron. __Cut out Clouds 1 & 2 on the traced line and set __aside.
J 51710D-X Multi ⅜
Cut the following templates WOF from yardage. __(Arrange before cutting to ensure they will fit onto __yards).• Road Template O• Road Template X
K 40171-8 Green/Yellowartisan cotton ⅛
Cut the following templates WOF from yardage. __(Arrange before cutting to ensure they will fit onto __yards).• Landscape Template BB
L 40171-44 Yellow/Turq.artisan cotton ⅛
Cut the following templates WOF from yardage. __(Arrange before cutting to ensure they will fit onto __yards).• Landscape Template FF
WOF = Width of Fabric
Mohawk Trail
3
windhamfabrics.com
Revi
sed
04.0
6.20
KEY FABRIC SKU YD CUTTING INSTRUCTIONS
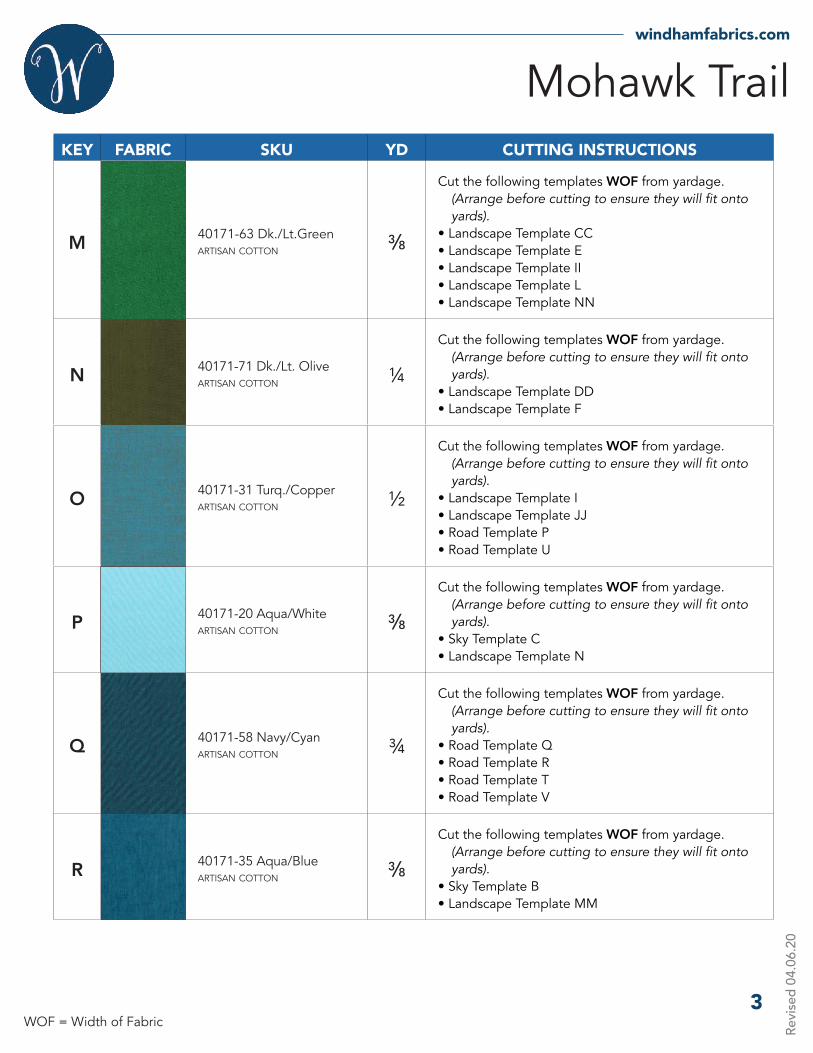
M 40171-63 Dk./Lt.Greenartisan cotton ⅜
Cut the following templates WOF from yardage. __(Arrange before cutting to ensure they will fit onto __yards).• Landscape Template CC• Landscape Template E• Landscape Template II• Landscape Template L• Landscape Template NN
N 40171-71 Dk./Lt. Oliveartisan cotton ¼
Cut the following templates WOF from yardage. __(Arrange before cutting to ensure they will fit onto __yards).• Landscape Template DD• Landscape Template F
O 40171-31 Turq./Copperartisan cotton ½
Cut the following templates WOF from yardage. __(Arrange before cutting to ensure they will fit onto __yards).• Landscape Template I• Landscape Template JJ• Road Template P• Road Template U
P 40171-20 Aqua/Whiteartisan cotton ⅜
Cut the following templates WOF from yardage. __(Arrange before cutting to ensure they will fit onto __yards).• Sky Template C• Landscape Template N
Q 40171-58 Navy/Cyanartisan cotton ¾
Cut the following templates WOF from yardage. __(Arrange before cutting to ensure they will fit onto __yards).• Road Template Q• Road Template R• Road Template T• Road Template V
R 40171-35 Aqua/Blueartisan cotton ⅜
Cut the following templates WOF from yardage. __(Arrange before cutting to ensure they will fit onto __yards).• Sky Template B• Landscape Template MM
WOF = Width of Fabric

Mohawk Trail
4
windhamfabrics.com
Revi
sed
04.0
6.20
KEY FABRIC SKU YD CUTTING INSTRUCTIONS
S 40171-53 Walnut/Tanartisan cotton ½
Use yardage to fuse the following templates onto __the wrong side of fabric. Place fusible web __templates WOF, and fuse into place with an iron. __Cut out all templates on the traced line and set aside.• Complete sets of Telephone Pole 1-3• Wires A-N
Backing 2²⁄348” x 48” piece of batting.
WOF = Width of Fabric
Template Cutting & Taping Instructions:
• Templates used for traditional piecing are labeled as A-RR. Each printed template is labeled as “Landscape”, “Sky” or “Road” to help identify and separate templates by quilt section.
• Templates used for applique and/or thread painting are labeled as Road Lines 1-2, Clouds 1-2, Telephone Poles 1-3 and Wires A-N.
• Cut out each individual template and organize by Landscape, Sky, Road or applique. Cut out templates making sure to include the outermost printed line for the seam allowances.
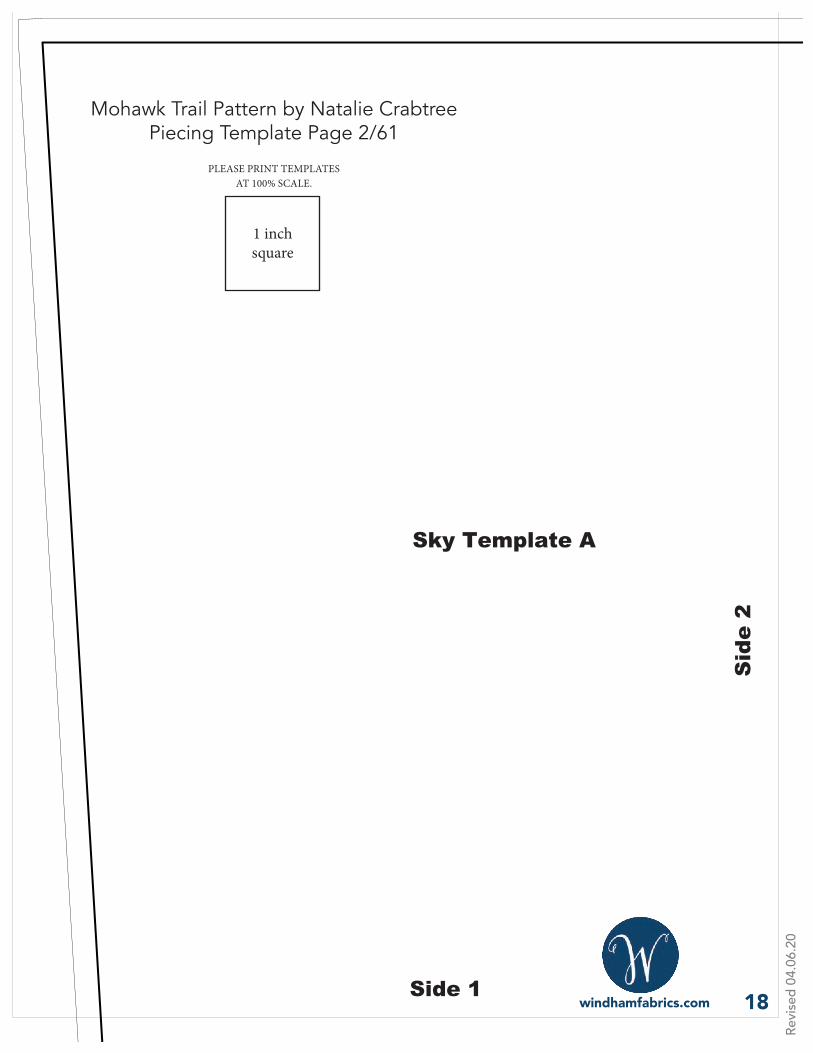
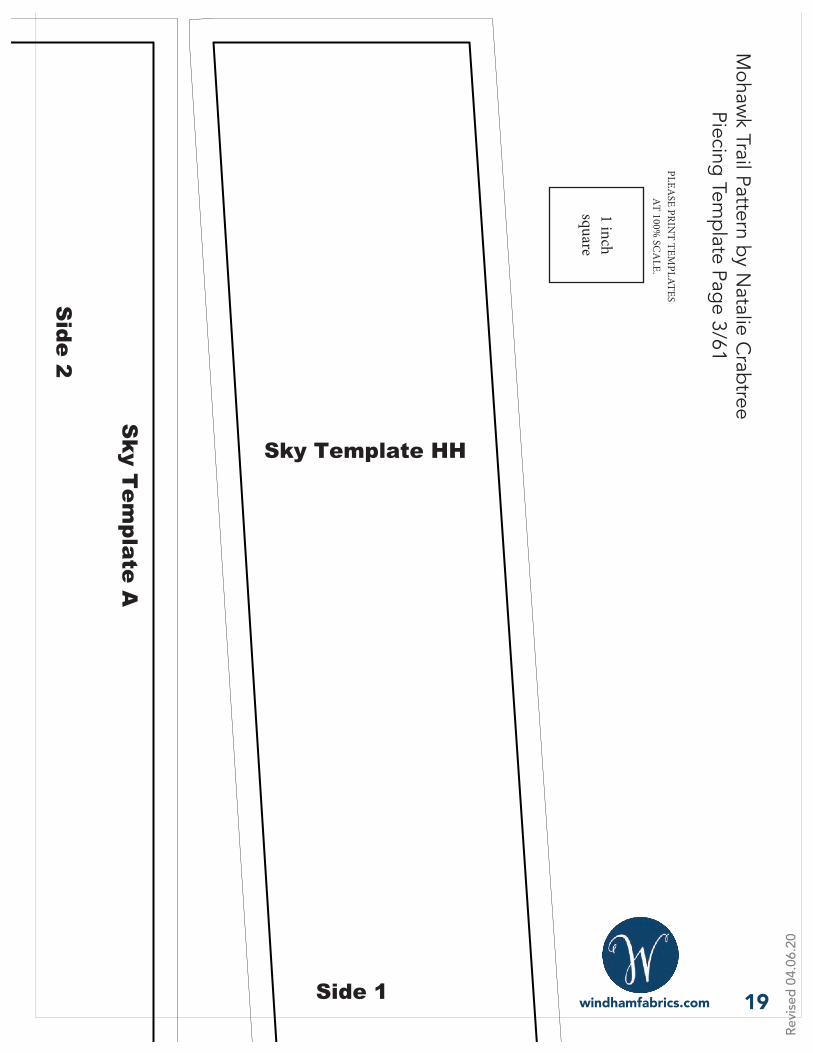
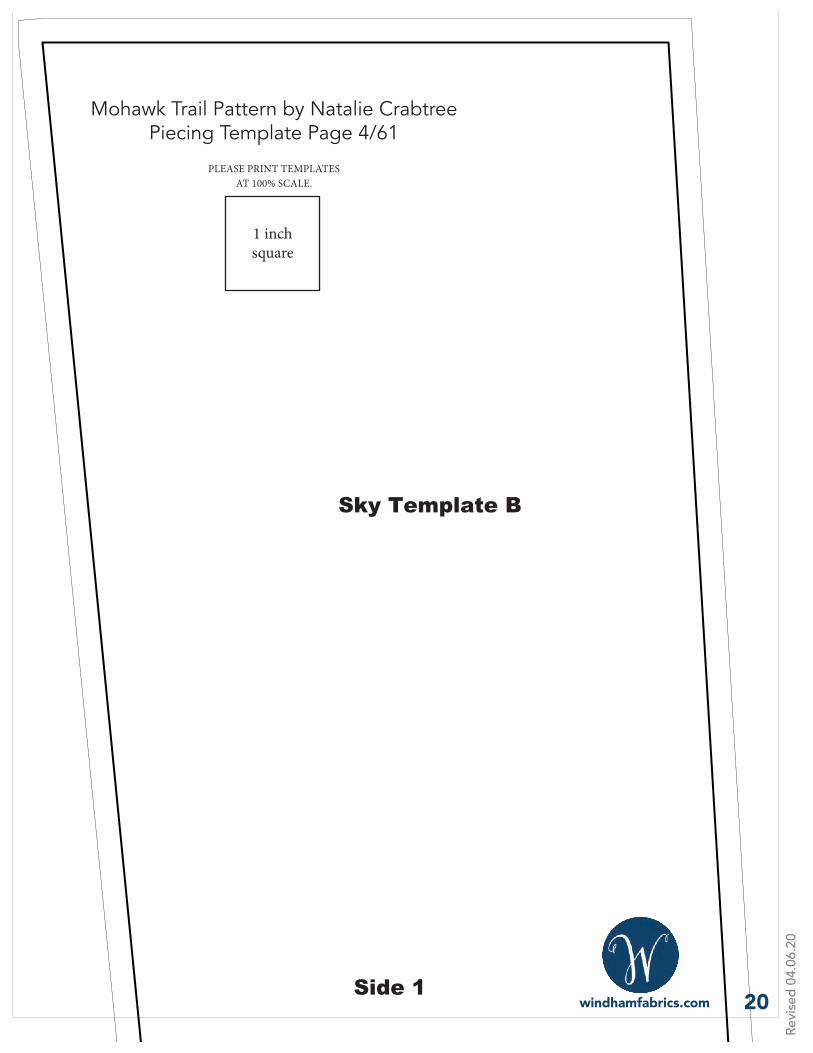
• Many templates are printed across multiple pages. For example, Sky Template A is printed across multiple pages. Gather all sections for Sky Template A and tape together accordingly by matching sides. Match Side 1 with Side 1, and Side 2 with Side 2 etc. Use the large template guide printed on the template pages and in this pattern to assist you in taping together templates.
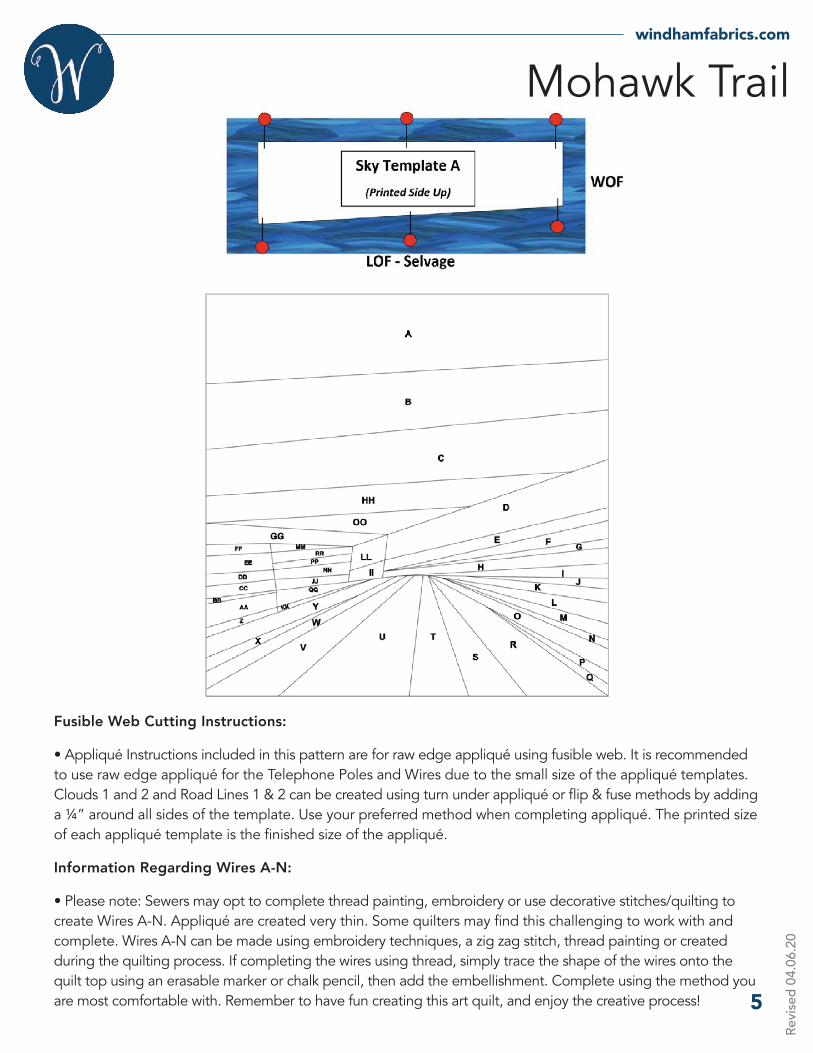
• When cutting out templates from fabric, use pins to keep the templates in place on the fabric. Some templates are too large to effectively hold in place while cutting. Pin thoroughly to decrease the chance of the template slipping. Place templates printed side up, on the right side of fabric as shown in the diagram below.
• Plan how you will cut each template. Some templates, such as Sky Template A need to be cut LOF, verses WOF to keep fabric directional. (See diagram below) Cutting instructions for Fabrics A-S indicate whether to cut templates WOF or LOF. Use the quilt cover image as your guide.
• Templates can be cut from fabric using the paper template as a guide. Or you can trace the template onto fabric with an erasable marker or chalk pencil, then cut the fabric template out with scissors or a rotary cutter.
• After cutting each fabric template, label for organization.
Mohawk Trail
5
windhamfabrics.com
Revi
sed
04.0
6.20
Fusible Web Cutting Instructions:
• Appliqué Instructions included in this pattern are for raw edge appliqué using fusible web. It is recommended to use raw edge appliqué for the Telephone Poles and Wires due to the small size of the appliqué templates. Clouds 1 and 2 and Road Lines 1 & 2 can be created using turn under appliqué or flip & fuse methods by adding a ¼” around all sides of the template. Use your preferred method when completing appliqué. The printed size of each appliqué template is the finished size of the appliqué.
Information Regarding Wires A-N:
• Please note: Sewers may opt to complete thread painting, embroidery or use decorative stitches/quilting to create Wires A-N. Appliqué are created very thin. Some quilters may find this challenging to work with and complete. Wires A-N can be made using embroidery techniques, a zig zag stitch, thread painting or created during the quilting process. If completing the wires using thread, simply trace the shape of the wires onto the quilt top using an erasable marker or chalk pencil, then add the embellishment. Complete using the method you are most comfortable with. Remember to have fun creating this art quilt, and enjoy the creative process!
Mohawk Trail
6
windhamfabrics.com
Revi
sed
04.0
6.20
• Cut out Clouds 1 & 2, Road Lines 1 & 2, Telephone Poles 1-3 and Wires A-N along the printed line. Trace each template onto the smooth side of fusible web with the printed side of template facing down, and the wrong side of the template facing up. (Please note: If opting to complete Wires A-N using a method other than applique, do not trace Wires A-M onto fusible web).
• Roughly cut out each fusible web template just outside of the traced line and set aside. Refer to cutting in-structions for Fabrics A-S for further direction.
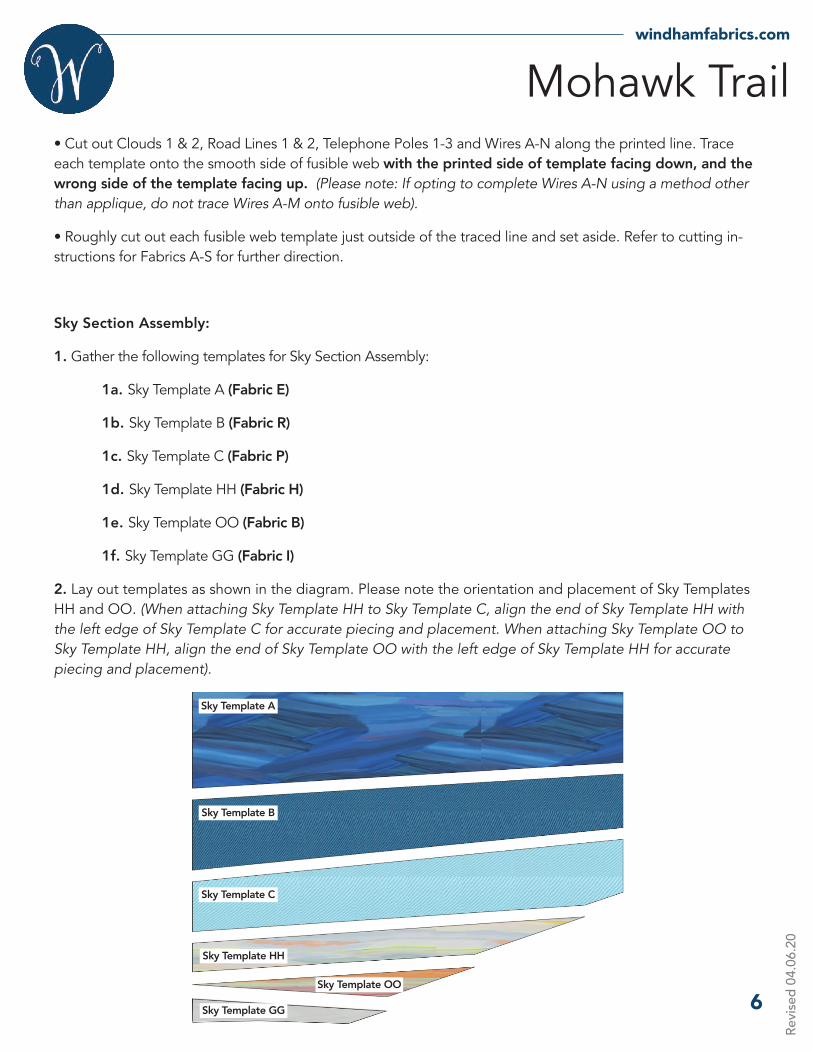
Sky Section Assembly:
1. Gather the following templates for Sky Section Assembly:
1a. Sky Template A (Fabric E)
1b. Sky Template B (Fabric R)
1c. Sky Template C (Fabric P)
1d. Sky Template HH (Fabric H)
1e. Sky Template OO (Fabric B)
1f. Sky Template GG (Fabric I)
2. Lay out templates as shown in the diagram. Please note the orientation and placement of Sky Templates HH and OO. (When attaching Sky Template HH to Sky Template C, align the end of Sky Template HH with the left edge of Sky Template C for accurate piecing and placement. When attaching Sky Template OO to Sky Template HH, align the end of Sky Template OO with the left edge of Sky Template HH for accurate piecing and placement).
Sky Template A
Sky Template B
Sky Template C
Sky Template HH
Sky Template OO
Sky Template GG
Mohawk Trail
7
windhamfabrics.com
Revi
sed
04.0
6.20
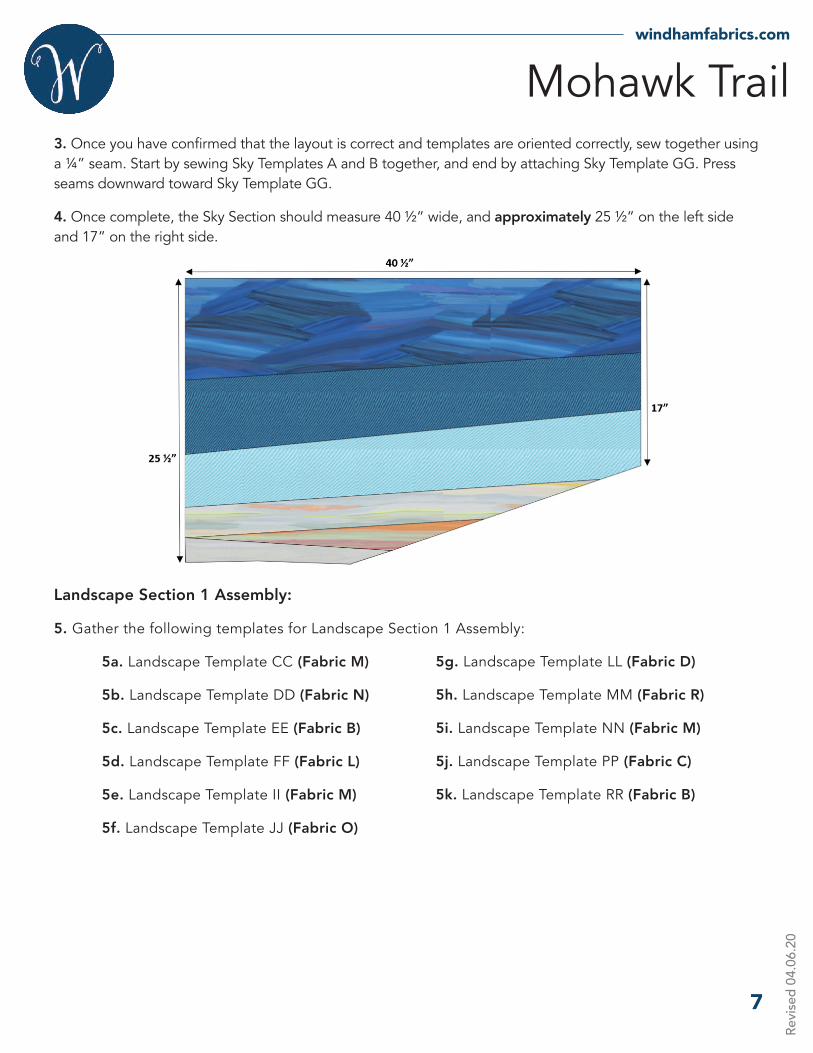
3. Once you have confirmed that the layout is correct and templates are oriented correctly, sew together using a ¼” seam. Start by sewing Sky Templates A and B together, and end by attaching Sky Template GG. Press seams downward toward Sky Template GG.
4. Once complete, the Sky Section should measure 40 ½” wide, and approximately 25 ½” on the left side and 17” on the right side.
Landscape Section 1 Assembly:
5. Gather the following templates for Landscape Section 1 Assembly:
5a. Landscape Template CC (Fabric M)
5b. Landscape Template DD (Fabric N)
5c. Landscape Template EE (Fabric B)
5d. Landscape Template FF (Fabric L)
5e. Landscape Template II (Fabric M)
5f. Landscape Template JJ (Fabric O)
5g. Landscape Template LL (Fabric D)
5h. Landscape Template MM (Fabric R)
5i. Landscape Template NN (Fabric M)
5j. Landscape Template PP (Fabric C)
5k. Landscape Template RR (Fabric B)
Mohawk Trail
8
windhamfabrics.com
Revi
sed
04.0
6.20
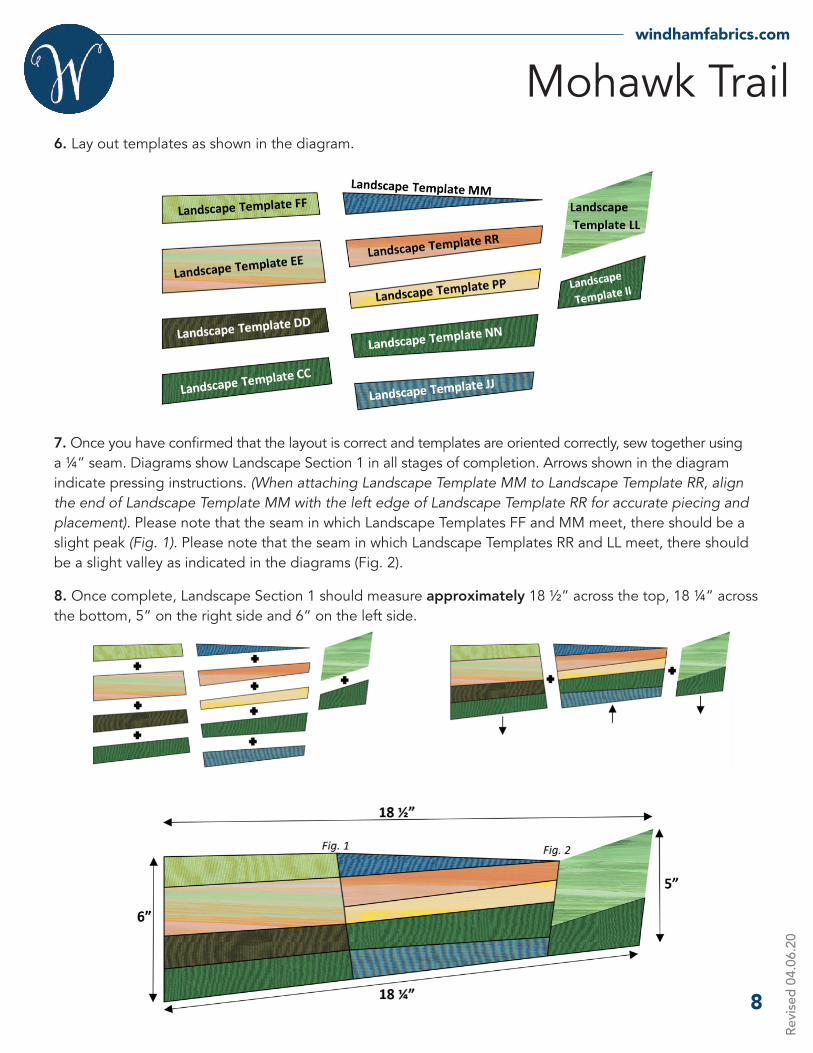
6. Lay out templates as shown in the diagram.
7. Once you have confirmed that the layout is correct and templates are oriented correctly, sew together using a ¼” seam. Diagrams show Landscape Section 1 in all stages of completion. Arrows shown in the diagram indicate pressing instructions. (When attaching Landscape Template MM to Landscape Template RR, align the end of Landscape Template MM with the left edge of Landscape Template RR for accurate piecing and placement). Please note that the seam in which Landscape Templates FF and MM meet, there should be a slight peak (Fig. 1). Please note that the seam in which Landscape Templates RR and LL meet, there should be a slight valley as indicated in the diagrams (Fig. 2).
8. Once complete, Landscape Section 1 should measure approximately 18 ½” across the top, 18 ¼” across the bottom, 5” on the right side and 6” on the left side.
Mohawk Trail
9
windhamfabrics.com
Revi
sed
04.0
6.20
Landscape Section 2 Assembly:
9. Gather the following templates for Landscape Section 2 Assembly:
9a. Landscape Template D (Fabric D)
9b. Landscape Template E (Fabric M)
9c. Landscape Template F (Fabric N)
9d. Landscape Template G (Fabric A)
9e. Landscape Template H (Fabric F)
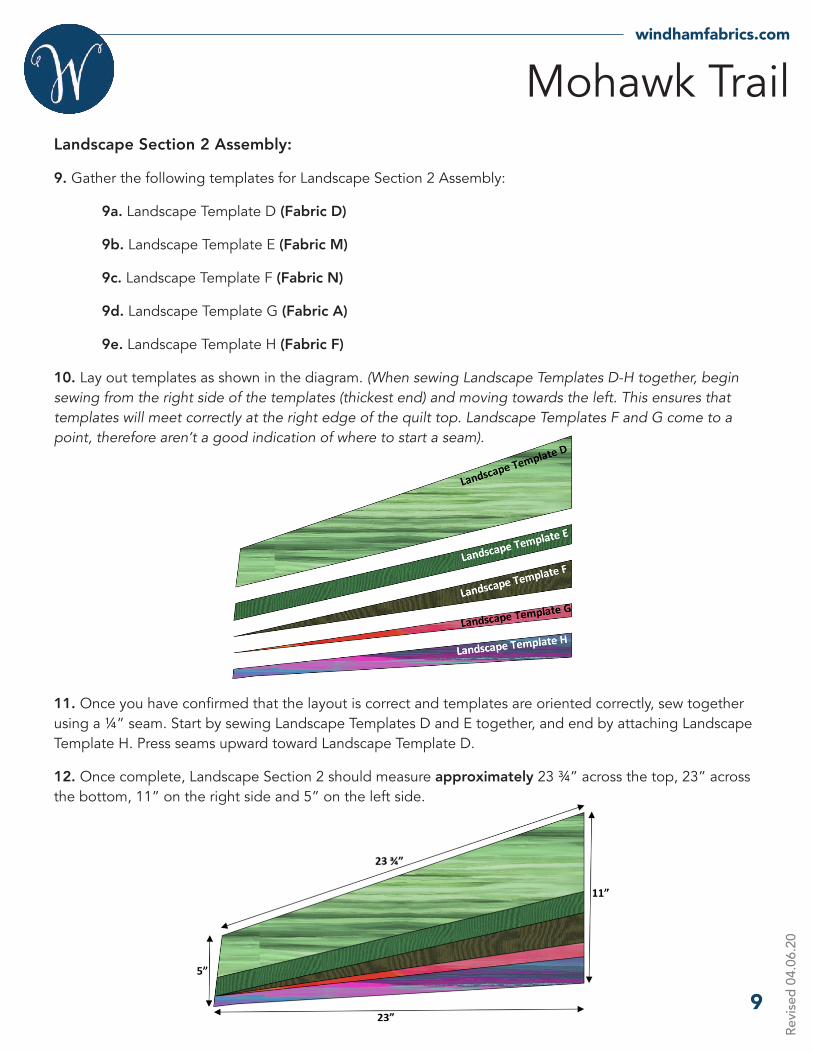
10. Lay out templates as shown in the diagram. (When sewing Landscape Templates D-H together, begin sewing from the right side of the templates (thickest end) and moving towards the left. This ensures that templates will meet correctly at the right edge of the quilt top. Landscape Templates F and G come to a point, therefore aren’t a good indication of where to start a seam).
11. Once you have confirmed that the layout is correct and templates are oriented correctly, sew together using a ¼” seam. Start by sewing Landscape Templates D and E together, and end by attaching Landscape Template H. Press seams upward toward Landscape Template D.
12. Once complete, Landscape Section 2 should measure approximately 23 ¾” across the top, 23” across the bottom, 11” on the right side and 5” on the left side.
Mohawk Trail
10
windhamfabrics.com
Revi
sed
04.0
6.20
Road Section Assembly:
13. Gather the following templates for Road Section Assembly:
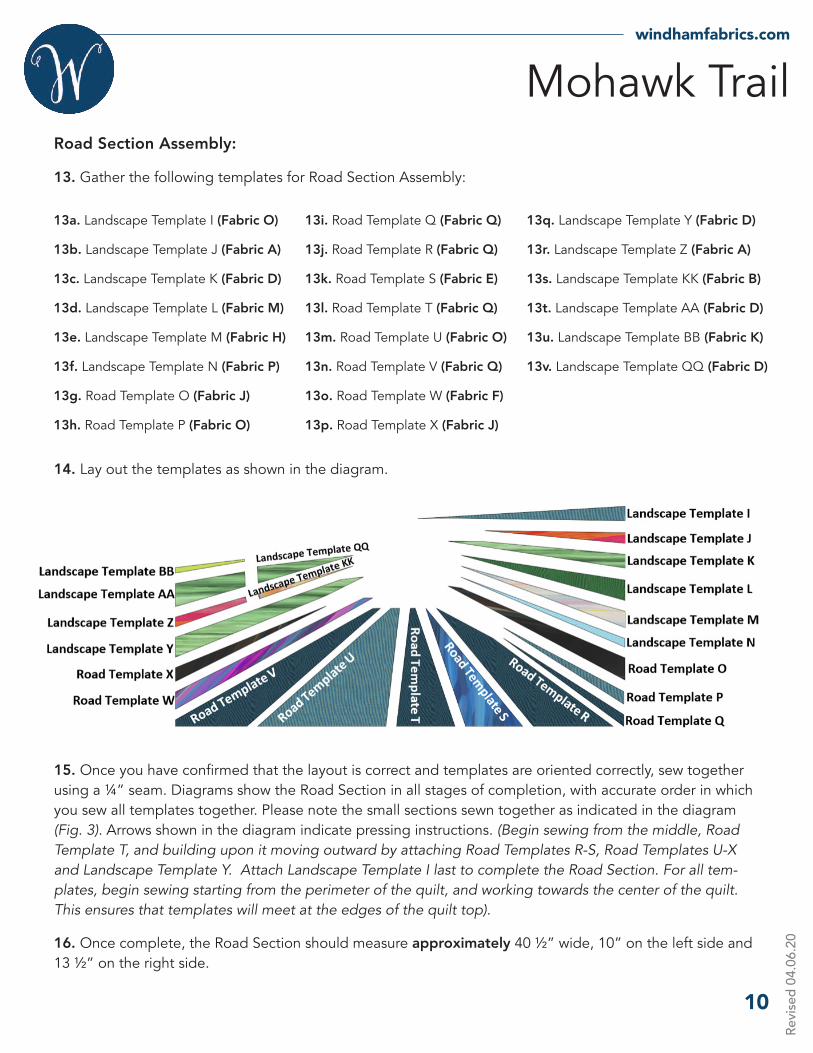
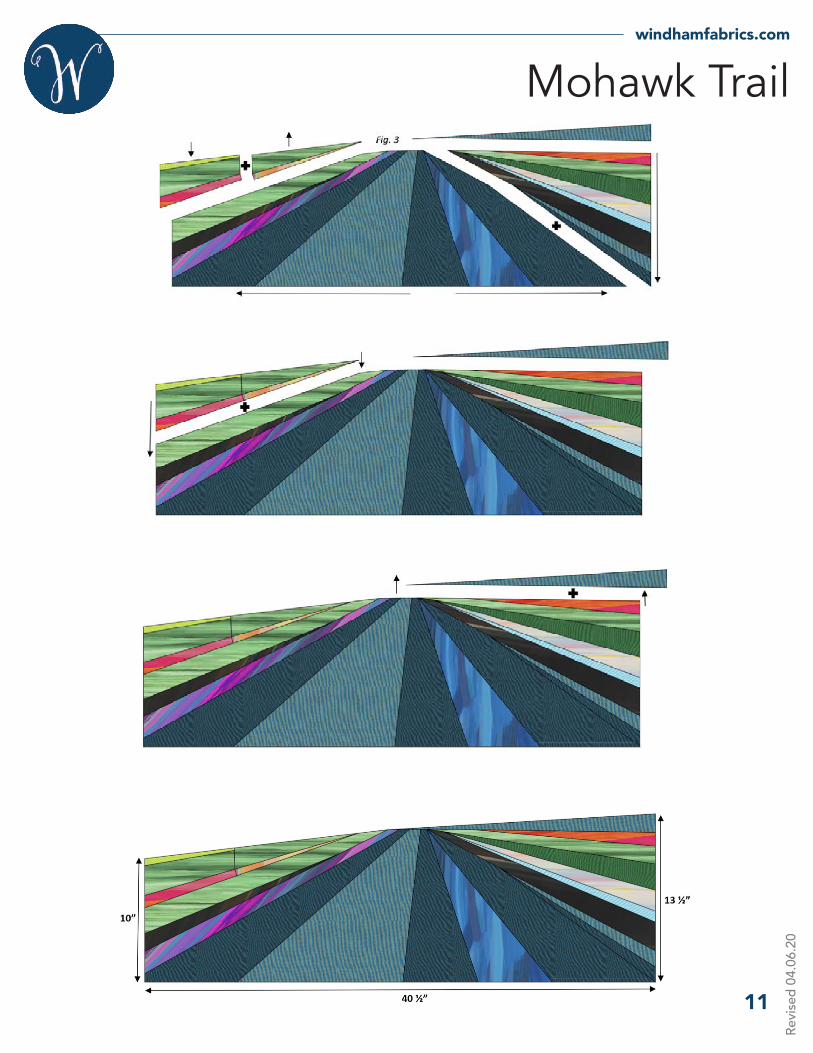
14. Lay out the templates as shown in the diagram.
15. Once you have confirmed that the layout is correct and templates are oriented correctly, sew together using a ¼” seam. Diagrams show the Road Section in all stages of completion, with accurate order in which you sew all templates together. Please note the small sections sewn together as indicated in the diagram (Fig. 3). Arrows shown in the diagram indicate pressing instructions. (Begin sewing from the middle, Road Template T, and building upon it moving outward by attaching Road Templates R-S, Road Templates U-X and Landscape Template Y. Attach Landscape Template I last to complete the Road Section. For all tem-plates, begin sewing starting from the perimeter of the quilt, and working towards the center of the quilt. This ensures that templates will meet at the edges of the quilt top).
16. Once complete, the Road Section should measure approximately 40 ½” wide, 10” on the left side and 13 ½” on the right side.
13i. Road Template Q (Fabric Q)
13j. Road Template R (Fabric Q)
13k. Road Template S (Fabric E)
13l. Road Template T (Fabric Q)
13m. Road Template U (Fabric O)
13n. Road Template V (Fabric Q)
13o. Road Template W (Fabric F)
13p. Road Template X (Fabric J)
13q. Landscape Template Y (Fabric D)
13r. Landscape Template Z (Fabric A)
13s. Landscape Template KK (Fabric B)
13t. Landscape Template AA (Fabric D)
13u. Landscape Template BB (Fabric K)
13v. Landscape Template QQ (Fabric D)
13a. Landscape Template I (Fabric O)
13b. Landscape Template J (Fabric A)
13c. Landscape Template K (Fabric D)
13d. Landscape Template L (Fabric M)
13e. Landscape Template M (Fabric H)
13f. Landscape Template N (Fabric P)
13g. Road Template O (Fabric J)
13h. Road Template P (Fabric O)
Mohawk Trail
11
windhamfabrics.com
Revi
sed
04.0
6.20
Mohawk Trail
12
windhamfabrics.com
Revi
sed
04.0
6.20
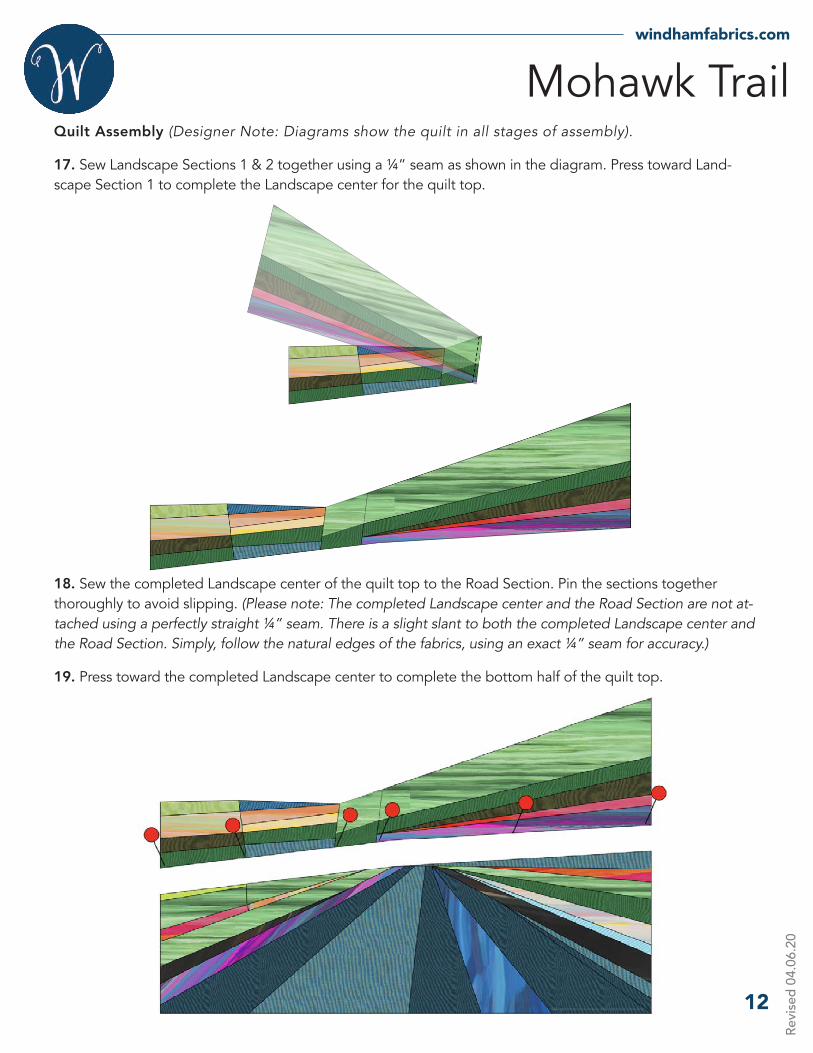
Quilt Assembly (Designer Note: Diagrams show the quilt in all stages of assembly).
17. Sew Landscape Sections 1 & 2 together using a ¼” seam as shown in the diagram. Press toward Land-scape Section 1 to complete the Landscape center for the quilt top.
18. Sew the completed Landscape center of the quilt top to the Road Section. Pin the sections together thoroughly to avoid slipping. (Please note: The completed Landscape center and the Road Section are not at-tached using a perfectly straight ¼” seam. There is a slight slant to both the completed Landscape center and the Road Section. Simply, follow the natural edges of the fabrics, using an exact ¼” seam for accuracy.)
19. Press toward the completed Landscape center to complete the bottom half of the quilt top.
Mohawk Trail
13
windhamfabrics.com
Revi
sed
04.0
6.20
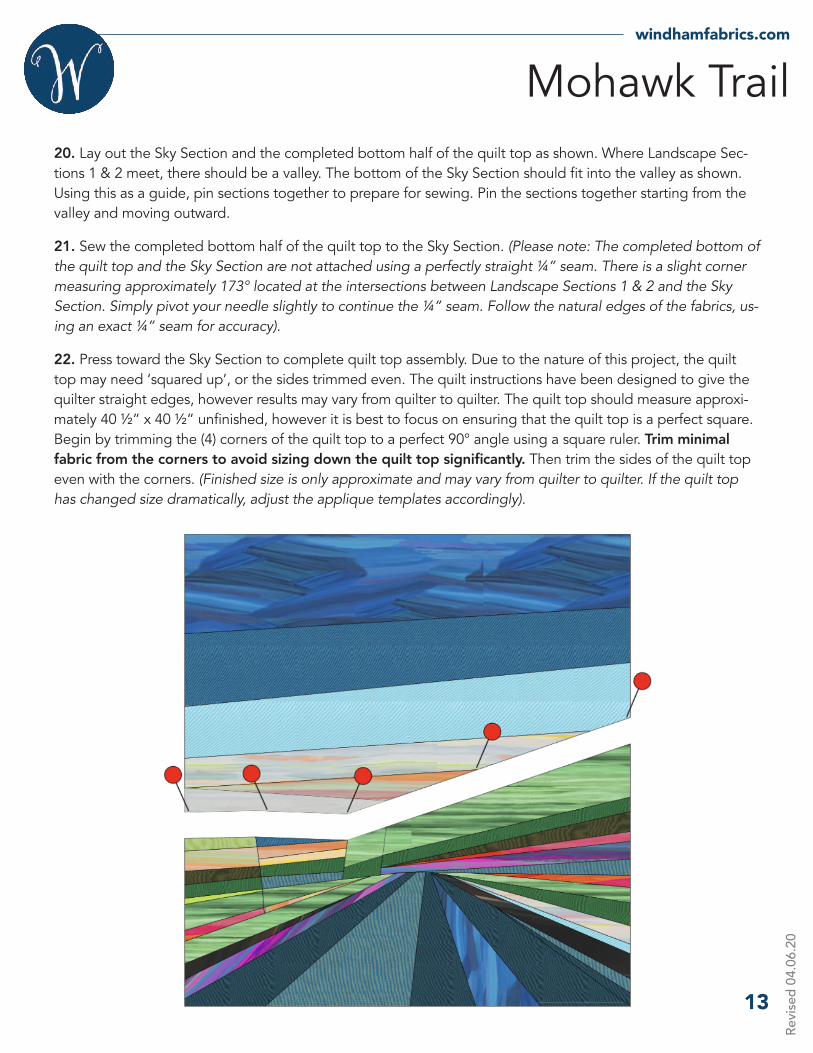
20. Lay out the Sky Section and the completed bottom half of the quilt top as shown. Where Landscape Sec-tions 1 & 2 meet, there should be a valley. The bottom of the Sky Section should fit into the valley as shown. Using this as a guide, pin sections together to prepare for sewing. Pin the sections together starting from the valley and moving outward.
21. Sew the completed bottom half of the quilt top to the Sky Section. (Please note: The completed bottom of the quilt top and the Sky Section are not attached using a perfectly straight ¼” seam. There is a slight corner measuring approximately 173° located at the intersections between Landscape Sections 1 & 2 and the Sky Section. Simply pivot your needle slightly to continue the ¼” seam. Follow the natural edges of the fabrics, us-ing an exact ¼” seam for accuracy).
22. Press toward the Sky Section to complete quilt top assembly. Due to the nature of this project, the quilt top may need ‘squared up’, or the sides trimmed even. The quilt instructions have been designed to give the quilter straight edges, however results may vary from quilter to quilter. The quilt top should measure approxi-mately 40 ½” x 40 ½” unfinished, however it is best to focus on ensuring that the quilt top is a perfect square. Begin by trimming the (4) corners of the quilt top to a perfect 90° angle using a square ruler. Trim minimal fabric from the corners to avoid sizing down the quilt top significantly. Then trim the sides of the quilt top even with the corners. (Finished size is only approximate and may vary from quilter to quilter. If the quilt top has changed size dramatically, adjust the applique templates accordingly).
Mohawk Trail
14
windhamfabrics.com
Revi
sed
04.0
6.20
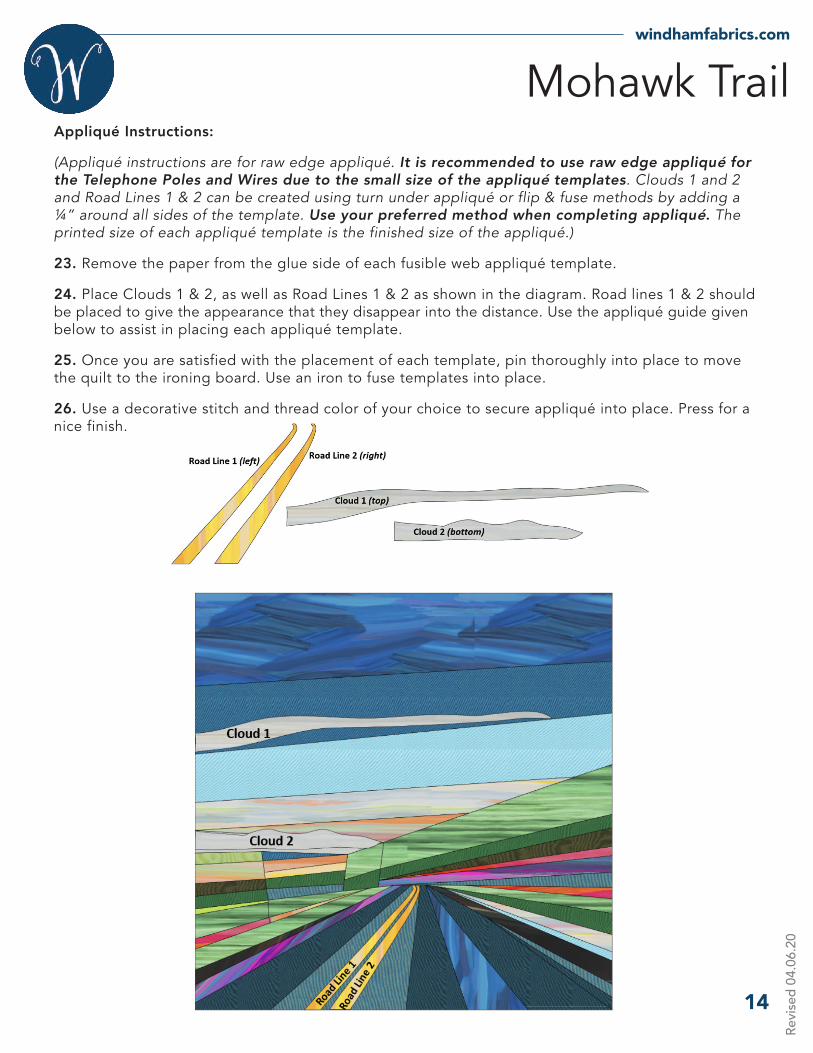
Appliqué Instructions:
(Appliqué instructions are for raw edge appliqué. It is recommended to use raw edge appliqué for the Telephone Poles and Wires due to the small size of the appliqué templates. Clouds 1 and 2 and Road Lines 1 & 2 can be created using turn under appliqué or flip & fuse methods by adding a ¼” around all sides of the template. Use your preferred method when completing appliqué. The printed size of each appliqué template is the finished size of the appliqué.)
23. Remove the paper from the glue side of each fusible web appliqué template.
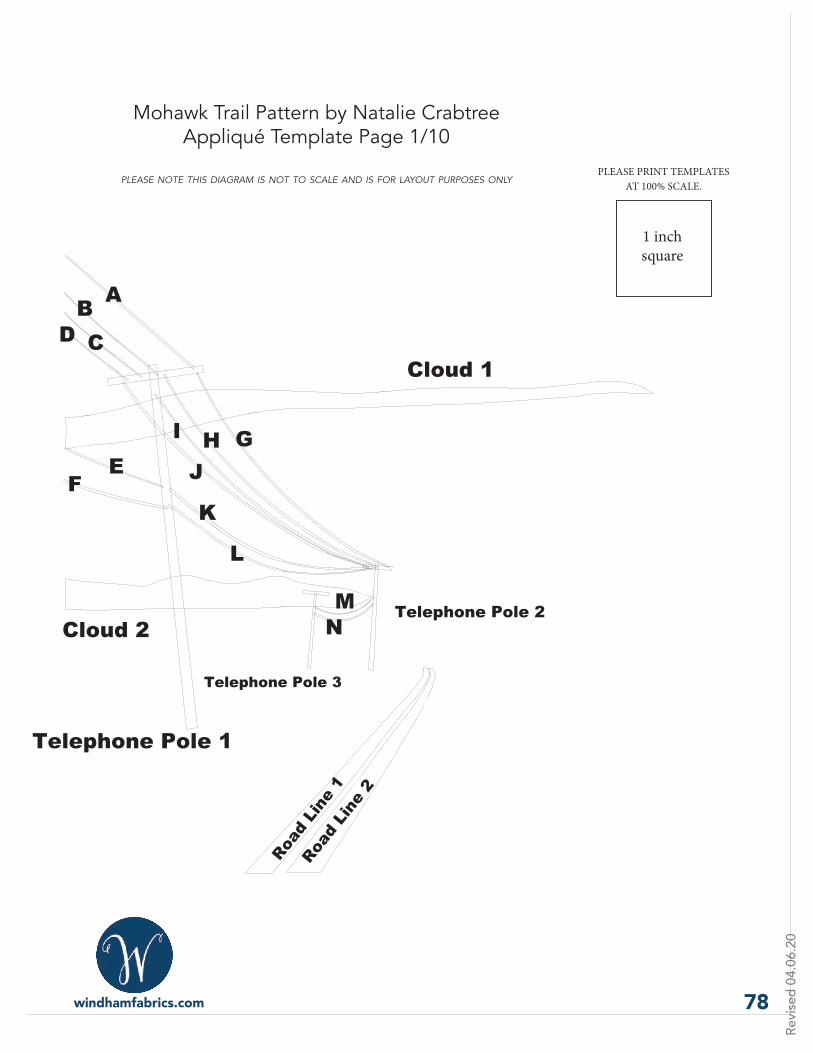
24. Place Clouds 1 & 2, as well as Road Lines 1 & 2 as shown in the diagram. Road lines 1 & 2 should be placed to give the appearance that they disappear into the distance. Use the appliqué guide given below to assist in placing each appliqué template.
25. Once you are satisfied with the placement of each template, pin thoroughly into place to move the quilt to the ironing board. Use an iron to fuse templates into place.
26. Use a decorative stitch and thread color of your choice to secure appliqué into place. Press for a nice finish.
Mohawk Trail
15
windhamfabrics.com
Revi
sed
04.0
6.20
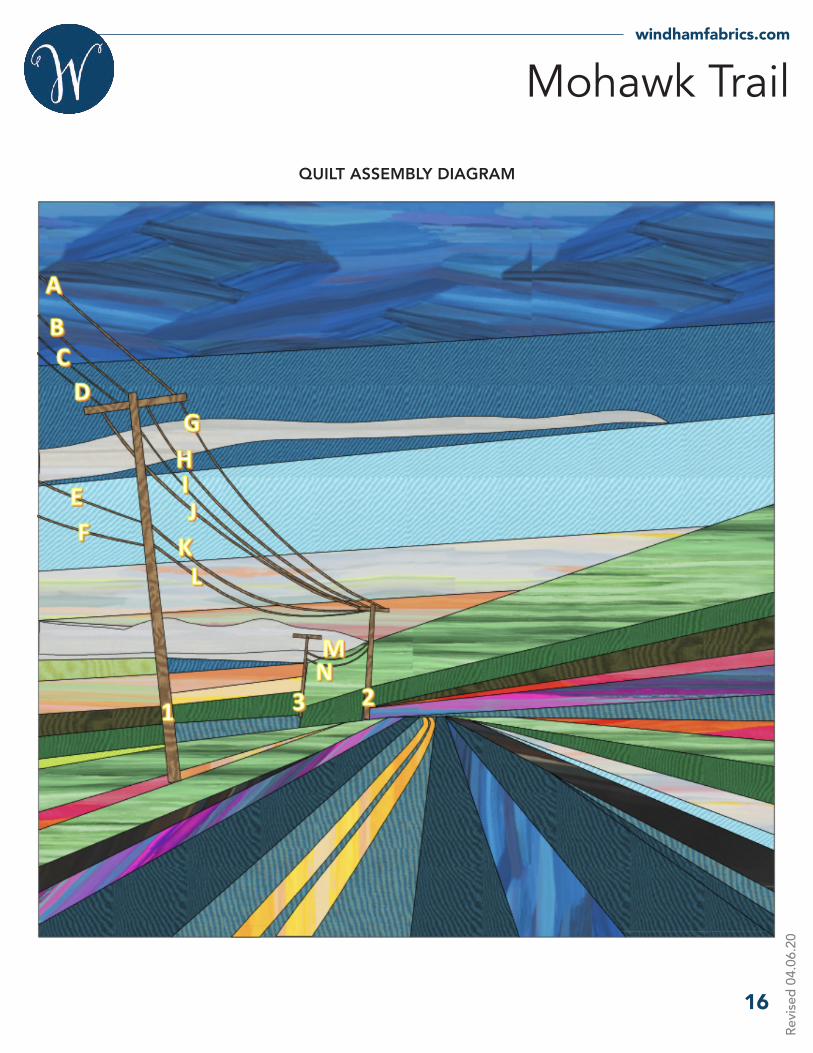
27. Place Telephone Poles 1-3 and Wires A-N as shown in the Quilt Assembly Diagram on Page 16. (Please note: If completing methods other than applique to finish Wires A-N, disregard these instructions. Simply trace the wires onto the quilt top using the templates as your guide. Complete wires using your preferred method). Please note: The ends of Wires A-N should run underneath Telephone Poles 1-3 to cover the raw edges. Telephone Poles 1-3 are placed over quilt top seams as shown. Telephone Pole 1 is placed over the left seam in Landscape Section 1. Telephone Pole 2 is placed over the seam connecting Landscape Sections 1 & 2. Telephone Pole 3 is placed over the right seam in Landscape Section 1.
28. Once you are satisfied with the placement of each template, pin thoroughly into place to move the quilt to the ironing board. Use an iron to fuse templates into place.
29. Use a decorative stitch and thread color of your choice to secure appliqué into place. Press for a nice finish to complete the quilt top.
Finishing
30. With the backing fabric laying taut, place batting and then quilt top to form quilt sandwich.
31. Baste sandwich. Quilt as desired.
32. Bind with Fabric G to finish quilt.
Mohawk Trail
16
windhamfabrics.com
Revi
sed
04.0
6.20
QUILT ASSEMBLY DIAGRAM
Revi
sed
04.0
6.20
Mohawk Trail Piecing Templates
by Natalie Crabtree
A
B
C
D
E F G
HI
JKL
M
N
O
PQ
RS
TUV
W
X
YZ
AABB
CC
DD
EE
FF
GG
HH
IIJJ
KK
LLMM
NN
OO
PP
RR
1 inch
17
1 inch square
PLEASE PRINT TEMPLATES AT 100% SCALE.
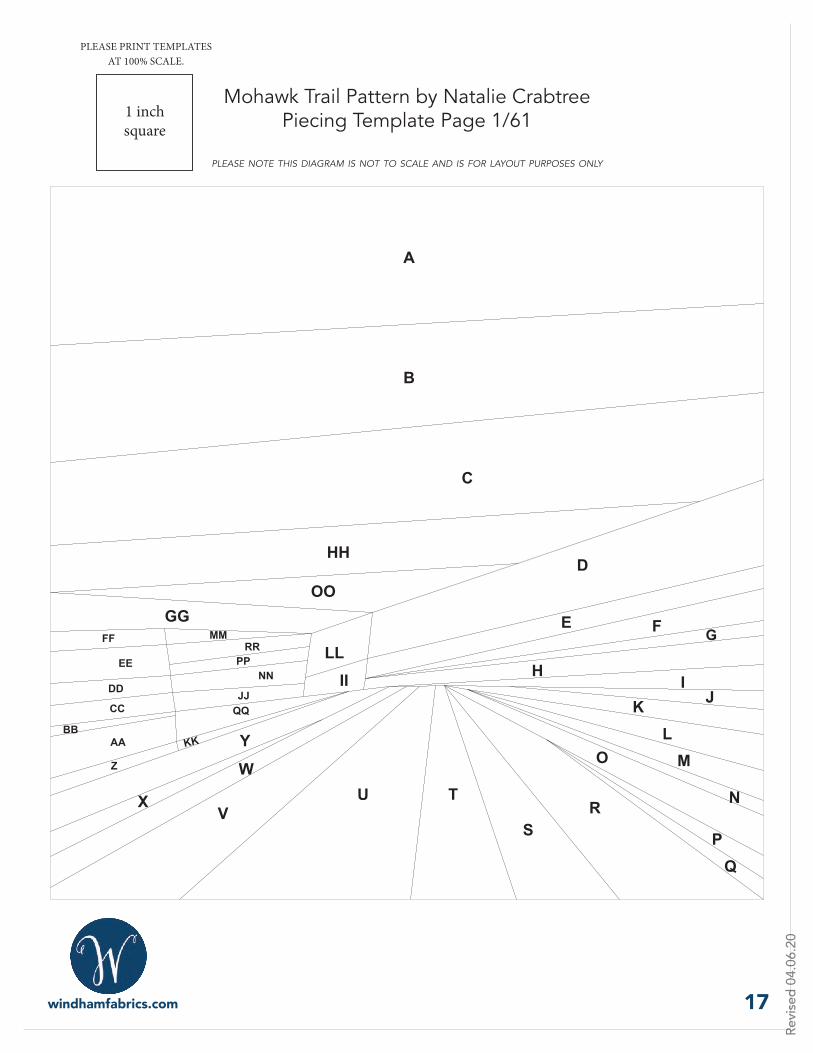
Mohawk Trail Pattern by Natalie CrabtreePiecing Template Page 1/61
please note this diagram is not to scale and is for layout purposes only
Revi
sed
04.0
6.20
Sky Template A
Side 1
Sid
e 2
18
1 inch square
PLEASE PRINT TEMPLATES AT 100% SCALE.
Mohawk Trail Pattern by Natalie CrabtreePiecing Template Page 2/61
Revi
sed
04.0
6.20
Sky T
emplate A
Side 2
Sky Template HH
Side 1 19
1 inch square
PLEASE PRIN
T TEMPLATES
AT 100% SC
ALE.
Mohaw
k Trail Pattern by Natalie C
rabtreePiecing Tem
plate Page 3/61
Revi
sed
04.0
6.20
Sky Template B
Side 1 20
1 inch square
PLEASE PRINT TEMPLATES AT 100% SCALE.
Mohawk Trail Pattern by Natalie CrabtreePiecing Template Page 4/61
Revi
sed
04.0
6.20
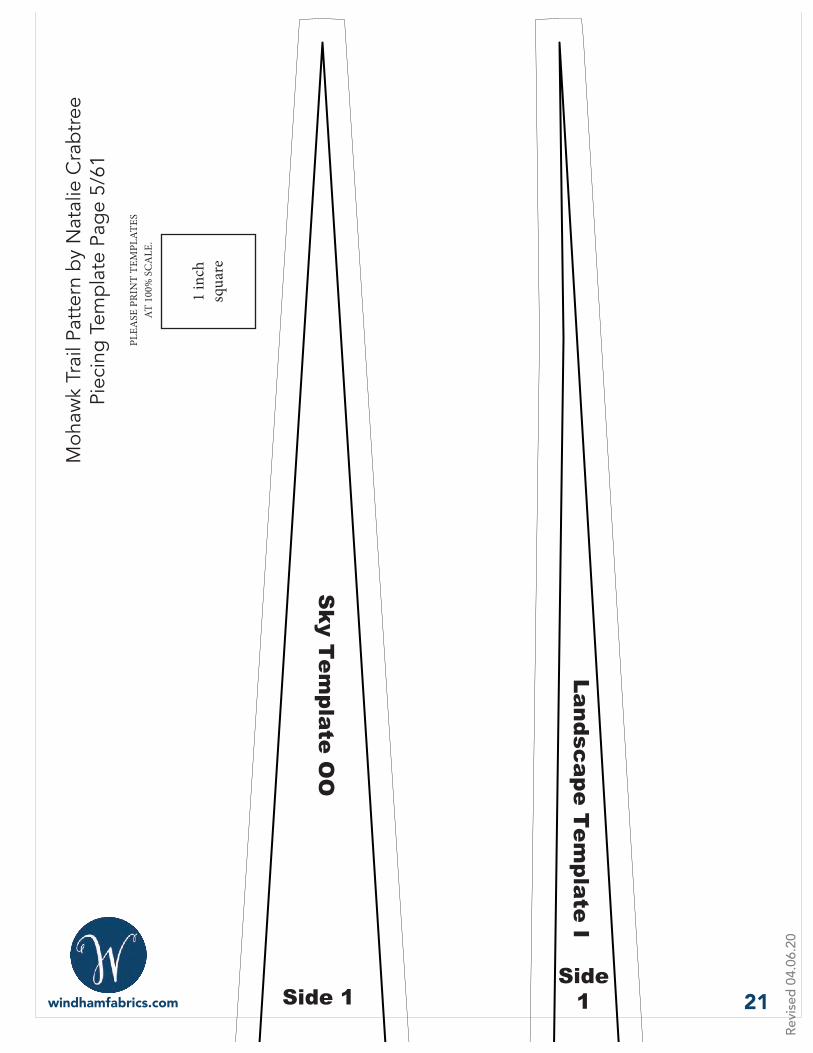
Sky T
emplate O
O
Side 1
Landscape Tem
plate I
Side 1 21
1 in
ch
squa
re
PLEA
SE P
RIN
T TE
MPL
ATES
AT
100
% S
CA
LE.
Moh
awk
Trai
l Pat
tern
by
Nat
alie
Cra
btre
ePi
ecin
g Te
mpl
ate
Page
5/6
1
Revi
sed
04.0
6.20
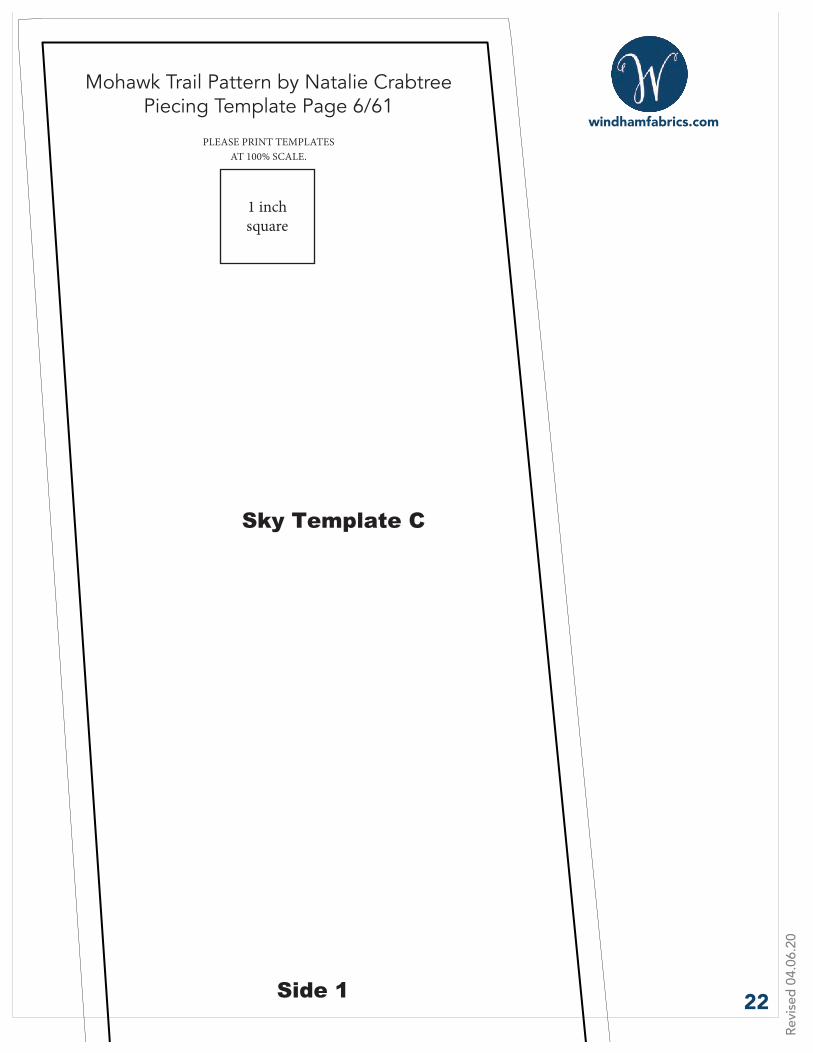
Sky Template C
Side 1 22
1 inch square
PLEASE PRINT TEMPLATES AT 100% SCALE.
Mohawk Trail Pattern by Natalie CrabtreePiecing Template Page 6/61
Revi
sed
04.0
6.20
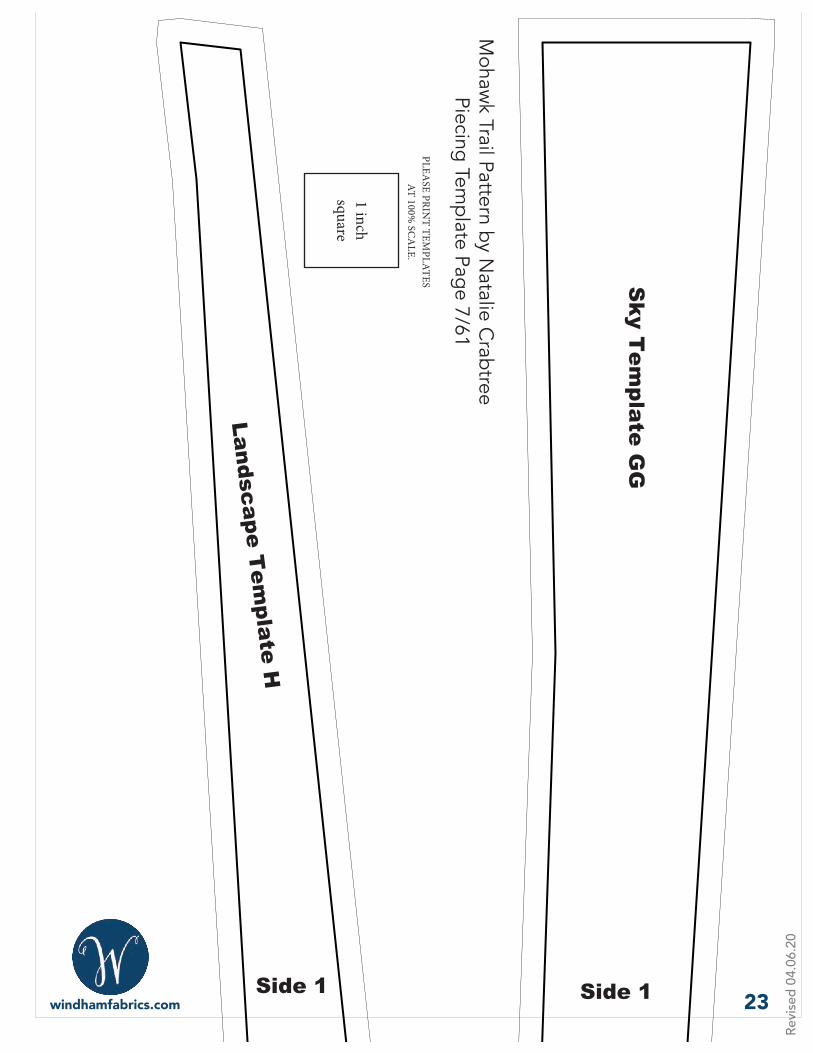
Landscape Tem
plate H
Side 1 Side 1
Sky T
emplate G
G
23
1 inch square
PLEASE PRIN
T TEMPLATES
AT 100% SC
ALE.
Mohaw
k Trail Pattern by Natalie C
rabtreePiecing Tem
plate Page 7/61
Revi
sed
04.0
6.20
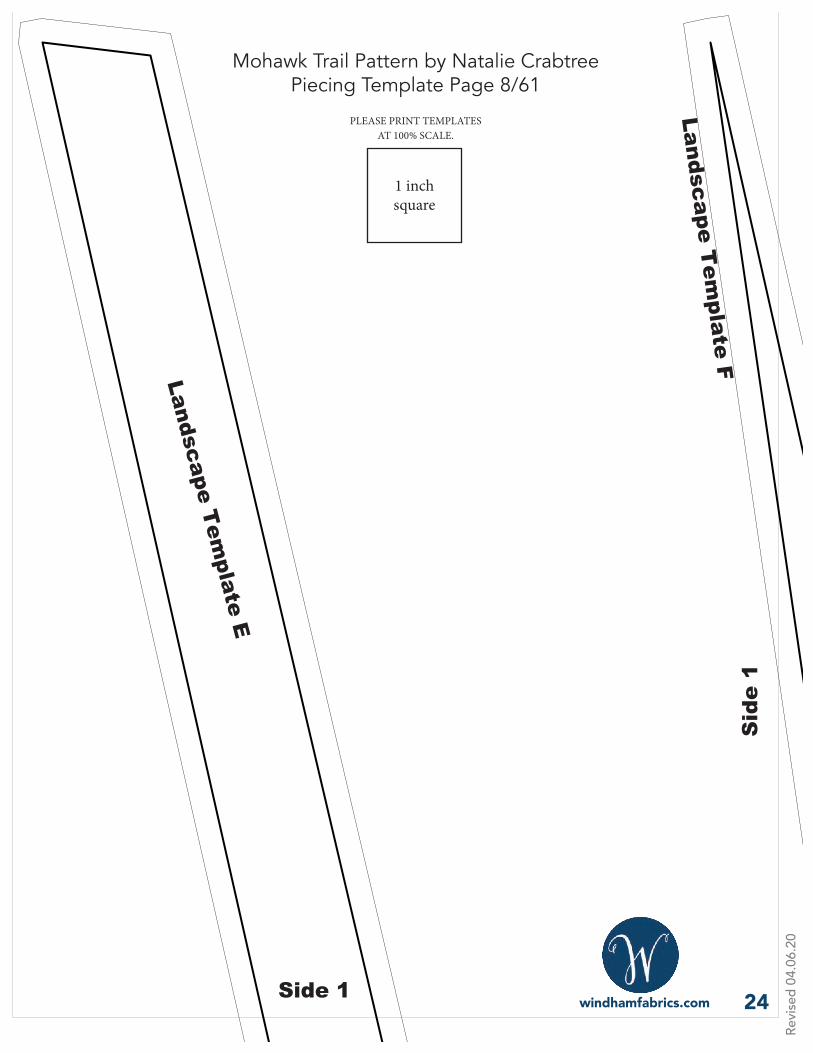
Landscape Tem
plate E
Side 1
Landscape Tem
plate F
Sid
e 1
24
1 inch square
PLEASE PRINT TEMPLATES AT 100% SCALE.
Mohawk Trail Pattern by Natalie CrabtreePiecing Template Page 8/61
Revi
sed
04.0
6.20
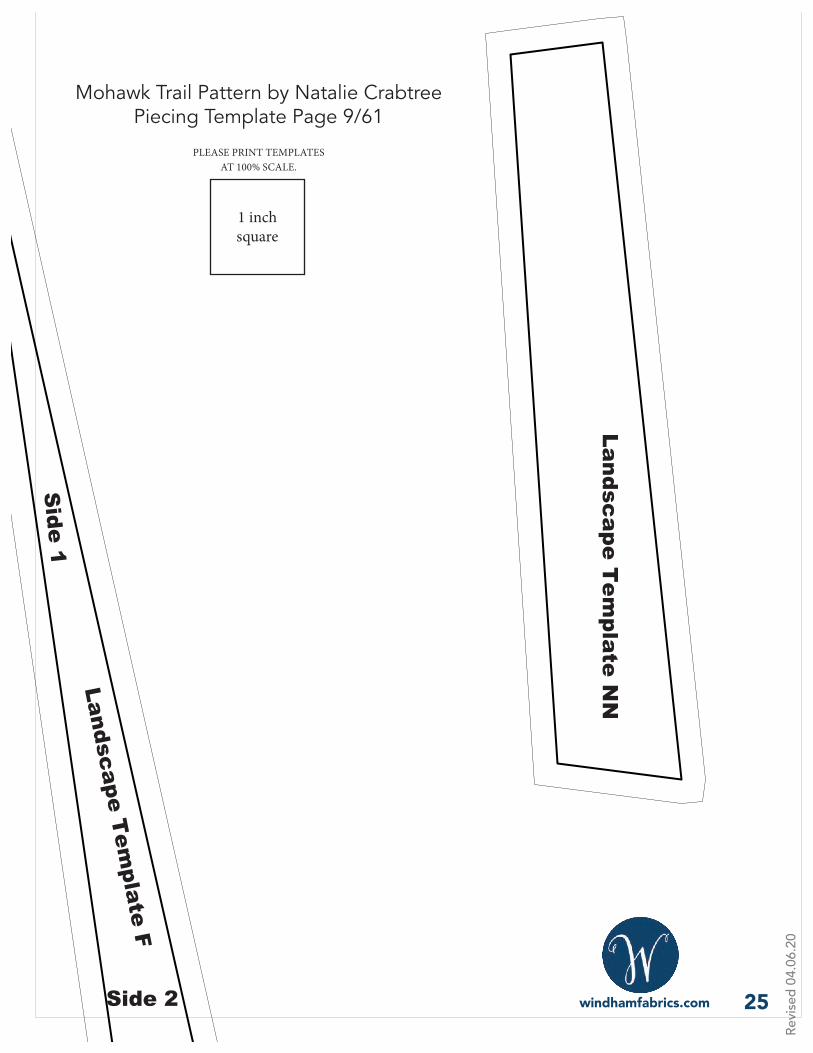
Landscape Tem
plate NNLandscape T
emplate F
Side 1
Side 2 25
1 inch square
PLEASE PRINT TEMPLATES AT 100% SCALE.
Mohawk Trail Pattern by Natalie CrabtreePiecing Template Page 9/61
Revi
sed
04.0
6.20
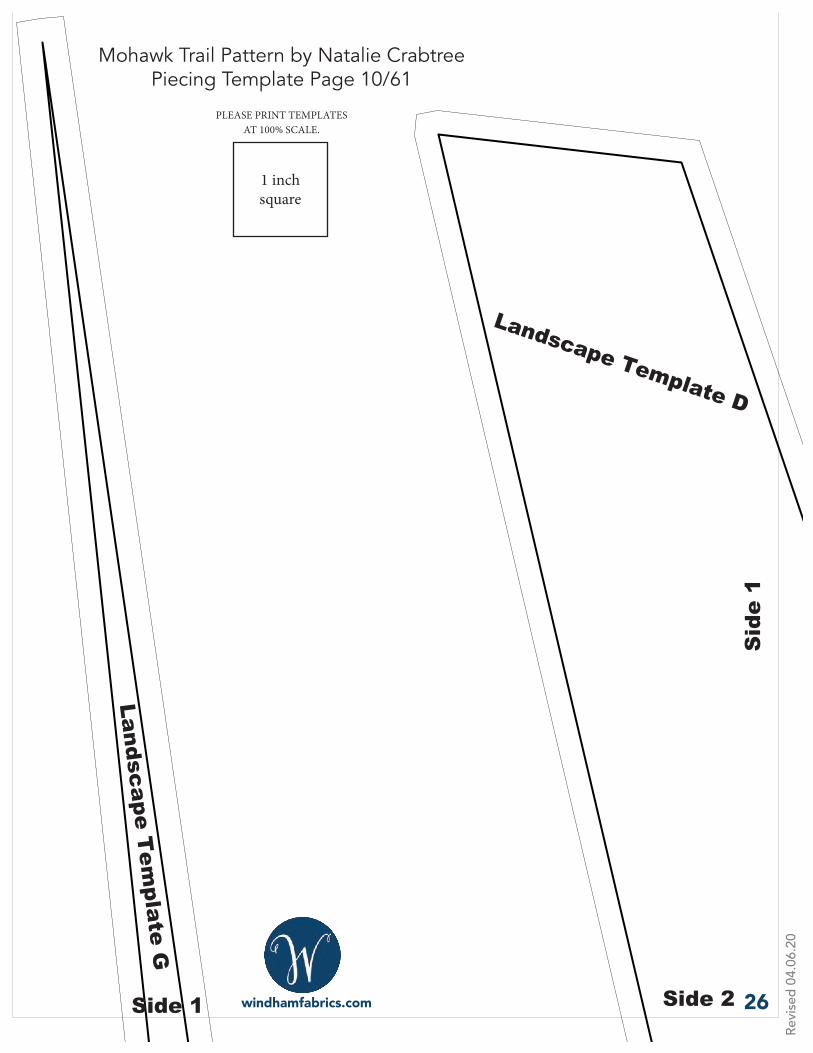
Landscape Tem
plate G
Side 1
Landscape Template D
Sid
e 1
Side 2 26
1 inch square
PLEASE PRINT TEMPLATES AT 100% SCALE.
Mohawk Trail Pattern by Natalie CrabtreePiecing Template Page 10/61
Revi
sed
04.0
6.20
Landscape Template QQ
Landscape Template D
Side 1
Side 4 27
1 inch square
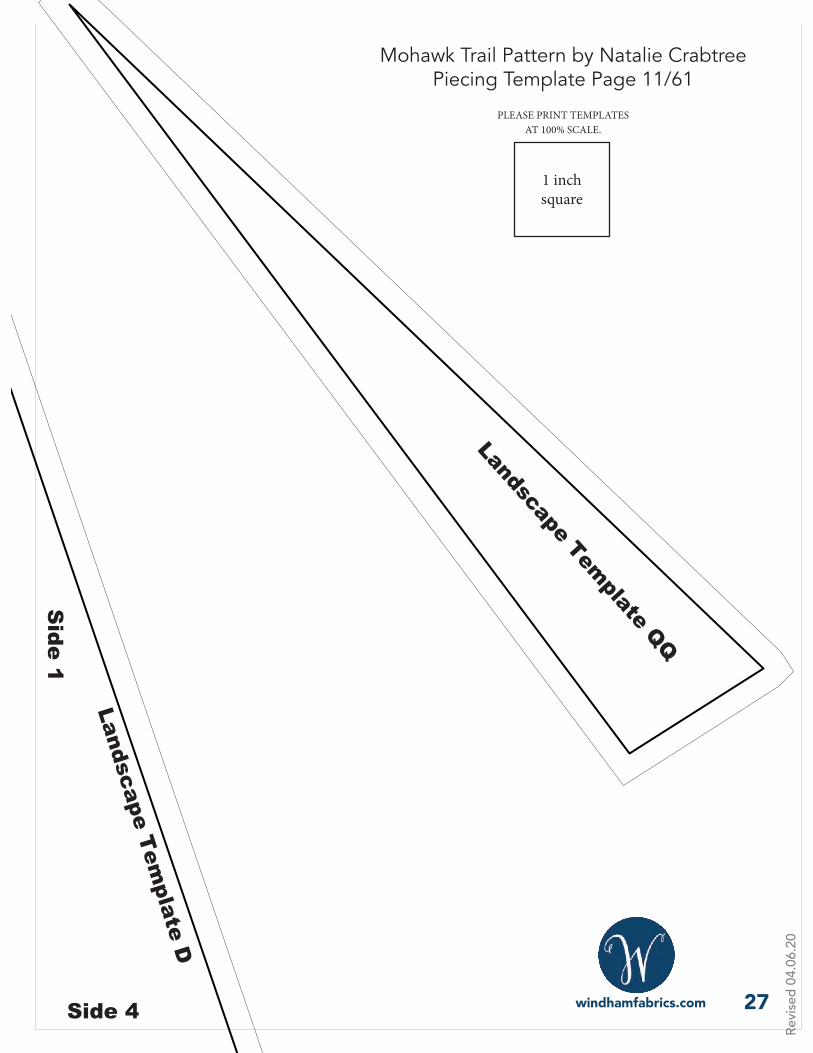
PLEASE PRINT TEMPLATES AT 100% SCALE.
Mohawk Trail Pattern by Natalie CrabtreePiecing Template Page 11/61
Revi
sed
04.0
6.20
Road Template V
Side 1
Sid
e 2
28
1 inch square
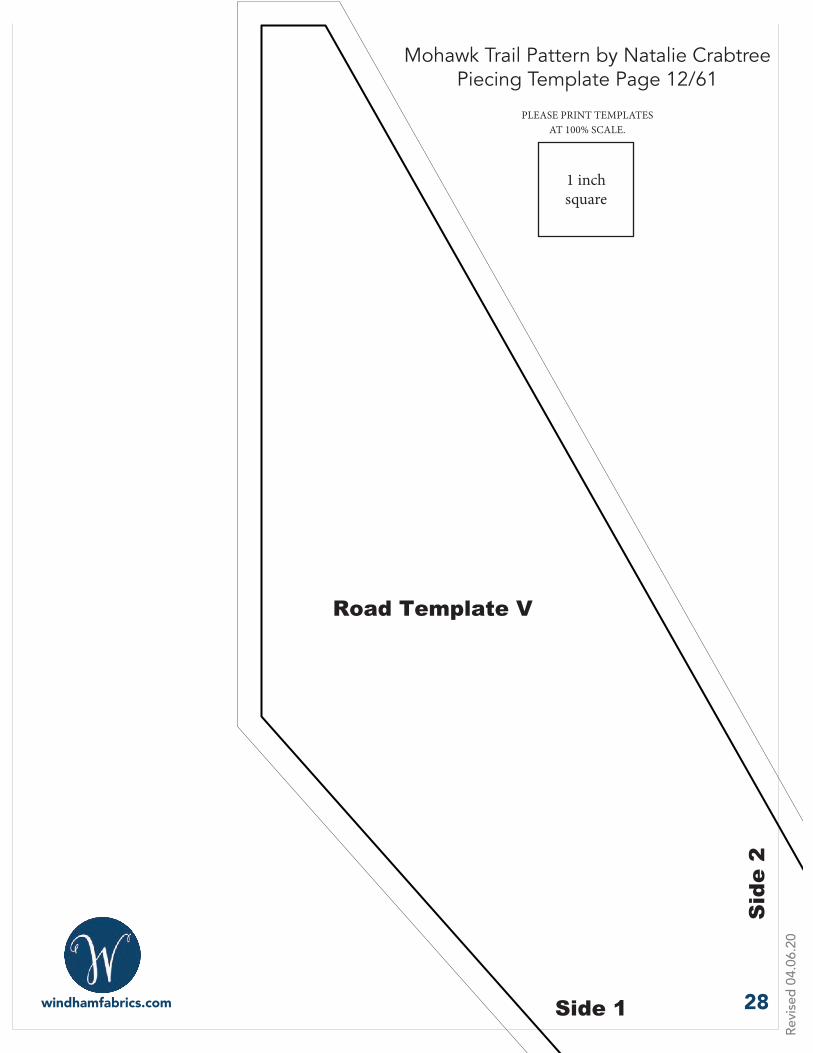
PLEASE PRINT TEMPLATES AT 100% SCALE.
Mohawk Trail Pattern by Natalie CrabtreePiecing Template Page 12/61
Revi
sed
04.0
6.20
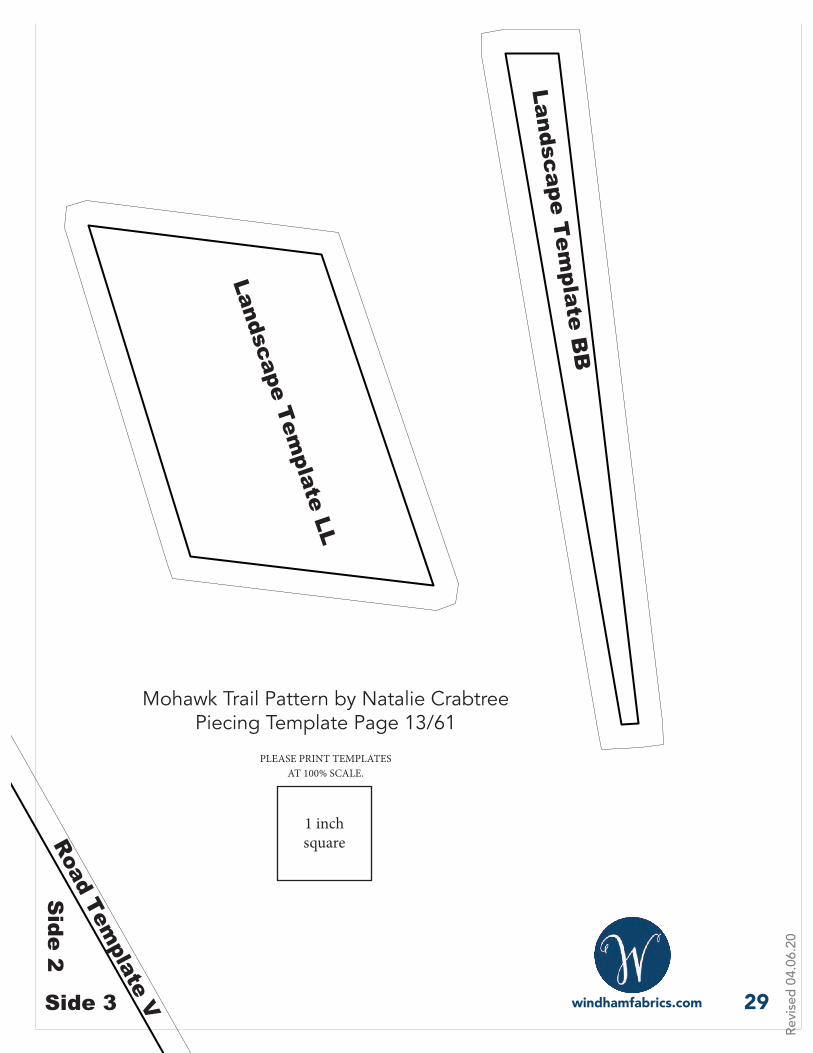
Landscape Template LL
Landscape Tem
plate BB
Road Template V
Side 2
Side 3 29
1 inch square
PLEASE PRINT TEMPLATES AT 100% SCALE.
Mohawk Trail Pattern by Natalie CrabtreePiecing Template Page 13/61
Revi
sed
04.0
6.20
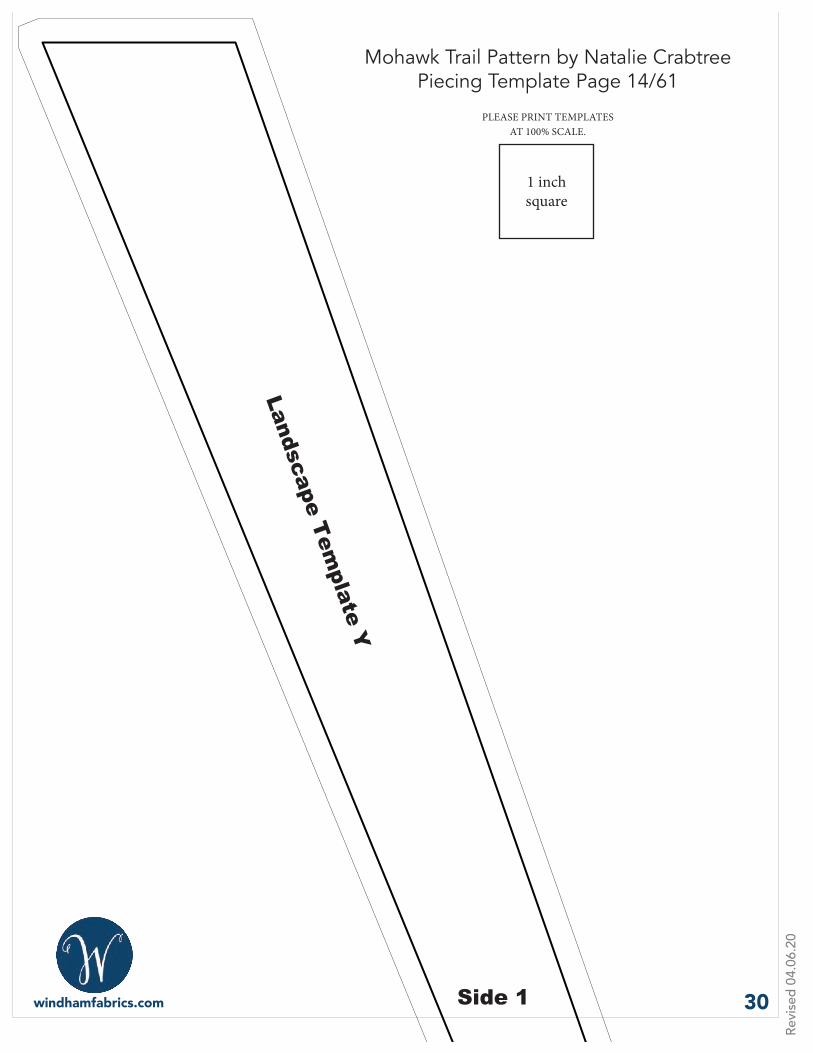
Landscape Template Y
Side 1 30
1 inch square
PLEASE PRINT TEMPLATES AT 100% SCALE.
Mohawk Trail Pattern by Natalie CrabtreePiecing Template Page 14/61

Revi
sed
04.0
6.20
Roa
d T
empl
ate
Q
Side 1 Side 1
Landscape Tem
plate M
31
1 inch square
PLEASE PRINT TEMPLATES AT 100% SCALE.
Mohawk Trail Pattern by Natalie CrabtreePiecing Template Page 15/61
Revi
sed
04.0
6.20
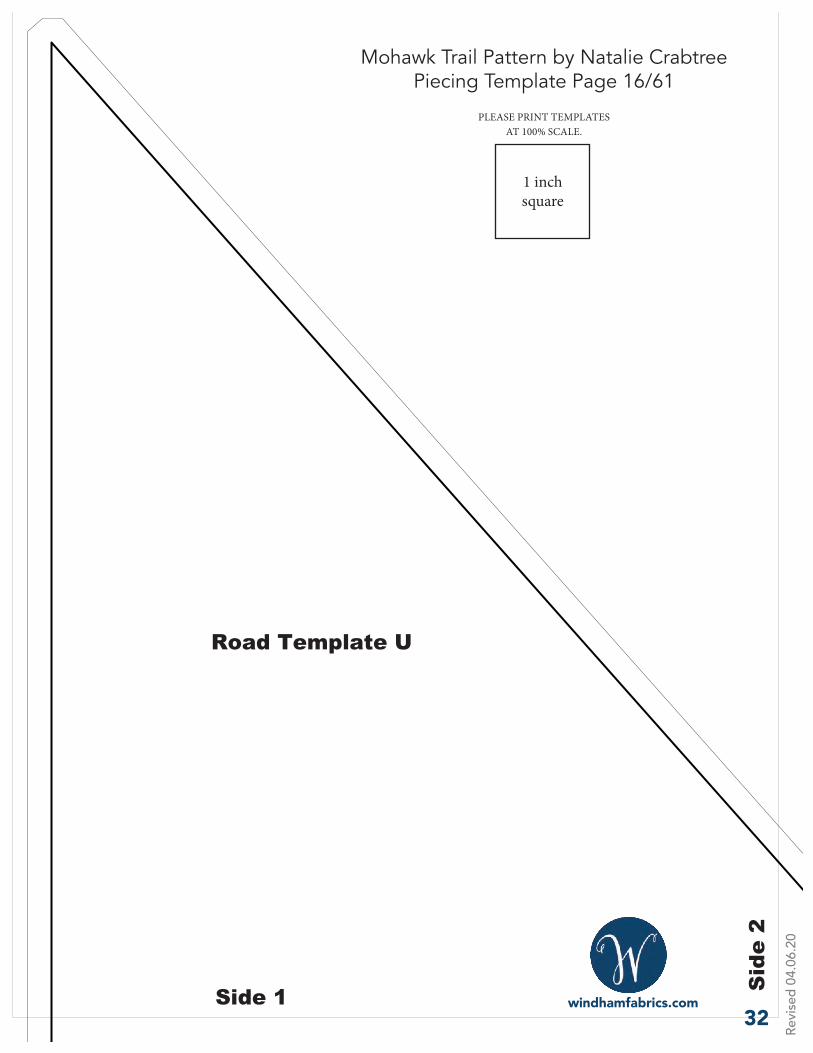
Road Template U
Side 1 Sid
e 2
32
1 inch square
PLEASE PRINT TEMPLATES AT 100% SCALE.
Mohawk Trail Pattern by Natalie CrabtreePiecing Template Page 16/61
Revi
sed
04.0
6.20
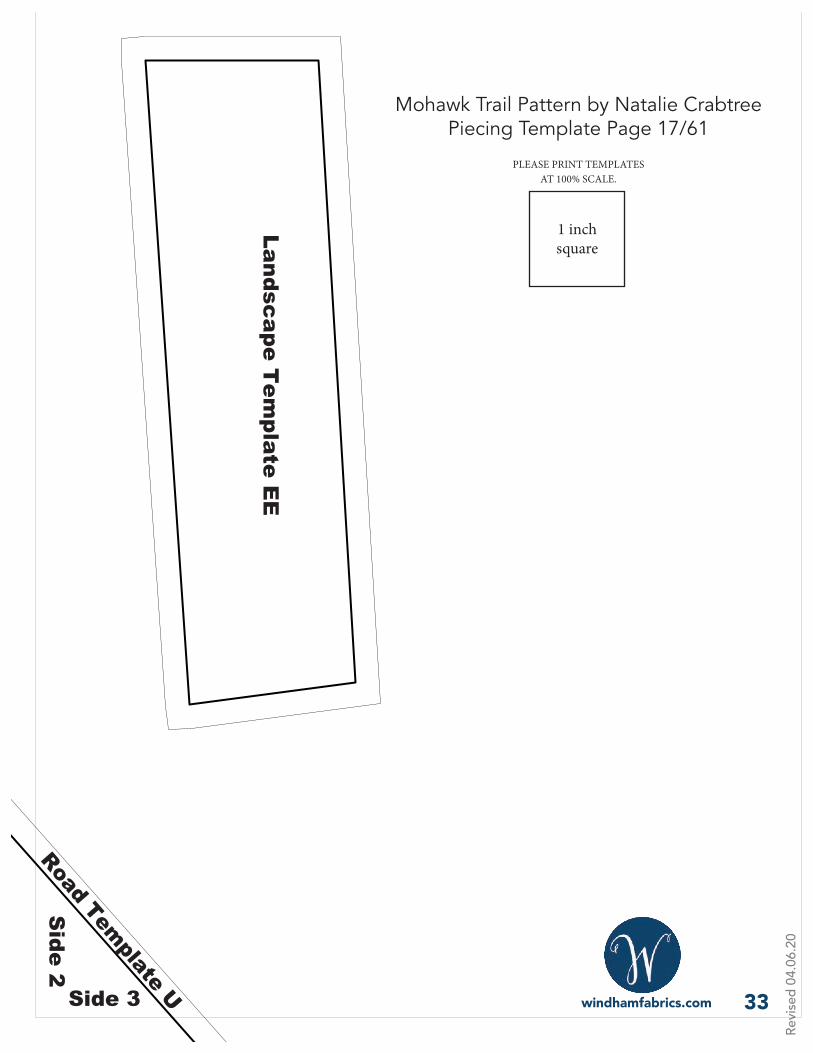
Landscape Tem
plate EE
Road Template U
Side 2
Side 3 33
1 inch square
PLEASE PRINT TEMPLATES AT 100% SCALE.
Mohawk Trail Pattern by Natalie CrabtreePiecing Template Page 17/61
Revi
sed
04.0
6.20
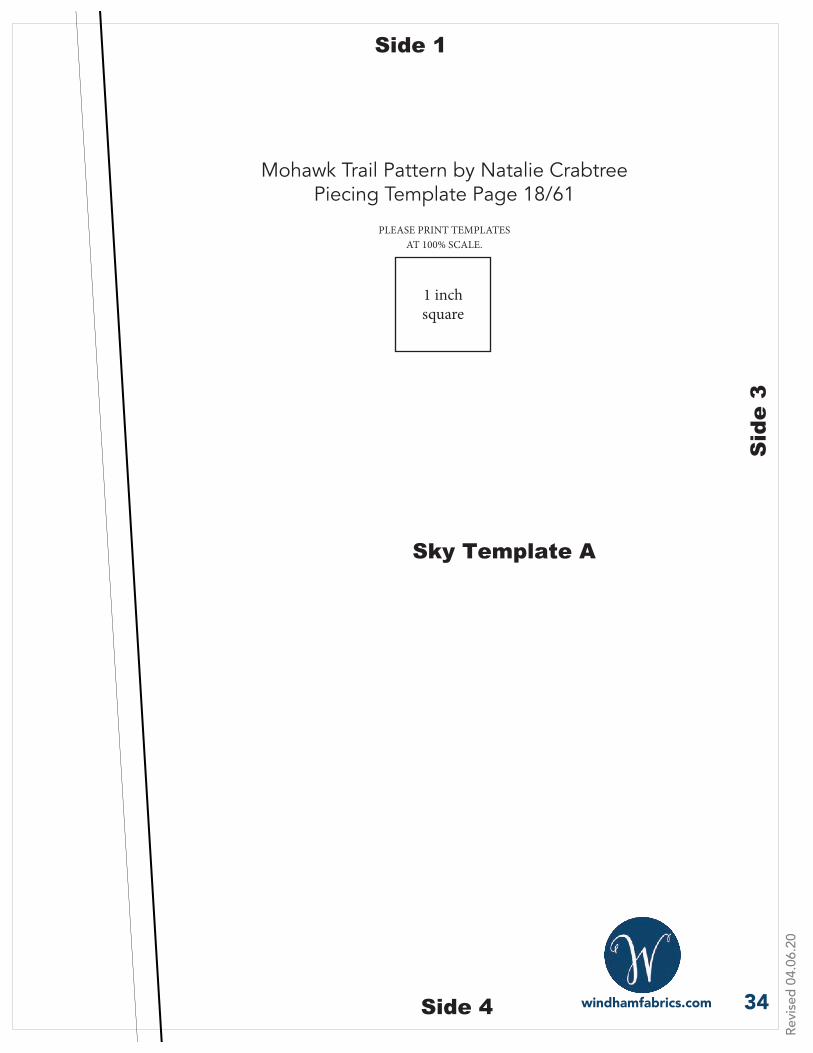
Sky Template A
Side 1
Sid
e 3
Side 4 34
1 inch square
PLEASE PRINT TEMPLATES AT 100% SCALE.
Mohawk Trail Pattern by Natalie CrabtreePiecing Template Page 18/61
Revi
sed
04.0
6.20
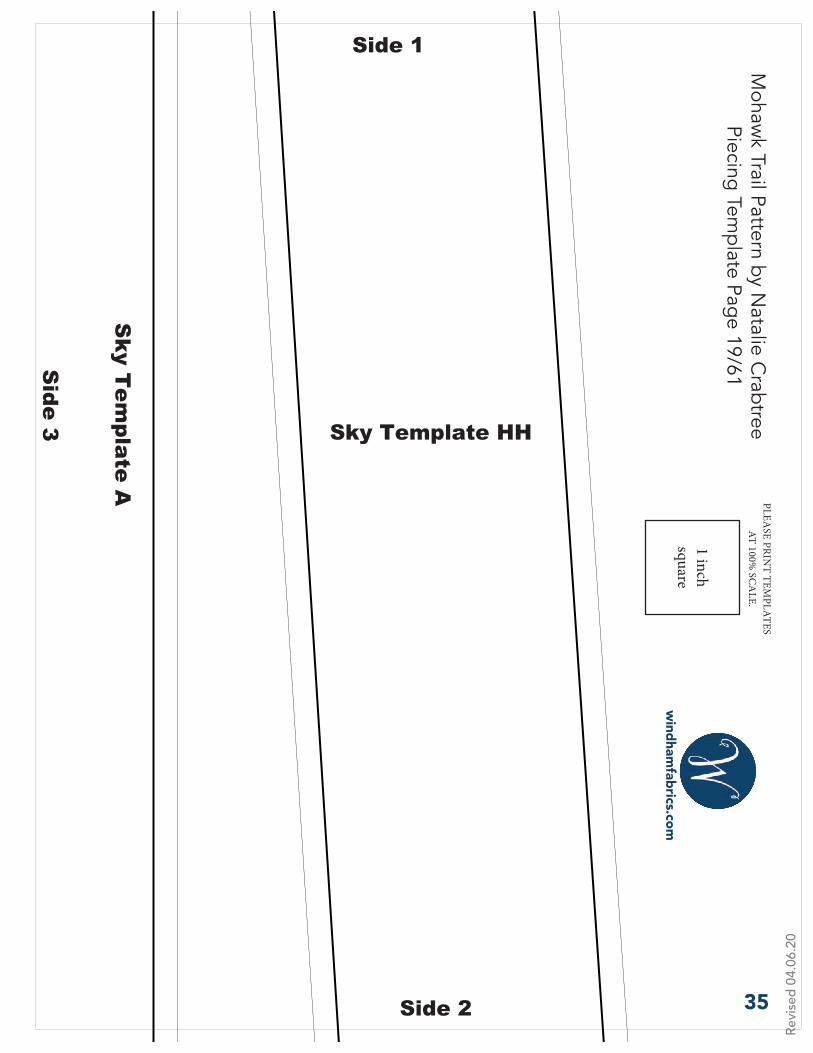
Sky T
emplate A
Side 3 Sky Template HH
Side 1
Side 2 35
1 inch square
PLEASE PRIN
T TEMPLATES
AT 100% SC
ALE.
Mohaw
k Trail Pattern by Natalie C
rabtreePiecing Tem
plate Page 19/61
Revi
sed
04.0
6.20
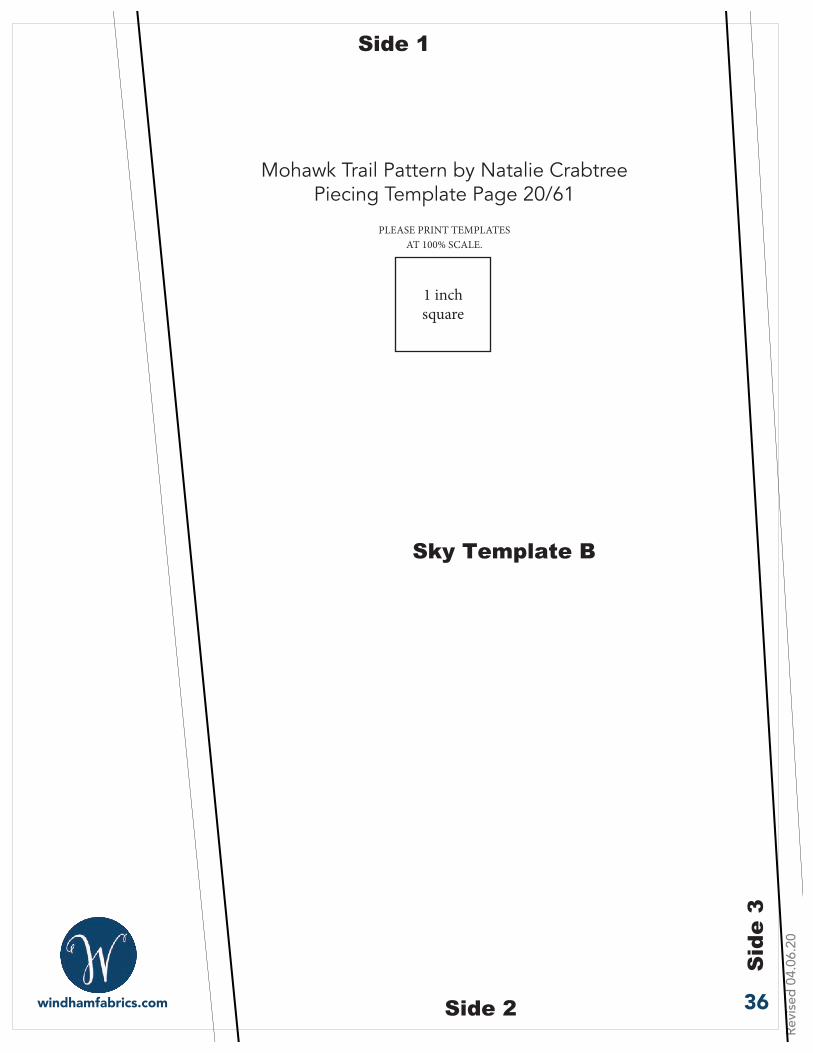
Sky Template B
Side 1
Side 2
Sid
e 3
36
1 inch square
PLEASE PRINT TEMPLATES AT 100% SCALE.
Mohawk Trail Pattern by Natalie CrabtreePiecing Template Page 20/61
Revi
sed
04.0
6.20
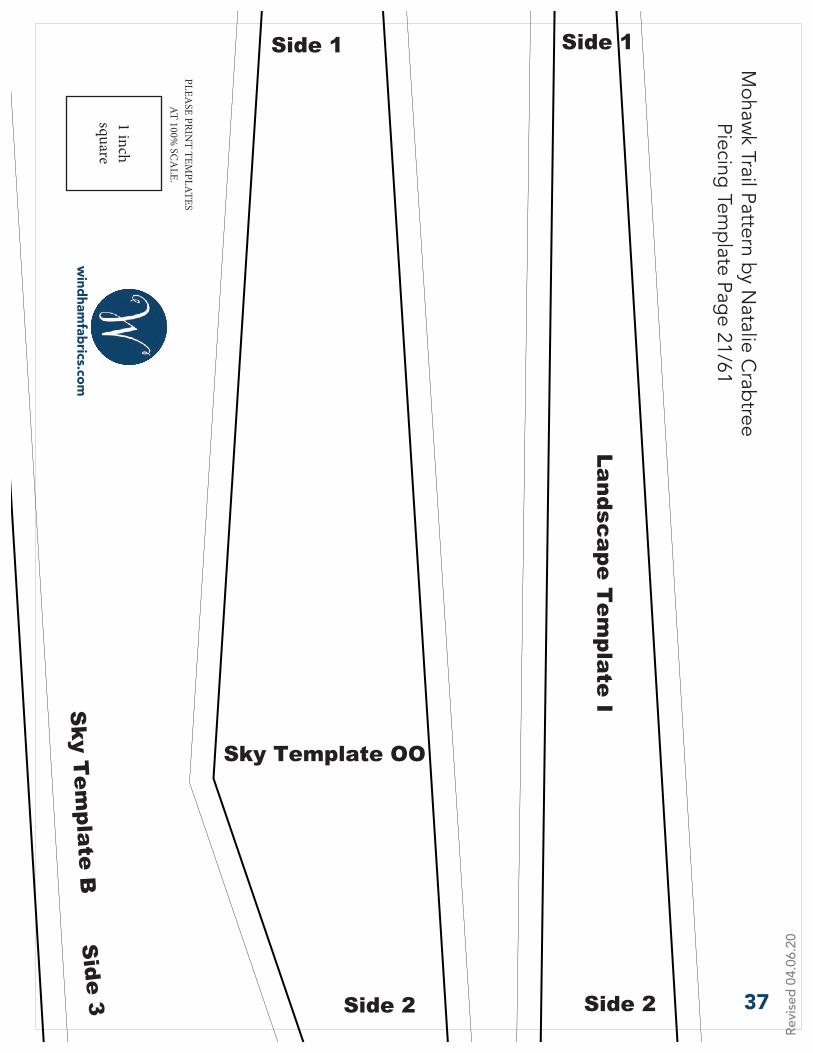
Sky Template OO
Side 1 Side 1
Landscape Tem
plate I
Side 2 Side 2
Sky T
emplate B
Side 3 37
1 inch square
PLEASE PRIN
T TEMPLATES
AT 100% SC
ALE.
Mohaw
k Trail Pattern by Natalie C
rabtreePiecing Tem
plate Page 21/61
Revi
sed
04.0
6.20
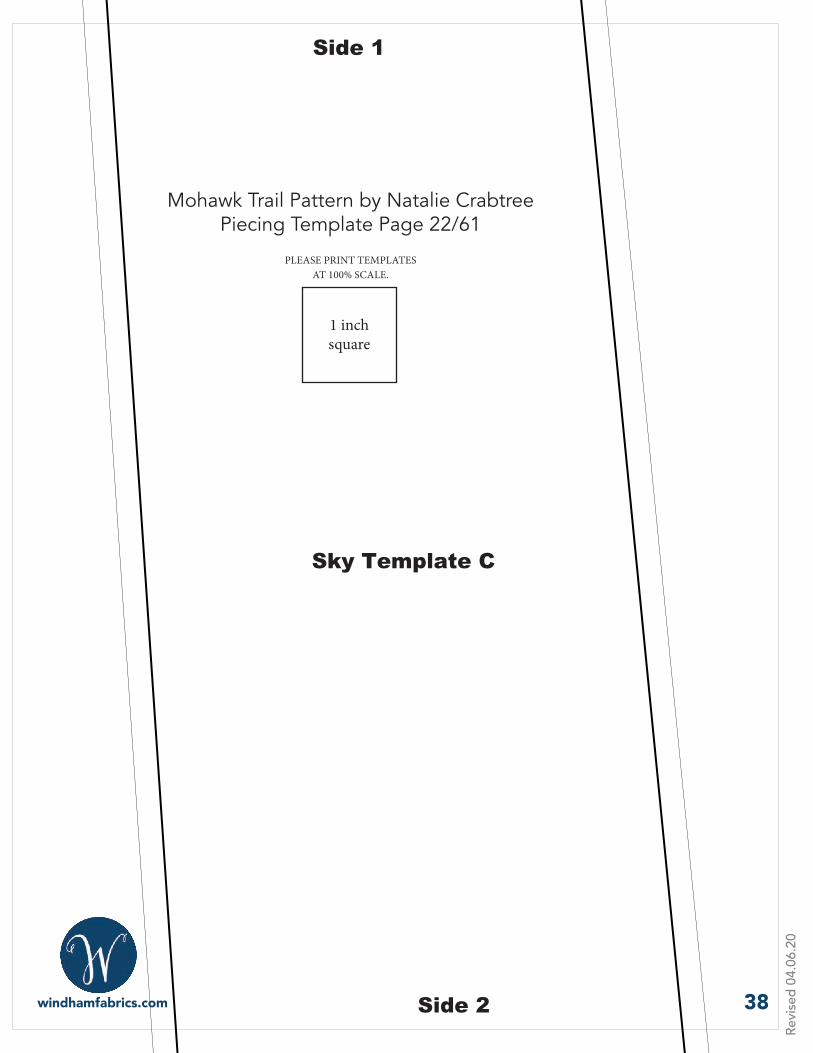
Side 2
Side 1
Sky Template C
38
1 inch square
PLEASE PRINT TEMPLATES AT 100% SCALE.
Mohawk Trail Pattern by Natalie CrabtreePiecing Template Page 22/61
Revi
sed
04.0
6.20
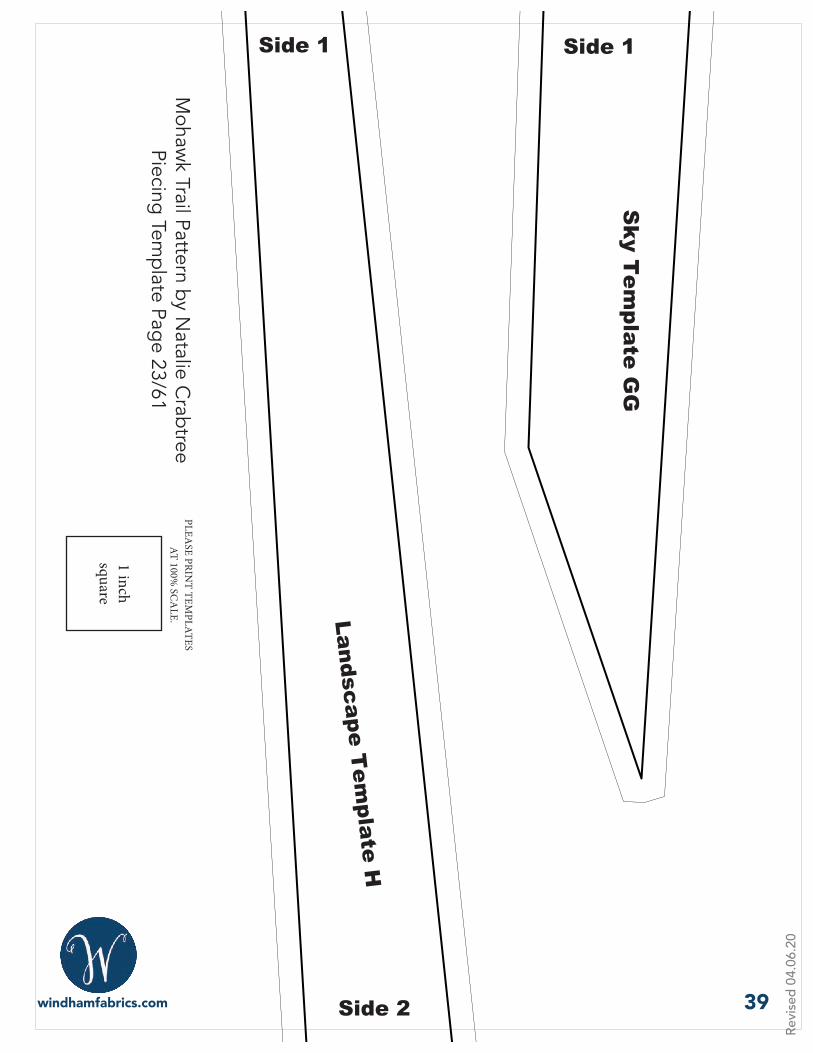
Landscape Tem
plate H
Side 1
Side 2
Sky T
emplate G
G
Side 1
39
1 inch square
PLEASE PRIN
T TEMPLATES
AT 100% SC
ALE.
Mohaw
k Trail Pattern by Natalie C
rabtreePiecing Tem
plate Page 23/61
Revi
sed
04.0
6.20
Landscape Tem
plate E
Side 1
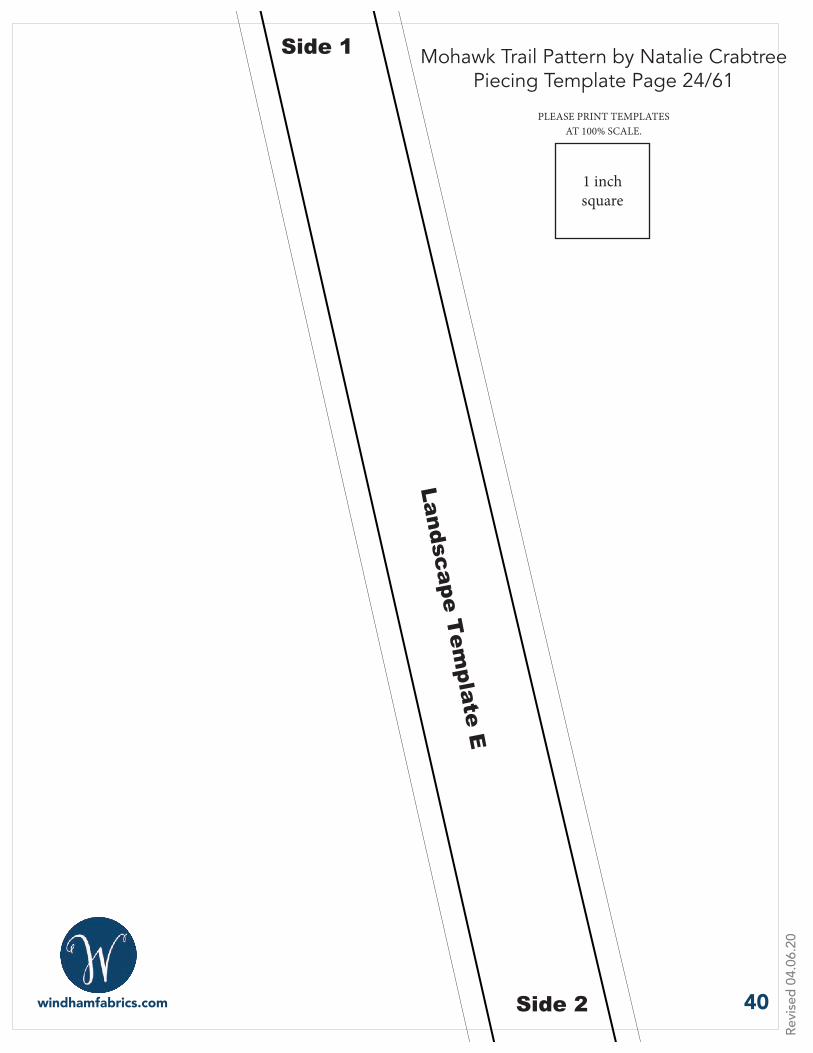
Side 2 40
1 inch square
PLEASE PRINT TEMPLATES AT 100% SCALE.
Mohawk Trail Pattern by Natalie CrabtreePiecing Template Page 24/61
Revi
sed
04.0
6.20
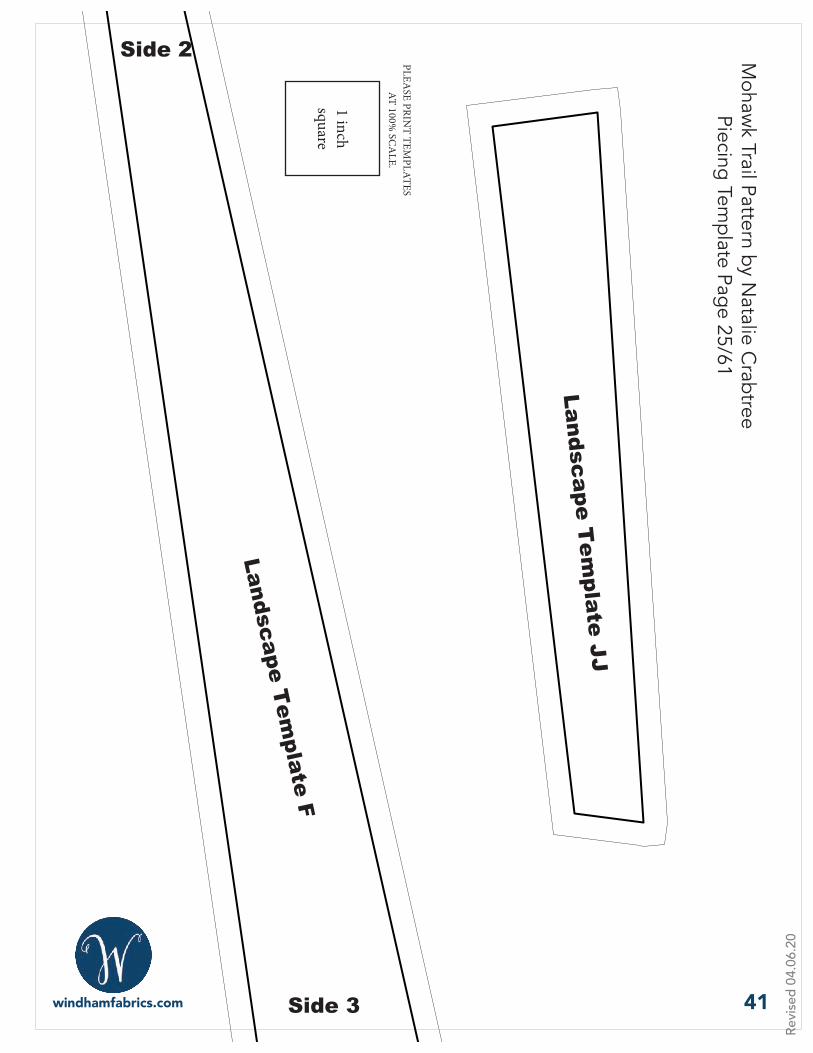
Landscape Tem
plate F
Side 2
Side 3
Landscape Tem
plate JJ
41
1 inch square
PLEASE PRIN
T TEMPLATES
AT 100% SC
ALE.
Mohaw
k Trail Pattern by Natalie C
rabtreePiecing Tem
plate Page 25/61
Revi
sed
04.0
6.20
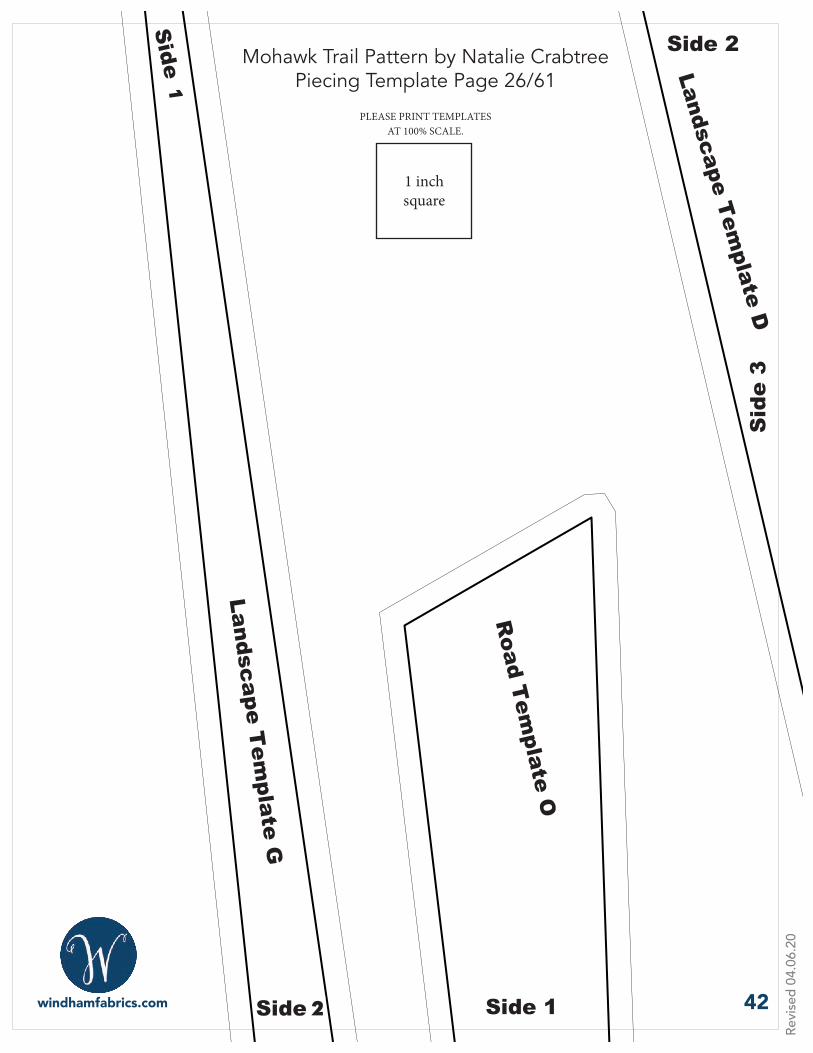
Landscape Tem
plate G
Side 2
Side 1
Road T
emplate O
Side 1
Landscape Template D
Side 2
Sid
e 3
42
1 inch square
PLEASE PRINT TEMPLATES AT 100% SCALE.
Mohawk Trail Pattern by Natalie CrabtreePiecing Template Page 26/611
2
Revi
sed
04.0
6.20
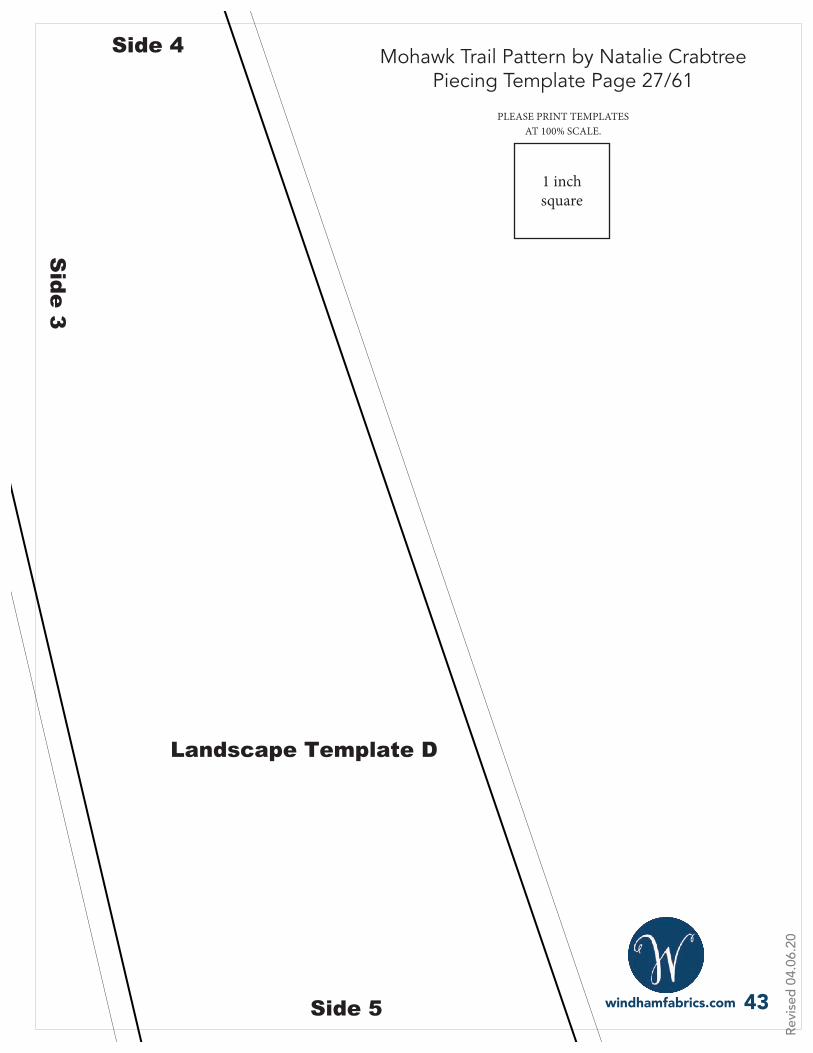
Landscape Template D
Side 4
Side 3
Side 5 43
1 inch square
PLEASE PRINT TEMPLATES AT 100% SCALE.
Mohawk Trail Pattern by Natalie CrabtreePiecing Template Page 27/61
Revi
sed
04.0
6.20
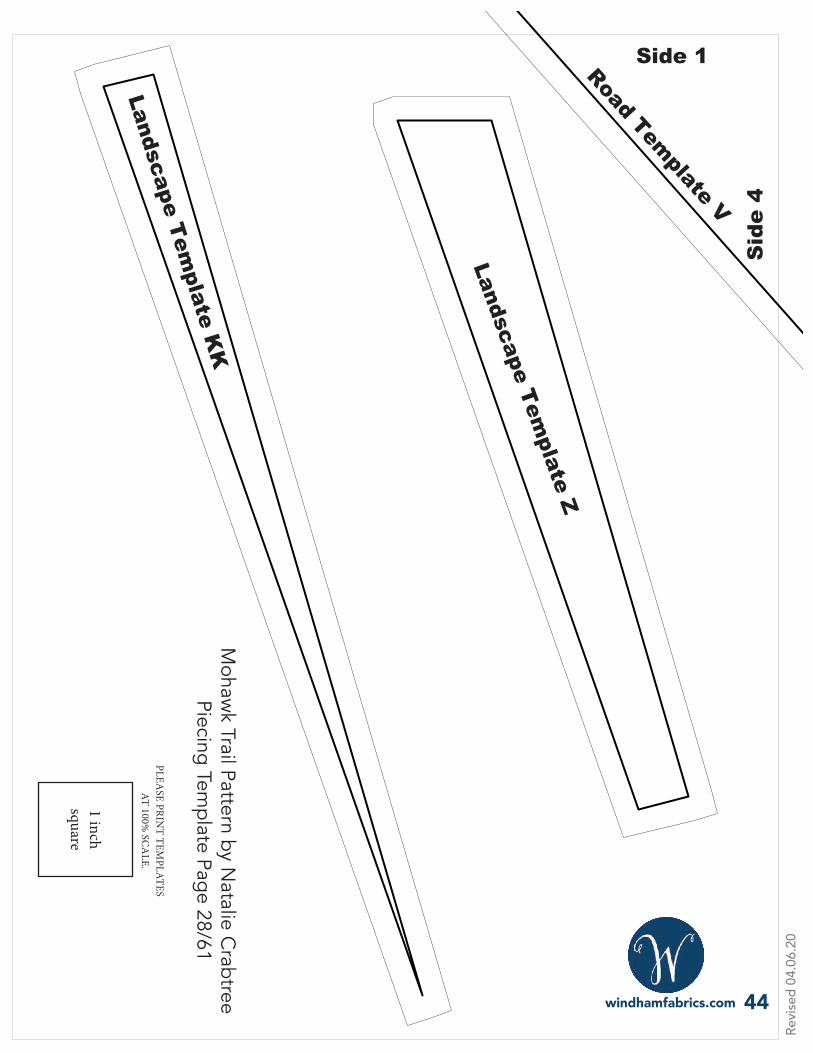
Landscape Template K
K
Landscape Template Z
Road Template V
Side 1
Sid
e 4
44
1 inch square
PLEASE PRIN
T TEMPLATES
AT 100% SC
ALE.
Mohaw
k Trail Pattern by Natalie C
rabtreePiecing Tem
plate Page 28/61
Revi
sed
04.0
6.20
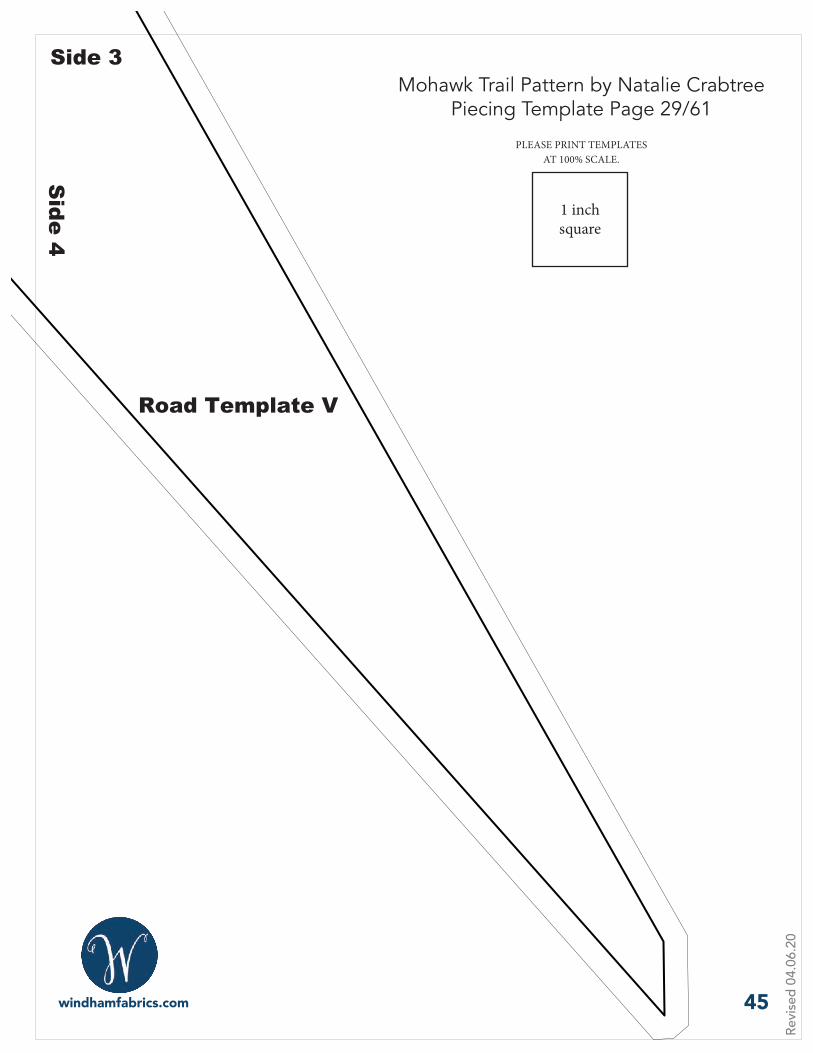
Road Template V
Side 4
Side 3
45
1 inch square
PLEASE PRINT TEMPLATES AT 100% SCALE.
Mohawk Trail Pattern by Natalie CrabtreePiecing Template Page 29/61
Revi
sed
04.0
6.20
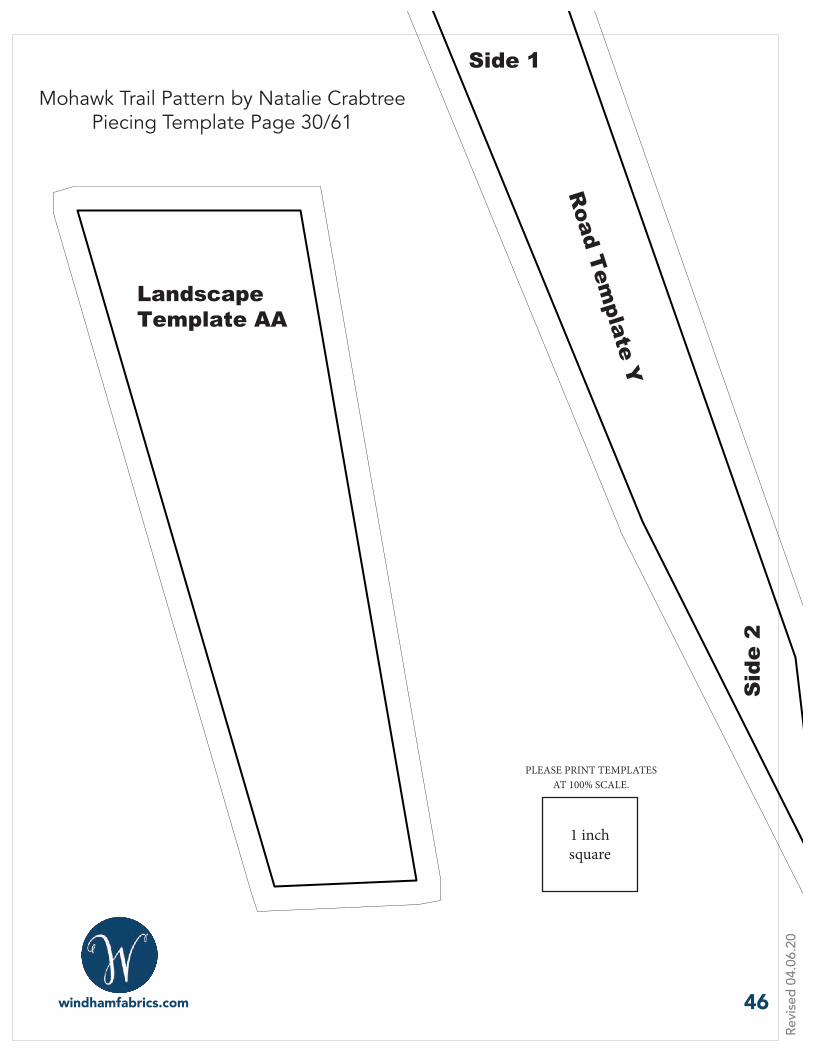
Landscape Template AA
Road Tem
plate Y
Side 1
Sid
e 2
46
1 inch square
PLEASE PRINT TEMPLATES AT 100% SCALE.
Mohawk Trail Pattern by Natalie CrabtreePiecing Template Page 30/61
Revi
sed
04.0
6.20
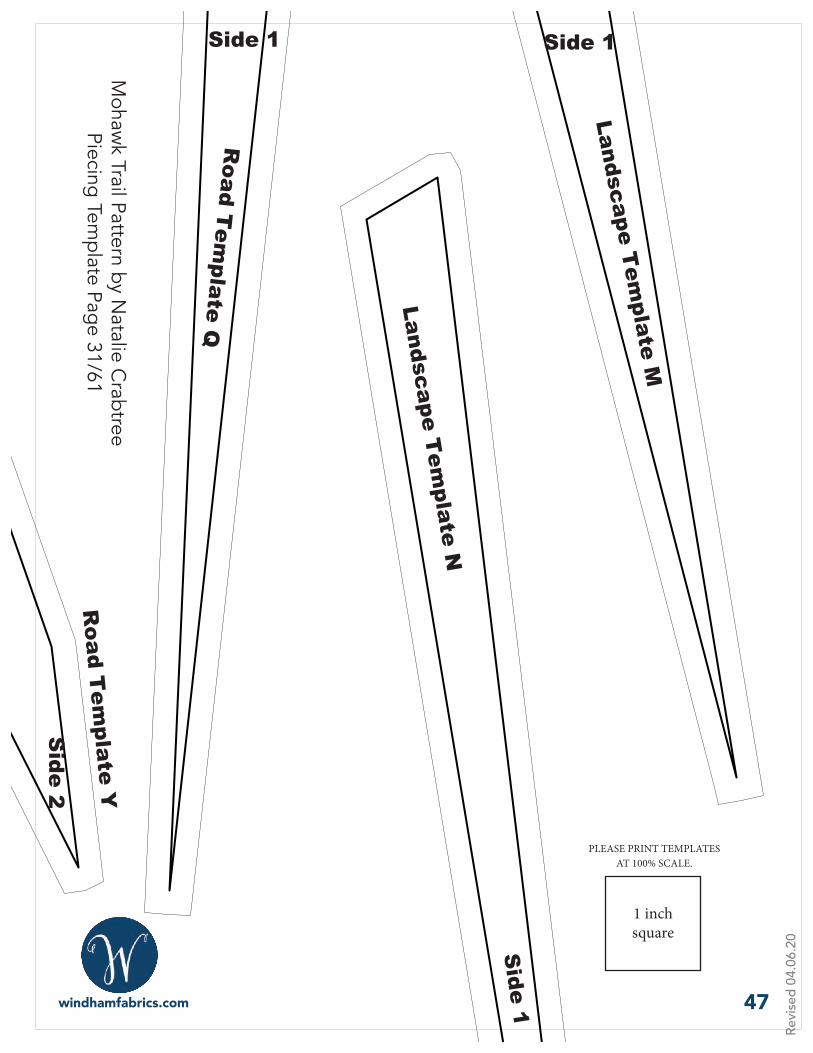
Road T
emplate Y
Side 2
Road T
emplate Q
Side 1
Landscape Tem
plate N
Side 1
Landscape Tem
plate M
Side 1
47
1 inch square
PLEASE PRINT TEMPLATES AT 100% SCALE.
Mohaw
k Trail Pattern by Natalie C
rabtreePiecing Tem
plate Page 31/61
Revi
sed
04.0
6.20
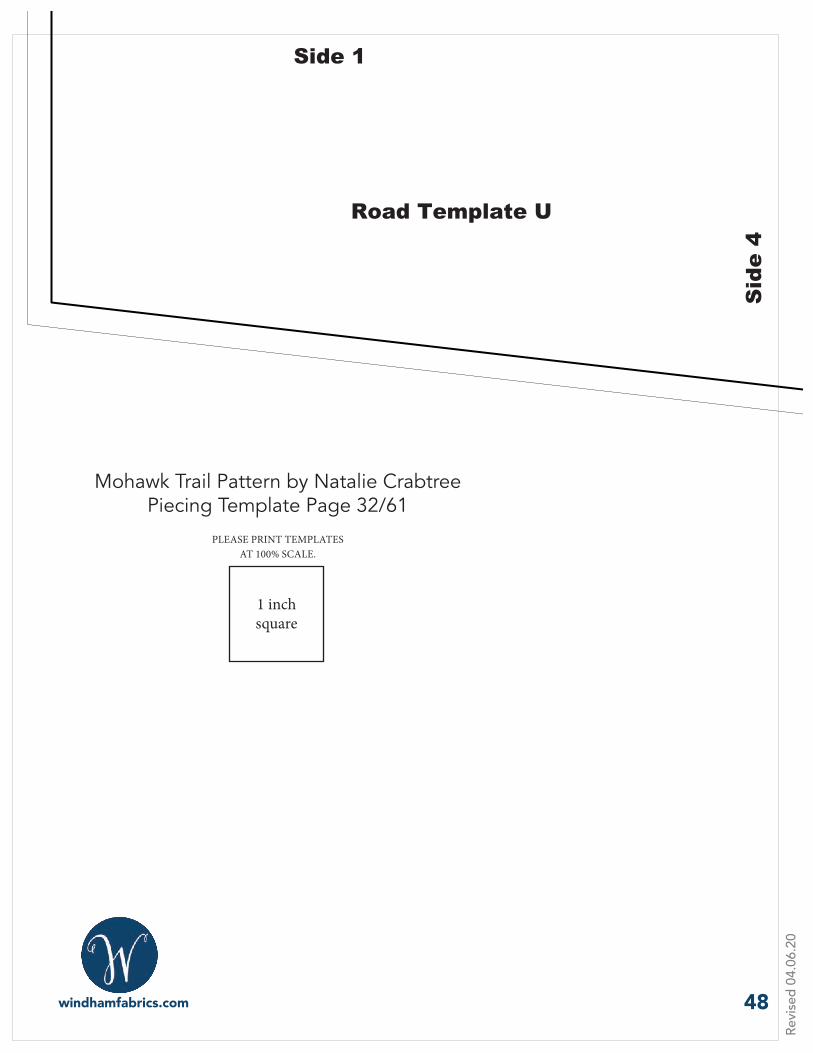
Road Template U
Side 1
Sid
e 4
48
1 inch square
PLEASE PRINT TEMPLATES AT 100% SCALE.
Mohawk Trail Pattern by Natalie CrabtreePiecing Template Page 32/61
Revi
sed
04.0
6.20
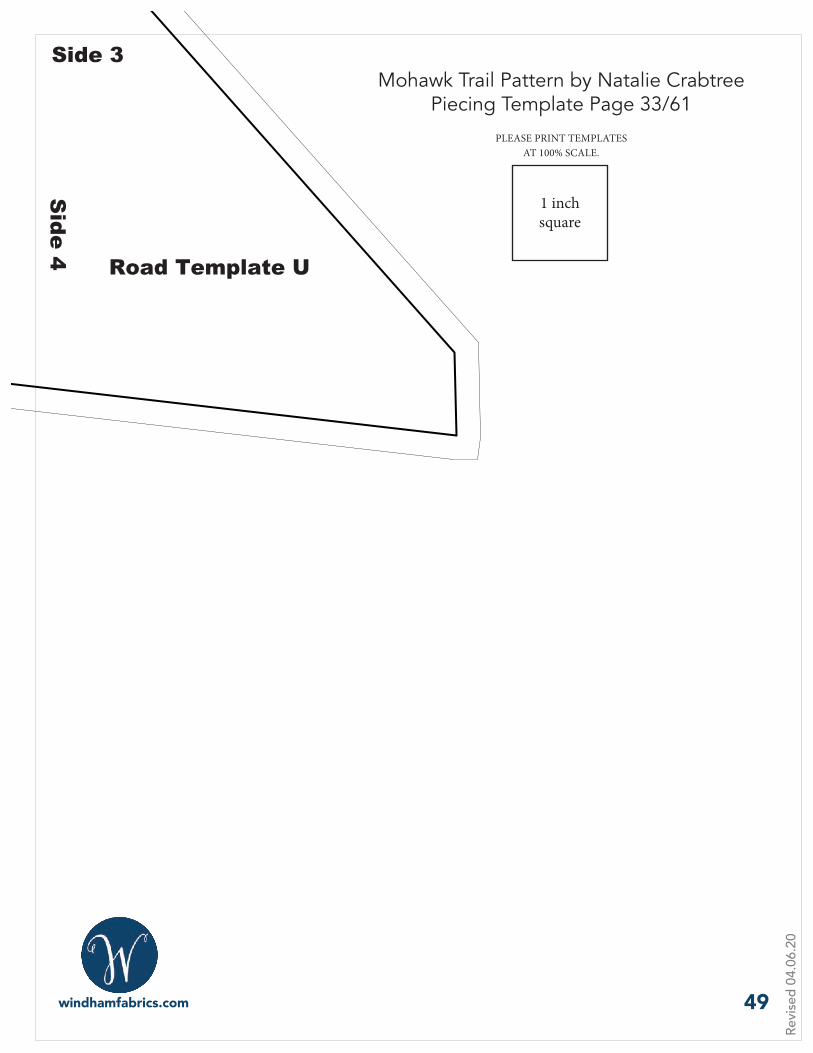
Road Template U
Side 3
Side 4
49
1 inch square
PLEASE PRINT TEMPLATES AT 100% SCALE.
Mohawk Trail Pattern by Natalie CrabtreePiecing Template Page 33/61
Revi
sed
04.0
6.20
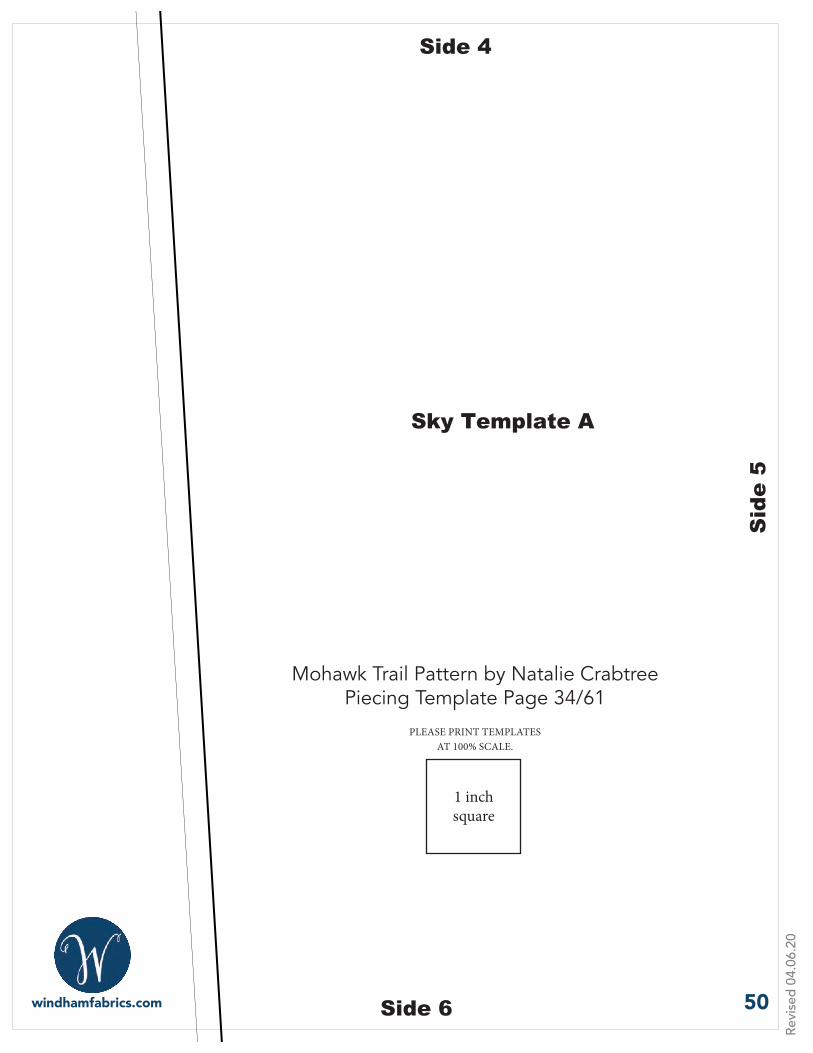
Sky Template A
Side 4
Sid
e 5
Side 6 50
1 inch square
PLEASE PRINT TEMPLATES AT 100% SCALE.
Mohawk Trail Pattern by Natalie CrabtreePiecing Template Page 34/61
Revi
sed
04.0
6.20
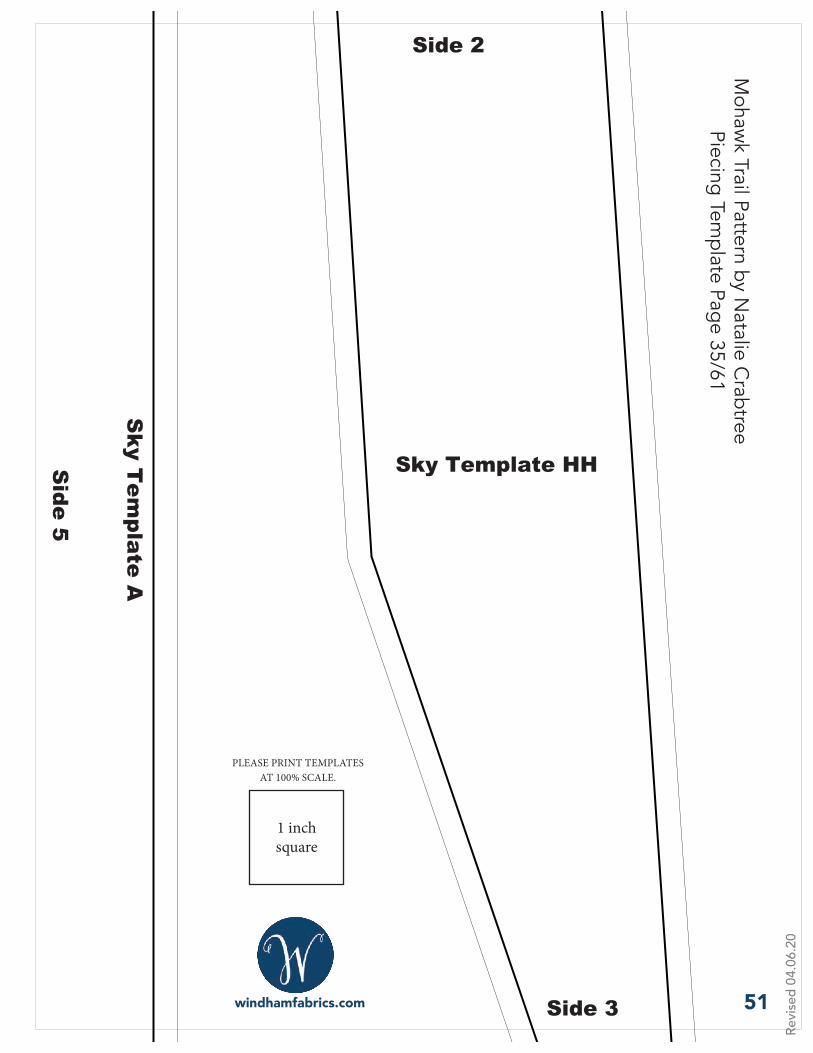
Sky T
emplate A
Side 5
Sky Template HH
Side 2
Side 3 51
1 inch square
PLEASE PRINT TEMPLATES AT 100% SCALE.
Mohaw
k Trail Pattern by Natalie C
rabtreePiecing Tem
plate Page 35/61
Revi
sed
04.0
6.20
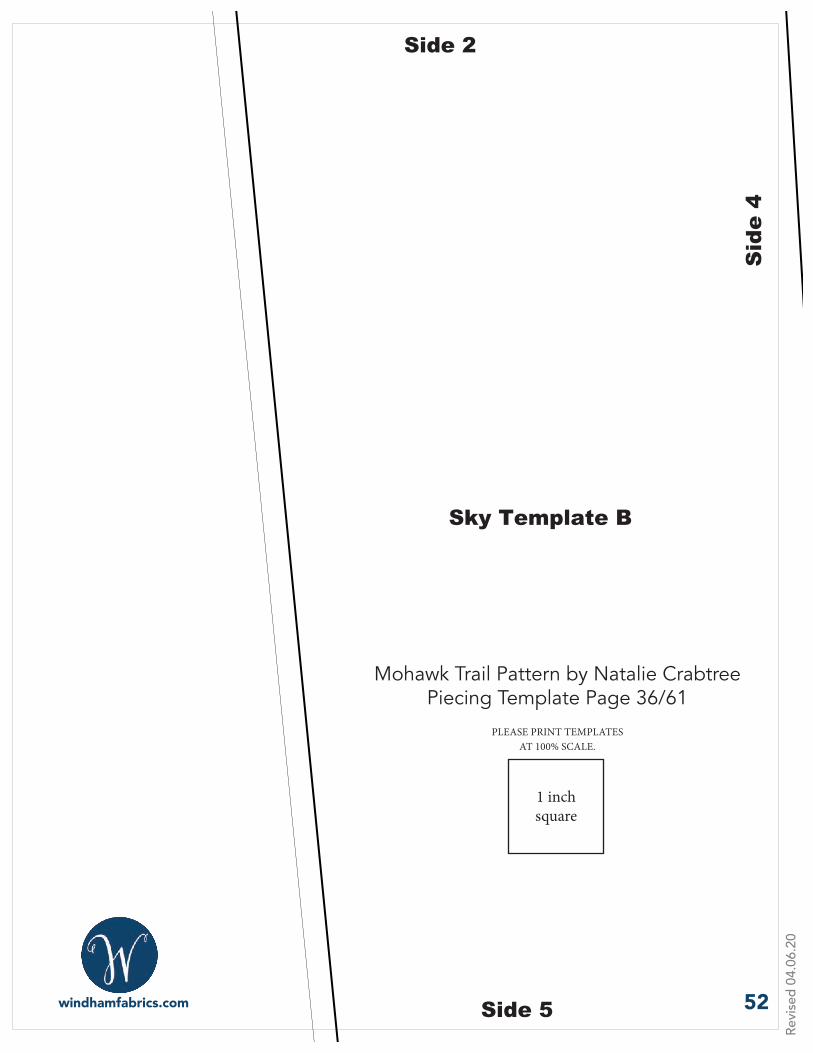
Sky Template B
Side 2
Sid
e 4
Side 5 52
1 inch square
PLEASE PRINT TEMPLATES AT 100% SCALE.
Mohawk Trail Pattern by Natalie CrabtreePiecing Template Page 36/61
Revi
sed
04.0
6.20
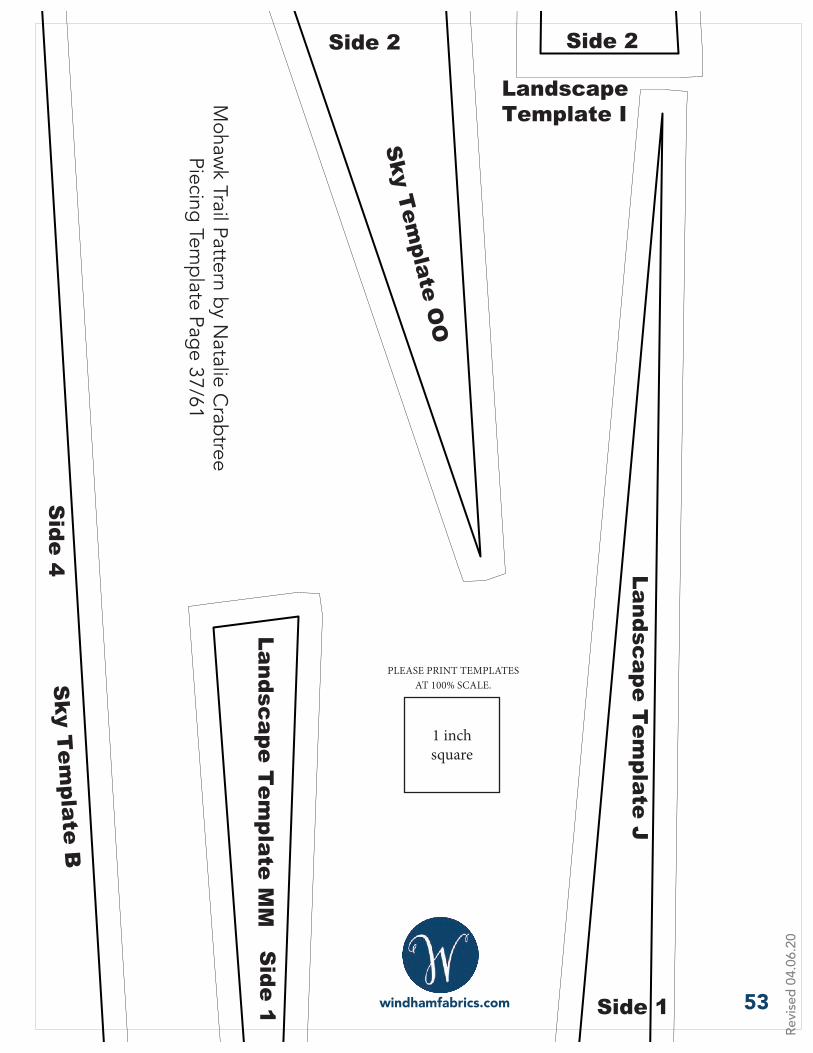
Landscape Template I
Side 2
Sky T
emplate O
O
Side 2
Sky T
emplate B
Side 4
Landscape Tem
plate MM
Side 1
Landscape Tem
plate J
Side 1 53
1 inch square
PLEASE PRINT TEMPLATES AT 100% SCALE.
Mohaw
k Trail Pattern by Natalie C
rabtreePiecing Tem
plate Page 37/61
Revi
sed
04.0
6.20
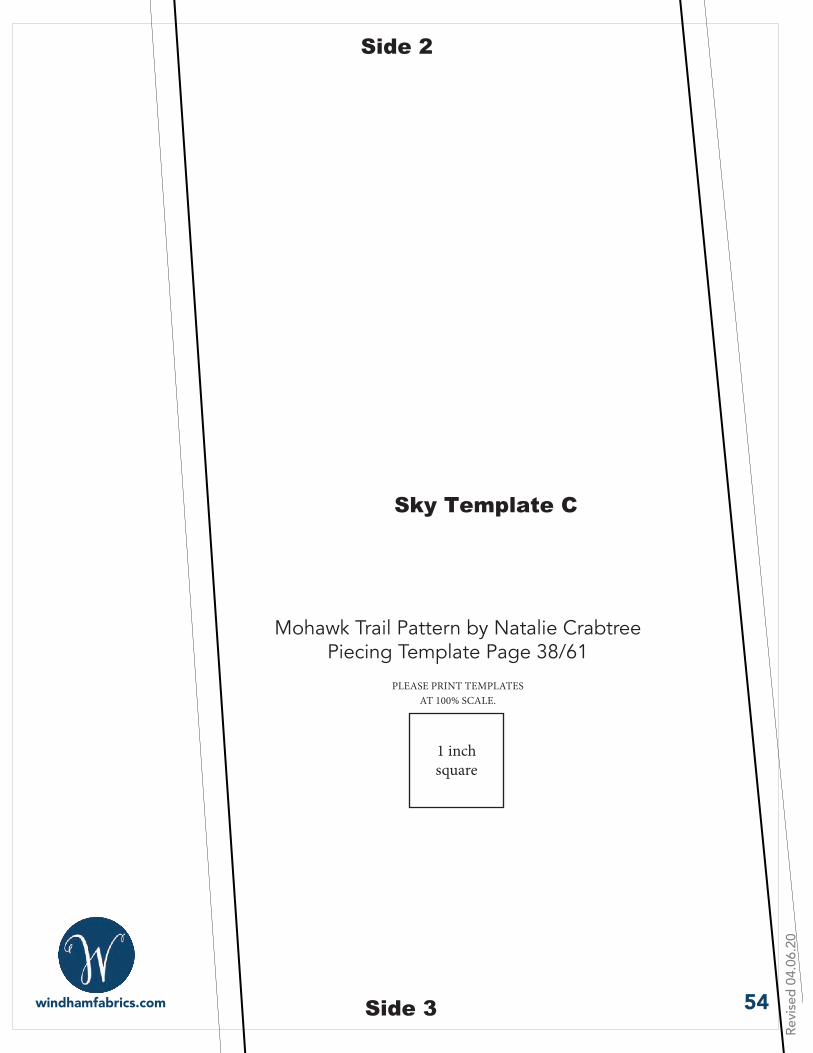
Sky Template C
Side 2
Side 3 54
1 inch square
PLEASE PRINT TEMPLATES AT 100% SCALE.
Mohawk Trail Pattern by Natalie CrabtreePiecing Template Page 38/61
Revi
sed
04.0
6.20
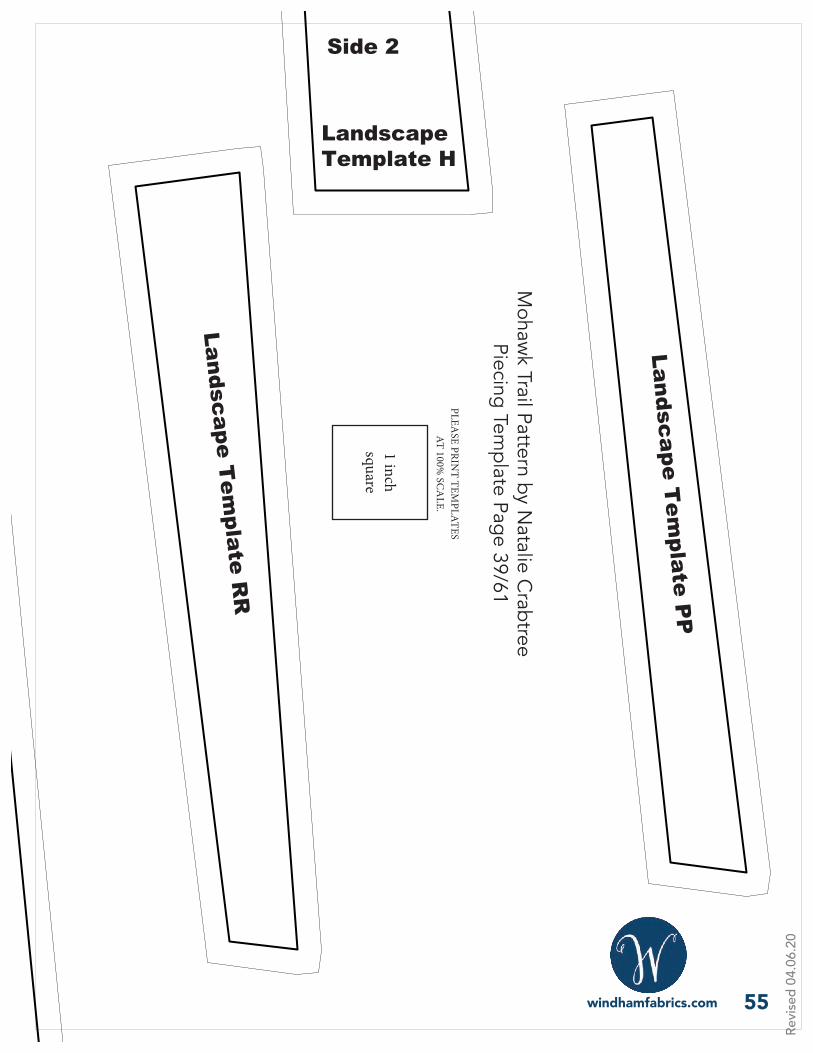
LandscapeTemplate H
Side 2
Landscape Tem
plate RR
Landscape Tem
plate PP
55
1 inch square
PLEASE PRIN
T TEMPLATES
AT 100% SC
ALE.
Mohaw
k Trail Pattern by Natalie C
rabtreePiecing Tem
plate Page 39/61
Revi
sed
04.0
6.20
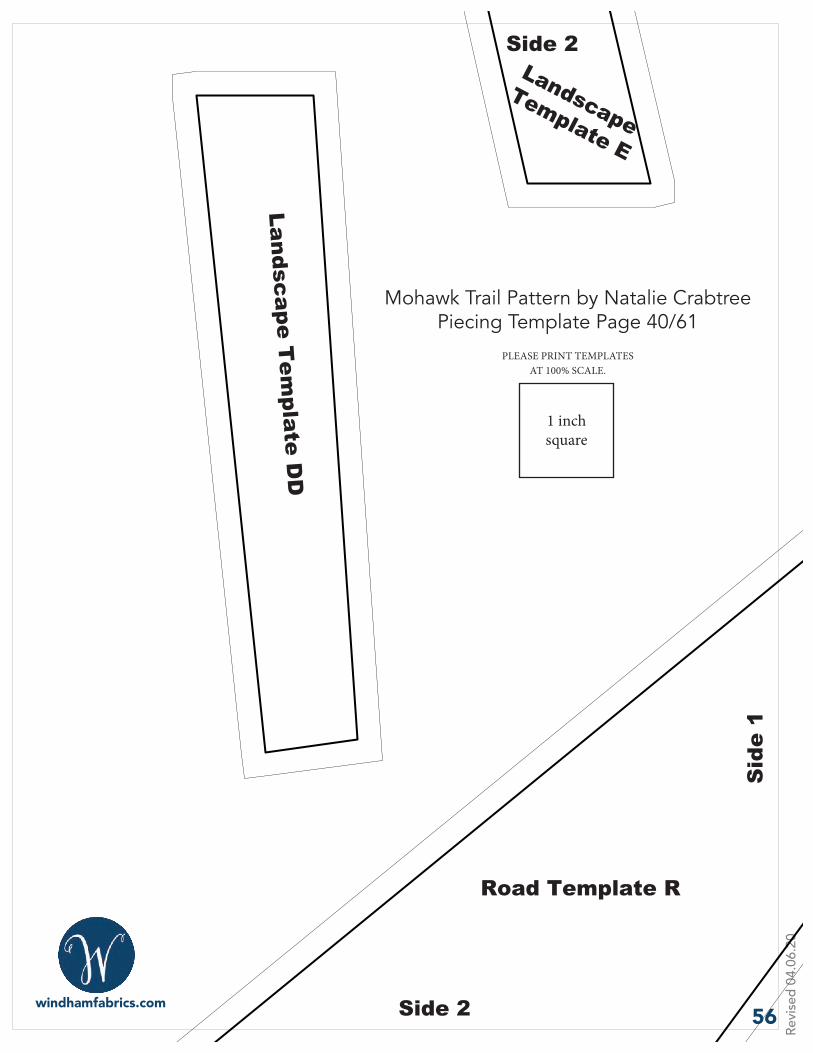
Landscape Tem
plate DD
Landscape Template E
Side 2
Road Template R
Sid
e 1
Side 2 56
1 inch square
PLEASE PRINT TEMPLATES AT 100% SCALE.
Mohawk Trail Pattern by Natalie CrabtreePiecing Template Page 40/61
Revi
sed
04.0
6.20
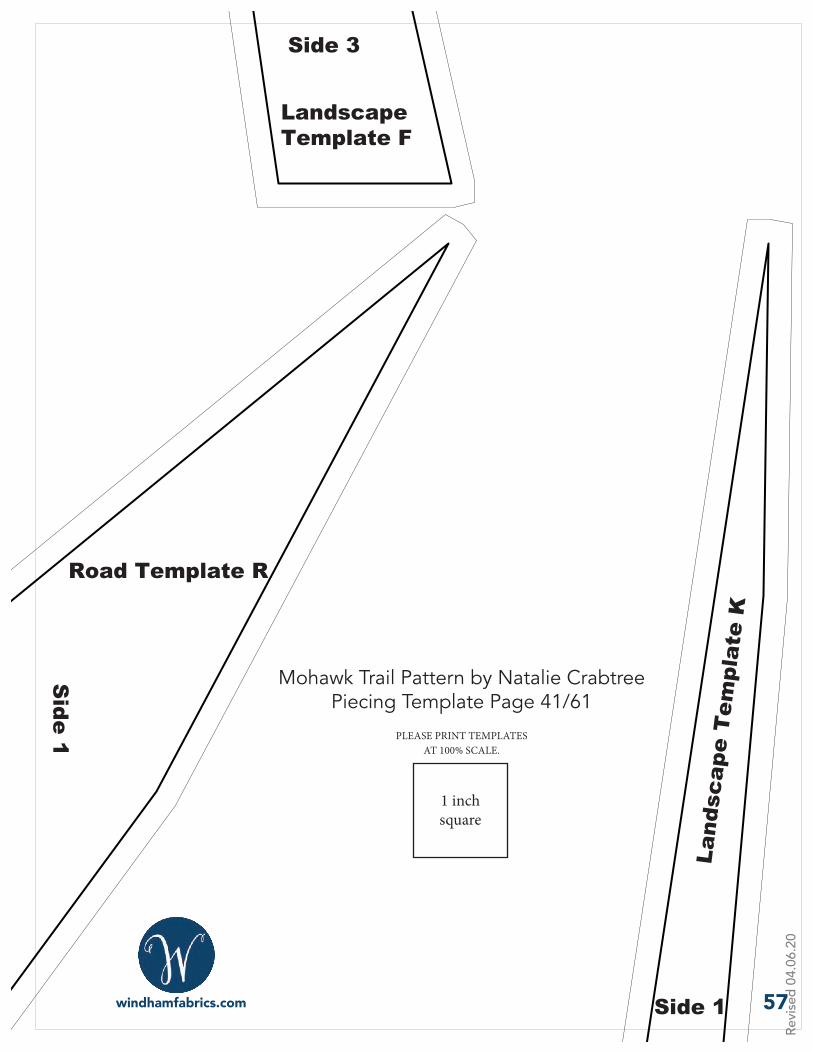
Landscape Template F
Side 3
Road Template R
Side 1
Land
scap
e T
empl
ate
K
Side 1 57
1 inch square
PLEASE PRINT TEMPLATES AT 100% SCALE.
Mohawk Trail Pattern by Natalie CrabtreePiecing Template Page 41/61
Revi
sed
04.0
6.20
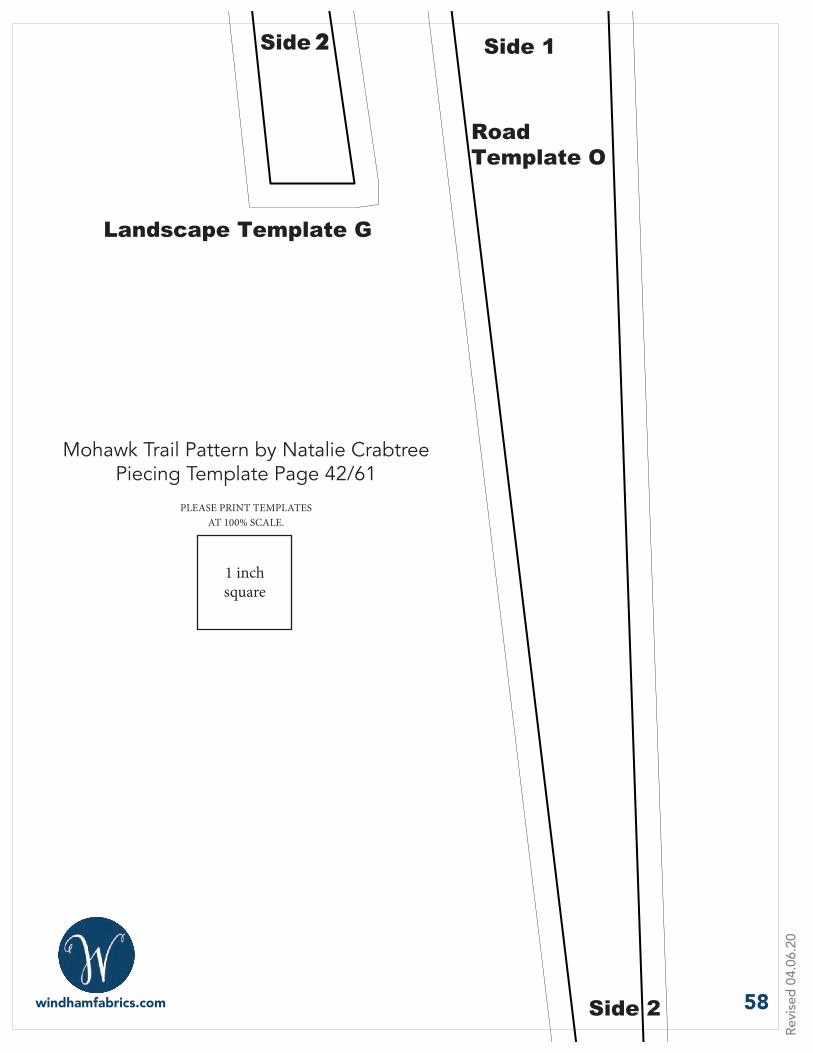
Landscape Template G
Side 1
Road Template O
Side 1
Side 2 58
1 inch square
PLEASE PRINT TEMPLATES AT 100% SCALE.
Mohawk Trail Pattern by Natalie CrabtreePiecing Template Page 42/61
2
Revi
sed
04.0
6.20
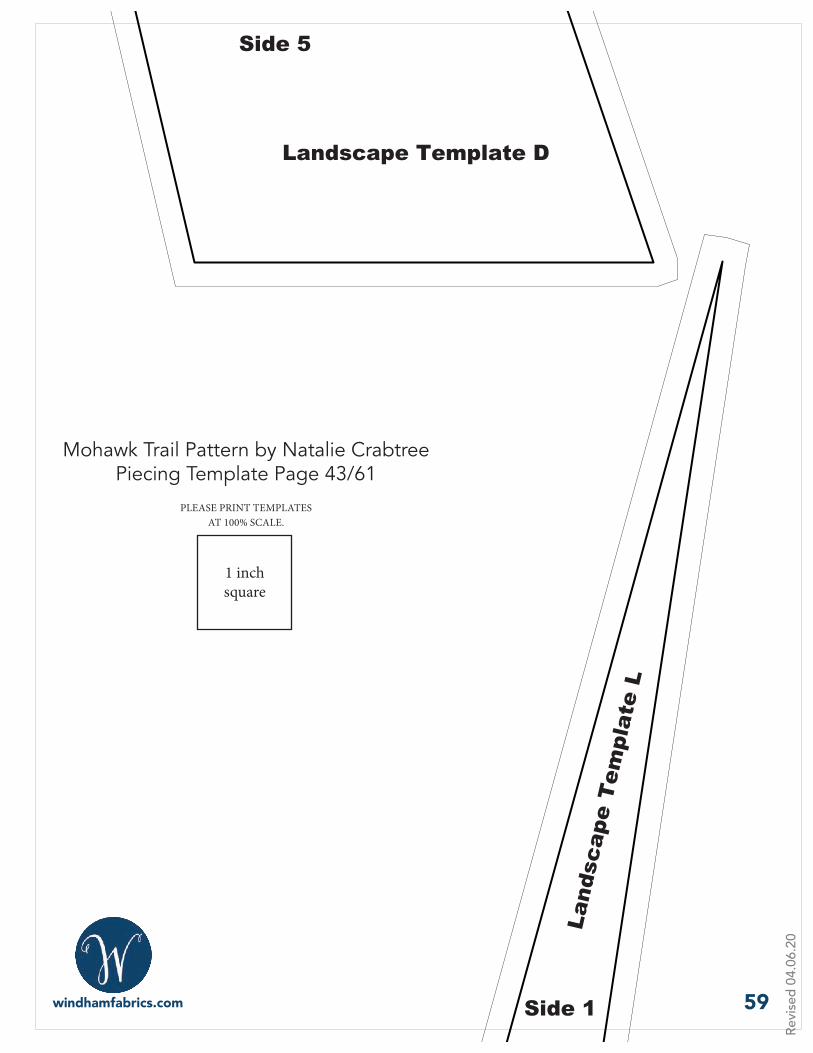
Landscape Template D
Side 5
Land
scap
e T
empl
ate
L
Side 1 59
1 inch square
PLEASE PRINT TEMPLATES AT 100% SCALE.
Mohawk Trail Pattern by Natalie CrabtreePiecing Template Page 43/61
Revi
sed
04.0
6.20
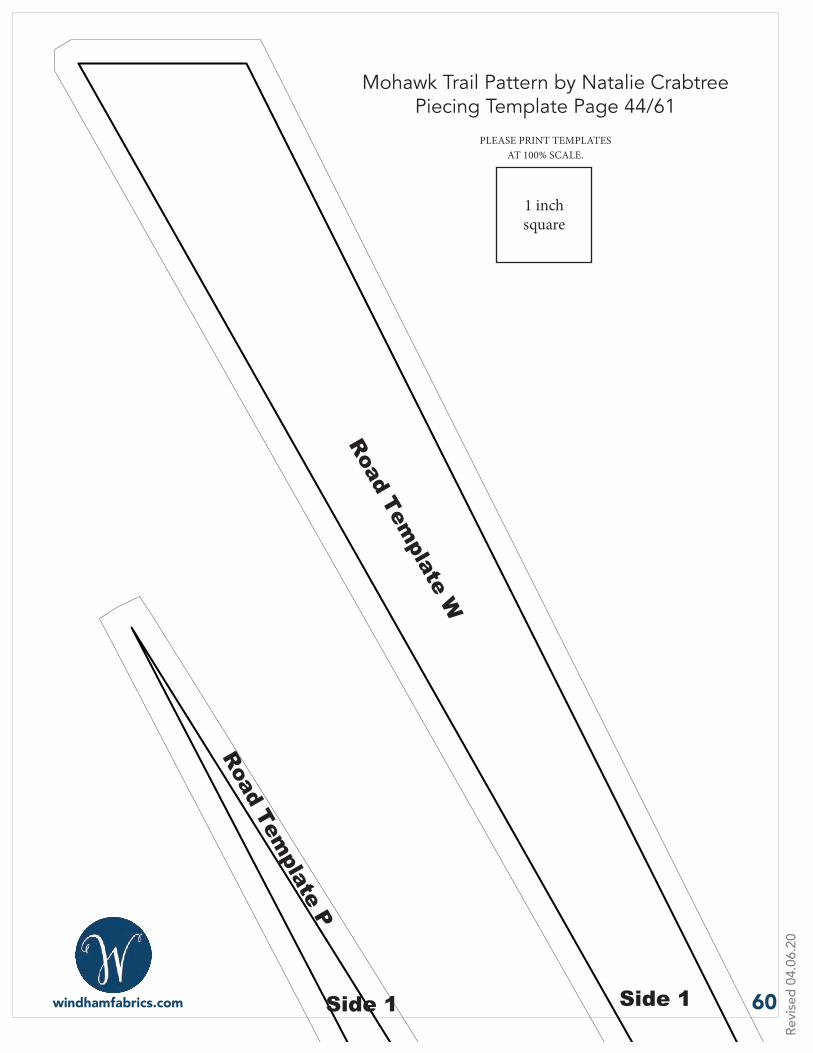
Road Template W
Side 1
Road Template P
Side 1 60
1 inch square
PLEASE PRINT TEMPLATES AT 100% SCALE.
Mohawk Trail Pattern by Natalie CrabtreePiecing Template Page 44/61
Revi
sed
04.0
6.20
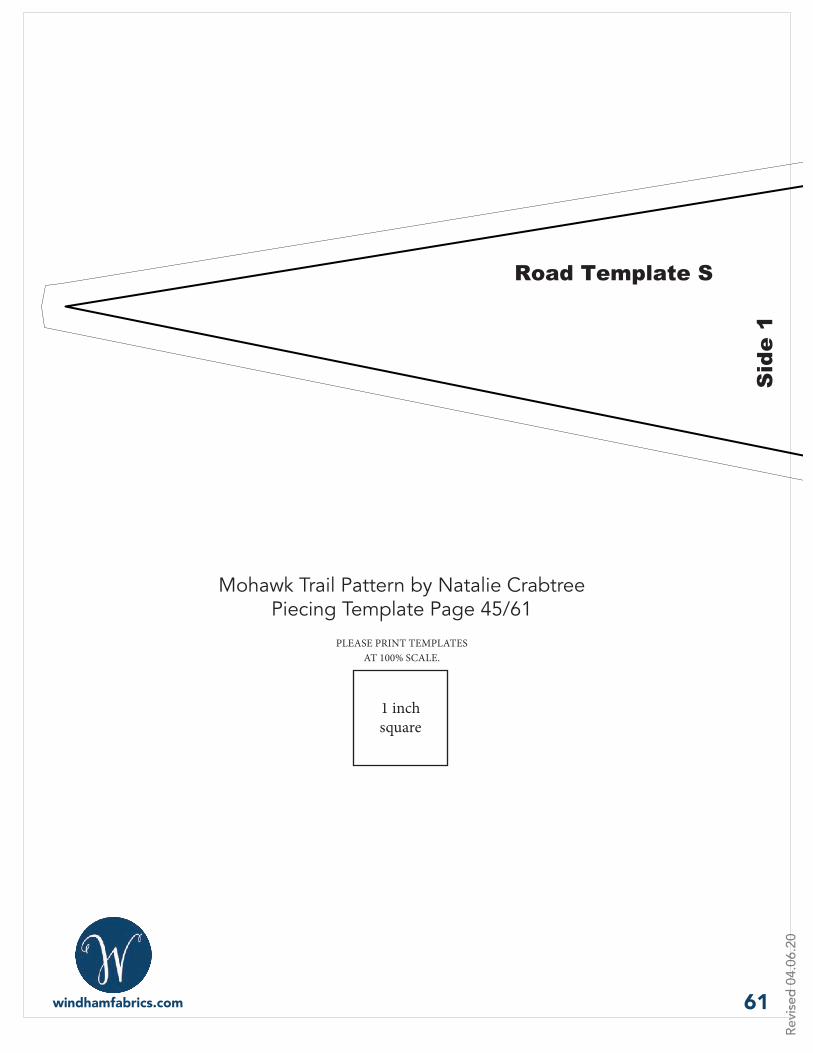
Road Template S
Sid
e 1
61
1 inch square
PLEASE PRINT TEMPLATES AT 100% SCALE.
Mohawk Trail Pattern by Natalie CrabtreePiecing Template Page 45/61
Revi
sed
04.0
6.20
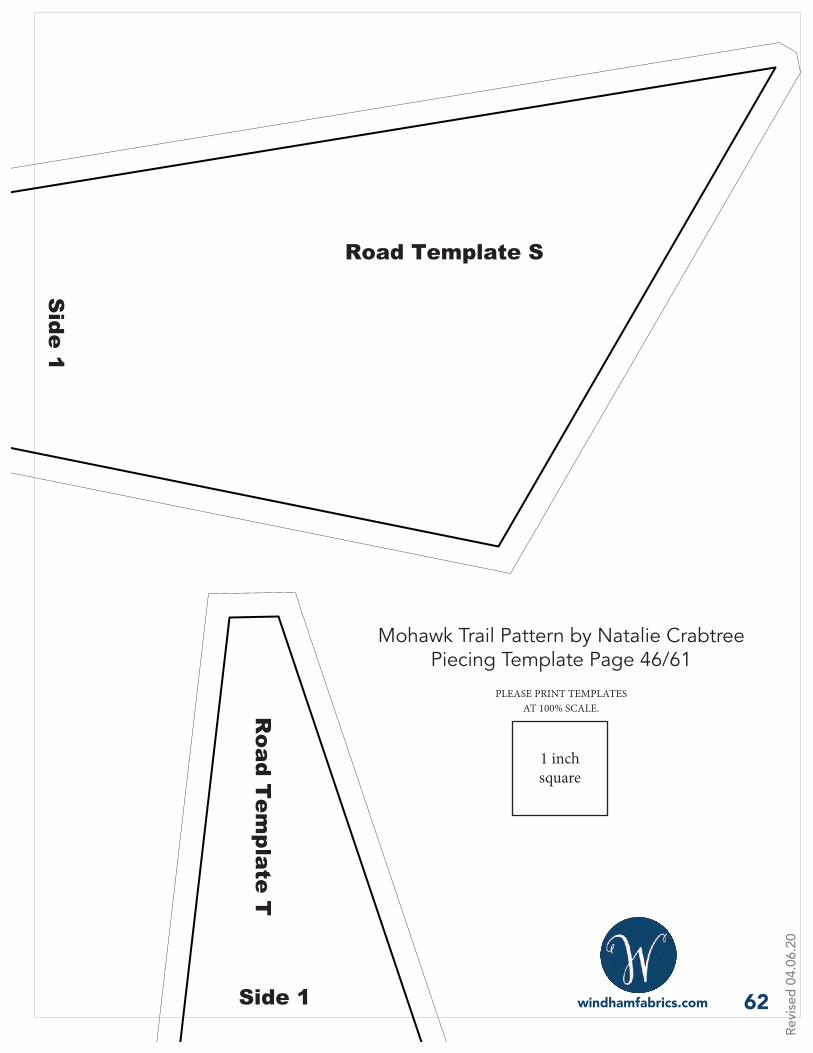
Road Template S
Side 1
Road T
emplate T
Side 1 62
1 inch square
PLEASE PRINT TEMPLATES AT 100% SCALE.
Mohawk Trail Pattern by Natalie CrabtreePiecing Template Page 46/61
Revi
sed
04.0
6.20
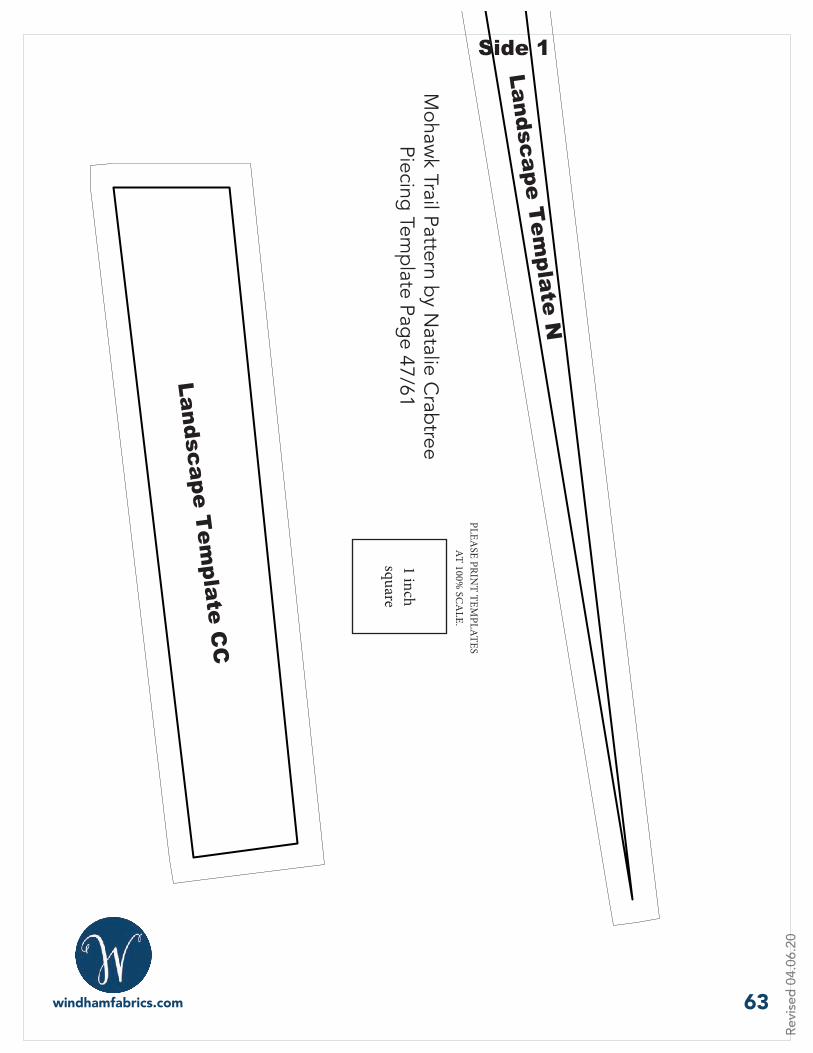
Landscape Tem
plate CC
Landscape Tem
plate N
Side 1
63
1 inch square
PLEASE PRIN
T TEMPLATES
AT 100% SC
ALE.
Mohaw
k Trail Pattern by Natalie C
rabtreePiecing Tem
plate Page 47/61
Revi
sed
04.0
6.20
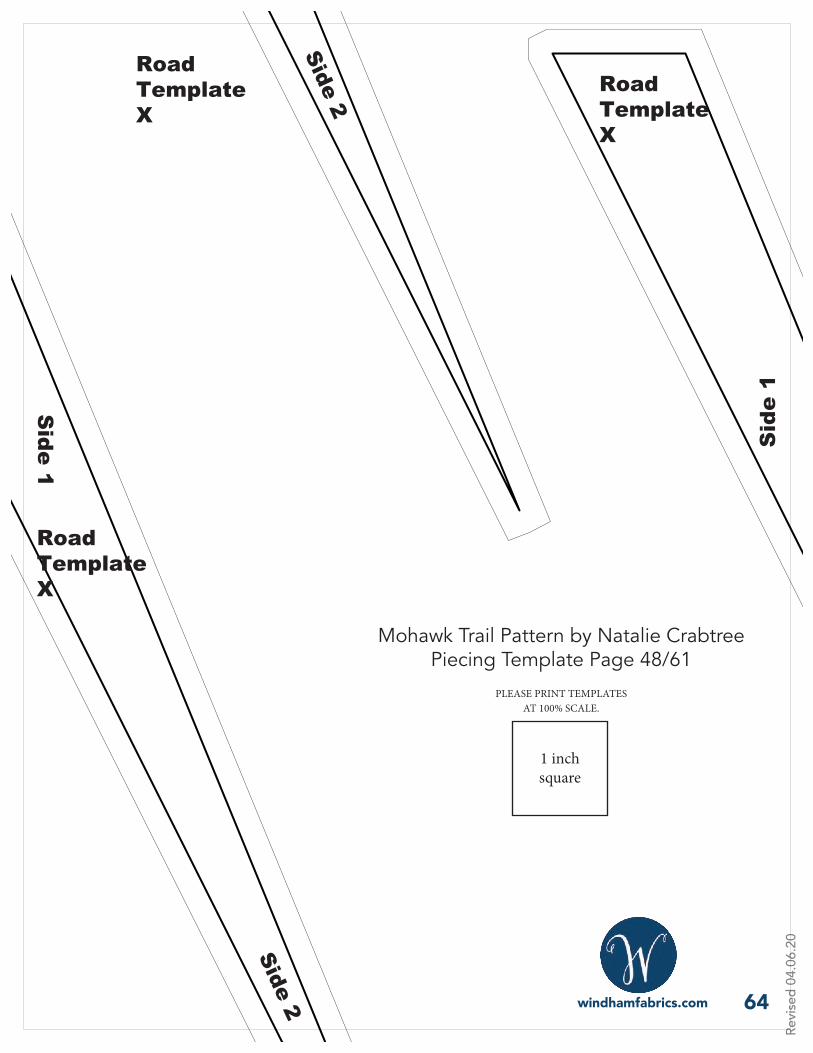
Sid
e 1
Road Template X
Road Template X
Side 1
Side 2
Road Template X
Side 2
64
1 inch square
PLEASE PRINT TEMPLATES AT 100% SCALE.
Mohawk Trail Pattern by Natalie CrabtreePiecing Template Page 48/61
Revi
sed
04.0
6.20
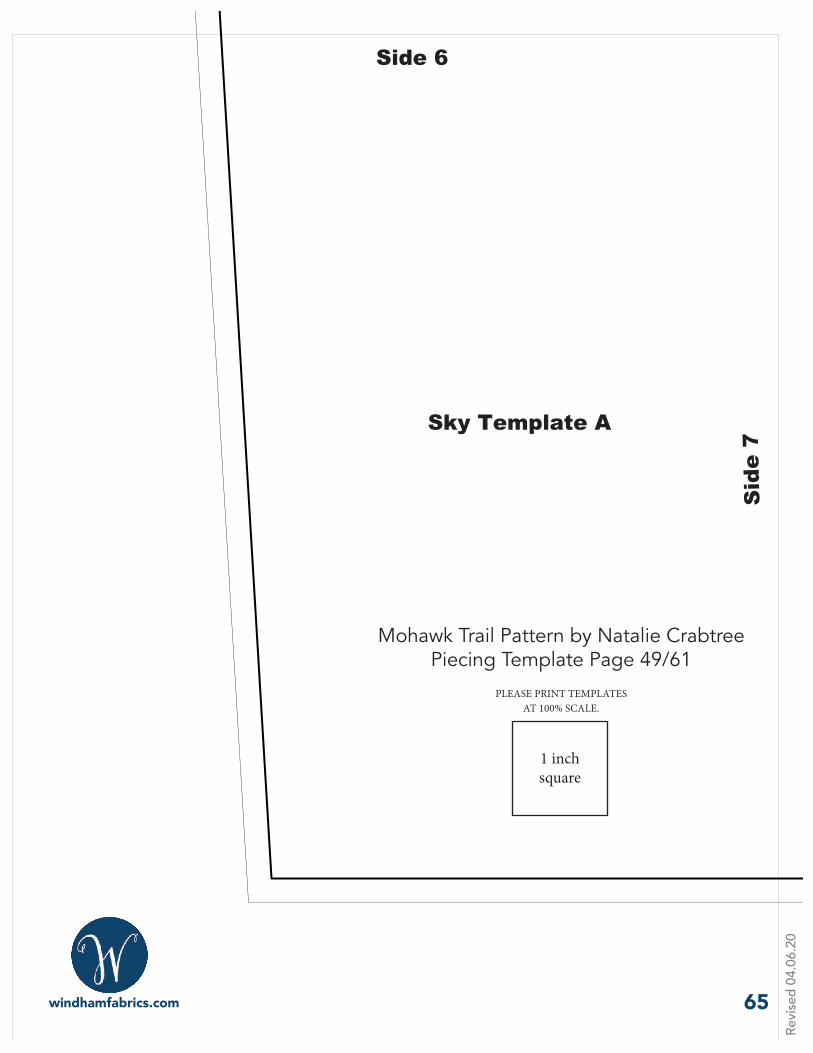
Sky Template A
Side 6
Sid
e 7
65
1 inch square
PLEASE PRINT TEMPLATES AT 100% SCALE.
Mohawk Trail Pattern by Natalie CrabtreePiecing Template Page 49/61
Revi
sed
04.0
6.20
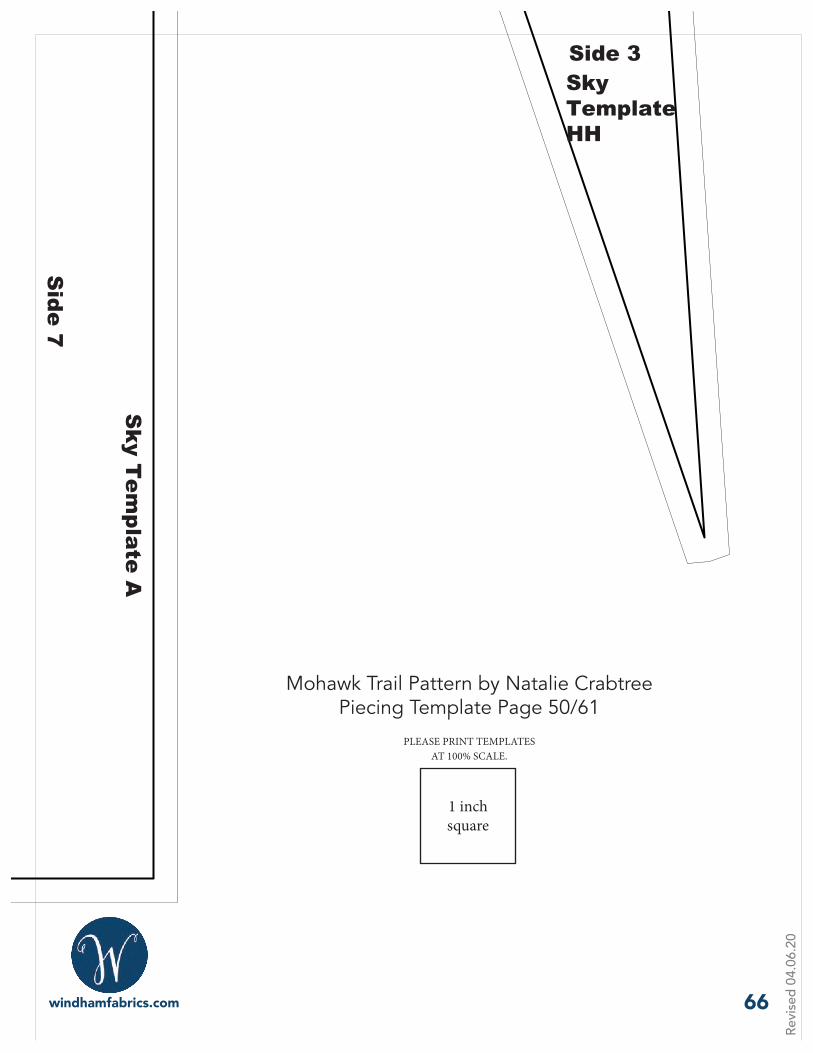
Sky T
emplate A
Side 7
Sky Template HH
Side 3
66
1 inch square
PLEASE PRINT TEMPLATES AT 100% SCALE.
Mohawk Trail Pattern by Natalie CrabtreePiecing Template Page 50/61
Revi
sed
04.0
6.20
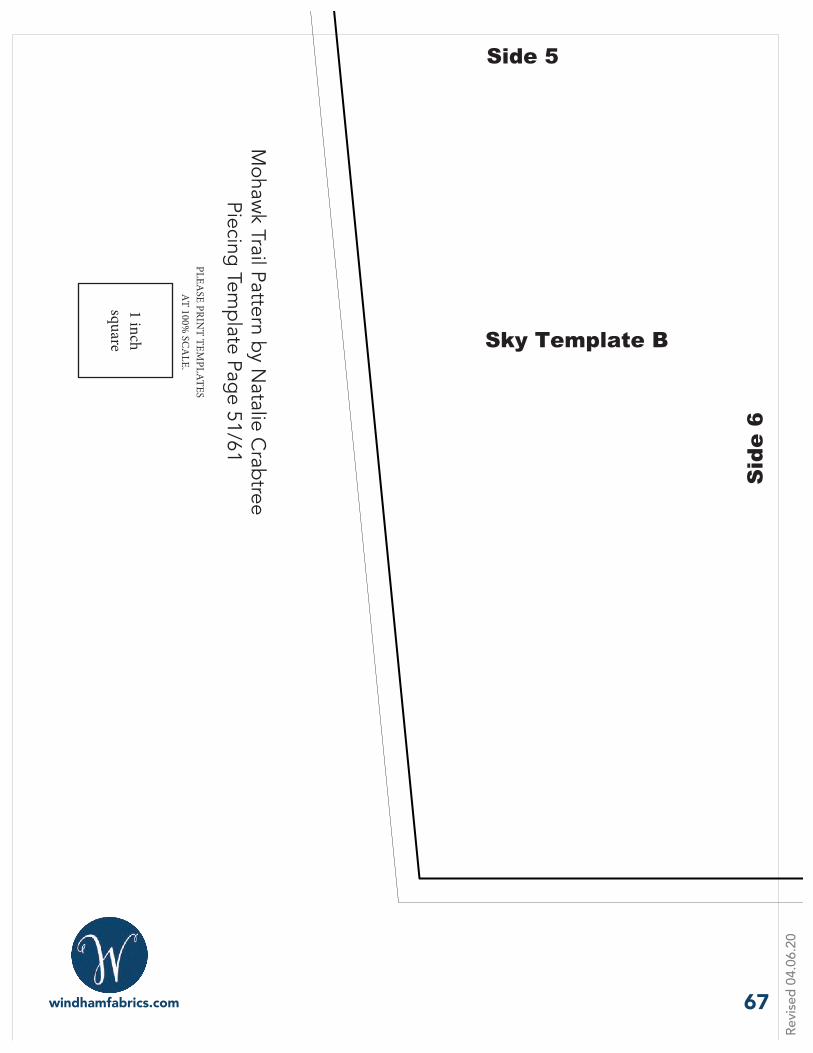
Sky Template B
Side 5
Sid
e 6
67
1 inch square
PLEASE PRIN
T TEMPLATES
AT 100% SC
ALE.
Mohaw
k Trail Pattern by Natalie C
rabtreePiecing Tem
plate Page 51/61
Revi
sed
04.0
6.20
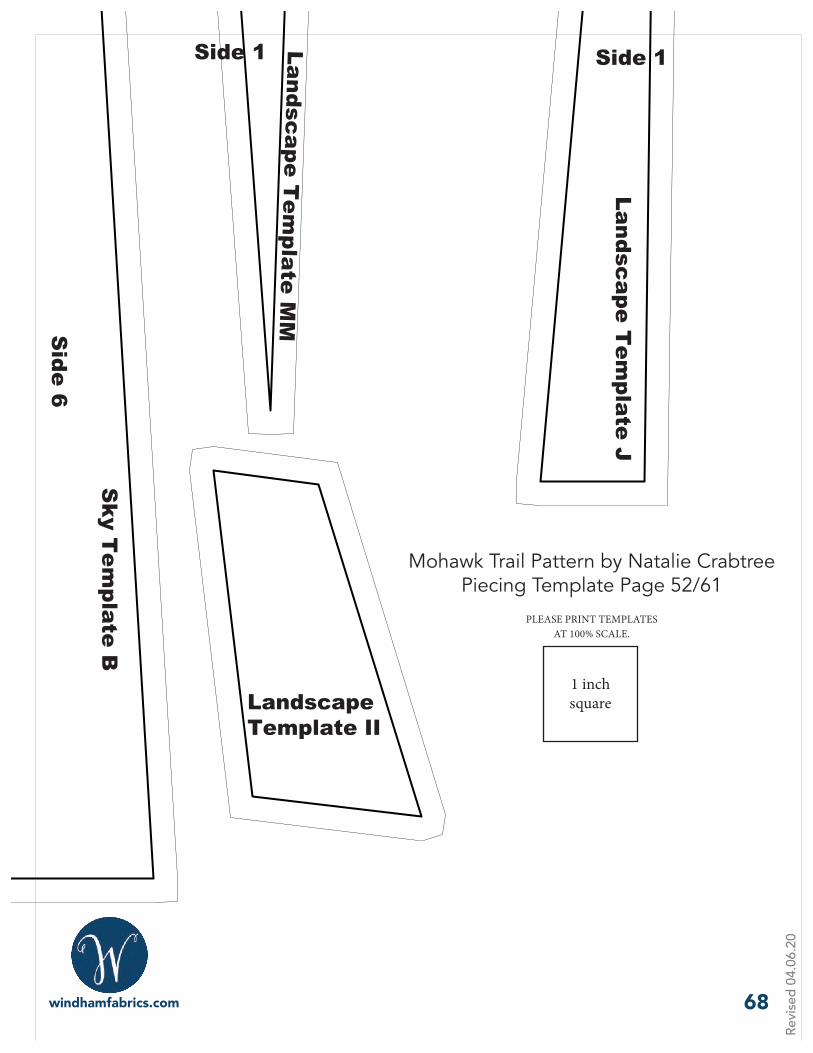
Sky T
emplate B
Side 6
Landscape Tem
plate MM
Side 1
Landscape Template II
Landscape Tem
plate J
Side 1
68
1 inch square
PLEASE PRINT TEMPLATES AT 100% SCALE.
Mohawk Trail Pattern by Natalie CrabtreePiecing Template Page 52/61
Revi
sed
04.0
6.20
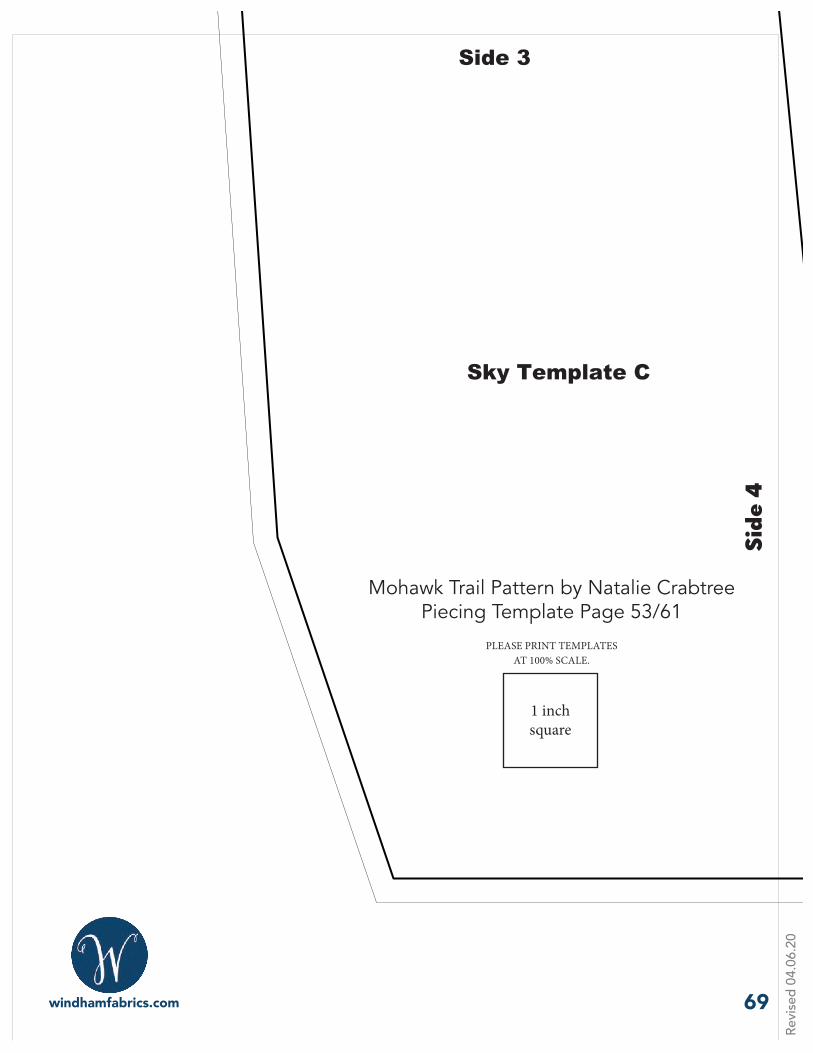
Sky Template C
Side 3
Sky
4
69
1 inch square
PLEASE PRINT TEMPLATES AT 100% SCALE.
Mohawk Trail Pattern by Natalie CrabtreePiecing Template Page 53/61
Side
4
Revi
sed
04.0
6.20
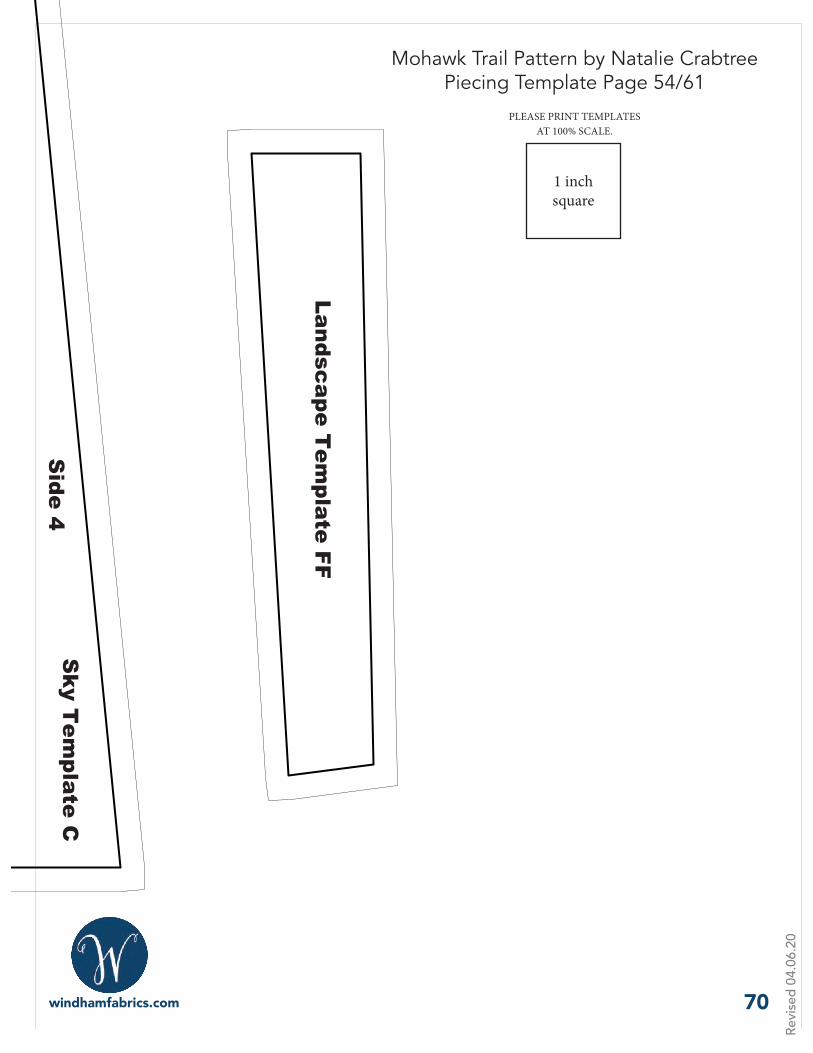
Sky T
emplate C
Side 4
Landscape Tem
plate FF
70
1 inch square
PLEASE PRINT TEMPLATES AT 100% SCALE.
Mohawk Trail Pattern by Natalie CrabtreePiecing Template Page 54/61
Revi
sed
04.0
6.20
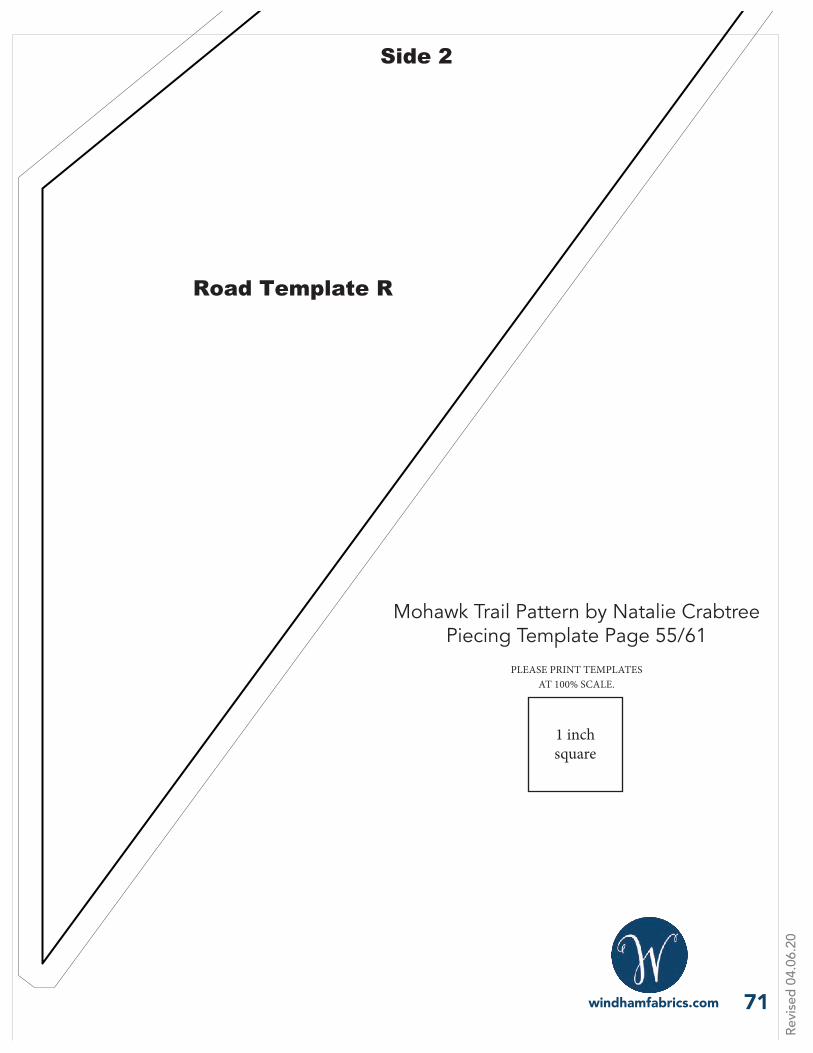
Road Template R
Side 2
71
1 inch square
PLEASE PRINT TEMPLATES AT 100% SCALE.
Mohawk Trail Pattern by Natalie CrabtreePiecing Template Page 55/61
Revi
sed
04.0
6.20
Land
scap
e T
empl
ate
K
Side 1
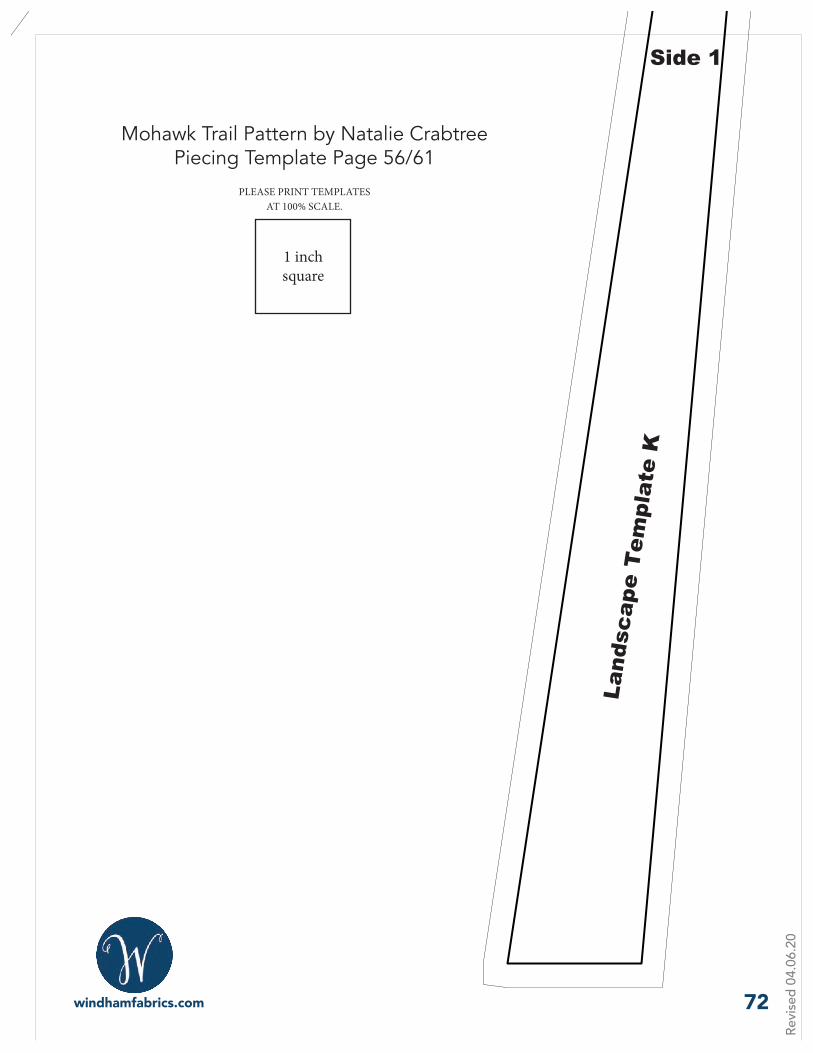
72
1 inch square
PLEASE PRINT TEMPLATES AT 100% SCALE.
Mohawk Trail Pattern by Natalie CrabtreePiecing Template Page 56/61
Revi
sed
04.0
6.20
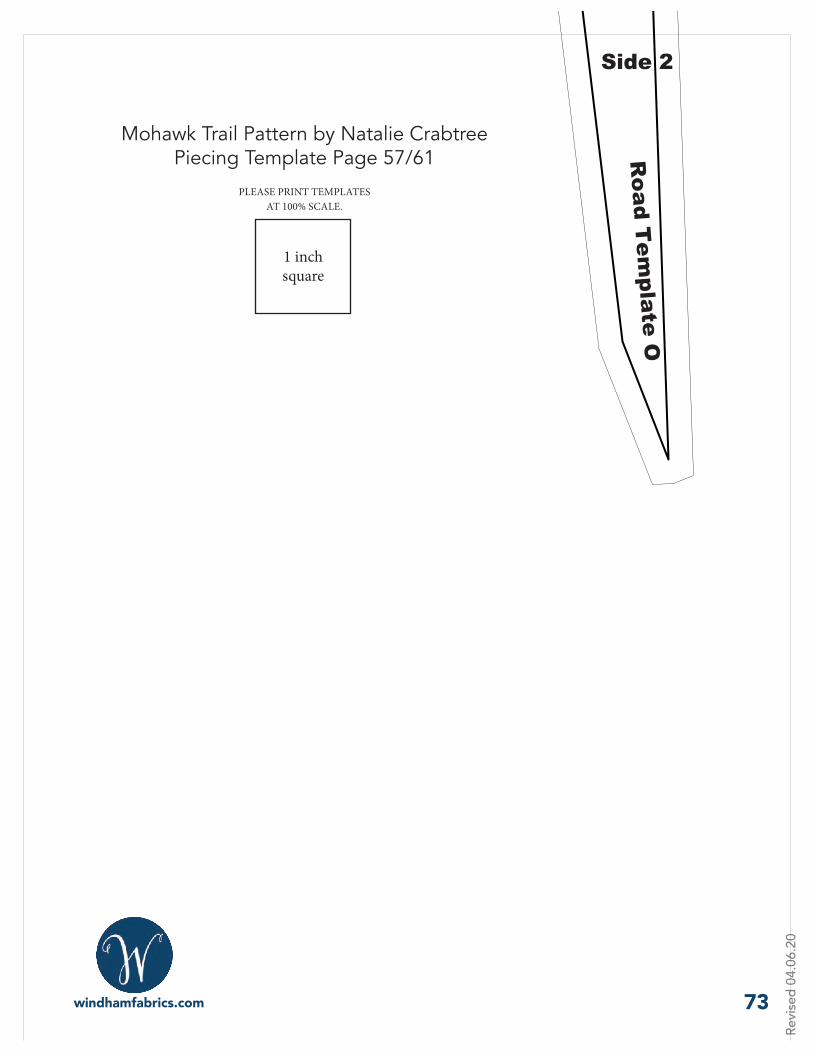
Road T
emplate O
Side 2
73
1 inch square
PLEASE PRINT TEMPLATES AT 100% SCALE.
Mohawk Trail Pattern by Natalie CrabtreePiecing Template Page 57/61
Revi
sed
04.0
6.20
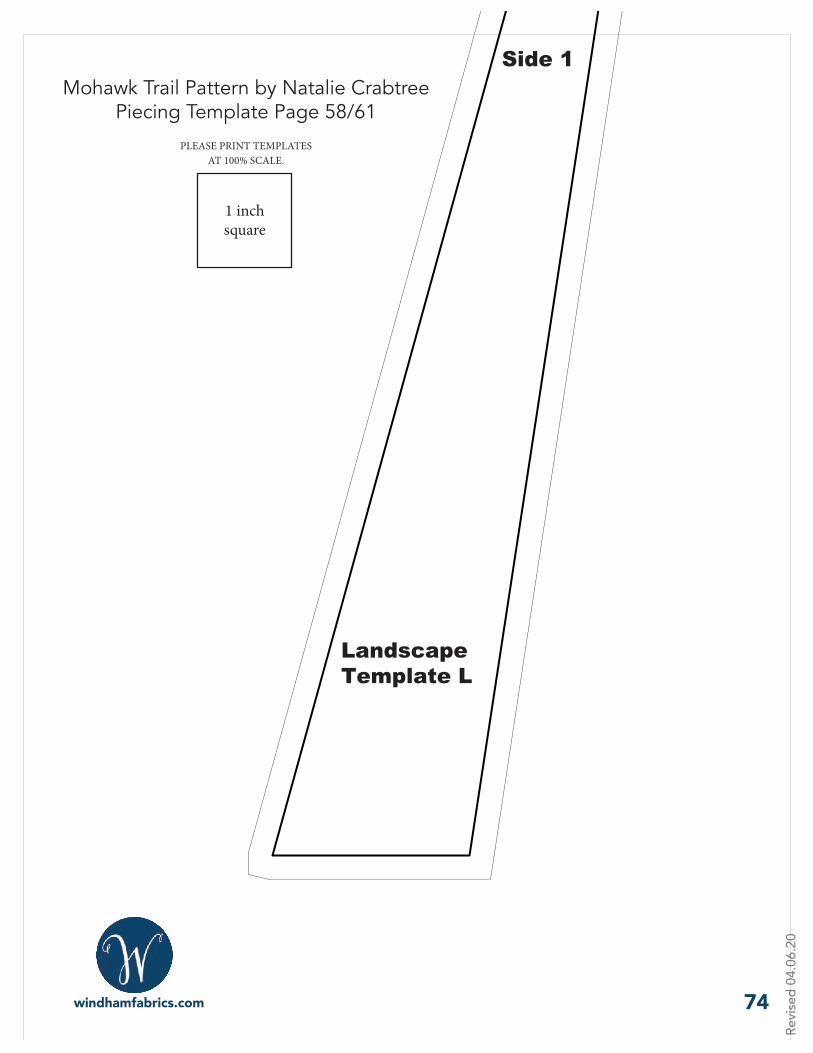
Landscape Template L
Side 1
74
1 inch square
PLEASE PRINT TEMPLATES AT 100% SCALE.
Mohawk Trail Pattern by Natalie CrabtreePiecing Template Page 58/61
Revi
sed
04.0
6.20
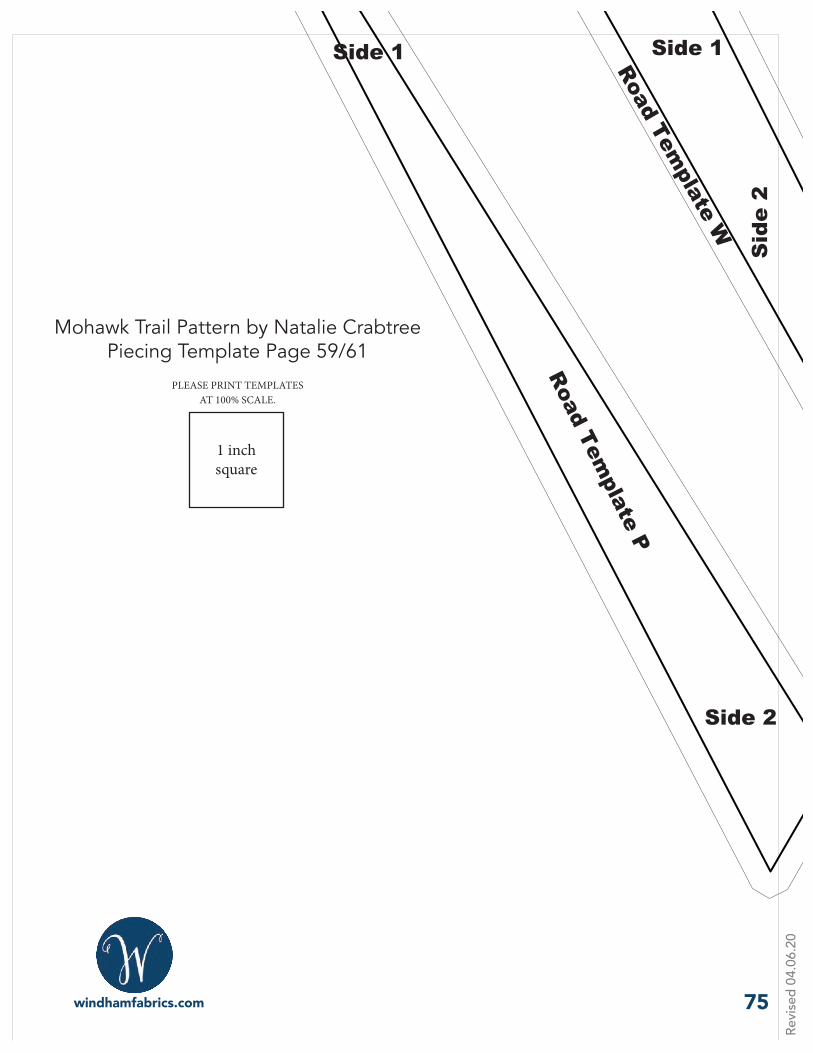
Road Template P
Side 1
Side 2
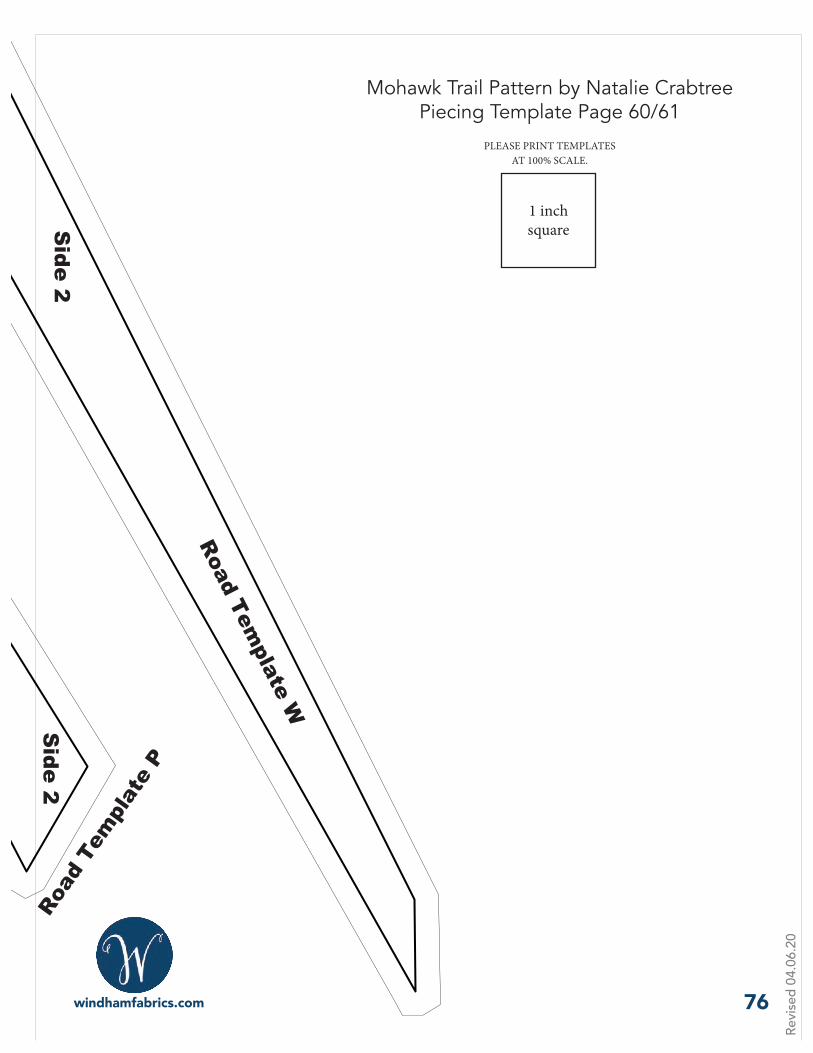
Road Template W
Side 1
Sid
e 2
75
1 inch square
PLEASE PRINT TEMPLATES AT 100% SCALE.
Mohawk Trail Pattern by Natalie CrabtreePiecing Template Page 59/61
Revi
sed
04.0
6.20
Road Template W
Side 2
Road
Tem
plat
e P
Side 2
76
1 inch square
PLEASE PRINT TEMPLATES AT 100% SCALE.
Mohawk Trail Pattern by Natalie CrabtreePiecing Template Page 60/61

Revi
sed
04.0
6.20
Road Template T
Side 1
77
1 inch square
PLEASE PRINT TEMPLATES AT 100% SCALE.
Mohawk Trail Pattern by Natalie CrabtreePiecing Template Page 61/61
Revi
sed
04.0
6.20
B A
D C
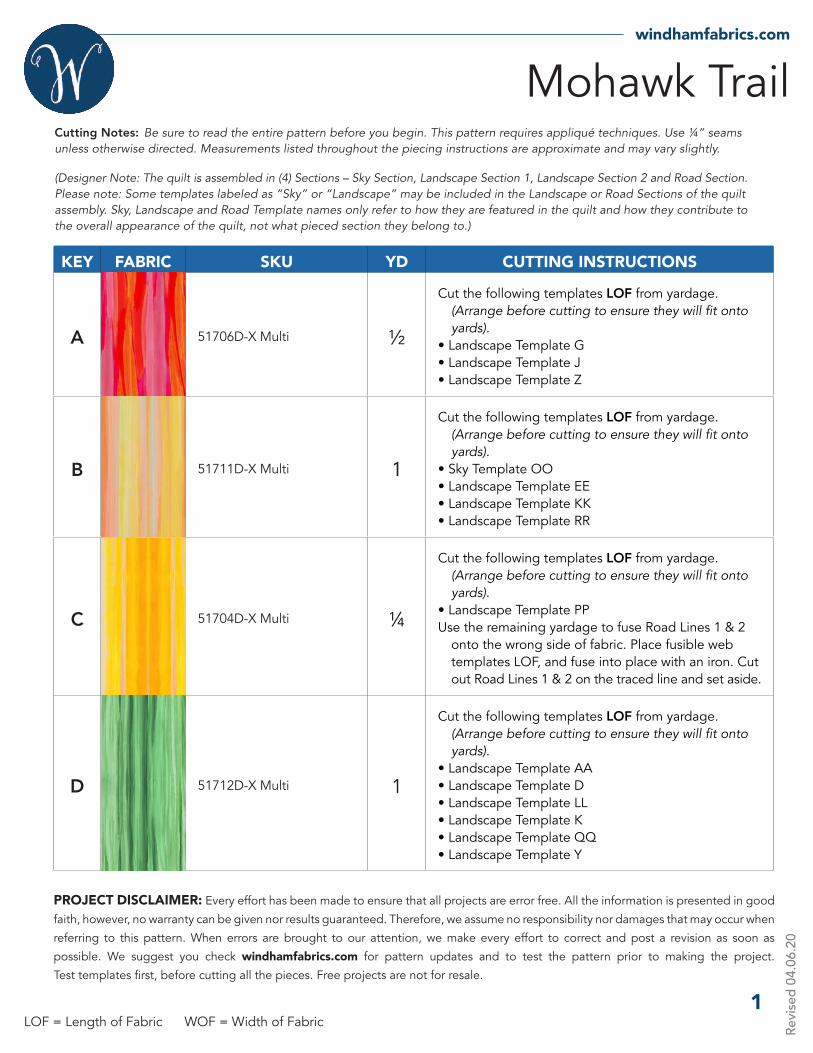
Telephone Pole 1
Road
Li
Road
Lin
e 1
ne 2
Telephone Pole 2
Telephone Pole 3
EF
I H GJ
K
L
MN
Cloud 1
Cloud 2
Mohawk Trail Applique Templates by Natalie Crabtree
1 inch
78
1 inch square
PLEASE PRINT TEMPLATES AT 100% SCALE.
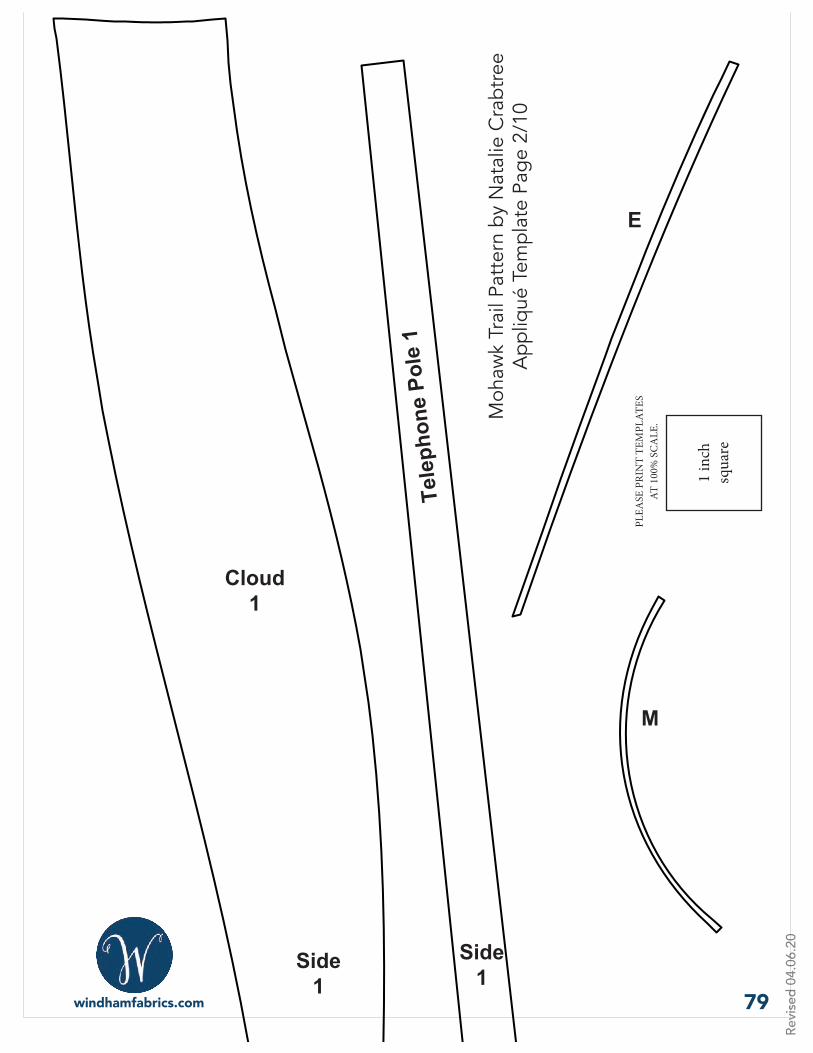
Mohawk Trail Pattern by Natalie CrabtreeAppliqué Template Page 1/10
please note this diagram is not to scale and is for layout purposes only
Revi
sed
04.0
6.20
E
M
Tele
phon
e Po
le 1
Side 1
Side 1
Cloud1
79
1 in
ch
squa
re
PLEA
SE P
RIN
T TE
MPL
ATES
AT
100
% S
CA
LE.M
ohaw
k Tr
ail P
atte
rn b
y N
atal
ie C
rabt
ree
App
liqué
Tem
plat
e Pa
ge 2
/10
Revi
sed
04.0
6.20
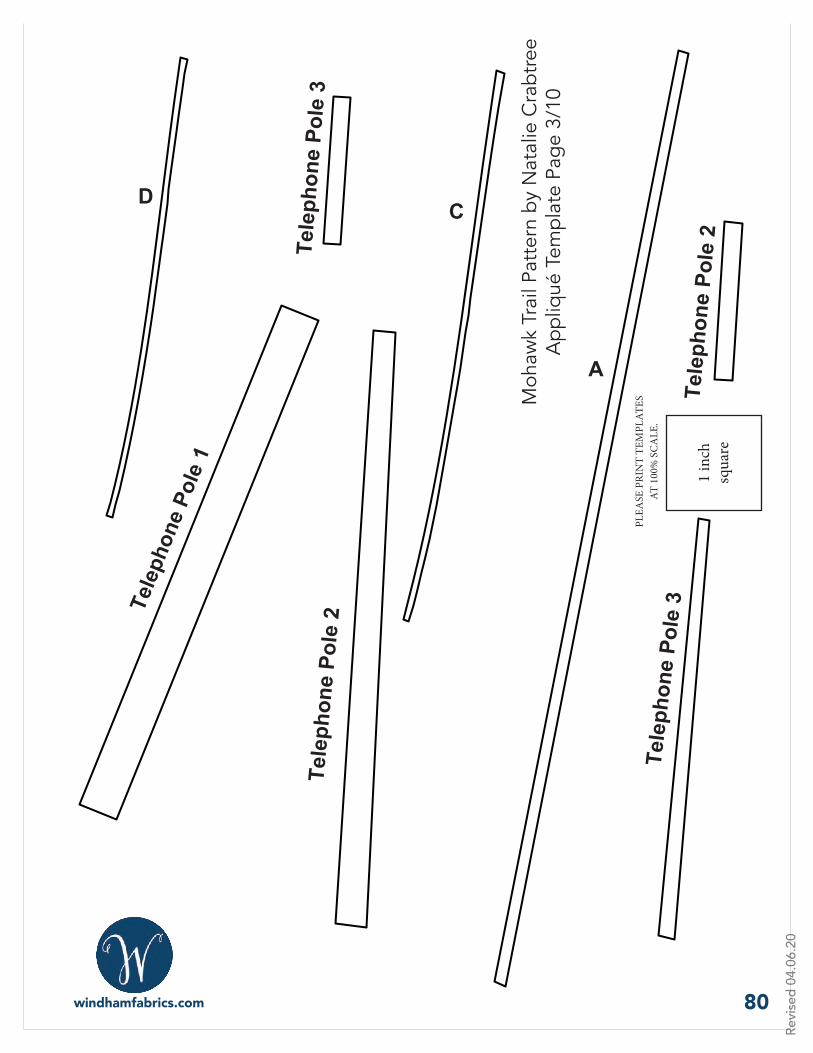
D
Tele
phon
e Po
le 3
Tele
phon
e Po
le 1
Tele
phon
e Po
le 2
C
A
Tele
phon
e Po
le 3
Tele
phon
e Po
le 2
80
1 in
ch
squa
re
PLEA
SE P
RIN
T TE
MPL
ATES
AT
100
% S
CA
LE.
Moh
awk
Trai
l Pat
tern
by
Nat
alie
Cra
btre
eA
ppliq
ué T
empl
ate
Page
3/1
0
Revi
sed
04.0
6.20
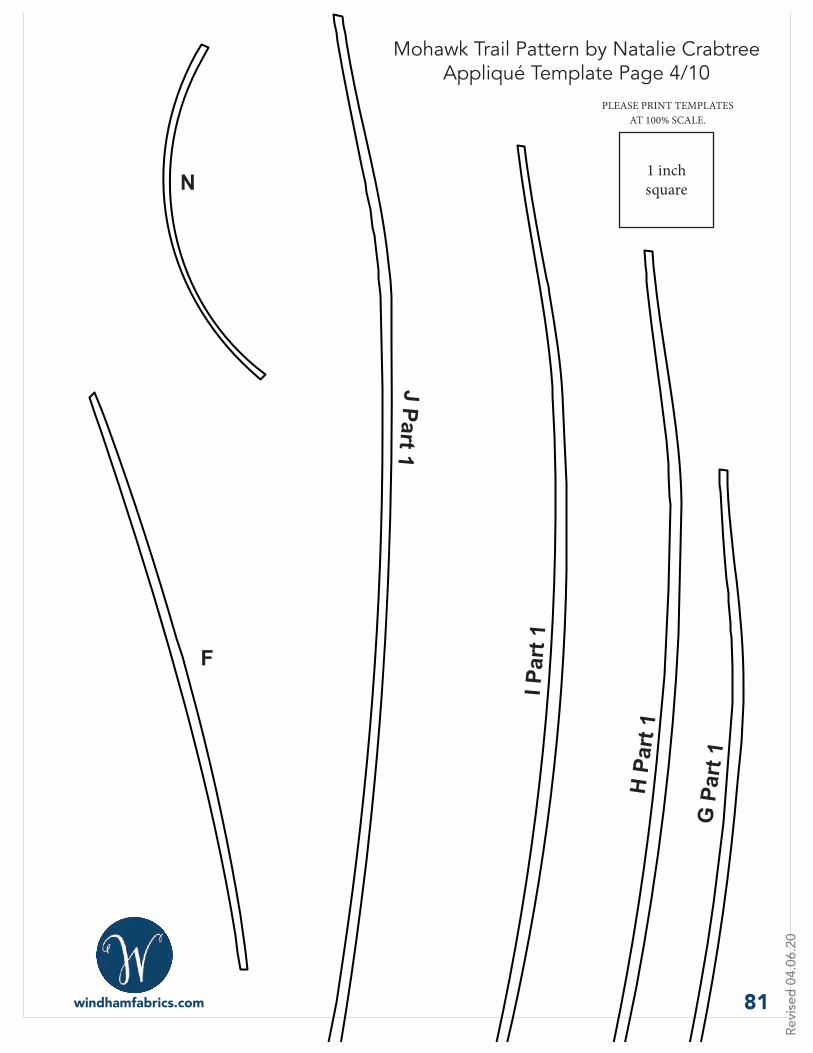
N
J Part 1
I Par
t 1
H Pa
rt 1
F
G P
art 1
81
1 inch square
PLEASE PRINT TEMPLATES AT 100% SCALE.
Mohawk Trail Pattern by Natalie CrabtreeAppliqué Template Page 4/10
Revi
sed
04.0
6.20
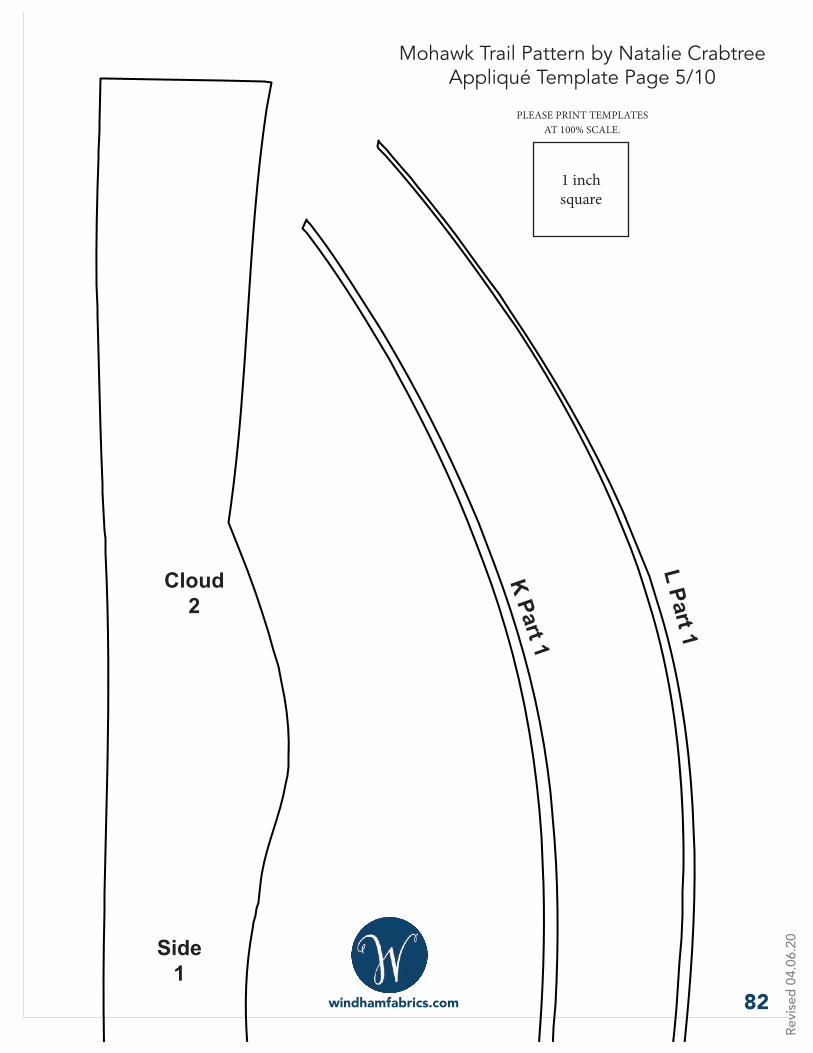
Cloud2
Side1
K Part 1
L Part 1
82
1 inch square
PLEASE PRINT TEMPLATES AT 100% SCALE.
Mohawk Trail Pattern by Natalie CrabtreeAppliqué Template Page 5/10
Revi
sed
04.0
6.20
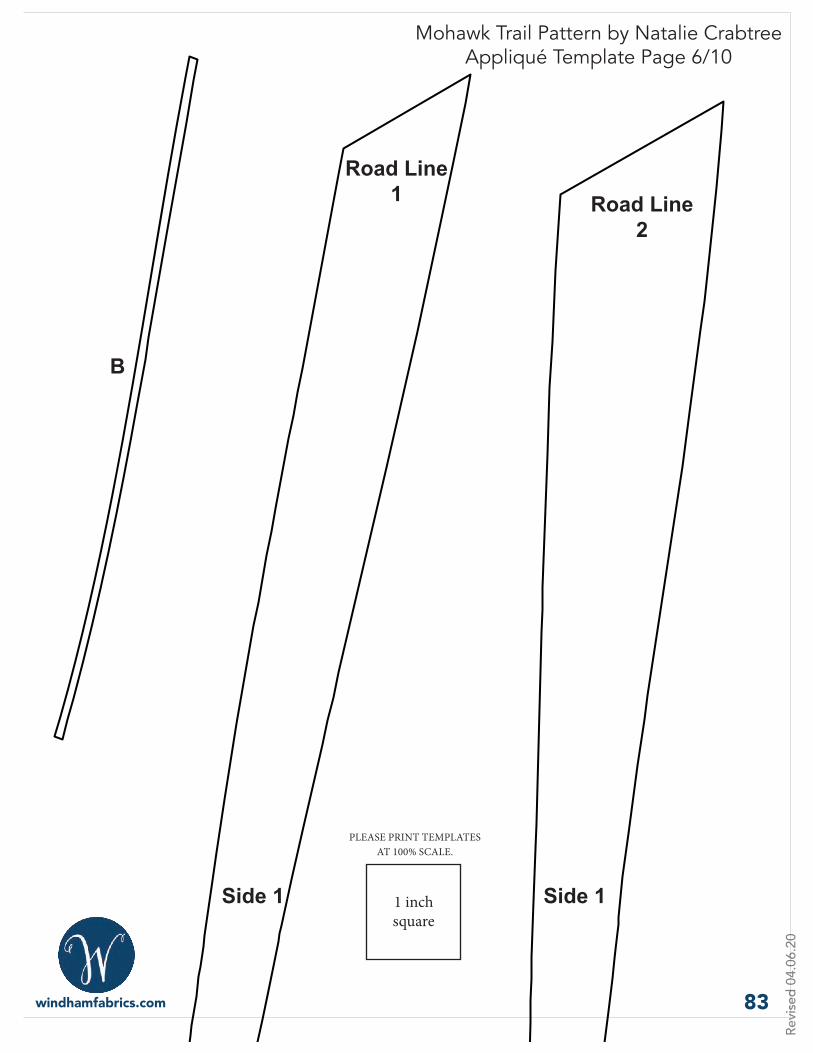
B
Road Line 1
Side 1 Side 1
Road Line 2
83
1 inch square
PLEASE PRINT TEMPLATES AT 100% SCALE.
Mohawk Trail Pattern by Natalie CrabtreeAppliqué Template Page 6/10
Revi
sed
04.0
6.20
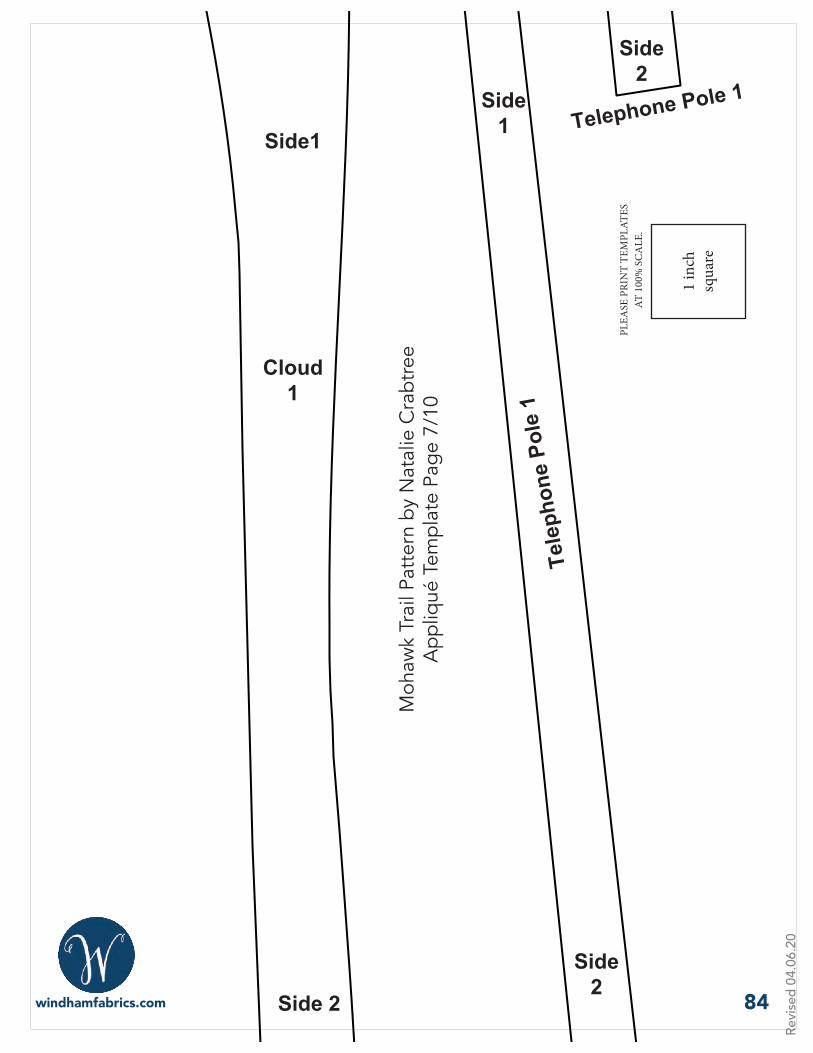
Cloud1
Side1
Side 2
Tele
phon
e Po
le 1
Side1
Side2
Telephone Pole 1
Side2
84
1 in
ch
squa
re
PLEA
SE P
RIN
T TE
MPL
ATES
AT
100
% S
CA
LE.
Moh
awk
Trai
l Pat
tern
by
Nat
alie
Cra
btre
eA
ppliq
ué T
empl
ate
Page
7/1
0
Revi
sed
04.0
6.20
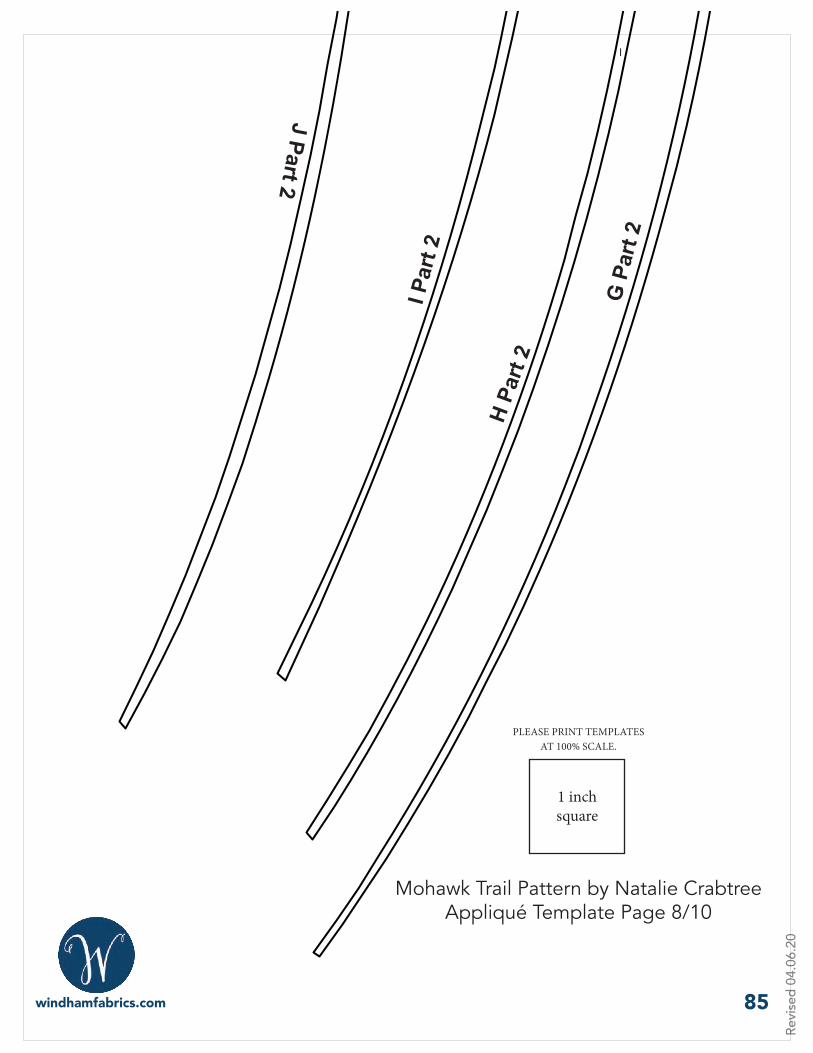
I
J Part 2
I Par
t 2
H Pa
rt 2
G P
art 2
85
1 inch square
PLEASE PRINT TEMPLATES AT 100% SCALE.
Mohawk Trail Pattern by Natalie CrabtreeAppliqué Template Page 8/10
Revi
sed
04.0
6.20
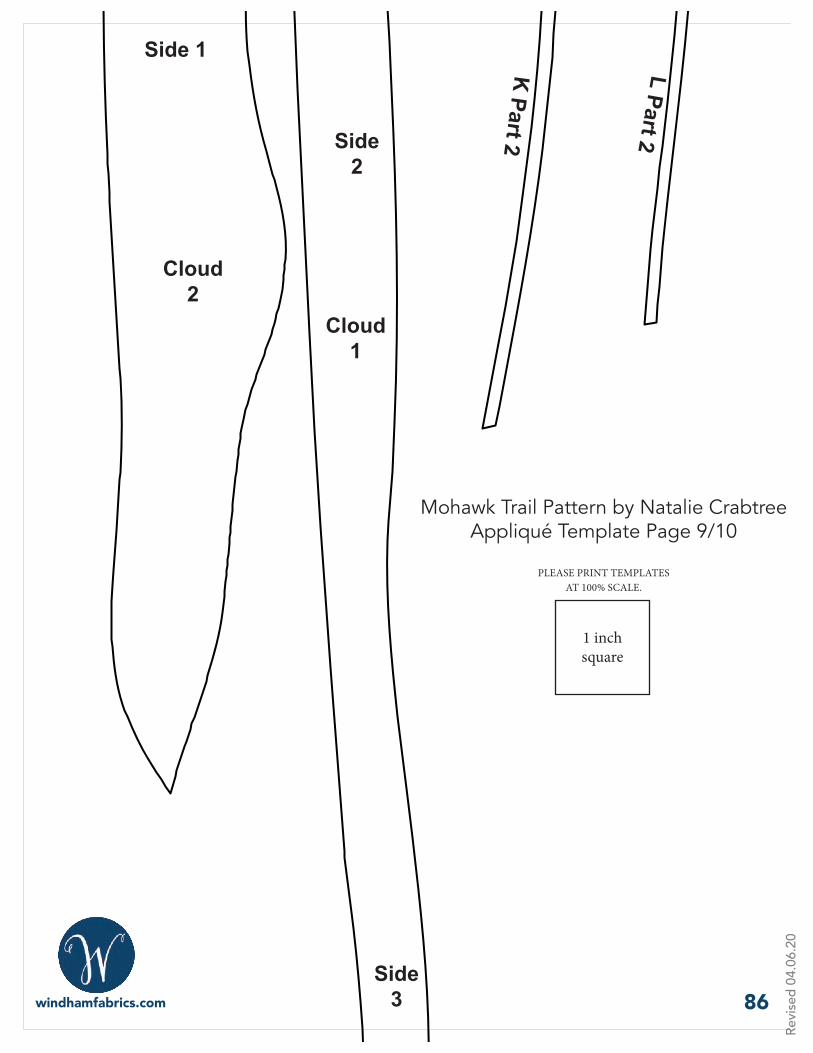
Cloud2
Side 1
K Part 2
L Part 2
Cloud 1
Side2
Side3 86
1 inch square
PLEASE PRINT TEMPLATES AT 100% SCALE.
Mohawk Trail Pattern by Natalie CrabtreeAppliqué Template Page 9/10
Revi
sed
04.0
6.20
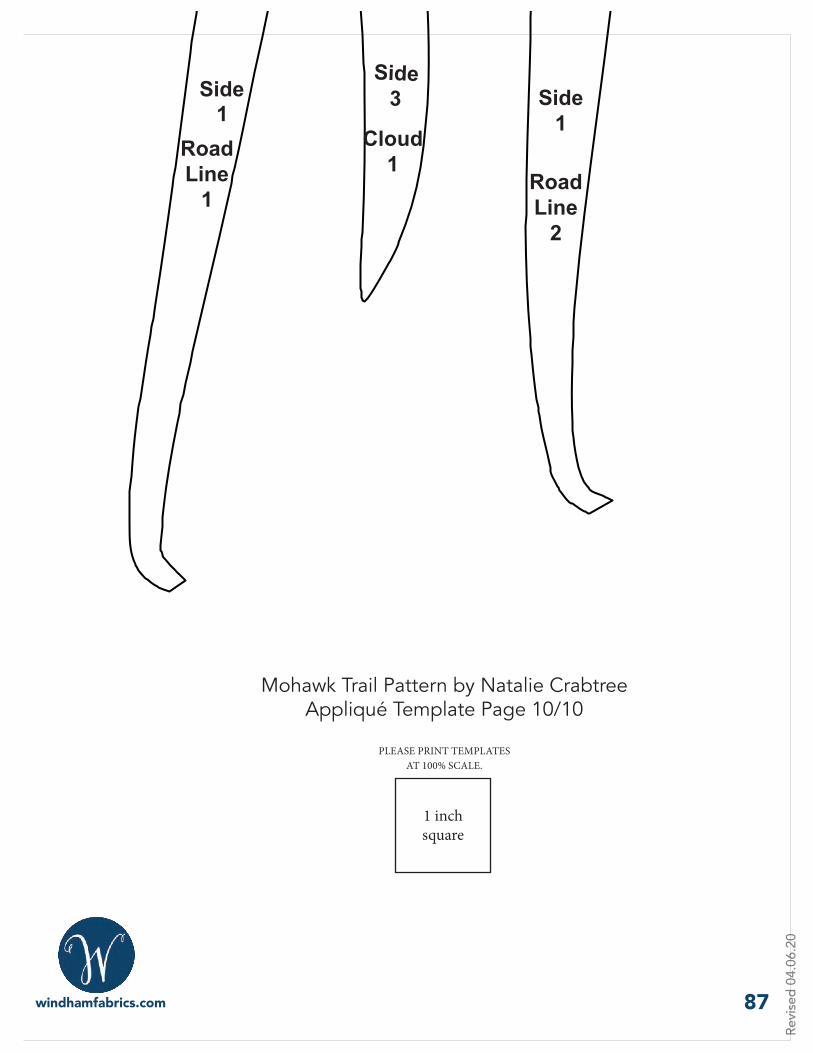
Road Line
2
Road Line
1
Side 1
Side 2
Side3
Cloud 1
87
1 inch square
PLEASE PRINT TEMPLATES AT 100% SCALE.
Mohawk Trail Pattern by Natalie CrabtreeAppliqué Template Page 10/10
Road Line
2
Road Line
1
Side 1
Side 2
Side3
Cloud 1