Embed Size (px)
Citation preview
Mogwai ERDesigner NGUser Documentation
Mogwai ERDesigner NG
User Documentation
© http://mogwai.sourceforge.net Page 1 / 33
Mogwai ERDesigner NGUser Documentation
About Mogwai ERDesigner NG.....................................................................................3
Support..........................................................................................................................4
Download and installation.............................................................................................4
Mogwai ERDesigner NG main screen..........................................................................5
The Main menu..........................................................................................................6
The model outline......................................................................................................7
The SQL preview.......................................................................................................8
The 3D editor.............................................................................................................9
Classpath configuration for JDBC drivers...................................................................10
Creating the first database model...............................................................................11
Adding tables...........................................................................................................12
Adding relations.......................................................................................................13
Modifying existing model objects.............................................................................15
Adding views to the model.......................................................................................16
Adding comments to the model...............................................................................17
Working with domains..............................................................................................18
Working with subject areas......................................................................................19
DDL script generation..............................................................................................20
Exporting the diagram..............................................................................................21
Reverse engineering existing databases....................................................................22
The complete compare functionality...........................................................................24
Guide to the version control tracking system..............................................................25
Using the Model Repository........................................................................................27
Setting up a Model Repository connection..............................................................27
Saving a model to the Model Repository.................................................................27
Loading a model from the Model Repository...........................................................28
Generating migration scripts....................................................................................28
Converting a database model.....................................................................................30
Creating a database documentation...........................................................................31
Generating an OpenXava Application.........................................................................32
© http://mogwai.sourceforge.net Page 2 / 33
Mogwai ERDesigner NGUser Documentation
About Mogwai ERDesigner NGThe Mogwai ERDesigner NG is an database modelling tool such as ERWin and co.
The only difference is that it is Open Source and does not cost anything. It was
designed to make database modelling as easy as it can be and to support the
developer in the whole development process, from database design to schema and
code generation. This tool was also designed to support a flexible plug in
architecture, to extend the system simply by installing a new plug in. This way,
everybody can implement new features and tools to make Mogwai ERDesigner NG
fit the requirements.
Mogwai ERDesigner NG has the following key features:
• is based on Java and therefore can run on Windows, Linux / Unix and MacOS
• has a powerful WYSIWYG editor for database schemas
• supports 2D and 3D editing modes
• handles Tables, Views, Indexes and Relations
• supports Subject Areas and Domains
• supports MySQL, MSSQL, Oracle, Postgres, H2 and DB2 using JDBC
• generates SQL DDL scripts for schema generation
• supports a central repository for all models ( Schema Repository )
• has an integrated version control system
• generates migration scripts for schema changes
• stores it’s model as XML files
• has an integrated reverse engineering module
• exports diagrams as GIF, PNG, JPEG and SVG files
• is based on GPL license
• has a good support by newsgroups and authors
• localisation is available in English and German
© http://mogwai.sourceforge.net Page 3 / 33
Mogwai ERDesigner NGUser Documentation
Mogwai ERDesigner NG is based on Mogwai ERDesigner. The core SQL API and
the visual database editor were completely redesigned, bug fixed and enhanced to
build the new Mogwai ERDesigner NG.
Support
Support is available using the project homepage and also using the provided task
tracker from the SourceForge.net project site. Please submit help / feature requests
or bugs to these trackers or to the project mailing lists also available using the
website. Feel free to directly consult the project members for technical support and
questions.
Since Mogwai ERDesigner NG is Open Source, the project lives from user feedback,
so annotations, questions and remarks are very welcome!
Project homepage: http://mogwai.sourceforge.net
SF Project page: http://sourceforge.net/projects/mogwai
Mailing list: [email protected]
Download and installation
Download and installation is quite easy. Please consult the Sourceforge.net project
homepage and select downloads. There, you will find the distribution package of
Mogwai ERDesigner NG. You will find one version for Linux/Unix operating systems
in tar.gz format, and one version for Windows operating systems in .zip format.
After downloading the distribution for your operating system, you have to extract it to
your hard disc. After extraction, you will find a new directory named mogwai-
erdesignerng. The current version number is also added to the directory name. In this
directory, you will find the following files:
run.bat Use this to start Mogwai ERDesigner NG on Windows systems
© http://mogwai.sourceforge.net Page 4 / 33

Mogwai ERDesigner NGUser Documentation
run.sh Use this to start Mogwai ERDesigner NG on Unix systems
Mogwai ERDesigner NG main screen
One you have started Mogwai ERDesigner NG, you will see a splash screen
informing you that Mogwai ERDesigner NG is loading. After this short loading
process, you will see the ERDesigner NG main screen:
After the first start-up, the main screen will look like above. It is divided into tree
working areas, the editing area, the model outline and the SQL preview area. The
layout can be changed every time easily using drag and drop of areas to other
docking positions. The layout is saved on exit, and will be restored when
ERDesignerNG is restarted again.
© http://mogwai.sourceforge.net Page 5 / 33
Main menu
Editing area
Model outline
SQL Preview
Mogwai ERDesigner NGUser Documentation
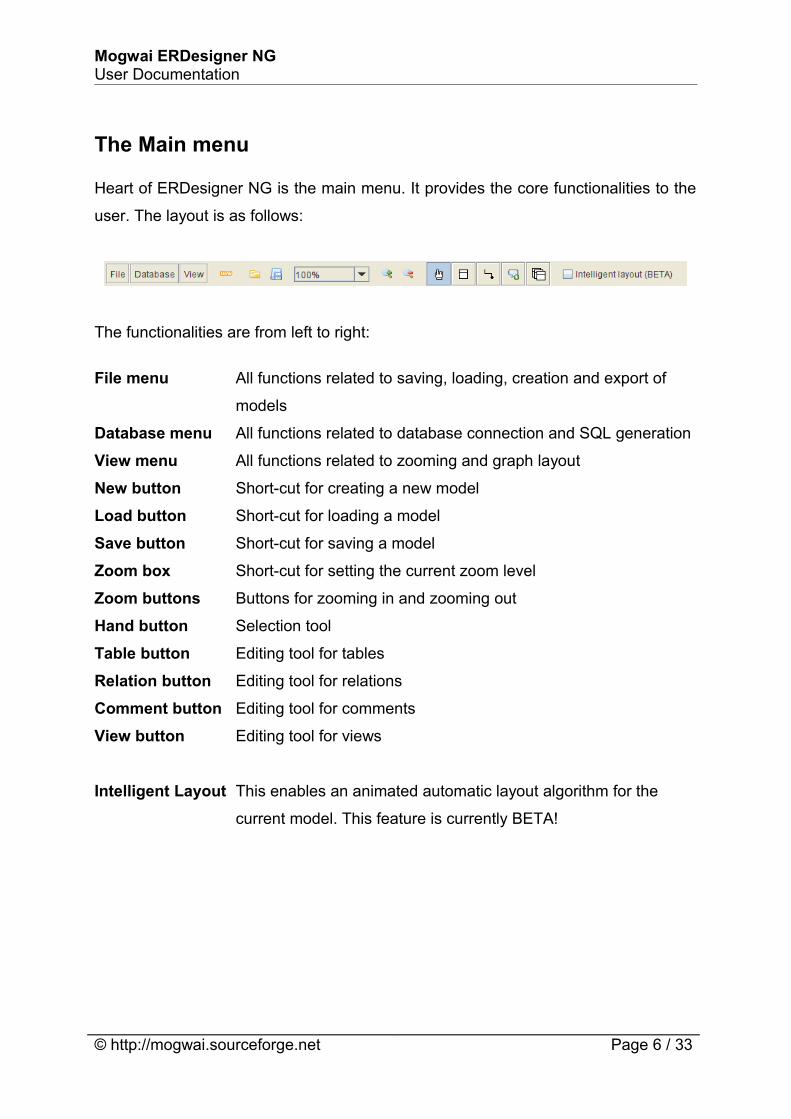
The Main menu
Heart of ERDesigner NG is the main menu. It provides the core functionalities to the
user. The layout is as follows:
The functionalities are from left to right:
File menu All functions related to saving, loading, creation and export of
models
Database menu All functions related to database connection and SQL generation
View menu All functions related to zooming and graph layout
New button Short-cut for creating a new model
Load button Short-cut for loading a model
Save button Short-cut for saving a model
Zoom box Short-cut for setting the current zoom level
Zoom buttons Buttons for zooming in and zooming out
Hand button Selection tool
Table button Editing tool for tables
Relation button Editing tool for relations
Comment button Editing tool for comments
View button Editing tool for views
Intelligent Layout This enables an animated automatic layout algorithm for the
current model. This feature is currently BETA!
© http://mogwai.sourceforge.net Page 6 / 33
Mogwai ERDesigner NGUser Documentation
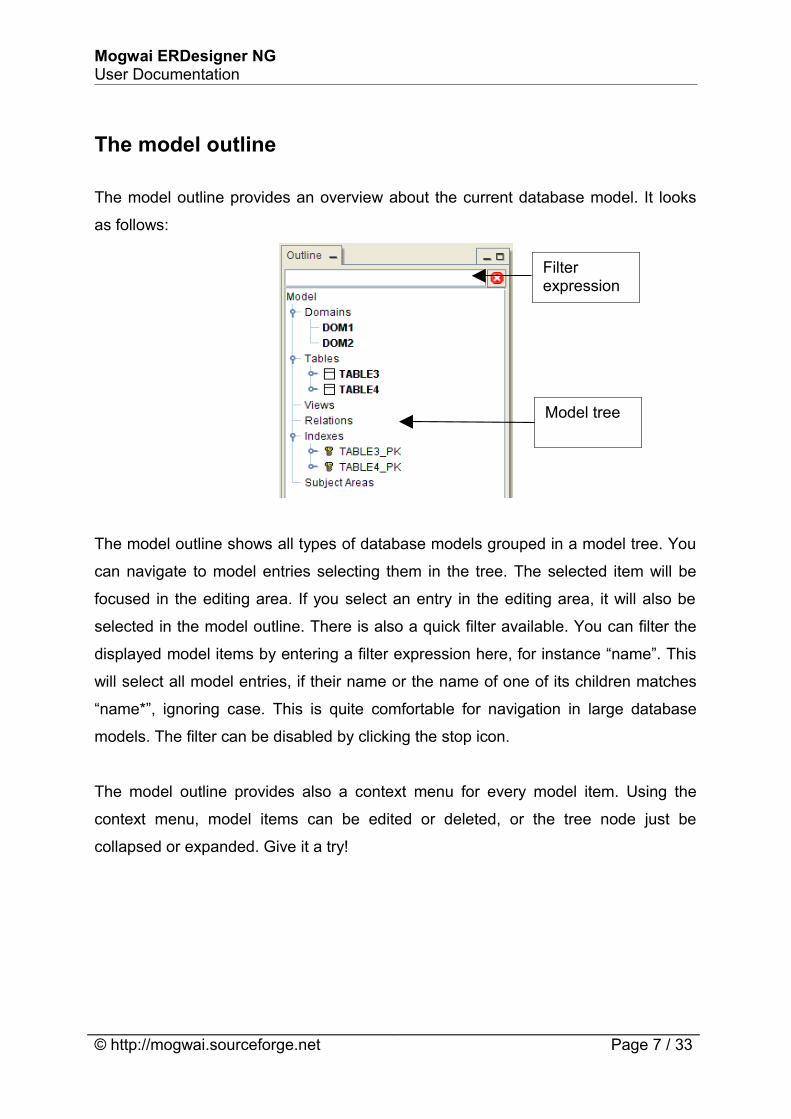
The model outline
The model outline provides an overview about the current database model. It looks
as follows:
The model outline shows all types of database models grouped in a model tree. You
can navigate to model entries selecting them in the tree. The selected item will be
focused in the editing area. If you select an entry in the editing area, it will also be
selected in the model outline. There is also a quick filter available. You can filter the
displayed model items by entering a filter expression here, for instance “name”. This
will select all model entries, if their name or the name of one of its children matches
“name*”, ignoring case. This is quite comfortable for navigation in large database
models. The filter can be disabled by clicking the stop icon.
The model outline provides also a context menu for every model item. Using the
context menu, model items can be edited or deleted, or the tree node just be
collapsed or expanded. Give it a try!
© http://mogwai.sourceforge.net Page 7 / 33
Filter expression
Model tree
Mogwai ERDesigner NGUser Documentation
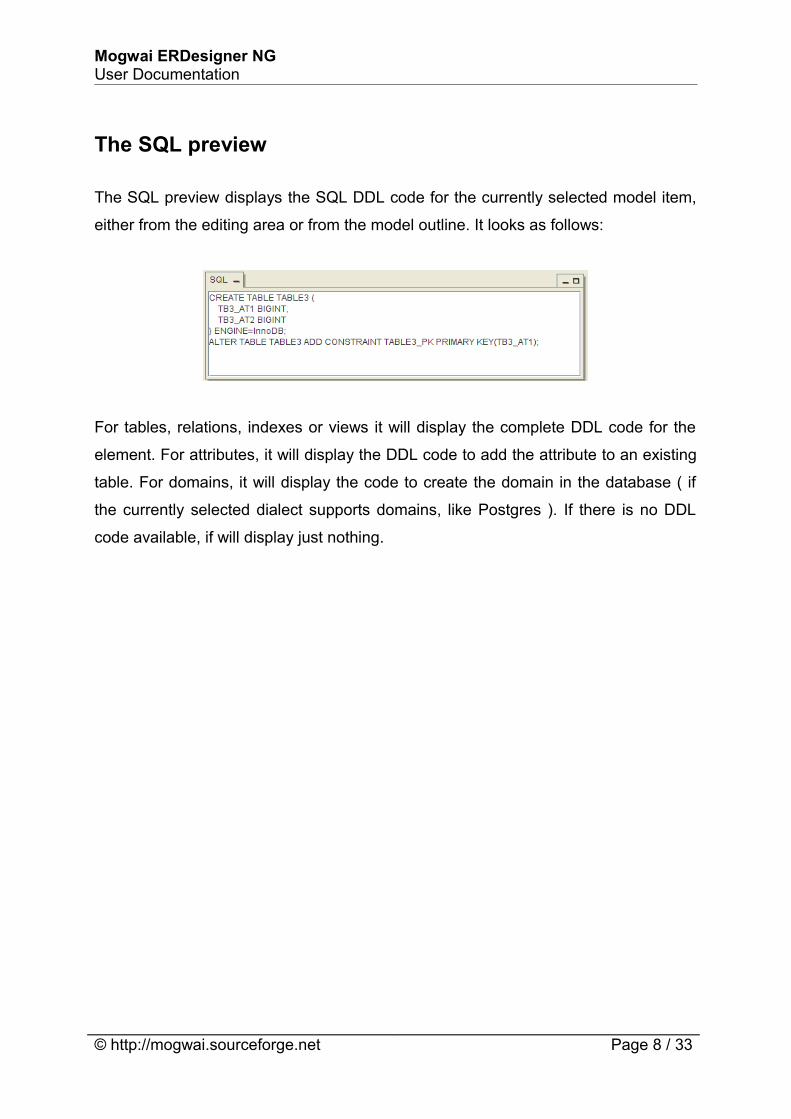
The SQL preview
The SQL preview displays the SQL DDL code for the currently selected model item,
either from the editing area or from the model outline. It looks as follows:
For tables, relations, indexes or views it will display the complete DDL code for the
element. For attributes, it will display the DDL code to add the attribute to an existing
table. For domains, it will display the code to create the domain in the database ( if
the currently selected dialect supports domains, like Postgres ). If there is no DDL
code available, if will display just nothing.
© http://mogwai.sourceforge.net Page 8 / 33
Mogwai ERDesigner NGUser Documentation
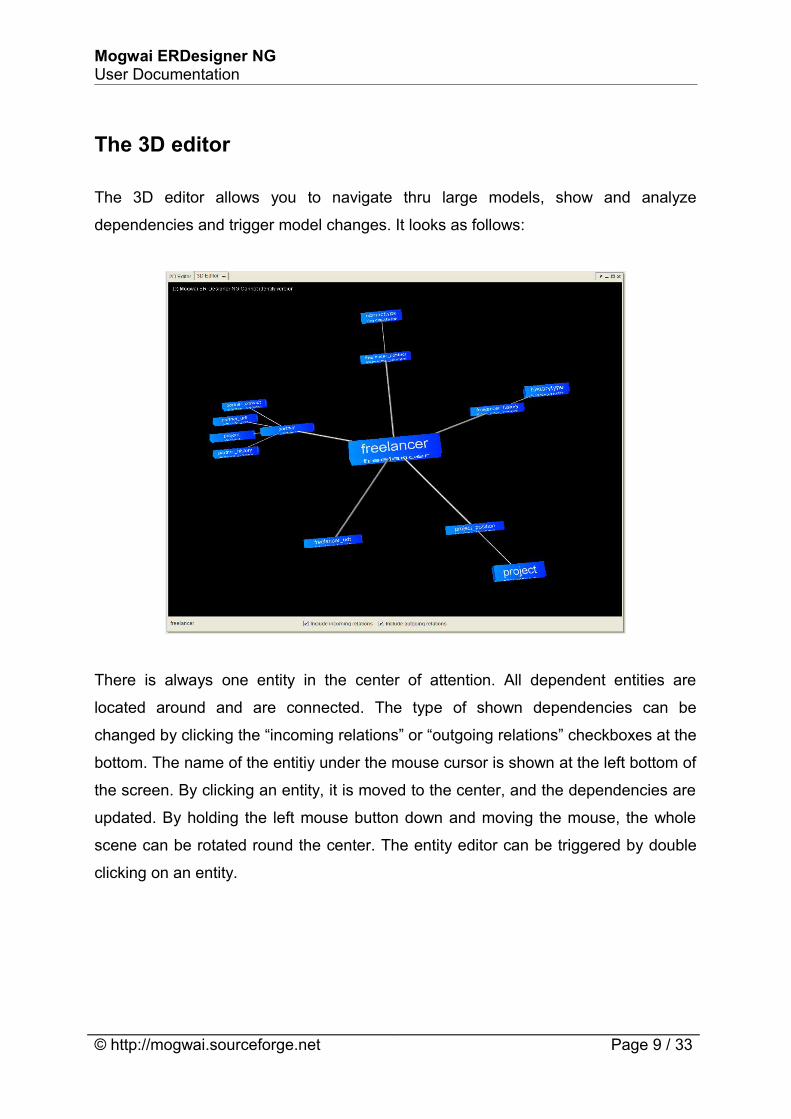
The 3D editor
The 3D editor allows you to navigate thru large models, show and analyze
dependencies and trigger model changes. It looks as follows:
There is always one entity in the center of attention. All dependent entities are
located around and are connected. The type of shown dependencies can be
changed by clicking the “incoming relations” or “outgoing relations” checkboxes at the
bottom. The name of the entitiy under the mouse cursor is shown at the left bottom of
the screen. By clicking an entity, it is moved to the center, and the dependencies are
updated. By holding the left mouse button down and moving the mouse, the whole
scene can be rotated round the center. The entity editor can be triggered by double
clicking on an entity.
© http://mogwai.sourceforge.net Page 9 / 33
Mogwai ERDesigner NGUser Documentation
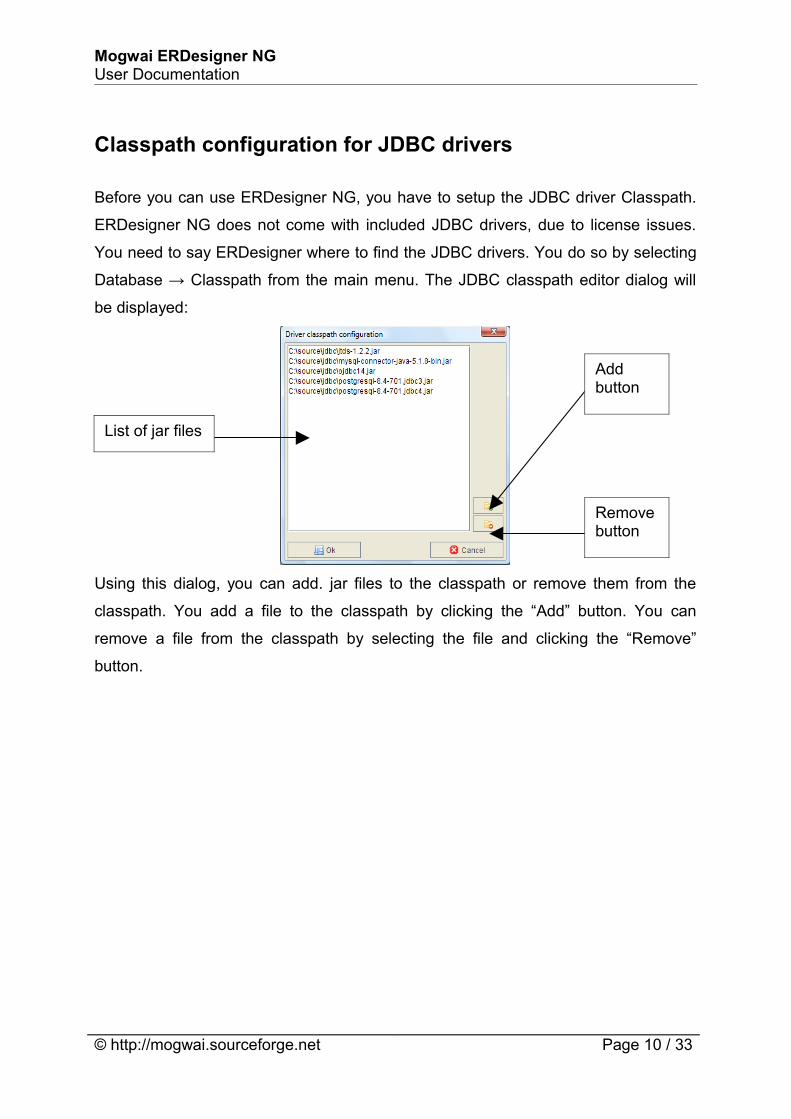
Classpath configuration for JDBC drivers
Before you can use ERDesigner NG, you have to setup the JDBC driver Classpath.
ERDesigner NG does not come with included JDBC drivers, due to license issues.
You need to say ERDesigner where to find the JDBC drivers. You do so by selecting
Database → Classpath from the main menu. The JDBC classpath editor dialog will
be displayed:
Using this dialog, you can add. jar files to the classpath or remove them from the
classpath. You add a file to the classpath by clicking the “Add” button. You can
remove a file from the classpath by selecting the file and clicking the “Remove”
button.
© http://mogwai.sourceforge.net Page 10 / 33
List of jar files
Add button
Remove button
Mogwai ERDesigner NGUser Documentation
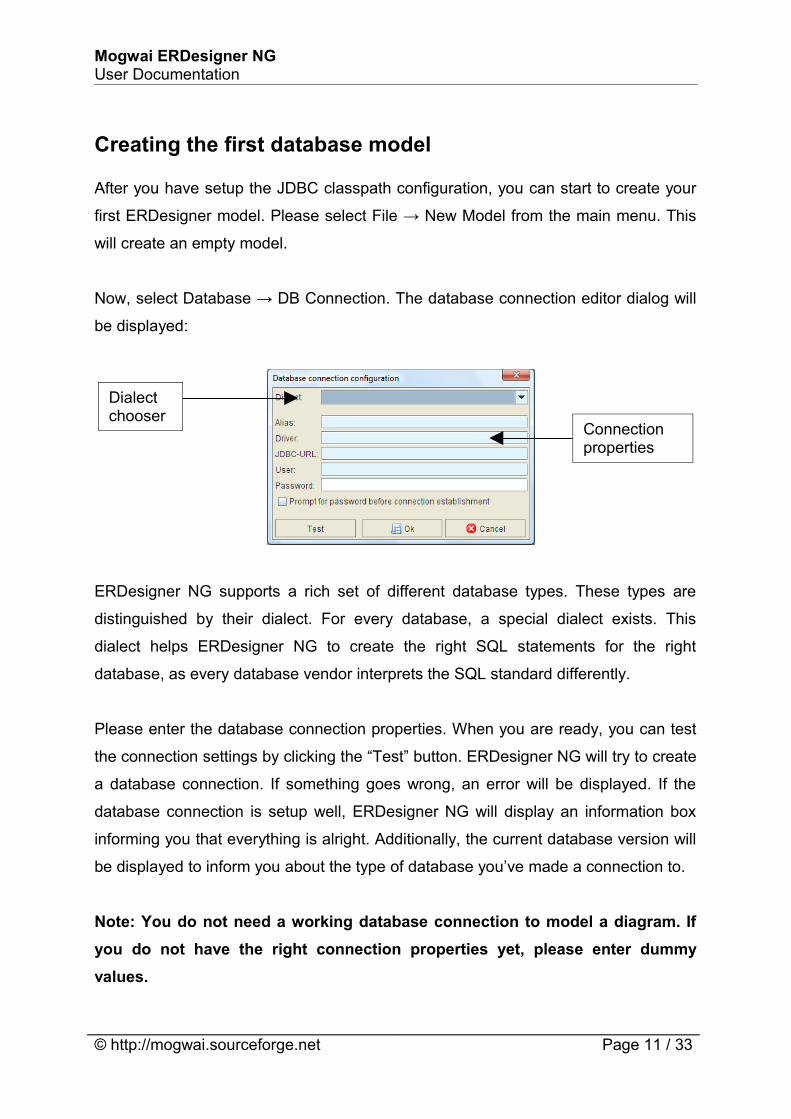
Creating the first database model
After you have setup the JDBC classpath configuration, you can start to create your
first ERDesigner model. Please select File → New Model from the main menu. This
will create an empty model.
Now, select Database → DB Connection. The database connection editor dialog will
be displayed:
ERDesigner NG supports a rich set of different database types. These types are
distinguished by their dialect. For every database, a special dialect exists. This
dialect helps ERDesigner NG to create the right SQL statements for the right
database, as every database vendor interprets the SQL standard differently.
Please enter the database connection properties. When you are ready, you can test
the connection settings by clicking the “Test” button. ERDesigner NG will try to create
a database connection. If something goes wrong, an error will be displayed. If the
database connection is setup well, ERDesigner NG will display an information box
informing you that everything is alright. Additionally, the current database version will
be displayed to inform you about the type of database you’ve made a connection to.
Note: You do not need a working database connection to model a diagram. If you do not have the right connection properties yet, please enter dummy values.
© http://mogwai.sourceforge.net Page 11 / 33
Dialect chooser
Connection properties
Mogwai ERDesigner NGUser Documentation
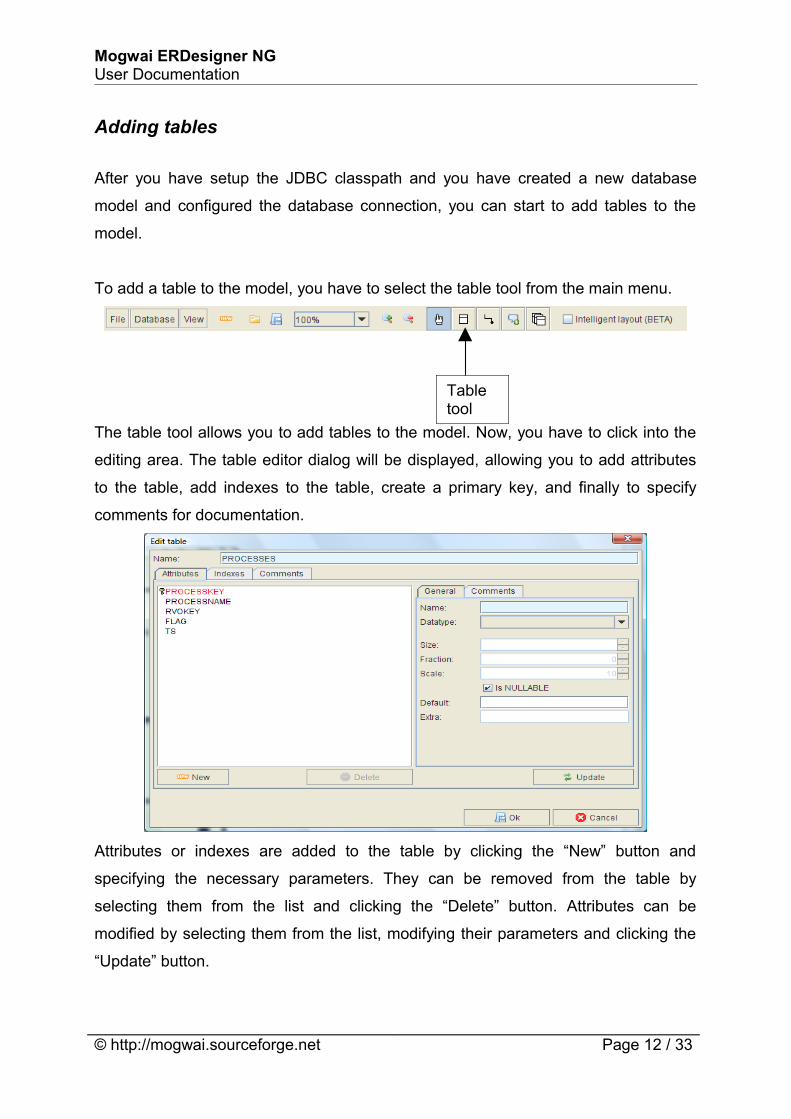
Adding tables
After you have setup the JDBC classpath and you have created a new database
model and configured the database connection, you can start to add tables to the
model.
To add a table to the model, you have to select the table tool from the main menu.
The table tool allows you to add tables to the model. Now, you have to click into the
editing area. The table editor dialog will be displayed, allowing you to add attributes
to the table, add indexes to the table, create a primary key, and finally to specify
comments for documentation.
Attributes or indexes are added to the table by clicking the “New” button and
specifying the necessary parameters. They can be removed from the table by
selecting them from the list and clicking the “Delete” button. Attributes can be
modified by selecting them from the list, modifying their parameters and clicking the
“Update” button.
© http://mogwai.sourceforge.net Page 12 / 33
Table tool
Mogwai ERDesigner NGUser Documentation
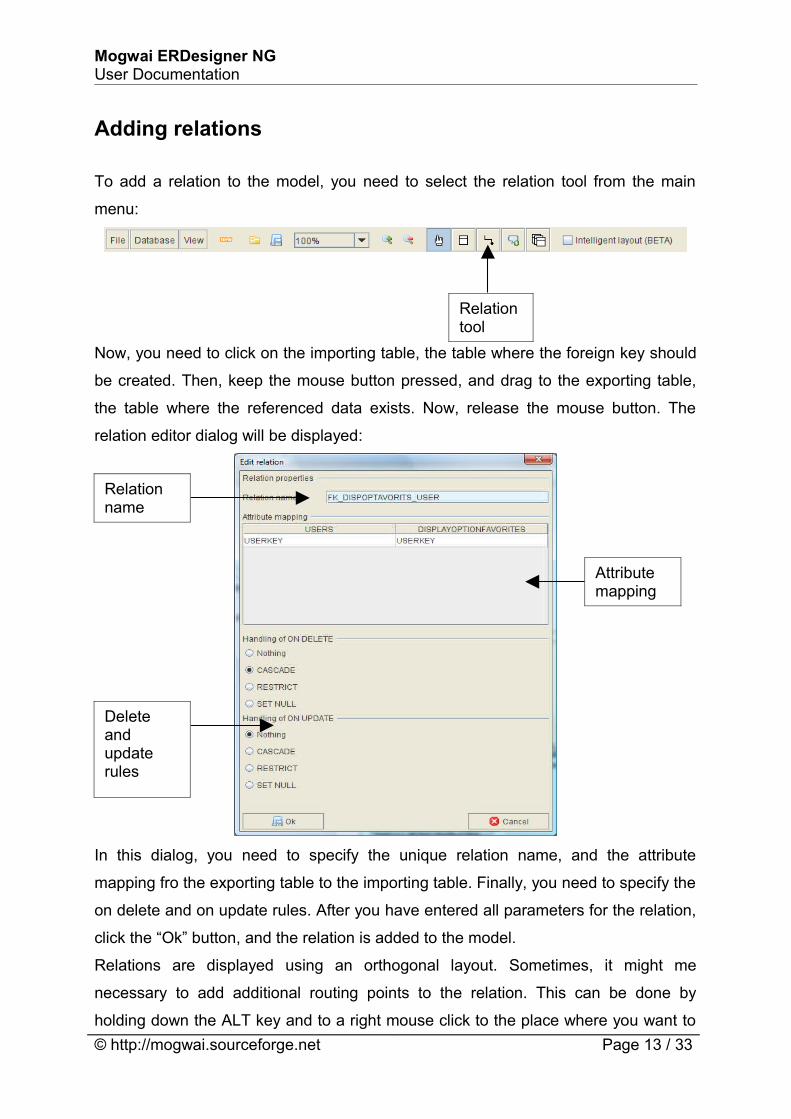
Adding relations
To add a relation to the model, you need to select the relation tool from the main
menu:
Now, you need to click on the importing table, the table where the foreign key should
be created. Then, keep the mouse button pressed, and drag to the exporting table,
the table where the referenced data exists. Now, release the mouse button. The
relation editor dialog will be displayed:
In this dialog, you need to specify the unique relation name, and the attribute
mapping fro the exporting table to the importing table. Finally, you need to specify the
on delete and on update rules. After you have entered all parameters for the relation,
click the “Ok” button, and the relation is added to the model.
Relations are displayed using an orthogonal layout. Sometimes, it might me
necessary to add additional routing points to the relation. This can be done by
holding down the ALT key and to a right mouse click to the place where you want to © http://mogwai.sourceforge.net Page 13 / 33
Relation tool
Delete and update rules
Attribute mapping
Relation name
Mogwai ERDesigner NGUser Documentation
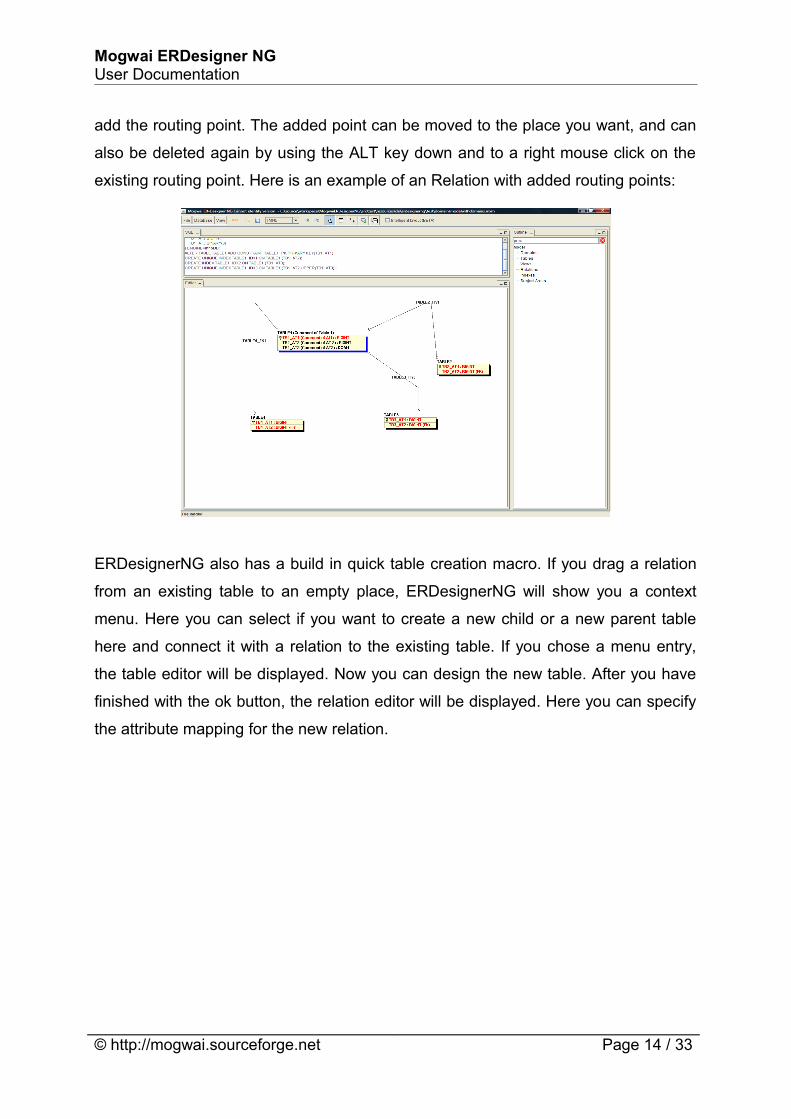
add the routing point. The added point can be moved to the place you want, and can
also be deleted again by using the ALT key down and to a right mouse click on the
existing routing point. Here is an example of an Relation with added routing points:
ERDesignerNG also has a build in quick table creation macro. If you drag a relation
from an existing table to an empty place, ERDesignerNG will show you a context
menu. Here you can select if you want to create a new child or a new parent table
here and connect it with a relation to the existing table. If you chose a menu entry,
the table editor will be displayed. Now you can design the new table. After you have
finished with the ok button, the relation editor will be displayed. Here you can specify
the attribute mapping for the new relation.
© http://mogwai.sourceforge.net Page 14 / 33
Mogwai ERDesigner NGUser Documentation
Modifying existing model objects
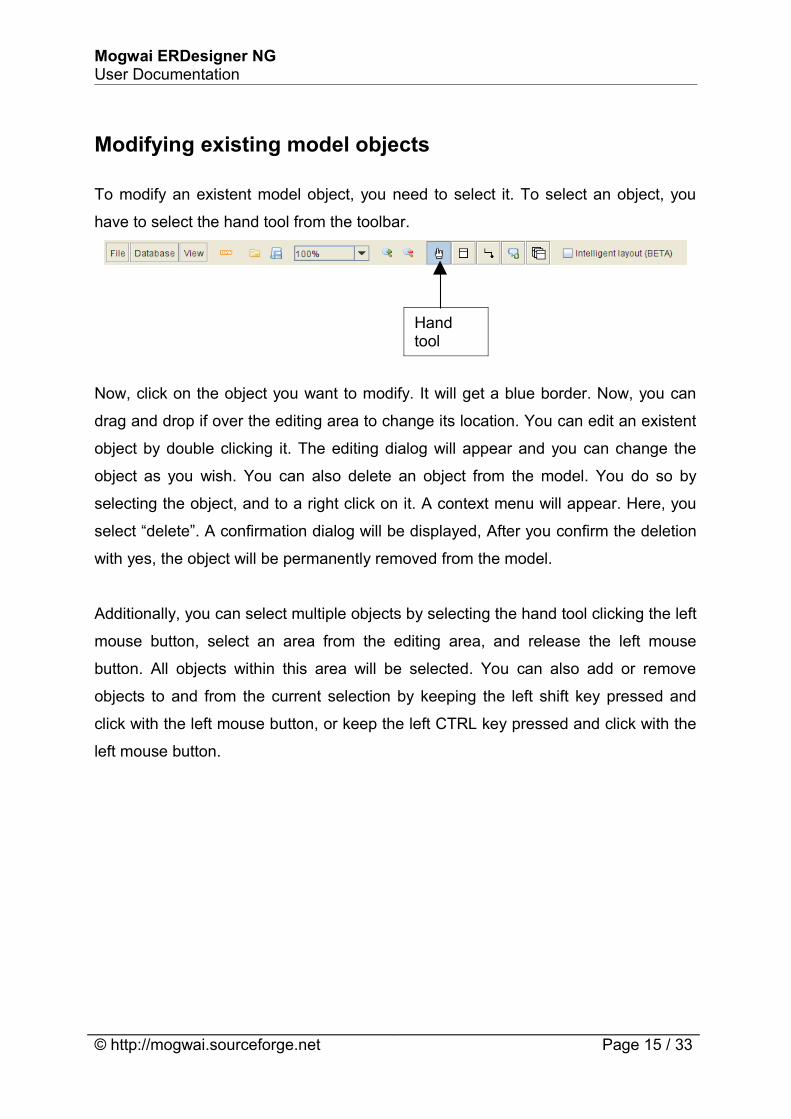
To modify an existent model object, you need to select it. To select an object, you
have to select the hand tool from the toolbar.
Now, click on the object you want to modify. It will get a blue border. Now, you can
drag and drop if over the editing area to change its location. You can edit an existent
object by double clicking it. The editing dialog will appear and you can change the
object as you wish. You can also delete an object from the model. You do so by
selecting the object, and to a right click on it. A context menu will appear. Here, you
select “delete”. A confirmation dialog will be displayed, After you confirm the deletion
with yes, the object will be permanently removed from the model.
Additionally, you can select multiple objects by selecting the hand tool clicking the left
mouse button, select an area from the editing area, and release the left mouse
button. All objects within this area will be selected. You can also add or remove
objects to and from the current selection by keeping the left shift key pressed and
click with the left mouse button, or keep the left CTRL key pressed and click with the
left mouse button.
© http://mogwai.sourceforge.net Page 15 / 33
Handtool
Mogwai ERDesigner NGUser Documentation
Adding views to the model
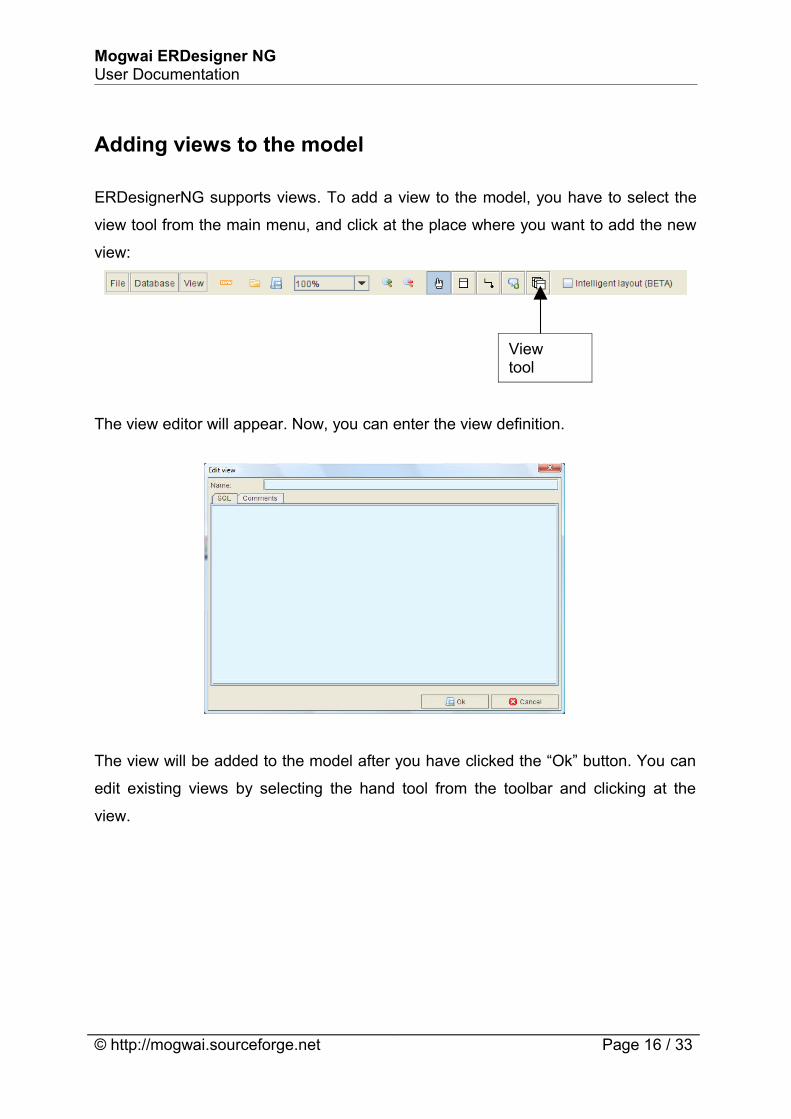
ERDesignerNG supports views. To add a view to the model, you have to select the
view tool from the main menu, and click at the place where you want to add the new
view:
The view editor will appear. Now, you can enter the view definition.
The view will be added to the model after you have clicked the “Ok” button. You can
edit existing views by selecting the hand tool from the toolbar and clicking at the
view.
© http://mogwai.sourceforge.net Page 16 / 33
Viewtool
Mogwai ERDesigner NGUser Documentation
Adding comments to the model
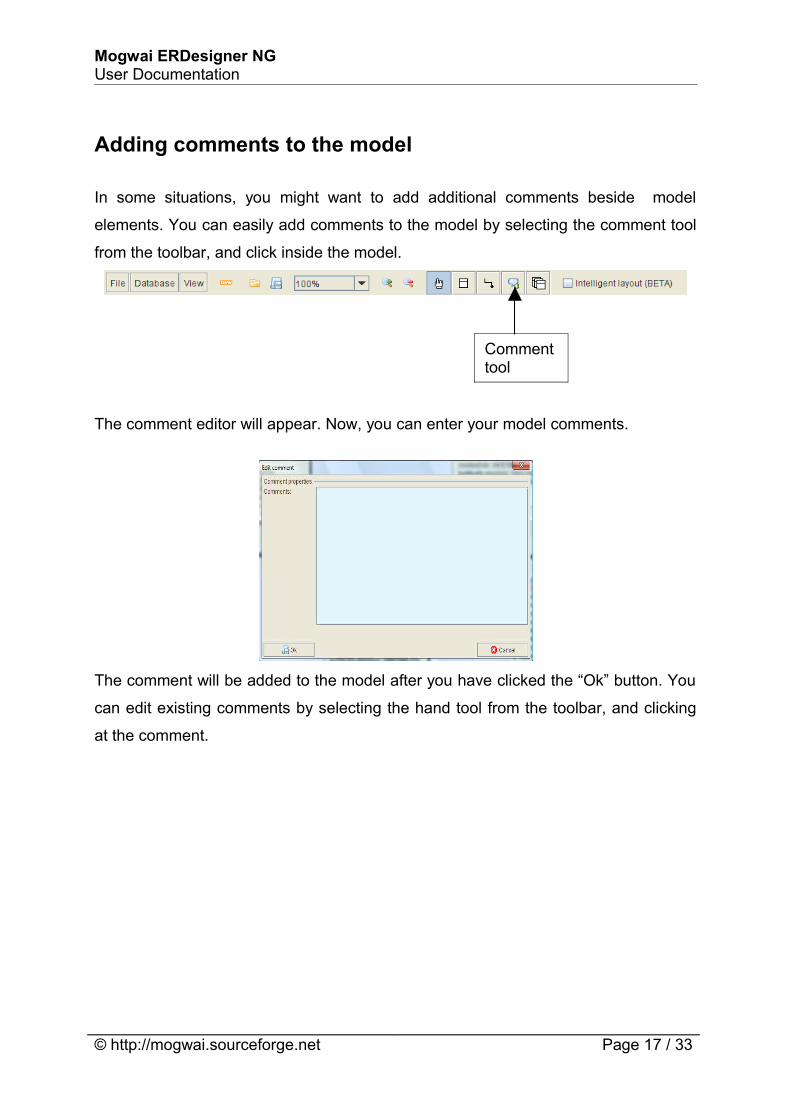
In some situations, you might want to add additional comments beside model
elements. You can easily add comments to the model by selecting the comment tool
from the toolbar, and click inside the model.
The comment editor will appear. Now, you can enter your model comments.
The comment will be added to the model after you have clicked the “Ok” button. You
can edit existing comments by selecting the hand tool from the toolbar, and clicking
at the comment.
© http://mogwai.sourceforge.net Page 17 / 33
Commenttool
Mogwai ERDesigner NGUser Documentation
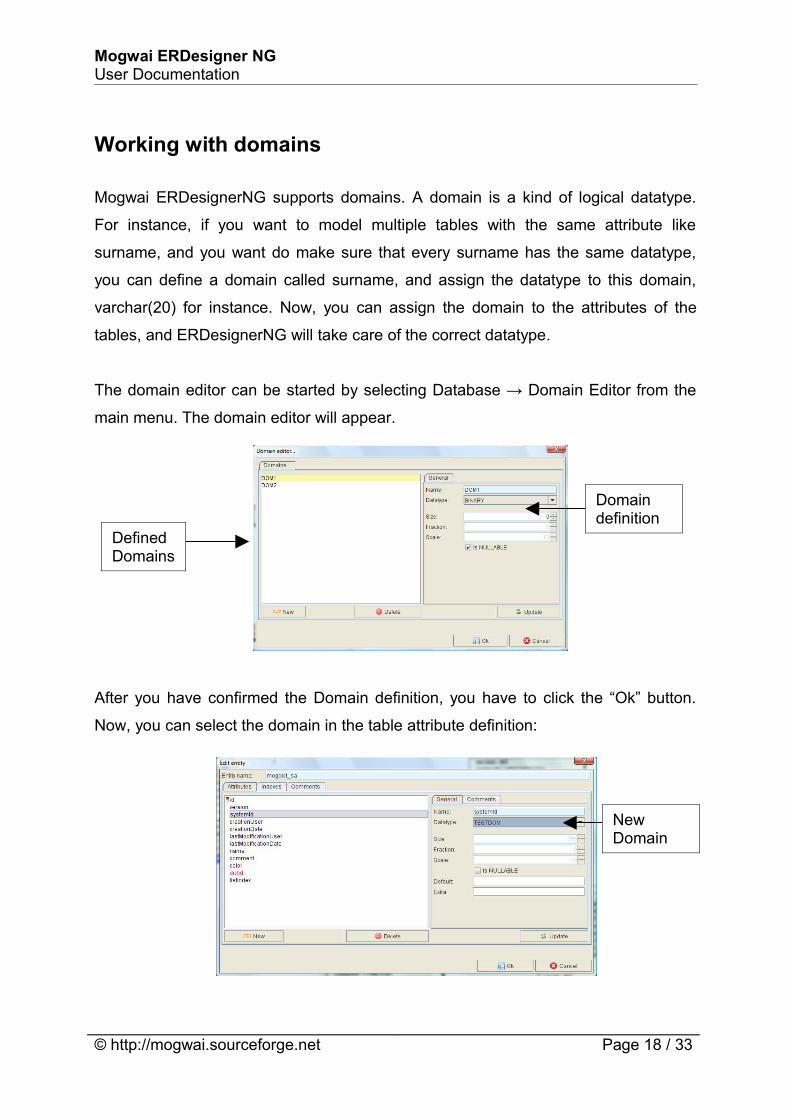
Working with domains
Mogwai ERDesignerNG supports domains. A domain is a kind of logical datatype.
For instance, if you want to model multiple tables with the same attribute like
surname, and you want do make sure that every surname has the same datatype,
you can define a domain called surname, and assign the datatype to this domain,
varchar(20) for instance. Now, you can assign the domain to the attributes of the
tables, and ERDesignerNG will take care of the correct datatype.
The domain editor can be started by selecting Database → Domain Editor from the
main menu. The domain editor will appear.
After you have confirmed the Domain definition, you have to click the “Ok” button.
Now, you can select the domain in the table attribute definition:
© http://mogwai.sourceforge.net Page 18 / 33
Defined Domains
Domain definition
New Domain
Mogwai ERDesigner NGUser Documentation
Working with subject areas
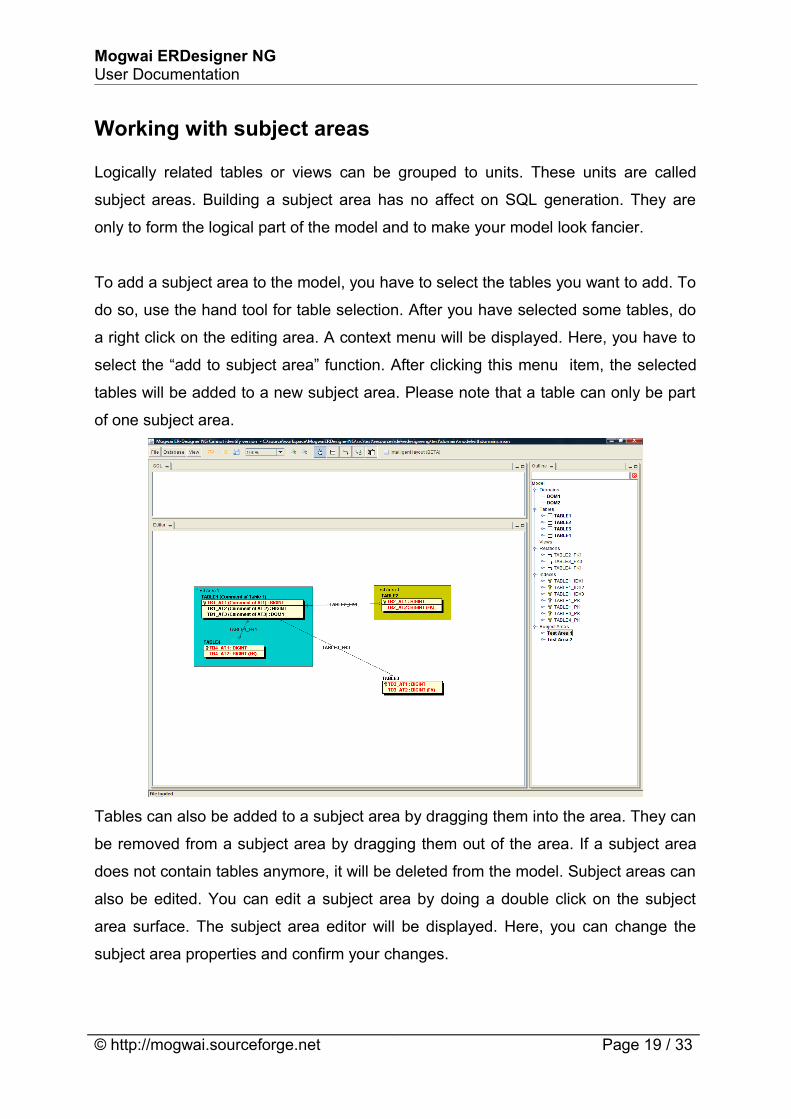
Logically related tables or views can be grouped to units. These units are called
subject areas. Building a subject area has no affect on SQL generation. They are
only to form the logical part of the model and to make your model look fancier.
To add a subject area to the model, you have to select the tables you want to add. To
do so, use the hand tool for table selection. After you have selected some tables, do
a right click on the editing area. A context menu will be displayed. Here, you have to
select the “add to subject area” function. After clicking this menu item, the selected
tables will be added to a new subject area. Please note that a table can only be part
of one subject area.
Tables can also be added to a subject area by dragging them into the area. They can
be removed from a subject area by dragging them out of the area. If a subject area
does not contain tables anymore, it will be deleted from the model. Subject areas can
also be edited. You can edit a subject area by doing a double click on the subject
area surface. The subject area editor will be displayed. Here, you can change the
subject area properties and confirm your changes.
© http://mogwai.sourceforge.net Page 19 / 33

Mogwai ERDesigner NGUser Documentation
DDL script generation
Heart of Mogwai ERDesigner NG is the SQL DDL script generation module. Using
this module, you can easily create the SQL statements for the current database
model. The SQL statements will be optimized for the current database dialect (the
dialect you have chosen when you have setup the database connection).
To create a DDL script for the current model, select Database → Create DDL for
model from the main menu. The DDL SQL dialog will be displayed:
Now, you can save the generated statements to disc. Of course, you can also send
them directly to the current database connection for execution. Statements you don’t
want to be executed can be removed. Creating a full functional database creation
SQL file is quite easy with this functionality!
© http://mogwai.sourceforge.net Page 20 / 33
Mogwai ERDesigner NGUser Documentation
Exporting the diagram
The current database diagram can be exported in various output formats. Currently,
Mogwai ERDesigner NG supports the following formats:
• .MXM File : The core database model in XML notation (Mogwai format)• .PNG file• .BMP file• .GIF file• .SVG file
For every export, there are two operating modes. On mode is to export the whole
model to the destination format, and one mode to export every table to a single file of
the desired format.
You can start to export the current model to file by selecting File → Export as. Now,
you have to select the item corresponding to the export format, and finally, select “All
in one file”, or “One file per table”. After you have clicked the menu item of your
choice, the “Save as” dialog will appear. Here, you have to select the target directory
in one file per table mode, or the target file name in all on one file mode. If you export
the model in one file per table mode, the files will be named by their tables, e.g. if the
table is named “DATA” and you export it as a .PNG file, the file will be named
“DATA.png”.
© http://mogwai.sourceforge.net Page 21 / 33

Mogwai ERDesigner NGUser Documentation
Reverse engineering existing databases
Mogwai ERDesigner NG can also reverse engineer existing databases. To reverse
engineer a database, you need a working database connection. Now, you have to
select Database → Reverse engineer from the main menu. The reverse engineering
dialog will be displayed:
If the current database dialect supports schemas, you have to select a database
schema you want to reverse engineer. Click the “Update” button, and select one ore
more schemas. If the current dialect does not support schemas, just select the
standard table generation engineering method and click the “Ok” button. Now, you
have to select the tables and views you want to reverse engineer. The table selection
dialog will be displayed:
© http://mogwai.sourceforge.net Page 22 / 33
Mogwai ERDesigner NGUser Documentation
By default, all available tables are selected. If you don’t want to reverse engineer
some tables, just deselect them. When you are ready, click the “Ok” button, and the
reverse engineering process will start. The reverse engineering process will run in
three steps. The first step is to add the tables to the model. The second step is to add
indexes and primary keys to the tables. The third and last step is to add the relations
and foreign keys to the reverse engineered tables.
© http://mogwai.sourceforge.net Page 23 / 33
Mogwai ERDesigner NGUser Documentation
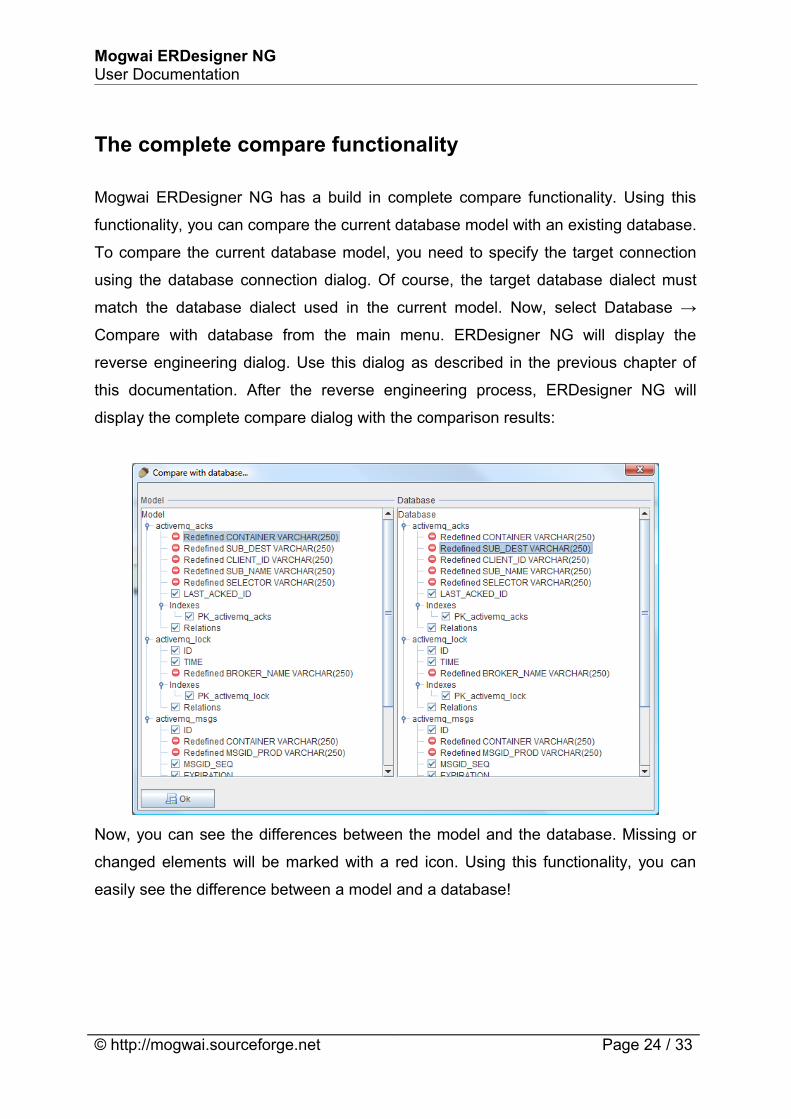
The complete compare functionality
Mogwai ERDesigner NG has a build in complete compare functionality. Using this
functionality, you can compare the current database model with an existing database.
To compare the current database model, you need to specify the target connection
using the database connection dialog. Of course, the target database dialect must
match the database dialect used in the current model. Now, select Database →
Compare with database from the main menu. ERDesigner NG will display the
reverse engineering dialog. Use this dialog as described in the previous chapter of
this documentation. After the reverse engineering process, ERDesigner NG will
display the complete compare dialog with the comparison results:
Now, you can see the differences between the model and the database. Missing or
changed elements will be marked with a red icon. Using this functionality, you can
easily see the difference between a model and a database!
© http://mogwai.sourceforge.net Page 24 / 33
Mogwai ERDesigner NGUser Documentation
Guide to the version control tracking system
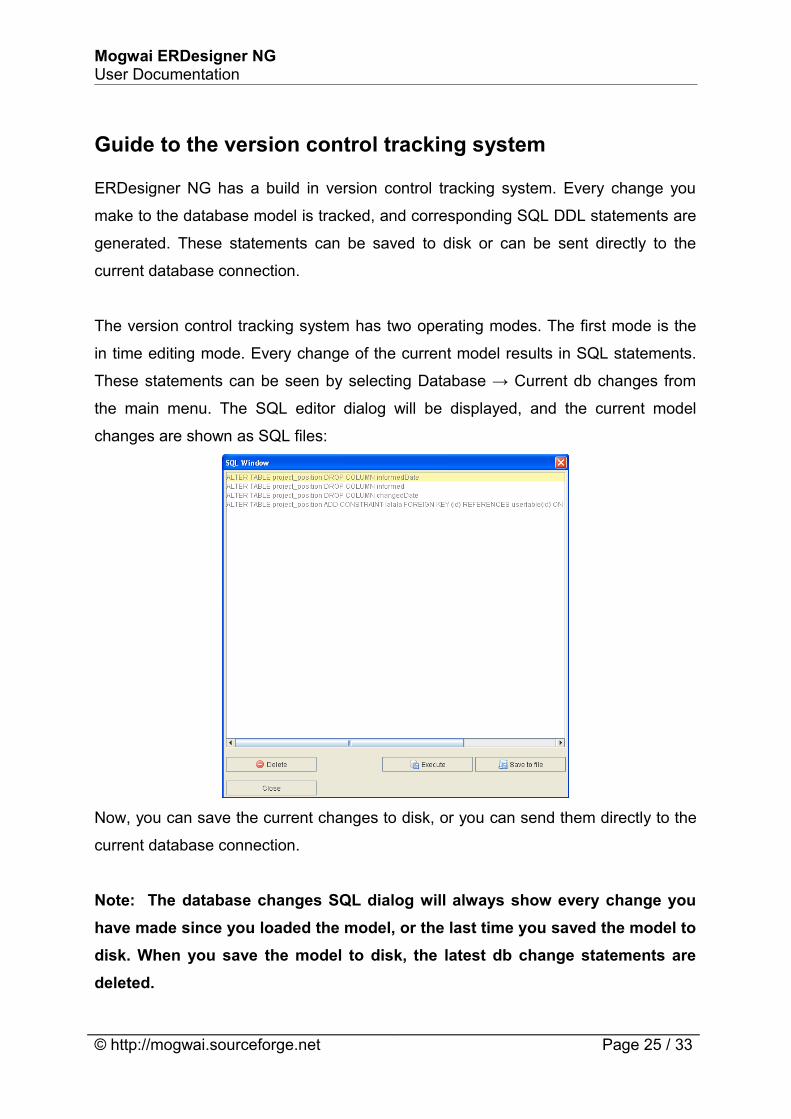
ERDesigner NG has a build in version control tracking system. Every change you
make to the database model is tracked, and corresponding SQL DDL statements are
generated. These statements can be saved to disk or can be sent directly to the
current database connection.
The version control tracking system has two operating modes. The first mode is the
in time editing mode. Every change of the current model results in SQL statements.
These statements can be seen by selecting Database → Current db changes from
the main menu. The SQL editor dialog will be displayed, and the current model
changes are shown as SQL files:
Now, you can save the current changes to disk, or you can send them directly to the
current database connection.
Note: The database changes SQL dialog will always show every change you have made since you loaded the model, or the last time you saved the model to disk. When you save the model to disk, the latest db change statements are deleted.
© http://mogwai.sourceforge.net Page 25 / 33

Mogwai ERDesigner NGUser Documentation
Well, the statements are not completely deleted. The version control tracking system
has a second operating mode. Every time you save the model to disk, a migration
SQL DDL script is generated to migrate an existing database from the state when it
was loaded to the state when it is saved. And you can guess: the content of this
migration file is the content of the current db changes dialog. So, the statements are
saved to disk (with a timestamp appended to the model file name, and with the .SQL
extension), and then they are deleted.
Mogwai ERDesigner NG will also make a backup of an existing model before it is
overwritten. Using these backup files, you can easily go back to a prior version of
your model. And with the generated migration files, it is quite easy to migrate an
existing database to another version!
© http://mogwai.sourceforge.net Page 26 / 33
Mogwai ERDesigner NGUser Documentation
Using the Model Repository
Mogwai ERDesigner NG as a build in Model Repository support. Using this feature,
multiple models can be stored in the single repository. This repository is stored in a
SQL database, and enables ERDesignerNG for future multi user support and better
audit trails. Model information are stored in special tables with audit trails, so for
every model item is tracked who created it and who changed it the last time. Model
changes are also stored in this central repository, supporting you to create database
schema migration scripts from one version of the schema to another!
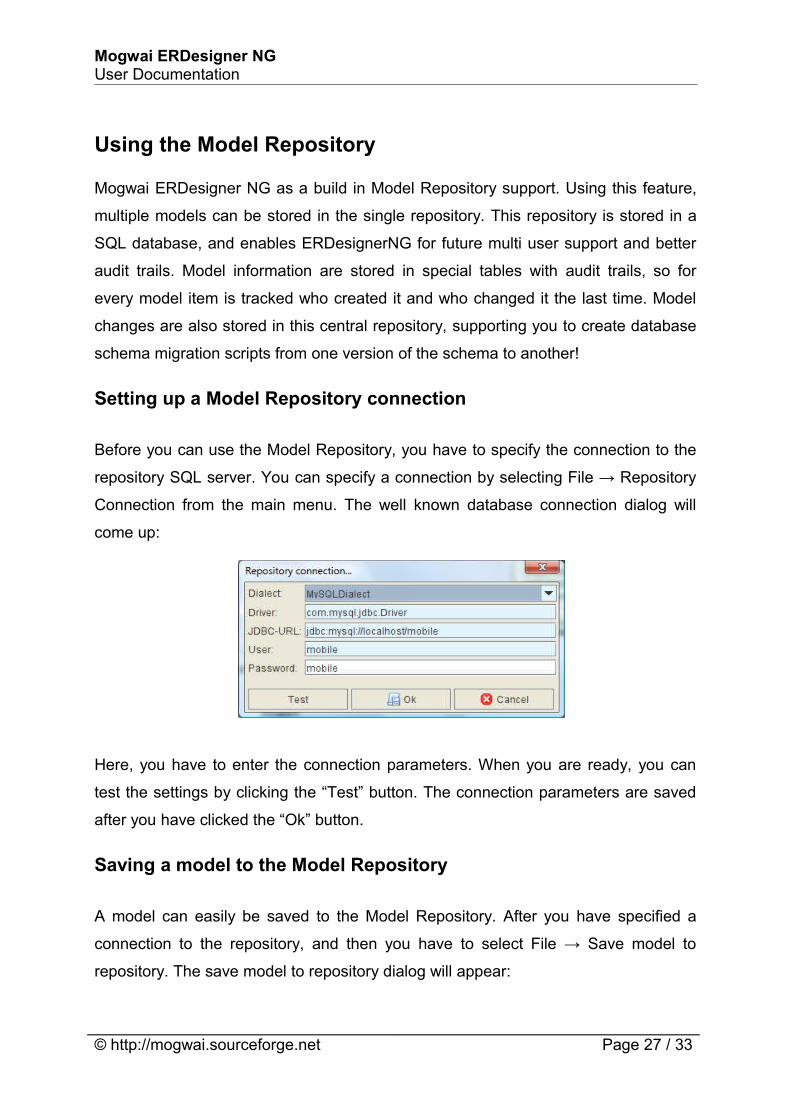
Setting up a Model Repository connection
Before you can use the Model Repository, you have to specify the connection to the
repository SQL server. You can specify a connection by selecting File → Repository
Connection from the main menu. The well known database connection dialog will
come up:
Here, you have to enter the connection parameters. When you are ready, you can
test the settings by clicking the “Test” button. The connection parameters are saved
after you have clicked the “Ok” button.
Saving a model to the Model Repository
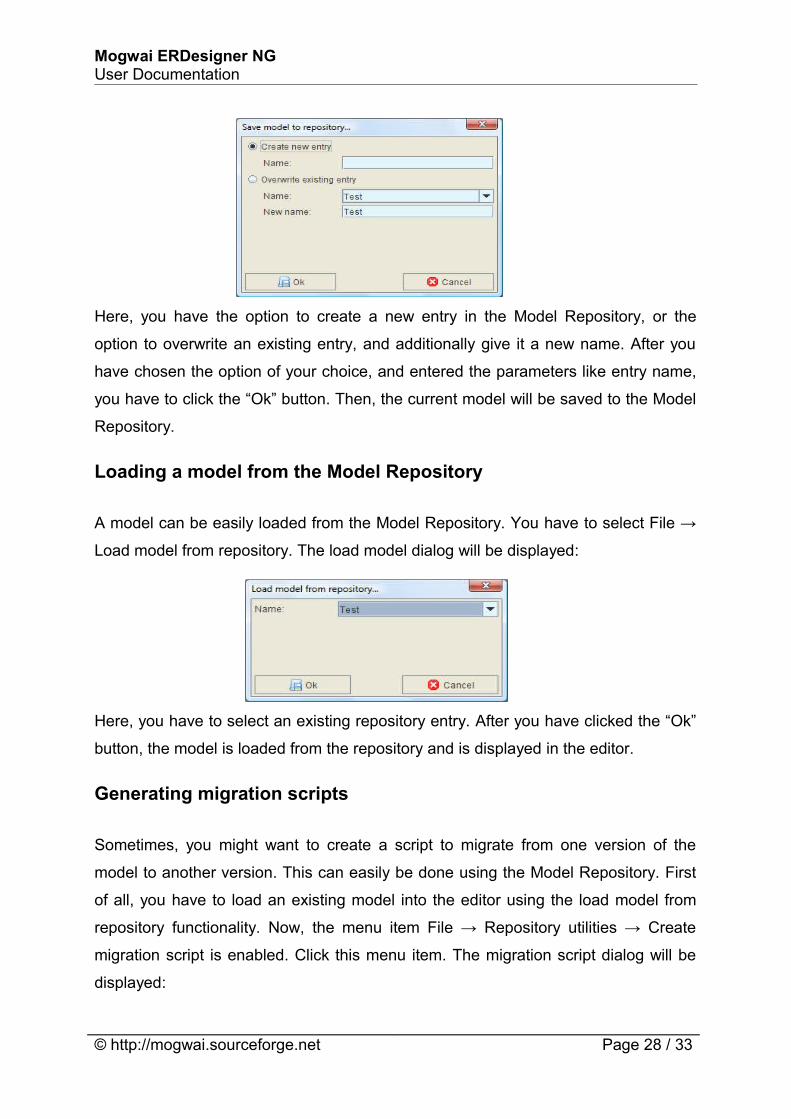
A model can easily be saved to the Model Repository. After you have specified a
connection to the repository, and then you have to select File → Save model to
repository. The save model to repository dialog will appear:
© http://mogwai.sourceforge.net Page 27 / 33
Mogwai ERDesigner NGUser Documentation
Here, you have the option to create a new entry in the Model Repository, or the
option to overwrite an existing entry, and additionally give it a new name. After you
have chosen the option of your choice, and entered the parameters like entry name,
you have to click the “Ok” button. Then, the current model will be saved to the Model
Repository.
Loading a model from the Model Repository
A model can be easily loaded from the Model Repository. You have to select File →
Load model from repository. The load model dialog will be displayed:
Here, you have to select an existing repository entry. After you have clicked the “Ok”
button, the model is loaded from the repository and is displayed in the editor.
Generating migration scripts
Sometimes, you might want to create a script to migrate from one version of the
model to another version. This can easily be done using the Model Repository. First
of all, you have to load an existing model into the editor using the load model from
repository functionality. Now, the menu item File → Repository utilities → Create
migration script is enabled. Click this menu item. The migration script dialog will be
displayed:
© http://mogwai.sourceforge.net Page 28 / 33
Mogwai ERDesigner NGUser Documentation
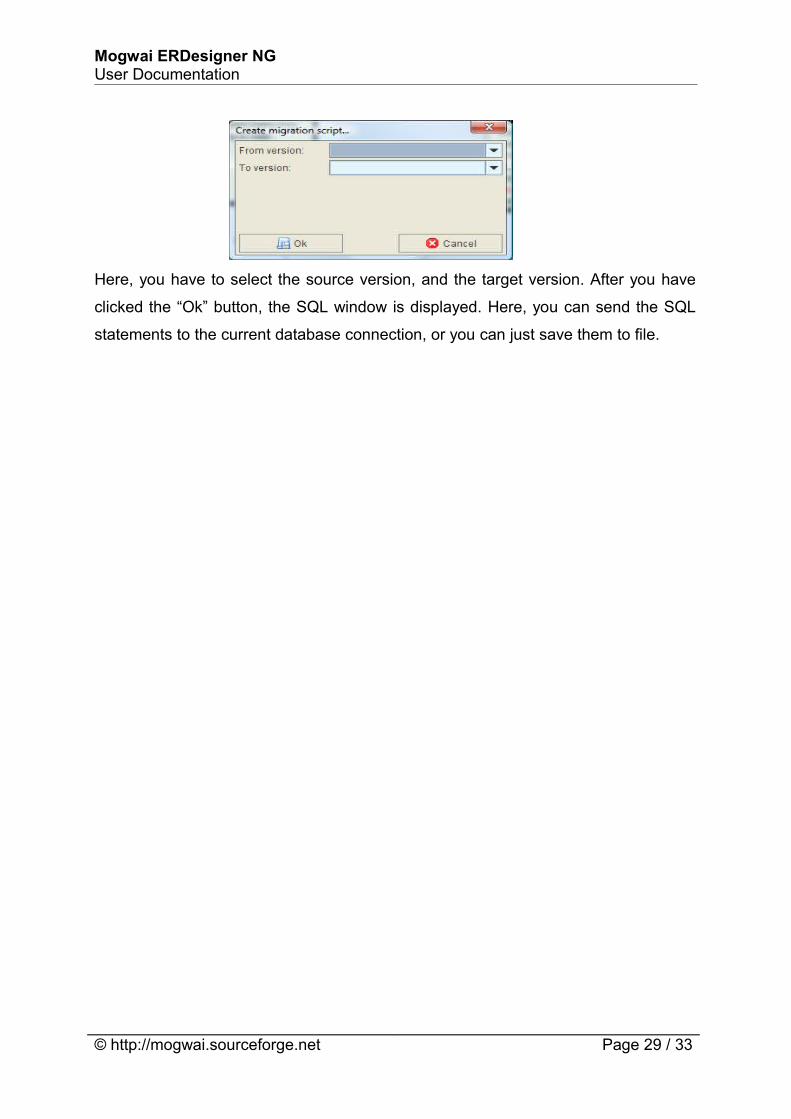
Here, you have to select the source version, and the target version. After you have
clicked the “Ok” button, the SQL window is displayed. Here, you can send the SQL
statements to the current database connection, or you can just save them to file.
© http://mogwai.sourceforge.net Page 29 / 33
Mogwai ERDesigner NGUser Documentation
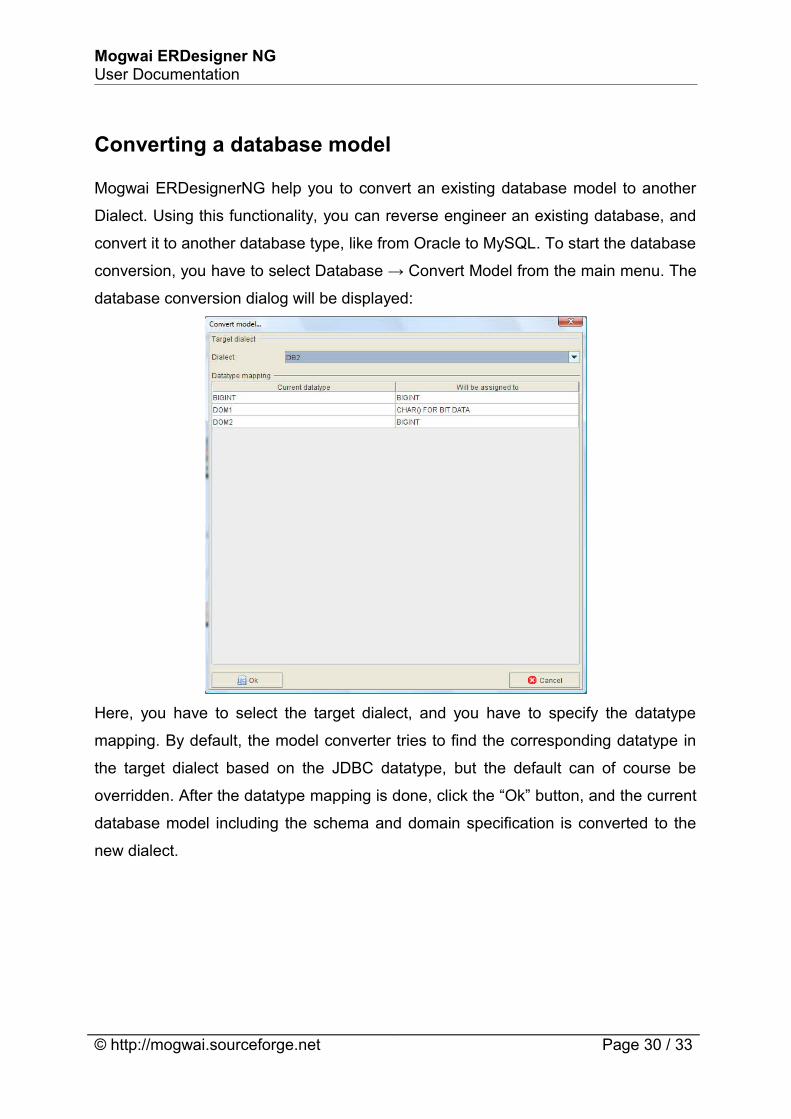
Converting a database model
Mogwai ERDesignerNG help you to convert an existing database model to another
Dialect. Using this functionality, you can reverse engineer an existing database, and
convert it to another database type, like from Oracle to MySQL. To start the database
conversion, you have to select Database → Convert Model from the main menu. The
database conversion dialog will be displayed:
Here, you have to select the target dialect, and you have to specify the datatype
mapping. By default, the model converter tries to find the corresponding datatype in
the target dialect based on the JDBC datatype, but the default can of course be
overridden. After the datatype mapping is done, click the “Ok” button, and the current
database model including the schema and domain specification is converted to the
new dialect.
© http://mogwai.sourceforge.net Page 30 / 33
Mogwai ERDesigner NGUser Documentation
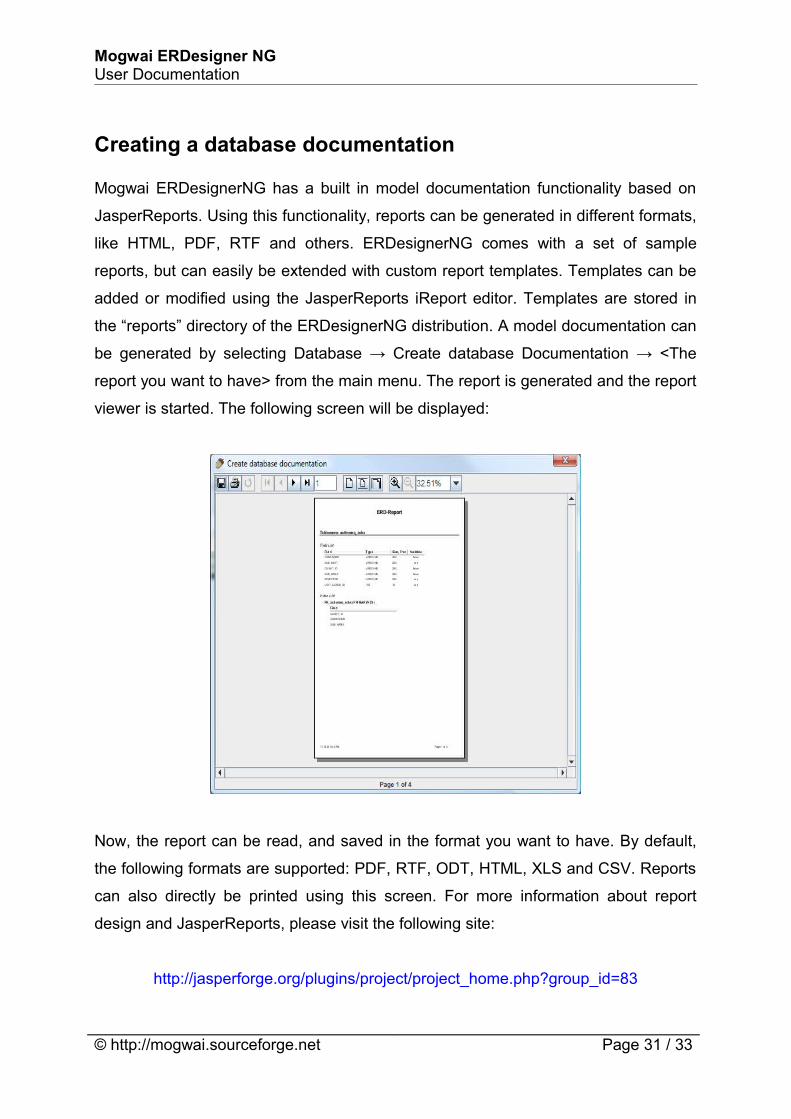
Creating a database documentation
Mogwai ERDesignerNG has a built in model documentation functionality based on
JasperReports. Using this functionality, reports can be generated in different formats,
like HTML, PDF, RTF and others. ERDesignerNG comes with a set of sample
reports, but can easily be extended with custom report templates. Templates can be
added or modified using the JasperReports iReport editor. Templates are stored in
the “reports” directory of the ERDesignerNG distribution. A model documentation can
be generated by selecting Database → Create database Documentation → <The
report you want to have> from the main menu. The report is generated and the report
viewer is started. The following screen will be displayed:
Now, the report can be read, and saved in the format you want to have. By default,
the following formats are supported: PDF, RTF, ODT, HTML, XLS and CSV. Reports
can also directly be printed using this screen. For more information about report
design and JasperReports, please visit the following site:
http://jasperforge.org/plugins/project/project_home.php?group_id=83
© http://mogwai.sourceforge.net Page 31 / 33
Mogwai ERDesigner NGUser Documentation
Generating an OpenXava Application
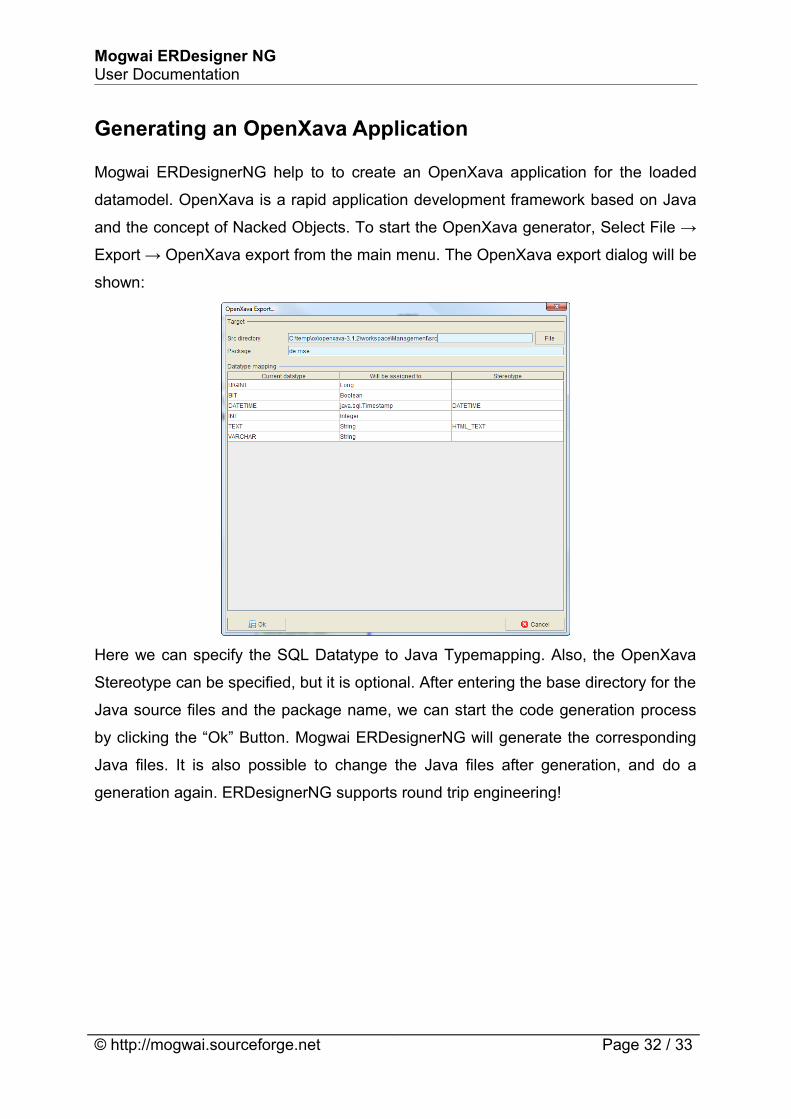
Mogwai ERDesignerNG help to to create an OpenXava application for the loaded
datamodel. OpenXava is a rapid application development framework based on Java
and the concept of Nacked Objects. To start the OpenXava generator, Select File →
Export → OpenXava export from the main menu. The OpenXava export dialog will be
shown:
Here we can specify the SQL Datatype to Java Typemapping. Also, the OpenXava
Stereotype can be specified, but it is optional. After entering the base directory for the
Java source files and the package name, we can start the code generation process
by clicking the “Ok” Button. Mogwai ERDesignerNG will generate the corresponding
Java files. It is also possible to change the Java files after generation, and do a
generation again. ERDesignerNG supports round trip engineering!
© http://mogwai.sourceforge.net Page 32 / 33
Mogwai ERDesigner NGUser Documentation
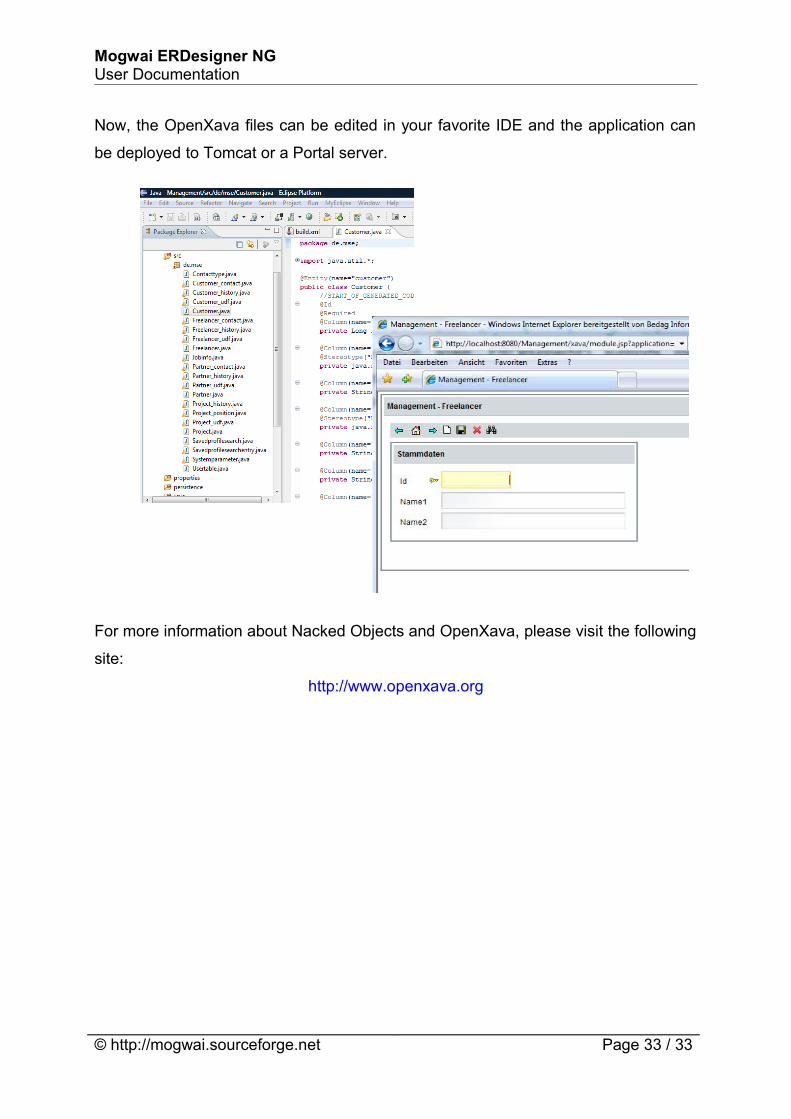
Now, the OpenXava files can be edited in your favorite IDE and the application can
be deployed to Tomcat or a Portal server.
For more information about Nacked Objects and OpenXava, please visit the following
site:
http://www.openxava.org
© http://mogwai.sourceforge.net Page 33 / 33