Embed Size (px)
Citation preview

MODULE 6: SET UP POSTING GROUPS
Module Overview Companies use posting groups to create links between accounts in the different application areas and the G/L accounts in the General Ledger application area. When users record and post sales, purchases, and other transactions where a specific G/L account is not directly specified, posting groups provide the mapping to the correct accounts. Therefore, users must set up the chart of accounts before setting up posting groups.
Typically, three types of G/L accounts are required for a transaction. Therefore, three types of posting groups are used when selling inventory and resources to customers and buying inventory from vendors. The following table shows the link between the posting group type and the type of G/L account:
Posting group G/L account
Specific posting groups Balance sheet account
General posting groups Income statement account
VAT posting groups VAT account
In addition to knowing the three types of posting groups, companies must be able to set them up. This involves becoming familiar with the functions of a posting group structure using a posted sales invoice.
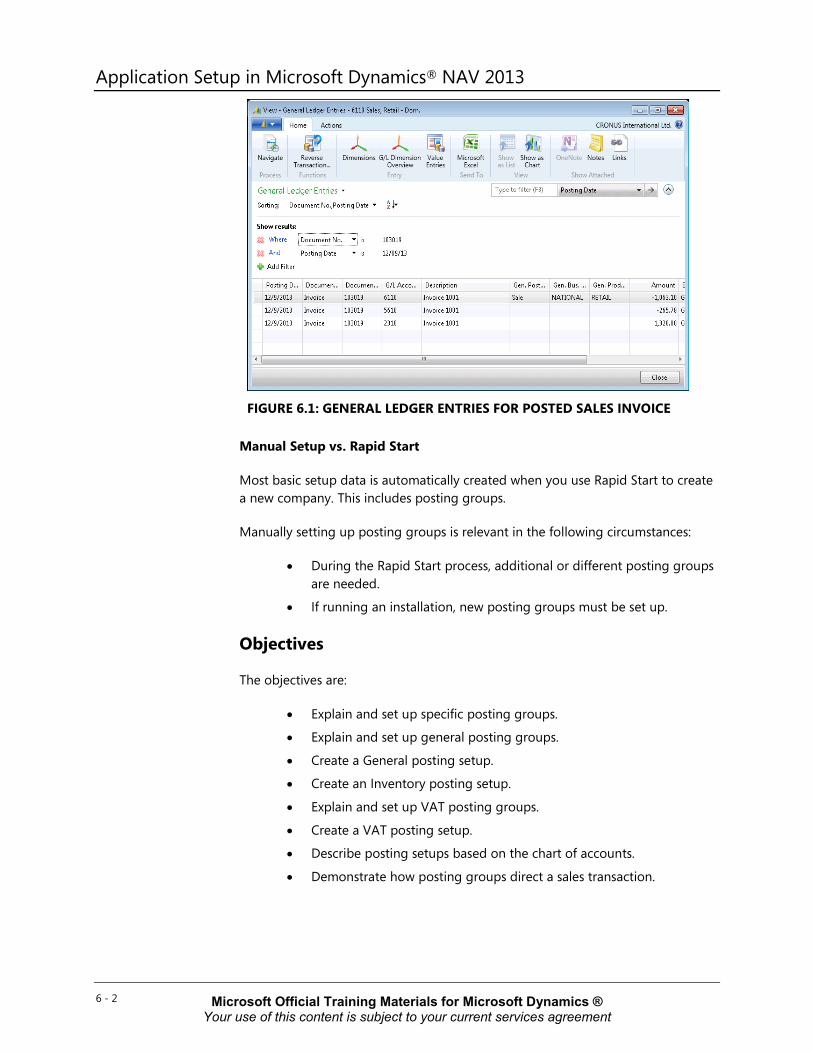
Example: From Posted Sales Invoice to General Ledger Entries
The following posted sales invoice is used to review the general ledger entries created. Throughout the rest of this module, this example explains how each posting group was set up to map to that particular G/L account.
1. In the navigation pane, click Posted Documents. 2. Click Posted Sales Invoices. 3. Select sales invoice 103019.
4. On the Actions tab, click Navigate. 5. Notice the three G/L entries created when you post the sales invoice. 6. Click the G/L Entry line and then click Show, to view the G/L entries. 7. The following G/L accounts are affected:
o 2310 - balance sheet account
o 6110 - income statement account
o 5610 - VAT account
6 - 1 Microsoft Official Training Materials for Microsoft Dynamics ® Your use of this content is subject to your current services agreement
Application Setup in Microsoft Dynamics® NAV 2013
FIGURE 6.1: GENERAL LEDGER ENTRIES FOR POSTED SALES INVOICE
Manual Setup vs. Rapid Start
Most basic setup data is automatically created when you use Rapid Start to create a new company. This includes posting groups.
Manually setting up posting groups is relevant in the following circumstances:
• During the Rapid Start process, additional or different posting groups are needed.
• If running an installation, new posting groups must be set up.
Objectives
The objectives are:
• Explain and set up specific posting groups.
• Explain and set up general posting groups.
• Create a General posting setup.
• Create an Inventory posting setup.
• Explain and set up VAT posting groups.
• Create a VAT posting setup.
• Describe posting setups based on the chart of accounts.
• Demonstrate how posting groups direct a sales transaction.
6 - 2 Microsoft Official Training Materials for Microsoft Dynamics ® Your use of this content is subject to your current services agreement

Module 6: Set Up Posting Groups
Specific Posting Groups The main purpose of specific posting groups is to identify the balance sheet account for each subsidiary, or supporting ledger. For example, the total outstanding accounts receivable balance of all customers must correspond to the total balance of the accounts receivable accounts in the balance sheet.
Note: Generally these balance sheet accounts are set up not to allow direct posting. The only postings that can be done are through the supporting ledger, avoiding differences between the total balance on the supporting ledger side and the general ledger.
The following table provides descriptions of specific posting groups and where they are assigned to.
Specific posting group Description Assigned to
Customer posting group
Maps the accounts receivable account, payment discount accounts, invoice and application rounding accounts, and interest and fee accounts that relate to customers.
Customers
Vendor posting group Maps the accounts payable account, payment discount accounts, invoice and application rounding accounts, and interest and fee accounts that relate to vendors.
Vendors
Inventory posting group/Inventory posting setup
Inventory posting groups specify the type of inventory and are then combined with location codes in the Inventory Posting Setup page. Each combination is then mapped to the inventory accounts, WIP account, and other variance accounts that relate to inventory in the chart of accounts.
Items
Bank Account posting group
Maps a bank account to a bank G/L account.
Bank Accounts
Fixed Asset posting group
Specifies the accounts to which transactions involving fixed assets are posted.
Fixed Assets
Job posting groups Specifies the accounts to which transactions involving jobs are posted.
Jobs
6 - 3 Microsoft Official Training Materials for Microsoft Dynamics ® Your use of this content is subject to your current services agreement

Application Setup in Microsoft Dynamics® NAV 2013 Set Up and Assign Specific Posting Groups
There are two steps in creating specific posting groups:
1. Set up the specific posting group. 2. Assign the specific posting group to the corresponding master item:
o Customer
o Vendor
o Item
o Bank Account
o Fixed Asset
o Job
Procedure: Set Up Customer Posting Groups
To set up customer posting groups, follow these steps:
1. In the navigation pane, click Departments. 2. Click Administration, and then click Application Setup.
3. On the Application Setup page, under Financial Management, click Posting Groups, and then click Customer Posting Groups.
4. Click New.
FIGURE 6.2: CUSTOMER POSTING GROUPS WINDOW
5. In the Code field, type a unique identifier. 6. In each relevant account field, enter the G/L accounts that are used to
post transactions for: o Receivables
o Service charges
6 - 4 Microsoft Official Training Materials for Microsoft Dynamics ® Your use of this content is subject to your current services agreement

Module 6: Set Up Posting Groups o Payment discounts
o Additional fees
o Interest
o Invoice rounding
o Payment tolerances
7. Repeat steps 4-6 to set up additional customer posting groups. 8. Click OK to close the Customer Posting Groups page.
Note: The primary G/L account associated with the customer posting group is the Receivables Account. Other accounts are only required when specific application areas are used and is covered in detail in the course Finance Essentials in Microsoft Dynamics NAV 2013.
Procedure: Assign Customer Posting Groups
To assign a customer posting group to a customer account, follow these steps:
1. In the navigation pane, click Departments.
2. Click Financial Management and then click Receivables. 3. On the Receivables page, click Customers. 4. Locate the customer, and open the Customer Card.
5. Expand the Invoicing FastTab. 6. In the Customer Posting Group field, enter the appropriate posting
group. 7. Click OK to close the Customer Card.
When customer-related transactions, such as orders, invoices, credit memos, and payments are posted, Microsoft Dynamics NAV uses the customer posting group to locate and post the specified accounts.
Example: From Posted Sales Invoice to Balance Sheet Account
For sales invoice 103019 a general ledger entry was created for the balance sheet account 2310. The sales invoice was for customer 40000 Deerfield Graphics Company. To review that the customer posting group was used for the link between the customer ledger and the G/L account, perform following steps:
1. In the navigation pane, click Home, and then click Customers.
2. Select customer 40000, and open the Customer Card. Notice that on the Invoicing FastTab, the Customer Posting Group field contains the value DOMESTIC.
6 - 5 Microsoft Official Training Materials for Microsoft Dynamics ® Your use of this content is subject to your current services agreement

Application Setup in Microsoft Dynamics® NAV 2013 3. Click the Customer Posting Group field, and then click Advanced to
open the Customer Posting Groups page. Notice that the Receivables Account field contains G/L account 2310 for the Customer Posting Group DOMESTIC.
Procedure: Set Up Vendor Posting Groups
Setting up vendor posting groups is the same process as setting up customer posting groups and a similar page is used.
To set up vendor posting groups, follow these steps:
1. In the navigation pane, click Departments. 2. Click Administration, and then click Application Setup. 3. On the Application Setup page, under Financial Management, click
Posting Groups , and then click Vendor Posting Groups. 4. Click New.
FIGURE 6.3: VENDOR POSTING GROUPS WINDOW
5. In the Code field, type a unique identifier. 6. In each relevant account field, enter the G/L accounts that are used to
post transactions for: o Payables
o Service charges
o Payment discounts
o Invoice rounding
o Payment tolerances
7. Repeat steps 2-4 to set up additional vendor posting groups.
6 - 6 Microsoft Official Training Materials for Microsoft Dynamics ® Your use of this content is subject to your current services agreement

Module 6: Set Up Posting Groups 8. Click OK to close the Vendor Posting Groups page.
Note: At first, you are only required to fill a G/L account on the Payables Account field. Other accounts are only necessary when specific application areas are used. This is covered into detail in the course Finance Essentials in Microsoft Dynamics NAV 2013.
Procedure: Assign Vendor Posting Groups
To assign a vendor posting group to a vendor account, follow these steps:
1. In the navigation pane, click Departments. 2. Click Financial Management, and then click Payables.
3. On the Payables page, click Vendors. 4. Locate the vendor, and open the Vendor Card. 5. Expand the Invoicing FastTab.
6. In the Vendor Posting Group field, enter the appropriate posting group.
7. Click OK to close the Vendor Card.
When vendor-related transactions, such as orders, invoices, credit memos, and payments are posted, Microsoft Dynamics NAV uses the vendor posting group code to locate and post to the specified accounts.
Inventory Posting Groups and Inventory Posting Setup
Inventory posting groups are used to group items and map to inventory accounts, WIP accounts, and other accounts that relate to inventory. Reports, such as the Inventory Valuation, and batch jobs, such as the Post Inventory Cost to G/L, use inventory posting groups to list the results.
The inventory posting group setup is slightly different from the setup of customer and vendor posting groups because two pages are used:
• Inventory Posting Groups
• Inventory Posting Setup
In the Inventory Posting Groups page, inventory item groups are specified. With this setup, users can link G/L accounts to item groups instead of specific items.
The Inventory Posting Setup page holds the links between the inventory posting group, inventory locations, and G/L accounts.
Note: When items are not tracked in the warehouse, it is common to set up inventory posting groups without locations.
6 - 7 Microsoft Official Training Materials for Microsoft Dynamics ® Your use of this content is subject to your current services agreement

Application Setup in Microsoft Dynamics® NAV 2013 As soon as the inventory posting group is assigned to an item, Microsoft Dynamics NAV posts to the G/L account specified for the combination of inventory posting group and location code specified on the item line entry of the transaction.
Procedure: Set Up Inventory Posting Groups
To set up an inventory posting group, follow these steps:
1. In the navigation pane, click Departments.
2. Click Administration, and then click Application Setup. 3. On the Application Setup page, under Financial Management, click
Posting Groups, and then click Inventory Posting Groups. 4. Click New.
FIGURE 6.4: INVENTORY POSTING GROUPS WINDOW
5. In the Code field, type a unique, descriptive identifier. This code is used on reports.
6. In the Description field, type a short description of the inventory posting group.
7. Repeat steps 4-6 to set up additional inventory posting groups.
8. Click OK to close the Inventory Posting Groups page.
6 - 8 Microsoft Official Training Materials for Microsoft Dynamics ® Your use of this content is subject to your current services agreement

Module 6: Set Up Posting Groups Procedure: Set Up Inventory Posting
To complete the setup accounts for inventory posting, follow these steps:
1. In the navigation pane, click Departments. 2. Click Administration, and then click Application Setup.
3. On the Application Setup page, under Financial Management, click Posting Groups, and then click Inventory Posting Setup.
Note: The Inventory Posting Setup page can also be accessed from the Inventory Posting Groups page, by selecting Setup on the Actions tab.
FIGURE 6.5: INVENTORY POSTING SETUP WINDOW
4. Insert a new line (Ctrl+Ins). 5. In the Location Code field, enter the relevant location to combine
with the inventory posting group. 6. In the Inventory Posting Group Code field, enter the relevant
inventory posting group. 7. In each relevant account field, enter the G/L accounts that will be
used to post transactions to the following: o Inventory accounts
o WIP accounts
o Manufacturing accounts
8. Repeat steps 4-7 to set up additional inventory posting group accounts.
9. Click OK to close the Inventory Posting Groups page.
6 - 9 Microsoft Official Training Materials for Microsoft Dynamics ® Your use of this content is subject to your current services agreement

Application Setup in Microsoft Dynamics® NAV 2013
Note: The primary G/L accounts associated with the inventory posting group are the Inventory Account and Inventory Account (Interim). Other accounts are only necessary when specific application areas are used.
Procedure: Assign Inventory Posting Groups
To assign a inventory posting groups to items, follow these steps:
1. In the navigation pane, click Departments. 2. Click Warehouse, and then click Planning & Execution. 3. On the Planning & Execution page, click Items.
4. Locate the item, and open the Item Card. 5. Expand the Invoicing FastTab. 6. In the Inventory Posting Group field, enter the appropriate posting
group. 7. Click OK to close the Item Card.
Procedure: Set Up Bank Account Posting Groups
Bank account posting groups are used to link bank accounts to the general ledger. To simplify tracing transactions and bank reconciliations, we recommend that you do the following:
• Set up unique G/L accounts for all bank accounts.
• Create bank account posting groups for each G/L account.
• Assign each bank account with the unique posting group.
To set up a bank account posting group, follow these steps:
1. In the navigation pane, click Departments. 2. Click Administration, and then click Application Setup. 3. On the Application Setup page, under Financial Management, click
Posting Group, and then click Bank Account Posting Groups.
4. Click New.
6 - 10 Microsoft Official Training Materials for Microsoft Dynamics ® Your use of this content is subject to your current services agreement

Module 6: Set Up Posting Groups
FIGURE 6.6: BANK ACCOUNT POSTING GROUPS WINDOW
5. In the Code field, type a unique identifier that corresponds to one of the bank accounts set up in the program.
6. In the G/L Bank Account No. field, enter the account number that corresponds to the bank account set up in the program.
7. Click OK to close the Bank Account Posting Groups page.
Procedure: Assign Bank Account Posting Groups
To assign a bank account posting group to a bank account, follow these steps:
1. In the navigation pane, click Departments.
2. Click Financial Management, and then click Cash Management. 3. On the Cash Management page, click Bank Accounts. 4. Locate the bank account, and open the Bank Account Card. 5. Expand the Posting FastTab.
6. In the Bank Acc. Posting Group field, enter the appropriate posting group.
7. Click OK to close the Bank Account Card.
When bank transactions are posted, Microsoft Dynamics NAV uses the bank account posting group code to locate and post to the specified account.
6 - 11 Microsoft Official Training Materials for Microsoft Dynamics ® Your use of this content is subject to your current services agreement

Application Setup in Microsoft Dynamics® NAV 2013
Lab 6.1: Set Up and Assign a Vendor Posting Group Scenario
CRONUS International, Ltd. currently has three vendor posting groups:
• Domestic
• EU
• Foreign
Management has decided to add an intercompany vendor posting group to accommodate the intercompany purchases between business partners.
As the accounting manager, it is your responsibility to set up an intercompany vendor posting group, with the description of intercompany vendors.
Because they only have domestic intercompany business partners, you can use the same G/L accounts as for the Domestic vendor posting group, except for the Payables account for which G/L account 5425 is used.
Assign the new vendor posting group to the existing vendor Mortimor Car Company.
Objectives
This lab reinforces your understanding of the process required to set up a Vendor posting group.
Exercise 1: Set Up and Assign a Vendor Posting Group
Task 1: Set Up and Assign a Vendor Posting Group
High Level Steps 1. Create a new vendor posting group. 2. Assign the new vendor posting group.
Detailed Steps 1. Create a new vendor posting group.
a. In the navigation pane, click Departments. b. Click Administration, and then click Application Setup. c. On the Application Setup page, under Financial Management,
click Posting Groups > Vendor Posting Groups. d. Click New. e. In the Code field, type "IC". f. In the Payables Account field, type "5425".
6 - 12 Microsoft Official Training Materials for Microsoft Dynamics ® Your use of this content is subject to your current services agreement

Module 6: Set Up Posting Groups g. Copy the other accounts from the vendor posting group
DOMESTIC.
h. Click OK to close the Vendor Posting Groups page. 2. Assign the new vendor posting group.
a. In the navigation pane, click Departments. b. Click Financial Management, and then click Payables.
c. On the Payables page, click Vendors. d. Locate the vendor Mortimor Car Company, and open the Vendor
Card. e. Expand the Invoicing FastTab.
f. In the Vendor Posting Group field, enter IC. g. Click OK to close the Vendor Card.
General Posting Groups The main purpose for general posting groups is to identify the Income Statement accounts for each subsidiary, or supporting ledger. General posting groups are used to link the general ledger to the following:
• Item transactions, resource transactions, or both from purchases and sales documents.
• Item journals and job journals.
• Machine centers, work centers, and item charges.
The following table shows the two types of general posting groups.
General posting group Description
General business posting group Specifies who is sold to (customers) and who is purchased from (vendors).
General product posting group Specifies what is being sold (items and resources) and what is being purchased (items).
6 - 13 Microsoft Official Training Materials for Microsoft Dynamics ® Your use of this content is subject to your current services agreement

Application Setup in Microsoft Dynamics® NAV 2013 General Business Posting Groups
General business posting groups are assigned to the following:
• Customers
• Vendors
• G/L Accounts
Best Practice: Only G/L accounts that are used in sales and purchase documents, and journals with VAT calculation require a general business posting group.
When you set up general business posting groups, consider how many groups are needed to analyze the following:
• Sales by customers
• Purchases by vendors
For example, general business posting groups can be divided by:
• Geographical area
• Type of business
• Type of industry
Procedure: Set Up General Business Posting Groups
To set up general business posting groups, follow these steps:
1. In the navigation pane, click Departments.
2. Click Administration, and then click Application Setup. 3. On the Application Setup page, click Posting Groups, and then click
Gen. Business Posting Groups.
4. Click New.
6 - 14 Microsoft Official Training Materials for Microsoft Dynamics ® Your use of this content is subject to your current services agreement

Module 6: Set Up Posting Groups
FIGURE 6.7: GENERAL BUSINESS POSTING GROUPS WINDOW
5. In the Code field, type a unique identifier for the business group.
6. In the Description field, type a short description. 7. In the Def. VAT Bus. Posting Group field, enter the VAT business
posting group to be used as the default for transactions involving this business group.
8. Select the Auto Insert Default check box to automatically insert the Def. VAT Bus. Posting Group when the corresponding general business posting group is assigned to a customer, vendor, or G/L account.
9. Click OK to close the Gen. Business Posting Groups page.
Note: Messages appear when you change the contents of the Def. VAT Bus. Posting Group field that ask you to update any G/L accounts, customers, and vendors affected by this change.
6 - 15 Microsoft Official Training Materials for Microsoft Dynamics ® Your use of this content is subject to your current services agreement

Application Setup in Microsoft Dynamics® NAV 2013 General Product Posting Groups
General product posting groups are used to specify what is being sold and what is being purchased. They are assigned to the following:
• Items
• Resources
• G/L accounts
• Machine centers
• Work centers
• Item charges
When you are setting up general product posting groups, consider how many groups are needed to analyze the following:
• Sales by products (items and resources)
• Purchases by items
For example, general product posting groups can be divided by the following:
• Raw material items
• Retail items
• Resources
• Capacities
General product posting groups provide the major product groups reflected in the chart of accounts. Each inventory item and resource is assigned a product posting group.
Procedure: Set Up General Product Posting Groups
To set up general product posting groups, follow these steps:
1. In the navigation pane, click Departments.
2. Click Administration, and then click Application Setup. 3. On the Application Setup page, click Posting Groups, and then click
Gen. Product Posting Groups. 4. Click New.
6 - 16 Microsoft Official Training Materials for Microsoft Dynamics ® Your use of this content is subject to your current services agreement

Module 6: Set Up Posting Groups
FIGURE 6.8: GENERAL PRODUCT POSTING GROUPS WINDOW
5. In the Code field, type a unique identifier for the product group. 6. In the Description field, type a short description. 7. In the Def. VAT Prod. Posting Group field, enter the VAT Product
posting group to be used as the default for transactions involving this product group.
8. Select the Auto Insert Default check box to automatically insert the Def. VAT Prod. Posting Group when the corresponding general product posting group is assigned to an item, resource, or G/L account.
9. Click OK to close the Gen. Product Posting Groups page.
Note: Messages appear when you change the contents of the Def. VAT Prod. Posting Group field that ask you to update any G/L accounts, items, resources, and item charges affected by this change.
6 - 17 Microsoft Official Training Materials for Microsoft Dynamics ® Your use of this content is subject to your current services agreement

Application Setup in Microsoft Dynamics® NAV 2013 Procedure: Assign General Posting Groups
To assign general posting groups to G/L accounts, follow these steps:
1. In the navigation pane, click Departments. 2. Click Financial Management. 3. On the Financial Management page, click General Ledger, and
then click Chart of Accounts. 4. Open the relevant G/L Account Card.
5. On the Posting FastTab, in the Gen. Bus. Posting Group and Gen. Prod. Posting Group field, enter the relevant business and product group.
6. Click OK to close the G/L Account Card.
6 - 18 Microsoft Official Training Materials for Microsoft Dynamics ® Your use of this content is subject to your current services agreement
Module 6: Set Up Posting Groups
Lab 6.2: Set Up and Assign a Product Posting Group Scenario
As the accounting manager at CRONUS, it is your responsibility to set up general posting groups. A new product group is needed for the newly acquired Home and Garden division of the company.
Use Home as the code and VAT25 as the default VAT posting group. Confirm all messages generated during this setup process, and make sure that the default VAT posting group is always used with this product group.
Assign the new general product posting group to the existing item 1500 - Lamp.
Objectives
This lab is to reinforces your understanding of the process required to set up a product posting group.
Exercise 1: Set Up and Assign a Product Posting Group
Task 1: Set Up and Assign a Product Posting Group
High Level Steps 1. Create the product posting group as specified in the scenario.
2. Assign the new general product posting group.
Detailed Steps 1. Create the product posting group as specified in the scenario.
a. In the navigation pane, click Departments. b. Click Administration, and then click Application Setup. c. On the Application Setup page, under Financial Management,
click Posting Groups > Gen. Product Posting Groups.
d. Click New. e. In the Code field, type "Home". f. In the Description field, type "Home and Garden". g. In the Def. VAT Prod. Posting Group, enter VAT25.
h. Leave the field by choosing another field or pressing TAB. i. Click Yes to all requests to change all occurrences of this VAT
product posting group.
j. Make sure that the Auto Insert Default check box is selected. k. Click OK to close the Gen. Product Posting Groups page.
6 - 19 Microsoft Official Training Materials for Microsoft Dynamics ® Your use of this content is subject to your current services agreement

Application Setup in Microsoft Dynamics® NAV 2013 2. Assign the new general product posting group.
a. In the navigation pane, click Departments.
b. Click Warehouse, and then click Planning & Execution. c. On the Planning & Execution page, click Items. d. Locate item 1500 - Lamp, and open the Item Card. e. Expand the Invoicing FastTab.
f. In the Gen. Prod. Posting Group field, type "HOME". g. Click OK to close the Item Card.
General Posting Setup The General Posting Setup page is a matrix that combines business and product posting groups. Each combination determines the accounts that are used to post:
• Sales and purchases
• Sales and purchase credit memos
• Sales and purchase prepayments
• Sales and purchase invoice discounts and payment discounts
• Cost of goods sold and inventory adjustments
• Direct cost applied and overhead applied
• Purchase variances
For each combination of business and product posting groups, users can assign a different set of G/L accounts. Therefore, users can post the sale of the same item to different sales accounts in the general ledger because customers are assigned different general business posting groups.
Users can populate the General Posting Setup matrix in the following ways:
• On the General Posting Setup page:
o Manually
o Using a copy feature
• From the individual general posting group pages.
Procedure: Manually Enter General Posting Setup Lines
To manually fill in the General Posting Setup page. follow these steps:
1. In the navigation pane, click Departments.. 2. Click Administration, and then click Application Setup.
3. On the Application Setup page, click Posting Groups, and then click General Posting Setup.
4. Click New to open a new General Posting Setup Card.
6 - 20 Microsoft Official Training Materials for Microsoft Dynamics ® Your use of this content is subject to your current services agreement

Module 6: Set Up Posting Groups
FIGURE 6.9: GENERAL POSTING SETUP WINDOW
5. On the General FastTab, in the Gen. Bus. Posting Group field, enter
the relevant business group. 6. In the Gen. Prod. Posting Group field, enter the relevant product
group to complete the combination. 7. On the Sales, Purchase, and Inventory FastTabs, in each relevant
account field, enter the G/L accounts that were used to post transactions for the selected general posting combination.
8. Click OK to close the General Posting Setup Card. 9. Repeat steps 4-8 to set up additional combinations.
10. Click OK to close the General Posting Setup page.
Note: If you use inventory, in addition to entering every possible combination of general business and general product posting groups, enter a line for each general product posting group that has a blank general business posting group. This combination is necessary, for example, for posting activity from item journals when there is no customer or vendor assigned to the transaction.
Note: The primary G/L accounts associated with the general posting setup are the sales account and purchase account. Other accounts are only required when specific application areas are used. This is discussed in detail in appropriate courses.
Procedure: Copy General Posting Setup Lines
The more business and product posting groups, the more combinations have to be set up in the General Posting Setup page. Although there may be many combinations, frequently, the G/L account numbers are the same (or approximately the same) on several lines.
6 - 21 Microsoft Official Training Materials for Microsoft Dynamics ® Your use of this content is subject to your current services agreement
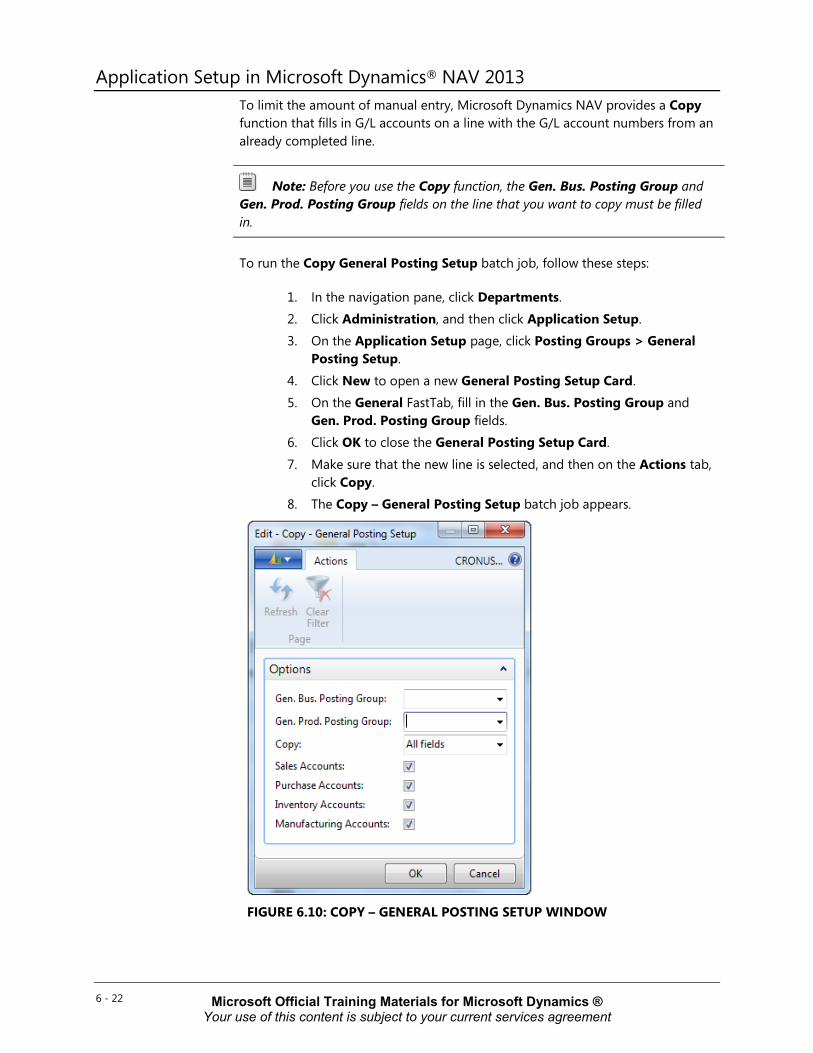
Application Setup in Microsoft Dynamics® NAV 2013 To limit the amount of manual entry, Microsoft Dynamics NAV provides a Copy function that fills in G/L accounts on a line with the G/L account numbers from an already completed line.
Note: Before you use the Copy function, the Gen. Bus. Posting Group and Gen. Prod. Posting Group fields on the line that you want to copy must be filled in.
To run the Copy General Posting Setup batch job, follow these steps:
1. In the navigation pane, click Departments. 2. Click Administration, and then click Application Setup. 3. On the Application Setup page, click Posting Groups > General
Posting Setup.
4. Click New to open a new General Posting Setup Card. 5. On the General FastTab, fill in the Gen. Bus. Posting Group and
Gen. Prod. Posting Group fields. 6. Click OK to close the General Posting Setup Card.
7. Make sure that the new line is selected, and then on the Actions tab, click Copy.
8. The Copy – General Posting Setup batch job appears.
FIGURE 6.10: COPY – GENERAL POSTING SETUP WINDOW
6 - 22 Microsoft Official Training Materials for Microsoft Dynamics ® Your use of this content is subject to your current services agreement

Module 6: Set Up Posting Groups 9. Specify the Gen. Bus. Posting Group and Gen. Prod. Posting
Group of the line to copy from.
10. In the Copy field, select either All fields or Selected fields. 11. Click OK. 12. Click Yes to copy the General Posting Setup. 13. Adjust the copied account numbers as needed.
14. Click OK to close the General Posting Setup page.
Procedure: Create Posting Setup Lines from General Posting Groups
Instead of setting up all general posting groups at the same time in the General Posting Setup page, general business and product posting groups can be set up individually from the respective pages by selecting Setup on the Action FastTab in the ribbon.
In the following example, the general business posting group is used; however, the process is the same for the general product posting group.
To review or fill in the General Posting Setup page from the Gen. Business Posting Groups page, follow these steps:
1. In the navigation pane, click Departments. 2. Click Administration, and then click Application Setup. 3. On the Application Setup page, click Posting Groups, and then click
Gen. Business Posting Groups. 4. Select the general business posting group line to review or set up. 5. Click Setup. 6. The General Posting Setup page for the selected general business
posting group appears. The posting setup lines are filtered to only show those combinations with the selected general business posting group.
7. Click New to open a new General Posting Setup Card.
8. On the General FastTab, the Gen. Bus. Posting Group field is automatically populated based on the selected general business posting group.
9. In the Gen. Prod. Posting Group field, enter the relevant product group to complete the combination.
10. On the Sales, Purchase, and Inventory FastTab, in each relevant account field, enter the G/L accounts that are used to post transactions for the selected general posting combination.
11. Click OK to close the General Posting Setup Card.
6 - 23 Microsoft Official Training Materials for Microsoft Dynamics ® Your use of this content is subject to your current services agreement
Application Setup in Microsoft Dynamics® NAV 2013 12. Repeat steps 7-11 to set up additional combinations. 13. Click OK to close the General Posting Setup page.
14. Complete the general product posting group fields and account fields as necessary.
Example: From Posted Sales Invoice to Income Statement Account
For sales invoice 103019 a general ledger entry was created for the income statement account 6110. Items 8908-W Computer – Highline Package, 8916-W Computer – TURBO Package, and 8924-W Server – Enterprise Package were sold to customer 40000 Deerfield Graphics Company. To review that the general posting groups were used for the link to the G/L account, follow these steps:
1. In the navigation pane, click Home , and then click Customers.
2. Select customer 40000, and open the Customer Card. Notice that in the Invoicing FastTab, the Gen. Bus. Posting Group field contains the value NATIONAL.
3. In the navigation pane, click Home, and then click Items.
4. Select item 8908-W, and open the Item Card. 5. On the Invoicing FastTab, the Gen. Prod. Posting Group field
contains the value RETAIL. 6. Repeat steps 4-6 for the items 8916-W and 8924-W. Notice that all
three items have the same general product posting group set up. 7. In the navigation pane, click Departments. 8. Click Administration, and then click Application Setup. 9. On the Application Setup page, click Posting Groups and then click
General Posting Setup. The Sales Account field contains G/L account 6110 for the combination of Gen. Bus. Posting Group NATIONAL and Gen. Prod. Posting Group RETAIL.
Note: Only one general ledger entry was created for G/L account 6110, because the three item lines contain the same posting and dimension information.
6 - 24 Microsoft Official Training Materials for Microsoft Dynamics ® Your use of this content is subject to your current services agreement

Module 6: Set Up Posting Groups
Lab 6.3: Copy a General Posting Setup Line Scenario
Previously, you set up a general product posting group for the newly acquired Home and Garden division of the company. It is now time to set up the posting combination by using the general business posting group NATIONAL.
Because this new posting set up combination uses the same G/L accounts as the NATIONAL/RETAIL combination, use the Copy function to copy all fields.
Objectives
This lab reinforces your understanding of the process required to copy a General Posting Setup line.
Exercise 1: Copy a General Posting Setup Line
Task 1: Copy a General Posting Setup Line
High Level Steps 1. Create the new general posting setup combination specified in the
scenario. 2. Run the Copy function as specified in the scenario.
Detailed Steps 1. Create the new general posting setup combination specified in the
scenario.
a. In the navigation pane, click Departments. b. Click Administration, and then click Application Setup. c. On the Application Setup page, under Financial Management,
click Posting Groups > General Posting Setup.
d. Click New to open a new General Posting Setup Card. e. On the General FastTab, in the Gen. Bus. Posting Group field,
enter NATIONAL. f. On the General FastTab, in the Gen. Prod. Posting Group field,
enter HOME . g. Click OK to close the General Posting Setup Card.
2. Run the Copy function as specified in the scenario.
a. In the General Posting Setup page, make sure the new line is selected and then, on the Actions tab, click Copy. The Copy - General Posting Setup batch job appears.
b. In the Gen. Bus. Posting Group field, enter NATIONAL.
c. In the Gen. Prod. Posting Group field, enter RETAIL.
6 - 25 Microsoft Official Training Materials for Microsoft Dynamics ® Your use of this content is subject to your current services agreement

Application Setup in Microsoft Dynamics® NAV 2013 d. Make sure that the Copy field is set to All fields, and then click
OK.
e. Click Yes to copy the general posting setup. f. Click Close to close the General Posting Setup page.
VAT Posting Groups Value-added tax (VAT) is a transaction tax paid by the end consumer, including businesses.
VAT posting groups define how VAT is calculated and posted according to the following:
• Who is sold to or purchased from (customers and vendors).
• What is sold or purchased (items and resources).
The principles for setting up VAT posting groups resemble those for setting up general posting groups:
• VAT business posting groups are set up and assigned to customers and vendors.
• VAT product posting groups are set up and assigned to items and resources.
• Combinations of VAT business and product posting groups are specified in the VAT Posting Setup page.
Procedure: Set Up VAT Business Posting Groups
VAT business posting groups determine the calculation and posting of VAT according to the location (country/region) of the customer or vendor involved in a transaction.
When you set up VAT business posting groups, consider how many groups are needed, based on several factors, including the following:
• Local legislation
• Trading both domestically and internationally
To set up VAT business posting groups, follow these steps:
1. In the navigation pane, click Departments. 2. Click Administration, and then click Application Setup.
3. On the Application Setup page, click VAT Posting Group, and then click VAT Business Posting Groups.
4. Click New.
6 - 26 Microsoft Official Training Materials for Microsoft Dynamics ® Your use of this content is subject to your current services agreement

Module 6: Set Up Posting Groups
FIGURE 6.11: VAT BUSINESS POSTING GROUPS WINDOW
5. In the Code field, type a unique identifier for the business group. 6. In the Description field, type a short description. 7. Click OK to close the VAT Business Posting Groups page.
Procedure: Set Up VAT Product Posting Groups
VAT product posting groups determine the calculation and posting of VAT according to the type of:
• Item being purchased
• Item or resource being sold
• Costs such as item charges
When you set up VAT product posting groups, consider how many groups are needed, based on the tax liability for items and resources. For example, VAT product posting groups can be set up to group items into food items that require 10 percent VAT, and non-food items that require 15 percent VAT.
6 - 27 Microsoft Official Training Materials for Microsoft Dynamics ® Your use of this content is subject to your current services agreement

Application Setup in Microsoft Dynamics® NAV 2013 To set up VAT product posting groups, follow these steps:
1. In the navigation pane, click Departments.
2. Click Administration, and then click Application Setup. 3. On the Application Setup page, click VAT Posting Group, and then
click VAT Product Posting Groups. 4. Click New.
FIGURE 6.12: VAT PRODUCT POSTING GROUPS WINDOW
5. In the Code field, type a unique identifier for the product group. 6. In the Description field, type a short description. 7. Click OK to close the VAT Product Posting Groups page.
Assign Default VAT Posting Groups
As soon as the VAT posting groups are set up, they must be assigned to the following:
• Customers and vendors
• Items and resources
• G/L accounts (where applicable)
6 - 28 Microsoft Official Training Materials for Microsoft Dynamics ® Your use of this content is subject to your current services agreement

Module 6: Set Up Posting Groups Instead of manually assigning these groups to accounts, assign them as follows:
• Default VAT business posting groups to general business posting groups.
• Default VAT product posting groups to general product posting groups.
Microsoft Dynamics NAV then automatically inserts the relevant code as the VAT business or product posting group when the relevant general business or product posting group is assigned to a customer, vendor, item, resource, or G/L account. When it is required the VAT business or product posting group can be changed for an individual record.
Procedure: Manually Assign VAT Posting Groups
If the default feature is not used, manually assign VAT posting groups to customers, vendors, items, resources, and G/L accounts.
To assign VAT business posting groups to customers, follow these steps:
1. In the navigation pane, click Departments. 2. Click Financial Management, and then click Receivables. 3. On the Receivables page, click Customers.
4. Expand the Invoicing FastTab. 5. In the VAT Bus. Posting Group field, enter the relevant business
group. 6. Click OK to close the Customer Card.
When customer-related transactions, such as orders, invoices, credit memos, and payments are posted, Microsoft Dynamics NAV uses the customer posting group to locate and post the specified accounts.
6 - 29 Microsoft Official Training Materials for Microsoft Dynamics ® Your use of this content is subject to your current services agreement

Application Setup in Microsoft Dynamics® NAV 2013
Lab 6.4: Create and Assign a VAT Product Posting Group
Scenario
The EU has announced a percent change in VAT, from 25 percent to 26 percent. As the accounting manager at CRONUS, it is your responsibility to create a new VAT product posting group named VAT26. Use a similar description as that used for the VAT25 line.
Note: Usually, the setup to accommodate VAT percent changes would be handled with the VAT Rate Change Tool.
Assign the new VAT product posting group to the existing item 1600 - Bell.
Exercise 1: Create and Assign a VAT Product Posting Group
Task 1: Create and Assign a VAT Product Posting Group
High Level Steps 1. Set up the new VAT posting group as specified in the scenario. 2. Assign the new vat product posting group.
Detailed Steps 1. Set up the new VAT posting group as specified in the scenario.
a. In the navigation pane, click Departments.
b. Click Administration, and then click Application Setup. c. On the Application Setup page, click VAT Posting Group, and
then click VAT Product Posting Groups. d. Click New.
e. In the Code field, type "VAT26". f. In the Description field, type "Miscellaneous with 26 % VAT". g. Click OK to close the VAT Product Posting Groups page.
2. Assign the new vat product posting group.
a. In the navigation pane, click Departments. b. Click Warehouse, and then click Planning & Execution. c. On the Planning & Execution page, click Items. d. Locate the item 1600 - Bell, and open the Item Card.
6 - 30 Microsoft Official Training Materials for Microsoft Dynamics ® Your use of this content is subject to your current services agreement
Module 6: Set Up Posting Groups e. Expand the Invoicing FastTab. f. In the VAT Prod. Posting Group field, enter VAT26.
g. Click OK to close the Item Card.
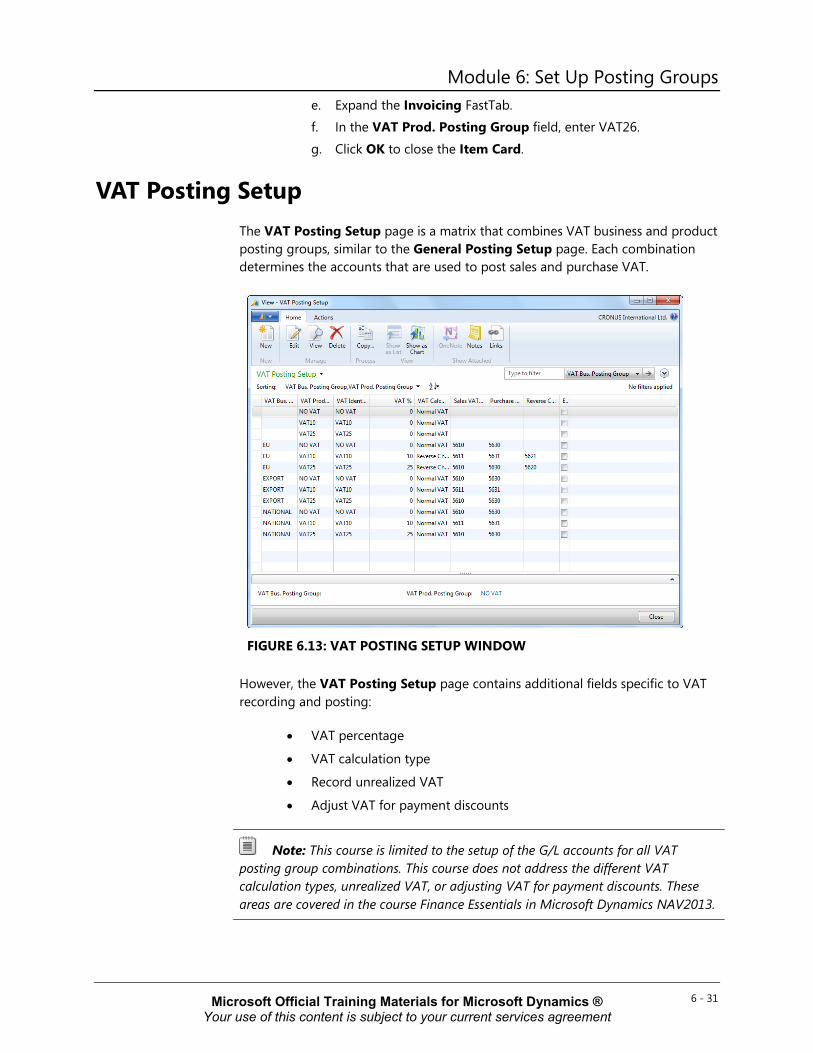
VAT Posting Setup The VAT Posting Setup page is a matrix that combines VAT business and product posting groups, similar to the General Posting Setup page. Each combination determines the accounts that are used to post sales and purchase VAT.
FIGURE 6.13: VAT POSTING SETUP WINDOW
However, the VAT Posting Setup page contains additional fields specific to VAT recording and posting:
• VAT percentage
• VAT calculation type
• Record unrealized VAT
• Adjust VAT for payment discounts
Note: This course is limited to the setup of the G/L accounts for all VAT posting group combinations. This course does not address the different VAT calculation types, unrealized VAT, or adjusting VAT for payment discounts. These areas are covered in the course Finance Essentials in Microsoft Dynamics NAV2013.
6 - 31 Microsoft Official Training Materials for Microsoft Dynamics ® Your use of this content is subject to your current services agreement
Application Setup in Microsoft Dynamics® NAV 2013 Users can populate the VAT Posting Setup matrix in the following ways:
• On the VAT Posting Setup page:
o Manually
o Using a copy feature
• From the individual VAT posting group pages.
• Using the VAT Rate Change Tool.
Note: The VAT Rate Change Tool is covered in the course Finance Advanced in Microsoft Dynamics NAV2013.
Procedure: Manually Enter VAT Posting Setup Lines
To manually fill in the VAT Posting Setup page, follow these steps:
1. In the navigation pane, click Departments.
2. Click Administration > Application Setup > VAT Posting Group > VAT Posting Setup.
3. Click New to open a new VAT Posting Setup Card. 4. On the General FastTab, in the VAT. Bus. Posting Group field, enter
the relevant VAT business group. 5. In the VAT Prod. Posting Group field, enter the relevant VAT
product group to complete the combination. 6. In the VAT Identifier field, type a VAT grouping identifier.
7. In the VAT % field, type the relevant VAT rate. Do not enter the percentage sign (%).
8. In the VAT Calculation Type field, enter the relevant calculation method.
9. On the Sales and Purchase FastTab, in each relevant account field, enter the G/L accounts that are used to post transactions for the selected VAT posting combination.
10. Click OK to close the VAT Posting Setup Card. 11. Repeat steps 4-11 to set up additional VAT posting combinations. 12. Click OK to close the VAT Posting Setup page.
Note: If you use inventory, in addition to entering every possible combination of VAT business and VAT product posting groups, enter a line for each VAT product posting group that has a blank VAT business posting group. This combination is necessary, for example, for posting activity from item journals when there is no customer or vendor assigned to the transaction.
6 - 32 Microsoft Official Training Materials for Microsoft Dynamics ® Your use of this content is subject to your current services agreement

Module 6: Set Up Posting Groups Procedure: Copy VAT Posting Setup Lines
The more VAT business and product posting groups, the more combinations have to be set up in the VAT Posting Setup page.
To limit the amount of manual entry, Microsoft Dynamics NAV provides a Copy function that fills all fields or selected fields from an already completed line.
Note: Before you use the Copy function, the VAT Bus. Posting Group and VAT Prod. Posting Group fields on the line that you want to copy must be filled in.
To run the Copy - VAT Posting Setup batch job, follow these steps:
1. In the navigation pane, click Departments.
2. Click Administration > Application Setup > VAT Posting Group > VAT Posting Setup.
3. Click New to open a new VAT Posting Setup Card.
4. On the General FastTab, in the VAT. Bus. Posting Group field, enter the relevant VAT business group.
5. In the VAT Prod. Posting Group field, enter the relevant VAT product group to complete the combination.
6. Make sure that the new line is selected and then, on the Actions tab, click Copy.
7. The Copy - VAT Posting Setup batch job appears.
FIGURE 6.14: COPY – VAT POSTING SETUP WINDOW
6 - 33 Microsoft Official Training Materials for Microsoft Dynamics ® Your use of this content is subject to your current services agreement
Application Setup in Microsoft Dynamics® NAV 2013 8. Specify the VAT Bus. Posting Group and VAT Prod. Posting Group
of the line to copy from.
9. In the Copy field, select either All fields or Selected fields. The following table shows the fields copied.
Option Includes
VAT % etc. VAT %, VAT Calculation Type, Unrealized VAT Type, and Adjust for Payment Discount fields.
Sales Accounts All sales account information.
Purchase Accounts Purchases and reverse charge account information.
10. Click OK. 11. Click Yes to copy the VAT posting setup. 12. Adjust the copied information as needed.
13. Click OK to close the VAT Posting Setup page.
Procedure: Create Posting Setup Lines from VAT Posting Groups
Instead of setting up all VAT posting groups at the same time in the VAT Posting Setup page, VAT business and product posting groups can be set up individually from the respective pages by selecting Setup on the Action tab in the ribbon.
In the following example, the VAT business posting group is used; however, the process is the same for the VAT product posting group.
To review or fill in the VAT Posting Setup page from the VAT Business Posting Groups page, follow these steps:
1. In the navigation pane, click Departments. 2. Click Administration, and then click Application Setup. 3. On the Application Setup page, click VAT Posting Group , and then
click VAT Business Posting Groups.
4. Select the VAT business posting group line to review or set up. 5. Click Setup. The VAT Posting Setup page for the selected VAT
business posting group appears. The posting setup lines are filtered to only show those combinations with the selected VAT business posting group.
6. Click New to open a new VAT Posting Setup Card. 7. On the General FastTab, the VAT Bus. Posting Group field is
automatically populated based on the selected VAT business posting group.
8. In the VAT Prod. Posting Group field, enter the relevant product group to complete the combination.
6 - 34 Microsoft Official Training Materials for Microsoft Dynamics ® Your use of this content is subject to your current services agreement

Module 6: Set Up Posting Groups 9. In the VAT Identifier field, type a VAT grouping identifier. 10. In the VAT % field, type the relevant VAT rate. Do not enter the
percentage sign (%). 11. In the VAT Calculation Type field, enter the relevant calculation
method. 12. On the Sales and Purchase FastTab, in each relevant account field,
enter the G/L accounts that are used to post transactions for the selected general posting combination.
13. Click OK to close the VAT Posting Setup Card. 14. Repeat steps 6-13 to set up additional combinations.
15. Click OK to close the General Posting Setup page. 16. Complete the VAT product posting group fields and account fields as
necessary.
Example: From Posted Sales Invoice to VAT Account
For sales invoice 103019 a general ledger entry was created for the VAT account 5610. Items 8908-W Computer – Highline Package, 8916-W Computer – TURBO Package, and 8924-W Server – Enterprise Package were sold to customer 40000 Deerfield Graphics Company. To review that the VAT posting groups were used for the link to the G/L account, perform following steps:
1. In the navigation pane, click Home, and then click Customers. 2. Select customer 40000, and open the Customer Card. 3. On the Invoicing FastTab, the VAT Bus. Posting Group field
contains the value NATIONAL.
4. In the navigation pane, click Home, and then click Items. 5. Select item 8908-W, and open the Item Card. Notice that on the
Invoicing FastTab, the VAT Prod. Posting Group field contains the value VAT25.
6. Repeat steps 4-6 for the items 8916-W and 8924-W. Notice that all three items have the same general product posting group set up.
7. In the navigation pane, click Departments.
8. Click Administration, and then click Application Setup. 9. On the Application Setup page, click VAT Posting Groups > VAT
Posting Setup. Note the Sales VAT Account field contains G/L account 5610 for the combination of VAT Bus. Posting Group NATIONAL and VAT Prod. Posting Group VAT25.
Note: Only one general ledger entry was created for G/L account 6110, because the three item lines contain the same posting and dimension information.
6 - 35 Microsoft Official Training Materials for Microsoft Dynamics ® Your use of this content is subject to your current services agreement

Application Setup in Microsoft Dynamics® NAV 2013
Lab 6.5: Copy a VAT Posting Setup Scenario
Previously, you set up a VAT product posting group for the new EU percentage change in VAT, from 25 to 26 percent. As the accounting manager at CRONUS, it is your responsibility to do the following:
• Create a posting combination of the new VAT product posting group together with the existing VAT business posting group for the EU.
• Make sure that the new combination uses the same information and G/L accounts as the VAT25 posting group.
Note: Usually, new G/L accounts are created to post the G/L entries with the new VAT percentage to separate accounts. However, setting up new accounts is not the focus of this exercise.
Objectives
This lab reinforces your understanding of the process required to copy a VAT posting setup.
Exercise 1: Copy a VAT Posting Setup
Task 1: Copy a VAT Posting Setup
High Level Steps 1. Create the VAT posting combination as specified in the scenario. 2. Run the Copy function as specified in the scenario.
Detailed Steps 1. Create the VAT posting combination as specified in the scenario.
a. In the navigation pane, click Departments.
b. Click Administration, and then click Application Setup. c. On the Application Setup page, under Financial Management,
click VAT Posting Group > VAT Posting Setup. d. Click New to open a new VAT Posting Setup Card.
e. On the General FastTab, in the VAT. Bus. Posting Group field, enter EU.
f. In the VAT Prod. Posting Group field, enter VAT26.
g. Click OK to close the VAT Posting Setup Card.
6 - 36 Microsoft Official Training Materials for Microsoft Dynamics ® Your use of this content is subject to your current services agreement

Module 6: Set Up Posting Groups 2. Run the Copy function as specified in the scenario.
a. In the VAT Posting Setup page, make sure that the new line is selected and then, on the Actions tab, click Copy. The Copy - VAT Posting Setup batch job appears.
b. In the VAT Bus. Posting Group field, enter EU. c. In the VAT Prod. Posting Group field, enter VAT25.
d. Make sure that the Copy field is set to All fields, and then click OK.
e. Click Yes to copy the VAT posting setup. f. Double-click the new line to open the VAT Posting Setup Card
page. g. In the VAT % field, type "26". h. In the VAT Identifier field, type "VAT26". i. Click Close to close the VAT Posting Setup page.
Best Practices
Procedure: Determine Posting Groups
The posting group structure is set up to use the chart of accounts as a guide. To provide more explanation of posting group setup decisions, this lesson discusses how general posting groups were established in CRONUS.
One of the first considerations is the segregation of products. For CRONUS, the primary categories of products are as follows:
• Retail
• Raw materials
• Resources (services)
• Capacities
These categories are set up as general product posting groups.
The next consideration is the division of customers and vendors. The following primary classifications of customers and vendors are used in CRONUS:
• Domestic (or national)
• EU
• Export for the sales accounts and the purchases accounts
These categories are set up as general business posting groups.
In the CRONUS company, the names that are used in the general posting groups correspond with account names that are used in the chart of accounts.
6 - 37 Microsoft Official Training Materials for Microsoft Dynamics ® Your use of this content is subject to your current services agreement

Application Setup in Microsoft Dynamics® NAV 2013 To compare the chart of accounts that use the general business posting groups, as set up in CRONUS, follow these steps:
1. In the navigation pane, click Financial Management. 2. On the Financial Management page, click General Ledger and then
click Chart of Accounts. 3. Locate account 6100, Revenue in the list of accounts (do not set a
filter). 4. Note the account classifications of Revenue:
o 6105, Sales of Retail
o 6205, Sales of Raw Material
o 6405, Sales of Resources
These charts of account classifications correspond to the general product posting groups.
Each revenue classification has subcategories including:
• Dom
• EU
• Export
These chart of accounts sub-classifications correspond to the general business posting groups.
To compare the general posting groups with the chart of accounts as set up in CRONUS, follow these steps:
1. In the navigation pane, click Departments. 2. Click Administration, and then click Application Setup. 3. On the Application Setup page, click Financial Management >
Posting Groups > Gen. Product Posting Groups. Notice that the general product posting group names resemble the chart of account names attached to the product classifications.
4. On the address bar, click Posting Groups to reopen the Posting Groups page.
5. Click Gen. Business Posting Groups. Notice that general business posting group names resemble the chart of account names attached to the sub-categories of the product classifications.
The following reviews how the chart of accounts is mapped to posting groups in the General Posting Setup page in CRONUS for:
6 - 38 Microsoft Official Training Materials for Microsoft Dynamics ® Your use of this content is subject to your current services agreement

Module 6: Set Up Posting Groups • The combination of Export general business posting group and Retail
general product posting group.
• The sales account posting.
To review the mapping, follow these steps:
1. In the navigation pane, click Departments.
2. Click Administration, and then click Application Setup. 3. On the Application Setup page, click Financial Management >
Posting Groups > General Posting Setup. 4. Locate the EXPORT general business posting group and RETAIL
general product posting group combination. 5. Review the account in the Sales Account field. Based on this setup,
when a sales transaction is posted by using this posting group combination, the amount is posted to G/L Account 6130, the Sales, Retail - Export account.
6. Close the General Posting Setup page.
General Posting Groups vs. Dimensions
General posting groups and dimensions have similar characteristics. Both are used for analyzing and grouping sales and purchases. For example, grouping sales by geographical area can be done by using general business posting groups, but also by using dimensions.
Whereas general posting groups only provide a link to G/L accounts, dimensions offer more extensive analysis and reporting functionalities.
Also, when expanding business, it is less difficult to create new dimensions and dimension values than it is to create new general posting groups that have accompanying G/L accounts.
Note: Dimensions and their setup are described in the “Set Up Dimensions” module of this course.
6 - 39 Microsoft Official Training Materials for Microsoft Dynamics ® Your use of this content is subject to your current services agreement
Application Setup in Microsoft Dynamics® NAV 2013
Post and Review a Sales Transaction The following demonstrations use an analysis of a posted sales transaction to review the effect of posting on the chart of accounts and the impact of the posting setup.
Demonstration: Review Customer Posting Setup from the Sales Invoice Header
Scenario: Arnie, the Accounts Receivable Administrator at CRONUS, creates a sales invoice to customer 10000 for items 1964-W and 70011. He reviews the posting groups for the customer and items to compare them to the posted G/L entries.
Demonstration Steps
1. Create the sales invoice header and review the customer posting setup. a. In the navigation pane, click Departments. b. Click Sales & Marketing, and then click Order Processing. c. On the Order Processing page, click Sales Invoices.
d. Click New, and press ENTER to automatically assign the Sales Invoice No.
e. In the Sell-to Customer No. field, enter 10000. f. Leave the field by selecting another field or pressing TAB. The
sales invoice header is populated. g. In the Customer Details FactBox, click Customer No. 10000 to
open the Customer Card. h. Expand the Invoicing FastTab. This customer is set up with the
following posting setup: Gen. Bus. Posting Group: NATIONAL
VAT Bus. Posting Group: NATIONAL
Customer Posting Group: DOMESTIC
i. Click the Customer Posting Group field, to view all the options, and then click Advanced to review the posting setup for domestic customers.
Account 2310 appears in the Receivables Account field. This is the account to which Microsoft Dynamics NAV posts the receivables amount (sales amount including VAT) for this sales invoice.
6 - 40 Microsoft Official Training Materials for Microsoft Dynamics ® Your use of this content is subject to your current services agreement

Module 6: Set Up Posting Groups
FIGURE 6.15: POSTING GROUPS AND G/L ACCOUNTS ASSIGNED TO CUSTOMER 10000
j. Close the Customer Posting Groups and Customer Card pages.
k. On the Sales Invoice page, in the Posting Date field, type "01/24/14" and then press ENTER.
Demonstration: Review Item Posting Setup from the Sales Invoice Line
Follow these steps to create the sales invoice lines and review the posting setup for two items.
Demonstration Steps
1. Create the sales invoice lines and review the posting setup for two items.
a. Select the sales invoice lines. b. In the Type field, enter Item. c. In the No. field, type "1964-W", and then press TAB. d. In the Quantity field, type "10", and then press ENTER.
e. In the Item Details - Invoicing FactBox, click Item No. 1964-W to open the Item Card.
f. Expand the Invoicing FastTab. This item uses the following posting setup:
6 - 41 Microsoft Official Training Materials for Microsoft Dynamics ® Your use of this content is subject to your current services agreement

Application Setup in Microsoft Dynamics® NAV 2013 Gen. Prod. Posting Group: RETAIL
VAT Prod. Posting Group: VAT25
Inventory Posting Group: FINISHED
g. Close the Item Card page. h. On the Sales Invoice page, click the next sales invoice line. i. In the Type field, enter Item.
j. In the No. field, type "70011" and then press ENTER. k. In the Quantity field, type "10" and then press ENTER. l. In the Item Details - Invoicing FactBox, click Item No. 70011. m. Review the Invoicing FastTab. This item uses the following
posting setup: Gen. Prod. Posting Group: RAW MAT
VAT Prod. Posting Group: VAT25
Inventory Posting Group: RAW MAT
n. Close the Item Card page.
The following table shows how general and VAT posting group combinations are used when you post the invoice, based on the customer and item posting setup.
Gen. Bus. Posting Group
Gen. Prod. Posting Group
VAT Bus. Posting Group
VAT Prod. Posting Group
Sale of item 1964-W
NATIONAL RETAIL NATIONAL VAT 25
Sale of item 70011
NATIONAL RAW MAT NATIONAL VAT 25
Demonstration: Review the General Posting Setup
Follow these steps to review the general posting combinations in the General Posting Setup page.
Demonstration Steps
1. Review the general posting combinations in the General Posting Setup page. a. In the navigation pane, click Departments. b. Click Administration, and then click Application Setup. c. On the Application Setup page, click Posting Groups and then
click General Posting Setup.
6 - 42 Microsoft Official Training Materials for Microsoft Dynamics ® Your use of this content is subject to your current services agreement
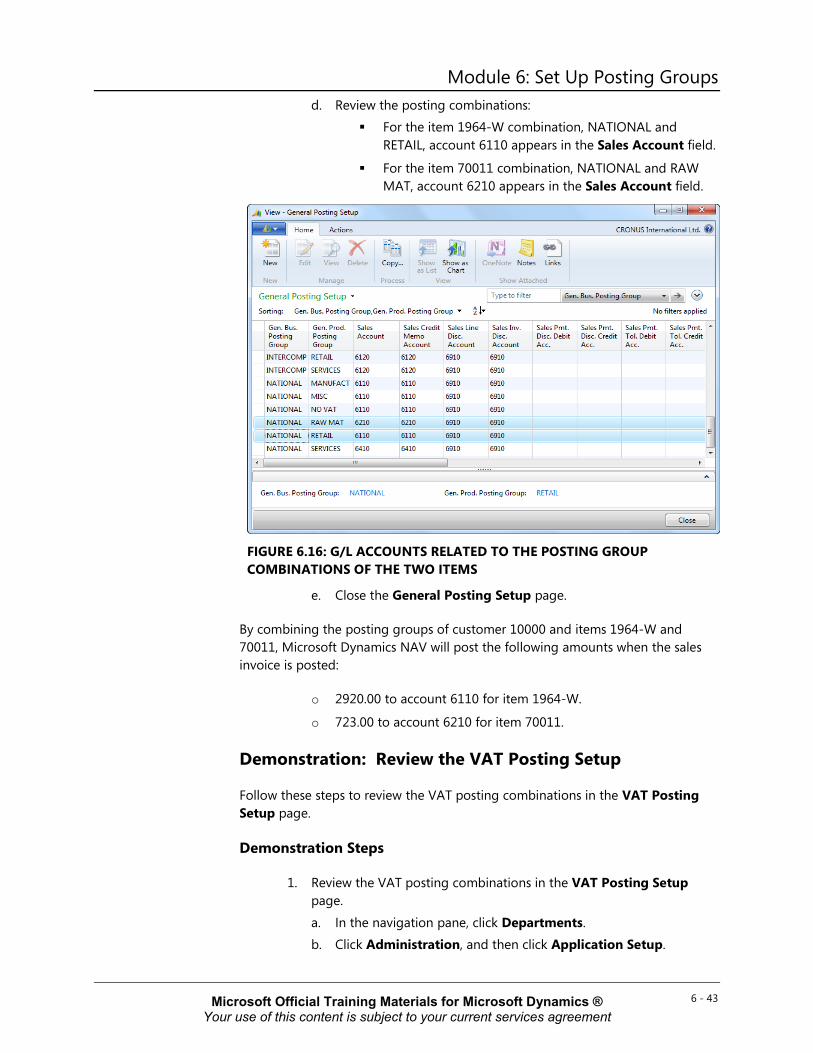
Module 6: Set Up Posting Groups d. Review the posting combinations:
For the item 1964-W combination, NATIONAL and RETAIL, account 6110 appears in the Sales Account field.
For the item 70011 combination, NATIONAL and RAW MAT, account 6210 appears in the Sales Account field.
FIGURE 6.16: G/L ACCOUNTS RELATED TO THE POSTING GROUP COMBINATIONS OF THE TWO ITEMS
e. Close the General Posting Setup page.
By combining the posting groups of customer 10000 and items 1964-W and 70011, Microsoft Dynamics NAV will post the following amounts when the sales invoice is posted:
o 2920.00 to account 6110 for item 1964-W.
o 723.00 to account 6210 for item 70011.
Demonstration: Review the VAT Posting Setup
Follow these steps to review the VAT posting combinations in the VAT Posting Setup page.
Demonstration Steps
1. Review the VAT posting combinations in the VAT Posting Setup page.
a. In the navigation pane, click Departments. b. Click Administration, and then click Application Setup.
6 - 43 Microsoft Official Training Materials for Microsoft Dynamics ® Your use of this content is subject to your current services agreement

Application Setup in Microsoft Dynamics® NAV 2013 c. On the Application Setup page, under Financial Management,
click VAT Posting Group > VAT Posting Setup.
d. Review the posting combination of NATIONAL and VAT25: Account 5610 appears in the Sales VAT Account field.
The VAT % field contains 25, so VAT for the sale of each item is as follows:
For item 1964-W, 2920 x 25% = 730.00
For item 70011, 723 x 25% = 180.75
FIGURE 6.17: VAT POSTING SETUP OF BOTH ITEMS
e. Close the VAT Posting Setup page.
By combining the posting groups of customer 10000 and items 1964-W and 70011, Microsoft Dynamics NAV will perform the following when the sales invoice is posted:
o Determine the sales VAT account and VAT percentage.
o Calculate VAT on the sale.
o Post two separate VAT entries (730.00 and 180.75) for account 5610.
6 - 44 Microsoft Official Training Materials for Microsoft Dynamics ® Your use of this content is subject to your current services agreement

Module 6: Set Up Posting Groups Demonstration: Post the Sales Invoice
The following table shows the expected results of posting the sales invoice:
Account Debit Credit
6210 Sales, Raw Materials - Domestic
Sale amount (723.00)
6110 Sales, Retail - Domestic Sale amount (2920.00)
5610 Sales VAT 25% Account VAT (180.75+730.00)
2310 Customers, Domestic Sale Amount (723.00+2920.00) + VAT (180.75+730.00) = 4,553.75
Demonstration Steps
1. Post the sales invoice. a. In the navigation pane, click Departments. b. Click Sales & Marketing, and then click Order Processing. c. On the Order Processing page, click Sales Invoices.
d. On the Sales Invoice List select the new sales invoice to customer 10000, The Cannon Group PLC.
e. On the Home tab, click Post. f. Click Yes to post the sales invoice.
Demonstration: Review a Sales Transactions in G/L
Demonstration Steps
1. Review the posted G/L entries. a. In the navigation pane, click Posted Documents and then click
Posted Sales Invoices. b. Locate and select the sales invoice posted to customer 10000, The
Cannon Group PLC, in the amount of 3,643.00 or 4,553.75, including VAT.
c. On the Actions tab, click Navigate to review the list of all documents and ledger entries related to this posted invoice. When the sales invoice was posted, Microsoft Dynamics NAV also created and posted:
G/L entries
VAT entries
6 - 45 Microsoft Official Training Materials for Microsoft Dynamics ® Your use of this content is subject to your current services agreement

Application Setup in Microsoft Dynamics® NAV 2013 Customer ledger entries
Detailed customer ledger entries
Value entries for the items
d. Select the G/L Entry line and then, on the Home tab, click Show. The General Ledger Entries page appears and shows only entries related to the posted sales invoice.
FIGURE 6.18: G/L ENTRIES RELATED TO THE POSTED SALES INVOICE
e. The G/L accounts and the posted amounts match the expected results earlier.
f. Close all open pages.
6 - 46 Microsoft Official Training Materials for Microsoft Dynamics ® Your use of this content is subject to your current services agreement

Module 6: Set Up Posting Groups
Lab 6.6: Post and Review a Purchase Transaction Scenario
Alicia, the purchasing agent at CRONUS International, Ltd., is responsible for all intercompany purchases. Recently she ordered 25 lamps from Mortimor Car Company at 20.00 LCY (excl VAT) per piece. Today, the items were delivered and Alicia posts the purchase invoice.
Review the posting groups to compare them to the posted G/L entries.
• Vendor posting group: IC – vendor Mortimor Car Company – payables account 5425
• Product posting group: HOME – NATIONAL Purch. Account 7110
• VAT product posting group : VAT25 – NATIONAL Purchase VAT Account 5630 , VAT% 25
Note: In order to complete this lab successfully, you must first complete all previous labs in this module.
Note: Log on as the user Alicia. This user was set up in the module, "Manage User Rights and Profiles." Make sure she is assigned the profile PURCHASING AGENT.
If you have not created this user in the previous module, just assign the PURCHASING AGENT profile to your own user ID in order to follow the detailed steps that follow.
Exercise 1: Post and Review a Purchase Transaction
Task 1: Post and Review a Purchase Transaction
High Level Steps 1. Review Vendor posting setup from the Purchase Invoice header. 2. Review Item posting setup from the Purchase Invoice line. 3. Review the General posting setup. 4. Review the VAT posting setup.
5. Post the purchase invoice. 6. Review a purchase transactions in G/L
6 - 47 Microsoft Official Training Materials for Microsoft Dynamics ® Your use of this content is subject to your current services agreement
Application Setup in Microsoft Dynamics® NAV 2013 Detailed Steps
1. Review Vendor posting setup from the Purchase Invoice header.
a. In the Search box, type Purchase Invoices, and choose the related link.
b. Click New, and press ENTER to automatically assign the Purchase Invoice No.
c. In the Buy-from Vendor No. field, enter 44127914. d. Leave the field by choosing another field or pressing TAB. The
purchase invoice header is populated.
e. In the Vendor Invoice No. field, type MCC001. f. In the Vendor Statistics FactBox, click Vendor No. 44127914 to
open the Vendor Card. g. Expand the Invoicing FastTab. This vendor is set up as follows:
Gen. Bus. Posting Group: NATIONAL
VAT Bus. Posting Group: NATIONAL
Vendor Posting Group: IC
h. Click the Vendor Posting Group field to view all the options, and then click Advanced to review the posting setup for IC vendors.
Account 5425 appears in the Payables Account field. This is the account to which Microsoft Dynamics NAV posts the payables amount (purchase amount including VAT) for this purchase invoice.
i. Close the Vendor Posting Groups and Vendor Card pages. 2. Review Item posting setup from the Purchase Invoice line.
a. Select the purchase invoice lines.
b. In the Type field, enter Item. c. In the No. field, type 1500 and then press TAB. d. In the Quantity field, type "25" and then press ENTER. e. In the Direct Unit Cost Excl. VAT field, type 20.00 and then press
ENTER. f. In the Microsoft Dynamics NAV Application menu, choose
Customize > Customize this page, and then click FactBoxes. g. From the available FactBoxes, select the Purchase Line Details
FactBox and then click Add. h. Click OK to close the Customize Purchase Invoice page. i. In the Purchase Line Details FactBox, click Item No. 1500 to
open the Item Card.
j. Expand the Invoicing FastTab. This item is set up as follows: Gen. Prod. Posting Group: HOME
VAT Prod. Posting Group: VAT25
Inventory Posting Group: RAW MAT
6 - 48 Microsoft Official Training Materials for Microsoft Dynamics ® Your use of this content is subject to your current services agreement
Module 6: Set Up Posting Groups k. Close the Item Card page.
3. Review the General posting setup.
a. In the navigation pane, click Departments. b. Click Administration, and then click Application Setup. c. On the Application Setup page, click Posting Groups and then
click General Posting Setup.
d. Review the posting combination NATIONAL/HOME; account 7110 appears in the Purch. Account field.
e. Close the General Posting Setup page.
When you combine the posting groups of vendor 44127914 and item 1500, Microsoft Dynamics NAV will post 500.00 to account 7110 when the purchase invoice is posted.
4. Review the VAT posting setup. a. In the navigation pane, click Departments.
b. Click Administration, and then click Application Setup. c. On the Application Setup page, click VAT Posting Group and
then click VAT Posting Setup. d. Review the posting combination of NATIONAL and VAT25:
o Account 5630 appears in the Purchase VAT Account field.
o The VAT % field contains 25, so VAT for the purchase of item 1500 is 500.00 x 25% = 125
e. Close the VAT Posting Setup page. 5. Post the purchase invoice.
a. On the Purchase Invoice page, on the Actions tab, click Post. b. Click Yes to post the invoice.
6. Review a purchase transactions in G/L.
a. In the navigation pane, click Posted Documents and then click Posted Purchase Invoices.
b. Locate and select the purchase invoice posted to vendor 44127914 , in the amount of 500.00 or 625.00, including VAT.
c. On the Actions tab, click Navigate to review the G/L entries related to this posted invoice.
d. Select the G/L Entry line, and then, on the Actions tab, click Show. The General Ledger Entries page appears and shows only entries related to the posted purchase invoice.
e. The G/L accounts and the posted amounts match the expected results.
f. Close all open pages.
6 - 49 Microsoft Official Training Materials for Microsoft Dynamics ® Your use of this content is subject to your current services agreement

Application Setup in Microsoft Dynamics® NAV 2013
Module Review Module Review and Takeaways
The three types of posting groups that are used when selling inventory and resources to customers, in addition to buying inventory from vendors are as follows:
• Specific posting groups
• General posting groups
• VAT posting groups
Using the chart of accounts as a guide, posting groups provide the link between the general ledger and the other application areas in Microsoft Dynamics NAV.
To make sure that posting groups are set up correctly and support the defined business strategy, the person in charge of application setup must understand how posting groups are used in Microsoft Dynamics NAV.
Test Your Knowledge
Test your knowledge with the following questions.
1. Which type of posting group is used to identify balance sheet accounts for each subsidiary or supporting ledger?
( ) All posting groups
( ) Specific posting groups
( ) General posting groups
( ) VAT posting groups
2. Which type of posting group is used to identify income statement accounts for each subsidiary or supporting ledger?
( ) All posting groups
( ) Specific posting groups
( ) General posting groups
( ) VAT posting groups
6 - 50 Microsoft Official Training Materials for Microsoft Dynamics ® Your use of this content is subject to your current services agreement

Module 6: Set Up Posting Groups 3. Which of the following does not apply to the definition of VAT?
( ) Tax paid by the end consumer, including businesses
( ) Value-added tax
( ) A transaction tax
( ) Value assessment tax
4. Which of the following is not a specific posting groups?
( ) Item
( ) Customer
( ) Resource
( ) Fixed Asset
5. Which of the following is not assigned general posting groups?
( ) Fixed asset
( ) Resource
( ) Customer
( ) Item
6. Which of the following is not assigned VAT posting groups?
( ) Item
( ) Vendor
( ) Resource
( ) Bank account
6 - 51 Microsoft Official Training Materials for Microsoft Dynamics ® Your use of this content is subject to your current services agreement

Application Setup in Microsoft Dynamics® NAV 2013
Test Your Knowledge Solutions
Module Review and Takeaways
1. Which type of posting group is used to identify balance sheet accounts for each subsidiary or supporting ledger?
( ) All posting groups
(√) Specific posting groups
( ) General posting groups
( ) VAT posting groups
2. Which type of posting group is used to identify income statement accounts for each subsidiary or supporting ledger?
( ) All posting groups
( ) Specific posting groups
(√) General posting groups
( ) VAT posting groups
3. Which of the following does not apply to the definition of VAT?
( ) Tax paid by the end consumer, including businesses
( ) Value-added tax
( ) A transaction tax
(√) Value assessment tax
4. Which of the following is not a specific posting groups?
( ) Item
( ) Customer
(√) Resource
( ) Fixed Asset
6 - 52 Microsoft Official Training Materials for Microsoft Dynamics ® Your use of this content is subject to your current services agreement
Module 6: Set Up Posting Groups 5. Which of the following is not assigned general posting groups?
(√) Fixed asset
( ) Resource
( ) Customer
( ) Item
6. Which of the following is not assigned VAT posting groups?
( ) Item
( ) Vendor
( ) Resource
(√) Bank account
6 - 53 Microsoft Official Training Materials for Microsoft Dynamics ® Your use of this content is subject to your current services agreement

Application Setup in Microsoft Dynamics® NAV 2013
6 - 54 Microsoft Official Training Materials for Microsoft Dynamics ® Your use of this content is subject to your current services agreement