Embed Size (px)
Citation preview
8/6/2019 Module 6 - Reports v7.0
http://slidepdf.com/reader/full/module-6-reports-v70 1/17
1
Module 6: Reporting and VAT
8/6/2019 Module 6 - Reports v7.0
http://slidepdf.com/reader/full/module-6-reports-v70 2/17
2
Contents
Add a New VAT Rate................................................................................... 3
Generate a Standard VAT Return................................................................ 5
Profit and Loss ............................................................................................ 8
Balance Sheet ........................................................................................... 12
Turnover................................................................................................... 15
Year End Process...................................................................................... 17
8/6/2019 Module 6 - Reports v7.0
http://slidepdf.com/reader/full/module-6-reports-v70 3/17
3
Add a New VAT Rate
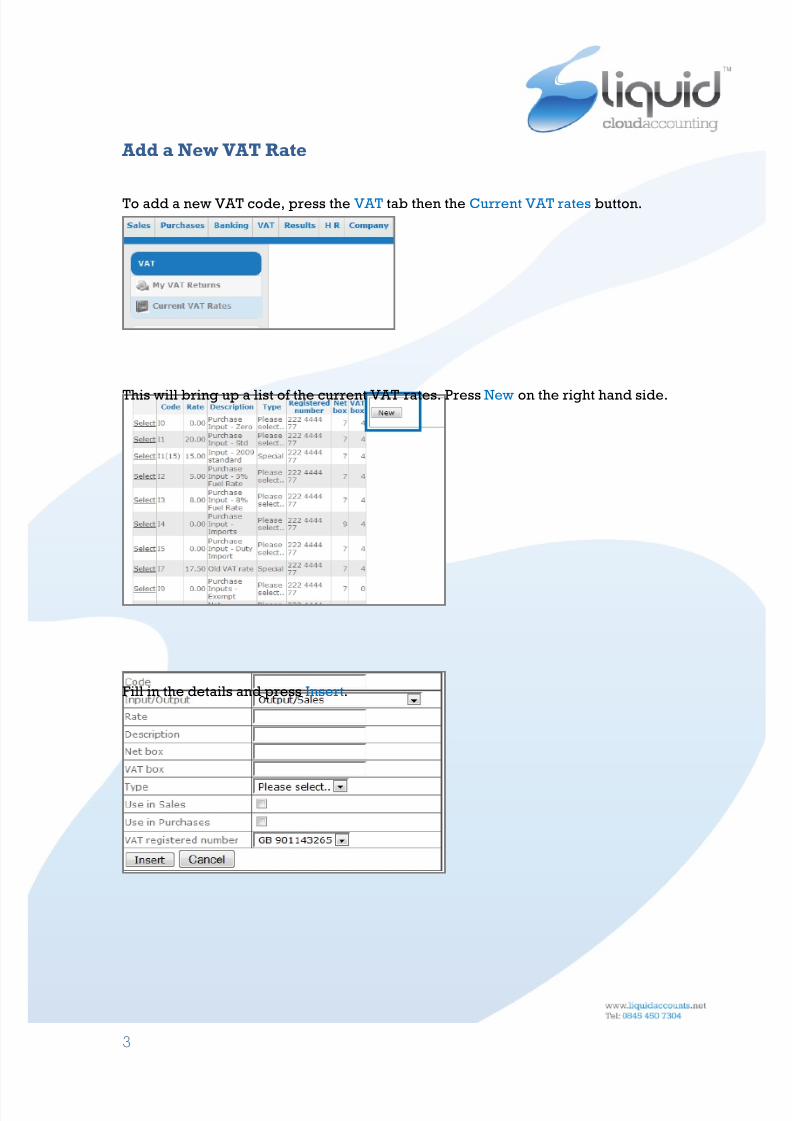
To add a new VAT code, press the VAT tab then the Current VAT rates button.
This will bring up a list of the current VAT rates. Press New on the right hand side.
Fill in the details and press Insert.
8/6/2019 Module 6 - Reports v7.0
http://slidepdf.com/reader/full/module-6-reports-v70 4/17
4
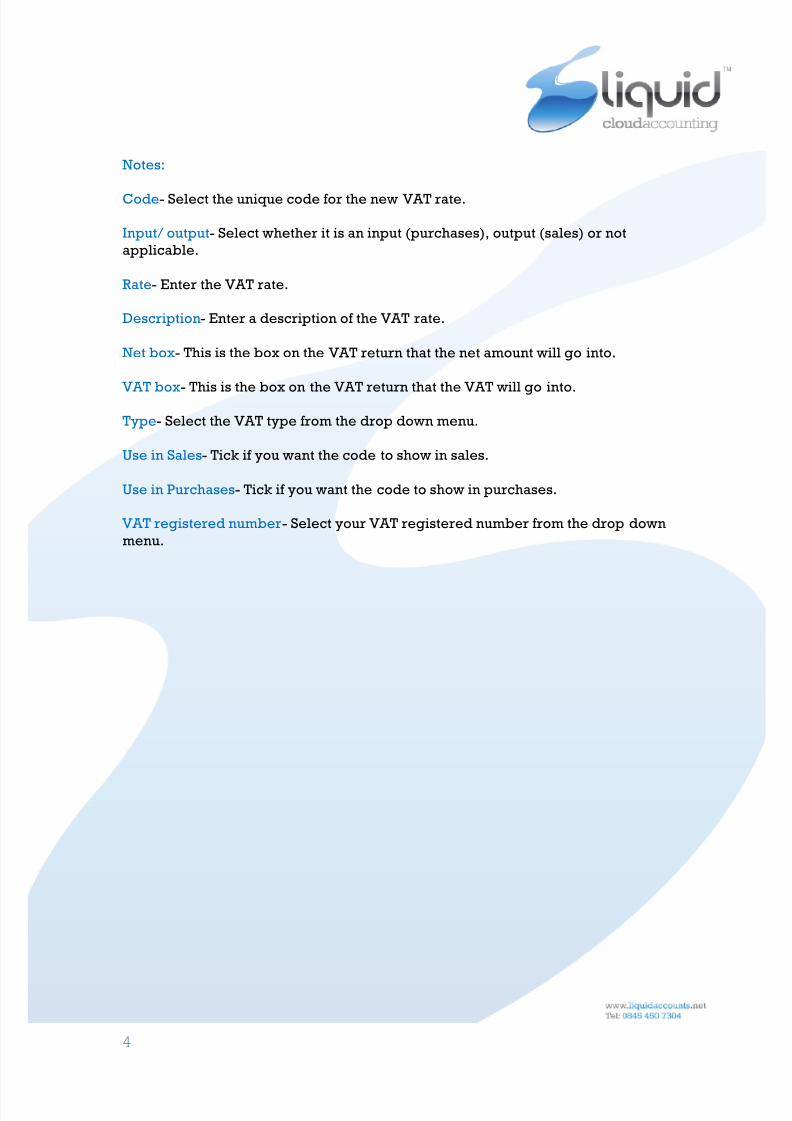
Notes:
Code- Select the unique code for the new VAT rate.
Input/ output- Select whether it is an input (purchases), output (sales) or not
applicable.
Rate- Enter the VAT rate.
Description- Enter a description of the VAT rate.
Net box- This is the box on the VAT return that the net amount will go into.
VAT box- This is the box on the VAT return that the VAT will go into.
Type- Select the VAT type from the drop down menu.
Use in Sales- Tick if you want the code to show in sales.
Use in Purchases- Tick if you want the code to show in purchases.
VAT registered number- Select your VAT registered number from the drop down
menu.
8/6/2019 Module 6 - Reports v7.0
http://slidepdf.com/reader/full/module-6-reports-v70 5/17
5
Generate a Standard VAT Return
This help document is for standard VAT accounting. If you use cash accounting
see the relevant help document. To set up the VAT scheme, go to the Company
details page.
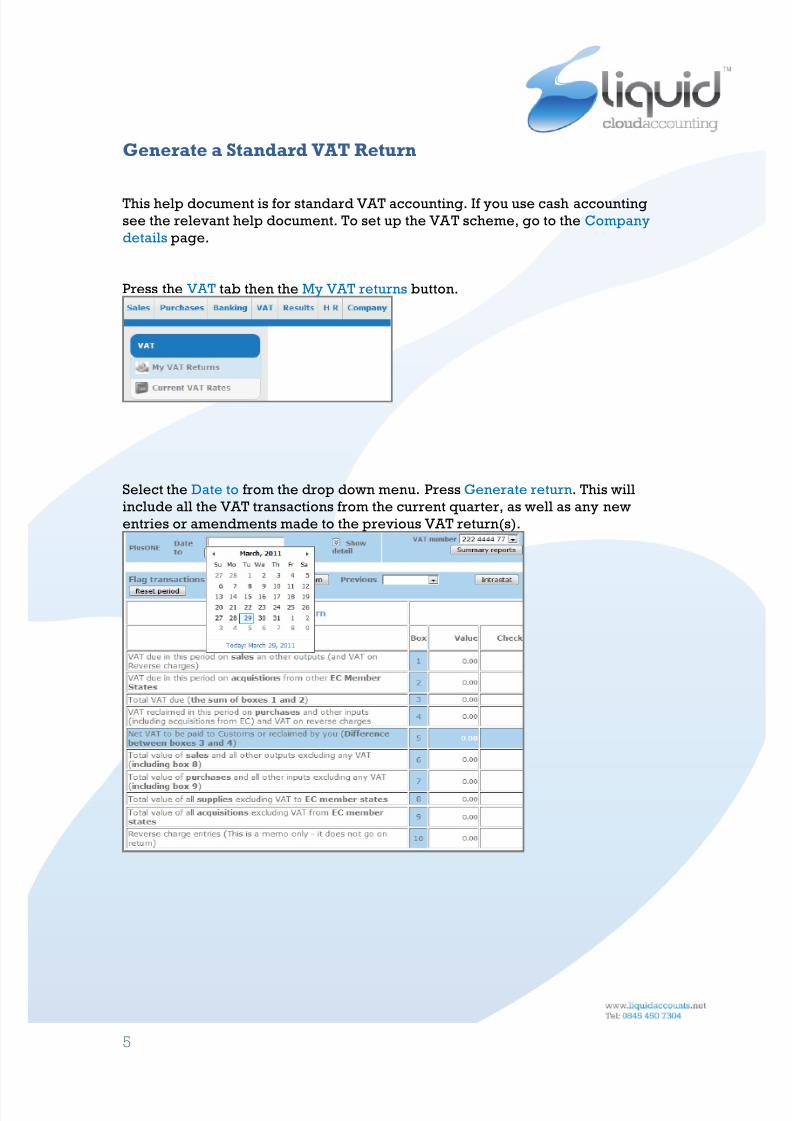
Press the VAT tab then the My VAT returns button.
Select the Date to from the drop down menu. Press Generate return. This will
include all the VAT transactions from the current quarter, as well as any new
entries or amendments made to the previous VAT return(s).

8/6/2019 Module 6 - Reports v7.0
http://slidepdf.com/reader/full/module-6-reports-v70 6/17
6
This will bring up the details of how much VAT you owe or are owed from HMRC.
The value is shown in box 5. This figure is calculated by subtracting box 4 from
box 3. The Check column shows the average amount of VAT paid for all of thesales or purchases in this time period.
Pressing Show detail will bring up a breakdown of the VAT by nominal code, as
well as any items deleted from previous periods. Clicking on an individual VATcode will bring a breakdown of its transactions.

8/6/2019 Module 6 - Reports v7.0
http://slidepdf.com/reader/full/module-6-reports-v70 7/17
7
When you are happy with the figures, press Save return. Please note, until you
save the VAT return it won’t be finalised.
To view previous VAT returns, press the Previous drop down box and select thedate of the VAT return you wish to view.
8/6/2019 Module 6 - Reports v7.0
http://slidepdf.com/reader/full/module-6-reports-v70 8/17
8
Profit and Loss
This help document take you through the profit and loss function. This allows you
to review the profitability of your company.
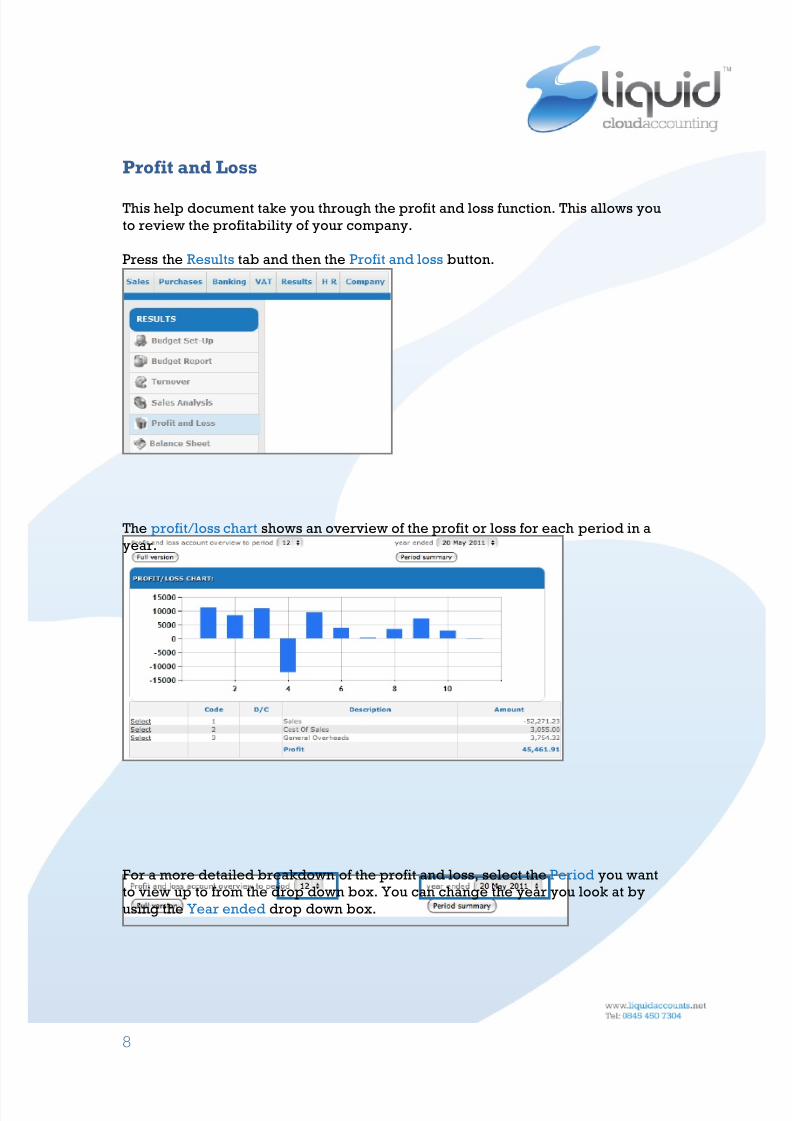
Press the Results tab and then the Profit and loss button.
The profit/loss chart shows an overview of the profit or loss for each period in a
year.
For a more detailed breakdown of the profit and loss, select the Period you want
to view up to from the drop down box. You can change the year you look at by
using the Year ended drop down box.

8/6/2019 Module 6 - Reports v7.0
http://slidepdf.com/reader/full/module-6-reports-v70 9/17
9
Press the Select button next to the Sales, Cost of Sales or General Overheads to
see a breakdown of the nominal codes used. The codes for the chosen area will
then appear on the right.
To see a breakdown of the profit and loss of each nominal code, press on the code
you want to examine. The image below shows the General Overheads’ nominal
codes.
A new window will then open showing every transaction within the time period
selected for that nominal code. To change a nominal code, press the Amend
button next to the transaction you wish to alter.
8/6/2019 Module 6 - Reports v7.0
http://slidepdf.com/reader/full/module-6-reports-v70 10/17
10
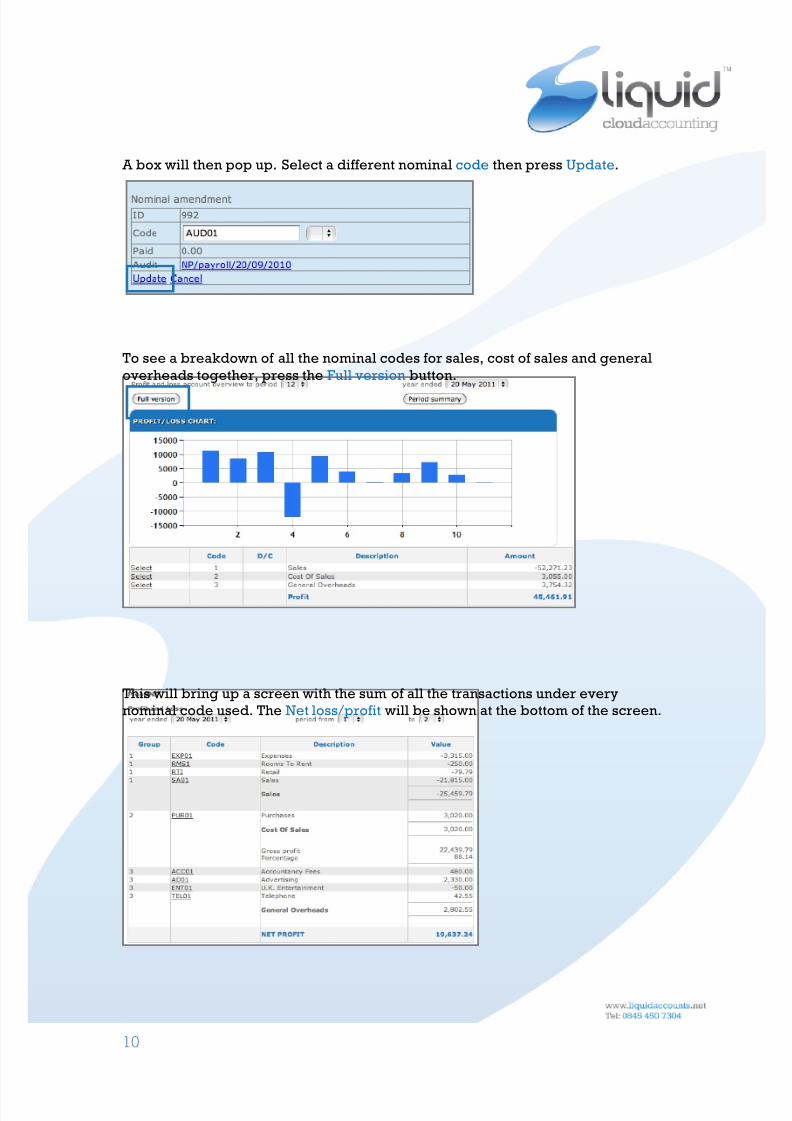
A box will then pop up. Select a different nominal code then press Update.
To see a breakdown of all the nominal codes for sales, cost of sales and general
overheads together, press the Full version button.
This will bring up a screen with the sum of all the transactions under every
nominal code used. The Net loss/profit will be shown at the bottom of the screen.
8/6/2019 Module 6 - Reports v7.0
http://slidepdf.com/reader/full/module-6-reports-v70 11/17
11
The searching criteria can be changed at the top of the screen. The year ended date allows you to choose the year to look at. The period from and to can be
changed to see the profit and loss for a particular period or between set periods.
Clicking on the individual nominal codes will bring up the breakdown of the
transactions within the code and allow you to alter them.
8/6/2019 Module 6 - Reports v7.0
http://slidepdf.com/reader/full/module-6-reports-v70 12/17
12
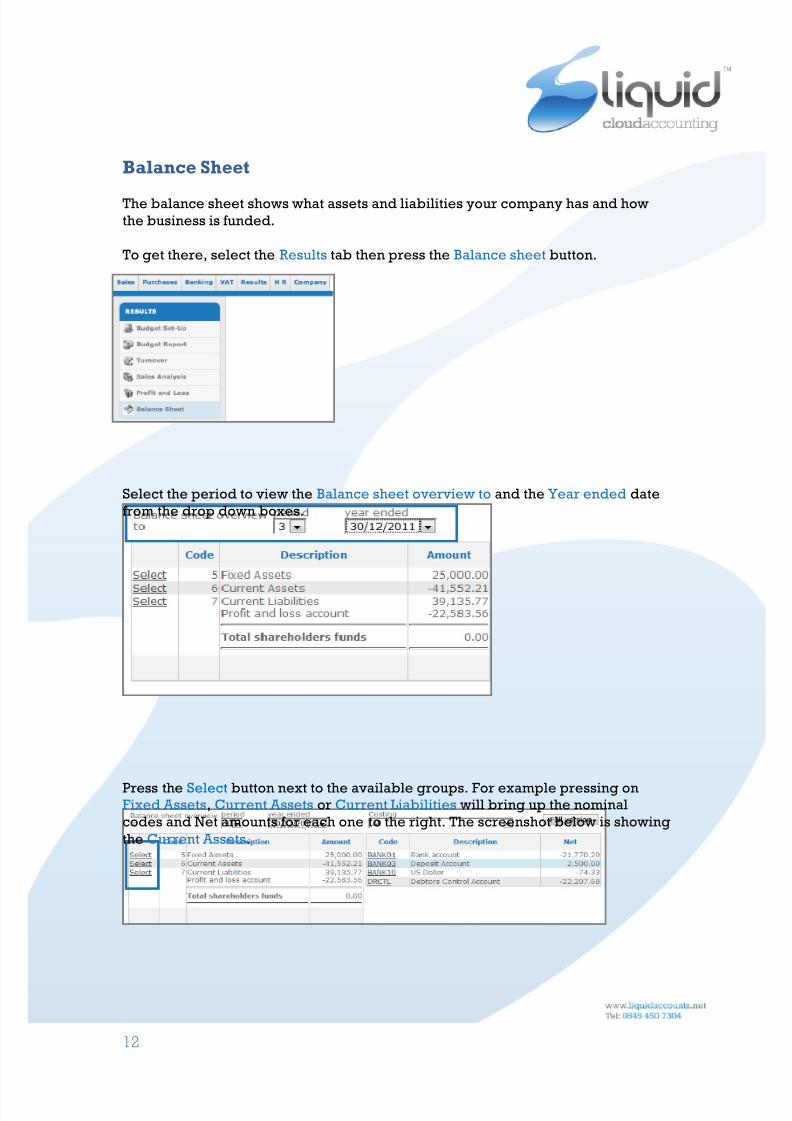
Balance Sheet
The balance sheet shows what assets and liabilities your company has and how
the business is funded.
To get there, select the Results tab then press the Balance sheet button.
Select the period to view the Balance sheet overview to and the Year ended date
from the drop down boxes.
Press the Select button next to the available groups. For example pressing onFixed Assets, Current Assets or Current Liabilities will bring up the nominal
codes and Net amounts for each one to the right. The screenshot below is showing
the Current Assets.
8/6/2019 Module 6 - Reports v7.0
http://slidepdf.com/reader/full/module-6-reports-v70 13/17
13
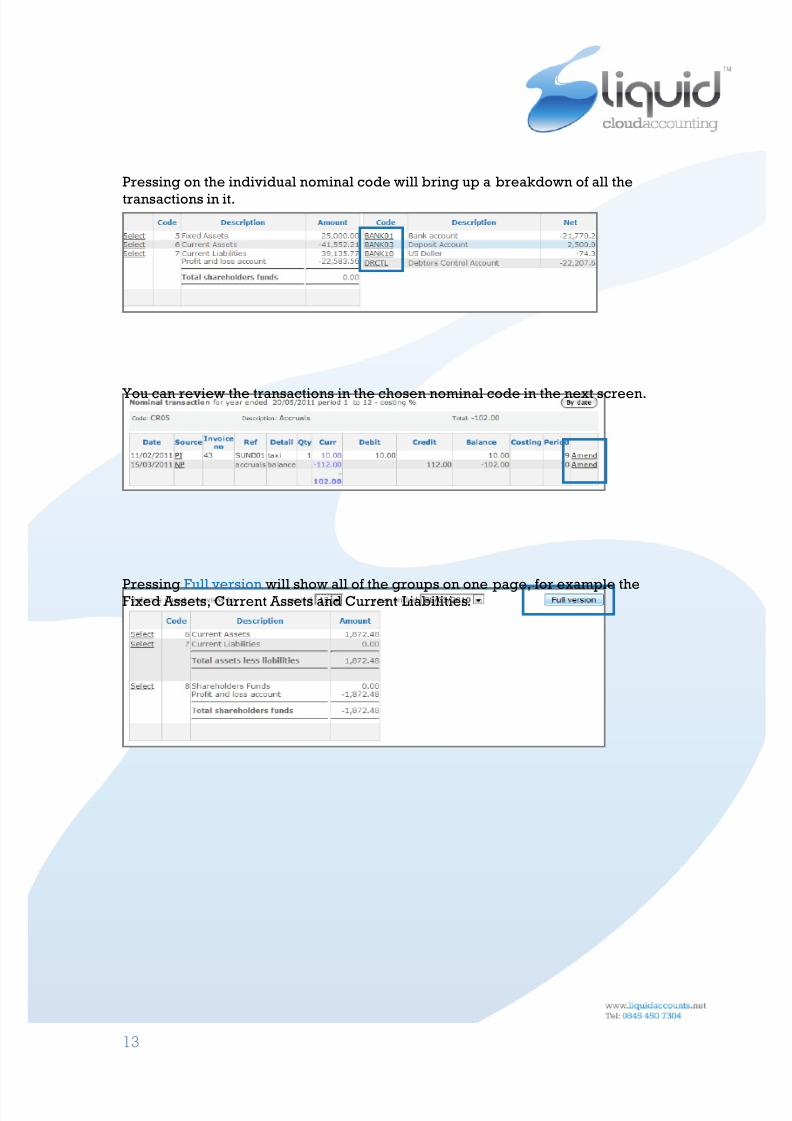
Pressing on the individual nominal code will bring up a breakdown of all the
transactions in it.
You can review the transactions in the chosen nominal code in the next screen.
Pressing Full version will show all of the groups on one page, for example theFixed Assets, Current Assets and Current Liabilities.
8/6/2019 Module 6 - Reports v7.0
http://slidepdf.com/reader/full/module-6-reports-v70 14/17
14
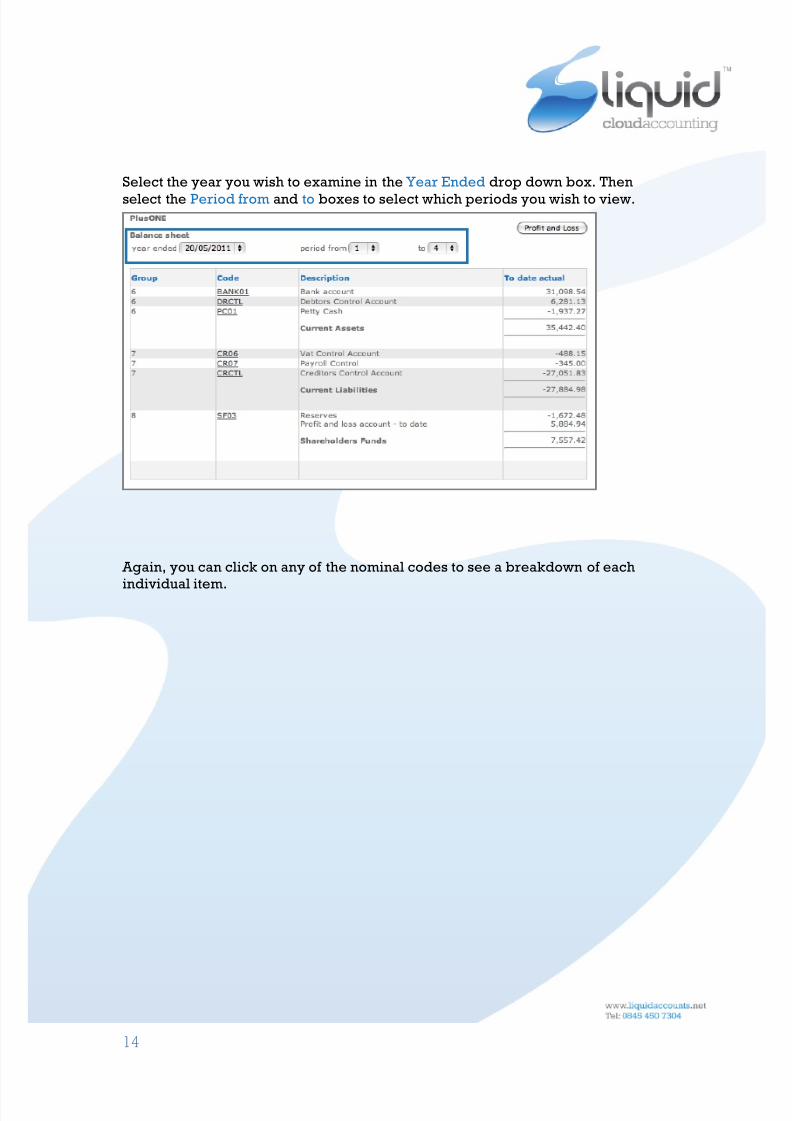
Select the year you wish to examine in the Year Ended drop down box. Then
select the Period from and to boxes to select which periods you wish to view.
Again, you can click on any of the nominal codes to see a breakdown of each
individual item.
8/6/2019 Module 6 - Reports v7.0
http://slidepdf.com/reader/full/module-6-reports-v70 15/17
15
Turnover
The Turnover tab allows you to view your turnover for each customer in a set
period. It will also show you each customer’s turnover as a percentage of your
total.
Press the Results tab and then the Turnover button.
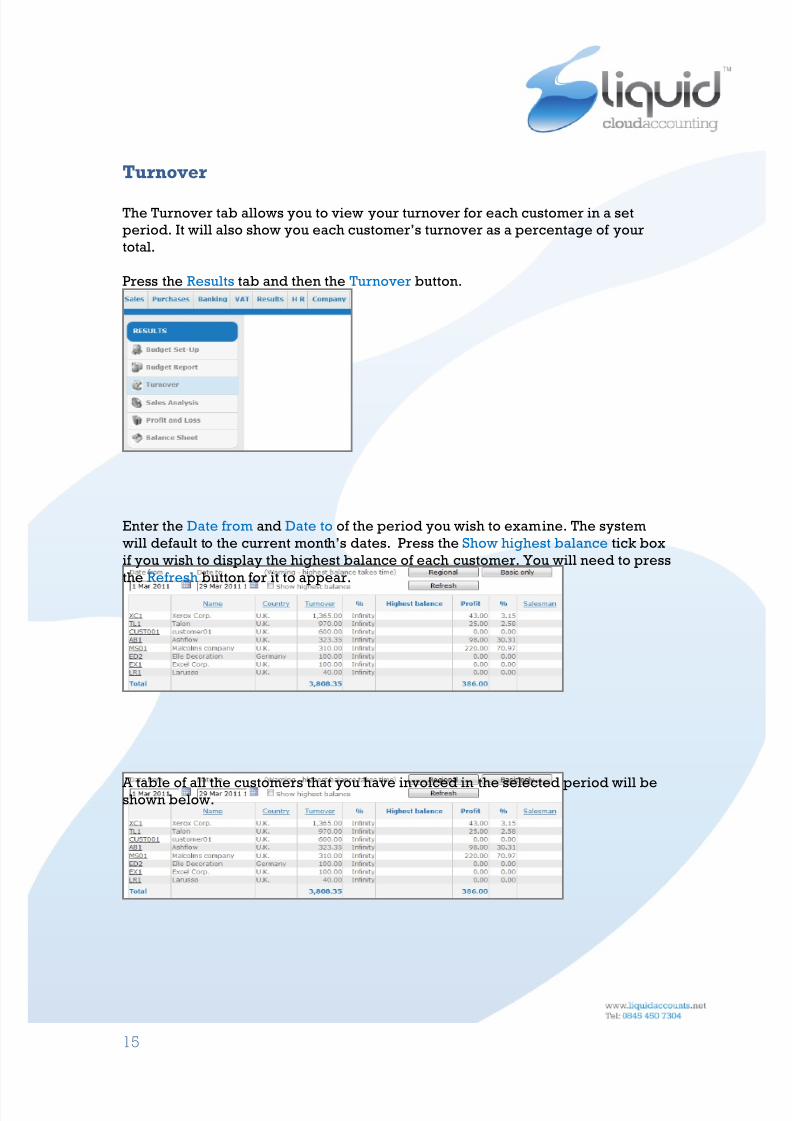
Enter the Date from and Date to of the period you wish to examine. The system
will default to the current month’s dates. Press the Show highest balance tick box
if you wish to display the highest balance of each customer. You will need to press
the Refresh button for it to appear.
A table of all the customers that you have invoiced in the selected period will beshown below.
8/6/2019 Module 6 - Reports v7.0
http://slidepdf.com/reader/full/module-6-reports-v70 16/17
16
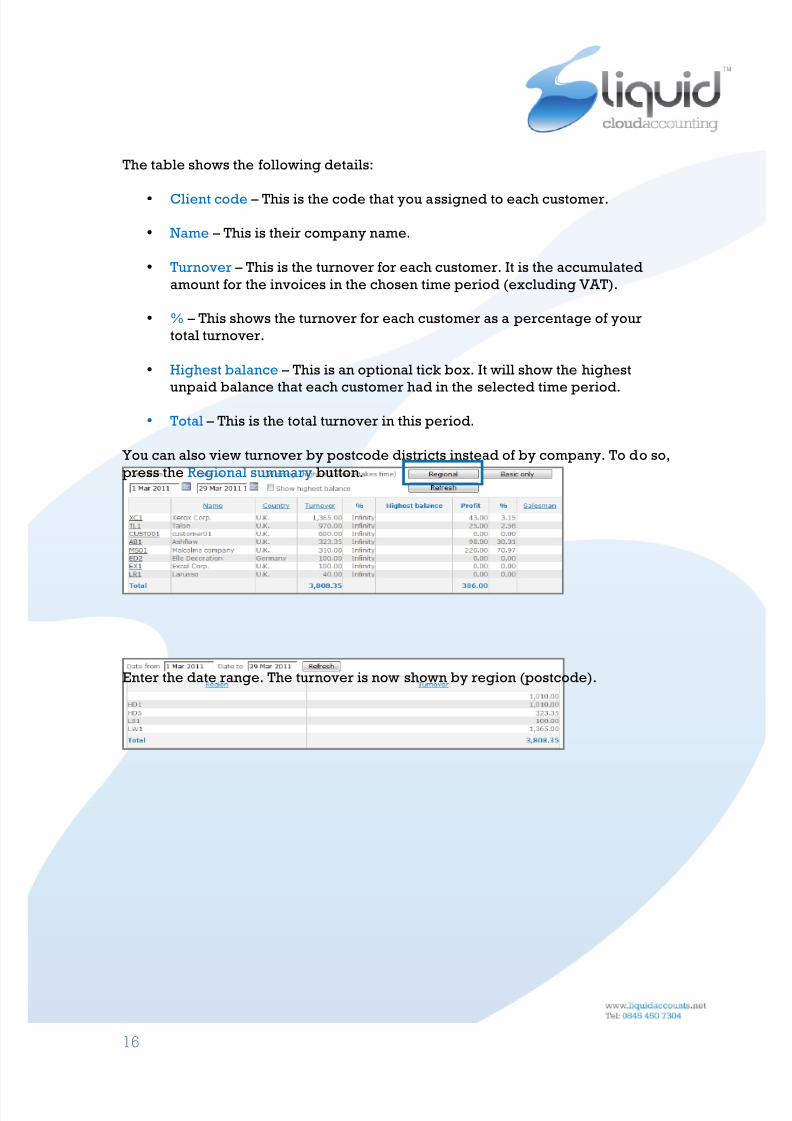
The table shows the following details:
• Client code – This is the code that you assigned to each customer.
• Name – This is their company name.
• Turnover – This is the turnover for each customer. It is the accumulated
amount for the invoices in the chosen time period (excluding VAT).
• % – This shows the turnover for each customer as a percentage of your
total turnover.
• Highest balance – This is an optional tick box. It will show the highest
unpaid balance that each customer had in the selected time period.
• Total – This is the total turnover in this period.
You can also view turnover by postcode districts instead of by company. To do so,
press the Regional summary button.
Enter the date range. The turnover is now shown by region (postcode).
8/6/2019 Module 6 - Reports v7.0
http://slidepdf.com/reader/full/module-6-reports-v70 17/17
17
Year End Process
Processing the year end is done at the end of your company’s financial year. Itfinalises the previous year’s accounts and stops any new invoices being posted
into it, although the year can be re-opened if required. This allows the opening
balances for the new year to be calculated.
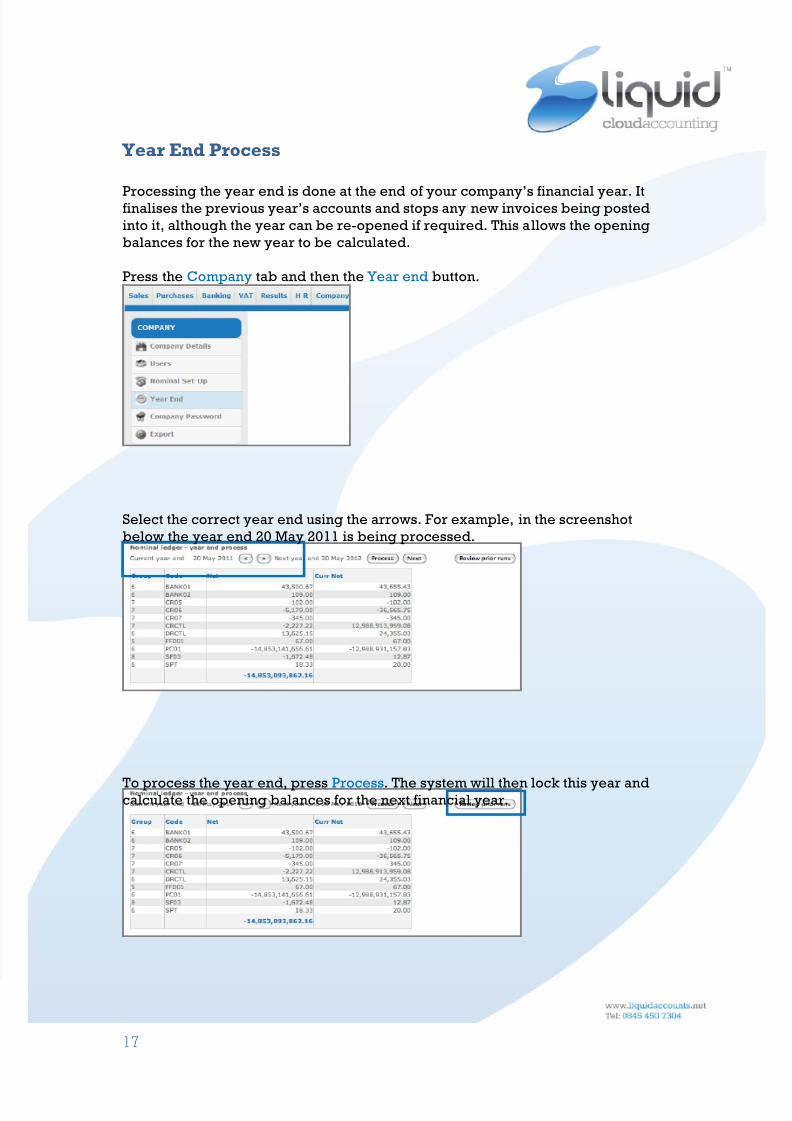
Press the Company tab and then the Year end button.
Select the correct year end using the arrows. For example, in the screenshot
below the year end 20 May 2011 is being processed.
To process the year end, press Process. The system will then lock this year andcalculate the opening balances for the next financial year.