Embed Size (px)
DESCRIPTION
Module 4 Forms Based Authentication
Citation preview

Microsoft® Virtual Labs Module 4: Forms Based Authentication

Module 4- Forms Based Authentication
Table of Contents
Module 4: Forms Based Authentication ..................................................................................... 1
Exercise 1 Enable Forms Based Authentication on a SharePoint Web Application ...................................................... 2
Module 4- Forms Based Authentication
Page 1 of 13
Module 4: Forms Based Authentication
Objectives
After completing this lab, you will be better able to:
Enable Forms Based Authentication on a SharePoint Web Application
Scenario In this lab, you will first create FBA users and roles using Web Site
Administration Tool. Then you will create a web application and Site Collection
for the new FBA lab site, create the new Shared Service Provider, and enable
Forms Authentication in FbaLab Extranet zone. Finally, you will extend the new
Shared Service Provider to enable FBA.
Estimated Time to
Complete This Lab
60 Minutes
Computers used in this
Lab Image014-5
The password for the Administrator account on all computers in this lab is:
pass@word1

Module 4- Forms Based Authentication
Page 2 of 13
Exercise 1 Enable Forms Based Authentication on a SharePoint Web Application
Tasks Detailed Steps
Complete the following
task on:
Image014-5
1. Review and run the
ASP.NET SQL
Server Setup Wizard
a. Ensure you are logged into the server as user name litwareinc\administrator with
password pass@word1
Note: In wizard mode there are several screens to be navigated
In scriptable mode all settings can be supplied as command line parameters
b. Open a command prompt.
c. Change the directory to C:\windows\Microsoft.net\Framework\v2.0.50727
d. At the command prompt, type run aspnet_regsql.exe /? and press Enter.
e. Then type the following command and press Enter: run aspnet_regsql.exe -S
127.0.0.1 E -A all -d AspNetMembershipRoles-FbaLab –Q
f. Issue the command and observe the output is error free.
2. Confirm the
database has been
created
a. Load up SQL Server Management Studio.
b. Connect to default server.
c. Expand the Object Explorer, then the Databases node to view
AspNetMembershipRoles-FbaLab
d. Examine tables, stored procedures, etc.
e. Close SQL Server Management Studio
3. Create FBA users
and roles using Web
Site Administration
Tool
a. Load Visual Studio 2008
b. Create a new file system web site
Note: We are doing this merely to access the WSAT we will never actually use the web
site created here
File | Open | Website
Or
SHIFT + ALT + O
Ensure: File system in left panel
c. Click the folder icon top right to create new site
d. Confirm path is C:\InetPub\wwwroot\FbaLab_admin
e. Create the site
f. Add a web.config file to the solution. Right click C:\...\FbaLab_admin, select
Add | New Item. In the item choose dialog select web configuration file, set the
language to Visual C# and hit Add.
Note: We will now supply some configuration which will link us to the database we
created earlier
g. Replace the connectionStrings node with this:
<connectionStrings>
<add name="AspNetDbFBALabConnectionString"
connectionString="Data Source=localhost;Initial
Catalog=AspNetMembershipRoles-FbaLab;Integrated
Security=True" />
<add name="fbaSql"
connectionString="server=(local);database=AdventureWorksAs

Module 4- Forms Based Authentication
Page 3 of 13
Tasks Detailed Steps
pnetdb;Integrated Security=SSPI;"
providerName="System.Data.SqlClient" />
</connectionStrings>
h. Inside the <system.web> node paste this:
<!-- membership provider -->
<membership defaultProvider="FBALabMember">
<providers>
<add
connectionStringName="AspNetDbFBALabConnectionString"
enablePasswordRetrieval="false"
enablePasswordReset="true"
requiresQuestionAndAnswer="false"
applicationName="FbaLab"
requiresUniqueEmail="false"
passwordFormat="Hashed"
maxInvalidPasswordAttempts="5"
minRequiredPasswordLength="1"
minRequiredNonalphanumericCharacters="0"
passwordAttemptWindow="10"
passwordStrengthRegularExpression=""
name="FBALabMember"
type="System.Web.Security.SqlMembershipProvider,System.Web
,Version=2.0.0.0,Culture=neutral,PublicKeyToken=b03f5f7f11
d50a3a" />
</providers>
</membership>
<!-- role provider -->
<roleManager enabled="true"
defaultProvider="FBALabRole">
<providers>
<add
connectionStringName="AspNetDbFBALabConnectionString"
applicationName="FbaLab"
name="FBALabRole"
type="System.Web.Security.SqlRoleProvider,System.Web,Versi
on=2.0.0.0,Culture=neutral,PublicKeyToken=b03f5f7f11d50a3a
" />
</providers>
</roleManager>
i. Now we fire up the WSAT. Visual Studio top menu | Website | ASP.NET
Configuration. The tool loads up in a browser window.
j. If the front page mentions “Site is using windows authentication”, close the tool.
k. Back in web.config replace the <authentication> node with this:
<authentication mode="Forms">
<forms loginUrl="/pages/login.aspx"
defaultUrl="/pages/default.aspx" />
</authentication>

Module 4- Forms Based Authentication
Page 4 of 13
Tasks Detailed Steps
l. Reload the WSAT. Visual Studio top menu Website | ASP.NET Configuration.
m. Configure provider. Use the second option, select a different provider for each
feature (Advanced).
n. Confirm on the screen now displayed that the tool has picked up the values in our
web.config.
Membership Provider
FBALabMember
Role Provider
FBALabRole
Note: Now you will add some Members and Roles
o. Click the Security tab
p. Create and manage Roles
q. Add the following Roles
FbaLabAdmins
FbaLabAllUsers
r. Click back on Security tab and hit Manage Users
s. Add two users:
User Name: FbaLabUser
Password: pass@word1
E-mail: [email protected]
Roles: FbaLabAllUsers
User Name: FbaLabAdmin
Password: pass@word1
E-mail: [email protected]
Roles: FbaLabAllUsers, FbaLabAdmins
4. Create a web
application and Site
Collection for the
new FBA lab site
a. Open Central Administration. Start | All Programs | Administrative Tools |
SharePoint 3.0 Central Administration.
b. Go to Create a new Web application. Application Management | Create or
extend Web application | Create a new Web application.
c. Create SharePoint application for lab site
IIS Settings
Description: FbaLab
Port: 80
Host Header: FbaLab
Security Configuration
Default settings
Load Balanced URL
Default settings
Module 4- Forms Based Authentication
Page 5 of 13
Tasks Detailed Steps
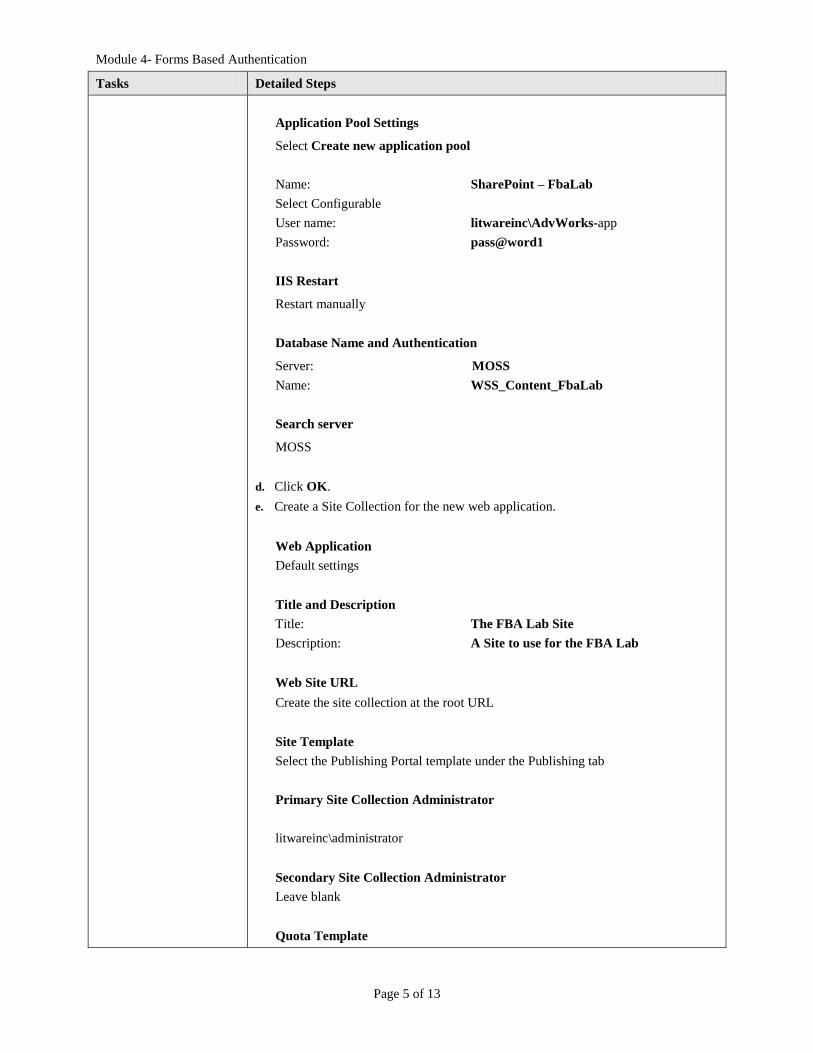
Application Pool Settings
Select Create new application pool
Name: SharePoint – FbaLab
Select Configurable
User name: litwareinc\AdvWorks-app
Password: pass@word1
IIS Restart
Restart manually
Database Name and Authentication
Server: MOSS
Name: WSS_Content_FbaLab
Search server
MOSS
d. Click OK.
e. Create a Site Collection for the new web application.
Web Application
Default settings
Title and Description
Title: The FBA Lab Site
Description: A Site to use for the FBA Lab
Web Site URL
Create the site collection at the root URL
Site Template
Select the Publishing Portal template under the Publishing tab
Primary Site Collection Administrator
litwareinc\administrator
Secondary Site Collection Administrator
Leave blank
Quota Template

Module 4- Forms Based Authentication
Page 6 of 13
Tasks Detailed Steps
Default values
f. Click OK
5. Create a web
application for the
new Shared Services
Provider
a. Go to Create a new Web application. Application Management | Create or
extend Web application | Create a new Web application.
b. Create SharePoint application for the new SSP
IIS Settings
Description: SspFba
Port: 80
Host Header: SspFba
Security Configuration
Default settings
Load Balanced URL
Default settings
Application Pool Settings
Select Create new application pool
Name: SharePoint – SspFba
Select Configurable
User name: litwareinc\AdvWorks-ssp-app
Password: pass@word1
IIS Restart
Restart manually
Database Name and Authentication
Server: MOSS
Name: WSS_Content_SspFba
Search server
MOSS
c. Click OK.
6. Create the new
Shared Service
Provider
a. Go to Shared Services Administration. Click link in quick launch panel on left
hand side.
b. Create new SSP. Click on New SSP.
SSP Name
Module 4- Forms Based Authentication
Page 7 of 13
Tasks Detailed Steps
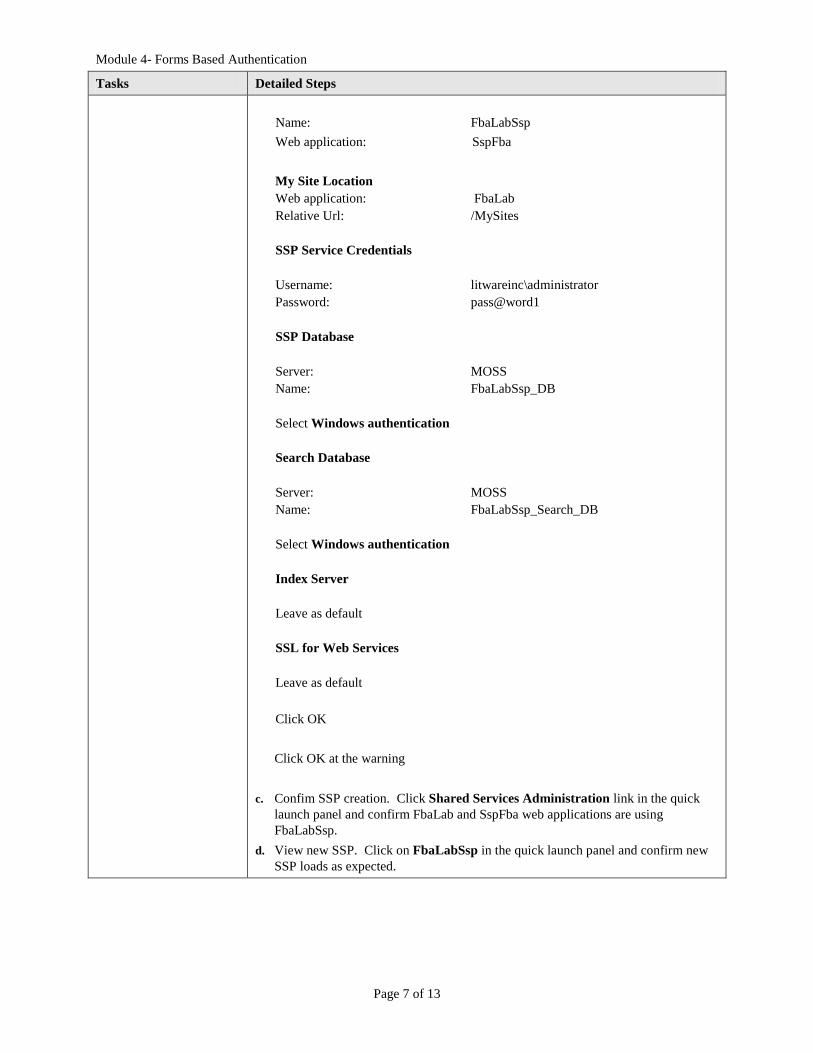
Name: FbaLabSsp
Web application: SspFba
My Site Location
Web application: FbaLab
Relative Url: /MySites
SSP Service Credentials
Username: litwareinc\administrator
Password: pass@word1
SSP Database
Server: MOSS
Name: FbaLabSsp_DB
Select Windows authentication
Search Database
Server: MOSS
Name: FbaLabSsp_Search_DB
Select Windows authentication
Index Server
Leave as default
SSL for Web Services
Leave as default
Click OK
Click OK at the warning
c. Confim SSP creation. Click Shared Services Administration link in the quick
launch panel and confirm FbaLab and SspFba web applications are using
FbaLabSsp.
d. View new SSP. Click on FbaLabSsp in the quick launch panel and confirm new
SSP loads as expected.

Module 4- Forms Based Authentication
Page 8 of 13
Tasks Detailed Steps
7. Update the Hosts file a. Open Hosts file in Notepad. Start | Run, enter notepad
C:\windows\system32\drivers\etc\hosts. Then click OK.
b. Add lab domain information to Hosts file
# FbaLab additions
#
127.0.0.1 FbaLab www.FbaLab.com SspFba
::1 FbaLab
# End FbaLab additions
c. Save changes and close Notepad.
d. Check Hosts information updated successfully. Browse to http://fbalab. Confirm
FbaLab site loads as expected.
8. Extend the FbaLab
SharePoint
application to the
Internet zone
a. Open Central Administration: Start | All Programs | Administrative Tools |
SharePoint 3.0 Central Administration.
b. Go to Extend an existing Web application. Application Management | Create or
extend Web application | Extend an existing Web application
c. Extend FbaLab site to Extranet zone
Web Application
http://fbalab/
IIS Web Site
Select Create a new IIS web site
Description: www.FbaLab.com
Port: 80
Host Header: www.FbaLab.com
Security Configuration
Default settings
Load Balanced URL
Select Extranet
d. Click OK
e. Check FbaLab authentication providers. Under Application Security, click on
Authentication Providers. Set web application to http://fbalab. Confirm both
Default and Extranet zones are present and set to Windows as Membership
Provider.
f. Confirm Extranet sign in prompt. Browse to http://www.fbalab.com/.
Username: litwareinc\administrator
Password: pass@word1
9. Add provider
information to
web.config files
a. Navigate to SharePoint IIS web sites directory. Open Windows Explorer, go to
C:\Inetpub\wwwroot\wss\VirtualDirectories.
b. Update FbaLab sites web.configs. Open the following web.configs in Notepad:
\FbaLab\web.config

Module 4- Forms Based Authentication
Page 9 of 13
Tasks Detailed Steps
\www.FbaLab.com\web.config
c. Make the following changes in both files:
Replace the <system.web> node with:
<connectionStrings>
<add name="AspNetDbFBALabConnectionString"
connectionString="Data Source=localhost;Initial
Catalog=AspNetMembershipRoles-FbaLab;Integrated
Security=True" />
</connectionStrings>
<system.web>
<!-- membership provider -->
<membership defaultProvider="FBALabMember">
<providers>
<add
connectionStringName="AspNetDbFBALabConnectionString"
enablePasswordRetrieval="false"
enablePasswordReset="true"
requiresQuestionAndAnswer="false"
applicationName="FbaLab"
requiresUniqueEmail="false"
passwordFormat="Hashed"
maxInvalidPasswordAttempts="5"
minRequiredPasswordLength="1"
minRequiredNonalphanumericCharacters="0"
passwordAttemptWindow="10"
passwordStrengthRegularExpression=""
name="FBALabMember"
type="System.Web.Security.SqlMembershipProvider,System.Web
,Version=2.0.0.0,Culture=neutral,PublicKeyToken=b03f5f7f11
d50a3a" />
</providers>
</membership>
<!-- role provider -->
<roleManager enabled="true"
defaultProvider="FBALabRole">
<providers>
<add
connectionStringName="AspNetDbFBALabConnectionString"
applicationName="FbaLab"
name="FBALabRole"
type="System.Web.Security.SqlRoleProvider,System.Web,Versi
on=2.0.0.0,Culture=neutral,PublicKeyToken=b03f5f7f11d50a3a
" />
</providers>
</roleManager>
d. Update Central Admin and SSP sites web.configs. Open the following
web.configs in Notepad:
\27708\web.config

Module 4- Forms Based Authentication
Page 10 of 13
Tasks Detailed Steps
\SspFba\web.config
e. Make the following changes in both files:
Add the following to the <connectionStrings> section:
<add name="AspNetDbFBALabConnectionString"
connectionString="Data Source=localhost;Initial
Catalog=AspNetMembershipRoles-FbaLab;Integrated
Security=True" />
Add the following to the <membership><providers> section:
<add
connectionStringName="AspNetDbFBALabConnectionString"
enablePasswordRetrieval="false"
enablePasswordReset="true"
requiresQuestionAndAnswer="false"
applicationName="FbaLab"
requiresUniqueEmail="false"
passwordFormat="Hashed"
maxInvalidPasswordAttempts="5"
minRequiredPasswordLength="1"
minRequiredNonalphanumericCharacters="0"
passwordAttemptWindow="10"
passwordStrengthRegularExpression=""
name="FBALabMember"
type="System.Web.Security.SqlMembershipProvider,System.Web
,Version=2.0.0.0,Culture=neutral,PublicKeyToken=b03f5f7f11
d50a3a" />
f. Add the following to the <roleManager><providers> section:
<add
connectionStringName="AspNetDbFBALabConnectionString"
applicationName="FbaLab"
name="FBALabRole"
type="System.Web.Security.SqlRoleProvider,System.Web,Versi
on=2.0.0.0,Culture=neutral,PublicKeyToken=b03f5f7f11d50a3a
" />
g. Save and close all four web.config files.
10. Enable Forms
Authentication in
FbaLab Extranet
zone
a. Open Central Administration: Start | All Programs | Administrative Tools |
SharePoint 3.0 Central Administration.
b. Go to Authentication Providers: Application Management | Authentication
Providers.
c. Select Extranet zone of FbaLab web application.
d. Enable forms based authentication for Extranet zone.
Web Application: http://fbalab/
Authentication Type: Forms
Anonymous Access: Enabled
Membership Provider: FBALabMember
Role Manager: FBALabRole
Client Integration: No

Module 4- Forms Based Authentication
Page 11 of 13
Tasks Detailed Steps
e. Click OK
f. Add an FBA site collection administrator to FbaLab site. Browse to
http://FbaLab. Site Actions Menu | Site Settings | Modify All Site Settings |
Users and Permissions | Site Collection Administrators
g. Add fbalabadmin to the list of site collection administrators
h. Click OK
i. Reset IIS. Start | Run, type IISRESET, then click OK.
j. Enable anonymous access on FbaLab site. Browse to http://www.fbalab.com/
Username: fbalabadmin
Password: pass@word1
k. Site Actions Menu | Site Settings | Modify All Site Settings
l. Users and Permissions | Advanced Permissions
m. From the Settings menu, select Anonymous Access
n. Select Entire Web Site and click OK
o. Now select Sign Out from the Welcome menu and close the browser to fully
log out
p. Log out of the site. Select Sign Out from the Welcome menu and close the
browser.
q. Confirm anonymous access is enabled. Browse http://www.fbalab.com/.
Confirm that you are not prompted to sign in and the site loads the homepage as
expected.
11. Extend the new
Shared Service
Provider to enable
FBA
a. Open Central Administration: Start | All Programs | Administrative Tools |
SharePoint 3.0 Central Administration.
b. Go to Extend an existing Web application: Application Management | Create or
extend Web application | Extend an existing Web application.
c. Extend SspFba site to Internet zone:
Web Application
http://sspfba/
IIS Web Site
Select Create a new IIS web site
Description: FbaLab_ssp_FBA
Port: 80
Host Header: FbaLab_ssp_FBA
Security Configuration
Default settings
Load Balanced URL
Select Internet
d. Click OK
e. Go to Authentication Providers: Application Management | Authentication
Module 4- Forms Based Authentication
Page 12 of 13
Tasks Detailed Steps
Providers.
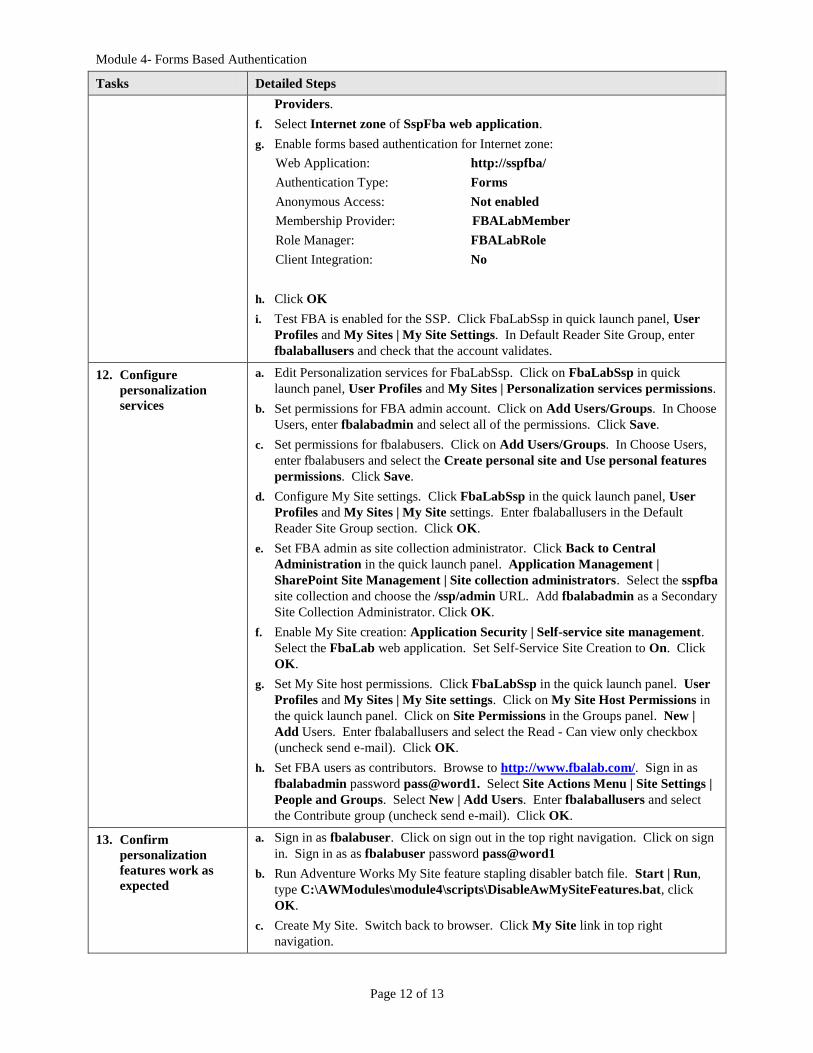
f. Select Internet zone of SspFba web application.
g. Enable forms based authentication for Internet zone:
Web Application: http://sspfba/
Authentication Type: Forms
Anonymous Access: Not enabled
Membership Provider: FBALabMember
Role Manager: FBALabRole
Client Integration: No
h. Click OK
i. Test FBA is enabled for the SSP. Click FbaLabSsp in quick launch panel, User
Profiles and My Sites | My Site Settings. In Default Reader Site Group, enter
fbalaballusers and check that the account validates.
12. Configure
personalization
services
a. Edit Personalization services for FbaLabSsp. Click on FbaLabSsp in quick
launch panel, User Profiles and My Sites | Personalization services permissions.
b. Set permissions for FBA admin account. Click on Add Users/Groups. In Choose
Users, enter fbalabadmin and select all of the permissions. Click Save.
c. Set permissions for fbalabusers. Click on Add Users/Groups. In Choose Users,
enter fbalabusers and select the Create personal site and Use personal features
permissions. Click Save.
d. Configure My Site settings. Click FbaLabSsp in the quick launch panel, User
Profiles and My Sites | My Site settings. Enter fbalaballusers in the Default
Reader Site Group section. Click OK.
e. Set FBA admin as site collection administrator. Click Back to Central
Administration in the quick launch panel. Application Management |
SharePoint Site Management | Site collection administrators. Select the sspfba
site collection and choose the /ssp/admin URL. Add fbalabadmin as a Secondary
Site Collection Administrator. Click OK.
f. Enable My Site creation: Application Security | Self-service site management.
Select the FbaLab web application. Set Self-Service Site Creation to On. Click
OK.
g. Set My Site host permissions. Click FbaLabSsp in the quick launch panel. User
Profiles and My Sites | My Site settings. Click on My Site Host Permissions in
the quick launch panel. Click on Site Permissions in the Groups panel. New |
Add Users. Enter fbalaballusers and select the Read - Can view only checkbox
(uncheck send e-mail). Click OK.
h. Set FBA users as contributors. Browse to http://www.fbalab.com/. Sign in as
fbalabadmin password pass@word1. Select Site Actions Menu | Site Settings |
People and Groups. Select New | Add Users. Enter fbalaballusers and select
the Contribute group (uncheck send e-mail). Click OK.
13. Confirm
personalization
features work as
expected
a. Sign in as fbalabuser. Click on sign out in the top right navigation. Click on sign
in. Sign in as as fbalabuser password pass@word1
b. Run Adventure Works My Site feature stapling disabler batch file. Start | Run,
type C:\AWModules\module4\scripts\DisableAwMySiteFeatures.bat, click
OK.
c. Create My Site. Switch back to browser. Click My Site link in top right
navigation.

Module 4- Forms Based Authentication
Page 13 of 13
Tasks Detailed Steps
d. Add FbaLab site homepage to My Links. Browse to http://www.fbalab.com.
Click on My Links | Add To My Links. Click on My Links | Manage Links.
Confirm Home page exists in My Links.
e. Run Adventure Works My Site feature stapling enabler batch file. Start | Run,
type C:\AWModules\module4\scripts\EnableAwMySiteFeatures.bat, click
OK.


![[MS-OFBA]: Office Forms Based Authentication Protocolinteroperability.blob.core.windows.net/files/MS-OFBA/[MS-OFBA].pdf · [MS-OFBA]: Office Forms Based Authentication Protocol Intellectual](https://img.pdfslide.us/doc/110x75/5ad264207f8b9afa798ca5a4/ms-ofba-office-forms-based-authentication-prot-ms-ofbapdfms-ofba-office.jpg)