Embed Size (px)
DESCRIPTION
folio for module 4 submission
Citation preview
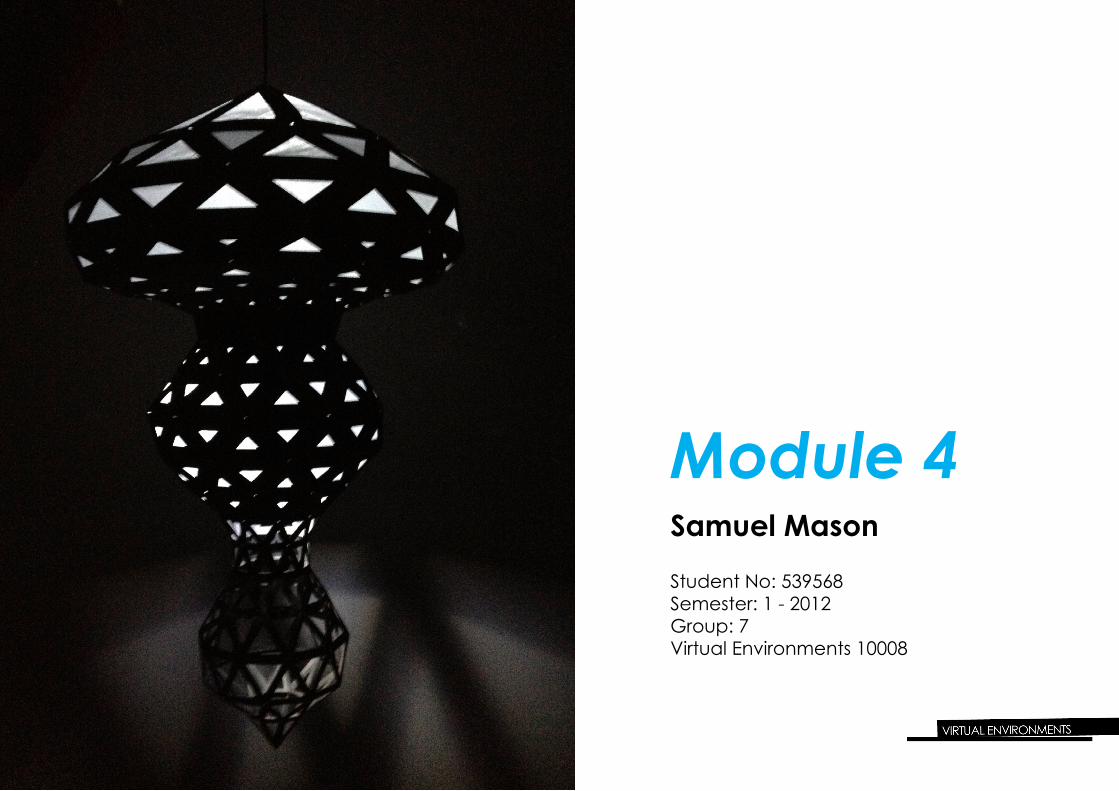
Samuel MasonStudent No: 539568Semester: 1 - 2012Group: 7Virtual Environments 10008
Module 4
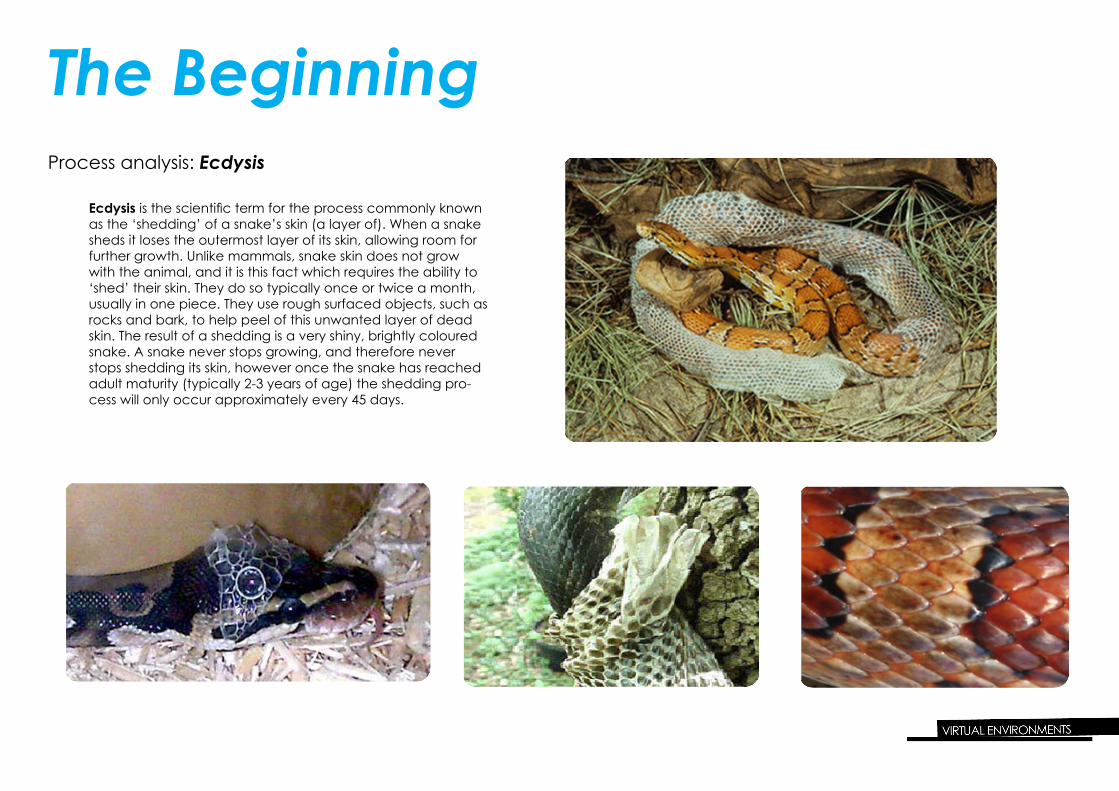
Process analysis: Ecdysis
Ecdysis is the scientific term for the process commonly known as the ‘shedding’ of a snake’s skin (a layer of). When a snake sheds it loses the outermost layer of its skin, allowing room for further growth. Unlike mammals, snake skin does not grow with the animal, and it is this fact which requires the ability to ‘shed’ their skin. They do so typically once or twice a month, usually in one piece. They use rough surfaced objects, such as rocks and bark, to help peel of this unwanted layer of dead skin. The result of a shedding is a very shiny, brightly coloured snake. A snake never stops growing, and therefore never stops shedding its skin, however once the snake has reached adult maturity (typically 2-3 years of age) the shedding pro-cess will only occur approximately every 45 days.
The Beginning
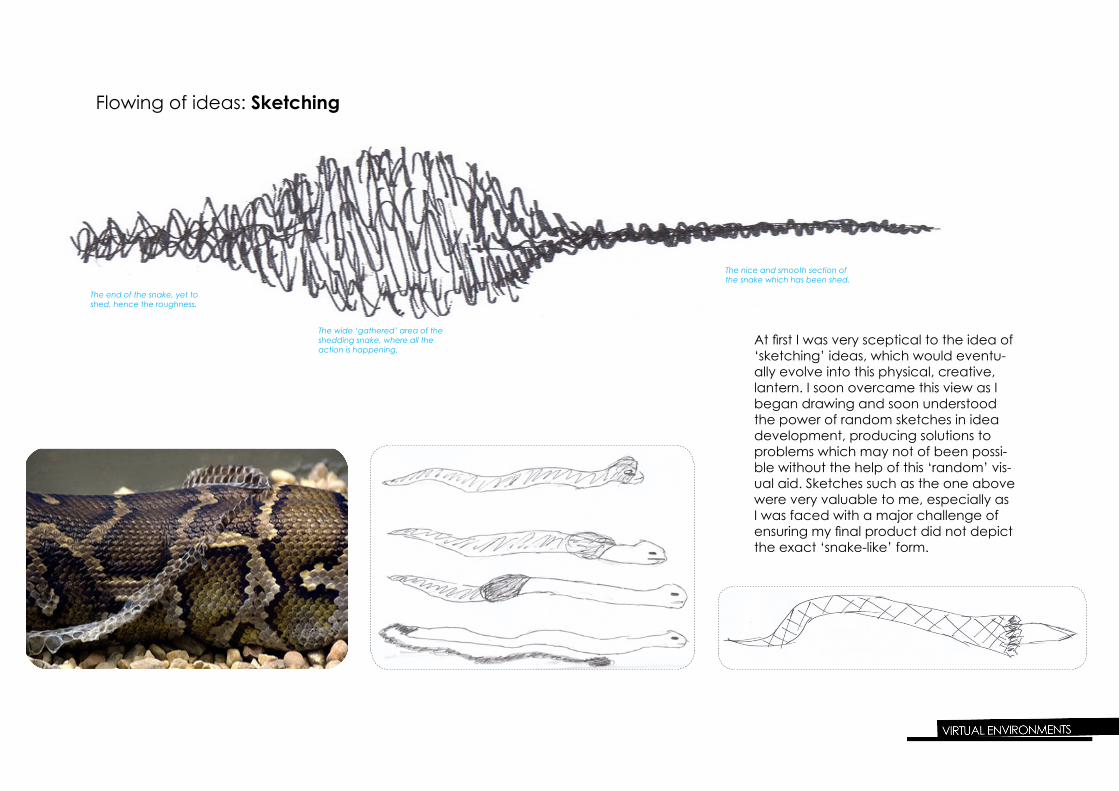
Flowing of ideas: Sketching
The end of the snake, yet to shed, hence the roughness.
The wide ‘gathered’ area of the shedding snake, where all the action is happening.
The nice and smooth section of the snake which has been shed.
At first I was very sceptical to the idea of ‘sketching’ ideas, which would eventu-ally evolve into this physical, creative, lantern. I soon overcame this view as I began drawing and soon understood the power of random sketches in idea development, producing solutions to problems which may not of been possi-ble without the help of this ‘random’ vis-ual aid. Sketches such as the one above were very valuable to me, especially as I was faced with a major challenge of ensuring my final product did not depict the exact ‘snake-like’ form.

Flowing of ideas: Physical modelling
My first few models (fig.1) were still too snake-like, and I had quite a bit of trouble getting my head to think
outside of the square, and coming up with a representa-tion, not a replica. I wanted to focus on the coiling of the snake upwards, and decide to build on this keep-ing the shedding process closely related. Attempting
to bring my sketches to ‘life’ through the construction of clay models, I was beginning to see a form which I liked (fig. 2), which drew away from the snake-like realistic shape and focused on the coiling of a snake upwards, as shown in the photos. As shown in these photos, there is clear contrast between the ‘old and
rough’, and the ‘new and smooth’. Fig. 2 also shows my attempt at further emphasising the shed section of the
snake, through the shinning of light through holes, and was definitely something which I wanted to incorporate
into my final design.
Fig. 1
Fig. 2

Flowing of ideas: Precedents
Palimpsest in Architecture
In the pursuit of continu-ing the theme of old versus
new, palimpsest in archi-tecture closely related to
the juxtaposition I was trying to achieve in my design.
This dovecote studio (fig.1) located in Aldeburgh, U.K, is made of oxidised cortex
steel, placed in what was a brick dovecote (housing for
pigeons or doves). The archi-tect, Haworth Tompkins, used
the favourable technique called ‘adaptive reuse’. This technique gives what would
have been an otherwise quite plain building (the new) a lot of character, and gives credit to the history (the old)
of what it once was.Palimpsest in architecture is
quite a common concept, as it provokes different feelings at one time, and has an as-pect of layering – something which was very relevant to
the process of the skin shed-ding, and was something
which I portrayed in my final design.
Fig. 1
Innovation and originality is a vital part of design and architecture in today’s society. There is a trend, drawing away from basing designs on basic design principles (contrast, symmetry, balance, etc.) and more towards abstract, unique and highly accurate designs and struc-
tures.By analysing a natural process I began realising just how evident patterns and structures create every process we often think little about.
Every process is shaped by its surrounding environment, and this is a key concept which must have been considered during this module to understand and portray a crisp interpretation of the chosen process. Once the process had been analysed and understood the important
yet very challenging task was to translate the ideas you had gathered into your own words. During my ‘idea-flowing’ chapter, I tried to think little about practicality and focus more on creating an original interpretation of a natural
process. Creating an interpretation and not a straight replica produced many challenges, as any designer would face. However, this origi-nality is vital in today’s design world; leaving final products forms open to analysis and judgements from the observer.
To express ones ideas, I learnt it is not just a matter of thinking of an idea and making a model of it. As discussed by Ware (2008) in his chapter in ‘Visual thinking in design’, sketching and model making is a constructive act in itself, a way of generating ideas, not just a way of showing a previously thought about concept. This was a valuable lesson for me to learn, and as I began sketching and creating mod-els the ideas and creativity began flowing and I began having a vision of what the following modules and final product could hopefully
produce. I was not overly satisfied with the form I had come up with on completion of this module, however I was confident that with the help of
digital desgin I would refine this form more time-efficiently than I would by hand.
Ideation: Reflection
DigitizationDigitizing physical model: Contouring
Fig. 1
Fig. 2
Fig. 3
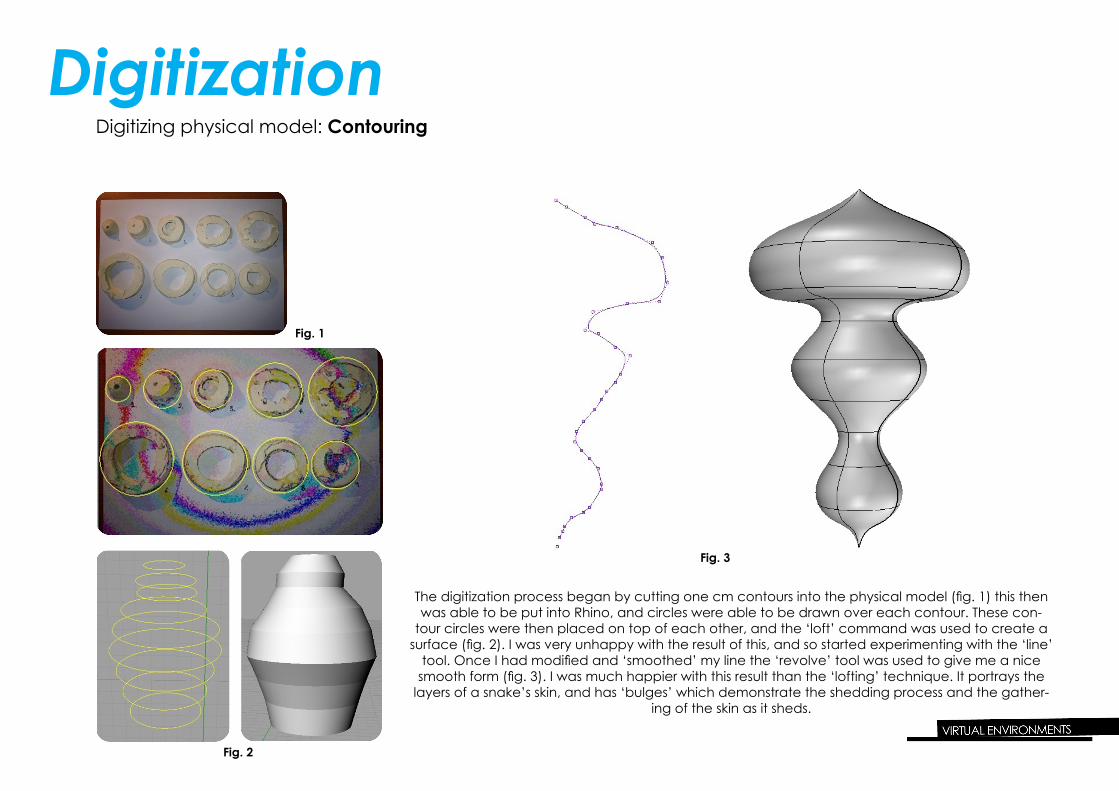
The digitization process began by cutting one cm contours into the physical model (fig. 1) this then was able to be put into Rhino, and circles were able to be drawn over each contour. These con-
tour circles were then placed on top of each other, and the ‘loft’ command was used to create a surface (fig. 2). I was very unhappy with the result of this, and so started experimenting with the ‘line’
tool. Once I had modified and ‘smoothed’ my line the ‘revolve’ tool was used to give me a nice smooth form (fig. 3). I was much happier with this result than the ‘lofting’ technique. It portrays the
layers of a snake’s skin, and has ‘bulges’ which demonstrate the shedding process and the gather-ing of the skin as it sheds.
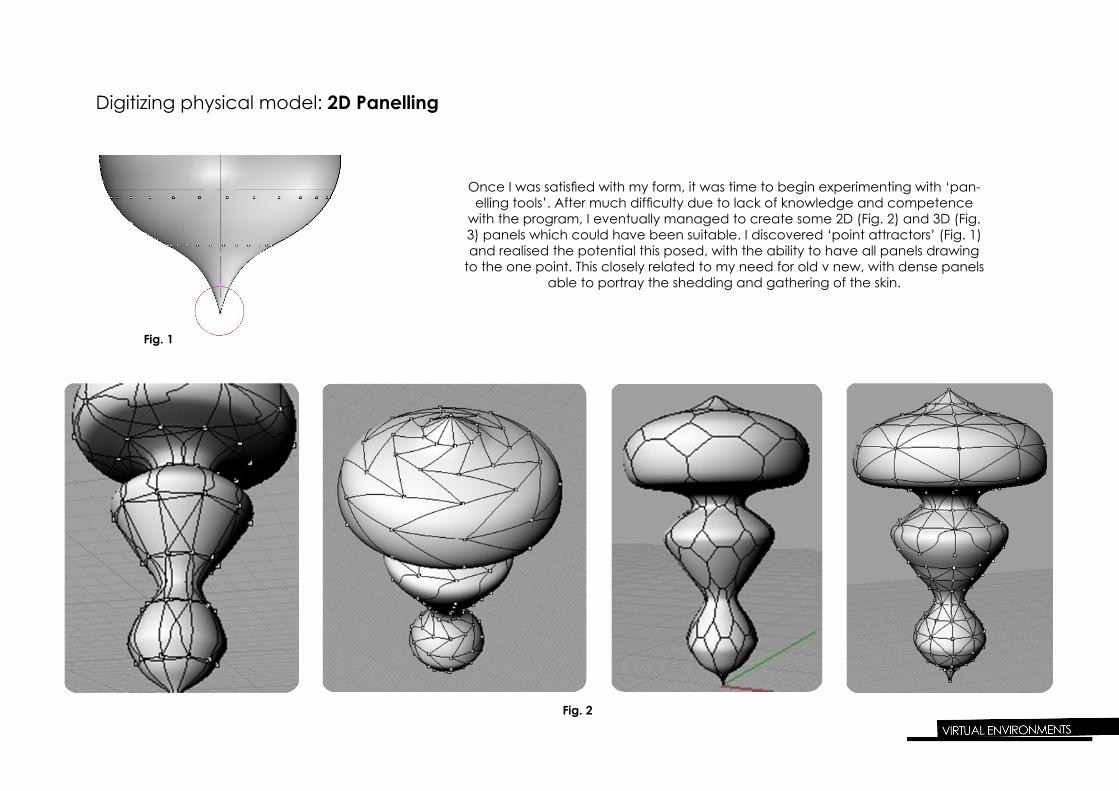
Digitizing physical model: 2D Panelling
Fig. 1
Fig. 2
Once I was satisfied with my form, it was time to begin experimenting with ‘pan-elling tools’. After much difficulty due to lack of knowledge and competence
with the program, I eventually managed to create some 2D (Fig. 2) and 3D (Fig. 3) panels which could have been suitable. I discovered ‘point attractors’ (Fig. 1) and realised the potential this posed, with the ability to have all panels drawing
to the one point. This closely related to my need for old v new, with dense panels able to portray the shedding and gathering of the skin.
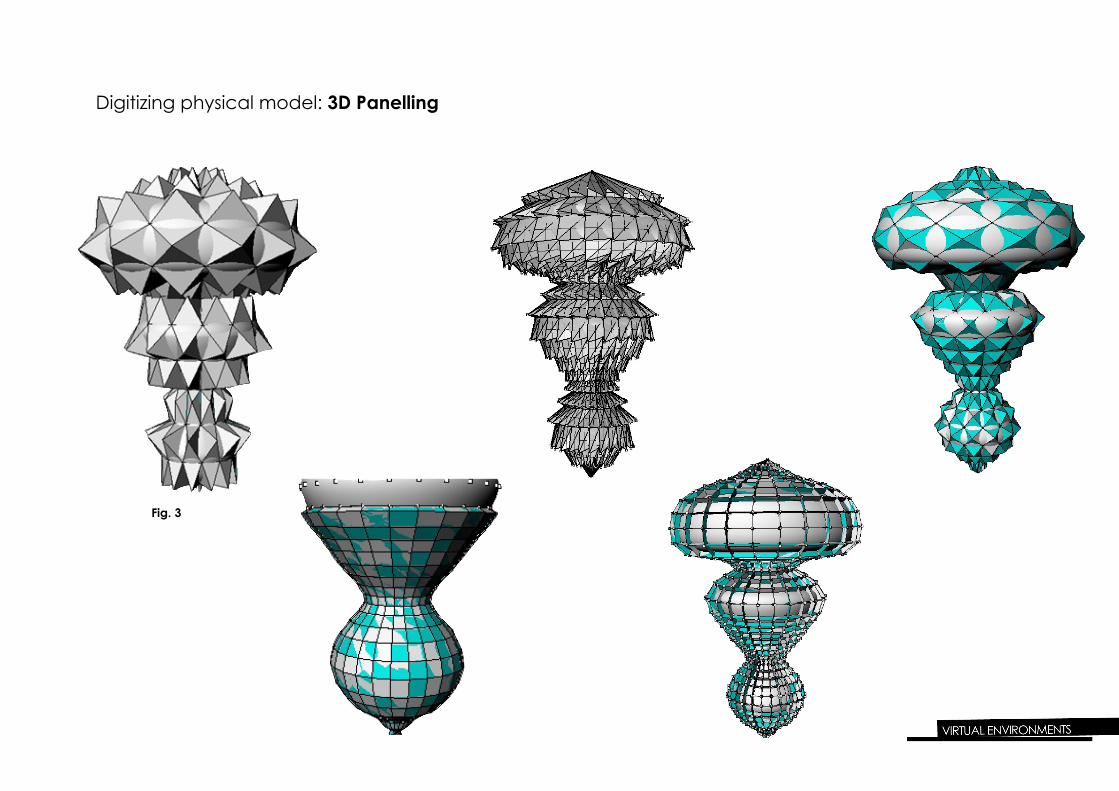
Digitizing physical model: 3D Panelling
Fig. 3
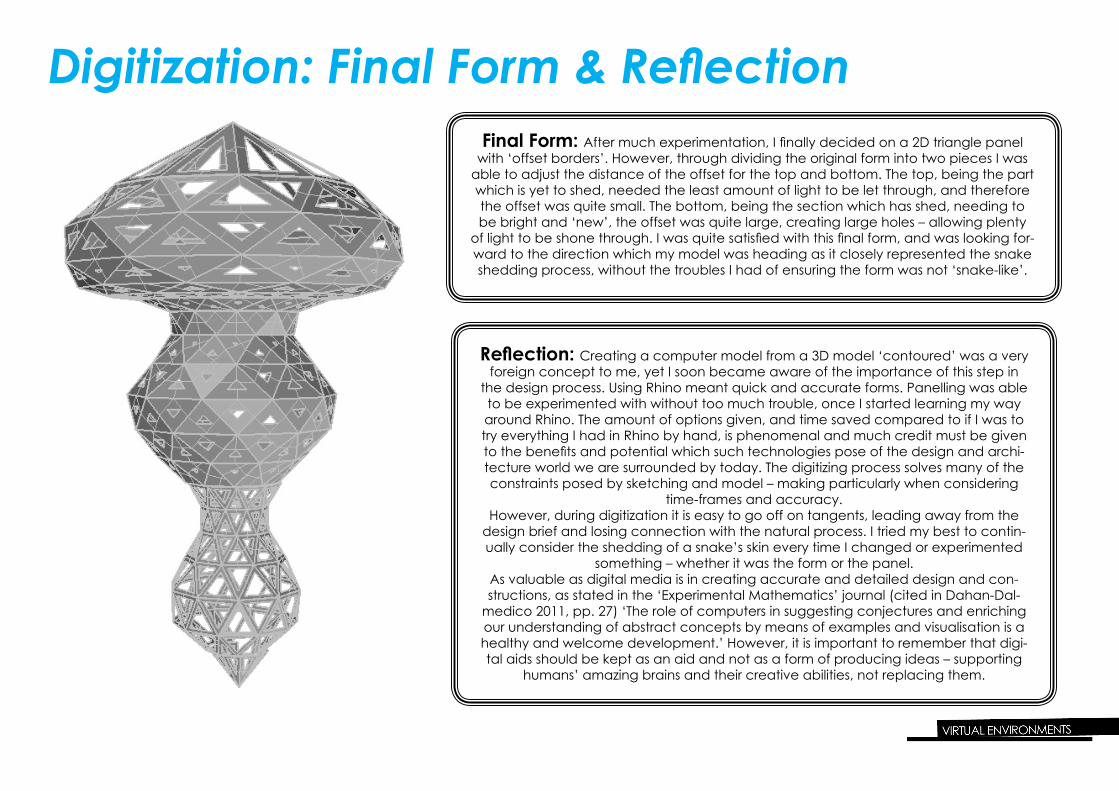
Final Form: After much experimentation, I finally decided on a 2D triangle panel with ‘offset borders’. However, through dividing the original form into two pieces I was
able to adjust the distance of the offset for the top and bottom. The top, being the part which is yet to shed, needed the least amount of light to be let through, and therefore the offset was quite small. The bottom, being the section which has shed, needing to be bright and ‘new’, the offset was quite large, creating large holes – allowing plenty
of light to be shone through. I was quite satisfied with this final form, and was looking for-ward to the direction which my model was heading as it closely represented the snake shedding process, without the troubles I had of ensuring the form was not ‘snake-like’.
Digitization: Final Form & Reflection
Reflection: Creating a computer model from a 3D model ‘contoured’ was a very foreign concept to me, yet I soon became aware of the importance of this step in
the design process. Using Rhino meant quick and accurate forms. Panelling was able to be experimented with without too much trouble, once I started learning my way around Rhino. The amount of options given, and time saved compared to if I was to try everything I had in Rhino by hand, is phenomenal and much credit must be given to the benefits and potential which such technologies pose of the design and archi-tecture world we are surrounded by today. The digitizing process solves many of the constraints posed by sketching and model – making particularly when considering
time-frames and accuracy.However, during digitization it is easy to go off on tangents, leading away from the
design brief and losing connection with the natural process. I tried my best to contin-ually consider the shedding of a snake’s skin every time I changed or experimented
something – whether it was the form or the panel.As valuable as digital media is in creating accurate and detailed design and con-structions, as stated in the ‘Experimental Mathematics’ journal (cited in Dahan-Dal-
medico 2011, pp. 27) ‘The role of computers in suggesting conjectures and enriching our understanding of abstract concepts by means of examples and visualisation is a healthy and welcome development.’ However, it is important to remember that digi-tal aids should be kept as an aid and not as a form of producing ideas – supporting
humans’ amazing brains and their creative abilities, not replacing them.
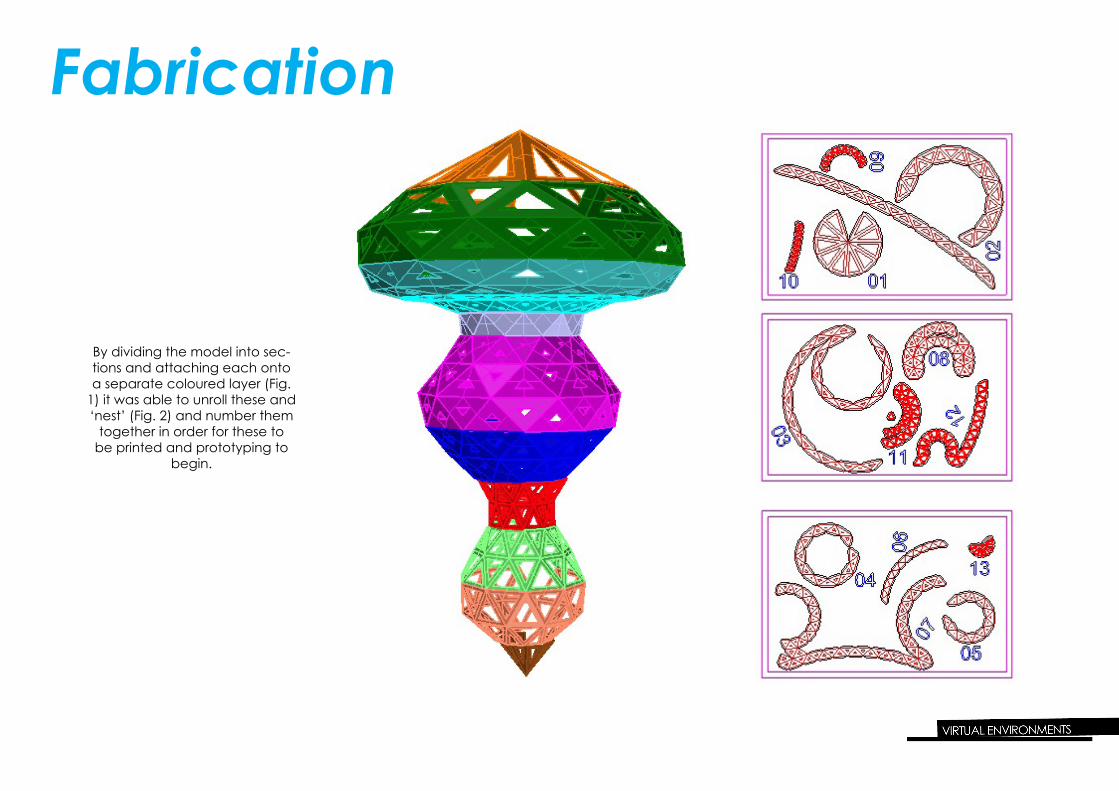
Fabrication
By dividing the model into sec-tions and attaching each onto a separate coloured layer (Fig.
1) it was able to unroll these and ‘nest’ (Fig. 2) and number them
together in order for these to be printed and prototyping to
begin.
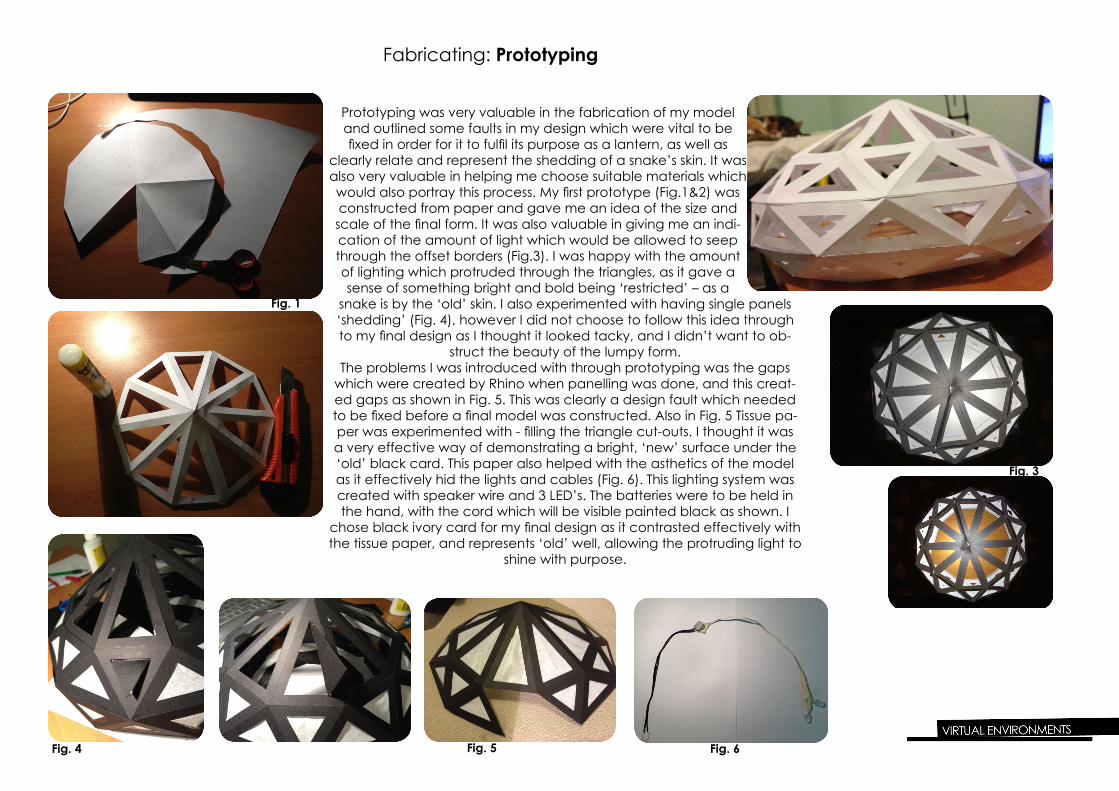
Fig. 1
Fig. 3
Fabricating: Prototyping
Fig. 4 Fig. 5
Prototyping was very valuable in the fabrication of my model and outlined some faults in my design which were vital to be fixed in order for it to fulfil its purpose as a lantern, as well as
clearly relate and represent the shedding of a snake’s skin. It was also very valuable in helping me choose suitable materials which would also portray this process. My first prototype (Fig.1&2) was constructed from paper and gave me an idea of the size and scale of the final form. It was also valuable in giving me an indi-cation of the amount of light which would be allowed to seep through the offset borders (Fig.3). I was happy with the amount of lighting which protruded through the triangles, as it gave a sense of something bright and bold being ‘restricted’ – as a
snake is by the ‘old’ skin. I also experimented with having single panels ‘shedding’ (Fig. 4), however I did not choose to follow this idea through to my final design as I thought it looked tacky, and I didn’t want to ob-
struct the beauty of the lumpy form.The problems I was introduced with through prototyping was the gaps
which were created by Rhino when panelling was done, and this creat-ed gaps as shown in Fig. 5. This was clearly a design fault which needed to be fixed before a final model was constructed. Also in Fig. 5 Tissue pa-per was experimented with - filling the triangle cut-outs. I thought it was a very effective way of demonstrating a bright, ‘new’ surface under the ‘old’ black card. This paper also helped with the asthetics of the model as it effectively hid the lights and cables (Fig. 6). This lighting system was created with speaker wire and 3 LED’s. The batteries were to be held in the hand, with the cord which will be visible painted black as shown. I
chose black ivory card for my final design as it contrasted effectively with the tissue paper, and represents ‘old’ well, allowing the protruding light to
shine with purpose.
Fig. 6
Fabricating: Digital refinement
Fig. 1
Fig. 2
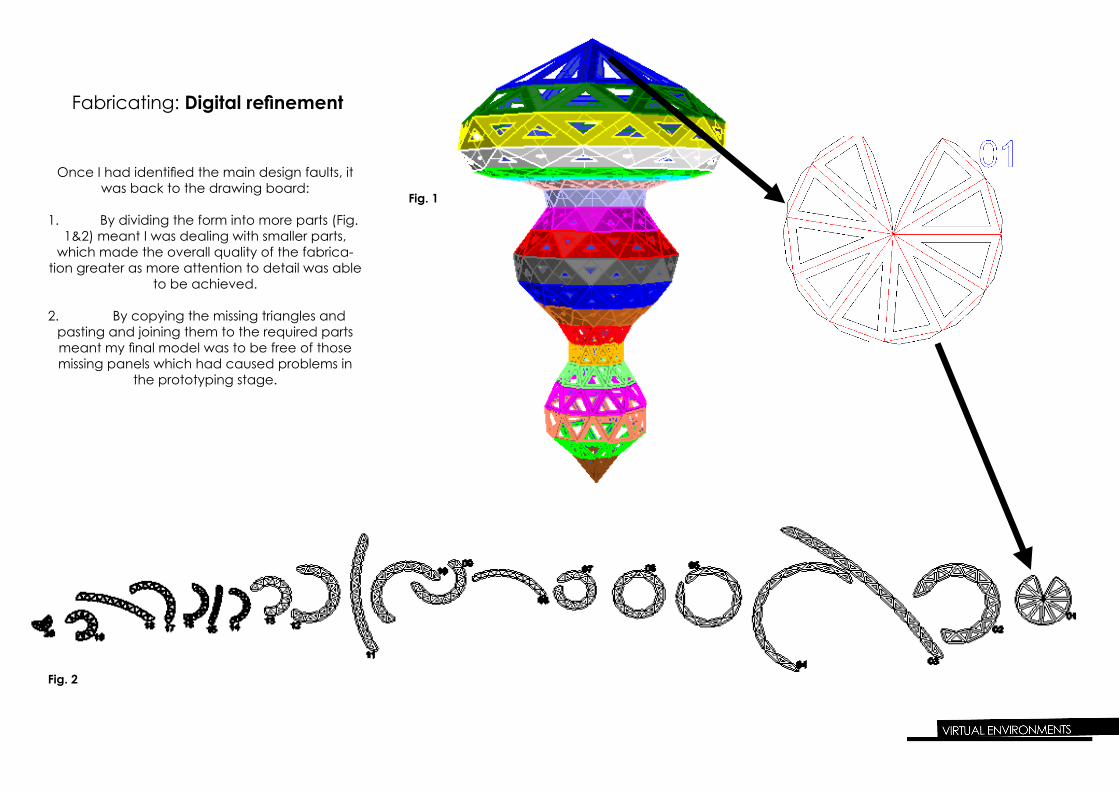
Once I had identified the main design faults, it was back to the drawing board:
1. By dividing the form into more parts (Fig. 1&2) meant I was dealing with smaller parts,
which made the overall quality of the fabrica-tion greater as more attention to detail was able
to be achieved.
2. By copying the missing triangles and pasting and joining them to the required parts meant my final model was to be free of those missing panels which had caused problems in
the prototyping stage.
Fabricating: Final Model
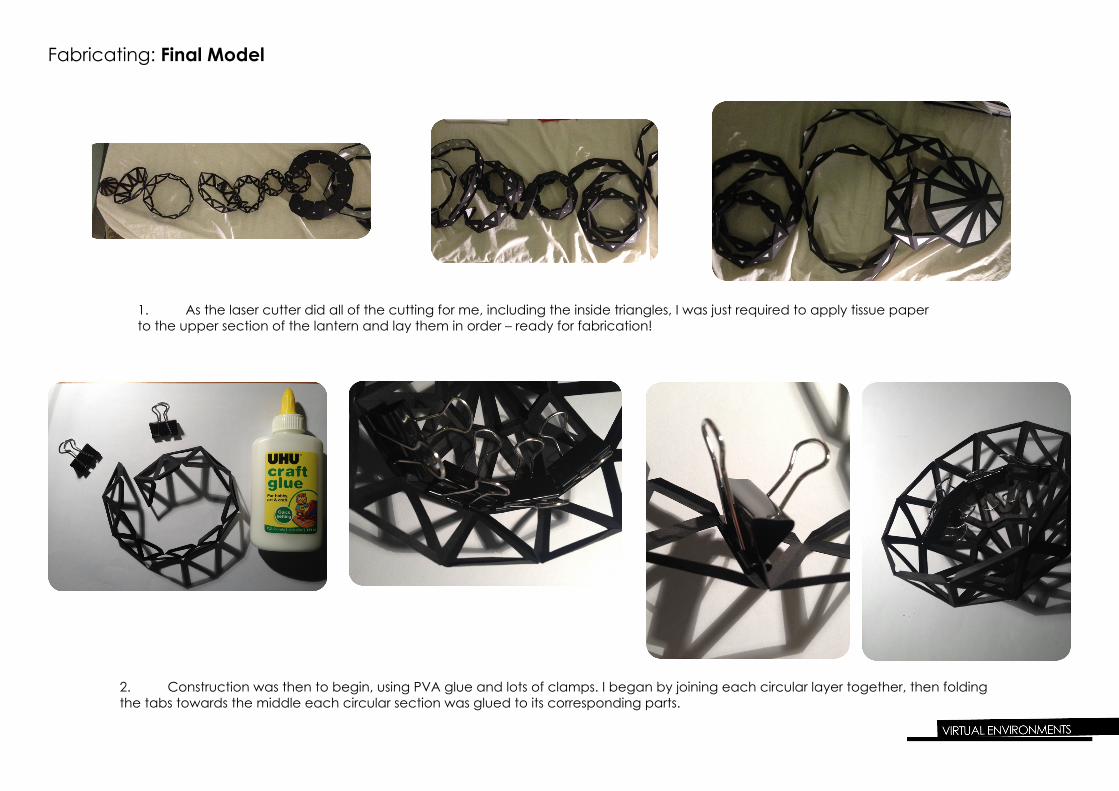
1. As the laser cutter did all of the cutting for me, including the inside triangles, I was just required to apply tissue paper to the upper section of the lantern and lay them in order – ready for fabrication!
2. Construction was then to begin, using PVA glue and lots of clamps. I began by joining each circular layer together, then folding the tabs towards the middle each circular section was glued to its corresponding parts.
Fabricating: Final Model
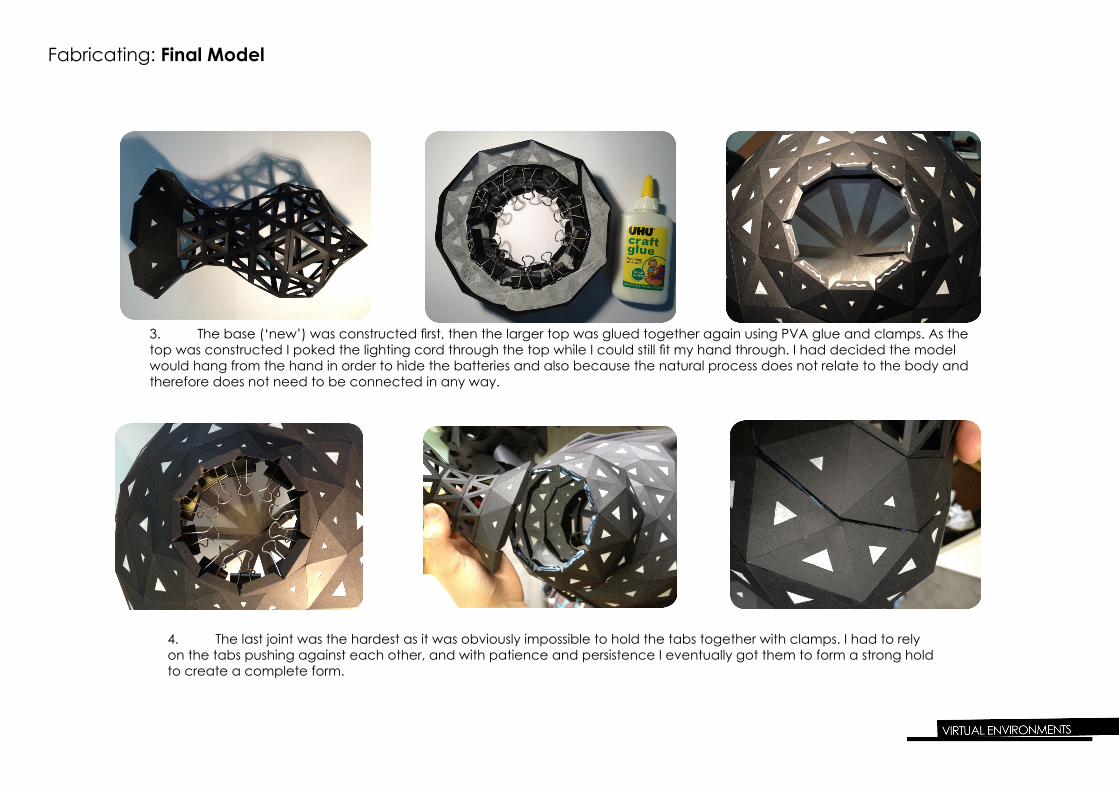
3. The base (‘new’) was constructed first, then the larger top was glued together again using PVA glue and clamps. As the top was constructed I poked the lighting cord through the top while I could still fit my hand through. I had decided the model would hang from the hand in order to hide the batteries and also because the natural process does not relate to the body and therefore does not need to be connected in any way.
4. The last joint was the hardest as it was obviously impossible to hold the tabs together with clamps. I had to rely on the tabs pushing against each other, and with patience and persistence I eventually got them to form a strong hold to create a complete form.
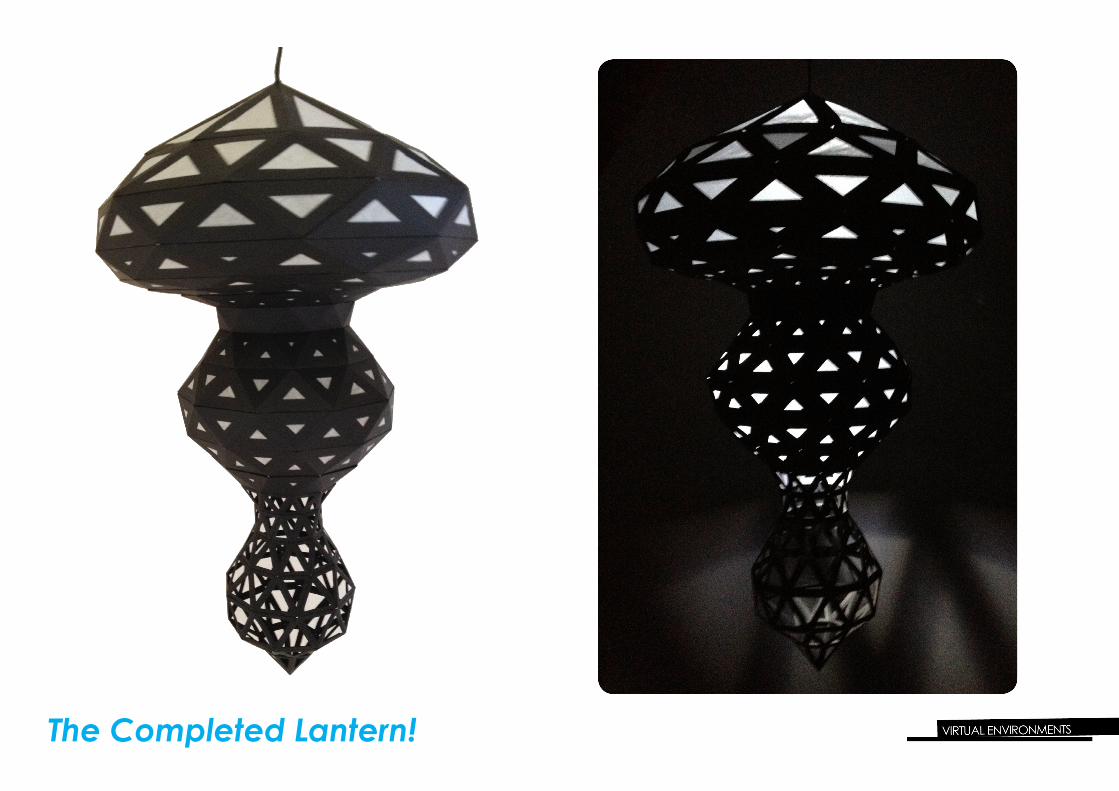
The Completed Lantern!
Fabrication: Reflection
Designing is not a simple process, and one which takes much consideration and constant reference to the brief and origi-nal requirements. I have learnt this through the whole process from generating ideas and model making, to digitization and
finally the fabrication of the final model. Not one step was easy, but if design was easy it would not get the same level of appreciation and attention to detail it currently beholds.
Through creating prototypes I was able to have a visual idea of what worked and didn’t work, constantly refining until a satisfactory result was created. If prototyping was not done my final model would have been of a far less standard. During
prototyping I did most of the cutting of panels and layers by hand, a very time consuming process. When it came to my final model I made sure I assigned the right parts to be cut by the laser cutter and this proved to be an extremely time-efficient
process. By utilising such technology prototyping and critical assessment is possible with little trouble and far less time than if it was to be completed by hand – hence creating far more accurate and aesthetically pleasing designs as the opportunity
to refine design faults is greater.As discussed in the module three reading ‘The Coming Revolution on Your Desktop--From Personal Computers to Personal Fabrication’ (Gershenfeld 2005, pp. 92) tools such as laser cutters ‘...can help develop the planet’s most precious natural
resource of all - its peopleand their ideas.’ This statement really rang true to me as I was completely the fabrication module and I learnt of the conven-
ience of such advanced technology in the design process and its ability to create such accurate results.
Final Reflection
The greatest lesson I have learnt from completing Virtual Environments is the importance of the design process and constantly relating it back to the ulti-mate goal to be achieved. The biggest pressure from this subject would have to be the time constraints, and this is something which I’m sure will always be the case if I was to pursue a career in architecture so I am grateful to be learn-ing these vital skills such as time management. Every brief a designer faces will be constrained by budget, time-frame, materials, surrounding natural environ-ment, etc. – all of which were required to be closely considered throughout the entire design process in creating our lanterns. Overall, I was satisfied with what I have achieved and my final model given my lack of previous experience and knowledge, particularly in the digital de-sign aspect. Of course, there are things which I would have done differently given my time again, but I believe that is what design is all about and if you are 100% satisfied with what you have achieved then you are probably not being critical enough of your own work.

Refrences
• Gershenfeld, N. 2005, Selected extracts in Fab: The coming revolution on your desktop - from personal computers to personal fabrication, Basic Books, New York, pp. 92• Ware, Colin 2008, Visual Thinking: For Design, Morgan Kaufmann plublishers, USA• Dahan-Dalmedico, Dahan 2011, Mathematics and the Sensible World: Represent-ing, Constructing, Simulating, AD: Architectural Design, Wiley, pp. 27