Embed Size (px)
Citation preview

Modular Aluminum Compressed Air Piping Installation Instructions 3/4”-2”
PLANNING/LAYOUTBefore beginning the installation, create a plan as to the location of the air compressor and where you are going to mount the compressed air outlets. On the plan locate outlets, tees, and elbows.
AIR COMPRESSORUse a flexible jumper hose from the air compressor to the filter regulator unit to reduce vibration to the FastPipe System.
FILTER REGULATORA filter regulator unit is reccomended to keep contaminants out of the air system and to allow for pressure adjustment.
PRESSURE RATINGSThe FastPipe system has a maximum working pressure of 190 psi and a temperature range from 0 to 140 deg F.
ASSEMBLY OF THREADED COMPONENTSAssemble all NPT threads with two wraps of teflon tape and then PIPE SEALANT which prevents thread galling.
IF YOU ARE EXPERIENCING TROUBLE WITH THIS PRODUCT, OR MISSING PARTS, PLEASE CALL 800-954-3310 FOR ASSISTANCE
DO NOT RETURN TO STORE
• Use pipe clips to secure pipe to any flat surface withmounting screw
• Ceiling or wall mount• Clip has 5/16” thru hole and hex bore for a 5/16” hex nut• Hex nut serves at a backer for screws• Use #10 Drywall Screw or Tapcon• In horizontal installations, mount clip pivot tab up
• Hangers or mounting clips should be no more than10 ft apart and one must be at least 6” from a fitting
FLAT SURFACE INSTALLATION HANGING INSTALLATION
• Beam Clamp• 5/16” Threaded Rod• Pipe Clip
• Beam Clamp• 3/8” Threaded Rod• Pipe Clip
EXPANSION JOINTS
TEMPCHANGE
10°F20°F35°F55°F70°F
3/4” 1” 11/2” 2”MAXIMUM STRAIGHT RUN DISTANCE
700ft500ft350ft260ft200ft
550ft420ft280ft200ft170ft
600ft460ft310ft230ft190ft
500ft370ft250ft190ft150ft
Any piping system will expand and contract with temperature changes, use this guide for installation of expansion joints to compensate for this movement of
aluminum pipe in non-conditioned buildings
Pipe Clip Strut Cushion Clamp
1 2 3
4 5 6
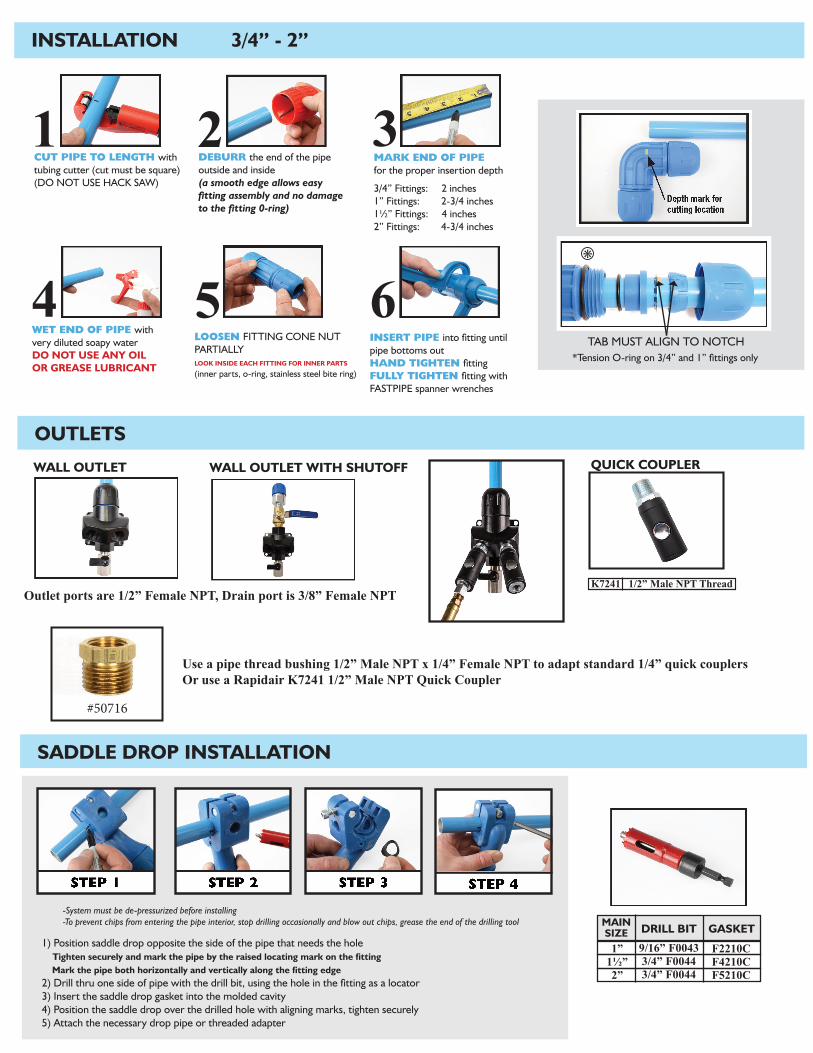
CUT PIPE TO LENGTH with tubing cutter (cut must be square)(DO NOT USE HACK SAW)
DEBURR the end of the pipe outside and inside(a smooth edge allows easy fitting assembly and no damage to the fitting 0-ring)
MARK END OF PIPE for the proper insertion depth
3/4” Fittings: 2 inches1” Fittings: 2-3/4 inches11/2” Fittings: 4 inches2” Fittings: 4-3/4 inches
WET END OF PIPE with very diluted soapy waterDO NOT USE ANY OIL OR GREASE LUBRICANT
LOOSEN FITTING CONE NUT PARTIALLYLOOK INSIDE EACH FITTING FOR INNER PARTS
(inner parts, o-ring, stainless steel bite ring)
INSERT PIPE into fitting until pipe bottoms outHAND TIGHTEN fittingFULLY TIGHTEN fitting with FASTPIPE spanner wrenches
INSTALLATION
SADDLE DROP INSTALLATION
OUTLETSWALL OUTLET WALL OUTLET WITH SHUTOFF
Outlet ports are 1/2” Female NPT, Drain port is 3/8” Female NPT
QUICK COUPLER
-System must be de-pressurized before installing-To prevent chips from entering the pipe interior, stop drilling occasionally and blow out chips, grease the end of the drilling tool
1) Position saddle drop opposite the side of the pipe that needs the holeTighten securely and mark the pipe by the raised locating mark on the fittingMark the pipe both horizontally and vertically along the fitting edge
2) Drill thru one side of pipe with the drill bit, using the hole in the fitting as a locator3) Insert the saddle drop gasket into the molded cavity4) Position the saddle drop over the drilled hole with aligning marks, tighten securely5) Attach the necessary drop pipe or threaded adapter
DRILL BIT
1”11/2”2”
F2210CF4210CF5210C
9/16” F00433/4” F00443/4” F0044
GASKETMAINSIZE
K7241 1/2” Male NPT Thread
Use a pipe thread bushing 1/2” Male NPT x 1/4” Female NPT to adapt standard 1/4” quick couplersOr use a Rapidair K7241 1/2” Male NPT Quick Coupler
#50716
3/4” - 2”
*Tension O-ring on 3/4” and 1” fittings onlyTAB MUST ALIGN TO NOTCH
Care must be taken on any installation of the Fastpipe system. Pipes will be carrying compressed air/gas up to 190 psi. The Fastpipe system is only as safe as a thorough installation. Read all installation instructions and watch installation videos before starting. Below are some tips for a safe installation.
We strongly recommend that the installer contact our tech department for installation questions PRIOR to the installation.
-Assemble all NPT PIPE THREADS with two wraps of Teflon tape and then pipe sealant which prevents thread galling
-Support the pipe with clips / hangers a maximum of 10 FT SPACING and on ONE SIDE OF EACH FITTING
-Any machine/compressor plumbed to the Fastpipe must have a JUMPER HOSE to reduce vibration
-Any piping system will expand and contract with temperature changes. Use EXPANSION JOINTS to compensate for this movement of aluminum pipe in non-conditioned buildings.
-DO NOT USE Fastpipe for PULSING desiccant dryers or other like equipment.
-CAUTION installing inert gas bulk tank systems, gas must be warmed up to Fastpipe temperature range
-Use a strain relief attached to the building for any rubber hose drops attached to the piping
-DO NOT connect quick couplings for air hoses to reducing elbows or tee fittings. The constant connecting/disconnecting and pulling of air hoses could loosen the fitting. Use the Fastpipe WALL OUTLET which can be secured to a wall or post. Any hoses attached in the ceiling area to a fitting must use a strain relief attached to the building structure
-CHECK that all fittings are tightened before pressurizing the system for the first time
-For initial installation, pressurize system SLOWLY to 50 psi and check for leaks, then pressurize slowly to MAX 190 psi-Make sure compressor output temperature does not exceed 140°F.
-AFTER 24 HOURS of being pressurized, depressurize the system and RETIGHTEN the compression nuts.Some settling of components may have occurred. This is not optional, it must be done.
-FASTPIPE can be bent to conform around minor obstacles to a maximum of 15 degrees. DO NOT OVERBEND.
FASTPIPE INSTALLATION TIPS AND RECOMMENDATIONS:
-For underground burial-To electrically ground equipment-To be welded-To take violent impacts-To be used where the compressed air temperature is above 140 deg F-For environments of caustic or corrosive chemicals
PRODUCTS MANUFACTURED BY THE SELLER CARRY A LIMITED ONE YEAR WARRANTY.SEE WWW.RAPIDAIRPRODUCTS.COM FOR MORE DETAILS
3-2018