Embed Size (px)
DESCRIPTION
Case study on:1. Can a computer work without an operating system?2. How to install operating system on your PC for the first time?
Citation preview

operatingsystemoperatingsystemoperatingsystemoperatingsystemoperatingsystemoperatingsystemoperatingsystemoperatingsystemoperatingsystemoperatingsystemoperatingsystemoperatingsystemoperatingsystemoperatingsystemoperatingsystemoperatingsystemoperatingsystemoperatingsystemoperatingsystemoperatingsystemoperatingsystemoperatingsystemoperatingsystemoperatingsystemoperatingsystemoperatingsystemoperatingsystemoperatingsystemoperatingsystemoperatingsystemoperatingsystemoperatingsystemoperatingsystemoperatingsystemoperatingsystemoperatingsystemoperatingsystemoperatingsystemoperatin
MOS Case Study
IT - 4058
14/10/2014
Sejal Pawar
This case study covers the following three topics:
1. Is it possible for a PC to work without an Operating System?
2. How to install Windows 7 on a Computer?3. Protecting a computer from virus invasion.
Is it possible for a PC to work without an operating system?
We all have our favorite operating system -- some of us will only pick from the tree of Apple, while others prefer the Windows seat. It's easy to assume that a computer without an operating system is as useful as a cup of coffee without the cup. But what does an operating system do, and can a computer still compute without it?
Let's tackle the first question before we get into the nitty-gritty of a system-less computer. An operating system is basically the general contractor of the computer. While the programs are busy doing their one specialized thing -- plumbing, electrical, carpentry -- the operating system is overseeing them all, communicating what they need to the processor and providing a common language that they can all work with to stay on the same page.
There are a few other things your operating system does that you probably don't think about. For instance, it's the operating system (not just the hard drive) that's going to decide how to manage memory. The operating system needs to delegate how much memory each process uses and make sure no memory overlaps. Also keep in mind that your home computer is most likely a single-user, multitasking operating system. That means you only have one processor, but it can run many programs at once.
But here's the kicker: it can't actually do that.
When you're downloading files, working on a spreadsheet and listening to music, your computer just appears to be doing these things simultaneously. In reality, the computer is switching between processes at extremely high speeds -- so high, you don't know it. While you're under the illusion that your CPU and operating system have a hand in every pot, your programs are under the impression that they have complete control of the operating system at any given moment.
So really, your operating system is designed to let the CPU deal with one thing at a time. But because it's a computer and not a harried secretary, it can multitask so fast that the user wouldn't even know.
Now that we know a few of the ways our operating system works for us, let's get into what a computer without an operating system would look like.
So, what does a computer without an OS look like?If an operating system does all the things we know it does, it seems downright impossible for a computer to exist without one.
In reality, the earliest computers didn't have operating systems; they were huge machines tasked with one program at a time. For that reason, they didn't really need operating systems. In fact, the earliest computers required a user to physically connect and disconnect wires from a plug board to retrieve computations. But if you don't have an operating system, can you make your computer do anything?
Yes. But you have a lot of work to do. Without an operating system using and enforcing a standard, systematic approach to running the computer, you're put in the position of writing code (or programs) that must tell the computer exactly what to do. So if you want to type up a document in a word processing program, you'd have to create from scratch code that tells your computer to respond to each character pressed on your keyboard. Then you'd have to write a code that told the computer how those responses must translate to a screen. You'd have to tell your computer how to draw the character you want! Think of every single option or possibility your word processing program has. You'd have to write code for every single one of those directly onto your hard drive.
Let's go back to our general contractor analogy. If we're building a house, we'll want it to have certain features like plumbing, electrical work and windows. In a computer, we also want features like a program that creates documents, one that accesses the Internet and one that stores our photos. Without an operating system, it's not just that your "carpenter" doesn't know where to hammer in nails to a beam to get the room you want -- it's also that you have to forge the hammers, and you have to create the nails.
An operating system provides a uniform set of screws, lumber and any other material you need. It can go back and forth between rooms so fast you didn't even know it left the one you were in.
And that's really important, because here's another thing: Remember how we were talking about the operating system only being able to concentrate on one thing at a time? Well, without one, your computer could run one program. Period. You could create a document. You could save it. You could print it. But you couldn't look at that document and keep a clock running on your desktop. If you don't have an operating system, you're stuck doing one -- and only one -- process at a time.
To Conclude:
You can uninstall OS from your computer, but your computer would stop working because Windows is the operating system, the software that makes it tick and provides a platform for programs, like your web browser, to run on. Without an operating system your laptop is just a box of bits that do not know how to communicate with one another, or you. Windows is by no means compulsory but it is usually the simplest option for most users because it is pre-installed on most computers, relatively easy to use, and Windows 7 is quite well behaved, but there is nothing to stop you from exploring the alternatives.
"Normal" Computers
Without an operating system, You cannot run a program that was written to be run in an operating system. Most programs are of this sort.
You could write a program that runs without an operating system but this would be a very hard task, mainly because the operating system provides drivers for all the hardware. Without the OS, your program would have to drive the specific hardware directly. Not all hardware makers release details of how to do this (e.g. nVidia) but only provide drivers for specific operating systems.
You'd also have the problem of how to get the computer to load and run your program. With most desktop computers you'd have to place the program where the BIOS would expect to find an OS loader.
It is likely you'd have to write the program in a low level language - assembler or perhaps something like C without any standard libraries that are OS dependent.
Microcontrollers
You can write programs for things like the Arduino without any OS on the Arduino. There are development kits that allow you to write code in relatively high level languages, the development kits usually provide the equivalent of drivers for the specific hardware.
How to install Microsoft Windows 7 on Computer?
Performing a New Installation of Windows 7
The three basic types of clean installation procedures are as follows:
• Install on a brand new disk or computer system
• Erase the disk, format it, and install
• Install into a new directory for dual-booting
If you intend to use either of the first two methods, be sure your computer can boot from a DVD (most newer computers support booting from a DVD drive). Doing so might require changing the drive boot order in the BIOS or CMOS, but try it first as-is. With no floppy disk inserted and a clean hard disk, try the DVD drive next. The Windows 7 DVD is bootable and should run the Setup program automatically.
Installation takes 15 to 30 minutes, depending on the speed of your machine. Refer to the following sections if you have questions about any steps in this process.
Note: Windows 7 automatically applies the NTFS format to any disk partition upon which it is installed during a clean installation.
Typical Clean Setup Procedure
If you're installing into an empty partition and you can boot an operating system that is supported for the purpose of Setup (Windows Vista or XP), just boot up, insert the DVD and choose Install Now from the resulting dialog box. Then you can follow the installation step-by-step procedure.
If Windows doesn't detect the DVD automatically upon insertion, you must run the Setup program, setup.exe, from the Start, Run dialog box (after opening the Run dialog box, type D:/setup.exe; on Vista use the Start menu Search box instead [using the corect letter for your DVD drive if it isn't D]). The setup.exe application is located in the Sources directory on the DVD. After the Setup routine starts, you can follow the installation procedure step by step.
If your computer has a blank hard disk or your current OS isn't supported, this process changes. You must launch the installation process from the Windows 7 DVD (this works only if you can boot from the DVD drive). Setup automatically runs if you boot from the DVD.
Yet another setup method involves the network. To initiate a network installation, you must create a network share of the distribution DVD or a copy of the DVD on a hard drive. The
destination system must have network access, and the user account must have at least read access to the installation files. Initiate Setup by executing setup.exe from the network share. For example, from the Start, Run command, or the Vista Start menu Search box, type this path: \\\ \sources\Setup. Setup recognizes an over-the-network installation and automatically copies all files from the network share to the local system before the first reboot.
Tip: All versions of Windows 7, 32- or 64-bit, are included on the same DVD. The product key that you enter during setup determines which actual version of Windows 7 you end up with after the installation completes. Keep your Windows 7 DVD and product key in a safe location after you've performed your installation. It's useful for repairs of all kinds.
Clean Install from DVD, Step by Step
A typical clean installation (on a blank hard disk) step-by-step procedure is as follows:
1. Insert the Windows 7 DVD into your computer's DVD-ROM drive, and restart the computer. Windows 7 Setup should start automatically. If Setup does not start automatically, ensure that your computer is configured to boot from the DVD drive.
2. You are asked to select regional options for the Windows 7 installation. Make your selections and click Next to continue.
3. In the next dialog box, you are prompted to start the installation. Click Install Now to begin the installation. This produces a screen that tells you that Setup is starting.
4. In the Software License Terms dialog box, ensure that you read and understand the End User Licensing Agreement (EULA). When you're ready, select the I Accept the License Terms option and click Next to continue.
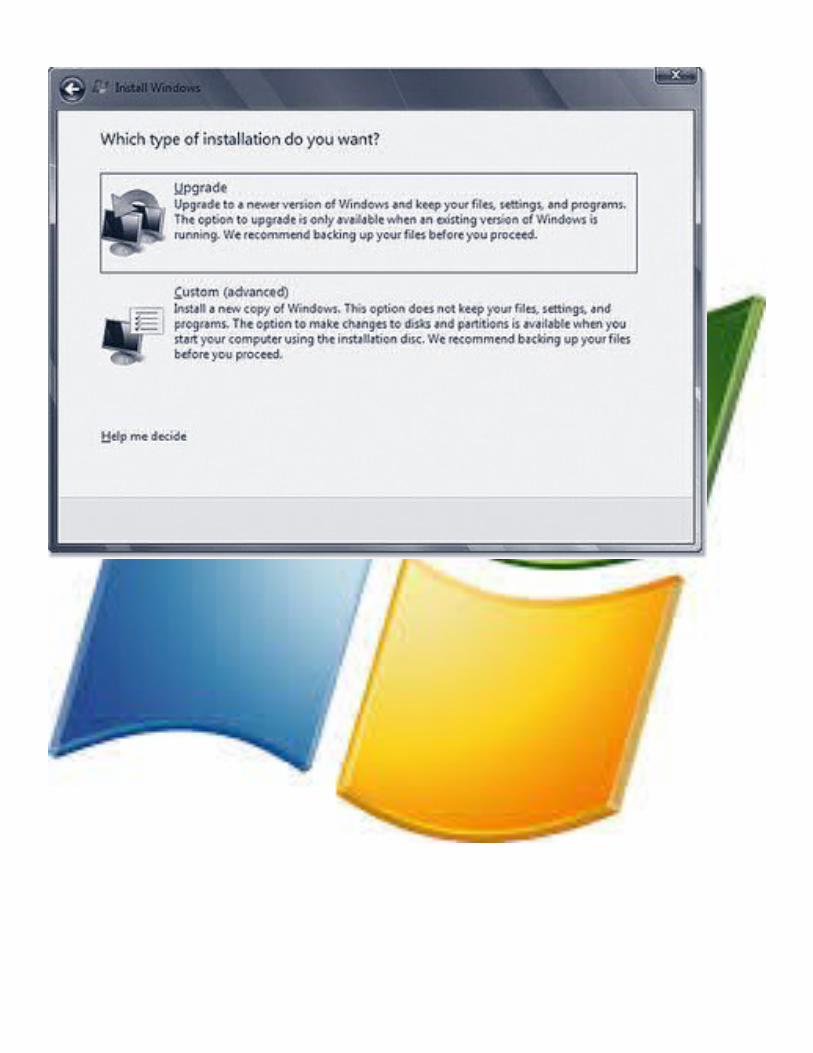
5. In the Which Type of Installation Do You Want? dialog box, shown in Figure 2.10, you can select only the Custom (Advanced) option because you're performing a new installation on a blank hard disk. Click Custom (Advanced) to continue.
6. In the Where Do You Want to Install Windows? dialog box, select the partition onto which you'll install Windows 7. When you're ready to proceed, click Next. If you need to provide a RAID or SCSI driver, now is the time to do it.
7. The Installing Windows dialog box appears and gives you an updated status of the upgrade process.
8. After some time, your computer restarts and the newly installed Windows 7 loads. Windows 7 resumes the installation process. Before the restart, a warning appears.
9. After the restart, you'll see a notification telling you that Windows 7 is preparing the new installation. Windows 7 moves back into a graphical display after a few minutes and tells you
it's updating Registry settings and starting services, after which it lets you know it's completing the installation.
10. After completing the installation, Windows 7 asks you to provide a username and a computer name. After providing this information, click Next to continue.
Note: Always choose a computer name that is unique. It must differ from any other computer, workgroup, or domain names on the network. You'll probably want to enter your name or a name of your own choice, although Setup supplies a recommendation. You might want to coordinate naming your computer with your LAN administrator, if you have one.
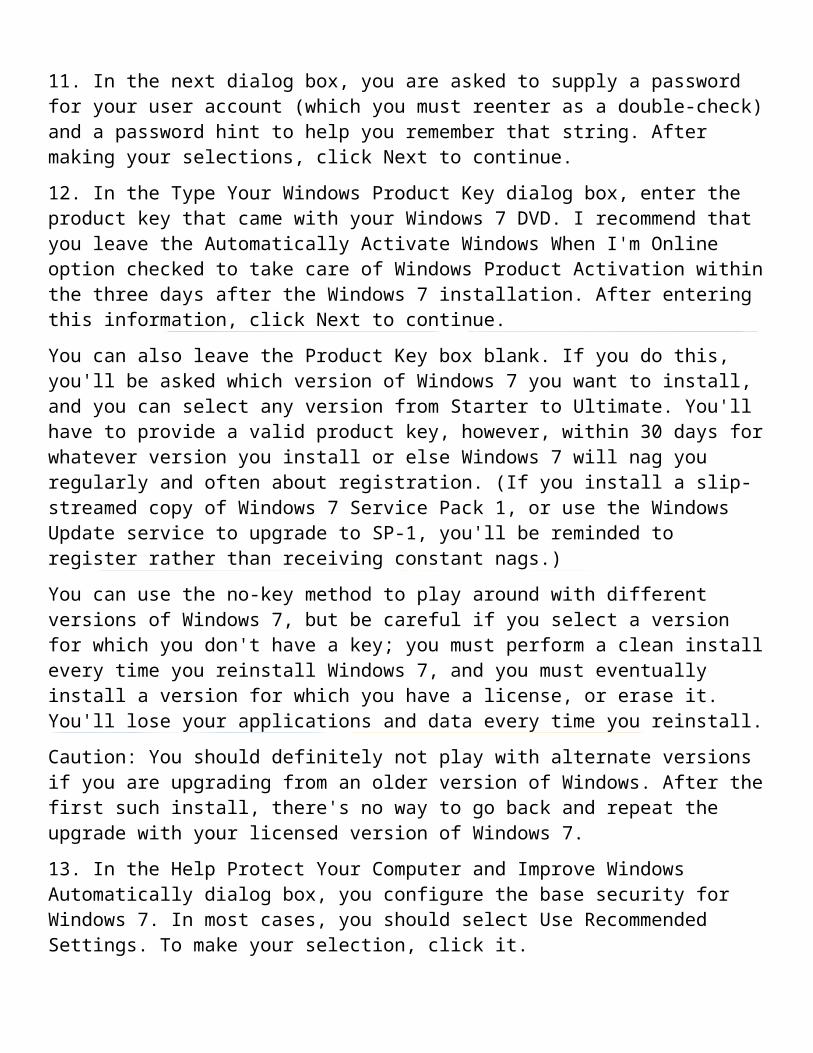
11. In the next dialog box, you are asked to supply a password for your user account (which you must reenter as a double-check) and a password hint to help you remember that string. After making your selections, click Next to continue.
12. In the Type Your Windows Product Key dialog box, enter the product key that came with your Windows 7 DVD. I recommend that you leave the Automatically Activate Windows When I'm Online option checked to take care of Windows Product Activation within the three days after the Windows 7 installation. After entering this information, click Next to continue.
You can also leave the Product Key box blank. If you do this, you'll be asked which version of Windows 7 you want to install, and you can select any version from Starter to Ultimate. You'll have to provide a valid product key, however, within 30 days for whatever version you install or else Windows 7 will nag you regularly and often about registration. (If you install a slip-streamed copy of Windows 7 Service Pack 1, or use the Windows Update service to upgrade to SP-1, you'll be reminded to register rather than receiving constant nags.)
You can use the no-key method to play around with different versions of Windows 7, but be careful if you select a version for which you don't have a key; you must perform a clean install every time you reinstall Windows 7, and you must eventually install a version for which you have a license, or erase it. You'll lose your applications and data every time you reinstall.
Caution: You should definitely not play with alternate versions if you are upgrading from an older version of Windows. After the first such install, there's no way to go back and repeat the upgrade with your licensed version of Windows 7.
13. In the Help Protect Your Computer and Improve Windows Automatically dialog box, you configure the base security for Windows 7. In most cases, you should select Use Recommended Settings. To make your selection, click it.
14. In the Review Your Time and Date Settings dialog box, select your time zone, daylight savings option, and current date options. Click Finish to complete the upgrade process.
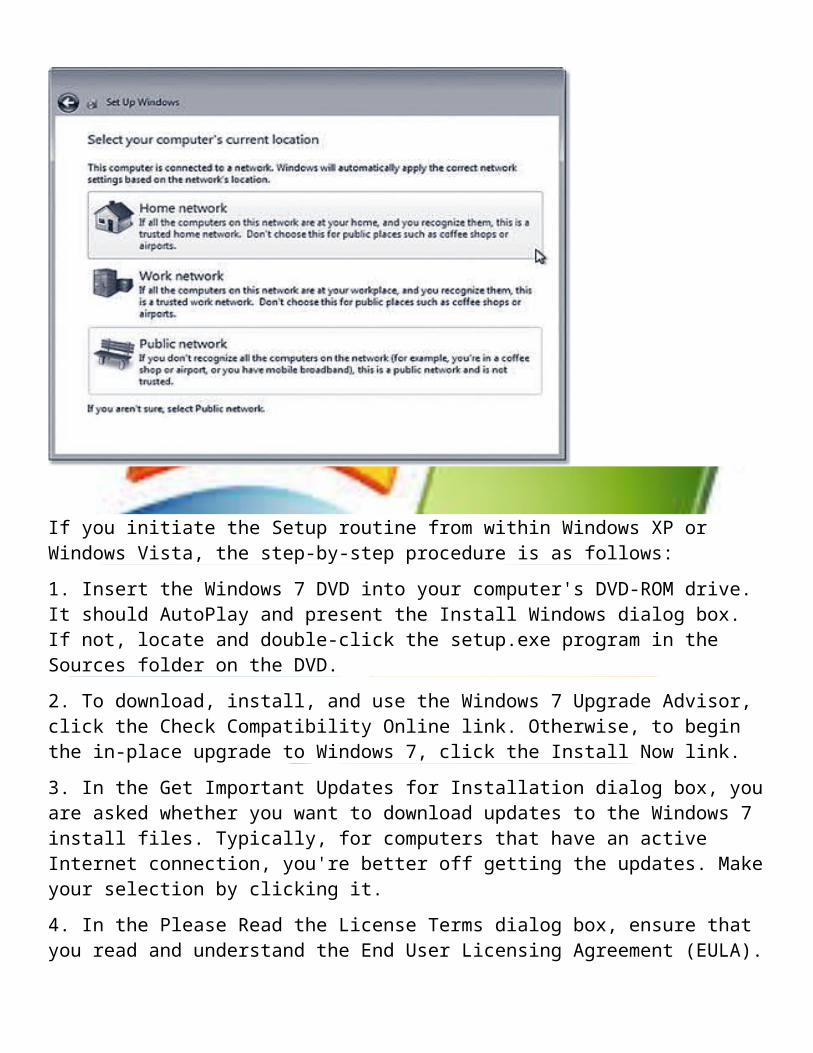
15. In the Select Your Computer's Current Location dialog box, shown in Figure 2.17, tell Windows where you'll be using your computer. As with Windows Vista, Windows 7 configures your network adapters for DHCP and does not ask you what to do.
16. Windows prompts you one last time-after you click Start, you're finished with the installation.
17. After a few more minutes, you are finally presented with your brand new Windows 7 login screen, as shown in Figure 2.18. Congratulations, you've completed the installation of Windows 7!
Tip: If you plan to perform a clean installation on your computer that is currently running some earlier Windows version, be sure to get your data and other files off the computer beforehand. You can perform this process manually, or you can opt to use Windows Easy Transfer to automatically copy all your files and settings to an external hard drive or network location.
After the clean installation of Windows 7 has completed, you can run Windows Easy Transfer again to reload your files and settings on the new installation of Windows 7
If you initiate the Setup routine from within Windows XP or Windows Vista, the step-by-step procedure is as follows:
1. Insert the Windows 7 DVD into your computer's DVD-ROM drive. It should AutoPlay and present the Install Windows dialog box. If not, locate and double-click the setup.exe program in the Sources folder on the DVD.
2. To download, install, and use the Windows 7 Upgrade Advisor, click the Check Compatibility Online link. Otherwise, to begin the in-place upgrade to Windows 7, click the Install Now link.
3. In the Get Important Updates for Installation dialog box, you are asked whether you want to download updates to the Windows 7 install files. Typically, for computers that have an active Internet connection, you're better off getting the updates. Make your selection by clicking it.
4. In the Please Read the License Terms dialog box, ensure that you read and understand the End User Licensing Agreement (EULA). When you're ready, select the I Accept the License Terms option and click Next to continue.
5. In the Type Your Product Key for Activation dialog box, you are asked to enter your Windows 7 product key. Enter the key and ensure that the Automatically Activate Windows When I'm Online option is checked, to enable Windows Product Activation. After entering the product key, click Next to continue.
6. In the Which Type of Installation Do You Want? dialog box, shown previously in Figure 2.10, select Custom (Advanced) because you're performing a clean installation here on top of an existing Windows XP installation.
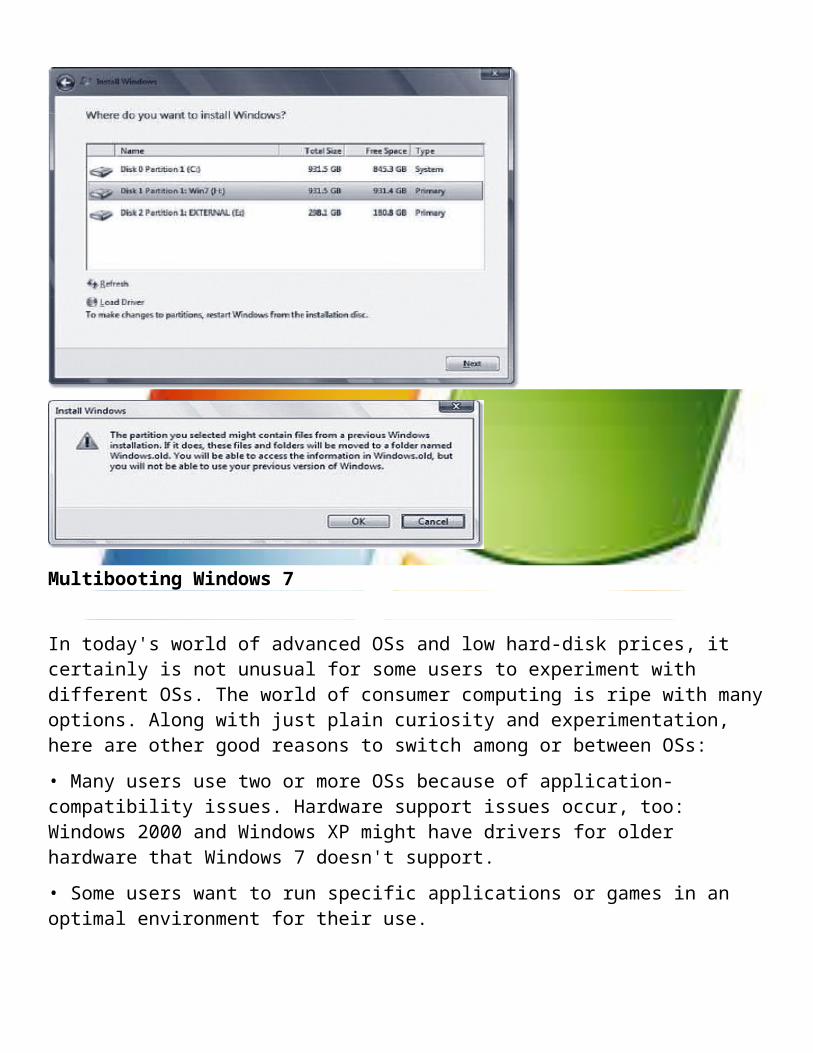
7. In the Where Do You Want to Install Windows? dialog box, shown in Figure 2.20, select the partition onto which you'll install Windows 7. When you're ready to proceed, click Next.
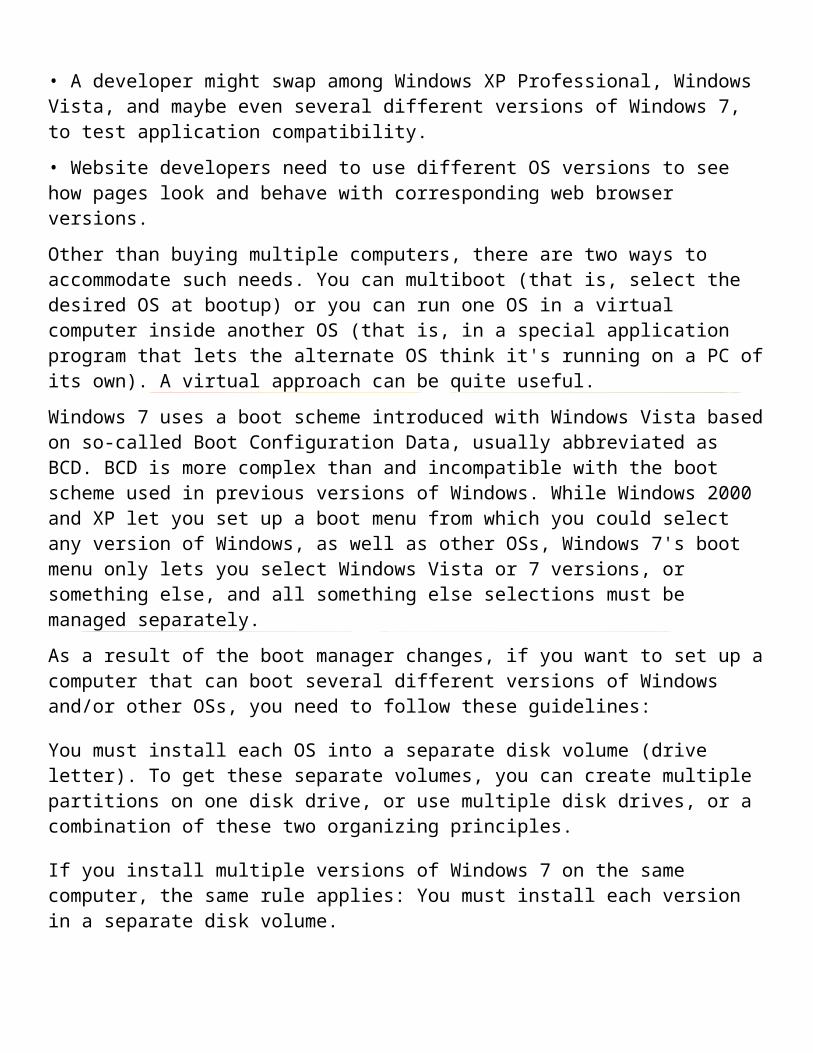
8. The Setup application warns you that the selected partition contains files from another Windows installation, as shown in Figure 2.21. After you read this information, click OK to continue.
9. The Installing Windows dialog box appears and updates the status for the upgrade process.
10. From here, the rest of the process is just like that for a clean installation (on a blank hard disk) above, starting withstep 9. After some time, your computer restarts and the newly installed Windows 7 loads.
Multibooting Windows 7
In today's world of advanced OSs and low hard-disk prices, it certainly is not unusual for some users to experiment with different OSs. The world of consumer computing is ripe with many options. Along with just plain curiosity and experimentation, here are other good reasons to switch among or between OSs:
• Many users use two or more OSs because of application-compatibility issues. Hardware support issues occur, too: Windows 2000 and Windows XP might have drivers for older hardware that Windows 7 doesn't support.
• Some users want to run specific applications or games in an optimal environment for their use.
• A developer might swap among Windows XP Professional, Windows Vista, and maybe even several different versions of Windows 7, to test application compatibility.
• Website developers need to use different OS versions to see how pages look and behave with corresponding web browser versions.
Other than buying multiple computers, there are two ways to accommodate such needs. You can multiboot (that is, select the desired OS at bootup) or you can run one OS in a virtual computer inside another OS (that is, in a special application program that lets the alternate OS think it's running on a PC of its own). A virtual approach can be quite useful.
Windows 7 uses a boot scheme introduced with Windows Vista based on so-called Boot Configuration Data, usually abbreviated as BCD. BCD is more complex than and incompatible with the boot scheme used in previous versions of Windows. While Windows 2000 and XP let you set up a boot menu from which you could select any version of Windows, as well as other OSs, Windows 7's boot menu only lets you select Windows Vista or 7 versions, or something else, and all something else selections must be managed separately.
As a result of the boot manager changes, if you want to set up a computer that can boot several different versions of Windows and/or other OSs, you need to follow these guidelines:
You must install each OS into a separate disk volume (drive letter). To get these separate volumes, you can create multiple partitions on one disk drive, or use multiple disk drives, or a combination of these two organizing principles.
If you install multiple versions of Windows 7 on the same computer, the same rule applies: You must install each version in a separate disk volume.
Install versions of Windows starting with the oldest and working toward the newest. For example, to set up a computer that can boot into Windows Me, Windows XP, and Windows 7, install Me first, then XP, then Windows 7. You mustinstall Windows 7 last!
To install OSs other than Windows, such as Linux, you might need a boot manager that can recognize all the different OSs in use. Linux offers a choice of several different boot managers. Their use is beyond the scope of this book, but you should be able to find instructions on the Web for multibooting Linux and Windows 7.
The Skinny on Boot Scheme Changes
Here's a rough sketch of what's changed: In the boot scheme used by the Intel x86 versions of Windows 2000 and XP, the boot partition's boot sector program loaded ntldr, which read the menu file boot.ini, and then loaded Windows. Aside from the boot sector, all of the stuff was in super hidden files (files marked with the system and hidden attributes), stored in the root directory.
The Windows Vista and Windows 7 boot sectors load a file called bootmgr from the root directory, which loads a set of programs and DLLs in the \boot folder, which then reads the BCD file (actually a Registry hive), and then loads Windows. The BCD hive is also loaded into and visible in the Windows Registry after bootup.
In a Windows 7 multiboot configuration, the root directory file bootsect.bak is a copy of the preWindows 7 boot sector (XP's version of the boot sector). Choosing Legacy from the Windows 7 boot menu loads and runs the original boot sector program, which carries on as before.
The reason for making this change was to create a common boot system that would work on both BIOS-based computers and computers using the newer EFI configuration system (built around Intel's Extensible Firmware Interface). The impact of this new scheme is that the Windows 7 boot menu can offer only Windows 7, Windows Vista, and Windows Server 2008 versions, where anything using the older boot loader gets lumped under the Legacy entry. The boot.ini file is used only to list and load non-BCD operating systems.
To create a multiboot installation on a computer that already has Windows Vista installed, follow this procedure. These steps are quite similar to the clean install procedure described earlier.
1. Insert the Windows 7 DVD into your computer's DVD-ROM drive. It should AutoPlay and present the Install Windows dialog box. If not, locate the setup.exe program in the Sources folder on the DVD, and double-click it.
(Alternatively, you can restart your computer and boot from the DVD.)
2. To download, install, and use the Windows 7 Upgrade Advisor, as detailed previously, click the Check Compatibility Online link. Otherwise, to begin the in-place upgrade to Windows 7, click the Install Now link.
3. In the Get Important Updates for Installation dialog box, you are asked whether you want to download updates to the Windows 7 install files. Typically, for computers that have an active Internet connection, you are better off getting the updates. Make your selection by clicking it.
4. In the Please Read the License Terms dialog box, ensure that you read and understand the End User Licensing Agreement (EULA). When you're ready, select the I Accept the License Terms option, and click Next to continue.
5. In the Type Your Product Key for Activation dialog box, you are asked to enter your Windows 7 product key. Enter the key and ensure that the Automatically Activate Windows When I'm Online option is checked, to enable Windows Product Activation. After entering the product key, click Next to continue.
6. In the Which Type of Installation Do You Want? dialog box, select Custom (Advanced) because here you're performing a clean, multiboot installation of Windows 7, not an upgrade.
7. In the Where Do You Want to Install Windows? dialog box, shown in Figure 2.24, select the partition into which you'll install Windows 7. This must be a partition that does not already have a version of Windows installed on it. When you're ready to proceed, click Next.
8. Follow the rest of the procedure described previously under Typical Clean Setup Procedure, from step 6 on through the end.
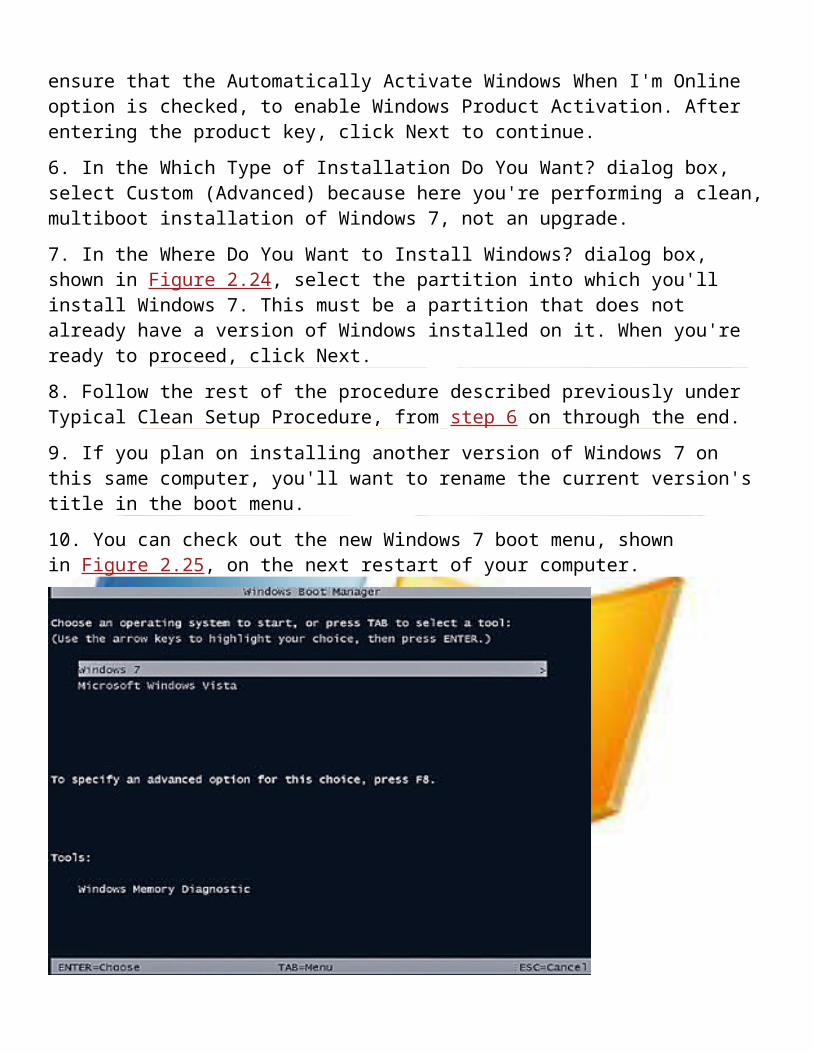
9. If you plan on installing another version of Windows 7 on this same computer, you'll want to rename the current version's title in the boot menu.
10. You can check out the new Windows 7 boot menu, shown in Figure 2.25, on the next restart of your computer.
How can I protect my computer from viruses?
Protecting your computer from viruses and other threats isn't difficult, but you have to be diligent.
Install an antivirus program. Installing an antivirus program and keeping it up-to-date can help defend your computer against viruses. Antivirus programs scan for viruses trying to get into your email, operating system, or files. New viruses can appear daily, so check the antivirus manufacturer's website frequently for updates. Some antivirus programs are sold with annual subscriptions that can be renewed as needed, but many are also available for free. Microsoft offers Microsoft Security Essentials, a free antivirus program you can download from the Microsoft Security Essentials website. You can also visit the Windows Security software providers webpage to find a third-party antivirus program.
Don't open email messages from unfamiliar senders, or email attachments that you don't recognize. Many viruses are attached to email messages and will spread as soon as you open the email attachment. It's best not to open any attachment unless it is something you are expecting. Microsoft Outlook and Windows Mail help block potentially dangerous attachments.
Use a pop-up blocker with your browser. Pop-up windows are small browser windows that appear on top of the website you're viewing. Although most are created by advertisers, they can also contain malicious or unsafe code. A pop-up blocker can prevent some or all of these windows from appearing.
The Pop-up Blocker feature in Internet Explorer is turned on by default.
Keep Windows updated. Periodically, Microsoft releases special security updates that can help protect your computer. These updates can help prevent viruses and other computer attacks by closing possible security holes. Make sure that Windows receives these updates by turning on Windows automatic updating.
Use a firewall. Windows Firewall or any other firewall program can help alert you to suspicious activity if a virus or worm attempts to connect to your computer. It can also block viruses, worms, and hackers from attempting to download potentially harmful programs to your computer.
Use your browser's privacy settings. Being aware of how websites might use your private information is important to help prevent targeted advertising, fraud, and identity theft. If
you're using Internet Explorer, you can adjust your Privacy settings or restore the default settings whenever you want.
Turn on User Account Control (UAC). When changes are going to be made to your computer that require administrator-level permission, UAC notifies you and gives you the opportunity to approve the change. UAC can help keep viruses from making unwanted changes
Clear your Internet cache and your browsing history. Most browsers store information about the websites you visit, and information that websites might ask you to provide (such as your name and address). While it can be helpful to have these details stored on your computer, there are times when you might want to delete some or all of them, for example when you're using a public computer and don't want to leave personal information behind.
Understanding Windows Firewall settings
In this page Turn on Windows Firewall
Block all incoming connections, including those in the list of allowed programs
Notify me when Windows Firewall blocks a new program
Turn off Windows Firewall A firewall can help prevent hackers or malicious software (such as worms) from gaining access to your computer through a network or the Internet. A firewall can also help stop your computer from sending malicious software to other computers.
You can customize four settings for each type of network location in Windows Firewall. To find these settings, follow these steps:
1. Open Windows Firewall by clicking the Start button , and then clicking Control Panel. In the search box, type firewall, and then click Windows Firewall.
2. In the left pane, click Turn Windows Firewall on or off. If you're prompted for an administrator password or confirmation, type the password or provide confirmation.
Here's what the settings do and when you should use them.
Turn on Windows FirewallThis setting is selected by default. When Windows Firewall is on, most programs are blocked from communicating through the firewall. If you want to allow a program to communicate through the firewall, you can add it to the list of allowed programs. For example, you might not be able to send photos in an instant message until you add the instant messaging program to the list of allowed programs. To add a program to the list, see Allow a program to communicate through Windows Firewall.
Block all incoming connections, including those in the list of allowed programsThis setting blocks all unsolicited attempts to connect to your computer. Use this setting when you need maximum protection for your computer, such as when you connect to a public network in a hotel or airport, or when a computer worm is spreading over the Internet. With this setting, you aren't notified when Windows Firewall blocks programs, and programs in the list of allowed programs are ignored.
When you block all incoming connections, you can still view most webpages, send and receive e-mail, and send and receive instant messages.
Notify me when Windows Firewall blocks a new programIf you select this check box, Windows Firewall will inform you when it blocks a new program and give you the option of unblocking that program.
Turn off Windows FirewallAvoid using this setting unless you have another firewall running on your computer. Turning off Windows Firewall might make your computer (and your network, if you have one) more vulnerable to damage from hackers and malicious software.
Top of page
Notes
If some firewall settings are unavailable and your computer is connected to a domain, your system administrator might be controlling these settings through Group Policy.
Turn User Account Control on or off
User Account Control (UAC) can help prevent unauthorized changes to your computer. UAC notifies you when changes are going to be made to your computer that require administrator-level permission. These types of changes can affect the security of your computer or can affect settings for other people that use the computer. We recommend that you leave UAC on to help make your computer secure.
Watch this video to learn how to turn UAC on or off (1:11)
To turn UAC on or off
1. Open User Account Control Settings by clicking the Start button , and then clicking Control Panel. In the search box, type uac, and then click Change User Account Control settings.
2. Do one of the following: To turn off UAC, move the slider to the Never notify position, and then click OK.
If you're prompted for an administrator password or confirmation, type the password or provide confirmation. You will need to restart your computer for UAC to be turned off.
To turn on UAC, move the slider to choose when you want to be notified, and then click OK. If you're prompted for an administrator password or confirmation, type the password or provide confirmation.
Why you need antivirus? What is antivirus?
Antivirus software detecs, and then prevents, disarms or removes malicious programs or malware, often referred to as 'viruses'. Antivirus doesn't offer a perfect solution to the problem of malware, but it is a critical first step to securing your PC or laptop. To help prevent viruses infecting your PC you must install antivirus, and then regularly update your antivirus software. All of the antivirus software reviewed here will update automatically.
How to choose antivirus
Malware is evolving faster than ever, but fortunately the latest generation of antivirus - or AV - is better equipped than ever to handle new threats.
In recent years, the technology that powers AV software has changed dramatically. An AV package you purchased a few years ago was able to stop known viruses and other known malware, but brand-new, unknown viruses proved more difficult. Newer products do a better job of stopping them.
For our antivirus tests we team up with AV-Test, a respected security-software testing lab based in Germany. AV-Test rigorously tests AV products from a number of leading security companies. The multifaceted testing procedure looks not only at how well an AV product can detect malware using traditional, largely signature-based methods (that is, employing a database of known malware types), but also at how well it can block brand-new, unknown malware. AV-Test also examines how well a security product can clean up after an infection in the event that a piece of malware does get through.
Antivirus: free or paid for?
Our tests focus on paid-for and free AV products. Paid-for AV products usually offer better technical support and more comprehensive protection features than free programs. Internet security suites go further still, offering firewalls, parental controls, identity theft protection and more.
The best antivirus
Here we review the best antivirus programs you can buy or download in the UK right now. Securing your PC is, of course, about a lot more than antivirus. At the very least you need to run up to date antivirus, antispyware and a firewall. You'll find that almost all of the best antivirus software we test these days forms part of aninternet security suite: so all of the above and more is included.
The trouble is, some antivirus is better than others. They all offer a blacklist of known threats, and a whitelist of software that is known to be legitimate. But these days new threats emerge every day, and knowing what is friend and what is foe in real-time can be critical. And that's where we come
in. AV-Test challenges Windows security software to withstand threats both old and new, known and unknown.
We then combine that with our own experienced and expert tests of interface and system overhead. We test antivirus programs for how much (if at all) they slow down your PC or laptop, as well as how easy to use and how intrusive they are. Thus you can see from our regularly updated list of the best antivirus for PC or laptop, which is the best for you. Best antivirus for protection, best antivirus for performance, and best antivirus for value. Click through to read the individual antivirus reviews.
15 best antivirus of 2014Best AntiVirus Software 2014 | FindTheBest
15. AhnLab V3 Internet Security 8.0
Reviewed on: 30 April 13 RRP: £50 inc VAT (3 PCs, 1-year subscription) Best Price: Find The Best AhnLab V3 Internet Security 8.0 Deals Rating:
Scraping an AV-Test Certification may put some people off AhnLab V3 Internet Security 8.0, but standards in malware protection are now very high. We wonder if its scanning should be more thorough too. In its favour it's very easy to setup and use. For general-purpose home protection it's definitely better than having nothing, but there are more secure alternatives available at similar and lower cost.
14. Panda Global Protection 2014
Reviewed on: 3 September 13 RRP: £64 (3 PC licence) inc VAT Best Price: Find The Best Panda Global Protection 2014 Deals Rating:
Panda Global Protection 2014 is very easy to set up and use and offers good coverage of the key malware threats, using cloud support for database and backup. Just 2 GB online storage is a bit feeble for three devices, although the Android and Mac protection is a welcome extension to the core PC software.
13. Webroot SecureAnywhere Internet Security Complete 2014
Reviewed on: 18 November 13 RRP: £65 (5 device licence, 1 year) Best Price: Find The Best Webroot SecureAnywhere Internet Security Complete
2014 Deals Rating:
Webroot's utilitarian approach may appeal to those who shun ostentatious software, and it's undoubtedly useful to have a product which can protect up to five devices at a time. That those devices can be based on a number of different platforms is also a benefit. The problem with SecureAnywhere Internet Security Complete 2014 is the question mark over its ability to do the business spotting malware.
12. Avira Free Antivirus 2014
Reviewed on: 16 December 13 RRP: Free Best Price: Find The Best Avira Free Antivirus 2014 Deals Rating:
Avira Free Antivirus 2014 is easy to set up and use and it's good to see free mobile support and backup, as well as the core AV functions. It's not the best free protection available though, with both AVG and Avast! scoring higher in test lab results.
11. Qihoo 360 Internet Security 4.3
Reviewed on: 28 October 13 RRP: Free (unlimited licence) Best Price: Find The Best Qihoo 360 Internet Security 4.3 Deals Rating:
Although the Performance score, which shows the resource hit, is a bit low, this wasn’t reflected in our own, admittedly simpler, test. The Protection result was pretty good on recent threats, though it dropped down to around 90 percent on zero-day attacks.
10. Lookout Security & Antivirus
Reviewed on: 11 February 14 RRP: Free; £1.99 per month for premium features Best Price: Find The Best Lookout Security & Antivirus Deals Rating:
A superbly designed, unobtrusive Android security suite that steps in when it needs to, but otherwise keeps out of the way. It doesn't offer as many features as rival suites, but what it does, it does with aplomb
9. Malwarebytes Anti-Malware Premium
Reviewed on: 24 March 14 RRP: £17 inc VAT (3-PC licence) Best Price: Find The Best Malwarebytes Anti-Malware Premium Deals
Rating:
Malwarebytes Anti-Malware Premium sits beside your traditional IS suite, filling in any gaps in its defences. It's small and efficient, quick to scan and appears to offer extra protection against sneakier security threats. It represents an inexpensive addition to the arsenal of software needed to keep your computing safe.
8. Bullguard Internet Security 2014
Reviewed on: 7 November 13 RRP: £50 (3 PC licence, 1 year) Best Price: Find The Best Bullguard Internet Security 2014 Deals Rating:
We like Bullguard Internet Security 2014 a lot. It's AV and protection provision is robust and well automated, but it's also one of the most comprehensive suites we look at each year. Combining IS, backup and tune-up seems to us the ideal approach and this one suite handles all these issues in a sensible and easily controllable way. It's also one of the most economically-priced solutions out there.
7. F-Secure Safe 2014
Reviewed on: 25 October 13 RRP: £60 (3 device licence) Best Price: Find The Best F-Secure Safe 2014 Deals Rating:
The Usability score of 5.5 reflects a low total of five false positives, during system scans and the use of legitimate applications. The 4.5 figure for a Performance score shows a noticeable resource hit while running regular computing tasks, like downloading and installing software.
6. Trend Micro Titanium Internet Security
Reviewed on: 1 February 13 RRP: £60 for 1 year/3 PCs Best Price: Find The Best Trend Micro Titanium Internet Security Deals Rating:
Overall, Trend Micro Titanium Internet Security is a great choice. This security suite boasts excellent performance, a quick installation process, a user-friendly interface, and speedy scans. Its settings pane is a tad confusing, but that’s a minor issue considering the protection you’ll be getting.
5. eScan Total Security Suite 1
Reviewed on: 30 April 14 RRP: £80 (£48 approx for 3-PC licence) Best Price: Find The Best eScan Total Security Suite 1 Deals Rating:
Since Microworld produces IS software for Mac and Android, as well as PC, it would be good to have cross-platform support in this suite, but given the asking price for a 3-PC licence (you can buy 1, 2, 3 and 5 PC variants), it's still very good value. It's quick, AV-Test shows it to be effective and its no-nonsense interface is refreshing.
4. Kaspersky PURE 3.0 Total Security review
Reviewed on: 20 August 13 RRP: £50 (3 PC licence) inc VAT Best Price: Find The Best Kaspersky PURE 3.0 Total Security review Deals Rating:
The price of Kaspersky PURE 3.0 Total Security makes it a competitive product for a full IS suite with all the trimmings and its AV-Test results put it in a very strong position. It's good to see anti-malware and backup apps combined in a wash-and-go product like this, though the interface would benefit from a more equable distribution of its function links.
3. G Data TotalProtection 2014
Reviewed on: 7 November 13 RRP: £50 inc. VAT Best Price: Find The Best G Data TotalProtection 2014 Deals Rating:
With excellent protection and decent performance at a good price, we like G Data TotalProtection 2014.
2. Bitdefender Total Security 2014
Reviewed on: 20 August 13 RRP: £50 (3 PC licence) inc VAT Best Price: Find The Best Bitdefender Total Security 2014 Deals Rating:
Technically one of the best IS suites you can buy, Bitdefender Total Security 2014 also offers a swathe of extras which all help to protect some aspects of your Windows life online. Even though it's so feature-rich, it manages to set itself up and run unobtrusively in the background. We'd have
liked a bit more online storage, particularly since it's a 3-PC licence, and there are better Bitdefender choices if you want to protect devices running a variety of operating systems.
1. Symantec Norton 360 2014
Reviewed on: 29 October 13 RRP: £60 (3 PC licence) Best Price: Find The Best Symantec Norton 360 2014 Deals Rating:
AV-Test gave the Norton code 17.0/18.0, a very good result. Broken down, this gives 5.5/6.0 in both Protection and Usability and a full 6.0/6.0 in Performance, even if this wasn’t reflected in our own tests of PC slowdown.