Embed Size (px)
Citation preview
MODERN DRUM PRODUCTION PROJECT:
Creating a virtual multi-layered drum sam-
ple library & Conducting an AB-test
against the played version of the same
drum kit
Joona Vuopala
Bachelor’s thesis May 2018
Degree Programme in Media & Arts Music Production
ABSTRACT
Tampereen ammattikorkeakoulu Tampere University of Applied Sciences Degree Programme in Media & Arts Music Production JOONA VUOPALA: Modern Drum Production Project: Creating a virtual multi-layered drum sample library & Conducting an AB-test against the played version of the same drum kit Bachelor's thesis 39 pages, appendices 1 pages May 2018
Recording drums can be very challenging, expensive and time consuming. It is required to have the player, drums, space, recording equipment & money, in order to capture a high quality recording. In this day & age, the most common reason for people to go to a commercial recording studio, is to record acoustic drums. The aim of this thesis was to find out if it is possible to achieve similar results by sampling a drum kit in high detail and programming the samples in MIDI, as by physically playing the drum kit. As the practical part for this thesis, a virtual multi-instrument library was created, containing 764 individual drum samples. To reinforce the statement of the thesis, an AB-test in comparison to live drums was con-ducted with 41 respondents coming from different musical and non-musical backgrounds. Analyzing the results of the blind test, it can be concluded that it truly is possible to achieve great results with carefully sampled and programmed instrument libraries that are on par with real, live drums.
Key words: drums, sample instrument library, recording, music production
3
CONTENTS
1 INTRODUCTION ..............................................................................................62 FRAME OF REFERENCE & THEORETICAL BACKGROUND ..................7
2.1 Frame of reference ......................................................................................72.2 Recording drums .........................................................................................72.3 What is sampling? ......................................................................................92.4 What is MIDI? ............................................................................................92.5 A brief history of drum machines & samplers ............................................92.6 Modern production & Sample libraries ....................................................10
3 THESIS PROJECT ..........................................................................................123.1 Drum setup ...............................................................................................123.2 Choosing & placing the microphones ......................................................12
3.2.1 Kick drum .....................................................................................133.2.2 Snare drum ....................................................................................143.2.3 Toms .............................................................................................143.2.4 Hi-Hat ...........................................................................................153.2.5 Overheads .....................................................................................153.2.6 Room ............................................................................................16
4 RECORDING & SAMPLING .........................................................................174.1 Recording Hardware & Software .............................................................174.2 Playing the beats .......................................................................................194.3 Recording the samples ..............................................................................19
5 EDITING THE SAMPLES & BUILDING THE KONTAKT-LIBRARY .....215.1 Choosing & exporting the samples ...........................................................215.2 Implementing the samples in Kontakt ......................................................23
6 PROGRAMMING & MIXING DRUMS ........................................................266.1 Performing the beats in MIDI .................................................................266.2 Mixing drums ..........................................................................................28
6.2.1 Kick drum .....................................................................................296.2.2 Snare drum ....................................................................................296.2.3 Toms .............................................................................................296.2.4 Hi-Hat ...........................................................................................306.2.5 Overheads .....................................................................................306.2.6 Room ............................................................................................306.2.7 Drum bus ......................................................................................316.2.8 Effects ...........................................................................................31
6.3 Mastering the stereo drum tracks ............................................................32

4
7 AB-TEST & RESULTS ...................................................................................347.1 Conducting the AB-test ...........................................................................347.2 Test results ...............................................................................................35
8 DISCUSSION & CONCLUSION ...................................................................36REFERENCES ......................................................................................................37
5
ABBREVIATIONS AND TERMS
TAMK Tampere University of Applied Sciences
Preamplifier A unit that boosts the incoming audio signal to line-level.
Audio Interface A unit that allows the recording of analog audio into digital
audio.
Saturation Mild distortion that enhances the overtones of audio content.
Equalizer Also known as “EQ”. Used to balance the frequency content
of an audio source.
Compressor A unit used to control the dynamics of an incoming audio sig-
nal.
Limiter A compressor with a very high ratio, limiting the audio from
exceeding a pre-determined level.
DAW “Digital Audio Workstation”. A software used to capture, edit
& export audio.
Plugin A software add-on to be used inside a DAW to manipulate
audio content.
Sample recording Also known as “sampling”. Recording an audio source with
as much detail as possible, usually with several layers and var-
iations.
MIDI A musical data communication language.
6
1 INTRODUCTION
The main research questions in this thesis were: “How close can one get to the recorded
drums’ feel/groove by using sampled drums from the same drum kit?”, and “Is it nowa-
days still necessary to go to a recording studio to record real drums, or is it possible to get
acceptable results with a sample library?”. The hypothesis I had was that you could get
remarkably close to live drums by careful programming, and the end-result could be used
in a final production. Also, another reason why I chose this topic was that I could not find
a comparison anywhere that included an AB-test between played & sampled drums of the
same drum kit.
There are many drum libraries around with great recording quality of very high-end drum
kits. Some use these libraries to make demos or for songwriting purposes, whereas some
use them to replace real drums by spending lots of time to make them work within the
song. (Nick Magnus, 2015, www.soundonsound.com.) Magnus (2015) also says that
drum libraries such as Toontrack Superior Drummer & EZdrummer 2, Drumasonic,
FXpansion BFD3 alongside Native Instruments Drummer Series & Steven Slate Drums
have raw, high quality recorded sounds with many details. Each of them also have their
own uniqueness and versatility. I, personally have over six years of experience dealing
with drum instrument libraries, having tried out most of the biggest commercial libraries
available. To my ears, many of the drum samples in these libraries simply sound too clean
& processed. It can be difficult to achieve natural-sounding drums if the base sound is
already quite sterile to begin with.
The primary goal in the practical part of the thesis was to create a multi-instrument library
with high-quality drum samples and with minimal processing applied to it, in order to
have an instrument that sounds raw & natural and behaves like a real, live drum kit. This
was also the first instrument library I ever created. All the recordings were made in the
studios of TAMK Mediapolis campus, in Tampere, on the 7th of March 2018. In the written
part of the thesis, I will first cover the theoretical background on the subject and then
continue explaining the thesis project; how I recorded the drum beats & samples, edited
& implemented the samples into Kontakt, mixed the drum sounds together and created &
conducted the survey for AB-testing.
7
2 FRAME OF REFERENCE & THEORETICAL BACKGROUND
2.1 Frame of reference
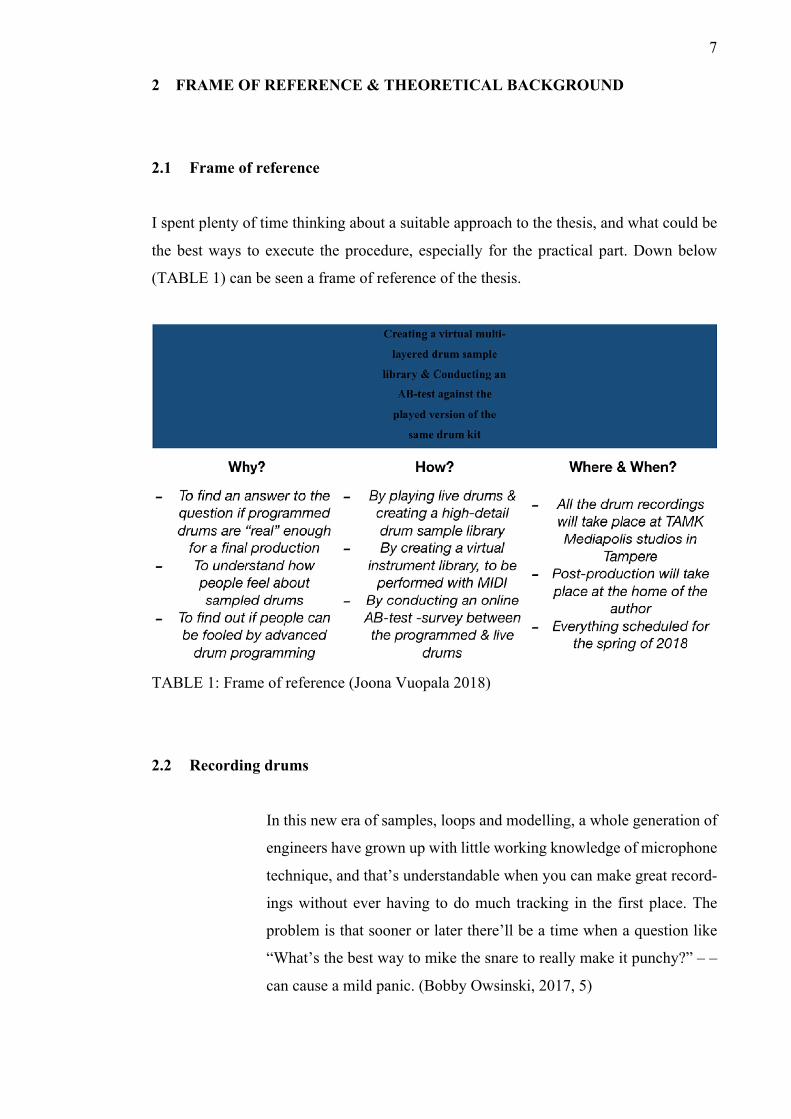
I spent plenty of time thinking about a suitable approach to the thesis, and what could be
the best ways to execute the procedure, especially for the practical part. Down below
(TABLE 1) can be seen a frame of reference of the thesis.
TABLE 1: Frame of reference (Joona Vuopala 2018)
2.2 Recording drums
In this new era of samples, loops and modelling, a whole generation of
engineers have grown up with little working knowledge of microphone
technique, and that’s understandable when you can make great record-
ings without ever having to do much tracking in the first place. The
problem is that sooner or later there’ll be a time when a question like
“What’s the best way to mike the snare to really make it punchy?” – –
can cause a mild panic. (Bobby Owsinski, 2017, 5)
8
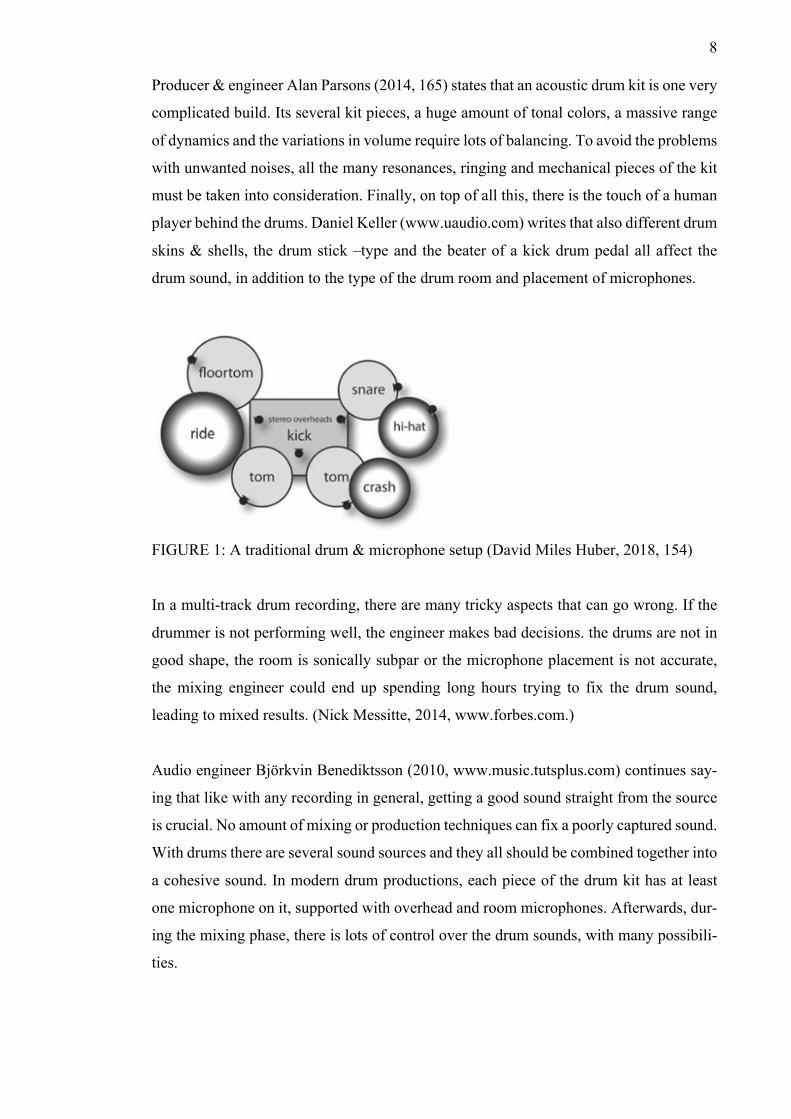
Producer & engineer Alan Parsons (2014, 165) states that an acoustic drum kit is one very
complicated build. Its several kit pieces, a huge amount of tonal colors, a massive range
of dynamics and the variations in volume require lots of balancing. To avoid the problems
with unwanted noises, all the many resonances, ringing and mechanical pieces of the kit
must be taken into consideration. Finally, on top of all this, there is the touch of a human
player behind the drums. Daniel Keller (www.uaudio.com) writes that also different drum
skins & shells, the drum stick –type and the beater of a kick drum pedal all affect the
drum sound, in addition to the type of the drum room and placement of microphones.
FIGURE 1: A traditional drum & microphone setup (David Miles Huber, 2018, 154)
In a multi-track drum recording, there are many tricky aspects that can go wrong. If the
drummer is not performing well, the engineer makes bad decisions. the drums are not in
good shape, the room is sonically subpar or the microphone placement is not accurate,
the mixing engineer could end up spending long hours trying to fix the drum sound,
leading to mixed results. (Nick Messitte, 2014, www.forbes.com.)
Audio engineer Björkvin Benediktsson (2010, www.music.tutsplus.com) continues say-
ing that like with any recording in general, getting a good sound straight from the source
is crucial. No amount of mixing or production techniques can fix a poorly captured sound.
With drums there are several sound sources and they all should be combined together into
a cohesive sound. In modern drum productions, each piece of the drum kit has at least
one microphone on it, supported with overhead and room microphones. Afterwards, dur-
ing the mixing phase, there is lots of control over the drum sounds, with many possibili-
ties.

9
2.3 What is sampling?
According to authors Sam Mcguire & Roy Pritts (2008, 1-3), sampling means the
recording process of a sound source, in which each part of the source is recorded
separately, and then implemented into a sampler for playback. Samplers recreate the
implemented sounds in the most realistic way possible and are capable of manipulating
them further. To trigger the samples inside the sampler, a MIDI device is needed. Using
a tool like a sampler is a powerful way to represent sounds that can be stored and recalled
with ease. Even though samplers may not be able to include all the variations of the
original instrument, it is possible to achieve realistic results with them.
2.4 What is MIDI?
Simply put, MIDI is a language made of chains of different commands to record and send
data in & out between devices, for example a synthesizer and a computer. MIDI itself
does not include sound, but rather tells other devices what they should do via triggering
commands. (Parsons, 2014, 79.)
2.5 A brief history of drum machines & samplers
The first drum machines were actually never supposed to be used in a studio environment
for recording purposes. For example, one of the earliest commercial drum machines
Wurlitzer 1959 Sideman had vacuum tubes for creating percussive sounds, but was
actually aimed for organ players to replace the drummer in their solo act. (Oliver Wang,
2014, www.npr.org.) In the late ’70s, only the most high-end studios would have the very
expensive samplers, such as Fairlight or Synclavier at their disposal. Around the mid
’80s, samplers became a lot more affordable with the likes of Emulator and Mirage. The
lower cost of the equipment also launched the birth of new electronic genres and Hip
Hop. Throughout the ’90s, samplers were already very common among producers, with
the equipment becoming more and more cheaper and technologically advanced, with
successful products from Akai and EMU. The success of these samplers led to the
evolution of software solutions that are widely used in modern music production.
(www.imusiciandigital.com.)
10
2.6 Modern production & Sample libraries
When recording acoustic sounds, microphones, cables & preamplifiers are needed, but
afterwards all the other actions can be performed and memorized inside a DAW, on a
computer. In this environment, it is possible to also synthesize & trigger sounds from a
compatible library or via plug-ins. Before, it was common to have the need for a separate
unit or console, a patch-bay, outboard gear with many connectors and converters only for
summing, routing, recording & editing audio, Nowadays, there are almost each and every
instrument or effect processor available in a plug-in form. It still takes a great effort to
replace real instruments with digital ones, requiring storage and creative mixing &
editing. (Richard James Burgess, 2014, 145.)
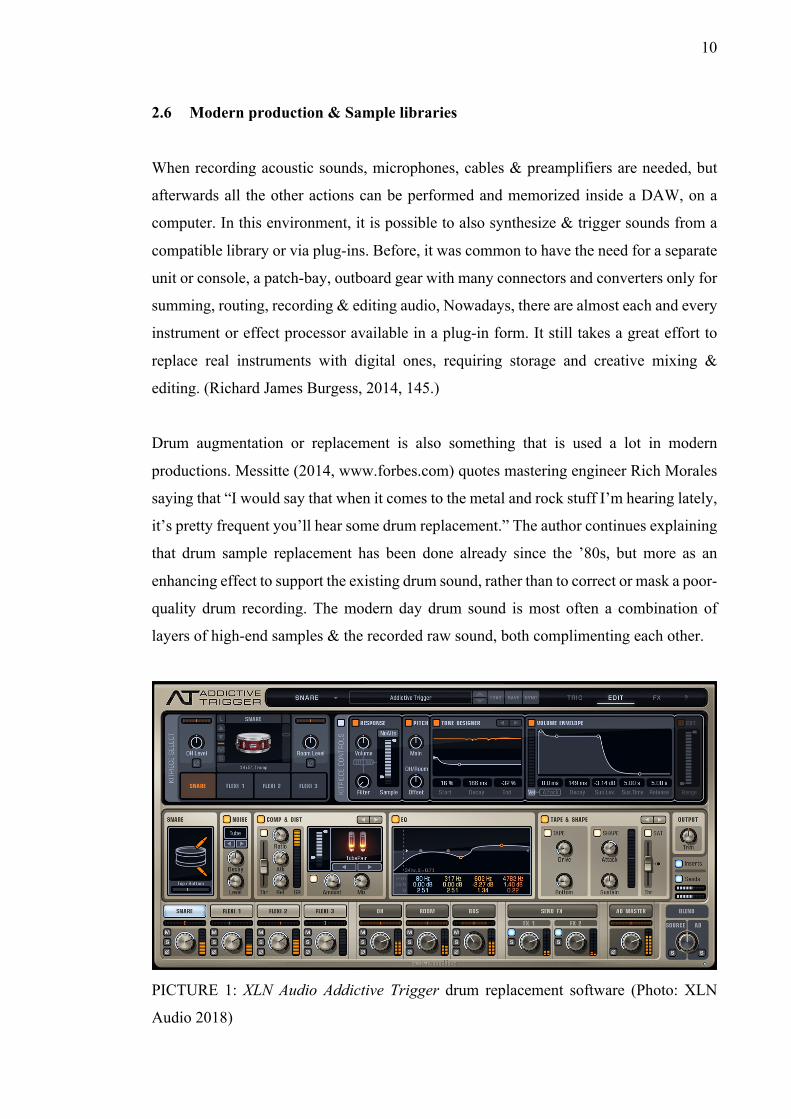
Drum augmentation or replacement is also something that is used a lot in modern
productions. Messitte (2014, www.forbes.com) quotes mastering engineer Rich Morales
saying that “I would say that when it comes to the metal and rock stuff I’m hearing lately,
it’s pretty frequent you’ll hear some drum replacement.” The author continues explaining
that drum sample replacement has been done already since the ’80s, but more as an
enhancing effect to support the existing drum sound, rather than to correct or mask a poor-
quality drum recording. The modern day drum sound is most often a combination of
layers of high-end samples & the recorded raw sound, both complimenting each other.
PICTURE 1: XLN Audio Addictive Trigger drum replacement software (Photo: XLN
Audio 2018)

11
The one complete step further away from drum replacement are the software drum librar-
ies, allowing the user to fully create comprehensive drum performances. Software design-
ers offer the users plenty of products, to achieve drum tracks that sound professional and
all is done inside a computer. The top studios with top recording gear and rooms have
recorded and sampled in high detail quality drum kits that can be triggered and pro-
grammed inside a DAW. (www.soundonsound.com.)
Huber (2018, 276-277) explains that software drum machines can create a great variety
of grooves, with a vast sonic palette in the digital audio & MIDI realm. These instrument
parts can be easily locked into the tempo of a project and can be as simple or complex as
the user wants to, either by programming or performing in real-time.
PICTURE 2: FXpansion BFD3 virtual drum instrument library (Photo: FXpansion 2018)
12
3 THESIS PROJECT
In the upcoming chapters, I will explain my working process for the practical part of this
thesis: Creating the drum sample library & survey for the AB-test.
3.1 Drum setup
I chose to record the drums in the small live room of my school studios, in TAMK Me-
diapolis, in Tampere. The room was a rather dry-sounding but had high enough a ceiling
for a decent drum recording, with a control room right next to it for easy access. The drum
kit in question was a Premier birch kit consisting of 22” kick, 14” snare and 12” & 16”
toms. I decided to use my own Sabian HHX –cymbal set of 14” hi-hat, 16” crash and 20”
ride. For drumsticks I picked Promark TX707W Simon Phillips Wood Tip 5A drumsticks
that are nicely balanced and responsive. I aimed for a very basic drum setup and adjusted
each kit piece to my personal taste for playing.
I am glad the drums were already well in-tune and had very little resonance. I ended up
putting an extra piece of tape on the edge of the rack tom for controlling the resonance
and ringing even further. An online guide (www.drumheadauthority) tells that it makes a
difference where and how much you would add tape. If you put the tape on the edge of
the drumhead, it attenuates the harmonics, while keeping part of the sustain intact. It helps
the ringing of the drum to stop without sacrificing tone.
3.2 Choosing & placing the microphones
Once the instrument itself is in a good condition, the next crucial step in recording is
choosing the correct microphones for the situation and placing them accurately, for the
best possible results. For this project, I chose some of the most iconic and trustworthy
microphones that are well suited for a drum recording. The frequency, polar & transient
responses of the microphone and the proximity effect should be considered when choos-
ing a group of microphones for drums (Huber, 2018, 156). Next, it can be seen how I
approached the recording process of the drums.
13
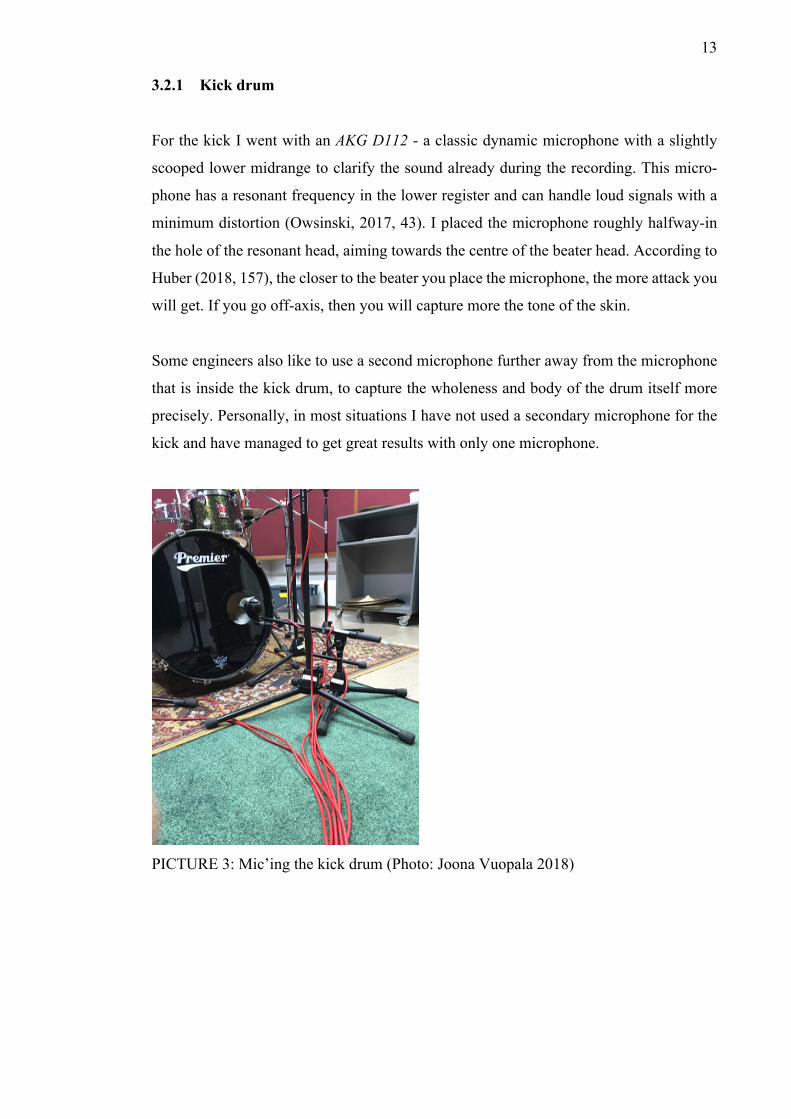
3.2.1 Kick drum
For the kick I went with an AKG D112 - a classic dynamic microphone with a slightly
scooped lower midrange to clarify the sound already during the recording. This micro-
phone has a resonant frequency in the lower register and can handle loud signals with a
minimum distortion (Owsinski, 2017, 43). I placed the microphone roughly halfway-in
the hole of the resonant head, aiming towards the centre of the beater head. According to
Huber (2018, 157), the closer to the beater you place the microphone, the more attack you
will get. If you go off-axis, then you will capture more the tone of the skin.
Some engineers also like to use a second microphone further away from the microphone
that is inside the kick drum, to capture the wholeness and body of the drum itself more
precisely. Personally, in most situations I have not used a secondary microphone for the
kick and have managed to get great results with only one microphone.
PICTURE 3: Mic’ing the kick drum (Photo: Joona Vuopala 2018)
14
3.2.2 Snare drum
Shure SM57 is a legend of a microphone for vocals and instruments. It has a clean, present
sound that is suited for live & studio applications. It is considered great on drum, wood-
wind and guitar recordings. (www.shure.com.) I placed an SM57 on both the top and
bottom of the snare drum. The top microphone captures the body, punch & wood/metal
of the drum, whereas the bottom microphone the sizzle & rattle of the snare. Both micro-
phones were targeted at the centres of the drum heads for a balanced tone. It is good to
remember to change the polarity of the bottom microphone, because it would be out of
phase otherwise (Huber, 2018, 158).
3.2.3 Toms
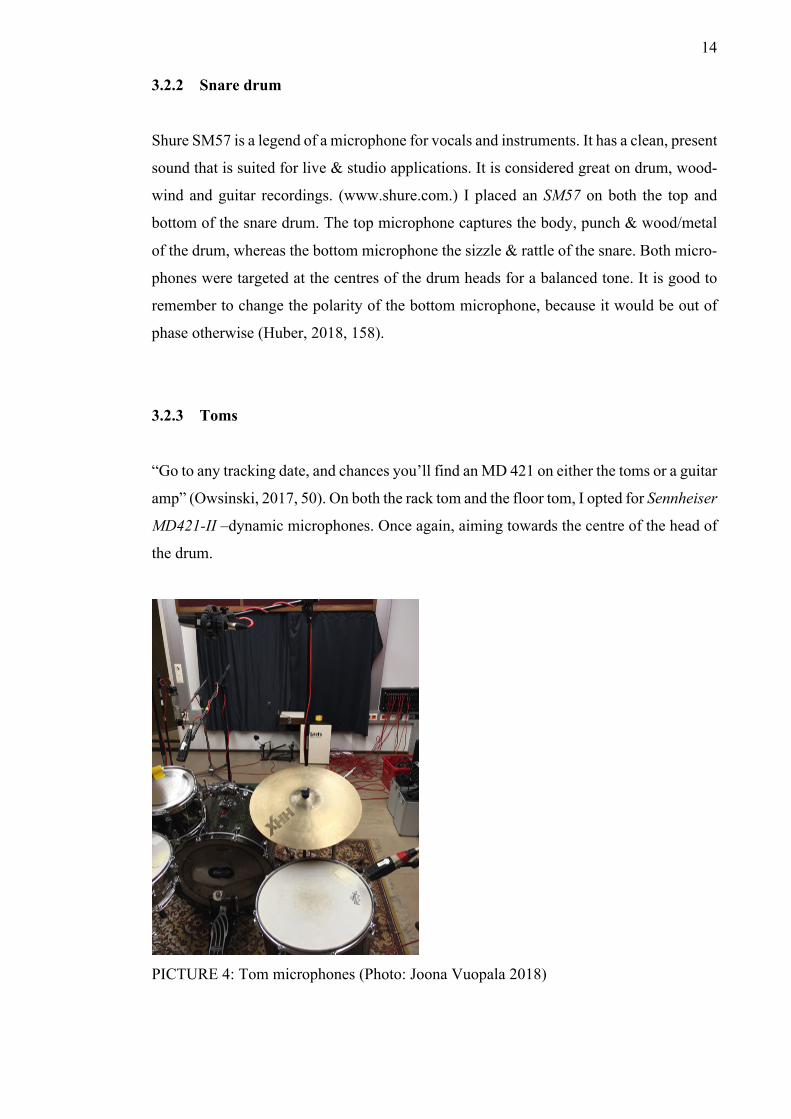
“Go to any tracking date, and chances you’ll find an MD 421 on either the toms or a guitar
amp” (Owsinski, 2017, 50). On both the rack tom and the floor tom, I opted for Sennheiser
MD421-II –dynamic microphones. Once again, aiming towards the centre of the head of
the drum.
PICTURE 4: Tom microphones (Photo: Joona Vuopala 2018)
15
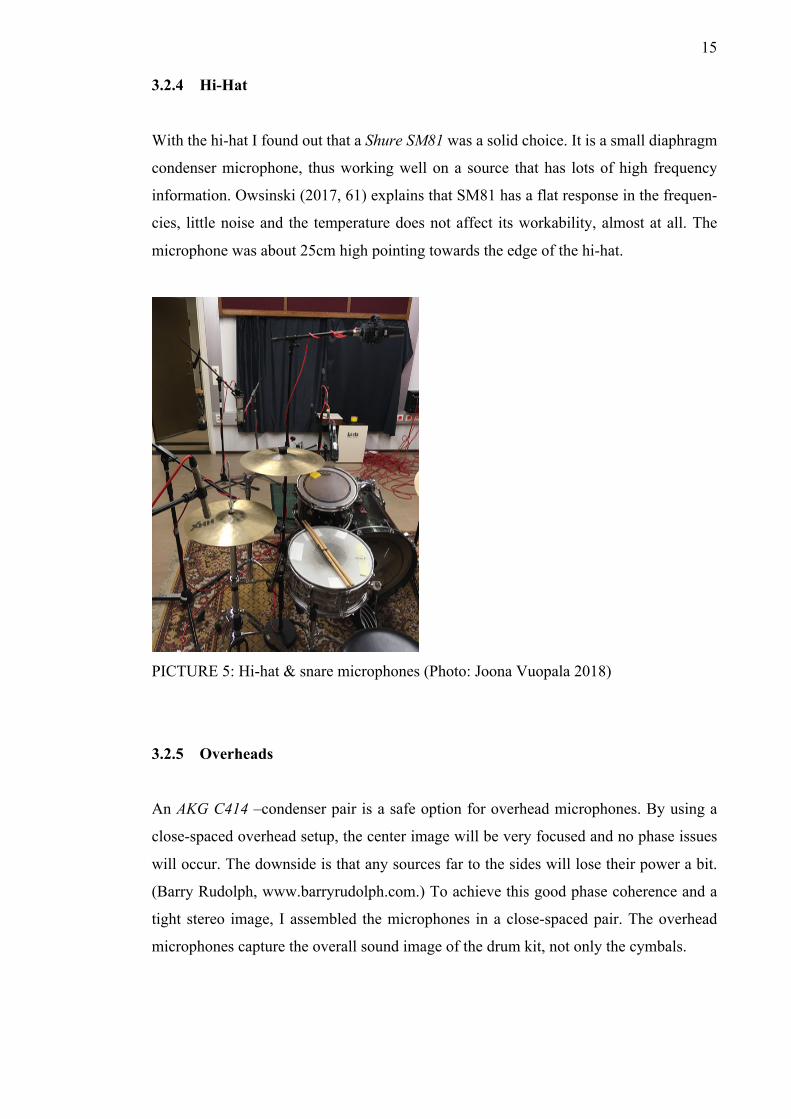
3.2.4 Hi-Hat
With the hi-hat I found out that a Shure SM81 was a solid choice. It is a small diaphragm
condenser microphone, thus working well on a source that has lots of high frequency
information. Owsinski (2017, 61) explains that SM81 has a flat response in the frequen-
cies, little noise and the temperature does not affect its workability, almost at all. The
microphone was about 25cm high pointing towards the edge of the hi-hat.
PICTURE 5: Hi-hat & snare microphones (Photo: Joona Vuopala 2018)
3.2.5 Overheads
An AKG C414 –condenser pair is a safe option for overhead microphones. By using a
close-spaced overhead setup, the center image will be very focused and no phase issues
will occur. The downside is that any sources far to the sides will lose their power a bit.
(Barry Rudolph, www.barryrudolph.com.) To achieve this good phase coherence and a
tight stereo image, I assembled the microphones in a close-spaced pair. The overhead
microphones capture the overall sound image of the drum kit, not only the cymbals.
16
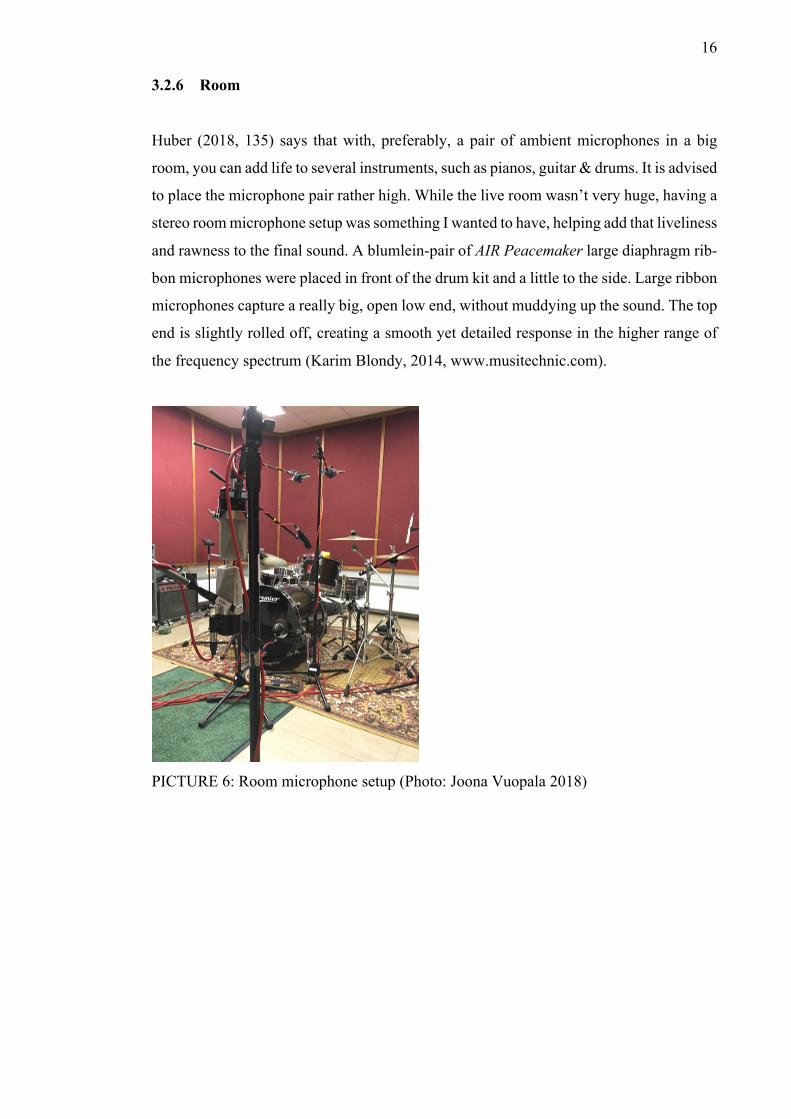
3.2.6 Room
Huber (2018, 135) says that with, preferably, a pair of ambient microphones in a big
room, you can add life to several instruments, such as pianos, guitar & drums. It is advised
to place the microphone pair rather high. While the live room wasn’t very huge, having a
stereo room microphone setup was something I wanted to have, helping add that liveliness
and rawness to the final sound. A blumlein-pair of AIR Peacemaker large diaphragm rib-
bon microphones were placed in front of the drum kit and a little to the side. Large ribbon
microphones capture a really big, open low end, without muddying up the sound. The top
end is slightly rolled off, creating a smooth yet detailed response in the higher range of
the frequency spectrum (Karim Blondy, 2014, www.musitechnic.com).
PICTURE 6: Room microphone setup (Photo: Joona Vuopala 2018)

17
4 RECORDING & SAMPLING
4.1 Recording Hardware & Software
After having set up the drum kit, microphones & cables, I routed each source to a dedi-
cated preamplifier. Since almost all microphones can not reach line-level of 30 to 70dB,
a preamplifier is needed to get a good output signal (Huber, 2018, 121). Owsinski (2017,
71) states that the quality of the built-in preamplifiers that most consoles or audio inter-
faces have, is really low compared to an external preamplifier. In many cases, the audio
engineer will choose different kinds of preamplifiers in order to give varying coloration
to the sound of the instruments.
The audio interface I used was a Universal Audio Apollo Quad. The kick, both snare
microphones & hi-hat were connected straight to the preamps of the Apollo -audio inter-
face. Universal Audio Apollo -interfaces have a unique feature called Unison-technology
that allows users to record through different emulations of famous hardware preamps. By
modelling the criticalities like impedance, the best parts of the gain stage & components
in the circuits, Unison brings UA interfaces the sound and behaviour of sought-after pre-
amps from API, Manley, Neve, SSL, UA, and so on (www.uaudio.com). For these four
sources I used UA 610-B – preamp emulations, which add pleasant color & saturation,
enhancing the harmonic content of the recording.
If the drums are recorded only by using a transparent preamplifier of a digital audio in-
terface, the end result usually will sound “dead” and “2D-like”. The “color” that audio
engineers look for to achieve depth, openness and warmness, is gotten by saturating the
overtones with analog units. (Thomas Brett, www.urm.academy.com.)
Next, I had the toms connected to an external Focusrite Octopre Platinum –eight-chan-
nel-preamp on channels one & two. For overheads, I used a very high-end external DBX
786 –stereo preamp, and finally the room microphones were connected to the external
Octopre Platinum preamp on channels three & four. Both the external preamps were con-
nected to the Apollo interface via two ADAT cables.
18
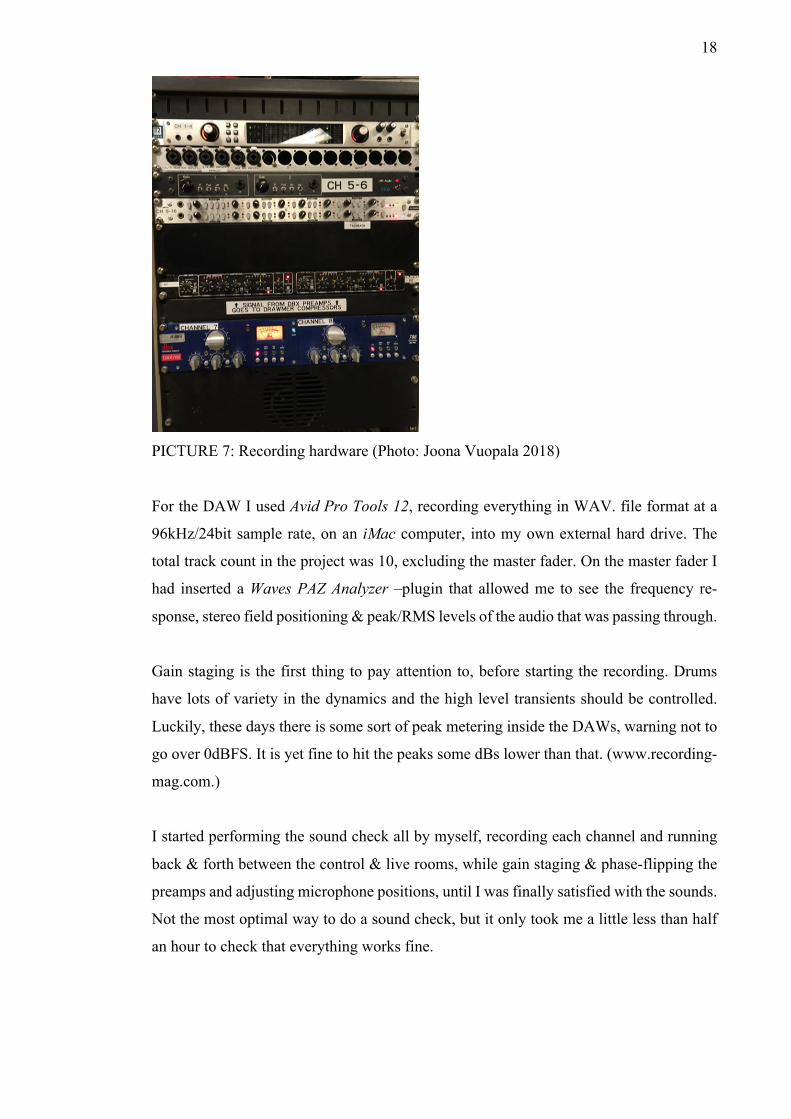
PICTURE 7: Recording hardware (Photo: Joona Vuopala 2018)
For the DAW I used Avid Pro Tools 12, recording everything in WAV. file format at a
96kHz/24bit sample rate, on an iMac computer, into my own external hard drive. The
total track count in the project was 10, excluding the master fader. On the master fader I
had inserted a Waves PAZ Analyzer –plugin that allowed me to see the frequency re-
sponse, stereo field positioning & peak/RMS levels of the audio that was passing through.
Gain staging is the first thing to pay attention to, before starting the recording. Drums
have lots of variety in the dynamics and the high level transients should be controlled.
Luckily, these days there is some sort of peak metering inside the DAWs, warning not to
go over 0dBFS. It is yet fine to hit the peaks some dBs lower than that. (www.recording-
mag.com.)
I started performing the sound check all by myself, recording each channel and running
back & forth between the control & live rooms, while gain staging & phase-flipping the
preamps and adjusting microphone positions, until I was finally satisfied with the sounds.
Not the most optimal way to do a sound check, but it only took me a little less than half
an hour to check that everything works fine.
19
4.2 Playing the beats
I had planned to record five different kinds of beats; a straight 4/4 beat, a beat focused on
toms, a ride groove, a heavy beat and a bossa nova -style beat. By creating track markers
for these beats inside the project, I was able to easily navigate and organize my recording
session. I decided not to use a metronome at all, because I wanted to maintain a natural
groove in my playing. I recorded several takes of each beat, so I had plenty of options to
choose from. Even though I didn’t monitor my performance whilst playing, I used ear
protection, which I consider to be very important.
4.3 Recording the samples
Once I had performed the beats live, it was time to begin the sampling process. I would
record each drum piece and cymbal multiple times at five velocities; soft, medium soft,
medium loud, loud & extra loud. Again, I created track markers for each drum and cym-
bal, so that later on during the editing stage I would know where everything is located,
for clear access and control.
Author Alan Moore (2004, www.alandmoore.com) says that in order to re-create the dy-
namics, it takes a lot more than basic volume variation, and the optimal way would be to
capture the instrument with several samples in several velocities. The kick drum and the
toms had only centre one-shots with the different velocities, but on the snare drum, in
addition to the centre hit, I also recorded rim shots and rim stick hits for extra variety. On
the hi-hat I recorded top, edge, semi-open, open & pedal hit variations. On the crash cym-
bal I only sampled the edge hit, whereas on the ride cymbal recording top, edge & bell
hit variations.
Surprisingly, the biggest challenge regarding the acoustics of the recording was the drum
chair. It was squeaking a lot. I mean, really a lot. So, I ended up sampling the chair as
well, let’s say for “added realism”. Of course, in addition I had to stay as silent as possible,
not breathing during some of the very quietest hits, to avoid any unwanted noises during
the sample recording process.

20
PICTURE 8: Recording in Pro Tools (Screenshot of Pro Tools 11 by Joona Vuopala
2018)
After a 10-hour day in the studio, I had approximately a total of 1500 audio samples, and
the beats, together combining nearly 30 gigabytes worth of audio data. In the next chapter,
I will cover the editing process of the recordings.
21
5 EDITING THE SAMPLES & BUILDING THE KONTAKT-LIBRARY
5.1 Choosing & exporting the samples
I did the editing process at my home, using a Macbook Pro, Avid Pro Tools 11, Universal
Audio Apollo Twin Quad MkII Quad -audio interface & Sennheiser HD600 –headphones
for critical monitoring. Before opening the actual project inside Pro Tools, I created &
named folders for the soon-to-be-exported samples. Keeping all the files organized was
challenging, but absolutely essential and had to be done. When the folder structure was
complete, I opened the recording session for editing.
At first, I edited the beats I had played, choosing one take from each variation and clean-
ing up any noises in the start & end of the recordings, by using fades. I made a quick level
balance with the faders and pan knobs. Even though the preamps and microphones used
in the recording were really high quality, at this point I wanted to add a little bit of cor-
rective equalization and extra colour to the otherwise rather clean recording, still keeping
everything sounding as natural as I could.
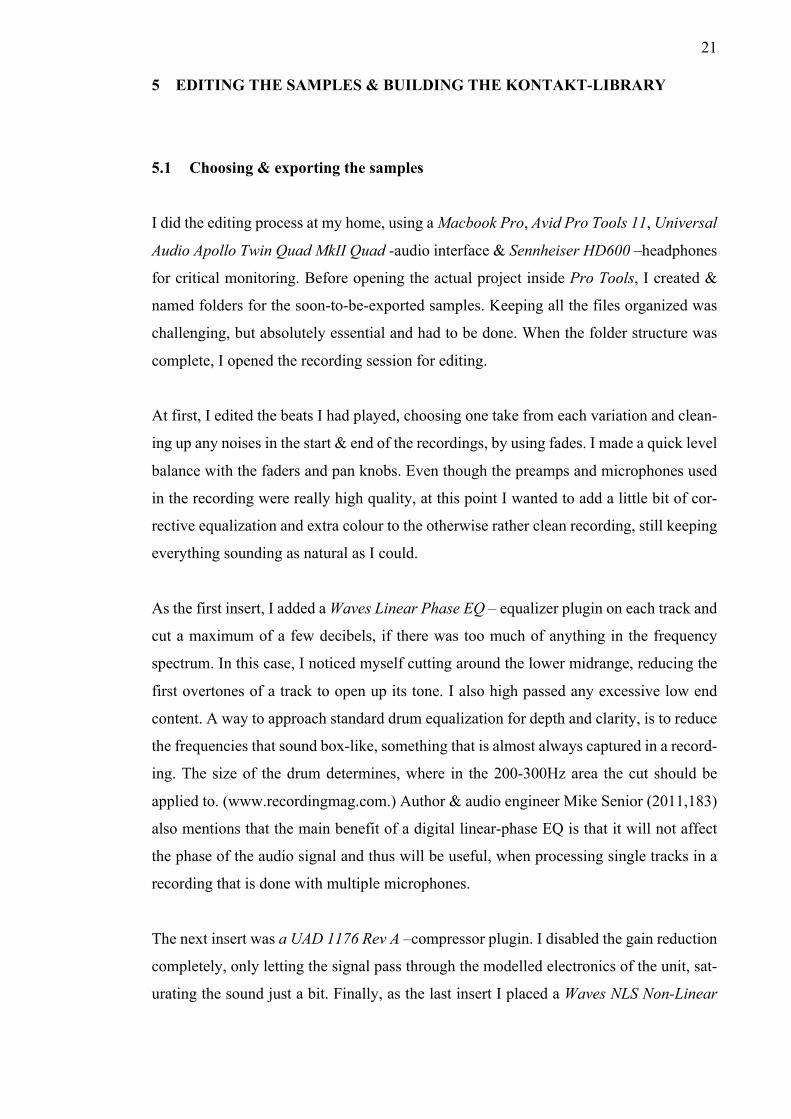
As the first insert, I added a Waves Linear Phase EQ – equalizer plugin on each track and
cut a maximum of a few decibels, if there was too much of anything in the frequency
spectrum. In this case, I noticed myself cutting around the lower midrange, reducing the
first overtones of a track to open up its tone. I also high passed any excessive low end
content. A way to approach standard drum equalization for depth and clarity, is to reduce
the frequencies that sound box-like, something that is almost always captured in a record-
ing. The size of the drum determines, where in the 200-300Hz area the cut should be
applied to. (www.recordingmag.com.) Author & audio engineer Mike Senior (2011,183)
also mentions that the main benefit of a digital linear-phase EQ is that it will not affect
the phase of the audio signal and thus will be useful, when processing single tracks in a
recording that is done with multiple microphones.
The next insert was a UAD 1176 Rev A –compressor plugin. I disabled the gain reduction
completely, only letting the signal pass through the modelled electronics of the unit, sat-
urating the sound just a bit. Finally, as the last insert I placed a Waves NLS Non-Linear
22
Summer –plugin that acts as a console channel emulation. In the digital audio, the trans-
parency has its cons, when one is looking to achieve colourful tracks with high harmonic
content. With NLS, it is possible to give the audio depth and texture, that was accessible
only in the analog world before. (Waves NLS User Manual, www.waves.com.) From the
emulations I chose “Nevo”, which is modelled after a Neve 5116 console. Neve console
preamps tend to add characteristics for a smooth high end & round low end, and they
worked fantastically on this specific drum recording. Once I was satisfied with the pre-
mixed sound of the played beats, I zeroed the panning of the tracks and exported each
track individually in 48kHz/24bit.
PICTURE 9: Cleaning up & Processing the recorded samples in Pro Tools (Screenshot
of Pro Tools 11 by Joona Vuopala 2018)
Next up was editing the samples themselves. I picked four to five alternatives per velocity
layer for each drum or a cymbal. Pro Tools has a neat feature called “Tab to transient”,
which let me jump to the beginning of the sample with ease. I would clean up the start
and end of a sample with fades, then export the dry, direct sound from the microphone,
and also stereo samples, one with the overheads and the second with the room micro-
phones open. I colour-coded each sample based on the velocity, in effort to help me vis-
ualize what to export, in to which folder.

23
PICTURE 10: Exporting the samples in Pro Tools (Screenshot of Pro Tools 11 by Joona
Vuopala 2018)
The editing part was probably the most tedious one during this whole project. Choosing,
editing & exporting 1004 individual samples by hand took a really long time, roughly 30
hours or so.
5.2 Implementing the samples in Kontakt
“From simple one‑shot sample playback to the creation of complex, scripted virtual in-
struments, Kontakt seems to be capable of pretty much anything to do with sampling”
(Magnus, 2012, www.soundonosound.com). Previously, I had only used Native Instru-
ments Kontakt as a player for sample libraries within a DAW. Never before had I created
a sample library of my own.
Fortunately, there is lots of information to be found on the Internet. I managed to find
forums, articles, tutorials & videos on the subject. Also, the manual for Kontakt gives a
great insight in to its powerful features, but I actually went and bought a video tutorial
series made by Groove3 - an online platform with detailed tutorials on almost every audio
related software around. The “Kontakt Explained” –video tutorial series covered all the
basic features Kontakt has, plus advanced topics on e.g. how to build your own Kontakt -
sample library. Once I had gotten the grip on how the implementation of samples into
24
Kontakt works in theory, I began experimenting with various settings in the standalone
software itself. What people usually do with sample velocity layers, is to group them
according to their velocity, so that the triggering of the notes stays in order within the
group (Kontakt Explained, Groove3, www.groove3.com).
The Kontakt 5 Manual (165, www.native-instruments.com) informs that “You can man-
ually create Zones by dragging one or multiple Samples from the Browser or your desktop
into the Zone grid of the Mapping Editor. While dragging, a highlighted region will tell
you where KONTAKT would place the Zone(s) on the keyboard.” On top of having ex-
ported the different velocity layers of each sample, I still had those many variations of
them. When I had figured out the velocity ranges between 0-127 inside the MIDI map of
Kontakt, I dragged multiple sample variations into the range in question. As a guide line
for mapping I used General MIDI – a standard map setup for MIDI. According to the
Kontakt Explained (Groove3, www.groove3.com) you can also use only MIDI to edit the
parameters, which is really efficient.
PICTURE 11: Implementing the samples into Kontakt (Screenshot of Kontakt 5 by Joona
Vuopala 2018)
In addition, with Kontakt I could also program ‘round robins’, meaning that when, for
example the “Hi-Hat Edge” triggers four times in a row at a velocity of “medium soft”,
the sample player cycles between these four different samples of the medium soft –ve-
locity, I had implemented earlier. This will result to a more natural and humane-sounding
25
programming. So, each drum/cymbal would have three to five round robins and five ve-
locity layers to them.
With acoustic sample instruments, it is able to have many different samples with slight
variations at different velocities. By programming round-robins, Kontakt cycles between
the samples, if triggered after each other. This way, the “machine gun effect” that is the
most common giveaway for sample instruments, will not be present. (Kontakt 5 Manual,
161, www.native-instruments.com.) Once all of the sample implementation was complete
for each instrument, I saved a monolith multi-instrument out of them that can be quickly
loaded inside Kontakt.
26
6 PROGRAMMING & MIXING DRUMS
6.1 Performing the beats in MIDI
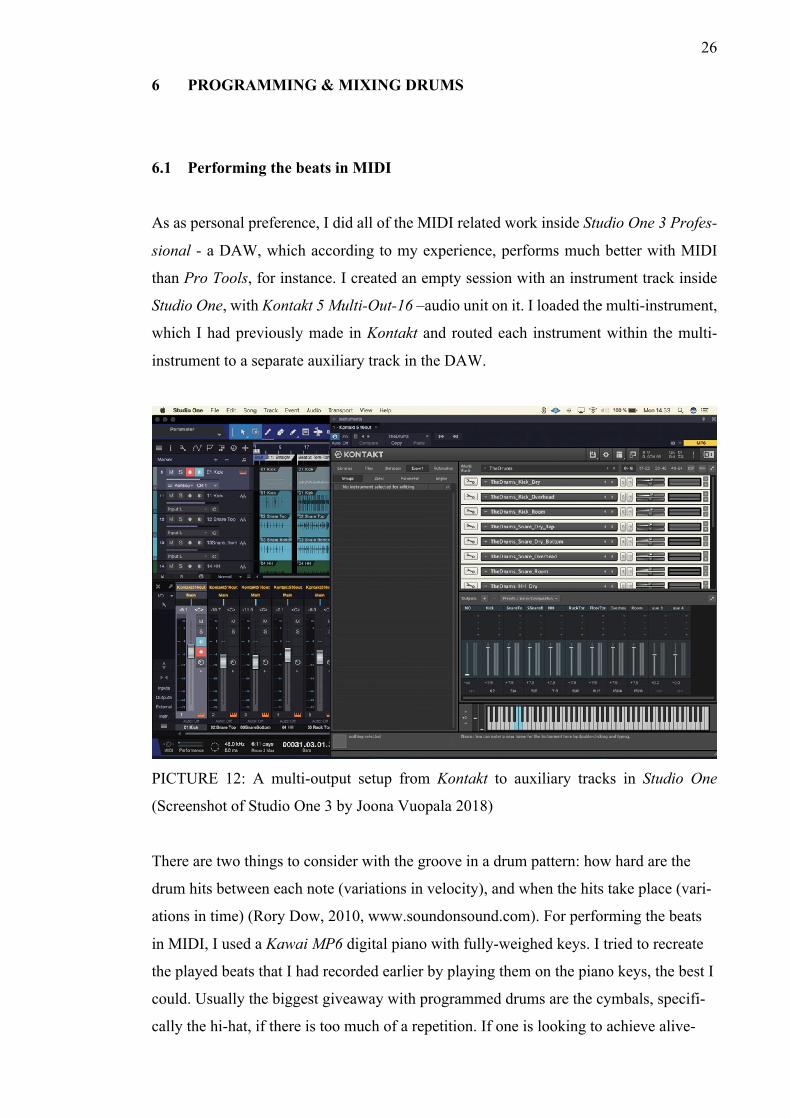
As as personal preference, I did all of the MIDI related work inside Studio One 3 Profes-
sional - a DAW, which according to my experience, performs much better with MIDI
than Pro Tools, for instance. I created an empty session with an instrument track inside
Studio One, with Kontakt 5 Multi-Out-16 –audio unit on it. I loaded the multi-instrument,
which I had previously made in Kontakt and routed each instrument within the multi-
instrument to a separate auxiliary track in the DAW.
PICTURE 12: A multi-output setup from Kontakt to auxiliary tracks in Studio One
(Screenshot of Studio One 3 by Joona Vuopala 2018)
There are two things to consider with the groove in a drum pattern: how hard are the
drum hits between each note (variations in velocity), and when the hits take place (vari-
ations in time) (Rory Dow, 2010, www.soundonsound.com). For performing the beats
in MIDI, I used a Kawai MP6 digital piano with fully-weighed keys. I tried to recreate
the played beats that I had recorded earlier by playing them on the piano keys, the best I
could. Usually the biggest giveaway with programmed drums are the cymbals, specifi-
cally the hi-hat, if there is too much of a repetition. If one is looking to achieve alive-
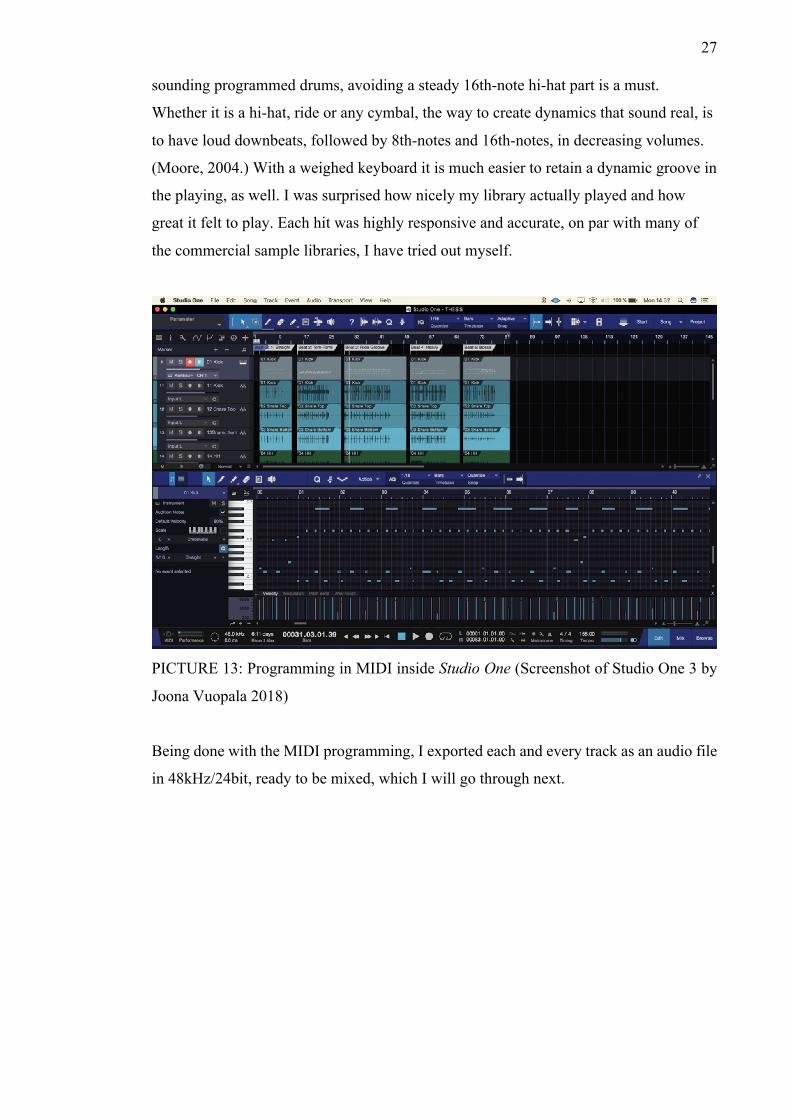
27
sounding programmed drums, avoiding a steady 16th-note hi-hat part is a must.
Whether it is a hi-hat, ride or any cymbal, the way to create dynamics that sound real, is
to have loud downbeats, followed by 8th-notes and 16th-notes, in decreasing volumes.
(Moore, 2004.) With a weighed keyboard it is much easier to retain a dynamic groove in
the playing, as well. I was surprised how nicely my library actually played and how
great it felt to play. Each hit was highly responsive and accurate, on par with many of
the commercial sample libraries, I have tried out myself.
PICTURE 13: Programming in MIDI inside Studio One (Screenshot of Studio One 3 by
Joona Vuopala 2018)
Being done with the MIDI programming, I exported each and every track as an audio file
in 48kHz/24bit, ready to be mixed, which I will go through next.
28
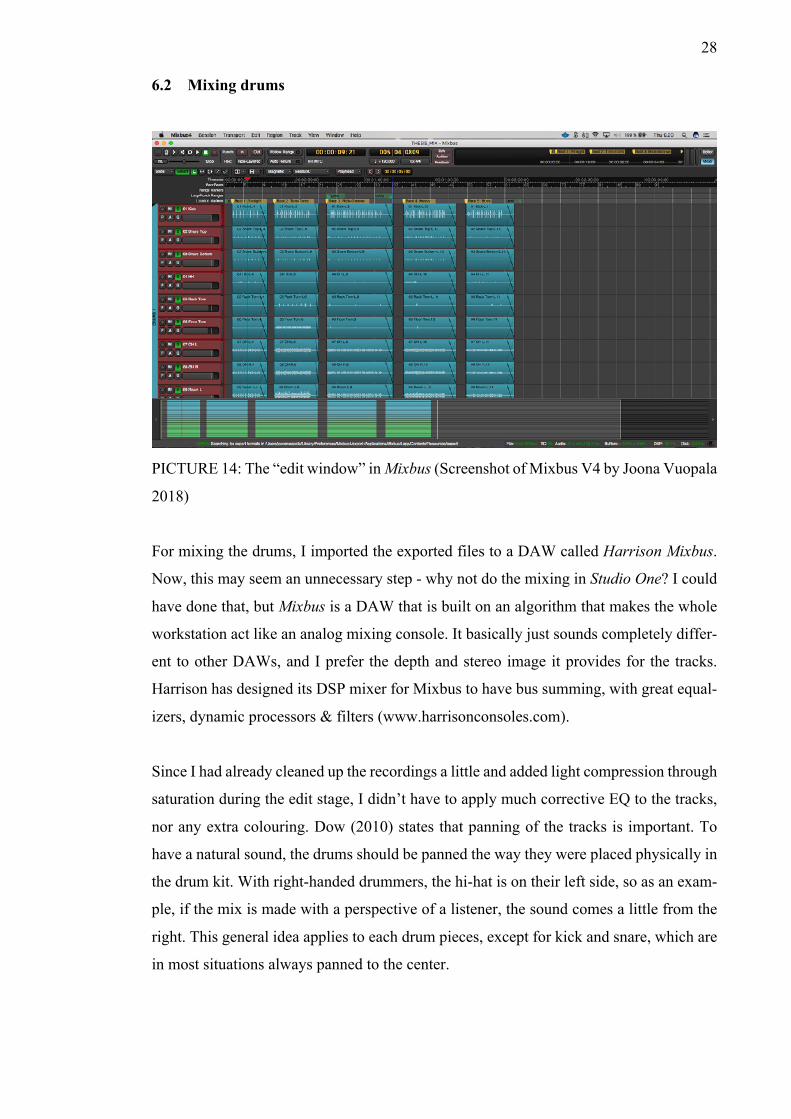
6.2 Mixing drums
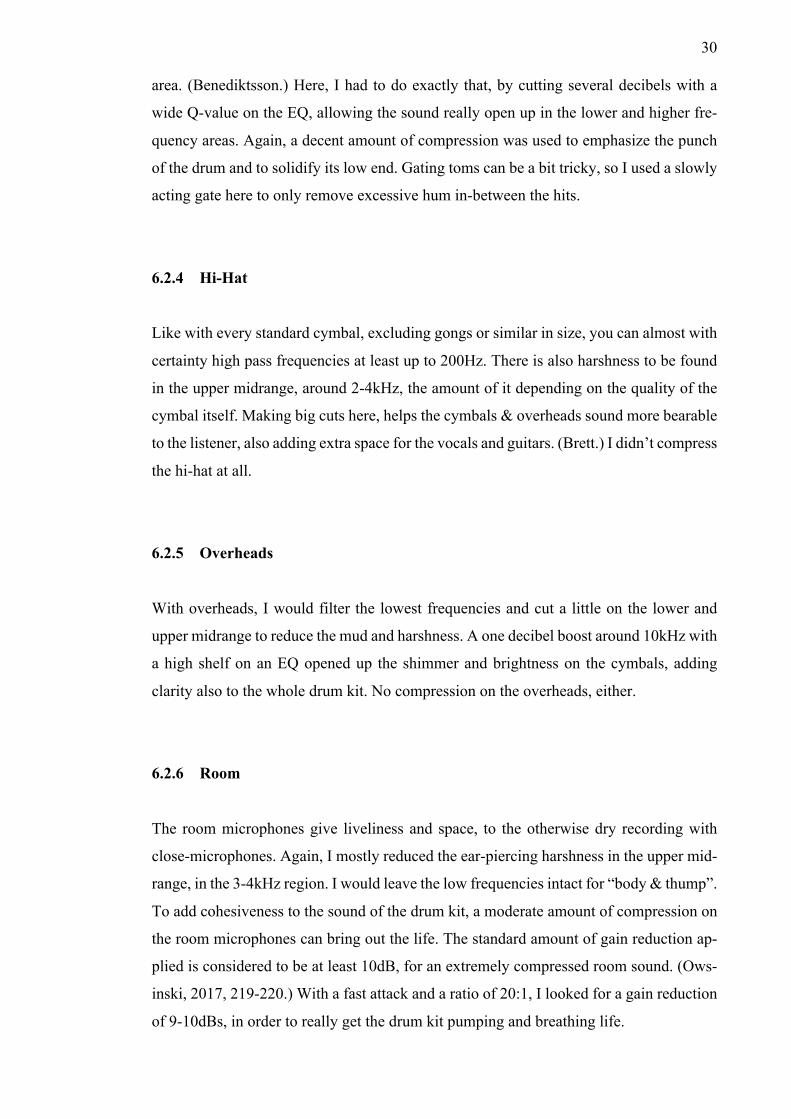
PICTURE 14: The “edit window” in Mixbus (Screenshot of Mixbus V4 by Joona Vuopala
2018)
For mixing the drums, I imported the exported files to a DAW called Harrison Mixbus.
Now, this may seem an unnecessary step - why not do the mixing in Studio One? I could
have done that, but Mixbus is a DAW that is built on an algorithm that makes the whole
workstation act like an analog mixing console. It basically just sounds completely differ-
ent to other DAWs, and I prefer the depth and stereo image it provides for the tracks.
Harrison has designed its DSP mixer for Mixbus to have bus summing, with great equal-
izers, dynamic processors & filters (www.harrisonconsoles.com).
Since I had already cleaned up the recordings a little and added light compression through
saturation during the edit stage, I didn’t have to apply much corrective EQ to the tracks,
nor any extra colouring. Dow (2010) states that panning of the tracks is important. To
have a natural sound, the drums should be panned the way they were placed physically in
the drum kit. With right-handed drummers, the hi-hat is on their left side, so as an exam-
ple, if the mix is made with a perspective of a listener, the sound comes a little from the
right. This general idea applies to each drum pieces, except for kick and snare, which are
in most situations always panned to the center.
29
Both the played and the sampled kits would have the same processing applied to them
and routed to their own group busses, before hitting the master fader. Down below, I’ll
explain one way to approach mixing & processing of the drums. I wished to create a
natural, unprocessed-sounding mix that still has the clarity and power in it.
6.2.1 Kick drum
On this specific kick drum, the tuning was a bit higher than it maybe normally would.
The root tone was around 65Hz being the fundamental base frequency for this drum. As
the first step, I used the built-in compressor Mixbus has, setting a ratio of 3:1 with a me-
dium attack, so that the transients pass through but the bottom end stays in control with a
gain reduction of four to five decibels. To not kill the transients completely or have a
“pumping” sound with the compressor, it is critical to adjust the settings for attack, re-
lease, threshold & ratio with utmost care (Huber, 2018, 425). After the compressor, I
added a gate-plugin to tighten up the sound more by cleaning up leakage from other drums
and cymbals. Finally, I attenuated the lower midrange a bit further down with an EQ,
leaving more room for the snare and the toms.
6.2.2 Snare drum
The snare was recorded in such a way that it didn’t need any corrective EQ anymore at
this stage. According to an online article (Justin Matley, sessionville.com) a small boost
that is above 9-10 kHz may result to brightening up the track nicely, if wanted. On top of
this small boost in the higher frequencies, I applied the same compression settings as on
the kick drum, with a gain reduction of three to four decibels. Also, a gate was added here
also, for cleaning up the signal.
6.2.3 Toms
With toms, it is not uncommon to reduce the lower midrange a lot, in effort to clean up
the mud captured with close-microphones. An equalizer is good tool for sculpting a pow-
erful tom sound. The undesired middle frequencies are usually found in the 300 to 800Hz
30
area. (Benediktsson.) Here, I had to do exactly that, by cutting several decibels with a
wide Q-value on the EQ, allowing the sound really open up in the lower and higher fre-
quency areas. Again, a decent amount of compression was used to emphasize the punch
of the drum and to solidify its low end. Gating toms can be a bit tricky, so I used a slowly
acting gate here to only remove excessive hum in-between the hits.
6.2.4 Hi-Hat
Like with every standard cymbal, excluding gongs or similar in size, you can almost with
certainty high pass frequencies at least up to 200Hz. There is also harshness to be found
in the upper midrange, around 2-4kHz, the amount of it depending on the quality of the
cymbal itself. Making big cuts here, helps the cymbals & overheads sound more bearable
to the listener, also adding extra space for the vocals and guitars. (Brett.) I didn’t compress
the hi-hat at all.
6.2.5 Overheads
With overheads, I would filter the lowest frequencies and cut a little on the lower and
upper midrange to reduce the mud and harshness. A one decibel boost around 10kHz with
a high shelf on an EQ opened up the shimmer and brightness on the cymbals, adding
clarity also to the whole drum kit. No compression on the overheads, either.
6.2.6 Room
The room microphones give liveliness and space, to the otherwise dry recording with
close-microphones. Again, I mostly reduced the ear-piercing harshness in the upper mid-
range, in the 3-4kHz region. I would leave the low frequencies intact for “body & thump”.
To add cohesiveness to the sound of the drum kit, a moderate amount of compression on
the room microphones can bring out the life. The standard amount of gain reduction ap-
plied is considered to be at least 10dB, for an extremely compressed room sound. (Ows-
inski, 2017, 219-220.) With a fast attack and a ratio of 20:1, I looked for a gain reduction
of 9-10dBs, in order to really get the drum kit pumping and breathing life.
31
6.2.7 Drum bus
Routing all the drum tracks to an auxiliary bus track for processing, has many benefits.
First of all, I inserted a Slate Digital FG-Grey –buss compressor –plugin, that emulates
the master compressor section of an SSL4000G –console, also known as the “Glue” com-
pressor. Owsinski (2017, 224) says that on many great records made in the ‘80s & ‘90s,
have the signature sound of an SSL mix buss compressor. “This is an aggressive com-
pressor with a very distinct sonic signature.” A slow attack, fast release, 4:1 ratio and 3-
4dB gain reduction brings the drum tracks together, sounding more of a one, unified drum
kit, rather than separate pieces of a kit. After the compressor, I added a Waves Kramer
Master Tape –plugin to saturate the whole drum kit a bit further, smoothing out the tran-
sients and rounding the low end.
6.2.8 Effects
The only effect I applied to these drums was a short, plate reverb, achieved with a Waves
Abbey Road Plates –plugin, placed on an auxiliary track. I would send most of the reverb
to the snare and toms, but also just a bit to every track, creating a roomy space for the
drum kit. Before the reverb plugin, I had a digital Harrison EQ filtering the low end until
120Hz, the high end down to 10kHz and a wide cut around 1,5-2kHz for a more distant,
softer reverb sound. Senior (2011, 240) explains that if the reverb should be more in the
background, equalizing helps in this regard. With otherwise natural-sounding recordings,
a digital reverb that has inorganic sound characteristic, may break the honesty and sensi-
tivity of the music.
32
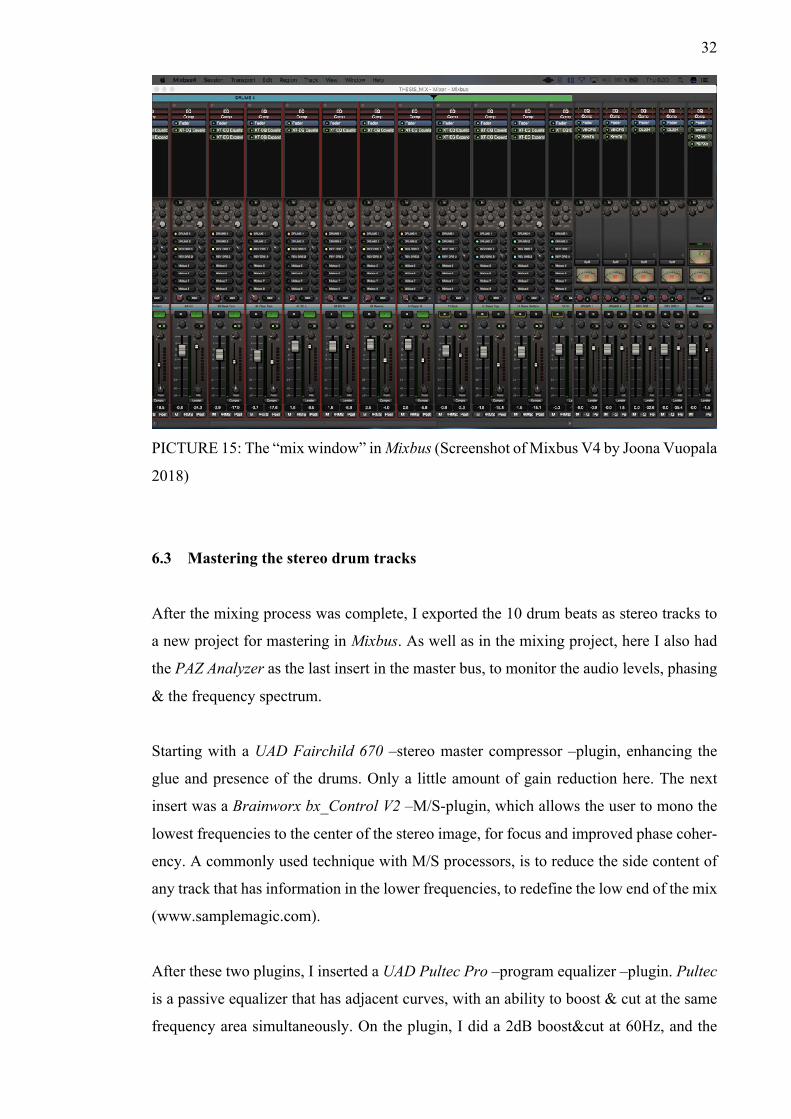
PICTURE 15: The “mix window” in Mixbus (Screenshot of Mixbus V4 by Joona Vuopala
2018)
6.3 Mastering the stereo drum tracks
After the mixing process was complete, I exported the 10 drum beats as stereo tracks to
a new project for mastering in Mixbus. As well as in the mixing project, here I also had
the PAZ Analyzer as the last insert in the master bus, to monitor the audio levels, phasing
& the frequency spectrum.
Starting with a UAD Fairchild 670 –stereo master compressor –plugin, enhancing the
glue and presence of the drums. Only a little amount of gain reduction here. The next
insert was a Brainworx bx_Control V2 –M/S-plugin, which allows the user to mono the
lowest frequencies to the center of the stereo image, for focus and improved phase coher-
ency. A commonly used technique with M/S processors, is to reduce the side content of
any track that has information in the lower frequencies, to redefine the low end of the mix
(www.samplemagic.com).
After these two plugins, I inserted a UAD Pultec Pro –program equalizer –plugin. Pultec
is a passive equalizer that has adjacent curves, with an ability to boost & cut at the same
frequency area simultaneously. On the plugin, I did a 2dB boost&cut at 60Hz, and the
33
same amount at 16kHz, giving the signal more impact to the low end with the addition of
smooth, crispy highs. Next in line was a UAD Chandler Limited Curve Bender EQ –
plugin, with its modelled transformers musically colouring the sound. With the EQ sec-
tion of the Curve Bender, I made a small cut at 150Hz and 3,6kHz – instant depth &
clarity. Owsinski (2017, 52) says that while in the other stages of music production large
cuts or boosts can be done, in mastering it should always be tiny changes, within a max-
imum of a few decibels.
As a final touch to the signal chain I placed a PSP Audioware Xenon –limiter plugin. To
my ears, Xenon is a very transparent limiter that retains the whole frequency spectrum,
while bringing up the overall audio level up to the loudness standards, with audio peaks
at -0.1dB to avoid clipping. Be it software or hardware, the digital limiters have a look-
ahead –feature, which detects the signal milliseconds earlier before hitting the actual lim-
iter. This way, the amount of time it takes the limiter to act, is reduced highly and no loss
of transients will occur, unlike with some slower analog limiter units. (Owsinski, 2017,
203.)
The mastering was complete as I exported the tracks in 44.1kHz/16bit, ready to be up-
loaded to SoundCloud for AB-testing.
34
7 AB-TEST & RESULTS
7.1 Conducting the AB-test
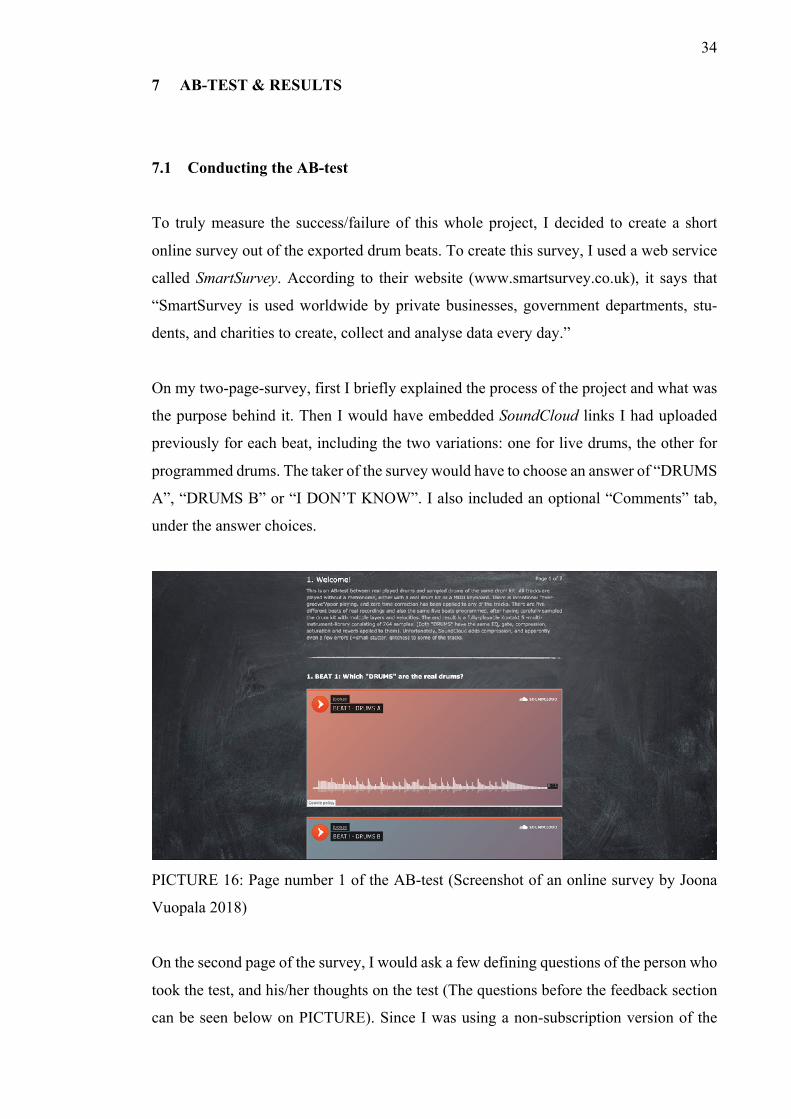
To truly measure the success/failure of this whole project, I decided to create a short
online survey out of the exported drum beats. To create this survey, I used a web service
called SmartSurvey. According to their website (www.smartsurvey.co.uk), it says that
“SmartSurvey is used worldwide by private businesses, government departments, stu-
dents, and charities to create, collect and analyse data every day.”
On my two-page-survey, first I briefly explained the process of the project and what was
the purpose behind it. Then I would have embedded SoundCloud links I had uploaded
previously for each beat, including the two variations: one for live drums, the other for
programmed drums. The taker of the survey would have to choose an answer of “DRUMS
A”, “DRUMS B” or “I DON’T KNOW”. I also included an optional “Comments” tab,
under the answer choices.
PICTURE 16: Page number 1 of the AB-test (Screenshot of an online survey by Joona
Vuopala 2018)
On the second page of the survey, I would ask a few defining questions of the person who
took the test, and his/her thoughts on the test (The questions before the feedback section
can be seen below on PICTURE). Since I was using a non-subscription version of the

35
service, I was unable to collect the email addresses of the survey takers, and instead would
ask their name, enabling me to inform them about the results of the AB-test.
PICTURE 17: Page number 2 of the AB-test (Screenshot of an online survey by Joona
Vuopala 2018)
I sent the survey link to some of my friends, classmates, teachers, professional musicians,
producers and carefully selected family members. Most of these people had a previous
music background, one way or another, yet some were purely music consumers. A few
persons would also kindly forward the link to their friends and acquaintances, be they
involved in music production or not.
7.2 Test results
The AB-test turned out to be a major success. In total, during the month the survey was
open, I received 40 responses. The average test score was two out of five beats correct.
There was not a specific beat that people would always get right or wrong. The division
amongst the answers was great. There were two 0/5 responses and a few 4/5, but not a
single perfect score. Yet, I considered a “perfect score” for me to be 2/5 or 3/5, since it
would show that both drum examples were almost evenly good, leading to a result and
conclusion that sampled drums, indeed, are good enough to be used in most situations,
regarding the final product.
36
8 DISCUSSION & CONCLUSION
During this thesis project I learned so very much. I had never before created a sample
instrument library from scratch, nor conducted an online survey. I gained more experience
on drum recording techniques by studying and experimenting new things with the over-
head and room microphones, and different preamplifier setups. I could say that I feel more
confident as a mixing engineer as well, making definitive decisions and actions inside the
project. And finally, now I know what and how long it takes to create a fully-working
sample library from a drum kit.
If I went through the whole process of creating a sample library again in the future, there
are a couple of things I would try experiment and maybe develop further. Firstly, on this
library the biggest giveaway appeared to be the toms, not the cymbals, surprisingly. I
believe the reason behind this is that I hit the toms a bit too hard during the sample re-
cording process, thus the drums do not actually ring enough and have less low end. An-
other thing is that when exporting the samples from the edit project, I would leave every
close microphone channel open, even though I was only exporting the one being hit. As
a result, the drum mix might have had more of a natural resonance, since each track would
also get the bleed from other microphones to it. Initially, I had this thought on my mind
before starting exporting of samples, but I was worried about the overall noise floor rais-
ing too high when triggering multiple samples at once.
I am very pleased, yet astonished that the AB-test turned out to be this successful. Up
until that point, I was not exactly sure if the work I had done was good enough. Surely, it
would have been great to receive even more responses, but with the amount now, a direc-
tional insight still can be gained. In the future I would like to perform a blind test between
live and sampled drums in a mix. With this test it might be possible to find out the ultimate
answer to my thesis; if well-programmed sampled drums can fool absolutely anyone.
Without a doubt, it can now be stated that sampled drums are almost even with their real-
life counterparts, and amazing results can be achieved by programming them with dedi-
cation and care. I, yet, firmly wish that we will always have the need for live drums, for
certain applications. Still, it is nice to know that if you need a drummer but do not have
one around, or you are missing the equipment, space or time & money to record one, it is
still possible to create a virtual performance that sounds as musical and true.
37
REFERENCES
Albano J. Recording The Drums. Article. N.d. Read 30.04.2018. http://recording-mag.com/recording-resources/recording-info/recording-the-drums/ Benediktsson B. A Powerful Guide to Mixing Killer Drums in 6 Simple Steps. Article. N.d. Read 21.04.2018. https://www.audio-issues.com/music-mixing/mixing-drums-guide/ Benediktsson B. How to Record Drums Like an Expert: Basix. Article. 2010. Enva-toTuts+. Read 04.05.2018. https://music.tutsplus.com/tutorials/how-to-record-drums-like-an-expert-basix--audio-7499 Blondy K. 2014. Ribbon Microphones. Article. Musitechnic. Read. 02.05.2018. https://musitechnic.com/en/ribbon-microphones/ Brett T. Mixing Secrets – Volume 3: Drums. Article. N.d. Read 21.04.2018. https://urm.academy/mixing-secrets-volume-3-drums/ Burgess R.J. 2014. The History of Music Production. Published: Oxford University Press. Dow R. Programming Realistic Drum Parts. Article. Sound On Sound. 2010. Read 04.04.2018. http://www.soundonsound.com/techniques/programming-realistic-drum-parts Drum Dampening: The Ultimate Guide. Article. N.d. Read 01.05.2018. http://drum-headauthority.com/articles/drum-dampening-ultimate-guide/ Groove3. Kontakt Explained. Video tutorial series. N.d. Watched 10.03.2018. https://www.groove3.com/tutorials/kontakt-explained Harrison Consoles. Mixbus V4 product page. N.d. http://harrisoncon-soles.com/site/mixbus.html Huber D.M. 2018. Modern Recording Techniques 9th Edition. Published: Routledge. iMusician. Sampling – History and definition (part 1). Article. N.d. Read. 07.05.2018. https://www.imusiciandigital.com/en/sampling-technology-effects-part-1/ Keller D. Beats Working – A Short Primer On Miking and Recording Drums. Article. N.d. Read. 07.05.2018. https://www.uaudio.com/blog/miking-and-recording-drums/ Kontakt Manual English. N.d. Read 12.03.2018. https://www.native-instru-ments.com/fileadmin/ni_media/downloads/manuals/KONTAKT_5_6_8_Manual_Eng-lish.pdf Magnus N. NI Kontakt 5. Article. Sound On Sound. 2012. Read 04.04.2018. www.soundonsound.com/reviews/ni-kontakt-5 Magnus N. XLN Addictive Drums 2. Article. Sound On Sound. 2015. Read 03.04.2018. https://www.soundonsound.com/reviews/xln-addictive-drums-2
38
Matley J. EQ Series, Part 5: Snare Drum. Article. 2013. Read 21.04.2018. http://session-ville.com/articles/eq-series-part5-snare-drum McGuire S. & Pritts R. 2008. Audio Sampling – A Practical Guide. Published: Elsevier, Inc. Messitte N. Drum Replacement: The Dirty Little Secret That Changed Rock. Article. Forbes. 2014. Read. 8.05.2018. https://www.forbes.com/sites/nickmes-sitte/2014/04/30/drum-replacement-the-dirty-little-secret-that-changed-rock/2/#1932490c2c54 Moore A.D. The Theory of Drum Programming. Article. 2004. Read 15.02.2018. www.alandmoore.com/blog/the-theory-of-drum-programming/ Rudolph B. Studio Drum Miking Techniques. Article. N.d. Read 10.02.2018. http://www.barryrudolph.com/stellar/drums.html Owsinski B. 2017. The Mastering Engineer’s Handbook 4th Edition. Published: Bobby Owsinski Media Group. Owsinski B. 2017. The Mixing Engineer’s Handbook 4th Edition. Published: Bobby Ows-inski Media Group. Owsinski B. 2017. The Recording Engineer’s Handbook 4th Edition. Published: Bobby Owsinski Media Group. Parsons A. 2014. Art & Science of Sound Recording. Published: Hal Leonard Books. Production Tips – M/S Processing. Article. N.d. Read 22.04.2018. https://www.sample-magic.com/journal/2017/02/production-tips-ms-processing/ Senior M. 2011. Mixing Secrets For The Small Studio. Published: Elservier Inc. Shure SM57 product page. N.d. http://www.shure.com/americas/products/micro-phones/sm/sm57-instrument-microphone SmartSurvey. Web Page. N.d. Viewed 30.04.2018. www.smartsurvey.co.uk Sound On Sound. Software Drum Instruments. Article. Sound On Sound. 2014. Read. 08.05.2018. https://www.soundonsound.com/reviews/software-drum-instruments Universal Audio. Set Up Unison Technology With Your Audio Interface. Blog. N.d. Read 01.05.2018. https://www.uaudio.com/blog/unison-quick-tip/ Wang O. Gimme The Beat (Box): The Journey Of The Drum Machine. Article. NPR Music. 2014. Read. 08.05.2018. https://www.npr.org/sections/the-record/2014/01/17/263071563/gimme-the-beat-box-the-journey-of-the-drum-machine Waves NLS User Guide. N.d. https://www.waves.com/1lib/pdf/plugins/nls-non-linear-summer.pdf
39
APPENDICES
Appendix 1. AB-test SoundCloud links
https://soundcloud.com/user-577898932/beat-1-drums-a/s-1cvtW
https://soundcloud.com/user-577898932/beat-1-drums-b/s-FH4Rr
https://soundcloud.com/user-577898932/beat-2-drums-a/s-f8jLd
https://soundcloud.com/user-577898932/beat-2-drums-b/s-Sf3HD
https://soundcloud.com/user-577898932/beat-3-drums-a/s-Yv6zF
https://soundcloud.com/user-577898932/beat-3-drums-b/s-BjefJ
https://soundcloud.com/user-577898932/beat-4-drums-a/s-lwijo
https://soundcloud.com/user-577898932/beat-4-drums-b/s-rm3cl
https://soundcloud.com/user-577898932/beat-5-drums-a/s-a8qDC
https://soundcloud.com/user-577898932/beat-5-drums-b/s-jt1Cg


![[Drum] The Best Of Modern Drummer Rock.pdf](https://img.pdfslide.us/doc/110x75/577c7c9f1a28abe0549b5457/drum-the-best-of-modern-drummer-rockpdf.jpg)


![[Drum] Jack de Johnette and Charlie Perry - Modern Jazz Drumming (2)](https://img.pdfslide.us/doc/110x75/5695d3691a28ab9b029dd357/drum-jack-de-johnette-and-charlie-perry-modern-jazz-drumming-2.jpg)


![[Drum] Jim Chapin - Advanced Techniques for the Modern Drummer](https://img.pdfslide.us/doc/110x75/544e67a5b1af9f2f638b4eaf/drum-jim-chapin-advanced-techniques-for-the-modern-drummer.jpg)
![[Drum] Morris Goldenberg - Modern School for Snare Drum (Version 2)](https://img.pdfslide.us/doc/110x75/544af9a1b1af9f51498b467c/drum-morris-goldenberg-modern-school-for-snare-drum-version-2.jpg)