Embed Size (px)
Citation preview
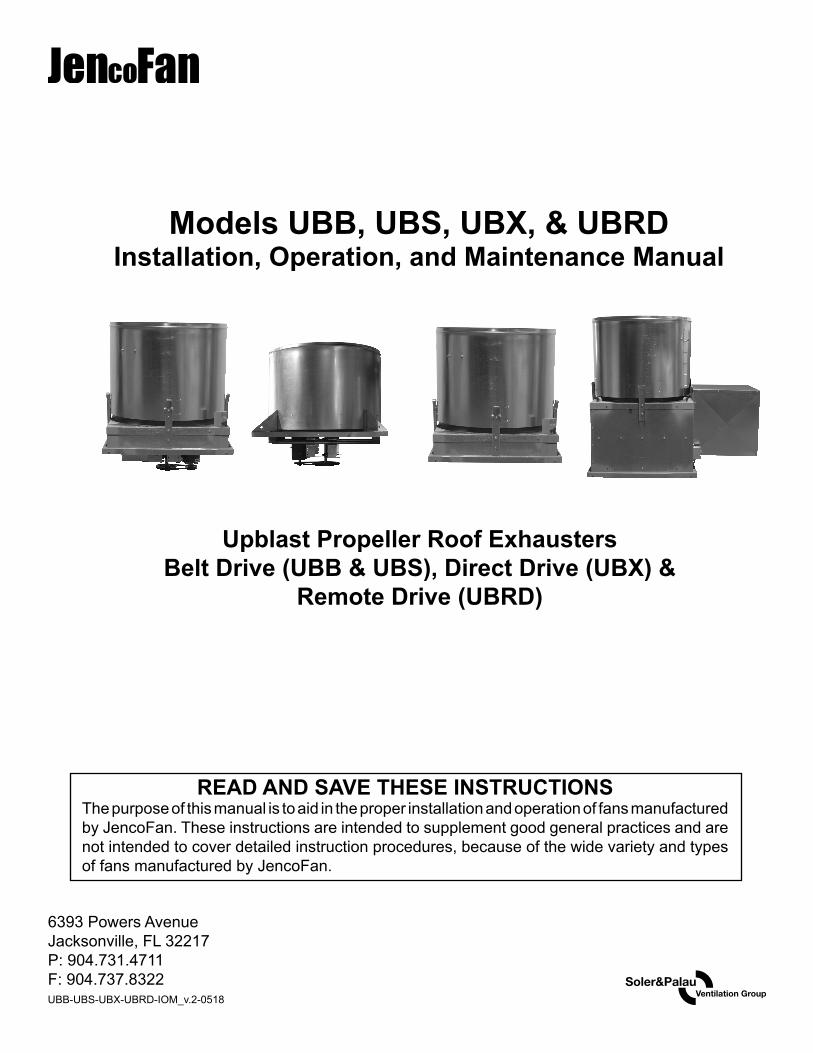
Models UBB, UBS, UBX, & UBRDInstallation, Operation, and Maintenance Manual
6393 Powers AvenueJacksonville, FL 32217P: 904.731.4711F: 904.737.8322UBB-UBS-UBX-UBRD-IOM_v.2-0518
Upblast Propeller Roof ExhaustersBelt Drive (UBB & UBS), Direct Drive (UBX) &
Remote Drive (UBRD)
READ AND SAVE THESE INSTRUCTIONSThe purpose of this manual is to aid in the proper installation and operation of fans manufactured by JencoFan. These instructions are intended to supplement good general practices and are not intended to cover detailed instruction procedures, because of the wide variety and types of fans manufactured by JencoFan.

INSTALLATION, OPERATION AND MAINTENANCE MANUAL
INTRODUCTION:DO NOT INSTALL, USE OR OPERATE THIS EQUIPMENT UNTIL THIS MANUAL HAS BEEN READ AND UNDERSTOOD. READ AND SAVE THESE INSTRUCTIONS FOR FUTURE USE.
It is the responsibility of the purchaser to assure that the installation and maintenance of this equipment is handled by qualified personnel experienced in such work and equipment.
Contact your local representative should you need further information.
SHIPMENT AND RECEIVING:Prior to shipment, all fans have been thoroughly inspected and tested.
All equipment shipped from JencoFan is skidded or crated to fully comply with trucking requirements. Inspect all shipments carefully for damage. THE RECEIVER MUST NOTE ANY DAMAGE ON THE CARRIER’S BILL OF LADING AND FILE A CLAIM IMMEDIATELY WITH THE FREIGHT COMPANY, IN THE CASE OF ANY DAMAGE. Keep a record of all equipment received, including inspection details and date of receipt, because of the possibility of partial shipments.
If you receive damaged goods, contact your JencoFan representative for repair or replacement service.
HANDLING:Handle your equipment with caution. Some fans are provided with lifting lugs or holes for easy handling. Others must be handled using nylon straps that protect the fan’s coating and housing. Spreader bars should be used when lifting large parts.
Fans should be lifted by using straps around the fan housing only. DO NOT LIFT FANS BY THE MOTOR, BASE, PROP, WHEEL, OR FLANGES.
Roof ventilators should be lifted by using straps around the fan housing or base only. Spreader bars should also be used to avoid damage to stack caps or hoods. DO NOT LIFT ROOF VENTILATORS BY THE STACK CAP OR HOOD. On hooded units, disassemble the stack from hood when lifting. Upblast models may be lifted assembled.
STORAGE:If fans are stored for any length of time, they should be stored in a clean, dry location to prevent rust and corrosion. Outdoor storage is not recommended. When outdoor storage is necessary, they should be protected from the elements as best as possible. Cover the fan inlet and outlet and keep motors dry and clean.
For extended storage (more than 3 months), motor shafts and bearings should be rotated monthly. If stored greater than 6 months, bearing grease in motor and fan should be purged and replaced with compatible grease. Re-check belts for proper tension. Storage records should be kept to assure proper maintenance. The factory can advise warranty centers to provide motor and bearing service if needed.
INSTALLATION:Roof ventilators should always be mounted to a flat level, solid and rigid structure. Particular caution should be exercised when installing fans on metal buildings. Be sure wall or roofs are capable of supporting the fan(s). Walls/Roofs not supported correctly will cause vibration that could cause damage or injury.
Fans mounted off ground level should be rigidly mounted to a special platform and be placed as near as possible to, or over, a solid wall or column.
Supports for suspended fans must be crossbraced for live load support to prevent side sway.
Use guy wires to help secure root units if excessively windy conditions prevail.
1
1. CAUTION! This fan contains rotating parts and requires special service. Appropriate safety precautions should be taken during installation, operation and maintenance.
2. WARNING! Do not install or operate this fan in an environment or atmosphere where combustible or flammable materials, gasses or fumes are present, unless it was specifically designed and manufactured for use in that environment. Explosion or fire can result. Explosive, corrosive, high temperature, etc. conditions may require special construction, inspection and maintenance. It is necessary to observe the fan manufacturer’s recommendations and limitation concerning the type of material to be handled by the fan and its application in special conditions.
3. When ventilator is designed to be mounted on a curb, the curb should be securely installed prior to fan installation.
4. A damper, if used, should be securely mounted within the curb or wall in a manner that allows free and unobstructed operation.
5. CAUTION! All electrical work must be done in accordance with local and/or national electrical codes as applicable. If you are unfamiliar with methods of installing electrical wiring, secure the services of a qualified electrician.
6. WARNING! This product must be grounded.
7. DANGER! Make sure power is turned off and locked in the OFF position at the service entrance before installing, wiring or servicing fan.
8. CAUTION! Before wiring the motor, check the supply voltage against the motor nameplate voltage. High or low voltage can damage the motor and void the motor warranty.
9. WARNING! Be sure to keep all wiring clear of rotating or moving parts.
10. WARNING! Before starting the fan, turn the wheel to assure it rotates freely. If needed, adjust the wheel/shaft/bearing/motor position as required to achieve necessary clearances.
11. CAUTION! On belt drive units, assure belts are tensioned and aligned properly. (See Maintenance section).
12. WARNING! Check all setscrews and keys. Tighten as necessary prior to fan startup.
13. On roof units, anchor the fan securely to the curb. Anchoring through the vertical portion of the curb cap flange is recommended. Use a minimum of four lag bolts or other suitable fasteners.
14. Due to the general nature of its applications, the basic air mover is available with protective guards and/or other devices for required operating safety as with most installations of rotating machinery. Before operating the basic unit in any of its applications determine requirements for such guards and/or devices needed for protection against accidental contact with moving parts or against injury to nearby personnel or critical equipment due to accidental rupture of fast moving parts.
START-UP:Lock out the power source.
Tighten all bolts and setscrews securely and, on belt drive fans, check sheave alignment and belt tension. Tighten belts if necessary. NOTE THAT ALL BOLTS, SETSCREWS AND BELTS SHOULD BE TIGHTENED AFTER TWO DAYS OF INITIAL OPERATION.
Clearance should be checked all around between wheel or propeller tips and the housing before starting up. The wheel or propeller should not strike the housing.
No initial lubrication is required. Motors have been pre-lubricated by motor manufacturer and fan bearings by JencoFan.
Arrows to show direction of rotation and airflow are attached to the fan housings.2
After the electrical connections are completed, apply just enough power to start the impeller as indicated by the directional arrows on the unit. If the impeller is turning the wrong direction, it will not deliver rated airflow and the motor connections must be altered to correct rotation.
Lock out the power source before the installation of all accessories.
Fan electrical power can now be applied and special attention should be given to determine if motor is working properly. At this time, with air system in full operation, with guards attached, it is well for the electrician to measure the operating amperage of the motor and compare with the nameplate rating to determine that the motor is operating under safe load conditions.
The fan should not need balancing, as it was balanced at the factory to meet stringent vibration levels before shipment. However, there are several things that may cause vibration, such as rough handling in shipment and erection, weak foundations, and alignments.
MAINTENANCE:1. Before performing any maintenance on the fan, be sure power is turned off and locked in the OFF position at
the service entrance before servicing the fan.
2. Ventilators should be carefully checked at least once a year. For critical or rugged applications, a routine check every two or three months is suggested.
3. All motors supplied with JencoFan ventilators carry a one-year warranty from date of shipment. For repairs within the warranty period, the motor must be taken to the motor manufacturer’s authorized service dealer. Contact your representative for additional warranty details.
4. A periodic motor check should consist of spinning the motor shaft with the power off to be sure the motor turns freely and the bearings run smoothly. The belt on belt driven units should be removed from the motor sheave.
5. When removing or installing a belt, do not force the belt over the sheave. Loosen the motor mount so that the belt can be easily slipped over the sheave.
6. The belt on belt driven units should be removed and carefully checked for radial cracks, ply separation or irregular wear. A small irregularity in the contact surface of the belt will result in noisy operation. If any of these defects are apparent, the belt should be replaced. Check the sheaves also for chipping, dents or rough surfaces, which could damage the belt.
7. The correct belt tension is important. If the belt is too tight it will result in excess bearing pressure on the motor bearings and shaft pillow block and may also overload the motor. If the belt is too loose it will result in slippage, which will quickly burn out belts. A belt should feel “live” when thumped, approximately ¼” belt deflection when subject to finger pressure (3-5 lb.) at midpoint between sheaves.
8. The belt alignment should also be checked to be sure the belt is running perpendicular to the rotating shafts. Motor and drive shafts must be parallel. Improper alignments will result in excessive belt wear.
9. Check sheave set screws to ensure tightness. Proper keys must be in keyways.
10. Do not readjust blade pitch or fan RPM. If sheaves are replaces, use only sheaves of identical size and type.
11. If unit is to be left idle for an extended period, it is recommended that belts be removed and stored in a cool, dry place to avoid premature belt failure.
12. The standard pillow block bearings on belt driven ventilators are factory lubricated and are provided with external grease fittings. Relubrication annually or more frequently, if required, is recommended.
3
13. During the first few months of operation, it is recommended that the setscrews be checked to assure they are tight.
14. The rotating wheel or propeller requires particular attention in most applications since materials in the air being handled can build up on the blades to cause destructive vibration; and may also corrode and/or erode the blade metal to weaken the structure of the propeller. Regular inspection and corrective action at intervals determined by the severity of each application are essential to good service life.
BEARINGS AND LUBRICATION:All JencoFan belt drive fan bearings are heavy duty, self-aligning ball type and are relubricable for continuous service.
Selection of the correct bearing grease and greasing intervals depends on several things. Extreme high or low temperatures, dirty or damp surrounds, and vibration exceeding 1 or 2 mils are all things that will require more frequent greasing or special greases. For standard service, use a lithium base grease that conforms to NLGI grade 2 consistency.
The motor bearings and the fan bearings on the belt drive fans should be greased at regular intervals. Motor manufacturer’s greasing instructions and recommendations should be followed closely. Avoid the use of a pressure greasing system which tends to fill the bearing chamber completely. Do not over grease. Use only 1 or 2 shots with a hand gun in most cases. Maximum hand gun rating 40 P.S.I. Rotate bearings during lubrication where good safety practice permits. NOTE: On motors with non-regreasable sealed bearings, no lubrication is required for the life of the bearings.
Some of the most frequent causes of bearing failure is not greasing often enough, using an excessive quantity of grease, or using incompatible greases. Excessive vibration, especially if the bearing is not rotating, will also cause bearings to fail. Bearings must also be protected from water and moisture to avoid internal corrosion.
BEARING REPLACEMENT:Fan bearings on belt drive fans should not need to be replaced for many years if the above recommendations are strictly adhered to. However, use the following procedure when bearing replacement is necessary:
1. Gain access to the fan bearings. Remove the bearing cover, if any.
2. Loosen the belts by shifting the motor.
3. Remove the propeller and disconnect the remote lube tubes (if applicable).
4. Measure the location of the bearing to the propeller end of the shaft and the bearing spacing.
5. Remove the shaft and bearing assembly. Note the position of the bearings’ shims (if applicable).
6. Loosen all bearing/shaft setscrews or other locking device.
7. Remove bearings (may have to be pressed off the shaft).
8. Polish the shaft with fine emery paper (240 Grit or finer) and file the setscrew dimples flat.
9. Install new bearings on the shaft, making sure that the collars are together, (i.e., facing each other on the shaft). Lightly seat one setscrew or eccentric locking collar on each bearing to hold in the approximate marked position.
10. Mount the shaft/bearing assembly in the fan, with bolts. Do not tighten yet. Just snug up. Loosen the setscrew.
11. Center the shaft in the house (both ends) as closely as possible. (The fan propeller may need to be temporarily installed to get its clearances equal).
12. Tighten the bearing mounting bolts.
4
13. Reinstall the lube tubes (if applicable).
14. Install bearing cover, propeller, and belts, and adjust the motor to get proper belt tension. Also, make sure that the sheaves are properly aligned.
15. If a new shaft is supplied, then ignore items #6 through #8.
V-BELTS:V-belts on JencoFan belt drive fans are oil, heat and static resistant type, and oversized for continuous duty. With proper installation and maintenance, years of operating efficiency can be added to the life span of the V-belt drive.
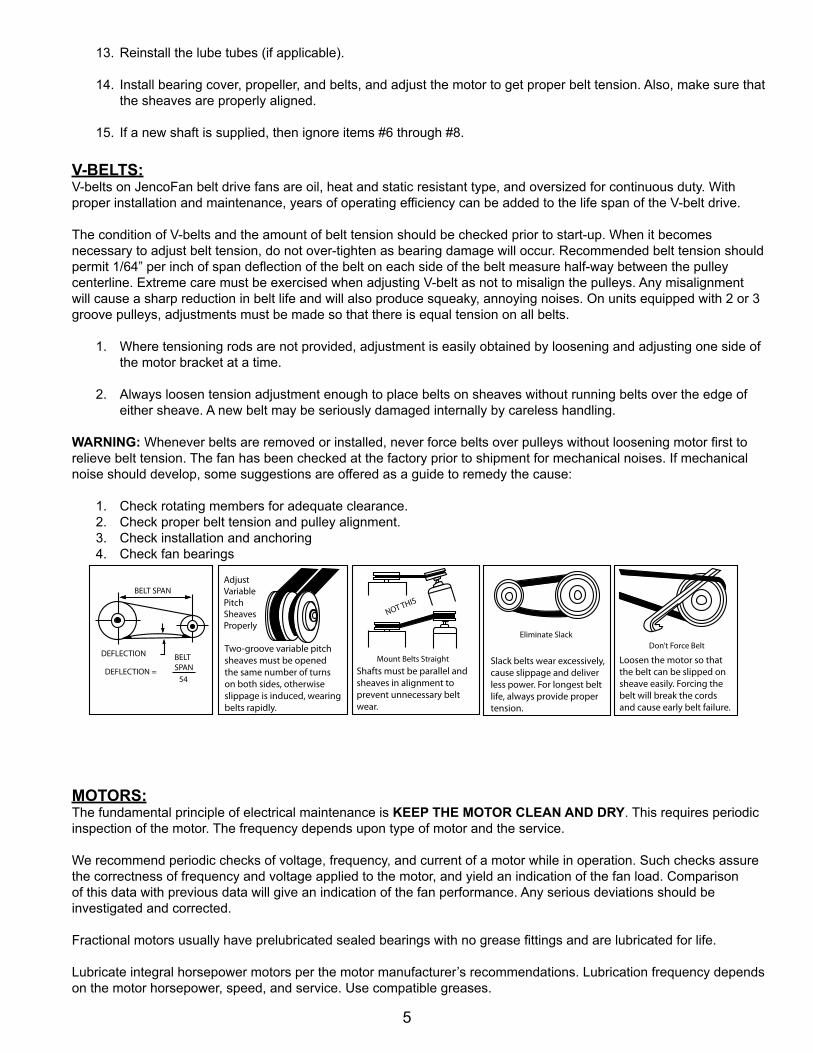
The condition of V-belts and the amount of belt tension should be checked prior to start-up. When it becomes necessary to adjust belt tension, do not over-tighten as bearing damage will occur. Recommended belt tension should permit 1/64” per inch of span deflection of the belt on each side of the belt measure half-way between the pulley centerline. Extreme care must be exercised when adjusting V-belt as not to misalign the pulleys. Any misalignment will cause a sharp reduction in belt life and will also produce squeaky, annoying noises. On units equipped with 2 or 3 groove pulleys, adjustments must be made so that there is equal tension on all belts.
1. Where tensioning rods are not provided, adjustment is easily obtained by loosening and adjusting one side of the motor bracket at a time.
2. Always loosen tension adjustment enough to place belts on sheaves without running belts over the edge of either sheave. A new belt may be seriously damaged internally by careless handling.
WARNING: Whenever belts are removed or installed, never force belts over pulleys without loosening motor first to relieve belt tension. The fan has been checked at the factory prior to shipment for mechanical noises. If mechanical noise should develop, some suggestions are offered as a guide to remedy the cause:
1. Check rotating members for adequate clearance.2. Check proper belt tension and pulley alignment.3. Check installation and anchoring4. Check fan bearings
MOTORS:The fundamental principle of electrical maintenance is KEEP THE MOTOR CLEAN AND DRY. This requires periodic inspection of the motor. The frequency depends upon type of motor and the service.
We recommend periodic checks of voltage, frequency, and current of a motor while in operation. Such checks assure the correctness of frequency and voltage applied to the motor, and yield an indication of the fan load. Comparison of this data with previous data will give an indication of the fan performance. Any serious deviations should be investigated and corrected.
Fractional motors usually have prelubricated sealed bearings with no grease fittings and are lubricated for life.
Lubricate integral horsepower motors per the motor manufacturer’s recommendations. Lubrication frequency depends on the motor horsepower, speed, and service. Use compatible greases.
5
Adjust Variable Pitch Sheaves Properly
Mount Belts Straight
Eliminate Slack
NOT THIS
Don’t Force Belt
BELT SPAN
DEFLECTION
DEFLECTION =
BELTSPAN
54
Two-groove variable pitch sheaves must be opened the same number of turns on both sides, otherwise slippage is induced, wearing belts rapidly.
Shafts must be parallel and sheaves in alignment to prevent unnecessary belt wear.
Slack belts wear excessively, cause slippage and deliver less power. For longest belt life, always provide proper tension.
Loosen the motor so that the belt can be slipped on sheave easily. Forcing the belt will break the cords and cause early belt failure.
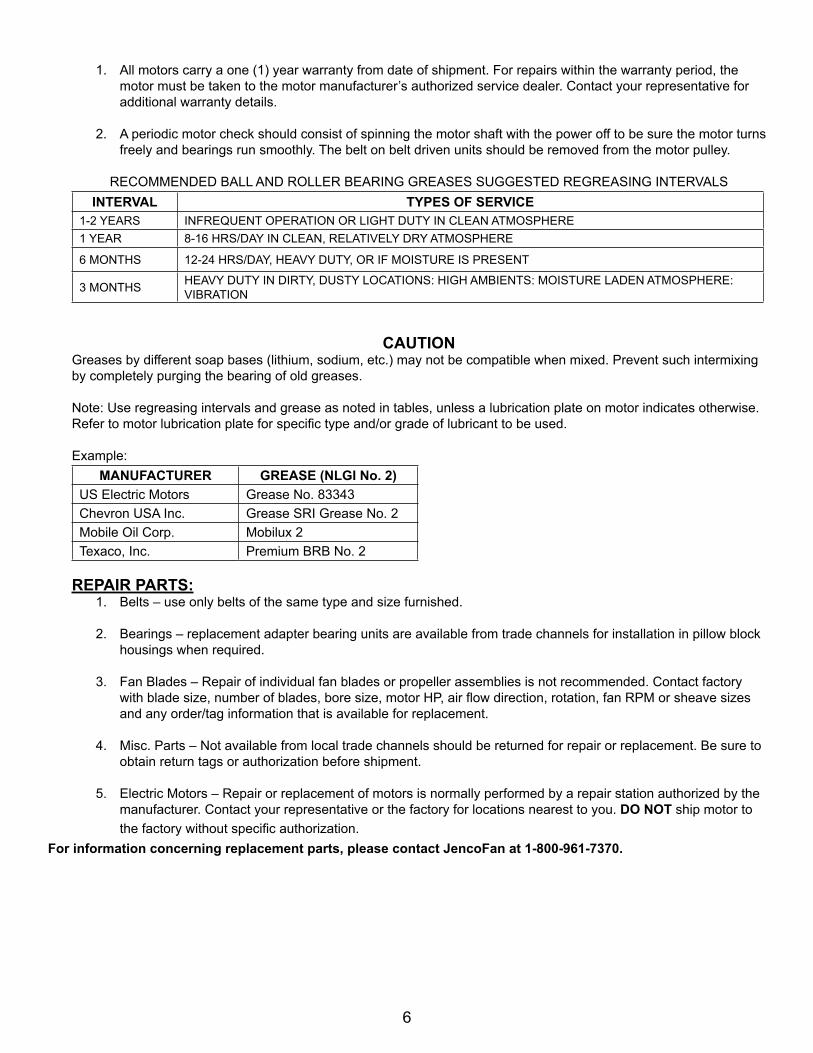
1. All motors carry a one (1) year warranty from date of shipment. For repairs within the warranty period, the motor must be taken to the motor manufacturer’s authorized service dealer. Contact your representative for additional warranty details.
2. A periodic motor check should consist of spinning the motor shaft with the power off to be sure the motor turns freely and bearings run smoothly. The belt on belt driven units should be removed from the motor pulley.
RECOMMENDED BALL AND ROLLER BEARING GREASES SUGGESTED REGREASING INTERVALSINTERVAL TYPES OF SERVICE
1-2 YEARS INFREQUENT OPERATION OR LIGHT DUTY IN CLEAN ATMOSPHERE1 YEAR 8-16 HRS/DAY IN CLEAN, RELATIVELY DRY ATMOSPHERE
6 MONTHS 12-24 HRS/DAY, HEAVY DUTY, OR IF MOISTURE IS PRESENT
3 MONTHS HEAVY DUTY IN DIRTY, DUSTY LOCATIONS: HIGH AMBIENTS: MOISTURE LADEN ATMOSPHERE: VIBRATION
CAUTIONGreases by different soap bases (lithium, sodium, etc.) may not be compatible when mixed. Prevent such intermixing by completely purging the bearing of old greases.
Note: Use regreasing intervals and grease as noted in tables, unless a lubrication plate on motor indicates otherwise. Refer to motor lubrication plate for specific type and/or grade of lubricant to be used.
Example:MANUFACTURER GREASE (NLGI No. 2)
US Electric Motors Grease No. 83343Chevron USA Inc. Grease SRI Grease No. 2Mobile Oil Corp. Mobilux 2Texaco, Inc. Premium BRB No. 2
REPAIR PARTS:1. Belts – use only belts of the same type and size furnished.
2. Bearings – replacement adapter bearing units are available from trade channels for installation in pillow block housings when required.
3. Fan Blades – Repair of individual fan blades or propeller assemblies is not recommended. Contact factory with blade size, number of blades, bore size, motor HP, air flow direction, rotation, fan RPM or sheave sizes and any order/tag information that is available for replacement.
4. Misc. Parts – Not available from local trade channels should be returned for repair or replacement. Be sure to obtain return tags or authorization before shipment.
5. Electric Motors – Repair or replacement of motors is normally performed by a repair station authorized by the manufacturer. Contact your representative or the factory for locations nearest to you. DO NOT ship motor to the factory without specific authorization.
6
For information concerning replacement parts, please contact JencoFan at 1-800-961-7370.
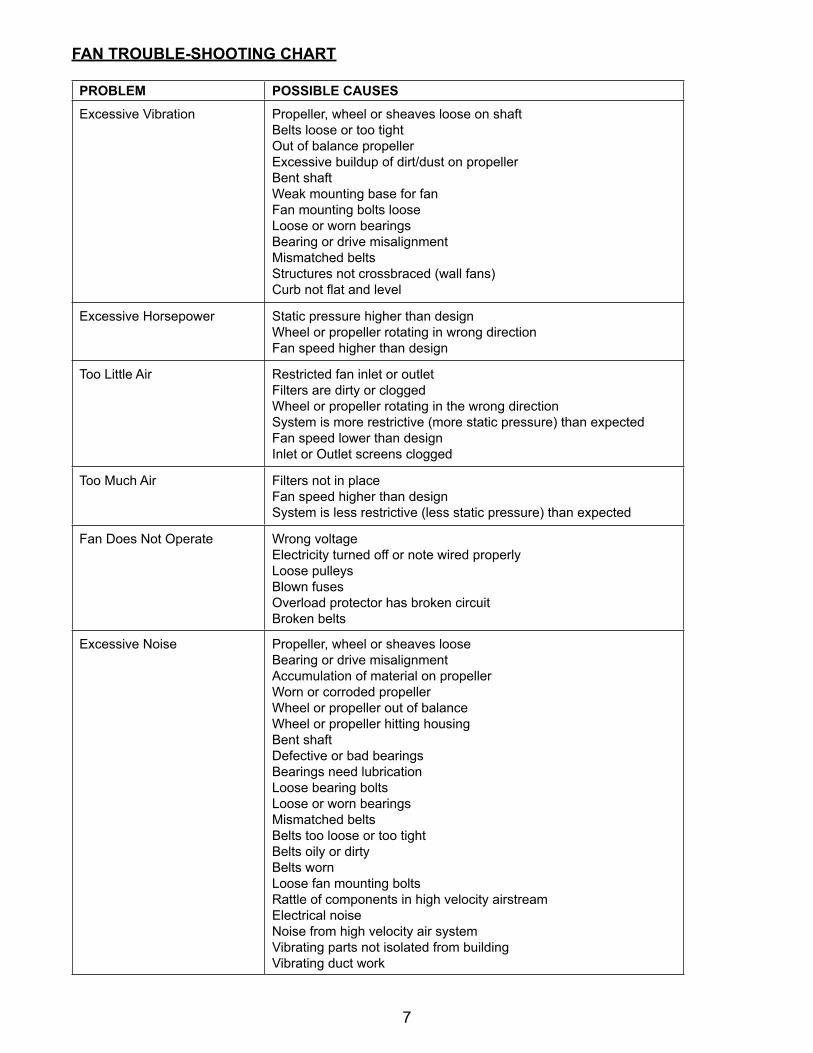
FAN TROUBLE-SHOOTING CHART
PROBLEM POSSIBLE CAUSESExcessive Vibration Propeller, wheel or sheaves loose on shaft
Belts loose or too tightOut of balance propellerExcessive buildup of dirt/dust on propellerBent shaftWeak mounting base for fanFan mounting bolts looseLoose or worn bearings Bearing or drive misalignmentMismatched beltsStructures not crossbraced (wall fans)Curb not flat and level
Excessive Horsepower Static pressure higher than designWheel or propeller rotating in wrong directionFan speed higher than design
Too Little Air Restricted fan inlet or outletFilters are dirty or cloggedWheel or propeller rotating in the wrong directionSystem is more restrictive (more static pressure) than expectedFan speed lower than designInlet or Outlet screens clogged
Too Much Air Filters not in placeFan speed higher than designSystem is less restrictive (less static pressure) than expected
Fan Does Not Operate Wrong voltageElectricity turned off or note wired properlyLoose pulleysBlown fusesOverload protector has broken circuitBroken belts
Excessive Noise Propeller, wheel or sheaves looseBearing or drive misalignmentAccumulation of material on propellerWorn or corroded propellerWheel or propeller out of balanceWheel or propeller hitting housingBent shaftDefective or bad bearingsBearings need lubricationLoose bearing boltsLoose or worn bearingsMismatched beltsBelts too loose or too tightBelts oily or dirtyBelts wornLoose fan mounting boltsRattle of components in high velocity airstreamElectrical noiseNoise from high velocity air systemVibrating parts not isolated from buildingVibrating duct work
7
WARRANTY:JencoFan warrants this equipment to be free from defects in material and workmanship for five (5) years from date of shipment. Any units or parts which prove to be defective and are reported during the warranty period will be replaced at our option when returned to our factory, transportation prepaid. Deterioration or wear by heat, abrasive action, chemicals, improper installation or operation or lack of normal maintenance shall not constitute defects, and are not covered by warranty.
The motor is warranted by the motor manufacturer for one year. If the motor becomes defective in the warranty period, it should be taken to the nearest authorized motor service station. If this is not done, the motor manufacturer will not warrant the motor. Call the factory for instructions if authorized service station is not known.
JencoFan will not be responsible for any installation, removal or re-installation costs or any consequential damage resulting in failure to meet conditions of any warranty.
LIMITATION OF WARRANTY AND LIABILITYThis warranty does not apply to any such JencoFan product or parts which have failed as a result of faulty installation or abuse, or incorrect electrical connections or alterations, made by others, or use under abnormal operating conditions or misapplication of the products and parts.
JencoFan will not approve for payment any repairs made outside the factory without prior written consent of its Jacksonville, Florida office.
The foregoing shall constitute our sole and exclusive warranty and our sole and exclusive liability and is in lieu of all other warranties, whether written, oral, implied or statutory. There are no warranties which extend beyond the description of the page hereof. Seller does not warrant that said goods and articles are of merchantable quality or that they are fit for any particular purpose. The liability of seller on any claim of any kind, including negligence, for any loss or damage arising out of or connected with, or resulting from the sale and purchase of the products and parts covered by this proposal, acknowledgement, order or from the performance or breach of any contract pertaining to such sale or purchase, or from the design, manufacture, sale, delivery, resale, installation, technical direction of installation, inspection, repair, operation or use of any products or parts covered by this proposal, acknowledgement, order or furnished by seller shall, in no case exceed the price allocable to the products or parts thereof which give rise to the claim and shall terminate one (1) year after the shipment of said products and parts.
In no event, whether as a result of breach of contract, or warranty or alleged negligence, defects, incorrect advice or other causes, shall seller be liable for special or consequential damages, including, but not limited to, loss of profits or revenue, loss of use of the equipment or any associated equipment, cost of capital, cost of substitute equipment, facilities or services, down time costs, or claims of customers of the purchaser for such damages. JencoFan neither assumes nor authorizes any persons to assume for it any other liability in connection with the sale of its fan products and parts. Some states do not allow the exclusion or limitation of incidental or consequential damages, so all of the above limitations or exclusions may not apply to you.
SAFETY ACCESSORIES WARNING:The responsibility for providing safety accessories for equipment supplied by JencoFan is that of the installer and user of this equipment. JencoFan sells its equipment with and without safety accessories, and accordingly it can supply such safety accessories upon receipt of order.
The user, in making its determination as to the appropriate safety accessories to be installed and any warning notices, should consider (1) the location of the installation, (2) the accessibility of employees and other persons to this equipment, (3) any adjacent equipment, (4) applicable building codes, and (5) requirements of the Federal Occupational Safety and Health Act.Users and installers of this equipment should read “RECOMMENDED SAFETY PRACTICES FOR AIR MOVING DEVICES” which is published by Air Movement and Control Association, 30 West University Drive, Arlington Heights, Illinois 60004.
8

www.jencofan.com
![UBB SySTEM COMPATIBILITy CHART - ROTOR · PDF file68 UBB SySTEM COMPATIBILITy CHART ENCOMPASSING ALL BOTTOM BRACKET STANDARDS]]ROTOR’s “UBB” is a super-standard that encompasses](https://img.pdfslide.us/doc/110x75/5a78bacd7f8b9ae6228c2430/ubb-system-compatibility-chart-rotor-ubb-system-compatibility-chart-encompassing.jpg)