Embed Size (px)
Citation preview
7/24/2019 Modelismo Escala de Arboles
http://slidepdf.com/reader/full/modelismo-escala-de-arboles 1/2
46
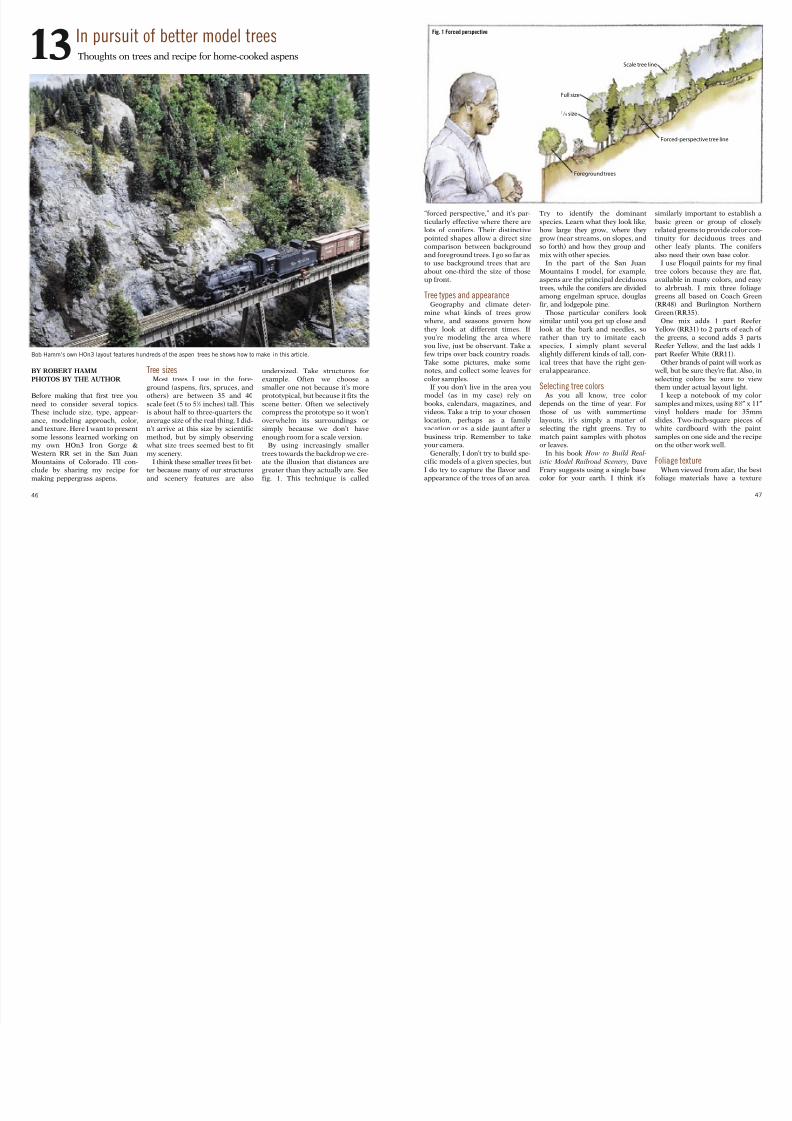
13In pursuit of better model treesThoughts on trees and recipe for home-cooked aspens
BY ROBERT HAMM
PHOTOS BY THE AUTHOR
Before making that first tree you
need to consider several topics.
These include size, type, appear-ance, modeling approach, color,and texture. Here I want to present
some lessons learned working onmy own HOn3 Iron Gorge &Western RR set in the San Juan
Mountains of Colorado. I’ll con-clude by sharing my recipe for
making peppergrass aspens.
Tree sizesMost trees I use in the fore-
ground (aspens, firs, spruces, andothers) are between 35 and 40
scale feet (5 to 51 ⁄ 2 inches) tall. This
is about half to three-quarters theaverage size of the real thing. I did-n’t arrive at this size by scientific
method, but by simply observingwhat size trees seemed best to fit
my scenery.I think these smaller trees fit bet-
ter because many of our structures
and scenery features are also
undersized. Take structures forexample. Often we choose a
smaller one not because it’s moreprototypical, but because it fits the
scene better. Often we selectively
compress the prototype so it won’toverwhelm its surroundings orsimply because we don’t have
enough room for a scale version.By using increasingly smaller
trees towards the backdrop we cre-ate the illusion that distances aregreater than they actually are. See
fig. 1. This technique is called
Bob Hamm’s own HOn3 layout features hundreds of the aspen trees he shows how to make in this article.
“forced perspective,” and it’s par-
ticularly effective where there arelots of conifers. Their distinctive
pointed shapes allow a direct sizecomparison between background
and foreground trees. I go so far asto use background trees that are
about one-third the size of thoseup front.
Tree types and appearanceGeography and climate deter-
mine what kinds of trees growwhere, and seasons govern how
they look at different times. If you’re modeling the area where
you live, just be observant. Take afew trips over back country roads.
Take some pictures, make somenotes, and collect some leaves for
color samples.If you don’t live in the area you
model (as in my case) rely on
books, calendars, magazines, and
videos. Take a trip to your chosenlocation, perhaps as a family vacation or as a side jaunt after a
business trip. Remember to takeyour camera.
Generally, I don’t try to build spe-cific models of a given species, but
I do try to capture the flavor andappearance of the trees of an area.
Try to identify the dominant
species. Learn what they look like,how large they grow, where they
grow (near streams, on slopes, andso forth) and how they group and
mix with other species.In the part of the San Juan
Mountains I model, for example,aspens are the principal deciduous
trees, while the conifers are dividedamong engelman spruce, douglasfir, and lodgepole pine.
Those particular conifers looksimilar until you get up close and
look at the bark and needles, sorather than try to imitate each
species, I simply plant severalslightly different kinds of tall, con-
ical trees that have the right gen-eral appearance.
Selecting tree colorsAs you all know, tree color
depends on the time of year. For
those of us with summertimelayouts, it’s simply a matter of selecting the right greens. Try to
match paint samples with photosor leaves.
In his book How to Build Real-
istic Model Railroad Scenery, Dave
Frary suggests using a single basecolor for your earth. I think it’s
similarly important to e
basic green or group related greens to provide
tinuity for deciduous other leafy plants. The
also need their own baseI use Floquil paints fo
tree colors because theyavailable in many colors
to alrbrush. I mix thrgreens all based on Coa(RR48) and Burlington
Green (RR35).One mix adds 1 pa
Yellow (RR31) to 2 parts the greens, a second ad
Reefer Yellow, and the lapart Reefer White (RR11
Other brands of paint wwell, but be sure they’re fl
selecting colors be surthem under actual layout
I keep a notebook of
samples and mixes, using
vinyl holders made fslides. Two-inch-squarewhite cardboard with
samples on one side and on the other work well.
Foliage textureWhen viewed from afa
foliage materials have
Forced-perspective tree line
Forced Perspective
Full size
3 ⁄ 4 size
Scale tree line
Foreground trees
Fig. 1 Forced perspective
7/24/2019 Modelismo Escala de Arboles
http://slidepdf.com/reader/full/modelismo-escala-de-arboles 2/2
48
Fig. 2 Tree-making supplies. Here’s what you need to make the tree shown in fig. 3. The
shaker, lower left, contains Highball N scale ballast for adding speckles to the trunk.
like clusters of leaf-size specks.The more they “pop out” the better
the effect.Another desirable attribute is a
delicate or airy structure. You want
to be able to look between leaf clus-ters and see the inner branches.
Fine-textured commercial groundfoam when applied to a delicate
support armature does a good jobof meeting both requirements. I
particularly like the AMSI line of ground foams, for both their colors
and fine texture.Many natural materials also have
these qualities. Some of the best
are: peppergrass (also called babybush, candy bush, and beige lace),
hardhacket (or hardcap), and wildspirea (or meadowsweet). These
plants may be known by othernames as well.
I buy the peppergrass in floristshops and craft stores, but gather
the other materials from over-grown fields and meadows in east-
ern New York and Western Mas-sachusetts in the early fall.
All these natural materials arecharacterized by tight clusters of what appear to be seed pods
connected by a delicate armatureof branches. The seed pods are
about leaf size and generallymulti-faceted.
Some of the best-formed weedheads make good trees with little
more than trimming and paint-ing. I use wild spirea in this man-
ner for my background trees.Sprigs of the peppergrass workwell for aspen saplings and filling
in the foreground.
A recipe for aspen treesColorado Rockies modelers
need aspen trees by the bushel. Ibuild my foreground aspens by
gluing peppergrass sprigs to thetrunk. Figure 2 shows the tools
and materials needed.For the trunks I use straight
twigs or weed stalks 1 ⁄ 16″ to 1 ⁄ 8″ indiameter and 3 to 6 inches long.
The glue should be thick-bodiedand fast drying. Walthers Gooworks well, as does Quick Grab
by the 3C Co. in Woburn, Mass.A small piece of foam board
makes a useful base for settingthe tree down.
Typically peppergrass costs $3 to$4 a bunch. Choose the kind that is
straw-colored, or “natural.” It’smost likely to have the “seed pods”
that look like leaves. Pick thebunches with the fullest clusters.I’ve found the quality varies.
Let’s build an aspenThe sequence of photos in fig. 3
takes you through the construc-
tion, so grab a twig and let’s go. Ithelps to have an image of the tree’s
basic shape in mind, and that’sprovided in fig. 4.
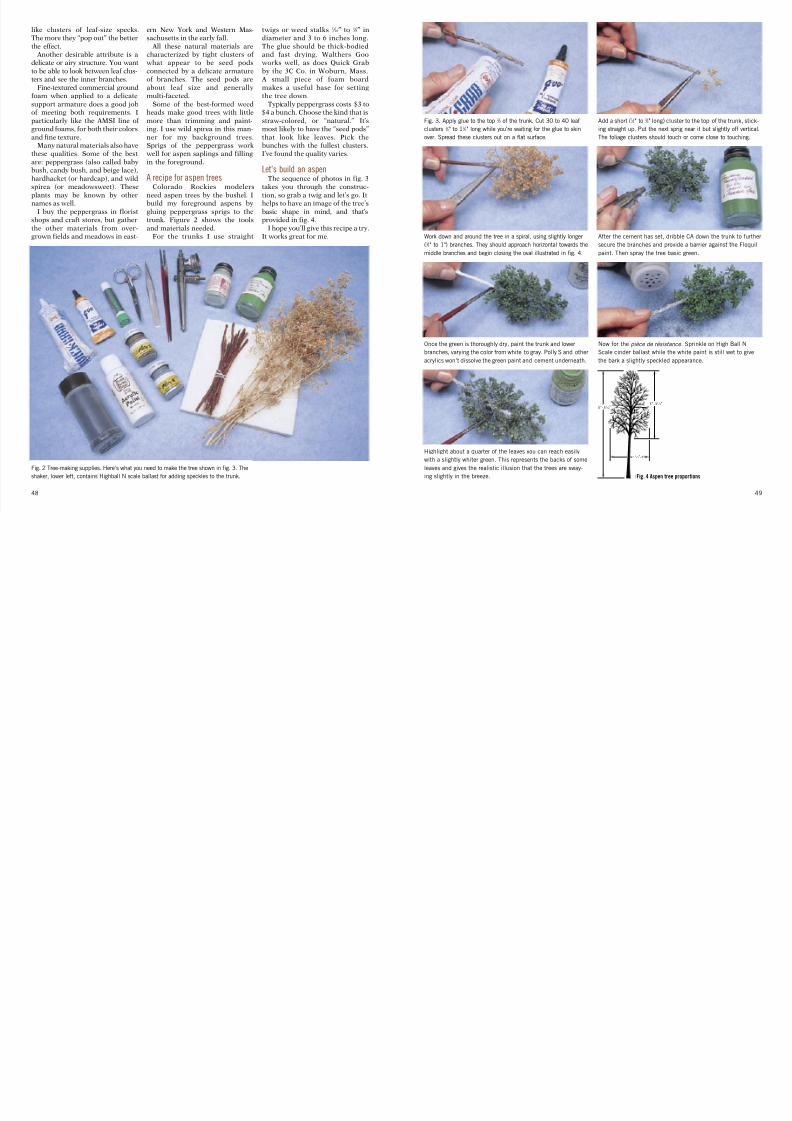
I hope you’ll give this recipe a try.It works great for me. Work down and around the tree in a spiral, using slightly longer
(3 ⁄ 4" to 1") branches. They should approach horizontal towards the
middle branches and begin closing the oval illustrated in fig. 4.
After the cement has set, dribble CA down the trun
secure the branches and provide a barrier against t
paint. Then spray the tree basic green.
Fig. 3. Apply glue to the top 2 ⁄ 3 of the trunk. Cut 30 to 40 leaf
clusters 1 ⁄ 2" to 11 ⁄ 2" long while you’re waiting for the glue to skin
over. Spread these clusters out on a flat surface.
Add a short (1 ⁄ 2" to 3 ⁄ 4" long) cluster to the top of the tr
ing straight up. Put the next sprig near it but slightly
The foliage clusters should touch or come close to to
Once the green is thoroughly dry, paint the trunk and lower
branches, varying the color from white to gray. Polly S and other
acrylics won’t dissolve the green paint and cement underneath.
Now for the pièce de résistance. Sprinkle on High
Scale cinder ballast while the white paint is still w
the bark a slightly speckled appearance.
Aspen treeproportions
3"-31 ⁄ 2"
5"-51 ⁄ 2"
11 ⁄ 2"-2"
Highlight about a quarter of the leaves you can reach easily
with a slightly whiter green. This represents the backs of some
leaves and gives the realistic illusion that the trees are sway-
ing slightly in the breeze.
Fig. 4 Aspen tree proportions