Embed Size (px)
Citation preview
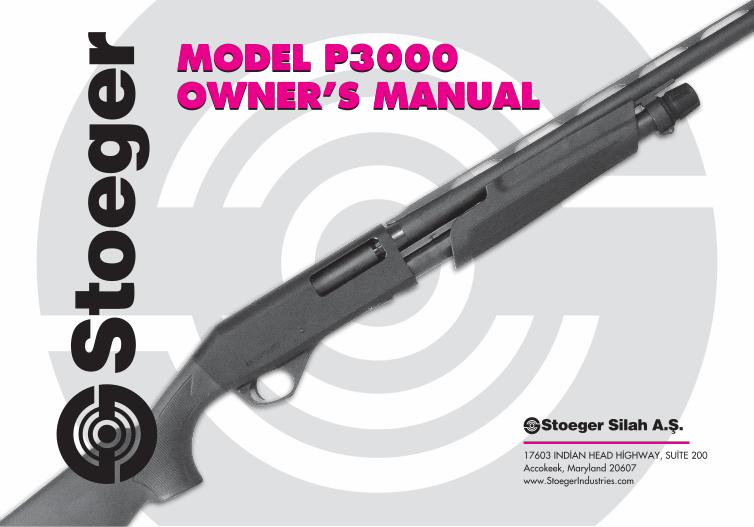
Stoeger Silah A.Ş.
17603 INDİAN HEAD HİGHWAY, SUİTE 200Accokeek, Maryland 20607www.StoegerIndustries.com
MODEL P3000OWNER’S MANUALMODEL P3000OWNER’S MANUAL

CONTENTS:
1. Introduction
2. Safety Rules
3. Assembly
4. Ammunition and Loading
6. Firing the Shotgun
7. Unloading the Shotgun
7. Disassembly of the Shotgun
9. Firearm Re-assembly
10. Function Testing
11. Maintenance
13-20. Parts Diagrams
FOR WARRANTY REPAIR PLEASE CALL STOEGER INDUSTRIES TO RECEIVE
A RETURN AUTHORIZATION NUMBER: 1- 301 - 293 - 6300
1
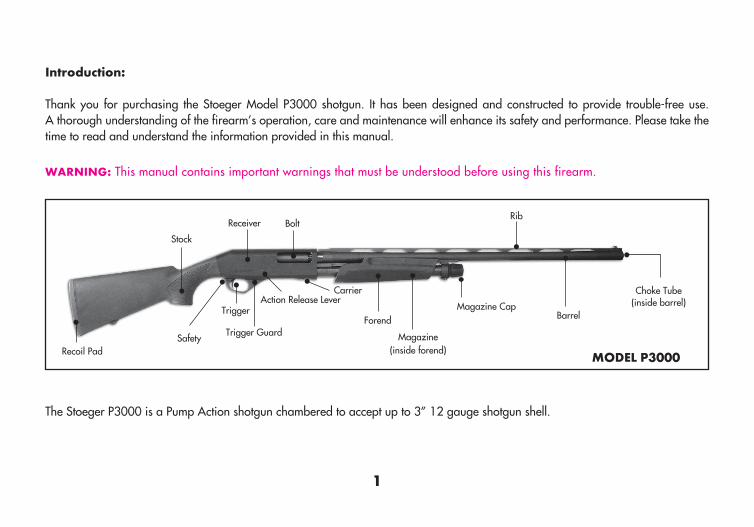
Stock
Safety
Trigger
Trigger Guard
Carrier
Forend
Action Release Lever
Magazine(inside forend)
Magazine CapBarrel
RibBolt
Choke Tube(inside barrel)
Recoil Pad
Receiver
Introduction:
Thank you for purchasing the Stoeger Model P3000 shotgun. It has been designed and constructed to provide trouble-free use. A thorough understanding of the firearm’s operation, care and maintenance will enhance its safety and performance. Please take the time to read and understand the information provided in this manual.
The Stoeger P3000 is a Pump Action shotgun chambered to accept up to 3” 12 gauge shotgun shell.
WARNING: This manual contains important warnings that must be understood before using this firearm.
MODEL P3000

2
SAFETY PRACTICES WARNING A FIREARM HAS THE POTENTIAL OF TAKING YOUR LIFE OR THAT OF ANOTHER PERSON. BE CAREFUL WITH ALL FIREARMS, AN ACCIDENT IS ALMOST ALWAYS THE RESULT OF NOT FOLLOWING BASIC SAFETY RULES.
SAFETY RULESPlease read this before handling your firearm.The following safety rules are an important reminder that firearm safety is YOUR responsibility. Firearms can be dangerous and can potentially cause damage to property, serious injury or death if handled improperly. 1. Always treat all firearms as if they are loaded. 2. Never point a firearm at anyone, or in any direction that
is unsafe -always point the firearm downrange or other known safe direction.
3. Never give or take a firearm from another person unless the action is open and the gun is unloaded.
4. Keep the manual safety applied and your finger off the trigger while handling, loading or unloading.
5. Before handling or loading any firearm unfamiliar to you, make certain you understand how it functions. Unfamiliarity can cause serious accidents. Attend a certified training course on any firearm that you intend to use or are not sufficiently familiar with handling.
6. Be sure the ammunition you are using matches the firearm and is factory loaded and is not damaged in any way.
7. Before loading open the bolt and check the barrel to be sure it is clear of any obstructions.
8. Be sure of your target and the backstop beyond it. 9. Keep your finger off the trigger until your sights are on the
target. 10. Keep your hands, fingers and feet away from the muzzle
of any loaded firearm at all time.11. Wear hearing protection and eye protection when
shooting your firearm or observing shooting at the range.
12. Firearms and ammunition should be stored separately and out of the reach of children.13. Avoid the use of alcoholic beverages before and during
shooting activities.14. Discharging firearms in poorly ventilated areas, cleaning
firearms, or handling ammunition may result in exposure to lead, a substance known to be associated with birth defects, reproductive harm, and other serious injury. Have adequate ventilation at all times. Wash hands thoroughly after exposure.
3
ASSEMBLY PROCEDURE
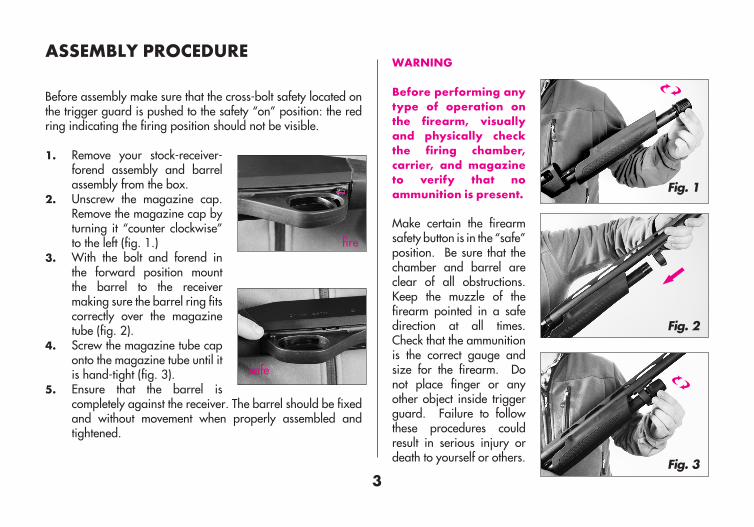
Before assembly make sure that the cross-bolt safety located on the trigger guard is pushed to the safety “on” position: the red ring indicating the firing position should not be visible.
1. Remove your stock-receiver-forend assembly and barrel assembly from the box.
2. Unscrew the magazine cap. Remove the magazine cap by turning it “counter clockwise” to the left (fig. 1.)
3. With the bolt and forend in the forward position mount the barrel to the receiver making sure the barrel ring fits correctly over the magazine tube (fig. 2).
4. Screw the magazine tube cap onto the magazine tube until it is hand-tight (fig. 3).
5. Ensure that the barrel is completely against the receiver. The barrel should be fixed and without movement when properly assembled and tightened.
WARNING
Before performing any type of operation on the firearm, visually and physically check the firing chamber, carrier, and magazine to verify that no ammunition is present.
Make certain the firearm safety button is in the “safe” position. Be sure that the chamber and barrel are clear of all obstructions. Keep the muzzle of the firearm pointed in a safe direction at all times. Check that the ammunition is the correct gauge and size for the firearm. Do not place finger or any other object inside trigger guard. Failure to follow these procedures could result in serious injury or death to yourself or others.
fire
safe
Fig. 1
Fig. 2
Fig. 3
4
Ammunition & Loading
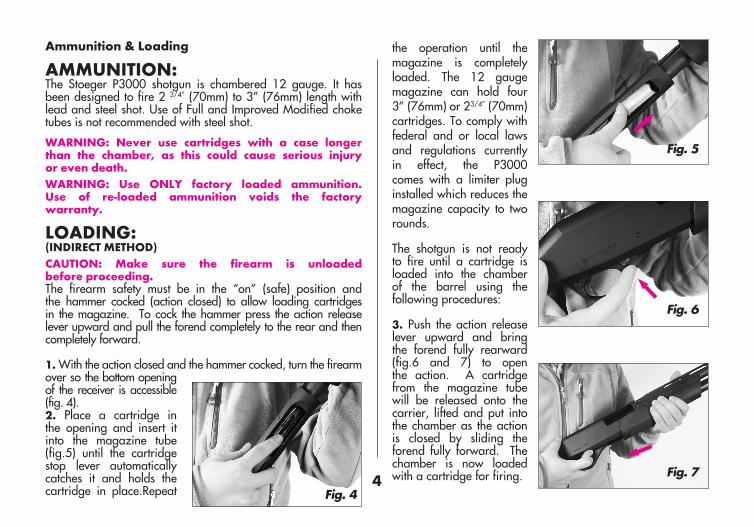
AMMUNITION: The Stoeger P3000 shotgun is chambered 12 gauge. It has been designed to fire 2 3/4” (70mm) to 3” (76mm) length with lead and steel shot. Use of Full and Improved Modified choke tubes is not recommended with steel shot.
WARNING: Never use cartridges with a case longer than the chamber, as this could cause serious injury or even death.WARNING: Use ONLY factory loaded ammunition. Use of re-loaded ammunition voids the factory warranty.
LOADING: (INDIRECT METHOD)CAUTION: Make sure the firearm is unloaded before proceeding.The firearm safety must be in the “on” (safe) position and the hammer cocked (action closed) to allow loading cartridges in the magazine. To cock the hammer press the action release lever upward and pull the forend completely to the rear and then completely forward.
1. With the action closed and the hammer cocked, turn the firearm over so the bottom opening of the receiver is accessible (fig. 4).2. Place a cartridge in the opening and insert it into the magazine tube (fig.5) until the cartridge stop lever automatically catches it and holds the cartridge in place.Repeat
the operation until the magazine is completely loaded. The 12 gauge magazine can hold four 3” (76mm) or 23/4” (70mm) cartridges. To comply with federal and or local laws and regulations currently in effect, the P3000 comes with a limiter plug installed which reduces the magazine capacity to two rounds.
The shotgun is not ready to fire until a cartridge is loaded into the chamber of the barrel using the following procedures: 3. Push the action release lever upward and bring the forend fully rearward (fig.6 and 7) to open the action. A cartridge from the magazine tube will be released onto the carrier, lifted and put into the chamber as the action is closed by sliding the forend fully forward. The chamber is now loaded with a cartridge for firing.
Fig. 4
Fig. 7
Fig. 5
Fig. 6
5
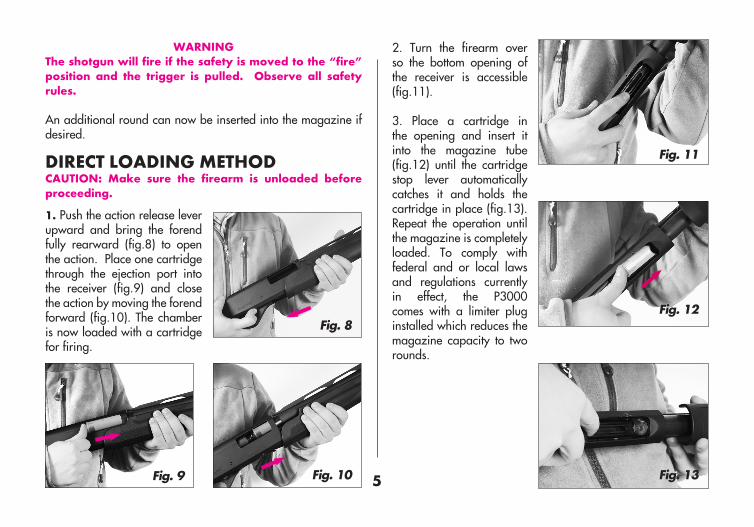
2. Turn the firearm over so the bottom opening of the receiver is accessible (fig.11).
3. Place a cartridge in the opening and insert it into the magazine tube (fig.12) until the cartridge stop lever automatically catches it and holds the cartridge in place (fig.13). Repeat the operation until the magazine is completely loaded. To comply with federal and or local laws and regulations currently in effect, the P3000 comes with a limiter plug installed which reduces the magazine capacity to two rounds.
WARNING The shotgun will fire if the safety is moved to the “fire” position and the trigger is pulled. Observe all safety rules.
An additional round can now be inserted into the magazine if desired.
DIRECT LOADING METHODCAUTION: Make sure the firearm is unloaded before proceeding.
1. Push the action release lever upward and bring the forend fully rearward (fig.8) to open the action. Place one cartridge through the ejection port into the receiver (fig.9) and close the action by moving the forend forward (fig.10). The chamber is now loaded with a cartridge for firing.
Fig. 13
Fig. 8
Fig. 11
Fig. 12
Fig. 9 Fig. 10
6
FIRING THE SHOTGUN
WARNING Observe all safety practices at the beginning of this manual.
1. With a cartridge in the chamber move the safety button to the “fire” position. 2. Place your finger on the trigger and pull it rearward to fire the gun. 3. The action will unlock automatically after firing. 4. Pulling the forearm fully rearward will extract and eject the fired round and release a round from the magazine onto the carrier. 5. Moving the forearm fully forward will chamber the next round for firing. 6. The trigger must be released and allowed to re-set before the next round can be fired. 7. Pulling the trigger will fire the chambered round, and the cycle can be repeated until all rounds loaded in the shotgun have been fired. 8. After Firing: Open the action by sliding the forearm to the rear, put the safety in the “on” position, visually and physically check chamber, carrier and magazine to be sure the firearm is completely unloaded.
UNLOADING THE FIREARM
WARNINGMake sure the safety is in the “on” (safe) position. All of the safety procedures listed in the beginning of this manual must be followed strictly. Always keep the muzzle pointed in a safe direction and during these phases always keep fingers away from the trigger.
1. Depress the action release locking lever and keep it depressed. Sliding the forend fully rearward will extract the chambered round and eject it through the ejection port. It will also release a round from the magazine on to the carrier. 2. Sliding the forearm fully forward will chamber the round resting on the carrier. 3. Repeat this cycle until all the cartridges from the magazine have been released and ejected. 4. Open the action and re-check the chamber, carrier and magazine visually and physically to be sure the firearm is completely unloaded.
CAUTION: Be certain that the ejected rounds do no land on a hard surface. Wipe the ejected rounds clean before loading them into a firearm.
7
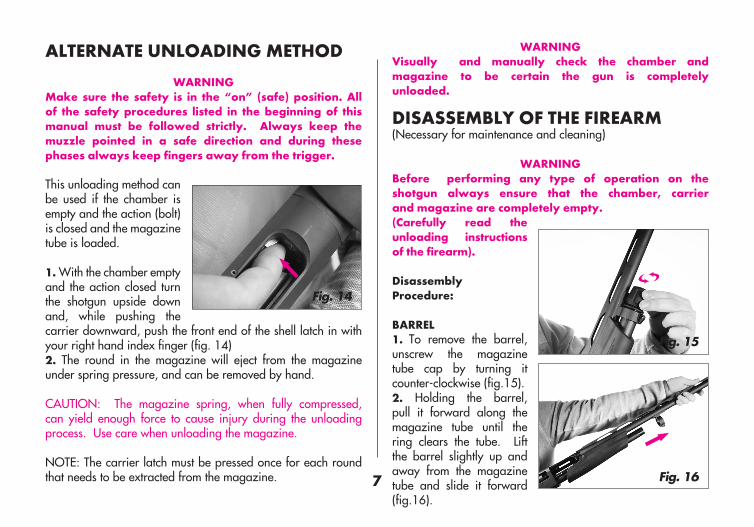
ALTERNATE UNLOADING METHOD
WARNINGMake sure the safety is in the “on” (safe) position. All of the safety procedures listed in the beginning of this manual must be followed strictly. Always keep the muzzle pointed in a safe direction and during these phases always keep fingers away from the trigger.
This unloading method can be used if the chamber is empty and the action (bolt) is closed and the magazine tube is loaded.
1. With the chamber empty and the action closed turn the shotgun upside down and, while pushing the carrier downward, push the front end of the shell latch in with your right hand index finger (fig. 14)2. The round in the magazine will eject from the magazine under spring pressure, and can be removed by hand.
CAUTION: The magazine spring, when fully compressed, can yield enough force to cause injury during the unloading process. Use care when unloading the magazine.
NOTE: The carrier latch must be pressed once for each round that needs to be extracted from the magazine.
WARNING Visually and manually check the chamber and magazine to be certain the gun is completely unloaded.
DISASSEMBLY OF THE FIREARM(Necessary for maintenance and cleaning)
WARNINGBefore performing any type of operation on the shotgun always ensure that the chamber, carrier and magazine are completely empty. (Carefully read the unloading instructions of the firearm).
Disassembly Procedure: BARREL1. To remove the barrel, unscrew the magazine tube cap by turning it counter-clockwise (fig.15).2. Holding the barrel, pull it forward along the magazine tube until the ring clears the tube. Lift the barrel slightly up and away from the magazine tube and slide it forward (fig.16).
Fig. 14
Fig. 15
Fig. 16
8
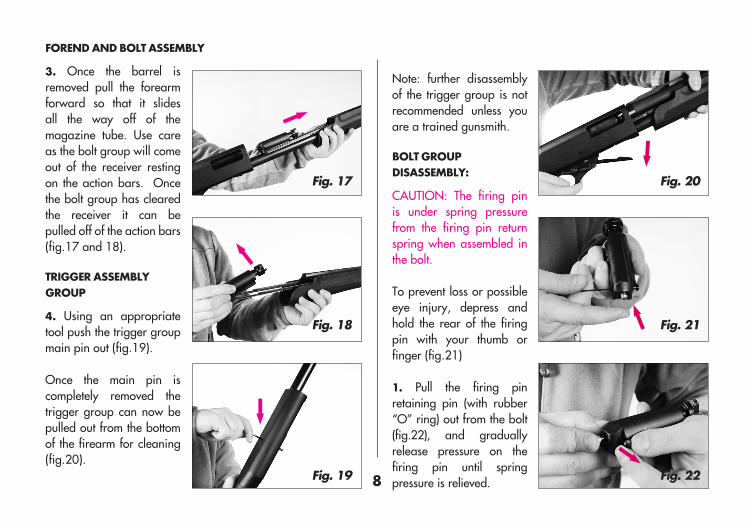
FOREND AND BOLT ASSEMBLY
3. Once the barrel is removed pull the forearm forward so that it slides all the way off of the magazine tube. Use care as the bolt group will come out of the receiver resting on the action bars. Once the bolt group has cleared the receiver it can be pulled off of the action bars (fig.17 and 18).
TRIGGER ASSEMBLY GROUP
4. Using an appropriate tool push the trigger group main pin out (fig.19).
Once the main pin is completely removed the trigger group can now be pulled out from the bottom of the firearm for cleaning (fig.20).
Fig. 18
Fig. 17 Fig. 20
Fig. 19 Fig. 22
Note: further disassembly of the trigger group is not recommended unless you are a trained gunsmith.
BOLT GROUP DISASSEMBLY:
CAUTION: The firing pin is under spring pressure from the firing pin return spring when assembled in the bolt. To prevent loss or possible eye injury, depress and hold the rear of the firing pin with your thumb or finger (fig.21)
1. Pull the firing pin retaining pin (with rubber “O” ring) out from the bolt (fig.22), and gradually release pressure on the firing pin until spring pressure is relieved.
Fig. 21

9
1. Slide the firing pin spring over the front of the firing pin and insert the as-sembly into the rear of the bolt. 2. Depress the end of the firing pin with your thumb and hold it in that position while inserting cross pin (firing pin retaining pin) which retains it in the bolt. Push the cross pin in fully against the side of the bolt. The resistance of the “O” ring is designed to prevent the pin from working loose during normal operation (fig.24)
WARNING: Improper assembly of the bolt group can cause accidental discharge resulting in serious injury or death. Ensure that the assembly of the bolt group is completed in the specified order and that the rear of the firing pin is visible at the back of the bolt. If the rear of the firing pin is not visible, reassemble the bolt group according to the procedure shown in the manual, taking special care that the rear of the firing pin is clearly visible at the rear of the bolt carrier. Do not use tools to insert the firing pin into the bolt carrier, use fingers only.
2. Remove the firing pin and firing pin spring from the bolt (fig.23)
Fig. 23
FIREARM RE-ASSEMBLY
Follow the assembly instructions carefully to ensure proper placement of all components. Do not use excessive force. If components do not assemble easily, re-read instructions or call Stoeger Industries for assistance.
Fig. 24
10
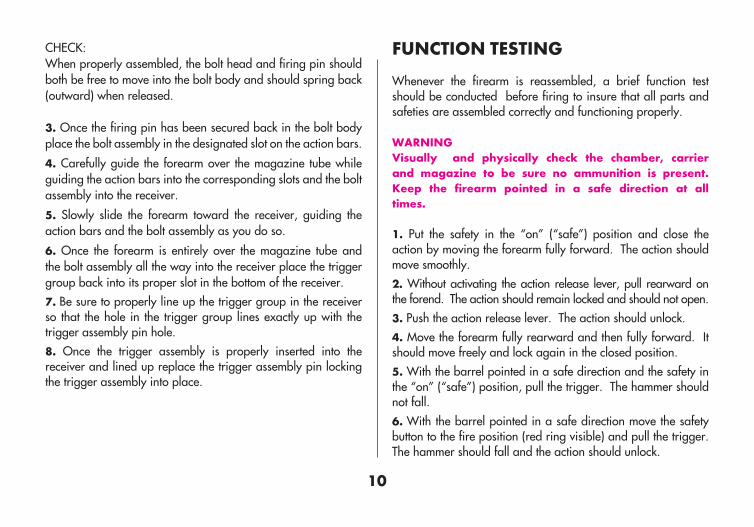
CHECK: When properly assembled, the bolt head and firing pin should both be free to move into the bolt body and should spring back (outward) when released.
3. Once the firing pin has been secured back in the bolt body place the bolt assembly in the designated slot on the action bars.
4. Carefully guide the forearm over the magazine tube while guiding the action bars into the corresponding slots and the bolt assembly into the receiver.
5. Slowly slide the forearm toward the receiver, guiding the action bars and the bolt assembly as you do so.
6. Once the forearm is entirely over the magazine tube and the bolt assembly all the way into the receiver place the trigger group back into its proper slot in the bottom of the receiver.7. Be sure to properly line up the trigger group in the receiver so that the hole in the trigger group lines exactly up with the trigger assembly pin hole. 8. Once the trigger assembly is properly inserted into the receiver and lined up replace the trigger assembly pin locking the trigger assembly into place.
FUNCTION TESTING
Whenever the firearm is reassembled, a brief function test should be conducted before firing to insure that all parts and safeties are assembled correctly and functioning properly.
WARNING Visually and physically check the chamber, carrier and magazine to be sure no ammunition is present. Keep the firearm pointed in a safe direction at all times.
1. Put the safety in the “on” (“safe”) position and close the action by moving the forearm fully forward. The action should move smoothly. 2. Without activating the action release lever, pull rearward on the forend. The action should remain locked and should not open. 3. Push the action release lever. The action should unlock. 4. Move the forearm fully rearward and then fully forward. It should move freely and lock again in the closed position.5. With the barrel pointed in a safe direction and the safety in the “on” (“safe”) position, pull the trigger. The hammer should not fall.6. With the barrel pointed in a safe direction move the safety button to the fire position (red ring visible) and pull the trigger. The hammer should fall and the action should unlock.
11
7. Cycle the action again by moving the forearm fully rearward and then fully forward. Check to be sure the bolt locks properly. With the barrel pointed in a safe direction pull the trigger. The hammer should fall. Open the action fully.
MAINTENANCEWARNING: Before beginning these procedures, move the safety to the “on” (”safe”) position, open the action, visually and physically check chamber, carrier and magazine to be sure the firearm is completely unloaded. Keep the firearm pointed in a safe direction at all times. Failure to do so may result in serious injury or death to you or others. Wear eye protection to avoid potential injury from small parts or cleaning agents.
BARRELRemove the barrel when cleaning the bore so the cleaning rod can be inserted from the chamber end. Leave the choke tube in the bore to avoid contaminating the threads with powder residue. Clean with a commercially available gun solvent. Put a light coat of gun oil in the bore and on the outside metal surfaces to protect against corrosion.
TRIGGER ASSEMBLYClean as a unit with gun solvent. Blow dry with compressed air if available. Lightly oil to prevent corrosion. Wipe dry.
NOTE:Do not use excessive amounts of oil that will hold dirt and other contaminants.
BOLT ASSEMBLYDisassemble as described previously. Clean with solvent, lightly oil and wipe dry.
NOTE:Avoid excessive oil in firing pin hole. Use special lubricant designed for sub-zero use when hunting in extreme cold conditions.
WARNING Follow all safety instructions regarding placement of the safety in the “on” position and keeping the muzzle pointed in a safe direction. Make sure the firearm is unloaded.
To install optional recoil reduction device:
1. Remove the recoil pad on the end of the stock by removing the two screws that hold it in place. 2. In the hollow cavity inside the stock you will see a circular bracket that has a threaded bolt head extending into it. Place your 11 oz. Stoeger Recoil Reducer into the stock cavity and screw it counter clockwise onto the exposed bolt until hand tight. 3. Replace the recoil pad and reattach using the two screws.
12
INTERNAL CHOKE
The barrel is equipped with interchangeable internal chokes. Before leaving the firearm unused for an extended period, it is advisable to remove, clean and lubricate the internal choke and barrel.
Before performing any type of operation on the shotgun always ensure that the chamber, carrier and magazine are completely empty. Carefully read the loading and unloading instructions of the firearms.
WARNINGBefore using the shotgun, make sure that the barrel has a choke correctly installed.
WARNINGThe internal choke correctly mounted must not stick out of the barrel’s muzzle. It must remain inside the barrel. Use only the Stoeger internal choke length which correctly fits the barrel.
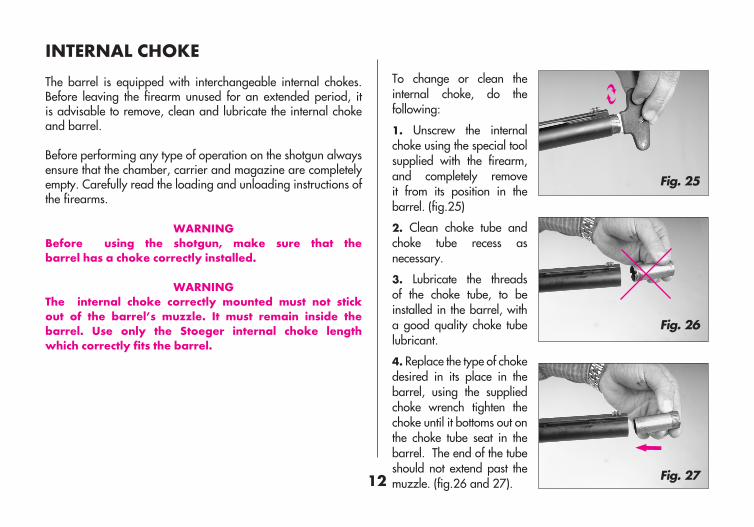
To change or clean the internal choke, do the following:
1. Unscrew the internal choke using the special tool supplied with the firearm, and completely remove it from its position in the barrel. (fig.25)
2. Clean choke tube and choke tube recess as necessary.
3. Lubricate the threads of the choke tube, to be installed in the barrel, with a good quality choke tube lubricant.
4. Replace the type of choke desired in its place in the barrel, using the supplied choke wrench tighten the choke until it bottoms out on the choke tube seat in the barrel. The end of the tube should not extend past the muzzle. (fig.26 and 27).
Fig. 25
Fig. 27
Fig. 26
13
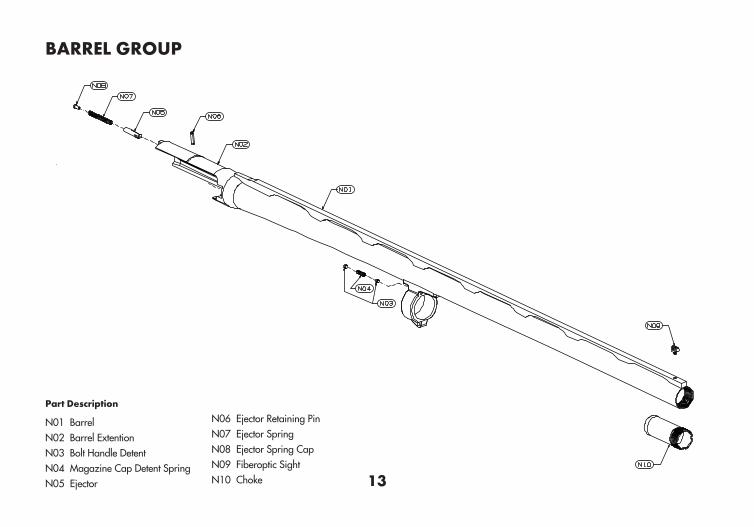
Part Description
N01 Barrel N02 Barrel ExtentionN03 Bolt Handle DetentN04 Magazine Cap Detent SpringN05 Ejector
N06 Ejector Retaining PinN07 Ejector SpringN08 Ejector Spring CapN09 Fiberoptic SightN10 Choke
BARREL GROUP

14
BOLT GROUPPart Description
M01 Body M02 Locking HeadM03 Extractor SpringM04 ExtractorM05 Extractor PinM06 Locking Head PinM07 Firing Pin SpringM08 Firing Pin M09 O-Ring M10 Firing Pin Retaining Pin
15
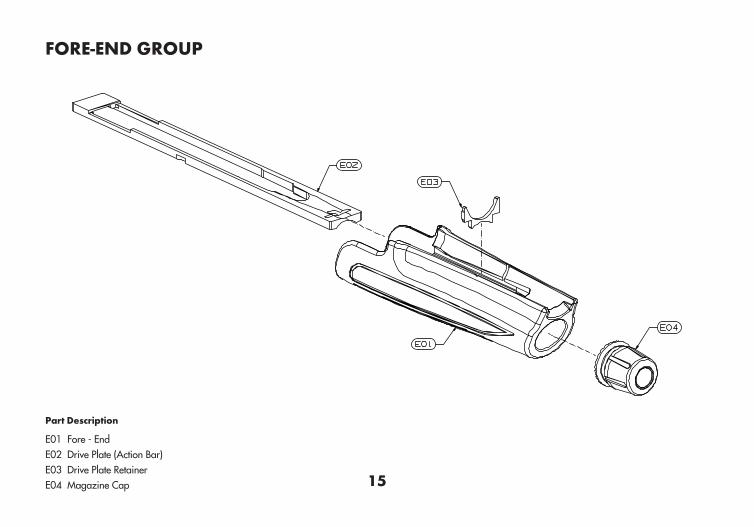
Part Description
E01 Fore - EndE02 Drive Plate (Action Bar)E03 Drive Plate RetainerE04 Magazine Cap
FORE-END GROUP
16
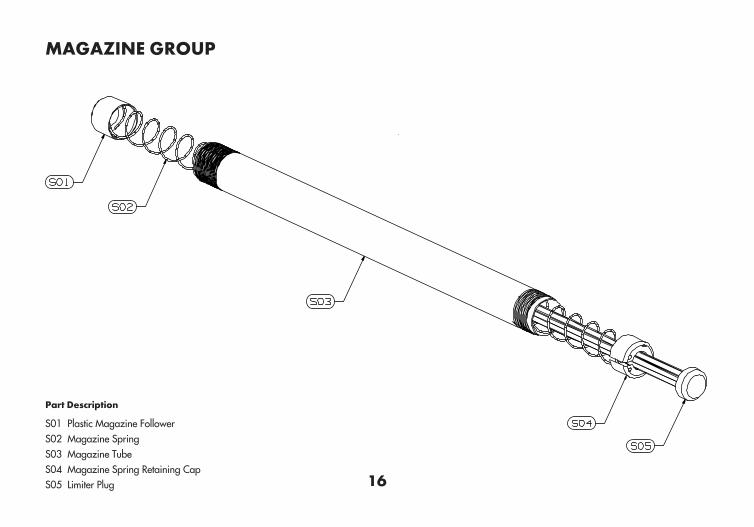
MAGAZINE GROUP
Part Description
S01 Plastic Magazine FollowerS02 Magazine SpringS03 Magazine TubeS04 Magazine Spring Retaining CapS05 Limiter Plug
17
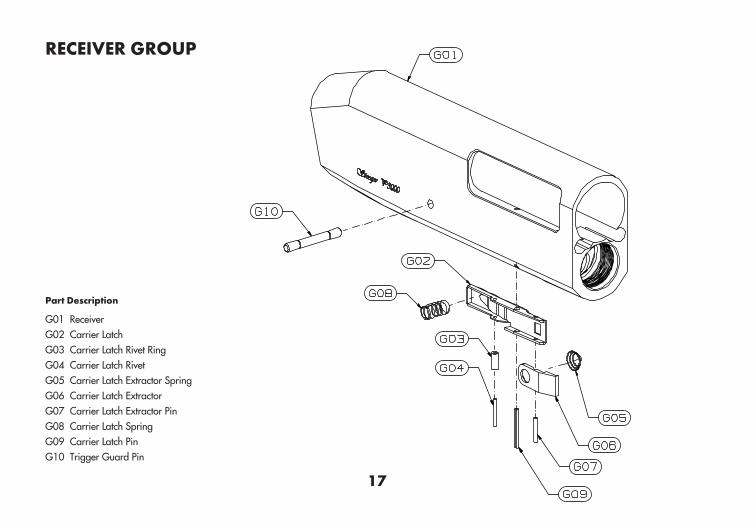
Part Description
G01 Receiver G02 Carrier Latch G03 Carrier Latch Rivet RingG04 Carrier Latch Rivet G05 Carrier Latch Extractor SpringG06 Carrier Latch Extractor G07 Carrier Latch Extractor PinG08 Carrier Latch SpringG09 Carrier Latch Pin G10 Trigger Guard Pin
RECEIVER GROUP
18
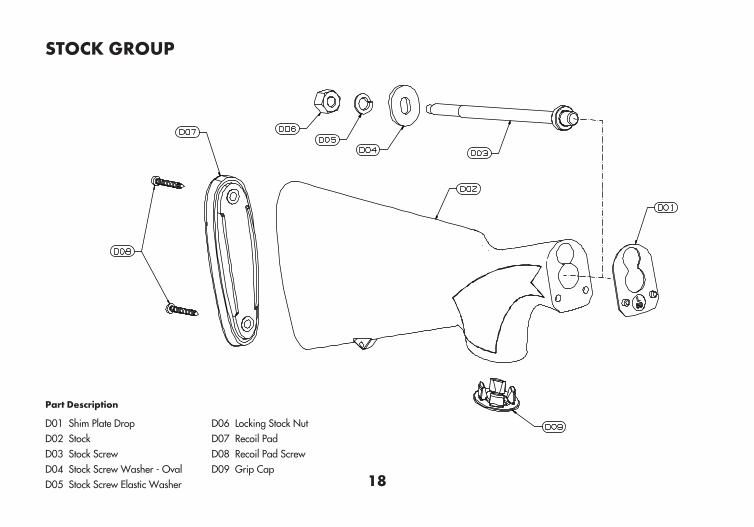
Part Description
D01 Shim Plate Drop D02 Stock D03 Stock Screw D04 Stock Screw Washer - Oval D05 Stock Screw Elastic Washer
D06 Locking Stock Nut D07 Recoil Pad D08 Recoil Pad ScrewD09 Grip Cap
STOCK GROUP
19
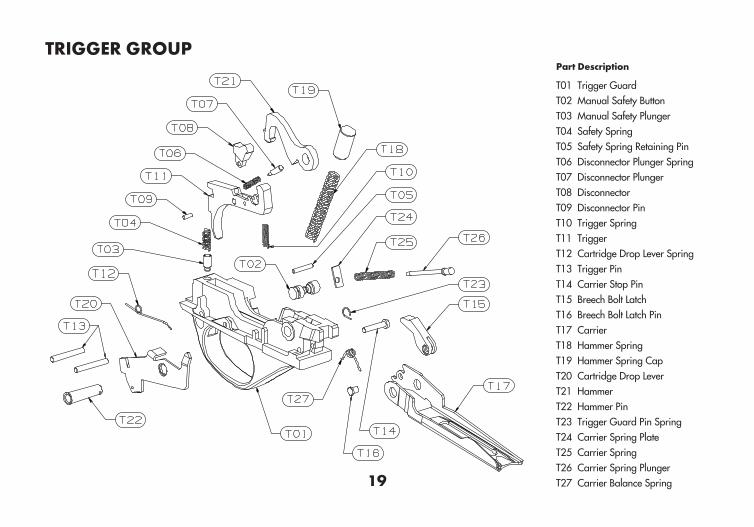
Part Description
T01 Trigger Guard T02 Manual Safety ButtonT03 Manual Safety PlungerT04 Safety SpringT05 Safety Spring Retaining PinT06 Disconnector Plunger SpringT07 Disconnector Plunger T08 Disconnector T09 Disconnector Pin T10 Trigger Spring T11 Trigger T12 Cartridge Drop Lever Spring T13 Trigger Pin T14 Carrier Stop PinT15 Breech Bolt Latch T16 Breech Bolt Latch Pin T17 CarrierT18 Hammer Spring T19 Hammer Spring Cap T20 Cartridge Drop LeverT21 Hammer T22 Hammer Pin T23 Trigger Guard Pin Spring T24 Carrier Spring PlateT25 Carrier Spring T26 Carrier Spring PlungerT27 Carrier Balance Spring
TRIGGER GROUP

20

STOEGER MODEL P3000 Use the space below to record information about your STOEGER MODEL P3000.
Stoeger Industries, Inc., 901 Eighth Street, Pocomoke City, Maryland 21851Toll Free: 800-264-4962 Fax: 301-283-6986 www.StoegerIndustries.com
Model: Notes:
Serial Number:
Purchased From:
Address:
Date of Purchase:

Stoeger IndustriesREAD CAREFULLY BEFORE USING THIS FIREARM
IMPORTANT! Do not discard! Keep this manual with your shotgun.It should accompany the shotgun to any new owner.
MOST GUN ACCIDENTS HAPPEN BECAUSE THE SHOOTER CARELESSLY VIOLATESTHE SINGLE MOST IMPORTANT RULE OF SAFE GUN HANDLING:
ALWAYS KEEP THE MUZZLE POINTED IN A SAFE DIRECTION!
For Sales, Customer Service, Accounting and Marketing contact:Stoeger Industries, Inc., 17603 Indian Head Highway, Suite 200, Accokeek, Maryland 20607-2501
Toll Free: 800-264-4962 Fax: 301-283-6986 www.StoegerIndustries.com
SHIP FIREARMS FOR REPAIR ONLY TO THE ADDRESS BELOW:Stoeger Industries, Inc., 901 EİGHTH STREET, POCOMOKE CİTY, MARYLAND 21851
Warranty Repairs can ONLY be performed by the Stoeger Authorized Warranty Repair Facility.MOD.2