Embed Size (px)
Citation preview

HVAC Automation
Model 8800 Communicating Thermostat System Installation Manual
READ AND SAVE THESE INSTRUCTIONS

COMMUNICATING THERMOSTAT SYSTEM INSTALLATION MANUAL
WARNING1. 120 volts may cause serious injury from electrical shock. Disconnect electrical power to the HVAC system before starting
installation. This system is a low-voltage system.2. Improper installation may cause serious injury from electrical shock. This system must be installed by a qualified contractor in
accordance with NEC Standards and applicable local and state codes.
This manual will guide the installer through the installation, wiring and checkout of an Aprilaire® Model 8800 Communicating Thermostat System. For a complete command set with programming suggestions, see the programming manual (Part No. 10009414). Please visit www.aprilairepartners.com/docs/literature for this document.
Collect the components needed . . . . . . . . . . . . . . . . . . . . . . . . . . . . . . . . . . . . . . . . . . . . . . . . . . . . . . . . . . . . . . . . . . . . . . . . . . . . . . . . . . . . . . . . . . . . 3
Disconnect power to all HVAC equipment and/or zone control panels . . . . . . . . . . . . . . . . . . . . . . . . . . . . . . . . . . . . . . . . . . . . . . . . . . . . . . . . . . . . . 4
Run the required wires and mount the system components . . . . . . . . . . . . . . . . . . . . . . . . . . . . . . . . . . . . . . . . . . . . . . . . . . . . . . . . . . . . . . . . . . . . . . 5
Connect the control wires to the HVAC/zone system and thermostats . . . . . . . . . . . . . . . . . . . . . . . . . . . . . . . . . . . . . . . . . . . . . . . . . . . . . . . . . . . . . 7
Connect the communication and power wires to the distribution panel and thermostat . . . . . . . . . . . . . . . . . . . . . . . . . . . . . . . . . . . . . . . . . . . . . . . 8
Connect multiple distribution panels . . . . . . . . . . . . . . . . . . . . . . . . . . . . . . . . . . . . . . . . . . . . . . . . . . . . . . . . . . . . . . . . . . . . . . . . . . . . . . . . . . . . . . . . 9
Connect protocol adapter to the distribution panel and host computer or automation system . . . . . . . . . . . . . . . . . . . . . . . . . . . . . . . . . . . . . . . . . 10
Powering up the distribution panel and thermostats. . . . . . . . . . . . . . . . . . . . . . . . . . . . . . . . . . . . . . . . . . . . . . . . . . . . . . . . . . . . . . . . . . . . . . . . . . . 11
Check-out HVAC system operation . . . . . . . . . . . . . . . . . . . . . . . . . . . . . . . . . . . . . . . . . . . . . . . . . . . . . . . . . . . . . . . . . . . . . . . . . . . . . . . . . . . . . . . . . 11
Set thermostat address and total number of thermostats . . . . . . . . . . . . . . . . . . . . . . . . . . . . . . . . . . . . . . . . . . . . . . . . . . . . . . . . . . . . . . . . . . . . . . 11
Setup computer for communication system checkout . . . . . . . . . . . . . . . . . . . . . . . . . . . . . . . . . . . . . . . . . . . . . . . . . . . . . . . . . . . . . . . . . . . . . . . . . . 12
Check-out communications to the thermostat network. . . . . . . . . . . . . . . . . . . . . . . . . . . . . . . . . . . . . . . . . . . . . . . . . . . . . . . . . . . . . . . . . . . . . . . . . 15
Appendix 1 – Special considerations for installing the Model 8800 with the 8870 Series Communicating Thermostat . . . . . . . . . . . . . . . . . . . . . 16
Appendix 2 – Sensor averaging . . . . . . . . . . . . . . . . . . . . . . . . . . . . . . . . . . . . . . . . . . . . . . . . . . . . . . . . . . . . . . . . . . . . . . . . . . . . . . . . . . . . . . . . . . . 17
Appendix 3 – Model 8022: 4 wire thermostat to 3 wire cable interface . . . . . . . . . . . . . . . . . . . . . . . . . . . . . . . . . . . . . . . . . . . . . . . . . . . . . . . . . . . 18
TABLE OF CONTENTS
2

COLLECT THE COMPONENTS NEEDED
• Small flat head screwdriver for terminal screws (1/8” wide tip).
• Medium size flat/phillips head screwdriver for component mounting screws.
• Volt/ohm meter.
• Computer with available com port (RS-232) and terminal emulator such as HyperTerminal (for system checkout).
• Wire strippers.
• Small level (use to mount components level, required for appearance only).
TOOLS NEEDED
• Multi-conductor thermostat cable (18–20 gauge).
• Category 5 communication wire (4 pair twisted cable).
WIRE NEEDED
Model 8800 Communicating Thermostat
The Model 8800 thermostat is an RS-485 communicating thermostat, configurable for single and multi-stage heat/cool or heat pump systems. It is also configurable as a whole home humidifier/dehumidifier control.
SYSTEM COMPONENTS
Model 8819 Distribution Panel
The distribution panel is a switch controlled communication bus that can be wired to eight Model 8800 thermostats. This allows thermostat communication to be turned on and off at one convenient location which simplifies installation and troubleshooting.
Model 8811 Protocol Adapter
The 8811 protocol adapter is used to convert an RS-485 communication signal to an RS-232 signal that is readable by a host computer’s serial port.
Automation System Controller
RS-232 or RS-485 based automation system controller such as the Aprilaire System Controller.
RS-232
POWER
RXD
TXD
RS-485/422DC +9V
MODEL 8081 AND 8082 SUPPORT MODULES (OPTIONAL)
Support modules can be added if you require additional temperature or humidity values. Support modules can also be used for sensor averaging in large areas.
Model 8081 Support Module
Provides two temperature values.• One onboard or remote temperature sensor.• One remote temperature sensor.
Model 8082 Support Module
Provides one temperature and one humidity value.• One onboard humidity sensor.• One onboard or remote temperature sensor.
WARNINGUse only the correct support module with each thermostat. Damage will occur if they are mixed.
8800s use only 8081 & 8082 support modules. 8870s use only 8061 & 8062 support modules.
3

• Use Category-5 cable for all communication wiring.
• Check and recheck to ensure connection to the proper terminals before powering up the thermostats. Use wire color as a guide and be consistent.
• Use a Distribution Panel on all systems with more than one zone to simplify wiring and troubleshooting.
FOR EASE OF INSTALLATION AND TROUBLESHOOTING DO THE FOLLOWING:
DISCONNECT POWER TO ALL HVAC EQUIPMENT AND/OR ZONE CONTROL PANELS
• If the thermostats are wired to a zone control panel, there is generally one set of input terminals supplying power to the thermostats and dampers. This must be disconnected.
• If the thermostats are wired directly to HVAC equipment, the power must be shut off at the equipment. This can generally be accomplished by turning off the disconnect switch located near the equipment. If an obvious disconnect switch is unavailable, you will need to turn the circuit off using the fuse or circuit breaker. Remove the fuse or shut down the circuit breaker serving the equipment.
CAUTIONFailure to disconnect power could result in damage to the HVAC equipment or thermostats. Leave power disconnected until all other electrical connections have been made and checked for accuracy.
MODEL 8051, 8052 AND 8053 REMOTE TEMPERATURE SENSORS (OPTIONAL)
These sensors can be used directly with the Model 8800 thermostat or with support modules.
Model 8051 Flush Mount Sensor Model 8052 Outdoor Temperature Sensor Model 8053 Wall Mount Sensor
4

RS-232
POWER
RXD
TXD
RS-485/422DC +9V
RC
24VAC
AutomationSystem
Protocol Adapter(if needed)
Distribution Panel
Communicating Thermostat
Communicating Humidistat
Support Module
Model 8051Flush Mount Sensor
Zone Dampers
Zone Comfort Control Panel HVAC System
Straight through serial cable provided with Protocol Adapter
Thermostat cable
Category 5 (4 pair twisted) communication wire
24 VACfrom HVAC equipment,
thermostat, or plug-in transformer
HVAC Unit Model 8051Flush Mount Sensor
Model 8052Outdoor Temperature Sensor
Support Module
FIGURE 1 – Run Wire for System
RUN THE REQUIRED WIRES AND MOUNT THE SYSTEM COMPONENTS
1. Determine component locations.
2. Run and label wires. Use FIGURE 1 for selecting wire type.
3. Mount components as specified in each product’s installation instructions.
Maximum Wiring Distances
From To Maximum Distance
Automation or Computer System Protocol Adapter 3 ft. Cable Provided with Protocol Adapter
Protocol Adapter Thermostat (this includes going through the Distribution Panel) 4000 ft. (cumulative)
Thermostat Support Module 1000 ft. (cumulative)
Support Module Temperature Sensor Option 300 ft.
Thermostat Temperature Sensor Option 300 ft.
5

TO DISTRIBUTION PANEL
CAT-5WIRE
CAT-5WIRE
CAT-5WIRE
CAT-5WIRE
CAT-5WIRECAT-5
WIRE
CAT-5WIRE
CAT-5WIRE
CAT-5WIRE
Fill Out and Leave with System Software PackageJOB TITLE:
JOB LOCATION:
DATE:
INSTALLINGCONTRACTOR:
DISTRIBUTION PANEL LOCATION / NAME ADDRESS LOCATION
ADDRESS LOCATION
ADDRESS LOCATION
ADDRESS LOCATION
ADDRESS LOCATION
ADDRESS LOCATION
ADDRESS LOCATION
ADDRESS LOCATION
FIGURE 2 – Network Interconnection Worksheet
6

CONNECT THE CONTROL WIRES TO THE HVAC/ZONE SYSTEM AND THERMOSTATS
A qualified HVAC technician should perform this step to ensure proper termination.
1. Make sure the HVAC system power is off.
2. The Thermostat Installation Instructions show wiring diagrams for several different HVAC equipment types. Use FIGURES 3-5 as a reference only. Use color coding where possible.
Refer to the thermostat installation manual for check-out procedure and other wiring details
DO NOT TURN ON THE HVAC SYSTEM POWER YET!
JUM
PER
OUTD
OOR
TEM
P SE
NSO
R
1st H
EATI
NG
1st C
OOLI
NG
FAN
2nd
HEAT
ING
2nd
COOL
ING
NOT
USE
D
NOT
USE
D
TRAN
SFOR
MER
REM
OTE
TEM
P SE
NSO
R
NOT
USE
D
GY2YOB WRC R W2 S2LC S1 T1 T2A-B-A+B+ RSB RSA
COMMUNICATIONTERMINALS
SUPPORTMODULE
FIGURE 3 – Conventional Heat /Cool
SINGLE TRANSFORMER (USE JUMPER WIRE)
2nd
COM
PRES
SOR
2nd
AUX
HEAT
ING
FAN
1st C
OMPR
ESSO
R
1st A
UX H
EATI
NG
OUTD
OOR
TEM
P SE
NSO
R
JUM
PER FA
ULT
DETE
CT
REVE
RSIN
G VA
LVE
HEAT
PUM
PTR
ANSF
ORM
ER
REM
OTE
TEM
P SE
NSO
R
OR
GY2YOB WRC R W2 S2LC S1 T1 T2A-B-A+B+ RSB RSA
COMMUNICATIONTERMINALS
SUPPORTMODULE
FIGURE 4 – Heat Pump
SINGLE TRANSFORMER (USE JUMPER WIRE)
DEHU
MID
IFIE
R
DEHU
MID
IFIE
R
HUM
IDIF
IER
TRAN
SFOR
MER
DRY CONTACT
DRY
CON
TACT
GY2YOB WRC R W2 S2LC S1 T1 T2A-B-A+B+ RSB RSA
OR
8024
OR
REMOVE JUMPER FOR DRY CONTACT HUMIDIFIER
COMMUNICATIONTERMINALS
SUPPORTMODULE
FIGURE 5 – Humidistat
NOTE: “O” is active in cooling and “B” is active in heating.
W = Humidifier Control Remove jumper for dry contact control.
Y = Dehumidifier Control Use Aprilaire Model 8024 relay card or equivalent for dry contact control.
Note: If you use a dry contact humidifier without a dehumidifier, you will have to provide 24VAC to the RC and C terminals in order to power the thermostat.
7

CONNECT THE COMMUNICATION AND POWER WIRES TO THE DISTRIBUTION PANEL AND THERMOSTAT
1. MAKE SURE THAT ALL SWITCHES ON THE DISTRIBUTION PANEL ARE OFF!
2. Connect the communication wires. FIGURE 6 shows how each thermostat is to be wired to the distribution panel.
• Use the wire colors shown in FIGURE 6 to help ensure proper, consistent connections.
3. Determine the power source for the distribution panel. Each panel requires 24VAC at 1VA. See FIGURE 6 for options.
OR
G/W
HT
OR
G
BLU
BLU
/WH
T
B+ B-A-
A+
A-
B+
B-
A+
A-
B+
B-
A+
A-
B+
B-
A+
A-
B+
B-
A
B
A+
OFF ON
OFF ON
OFF ON
OFF ON
OFF ON
OFF ON
OFF ON
OFF ON
ON OFF
ON OFF
ON OFF
ON OFF
ON OFF
ON OFF
ON OFF
ON OFF
A
B
A
B
A
B
A
B
A
B
A
B
A
B
A
B
MAINPWR
ON OFFRC
24VAC
FU
SE
SPA
RE
FU
SE
A+
A-
B+
B-
A+
A-
B+
B-
A+
A-
B+
B-
A+
A-
B+
B-
BLU/WHT
ORG/WHT
BLU
ORG
BLU/WHT
ORG/WHT
BLU
ORG
BLU/WHT
ORG/WHT
BLU
ORG
DO NOTCONNECT
B+ B-A- A+
CAT
-5
OR
G/W
HT
OR
G
BLU
BLU
/WH
T
T2T1S1C L S2W2RRC WB O Y Y2 G RSBRSAB+ A+ B- A-
OR
G/W
HT
OR
G
BLU
BLU
/WH
T
24VACCAT
-5
T2T1S1C L S2W2RRC WB O Y Y2 G RSBRSAB+ A+ B- A-
OR
G/W
HT
OR
G
BLU
BLU
/WH
T
24VAC
CAT
-5
T2T1S1C L S2W2RRC WB O Y Y2 G RSBRSAB+ A+ B- A-
OR
G/W
HT
OR
G
BLU
BLU
/WH
T24VAC
RC
C
RSB
RSA
T1
T2
T3
T4
CAT
-5
GR
N/W
HT
GR
N
GRN/WHT
GRN
MODEL 8811RS-485
BREAKOUTADAPTER
(PROVIDED)
MODEL 8819DISTRIBUTION PANEL MODEL
8081 OR 8082SUPPORT MODULE
MODEL 8052OUTDOORTEMPERATURESENSOR
MODEL 8051FLUSH MOUNTSENSOR
MODEL 8051FLUSH MOUNTSENSOR
MODEL 8800 THERMOSTAT
MODEL 8800 THERMOSTAT
MODEL 8800 THERMOSTAT
HVAC EQUIPMENT
OR
OR
FIGURE 6 – System Communication Wiring
1. 24VAC from any one thermostat.
2. 24VAC from plug-in transformer.
3. 24VAC from HVAC equipment.
8

CONNECT MULTIPLE DISTRIBUTION PANELS
1. MAKE SURE THAT ALL SWITCHES ON THE DISTRIBUTION PANELS ARE OFF!
2. If more than one Distribution Panel is used in the thermostat network, the communication lines must be daisy-chained together.
• Use the wire colors shown in FIGURE 7 to help ensure proper, consistent connections.
3. Power from the HVAC equipment or plug-in transformer can be used to power multiple distribution panels, but if you are powering the panel from a thermostat, use one thermostat per panel.
BLU/WHT
BLUORG/WHT
ORG
BLU
/WH
T
BLU
OR
G/W
HT
OR
G
CAT-5
RC
A+
A-
B+
B-
A
B
OFF ON
OFF ON
ON OFF
ON OFF
PWRPWR
A
B
A
B
RC
A+
A-
B+
B-
B+ B-A-
RC
A+
A-
B+
B-
A
B
A+
OFF ON
OFF ON
ON OFF
ON OFF
PWRPWR
A
B
A
B
RC
A+
A-
B+
B-
CAT-5
DO NOTCONNECT
A- A+ B+ B-
OR
G/W
HT
BLU
BLU
/WH
T
OR
G
B+ B-A-A+
MAINPWR
ON OFFRC
24VAC
GRN/WHT
GRN
HVAC EQUIPMENT
MAINPWR
ON OFFRC
24VAC
TO THERMOSTATGRN/WHT
GRN
TO THERMOSTAT
OR
OR
OR
OR
FIGURE 7 – Multiple Distribution Panels
9

CONNECT PROTOCOL ADAPTER TO THE DISTRIBUTION PANEL AND HOST COMPUTER OR AUTOMATION SYSTEM
1. MAKE SURE THAT ALL SWITCHES ON THE DISTRIBUTION PANEL ARE OFF!
2. Use Category-5 wire to connect the main communication terminals on the Distribution Panel to the “Breakout Adapter” of the protocol adapter (see FIGURE 8).
3. Connect the RS-232 cable from the protocol adapter to the computer or automation system. A 3 ft. RS-232 cable is provided.
Some computers use 25-pin connectors on serial ports, which requires a DB25 connector. A DB9 connector fits a 9-pin port. DB9 to DB25 transitions are available at most computer retail stores.
4. Power up the Protocol Adapter with the plug-in transformer provided. The “Power” LED on the Protocol Adapter should light up when power is applied.
RS-232
POWER
RXD
TXD
RS-485/422DC +9V
A-A+B+B-
A+ A- B+ B- REF REF
B- B+ A+ A-
BLU/WHT
BLUE
ORANGE
ORG/WHT
RS-485/422 DC +9V
PIN #1
DO NOTCONNECT
PIN # 1 2 3 4 5 6 7 8 9
RS-485/422A-Tx-
A+Tx+
B-Rx-
B+Rx+
GND NC +9V NC NC
DB9 RS-485/422 CONNECTOR PIN-OUT
9VDC 500mAAC PLUG-IN
TRANSFORMER(PROVIDED)
CAT-5 NETWORK CABLE (NOT PROVIDED)
APRILAIRE MODEL 8819DISTRIBUTION PANEL
OR MODEL 8800COMMUNICATING
THERMOSTAT
RS-485/422 BREAKOUTADAPTER (PROVIDED)
RS-232 3FT CABLE(PROVIDED)
STRAIGHT THROUGH
COMPUTER OR AUTOMATIONSYSTEM WITH RS232 SERIAL
COMMUNICATION PORT(NOT PROVIDED)
FIGURE 8 – Protocol Adapter Wiring
10

POWERING UP THE DISTRIBUTION PANEL AND THERMOSTATS
1. MAKE SURE THAT ALL SWITCHES ON THE DISTRIBUTION PANEL ARE OFF!
2. The distribution panel can be powered from 24 VAC from the HVAC equipment, thermostat, or separate plug-in transformer.
3. After power has been connected, turn on the main power switch on the distribution panel.
4. Power the thermostats up.
CHECK-OUT HVAC SYSTEM OPERATION
Use the thermostat to verify that the equipment is being controlled. A checkout procedure is supplied in the installation instructions with the thermostat. This procedure will verify only that the thermostat operates the equipment. Communication system checkout will be performed next.
SET THERMOSTAT ADDRESS AND TOTAL NUMBER OF THERMOSTATS
IMPORTANT! THESE STEPS MUST BE DONE AT EACH THERMOSTAT FOR COMMUNICATION TO WORK PROPERLY.
SETTING NUMBER
SETTING DESCRIPTION
SETTING OPTIONS
FIGURE 91. Enter the thermostat’s Installer Setup Menu.
Press [MODE] to set system to OFF.
Press [MENU] to enter main menu.
Press and hold [SETUP] for seven seconds, [INSTALL SETUP] appears.
Press [INSTALL SETUP] to enter installer setup menu.
Press [NEXT] or [BACK] to page through the settings.
2. Select System Setting 00 NETWORK ADDRESS.
Press up or down to adjust the setting.
• Numbering should start at 1 and continue sequentially (64 maximum).
• No two thermostats should have the same address.
3. Select System Setting 01 NUMBER OF NODES and set the total number of thermostats on the network.
Press up or down to adjust the setting.
• This number must be set the same on all thermostats.
4. (Optional depending on automation equipment) Select System Setting 02 BAUD RATE and set the communication baud rate. Default is 9600.
5. Press [DONE] to save and exit, or [CANCEL] to exit without saving.
The thermostat will discard changes and exit if nothing is pressed within 60 seconds.
To reset the installer settings to the default, reset the thermostat by pressing the [RESET] button inside the battery cover.
11

SETUP COMPUTER FOR COMMUNICATION SYSTEM CHECKOUT
REQUIREMENT: HyperTerminal software and a PC with a serial port or usb to serial port adapter.
1. Connect the Protocol Adapter RS-232 output to a computer with Windows ’95, ’98, Windows 2000, Windows NT, or XP. Note: Newer Windows systems may not include HyperTerminal.
2. From the Start menu, select PROGRAMS ACCESSORIES COMMUNICATION HYPERTERMINAL. HyperTerminal is a terminal emulator program provided with Windows that will be used to test the communication system.
3. Double click the Hypertrm icon. You will then be asked to name the new connection and select an icon. Type in any name you want (the shorter the better) and select the “atom-like” symbol at the end of the Icon list (see FIGURE 10). Then click OK.
FIGURE 10 – New Connection
12
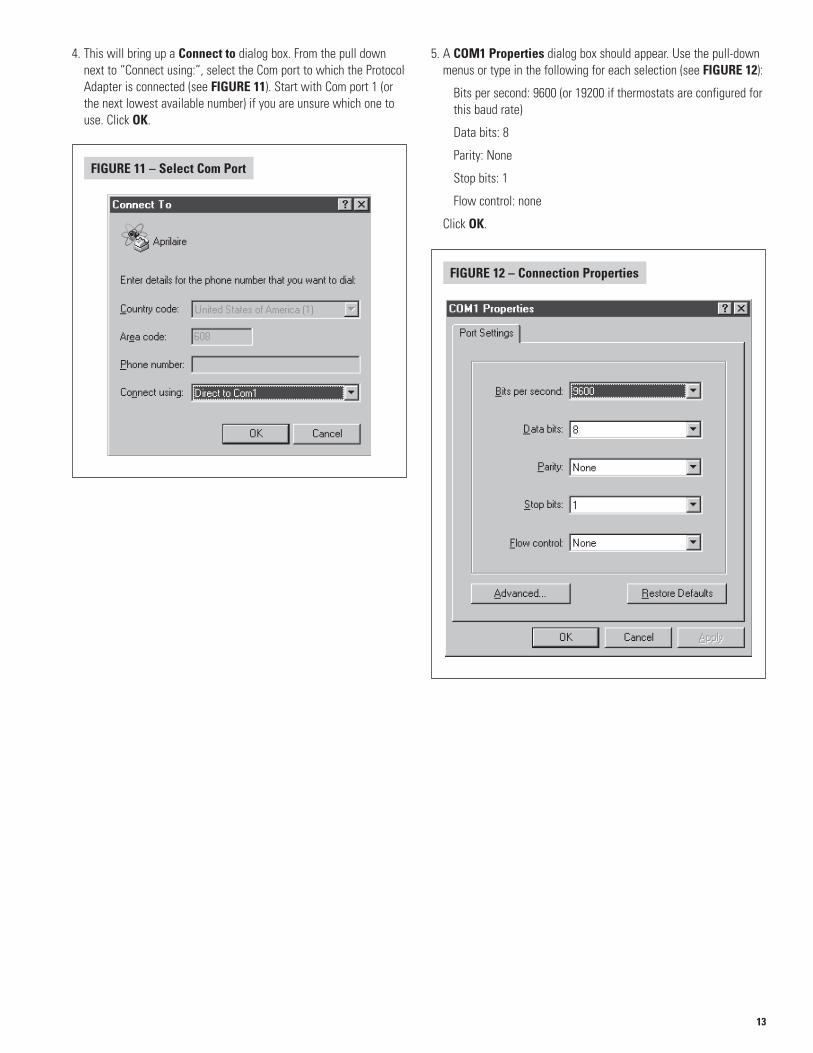
4. This will bring up a Connect to dialog box. From the pull down next to “Connect using:”, select the Com port to which the Protocol Adapter is connected (see FIGURE 11). Start with Com port 1 (or the next lowest available number) if you are unsure which one to use. Click OK.
FIGURE 11 – Select Com Port
5. A COM1 Properties dialog box should appear. Use the pull-down menus or type in the following for each selection (see FIGURE 12):
Bits per second: 9600 (or 19200 if thermostats are configured for this baud rate)
Data bits: 8
Parity: None
Stop bits: 1
Flow control: none
Click OK.
FIGURE 12 – Connection Properties
13

6. From the File pull-down menu, select Properties. This will bring up a Properties dialog box.
7. Select the Settings tab. Make the following selections (see FIGURE 13):
Terminal keys
Ctrl+H
Emulation: Auto Detect
Telnet terminal: ANSI
Backscroll buffer lines: 500
FIGURE 13 – Terminal Settings
8. Then select the ASCII Setup button. This will bring up an ASCII Setup dialog box. Make the following selections (see FIGURE 14):
Echo typed characters locally
Append line feeds to incoming line ends
Wrap lines that exceed terminal width
NOTE: IF USING AN EXISTING HYPERTERMINAL CONNECTION YOU MAY NEED TO UNCHECK THE “SEND LINE FEEDS…” BOX.
FIGURE 14 – ASCII Setup
9. Click OK to put away both dialog boxes.
10. Verify that you have a connection between the computer and the Protocol Adapter. Have the Protocol Adapter within eyesight of the computer keyboard. Type any character and confirm that the “RXD” LEDs on the Protocol Adapter flash as you type (see FIGURE 8 on page 10). The LEDs flash very quickly.
11. Press Enter to clear the command line.
Note: On Windows ’98 computers, HyperTerminal does not echo typed characters (doesn’t show them on the screen as you type) locally. Do not be concerned. This can be a little confusing, but does not affect the checkout of the thermostat communication system.
• If you were unable to verify a connection, specify a different com port. Go to the File pull down menu, and select Properties. Change the “Connect using:” setting to a different port by using the pull down menu options. Start typing and look for the Protocol Adapter “RXD” or “TXD” LEDs to flash. Repeat until you have successfully verified connection between the computer and communication system, or until you run out of com ports to choose from in the “Connect using:” pull down. If there is still no communication you are going to have to consult a computer professional.
14

CHECK-OUT COMMUNICATIONS TO THE THERMOSTAT NETWORK
This section confirms communications to each thermostat and each thermostats network address.
1. At the distribution panel turn on the communication switches A and B for the thermostat with address#1 (see FIGURE 15).
2. At the Hyperterminal program type: SN ID? and press Enter.
You should see response: SN1 MODEL# 8800 VER: x.xxx - RPC 2011 (x.xxx represents the current firmware version number)
• If the response is not exactly as shown, there is a communication signal problem. The most likely sources are a loose terminal connection, incorrect wiring, incorrect wire type, damaged wire, electrical interference or incorrect power supply.
3. Now back at the distribution panel turn on the communication switches A and B for the thermostat with address#2.
4. At the Hyperterminal program type: SN ID? and press Enter.
You should see response from both thermostats: SN1 MODEL# 8800 VER: x.xxx - RPC 2011 SN2 MODEL# 8800 VER: x.xxx - RPC 2011
5. Repeat this process adding one thermostat each time to verify communications to all thermostats. Each time you turn on the communication switches and send SN ID? command to a new thermostat, a new “SN” number should respond.
6. Once you have successfully completed this procedure you have verified that proper communication exists between the computer and all of the thermostats. To test out all of the functions of the thermostat, use the software or automation package being installed with this system.
B+ B-A-
A+
A-
B+
B-
A
B
A+
OFF ON
OFF ON
ON OFF
ON OFFA
B
A
B
A+
A-
B+
B-
“A” LED flashes when communications are transmitted by the thermostats
“B” LED flashes when communications are transmitted by the host computer or automation system.
FIGURE 15 – Com Switches
15

APPENDIX 1 – SPECIAL CONSIDERATIONS FOR INSTALLING THE MODEL 8800 WITH THE 8870 COMMUNICATING THERMOSTAT
WARNINGWHEN REPLACING AN 8870 THERMOSTAT WITH THE MODEL 8800 THERMOSTAT THESE ADDITIONAL STEPS ARE REQUIRED IN ORDER FOR PROPER OPERATION. 1. The 8800 Thermostat cannot be powered from an 8818 Distribution Panel. The 8800 Thermostat must be powered from the
HVAC 24VAC power.2. The Model 8800 thermostat must be set to non-programmable mode to be used in a 8870/8818 system. 3. Replace any 8061 TT Support Modules connected to the thermostat with 8081 TT Support Modules, but in cases where a
single flush mount and/or outdoor sensor is used they can be directly connected to the new 8800 Thermostat and the Support Module can be eliminated.
4. Replace any 8062 TrH Support Modules connected to the thermostat with 8082 TrH Support Modules.
RCRH
G
W2
C
RSC
RSARSB
RSRR
REF
Y2
B-B+A-
RSR
RSA
T2T1
RSBRSC
T3
T4
A+
DEH Y1HUM W1
R.V.-Cool (O)R.V.-Cool (O)
R.V.-Heat (B)R.V.-Heat (B)
B+ B- REFA-
RC
A+
A-
B+
B-
RC
A+
A-
B+
B-
RC
A+
A-
B+
B-
RC
A+
A-
B+
B-
A
B
A+
OFF ON
OFF ON
OFF ON
OFF ON
OFF ON
OFF ON
OFF ON
OFF ON
ON OFF
ON OFF
ON OFF
ON OFF
ON OFF
ON OFF
ON OFF
ON OFF
PWR
PWR
PWR
PWR
PWR
PWR
PWR
PWR
A
B
A
B
A
B
A
B
A
B
A
B
A
B
A
B
MAINPWR
ON OFFRC
24VAC
FU
SE
SPA
RE
FU
SE
RC
A+
A-
B+
B-
RC
A+
A-
B+
B-
RC
A+
A-
B+
B-
RC
A+
A-
B+
B-
GRN/WHT
BRN
BRN/WHT
GRN
BLU/WHT
ORG/WHT
BLU
GRN
ORG
GRN/WHT
BLU/WHT
ORG/WHT
BLU
ORG
GRN/WHT
GRN
BLU/WHT
ORG/WHT
BLU
ORG
MODEL 8818 DISTRIBUTION PANEL
MODEL 8870 THERMOSTAT
DO NOT CONNECTTO 8800
MODEL 8061 OR 8062 SUPPORT MODULE
MODEL 8081 OR 8082 SUPPORT MODULE
GRN/WHT
BRN
BRN/WHT
GRN
T2T1S1C L S2W2RRC WB O Y Y2 G RSBRSAB+ A+ B- A-
OR
G/W
HT
OR
G
BLU
BLU
/WH
T
24VAC
RC
C
RSB
RSA
T1
T2
T3
T4
CAT-5
MODEL 8800 THERMOSTAT
CAT-5
CAT-5
FIGURE 16
16

APPENDIX 2 – SENSOR AVERAGING
C B YO RC RGY2 W2 L T2T1S1S2WB+ A+ A-B- RSARSB
C B YO RC RGY2 W2 L T2T1S1S2WB+ A+ A-B- RSARSB
S1 S2 S3
S6S5S4
S9S8S7
T1
T2R
W
R R
W W
R
W
WW
R
RR
W
WR R
W
R W
W
R
W
R
W
R
W
R
W
R R
W W
R
W
R
S1 S2
S4S3
T1
T2
W
R
W
WW
R
RR
W
R
R W
W
R
W
R
WIRING SHOWN USING MODEL 8051 FLUSH MOUNT SENSORS.SAME WIRING FOR MODEL 8053 SURFACE MOUNT SENSORS.
NINE SENSOR TEMPERATURE AVERAGING – WIRING
NINE SENSOR TEMPERATURE AVERAGING – SCHEMATIC
MODEL 8800 THERMOSTAT
WIRING SHOWN USING MODEL 8051 FLUSH MOUNT SENSORS.SAME WIRING FOR MODEL 8053 SURFACE MOUNT SENSORS.
FOUR SENSOR TEMPERATURE AVERAGING – WIRING
FOUR SENSOR TEMPERATURE AVERAGING – SCHEMATIC
MODEL 8800 THERMOSTAT
2-WIRETHERMOSTAT CABLE(R=RED, W=WHITE)
2-WIRETHERMOSTAT CABLE(R=RED, W=WHITE)
FIGURE 17
90-1584
90-1585
This is an option for sensor averaging that does not require support modules. This option can only be used with a specific number of sensors (4 or 9).
17

APPENDIX 3 – MODEL 8022: 4 WIRE THERMOSTAT TO 3 WIRE CABLE INTERFACE
W1Y1GR
RCC
APRILAIRE THERMOSTAT
EQUI
PMEN
TTE
RMIN
ALS
WY
Y
GR
WYGWR
RX
GY
W
RX
GY
WK1
K2
K1
K2
Y
G
W
RBlK
8022
EQUIPSTAT
Y
G
W
C
R
FURNACE
120
VA
C
24 V
AC
SUPPLIEDWIRE NUT
5 TERMINAL THERMOSTAT
4 WIRE CONDUCTOR
DO NOT REMOVESUPPLIED JUMPER SEE NOTE
SEE NOTE
NOTEThe thermostat terminal connected to the W lead of the diode pair must match the equipment terminal connected to the W terminal on the EQUIP side of the 8022. The thermostat terminal connected to the Y lead of the diode pair must match the equipment terminal connected to the Y terminal on the EQUIP side of the 8022. R (24V hot) and X (24V common) must be connected to the EQUIP side of the 8022, all other equipment terminals may bypass the 8022.
FIGURE 18
Any two thermostat equipment terminals (not 24V hot or common) can be combined with the diode pair and run to the 8022 through one wire, avoiding the need to run an extra wire.
18

19

P.O. Box 1467 • Madison, WI 53701-1467 • Phone: 800/334-6011 • Fax: 608/257-4357 • www.aprilairepartners.com
10009416 6.11B2205497A
Printed in U.S.A.© 2011 Aprilaire – A division of Research Products Corporation


![Untitled-1 [uralbeznarkotikov.ru]uralbeznarkotikov.ru/cat/paper/1-2016.pdf · 800 3333 118 8800 3333 118 "talbeznarkotihov.ru 8800 3333 8800 3333 118 8800 3333 118 B 800 3333 118](https://img.pdfslide.us/doc/110x75/5fa8ba52bd5e685c68532c8a/untitled-1-800-3333-118-8800-3333-118-talbeznarkotihovru-8800-3333-8800.jpg)