Embed Size (px)
Citation preview

Mobility XE™ Evaluation Guide
Mobility XE is an easily deployed, mobile VPN built specifically for highly mobile workers who
need reliable wireless access to mission‐critical data and applications.
Mobility XE is packaged as a complete wireless solution that includes:
Quick and easy setup and configuration
Strong VPN security, including single sign‐on authentication, multi‐factor authentication,
user reauthentication, and strong encryption
Seamless, InterNetwork Roaming™
Application session persistence
Improved performance using numerous mobile WWAN optimizations
Centralized management capabilities
Unattended access to the mobile device
Failover, load balancing and scalability
A Policy Management module including quality of service (QoS) and real‐time application
optimizations (e.g. VoIP, streaming video, etc.)
A mobile Network Access Control (NAC) module that helps administrators restrict VPN
access based on the device’s configuration
An Analytics Module that provides detailed insight and intelligence on the networks and
applications used by your mobile workers
The best way to see how Mobility XE enhances the security and productivity of your mobile workers
is to evaluate its features in your own environment using your devices, applications and networks.
Setup & Configuration
This guide assumes that you have already successfully installed the Mobility XE software. Please
consult the Mobility XE Quick Start Guide for information on how to install the software. In addition,
the Mobility Setup and Deployment Guide provides a quick overview with links to additional resources
and the most common questions during setup and configuration. Some of Mobility XE’s advanced
features require a properly configured PKI. This guide presumes that you are familiar with how
your PKI implementation integrates with third party applications.
Support During Evaluation
NetMotion Wireless is available to assist you with any questions concerning your evaluation.
Please contact your preferred NetMotion Wireless reseller, your NetMotion Wireless sales engineer,
or access our online technical support.
For More Information
If you would like to purchase this product or if you would like more information, please contact us.
Mobility XE Evaluation Guide Page 2
North America: (206) 691‐5555 or www.netmotionwireless.com
International: +44 (0) 20 7871 0990 or www.netmotionwireless.com
Additional Resources
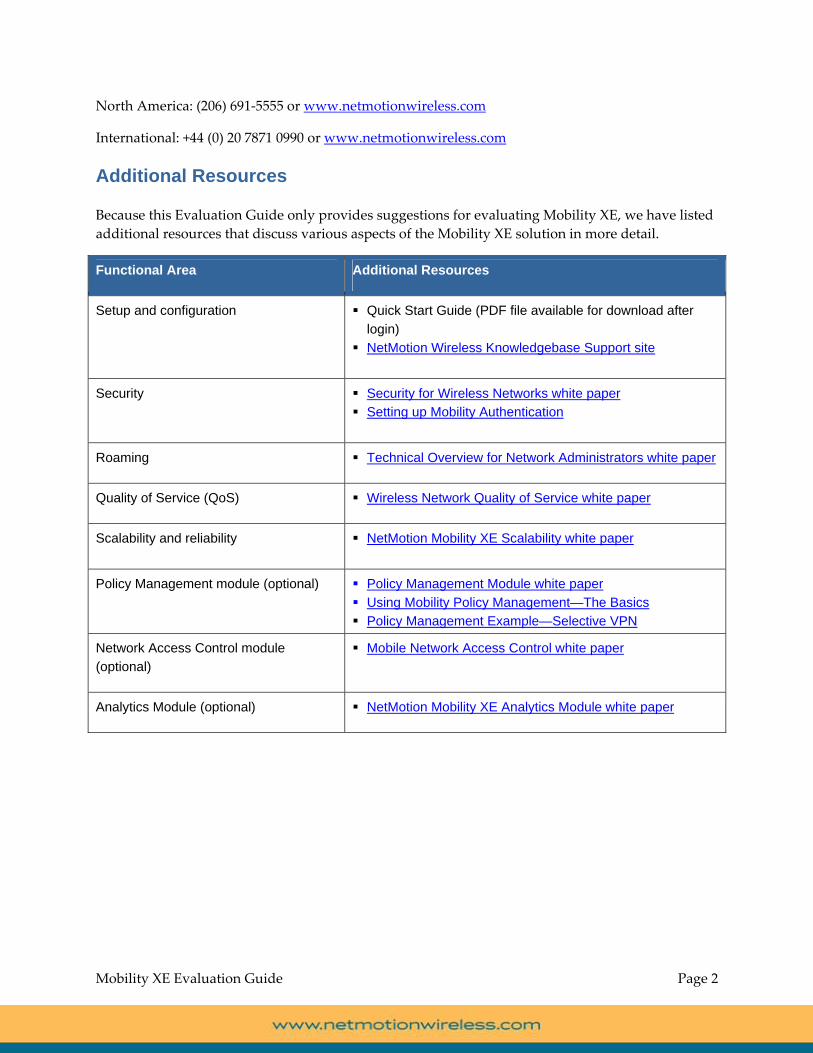
Because this Evaluation Guide only provides suggestions for evaluating Mobility XE, we have listed
additional resources that discuss various aspects of the Mobility XE solution in more detail.
Functional Area Additional Resources
Setup and configuration Quick Start Guide (PDF file available for download after
login)
NetMotion Wireless Knowledgebase Support site
Security Security for Wireless Networks white paper
Setting up Mobility Authentication
Roaming Technical Overview for Network Administrators white paper
Quality of Service (QoS) Wireless Network Quality of Service white paper
Scalability and reliability NetMotion Mobility XE Scalability white paper
Policy Management module (optional) Policy Management Module white paper
Using Mobility Policy Management—The Basics
Policy Management Example—Selective VPN
Network Access Control module
(optional)
Mobile Network Access Control white paper
Analytics Module (optional) NetMotion Mobility XE Analytics Module white paper

Mobility XE Evaluation Guide Page 3
Testing Mobility XE Features
Test Applications
Mobility XE allows users to run network applications and gain remote access to enterprise network
resources over any IP network, especially slow or less‐reliable networks, such as wireless WANs.
Because Mobility XE is transparent to the operating system and applications, there is no need to
customize, recompile, or develop “connectors” for your applications.
Almost all IP‐based applications are suitable for use when testing Mobility XE, including dispatch,
CRM and ERP applications, remote database access, email, Web‐based applications, and FTP. If you
are planning to test real‐time applications like voice over IP (VoIP) or streaming video, you should
also test the quality of service (QoS) policies and real‐time application optimizations included in the
Policy Management module, which are discussed later in this document.
For evaluation purposes, we recommend that you use the same applications you are planning to use
in your mobile deployment. Since there is no need to modify your applications, you just need to
make sure that users connected to the Mobility server have access to the application you want them
to use during testing.
Security
Importance/Benefits Authentication with common enterprise methods allows for an easy, transparent
deployment.
Support for PKI, smart cards, and both user and device certificates provides strong, two‐
factor / multi‐factor authentication that ensures only authorized users gain remote access to
corporate computing resources from authorized devices.
Single sign‐on authentication removes the need for additional user training and keeps
workers productive.
Strong encryption using cryptographic libraries validated to FIPS 140‐2 level 1 keeps
information secure while in transit over public airwaves and the Internet.
User‐reauthentication provides a seamless reauthentication experience to mobile workers
without needlessly disrupting their application sessions. Since workers can re‐enter their
credentials without shutting down and restarting their applications, workers stay
productive and your network stays secure.
NetMotion Wireless’ Mobility XE supports native authentication with Microsoft ActiveDirectory,
with RADIUS using EAP‐TLS, PEAP or LEAP and with RSA SecurID. To configure the
authentication method, open the Mobility Console to the Server Settings page and click on the
Authentication – Protocol settings.
Single sign‐on
Start up the mobile device with the Mobility XE client already installed, and allow it to go
through its normal boot cycle. The standard Windows login dialog (GINA) will appear.

Mobility XE Evaluation Guide Page 4
After entering your credentials, you will be automatically logged on to the Mobility server
(provided your Windows desktop credentials match your domain or RADIUS credentials.)
There is no need to memorize a different set of credentials or go through an additional log
on process to use the Mobility XE VPN. It is entirely transparent to the mobile worker.
Strong, two‐factor user authentication
If you’ve previously set up a PKI authentication infrastructure or are using RSA SecurID,
Mobility XE fully supports user authentication using smart cards, X.509v3 user certificates,
or RSA SecurID soft or hard authentication tokens. After configuring Mobility XE for the
appropriate type of authentication and deploying user certificates to the devices, Mobility
XE users can log on to mobile devices with the same ease and the same strong security as
though they were plugged into the corporate network in an office.
Certificate based device authentication
Certificate based device authentication enables unattended access to remote devices and
restricts users from accessing your network unless they use an authorized device. Mobility
XE supports device based authentication using X.509v3 certificates and your PKI.
After configuring your devices and Mobility XE to use device authentication in unattended
mode using the process described in the system administrator’s guide, verify that no user is
logged into the remote device and then start an RDP session to the device’s virtual IP.
Administrators can remotely manage devices over the air, pushing down application and OS
updates without taking the device out of the field.
Change a user’s authentication mode to Multi‐factor (Client Settings > Authentication –
Mode) and add a specific device to the list of approved devices for that user (Client settings
> Security ‐ Approved devices). Attempt to login to the network from a different device
using valid user credentials. Limiting users’ network access to trusted machines improves
network stability, security and manageability.
Changing encryption strength
By default, Mobility XE automatically encrypts all network traffic using 128‐bit AES
encryption that is FIPS 140‐2 validated. You can change the encryption strength on the Client
Settings page in the Mobility console by clicking on the “Security – Encryption Type” setting.
This setting can be changed globally, for a group of users, or for an individual user. After
changing the setting, reconnect the device to the Mobility server so that it gets the updated
setting. Then open the Client Properties application by clicking on the Mobility XE tray icon,
and go to the Details tab. The encryption type in use is listed.
User Reauthentication
Mobility XE provides a seamless reauthentication experience to mobile workers without
needlessly disrupting their application sessions. Go to Client Settings >Logon. Set a short
reauthentication interval and grace period. Login to a remote device, and start pinging (ping
–t) a system on the other side of the tunnel.
o Wait for the reauthentication interval to pass and then reauthenticate; there will be
no disruption to the ping command.

Mobility XE Evaluation Guide Page 5
o Wait for both the reauthentication interval and grace period to pass; the tunnel will
be shut down when the grace period expires.
o With the tunnel active, disconnect the device from the network (e.g. unplug an
Ethernet cable, turn off an access point). Wait for both the reauthentication interval
and grace period to pass and reconnect the device. Since the device was out of range
when the reauthentication interval expired, the grace period for reauthentication
doesn’t begin until the device reconnects. Support calls are reduced and users aren’t
penalized for being out of range when it’s time to reauthenticate.
Since workers can re‐enter their credentials without shutting down and restarting their
applications, workers stay productive and your network stays secure.
Roaming
Importance/Benefits Easy to take advantage of multiple networks and new wireless technologies.
Improves wireless computing reliability.
Keeps mobile workers productive by preventing applications from crashing when workers
suspend‐and‐resume their device, cross coverage gaps, or traverse subnets.
Provides you flexibility now and into the future because it supports all IP‐based networks—
1xEV‐DO, 1xRTT, HSPA/HSUPA/HSDPA, UMTS, EDGE, GPRS, WiMax, 802.11n, 802.11b/g,
802.11a, etc.
Connect a wireless‐enabled device running the Mobility client to the Mobility server, launch the
applications that require network access, and then perform the tests below. The device connection
information on the Client Status page in the Mobility console updates information when the device
roams:
Roam between subnets
Move from one WLAN subnet to another. Often the easiest way to do this is to unplug the
power for the access point to which the device is currently connected. Alternatively, you can
simply move within range of an access point located on another subnet.
Roam between network types (media switching)
Switch from a Wi‐Fi connection to a wide area connection (e.g., 1xEV‐DO, 1xRTT, HSUPA,
HSDPA, UMTS, EDGE, GPRS, or WiMAX).
Roam from a wired to a wireless connection
Undock the device, then insert a WLAN or WWAN card.
Automatically use fastest interface
Ensure that Roaming – Use Fastest Interface is selected on the Client Settings page of the
Mobility console. Start two network cards with different speeds (WLAN and WWAN) so
that both are connected and have coverage. When you move out of range of the faster card,
the slower one will automatically pick up communications. When you are back in range of

Mobility XE Evaluation Guide Page 6
the faster card, Mobility will automatically switch back to the higher speed connection
without user intervention.
Client network failover
With a Wi‐Fi interface and a wireless WAN interface active in the device, unplug the
Ethernet cable to the Wi‐Fi access point that the device is connected to. After a brief period,
the device will automatically start using the wireless WAN interface.
Now, put the Mobility XE client into bypass mode and repeat the above tests to see how the
applications behave without the help of Mobility XE.
Application Session Persistence
Importance/Benefit Increase application reliability in a wireless deployment, allowing you to deploy more
applications without additional cost.
Eliminate coverage issues so you can provide mobile workers with dependable mobile
computing and real‐time access.
Leverage existing investments in software (including CRM, ERP, and other mission‐critical
enterprise applications) and avoid costly and time‐consuming upgrades and customization.
Connect a device running the Mobility client to the Mobility server, launch the applications that
require network access, and then perform the following tests:
Roam out of range
Move out of range of all access points, power down available access points, stop and remove
the current network interface card, or walk into a parking garage or other area where no
wireless network coverage is available.
Suspend/hibernate
Suspend or hibernate the device, then resume.
Now put the Mobility XE client into bypass mode and repeat the above tests to see how the
applications behave without the help of Mobility XE.
Improved Performance
Importance/Benefits Reduces network traffic and improves speed performance over wireless WANs, making
applications more responsive and usable, even over slower wireless networks.
Increases worker productivity due to the fact that applications operating over wireless
networks—especially wireless WANs—perform significantly better.
Lowers costs by reducing application traffic if users are on limited data plans/allotments.
Before performing these tests, be sure to turn off any Web or image compression utilities that may
have been provided by a wireless data carrier (e.g., Venturi, Flash Network, or ByteMobile). Image

Mobility XE Evaluation Guide Page 7
compression utilities provided by most wireless carriers cannot be used in conjunction with a VPN,
including Mobility XE. In general, they are turned off from the connection manager supplied with
the wireless WAN card by the network service provider.
Data Compression Mobility XE includes the option to automatically switch compression on or off based on the current
interface speed, removing the need for an administrator to change the setting for specific users.
When roaming from high‐bandwidth 802.11b/g WLANs (or faster) to slower‐speed WWANs (the
default threshold is 2.5 Mbps), users automatically get the best performance possible.
With the Mobility XE client loaded and running, connect your device to a wireless WAN
network. Open your Web browser to the following address: http://performance.toast.net.
Select the “Text (341K)” speed test, choose a Web host, and then click “Run Test”. Note the
speed and elapsed time on the results page. Then, bypass the Mobility client, and run the
same test using the same Web host again, and note the speed and elapsed time.
Using the same setup, you can use other applications—like FTP—to measure the benefits of
data compression. In general, data compression provides greater improvements when the
data being transmitted is “text” rather than “binary,” although you should see
improvements in either case.
Web Image Acceleration Mobility XE includes the option to do image compression of GIF and JPEG files in order to speed up
Web browsing. There are two ways to do this—with and without Policy Management:
Mobility XE can be configured to control the amount of Web image acceleration that users
experience: users see Web images at the configured compression level. Like data compression, Web
image acceleration can be set globally, or per group, device, or user from the Mobility console (on
the Client Settings page). By default, Web image compression is not turned on.
In the Mobility console, turn on Web Acceleration in the Client Settings globally, for groups,
classes, users, or devices by clicking on the appropriate object and then clicking on the “Web
Acceleration – Images” setting. Select “Fastest (Lowest Quality)” in the Download speed
drop down, and click Apply. (Note that new settings are not pushed down from the server
to the client until you bypass and reconnect.)
Now, with the Mobility XE client loaded and running, connect your device to a wireless
WAN network. Open your Web browser to the following address:
http://performance.toast.net. Select the “Shuttle,” “Blue Angels,” or “F‐16 Jets” speed test,
choose a Web host, and then click “Run Test”. Note the speed and elapsed time on the
results page. Then, bypass the Mobility client, and run the same test using the same Web
host again, and note the speed and elapsed time.
In addition to using the Toast.net performance test, you can also use Google image search to
benchmark the amount of time required to load a page of Web images. Be sure to use the
same criteria each time.

Mobility XE Evaluation Guide Page 8
With the optional Policy Management module you can fine‐tune Web acceleration. For example, you
can implement a policy that controls the quality of the images based on the speed of your
connection: Over a LAN you see the highest quality display, and when you switch to a slower link
over a wide area wireless network, you see images with fewer colors (GIF) or a more ʺblockyʺ effect
(JPEG). Consult the section on Policy Management for more information on testing this feature.
Mobile WWAN Optimizations Mobility contains a number of mobile WWAN optimizations that benefit every connection and
application. These optimizations are built into Mobility XE—they do not require administrative
configuration or management. They include:
Link optimizations that reduce superfluous data retransmissions by allowing all applications
to share link‐level information, such as network latency and roundtrip time.
A synchronized retransmission policy that prevents frames from being submitted until the
current one has been forwarded.
Selective acknowledgement algorithms that enable fast data recovery in networks subject to
high packet loss.
A congestion avoidance algorithm that, like TCP, gracefully decays throughput when
necessary. But unlike TCP, this information is shared among all active application sessions,
further reducing network overhead.
Frame‐size optimizations that piggyback data and acknowledgement information for
multiple application sessions in a single IP frame. These optimizations adjust frame sizes and
protocol timing over transports that are not mobile‐aware, reducing bandwidth
consumption and increasing battery life.
Real-time Application Optimizations Using the Policy Management module, Mobility XE can be configured to optimize the performance
of real‐time application like voice over IP (VoIP), streaming video and real‐time Web conferencing.
These optimizations, including packet loss recovery (PLR) are particular beneficial and noticeable
when using wireless networks that have appreciable packet loss, latency, and jitter.
To test Mobility XE’s performance improvements for real‐time applications, follow the instructions
in the Policy Management Module section later in this paper and use the “Example – Quality of
Service” rule. Note that the benefits of PLR are only available to real‐time applications that use the
user datagram protocol (UDP).
Centralized Management
Importance/Benefit The Mobility management console makes it easy and efficient for IT managers to administer
large‐scale mobile computing deployments.
The Mobility console provides broad remote‐management capabilities to support global
deployments.

Mobility XE Evaluation Guide Page 9
The Mobility console allows system administrators to access it from any secure Web browser
connection—from a desk, at home, on site, or on the road. The Mobility console organizes all the
administrative options. Every administrative task is available from a single, unified interface.
After logging in to the browser‐based management console, the following functions are available.
Status > Server The Server Status page organizes critical information about each server in a pool. Each
server’s overall “health” is displayed across the top of the page.
Critical statistics for each server (which are also used for load balancing) are displayed
graphically.
Administrators can quickly drill down on connections, activity logs, system events, server
statistics, and server details.
Status > Client The Client Status page starts with a dynamic report of the connections and registered
devices in the server pool.
You can view all connected users in one console, from a handful of users to thousands.
Drill down on any statistic to display current information about filtered sets of users and
devices.
Detailed statistics are available for each connection, including which processes on the device
are using the network. This makes it easy for administrators to see which applications are
consuming bandwidth.
From the Client Status page you can also quarantine users or devices, disconnect them,
reconnect them, or force failover.
Status > Warehouse The Warehouse Status page displays critical information about your primary warehouse and
any standby warehouses.
Detailed statistics are available for overall performance and to monitor the status of
warehouse replication.
Status > Reporting Server The Reporting Server status page displays critical information about configuration and
status of the reporting server used by the Analytics Module.
Detailed statistics are available for overall configuration of when to purge old data, the
reporting database’s status and size, and the reporting server’s status.
Analytics > Generate Report This page shows the list of all the reports available in the Analytics Module, which is
discussed in more detail in its own section further below.
Analytics > Save Queries This page shows a list of commonly run reports; this list is user‐customizable.

Mobility XE Evaluation Guide Page 10
Analytics > Configure Network Interface Groups This page allows a system administrator to assign network interface cards (NICs) to a pre‐
defined set of groups. The groups are used to classify information in some of the reports
available in the Analytics Module.
Setting > Server and Settings > Client From the Server Settings page administrators can make global configuration changes to the
pool. Individual server settings can be configured to override global settings. The interface
shows which server settings differ from the global settings. Changes to server settings are
automatically propagated to all affected servers.
From the Client Settings page administrators can quickly configure global settings for all
users and devices. Individual users, devices, user groups, and device groups are easily
configured.
Only users and devices whose settings vary from the global settings appear in the
“Overrides” list. This makes it easy to identify where configurations differ from the global
settings, even in very large deployments with thousands of users.
The Settings list indicates which settings have been changed with a “wavy arrow” ( ).
Changes to client settings are propagated to the client either the next time the client logs on,
or by “reconnecting” the client.
Tools > Policy Management The optional Mobility XE Policy Management Module gives administrators unprecedented
flexibility and control over mobile productivity and security. With Policy Management,
administrators can create custom policies to manage access to network resources.
Techniques for evaluating the features in the Policy Management module are discussed later
in this paper.
Tools > Network Access Control Mobility XE’s Mobile Network Access Control (NAC) Module allows devices to connect to
the enterprise network only after meeting specified security policies, but also gives
administrators greater control and flexibility over how and when to administer remediation
policies. Techniques for evaluating the features in the NAC module are discussed later in
this paper.
Licensing License keys can be issued on‐the‐fly and automatically take effect, allowing administrators
to add system capacity or optional modules on demand.
License keys apply pool‐wide, to allow servers to share capacity and functionality.
About The About screen on the Mobility console contains information about the current version of
the Mobility software being run, including copyright and trademark information, and
information that identifies the server pool.
Mobility XE Evaluation Guide Page 11
Logoff The Logoff link provides a quick way to exit the Mobility console, and ensures that future
access from the computer you are on requires the person to enter authorized administrative
credentials.
Help On most screens a help link or a button with a question mark (“?”) appears on the right hand
side of the screen, providing context sensitive help and online access to the Mobility XE
documentation.
Scalability and Reliability
Importance/Benefit Full system redundancy ensures continued service even if a piece of hardware fails.
Component architecture allows deployment flexibility based on each enterprise’s needs.
Pool‐based architecture allows administrators to add capacity on‐the‐fly as demand
increases
Load‐balancing ensures that all servers participate in servicing mobile workers efficiently,
even during peak periods.
Mobility XE scalability and reliability are achieved by adding additional servers to the server pool.
In its simplest form—which is the most common configuration for testing/piloting—all of the server
components can be installed (collocated) on a single machine–a one‐server pool. While this is the
simplest and easiest configuration to set up, it does not provide any system redundancy in case of a
hardware failure and does not provide enough capacity to service more than 100 concurrent
connections. To achieve redundancy and add system capacity, additional servers can be added to a
server pool.
Mobility XE server pools offer the following additional functionality not available in single‐server
deployments:
Multiple Mobility XE servers can function as a single, logical pool.
System capacity can be added on‐the‐fly by connecting additional Mobility XE servers to the
Mobility warehouse, all without disrupting current users.
Newly added servers are automatically configured based on global settings.
Newly added servers automatically participate in load balancing and failover.
The easiest way to test server pools is to install the Mobility XE system on a single server, then install
the Mobility XE server on a second machine and point it to the first server’s warehouse. Note that
adding servers to a pool may require additional evaluation licenses. Several of the most common
options for testing and configuring server pools for redundancy and scalability are shown below.
Note also that Mobility XE server components are fully supported when run in a virtualized server
environment using Microsoft Server 2008 R2 Hyper‐V or VMware ESX. See the System Administrator
Guide for more information.

Mobility XE Evaluation Guide Page 12
Configuration 1: Dual-Server Installation
The Mobility warehouse (W) is installed on server 1; the Mobility XE server (S)
is installed on server 2.
This configuration provides a better environment for testing overall server
capacity by offloading Mobility warehouse processing onto a second server. In
addition, if the warehouse’s hardware (1) were to fail for any reason, clients
connected to the Mobility server (2) would continue to receive uninterrupted
service.
Configuration 2: Server Pool with Load Balancing
The Mobility warehouse (W) and server (S) are collocated on server 1.
A second Mobility server (S) is installed on server 2.
This configuration represents a typical field deployment and is useful for testing
load balancing – the load of clients is distributed between the two servers.
Server 2 also increases the pool’s capacity.
Configuration 3: Server Pool with Full System Redundancy
The Mobility warehouse (W) and server (S) are collocated on server 1. A
second Mobility server (S) is installed on server 2. A stand-by warehouse is also
installed on server 2, which replicates with server 1’s warehouse.
This configuration provides full system redundancy with minimal hardware. The
load of the clients is distributed between the two servers. The standby
warehouse does not service client connections unless the primary warehouse
fails. If either server has a hardware failure, the users connected to the failed
server automatically fail over to the other server.
This configuration is useful for testing load balancing, failover, and hardware
failure scenarios, but it is not ideal for testing single-server capacity or system
capacity limits.
Configuration 4: Server Pool – Full Capacity and Redundancy
The primary Mobility warehouse (W) is installed on server 1. A
backup Mobility warehouse (W) is installed on server 3 and
replicates the warehouse on server 1. Mobility servers (S) are
installed on servers 2 and 4.
This configuration provides full system capacity and full system
redundancy. It is useful for testing load balancing, component
failure, and failover scenarios. It also provides full
system/processing capacity and is useful for determining peak
W
S
1 2
S
W
S
1 2
S
W
S
W
1 2
S
W
1 32 4
W
S

Mobility XE Evaluation Guide Page 13
loads and other capacity metrics.
With any of the above configurations, the following load‐balancing behaviors are available:
In a server pool, new connections are automatically distributed across the servers in the
pool, based on each Mobility server’s capacity at the time a device connects. All of the
servers in the pool communicate with each other and work together to service the combined
Mobility client load, which can number in the thousands.
There is no single point of failure in load balancing: Every server in the pool can function as
a load balancer. So if one server becomes unavailable, the other servers automatically
distribute new connections among the remaining Mobility servers.
At the time of connection, the system balances the connections across the server pool to
obtain the best resource utilization based on the current number of connections, as well as
memory, network, and CPU usage.
If servers with different capacity and power are used in the same pool, load balancing
automatically accounts for these differences and distributes the user load accordingly.
Note: With the default load balancing scheme, you should not expect perfectly symmetrical
loads on each server in a pool. Because the load balancing metrics vary from second to
second, even servers with identical hardware will not have a perfectly balanced load. This is
normal, especially with only a few handfuls of connections.
Using one of the above configurations, the following failover behaviors are available:
Mobility XE provides native failover capabilities to support the need for high availability in
mission‐critical work environments.
The failover feature is integrated with load balancing: If one server fails, the clients that were
connected automatically reconnect to the remaining servers in the pool and are
automatically load balanced as they connect to the remaining servers.
Failover servers are listed in the Mobility console on the Server Status page. Servers in your
pool are (by default) also failover servers. You can exclude a server from being used for
failover on the Server Settings page.
If an administrator needs to perform maintenance on a server in a pool, the server can be
taken offline. Taking a server offline causes it to refuse new connection attempts but allows
connected users to continue working until they log off. If the administrator needs to remove
connections immediately, failover can be forced on one or more sessions. The connections
are then automatically redirected to an available server.

Mobility XE Evaluation Guide Page 14
Policy Management Module
Importance/Benefit: Provides flexible, customizable administrative control of bandwidth consumption and
remote access privileges.
Increases worker productivity by matching application and bandwidth usage to networks in
use.
Enforces security on the mobile device over any IP network.
Provides superior flexibility to create custom policies for different users and workgroups.
Centralizes management of large deployments with minimal effort and cost.
Ensures that mission critical applications receive sufficient bandwidth to operate effectively.
Improves the performance of real‐time applications like VoIP, video, Web conferencing and
instant messaging when they are used over wireless networks where there is higher packet
loss, latency, and jitter.
Maintains much higher transmission quality than traditional IPSec or SSL VPNs, even on
wireless networks.

Mobility XE Evaluation Guide Page 15
Policy Management is an optional module for Mobility XE. The Policy Management page is always
available in the Mobility console from the Tools menu, and a 30‐day, time‐limited license key is
automatically installed with each evaluation copy of Mobility XE. The Mobility server will only send
rule sets to client devices if there is an unexpired Policy Management license key installed in the
server pool. Check the Licensing page in the Mobility console for a valid license before you begin
testing.
There are literally an unlimited number of uses for policies. Some of the more common uses include
the following:
Block e‐mail traffic, Web surfing or video streaming when connected to ‘slow’ connections,
or disable selected applications completely.
Restrict traffic to corporate IP address ranges.
Selectively change the level of compression or Web image optimization.
Control application access by time of day or network.
Automatically synchronize data or update antivirus when a high‐bandwidth connection
becomes available.
Extend desktop management tools and applications to mobile devices.
Block network access by Trojans or other malware.
Turn off the Mobility VPN when a device connects to Ethernet, and turn it on automatically
when connected to wireless networks.
Implement policies for whole classes of users, based on their roles in the organization.
The Policy Management module contains a number of predefined example rules and rule sets—
some can be used successfully without modification. Other example rule sets may require changes
before they can be used in your specific environment.
Sample rule sets that can be tested without modification include:
Rule Set Comments
Example – Allow network traffic for Windows system application(s)
This allows core operating system applications to function properly (e.g. DNS lookups, etc.)
Example – Enable local networking Can be used without modification if your local network is 10.1.0.0/16-bit subnet mask
Example – Hotspot Can be used without modification if you are using T-Mobile or Wayport hotspots
Example – Set Web acceleration levels Sets “fastest” on WWAN, “fast” on WLANs, and “slowest” on LAN
Example – Remediate 6 Antivirus VirDef Not Compliant
This rule set demonstrates how to integrate the Policy Management module with the Network Access Control module. This rule set cuts off all network access except DNS if the NAC module detects that the antivirus definition files are out of date.

Mobility XE Evaluation Guide Page 16
Sample rule sets that may require some rule modification include:
Rule Set Comments
Example – Block an application over a slow interface
Define the interface speed, application(s), and address(es)/port(s)
Example – Hotspot Selective VPN Modify the local network addresses and routes to reflect your network configuration
Example – Keep high bandwidth traffic off the WWAN network
Specify the application(s) used in your organization
Example – Only allow a specific application on the WWAN network (bypassing server)
Modify the application(s) and routes for your organization
Example – Only allow a specific application on the WWAN network (using server)
Modify the application(s) and routes for your organization
Example – Quality of Service Modify the applications listed for “High Priority VoIP applications” and for “Windows Update Background Priority”.
NOTE: Any applications that are listed as ‘High Priority VoIP applications’ will automatically be optimized for real-time communications using Mobility XE advanced packet loss recovery (PLR) techniques.
Example – Restrict Web browsing to specified sites
Modify the network addresses/ports for your organization.
For a simple introduction on how to create a policy, please refer to Using Mobility Policy
Management—The Basics for a brief tutorial.
Before testing a rule set, you need to understand what each rule in the rule set does. Since most rules
have at least one condition, familiarize yourself with the conditions and actions in each rule before
testing. To see what a rule does, go to the Rule Sets tab on the Policy Management page in the
Mobility console, then check the checkbox to the left of the rule set description and click the Edit
link. The individual rules in the rule set will be displayed. Click on a rule to see its English‐language
description at the bottom of the screen.
Rule sets can be applied globally or to particular device classes, devices, user groups or users. To test
an example policy, subscribe a user group, user, device class, or device to it. The rule set will
automatically be sent to the subscribed users or devices. (NOTE: Only one rule set at a time can be
active on a device.)

Mobility XE Evaluation Guide Page 17
Test: Example – Set Web Acceleration Levels Policy The “Example – Set Web acceleration levels” rule set has three rules, each of which is summarized
below.
Rule name Condition(s) Action(s)
Example - Set Web acceleration to fastest on WWAN
When interface speed is less than 11,000 Kbps (11 Mbps)
Set Web acceleration speed to “fastest” for ports 80 & 8080
Example - Set Web acceleration to fast on WLAN
When interface speed is less than 100,000 Kbps (100 Mbps)
Set Web acceleration speed to “fast” for ports 80 & 8080
Example - Set Web acceleration to slowest on LAN
For any condition Set Web acceleration speed to “slowest” (no reduction in image quality) for ports 80 & 8080
The first two rules in this rule set look to see if the network interface’s speed is slower than 11 Mbps
or 100 Mbps, and then they set the Web acceleration speed accordingly. The last rule is a catchall: It
sets the Web acceleration speed to slowest (least amount of acceleration) if neither of the rules above
it are true, which will occur only if the network interface’s advertised speed is faster than 100 Mbps.
To test this rule set, subscribe a test device or user to it. Then load a Web page with one very
large or several medium size images on it. (A Google image search is an effective way to
generate a Web page full of images.) Each time you switch between network interfaces,
refresh the Web page. When using slower network adapters, you’ll see degraded image
quality; when using fast network adapters, you’ll see better image quality.
How to Test: Writing Your Own Policy to Block an Application on WWAN In addition to testing with any of the sample rule sets, you can also create your own rules and rule
sets. One common use for the Policy Management module is to block one or more applications when
a mobile worker is connected to a specific network but allow access to the application on other
networks. In this example, we’ll write a rule set that blocks Internet traffic only when using a
wireless WWAN.
From the Policy Management page in the Mobility console, do the following:
1. Click the Rule Set tab and click the New link to add a new rule set named “Test – Block
Browsing”.
2. Add a new rule by clicking the New button at the right; name it “Block Internet on WWAN.”
3. Choose the condition(s) you want to use to trigger this rule. To sense when the WWAN is in
use, check the “When interface speed is less than speed Kbps” check box. The English
language Rule Description at the bottom of the page will be updated after checking the check
box.
4. Click the underlined “speed” link in the rule description. Enter 5000 in the dialog box that
appears and click OK. (As of May 2008, there aren’t any WWAN cards that exceed 5 Mbps,
but almost all WLAN cards are faster.) Then click the Next> button at the top of the page.
5. Choose the target action you want to use to block the Internet. There are two common
choices. You can choose either:

Mobility XE Evaluation Guide Page 18
Block network traffic for port(s): You can block common ports used for Internet browsing
(80, 8080, and 443)–To use this method, select the “Block network traffic for port(s)”
checkbox, then click on the port(s) link in the Rule Description, add the ports you want
to block, then click OK.
Block network traffic for application(s): You can prevent specifically named applications like
Internet Explorer and Firefox from accessing the network. If you want to use this
method, select the “Block network traffic for application(s)” check box, then click the
application(s) link in the Rule Description and add iexplore.exe and firefox.exe to the
Application list, and then click OK.
6. Click the Finish button at the top of the page.
7. Now go to the Subscribers tab and subscribe the ‘Test – Block Browsing’ button to a device
or user.
When using a network interface that is slower than 5 Mbps, Internet traffic will be blocked in the
way you specified in the rule.
Network Access Control (NAC)
Importance/Benefit: Allows IT administrators who support highly mobile field forces to protect their networks
without impacting mobile worker productivity.
Provides flexible, customizable administrative control over how and when to administer
remediation policies.
Ensures device compliance for required software including antivirus, antispyware, firewall,
operating system version, Windows™ Update status, registry keys, and other applications.
The Network Access Control (NAC) module is an optional module for Mobility XE. The NAC
module page is always available from the Tools menu in the Mobility console. A 30‐day, time‐
limited license key is automatically installed with each evaluation copy of Mobility XE. The Mobility
server will only send NAC policies to subscribed client devices if there is an unexpired NAC license
key installed in the server pool. Check the Licensing page in the Mobility console for a valid,
unexpired license before you begin testing.
The purpose of the NAC module is to allow you to audit a mobile device’s configuration and ensure
that it meets corporate policies before allowing it to connect to the Mobility XE server. The NAC
module has the ability to check almost any configuration characteristic associated with the device’s
security posture, including anti‐spyware, anti‐virus, firewall, files, processes, registry keys,
operating system version, Windows update status, and the Mobility XE version.
Unlike automatic security policies that force users to perform time‐consuming, non‐critical software
updates before allowing access, mobile NAC integrates with Mobility XE’s Policy Management
module, giving administrators flexibility and control over the response to a device that does not
meet security guidelines. Based on severity and even the speed of their connection, administrators
may choose from simple warnings, to triggering customizable remediation policies (that can limit
application access, launch websites, or even initiate software downloads), to disconnecting or
quarantining the device. When rules are updated, they are automatically pushed down to client
devices, and devices are automatically rescanned at regular intervals to ensure ongoing compliance.
Mobility XE Evaluation Guide Page 19
How to Test: Using the Example NAC Policies The NAC module contains a number of generically written example rule sets—most can be used
successfully without modification. Other example rule sets may require changes before they can be
used in your specific environment. Note that most of these example rule sets only warn the user of
the infraction. You may wish to modify them to take stronger action before deploying them in a
production environment.
In addition, the NAC module can integrate with the Policy module to provide significant additional
flexibility when remediating clients. However, for simplicity’s sake, procedures for using the two
modules in an integrated fashion are not covered in this evaluation guide.
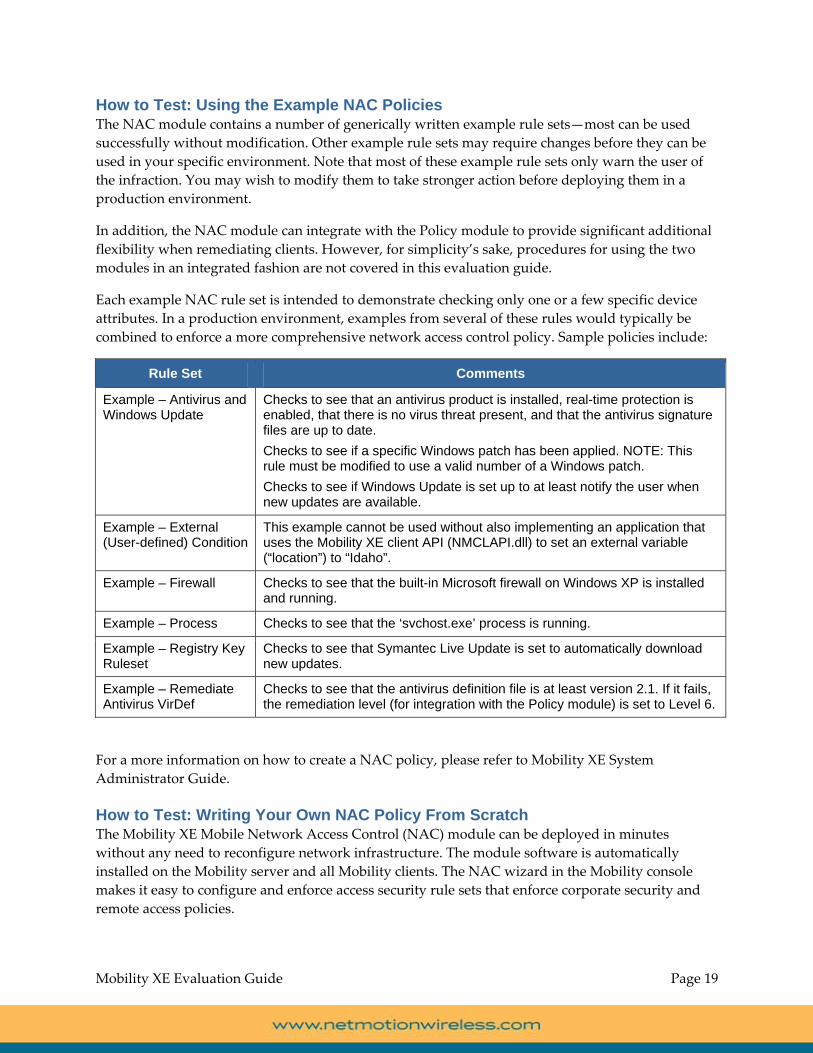
Each example NAC rule set is intended to demonstrate checking only one or a few specific device
attributes. In a production environment, examples from several of these rules would typically be
combined to enforce a more comprehensive network access control policy. Sample policies include:
Rule Set Comments
Example – Antivirus and Windows Update
Checks to see that an antivirus product is installed, real-time protection is enabled, that there is no virus threat present, and that the antivirus signature files are up to date.
Checks to see if a specific Windows patch has been applied. NOTE: This rule must be modified to use a valid number of a Windows patch.
Checks to see if Windows Update is set up to at least notify the user when new updates are available.
Example – External (User-defined) Condition
This example cannot be used without also implementing an application that uses the Mobility XE client API (NMCLAPI.dll) to set an external variable (“location”) to “Idaho”.
Example – Firewall Checks to see that the built-in Microsoft firewall on Windows XP is installed and running.
Example – Process Checks to see that the ‘svchost.exe’ process is running.
Example – Registry Key Ruleset
Checks to see that Symantec Live Update is set to automatically download new updates.
Example – Remediate Antivirus VirDef
Checks to see that the antivirus definition file is at least version 2.1. If it fails, the remediation level (for integration with the Policy module) is set to Level 6.
For a more information on how to create a NAC policy, please refer to Mobility XE System
Administrator Guide.
How to Test: Writing Your Own NAC Policy From Scratch The Mobility XE Mobile Network Access Control (NAC) module can be deployed in minutes
without any need to reconfigure network infrastructure. The module software is automatically
installed on the Mobility server and all Mobility clients. The NAC wizard in the Mobility console
makes it easy to configure and enforce access security rule sets that enforce corporate security and
remote access policies.

Mobility XE Evaluation Guide Page 20
Do the following from the Tools > Network Access Control screen in the Mobility console:
1. Click the Rule Set tab and click the New link to add a new rule set named “Test – NAC
Policy”.
An empty list of NAC rules appears on the screen.
2. Click the Wizard button at the right.
3. Choose the client operating system(s) where the rules will be applied. Choose one or more of
the other attributes to check by clicking on the appropriate check boxes and drop‐down lists.
It’s best, when you are initially testing, to start with fairly generic (high‐level) rules. You can
always edit them later to make them more specific. When you are satisfied, click the OK
button on the dialog.
The wizard automatically creates a series of rules and puts them in the proper order. Note
that the failure action for each rule is set to ‘Warn’.
4. If you want to change a rules failure action, click on the rule, then click the Edit button.
The rule editing dialog will appear.
5. Choose a different value in the Failure Action drop down box. You might also want to type
in a more descriptive ‘Failure Message.’ When you are finished, click the Save button.
The NAC rule set will reappear with the rule’s Failure Action updated.
6. Arrange the rules in the rule set so that the rules with the most severe Failure Action appear
prior to rules with less severe failure actions.
7. When you have finished editing the rule set, click the Save button at the top of the page.
8. Now go to the Subscribers tab and subscribe the ‘Test – NAC Policy’ to a device or user.
Analytics Module
Importance/Benefit: Proactively manage and gain visibility into mobile deployments. Save administration
time, and facilitate fine‐tuning and capacity planning.
See the big picture; drill down to the details. Go far beyond simple activity logs used by
typical VPNs, with more than 20 graphical reports that clearly show usage and trends over
time, across all servers in the pool, and use the filters to selectively view the data.
Know how resources are used. See which applications, devices and/or users are consuming
the most bandwidth, for setting policies, improving productivity and complying with carrier
service agreements.
Spot coverage or connection problems. See which devices are having connection problems
and when, which network is involved, and why they occur to speed help desk calls or
eliminate them.
Verify performance and plan proactively. Show that users are using the mobile
environment efficiently, and know when more bandwidth or better coverage might be
needed.
Receive alerts of impending problems. More than 30 notifications, many with adjustable
thresholds, alert via email, SNMP or Syslog when problems might be imminent; follow‐up
alerts issue an “all‐clear” when problems correct themselves.

Mobility XE Evaluation Guide Page 21
The Analytics Module is a revolutionary business productivity tool that “turns the lights on” for
mobile, wireless deployments, enabling management to analyze, understand and control wireless
usage. For the first time in a VPN, aggregated information showing application usage, data
consumption, connection gaps, capacity and other mobile data are available, further distinguishing
the Mobility XE mobile VPN from other VPNs.
Analytics is an optional module for Mobility XE, depending on the size of your deployment. The
Tools > Analytics page is always available in the Mobility console, and a 30‐day, time‐limited license
key is automatically installed with each evaluation copy of Mobility XE. The Analytics Module’s
reporting server will only put newly generated data into the reporting database if there is an
unexpired Analytics Module license key installed in the server pool. Check the Licensing page in the
Mobility console for a valid license before you begin testing.
How to Test: Analytics Module Notifications Most of the notifications available in the Analytics Module are automatically configured and
generated by default. You’ll first need to configure at least one notification mechanism, in this case
email (SMTP):
1. In the Mobility console go to the Settings > Server page, and click on Reporting Server
Settings.
2. Click the Notifications SMTP – ‘From’ Address setting. Type in the email address you have
assigned to the reporting server, and click the Apply button.
3. Click the Notifications SMTP – ‘To’ Address setting. Type in the email address you want to
notifications sent to. (NOTE: You can enter multiple email addresses separated by a comma).
Click the Apply button.
4. Click the Notifications SMTP – Host setting. Type in the host name or IP address of your
email server, and click the Apply button.
5. Click the Notifications SMTP – Subject Line setting. Type in the text that should appear in
the subject line of all notification emails sent by the reporting server. For example, “Mobility
XE system notification”.
6. Now that SMTP has been configured, click on the Notifications – Mechanism #1 setting.
Choose SMTP in the drop‐down box, then click Apply.
Now that a notification mechanism is configured, you can browse through the available notifications
in the settings list. Note that some notifications require thresholds to be configured, while others are
automatically triggered based on system events.
How to Test: Analytics Module Reports The key to testing the Analytics Module’s reports is to first generate enough data to make the
reports meaningful. After connecting several devices running the Mobility client software for at least
a day of normal, mobile use, the reports available in the Analytics Module will start to become
useful. We recommend that the Mobility server pool run for at least a week of regular use by a
handful or more Mobility client devices to generate enough data to make most of the reports useful.

Mobility XE Evaluation Guide Page 22
Viewing Application Usage Mobility XE makes sure that your wireless connectivity dollars are being spent on the applications
for which they were intended by helping you see which applications are launched most often, which
consume the most bandwidth, and which users are running them.
1. From the Analytics > Generate Report page, run the following reports:
Network Usage by Application
Network Usage by Device
Network Usage by NIC Group
Network Usage by User
2. Use the filters in each report to limit and format the data shown.
3. Click the Submit button to run the report.
After running these reports and identifying any issues, you can construct simple, straight forward
policies to ensure that mission‐critical applications receive priority on wireless networks. Or if you
find unauthorized applications (e.g. iTunes, Skype, Bit Torrent, etc.), either limit which networks
they can use or prevent their use during peak times or altogether.
Run the other reports available in the Analytics Module to see what you can discover and learn
about mobile worker behavior and the value of your mobile deployment. Armed with this
knowledge, you can better plan and predict mobile worker usage patterns, allowing you to purchase
the right data plans or identify new opportunities to increase your deployment’s effectiveness.
© 2010 NetMotion Wireless, Inc. All rights reserved. NetMotion and NetMotion Mobility are registered trademarks, and Mobility XE, Roamable IPSec, InterNetwork Roaming, Best-Bandwidth Routing and Analytics Module are trademarks of NetMotion Wireless, Inc. Microsoft, Microsoft Windows, Active Directory, ActiveSync, Internet Explorer, Windows Mobile, Windows Server, Windows XP, SQL Server, Windows XP Tablet PC Edition and Windows Vista are registered trademarks of Microsoft Corporation. All other trademarks, trade names or company names referenced herein are used for identification purposes only and are the property of their respective owners. NetMotion Wireless technology is protected by one or more of the following US Patents: 5,717,737; 6,198,920; 6,418,324; 6,546,425; 6,826,405; 6,981,047; 7,136,645; 7,293,107; 7,574,208; 7,602,782; 7,644,171; 7,778,260 and Canadian Patent 2,303,987. Other US and foreign patents pending.


![Periodic Table Electron Configuration - BBG - 2015 · Electron Configuration 1s1 [Rn ... [Xe]5d16s2 [Xe]4f15d16s2 [Xe]4f36s2 [Xe]4f46s2 [Xe]4f56s2 [Xe]4f66s2 [Xe]4f76s2 [Xe ... Color](https://img.pdfslide.us/doc/110x75/5b6b1a407f8b9a9f1b8d06f2/periodic-table-electron-configuration-bbg-2015-electron-configuration-1s1.jpg)