Embed Size (px)
Citation preview
Mobile DVR DMB-X Installation and Setup Manual v2.5 © Aventura Technologies 2009 Page 1 of 30
Mobile DVR Installation and Setup Guide For use with the DMB-X series DVRs V2.5 14th Apr 2009
CONTENTS 1.0 Introduction 2.0 Connecting up
2.1 Remote hard drives 2.2 Rear panel connections
3.0 Powering the DMB-X Series DVR 3.1 Power Connections 4.0 Setting Up - Main Menu
4.1 Log on 4.2 Camera Set up 4.2.1 Display Menu 4.2.2 Picture Menu 4.2.3 Recording Menu 4.2.4 Video Streaming Menu 4.2.5 Motion Detection Menu 4.2.6 Copy Camera Settings 4.3 Recording schedule 4.4 Replaying recordings 4.5 Administration menu 4.5.1 Utilities menu 4.5.1.1 View/Manage Log Files Menu 4.5.1.2 Write CD/DVD menu 4.5.1.3 Launch H264 Media Player 4.5.1.4 Launch external application 4.5.2 DVR setup menu 4.5.2.1 Disk Usage menu 4.5.2.2 Network menu 4.5.2.3 E-Mail 4.5.2.4 Live Preview Menu 4.5.2.5 Widgets Menu 4.5.2.6 GPS 4.5.2.7 Accelerometer 4.5.2.8 Logging 4.6 Add/Edit users menu 4.6.1 Local Access 4.6.2 Remote Access 4.6.3 Authentication 4.7 Alarm Settings 4.7.1 Switch to preview camera 4.7.2 Start/Stop alarm recording
Mobile DVR DMB-X Installation and Setup Manual v2.5 © Aventura Technologies 2009 Page 2 of 30
4.7.3 Run Program 4.7.4 Play Sound 4.7.5 Send E-mail 4.7.6 Send E-mail with snapshot 4.8 Alarm Logging 4.9 Hardware
5.0 Fault Finding Introduction Thank you for purchasing Aventura Technologies’ Mobile DVR. This unit has been designed, developed and manufactured in the USA to the highest standards and provides a reliable platform for video recording in the demanding road transportation environment. To ensure that you get started quickly and derive the most benefit out of this product in the minimum time please take a moment to read this guide. The guide will take you through the key steps of:
a) Connecting cameras b) Powering the unit c) Configuring the unit to record images to a hard disk, and d) Downloading or backing up your recordings.
A separate guide is available for the Client software to be used by CCTV operators for evidential analysis. 0BContents First please familiarise yourself with the hardware. In the DVR box you will find:
a) DMB-X Series Mobile DVR b) Pigtail connector for power input (3ft long) c) Connector with “pig tail” cables for video and audio input d) HDD power cable e) Pigtail connector for the Alarm input. f) CD containing Installation and Setup Guide and Client software g) Quick install guide.
In the HDD box you will find:
a) Ruggedized HDD b) Mounting plate c) Ruggedized USB A to B cable
Mobile DVR DMB-X Installation and Setup Manual v2.5 © Aventura Technologies 2009 Page 3 of 30
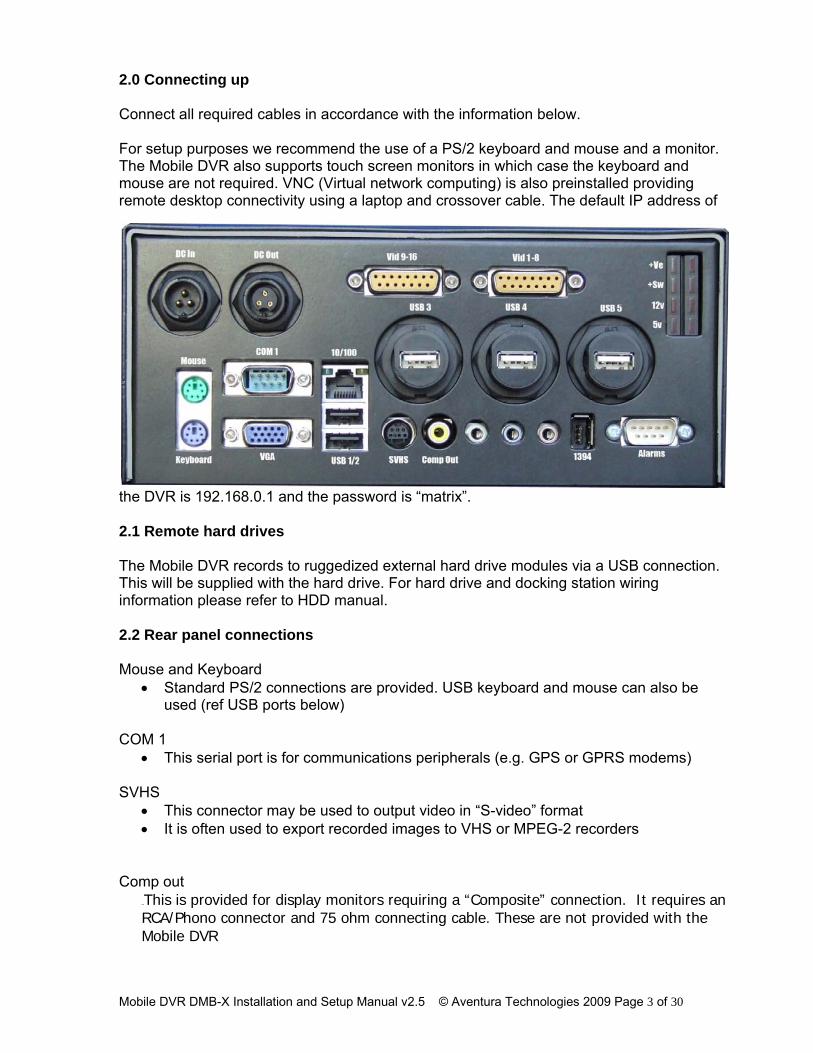
1B2.0 Connecting up Connect all required cables in accordance with the information below. For setup purposes we recommend the use of a PS/2 keyboard and mouse and a monitor. The Mobile DVR also supports touch screen monitors in which case the keyboard and mouse are not required. VNC (Virtual network computing) is also preinstalled providing remote desktop connectivity using a laptop and crossover cable. The default IP address of
the DVR is 192.168.0.1 and the password is “matrix”. 2B2.1 Remote hard drives The Mobile DVR records to ruggedized external hard drive modules via a USB connection. This will be supplied with the hard drive. For hard drive and docking station wiring information please refer to HDD manual. 2.2 Rear panel connections Mouse and Keyboard
• Standard PS/2 connections are provided. USB keyboard and mouse can also be used (ref USB ports below)
30BCOM 1
• This serial port is for communications peripherals (e.g. GPS or GPRS modems) 20BSVHS
• This connector may be used to output video in “S-video” format • It is often used to export recorded images to VHS or MPEG-2 recorders
5B
Comp out
26BThis is provided for display monitors requiring a “Composite” connection. It requires an RCA/Phono connector and 75 ohm connecting cable. These are not provided with the Mobile DVR
Mobile DVR DMB-X Installation and Setup Manual v2.5 © Aventura Technologies 2009 Page 4 of 30
Notes • If you wish to use the composite connection it must be connected before the DVR is booted. Once
the DVR boots it will auto detect the composite screen and display in NTSC by default (for other regions change the output format using the normal Windows Display settings screen).
• 8BIf using a touch-screen monitor to run the system, and the screen is new, then the screen calibration will need setting up in accordance with the manufacturer’s instructions. Drivers may also need installing.
21BVGA
• This connector is used to provide video output to monitors used by bus drivers to view live CCTV images, and also for monitors used by engineers for installation and maintenance.
22B10/100 Ethernet
• This RJ45 connector allows the Mobile DVR to connect to a LAN/ WAN/ WLAN. 23BUSB Ports
• There are 2x Normal and 3 rugged USB2.0 connections for a variety of applications: o Recording images to external hard drives o Archiving or downloading images onto a CD/DVD recorder o Installation of drivers for new devices via flash memory sticks o Connecting mice, keyboards, GPS units and G-chip sensors
24BVideo/Audio inputs
• The picture in 2.2 above shows 2 x15-way D-Sub connector for a 16-channel Mobile DVR. A 4-channel Mobile DVR will have 1 of these 15-way D-Sub connectors. An 8-channel unit would also have 2 15-way D Sub connectors.
• Cameras are connected via 15 way D-Sub “pig tails” which are provided with the Mobile DVR.
• The camera end of the “pig tails” are clearly marked “VID 1, AUD 1” etc to distinguish between video and audio inputs.
• The 4-channel Mobile DVR uses one set of “video + audio pigtails”, each with 4 video and 4 audio connectors.
• The 8-channel unit uses two sets of the same “video + audio.pig tails”. • The 16-channel units use two different sets of “video + audio pig tails”. N.B on 16
channel units ONLY the first 2 channels of each bank (i.e. channels 1, 2 and 9, 10 have audio).Audio Inputs require a line level input (2.0-2.4Vp-p,1kΩ)
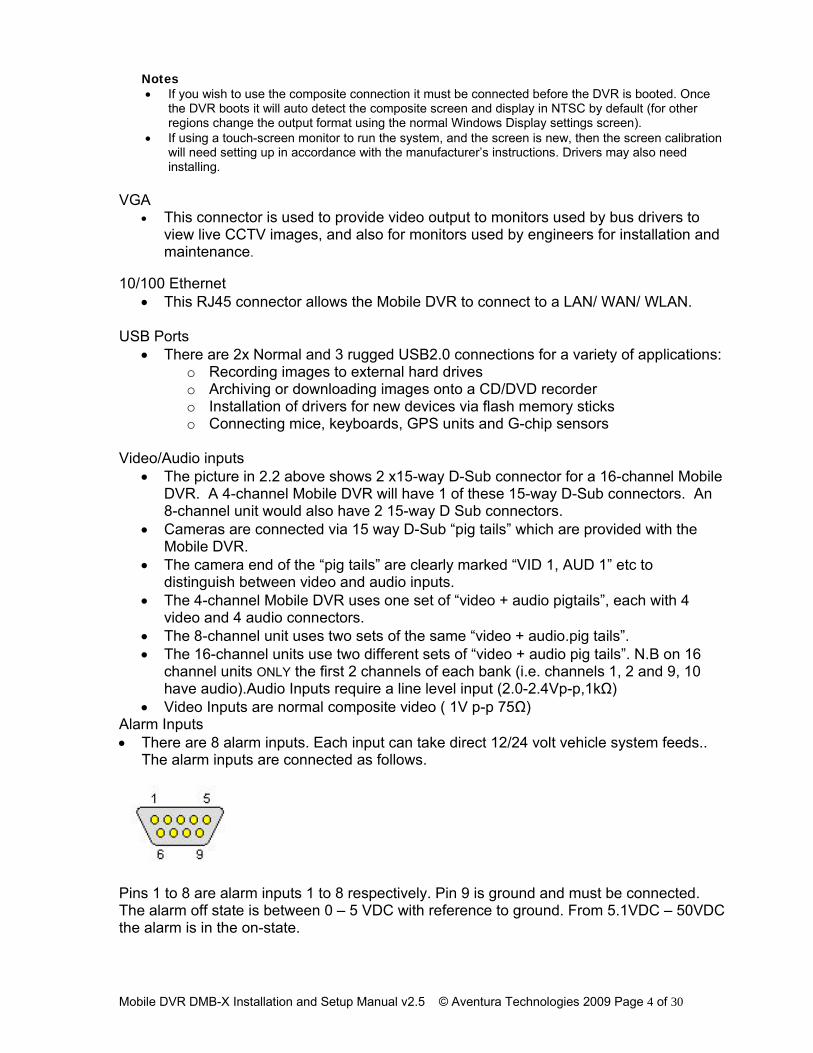
• Video Inputs are normal composite video ( 1V p-p 75Ω) Alarm Inputs • There are 8 alarm inputs. Each input can take direct 12/24 volt vehicle system feeds..
The alarm inputs are connected as follows.
Pins 1 to 8 are alarm inputs 1 to 8 respectively. Pin 9 is ground and must be connected. The alarm off state is between 0 – 5 VDC with reference to ground. From 5.1VDC – 50VDC the alarm is in the on-state.
Mobile DVR DMB-X Installation and Setup Manual v2.5 © Aventura Technologies 2009 Page 5 of 30
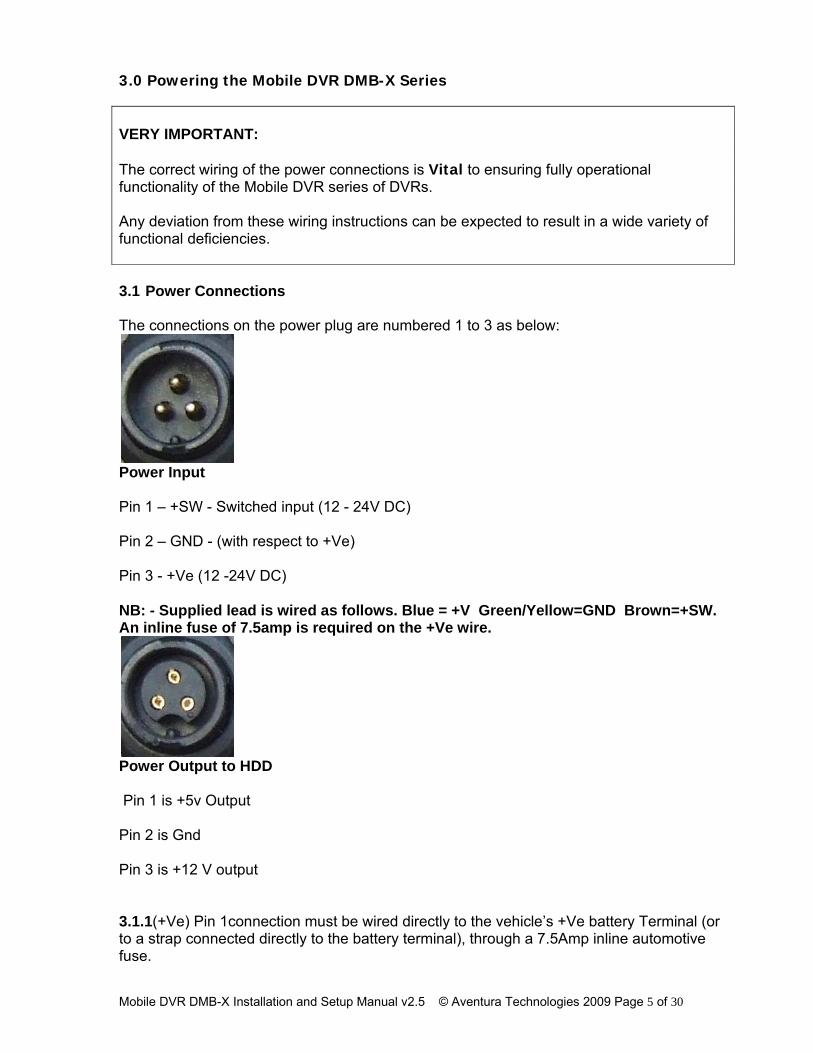
3.0 Powering the Mobile DVR DMB-X Series VERY IMPORTANT: The correct wiring of the power connections is Vital to ensuring fully operational functionality of the Mobile DVR series of DVRs. Any deviation from these wiring instructions can be expected to result in a wide variety of functional deficiencies. 3.1 Power Connections The connections on the power plug are numbered 1 to 3 as below:
Power Input Pin 1 – +SW - Switched input (12 - 24V DC) Pin 2 – GND - (with respect to +Ve) Pin 3 - +Ve (12 -24V DC) NB: - Supplied lead is wired as follows. Blue = +V Green/Yellow=GND Brown=+SW. An inline fuse of 7.5amp is required on the +Ve wire.
Power Output to HDD Pin 1 is +5v Output Pin 2 is Gnd Pin 3 is +12 V output
3.1.1(+Ve) Pin 1connection must be wired directly to the vehicle’s +Ve battery Terminal (or to a strap connected directly to the battery terminal), through a 7.5Amp inline automotive fuse.
2
1
3
1
2 3
2
1
3
1
2 3
1
2 3

Mobile DVR DMB-X Installation and Setup Manual v2.5 © Aventura Technologies 2009 Page 6 of 30
3.1.2 Pin 3 is a switched voltage used to turn the Mobile DVR on/off. An input on this pin above 11.6Vdc will turn the DVR on and maintain it in the on-state. 3.1.3 Note: - The DVR is factory preset to continue recording for 30 minutes after the voltage on the IGN lead is removed. 4.0 Setting Up All the required software and default settings are pre-installed. Power up the DVR and wait till the system is fully operational, you will either see a connected camera display or the “No Video Signal” message displayed. Depending on your setup method (touch screen or mouse), either double tap the centre of the touch-screen or double click with the mouse. Once you have double tapped (“activated”) you will be presented with the following screen: Once you are in this screen you can see there are sub menus. We will go through each menu one at a time but first we need to logon. 4.1 Log On Click on the “Camera 1 Setup” bar and the following screen will be displayed: Enter a valid username and password (the default username and password being admin and admin) into the respective boxes and press “Log on”.
Mobile DVR DMB-X Installation and Setup Manual v2.5 © Aventura Technologies 2009 Page 7 of 30
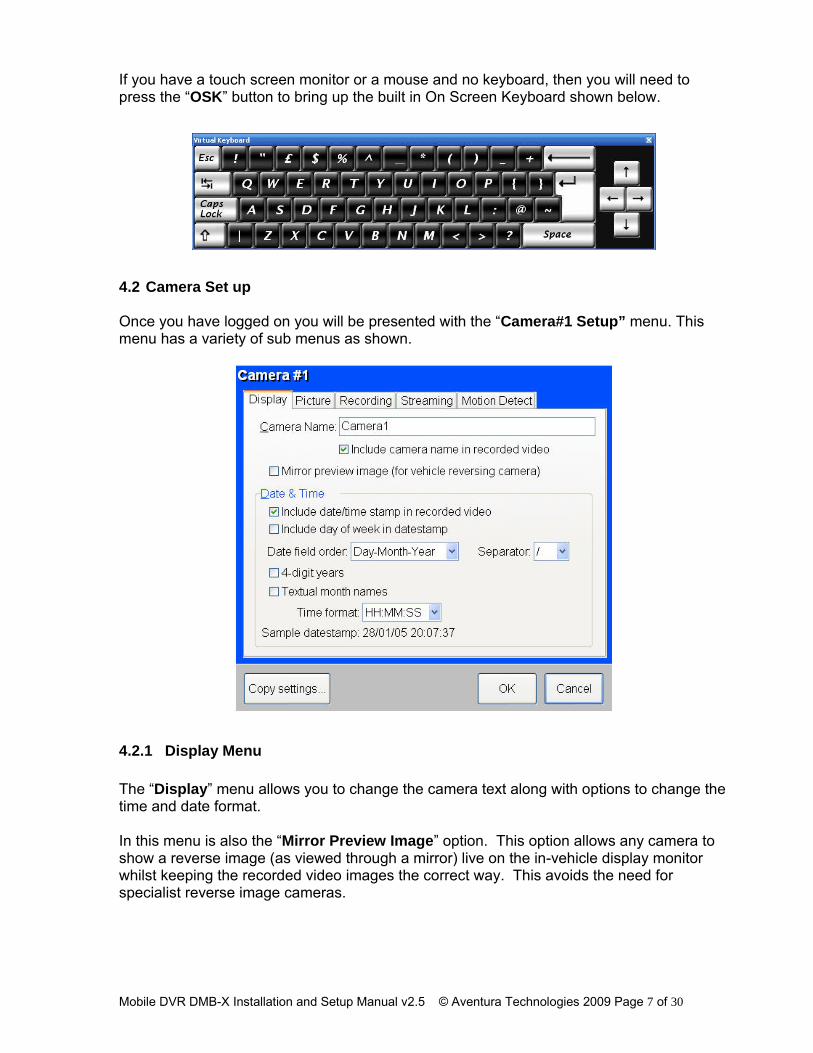
If you have a touch screen monitor or a mouse and no keyboard, then you will need to press the “OSK” button to bring up the built in On Screen Keyboard shown below.
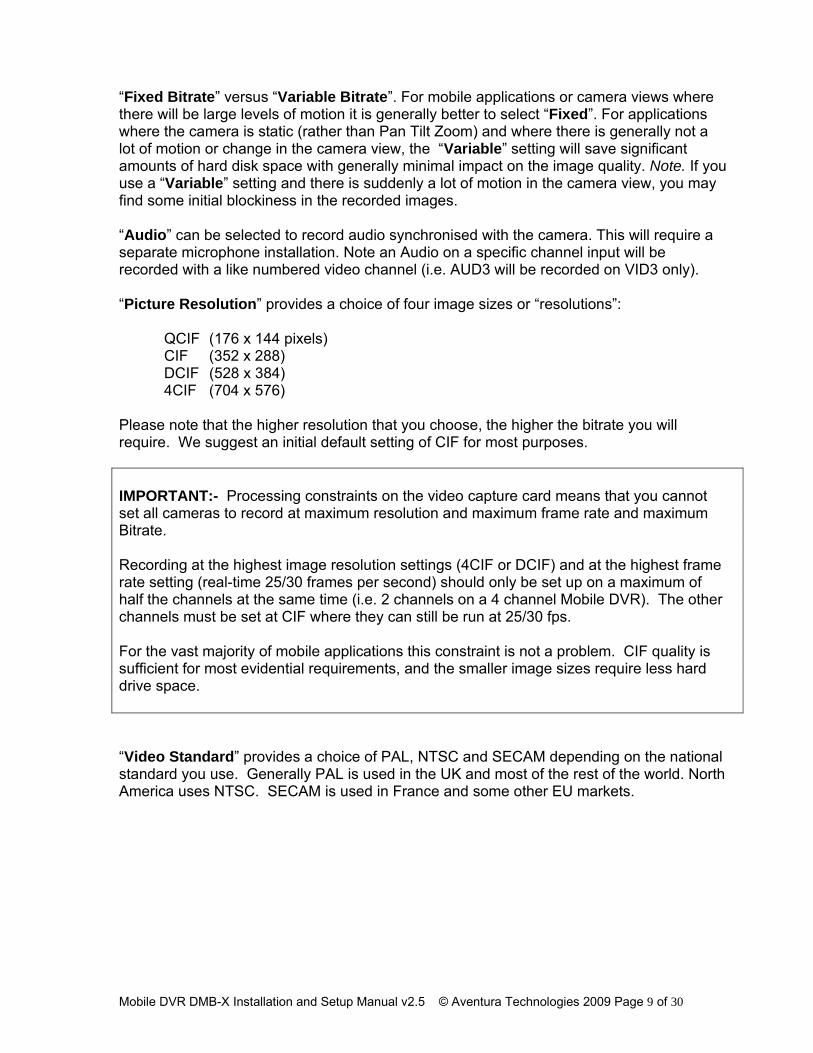
4.2 Camera Set up
Once you have logged on you will be presented with the “Camera#1 Setup” menu. This menu has a variety of sub menus as shown.
5B4.2.1 Display Menu The “Display” menu allows you to change the camera text along with options to change the time and date format. In this menu is also the “Mirror Preview Image” option. This option allows any camera to show a reverse image (as viewed through a mirror) live on the in-vehicle display monitor whilst keeping the recorded video images the correct way. This avoids the need for specialist reverse image cameras.

Mobile DVR DMB-X Installation and Setup Manual v2.5 © Aventura Technologies 2009 Page 8 of 30
4.2.2 Picture Menu This menu lets you adjust the Brightness, Contrast, Hue and Saturation (colour balance) of image generated by the camera. Adjusting these settings may, to a limited extent, address deficiencies in the camera image.
4.2.3 Recording Menu
This menu has controls for all of the recording parameters for this particular camera. “Frame rate” is the number of pictures you wish to record every second. “Encoding Bitrate” is the amount of hard disk memory used for each second of recorded video and is a key determinant of picture quality. “Fixed Bitrate” allocates a fixed amount of hard disk memory per second to record each camera, regardless of the complexity, colour, light or motion in the recorded images. “Variable Bitrate” will optimise the use of hard disk memory by assessing the complexity, colour, light or motion in the image, and allocating less memory where there is less change or complexity to record.
Mobile DVR DMB-X Installation and Setup Manual v2.5 © Aventura Technologies 2009 Page 9 of 30
“Fixed Bitrate” versus “Variable Bitrate”. For mobile applications or camera views where there will be large levels of motion it is generally better to select “Fixed”. For applications where the camera is static (rather than Pan Tilt Zoom) and where there is generally not a lot of motion or change in the camera view, the “Variable” setting will save significant amounts of hard disk space with generally minimal impact on the image quality. Note. If you use a “Variable” setting and there is suddenly a lot of motion in the camera view, you may find some initial blockiness in the recorded images. “Audio” can be selected to record audio synchronised with the camera. This will require a separate microphone installation. Note an Audio on a specific channel input will be recorded with a like numbered video channel (i.e. AUD3 will be recorded on VID3 only). “Picture Resolution” provides a choice of four image sizes or “resolutions”:
QCIF (176 x 144 pixels) CIF (352 x 288) DCIF (528 x 384) 4CIF (704 x 576)
Please note that the higher resolution that you choose, the higher the bitrate you will require. We suggest an initial default setting of CIF for most purposes. IMPORTANT:- Processing constraints on the video capture card means that you cannot set all cameras to record at maximum resolution and maximum frame rate and maximum Bitrate. Recording at the highest image resolution settings (4CIF or DCIF) and at the highest frame rate setting (real-time 25/30 frames per second) should only be set up on a maximum of half the channels at the same time (i.e. 2 channels on a 4 channel Mobile DVR). The other channels must be set at CIF where they can still be run at 25/30 fps. For the vast majority of mobile applications this constraint is not a problem. CIF quality is sufficient for most evidential requirements, and the smaller image sizes require less hard drive space. “Video Standard” provides a choice of PAL, NTSC and SECAM depending on the national standard you use. Generally PAL is used in the UK and most of the rest of the world. North America uses NTSC. SECAM is used in France and some other EU markets.
7B
Mobile DVR DMB-X Installation and Setup Manual v2.5 © Aventura Technologies 2009 Page 10 of 30
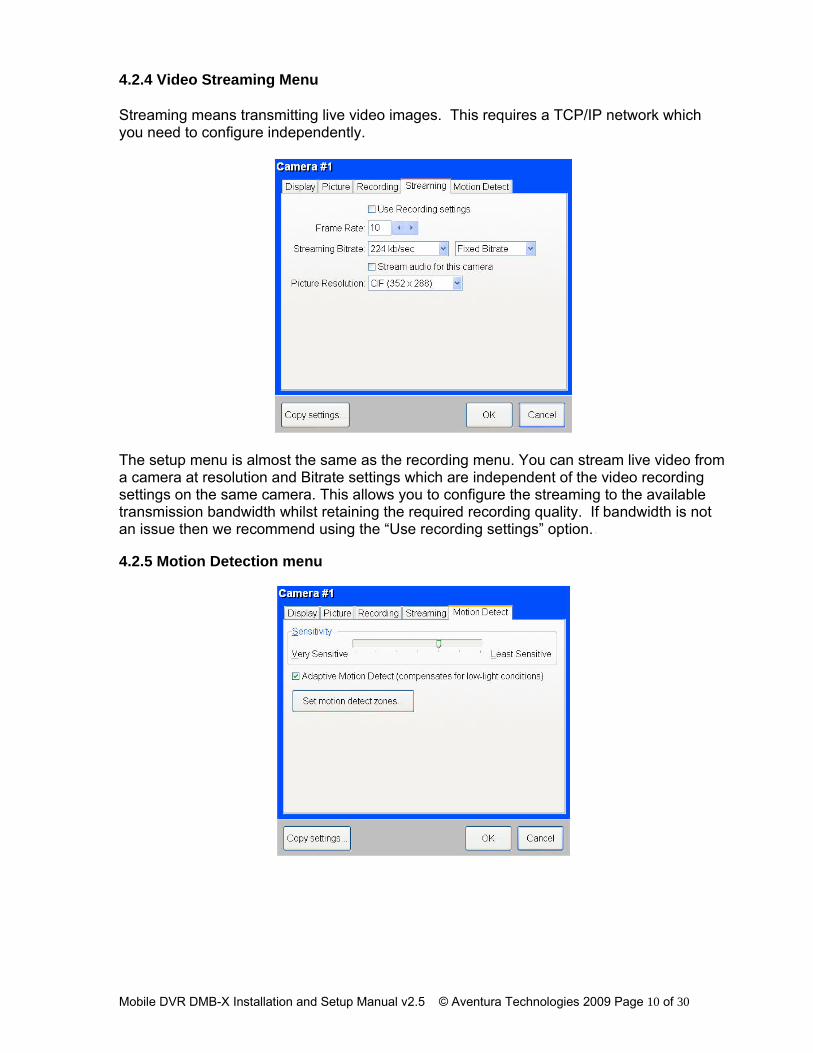
4.2.4 Video Streaming Menu Streaming means transmitting live video images. This requires a TCP/IP network which you need to configure independently.
The setup menu is almost the same as the recording menu. You can stream live video from a camera at resolution and Bitrate settings which are independent of the video recording settings on the same camera. This allows you to configure the streaming to the available transmission bandwidth whilst retaining the required recording quality. If bandwidth is not an issue then we recommend using the “Use recording settings” option.8
B4.2.5 Motion Detection menu
Mobile DVR DMB-X Installation and Setup Manual v2.5 © Aventura Technologies 2009 Page 11 of 30
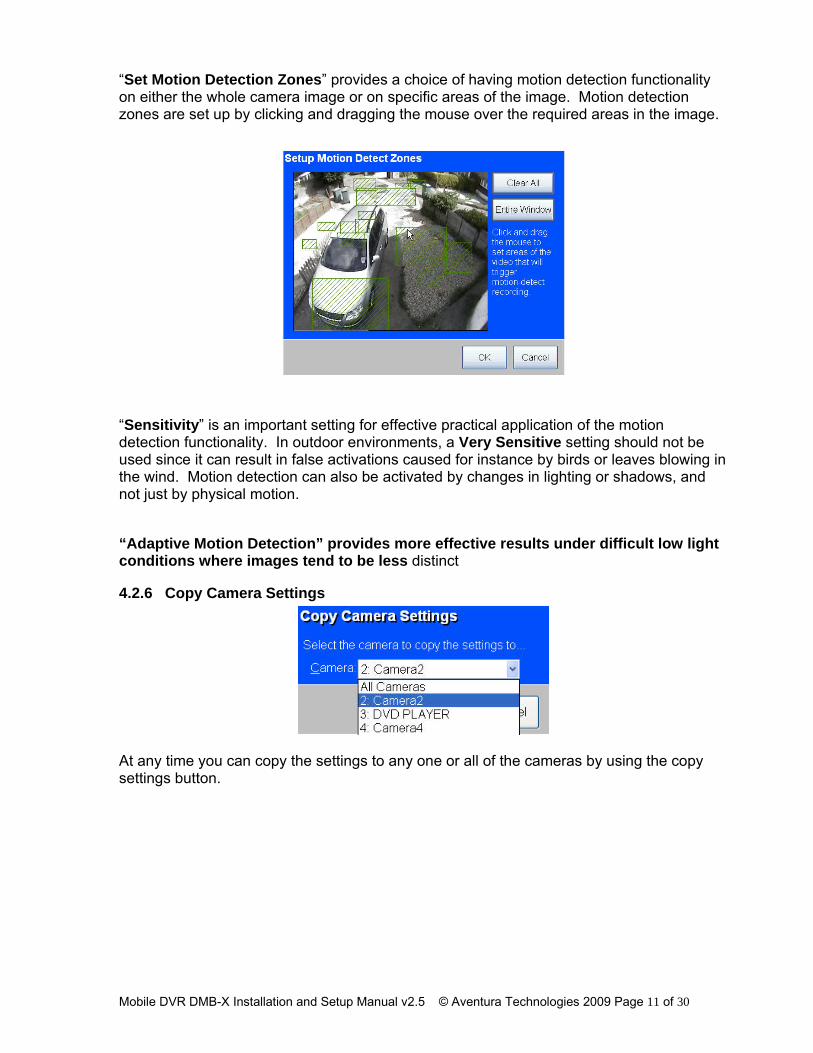
“Set Motion Detection Zones” provides a choice of having motion detection functionality on either the whole camera image or on specific areas of the image. Motion detection zones are set up by clicking and dragging the mouse over the required areas in the image. “Sensitivity” is an important setting for effective practical application of the motion detection functionality. In outdoor environments, a Very Sensitive setting should not be used since it can result in false activations caused for instance by birds or leaves blowing in the wind. Motion detection can also be activated by changes in lighting or shadows, and not just by physical motion.
“Adaptive Motion Detection” provides more effective results under difficult low light conditions where images tend to be less distinct
4.2.6 Copy Camera Settings
At any time you can copy the settings to any one or all of the cameras by using the copy settings button. B
Mobile DVR DMB-X Installation and Setup Manual v2.5 © Aventura Technologies 2009 Page 12 of 30
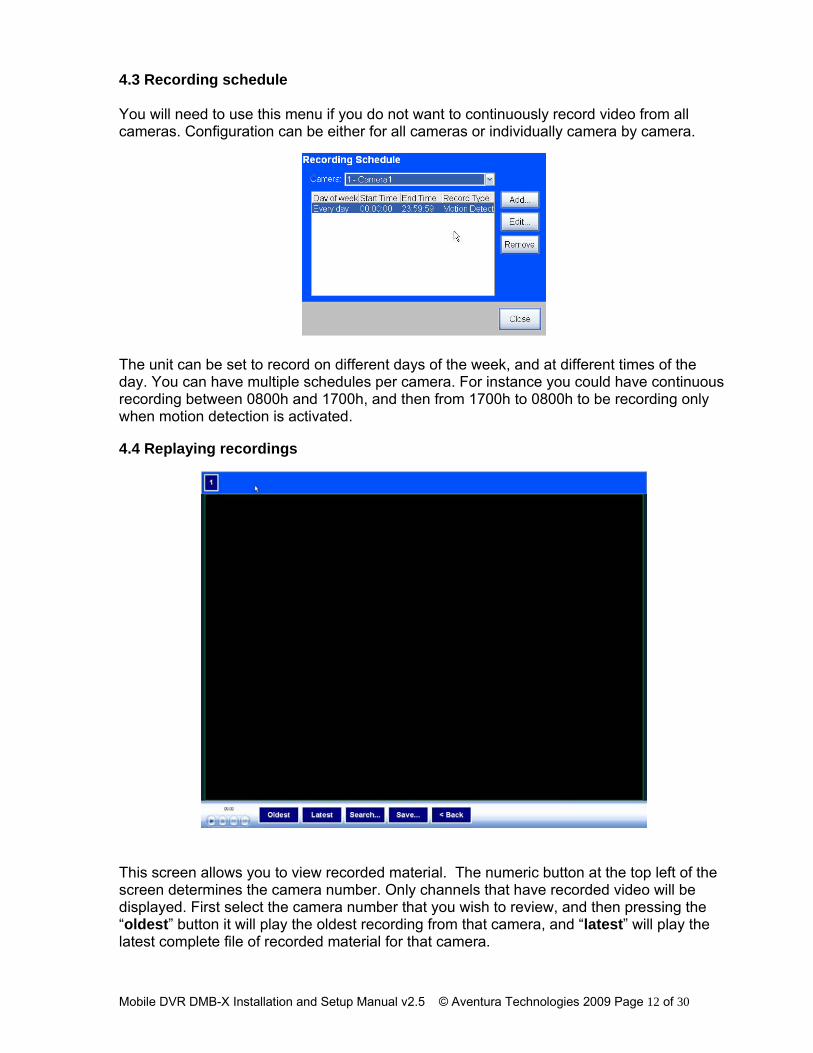
4.3 Recording schedule You will need to use this menu if you do not want to continuously record video from all cameras. Configuration can be either for all cameras or individually camera by camera.
The unit can be set to record on different days of the week, and at different times of the day. You can have multiple schedules per camera. For instance you could have continuous recording between 0800h and 1700h, and then from 1700h to 0800h to be recording only when motion detection is activated.
0B4.4 Replaying recordings This screen allows you to view recorded material. The numeric button at the top left of the screen determines the camera number. Only channels that have recorded video will be displayed. First select the camera number that you wish to review, and then pressing the “oldest” button it will play the oldest recording from that camera, and “latest” will play the latest complete file of recorded material for that camera.
Mobile DVR DMB-X Installation and Setup Manual v2.5 © Aventura Technologies 2009 Page 13 of 30
IMPORTANT NOTE: The Mobile DVR’s video recordings are compiled into files of a configurable minimum size. See Disk Usage Menu below for how to configure. Only when the minimum file size is reached is the video recording stored and made available for review. This is an important feature to note because you can only view the latest complete file i.e. you cannot view the very latest video images that are yet to form the minimum-sized file. You can pause, speed up or slow down the video replay using the play controls.
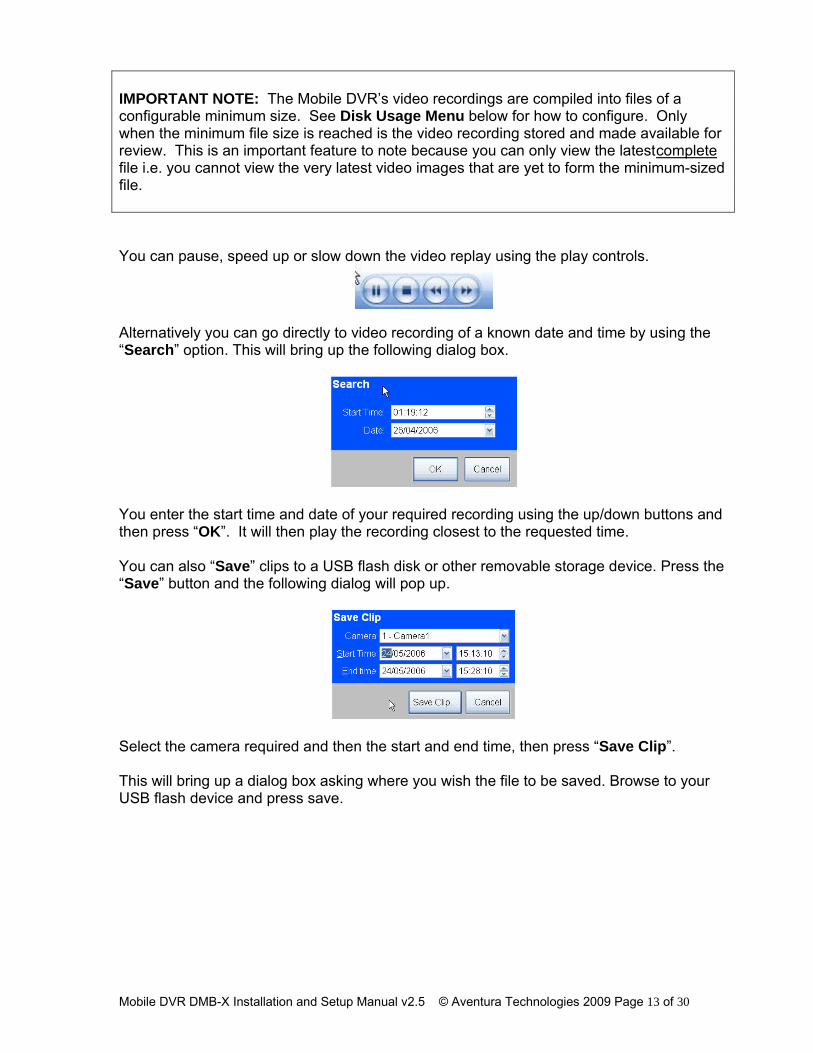
Alternatively you can go directly to video recording of a known date and time by using the “Search” option. This will bring up the following dialog box.
You enter the start time and date of your required recording using the up/down buttons and then press “OK”. It will then play the recording closest to the requested time. You can also “Save” clips to a USB flash disk or other removable storage device. Press the “Save” button and the following dialog will pop up.
Select the camera required and then the start and end time, then press “Save Clip”. This will bring up a dialog box asking where you wish the file to be saved. Browse to your USB flash device and press save.

Mobile DVR DMB-X Installation and Setup Manual v2.5 © Aventura Technologies 2009 Page 14 of 30
11B4.5 Administration Menu
This menu has a number of sub menus. We will go through them one at a time.
4.5.1 Utilities menu
13B4.5.1.1 View/Manage Log Files Menu
Mobile DVR DMB-X Installation and Setup Manual v2.5 © Aventura Technologies 2009 Page 15 of 30
This menu will show you all the log files for the system. If you click on one of the log files it will give you information such as start-up/shutdown times, log on info, and parameters that have been changed. These log files contain valuable information for maintenance support activities.
14B4.5.1.2 Write CD/DVD menu
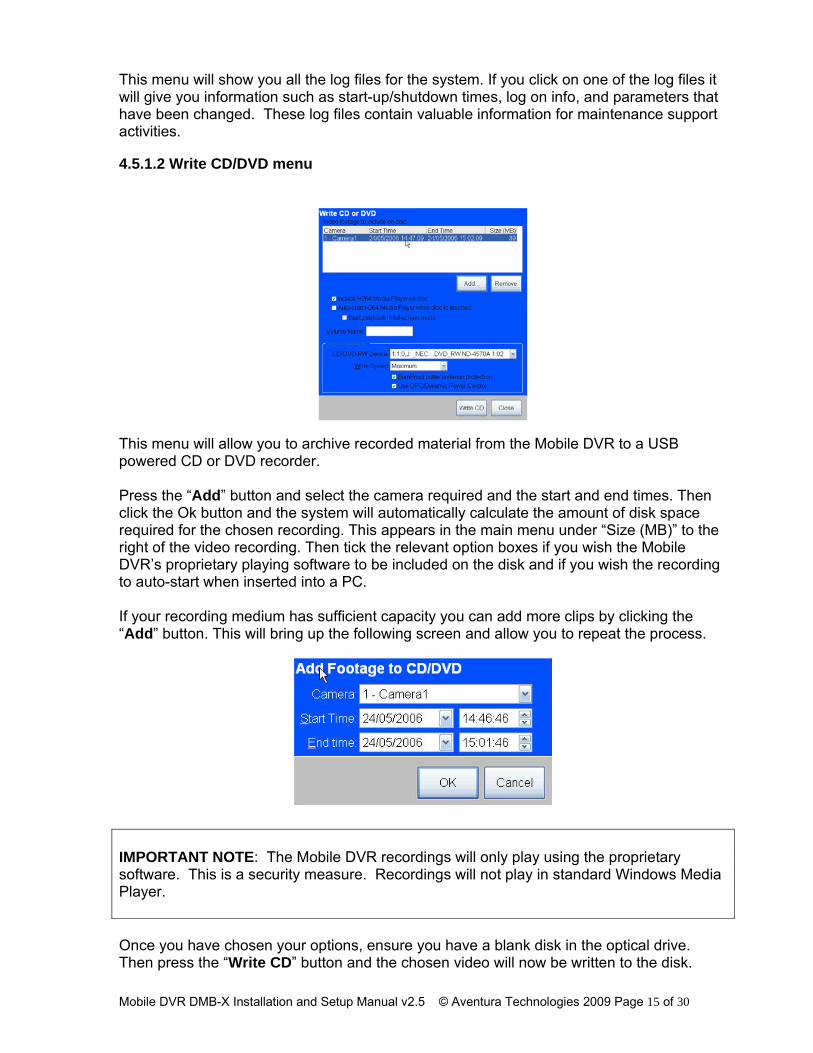
This menu will allow you to archive recorded material from the Mobile DVR to a USB powered CD or DVD recorder. Press the “Add” button and select the camera required and the start and end times. Then click the Ok button and the system will automatically calculate the amount of disk space required for the chosen recording. This appears in the main menu under “Size (MB)” to the right of the video recording. Then tick the relevant option boxes if you wish the Mobile DVR’s proprietary playing software to be included on the disk and if you wish the recording to auto-start when inserted into a PC. If your recording medium has sufficient capacity you can add more clips by clicking the “Add” button. This will bring up the following screen and allow you to repeat the process. IMPORTANT NOTE: The Mobile DVR recordings will only play using the proprietary software. This is a security measure. Recordings will not play in standard Windows Media Player. Once you have chosen your options, ensure you have a blank disk in the optical drive. Then press the “Write CD” button and the chosen video will now be written to the disk.
Mobile DVR DMB-X Installation and Setup Manual v2.5 © Aventura Technologies 2009 Page 16 of 30
15B4.5.1.3 Launch H264 Media Player
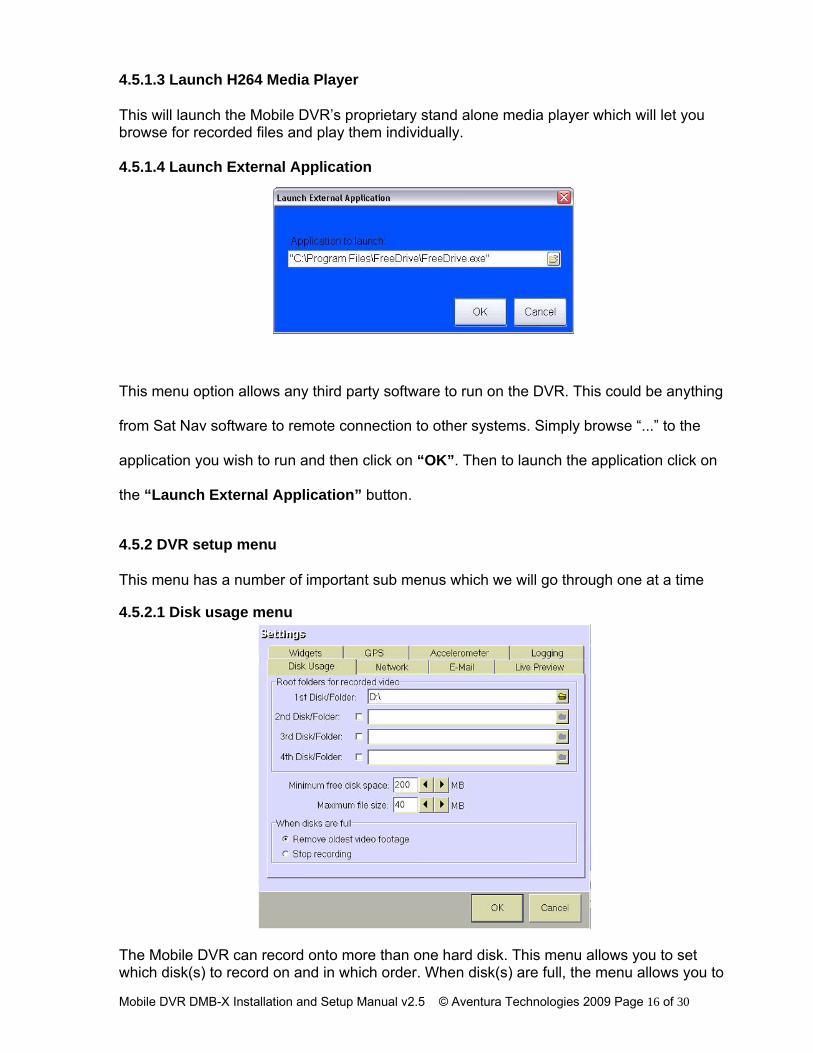
This will launch the Mobile DVR’s proprietary stand alone media player which will let you browse for recorded files and play them individually. 4.5.1.4 Launch External Application
This menu option allows any third party software to run on the DVR. This could be anything
from Sat Nav software to remote connection to other systems. Simply browse “...” to the
application you wish to run and then click on “OK”. Then to launch the application click on
the “Launch External Application” button.
16B4.5.2 DVR setup menu This menu has a number of important sub menus which we will go through one at a time
17B4.5.2.1 Disk usage menu
The Mobile DVR can record onto more than one hard disk. This menu allows you to set which disk(s) to record on and in which order. When disk(s) are full, the menu allows you to
Mobile DVR DMB-X Installation and Setup Manual v2.5 © Aventura Technologies 2009 Page 17 of 30
choose whether to stop recording or set to record over the oldest recordings (which are then lost). In this menu you can determine the file size at which all video recordings are transferred to long term memory and are thus available for replay. When video files are replayed you may notice an occasional short pause whilst video is buffered for the next file. The default setting of 40MB is a good compromise between disk fragmentation and replay performance.18B
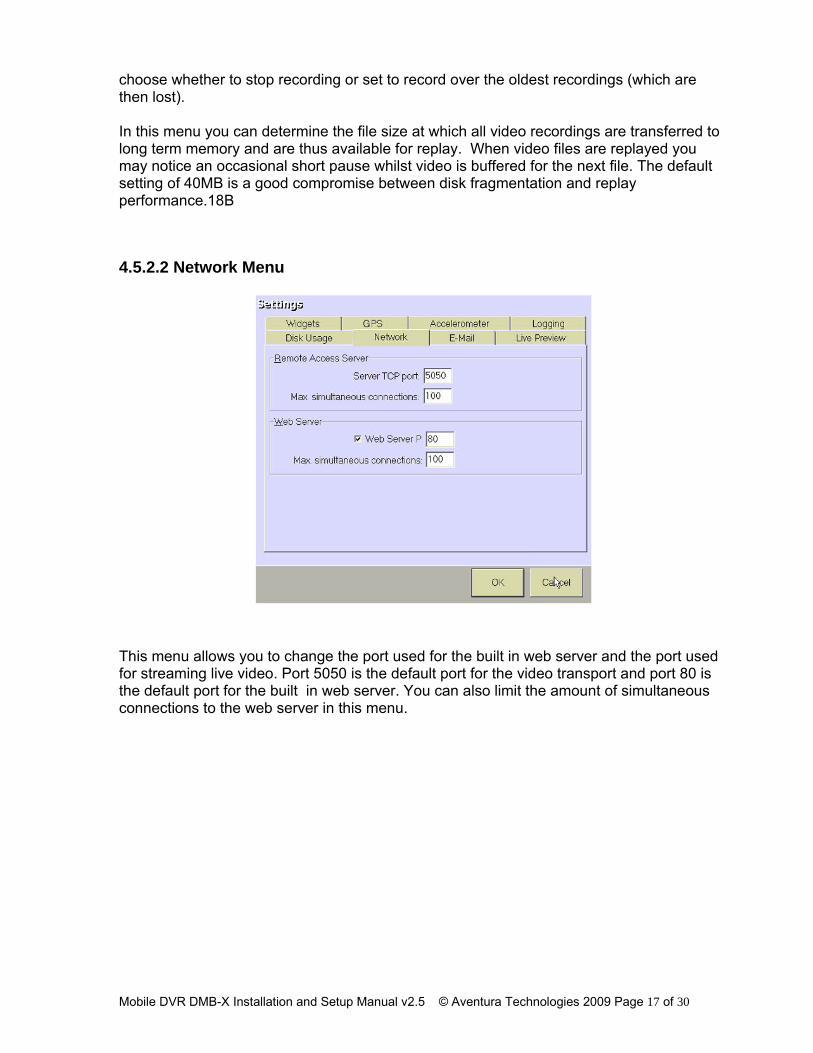
4.5.2.2 Network Menu
This menu allows you to change the port used for the built in web server and the port used for streaming live video. Port 5050 is the default port for the video transport and port 80 is the default port for the built in web server. You can also limit the amount of simultaneous connections to the web server in this menu.
Mobile DVR DMB-X Installation and Setup Manual v2.5 © Aventura Technologies 2009 Page 18 of 30
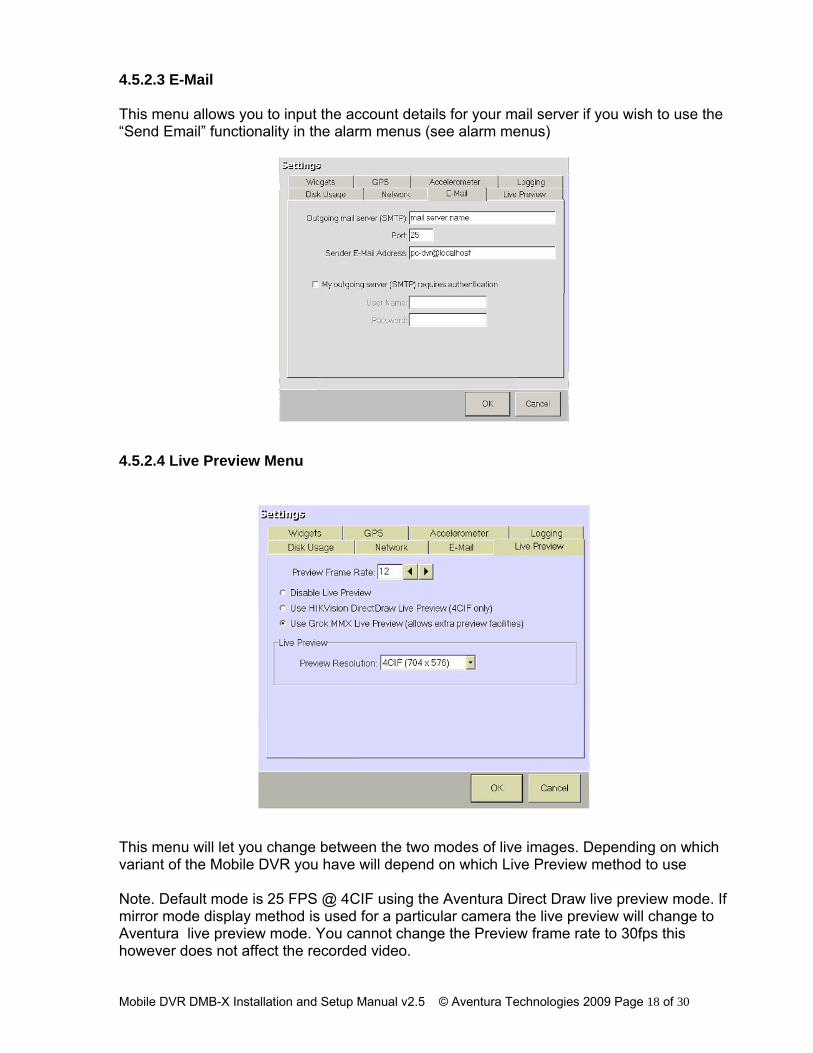
4.5.2.3 E-Mail This menu allows you to input the account details for your mail server if you wish to use the “Send Email” functionality in the alarm menus (see alarm menus)
1B4.5.2.4 Live Preview Menu
This menu will let you change between the two modes of live images. Depending on which variant of the Mobile DVR you have will depend on which Live Preview method to use Note. Default mode is 25 FPS @ 4CIF using the Aventura Direct Draw live preview mode. If mirror mode display method is used for a particular camera the live preview will change to Aventura live preview mode. You cannot change the Preview frame rate to 30fps this however does not affect the recorded video.
Mobile DVR DMB-X Installation and Setup Manual v2.5 © Aventura Technologies 2009 Page 19 of 30
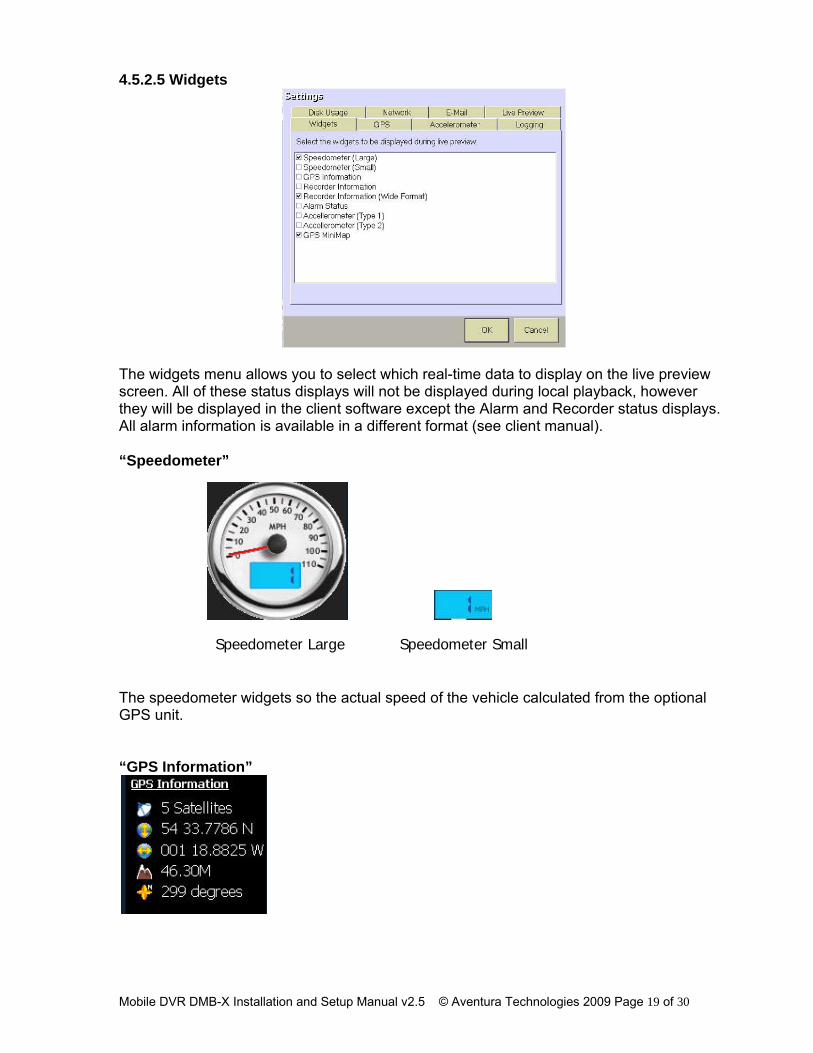
4.5.2.5 Widgets
The widgets menu allows you to select which real-time data to display on the live preview screen. All of these status displays will not be displayed during local playback, however they will be displayed in the client software except the Alarm and Recorder status displays. All alarm information is available in a different format (see client manual). “Speedometer”
The speedometer widgets so the actual speed of the vehicle calculated from the optional GPS unit. “GPS Information”
Speedometer Large Speedometer Small
Mobile DVR DMB-X Installation and Setup Manual v2.5 © Aventura Technologies 2009 Page 20 of 30
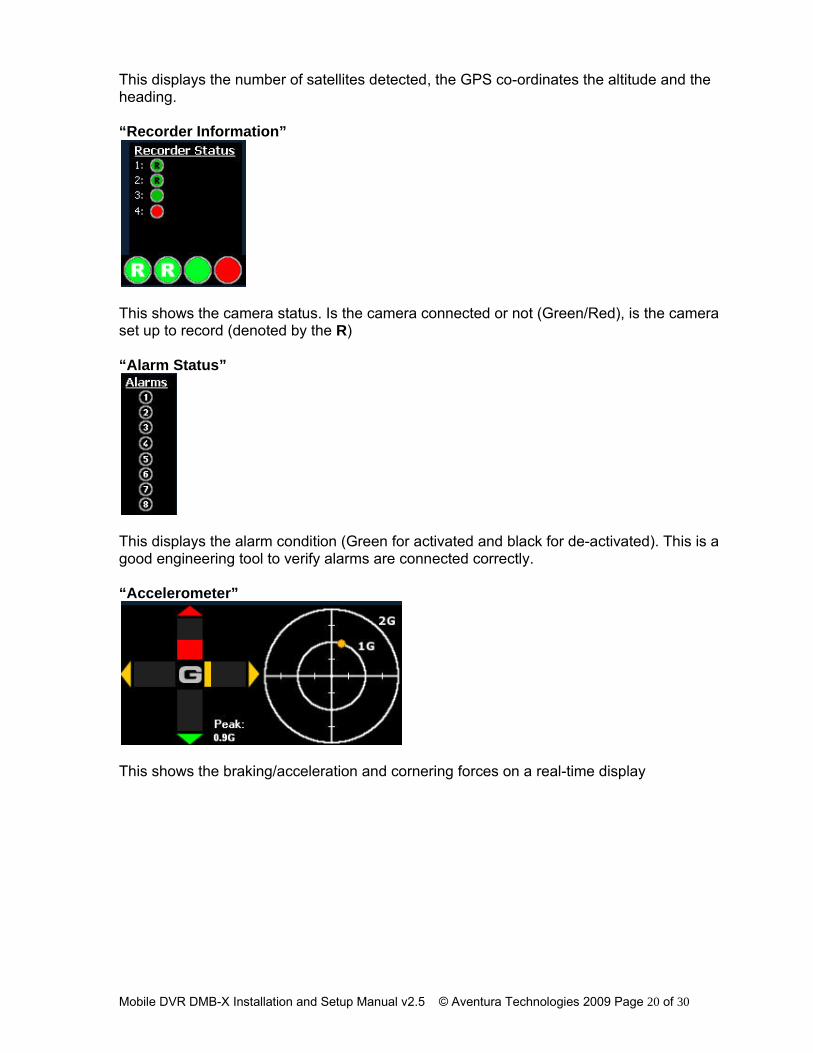
This displays the number of satellites detected, the GPS co-ordinates the altitude and the heading. “Recorder Information”
This shows the camera status. Is the camera connected or not (Green/Red), is the camera set up to record (denoted by the R) “Alarm Status”
This displays the alarm condition (Green for activated and black for de-activated). This is a good engineering tool to verify alarms are connected correctly. “Accelerometer”
This shows the braking/acceleration and cornering forces on a real-time display
“GPS Mi
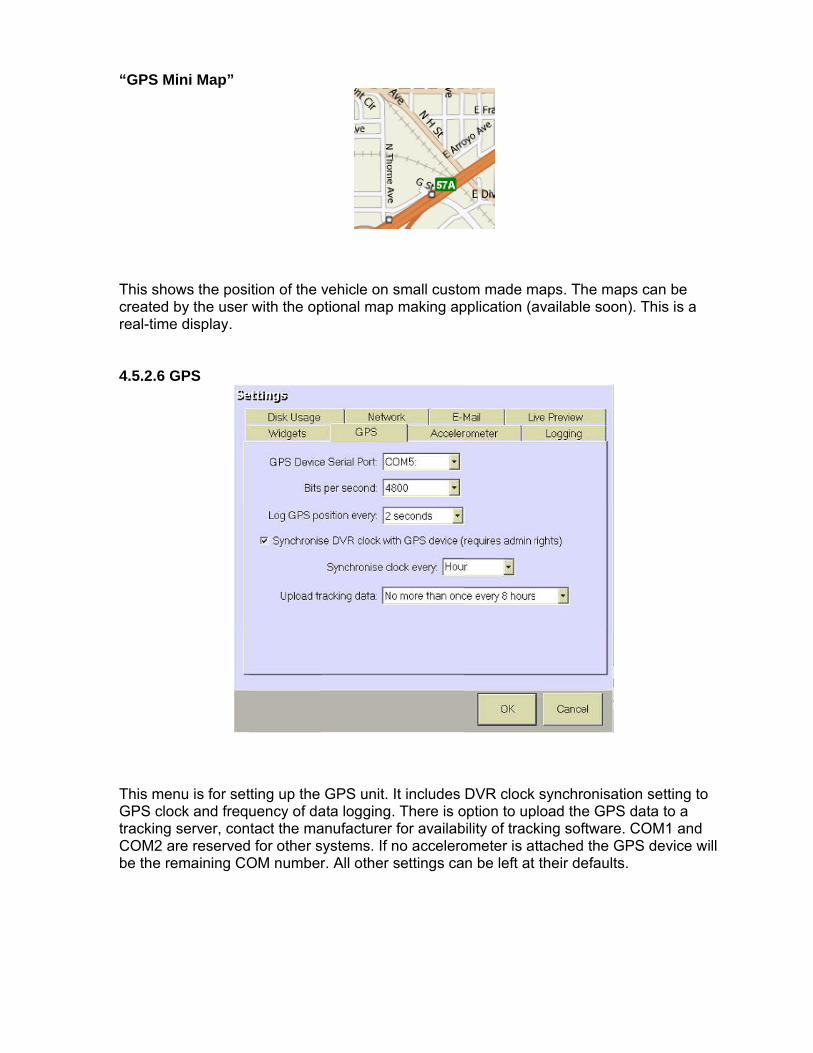
This showcreated breal-time 4.5.2.6 G
This menGPS cloctracking sCOM2 arbe the re
ini Map”
ws the posiby the user
display.
GPS
nu is for setck and freqserver, conre reservedmaining CO
ition of the with the op
tting up the uency of datact the ma
d for other sOM numbe
vehicle on ptional map
GPS unit. ata logginganufacturer systems. If nr. All other
small custop making ap
It includes. There is ofor availab
no accelerosettings ca
om made mpplication (a
DVR clock option to upbility of trackometer is atn be left at
maps. The mavailable so
synchronispload the GPking softwattached thetheir defau
maps can boon). This is
sation settinPS data to
are. COM1 ae GPS devicults.
e s a
ng to a and ce will

Mobile DVR DMB-X Installation and Setup Manual v2.5 © Aventura Technologies 2009 Page 22 of 30
4.5.2.7 Accelerometer
This screen allows you to change the parameters of the optional Accelerometer (G-Chip). The settings are the sample frequency, this is either 5hz,10hz or 20hz the higher the figure the more accurate the data (1hz = 1 sample per second so 20hz = 20 samples per second), however as this has such a small impact on HDD space used we recommend you always use the highest 20Hz setting. 4.5.2.8 Logging
This allows you to set the amount of time in days for each type of data logged by the system irrespective of the video data recorded. There is an option to duplicate the server
Mobile DVR DMB-X Installation and Setup Manual v2.5 © Aventura Technologies 2009 Page 23 of 30
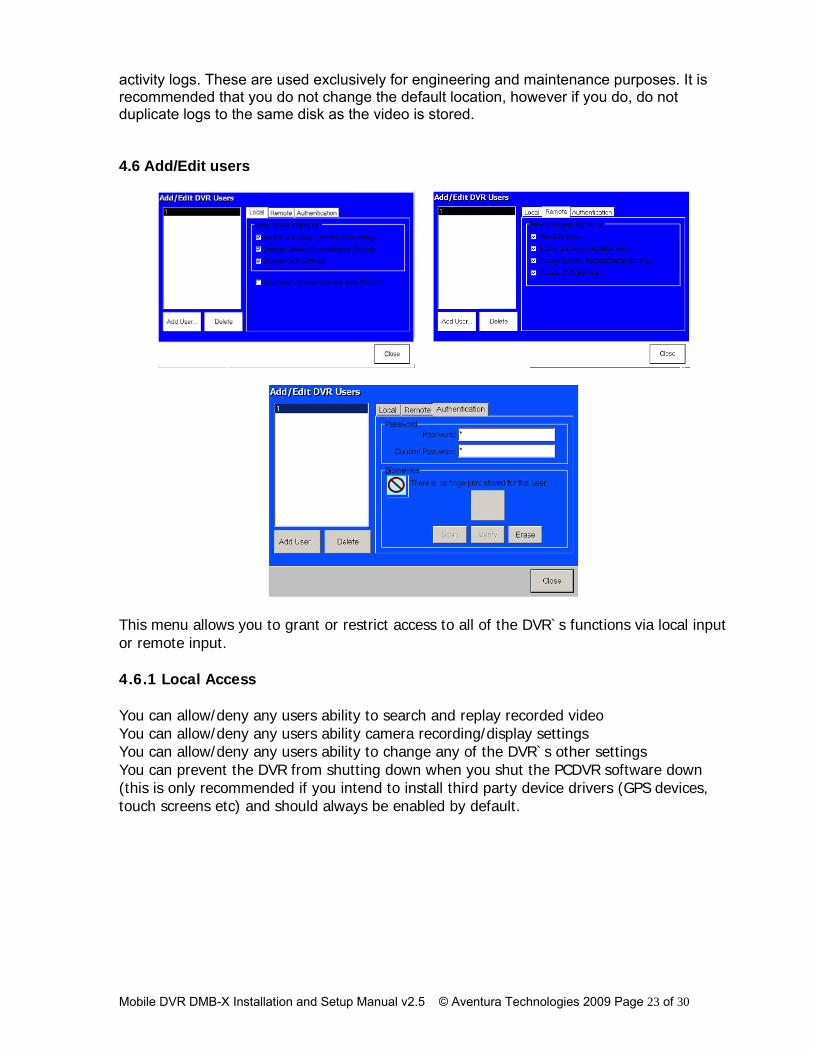
activity logs. These are used exclusively for engineering and maintenance purposes. It is recommended that you do not change the default location, however if you do, do not duplicate logs to the same disk as the video is stored. 4.6 Add/Edit users
This menu allows you to grant or restrict access to all of the DVR`s functions via local input or remote input. 4.6.1 Local Access You can allow/deny any users ability to search and replay recorded video You can allow/deny any users ability camera recording/display settings You can allow/deny any users ability to change any of the DVR`s other settings You can prevent the DVR from shutting down when you shut the PCDVR software down (this is only recommended if you intend to install third party device drivers (GPS devices, touch screens etc) and should always be enabled by default.
Mobile DVR DMB-X Installation and Setup Manual v2.5 © Aventura Technologies 2009 Page 24 of 30
4.6.2 Remote Access You can allow/deny any user ability to view live video through the web server. You can allow/deny any user the ability to search and replay recorded video through the web server. You can allow/deny any users ability camera recording/display settings through the web server. You can allow/deny any users ability to change any of the DVR`s other settings through the web server. You can allow/deny any users ability to change any of the DVR`s other settings through the web server. Note. Ensure you do not uncheck BOTH local and remote change DVR settings for the main user as you will lock yourself out of the unit and it will have to be returned to the factory to be unlocked. 4.6.3 Authentication This screen allows you to add new users to the system and setup that users username and password. There is also biometric support for “Suprema” biometrics devices.
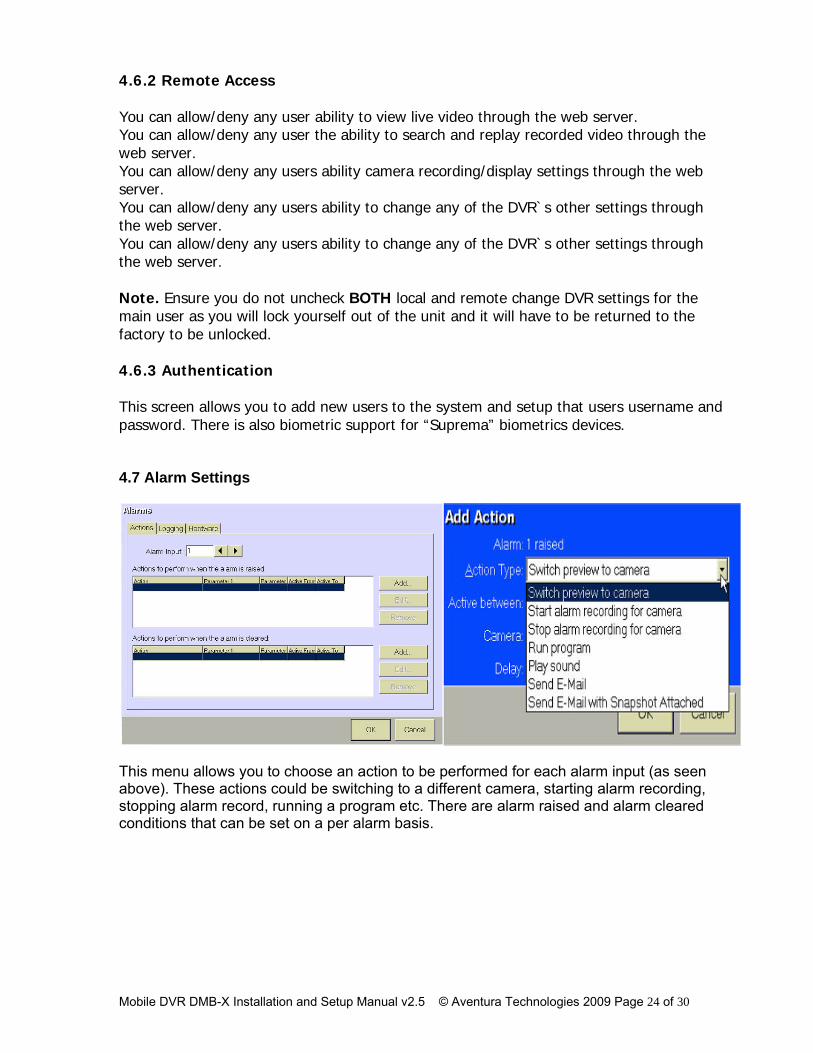
4.7 Alarm Settings
This menu allows you to choose an action to be performed for each alarm input (as seen above). These actions could be switching to a different camera, starting alarm recording, stopping alarm record, running a program etc. There are alarm raised and alarm cleared conditions that can be set on a per alarm basis.
Mobile DVR DMB-X Installation and Setup Manual v2.5 © Aventura Technologies 2009 Page 25 of 30
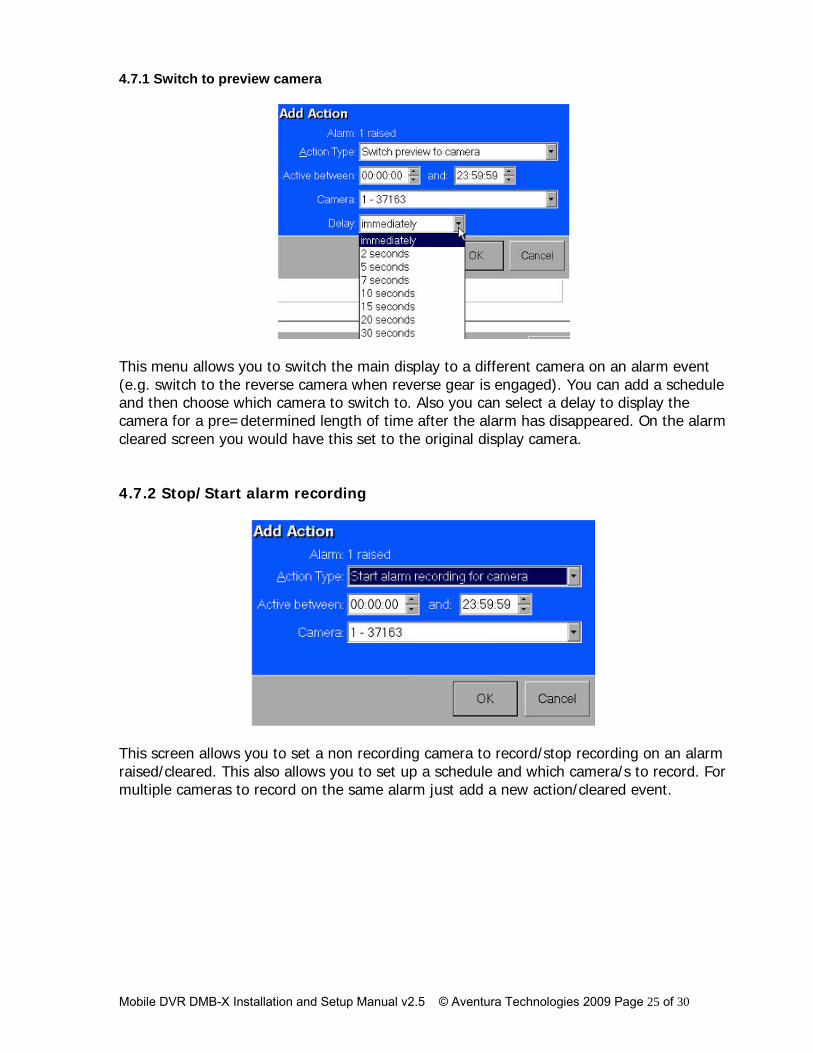
4.7.1 Switch to preview camera
This menu allows you to switch the main display to a different camera on an alarm event (e.g. switch to the reverse camera when reverse gear is engaged). You can add a schedule and then choose which camera to switch to. Also you can select a delay to display the camera for a pre=determined length of time after the alarm has disappeared. On the alarm cleared screen you would have this set to the original display camera. 4.7.2 Stop/Start alarm recording
This screen allows you to set a non recording camera to record/stop recording on an alarm raised/cleared. This also allows you to set up a schedule and which camera/s to record. For multiple cameras to record on the same alarm just add a new action/cleared event.
Mobile DVR DMB-X Installation and Setup Manual v2.5 © Aventura Technologies 2009 Page 26 of 30
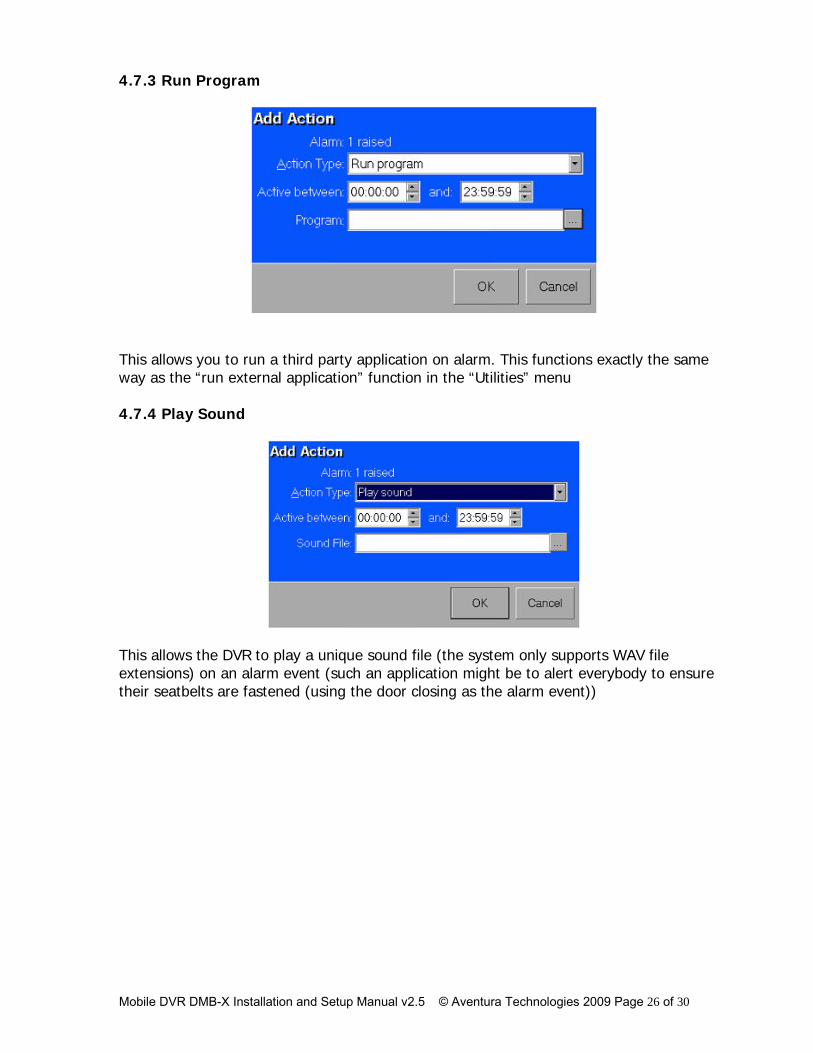
4.7.3 Run Program
This allows you to run a third party application on alarm. This functions exactly the same way as the “run external application” function in the “Utilities” menu 4.7.4 Play Sound
This allows the DVR to play a unique sound file (the system only supports WAV file extensions) on an alarm event (such an application might be to alert everybody to ensure their seatbelts are fastened (using the door closing as the alarm event))
Mobile DVR DMB-X Installation and Setup Manual v2.5 © Aventura Technologies 2009 Page 27 of 30
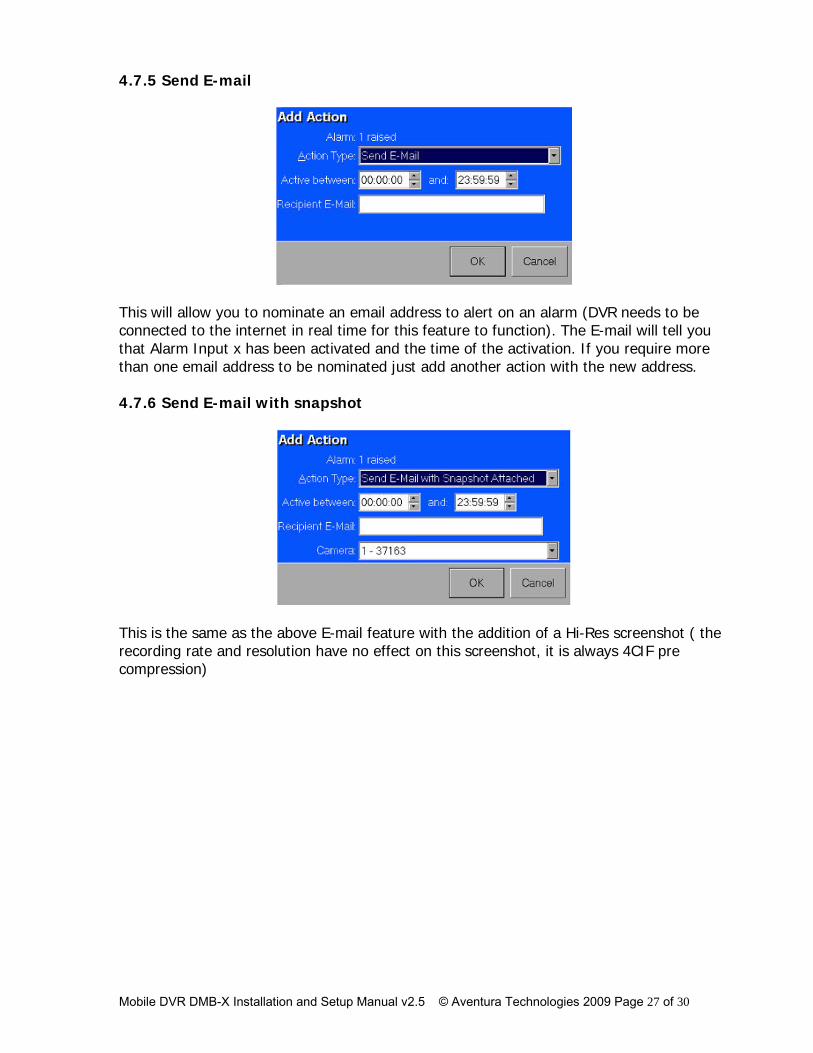
4.7.5 Send E-mail
This will allow you to nominate an email address to alert on an alarm (DVR needs to be connected to the internet in real time for this feature to function). The E-mail will tell you that Alarm Input x has been activated and the time of the activation. If you require more than one email address to be nominated just add another action with the new address. 4.7.6 Send E-mail with snapshot
This is the same as the above E-mail feature with the addition of a Hi-Res screenshot ( the recording rate and resolution have no effect on this screenshot, it is always 4CIF pre compression)
Mobile DVR DMB-X Installation and Setup Manual v2.5 © Aventura Technologies 2009 Page 28 of 30
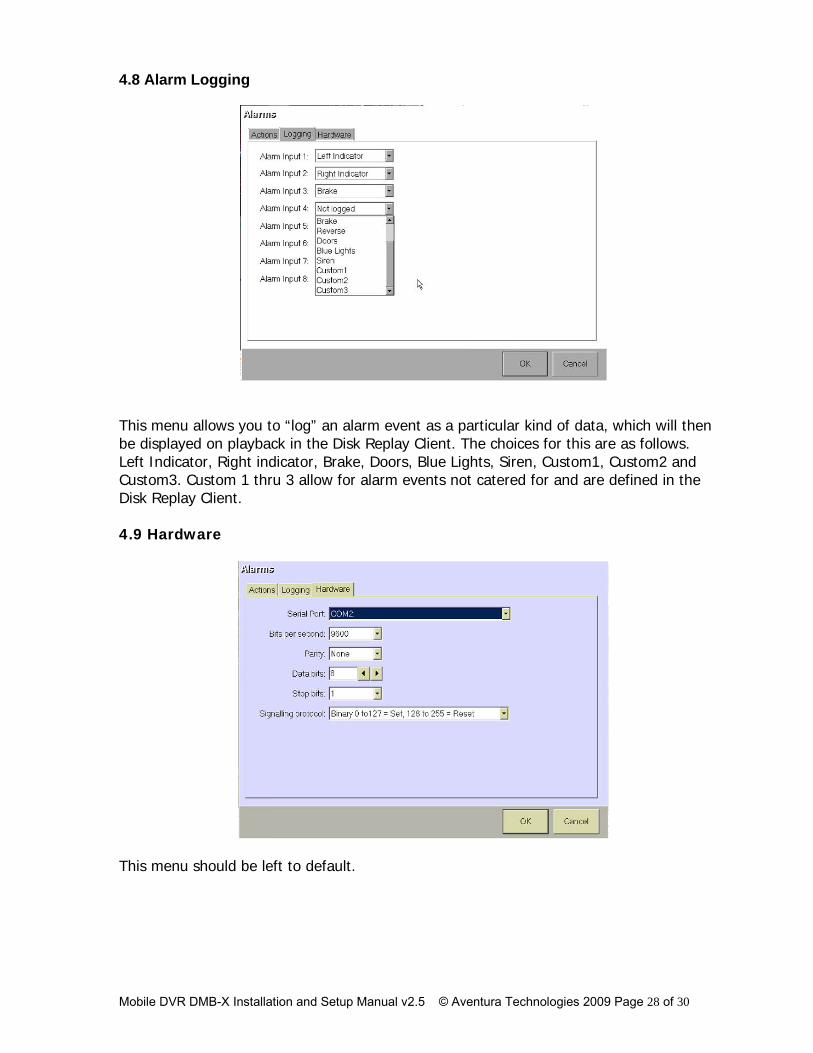
4.8 Alarm Logging
This menu allows you to “log” an alarm event as a particular kind of data, which will then be displayed on playback in the Disk Replay Client. The choices for this are as follows. Left Indicator, Right indicator, Brake, Doors, Blue Lights, Siren, Custom1, Custom2 and Custom3. Custom 1 thru 3 allow for alarm events not catered for and are defined in the Disk Replay Client. 4.9 Hardware
This menu should be left to default.
Mobile DVR DMB-X Installation and Setup Manual v2.5 © Aventura Technologies 2009 Page 29 of 30
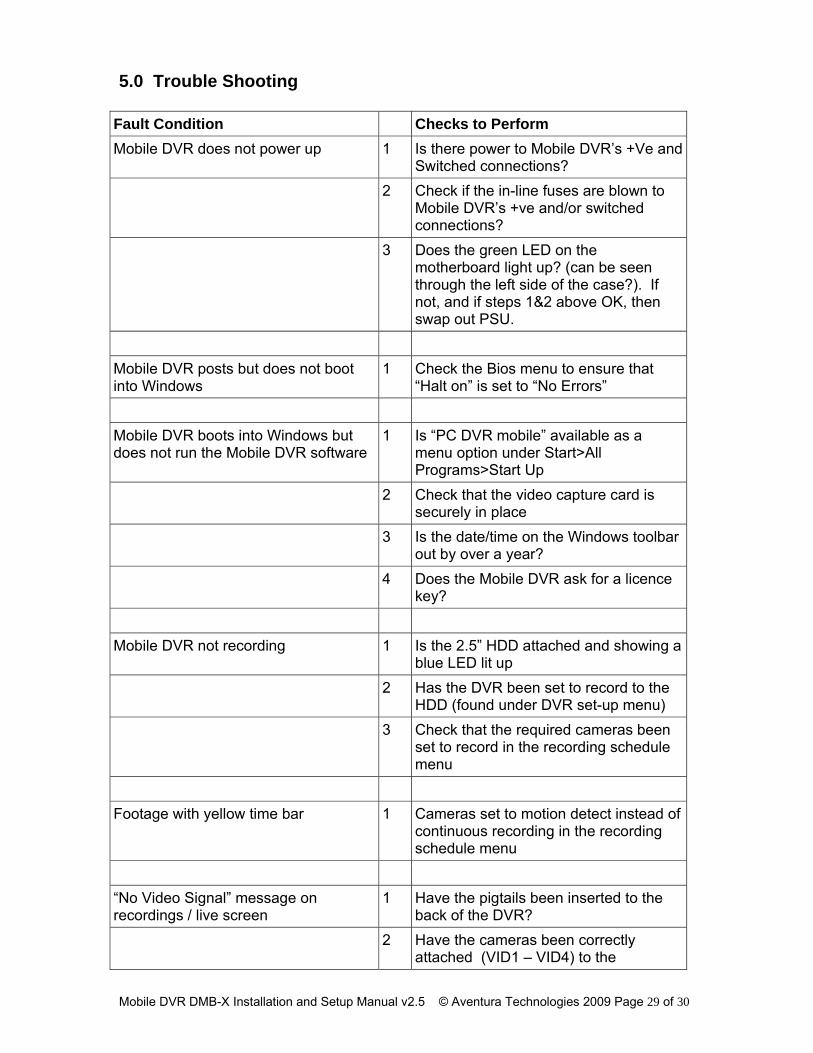
5.0 Trouble Shooting
Fault Condition Checks to Perform Mobile DVR does not power up 1 Is there power to Mobile DVR’s +Ve and
Switched connections? 2 Check if the in-line fuses are blown to
Mobile DVR’s +ve and/or switched connections?
3 Does the green LED on the motherboard light up? (can be seen through the left side of the case?). If not, and if steps 1&2 above OK, then swap out PSU.
Mobile DVR posts but does not boot into Windows
1 Check the Bios menu to ensure that “Halt on” is set to “No Errors”
Mobile DVR boots into Windows but does not run the Mobile DVR software
1 Is “PC DVR mobile” available as a menu option under Start>All Programs>Start Up
2 Check that the video capture card is securely in place
3 Is the date/time on the Windows toolbar out by over a year?
4 Does the Mobile DVR ask for a licence key?
Mobile DVR not recording 1 Is the 2.5” HDD attached and showing a
blue LED lit up 2 Has the DVR been set to record to the
HDD (found under DVR set-up menu) 3 Check that the required cameras been
set to record in the recording schedule menu
Footage with yellow time bar 1 Cameras set to motion detect instead of
continuous recording in the recording schedule menu
“No Video Signal” message on recordings / live screen
1 Have the pigtails been inserted to the back of the DVR?
2 Have the cameras been correctly attached (VID1 – VID4) to the

Mobile DVR DMB-X Installation and Setup Manual v2.5 © Aventura Technologies 2009 Page 30 of 30
corresponding DVR inputs and not to any audio inputs
3 Is there 12V power to the cameras Monitor goes off after 20mins. 1 Check the power options properties tab
under the Display properties/Screen saver tab in Windows
--END-- In case of difficulty or technical query relating to any of the above please contact us at the address shown below.
180 Adams Ave. Hauppauge, NY. 11788 USA
Tel: 1-631-300-4000 Fax: 1-631-434-7000