Embed Size (px)
Citation preview
ATTENTION
PLEASE READ THIS SOFTWARE LICENSE AGREEMENT (“AGREEMENT”) CAREFULLY BEFORE USING THIS SOFTWARE. YOU ARE ONLY PERMITTED TO USE THIS SOFTWARE PURSUANT TO THE TERMS AND CONDITIONS OF THIS AGREE-MENT. THIS AGREEMENT IS BETWEEN YOU (AS AN INDIVIDUAL OR LEGAL ENTITY) AND YAMAHA CORPORATION (“YAMAHA”). BY Downloading, installing, copying, or otherwise using this software YOU ARE AGREEING to BE BOUND BY THE TERMS OF THIS LICENSE. If you do not agree with the terms, do not download, install, copy, or otherwise use this software. if you have down-loaded or installed THE SOFTWARE AND DO NOT AGREE TO THE TERMS, PROMPTLY DELETE THE SOFTWARE.
1. GRANT OF LICENSE AND COPYRIGHTYamaha hereby grants you the right to use one copy of the soft-ware program(s) and data (“SOFTWARE”) accompanying this Agreement. The term SOFTWARE shall encompass any updates to the accompanying software and data. The SOFTWARE is owned by Yamaha and/or Yamaha’s licensor(s), and is protected by relevant copyright laws and all applicable treaty provisions. While you are entitled to claim ownership of the data created with the use of SOFTWARE, the SOFTWARE will continue to be protected under relevant copyrights. • You may use the SOFTWARE on a single computer. • You may make one copy of the SOFTWARE in machine-
readable form for backup purposes only, if the SOFTWARE is on media where such backup copy is permitted. On the backup copy, you must reproduce Yamaha’s copyright notice and any other proprietary legends that were on the original copy of the SOFTWARE.
• You may permanently transfer to a third party all your rights in the SOFTWARE, provided that you do not retain any copies and the recipient reads and agrees to the terms of this Agree-ment.
2. RESTRICTIONS• You may not engage in reverse engineering, disassembly,
decompilation or otherwise deriving a source code form of the SOFTWARE by any method whatsoever.
• You may not reproduce, modify, change, rent, lease, or dis-tribute the SOFTWARE in whole or in part, or create deriva-tive works of the SOFTWARE.
• You may not electronically transmit the SOFTWARE from one computer to another or share the SOFTWARE in a net-work with other computers.
• You may not use the SOFTWARE to distribute illegal data or data that violates public policy.
• You may not initiate services based on the use of the SOFT-WARE without permission by Yamaha Corporation.
Copyrighted data, including but not limited to MIDI data for songs, obtained by means of the SOFTWARE, are subject to the following restrictions which you must observe. • Data received by means of the SOFTWARE may not be used
for any commercial purposes without permission of the copy-right owner.
• Data received by means of the SOFTWARE may not be dupli-cated, transferred, or distributed, or played back or performed for listeners in public without permission of the copyright owner.
• The encryption of data received by means of the SOFTWARE may not be removed nor may the electronic watermark be modified without permission of the copyright owner.
3. TERMINATIONThis Agreement becomes effective on the day that you receive the SOFTWARE and remains effective until terminated. If any copyright law or provisions of this Agreement is violated, the Agreement shall terminate automatically and immediately with-out notice from Yamaha. Upon such termination, you must immediately destroy the licensed SOFTWARE, any accompany-ing written documents and all copies thereof.
4. DISCLAIMER OF WARRANTY ON SOFTWARE You expressly acknowledge and agree that use of the SOFT-WARE is at your sole risk. The SOFTWARE and related docu-mentation are provided “AS IS” and without warranty of any kind. NOTWITHSTANDING ANY OTHER PROVISION OF THIS AGREEMENT, YAMAHA EXPRESSLY DISCLAIMS ALL WARRANTIES AS TO THE SOFTWARE, EXPRESS, AND IMPLIED, INCLUDING BUT NOT LIMITED TO THE IMPLIED WARRANTIES OF MERCHANTABILITY, FIT-NESS FOR A PARTICULAR PURPOSE AND NON-INFRINGEMENT OF THIRD PARTY RIGHTS. SPECIFI-CALLY, BUT WITHOUT LIMITING THE FOREGOING, YAMAHA DOES NOT WARRANT THAT THE SOFTWARE WILL MEET YOUR REQUIREMENTS, THAT THE OPERA-TION OF THE SOFTWARE WILL BE UNINTERRUPTED OR ERROR-FREE, OR THAT DEFECTS IN THE SOFTWARE WILL BE CORRECTED.
Software License Agreement
mLAN Driver / mLAN Tools Installation Guide
mLAN Driver / mLAN Tools Installation Guide
mLAN Driver/mLAN Tools Installation Guide 1
5. LIMITATION OF LIABILITYYAMAHA’S ENTIRE OBLIGATION HEREUNDER SHALL BE TO PERMIT USE OF THE SOFTWARE UNDER THE TERMS HEREOF. IN NO EVENT SHALL YAMAHA BE LIA-BLE TO YOU OR ANY OTHER PERSON FOR ANY DAM-AGES, INCLUDING, WITHOUT LIMITATION, ANY DIRECT, INDIRECT, INCIDENTAL OR CONSEQUENTIAL DAMAGES, EXPENSES, LOST PROFITS, LOST DATA OR OTHER DAMAGES ARISING OUT OF THE USE, MISUSE OR INABILITY TO USE THE SOFTWARE, EVEN IF YAMAHA OR AN AUTHORIZED DEALER HAS BEEN ADVISED OF THE POSSIBILITY OF SUCH DAMAGES. In no event shall Yamaha’s total liability to you for all damages, losses and causes of action (whether in contract, tort or other-wise) exceed the amount paid for the SOFTWARE.
6. THIRD PARTY SOFTWAREThird party software and data (“THIRD PARTY SOFTWARE”) may be attached to the SOFTWARE. If, in the written materials or the electronic data accompanying the Software, Yamaha iden-tifies any software and data as THIRD PARTY SOFTWARE, you acknowledge and agree that you must abide by the provi-sions of any Agreement provided with the THIRD PARTY SOFTWARE and that the party providing the THIRD PARTY SOFTWARE is responsible for any warranty or liability related to or arising from the THIRD PARTY SOFTWARE. Yamaha is not responsible in any way for the THIRD PARTY SOFTWARE or your use thereof.• Yamaha provides no express warranties as to the THIRD
PARTY SOFTWARE. IN ADDITION, YAMAHA
EXPRESSLY DISCLAIMS ALL IMPLIED WARRANTIES, INCLUDING BUT NOT LIMITED TO THE IMPLIED WARRANTIES OF MERCHANTABILITY AND FITNESS FOR A PARTICULAR PURPOSE, as to the THIRD PARTY SOFTWARE.
• Yamaha shall not provide you with any service or maintenance as to the THIRD PARTY SOFTWARE.
• Yamaha is not liable to you or any other person for any dam-ages, including, without limitation, any direct, indirect, inci-dental or consequential damages, expenses, lost profits, lost data or other damages arising out of the use, misuse or inabil-ity to use the THIRD PARTY SOFTWARE.
7. GENERALThis Agreement shall be interpreted according to and governed by Japanese law without reference to principles of conflict of laws. Any dispute or procedure shall be heard before the Tokyo District Court in Japan. If for any reason a court of competent jurisdiction finds any portion of this Agreement to be unenforce-able, the remainder of this Agreement shall continue in full force and effect.
8. COMPLETE AGREEMENTThis Agreement constitutes the entire agreement between the parties with respect to use of the SOFTWARE and any accompa-nying written materials and supersedes all prior or contempora-neous understandings or agreements, written or oral, regarding the subject matter of this Agreement. No amendment or revision of this Agreement will be binding unless in writing and signed by a fully authorized representative of Yamaha.
• The software and this Installation Guide are the exclusive copyrights of Yamaha Corporation. • Please read carefully the Software Licensing Agreement at the front of this Installation Guide before installing the software. • Copying of the software or reproduction of this Installation Guide in whole or in part by any means is expressly forbidden without the
written consent of the manufacturer. • Yamaha makes no representations or warranties with regard to the use of the software and documentation and cannot be held responsi-
ble for the results of the use of this Installation Guide and the software. • Future upgrades of application and system software and any changes in specifications and functions will be announced at the following
website.http://www.yamahasynth.com/
• The screen displays as illustrated in this Installation Guide are for instructional purposes, and may appear somewhat different from the screens which appear on your computer.
• Copying of the commercially available musical data including but not limited to MIDI data and/or audio data is strictly prohibited except for your personal use.
• Windows is the registered trademark of Microsoft® Corporation. • The company names and product names in this Installation Guide are the trademarks or registered trademarks of their respective com-
panies.
Special Notice
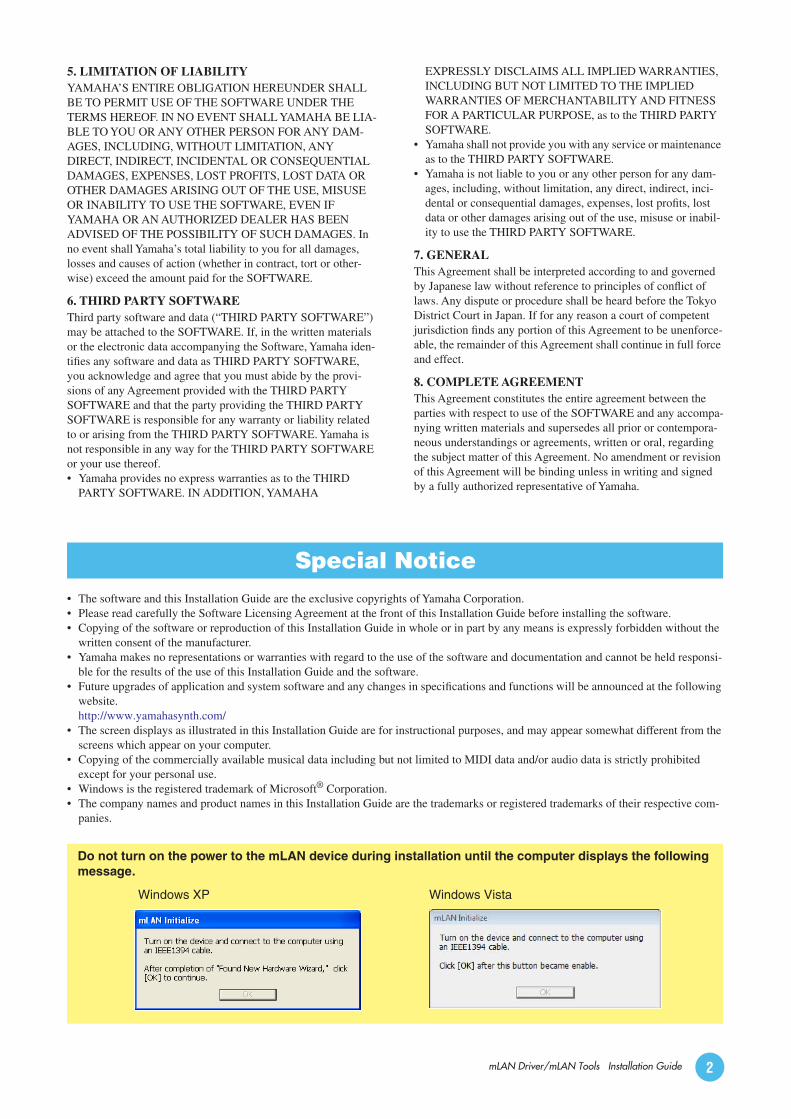
Do not turn on the power to the mLAN device during installation until the computer displays the following message.
Windows XP Windows Vista
mLAN Driver/mLAN Tools Installation Guide 2
The mLAN Driver/mLAN Tools enable you to use the mLAN devices such as 01X, i88X, mLAN16E, mLAN16E2, MY16-mLAN and n8/n12 connected to your computer via an IEEE1394 (mLAN) cable. The following items are included in the mLAN Driver/mLAN Tools.
mLAN Bus Driver
01X Driver
i88X Driver
mLAN16E Driver
MY16-mLAN Driver
n8/n12/mLAN16E2 Driver
mLAN Connection Manager for n8/n12/mLAN16E2
mLAN Auto Connector for 01X/i88X/mLAN16E/MY16-mLAN
mLAN Graphic Patchbay
mLAN Manager
NOTE
• The MOTIF XS8 is equipped with the mLAN16E2 as standard.
To use mLAN, it is necessary to make a connection between the virtual Audio/MIDI terminals of the mLAN devices and enable synchronization between the mLAN devices. Such a setup is referred to as “mLAN connection” in this Installation Guide.
The mLAN connection can be set by using mLAN Auto Connector or mLAN Graphic Patchbay.
When using the n8, n12 or mLAN16E2, mLAN Connection Manager automatically sets the mLAN connection, which can be changed in mLAN Graphic Patchbay.
The system requirements below are necessary for using mLAN Driver/mLAN Tools.
NOTE
• The system requirements below may differ slightly depending on the particular operating system. • For details on minimum requirements for each DAW software, refer to the respective owner’s manual. • You can check the latest version information of mLAN Driver/mLAN Tools, its system requirements and 64bit operating system at the follow-
ing website:http://www.yamahasynth.com/download/
OS: Windows XP Professional SP2 or later/XP Home Edition SP2 or later/Vista (32bit)
Computer: Intel Core/Pentium/Celeron family processor, with an S400 (400Mbps) IEEE1394 (FireWire) or i.LINK terminal (*1).
Hard Disk: Free disk space of 110 MB or more; high-speed hard disk
Windows XP Professional SP2 or later/XP Home Edition SP2 or later
Recommended system requirements (*2)• Connecting a single mLAN device to a computer peer-
to-peer:Computer: 1.66 GHz or higher;
Intel Core 2 Duo processorAvailable Memory: 512 MB or more
• Connecting a computer and three mLAN devices in an mLAN network:Computer: 1.66 GHz or higher;
Intel Core 2 Duo processorAvailable Memory: 512 MB or more
Minimum system requirements (*2)Computer: Intel Pentium 1.4 GHz or Intel
Celeron 1.7 GHz (or higher)Available Memory: 512 MB or more
Windows Vista (32bit)Recommended system requirements (*2)• Connecting a single mLAN device to a computer peer-
to-peer:Computer: 1.8 GHz or higher;
Intel Core 2 Duo processorAvailable Memory: 1 GB or more
• Connecting a computer and three mLAN devices in an mLAN network:Computer: 1.8 GHz or higher;
Intel Core 2 Duo processorAvailable Memory: 1 GB or more
Minimum system requirements (*2)Computer: Intel Pentium 1.4GHz or Intel
Celeron 1.7GHz(or higher)
Available Memory: 512 MB or more
*1 The computer must have an IEEE1394 (FireWire/i.LINK) connec-tor. If there is no connector, install an IEEE1394 interface card (PCI or PC). For more details on system requirements and recommended PCI or PC cards, see the following page: http://www.yamahasynth.com/
What is mLAN Driver/mLAN Tools?
System Requirements
mLAN Driver/mLAN Tools Installation Guide 3
*2 The system requirements listed here apply when playing the audio/MIDI data described below on a typical DAW. This may differ depending on the particular DAW you are using.
Recommended system requirements (Connecting a single mLAN device to a computer peer-to-peer)
Frequency/resolution: 44.1KHz/24-bitAudio Driver: Connected to all In/Out
terminals of each mLAN device
MIDI Driver: Connected to all In/Out terminals of each mLAN device
Audio playback tracks: 16Audio recording tracks: 1MIDI playback tracks: 18MIDI Remote Control / AutomationSend effects (plug-in): 3Insert effects (plug-in): 9Plug-in software synthesizer: 2Latency: about 6 msec
Recommended system requirements (Connecting a com-puter and three mLAN devices)
Frequency/resolution: 44.1KHz/24-bitAudio Driver: 32 In/32 Out (total)MIDI Driver: 5 In/5 Out (total)Audio playback tracks: 16Audio recording tracks: 1MIDI playback tracks: 18MIDI Remote Control / Automation Send effects (plug-in): 3Insert effects (plug-in): 9Plug-in software synthesizer: 2Latency: about 6 msec
Minimum system requirementsFrequency/resolution: 44.1KHz/24-bitAudio Driver: Connected to all In/Out
terminals of each mLAN device
MIDI Driver: Connected to all In/Out terminals of each mLAN device
Audio playback tracks: 15MIDI Remote Control / AutomationSend effects (plug-in): 3Insert effects (plug-in): 9Plug-in software synthesizer: noneLatency: about 50 msec
NOTE
• When using a laptop or notebook computer, a built-in IEEE1394 terminal may not be available. If this is the case, install an appro-priate PC interface card.
mLAN Driver/mLAN Tools Installation Guide 4
Installing the software (page 5)Explains how to install mLAN Driver/mLAN Tools for the first time.
Setting up from the mLAN Auto Connector (page 16)Explains how to connect a computer to an mLAN device (01X, i88X, mLAN16E or MY16-mLAN) via mLAN in a peer-to-peer connection by using mLAN Auto Connector.
Upgrading the firmware of the mLAN device (01X, i88X and mLAN16E) (page 23)Explains how to upgrade the firmware of the 01X, i88X and mLAN16E. An upgrade may be necessary depending on the firmware version.
Uninstalling the software (page 24)Explains how to uninstall mLAN Driver/mLAN Tools.
Updating the software (page 25)Explains how to update the old version of mLAN Driver/mLAN Tools that you’re currently using to the new version of the soft-ware. This section also explains how to replace n Driver or AI Driver that you’re currently using with mLAN Driver/mLAN Tools.
Troubleshooting (page 27)Explains how to solve problems that you may encounter while you are using the mLAN devices along with your computer.
• Keep in mind that noise may be generated when installing or uninstalling mLAN Driver/mLAN Tools. Before performing either of these operations, make sure to lower the output level of each device.
mLAN Driver/mLAN Tools consists of two software components: mLAN Tools 2.0 and mLAN Applications for Yamaha. mLAN Tools 2.0 software includes a driver that enables you to connect mLAN devices to a computer. mLAN Applications for Yamaha enables audio and MIDI signals to be transferred between a computer and mLAN devices via IEEE1394 (mLAN) cables. These software components enable you to connect the 01X, i88X, mLAN16E, mLAN16E2, MY16-mLAN, n8 or n12 to a computer via mLAN.
Follow the steps below to install these software.
NOTE
• For explanations of the error messages, see page 27.
About this guide
Installing the software
CAUTION
If you have already installed mLAN Driver/mLAN Tools, n Driver or AI Driver on your computer:You must uninstall the software. During the installation of mLAN Driver/mLAN Tools, a software maintenance window appears. Follow the instructions in the window to remove the software. The installation of mLAN Driver/mLAN Tools will then resume. For more information on removing the software, refer to page 24.
1 Preparing to installWhen using Windows XP.............................................. page 6When using Windows Vista .......................................... page 9
2 Starting up the InstallerWhen using Windows XP.............................................. page 7When using Windows Vista ........................................ page 10
3 Confirming the installation and changing settings after installation........................... page 12
mLAN Driver/mLAN Tools Installation Guide 5
When using Windows XP
Preparing to install
1 Make sure that the power to the mLAN device is turned off.
2 Disconnect all MIDI cables connected to the MIDI IN/OUT jacks on the mLAN device.
3 Using an IEEE1394 (mLAN) cable, connect the mLAN device directly to the computer (without using a hub), and disconnect all other IEEE1394 devices from the computer.
4 Start the computer and log on to the Adminis-trator account.
5 Select [Start] (→[Settings]) → [Control Panel]. If the control panel appears as shown below, click “Switch to Classic View” in the upper left of the window. All control panels and icons will be displayed.
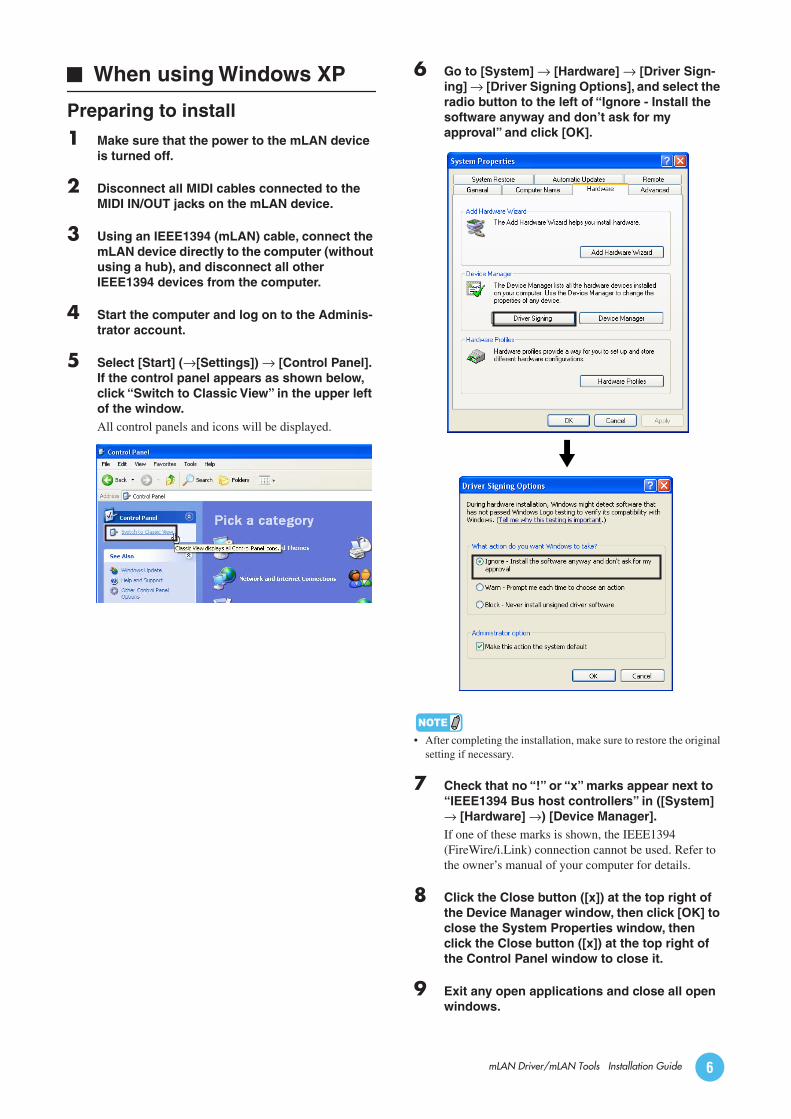
6 Go to [System] → [Hardware] → [Driver Sign-ing] → [Driver Signing Options], and select the radio button to the left of “Ignore - Install the software anyway and don’t ask for my approval” and click [OK].
NOTE
• After completing the installation, make sure to restore the original setting if necessary.
7 Check that no “!” or “x” marks appear next to “IEEE1394 Bus host controllers” in ([System] → [Hardware] →) [Device Manager]. If one of these marks is shown, the IEEE1394 (FireWire/i.Link) connection cannot be used. Refer to the owner’s manual of your computer for details.
8 Click the Close button ([x]) at the top right of the Device Manager window, then click [OK] to close the System Properties window, then click the Close button ([x]) at the top right of the Control Panel window to close it.
9 Exit any open applications and close all open windows.
mLAN Driver/mLAN Tools Installation Guide 6
Starting up the InstallerThe installer will install the following two software compo-nents to your computer.
• mLAN Tools 2.0• mLAN Applications for Yamaha
NOTE
• Use the Cancel button or Close button to quit the installation. Quitting by using the [Ctrl] + [Alt] + [Delete] buttons or by turn-ing off the power while installation is in process can result in problems since the installation is terminated without performing a proper uninstall.
10 After the downloaded compressed file is prop-erly extracted, double-click the “setup.exe” file.
NOTE
• If n Driver, AI Driver, or mLAN Driver/mLAN Tools has already been installed on your computer, a software main-tenance window appears. Follow the instructions in the window to remove the software and install the new soft-ware. For more information on removing the software, refer to page 24.
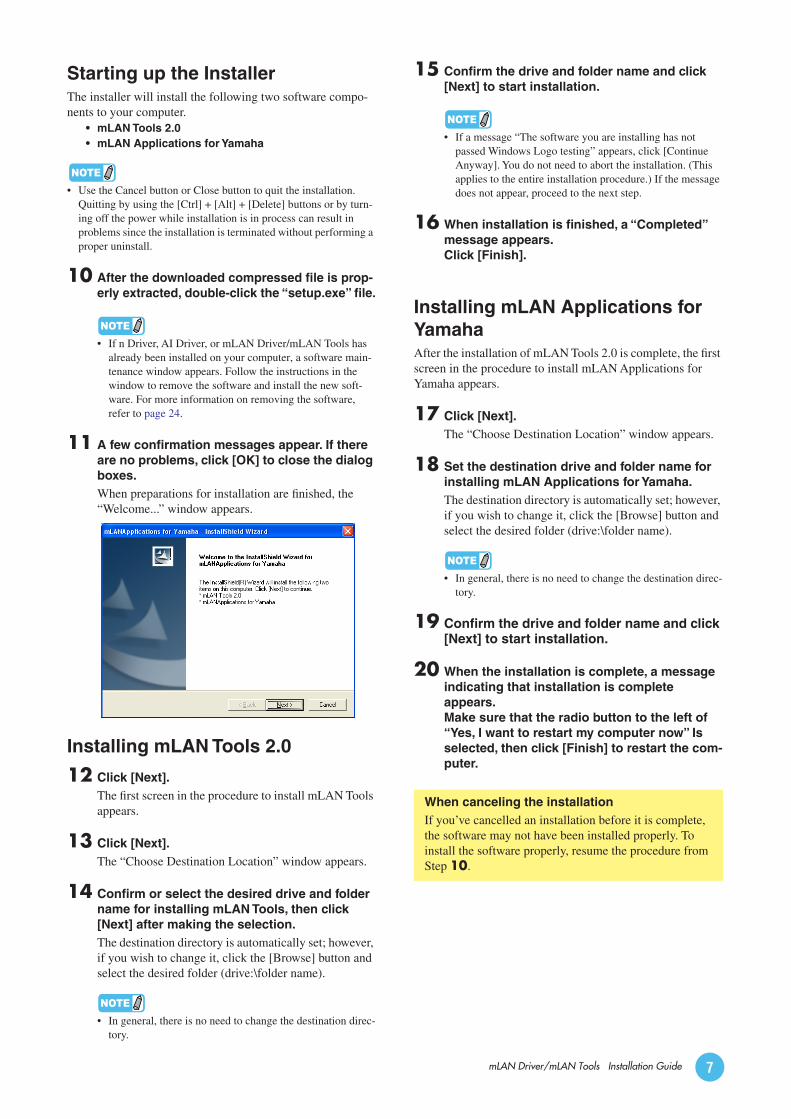
11 A few confirmation messages appear. If there are no problems, click [OK] to close the dialog boxes. When preparations for installation are finished, the “Welcome...” window appears.
Installing mLAN Tools 2.0
12 Click [Next].The first screen in the procedure to install mLAN Tools appears.
13 Click [Next].The “Choose Destination Location” window appears.
14 Confirm or select the desired drive and folder name for installing mLAN Tools, then click [Next] after making the selection. The destination directory is automatically set; however, if you wish to change it, click the [Browse] button and select the desired folder (drive:\folder name).
NOTE
• In general, there is no need to change the destination direc-tory.
15 Confirm the drive and folder name and click [Next] to start installation.
NOTE
• If a message “The software you are installing has not passed Windows Logo testing” appears, click [Continue Anyway]. You do not need to abort the installation. (This applies to the entire installation procedure.) If the message does not appear, proceed to the next step.
16 When installation is finished, a “Completed” message appears. Click [Finish].
Installing mLAN Applications for YamahaAfter the installation of mLAN Tools 2.0 is complete, the first screen in the procedure to install mLAN Applications for Yamaha appears.
17 Click [Next].The “Choose Destination Location” window appears.
18 Set the destination drive and folder name for installing mLAN Applications for Yamaha.The destination directory is automatically set; however, if you wish to change it, click the [Browse] button and select the desired folder (drive:\folder name).
NOTE
• In general, there is no need to change the destination direc-tory.
19 Confirm the drive and folder name and click [Next] to start installation.
20 When the installation is complete, a message indicating that installation is complete appears. Make sure that the radio button to the left of “Yes, I want to restart my computer now” Is selected, then click [Finish] to restart the com-puter.
When canceling the installationIf you’ve cancelled an installation before it is complete, the software may not have been installed properly. To install the software properly, resume the procedure from Step 10.
mLAN Driver/mLAN Tools Installation Guide 7
mLAN Driver initial settingsAfter you restart the computer, complete the mLAN Driver initial settings.
21 A dialog box in the upper left corner of the screen prompts you to turn on the power to the device. Connect the mLAN device to the computer, then turn on the power to the device.The “Found New Hardware Wizard” window is dis-played.
NOTE
• A dialog box may appear asking you whether you wish to connect to Windows Update. In this case, select the radio button to the left of “Not at this time,” then click [Next].
22 Select the radio button next to “Install the software automatically [Recommended],” then click [Next].
23 When the installation is complete, a message indicating that installation is complete appears. Click [Finish], then click [OK] in the same dialog box (that prompted you to turn on the power to the device) indicated in Step 21.
24 The following message appears in the upper left corner of the screen: “The driver initializa-tion will be executed.” Click [OK].
NOTE
• During Steps 25 and 26, and Steps 28 and 29, a window appears indicating that you are now making the initial set-tings for each driver. This window also indicates the num-ber of times the “Found New Hardware Wizard” will be displayed during the procedure. Unless you wish to cancel installation, do not close this window.
Example
Bus driver initial settings
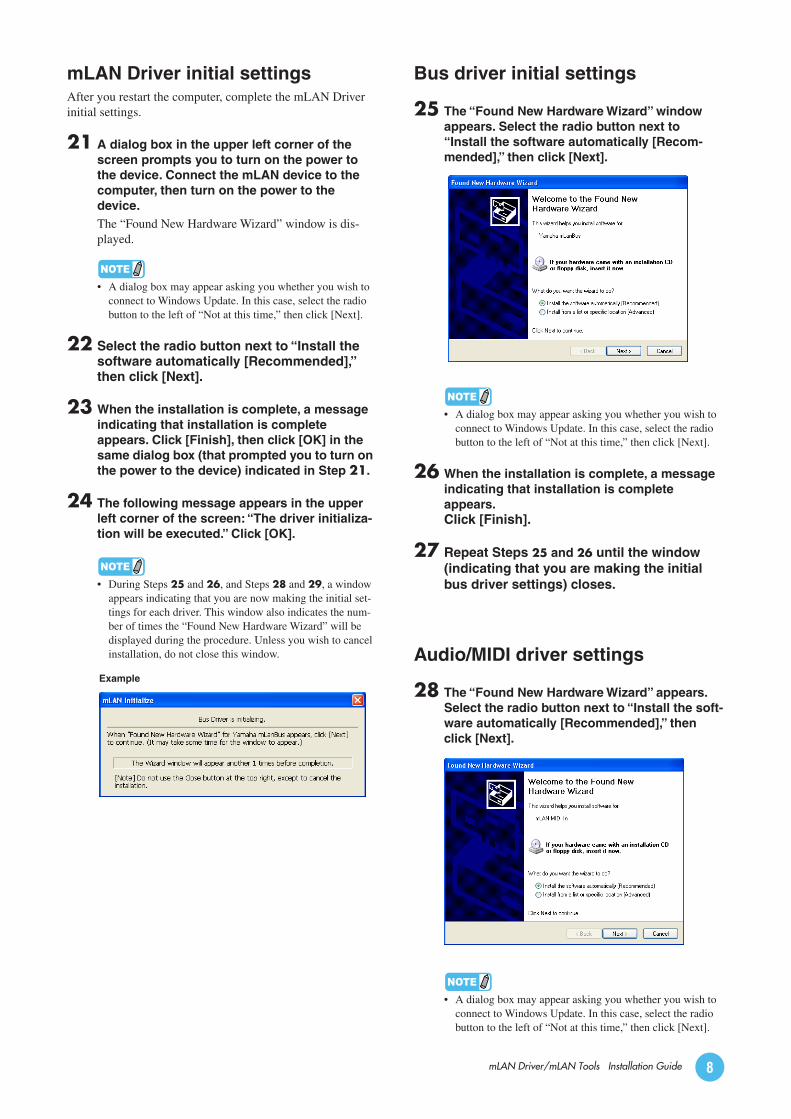
25 The “Found New Hardware Wizard” window appears. Select the radio button next to “Install the software automatically [Recom-mended],” then click [Next].
NOTE
• A dialog box may appear asking you whether you wish to connect to Windows Update. In this case, select the radio button to the left of “Not at this time,” then click [Next].
26 When the installation is complete, a message indicating that installation is complete appears.Click [Finish].
27 Repeat Steps 25 and 26 until the window (indicating that you are making the initial bus driver settings) closes.
Audio/MIDI driver settings
28 The “Found New Hardware Wizard” appears. Select the radio button next to “Install the soft-ware automatically [Recommended],” then click [Next].
NOTE
• A dialog box may appear asking you whether you wish to connect to Windows Update. In this case, select the radio button to the left of “Not at this time,” then click [Next].
mLAN Driver/mLAN Tools Installation Guide 8
29 When the installation is complete, a message indicating that installation is complete appears. Click [Finish].
30 Repeat Steps 28 and 29 until the window (indi-cating that you are making the Audio/MIDI driver initial settings) closes.
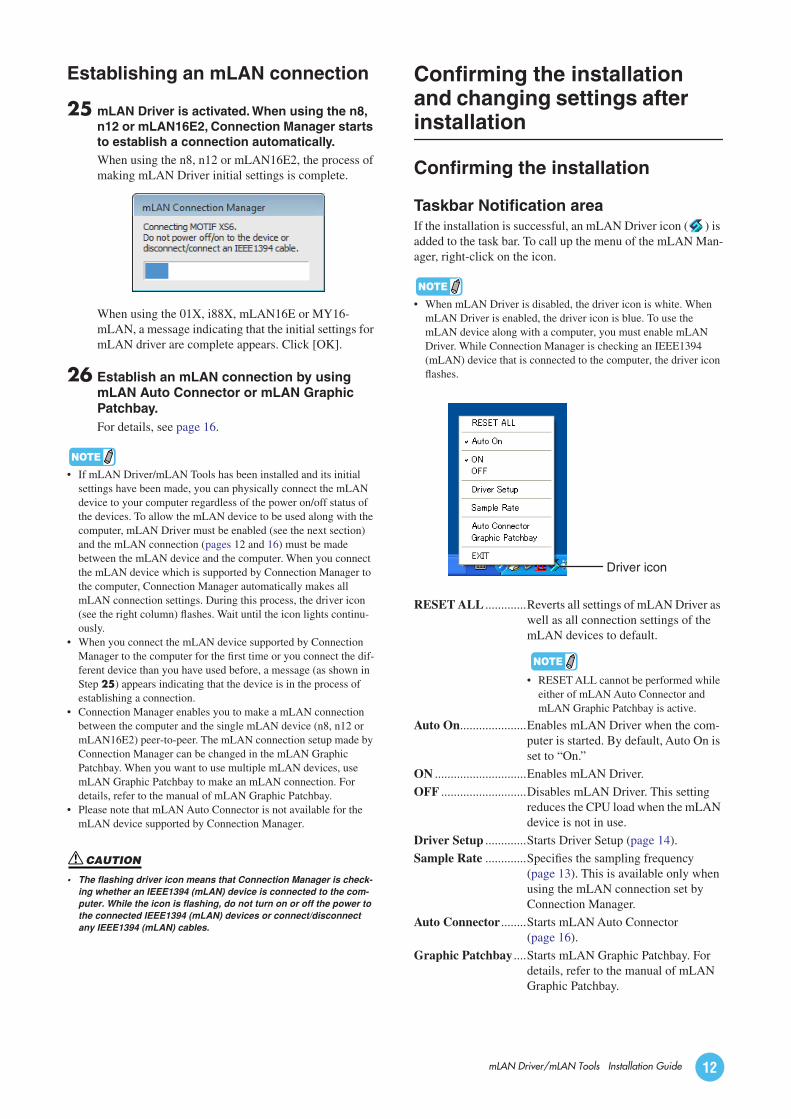
Establishing an mLAN connection
31 mLAN Driver is activated. When using the n8, n12 or mLAN16E2, Connection Manager starts to establish a connection automatically. When using the n8, n12 or mLAN16E2, the process of making mLAN Driver initial settings is complete.
When using the 01X, i88X, mLAN16E or MY16-mLAN, a message indicating that the initial settings for mLAN driver are complete appears.
32 Establish an mLAN connection by using mLAN Auto Connector or mLAN Graphic Patchbay. For details, see page 16.
NOTE
• If mLAN Driver/mLAN Tools has been installed and its initial settings have been made, you can physically connect the mLAN device to your computer regardless of the power on/off status of the devices. To allow the mLAN device to be used along with the computer, mLAN Driver must be enabled (see page 12) and the mLAN connection (pages 9 and 16) must be made between the mLAN device and the computer. When you connect the mLAN device which is supported by Connection Manager to the com-puter, Connection Manager automatically makes all connection settings. During this process, the driver icon (see page 12) flashes. Wait until the icon lights continuously.
• When you connect the mLAN device supported by Connection Manager to the computer for the first time or you connect the dif-ferent device than you have used before, a message (as shown in Step 31) appears indicating that the device is in the process of establishing a connection.
• Connection Manager enables you to make a mLAN connection between the computer and the single mLAN device (n8, n12 or mLAN16E2) peer-to-peer. The mLAN connection setup made by Connection Manager can be changed in the mLAN Graphic Patchbay. When you want to use multiple mLAN devices, use mLAN Graphic Patchbay to make an mLAN connection. For details, refer to the manual of mLAN Graphic Patchbay.
• Please note that mLAN Auto Connector is not available for the mLAN device supported by Connection Manager.
• The flashing driver icon means that Connection Manager is check-ing whether an IEEE1394 (mLAN) device is connected to the com-puter. While the icon is flashing, do not turn on or off the power to the connected IEEE1394 (mLAN) devices or connect/disconnect any IEEE1394 (mLAN) cables.
When using Windows Vista
Preparing to install
1 Make sure that the power to the mLAN device is turned off.
2 Disconnect all MIDI cables connected to the MIDI IN/OUT jacks on the mLAN device.
3 Using an IEEE1394 (mLAN) cable, connect the mLAN device directly to the computer (without using a hub), and disconnect all other IEEE1394 devices from the computer.
4 Start the computer and log on to the Adminis-trator account.
5 Select [Start] (→ [Settings]) → [Control Panel]. If the control panel appears as shown below, click “Classic View” in the upper left of the window. All control panels and icons will be displayed.
6 Double-click the Device Manager icon.
NOTE
• If the “User Account Control” window appears, click [Con-tinue].
7 Check that no “!” or “x” marks appear next to “IEEE1394 Bus host controllers.”If one of these marks is shown, the IEEE1394 (FireWire/i.LINK) connection cannot be used. Refer to the owner’s manual of your computer for details.
8 Click the Close button ([x]) at the top right of the Device Manager window, then click the Close button ([x]) at the top right of the Con-trol Panel window to close it.
9 Exit any open applications and close all open windows.
CAUTION
mLAN Driver/mLAN Tools Installation Guide 9

Starting up the InstallerThe installer will install the following two software compo-nents to your computer.
• mLAN Tools 2.0• mLAN Applications for Yamaha
NOTE
• Use the Cancel button or Close button to quit the installation. Quitting by using the [Ctrl] + [Alt] + [Delete] buttons or by turn-ing off the power while installation is in process can result in problems since the installation is terminated without performing a proper uninstall.
10 After the downloaded compressed file is prop-erly extracted, double-click the “setup.exe” file.
NOTE
• If the “User Account Control” window appears, click [Con-tinue].
• If n Driver, AI Driver, or mLAN Driver/mLAN Tools has already been installed on your computer, a software main-tenance window appears. Follow the instructions in the window to remove the software and install the new soft-ware. For more information on removing the software, refer to page 24.
11 A confirmation message appears. If there are no problems, click [OK] to close the dialog box.When preparations for installation are finished, the “Welcome...” window appears.
Installing mLAN Tools 2.0
12 Click [Next].The first screen in the procedure to install mLAN Tools appears.
13 Click [Next].The “Choose Destination Location” window appears.
14 Confirm or select the desired drive and folder name for installing mLAN Tools, then click [Next].The destination directory is automatically set; however, if you wish to change it, click the [Browse] button and select the desired folder (drive:\folder name).
NOTE
• In general, there is no need to change the destination direc-tory.
15 Confirm the drive and folder name and click [Next] to start installation.
16 When installation is finished, a “Completed” message appears. Click [Finish].
NOTE
• If the “Windows Security” window appears, confirm that the publisher is “YAMAHA CORPORATION,” then click [Install].
mLAN Driver/mLAN Tools Installation Guide 10

Installing mLAN Applications for Yamaha After the installation of mLAN Tools 2.0 is complete, the first screen in the procedure to install mLAN Applications for Yamaha appears.
17 Click [Next].The “Choose Destination Location” window appears.
18 Set the destination drive and folder name for installing mLAN Applications for Yamaha.The destination directory is automatically set; however, if you wish to change it, click the [Browse] button and select the desired folder (drive:\folder name).
NOTE
• In general, there is no need to change the destination direc-tory.
19 Confirm the drive and folder name and click [Next] to start installation.
20 When the installation is complete, a message indicating that installation is complete appears. Make sure that the radio button to the left of “Yes, I want to restart my computer now” Is selected, then click [Finish] to restart the com-puter.
NOTE
• If the “Windows Security” window appears, confirm that the publisher is “YAMAHA CORPORATION,” then click [Install].
mLAN Driver initial settingsAfter you restart the computer, complete the mLAN Driver initial settings.
21 A dialog box in the upper left corner of the screen prompts you to turn on the power to the device. Connect the mLAN device to the computer, then turn on the power to the device.
22 Click [OK] in the same dialog box (that prompted you to turn on the power to the device) indicated in Step 21.
23 The following message appears in the upper left corner of the screen: “The driver initializa-tion will be executed.” Click [OK].
NOTE
• If the “User Account Control” window appears, click [Con-tinue].
24 Initial setup of mLAN Driver is automatically started. Wait until the initial setup is com-pleted. During this process, a window indicat-ing the current status is shown at the upper left corner of the screen.
When canceling the installationIf you’ve cancelled an installation before it is complete, the software may not have been installed properly. To install the software properly, resume the procedure from Step 10.
mLAN Driver/mLAN Tools Installation Guide 11
Establishing an mLAN connection
25 mLAN Driver is activated. When using the n8, n12 or mLAN16E2, Connection Manager starts to establish a connection automatically. When using the n8, n12 or mLAN16E2, the process of making mLAN Driver initial settings is complete.
When using the 01X, i88X, mLAN16E or MY16-mLAN, a message indicating that the initial settings for mLAN driver are complete appears. Click [OK].
26 Establish an mLAN connection by using mLAN Auto Connector or mLAN Graphic Patchbay. For details, see page 16.
NOTE
• If mLAN Driver/mLAN Tools has been installed and its initial settings have been made, you can physically connect the mLAN device to your computer regardless of the power on/off status of the devices. To allow the mLAN device to be used along with the computer, mLAN Driver must be enabled (see the next section) and the mLAN connection (pages 12 and 16) must be made between the mLAN device and the computer. When you connect the mLAN device which is supported by Connection Manager to the computer, Connection Manager automatically makes all mLAN connection settings. During this process, the driver icon (see the right column) flashes. Wait until the icon lights continu-ously.
• When you connect the mLAN device supported by Connection Manager to the computer for the first time or you connect the dif-ferent device than you have used before, a message (as shown in Step 25) appears indicating that the device is in the process of establishing a connection.
• Connection Manager enables you to make a mLAN connection between the computer and the single mLAN device (n8, n12 or mLAN16E2) peer-to-peer. The mLAN connection setup made by Connection Manager can be changed in the mLAN Graphic Patchbay. When you want to use multiple mLAN devices, use mLAN Graphic Patchbay to make an mLAN connection. For details, refer to the manual of mLAN Graphic Patchbay.
• Please note that mLAN Auto Connector is not available for the mLAN device supported by Connection Manager.
• The flashing driver icon means that Connection Manager is check-ing whether an IEEE1394 (mLAN) device is connected to the com-puter. While the icon is flashing, do not turn on or off the power to the connected IEEE1394 (mLAN) devices or connect/disconnect any IEEE1394 (mLAN) cables.
Confirming the installation and changing settings after installation
Confirming the installation
Taskbar Notification areaIf the installation is successful, an mLAN Driver icon ( ) is added to the task bar. To call up the menu of the mLAN Man-ager, right-click on the icon.
NOTE
• When mLAN Driver is disabled, the driver icon is white. When mLAN Driver is enabled, the driver icon is blue. To use the mLAN device along with a computer, you must enable mLAN Driver. While Connection Manager is checking an IEEE1394 (mLAN) device that is connected to the computer, the driver icon flashes.
RESET ALL .............Reverts all settings of mLAN Driver as well as all connection settings of the mLAN devices to default.
• RESET ALL cannot be performed while either of mLAN Auto Connector and mLAN Graphic Patchbay is active.
Auto On.....................Enables mLAN Driver when the com-puter is started. By default, Auto On is set to “On.”
ON .............................Enables mLAN Driver.
OFF ...........................Disables mLAN Driver. This setting reduces the CPU load when the mLAN device is not in use.
Driver Setup .............Starts Driver Setup (page 14).
Sample Rate .............Specifies the sampling frequency (page 13). This is available only when using the mLAN connection set by Connection Manager.
Auto Connector ........Starts mLAN Auto Connector (page 16).
Graphic Patchbay ....Starts mLAN Graphic Patchbay. For details, refer to the manual of mLAN Graphic Patchbay.
CAUTION
Driver icon
NOTE
mLAN Driver/mLAN Tools Installation Guide 12
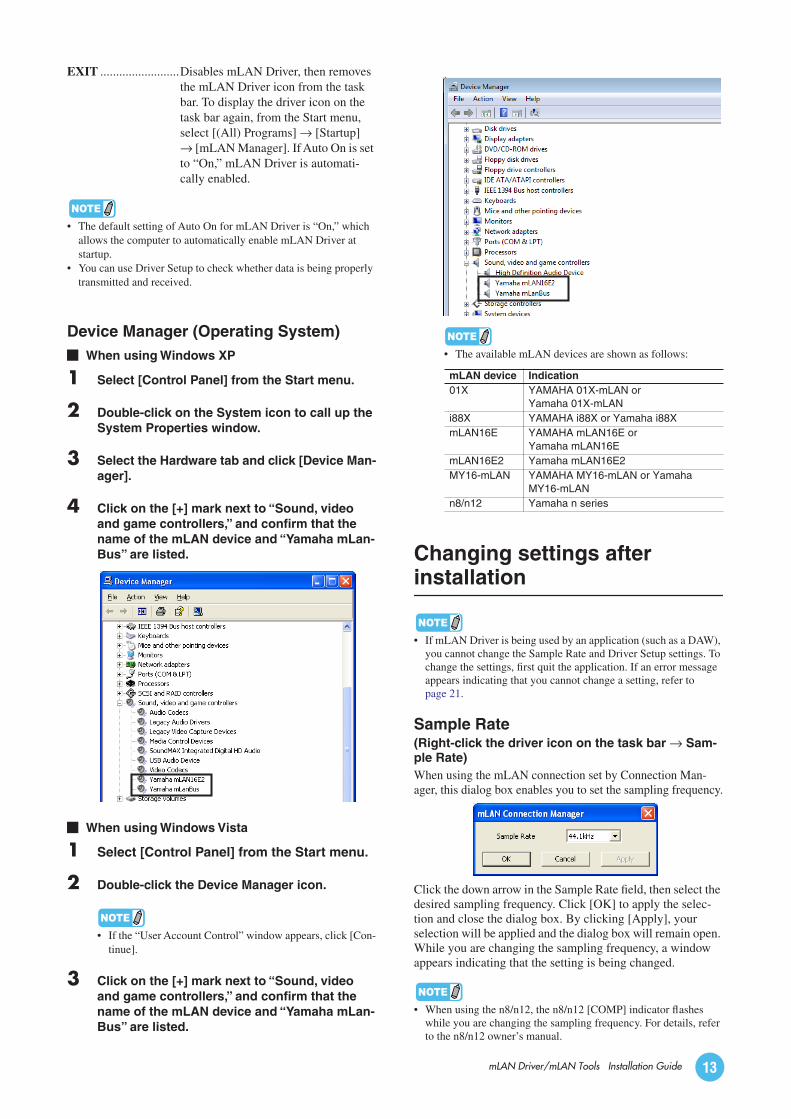
EXIT .........................Disables mLAN Driver, then removes the mLAN Driver icon from the task bar. To display the driver icon on the task bar again, from the Start menu, select [(All) Programs] → [Startup] → [mLAN Manager]. If Auto On is set to “On,” mLAN Driver is automati-cally enabled.
NOTE
• The default setting of Auto On for mLAN Driver is “On,” which allows the computer to automatically enable mLAN Driver at startup.
• You can use Driver Setup to check whether data is being properly transmitted and received.
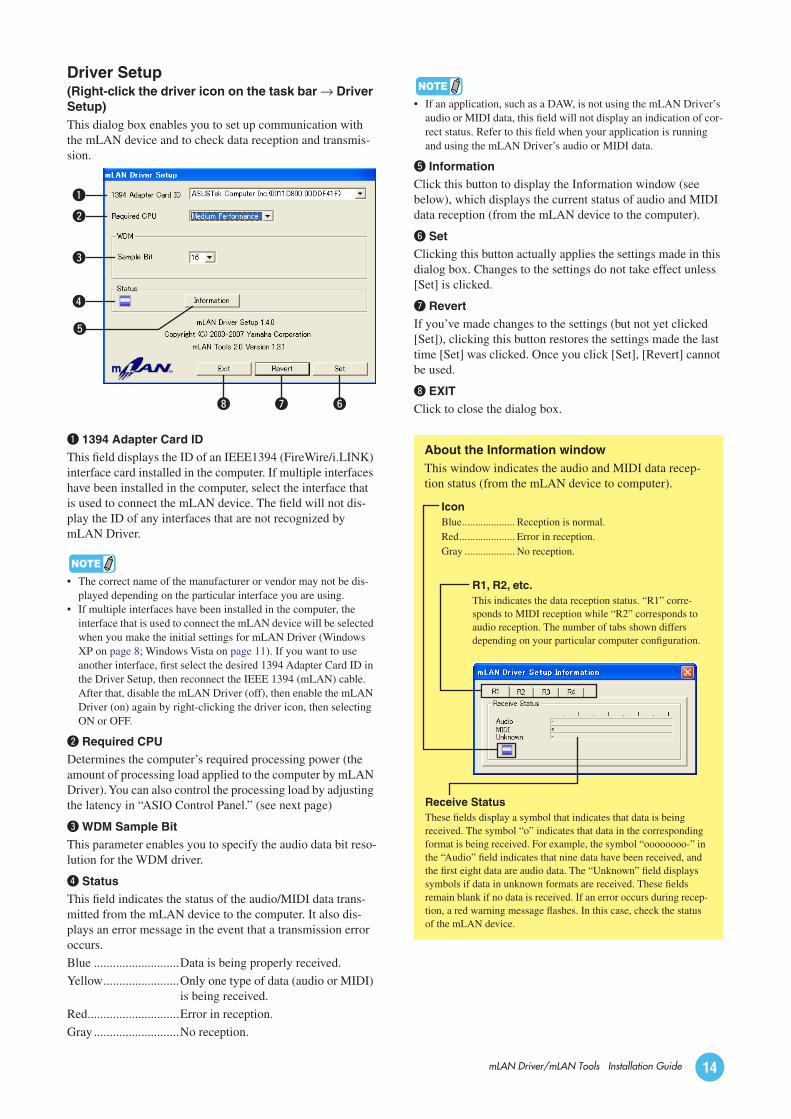
Device Manager (Operating System)When using Windows XP
1 Select [Control Panel] from the Start menu.
2 Double-click on the System icon to call up the System Properties window.
3 Select the Hardware tab and click [Device Man-ager].
4 Click on the [+] mark next to “Sound, video and game controllers,” and confirm that the name of the mLAN device and “Yamaha mLan-Bus” are listed.
When using Windows Vista
1 Select [Control Panel] from the Start menu.
2 Double-click the Device Manager icon.
NOTE
• If the “User Account Control” window appears, click [Con-tinue].
3 Click on the [+] mark next to “Sound, video and game controllers,” and confirm that the name of the mLAN device and “Yamaha mLan-Bus” are listed.
NOTE
• The available mLAN devices are shown as follows:
Changing settings after installation
NOTE
• If mLAN Driver is being used by an application (such as a DAW), you cannot change the Sample Rate and Driver Setup settings. To change the settings, first quit the application. If an error message appears indicating that you cannot change a setting, refer to page 21.
Sample Rate(Right-click the driver icon on the task bar → Sam-ple Rate)When using the mLAN connection set by Connection Man-ager, this dialog box enables you to set the sampling frequency.
Click the down arrow in the Sample Rate field, then select the desired sampling frequency. Click [OK] to apply the selec-tion and close the dialog box. By clicking [Apply], your selection will be applied and the dialog box will remain open. While you are changing the sampling frequency, a window appears indicating that the setting is being changed.
NOTE
• When using the n8/n12, the n8/n12 [COMP] indicator flashes while you are changing the sampling frequency. For details, refer to the n8/n12 owner’s manual.
mLAN device Indication01X YAMAHA 01X-mLAN or
Yamaha 01X-mLANi88X YAMAHA i88X or Yamaha i88XmLAN16E YAMAHA mLAN16E or
Yamaha mLAN16EmLAN16E2 Yamaha mLAN16E2MY16-mLAN YAMAHA MY16-mLAN or Yamaha
MY16-mLANn8/n12 Yamaha n series
mLAN Driver/mLAN Tools Installation Guide 13
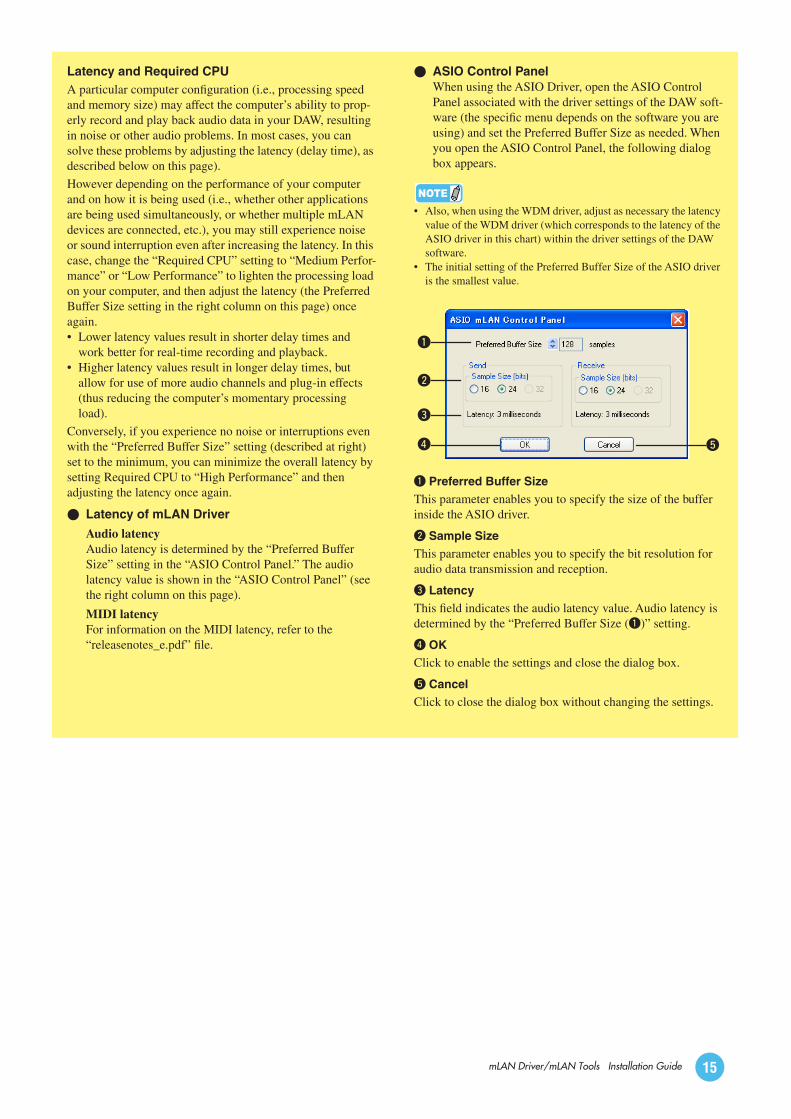
Driver Setup(Right-click the driver icon on the task bar → Driver Setup)This dialog box enables you to set up communication with the mLAN device and to check data reception and transmis-sion.
q 1394 Adapter Card IDThis field displays the ID of an IEEE1394 (FireWire/i.LINK) interface card installed in the computer. If multiple interfaces have been installed in the computer, select the interface that is used to connect the mLAN device. The field will not dis-play the ID of any interfaces that are not recognized by mLAN Driver.
NOTE
• The correct name of the manufacturer or vendor may not be dis-played depending on the particular interface you are using.
• If multiple interfaces have been installed in the computer, the interface that is used to connect the mLAN device will be selected when you make the initial settings for mLAN Driver (Windows XP on page 8; Windows Vista on page 11). If you want to use another interface, first select the desired 1394 Adapter Card ID in the Driver Setup, then reconnect the IEEE 1394 (mLAN) cable. After that, disable the mLAN Driver (off), then enable the mLAN Driver (on) again by right-clicking the driver icon, then selecting ON or OFF.
w Required CPUDetermines the computer’s required processing power (the amount of processing load applied to the computer by mLAN Driver). You can also control the processing load by adjusting the latency in “ASIO Control Panel.” (see next page)
e WDM Sample BitThis parameter enables you to specify the audio data bit reso-lution for the WDM driver.
r StatusThis field indicates the status of the audio/MIDI data trans-mitted from the mLAN device to the computer. It also dis-plays an error message in the event that a transmission error occurs.
Blue ...........................Data is being properly received.
Yellow........................Only one type of data (audio or MIDI) is being received.
Red.............................Error in reception.
Gray ...........................No reception.
NOTE
• If an application, such as a DAW, is not using the mLAN Driver’s audio or MIDI data, this field will not display an indication of cor-rect status. Refer to this field when your application is running and using the mLAN Driver’s audio or MIDI data.
t InformationClick this button to display the Information window (see below), which displays the current status of audio and MIDI data reception (from the mLAN device to the computer).
y SetClicking this button actually applies the settings made in this dialog box. Changes to the settings do not take effect unless [Set] is clicked.
u RevertIf you’ve made changes to the settings (but not yet clicked [Set]), clicking this button restores the settings made the last time [Set] was clicked. Once you click [Set], [Revert] cannot be used.
i EXITClick to close the dialog box.
q
y
t
w
e
r
ui
About the Information windowThis window indicates the audio and MIDI data recep-tion status (from the mLAN device to computer).
IconBlue.................... Reception is normal.Red..................... Error in reception.Gray ................... No reception.
R1, R2, etc.This indicates the data reception status. “R1” corre-sponds to MIDI reception while “R2” corresponds to audio reception. The number of tabs shown differs depending on your particular computer configuration.
Receive StatusThese fields display a symbol that indicates that data is being received. The symbol “o” indicates that data in the corresponding format is being received. For example, the symbol “oooooooo-” in the “Audio” field indicates that nine data have been received, and the first eight data are audio data. The “Unknown” field displays symbols if data in unknown formats are received. These fields remain blank if no data is received. If an error occurs during recep-tion, a red warning message flashes. In this case, check the status of the mLAN device.
mLAN Driver/mLAN Tools Installation Guide 14
Latency and Required CPUA particular computer configuration (i.e., processing speed and memory size) may affect the computer’s ability to prop-erly record and play back audio data in your DAW, resulting in noise or other audio problems. In most cases, you can solve these problems by adjusting the latency (delay time), as described below on this page).
However depending on the performance of your computer and on how it is being used (i.e., whether other applications are being used simultaneously, or whether multiple mLAN devices are connected, etc.), you may still experience noise or sound interruption even after increasing the latency. In this case, change the “Required CPU” setting to “Medium Perfor-mance” or “Low Performance” to lighten the processing load on your computer, and then adjust the latency (the Preferred Buffer Size setting in the right column on this page) once again.• Lower latency values result in shorter delay times and
work better for real-time recording and playback.• Higher latency values result in longer delay times, but
allow for use of more audio channels and plug-in effects (thus reducing the computer’s momentary processing load).
Conversely, if you experience no noise or interruptions even with the “Preferred Buffer Size” setting (described at right) set to the minimum, you can minimize the overall latency by setting Required CPU to “High Performance” and then adjusting the latency once again.
Latency of mLAN Driver
Audio latencyAudio latency is determined by the “Preferred Buffer Size” setting in the “ASIO Control Panel.” The audio latency value is shown in the “ASIO Control Panel” (see the right column on this page).
MIDI latencyFor information on the MIDI latency, refer to the “releasenotes_e.pdf” file.
ASIO Control PanelWhen using the ASIO Driver, open the ASIO Control Panel associated with the driver settings of the DAW soft-ware (the specific menu depends on the software you are using) and set the Preferred Buffer Size as needed. When you open the ASIO Control Panel, the following dialog box appears.
NOTE
• Also, when using the WDM driver, adjust as necessary the latency value of the WDM driver (which corresponds to the latency of the ASIO driver in this chart) within the driver settings of the DAW software.
• The initial setting of the Preferred Buffer Size of the ASIO driver is the smallest value.
q Preferred Buffer SizeThis parameter enables you to specify the size of the buffer inside the ASIO driver.
w Sample SizeThis parameter enables you to specify the bit resolution for audio data transmission and reception.
e LatencyThis field indicates the audio latency value. Audio latency is determined by the “Preferred Buffer Size (q)” setting.
r OKClick to enable the settings and close the dialog box.
t CancelClick to close the dialog box without changing the settings.
q
t
w
e
r
mLAN Driver/mLAN Tools Installation Guide 15

This section describes the procedure for connecting a computer to a single 01X, i88X, mLAN16E or MY16-mLAN peer-to-peer by using mLAN Auto Connector.
In mLAN Auto Connector, you can easily connect an mLAN device by setting up the wordclock and the number of audio I/O channels.
To connect multiple mLAN devices to a computer, use mLAN Graphic Patchbay. For more information on mLAN Graphic Patch-bay, refer to the mLAN Graphic Patchbay Manual.
Noise may be generated during the following operations. Before performing these operations, lower the output level of each device.
• Turning the power to the computer and mLAN devices on or off
• Connecting or disconnecting an IEEE1394 (mLAN) cable
• Making an mLAN connection in mLAN Auto Connector• Changing the wordclock master and slave status in mLAN Auto Connector or mLAN Graphic Patchbay• Making mLAN Driver active or inactive• Starting or quitting the OS• Installing/uninstalling mLAN Driver/mLAN Tools, n Driver or AI Driver.
NOTE
• If you use mLAN Auto Connector after you make connections in mLAN Graphic Patchbay, the connections made in mLAN Graphic Patchbay will be replaced.
• You can also use mLAN Graphic Patchbay to connect a computer to a single mLAN device peer-to-peer.
• The mLAN Auto Connector windows may appear different when certain mLAN devices are connected.
1 Connect a computer to an mLAN device using an IEEE1394 (mLAN) cable.
2 Right-click the Driver icon in the Task bar, then select [Auto Connector].mLAN Auto connector starts.
The procedure from the next step differs depending on the mLAN device you are using now.
01X → See the next sectioni88X → See page 18mLAN16E → See page 19MY16-mLAN → See page 20
When connecting the 01X
Setting of mLAN AUTO W.CLK (01X)
3 To ensure that settings of the mLAN Auto Con-nector or mLAN Graphic Patchbay are prop-erly received, set the mLAN AUTO W.CLK (wordclock) parameter to ENABLE, as described in the following instructions. These settings can also be made after the mLAN Auto Connector or mLAN Graphic Patchbay has run.
Setting on the 01X3-1 Enter the UTILITY mode by pressing the
[UTILITY] button on the 01X.
3-2 Call up the mLAN AUTO W.CLK display by pressing W.CLK (channel knob 3).
3-3 Press ENABLE (channel knob 1).
3-4 The “ENABLE SURE?” prompt is shown. Change the setting by pressing channel knob 8.If this parameter is already set to ENABLE, the prompt will not appear, so proceed to the next step.
NOTE
• The 01X Utility settings are lost when the power is turned off, unless System Backup is performed. (Refer to the 01X Owner’s Manual.) In order to ensure the settings here are effective the next time you turn the 01X on, perform System Backup by holding [SHIFT] and pressing [UTILITY].
Setting up from the mLAN Auto Connector
CAUTION
Wordclock Transition Speed setting (mLAN Con-trol Panel)When you click the [Setup] button in the Node Informa-tion window in mLAN Auto Connector or mLAN Graphic Patchbay, the computer displays the mLAN Control Panel, which enables you to set the wordclock transition speed. The Wordclock Transition Speed parameter enables you to specify how fast the initial wordclock setting will change to a new setting if the 01X, i88X, mLAN16E or MY16-mLAN is operating as a slave in an mLAN network.
Slow: In general, select this option.
Fast: Select this option if the wordclock master device is referencing timecode, such as MTC, thus changing the wordclock.
UTILITY mLAN AUTO W.CLK [INT : 48 kHz] 1/2
ENABLE/DISABLE
mLAN Driver/mLAN Tools Installation Guide 16
Setting in the mLAN Auto Connector
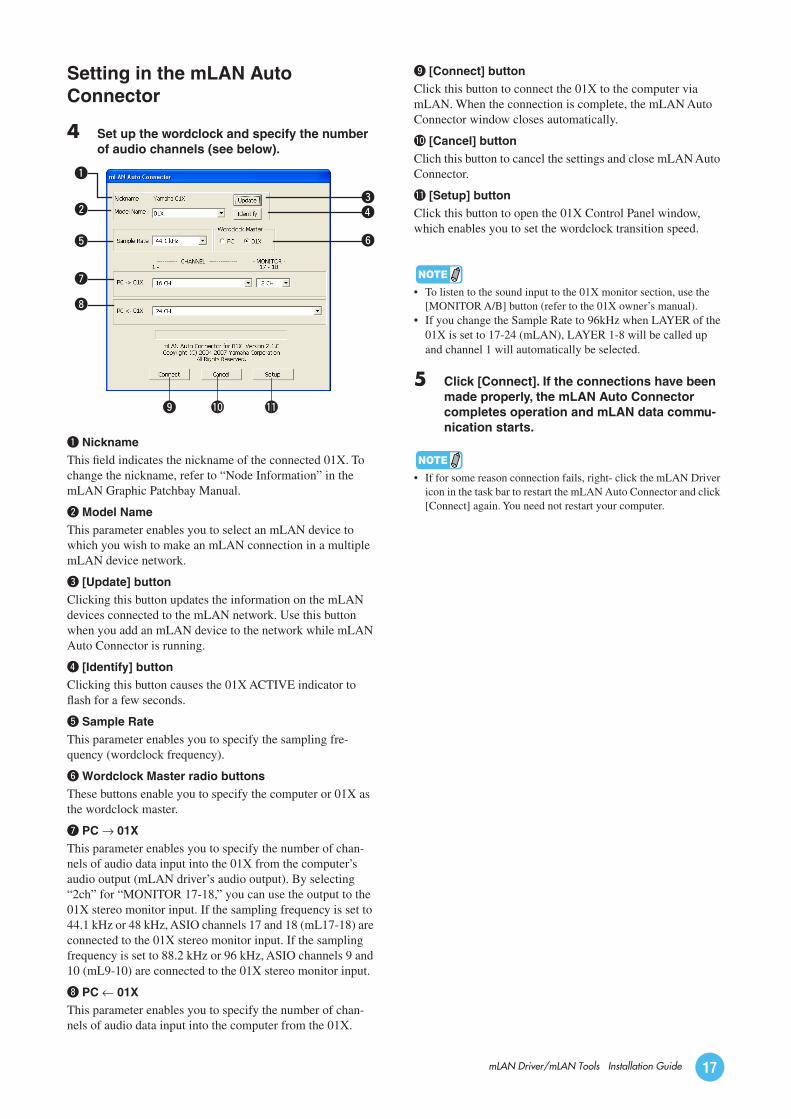
4 Set up the wordclock and specify the number of audio channels (see below).
q NicknameThis field indicates the nickname of the connected 01X. To change the nickname, refer to “Node Information” in the mLAN Graphic Patchbay Manual.
w Model NameThis parameter enables you to select an mLAN device to which you wish to make an mLAN connection in a multiple mLAN device network.
e [Update] buttonClicking this button updates the information on the mLAN devices connected to the mLAN network. Use this button when you add an mLAN device to the network while mLAN Auto Connector is running.
r [Identify] buttonClicking this button causes the 01X ACTIVE indicator to flash for a few seconds.
t Sample RateThis parameter enables you to specify the sampling fre-quency (wordclock frequency).
y Wordclock Master radio buttonsThese buttons enable you to specify the computer or 01X as the wordclock master.
u PC → 01XThis parameter enables you to specify the number of chan-nels of audio data input into the 01X from the computer’s audio output (mLAN driver’s audio output). By selecting “2ch” for “MONITOR 17-18,” you can use the output to the 01X stereo monitor input. If the sampling frequency is set to 44.1 kHz or 48 kHz, ASIO channels 17 and 18 (mL17-18) are connected to the 01X stereo monitor input. If the sampling frequency is set to 88.2 kHz or 96 kHz, ASIO channels 9 and 10 (mL9-10) are connected to the 01X stereo monitor input.
i PC ← 01XThis parameter enables you to specify the number of chan-nels of audio data input into the computer from the 01X.
o [Connect] buttonClick this button to connect the 01X to the computer via mLAN. When the connection is complete, the mLAN Auto Connector window closes automatically.
!0 [Cancel] buttonClich this button to cancel the settings and close mLAN Auto Connector.
!1 [Setup] buttonClick this button to open the 01X Control Panel window, which enables you to set the wordclock transition speed.
NOTE
• To listen to the sound input to the 01X monitor section, use the [MONITOR A/B] button (refer to the 01X owner’s manual).
• If you change the Sample Rate to 96kHz when LAYER of the 01X is set to 17-24 (mLAN), LAYER 1-8 will be called up and channel 1 will automatically be selected.
5 Click [Connect]. If the connections have been made properly, the mLAN Auto Connector completes operation and mLAN data commu-nication starts.
NOTE
• If for some reason connection fails, right- click the mLAN Driver icon in the task bar to restart the mLAN Auto Connector and click [Connect] again. You need not restart your computer.
q
wer
t y
u
i
o !0 !1
mLAN Driver/mLAN Tools Installation Guide 17
When connecting the i88X
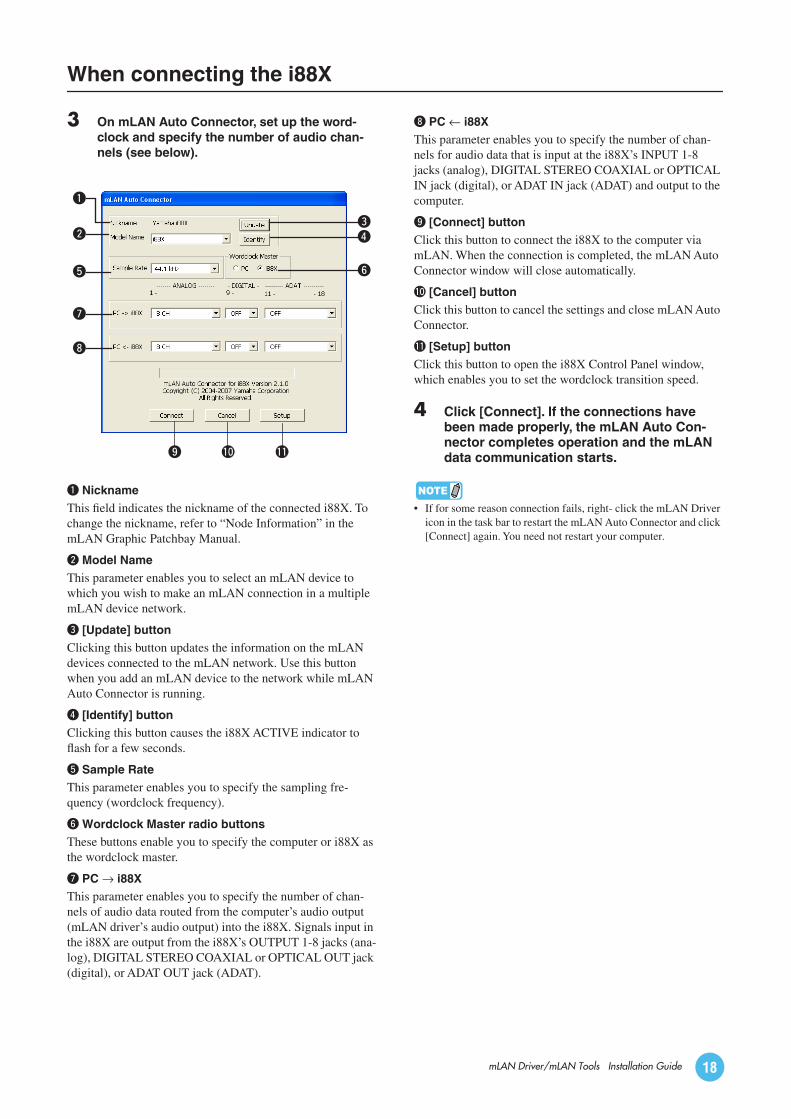
3 On mLAN Auto Connector, set up the word-clock and specify the number of audio chan-nels (see below).
q NicknameThis field indicates the nickname of the connected i88X. To change the nickname, refer to “Node Information” in the mLAN Graphic Patchbay Manual.
w Model NameThis parameter enables you to select an mLAN device to which you wish to make an mLAN connection in a multiple mLAN device network.
e [Update] buttonClicking this button updates the information on the mLAN devices connected to the mLAN network. Use this button when you add an mLAN device to the network while mLAN Auto Connector is running.
r [Identify] buttonClicking this button causes the i88X ACTIVE indicator to flash for a few seconds.
t Sample RateThis parameter enables you to specify the sampling fre-quency (wordclock frequency).
y Wordclock Master radio buttonsThese buttons enable you to specify the computer or i88X as the wordclock master.
u PC → i88XThis parameter enables you to specify the number of chan-nels of audio data routed from the computer’s audio output (mLAN driver’s audio output) into the i88X. Signals input in the i88X are output from the i88X’s OUTPUT 1-8 jacks (ana-log), DIGITAL STEREO COAXIAL or OPTICAL OUT jack (digital), or ADAT OUT jack (ADAT).
i PC ← i88XThis parameter enables you to specify the number of chan-nels for audio data that is input at the i88X’s INPUT 1-8 jacks (analog), DIGITAL STEREO COAXIAL or OPTICAL IN jack (digital), or ADAT IN jack (ADAT) and output to the computer.
o [Connect] buttonClick this button to connect the i88X to the computer via mLAN. When the connection is completed, the mLAN Auto Connector window will close automatically.
!0 [Cancel] buttonClick this button to cancel the settings and close mLAN Auto Connector.
!1 [Setup] buttonClick this button to open the i88X Control Panel window, which enables you to set the wordclock transition speed.
4 Click [Connect]. If the connections have been made properly, the mLAN Auto Con-nector completes operation and the mLAN data communication starts.
NOTE
• If for some reason connection fails, right- click the mLAN Driver icon in the task bar to restart the mLAN Auto Connector and click [Connect] again. You need not restart your computer.
q
wer
t y
u
i
o !0 !1
mLAN Driver/mLAN Tools Installation Guide 18
When connecting the mLAN16E (MOTIF ES/S90ES)
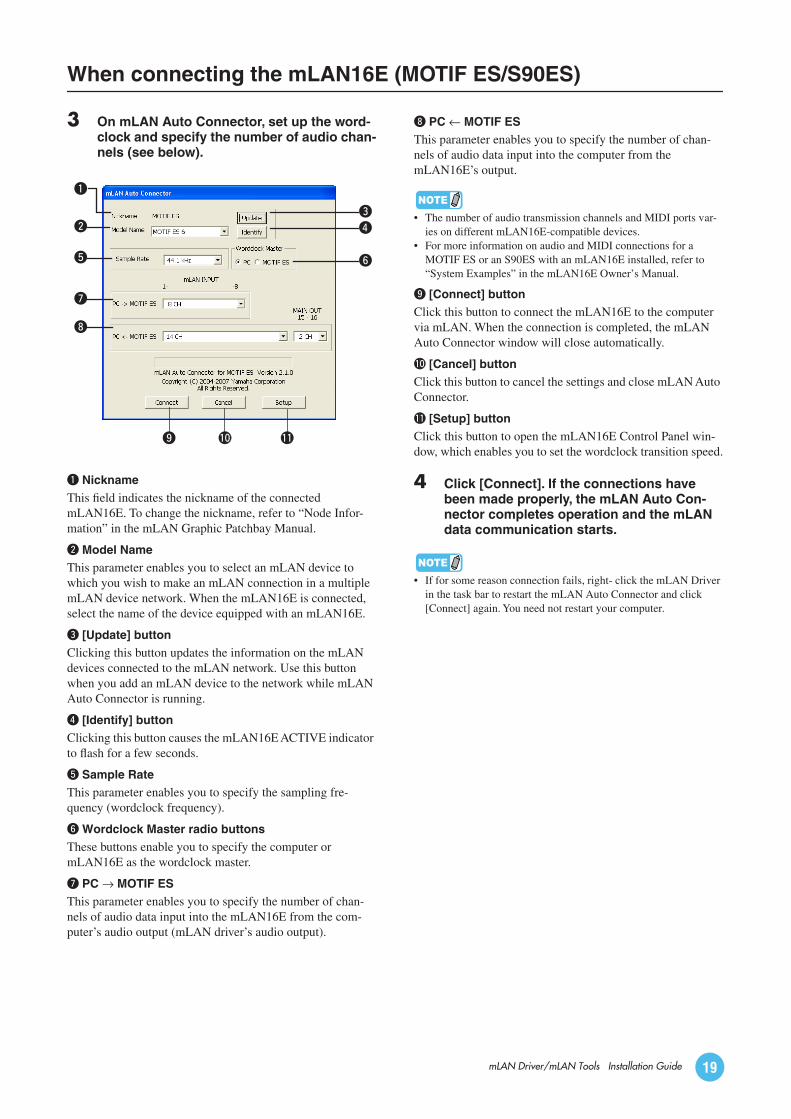
3 On mLAN Auto Connector, set up the word-clock and specify the number of audio chan-nels (see below).
q NicknameThis field indicates the nickname of the connected mLAN16E. To change the nickname, refer to “Node Infor-mation” in the mLAN Graphic Patchbay Manual.
w Model NameThis parameter enables you to select an mLAN device to which you wish to make an mLAN connection in a multiple mLAN device network. When the mLAN16E is connected, select the name of the device equipped with an mLAN16E.
e [Update] buttonClicking this button updates the information on the mLAN devices connected to the mLAN network. Use this button when you add an mLAN device to the network while mLAN Auto Connector is running.
r [Identify] buttonClicking this button causes the mLAN16E ACTIVE indicator to flash for a few seconds.
t Sample RateThis parameter enables you to specify the sampling fre-quency (wordclock frequency).
y Wordclock Master radio buttonsThese buttons enable you to specify the computer or mLAN16E as the wordclock master.
u PC → MOTIF ESThis parameter enables you to specify the number of chan-nels of audio data input into the mLAN16E from the com-puter’s audio output (mLAN driver’s audio output).
i PC ← MOTIF ESThis parameter enables you to specify the number of chan-nels of audio data input into the computer from the mLAN16E’s output.
NOTE
• The number of audio transmission channels and MIDI ports var-ies on different mLAN16E-compatible devices.
• For more information on audio and MIDI connections for a MOTIF ES or an S90ES with an mLAN16E installed, refer to “System Examples” in the mLAN16E Owner’s Manual.
o [Connect] buttonClick this button to connect the mLAN16E to the computer via mLAN. When the connection is completed, the mLAN Auto Connector window will close automatically.
!0 [Cancel] buttonClick this button to cancel the settings and close mLAN Auto Connector.
!1 [Setup] buttonClick this button to open the mLAN16E Control Panel win-dow, which enables you to set the wordclock transition speed.
4 Click [Connect]. If the connections have been made properly, the mLAN Auto Con-nector completes operation and the mLAN data communication starts.
NOTE
• If for some reason connection fails, right- click the mLAN Driver in the task bar to restart the mLAN Auto Connector and click [Connect] again. You need not restart your computer.
q
we
r
t y
u
i
o !0 !1
mLAN Driver/mLAN Tools Installation Guide 19
When connecting the MY16-mLAN
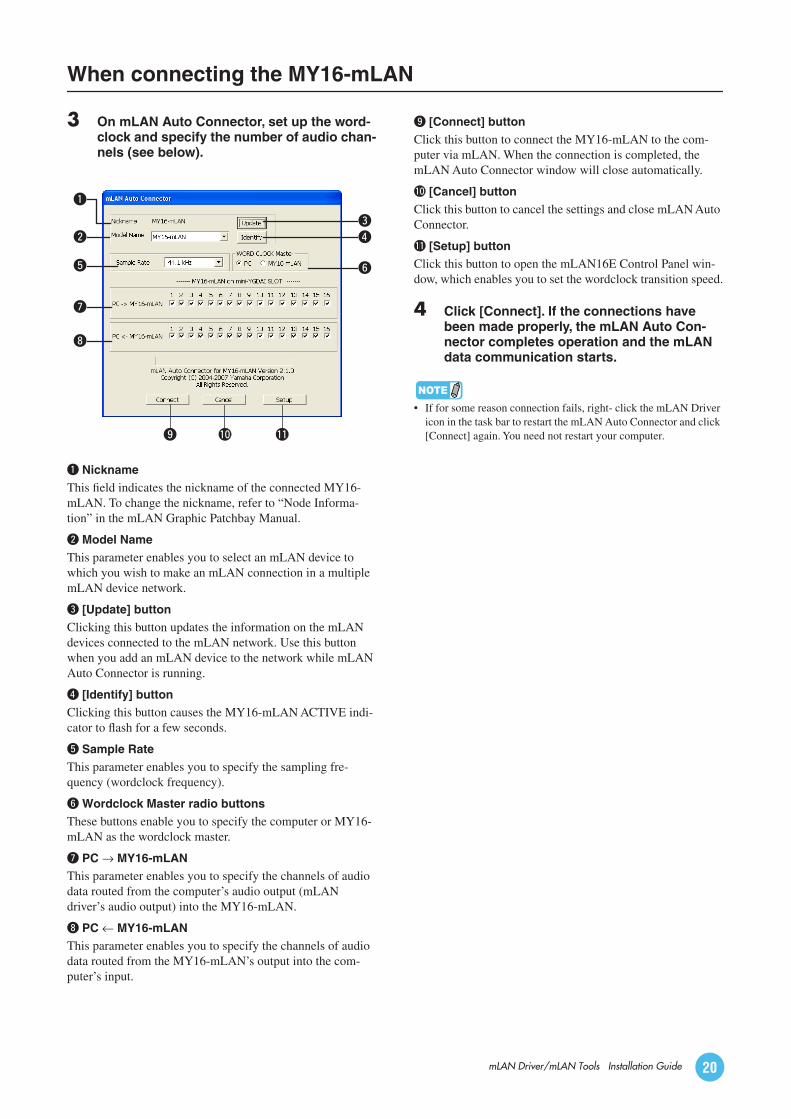
3 On mLAN Auto Connector, set up the word-clock and specify the number of audio chan-nels (see below).
q NicknameThis field indicates the nickname of the connected MY16-mLAN. To change the nickname, refer to “Node Informa-tion” in the mLAN Graphic Patchbay Manual.
w Model NameThis parameter enables you to select an mLAN device to which you wish to make an mLAN connection in a multiple mLAN device network.
e [Update] buttonClicking this button updates the information on the mLAN devices connected to the mLAN network. Use this button when you add an mLAN device to the network while mLAN Auto Connector is running.
r [Identify] buttonClicking this button causes the MY16-mLAN ACTIVE indi-cator to flash for a few seconds.
t Sample RateThis parameter enables you to specify the sampling fre-quency (wordclock frequency).
y Wordclock Master radio buttonsThese buttons enable you to specify the computer or MY16-mLAN as the wordclock master.
u PC → MY16-mLANThis parameter enables you to specify the channels of audio data routed from the computer’s audio output (mLAN driver’s audio output) into the MY16-mLAN.
i PC ← MY16-mLANThis parameter enables you to specify the channels of audio data routed from the MY16-mLAN’s output into the com-puter’s input.
o [Connect] buttonClick this button to connect the MY16-mLAN to the com-puter via mLAN. When the connection is completed, the mLAN Auto Connector window will close automatically.
!0 [Cancel] buttonClick this button to cancel the settings and close mLAN Auto Connector.
!1 [Setup] buttonClick this button to open the mLAN16E Control Panel win-dow, which enables you to set the wordclock transition speed.
4 Click [Connect]. If the connections have been made properly, the mLAN Auto Con-nector completes operation and the mLAN data communication starts.
NOTE
• If for some reason connection fails, right- click the mLAN Driver icon in the task bar to restart the mLAN Auto Connector and click [Connect] again. You need not restart your computer.
q
w
e
r
t y
u
i
o !0 !1
mLAN Driver/mLAN Tools Installation Guide 20
When the settings of mLAN Driver cannot be changed, or when mLAN Driver/mLAN Tools (mLAN Applications for Yamaha/mLAN Tools 2.0) cannot be uninstalled
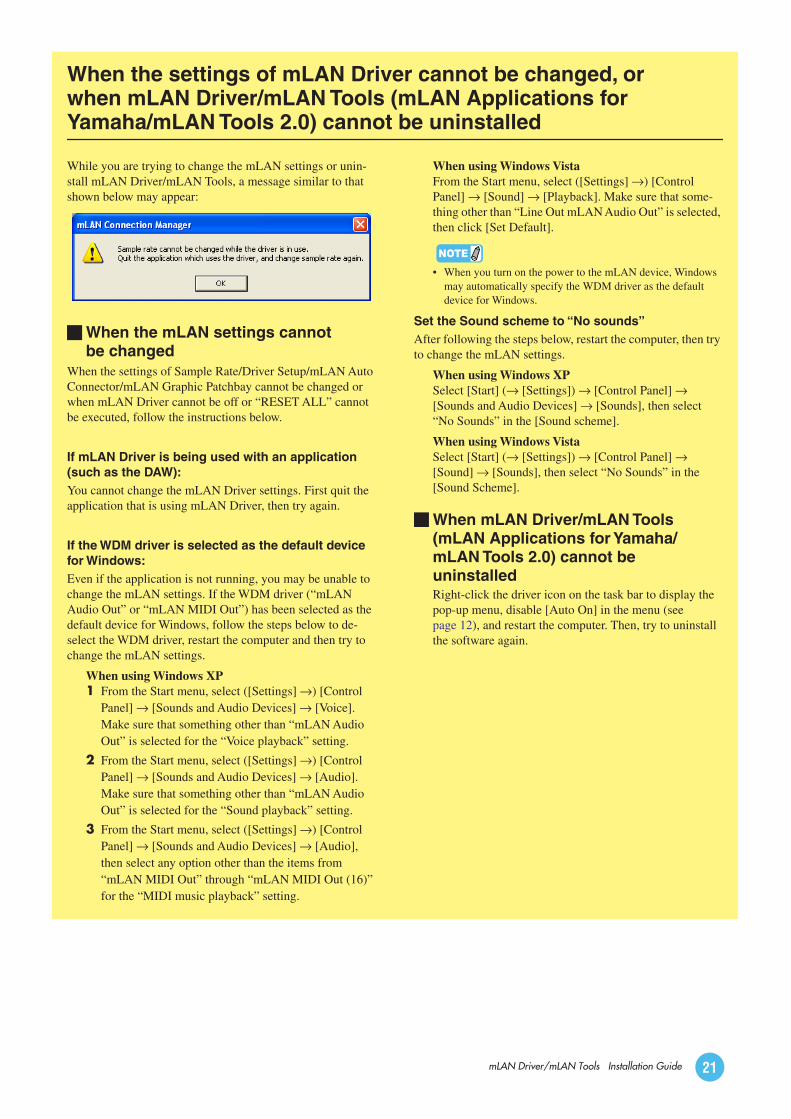
While you are trying to change the mLAN settings or unin-stall mLAN Driver/mLAN Tools, a message similar to that shown below may appear:
When the mLAN settings cannot be changed
When the settings of Sample Rate/Driver Setup/mLAN Auto Connector/mLAN Graphic Patchbay cannot be changed or when mLAN Driver cannot be off or “RESET ALL” cannot be executed, follow the instructions below.
If mLAN Driver is being used with an application (such as the DAW):You cannot change the mLAN Driver settings. First quit the application that is using mLAN Driver, then try again.
If the WDM driver is selected as the default device for Windows:Even if the application is not running, you may be unable to change the mLAN settings. If the WDM driver (“mLAN Audio Out” or “mLAN MIDI Out”) has been selected as the default device for Windows, follow the steps below to de-select the WDM driver, restart the computer and then try to change the mLAN settings.
When using Windows XP1 From the Start menu, select ([Settings] →) [Control
Panel] → [Sounds and Audio Devices] → [Voice]. Make sure that something other than “mLAN Audio Out” is selected for the “Voice playback” setting.
2 From the Start menu, select ([Settings] →) [Control Panel] → [Sounds and Audio Devices] → [Audio]. Make sure that something other than “mLAN Audio Out” is selected for the “Sound playback” setting.
3 From the Start menu, select ([Settings] →) [Control Panel] → [Sounds and Audio Devices] → [Audio], then select any option other than the items from “mLAN MIDI Out” through “mLAN MIDI Out (16)” for the “MIDI music playback” setting.
When using Windows VistaFrom the Start menu, select ([Settings] →) [Control Panel] → [Sound] → [Playback]. Make sure that some-thing other than “Line Out mLAN Audio Out” is selected, then click [Set Default].
• When you turn on the power to the mLAN device, Windows may automatically specify the WDM driver as the default device for Windows.
Set the Sound scheme to “No sounds”After following the steps below, restart the computer, then try to change the mLAN settings.
When using Windows XPSelect [Start] (→ [Settings]) → [Control Panel] → [Sounds and Audio Devices] → [Sounds], then select “No Sounds” in the [Sound scheme].
When using Windows VistaSelect [Start] (→ [Settings]) → [Control Panel] → [Sound] → [Sounds], then select “No Sounds” in the [Sound Scheme].
When mLAN Driver/mLAN Tools (mLAN Applications for Yamaha/mLAN Tools 2.0) cannot be uninstalledRight-click the driver icon on the task bar to display the pop-up menu, disable [Auto On] in the menu (see page 12), and restart the computer. Then, try to uninstall the software again.
NOTE
mLAN Driver/mLAN Tools Installation Guide 21
Optimizing audio performanceFor optimum use of the audio functions, we recommend you make the following settings. These settings minimize possible audio problems, such as drop outs, glitches and noise.
• Set the DMA mode (high-speed transfer mode) of the hard disk to on Windows XPSelect [Control Panel] → [System] → [Hardware] → [Device Manager] → “IDE ATA/ATAPI controllers,” then double-click “Primary IDE Channel” and “Secondary IDE Channel,” open [Advanced Settings]. Set “Transfer Mode” in the “Device” section to “DMA if available.”
Windows VistaSelect [Control Panel] → [Device Manager] (→ [Con-tinue] in the “User Account Control” window) → “IDE ATA/ATAPI controllers,” then double-click “ATA Chan-nel 0” and open [Advanced Settings]. Check (enable) “Enable DMA” in the “Device Properties” section.
• Set Processor Scheduling to “Background ser-vices”Windows XPSelect [Control Panel] → [System] → [Advanced] → [Settings] in the “Performance” section → [Advanced] and select the radio button to the left of “Background ser-vices” in the “Processor scheduling” section.
Windows VistaSelect [Control Panel] → [System] → [Advanced system settings] in the upper left of the window (→ [Continue] in the “User Account Control” window) → [Advanced] → [Settings] in the “Performance” section → [Advanced] and select the radio button to the left of “Background ser-vices” in the “Processor scheduling” section.
• Set the Visual Effects options to “best perfor-mance”Windows XPSelect [Control Panel] → [System] → [Advanced] → [Settings] in the “Performance” section → [Visual Effects] and select the radio button to the left of “Adjust for best performance.”
Windows VistaSelect [Control Panel] → [System] → [Advanced system settings] in the upper left of the window (→ [Continue] in the “User Account Control” window) → [Advanced] → [Settings] in the “Performance” section → [Visual Effects] and select the radio button to the left of “Adjust for best performance.”
• Set Remote Assistance to offWindows XPSelect [Control Panel] → [System] → [Remote] and uncheck “Allow Remote Assistance invitations....”
Windows VistaSelect [Control Panel] → [System] → [Remote settings] in the upper left of the window (→ [Continue] in the “User Account Control” window) → [Remote] and uncheck “Allow Remote Assistance connections....”
• Enable the Classic Start menuRight-click on an empty space on the task bar and select [Properties] → [Start Menu], then select the radio button to the left of “Classic Start menu.”
• Disable transition effectsWindows XPSelect [Control Panel] → [Display] (→ [Appearance]) → [Effects...], and uncheck (disable) “Use the following transition effect for menus and tooltips.”
Windows VistaSelect [Control Panel] → [Ease of Access Center] → “Make it easier to focus on tasks,” then check (enable) “Turn off all unnecessary animations (when possible)” in the “Adjust time limits and flashing visuals” section.
• Disable SpeedStepTM
Refer to “Troubleshooting” (see page 27).
mLAN Driver/mLAN Tools Installation Guide 22

For 01X• Upgrading the main section of the 01X
While holding down the 01X’s [UTILITY] key, turning on the power calls up the current version on the LCD display of the 01X. If the displayed version is earlier than 1.03, you will need upgrade the main section of the 01X. For detailed instructions, refer to “UpgradeE.pdf” (you can find by select-ing “for_01X_user” folder → “01X_v103_updater” folder).
• Upgrading the mLAN section of the 01XYou can get the version from the node information in mLAN Graphic Patchbay. For more information, refer to the manual of mLAN Graphic Patchbay.
When the number indicated in bold is less than 519, upgrade the mLAN section of the 01X. For detailed instructions, refer to “user_guide_e.htm” (you can find by selecting “for_01X_user” → “mLAN_updater” folder).
For i88X• Upgrading the mLAN section of the i88X
You can get the version from the node information in mLAN Graphic Patchbay. For more information, refer to the manual of mLAN Graphic Patchbay.
When the number indicated in bold is less than 519, upgrade the mLAN section of the i88X. For detailed instructions, refer to “user_guide_e.htm” (you can find by selecting “for_i88X_user” → “mLAN_updater” folder).
For mLAN16E• Upgrading the mLAN section of the mLAN16E
You can get the version from the node information in mLAN Graphic Patchbay. For more information, refer to the manual of mLAN Graphic Patchbay.
When the number indicated in bold is less than 519, upgrade the mLAN section of the mLAN16E. For detailed instructions, refer to “user_guide_e.htm” (you can find by selecting “for_mLAN16E_user” → “mLAN_updater” folder).
Upgrading the firmware of the mLAN device
When using the 01X, i88X or mLAN16E along with the computer via the mLAN connection, it may be nec-essary to upgrade the firmware of these devices. While the upgrade is in process, never turn off the mLAN device, never disconnect/connect the IEEE1394 (mLAN) cable, and never connect the new mLAN device in addition to the current network.
Example of version indication: NCP0405-B0-519-2004-09-03
Example of version indication: NCP0405-B0-519-2004-09-03
Example of version indication: NCP0405-B0-519-2004-09-03
mLAN Driver/mLAN Tools Installation Guide 23
To uninstall mLAN Driver/mLAN Tools, you must remove the following two software components:• mLANApplications for Yamaha• mLAN Tools 2.0
Installed software can be removed from your computer as follows.
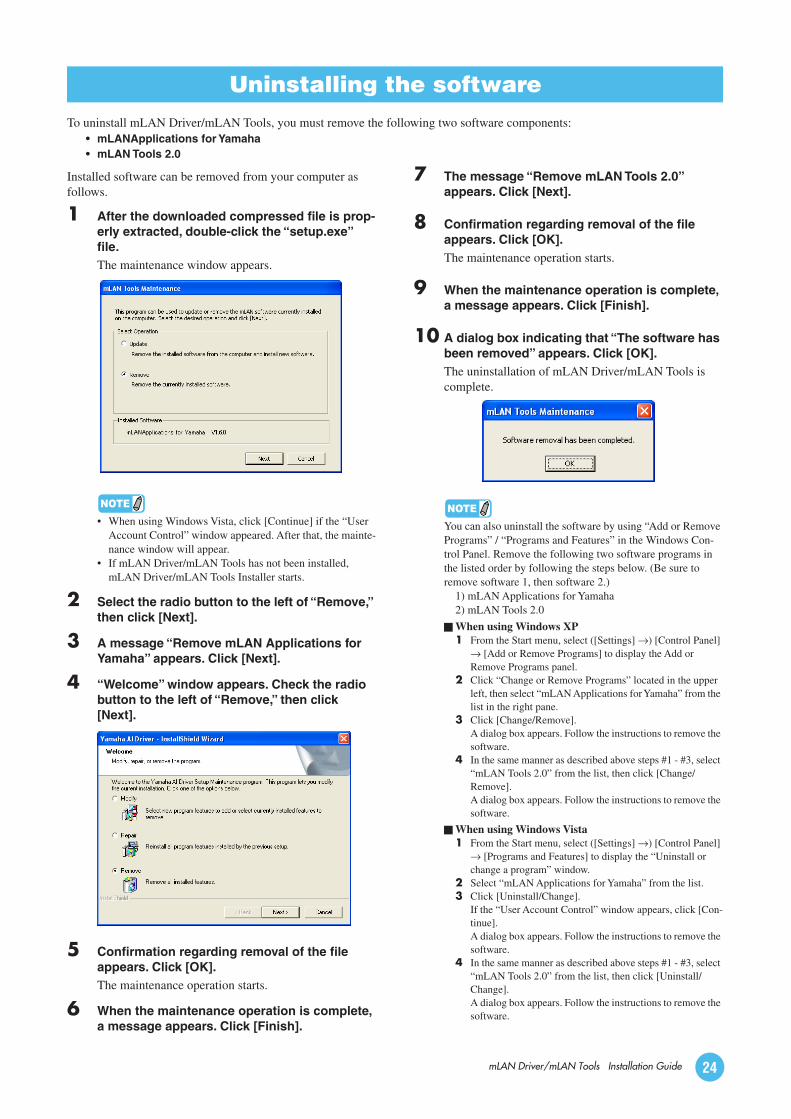
1 After the downloaded compressed file is prop-erly extracted, double-click the “setup.exe” file.The maintenance window appears.
NOTE
• When using Windows Vista, click [Continue] if the “User Account Control” window appeared. After that, the mainte-nance window will appear.
• If mLAN Driver/mLAN Tools has not been installed, mLAN Driver/mLAN Tools Installer starts.
2 Select the radio button to the left of “Remove,” then click [Next].
3 A message “Remove mLAN Applications for Yamaha” appears. Click [Next].
4 “Welcome” window appears. Check the radio button to the left of “Remove,” then click [Next].
5 Confirmation regarding removal of the file appears. Click [OK].The maintenance operation starts.
6 When the maintenance operation is complete, a message appears. Click [Finish].
7 The message “Remove mLAN Tools 2.0” appears. Click [Next].
8 Confirmation regarding removal of the file appears. Click [OK].The maintenance operation starts.
9 When the maintenance operation is complete, a message appears. Click [Finish].
10 A dialog box indicating that “The software has been removed” appears. Click [OK].The uninstallation of mLAN Driver/mLAN Tools is complete.
NOTE
You can also uninstall the software by using “Add or Remove Programs” / “Programs and Features” in the Windows Con-trol Panel. Remove the following two software programs in the listed order by following the steps below. (Be sure to remove software 1, then software 2.)
1) mLAN Applications for Yamaha2) mLAN Tools 2.0
When using Windows XP1 From the Start menu, select ([Settings] →) [Control Panel]
→ [Add or Remove Programs] to display the Add or Remove Programs panel.
2 Click “Change or Remove Programs” located in the upper left, then select “mLAN Applications for Yamaha” from the list in the right pane.
3 Click [Change/Remove].A dialog box appears. Follow the instructions to remove the software.
4 In the same manner as described above steps #1 - #3, select “mLAN Tools 2.0” from the list, then click [Change/Remove]. A dialog box appears. Follow the instructions to remove the software.
When using Windows Vista1 From the Start menu, select ([Settings] →) [Control Panel]
→ [Programs and Features] to display the “Uninstall or change a program” window.
2 Select “mLAN Applications for Yamaha” from the list.3 Click [Uninstall/Change].
If the “User Account Control” window appears, click [Con-tinue].A dialog box appears. Follow the instructions to remove the software.
4 In the same manner as described above steps #1 - #3, select “mLAN Tools 2.0” from the list, then click [Uninstall/Change].A dialog box appears. Follow the instructions to remove the software.
Uninstalling the software
mLAN Driver/mLAN Tools Installation Guide 24
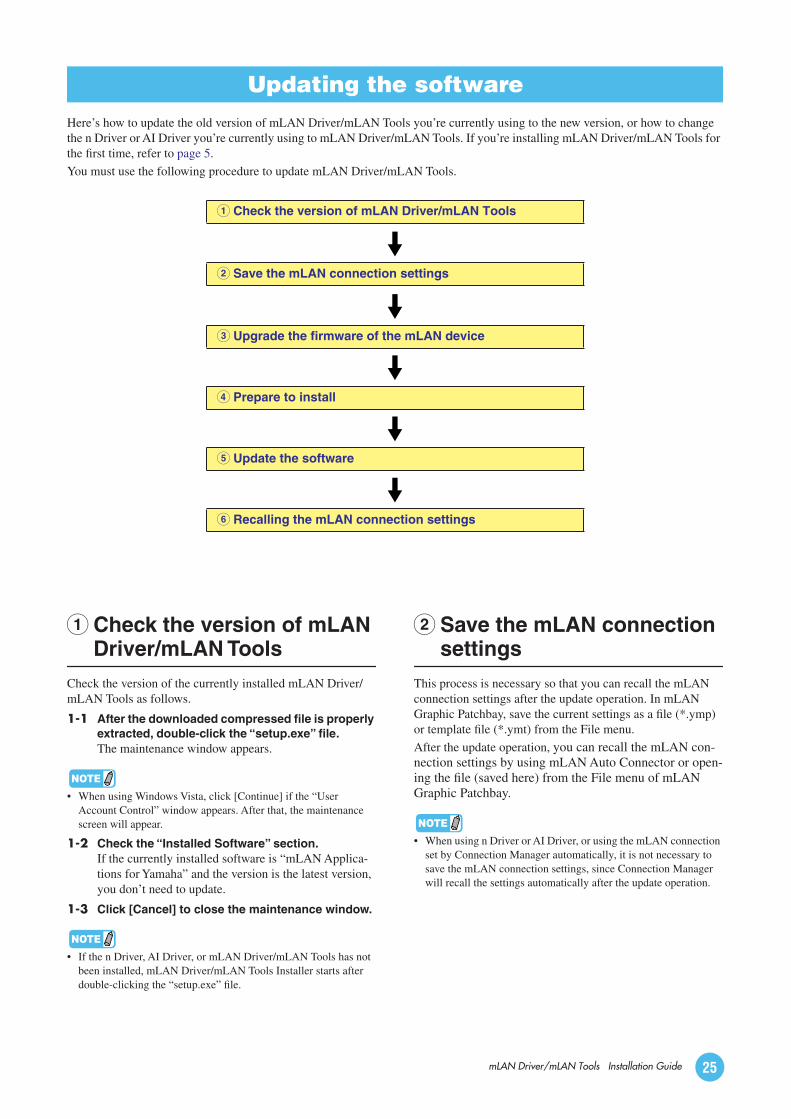
Here’s how to update the old version of mLAN Driver/mLAN Tools you’re currently using to the new version, or how to change the n Driver or AI Driver you’re currently using to mLAN Driver/mLAN Tools. If you’re installing mLAN Driver/mLAN Tools for the first time, refer to page 5.
You must use the following procedure to update mLAN Driver/mLAN Tools.
1 Check the version of mLAN Driver/mLAN Tools
Check the version of the currently installed mLAN Driver/mLAN Tools as follows.
1-1 After the downloaded compressed file is properly extracted, double-click the “setup.exe” file. The maintenance window appears.
NOTE
• When using Windows Vista, click [Continue] if the “User Account Control” window appears. After that, the maintenance screen will appear.
1-2 Check the “Installed Software” section.If the currently installed software is “mLAN Applica-tions for Yamaha” and the version is the latest version, you don’t need to update.
1-3 Click [Cancel] to close the maintenance window.
NOTE
• If the n Driver, AI Driver, or mLAN Driver/mLAN Tools has not been installed, mLAN Driver/mLAN Tools Installer starts after double-clicking the “setup.exe” file.
2 Save the mLAN connection settings
This process is necessary so that you can recall the mLAN connection settings after the update operation. In mLAN Graphic Patchbay, save the current settings as a file (*.ymp) or template file (*.ymt) from the File menu.
After the update operation, you can recall the mLAN con-nection settings by using mLAN Auto Connector or open-ing the file (saved here) from the File menu of mLAN Graphic Patchbay.
NOTE
• When using n Driver or AI Driver, or using the mLAN connection set by Connection Manager automatically, it is not necessary to save the mLAN connection settings, since Connection Manager will recall the settings automatically after the update operation.
Updating the software
1 Check the version of mLAN Driver/mLAN Tools
2 Save the mLAN connection settings
3 Upgrade the firmware of the mLAN device
4 Prepare to install
5 Update the software
6 Recalling the mLAN connection settings
mLAN Driver/mLAN Tools Installation Guide 25
3 Upgrade the firmware of the mLAN device
When using the 01X, i88X or mLAN16E along with the computer via the mLAN connection, it may be necessary to upgrade the firmware of these devices. If so, perform the upgrade operation. For details, see page 23.
4 Prepare to installMake the preparations that are required for the installation. Refer to page 6 for details.
5 Update the softwareUninstall the old version of the software and install the new version of the software as follows.
5-1 After the downloaded compressed file is properly extracted, double-click the “setup.exe” file. The maintenance window appears.
NOTE
• When using Windows Vista, click [Continue] if the “User Account Control” window appears. After that, the maintenance screen will appear.
5-2 Select the radio button to the left of “Update,” then click [Next].
5-3 Follow the instructions to uninstall the old version of the software, then install the new version of the software.For details, refer to “Uninstalling the software” (see page 24) and “Installing the software” (see page 5). The method for uninstalling n Driver or AI Driver is the same as in the procedure “Uninstalling the software.”
6 Recalling the mLAN connection settings
You can recall the mLAN connection settings by using mLAN Auto Connector or opening the file (saved in step 2) from the File menu of mLAN Graphic Patchbay.
NOTE
• When using the mLAN device which is supported by Connection Manager, the mLAN connection settings will be recalled automat-ically by Connection Manager.
mLAN Driver/mLAN Tools Installation Guide 26
If an error message appears:• If you see one of the following messages, right-click the
driver icon on the task bar and select “ON” (see page 12) to enable mLAN: “Select “ON” from the menu of “mLAN Manager” application.” “Execute mLAN Start.” “Start mLAN.”
• If the message “Execute mLAN Stop” appears, right-click the driver icon on the task bar and select “OFF” (see page 12) to disable mLAN.
• If other error messages appear, follow the onscreen instruc-tions.
No sound is heard, or the sound is too faint.Setting on the computer, mLAN device connection• The volume settings within your application must be set to
appropriate levels. • Make sure that mLAN Driver is enabled. (The driver icon
should be blue.) If not, right-click the driver icon on the task bar, then select “ON.”
Refer to “Confirming the installation” (see page 12)
• Are the other settings of mLAN Driver appropriate? Refer to “Unable to transfer/receive audio data
or MIDI data” item in this chapter
• If there are more than four devices (including a computer) on the network, the limit of the IEEE1394 BUS bandwidth may be exceeded.
• The limit of the IEEE1394 BUS bandwidth may have been exceeded. Check the current bandwidth using mLAN Graphic Patchbay, and disconnect some devices if necessary.
• If there is an mLAN device that supports only S200 on the mLAN network, the IEEE1394 BUS bandwidth may be reduced and its limit exceeded. Reduce the number of mLAN devices connected to the network, or disconnect some devices as necessary.
Setting on the mLAN device (mLAN16E/mLAN16E2/MY16-mLAN-equipped device) and other external devices• Make sure that the speakers or headphones are connected
correctly. • Make sure that the power to your amplifier and other external
devices are turned on.• The volume of all connected tone generators and playback
devices must be set to an appropriate level. • The cable that connects the mLAN device and the external
device may be damaged.• Is the wordclock setting correct for both the mLAN device
and the external device(s)?Refer to “Setting up from the mLAN Auto Connector”
(see page 16)Refer to “Wordclock Settings” in the manual
of mLAN Graphic Patchbay
Sound is distorted.Setting on the computer, the mLAN device (mLAN16E/mLAN16E2/MY16-mLAN-equipped device and other external devices• Make sure that audio was recorded at an appropriate level. • Is the wordclock setting correct for both the mLAN device
and the external device(s)?• The cable that connects the mLAN device and the external
device may be damaged. Refer to “Setting up from the mLAN Auto Connector”
(see page 16)
Noise is produced.Setting on the computer• Make sure that your computer satisfies the system require-
ments.Refer to “System Requirements” (see page 3)
• Make sure that the latency setting of mLAN Driver is appro-priate.
Refer to “Driver Setup” (see page 14) and “ASIO Control Panel” (see page 15)
• Make sure that the sampling frequency is appropriate. A high sampling frequency may be the cause of noise, depending on the computer’s capacity and speed. Otherwise, try setting the computer to a wordclock master.
Refer to “Sample Rate” (see page 13)Refer to “Setting up from the mLAN Auto Connector”
(see page 16)Refer to “Wordclock Settings” in the manual
of mLAN Graphic Patchbay
• Is the number of audio channels appropriate?Refer to “Setting up from the mLAN Auto Connector”
(see page 16)Refer to “mLAN Connection Settings” in the manual
of mLAN Graphic Patchbay
• If your computer’s hard disk is slow, problems may occur during recording and playback.
• Try increasing the computer’s memory capacity. • Quit all applications that are running in the background when
you use mLAN. If such software is running, driver operation may become unstable and create noise. When you are not using mLAN, you can start up these applications again.
• Some network adaptors can cause noise. In such a case, use the Device Manager to disable the suspected network adaptor to remove the noise.
Connecting the mLAN device• The IEEE1394 (mLAN) cable may be damaged. Cables that
do not satisfy IEEE1394 (S400) standards may cause noise. • There may be a noise-producing device (such as a device
containing a power inverter, etc.) near the IEEE1394 (mLAN) cable. Move all cables away from any possible sources of noise.
• Make sure that an appropriate number of devices is con-nected to the computer. Connection of too many devices may cause noise, depending on the capacity of the computer.
Setting on the mLAN device (mLAN16E/mLAN16E2/MY16-mLAN-equipped device) and other external devices• There may be a noise-producing device (such as a device
containing a power inverter, etc.) near the cable connecting the mLAN device to other external devices. Move all cables away from any possible sources of noise.
• Is the wordclock setting correct for both the mLAN device and the external device(s)?
Refer to “Setting up from the mLAN Auto Connector”(see page 16)
Refer to “Wordclock Settings” in the manualof mLAN Graphic Patchbay
Troubleshooting
mLAN Driver/mLAN Tools Installation Guide 27
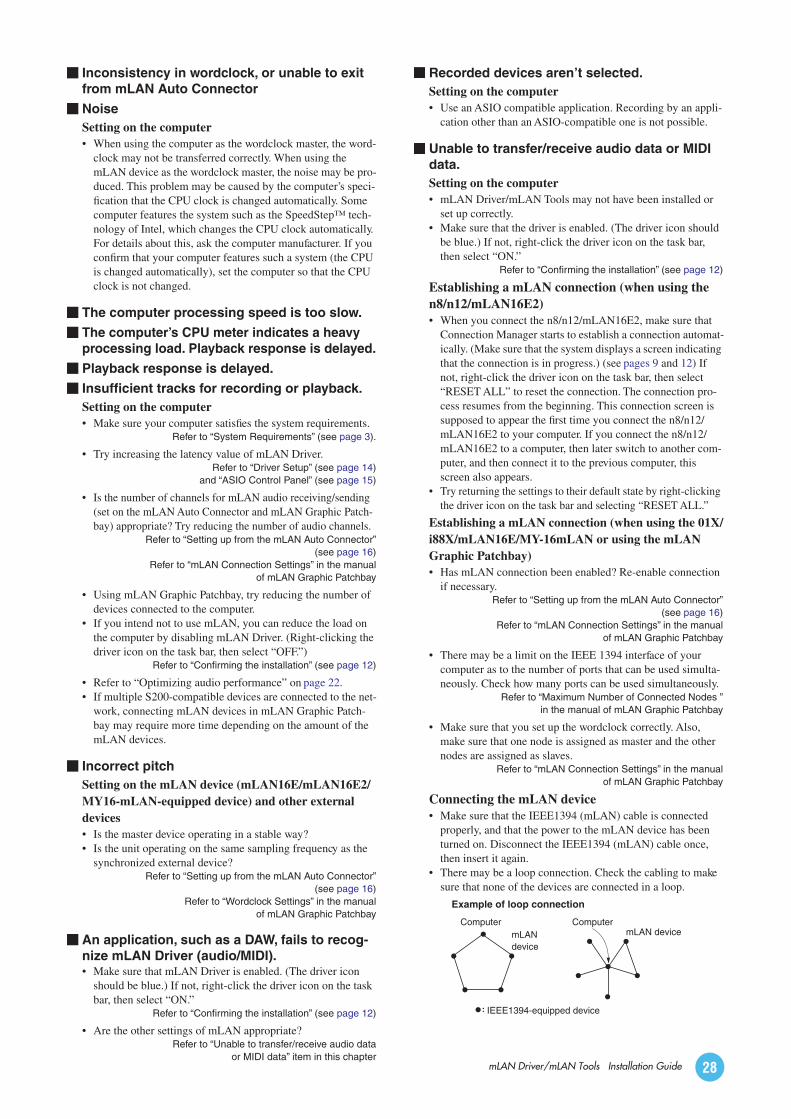
mLAN Driver/mLAN Tools Installation Guide 28
Inconsistency in wordclock, or unable to exit from mLAN Auto Connector
NoiseSetting on the computer• When using the computer as the wordclock master, the word-
clock may not be transferred correctly. When using the mLAN device as the wordclock master, the noise may be pro-duced. This problem may be caused by the computer’s speci-fication that the CPU clock is changed automatically. Some computer features the system such as the SpeedStep™ tech-nology of Intel, which changes the CPU clock automatically. For details about this, ask the computer manufacturer. If you confirm that your computer features such a system (the CPU is changed automatically), set the computer so that the CPU clock is not changed.
The computer processing speed is too slow.
The computer’s CPU meter indicates a heavy processing load. Playback response is delayed.
Playback response is delayed.
Insufficient tracks for recording or playback.Setting on the computer• Make sure your computer satisfies the system requirements.
Refer to “System Requirements” (see page 3).
• Try increasing the latency value of mLAN Driver.Refer to “Driver Setup” (see page 14)
and “ASIO Control Panel” (see page 15)
• Is the number of channels for mLAN audio receiving/sending (set on the mLAN Auto Connector and mLAN Graphic Patch-bay) appropriate? Try reducing the number of audio channels.
Refer to “Setting up from the mLAN Auto Connector”(see page 16)
Refer to “mLAN Connection Settings” in the manualof mLAN Graphic Patchbay
• Using mLAN Graphic Patchbay, try reducing the number of devices connected to the computer.
• If you intend not to use mLAN, you can reduce the load on the computer by disabling mLAN Driver. (Right-clicking the driver icon on the task bar, then select “OFF.”)
Refer to “Confirming the installation” (see page 12)
• Refer to “Optimizing audio performance” on page 22. • If multiple S200-compatible devices are connected to the net-
work, connecting mLAN devices in mLAN Graphic Patch-bay may require more time depending on the amount of the mLAN devices.
Incorrect pitchSetting on the mLAN device (mLAN16E/mLAN16E2/MY16-mLAN-equipped device) and other external devices• Is the master device operating in a stable way?• Is the unit operating on the same sampling frequency as the
synchronized external device?Refer to “Setting up from the mLAN Auto Connector”
(see page 16)Refer to “Wordclock Settings” in the manual
of mLAN Graphic Patchbay
An application, such as a DAW, fails to recog-nize mLAN Driver (audio/MIDI).• Make sure that mLAN Driver is enabled. (The driver icon
should be blue.) If not, right-click the driver icon on the task bar, then select “ON.”
Refer to “Confirming the installation” (see page 12)
• Are the other settings of mLAN appropriate?Refer to “Unable to transfer/receive audio data
or MIDI data” item in this chapter
Recorded devices aren’t selected.Setting on the computer• Use an ASIO compatible application. Recording by an appli-
cation other than an ASIO-compatible one is not possible.
Unable to transfer/receive audio data or MIDI data.Setting on the computer• mLAN Driver/mLAN Tools may not have been installed or
set up correctly. • Make sure that the driver is enabled. (The driver icon should
be blue.) If not, right-click the driver icon on the task bar, then select “ON.”
Refer to “Confirming the installation” (see page 12)
Establishing a mLAN connection (when using the n8/n12/mLAN16E2)• When you connect the n8/n12/mLAN16E2, make sure that
Connection Manager starts to establish a connection automat-ically. (Make sure that the system displays a screen indicating that the connection is in progress.) (see pages 9 and 12) If not, right-click the driver icon on the task bar, then select “RESET ALL” to reset the connection. The connection pro-cess resumes from the beginning. This connection screen is supposed to appear the first time you connect the n8/n12/mLAN16E2 to your computer. If you connect the n8/n12/mLAN16E2 to a computer, then later switch to another com-puter, and then connect it to the previous computer, this screen also appears.
• Try returning the settings to their default state by right-clicking the driver icon on the task bar and selecting “RESET ALL.”
Establishing a mLAN connection (when using the 01X/i88X/mLAN16E/MY-16mLAN or using the mLAN Graphic Patchbay)• Has mLAN connection been enabled? Re-enable connection
if necessary. Refer to “Setting up from the mLAN Auto Connector”
(see page 16)Refer to “mLAN Connection Settings” in the manual
of mLAN Graphic Patchbay
• There may be a limit on the IEEE 1394 interface of your computer as to the number of ports that can be used simulta-neously. Check how many ports can be used simultaneously.
Refer to “Maximum Number of Connected Nodes ”in the manual of mLAN Graphic Patchbay
• Make sure that you set up the wordclock correctly. Also, make sure that one node is assigned as master and the other nodes are assigned as slaves.
Refer to “mLAN Connection Settings” in the manualof mLAN Graphic Patchbay
Connecting the mLAN device• Make sure that the IEEE1394 (mLAN) cable is connected
properly, and that the power to the mLAN device has been turned on. Disconnect the IEEE1394 (mLAN) cable once, then insert it again.
• There may be a loop connection. Check the cabling to make sure that none of the devices are connected in a loop.
Example of loop connection
ComputermLAN device
IEEE1394-equipped device
mLAN device
Computer

tion
• Turn off all devices on the mLAN network (except the com-puter) and re-connect each device one-by-one until the device causing the problem is found.
• There may be multiple IEEE1394 interfaces installed on the computer. In this case, right-click the driver icon on the task bar, then select Driver Setup, and then select one of the IEEE1394 interfaces to which you wish to connect the mLAN device. After the setting is complete, re-insert the IEEE1394 (mLAN) cable, disable the mLAN Driver (off), then enable the mLAN Driver (on) again by right-clicking the driver icon then selecting ON or OFF.
Refer to “Driver Setup” (see page 14)
Settings on the mLAN device (mLAN16E/mLAN16E2/MY16-mLAN-equipped device)• (mLAN16E/mLAN16E2/MY16-mLAN) Is the ACTIVE
lamp on the rear panel of the mLAN16E lit (in blue)? If it is not lit, check the following: In mLAN Driver Setup, is the Status indicator normal? If not, restart the mLAN device (mLAN16E/mLAN16E2/MY16-mLAN-equipped device) and re-enable mLAN connection by using mLAN Auto Con-nector or mLAN Graphic Patchbay.
Refer to “Driver Setup” (see page 14)Refer to “Setting up from the mLAN Auto Connector”
(see page 16)Refer to the manual of the mLAN Graphic Patchbay.
• Have you changed the device? Even if the model is the same, if the actual device is different, it is necessary to re-enable mLAN connection.
Refer to “Setting up from the mLAN Auto Connector”(see page 16)
Refer to “mLAN Connection Settings” in the manualof mLAN Graphic Patchbay.
Unable to transfer/receive MIDI data or pro-gram changes.Setting on the computer, mLAN device (mLAN16E/mLAN16E2/MY16-mLAN-equipped device) and other external devices• In the application, such as a DAW, make sure the correct
MIDI port has been selected. • Make sure the transmission and reception channels of each
device or application (such as a DAW) match. • Are the MIDI settings of the mLAN16E- or mLAN16E2-
equipped device appropriate?Refer to the Owner’s Manual
of the mLAN16E/mLA16E2-equipped device
• Is the power turned on for the transmitting and receiving devices?
Connecting the mLAN device• Make sure that the IEEE1394 (mLAN) cable is connected
properly. • Make sure that the IEEE1394 (mLAN) cable is not broken.
In mLAN Graphic Patchbay, a connected mLAN device is not recognized.• Refresh the information by selecting [View], then [Update] in
the Menu bar. Refer to “Menu Bar” in the manual
of the mLAN Graphic Patchbay
Connections are changed each time you start mLAN Graphic Patchbay.• If the network includes a non-S400-compatible device, the
total number of transmission channels of all devices will be reduced. mLAN Graphic Patchbay recalls the previous con-nections of the mLAN devices in the order of power-up. Channels in excess of the permitted number will not be con-nected.
• If five or more mLAN devices (including a computer) have been connected to a network, the total number of transmis-sion channels of all devices will be limited. You can connect up to 86 channels in Windows.
Launching mLAN Graphic Patchbay or updat-ing to the latest information takes a while.• When you try to update the network information after con-
necting or disconnecting an mLAN device that does not sup-port S400, the system adjusts the mLAN transfer speed, and requires more time to process your request. However, this will not affect any subsequent operations.
In mLAN Graphic Patchbay, an error message appears when opening a template file. • Depending on the specifications of the computer and
IEEE1394 card, there are two situations: 1) up to four mLAN devices can be connected, and 2) up to two mLAN devices can be connected. If you’ve established the mLAN connec-tion and saved the settings as a template file on the computer/IEEE1394 card which enables you to connect up to four mLAN devices, and then you open the template file on the computer/IEEE1394 card which enables you to connect up to just two mLAN devices, an error message is called up. If such a situation occurs, use only up to two mLAN devices. You can confirm the amount (two or four) of the mLAN devices which can be connected on the Information window (page 14) of the Driver Setup. Half of the tab’s amount indi-cates the maximum number of the mLAN devices which can be connected.
Cannot change the settings of Sample Rate/Driver Setup/mLAN Auto Connector/mLAN Graphic Patchbay.
Cannot disable mLAN Driver. Failed to execute “RESET ALL.”• Refer to “When the settings of mLAN Driver cannot be
changed, or when mLAN Driver/mLAN Tools (mLAN Applications for Yamaha/mLAN Tools 2.0) cannot be unin-stalled.” (see page 21).
Cannot uninstall (remove) mLAN Driver/mLAN Tools (mLAN Applications for Yamaha/mLAN Tools 2.0) • Refer to “When the settings of mLAN Driver cannot be
changed, or when mLAN Driver/mLAN Tools (mLAN Applications for Yamaha/mLAN Tools 2.0) cannot be unin-stalled.” (see page 21).
The driver icon in the task bar has disap-peared.• Select [Start] → [(All) Programs] → [Startup] or [mLAN
Tools], then select mLAN Manager.
Cannot use other connected IEEE1394-equipped devices correctly.• Turn mLAN Driver off. To do so, right-clicking the driver
icon on the task bar, then select “OFF.”Refer to “Confirming the installation” (see page 12)
NOTE
• For information on audio problems such as no sound or excess noise, refer to the Troubleshooting section of the mLAN device Owner’s Manual as well as the Troubleshooting section of this Installation Guide.
U.R.G., Pro Audio & Digital Musical Instrument Division, Yamaha Corpora
© 2004 Yamaha Corporation