Embed Size (px)
Citation preview

Version 1.6
MiY Product Line
GateApp Development Guide

©2012 Cogent, Inc. All rights reserved.
This document contains commercial information and trade secrets of Cogent, Inc. which are confidential and
proprietary in nature and are subject to protection under law. Access to the information contained herein, howsoever
acquired and of whatsoever nature, will not entitle the accessor thereof to acquire any right thereto. The data subject to
this restriction are contained in all sheets of this document. Disclosure of any such information or trade secrets shall
not be made without the prior written permission of Cogent, Inc.
No part of this publication may be reproduced, stored in a retrieval system, or transmitted, in any form or by any
means, electronic, mechanical, photocopying, recording, or otherwise, without the prior written permission of Cogent,
Inc.
The information in this document is subject to change without notice. The software mentioned in this document is
furnished under license and may only be used or copied in accordance with the terms of such license. Contact software
manufacturers directly for terms of software licenses for any software mentioned in this document not originating from
Cogent, Inc.
All brand or product names are the trademarks or registered trademarks of their respective holders.
Cogent Document # MiY-AE-SP-2011-1.00
Document Revision History
Version Date Author Comment
1.0 07/19/2011 JL,CP,CC Initial version
1.1 08/15/2011 CP Minor revisions. Updated Relay/Line Trigger, SDK Installer section and added reference to LocalCardTest sample application.
1.2 09/28/2011 CP Added Indicate and UnregisteredFromDevice GateDevice events, show/hide mouse section and a list of Sandbox namespaces.
1.3 03/02/2012 CP Added new 1.5 features, including GateApp Images, Animations, Signatures and ScriptTask sections.
1.4 05/24/2012 CP Updated Integration Points
1.5 06/22/2012 CP Added GateDevice.MessageWindow object. Removed reference to PEM files because they are now embedded in the SecurAPI. Removed reference to MyCustomGateApp sample project because it is a duplicate of the MiY GateApp VS 2008 template project.
1.6 08/03/2012 CP Updated screen shots. Added how to request DEV license from Security Manager.

Contents � iii
Proprietary
Contents
1 Introduction 1
2 MiY Sandbox SDK Installer 4
3 USB Ports 5
4 GateApps 9
4.1 Sample Application and Project Templates ...................................................................... 9
4.2 Creating a GateApp ......................................................................................................... 10
4.2.1 Project Template GateApp Creation .................................................................. 10
4.2.2 Manual GateApp Creation .................................................................................. 12
4.3 Packaging a GateApp ...................................................................................................... 18
4.4 Deploying a GateApp ...................................................................................................... 24
4.4.1 Deploying to a Managed Device ........................................................................ 24
4.4.2 Deploying to a Standalone Device ..................................................................... 27
4.5 Debugging a GateApp ..................................................................................................... 30
4.5.1 Using the Mouse ................................................................................................. 30
4.5.2 Stopping the Nurse ............................................................................................. 30
4.5.3 Stopping the Factory GateApp ........................................................................... 31
4.5.4 Device Files ......................................................................................................... 31
4.6 GateApp Signatures ......................................................................................................... 32
5 MiY Device Emulator 33
5.1 Device Emulator Layout .................................................................................................. 33
5.2 GPIO Functionality ........................................................................................................... 34
5.3 Using the MiY Device Emulator ...................................................................................... 34
6 Sandbox 38
6.1 GateDevice ....................................................................................................................... 39
6.1.1 MessageWindow.................................................................................................. 40
6.1.2 PropertyHelper .................................................................................................... 40
6.1.3 UserHelper ........................................................................................................... 40
6.1.4 EthernetAdapter .................................................................................................. 40
6.1.5 EventLog .............................................................................................................. 40
6.1.6 KeyHandler .......................................................................................................... 41
6.1.7 WiegandIn ............................................................................................................ 41
6.1.8 WiegandOut ......................................................................................................... 41
6.1.9 Panel In ................................................................................................................ 42
6.1.10 TcpMessageClient ............................................................................................... 43
6.1.11 TlsMessageClient ................................................................................................ 43
Contents � iv
Proprietary
6.1.12 Biometric ............................................................................................................. 43
6.1.13 Relay .................................................................................................................... 44
6.1.14 Line Trigger ......................................................................................................... 44
6.1.15 Tamper ................................................................................................................ 44
6.1.16 Indicate ................................................................................................................ 44
6.1.17 UnregisteredFromDevice .................................................................................... 44
6.2 Events ............................................................................................................................... 45
6.2.1 DeviceEventReceiver ........................................................................................... 45
6.2.2 LocalDeviceEvent ................................................................................................ 46
6.2.3 Data Changed Events ......................................................................................... 46
6.3 Keypad.............................................................................................................................. 47
6.4 LEDs .................................................................................................................................. 47
6.5 Flash Storage ................................................................................................................... 50
6.6 Smartcards ....................................................................................................................... 51
6.7 Sounds .............................................................................................................................. 51
6.8 Images .............................................................................................................................. 52
6.9 Animations ....................................................................................................................... 52
6.10 SSL .................................................................................................................................... 53
7 MiY Integration Points 54
7.1 Server Integration ............................................................................................................ 55
7.1.1 IServerModule Extension .................................................................................... 55
7.1.2 IServerService Extension .................................................................................... 55
7.2 ScriptTask Database Table ............................................................................................. 56
8 Glossary of Terms 57
1 -Introduction � 1
Proprietary
1 Introduction
The Make-it-Yours (MiY) product line is a rapid application development framework that allows
integrators to easily customize their access workflow, deploy their customizations, and allow
for innovation beyond the basic physical access reader.
The solution is considered a framework rather than an SDK, because of its built-in
comprehensive access modules that can be mixed and re-ordered to accomplish various
workflows. This allows an integrator to develop applications that:
♦ Maintain full control over their intellectual property ♦ Mold 3M Cogent biometric and smartcard technology into their solutions ♦ Meet the unique needs of their customers
3M Cogent’s MiY Product line is built to take advantage of Microsoft’s .NET C# architecture for
ease of development. Enabling developers to establish secure socket connections to a separate
system, request web-services from enterprise solutions, or even integrate with virtually any USB
device via the USB host port on the back of the MiY device.
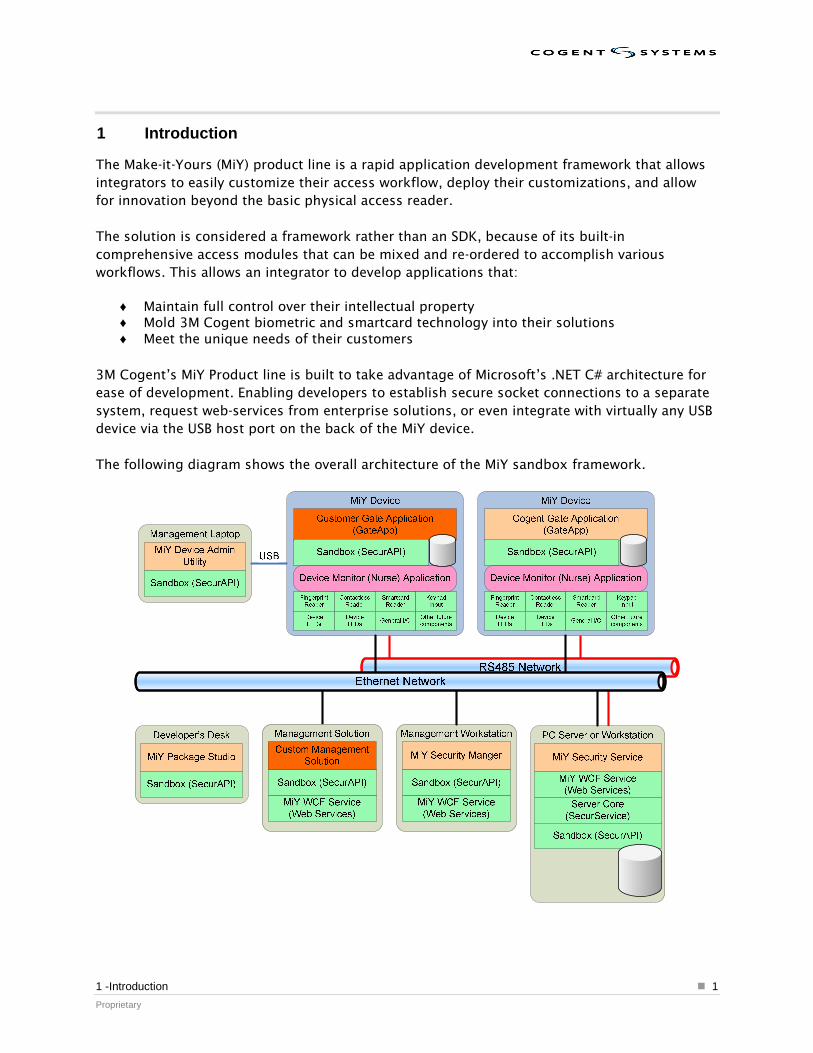
The following diagram shows the overall architecture of the MiY sandbox framework.
1 -Introduction � 2
Proprietary
The MiY framework is composed of the following components:
1. MiY Security Service – A .NET based server that provides several services and
integration points for the framework:
♦ Windows Communication Foundation (WCF) SOAP web service: is
designed to manage all access related and system related data. These web services are designed to allow for easy integration with other systems or customized management GUI interfaces. WCF technology allows the server to run on small and large scale systems. The server handles all network communication and synchronization of data with the devices.
♦ SecurProtocol Sandbox Communications service: allows the service to
communicate directly with the MiY Devices over Ethernet or RS485 networks. SecurProtocol is used to abstract the detailed differences between the two communication protocols and allow simplified management through the Sandbox framework.
♦ Microsoft Extensibility Framework (MEF): also provides additional integration points using MEF as a fast and easy way to enhance the MiY Security Service with additional modules.
The service is also designed to handle automatic creation and upgrade of new or
existing MiY system databases automatically. The MiY Security Service currently
supports Microsoft SQL Server 2008.
2. Sandbox – A .NET (Full and Compact) based, extendible framework providing all core
functionality, including message protocols, smart cards, biometrics, etc., used by the server and devices.
3. MiY Security Manager – The standard user interface client application for managing all
aspects of the MiY platform, including user management, device management, government credential, etc. The security manager is .NET based and communicates directly with the same MiY Security Service web service calls that are also available for other integrators to use if they would like to customize their own Security Manager.
4. MiY Device (MiY ID/MiY Card/MiY Search) – A Windows CE 6 based device with a built-
in background “Nurse” monitoring application and replaceable GateApp. The Nurse maintains the core functionality within the framework such as managing device registration, user templates, settings, package upload, etc… The GateApp manages the workflow and user interface. The Nurse and standard GateApps are both based on the Sandbox and underlying .NET Compact Framework.
5. MiY Package Studio – A .NET based, developer friendly application used to build packages for custom GateApps. After a package is built, they can then be deployed to devices to replace or enhance the standard functionality. GateApp packages can be deployed to MiY devices in two (2) ways:
a. Using the MiY Security Manager to upload the package through the MiY Framework. The MiY Security Service then manages the deployment to one or more specific devices based on assigned relationship between packages and zones.
1 -Introduction � 3
Proprietary
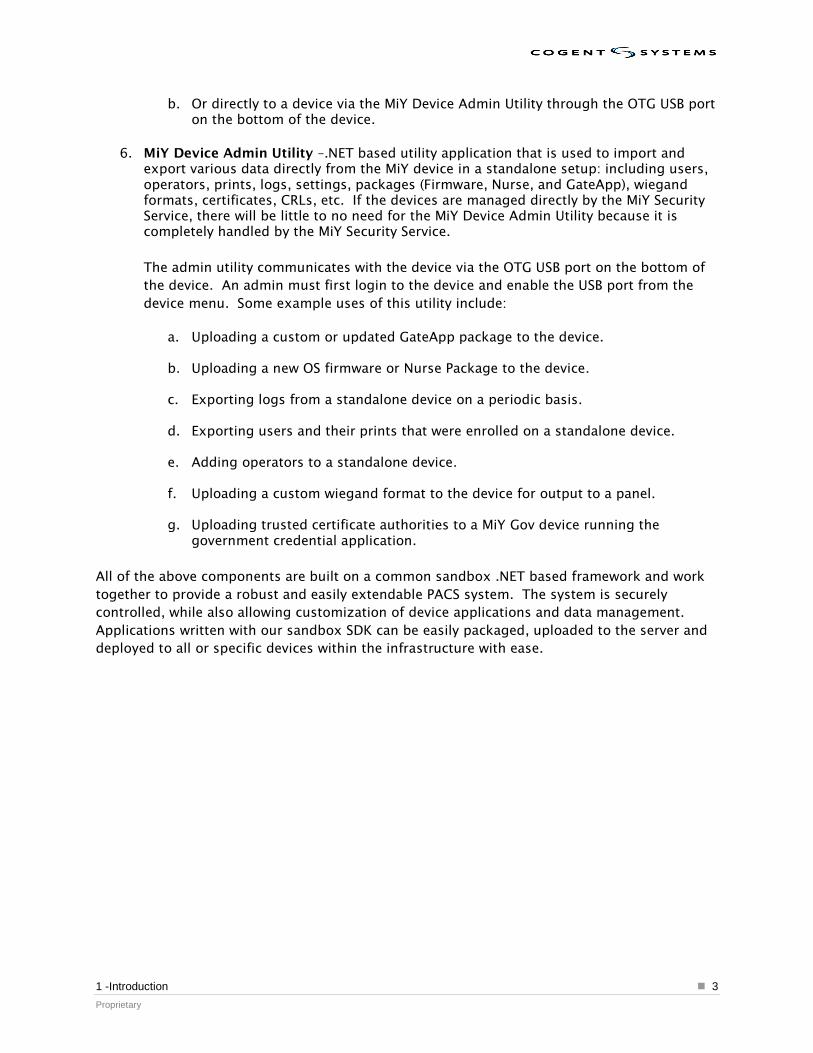
b. Or directly to a device via the MiY Device Admin Utility through the OTG USB port on the bottom of the device.
6. MiY Device Admin Utility –.NET based utility application that is used to import and
export various data directly from the MiY device in a standalone setup: including users, operators, prints, logs, settings, packages (Firmware, Nurse, and GateApp), wiegand formats, certificates, CRLs, etc. If the devices are managed directly by the MiY Security Service, there will be little to no need for the MiY Device Admin Utility because it is completely handled by the MiY Security Service.
The admin utility communicates with the device via the OTG USB port on the bottom of
the device. An admin must first login to the device and enable the USB port from the
device menu. Some example uses of this utility include:
a. Uploading a custom or updated GateApp package to the device.
b. Uploading a new OS firmware or Nurse Package to the device.
c. Exporting logs from a standalone device on a periodic basis.
d. Exporting users and their prints that were enrolled on a standalone device.
e. Adding operators to a standalone device.
f. Uploading a custom wiegand format to the device for output to a panel.
g. Uploading trusted certificate authorities to a MiY Gov device running the
government credential application.
All of the above components are built on a common sandbox .NET based framework and work
together to provide a robust and easily extendable PACS system. The system is securely
controlled, while also allowing customization of device applications and data management.
Applications written with our sandbox SDK can be easily packaged, uploaded to the server and
deployed to all or specific devices within the infrastructure with ease.

2 -MiY Sandbox SDK Installer � 4
Proprietary
2 MiY Sandbox SDK Installer
The MiY Sandbox SDK installer is an MSI designed to help developers create custom GateApps
in the MiY framework. Installing this SDK provides all necessary binaries, help files, sample
applications and Visual Studio GateApp project templates used to create applications for MiY
devices. The SDK also includes the MiY device emulator that can be used for limited
development when a real MiY device is not available.
The MiY Sandbox SDK installer is an MSI installer and assumes that it is being installed on a
development machine where any prerequisites for development have already been installed,
such as the latest Windows Installer and Microsoft Visual Studio 2008.
To install the SDK, simply run MiYSandboxSdk.msi and follow the instructions. You may elect
to perform a Custom install and only install desired components, but a Typical or Complete
install is recommended to get all SDK components for optimal development.
If the device emulator is needed, run the Biogate_DeviceEmulator Windows CE6 Emulator
installer from Start\Programs\3M Cogent Inc\MiY SDK Installer\Install Emulator. Run these
installers and follow the instruction on the screen until completion.
Once these are installed, you’re ready to get started.
3 -USB Ports � 5
Proprietary
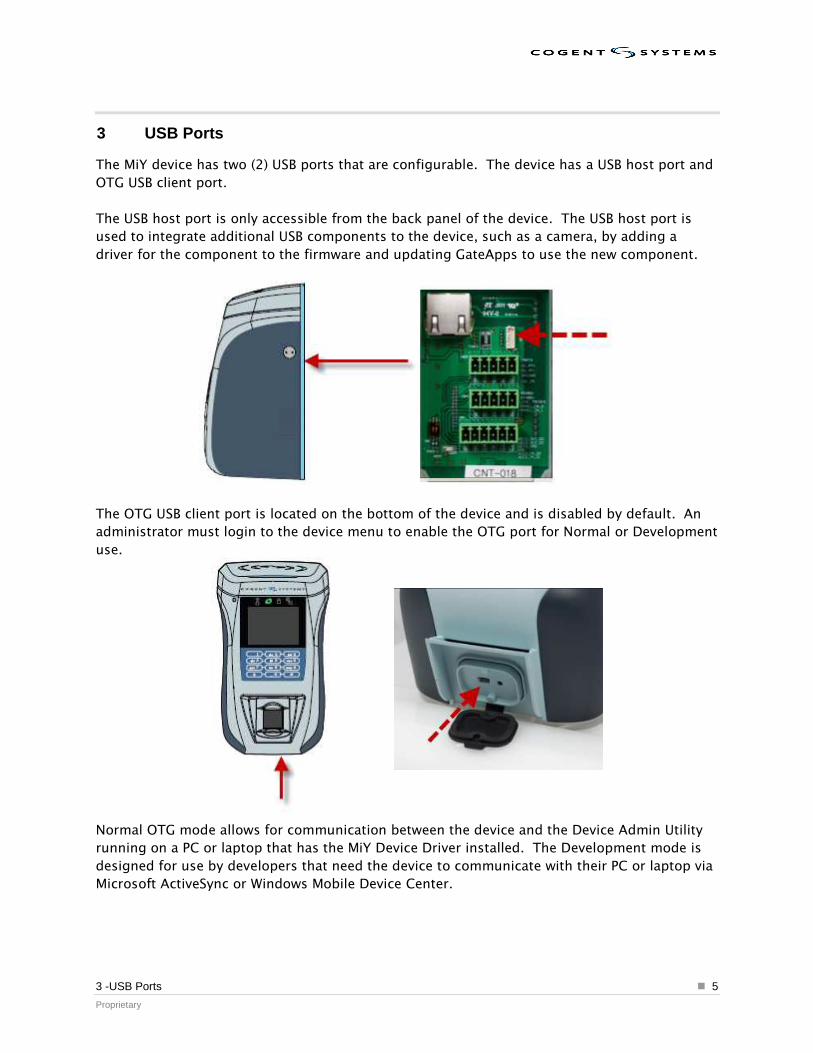
3 USB Ports
The MiY device has two (2) USB ports that are configurable. The device has a USB host port and
OTG USB client port.
The USB host port is only accessible from the back panel of the device. The USB host port is
used to integrate additional USB components to the device, such as a camera, by adding a
driver for the component to the firmware and updating GateApps to use the new component.
The OTG USB client port is located on the bottom of the device and is disabled by default. An
administrator must login to the device menu to enable the OTG port for Normal or Development
use.
Normal OTG mode allows for communication between the device and the Device Admin Utility
running on a PC or laptop that has the MiY Device Driver installed. The Development mode is
designed for use by developers that need the device to communicate with their PC or laptop via
Microsoft ActiveSync or Windows Mobile Device Center.
3 -USB Ports � 6
Proprietary
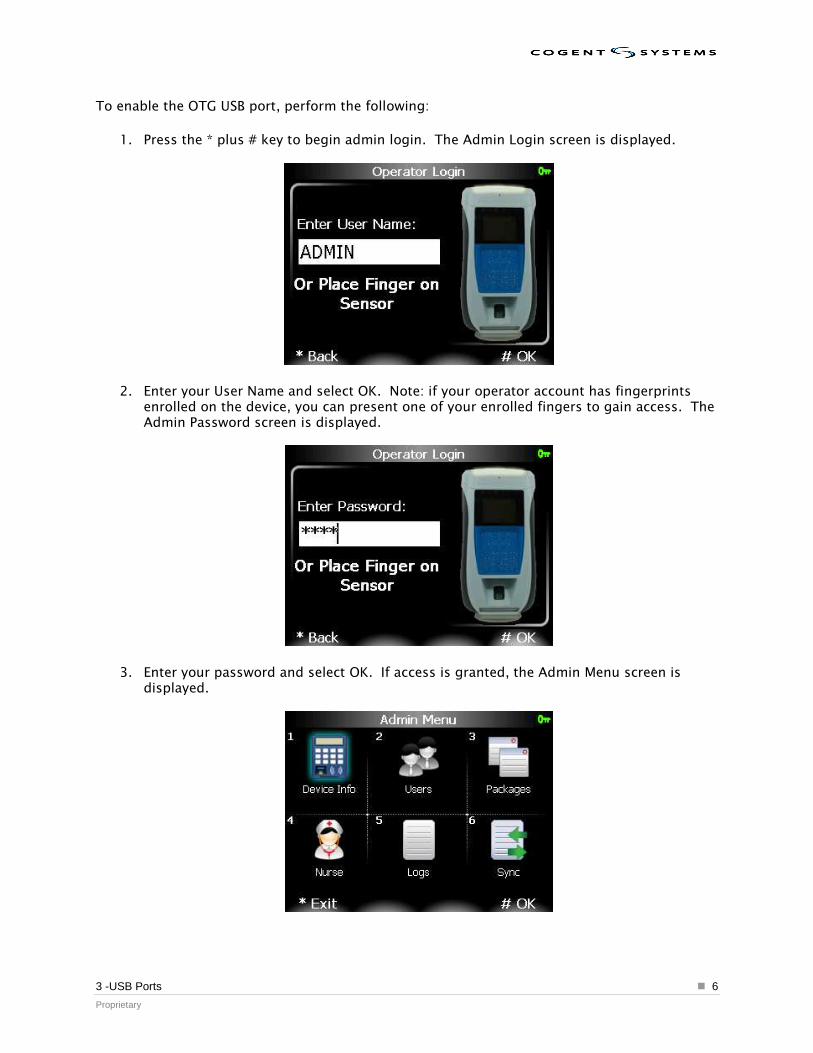
To enable the OTG USB port, perform the following:
1. Press the * plus # key to begin admin login. The Admin Login screen is displayed.
2. Enter your User Name and select OK. Note: if your operator account has fingerprints enrolled on the device, you can present one of your enrolled fingers to gain access. The Admin Password screen is displayed.
3. Enter your password and select OK. If access is granted, the Admin Menu screen is displayed.
3 -USB Ports � 7
Proprietary
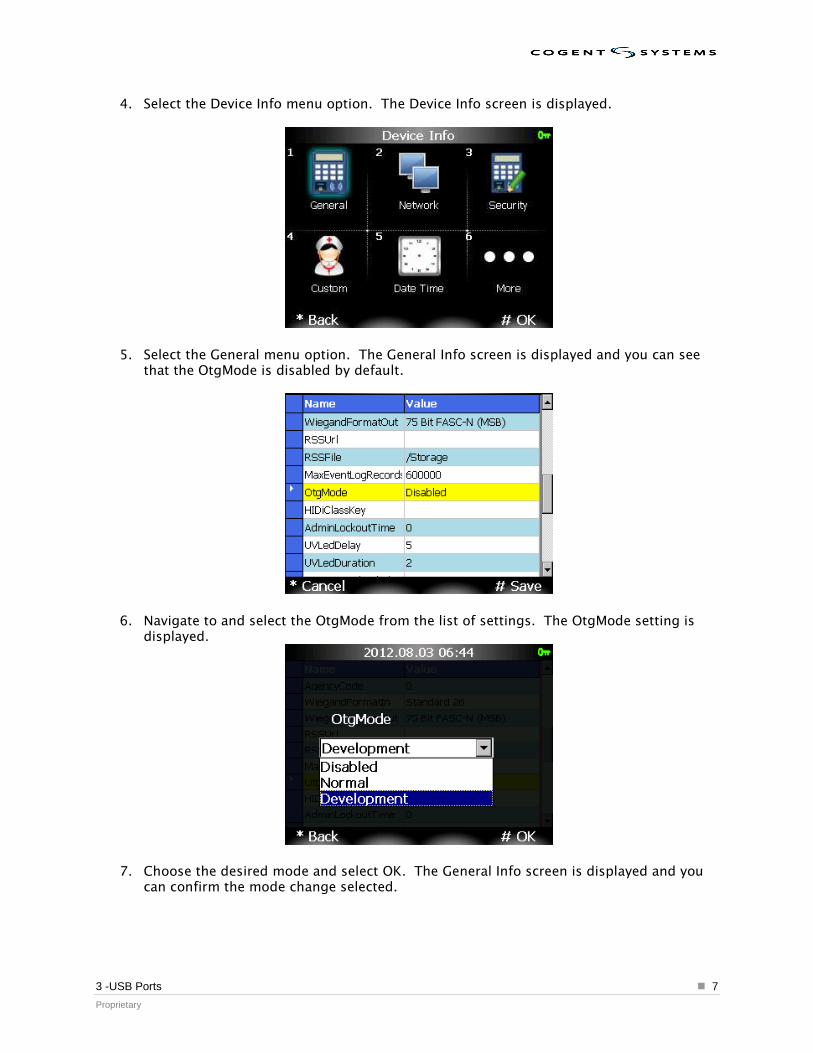
4. Select the Device Info menu option. The Device Info screen is displayed.
5. Select the General menu option. The General Info screen is displayed and you can see that the OtgMode is disabled by default.
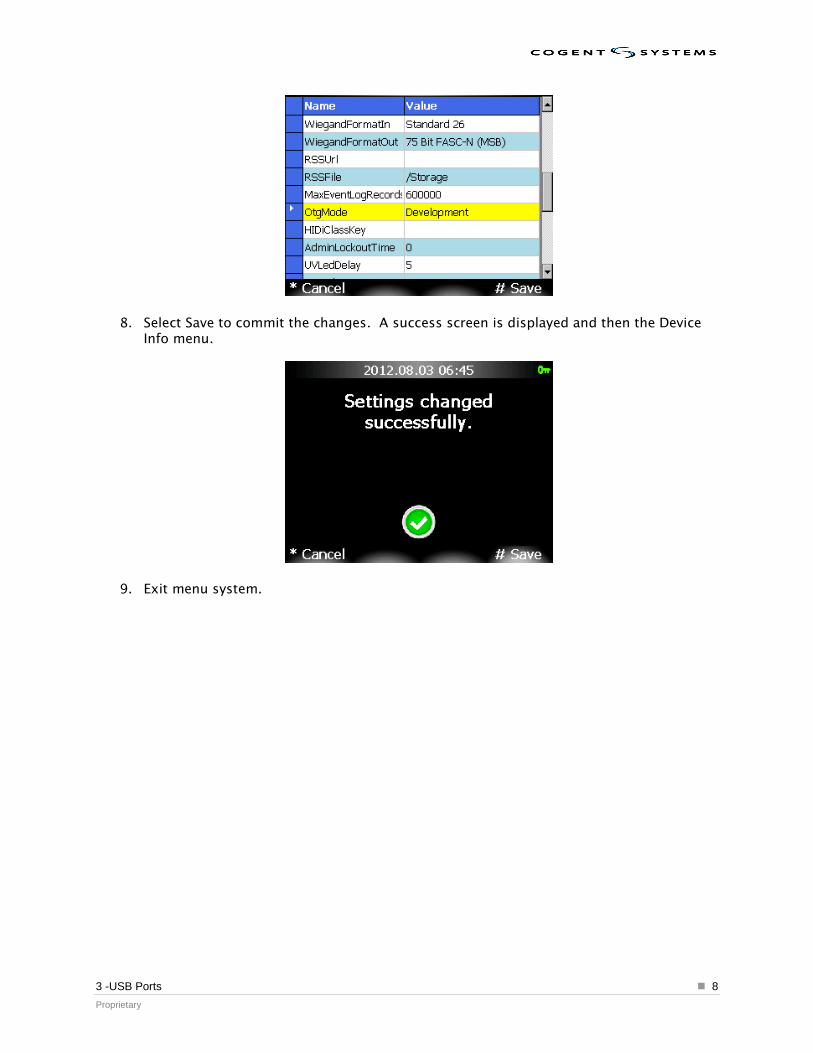
6. Navigate to and select the OtgMode from the list of settings. The OtgMode setting is displayed.
7. Choose the desired mode and select OK. The General Info screen is displayed and you can confirm the mode change selected.
3 -USB Ports � 8
Proprietary
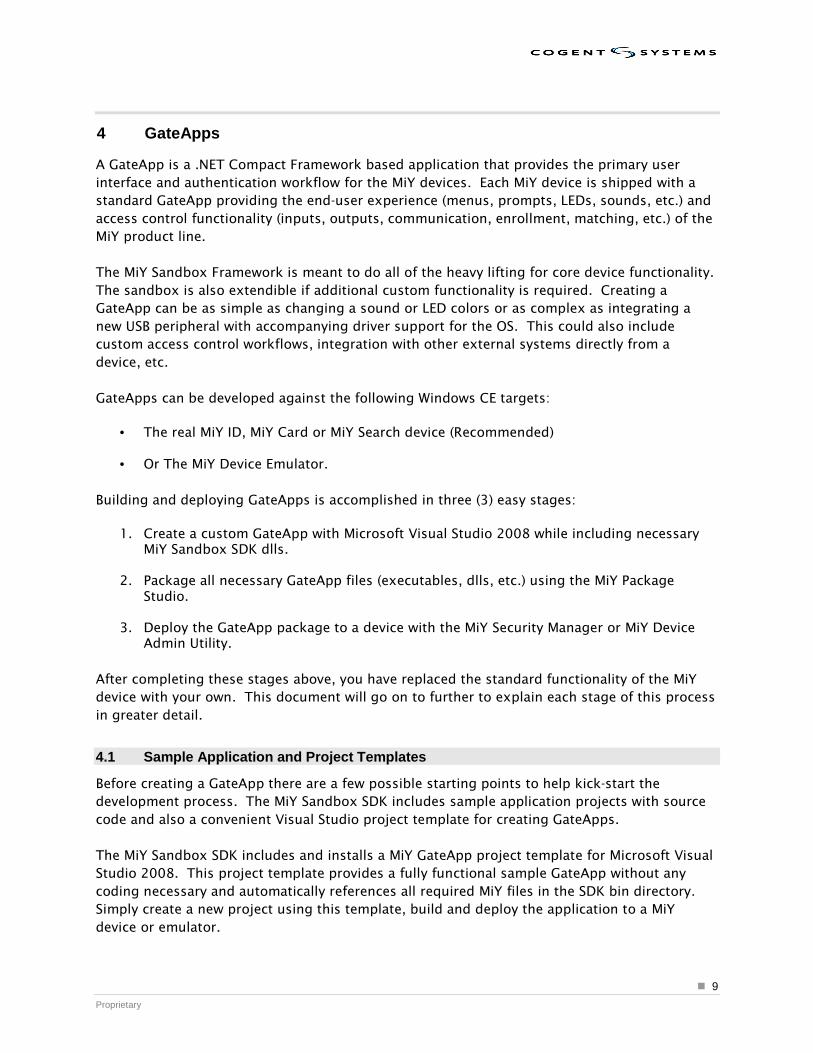
8. Select Save to commit the changes. A success screen is displayed and then the Device Info menu.
9. Exit menu system.
� 9
Proprietary
4 GateApps
A GateApp is a .NET Compact Framework based application that provides the primary user
interface and authentication workflow for the MiY devices. Each MiY device is shipped with a
standard GateApp providing the end-user experience (menus, prompts, LEDs, sounds, etc.) and
access control functionality (inputs, outputs, communication, enrollment, matching, etc.) of the
MiY product line.
The MiY Sandbox Framework is meant to do all of the heavy lifting for core device functionality.
The sandbox is also extendible if additional custom functionality is required. Creating a
GateApp can be as simple as changing a sound or LED colors or as complex as integrating a
new USB peripheral with accompanying driver support for the OS. This could also include
custom access control workflows, integration with other external systems directly from a
device, etc.
GateApps can be developed against the following Windows CE targets:
• The real MiY ID, MiY Card or MiY Search device (Recommended)
• Or The MiY Device Emulator.
Building and deploying GateApps is accomplished in three (3) easy stages:
1. Create a custom GateApp with Microsoft Visual Studio 2008 while including necessary
MiY Sandbox SDK dlls.
2. Package all necessary GateApp files (executables, dlls, etc.) using the MiY Package Studio.
3. Deploy the GateApp package to a device with the MiY Security Manager or MiY Device Admin Utility.
After completing these stages above, you have replaced the standard functionality of the MiY
device with your own. This document will go on to further to explain each stage of this process
in greater detail.
4.1 Sample Application and Project Templates
Before creating a GateApp there are a few possible starting points to help kick-start the
development process. The MiY Sandbox SDK includes sample application projects with source
code and also a convenient Visual Studio project template for creating GateApps.
The MiY Sandbox SDK includes and installs a MiY GateApp project template for Microsoft Visual
Studio 2008. This project template provides a fully functional sample GateApp without any
coding necessary and automatically references all required MiY files in the SDK bin directory.
Simply create a new project using this template, build and deploy the application to a MiY
device or emulator.

� 10
Proprietary
The MiY Sandbox SDK includes the following Device (.NET Compact Framework) sample
applications with source code:
• GateAppSample – This sample application shows how to use many of the core sandbox
components available when developing a GateApp. These core sandbox components include, fingerprint enrollment and matching, event logging, property creation, user creation, etc.
The MiY Sandbox SDK includes the following Desktop (Full .NET Framework) sample
applications with source code:
• LocalCardTest – This application demonstrates:
o How to enroll user fingerprints with local USB fingerprint scanners o How to read and write 3M Cogent formatted contactless cards using local USB
smart card RFID readers, such as the SCM SCL010. These cards contain user information and fingerprints and can be used for access control with MiY Readers.
4.2 Creating a GateApp
GateApps are developed using Microsoft Visual Studio 2008 and the MiY Sandbox SDK.
Developers can debug and test the GateApps against a real MiY ID, MiY Card or MiY Search
device or the MiY Device Emulator.
Note: the emulator is a good starting point for development but does have limitations because
it is not running on the actual hardware and operating system. A real MiY device is a more
accurate representation of GateApp performance.
The following are required to develop applications for MiY devices:
• MiY Sandbox SDK • MiY device or emulator • Microsoft Visual Studio 2008 with SP1 • Microsoft .NET Compact Framework 3.5 • Microsoft SQL Compact 3.5 SP1 Device Runtime
4.2.1 Project Template GateApp Creation
Use the following steps to create a GateApp with the provided visual studio project template:
1. Open Microsoft Visual Studio 2008. 2. Select File/New/Project to create a new MiY GateApp project and specify a Name, such
as MyCustomGateApp.
� 11
Proprietary
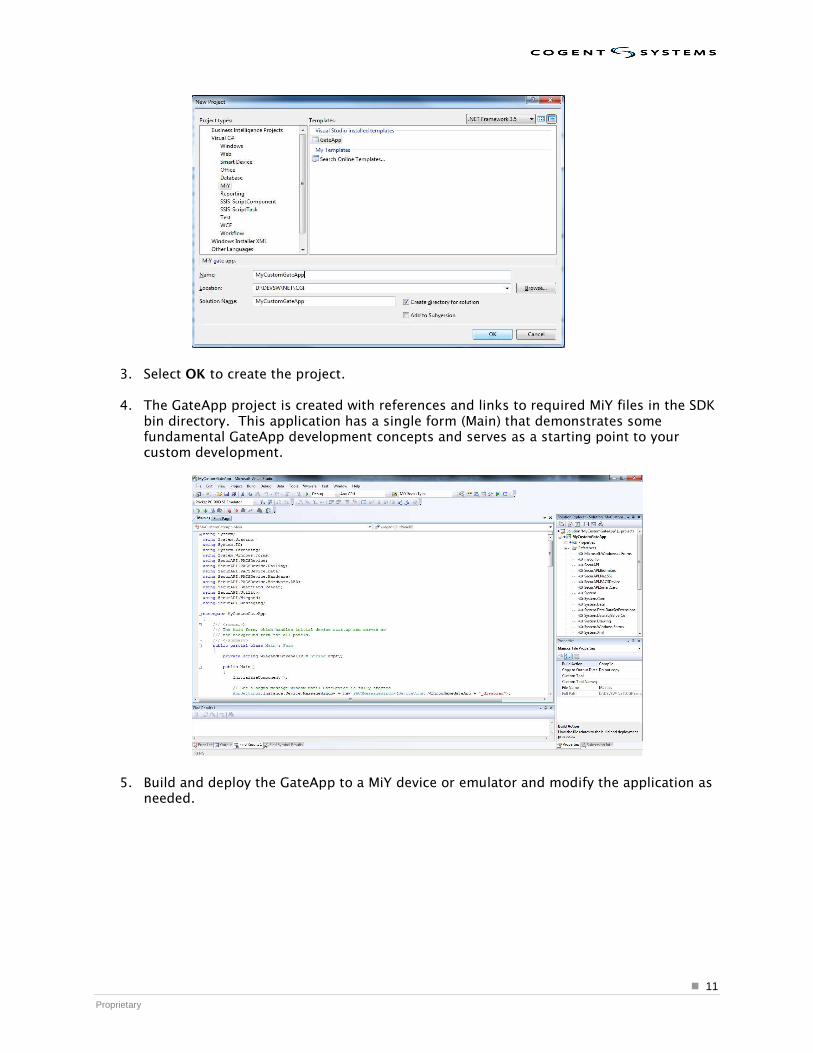
3. Select OK to create the project. 4. The GateApp project is created with references and links to required MiY files in the SDK
bin directory. This application has a single form (Main) that demonstrates some fundamental GateApp development concepts and serves as a starting point to your custom development.
5. Build and deploy the GateApp to a MiY device or emulator and modify the application as
needed.
� 12
Proprietary
4.2.2 Manual GateApp Creation
Use the following steps to create a GateApp manually without the project template:
1. Open Microsoft Visual Studio 2008.
2. Select File/New/Project to create a new Smart Device Project and specify a Name, such
as MyCustomGateApp.
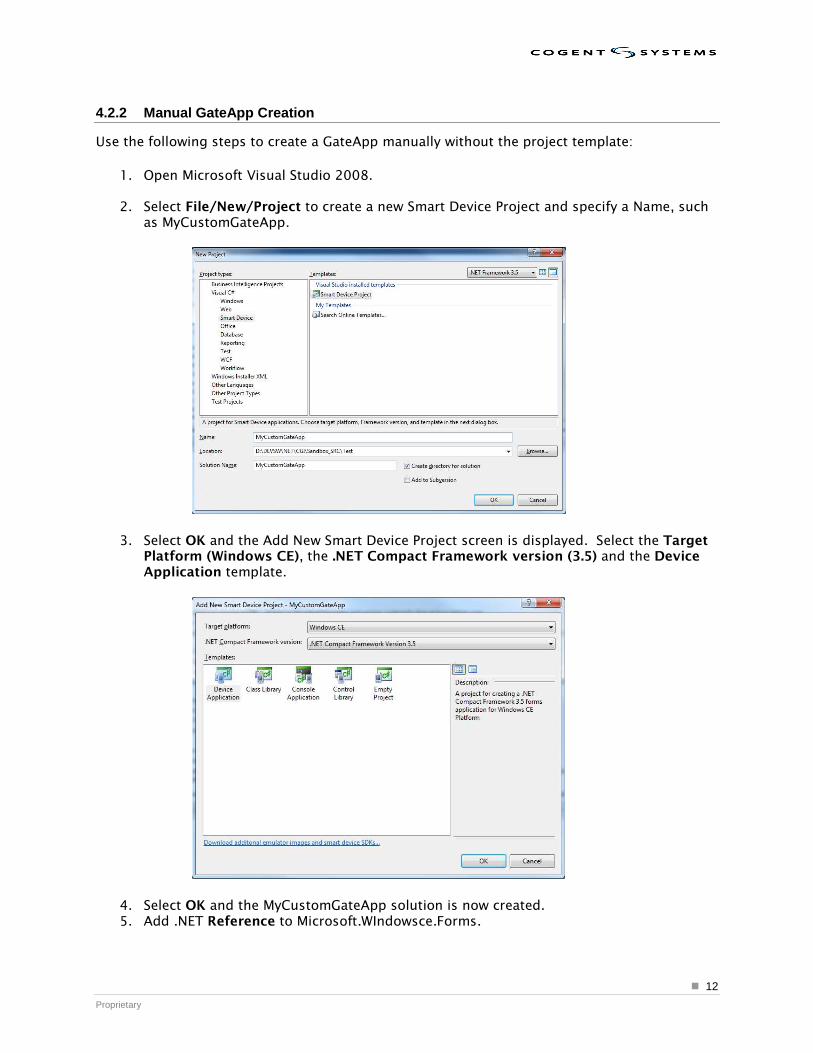
3. Select OK and the Add New Smart Device Project screen is displayed. Select the Target Platform (Windows CE), the .NET Compact Framework version (3.5) and the Device Application template.
4. Select OK and the MyCustomGateApp solution is now created. 5. Add .NET Reference to Microsoft.WIndowsce.Forms.
� 13
Proprietary
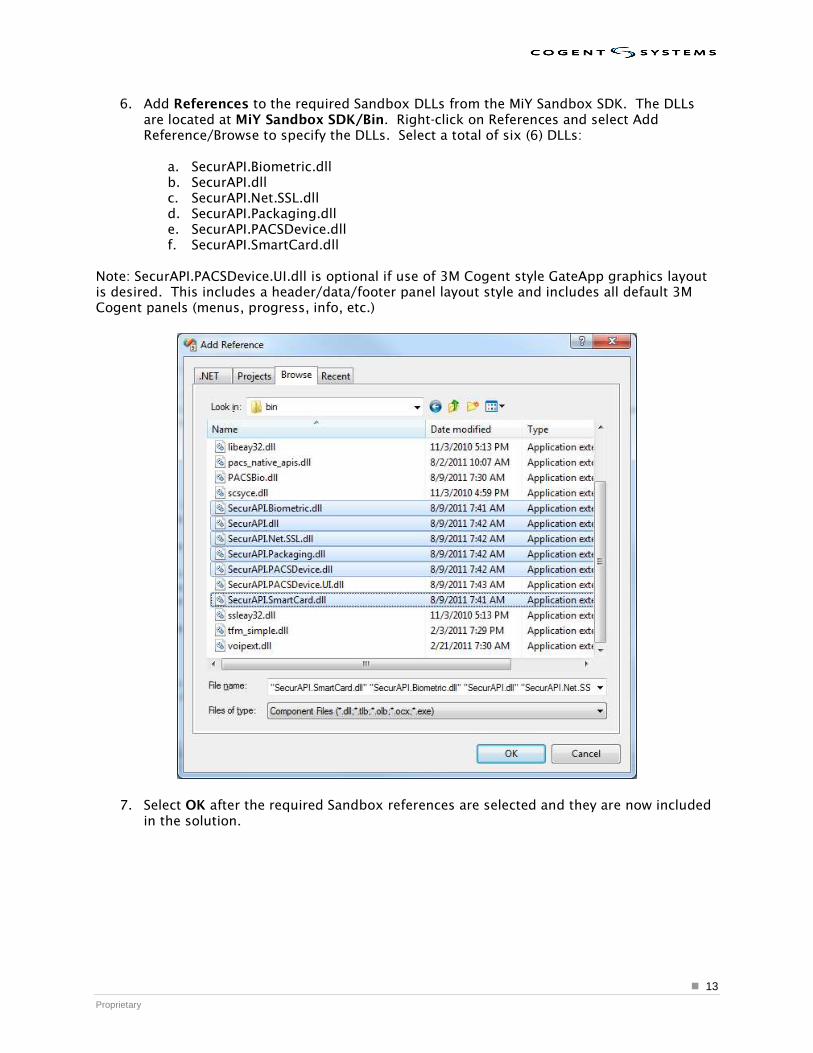
6. Add References to the required Sandbox DLLs from the MiY Sandbox SDK. The DLLs are located at MiY Sandbox SDK/Bin. Right-click on References and select Add Reference/Browse to specify the DLLs. Select a total of six (6) DLLs:
a. SecurAPI.Biometric.dll b. SecurAPI.dll c. SecurAPI.Net.SSL.dll d. SecurAPI.Packaging.dll e. SecurAPI.PACSDevice.dll f. SecurAPI.SmartCard.dll
Note: SecurAPI.PACSDevice.UI.dll is optional if use of 3M Cogent style GateApp graphics layout is desired. This includes a header/data/footer panel layout style and includes all default 3M Cogent panels (menus, progress, info, etc.)
7. Select OK after the required Sandbox references are selected and they are now included in the solution.
� 14
Proprietary
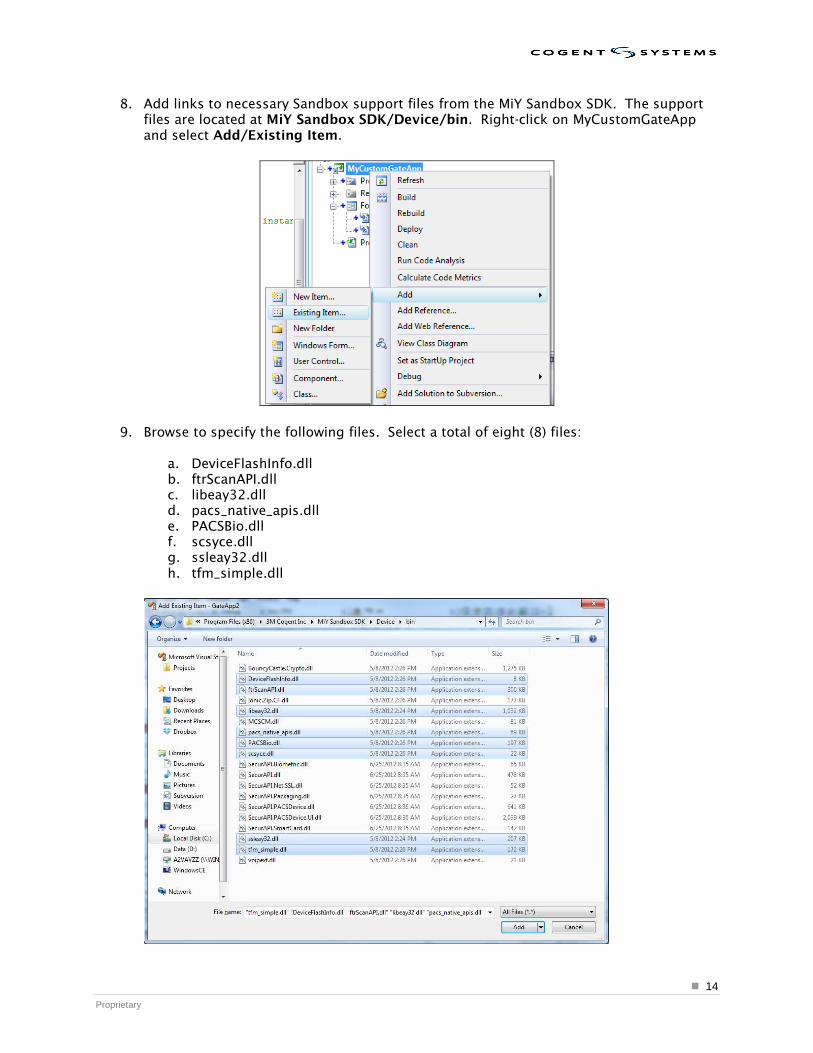
8. Add links to necessary Sandbox support files from the MiY Sandbox SDK. The support files are located at MiY Sandbox SDK/Device/bin. Right-click on MyCustomGateApp and select Add/Existing Item.
9. Browse to specify the following files. Select a total of eight (8) files:
a. DeviceFlashInfo.dll b. ftrScanAPI.dll c. libeay32.dll d. pacs_native_apis.dll e. PACSBio.dll f. scsyce.dll g. ssleay32.dll h. tfm_simple.dll
� 15
Proprietary
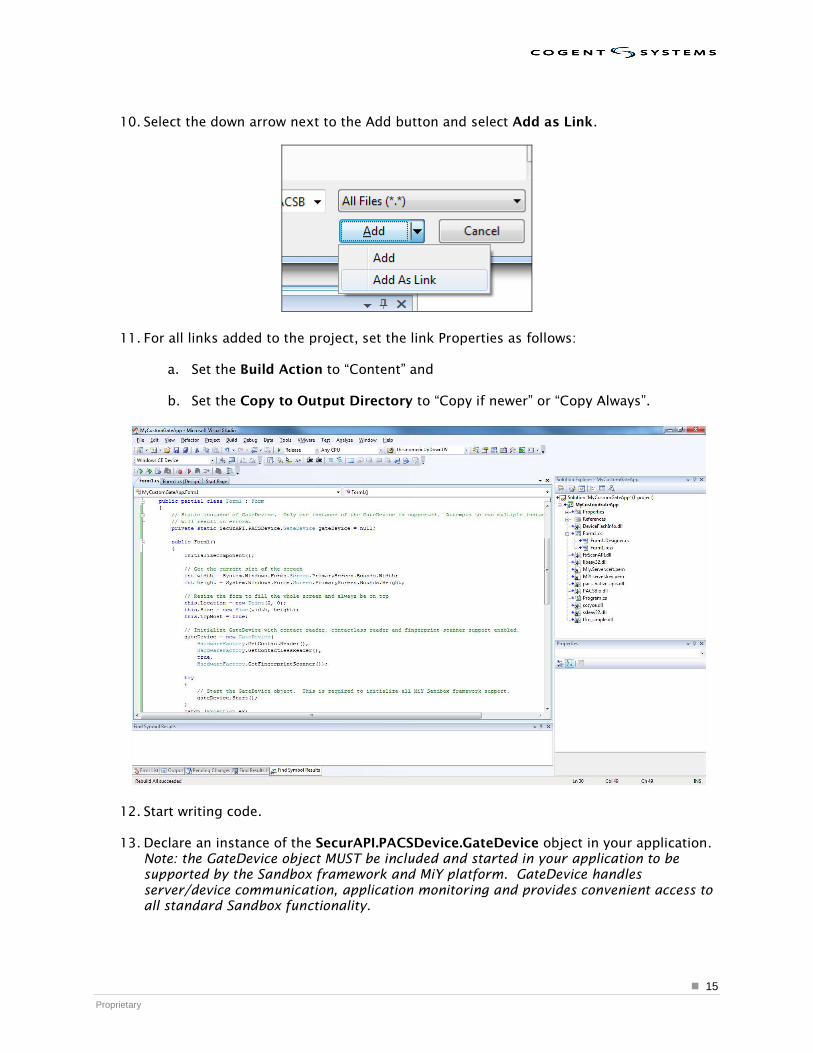
10. Select the down arrow next to the Add button and select Add as Link.
11. For all links added to the project, set the link Properties as follows:
a. Set the Build Action to “Content” and
b. Set the Copy to Output Directory to “Copy if newer” or “Copy Always”.
12. Start writing code.
13. Declare an instance of the SecurAPI.PACSDevice.GateDevice object in your application.
Note: the GateDevice object MUST be included and started in your application to be supported by the Sandbox framework and MiY platform. GateDevice handles server/device communication, application monitoring and provides convenient access to all standard Sandbox functionality.
� 16
Proprietary
14. Call GateDevice.Start during application initialization.
15. Call GateDevice.Stop during application shutdown.
16. Insert code to resize your application to the current screen size (320 W x 240 H) (optional) and set your application to TopMost, as seen in the sample code below. If your application is not set to TopMost, then it will not display.
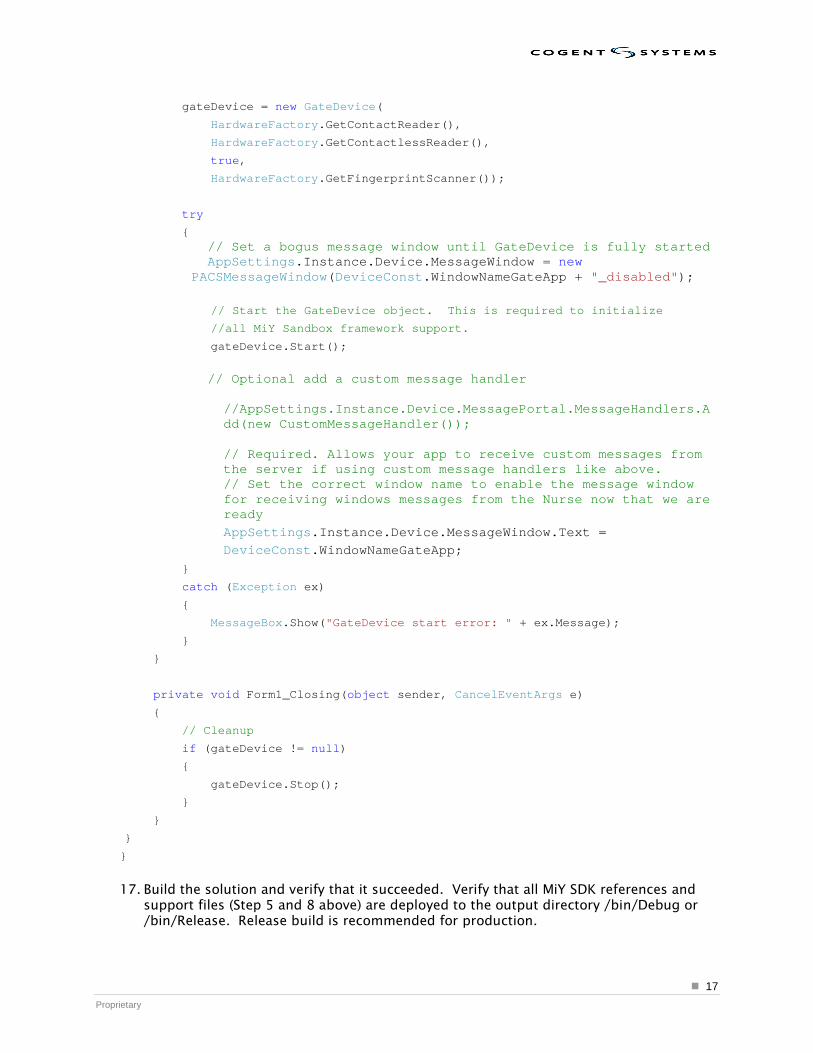
The below code sample shows an example of how to incorporate the GateDevice object into
your application. When initializing the GateDevice, you can specify null for the contact reader,
contactless reader and fingerprint scanner parameters if they are not needed by your
application.
using System;
using System.Linq;
using System.Collections.Generic;
using System.ComponentModel;
using System.Data;
using System.Drawing;
using System.Text;
using System.Windows.Forms;
using SecurAPI.PACSDevice;
using SecurAPI.PACSDevice.Hardware;
namespace MyCustomGateApp
{
public partial class Form1 : Form
{
// Static instance of GateDevice. Only one instance of the GateDevice
// is supported. Attempts to run multiple instances
// will result in errors.
private static SecurAPI.PACSDevice.GateDevice gateDevice = null;
public Form1()
{
InitializeComponent();
// Get the current size of the screen
int width = System.Windows.Forms.Screen.PrimaryScreen.Bounds.Width;
int height = System.Windows.Forms.Screen.PrimaryScreen.Bounds.Height;
// Resize the form to fill the whole screen and always be on top
this.Location = new Point(0, 0);
this.Size = new Size(width, height);
this.TopMost = true;
// Initialize GateDevice with contact reader, contactless reader
//and fingerprint scanner support enabled.
� 17
Proprietary
gateDevice = new GateDevice(
HardwareFactory.GetContactReader(),
HardwareFactory.GetContactlessReader(),
true,
HardwareFactory.GetFingerprintScanner());
try
{ // Set a bogus message window until GateDevice is fully started
AppSettings.Instance.Device.MessageWindow = new PACSMessageWindow(DeviceConst.WindowNameGateApp + "_disabled");
// Start the GateDevice object. This is required to initialize
//all MiY Sandbox framework support.
gateDevice.Start();
// Optional add a custom message handler
//AppSettings.Instance.Device.MessagePortal.MessageHandlers.Add(new CustomMessageHandler());
// Required. Allows your app to receive custom messages from the server if using custom message handlers like above. // Set the correct window name to enable the message window for receiving windows messages from the Nurse now that we are ready
AppSettings.Instance.Device.MessageWindow.Text =
DeviceConst.WindowNameGateApp;
}
catch (Exception ex)
{
MessageBox.Show("GateDevice start error: " + ex.Message);
}
}
private void Form1_Closing(object sender, CancelEventArgs e)
{
// Cleanup
if (gateDevice != null)
{
gateDevice.Stop();
}
}
}
}
17. Build the solution and verify that it succeeded. Verify that all MiY SDK references and
support files (Step 5 and 8 above) are deployed to the output directory /bin/Debug or /bin/Release. Release build is recommended for production.

� 18
Proprietary
a. You can now package the resulting application files and deploy them to a MiY device.
b. For debugging, specify the Target Device to deploy to. Select Windows CE Device if a MiY device is connected to your machine via OTG USB. If you are using the MiY Device Emulator, then select Biogate_DeviceEmulator Emulator to deploy to the emulator.
4.3 Packaging a GateApp
After you have created a GateApp, you can now package the GateApp using the MiY Package
Studio. The MiY Package Studio has the same look and feel as Microsoft Visual Studio and is
used to create package project solutions (.cpgproj) for managing and building one or more
GateApp package files (.cpg).
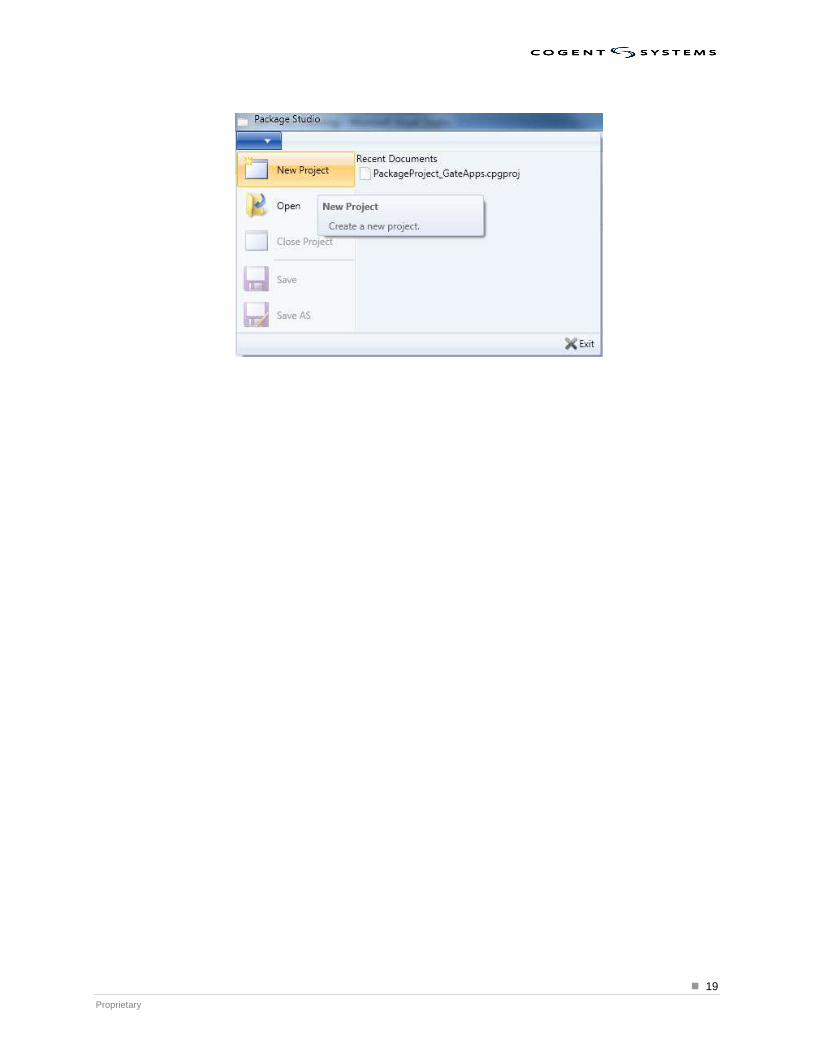
Use the MiY Package Studio application to package your GateApp files as follows: 1. Install and run the MiY Package Studio.
2. From the top-left corner, select New Project to create a new package project.
� 19
Proprietary
� 20
Proprietary
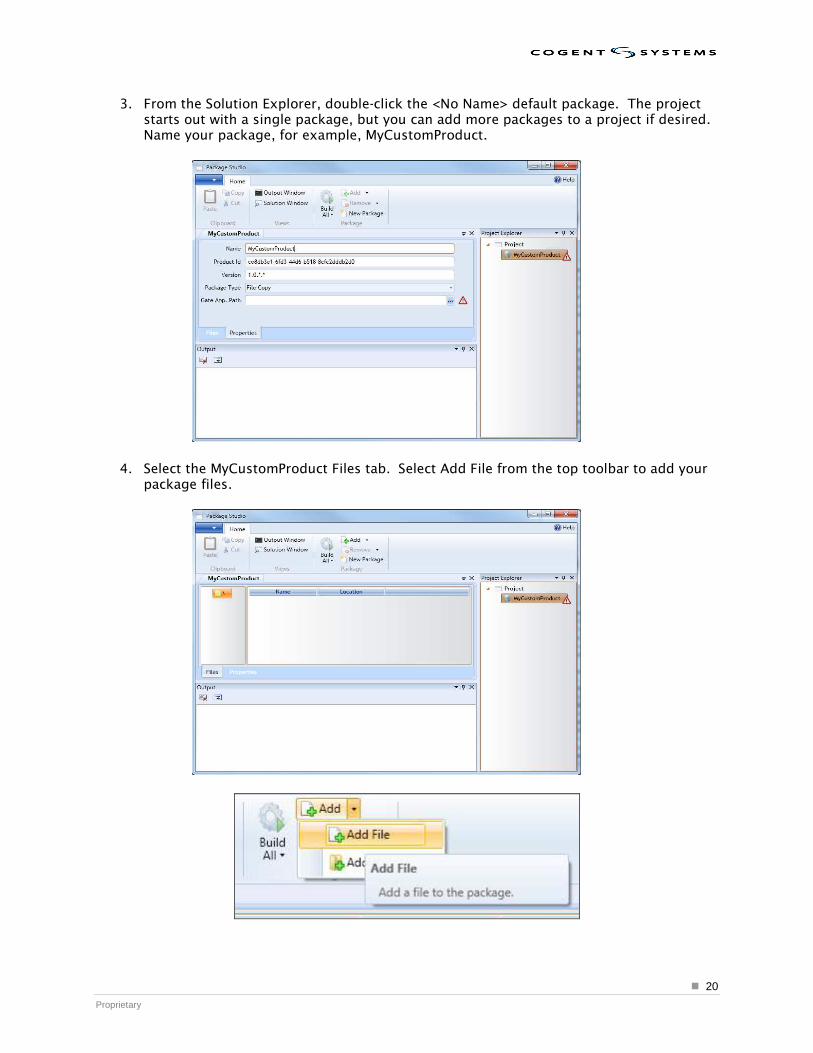
3. From the Solution Explorer, double-click the <No Name> default package. The project starts out with a single package, but you can add more packages to a project if desired. Name your package, for example, MyCustomProduct.
4. Select the MyCustomProduct Files tab. Select Add File from the top toolbar to add your package files.
� 21
Proprietary
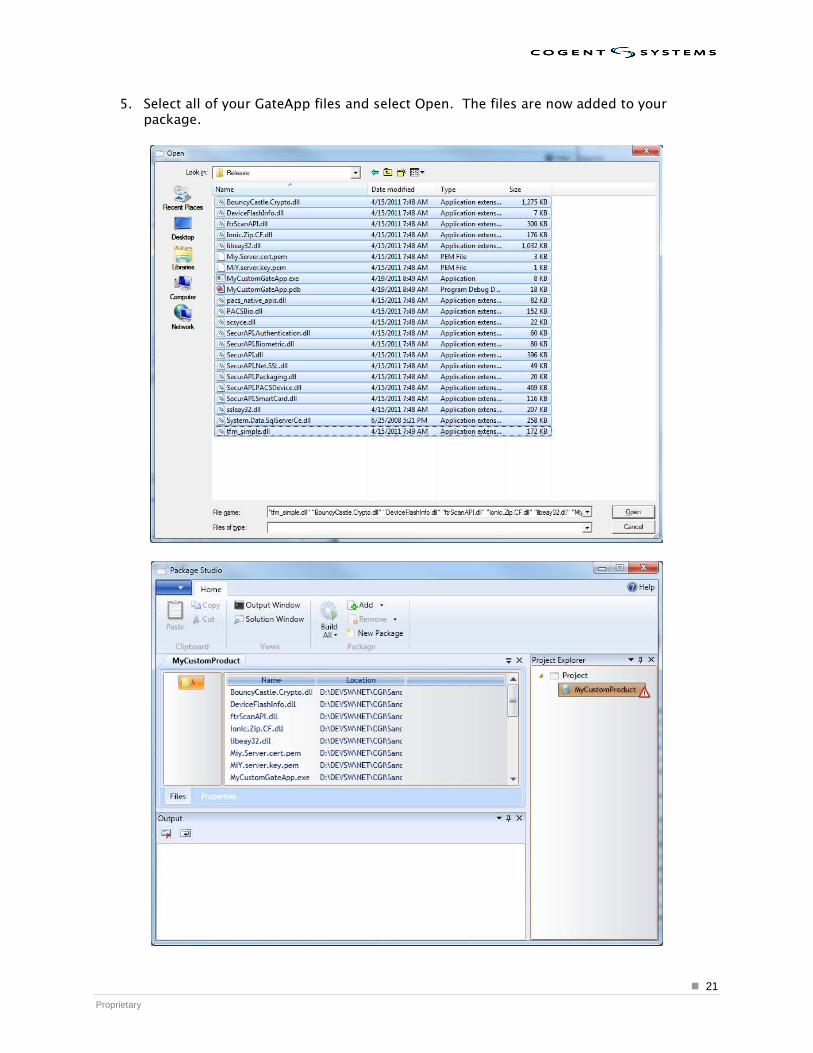
5. Select all of your GateApp files and select Open. The files are now added to your package.
� 22
Proprietary
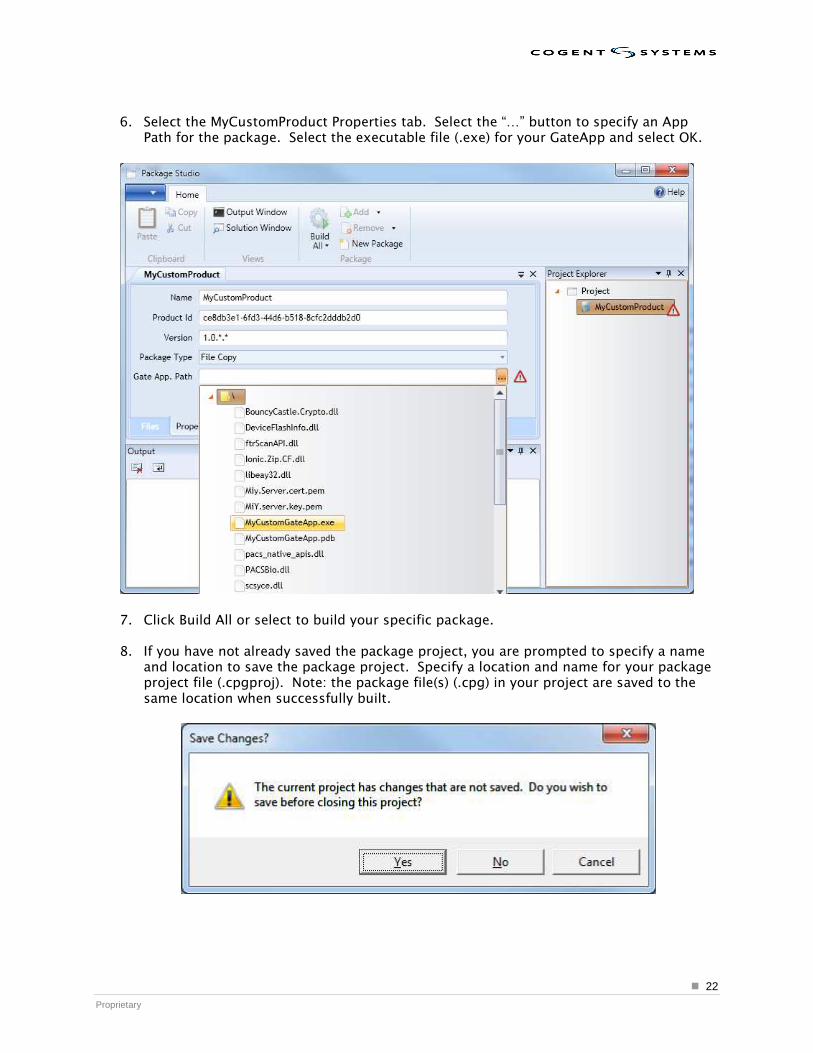
6. Select the MyCustomProduct Properties tab. Select the “…” button to specify an App
Path for the package. Select the executable file (.exe) for your GateApp and select OK.
7. Click Build All or select to build your specific package.
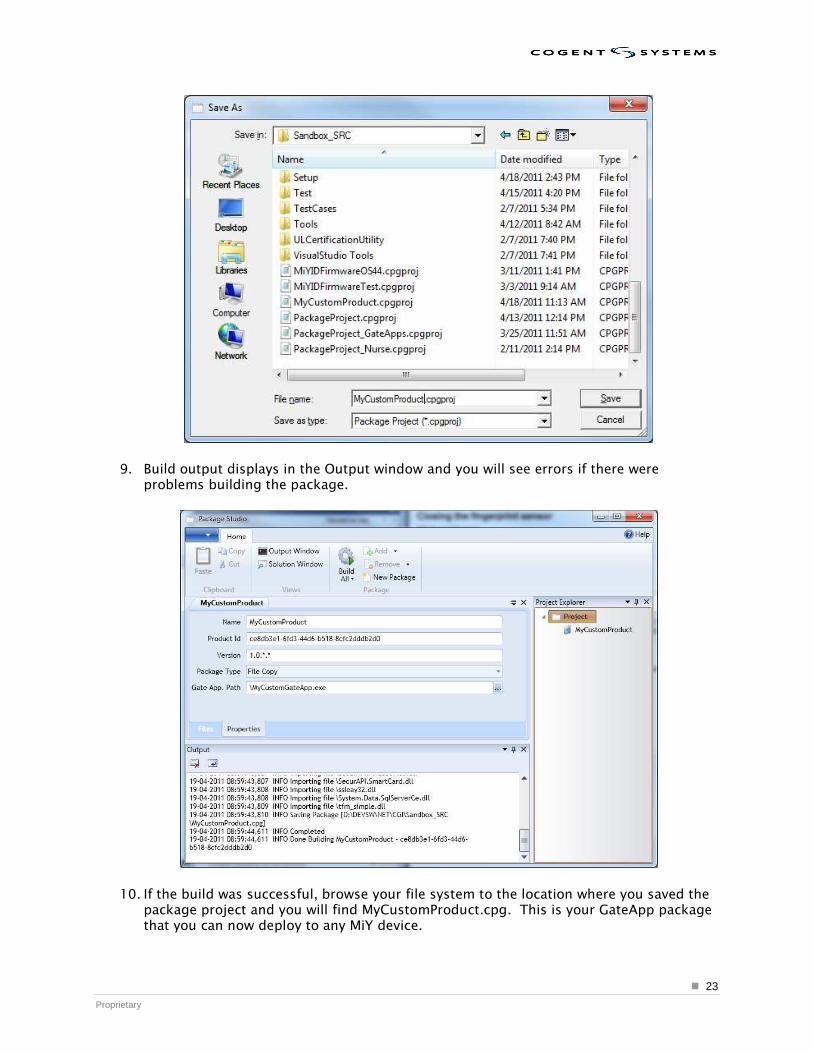
8. If you have not already saved the package project, you are prompted to specify a name
and location to save the package project. Specify a location and name for your package project file (.cpgproj). Note: the package file(s) (.cpg) in your project are saved to the same location when successfully built.
� 23
Proprietary
9. Build output displays in the Output window and you will see errors if there were
problems building the package.
10. If the build was successful, browse your file system to the location where you saved the
package project and you will find MyCustomProduct.cpg. This is your GateApp package that you can now deploy to any MiY device.
� 24
Proprietary
4.4 Deploying a GateApp
After you have packaged your GateApp as a .cpg file, you are now ready to deploy it to a MiY
device. GateApp packages can be deployed to devices in two ways:
1. Using the MiY Security Manager to upload the package to the server and deploy the
package to one or more specific devices,
2. Or directly to a device via the MiY Device Admin Utility and OTG USB port on the bottom of the device.
4.4.1 Deploying to a Managed Device
Managed devices are devices that have been registered to a server. All data on registered
devices is managed by the server, which includes assigning and deploying GateApp packages to
devices.
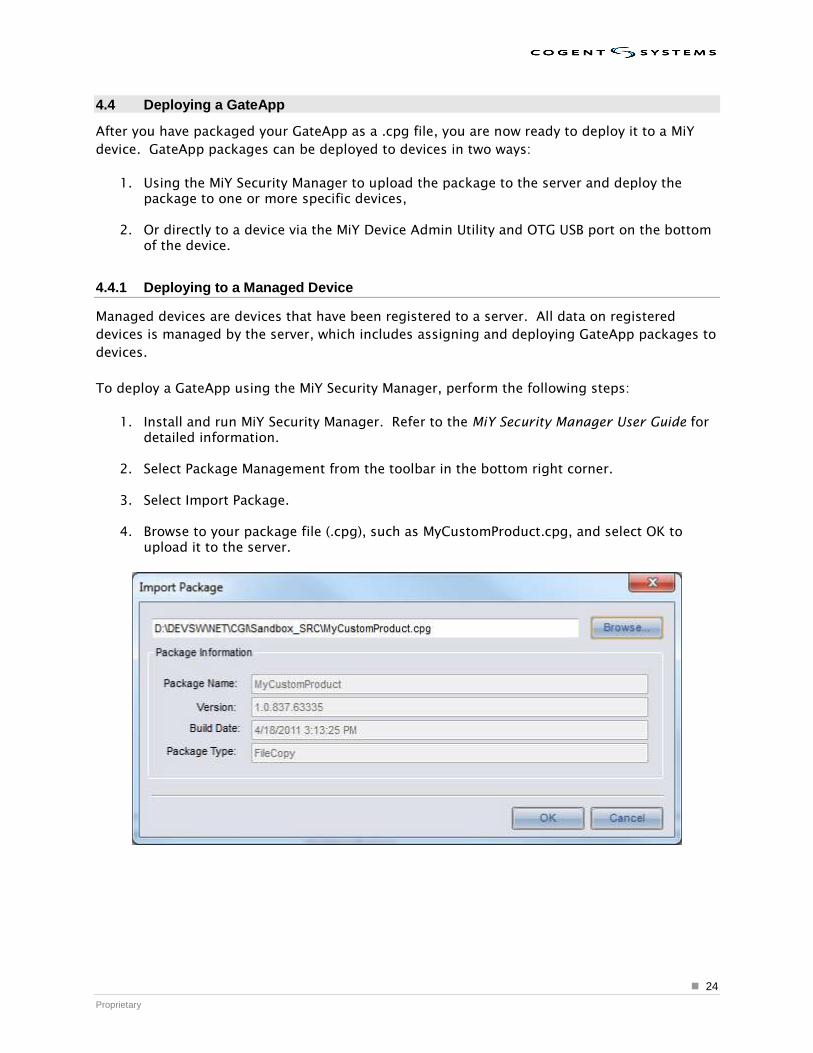
To deploy a GateApp using the MiY Security Manager, perform the following steps:
1. Install and run MiY Security Manager. Refer to the MiY Security Manager User Guide for
detailed information.
2. Select Package Management from the toolbar in the bottom right corner.
3. Select Import Package.
4. Browse to your package file (.cpg), such as MyCustomProduct.cpg, and select OK to upload it to the server.
� 25
Proprietary
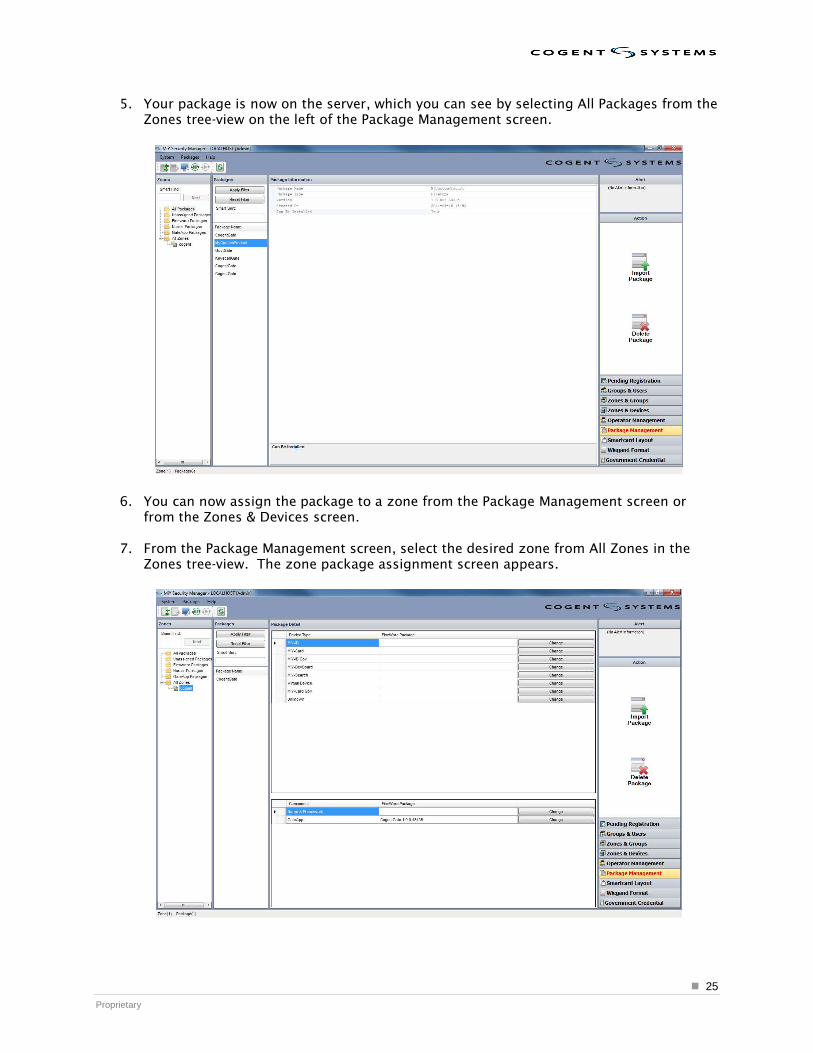
5. Your package is now on the server, which you can see by selecting All Packages from the Zones tree-view on the left of the Package Management screen.
6. You can now assign the package to a zone from the Package Management screen or from the Zones & Devices screen.
7. From the Package Management screen, select the desired zone from All Zones in the Zones tree-view. The zone package assignment screen appears.
� 26
Proprietary
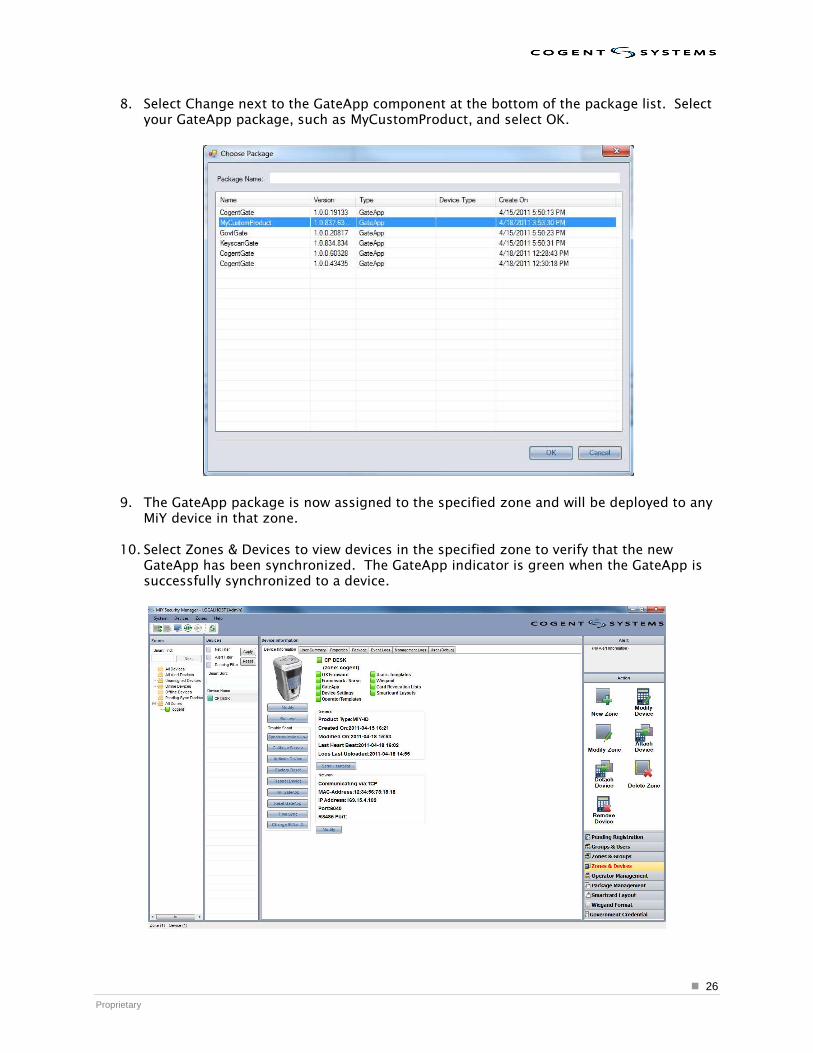
8. Select Change next to the GateApp component at the bottom of the package list. Select your GateApp package, such as MyCustomProduct, and select OK.
9. The GateApp package is now assigned to the specified zone and will be deployed to any
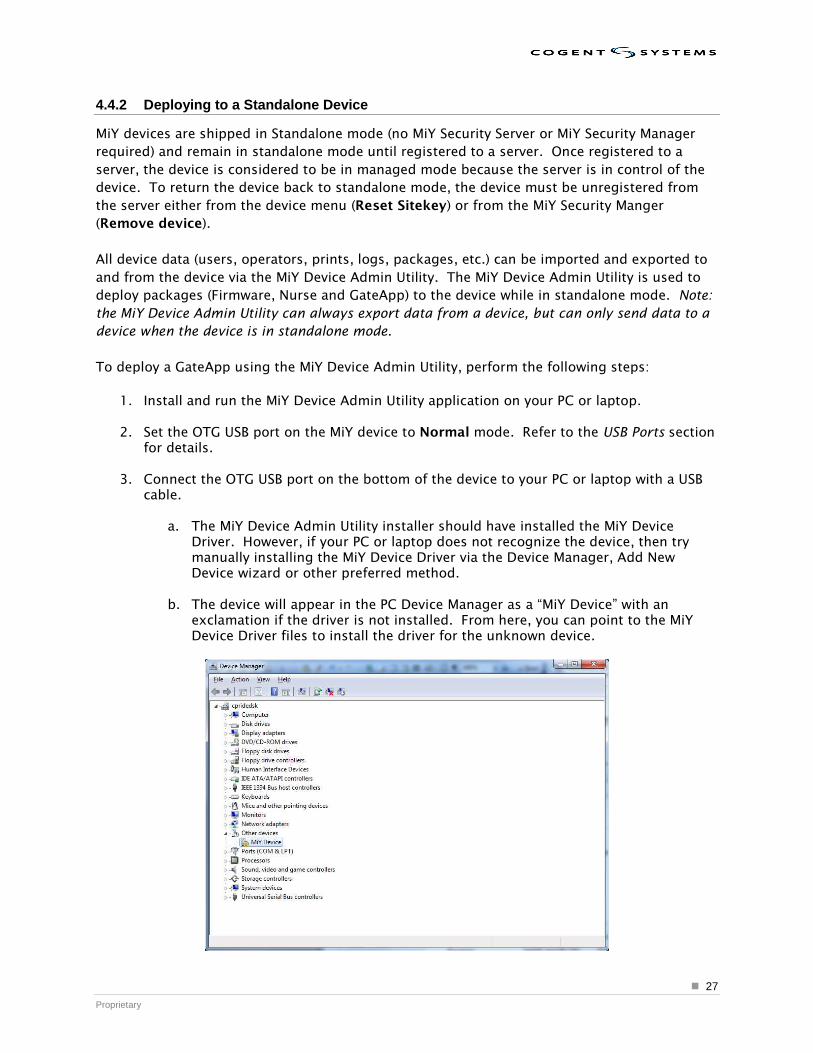
MiY device in that zone.
10. Select Zones & Devices to view devices in the specified zone to verify that the new GateApp has been synchronized. The GateApp indicator is green when the GateApp is successfully synchronized to a device.
� 27
Proprietary
4.4.2 Deploying to a Standalone Device
MiY devices are shipped in Standalone mode (no MiY Security Server or MiY Security Manager
required) and remain in standalone mode until registered to a server. Once registered to a
server, the device is considered to be in managed mode because the server is in control of the
device. To return the device back to standalone mode, the device must be unregistered from
the server either from the device menu (Reset Sitekey) or from the MiY Security Manger
(Remove device).
All device data (users, operators, prints, logs, packages, etc.) can be imported and exported to
and from the device via the MiY Device Admin Utility. The MiY Device Admin Utility is used to
deploy packages (Firmware, Nurse and GateApp) to the device while in standalone mode. Note:
the MiY Device Admin Utility can always export data from a device, but can only send data to a
device when the device is in standalone mode.
To deploy a GateApp using the MiY Device Admin Utility, perform the following steps:
1. Install and run the MiY Device Admin Utility application on your PC or laptop.
2. Set the OTG USB port on the MiY device to Normal mode. Refer to the USB Ports section
for details.
3. Connect the OTG USB port on the bottom of the device to your PC or laptop with a USB cable.
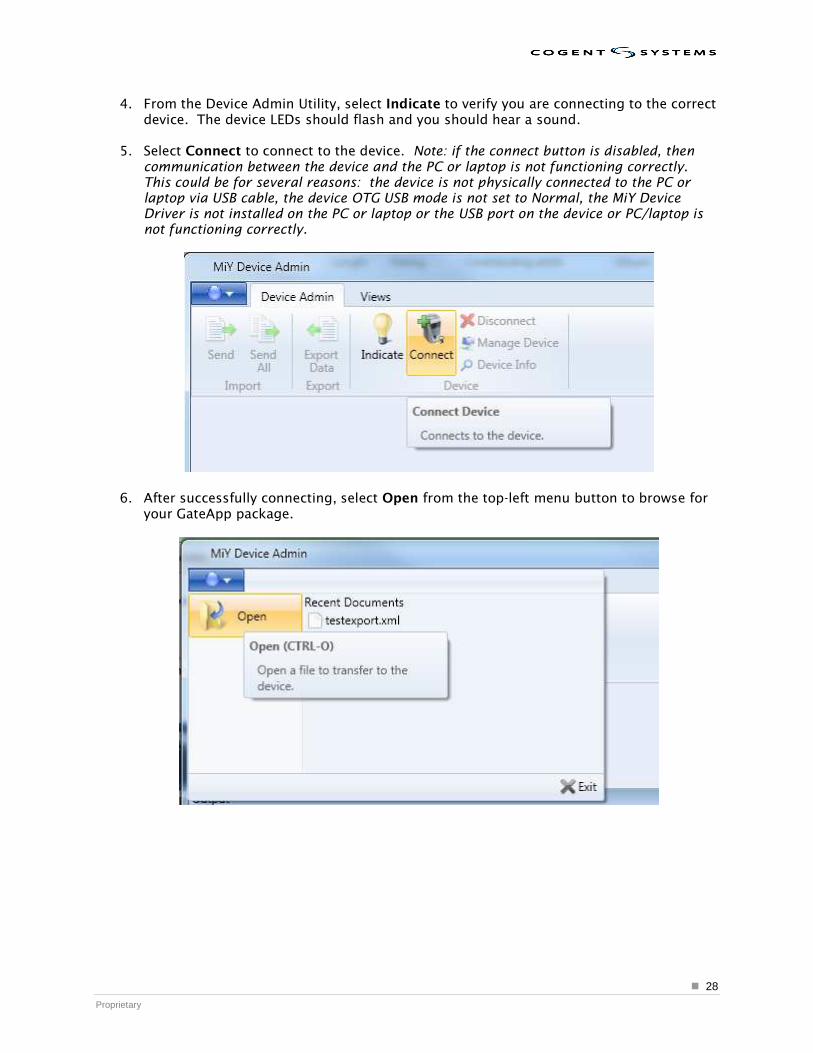
a. The MiY Device Admin Utility installer should have installed the MiY Device Driver. However, if your PC or laptop does not recognize the device, then try manually installing the MiY Device Driver via the Device Manager, Add New Device wizard or other preferred method.
b. The device will appear in the PC Device Manager as a “MiY Device” with an exclamation if the driver is not installed. From here, you can point to the MiY Device Driver files to install the driver for the unknown device.
� 28
Proprietary
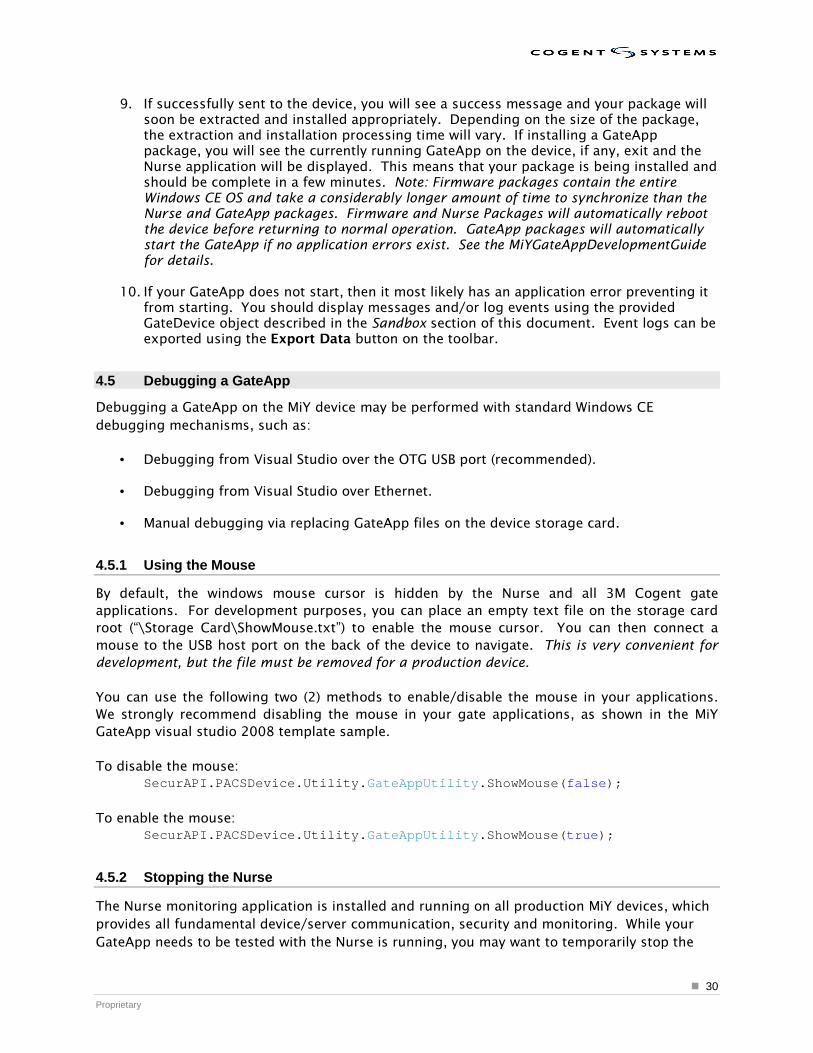
4. From the Device Admin Utility, select Indicate to verify you are connecting to the correct device. The device LEDs should flash and you should hear a sound.
5. Select Connect to connect to the device. Note: if the connect button is disabled, then communication between the device and the PC or laptop is not functioning correctly. This could be for several reasons: the device is not physically connected to the PC or laptop via USB cable, the device OTG USB mode is not set to Normal, the MiY Device Driver is not installed on the PC or laptop or the USB port on the device or PC/laptop is not functioning correctly.
6. After successfully connecting, select Open from the top-left menu button to browse for your GateApp package.

� 29
Proprietary
7. Browse for your GateApp package and select Open.
8. The package file is loaded and basic package information is displayed if the package file is valid. Select send to upload the GateApp package to the device. You will see “Sending Package File…” in the output window and the Send/Send All buttons are disabled until the operation is complete.
� 30
Proprietary
9. If successfully sent to the device, you will see a success message and your package will soon be extracted and installed appropriately. Depending on the size of the package, the extraction and installation processing time will vary. If installing a GateApp package, you will see the currently running GateApp on the device, if any, exit and the Nurse application will be displayed. This means that your package is being installed and should be complete in a few minutes. Note: Firmware packages contain the entire Windows CE OS and take a considerably longer amount of time to synchronize than the Nurse and GateApp packages. Firmware and Nurse Packages will automatically reboot the device before returning to normal operation. GateApp packages will automatically start the GateApp if no application errors exist. See the MiYGateAppDevelopmentGuide for details.
10. If your GateApp does not start, then it most likely has an application error preventing it from starting. You should display messages and/or log events using the provided GateDevice object described in the Sandbox section of this document. Event logs can be exported using the Export Data button on the toolbar.
4.5 Debugging a GateApp
Debugging a GateApp on the MiY device may be performed with standard Windows CE
debugging mechanisms, such as:
• Debugging from Visual Studio over the OTG USB port (recommended).
• Debugging from Visual Studio over Ethernet.
• Manual debugging via replacing GateApp files on the device storage card.
4.5.1 Using the Mouse
By default, the windows mouse cursor is hidden by the Nurse and all 3M Cogent gate
applications. For development purposes, you can place an empty text file on the storage card
root (“\Storage Card\ShowMouse.txt”) to enable the mouse cursor. You can then connect a
mouse to the USB host port on the back of the device to navigate. This is very convenient for
development, but the file must be removed for a production device.
You can use the following two (2) methods to enable/disable the mouse in your applications.
We strongly recommend disabling the mouse in your gate applications, as shown in the MiY
GateApp visual studio 2008 template sample.
To disable the mouse: SecurAPI.PACSDevice.Utility.GateAppUtility.ShowMouse(false);
To enable the mouse: SecurAPI.PACSDevice.Utility.GateAppUtility.ShowMouse(true);
4.5.2 Stopping the Nurse
The Nurse monitoring application is installed and running on all production MiY devices, which
provides all fundamental device/server communication, security and monitoring. While your
GateApp needs to be tested with the Nurse is running, you may want to temporarily stop the

� 31
Proprietary
Nurse during GateApp development. Note: you will lose all standard communication with the
server if you stop the Nurse. You can stop the Nurse in two (2) ways:
• By killing the process (Nurse.exe) with the Windows CE Remote Process Viewer included
with Microsoft Visual Studio 2008 Remote Tools.
• By connecting a mouse to the USB host port on the back of the device and double-clicking the Nurse title bar at the top of the screen that displays the current date/time. You may need to move the mouse around a little before the mouse cursor becomes active on the screen.
4.5.3 Stopping the Factory GateApp
You can stop the factory installed GateApp with the same procedure as above for the Nurse. If
the Nurse is running, it will attempt restart the installed GateApp on the
GateAppHealthCheckInterval (default is 30 seconds). You can prevent the Nurse from restarting
the GateApp by setting the GateAppHealthCheckInterval to 0 from the device menu Device
Info/General, the MiY Security Manager (if the device is registered to a server)
system/zone/device properties or the MiY Device Admin Utility property file upload to device.
4.5.4 Device Files
All MiY device files are maintained in the “\Storage Card” folder. Your GateApp is also free to
access the Storage Card via the standard windows file system as needed.
There are three (3) system databases on the Storage Card root called:
• PACSDeviceData.sdf • PACSUserData.sdf • PACSDeviceLog.sdf
The Device and UserData databases are encrypted for security, but the DeviceLog is
unprotected for easy access to logs. These databases are all controlled by the Nurse and
should not be tampered with except to possibly view logs.
The MiY folder structure is as follows:
\Storage Card – Root storage card folder where MiY databases are stored.
\PACS
\Nurse – Nurse monitoring application and related files.
\GateApp – Currently installed GateApp and related files.
\Installed – MiY system files used for installation of packages.
\Pending – MiY system files used for installation of packages.
Note: the “\GateApp” directory is where custom GateApps are installed via package upload.
One (1) GateApp package may be installed, which could contain multiple programs if desired.
� 32
Proprietary
4.6 GateApp Signatures
Beginning with version 1.5 of the MiY framework, all GateApp packages must be signed by 3M
Cogent before they can be deployed to production devices. For development purposes, the
device OtgMode can be set to Development to allow for unsigned packages to be installed on
the device. The MiY SDK also comes with a DevMode license file, which can be uploaded to the
server from the MiY Security Manager System Settings/Licensing tab. This allows unsigned
packages to be uploaded to devices from the Security Manager for testing.
To request a DevMode license, go to the System Settings/Licensing tab in the Security Manager.
Select DevMode from the drop down list and click Create License Request to save a license
request file. Send this license request file to 3M Cogent SDK support and they will send back a
signed license file. Click Load License to import the signed DevMode license from 3M Cogent.
Once development and testing are finished, send a request to 3M Cogent to have your GateApp
validated and signed for production use.
This feature helps ensure the security and integrity of your MiY system.
� 33
Proprietary
5 MiY Device Emulator
The MiY Device Emulator is designed to give developers a development and debugging platform
without having to purchase a physical device for each individual developer. While you can use
the emulator for development, we recommend that you run your gate application on a real
device first. Note: the MiY Sandbox SDK installer automatically installs the emulator shell
application described below. However, you must manually install the MiY Windows CE6
Emulator (Biogate_DeviceEmulator), which you can launch from Start\Programs\3M Cogent
Inc\MiY Sandbox SDK\Install Emulator.
5.1 Device Emulator Layout
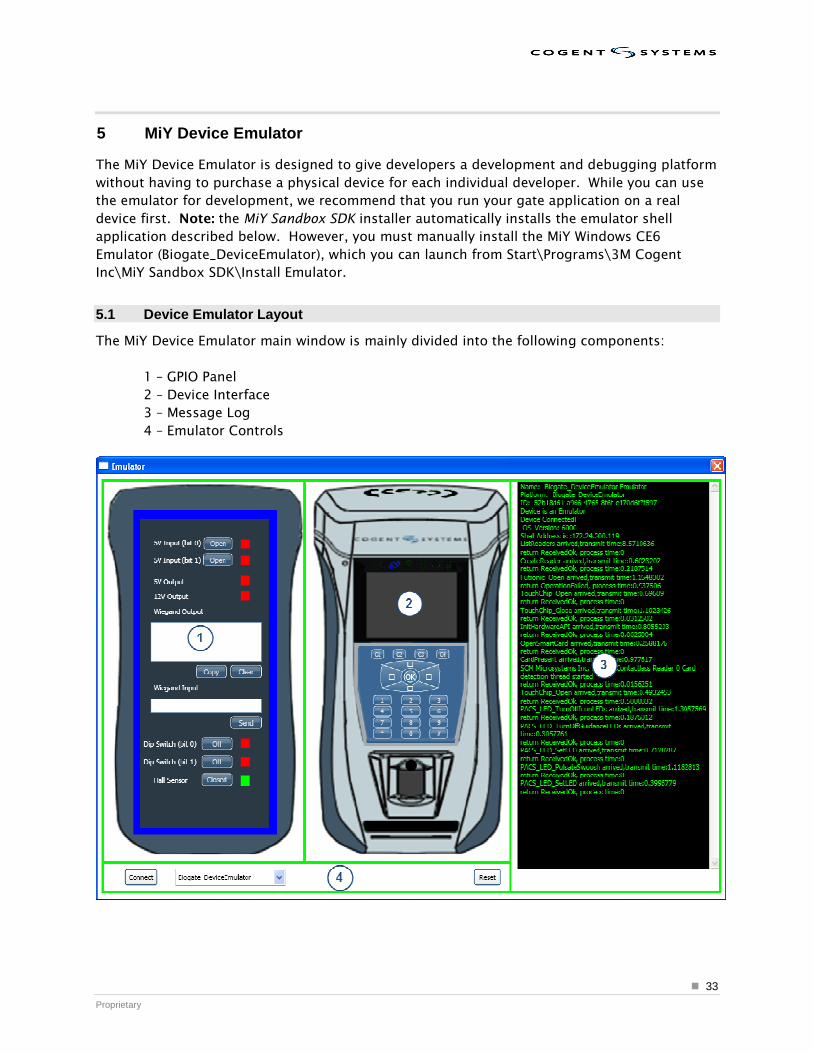
The MiY Device Emulator main window is mainly divided into the following components:
1 – GPIO Panel
2 – Device Interface
3 – Message Log
4 – Emulator Controls
� 34
Proprietary
5.2 GPIO Functionality
This section will define the correlation between the buttons and color boxes on the emulator
with the actual device.
5V Input (bit 0) – This corresponds to the Panel_In_0 port on the back of the device. When you
press the “Open” button, then the color box will change from “Red” to “Green” and the button
text will change from “Open” to “Closed.” The controls will just toggle.
5V Input (bit 1) – This corresponds to the Panel_In_1 port on the back of the device. When you
press the “Open” button, then the color box will change from “Red” to “Green” and the button
text will change from “Open” to “Closed.” The controls will just toggle.
5V Output – This corresponds to the Line_Trigger port on the back of the device. The color
box will change to “Green” when you command the line trigger to turn on via the SecurAPI calls.
It is turned off by default; hence the color box is “Red.”
12V Output – This corresponds to the Relay port on the back of the device. The color box will
change to “Green” when you command the relay to turn on via the SecurAPI calls. It is turned
off by default; hence the color box is “Red.”
Wiegand Output – This corresponds to the wiegand output from the back of the device. The
bits outputted through our SecurAPIs will appear as binary bits. We have given you the option
to copy the outputted bits to your clipboard as well as clearing the textbox.
Wiegand Input – This corresponds to the wiegand input from the back of the device. You input
the bits that you want to send to the device and then click Send.
Dip Switch (bit 0) – This corresponds to pin 1 of the 2-pin dipswitch on the back of the device.
When you press the “Off” button, then the text will change from “Off” to “On” and the color box
will change from “Red” to “Green” and vice versa. By default, this is set to off.
Dip Switch (bit 1) – This corresponds to pin 2 of the 2-pin dipswitch on the back of the device.
When you press the “Off” button, then the text will change from “Off” to “On” and the color box
will change from “Red” to “Green” and vice versa. By default, this is set to off.
Hall Sensor – This corresponds to the Hall Effect sensor that is attached to the back of the
device. Clicking on the button will toggle between the text being “Closed” and “Green” to
“Open” and “Red” respectively.
5.3 Using the MiY Device Emulator
The MiY Device Emulator must be started before you try to debug a gate application.
The following steps will show you how to start and configure the emulator:
� 35
Proprietary
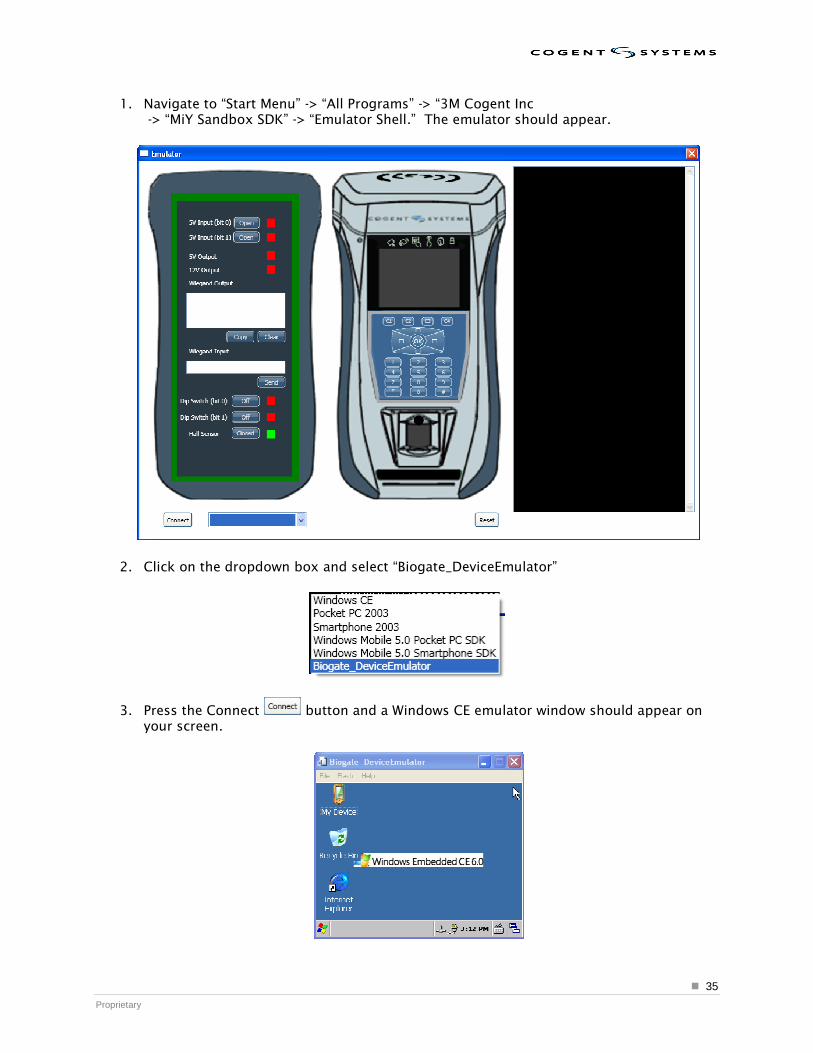
1. Navigate to “Start Menu” -> “All Programs” -> “3M Cogent Inc -> “MiY Sandbox SDK” -> “Emulator Shell.” The emulator should appear.
2. Click on the dropdown box and select “Biogate_DeviceEmulator”
3. Press the Connect button and a Windows CE emulator window should appear on your screen.
� 36
Proprietary
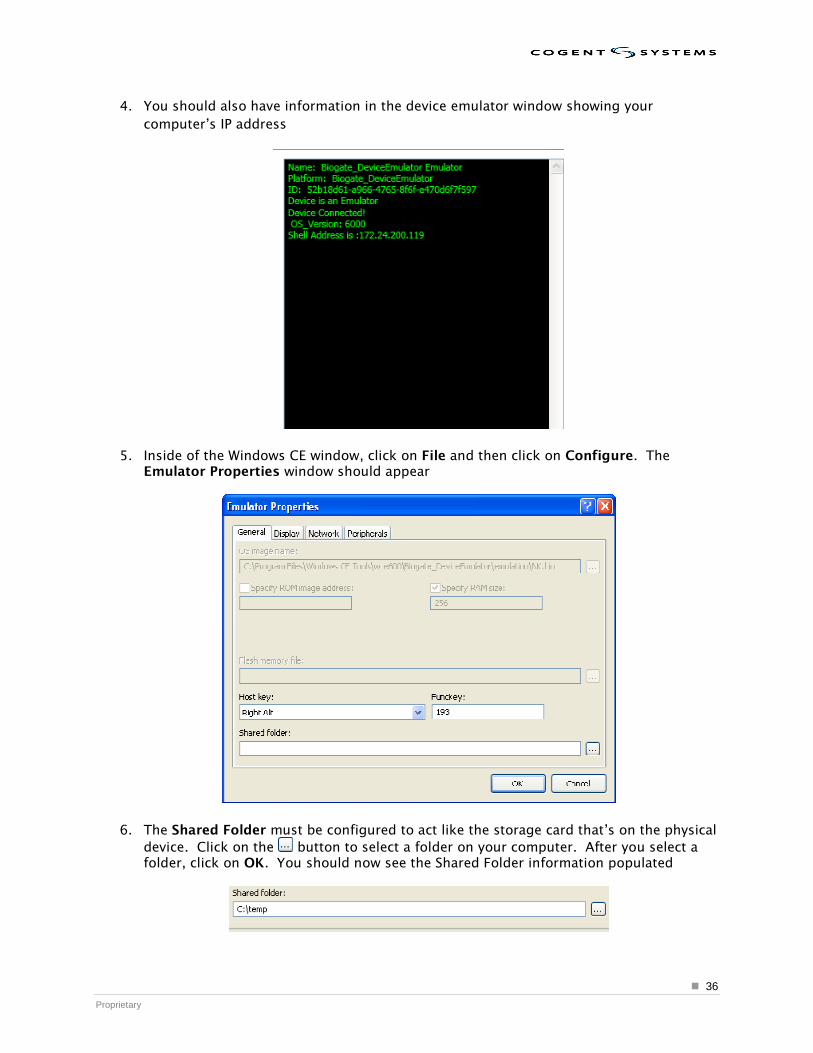
4. You should also have information in the device emulator window showing your
computer’s IP address
5. Inside of the Windows CE window, click on File and then click on Configure. The
Emulator Properties window should appear
6. The Shared Folder must be configured to act like the storage card that’s on the physical
device. Click on the button to select a folder on your computer. After you select a folder, click on OK. You should now see the Shared Folder information populated
� 37
Proprietary
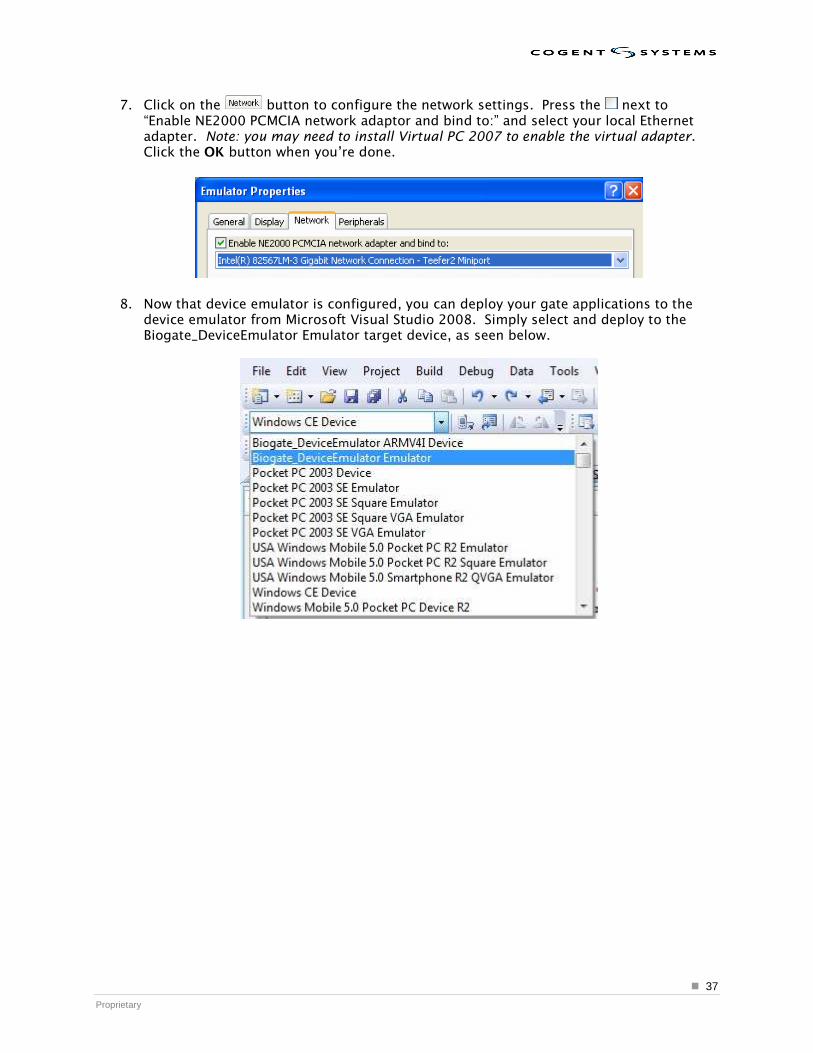
7. Click on the button to configure the network settings. Press the next to “Enable NE2000 PCMCIA network adaptor and bind to:” and select your local Ethernet adapter. Note: you may need to install Virtual PC 2007 to enable the virtual adapter. Click the OK button when you’re done.
8. Now that device emulator is configured, you can deploy your gate applications to the device emulator from Microsoft Visual Studio 2008. Simply select and deploy to the Biogate_DeviceEmulator Emulator target device, as seen below.

� 38
Proprietary
6 Sandbox
The Sandbox is a collection of APIs in the SecurAPI namespace that provide all core MiY
functionality and is designed to simplify integration and expansion. The Sandbox serves as the
foundation of the MiY platform and is used by the MiY server, devices and related applications.
It supports the .NET Full and Compact Framework and is fully extendable.
The Sandbox provides a rich set of developer tools in the following namespaces:
• SecurAPI.Biometrics
• SecurAPI.Collections
• SecurAPI.Cryptography
• SecurAPI.Data
• SecurAPI.IO
• SecurAPI.Messaging
• SecurAPI.Net
• SecurAPI.Net.SSL
• SecurAPI.Packaging
• SecurAPI.PACSDevice
• SecurAPI.PACSDevice.UI
• SecurAPI.Resources
• SecurAPI.SmartCard
• SecurAPI.Utility
• SecurAPI.Wiegand

� 39
Proprietary
6.1 GateDevice
SecurAPI.PACSDevice.GateDevice is a fundamental object for GateApp development and is
required by all GateApps to be supported by the MiY platform. GateDevice handles all
server/device communication, application monitoring and provides convenient access to all
standard Sandbox device functionality. There are many APIs in the sandbox framework that can
be leveraged by developers, but GateDevice is a convenient way to access device basics. These
basic operations include access to users, properties, logs, device events, wiegand, Ethernet
adapters, etc.
� 40
Proprietary
6.1.1 MessageWindow
The GateDevice.MessageWindow object is a SecurAPI.PACSDevice.Utility.PACSMessageWindow
that must be set or the GateDevice fails to start with an ArgumentNullException. The
PACSMessageWindow should be created on the primary window in your application, as
demonstrated in the MiY GateApp VS2008 template. The MessageWindow allows the Nurse to
communicate with the GateApp in various ways using windows messaging, such as sending
over any custom messages to your GateApp.
You should initialize the object on a primary window, such as the MainForm, and set a bogus
window name, as shown below. This is optional to specify a bogus window name, but prevents
your application from receiving any messages until fully started and any custom message
handlers are added.
AppSettings.Instance.Device.MessageWindow = new PACSMessageWindow(DeviceConst.WindowNameGateApp + "_disabled");
After the GateDevice object is started and any custom message handlers are added, set the window text to the correct GateApp window name to start receiving messages.
// Set the correct window name to enable the message window for receiving windows messages from the Nurse now that we are ready AppSettings.Instance.Device.MessageWindow.Text = DeviceConst.WindowNameGateApp;
6.1.2 PropertyHelper
Properties are name/value pairs that provide a generic mechanism for managing settings and
having them automatically synchronized between the server and device. Properties are Unicode
strings and are stored as nvarchar(4000).
The GateDevice.PropertyHelper object provides various methods for getting and setting device
properties. The get property methods provide convenient methods to get properties stored as
basic data types, such as bool, integer and enumerations.
PropertyRecord property = AppSettings.Instance.Device.PropertyHelper.GetProperty("GENGate.Mode");
6.1.3 UserHelper
The GateDevice.UserHelper object provides various methods for managing users and operators
on the device.
6.1.4 EthernetAdapter
The GateDevice.EthernetAdapter object provides access to the device Ethernet adapter.
6.1.5 EventLog
The GateDevice.EventLog object provides methods for logging reserved and custom events on
the device. If connected to a server, then device uploads the logs to the server on the
� 41
Proprietary
LogUploadInterval property. The EventLogger.EventLogActivityCodes enumeration defines all
reserved event codes. The EventLogger also has various methods for querying the event logs
on the device. The advantage of using event logs is that all event logs are automatically centralized by the Sandbox MiY Framework. This makes it easy to centralize data in a distributed system. Note: Creating extremely verbose event logs will over run the system if not used with care. They are great for capturing event based information.
AppSettings.Instance.Device.EventLog.LogEventActivity(
EventLogger.EventLogActivityCodes.WARN, null, AppSettings.Instance.Device.MACAddress, "Hello world!");
6.1.6 KeyHandler
The GateDevice.KeyHandler object is an instance of the
SecurAPI.PACSDevice.Hardware.PACSKeypad object, which provides events when keys are
pressed on the device. To get a key press, simply handle the
GateDevice.KeyHandler.KeyPressed event.
protected override void KeyHandler_KeyPressed(object sender, KeyPressedEventArgs e) {
if (e.KeyValue == PACSKeypad.PACSKeys.Num5) {
//Do something }
}
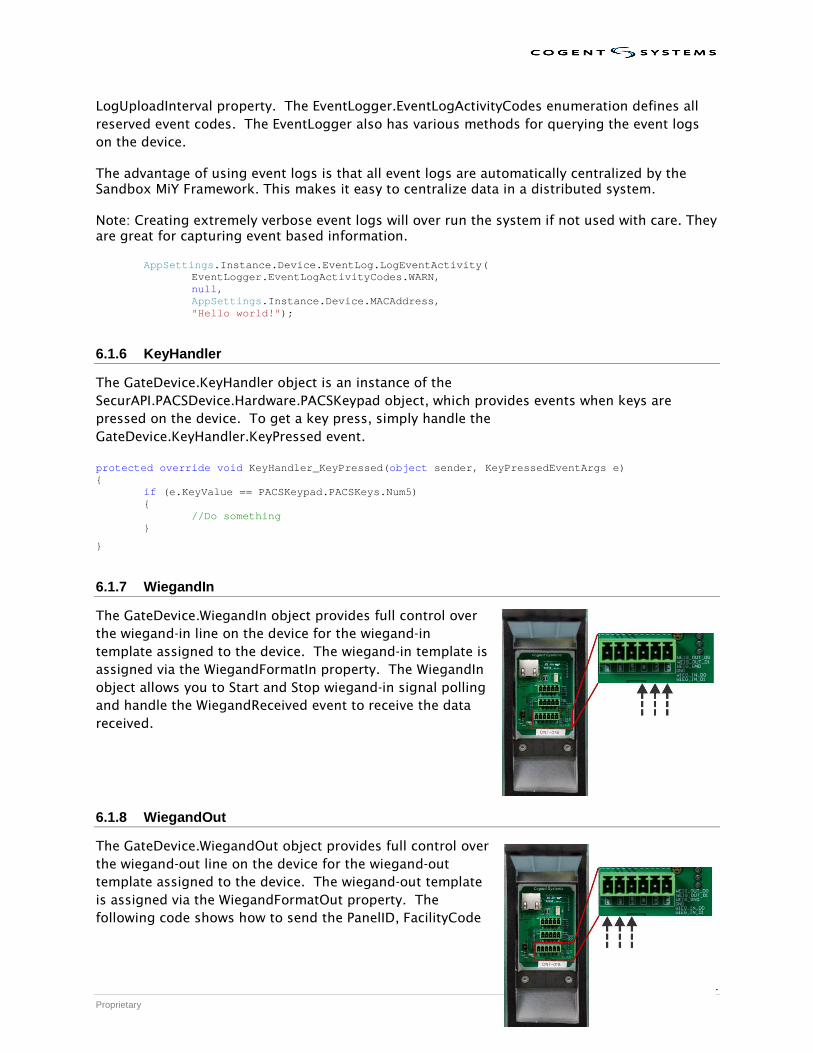
6.1.7 WiegandIn
The GateDevice.WiegandIn object provides full control over
the wiegand-in line on the device for the wiegand-in
template assigned to the device. The wiegand-in template is
assigned via the WiegandFormatIn property. The WiegandIn
object allows you to Start and Stop wiegand-in signal polling
and handle the WiegandReceived event to receive the data
received.
6.1.8 WiegandOut
The GateDevice.WiegandOut object provides full control over
the wiegand-out line on the device for the wiegand-out
template assigned to the device. The wiegand-out template
is assigned via the WiegandFormatOut property. The
following code shows how to send the PanelID, FacilityCode

� 42
Proprietary
and AgencyCode elements out over a wiegand format that includes any of these elements.
private string wiegandOutPanelID = String.Empty; private void SendWiegand(string panelID) { this.wiegandOutPanelID = panelID; if (AppSettings.Instance.Device.WiegandOut != null && AppSettings.Instance.Device.WiegandOut.Template != null) {
AppSettings.Instance.Device.WiegandOut.Transmit((Action<IWiegandSection, WiegandEncoder>)this.GetWiegandFieldCallback);
} … /// <summary> /// Get wiegand field callback to populate wiegand out values. /// </summary> /// <param name="section">The wiegand section</param> /// <param name="encoder">The wiegand encoder</param> private void GetWiegandFieldCallback(IWiegandSection section, WiegandEncoder encoder) { if (section.ValueSource == WiegandValueSource.PanelID) { ulong fieldData = 0; if (!String.IsNullOrEmpty(this.wiegandOutPanelID)) { fieldData = Convert.ToUInt64(this.wiegandOutPanelID); } encoder.Encode(fieldData, section.StartIndex, section.Length, section.BitOrder); } else if (section.ValueSource == WiegandValueSource.FacilityCode) { ulong fieldData = Convert.ToUInt64(AppSettings.Instance.Device.FacilityCode); encoder.Encode(fieldData, section.StartIndex, section.Length, section.BitOrder); } else if (section.ValueSource == WiegandValueSource.AgencyCode) { ulong fieldData = Convert.ToUInt64(AppSettings.Instance.Device.AgencyCode); encoder.Encode(fieldData, section.StartIndex, section.Length, section.BitOrder); }
}
6.1.9 Panel In
The GateDevice object exposes a PanelInReceived event that
is fired when a panel in signal is received on the device
panel in lines. The GateDevice.PanelInMonitoringEnabled
flag is used to enable or disable panel in monitoring. The
GateDevice.PanelInMonitorInterval value is used to set how
often the panel in status is checked when panel in
monitoring is enabled. private void Device_PanelInReceived(object sender, PanelInEventArgs e) { if (e.LineStatus != PanelInStatus.NoLinesRaised) { //Turn the Lock Icon LED Green
� 43
Proprietary
Program.MainForm.LockIconLed.TurnOn(LedColor.Green); } else { //Turn the Lock Icon LED Red Program.MainForm.LockIconLed.TurnOn(LedColor.Red); }
}
6.1.10 TcpMessageClient
The GateDevice.TcpMessageClient object provides easy access to send messages via TCP to the
server. If custom messages are sent to the server, a corresponding message handler assembly
to handle the custom message must be added to the server.
Please refer to the MiY Server Integration section for details for adding custom handlers.
6.1.11 TlsMessageClient
The GateDevice.TlsMessageClient object provides easy access to send TLS encrypted messages
to the server. If custom messages are sent to the server, a corresponding message handler
assembly to handle the custom message must be added to the server.
Please refer to the MiY Server Integration section for details for adding custom handlers.
As long as the device is registered to a server all TLS communication setup and teardown will be
automatically performed.
6.1.12 Biometric
The GateDevice object has several properties that provide access to the fingerprint scanner and
important fingerprint operations, such as enrollment, 1 to 1 matching and 1 to N matching.
These properties include:
• PrintScanner – an IFingerprintScanner object that provides access to the fingerprint
scanner on the device. This interface is designed to allow for easy integratation of different USB fingerprint scanners.
• PrintEnroller – an IBiometricEnroll object that provides the ability to enroll user fingerprints.
• PrintSearcher – an IBiometricSearch object that provides the ability to perform 1 to N user fingerprint searches. Note: to perform searches you must first call GateDevice.LoadUserFingerMatchingDatabase, which loads device user prints into memory. Program memory usage will increase and device performance may degrade as the number of user prints increases. Use GateDevice.UnloadUserFingerMatchingDatabase to release the prints from memory if fingerprint searching is not required.
• PrintVerifier – an IBiometricVerify object that provides the ability to perform 1 to 1 user fingerprint matches.
� 44
Proprietary
GateDevice.SearchFinger is a convenient method for performing user fingerprint searches.
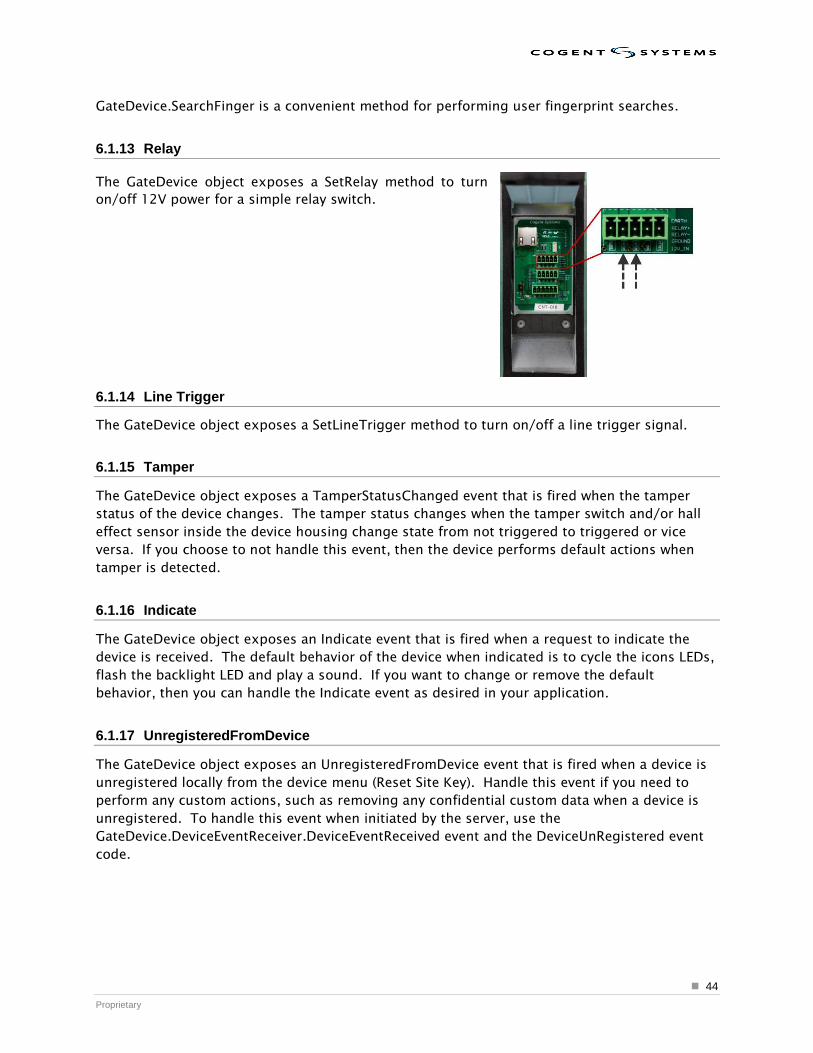
6.1.13 Relay
The GateDevice object exposes a SetRelay method to turn
on/off 12V power for a simple relay switch.
6.1.14 Line Trigger
The GateDevice object exposes a SetLineTrigger method to turn on/off a line trigger signal.
6.1.15 Tamper
The GateDevice object exposes a TamperStatusChanged event that is fired when the tamper
status of the device changes. The tamper status changes when the tamper switch and/or hall
effect sensor inside the device housing change state from not triggered to triggered or vice
versa. If you choose to not handle this event, then the device performs default actions when
tamper is detected.
6.1.16 Indicate
The GateDevice object exposes an Indicate event that is fired when a request to indicate the
device is received. The default behavior of the device when indicated is to cycle the icons LEDs,
flash the backlight LED and play a sound. If you want to change or remove the default
behavior, then you can handle the Indicate event as desired in your application.
6.1.17 UnregisteredFromDevice
The GateDevice object exposes an UnregisteredFromDevice event that is fired when a device is
unregistered locally from the device menu (Reset Site Key). Handle this event if you need to
perform any custom actions, such as removing any confidential custom data when a device is
unregistered. To handle this event when initiated by the server, use the
GateDevice.DeviceEventReceiver.DeviceEventReceived event and the DeviceUnRegistered event
code.
� 45
Proprietary
6.2 Events
The SecurAPI.PACSDevice.GateDevice object provides various events that can be handled by
your application to perform special actions when important events occur on the device. These
events may be initiated by the server or directly from the device.
6.2.1 DeviceEventReceiver
The GateDevice.DeviceEventReceiver exposes a DeviceEventReceived event that is fired when
important device events occur that are performed by the server on the device. These events are
defined in SecurAPI.PACSDevice.Event.DeviceEvents and include:
• DeviceRegistered – Occurs when the device is registered to a server.
• DeviceUnRegistered – Occurs when the device is un-registered from a server.
• EthernetChanged – Occurs when the device network configuration is changed by the
server (Ethernet or RS485).
• PropertyUpdated – Occurs when a property is updated by the server.
• UserRemoved – Occurs when a user is removed by the server.
• UserUpdated – Occurs when a user is added/updated by the server.
• OperatorAdded – Occurs when an operator is added by the server.
• OperatorRemoved – Occurs when an operator is removed by the server.
• CardTypeAdded – Occurs when a smart card type is added by the server.
• CardTypeRemoved – Occurs when a smart card type is removed by the server.
• CardLayoutAdded – Occurs when a smart card layout is added by the server.
• CardLayoutRemoved – Occurs when a smart card layout is removed by the server.
• RevokedCardAdded – Occurs when a revoked smart card is added by the server.
• RevokedCardRemoved – Occurs when a revoked smart card is removed by the server.
• BurnedCardAdded – Occurs when a burned card is added by the server.
• BurnedCardRemoved – Occurs when a burned card is removed by the server.
• WiegandTemplateAdded – Occurs when a wiegand template is added by the server.
• WiegandTemplateRemoved – Occurs when a wiegand template is removed by the server.
• GateAppExitRequest – IMPORTANT. Occurs when the GateApp needs to exit, such as when a KillGateApp request is initiated by the server or the GateApp is being replaced by a new GateApp package. This event should always be handled by a custom GateApp so that it can exit gracefully when necessary. If not handled, the GateApp will be forcefully
� 46
Proprietary
killed which can have undesirable side effects on the device.
• ServerOnline – Occurs when communication is received from the server.
6.2.2 LocalDeviceEvent
The GateDevice exposes a LocalDeviceEvent event that is fired when important device events
occur that are initiated locally on the device. These events are defined in
SecurAPI.PACSDevice.Event.DeviceEvents and currently include:
• DeviceUnRegistered – Occurs when the device is un-registered from a server (Reset Site
Key device menu option).
• EthernetChanged – Occurs when the device network configuration is changed (Ethernet or RS485).
• PropertyUpdated – Occurs when a property is updated.
• UserAdded – Occurs when a user is added.
• UserRemoved – Occurs when a user is removed.
• UserUpdated – Occurs when a user is updated.
• UserPrintTemplatesUpdated – Occurs when user print templates are updated.
• OperatorAdded – Occurs when an operator is added.
• OperatorRemoved – Occurs when an operator is removed.
6.2.3 Data Changed Events
The GateDevice object exposes several events that get fired when important data changes on
the device. These events can be subscribed to if there is a need to perform actions when these
events occur. The supported events include:
• OperatorPrintsChanged – fired when operator prints change on the device. They may
have been added, updated or removed.
• UserPrintsChanged – fired when user prints change on the device. They may have been added, updated or removed.
• PropertiesChanged – fired when properties change on the device. They may have been added, updated or removed. Note: this does not include changes to PropertyRecord.DeviceOnly properties.
• CertificatesChanged – fired when certificates change on the device. They may have been added, updated or removed.
• CRLsChanged – fired when CRLs (Certificate Revocation Lists) change on the device. They may have been added, updated or removed.

� 47
Proprietary
6.3 Keypad
The SecurAPI.PACSDevice.Hardware.PACSKeypad object provides an IKeyHandler
implementation for the MiY device keypad. The GateDevice.Keyhandler provides convenient
access to this object for detecting key presses.
The keypad is designed to only handle a single key press at a time. Before a second key press is
announced to the handler the first finger must have left the detection field.
Additionally keypad events are buffered, such that the keys can be pressed and queued by the
device. Each event is then passed to the handlers when available.
Note: The keypad is designed to compensate automatically for changes in humidity,
temperature, and air density due to elevation. Due to this design the keypad is not meant for
“press and hold” actions. When fingers are left in the field, the keypad may slowly calibrate and
be come less sensitive. Once the finger is removed from the field, it will slowly calibrate back to
normal. Though in normal cases this will not be an issue, as an example, it is not recommended
to hold the button for longer than 20 minutes, as it will take a few minutes to return to normal
after the button is released.
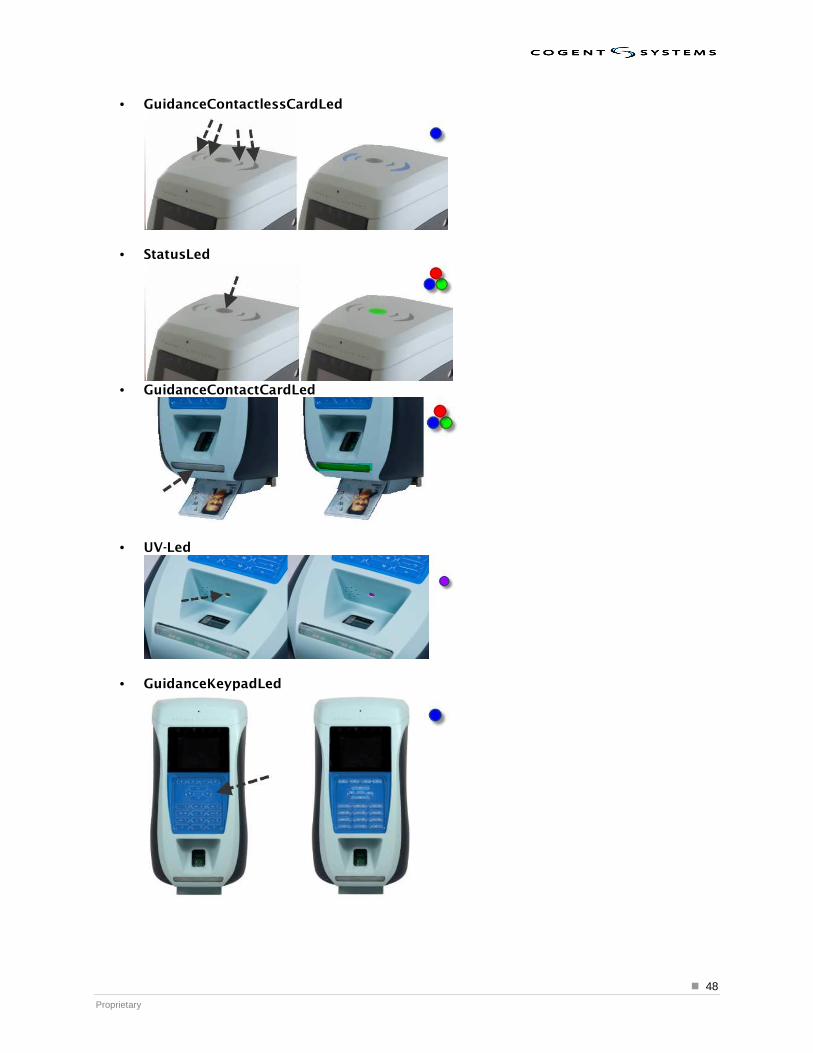
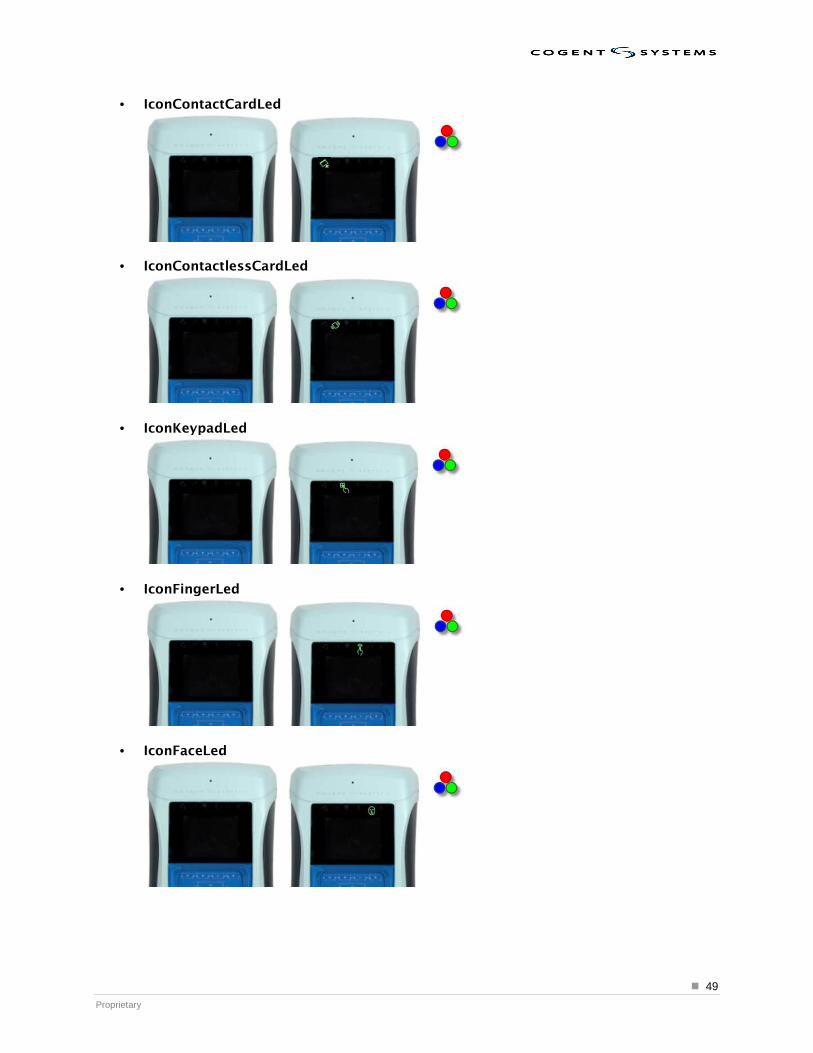
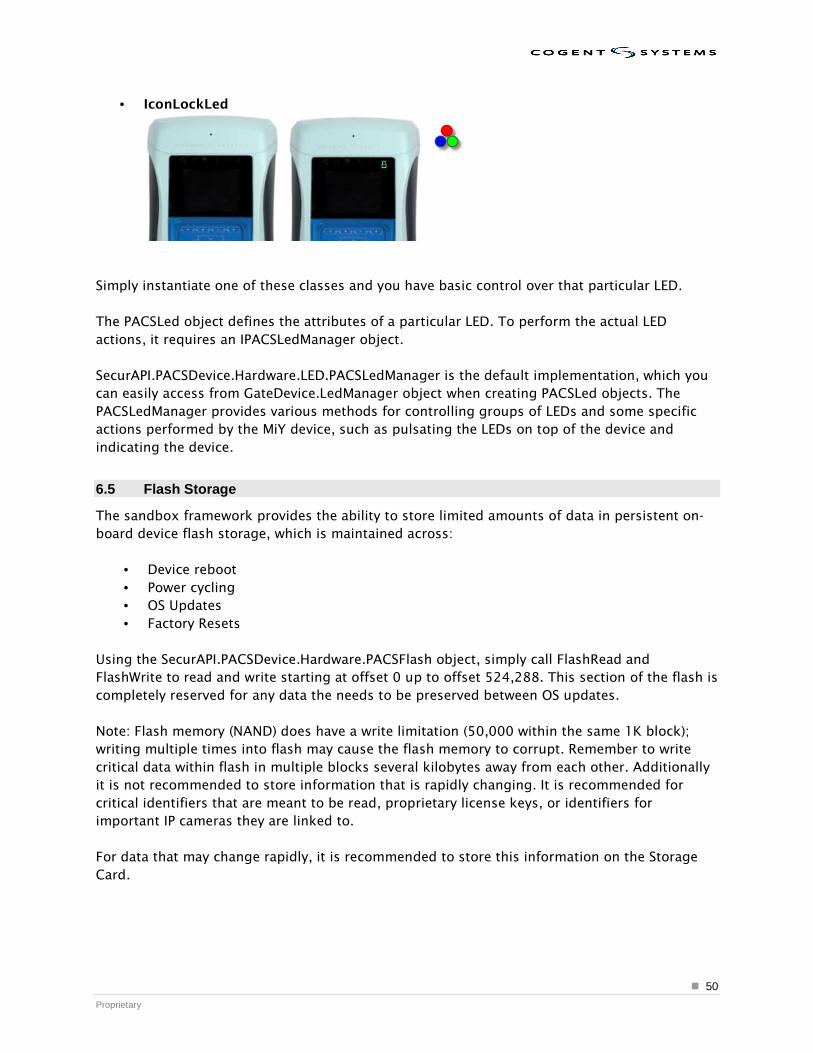
6.4 LEDs
The SecurAPI.PACSDevice.Hardware.LED namespace provides methods for controlling the device
LEDs.
The PACSLed object represents a single device LED and can be used to turn on/off, blink and
set the color of a particular LED. There are a total of twelve (12) supported LEDs, which are
defined in the LedNumber enumeration. There are convenient PACSLed classes that extend
PACSLed to define each of these LEDs, which you can use to control a particular LED. Some LEDs
are capable of RGB (red, green, blue) where as some are only capable of a limited number of
colors. These include:
• BacklightLed
� 48
Proprietary
• GuidanceContactlessCardLed
• StatusLed
• GuidanceContactCardLed
• UV-Led
• GuidanceKeypadLed
� 49
Proprietary
• IconContactCardLed
• IconContactlessCardLed
• IconKeypadLed
• IconFingerLed
• IconFaceLed
� 50
Proprietary
• IconLockLed
Simply instantiate one of these classes and you have basic control over that particular LED.
The PACSLed object defines the attributes of a particular LED. To perform the actual LED
actions, it requires an IPACSLedManager object.
SecurAPI.PACSDevice.Hardware.LED.PACSLedManager is the default implementation, which you
can easily access from GateDevice.LedManager object when creating PACSLed objects. The
PACSLedManager provides various methods for controlling groups of LEDs and some specific
actions performed by the MiY device, such as pulsating the LEDs on top of the device and
indicating the device.
6.5 Flash Storage
The sandbox framework provides the ability to store limited amounts of data in persistent on-
board device flash storage, which is maintained across:
• Device reboot
• Power cycling
• OS Updates
• Factory Resets
Using the SecurAPI.PACSDevice.Hardware.PACSFlash object, simply call FlashRead and
FlashWrite to read and write starting at offset 0 up to offset 524,288. This section of the flash is
completely reserved for any data the needs to be preserved between OS updates.
Note: Flash memory (NAND) does have a write limitation (50,000 within the same 1K block);
writing multiple times into flash may cause the flash memory to corrupt. Remember to write
critical data within flash in multiple blocks several kilobytes away from each other. Additionally
it is not recommended to store information that is rapidly changing. It is recommended for
critical identifiers that are meant to be read, proprietary license keys, or identifiers for
important IP cameras they are linked to.
For data that may change rapidly, it is recommended to store this information on the Storage
Card.
� 51
Proprietary
6.6 Smartcards
The sandbox framework provides a comprehensive set of contact and contactless smart card
and reader functionality in the SecurAPI.SmartCard namespace of the SecurAPI and
SecurAPI.SmartCard assemblies. The smart card support includes:
• Low level PCSC reader implementations for exchanging APDUs with ISO 7816 smart
cards (SecurAPI.SmartCard.Reader.PCSC).
• High level abstraction layer for reading Java based contact smart cards with applets and containers.
• Low level support for reading/writing Mifare, DESFire and HID iClass (SecurAPI.SmartCard.ContactlessCard).
• High level Mifare, DESFire and HID iClass support for reading/writing 3M Cogent formatted user cards.
• Card detection helper class for detecting card insertion and removal (SecurAPI.SmartCard.Reader.CardDetector).
• BER-TLV, TV, CBEFF and FASCN parsers.
Smart card capabilities of each MiY device may differ depending on the type and model of the
MiY-device. HID readers, at the time of this writing, are only available on the MiY-ID readers and
must be ordered with and HID reader from your local distributor.
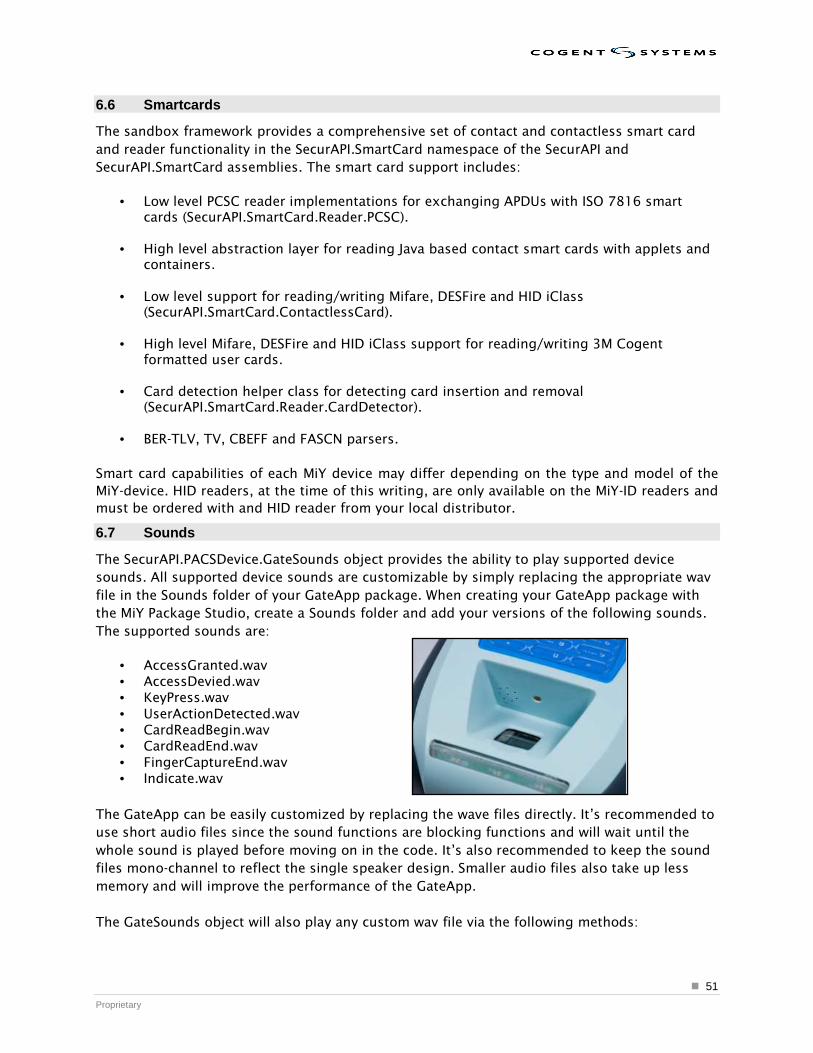
6.7 Sounds
The SecurAPI.PACSDevice.GateSounds object provides the ability to play supported device
sounds. All supported device sounds are customizable by simply replacing the appropriate wav
file in the Sounds folder of your GateApp package. When creating your GateApp package with
the MiY Package Studio, create a Sounds folder and add your versions of the following sounds.
The supported sounds are:
• AccessGranted.wav • AccessDevied.wav • KeyPress.wav • UserActionDetected.wav • CardReadBegin.wav • CardReadEnd.wav • FingerCaptureEnd.wav • Indicate.wav
The GateApp can be easily customized by replacing the wave files directly. It’s recommended to
use short audio files since the sound functions are blocking functions and will wait until the
whole sound is played before moving on in the code. It’s also recommended to keep the sound
files mono-channel to reflect the single speaker design. Smaller audio files also take up less
memory and will improve the performance of the GateApp.
The GateSounds object will also play any custom wav file via the following methods:
� 52
Proprietary
public static void PlaySound(string wavFile) public static void PlaySoundAsync(string wavFile)
6.8 Images
The SecurAPI.PACSDevice.GateImages object provides access to all standard GateApp images.
All supported images are customizable by simply replacing the appropriate image file (PNG
format) in the Images folder of your GateApp package. When creating your GateApp package
with the MiY Package Studio, create an Images folder and add your versions of the following
images. The supported images are:
• HeaderPanelBackground.png – The header bar image at the top of the application
where the date and time is displayed. • MainPanelBackground.png – The main panel background in the middle of the screen
for all normal application operations. This is where text and animations are displayed. • MenuPanelSixIconBackground.png – The background for Admin screens with six icons. • MenuPanelSixIconBackground_SmallKeypad.png – The background for Admin screens
with six icons on the smaller MiY-Card device. • FooterMenuButtonNormal.png – The normal, non-selected state image for each of the
4 (MiY-ID) or 3 (MiY-Card) menu buttons at the bottom of the screen. • FooterMenuButtonSelected.png – The selected, button pressed state image for each of
the 4 (MiY-ID) or 3 (MiY-Card) menu buttons at the bottom of the screen. • MenuPanelBackground.png – The background image for all Admin menu panels that
are not icon selection menus, which use the SixIconBackground images. • InstructionBarBackground.png – The images for the instruction bar that is displayed
on data grids in the Admin menu. For the smaller MiY-Card device only. The instruction bar is displayed when initially on a data grid panel, such as the Security Panel, to show the *Back/#OK options on the smaller keypad.
All standard images are available in the MiY SDK installation folder under resources\images.
6.9 Animations
The SecurAPI.PACSDevice.GateAnimations object provides access to all standard GateApp
animations. All supported animations are customizable by simply replacing the appropriate
image file (PNG format) in the Images folder of your GateApp package. When creating your
GateApp package with the MiY Package Studio, create an Images folder and add your versions
of the following animations. Note: the animations are images in a storyboard format that is
loaded and looped through for the frame width of each image. All images have a frame width
of 120. You can make the storyboard longer (more frames), but you must use a width of 120
for each frame and a height of 200.
The supported animations are:
• MiY_Progress_120x200_24.png • MiYCard_Contact_120x200_24.png • MiYCard_Contactless_120x200_24.png • MiYCard_ContactlessContact_120x200_24.png • MiYCard_ContactlessContactPINFinger_120x200_24.png • MiYCard_ContactlessPINFinger_120x200_24.png • MiYCard_Finger_120x200_24.png • MiYCard_PIN_120x200_24.png • MiYCard_PINFinger_120x200_24.png
� 53
Proprietary
• MiYID_Contact_120x200_24.png • MiYID_Contactless_120x200_24.png • MiYID_ContactlessContact_120x200_24.png • MiYID_ContactlessContactPINFinger_120x200_24.png • MiYID_Finger_120x200_24.png • MiYID_PIN_120x200_24.png • MiYID_PINFinger_120x200_24.png
All standard animations are available in the MiY SDK installation folder under resources\images.
6.10 SSL
The SecurAPI.Net.SSL namespace provides methods for SSL socket communication that is based
on OpenSSL. This namespace provides SecurSocket and SslContext objects for establishing
secure communication with a custom protocol and also includes some higher level client/server
class for exchanging SecurProtocol formatted messages.
� 54
Proprietary
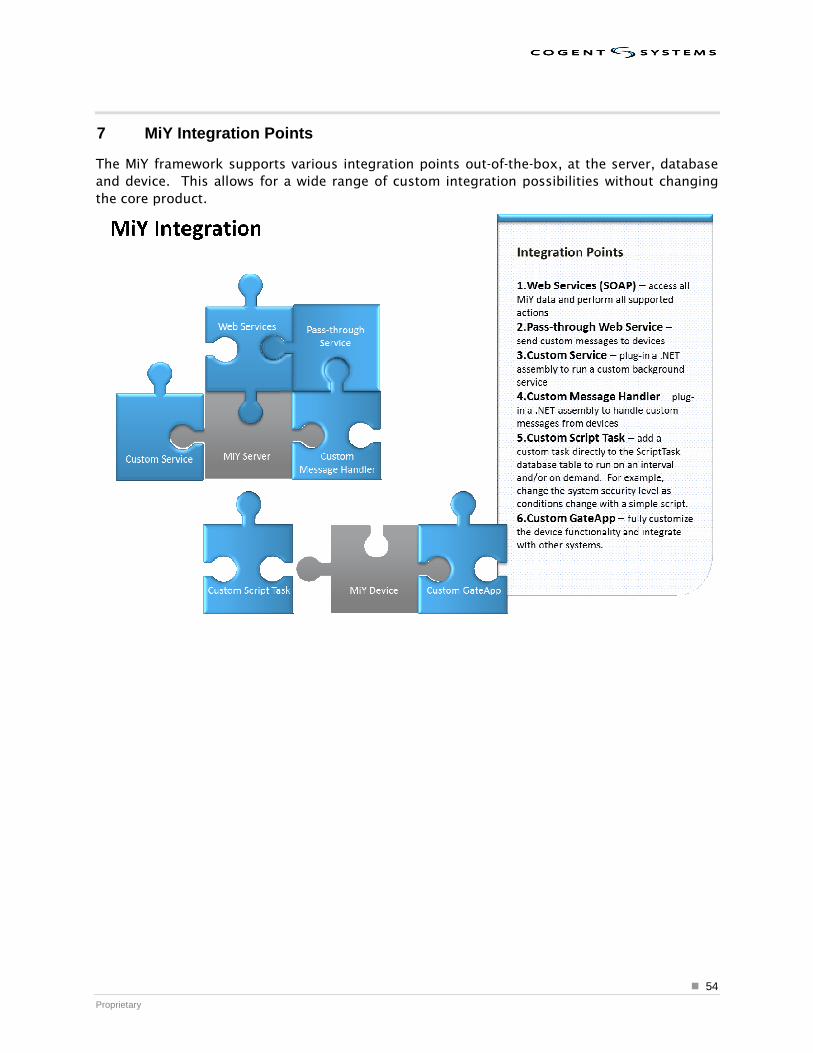
7 MiY Integration Points
The MiY framework supports various integration points out-of-the-box, at the server, database
and device. This allows for a wide range of custom integration possibilities without changing
the core product.
� 55
Proprietary
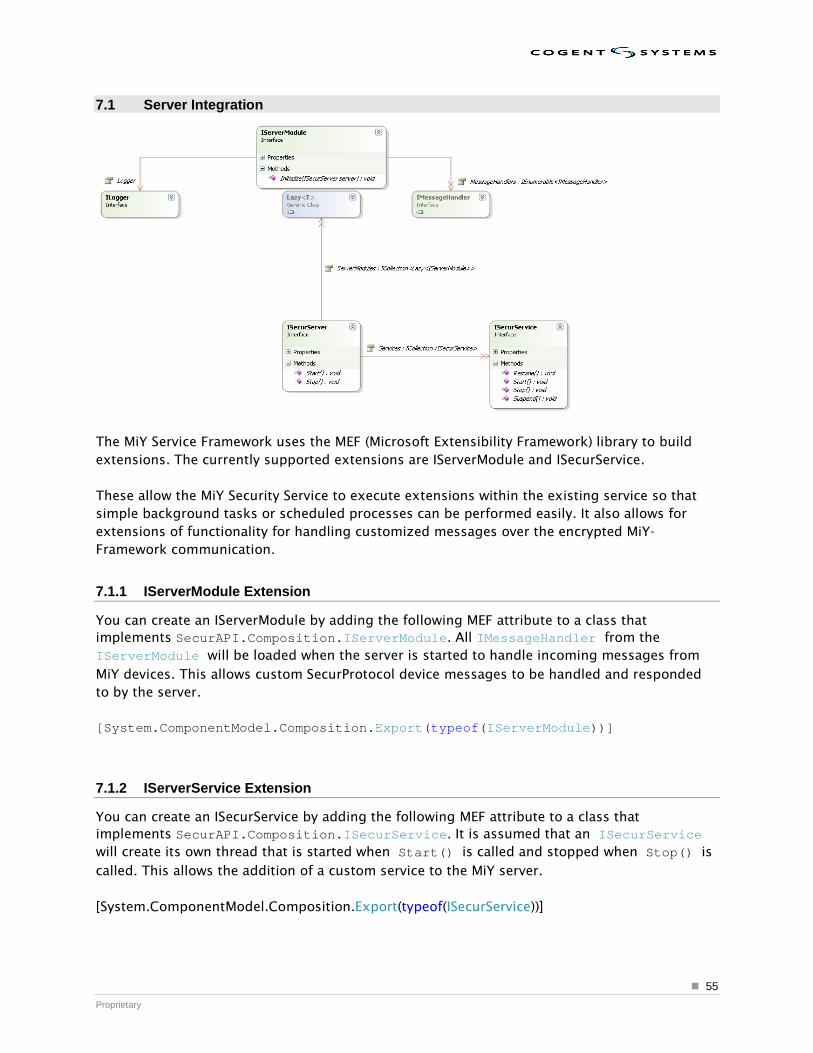
7.1 Server Integration
The MiY Service Framework uses the MEF (Microsoft Extensibility Framework) library to build
extensions. The currently supported extensions are IServerModule and ISecurService.
These allow the MiY Security Service to execute extensions within the existing service so that
simple background tasks or scheduled processes can be performed easily. It also allows for
extensions of functionality for handling customized messages over the encrypted MiY-
Framework communication.
7.1.1 IServerModule Extension
You can create an IServerModule by adding the following MEF attribute to a class that
implements SecurAPI.Composition.IServerModule. All IMessageHandler from the
IServerModule will be loaded when the server is started to handle incoming messages from
MiY devices. This allows custom SecurProtocol device messages to be handled and responded
to by the server.
[System.ComponentModel.Composition.Export(typeof(IServerModule))]
7.1.2 IServerService Extension
You can create an ISecurService by adding the following MEF attribute to a class that
implements SecurAPI.Composition.ISecurService. It is assumed that an ISecurService
will create its own thread that is started when Start() is called and stopped when Stop() is
called. This allows the addition of a custom service to the MiY server.
[System.ComponentModel.Composition.Export(typeof(ISecurService))]
� 56
Proprietary
7.2 ScriptTask Database Table
New to version 1.5 of the MiY framework is the addition of an MiY SecurSetup database
integration point called the ScriptTask table. The ScriptTask table allows for direct database
integration with the MiY server to execute custom tasks on a schedule. For example, this table
can be used to change the security level of the devices on demand.
As of version 1.5, the ScriptTask table only supports changing a system level property.
However, version 1.6 will allow for more custom tasks using the BOO scripting language. For
any additional needs, please contact 3M Cogent for support.
The dbo.ScriptTask table is defined as follows:
ScriptTaskId (PK, uniqueidentifier, not null) – Unique Task ID
ScriptName (nvarchar(255), not null) – Name of script
Interval (int, not null) – Interval (Seconds) to run the script if Repeat = 1
LastRun (datetime, null) – Time the script was last run by the server
StartTime (datetime, not null) – Time the script was started
CreatedOn (datetime, not null) – Time the script was created
Repeat (bit, not null) – Repeat flag (0 = Do Not Run, 1 = Run on Interval)
Script (nvarchar(max), not null) – The script code to execute in the BOO scripting language
Value (nvarchar(max), not null) – The value to set, as expected by the Script
StateId (FK, int, not null) – The State of the script task (0 = Disabled, 1 = Enabled, 2 =
ScriptError)
For example, the following script updates the verification mode of the GovGate device
application, where @Value is the mode of the GovGate application. The server will process the
script on the Interval and set LastRun to the UTC of the udpate and the StateId back to 0
(Success) or 2 (Error) based on the result.
UPDATE [dbo].[ScriptTask] SET [Repeat]=1, [Value]=@Value, [StateId]=1 WHERE [ScriptTaskId]='C7D556FE-5ACD-4e65-84E8-ED03C8FEC243'
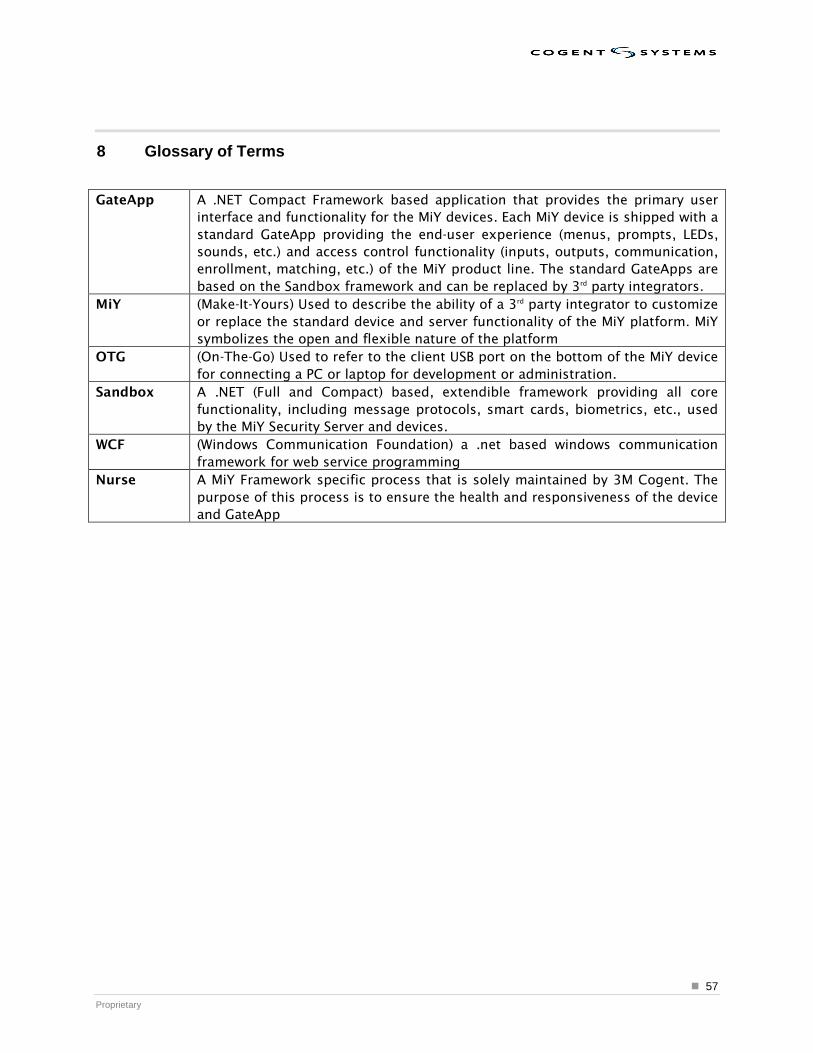
� 57
Proprietary
8 Glossary of Terms
GateApp A .NET Compact Framework based application that provides the primary user
interface and functionality for the MiY devices. Each MiY device is shipped with a
standard GateApp providing the end-user experience (menus, prompts, LEDs,
sounds, etc.) and access control functionality (inputs, outputs, communication,
enrollment, matching, etc.) of the MiY product line. The standard GateApps are
based on the Sandbox framework and can be replaced by 3rd party integrators.
MiY (Make-It-Yours) Used to describe the ability of a 3rd party integrator to customize
or replace the standard device and server functionality of the MiY platform. MiY
symbolizes the open and flexible nature of the platform
OTG (On-The-Go) Used to refer to the client USB port on the bottom of the MiY device
for connecting a PC or laptop for development or administration.
Sandbox A .NET (Full and Compact) based, extendible framework providing all core
functionality, including message protocols, smart cards, biometrics, etc., used
by the MiY Security Server and devices.
WCF (Windows Communication Foundation) a .net based windows communication
framework for web service programming
Nurse A MiY Framework specific process that is solely maintained by 3M Cogent. The
purpose of this process is to ensure the health and responsiveness of the device
and GateApp