Embed Size (px)
Citation preview
MITEL
COMMUNICATIONS DIRECTOR
INSTALLATION AND ADMINISTRATION GUIDEFOR INDUSTRY STANDARD SERVERS (ISS)RELEASE 6.0 SP2
ii
NOTICE
The information contained in this document is believed to be accurate in all respects but is not warranted by Mitel Networks™ Corporation (MITEL®). The information is subject to change without notice and should not be construed in any way as a commitment by Mitel or any of its affiliates or subsidiaries. Mitel and its affiliates and subsidiaries assume no responsibility for any errors or omissions in this document. Revisions of this document or new editions of it may be issued to incorporate such changes.
No part of this document can be reproduced or transmitted in any form or by any means - electronic or mechanical - for any purpose without written permission from Mitel Networks Corporation.
Trademarks
Mitel, SX-200, and SUPERSET are trademarks of Mitel Networks Corporation.
Adobe Acrobat Reader is a registered trademark of Adobe Systems Incorporated.
Window and Microsoft are trademarks of Microsoft Corporation.
Other product names mentioned in this document may be trademarks of their respective companies and are hereby acknowledged.
Mitel Communications DirectorInstallation and Administration Guide for Industry Standard Servers (ISS)
Release 6.0 SP2
®,™ Trademark of Mitel Networks Corporation© Copyright 2013, Mitel Networks Corporation
All rights reserved
Table of Contents
iii
Chapter 1: Introduction
About this Guide . . . . . . . . . . . . . . . . . . . . . . . . . . . . . . . . . . . . . . . . . . . . . . . . . . . . . . . . . . . . . . . 3
What’s New in this Release? . . . . . . . . . . . . . . . . . . . . . . . . . . . . . . . . . . . . . . . . . . . . . . . . . . . . . 3
MCD Release 6.0 SP2 . . . . . . . . . . . . . . . . . . . . . . . . . . . . . . . . . . . . . . . . . . . . . . . . . . . . . . . . . 3
MCD Release 6.0 SP1 . . . . . . . . . . . . . . . . . . . . . . . . . . . . . . . . . . . . . . . . . . . . . . . . . . . . . . . . . 3
MCD Release 6.0 . . . . . . . . . . . . . . . . . . . . . . . . . . . . . . . . . . . . . . . . . . . . . . . . . . . . . . . . . . . . 3
About Mitel Communications Director (MCD) for ISS. . . . . . . . . . . . . . . . . . . . . . . . . . . . . . . . . . . 4
Linux Operating Systems . . . . . . . . . . . . . . . . . . . . . . . . . . . . . . . . . . . . . . . . . . . . . . . . . . . . . . . 4
Mitel Standard Linux . . . . . . . . . . . . . . . . . . . . . . . . . . . . . . . . . . . . . . . . . . . . . . . . . . . . . . . . 4
Red Hat Enterprise Linux . . . . . . . . . . . . . . . . . . . . . . . . . . . . . . . . . . . . . . . . . . . . . . . . . . . . 4
About the Documentation Set . . . . . . . . . . . . . . . . . . . . . . . . . . . . . . . . . . . . . . . . . . . . . . . . . . . 5
Access Product Documentation . . . . . . . . . . . . . . . . . . . . . . . . . . . . . . . . . . . . . . . . . . . . . . . 5
View or Download a Document . . . . . . . . . . . . . . . . . . . . . . . . . . . . . . . . . . . . . . . . . . . . . . . 5
Applications Management Center (AMC) Licensing . . . . . . . . . . . . . . . . . . . . . . . . . . . . . . . . . . . . 6
About AMC Licensing . . . . . . . . . . . . . . . . . . . . . . . . . . . . . . . . . . . . . . . . . . . . . . . . . . . . . . . . . 6
Requesting a New AMC Account . . . . . . . . . . . . . . . . . . . . . . . . . . . . . . . . . . . . . . . . . . . . . . . . 7
Accessing your Account . . . . . . . . . . . . . . . . . . . . . . . . . . . . . . . . . . . . . . . . . . . . . . . . . . . . . . . 7
Chapter 2: Software Installation
Installation Overview. . . . . . . . . . . . . . . . . . . . . . . . . . . . . . . . . . . . . . . . . . . . . . . . . . . . . . . . . . . 11
MCD for ISS on Mitel Standard Linux. . . . . . . . . . . . . . . . . . . . . . . . . . . . . . . . . . . . . . . . . . . . . . 12
Before you Begin . . . . . . . . . . . . . . . . . . . . . . . . . . . . . . . . . . . . . . . . . . . . . . . . . . . . . . . . . . . . 12
Collect Site Information . . . . . . . . . . . . . . . . . . . . . . . . . . . . . . . . . . . . . . . . . . . . . . . . . . . . . . . 13
Install the MCD for ISS Software . . . . . . . . . . . . . . . . . . . . . . . . . . . . . . . . . . . . . . . . . . . . . . . . 13
Launch the MCD System Administration Tool . . . . . . . . . . . . . . . . . . . . . . . . . . . . . . . . . . . . . . 14
MCD for ISS on Red Hat Enterprise Linux . . . . . . . . . . . . . . . . . . . . . . . . . . . . . . . . . . . . . . . . . . 16
Preconditions . . . . . . . . . . . . . . . . . . . . . . . . . . . . . . . . . . . . . . . . . . . . . . . . . . . . . . . . . . . . . . . 16
Hardware Requirements . . . . . . . . . . . . . . . . . . . . . . . . . . . . . . . . . . . . . . . . . . . . . . . . . . . . 16
Software Requirements . . . . . . . . . . . . . . . . . . . . . . . . . . . . . . . . . . . . . . . . . . . . . . . . . . . . 16
Collect Site Information . . . . . . . . . . . . . . . . . . . . . . . . . . . . . . . . . . . . . . . . . . . . . . . . . . . . . . . 18
Stratus ftServer 2600/4500 Software Installation and Configuration . . . . . . . . . . . . . . . . . . . . . 18
Stratus ftServer 2700 Software Installation and Configuration . . . . . . . . . . . . . . . . . . . . . . . . . 22
RHEL Maintenance Commands . . . . . . . . . . . . . . . . . . . . . . . . . . . . . . . . . . . . . . . . . . . . . . . . 26
Installation and Administration Guide for Industry Standard Servers (ISS)
iv
Chapter 3: Maintenance and Troubleshooting
Hardware Maintenance. . . . . . . . . . . . . . . . . . . . . . . . . . . . . . . . . . . . . . . . . . . . . . . . . . . . . . . . . 31
Software Maintenance . . . . . . . . . . . . . . . . . . . . . . . . . . . . . . . . . . . . . . . . . . . . . . . . . . . . . . . . . 32
MCD for ISS on Mitel Standard Linux . . . . . . . . . . . . . . . . . . . . . . . . . . . . . . . . . . . . . . . . . . . .32
Upgrade the MCD for ISS Software . . . . . . . . . . . . . . . . . . . . . . . . . . . . . . . . . . . . . . . . . . .32
Back up the MCD-ISS Database . . . . . . . . . . . . . . . . . . . . . . . . . . . . . . . . . . . . . . . . . . . . .35
Restore the MCD-ISS Database . . . . . . . . . . . . . . . . . . . . . . . . . . . . . . . . . . . . . . . . . . . . . .36
Disaster Recovery . . . . . . . . . . . . . . . . . . . . . . . . . . . . . . . . . . . . . . . . . . . . . . . . . . . . . . . .37
MCD for ISS on Red Hat Enterprise Linux . . . . . . . . . . . . . . . . . . . . . . . . . . . . . . . . . . . . . . . . .39
Upgrade the MCD for ISS Software . . . . . . . . . . . . . . . . . . . . . . . . . . . . . . . . . . . . . . . . . . .39
Back up the Call Server Database . . . . . . . . . . . . . . . . . . . . . . . . . . . . . . . . . . . . . . . . . . . .39
Restore the Call Server Database . . . . . . . . . . . . . . . . . . . . . . . . . . . . . . . . . . . . . . . . . . . .40
Routine Maintenance Procedures . . . . . . . . . . . . . . . . . . . . . . . . . . . . . . . . . . . . . . . . . . . .42
Troubleshooting . . . . . . . . . . . . . . . . . . . . . . . . . . . . . . . . . . . . . . . . . . . . . . . . . . . . . . . . . . . . . . 44
Installation and Upgrade . . . . . . . . . . . . . . . . . . . . . . . . . . . . . . . . . . . . . . . . . . . . . . . . . . . . . .44

Table of Contents
v

Installation and Administration Guide for Industry Standard Servers (ISS)
vi

Chapter 1
Introduction

Installation and Administration Guide for Industry Standard Servers (ISS)
2
About this Guide
3
About this Guide
The Mitel Communications Director (MCD) Installation and Administration Guide is intended for Distributors and Resellers who are installing and configuring MCD software on an Industry Standard Server (ISS).
MCD introduces separate brands for the Mitel range of hardware and software-only solutions for the IP communications market. Mitel Communications Director (MCD) is the brand name of the call-processing software that runs on hardware platforms such as the 3300 ICP and industry standard servers. The 3300 ICP name continues as the brand for Mitel hardware platforms that run MCD.
This guide describes the installation, administration, maintenance, and troubleshooting of the MCD for ISS software on the Mitel Standard Linux (MSL) platform, and Red Hat Enterprise Linux (RHEL) on Stratus fault tolerant hardware.
What’s New in this Release?
MCD Release 6.0 SP2
MSL 10.0 is supported effective Release 6.0 SP2.
MCD Release 6.0 SP1
• Effective Release 6.0 SP1, MCD for ISS on RHEL can be installed on the Stratus ftServer 2700 hardware server.
• Embedded Voice Mail Application prompts are installed automatically with the MCD-ISS software on RHEL.
• Support for the Stratus fault tolerant hardware platforms to be a Designated License Man-ager (DLM).
MCD Release 6.0
• Integrated MCD/MSL Backup. During an MSL backup, the MCD is also backed up, and bundled into the MSL backup file.
• The number of addresses is reduced to one for MSL and one for MCD-ISS.
• When upgrading to Release 6.0, the Automatic Local Network Addition in the MSL Local Network Panels is configured according to the RFC 1918.
• Embedded Voice Mail Application prompts are included in MCD-ISS ISO as a blade.
• Secure Shell Settings are disabled when configuring Remote Access in MSL due to security reasons.
Installation and Administration Guide for Industry Standard Servers (ISS)
4
About Mitel Communications Director (MCD) for ISS
Mitel Communications Director (MCD) for ISS is an application package installed and delivered on a server offering PBX functionality. MCD for ISS is based on the 3300 ICP software, utilizing only its call control aspects. Essentially, MCD for ISS treats voice as an application independent of any hardware.
MCD for ISS has the following characteristics:
• a call-control only application, with no TDM or analog interfaces
• IP addressing provisioned during Linux installation
• Layer 2 switching and VLAN tagging performed by an external Layer 2 switch
• Media Server functionality such as conferencing, music on hold, and group paging provi-sioned as a software solution
Linux Operating Systems
The MCD for ISS is available for installation on two variants of the Linux operating system:
• Mitel Standard Linux
• Red Hat Enterprise Linux
Mitel Standard Linux
Mitel Standard Linux (MSL) is 32-bit operating system and server solution that provides a base for a suite of managed services and applications. MSL can be installed on a variety of hardware server platforms and, during installation, provision IP addressing. To protect data integrity, MSL can be configured to support disk mirroring (RAID 1).
When it is installed on MSL, MCD for ISS contains a software application blade that offers PBX functionality independent of any specialized hardware.
Red Hat Enterprise Linux
Red Hat Enterprise Linux (RHEL) is a 64-bit operating system targeted toward the commercial market. In the current release, RHEL must be installed on a Stratus® ftServer system. The Stratus system provides the following advantages:
• Redundant CPU, power and network connections.
• Continuous availability of local devices and applications.
• Continuous availability of remote suites hosted on analog controllers.
When it is installed on RHEL, MCD for ISS provides PBX functionality on the Stratus ftServer system.
About Mitel Communications Director (MCD) for ISS
5
About the Documentation Set
To access the documentation pages at Mitel OnLine, go to http://edocs.mitel.com. You require a Mitel Online username and password to access the documents on this web site.
Mitel Communications Director:
• Mitel Communications Director Installation and Administration Guide for ISS (this guide) provides installation, administration, maintenance, and troubleshooting instructions for the MCD software.
• Mitel Communications Director for 3300 ICP System Administration Tool Help provides administration and programming procedures for the call control aspects of the product.
• Engineering Guidelines for Industry Standard Servers (ISS) and Virtual Mitel Communica-tions Director (vMCD) provides information on hardware and available configurations.
Access Product Documentation
1. Go to www.edocs.mitel.com.
2. Select a documentation suite from one of the following drop-down menus:
- Communications Platforms
- Messaging
- Applications & Solutions
- Software Development
- End User Documents
3. Log in if asked to do so.
4. To access IP Phone documentation, select PDF Guides from the End User Documents drop-down menu at the top of the page.
View or Download a Document
To view a document:
• Click the document title.
To download a document:
• Right-click on the document title, and then click Save Target As.ORWhen viewing a PDF document, click the disk icon.
Note: For Technical Bulletins (TB) and Release Notes (RN), click Knowledge Base in the Other Resources window in the left-side navigation pane.
Installation and Administration Guide for Industry Standard Servers (ISS)
6
Applications Management Center (AMC) Licensing
The Mitel Applications Management Center (AMC) is an online service accessed through the web that provides licensing, monitoring, management, and a variety of other services for installations of software applications.
About AMC Licensing
The AMC allows licensing keys to be automatically created at all times (24 hours a day, 7 days a week) through remote license keys generation.
The AMC is also the procurement and provisioning interface for AMC-delivered products and services. As a reseller of Mitel products, you receive a unique licensing account on the AMC. By logging in to the AMC with the username and password you are given when you obtain your account, you can view a list of your AMC-enabled products, check their status, and add services to any of them.
When you place a new order for products with the Mitel Customer Care Center, the order information is entered into the AMC system. The AMC places the purchased licenses into your licensing account for use in creating an application record. You must:
1. Install the MCD application.
2. Log in to the AMC.
3. Create the application record.
4. Assign purchased products, features, and options to that application record.
5. Activate the customer's MSL or RHEL operating system.
MCD for ISS is delivered in a software only format for field installation on industry standard platforms. The software can be obtained in several methods:
• Download from the AMC (MSL only) — The MCD blade can be downloaded from the AMC through the regular MSL software blade download mechanism.
• Download from Mitel OnLineSoftware (MSL or RHEL) — The MCD ISO image can be downloaded from Mitel OnLine, burned to a CD-ROM or stored on a network drive. The software can then be installed from either location onto the server.
The MCD for ISS application uses the AMC to obtain licensing information, which is required for installing main base software, for installing upgrade software (language packs excluded), and for installing system option upgrade software (language packs excluded). To complete the installation from the AMC, you must install the operating system and register it with the AMC online, and then install and upgrade MCD for ISS and all your purchased options.
When the installation of the MSL or RHEL operating system software is complete, the system generates a unique Hardware ID that includes the MAC address of the server. When you connect to the AMC over the Internet, the system uses the Hardware ID and the Application Record ID to communicate with the AMC to obtain licensing information.
Applications Management Center (AMC) Licensing
7
For additional information about the Mitel Applications Management Center (AMC), refer to the AMC Web site and the AMC online Help (https://www.mitel-amc.com/).
Requesting a New AMC Account
To request an AMC account, send an e-mail containing the following information to [email protected]:
• Name of your certified Technician
• Full company name
• Company mailing address
• Phone 1/Phone2
• Fax number
• Admin e-mail (address of the person who should receive notification of service expiry dates)
• Tech e-mail (address of the person who should receive notification of update releases and other technical notices)
• Company URL (if any)
• Your Mitel SAP account number
• Specify if you would like your user ID and password delivered to you by fax, phone, or both (for security reasons user IDs and passwords are not sent by e-mail).
Accessing your Account
To access your account for the first time:
1. Go to the Mitel web site (http://www.mitel.com) and log in to your Mitel OnLine account.
2. In the grey menu bar, point to Online Tools and then click AMC.
3. Sign in with your unique AMC ID and password to establish your "single sign on". On subsequent visits, you access your AMC account directly after signing in to Mitel OnLine.
For information about using the AMC, click the online Help link in your AMC account.
Note: Please allow two business days for your AMC account to be created.

Installation and Administration Guide for Industry Standard Servers (ISS)
8
Chapter 2
Software Installation

Installation and Administration Guide for Industry Standard Servers (ISS)
10
Installation Overview
11
Installation Overview
The MCD for ISS is available for installation on two variants of the Linux operating system. For details, see:
• “MCD for ISS on Mitel Standard Linux” on page 12
• “MCD for ISS on Red Hat Enterprise Linux” on page 16
Installation and Administration Guide for Industry Standard Servers (ISS)
12
MCD for ISS on Mitel Standard Linux
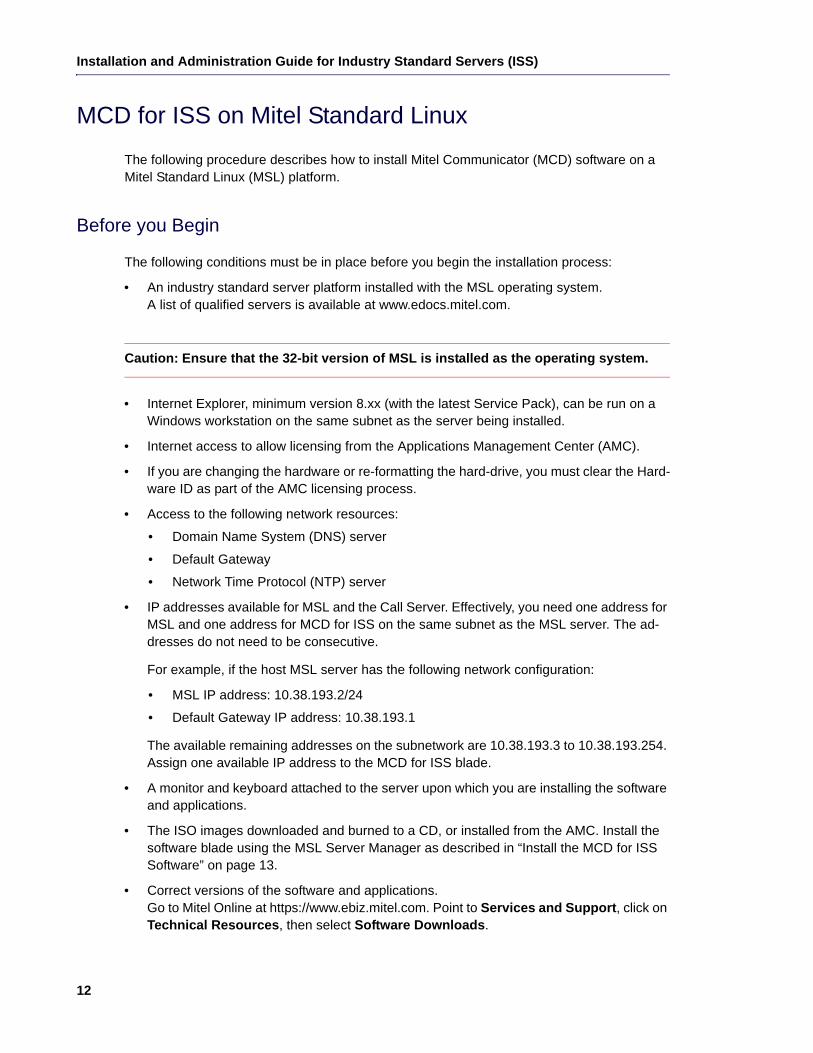
The following procedure describes how to install Mitel Communicator (MCD) software on a Mitel Standard Linux (MSL) platform.
Before you Begin
The following conditions must be in place before you begin the installation process:
• An industry standard server platform installed with the MSL operating system. A list of qualified servers is available at www.edocs.mitel.com.
Caution: Ensure that the 32-bit version of MSL is installed as the operating system.
• Internet Explorer, minimum version 8.xx (with the latest Service Pack), can be run on a Windows workstation on the same subnet as the server being installed.
• Internet access to allow licensing from the Applications Management Center (AMC).
• If you are changing the hardware or re-formatting the hard-drive, you must clear the Hard-ware ID as part of the AMC licensing process.
• Access to the following network resources:
• Domain Name System (DNS) server
• Default Gateway
• Network Time Protocol (NTP) server
• IP addresses available for MSL and the Call Server. Effectively, you need one address for MSL and one address for MCD for ISS on the same subnet as the MSL server. The ad-dresses do not need to be consecutive.
For example, if the host MSL server has the following network configuration:
• MSL IP address: 10.38.193.2/24
• Default Gateway IP address: 10.38.193.1
The available remaining addresses on the subnetwork are 10.38.193.3 to 10.38.193.254. Assign one available IP address to the MCD for ISS blade.
• A monitor and keyboard attached to the server upon which you are installing the software and applications.
• The ISO images downloaded and burned to a CD, or installed from the AMC. Install the software blade using the MSL Server Manager as described in “Install the MCD for ISS Software” on page 13.
• Correct versions of the software and applications.Go to Mitel Online at https://www.ebiz.mitel.com. Point to Services and Support, click on Technical Resources, then select Software Downloads.
MCD for ISS on Mitel Standard Linux
13
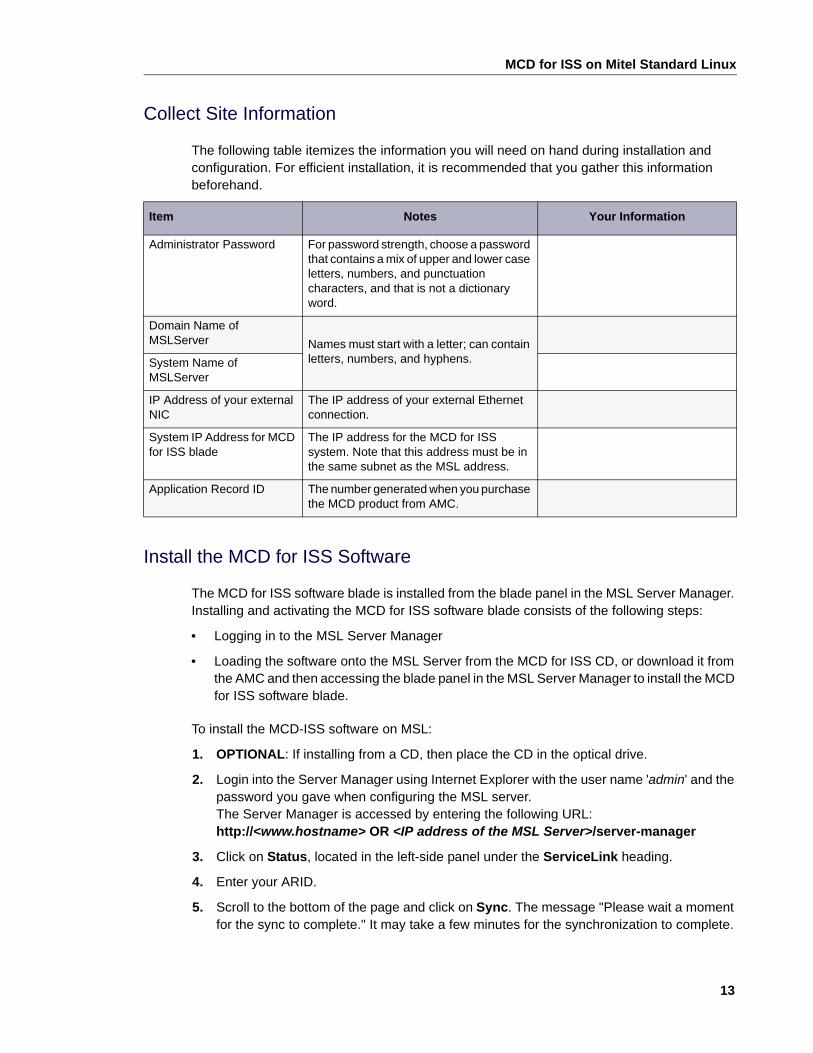
Collect Site Information
The following table itemizes the information you will need on hand during installation and configuration. For efficient installation, it is recommended that you gather this information beforehand.
Install the MCD for ISS Software
The MCD for ISS software blade is installed from the blade panel in the MSL Server Manager. Installing and activating the MCD for ISS software blade consists of the following steps:
• Logging in to the MSL Server Manager
• Loading the software onto the MSL Server from the MCD for ISS CD, or download it from the AMC and then accessing the blade panel in the MSL Server Manager to install the MCD for ISS software blade.
To install the MCD-ISS software on MSL:
1. OPTIONAL: If installing from a CD, then place the CD in the optical drive.
2. Login into the Server Manager using Internet Explorer with the user name 'admin' and the password you gave when configuring the MSL server.The Server Manager is accessed by entering the following URL:http://<www.hostname> OR <IP address of the MSL Server>/server-manager
3. Click on Status, located in the left-side panel under the ServiceLink heading.
4. Enter your ARID.
5. Scroll to the bottom of the page and click on Sync. The message "Please wait a moment for the sync to complete." It may take a few minutes for the synchronization to complete.
Item Notes Your Information
Administrator Password For password strength, choose a password that contains a mix of upper and lower case letters, numbers, and punctuation characters, and that is not a dictionary word.
Domain Name of MSLServer Names must start with a letter; can contain
letters, numbers, and hyphens.System Name of MSLServer
IP Address of your external NIC
The IP address of your external Ethernet connection.
System IP Address for MCD for ISS blade
The IP address for the MCD for ISS system. Note that this address must be in the same subnet as the MSL address.
Application Record ID The number generated when you purchase the MCD product from AMC.
Installation and Administration Guide for Industry Standard Servers (ISS)
14
6. Click on Blades, located in the left-side panel under the ServiceLink heading.
7. Click Update List to ensure an up-to-date listing of software blades.
8. Click the Install link, located beside the MCD for ISS blade name.It may take a few minutes for the software to install.
9. Click the Install link located beside the EMEM Prompts blade name.It may take a few minutes for the software to install.
10. When the installation is complete, click on Mitel Communications Director, located in the left-side panel under the Applications heading.
11. On the next screen click Modify.
12. Configure the System IP address for the MCD for ISS blade. The IP address should be in the MSL network subnet.
13. Click Save.
14. Test the installation:
a. log into the MCD for ISS System Administration Tool
b. navigate to the License and Options (LOS) form
c. check that the license information is properly displayed
Launch the MCD System Administration Tool
The MCD System Administration Tool provides a web-based interface that trained technicians use to perform the following functions:
• System Configuration
• System Administration
• Maintenance and Diagnostics
• Accessing programming and configuration forms
To launch the MCD System Administration Tool:
1. Browse to the System IP address for the MCD for ISS blade using Internet Explorer.
Note: If the MSL IP address falls under one of the RFC 1918 private local networks, the corresponding network is added in Local Networks. For example, if the MSL IP address is 10.45.102.222, then in the Local Networks you will see 10.0.0.0.
1. Click Local Networks, located in the left-side panel under the Security heading.
2. In the right-side main window, click Add Network.
3. In the Network Address field, enter the IP address of the network to designate as “local”.
4. In the Subnet Mask field, enter the mask to apply to the Network Address.
5. In the Router field, enter the IP address of the router you will use to access the newly-added network.
6. Click Add.
MCD for ISS on Mitel Standard Linux
15
2. Enter the username 'system' and the password 'password'.
3. Click on System Administration Tool.
For more information about the MCD System Administration Tool, see the Mitel Communications Director for 3300 ICP System Administration Tool Help.
Note: This is the IP address you entered in Step 12 of "Install the MCD for ISS Software" above, and gives you access to the MCD Embedded System Manager (ESM).
Note: You will be prompted to choose between using the Telephone Directory synchronization via OPS Manager or via System Data Synchronization (SDS).
Note: If logging in for the first time, you will be prompted to enter a new password. Do not forget this new password!
Installation and Administration Guide for Industry Standard Servers (ISS)
16
MCD for ISS on Red Hat Enterprise Linux
The following procedure describes how to install Mitel Communicator (MCD) software on a Red Hat Enterprise Linux (RHEL) platform.
Preconditions
The following hardware and software requirements must be met before installing MCD for ISS.
Hardware Requirements
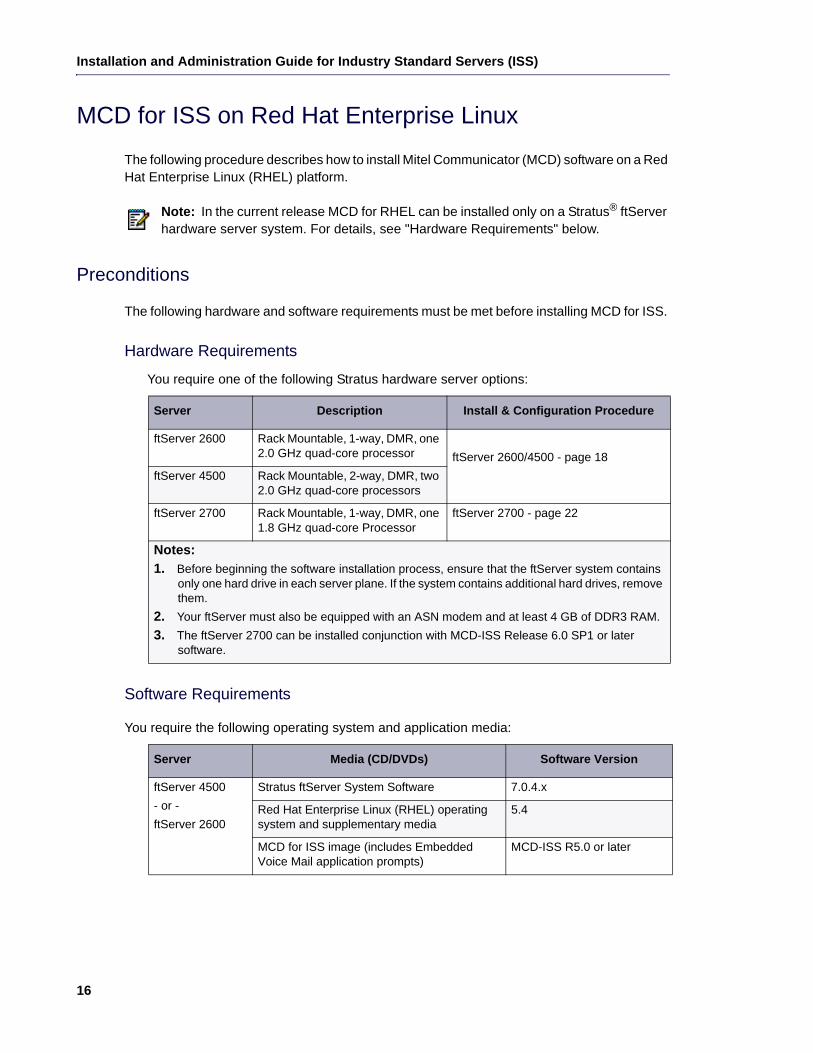
You require one of the following Stratus hardware server options:
Software Requirements
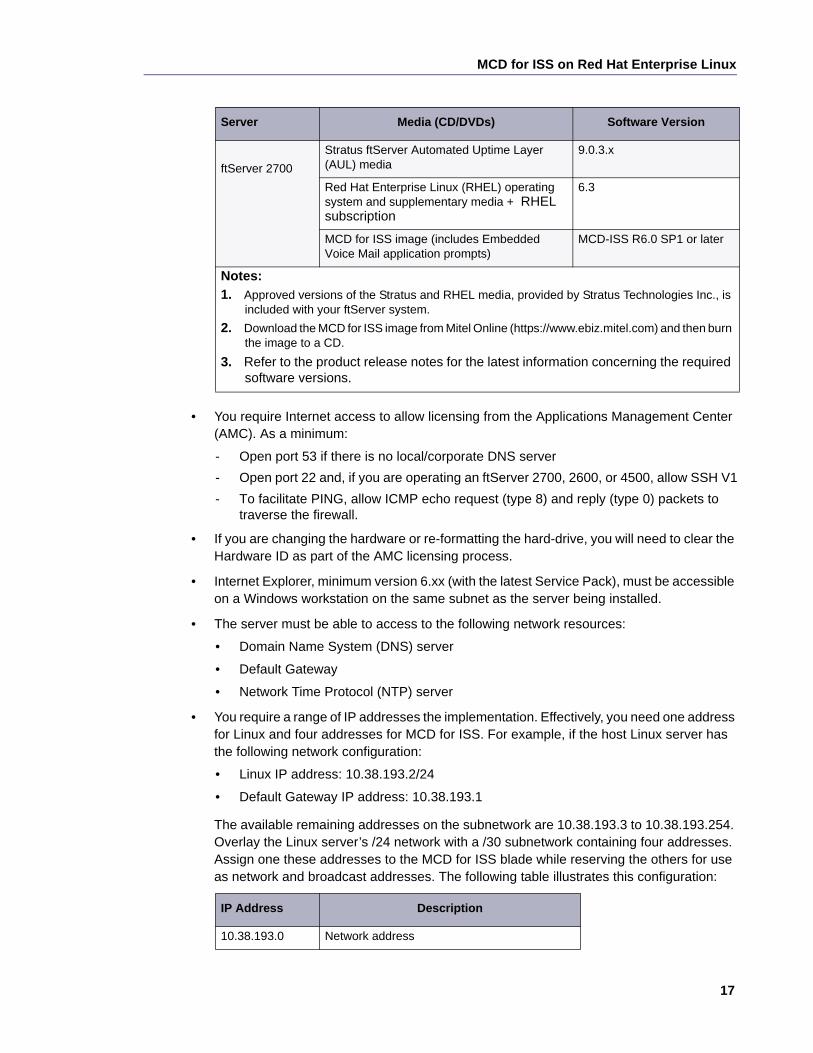
You require the following operating system and application media:
Note: In the current release MCD for RHEL can be installed only on a Stratus® ftServer hardware server system. For details, see "Hardware Requirements" below.
Server Description Install & Configuration Procedure
ftServer 2600 Rack Mountable, 1-way, DMR, one 2.0 GHz quad-core processor ftServer 2600/4500 - page 18
ftServer 4500 Rack Mountable, 2-way, DMR, two 2.0 GHz quad-core processors
ftServer 2700 Rack Mountable, 1-way, DMR, one 1.8 GHz quad-core Processor
ftServer 2700 - page 22
Notes:
1. Before beginning the software installation process, ensure that the ftServer system contains only one hard drive in each server plane. If the system contains additional hard drives, remove them.
2. Your ftServer must also be equipped with an ASN modem and at least 4 GB of DDR3 RAM.
3. The ftServer 2700 can be installed conjunction with MCD-ISS Release 6.0 SP1 or later software.
Server Media (CD/DVDs) Software Version
ftServer 4500
- or -
ftServer 2600
Stratus ftServer System Software 7.0.4.x
Red Hat Enterprise Linux (RHEL) operating system and supplementary media
5.4
MCD for ISS image (includes Embedded Voice Mail application prompts)
MCD-ISS R5.0 or later
MCD for ISS on Red Hat Enterprise Linux
17
• You require Internet access to allow licensing from the Applications Management Center (AMC). As a minimum:
- Open port 53 if there is no local/corporate DNS server
- Open port 22 and, if you are operating an ftServer 2700, 2600, or 4500, allow SSH V1
- To facilitate PING, allow ICMP echo request (type 8) and reply (type 0) packets to traverse the firewall.
• If you are changing the hardware or re-formatting the hard-drive, you will need to clear the Hardware ID as part of the AMC licensing process.
• Internet Explorer, minimum version 6.xx (with the latest Service Pack), must be accessible on a Windows workstation on the same subnet as the server being installed.
• The server must be able to access to the following network resources:
• Domain Name System (DNS) server
• Default Gateway
• Network Time Protocol (NTP) server
• You require a range of IP addresses the implementation. Effectively, you need one address for Linux and four addresses for MCD for ISS. For example, if the host Linux server has the following network configuration:
• Linux IP address: 10.38.193.2/24
• Default Gateway IP address: 10.38.193.1
The available remaining addresses on the subnetwork are 10.38.193.3 to 10.38.193.254. Overlay the Linux server’s /24 network with a /30 subnetwork containing four addresses. Assign one these addresses to the MCD for ISS blade while reserving the others for use as network and broadcast addresses. The following table illustrates this configuration:
ftServer 2700
Stratus ftServer Automated Uptime Layer (AUL) media
9.0.3.x
Red Hat Enterprise Linux (RHEL) operating system and supplementary media + RHEL subscription
6.3
MCD for ISS image (includes Embedded Voice Mail application prompts)
MCD-ISS R6.0 SP1 or later
Notes:
1. Approved versions of the Stratus and RHEL media, provided by Stratus Technologies Inc., is included with your ftServer system.
2. Download the MCD for ISS image from Mitel Online (https://www.ebiz.mitel.com) and then burn the image to a CD.
3. Refer to the product release notes for the latest information concerning the required software versions.
IP Address Description
10.38.193.0 Network address
Server Media (CD/DVDs) Software Version

Installation and Administration Guide for Industry Standard Servers (ISS)
18
• You require a monitor and keyboard attached to the Stratus server.
Collect Site Information
The following table itemizes the information you will need on hand during installation and configuration. For efficient installation, it is recommended that you gather this information beforehand.
Stratus ftServer 2600/4500 Software Installation and Configuration
Employ the following procedures to install MCD for ISS on either of the following Stratus hardware server platforms:
• ftServer 4500 Rack Mountable, 2-way, DMR, two 2.0 GHz quad-core processors
• ftServer 2600 Rack Mountable, 1-way, DMR, one 2.0 GHz quad-core processor
10.38.193.1 Default Gateway (router) address
10.38.193.2 Linux server IP address
10.38.193.3 Spare
10.38.193.4 MCD subnetwork address
10.38.193.5 MCD system IP address
10.38.193.6 Reserved
10.38.193.7 MCD subnetwork broadcast address
Item Notes Your Information
Administrator Password For password strength, choose a password that contains a mix of upper and lower case letters, numbers, and punctuation characters, and that is not a dictionary word.
Linux Network information • Linux domain
• Linux server IP address
• Default Gateway and subnet mask
MCD for ISS blade system IP Address
The IP address for the MCD for ISS system, which falls within a /30 subnetwork.
Network Time Protocol server address
The IP address or FQDN of the NTP server.
Application Record ID The number generated when you purchase the MCD product from AMC.
IP Address Description
MCD for ISS on Red Hat Enterprise Linux
19
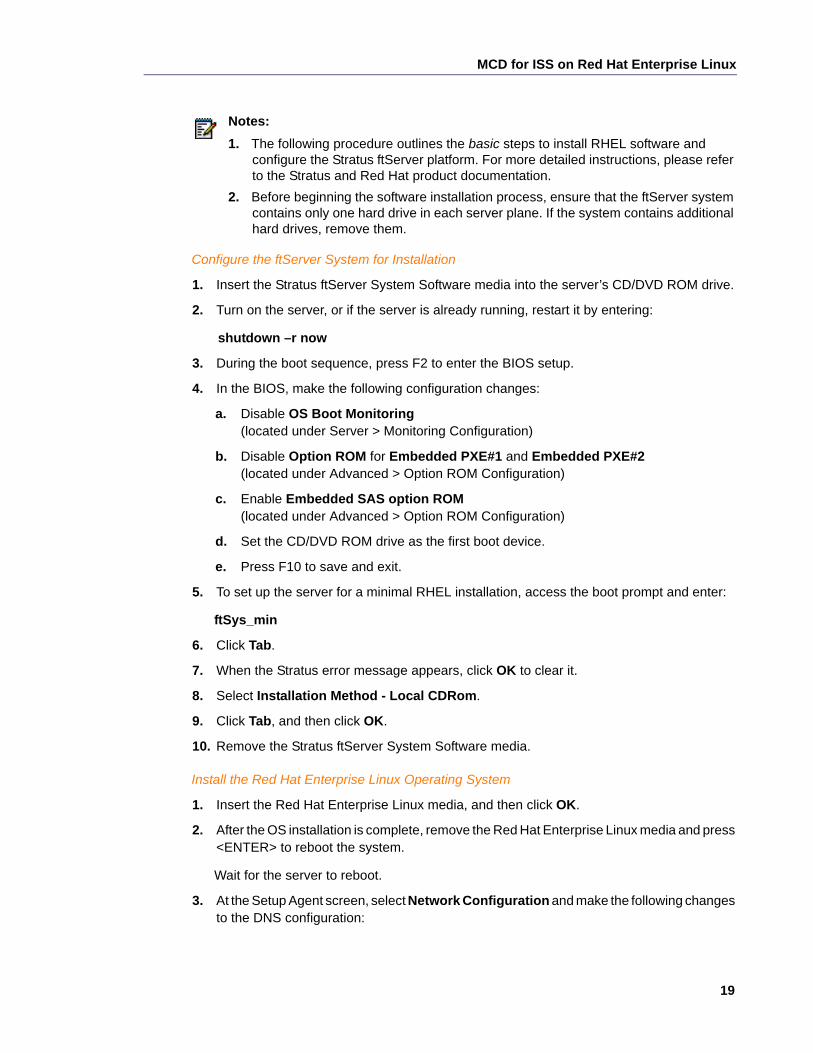
Configure the ftServer System for Installation
1. Insert the Stratus ftServer System Software media into the server’s CD/DVD ROM drive.
2. Turn on the server, or if the server is already running, restart it by entering:
shutdown –r now
3. During the boot sequence, press F2 to enter the BIOS setup.
4. In the BIOS, make the following configuration changes:
a. Disable OS Boot Monitoring (located under Server > Monitoring Configuration)
b. Disable Option ROM for Embedded PXE#1 and Embedded PXE#2 (located under Advanced > Option ROM Configuration)
c. Enable Embedded SAS option ROM (located under Advanced > Option ROM Configuration)
d. Set the CD/DVD ROM drive as the first boot device.
e. Press F10 to save and exit.
5. To set up the server for a minimal RHEL installation, access the boot prompt and enter:
ftSys_min
6. Click Tab.
7. When the Stratus error message appears, click OK to clear it.
8. Select Installation Method - Local CDRom.
9. Click Tab, and then click OK.
10. Remove the Stratus ftServer System Software media.
Install the Red Hat Enterprise Linux Operating System
1. Insert the Red Hat Enterprise Linux media, and then click OK.
2. After the OS installation is complete, remove the Red Hat Enterprise Linux media and press <ENTER> to reboot the system.
Wait for the server to reboot.
3. At the Setup Agent screen, select Network Configuration and make the following changes to the DNS configuration:
Notes:
1. The following procedure outlines the basic steps to install RHEL software and configure the Stratus ftServer platform. For more detailed instructions, please refer to the Stratus and Red Hat product documentation.
2. Before beginning the software installation process, ensure that the ftServer system contains only one hard drive in each server plane. If the system contains additional hard drives, remove them.
Installation and Administration Guide for Industry Standard Servers (ISS)
20
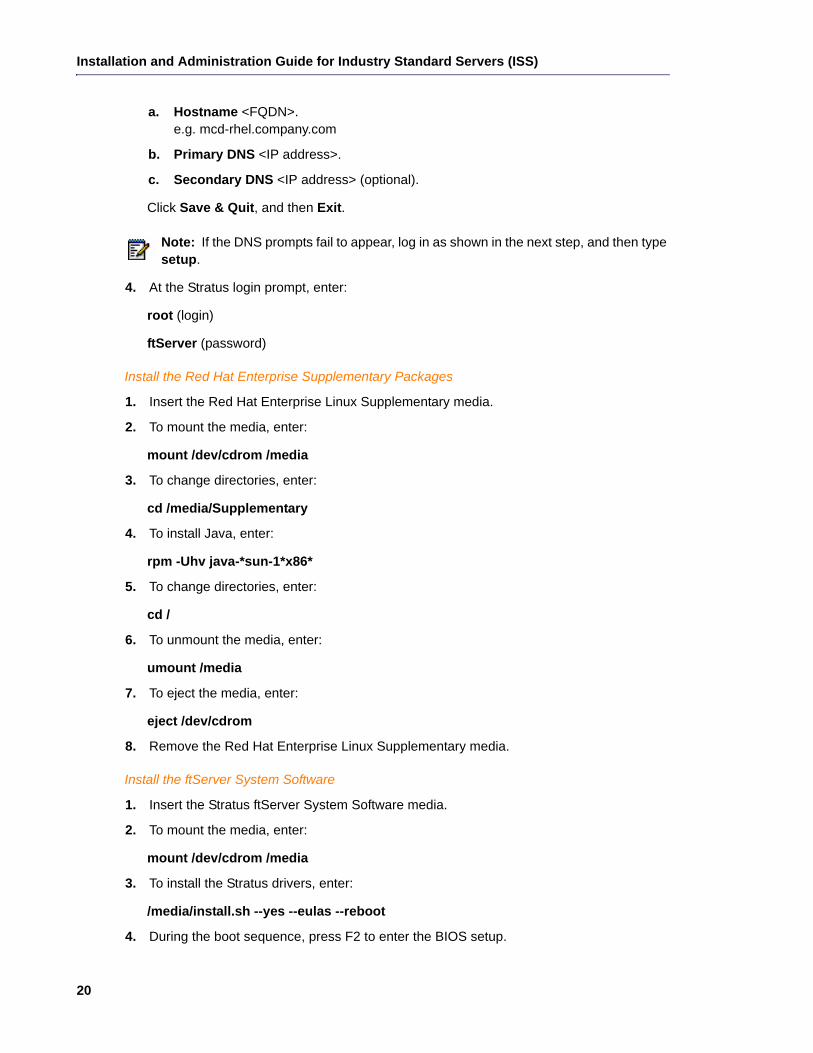
a. Hostname <FQDN>. e.g. mcd-rhel.company.com
b. Primary DNS <IP address>.
c. Secondary DNS <IP address> (optional).
Click Save & Quit, and then Exit.
4. At the Stratus login prompt, enter:
root (login)
ftServer (password)
Install the Red Hat Enterprise Supplementary Packages
1. Insert the Red Hat Enterprise Linux Supplementary media.
2. To mount the media, enter:
mount /dev/cdrom /media
3. To change directories, enter:
cd /media/Supplementary
4. To install Java, enter:
rpm -Uhv java-*sun-1*x86*
5. To change directories, enter:
cd /
6. To unmount the media, enter:
umount /media
7. To eject the media, enter:
eject /dev/cdrom
8. Remove the Red Hat Enterprise Linux Supplementary media.
Install the ftServer System Software
1. Insert the Stratus ftServer System Software media.
2. To mount the media, enter:
mount /dev/cdrom /media
3. To install the Stratus drivers, enter:
/media/install.sh --yes --eulas --reboot
4. During the boot sequence, press F2 to enter the BIOS setup.
Note: If the DNS prompts fail to appear, log in as shown in the next step, and then type setup.
MCD for ISS on Red Hat Enterprise Linux
21
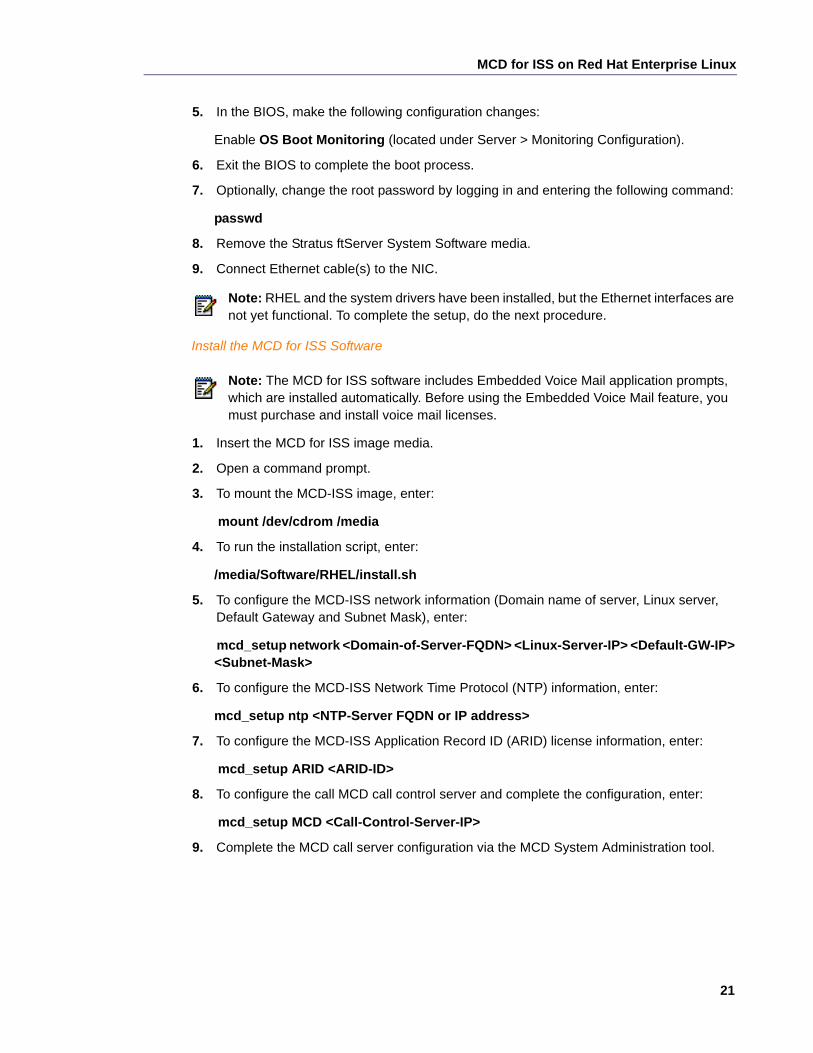
5. In the BIOS, make the following configuration changes:
Enable OS Boot Monitoring (located under Server > Monitoring Configuration).
6. Exit the BIOS to complete the boot process.
7. Optionally, change the root password by logging in and entering the following command:
passwd
8. Remove the Stratus ftServer System Software media.
9. Connect Ethernet cable(s) to the NIC.
Install the MCD for ISS Software
1. Insert the MCD for ISS image media.
2. Open a command prompt.
3. To mount the MCD-ISS image, enter:
mount /dev/cdrom /media
4. To run the installation script, enter:
/media/Software/RHEL/install.sh
5. To configure the MCD-ISS network information (Domain name of server, Linux server, Default Gateway and Subnet Mask), enter:
mcd_setup network <Domain-of-Server-FQDN> <Linux-Server-IP> <Default-GW-IP> <Subnet-Mask>
6. To configure the MCD-ISS Network Time Protocol (NTP) information, enter:
mcd_setup ntp <NTP-Server FQDN or IP address>
7. To configure the MCD-ISS Application Record ID (ARID) license information, enter:
mcd_setup ARID <ARID-ID>
8. To configure the call MCD call control server and complete the configuration, enter:
mcd_setup MCD <Call-Control-Server-IP>
9. Complete the MCD call server configuration via the MCD System Administration tool.
Note: RHEL and the system drivers have been installed, but the Ethernet interfaces are not yet functional. To complete the setup, do the next procedure.
Note: The MCD for ISS software includes Embedded Voice Mail application prompts, which are installed automatically. Before using the Embedded Voice Mail feature, you must purchase and install voice mail licenses.
Installation and Administration Guide for Industry Standard Servers (ISS)
22
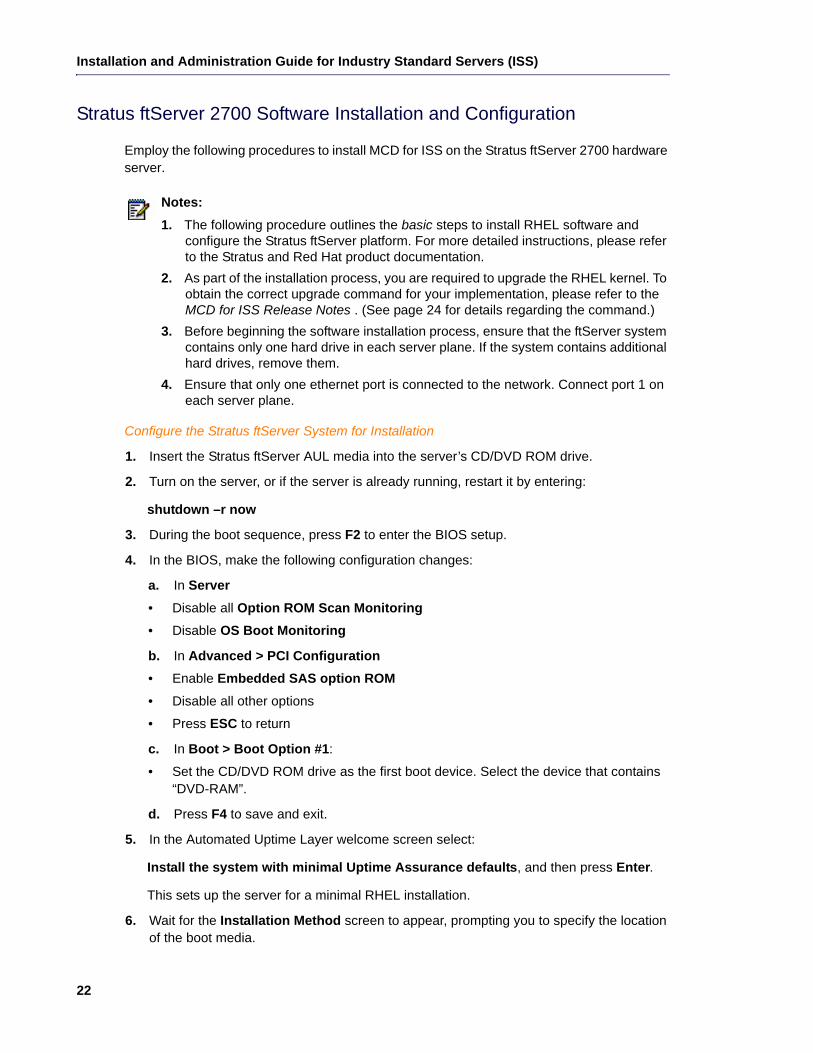
Stratus ftServer 2700 Software Installation and Configuration
Employ the following procedures to install MCD for ISS on the Stratus ftServer 2700 hardware server.
Configure the Stratus ftServer System for Installation
1. Insert the Stratus ftServer AUL media into the server’s CD/DVD ROM drive.
2. Turn on the server, or if the server is already running, restart it by entering:
shutdown –r now
3. During the boot sequence, press F2 to enter the BIOS setup.
4. In the BIOS, make the following configuration changes:
a. In Server
• Disable all Option ROM Scan Monitoring
• Disable OS Boot Monitoring
b. In Advanced > PCI Configuration
• Enable Embedded SAS option ROM
• Disable all other options
• Press ESC to return
c. In Boot > Boot Option #1:
• Set the CD/DVD ROM drive as the first boot device. Select the device that contains “DVD-RAM”.
d. Press F4 to save and exit.
5. In the Automated Uptime Layer welcome screen select:
Install the system with minimal Uptime Assurance defaults, and then press Enter.
This sets up the server for a minimal RHEL installation.
6. Wait for the Installation Method screen to appear, prompting you to specify the location of the boot media.
Notes:
1. The following procedure outlines the basic steps to install RHEL software and configure the Stratus ftServer platform. For more detailed instructions, please refer to the Stratus and Red Hat product documentation.
2. As part of the installation process, you are required to upgrade the RHEL kernel. To obtain the correct upgrade command for your implementation, please refer to the MCD for ISS Release Notes . (See page 24 for details regarding the command.)
3. Before beginning the software installation process, ensure that the ftServer system contains only one hard drive in each server plane. If the system contains additional hard drives, remove them.
4. Ensure that only one ethernet port is connected to the network. Connect port 1 on each server plane.
MCD for ISS on Red Hat Enterprise Linux
23
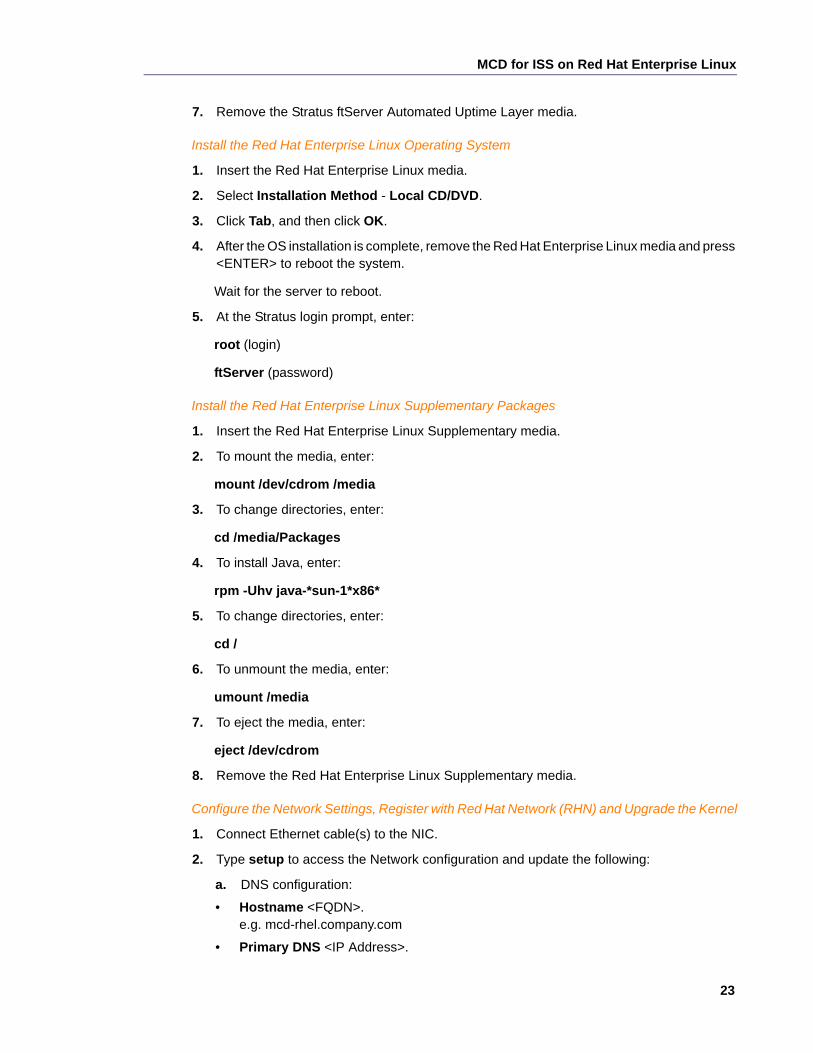
7. Remove the Stratus ftServer Automated Uptime Layer media.
Install the Red Hat Enterprise Linux Operating System
1. Insert the Red Hat Enterprise Linux media.
2. Select Installation Method - Local CD/DVD.
3. Click Tab, and then click OK.
4. After the OS installation is complete, remove the Red Hat Enterprise Linux media and press <ENTER> to reboot the system.
Wait for the server to reboot.
5. At the Stratus login prompt, enter:
root (login)
ftServer (password)
Install the Red Hat Enterprise Linux Supplementary Packages
1. Insert the Red Hat Enterprise Linux Supplementary media.
2. To mount the media, enter:
mount /dev/cdrom /media
3. To change directories, enter:
cd /media/Packages
4. To install Java, enter:
rpm -Uhv java-*sun-1*x86*
5. To change directories, enter:
cd /
6. To unmount the media, enter:
umount /media
7. To eject the media, enter:
eject /dev/cdrom
8. Remove the Red Hat Enterprise Linux Supplementary media.
Configure the Network Settings, Register with Red Hat Network (RHN) and Upgrade the Kernel
1. Connect Ethernet cable(s) to the NIC.
2. Type setup to access the Network configuration and update the following:
a. DNS configuration:
• Hostname <FQDN>.e.g. mcd-rhel.company.com
• Primary DNS <IP Address>.

Installation and Administration Guide for Industry Standard Servers (ISS)
24
• Secondary DNS (optional).
• Click OK
b. Device configuration (to configure Linux host IP address):
• Select eth0
• Deselect Use DHCP
• Program the Static IP, Netmask and Default gateway IP
• Click OK
• Click Save
c. Click Save & Quit
d. Click Quit
3. At the command prompt, enable eth0 device:
ifup eth0
4. Register your system with Red Hat Network:
a. Type setup to access the RHN Register.
b. In RHN Register, click Next to proceed.
c. Enter your RHN login/password and click Next.
d. Follow the instructions, and then click Finish when prompted.
e. Click Quit
5. To upgrade the RHEL kernel, enter:
yum install kernel-2.6.32-279.19.1.el6 kernel-devel-2.6.32-279.19.1.el6 kernel-firmware-2.6.32-279.19.1.el6
Install ftServer Automated Uptime Layer Software
1. Insert the Stratus ftServer AUL media.
2. To mount the media, enter:
mount /dev/cdrom /media
3. To install the Stratus drivers, enter:
/media/install.sh --yes --eulas --reboot
4. During the boot sequence, press F2 to enter the BIOS setup.
5. In the BIOS, make the following configuration changes:
Enable OS Boot Monitoring (located under Server).
6. Exit the BIOS to complete the boot process.
Note: The above-noted command is an example only. To obtain the correct command for your implementation, refer to the product release notes. Entering an invalid RHEL upgrade command may cause your implementation to fail.
MCD for ISS on Red Hat Enterprise Linux
25
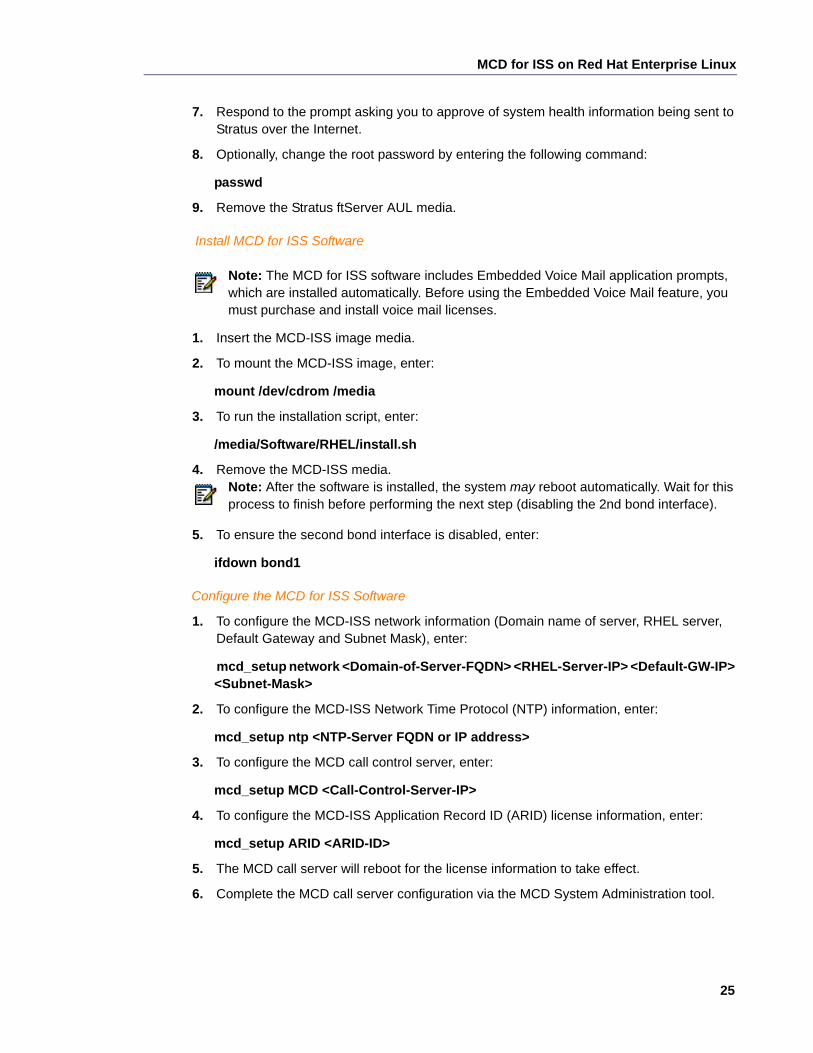
7. Respond to the prompt asking you to approve of system health information being sent to Stratus over the Internet.
8. Optionally, change the root password by entering the following command:
passwd
9. Remove the Stratus ftServer AUL media.
Install MCD for ISS Software
1. Insert the MCD-ISS image media.
2. To mount the MCD-ISS image, enter:
mount /dev/cdrom /media
3. To run the installation script, enter:
/media/Software/RHEL/install.sh
4. Remove the MCD-ISS media.
5. To ensure the second bond interface is disabled, enter:
ifdown bond1
Configure the MCD for ISS Software
1. To configure the MCD-ISS network information (Domain name of server, RHEL server, Default Gateway and Subnet Mask), enter:
mcd_setup network <Domain-of-Server-FQDN> <RHEL-Server-IP> <Default-GW-IP> <Subnet-Mask>
2. To configure the MCD-ISS Network Time Protocol (NTP) information, enter:
mcd_setup ntp <NTP-Server FQDN or IP address>
3. To configure the MCD call control server, enter:
mcd_setup MCD <Call-Control-Server-IP>
4. To configure the MCD-ISS Application Record ID (ARID) license information, enter:
mcd_setup ARID <ARID-ID>
5. The MCD call server will reboot for the license information to take effect.
6. Complete the MCD call server configuration via the MCD System Administration tool.
Note: The MCD for ISS software includes Embedded Voice Mail application prompts, which are installed automatically. Before using the Embedded Voice Mail feature, you must purchase and install voice mail licenses.
Note: After the software is installed, the system may reboot automatically. Wait for this process to finish before performing the next step (disabling the 2nd bond interface).
Installation and Administration Guide for Industry Standard Servers (ISS)
26
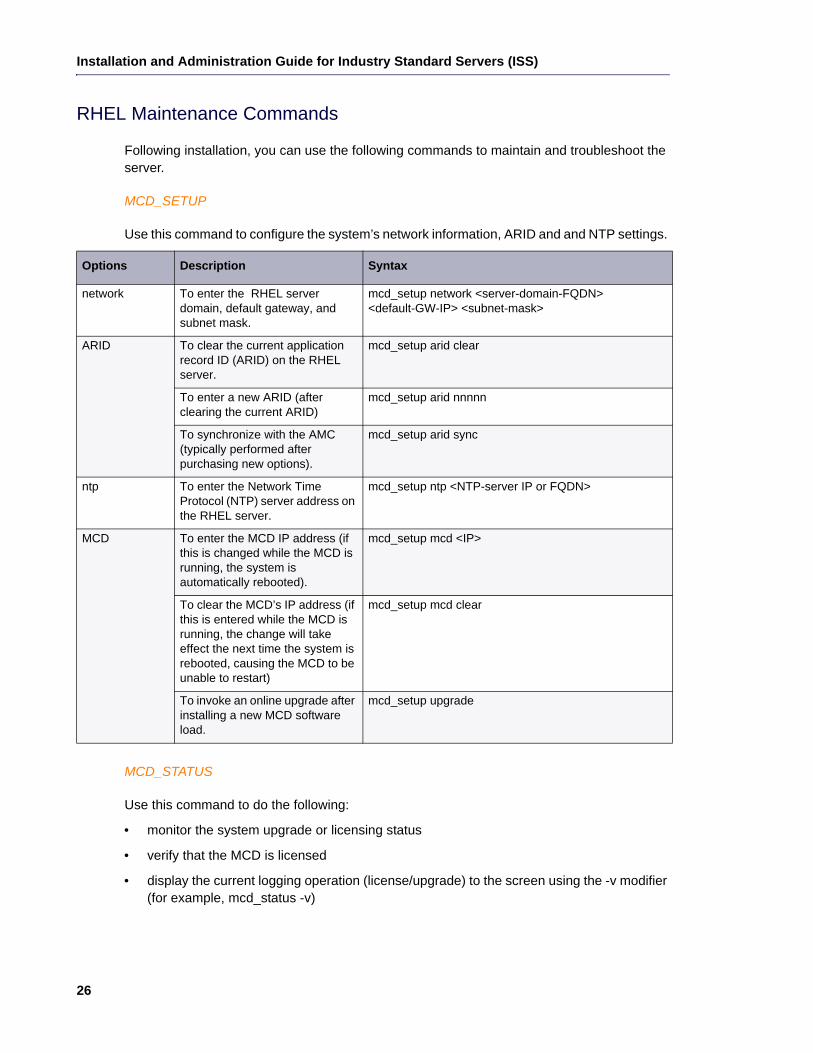
RHEL Maintenance Commands
Following installation, you can use the following commands to maintain and troubleshoot the server.
MCD_SETUP
Use this command to configure the system’s network information, ARID and and NTP settings.
MCD_STATUS
Use this command to do the following:
• monitor the system upgrade or licensing status
• verify that the MCD is licensed
• display the current logging operation (license/upgrade) to the screen using the -v modifier (for example, mcd_status -v)
Options Description Syntax
network To enter the RHEL server domain, default gateway, and subnet mask.
mcd_setup network <server-domain-FQDN> <default-GW-IP> <subnet-mask>
ARID To clear the current application record ID (ARID) on the RHEL server.
mcd_setup arid clear
To enter a new ARID (after clearing the current ARID)
mcd_setup arid nnnnn
To synchronize with the AMC (typically performed after purchasing new options).
mcd_setup arid sync
ntp To enter the Network Time Protocol (NTP) server address on the RHEL server.
mcd_setup ntp <NTP-server IP or FQDN>
MCD To enter the MCD IP address (if this is changed while the MCD is running, the system is automatically rebooted).
mcd_setup mcd <IP>
To clear the MCD’s IP address (if this is entered while the MCD is running, the change will take effect the next time the system is rebooted, causing the MCD to be unable to restart)
mcd_setup mcd clear
To invoke an online upgrade after installing a new MCD software load.
mcd_setup upgrade

MCD for ISS on Red Hat Enterprise Linux
27
MCD_LOGS_COLLECT
Use this command to collect a set of system logs. The resulting tarball file is located under /tmp/mcd-logs.tgz.

Installation and Administration Guide for Industry Standard Servers (ISS)
28
Chapter 3
Maintenance and Troubleshooting

Installation and Administration Guide for Industry Standard Servers (ISS)
30
Hardware Maintenance
31
Hardware Maintenance
Because MCD for ISS is hardware-independent, the following maintenance commands are not required and not described:
• Show Stratus Redundant
• L2 maintenance commands
• DSP maintenance commands
• SWAP
Hardware maintenance is now specific to the servers and associated components upon which the software has been installed. Please refer to those manufacturer’s documentation for hardware maintenance.
Installation and Administration Guide for Industry Standard Servers (ISS)
32
Software Maintenance
Software maintenance involves upgrading the MCD for ISS blade, backing up and restoring the databases, and performing basic maintenance commands.
For details, see:
• “MCD for ISS on Mitel Standard Linux” on page 32
• “MCD for ISS on Red Hat Enterprise Linux” on page 39
Caution: During the upgrade process, the MCD application may need to be restarted which will result in service degradation.
MCD for ISS on Mitel Standard Linux
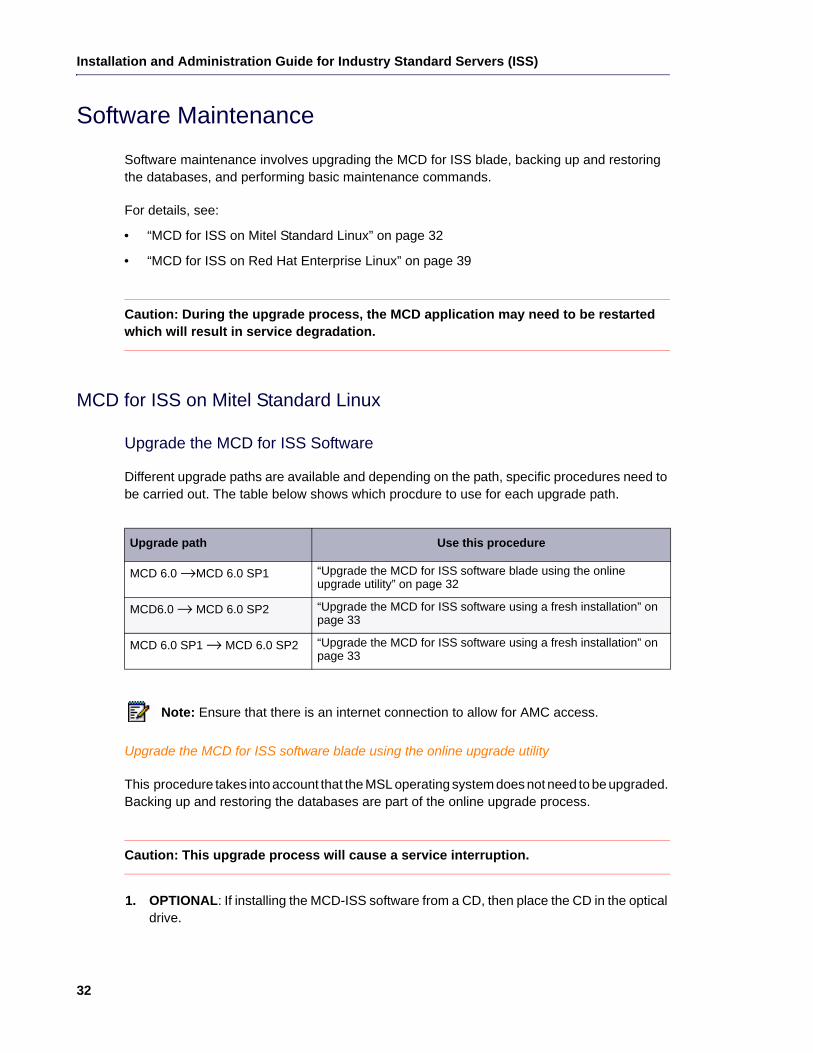
Upgrade the MCD for ISS Software
Different upgrade paths are available and depending on the path, specific procedures need to be carried out. The table below shows which procdure to use for each upgrade path.
Upgrade the MCD for ISS software blade using the online upgrade utility
This procedure takes into account that the MSL operating system does not need to be upgraded. Backing up and restoring the databases are part of the online upgrade process.
Caution: This upgrade process will cause a service interruption.
1. OPTIONAL: If installing the MCD-ISS software from a CD, then place the CD in the optical drive.
Upgrade path Use this procedure
MCD 6.0 →MCD 6.0 SP1 “Upgrade the MCD for ISS software blade using the online upgrade utility” on page 32
MCD6.0 → MCD 6.0 SP2 “Upgrade the MCD for ISS software using a fresh installation” on page 33
MCD 6.0 SP1 → MCD 6.0 SP2 “Upgrade the MCD for ISS software using a fresh installation” on page 33
Note: Ensure that there is an internet connection to allow for AMC access.
Software Maintenance
33
2. Log in to the MSL Server Manager using a browser with the user name and password when initially configuring the MSL server.
3. Click on Blades, located in the left-side panel under the ServiceLink heading.
4. Click Update List to view the new versions available from the AMC in the blade list.
5. In the MCD for ISS row of the list of blades, click on the Upgrade link beside the version being upgraded. The End User License page appears.
6. Scroll to the bottom of the page and click Accept all licenses. A page showing the upgrade progress appears.
7. When the installation is complete, click Clear this report.
8. Click Mitel Communications Director, located in the left-side panel under the Applica-tions heading. A message appears describing the status of the upgrade.
Upgrade the MCD for ISS software using a fresh installation
The fresh installation process involves "flattening the server" and consists of the following steps:
• Backing up the MSL and MCD-ISS databases
• Installing the new version the MSL operating system
• Re-installing a new version of the MCD-ISS software
• Restoring the databases
Database information such as the System (Call Server) IP, local network settings, date and time settings, ARID, etc. is retained in the databases during the upgrade process.
Caution: This procedure will cause a service interruption.
1. Backup MSL and the MCD-ISS databases:
a. Log in to the MSL Server Manager using a browser with the user name and password when initially configuring the MSL server.
b. Click on Backup, located in the left-side panel under the Adminstration heading.
c. In the Select an action drop-down list, choose to back up to either a desktop or network location.
d. Click Perform.
Time: The installation time is dependent on the size of the database being backed up. The system takes approximately 30 to 90 minutes to back up an average-sized database (50 - 100 MB).
Note: This procedure also backs up all application data through the MSL backup feature. Performing a separate backup of the MCD-ISS database (below) may not be necessary, depending on local administration/maintenance protocols.
Installation and Administration Guide for Industry Standard Servers (ISS)
34
2. Optional: Backup the MCD-ISS database on an external PC using the MCD ESM backup facility (see “Back up the MCD-ISS Database” on page 35).
3. Obtain a printout or an export copy of the licence and options form to determine which configuration options need to be set after installing the new blade.
4. Install the new MSL operating system software. See the MItel Standard Linux Installation and Administration Guide for details.
Once the server has been re-configured, log back into the MSL Server Manager with the user name and password when configuring the upgraded MSL server.
5. Optional: If installing the MCD-ISS software from a CD, then place the CD in the optical drive.
6. Click on Status, located in the left-side panel under the ServiceLink heading.
7. Enter your ARID.
8. Scroll to the bottom of the page and click on Sync. The message "Please wait a moment for the sync to complete." It may take a few minutes for the synchronization to complete.
9. Click on Blades, located in the left-side panel under the ServiceLink heading.
10. Click Update List to view the new version available from the AMC in the blade list.
11. Click the Install link, located beside the MCD for ISS blade name to start the installation process. The End User License page appears.
12. Scroll to the bottom of the page and click Accept all licenses. A page showing the instal-lation progress appears.
13. Click the Install link located beside the EMEM Prompts blade name.It may take a few minutes for the software to install.
14. Click Mitel Communications Director, located in the left-side panel under the Applica-tions heading. Wait until the MCD has been licensed. When the MCD is licensed, the status field in the MCD-ISS web page is changed to Licensed.
15. Click Restore MCD Backup File.
Note: During installation, make sure to select the following options:
• Erase all disks and perform fresh install
• Yes, when prompted to restore from backup
Note: Physical servers running MSL 9.3 or 9.4 can upgrade to MSL 10 without the need for physical media or console access, by using the Remote Fresh Install (RFI) blade feature. The RFI blade requires sufficient disk space for a backup. If the system has insufficient disk space, the blade will not be listed on the Blades panel. See the MItel Standard Linux Installation and Administration Guide for details.
Time: The installation process may take up to 5 minutes to complete.
Software Maintenance
35
16. Click Browse opposite the MCD or MSL Backup File Path field, and navigate to the location of the backup file.Click Upload.
Refer to the product Release Notes for any additional information.
Back up the MCD-ISS Database
You need the following information and equipment to back up a database:
• Installer PC
• System IP address
• System Administration Tool username and password
Use the following procedure to back up a database.
Caution: During a system backup, no other users can access any of the web- based tools (Desktop Tool, Group Administration Tool, or System Administration Tool), or save changes. To avoid blocking other users, we recommended that you perform system backups outside of business hours.
1. Access the MCD System Administration Tool. See “Launch the MCD System Administration Tool” on page 14.
2. Click Maintenance and Diagnostics from the drop-down menu in the Selection area on the left.
3. Click Backup.
4. Copy the identitydb.obj file to your PC (required for every user profile on every PC used for backup and restore). Follow the instructions displayed on the screen.
Note: This will restore the MCD-ISS databases. If for some reason the database is not restored, use the “Restore the MCD-ISS Database” procedure on page 36.
Note: You will need to select Use dimensions from backup file in the restore window.
Tip: It is very important to maintain current database backups; backups should be done on a regular basis.
Note: A MCD-ISS Database backup is only needed if you are upgrading from a version prior to Release 6.0, or when upgrading to Release 6.0 SP2. Otherwise only an MSL backup is needed for MCD-ISS Release 6.0 SP1 or earlier.
Time: The system takes approximately 10 to 15 minutes to back up an average-sized database (50 - 100 MB).
Tip: Do this only once per PC per user.
Installation and Administration Guide for Industry Standard Servers (ISS)
36
5. Click Browse to launch the Save As dialog box, then navigate to the location on your local drive where you want to save the backup file (for example C:\3300_ICP\backup).
6. Type a name for your backup file, and then click Save As.
7. Select the check box for Call History records if you want them included in your backup. Each addition can increase the backup time noticeably.
8. Click Start Backup. System will display progress and then a backup complete message.
9. Click OK.
10. Verify the presence of the backup file on the local drive.
Restore the MCD-ISS Database
You need the following information and equipment to restore a database:
• Installer PC
• MSL system IP address
• MSL Server Manager username and password
Use the following procedure to restore a previously saved database.
Caution: You must restart the MCD application after restoring a database. Service will be LOST during this reboot.
1. Log in to the MSL Server Manager using a browser with the user name and password when initially configuring the MSL server.
2. Click Mitel Communications Director, located in the left-side panel under the Applica-tions heading. The Mitel Communications Director main page displays.
3. Click Restore MCD Backup File. A new page displays asking for the path to the backup file.
4. Enter the full path to where the MCD backup file (or MSL backup file) is located.
5. Click Upload. The following information displays:
• date and time of the backup file
Note: Only backup files from systems supporting the Global Data Model (GDM) can be restored.
Time: The system takes approximately 10 to 15 minutes to restore an average-sized database, during which time the files are copied to the server. Once the files have been copied, you must reset the server. Note that the system can take up to an additional 1 hour to reset.
Note: The backup file can be either an MCD or MSL backup file. The MSL backup file will be extracted to retrieve the MCD backup file. An error message displays if the MCD backup file is not included in the MSL backup.
Software Maintenance
37
• version of the backup data file
• two columns of configuration options:
- the first column showing the current configuration options stored in the backup file
- the second column is to set the proper configuration options for the restored database
6. Click Restore to begin restoring the database.The page shows the progress status.
Disaster Recovery
Having a backup and recovery plan in place will contribute to mitigating any potential major outages. Such outages can include:
• Computer migration
• Hard disk replacement
• Hard disk re-formatting (e.g. clean installation of MSL)
To prepare for any potential disaster, implement a backup plan where a scheduled MSL backup will contain the MCD-ISS backup. MSL has a backup facility that will perform regular backups of the MSL databases and any completed MCD-ISS backups. MSL backups will include the most recent previously created MCD-ISS backup. As an added precaution, bakup the MCD database separately using the MCD System Administration Tool. See “Back up the MCD-ISS Database” on page 35.
To recover from a disaster
1. Backup MSL and the MCD database. See “To schedule an MSL backup” on page 38.
2. Install the new MSL operating system software. See the MItel Standard Linux Installation and Administration Guide for details.
3. Restore the MSL and the MCD database. See “Restore the MCD-ISS Database” on page 36.
4. Install the MCD-ISS software blade. See “Install the MCD for ISS Software” on page 13.
5. De-activate the ServiceLink account:
a. In the MSL Server Manager, click on Status located in the left-side panel under ServiceLink.
b. In the right-side panel, click the link in If you wish to deactivate your ServiceLink account, please click here.
Note: If an MSL backup file was restored which did not contain any License and Options (LOS) information for the MCD, N/A displays for those current configuration options. The new configuration options column will list the default values for those options.
Tip: While the System Administration Tool is restoring the database, no other users can access any of the web-based tools. We recommend performing restores outside of business hours.

Installation and Administration Guide for Industry Standard Servers (ISS)
38
c. Click Deactivate on the next page that displays.
6. Log in to the AMC and clear the hardware ID.
7. Acitvate the ServiceLink account:
a. In the MSL Server Manager, click on Status located in the left-side panel under ServiceLink.
b. Complete the fields as appropriate and click Activate.
8. The recovery will automatically proceed until completion.
To schedule an MSL backup
1. Log in to the MSL Server Manager using a browser with the user name and password when initially configuring the MSL server.
2. Under Administration, click Backup.
3. From the Select an action list, click Configure network backup.
4. Click Perform.
5. Configure the server where the backup file will be stored:
a. Enter the IP address of the file server where the backup will be stored.
b. Enter the Sharename of the shared folder where the backup file will be stored. (For example, "Backups".) The shared folder must have permissions set to "Full Control".
c. Enter the (Optional) Sub Directory where the backup will be stored. If you leave this field blank, the file will be stored at the root of the shared folder. Spaces and multi-level directory names are permitted; for example, “MSL backup” and “MSL backup/2011/Oc-tober” are valid sub directory names. Dashes (-) are not permitted.
d. Enter the Username to use when connecting to the backup server.
e. Enter the Domain or Workgroup name of the server. (For example, mitel.com.)
f. Enter the Password to use when connecting to the backup server. Available storage space is displayed.
g. Select the Maximum number of backup files to keep (1-999) on the server (default is 5). When the number of stored files reaches this maximum count, the oldest version is deleted.
6. Select the frequency with which you want to perform backups (Daily, Weekly, Monthly, Never). Backup file names will include timestamps in the format: mslserver_<hostname>_yyyy-mm-dd_hh-mm.tgz):
a. To disable regularly scheduled backups, click Disabled.
b. For Daily backups, select a time of day (hour, minute, AM/PM)
c. For Weekly backups, select a time of day, and day of the week
d. For Monthly backups, select a time of day, and day of the month
e. For immediate backup file creation, proceed to the next step.
7. To test your backup configuration, or to run an immediate backup, click Backup Now.
Software Maintenance
39
8. Click Save to save the schedule information.
If the scheduled backup fails, an alarm is raised and can be seen in the Event Viewer panel. Refer to the Mitel Standard Linux Installation and Administration Guide for details.
For MCD-ISS releases prior to Release 6.0, separately restore the MSL backup and the MCD-ISS backup. Refer to the Mitel Standard Linux Installation and Administration Guide for details about restoring the MSL backup; follow the procedures in “Upgrade the MCD for ISS software using a fresh installation” on page 33, beginning at Step 3.
MCD for ISS on Red Hat Enterprise Linux
Upgrade the MCD for ISS Software
The MCD software upgrade process consists of backing up and restoring the databases, and removing the current software. Database information such as the System (Call Server) IP and ARID is retained in the restored databases during the upgrade process.
Caution: This upgrade process will cause a service interruption.
To upgrade the MCD for ISS software blade on RHEL:
1. Back up the MCD Call Server database using the MCD System Administration Tool (see “Back up the Call Server Database” on page 39).
2. Place the MCD-ISS software media into the CD/DVD ROM drive of the Status ftServer.
3. To mount the MCD-ISS image, enter:
mount /dev/cdrom /media
4. To run the installation script, enter:
/media/Software/RHEL/install.sh
5. To upgrade the MCD software, enter:
mcd_setup upgrade
6. Restore the Call Server Database (see “Restore the Call Server Database” on page 40).
Back up the Call Server Database
You need the following information and equipment to back up a database:
• Installer PC
• System IP address for the MCD for ISS blade
Tip: It is very important to maintain current database backups; backups should be done on a regular basis.
Installation and Administration Guide for Industry Standard Servers (ISS)
40
• System Administration Tool username and password
Use the following procedure to back up a database.
Caution: During a system backup, no other users can access any of the web- based tools (Desktop Tool, Group Administration Tool, or System Administration Tool), or save changes. To avoid blocking other users, we recommended that you perform system backups outside of business hours.
1. Access the MCD System Administration Tool. See “Launch the MCD System Administration Tool” on page 14.
2. Click Maintenance and Diagnostics from the drop-down menu in the Selection area on the left.
3. Click Backup.
4. Copy the identitydb.obj file to your PC (required for every user profile on every PC used for backup and restore). Follow the instructions displayed on the screen.
5. Click Browse to launch the Save As dialog box, then navigate to the location on your local drive where you want to save the backup file (for example C:\3300_ICP\backup).
6. Type a name for your backup file, and then click Save As.
7. Select the check box for Call History records if you want them included in your backup. Each addition can increase the backup time noticeably.
8. Click Start Backup. System will display progress and then a backup complete message.
9. Click OK.
10. Verify the presence of the backup file on the local drive.
Restore the Call Server Database
You need the following information and equipment to restore a database:
• Installer PC
• System IP address for the MCD for ISS blade
• System Administration Tool username and password
Use the following procedure to restore a previously saved database.
Time: The system takes approximately 10 to 15 minutes to back up an average-sized database (50 - 100 MB).
Tip: Do this only once per PC per user.
Software Maintenance
41
Caution: You must restart the server after restoring a database. Service will be LOST during this reboot.
1. Access the MCD System Administration Tool. See “Launch the MCD System Administration Tool” on page 14.
2. Click Maintenance and Diagnostics from the drop-down menu in the Selection area on the left.
3. Click Restore.
4. Copy the identitydb.obj file to your PC (required for every user profile on every PC used for backup and restore). Follow the instructions displayed on the screen.
5. Type the location of the database that is being restored, or use the browse facility.
6. Click Yes if you want to include Hotel/Motel wake-up information in your restore.
7. Choose the Dimension Selections:
- if there are no changes to the software dimensions, accept Use Dimension Selections from backup file
OR
- click Use Current Dimension Selections if you are restoring the database after programming new Dimension Selection information.
8. Click Start Restore.
9. Click OK. The system shows an "in progress" message.
10. When the status window shows "complete”, click OK.
11. Reset the system:
a. Log into the MCD System Administration Tool. See “Launch the MCD System Admin-istration Tool” on page 14.
b. In the Maintenance Commands form enter the reset system command.
- When the reset is complete, the database is converted, and the system automatically resets.
- If you have programmed Dimension Selection, the system reboots automatically one more time.
Time: The system takes approximately 10 to 15 minutes to restore an average-sized database, during which time the files are copied to the server. Once the files have been copied, you must reset the server. Note that the system can take up to an additional 1 hour to reset.
Tip: If you are doing the restore on the same PC the backup was saved to and you are logged in as the same user (same user profile), you do not need to copy the identitydb.obj again.
Installation and Administration Guide for Industry Standard Servers (ISS)
42
Routine Maintenance Procedures
A number of commands enable you to perform basic maintenance on the MCD for ISS on RHEL platform. For details, see:
• “Reset the Application Record ID (ARID)” on page 42
• “Collect MCD for ISS Logs” on page 42
• “Monitor the System Status” on page 42
Reset the Application Record ID (ARID)
Use this procedure to clear the existing ARID, enter a new one, and then re-synchronize with the AMC.
To reset the ARID:
1. Open a command prompt.
2. To clear the current ARID, enter:
mcd_setup arid clear
3. To enter a new ARID (after clearing the current ARID), enter:
mcd_setup arid <nnnnn>
4. To synchronize with the AMC, enter:
mcd_setup arid sync
Collect MCD for ISS Logs
Use this procedure to collect MCD-level logs on the RHEL server platform.
To collect and save log files:
1. Open a command prompt.
2. To generate the tarball file, enter:
mcd_logs_collect
The tarball file is stored under /tmp/mcd-logs.tgz.
3. Copy the tarball file and send it to Mitel Product Support for analysis.
Monitor the System Status
Use this procedure to do the following:
• monitor the system upgrade or licensing status
Tip: While the System Administration Tool is restoring the database, no other users can access any of the web-based tools. We recommend performing restores outside of business hours.
Software Maintenance
43
• verify that the MCD is licensed
• display the current logging operation (license/upgrade) to the screen using the -v modifier
To determine the system status:
1. Open a command prompt.
2. To monitor the upgrade and licensing status, enter:
mcd_status
3. To verify that the MCD is licensed, enter:
mcd_status
4. To display the current logging operation, enter:
mcd_status -v
Installation and Administration Guide for Industry Standard Servers (ISS)
44
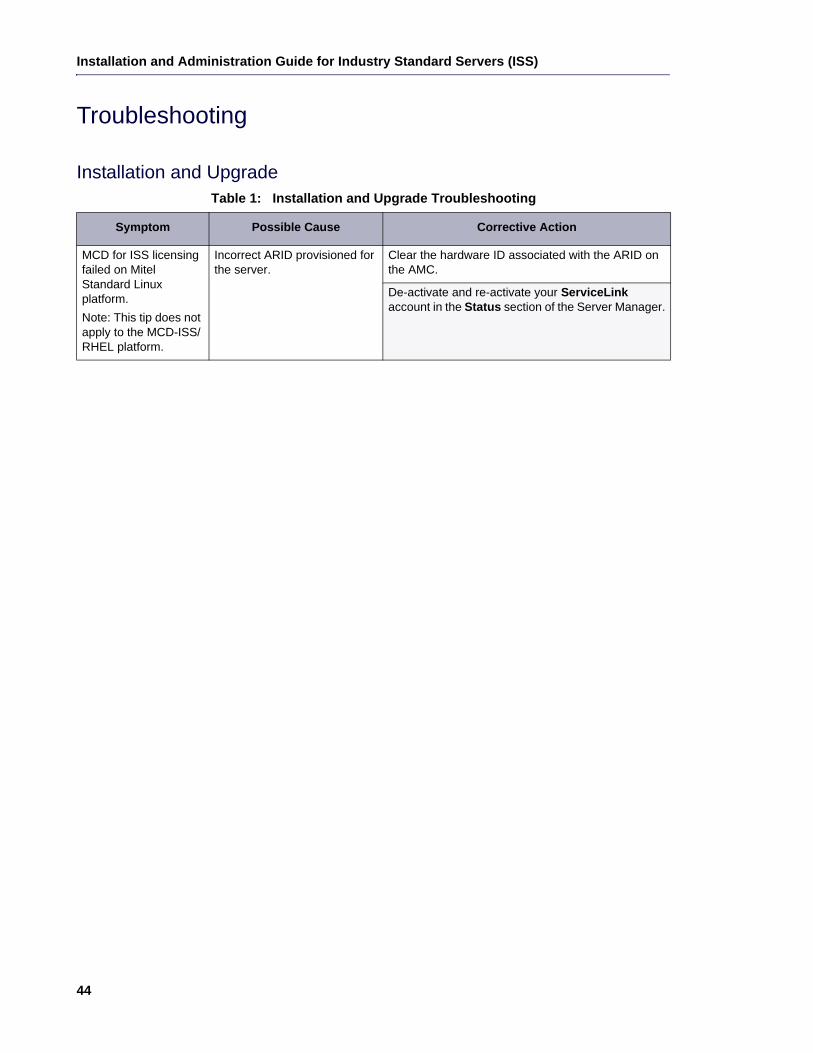
Troubleshooting
Installation and UpgradeTable 1: Installation and Upgrade Troubleshooting
Symptom Possible Cause Corrective Action
MCD for ISS licensing failed on Mitel Standard Linux platform.
Note: This tip does not apply to the MCD-ISS/ RHEL platform.
Incorrect ARID provisioned for the server.
Clear the hardware ID associated with the ARID on the AMC.
De-activate and re-activate your ServiceLink account in the Status section of the Server Manager.