Embed Size (px)
Citation preview
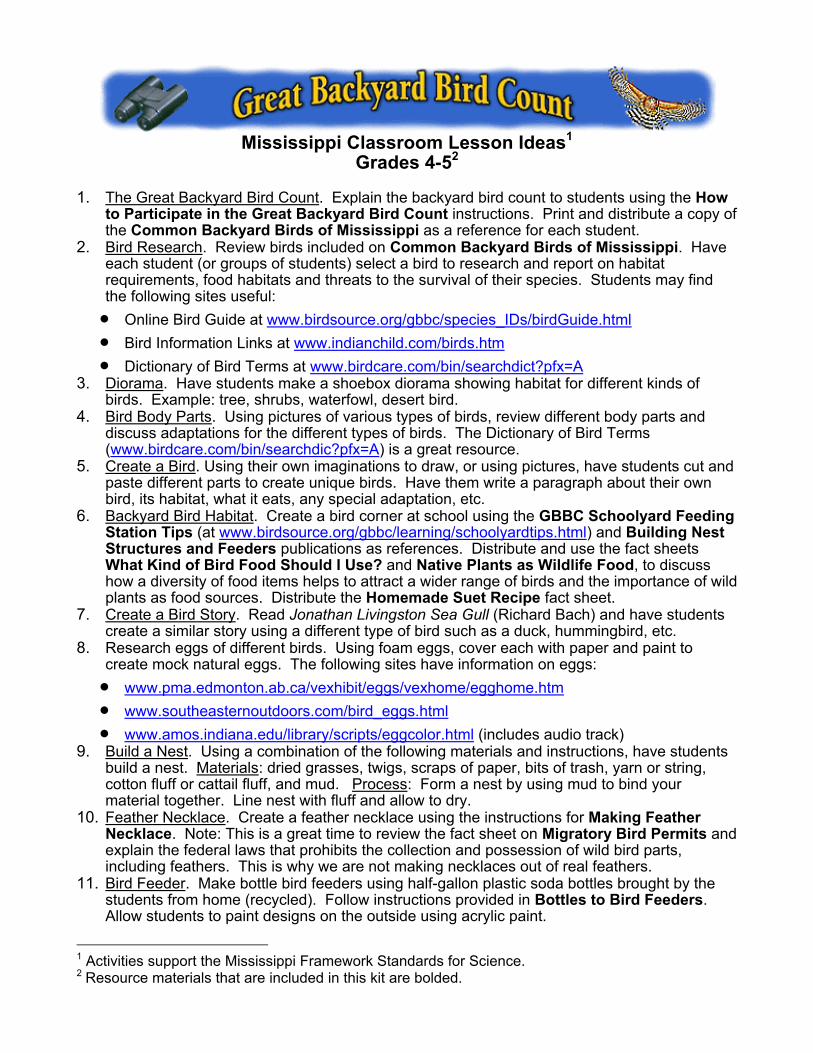
Mississippi Classroom Lesson Ideas1
Grades 4-52 1. The Great Backyard Bird Count. Explain the backyard bird count to students using the How
to Participate in the Great Backyard Bird Count instructions. Print and distribute a copy of the Common Backyard Birds of Mississippi as a reference for each student.
2. Bird Research. Review birds included on Common Backyard Birds of Mississippi. Have each student (or groups of students) select a bird to research and report on habitat requirements, food habitats and threats to the survival of their species. Students may find the following sites useful: • Online Bird Guide at www.birdsource.org/gbbc/species_IDs/birdGuide.html • Bird Information Links at www.indianchild.com/birds.htm • Dictionary of Bird Terms at www.birdcare.com/bin/searchdict?pfx=A
3. Diorama. Have students make a shoebox diorama showing habitat for different kinds of birds. Example: tree, shrubs, waterfowl, desert bird.
4. Bird Body Parts. Using pictures of various types of birds, review different body parts and discuss adaptations for the different types of birds. The Dictionary of Bird Terms (www.birdcare.com/bin/searchdic?pfx=A) is a great resource.
5. Create a Bird. Using their own imaginations to draw, or using pictures, have students cut and paste different parts to create unique birds. Have them write a paragraph about their own bird, its habitat, what it eats, any special adaptation, etc.
6. Backyard Bird Habitat. Create a bird corner at school using the GBBC Schoolyard Feeding Station Tips (at www.birdsource.org/gbbc/learning/schoolyardtips.html) and Building Nest Structures and Feeders publications as references. Distribute and use the fact sheets What Kind of Bird Food Should I Use? and Native Plants as Wildlife Food, to discuss how a diversity of food items helps to attract a wider range of birds and the importance of wild plants as food sources. Distribute the Homemade Suet Recipe fact sheet.
7. Create a Bird Story. Read Jonathan Livingston Sea Gull (Richard Bach) and have students create a similar story using a different type of bird such as a duck, hummingbird, etc.
8. Research eggs of different birds. Using foam eggs, cover each with paper and paint to create mock natural eggs. The following sites have information on eggs: • www.pma.edmonton.ab.ca/vexhibit/eggs/vexhome/egghome.htm • www.southeasternoutdoors.com/bird_eggs.html • www.amos.indiana.edu/library/scripts/eggcolor.html (includes audio track)
9. Build a Nest. Using a combination of the following materials and instructions, have students build a nest. Materials: dried grasses, twigs, scraps of paper, bits of trash, yarn or string, cotton fluff or cattail fluff, and mud. Process: Form a nest by using mud to bind your material together. Line nest with fluff and allow to dry.
10. Feather Necklace. Create a feather necklace using the instructions for Making Feather Necklace. Note: This is a great time to review the fact sheet on Migratory Bird Permits and explain the federal laws that prohibits the collection and possession of wild bird parts, including feathers. This is why we are not making necklaces out of real feathers.
11. Bird Feeder. Make bottle bird feeders using half-gallon plastic soda bottles brought by the students from home (recycled). Follow instructions provided in Bottles to Bird Feeders. Allow students to paint designs on the outside using acrylic paint.
1 Activities support the Mississippi Framework Standards for Science. 2 Resource materials that are included in this kit are bolded.

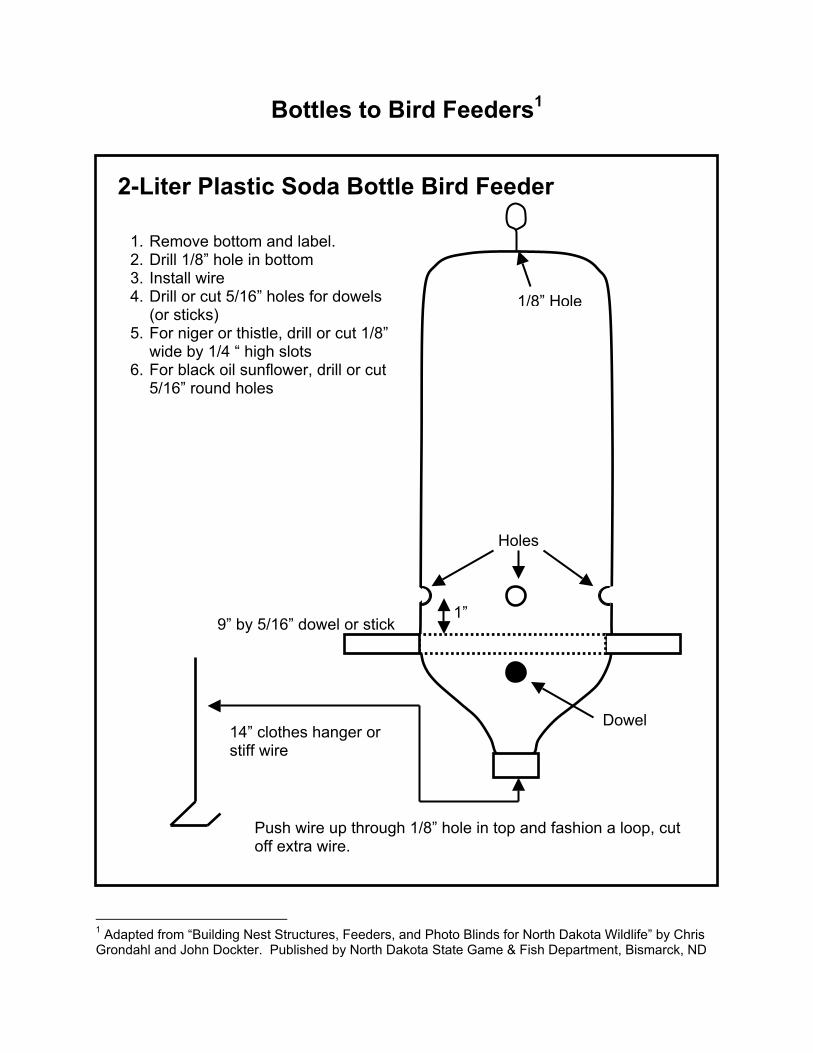
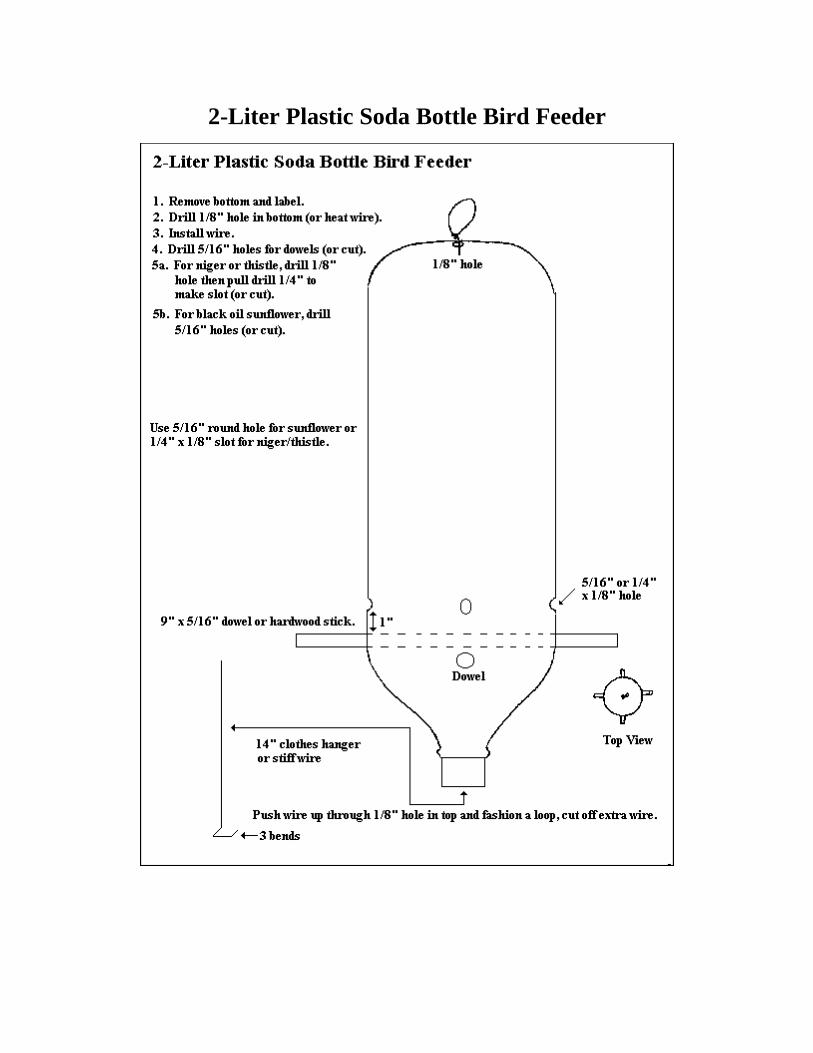
Bottles to Bird Feeders1
1 Adapted from “Building Nest Structures, Feeders, and Photo Blinds for North Dakota Wildlife” by Chris Grondahl and John Dockter. Published by North Dakota State Game & Fish Department, Bismarck, ND
Push wire up through 1/8” hole in top and fashion a loop, cut off extra wire.
2-Liter Plastic Soda Bottle Bird Feeder
1. Remove bottom and label. 2. Drill 1/8” hole in bottom 3. Install wire 4. Drill or cut 5/16” holes for dowels
(or sticks) 5. For niger or thistle, drill or cut 1/8”
wide by 1/4 “ high slots 6. For black oil sunflower, drill or cut
5/16” round holes
9” by 5/16” dowel or stick
14” clothes hanger or stiff wire
1”
Dowel
Holes
1/8” Hole

Building Nest Structures, Feeders, and PhotoBlinds for North Dakota Wildlife
byChris Grondahl
andJohn Dockter
State Game and Fish Department100 North Bismarck Expressway
Bismarck, North Dakota 58501-5095
Table of Contents
Introduction
Section 1 -- Nest Boxes and Nesting Platforms
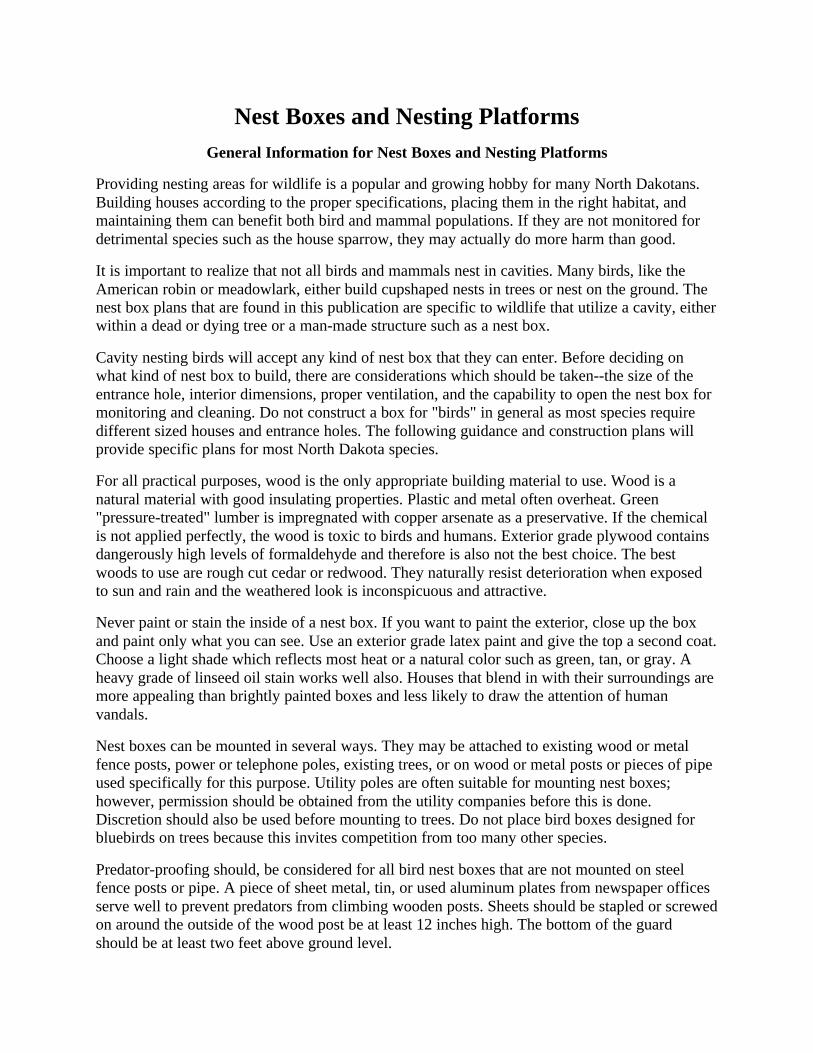
• House Wren, Black-capped Chickadee, White-breasted Nuthatch
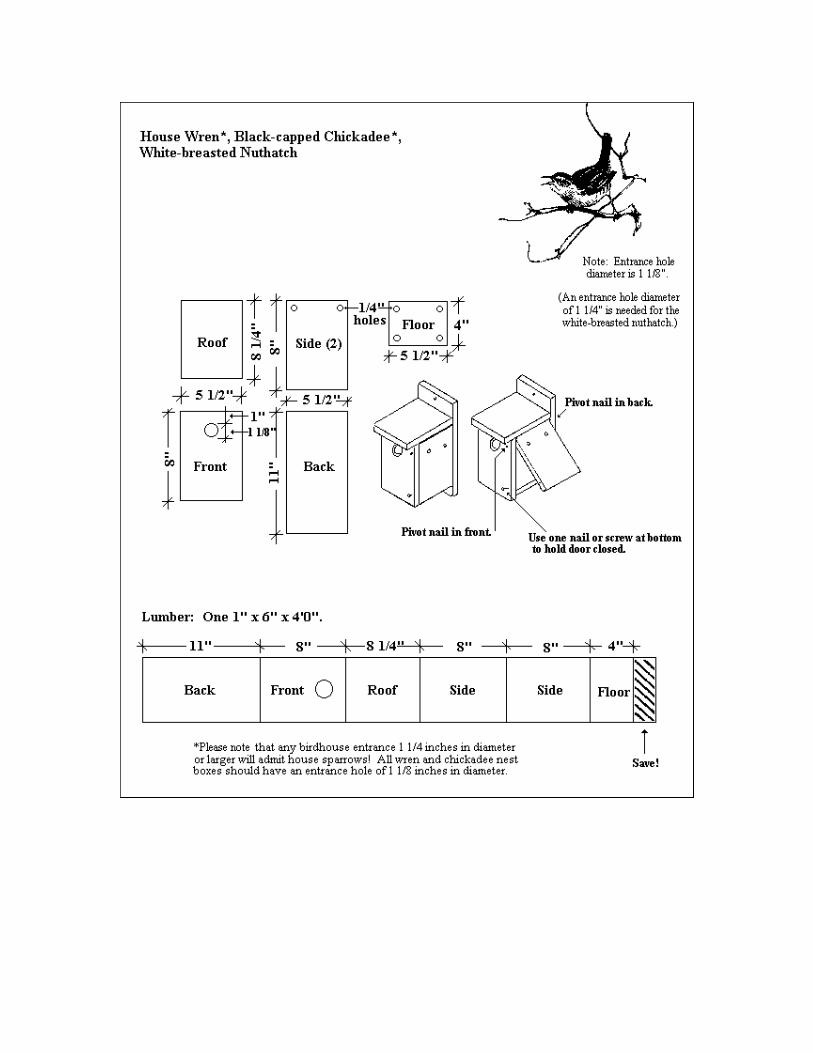
• Tree Swallow and Eastern Bluebird
• Peterson Bluebird House
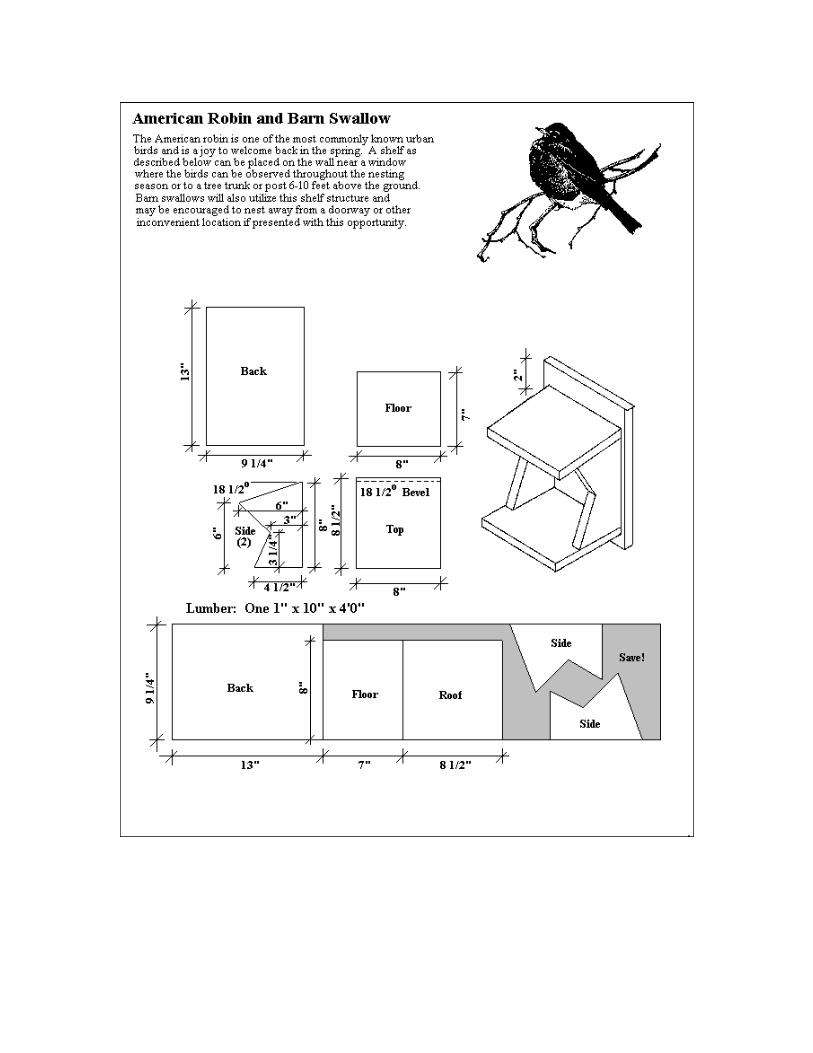
• American Robin and Barn Swallow
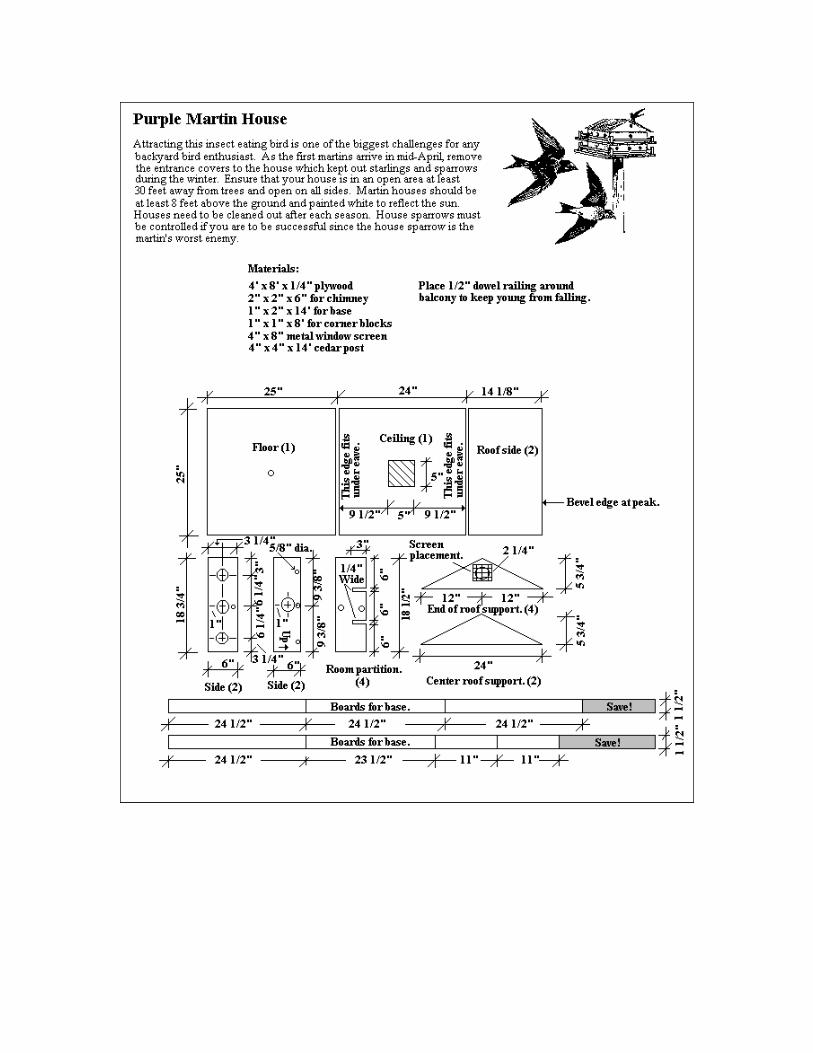
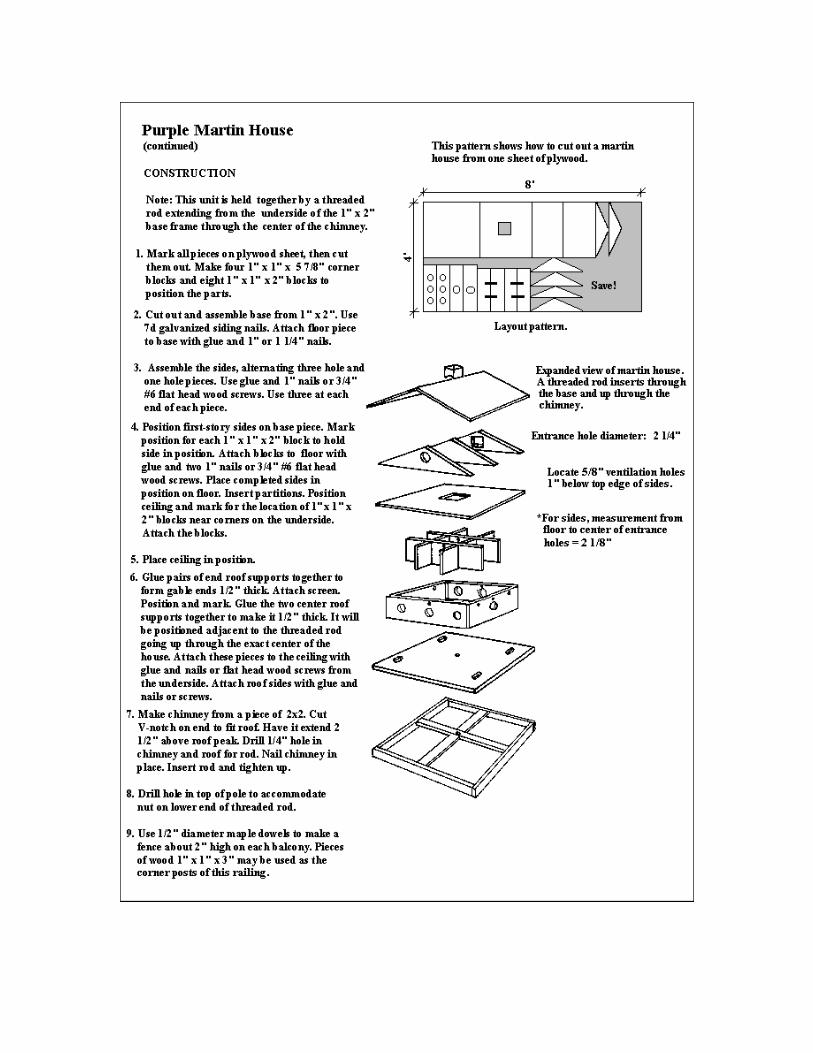
• Purple Martin House
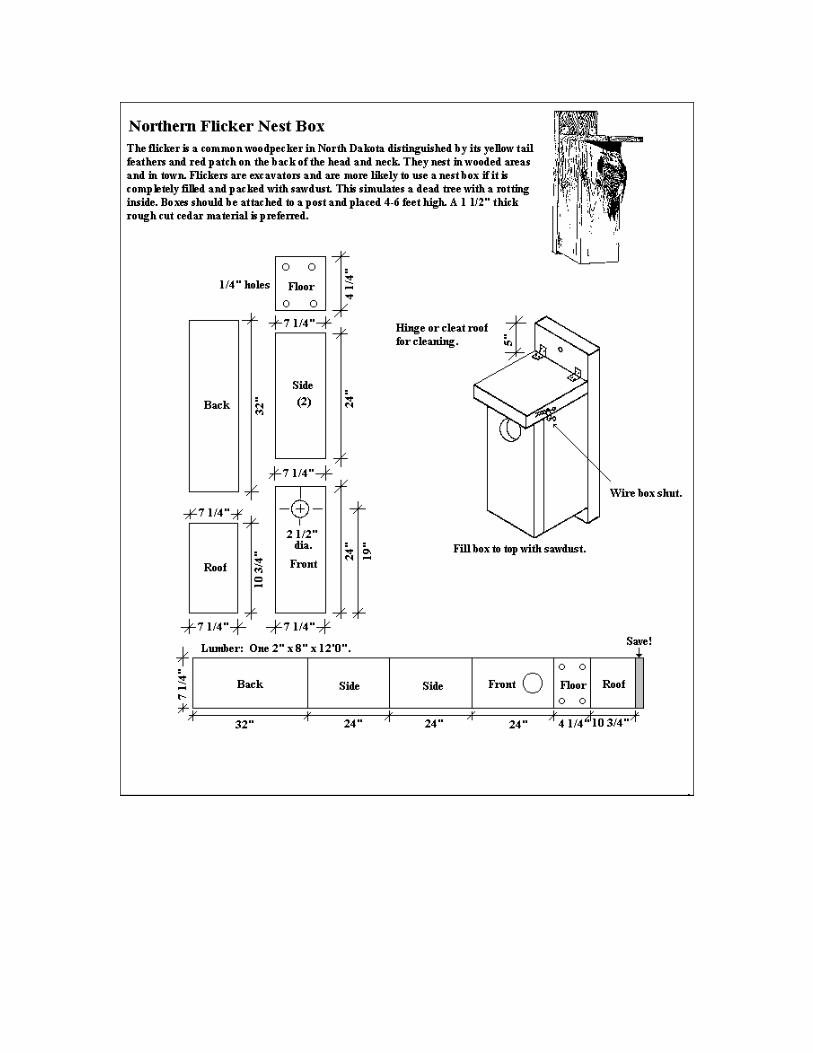
• Northern Flicker Nest Box
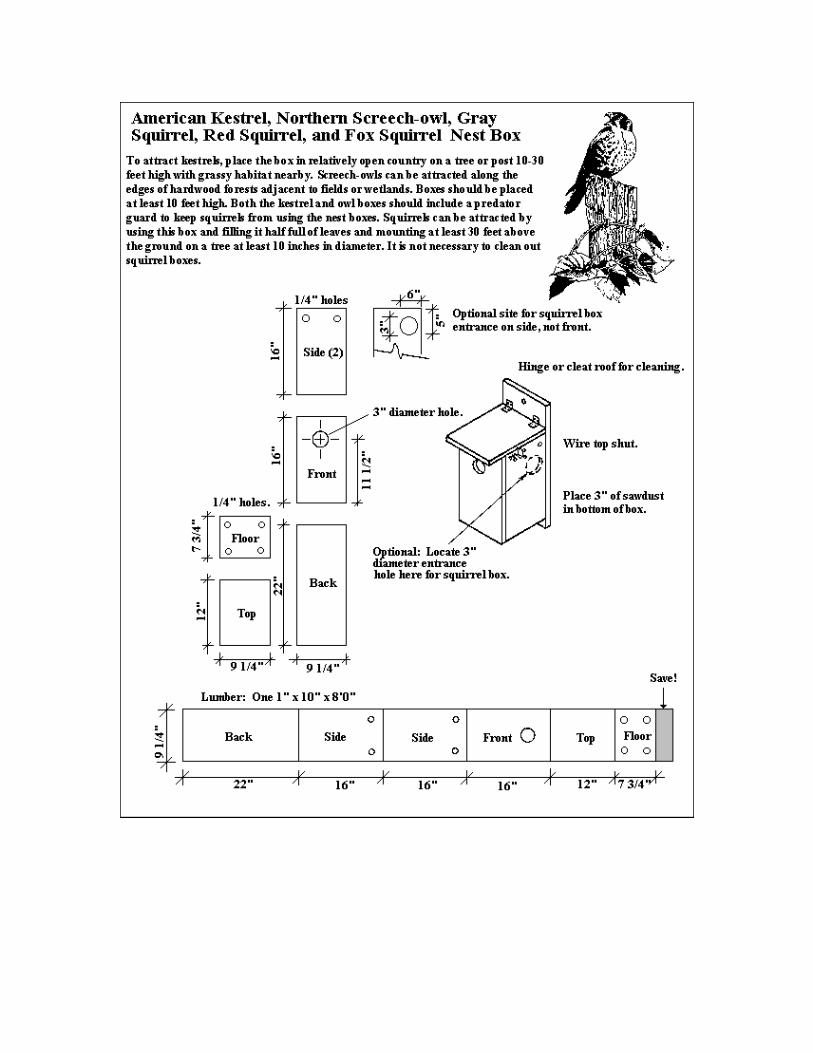
• American Kestrel, Northern Screech-owl, Gray Squirrel, Red Squirrel, and Fox SquirrelNest Box
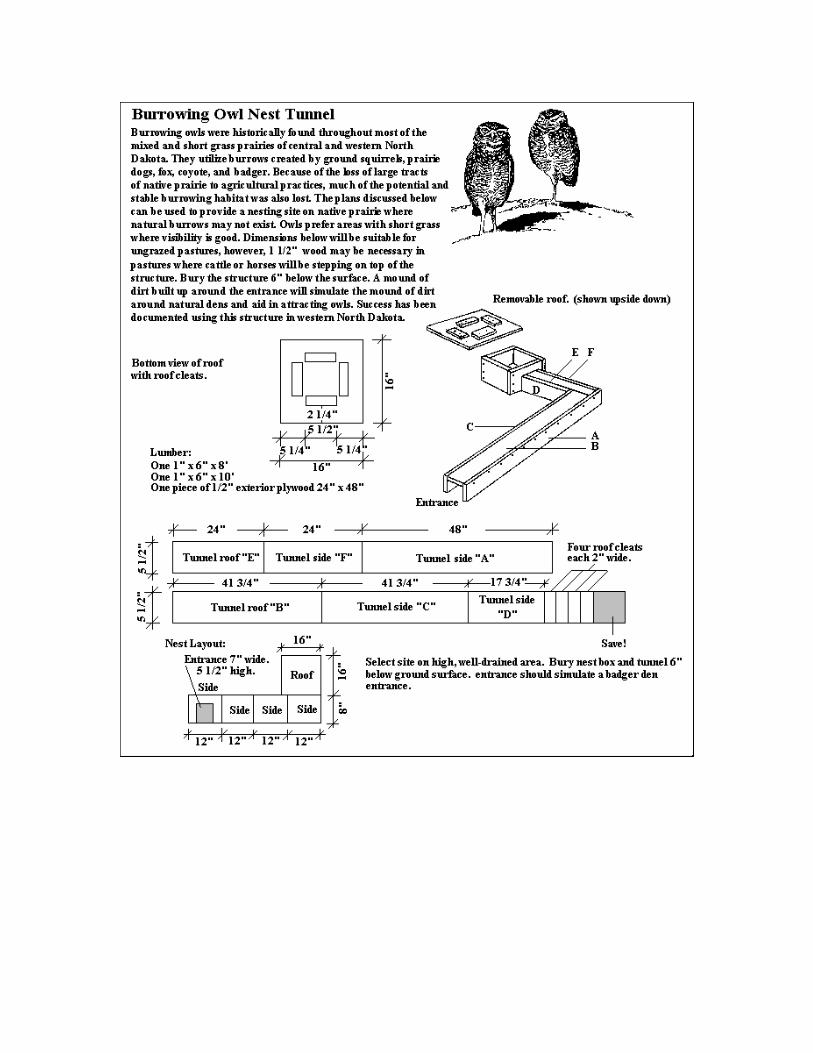
• Burrowing Owl Nest Tunnel
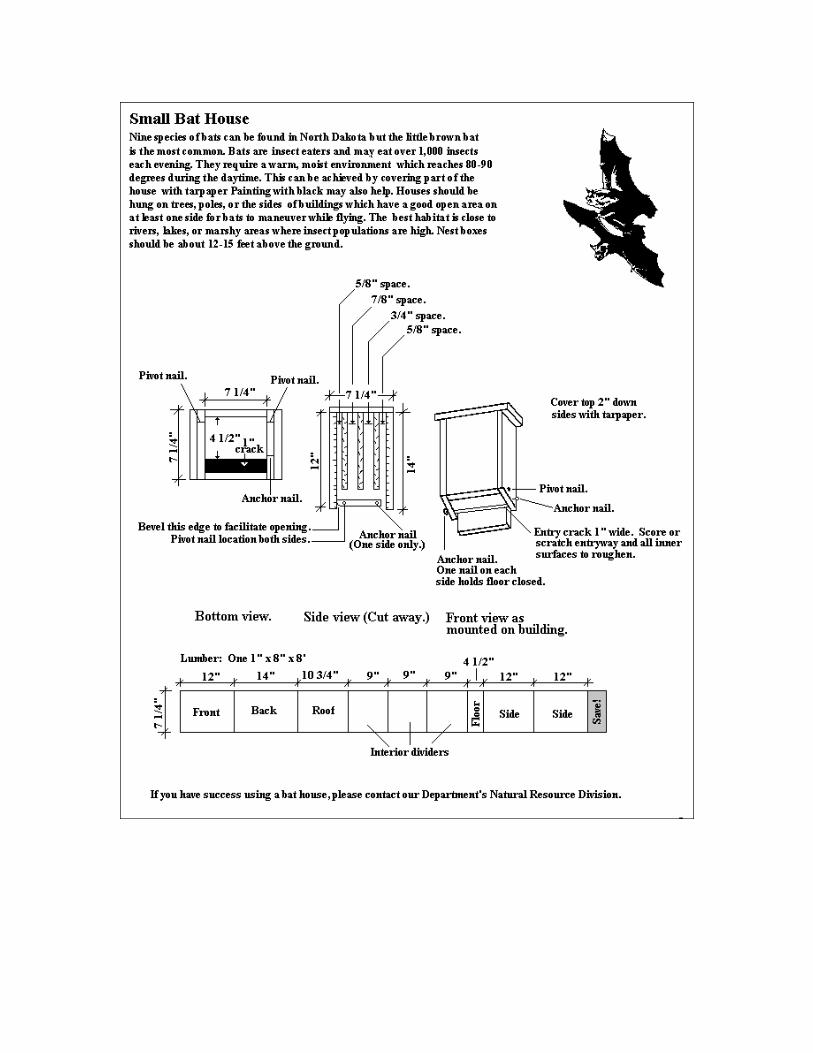
• Small Bat House
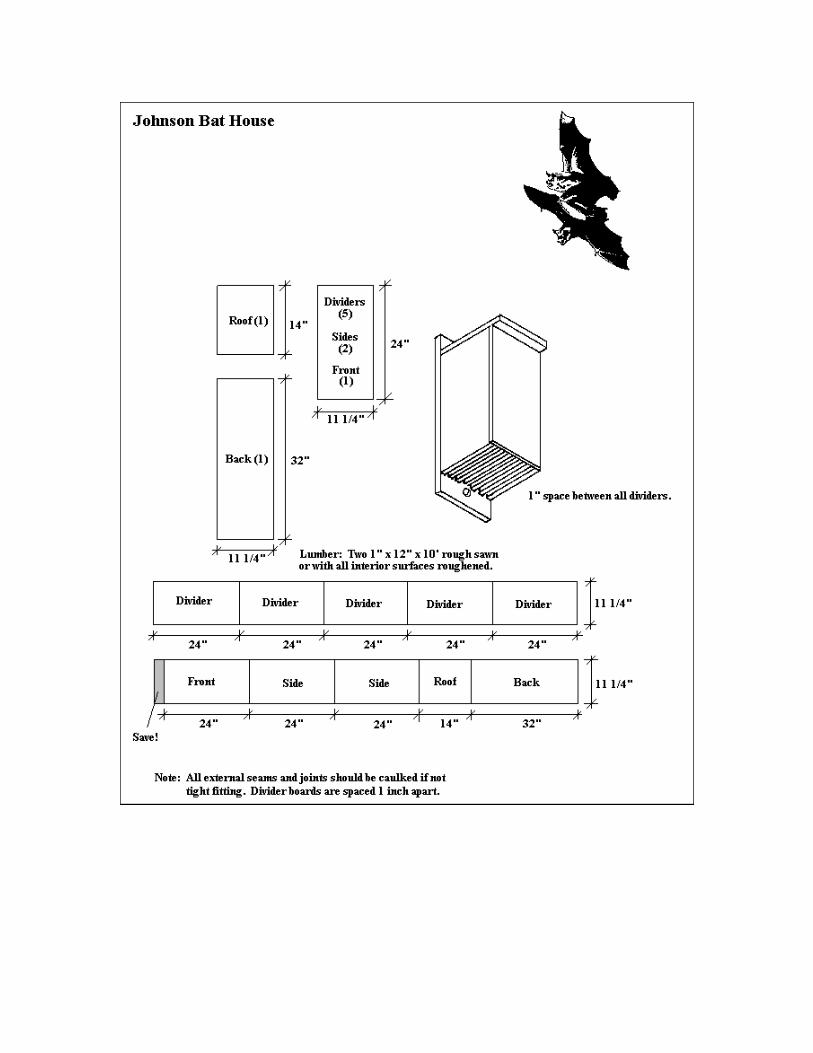
• Johnson Bat House
• Wood Duck and Hooded Merganser Nest Box
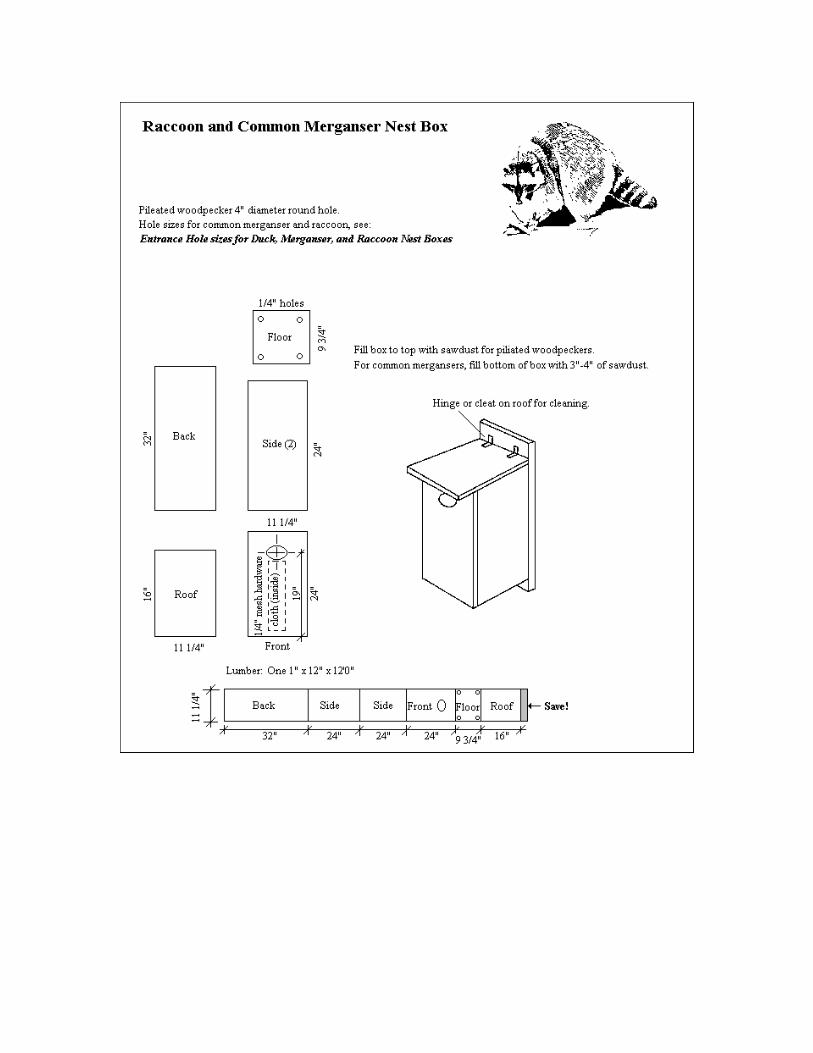
• Raccoon and Common Merganser Nest Box
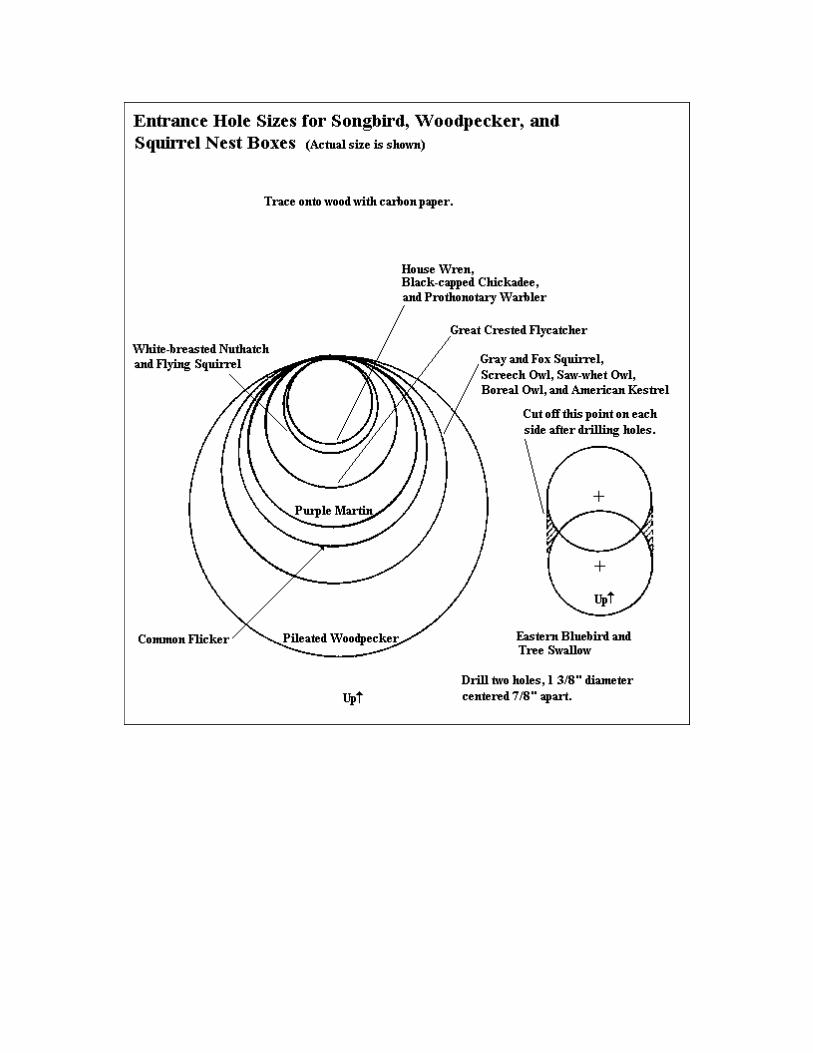
• Entrance Hole Sizes for Songbird, Woodpecker, and Squirrel Nest Boxes
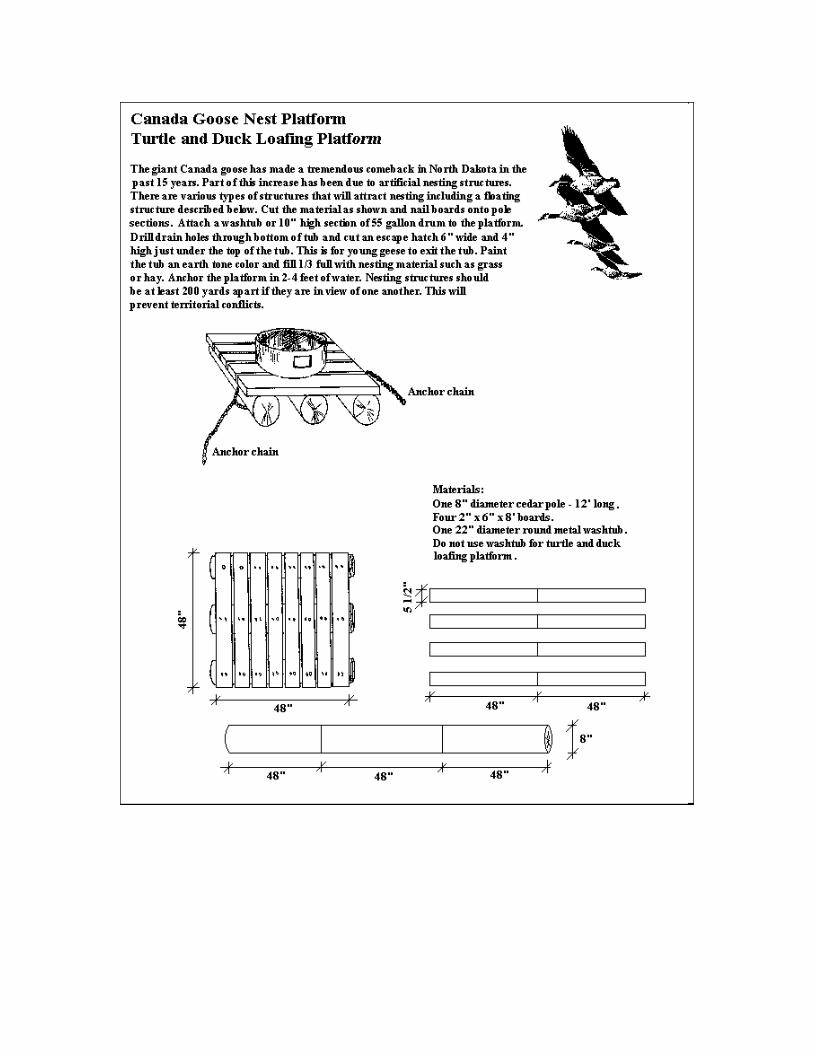
• Canada Goose Nest Platform, Turtle and Duck Loafing Platform
• Canada Goose Nest Tub
• Culvert Nest Structure
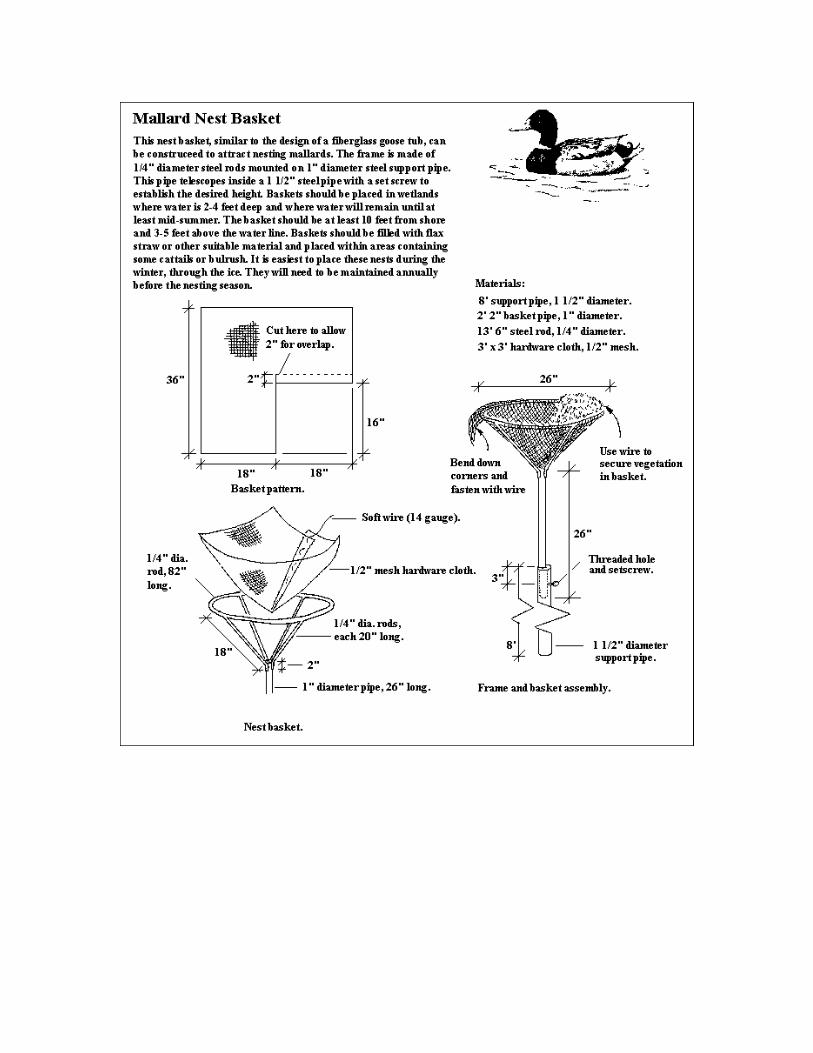
• Mallard Nest Basket
• Hen House
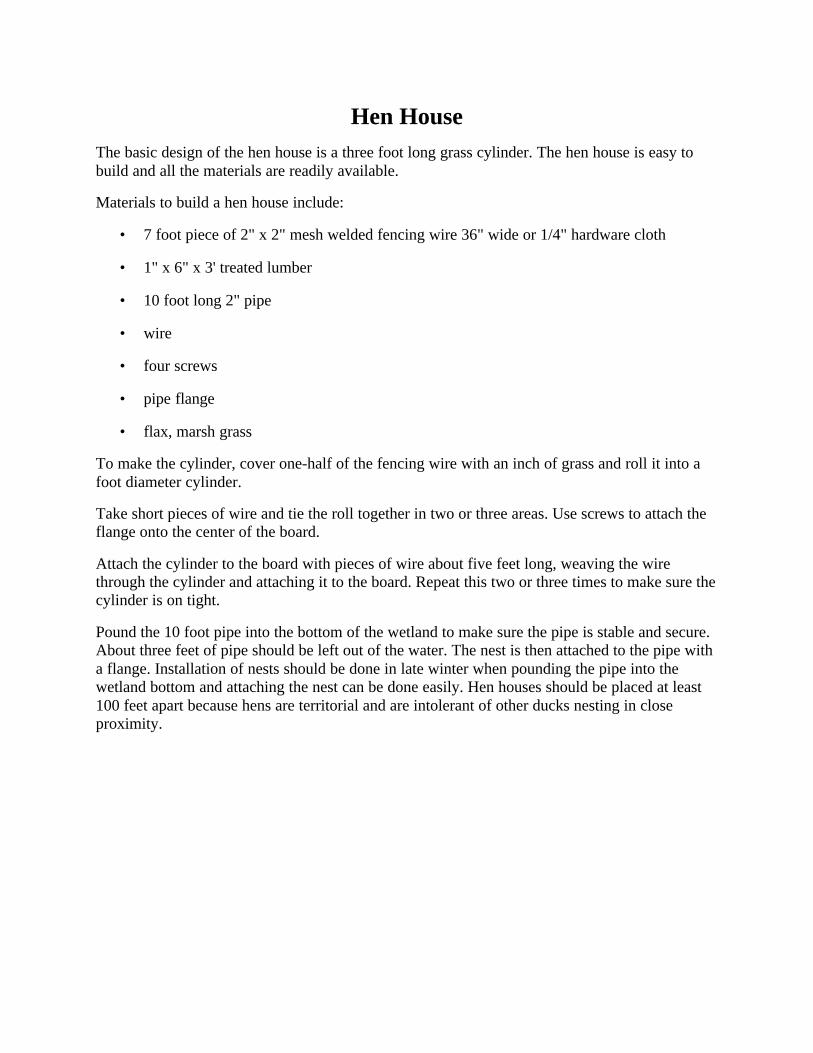
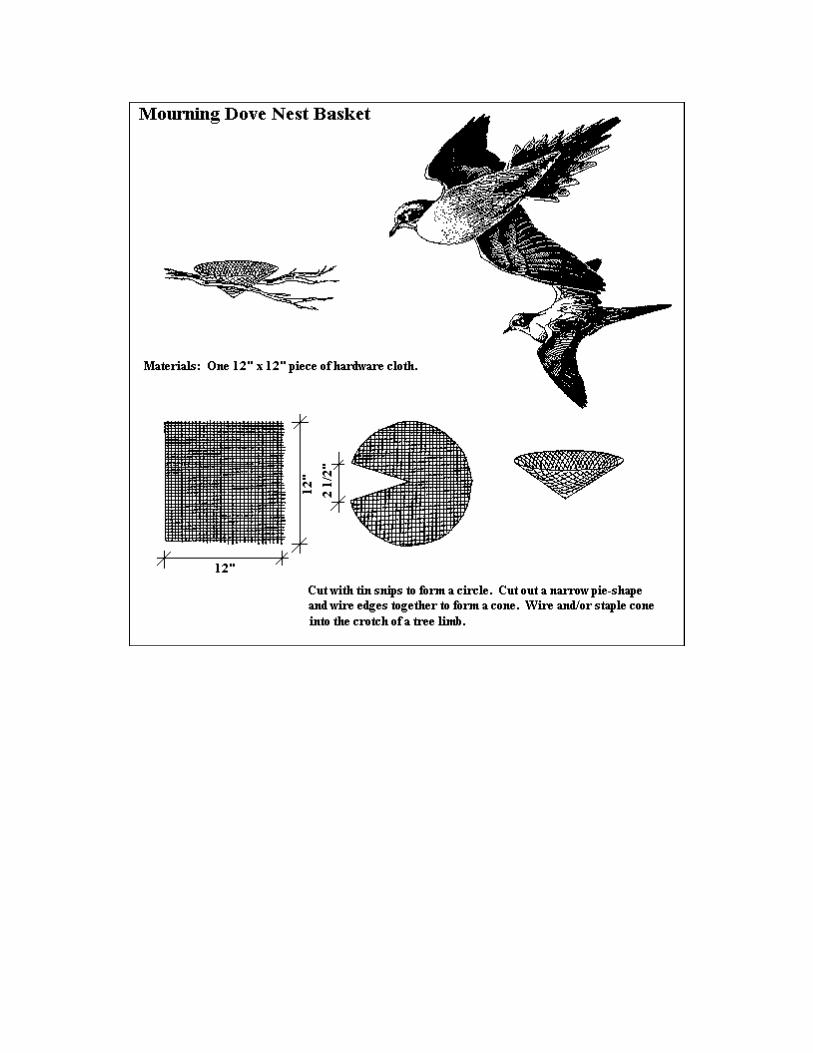
• Mourning Dove Nest Basket
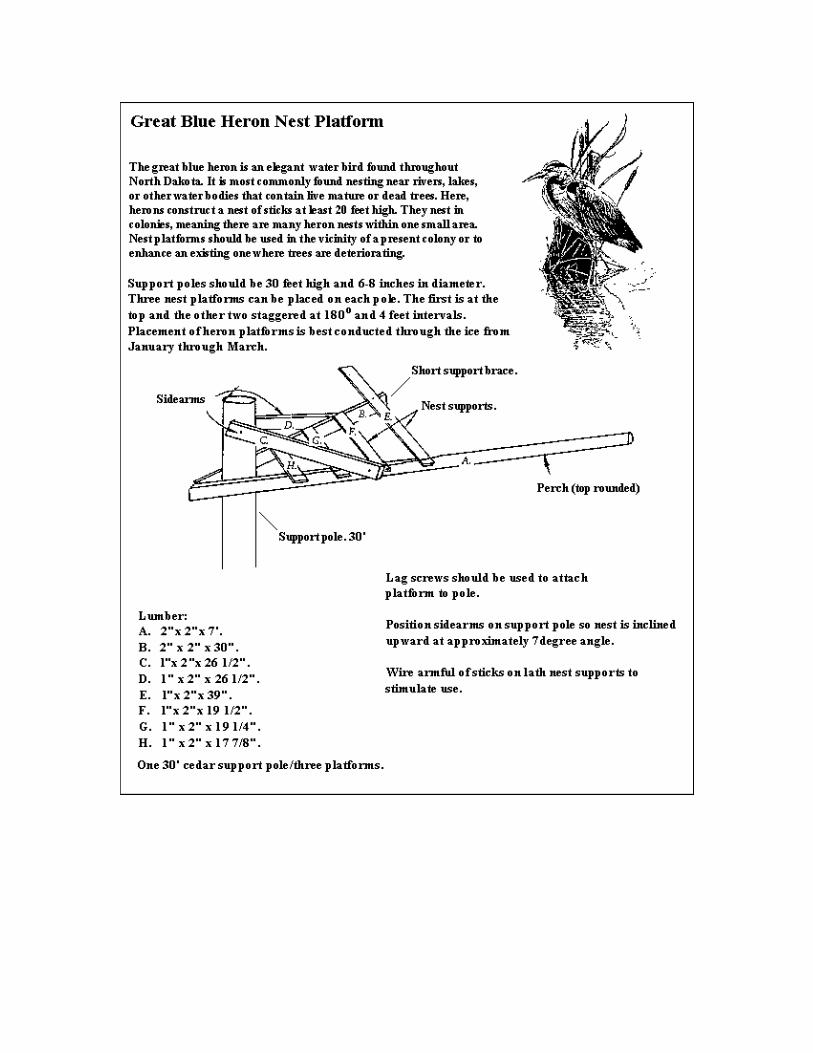
• Great Blue Heron Nest Platform
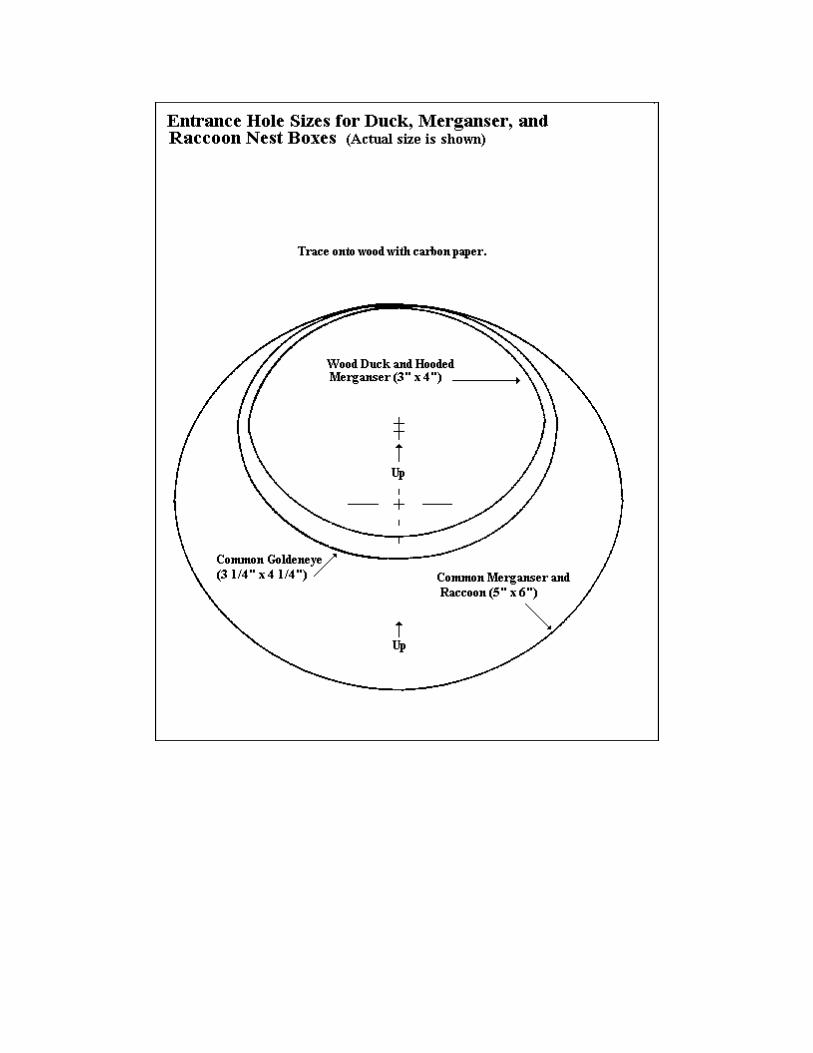
• Entrance Hole Sizes for Duck, Merganser, and Raccoon Nest Boxes
Section 2 -- Feeders
• 2-Liter Plastic Soda Bottle Bird Feeder
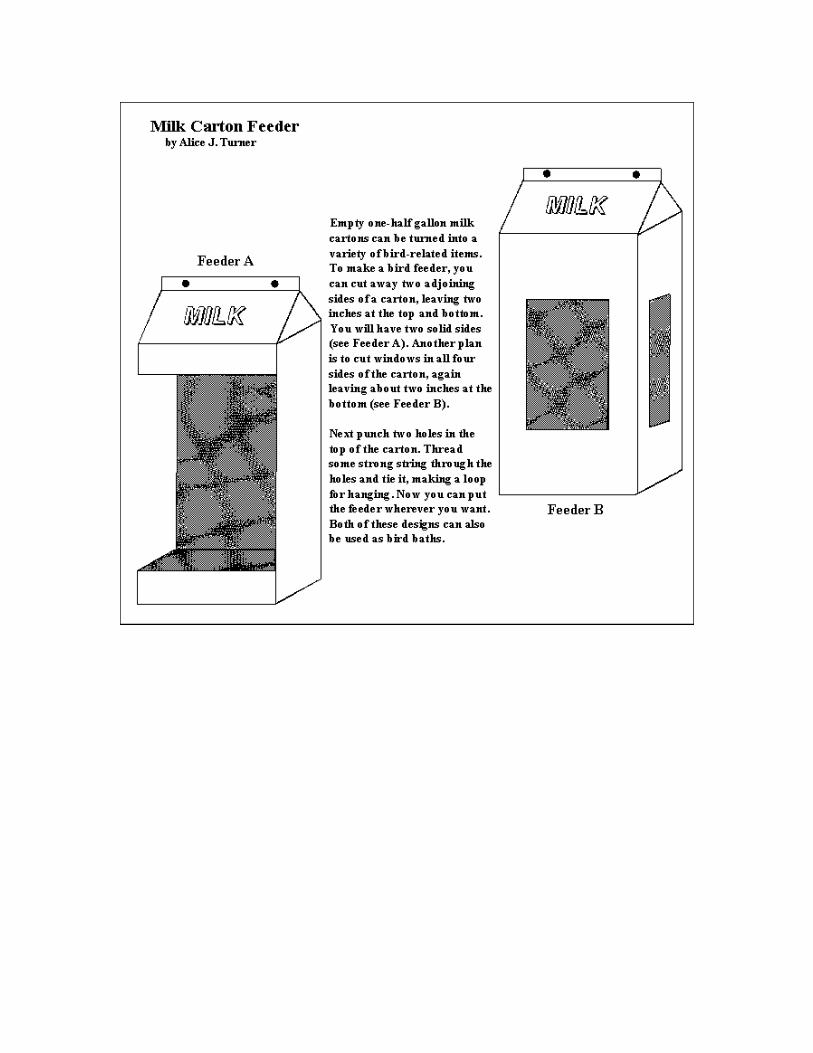
• Milk Carton Feeder
• Large Self-Feeder
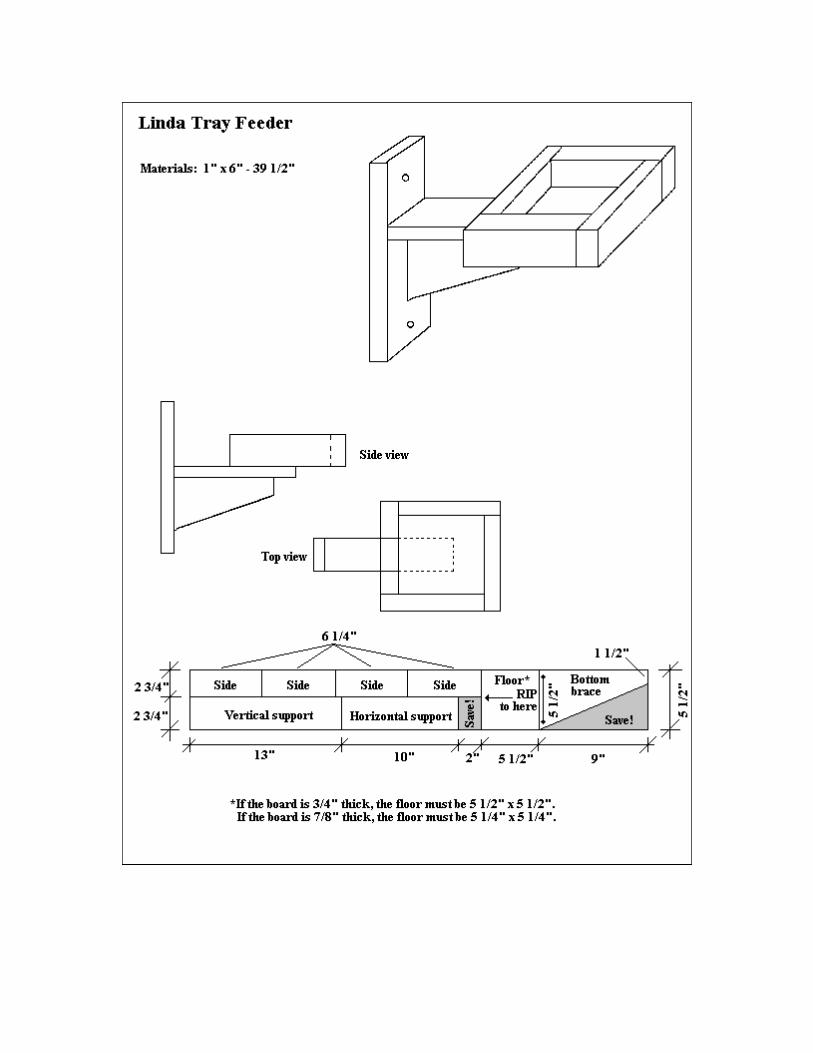
• Linda Tray Feeder
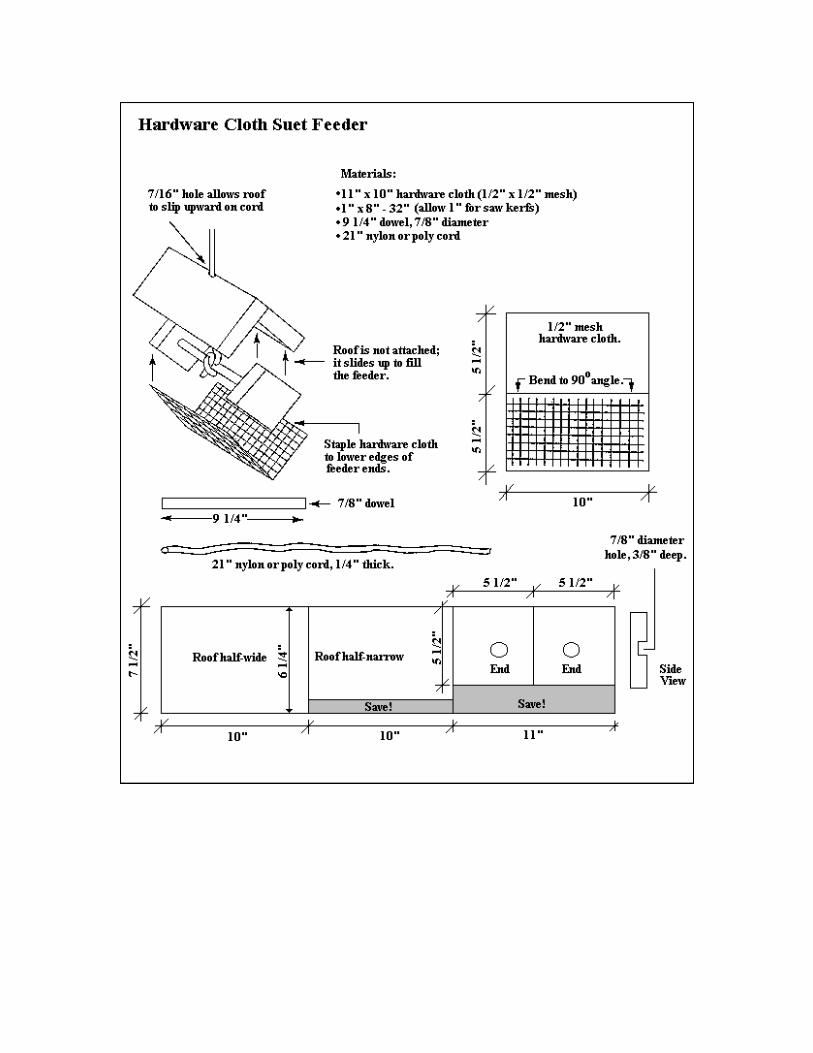
• Hardware Cloth Suet Feeder
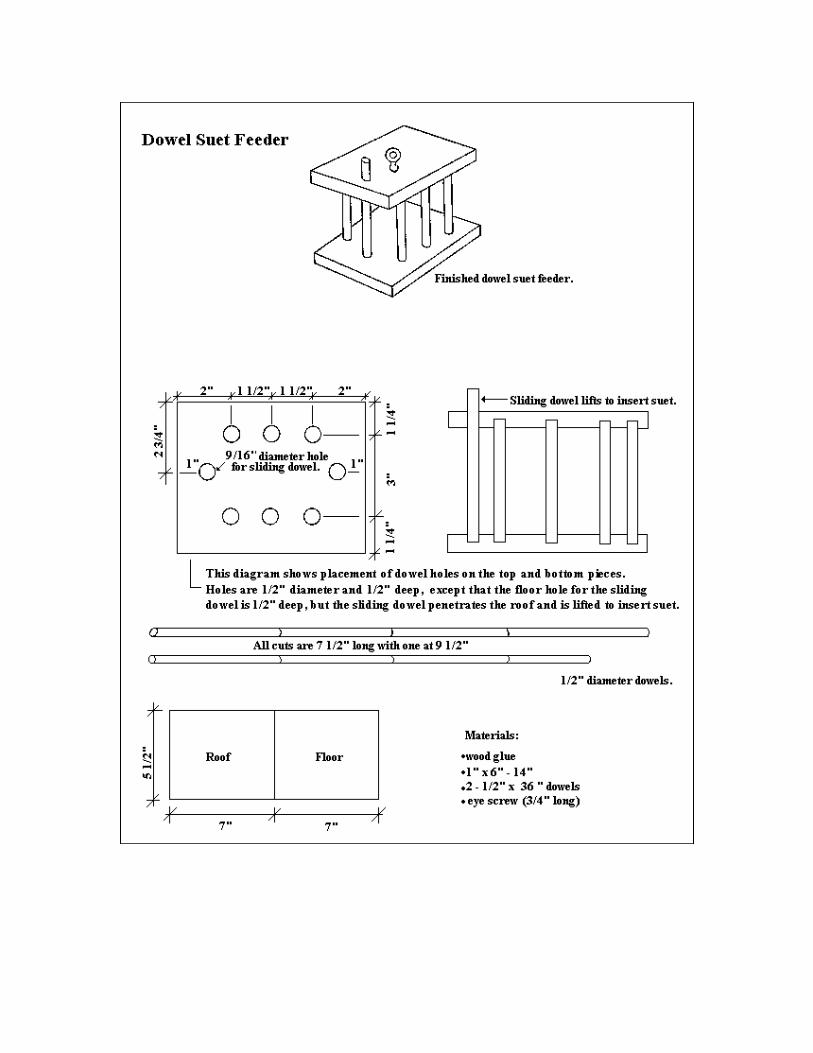
• Dowel Suet Feeder
• Barrel Feeder for Wildlife
Section 3 -- Predator Guards
Section 4 -- Wildlife Viewing and Photography Blinds
• Low-Profile A-Frame Blind
• Modified Portable Fishhouse-Type Blind
CreditsThanks to Carrol L. Henderson of the Minnesota DNR for contributing artwork from
Woodworking for Wildlife. Thanks to Linda Roeder for organization and layout of thispublication.
Photosby Chris Grondahl and Harold Umber
IntroductionProviding nesting areas, feeding, and watching wildlife are becoming increasingly popular sportsin North Dakota. These activities generate about 18 million dollars annually to our state. Moreimportantly, these pastimes provide hours of relaxation, entertainment, and enjoyment for bothyoung and old alike.
This publication introduces some types of nest structures, feeders, and photo blinds which can beconstructed in your home at a minimal expense.
There are four sections to this publication. The first covers nest boxes and platforms. Thesestructures are meant to enhance existing habitat or provide a nest structure where none presentlyexists. This does not mean that natural habitat is not important. Dead and dying trees whichprovide nesting cavities are still the best type of habitat available.
The second section describes wildlife feeders. Feeding birds and mammals in the winter can begood for both you and wildlife. First, it provides you a pastime and viewing opportunity duringthe cold winter months. Secondly, wildlife may have difficulty finding adequate food and thisadditional source can help them survive the winter. Remember, planting a crop for feed is just asgood, or better, than grain in a feeder.
Section three is a short description of predator guards which are very important additions to anywooden support post.
The final section describes two types of homemade photo blinds which can be made withminimal effort or dollars spent. If you've never tried a photo blind, you may be surprised at theresults.
Nest Boxes and Nesting PlatformsGeneral Information for Nest Boxes and Nesting Platforms
Providing nesting areas for wildlife is a popular and growing hobby for many North Dakotans.Building houses according to the proper specifications, placing them in the right habitat, andmaintaining them can benefit both bird and mammal populations. If they are not monitored fordetrimental species such as the house sparrow, they may actually do more harm than good.
It is important to realize that not all birds and mammals nest in cavities. Many birds, like theAmerican robin or meadowlark, either build cupshaped nests in trees or nest on the ground. Thenest box plans that are found in this publication are specific to wildlife that utilize a cavity, eitherwithin a dead or dying tree or a man-made structure such as a nest box.
Cavity nesting birds will accept any kind of nest box that they can enter. Before deciding onwhat kind of nest box to build, there are considerations which should be taken--the size of theentrance hole, interior dimensions, proper ventilation, and the capability to open the nest box formonitoring and cleaning. Do not construct a box for "birds" in general as most species requiredifferent sized houses and entrance holes. The following guidance and construction plans willprovide specific plans for most North Dakota species.
For all practical purposes, wood is the only appropriate building material to use. Wood is anatural material with good insulating properties. Plastic and metal often overheat. Green"pressure-treated" lumber is impregnated with copper arsenate as a preservative. If the chemicalis not applied perfectly, the wood is toxic to birds and humans. Exterior grade plywood containsdangerously high levels of formaldehyde and therefore is also not the best choice. The bestwoods to use are rough cut cedar or redwood. They naturally resist deterioration when exposedto sun and rain and the weathered look is inconspicuous and attractive.
Never paint or stain the inside of a nest box. If you want to paint the exterior, close up the boxand paint only what you can see. Use an exterior grade latex paint and give the top a second coat.Choose a light shade which reflects most heat or a natural color such as green, tan, or gray. Aheavy grade of linseed oil stain works well also. Houses that blend in with their surroundings aremore appealing than brightly painted boxes and less likely to draw the attention of humanvandals.
Nest boxes can be mounted in several ways. They may be attached to existing wood or metalfence posts, power or telephone poles, existing trees, or on wood or metal posts or pieces of pipeused specifically for this purpose. Utility poles are often suitable for mounting nest boxes;however, permission should be obtained from the utility companies before this is done.Discretion should also be used before mounting to trees. Do not place bird boxes designed forbluebirds on trees because this invites competition from too many other species.
Predator-proofing should, be considered for all bird nest boxes that are not mounted on steelfence posts or pipe. A piece of sheet metal, tin, or used aluminum plates from newspaper officesserve well to prevent predators from climbing wooden posts. Sheets should be stapled or screwedon around the outside of the wood post be at least 12 inches high. The bottom of the guardshould be at least two feet above ground level.

Do not put perches on any bird houses. Only the unwanted house sparrows and starlings preferperches. If house sparrows or starlings begin nesting in a bird house tear out the nest material asthese species are not protected by state or federal law. Nests may need to be removed numeroustimes before these birds abandon their efforts.
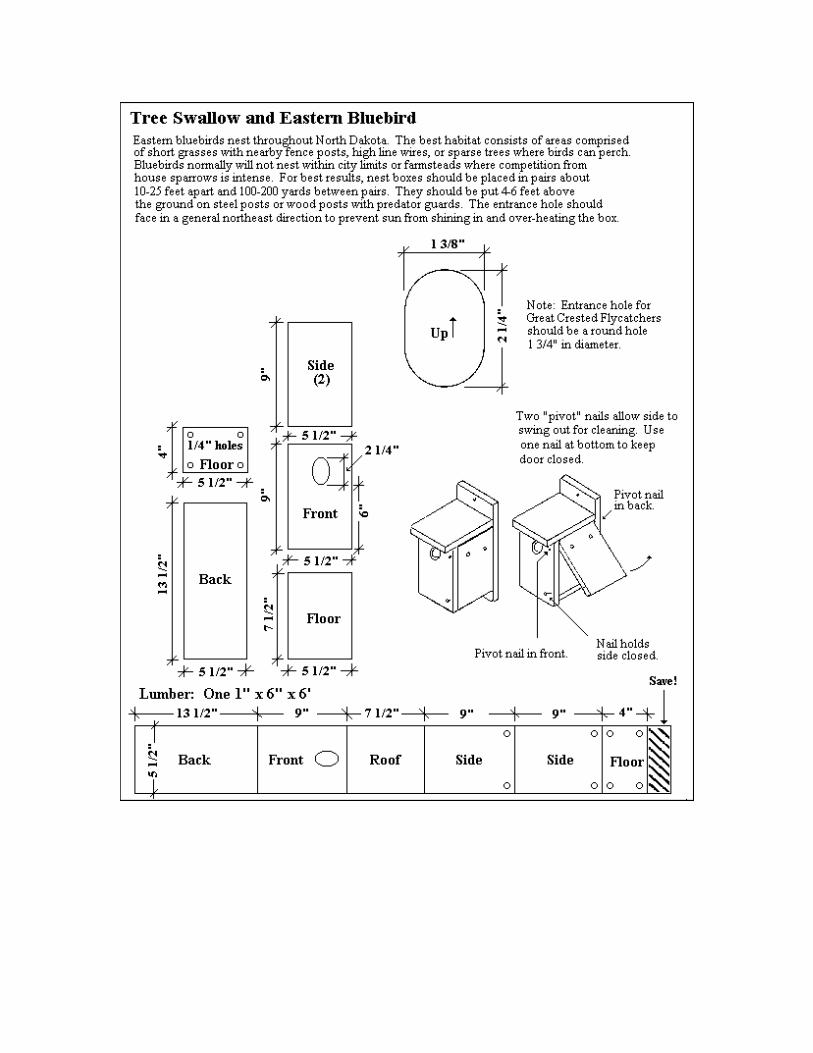
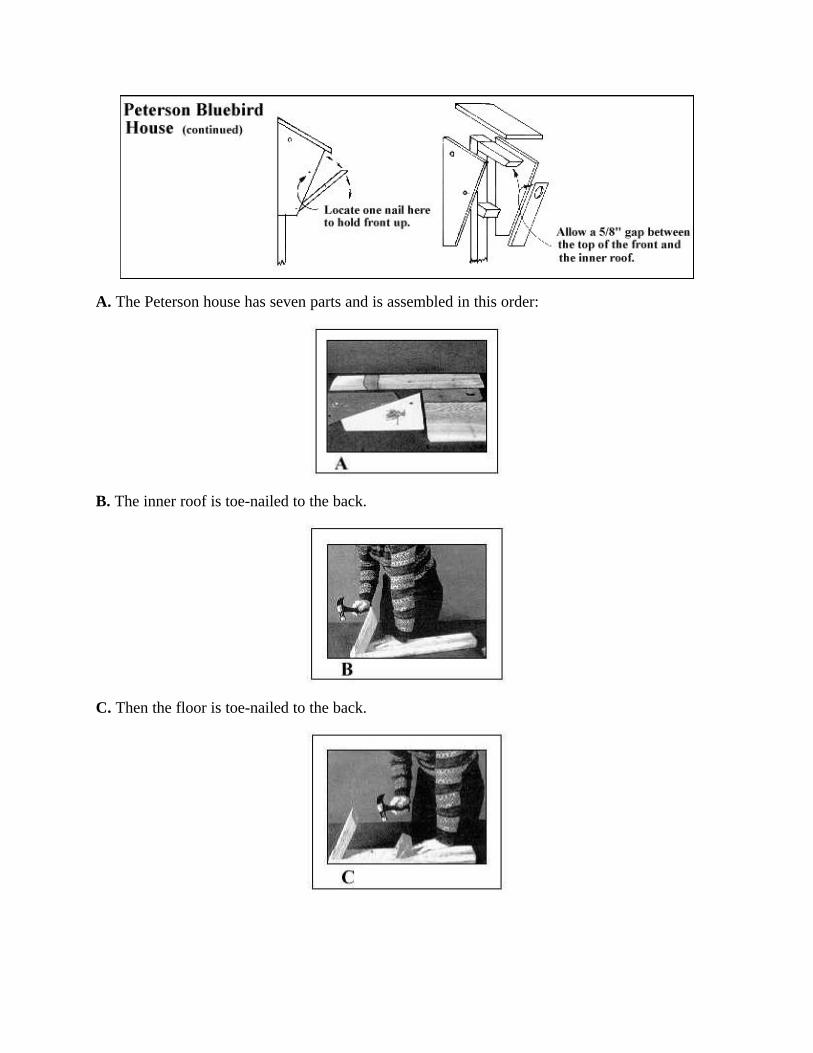
A. The Peterson house has seven parts and is assembled in this order:
B. The inner roof is toe-nailed to the back.
C. Then the floor is toe-nailed to the back.

D. Third, one side is nailed to the resulting frame.
E. Then the other side is nailed to the frame.
F. Next, the swing-down front is fastened by a nail into each side. A third nail is pounded partway into the side near the entrance hole. This is removed each time the house is a checked.
G. Finally, the outer roof is nailed on top.

Editor's Note: -- Good sanitation and maintenance of the nest box at the end of the breedingseason are your best defenses against ectoparasites and other insects. To repel blowflies, waspsand ants during the breeding season, some researchers recommend using a pyrethrin insecticideas the safest pesticide.

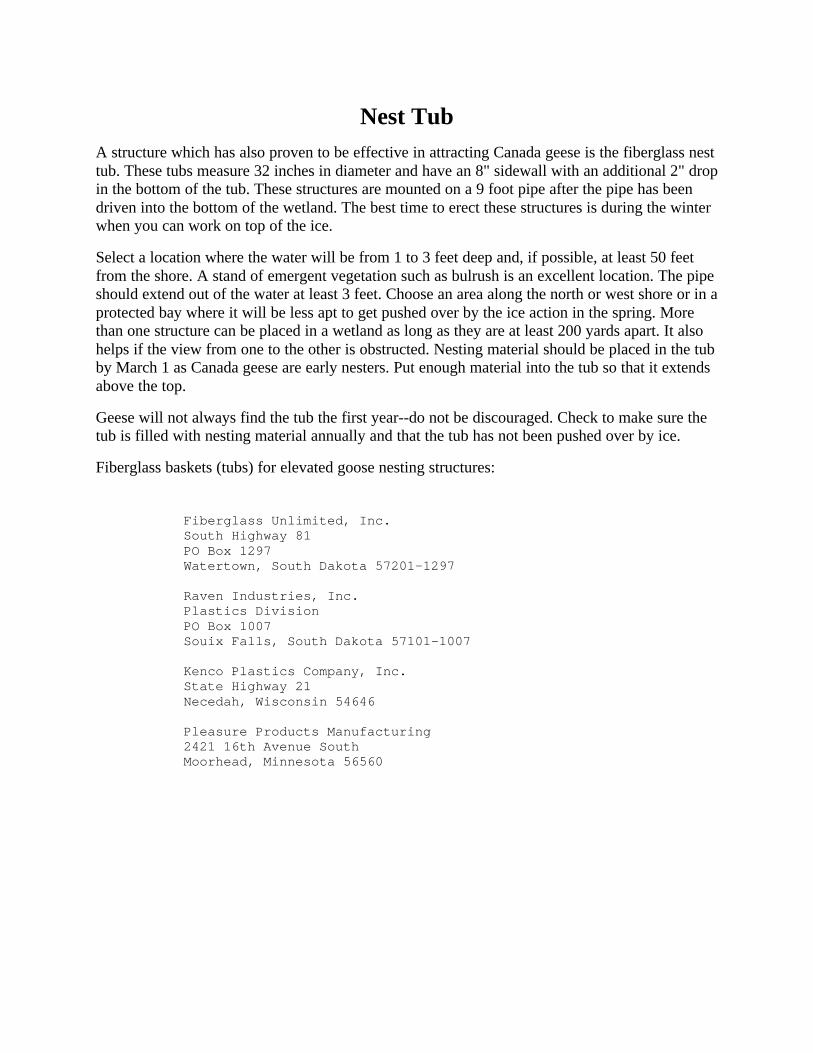
Nest TubA structure which has also proven to be effective in attracting Canada geese is the fiberglass nesttub. These tubs measure 32 inches in diameter and have an 8" sidewall with an additional 2" dropin the bottom of the tub. These structures are mounted on a 9 foot pipe after the pipe has beendriven into the bottom of the wetland. The best time to erect these structures is during the winterwhen you can work on top of the ice.
Select a location where the water will be from 1 to 3 feet deep and, if possible, at least 50 feetfrom the shore. A stand of emergent vegetation such as bulrush is an excellent location. The pipeshould extend out of the water at least 3 feet. Choose an area along the north or west shore or in aprotected bay where it will be less apt to get pushed over by the ice action in the spring. Morethan one structure can be placed in a wetland as long as they are at least 200 yards apart. It alsohelps if the view from one to the other is obstructed. Nesting material should be placed in the tubby March 1 as Canada geese are early nesters. Put enough material into the tub so that it extendsabove the top.
Geese will not always find the tub the first year--do not be discouraged. Check to make sure thetub is filled with nesting material annually and that the tub has not been pushed over by ice.
Fiberglass baskets (tubs) for elevated goose nesting structures:
Fiberglass Unlimited, Inc. South Highway 81 PO Box 1297 Watertown, South Dakota 57201-1297
Raven Industries, Inc. Plastics Division PO Box 1007 Souix Falls, South Dakota 57101-1007
Kenco Plastics Company, Inc. State Highway 21 Necedah, Wisconsin 54646
Pleasure Products Manufacturing 2421 16th Avenue South Moorhead, Minnesota 56560
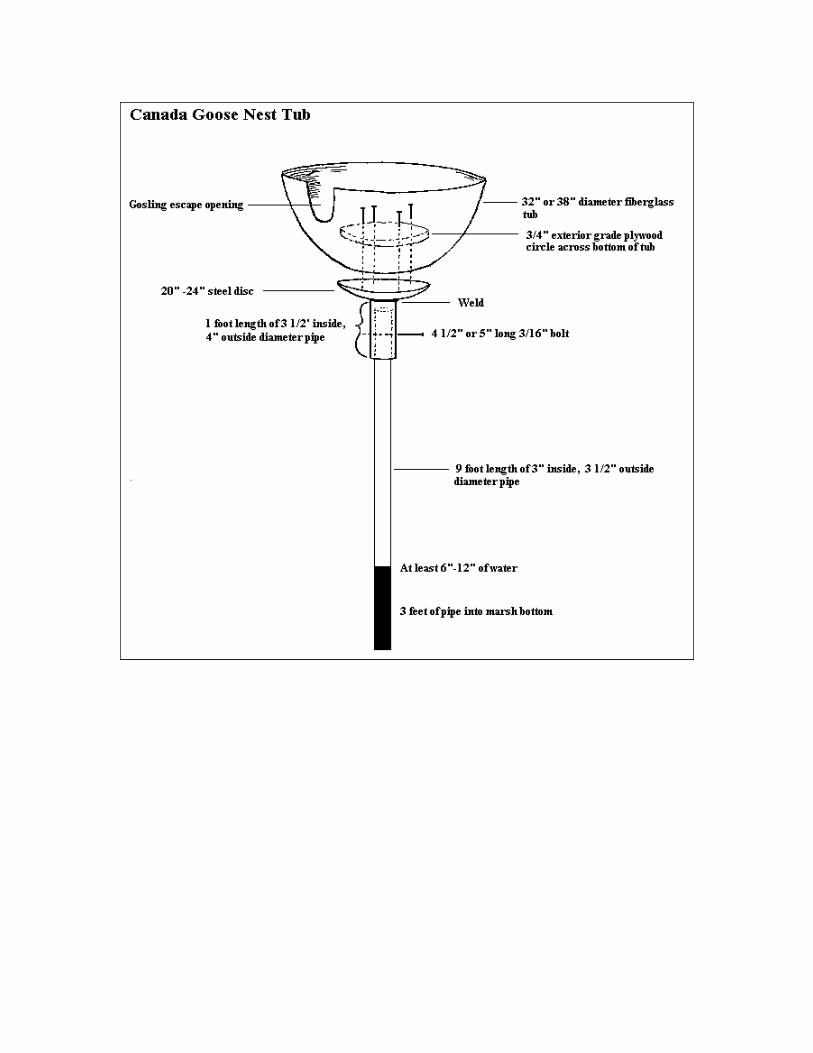
Culvert Nest StructureA major downfall of most nest structures on private land has been that maintenance generallydrops off with time. This causes structures like baskets to become useless, or even worse, deathtraps. Culverts, however, offer ideal nesting conditions and, if properly installed, require verylittle maintenance after the initial installation.
Location
Culverts are best suited for Type IV wetlands, followed by larger Type IIIs and sheltered areas ofType Vs. Culverts should be placed within six feet of emergent vegetation in a water depth ofapproximately 18 inches in the spring. One structure per 10 to 20 acres is a good goal and thereshould never be more than one per wetland acre. Areas with nearby trees should be avoidedbecause they provide hunting perches for raptors and crows.
Installation
(Culverts of 1.5-1.8 m in height are preferable.) A culvert can be either installed in a dry wetlandor through the ice. Installation in a dry wetland is much easier and less hazardous than throughthe ice. To install in a dry wetland, scrape a depression in the wetland bottom with a loaderbucket. Using the bucket, push down and square the culvert in the depression. While installingthrough the ice, use good judgment as to what the ice conditions are. If ice is thick enough tosupport the equipment, start by cutting a hole in the ice. Cutting a hole in the middle of the circleof ice will make it easier to lift out. Once the ice is removed, push the culvert down into the mudand level it. Try to get the culvert into solid (but not frozen) bottom substrate.
Filling the Culvert
Culverts should be filled with soil suitable for plant growth. Rock or gravel are not acceptablefill material because they do not allow moisture to reach growing plants. The soil will settle andthe culverts must be revisited to replenish the settled soil. The soil can settle as much as two feet,making it impossible for ducklings and goslings to escape. Filling the culvert with watersaturated fill material may decrease the settling. Plan on revisiting the site(s) at least once andprobably twice to replenish the settled soil.
Habitat/Cover
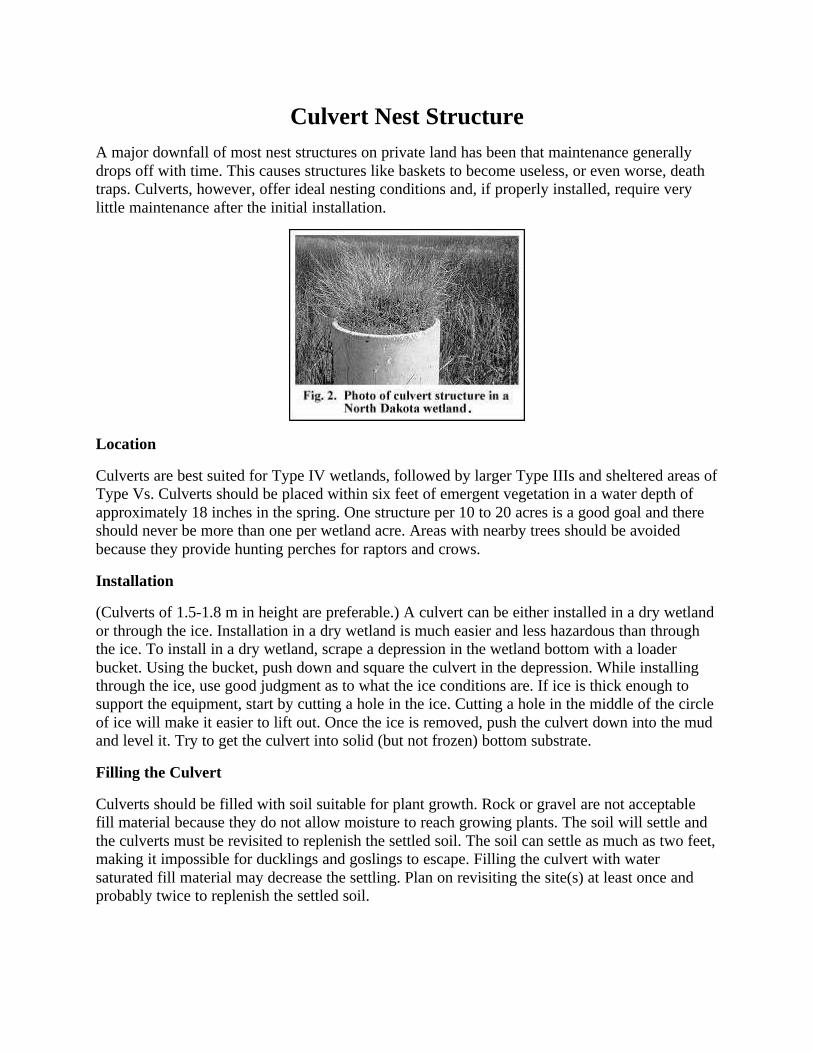
Culverts grow a variety of weeds from windblown or soil-stored sources. This is generally okay,but seed such as alfalfa, sweet clover, and native grasses could be spread into the soil to improveconditions. It generally takes 1 to 2 years before cover is adequate to attract nesting waterfowl.Nesting geese usually break down nearly all residual vegetation and use it as nest material. Theyalso destroy the vertical and horizontal cover that attracts mallards. Generally geese and mallardswill not occupy the same sight unless modifications are made. A partition may be placed into alarger culvert that separates geese and mallard nesting sights. The partition can be made fromcedar boards (4 cm thick) to resist rot. Covering the partition with 15 cm mesh wire will allowmallards to squeeze through the mesh if necessary. A rounded opening of approximately 15 x 20cm will provide access to the covered quadrants of the partition. Weaving 1-2 cm diameterwillow sticks through the wire mesh on the side facing the open goose nesting area will ensurethat the cover for the mallard nesting sight will not be incorporated into the goose nest.
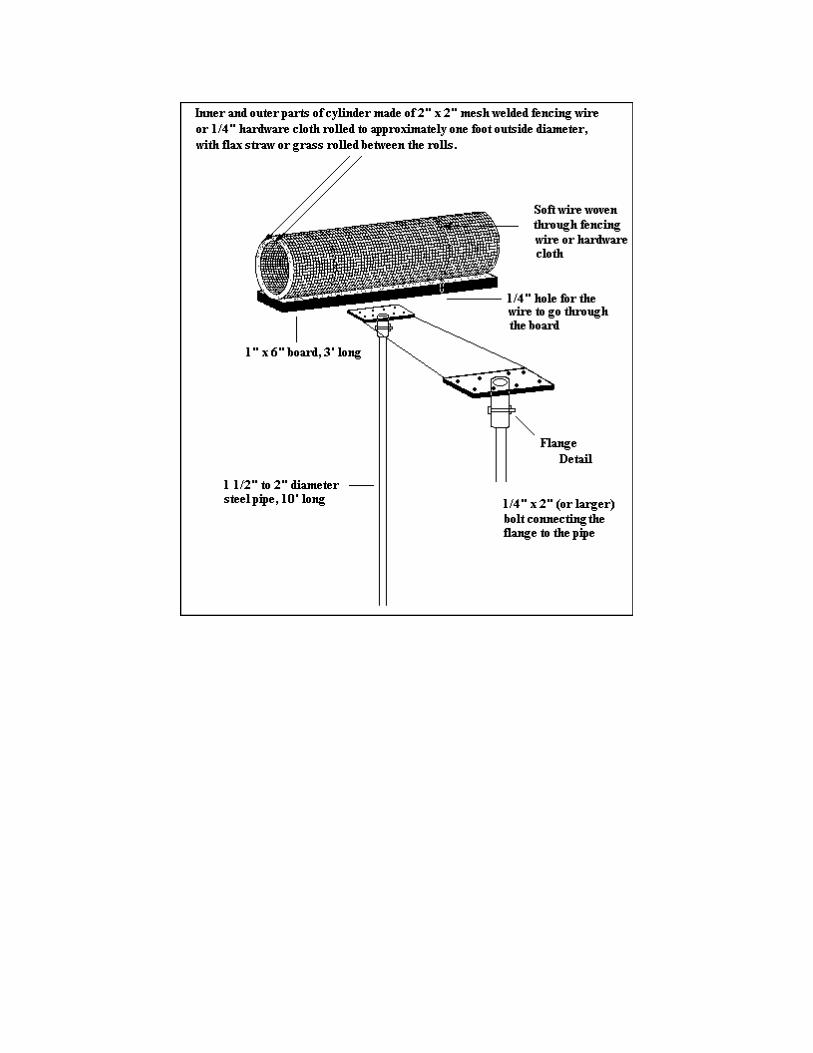
Hen HouseThe basic design of the hen house is a three foot long grass cylinder. The hen house is easy tobuild and all the materials are readily available.
Materials to build a hen house include:
• 7 foot piece of 2" x 2" mesh welded fencing wire 36" wide or 1/4" hardware cloth
• 1" x 6" x 3' treated lumber
• 10 foot long 2" pipe
• wire
• four screws
• pipe flange
• flax, marsh grass
To make the cylinder, cover one-half of the fencing wire with an inch of grass and roll it into afoot diameter cylinder.
Take short pieces of wire and tie the roll together in two or three areas. Use screws to attach theflange onto the center of the board.
Attach the cylinder to the board with pieces of wire about five feet long, weaving the wirethrough the cylinder and attaching it to the board. Repeat this two or three times to make sure thecylinder is on tight.
Pound the 10 foot pipe into the bottom of the wetland to make sure the pipe is stable and secure.About three feet of pipe should be left out of the water. The nest is then attached to the pipe witha flange. Installation of nests should be done in late winter when pounding the pipe into thewetland bottom and attaching the nest can be done easily. Hen houses should be placed at least100 feet apart because hens are territorial and are intolerant of other ducks nesting in closeproximity.
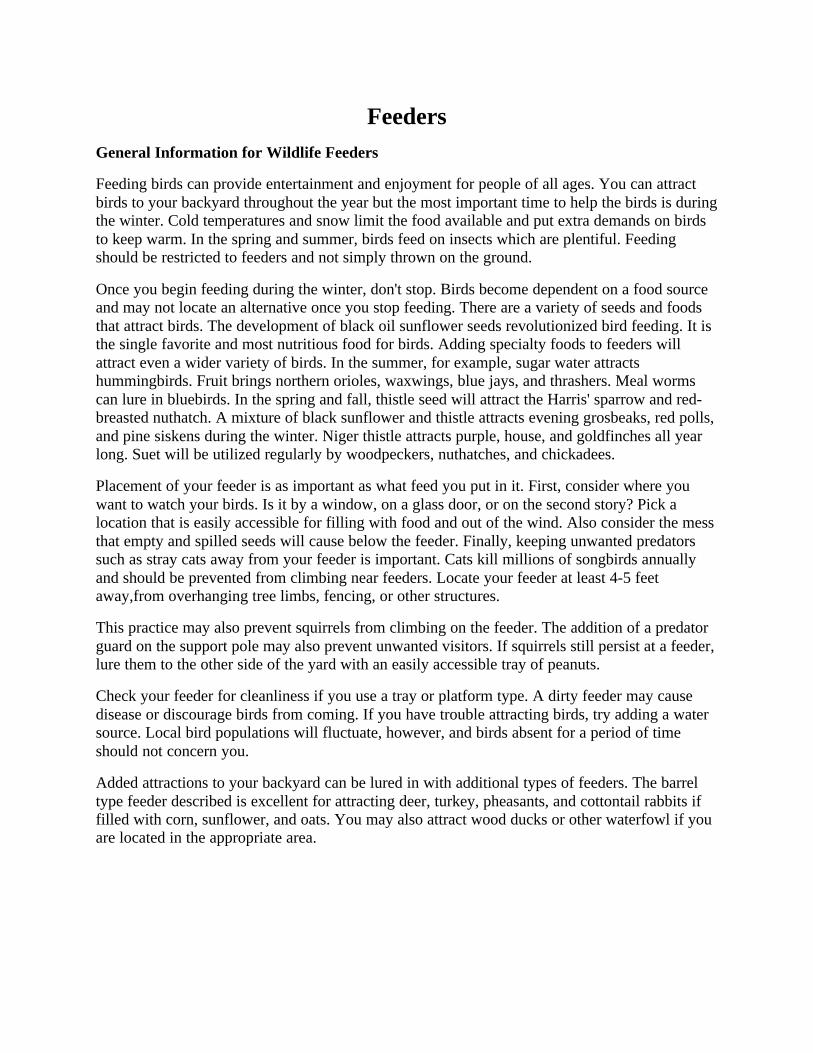
FeedersGeneral Information for Wildlife Feeders
Feeding birds can provide entertainment and enjoyment for people of all ages. You can attractbirds to your backyard throughout the year but the most important time to help the birds is duringthe winter. Cold temperatures and snow limit the food available and put extra demands on birdsto keep warm. In the spring and summer, birds feed on insects which are plentiful. Feedingshould be restricted to feeders and not simply thrown on the ground.
Once you begin feeding during the winter, don't stop. Birds become dependent on a food sourceand may not locate an alternative once you stop feeding. There are a variety of seeds and foodsthat attract birds. The development of black oil sunflower seeds revolutionized bird feeding. It isthe single favorite and most nutritious food for birds. Adding specialty foods to feeders willattract even a wider variety of birds. In the summer, for example, sugar water attractshummingbirds. Fruit brings northern orioles, waxwings, blue jays, and thrashers. Meal wormscan lure in bluebirds. In the spring and fall, thistle seed will attract the Harris' sparrow and red-breasted nuthatch. A mixture of black sunflower and thistle attracts evening grosbeaks, red polls,and pine siskens during the winter. Niger thistle attracts purple, house, and goldfinches all yearlong. Suet will be utilized regularly by woodpeckers, nuthatches, and chickadees.
Placement of your feeder is as important as what feed you put in it. First, consider where youwant to watch your birds. Is it by a window, on a glass door, or on the second story? Pick alocation that is easily accessible for filling with food and out of the wind. Also consider the messthat empty and spilled seeds will cause below the feeder. Finally, keeping unwanted predatorssuch as stray cats away from your feeder is important. Cats kill millions of songbirds annuallyand should be prevented from climbing near feeders. Locate your feeder at least 4-5 feetaway,from overhanging tree limbs, fencing, or other structures.
This practice may also prevent squirrels from climbing on the feeder. The addition of a predatorguard on the support pole may also prevent unwanted visitors. If squirrels still persist at a feeder,lure them to the other side of the yard with an easily accessible tray of peanuts.
Check your feeder for cleanliness if you use a tray or platform type. A dirty feeder may causedisease or discourage birds from coming. If you have trouble attracting birds, try adding a watersource. Local bird populations will fluctuate, however, and birds absent for a period of timeshould not concern you.
Added attractions to your backyard can be lured in with additional types of feeders. The barreltype feeder described is excellent for attracting deer, turkey, pheasants, and cottontail rabbits iffilled with corn, sunflower, and oats. You may also attract wood ducks or other waterfowl if youare located in the appropriate area.
2-Liter Plastic Soda Bottle Bird Feeder
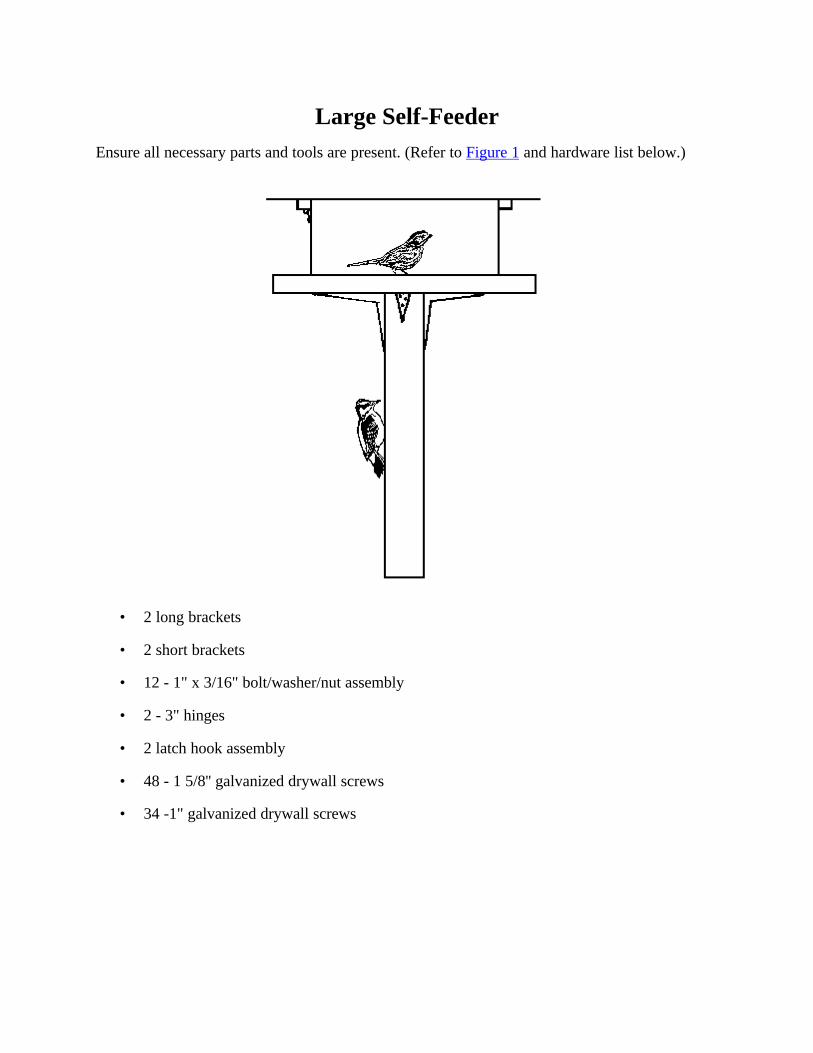
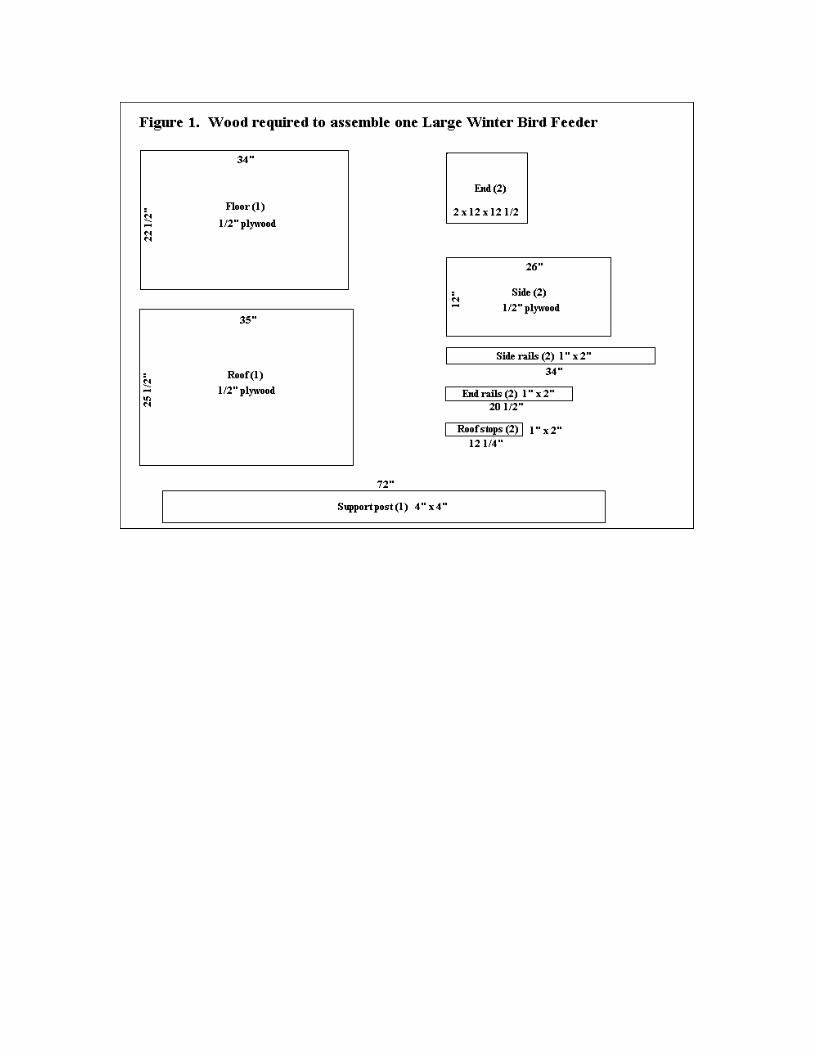
Large Self-FeederEnsure all necessary parts and tools are present. (Refer to Figure 1 and hardware list below.)
• 2 long brackets
• 2 short brackets
• 12 - 1" x 3/16" bolt/washer/nut assembly
• 2 - 3" hinges
• 2 latch hook assembly
• 48 - 1 5/8'' galvanized drywall screws
• 34 -1" galvanized drywall screws
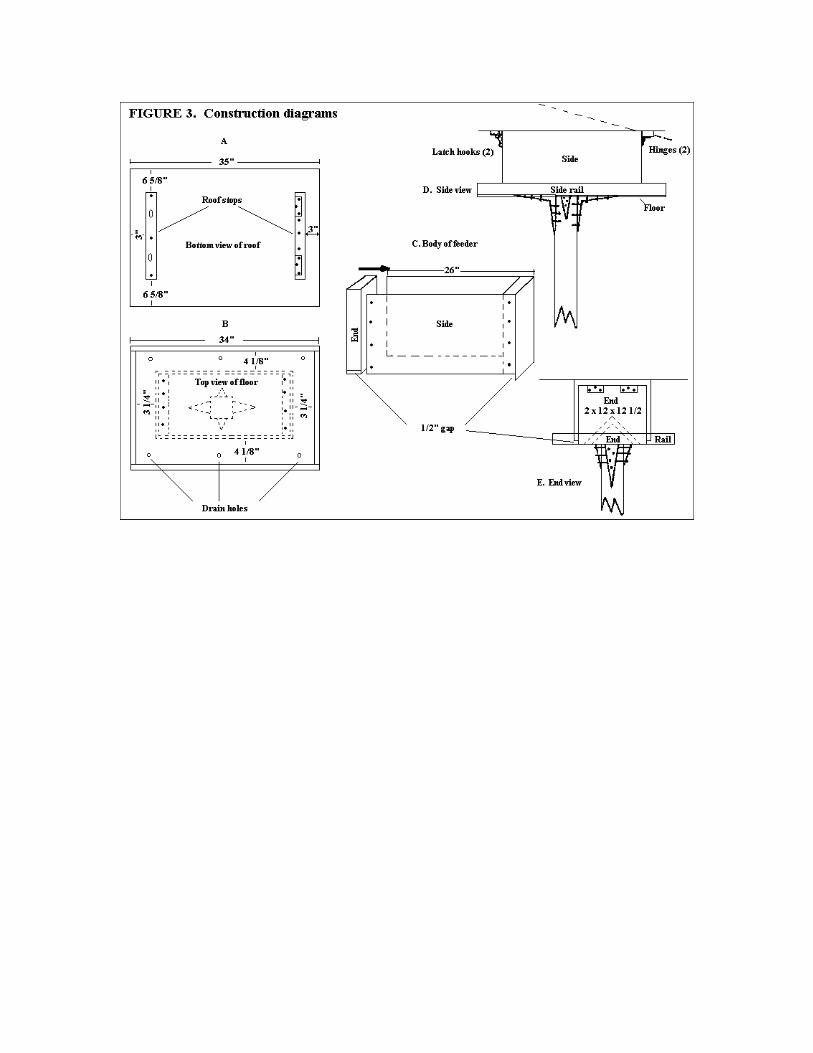
Attach two roof stops to bottom of roof using three 1" screws per roof stop. Screws should bedriven from top of roof (refer to Figure 3A).
Attach two side rails to two end rails forming a rectangle of 1 by 2s. 1 5/8" screws should bedriven into side rails which overlap the end rails. Attach this rectangle of 1 by 2s to plywoodfloor with 1 5/8" screws driven in from plywood side (see Figure 3B). This railing will hold seedon the platform.
Assemble body of feeder utilizing two 2 x 12 x 12 1/2" ends and two 12 x 26" sides. Attach 12"plywood sides to the longer (12 1/2") length of the end pieces with four 1". screws. The 1/2" gapremaining at the bottom of the rectangular box will function to release seeds from the body of thefeeder (refer to Figure 3C).
Center body of feeder on top of floor and attach from bottom of floor with 1 5/8" screws. Screwsshould come up through plywood and into the 2 x 12" ends.
Drill at least six 1/4" drain holes into floor of feeder platform.
Place roof assembly on the ground with roof stops facing upward. Turn body of floor assemblyupside down, grasp the floor, and insert body of feeder between roof stops. (Body of feedershould fit snugly between roof stops.) Attach two hinges to one roof stop and two latch hooks toother roof stop. Attach hinges and latch hooks to body of feeder. Use 1" screws to attach hinges(refer to Figure 3D).
With roof latched and top of roof on the ground, center 4 x 4 post on bottom of floor and markwith pencil. Position brackets using pencil outline of 4 x 4 post. Mark and drill bracket holesthrough plywood and attach brackets with l" x 3/16" bolts, tighten. Place 4 x 4 post into positionand fasten using 15/8 screws. (Disregard this step if you plan to move the feeder to its finallocation in two pieces.)
Optional: Add a center peak structure as illustrated by the dashed line in Figure 3E. Two piecesof either 1/2" plywood or pine should be cut 26" long and approximately 5" wide. Nail or screwtogether to form a 45 degree angle and fasten to the center of the floor of the feeder body. (Thisstructure prevents old seed from accumulating in the center of the seed reservoir and increasesefficiency of seed dispersal.)
To erect feeder, dig a hole approximately two feet deep. Place post in hole and keep straightwhile occasionally packing dirt as hole is filled. IMPORTANT NOTE: Feeders must be coatedwith a good exterior paint for long life and weather proofing. This may be done before or afterputting the feeder up. However, the portion of the post being buried should be painted unlesslumber is pre-treated.
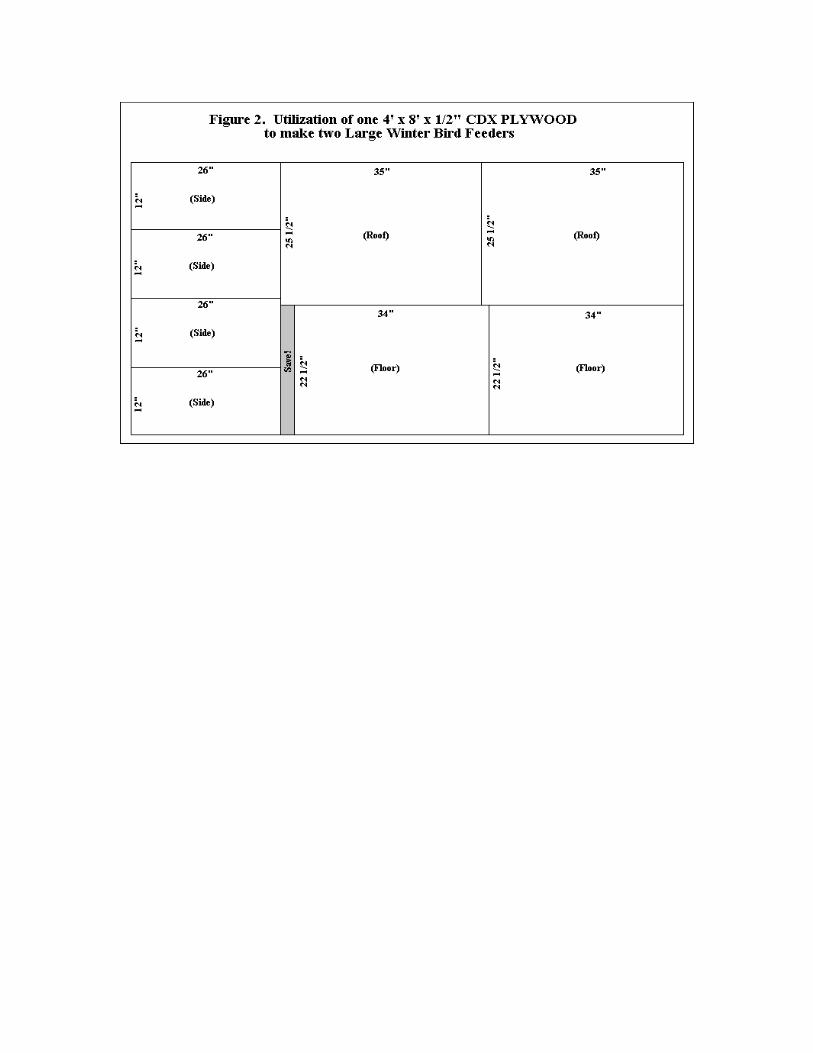
Additional: Figure 2 demonstrates how to get the necessary plywood pieces to construct twolarge winter bird feeders from one sheet of plywood. (The cost of approximately $9 per feederfor plywood and a $6 charge per 4 x 4 post demonstrates that the material to build this feeder canbe purchased for under $25.)
TOOLS REQUIRED
• Table saw
• Philips head screwdriver
• Wrench to tighten bolt assemblies
• Standard screwdriver
• Paint brush/paint
• Post hole digger

Barrel Feeder for WildlifeA simple feeder can be constructed from a 55 or 30 gallon steel barrel which can often beacquired for little or no cost. This type of feeder can be filled with any grain including black oilsunflower, corn, oats, or a mixture of grains. It serves as a ground feeder and is excellent fordeer, turkeys, and other upland birds.
Instructions
Find a barrel which did not contain pesticides or other toxic chemicals. The barrels mostcommonly available are those which contained petroleum products. Ensure any residue iswashed from the inside of such barrels.
Remove one end of the barrel. This will become the top end into which grain is poured. Do notattempt cutting out the end with a cutting torch as vapors within the barrel may be explosive.Instead, use a saber saw with a metal cutting blade or a large hammer and metal cutting chisel.
Make a 12 inch cut lengthwise along the bottom edge of the barrel about 2 inches above thebottom base ring. The cut should be started by first drilling a 3/8 inch hole where the cut willbegin. Cut 12 inches across the bottom beginning at the 3/8 inch hole with a saber saw and finemetal cutting blade.
Pound in the metal above the 12 inch cut. The result should be a half-moon shaped opening thatwill release grain as it is taken from the small tray opening below.
If the barrel did not come with a lid, cut a section of exterior plywood slightly larger than theopening in the top of the barrel. Secure this lid to the barrel using tarp straps. Eye bolts can befastened to both the barrel and the plywood for points to hook the straps. As an alternate andmore simple method, nail three small blocks of wood on the bottom side of the lid just inside thetop edge of the barrel and place a brick or other heavy object on top to hold the lid in place.
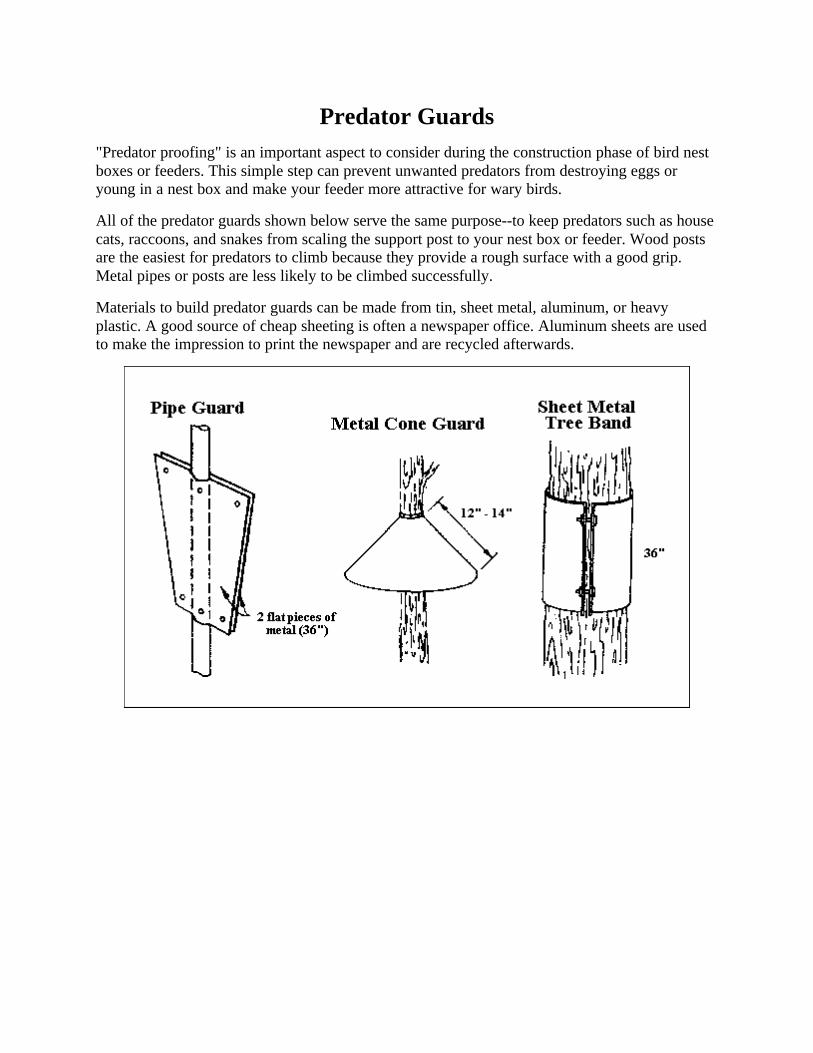
Predator Guards"Predator proofing" is an important aspect to consider during the construction phase of bird nestboxes or feeders. This simple step can prevent unwanted predators from destroying eggs oryoung in a nest box and make your feeder more attractive for wary birds.
All of the predator guards shown below serve the same purpose--to keep predators such as housecats, raccoons, and snakes from scaling the support post to your nest box or feeder. Wood postsare the easiest for predators to climb because they provide a rough surface with a good grip.Metal pipes or posts are less likely to be climbed successfully.
Materials to build predator guards can be made from tin, sheet metal, aluminum, or heavyplastic. A good source of cheap sheeting is often a newspaper office. Aluminum sheets are usedto make the impression to print the newspaper and are recycled afterwards.
Wildlife Viewing and Photography BlindsViewing or photographing wildlife is made easier if you are stationary and let the wildlife cometo you. It is easy to attest to that if you've ever fed birds in your back yard at a feeding station.The same approach should be used if you travel out-of-doors to view or photograph wildlife. Thefact is that wildlife subjects are just that--wild, and normally won't allow you to approachclosely. A little more time will be required to construct, place, and maintain a blind, but the timeinvolved will be far less than the time spent in frustrating pursuit of wary wildlife.
There are as many types and shapes of blinds as there are inventive minds who build them. Themain point is that the blind be large enough to make you comfortable, made of dark canvas solight cannot penetrate, and allow your shadow to be seen, made sturdy and anchored to theground to prevent it from blowing away, and placed in the correct habitat and camouflaged tomaximize your chances of seeing wildlife.
Choosing the correct habitat to place the blind is easier and more effective if you know yoursubjects' habitat and characteristics. Viewing deer, for instance, would require that a blind isplaced near a food source where the deer is feeding in the evening, or on a trail that leads fromwhere it feeds to a bedding area where it rets during the day. Another possibility would be ablind near a trail of rubbed trees where a buck frequents in the fall or an area where deercongregate to winter. Every species of wildlife act relatively the same from day to day or seasonto season and a pattern can usually be established if you do your research.
Other useful tips that may enhance your success include pre-positioning a blind for some timebefore you plan to use it. Time for the wildlife to get used to the presence of the blind isimportant. The blind should also be positioned so that the prevailing winds blow from the subjectto your blind and not toward the wildlife. Birds are not of concern with this issue. Movementwithin the blind should be minimal and loud talking prohibited. Bringing a stool or short chairwill make the stay more comfortable as patience is often a virtue when sitting in a blind.
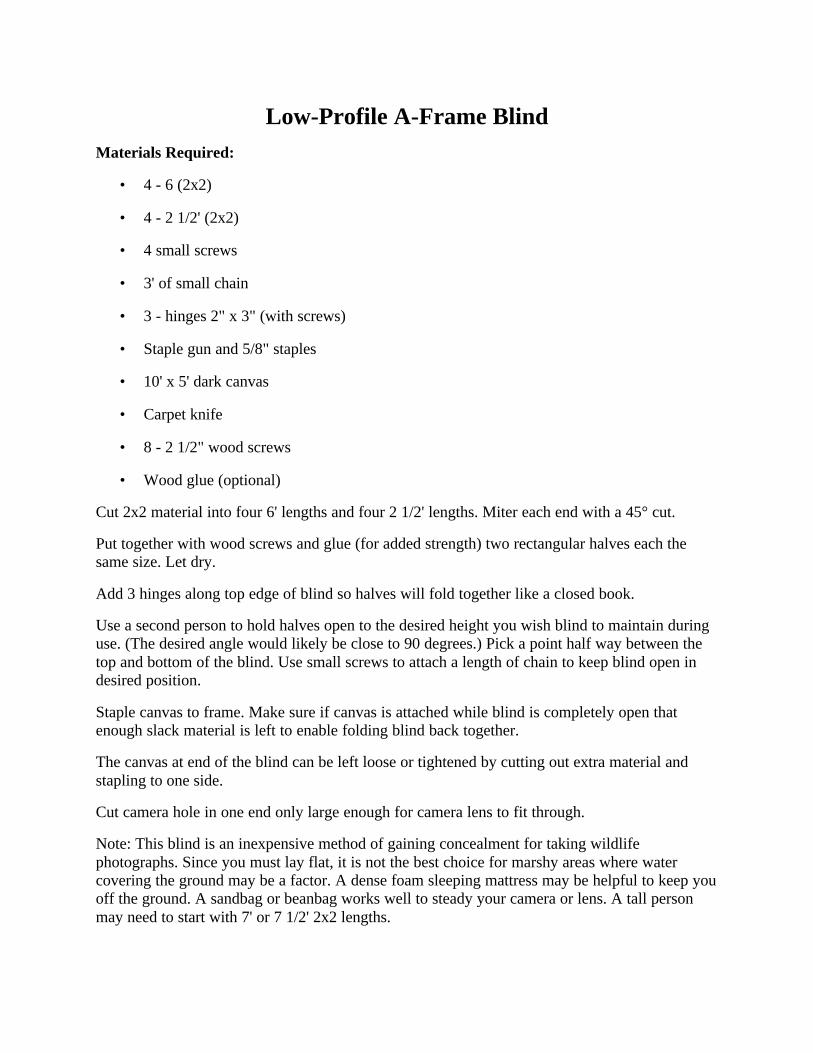
Low-Profile A-Frame BlindMaterials Required:
• 4 - 6 (2x2)
• 4 - 2 1/2' (2x2)
• 4 small screws
• 3' of small chain
• 3 - hinges 2" x 3" (with screws)
• Staple gun and 5/8" staples
• 10' x 5' dark canvas
• Carpet knife
• 8 - 2 1/2" wood screws
• Wood glue (optional)
Cut 2x2 material into four 6' lengths and four 2 1/2' lengths. Miter each end with a 45° cut.
Put together with wood screws and glue (for added strength) two rectangular halves each thesame size. Let dry.
Add 3 hinges along top edge of blind so halves will fold together like a closed book.
Use a second person to hold halves open to the desired height you wish blind to maintain duringuse. (The desired angle would likely be close to 90 degrees.) Pick a point half way between thetop and bottom of the blind. Use small screws to attach a length of chain to keep blind open indesired position.
Staple canvas to frame. Make sure if canvas is attached while blind is completely open thatenough slack material is left to enable folding blind back together.
The canvas at end of the blind can be left loose or tightened by cutting out extra material andstapling to one side.
Cut camera hole in one end only large enough for camera lens to fit through.
Note: This blind is an inexpensive method of gaining concealment for taking wildlifephotographs. Since you must lay flat, it is not the best choice for marshy areas where watercovering the ground may be a factor. A dense foam sleeping mattress may be helpful to keep youoff the ground. A sandbag or beanbag works well to steady your camera or lens. A tall personmay need to start with 7' or 7 1/2' 2x2 lengths.
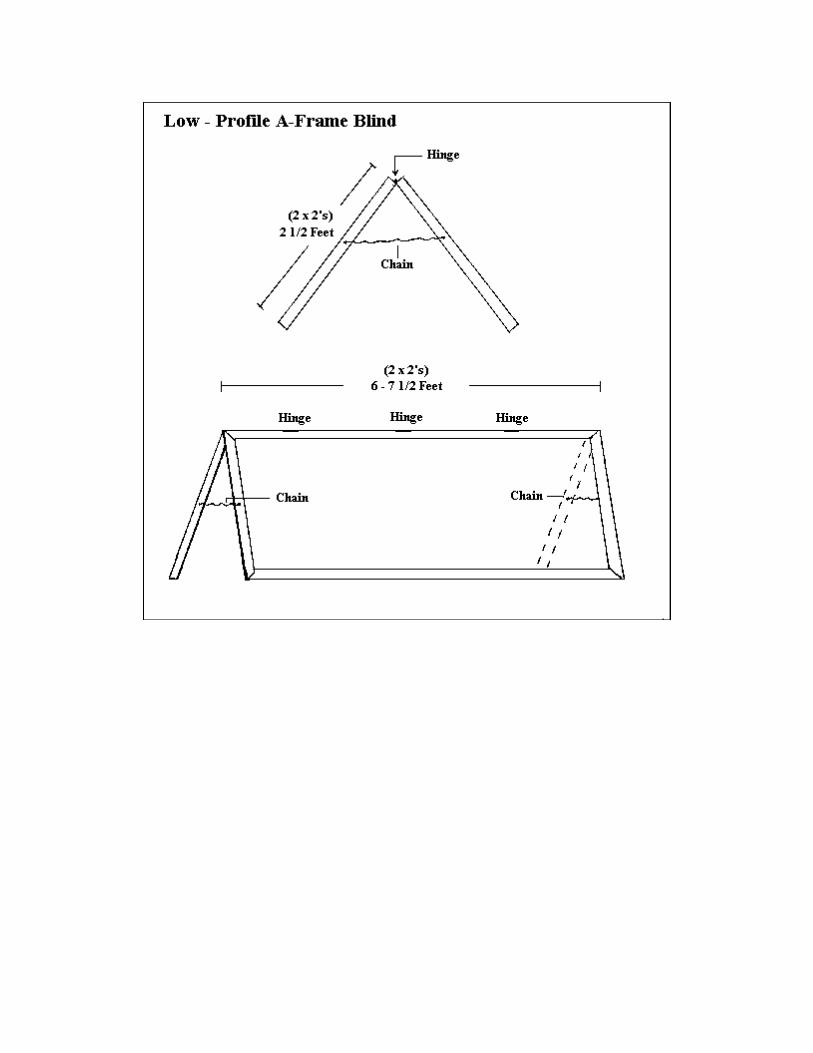
Modified Portable Fishhouse-Type BlindThis blind is fashioned after the typical portable ice house. Finding someone who owns one maygive you a head start before construction.
Materials Needed:
• 2 - 4' 1 1/4" (l " x 2")
• 2 - 4' (2" x 4")
• 2 - 5' (2" x 4")
• 2 - (4' x 4') 3/8" plywood
• 7' x 14' dark canvas
• Drill and 1/16" bit, 3/8" bit
• 8' piano hinge
• Jig saw
• 1 box small wood screws (1/2")
• 1 box medium wood screws (3/4")
• Staple gun with 1/2" staples
• Carpet knife
• 8 - 3" wood screws
• Wood glue
• 8 - 4' lengths of 2" x 1/4" lathe
Cut two 4' 2x4s and two 5' 2x4s. Miter ends 90 degrees.
Make base of blind with above 2x4s by joining mitered ends together. Glue and join togetherwith 3" wood screws.
Use piano hinge on inside edge of blind. Attach to each 4' 2x4 one 4x4 sheet of 3/8" plywood.Use 1/2" screws in plywood and 3/4" screws in 2x4. Both plywood pieces should be free to foldtoward center of blind.
Begin attaching canvas on one 5' 2x4. Drill pilot holes in lathe material with 1/16" bit. Doublecanvas over and place lathe material over canvas. Sink 3/4" screws through lathe, canvas, andinto 2x4. Have assistant hold both plywood sides straight up.
Stretch canvas over entire blind and repeat above process on opposite 5' 2x4. Cutting of someexcess canvas may be necessary.
Secure 1x2s inside blind wedging them between plywood walls. These will be the supports thatkeep your blind from collapsing. For right now, you may wish to nail them temporarily for easeof working.
Attach canvas on plywood by using lathe and 1/2" screws. Remember doubling canvas anddrilling pilot holes. Extra canvas will need to be trimmed. Use your own best judgment,however, canvas should overlap wood by at least 3".
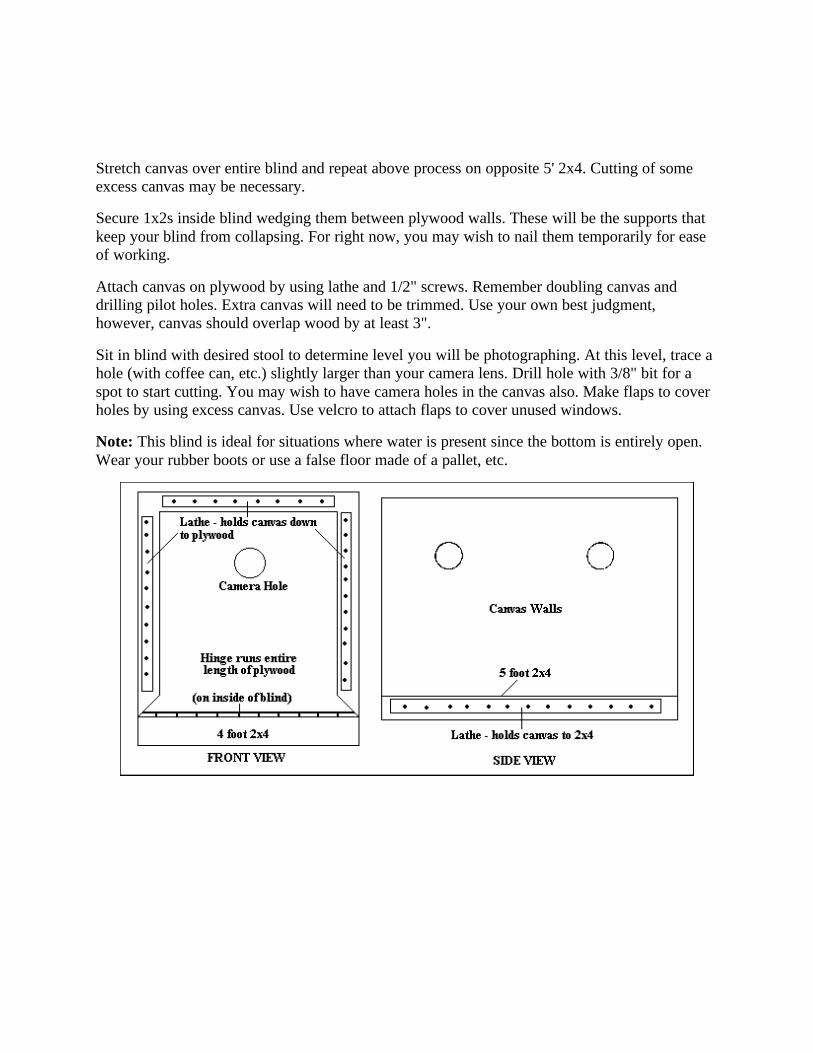
Sit in blind with desired stool to determine level you will be photographing. At this level, trace ahole (with coffee can, etc.) slightly larger than your camera lens. Drill hole with 3/8" bit for aspot to start cutting. You may wish to have camera holes in the canvas also. Make flaps to coverholes by using excess canvas. Use velcro to attach flaps to cover unused windows.
Note: This blind is ideal for situations where water is present since the bottom is entirely open.Wear your rubber boots or use a false floor made of a pallet, etc.

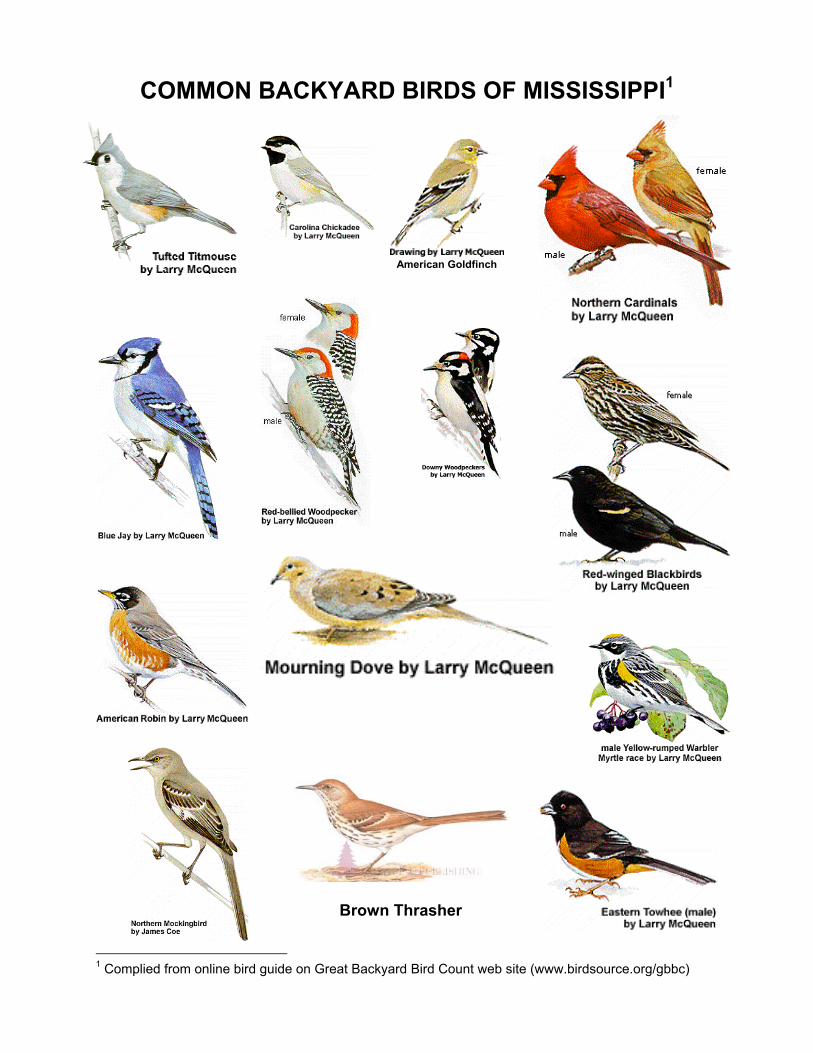
COMMON BACKYARD BIRDS OF MISSISSIPPI1
1 Complied from online bird guide on Great Backyard Bird Count web site (www.birdsource.org/gbbc)
American Goldfinch
Brown Thrasher
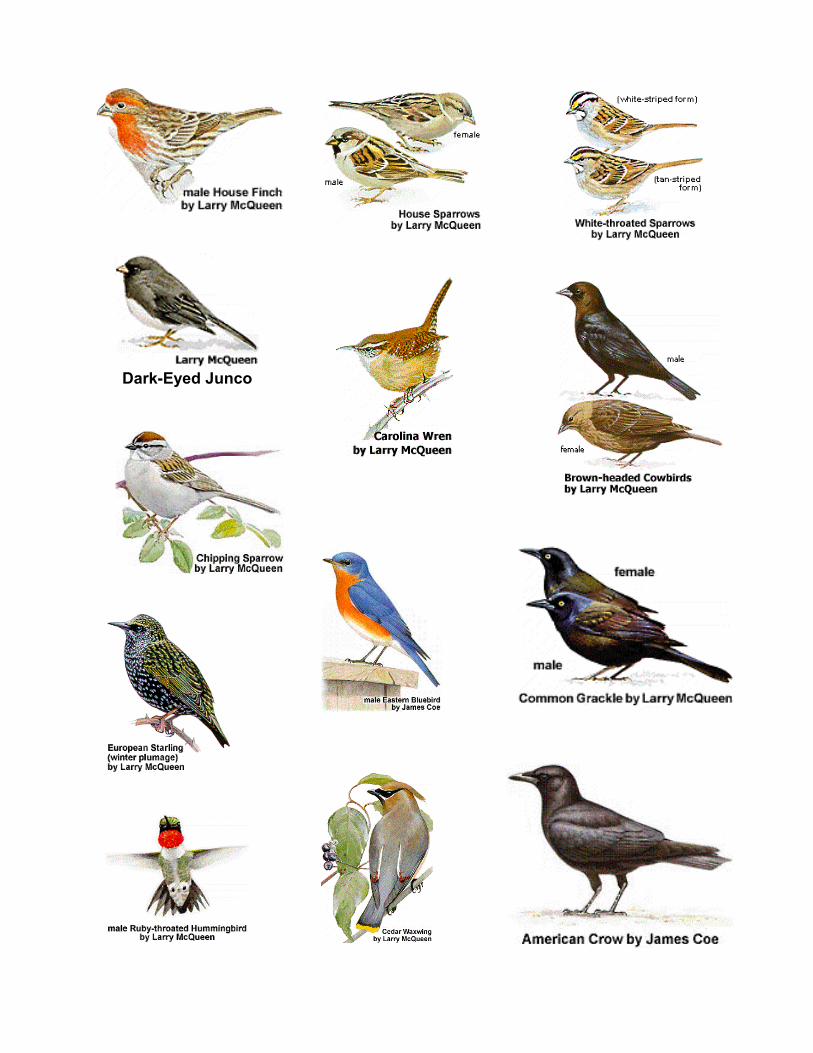
Dark-Eyed Junco

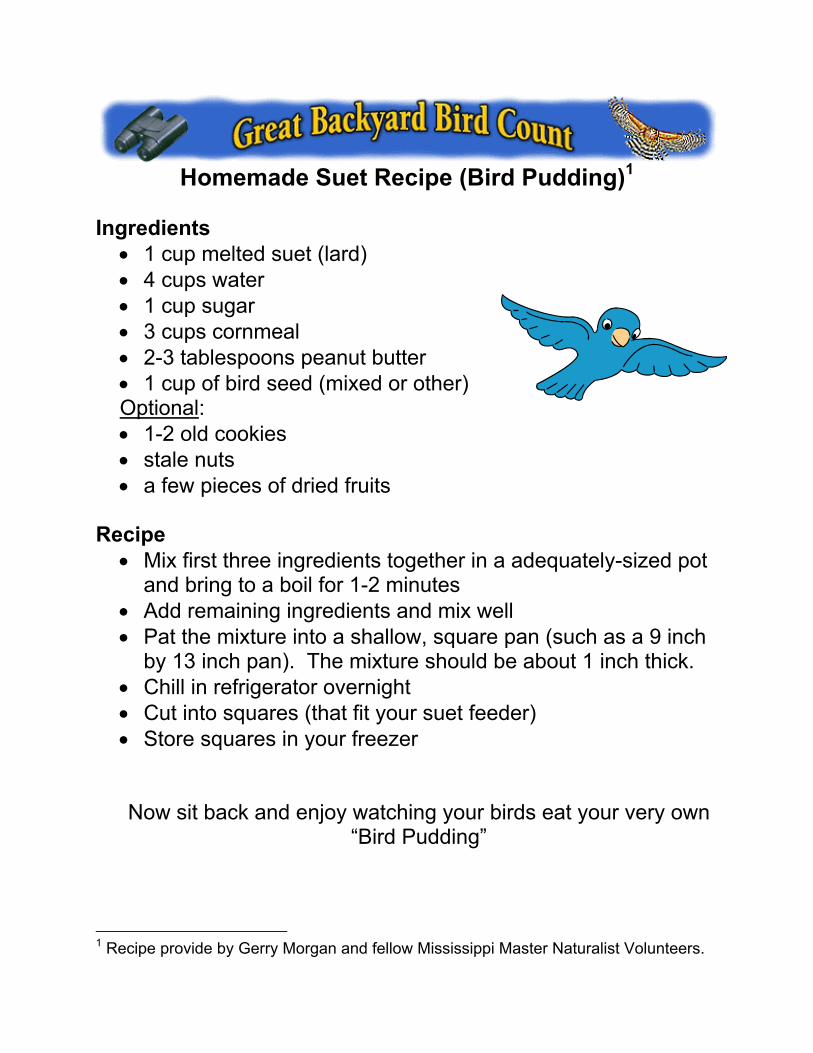
Homemade Suet Recipe (Bird Pudding)1
Ingredients
• 1 cup melted suet (lard) • 4 cups water • 1 cup sugar • 3 cups cornmeal • 2-3 tablespoons peanut butter • 1 cup of bird seed (mixed or other) Optional: • 1-2 old cookies • stale nuts • a few pieces of dried fruits
Recipe
• Mix first three ingredients together in a adequately-sized pot and bring to a boil for 1-2 minutes
• Add remaining ingredients and mix well • Pat the mixture into a shallow, square pan (such as a 9 inch
by 13 inch pan). The mixture should be about 1 inch thick. • Chill in refrigerator overnight • Cut into squares (that fit your suet feeder) • Store squares in your freezer Now sit back and enjoy watching your birds eat your very own
“Bird Pudding”
1 Recipe provide by Gerry Morgan and fellow Mississippi Master Naturalist Volunteers.

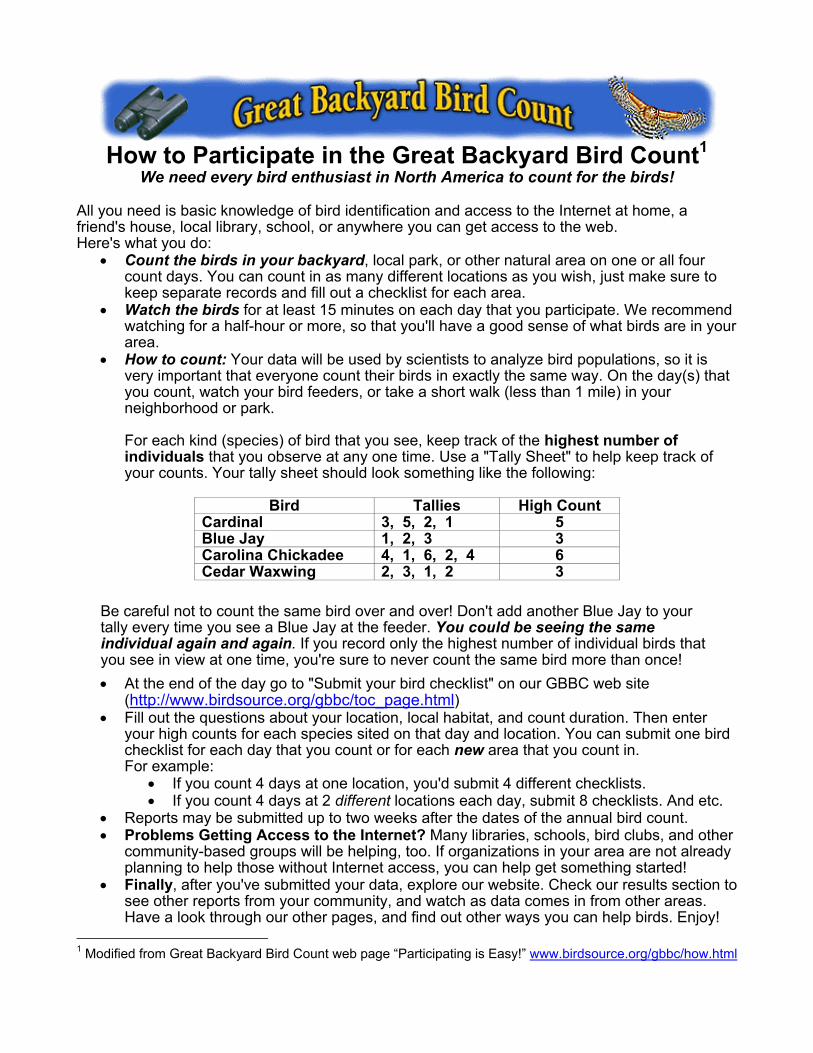
How to Participate in the Great Backyard Bird Count1
We need every bird enthusiast in North America to count for the birds! All you need is basic knowledge of bird identification and access to the Internet at home, a friend's house, local library, school, or anywhere you can get access to the web. Here's what you do:
• Count the birds in your backyard, local park, or other natural area on one or all four count days. You can count in as many different locations as you wish, just make sure to keep separate records and fill out a checklist for each area.
• Watch the birds for at least 15 minutes on each day that you participate. We recommend watching for a half-hour or more, so that you'll have a good sense of what birds are in your area.
• How to count: Your data will be used by scientists to analyze bird populations, so it is very important that everyone count their birds in exactly the same way. On the day(s) that you count, watch your bird feeders, or take a short walk (less than 1 mile) in your neighborhood or park. For each kind (species) of bird that you see, keep track of the highest number of individuals that you observe at any one time. Use a "Tally Sheet" to help keep track of your counts. Your tally sheet should look something like the following:
Bird Tallies High Count
Cardinal 3, 5, 2, 1 5 Blue Jay 1, 2, 3 3 Carolina Chickadee 4, 1, 6, 2, 4 6 Cedar Waxwing 2, 3, 1, 2 3
Be careful not to count the same bird over and over! Don't add another Blue Jay to your tally every time you see a Blue Jay at the feeder. You could be seeing the same individual again and again. If you record only the highest number of individual birds that you see in view at one time, you're sure to never count the same bird more than once! • At the end of the day go to "Submit your bird checklist" on our GBBC web site
(http://www.birdsource.org/gbbc/toc_page.html) • Fill out the questions about your location, local habitat, and count duration. Then enter
your high counts for each species sited on that day and location. You can submit one bird checklist for each day that you count or for each new area that you count in. For example:
• If you count 4 days at one location, you'd submit 4 different checklists. • If you count 4 days at 2 different locations each day, submit 8 checklists. And etc.
• Reports may be submitted up to two weeks after the dates of the annual bird count. • Problems Getting Access to the Internet? Many libraries, schools, bird clubs, and other
community-based groups will be helping, too. If organizations in your area are not already planning to help those without Internet access, you can help get something started!
• Finally, after you've submitted your data, explore our website. Check our results section to see other reports from your community, and watch as data comes in from other areas. Have a look through our other pages, and find out other ways you can help birds. Enjoy!
1 Modified from Great Backyard Bird Count web page “Participating is Easy!” www.birdsource.org/gbbc/how.html

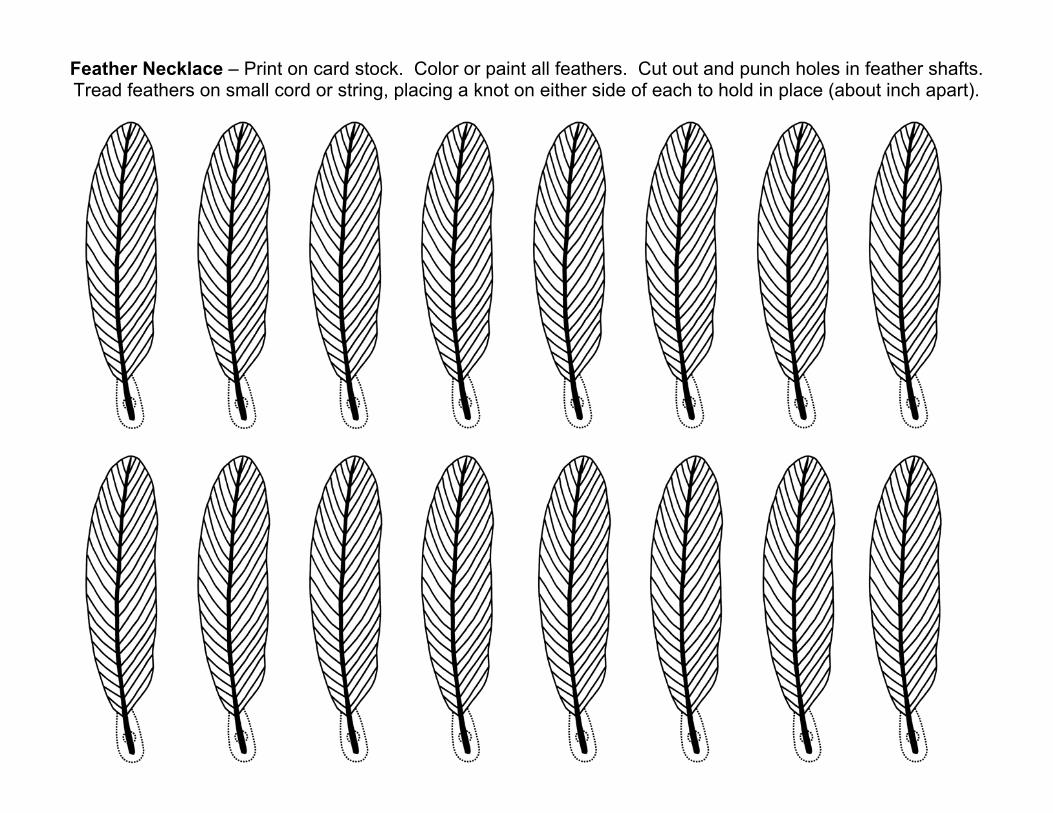
Feather Necklace – Print on card stock. Color or paint all feathers. Cut out and punch holes in feather shafts. Tread feathers on small cord or string, placing a knot on either side of each to hold in place (about inch apart).


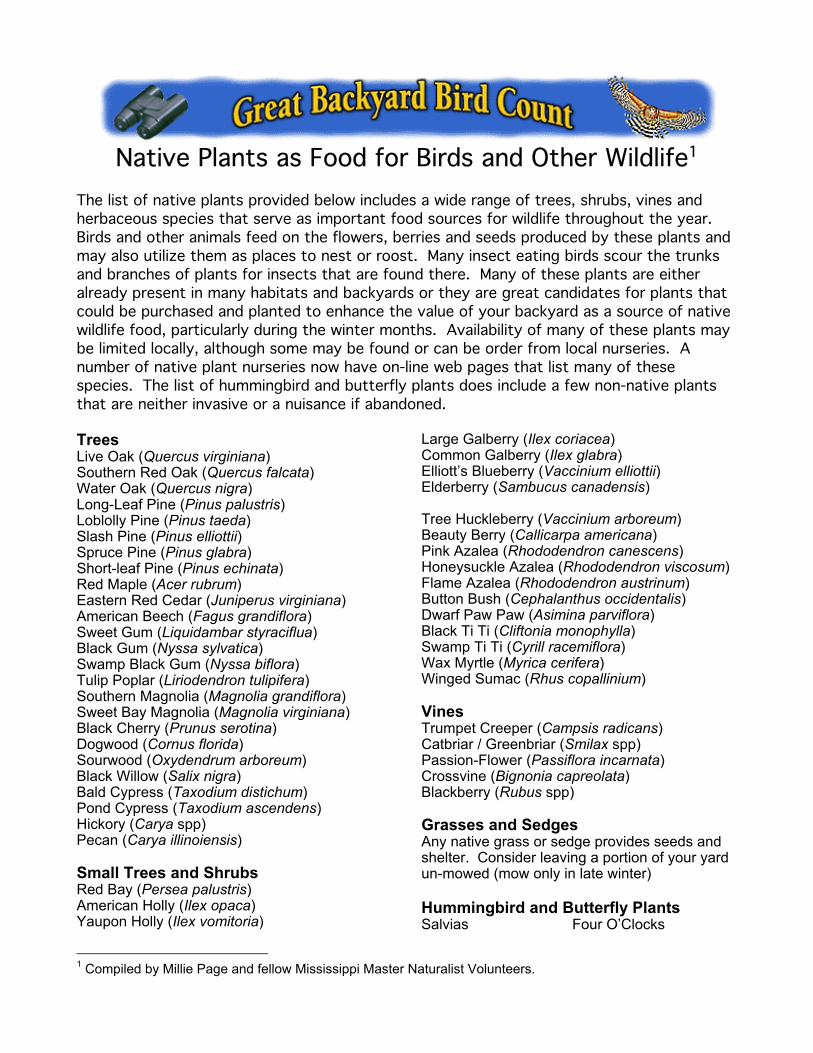
Native Plants as Food for Birds and Other Wildlife1
The list of native plants provided below includes a wide range of trees, shrubs, vines and herbaceous species that serve as important food sources for wildlife throughout the year. Birds and other animals feed on the flowers, berries and seeds produced by these plants and may also utilize them as places to nest or roost. Many insect eating birds scour the trunks and branches of plants for insects that are found there. Many of these plants are either already present in many habitats and backyards or they are great candidates for plants that could be purchased and planted to enhance the value of your backyard as a source of native wildlife food, particularly during the winter months. Availability of many of these plants may be limited locally, although some may be found or can be order from local nurseries. A number of native plant nurseries now have on-line web pages that list many of these species. The list of hummingbird and butterfly plants does include a few non-native plants that are neither invasive or a nuisance if abandoned.
1 Compiled by Millie Page and fellow Mississippi Master Naturalist Volunteers.
Trees Live Oak (Quercus virginiana) Southern Red Oak (Quercus falcata) Water Oak (Quercus nigra) Long-Leaf Pine (Pinus palustris) Loblolly Pine (Pinus taeda) Slash Pine (Pinus elliottii) Spruce Pine (Pinus glabra) Short-leaf Pine (Pinus echinata) Red Maple (Acer rubrum) Eastern Red Cedar (Juniperus virginiana) American Beech (Fagus grandiflora) Sweet Gum (Liquidambar styraciflua) Black Gum (Nyssa sylvatica) Swamp Black Gum (Nyssa biflora) Tulip Poplar (Liriodendron tulipifera) Southern Magnolia (Magnolia grandiflora) Sweet Bay Magnolia (Magnolia virginiana) Black Cherry (Prunus serotina) Dogwood (Cornus florida) Sourwood (Oxydendrum arboreum) Black Willow (Salix nigra) Bald Cypress (Taxodium distichum) Pond Cypress (Taxodium ascendens) Hickory (Carya spp) Pecan (Carya illinoiensis) Small Trees and Shrubs Red Bay (Persea palustris) American Holly (Ilex opaca) Yaupon Holly (Ilex vomitoria)
Large Galberry (Ilex coriacea) Common Galberry (Ilex glabra) Elliott’s Blueberry (Vaccinium elliottii) Elderberry (Sambucus canadensis) Tree Huckleberry (Vaccinium arboreum) Beauty Berry (Callicarpa americana) Pink Azalea (Rhododendron canescens) Honeysuckle Azalea (Rhododendron viscosum) Flame Azalea (Rhododendron austrinum) Button Bush (Cephalanthus occidentalis) Dwarf Paw Paw (Asimina parviflora) Black Ti Ti (Cliftonia monophylla) Swamp Ti Ti (Cyrill racemiflora) Wax Myrtle (Myrica cerifera) Winged Sumac (Rhus copallinium) Vines Trumpet Creeper (Campsis radicans) Catbriar / Greenbriar (Smilax spp) Passion-Flower (Passiflora incarnata) Crossvine (Bignonia capreolata) Blackberry (Rubus spp) Grasses and Sedges Any native grass or sedge provides seeds and shelter. Consider leaving a portion of your yard un-mowed (mow only in late winter) Hummingbird and Butterfly Plants Salvias Four O’Clocks

Firecracker Bush Firespike Milkweed Coral Bean Ageratum
Goldenrod Coral Honeysuckle Sunflowers Coreopsis Carolina Jasmine

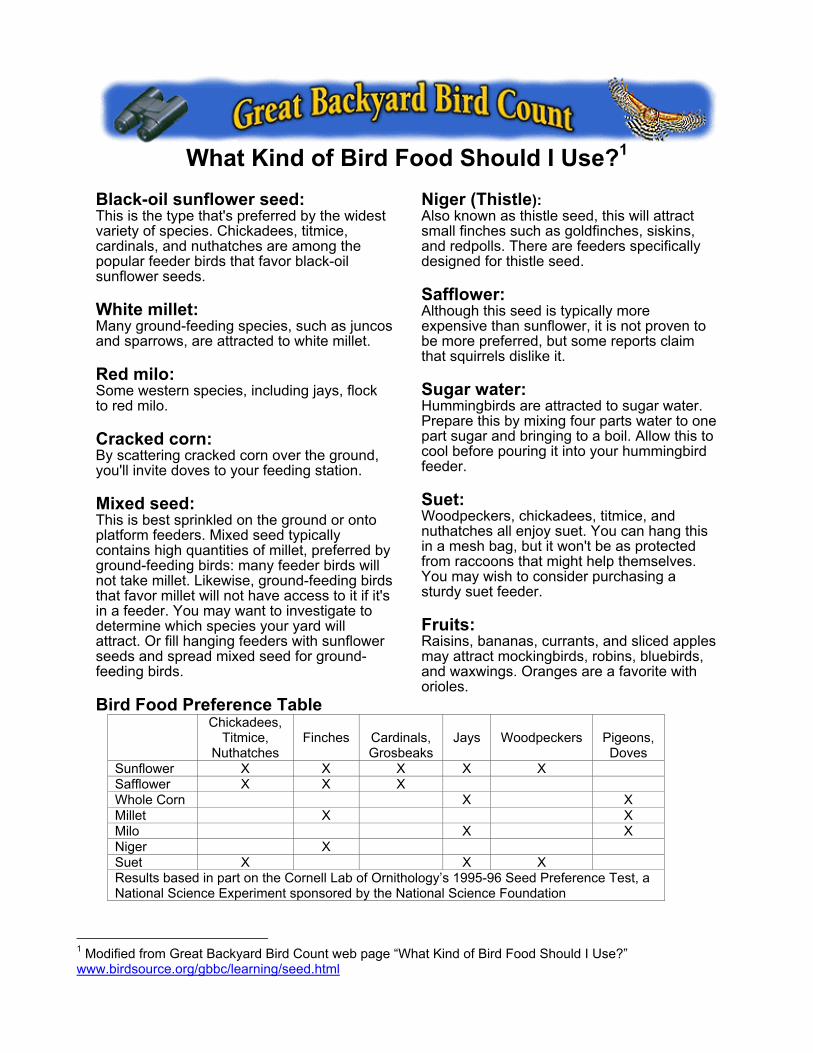
What Kind of Bird Food Should I Use?1
1 Modified from Great Backyard Bird Count web page “What Kind of Bird Food Should I Use?” www.birdsource.org/gbbc/learning/seed.html
Black-oil sunflower seed: This is the type that's preferred by the widest variety of species. Chickadees, titmice, cardinals, and nuthatches are among the popular feeder birds that favor black-oil sunflower seeds. White millet: Many ground-feeding species, such as juncos and sparrows, are attracted to white millet. Red milo: Some western species, including jays, flock to red milo. Cracked corn: By scattering cracked corn over the ground, you'll invite doves to your feeding station. Mixed seed: This is best sprinkled on the ground or onto platform feeders. Mixed seed typically contains high quantities of millet, preferred by ground-feeding birds: many feeder birds will not take millet. Likewise, ground-feeding birds that favor millet will not have access to it if it's in a feeder. You may want to investigate to determine which species your yard will attract. Or fill hanging feeders with sunflower seeds and spread mixed seed for ground-feeding birds.
Niger (Thistle): Also known as thistle seed, this will attract small finches such as goldfinches, siskins, and redpolls. There are feeders specifically designed for thistle seed. Safflower: Although this seed is typically more expensive than sunflower, it is not proven to be more preferred, but some reports claim that squirrels dislike it. Sugar water: Hummingbirds are attracted to sugar water. Prepare this by mixing four parts water to one part sugar and bringing to a boil. Allow this to cool before pouring it into your hummingbird feeder. Suet: Woodpeckers, chickadees, titmice, and nuthatches all enjoy suet. You can hang this in a mesh bag, but it won't be as protected from raccoons that might help themselves. You may wish to consider purchasing a sturdy suet feeder. Fruits: Raisins, bananas, currants, and sliced apples may attract mockingbirds, robins, bluebirds, and waxwings. Oranges are a favorite with orioles.
Bird Food Preference Table Chickadees,
Titmice, Nuthatches
Finches
Cardinals, Grosbeaks
Jays
Woodpeckers
Pigeons, Doves
Sunflower X X X X X Safflower X X X Whole Corn X X Millet X X Milo X X Niger X Suet X X X Results based in part on the Cornell Lab of Ornithology’s 1995-96 Seed Preference Test, a National Science Experiment sponsored by the National Science Foundation