Embed Size (px)
Citation preview

www.resmed.com Waking people up to sleep
Mirage Activa™ Nasal MaskUser’s GUide
english
Log on now to www.myresmed.com
to find useful tips on managing your treatment.

A
B
B-1
B-2
B-3
B-4B-5
B-6
B-7B-8
B-9 B-10
©20
12 R
esM
ed L
td.
©20
12 R
esM
ed L
td.
Mask CushionBulle du masqueAlmohadilla de la mascarillaAlmofada da máscara
Headgear clipsClips du harnaisBroches del arnés para la cabezaClipes do arnês
Ports capBouchon des portsTapa de los puertosTampa das portas
Mask elbowCoude du masqueCodo de la mascarillaCotovelo da máscara
Vent coverCache des orifices de ventilationCubierta de la ventilaciónTampa do dispositivo de ventilação
short air tubingTuyau à air courtTubo de aire cortoTubo de ar curto
swivelPièce pivotantePieza giratoriaPeça giratória
Upper Velcro®strapsBandes Velcro®supérieuresCorreas superiores de Velcro®Correias de Velcro®superiores
CuffManchonMango Manga
Mask FrameEntourage rigideArmazón de la mascarillaArmação da máscara
Cushion clipClip de la bulleTraba de la almohadillaClipe da almofada
Forehead padsTampons frontauxAlmohadillas para la frenteAlmofadas da testa
Lower Velcro strapsBandes Velcro inférieuresCorreas inferiores de VelcroCorreias de Velcro inferiores
Forehead supportSupport frontalApoyo para la frenteSuporte da testa
ActiveCell™
Headgear assemblyHarnais / Arnés para la cabeza / Montagem do arnês

A
B
C
D
©20
12 R
esM
ed L
td.
C-2
C-3
C-1
C-4
C-5
C-6
D-1 D-2
D-3
D-5
D-6
C-7
D-7D-8
D-12
D-4
C-a
©20
12 R
esM
ed L
td.
D-9
D-10 D-11(a) (b) (a) (b)
(c)
“click”
“click”
“click”

ENGLISH
608335.book Page 1 Tuesday, April 10, 2012 11:52 AM
Mirage Activa™ Nasal MaskThe MIRAGE ACTIVA™ nasal mask is an accessory to a non-continuous ventilator (respirator), intended for multi-patient use for adult patients prescribed continuous positive airway pressure (CPAP) or bilevel therapy in hospital, clinic, and/or home environments.
CAUTION
In the USA, federal law restricts this device to sale by or on the order of a physician.
MEDICAL INFORMATION
Note: The mask system does not contain latex materials.
WARNINGS
• This mask should be used only with CPAP or bilevel systems recommended by your physician or respiratory therapist. A mask should not be used unless the CPAP or bilevel system is turned on and operating properly. The exhalation device should never be blocked.Explanation of the Warning: CPAP or bilevel systems are intended to be used with special masks with connectors which have vent holes or separate exhalation devices to allow continuous flow of air out of the mask. When the CPAP or
!
!
1

2
608335.book Page 2 Tuesday, April 10, 2012 11:52 AM
bilevel device is turned on and functioning properly, new air from the flow generator flushes the exhaled air out through the attached mask exhalation port. However, when the CPAP or bilevel device is not operating, enough fresh air will not be provided through the mask, and exhaled air may be rebreathed. Rebreathing of exhaled air for longer than several minutes can in some circumstances lead to suffocation. This warning applies to most models of CPAP or bilevel systems.
• The exhaust vent flow is lower at lower mask pressures (see “Pressure/Flow Curve” on page 9). If the mask pressure during expiration is too low, there may not be enough exhaust vent flow to completely flush the air delivery hose of exhaled air before the start of the next inspiration.
• The MIRAGE ACTIVA features an elbow that can be easily removed while the mask is fitted. The mask should not be used with the elbow attached unless the CPAP or bilevel system is turned on and operating properly.
• The mask must be cleaned and disinfected/sterilized if it is used between patients. Refer to the section “Cleaning the Mask between Patients” for details.
• If oxygen is used with the CPAP or bilevel device, the oxygen flow must be turned off when the flow generator is not operating.Explanation of the Warning: When the CPAP or bilevel device is not in operation, and the oxygen flow is left on, oxygen delivered into the ventilator tubing may accumulate within the flow generator enclosure. Oxygen accumulated in the CPAP or bilevel device enclosure will create a risk of fire. This warning applies to most types of CPAP or bilevel flow generators.
• Please refrain from smoking while oxygen is in use.

ENGLISH
608335.book Page 3 Tuesday, April 10, 2012 11:52 AM
• Using a mask may cause tooth, gum or jaw soreness or aggravate an existing dental condition. If symptoms occur, consult your physician or dentist.
Note: At a fixed flow rate of supplemental oxygen flow, the inhaled oxygen concentration will vary depending on pressure settings, patient breathing pattern, mask selection, and leak rate.
PARTS OF THE MASKSee Figure A for a list of all parts.The MIRAGE ACTIVA mask cushion uses ResMed's innovative ACTIVECELL™ technology. The ACTIVECELL is an expandable chamber that inflates during therapy. This technology means that the MIRAGE ACTIVA is "self sealing" as it responds to factors that cause leak. This provides you with a better seal, especially when you are moving during the night. The ACTIVECELL technology does not require as much headgear strap tension as other masks, which makes the MIRAGE ACTIVA more comfortable to use.
FITTING THE MASK Note: Before fitting the mask, refer to the section on “Cleaning the Mask in the Home” on page 6.
1 Squeeze one of the headgear clips to release it from the mask frame (Fig. B-1).
2 Place the mask cushion over your nose.3 Pull the headgear over your head (Fig. B-2). Make sure the
lower straps pass below your ears, and the upper straps pass over your forehead.
4 Connect the free headgear clip to the mask frame (Fig. B-3).5 Adjust the lower (Fig. B-4) and then the upper (Fig. B-5)
straps of the headgear so the cushion sits loosely on your face. Do not tighten the headgear straps at this stage.
3

4
608335.book Page 4 Tuesday, April 10, 2012 11:52 AM
6 The pads of the forehead support should lightly touch your forehead when the mask is in place. Adjust the forehead support by depressing its tab and moving it to one of the other slot positions (Fig. C-7).
7 Connect one end of the main air tubing to your CPAP or bilevel device and the other end to the swivel.
Note: The swivel, short air tubing, and mask elbow are supplied assembled.
8 Connect the mask elbow to the mask frame. To do this, firmly push the mask elbow onto the mask frame until it clicks into place (Fig. B-6).Check that you have connected the mask elbow correctly by rotating it. Be careful not to squeeze the sides of the elbow as it may release from the mask frame. If the mask elbow is fitted correctly, it should rotate freely and not separate from the mask frame.
9 The fitted mask should look like this (Fig. B-7).10 Turn your flow generator on. If you feel air leaks around the
cushion, reposition the mask on your face to achieve a better seal. You may also need to readjust the headgear straps or forehead support. Do not over-tighten the straps. The straps should be adjusted so that the ACTIVECELL is moderately and evenly expanded as shown in Figure B-8.
The ACTIVECELL should not be collapsed (Fig. B-9) or over-expanded (Fig. B-10).
Take time to adjust the straps and the position of the mask to achieve a comfortable and secure fit. If you feel excessive pressure on your nasal bridge or upper lip, adjust the forehead support.

ENGLISH
608335.book Page 5 Tuesday, April 10, 2012 11:52 AM
Note: Select "Standard" as the mask option, when using ResMed AutoSet™ devices.
REMOVING THE MASK To remove the MIRAGE ACTIVA mask, squeeze the headgear clips (Fig. C-a). This releases the headgear clips from the mask frame. Pull the mask and headgear away from your head.
Note: Do not pull the headgear off your head without releasing the headgear clips first.
TIP!You can detach the elbow from the mask frame while wearing the mask (see “Disassembling For Cleaning”). This is useful when therapy needs to be stopped for a short time; for example if you need to go to the bathroom.
DISASSEMBLING FOR CLEANING1 Detach the mask elbow. To do this, squeeze the raised dots
on the sides of the mask elbow while pulling it away from the mask frame (Fig. C-1).
2 Disconnect and separate the main air tubing, short air tubing, mask elbow, and vent cover (Fig. C-2).
Notes • To prevent damage to the short air tubing, disconnect it by
holding it at the cuff.• The swivel does not need to be disconnected from the short air
tubing.
3 Squeeze the headgear clips to release them from the mask frame. Unfasten the Velcro® straps and unthread the upper headgear straps through the slots of the forehead support.
4 Remove the ports cap from the mask frame (Fig. C-3).
5
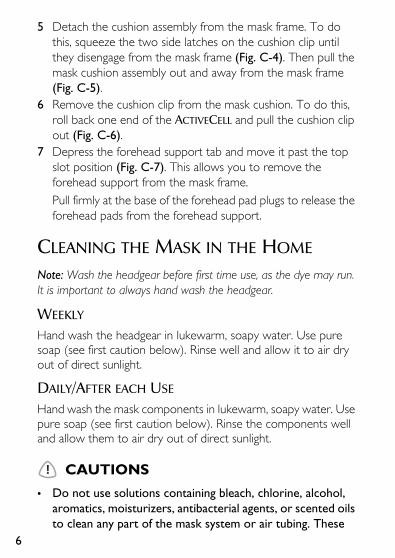
6
608335.book Page 6 Tuesday, April 10, 2012 11:52 AM
5 Detach the cushion assembly from the mask frame. To do this, squeeze the two side latches on the cushion clip until they disengage from the mask frame (Fig. C-4). Then pull the mask cushion assembly out and away from the mask frame (Fig. C-5).
6 Remove the cushion clip from the mask cushion. To do this, roll back one end of the ACTIVECELL and pull the cushion clip out (Fig. C-6).
7 Depress the forehead support tab and move it past the top slot position (Fig. C-7). This allows you to remove the forehead support from the mask frame.Pull firmly at the base of the forehead pad plugs to release the forehead pads from the forehead support.
CLEANING THE MASK IN THE HOME
Note: Wash the headgear before first time use, as the dye may run. It is important to always hand wash the headgear.
WEEKLY
Hand wash the headgear in lukewarm, soapy water. Use pure soap (see first caution below). Rinse well and allow it to air dry out of direct sunlight.
DAILY/AFTER EACH USE
Hand wash the mask components in lukewarm, soapy water. Use pure soap (see first caution below). Rinse the components well and allow them to air dry out of direct sunlight.
CAUTIONS
• Do not use solutions containing bleach, chlorine, alcohol, aromatics, moisturizers, antibacterial agents, or scented oils to clean any part of the mask system or air tubing. These
!

ENGLISH
608335.book Page 7 Tuesday, April 10, 2012 11:52 AM
solutions may cause damage and reduce the life of the product.
• Do not expose any part of the mask system or tubing to direct sunlight as it may cause the product to deteriorate.
• If any visible deterioration of a mask component is apparent (cracking, crazing, tears, etc), the mask component should be discarded and replaced.
REPROCESSING THE MASK BETWEEN PATIENTSThe mask should be reprocessed when used between patients. Cleaning, disinfection and sterilization instructions are available from the ResMed website, www.resmed.com/masks/sterilization/americas. If you do not have Internet access, please contact your ResMed representative.
REASSEMBLING THE MASK
1 Attach the forehead pads to the forehead support. To do this, place the forehead pad plugs into the two round holes of the forehead support. Then push firmly behind the base of the forehead pad plugs (Fig. D-1) until the tip of the plug is securely seated over the hole. The base of the forehead pad plug should be flush against the forehead support.
2 Reconnect the forehead support to the mask frame (Fig. D-2). Depress the tab and move the forehead support into one of the four slot positions.
3 Fit the cushion clip into the groove of the mask cushion. Ensure the cut outs under the cushion clip latches are aligned with the blocks in the groove of the mask cushion.
7
8
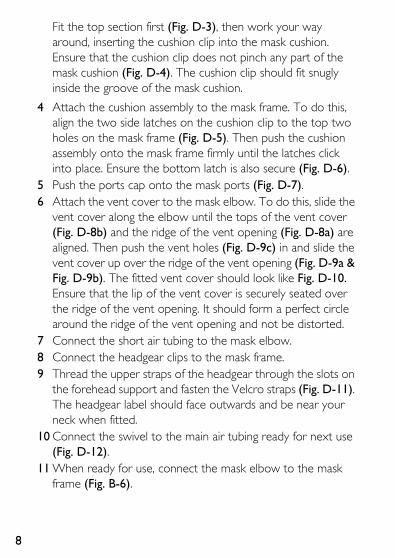
608335.book Page 8 Tuesday, April 10, 2012 11:52 AM
Fit the top section first (Fig. D-3), then work your way around, inserting the cushion clip into the mask cushion. Ensure that the cushion clip does not pinch any part of the mask cushion (Fig. D-4). The cushion clip should fit snugly inside the groove of the mask cushion.
4 Attach the cushion assembly to the mask frame. To do this, align the two side latches on the cushion clip to the top two holes on the mask frame (Fig. D-5). Then push the cushion assembly onto the mask frame firmly until the latches click into place. Ensure the bottom latch is also secure (Fig. D-6).
5 Push the ports cap onto the mask ports (Fig. D-7).6 Attach the vent cover to the mask elbow. To do this, slide the
vent cover along the elbow until the tops of the vent cover (Fig. D-8b) and the ridge of the vent opening (Fig. D-8a) are aligned. Then push the vent holes (Fig. D-9c) in and slide the vent cover up over the ridge of the vent opening (Fig. D-9a & Fig. D-9b). The fitted vent cover should look like Fig. D-10. Ensure that the lip of the vent cover is securely seated over the ridge of the vent opening. It should form a perfect circle around the ridge of the vent opening and not be distorted.
7 Connect the short air tubing to the mask elbow.8 Connect the headgear clips to the mask frame.9 Thread the upper straps of the headgear through the slots on
the forehead support and fasten the Velcro straps (Fig. D-11). The headgear label should face outwards and be near your neck when fitted.
10 Connect the swivel to the main air tubing ready for next use (Fig. D-12).
11 When ready for use, connect the mask elbow to the mask frame (Fig. B-6).

ENGLISH
608335.book Page 9 Tuesday, April 10, 2012 11:52 AM
TECHNICAL SPECIFICATIONS
PRESSURE/FLOW CURVE
The following graph shows the rate of air flow through the mask vents at varying mask pressures.
DEAD SPACE INFORMATION
The dead space of the MIRAGE ACTIVA mask is 127mL.Explanation: Dead space is the empty volume of the mask up to the elbow.
LIMITED WARRANTYResMed warrants that your ResMed mask system, including its components: mask frame, cushion, headgear, tubing and other accessories (“Product”) shall be free from defects in material and workmanship for a period of ninety (90) days from the date of purchase by the initial consumer.For further details refer to the Warranty.
0
10
20
30
40
50
60
70
4 5 6 7 8 9 10 11 12 13 14 15 16 17 18 19 20
Exhaust Vent Pressure / Flow Characteristics
Pressure (cm H2O)
Flow
(L/
min
)
9
www.resmed.com Waking people up to sleep Global leaders in sleep and respiratory medicine www.myresmed.com
Manufacturer:ResMed Ltd 1 Elizabeth Macarthur Drive Bella Vista NSW 2153 AustraliaDistributed by:ResMed Corp 9001 Spectrum Center Boulevard San Diego CA 92123 USA ResMed (UK) Ltd 96 Milton Park Abingdon Oxfordshire OX14 4RY UK See www.resmed.com for other ResMed locations worldwide.
For patent information, see www.resmed.com/ip.
Velcro is a registered trademark of Velcro Industries B.V. Activa, ActiveCell, AutoSet, AutoSet T, Mirage and are trademarks of ResMed Ltd.
© 2012 ResMed Ltd. 608335/1,Dmf 2012-04