Embed Size (px)
Citation preview

MiniView™ Micro USB Plus2-Port KVM Switch with Built-in KVM Cables and Audio Support
Installation Manual (GCS632U)
®

©2005 IOGEAR. All Rights Reserved. PKG-M0089b
IOGEAR®, the IOGEAR® logo, MiniView, VSE are trademarks or registered trademarks of IOGEAR®,Inc. Microsoft® and Windows® are registered trademarks of Microsoft Corporation. IBM is a registeredtrademark of International Business Machines, Inc. Macintosh, G3/G4 and iMac are registeredtrademarks of Apple Computer, Inc. IOGEAR® makes no warranty of any kind with regards to theinformation presented in this document. All information furnished here is for informational purposesonly and is subject to change without notice. IOGEAR®, Inc. assumes no responsibility for anyinaccuracies or errors that may appear in this document.

Thank you for purchasing one of the most feature-rich keyboard, video, andmouse switches on the market. IOGEAR®’s MiniView™ Micro USB PLUSswitches are first-rate connectivity accessories designed to help reduce thefrustration of managing multiple computer systems. With the MiniView™ MicroUSB PLUS by IOGEAR®, you can access two USB computers from a singleUSB console (USB keyboard, USB mouse and monitor). MiniView™ MicroUSB PLUS allows you to change ports easily by entering Hot Key combina-tions from the keyboard. Setup is fast and easy; plugging cables into theirappropriate ports is all that is entailed.
We hope you enjoy using your MiniView™ Micro USB PLUS, yet another first-rate connectivity solution from IOGEAR®.
Welcome
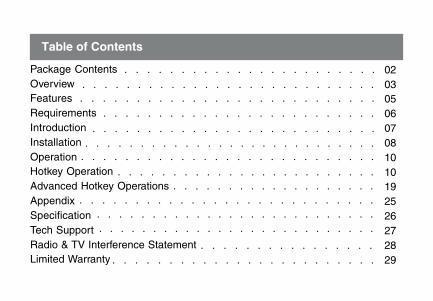
Package ContentsOverviewFeaturesRequirementsIntroductionInstallationOperationHotkey OperationAdvanced Hotkey OperationsAppendixSpecificationTech SupportRadio & TV Interference StatementLimited Warranty
0203050607081010192526272829
Table of Contents
○ ○ ○ ○ ○ ○ ○ ○ ○ ○ ○ ○ ○ ○ ○ ○ ○ ○ ○ ○ ○ ○ ○ ○ ○ ○ ○
○ ○ ○ ○ ○ ○ ○ ○ ○ ○ ○ ○ ○ ○ ○ ○ ○ ○ ○ ○ ○ ○ ○
○ ○ ○ ○ ○ ○ ○ ○ ○ ○ ○ ○ ○ ○ ○ ○ ○ ○ ○ ○ ○ ○ ○ ○ ○ ○ ○
○ ○ ○ ○ ○ ○ ○ ○ ○ ○ ○ ○ ○ ○ ○ ○ ○ ○ ○ ○ ○ ○ ○ ○ ○
○ ○ ○ ○ ○ ○ ○ ○ ○ ○ ○ ○ ○ ○ ○ ○ ○ ○ ○ ○ ○ ○ ○ ○ ○ ○
○ ○ ○ ○ ○ ○ ○ ○ ○ ○ ○ ○ ○ ○ ○ ○ ○ ○ ○ ○ ○ ○ ○ ○ ○ ○ ○
○ ○ ○ ○ ○ ○ ○ ○ ○ ○ ○ ○ ○ ○ ○ ○ ○ ○ ○
○ ○ ○ ○ ○ ○ ○ ○ ○ ○ ○ ○ ○ ○ ○ ○ ○ ○ ○ ○ ○ ○ ○ ○ ○ ○ ○
○ ○ ○ ○ ○ ○ ○ ○ ○ ○ ○ ○ ○ ○ ○ ○
○ ○ ○ ○ ○ ○ ○ ○ ○ ○ ○ ○ ○ ○ ○ ○ ○ ○ ○ ○ ○ ○ ○ ○ ○ ○ ○
○ ○ ○ ○ ○ ○ ○ ○ ○ ○ ○ ○ ○ ○ ○ ○ ○ ○ ○ ○ ○ ○ ○ ○
○ ○ ○ ○ ○ ○ ○ ○ ○ ○ ○ ○ ○ ○ ○ ○ ○ ○ ○ ○ ○ ○ ○ ○ ○ ○
○ ○ ○ ○ ○ ○ ○ ○ ○ ○ ○ ○ ○ ○ ○ ○ ○ ○ ○ ○ ○ ○ ○ ○ ○ ○
○ ○ ○ ○ ○ ○ ○ ○ ○ ○ ○ ○ ○ ○ ○ ○ ○ ○ ○ ○ ○ ○ ○ ○
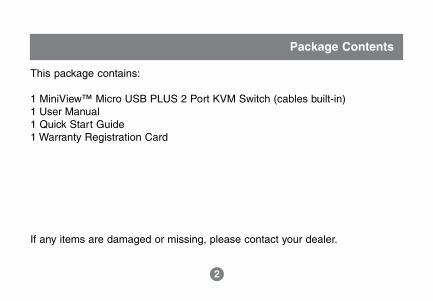
This package contains:
1 MiniView™ Micro USB PLUS 2 Port KVM Switch (cables built-in)1 User Manual1 Quick Start Guide1 Warranty Registration Card
If any items are damaged or missing, please contact your dealer.
Package Contents
2

Introducing the two port MiniView™ Micro USB PLUS KVM switch fromIOGEAR® – A simple solution for those with more PCs than hands. Use one USBkeyboard, one monitor and one USB mouse to control two USB computers. Thisself-powered KVM switch features the unique USB sniffing technology for USBmouse & keyboard emulation to ensure smooth operation, as well as support forPlug-n-Play monitors and most wheel mice. Our patented VSE Video SignalEnhancement® technology provides rich, 32-bit color at resolutions up to 2048 x1536.
Another big plus of this switch is the capability to provide audio support, it allowsyou to share your multimedia speakers among the two connected computers.
This switch also offers multi-platform support, it is compatible with Macs andSun Solaris workstations. IOGEAR® made a huge breakthrough in supportingMac and Sun, by allowing Mac and Sun special keys to be functional, either with
Overview
3

the Mac or Sun keyboard as the console keyboard, or with a standard PC key-board. When use a PC keyboard, a special set of hot keys are designated toemulate the Mac and Sun special keys.
With KVM cables (6' long) molded into the unit, all you need to do is to plug it intoyour computers, and you’ve got a complete KVM solution from IOGEAR®.
Overview
4

Features
• Use one USB keyboard, monitor and USB mouse to control two USB computers.• 6' long molded-in cables to simplify setup.• Share your multimedia speakers among the two connected computers.• Full support for Mac and Sun systems.• Supports special keys on Mac and Sun keyboards.• Port selection through convenient Hot Keys.• USB sniffing technology allows complete USB mouse and keyboard emulation for error-free boot-up.• Plug-n-Play monitor support.• Support video resolutions up to 2048 x 1536• No software required.• Built in AutoScan mode.• LEDs allow for easy status monitoring.• 3 Year Limited Warranty.
5

6
Console• A VGA, SVGA, or Multisync monitor capable of the highest resolution that you will be using on any computer in the installation• A USB Keyboard• A USB Mouse
ComputersThe following equipment must be installed on each computer that is to be con-nected to the system:• A VGA, SVGA or Multisync card• A USB type A port
Requirements
• A multimedia sound card for audio sharing
Audio• Only 2-piece, powered speakers system supported

12
3 4
Introduction
7
1. Port LEDs (Refer to Appendix for LED indications)2. KVM Cables3. Console Ports4. Speaker Jack
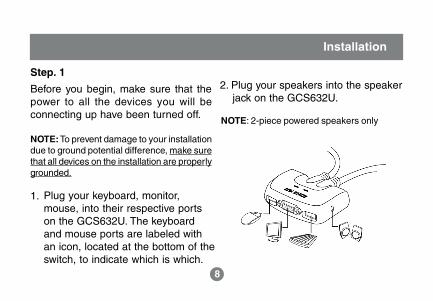
Before you begin, make sure that thepower to all the devices you will beconnecting up have been turned off.
NOTE: To prevent damage to your installationdue to ground potential difference, make surethat all devices on the installation are properlygrounded.
Plug your keyboard, monitor,mouse, into their respective portson the GCS632U. The keyboardand mouse ports are labeled withan icon, located at the bottom of theswitch, to indicate which is which.
Step. 12. Plug your speakers into the speaker jack on the GCS632U.
NOTE: 2-piece powered speakers only
Installation
8
1.
Step. 2
Installation
9
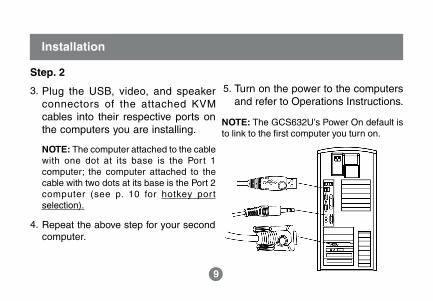
Plug the USB, video, and speakerconnectors of the attached KVMcables into their respective ports onthe computers you are installing.
NOTE: The computer attached to the cablewith one dot at its base is the Port 1computer; the computer attached to thecable with two dots at its base is the Port 2computer (see p. 10 for hotkey portselection).
Repeat the above step for your secondcomputer.
Turn on the power to the computersand refer to Operations Instructions.
3.
4.
5.
NOTE: The GCS632U’s Power On default isto link to the first computer you turn on.

3 4Operation
10
Hotkey Operation
The hotkey operations of the KVMassume the use of a PC-Compatiblekeyboard with the Scroll Lock key. Ifyou are using a MAC Keyboard (or a
keyboard that does not have Scroll Lockkey), refer to the section in the manual“Alternate Port Switching Keys” forinformation on re-configuring the KVM’shotkeys, and page 13 for Mac keyboardoperation.
PC keyboard
Scroll Lock

Operation
11
Port SwitchingTo toggle between the two computers,quickly tap the Scroll Lock key twice:
[Scroll Lock], [Scroll Lock]
NOTE: You can change this hotkey to [ctrl][ctrl], see page 17 for details.
Hotkey Setting Mode (HSM)For all Hotkey operations, you mustuse the number keypad on the rightside of your keyboard
To Invoke Hotkey Mode(PC-Compatible Keyboard):
1. Press and hold Num Lock key fortwo seconds
2. Press and hold Minus key [ – ] forone second
3. Release Minus key [ – ] and withinone second also release NumLock key

Operation
12
The KVM will now enter Hotkey mode,and the Caps Lock and Scroll LockLEDs flash in succession to indicatethis. On PC-Compatible keyboards thisLED is usually located on top right-handcorner.
If the KVM did not enter Hotkey mode,repeat the above procedure keeping inmind that this procedure must be donequickly and in the time-frame indicated.
PC keyboard
Num Lock
Minus

Operation
To Invoke Hotkey Mode(MAC Keyboard):
1. Press and hold Clear key for twoseconds
2. Press and hold Minus key [ – ]key for one second
3. Release Minus key [ – ] andwithin one second also releaseClear key
The KVM will now enter Hotkey mode;indicated by blinking of the Caps LocksLED. On some MAC keyboards, thisLED is on the Caps Lock key itself.
If the KVM did not enter Hotkey mode,repeat the above procedure keeping inmind that this procedure must be donequickly and in the time-frame indicated.
13

Clear Minus
Operation
Mac keyboard
14

NOTE:If using the Num Lock and Minus key to invokeHotkey function is not optimal, refer to the nextpage for instructions on changing the hotkeyinvocation keys.
When Hotkey Mode is active, ordinarykeyboard and mouse functions aresuspended – only Hotkey compliantkeystrokes can be input. At theconclusion of some hotkey operations,you automatically exit Hotkey mode.With some operations, you must exitmanually by pressing the Esc orSpacebar on your keyboard.
Switching PortsYou may also switch ports on the KVMby doing the following:
1. Invoke Hotkey Mode (See page 11)2. Press and release the computer’s
port number (1 or 2)3. Press [Enter]
The KVM focus switches to the specifiedport and automatically exits Hotkeymode
15
Operation

16
Auto Scan Mode1. Invoke Hotkey Mode (See page
11-13)2. Press and release the [A] key
Once scanning begins, it continuesuntil you press the [Esc] or [Spacebar]to exit.
NOTE: While Auto Scan mode is in effect,ordinary keyboard and mouse functions aresuspended.
Alternate Hotkey Invocation KeysIn case the default Hotkey Modeinvocation keys (Num Lock and Minus)
are not optimal in your setup, you maychange them to Ctr l and F12,respectively.
To switch the Hotkey Invocation Keys,do the following:1. Invoke Hotkey Mode (See Page
11-13)2. Press and release H3. This will change the Hotkey
Invocation key to Ctrl and F12(instead of Num Lock and Minus).
NOTE: This procedure is a toggle between thetwo methods. To revert back to the original HSMinvocation keys, repeat the above procedure.
Operation

17
Alternate Port Switching KeysThe por t switching keys can bechanged from tapping Scroll Lock keytwice, to tapping Ctrl key twice.
If you have a MAC keyboard (or akeyboard that does not have ScrollLock key), change the port switchingkeys by doing the following:
1. Invoke Hotkey Mode (See Page 11-13)
2. Press and release T
The port switching key will now be theCtrl key. To switch between computers,simply tap the Ctrl key twice:[Ctrl], [Ctrl]
NOTE: This procedure is a toggle betweenthe two methods. To revert back to the originalport switching keys, repeat the aboveprocedure.
Operation
18
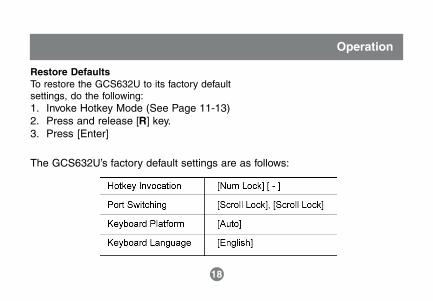
Restore DefaultsTo restore the GCS632U to its factory defaultsettings, do the following:1. Invoke Hotkey Mode (See Page 11-13)2. Press and release [R] key.3. Press [Enter]
The GCS632U’s factory default settings are as follows:
Operation

Operation
19
Multi Platform (Mac, Sun, Win) andMulti Language Setup
The default port settings are for aWindows Compatible operatingplatform, and US English keyboardlanguage code (Refer to the previoussection).
Some multi platform operations requireyou to change the Keyboard platformin order to fully support all the functionsunder that particular platform. Once theappropriate Keyboard Platform is set,
such as Mac or Sun, you will be ableto use all the special keys on thesespecial platform keyboards (Mac andSun).
Following is a matrix table showing therequired Keyboard Platform undervarious multi platform operations:

Operation
20
Operation
Using a PC keyboard to control a Window based PC
Using a Mac keyboard to control a Mac
Using a Sun keyboard to control a Solaris based Sun
Using a PC keyboard to control a Mac
Using a PC keyboard to control a Solaris based Sun
Keyboard Platform
Auto
Auto
Auto
Mac
Sun

Operation
21
○
○
○
○
○
○
○
○
○
○
○
○
○
○
○
○
○
Keyboard Operating PlatformThe GCS632U default configuration isfor a PC-Compatible keyboard operatingplatform.
To change the keyboard operatingplatform, do the following:
1. Bring the KVM focus to the desiredport
2. Invoke Hotkey Mode (See Page11-13)
3. Press and release the appropriatefunction key (see table):
Keyboard Language

Operation
22
After completing a setting, you automatically exit Hotkey Mode.
Using a PC keyboard to emulate aSun Keyboard
After you set up the appropriateKeyboard Platform (refer to Page16),you will be able to use a PC (101/104)key keyboard to emulate the functionsof the Sun keyboard when the Controlkey [Ctrl] is used in conjunction withother keys. The corresponding functionsare shown in the table to the right.
NOTE: When using [Ctrl] combinations, pressand release the [Ctrl] key, then press andrelease the activation key.

Using a PC keyboard to emulate aMac Keyboard
After you set up the appropriateKeyboard Platform (refer to Page16),you will be able to use a PC (101/104)key keyboard to emulate the functionsof the Mac keyboard. Thecorresponding functions are shown inthe table to the right.
NOTE: When using key combinations, pressand release the first key [Ctrl] or [Alt]), thenpress and release the activation key.
Operation
23
Operation
24
List Hotkey SettingsTo see a list of the current hotkey settings,do the following:
1. Open a text editor (such asNotepad, Textedit, or Word)
2. Invoke Hotkey Mode (See Page11-13)
3. Press F4 to ‘paste’ the KVMconfiguration on your text editor
USB ResetIf the USB loses focus and needs to bereset, do the following:
1. Invoke Hotkey Mode (See Page 11-13)
2. Press and release F5 function key

Appendix
LED Display Table
25
Activity
Off
On (Steady)
Flashing (On and Off Equal)
Indication
Port is not selected
Port is connected to an active computer
Port is connected to an active computerand is being accessed in Auto Scan Mode

Specification
26

If you need technical support, please check out our IOGEAR Tech Info Library(T.I.L.) at www.iogear.com/support for the latest tips, tricks, and trouble-shooting. The IOGEAR T.I.L. was designed to provide you with the latesttechnical information about our products. Most of the answers to yourquestions can be found here, so please try it out before contacting technicalsupport.
Technical support is available Monday through Friday from 8:00 am to 5:00 pmPST and can be reached at 866-946-4327 or by email [email protected].
Technical Support
27
Radio & TV Interference Statement
WARNING!!! This equipment generates, uses and can radiate radio frequencyenergy and, if not installed and used in accordance with the instructionmanual, may cause interference to radio communications. This equipment hasbeen tested and found to comply with the limits for a Class B computingdevice pursuant to Subpart J of Part 15 of FCC Rules, which are designed toprovide reasonable protection against such interference when operated in acommercial environment. Operation of this equipment in a residential area islikely to cause interference, in which case the user at his own expense will berequired to take whatever measures may be required to correct the interfer-ence.
28

IN NO EVENT SHALL THE DIRECT VENDOR’S LIABILITY FOR DIRECT,INDIRECT, SPECIAL, INCIDENTAL OR CONSEQUENTIAL DAMAGESRESULTING FROM THE USE OF THE PRODUCT, DISK OR ITS DOCUMEN-TATION EXCEED THE PRICE PAID FOR THE PRODUCT.
The direct vendor makes no warranty or representation, expressed, implied, orstatutory with respect to the contents or use of this documentation, andespecially disclaims its quality, performance, merchantability, or fitness for anyparticular purpose.
The direct vendor also reserves the right to revise or update the device ordocumentation without obligation to notify any individual or entity of suchrevisions, or updates. For further inquires please contact your direct vendor.
Limited Warranty
29

Contact info.23 Hubble • Irvine, CA 92618 • (P)949.453.8782 • (F)949.453.8785 • www.iogear.com
®