Embed Size (px)
Citation preview

MINI SEWING MACHINE MINIMÁQUINA DE COSER
English……3 Español…..18
User Manual
Manual
del usuario
Contents
Parts list .......................................................................... 3 Contents ..................................................................... 3
General information ....................................................... 4
Safety instructions ..................................................... 5
User instructions ............................................................. 6
Before first use .......................................................... 7
Operating the machine ............................................. 7
With the foot pedal .............................................. 7
Without the foot pedal ........................................ 8
Winding the bobbin ................................................... 9
Threading the sewing machine ............................... 11
Using side bobbin ............................................... 11
Using thread spindle .......................................... 12
Bottom bobbin placement ...................................... 13
Adjusting tension ..................................................... 14
Changing the needle ................................................ 14
Helpful hints ............................................................. 15
Cleaning and maintenance ........................................... 15
Other useful information ............................................. 16
Technical specifications ........................................... 16
Storing ...................................................................... 16
FCC ........................................................................... 17
Parts list
3
1
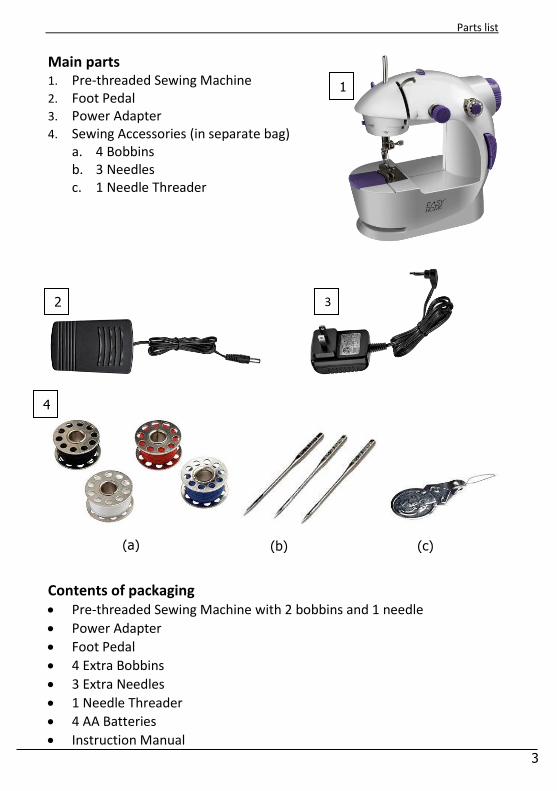
Main parts 1. Pre-threaded Sewing Machine 2. Foot Pedal 3. Power Adapter 4. Sewing Accessories (in separate bag)
a. 4 Bobbins b. 3 Needles c. 1 Needle Threader
Contents of packaging Pre-threaded Sewing Machine with 2 bobbins and 1 needle
Power Adapter
Foot Pedal
4 Extra Bobbins
3 Extra Needles
1 Needle Threader
4 AA Batteries
Instruction Manual
2 3
4
(a) (c) (b)
General information
4
General information
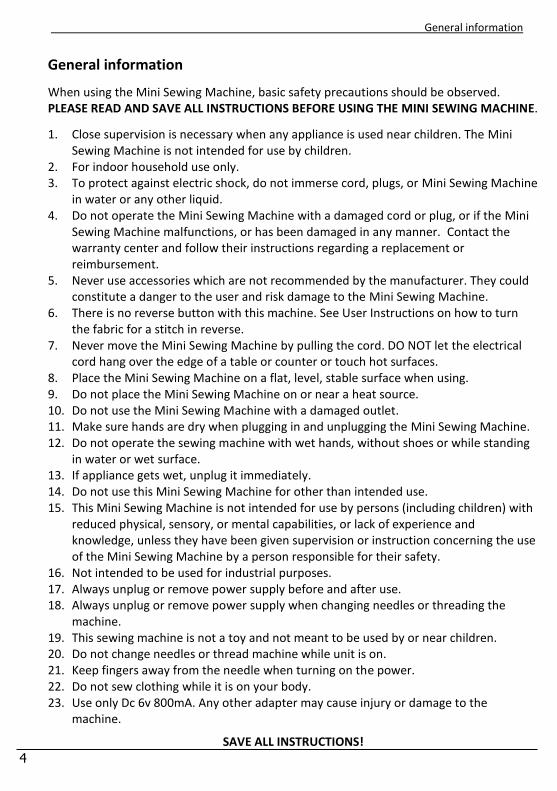
When using the Mini Sewing Machine, basic safety precautions should be observed. PLEASE READ AND SAVE ALL INSTRUCTIONS BEFORE USING THE MINI SEWING MACHINE.
1. Close supervision is necessary when any appliance is used near children. The Mini Sewing Machine is not intended for use by children.
2. For indoor household use only. 3. To protect against electric shock, do not immerse cord, plugs, or Mini Sewing Machine
in water or any other liquid. 4. Do not operate the Mini Sewing Machine with a damaged cord or plug, or if the Mini
Sewing Machine malfunctions, or has been damaged in any manner. Contact the warranty center and follow their instructions regarding a replacement or reimbursement.
5. Never use accessories which are not recommended by the manufacturer. They could constitute a danger to the user and risk damage to the Mini Sewing Machine.
6. There is no reverse button with this machine. See User Instructions on how to turn the fabric for a stitch in reverse.
7. Never move the Mini Sewing Machine by pulling the cord. DO NOT let the electrical cord hang over the edge of a table or counter or touch hot surfaces.
8. Place the Mini Sewing Machine on a flat, level, stable surface when using. 9. Do not place the Mini Sewing Machine on or near a heat source. 10. Do not use the Mini Sewing Machine with a damaged outlet. 11. Make sure hands are dry when plugging in and unplugging the Mini Sewing Machine. 12. Do not operate the sewing machine with wet hands, without shoes or while standing
in water or wet surface. 13. If appliance gets wet, unplug it immediately. 14. Do not use this Mini Sewing Machine for other than intended use. 15. This Mini Sewing Machine is not intended for use by persons (including children) with
reduced physical, sensory, or mental capabilities, or lack of experience and knowledge, unless they have been given supervision or instruction concerning the use of the Mini Sewing Machine by a person responsible for their safety.
16. Not intended to be used for industrial purposes. 17. Always unplug or remove power supply before and after use. 18. Always unplug or remove power supply when changing needles or threading the
machine. 19. This sewing machine is not a toy and not meant to be used by or near children. 20. Do not change needles or thread machine while unit is on. 21. Keep fingers away from the needle when turning on the power. 22. Do not sew clothing while it is on your body. 23. Use only Dc 6v 800mA. Any other adapter may cause injury or damage to the
machine.
SAVE ALL INSTRUCTIONS!
User instructions
5
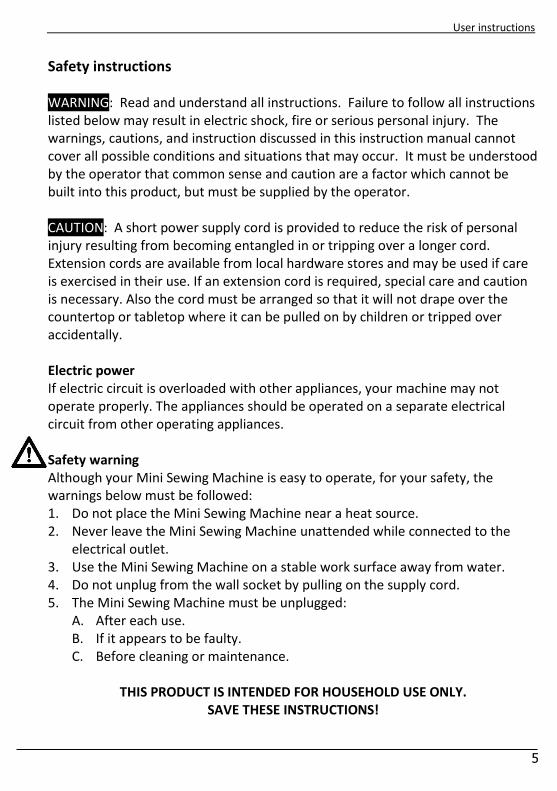
Safety instructions WARNING: Read and understand all instructions. Failure to follow all instructions listed below may result in electric shock, fire or serious personal injury. The warnings, cautions, and instruction discussed in this instruction manual cannot cover all possible conditions and situations that may occur. It must be understood by the operator that common sense and caution are a factor which cannot be built into this product, but must be supplied by the operator. CAUTION: A short power supply cord is provided to reduce the risk of personal injury resulting from becoming entangled in or tripping over a longer cord. Extension cords are available from local hardware stores and may be used if care is exercised in their use. If an extension cord is required, special care and caution is necessary. Also the cord must be arranged so that it will not drape over the countertop or tabletop where it can be pulled on by children or tripped over accidentally. Electric power If electric circuit is overloaded with other appliances, your machine may not operate properly. The appliances should be operated on a separate electrical circuit from other operating appliances. Safety warning Although your Mini Sewing Machine is easy to operate, for your safety, the warnings below must be followed: 1. Do not place the Mini Sewing Machine near a heat source. 2. Never leave the Mini Sewing Machine unattended while connected to the
electrical outlet. 3. Use the Mini Sewing Machine on a stable work surface away from water. 4. Do not unplug from the wall socket by pulling on the supply cord. 5. The Mini Sewing Machine must be unplugged:
A. After each use. B. If it appears to be faulty. C. Before cleaning or maintenance.
THIS PRODUCT IS INTENDED FOR HOUSEHOLD USE ONLY.
SAVE THESE INSTRUCTIONS!
User instructions
6
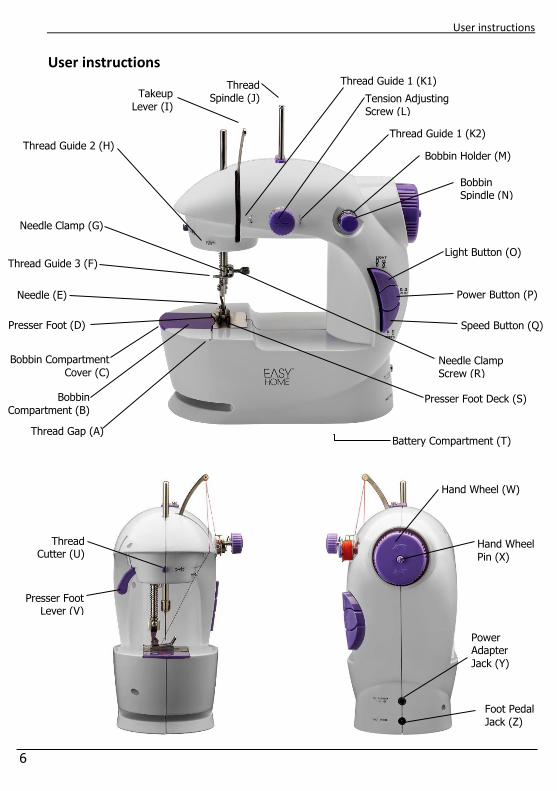
User instructions
Foot Pedal Jack (Z)
Power Adapter
Jack (Y)
Thread Guide 1 (K1)
Thread Cutter (U)
Hand Wheel (W)
Hand Wheel
Pin (X)
Takeup
Lever (I)
Thread Spindle (J)
Power Button (P)
Speed Button (Q)
Needle Clamp Screw (R)
Presser Foot Deck (S)
Light Button (O)
Bobbin Spindle (N)
Bobbin Holder (M)
Tension Adjusting Screw (L)
Thread Guide 2 (H)
Needle (E)
Presser Foot (D)
Bobbin Compartment
Cover (C)
Bobbin
Compartment (B)
Thread Gap (A)
Thread Guide 3 (F)
Needle Clamp (G)
Presser Foot Lever (V)
Battery Compartment (T)
Thread Guide 1 (K2)
User instructions
7
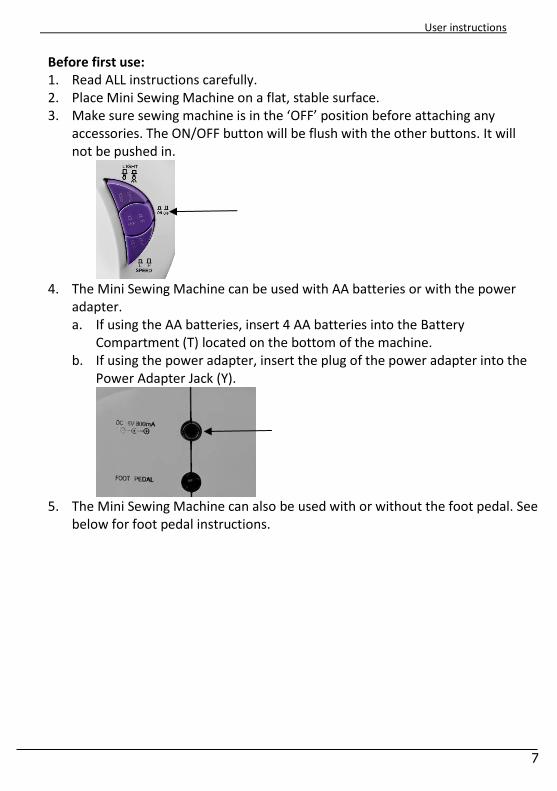
Before first use: 1. Read ALL instructions carefully. 2. Place Mini Sewing Machine on a flat, stable surface. 3. Make sure sewing machine is in the ‘OFF’ position before attaching any
accessories. The ON/OFF button will be flush with the other buttons. It will not be pushed in.
4. The Mini Sewing Machine can be used with AA batteries or with the power
adapter. a. If using the AA batteries, insert 4 AA batteries into the Battery
Compartment (T) located on the bottom of the machine. b. If using the power adapter, insert the plug of the power adapter into the
Power Adapter Jack (Y).
5. The Mini Sewing Machine can also be used with or without the foot pedal. See
below for foot pedal instructions.
User instructions
8
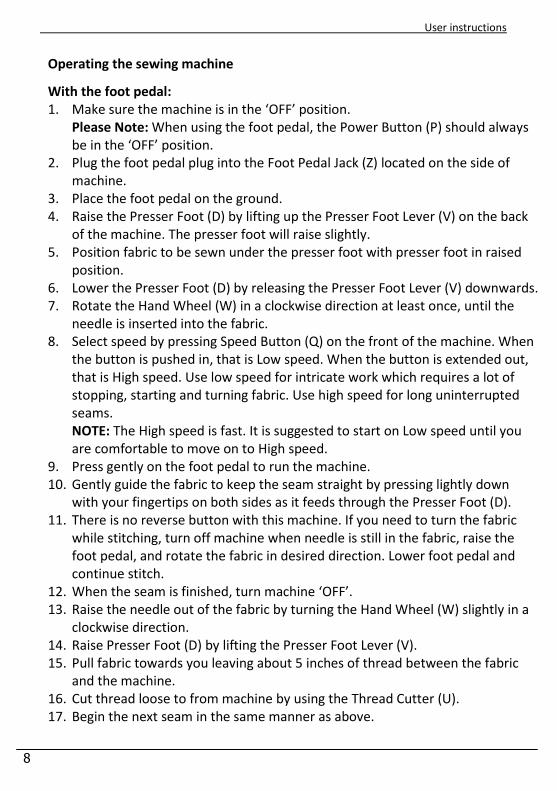
Operating the sewing machine
With the foot pedal: 1. Make sure the machine is in the ‘OFF’ position.
Please Note: When using the foot pedal, the Power Button (P) should always be in the ‘OFF’ position.
2. Plug the foot pedal plug into the Foot Pedal Jack (Z) located on the side of machine.
3. Place the foot pedal on the ground. 4. Raise the Presser Foot (D) by lifting up the Presser Foot Lever (V) on the back
of the machine. The presser foot will raise slightly. 5. Position fabric to be sewn under the presser foot with presser foot in raised
position. 6. Lower the Presser Foot (D) by releasing the Presser Foot Lever (V) downwards. 7. Rotate the Hand Wheel (W) in a clockwise direction at least once, until the
needle is inserted into the fabric. 8. Select speed by pressing Speed Button (Q) on the front of the machine. When
the button is pushed in, that is Low speed. When the button is extended out, that is High speed. Use low speed for intricate work which requires a lot of stopping, starting and turning fabric. Use high speed for long uninterrupted seams. NOTE: The High speed is fast. It is suggested to start on Low speed until you are comfortable to move on to High speed.
9. Press gently on the foot pedal to run the machine. 10. Gently guide the fabric to keep the seam straight by pressing lightly down
with your fingertips on both sides as it feeds through the Presser Foot (D). 11. There is no reverse button with this machine. If you need to turn the fabric
while stitching, turn off machine when needle is still in the fabric, raise the foot pedal, and rotate the fabric in desired direction. Lower foot pedal and continue stitch.
12. When the seam is finished, turn machine ‘OFF’. 13. Raise the needle out of the fabric by turning the Hand Wheel (W) slightly in a
clockwise direction. 14. Raise Presser Foot (D) by lifting the Presser Foot Lever (V). 15. Pull fabric towards you leaving about 5 inches of thread between the fabric
and the machine. 16. Cut thread loose to from machine by using the Thread Cutter (U). 17. Begin the next seam in the same manner as above.
User instructions
9
Without the foot pedal: 1. Make sure the sewing machine is in the ‘OFF’ position. 2. Lift the needle above the presser foot by turning the Hand Wheel (W) slightly
in a clockwise direction (away from you). 3. Raise the Presser Foot (D) by lifting up the Presser Foot Lever (V) on the back
of the machine. The presser foot will raise slightly. 4. Position fabric to be sewn under the presser foot with presser foot in raised
position. 5. Lower the Presser Foot (D) by releasing the Presser Foot Lever (V) downwards. 6. Rotate the Hand Wheel (W) in a clockwise direction at least once, until the
needle is inserted into the fabric. 7. Select speed by pressing Speed Button (Q) on the front of the machine. When
the button is pushed in, that is Low speed. When the button is extended out, that is High speed. Use low speed for intricate work which requires a lot of stopping, starting and turning fabric. Use high speed for long uninterrupted seams. NOTE: The High speed is fast. It is suggested to start on Low speed until you are comfortable to move on to High speed.
8. Press the Power Button (P) to the ‘ON’ position. 9. Gently guide the fabric to keep the seam straight by pressing lightly down
with your fingertips on both sides as it feeds through the Presser Foot (D). 10. If need to turn fabric during stitch, turn off machine when needle is still in the
fabric, raise the foot pedal, and rotate the fabric in desired direction. Lower foot pedal and continue stitch.
11. When the seam is finished, turn machine ‘OFF’. 12. Raise the needle out of the fabric by turning the Hand Wheel (W) slightly in a
clockwise direction. 13. Raise Presser Foot (D) by lifting the Presser Foot Lever (V). 14. Pull fabric towards you leaving about 5 inches of thread between the fabric
and the machine. 15. Cut thread loose to from machine by using the Thread Cutter (U). 16. Begin the next seam in the same manner as above.
User instructions
10
Winding the bobbin Please Note: For safety precautions, always remove the bobbin from the Bobbin Compartment (B). 1. Raise Thread Spindle (J) by grasping the notch on the top of the spindle and
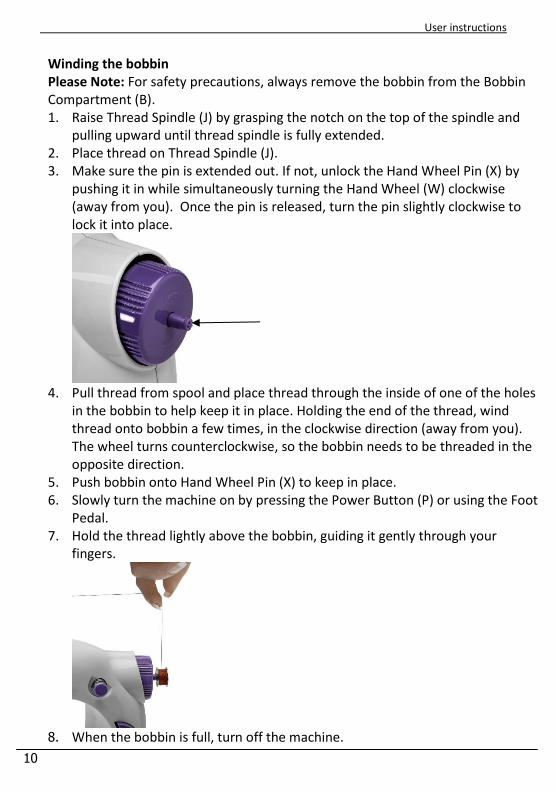
pulling upward until thread spindle is fully extended. 2. Place thread on Thread Spindle (J). 3. Make sure the pin is extended out. If not, unlock the Hand Wheel Pin (X) by
pushing it in while simultaneously turning the Hand Wheel (W) clockwise (away from you). Once the pin is released, turn the pin slightly clockwise to lock it into place.
4. Pull thread from spool and place thread through the inside of one of the holes
in the bobbin to help keep it in place. Holding the end of the thread, wind thread onto bobbin a few times, in the clockwise direction (away from you). The wheel turns counterclockwise, so the bobbin needs to be threaded in the opposite direction.
5. Push bobbin onto Hand Wheel Pin (X) to keep in place. 6. Slowly turn the machine on by pressing the Power Button (P) or using the Foot
Pedal. 7. Hold the thread lightly above the bobbin, guiding it gently through your
fingers.
8. When the bobbin is full, turn off the machine.
User instructions
11
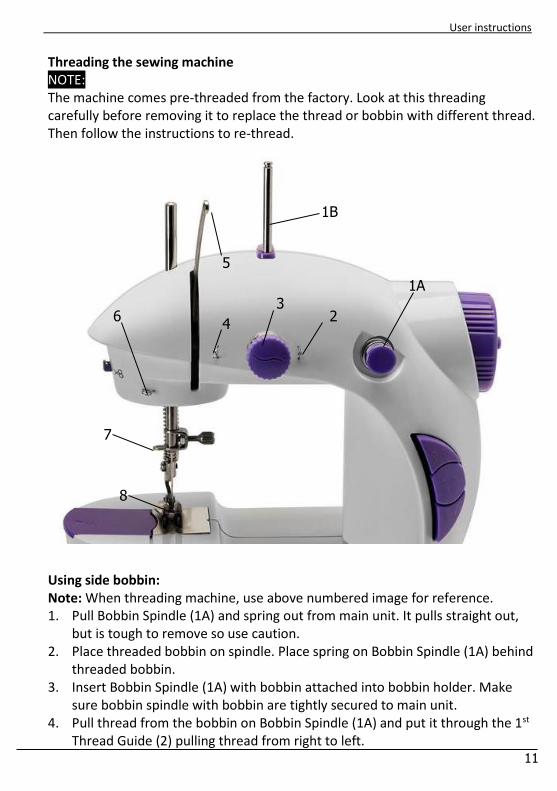
Threading the sewing machine NOTE: The machine comes pre-threaded from the factory. Look at this threading carefully before removing it to replace the thread or bobbin with different thread. Then follow the instructions to re-thread. Using side bobbin: Note: When threading machine, use above numbered image for reference. 1. Pull Bobbin Spindle (1A) and spring out from main unit. It pulls straight out,
but is tough to remove so use caution. 2. Place threaded bobbin on spindle. Place spring on Bobbin Spindle (1A) behind
threaded bobbin. 3. Insert Bobbin Spindle (1A) with bobbin attached into bobbin holder. Make
sure bobbin spindle with bobbin are tightly secured to main unit. 4. Pull thread from the bobbin on Bobbin Spindle (1A) and put it through the 1st
Thread Guide (2) pulling thread from right to left.
1A
7
6
5
1B
4
3 2
8
User instructions
12
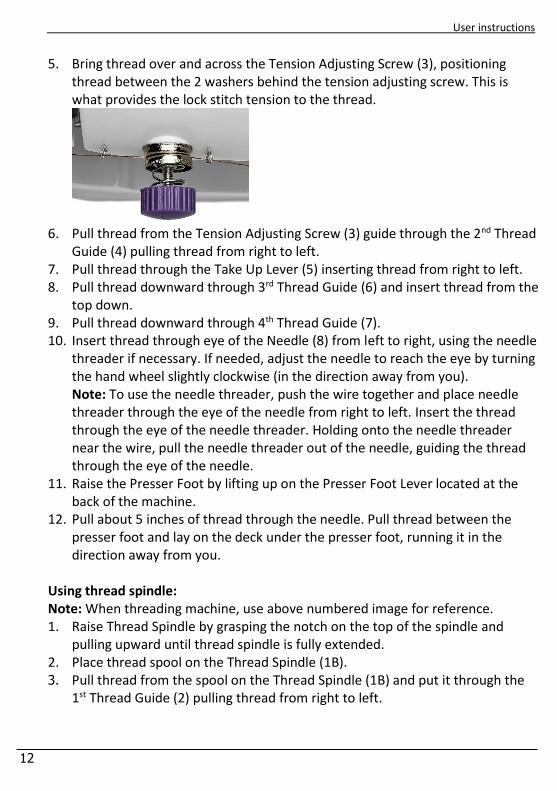
5. Bring thread over and across the Tension Adjusting Screw (3), positioning
thread between the 2 washers behind the tension adjusting screw. This is what provides the lock stitch tension to the thread.
6. Pull thread from the Tension Adjusting Screw (3) guide through the 2nd Thread
Guide (4) pulling thread from right to left. 7. Pull thread through the Take Up Lever (5) inserting thread from right to left. 8. Pull thread downward through 3rd Thread Guide (6) and insert thread from the
top down. 9. Pull thread downward through 4th Thread Guide (7). 10. Insert thread through eye of the Needle (8) from left to right, using the needle
threader if necessary. If needed, adjust the needle to reach the eye by turning the hand wheel slightly clockwise (in the direction away from you). Note: To use the needle threader, push the wire together and place needle threader through the eye of the needle from right to left. Insert the thread through the eye of the needle threader. Holding onto the needle threader near the wire, pull the needle threader out of the needle, guiding the thread through the eye of the needle.
11. Raise the Presser Foot by lifting up on the Presser Foot Lever located at the back of the machine.
12. Pull about 5 inches of thread through the needle. Pull thread between the presser foot and lay on the deck under the presser foot, running it in the direction away from you.
Using thread spindle:
Note: When threading machine, use above numbered image for reference. 1. Raise Thread Spindle by grasping the notch on the top of the spindle and
pulling upward until thread spindle is fully extended. 2. Place thread spool on the Thread Spindle (1B). 3. Pull thread from the spool on the Thread Spindle (1B) and put it through the
1st Thread Guide (2) pulling thread from right to left.
User instructions
13
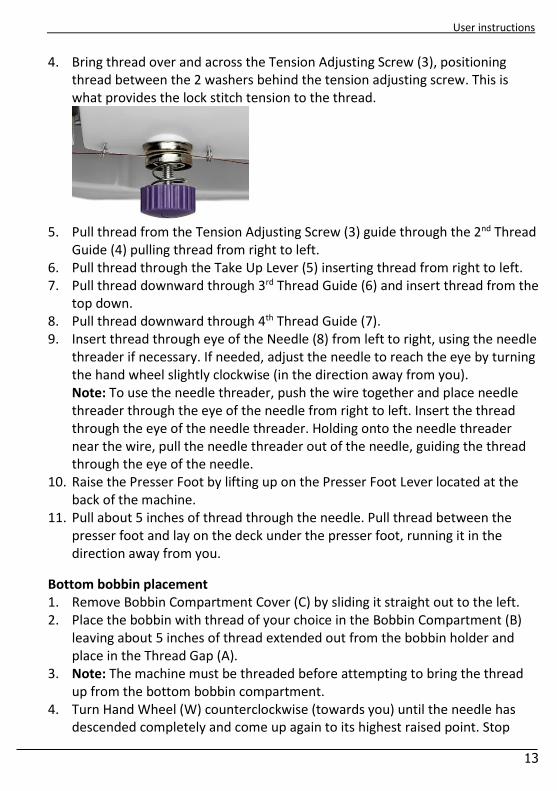
4. Bring thread over and across the Tension Adjusting Screw (3), positioning thread between the 2 washers behind the tension adjusting screw. This is what provides the lock stitch tension to the thread.
5. Pull thread from the Tension Adjusting Screw (3) guide through the 2nd Thread
Guide (4) pulling thread from right to left. 6. Pull thread through the Take Up Lever (5) inserting thread from right to left. 7. Pull thread downward through 3rd Thread Guide (6) and insert thread from the
top down. 8. Pull thread downward through 4th Thread Guide (7). 9. Insert thread through eye of the Needle (8) from left to right, using the needle
threader if necessary. If needed, adjust the needle to reach the eye by turning the hand wheel slightly clockwise (in the direction away from you). Note: To use the needle threader, push the wire together and place needle threader through the eye of the needle from right to left. Insert the thread through the eye of the needle threader. Holding onto the needle threader near the wire, pull the needle threader out of the needle, guiding the thread through the eye of the needle.
10. Raise the Presser Foot by lifting up on the Presser Foot Lever located at the back of the machine.
11. Pull about 5 inches of thread through the needle. Pull thread between the presser foot and lay on the deck under the presser foot, running it in the direction away from you.
Bottom bobbin placement 1. Remove Bobbin Compartment Cover (C) by sliding it straight out to the left. 2. Place the bobbin with thread of your choice in the Bobbin Compartment (B)
leaving about 5 inches of thread extended out from the bobbin holder and place in the Thread Gap (A).
3. Note: The machine must be threaded before attempting to bring the thread up from the bottom bobbin compartment.
4. Turn Hand Wheel (W) counterclockwise (towards you) until the needle has descended completely and come up again to its highest raised point. Stop
User instructions
14
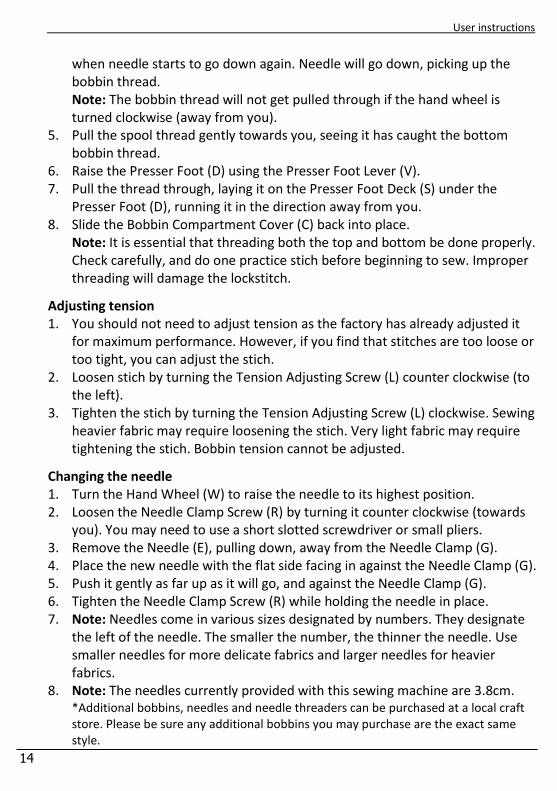
when needle starts to go down again. Needle will go down, picking up the bobbin thread. Note: The bobbin thread will not get pulled through if the hand wheel is turned clockwise (away from you).
5. Pull the spool thread gently towards you, seeing it has caught the bottom bobbin thread.
6. Raise the Presser Foot (D) using the Presser Foot Lever (V). 7. Pull the thread through, laying it on the Presser Foot Deck (S) under the
Presser Foot (D), running it in the direction away from you. 8. Slide the Bobbin Compartment Cover (C) back into place.
Note: It is essential that threading both the top and bottom be done properly. Check carefully, and do one practice stich before beginning to sew. Improper threading will damage the lockstitch.
Adjusting tension 1. You should not need to adjust tension as the factory has already adjusted it
for maximum performance. However, if you find that stitches are too loose or too tight, you can adjust the stich.
2. Loosen stich by turning the Tension Adjusting Screw (L) counter clockwise (to the left).
3. Tighten the stich by turning the Tension Adjusting Screw (L) clockwise. Sewing heavier fabric may require loosening the stich. Very light fabric may require tightening the stich. Bobbin tension cannot be adjusted.
Changing the needle 1. Turn the Hand Wheel (W) to raise the needle to its highest position. 2. Loosen the Needle Clamp Screw (R) by turning it counter clockwise (towards
you). You may need to use a short slotted screwdriver or small pliers. 3. Remove the Needle (E), pulling down, away from the Needle Clamp (G). 4. Place the new needle with the flat side facing in against the Needle Clamp (G). 5. Push it gently as far up as it will go, and against the Needle Clamp (G). 6. Tighten the Needle Clamp Screw (R) while holding the needle in place. 7. Note: Needles come in various sizes designated by numbers. They designate
the left of the needle. The smaller the number, the thinner the needle. Use smaller needles for more delicate fabrics and larger needles for heavier fabrics.
8. Note: The needles currently provided with this sewing machine are 3.8cm. *Additional bobbins, needles and needle threaders can be purchased at a local craft store. Please be sure any additional bobbins you may purchase are the exact same style.
Helpful hints / cleaning and maintenance
15
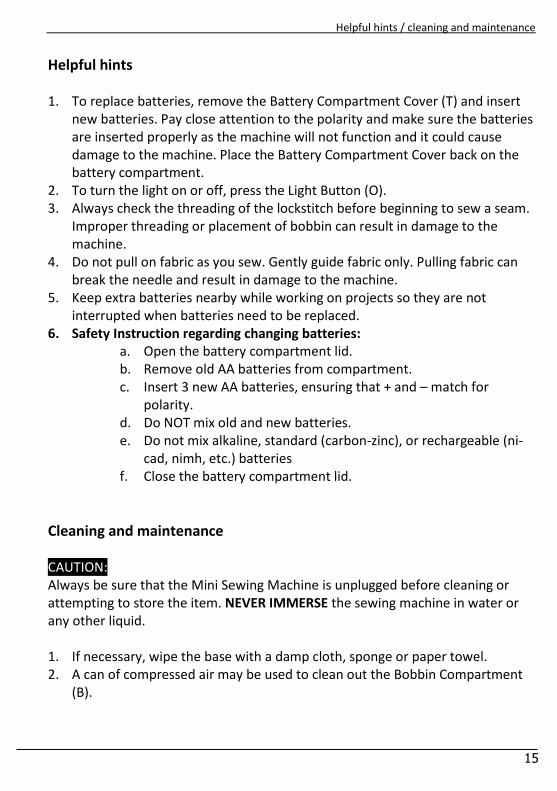
Helpful hints 1. To replace batteries, remove the Battery Compartment Cover (T) and insert
new batteries. Pay close attention to the polarity and make sure the batteries are inserted properly as the machine will not function and it could cause damage to the machine. Place the Battery Compartment Cover back on the battery compartment.
2. To turn the light on or off, press the Light Button (O). 3. Always check the threading of the lockstitch before beginning to sew a seam.
Improper threading or placement of bobbin can result in damage to the machine.
4. Do not pull on fabric as you sew. Gently guide fabric only. Pulling fabric can break the needle and result in damage to the machine.
5. Keep extra batteries nearby while working on projects so they are not interrupted when batteries need to be replaced.
6. Safety Instruction regarding changing batteries: a. Open the battery compartment lid. b. Remove old AA batteries from compartment. c. Insert 3 new AA batteries, ensuring that + and – match for
polarity. d. Do NOT mix old and new batteries. e. Do not mix alkaline, standard (carbon-zinc), or rechargeable (ni-
cad, nimh, etc.) batteries f. Close the battery compartment lid.
Cleaning and maintenance CAUTION: Always be sure that the Mini Sewing Machine is unplugged before cleaning or attempting to store the item. NEVER IMMERSE the sewing machine in water or any other liquid. 1. If necessary, wipe the base with a damp cloth, sponge or paper towel. 2. A can of compressed air may be used to clean out the Bobbin Compartment
(B).
Other useful information
16
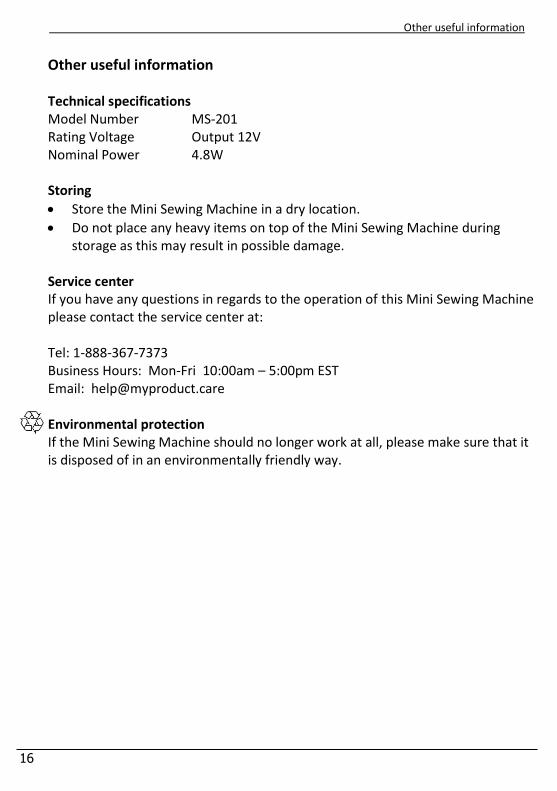
Other useful information Technical specifications Model Number MS-201 Rating Voltage Output 12V Nominal Power 4.8W Storing
Store the Mini Sewing Machine in a dry location.
Do not place any heavy items on top of the Mini Sewing Machine during storage as this may result in possible damage.
Service center If you have any questions in regards to the operation of this Mini Sewing Machine please contact the service center at: Tel: 1-888-367-7373 Business Hours: Mon-Fri 10:00am – 5:00pm EST Email: [email protected] Environmental protection If the Mini Sewing Machine should no longer work at all, please make sure that it is disposed of in an environmentally friendly way.
FCC
17
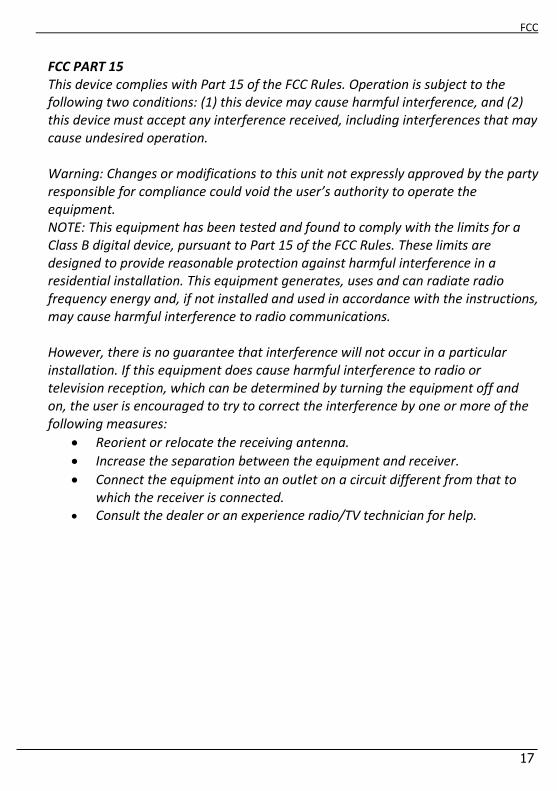
FCC PART 15 This device complies with Part 15 of the FCC Rules. Operation is subject to the following two conditions: (1) this device may cause harmful interference, and (2) this device must accept any interference received, including interferences that may cause undesired operation.
Warning: Changes or modifications to this unit not expressly approved by the party responsible for compliance could void the user’s authority to operate the equipment. NOTE: This equipment has been tested and found to comply with the limits for a Class B digital device, pursuant to Part 15 of the FCC Rules. These limits are designed to provide reasonable protection against harmful interference in a residential installation. This equipment generates, uses and can radiate radio frequency energy and, if not installed and used in accordance with the instructions, may cause harmful interference to radio communications. However, there is no guarantee that interference will not occur in a particular installation. If this equipment does cause harmful interference to radio or television reception, which can be determined by turning the equipment off and on, the user is encouraged to try to correct the interference by one or more of the following measures:
Reorient or relocate the receiving antenna.
Increase the separation between the equipment and receiver.
Connect the equipment into an outlet on a circuit different from that to which the receiver is connected.
Consult the dealer or an experience radio/TV technician for help.
Lista de componentes
19
Contenido
Lista de componentes .............................................. 19
Contenido ............................................................ 19
Información general ................................................. 20
Instrucciones de seguridad .................................. 22
Modo de empleo ...................................................... 23
Antes del primer uso ........................................... 23
Uso de la máquina .............................................. 24
Con el pedal .................................................... 25
Sin el pedal ..................................................... 25
Enrollado de la bobina ......................................... 26
Enhebrado de la máquina de coser ..................... 25
Uso de la bobina lateral ................................. 28
Uso del portahilo ............................................ 30
Colocación de la bobina inferior .......................... 31
Ajuste de la tensión ............................................. 31
Cambio de la aguja .............................................. 32
Consejos útiles ..................................................... 33
Limpieza y mantenimiento ....................................... 33
Información adicional de utilidad ............................ 34
Especificaciones técnicas ..................................... 34
Almacenamiento.................................................. 34
FCC ....................................................................... 35
Lista de componentes
19
1
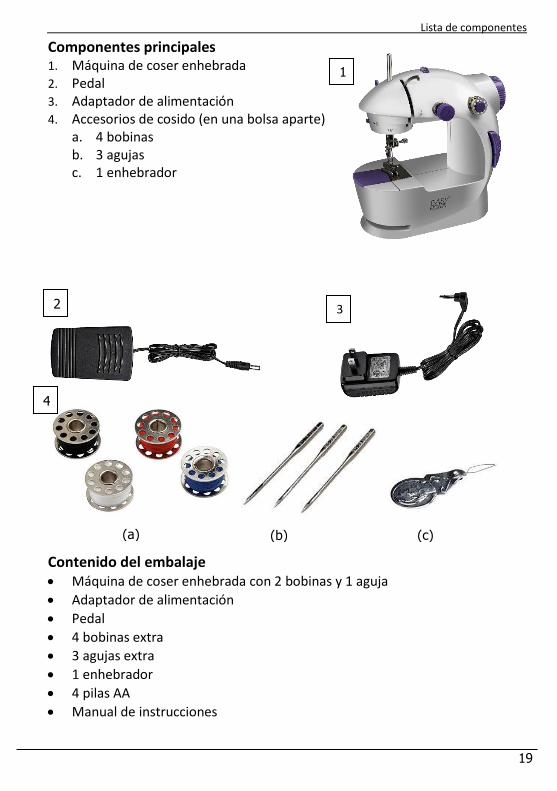
Componentes principales 1. Máquina de coser enhebrada 2. Pedal 3. Adaptador de alimentación 4. Accesorios de cosido (en una bolsa aparte)
a. 4 bobinas b. 3 agujas c. 1 enhebrador
Contenido del embalaje Máquina de coser enhebrada con 2 bobinas y 1 aguja
Adaptador de alimentación
Pedal
4 bobinas extra
3 agujas extra
1 enhebrador
4 pilas AA
Manual de instrucciones
2 3
4
(a) (c) (b)
Información general
20
Información general Al utilizar la minimáquina de coser, es necesario seguir unas precauciones de seguridad básicas. POR FAVOR, LEA Y GUARDE TODAS LAS INSTRUCCIONES ANTES DE UTILIZAR LA MINIMÁQUINA DE COSER. 1. Es necesaria una atenta supervisión cuando el aparato se usa cerca de los
niños. La minimáquina de coser no está diseñada para ser usada por los niños. 2. Para uso doméstico en interiores solamente. 3. Para protegerse contra descargas eléctricas, no sumerja el cable, el enchufe o
la minimáquina de coser en agua ni en ningún otro líquido. 4. No utilice la minimáquina de coser con un cable o enchufe dañado, si ha
sufrido una avería o si se ha dañado de cualquier manera. Póngase en contacto con el centro de garantía y siga sus instrucciones para reemplazarla o recibir un reembolso.
5. Nunca utilice accesorios que el fabricante no haya recomendado. Podrían ser peligrosos para el usuario y causar daños a la minimáquina de coser.
6. Esta máquina no tiene un botón de retroceso. Consulte el modo de empleo para conocer cómo girar la tela para coser en sentido contrario.
7. No mueva nunca la minimáquina de coser jalando del cable. NO permita que el cable eléctrico cuelgue sobre el borde de una mesa o mostrador, ni que toque superficies calientes.
8. Coloque la minimáquina de coser en una superficie plana, nivelada y estable al utilizarla.
9. No coloque la minimáquina de coser sobre o cerca de una fuente de calor. 10. No utilice la minimáquina de coser con un enchufe dañado. 11. Asegúrese de que sus manos estén secas al enchufar y desenchufar la
minimáquina de coser. 12. No utilice la máquina de coser con las manos mojadas, sin zapatos o si está
parado sobre un charco de agua o una superficie húmeda. 13. Si el aparato se moja, desenchúfelo inmediatamente. 14. No utilice la minimáquina de coser para un uso que no sea el previsto. 15. La minimáquina de coser no está diseñada para ser utilizada por personas
(incluidos niños) con capacidades físicas, sensoriales o mentales reducidas, o sin experiencia o conocimiento, a menos que sean supervisados o reciban instrucciones acerca de su uso por parte de una persona responsable de su seguridad.
16. Este aparato no está diseñado para ser usado con fines industriales.
Información general
21
17. Desenchufe o desconecte la fuente de alimentación siempre antes y después
de usar este aparato. 18. Desenchufe o desconecte la fuente de alimentación siempre al cambiar las
agujas o al enhebrar la máquina. 19. Esta máquina de coser no es un juguete y no está diseñada para ser usada por
o cerca de los niños. 20. No cambie las agujas o enhebre la máquina mientras la unidad esté
encendida. 21. Mantenga los dedos alejados de la aguja al encender la máquina. 22. No cosa ropa que lleve puesta o que tenga sobre su cuerpo. 23. Use sólo un adaptador de CC de 6 v y 800 mA. El uso de cualquier otro
adaptador puede causar lesiones o provocar daños a la máquina.
GUARDE TODAS LAS INSTRUCCIONES
Instrucciones de seguridad
22
Instrucciones de seguridad
ADVERTENCIA: Lea y comprenda todas las instrucciones. Si no se cumplen todas las instrucciones indicadas a continuación se pueden producir descargas eléctricas, incendios o lesiones graves. Las advertencias, precauciones e instrucciones que se detallan en este manual de instrucciones no cubren todas las condiciones y situaciones posibles que podrían suceder. El operador debe entender que el sentido común y la precaución son factores que no se pueden incluir en el producto, sino que los debe aportar el operador mismo. PRECAUCIÓN: Se proporciona un cable eléctrico corto para reducir el riesgo de lesiones personales resultantes de enredarse o tropezar con un cable más largo. Hay disponibles cables de extensión en las tiendas locales de hardware y estos se pueden utilizar si se tiene cuidado en su uso. Si se requiere usar un cable de extensión, es necesario tener especial cuidado y precaución. Además el cable debe colocarse de manera que no cuelgue de un mostrador o mesa en donde los niños pudieran halarlo o tropezar con él accidentalmente. Alimentación eléctrica Si el circuito eléctrico está sobrecargado con otros electrodomésticos, la máquina podría no funcionar correctamente. Los electrodomésticos se deben utilizar en un circuito eléctrico diferente al de otros aparatos en funcionamiento. Advertencia de seguridad Si bien la minimáquina de coser es fácil de utilizar, se deben cumplir las siguientes advertencias por razones de seguridad: 1. No coloque la minimáquina de coser cerca de una fuente de calor. 2. No deje nunca la minimáquina de coser desatendida mientras esté conectada
al tomacorriente. 3. Use la minimáquina de coser sobre una superficie de trabajo estable alejada
del agua. 4. No la desconecte del tomacorriente tirando del cable de alimentación. 5. La minimáquina de coser debe desenchufarse:
A. Después de cada uso. B. Si parece estar defectuosa. C. Antes de cualquier operación de limpieza o mantenimiento.
ESTE PRODUCTO ESTÁ DESTINADO EXCLUSIVAMENTE PARA USO DOMÉSTICO.
¡GUARDE ESTAS INSTRUCCIONES!

Modo de empleo
23
Modo de empleo
Cortahilo (U)
Rueda de mano (W)
Pasador de la rueda de mano (X)
Palanca del tirahilo (I)
Guía de hilo 1 (K1) Portahilo (J)
Botón de
encendido (P)
Botón de velocidad (Q)
Tornillo de ajuste de la aguja (R)
Superficie del pie
prensatelas (S)
Botón de iluminación (O)
Eje del portabobina (N)
Portabobina (M)
Tornillo de ajuste de la tensión (L)
Guía de hilo 2 (H)
Aguja (E)
Pie prensatelas (D)
Cubierta del compartimento de la
bobina (C)
Compartimento de
la bobina (B)
Muesca para hilo (A)
Guía de hilo 3 (F)
Cierre de la aguja (G)
Palanca del pie prensatelas (V)
Conexión del pedal (Z)
Conexión del adaptador de alimentación (Y)
Compartimento de las pilas (T)
Guía de hilo 1 (K2)
Modo de empleo
24
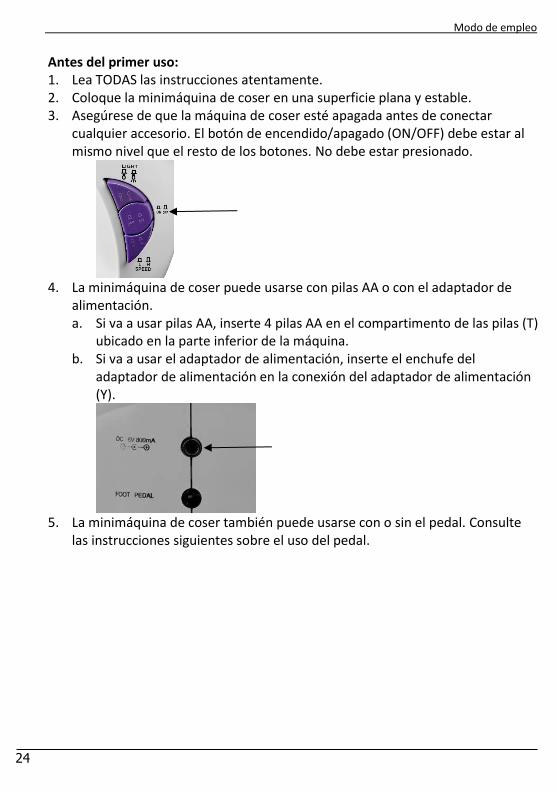
Antes del primer uso: 1. Lea TODAS las instrucciones atentamente. 2. Coloque la minimáquina de coser en una superficie plana y estable. 3. Asegúrese de que la máquina de coser esté apagada antes de conectar
cualquier accesorio. El botón de encendido/apagado (ON/OFF) debe estar al mismo nivel que el resto de los botones. No debe estar presionado.
4. La minimáquina de coser puede usarse con pilas AA o con el adaptador de
alimentación. a. Si va a usar pilas AA, inserte 4 pilas AA en el compartimento de las pilas (T)
ubicado en la parte inferior de la máquina. b. Si va a usar el adaptador de alimentación, inserte el enchufe del
adaptador de alimentación en la conexión del adaptador de alimentación (Y).
5. La minimáquina de coser también puede usarse con o sin el pedal. Consulte
las instrucciones siguientes sobre el uso del pedal.
Modo de empleo
25
Uso de la máquina de coser
Con el pedal: 1. Asegúrese que la máquina esté apagada (OFF).
Importante: Cuando use el pedal, el botón de encendido (P) siempre debe estar en la posición de apagado (OFF).
2. Inserte el enchufe del pedal en la conexión del pedal (Z) situada en el lateral de la máquina.
3. Ponga el pedal en el suelo. 4. Suba la palanca del pie prensatelas (V) situada en la parte posterior de la
máquina para elevar el pie prensatelas (D). El pie prensatelas se elevará ligeramente.
5. Coloque la tela que vaya a coser debajo del pie prensatelas elevado. 6. Baje la palanca del pie prensatelas (V) para hacer descender el pie prensatelas
(D). 7. Gire la rueda de mano (W) en sentido horario al menos una vez, hasta que la
aguja se introduzca en la tela. 8. Seleccione la velocidad con el botón de velocidad (Q) situado en la parte
frontal de la máquina. La velocidad baja se selecciona cuando el botón está presionado. La velocidad alta se selecciona cuando el botón está extendido. Use la velocidad baja para realizar trabajos de cosido intricados que requieran detenerse y girar la tela con frecuencia. Use la velocidad alta para costuras largas ininterrumpidas. NOTA: La velocidad alta es rápida. Se recomienda comenzar con la velocidad baja hasta que se sienta cómodo antes de utilizar la velocidad rápida.
9. Presione el pedal ligeramente para hacer funcionar la máquina. 10. Con cuidado, guíe la tela de manera que la costura quede recta presionando
ligeramente con las yemas de los dedos en ambos lados a medida que avanza por el pie prensatelas (D).
11. Esta máquina no tiene un botón de retroceso. Si necesita girar la tela mientras cose, apague la máquina con la aguja aún insertada en la tela, levante el pedal y gire la tela en la dirección deseada. Baje el pedal y siga cosiendo.
12. Cuando haya terminado la costura, apague la máquina (OFF). 13. Eleve la aguja girando la rueda de mano (W) ligeramente en sentido horario. 14. Suba la palanca del pie prensatelas (V) para elevar el pie prensatelas (D). 15. Tire o jale de la tela hacia usted, dejando unas 5 pulgadas de hilo entre la tela
y la máquina. 16. Corte el hilo de la máquina con el cortahilo (U). 17. Comience la siguiente costura de la misma manera que se ha explicado.
Modo de empleo
26
Sin el pedal: 1. Asegúrese que la máquina de coser esté apagada (OFF). 2. Eleve la aguja por encima del pie prensatelas girando la rueda de mano (W)
ligeramente en sentido horario (alejándose de usted). 3. Suba la palanca del pie prensatelas (V) situada en la parte posterior de la
máquina para elevar el pie prensatelas (D). El pie prensatelas se elevará ligeramente.
4. Coloque la tela que vaya a coser debajo del pie prensatelas elevado. 5. Baje la palanca del pie prensatelas (V) para hacer descender el pie prensatelas
(D). 6. Gire la rueda de mano (W) en sentido horario al menos una vez, hasta que la
aguja se introduzca en la tela. 7. Seleccione la velocidad con el botón de velocidad (Q) situado en la parte
frontal de la máquina. La velocidad baja se selecciona cuando el botón está presionado. La velocidad alta se selecciona cuando el botón está extendido. Use la velocidad baja para realizar trabajos de cosido intricados que requieran detenerse y girar la tela con frecuencia. Use la velocidad alta para costuras largas ininterrumpidas. NOTA: La velocidad alta es rápida. Se recomienda comenzar con la velocidad baja hasta que se sienta cómodo antes de utilizar la velocidad rápida.
8. Presione el botón de encendido (P) para ponerlo en la posición de encendido (ON).
9. Con cuidado, guíe la tela de manera que la costura quede recta presionando ligeramente con las yemas de los dedos en ambos lados a medida que avanza por el pie prensatelas (D).
10. Si necesita girar la tela durante el cosido, apague la máquina con la aguja aún insertada en la tela, levante el pedal y gire la tela en la dirección deseada. Baje el pedal y siga cosiendo.
11. Cuando haya terminado la costura, apague la máquina (OFF). 12. Eleve la aguja girando la rueda de mano (W) ligeramente en sentido horario. 13. Suba la palanca del pie prensatelas (V) para elevar el pie prensatelas (D). 14. Tire o jale de la tela hacia usted, dejando unas 5 pulgadas de hilo entre la tela
y la máquina. 15. Corte el hilo de la máquina con el cortahilo (U). 16. Comience la siguiente costura de la misma manera que se ha explicado.
Modo de empleo
27
Enrollado de la bobina Importante: Por seguridad, quite siempre la bobina del compartimento de la bobina (B). 1. Ayudándose con la muesca situada en la parte superior del portahilo (J), tire de él
y elévelo hasta que quede completamente extendido. 2. Ponga el hilo en el portahilo (J). 3. Asegúrese de que el pasador esté extendido. De no ser así, desbloquee el pasador
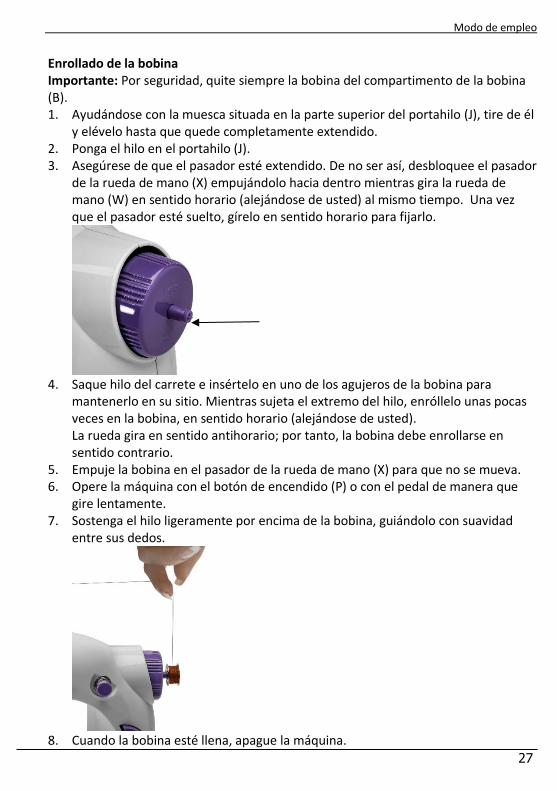
de la rueda de mano (X) empujándolo hacia dentro mientras gira la rueda de mano (W) en sentido horario (alejándose de usted) al mismo tiempo. Una vez que el pasador esté suelto, gírelo en sentido horario para fijarlo.
4. Saque hilo del carrete e insértelo en uno de los agujeros de la bobina para
mantenerlo en su sitio. Mientras sujeta el extremo del hilo, enróllelo unas pocas veces en la bobina, en sentido horario (alejándose de usted). La rueda gira en sentido antihorario; por tanto, la bobina debe enrollarse en sentido contrario.
5. Empuje la bobina en el pasador de la rueda de mano (X) para que no se mueva. 6. Opere la máquina con el botón de encendido (P) o con el pedal de manera que
gire lentamente. 7. Sostenga el hilo ligeramente por encima de la bobina, guiándolo con suavidad
entre sus dedos.
8. Cuando la bobina esté llena, apague la máquina.
Modo de empleo
28
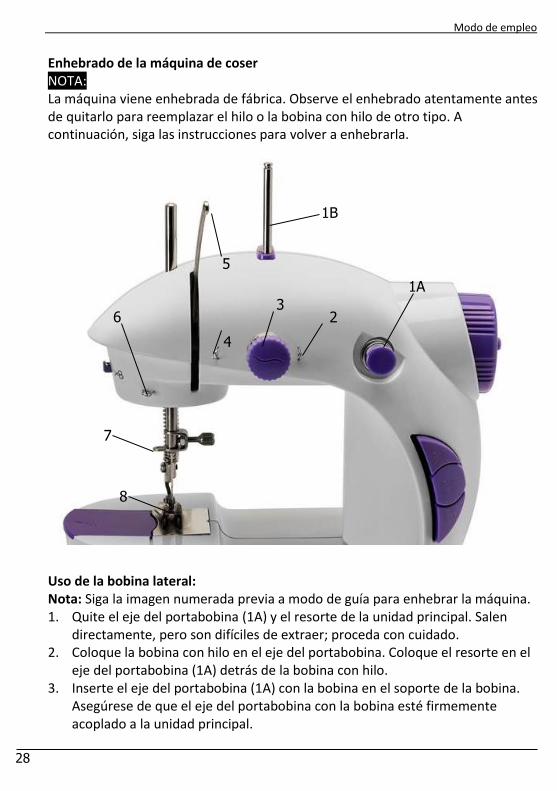
Enhebrado de la máquina de coser NOTA: La máquina viene enhebrada de fábrica. Observe el enhebrado atentamente antes de quitarlo para reemplazar el hilo o la bobina con hilo de otro tipo. A continuación, siga las instrucciones para volver a enhebrarla. Uso de la bobina lateral: Nota: Siga la imagen numerada previa a modo de guía para enhebrar la máquina. 1. Quite el eje del portabobina (1A) y el resorte de la unidad principal. Salen
directamente, pero son difíciles de extraer; proceda con cuidado. 2. Coloque la bobina con hilo en el eje del portabobina. Coloque el resorte en el
eje del portabobina (1A) detrás de la bobina con hilo. 3. Inserte el eje del portabobina (1A) con la bobina en el soporte de la bobina.
Asegúrese de que el eje del portabobina con la bobina esté firmemente acoplado a la unidad principal.
1A
7
6
5
1B
4
3 2
8
Modo de empleo
29
4. Tire del hilo de la bobina en el eje del portabobina (1A) e introdúzcalo en la 1.a
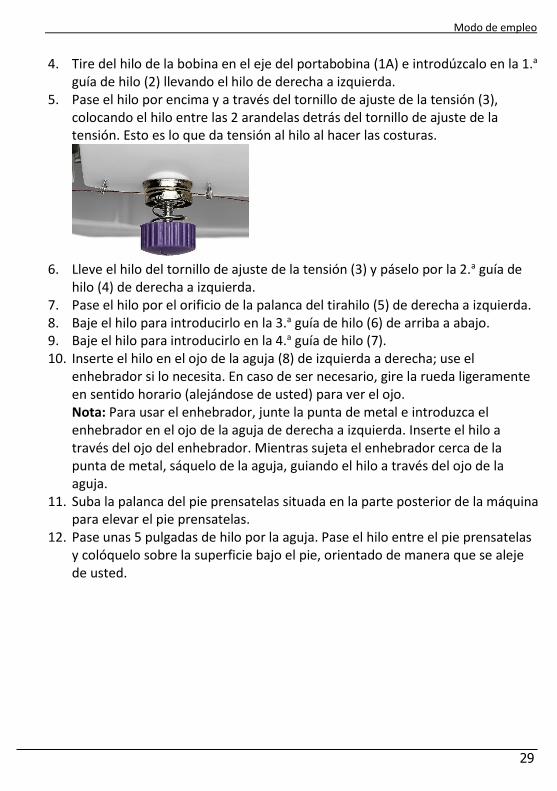
guía de hilo (2) llevando el hilo de derecha a izquierda. 5. Pase el hilo por encima y a través del tornillo de ajuste de la tensión (3),
colocando el hilo entre las 2 arandelas detrás del tornillo de ajuste de la tensión. Esto es lo que da tensión al hilo al hacer las costuras.
6. Lleve el hilo del tornillo de ajuste de la tensión (3) y páselo por la 2.a guía de
hilo (4) de derecha a izquierda. 7. Pase el hilo por el orificio de la palanca del tirahilo (5) de derecha a izquierda. 8. Baje el hilo para introducirlo en la 3.a guía de hilo (6) de arriba a abajo. 9. Baje el hilo para introducirlo en la 4.a guía de hilo (7). 10. Inserte el hilo en el ojo de la aguja (8) de izquierda a derecha; use el
enhebrador si lo necesita. En caso de ser necesario, gire la rueda ligeramente en sentido horario (alejándose de usted) para ver el ojo. Nota: Para usar el enhebrador, junte la punta de metal e introduzca el enhebrador en el ojo de la aguja de derecha a izquierda. Inserte el hilo a través del ojo del enhebrador. Mientras sujeta el enhebrador cerca de la punta de metal, sáquelo de la aguja, guiando el hilo a través del ojo de la aguja.
11. Suba la palanca del pie prensatelas situada en la parte posterior de la máquina para elevar el pie prensatelas.
12. Pase unas 5 pulgadas de hilo por la aguja. Pase el hilo entre el pie prensatelas y colóquelo sobre la superficie bajo el pie, orientado de manera que se aleje de usted.
Modo de empleo
30
Uso del portahilo:
Nota: Siga la imagen numerada previa a modo de guía para enhebrar la máquina. 1. Ayudándose con la muesca situada en la parte superior del portahilo, tire de
él y elévelo hasta que quede completamente extendido. 2. Ponga el carrete de hilo en el portahilo (1B). 3. Tire del hilo del carrete en el portahilo (1B) e introdúzcalo en la 1.a guía de hilo
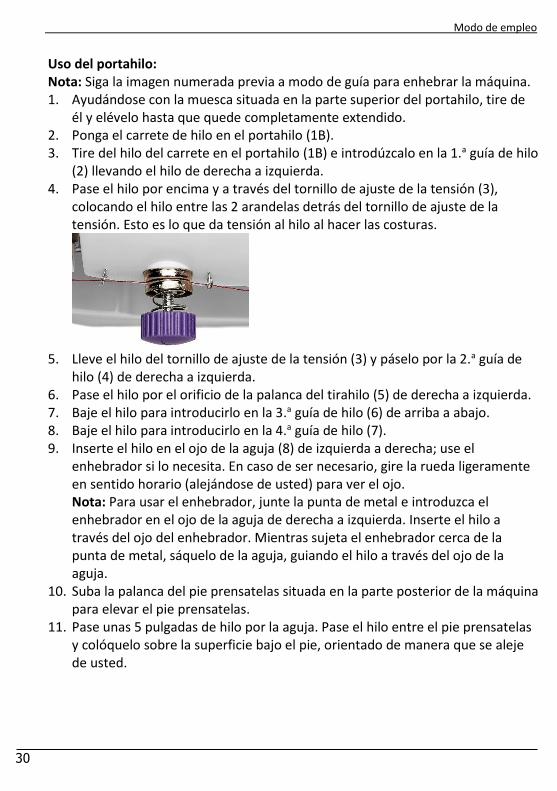
(2) llevando el hilo de derecha a izquierda. 4. Pase el hilo por encima y a través del tornillo de ajuste de la tensión (3),
colocando el hilo entre las 2 arandelas detrás del tornillo de ajuste de la tensión. Esto es lo que da tensión al hilo al hacer las costuras.
5. Lleve el hilo del tornillo de ajuste de la tensión (3) y páselo por la 2.a guía de
hilo (4) de derecha a izquierda. 6. Pase el hilo por el orificio de la palanca del tirahilo (5) de derecha a izquierda. 7. Baje el hilo para introducirlo en la 3.a guía de hilo (6) de arriba a abajo. 8. Baje el hilo para introducirlo en la 4.a guía de hilo (7). 9. Inserte el hilo en el ojo de la aguja (8) de izquierda a derecha; use el
enhebrador si lo necesita. En caso de ser necesario, gire la rueda ligeramente en sentido horario (alejándose de usted) para ver el ojo. Nota: Para usar el enhebrador, junte la punta de metal e introduzca el enhebrador en el ojo de la aguja de derecha a izquierda. Inserte el hilo a través del ojo del enhebrador. Mientras sujeta el enhebrador cerca de la punta de metal, sáquelo de la aguja, guiando el hilo a través del ojo de la aguja.
10. Suba la palanca del pie prensatelas situada en la parte posterior de la máquina para elevar el pie prensatelas.
11. Pase unas 5 pulgadas de hilo por la aguja. Pase el hilo entre el pie prensatelas y colóquelo sobre la superficie bajo el pie, orientado de manera que se aleje de usted.
Modo de empleo
31
Colocación de la bobina inferior 1. Quite la cubierta del compartimento de la bobina (C) deslizándola hacia la
izquierda. 2. Ponga una bobina con el hilo que haya elegido en el compartimento de la
bobina (B), dejando unas 5 pulgadas de hilo fuera del soporte de la bobina y colóquelo en la muesca para hilo (A).
3. Nota: La máquina debe enhebrarse antes de intentar sacar el hilo del compartimento de la bobina inferior.
4. Gire la rueda de mano (W) en sentido antihorario (hacia usted) hasta que la aguja haya descendido completamente y haya vuelto a subir hasta el punto de izado más alto. Deténgase cuando la aguja comience a bajar de nuevo. La aguja bajará recogiendo el hilo de la bobina. Nota: El hilo de la bobina no avanzará si la rueda de mano se gira en sentido horario (alejándose de usted).
5. Con cuidado, tire del hilo del carrete hacia usted y observe cómo se ha enganchado con el hilo de la bobina inferior.
6. Eleve el pie prensatelas (D) con la palanca del pie prensatelas (V). 7. Pase el hilo y colóquelo sobre la superficie del pie prensatelas (S) bajo el pie
prensatelas (D), orientado de manera que se aleje de usted. 8. Vuelva a poner la cubierta del compartimento de la bobina (C) en su lugar.
Nota: Es esencial enhebrar correctamente el hilo de la bobina superior e inferior. Verifíquelo detenidamente y haga una puntada de prueba antes de comenzar a coser. Un enhebrado incorrecto afectará el pespunte.
Ajuste de la tensión 1. No debería ser necesario que ajuste de la tensión, ya que ha sido ajustada en
la fábrica para obtener el rendimiento máximo. No obstante, si considera que las puntadas están demasiado sueltas o prietas, puede ajustarlas.
2. Para aflojar la puntada, gire el tornillo de ajuste de la tensión (L) en sentido antihorario (hacia la izquierda).
3. Para apretar la puntada, gire el tornillo de ajuste de la tensión (L) en sentido horario. Quizá sea necesario aflojar la puntada para coser telas más gruesas. Las telas más finas pueden necesitar una puntada más ajustada. La tensión de la bobina no puede ajustarse.
Modo de empleo
32
Cambio de la aguja 1. Gire la rueda de mano (W) para elevar la aguja a su posición más alta. 2. Afloje el tornillo de ajuste de la aguja (R) girándolo en sentido antihorario
(hacia usted). Quizá necesite usar un pequeño destornillador plano o unos alicates pequeños.
3. Saque la aguja (E) tirando de ella hacia abajo para separarla del cierre de la aguja (G).
4. Coloque la nueva aguja con el lado plano orientado hacia el cierre de la aguja (G).
5. Empújela hacia arriba tanto como sea posible y contra el cierre de la aguja (G). 6. Apriete el tornillo de ajuste de la aguja (R) mientras sujeta la aguja en su lugar. 7. Nota: Las agujas vienen en distintos tamaños numerados. Indican el lado
izquierdo de la aguja. Cuanto más pequeño es el número, más fina es la aguja. Use agujas más pequeñas para los tejidos delicados y agujas más grandes para los tejidos gruesos.
8. Nota: Las agujas que se proporcionan actualmente con la máquina de coser son de 3.8 cm. *Puede comprar bobinas adicionales, agujas y enhebradores en su tienda de manualidades local. Asegúrese de que las bobinas adicionales que compre sean exactamente del mismo estilo.
Consejos útiles / Limpieza y mantenimiento
33
Consejos útiles 1. Para cambiar las pilas, quite la tapa del compartimento de las pilas (T) y ponga
pilas nuevas. Preste atención a la polaridad y asegúrese de insertar las pilas correctamente, ya que de lo contrario la máquina no funcionará y podría sufrir algún daño. Vuelva a poner la tapa del compartimento de las pilas en el compartimento de las pilas.
2. Para encender o apagar la luz, presione el botón de iluminación (O). 3. Verifique siempre el enhebrado del pespunte antes de comenzar a coser una
costura. Un enhebrado equivocado o una colocación incorrecta de la bobina pueden dañar la máquina.
4. No tire o jale de la tela al coser; sólo guíela. Tirar o jalar de la tela puede hacer que la aguja se rompa y dañar la máquina.
5. Tenga pilas de repuesto cerca mientras trabaja para que no tenga que interrumpir la tarea en caso de que sea necesario cambiarlas.
6. Instrucciones de seguridad para el cabino de las pilas: a. Abra la tapa del compartimiento de las pilas. b. Quite las pilas AA viejas del compartimiento. c. Inserte 3 pilas AA nuevas asegurándose de que coincide la
polaridad + y -. d. NO mezcle pilas viejas y nuevas. e. No mexcle pilas alcalinas, etándar (zinc-carbono) o recargables
(ni-cad, nimh, etc.). f. Cierre la tapa del compartimiento de las pilas.
Limpieza y mantenimiento PRECAUCIÓN: Asegúrese siempre de que la minimáquina de coser esté desenchufada antes de limpiarla o guardarla. NO SUMERJA NUNCA la máquina de coser en agua ni en ningún otro líquido. 1. En caso de que sea necesario, limpie la base con un trapo húmedo, una
esponja o una toalla de papel. 2. Puede usarse un bote de aire comprimido para limpiar el compartimento de la
bobina (B).

Información adicional de utilidad
34
Información adicional de utilidad Especificaciones técnicas Número de modelo MS-201 Voltaje nominal Salida 12 V Potencia nominal 4.8 W Almacenamiento
Guarde la minimáquina de coser en un lugar seco.
No coloque objetos pesados sobre la minimáquina de coser durante el almacenamiento, ya que esto puede dar lugar a posibles daños.
Centro de servicio Si tiene alguna pregunta sobre la operación de esta minimáquina de coser, póngase en contacto con nuestro centro de servicio en: Tel: 1-888-367-7373 (Horario de oficina de lunes a viernes, 10:00 a.m. a 5:00 p.m., hora del Este) Correo electrónico: [email protected] Protección del medio ambiente Si la minimáquina de coser dejase de funcionar por completo, asegúrese de desecharla de forma respetuosa con el medio ambiente.
FCC
35
FCC Parte 15 Este dispositivo cumple la Parte 15 de las Normas de la FCC. Su funcionamiento está sujeto a las dos condiciones siguientes: (1) este dispositivo no puede causar interferencias perjudiciales, y (2) este dispositivo debe aceptar cualquier interferencia recibida, incluyendo interferencias que puedan causar un funcionamiento no deseado.
Advertencia: Los cambios o modificaciones a esta unidad no aprobados expresamente por la parte responsable del cumplimiento podrían anular la autoridad del usuario para operar el equipo. AVISO: Este equipo ha sido probado y cumple con los límites establecidos para los dispositivos digitales de Clase B, de acuerdo con la Parte 15 de las Normas de la FCC. Estos límites están diseñados para proporcionar una protección razonable contra interferencias perjudiciales en una instalación residencial. Este equipo genera, utiliza y puede irradiar energía de radiofrecuencia y, si no se instala y utiliza de acuerdo con las instrucciones, puede causar interferencias molestas en las comunicaciones de radio. Sin embargo, no hay garantía de que no se produzcan interferencias en una instalación en particular. Si este equipo causa interferencias molestas en la recepción de radio o televisión, lo cual puede determinarse apagando y encendiendo el equipo, se recomienda intentar corregir la interferencia por medio de una o más de las siguientes medidas:
Reorientar o reubicar la antena receptora.
Aumentar la separación entre el equipo y el receptor.
Conectar el equipo a un tomacorriente en un circuito diferente al que está conectado el receptor.
Consulte al distribuidor o un técnico experimentado de radio/televisión para obtener ayuda.


Your details:
Name
Address
Date of purchase* *We recommend you keep the receipt with this warranty card
Location of purchase
Description of malfunction:
WARRANTY CARD
MINI SEWING MACHINE
Return your completed warranty card to:
Wachsmuth & Krogmann, Inc.
1015 Hawthorn Drive
Itasca, IL
60143
USA
Hotline: 888-367-7373 Operating hours: Monday – Friday 10:00am – 5:00pm EST
2
AFTER SALES SUPPORT 50714
888 367 7373
MODEL: MS-201 11/2017
ALDI INC. FULL WARRANTY CONDITIONS
Dear Customer:
The ALDI warranty is a fully warranty offering you the following benefits:
Warranty period: 2 years from date of purchase. 6 months for movable parts and consumables under normal and proper conditions of use (e.g. rechargeable batteries).
Costs: Free repair/exchange or refund. No transport costs.
ADVICE: Please contact our service hotline by phone, e-mail or fax before sending in the device. This allows us to provide support in the event of possible operator errors.
In order to make a claim under the warranty, please send us: The faulty item with all the component parts, the original receipt and the warranty card properly completed.
The warranty does not cover damage caused by:
Accident or unanticipated events (e.g. lightning, water, fire).
Improper use or transport.
Failure to follow the safety and maintenance instructions.
Other improper treatment or modification of the product.
After the expiration of the warranty period, you may wish to have your product repaired at your own expense.
This warranty gives you specific legal rights, and you may also have other rights which vary from state to state but this warranty is not intended to exceed statutory minimum requirements beyond what is included above.
This warranty does not limit the statutory obligation of the seller arising from any implied warranties. The period of warranty can only be extended in accordance with applicable law.
Neither the service company nor ALDI will assume any liability for data or settings stored on any returned product.
Sus datos:
Nombre
Dirección
Correo electrónico
Fecha de la compra*
* Le recomendamos guardar el recibo de compra junto con esta tarjeta de garantía Lugar de la compra
Descripción de la avería:
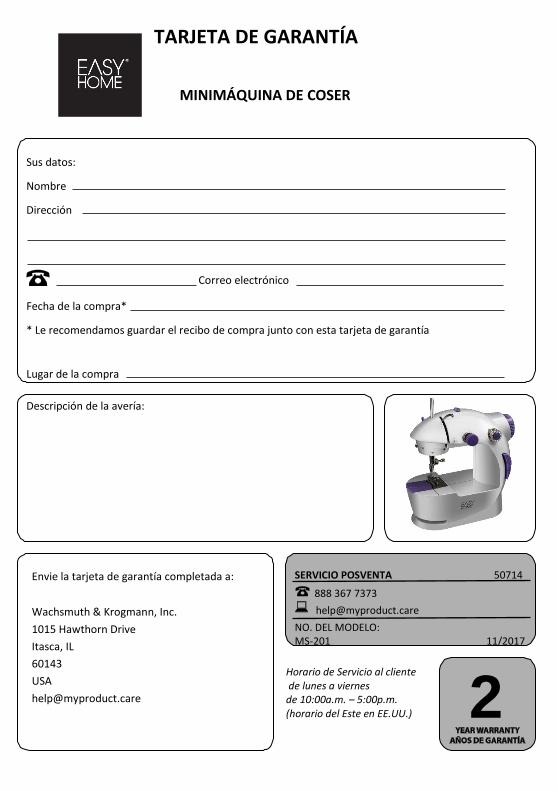
TARJETA DE GARANTÍA
MINIMÁQUINA DE COSER
Envie la tarjeta de garantía completada a:
Wachsmuth & Krogmann, Inc.
1015 Hawthorn Drive
Itasca, IL
60143
USA
Horario de Servicio al cliente de lunes a viernes de 10:00a.m. – 5:00p.m. (horario del Este en EE.UU.) 2
SERVICIO POSVENTA 50714
888 367 7373
NO. DEL MODELO: MS-201 11/2017
CONDICIONES DE LA GARANTÍA COMPLETA DE ALDI INC. Estimado cliente:
La Garantía ALDI es una garantía completa que le ofrece los siguientes beneficios:
Período de garantía: 2 años a partir de la fecha de la compra. 6 meses para las piezas de recambio y consumibles en condiciones normales y adecuadas de uso (por ejemplo, baterías recargables).
Costos: Reparación/sustitución gratis o reembolso. No hay costos de transporte.
AVISO: Póngase en contacto con nuestra línea directa de atención por teléfono, correo electrónico o fax antes de retornar el producto. Esto nos permite proporcionar ayuda en caso de posibles errores del operador.
Para hacer una reclamación bajo la garantía, por favor envíenos:
El artículo defectuoso junto con todas las piezas, el recibo de compra orginal y la tarjeta de garantía completada de manera apropiada
La garantía no cubre los daños ocasionados por:
Accidentes o eventos imprevistos (por ejemplo, rayos, agua, fuego)
Uso o transporte inadecuados
Incumplimiento de las instrucciones de seguridad y mantenimiento
Otro tratamiento o modificación inadecuados del producto.
Después del vencimiento del período de garantía, tiene la posibilidad de mandar a reparar su producto si usted corre con los gastos.
Esta garantía le otorga derechos legales específicos y es possible que también tenga otros derechos que pueden variar de un estado a otro, pero no tiene como fin exceeder los requisitos legales mínimos que aquí se incluyen.
Esta garantía no limita la obligación legal del vendedor derivada de cualquier garantía implícita. El período de garantía solo se puede extender hasta donde lo permita la ley.
Ni la compañía de servicio ni ALDI asumen ninguna responsabilidad por los datos o configuraciones que puedan haberse almacenado en cualquier product retornado.


DISTRIBUTED BY • DISTRIBUIDO POR:
ALDI INC., BATAVIA, IL 60510
WWW.ALDI.US
MODEL: MS-201 11/2017
50714


![MySewingMall.com [Sewing Machine Parts & Sewing Jargons]](https://img.pdfslide.us/doc/110x75/587a415b1a28ab00148b4837/mysewingmallcom-sewing-machine-parts-sewing-jargons.jpg)