Embed Size (px)
Citation preview

Mini Hi-Fi System
Read this first!Congratulations on purchasing this Philips product. We’ve included everything you need to get started. If you have any problems, Philips Representatives canhelp you get the most from your new product by explaining: • Hookups, • First Time Setup, and • Feature Operation.Before you return this product to the store.
For fast help, call us first! 1-800-531-0039
Thank you for making Philips a part of your home!
Important!Return yourWarranty
Registration Cardwithin 10 days.See why inside.
FWC555
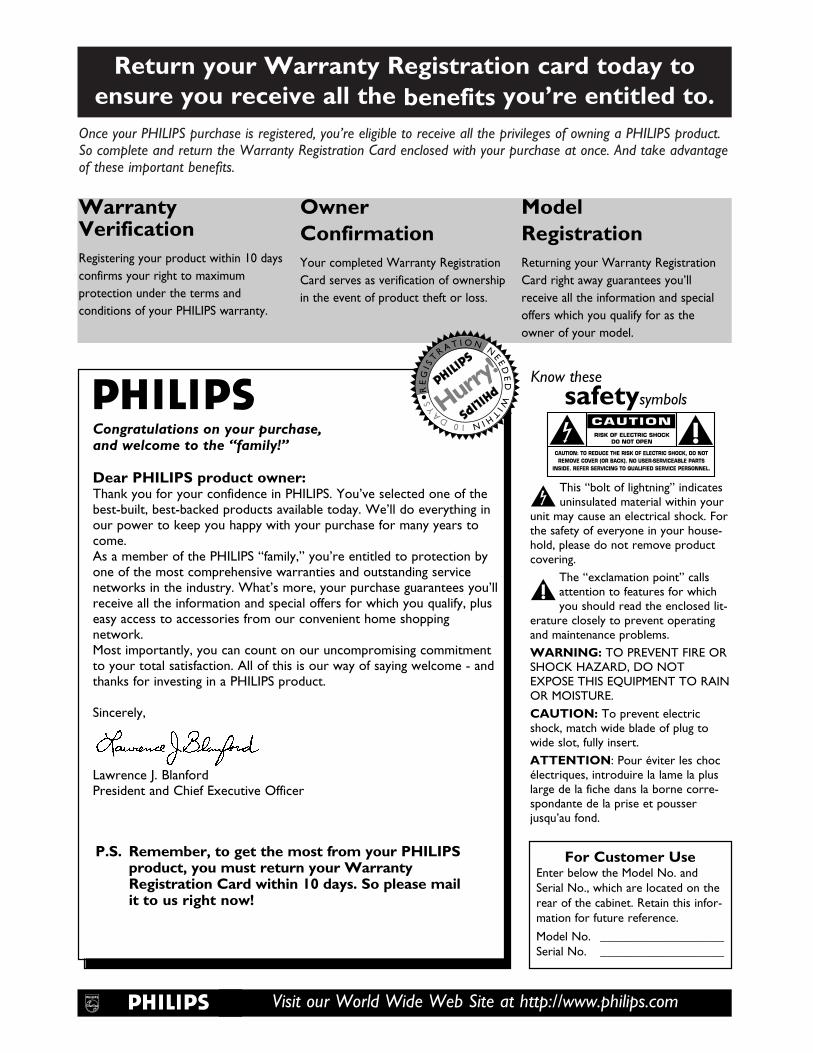
Once your PHILIPS purchase is registered, you’re eligible to receive all the privileges of owning a PHILIPS product.So complete and return the Warranty Registration Card enclosed with your purchase at once. And take advantageof these important benefits.
Return your Warranty Registration card today toensure you receive all the benefits you’re entitled to.
For Customer UseEnter below the Model No. andSerial No., which are located on therear of the cabinet. Retain this infor-mation for future reference.
Model No. ____________________Serial No. ____________________
Congratulations on your purchase, and welcome to the “family!”
Dear PHILIPS product owner:Thank you for your confidence in PHILIPS. You’ve selected one of thebest-built, best-backed products available today. We’ll do everything inour power to keep you happy with your purchase for many years tocome. As a member of the PHILIPS “family,” you’re entitled to protection byone of the most comprehensive warranties and outstanding service networks in the industry. What’s more, your purchase guarantees you’llreceive all the information and special offers for which you qualify, pluseasy access to accessories from our convenient home shopping network.Most importantly, you can count on our uncompromising commitmentto your total satisfaction. All of this is our way of saying welcome - andthanks for investing in a PHILIPS product.
Sincerely,
Lawrence J. BlanfordPresident and Chief Executive Officer
P.S. Remember, to get the most from your PHILIPSproduct, you must return your WarrantyRegistration Card within 10 days. So please mailit to us right now!
Know thesesafetysymbols
This “bolt of lightning” indicatesuninsulated material within your
unit may cause an electrical shock. Forthe safety of everyone in your house-hold, please do not remove productcovering.
The “exclamation point” callsattention to features for whichyou should read the enclosed lit-
erature closely to prevent operatingand maintenance problems.WARNING: TO PREVENT FIRE ORSHOCK HAZARD, DO NOTEXPOSE THIS EQUIPMENT TO RAINOR MOISTURE.CAUTION: To prevent electricshock, match wide blade of plug towide slot, fully insert.ATTENTION: Pour éviter les chocélectriques, introduire la lame la pluslarge de la fiche dans la borne corre-spondante de la prise et pousserjusqu’au fond.
CAUTIONRISK OF ELECTRIC SHOCK
DO NOT OPEN
CAUTION: TO REDUCE THE RISK OF ELECTRIC SHOCK, DO NOTREMOVE COVER (OR BACK). NO USER-SERVICEABLE PARTS
INSIDE. REFER SERVICING TO QUALIFIED SERVICE PERSONNEL.
WarrantyVerificationRegistering your product within 10 daysconfirms your right to maximumprotection under the terms and conditions of your PHILIPS warranty.
OwnerConfirmationYour completed Warranty RegistrationCard serves as verification of ownershipin the event of product theft or loss.
ModelRegistrationReturning your Warranty RegistrationCard right away guarantees you’llreceive all the information and specialoffers which you qualify for as theowner of your model.
Visit our World Wide Web Site at http://www.philips.com
t
s
RE
GI S
T
R A T I O N N
E ED
ED
WIT
HIN10DA
YS Hurry
!

Table of Contents 3General InformationTable of Contents . . . . . . . . . . . . . . . . . . . . . . . . . . . . . . . . . . . . . . . . . . . . . . . . . . . . . . . . . . . . . . . . . . . . . . . . . . . . . . . . . .3Safety Instructions . . . . . . . . . . . . . . . . . . . . . . . . . . . . . . . . . . . . . . . . . . . . . . . . . . . . . . . . . . . . . . . . . . . . . . . . . . . . . . . . . .4
Getting StartedIntroduction . . . . . . . . . . . . . . . . . . . . . . . . . . . . . . . . . . . . . . . . . . . . . . . . . . . . . . . . . . . . . . . . . . . . . . . . . . . . . . . . . . . . . .5Safety Information . . . . . . . . . . . . . . . . . . . . . . . . . . . . . . . . . . . . . . . . . . . . . . . . . . . . . . . . . . . . . . . . . . . . . . . . . . . . . . . . . .6
System ControlsRemote Control . . . . . . . . . . . . . . . . . . . . . . . . . . . . . . . . . . . . . . . . . . . . . . . . . . . . . . . . . . . . . . . . . . . . . . . . . . . . . . . . . .7Front Panel . . . . . . . . . . . . . . . . . . . . . . . . . . . . . . . . . . . . . . . . . . . . . . . . . . . . . . . . . . . . . . . . . . . . . . . . . . . . . . . . . . . . .8-9Rear Panel . . . . . . . . . . . . . . . . . . . . . . . . . . . . . . . . . . . . . . . . . . . . . . . . . . . . . . . . . . . . . . . . . . . . . . . . . . . . . . . . . . . . . . .10
First Time SetupFirst Time Setup . . . . . . . . . . . . . . . . . . . . . . . . . . . . . . . . . . . . . . . . . . . . . . . . . . . . . . . . . . . . . . . . . . . . . . . . . . . . . . . . . .11
Where Do You Start? . . . . . . . . . . . . . . . . . . . . . . . . . . . . . . . . . . . . . . . . . . . . . . . . . . . . . . . . . . . . . . . . . . . . . . . . . . .11Battery Installation . . . . . . . . . . . . . . . . . . . . . . . . . . . . . . . . . . . . . . . . . . . . . . . . . . . . . . . . . . . . . . . . . . . . . . . . . . . . . .11Antenna Connections . . . . . . . . . . . . . . . . . . . . . . . . . . . . . . . . . . . . . . . . . . . . . . . . . . . . . . . . . . . . . . . . . . . . . . . . . . .11
Speaker Connections . . . . . . . . . . . . . . . . . . . . . . . . . . . . . . . . . . . . . . . . . . . . . . . . . . . . . . . . . . . . . . . . . . . . . . . . . . . . . .12Optional Connections . . . . . . . . . . . . . . . . . . . . . . . . . . . . . . . . . . . . . . . . . . . . . . . . . . . . . . . . . . . . . . . . . . . . . . . . . . . . . .12Plug & Play . . . . . . . . . . . . . . . . . . . . . . . . . . . . . . . . . . . . . . . . . . . . . . . . . . . . . . . . . . . . . . . . . . . . . . . . . . . . . . . . . . . . . .13Demo . . . . . . . . . . . . . . . . . . . . . . . . . . . . . . . . . . . . . . . . . . . . . . . . . . . . . . . . . . . . . . . . . . . . . . . . . . . . . . . . . . . . . . . . . .13Power Settings . . . . . . . . . . . . . . . . . . . . . . . . . . . . . . . . . . . . . . . . . . . . . . . . . . . . . . . . . . . . . . . . . . . . . . . . . . . . . . . . . . .14
Sound OptionsVolume Control, MAX Sound, Digital Sound Control (DSC) . . . . . . . . . . . . . . . . . . . . . . . . . . . . . . . . . . . . . . . . . . . . . . . .15Virtual Ambience Control (VAC), Dynamic Bass Boost (DBB), Incredible Surround . . . . . . . . . . . . . . . . . . . . . . . . . . . . . .16
CD OperationsLoading . . . . . . . . . . . . . . . . . . . . . . . . . . . . . . . . . . . . . . . . . . . . . . . . . . . . . . . . . . . . . . . . . . . . . . . . . . . . . . . . . . . . . . . . .17Playback . . . . . . . . . . . . . . . . . . . . . . . . . . . . . . . . . . . . . . . . . . . . . . . . . . . . . . . . . . . . . . . . . . . . . . . . . . . . . . . . . . . . . . . .17Programming . . . . . . . . . . . . . . . . . . . . . . . . . . . . . . . . . . . . . . . . . . . . . . . . . . . . . . . . . . . . . . . . . . . . . . . . . . . . . . . . . . . . .18Repeat . . . . . . . . . . . . . . . . . . . . . . . . . . . . . . . . . . . . . . . . . . . . . . . . . . . . . . . . . . . . . . . . . . . . . . . . . . . . . . . . . . . . . . . . .19Shuffle . . . . . . . . . . . . . . . . . . . . . . . . . . . . . . . . . . . . . . . . . . . . . . . . . . . . . . . . . . . . . . . . . . . . . . . . . . . . . . . . . . . . . . . . . .19
Radio OperationAutomattic Station Preset . . . . . . . . . . . . . . . . . . . . . . . . . . . . . . . . . . . . . . . . . . . . . . . . . . . . . . . . . . . . . . . . . . . . . . . . . . .20Manual Tuning . . . . . . . . . . . . . . . . . . . . . . . . . . . . . . . . . . . . . . . . . . . . . . . . . . . . . . . . . . . . . . . . . . . . . . . . . . . . . . . . . . . .21
Cassette OperationPlayback . . . . . . . . . . . . . . . . . . . . . . . . . . . . . . . . . . . . . . . . . . . . . . . . . . . . . . . . . . . . . . . . . . . . . . . . . . . . . . . . . . . . . . . .22Recording . . . . . . . . . . . . . . . . . . . . . . . . . . . . . . . . . . . . . . . . . . . . . . . . . . . . . . . . . . . . . . . . . . . . . . . . . . . . . . . . . . . . . . .23
CD Synchro . . . . . . . . . . . . . . . . . . . . . . . . . . . . . . . . . . . . . . . . . . . . . . . . . . . . . . . . . . . . . . . . . . . . . . . . . . . . . . . . . . .23Dubbing Cassettes . . . . . . . . . . . . . . . . . . . . . . . . . . . . . . . . . . . . . . . . . . . . . . . . . . . . . . . . . . . . . . . . . . . . . . . . . . . . . .23
Clock/TimerClock . . . . . . . . . . . . . . . . . . . . . . . . . . . . . . . . . . . . . . . . . . . . . . . . . . . . . . . . . . . . . . . . . . . . . . . . . . . . . . . . . . . . . . . . . .24Timer . . . . . . . . . . . . . . . . . . . . . . . . . . . . . . . . . . . . . . . . . . . . . . . . . . . . . . . . . . . . . . . . . . . . . . . . . . . . . . . . . . . . . . . . . .25Sleep Timer . . . . . . . . . . . . . . . . . . . . . . . . . . . . . . . . . . . . . . . . . . . . . . . . . . . . . . . . . . . . . . . . . . . . . . . . . . . . . . . . . . . . .26
Additional InformationHelpful Hints . . . . . . . . . . . . . . . . . . . . . . . . . . . . . . . . . . . . . . . . . . . . . . . . . . . . . . . . . . . . . . . . . . . . . . . . . . . . . . . . . . . . .27Specifications . . . . . . . . . . . . . . . . . . . . . . . . . . . . . . . . . . . . . . . . . . . . . . . . . . . . . . . . . . . . . . . . . . . . . . . . . . . . . . . . . . . . .28Index . . . . . . . . . . . . . . . . . . . . . . . . . . . . . . . . . . . . . . . . . . . . . . . . . . . . . . . . . . . . . . . . . . . . . . . . . . . . . . . . . . . . . . . . . . .29Limited Warranty . . . . . . . . . . . . . . . . . . . . . . . . . . . . . . . . . . . . . . . . . . . . . . . . . . . . . . . . . . . . . . . . . . . . . . . . . . . . . . . . .30

1. Read these instructions.2. Keep these instructions.3. Heed all warnings.4. Follow all instructions.5. Do not use this apparatus near water.6. Clean only with dry cloth.7. Do not block any ventilation openings. Install in
accordance with the manufacturer´s instructions.8. Do not install near any heat sources such as radia-
tors, heat registers,stoves,or other apparatus (includingamplifiers) that produce heat.
9. Do not defeat the safety pur-pose of the polarized or ground-ing-type plug. A polarized plug hastwo blades with one wider than theother. A grounding type plug hastwo blades and a third groundingprong. The wide blade or the third prong are providedfor your safety. If the provided plug does not fit into youroutlet,consult an electrician for replacement of the obso-lete outlet.
10.Protect the power cord from being walked on orpinched, particularly at plugs, convenience receptacles,andthe point where they exit from the apparatus.
11.Only use attachments/accessories specified by themanufacturer.
12. Use only with the cart, stand, tripod, bracket,or table specified by the manufacturer or soldwith the apparatus. When a cart is used,use cau-tion when moving the cart/apparatus combination
to avoid injury from tip-over.13.Unplug this apparatus during lightning storms or when
unused for long periods of time.
14.Refer all servicing to qualified service personnel.Servicing is required when the apparatus has been dam-aged in any way, such as power-supply cord or plug isdamaged, liquid has been spilled or objects have fallen intothe apparatus,the apparatus has been exposed to rain ormoisture,does not operate normally, or has beendropped.
15.Battery usage CAUTION – To prevent battery leak-age which may result in bodily injury or damage to theunit:
Install all batteries correctly, + and - as marked on theunit.
Do not mix batteries (old and new or carbon and alka-line etc.).
Remove batteries when the unit is not used for a longtime.
4 IMPORTANT SAFETY INSTRUCTIONS
Class II equipment symbolThis symbol indicates that the unit has
a double insulation system
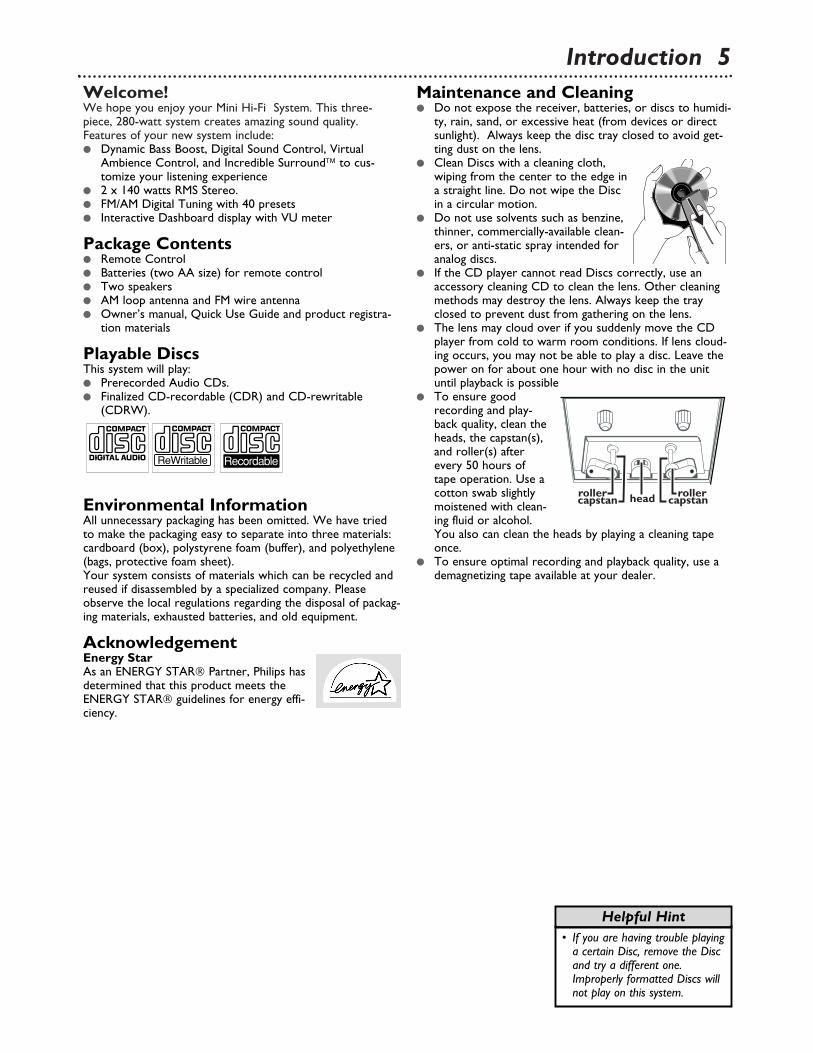
Introduction 5Welcome!We hope you enjoy your Mini Hi-Fi System. This three-piece, 280-watt system creates amazing sound quality.Features of your new system include: Dynamic Bass Boost, Digital Sound Control, Virtual
Ambience Control, and Incredible Surround to cus-tomize your listening experience
2 x 140 watts RMS Stereo. FM/AM Digital Tuning with 40 presets Interactive Dashboard display with VU meter
Package Contents Remote Control Batteries (two AA size) for remote control Two speakers AM loop antenna and FM wire antenna Owner’s manual, Quick Use Guide and product registra-
tion materials
Playable DiscsThis system will play: Prerecorded Audio CDs. Finalized CD-recordable (CDR) and CD-rewritable
(CDRW).
Environmental InformationAll unnecessary packaging has been omitted. We have triedto make the packaging easy to separate into three materials:cardboard (box), polystyrene foam (buffer), and polyethylene(bags, protective foam sheet).Your system consists of materials which can be recycled andreused if disassembled by a specialized company. Pleaseobserve the local regulations regarding the disposal of packag-ing materials, exhausted batteries, and old equipment.
AcknowledgementEnergy Star As an ENERGY STAR Partner, Philips hasdetermined that this product meets theENERGY STAR guidelines for energy effi-ciency.
Maintenance and Cleaning Do not expose the receiver, batteries, or discs to humidi-
ty, rain, sand, or excessive heat (from devices or directsunlight). Always keep the disc tray closed to avoid get-ting dust on the lens.
Clean Discs with a cleaning cloth, wiping from the center to the edge ina straight line. Do not wipe the Discin a circular motion.
Do not use solvents such as benzine,thinner, commercially-available clean-ers, or anti-static spray intended foranalog discs.
If the CD player cannot read Discs correctly, use anaccessory cleaning CD to clean the lens. Other cleaningmethods may destroy the lens. Always keep the trayclosed to prevent dust from gathering on the lens.
The lens may cloud over if you suddenly move the CDplayer from cold to warm room conditions. If lens cloud-ing occurs, you may not be able to play a disc. Leave thepower on for about one hour with no disc in the unituntil playback is possible
To ensure good recording and play-back quality, clean theheads, the capstan(s),and roller(s) afterevery 50 hours oftape operation. Use acotton swab slightlymoistened with clean-ing fluid or alcohol.You also can clean the heads by playing a cleaning tapeonce.
To ensure optimal recording and playback quality, use ademagnetizing tape available at your dealer.
headcapstan capstanrollerroller
ReWritable Recordable
• If you are having trouble playinga certain Disc, remove the Discand try a different one.Improperly formatted Discs willnot play on this system.
Helpful Hint

Safety Information Before operating the system, check that the operating
voltage indicated on the typeplate (or the voltage indica-tion beside the voltage selector) of your system is identi-cal with the voltage of your local power supply. If not,please consult your dealer.
Place the system on a flat, hard, and stable surface. Place the system in a location with adequate ventilation to
prevent internal heat build-up in your system. Allow atleast 4 inches (10 cm) clearance from the rear and the topof the unit and 2 inches (5 cm) from each side.
The mechanical parts of the set contain self-lubricatingbearings and must not be oiled or lubricated.
When the system is switched to Standby mode, it is stillconsuming some power. To disconnect the system fromthe power supply completely, remove the AC power plugfrom the wall socket.
Copyright ProtectionThis product incorporates copyright protection technologythat is protected by method claims of certain U.S. patents andother intellectual property rights owned by MacrovisionCorporation and other rights owners. Use of this copyrightprotection technology must be authorized by MacrovisionCorporation, and is intended for home and other limited view-ing uses only unless otherwise authorized by MacrovisionCorporation. Reverse engineering or disassembly is prohibited.
CAUTIONUse of controls or adjustments or performance of proceduresother than herein may result in hazardous radiation exposureor other unsafe operation.
ATTENTIONL'utilisation des commandes ou réglages ou le non-respect desprocédures ci-incluses peuvent se traduire par une expositiondangereuse à l'irradiation.ATENCIÓNEl uso de mando o ajustes o la ejecucción de métodos que nosean los aquí descritos puede ocasionar peligro de exposición aradiación.
Important Information for CanadaThis digital apparatus does not exceed the Class B limits forradio noise emissions from digital apparatus as set out in theRadio Interference Regulations of the Canadian Department ofCommunications.Cet appareil numérique n'emet pas de bruits radioélectriques dépassant les limites applicables aux appareilsnumériques de Class B prescrites dans le Règlement sur leBrouillage Radioélectrique édicté par le Ministère desCommunications du Canada.
Federal Communications Commission (FCC)The set complies with the FCC-Rules, Part 15 and with 21CFR 1040.1. Operation is subject to the following two condi-tions:1. This device may not cause harmful interference, and2. This device must accept any interference received, including
interference that may cause problematic operation.
6 Introduction

Remote Control 7Source ButtonsPress to have the remoteoperate a specific source(CD 123, TUNER, TAPE1/2, or AUX/CDR).
MUTE ButtonPress to turn off thesound. Press again torestore the sound to itsprevious level.
CD DIRECT ButtonsPress for one-touch CDplayback.
CLOCK ButtonPress to activate theClock.
DISPLAY ButtonPress to select a displaymode
AUTO RE. (replay)ButtonPress to select cassetteplayback mode (AUTOPLAY or ONCE).
VOLUME +/- ButtonPress to to adjust the vol-ume.
3 ButtonPress to start playback inCD or TAPE mode.
w ButtonCD: Press to skip to thebeginning of the currenttrack or previous tracks.TUNER: Press to select apreset radio station.
7 ButtonCD: Press to stop play-back or clear a program.TUNER: Press to stopprogramming.TAPE: Press to stop play-back or recording.
1 ButtonCD: Press to search thecurrent track.TAPE: Press to rewind.TUNER: Press to tune toa lower radio station.
REPEAT ButtonPress to repeat playbackof a specific section on aDisc.
DBB/DSC/VACButtonsPress to select thedesired sound feature.
Power yy ButtonPress to turn the DVDReceiver on or off(Standby).
IS (IncredibleSurround)Press to turn IncredibleSurround on and off.
SLEEP ButtonPress to turn on or offand set the sleep timer.
8 PAUSE ButtonPress to pause playbackin CD and TAPE mode.
TIMER ON/OFFButtonPress to turn the timeron and off.
∑ ButtonCD: Press to skip to thebeginning of the nexttrack.TUNER: Press to selecta preset radio station.
¡ ButtonCD: Press to search thecurrent track.TAPE: Press to fast for-ward.TUNER: Press to tuneto a higher radio station.
PROG. ButtonCD: Press to programdisc tracksTUNER: Press to pro-gram radio stations.
SHUFFLE ButtonPress to playback alldiscs and their tracks inrandom order.
MAX ON/OFFButtonPress to turn on or offMAX Sound.

8 Front Panel
38 ButtonPress to start play-back in CD orTAPE mode.PLUG & PLAY:Press to initiateplug & play.
w ∑ ButtonsCD: Press to skipto the beginning of the current trackor skip to previoustracks.TUNER: Press toselect a presetradio station.CLOCK: Press toset the minutes.
7 ButtonCD: Press to stopplayback or clear aprogram.TUNER: Press tostop programming.TAPE: Press tostop playback orrecording.DEMO: Press andhold to deactivateDEMO mode.CLOCK: Press toexit clock ModePLUG & PLAY:Press to exit plug& play mode.
STANDBY ONPress to switch thesystem on or toStandby mode.
DISC CHANGEPress to changedisc(s)
DISC 1, 2, 3 (CDDIRECT)Press to select a disctray for playback
INTERACTIVEVU METERDisplays the musicand volume levels.
JOG CONTROLTurn to select thedesired soundeffect: DSC, VAC,DBB
TAPE DECK 2Press 0 to open thetape deck door.
TAPE 2REC / PLAY
TAPE 1PLAYBACK
1 33 ButtonsCD: Press tosearch the currenttrack.TAPE: Press torewind or fast for-ward.TUNER: Press totune to a radio sta-tion.CLOCK: Press toset the hour.

Front Panel 9
TAPE DECK 1Press 0 to open thetape deck door.
llHeadphones Jack
SOURCEPress to select thefollowing:CD: to select disctray 1,2 or 3.TUNER: to selectwaveband (FM orAM).TAPE: to select tapedeck 1 or 2.AUX: to select aconnected externalsource.
ECO POWERPress to switch thesystem on or to EcoPower Standbymode.
DISPLAYSCREENDisplays the currentstatus of the system.
TAPE FEATURESREC: Press to startrecording on Tape 2.DUBBING: Press todub a tape.AUTO REPLAY:Press to select tapeplay back mode:Auto Play or OnceOnly
PROG (PRO-GRAM) ButtonCD: Press to pro-gram disc tracksTUNER: Press toprogram radio sta-tionsCLOCK: Press toselect 12 or 24 hourmode.
CLOCK•TIMERPress to activate andprogram the clockand timer.
DISPLAYPress to select dif-ferent screen displaymode : NORMAL,MODE 1, MODE 2or MODE 3.
OPEN•CLOSEPress to open orclose the disc tray.
DISC TRAY
VOLUMEPress to increase ordecrease the volume.
MAX SOUND(MAX ON/OFF)Press to activate ordeactivate the opti-mal mix of varioussound features.
INCREDIBLESURROUND (IS)Press to activate ordeactivate the sur-round sound effect.
TAPE 2REC / PLAY
TAPE 1PLAYBACK

10 Rear Panel
AM ANTENNA FM ANTENNA
AUX/CDRIN
ACMAINS
SPEAKERS
-+
-+
L
R
speaker(right)
speaker(left)
FM ANTENNAConnect the supplied FM antennato the FM (75 ohm) jack .
AC Power cordConnect to a standard AC outlet.
AUDIO IN(AUX/CDR)Connect these jacks tothe Audio Out jacks of aTV, VCR, DVD Player, orCD recorder.
AM ANTENNAConnect the supplied AMloop antenna to the AMjack.
SPEAKERSConnect the red +/black -speaker wires here.

First Time Setup 11
Where to Start
1 Put the batteries in the remote control and connect theAM and FM antennas as detailed below.
2 Connect the speakers to the system as detailed in yourQuick Use Guide (or on page 10).
3 Plug in the system.
4 Install or exit Plug & Play. Follow the on screen instruction to install Plug & Play. Press 7 to exit Plug & Play without installing.
Battery Installation
1 Remove the battery compartment lid by pressing in thetab, then lifting off the lid.
2 Place the batteries in the battery compartment, match-ing the +/- markings on the batteries to the +/- markings insidethe remote.
3 Replace the battery compartment lid.
Antenna Connections
1 Connect the supplied AM loop antenna to the AM jack onthe rear of the system. Reposition the loop antenna to receive the clearest sound for
area stations. Attach the antenna to the base stand if desired.
2 Connect the supplied FM antenna to the FM jacks on therear of the system. Extend and adjust the antenna until theclearest station signal is received.
Put the clawinto the slot.
1
2
3

AC power cord
speaker(right)
speaker(left)
AM ANTENNA FM ANTENNA
ACMAINS
SPEAKERS
-+
-+
L
R
1
AUX/CDRIN
R L
AUX/CDRIN
R L
1 Connect the supplied Right speaker to the “R” jacks. Connectthe red wire to the “—” jack and the black wire to the “+” jack.
2 Connect the supplied Left speaker to the “L” jacks. Connect thered wire to the “—” jack and the black wire to the “+” jack.
12 Speaker Connections, Optional Connections
Connecting the Speakers
The optional equipment and connecting wires are not supplied. Refer to theoperating instructions of the connected equipment for details.
1 Connect the audio left and right out terminals of a TV, VCR,DVD player, or CD recorder to the AUX/CDR IN jacks.
Connect equipment with a monaural output (a single audio output)to the left AUX/CDR IN jack.
Optional Connections
AC power cord
speaker(right)
speaker(left)
AM ANTENNA FM ANTENNA
ACMAINS
SPEAKERS
-+
-+
L
R
1
2AUX/CDRIN
R L

Plug & Play, Demo 13
PLUG & PLAYPlug and play automatically detects and programs all available radiostations (up to 40). Plug and Play will be activated when you turn onthe system for the first time.
1 Turn the system on.
2 Press the PLAY 33 button when “AUTO INSTALL—PRESSPLAY” appears in the display window.
“INSTALL” will appear, followed by “TUNER” then “AUTO”.
“Prog” flashes as the tuner searches for radio stations on the FM and AM bands.
3 The system stops searching and the last preset stationplays when all radio stations with sufficient signal have beenprogrammed, or the limit of 40 programmed stations has beenreached.
If you skip Plug and Play installation, it will reactivate next time you turn the system on.
DemoThe system features a demonstration mode that shows it’s various fea-tures.
1 Turn the system off (standby).
2 After five seconds DEMO ON will appear on the display. ifit does not appear, press and hold 77 on the system until DEMOON appears.
3 The demonstration will begin.
4 Press and hold 77 until DEMO OFF appears on the display. Thesystem returns to Standby Mode.
DBB
PR
EVPRESET NEXT
SEARCH-TUNING
DEMOSTOP/CLEAR
PLAY-PAUSE
CD TUNER
AUXTAPE
CD 1-2-3 AM-FM
SOURCE
TAPE 1-2 CDR/DVD
DISPLAY PROGCLOCK-TIMER
AUTOREPLAY DUBBING REC
ECO POWER
STANDBY-ON
FW-996 MINI HIFI SYSTEM
DISCCHANGE DISC 1 DISC 2 DISC 3
THREE DISC DIRECT PLAY
OPEN-CLOSE
CD/CDR/CD-RW COMPATIBLECD SYNCHRO RECORDING
VOLUME
INTERACTIVE VU METER
DSC
VA
C
INC
RE
DIB
LE
SU
RR
OU
ND
SOUND NAVIGATION - JOG
13
2-MAX BASS DYNAMIC AMPLIFICATIONCONTROL (DAC)
-MAX BASS POR
TAPE 2REC / PLAY
TAPE 1PLAYBACK
DBB
PR
EVPRESET NEXT
SEARCH-TUNING
DEMOSTOP/CLEAR
PLAY-PAUSE
CD TUNER
AUXTAPE
CD 1-2-3 AM-FM
SOURCE
TAPE 1-2 CDR/DVD
DISPLAY PROGCLOCK-TIMER
AUTOREPLAY DUBBING REC
ECO POWER
STANDBY-ON
FW-996 MINI HIFI SYSTEM
DISCCHANGE DISC 1 DISC 2 DISC 3
THREE DISC DIRECT PLAY
OPEN-CLOSE
CD/CDR/CD-RW COMPATIBLECD SYNCHRO RECORDING
VOLUME
INTERACTIVE VU METER
DSC
VA
C
INC
RE
DIB
LE
SU
RR
OU
ND
SOUND NAVIGATION - JOG
1
2,4-MAX BASS DYNAMIC AMPLIFICATIONCONTROL (DAC)
-MAX BASS POR
3
TAPE 2REC / PLAY
TAPE 1PLAYBACK

14 Power SettingsThis mini hi-fi system has several power saving features including: Standby,Eco Power, and Display settings.
POWER MODES
1 Press STANDBY ON ff to turn the system on. You can also press CD, TUNER, TAPE, or AUX (CD 123,
TUNER, TAPE 1/2, or AUX/CDR on the remote control.)
2 Press STANDBY ON ff to switch the system off (standby). Press and hold 7 in Demonstration Mode to turn the system off
(standby).
3 Press ECO POWER or press and hold f on the remote controlto switch the system to Eco Power Standby mode. In Eco Powermode, the system uses less than 1 watt of power.
DISPLAY MODE
1 Press DISPLAY to select a Display Mode.
NORMAL All LEDs light up and the display screen has fullbrightness. The Volume Unit (VU) meter displaysthe music level.
MODE 1 All LEDs light up and the display screen has fullbrightness. The Volume Unit (VU) meter displaysthe volume level.
MODE 2 All LEDs light up and the display screen has halfbrightness. The VU displays the music level.
MODE 3 The display screen is at half brightness and allLEDs and the VU meter are off.
• To conserve power the systemwill automatically switch toStandby mode (off) if no buttonsare press for 3 minutes after adisc or tape has stopped play-ing.
Helpful Hints
DBB
PR
EVPRESET NEXT
SEARCH-TUNING
DEMOSTOP/CLEAR
PLAY-PAUSE
CD TUNER
AUXTAPE
CD 1-2-3 AM-FM
SOURCE
TAPE 1-2 CDR/DVD
DISPLAY PROGCLOCK-TIMER
AUTOREPLAY DUBBING REC
ECO POWER
STANDBY-ON
FW-996 MINI HIFI SYSTEM
DISCCHANGE DISC 1 DISC 2 DISC 3
THREE DISC DIRECT PLAY
OPEN-CLOSE
CD/CDR/CD-RW COMPATIBLECD SYNCHRO RECORDING
VOLUME
INTERACTIVE VU METER
DSC
VA
C
INC
RE
DIB
LE
SU
RR
OU
ND
SOUND NAVIGATION - JOG
1,23
-MAX BASS DYNAMIC AMPLIFICATIONCONTROL (DAC)
-MAX BASS POR
TAPE 2REC / PLAY
TAPE 1PLAYBACK
DBB
PR
EVPRESET NEXT
SEARCH-TUNING
DEMOSTOP/CLEAR
PLAY-PAUSE
CD TUNER
AUXTAPE
CD 1-2-3 AM-FM
SOURCE
TAPE 1-2 CDR/DVD
DISPLAY PROGCLOCK-TIMER
AUTOREPLAY DUBBING REC
ECO POWER
STANDBY-ON
FW-996 MINI HIFI SYSTEM
DISCCHANGE DISC 1 DISC 2 DISC 3
THREE DISC DIRECT PLAY
OPEN-CLOSE
CD/CDR/CD-RW COMPATIBLECD SYNCHRO RECORDING
VOLUME
INTERACTIVE VU METER
DSC
VA
C
INC
RE
DIB
LE
SU
RR
OU
ND
SOUND NAVIGATION - JOG
AXSOUND
-MAX BASS DYNAMIC AMPLIFICATIONCONTROL (DAC)
-MAX BASS POR1TAPE 2
REC / PLAYTAPE 1PLAYBACK

Sound Options 15
VOLUME CONTROL
1 Press VOLUME + / - (or turn the VOLUME knob on the unit) toadjust the volume.
2 Press MUTE to mute the sound while playback continues. MUTEwill appear on the display.
MAX SOUNDMAX sound provides the best mixture of the various sound features.
1 Press MAX SOUND (or MAX ON/OFF on the remote con-trol) to activate or deactivate MAX sound. When active, MAX willappear on the display. When deactivated, MAX OFF appears onthe display. When MAX sound is activated all other sound options will switch
off.
DIGITAL SOUND CONTROL (DSC)DSC allows you to adust the system to your preference.
1 Press DSC. The DSC button lights up.
2 Adjust the JOG CONTROL (or press DSC on the remote) to selectthe desired Digital Sound effect: DIGITAL, ROCK, POP, NEWAGE,CLASSIC, or ELECTRIC. The selected DSC will be highlighted For a neutral sound select Classic
1
2
1
DBB
CD TUNER
AUXTAPE
CD 1-2-3 AM-FM
SOURCE
TAPE 1-2 CDR/DVD
PROGCLOCK-TIMER
AUTOREPLAY DUBBING REC
YSTEM
CD SYNCHRO RECORDING
VOLUME
INTERACTIVE VU METER
DSC
VA
C
INC
RE
DIB
LE
SU
RR
OU
ND
SOUND NAVIGATION - JOG
1AXSOUND
-MAX BASS DYNAMIC AMPLIFICATIONCONTROL (DAC)
-MAX BASS POR2

16 Sound Options
VIRTUAL AMBIENCE CONTROL (VAC)VAC allows you to adust the system to your preference.
1 Press VAC. The DSC button lights up.
2 Adjust the JOG CONTROL (or press VAC on the remote) to selectthe desired Virtual Ambience effect: HALL, CONCERT, CINEMA,DISCO ARCADE, or CYBER. The selected VAC will be highlighted When you select VAC, Incredible sound will be switched on
automatically.
DYNAMIC BASS BOOST (DBB)DBB allows you to enhance the bass sound reproduction. There are threesettings.
1 Press DBB. The DBB button lights up.
2 Adjust the JOG CONTROL (or press DBB on the remote) to selectthe desired Dynamic Bass Boost level: BEAT (DBB 1), PUNCH (DBB2, BLAST (DBB 3), or DBB OFF. The selected DBB level appears on the display.
INCREDIBLE SURROUNDIncredible Surround magnifies the virtual distance between the front speak-ers for a wider stereo effect.
1 Press INCREDIBLE SURROUND (IS on the remote control) toturn Incredible Surround on or off. When activated, INCREDIBLE SURROUND appears of the displayand the Incredible Surround buttons lights up. When turned off, IS OFF appears on the display
• The best DBB setting for eachDSC or VAC setting is automati-cally set.
Helpful Hints
1,2
1,2
1

CD Operations 17
LOADING DISCS
1 Press CD to select CD Mode.
2 Press OPEN•CLOSE to open the disc tray.
3 Place one disc in each individual tray, label side up.
4 Press DISC CHANGE to load a third disc.
5 Press OPEN•CLOSE to close the disc tray. READINGappears on the display. Then the selected disc tray, total numberof tracks, and playing time appearas. A lighted disc button indicates that there is a disc in that tray.
DISC PLAYBACK
1 Press PLAY 3 to start playback of all discs in the tray. Eachdisc will play once than stop. Press the desired DISC DIRECT PLAY button to play only one
disc.
2 Press PAUSE 8 to interrupt playback. Press PLAY 3 toresume playback.
3 Press STOP 77 to stop playback.
SEARCHING
1 Press and hold 1 or ¡ during playback to find a particu-lar part of a track. Release the button when the desired passage islocated.
2 Press w or ∑ to skip to the previous or next track.
3 Press w once to skip to the beginning of the current track.
DBB
PR
EVPRESET NEXT
SEARCH-TUNING
DEMOSTOP/CLEAR
PLAY-PAUSE
CD TUNER
AUXTAPE
CD 1-2-3 AM-FM
SOURCE
TAPE 1-2 CDR/DVD
DISPLAY PROGCLOCK-TIMER
AUTOREPLAY DUBBING REC
ECO POWER
DISCCHANGE DISC 1 DISC 2 DISC 3
THREE DISC DIRECT PLAY
OPEN-CLOSE
INTERACTIVE VU METER
DSC
VA
C
INC
RE
DIB
LE
SU
RR
OU
ND
SOUND NAVIGATION - JOG
CD/CDR/CD-RW COMPATIBLECD SYNCHRO RECORDING
1
2,5
volumeel
MAX SOUND
-MAX BASS DYNAMIC AMPLIFICATIONCONTROL (DAC)
-MAX BASS POR
3,4
TAPE 2REC / PLAY
TAPE 1PLAYBACK
123
1
23
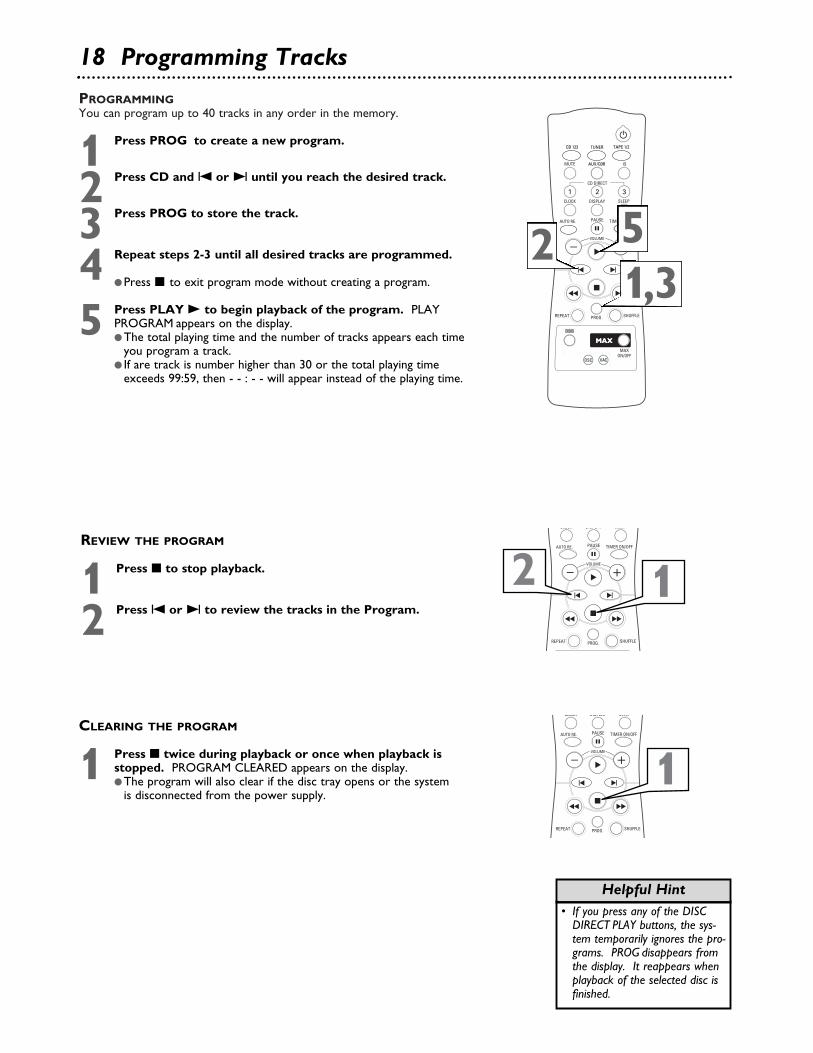
PROGRAMMINGYou can program up to 40 tracks in any order in the memory.
1 Press PROG to create a new program.
2 Press CD and w or ∑ until you reach the desired track.
3 Press PROG to store the track.
4 Repeat steps 2-3 until all desired tracks are programmed.
Press 7 to exit program mode without creating a program.
5 Press PLAY 3 to begin playback of the program. PLAYPROGRAM appears on the display. The total playing time and the number of tracks appears each time
you program a track. If are track is number higher than 30 or the total playing time
exceeds 99:59, then - - : - - will appear instead of the playing time.
18 Programming Tracks
• If you press any of the DISCDIRECT PLAY buttons, the sys-tem temporarily ignores the pro-grams. PROG disappears fromthe display. It reappears whenplayback of the selected disc isfinished.
Helpful Hint
REVIEW THE PROGRAM
1 Press 7 to stop playback.
2 Press w or ∑ to review the tracks in the Program.
CLEARING THE PROGRAM
1 Press 7 twice during playback or once when playback isstopped. PROGRAM CLEARED appears on the display. The program will also clear if the disc tray opens or the system
is disconnected from the power supply.
2 1
1
1,32 5

REPEATYou can use the repeat function to repeatedly play the current track, adisc, a program, or all discs in the tray.
1 Press REPEAT to select the repeat mode you want.RPT appears in the displayDuring normal playback: TRACK repeats the current track. DISC repeats the current disc. ALL DISC repeats all discs in the tray.
During program playback: TRACK repeats the current programmed track. PROGRAM repeats all programmed tracks.
2 Press REPEAT until OFF appears to resume normal play-back.
Repeat, Shuffle 19
• Selecting Shuffle during repeatplayback will cancel repeatmode.
Helpful Hint
SHUFFLEYou can use the shuffle feature to playback tracks and discs in a randomorder.
1 Press SHUFFLE and the discs in the tray and their tracks will beplayed in a random order. SHUFF appears on the displayscreen.
SHUFFLE AND REPEATAfter setting shuffle, you can engage one of several repeat modes.
1 Press REPEAT (after pressing shuffle) to select the repeatmode you want.During normal playback: TRACK repeats the current track ALL DISC repeats all discs in the tray.
During program playback: TRACK repeats the current programmed track. PROGRAM repeats all programmed tracks.
1-2
1
1

TUNING TO RADIO STATIONSThere are several ways to tune to a radio station. Plug & Play automatical-ly programs up to 40 radio stations. You can use the automatic preset fea-ture to program radio stations. Or, you can manually tune to a radio sta-tion.
TUNING TO PRESET RADIO STATIONS
1 Press TUNER to select tuner mode.
2 Press w or ∑ to select the desired preset number.
20 Programming Radio Presets
AUTOMATIC PRESET PROGRAMMING
1 Press TUNER. to select tuner mode.
2 Press w or ∑ if you want to begin programming from aspecific preset number.
3 Press and hold PROG until “AUTO” appears on the display. Thetuner will now program radio stations. Stations already pro-grammed will not be stored again.
4 Press 7 to stop the automatic preset.
• “PROGRAM FULL” appearswhen you attempt to store morethan 40 radio stations.
• When in the programmingmode, the system will exit thatmode if no button is pressedwith 20 seconds.
Helpful Hints
PLUG & PLAYPlug and play automatically detects and programs all available radio stations(up to 40). Plug and Play will be activated when you turn on the system forthe first time.
1 Turn the system off (standby mode).
2 Press and hold 3 until “AUTO INSTALL--PRESS PLAY” appearson the display.
3 Press 3 to start installation All previously programmed stations will be replaced.
2
1
2-3
1
2 43
1

Manual Programming, Deleting Presets 21MANUAL PROGRAMMING
1 Press PROG. The next available preset number appears you wantto begin programming from a specific preset number.
2 Press 1 or ¡ to tune to the desired frequency.
3 Press PROG once a radio station is found to program it. If you donot want to program the station, repeat step three.
4 Press w or ∑ to select another preset number.
5 Repeat steps 2-5 to program more stations.
Press 7 to stop to exit the manual program.
DELETING PRESET RADIO STATIONS
1 Press w or ∑ to select the desired preset number.
2 Press and hold 7 until “PRESET DELETED” appears on the dis-play. All other presets higher than the one deleted decrease by one.
4
21,3
1
2

22 Cassette Playback
TAPE PLAYBACK
1 Press 0 to open the tape deck door, insert arecorded tape, and close the door. Make sure thetape is loaded with the open side down and the full spoolto the left.
2 Press TAPE (TAPE 1•2) to select the correct tapedeck. The selected deck number will appear on the dis-play.
3 Press 38 to begin playback.
4 Press 1 or ¡ to search.
5 Press 7 to stop playback.
PLAYBACK MODE
1 Press AUTO REPLAY (“AUTO RE.” on the remote) toselect the playback mode. AUTO REPLAY rewinds and replays the cassette 20
times or until you press 7. ONCE stops the cassette at the end of the current
side.
DBB
PR
EVPRESET NEXT
SEARCH-TUNING
DEMOSTOP/CLEAR
PLAY-PAUSE
CD TUNER
AUXTAPE
CD 1-2-3 AM-FM
SOURCE
TAPE 1-2 CDR/DVD
DISPLAY PROGCLOCK-TIMER
AUTOREPLAY DUBBING REC
ECO POWER
STANDBY-ON
FW-996 MINI HIFI SYSTEM
DISCCHANGE DISC 1 DISC 2 DISC 3
THREE DISC DIRECT PLAY
OPEN-CLOSE
CD/CDR/CD-RW COMPATIBLECD SYNCHRO RECORDING
VOLUME
INTERACTIVE VU METER
DSC
VA
C
INC
RE
DIB
LE
SU
RR
OU
ND
SOUND NAVIGATION - JOG
volume
MAX SOUND
-MAX BASS DYNAMIC AMPLIFICATIONCONTROL (DAC)
-MAX BASS POR
1 2TAPE 2
REC / PLAY
TAPE 1PLAYBACK
1
3-5

Cassette Recording 23
BASIC RECORDING
1 Prepare the tape you are recording on. It must be inTape Deck 2 with the full spool to the left.
2 Prepare the source you will be recording. Tune to the desired radio station to record from thetuner. Load the disc or discs to record from the CD player. Load a prerecorded tape into Tape Deck 1 to recordfrom a tape. Connect external equipment to record from an auxiliarysource.
3 Press REC for CD, TUNER, or AUX recording; orpress DUBBING for TAPE recording.
4 Press STOP 7 to stop recording.
CD SYNCHRO RECODING
1 Select the CD or track to record using CD 1•2•3and w or ∑. You can also program tracks in the orderyou want to record them. See page 18 for CD programming.
2 Press REC to start recording. The disc will start playback automatically.
3 To select another track during recording: Press PAUSE 8 to stop recording. Press w or ∑ to select the desired track. Press PLAY 3 to resume recording.
4 Press STOP 7 to stop recording.
• Recoding is possible only onTape Deck 2.
• If “SELECT SOURCE” appearsselect the mode (CD, TUNER,or AUX) that you want torecord from.
• While dubbing tapes you can lis-ten to another source.
Helpful Hints
DBB
PR
EVPRESET NEXT
SEARCH-TUNING
DEMOSTOP/CLEAR
PLAY-PAUSE
CD TUNER
AUXTAPE
CD 1-2-3 AM-FM
SOURCE
TAPE 1-2 CDR/DVD
DISPLAY PROGCLOCK-TIMER
AUTOREPLAY DUBBING REC
ECO POWER
STANDBY-ON
FW-996 MINI HIFI SYSTEM
DISCCHANGE DISC 1 DISC 2 DISC 3
THREE DISC DIRECT PLAY
OPEN-CLOSE
CD/CDR/CD-RW COMPATIBLECD SYNCHRO RECORDING
VOLUME
INTERACTIVE VU METER
TAPE 2REC / PLAY
TAPE 1PLAYBACK
DSC
VA
C
INC
RE
DIB
LE
SU
RR
OU
ND
SOUND NAVIGATION - JOG
-MAX BASS DYNAMIC AMPLIFICATIONCONTROL (DAC)
-MAX BASS POR
21
34
DBB
PR
EVPRESET NEXT
SEARCH-TUNING
DEMOSTOP/CLEAR
PLAY-PAUSE
CD TUNER
AUXTAPE
CD 1-2-3 AM-FM
SOURCE
TAPE 1-2 CDR/DVD
DISPLAY PROGCLOCK-TIMER
AUTOREPLAY DUBBING REC
ECO POWER
STANDBY-ON
FW-996 MINI HIFI SYSTEM
DISCCHANGE DISC 1 DISC 2 DISC 3
THREE DISC DIRECT PLAY
OPEN-CLOSE
CD/CDR/CD-RW COMPATIBLECD SYNCHRO RECORDING
VOLUME
INTERACTIVE VU METER
TAPE 2REC / PLAY
TAPE 1PLAYBACK
DSC
VA
C
INC
RE
DIB
LE
SU
RR
OU
ND
SOUND NAVIGATION - JOG
-MAX BASS DYNAMIC AMPLIFICATIONCONTROL (DAC)
-MAX BASS POR
14 2
3

24 Clock
SETTING THE CLOCK
1 Press CLOCK•TIMER on the system if it is off (stand-by mode). The display brightens to indicate Clock settingmode is active. Press twice if it is on. The time blinks toindicate clock setting is active.
2 Press PROG to select 12- or 24-hour mode. “AM12:00” appears for 12-hour and “00:00” appears for 24-hourmode
3 Press 1 or ¡ to set the hour.
4 Press w or ∑ to set the minute.
5 Press CLOCK•TIMER to save the setting.
6 Press STOP 7 to exit with saving the setting.
The clock is always displayed in Standby (off) mode. It is not displayed inEco Power Standby mode. To view the clock while the system is on, pressCLOCK on the remote control or CLOCK•TIMER on the system. TheClock will display for several seconds.
• The clock setting erases if thesystem loses power completely.
• If no button is pressed for 90seconds, the system automati-cally exits the clock settingmode.
Helpful Hints
TAPE 2REC / PLAY
TAPE 1PLAYBACK
CD TUNER
AUXTAPE
CD 1-2-3 AM-FM
SOURCE
TAPE 1-2 CDR/DVD
DISPLAY PROGCLOCK-TIMER
AUTOREPLAY DUBBING REC
INTERACTIVE VU METER
2 1,5
3-4,6

Timer 25
• Once set the timer is always onuntil canceled.
• If no button is pressed for 90seconds, the system automati-cally exits the clock settingmode.
Helpful Hints
SETTING THE TIMER
1 Press and hold CLOCK•TIMER on the system. “AM12:00” or “00:00” or the last timer setting blinks to indicatetimer setting mode is active. Timer also blinks.
2 Prepare the source you wantthe timer to activate. For CD, load the disc(s). To play a specific track, createa program. See page 16. For TUNER, tune to the desired radio station. For TAPE, load the cassette into tape deck 2.
2 Press CD, TUNER, or TAPE to select the desiredsource. The selected source light up while the other avail-able source flash.
3 Press 1 or ¡ to set the hour.
4 Press w or ∑ to set the minute.
5 Press CLOCK•TIMER to save the setting. “TIMERON” appears followed by the selected time and source.TIMER remains on the display.
6 Press STOP 7 to exit with saving the setting.
When the Timer is on, the system will turn on and begin playback at apreset time. The volume will begin at the minimum level and slowlyincrease to the last selected level.
ACTIVATING THE TIMER
1 Press TIMER ON/OFF on the remote control tocancel or activate the timer. “CANCEL” appears andTIMER disappears. If you activated the timer, the lasttimer information displays and TIMER remains on thedisplay.
TAPE 2REC / PLAY
TAPE 1PLAYBACK
CDR/DVD
3
26 1,5
4WOOXWOOXDYNAMICDYNAMICAMPLIFICATIONCONTROLCONTROL
ON-OFF WOOX LEVEL
1

The Sleep Timer turns the system to Standby (off) mode at a preselectedtime interval.
1 Press SLEEP repeatedly to select 15, 30, 45, 60, OFF. SLEEP willappear on the display when the sleep timer is active. This is howlong the system will remain on before switching to Standby (off)mode.
Press SLEEP once to check the time remaining for the SleepTimer.
Press SLEEP repeatedly to change the amount of time remainingon the Sleep Timer.
Press SLEEP repeatedly to cancel the Sleep Timer.
26 Sleep Timer
1

Helpful Hints 27WARNING! Under no circumstances should you try to repair the system yourself. This will invalidate the warranty. Donot open the system due to a risk of electric shock.
If you are having problems with your product, check this list of problems and possible solutions before requesting service. Youmay be able to solve the problem yourself.
“NO DISC” appears.• Insert a disc.• Inspect disc for scratches and to make sure it is loaded correctly.• Wait until moisture has cleared from the lens.
“DISC NOT FINALIZED” appears.• Use a finalized CD-R(W) or CD-R.
Poor radio Reception.• Adjust the antenna or connect an external antenna for better reception.• Increase the distance between the System and other sources of electronic interference like a TV, VCR, or DVD player.• Make sure the AC outlet has power by trying another appliance in the same outlet.
Tape recording cannot be made.• Place a piece of tape over the missing tab space on the cassette.
Tape will not playback.• Use only NORMAL (IEC 1) tape.• Clean the deck parts. See page 5 .
Deck door does not open.• Unplug the system for a moment.
The system does not respond.• Unplug the system for a moment.
There is no sound.• Adust the volume.• Disconnect the headphones.• Check the speaker connections.
The left and right outputs are reversed.• Check speaker connections and location.
Remote Control does no work properly.• Select the correct source (CD, TUNER, TAPE, AUX) before pressing a button.• Move the remote closer to the system.• Check the batteries for correct polarity.• Replace the batteries.• Make sure the front of the remote control is pointed at the system.
The timer is not working.• Set the clock properly.• Press TIMER ON/OFF to activate the timer.• If you are recording, the timer will not interrupt the recording process.
Some lights are not lighting up.• Press DISPLAY and select NORMAL or DISPLAY 1 mode.
The Clock/Timer setting is deleted.• The power supply has been interrupted. Reset the clock and timer.
The system display and buttons start randomly flashing.• The system is in DEMO mode. Press and hold STOP 7 until the demo stops.

AMPLIFIER SECTIONOutput power . . . . . . . . . . . . . . . . . . . . . . . . . .280 total W . . . . . . . . . . . . . . . . . . . .2X140 W RMS(1)/2X110 W FTC(1)
Signal-to-Noise Ratio . . . . . . . . . . . . . . . . . .> 75 dBA (IEC)Frequency Response . . . . . . . . . . . .50 Hz – 20 kHz / ±3 dBInput Sensitivity . . . . . . . . . . . . . . . . . . . . . . . . . . . . .500 mVOutput
Speakers . . . . . . . . . . . . . . . . . . . . . . . . . . . . . . . . . .>6 ΩHeadphones . . . . . . . . . . . . . . . . . . . . . . . . . .32 Ω - 1000
(1) (6Ω60 Hz - 125 kHz, 10% THD)
CD PLAYER SECTIONProgrammable Tracks . . . . . . . . . . . . . . . . . . . . . . . . . . . .40Frequency Response . . . . . . . . . . . . . . . . . . .20 Hz – 20 kHzSignal-to-Noise Ratio . . . . . . . . . . . . . . . . . . . . . . . .>76 dBAChannel Separation . . . . . . . . . . . . . . . . . . . .> 79 dB (1kHz)Total harmonic distortion . . . . . . . . . . . . . . .<0.02% (1kHz)
TUNER SECTIONTuning Range, FM . . . . . . . . . . . . . . . . . . . . . .87.5–108MHzTuning Range, AM . . . . . . . . . . . . . . . . . . .530kHz–1700kHzNumber of presets . . . . . . . . . . . . . . . . . . . . . . . . . . . . . .40Antenna
FM . . . . . . . . . . . . . . . . . . . . . . . . . . . . .300Ω dipole wireAM . . . . . . . . . . . . . . . . . . . . . . . . . . . . . . . .Loop antenna
TAPE PLAYERFrequency response
Normal tape (type 1) . . . . . . . . . . .80Hz - -10 kHz (8 dB)Signal-to-noise ratio
Normal tape (type 1) . . . . . . . . . . . . . . . . . . . . . .>48 dBAWow and flutter . . . . . . . . . . . . . . . . . . . . . . . . .< 0.4% DIN
Tweeter . . . . . . . . . . . . . . . . . . . . . . . . . . . . . . . . . . .1 X 2”Polydome Tweeter . . . . . . . . . . . . . . . . . . . . . . . . . .1 X 1”)Dimensions (w x h x d) . . . . .240 mm x 310 mm x 290 mm . . . . . . . . . . . . . . . . . . . . . . . .9.45 x 12.20 x 11.62 (inches)
Weight . . . . . . . . . . . . . . . .3.95 kg each / 8.69 pounds each
GENERALMaterial/finish . . . . . . . . . . . . . . . . . . . . . .Polystyrene/MetalAC Power . . . . . . . . . . . . . . . . . . . . . . . . . . . .120V / 60 HzPower Consumption
Active . . . . . . . . . . . . . . . . . . . . . . . . . . . . . . . . . . .175WStandby . . . . . . . . . . . . . . . . . . . . . . . . . . . . . . . . . . .25WEco Power Standby . . . . . . . . . . . . . . . . . . . . . . . . . .<1W
Dimensions (w x h x d) . . . . . . . . . . .240 x 310 x 290 (mm) . . . . . . . . . . . . . . . . . . . . . . . .9.45 x 12.20 x 11.42 (inches)
Weight (without speakers . . . . . . . . . . . . . .9.0 kg / 19.8 lbsSpecifications are subject to change without notice.
28 Specifications

antenna connections . . . . . . . . . . . . . . . . . . . . . . . . . . . . .11automatic preset programming . . . . . . . . . . . . . . . . . . . . .20autoreplay button . . . . . . . . . . . . . . . . . . . . . . . . . . . . . . . .7
basic recording . . . . . . . . . . . . . . . . . . . . . . . . . . . . . . . . .23batteries . . . . . . . . . . . . . . . . . . . . . . . . . . . . . . . . . . . . . .11
cassette recording . . . . . . . . . . . . . . . . . . . . . . . . . . . . . . .23cd direct buttons . . . . . . . . . . . . . . . . . . . . . . . . . . . . . . . . .7cd operations . . . . . . . . . . . . . . . . . . . . . . . . . . . . . . . . . . . .cd synchro recoding . . . . . . . . . . . . . . . . . . . . . . . . . . . . .23clock button . . . . . . . . . . . . . . . . . . . . . . . . . . . . . . . . . . . .7connections . . . . . . . . . . . . . . . . . . . . . . . . . . . . . . . . . . . .12
dbb/dsc/vac buttons . . . . . . . . . . . . . . . . . . . . . . . . . . . . . . .7deleting preset stations . . . . . . . . . . . . . . . . . . . . . . . . . . .21demo . . . . . . . . . . . . . . . . . . . . . . . . . . . . . . . . . . . . . . . . .13digital sound control (dsc) . . . . . . . . . . . . . . . . . . . . . . . . .15disc playback . . . . . . . . . . . . . . . . . . . . . . . . . . . . . . . . . . .17display button . . . . . . . . . . . . . . . . . . . . . . . . . . . . . . . . . . .7display mode . . . . . . . . . . . . . . . . . . . . . . . . . . . . . . . . . . .14dynamic bass boost (dbb) . . . . . . . . . . . . . . . . . . . . . . . . .16
eco power . . . . . . . . . . . . . . . . . . . . . . . . . . . . . . . . . . . . .14environmental information . . . . . . . . . . . . . . . . . . . . . . . . .5
first time setup . . . . . . . . . . . . . . . . . . . . . . . . . . . . . . . . .11forward ¡ button . . . . . . . . . . . . . . . . . . . . . . . . . . . . . .7front panel . . . . . . . . . . . . . . . . . . . . . . . . . . . . . . . . . . . .8-9
helpful hints (troubleshooting) . . . . . . . . . . . . . . . . . . . . . .27incredible surround . . . . . . . . . . . . . . . . . . . . . . . . . . . . . .16interactive vu meter . . . . . . . . . . . . . . . . . . . . . . . . . . . . . .8introduction . . . . . . . . . . . . . . . . . . . . . . . . . . . . . . . . . . . .5is (incredible surround) . . . . . . . . . . . . . . . . . . . . . . . . . . . .7
limited warranty . . . . . . . . . . . . . . . . . . . . . . . . . . . . . . . .29
maintenance and cleaning . . . . . . . . . . . . . . . . . . . . . . . . . .5manual programming . . . . . . . . . . . . . . . . . . . . . . . . . . . . .21max on/off button . . . . . . . . . . . . . . . . . . . . . . . . . . . . . . . .7max sound . . . . . . . . . . . . . . . . . . . . . . . . . . . . . . . . . . . . .15mute button . . . . . . . . . . . . . . . . . . . . . . . . . . . . . . . . . . . .7
next ∑ button 7 . . . . . . . . . . . . . . . . . . . . . . . . . . . . . . . . . .
optional connections . . . . . . . . . . . . . . . . . . . . . . . . . . . . .12
package contents . . . . . . . . . . . . . . . . . . . . . . . . . . . . . . . . .5play 3 button . . . . . . . . . . . . . . . . . . . . . . . . . . . . . . . . . . .7playable discs . . . . . . . . . . . . . . . . . . . . . . . . . . . . . . . . . . . .5playback mode . . . . . . . . . . . . . . . . . . . . . . . . . . . . . . . . . .22plug & play . . . . . . . . . . . . . . . . . . . . . . . . . . . . . . . . . .13, 20power modes . . . . . . . . . . . . . . . . . . . . . . . . . . . . . . . . . .14power y button . . . . . . . . . . . . . . . . . . . . . . . . . . . . . .7, 14previous w Button . . . . . . . . . . . . . . . . . . . . . . . . . . . . . . .7prog. button . . . . . . . . . . . . . . . . . . . . . . . . . . . . . . . . . . . .7programming . . . . . . . . . . . . . . . . . . . . . . . . . . . . . . . . . . .18programming radio presets . . . . . . . . . . . . . . . . . . . . . . . .20programming tracks . . . . . . . . . . . . . . . . . . . . . . . . . . . . . .18
rear panel . . . . . . . . . . . . . . . . . . . . . . . . . . . . . . . . . . . . .10remote control . . . . . . . . . . . . . . . . . . . . . . . . . . . . . . . . . .7repeat . . . . . . . . . . . . . . . . . . . . . . . . . . . . . . . . . . . . . . . .19repeat button . . . . . . . . . . . . . . . . . . . . . . . . . . . . . . . . . . .7reverse 1 button . . . . . . . . . . . . . . . . . . . . . . . . . . . . . . .7
safety information . . . . . . . . . . . . . . . . . . . . . . . . . . . . . . . .6safety instructions . . . . . . . . . . . . . . . . . . . . . . . . . . . . . . . .4searching . . . . . . . . . . . . . . . . . . . . . . . . . . . . . . . . . . . . . .17setting the clock . . . . . . . . . . . . . . . . . . . . . . . . . . . . . . . .24setting the timer . . . . . . . . . . . . . . . . . . . . . . . . . . . . . . . .25setup . . . . . . . . . . . . . . . . . . . . . . . . . . . . . . . . . . . . . . . . .11shuffle . . . . . . . . . . . . . . . . . . . . . . . . . . . . . . . . . . . . . . . .19shuffle button . . . . . . . . . . . . . . . . . . . . . . . . . . . . . . . . . . .7sleep button . . . . . . . . . . . . . . . . . . . . . . . . . . . . . . . . . . . .7sleep timer . . . . . . . . . . . . . . . . . . . . . . . . . . . . . . . . . . . .26sound options . . . . . . . . . . . . . . . . . . . . . . . . . . . . . . . . . .15source buttons . . . . . . . . . . . . . . . . . . . . . . . . . . . . . . . . . .7speaker connections . . . . . . . . . . . . . . . . . . . . . . . . . . . . .12specifications . . . . . . . . . . . . . . . . . . . . . . . . . . . . . . . . . . .28standby y button . . . . . . . . . . . . . . . . . . . . . . . . . . . . . . . .7stop 7 button . . . . . . . . . . . . . . . . . . . . . . . . . . . . . . . .7, 14
table of contents . . . . . . . . . . . . . . . . . . . . . . . . . . . . . . . . .3tape playback . . . . . . . . . . . . . . . . . . . . . . . . . . . . . . . . . . .22timer . . . . . . . . . . . . . . . . . . . . . . . . . . . . . . . . . . . . . . . . .25timer on/off button . . . . . . . . . . . . . . . . . . . . . . . . . . . . . . .7tuning to radio stations . . . . . . . . . . . . . . . . . . . . . . . . . . .20
virtual ambience control (vac) . . . . . . . . . . . . . . . . . . . . . .16volume . . . . . . . . . . . . . . . . . . . . . . . . . . . . . . . . . . . . . . .15volume +/- buttons . . . . . . . . . . . . . . . . . . . . . . . . . . . . . . .7
warranty . . . . . . . . . . . . . . . . . . . . . . . . . . . . . . . . . . . . . .30
Index 29
30 Limited Warranty
AUDIO SYSTEMOne Year Free Labor
One Year Free Service on PartsThis product must be carried in for repair.
WHO IS COVERED?You must have proof of purchase to receive warrantyservice. A sales receipt or other document showingthat you purchased the product is considered proof ofpurchase.
WHAT IS COVERED?Warranty coverage begins the day you buy your prod-uct. For one year thereafter, all parts will be repaired orreplaced, and labor is free. After one year from the dayof purchase, you pay for the replacement or repair ofall parts, and for all labor charges.All parts, including repaired and replaced parts, are cov-ered only for the original warranty period. When thewarranty on the product expires, the warranty on allreplaced and repaired parts also expires.
WHAT IS EXCLUDED?Your warranty does not cover:• labor charges for installation or setup of the product,
adjustment of customer controls on the product, andinstallation or repair of antenna systems outside ofthe product.
• product repair and/or part replacement because ofmisuse, accident, unauthorized repair or other causenot within the control of Philips.
• reception problems caused by signal conditions orcable or antenna systems outside the unit.
• a product that requires modification or adaptation toenable it to operate in any country other than thecountry for which it was designed, manufactured,approved and/or authorized, or repair of productsdamaged by these modifications.
• incidental or consequential damages resulting fromthe product. (Some states do not allow the exclu-sion of incidental or consequential damages, so theabove exclusion may not apply to you. This includes,but is not limited to, prerecorded material, whethercopyrighted or not copyrighted.)
• a product that is used for commercial or institutionalpurposes.
WHERE IS SERVICE AVAILABLE?Warranty service is available in all countries where theproduct is officially distributed by Philips. In countrieswhere Philips does not distribute the product, the localPhilips service organization will attempt to provide ser-vice (although there may be a delay if the appropriatespare parts and technical manual(s) are not readily avail-able).
MAKE SURE YOU KEEP...Please keep your sales receipt or other documentshowing proof of purchase. Attach it to this owner’smanual and keep both nearby. Also keep the originalbox and packing material in case you need to returnyour product.
BEFORE REQUESTING SERVICE...Please check your owner’s manual before requestingservice. Adjustments of the controls Discussed theremay save you a service call.
TO GET WARRANTY SERVICE IN U.S.A., PUERTO RICO, OR U.S. VIRGIN ISLANDS...Take the product to a Philips factory service center(see enclosed list) or authorized service center forrepair. When the product has been repaired, you mustpick up the unit at the center. Centers may keepdefective parts.(In U.S.A., Puerto Rico, and U.S. Virgin Islands, allimplied warranties, including implied warranties of mer-chantability and fitness for a particular purpose, are lim-ited in duration to the duration of this express warran-ty. But, because some states do not allow limitationson how long an implied warranty may last, this limita-tion may not apply to you.)
TO GET WARRANTY SERVICE IN CANADA...Please contact Philips at:1-800-661-6162 (French Speaking)1-800-531-0039 (English Speaking or Spanish Speaking)(In Canada, this warranty is given in lieu of all otherwarranties. No other warranties are expressed orimplied, including any implied warranties of mer-chantability or fitness for a particular purpose. Philips isnot liable under any circumstances for any direct, indi-rect, special, incidental or consequential damages, how-soever incurred, even if notified of the possibility ofsuch damages.)
REMEMBER...Please record the model and serial numbers found onthe product below. Also, please fill out and mail yourwarranty registration card promptly. It will be easierfor us to notify you if necessary.
MODEL # ___________________________________SERIAL # ____________________________________
This warranty gives you specific legal rights. You may haveother rights which vary from state/province to state/province.
This warranty gives you specific


![Powerful Innovation - IsoTek SMART Power · IsoTek Mini Sub [Mk1] 2002 Hi-Fi News Category Winner IsoTek SubStation 2011 Hi-Fi Voice 1st Place Winner IsoTek EVO3 Aquarius 2011 Hi-Fi](https://img.pdfslide.us/doc/110x75/5edaed1009ac2c67fa6887b5/powerful-innovation-isotek-smart-power-isotek-mini-sub-mk1-2002-hi-fi-news-category.jpg)