Embed Size (px)
Citation preview

7/31/2019 Mini Children’s Theatre
http://slidepdf.com/reader/full/mini-childrens-theatre 1/10
make & do activity kit
This activity kit contains:
1. Make and do activity steps 1 - 122. Information page3. 8 template pagesVisit http://play.powerhousemuseum.com to download any missing elements.
Mini Children’s Theatre
500 Harris St UltimoPO Box K346 Haymarket NSW 1238 Australiatel: 02 6217 0111web: http://play.powerhousemuseum.com
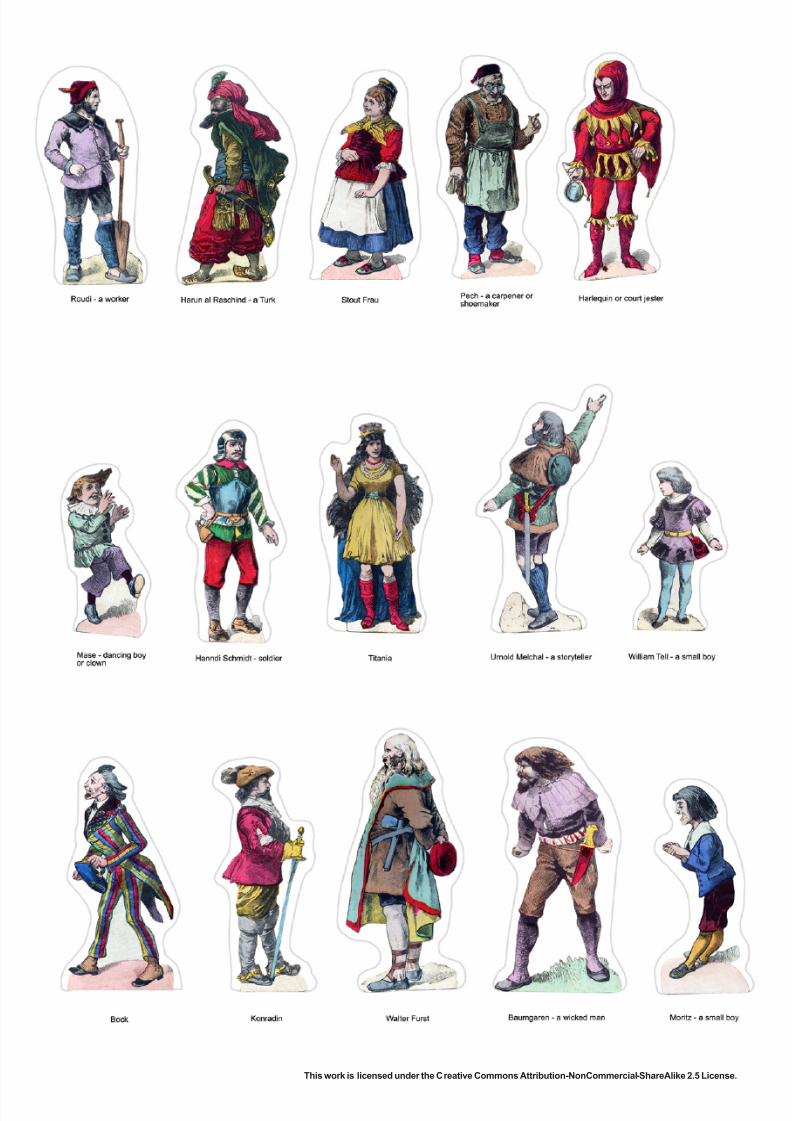
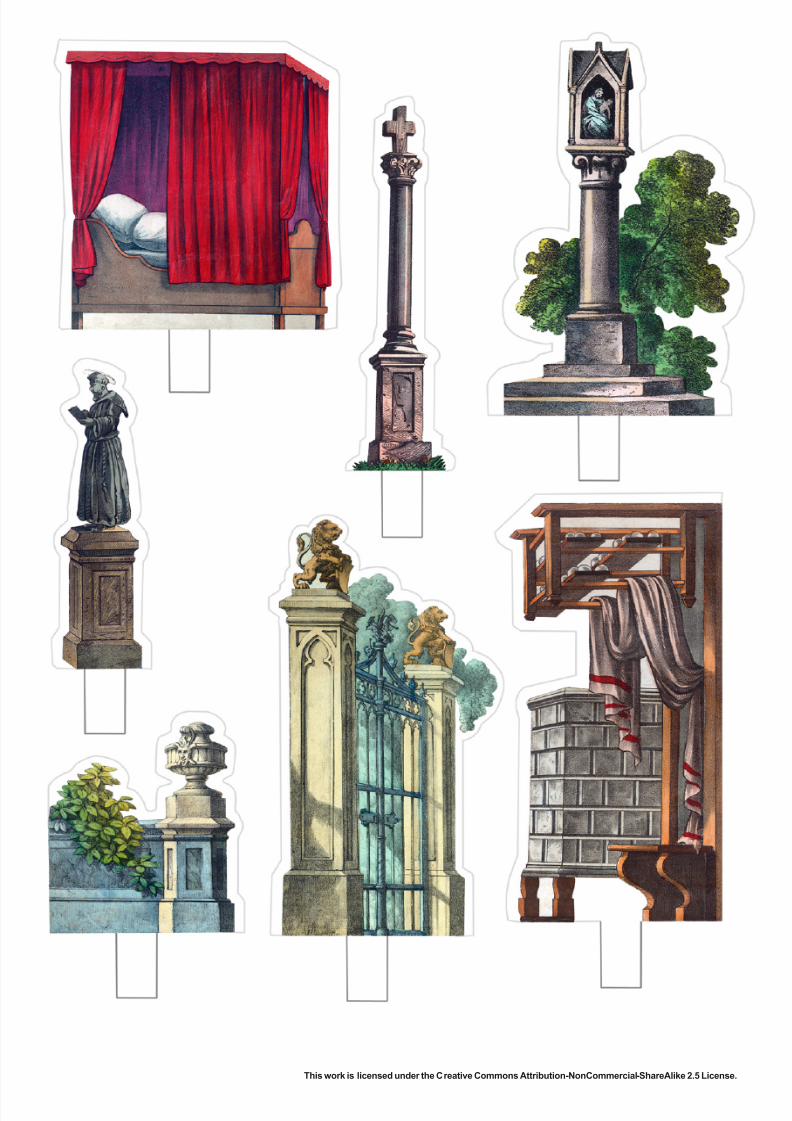
1 Print out thet e m p l a t e sof actors
& props. Cut out eachpiece roughly and stickto light card. Cut outproperly when dry.
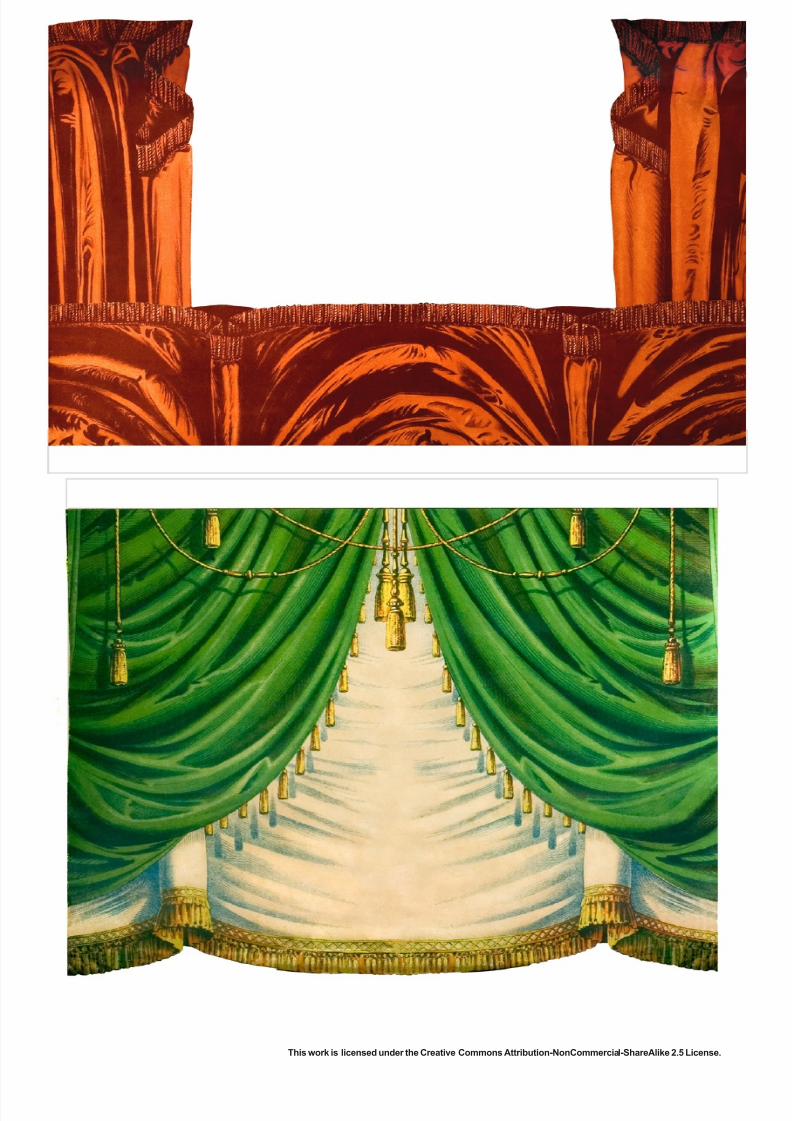
2 Cut out and join the 2 sidesof the front of
the theatre together.Using stick glue to
stick the tabs one half behind the other. Glueto card and cut out.
3 Place thefront of your theatre over the
shoe box as shown, tomeasure how much of the shoe box you needto create the stage.Mark with a pen.
4 Stand the boxup as shown.With a craft
knife (an adult’s job) cutoff the whole right sideat the marked points.
Things you need:scissorsstanley knife ( for adults only please )stick gluelight cardboardtemplate printoutsruler 24 wooden skewers ( points cut off )1 shoe box ( without the lid )
This work is licensed under the Creative Commons Attribution-NonCommercial-ShareAlike 2.5 License.
5 Top: As shown,cut two long
slots 20cm x.5 cm at the front of thebox. These are for thetwo curtains to hang.
6 Left side: Cutout a hole asshown leaving
4cm on top and 4cm atthe bottom. This holewill allow for actors tocome and go.

7/31/2019 Mini Children’s Theatre
http://slidepdf.com/reader/full/mini-childrens-theatre 2/10
make & do activity kit
This work is licensed under the Creative Commons Attribution-NonCommercial-ShareAlike 2.5 License.
8 Sticky tape thefront of the the-atre to the shoe
box. The orchestra atthe bottom should hangdown 4cm to hang over a table when in use.
9 Attach oneskewer to theback of each
actor with sticky tape.They should be stucksideward as shown.
10 Attach eachcurtain to askewer at the
top with sticky tape.
11 Slot the greenand creamcurtain into
the back slot and thered one into the front.Raise them when youstart your play.
12 Place someprops in theslots. You
can prop the bottom of the theatre up on eachside so the tabs hangdown or just bend themand tape tabs under-neath the foor.
7 Bottom: Cut1cm slots inthe foor to hold
different props. Therecan be as many as youlike. We put in 5.
Children enjoying the replica Children’sTheatre at the Tinytoreum Exhibition at thePowerhouse Museum, July 2010 .
The original Children’s Theatre is aprecious object in the Powerhouse Museum’sCollection . It was made in Germany between1880 and 1890.

7/31/2019 Mini Children’s Theatre
http://slidepdf.com/reader/full/mini-childrens-theatre 3/10
make & do activity kit
This work is licensed under the Creative Commons Attribution-NonCommercial-ShareAlike 2.5 License.

7/31/2019 Mini Children’s Theatre
http://slidepdf.com/reader/full/mini-childrens-theatre 4/10
make & do activity kit
This work is licensed under the Creative Commons Attribution-NonCommercial-ShareAlike 2.5 License.
7/31/2019 Mini Children’s Theatre
http://slidepdf.com/reader/full/mini-childrens-theatre 5/10
make & do activity kit
This work is licensed under the Creative Commons Attribution-NonCommercial-ShareAlike 2.5 License.
7/31/2019 Mini Children’s Theatre
http://slidepdf.com/reader/full/mini-childrens-theatre 6/10
make & do activity kit
This work is licensed under the Creative Commons Attribution-NonCommercial-ShareAlike 2.5 License.

7/31/2019 Mini Children’s Theatre
http://slidepdf.com/reader/full/mini-childrens-theatre 7/10
make & do activity kit
This work is licensed under the Creative Commons Attribution-NonCommercial-ShareAlike 2.5 License.

7/31/2019 Mini Children’s Theatre
http://slidepdf.com/reader/full/mini-childrens-theatre 8/10
make & do activity kit
This work is licensed under the Creative Commons Attribution-NonCommercial-ShareAlike 2.5 License.
7/31/2019 Mini Children’s Theatre
http://slidepdf.com/reader/full/mini-childrens-theatre 9/10
make & do activity kit
This work is licensed under the Creative Commons Attribution-NonCommercial-ShareAlike 2.5 License.

7/31/2019 Mini Children’s Theatre
http://slidepdf.com/reader/full/mini-childrens-theatre 10/10
make & do activity kit
This work is licensed under the Creative Commons Attribution-NonCommercial-ShareAlike 2.5 License.