Embed Size (px)
Citation preview

COLLABORATE 15 – IOUG Forum
Middleware
1 | P a g e “WebCenter S i t es – Know Your DAM Opt ions”
Wh i t e Paper
WebCenter Sites – Know Your DAM Options
Jason Stortz, Redstone Content Solutions
ABSTRACT
Oracle WebCenter Sites can be integrated with a variety of Digital Asset Management (DAM) solutions. Did you realize that you could also create a simplified solution right within Oracle WebCenter Sites? Now is the time to understand all your DAM Options!
Learn about the offerings provided by Oracle, options provide by Oracle Partners and Vendors, and even a few options you can develop all on your own!
TARGET AUDIENCE
This while paper provides helpful information for those exploring the possibilities of DAM with WebCenter Sites such as Project Managers, Project Charter Members and Technical Architects.
Additionally, those seeking actual technical assistance and samples should find the samples and references helpful.
EXECUTIVE SUMMARY
Having attended the session that accompanies this paper the reader should be able to follow each of the examples outlined in this paper to accomplish:
Setting up the out-of-the-box example to create thumbnails for Image/Media assets
Install and use ImageMagick from the command line to manually craft renditions of images
Create a simple Flex filter to invoke ImageMagick and store the result in an asset attribute
BACKGROUND
Starting a DAM project at your organization can be overwhelming at first. This white paper does make several assumptions. The context, after all, is around Oracle WebCenter Sites. With that in mind, you are still faced with many options for planning, implementing and promoting a project for managing your digital assets.
However, you can mitigate the stress, time and budget by following a few steps.
1. Understand what is available to you Out-of-the-Box (OOTB)
2. Setup and execute a simple implementation of the vision provided by the product
3. Begin to gather data on the gap between the features offered by the product and the features required by your project
4. Create milestones to close the gap
That should all sound at least somewhat familiar. Wait, isn’t that really just typical project management? Yes, it is. However, this is all still very sound advice. This paper will guide you through some of these steps providing varying levels of detail to help you move forward.
Understanding the options provided to you OOTB ensures you do not try to recreate the wheel. Executing a simple (not full) implementation that aligns with the vision set forth by the product will help you better understand the problem space you are
COLLABORATE 15 – IOUG Forum
Middleware
2 | P a g e “WebCenter S i t es – Know Your DAM Opt ions”
Wh i t e Paper
in and the potentially good and/or bad pieces of what you already have. Identifying your own requirements, and therefore the gaps versus the product offering, gives you a good idea about just what you are up against from a project perspective.
You should take this traditional gap analysis and break it into smaller projects. This approach will allow you to take some of the necessary next steps over time. Also, you will be able to report factual progress on things like:
1. Acquiring licensing for any additional software such as TeleStream Vantage or NConvert
2. Putting hardware, network or other infrastructure pieces in place for your installation
3. Crafting a documented, repeatable installation of your architecture
4. Implementing an Asset Model
5. Coding or connecting your selected DAM solution
CREATING THUMBNAILS
The simplest of the DAM solutions includes configuring Oracle WebCenter Sites to produce thumbnails of any image assets you create. Technically this isn’t full blown DAM, but it does provide a few valuable benefits:
1. Perhaps you only need thumbnails
2. Perhaps you need more, but would like to start with a something simple so you can learn about how to use Flex Filters before making one yourself
3. You get thumbnails for images, automatically
Important assets from the references list and the end of this paper: #1 & #2
A flex filter performs post-processing operations on flex assets. The asset model designer indicates which assets a flex filter is applied to. The filter is called when its associated asset is saved. If an edit operation is canceled the filter is not invoked. Most on creating flex filters and how they work on the hood later on.
Oracle WebCenter Sites provides four Flex Filters Out-of-the-Box (OOTB):
1. Doc-Type: Extracts components from an asset containing one or more MIME file types and maps each file type to an individually named attribute.
2. Field Copier: Copies the contents of a system-defined attribute into a user-defined attribute.
3. Document Transformation: Converts a document from one file type into another by invoking a registered transformation engine (an engine that is specified in the SystemTransforms table). The transformation engine functions as a wrapper that forwards calls to a document transformer, which then performs document conversion.
4. Thumbnail Creator: Converts an image to a thumbnail.
It is this last one, the Thumbnail Creator, you will now learn to implement.
Assumptions:
1. You already have Oracle WebCenter Sites installed
2. You already have a Site with Page Attribute, Page Definition and Page Filter enabled

COLLABORATE 15 – IOUG Forum
Middleware
3 | P a g e “WebCenter S i t es – Know Your DAM Opt ions”
Wh i t e Paper
THUMBNAILS – STEP ONE - CREATE NECESSARY ATTRIBUTES
1. Log in to Oracle WebCenter Sites
2. Select your site (In this case we use Test)
3. Click the Admin application
4. Click New on the Top Menu bar
5. Click New Page Attribute
6. Enter the following information for the Input Image
a. Name: ImageFile
b. Description: Image File
c. Attribute Type: blob
d. Number of Values: single
7. Click Save

COLLABORATE 15 – IOUG Forum
Middleware
4 | P a g e “WebCenter S i t es – Know Your DAM Opt ions”
Wh i t e Paper
8. Repeat for the following attributes:
a. Output Image
i. Name: ThumbnailImage
ii. Description: Thumbnail Image
iii. Attribute Type: blob
iv. Number of Values: single
b. Image Width
i. Name: ImageWidth
ii. Description: Image Width
iii. Attribute Type: int
iv. Number of Values: single
c. Image Height
i. Name: ImageHeight
ii. Description: Image Height
iii. Attribute Type: int
iv. Number of Values: single

COLLABORATE 15 – IOUG Forum
Middleware
5 | P a g e “WebCenter S i t es – Know Your DAM Opt ions”
Wh i t e Paper
d. Thumbnail Width
i. Name: ThumbnailWidth
ii. Description: Thumbnail Width
iii. Attribute Type: int
iv. Number of Values: single
e. Thumbnail Height
i. Name: ThumbnailHeight
ii. Description: Thumbnail Height
iii. Attribute Type: int
iv. Number of Values: single

COLLABORATE 15 – IOUG Forum
Middleware
6 | P a g e “WebCenter S i t es – Know Your DAM Opt ions”
Wh i t e Paper
THUMBNAILS – STEP TWO – CREATE FILTER
1. Log in to the Admin Interface
2. Click New from the Top Menu Bar
3. Click New Page Filter
a. Name: ThumbnailFilter
b. Description: Thumbnail Filter
4. From the Filter Dropdown select “Thumbnail Creator”
5. Click Get Arguments
6. From the Name Dropdown select: “input attribute name” and enter “ImageFile” for the Value
7. Click Add
8. Repeat this process for the following arguments
a. Name: Output attribute name, Value: ThumbnailImage
b. Name: Output attribute for Main Width, Value: ImageWidth
c. Name: Output attribute for Main Height, Value: ImageHeight
d. Name: Output attribute for Thumb Width, Value: ThumbnailWidth
e. Name: Output attribute for Thumb Height, Value: ThumbnailHeight
f. Name: Enter maximum pixel size, Value: 100
9. Click save
The Arguments List should look like this:

COLLABORATE 15 – IOUG Forum
Middleware
7 | P a g e “WebCenter S i t es – Know Your DAM Opt ions”
Wh i t e Paper
THUMBNAILS – STEP THREE – ADD FILTER AND ATTRIBUTE TO CONTENT DEFINITION
Note: You only need to add the Input Image attribute (ImageFile) and the filter (ThumbnailFilter) to the Content Definition. All other attributes are derived.
1. Log in to the Admin Interface
2. Click New from the Top Nav Bar
3. Click New Page Definition
a. Name: ThumbnailTest
b. Description: Thumbnail Test
4. In the Attributes section select “ImageFile” click Required
5. In the Filters Section select “ThumbnailFilter” click Select
6. Click Save
COLLABORATE 15 – IOUG Forum
Middleware
8 | P a g e “WebCenter S i t es – Know Your DAM Opt ions”
Wh i t e Paper
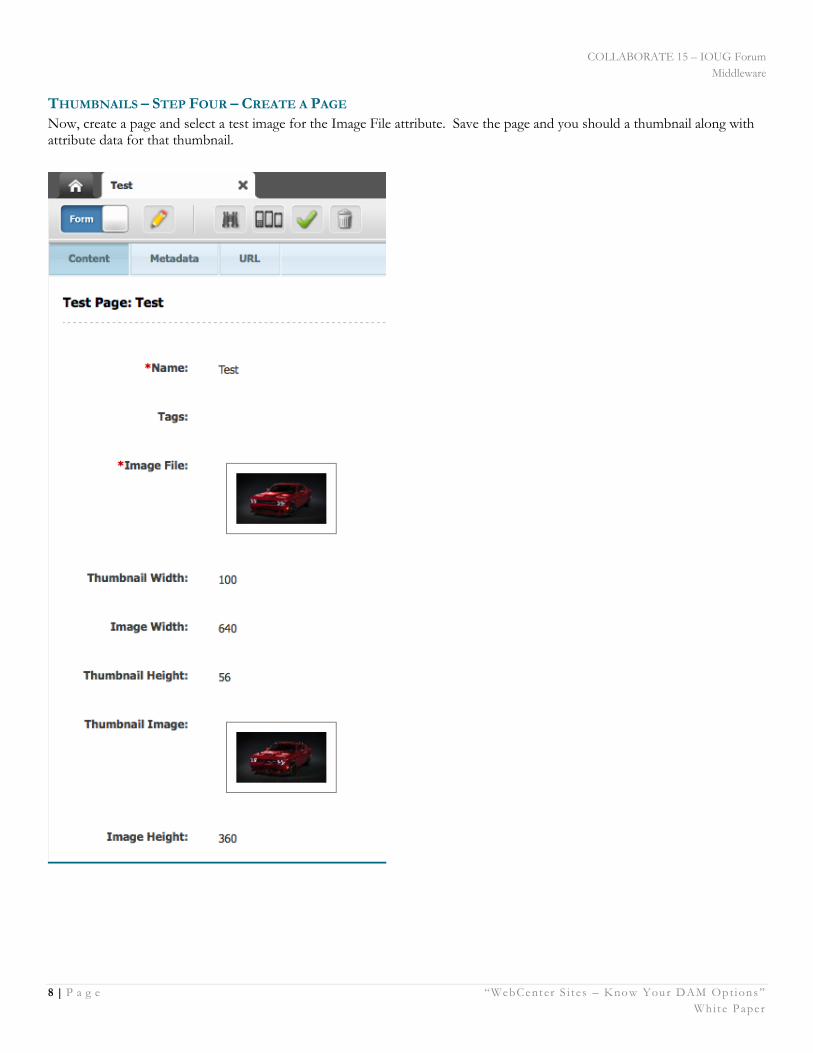
THUMBNAILS – STEP FOUR – CREATE A PAGE
Now, create a page and select a test image for the Image File attribute. Save the page and you should a thumbnail along with attribute data for that thumbnail.

COLLABORATE 15 – IOUG Forum
Middleware
9 | P a g e “WebCenter S i t es – Know Your DAM Opt ions”
Wh i t e Paper
INSTALL AND USE IMAGEMAGICK
What is ImageMagick? Simply put, ImageMagick is a set of command line utilities for image manipulation.
Per the ImageMagick web site:
ImageMagick® is a software suite to create, edit, compose, or convert bitmap images. It can read and write images in a variety of formats (over 200) including DPX, EXR, GIF, JPEG, JPEG-2000, PDF, PNG, Postscript, SVG, and TIFF. Use ImageMagick to resize, flip, mirror, rotate, distort, shear and transform images, adjust image colors, apply various special effects, or draw text, lines, polygons, ellipses and Bézier curves.
The ImageMagick software provides a long list of commands/binaries:
1. animate - animate an image sequence on any X server
2. compare - mathematically and visually annotate the difference between an image and its reconstruction
3. composite - overlap one image over another
4. Conjure - interpret and execute scripts written in the Magick Scripting Language (MSL)
5. Convert - convert between image formats, resize an image, blur, crop, draw on, flip, join, re-sample, and much more
6. Display - display an image or image sequence on any X server
7. Identify - describe the format and characteristics of one or more image files
8. Import - save any visible window, entire screen or rectangle portion of on an X server screen
9. Mogrify - resize an image, blur, crop, despeckle, dither, draw on, flip, join, re-sample, and much more. Mogrify overwrites the original image file, whereas, convert writes to a different image file
10. Montage - create a composite image by combining several separate images. The images are tiled on the composite image optionally adorned with a border, frame, image name, and more
11. Stream - a lightweight tool to stream one or more pixel components of the image or portion of the image to your choice of storage formats. It writes the pixel components as they are read from the input image a row at a time making stream desirable when working with large images or when you require raw pixel components
IMAGEMAGICK – STEP ONE – INSTALL IMAGEMAGICK
Installing ImageMagick on Oracle Enterprise Linux is pretty simple:
1. sudo yum install gcc
2. sudo yum install ImageMagick ImageMagick-devel
Installing gcc should have output similar to this: $ sudo yum install gcc
Setting up Install Process
Resolving Dependencies
...
===================================================================================================================================================================================
Package Arch Version Repository Size
===================================================================================================================================================================================
Installing:
gcc x86_64 4.4.7-11.el6 public_ol6_latest 10 M
Installing for dependencies:
cpp x86_64 4.4.7-11.el6 public_ol6_latest 3.7 M
glibc-devel x86_64 2.12-1.149.el6_6.5 public_ol6_latest 983 k
glibc-headers x86_64 2.12-1.149.el6_6.5 public_ol6_latest 611 k
kernel-headers x86_64 2.6.32-504.8.1.el6 public_ol6_latest 3.3 M
Transaction Summary
===================================================================================================================================================================================
Install 5 Package(s)
Total download size: 19 M
Installed size: 34 M
Is this ok [y/N]: y

COLLABORATE 15 – IOUG Forum
Middleware
10 | P a g e “WebCenter S i t es – Know Your DAM Opt ions”
Wh i t e Paper
Installing ImageMagick and ImageMagick-devel should have output similar to this: $ sudo yum install ImageMagick ImageMagick-devel
Setting up Install Process
Resolving Dependencies
...
===================================================================================================================================================================================
Package Arch Version Repository Size
===================================================================================================================================================================================
Installing:
ImageMagick x86_64 6.5.4.7-7.el6_5 public_ol6_latest 1.7 M
ImageMagick-devel x86_64 6.5.4.7-7.el6_5 public_ol6_latest 86 k
Installing for dependencies:
OpenEXR-libs x86_64 1.6.1-8.1.el6 public_ol6_latest 196 k
bzip2-devel x86_64 1.0.5-7.el6_0 public_ol6_latest 250 k
freetype-devel x86_64 2.3.11-14.el6_3.1 public_ol6_latest 363 k
ghostscript x86_64 8.70-19.el6 public_ol6_latest 4.4 M
ghostscript-devel x86_64 8.70-19.el6 public_ol6_latest 41 k
ghostscript-fonts noarch 5.50-23.2.el6 public_ol6_latest 589 k
ilmbase x86_64 1.0.1-6.1.el6 public_ol6_latest 72 k
jasper-devel x86_64 1.900.1-16.el6_6.3 public_ol6_latest 374 k
lcms-devel x86_64 1.19-1.el6 public_ol6_latest 48 k
lcms-libs x86_64 1.19-1.el6 public_ol6_latest 99 k
libICE-devel x86_64 1.0.6-1.el6 public_ol6_latest 15 k
libSM-devel x86_64 1.2.1-2.el6 public_ol6_latest 12 k
libX11-devel x86_64 1.6.0-2.2.el6 public_ol6_latest 982 k
libXau-devel x86_64 1.0.6-4.el6 public_ol6_latest 13 k
libXext-devel x86_64 1.3.2-2.1.el6 public_ol6_latest 74 k
libXt-devel x86_64 1.1.4-6.1.el6 public_ol6_latest 453 k
libcroco x86_64 0.6.2-5.el6 public_ol6_latest 99 k
libgsf x86_64 1.14.15-5.el6 public_ol6_latest 115 k
libjpeg-turbo-devel x86_64 1.2.1-3.el6_5 public_ol6_latest 96 k
librsvg2 x86_64 2.26.0-14.el6 public_ol6_latest 140 k
libtiff-devel x86_64 3.9.4-10.el6_5 public_ol6_latest 468 k
libwmf-lite x86_64 0.2.8.4-23.el6 public_ol6_latest 50 k
libxcb-devel x86_64 1.9.1-2.el6 public_ol6_latest 1.0 M
urw-fonts noarch 2.4-10.el6 public_ol6_latest 3.0 M
xorg-x11-font-utils x86_64 1:7.2-11.el6 public_ol6_latest 74 k
xorg-x11-proto-devel noarch 7.7-9.el6 public_ol6_latest 285 k
zlib-devel x86_64 1.2.3-29.el6 public_ol6_latest 43 k
Transaction Summary
===================================================================================================================================================================================
Install 29 Package(s)
Total download size: 15 M
Installed size: 48 M
Is this ok [y/N]: y
IMAGEMAGICK – STEP TWO – EXAMPLE COMMAND LINE EXECUTION
With ImageMagick installed you may want to open a terminal and attempt executing a few commands just to confirm everything is working. These same commands will be executed by your Custom Flex Filter, which is detailed in the next section. Practicing or figuring out the exact command line parameters and switches ahead of time is often very helpful.
Use the command below to convert a large sample JPEG image to a GIF thumbnail 90 pixels high with the width automatically adjusted (within the 250 pixel width limit) while still preserving the aspect ratio of the image.
convert /vagrant/source.jpg -auto-orient -thumbnail 250x90 -unsharp 0x.5 /vagrant/thumbnail.gif
Note the use of the "-thumbnail" option. This resizes the image, and strips all profile and comment information that may be present in the original JPEG image. Also as it uses the "-sample" resize operator for the initial downsizing of the image, it is reasonably fast, and produces good results for small thumbnails.
The "-auto-orient" operator ensures that the image, if from a digital camera, is rotated correctly according to the camera's orientation. This is not needed for the 'desktop' image I am using, but I included it in the above for digital camera users.
The result is a thumbnail of a specific height, but variable width.

COLLABORATE 15 – IOUG Forum
Middleware
11 | P a g e “WebCenter S i t es – Know Your DAM Opt ions”
Wh i t e Paper
CREATING A CUSTOM FLEX FILTER
First, you should learn a little more about Flex Filters.
A Flex Filter, like many other things in sites, is an Asset. This means it can be created, edited, associated, imported and exported. Multiple flex filters can be assigned to a flex asset. When the asset is saved, the filters assigned to that asset definition are invoked. Each filter is invoked in the order in which they are defined in the "Filters" section of the asset definition.
A Flex Filter is assigned a specific piece of code to be executed called a Flex Filter Class. For example, a flex filter assigned the Thumbnail Creator class can produce thumbnails of some types of binary content as well as populated additional attributes with data like Thumbnail Height and Width.
Attributes like the Thumbnail Height are called derived attributes. These derived attributes must exist in the same Flex Family as the Filter that populates them. Derived attributes are not, however, directly assigned to an Asset Definition. You will see them listed as unassigned when creating your Asset Definition. You may be tempted to try to assign them at that time. Do not do so. Derived assets are dynamically added/assigned to the Asset when the Flex Filter executes.
Per the Oracle Documentation about Filters:
When multiple filters are assigned to an asset, none of the filters must be dependent on
attributes that are output by any other filters associated with that asset.
A Flex filter class implements your specific logic and process for the Flex Filter Asset. Flex Filter Classes are listed in the Filters table in the Oracle WebCenter Sites database.
CUSTOM FLEX FILTER – STEP ONE – CREATE FILTER CLASS
Create a new Java Class extending com.openmarket.gator.flexfilters.AbstractFlexFilter. Then provide implementations of at least the following methods:
1. public String[] getArgumentLegalValues(IFilterEnvironment ife, String filterIdentifier, String argumentName) throws AssetException
2. public FTValList getLegalArguments(IFilterEnvironment arg0, String arg1) throws AssetException
3. public void filterAsset(IFilterEnvironment iFilterEnvironment, String filterIdentifier, FTValList filterArguments, IFilterableAssetInstance iFilterableAssetInstance) throws AssetException
CUSTOM FLEX FILTER – STEP TWO – REGISTER FILTER CLASS
Use your Sites Explorer or CatalogMover to create an entry in the Filters table of the database. You will supply a name for your Custom Flex Filter and the fully qualified Java class name. For this to take effect, you will have to restart your application server.
CUSTOM FLEX FILTER – STEP THREE – CREATE FLEX FILTER ASSET
Having registered your Filter Class and restarted your application server you can now create Flex Filter Assets that make use of your Flex Filter Class. This is where you define what fields will act as inputs to your logic and what fields will become derived attributes for your asset.

COLLABORATE 15 – IOUG Forum
Middleware
12 | P a g e “WebCenter S i t es – Know Your DAM Opt ions”
Wh i t e Paper
REFERENCES
1 | WebCenter Sites 11.1.1.8 Documentation
http://docs.oracle.com/cd/E29542_01/nav/wcsites.htm
2 | Fusion Middleware WebCenter Sites Developer's Guide - Flex Filters
http://docs.oracle.com/cd/E29542_01/doc.1111/e29634/flex_filters.htm#WBCSD1631
3 | WebCenter Sites and back-end integration via front-end app and REST
http://www.ateam-oracle.com/webcenter-sites-and-back-end-integration-via-front-end-app-and-rest/
4 | How to implement a custom WCS flex filter
http://www.ateam-oracle.com/how-to-implement-a-custom-wcs-flex-filter/
5 | Importance of Wrapper in WebCenter Sites11gR1
http://www.ateam-oracle.com/importance-of-wrapper-in-webcenter-sites11gr1/
6 | An alternate approach to integrating WebCenter Sites with WebCenter Portal
http://www.ateam-oracle.com/an-alternate-approach-to-integrating-webcenter-sites-with-webcenter-portal/
7 | Three Patterns for Integrating WebCenter Sites with Oracle Commerce
http://www.ateam-oracle.com/three-patterns-for-integrating-webcenter-sites-with-oracle-commerce/
8 | WebCenter Sites and WebCenter Content Integration
http://www.ateam-oracle.com/webcenter-sites-and-webcenter-content-integration/
9 | Integrating back-end services with WebCenter Sites using a lightweight MVC framework
http://www.ateam-oracle.com/integrating-back-end-services-with-webcenter-sites-using-a-lightweight-mvc-framework/
10 | Using groovy elements to redirect, set content-type at runtime and set HTTP status codes
http://www.ateam-oracle.com/using-groovy-elements-to-redirect-set-content-type-at-runtime-and-set-http-status-codes/
11 | Lookup up a translated asset with Groovy elements
http://www.ateam-oracle.com/lookup-up-a-translated-asset-with-groovy-elements/
12 | ImageMagick
http://www.imagemagick.org