Embed Size (px)
Citation preview

127142 – 07.28.15 Page 1 of 5
Mid-Century Entryway Mirrorassembly instructions
! Do not throw away any of the packaging materials until the assembly is complete.! To protect the finish, assemble this item on a soft surface, such as cardboard or carpet.! Proper assembly of this item requires 2 people.
CARE INSTRUCTIONS/ INSTRUCTIONS D’ENTRETIEN / INSTRUCCIONES DE CUIDADO
Hardware may loosen over time. Periodically check that all connections are tight. Wipe with a soft, dry cloth. To protect the finish, avoid the use of chemicals and household cleaners. All hot serving dishes should be placed on a trivet or pad. Any liquid spilled onto the table should be cleaned up immediately with a damp cloth.
Tools required: Philips Head Screwdriver (not included)
WARNING! DO NOT MOUNT THIS ITEM ABOVE CRIBS, BEDS, or CHANGING TABLES.
127142 – 07.28.15 Page 2 of 5
mid century entryway mirror assembly instructions
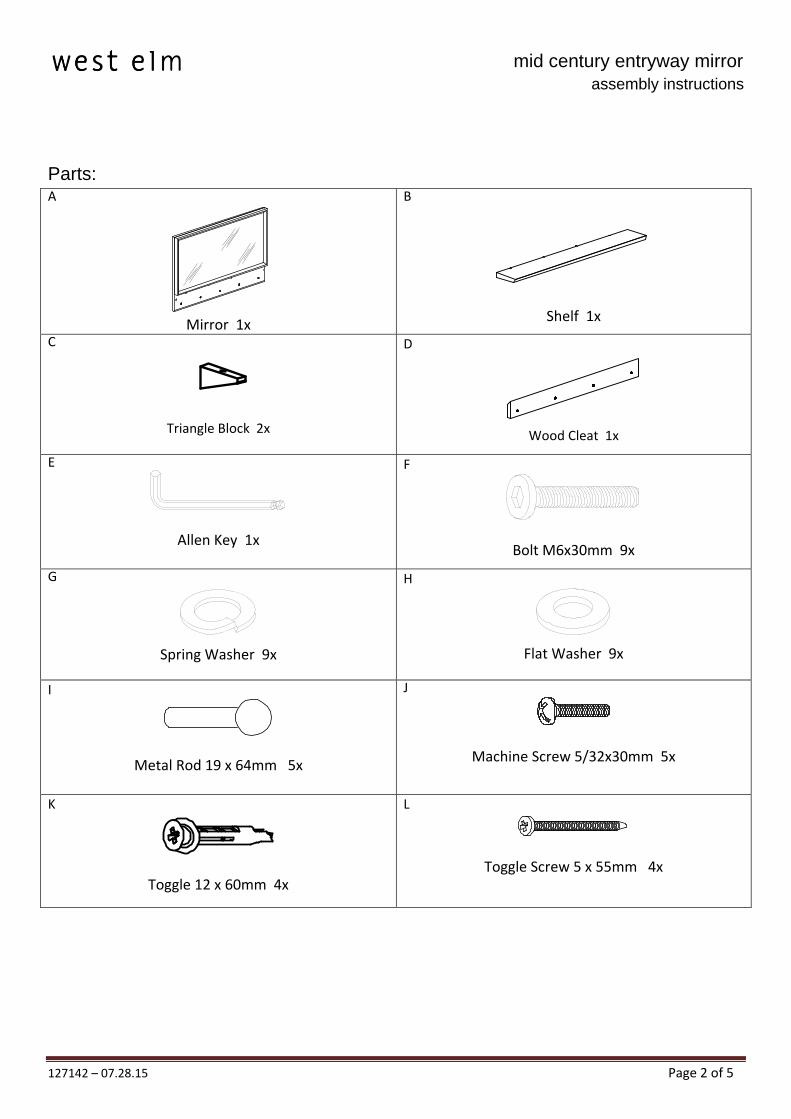
Parts: A
Mirror 1x
B
Shelf 1x
C
Triangle Block 2x
D
Wood Cleat 1x
E
Allen Key 1x
F
Bolt M6x30mm 9x
G
Spring Washer 9x
H
Flat Washer 9x
I
Metal Rod 19 x 64mm 5x
J
Machine Screw 5/32x30mm 5x
K
Toggle 12 x 60mm 4x
L
Toggle Screw 5 x 55mm 4x
127142 – 07.28.15 Page 3 of 5
mid century entryway mirror assembly instructions
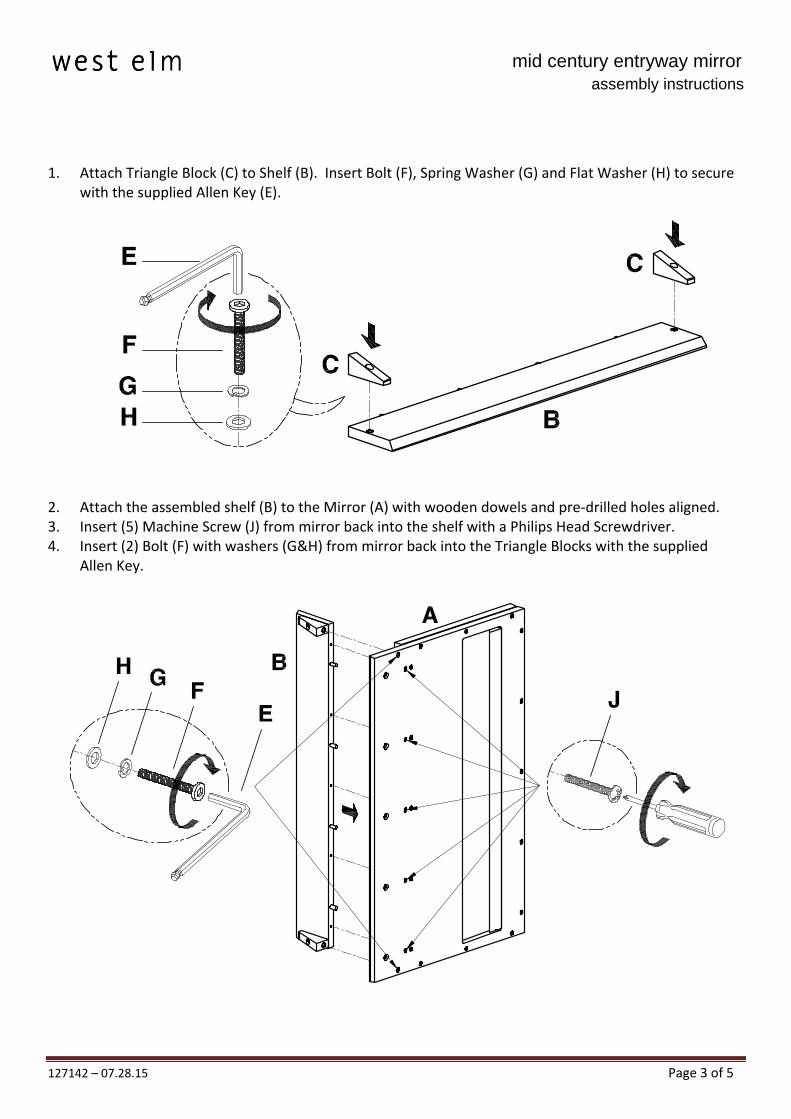
1. Attach Triangle Block (C) to Shelf (B). Insert Bolt (F), Spring Washer (G) and Flat Washer (H) to secure with the supplied Allen Key (E).
2. Attach the assembled shelf (B) to the Mirror (A) with wooden dowels and pre‐drilled holes aligned. 3. Insert (5) Machine Screw (J) from mirror back into the shelf with a Philips Head Screwdriver. 4. Insert (2) Bolt (F) with washers (G&H) from mirror back into the Triangle Blocks with the supplied
Allen Key.
127142 – 07.28.15 Page 4 of 5
mid century entryway mirror assembly instructions
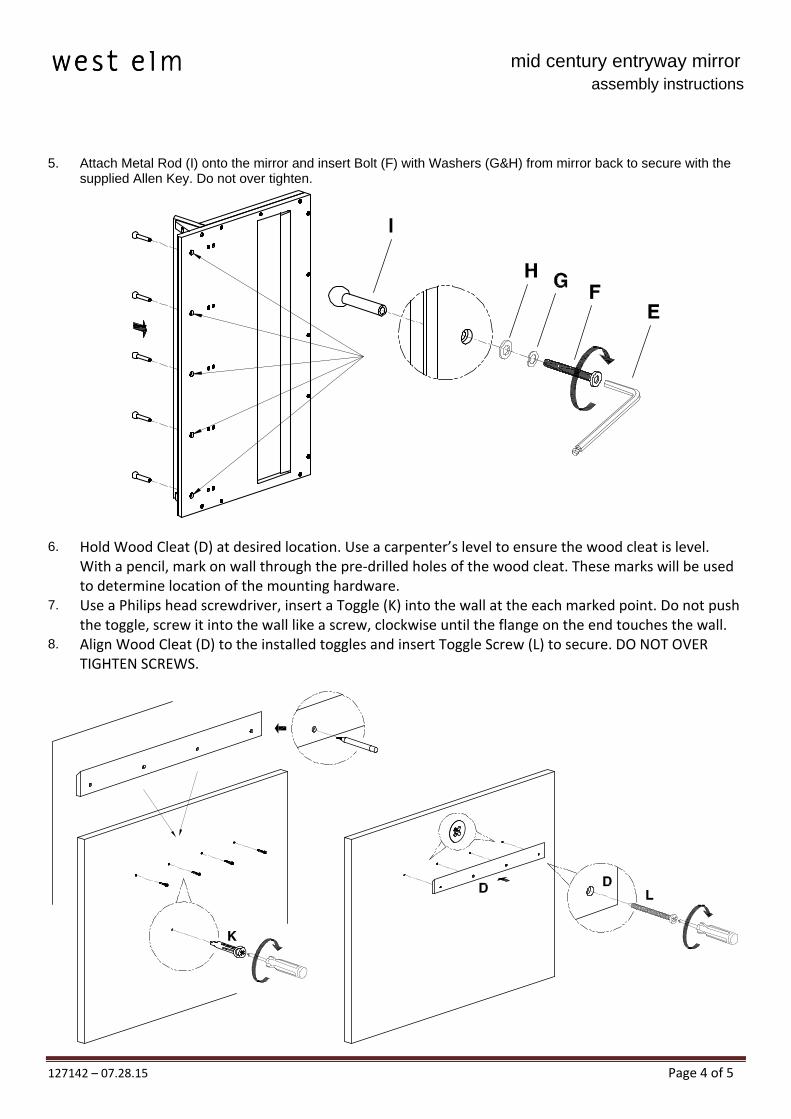
5. Attach Metal Rod (I) onto the mirror and insert Bolt (F) with Washers (G&H) from mirror back to secure with the supplied Allen Key. Do not over tighten.
6. Hold Wood Cleat (D) at desired location. Use a carpenter’s level to ensure the wood cleat is level.
With a pencil, mark on wall through the pre‐drilled holes of the wood cleat. These marks will be used to determine location of the mounting hardware.
7. Use a Philips head screwdriver, insert a Toggle (K) into the wall at the each marked point. Do not push the toggle, screw it into the wall like a screw, clockwise until the flange on the end touches the wall.
8. Align Wood Cleat (D) to the installed toggles and insert Toggle Screw (L) to secure. DO NOT OVER TIGHTEN SCREWS.

127142 – 07.28.15 Page 5 of 5
mid century entryway mirror assembly instructions
9. With help, attach the cabinet onto the Wood Cleat as shown in illustration below.
127142 – 28/07/2015 Page 1 sur 5
miroir d'entrée milieu de siècle instructions d’assemblage
! Ne pas jeter les matériaux d’emballage avant la fin de l’assemblage. ! Assembler cet article sur une surface douce, telle qu’un carton ou un tapis. ! Deux personnes sont requises pour l’assemblage approprié de cet article. CARE INSTRUCTIONS/INSTRUCTION D'ENTRETIEN/INSTRUCCIONES DE CUIDADO Le matériel peut se desserrer avec le temps. Vérifier de temps en temps que toutes les fixations sont bien serrées. Essuyer avec un chiffon doux et sec. Pour protéger la finition, éviter l’utilisation des produits chimiques et des produits de nettoyage domestiques. Les plats de service chauds doivent être placés sur un trépied ou un tampon. Les liquides déversés sur la table doivent être immédiatement nettoyés avec un chiffon humide. Outils nécessaires : Tournevis cruciforme Philips (non inclus)
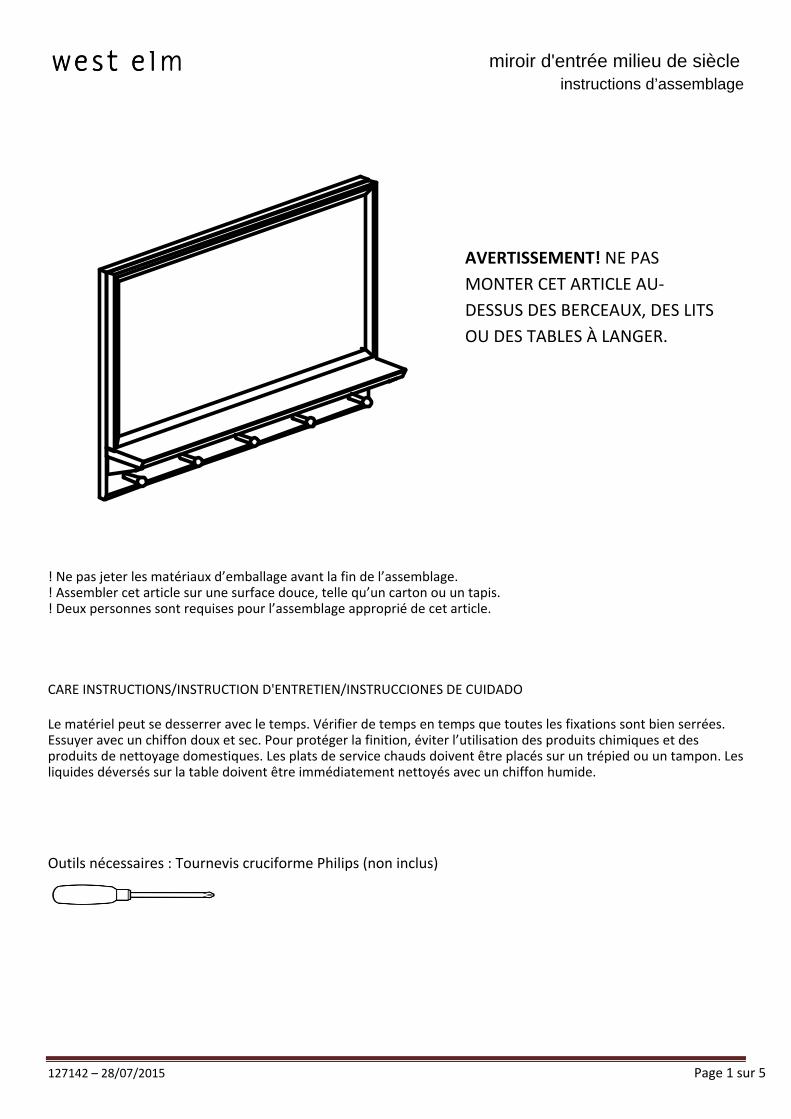
AVERTISSEMENT! NE PAS MONTER CET ARTICLE AU‐DESSUS DES BERCEAUX, DES LITS OU DES TABLES À LANGER.
127142 – 28/07/2015 Page 2 sur 5
miroir d'entrée milieu de siècle instructions d’assemblage
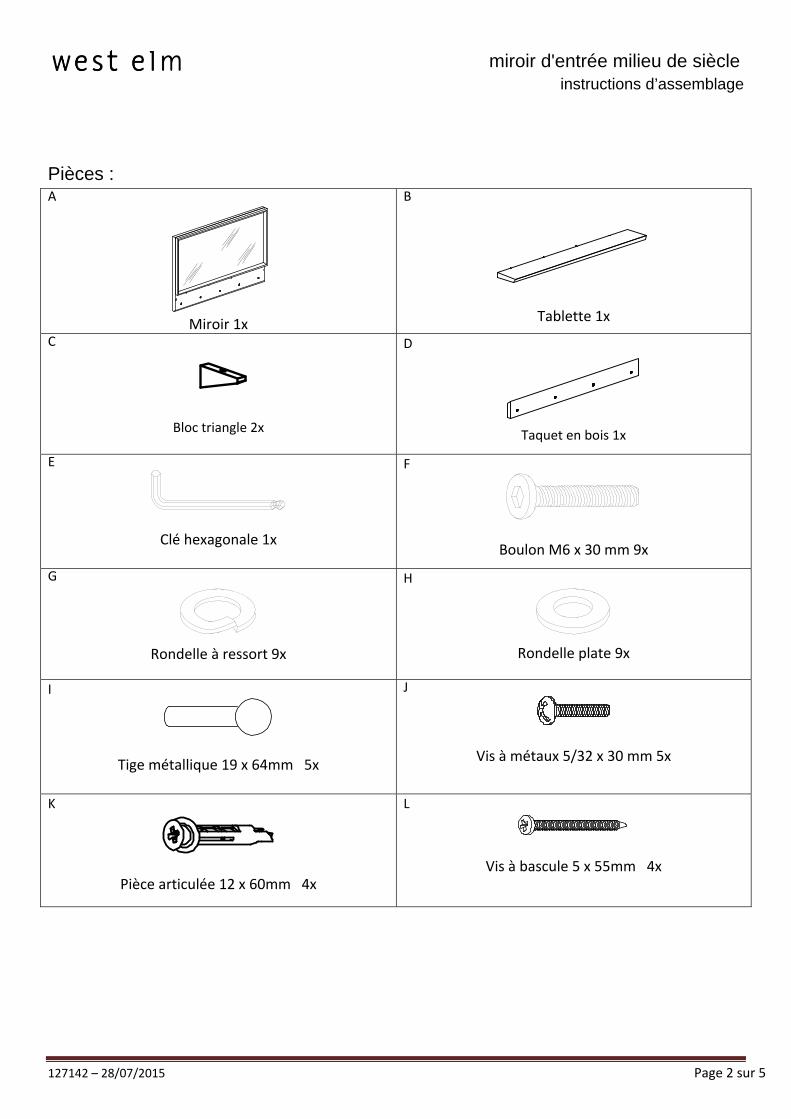
Pièces : A
Miroir 1x
B
Tablette 1x C
Bloc triangle 2x
D
Taquet en bois 1x
E
Clé hexagonale 1x
F
Boulon M6 x 30 mm 9x
G
Rondelle à ressort 9x
H
Rondelle plate 9x
I
Tige métallique 19 x 64mm 5x
J
Vis à métaux 5/32 x 30 mm 5x
K
Pièce articulée 12 x 60mm 4x
L
Vis à bascule 5 x 55mm 4x
127142 – 28/07/2015 Page 3 sur 5
miroir d'entrée milieu de siècle instructions d’assemblage
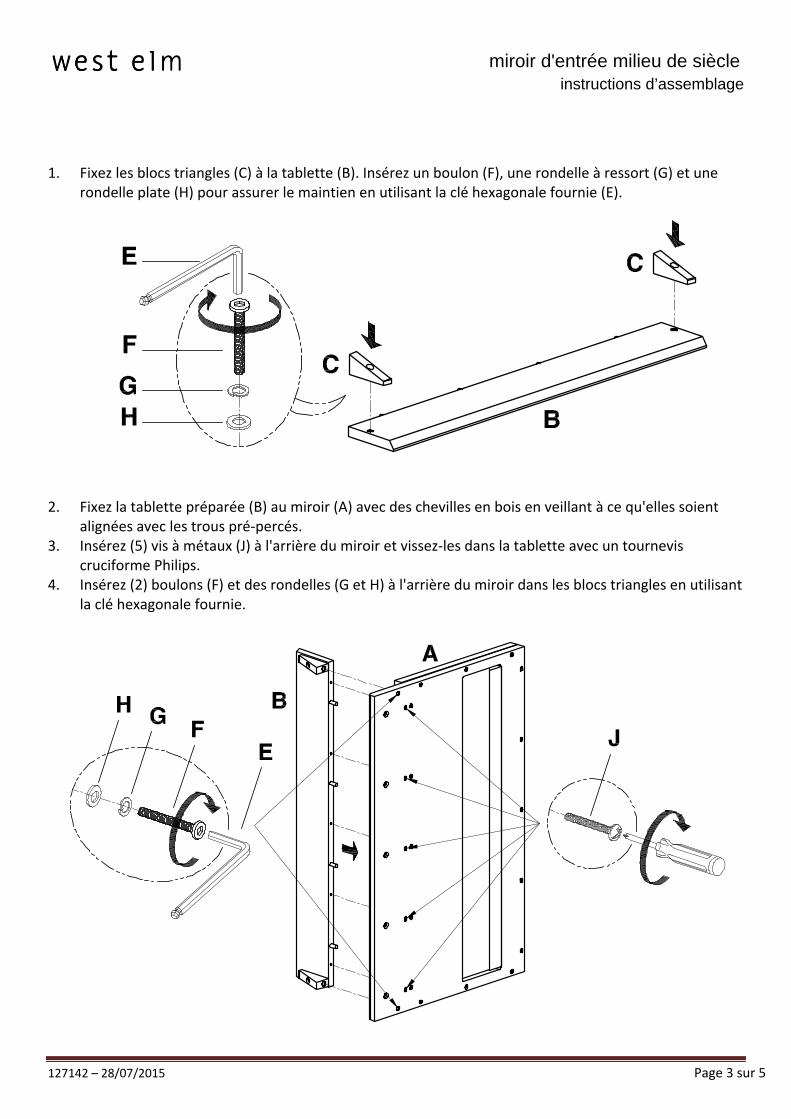
1. Fixez les blocs triangles (C) à la tablette (B). Insérez un boulon (F), une rondelle à ressort (G) et une rondelle plate (H) pour assurer le maintien en utilisant la clé hexagonale fournie (E).
2. Fixez la tablette préparée (B) au miroir (A) avec des chevilles en bois en veillant à ce qu'elles soient
alignées avec les trous pré‐percés. 3. Insérez (5) vis à métaux (J) à l'arrière du miroir et vissez‐les dans la tablette avec un tournevis
cruciforme Philips. 4. Insérez (2) boulons (F) et des rondelles (G et H) à l'arrière du miroir dans les blocs triangles en utilisant
la clé hexagonale fournie.
127142 – 28/07/2015 Page 4 sur 5
miroir d'entrée milieu de siècle instructions d’assemblage
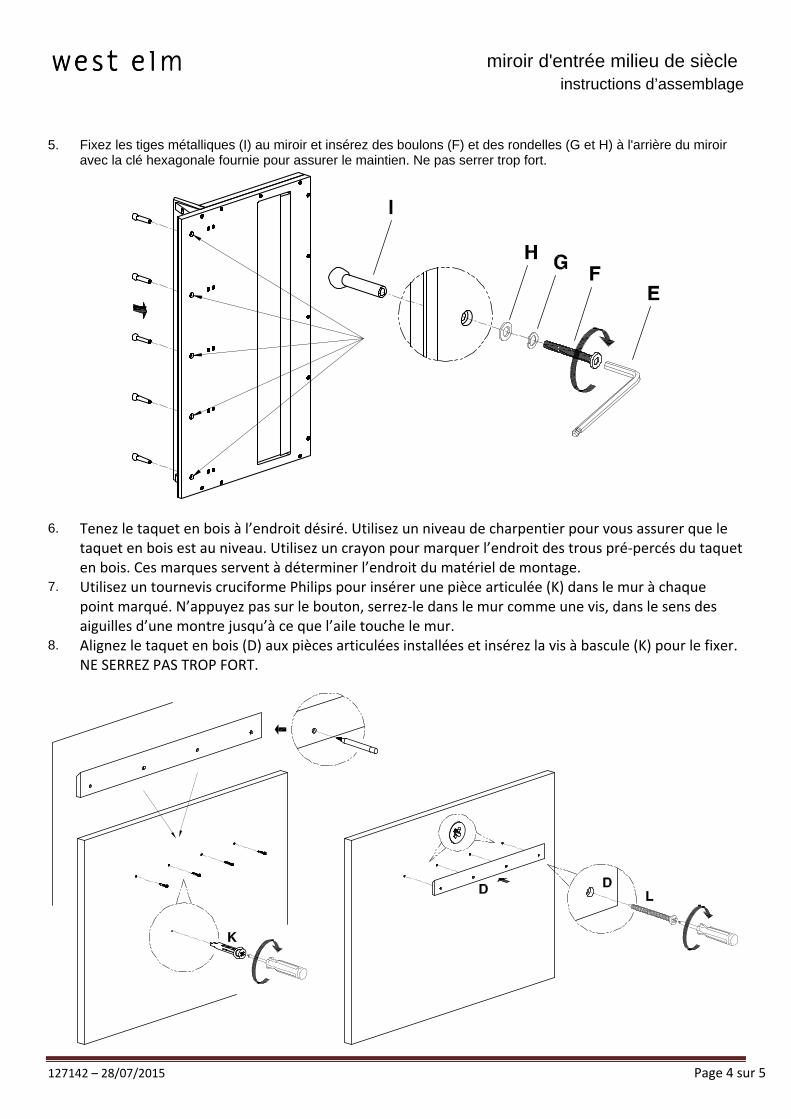
5. Fixez les tiges métalliques (I) au miroir et insérez des boulons (F) et des rondelles (G et H) à l'arrière du miroir avec la clé hexagonale fournie pour assurer le maintien. Ne pas serrer trop fort.
6. Tenez le taquet en bois à l’endroit désiré. Utilisez un niveau de charpentier pour vous assurer que le
taquet en bois est au niveau. Utilisez un crayon pour marquer l’endroit des trous pré‐percés du taquet en bois. Ces marques servent à déterminer l’endroit du matériel de montage.
7. Utilisez un tournevis cruciforme Philips pour insérer une pièce articulée (K) dans le mur à chaque point marqué. N’appuyez pas sur le bouton, serrez‐le dans le mur comme une vis, dans le sens des aiguilles d’une montre jusqu’à ce que l’aile touche le mur.
8. Alignez le taquet en bois (D) aux pièces articulées installées et insérez la vis à bascule (K) pour le fixer. NE SERREZ PAS TROP FORT.

127142 – 28/07/2015 Page 5 sur 5
miroir d'entrée milieu de siècle instructions d’assemblage
9. Avec de l’aide, fixez l’armoire sur le taquet en bois, comme illustré ci‐dessous.

127142 – 07.28.15 Página 1 de 5
espejo de entrada mid century Instrucciones de ensamblaje
! No desechar los materiales del empaque hasta haber completado el ensamblaje. ! Ensamblar este artículo en una superficie suave, como un cartón o una alfombra, para proteger el acabado. ! El ensamblaje apropiado de este artículo requiere de 2 personas. CARE INSTRUCTIONS/ INSTRUCTIONS D’ENTRETIEN / INSTRUCCIONES DE CUIDADO Las piezas de ferretería pueden aflojarse con el tiempo. Controlar periódicamente que estén bien ajustadas. Limpiar con un paño suave y seco. Para proteger el acabado evitar el uso de químicos y limpiadores de uso hogareño. Todos los platos calientes que se sirvan se deben colocar sobre un posa fuentes. Si se derrama cualquier tipo de líquido en la mesa se debe limpiar de inmediato con un paño húmedo. Herramientas necesarias: Destornillador Philips (no incluido)
ADVERTENCIA: NO ENSAMBLAR ESTE ARTÍCULO SOBRE CUNAS, CAMAS o CAMBIADORES DE BEBÉ.
127142 – 07.28.15 Página 2 de 5
espejo de entrada mid century Instrucciones de ensamblaje
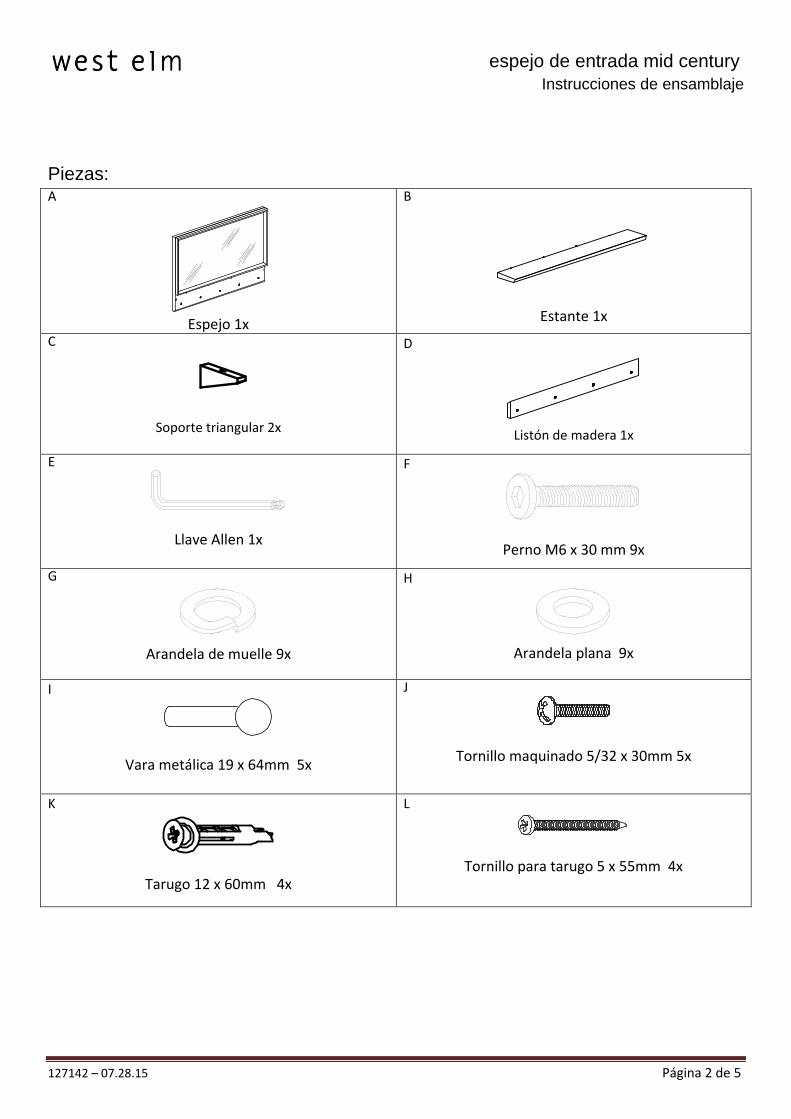
Piezas: A
Espejo 1x
B
Estante 1x C
Soporte triangular 2x
D
Listón de madera 1x
E
Llave Allen 1x
F
Perno M6 x 30 mm 9x
G
Arandela de muelle 9x
H
Arandela plana 9x
I
Vara metálica 19 x 64mm 5x
J
Tornillo maquinado 5/32 x 30mm 5x
K
Tarugo 12 x 60mm 4x
L
Tornillo para tarugo 5 x 55mm 4x
127142 – 07.28.15 Página 3 de 5
espejo de entrada mid century Instrucciones de ensamblaje
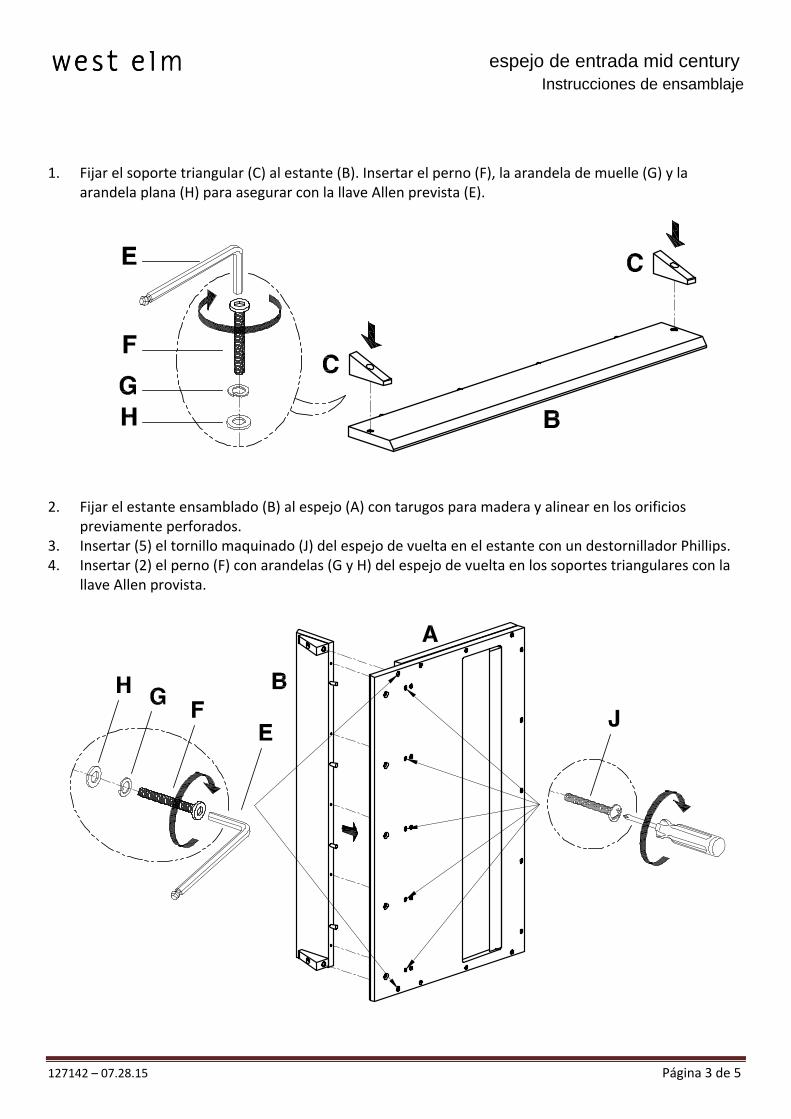
1. Fijar el soporte triangular (C) al estante (B). Insertar el perno (F), la arandela de muelle (G) y la arandela plana (H) para asegurar con la llave Allen prevista (E).
2. Fijar el estante ensamblado (B) al espejo (A) con tarugos para madera y alinear en los orificios
previamente perforados. 3. Insertar (5) el tornillo maquinado (J) del espejo de vuelta en el estante con un destornillador Phillips. 4. Insertar (2) el perno (F) con arandelas (G y H) del espejo de vuelta en los soportes triangulares con la
llave Allen provista.

127142 – 07.28.15 Página 4 de 5
espejo de entrada mid century Instrucciones de ensamblaje
5. Fijar la vara metálica (I) en el espejo e insertar el perno (F) con las arandelas (G y H) del espejo de vuelta para asegurar con la llave Allen provista. No ajustar demasiado.
6. Sostener el listón de madera (D) en la ubicación deseada. Utilizar un nivelador de carpintero para
asegurarse de que el listón de madera se encuentre nivelado. Con un lápiz, marcar en la pared a través de los orificios perforados previamente en el listón de madera. Estas marcas se utilizarán para determinar la ubicación de la tornillería de montaje.
7. Usar un destornillador Philips, insertar un tarugo (K) en la pared en cada punto marcado. No presionar el tarugo, atornillarlo a la pared como un tornillo, en dirección de las agujas del reloj, hasta que la brida en el extremo toque la pared.
8. Alinear el listón de madera (D) a los tarugos instalados e insertar el tornillo para tarugo (L) para fijar. NO AJUSTAR DEMASIADO LOS TORNILLOS.
127142 – 07.28.15 Página 5 de 5
espejo de entrada mid century Instrucciones de ensamblaje
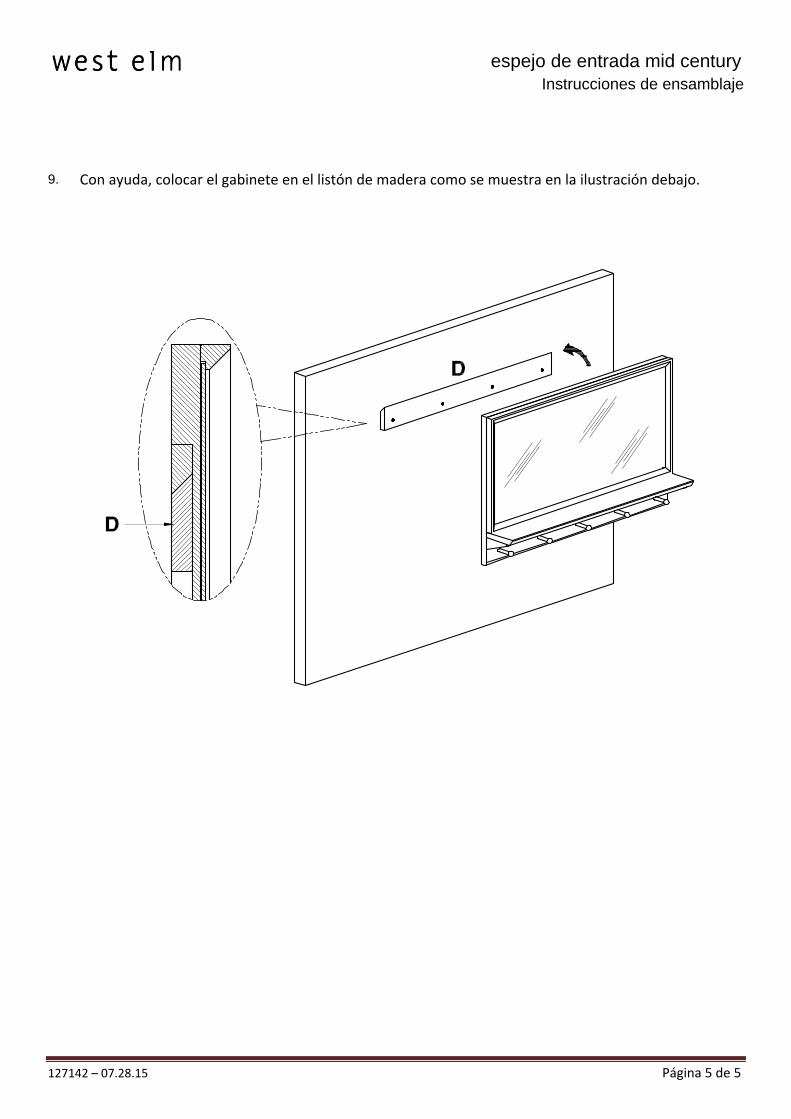
9. Con ayuda, colocar el gabinete en el listón de madera como se muestra en la ilustración debajo.