Embed Size (px)
Citation preview

A Built-in GUIDE
61833_Built-in Guide 05.indd 21 12/22/04 10:39:39 AM

Design Ideas2
TABLE OF CONTENTS
Introduction .................................................... 3
Design Ideas ..............................................4-13
Microwave Drawer Under the Counter 4
Microwave Oven in Wall Cabinets 5
Range Flexibility 6
6-in-1 Cooking Center 7
Wet Bar Ready to Warm 8
Corner Applications 9
Retrofi t for Over the Counter 10
Blank Wall OTC it... 11
Stand Alone 12
Universal Design 13
References ...............................................14-19
Drawer Installation 14
Range Installation 15
Built-in Kit Chart 16
Built-in Kit Frames 17
Over the Range Installation Guide 18
Over the Counter Installation Guide 19
Assistance ................................... Back Cover
61833_Built-in Guide 05.indd 261833_Built-in Guide 05.indd 2 12/22/04 8:46:13 AM12/22/04 8:46:13 AM

3
INTRODUCTION
Every kitchen needs a microwave — but where should it go? With such an assortment of microwave ovens to choose from, which best suits your needs? Whether you are designing a kitchen in a new home, remodeling an older kitchen or simply replacing a current microwave, this guide will help you choose the best microwave for your kitchen design — and help you install it properly.
Sharp is a leader in developing innovative solutions for microwave placement. Options include Over the Counter, Over the Range, built-in or countertop models. Now Sharp introduces the most innovative answer yet for where to put the microwave — the world’s fi rst Microwave Drawer.
MICROWAVE DRAWER™ – Sharp’s new Microwave Drawer takes the microwave off the counter and places it right at the most convenient height, making stirring food easier and safer. The angled front-mounted touch controls and superb accessibility make it ideal for people who use their microwave frequently. Most importantly, the 30-inch drawer design provides a sleek, integrated look so that the microwave oven blends in — wherever it goes.
INSIGHT™ RANGE – This new 3-in-1 cooking center combines a glass ceramic cooktop, conventional or convection oven, and Sharp’s exclusive Microwave Drawer in a single space-saving appliance. It’s ideal for smaller kitchens, islands or modern open-plan designs that offer lots of open space but few wall cabinets. By incorporating the microwave within the 30-inch range itself, awkward installations and cluttered countertops are eliminated while allowing the use of a stylish ventilation hood above the range. Both freestanding and slide-in models are available.
OVER THE COUNTER™ “OTC” – Designers often look for ways to place the microwave oven in the cabinets above the counter. In the past, the only options have been to use a shelf in a wall cabinet or to build the microwave into a custom cabinet. Sharp’s OTC™ microwaves provide a built-in-ready solution designed for standard 24-inch cabinets. Each OTC is equipped with an under-the-cabinet light that acts as a decorative accent light, functional task light, or serviceable nightlight. An optional Accessory Kit is available with two stainless steel accessory bars and eight “S” hooks, ideal for essential cooking tools.
OVER THE RANGE “OTR” – Locating a microwave oven over a range or cooktop provides the additional functions of hood ventilation and task lighting. Sharp’s OTRs offer the option of venting to the outside vertically or horizontally, or recirculating when outside venting is not available. Sharp offers the largest capacity OTR in the industry, as well as a convection microwave OTR that’s the perfect second oven.
BUILT-IN KITS FOR MICROWAVE OVENS – Often kitchen designers and appliance users look for an alternative location other than the countertop in order to save space, provide greater functionality or for a more integrated look. Sharp offers an assortment of UL-approved kits that allow you to build many of our larger countertop models into a cabinet or wall location. Kits are available in a number of color and material options. They provide proper air circulation when the microwave oven is built into a closed location. Please refer to each individual model’s operation manual (available at www. sharpusa.com) for installation recommendations.
COUNTERTOP – Sharp offers a range of microwave ovens from compacts (0.8 cu. ft.) to full size (2.0 cu. ft.) with wattage up to 1200 watts. An assortment of features, including one-touch sensor cooking, is available. Please refer to each model for specifi c features and installation options.
61833_Built-in Guide 05.indd 361833_Built-in Guide 05.indd 3 12/23/04 5:06:42 PM12/23/04 5:06:42 PM

30"
Standard Installation With Doors Below
2"
Cabinet WithDoors
Standard Installation With Drawers Below
30"
2"
Cabinet WithDrawers
Installation With Drop In Cooktop
30"
8.5"
Filler
Drop InCooktop
Installation With Warming Drawer Below
30"
2"
WarmingDrawer
KB-6015KS
Design Ideas4
Introducing Sharp’s newest innovation: the Insight Pro™ Microwave Drawer. It installs easily under a counter, cooktop or wall oven eliminating awkward installations and cluttered countertops. It frees the space above the cooktop or range for a stylish or powerful ventilation hood.
The Microwave Drawer places the microwave at the most convenient height for superb user access. The angled top-mounted controls are easy to see and easy to reach. Microwave cooking is simpler and safer for every cook in the family, with no need to remove the dish from the oven to check, stir or turn the food. For even greater convenience, the Microwave Drawer opens with the touch of a button.
MICROWAVE DRAWER Under the Counter...
61833_Built-in Guide 05.indd 461833_Built-in Guide 05.indd 4 12/23/04 5:13:50 PM12/23/04 5:13:50 PM

Wall Oven/Microwave Drawer/
Warming Drawer
OvenLight
KitchenTimer
Setup
Control Lock
On/Off
START
StopClear
High Speed Oven/Microwave Drawer
Check specifi c Installation Instructions packed with the KB-6015KS/KW/KK for details about building in the Microwave Drawer adjacent to a wall oven, cooktop or warming drawer.
5
MICROWAVES in Wall Cabinets...
The Sharp Microwave Drawer is the most innovative idea yet for where to put the microwave. It’s ideal for open-plan kitchens, islands or for kitchens with few wall-hung cabinets. The Microwave Drawer is built-in ready for easy installation with no additional kit required. Use it under a conventional wall oven or below the Sharp High Speed Oven, model R-90GC. You can even build-in a warming drawer beneath the Microwave Drawer.
61833_Built-in Guide 05.indd 561833_Built-in Guide 05.indd 5 12/22/04 11:50:40 AM12/22/04 11:50:40 AM

Model KB-4425
Design Ideas6
RANGE Flexibility...
The new Sharp Insight Pro™ Range is a 3-in-1 cooking center that combines a glass ceramic cooktop, a conventional and convection oven, and Sharp’s exclusive Microwave Drawer in a single space-saving appliance. Slide-in and freestanding models are available in stainless, white or black. While all this cooking versatility occupies a width of only 30-inches, its two spacious ovens offer the capacity to microwave a 9” x 13” pan of lasagna or roast a 25-pound turkey.
Island Cooking And Preping Area With Seating.30" Cutout
Seating Area
38"
1"
13"
30" BaseCabinet
30" BaseCabinet
61833_Built-in Guide 05.indd 661833_Built-in Guide 05.indd 6 12/22/04 9:23:56 AM12/22/04 9:23:56 AM

6”
12”
R-1874
KB-3300JS
7
6-in-1 Cooking Center...
By adding a Sharp Convection Microwave Over the Range above the Insight Range, you have a 6-in-1 cooking center: two ovens, two microwaves, a cooktop and a ventilation hood. This type of design eliminates steps between appliances, creating a high effi cient kitchen traffi c pattern. The range’s front mounted controls and superb microwave accessibility make it safe and convenient for every cook in the kitchen.
The adjustable backsplash on freestanding models offers seven positions to match existing wall treatments or new designs.
61833_Built-in Guide 05.indd 761833_Built-in Guide 05.indd 7 12/22/04 9:30:52 AM12/22/04 9:30:52 AM

R-1210
Design Ideas8
NEW DESIGNS FOR NEW LOCATIONS!
Sharp’s Over the Counter Microwave Oven opens new design options for the kitchen designer. This space saving location offers accent and task lighting with Auto-Touch controls on the door at easy-to-read eye level.
The arrangements shown above illustrate the OTC positioned in standard wall cabinets located over the counter in a wet bar. The microwave is always ready so you can enjoy your favorite snacks with a little wine and cheese.
WET BAR Ready to Warm...
Step out center 24” cabinet forward to make an accent
FOOD Preparation...
The arrangement shown to the right illustrates the new OTC located in standard wall cabinets over the counter. This creates a perfect cook station and preparation area.
61833_Built-in Guide 05.indd 861833_Built-in Guide 05.indd 8 12/22/04 9:34:12 AM12/22/04 9:34:12 AM

CORNER Applications...
valance under adjacentcabinets to match bottomof O.T.C. Microwave
1' -0"
typica
l
adjac
ent
cabin
ets
countertopbelow
±2" Verticalfiller panel
blocking
27"u
pper
cabi
net
2'-1
0"
(at
cabi
net)
2'-5
1 /2"
(at
mic
rowa
ve)
±2"
±2"
1'-1
17/8
"O.
T.C.
mic
rowa
ve
'2x runners(at microwave)
'2x runners(at cabinet)
2 1/4" inset
fasten '2x'runners to allavailablestuds
1' -8
3 /4"
(atmicr
owav
e)
2' -0"
(atca
binet)
2' -7"
PLAN
Align edge ofouter wrap withface of adjacentcabinets.
Valance under adjacentcabinets to match bottomof O.T.C. Microwave.
To allow for finish material
± 3/4"
2 1/4"inset
Provide runnerat mountingbracket
'2x' Runners
18"
Ca
bine
t
2'-
8"
1'-
21 /
16"
1' - 0"Typicalcabinet
SECTION
9
The arrangement shown illustrates the OTC located in a corner using standard 27-inch wall cabinets and custom trim wall mounting.
Sharp OTC microwave ovens offer an optional accessory kit with two stainless steel accessory bars and eight “S” hooks.
61833_Built-in Guide 05.indd 961833_Built-in Guide 05.indd 9 12/22/04 9:34:25 AM12/22/04 9:34:25 AM

27"Retrofit1 1/2" Filler 1 1/2" Filler24"Cabinet
36"Retrofit
OpenShelving
1'-11 7/8"O.T.C. Microwave
Open
Open
Design Ideas10
RETROFIT...
Want an OTC microwave but don’t want to remodel your entire kitchen? Retrofi t the OTC into your current cabinets. Pull out any wall cabinet over 24 inches wide, mount the OTC on the wall and trim it out with a number of optional ideas as illustrated.
Add a two inch valance to the bottom of the cabinets to line up with the bottom of the OTC.
DESIGN Tip...
for Over the Counter
61833_Built-in Guide 05.indd 1061833_Built-in Guide 05.indd 10 12/22/04 9:38:46 AM12/22/04 9:38:46 AM

side panel to come out
flush with otc outer case
upper cabinet to come out
flush with OTC outer case
counter top
(solid surface)cooking
preparation area
2.25
1212
top view
11
BLANK WALL OTC it...
Finish Panel Finish Panel24” Cabinet
1’ - 11 7/8”OTC Microwave
18”
Turn a blank wall into functional space. Simply mount an OTC microwave with a small cabinet above and place some fi nished panels on the side. Below, place a conventional cabinet or use a kitchen cart for a unique application and lighted work area.
Step-up Application
Simple Application
Step-Out Application
61833_Built-in Guide 05.indd 1161833_Built-in Guide 05.indd 11 12/22/04 9:38:53 AM12/22/04 9:38:53 AM

30"
3'-6"
30"
3'-6"
Design Ideas12
The trend is toward using freestanding furniture in the kitchen that includes built-in appliances. Free up your imagination and design a piece of furniture with a built-in Sharp Microwave Drawer in your next project.
Cabinet manufacturers now offer many optional arrangements. Raised cabinets that elevate appliances for easy access are becoming more common. A built-in Microwave Drawer in one of these raised cabinets creates an ideal functional work area.
STAND Alone...
61833_Built-in Guide 05.indd 1261833_Built-in Guide 05.indd 12 12/22/04 9:39:38 AM12/22/04 9:39:38 AM

30"
easy accessglass touchfront controls
42 5/8"
Lap 27"
27"15 5/8"
36 ±1/8"
13
Universal access — providing a safe and convenient location for users — should be an important design consideration in all kitchens. Located within the universal reach range of 15-inches to 48-inches, the Sharp Microwave Drawer provides easy and safe access to foods, requiring less bending and providing a convenient landing space. The universal reach range was established by the American National Standards Institute and is used as the universal access guideline for accessible reach.
The drawer location with its easy viewing of food and controls is more convenient for most cooks than other below the counter location options.
The Microwave Drawer can be accessed from a wheelchair. Auto-Touch controls are easy to see and to reach. The drawer opens automatically by simply touching a button (on most models). The location and operation of the Microwave Drawer are ideally suited for special needs.
UNIVERSAL Design...
61833_Built-in Guide 05.indd 1361833_Built-in Guide 05.indd 13 12/22/04 9:39:44 AM12/22/04 9:39:44 AM

28 1/8"
23 3/8"
14 19/32"
1 13/16"door thickness
15 13/32"
30"
13 5/8"auto drawer
opening
2"4 11/16"
84" wallcabinet
30" *cabinet min.
28 7/16"opening
14 3/4"opening
allow 1/4"overlap
allow7/16"overlap
allow 3/4"overlap
allow 3/4"overlap
19" to topof floor
4"
5"
electrical outletlocation 2x4 anti-
tip block
optional walloven cutoutillustrated insketch
floor mustsupport100 lbs.
14 1/4"to bottomof anti-tipblock
3 1/2"
(6")
23 1/2"min depth
36"countertopheight
30" *cabinet min.
28 7/16"opening
14 3/4"opening
allow 1/4"overlap
allow 7/16"overlap
allow 3/4"overlap
allow 3/4"overlap
19"to top of floor
4"
5"
electrical outletlocation
2x4 anti-tip block
floor mustsupport100 lbs.
14 1/4"to bottomof anti-tip
block
3 1/2"
(6")
23 1/2"min depth
Check specifi c Installation Instructions packed with the KB-6015KS/KW/KK for details about building in the Microwave Drawer adjacent to a wall oven, cooktop or warming drawer.
References14
DRAWER Installation...
The separate Microwave Drawer can be installed below a conventional wall oven following the illustration to the left. The fl oor of the opening should be constructed of plywood strong enough to support the weight of the oven (about 100 pounds). Locate electrical outlet in the shaded area in the upper left-hand corner of the cutout.
The 30-inch wide Microwave Drawer is completely built-in ready. It requires no additional trim kit or venting — just an electrical outlet in the designated shaded area. The microwave interior will easily accommodate a 9” x 13” oblong dish or a bag of microwave popcorn.
* Refer to cabinet manufacturer for compatible interior dimensions.
61833_Built-in Guide 05.indd 1461833_Built-in Guide 05.indd 14 12/28/04 1:09:24 PM12/28/04 1:09:24 PM

27"back to front
of doors
45 3/8"oven door
open
42 5/8"draweropen
36±1/8"to cooktop
surface
42-48"with
adjustablebacksplash
29 7/8"29 5/8"
adjustablebacksplash
width
30"door width
36"countertop
height
18"to uppercabinets
preferred electricaloutlet area
minimum 30"to bottom ofcabinet over
cooktop
30"
30"opening width
6 1/8"
7 3/8"
2 1/2"
17 3/4"
27"back to front
of doors
45 3/8"oven door
open
42 5/8"draweropen
36±1/8"to bottom of
cooktopsurface
31 1/4"glass and
control panel29 7/8"
width of unit
30"door width
36"countertop
height
18"to uppercabinets
23 1/8"
preferred electricaloutlet area
minimum 30"to bottom ofcabinet over
cooktop
30"
30"opening width
6 1/8"
7 3/8"
2 1/2"
17 3/4"
15
KB-3300, KB-3411 and KB-3425
KB-4425
RANGE Installation...
61833_Built-in Guide 05.indd 1561833_Built-in Guide 05.indd 15 12/22/04 10:02:43 AM12/22/04 10:02:43 AM

BUILT-IN KIT Chart...
The floor of the opening should be constructed of plywood strongenough to support the weight of the oven (about 100 pounds). Thefloor should be level for proper operation of the microwave. Be sureto check the local building code as it may require that the opening beenclosed with sides, ceiling and rear partition. The properfunctioning of the microwave does not require the enclosure.
Outlet should NOT be locatedin shaded area as indicatedunless there is a depth of more than21-inches from the front to the back,then the outlet may be located at anylocation on the rear wall.
23 1/2"
23 1/2"
23 1/2"
23 1/2"
26 7/8"
26 11/16"
26 7/8"
26 7/8"
26 7/8"
29 11/16"
29 7/8"
29 7/8"
15 13/16" ± 1/8"
15 13/16" ± 1/8"
15 13/16" ± 1/8"
18 3/16" ± 1/8"
16 7/8" ± 1/8"
16 7/8" ± 1/8"
17 7/8" (+ht.ofwood)
17 7/8" (+ht.ofwood)
20 1/8" ± 1/8"
16 7/8" ± 1/8"
17 7/8" (+ht.ofwood)
20 1/8" ± 1/8"
22 3/16" ± 1/8"
22 3/16" ± 1/8"
22 3/16" ± 1/8"
22 3/16" ± 1/8"
24 1/2" ± 3/16"
24 1/2" ± 3/16"
25 1/4" ± 1/8"
25 1/4" ± 1/8"
25 5/8" ± 1/8"
24 1/2" ± 3/16"
28 1/4" ± 1/8"
28 5/8" ± 1/8"
min. 20 3/8"
min. 20 3/8"
min. 19 1/4"
min. 21 1/16"
min. 20"
min. 20"
min. 19 1/2"
min. 19 1/2"
min. 22 3/4"
min. 20"
min. 20 1/8"
min. 22 3/4"
not used
not used
not used
not used
not used
not used
nominal 2"x2"actual: 1 9/16" x 1 9/16"
nominal 2"x2"actual: 1 9/16" x 1 9/16"
nominal 2"x2"actual: 1 9/16" x 1 9/16"
nominal 2"x2"actual: 1 9/16" x 1 9/16"
steel risersactual: 1 11/16" x 7 9/16"
steel risersactual: 1 11/16" x 7 9/16"
—
—
—
14 1/16" ± 1/8"
—
—
18 3/8" ± 1/8"
18 3/8" ± 1/8"
11 7/8" ± 1/8"
—
18 3/8" ± 1/8"
11 7/8" ± 1/8"
—
—
—
16 1/2"
—
—
15"
15 5/8"
22 3/4"
—
15 5/8"
22 3/4"
—
—
—
16 1/2"
—
—
17 1/8"
17 1/8"
20 1/8" ± 1/8"
—
17 1/8"
20 1/8" ± 1/8"
17 1/8"
17 1/8"
17 1/8"
19 7/8"
18 1/8"
18 1/8"
19 7/8"
20 1/8"
21 1/4"
18 1/8"
20 1/8"
21 1/4"
RK-46K24/RK-46W24
RK-46S24
RK-42S24
RK-6S24/RK-6K24
RK-51K/RK-51W
RK-51S27
RK-66A/66WB
RK-93S27
RK-90S27
RK-51S/51K/51W30
RK-93S30
RK-90S30
Your Sharp Microwave Oven can be built into your kitchen wall or cabinet using the appropriate Sharp Built-in Kit. Completehardware and easy-to follow instructions are included. Prepare cabinet or wall opening according to the illustration below,providing access to a separate 3-prong, 120V AC outlet, 15 amps or larger. Check specific model electrical requirements.
A
B
C
E
D
wooden supports (not included, use onlyfor specific kits)
6"
4"
4"
H
I
G
F
The following countertop microwave models offer one year in-homeservice when built-in using the applicable Sharp Built-in Kit:R-930AK/AW/CS R-530ES/EK/EW R-426HS
WIDTH KITS
References16
61833_Built-in Guide 05 R1.indd 1661833_Built-in Guide 05 R1.indd 16 1/7/05 1:22:55 PM1/7/05 1:22:55 PM
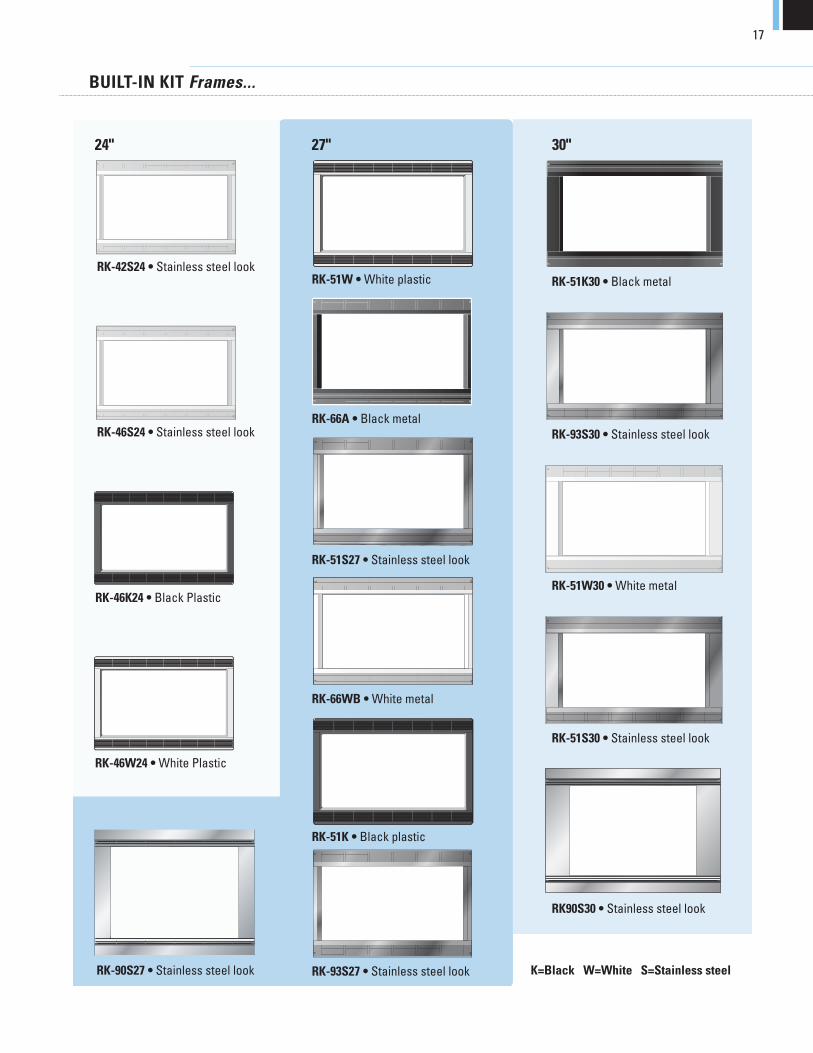
RK-46K24 • Black Plastic
RK-46S24 • Stainless steel look
RK-42S24 • Stainless steel look
RK-90S27 • Stainless steel look
RK-46W24 • White Plastic
24" 27" 30"
RK-51W • White plastic
RK-66A • Black metal
RK-51S27 • Stainless steel look
RK-66WB • White metal
RK-51K • Black plastic
RK-93S27 • Stainless steel look
RK-51K30 • Black metal
RK-93S30 • Stainless steel look
RK-51W30 • White metal
RK-51S30 • Stainless steel look
RK90S30 • Stainless steel look
K=Black W=White S=Stainless steel
BUILT-IN KIT Frames...
17
61833_Built-in Guide 05.indd 1761833_Built-in Guide 05.indd 17 12/22/04 10:02:57 AM12/22/04 10:02:57 AM

Separate 15 amp or greater electrical receptacle must be located in the cabinet directly above the microwave oven.
30” or more from cooking surface 66” or more from fl oor
30”12”
References18
Each Sharp Over the Range microwave oven can be easily adapted for either outside ventilation (vertical or horizontal) or for non-vented, ductless recirculation. Make sure the top of the oven is at least 66” from the fl oor and at least 30” from the cooking surface. A separate 15 amp or greater electrical receptacle must be located in the cabinet directly above the microwave oven.
OTR Installation Guide...Over the Range
61833_Built-in Guide 05.indd 1861833_Built-in Guide 05.indd 18 12/22/04 10:03:00 AM12/22/04 10:03:00 AM

24"
30"24"
18"
30"
18"
36"
36"42"
12"
19
OTC Installation Guide...Over the Counter
EASY Installation
Separate 15 amp or greater electrical receptacle must be located in the cabinet directly above the microwave oven. OTC outside dimensions (WxHxD) 23 7/8” x 14 1/16” x 15 9/16”
Wall cabinet options
Cabinet option above OTC
1 2
3
Optional Accessory Bar kit RK-OTC120
2 bars per kit8 “S” hooks
3 available positions
61833_Built-in Guide 05.indd 1961833_Built-in Guide 05.indd 19 12/22/04 10:03:14 AM12/22/04 10:03:14 AM

Assistance
PHONE Numbers...
MA-06-103
© 2005 Sharp Electronics Corporation
Dial 1.800. BE SHARP (237.4277) for:Service: For your nearest Sharp Authorized ServicerParts: For your authorized parts distributor
Additional Assistance:• Accessories and Cookbooks 1.800.642.2122• To receive the most current specifi cations, visit www.dexpress.com or call Dimension Express
at 775.833.3600 from a fax machine. Enter code 9026 for instructions and a directory of Sharp Microwave Ovens.
Internet Access: www.sharpusa.com * Design specifi cations and installation recommendations are subject to change without notice. Always consult your contractor and local building codes.
Sharp Electronics CorporationSharp Plaza, Mahwah, NJ 07430-2135www.sharpusa.com
61833_Built-in Guide 05.indd 20 12/23/04 5:40:57 PM