Embed Size (px)
Citation preview

®
Microwave Hood Combination
Combinacibn Microondas Campana
Models/Modelos 665.60622665.60629
\
4619-652-60231/8169675 Sears, Roebuck and Co., Hoffman Estates, IL 60179 www.sears.com

Table ofContents
MicrowaveOvenWarrantyWarranty .............................................................. 2
Sears Service ..................................................... 3
Microwave Oven Safety .................................... 4Installation Instructions ..................................... 7 FULL ONE-YEAR WARRANTY ONGetting to Know Your MICROWAVE OVENMicrowave Oven ................................................ 8 For one year from the date of purchase, if this
How your microwave oven works ................... 8 Kenmore Microwave Oven fails due to a defect inRadio interference ........................................... 8 material or workmanship, Sears will repair it free of
Testing your microwave oven .......................... 8 charge.
Testing your dinnerware or cookware ............. 9 FULL FIVE-YEAR WARRANTY ON THEOperating tips .................................................. 9 MAGNETRONElectrical connection ....................................... 9
For five years from the date of purchase, if theMicrowave oven features .............................. 10 magnetron in this Kenmore Microwave Oven failsControl panel features ................................... 11 due to a defect in material or workmanship, SearsUsing the cooking rack ................................. 14 will repair it free of charge.
Using the exhaust fan ................................... 14 The above warranty coverage applies only toUsing the cooktop/countertop light .............. 15 Microwave Ovens which are used for privateSetting the clock ........................................... 15 household purposes.
Using the kitchen timer ................................. 16 WARRANTY SERVICE IS AVAILABLE BY SIMPLYUsing ADD ONE MINUTE .............................. 17 CONTACTING THE NEAREST SEARS STORE OR
Changing preset cooking times .................... 17 SERVICE CENTER IN THE UNITED STATES.
Using Your Microwave Oven .......................... 18 This warranty applies only while this product is in useCooking at high cook power ......................... 18 in the United States.
Cooking at different cook powers ................. 18 This warranty gives you specific legal rights, and youCooking in stages ......................................... 20 may also have other rights which vary from state toProgress bar .................................................. 21 state.
Using AUTO COOK ....................................... 22 Seam, Roebuck and Co.,Using AUTO REHEAT .................................... 23 Dept. 817WA,Using ZiP DEFROST ..................................... 24 Hoffman Estates, IL 60179
ZiP DEFROST chart ...................................... 26 For service call:Defrosting tips ............................................... 27 1.800.4.MY.HOMES-
Using BREAD DEFROST ............................... 28 (1-800,469-4663)Using POPCORN .......................................... 28Using BEVERAGE ......................................... 29 Please record your model'sUsing BAKED POTATO .................................. 29 information.Using FRESH VEGETABLE ........................... 30 Whenever you call to request service for your appli-Using FROZEN VEGETABLE ......................... 31 ance, you need to know your complete model numberUsing HOLD WARM ...................................... 32 and serial number. You can find this information on
Caring for Your Microwave Oven ................... 33 the model and serial number label/plate (see"Microwave oven features" in the "Getting to Know
Installing and caring for filters ....................... 34 Your Microwave Oven" section), A!so, record the otherReplacing the cooktop and oven lights ........ 35 information shown below.
Cooking Guide ................................................. 36
Questions and Answers .................................. 38 Model Number
Troubleshooting ............................................... 39 Serial NumberIndex .................................................................. 41 Purchase Date
Service .............................................. Back Cover
2
Sears Service"We service what we sell""We service what we sell" is our assurance to you that you can depend on Sears for service because SearsService is nationwide.
Your Sears Kenmore Microwave Oven has added value when you consider that Sears has a service unit nearyou, staffed by Sears Trained Technicians - professional technicians specifically trained on Sears KenmoreMicrowave Ovens, having the parts, tools and equipment to insure that we meet our pledge to you - "Weservice what we sell!"
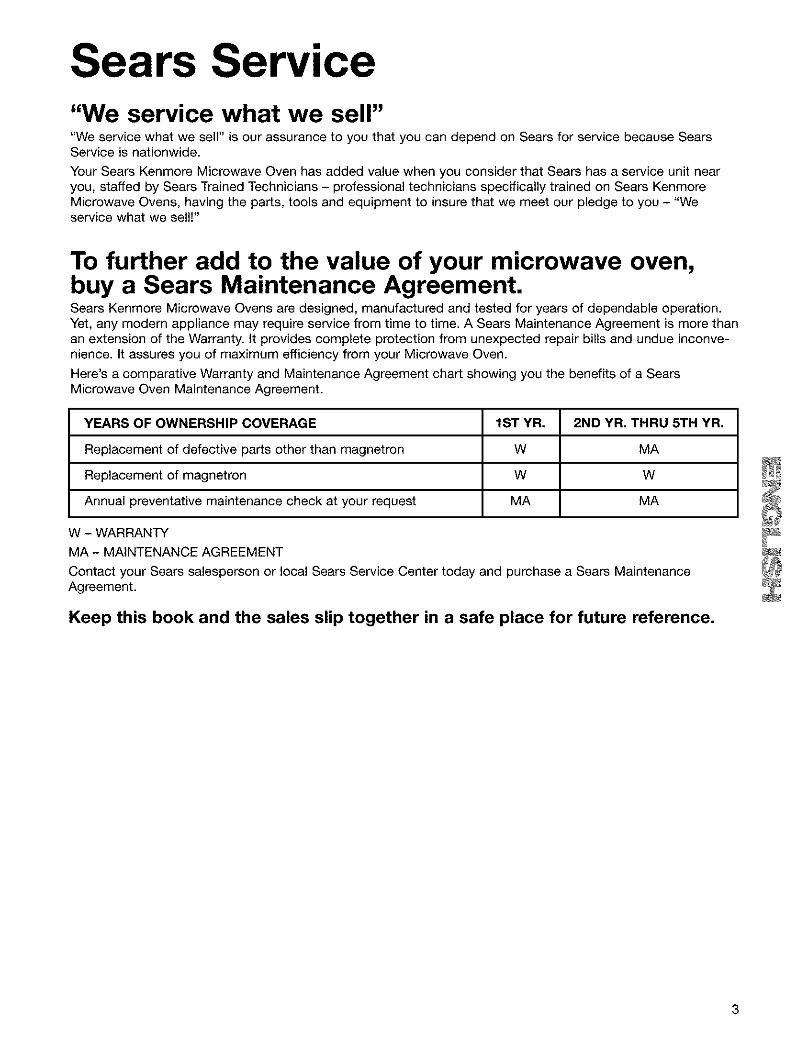
To further add to the value of your microwave oven,buy a Sears Maintenance Agreement.Sears Kenmore Microwave Ovens are designed, manufactured and tested for years of dependable operation.Yet, any modern appliance may require service from time to time. A Sears Maintenance Agreement is more thanan extension of the Warranty. It provides complete protection from unexpected repair bills and undue inconve-nience. It assures you of maximum efficiency from your Microwave Oven.
Here's a comparative Warranty and Maintenance Agreement chart showing you the benefits of a SearsMicrowave Oven Maintenance Agreement.
YEARS OF OWNERSHIP COVERAGE 1ST YR. 2ND YR. THRU 5TH YR.
Replacement of defective parts other than magnetron W MA
Replacement of magnetron W W
Annual preventative maintenance check at your request MA MA
W - WARRANTY
MA - MAINTENANCE AGREEMENT
Contact your Sears salesperson or local Sears Service Center today and purchase a Sears MaintenanceAgreement.
Keep this book and the sales slip together in a safe place for future reference.
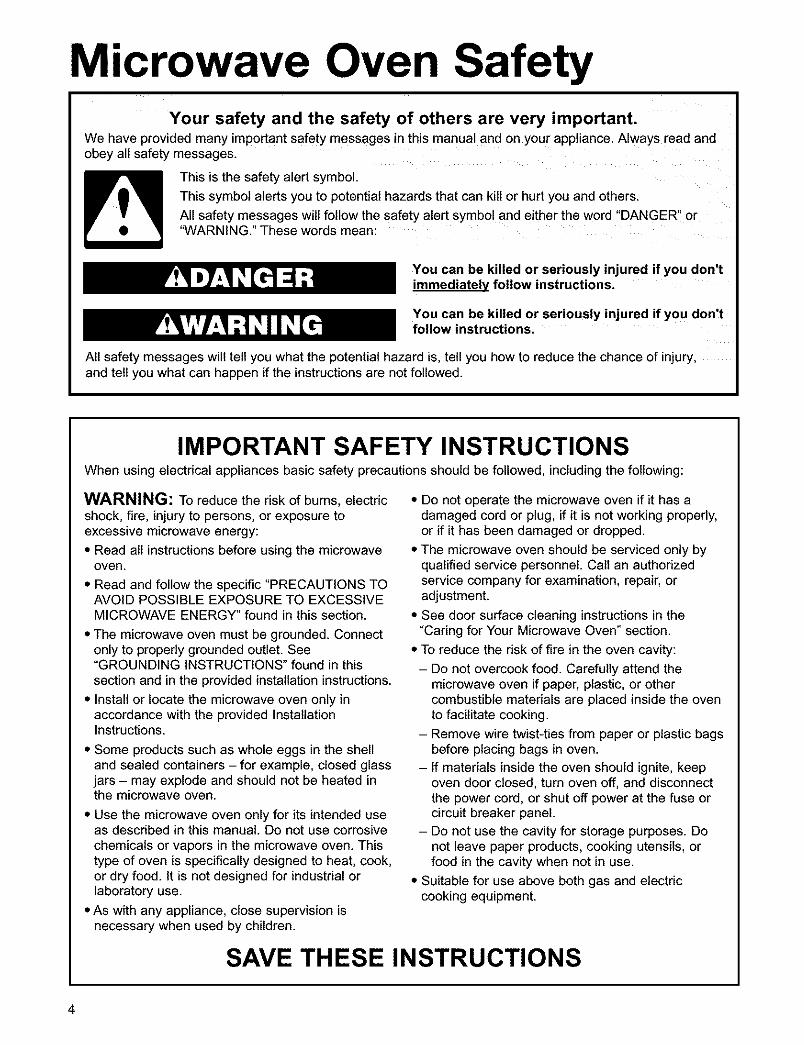
Microwave Oven SafetyYour safety and the safety of others are very important.
We have provided many important safety messages in this manual and on your appliance. Always read andobey all safety messages.
This is the safety alert symbol.
This symbol alerts you to potential hazards that can kill or hurt you and others.
All safety messages will follow the safety alert symbol and either the word "DANGER" or"WARNING." These words mean:
You can be killed or seriously injured if you don'timmediately follow instructions.
You can be killed or seriously injured if you don'tfollow instructions.
All safety messages will tell you what the potential hazard is, tell you how to reduce the chance of injury,and tell you what can happen if the instructions are not followed.
IMPORTANT SAFETY INSTRUCTIONSWhen using electrical appliances basic safety precautions should be followed, including the following:
WARNING: To reduce the risk of burns, electricshock, fire, injury to persons, or exposure toexcessive microwave energy:
• Read ait instructions before using the microwaveoven.
• Read and follow the specific "PRECAUTIONS TOAVOID POSSIBLE EXPOSURE TO EXCESSIVEMICROWAVE ENERGY" found in this section.
• The microwave oven must be grounded. Connectonly to propedy grounded outlet. See"GROUNDING INSTRUCTIONS" found in thissection and in the provided installation instructions.
• Install or locate the microwave oven only inaccordance with the provided InstallationInstructions.
• Some products such as whole eggs in the shelland sealed containers - for example, closed glassjars - may explode and should not be heated inthe microwave oven.
• Use the microwave oven only for its intended useas described in this manual. Do not use corrosivechemicals or vapors in the microwave oven. Thistype of oven is specifically designed to heat, cook,or dry food. It is not designed for industrial orlaboratory use.
• As with any appliance, close supervision isnecessary when used by children.
• Do not operate the microwave oven if it has adamaged cord or plug, if it is not working properly,or if it has been damaged or dropped.
• The microwave oven should be serviced only byqualified service personnel. Call an authorizedservice company for examination, repair, oradjustment.
• See door surface cleaning instructions in the"Caring for Your Microwave Oven" section.
• To reduce the risk of fire in the oven cavity:
- Do not overcook food. Carefully attend themicrowave oven if paper, plastic, or othercombustible materials are placed inside the ovento facilitate cooking.
- Remove wire twist-ties from paper or plastic bagsbefore placing bags in oven.
- If materials inside the oven should ignite, keepoven door closed, turn oven off, and disconnectthe power cord, or shut off power at the fuse orcircuit breaker panel.
- Do not use the cavity for storage purposes. Donot leave paper products, cooking utensils, orfood in the cavity when not in use.
• Suitable for use above both gas and electriccooking equipment.
SAVE THESE INSTRUCTIONS
4

IMPORTANT SAFETY INSTRUCTIONS• Intended to be used above ranges with maximum
width of 36 inches.
• Clean Ventilating Hoods Frequently - Greaseshould not be allowed to accumulate on hood orfilter.
• Oversized foods or oversized metal utensilsshould not be inserted in the microwave oven asthey may create a fire or risk of electric shock.
• Do not clean with metal scouring pads. Pieces canburn off the pad and touch electrical parts involv-ing a risk of electric shock.
• Do not use paper products when appliance isoperated in the "PAN BROWN" mode.
• Do not store any materials other than manufactur-er's recommended accessories in this oven whennot in use.
• Do not store anything directly on top of themicrowave oven when the microwave oven isin operation.
• When flaming foods under the hood, turn the fan on.
• Use care when cleaning the vent-hood filter.Corrosive cleaning agents, such as lye-based ovencleaners, may damage the filter.
• Do not cover or block any openings on themicrowave oven.
• Do not store this microwave oven outdoors.Do not use the microwave oven near water - forexample, near a kitchen sink, in a wet basement, ornear a swimming pool, and the like.
• Do not immerse cord or plug in water.
• Keep cord away from heated surfaces.
• Do not let cord hang over edge of table or counter.• Do not mount over a sink.
• Do not cover racks or any other part of the oven withmetal foil. This will cause overheating of the oven.
SAVE THESE INSTRUCTIONS
PRECAUTIONS TO AVOID POSSIBLE EXPOSURE TOEXCESSIVE MICROWAVE ENERGY(a) Do not attempt to operate this oven with the
door open since open-door operation can resultin harmful exposure to microwave energy. It isimportant not to defeat or tamper with the safetyinterlocks.
(b) Do not place any object between the oven frontface and the door or allow soil or cleaner residueto accumulate on sealing surfaces.
(c) Do not operate the oven if it is damaged. It isparticularly important that the oven door closeproperly and that there is no damage to the:
(1) Door (bent),
(2) Hinges and latches (broken or loosened),
(3) Door seals and sealing surfaces.
(d) The oven should not be adjusted or repaired byanyone except properly qualified servicepersonnel.
ELECTRICAL REQUIREMENTS
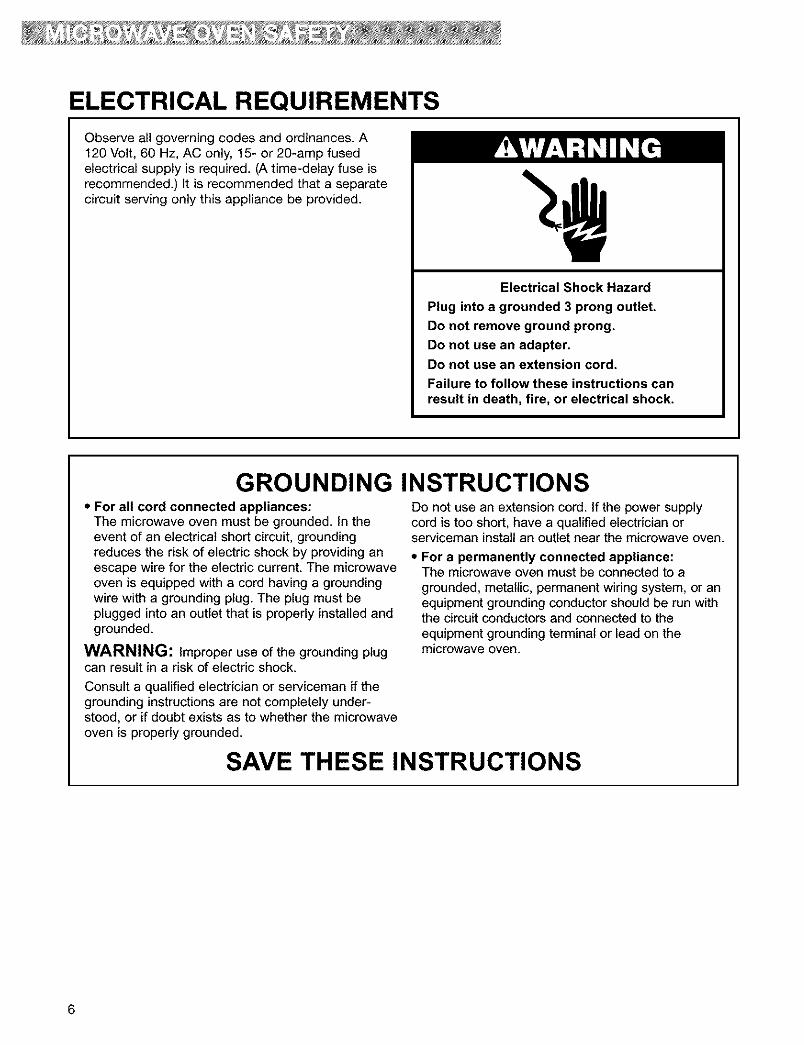
Observe all governing codes and ordinances. A120 Volt, 60 Hz, AC only, 15- or 20-amp fusedelectrical supply is required. (A time-delay fuse isrecommended.) It is recommended that a separatecircuit serving only this appliance be provided.
Electrical Shock Hazard
Plug into a grounded 3 prong outlet.
Do not remove ground prong.
Do not use an adapter.Do not use an extension cord.
Failure to follow these instructions canresult in death, fire, or electrical shock.
GROUNDING INSTRUCTIONS• For all cord connected appliances:
The microwave oven must be grounded. In theevent of an electrical short circuit, groundingreduces the risk of electric shock by providing anescape wire for the electric current. The microwaveoven is equipped with a cord having a groundingwire with a grounding plug. The plug must beplugged into an outlet that is properly installed andgrounded.
WARNING: Improper use of the grounding plugcan result in a risk of electric shock.
Consult a qualified electrician or serviceman if thegrounding instructions are not completely under-stood, or if doubt exists as to whether the microwaveoven is properly grounded.
Do not use an extension cord. If the power supplycord is too short, have a qualified electrician orserviceman install an outlet near the microwave oven.
• For a permanently connected appliance:The microwave oven must be connected to agrounded, metallic, permanent wiring system, or anequipment grounding conductor should be run withthe circuitconductors and connected to theequipment grounding terminal or lead on themicrowave oven.
SAVE THESE INSTRUCTIONS
6
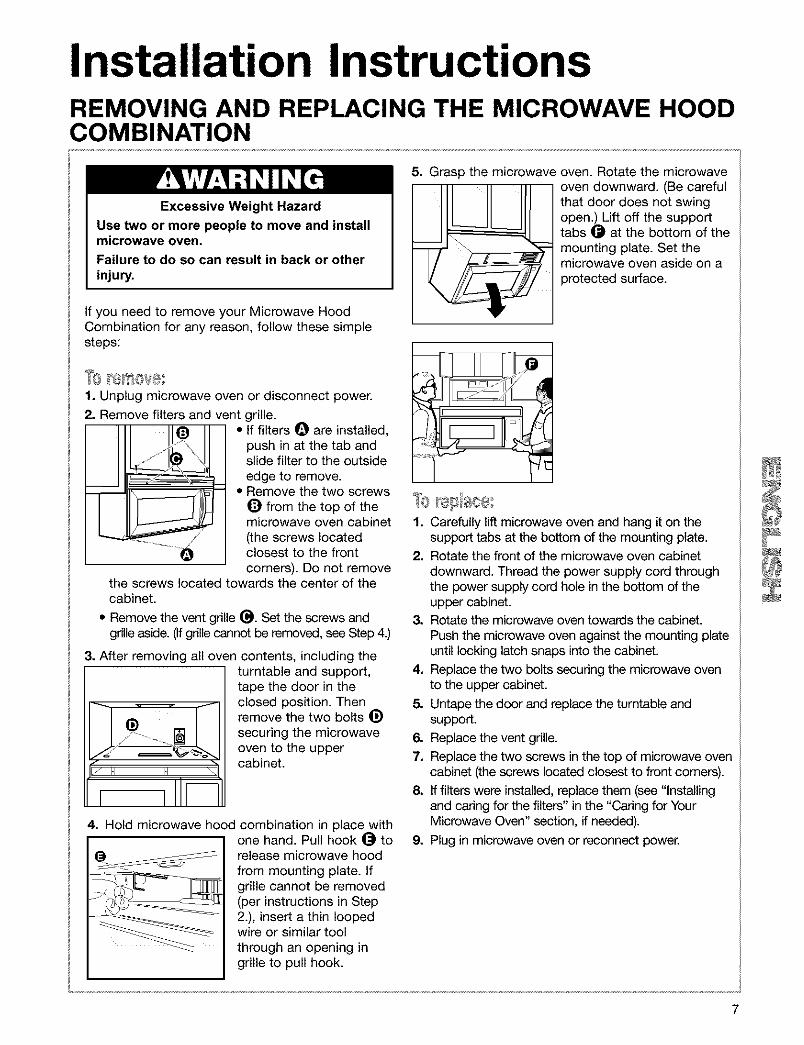
Installation InstructionsREMOVING AND REPLACING THE MICROWAVE HOODCOMBINATION
Excessive Weight Hazard
Use two or more people to move and installmicrowave oven.
Failure to do so can result in back or otherinjury.
If you need to remove your Microwave HoodCombination for any reason, follow these simplesteps:
[ I!e_fi_ i
..........................0
1. Unplug microwave oven or disconnect power.
2. Remove filters and vent grille.• If filters Q are installed,
push in at the tab andslide filter to the outsideedge to remove.
• Remove the two screws_) from the top of themicrowave oven cabinet(the screws locatedclosest to the frontcorners). Do not remove
the screws located towards the center of thecabinet.
• Remove the vent grille _). Set the screws andgrille aside. (Ifgrille cannot be removed, see Step 4.)
3. After removing all oven contents, including theturntable and support,
Jd ¸ _'_.,J H H \1
tape the door in theclosed position. Thenremove the two bolts _)securing the microwaveoven to the uppercabinet.
4. Hold microwave hood combination in place withone hand. Pull hook _ torelease microwave hoodfrom mounting plate. Ifgrille cannot be removed(per instructions in Step2.), insert a thin loopedwire or similar toolthrough an opening ingrille to pull hook.
5. Grasp the microwave oven. Rotate the microwave
oven downward. (Be careful
that door does not swingopen.) Lift off the supporttabs _ at the bottom of themounting plate. Set themicrowave oven aside on aprotected surface.
1. Carefully lift microwave oven and hang it on thesupport tabs at the bottom of the mounting plate.
2. Rotate the front of the microwave oven cabinetdownward. Thread the power supply cord throughthe power supply cord hole in the bottom of theupper cabinet.
3. Rotate the microwave oven towards the cabinet.Push the microwave oven against the mounting plateuntil locking latch snaps into the cabinet.
4. Replace the two bolts securing the microwave ovento the upper cabinet.
5. Untape the door and replace the turntable andsupport.
6. Replace the vent grille.
7. Replace the two screws in the top of microwave ovencabinet (the screws located closest to front comers).
8. If filters were installed, replace them (see "Installingand caring for the filters" in the "Caring for YourMicrowave Oven" section, if needed).
9. Plug in microwave oven or reconnect power.
Getting to Know YourMicrowave OvenThis section discusses the concepts behind microwave cooking. It also shows you the basics you needto know to operate your microwave oven. Please read this information before you use your oven.
HOW YOUR MICROWAVE OVEN WORKS
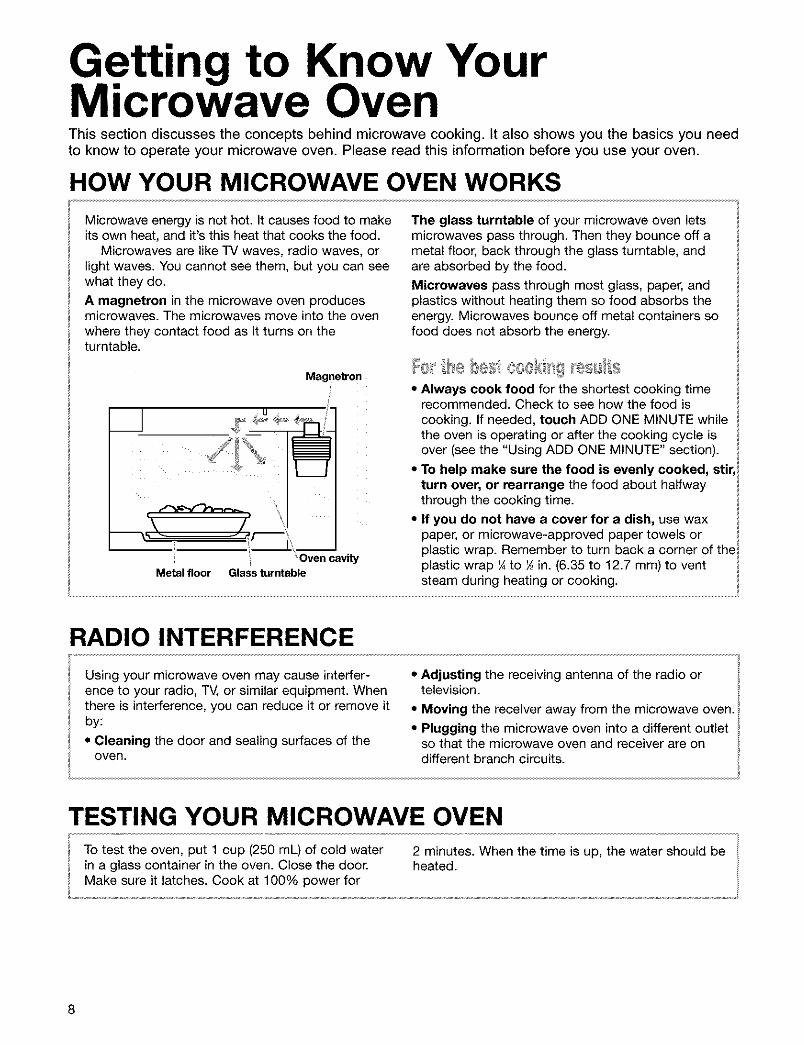
Microwave energy is not hot. It causes food to makeits own heat, and it's this heat that cooks the food.
Microwaves are like TV waves, radio waves, orlight waves. You cannot see them, but you can seewhat they do.
A magnetron in the microwave oven producesmicrowaves. The microwaves move into the ovenwhere they contact food as it turns on theturntable.
The glass turntable of your microwave oven letsmicrowaves pass through. Then they bounce off ametal floor, back through the glass turntable, andare absorbed by the food.
Microwaves pass through most glass, paper, andplastics without heating them so food absorbs theenergy. Microwaves bounce off metal containers sofood does not absorb the energy.
Magnetron
\ /
Metal floorOven cavity
Glassturntable
• Always cook food for the shortest cooking timerecommended. Check to see how the food iscooking. If needed, touch ADD ONE MINUTE whilethe oven is operating or after the cooking cycle isover (see the "Using ADD ONE MINUTE" section).
• To help make sure the food is evenly cooked, stir,turn over, or rearrange the food about halfwaythrough the cooking time.
• If you do not have a cover for a dish, use waxpaper, or microwave-approved paper towels orplastic wrap. Remember to turn back a corner of theplastic wrap ¼ to _ in. (6.35 to 12.7 mm) to ventsteam during heating or cooking.
RADIO INTERFERENCE
• Adjusting the receiving antenna of the radio ortelevision.
• Moving the receiver away from the microwave oven.
• Plugging the microwave oven into a different outletso that the microwave oven and receiver are on
Using your microwave oven may cause interfer-ence to your radio, TV, or similar equipment. Whenthere is interference, you can reduce it or remove itby:
• Cleaning the door and sealing surfaces of theoven. different branch circuits.
TESTING YOUR MICROWAVE OVEN
To test the oven, put 1 cup (250 mL) of cold water 2 minutes. When the time is up, the water should bein a glass container in the oven. Close the door. heated.Make sure it latches. Cook at 100% power for
8
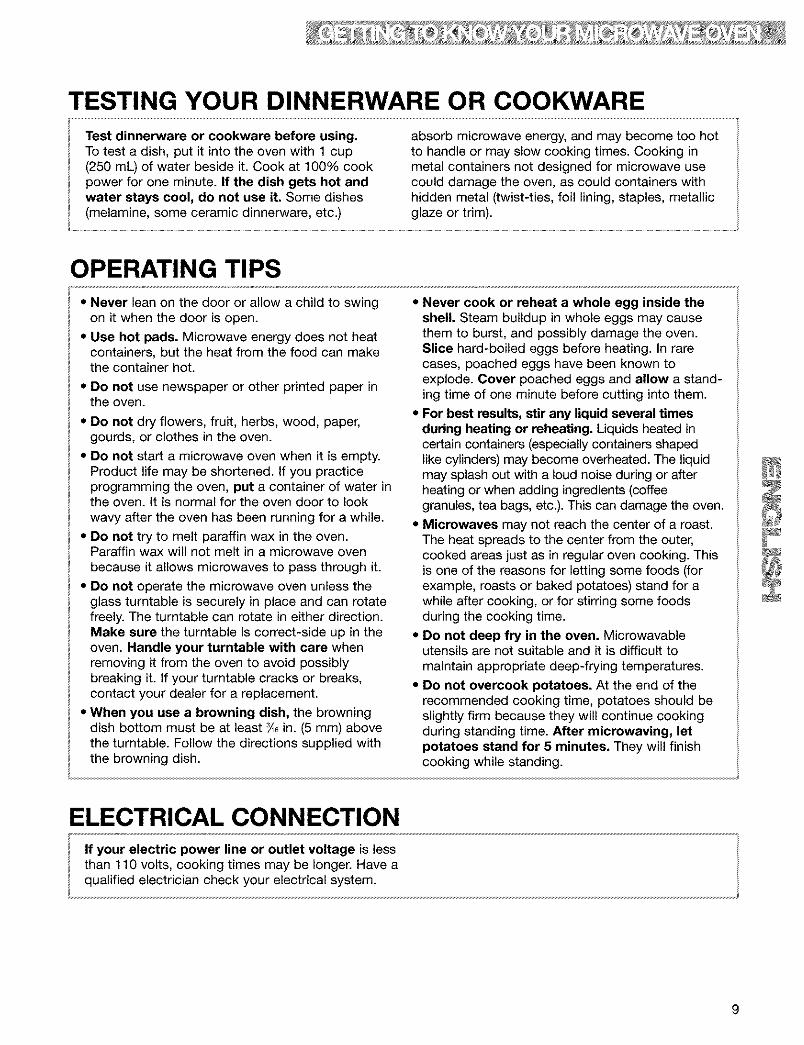
TESTING YOUR DINNERWARE OR COOKWARE
Test dinnerware or cookware before using.To test a dish, put it into the oven with 1 cup(250 mL) of water beside it. Cook at 100% cookpower for one minute. If the dish gets hot andwater stays cool, do not use it. Some dishes(melamine, some ceramic dinnerware, etc.)
absorb microwave energy, and may become too hotto handle or may slow cooking times. Cooking inmetal containers not designed for microwave usecould damage the oven, as could containers withhidden metal (twist-ties, foil lining, staples, metallicglaze or trim).
OPERATING TIPS• Never lean on the door or allow a child to swing
on it when the door is open.
• Use hot pads. Microwave energy does not heatcontainers, but the heat from the food can makethe container hot.
• Do not use newspaper or other printed paper inthe oven.
• Do not dry flowers, fruit, herbs, wood, paper,gourds, or clothes in the oven.
• Do not start a microwave oven when it is empty.Product life may be shortened. If you practiceprogramming the oven, put a container of water inthe oven. It is normal for the oven door to lookwavy after the oven has been running for a while.
• Do not try to melt paraffin wax in the oven.Paraffin wax will not melt in a microwave ovenbecause it allows microwaves to pass through it.
• Do not operate the microwave oven unless theglass turntable is securely in place and can rotatefreely. The turntable can rotate in either direction.Make sure the turntable is correct-side up in theoven. Handle your turntable with care whenremoving it from the oven to avoid possiblybreaking it. If your turntable cracks or breaks,contact your dealer for a replacement.
• When you use a browning dish, the browningdish bottom must be at least _ in. (5 mm) abovethe turntable. Follow the directions supplied withthe browning dish.
• Never cook or reheat a whole egg inside theshell. Steam buildup in whole eggs may causethem to burst, and possibly damage the oven.Slice hard-boiled eggs before heating. In rarecases, poached eggs have been known toexplode. Cover poached eggs and allow a stand-ing time of one minute before cutting into them.
• For best results, stir any liquid several timesduring heating or reheating. Liquids heated incertain containers (especially containers shapedlike cylinders) may become overheated. The liquidmay splash out with a loud noise during or afterheating or when adding ingredients (coffeegranules, tea bags, etc.). This can damage the oven.
• Microwaves may not reach the center of a roast.The heat spreads to the center from the outer,cooked areas just as in regular oven cooking. Thisis one of the reasons for letting some foods (forexample, roasts or baked potatoes) stand for awhile after cooking, or for stirring some foodsduring the cooking time.
• Do not deep fry in the oven. Microwavableutensils are not suitable and it is difficult tomaintain appropriate deep-frying temperatures.
• Do not overcook potatoes. At the end of therecommended cooking time, potatoes should beslightly firm because they will continue cookingduring standing time. After microwaving, letpotatoes stand for 5 minutes. They will finishcooking while standing.
ELECTRICAL CONNECTIONIf your electric power line or outlet voltage is lessthan 110 volts, cooking times may be longer. Have aqualified electrician check your electrical system.
MICROWAVE OVEN FEATURES
?
®
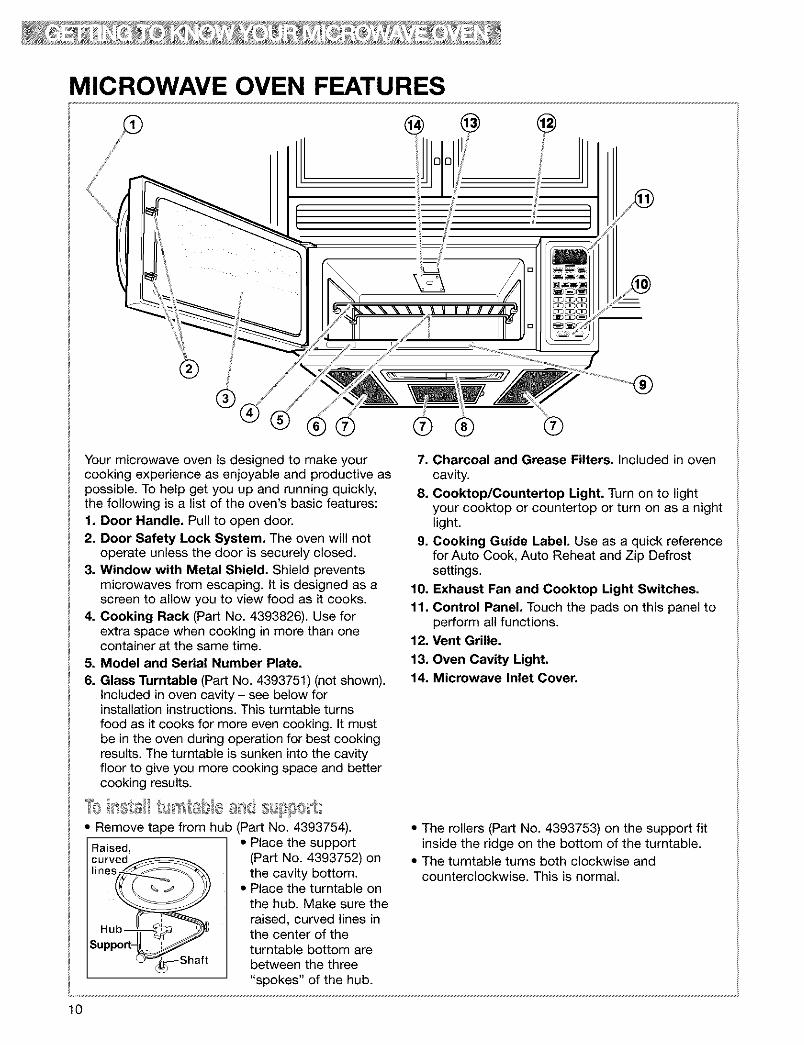
Your microwave oven is designed to make yourcooking experience as enjoyable and productive aspossible. To help get you up and running quickly,the following is a list of the oven's basic features:1. Door Handle. Pull to open door.2. Door Safety Lock System. The oven will not
operate unless the door is securely closed.3. Window with Metal Shield. Shield prevents
microwaves from escaping. It is designed as ascreen to allow you to view food as it cooks.
4. Cooking Rack (Part No. 4393826). Use forextra space when cooking in more than onecontainer at the same time.
5. Model and Serial Number Plate,
6. Glass Turntable (Part No. 4393751) (not shown).Included in oven cavity - see below forinstallation instructions. This turntable turnsfood as it cooks for more even cooking. It mustbe in the oven during operation for best cookingresults. The turntable is sunken into the cavityfloor to give you more cooking space and bettercooking results.
Remove tape from hub (Part No. 4393754).
Raised,curved
lines_
Hub_up
%_'_--- Shaft
• Place the support(Part No. 4393752) onthe cavity bottom.
• Place the turntable onthe hub. Make sure theraised, curved lines inthe center of theturntable bottom arebetween the three"spokes" of the hub.
®7. Charcoal and Grease Filters. Included in oven
cavity.
8. Cooktop/Countertop Light. Turn on to lightyour cooktop or countertop or turn on as a nightlight.
9. Cooking Guide Label. Use as a quick referencefor Auto Cook, Auto Reheat and Zip Defrostsettings.
10. Exhaust Fan and Cooktop Light Switches.11. Control Panel. Touch the pads on this panel to
perform all functions.12. Vent Grille.
13. Oven Cavity Light.14. Microwave Inlet Cover.
• The rollers (Part No. 4393753) on the support fitinside the ridge on the bottom of the turntable.
• The turntable turns both clockwise andcounterclockwise. This is normal.
10
CONTROL PANEL FEATURES
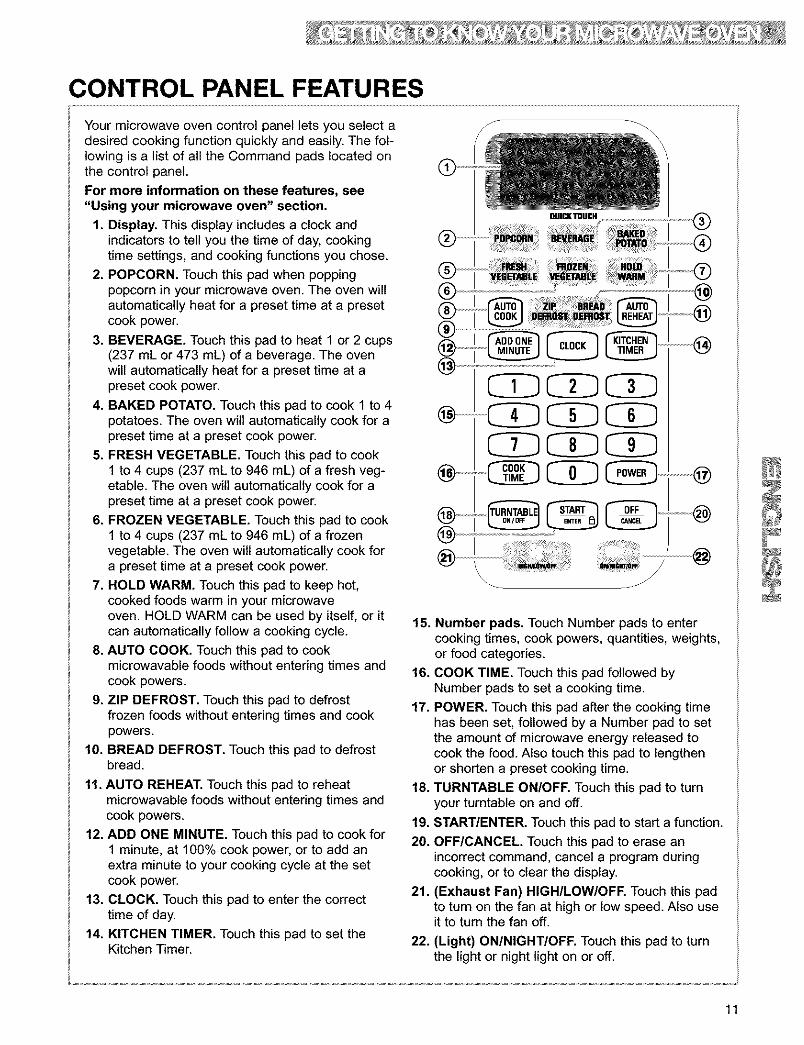
Your microwave oven control panel lets you select adesired cooking function quickly and easily. The fol-lowing is a list of all the Command pads located onthe control panel.
For more information on these features, see"Using your microwave oven" section.
1. Display. This display includes a clock andindicators to tell you the time of day, cookingtime settings, and cooking functions you chose.
2. POPCORN. Touch this pad when poppingpopcorn in your microwave oven. The oven willautomatically heat for a preset time at a presetcook power.
3. BEVERAGE. Touch this pad to heat 1 or 2 cups(237 mL or 473 mL) of a beverage. The ovenwill automatically heat for a preset time at apreset cook power.
4. BAKED POTATO. Touch this pad to cook 1 to 4potatoes. The oven will automatically cook for apreset time at a preset cook power.
5. FRESH VEGETABLE. Touch this pad to cook1 to 4 cups (237 mL to 946 mL) of a fresh veg-etable. The oven will automatically cook for apreset time at a preset cook power.
6. FROZEN VEGETABLE. Touch this pad to cook1 to 4 cups (237 mL to 946 mL) of a frozenvegetable. The oven wilt automatically cook fora preset time at a preset cook power.
7. HOLD WARM. Touch this pad to keep hot,cooked foods warm in your microwaveoven. HOLD WARM can be used by itself, or itcan automatically follow a cooking cycle.
8. AUTO COOK. Touch this pad to cookmicrowavable foods without entering times andcook powers.
9. ZIP DEFROST. Touch this pad to defrostfrozen foods without entering times and cookpowers.
10. BREAD DEFROST. Touch this pad to defrostbread.
11. AUTO REHEAT. Touch this pad to reheatmicrowavable foods without entering times andcook powers.
12. ADD ONE MINUTE. Touch this pad to cook for1 minute, at 100% cook power, or to add anextra minute to your cooking cycle at the setcook power.
13. CLOCK. Touch this pad to enter the correcttime of day.
14. KITCHEN TIMER. Touch this pad to set theKitchen Timer.
CC CZ -C CDC C CDC
@
15. Number pads. Touch Number pads to entercooking times, cook powers, quantities, weights,or food categories.
16. COOK TIME. Touch this pad followed byNumber pads to set a cooking time.
17. POWER. Touch this pad after the cooking timehas been set, followed by a Number pad to setthe amount of microwave energy released tocook the food. Also touch this pad to lengthenor shorten a preset cooking time.
18. TURNTABLE ON/OFF. Touch this pad to turnyour turntable on and off.
19. START/ENTER. Touch this pad to start a function.
20. OFF/CANCEL Touch this pad to erase anincorrect command, cancel a program duringcooking, or to clear the display.
21. (Exhaust Fan) HIGH/LOW/OFF. Touch this padto turn on the fan at high or low speed. Also useit to turn the fan off.
22. (Light) ON/NIGHT/OFF. Touch this pad to turnthe light or night light on or off.
11

CONTROL PANEL FEATURES (CONT.)
NOTES:
• if you have entered all settings for a function butdo not touch START/ENTER in 5 seconds, theSTART? indicator light will show.
• if you open the door while the oven is on andthen shut the door, the START? indicator light willshow. Touch START/ENTER to continue.
• if you choose a function but do not touch anothercommand pad within 1 minute, the display returnsto the time of day and you have to start over.
Your microwave oven comes with audiblesignals that can guide you when setting and usingyour oveR:
• [_ A programming tone will sound each timeyou touch a pad.
• [_ One long tone signals the end of a KitchenTimer countdown.
• II q Four tones signal the end of acooking cycle.FT_q FI_q
• "l_t2Jl"JJJI Two quick, short tones sound onceevery minute for the first 15 minutes after an end-of-cooking signal as a reminder if the food hasnot been removed from the oven.
• I_1_ Two quick, short tones will sound whileentering and exiting from a hidden feature (forexample, Child Lock).
• [_ "_[_-_l"_)))I Three tones sound if you havemade an incorrect entry.
To disable the programming tone:TOUCH
and hold for 5 seconds
To turn the programming tone back on:TOUCH
To disable all audible signals except theend-of-timer signal:TOUCH
and hold for 5 seconds
To turn signals back on:
TOUCH
and hold for 5 seconds
NOTE: Two tones will sound when audible signalsare turned on or off. This will only work when theoven is in standby mode.
You can stop the oven during a cycle by openingthe door. The oven stops heating and the fan stops,but the light stays on. To restart cooking, close thedoor and
TOUCH
If you do not want to continue cooking:• Close the door and the light goes off.OR
• TOUCH
NOTE: Before setting a function, touchOFF/CANCEL to make sure no otherfunction is on.
and hold for 5 seconds
12

CONTROL PANEL FEATURES (CONT.)
Mes '47 ha '$ele FAs I®of IcedWhen heating plates of food with a cook time that
you set, you can heattwo 10 in. (25.4 cm)plates side by side orone plate larger thanthe turntable. You canheat 2 more plates onthe Cooking Rack for apossible total of 4plates. For best results,halfway throughcooking turn the plates
halfway around until the food in the front is in theback. Do the same when heating a larger (9 to13 in. [23 to 33 cm]) casserole. When heating 4dinner plates, turn as described above and switchthe top plates with the bottom plates.
To heat 2 bottom plates together or one larger
plate, the turntable should not beturning. You can shut the turntableoff by touching TURNTABLE
ON/OFF. "TURNTABLE OFF" appears on thedisplay. If you touch TURNTABLE ON/OFF beforestarting to set the cooking function, your oven willprompt you to enter a cooking time without youneeding to touch COOK TIME. Your turntable willbe turned back on when cooking is over or whenyou touch OFF/CANCELNOTEs You cannot turn off the turntable whenusing automatic cooking functions. Automaticcooking functions include all Auto Reheat, AutoCook, Zip Defrost, and Quick Touch pads.
The Child Lock locks the control panel sochildren cannot use the microwave oven when youdo not want them to. This will only work when theoven is in standby mode.
To lock the control panel:
TOUCH
and hold for 5 seconds
Two tones will sound and _1 will appear on the dis-play. When the control panel is locked, 3 tones willsound and LOCK will appear when you touch anypad except for (Exhaust Fan) HIGH/LOW/OFF and(Light) ON/NIGHT/OFF and START/ENTER.
To unlock the control panel:TOUCH
and hold for 5 secondsTwo tones will sound and I°l will be cleared from
the display.
You can set your microwave oven to display yourcommands as you enter them without turning themagnetron on. This feature helps you learn to useyour oven without actually cooking food. This willonly work when the oven is in standby mode.
To set the demo/learning feature:
TOUCH
and hold for 5 seconds
Two tones will sound and a small "d" will appearon the display.
To cancel the demo/learning featuresTOUCH
and hold for 5 seconds
Two tones will sound and the small "d" willdisappear from the display.
13
USING THE COOKING RACK
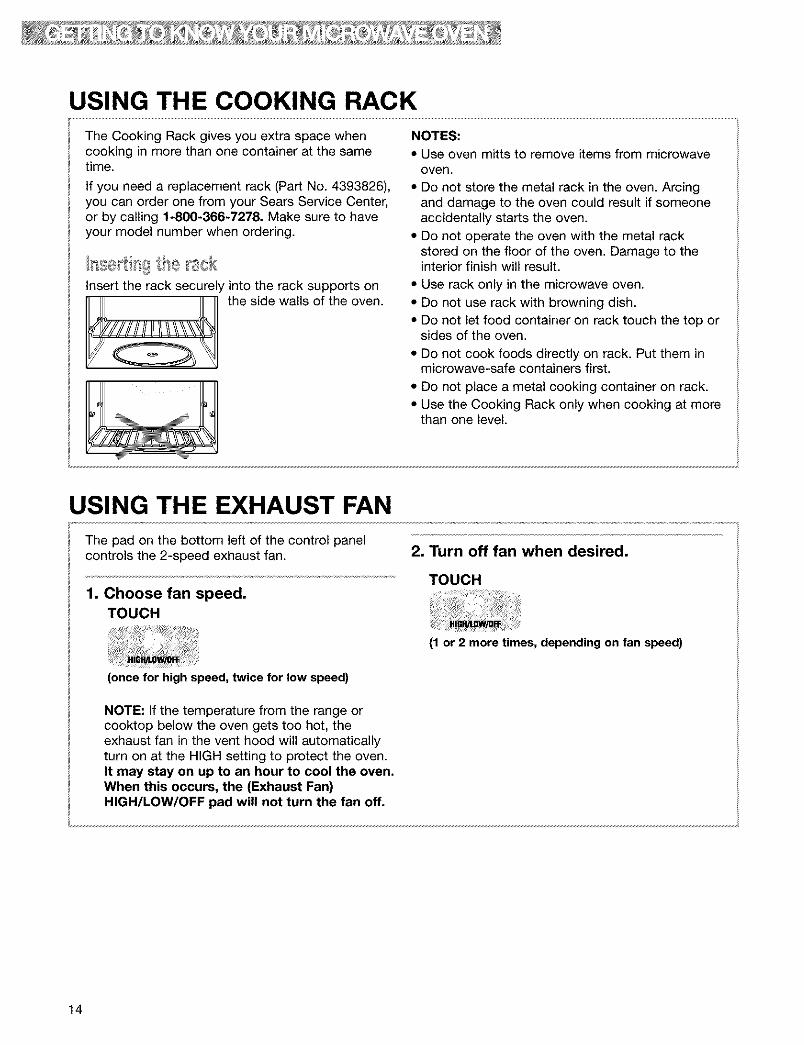
The Cooking Rack gives you extra space whencooking in more than one container at the sametime.
If you need a replacement rack (Part No. 4393826),you can order one from your Sears Service Center,or by calling 1-800-366-7278. Make sure to haveyour model number when ordering.
Insert the rack securely into the rack supports on
the side walls of the oven.
NOTES:
• Use oven mitts to remove items from microwaveoven.
• Do not store the metal rack in the oven. Arcingand damage to the oven could result if someoneaccidentally starts the oven.
• Do not operate the oven with the metal rackstored on the floor of the oven. Damage to theinterior finish will result.
• Use rack only in the microwave oven.
• Do not use rack with browning dish.• Do not let food container on rack touch the top or
sides of the oven.
• Do not cook foods directly on rack. Put them inmicrowave-safe containers first.
• Do not place a metal cooking container on rack.
• Use the Cooking Rack only when cooking at morethan one level.
USING THE EXHAUST FAN
The pad on the bottom left of the control panelcontrols the 2-speed exhaust fan.
1, Choose fan speed,TOUCH
2, Turn off fan when desired,
TOUCH
(1 or 2 more times, depending on fan speed)
(once for high speed, twice for low speed)
NOTE: If the temperature from the range orcooktop below the oven gets too hot, theexhaust fan in the vent hood will automaticallyturn on at the HIGH setting to protect the oven.It may stay on up to an hour to cool the oven.When this occurs, the (Exhaust Fan)HIGH/LOW/OFF pad will not turn the fan off.
14

USING THE COOKTOP/COUNTERTOP LIGHT
The pad on the bottom right of the control panelcontrols the cooktop/countertop light.
1, Turn on light,
TOUCH
2, Turn off light when desired,TOUCH
(1 or 2 times, depending on light setting)
(once for regular light, twice for night light)
SETTING THE CLOCK
When your microwave oven is first plugged in, orafter a power failure, the display will flash ":". if a 2,time of day is not set, ":" will flash until you touchany pad.
NOTES:
• If you touch in an invalid time and touch CLOCK,3 tones will sound. Enter the correct time.
• If you touch OFF/CANCEL while setting the clock,the display will show the last time of day set.
• To turn off the clock, touch CLOCK, Number pad0, and CLOCK again, the set time will disappearand ":" will show on the display.
1. Touch CLOCK.TOUCH YOU SEE
Enter the time of day,
Example for 12:00:TOUCH YOU SEE
3, Complete your entry,
TOUCH
OR
YOU SEE
15
USING THE KITCHEN TIMER
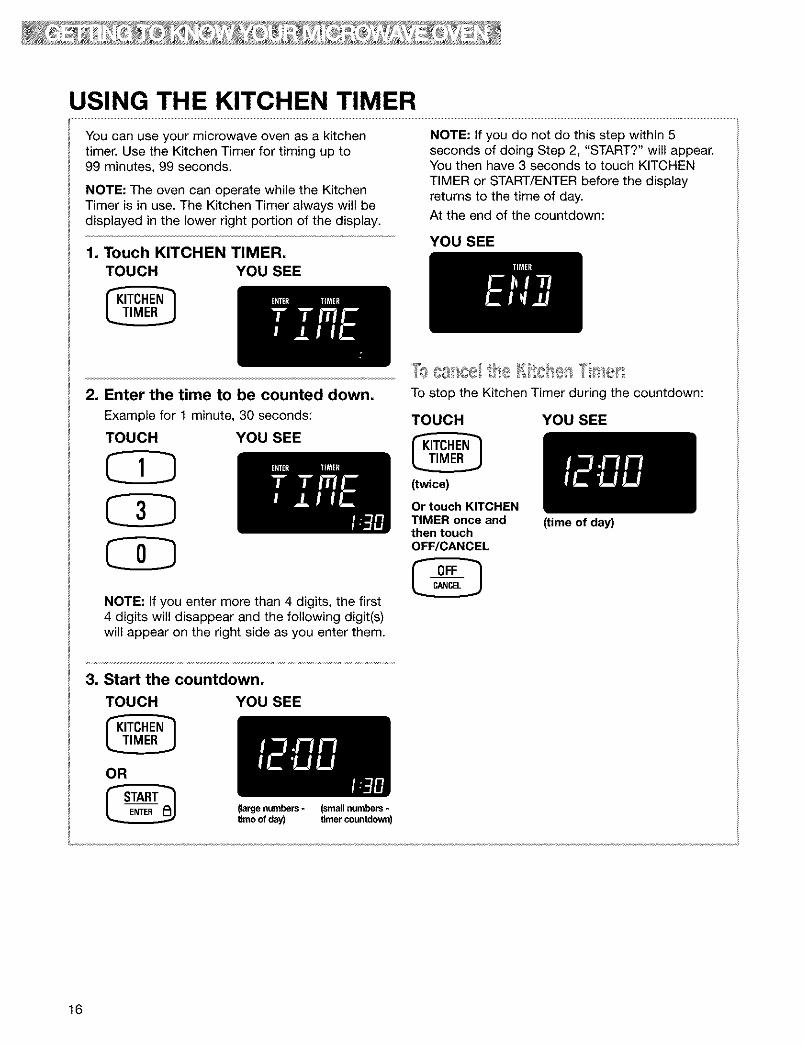
You can use your microwave oven as a kitchentimer. Use the Kitchen Timer for timing up to99 minutes, 99 seconds.
NOTE: The oven can operate while the KitchenTimer is in use. The Kitchen Timer always will bedisplayed in the lower right portion of the display.
1, Touch KITCHEN TIMER,TOUCH YOU SEE
NOTE: If you do not do this step within 5seconds of doing Step 2, "START?" will appear.You then have 3 seconds to touch KITCHENTIMER or START/ENTER before the displayreturns to the time of day.At the end of the countdown:
YOU SEE
2, Enter the time to be counted down.
Example for 1 minute, 30 seconds:
TOUCH YOU SEE
NOTE: If you enter more than 4 digits, the first4 digits will disappear and the following digit(s)will appear on the right side as you enter them.
To stop the Kitchen Timer during the countdown:
TOUCH
(twice)
YOU SEE
Or touch KITCHENTIMER once andthen touchOFF/CANCEL
3, Start the countdown,
TOUCH YOU SEE
OR
{large numbers -Umeofday)
(small numbers -timer countdown)
16
(time of day)
USING ADD ONE MINUTE
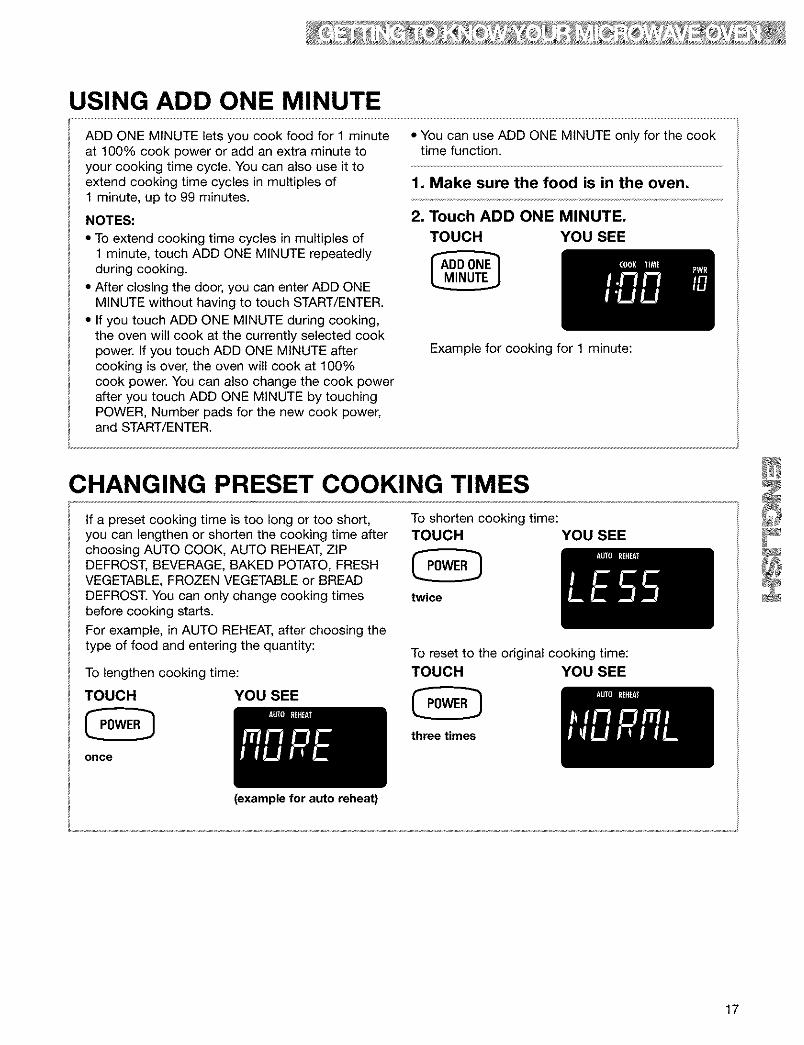
ADD ONE MINUTE lets you cook food for 1 minuteat 100% cook power or add an extra minute toyour cooking time cycle. You can also use it toextend cooking time cycles in multiples of1 minute, up to 99 minutes.
NOTES:
• To extend cooking time cycles in multiples of1 minute, touch ADD ONE MINUTE repeatedlyduring cooking.
• After closing the door, you can enter ADD ONEMINUTE without having to touch START/ENTER.
• If you touch ADD ONE MINUTE during cooking,the oven will cook at the currently selected cookpower. If you touch ADD ONE MINUTE aftercooking is over, the oven will cook at 100%cook power. You can also change the cook powerafter you touch ADD ONE MINUTE by touchingPOWER, Number pads for the new cook power,and START/ENTER.
• You can use ADD ONE MINUTE only for the cooktime function.
1, Make sure the food is in the oven,
2, Touch ADD ONE MINUTE,
TOUCH YOU SEE
Example for cooking for 1 minute:
CHANGING PRESET COOKING TIMES
If a preset cooking time is too long or too short,you can lengthen or shorten the cooking time afterchoosing AUTO COOK, AUTO REHEAT, ZIPDEFROST, BEVERAGE, BAKED POTATO, FRESHVEGETABLE, FROZEN VEGETABLE or BREADDEFROST. You can only change cooking timesbefore cooking starts.
For example, in AUTO REHEAT, after choosing thetype of food and entering the quantity:
To lengthen cooking time:
TOUCH YOU SEE
once
(example for auto reheat)
To shorten cooking time:TOUCH YOU SEE
twice
To reset to the original cooking time:TOUCH YOU SEE
three times
17

Usi Your Microwave OvenThis section gives you instructions for operating each function. Please read these instructionscarefully.
COOKING AT HIGH COOK POWER
1, Put your food in the oven and closethe door,
2, Touch COOK TIME,TOUCH YOU SEE
4, Start the oven,
TOUCH YOU SEE
At the end of the cooking time:
YOU SEE
3, Enter the cooking time,TOUCH YOU SEE
(four tones will sound)
You can change the cooking time any time
during cooking by repeating Steps 2, 3, and 4.
Example for 1 minute, 30 seconds:
COOKING AT DIFFERENT COOK POWERS
For best results, some recipes call for different cookpowers. The lower the cook power, the slower thecooking. Each Number pad also stands for adifferent percentage of cook power. Manymicrowave cookbook recipes tell you by number,percent, or name which cook power to use.
The following chart gives the percentage of cookpower each Number pad stands for, and the cookpower name usually used. It also tells you when touse each cook power. Follow recipe or food pack-age instructions if available.
NOTE: Refer to a reliable cookbook for cookingtimes.
COOK POWER NAME WHEN TO USE IT
10 = 100% of full power High • Quick heating many convenience foods and foods(automatic) with high water content, such as soups, beverages
and most vegetables
90 = 90% of full power • Cooking small tender pieces of meat, ground meat,poultry pieces, and fish fillets
• Heating cream soups
80 = 80% of full power • Heating rice, pasta, or casseroles• Cooking and heating foods that need a cook power
lower than high (for example, whole fish and meat loaf
70 = 70% of full power Medium-High • Reheating a single serving of food
18

COOKING AT DIFFERENT COOK POWERS (CONT.)
COOK POWER NAME WHEN TO USE IT
60 = 60% of full power • Cooking sensitive foods such as cheese and eggdishes, pudding, and custards
• Cooking non-stirrable casseroles, such aslasagna
P5O = 50% of full power Medium • Cooking ham, whole poultry, and pot roasts
• Simmering stews
P4O = 40% of full power • Melting chocolate
• Heating bread, rolls and pastries
P30-DEF = 30% of full Medium-Low, • Defrosting foods, such as bread, fish, meats,power Defrost poultry, and precooked foods
P2O = 20% of full power • Softening butter, cheese, and ice cream
P10-WRM = 10% of full Low • Keeping food warm
power • Taking chill out of fruit
NOTE: Once cook time has been entered you can also use the POWER pad as a second Kitchen Timerby entering "O" for the cook power. The oven will count down the cooking time you set without cooking.
1, Put your food in the oven and closethe door,
2, Touch COOK TIME,
TOUCH YOU SEE
3, Enter the cooking time,TOUCH YOU SEE
CDCDExample for 7 minutes, 30 seconds:
4, Set the cook power,TOUCH YOU SEE
Example for 50% cook power:TOUCH YOU SEE
OR
(repeat until desiredcook power appears)
continued on next page
19
COOKING AT DIFFERENT COOK POWERS (CONT.)
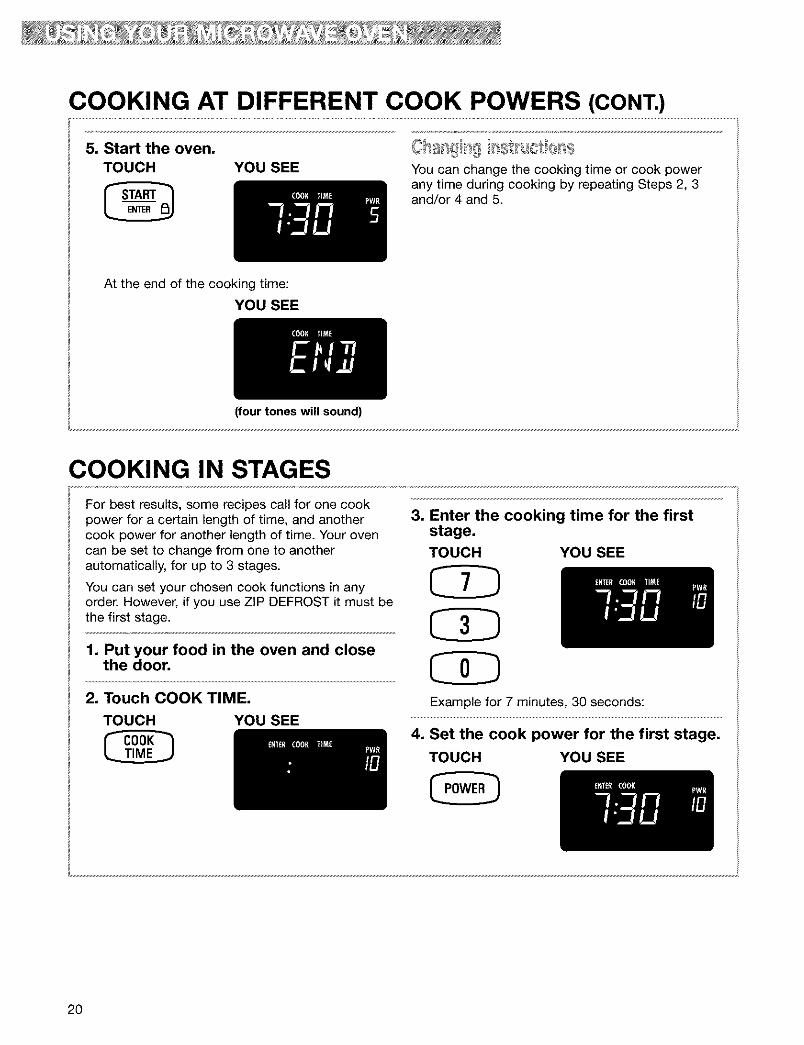
5, Start the oven,TOUCH YOU SEE You can change the cooking time or cook power
any time during cooking by repeating Steps 2, 3and/or 4 and 5.
At the end of the cooking time:
YOU SEE
(four tones will sound)
COOKING IN STAGES
For best results, some recipes call for one cookpower for a certain length of time, and anothercook power for another length of time. Your ovencan be set to change from one to anotherautomatically, for up to 3 stages.
You can set your chosen cook functions in anyorder. However, if you use ZIP DEFROST it must bethe first stage.
1, Put your food in the oven and closethe door,
2, Touch COOK TIME,
TOUCH YOU SEE
3, Enter the cooking time for the firststage,
TOUCH YOU SEE
Example for 7 minutes, 30 seconds:
4, Set the cook power for the first stage,
TOUCH YOU SEE
2O

COOKING IN STAGES (CONT.)
Example for 50% cook power:
TOUCH YOU SEE
OR
(repeat until desiredcook power appears)
5, Repeat Steps 2, 3, and 4 to set thecooking time and cook power foreach additional stage,
6, Start the oven,TOUCH YOU SEE
At the end of the cooking time:YOU SEE
(four tones will sound)
You can change cooking times or cook powers fora stage any time after that stage starts byrepeating Steps 2, 3 and/or 4 and 5.
After the first stage is over, you will hear 2tones. The next stage(s) will count down.
PROGRESS BAR
The display contains a Progress Bar, which indi-cates how far the Auto Cook functions have goneand how much more the functions have to go. Thefull length of the bar represents the estimated run-ning time of the cooking cycle. The Progress Baradvances line by line during a cycle.
The 12 segments on the Progress Bar give anestimate of progress during cooking and show theratio of the time remaining on Auto Cook functions.At the end of the cooking cycle, all 12 segmentswill be lighted.
NOTE: The Progress Bar appears with Auto Cook,Zip Defrost, Auto Reheat and Quick Touch, but notwith Manual Cooking functions.
21
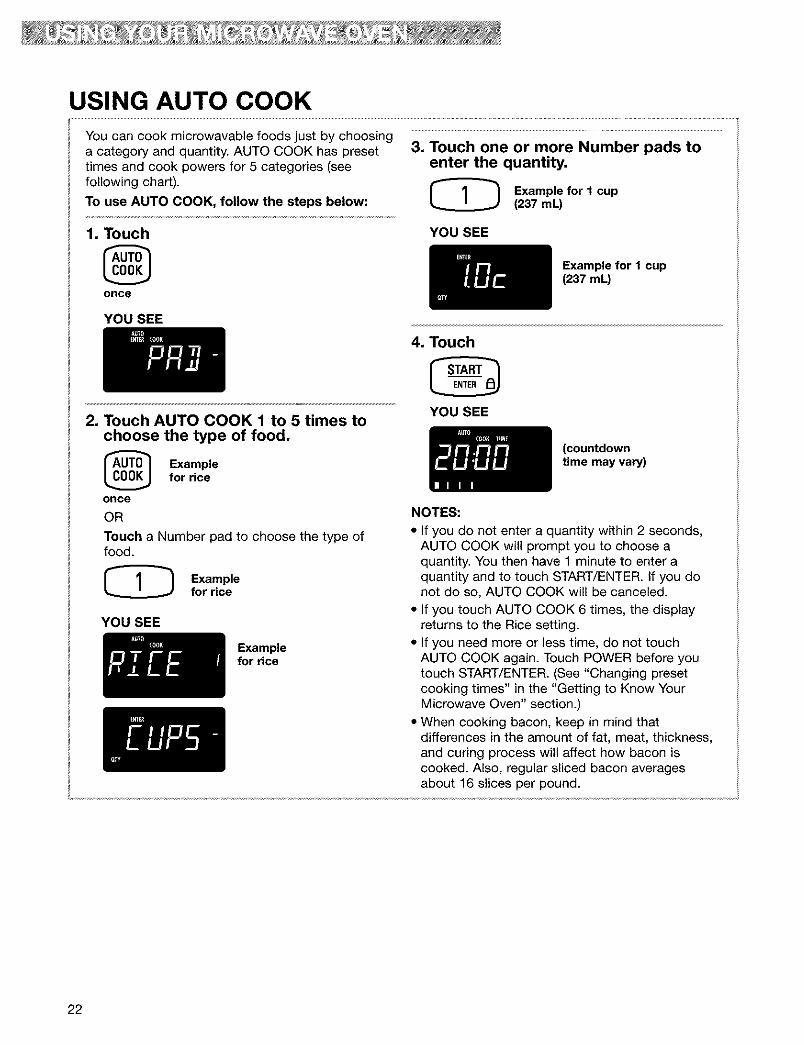
USING AUTO COOK
You can cook microwavable foods just by choosinga category and quantity. AUTO COOK has presettimes and cook powers for 5 categories (seefollowing chart).
To use AUTO COOK, follow the steps below:
3, Touch one or more Number pads toenter the quantity,
Example for 1 cup(237 mE)
1, Touch
once
YOU SEE
Example for 1 cup(237 mL)
YOU SEE
2, Touch AUTO COOK 1 to 5 times tochoose the type of food,
_ Examplefor rice
onceOR
Touch a Number pad to choose the type offood.
Examplefor rice
YOU SEE
Examplefor rice
4, Touch
YOU SEE
(countdowntime may vary)
NOTES:
• If you do not enter a quantity within 2 seconds,AUTO COOK will prompt you to choose aquantity. You then have 1 minute to enter aquantity and to touch START/ENTER. If you donot do so, AUTO COOK will be canceled.
• If you touch AUTO COOK 6 times, the displayreturns to the Rice setting.
• If you need more or less time, do not touchAUTO COOK again. Touch POWER before youtouch START/ENTER. (See "Changing presetcooking times" in the "Getting to Know YourMicrowave Oven" section.)
• When cooking bacon, keep in mind thatdifferences in the amount of fat, meat, thickness,and curing process will affect how bacon iscooked. Also, regular sliced bacon averagesabout 16 slices per pound.
22

USING AUTO COOK (CONT.)This chart shows you how to choose a type of food and the amounts you can choose for each type.
TOUCH OR TOUCH AMOUNTS YOUFOOD AUTO COOK* NUMBER PAD CAN CHOOSE
Rice once 1 0.5, 1, 1.5, or 2 cups**(118 ml, 237 ml, 355 ml, or 473 ml)
Canned Vegetables 2 times 2 1 to 4 cups (237 ml to 946 ml)
Bacon 3 times 3 1 to 6 pieces, average thickness
4 1 to 4 servings
French Toast 5 times 5 1 to 4 pieces
You must touch AUTO COOK once before choosing the food type.
Set 0.5 cup by touching "0" and "5" or only "0" or only "5." Set 1.0 cup by touching "1" and "0" or only "1 ." Set 1.5 cups bytouching "1" and "5". Set 2.0 cups by touching "2" and "0" or only "2".
USING AUTO REHEATYOU SEEYou can reheat microwavable foods just by
choosing a category and quantity. AUTO REHEAThas preset times and cook powers for 5 categories(see following chart).
To use AUTO REHEAT, follow the steps below:
Example forpizza slice
1, Touch
once
YOU SEE 3, Touch a Number pad to enter thequantity.
@ Examplefor 1 slice
2, Touch AUTO REHEAT 1 to 5 times tochoose the type of food,
_ xample forpizza slice
onceOR
Touch a Number pad to choose the type offood.
Example forpizza slice
YOU SEE
Examplefor I slice
23
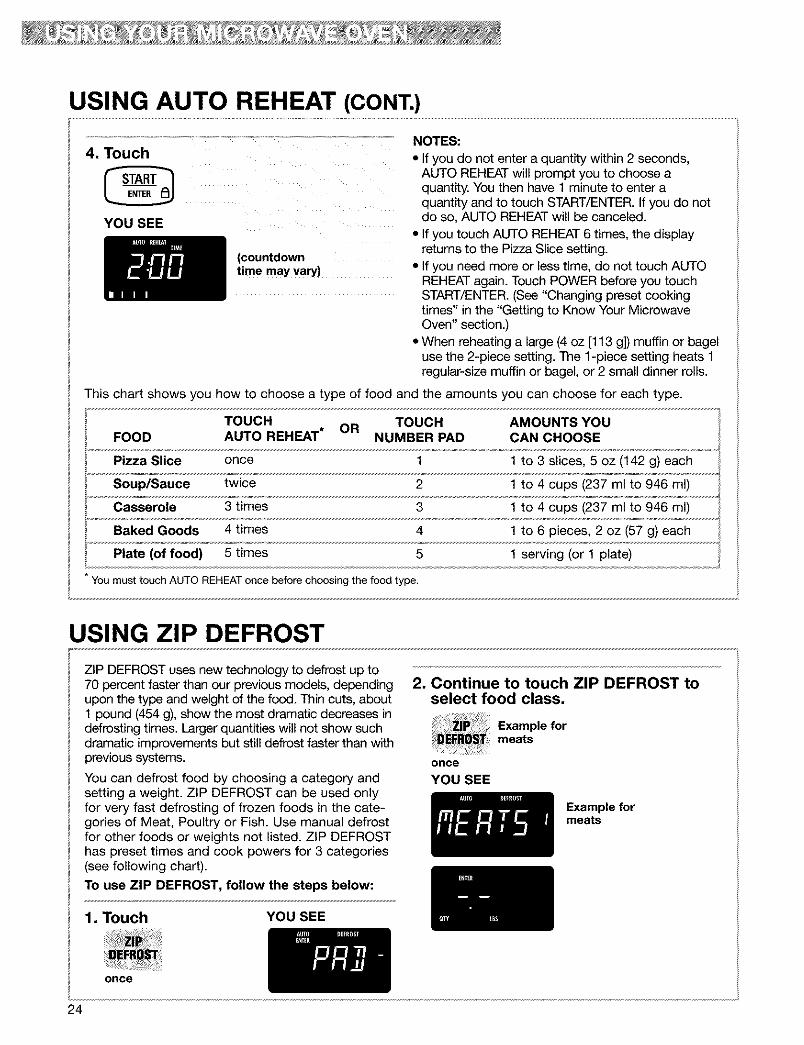
USING AUTO REHEAT (CONT.)
4. Touch
YOU SEE
NOTES:
(countdowntime may vary)
• If you do not enter a quantity within 2 seconds,AUTO REHEAT will prompt you to choose aquantity. You then have 1 minute to enter aquantity and to touch START/ENTER. If you do notdo so, AUTO REHEAT will be canceled.
• If you touch AUTO REHEAT 6 times, the displayreturns to the Pizza Slice setting.
• If you need more or less time, do not touch AUTOREHEAT again. Touch POWER before you touchSTART/ENTER. (See "Changing preset cookingtimes" in the "Getting to Know Your MicrowaveOven" section.)
• When reheating a large (4 oz [113 g]) muffin or bageluse the 2-piece setting. The 1-piece setting heats 1regular-size muffin or bagel, or 2 small dinner rolls.
This chart shows you how to choose a type of food and the amounts you can choose for each type.
TOUCH TOUCH AMOUNTS YOUFOOD AUTO REHEAT* OR NUMBER PAD CAN CHOOSE
Pizza Slice once 1 1 to 3 slices, 5 oz (142 g) each
Soup/Sauce twice 2 1 to 4 cups (237 ml to 946 ml)
Casserole 3 times 3 1 to 4 cups (237 ml to 946 ml)
Baked Goods 4 times 4 1 to 6 pieces, 2 oz (57 g) each
Plate (of food) 5 times 5 1 serving (or 1 plate)
YOUmust touch AUTO REHEAT once before choosing the food type.
USING ZIP DEFROST
ZIP DEFROST uses new technology to defrost up to70 percent faster than our previous models, dependingupon the type and weight of the food. Thin cuts, about1 pound (454 g), show the most dramatic decreases indefrosting times. Larger quantities will not show suchdramatic improvements but still defrost faster than withprevious systems.
You can defrost food by choosing a category andsetting a weight. ZIP DEFROST can be used onlyfor very fast defrosting of frozen foods in the cate-gories of Meat, Poultry or Fish. Use manual defrostfor other foods or weights not listed. ZIP DEFROSThas preset times and cook powers for 3 categories(see following chart).
To use ZIP DEFROST, follow the steps below:
2, Continue to touch ZIP DEFROST toselect food class,
Example formeats
onceYOU SEE
Example formeats
1, Touch YOU SEE
once
24

USING ZIP DEFROST (CONT.)
3. Touch Number pad(s) to enter theweight. Input the correct weight.
[_ Example for1.1 Ibs (0.5 kg)
YOU SEE
Example for1.1 Ibs (0.5 kg)
4. Touch
YOU SEE
(countdowntime may vary)
5. Approximately halfway through thecycle, the oven will beep.
The indicator will say "TURN". Turn food andthen touch START/ENTER. If you don't openthe door and turn the food, the oven will beepand continue defrosting but will take longer todefrost.
NOTES:
• If you do not enter a weight within 2 seconds,ZIP DEFROST will prompt you to enter a weight.You then have 1 minute to enter a weight and totouch START/ENTER. If you do not do so, ZIPDEFROST will be canceled.
• If you enter a weight higher than the highestweight or lower than the lowest weight (0.2 lb.)allowed for your food setting, 3 tones will soundand "RETRY" will appear on the display when youtouch START/ENTER. Then the maximum weightallowed will be displayed.
• If you touch ZIP DEFROST 4 times, the displayreturns to the Meats setting.
• If you need more or less defrosting time, do nottouch ZIP DEFROST again. Touch POWERbefore you touch START/ENTER. (See "Changingpreset cooking times" in the "Getting to KnowYour Microwave Oven" section.)
• See the "Zip defrost chart" later in this sectionfor defrosting directions for each food.
• To defrost items not listed in the "Zip defrostchart," use 30% cook power. Refer to a reliablecookbook for defrosting information.
• The shape of the package affects how quicklyfood will defrost. Shallow packages will defrostmore quickly than a deep block.
• As food begins to defrost, separate the pieces.Separated pieces defrost more evenly.
• Use small pieces of aluminum foil to shield partsof food such as chicken wings, leg tips, fish tails,or areas that start to get warm. Make sure the foildoes not touch the sides, top, or bottom ofthe oven.
This chart shows you how to choose a type of food and the weights you can set for each type.
TOUCH OR TOUCH WEIGHTS YOU CAN SETFOOD ZIP DEFROST* NUMBER PAD (tenths of a pound)
Meats once 1 .2 to 6.6 (91 g to 2994 g)
Poultry twice 2 .2 to 6.6 (91 g to 2994 g)
Fish 3 times 3 .2 to 4.4 (91 g to 1998 g)
You must touch ZIP DEFROST once before choosing the food type.
25
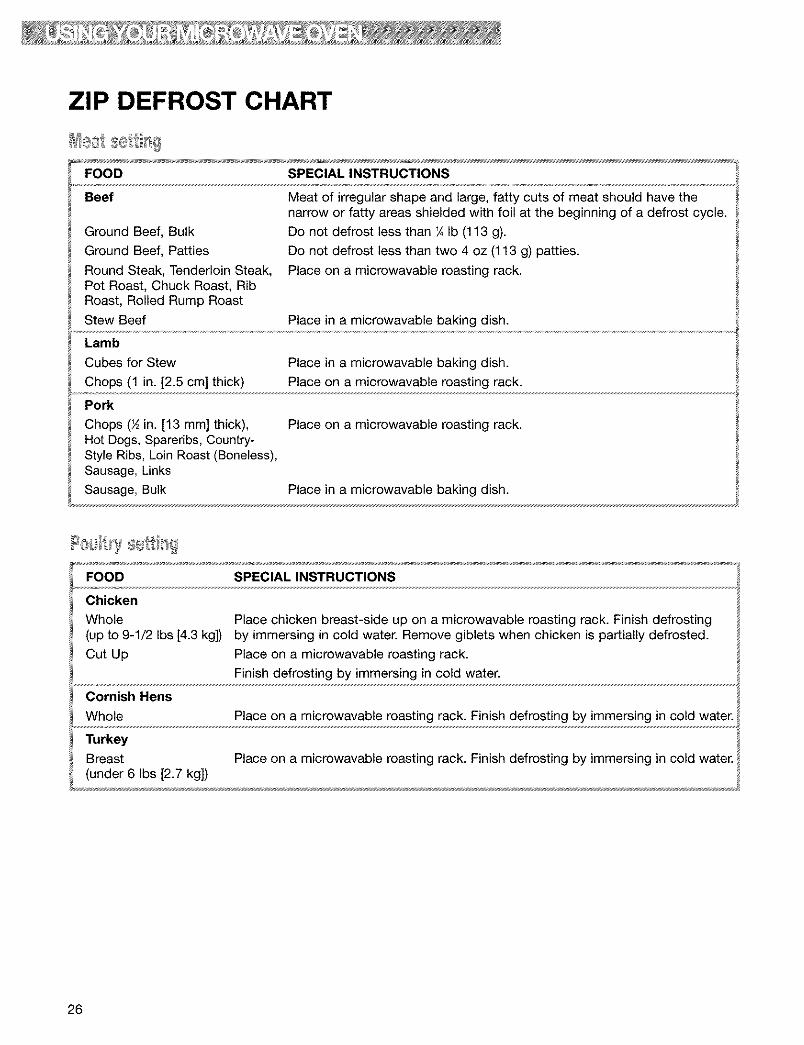
ZIP DEFROST CHART
FOOD SPECIAL INSTRUCTIONS
Beef Meat of irregular shape and large, fatty cuts of meat should have thenarrow or fatty areas shielded with foil at the beginning of a defrost cycle.
Do not defrost less than ¼ Ib (113 g).
Do not defrost less than two 4 oz (113 g) patties.
Place on a microwavable roasting rack.
Ground Beef, Bulk
Ground Beef, Patties
Round Steak, Tenderloin Steak,Pot Roast, Chuck Roast, RibRoast, Rolled Rump Roast
Stew Beef Place in a microwavable baking dish.
Lamb
Cubes for Stew Place in a microwavable baking dish.
Chops (1 in. [2.5 cm] thick) Place on a microwavable roasting rack.
Pork
Chops (½ in. [13 mm] thick), Place on a microwavable roasting rack.Hot Dogs, Spareribs, Country-Style Ribs, Loin Roast (Boneless),Sausage, Links
Sausage, Bulk Place in a microwavable baking dish.
FOOD SPECIAL INSTRUCTIONS
Chicken
Whole Place chicken breast-side up on a microwavable roasting rack. Finish defrosting(up to 9-1/2 Ibs [4.3 kg]) by immersing in cold water. Remove giblets when chicken is partially defrosted.
Cut Up Place on a microwavable roasting rack.
Finish defrosting by immersing in cold water.
Cornish Hens
Whole Place on a microwavable roasting rack. Finish defrosting by immersing in cold water.
Turkey
Breast(under 6 Ibs [2.7 kg])
Place on a microwavable roasting rack. Finish defrosting by immersing in cold water.
26
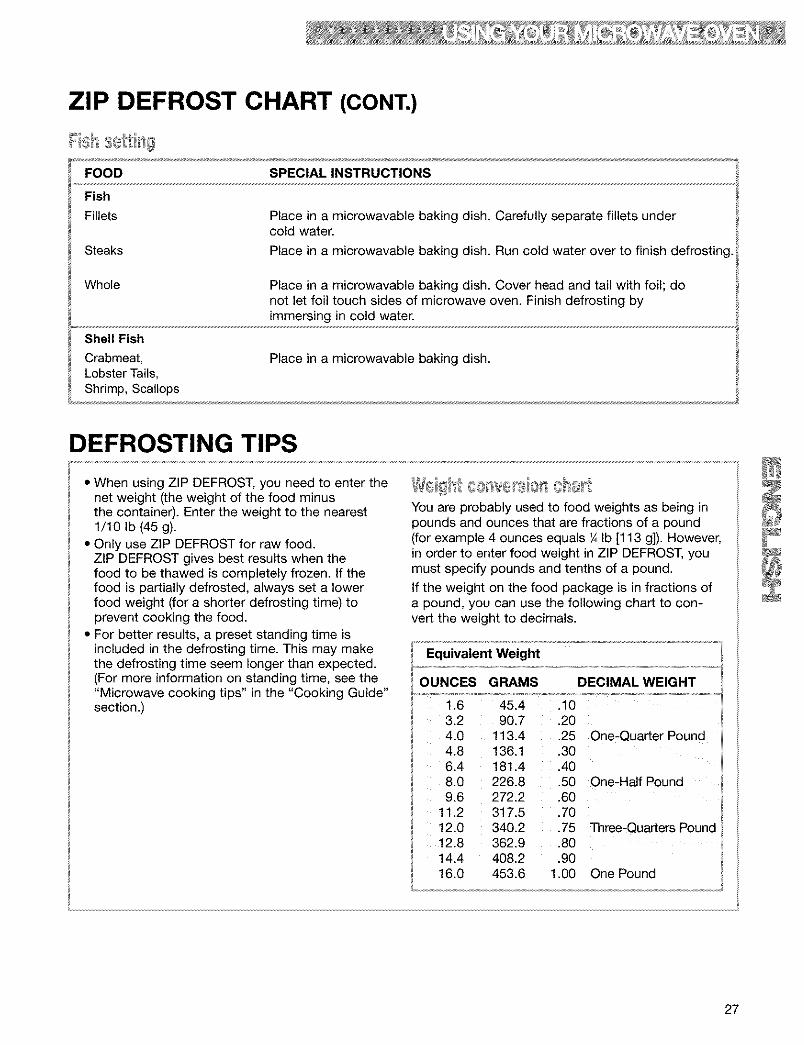
ZIP DEFROST CHART (CONT.)
ish oett g
FOOD
Fish
Fillets
Steaks
SPECIAL INSTRUCTIONS
Place in a microwavable baking dish. Carefully separate fillets undercold water.
Place in a microwavable baking dish. Run cold water over to finish defrosting.
Whole
Shell Fish
Crabmeat,Lobster Tails,Shrimp, Scallops
Place in a microwavable baking dish. Cover head and tail with foil; donot let foil touch sides of microwave oven. Finish defrosting byimmersing in cold water.
Place in a microwavable baking dish.
DEFROSTING TIPS
• When using ZIP DEFROST, you need to enter thenet weight (the weight of the food minusthe container). Enter the weight to the nearest1/10 Ib (45 g).
• Only use ZIP DEFROST for raw food.ZiP DEFROST gives best results when thefood to be thawed is completely frozen. If thefood is partially defrosted, always set a lowerfood weight (for a shorter defrosting time) toprevent cooking the food.
• For better results, a preset standing time isincluded in the defrosting time. This may makethe defrosting time seem longer than expected.(For more information on standing time, see the"Microwave cooking tips" in the "Cooking Guide"section.)
: OO(t%@FS@f_,,,,.,_
You are probably used to food weights as being inpounds and ounces that are fractions of a pound(for example 4 ounces equals ¼ Ib [113 g]). However,in order to enter food weight in ZIP DEFROST, youmust specify pounds and tenths of a pound.
if the weight on the food package is in fractions ofa pound, you can use the following chart to con-vert the weight to decimals.
Equivalent Weight
OUNCES GRAMS DECIMAL WEIGHT
1.6 45.43.2 90.74.0 113.44.8 136.1
6.4 181.48.0 226.89.6 272.2
11.2 317.512.0 340.212.8 362.914.4 408.216.0 453.6
.10
.20
.25 One-Quarter Pound
.30
.40
.50 One-HalfPound
.60
.70
.75 Th_e-QuaAe_ Pound
.80
.901.00 One Pound
27
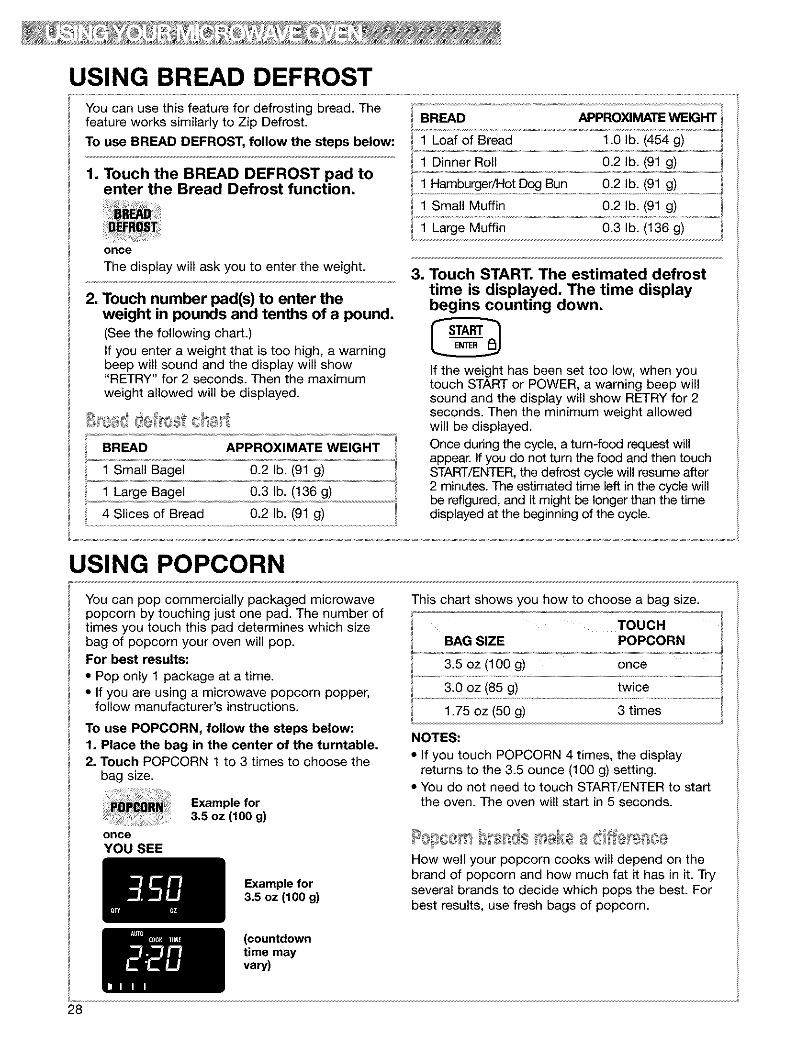
USING BREAD DEFROSTYou can use this feature for defrosting bread. Thefeature works similarly to Zip Defrost.
To use BREAD DEFROST, follow the steps below:
1, Touch the BREAD DEFROST pad toenter the Bread Defrost function,
once
The display will ask you to enter the weight.
2. Touch number pad(s) to enter theweight in pounds and tenths of a pound,(See the following chart.)If you enter a weight that is too high, a warningbeep will sound and the display will show"RETRY" for 2 seconds. Then the maximumweight allowed will be displayed.
BREAD APPROXIMATE WEIGHT
1 Small Bagel 0.2 lb. (91 g)
1 Large Bagel 0.3 lb. (136 g)
4 Slices of Bread 0.2 lb. (91 g)
BREAD APPRO)gMATE WEIGHT
1 Loaf of Bread 1.0 lb. (454 g)
1 Dinner Roll 0.2 lb. (91 g)
1 Hamburger/Hot Dog Bun 0.2 lb. (91 g)
1 Small Muffin 0.2 lb. (91 g)
1 Large Muffin 0.3 lb. (136 g)
, Touch START, The estimated defrosttime is displayed, The time displaybegins counting down.
If the weight has been set too low, when youtouch START or POWER, a warning beep willsound and the display will show RETRY for 2seconds. Then the minimum weight allowedwill be displayed.
Once during the cycle, a turn-food request willappear. If you do not turn the food and then touchSTART/ENTER, the defrost cycle will resume after2 minutes. The estimated time left in the cycle willbe refigured, and it might be longer than the timedisplayed at the beginning of the cycle.
USING POPCORN
You can pop commercially packaged microwavepopcorn by touching just one pad. The number oftimes you touch this pad determines which sizebag of popcorn your oven will pop.For best results:
• Pop only 1 package at a time.• If you are using a microwave popcorn popper,
follow manufacturer's instructions.
To use POPCORN, follow the steps below:1. Place the bag in the center of the turntable.2. Touch POPCORN 1 to 3 times to choose the
bag size.
Example for3.5 oz (100 g)
onceYOU SEE
Example for3.5 oz (100 g)
This chart shows you how to choose a bag size.
TOUCHBAG SIZE POPCORN
3.5 oz (100 g) once
3.0 oz (85 g) twice
1.75 oz (50 g) 3 times
NOTES:
• If you touch POPCORN 4 times, the displayreturns to the 3.5 ounce (100 g) setting.
• You do not need to touch START/ENTER to startthe oven. The oven will start in 5 seconds.
How well your popcorn cooks will depend on thebrand of popcorn and how much fat it has in it. Tryseveral brands to decide which pops the best. Forbest results, use fresh bags of popcorn.
(countdowntime mayvary)
28
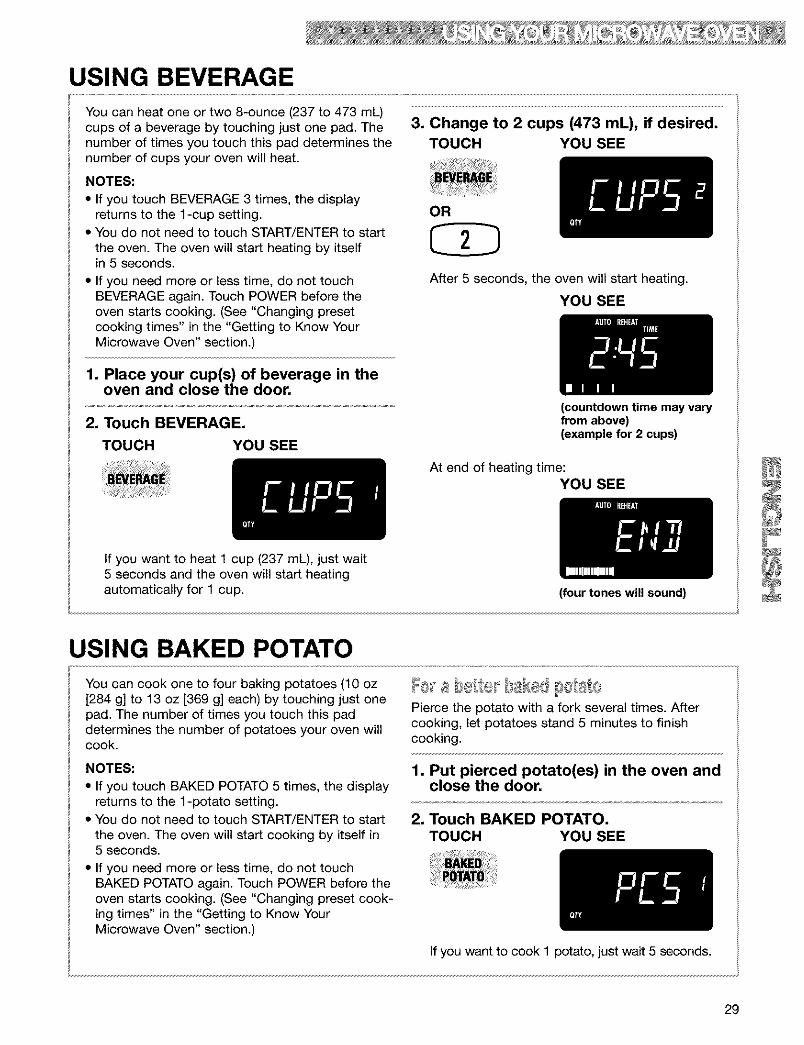
USING BEVERAGE
You can heat one or two 8-ounce (237 to 473 mL)cups of a beverage by touching just one pad. Thenumber of times you touch this pad determines thenumber of cups your oven will heat.
NOTES:
• If you touch BEVERAGE 3 times, the displayreturns to the 1-cup setting.
• You do not need to touch START/ENTER to startthe oven. The oven will start heating by itselfin 5 seconds.
• If you need more or less time, do not touchBEVERAGE again. Touch POWER before theoven starts cooking. (See "Changing presetcooking times" in the "Getting to Know YourMicrowave Oven" section.)
3. Change to 2 cups (473 mL), if desired.TOUCH YOU SEE
OR
After 5 seconds, the oven will start heating.
YOU SEE
1. Place your cup(s) of beverage in theoven and close the door,
2. Touch BEVERAGE.
TOUCH YOU SEE
(countdown time may varyfrom above)(example for 2 cups)
At end of heating time:YOU SEE
If you want to heat 1 cup (237 mL), just wait5 seconds and the oven will start heatingautomatically for 1 cup. (four tones will sound)
USING BAKED POTATO
You can cook one to four baking potatoes (10 oz[284 g] to 13 oz [369 g] each) by touching just onepad. The number of times you touch this paddetermines the number of potatoes your oven willcook.
NOTES:
• If you touch BAKED POTATO 5 times, the displayreturns to the 1-potato setting.
• You do not need to touch START/ENTER to startthe oven. The oven will start cooking by itself in5 seconds.
• If you need more or less time, do not touchBAKED POTATO again. Touch POWER before theoven starts cooking. (See "Changing preset cook-ing times" in the "Getting to Know YourMicrowave Oven" section.)
a b :.tt®bak : drs0tatoPierce the potato with a fork several times. Aftercooking, let potatoes stand 5 minutes to finishcooking.
1. Put pierced potato(es) in the oven andclose the door.
2. Touch BAKED POTATO.TOUCH YOU SEE
If you want to cook 1 potato, just wait 5 seconds.
29

USING BAKED POTATO (CONT.)
3, Change to 2 to 4 potatoes, if desired,
Example for 2 potatoes:
At end of cooking time:
YOU SEE
TOUCH YOU SEE
OR
After 5 seconds, the oven will start cooking.
Example for 2 potatoes:YOU SEE
(countdown time may varyfrom above)
USING FRESH VEGETABLE
You can cook 1 to 4 cups (237 mL to 946 mL) of afresh vegetable by touching just one pad. The num-ber of times you touch this pad determines thenumber of cups your oven will cook.
NOTES:
• If you touch FRESH VEGETABLE 5 times, thedisplay returns to the 1-cup setting.
• You do not need to touch START/ENTER to startthe oven. The oven will start cooking by itselfin 5 seconds.
• If you need more or less time, do not touchFRESH VEGETABLE again. Touch POWER beforethe oven starts cooking. (See "Changing presetcooking times" in the "Getting to Know YourMicrowave Oven" section.)
(four tones will sound)
2, Touch FRESH VEGETABLE,
TOUCH YOU SEE
If you want to cook 1 cup of vegetables, justwait 5 seconds.
1, Put your vegetables in the oven andclose the door,
30
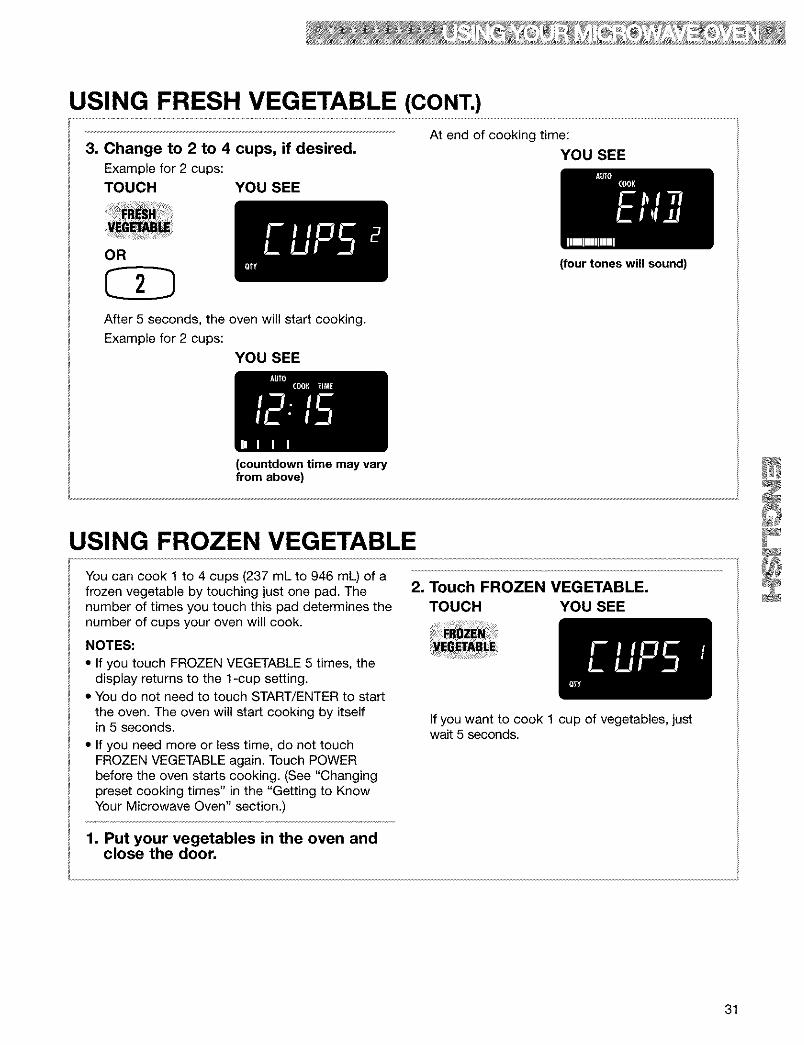
USING FRESH VEGETABLE (CONT.)
3, Change to 2 to 4 cups, if desired,
Example for 2 cups:TOUCH YOU SEE
At end of cooking time:
YOU SEE
OR
After 5 seconds, the oven will start cooking.
Example for 2 cups:YOU SEE
(countdown time may varyfrom above)
USING FROZEN VEGETABLE
You can cook 1 to 4 cups (237 mL to 946 mL) of afrozen vegetable by touching just one pad. Thenumber of times you touch this pad determines thenumber of cups your oven will cook.
NOTES:
• If you touch FROZEN VEGETABLE 5 times, thedisplay returns to the 1-cup setting.
• You do not need to touch START/ENTER to startthe oven. The oven will start cooking by itselfin 5 seconds.
• If you need more or less time, do not touchFROZEN VEGETABLE again. Touch POWERbefore the oven starts cooking. (See "Changingpreset cooking times" in the "Getting to KnowYour Microwave Oven" section.)
(four tones will sound)
2, Touch FROZEN VEGETABLE,
TOUCH YOU SEE
If you want to cook 1 cup of vegetables, justwait 5 seconds.
1, Put your vegetables in the oven andclose the door,
31
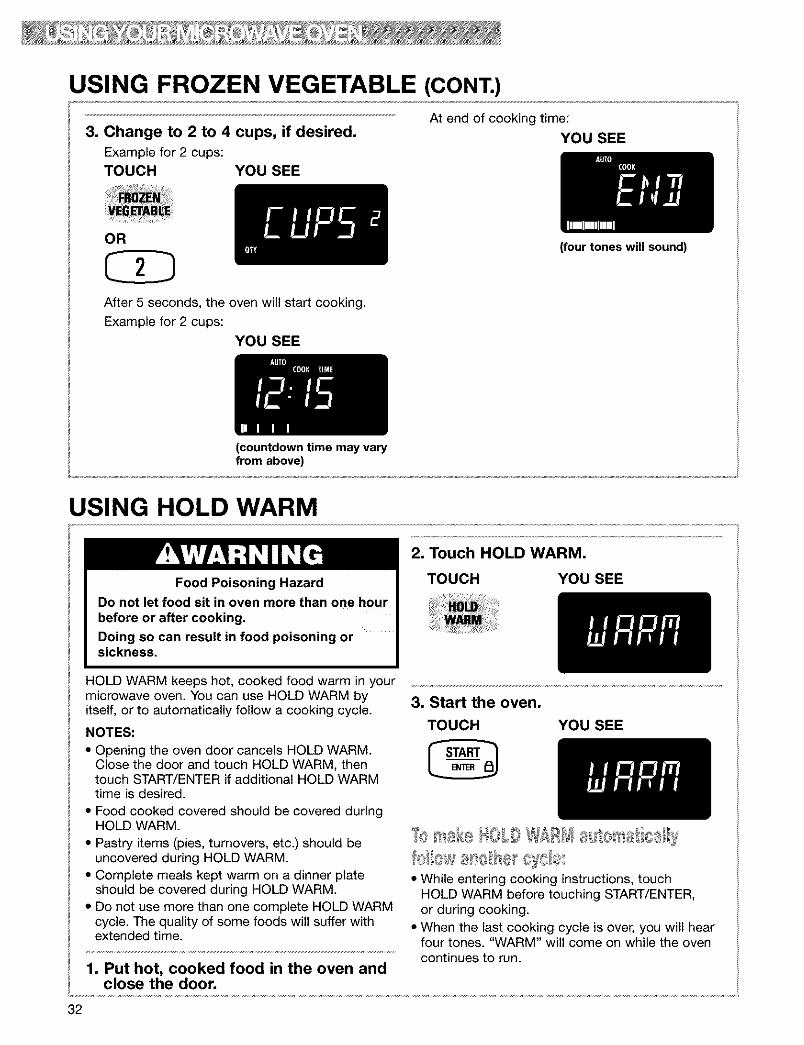
USING FROZEN VEGETABLE (CONT.)
3, Change to 2 to 4 cups, if desired,
Example for 2 cups:
TOUCH YOU SEE
OR
After 5 seconds, the oven will start cooking.
Example for 2 cups:
YOU SEE
(countdown time may varyfrom above)
At end of cooking time:
YOU SEE
USING HOLD WARM
Food Poisoning HazardDo not let food sit in oven more than one hourbefore or after cooking.
Doing so can result in food poisoning orsickness,
(four tones will sound)
2, Touch HOLD WARM,
TOUCH YOU SEE
HOLD WARM keeps hot, cooked food warm in yourmicrowave oven. You can use HOLD WARM byitself, or to automatically follow a cooking cycle.
NOTES:
• Opening the oven door cancels HOLD WARM.Close the door and touch HOLD WARM, thentouch START/ENTER if additional HOLD WARMtime is desired.
3, Start the oven,
TOUCH YOU SEE
• Food cooked covered should be covered duringHOLD WARM.
• Pastry items (pies, turnovers, etc.) should beuncovered during HOLD WARM.
• Complete meals kept warm on a dinner plateshould be covered during HOLD WARM.
• Do not use more than one complete HOLD WARMcycle. The quality of some foods will suffer withextended time.
1, Put hot, cooked food in the oven andclose the door,
cob• While entering cooking instructions, touch
HOLD WARM before touching START/ENTER,or during cooking.
• When the last cooking cycle is over, you will hearfour tones. "WARM" will come on while the ovencontinues to run.
32
Caring for Your Microwaveven
To make sure your microwave oven looks good and works well for a long time, you shouldmaintain it properly. For proper care, please follow these instructions carefully.
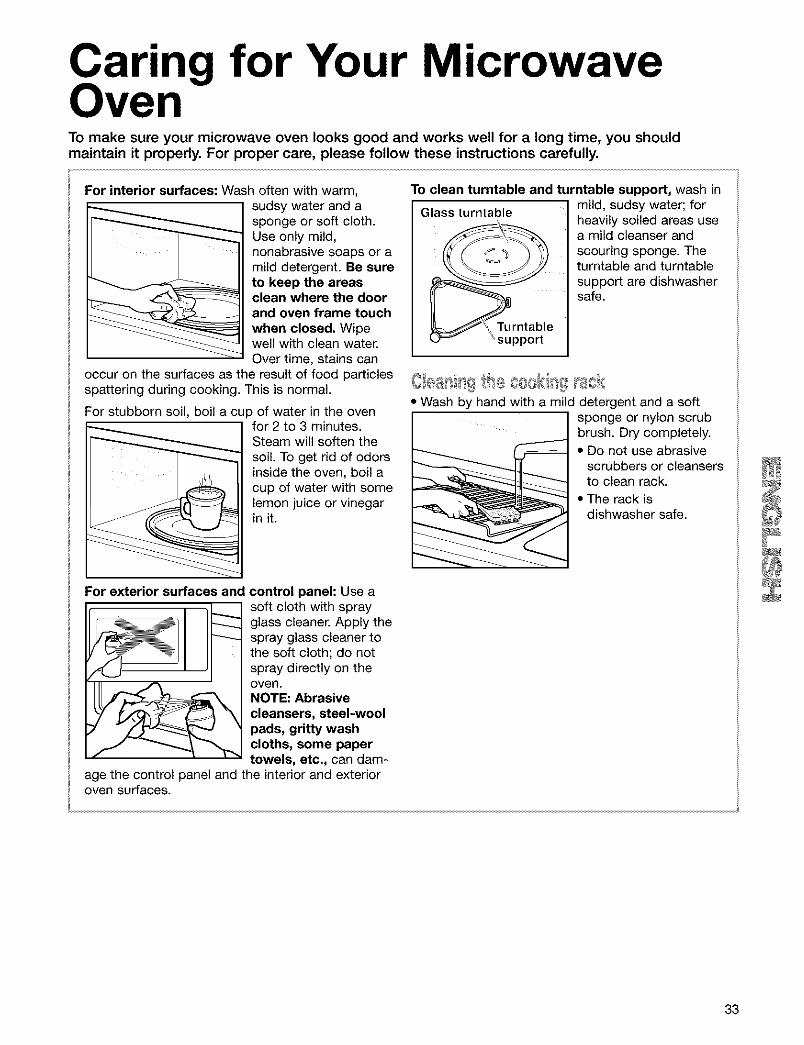
For interior surfaces: Wash often with warm,sudsy water and asponge or soft cloth.Use only mild,nonabrasive soaps or amild detergent. Be sureto keep the areasclean where the doorand oven frame touchwhen closed. Wipewell with clean water.Over time, stains can
occur on the surfaces as the result of food particlesspattering during cooking. This is normal.
For stubborn soil, boil a cup of water in the ovenfor 2 to 3 minutes.Steam will soften thesoil. To get rid of odorsinside the oven, boil acup of water with somelemon juice or vinegarin it.
To clean turntable and turntable support, wash in
Glass turntable mild, sudsy water; forheavily soiled areas usea mild cleanser andscouring sponge. Theturntable and turntablesupport are dishwashersafe.
ipport
• Wash by hand with a mild detergent and a softsponge or nylon scrubbrush. Dry completely.• Do not use abrasive
scrubbers or cleansersto clean rack.
• The rack isdishwasher safe.
For exterior surfaces and control panel: Use asoft cloth with sprayglass cleaner. Apply thespray glass cleaner tothe soft cloth; do notspray directly on theoven.NOTE: Abrasivecleansers, steel-woolpads, gritty washcloths, some papertowels, etc., can dam-
age the control panel and the interior and exterioroven surfaces.
33
INSTALLING AND CARING FOR FILTERS
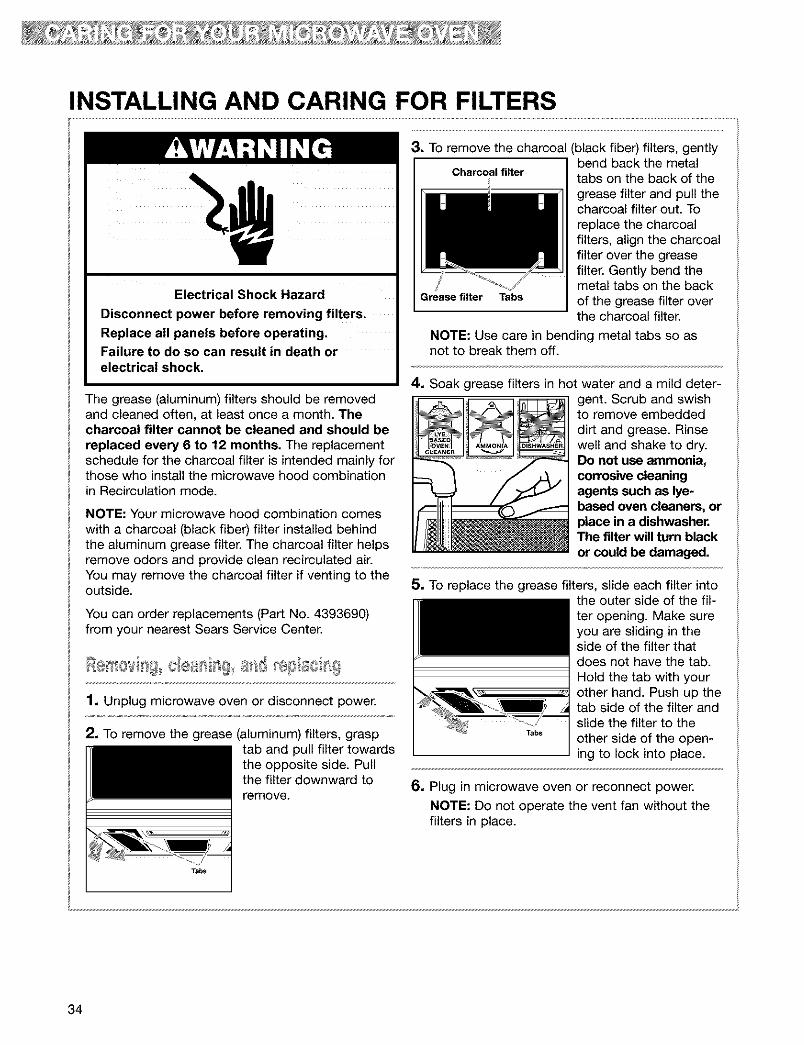
Electrical Shock Hazard
Disconnect power before removing filters.
Replace all panels before operating.Failure to do so can result in death orelectrical shock.
The grease (aluminum) filters should be removedand cleaned often, at least once a month. Thecharcoal filter cannot be cleaned and should bereplaced every 6 to 12 months. The replacementschedule for the charcoal filter is intended mainly forthose who install the microwave hood combinationin Recirculation mode.
NOTE."Your microwave hood combination comeswith a charcoal (black fiber) filter installed behindthe aluminum grease filter. The charcoal filter helpsremove odors and provide clean recirculated air.You may remove the charcoal filter if venting to theoutside.
You can order replacements (Part No. 4393690)from your nearest Sears Service Center.
1• Unplug microwave oven or disconnect power.
2. To remove the grease (aluminum) filters, grasptab and pull filter towardsthe opposite side. Pullthe filter downward toremove.
Tabs
3, To remove the charcoal
I Charcoal filter
Grease filter Tabs
(black fiber) filters, gentlybend back the metaltabs on the back of thegrease filter and pull thecharcoal filter out. Toreplace the charcoalfilters, align the charcoalfilter over the greasefilter. Gently bend themetal tabs on the backof the grease filter overthe charcoal filter.
NOTE." Use care in bending metal tabs so asnot to break them off.
4• Soak grease filters in hot water and a mild deter-gent. Scrub and swishto remove embeddeddirt and grease. Rinsewell and shake to dry.Do not use ammonia,corrosive cleaningagents such as lye-based oven cleaners, orplace in a dishwasher.The filter will turn blackor could be damaged.
5. To replace the grease filters, slide each filter intothe outer side of the fil-ter opening. Make sureyou are sliding in theside of the filter thatdoes not have the tab.Hold the tab with yourother hand. Push up thetab side of the filter andslide the filter to the
T,_, other side of the open-ing to lock into place.
6• Plug in microwave oven or reconnect power.
NOTE." Do not operate the vent fan without thefilters in place.
34
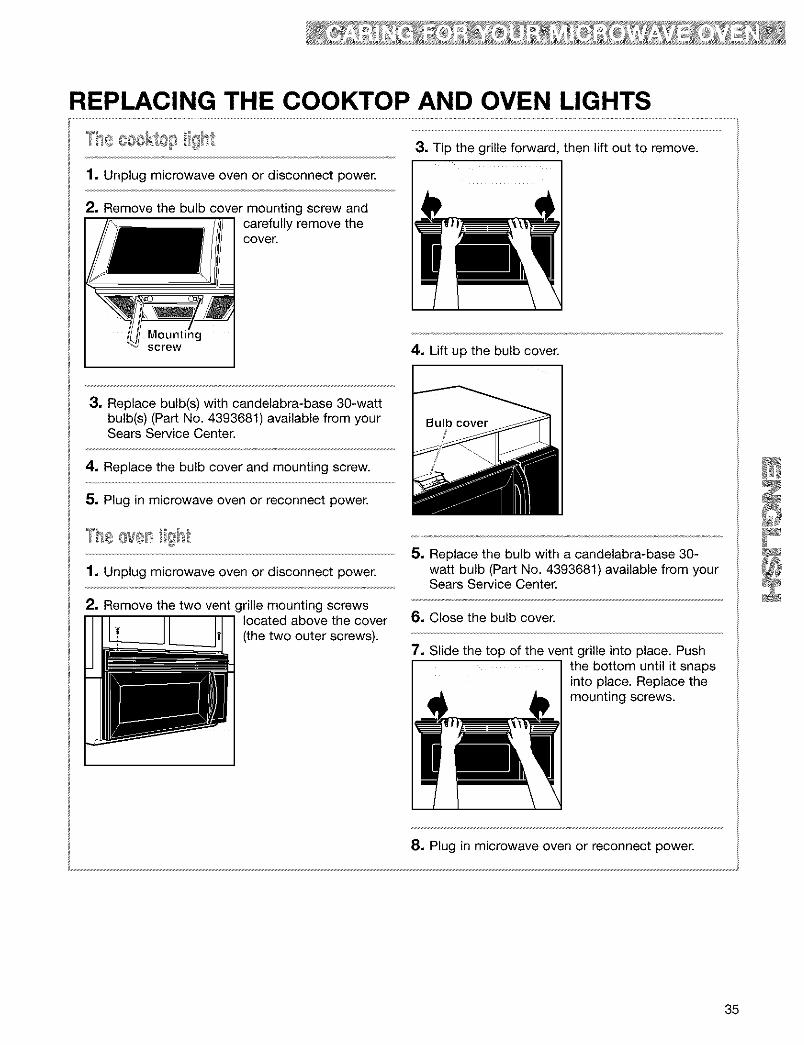
REPLACING THE COOKTOP AND OVEN LIGHTS
1, Unplug microwave oven or disconnect power.
3, Tip the grille forward, then lift out to remove.
I 12, Remove the bulb cover mounting screw and
carefully remove thecover.
Mountingscrew 4. Lift up the bulb cover.
3, Replace bulb(s) with candelabra-base 30-wattbulb(s) (Part No. 4393681) available from yourSears Service Center.
4. Replace the bulb cover and mounting screw.
5. Plug in microwave oven or reconnect power.
1. Unplug microwave oven or disconnect power.
2. Remove the two vent grille mounting screwslocated above the cover(the two outer screws).
5. Replace the bulb with a candelabra-base 30-watt bulb (Part No. 4393681) available from yourSears Service Center.
6. Close the bulb cover.
7, Slide the top of the vent grille into place. Push
I the bottom until it snapsinto place. Replace themounting screws.
8, Plug in microwave oven or reconnect power.
35
Cooking GuideMICROWAVE COOKING TIPS
• If you increase or decrease the amount of foodyou prepare, the time it takes to cook that foodwill also change. For example, if you double arecipe, add a little more than half the originalcooking time. Check for doneness and, ifnecessary, add more time in small increments.
• The lower the temperature of the food beingput into the microwave oven, the longer it takesto cook. Food at room temperature will be re-heated more quickly than food at refrigeratortemperature.
• Food with a lot of fat and sugar will be heatedfaster than food containing a lot of water. Fat andsugar will also reach a higher temperature thanwater in the cooking process.
• The more dense the food, the longer it takes toheat. "Very dense" food like meat takes longer toreheat than lighter, more porous food like spongecakes.
• Smaller pieces of food will cook faster thanlarger pieces. Also, same-shaped pieces cookmore evenly than different-shaped pieces.
• With foods that have different thicknesses, thethinner parts will cook faster than the thickerparts. Place the thinner parts of chicken wingsand legs in the center of the dish.
Itl[[l[l_] IIi_[III!I fOOlS
• Stirring and turning foods spreads heat quicklyto the center of the dish and avoids overcookingat the outer edges of the food.
Cover food to:
• Reduce splattering
• Shorten cooking times
• Keep food moist
You can use any covering that lets microwavespass through. See "Getting to Know YourMicrowave Oven" for materials that microwaves willpass through.
Several foods (for example: baked potatoes,sausages, egg yolks, and some fruits) are tightlycovered by a skin or membrane. Steam canbuild up under the membrane during cooking,causing the food to burst. To relieve the pressureand to prevent bursting, pierce these foodsbefore cooking with a fork, cocktail pick, ortoothpick.
Always allow food to stand after cooking.Standing time after defrosting and cooking allowsthe temperature to evenly spread throughout thefood, improving the cooking results.
The length of the standing time depends onhow much food you are cooking and how denseit is. Sometimes it can be as short as the time ittakes you to remove the food from the oven andtake it to the serving table. However, with larger,denser food, the standing time may be as long as10 minutes.
For best results, place food evenly on the plate. Youcan do this in several ways:
• If you are cooking several items of the samefood, such as baked potatoes, place them in aring pattern for uniform cooking.
• When cooking foods of uneven shapes orthickness, such as chicken breasts, place thesmaller or thinner area of the food towards thecenter of the dish where it will be heated last.
• Layer thin slices of meat on top of each other.
• When you cook or reheat whole fish, score theskin - this prevents cracking.
• Do not let food or a container touch the top orsides of the oven. This will prevent possible arcing.
, I = I@II=111[ 811]"@(@[IMetal containers should not be used in a micro-wave oven. There are, however, some exceptions.If you have purchased food which is prepackagedin an aluminum foil container, refer to theinstructions on the package. When using aluminumfoil containers, cooking times may be longerbecause microwaves will only penetrate the top ofthe food. If you use aluminum containers withoutpackage instructions, follow these guidelines:
36
MICROWAVE COOKING TIPS (CONT.)
• Place the container in a glass bowl and addsome water so that it covers the bottom of thecontainer, not more than ¼ in. (.64 cm) high. Thisensures even heating of the container bottom.
• Always remove the lid to avoid damage to theoven.
• Reheating food in aluminum foil containers usuallytakes up to double the time compared to reheatingin plastic, glass, china, or paper containers. Thetime when food is ready will vary depending uponthe type of container you use.
• Let food stand for 2 to 3 minutes after heating sothat heat is spread evenly throughout container.
• Use only undamaged containers.• DO not use containers taller than s/4in. (1.9 cm). (_'_@{}__=_ }I@1_,_{!i!I@ _1[} _{}! _f_} (} _¢'_*_:,_• Container must be at least half filled.
• To avoid arcing, there must be a minimum ¼ in.(.64 cm) between the aluminum container and thewalls of the oven and also between two alu-minum containers.
• Always place the container on the turntable.
• Do not do canning of foods in the oven. Closedglass jars may explode, resulting in damage to theoven.
• Do not use the microwave oven to sterilize objects(baby bottles, etc.). It is difficult to keep the oven atthe high temperature needed for sterilization.
37
Questions and AnswersQUESTIONS ANSWERS
Can I operate my microwave oven without the No. If you remove or turn over the turntable, youturntable or turn the turntable over to hold a will get poor cooking results. Dishes used inlarge dish? your oven must fit on the turntable.
Can I use a rack in my microwave oven so that I You can use a rack only if the rack is suppliedmay reheat or cook on two levels at a time? with your microwave oven. If you use a rack not
supplied with the microwave oven, you can getpoor cooking performance and/or arcing.
Can I use either metal or aluminum pans in my You can use aluminum foil for shielding (use small,microwave oven? flat pieces), small skewers, and shallow foil trays
(if tray is not taller than _ in. [1.9 cm] deep and halffilled with food to absorb microwave energy).
Never allow metal to touch walls or door.
Is it normal for the turntable to turn in Yes. The turntable rotates clockwise or counter-either direction? clockwise, depending on the rotation of the
motor when the cooking cycle begins.
Sometimes the door of my microwave oven ap- This appearance is normal and does not affect thepears wavy. Is this normal? operation of your oven.
What are the humming noises that I hear when my You may hear the sound of the transformer whenmicrowave oven is operating? the magnetron tube cycles on.
Why does the dish become hot when I microwave As the food becomes hot it will conduct the heatfood in it? I thought that this should not happen, to the dish. Be prepared to use hot pads to
remove food after cooking.
What does "standing time" mean? "Standing time" means that food should beremoved from the oven and covered for additionaltime to allow it to finish cooking. This frees theoven for other cooking.
Why does steam come out of the air exhaust vent? Steam is normally produced during cooking. Themicrowave oven has been designed to vent thissteam out the vents.
Can I pop popcorn in my microwave oven? Yes. Pop packaged microwave popcornHow do I get the best results? following manufacturer's guidelines or use the pre-
set POPCORN pad. Do not use regular paperbags. Use the "listening test" by stopping the ovenas soon as the popping slows to a "pop" every 1to 2 seconds. Do not repop unpopped kernels. Donot pop popcorn in glass cookware.
38

TroubleshootingMost cooking problems often are caused by little things you can find and fix without tools of any kind. Checkthe lists below and on the next page before calling for assistance or service. If you still need help, see theSears toll-free numbers on the back cover.
MICROWAVE OVEN DOES NOT WORK
PROBLEM CAUSE
Nothing works. • The power supply cord is not plugged into a grounded 3 prong outlet.(See the "Electrical requirements" section on page 6 and the "Electricalconnection" section on Page 9.)
• A household fuse has blown or a circuit breaker has tripped.
• The electric company has had a power failure.
The microwave oven • You are using the oven as a timer. Touch OFF/CANCEL to cancel thewill not run. Kitchen Timer.
• The door is not firmly closed and latched.• You did not touch START/ENTER.
• You did not follow directions exactly.• An operation that you set earlier is still running. Touch OFF/CANCEL to
cancel that operation.
COOKING TIMESPROBLEM CAUSE
Food is not cookedenough.
• The electric supply to your home or wall outlets is low or lower than normal.Your electric company can tell you if the line voltage is low. Your electricianor service technician can tell you if the outlet voltage is low.
• The cook power is not at the recommended setting. Check the chart onPage 18.
• You have not allowed enough cooking time for the amount of food beingcooked. Larger amounts of food need longer cooking times.
The display shows a time • The oven door is not closed completely.counting down but the • You have set the controls as a kitchen timer. Touch OFF/CANCEL to canceloven is not cooking, the Kitchen Timer.
39

TURNTABLE
PROBLEM
The turntable willnot turn.
CAUSE
• You have turned off the turntable. (See the "Heating more than one plate offood" section on Page 13.)
• The turntable is not correctly in place. It should be correct-side up andsitting firmly on the center shaft.
• The support is not operating correctly. Remove the turntable and restart theoven. If the support still does not move, call an authorized service technicianfor repair. Cooking without the turntable can give you poor results.
TONES
PROBLEM CAUSE
You do not hear the • You have not entered the correct command.
programming or • You have turned off the tone. (See the "Audible signals" section on Page 12.)end-of-cycle tone.
DISPLAY MESSAGES
PROBLEM CAUSE
The display is flashing " : ". • There has been a power interruption. Reset the clock. (See the "Setting theclock" section on Page 15.)
If none of these items are causing your problem, see the "Sears Toll-Free Numbers" section on Back Cover.
40
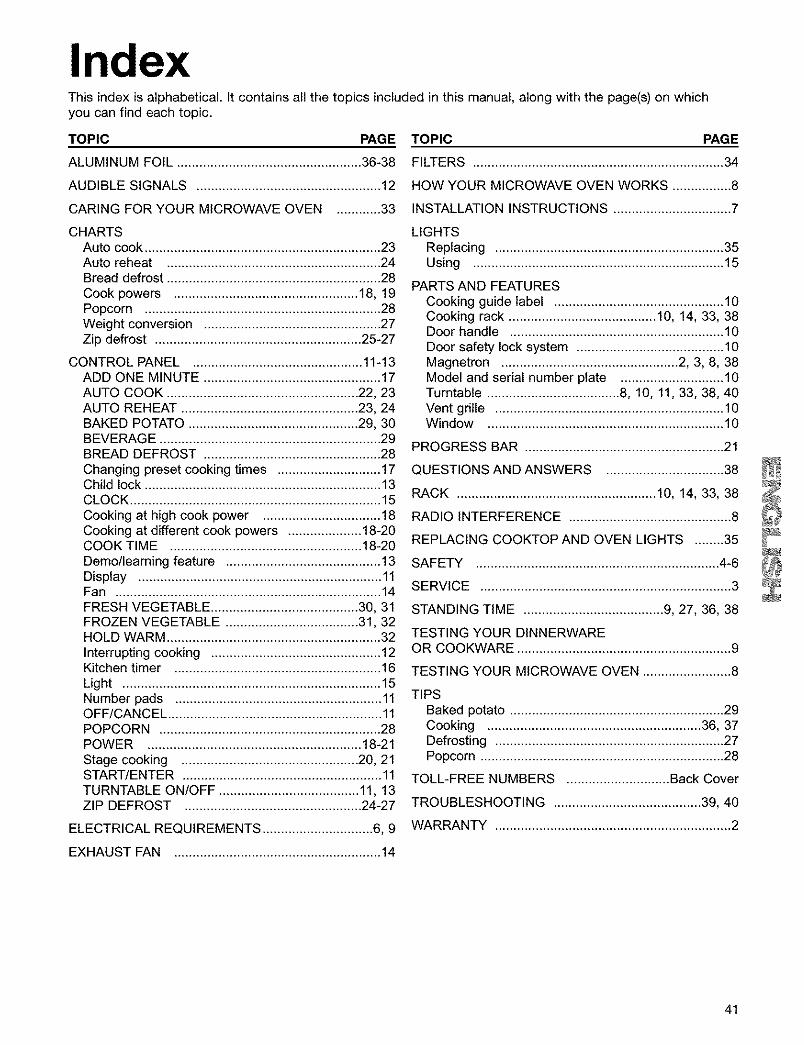
IndexThis index is alphabetical. It contains all the topics included in this manual, along with the page(s) on whichyou can find each topic.
TOPIC PAGE TOPIC PAGE
ALUMINUM FOIL .................................................. 36-38 FILTERS .................................................................... 34
AUDIBLE SIGNALS .................................................. 12 HOW YOUR MICROWAVE OVEN WORKS ................ 8
CARING FOR YOUR MICROWAVE OVEN ............ 33 INSTALLATION INSTRUCTIONS ................................ 7
CHARTSAuto cook ................................................................ 23Auto reheat .......................................................... 24Bread defrost .......................................................... 28Cook powers .................................................. 18, 19Popcorn ................................................................ 28Weight conversion ................................................ 27Zip defrost ........................................................ 25-27
CONTROL PANEL .............................................. 11-13ADD ONE MINUTE ................................................ 17AUTO COOK .................................................... 22, 23AUTO REHEAT ................................................ 23, 24BAKED POTATO .............................................. 29, 30BEVERAGE ............................................................ 29BREAD DEFROST ................................................ 28Changing preset cooking times ............................ 17Child lock ................................................................ 13CLOCK .................................................................... 15Cooking at high cook power ................................ 18Cooking at different cook powers .................... 18-20COOK TIME .................................................... 18-20Demo/learning feature .......................................... 13Display .................................................................. 11Fan ........................................................................ 14FRESH VEGETABLE ........................................ 30, 31FROZEN VEGETABLE .................................... 31, 32HOLD WARM .......................................................... 32Interrupting cooking .............................................. 12Kitchen timer ........................................................ 16Light ...................................................................... 15Number pads ........................................................ 11OFF/CANCEL .......................................................... 11POPCORN ............................................................ 28POWER .......................................................... 18-21Stage cooking ................................................ 20, 21START/ENTER ...................................................... 11TURNTABLE ON/OFF ...................................... 11, 13ZIP DEFROST ................................................ 24-27
ELECTRICAL REQUIREMENTS .............................. 6, 9
LIGHTSReplacing .............................................................. 35Using .................................................................... 15
PARTS AND FEATURESCooking guide label .............................................. 10Cooking rack ........................................ 10, 14, 33, 38Door handle .......................................................... 10Door safety lock system ........................................ 10Magnetron ................................................ 2, 3, 8, 38Model and serial number plate ............................ 10Turntable .................................... 8, 10, 11, 33, 38, 40Vent gdlle .............................................................. 10Window ................................................................ 10
PROGRESS BAR ...................................................... 21
QUESTIONS AND ANSWERS ................................ 38
RACK ...................................................... 10, 14, 33, 38
RADIO INTERFERENCE ............................................ 8
REPLACING COOKTOP AND OVEN LIGHTS ........35
SAFETY .................................................................. 4-6
SERVICE .................................................................... 3
STANDING TIME ...................................... 9, 27, 36, 38
TESTING YOUR DINNERWAREOR COOKWARE .......................................................... 9
TESTING YOUR MICROWAVE OVEN ........................ 8
TIPSBaked potato .......................................................... 29Cooking .......................................................... 36, 37Defrosting .............................................................. 27Popcorn .................................................................. 28
TOLL-FREE NUMBERS ............................ Back Cover
TROUBLESHOOTING ........................................ 39, 40
WARRANTY ................................................................ 2
EXHAUSTFAN ........................................................ 14
41

42

43

f •Ind,ce demateriasGarantia .................................................................... 44Servicio de Sears ..................................................... 45
Seguridad del homo de microondas ..................... 46Instrucciones para la instalacibn ........................... 49Conozca su horno de microondas ......................... 51
C6mo funciona su homo de microondas ............. 51
Interferencia electromagn6tica ............................. 51C6mo probar su homo de microondas ................ 51C6mo probar su vajilla o sus utensilios de cocina..52Consejos para el funcionamiento ......................... 52Conexi6n el_ctrica ................................................ 52Caracterlsticas del homo de microondas ............ 53
Caracterlsticas del panel de control ..................... 54C6mo utilizar la parrilla de cocci6n ...................... 57C6mo utilizar el extractor de aire ......................... 57
C6mo utilizar la luz de la superficiede cocci6n/mostrador .......................................... 58
C6mo poner el reloj a la hora ............................... 58C6mo utilizar el temporizador de cocina .............. 59C6mo utilizar ADD ONE MINUTE(agregar un minuto) ............................................... 60C6mo cambiar los tiempos prefijados de cocci6n...60
C6mo usar su horno de microondas ..................... 61Cocci6n a intensidad alta ..................................... 61Cocci6n a distintas intensidades .......................... 62Cocci6n por etapas .............................................. 64Barra indicadora de progreso ............................... 65C6mo utilizar AUTO COOK (cocci6n autom&tica)..65C6mo utilizar AUTO REHEAT(recalentamiento automatico) ............................... 67C6mo utilizar ZIP DEFROST(descongelaci6n veloz) ......................................... 68Cuadro para ZIP DEFROST(descongelaci6n veloz) ......................................... 70Consejos para la descongelaci6n ........................ 71C6mo utilizar BREAD DEFROST(descongelaci6n de pan) ....................................... 72C6mo utilizar POPCORN (palomitas de maiz)......72C6mo utilizar BEVERAGE (bebidas) ..................... 73C6mo utilizar BAKED POTATO (papas al horno)..74C6mo utilizar FRESH VEGETABLE(verdura fresca) ..................................................... 75C6mo utilizar FROZEN VEGETABLE(verdura congelada) .............................................. 76C6mo utilizar HOLD WARM (mantener caliente)..77
Cuidado de su horno de microondas .................... 78
Instalaci6n y cuidado de los filtros ....................... 79Cambio de las luces del homo yde la superficie de cocci6n ................................... 80
Guia para cocinar .................................................... 81
Preguntas y respuestas .......................................... 83Diagnbstico y solucibn de problemas ................... 84indice ......................................................................... 86
Servicio t_cnico .................................. Contraportada44
Garantia delhorno demicroondasGARANT|A COMPLETA DE UN AI IOPARA EL HORNO DE MICROONDASDurante un ado a partir de la fecha de compra, si estehomo de microondas Kenmore fallara debido a defec-tos en el material o la mano de obra, Sears Ioreparargt sin costo alguno.
GARANT|A COMPLETA DE CINCOAI IOS PARA EL MAGNETRON
Durante cinco a_os a partir de la fecha de compra, siel magnetr6n de este homo de microondas Kenmorefallara debido a defectos en el material o la mano deobra, Sears Io reparar& sin costo alguno.
La cobertura de la garantia antes citada correspondes61o a hornos de microondas, cuyo uso es para finesdom_sticos privados.
EL SERVICIO DE LA GARANTiA ESTA ASU DISPOSICI6N CON TAN S6LO PONERSE ENCONTACTO CON LA TIENDA O EL CENTRO DESERVICIO SEARS MAS CERCANO EN LOSESTADOS UNIDOS.
Esta garantia tiene vigor Qnicamente mientras esteproducto sea utilizado en los Estados Unidos.
Esta garantia le otorga derechos legales especificos yquiz_s usted tenga tambien otros derechos, loscuales pueden variar de estado a estado.
Seam, Roebuck and Co.,Dept. 817WA,Hoffman Estates, IL 60179
Para pedir servicio t_cnico Ilame ah1-888-SU-HOGARSM(1-888-784-6427)
Per favor anote la informacibn acercadel modelo de su electrodom stico.Siempre que Ilame para solicitar servicio t_cnico parasu electrodom_stico, usted necesitar& saber losnQmeros completos del modelo y de la serie. Ustedpodra encontrar esta informaci6n en la placa/etiquetacon los nQmeros del modelo y de la serie (yea"Caracteristicas del homo de microondas" en la sec-ci6n "Conozca su homo de microondas'). Asimismo,anote la informaci6n que se indica a continuaci6n.
Nt_mero del modelo
Nt_mero de la serie
Fecha de compra

Servicio de Sears"Reparamos Io que vendemos""Reparamos Io que vendemos" es nuestra garantla de que usted puede confiar en Sears para obtener serviciot6cnico porque el Servicio t6cnico de Sears esta en todo el paJs.
Su homo de microondas Kenmore de Sears adquiere un nuevo valor cuando usted considera que Sears tieneuna unidad de servicio t6cnico en su Iocalidad, la cual est& equipada con profesionales de servicio t6cnicocompetentes, capacitados especMcamente en homos de microondas Kenmore de Sears y cuentan con laspartes, herramientas y equipo para asegurar de que cumplamos nuestra promesa hecha a usted de que"Reparamos Io que vendemosF
Para realzar el valor de su horno de microondas,adquiera un contrato de mantenimiento Sears.Los hornos de microondas Kenmore de Sears se hart disedado, fabricado y sometido a prueba para brindarados de funcionamiento confiable. No obstante, cualquier electrodom6stico modemo puede necesitar serviciot6cnico de vez en cuando. El contrato de mantenimiento Sears es mucho masque una extensi6n de la garan-tla. Le ofrece una protecci6n completa contra facturas de reparaci6n inesperadas e inconveniencias indebidas.Le garantiza el m&ximo rendimiento de su homo de microondas.
He aquJ un cuadro comparativo de la Garantla y el Contrato de Mantenimiento, que le muestra los beneficiosde un contrato de mantenimiento Sears para su homo de microondas.
AI_IOS DE COBERTURA PARA EL PROPIETARIO
Reemplazo de piezas defectuosas, a excepci6n del magnetr6n
Reemplazo del magnetr6n
Revisi6n anual de mantenimiento preventivo a solicitud suya
G - GARANTIA
CM - CONTRATO DE MANTENIMIENTO
P6ngase en contacto con el representante de Sears o el Centro de Servicio Sears de su Iocalidad y adquieraun Contrato de mantenimiento Sears.
1° AI_IO 2° AL 5° AI_IO
G CM
G G
CM CM
Guarde este manual y el comprobante de ventas juntos en un lugar seguropara referencia en el futuro.
45

Seguridad del horno demicroondas
Su seguridad y la seguridad de los demos es muy importante.
Hemos incluido muchos mensajes importantes de seguridad en este manual yen su etectrodomestico.Lea y obedezca siempre todos los mensajes de seguridad.
Este es el simboto de advertencia de seguridad.Este simbolo te llama ta atenci6n sobre peligros potenciales que pueden ocasionar la muerteo una lesi6n a usted y a los demas.Todos los mensajes de seguridad iron a continuaci6n del simbolo de advertencia deseguridad y de la palabra "PELIGRO" o "ADVERTENCIA". Estas palabras significan:
Si no sigue las instrucciones de inmediato,usted puede morir o sufrir una lesibn grave.
Si no sigue las instrucciones, usted puedemorir o sufrir una lesibn grave.
Todos los mensajes de seguddad le diran el peligro potencial, te diran c6mo reducir las posibilidades desufrir una lesi6n y Io que puede suceder si no se siguen las instrucciones.
INSTRUCCIONES IMPORTANTES DE SEGURIDADCuando se usan aparatos etectrodomesticos, deben tomarse precauciones de seguridad, incluyendo lassiguientes:
ADVERTENCIA: Para reducir el riesgo dequemaduras, choques electricos, fuego, dafios per-sonales o exposici6n a energia excesiva demicroondas:
•' Lea todas las instrucciones antes de usar et homode microondas.
• Lea y siga las "PRECAUCIONES PARA EVITARLA POSIBLE EXPOSICION A ENERGfA •EXCESIVA DE MICROONDAS "especificasque se encuentran en esta secci6n.
• El horno de microondas debe estar conectado a •tierra. El enchufe se debe conectar a un tomacorri-ente con conexi6n a tierra. Vea "INSTRUCCIONESPARA CONEXION A TIERRA" en esta secci6n y •en las instrucciones de instalaci6n proporcionadas.
• Instale o ubique et homo de microondas s6to deacuerdo alas instrucciones para instalaci6nproporcionadas. •
• Atgunos productos tales como huevos enteros conla cascara y recipientes herm6ticos - por ejemplo,frascos de vidrio cerrados - pueden explotar y nodeben calentarse en el homo de microondas.
Use et homo de microondas s61amente como sedescribe en este manual. No use productosquimicos o vapores corrosivos en el homo demicroondas. Este tipo de homo est_ especifica-mente diseSado para calentar, cocinar odeshidratar alimentos. Este no est_ diseSado parauso industrial o de laboratorio.
Lo mismo que con cualquier aparatoelectrodomestico, es necesario supervisar decerca si 1ousan los ni_os.
No opere et horno de microondas si el cable o elenchufe est_n daSados, si el homo no funcionacorrectamente o si se ha daSado o caido.
El homo de microondas debe ser revisado yreparado s61o por personal tecnico calificado.Llame una compafiia de servicio autorizada parael examen, reparaci6n y ajuste.
Vea las instrucciones para limpieza de la puerta enla secciSn "Cuidado de su homo de microondas".
GUARDE ESTAS INSTRUCCIONES
46

INSTRUCCIONES IMPORTANTES DE SEGURIDAD• Para reducir el riesgo de incendio en la cavidad
del homo:
- No recocine los alimentos. Preste cuidadosaatenci6n al homo si usa papet, plastico u otromaterial combustible dentro del homo parafacilitar la cocci6n.
- Quite las ataduras de alambre de las bolsas depapel o plAstico antes de ponerlas en et homo.
- Si algQn elemento se prende fuego dentro delhomo, mantenga la puerta cerrada, apague elhomo y desenchOfelo o corte la corriente con losfusibles o el disyuntor.
- No use la cavidad para guardar cosas. No dejeproductos de papel, utensilios de cocina oalimentos en la cavidad cuando no estA en uso.
• Se adapta para el uso tanto sobre cocinas a gascomo electricas.
• Destinado para usarse sobre cocinas de unaanchura maxima de 36 pulgadas (91 cm).
• Limpie con frecuencia las salidas de aire de lacampana extractora - no permita que se acumulegrasa en la campana o en el filtro.
• No hay que introducir alimentos o utensilios demetal demasiado grandes en el homo demicroondas debido a que pueden ocasionar unincendio o riesgo de choque el6ctrico.
• No limpie con esponjas de lana de acero. Lasfibras de la esponja pueden desprenderse y tocarlas piezas el6ctricas originando un riesgo dechoque el6ctrico.
• No use articulos de papel mientras la operaci6ndel homo esta en el modo "Pan Brown" (Doradoen la sart_n).
• No almacene ningOn material en el homo cuandono est6 en uso, salvo los accesoriosrecomendados por el fabricante.
• No ponga nada directamente sobre el homo demicroondas cuando 6ste esta funcionando.
• Cuando flamee alimentos debajo de la campana,encienda el ventilador.
• Tenga cuidado al limpiar el filtro de la campanaextractora. Los agentes de limpieza corrosivos,tales como productos para limpieza de hornos conlejfa, pueden dadar el filtro.
• No cubra o bloquee ninguna abertura en el homode microondas.
• No guarde el homo de microondas a taintemperie. No use el horno de microondas cercadel agua - por ejemplo, cerca det fregadero en lacocina, en un s6tano hOmedo o cerca de unaalberca o lugares similares.
• No sumerja el cable o el enchufe en agua.
• Mantenga el cable alejado de superficies calientes.
• No deje que el cable cuelgue del borde de unamesa o mostrador.
• No monte el horno sobre un fregadero.
• Nunca cubra la parrilla o cualquier otro accesoriocon papel metAlico. Esto puede recalentar el horno.
GUARDE ESTAS INSTRUCCIONES
PRECAUCIONES PARA EVITAR LA POSIBLEEXPOSlClON A ENERGiA EXCESlVA DEMICROONDAS(a) No intente operar este homo con la puerta abier-
ta ya que esto puede resultar en exposici6nnociva a energfa de microondas. Es importanteno forzar o tocar las trabas de seguridad.
(b) No ponga ningOn objeto entre la cara frontal dethomo y la puerta y no permita que se acumulesuciedad o residues de limpiadores en lassuperficies de sellado.
(c) No opere el homo si este estA daSado. Es par-ticularmente importante que la puerta det homocierre correctamente y que no hayadaSo en:
(1) La puerta (torcida),
(2) Bisagras y seguros (rotos o flojos),
(3) Sellado de la puerta y superficies de sella-do.
(d) El homo no debe ser ajustado o reparado pornadie, excepto personal de servicio calificado.
47
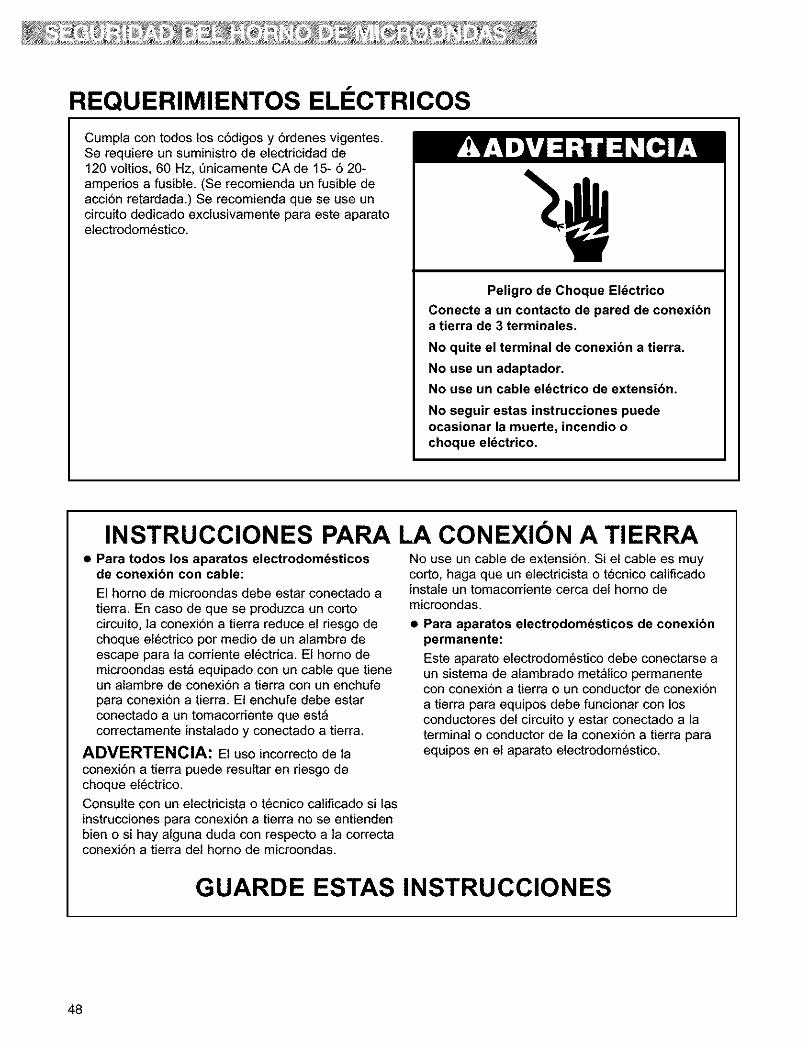
REQUERIMIENTOS ELI CTRICOS
Cumpla con todos los c6digos y 6rdenes vigentes.Se requiere un suministro de electdcidad de120 voltios, 60 Hz, Qnicamente CA de 15- 6 20-ampedos a fusible. (Se recomienda un fusible deacci6n retardada.) Se recomienda que se use uncircuito dedicado exctusivamente para este aparatoetectrodomestico.
Peligro de Choque EI6ctrico
Conecte a un contacto de pared de conexi6na tierra de 3 terminales.
No quite el terminal de conexibn a tierra.
No use un adaptador.
No use un cable el_ctrico de extensibn.
No seguir estas instrucciones puedeocasionar la muerte, incendio ochoque el_ctrico.
INSTRUCCIONES PARA LA CONEXION A TIERRA• Para todos los aparatos electrodom_sticos
de conexi6n con cable:
El horno de microondas debe estar conectado atierra. En case de que se produzca un cortocircuito, la conexi6n a tierra reduce el riesgo dechoque etectrico por medio de un alambre deescape para la corriente electrica. El homo demicroondas est_ equipado con un cable que tieneun alambre de conexi6n a tierra con un enchufepara conexi6n a tierra. Et enchufe debe estarconectado a un tomacorriente que est_correctamente instalado y conectado a tierra.
ADVERTENCIA: El uso incorrecto de laconexi6n a tierra puede resultar en riesgo decheque et6ctrico.Consulte con un etectricista o tecnico calificado si lasinstrucciones para conexi6n a tierra no se entiendenbien o si hay alguna duda con respecto a la cerrectaconexi6n a tierra det homo de microondas.
No use un cable de extensi6n. Si el cable es muycorto, haga que un electricista o t6cnico calificadoinstale un tomacordente cerca det homo demicroondas.
• Para aparatos electrodomdsticos de conexibnpermanente:
Este aparato electrodomestico debe conectarse aun sistema de alambrado metalico permanentecon conexi6n a tierra o un conductor de conexi6na tierra para equipos debe funcionar con losconductores del circuito y estar conectado a laterminal o conductor de la conexi6n a tierra paraequipos en et aparato etectrodomestico.
GUARDE ESTAS INSTRUCCIONES
48
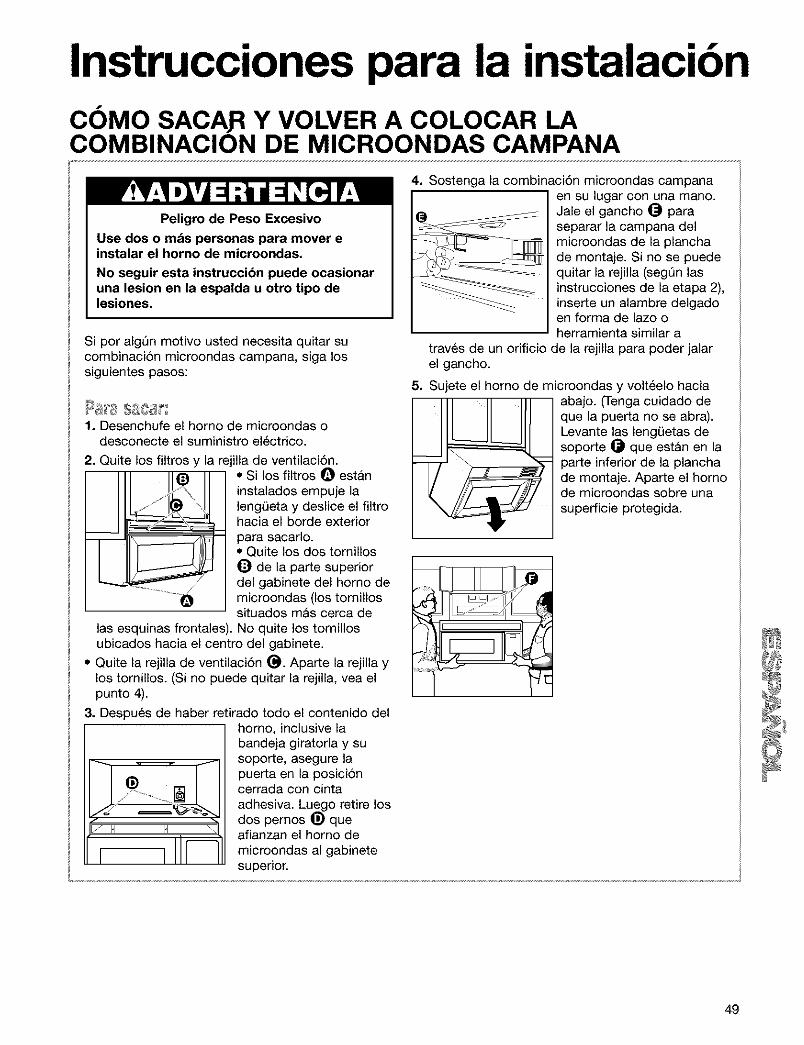
Instrucciones para la instalacibnCOMO SACA.R Y VOLVER A COLOCAR LACOMBINACION DE MICROONDAS CAMPANA
Peligro de Peso Excesivo
Use dos o mds personas para mover einstalar el horno de microondas.
No seguir esta instruccibn puede ocasionaruna lesion en la espalda u otro tipo delesiones.
Si por algQn motivo usted necesita quitar sucombinaci6n microondas campana, siga lossiguientes pasos:
1. Desenchufe el homo de microondas odesconecte el suministro el6ctrico.
I I!e2. Quite los filtros y la rejilla de ventilaci6n.
• Si los filtros _ estaninstalados empuje lalengQeta y deslice el filtrohacia el borde exteriorpara sacarlo.• Quite los dos tomillos_) de la parte superiordel gabinete del homo demicroondas (los tomillossituados m&s cerca de
las esquinas frontales). No quite los tornillosubicados hacia el centro del gabinete.
• Quite la rejilla de ventilaci6n (_. Aparte la rejilla ylos tornillos. (Si no puede quitar la rejilla, vea elpunto 4).
3. Despu_s de haber retirado todo el contenido del
J H H _1
homo, inclusive labandeja giratoria y susoporte, asegure lapuerta en la posici6ncerrada con cintaadhesiva. Luego retire losdos pemos _) queafianzan el homo demicroondas al gabinetesuperior.
4. Sostenga la combinaci6n microondas campanaen su lugar con una mano.Jale el gancho _ paraseparar la campana delmicroondas de la planchade montaje. Si no se puedequitar la rejilla (segQn lasinstrucciones de la etapa 2),inserte un alambre delgadoen forma de lazo oherramienta similar a
traves de un orificio de la rejilla para poder jalarel gancho.
5. Sujete el homo de microondas y volt_elo hacia
_ bajo. (Tenga cuidado de
que la puerta no se abra).Levante las lengL)etas desoporte _ que est&n en laparte inferior de la planchade montaje. Aparte el homode microondas sabre unasuperficie protegida.
49
COMO SACA.R Y VOLVER A COLOCAR LACOMBINACION DE MICROONDAS CAMPANA (CONT.)
1. Levante cuidadosamente el homo demicroondas y cu61guelo en las lengL)etas desoporte ubicadas en la parte inferior de laplancha de montaje.
2. Gire hacia abajo la parte frontal del gabinetepara el homo de microondas. Pase el cableelectrico a trav6s del orificio Iocalizado en laparte inferior del gabinete superior.
3, Gire el homo de microondas hacia el gabinete.Empuje el homo contra la placa de montajehasta que el pestillo de sujeci6n se acople enel gabinete.
4. Reponga los dos pemos que sirven paraasegurar el homo de microondas al gabinetesuperior.
5. Retire la cinta adhesiva de la puerta y vuelva acolocar en su sitio la bandeja giratoria y el soporte.
6. Reemplace la rejilla de ventilaci6n.
7. Reponga los dos tornillos en la parte superior delgabinete para el homo de microondas (lostomillos situados m&s pr6ximos alas esquinasfrontales).
5. Si se instalaron filtros, reempl&celos (de sernecesario, vea "lnstalaci6n y cuidado de losfiltros" en la secci6n "El cuidado de su homo demicroondas').
9. Enchufe el homo de microondas o conectenuevamente el suministro electrico.
50
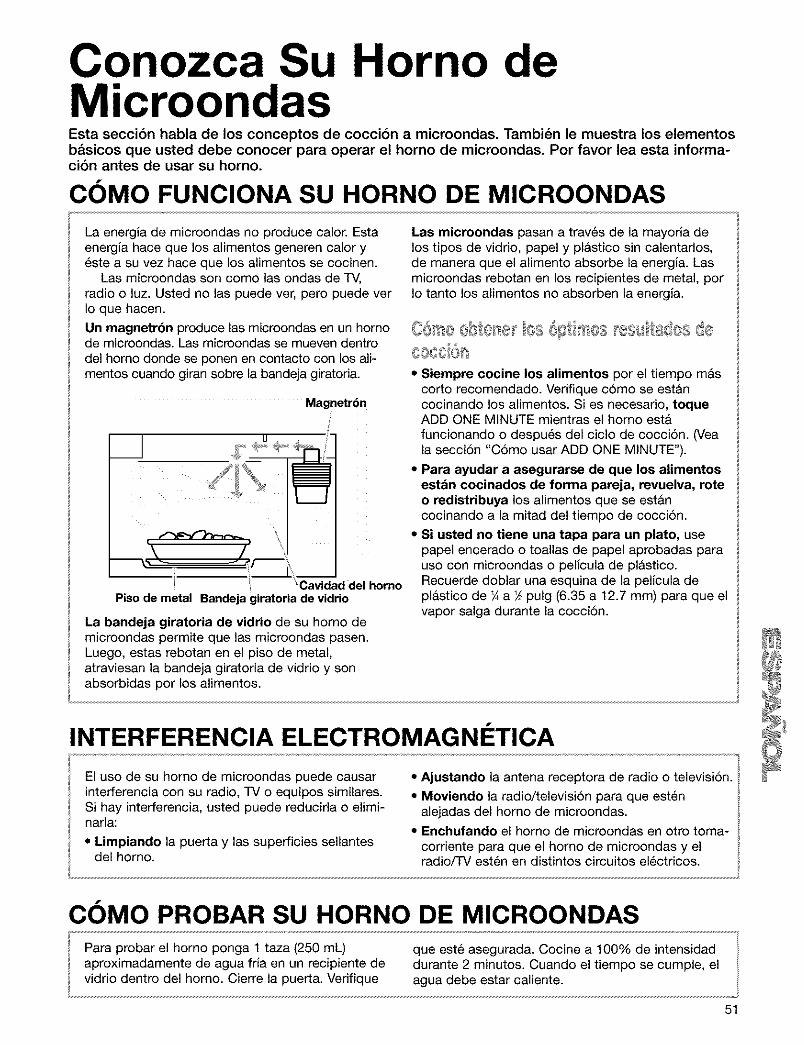
Conozca Su Horno deMicroondasEsta seccibn habla de los conceptos de coccibn a microondas. Tambi6n le muestra los elementosbasicos que usted debe conocer para operar el homo de microondas. Por favor lea esta informa-cibn antes de usar su homo.
COMO FUNCIONA SU HORNO DE MICROONDAS
La energla de microondas no produce calor. Estaenergia hace que los alimentos generen calor y6ste a su vez hace que los alimentos se cocinen.
Las microondas son como las ondas de TV,radio o luz. Usted no las puede vet, pero puede verIo que hacen.
Un magnetrbn produce ias microondas en un homode microondas. Las microondas se mueven dentrodel homo donde se ponen en contacto con los ali-mentos cuando giran sobre ia bandeja giratoria.
Magnetr6n
7"
' Cavidad del homoPisode metal Bandeja giratoria de vidrio
La bandeja giratoria de vidrio de su horno demicroondas permite que las microondas pasen.Luego, estas rebotan en el piso de metal,atraviesan la bandeja giratoria de vidrio y sonabsorbidas por los alimentos.
Las microondas pasan a trav6s de la mayoria delos tipos de vidrio, papel y pi&stico sin calentarlos,de manera que el alimento absorbe la energla. Lasmicroondas rebotan en los recipientes de metal, porIo tanto los alimentos no absorben la energla.
* Siempre cocine los alimentos por el tiempo m&scorto recomendado. Verifique c6mo se est&ncocinando los alimentos. Si es necesario, toqueADD ONE MINUTE mientras el homo est&funcionando o despu6s del ciclo de cocci6n. (Veala secci6n "C6mo usar ADD ONE MINUTE").
• Para ayudar a asegurarse de que los alimentosestdn cocinados de forma pareja, revuelva, roteo redistribuya los alimentos que se est&ncocinando a la mitad del tiempo de cocci6n.
• Si usted no tiene una tapa para un plato, usepapel encerado o toallas de papel aprobadas parauso con microondas o pelicula de pl&stico.Recuerde doblar una esquina de la pellcula depl&stico de ¼ a _ pulg (6.35 a 12.7 mm) para que elvapor salga durante la cocci6n.
INTERFERENCIA ELECTROMAGNI TICA
El uso de su homo de microondas puede causarinterferencia con su radio, TV o equipos similares.Si hay interferencia, usted puede reducirla o elimi-narla:
• Limpiando la puerta y las superficies sellantesdel homo.
• Ajustando la antena receptora de radio o televisi6n.
• Moviendo la radio/televisi6n para que est6nalejadas del homo de microondas.
• Enchufando el homo de microondas en otro toma-corriente para que el homo de microondas y elradio/TV est6n en distintos circuitos el6ctricos.
COMO PROBAR SU HORNO DE MICROONDAS
Para probar el homo ponga 1 taza (250 mL) que est_ asegurada. Cocine a 100% de intensidadaproximadamente de agua fria en un recipiente de durante 2 minutos. Cuando el tiempo se cumple, elvidrio dentro del homo. Cierre la puerta. Verifique agua debe estar caliente.
51

COMO PROBAR SU VAJILLA O SUS UTENSILIOSDE COCINA
Pruebe la vajilla de mesa o de cocina antes deusarla. Para saber si un plato se puede usar enforma segura, col6quelo dentro del homo junto a unataza (250 mL) con agua. Cocine a 100% de intensi-dad durante un minuto. Si el plato se calienta y elagua est_ fria, no Io use. Atgunos platos (melami-na, alguna vajilla ceramica, etc.) absorben energfa
de microondas, calent_ndose demasiado para agarrar-los y hace mas lentos los tiempos de cocci6n. La coc-ci6n en recipientes de metal que no est_n dise5adospara uso con microondas puede daSar el horno, Iomismo que recipientes con metal escondido (atadurasde alambre revestido, revestimiento de aluminio,broches metalicos, esmalte o adomos metalicos).
CONSEJOS PARA LA OPERACION
• Nunca se apoye sobre la puerta o permita que losniSos se columpien con ella mientras esta abierta.
• Use guantes para horno. La energfa de microon-das no calienta los recipientes, pero el calor de losalimentos puede hacer que et recipiente secaliente.
• No use peri6dicos u otros papeles impresos en elhomo.
• No seque flores, frutas, hierbas, madera, papel,calabazas o ropa en et homo.
• No encienda et homo cuando esta vacio. Laduraci6n del producto se puede acortar. Si practicacon la programacf6n del horno, coloque un recipi-ente con agua en el horno. Es normal que la puer-ta parezca ondulada cuando el homo ha estadofuncionando por un tiempo.
• No trate de fundir parafina en el homo. La parafinano se fundira en un homo de microondas porquepermite que las microondas la atraviesen.
• No opere et homo de microondas a menos que labandeja giratoria est6 asegurada en su lugar ypueda rotar con libertad. La bandeja giratodapuede rotar en ambas direcciones. Asegerese queet lade correcto de la bandeja giratoria esta haciaarriba. Maneje su bandeja giratoria con cuidadopara sacarla del horno para evitar que se rompa.Si su bandeja giratoria se quiebra o se astilta,Ilame a su distribuidor para reemplazarla.
• Cuando usa un plato para dorar alimentos, etfondo del plato debe quedar a una distancia de porIo menos 3/,_de pulgada (5 mm) por ardba de labandeja giratoria. Siga las instrucciones provistascon el plato para dorar alimentos.
• Nunca cocine o caliente un huevo entero con lacbscara. La acumulaci6n de vapor en el huevoentero puede hacer que explote y posiblemente ethomo se da_e. Corte los huevos duros antes decalentarlos. En raras ocasiones ha ocurrido quelos huevos poche han explotado. Cubra loshuevos poche y deje reposar durante un minutoantes de cortarlos.
• Para bptimos resultados, revuelva los liquidosvarias veces antes de calentar o recalentar. Losliquidos calentados en algunos recipientes (espe-cialmente recipientes con forma cilindrica) sepueden calentar excesivamente. El Iiquido puedesalpicar haciendo un ruido fuerte durante odespu6s det calentamiento o cuando se agreganingredientes (granules de car6, bolsitas de te, etc.).Esto puede daSar el homo.
• Las microondas pueden no Ilegar al centro de unasado. El calor se extiende al centro desde laparte de afuera cocinada, Io mismo que cuando secocina en un homo com_n. Esta es una de lasrazones para dejar que algunes alimentos (porejemplo asado o papas horneadas) reposen por untiempo luego de cocinar, o para revolver algunosalimentos mientras se est_n cocinando.
• No haga frituras en el homo. La vajilla para cocknar a microondas no es apropiada yes dificil man-tener las temperaturas apropiadas para freir.
• No recocine las papas. AI final del tiempo decocci6n recomendado, las papas deben estar ligera-mente firmes porque se seguir_n cocinando duranteel tiempo de repose. Luego de cocinar a microon-das, dejelas reposar por 5 minutos. €:stas se termi-naran de cocinar durante el tiempo de repose.
CONEXION ELI CTRICA
Los tiempos de cocci6n ser_n prolongados encaso de que su suministro de energia el_ctricao el voltaje de salida sea menor de 110 voltios.
Haga que un electricista calificado compruebe susistema electrico.
52

CARACTERiSTICAS DEL HORNO DE MICROONDAS
Su homo de microondas ha sido diseSado para quesu experiencia culinaria sea de Io mas amena y pro-ductiva posible. Para ayudarle a familiarizarse conrapidez, a continuaci6n tiene una lista de las carac-teristicas basicas del homo:
1. Manija de la puerta. Jalela para abrir la puerta.2. Sistema de traba de seguridad de la puerta. El
homo no funcionara a menos que la puerta est_bien cerrada.
3. Ventana con proteccibn metdlica. La protecci6nimpide el escape de las microondas. Ha sido dis-eSada como pantalla para permitide ver los ali-mentos mientras _stos se cocinan.
4. Parrilla de coccibn. (Parte No. 4393826) Utilicelapara obtener espacio extra cuando cocine en m&sde un recipiente a la vez.
5. Plata con el ndmero del rnodelo y de la serie.6. Bandeja giratoria de vidrio (Parte No. 4393751)
(no se ilustra). Esta incUda en la cavidad del homo-vea las instrucciones para la instalaci6n que seilustran a continuaci6n. Esta bandeja giratoria hacegirar los alimentos a medida que _stos se cocinanpara Iograr una cocci6n m&s uniforme. Debe estar
®en el homo durante el funcionamiento para Iograr6ptimos resultados de cocci6n. La bandeja giratoriaest& empotrada en la cavidad del piso para darlem&s espacio para cocinar y obtener mejores resul-tados de cocci6n.
7. Filtros para grasa y de carbbn. Estan incluidosen la cavidad del homo.
8. Luz de la superficie de cocci6n/mostrador.Enci_ndala para alumbrar la superficie de cocci6n oel mostrador o enci_ndala como luz nocturna.
9. Etiqueta con guia para cocinar. Usela como con-sulta rapida para los ajustes de Auto Cook (coc-ci6n autom&tica), Auto Reheat (recalentamientoautomatico) y Zip Defrost (descongelaci6n veloz).
10. Interruptores de las lutes del extractor de aire yde la superficie de coccibn.
11. Panel de control. Toque los botones que estan eneste panel para realizar todas las funciones.
12, Rejilla de ventilacibn.13. Luz de la cavidad del homo.
14. Cubierta de admisibn de microondas.
• 8aque la cinta adhesiva del eje (Pa_e No. 4393754). • Los rodillos (Pa_e No. 4393753) en el sopo_e
CUP/aS
alzadas_
k2_"__.-- Flecha
• Coloque el soporte(Parte No. 4393752) enel fondo de la cavidad.
• Coloque la bandeja girato-ria en el eje. AsegQrese deque las curvas alzadas,ubicadas en el centre delfondo de la bandeja gira-toria, est_n entre las tresprotuberancias del cubo.
encajan dentro de la ranura en la parte inferior dela bandeja giratoria.
• La bandeja giratoria gira tanto a la izquierda comoa la derecha. Esto es normal.
53
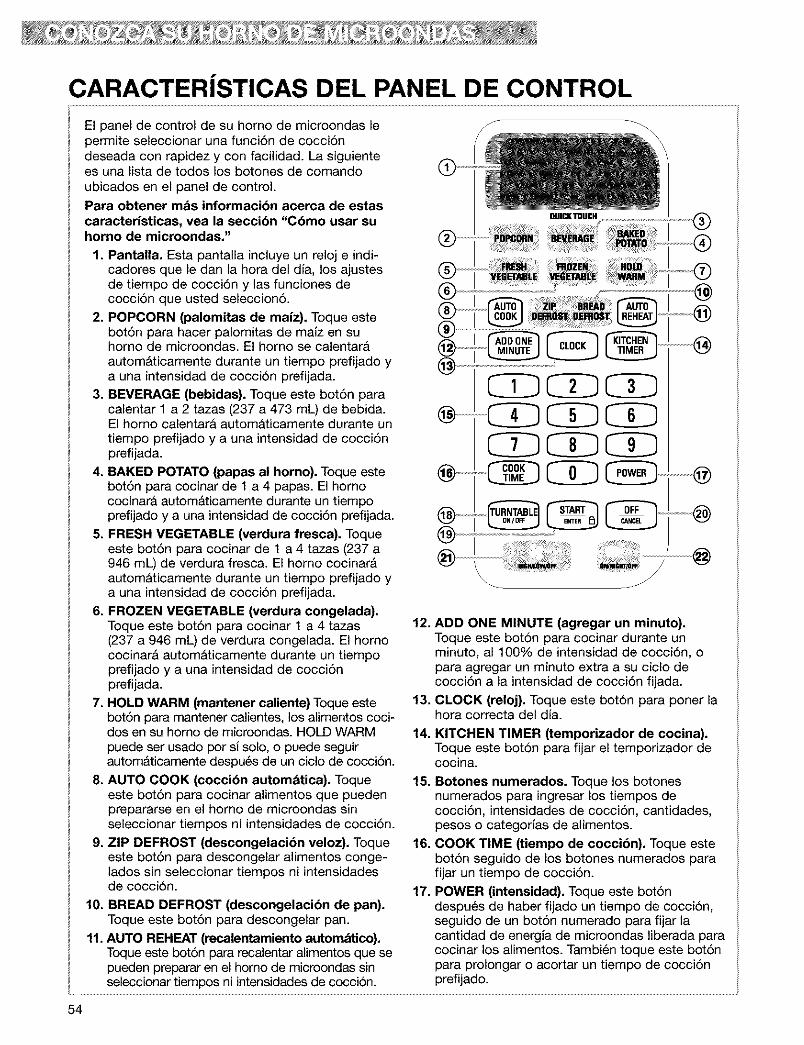
CARACTERJSTICAS DEL PANEL DE CONTROL
El panel de control de su horno de microondas lepermite seleccionar una funci6n de cocci6ndeseada con rapidez y con facilidad. La siguientees una Iista de todos los botones de comandoubicados en el panel de control.Para obtener mds informacibn acerca de estascaracteristicas, vea la seccibn "C6mo usar suhomo de microondas."
1. Pantalla. Esta pantalla incluye un reloj e indi-cadores que le dan la hora del dJa, los ajustesde tiempo de cocci6n y las funciones decocci6n que usted seleccion6.
2. POPCORN (palomitas de maJz). Toque estebot6n para hacer palomitas de malz en suhorno de microondas. El horno se calentarAautomAticamente durante un tiempo prefijado ya una intensidad de cocci6n prefijada.
3. BEVERAGE (bebidas). Toque este bot6n paracalentar 1 a 2 tazas (237 a 473 mL) de bebida.El homo calentar& autom&ticamente durante untiempo prefijado y a una intensidad de cocci6nprefijada.
4. BAKED POTATO (papas al horno). Toque estebot6n para cocinar de 1 a 4 papas. El homococinara autom&ticamente durante un tiempoprefijado y a una intensidad de cocci6n prefijada.
5. FRESH VEGETABLE (verdura fresca). Toqueeste bot6n para cocinar de 1 a 4 tazas (237 a946 mL) de verdura fresca. El horno cocinar&automAticamente durante un tiempo prefijado ya una intensidad de cocci6n prefijada.
6. FROZEN VEGETABLE (verdura congelada).Toque este bot6n para cocinar 1 a 4 tazas(237 a 946 mL) de verdura congelada. El homococinarA autom&ticamente durante un tiempoprefijado y a una intensidad de cocci6nprefijada.
7. HOLD WARM (mantener caliente) Toque estebot6n para mantener calientes, los alimentos cockdos en su homo de microondas. HOLD WARMpuede ser usado por si solo, o puede seguirautom&ticamente despu6s de un ciclo de cocci6n.
8. AUTO COOK (cocci6n automdtica). Toqueeste bot6n para cocinar alimentos que puedenprepararse en el homo de microondas sinseleccionar tiempos ni intensidades de cocci6n.
9. ZIP DEFROST (descongelaci6n veloz). Toqueeste bot6n para descongelar alimentos conge-lados sin seleccionar tiempos ni intensidadesde cocci6n.
10. BREAD DEFROST (descongelacibn de pan).Toque este bot6n para descongelar pan.
11. AUTO REHEAT (recalentamiento automdtico).Toque este bot6n para recalentar alimentos que sepueden preparar en el homo de microondas sinseleccionar tiempos ni intensidades de cocci6n.
CCDCZD.........C CDC C CDC
@
12. ADD ONE MINUTE (agregar un minuto).Toque este bot6n para cocinar durante unminuto, a1100% de intensidad de cocci6n, opara agregar un minuto extra a su ciclo decocci6n a la intensidad de cocci6n fijada.
13. CLOCK (reloj). Toque este bot6n para poner lahora correcta del dJa.
14. KITCHEN TIMER (temporizador de cocina).Toque este bot6n para fijar el temporizador decocina.
15. Botches numerados. Toque los botonesnumerados para ingresar los tiempos decocci6n, intensidades de cocci6n, cantidades,pesos o categorlas de alimentos.
16. COOK TIME (tiempo de coccibn). Toque estebot6n seguido de los botones numerados parafijar un tiempo de cocci6n.
17. POWER (intensidad). Toque este bot6ndespu_s de haber fijado un tiempo de cocci6n,seguido de un bot6n numerado para fijar lacantidad de energla de microondas liberada paracocinar los alimentos. Tambi6n toque este bot6npara prolongar o acortar un tiempo de cocci6nprefijado.
54
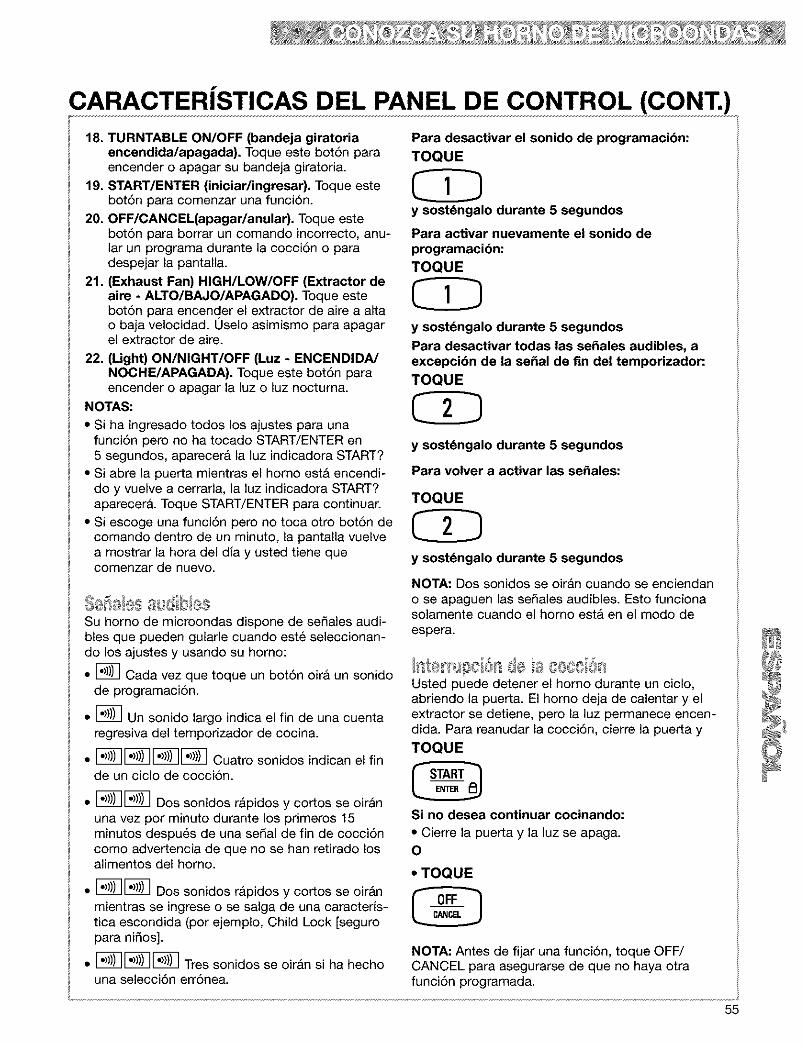
CARACTERiSTICAS DEL PANEL DE CONTROL (CONT.)
18. TURNTABLE ON/OFF (bandeja giratoriaencendida/apagada). Toque este bot6n paraencender o apagar su bandeja giratoria.
19. START/ENTER (iniciar/ingresar). Toque estebot6n para comenzar una funci6n.
20. OFFICANCEL(apagarlanular). Toque estebot6n para borrar un comando incorrecto, anu-lar un programa durante la cocciSn o paradespejar la pantalla.
21. (Exhaust Fan) HIGH/LOW/OFF (Extractor deaire - ALTO/BAJO/APAGADO). Toque estebot6n para encender el extractor de aire a altao baja velocidad. Uselo asimismo para apagarel extractor de aire.
22. (Light) ON/NIGHT/OFF (Luz - ENCENDIDA/NOCHE/APAGADA). Toque este bot6n paraencender o apagar la luz o luz nocturna.
NOTAS:
• Si ha ingresado todos los ajustes para unafunci6n pero no ha tocado START/ENTER en5 segundos, aparecera la luz indicadora START?
• Si abre la puerta mientras el homo est& encendi-do y vuelve a cerrarla, la luz indicadora START?aparecer& Toque START/ENTER para continuar.
• Si escoge una funci6n pero no toca otro botSn decomando dentro de un minuto, la pantalla vuelvea mostrar la hora del dia y usted tiene quecomenzar de nuevo.
Su homo de microondas dispone de se_ales audi-bles que pueden guiarle cuando est_ seleccionan-do los ajustes y usando su homo:
• [_ Cada vez que toque un bot6n oirA un sonidode programaci6n.
• [_ Un sonido largo indica el fin de una cuentaregresiva del temporizador de cocina.
• [_[_[_[_ Cuatro sonidos indican el finde un ciclo de cocci6n.
• [_[_ Dos sonidos r&pidos y cortos se oir&nuna vez por minuto durante los primeros 15minutos despu6s de una sedal de fin de cocciSncomo advertencia de que no se ban retirado losalimentos del homo.
• [_[_ DOSsonidos r&pidos y cortos se oir&nmientras se ingrese o se salga de una caracteris-tica escondida (por ejemplo, Child Lock [seguropara nidos].
• [_[_[_ Tres sonidos se oir&n si ha hechouna selecci6n err6nea.
Para desactivar el sonido de programacibn:TOQUE
y sost_ngalo durante 5 segundos
Para activar nuevamente el sonido deprogramacibn:TOQUE
y sost_ngalo durante 5 segundos
Para desactivar todas las seSales audibles, aexcepci6n de la sepal de fin del temporizador:TOQUE
y sost_ngalo durante 5 segundos
Para volver a activar las se_ales:
TOQUE
y sost_ngalo durante 5 segundos
NOTA: Dos sonidos se oir&n cuando se enciendano se apaguen las sedales audibles. Esto funcionasolamente cuando el homo estA en el modo de
espera.
Usted puede detener el homo durante un ciclo,abriendo la puerta. El homo deja de calentar y elextractor se detiene, pero la luz permanece encen-dida. Para reanudar la cocci6n, cierre la puerta yTOQUE
Si no desea continuar cocinando:
• Cierre la puerta y la luz se apaga.O
• TOQUE
NOTA: Antes de fijar una funci6n, toque OFF/CANCEL para asegurarse de que no haya otrafunciSn programada.
55
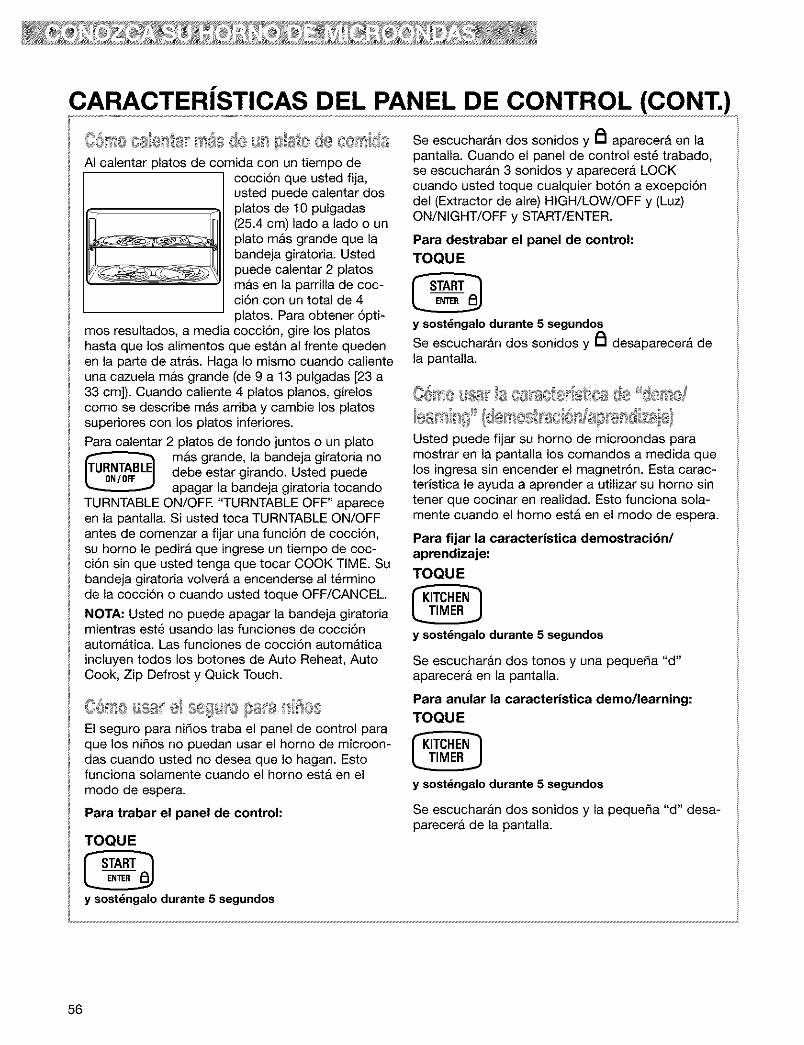
CARACTERiSTICAS DEL PANEL DE CONTROL (CONT.)
AI calentar platos de comida con un tiempo decocci6n que usted fija,usted puede calentar dosplatos de 10 pulgadas(25.4 cm) lado a lado o unplato m_s grande que labande_a giratoria. Ustedpuede calentar 2 platosmas en la parrilla de coc-ci6n con un total de 4platos. Para obtener 6pti-
mos resultados, a media cocci6n, gire los platoshasta que los alimentos que estan al frente quedenen la parte de atr&s. Haga Io mismo cuando calienteuna cazuela m&s grande (de 9 a 18 pulgadas [28 a88 cm]). Cuando caliente 4 platos pianos, gireloscomo se describe m_s arriba y cambie los platossuperiores con los platos inferiores.
Para calentar 2 platos de fondo juntos o un plato
mas grande, la bandeja giratoria nodebe estar girando. Usted puedeapagar la bandeja giratoria tocando
TURNTABLE ON/OFF. "TURNTABLE OFF" apareceen la pantalla. Si usted toca TURNTABLE ON/OFFantes de comenzar a fijar una funci6n de cocci6n,su homo le pedira que ingrese un tiempo de coc-ci6n sin que usted tenga que tocar COOK TIME. Subandeja giratoria volver& a encenderse al t6rminode la cocci6n o cuando usted toque OFF/CANCEL
NOTA: Usted no puede apagar la bandeja giratoriamientras est_ usando las funciones de cocci6nautom&tica. Las funciones de cocci6n autom&ticaincluyen todos los botones de Auto Reheat, AutoCook, Zip Defrost y Quick Touch.
El seguro para ni_os traba el panel de control paraque los ni_os no puedan usar el homo de microon-das cuando usted no desea que Io hagan. Estofunciona solamente cuando el homo est& en elmodo de espera.
Para trabar el panel de control:
TOQUE
y sost_ngalo durante 5 segundos
Se escucharan dos sonidos y lal aparecer& en lapantalla. Cuando el panel de control est_ trabado,se escucharan 3 sonidos y aparecer& LOCKcuando usted toque cualquier bot6n a excepci6ndel (Extractor de aire) HIGH/LOW/OFF y (Luz)ON/NIGHT/OFF y START/ENTER.
Para destrabar el panel de control:
TOQUE
@y sost_ngalo durante 5 segundosSe escuchar&n dos sonidos y PI desaparecer_ dela pantalla.
Ool @ b @ @,mOlII@_iII //1 l_lll@lll_I Ii'111 ,_@
Usted puede fijar su homo de microondas paramostrar en la pantalla los comandos a medida quelos ingresa sin encender el magnetr6n. Esta carac-teHstica le ayuda a aprender a utilizar su homo sintener que cocinar en realidad. Esto funciona sola-mente cuando el homo est& en el modo de espera.
Para fijar la caracteristica demostraci6n/aprendizaje:
TOQUE
y sost_ngalo durante 5 segundos
Se escuchar&n dos tonos y una peque_a "d"aparecer& en la pantalla.
Para anular la caracteristica demo/learning:TOQUE
y sost_ngalo durante 5 segundos
Se escucharan dos sonidos y la peque_a "d" desa-parecer& de la pantalla.
56

COMO UTILIZAR LA PARRILLA DE COCCION
La Parrilla de cocci6n le ofrece un espacio extracuando est& cocinando en mAs de un recipiente ala vez.
Si usted necesita una parrilla de recambio (ParteNo. 4393826), puede pedirla a su Centro deServicio Sears, o Ilamando al 1-888-784-6427.AsegQrese de tener consigo el nQmero del modeloen el momento de hacer su pedido.
Introduzca la parrilla con firmeza en los soportes de
la parrilla que estAn en las
paredes laterales del homo.
NOTAS:
• Use guantes de hornear para sacar los artlculosdel horno de microondas.
• No guarde la parrilla de metal en el homo. SepodHan producir chispas y da_os al homo si,accidentalmente, alguien Io pone a funcionar.
• No ponga a funcionar el horno con la parrilla demetal en el piso del homo ya que puede ocasion-ar da_os al acabado del interior.
• Use la parrilla s61o en el homo de microondas.
• No use la parrilla con una bandeja tostadora.• No deje que el recipiente de alimentos que est&
en la parrilla toque la parte superior o los ladosdel homo.
• No cocine los alimentos directamente en la parril-la. P6ngalos primero en recipientes recomenda-dos para el homo de microondas.
• No coloque un recipiente metAlico para cocinaren la parrilla.
• Use la parrilla de cocci6n s61o cuando cocine enmAs de un nivel.
CC)MO UTILIZAR EL EXTRACTOR DE AIRE
El bot6n que est& en el fondo izquierdo del panelde control controla el extractor de aire de dosvelocidades.
1. Elija la velocidad del extractor.
TOQUE
2. Apague el extractor de aire cuando Iodesee.
TOQUE
(1 o 2 veces, dependiendo de la velocidad delextractor)
(una vez para velocidad alta, dos veces paravelocidad baja)
NOTA: Si la temperatura de la cocina o superfi-cie de cocci6n, que estA debajo del homo, secalienta demasiado, el extractor de aire que estAen la campana extractora se encenderaautomAticamente al ajuste HIGH (alto) para pro-teger el homo. Puede permanecer encendidohasta una hora para enfriar el horno. Cuandoocurre eeto, el bot6n (Extractor de aire)HIGH/LOW/OFF no encender_ el extractor.
57
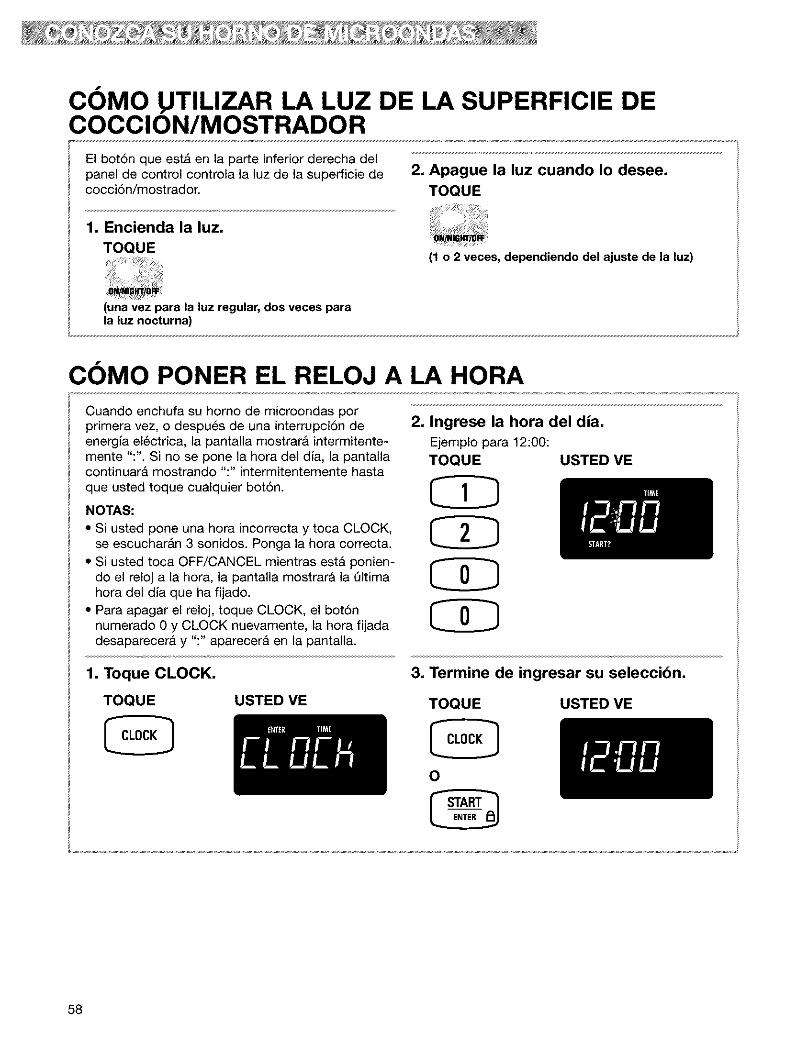
COMO UTILIZAR LA LUZ DE LA SUPERFICIE DECOCCION/MOSTRADOR
El bot6n que est& en la parte inferior derecha delpanel de control controla la luz de la superficie decocci6n/mostrador.
2. Apague la luz cuando Io desee.TOQUE
1. Encienda la luz.
TOQUE(1 o 2 veces, dependiendo del ajuste de la luz)
(una vez para la luz regular,dos veces parala luz nocturna)
COMO PONER EL RELOJ A I.A HORA
Cuando enchufa su homo de microondas porprimera vez, o despu_s de una interrupci6n de 2.energla el6ctrica, la pantalla mostrarA intermitente-mente ":". Si no se pone la hora del dla, la pantallacontinuarA mostrando ":" intermitentemente hastaque usted toque cualquier bot6n.
NOTAS:
• Si usted pone una hora incorrecta y toca CLOCK,se escuchar&n 3 sonidos. Ponga la hora correcta.
• Si usted toca OFF/CANCEL mientras estA ponien-do el reloj a la hora, la pantalla mostrar& la Qltimahora del dla que ha fijado.
• Para apagar el reloj, toque CLOCK, el bot6nnumerado 0 y CLOCK nuevamente, la hora fijadadesaparecer_ y ":" aparecer_ en la pantalla.
Ingrese la hora del dia.
Ejemplo para 12:00:TOQUE USTED ME
1. Toque CLOCK.
TOQUE USTED ME
3. Termine de ingresar su seleccibn.
TOQUE
o
USTED ME
58

COMO UTILIZAR EL TEMPORIZADOR DE COCINA
Usted puede usar su homo de microondas comaun temporizador de cocina. Use el temporizador decocina para fijar el tiempo hasta 99 minutos, 99segundos.
NOTA: El homo puede funcionar mientras el tem-porizador de cocina est& en uso. El temporizadorde cocina siempre aparecerA en la parte inferiorderecha de la pantalla.
NOTA: Si usted no sigue este paso en 5 segun-dos depu6s del paso 2, "START?" aparecerA. Dealli usted tendrA 3 segundos para tocarKITCHEN TIMER o START/ENTER antes de quela pantalla regrese a la hora del dia.
AI final de la cuenta regresiva:
USTED VE
1. Toque KITCHEN TIMER,TOQUE USTED ME
2, Ingrese el tiempo para la cuentaregresiva,
Ejemplo de 1 minuto, 30 segundos:TOQUE USTED ME
CZ}CDCD
Para detener el temporizador de cocina durante lacuenta regresiva:
TOQUE USTED VE
(dos veces)
O toque KITCHENTIMER una vez yluego toqueOFF/CANCEL
NOTA: Si usted ingresa mas de 4 digitos, losprimeros 4 digitos desaparecer&n y el(los)siguiente(s) digito(s) aparecer&n al lado derechoa medida que usted los ingresa.
3, Comience la cuenta regresiva,TOQUE USTED ME
0
(n_meros _rnmos pequefiosgrandes- - c_mdaregtesivahora del dia) deltempodzador)
(hora del dia)
59

COMO UTILIZAR ADD ONE MINUTE (AGREGAR UNMINUTO)
ADD ONE MINUTE le permite cocinar los alimentosdurante un minuto al 100% de intensidad de cocci6no agregar un minuto extra a su ciclo de cocci6n.Adem&s puede usarlo para prolongar los ciclos decocci6n en mQItiplos de 1 minuto, hasta 99 minutos.
NOTAS:
• Para extender los ciclos de cocci6n en mQItiplosde 1 minuto, toque ADD ONE MINUTE repetida-mente durante la cocci6n.
• Despu6s de cerrar la puerta, usted puede ingre-sar ADD ONE MINUTE sin tener que tocarSTART/ENTER.
• Si usted toca ADD ONE MINUTE durante la coc-ci6n, el homo cocinara a la intensidad de cocci6nactualmente seleccionada. Si usted toca ADDONE MINUTE despu_s de haber concluido lacocci6n, el homo cocinara al 100% de intensidadde cocci6n. Adem&s usted puede cambiar laintensidad de cocci6n despu6s de tocar ADDONE MINUTE tocando POWER, los botonesnumerados para la nueva intensidad de cocci6n ySTART/ENTER.
• Usted puede usar ADD ONE MINUTE s61o para lafunci6n de tiempo de cocci6n.
1, Asegdrese de que los alimentos estdnen el homo,
2, Toque ADD ONE MINUTE,TOQUE USTED VE
Ejemplo para cocinar durante 1 minuto:
COMO AMBIAR LOS TIEMPOS PREFIJADOS DECOCCION
Si un tiempo de cocci6n prefijado es demasiadolargo o demasiado corto, usted puede alargar oacortar el tiempo de cocci6n despu6s de selec-cionar AUTO COOK, AUTO REHEAT, ZIPDEFROST, BEVERAGE, BAKED POTATO, FRESHVEGETABLE, FROZEN VEGETABLE o BREADDEFROST. Usted s61o puede cambiar los tiemposde cocci6n antes de que comience la cocci6n.
Por ejemplo, en AUTO REHEAT, despu6s de escogerel tipo de alimentos y de ingresar la cantidad:
Para prolongar el tiempo de cocci6n:
TOQUE USTED VE
una vez
(ejemplo para auto reheat)
Para acortar el tiempo de cocci6n:
TOQUE USTED VE
dos veees
Para volver a fijar el tiempo de cocci6n original:
TOQUE USTED VE
tree vecee
6O

Cbmo Utilizar Su Horno deMicroondasEsta secci6n le proporciona instrucciones para el funcionamiento de cada funci6n. Por favor lea estas instruc-clones con cuidado.
COCClON A INTENSIDAD ALTA
1. Ponga sus alimentos en el horno ycierre la puerta.
2. Toque COOK TIME,
TOQUE USTED VE
3. Ingrese el tiempo de coccibn.
TOQUE USTED VE
Ejemplo de 1 minuto, 30 segundos:
4, Ponga el horno a funcionar,TOQUE USTED VE
AI final del tiempo de cocci6n:USTED VE
(se escuchar_in cuatrosonidos)
Usted puede cambiar el tiempo de cocci6n encualquier momento durante la cocci6n, repitiendolos pasos 2, 3 y 4.
61
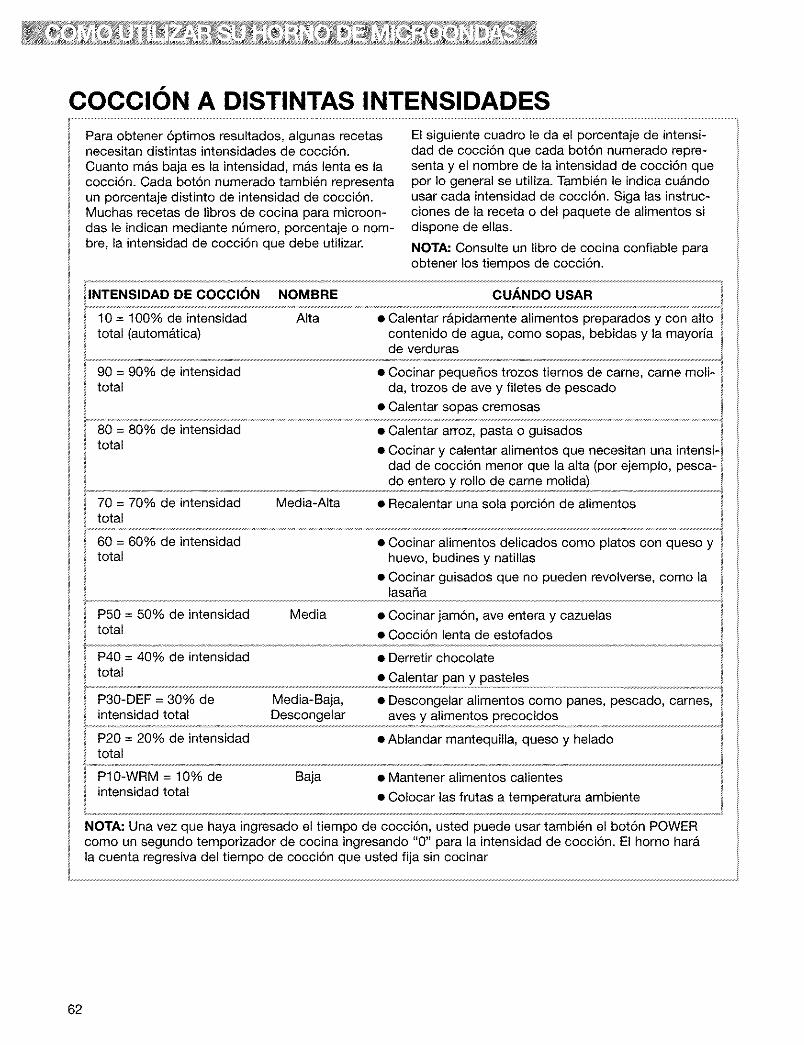
COCClON A DISTINTAS INTENSIDADES
Para obtener 6ptimos resultados, algunas recetasnecesitan distintas intensidades de cocci6n.Cuanto mas baja es la intensidad, m&s lenta es lacocci6n. Cada bot6n numerado tambi6n representaun porcentaje distinto de intensidad de cocci6n.Muchas recetas de libros de cocina para microon-das le indican mediante nQmero, porcentaje o nom-bre, la intensidad de cocci6n que debe utilizar.
El siguiente cuadro le da el porcentaje de intensi-dad de cocci6n que cada bot6n numerado repre-senta y el nombre de la intensidad de cocci6n quepor Io general se utiliza. Tambi6n le indica cuAndousar cada intensidad de cocci6n. Siga las instruc-ciones de la receta o del paquete de alimentos sidispone de elias.
NOTA: Consulte un libro de cocina confiable paraobtener los tiempos de cocci6n.
INTENSIDAD DE COCCION NOMBRE CUANDO USAR
10 = 100% de intensidad Alta • Calentar r_pidamente alimentos preparados y con altototal (autom&tica) contenido de agua, como sopas, bebidas y la mayorla
de verduras
90 = 90% de intensidad • Cocinar peque_os trozos tiernos de came, carne moli-total da, trozos de ave y filetes de pescado
• Calentar sopas cremosas
80 = 80% de intensidad • Calentar arroz, pasta o guisados
total • Cocinar y calentar alimentos que necesitan una intensi-dad de cocci6n menor que la alta (por ejemplo, pesca-do entero y rollo de carne molida)
70 = 70% de intensidad Media-Alta • Recalentar una sola porci6n de alimentostotal
60 = 60% de intensidad • Cocinar alimentos delicados como platos con queso ytotal huevo, budines y natillas
• Cocinar guisados que no pueden revolverse, como lalasada
P50 = 50% de intensidad Media • Cocinar jam6n, ave entera y cazuelastotal • Cocci6n lenta de estofados
P40 = 40% de intensidad • Derretir chocolate
total • Calentar pan y pasteles
P30-DEF = 30% de Media-Baja, • Descongelar alimentos como panes, pescado, carries,intensidad total Descongelar aves y alimentos precocidos
P20 = 20% de intensidad • Ablandar mantequilla, queso y heladototal
P10-WRM = 10% de Baja • Mantener alimentos calientes
intensidad total • Colocar las frutas a temperatura ambiente
NOTA: Una vez que haya ingresado el tiempo de cocci6n, usted puede usar tambi6n el bot6n POWERcomo un segundo temporizador de cocina ingresando "0" para la intensidad de cocci6n. El horno harAla cuenta regresiva del tiempo de cocci6n que usted fija sin cocinar
62
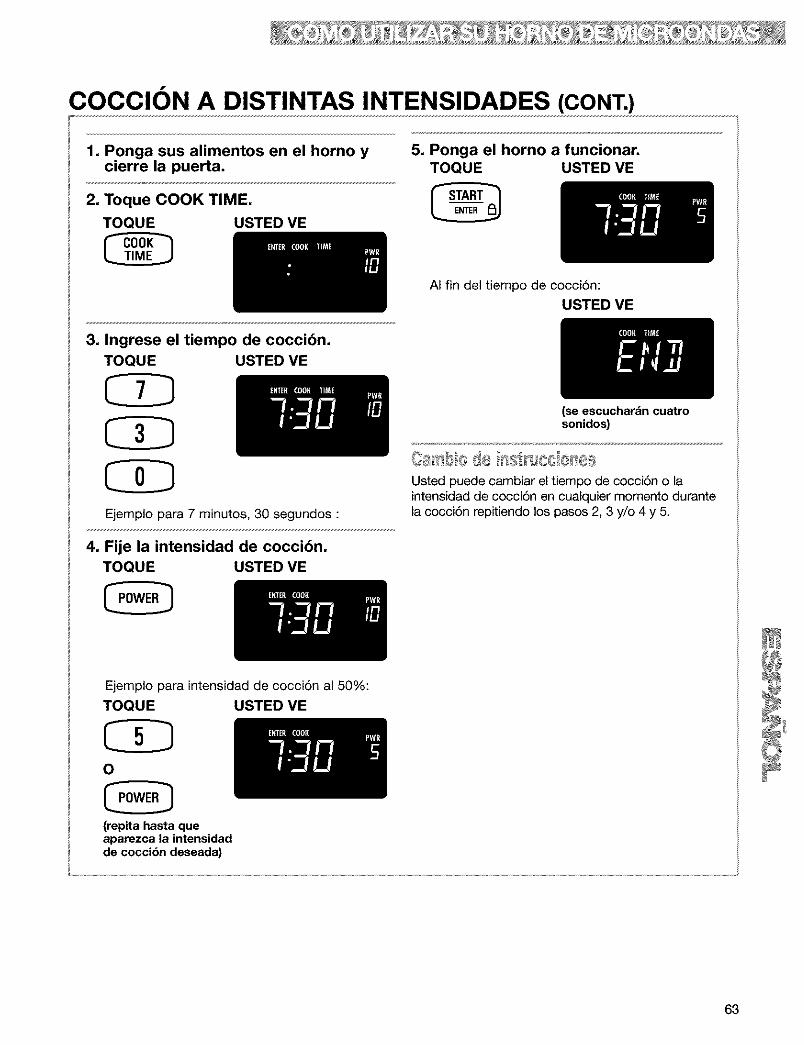
COCClON A DISTINTAS INTENSIDADES (CONT.)
1. Ponga sus alimentos en el horno ycierre la puerta.
2. Toque COOK TIME,
TOQUE USTED VE
3. Ingrese el tiempo de coccibn.TOQUE USTED VE
CDCDEjemplo para 7 minutos, 30 segundos :
4. Fije la intensidad de coccibn.TOQUE USTED VE
5. Ponga el horno a funcionar,TOQUE USTED VE
AI fin del tiempo de cocciSn:USTED VE
(se escuchar&n cuatrosonidos)
Usted puede cambiar el tiempo de cocci6n o laintensidad de cocci6n en cualquier momento durantela cocci6n repitiendo los pasos 2, 3 y/o 4 y 5.
Ejemplo para
TOQUE
intensidad de cocci6n al 50%:
USTED VE
O
(repita hasta queaparezca la intensidadde coccibn deseada)
63

COCCION POR ETAPAS
Para Iograr 6ptimos resultados, algunas recetasnecesitan una intensidad de cocci6n durante untiempo determinado y otra intensidad de cocci6ndurante otro perJodo de tiempo. Su homo puedeser fijado para cambiar de uno a otto automAtica-mente hasta un m&ximo de 3 etapas.
Usted puede fijar las funciones de cocci6n selec-cionadas en cualquier orden. Sin embargo, si ustedusa ZIP DEFROST, esta deberA ser la primeraetapa.
1. Ponga sus alirnentos en el horno ycierre la puerta.
2, Toque COOK TIME,TOQUE USTED VE
Ejemplo para intensidad de cocci6n al 50%:TOQUE USTED VE
O
(repita hasta queaparezca la intensidadde cocci6n deseada)
5. Repita los pasos 2, 3 y 4 para fijar eltiempo de cocci6n y la intensidad decocci6n para cada etapa adicional.
6. Ponga el horno a funcionar.TOQUE USTED VE
3. Ingrese el tiempo de cocci6n para laprimera etapa.TOQUE USTED VE
Ejemplo para 7 minutos, 30 segundos:
Despu6s de haber concluido la primera etapa,usted escuchara 2 sonidos. La cuenta regresi-va de la(s) etapa(s) siguiente(s) comenzarA.
AI final del tiempo de cocci6n:
USTED VE
4. Fije la intensidad de cocci6n para laprimera etapa.TOQUE USTED VE
(se escuchardn cuatrosonidos)
Usted puede cambiar los tiempos de cocci6n o lasintensidad de cocci6n para una etapa en cualquiermomento despu6s de haber iniciado esa etapa,repitiendo los pasos 2, 3 y/o 4 y 5.
64

BARRA INDICADORA DE PROGRESO
La pantalla contiene una barra indicadora de pro-greso, la cual indica hasta d6nde han avanzado lasfunciones de Auto Cook y cu&nto tiempo m&s restaa dichas funciones. La Iongitud total de la barrarepresenta el tiempo estimado de duraci6n delciclo de cocci6n. La barra indicadora avanza lineapor linea durante un ciclo.
Los 12 segmentos en la barra indicadora de pro-greso dan un estimado del avance durante la coc-ci6n y muestran la proporci6n del tiempo restanteen las funciones de Auto Cook. AI final del ciclo decocci6n los 12 segmentos estar&n encendidos.
NOTA: La barra indicadora de progreso aparece conAuto Cook, Zip Defrost, Auto Reheat y Quick Touch,pero no con las funciones de cocci6n manual.
COMO UTILIZAR AUTO COOK (COCCION AUTOMATICA)Usted puede cocinar alimentos con microondas tans61o eligiendo una categorla y cantidad. AUTOCOOK tiene tiempos e intensidades de cocci6n pre-fijados para 5 categorias (yea el cuadro siguiente).
Para usar AUTO COOK, siga los pasos acontinuacibn:
1, Toque
una vez
0
Toque un bot6n numerado para elegir el tipode alimentos.
(_ Ejemplo parael arroz
USTED ME
Ejemplo parael arroz
USTED ME
2, Toque AUTO COOK de 1 a 5 vecespara elegir el tipo de alimentos,
Ejemplo parael arroz
una vez
3, Toque uno o mds botones numeradospara ingresar la cantidad,
{_ Ejemplo para1 taza (237 mL)
USTED VE
Ejemplo para1 taza (237 mL)
65

COMO UTILIZAR AUTO COOK (COCCION AUTOMATICA)CONT.)
4, Toque
USTED VE
(el tiempo de cuentaregresiva puede variar)
NOTAS:
• Si usted no ingresa una cantidad dentro de 2segundos, AUTO COOK le pedira que elija unacantidad. De allf usted tendr& 1 minuto paraingresar una cantidad y para tocar START/ENTER. Si usted no Io hace, AUTO COOK seanularA.
• Si usted toca AUTO COOK 6 veces, la pan-talla regresa al ajuste de arroz.
• Si usted necesita m&s o menos tiempo, notoque AUTO COOK de nuevo. ToquePOWER antes de tocar START/ENTER.(Consulte "C6mo cambiar los tiempos prefi-jados de cocci6n" en la secci6n "Conozcasu horno de microondas.")
• AI cocinar tocino, tenga en mente que lasdiferencias en la cantidad de grasa, carne,espesor y proceso de ahumado afectar&n elmodo de cocinar el tocino. Asimismo, eltocino en Ionjas regulares rinde un promediode cerca de 16 Ionjas por libra.
Este cuadro le muestra c6mo elegir un tipo de alimentos y las cantidades que usted puede seleccionar)or cada tipo.
TOQUE O TOQUE CANTIDADES QUE USTEDALIMENTO AUTO COOK* BOT(_N NUMERADO PUEDE ELEGIR
Arroz una vez 1 0.5, 1, 1.5 o 2 tazas**
(118 ml, 237 ml, 355 ml, o 473 ml)
Verduras en conserva 2 veces 2 1 a 4 tazas (237 ml a 946 ml)
Tocino 3 veces 3 1 a 6 trozos, espesor promedio
Cereal (instantaneo) 4 veces 4 1 a 4 porciones
Torrejas 5 veces 5 1 a 4 pedazos
* Usted debe tocar AUTO COOK una vez antes de elegir el tipo de al+mentos.
** Fije0.5 taza tocando "0" y "5" o s61o"0" o s61o"5." Fije 1.0 taza tocando "1" y "0" o solo "1." Fije 1.5 tazas tocando "1" y "57' Fije2.0 tazas tocando "2" y "0" o s61o"2".
66

COMO UTILIZAR AUTO REHEAT (RECALENTAMIENTOAUTOMATICO)
Usted puede recalentar alimentos con microondastan s61oeligiendo una categorfa y cantidad. AUTOREHEAT tiene tiempos e intensidades de cocci6nprefijados para 5 categorfas (vea el cuadro siguiente).
Para usar AUTO REHEAT, siga los pasos indica-dos a continuacibn:
USTED VE
Ejemplo para unaporci6n de pizza
1, Toque
una vez
USTED VE3, Toque un bot6n numerado para
ingresar la cantidad,
@ jemplo _ra1 porci6n
USTED VE
2, Toque AUTO REHEAT 1 a 5 vecespara elegir el tipo de alimentos,
Ejemplo para unaporcibn de pizza
una vezO
Toque un bot6n numerado para elegir el tipode alimentos.
Ejemplo para unaporcibn de pizza
Ejemplo para1 porcibn
67

COMO UTILIZAR AUTO REHEAT (CONT.)
4. Toque
USTED VE
NOTAS:
• Si usted no ingresa una cantidad dentro de 2segundos, AUTO REHEAT le pedira que elija unacantidad. De alli usted tendr& 1 minuto para ingre-sar una cantidad y tocar START/ENTER. Si ustedno Io hace, AUTO REHEAT se anular&
• Si usted toca AUTO REHEAT 6 veces, la pantallaregresa al ajuste de la porci6n de pizza.
(el tiempo de • Si usted necesita m&s o menos tiempo, no toquecuenta regresiva AUTO REHEAT nuevamente. Toque POWERpuede variar) antes de tocar START/ENTER. (Vea "C6mo cam-
biar los tiempos prefijados de cocci6n" en la sec-ci6n "Conozca su homo de microondas.)
• AI recalentar un panecillo (muffin, 4 oz. [113 g]), oun bagel (rosca de pan), use un ajuste para 2piezas. El ajuste para 1 pieza calienta un muffin obagel de tamafio regular o 2 bollos pequefios.
Este cuadro le muestra c6mo elegir un tipo de alimentos y las cantidades que puede elegir de cada tipo.
TOQUE TOQUE BOT6N CANTIDADES QUE USTEDALIMENTOS AUTO REHEAT* O NUMERADO PUEDE ELEGIR
Porci6n de pizza una vez 1 1 a 3 porciones, 5 oz (142 g) c/u
Sopa/Salsa dos veces 2 1 a 4 tazas (237 ml a 946 ml)
Guisados 3 veces 3 1 a 4 tazas (237 ml a 946 ml)
Productos de panaderia 4 veces 4 1 a 6 piezas, 2 oz (57 g) c/u
Plato (de alimentos) 5 veces 5 1 porci6n (o 1 plato)
Usted debe tocar AUTO REHEAT una vez antes de elegir el tipo de alimentos.
COMO UTILIZAR ZIP DEFROST (DESOONGELAOIONVELOZ)
ZIP DEFROST utiliza una nueva tecnologla paradescongelar hasta el 70 por ciento mas r&pido quecon nuestros modelos previos, dependiendo del tipoy peso de los alimentos. Los cortes delgados, decerca de 1 libra (454 g), muestran la reducci6n masdramatica en los tiempos de descongelaci6n. Lascantidades m&s grandes no mostraran tan dram&ti-cas mejoras pero aQn asi descongelar&n mAs rApidoque con los sistemas previos.
Usted puede descongelar los alimentos eligiendouna categorfa y fijando un peso. ZIP DEFROSTpuede ser usando s61o para una descongelaci6nmuy veloz de alimentos congelados en las cate-gorfas de came, aves o pescado. Use la descon-gelaci6n manual para otros alimentos o pesos queno est6n en la list& ZIP DEFROST tiene tiempos eintensidades de cocci6n para 3 categorias (vea elsiguiente cuadro).
Para usar ZIP DEFROST, siga los pasos indica-dos a continuaci6n:
1,Toque USTED ME
una vez
2, Continde tocando ZIP DEFROST paraseleccionar la clase de alimentos,
Ejemploparacarries
una vez
68
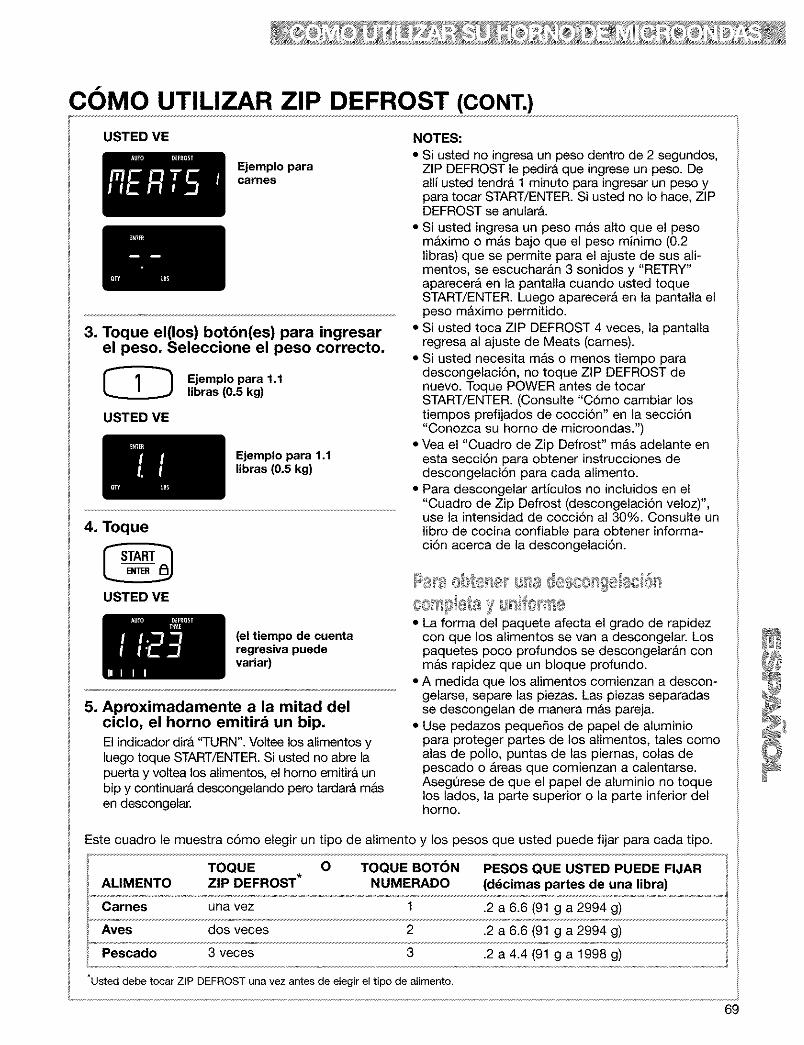
COMO UTILIZAR ZIP DEFROST (CONT.)
USTED VE
Ejemplo paracarnes
3. Toque el(los) botbn(es) para ingresarel peso, Seleccione el peso correcto,
Ejemplo para 1.1libras (0.5 kg)
USTED VE
Ejemplo para 1.1libras (0.5 kg)
4, Toque
USTED VE
(el tiempo de cuentaregresiva puedevariar)
5, Aproximadamente a la mitad delciclo, el horno emitird un bip,
El indicador dira "TURN". Voltee los almentos yluego toque START/ENTER. Si usted no abre lapuerta y voltea los alimentos, el homo emitira unbip y continuarA descongelando pero tardara masen descongelar.
NOTES:
• Si usted no ingresa un peso dentro de 2 segundos,ZIP DEFROST le pedira que ingrese un peso. Deall usted tendra 1 minuto para ingresar un peso ypara tocar START/ENTER. Si usted no Io hace, ZIPDEFROST se anularA.
• Si usted ingresa un peso mas alto que el pesomaximo o m&s bajo que el peso minimo (0.2libras) que se permite para el ajuste de sus ali-mentos, se escucharan 3 sonidos y "RETRY"aparecera en la pantalla cuando usted toqueSTART/ENTER. Luego aparecerA en la pantalla elpeso mAximo permitido.
• Si usted toca ZIP DEFROST 4 veces, la pantallaregresa al ajuste de Meats (cames).
• Si usted necesita mas o menos tiempo paradescongelaci6n, no toque ZIP DEFROST denuevo. Toque POWER antes de tocarSTART/ENTER. (Consulte "C6mo cambiar lostiempos prefijados de cocci6n" en la secci6n"Conozca su homo de microondas.")
• Vea el "Cuadro de Zip Defrost" mAs adelante enesta secci6n para obtener instrucciones dedescongelaci6n para cada alimento.
• Para descongelar artlculos no incluidos en el"Cuadro de Zip Defrost (descongelaci6n veloz)",use la intensidad de cocci6n al 30%. Consulte unlibro de cocina confiable para obtener informa-ci6n acerca de la descongelaci6n.
o s 'sa@scos!8 aci@s@rr_iSlSta)_I IfOhr_s• LI forma del paquete afecta el grado de rapidez
con que los alimentos se van a descongelar. Lospaquetes poco profundos se descongelarAn conmas rapidez que un bloque profundo.
• A medida que los alimentos comienzan a descon-gelarse, separe las piezas. Las piezas separadasse descongelan de manera mAs pareja.
• Use pedazos peque_os de papel de aluminiopara proteger partes de los alimentos, tales comoalas de polio, puntas de las piemas, colas depescado o Areas que comienzan a calentarse.Aseg0rese de que el papel de aluminio no toquelos lados, la parte superior o la parte inferior delhomo.
Este cuadro le muestra c6mo elegir un tipo de alimento y los pesos que usted puede fijar para cada tipo.
TOQUE O TOQUE BOTON PESOS QUE USTED PUEDE FIJARALIMENTO ZIP DEFROST* NUMERADO (d_cimas partes de una libra)
Carnes una vez 1 .2 a 6.6 (91 g a 2994 g)
Ayes dos veces 2 .2 a 6.6 (91 g a 2994 g)
Pescado 3 veces 3 .2 a 4.4 (91 g a 1998 g)
UsteddebetocarZIPDEFROSTunavezantesdeelegir el tipo dealimento.
69

CUADRO DE ZIP DEFROST (DESCONGELACIONVELOZ)
ALIMENTO INSTRUCCIONES ESPECIALES
Carne de res
Came molida, en bloque
Came molida, hamburguesas
Bistec redondo, Iomo, came paraestofar, carne del cuarto delantero,asado de costilla, asado de caderaenrollado
Came para guisar
Cordero
Cubos para guisado
Chuletas (1 pulg. [2.5 cm] de espesor)
Cerdo
Si la came es de forma irregular y son cortes grandes de camecon mucha grasa se debe proteger las Areas angostas o grasosascon papel de aluminio al inicio de un ciclo de descongelaciAn.
No descongele menos de ¼de libra (113 g).
No descongele menos de dos hamburguesas de 4 oz (113 g).
Coloque en una parrilla para asar con microondas.
Coloque en una bandeja para hornear con microondas.
Coloque en una bandeja para hornear con microondas.
Coloque en una parrilla para asar con microondas.
Chuletas (½ pulg. [13 mm] de espesor), Coloque en una parrilla para asar con microondas.Hot dogs, costillas, costillas a lacampesina, asado de Iomo (sin hueso),salchicha
Salchicha, en bloque Coloque en una parrilla para hornear con microondas.
ALIMENTO INSTRUCCIONES ESPECIALES
Polio
Entero(hasta 9-1/2 libras[4.3 kg])En trozos
Coloque el polio con la pechuga hacia arriba en una parrilla para asar con microon-das. Termine de descongelarla sumergiAndola en agua fHa. Saque las menudenciascuando el polio est6 parcialmente descongelado.
ColAquelos en una parrilla para asar con microondas.
Termine de descongelarla sumergiAndola en agua fria.
Gallinitas Cornish
Enteras ColAquela en una parrilla para asar con microondas. Termine de descongelarlasumergiAndola en agua fria.
Pavo
Pechuga(menos de 6 libras[2.7 kg])
ColAquela en una parrilla para asar con microondas. Termine de descongelarlasumergiAndola en agua fria.
7O
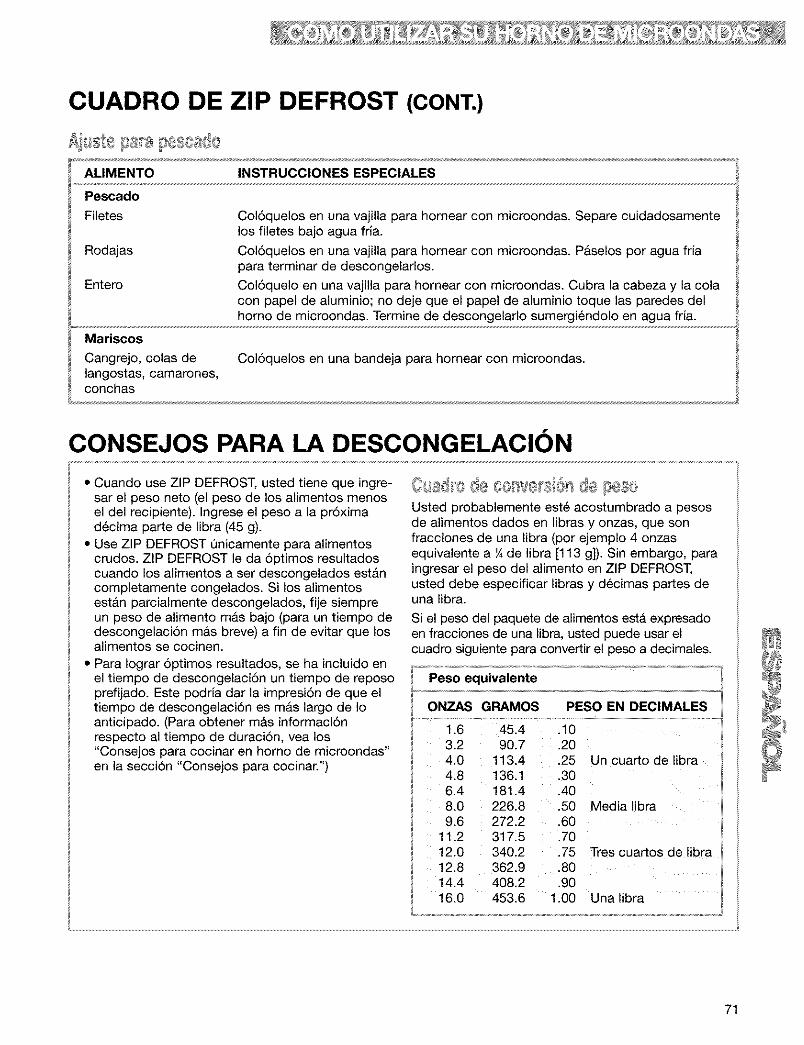
CUADRO DE ZIP DEFROST (CONT.)
ALIMENTO INSTRUCCIONES ESPECIALES
Pescado
Filetes
Rodajas
Entero
Mariscos
Cangrejo, colas delangostas, camarones,conchas
Col6quelos en una vajilla para homear con microondas. Separe cuidadosamentelos filetes bajo agua frla.
Col6quelos en una vajilla para homear con microondas. Paselos por agua frJapara terminar de descongelarlos.
Col6quelo en una vajilla para hornear con microondas. Cubra la cabeza y la colacon papel de aluminio; no deje que el papel de aluminio toque las paredes delhomo de microondas. Termine de descongelarlo sumergi6ndolo en agua fria.
Col6quelos en una bandeja para homear con microondas.
CONSEJOS PARA LA DESCONGELACION
• Cuando use ZIP DEFROST, usted tiene que ingre-sar el peso neto (el peso de los alimentos menosel del recipiente). Ingrese el peso a la pr6ximad6cima parte de libra (45 g).
• Use ZIP DEFROST Qnicamente para alimentoscrudos. ZIP DEFROST le da 6ptimos resultadoscuando los alimentos a ser descongelados est&ncompletamente congelados. Si los alimentosest&n parcialmente descongelados, fije siempreun peso de alimento mas bajo (para un tiempo dedescongelaci6n m&s breve) a fin de evitar que losalimentos se cocinen.
• Para Iograr 6ptimos resultados, se ha incluido enel tiempo de descongelaci6n un tiempo de reposoprefijado. Este podria dar la impresi6n de que eltiempo de descongelaci6n es mas largo de Ioanticipado. (Para obtener mas informaci6nrespecto al tiempo de duraci6n, vea los"Consejos para cocinar en homo de microondas"en la secci6n "Consejos para cocinar.")
@usd ede eo we si6s @ F es¢ Usted probablemente est_ acostumbrado a pesosde alimentos dados en libras y onzas, que sonfracciones de una libra (por ejemplo 4 onzasequivalente a ¼ de libra [113 g]). Sin embargo, paraingresar el peso del alimento en ZIP DEFROST,usted debe especificar libras y d@cimas partes deuna libra.
Si el peso del paquete de alimentos esta expresadoen fracciones de una libra, usted puede usar elcuadro siguiente para convertir el peso a decimales.
Peso equivalente
ONZAS GRAMOS
1.6 45.43.2 90.74.0 113.44.8 136.1 .30
6.4 181.4 .408.0 226.8 .509.6 272.2 .60
11.2 317.5 .7012.0 340.2 .7512.8 362.9 .8014.4 408.2 .9016.0 453.6 1.00
PESO EN DECIMALES
.10
.20
.25 Un cuarto de libra
Media libra
Tres cuartos de libra
Una libra
71
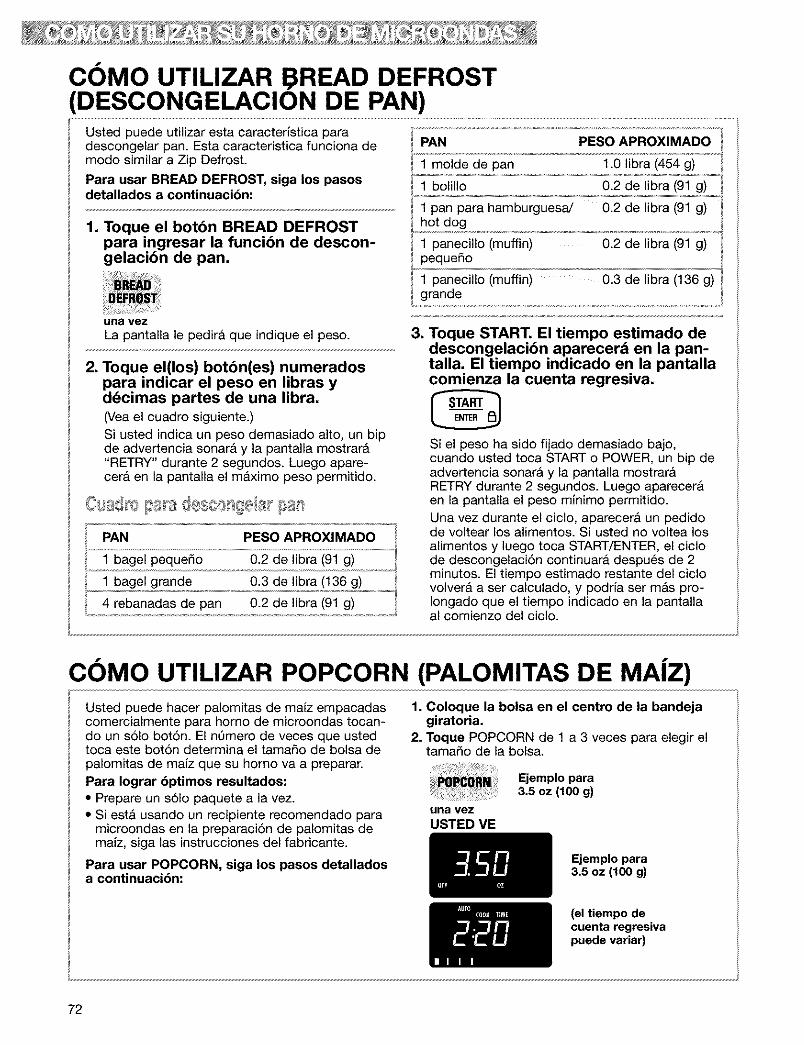
COMO UTILIZAR BREAD DEFROST(DESCONGELACION DE PAN)
Usted puede utilizar esta caracterlstica paradescongelar pan. Esta caracteristica funciona demodo similar a Zip Defrost.
Para usar BREAD DEFROST, siga los pasosdetallados a continuacibn:
1, Toque el botbn BREAD DEFROSTpara ingresar la funcibn de descon-gelacibn de pan,
PAN PESO APROXIMADO
1 molde de pan 1 .O libra (454 g)
1 bolillo 0.2 de libra (91 g)
1 pan para hamburguesa/ 0.2 de libra (91 g)hot dog
1 panecillo (muffin) 0.2 de libra (91 g)pequedo
1 panecillo (muffin) 0.3 de libra (136 g)grande
una vezLa pantalla le pedirfi que indique el peso.
2. Toque el(los) bot6n(es) numeradospara indicar el peso en libras yddcimas partes de una libra,(Vea el cuadro siguiente.)Si usted indica un peso demasiado alto, un bipde advertencia sonar& y la pantalla mostrar&"RETRY" durante 2 segundos. Luego apare-cer& en la pantalla el m&ximo peso permitido.
PAN PESO APROXIMADO
1 bagel peque_o 0.2 de libra (91 g)
1 bagel grande 0.3 de libra (136 g)
4 rebanadas de pan 0.2 de libra (91 g)
, Toque START, El tiempo estimado dedescongelacibn aparecer& en la pan-talla, El tiempo indicado en la pantallacomienza la cuenta regresiva,
Si el peso ha sido fijado demasiado bajo,cuando usted toca START o POWER, un bip deadvertencia sonar& y la pantalla mostrar&RETRY durante 2 segundos. Luego aparecer&en la pantalla el peso minimo permitido.Una vez durante el ciclo, aparecer& un pedidode voltear los alimentos. Si usted no voltea losalimentos y luego toca START/ENTER, el ciclode descongelaci6n continuar& despu6s de 2minutos. El tiempo estimado restante del ciclovolver& a ser calculado, y podria ser m&s pro-Iongado que el tiempo indicado en la pantallaal comienzo del ciclo.
COMO UTILIZAR POPCORN (PALOMITAS DE MA|Z)Usted puede hacer palomitas de maiz empacadascomercialmente para homo de microondas tocan-do un s61o bot6n. El n6mero de veces que ustedtoca este bot6n determina el tama_o de bolsa depalomitas de maiz que su homo va a preparar.Para Iograr 6ptimos resultados:• Prepare un s61o paquete a la vez.• Si est& usando un recipiente recomendado para
microondas en la preparaci6n de palomitas demalz, siga las instrucciones del fabricante.
Para usar POPCORN, siga los pasos detalladosa continuaci6n:
1. Coloque la bolsa en el centro de la bandejagiratoria.
2. Toque POPCORN de 1 a 3 veces para elegir eltama_o de la bolsa.
Ejemplo para3.5 oz (100 g)
una vezUSTED VE
Ejemplo para3.5 oz (100 g)
(el tiempo decuenta regresivapuede variar)
72

COMO UTILIZAR POPCORN (CONT.)
Este cuadro le indica c6mo elegir el tamado deuna bolsa.
3.5 oz (100 g) una vez
3.0 oz (85 g) dos veces
1.75 oz (50 g) 3 veces
Lasr na+cas@ pab s tas +t® +,_sfu8 8_++@El resultado de coaai6n de sus palomitas de maizdepender_ de la marca de palomitas de maiz y dela cantidad de grasa que contenga. Pruebe convarias marcas para decidir cu&l es la que rindemejor. Para Iograr 6ptimos resultados, use bolsasfrescas de palomitas de maiz.
NOTAS:
• Si usted toca POPCORN cuatro veces, la pantallaregresa al ajuste de 3.5 onzas (100 g).
• Usted no tiene que tocar START/ENTER paraponer a funcionar el homo. El homo comenzara afuncionar en 5 segundos.
COMO UTILIZAR BEVERAGE (BEBIDAS)Usted puede calentar una o dos tazas de 8 onzas(237 a 473 mL) de bebida tocando un s61o bot6n.El nQmero de veces que usted toca este bot6ndetermina el nQmero de tazas que su homo va acalentar.
NOTAS:
• Si usted toca BEVERAGE tres veces, la pantallaregresa al ajuste de 1 taza.
• No tiene que tocar START/ENTER para poner elhomo en marcha. El homo comenzara a calen-tarse por si mismo en 5 segundos.
• Si usted necesita mas o menos tiempo, no toqueBEVERAGE de nuevo. Toque POWER antes deque el homo comience a cocinar. (Vea "C6mocambiar los tiempos prefijados de cocci6n" en lasecci6n "Conozca su homo de microondas.")
3. Cambie a 2 tazas (500 mL) si Io desea.TOQUE USTED VE
O
Despu6s de 5 segundos, el homo comenzarA a
calentar. USTED VE
1. Coloque su(s) taza(s) de bebida en elhorno y cierre la puerta,
2, Toque BEVERAGE,
TOQUE USTED VE
(el tiempo de cuenta regre-siva puede variar del arribaindicado)(ejemplo para 2 tazas)
Alfinaldeltiempodecalentamiento:
USTED VE
Si usted desea calentar una taza (237 mL),s61o espere 5 segundos y el homo comenzar&a calentar automaticamente para 1 taza. (se escuchar_in cuatro
sonidos)
73
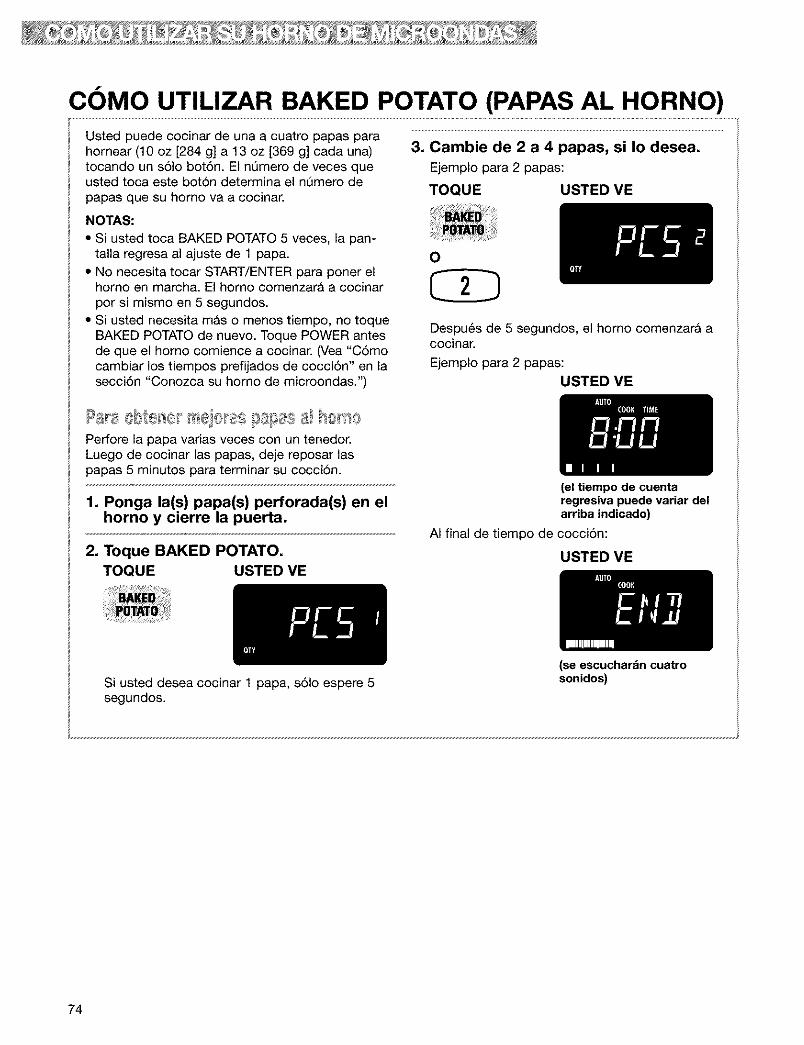
COMO UTILIZAR BAKED POTATO (PAPAS AL HORNO)Usted puede cocinar de una a cuatro papas parahomear (10 oz [284 g] a 13 oz [369 g] cada una)tocando un sSIo bot6n. El nQmero de veces queusted toca este botSn determina el nQmero depapas que su homo va a cocinar.
NOTAS:
• Si usted toca BAKED POTATO 5 veces, la pan-talla regresa al ajuste de 1 papa.
• No necesita tocar START/ENTER para poner elhomo en marcha. El homo comenzara a cocinarpot si mismo en 5 segundos.
• Si usted necesita mas o menos tiempo, no toqueBAKED POTATO de nuevo. Toque POWER antesde que el homo comience a cocinar. (Vea "C6mocambiar los tiempos prefijados de cocci6n" en lasecci6n "Conozca su homo de microondas.")
3, Cambie de 2 a 4 papas, si Io desea,
Ejemplo para 2 papas:
TOQUE USTED ME
O
Despu6s de 5 segundos, el homo comenzara acocinar.
Ejemplo para 2 papas:USTED VE
la[8 01)I®1(¢1IIl)IOl"eS l._all_as81 l"io[Io
Perfore la papa varias veces con un tenedor.Luego de cocinar las papas, deje reposar laspapas 5 minutos para terminar su cocci6n.
1. Ponga la(s) papa(s) perforada(s) en elhorno y cierre la puerta,
2, Toque BAKED POTATO,TOQUE USTED VE
(el tiempo de cuentaregresiva puede variar delarriba indicado)
AI final de tiempo de cocciSn:
USTED VE
Siusted desea cocinarl papa, s61o espere 5segundos.
74
(se escucharbn cuatrosonidos)

COMO UTILIZAR FRESH VEGETABLE (VERDURAFRESCA)
Usted puede cocinar de 1 a 4 tazas (237 mL a946 mL) de verdura fresca tocando s61o un bot6n.El nQmero de veces que usted toca este bot6ndetermina el nQmero de tazas que su homo va acocinar.
NOTAS:
• Si usted toca FRESH VEGETABLE 5 veces, lapantalla regresa al ajuste de 1 taza.
• Usted no necesita tocar START/ENTER paraponer el homo en marcha. El homo va acomenzar a cocinar pot si mismo en 5 segundos.
• Si usted necesita m&s o menos tiempo, no toqueFRESH VEGETABLE de nuevo. Toque POWERantes de que el homo comience a cocinar. (Vea"C6mo cambiar los tiempos prefijados decocci6n" en la secci6n "Conozca su homo demicroondas.")
1, Ponga sus verduras en el horno ycierre la puerta,
3, Cambie de 2 a 4 tazas, si Io desea,
Ejemplo para 2 tazas:
TOQUE USTED VE
O
Despu6s de 5 segundos, el homo comenzar& acocinar.
Ejemplo de 2 tazas:USTED VE
2, Toque FRESH VEGETABLE,TOQUE USTED VE
(el tiempo de cuentaregresiva puede variar delarriba indicado)
AI final del tiempo de cocci6n:
USTED VE
Si usted desea cocinar 1 taza de verduras,s61o espere 5 segundos.
(se escuchardn cuatrosonidos)
75
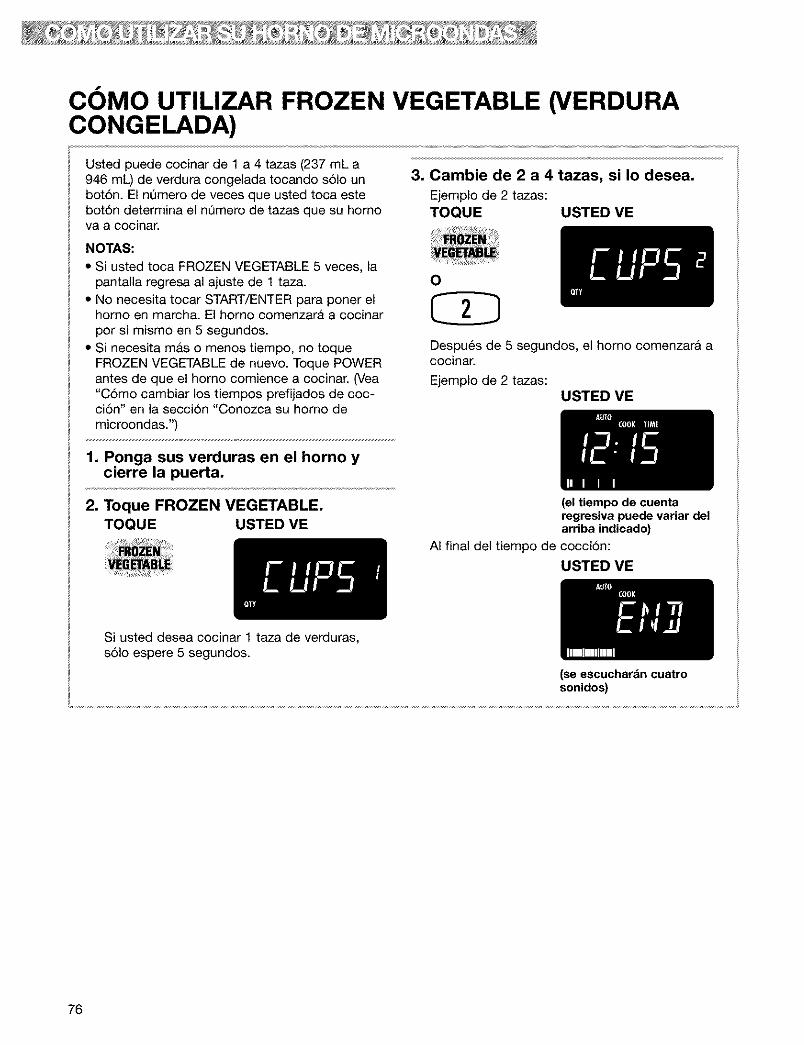
COMO UTILIZAR FROZEN VEGETABLE (VERDURACONGELADA)
Usted puede cocinar de 1 a 4 tazas (237 mL a946 mL) de verdura congelada tocando s61o unbot6n. El n0mero de veces que usted toca estebot6n determina el n0mero de tazas que su homova 8 cocinar.
NOTAS:
• Si usted toca FROZEN VEGETABLE 5 veces, lapantalla regresa al ajuste de 1 taza.
• No necesita tocar START/ENTER para poner elhomo en marcha. El homo comenzara a cocinarpor si mismo en 5 segundos.
• Si necesita m&s o menos tiempo, no toqueFROZEN VEGETABLE de nuevo. Toque POWERantes de que el homo comience a cocinar. (Vea"C6mo cambiar los tiempos prefijados de coc-ci6n" en la secci6n "Conozca su homo demicroondas.")
1, Ponga sus verduras en el horno ycierre la puerta,
3, Cambie de 2 a 4 tazas, si Io desea,
Ejemplo de 2 tazas:TOQUE USTED VE
O
Despu6s de 5 segundos, el homo comenzarA acocinar.
Ejemplo de 2 tazas:USTED VE
2, Toque FROZEN VEGETABLE,TOQUE USTED VE
(el tiempo de cuentaregresiva puede variar delarriba indicado)
AI final del tiempo de cocci6n:
USTED VE
Si usted desea cocinar 1 taza de verduras,s61o espere 5 segundos.
76
(se escuchardn cuatrosonidos)
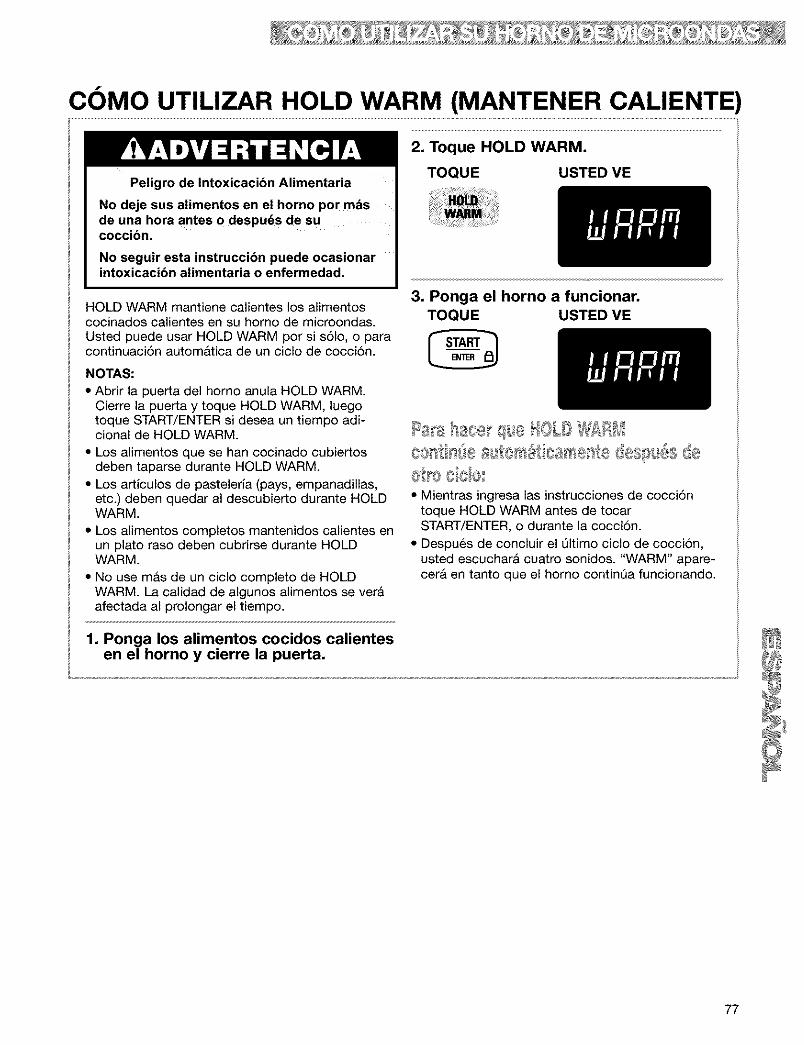
COMO UTILIZAR HOLD WARM (MANTENER CALIENTE)
Peligro de Intoxicacibn Alimentaria
No deje sus alimentos en el horno por mdsde una hora antes o despu_s de sucoccibn.
No seguir esta instruccibn puede ocasionarintoxicacibn alimentaria o enfermedad.
HOLD WARM mantiene calientes los alimentoscocinados calientes en su homo de microondas.Usted puede usar HOLD WARM por si s61o, o paracontinuaci6n autom&tica de un ciclo de cocci6n.
NOTAS:
• Abrir la puerta del homo anula HOLD WARM.Cierre la puerta y toque HOLD WARM, luegotoque START/ENTER si desea un tiempo adi-cional de HOLD WARM.
• Los alimentos que se han cocinado cubiertosdeben taparse durante HOLD WARM.
• Los artlculos de pasteleria (pays, empanadillas,etc.) deben quedar al descubierto durante HOLDWARM.
• Los alimentos completos mantenidos calientes enun plato raso deben cubrirse durante HOLDWARM.
• No use mas de un ciclo completo de HOLDWARM. La calidad de algunos alimentos sever&afectada al prolongar el tiempo.
1, Ponga los alimentos cocidos calientesen el horno y cierre la puerta.
2, Toque HOLD WARM,
TOQUE USTED VE
3, Ponga el horno a funcionar,TOQUE USTED VE
• Mientras ingresa las instrucciones de cocci6ntoque HOLD WARM antes de tocarSTART/ENTER, o durante la cocci6n.
• Despu6s de concluir el Qltimo ciclo de cocci6n,usted escuchar& cuatro sonidos. "WARM" apare-cera en tanto que el homo continQa funcionando.
77

El cuidado de su horno demicroondasPara asegurarse de que su homo de microondas luzca bien y funcione con eficiencia por mucho tiem-po, usted debe mantenerlo adecuadamente. Para Iograr un cuidado apropiado, por favor siga estasinstrucciones con cuidado.
Para superficies internas: Lavelas a menudo con
agua tibia jabonosa yuna esponja o padosuave. Use Qnicamentejabones suaves, noabrasivos o un deter-gente suave.Asegt_rese de man-tener limpias lasareas donde la puertay el marco del hornose tocan cuando el
horno estA cerrado. Limpie bien con agua limpia.DespuAs de un tiempo pueden aparecer manchasen las superficies como resultado de salpicadurasde partlculas de alimentos durante la cocciSn. Estoes normal.
Para suciedad rebelde, hierva una taza de agua enel homo durante 2 o 3minutos. El vaporablandara la suciedad.Para eliminar oloresdentro del homo, hiervauna taza de agua conjugo de limAn o vina-gre.
Para limpiar la bandeja giratoria y su soporte,
Bandejagiratoriade vidrio lavelos con una soluciAnjabonosa suave. Paralas Areas muy suciasuse un producto delimpieza suave y unestropajo. La bandejagiratoria y el soporte dela misma se puedenlavar en una lavavajillas.de
la bandejagiratoria
LIFilBI@II " .... " = ....- 118 £18 Ia(_=QOOQIOII
• LAvIII a mini con un detergente suave y uniesponja o un cepillopara refregar de nAilonsuave. SAquela porcompleto.• No use productos de
limpieza o estropajosasperos para limpiar laparrilla.
• La parrilla puedelavarse en lalavavajillas.
Para superficies externas y el panel de control:Use un paso suave conun limpiavidrios enaerosol. Aplique ellimpiavidrios a un padosuave; no Io rocie direc-tamente sobre el horno.NOTA: Los productosde limpieza abrasivos,esponjas de lana deacero, toallitasasperas, algunas toal-
las de papel, etc., pueden dinar el panel de con-trol y las superficies internas y externas del homo.
78
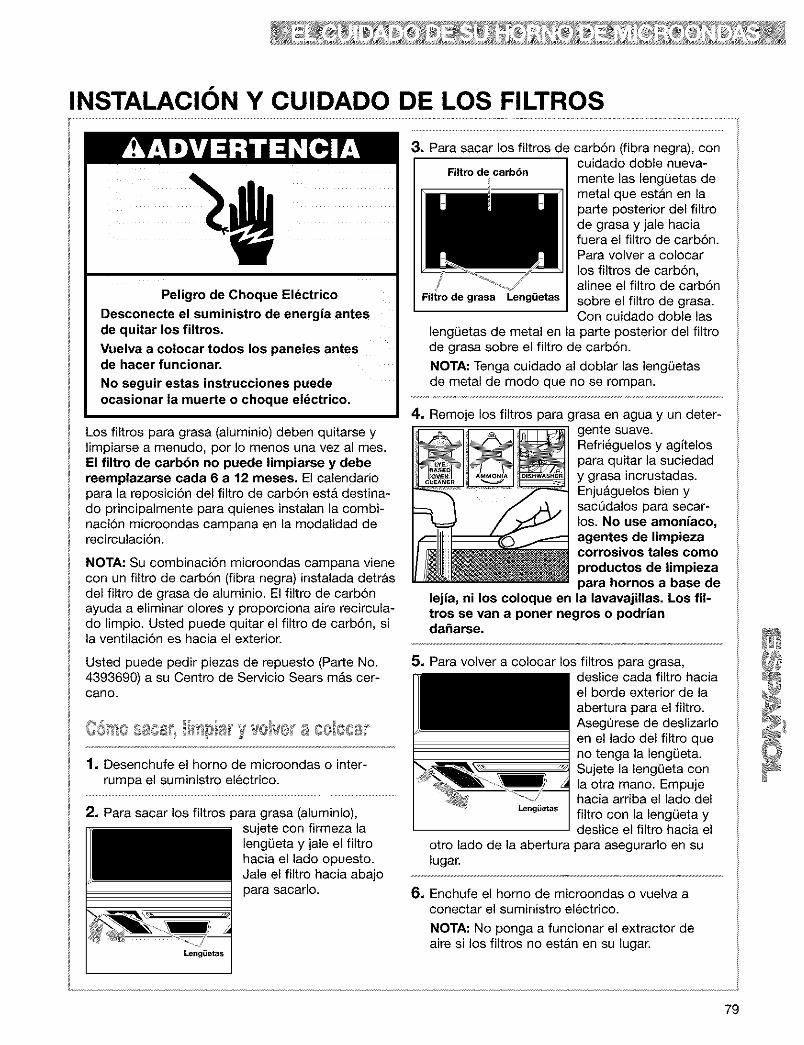
INSTALACION Y CUIDADO DE LOS FILTROS
Peligro de Choque Eldctrico
Desconecte el suministro de energia antesde quitar los filtros.
Vuelva a colocar todos los paneles antesde hacer funcionar.
No seguir estas instrucciones puedeocasionar la muerte o choque eldctrico.
Los filtros para grasa (aluminio) deben quitarse yIimpiarse a menudo, por Io menos una vez al mes.El filtro de carb6n no puede limpiarse y debereemplazarse cada 6 a 12 meses. El calendariopara la reposici6n del filtro de carb6n est& destina-do principalmente para quienes instalan la combi-naci6n microondas campana en la modalidad derecirculaci6n.
NOTA: Su combinaci6n microondas campana vienecon un filtro de carbSn (fibra negra) instalada detr&sdel filtro de grasa de aluminio. El filtro de carb6nayuda a eliminar olores y proporciona aire recircula-do limpio. Usted puede quitar el filtro de carb6n, sila ventilaci6n es hacia el exterior.
Usted puede pedir piezas de repuesto (Parte No.4393690) a su Centro de Servicio Sears m&s cer-cano.
1, Desenchufe el homo de microondas o inter-rumpa el suministro el_ctrico.
2, Para sacar los filtros para grasa (aluminio),sujete con firmeza laleng_ieta y jale el filtrohacia el lado opuesto.Jale el filtro hacia abajopara sacarlo.
Leng_etas
3, Para sacar los filtros de
I Filtro de carbbn
Filtro de grasa Leng_ietas
carb6n (fibra negra), concuidado doble nueva-mente las leng0etas demetal que est&n en laparte posterior del filtrode grasa y jale haciafuera el filtro de carb6n.Para volver a colocarlos filtros de carb6n,alinee el filtro de carb6nsobre el filtro de grasa.Con cuidado doble las
leng0etas de metal en la parte posterior del filtrode grasa sobre el filtro de carb6n.
NOTA: Tenga cuidado al doblar las lengQetasde metal de modo que no se rompan.
4, Remoje los filtros para grasa en agua y un deter-gente suave.Refri6guelos y agftelospara quitar la suciedady grasa incrustadas.Enju&guelos bien ysacQdalos para secar-los. No use amoniaco,agentes de limpiezacorrosivos tales comoproductos de limpiezapara hornos a base de
lejia, ni los coloque en la lavavajillas. Los fil-tros se van a poner negros o podriandaSarse.
Leng_etas
otro lado de la aberturalugar.
5. Para volver a colocar los filtros para grasa,deslice cada filtro haciael borde exterior de laabertura para el filtro.AsegQrese de deslizarloen el lado del filtro queno tenga la leng0eta.Sujete la lengQeta conla otra mano. Empujehacia arriba el lado delfiltro con la lengQeta ydeslice el filtro hacia elpara asegurarlo en su
6. Enchufe el homo de microondas o vuelva aconectar el suministro el6ctrico.
NOTA: No ponga a funcionar el extractor deaire si los filtros no estAn en su lugar.
79

CAMBIO DE LAS LUCES. DEL HORNO Y DE LASUPERFICIE DE COCCION
1. Desenchufe el horno o interrumpa el suministroelectrico.
2. Saque el tornillo de montaje de la pantalla de labombilla y con cuidadoquite la pantalla.
Tornillodemontaje
3, Incline la rejilla hacia adelante, luego lev&ntela
I ] para sacarla.
4. Levante la pantalla de la bombilla.
3. Reemplace la(s) bombilla(s) con una(s) de 30vatios con base de candelabro (Parte No.4393681) que se pueden adquirir en su Centrode Servicio Sears.
4. Vuelva a colocar la pantalla de la bombilla y eltomillo de montaje.
5. Enchufe el homo de microondas o vuelva aconectar el suministro el&ctrico.
1. Desenchufe el homo de microondas o inter-rumpa el suministro el_ctrico.
2. Saque los dos tornillos de montaje de la rejillade ventilaci6n que estanubicados encima de lapantalla (los dos tomillosde los extremos).
5. Reemplace la bombilla con una de 30 vatios conbase de candelabro (Parte No. 4393681) que sepueden adquirir en su Centro de Servicio Sears.
6. Cierre la pantalla de la bombilla.
7. Deslice la parte superior de la rejilla de venti-
I laci6n hasta su lugar.Empuje la parte inferiorhasta que encaje en sulugar. Vuelva a colocarlos tornillos de montaje.
8. Enchufe el homo de microondas o vuelva aconectar el suministro el6ctrico.
80
Guia para cocinarCONSEJOS PARA COCINAR CON EL HORNO DEMICROONDAS
• Si usted aumenta o disminuye la cantidad dealimentos que prepara, el tiempo requerido paracocinarlos tambi6n cambiar&. Por ejemplo, siusted usa el doble de una receta, agregue unpoco m&s de la mitad del tiempo de cocci6noriginal. Verifique si est& cocido y, si es nece-sario, agregue m&s tiempo en incrementospequedos.
[_C/a c_e/a Ise_sto
• Cuanto menor es la temperatura del alimentoque usted coloca en el homo de microondas,mayor serA el tiempo requerido para su cocci6n.Los alimentos a temperatura ambiente se reca-lentarAn m&s r&pido que los alimentos que estAna la temperatura del refrigerador.
Oo spos @o de/afs es Q• Los alimentos con mucha grasa o azt_car se
calentar_n m&s r_pido que los alimentos con altocontenido de agua. La grasa y el azScar alcanzanuna temperatura m&s alta que el agua durante elproceso de cocci6n.
• Cuanto m&s denso es el alimento, mayor es eltiempo requerido para calentarlo. Alimentos "muydensos" como las carnes necesitan m&s tiempopara recalentarse que los alimentos mas livianoso m&s porosos como pasteles esponjosos.
• Las piezas mds peque_as de alimento se coci-nar_n m&s r&pido que las piezas mas grandes ypiezas con la misma forma se cocinar&n enforma mAs pareja que los alimentos con formairregular.
• En los alimentos con gruesos diferentes, laspartes mAs delgadas se cocinar&n mAs rapidoque las partes mAs gruesas. Coloque las partesm&s delgadas de las alas y patas de polo en elcentro del plato.
Rs/;ac@ y af ta=e de• Cuando usted rota o revuelve los alimentos, el
calor se distribuye rapidamente al centro delplato y evita que los bordes del alimento serecocinen.
0,= IllllellI@;_,
Tape los alimentos para:
• Reducir salpicaduras
• Acortar los tiempos de cocci6n• Retener la humedad de los alimentos
Todas las tapas que permiten pasar las microondasson adecuadas. Para m&s informaci6n acerca delos materiales que permiten el paso de lasmicroondas, vet la secci6n "Conozca su homo demicroondas".
• Muchos alimentos (por ejemplo: papas alhomo, salchichas, yemas de huevo y algunasfrutas) est&n cubiertos por una piel o membranaapretada. Esto puede causar que los alimentosestallen por la acumulaci6n de vapor bajo lamembrana mientras se cocinan. Para aliviar lapresiin y prevenir los estallidos, trinche estosalimentos con un tenedor o un palillo de dientesantes de cocinarlos.
'XeF x@ :fe 'eises0• Siempre deje reposar los alimentos por un
rato despu6s de cocinar. El peHodo de reposodespu_s de cocinar, descongelar o recalentarsiempre mejora el resultado ya que la temperatu-ra se distribuye en forma pareja a trav6s del ali-mento.
El intervalo del tiempo de reposo depende delvolumen y la densidad del alimento. A vecespuede ser tan corto como el tiempo que le Ilevasacar los alimentos del homo y servirlos en lamesa. Sin embargo, con alimentos m&s volumi-nosos y mas densos, el intervalo de tiempo dereposo puede ser tan largo como 10 minutos.
{}ist il ¢ @ @ bs alisse tesPara resultados 6ptimos, distribuya los alimentosen forma pareja sobre el plato. Usted puede haceresto de varias maneras:
• Si usted est_ cocinando varias piezas delmismo tipo de alimento, como papas al homo,col6quelas en forma de anillo para una cocci6nuniforme.
81
CONSEJOS PARA COClNAR CON EL HORNO DEMICROONDAS (CONT.)
• Cuando cocina alimentos con forma o espe-sot irregular, tales como pechugas de polo,coloque las partes m_s peque_as y delgadashacia el centro del plato donde se calentar&n enQltimo lugar.
• Apile las rodajas delgadas de came una sobreotra.
• Cuando usted cocina o recalienta pescadosenteros, haga un corte en la piel - esto evitaque se quiebre.
• No deje que los alimentos o los recipientestoquen el techo o los costados del homo. Estoevitar& la posible formaci6n de chispas.
No deben usarse recipientes de metal in el homode microondas. Sin embargo, hay algunas excep-ciones. Si usted ha comprado alimentos que est&npre-empaquetados en un recipiente de papel dealuminio, siga las instrucciones del paquete. Si usa •recipientes de papel de aluminio, los tiempos decocci6n pueden ser m&s largos porque lasmicroondas penetraran s61o la parte superior del
• Siempre quite la tapa para evitar que el homo seda_e.
• Use sblo recipientes que no est&n da_ados.
• No use recipientes m&s altos de ¾ de pulgada(19 mm).
• El recipiente debe estar Ileno por Io menos hastala mitad.
• Para evitar que se formen chispas, debe habercomo minimo ¼ de pulgada (6.4 mm) entre elrecipiente de aluminio y las paredes del horno Iomismo que entre dos recipientes de aluminio.
• Siempre coloque el recipiente sobre la bandejagiratoria.
• El recalentamiento de alimentos en recipientespapel de aluminio Ileva el doble de tiempo querecalentarlos en recipientes de pl&stico, vidrio,porcelana o papel. El tiempo requerido para quelos alimentos est6n listos depende del tipo derecipiente que usted usa.
Deje reposar los alimentos por 2 6 3 minutosdespu_s de calentar para que el calor se distribuyaen forma pareja a trav_s del recipiente.
alimento. Si usted usa recipientes de aluminio que• _, _ _ _1 _ _ _no tienen instrucciones en el paquete, siga las L@ (_l>_ _j _(}_} [_@ f_(_/O(%C;Ou FIB @_ 8,_ l_O/_#0
siguientes indicaciones:
• Coloque el recipiente en un taz6n de vidrio yagregue un poco de agua para que cubra labase del recipiente, a no mas de Y44de pulgada(6.4 mm) de alto. Esto asegura un calentamientoparejo en la base del recipiente.
• No envase alimentos en el horno. Los frascos devidrio cerrados pueden explotar, resultando enda_os al homo.
• No use el horno de microondas para esterilizarobjetos (mamaderas, etc.). Es dificil mantener latemperatura alta requerida para una esterilizaci6nsegura.
82

Preguntas y RespuestasPREGUNTAS RESPUESTAS
&Puedo hacer funcionar mi homo de microondas No. Si usted saca o da vuelta a la bandeja girato-sin la bandeja giratoria o voltear la bandeja ria, tendra resultados de cocciSn insatisfactorios.giratoria para acomodar un plato m&s grande? Los platos que use en su homo deben caber en la
bandeja giratoria.
&Puedo usar una parrilla en mi homo de Usted puede usar una parrilla si 6sta vino con sumicroondas para recalentar o cocinar en dos homo de microondas. El uso de una parrilla ajenaniveles al mismo tiempo? al homo de microondas, puede dar como resulta-
do una cocci6n insatisfactoria y/o la producci6n dechispas.
&Puedo usar bandejas de metal o aluminio en mihomo de microondas?
Usted puede usar papel de aluminio paraprotecci6n (use pedazos peque5os y pianos),brochetas peque_as y bandejas poco profundasde aluminio (si la bandeja tiene una profundidad de¾ de pulgada [1.9 cm] y esta a medio Ilenar con
alimentos para absorber la energia de microondas).Nunca deje que el metal toque las paredes o lapuerta.
&Es normal que la bandeja giratoria rote en ambas Sf. La bandeja giratoria gira a la izquierda o a ladirecciones? derecha dependiendo de la rotaci6n del motor
cuando se inicia el ciclo de cocciSn.
A veces la puerta de mi homo de microondas Esta apariencia es normal y no afecta el fun-
&Qu_ son los zumbidos que escucho cuando el Usted puede escuchar el sonido del transformadorhomo de microondas est& funcionando? cuando el tubo de magnetr6n comienza los ciclos.
&Por que el plato se calienta cuando cocino all- A medida que los alimentos se calientan, 6stosmentos en el? Pense que esto no ocurriria, transfieren el calor al plato. Prep&rese para usar
guantes de hornear para sacar los alimentosdespu6s de la cocci6n.
_,Que significa "tiempo de reposo"? "Tiempo de reposo" significa que los alimentos
deben sacarse del homo y quedar tapados por untiem ?o adicional para permitir que se termine lacoccidn. Esto libera el homo ?ara cocinar otrascosas.
&Por que sale vapor del conducto de ventilaci6n? El vapor se produce normalmente durante la coc-
ci6n. El homo de microondas ha sido disedado paraventilar el vapor por los orificios de ventilaci6n.
Puedo hacer palomitas de maiz en mi homo de Sf. Haga palomitas de malz empaquetadas sigu-microondas? CSmo Iogro 6ptimos resultados? iendo las instrucciones del fabricante o use el
bot6n prefijado POPCORN. No use bolsascomunes de papel. Use la "prueba de sonido"parando el homo en cuanto los estallidos seanm&s espaciados hasta que haya uno cada uno odos segundos. No vuelva a usar granos de maizque no hayan reventado. No haga palomitas demalz en utensilios de vidrio.
83
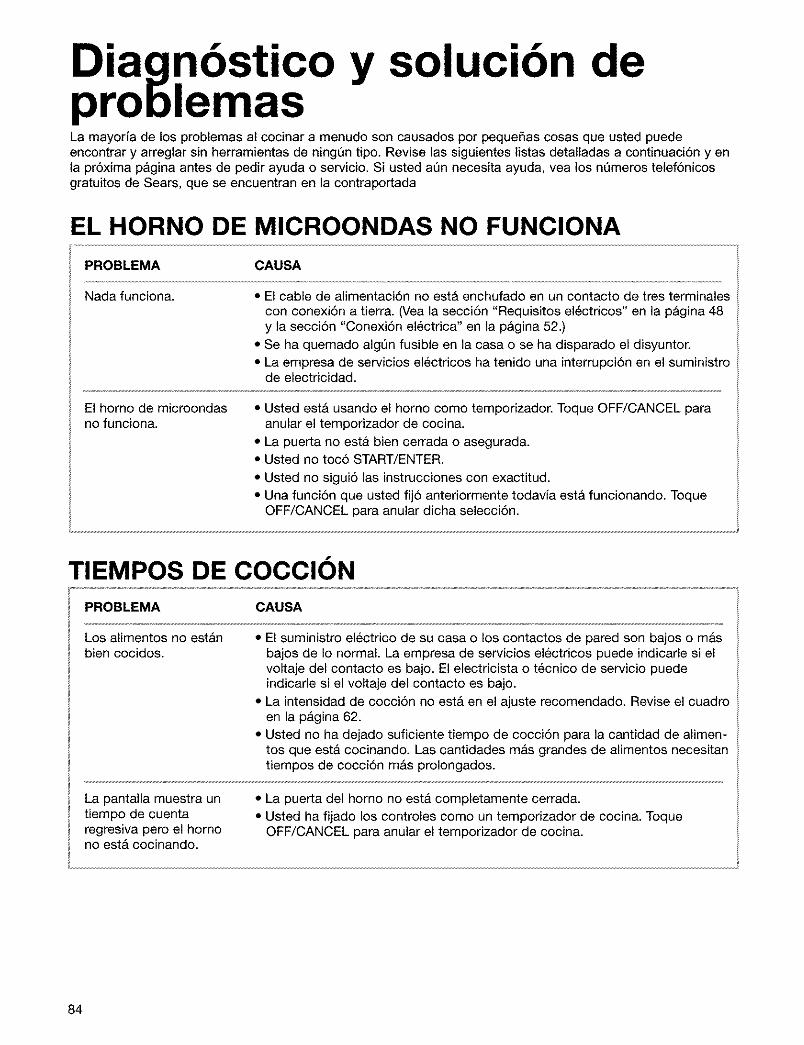
Diagnbstico y solucibn deproblemasLa mayorfa de los problemas al cocinar a menudo son causados per pequeSas cosas que usted puedeencontrar y arreglar sin herramientas de ningQn tipo. Revise las siguientes listas detaltadas a continuaci6n y enla pr6xima pagina antes de pedir ayuda o servicio. Si usted aQn necesita ayuda, vea los nQmeros tetef6nicosgratuitos de Sears, que se encuentran en la contraportada
EL HORNO DE MICROONDAS NO FUNCIONA
PROBLEMA CAUSA
Nada funciona. • El cable de alimentaci6n no est& enchufado en un contacto de tres terminalescon conexi6n a tierra. (Vea la secciSn "Requisitos el6ctricos" en la p&gina 48y la secciSn "Conexi6n electrica" en la p&gina 52.)
• Se ha quemado algQn fusible en la casa o se ha disparado el disyuntor.• La empresa de servicios electricos ha tenido una interrupciSn en el suministro
de electricidad.
El homo de microondasno funciona.
• Usted est& usando el horno como temporizador. Toque OFF/CANCEL paraanular el temporizador de cocina.
• La puerta no estA bien cerrada o asegurada.• Usted no toc5 START/ENTER.
• Usted no sigui5 las instrucciones con exactitud.• Una funciSn que usted fij5 anteriormente todavfa estA funcionando. Toque
OFF/CANCEL para anular dicha selecci6n.
TIEMPOS DE COCClON
PROBLEMA CAUSA
Los alimentos no est&nbien cocidos.
• El suministro electrico de su casa o los contactos de pared son bajos o m&sbajos de Io normal. La empresa de servicios electricos puede indicarle si elvoltaje del contacto es bajo. El electricista o t6cnico de servicio puedeindicarle si el voltaje del contacto es bajo.
• La intensidad de cocciSn no est& en el ajuste recomendado. Revise el cuadroen la pAgina 62.
• Usted no ha dejado suficiente tiempo de cocci6n para la cantidad de alimen-tos que estA cocinando. Las cantidades m&s grandes de alimentos necesitantiempos de cocci6n mAs prolongados.
La pantalla muestra untiempo de cuentaregresiva pero el hornono est& cocinando.
• La puerta del homo no est& completamente cerrada.
• Usted ha fijado los controles como un temporizador de cocina. ToqueOFF/CANCEL para anular el temporizador de cocina.
84

BANDEJA GIRATORIA
PROBLEMA CAUSA
La bandeja giratoria nofunciona.
• Usted ha apagado la bandeja giratoria. (Vea la secci6n "C6mo calentar mAsde un plato de alimentos" en la pAgina 56.)
• La bandeja giratoria no est& en su debido lugar. Su posici6n correcta debeser con el lado piano hacia arriba y bien asentada en el eje central.
• El soporte no esta funcionando correctamente. Saque la bandeja giratoria yponga el homo a funcionar de nuevo. Si el soporte todavia no se mueve,Ilame a un t_cnico autorizado para que Io repare. Los resultados de cocci6nsin la bandeja giratoria pueden ser insatisfactorios.
SONIDOS
PROBLEMA CAUSA
Usted no escucha • Usted no ha ingresado el comando correcto.el sonido de • Usted ha apagado el sonido. (Vea la secci6n "Sedales audibles" en laprogramaci6n o p&gina 55.)de fin de ciclo.
MENSAJES EN LA PANTALLA
PROBLEMA CAUSA
La pantalla muestra • Ha habido una interrupci6n en el suministro electrico. Vuelva a programar elintermitentemente":", reloj. (Vea la secci6n "C6mo poner el reloj a la hora" en la pAgina 58.)
Si ninguna de 6stas es la causa del problema, vea la secci6n "NQmeros telef6nicos gratuitos de Sears" en lacontraportada.
85

f •IndlceEste indice est& en orden alfab6tico. Contiene todos los temas incluidos en este manual al igual que la(s)p&gina(s) d6nde puede encontrar cada tema.
TEMA PAGINA TEMA PAGINA
BARRA INDICADORA DE AVANCE .......................... 65
CAMBIO DE LAS LUCES DEL HORNOY DE LA SUPERFICIE DE COCCION ...................... 80
CONSEJOSCocci6n ............................................................ 81, 82Descongelaci6n ..................................................... 71Palomitas de maiz ................................................. 72Papas al homo ....................................................... 74
CUADROSCocci6n automatica ............................................... 66Conversi6n de peso ............................................... 71Descongelaci6n pan .............................................. 72Intensidades de cocci6n ........................................ 62Popcorn (palomitas de maiz) ................................. 73Recalentamiento automatico ................................. 68Zip defrost (descongelaci6n vetoz) ................... 69-71
CUIDADO DE SU HORNO DE MICROONDAS ........ 78
DIAGNOSTICO Y SOLUCION DE PROBLEMAS ..84, 85
EXTRACTOR DE AIRE ............................................. 57
FILTROS .................................................................... 79
FUNCIONAMIENTO DE SU HORNODE MICROONDAS .................................................... 51
GARANTiA ................................................................. 44
INSTRUCCIONES PARA LA INSTALACION .......49-50
INTERFERENCIA ELECTROMAGNg:TICA ............... 51
LUCESC6mo cambiadas ................................................... 80C6mo usadas ......................................................... 58
NOMEROS TELEFONICOS GRATUITOS..Contraportada
PANEL DE CONTROL .......................................... 54-56ADD ONE MINUTE (agregar un minuto) ............... 60AUTO COOK (cocci6n autom_tica) ................. 65, 66AUTO REHEAT (recalentamiento automatico)..67, 68BAKED POTATO (Papas al homo) ........................ 74BEVERAGE (Bebidas) ........................................... 73Botones numerados ............................................... 54BREAD DEFROST (descongelaci6n de pan) ........ 72Cambio de los tiempos prefijados de cocci6n ....... 60Caracteristica de demostraci6n/aprendizaje ......... 56Cocci6n a intensidad alta ...................................... 61
Cocci6n a distintas intensidades ..................... 62, 63Cocci6n por etapas ................................................ 64Extractor de aire .................................................... 57FRESH VEGETABLE (verdura fresca) .................. 75FROZEN VEGETABLE (verdura congetada) ......... 76HOLD WARM (mantener caliente) ........................ 77Interrupci6n de la cocci6n ...................................... 55Luz ......................................................................... 58OFF/CANCEL (apagadanular) ............................... 55Pantalla .................................................................. 54POPCORN (palomitas de mafz) ....................... 72-73RELOJ ................................................................... 58Seguro para niSos ................................................. 56START/ENTER (iniciadingresar) ........................... 55Suministro et6ctrico (POWER) .................. 60, 63, 64Temporizador de cocina ......................................... 59TIEMPO DE COCCION ................................... 61, 64TURNTABLE ON/OFF (Bandeja giratoriaencendida/apagada) ........................................ 55, 56ZIP DEFROST (Descongetaci6n veloz) ........... 68-71
PAPEL DE ALUMINIO .......................................... 82-83
PARA PROBAR SU HORNO DE MICROONDAS.....51
PARA PROBAR SU VAJILLA OSUS UTENSILIOS DE COCINA ................................ 52
PARRILLA ............................................... 53, 57, 78, 83
PARTES Y CARACTERiSTICASBandeja giratoria ..................... 51, 52, 53, 78, 83, 85Etiqueta con guia para cocinar .............................. 53Magnetr6n ........................................... 44, 45, 51, 83Manija de la puerta ................................................ 53Parrilla de cocci6n ..................................... 53, 57, 78Placa con el nQmero det modeto y de la serie ......53Rejilla de ventitaci6n .............................................. 53Sistema de traba de seguridad de la puerta ......... 53Ventana .................................................................. 53
PREGUNTAS Y RESPUESTAS ................................ 83
REQUERIMIENTOS ELC:CTRICOS .................... 48, 52
SEGURIDAD ........................................................ 46-48
SEt_IALES AUDIBLES ................................................ 55
SERVICIO .................................................................. 45
TIEMPO DE REPOSO ............................ 52, 71, 81, 83
86

87
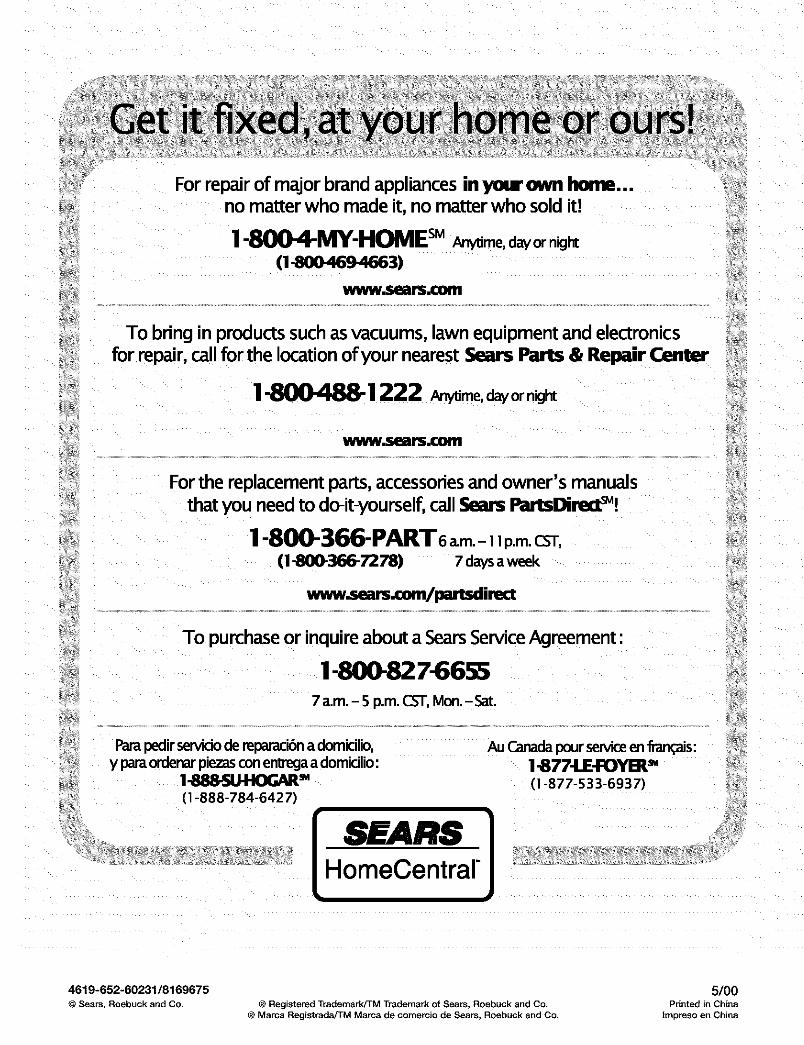
For repairof majorbrand appliancesin your own home...no matter who made it, no matterwho soldit!
1"8004"IVlY-HOME sMAnytime,dayor night
(1-8004694663)
wiA_l/.Seal_.OBitl
To bring in productssuchas vacuums,lawn equipmentand electronicsfor repair, callfor the locationofyour nearestSears Parts & Repair Center
1-800488-1222 AnyUme,dayor night
ww11/i/.sea13=col11
Forthe replacementparts, accessoriesand owner's manualsthat you needto do-it-yourself,call Sears PartsDire_L_!
1-800-366-PART 6=m-11p.m.C_-,
(!-800-366-7278) 7 daysaweek
www.sears.€om/partsdirea
To purchaseor inquireabout a SearsServiceAgreement:
! -800-82 7-66557a_m.- 5 p.m. CST, Mort.- Sat.
Parapedirservidode reparacibna domicilio,y paraordenarpiezasconentmgaa domidlio:
! -888-SU-HOGAR _(1-888-784-6427)
Au Canada pour senlice en francis:1-877-LE-FOYB_ _(1-877-533-6937)
SEARS 1HomeCentrar
4619-652-60231/8169675 5/00© Sears, Roebuck and Co. © RegisteredTrademark/TM Trademark of Sears, Roebuck and Co Printed in China
© Marca Registrada/TM Marca de comerciode Sears, Roebuck and Co trnpreso en China