Embed Size (px)
Citation preview
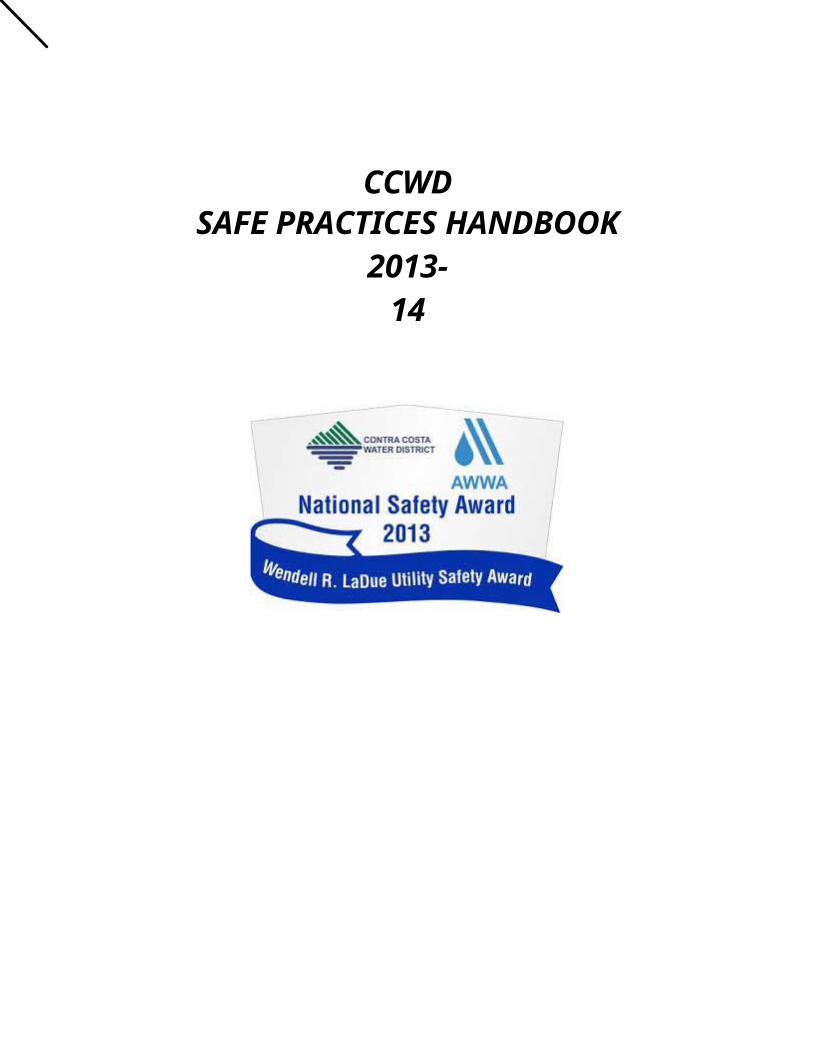
CCWDSAFE PRACTICES HANDBOOK
2013-14
2013-14 Safe Practices Handbook - Page 2 of 49
CCWDSAFE PRACTICES HANDBOOK
Contra Costa Water District’s (District’s) goal is to provide every employee with the benefits of a safe and healthy work environment. The District is committed to maintain a workplace free from work-related injuries and illnesses, and to comply with applicable laws and regulationsgoverning workplace safety.
To help achieve these goals, the District has developed a Safe Practices Handbook. The safe practices outlined in this handbook as well as the cross-referenced safety manuals and Administrative Procedures are intended to foster a safe and healthy work environment.
It is the responsibility of every District employee to work together to identify and eliminate conditions and practices that reduce the benefits of a safe and healthy work environment. Every employee shall report unsafe work conditions, practices, or policies by communicating to their respective Site Safety Committee Members, District Safety Committee Members and/or immediate supervisor.
The District’s Health and Safety Program’s objectives are to: maximize the safety of employees and the general public establish safety as a priority in conjunction with efficiency and productivity maintain a safe and healthy work environment as free as possible from threat of injury
or illness due to unsafe practices or conditions provide appropriate safety training programs for employees comply with all federal, state, city, and District safety requirements and guidelines, to follow
industry practices and, where necessary, to implement additional policies to ensure the safety of District employees
2013-14 Safe Practices Handbook - Page 3 of 49
CONTRA COSTA WATER DISTRICT Interoffice Memorandum
DATE: January 28, 2011
TO: FROM:
SUBJECT:
I am committed to creating a world-class safety culture here at the District. The foundation of such a culture must include mutual trust and respect. This organization needs to continue developing our workplace culture so every employee feels comfortable bringing up safety concerns and suggestions with confidence those concerns will be addressed. To achieve this:
1. Giving safety feedback is all about caring for people, not criticizing people. Ensure your care and concern comes through in your communication. Likewise, don't react defensively when receiving constructive safety feedback. Welcome the opportunity to learn and grow. Recognize that the person providing you with that feedback is looking out for you.
2. Hold each other accountable and be persistent in communicating valid safety concerns and constructive suggestions. If the concerns are not reviewed adequately or not acted upon timely or responsibly, continue raising the issue through other channels, such as the Safety Committees, the Safety Officer or a higher level of management.
3. Managers, supervisors and other workplace leaders must be committed to listening and being open, receptive to concerns and suggestions raised by employees; following through on every concern and suggestion to closure.
4. The District will continue to expend resources to improve treatment plants, pump stations, reservoirs, canal facilities and office space to ensure our work places continue to be safe for employees and the public. The District also will continue to dedicate labor resources to support the District Safety Program and Safety Committees.
My vision is for our organization to have an injury and severity rating of zero, meaning employees would not suffer workplace accidents and there would be no lost-time injuries. The ability to make this vision a reality rests on the commitment of each and every one of us to work safely and look out for one another. I welcome yom ideas and suggestions on how we can continue to work together towards our common goal of achieving a world-class safety culture at the District.
JB/sz:kc
Please keep this handbook with you at your place of work or in your District-assigned vehicle.
2013-14 Safe Practices Handbook - Page 4 of 49
Table of ContentsSafe Pract i ces PageGeneral Safety Practices .......................................................................... 5
Driving Safety ............................................................................................ 7
Electrical Safety ........................................................................................ 9
Fire Safety ............................................................................................... 11
Hand Tools .............................................................................................. 13
Ladder Safety .......................................................................................... 14
Office Safety............................................................................................ 16
Personal Protective Equipment (Head, Eye,
Face, Hand, and Hearing) ...................................................................... 17
Site Safety and Security .......................................................................... 20
Construction and Operations & Maintenance Work ............................... 23
Excavation Work ......................................................................... 23
Tools & Equipment ...................................................................... 25
Traffic Safety ............................................................................... 27
Canal and Grounds Maintenance................................................ 30
Plant Operations & Maintenance................................................. 30
Pump Shaft Machine Guarding and Packing Adjustments.......... 32
Welding, Cutting and Other Hot Work ......................................... 32
Boating Safety ......................................................................................... 34
Confined Spaces ..................................................................................... 35
Fall Protection ......................................................................................... 39
Lock and Tag .......................................................................................... 41
Forklift Operation..................................................................................... 43
Biological Hazard Precautions ................................................................ 44
Safety Feedback ..................................................................................... 46
Stretching Exercises ............................................................................... 47
Safety Committees .................................................................................. 49
The following are safe practices that shall be followed by all CCWD employees. These safe practices coincide with and/or augment other safety procedures found in CCWD Administrative Procedures, Standard Operating Procedures and the Safety & Health Manual.
2013-14 Safe Practices Handbook - Page 5 of 49
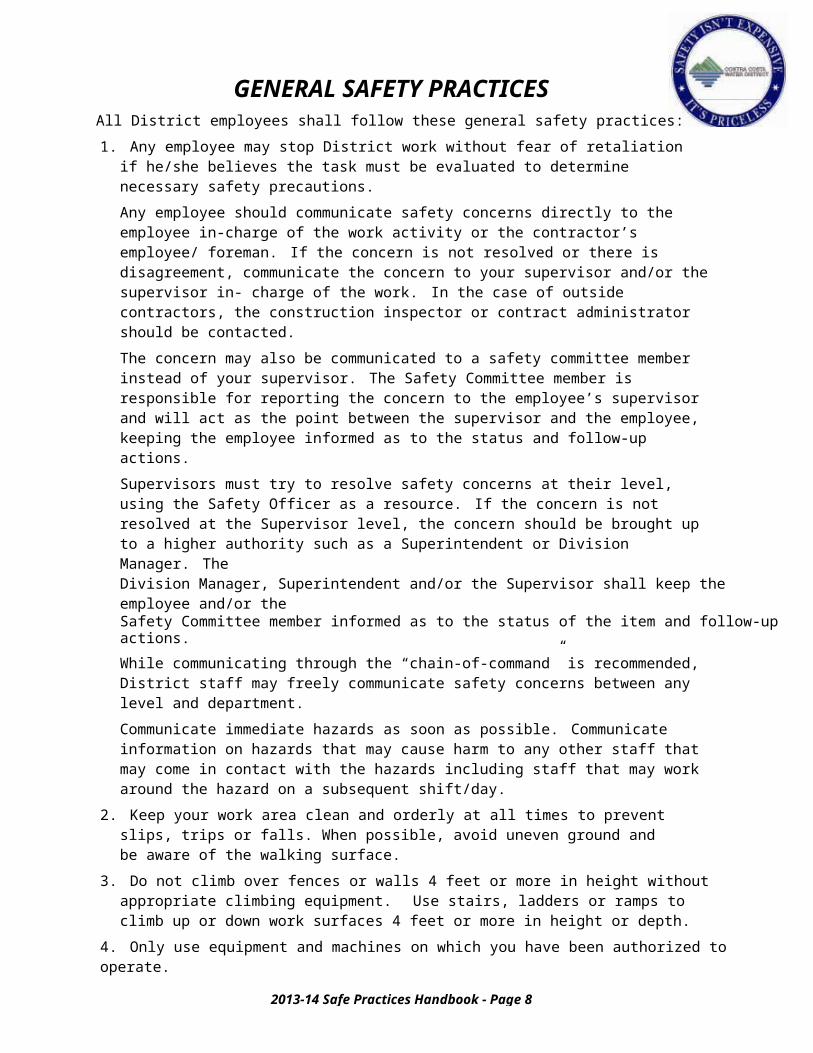
GENERAL SAFETY PRACTICESAll District employees shall follow these general safety practices:1. Any employee may stop District work without fear of retaliation if he/she believes the task
must be evaluated to determine necessary safety precautions.Any employee should communicate safety concerns directly to the employee in-charge of the work activity or the contractor’s employee/ foreman. If the concern is not resolved or there is disagreement, communicate the concern to your supervisor and/or the supervisor in- charge of the work. In the case of outside contractors, the construction inspector or contract administrator should be contacted.The concern may also be communicated to a safety committee member instead of your supervisor. The Safety Committee member is responsible for reporting the concern to the employee’s supervisor and will act as the point between the supervisor and the employee, keeping the employee informed as to the status and follow-up actions.Supervisors must try to resolve safety concerns at their level, using the Safety Officer as a resource. If the concern is not resolved at the Supervisor level, the concern should be brought up to a higher authority such as a Superintendent or Division Manager. TheDivision Manager, Superintendent and/or the Supervisor shall keep the employee and/or theSafety Committee member informed as to the status of the item and follow-up actions.While communicating through the “chain-of-command” is recommended, District staff may freely communicate safety concerns between any level and department.Communicate immediate hazards as soon as possible. Communicate information on hazards that may cause harm to any other staff that may come in contact with the hazards including staff that may work around the hazard on a subsequent shift/day.
2. Keep your work area clean and orderly at all times to prevent slips, trips or falls. When possible, avoid uneven ground and be aware of the walking surface.
3. Do not climb over fences or walls 4 feet or more in height without appropriate climbing equipment. Use stairs, ladders or ramps to climb up or down work surfaces 4 feet or more in height or depth.
4. Only use equipment and machines on which you have been authorized to operate.Supervisors ensure that employees are trained to operate appropriate equipment and machines.
5. Bend your knees and use your legs to lift, push or pull objects. Seek help of others if needed. Use tools to help lift heavy objects. When possible, use tools instead of hands tolift meter box lids. Use tools, the steel-toe of your shoe or the instep of your foot to slide lids back in place. (See the Construction and O & M section for more lifting work practices.)
6. Wear all personal protective equipment (PPE) appropriate for the work area. (See PPEsection)
7. Ensure there is adequate lighting to perform the job safely. Use a flashlight when walking in dark areas.
8. Use only those hazardous chemical containers that have appropriate labeling (name and hazard warning). Label all containers immediately after hazardous chemicals are placed inside them or when the containers’ labels have been removed or defaced. Properly dispose of waste chemicals.
9. Report immediately to your supervisor:
2013-14 Safe Practices Handbook - Page 6 of 49
a. On-the-job injuries or illnesses. If experiencing symptoms of heat illness (fatigue, headache, dizziness, nausea, cramps, hot/dry skin, and rapid pulse), seek shade in an area of open air or an air conditioned vehicle.
b. Hazards, unsafe practices, malfunctioning equipment or tools, defective personal protective equipment, or policies and procedures that you believe could create or result in a dangerous situation.
c. Near misses. A near miss is a condition or an incident where if not for a fortunate break in the chain of events, there is near certainty that an injury or property damage would have occurred. District employees can learn from near misses and potentially identify needs for changes in work procedures, additional training or equipment that would minimize potential re-occurrence.
10. Keep your supervisor informed of your work location, schedule, and type of work.11. Supervisors are required to notify their field employees of forecasted temperatures 85
degrees and above at the start of the work shift, and ask them to use caution (drink up to one quart of water per hour and seek shade for at least five minutes when experiencing symptoms of heat illness: fatigue, headache, dizziness, nausea, cramps, hot/dry skin, and rapid pulse). Supervisors must ensure that shade and water is available near the work area (within a ¼ mile or 5 minute walk) at all times. When forecasted temperatures exceed 105degrees, supervisors must schedule strenuous work activities during cooler times of the day, except for emergency job tasks that are necessary to be completed to avoid major service disruptions or impacts to public safety.
12. Apply sunscreen when working in the sun for long periods.13. Stay back at least 3 feet from transmitting antennas such roof-mounted cellular antennas
and vehicle-radio antennas.14. Workers that normally perform work alone at the plants, in the field or at other remote
locations, shall document hazards and controls (Pre-Task Work Plan) at least once every month and before any hazardous work task such as work in traffic, live electrical work and confined space entry.
15. If you are serving or performing duties as a CCWD contract administrator for contractors (non-CCWD employees) involved with construction, maintenance or repair work, or any work near water (reservoirs and canals) or in confined spaces, ensure that:a. Safety concerns are identified and communicated to the contractor representative.b. Special CCWD site procedures are communicated to the contractor representative, including the
Contractor (or Consultant) Safe Practices Handbook.c. Your safety-related communications with the contractor are documented.d. Pertinent written contractor safety plans, programs, and information are obtained before the start
of work (written programs on Injury-Illness Prevention Plan [IIPP], confined space entry, hot work, diving safety, fall protection, and/or respiratory protection are required). For work sites with limited space, review contractor plans for heavy equipment selection, sizing and parking during pre- construction meetings.
e. Contractors have current safety certifications or licenses when required. (i.e., large mobile crane operation and asbestos abatement).
f. Contractors are informed to use their own ladders, locks/tags, harnesses, and confined space gas monitors and rescue equipment as needed.
g. Contractors conduct at least one tailgate meeting per week.h. District staff and/or contractor staff have shut down and de-energized all hazardous energy
sources, locked and tagged all hazardous energy isolation points, and properly completed all lockout/tagout isolation forms through a thorough inspection.
16. If person(s) identifying themselves from OSHA show up at a work site, ask for identification and the purpose of the visit. Contact the Safety Officer and your supervisor for assistance.
Original Date: June 14, 2006Revised Date: September 20, 2013
2013-14 Safe Practices Handbook - Page 7 of 49
DRIVING SAFETYWhile driving on CCWD business, all employees shall:
1. Ensure you have the following with you prior to driving:
a. A valid driver's license for the type of vehicle you are driving, vehicle registration form, and proof of vehicle insurance.
b. A complete vehicle accident kit, first-aid kit, and fire extinguisher (for District vehicles only). If any of these items are missing, contact the Safety Officer for assistance.
2. Conduct a safety check prior to driving the vehicle:
a. Walk around the vehicle to check its condition including the tires. Check for possible obstructions around the vehicle. Document your inspection when required.
b. Be sure you have good visibility all around. Adjust side and rear view mirrors.
3. Designate a spotter when available to assist in directing you while backing your vehicle.Maintain eye contact while moving. Stop if you lose sight of the spotter’s signals. Ensure that all heavy equipment vehicles (Class A and B vehicles and tractors) have functional automatic backup warning devices.
4. Ensure that you and your passengers have your safety belts fastened while driving at all times.
5. Park all vehicles in compliance with the California Vehicle Code and local ordinances.Follow the “California Manual on Uniform Traffic Control Devices” whenever work is performed in and adjacent to vehicle traffic. http:/ / ww w . dot.c a .gov/hq/traffops/ s ignte c h/mutcdsupp/pdf/camutcd / CAMUT C D-Par t 6.pdf Park District vehicles out of vehicle and pedestrian traffic except when vehicle placement is determined by job requirements (e.g., excavation work in street, valve exercising, etc.).
6. Set all brakes when departing the vehicle. For operators of trucks, equipment, and vans with cargo weight of 1 ton or more, set one safety cone at the rear corner nearest to the flow of traffic and place one wheel chock on the downhill side of one of the drive wheels.
7. Secure tools and similar loose equipment to prevent them from becoming flying objects.Secure heavy equipment and vehicles loaded on a trailer prior to transport. Remove the hitch from the truck after towing activities are complete.
8. Secure non-automated facility gates so they do not swing back into your vehicle’s path.
9. While you are on the road in the driver’s seat, only cell phones with a hands-free device may be used. Cell phone usage while driving should be kept to an absolute minimum. You should pull over to a safe location when using the cell phone:a. for District business when the call duration of the conversation exceeds more than two minutes;b. if required to receive a personal call while driving a District vehicle or while driving on District
business. Personal calls should only be made while on scheduled breaks and meal periods.
Text messaging or use of smartphones, tablets or laptops is prohibited while driving.
10. In the event of a motor vehicle accident, follow the directions in the vehicle accident kit, contact the police and report the accident to your supervisor immediately, regardless of the level of damage or whether or not an injury is involved.
11. Do not drive a motor vehicle or operate heavy machinery if you are under the influence of drugs or alcohol.
12. Port Costa: Use caution when driving on McEwen Rd on route to Port Costa. When drivingClass A or B vehicles, use Cummings Skwy exit as only approved access, right on Crockett
2013-14 Safe Practices Handbook - Page 8 of 49
Blvd, right on Pomona St (turns into Carquinez Scenic Dr – go slow around curves and through narrow parts of the road).
13. Old River and Middle River Intakes: During foggy conditions, make a right turn when exiting the driveways, then turn around at a safe location.
14. Do not overload your vehicle above its rated capacity.
15. Know loading restrictions (review signage) on reservoir roofs to avoid overloading the roofs with the weight of vehicles.
16. Before work, inspect unpaved paths in steeply sloped areas with either a light vehicle or on foot before driving the path with heavy equipment. Determine and mark soft areas, sharp turns, slopes and other hazards.
17. Use caution when your vehicle is stuck in a rut, especially in sloped area. If your vehicle is stuck and cannot back out, seek assistance.
18. Watch and wait for vehicle and bicycle traffic to clear before swinging open the vehicle door onto the roadway.
Original Date: June 14, 2006Revised Date: September 20, 2013
2013-14 Safe Practices Handbook - Page 9 of 49
ELECTRICAL SAFETYFollow these electrical safety rules:
General1. Check equipment, cords and attachments before each use to ensure they are safe to use
and operate. Protect cords from damage. Remove damaged electrical equipment from service.
2. Ensure metal-encased equipment is properly grounded and plugged into grounded circuits when used. Do not use equipment that has the 3rd (ground) prong removed.
3. Use lockout/tagout procedures to ensure that power is completely off during maintenance and repairs of hard-wired equipment. Exception: electrical troubleshooting performed by electrical or instrument technicians that are considered to be qualified electrical workers. Remove dampness from the area and/or wear insulating gloves before touching equipment. Confirm de-energization before handling poorly insulated wiring and equipment with bare hands.
4. Keep electrical panel doors on and closed. Keep access to electrical panels clear with at least a 36” clearance. Do not use motor control center rooms as storage areas.
5. Use equipment designed for use in damp environments when exposed to such environments. All electrical equipment in these areas must be grounded.
6. Use ground fault circuit interrupters (GFCIs) when using electrically-powered tools and equipment during construction and maintenance activities.
7. To prevent fire hazard, never install extension cords in a permanent fashion, or inside ceilings, floors, or walls. Use extension cords only for temporary purposes, and disconnect them when not in use.
8. Only persons who are trained and authorized shall access electrical panels and equipment.
9. Electrical panels may occasionally become energized and place workers and others in danger. Energizing may occur as a result of electrical maintenance, theft of equipment, and equipment failure. Before accessing electrical panels, take safe and appropriate actions to check the panel enclosure for hazardous voltage prior to opening.
10. Persistent stray electrical current on the Taylor Blvd main presents electrical shock hazards to those contacting the pipeline. The main may be electrified up to 28 volts. As a precaution, notify Central County Maintenance (CCM) prior working on the pipe. CCM personnel will lower the voltage by implementing grounding as necessary. Wear dry gloves and boots and keep the excavation dry to minimize the shock hazard.
11. Electrical system deficiencies on buildings may cause metallic service lines to become neutral conductors. When removing and installing meters, the neutral conductor may be interrupted or connected causing arcing between the building service line and the main service line. Electrical shocks can occur if a worker contacts both sides of a service with the meter removed, or the service side of the meter while being well grounded in wet conditions. Meter personnel shall check metallic water service connections with an electric test device and if necessary, connect a bond cable between the service line and the main line prior to removing a meter to minimize the hazard. Working dry also minimizes the hazard. If voltages exceed 50 volts, and the electrical hazard cannot be eliminated, wear electrically insulated gloves.
2013-14 Safe Practices Handbook - Page 10 of 49
Electrical Maintenance12. Stay clear of energized parts whenever possible. If possible, de-energize electrical
equipment before maintenance. If it is not possible to de-energize the equipment and youmust work with or near energized parts with voltages exceeding 50 Volts (i.e., electricaltroubleshooting):a. Use protective equipment such as flame retardant clothing, face shields, rubber insulating gloves,
sleeves, hard hats, blankets, mats and non-conducting tools. When possible, follow the CCWD Safety & Health Manual’s Personal Protective Equipment Program Appendices J & K (see the Safety Website under Safety Library or refer to NFPA 70E, Tables 130.7(C)(15)(a) & (b) and130.7(C)(16)).
b. Do not wear metallic jewelry including watches.c. Follow arc flash warning label requirements. Wear appropriate PPE or maintain a safe distance
from live electrical parts. Where arc flash labels do not exist, stay at least 10 feet away fromwhere live low voltage (480 V and less) electrical work is being conducted unless you are wearing the appropriate personal protective equipment. Stay outside of the motor control center area (building or room) where live high voltage (more than 480 V) electrical work is being conducted unless you are wearing the appropriate personal protective equipment. Use barricade tape or signs to warn unprotected persons to keep away from the live electrical work area.
d. Do not use two bare hands when handling energized parts.
13. Electrically insulated gloves on each hand must be worn when working with energized parts over 250 Volts. Conduct a hazard analysis/pre-task plan to determine the precautions that need to be taken for working in close proximity to un-insulated, exposed parts of energized equipment operating at 50 to 250 volts. After proper identification use the following PPE, as necessary, in a manner that will prevent electrical current flow through torso due to accidental contact of energized parts and yet will not compromise one’s ability to troubleshoot safely. This PPE could include insulated mats, tools and gloves.
14. Ensure rated protective equipment such as gloves and hot sticks have been tested within the last 6 months before use.
15. Re-install equipment guards that protect electrical equipment after work is completed.
Original Date: June 14, 2006Revised Date: September 20, 2013
2013-14 Safe Practices Handbook - Page 11 of 49
Follow these fire safety rules:
General
FIRE SAFETY
1. Ensure good housekeeping is maintained, keeping work areas clean and free of debris.
2. Operate and maintain all electrical circuits so they do not become overloaded.
3. Use only electric space heaters that have:a. A safety device that shuts the unit off if the device topples over or overheats.b. Adequate power supply circuitry to handle the space heater’s electrical needs.
4. Keep fire exits and escape routes clear and well marked.
5. Know the evacuation routes from your work area. Know where alarm boxes are located.
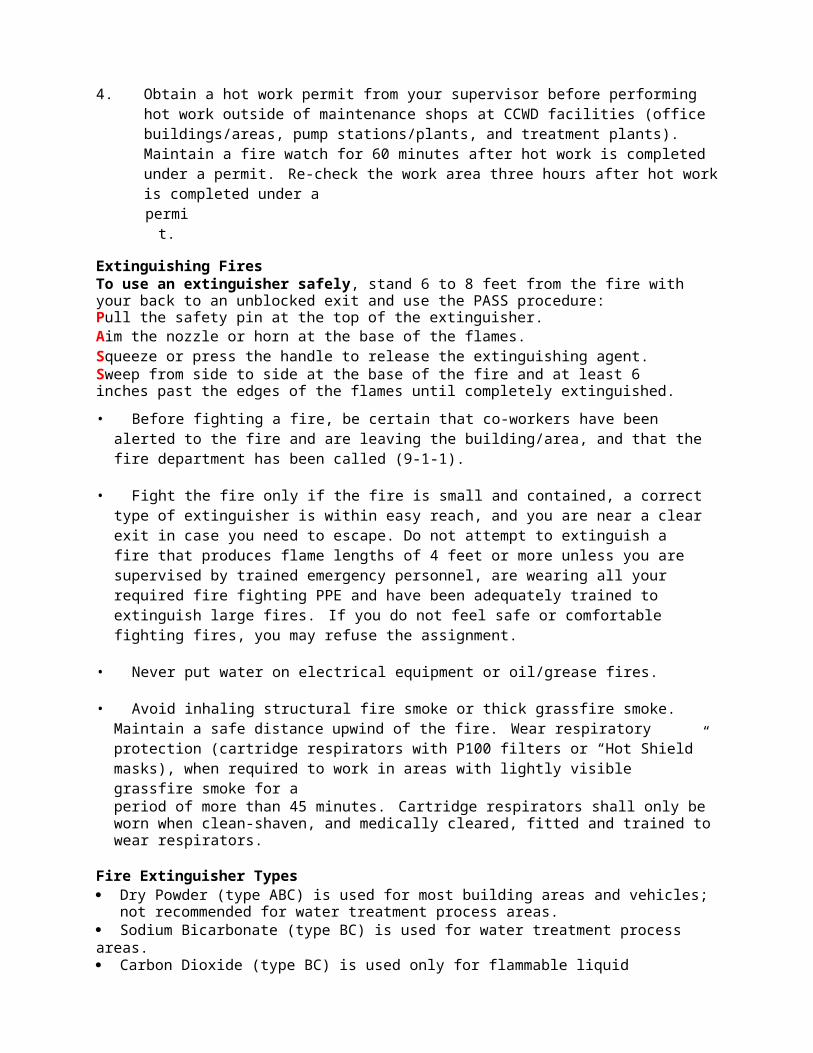
Stores and Maintenance Activities1. Store flammable materials in approved safety cans and/or cabinets. For indoor
locations, keep large amounts (more than 10 gallons of flammable liquid) in a flammable liquids cabinet. Ensure safety cans and flammable cabinets are properly labeled. Keep metal trash cans covered in shop areas.
a. Keep smoking, flames/sparks, and other ignition sources at least 35 feet away from areas where flammable fuel is dispensed.
b. To prevent the build up of static electricity and prevent sparks from causing a fire, bond dispensing and receiving containers together before dispensing flammable liquid.Additionally, ensure the dispensing container is grounded.
c. Report all fires.
2. Secure propane heaters to prevent them from tipping over. Remove the torch from propane cylinders prior to storage.
3. Maintain a fire watch when open flames, sparks, or smoke are present.a. Keep a fire extinguisher available when welding/cutting, grinding or conducting other hot work. b. If grinding or welding near dry vegetation, always wet down the vegetation at least 35 feet
around and 75 feet downwind of the work site. (See Welding, Cutting and Other Hot Work section.) Do not grind or weld near dry vegetation when wind speeds exceed 10 MPH andhumidity is less than 20%. If unsure about weather conditions, check weather on-line orcontact your supervisor.
c. Maintain a fire watch for 30 minutes after hot work or weed abatement activities are completed at areas with a high wildfire risk.
d. Whenever possible in areas with a high wildfire risk, avoid driving on tall grass to prevent fires caused by hot catalytic converters.
4. Obtain a hot work permit from your supervisor before performing hot work outside of maintenance shops at CCWD facilities (office buildings/areas, pump stations/plants, and treatment plants). Maintain a fire watch for 60 minutes after hot work is completed under a permit. Re-check the work area three hours after hot work is completed under apermit.
Extinguishing FiresTo use an extinguisher safely, stand 6 to 8 feet from the fire with your back to an unblocked exit and use the PASS procedure:Pull the safety pin at the top of the extinguisher.Aim the nozzle or horn at the base of the flames.Squeeze or press the handle to release the extinguishing agent.Sweep from side to side at the base of the fire and at least 6 inches past the edges of the flames until completely extinguished.
• Before fighting a fire, be certain that co-workers have been alerted to the fire and are leaving the building/area, and that the fire department has been called (9-1-1).
• Fight the fire only if the fire is small and contained, a correct type of extinguisher is within easy reach, and you are near a clear exit in case you need to escape. Do not attempt to extinguish a fire that produces flame lengths of 4 feet or more unless you are supervised by trained emergency personnel, are wearing all your required fire fighting PPE and have been adequately trained to extinguish large fires. If you do not feel safe or comfortable fighting fires, you may refuse the assignment.
• Never put water on electrical equipment or oil/grease fires.
• Avoid inhaling structural fire smoke or thick grassfire smoke. Maintain a safe distance upwind of the fire. Wear respiratory protection (cartridge respirators with P100 filters or “Hot Shield” masks), when required to work in areas with lightly visible grassfire smoke for aperiod of more than 45 minutes. Cartridge respirators shall only be worn when clean-shaven, and medically cleared, fitted and trained to wear respirators.
Fire Extinguisher Types Dry Powder (type ABC) is used for most building areas and vehicles; not recommended for
water treatment process areas. Sodium Bicarbonate (type BC) is used for water treatment process areas. Carbon Dioxide (type BC) is used only for flammable liquid and electrical fires; not
recommended for large wood, paper, or cardboard storage areas. Water (type A) is used only for only grassfires. Halon 1211 (type ABC) is used for the IS server room. M28/L2 Powder (type D) is used for the magnesium anode storage shed.
Original Date: June 14, 2006Revised Date: September 20, 2013
HAND TOOLSAll employees shall follow these hand tool safety rules:
1. Basic Rules a. Select the right tool for the job.b. Inspect the tool and ensure the tool is in good condition. c. Use the tool in the way it was designed.d. Use tools in a professional manner.e. After use, store the tool in a secure, safe location. f. Maintain tool in ready condition for the next job.
2. Handsawsa. Ensure all saws are sharp and properly set.b. Select the proper saw for the material being cut.c. Move the saw in a straight line, without twisting or binding.d. Hold the material being cut firmly so that it will not bind or stick. Clamp the work
piece if possible.
3. Hammersa. Select the correct hammer for the job; only soft hammers shall be used to drive
hardened drills or chisels.b. Hammer handles must fit tightly, and not have any cracks or splinters.c. Grip the hammer handle near the end; do not choke up your grip on the handle. d. Look at the object to be struck when delivering the blow, to avoid hitting hands or
fingers. Do not place hands near the intended point of impact.
4. Punches, Drills and Ch is els a. Grind flat the ends of struck tools with mushroomed heads such as cold chisels, star
drills, and punches.b. Grind or file a small radius around the edge of the striking surface to reduce spalling
and subsequent danger of flying steel chips.
5. Keep cutting edges sharp. Replace worn out tools (e.g., screwdrivers with rounded blades).
6. Do not use box cutters that require your hand(s) to hold the blade to retract it. Use handled cutting shears to open boxes.
Original Date: June 14, 2006Revised Date: September 20, 2013
LADDER SAFETYAll employees shall follow these ladder safety rules:
1. Select the right ladder for the job.a) The ladder shall be tall enough so that you can reach the required objects without standing on the
top or second-to-the-top rung/step of the ladder or putting the ladder on some other object to reach the required objects.
b) The ladder shall be made of a material that is appropriate for the work to be performed. Do not use metal (electrically conductive) ladders when working around or with electrical equipment.
2. Use ladders for only their intended purpose, i.e., climbing up and down.
3. Maintain ladders in good condition. Ladders in disrepair shall be either disposed or fixed.
4. Before climbing any ladder, check its condition:1) Nuts and bolts tight?2) Rungs secure?3) Spreaders working?4) Safety feet working right?
5. Always face the ladder when ascending or descending, holding on to the rungs with both hands. (Maintain a three-point contact at all times).
6. While working, hold on to the ladder with one hand.
7. Use a tool belt or a bucket attached to a hand line to transport tools.
8. Only one person climbs a ladder at a time to prevent overloading the ladder and objects falling down on another.
9. The trunk of your body shall not extend past the side of the ladder. Move the ladder if you have to reach outside of this area.
10. Wear slip-resistant footwear.
11. Keep the ladder rungs free of oil and grease.
12. Step Laddersa. Make sure the spreaders are locked open before climbing.b. Place a ladder only where it is safe to do so. For example, it is not safe to put a ladder in front of
doors opening toward the ladder unless the door is blocked open, locked or guarded.c. Do not climb above second rung from the top.
13. Straight/Extension Laddersa. Use the 4 to 1 rule. Position the base of the ladder one foot out from the wall for every four feet
of the ladder’s height up to the support point. For example, the base of a 16-foot ladder must be4 feet out from the wall.
b. Place the base of the ladder so that the ladder will not slip.c. Ensure that the ladder extends at least 3 feet above the elevated surface to which you are
climbing.d. Secure the ladder at the top to hold it in place. Have a second person hold the ladder in place
when ascending or descending until the ladder is secured.e. Adjust extension ladders while standing at the base, not while standing on the ladder or from a
position above the ladder.f. Keep at or below the third rung from the top on a straight ladder.
14. Fixed Laddersa. Use a ladder climbing safety device (LAD-SAF®) when climbing fixed tank ladders that have the
device installed. Attach a lanyard to the top of the climbing device before unhooking the sleeve to ensure 100% fall protection. (Note: a ladder climbing device must be in place for all fixed ladderstaller than 20 feet without a cage, or 30 feet with a cage).
b. To prevent injury, do not intentionally engage the ladder climbing device.
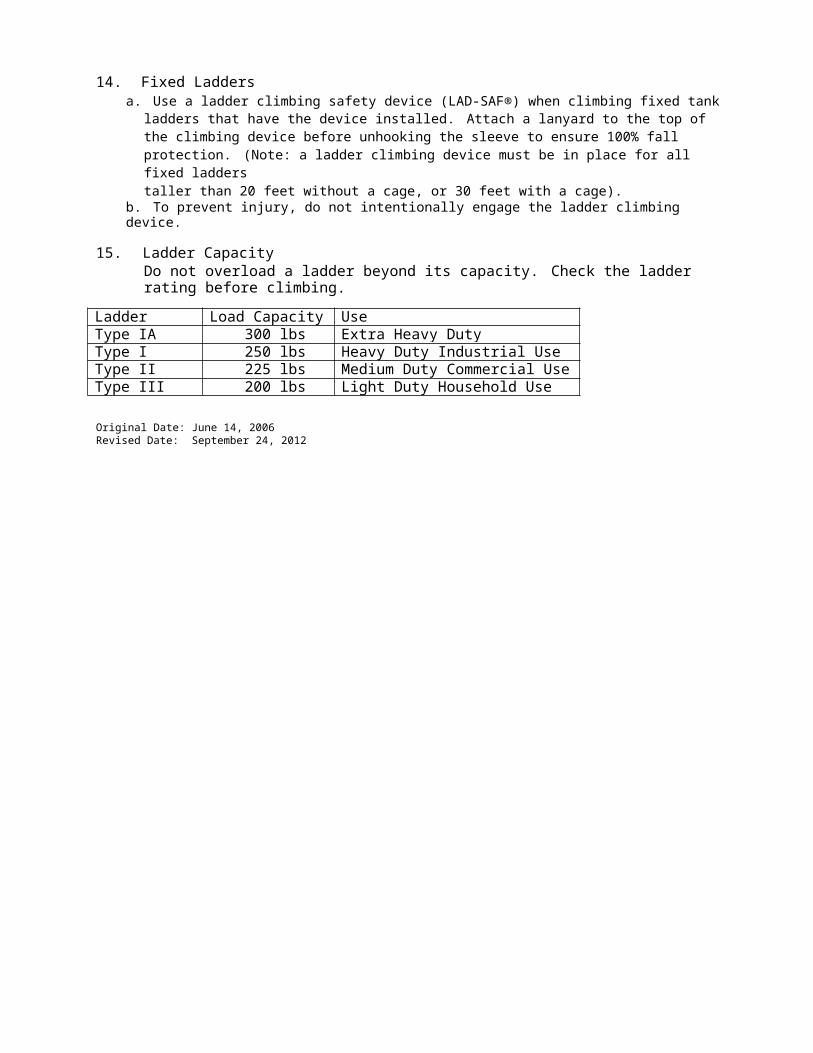
15. Ladder CapacityDo not overload a ladder beyond its capacity. Check the ladder rating before climbing.
Ladder Rating Load Capacity UseType IA 300 lbs Extra Heavy Duty Professional UseType I 250 lbs Heavy Duty Industrial UseType II 225 lbs Medium Duty Commercial UseType III 200 lbs Light Duty Household Use
Original Date: June 14, 2006Revised Date: September 24, 2012
OFFICE SAFETY1. Use caution when using stairs; hold on to handrails as you descend or ascend.
2. Open doors slowly, other people may be on the other side of doors as you enter or leave.
3. Keep your eyes on your path as you walk. Be aware of the hazards around you, and eliminate or avoid them.
4. Maintain an orderly and clean work environment at all times:a. Keep desk and file cabinet drawers closed when unattended.b. Keep materials out of pathways. If cords cannot be kept out of pathways, they must be
secured so they do not become tripping hazards.c. Clean up spills. Dispose of food and drink after use to keep pests away from the office.
5. Use a hand truck or get help to lift and move heavy items.
6. Wear suitable footwear for the task (i.e., low-heeled shoes when lifting boxes).
7. Always use a stepladder for overhead reaching. Chairs should never be used as ladders.
8. Ensure filing cabinets and book shelves in your office over 5 feet tall are secured.
9. At your work station:
a. Make sure your lower back is supported; do not slouch in your chair.b. Keep wrists straight (in-line with forearms) when using your keyboard and mouse. c. Keep feet flat on the floor or on a foot rest.d. Set the top of your monitor at or just below eye level. e. Avoid bending your head extensively.f. Avoid cradling the telephone between the head and shoulder. Hold the phone with your hand,
use the speaker phone, or a headset.g. Avoid excessive bending, twisting, and leaning backward while seated. h. Request an ergonomic evaluation after a change to your workstation.
Original Date: June 14, 2006Revised Date: September 23, 2011

PERSONAL PROTECTIVE EQUIPMENT(PPE) HEAD, EYE, FACE, HAND, FOOT, BODY and HEARING
All employees shall follow these rules for personal protective equipment:
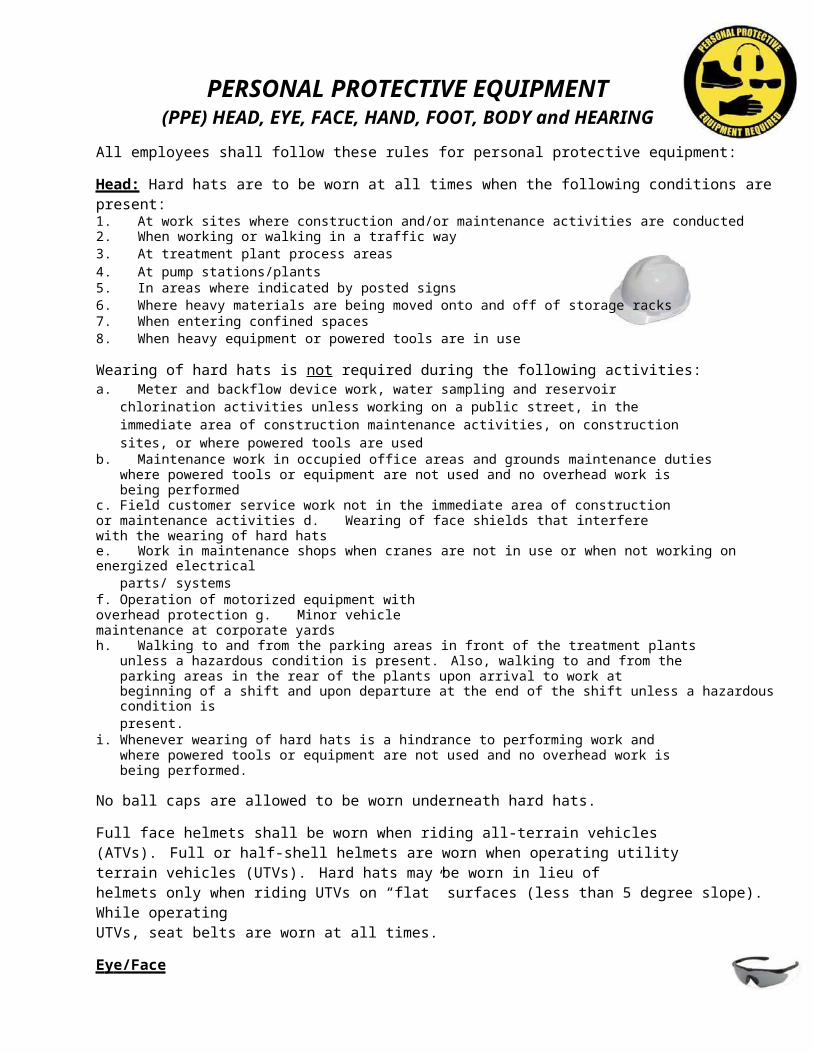
Head: Hard hats are to be worn at all times when the following conditions are present:1. At work sites where construction and/or maintenance activities are conducted2. When working or walking in a traffic way3. At treatment plant process areas4. At pump stations/plants5. In areas where indicated by posted signs6. Where heavy materials are being moved onto and off of storage racks7. When entering confined spaces8. When heavy equipment or powered tools are in use
Wearing of hard hats is not required during the following activities:a. Meter and backflow device work, water sampling and reservoir chlorination activities unless working
on a public street, in the immediate area of construction maintenance activities, on construction sites, or where powered tools are used
b. Maintenance work in occupied office areas and grounds maintenance duties where powered tools or equipment are not used and no overhead work is being performed
c. Field customer service work not in the immediate area of construction or maintenance activities d. Wearing of face shields that interfere with the wearing of hard hatse. Work in maintenance shops when cranes are not in use or when not working on energized electrical
parts/ systemsf. Operation of motorized equipment with overhead protection g. Minor vehicle maintenance at corporate yardsh. Walking to and from the parking areas in front of the treatment plants unless a hazardous condition is
present. Also, walking to and from the parking areas in the rear of the plants upon arrival to work atbeginning of a shift and upon departure at the end of the shift unless a hazardous condition ispresent.
i. Whenever wearing of hard hats is a hindrance to performing work and where powered tools or equipment are not used and no overhead work is being performed.
No ball caps are allowed to be worn underneath hard hats.
Full face helmets shall be worn when riding all-terrain vehicles (ATVs). Full or half-shell helmets are worn when operating utility terrain vehicles (UTVs). Hard hats may be worn in lieu ofhelmets only when riding UTVs on “flat” surfaces (less than 5 degree slope). While operatingUTVs, seat belts are worn at all times.
E y e/Face 1. Wear the appropriate (ANSI Z87 rated) eye and/or face protection when you are engaged
in metalworking activities, welding and cutting, using powered tools or otherwise exposedto flying particles/objects, injurious light rays, liquid chemicals, or hazardous gases.
2. Eye/Face protection is required to be worn at treatment plant process areas, pump stations/plants, laboratories, maintenance shops, and when hazardous chemicals are being used.
3. Full-face splash shields with safety glasses put on underneath, chemical splash goggles, or full-face respirators are required to be worn during pump catches at chemical feed or bulk storage areas, in immediate areas (within 6 feet or inside bermed secondary containment areas) where corrosive chemicals are off-loaded, handled, or leaking from process lines, or where corrosive chemical line breaking activities are conducted. (Corrosive chemicals have a pH of 0 to 3.5, or 11.0 to 14.) Consult individual chemical Material Safety Data
Sheets (MSDSs) for additional details regarding chemical handling and safety, chemical interactions, and PPE requirements.
4. Eye/face protection is required in the immediate areas where construction and maintenance activities are being performed except during operation of motorized equipment while inside an enclosed cab.
5. Wear eye protection in areas where indicated by posted signs.6. Always keep your safety eye protection equipment in good repair, replacing if scratched or
cracked. Keep lenses clean.7. If an eye becomes irritated in the course of work, do not rub the eye. Use appropriate eye
wash as first aid.8. Wear side shields with your prescription safety glasses where eye protection is required.9. When near welding or cutting operations, wear approved safety goggles or welding
helmets. Spectacle type safety eyeglasses shall not be used as a substitute for approved cutting goggles.
The following is a guide for the selection of the proper shade numbers:
Weld i ng O p eration Shade No.Shielded metal-arc welding: 1/16-, 3/32-, 1/8-, 5/32-inch electrodes
10
Gas-shielded arc welding (nonferrous): 1/16-, 3/32-, 1/8-,5/32-inch electrodes
11
Gas-shielded arc welding (ferrous): 1/16-, 3/32-, 1/8-, 5/32- inch electrodes
12
Shielded metal-arc welding:3/16-, 7/32-, 1/4-inch electrodes5/16-, 3/8-inch electrodes
1214
Atomic hydrogen welding 10-14Carbon arc welding 14Soldering 2Torch brazing 3 or 4Light cutting, up to 1 inch 3 or 4Medium cutting, 1 inch to 6 inches 4 or 5Heavy cutting, 6 inches and over 5 or 6Gas welding (light) up to 1/8 inch 4 or 5Gas welding (medium) 1/8 inch to 1/2 inch 5 or 6Gas welding (heavy) 1/2 inch and over 6 or 8
Note: In gas welding or oxygen cutting where the torch produces a high yellow light, it is desirable to use a filter or lens that absorbs the yellow or sodium line in the visible light of the operation.
Hand and Arm Wear appropriate protective gloves when you may be exposed to abrasions, hazardous substances, burns, cuts, punctures, live electricity, or other hazards. During construction and maintenance activities, wear protective gloves when using tools and equipment or handlingmaterials unless they are a hindrance to performing work where hazards to the hands are notpresent (e.g., writing, operating equipment controls, delicate tool and instrument use, driving, etc.). When welding, wear protective leather gauntlet gloves or leather gloves and sleeves. Do NOT wear gloves near equipment with in-running nip points such as the use of a bench grinder to prevent your hand(s) from being violently pulled into equipment. See the Construction and

O&M section for more information on chemical resistant gloves. See the Electrical Safety section for more information on electrically insulating glove requirements.
Foot1. Wear safety shoes/boots with toe protection that complies with ASTM F 2413-05, ASTM
F2412-05, and/or ANSI Z-41 when exposed to the risk of foot injuries from hot material, corrosive substances, falling objects, and crushing or penetrating activities. Safety shoes/ boots are required to be worn at all construction and maintenance worksites. Whenapplicable, employees shall follow union contract (Memorandum of Understanding)requirements to wear safety shoes/boots during all working hours. Exception: Fire boots used at Los Vaqueros Watershed need not have steel-toe protection.
2. Wear metatarsal (total foot) protection when using a jackhammer. When using a jack hammer within two feet of electrical markings or on private properties where electrical linesare not positively identified, wear 20kV rated electrically insulating over boots instead of metatarsal covers.
Bo d y and L eg 1. Wear chemical-resistant suits, coveralls or aprons, when working with bulk chemicals or
performing line-breaking operations where chemical exposure to the torso is possible.2. Wear approved personal floatation devices (PFDs, USCG rated as Type I, II,or III) to control
drowning hazards when inside the canal liner fence, near or over areas where water depths may exceed 4 feet, in areas where indicated by posted signs, or as directed by yoursupervisor. PFDs do not need to be worn when other protective measures are in place,such as:a. Keeping a horizontal distance of more than 6 feet from the drowning hazard.b. Using a fall prevention equipment system (anchor point, harness and connection device) that
effectively prevents a fall into the water.c. Working behind a proper guardrail or equivalent barrier that is at least 42 inches high.
3. Wear a wet suit and a rescue helmet when entering the water during water rescue training.4. Wear orange uniforms shirts/jackets, or orange or strong yellow-green vests if on foot and
exposed to the hazard of vehicular traffic. During rainy weather, orange, strong yellow- green, or yellow rainwear may be worn. During hours of darkness and/or on roads with a speed limit of 45 MPH or above, wear shirts or jackets with retro-reflective stripes on the torso and on each sleeve (rated Class 3 by ANSI 107-2004). On roads with a speed limit30, 35 or 40 MPH, wear a Class 2 ANSI-rated vest or a Class 3 shirt or jacket.
5. Wear appropriate clothing that conforms with Cal-OSHA requirements to support wildlands fire fighting duties.
6. Wear leg protection (chaps) when operating chainsaws (excluding pole saws).7. Wear leg protection (snake chaps) when working in snake-prone areas.8. Wear 6 oz. Nomex coveralls and a personal hydrogen sulfide monitor at refinery production
areas.
HearingWear hearing protection when near the operation of the following equipment: pneumatic tools, concrete saws, mowers, weed eaters, leaf blowers, chainsaws, grinders, welding/cuttingequipment, as well as other equipment where one must shout to be heard.
Respiratory Protection Respirators shall only be worn when clean-shaven, and medically cleared, fitted and trained within the last 12 months to wear respirators. (See the Safety & Health Manual, RespiratoryProtection Program for more information).
Original Date: June 14, 2006Revised Date: September 20, 2013
SITE SAFETY AND SECURITY1. Contact Operations Control when working outside normal business hours (Mon-Fri from
3:30 PM to 7:00 AM or weekends) immediately upon the beginning and end of your shift or service per O&M SOP 2008-04.
2. At the top of every hour, Operations Control initiates a safety check for all field CCWD employees working alone during after hours assignments. If contact is not made between Control and the employee within 30 minutes, the on-call O&M or Watershed supervisor shall be notified by Control. The supervisor shall initiate emergency procedures as per O&M SOP2008-04.
If the employee plans to enter an area with limited communication, the employee must notify Control of their intent to travel and expected duration of limited communication. At completion of assignment, the employee shall make contact with Control so hourly safety checks can resume.
3. When entering a customer’s house or into an area/situation that is a security risk, contact Control, your supervisor or delegate before entry and after exiting, and provide information on the situation and the length of your stay. Avoid situations that are clear, immediate security threats. If contact is not re-established with the employee after the expected stay length, Control and/or the employee’s supervisor shall initiate emergency procedures as per O&M SOP 2008-4.
4. Emergency Medical Situations: All employees including supervisors must know how to contact emergency medical services (dial 9-1-1) and be able to provide clear and precise directions to the work site. Call 9-1-1 immediat e ly if any employees or contractors show these warning signs:
a. Any signs of heat stroke. Advanced heat illness symptoms (heat stroke) include: red hot dry skin, very little sweating, and high body temperature. (Immediately immerse the victim in cool water or ice to reduce their high body temperature.)
b. Difficulty breathing, shortness of breathc. Chest or upper abdominal pain or pressure d. Loss of consciousnesse. Unresponsiveness when talked to or touched f. Drowningg. Seizures or convulsionsh. Sudden dizziness, weakness or change in visioni. Mental change (confusion, unusual behavior, difficulty speaking)j. Unexplained severe headaches k. Sudden intense painl. Bleeding that won’t stopm. Coughing or vomiting blood n. Chokingo. Severe burnsp. Allergic reactionq. Severe trauma to head, neck or backr. Possible fractures to arms, legs, or torsos. Electrical shocks across the torso, or any shocks of 240 V or greater
If available, use a landline to dial (9) 9-1-1 instead of a cell phone.
4. Buddy System: Employees and contractors shall not work alone under the following work conditions:a. Potentially hazardous atmospheres where self-contained breathing apparatus is required (a
minimum of four persons)b. Permit-required confined space entries

c. Work in excavations more than 4’ deepd. Excavation work when flagging is required (minimum of 4 persons)e. Chainsaw operation used for tree work (excluding work using only pole saws at the District
Center campus)f. High voltage (> 600 volts) electrical work g. Use of personal fall arrest systemh. Work using an extension ladder when the ladder is not secured.i. Night-time work near or over water (when personal floatation devices are required)j. When launching or retrieving a boat from a boat rampk. Operation of the lattice or articulating (knuckleboom) cranel. Line breaking activities at treatment plants involving toxic or corrosive substancesm. Work in public roadways (e.g., flagging, valve operation, etc.) with the speed limits of 30 MPH or
more and when traffic control measures are needed for an anticipated time period of more than15 minutes. A crew of a minimum of 4 persons shall be assigned to conduct excavationoperations when a flagger is required.
n. Work at Mallard Pump Station (PS)
Hourly safety checks shall be conducted by Control for work at Mallard PS, or at any time or place when requested by a supervisor. As needed, employees should request Control to call more frequently than hourly.
5. Do not, under any circumstances, loan your keys to anyone. If you have lost your keys, you must immediately report the loss to your supervisor.
6. Close gates and entry doors that will be unattended to prevent unauthorized entries.
7. Before putting your hands into a meter box or other enclosed spaces in the field, check the space for hazards such as rattlesnakes, spiders, bees or abandoned hypodermic needles. Tap on the meter box before lifting the lid. Wear gloves for added protection. Contact the Environmental Compliance Officer for guidance on disposal of hypodermic needles and syringes.
8. If a rattlesnake or other animal is found to obstruct your ability to safely perform your work, contact Contra Costa County Animal Services at 335-8300, or Los Vaqueros Watershed staff (when available) to have the snake or other animal safely removed from the worksite.
9. When entering private property, request property owners to confine their dogs away from you. If an unleashed aggressive dog approaches you, do not turn your back, step back from the dog and use a meter stick or similar item to help keep the dog at a safe distance from you.
10. Follow posted speed limits. The speed limit at CCWD facilities including water treatment plant roads, maintenance yards and employee parking lots is 10 MPH. At Los Vaqueros, the speed limit is 15 MPH for unpaved roads and 30 MPH for paved roads.
11. Contact Watershed supervisors before driving on unpaved Watershed roads. Watershed supervisors determine when it is safe to drive and what vehicle types may be used during, or shortly after periods of rain.
12. All employees and contractors working at the water treatment plants shall receive a safety orientation (e.g., view plant safety video). Exception: those persons visiting a single time, such as those on a plant tour or a job walkthrough while escorted by District personnel who have watched the safety video.
13. All employees not assigned to a water treatment plant or Watershed shall sign in and out on the visitor log when visiting. When groups are escorted by District personnel (school toursor facility/job walkthroughs), the escort signs the log for the group, and is responsible to ensure the group remains together and is in compliance with the plant safety video instructions.
14. Avoid being downhill of heavy equipment operations.15. If a canal liner fence is breached through which a small child may enter, do not leave the
breach unattended until the fence is repaired. The repair must be secure enough so that it cannot be undone without the use of tools.
16. Do not enter into the canal to conduct rescue or recovery activities. Only attempt non-entry rescues using throw rope bags or life rings.
17. Use caution when working around flying golf balls at Diablo Hills Reservoir. Wear hard hats.Work under netting for work periods of longer than 30 minutes.
Law Enforcement (Police, Sheriff, CHP) If in Doubt - 9 1 1EMER NON-EMER EMER NON-EMER
Antioch/Brentwood 778-3911 778-2441 EB Regional Park (510)881-1833Clayton 673-7350 Highway Patrol (925) 911 646-4980Concord 671-3333 671-3232 Highway Patrol (707) 911 (707)551-4100Martinez 228-4141 372-3540 MOTCO, Naval WS 246-4041Oakley 625-8060 Sheriff, Alameda 911 (510)272-6878Pittsburg 252-4980 Sheriff, CCC 911 646-2441Pleasant Hill 680-7000 288-4600 Sheriff, San Joaquin 911 (209)468-4445Walnut Creek 935-6400 943-5844
Fire Agencies OtherCon-Fire 933-1313 930-5531 Animal Control 335-8300Alameda 447-6880 447-4257 Vector Control 685-9301SRVFD-MorganTer 838-6691 838-6640 LV Marina 371-2628
Medical Facilities & HospitalsCentral CountyJohn Muir Hospital (ER)
Walnut Creek (Main)939-5800 1601 Ygnacio Valley Rd., WC939-3000
Mt. Diablo/John Muir Hosp (ER) Concord (Main)
674-2333 2540 East St., Concord682-8200
Muir/Diablo Occ Med 685-7744 2231 Galaxy Court, ConcordEast County & LV MarinaMuir/Diablo Brentwood Med Grp 308-8111 2400 Balfour Rd., BrentwoodSutter Delta Hospital 779-7200 3901 Lone Tree Way, AntiochKaiser Permanante Hospital 813-6500 4501 Sand Creek Road, AntiochValley Care Med Ctr (LV Marina) 847-3000 5555 W Las Positas, Pleasanton
Safety/Risk PersonnelSpiro Zapantis, Safety Officer Cell: 525-2632 Office - 688-8185Rick Drury, Risk Mgmt Officer Cell: 260-4163 Office - 688-8126PG&E Notification of Damaged Utility (800) 743-5000County Health Services (Hazardous Materials) 24 hour Emergencies: 335-3232Poison Control Hotline (800) 222-1222
Original Date: June 14, 2006Revised Date: September 20, 2013
CONSTRUCTION AND OPERATIONS & MAINTENANCE WORK
All employees shall follow these safety rules during construction and O&M work:
Tailgate MeetingsPre-task plans and tailgate meetings are required to be conducted just prior to all high hazard job tasks. The job tasks covered under this procedure are set out below:
Permit-required confined space entry; Maintenance tasks requiring lock-out/tag-out of more than one type of hazardous energy source; Line breaking tasks – Opening of equipment that may carry flammable, corrosive, or toxic material, or
an inert gas or any fluid, including water, at a volume, pressure, or temperature capable of causing serious injury;
Neutralizing large amounts of spilled corrosive substances at plant process areas; Work requiring the use of cartridge respirators or self-contained breathing apparatus; Use of mobile cranes with persons (other than the crane operator) on foot and in the immediate area
of operation; High-voltage electrical work above 600 volts or work with exposed live parts of low voltage (50 to 600
volts); Work using a personal fall arrest system where self-rescue after a fall is not possible; Prior to excavating with heavy equipment and/or working in an excavation deeper than 4 feet; Work in public roadways with the speed limits of 30 MPH or more and when traffic control measures
are needed for a time period of more than 15 minutes; Chainsaw operations; Work over water at night; Launching or retrieving a boat from a boat ramp; Any other job task determined as highly hazardous by the lead person, or the supervisor in charge.
The tailgate meeting must cover hazards expected throughout the job task, measures to protect against those hazards, and emergency response planning. Use available safety checklists for the job task (e.g., confined space entry permit), it is completed during the meeting. All employees involved in the high hazard job task must attend the meeting. Meeting information must be documented.
Before working on high hazard activities that are non-routine and not covered under a existing SOP, complete a High Hazard Work Plan as per O&M SOP 2010-01. The High Hazard Work Plan must be approved by a supervisor and the Safety Officer.
Staff shall delineate the work zone using cones, barricades, caution tape, or equivalent warning devices.
Excavation Work1. Follow CCWD O&M SOP Excavation Safety (2010-2). Conduct a tailgate meeting and
complete the Excavation Pre-Task Plan Tailgate Form before starting excavation work. Verify USA markings are completed and a valid ticket exists before proceeding.
When available, use approved engineering plans for construction. Contact Engineering if conflicts are identified in the field.
2. For high priority subsurface utilities (natural gas > 60 psig, high voltage electrical > 60kv, pressurized sewer, petroleum, or hazardous material) within 10 feet of the planned excavation, an onsite meeting with a representative of the utility is required to verify utility location. Document the detailed information communicated by the representative.
Question any inconsistent or potentially incorrect utility markings/identifications with the

utility representative and inform your supervisor. Stop work until the marking concern is resolved.
Notify the operator of the installation and USA North, immediately after discovering or causing damage to a subsurface installation.
3. Install adequate shoring, or bench or slope excavations that have either poor soil conditions or depths in excess of 5 feet (60 inches measured from the deepest point) prior to work in the excavations. When using shoring equipment to prevent excavation walls from caving-in, follow the shoring manufacturer’s tabulated data sheets. Manufacturer’s tabulated data must be available on the job site for the type of shoring used to ensure proper use and compliance with the manufacturer’s requirements at all times.
4. Only enter an excavation under the direction of a trained, competent person. A competent person shall constantly monitor an excavation occupied by workers and be ready to stop work when unsafe conditions arise.
5. Demarcate undermined perimeters of excavations with marking paint as a hazard warning.
6. Obtain supervisor approval of all excavation work where sloping and/or benching is used in lieu of shoring or trench shields/boxes. Simple slope excavations (Type B Soil, granular cohesion-less soil such as crushed rock, unstable rock, silt, sandy loam, or previously disturbed soil) shall have a maximum allowable slope of 1:1. Simple slope excavations (Type C Soil, cohesion-less soil such as gravel, sand, submerged soil or freely seeping soil, submerged unstable rock) shall have a maximum allowable slope of 1 ½:1.
7. Keep spoils or heavy equipment at least 2 feet from the edge of excavations to prevent them from falling or rolling into excavations. Also, keep tools and other materials that may pose a hazard at least 2 feet from excavation edge.
8. Set barricades, fencing, or guard rails around open excavations with depths in excess of 6 feet to prevent falls into the excavation (see Fall Protection section). When possible, use guard rails with trench boxes. Direct pedestrian traffic away from open excavations. Place fencing around or sturdy covers (road plates or 1 1/8” plywood) over excavations that are unattended.
9. Use manual-cutting tools (snap cutter or hammer) to cut asbestos cement (AC) pipe.Continuously wet the area of the pipe being cut with water to prevent asbestos fibers from becoming airborne. Dispose of AC pipe and metal valves with AC pipe in Concord yard’s large yellow debris box (wrap pipe with a double layer of plastic sheeting before disposal). Smoking is prohibited when handling asbestos materials.
10. For excavation work, arrange to have the atmospheric levels checked with an appropriate gas monitor, when there is a strong odor present, or other sign of a nearby release of sewage, fuel, natural gas or other hazardous chemical line. Ensure vehicle exhaust is not entering the excavation.
11. Use an appropriate mechanical aid or seek assistance from another person to transport a tamper (rammer) to and from excavation sites and on to and off of vehicles.
12. If available, use mechanical lifting equipment instead of manually lifting heavy objects on slippery surfaces.
13. Use hand tools to locate the exact location of underground utilities (hand dig or probe).While excavating laterally within 24” of the exterior surface of marked utilities or when all known utilities are not marked, probing or hand digging shall be required prior to mechanical excavation. In areas where buried power lines are suspected or within 24” of electric utility marks, use a non-conducting (fiberglass handle and shaft) probing tool to probe soil. A
probe with a steel shaft and electrically-rated insulated handle can be used probe soil further than 24” out from electric utility marks or identified electric utility.
14. Before work on water lines 36 inches in diameter or greater which are not double isolated, follow the O&M High Hazard SOP and assess the hazard of flooding the excavation. Tag out and, if possible, lockout main valves before work on water mains where potential drowning hazard exists.
Tools and EquipmentAlways select the correct tool/equipment for the job.1. Use grounded electric powered tools or double insulated powered tools with ground-fault
circuit interrupters (GFCIs).
2. Evaluate the working clearance to overhead high voltage (greater than 600 V) power lines and tree branches near power lines, and adjust work practices to provide for adequate (greater than 10 foot) clearances. Contact PG&E if you are unsure.
3. Use ladders in trench excavations or other confined spaces that are 4 feet or more in depth.Stairs, ladders or ramps shall be used to climb up and down work surfaces 4 feet or more in height. Refer to Ladder Safety section for more information.
4. Use hoisting equipment or a forklift for lifting materials weighing over 200 lbs. Ensure capacity ratings and lifting characteristics are appropriate for the task. Use chain slings, synthetic slings, or other rigging only when they are in good condition and their capacity tags or labels are attached. Do not make a lift beyond the rated capacity of the equipment or rigging. Consider wind conditions when handling materials.
5. Conduct annual, documented inspections of all chain slings.
6. Do not stand underneath loads handled by lifting or digging equipment. Set up the work site to avoid having employees position themselves directly under the boom or backhoe bucket to perform work. Stay away from the swing radius of the boom.
7. Heavy equipment operators and employees on foot shall make eye contact before employees on foot assist in controlling a load. Heavy equipment operators must know of the presence of all employees on foot in the areas of their operations. When exiting a tractor- loader-backhoe, lower the bucket(s) and turn off the engine.
Crane Hand Signal Chart
8. Use “bear paws” or tag lines to control trenchplate loads and other loads with a hazardous rotation. If on foot and assisting in controlling a load, make sure you have room to escape a potentially uncontrollable load.
9. Stand away from any vehicle being loaded or unloaded to avoid being struck by any spillage or falling materials.
10. Prior to driving heavy equipment on unpaved paths, inspect the paths, and determine and mark soft areas, sharp turns, slopes, hidden obstructions, ruts, washouts and other hazards.
11. Use a portable exhaust fan when welding, operating equipment with combustion engines, or using chemicals (e.g., black mastic, oil-based paints, etc.) in confined spaces orexcavations. Do not enter a leak truck’s rear enclosure while its generator is on.
12. To remove 12 inch valve can covers safely:a. Remove pavement that may interfere with cover removal. b. Attempt to remove the cover with the cover removal tool.c. If the cover does not lift off after two attempts, use a dead blow hammer to loosen the
cover. Re-attempt to remove the cover with the removal tool.d. If the cover does not lift after two more attempts, use a 5+ foot long pry-bar to pry the
cover.e. If the cover cannot be pried off, make arrangements to replace the valve can.
13. Seek assistance from another person to manually turn water main line valves. Use a valve operating machine if available. Only authorized staff can operate District valves. Adjust the valve key length so the top of the key is between shoulder and hip height when turning. For difficult valves, consider using a different, operable valve for the job.
14. Use water to prevent silica dust from becoming airborne when sawing concrete.
15. Use manufacturer-recommended safety devices, guards, and shields on grinders, saws, lawn mowers, weed-eaters, and other powered equipment.
16. Guard all rotating or moving parts of equipment, such as belts, pulleys, chains, and sprockets. Do not disengage safety devices and guards unless equipment is disabled so that it cannot unexpectedly energize. Exception: A chainsaw’s bar nose guard may be removed for certain situations as allowed by the manufacturer’s instruction manual.
17. Keep hands, fingers, hair, and other body parts away from the energized machine or its parts. When possible, place both hands on the handle(s) of the powered tool or equipment to firmly control it.
18. De-energize power tools and equipment before removing any guards to perform any service and maintenance on them. For non-cord and plug type equipment: isolate, lock and tag out hazardous energy sources (electrical disconnects and valves) before performing service and maintenance. See Lock and Tag section.
19. Check regularly all pneumatic and hydraulic hoses and couplings on power-operated equipment for deterioration or damage. Replace if necessary.
20. Use safety locking pins/clips or “whip-check” safety cables whenever pneumatic tools are used.
21. Use a fall arrest system (lanyard and harness) when using an aerial boom lift.
22. Secure all compressed gas cylinders during transport, use, or storage to prevent them from toppling over. When securing to a building wall, secure cylinders with two restraints (one at the top third and one at the bottom third of the cylinder). Place valve protection devices on all stored cylinders.

23. Grinders:a. Inspect grinding wheels for cracks or damage before use. Ensure guards are in place.
For bench/floor grinders, ensure that the tongue guard is within 1/4” of the wheel, and the tool rest is within 1/8” of the wheel.
b. Before using a new grinding wheel, make sure the manufacturer’s recommended speed, as posted on the wheel, is compatible with your grinder. Perform a “ring” test to ensure the integrity of the wheel.
c. Don’t stand directly in front of a grinding wheel whenever a grinder is started. d. Don’t grind material for which the wheel is not designed.e. Don’t force grinding so that motor slows noticeably.
24. Before starting demolition of structures, ensure all utilities (electric, gas, etc.) have been de- energized and locked out.
25. Read manufacturer’s instructions before operating equipment or tools unfamiliar to you.Comply with all manufacturers’ safety procedures. Use only manufacturer-approved parts for all tool and equipment repairs.
26. “Red-tag” all damaged or defective equipment and remove them from service immediately.Tag wording shall read “Danger: Do Not Operate” or equivalent wording.
27. Whenever possible, avoid being in the immediate area of equipment that is building pressure.
28. Do not use your hands to locate or attempt to stop a hydraulic leak.
Traffic Safety1. Follow the California Manual on Uniform Traffic Control Devices (CMUTCD) for work zones
on roads and bicycle paths.
2. Use flaggers when controlled traffic must drive on the wrong side of the road. Use a stop/slow sign to flag traffic. Designate a lead flagger and ensure two-way communication (line-of-sight or radio). One flagger may be used if the work zone is in a residential area with low traffic volume, the flagger has a good view of on-coming traffic in all directions, and the flagger is visible to all traffic from all directions. Use flagger(s) as needed when removing traffic cones and warning signs.
3. For work exceeding one hour on non-residential roads or roads with a speed limit of 30 MPHor more, place:a. a motor vehicle or heavy equipment in the space in front of the active work zone.
b. at least three (3) advanced warning signs and/or arrow boards before the flagger’s station or work zone. Ensure the flagger has an escape route in case of vehicles entering the flagger’s station. Place a visible barrier to protect the flagger from vehicles if there is no escape route.
4. For work lasting less than one hour at one road location, turn on the vehicle’s strobic light or high intensity flashing LED lights. For work performed between 15 minutes and one hour and directly exposed to traffic (the vehicle not used as a barrier), use a flagger and/or place traffic cones on the road appropriate for the speed and condition of the road, in addition to use of vehicle strobes and/or flashing LED lights.
5. Consider changing conditions in the evaluation of traffic signage and warning requirements.
6. Pump discharge hoses should not be placed in active traffic paths. When it is absolutely necessary to place a pump discharge hose in an active traffic path for means of safely conveying drainage water from the work area, the hose must be placed within an approved hose ramp. Use signage and a flagger to slow traffic going over the ramp.
7. Obtain City approval on traffic control plans when required. Provide notifications of park trail closures to the local parks agency.
8. Consider using flashing message boards for night work on busy intersections or as required by the City.
9. Place appropriate detour signs and other needed traffic control devices to route vehicle, pedestrian and bicycle traffic around closed streets or park trails. Place three (3) advanced warning signs, a visible barrier and other traffic controls required by CMUTCD before approaches to work zones on paths that may be used by bicycles. If your vehicle is equipped with a strobe beacon or LED flashers, turn them on when parked on an active trail.
Traffic Co n trol Guidel i nes
Suggested Advanced Warning Sign SpacingRoad Type Distance Between Signs (feet)
Urban – 25 mph or less 100Urban – 30 mph or more 350
Rural 500Freeway 1000
Placement Guidelines for Traffic ControlsApproach Speed
(mph)Taper Length (L)for 12’ wide lanes
# Cones for Taper Spacing ConesAlong Taper
25 (residential) 25’ 4 8’25 125’ 6 25’30 180’ 7 30’35 245’ 8 35’40 320’ 9 40’45 540’ 13 45’50 600’ 13 50’
50+ 1000’ 21 50’
Taper Length Criteria for Temporary Traffic Control ZonesType of Upstream Taper Taper Length
Merging Taper L minimumShifting Taper ½ L minimum
Shoulder Taper 1/3 L minimumTwo-Way Traffic Taper 100’ maximum
Length of Longitudinal Buffer SpaceSpeed (mph) Length of Buffer Space
20 3525 5530 8535 12040 17045 22050 28055 335
Parts of a Traffic Control Zone
Canal and Grounds Maintenance1. Evaluate projectile hazard risks to the other persons before mowing. Carefully inspect the
area to be mowed and check for rocks, ruts, washouts, debris, and obstructions that couldcause injury or mower damage. Close off trails and pathways to help keep pedestrians atleast 300 feet away from tractor mower operations. Ensure shields are in place in the front and rear of the mowers. Keep at least 50 feet away from other persons when using push mowers or weed eaters. Consider safer weed abatement alternatives where pedestrians may be present.
2. Wear cut-resistant Kevlar gloves during maintenance of the skip loader bucket used for canal cleaning.
3. Use a ladder when ascending or descending the de-watered canal. Slip-resistant materials on the canal liner may be used if the slope is less than 40 degrees.
4. Follow the Lattice Boom Crane SOP during canal cleaning. Keep away from the counterbalance of cranes and excavators.
5. When stepping on and off the canal cleaning sled while in the canal, wear a personal flotation device as well as a harness. Standby rescue personnel shall be ready and available to pull the harnessed employee using a tether tied to the harness.
6. Throw bags (or similar rescue equipment) must be available in all canal maintenance vehicles
7. Do not trim tree branches that are within 10 feet of live high voltage power lines or one foot of live low voltage power lines.
8. Do not climb trees. Use pole saws and/or an aerial manlift to trim high branches.
9. When removing animals from the canal, follow the O&M SOP 2011-01 “Animal Removal from the Contra Costa Canal.“
10. Place rebar caps that provide impalement protection on all vertical metal projections.
11. For all herbicide/pesticide applications, follow personal protective equipment requirement described on the herbicide/pesticide label.
12. Wear heavy-duty rubber gloves and boots when working with uncured concrete.
Plant Operations & Maintenance1. Where a large amount of a corrosive substance (pH 0-3.5, or pH 11-14) is found spilled in a
process area:a. Place danger signs/tape and barricade the hazardous area.b. Immediately notify appropriate plant operations and maintenance staff of the hazard.c. Do not enter into areas where corrosive substances may inundate and/or cause injury. d. Review and follow the plant’s Hazardous Material Business Plan,e. If it can be conducted safely with appropriate PPE, determine the pH of the spilled substance (as
needed), isolate the leak, contain the spill and capture any leaking liquid in plastic containers.f. Promptly dispose of spilled waste substances with a pH of 0 to 2 or a pH of 12.5 to 14 as
hazardous waste. Contact the Environmental Compliance Officer for guidance on disposal.Promptly neutralize spilled corrosive substances with a pH between 2 and 12.5.
2. When opening hazardous material piping or tanks, follow the O&M SOP “Line Breaking Involving Dangerous Materials.” Review the appropriate Material Safety Data Sheet (MSDS) before line breaking. Wear self-contained breathing apparatus (SCBAs) when opening systems containing chlorine gas, ozone, or ammonia. Before maintenance work, isolate (double block and bleed), depressurize, drain and/or flush equipment whenever possible and safe. Note that sulfuric acid draining is difficult because of its viscosity. Use

caution when clearing blockages. Ensure all drained hazardous chemical liquids arecaptured and properly disposed.
3. Always check atmospheric levels before entering a potentially hazardous atmosphere.Wear appropriate respiratory protection before entering a hazardous atmosphere. Continuously monitor the atmosphere. Ensure that you have been fit-tested for the respirators you wear within the last 12 months.
Exposure Limits and Required Respiratory ProtectionAir Contaminant Level in parts per
million (ppm)Respirator Type
Chlorine (at Randall- Bold WTP)
> 0.5 ppm SCBA only
Sodium Hypochlorite(at Bollman and City of
Brentwood WTP)
0.5 to 5 ppm Respirator withcartridge, or SCBA
> 5 ppm SCBA onlyOzone > 0.1 ppm SCBA only
Nitric Acid (in ozonesystems)
2 to 25 ppm Respirator w/cartridge> 25 ppm SCBA only
Ammonia 25 to 250 ppm Respirator w/cartridge> 250 ppm SCBA only
Hydrogen Sulfide > 10 ppm SCBA onlyCarbon Monoxide > 25 ppm SCBA onlyOxygen Deficiency < 19.5 % oxygen SCBA only
Sulfuric Acid mists; during line breaking
Respirator w/ cartridge
Review MSDSs for chemical permissible exposure limits, especially when using the chemicals inside enclosed spaces. MSDSs can be found on the Safety Website.
Cartridge Respirator Color CodeType of air contaminant Cartridge color code
Organic vapors: solvents, paint (OV) BlackAcid gases: Sulfuric acid, Chlorine (CL), Hydrofluorosilicic acid (HC), nitric acid,Hydrogen Sulfide, for escape only (HS)
White
Organic vapors & acid gases YellowAmmonia (AM, MA) GreenDusts, mists, & fumes: welding fumes,asbestos, silica (high efficiency, P100)
Magenta/Purple
Chemically Compatible GlovesChemical Recommended Glove
Sulfuric Acid Butyl Rubber, NeopreneHydrofluorosilicic Acid (Fluoride) Nitrile, Neoprene
Aluminum Sulfate (Alum) Butyl Rubber or NitrileSodium Hydroxide (Caustic) Butyl Rubber, Vinyl, or NitrileSodium Hypochlorite (Hypo) PVC or Nitrile
Aqueous Ammonia Vinyl or Nitrile
Recommended Maximum Work Time Between Rest Periods When WearingImpermeable or Semi-Impermeable Chemical Protective Clothing
MaximumTemperature
Full Sun PartlySunny
Full Shade
70 F 60 min. 90 min. 120 min.75 F 30 min. 60 min. 90 min.80 F 20 min. 30 min. 60 min.85 F 15 min. 20 min. 30 min.90 F 15 min., light work 15 min. 20 min.95 F Extreme Danger Danger 15 min.
Pump Shaft Machine Guarding and Packing Adjustments:1. During normal pump operation, guards such as expanded metal coverings shall be fastened
over all openings to pump shaft enclosures. The openings of the expanded metal guardsshall not be large enough so that any part of the body (e.g., finger) will be able to contact the shaft.
2. Only when adjusting packing, the guard may be removed while the pump shaft is rotating, however, care shall be taken so that no part of the body or clothing contacts the pump shaft. Use long handled tools to adjust packing to prevent bodily contact with the rotating shaft.For other pump maintenance work, the pump shall be de-energized and locked out.
3. Do not use hands to determine the temperature of the packing gland nut while the pump shaft is running. Use a non-contact infrared thermometer.
4. When pumps are rebuilt, ensure packing gland nuts are oriented so that they are as close to the shaft enclosure opening(s) as possible.
Welding, Cutting and Other Hot Work1. Keep cylinders, valves, regulators, hose fittings, clothes and gloves free of oil and
grease. Keep flammable and combustible materials out of shirt pockets.
2. Never swap oxygen or acetylene regulators and hoses, and never use them with any other gas. Oxygen hose and regulator fittings will have right-hand threads and its hose will be either black or green. Acetylene hoses and regulator fittings have left-hand threads and its hose will be red.
3. Ensure hoses are bound firmly to the connections and ensure all fittings are tight.
4. Never use oxygen and acetylene without the regulator valves and pressure gauges.
5. Use the pressures recommended by the torch manufacturer.
6. Before attaching a regulator to a cylinder, “crack” the cylinder valve (open the valve for an instant to blow dust or dirt out). Do not stand in front of valves when opening them.
7. Use the correct size cutting tip. Discard damaged tips.
8. Flash back arrestors must be installed on all torch connections.
9. Stand to one side of the regulator and very slowly open the cylinder valve on the oxygen all the way. Open the acetylene valve no more than ¾ of a turn. Take the T wrench out of the cylinder and keep it close at hand. Tops of cylinders must be unobstructed at all times so valves may be quickly closed.
10. Always set regulating pressures with torch valves open. Adjustments can be made only when the gases are flowing.
11. Light the torch only with a friction lighter.
12. Use exhaust ventilation when welding or cutting in enclosed spaces. Use a gas monitor to confirm safe atmospheres. Do not place cylinders into confined spaces.
13. Do not apply heat to coatings that generate hazardous fumes when heated. Containerswhich have contained flammables, combustibles or unknown materials shall not be cut or welded.
14. To prevent fires from flames, sparks and molten metal, remove or wet down dry vegetation at least 35 feet around the work area and 75 feet downwind. Cylinders shall be kept far enough away from hot work so that sparks, slag or flame will not reach them. Use fire resistant shields (plywood) as needed.
15. Turn off the torch before laying it down.
16. Always shut off the torch oxygen valve first, then the fuel torch valve. Close both cylinder valves. Re-open the torch oxygen valve to release system pressure then close it. Next, re- open the torch fuel valve then close it. Always release regulator adjusting screws after use.
17. Close all valves on cylinders when storing and/or transporting in vehicles. The regulator gauge should read zero. For long-term storage in buildings, close all valves, remove regulators and secure valve caps. Before a regulator is removed, close the cylinder valve and release the gas from the regulator.
18. Cylinders shall be used, stored or transported in an upright and secured so they cannot fall over and/or fall out of the truck.
19. Cylinders shall never be transported by a forklift unless in a secured and approved transportation apparatus.
20. Valves of empty cylinders shall be closed and cylinders marked “MT” (empty) and properly stored.
21. Separate acetylene and oxygen cylinders stored in buildings by 20 feet or a 2-hour fire wall.
22. Use an oil-free, non-combustible material to test lines for leaks. If leaks are found which cannot be stopped by closing valves, the cylinders shall be taken outdoors away from sources of ignition and slowly emptied. Do not use defective regulators, torches or hoses.
23. Shield welding work from others to prevent eye damage.
24. Ensure arc welder electrodes and ground are in good repair.
25. Do not recklessly discard electrode stub ends since they may ignite combustibles, cause burns or create a slip hazard.
26. Turn off electric welding equipment when not in use.
27. Keep an ABC-rated fire extinguisher near hot work activities. Follow fire watch and hot work permit procedures as required.
Original Date: June 14, 2006Revised Date: September 20, 2013
BOATING SAFETYFollow these safety rules while using a boat on reservoirs and canals:
1. Do not operate a boat unless properly trained.
2. Check the weather report before at the start of the day. Do not operate a boat in inclement weather except when needed to conduct a rescue. Boating for water quality sampling or other District functions at Los Vaqueros is prohibited during sustained winds above 20 MPH.
3. Each boat occupant must wear a USCG-approved personal flotation device (PFD). Each occupant must carry a whistle or horn to alert others in case of emergency.
4. Request the USCG Auxiliary to conduct a vessel safety check every two years. FollowUSCG recommendations. Inspect the condition of the boat before launching.
5. Each boat must have the maximum carry capacity marked. Do not exceed the maximum occupancy or carrying capacity.
6. Each boat must have a means of communication (e.g., push-to-talk device or cell phone).Use a District radio where cell service is not available. Hourly safety checks are conducted.
7. Each boat must carry a fire extinguisher and a USCG-approved throwable rescue device.
8. If the boat operator expects the boating activity to take longer than four hours, a written float plan must be prepared. The float plan must include the following information: names of personnel on board, activity to be performed, expected time of departure, route, time of return and means of communication. The plan is approved by the operator’s supervisor.
9. A minimum of two trained persons launch or retrieve a boat from a boat ramp.
10. Ensure there is enough fuel for the boating activity.
11. Ensure there is enough drinking water for the boating activity.
12. Stay seated while the boat is travelling.Original Date: September 23, 2011Revised Date: September 20, 2013
2013-14 Safe Practices Handbook - Page 35 of 49
CONFINED SPACESAll employees shall follow these confined space rules for permit- and non-permit-required confined spaces. If the rules are not feasible, please contact the Safety Officer for further guidance. Before entering confined spaces (vaults, tanks, buried reservoirs, tunnels and pipes):
1. Remove standing water to less than 3 inches in depth;
2. Monitor the atmosphere with a calibrated gas monitor device with oxygen, carbon monoxide, hydrogen sulfide and explosive atmosphere sensors. Where an atmosphere of ammonia, chlorine, ozone, or organic vapors may exist, monitor the atmosphere with sensors that can detect those hazards or use appropriate respiratory protection during entry.
3. Use an appropriate ladder when needed;
4. Use a “permit” procedure, where spaces are posted as “permit-required”, where spaces depths exceed 10 feet or where serious hazards (atmospheric, engulfment/drowning or electrical) exist. A permit procedure includes use of a Confined Space Permit checklist, use of a retrieval and fall protection system (unless the system poses a greater hazard or is notfeasible), and attendant(s) or rescue personnel available on-site that are prepared to act on a confined rescue plan;
5. Use mechanical ventilation as needed; use exhaust ventilation during welding/cutting activities;
6. Eliminate hazards by purging hazardous chemicals, using positive isolation methods (e.g., double block and bleed), and locking out energy sources;
7. Have self-contained breathing apparatus (SCBAs) available for standby rescuers where hazardous atmospheres may exist; and
8. Where access to and from the space is horizontal, fall protection may not be required.However, entrants shall wear harnesses to help assist rescue personnel in retrieval. Consider tethering entrants for ease of retrieval.
All confined space personnel must be trained. Rescue personnel must have participated in a confined space drill with the last 12 months, and be certified in CPR and first-aid.
When entering confined spaces, follow the CCWD Safety & Health Manual’s Confined Space Entry Program (see the Safety Website under Safety Library). A list of District Confined Spaces can be found at: http://www.ccwd-staff.com/spaces.asp .
Confined Space Rescue Planning
Non-Entry Rescues: If possible, an attendant may rescue a victim from a confined space using a retrieval system and without additional help if the rescue does not require the attendant to enter the space. For rescue planning purposes, the entrant must remain attached to theretrieval line at all times.
2013-14 Safe Practices Handbook - Page 36 of 49
Guidelines for Confined Space Entry Preparations and Rescue Planning for Common Activities: Additional measures may need to be taken based on hazards. Consult the Safety Officer if the recommended procedure is not feasible.
SpaceType
Activity PotentialHazards
Recommended Procedure
A. Non-permit vaults 4’ -10’ deep
Inspection,sampling, turning valves, minor repairs using non-powered hand tools
Atmospheric 1. Complete Pre-Entry Hazard Assessment Checklist2. Remove any water from vault to less than 3” depth3. Verify atmosphere with gas monitor4. Place guard rails around the opening or have an
attendant standby.5. Use a ladder
B. Non-permit vaults >10’ deep, accessonly byladder
Inspection,sampling, turning valves, minor repairs using non-powered hand tools
Atmosphericfall
1. Complete Pre-Entry Hazard Assessment Checklist2. Remove any water from vault to less than 3” depth3. Verify atmosphere with gas monitor4. Use an extension/straight ladder when needed.5. Use fall protection/ retrieval system.6. Attendant standby with ability to contact 911.
C. Vaults> 4’ deep access only by ladder (permit entry)
Major repairsbyMaintenance
Atmosphericengulfment, drowning, high pressure, electrical
1. Complete Confined Space Entry Permit2. Remove any water from vault to less than 3” depth3. Use gas monitor to check atmosphere4. Use mechanical ventilation as needed, exhaust
ventilation during welding/cutting,5. Double block & bleed to eliminate engulfment hazard;
lockout/tagout as needed.6. Place an extension/straight ladder when needed.7. Use fall protection/retrieval system unless use of a
retrieval system poses greater hazard.8. Attendant standby for non-entry rescue. Entrant
cannot detach from lifeline unless additional rescuepersonnel standing by for entry rescue
D. DrainPit > 5’ deep (permitentry)
Grounds maintenance
Atmospheric fall,engulfment
1. Complete Confined Space Entry Permit,2. Remove any water from pit to less than 3” depth3. Place an extension/straight ladder when needed.4. Verify atmosphere with gas monitor5. Isolate space from drain line6. Use fall protection/ retrieval system.7. Attendant standby for non-entry rescue. Entrant
cannot detach from lifeline unless additional rescue personnel standing by for entry rescue
E. ContraLoma Tunnel (non-permit)
Inspection Atmospheric fall
1. Complete Pre-Entry Hazard Assessment Checklist2. Ventilate space using fixed blower for at least 20
minutes before entry.3. Attendant standby with ability to contact 911.4. Verify atmosphere with gas monitor5. Verify two-way communication.
F. BuriedTreated Reservoir (permit entry)
Cleaning Atmosphericfall, high pressure
1. Remove water from space as needed.2. Complete Confined Space Entry Permit3. Verify atmosphere with gas monitor4. Isolate space5. Use fall protection/retrieval system.6. Attendant standby for non-entry rescue7. Ensure two-way communication.8. At least one rescuer standing by for entry rescue
2013-14 Safe Practices Handbook - Page 37 of 49
SpaceType
Activity PotentialHazards
Recommended Procedure
G. BuriedTreated Reservoir (permit entry)
Epoxycoating, sealants
Atmosphericfall, chemical contaminant
1. Remove water from space as needed.2. Complete Confined Space Entry Permit3. Verify atmosphere with gas monitor & VOC detector4. Use mechanical ventilation (blower)5. Isolate space6. Use fall protection/retrieval system7. Attendant standby for non-entry rescue8. Ensure two-way communication9. Two rescuers standing by for entry rescue with
SCBAsH. BuriedTreated Reservoir (permitentry)
Inspection Atmospheric fall
1. Remove water from space as needed.2. Complete Confined Space Entry permit3. Isolate space4. Verify atmosphere with gas monitor5. Use fall protection/ retrieval equipment6. Attendant standby7. Ensure two-way communication8. At least one rescuer standing by for entry rescue
I. Above-ground reservoir tank (permit entry)
Cleaning(side-entry)
Atmospherichigh pressure
1. Remove water from space as needed.2. Complete Confined Space Entry Permit3. Verify atmosphere with gas monitor4. Isolate space,5. Entrants wear harnesses6. Have tether available for retrieval system7. Attendant standing by
J.Above-ground reservoir tank (permit entry)
Epoxycoating, sealant (side entry)
Atmosphericchemical contaminant
1. Remove water from space as needed.2. Complete Confined Space Entry Permit3. Verify atmosphere with gas monitor & VOC detector4. Use mechanical ventilation (blower)5. Isolate space6. Entrants wear harnesses7. Attendant standing by8. Two rescuers standing by for entry rescue with
SCBAsK. Above-ground reservoir tank (permit)
Inspection Atmospheric 1. Remove water from space as needed.2. Complete Confined Space Entry Permit3. Isolate space4. Verify atmosphere with gas monitor5. Attendant and at least one rescuer standing by for
entry rescueL. OpenCanal dewatered> 4’ deep(non- permit)
Cleaning Heavy equipment,slip/fall
1. Conduct a pre-task tailgate meeting and document aPre-Entry Hazard Checklist.
2. Follow O&M Lattice Crane SOP3. Remove water and isolate the canal.4. Secure a straight or extension ladder for access5. Entrants wear harnesses,6. Have rescue board available,7. Attendant/rescue personnel standing by
M. Canalunder- crossings, siphons, box culverts (permit)
Cleaning Atmosphericdrowning, heavy equipment, slip/fall
1. Remove water from space as much as possible2. Complete Confined Space Entry Permit3. If depths > 4’ of water remain: entrants wear life
jackets. If < 4’ depth, entrants wear harnesses.4. Verify atmosphere with gas monitor, entrants carry
gas monitors during entry5. Attendant monitors entrant (line-of-sight), rescue
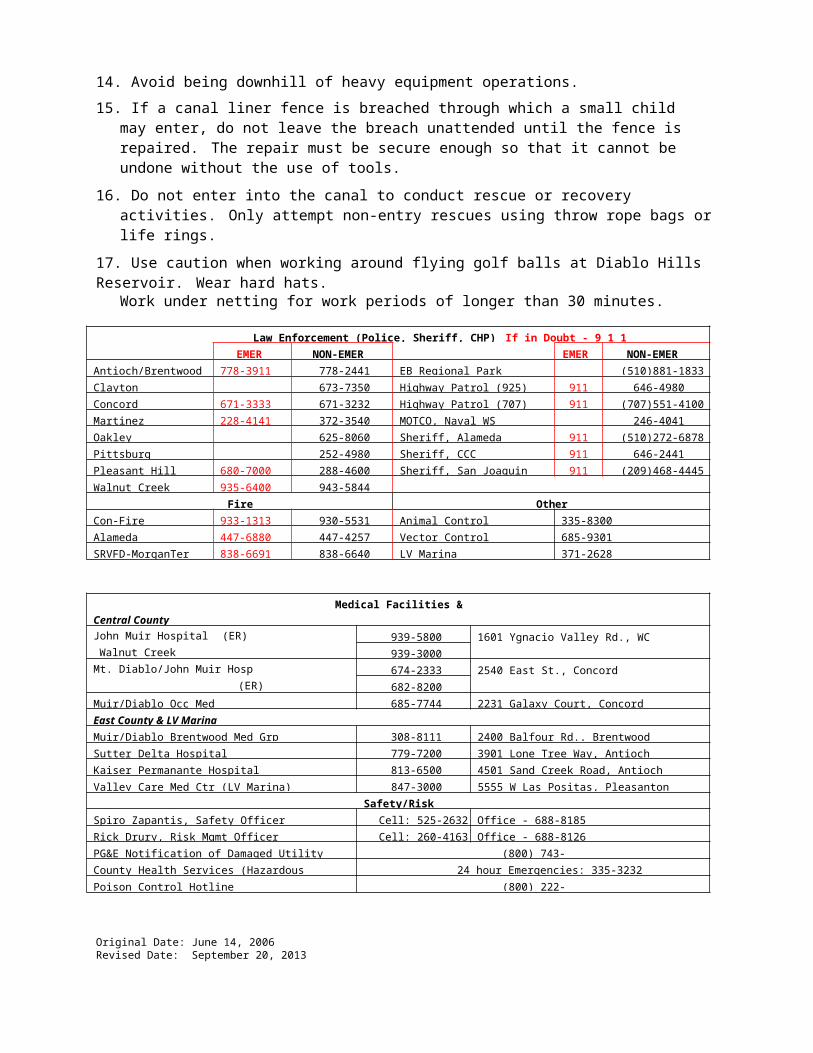
2013-14 Safe Practices Handbook - Page 38 of 49
personnel available6. Have rescue board available7. If atmosphere is hazardous (carbon monoxide level >
25 ppm, hydrogen sulfide > 10 ppm, or LEL > 10%, or oxygen < 19.5%), no entry without a High Hazard plan.
N. Sedimentbasin, launders(permit)
Cleaning Fall, engulfment
1. Complete Confined Space Entry Permit2. Isolate space3. Use retrieval system (or use PFDs at Randall-Bold)4. Attendant stands by; at least one rescuer available for
entry rescueO.Sediment basin (permit)
MajorRepairs byMaintenance
Fall,engulfment
1. Remove water from space2. Complete Confined Space Entry Permit3. Isolate space4. Attendant stands by; at least two rescuers available
for entry rescue5. Have a rescue board available
P.Corrosive chemical secondary contain- ment basins > 4’ deep, accessonly by ladder (permit ornon-permit)
Inspection(non-permit) Repairs by Maintenance, line breaking, cleaning (permit)
Chemicalexposure (alum, sulfuric acid, fluoride, caustic, hypochlorite)
1. From outside the containment, survey area foruncontained chemicals, leaks, etc.
2. Wear appropriate PPE3. Take a sample of any uncontained liquid4. If the pH sample is <3.5 or pH > 11 or if corrosive
liquid is freely flowing, have the liquid removed.5. If the liquid chemical hazard cannot be removed,
notify the treatment plant and maintenance supervisor of hazard. Barricade or tape off the entrance to the basin and place sign/tag describing the hazard.Follow the permit procedure for entries: conduct a pre-task hazard analysis meeting, review the MSDS, monitor atmosphere, complete Confined Space Entry Permit, have retrieval system available, and an attendant and rescue personnel standby.
6. Entries without uncontained chemical hazards present are to be performed with an attendant observing the work area. Entrants must: notify the treatment plant supervisor, be familiar with the MSDS, complete aPre-Entry Hazard Checklist, and wear required PPE.
7. For line breaking activities, follow the O&M Line Breaking SOP and permit procedure. Monitor and ventilate the atmosphere as needed.
Q. Ozone contactors(permit)
Maintenance Ozone exposure
1. Isolate space.2. Ventilate space for at least 24 hours. Place temporary
guard rails around open, unattended hatches.3. Follow the O&M Line Breaking SOP and the permit
procedure: conduct a pre-task hazard analysismeeting, review the MSDS, monitor the atmosphere, and complete Confined Space Entry Permit.
4. Use gas monitor and portable ozone monitor.5. Entrants wear harnesses. Enter using SCBAs if ozone
levels above 0.1 ppm. Do not enter if ozone levelsare above 5 ppm.
6. Attendant and at least two rescue personnel standing by with two SCBAs for entry rescue
Non-routine entries
- - Develop High Hazard Work Plan as per High Hazard SOP
Original Date: September 23, 2011Revised Date: September 20, 2013
2013-14 Safe Practices Handbook - Page 39 of 49
FALL PROTECTIONFollow these rules to safely work at elevated heights:
1. General Rules For Fall Protecti o n Not Covered Under “Specific Si t u a tions” For work within 6 feet of unprotected leading edges at elevated heights of 7.5 feet:
Consider the use of elevated work platforms, scaffolding, aerial manlifts or similar equipment with standard 42” guardrails, or install temporary standard 42” guard rails or fencing whenever possible to provide protection from falls over 7.5 feet.
If use of guardrail-type equipment is not feasible, wear proper fall protection equipment (harness with a fall arrest or fall restraint device tied to an anchor point). In fall arrest situations whenself-rescue is not possible, use the “buddy system” and have a rescue plan.
If using guard rail equipment or wearing fall protection equipment are not feasible or creates a greater hazard (for long duration work lasting more than one minute), contact the Safety Officer and your supervisor for guidance on preparing a written Fall Protection Plan that includes a “controlled access zone” and dedicated safety monitor.
2. Specific Sit u ations
Natural Slopes More Than 40 Degrees When possible, avoid climbing unprotected sloped surfaces greater than 40 degrees and more than 7.5 feet in elevation. If you must climb the slope, use proper fall protection equipment. If using conventional fall protection equipment is not feasible, use a walking stick or climbing pole or rope.
Other Slopes More Than 40 Degrees (Includi n g Canal Slopes) For work on sloped surfaces greater than 40 degrees and more than 7.5 feet in elevation, use proper fall protection equipment secured to a suitable anchor point. Install anchor points as needed.
Sloped Roofs More Than 30 Degrees For work on sloped surfaces greater than 30 degrees (7:12 slope) and more than 7.5 feet in elevation, use proper fall protection equipment secured to a suitable anchor point. Install anchor points as needed.
Flat Roofs o r Roofs Less Than 30 Degrees in Slope When possible, keep 6 feet from the leading edges more than 7.5 feet in elevation.When working within 6 feet from the leading edge and the work is expected to be of long duration (more than one week), use temporary guardrails to protect from falls. If work is of short duration (less than one week) or guardrails are not feasible, wear proper fall protection equipment to work within 6 feet of the edge. For leading edge work that is of duration of less than one minute such as climbing onto or off of a ladder, wearing fall protection is not requiredas long as care is used and center of gravity is maintained low to the climbing surface.
ExcavationsSet barricades, fencing, or guard rails around open excavations with depths in excess of 6 feet to prevent falls into the excavation. When possible, use trench boxes with guard rails. The competent person may work close to the edge for hole watch duties. Other employees not directly involved with the work shall keep away 6 feet from the edge.
Floor Openings/Open Hatches Unprotected floor openings shall never be left unattended.
2013-14 Safe Practices Handbook - Page 40 of 49
Whenever possible, keep 6 feet from the floor opening. If work must be performed within 6 feet of the opening (e.g., performing confined space attendant or entrant duties), then use fall protection measures.
Whenever possible, install temporary guard rails around the opening if work is expected to be of long duration (more than one day). If work is of shorter duration or guardrails are not feasible, the attendant shall use fall protection equipment whenever possible, tying off to available davit arms or other anchor point. For openings of filled treated water reservoirs, personal flotation devices are worn if use of fall protection equipment is not practical.
Crane Inspections and Maintenance When inspection of a crane requires working at an elevation more than 7.5 feet for more than one minute, use an aerial manlift or proper fall protection equipment to conduct the inspection.
Entry into Sediment Basin Launders Entry into the Randall-Bold sediment basin launders may be conducted without fall protection equipment when the basins are filled to at least the bottom of the launders. Personal flotation devices must be worn during entry and a ladder must be used for access. (Fall protection must be used for entry into the lower parts of de-watered basins and entry into the launders of Bollman and City of Brentwood sediment basins). Follow permit confined space procedures forsedimentation basin entries as well as sedimentation basin launder entries.
Other Construction Wo r k Cal-OSHA fall protection regulations (Title 8, Construction Safety Orders) apply for work involving: rebar work (section 1712(e); connectors and other iron workers (section 1710); and framers (section 1716.2(e)(1)).
3. Do not use fall protection equipment unless properly trained. Inspect fall protectionequipment before use. All fall protection equipment must undergo a semi-annual documented inspection by a trained, competent person.
4. Anchor points must be capable of supporting 5000 lbs per attached worker. Do not attach fall protection equipment to guard rails. When practical, secure the anchor end of the fall arrest device at a level not lower than your waist.
5. A fall arrest device can be a shock absorbing lanyard or a self-retracting lifeline. Lifelines shall be protected against damage.
6. Body belts are worn only for fall restraint, not as part of a fall arrest system.
7. Scaffolds are erected only by trained competent persons.
Original Date: September 23, 2011Revised Date: September 20, 2013
2013-14 Safe Practices Handbook - Page 41 of 49
LOCK AND TAGFollow these lock and tag procedures during all confined space entries and all construction and maintenance activities on machinery or equipment where a hazardous release of energy is possible including electrical, mechanical, chemical, hydraulic, pneumatic and potential. These steps shall be performed as part of Lock and Tag Procedures:
1. If available, obtain the approved equipment-specific lockout/tagout procedures for the machinery/equipment/facility.
2. If no equipment-specific procedure is available, the area or on-call supervisor shall assign available employee(s) that are the most knowledgeable of the machinery/equipment/facility to determine and document the proper energy isolation points on the Lockout/Tagout Isolation Sequencing form. Available recently completed Lockout/Tagout Isolation forms should be used to help determine energy isolation points.
3. Contract administrators shall ensure that contractors not perform work on machinery/ equipment/facilities without complying with equipment-specific lockout/tagout procedures or the Lockout/Tagout Isolation Sequencing form.
4. Notify all affected personnel (including operators of machinery/ equipment/facility) during a hazard analysis tailgate meeting before the activity.
5. If no equipment-specific procedures are available, identify all hazardous energy sources, their energy isolation devices (e.g., circuit breakers, valves, etc.), control circuit-type devices (e.g., push buttons, selector switches, etc.), block-out points, drain/bleed points and energy indicator devices (e.g., gauges, panel lights). If more than one energy isolation device is identified, then document all isolation devices on the Lockout/Tagout Isolation Sequencing form.
6. Shutdown. All operating controls shall be turned off or returned to the neutral position (depress stop button, open switch, close valve, etc.). Deactivate the energy isolation device so that the machine/ equipment is isolated from the energy source. Disable motor-operated valves.
7. Lockout. A locking device is placed on each energy-isolating device to isolate each energy source. If needed for large shutdowns, the lock keys are placed inside a lock box. Each employee involved shall place their own uniquely keyed lock and tag at each isolation point, or at the lock box. Ensure that outside contractor employees also use their own locks and tags on the isolation points. The lead employee, supervisor, or project engineer initials each isolation point description listed on the Lockout/Tagout Isolation Sequencing form after lockout.
8. Tagout. Do not use tags alone on energy isolation points unless the isolation point is not lockable. The tag must be attached using a zip tie (or equivalent) and have the following information: name, “Danger – Do Not Operate” (or equivalent wording), date, and contact information.
Machines or equipment not equipped with lockable controls shall be disconnected from its source of power to prevent inadvertent movement or release of hazardous energy. Tag equipment controls. Implement additional safety measures such as the removal of an isolating circuit element, blocking of a controlling switch, opening of an extra disconnecting device, or the removal of a valve handle to reduce the risk of inadvertent energization.
2013-14 Safe Practices Handbook - Page 42 of 49
9. Drain, Bleed, Purge Stored Energy. Stored or residual energy (such as capacitors, springs, elevated machine members, rotating flywheels, hydraulic systems, pressurized air, gas or water systems, chemicals, etc.) must be dissipated by methods like grounding, bleeding down, flushing, etc. If necessary, moveable parts shall be mechanically blocked to prevent inadvertent movement.
Portions of chemical systems to be opened must be depressurized and drained as completely as possible, thoroughly washed, flushed, purged and/or vented (if safe), Some toxic gases may not be safely vented. For more specific guidance, follow the O&M Line Breaking Procedures.
10. Verification of Lockout. First, check that no personnel are exposed, then verify isolation of equipment by operating the push buttons, switches or other normal operating controls, by testing to make certain the equipment is not energized (voltage tester), and/or by visual inspection to ensure the equipment will not otherwise operate. Return operating controls to neutral or “off” position after verification.
11. After work is completed, O&M and, if applicable, Construction staff assess the satisfactory completion of work and approve the machinery/equipment/facility for return-to-service.
12. The Safety Officer along with the area supervisor shall inspect lockout/tagout activities once per quarter.
Follow the CCWD Safety & Health Manual’s Lock and Tag Program (see the Safety Website). Exceptions to the Lock and Tag Program: electrical troubleshooting performed by qualified electricians and hot tapping of water pipelines.
Original Date: September 23, 2011Revised Date: September 20, 2013
2013-14 Safe Practices Handbook - Page 43 of 49
FORKLIFT OPERATIONFollow these rules to safely operate a forklift:
1. Do not drive/operate forklifts unless you have been certified to operate the forklift within the last 3 years.
2. Prior to operation inspect the forklift for its general condition and note any damage. At a minimum, check for fluid leaks, condition of forks, lift cylinder, load backrest, mast, carriage, chains, pedals, brakes, steering, horn as well as drive, tilt and hoist/lowering controls. Do not operate the forklift if any of these items need repair.
3. Do not exceed the capacity of the forklift.
4. Obey a 5 MPH speed limit, and wear a seat belt while driving and operating the forklift.
5. When turning, be aware of the rotation of the load and the rear of the forklift to avoid collisions.
6. When entering or exiting a building, use the horn to warn pedestrians.
7. Do not idle a forklift inside of a building.
8. When not in use, put in neutral gear and set the parking brake and set the forks on the ground.
9. Use of 2 forklifts in tandem requires a High Hazard Work Plan approved by the SafetyOfficer and the site supervisor.
Original Date: September 24, 2012Revised Date: September 24, 2012

2013-14 Safe Practices Handbook - Page 44 of 49
BIOLOGICAL HAZARD PRECAUTIONSAnimalborne Disease Prevention (Aerosol Transmissible Disease – Zoonotics)1. When handling live wildlife in an outdoor environment (e.g., birds, possums, raccoons) or
domestic animals (e.g., dogs, cats) that appear to be in good health, use standard personalprotective equipment (including disposable nitrile gloves and safety glasses). Snare poles and nets are recommended to handle the animals.
2. Wear an N95 respirator when:a. Handling animals (domestic or wild) that appear sickly,b. Transporting any wildlife or sickly animals in enclosed or indoor spaces,c. Handling dead wildlife that may have died of disease such as an area of a mass die-off
(the use of tools to avoid direct handling is recommended in this case)d. Creating dust in areas contaminated with rodent droppings.
3. When possible, avoid transporting wildlife or sickly animals inside of enclosed vehicles,
4. Use proper cleaning and disinfection techniques to handle rodent, bird or bat droppings.Before cleaning a contaminated work space and/or equipment, when possible, completely remove the existing rodent infestation. After infestation removal, wait 5 days before beginning to clean the work space. Before attempting to clean the work space, open all doors and windows for 30 minutes to allow fresh air to enter the work area. Use cross-ventilation and leave the area during the airing-out period.
If possible, avoid stirring up dust by sweeping or vacuuming up droppings, urine, or nesting materials. Wear disposable nitrile gloves and safety glasses when cleaning. Spray the waste with a disinfectant or a mixture of bleach and water and let soak 5 minutes. The recommended concentration of bleach solution is 1 part bleach to 10 parts water. (Caution:bleach is corrosive, avoid skin and eye contact). Use a paper towel to pick up the waste, and dispose of the waste in a plastic and seal tightly. Double bag as needed to ensure seal.After the waste has been removed, disinfect items that might have been contaminated. Lastly, remove gloves, and thoroughly wash hands with soap and water (or use a waterless alcohol-based hand rub when soap is not available and hands are not visibly soiled).
5. If feasible, disposal of dead animals and animal wastes and gloves shall be in sealed containers. Larger animals (dogs and deer) shall be transported in an open bed to Animal Services (check your body for ticks after handling animals). Small wildlife and its wastes are disposed in the sealed containers in the regular trash. Launder/clean reusable PPE and clothing before re-use.
6. In areas where ticks and mosquitoes are present, apply insect repellent to the skin.
Bloodborne Pathogens (Humans)1. Observe “universal precautions” to prevent contact with blood or other bodily fluids. All
blood/ bodily fluids is considered infectious regardless of the perceived status of the source individual.
2. Before cleaning a work space and/or equipment contaminated with blood/bodily fluids, wear disposable gloves and safety glasses. Wear face shield, an N95 respirator, apron or other outer garment whenever splashes, spatter or droplets of blood may be present.
3. Use a bodily fluid cleanup kit located at first-aid cabinets or a bleach solution (1 part bleach to10 parts water) to disinfect the work area/equipment. During cleaning, minimize generation of airborne droplets of blood/bodily fluids.
2013-14 Safe Practices Handbook - Page 45 of 49
4. After cleaning and decontamination, biohazardous waste is placed in a bag or other closeable container. Contact the Safety Officer or the Environmental Compliance Officer for guidance on waste disposal.
5. Use a CPR shield/barrier before attempting CPR on another employee. CPR shields can be found at first aid cabinets. If CPR shields are unavailable, “hands-only” CPR should be performed.
6. If possible, avoid handling abandoned hypodermic needles and syringes found at field locations. If the needles/syringes must be removed for public or worker safety concerns, wear gloves and use a long handled tool to handle the needle/syringe. Carefully place the needle/syringe in a sharps container and seal. Contact the Environmental Compliance Officer or Safety Officer for guidance on disposal.
Refer to the Safety & Health Manual Bloodborne Pathogens Exposure Control Plan for more information.
Untreated SewageAvoid direct contact. Use rubber gloves. If you come into contact with sewage, wash handswell with soap and clean water before eating or touching the mouth, nose or eyes. Wash hands with soap and clean water after touching any surfaces or objects that may have been contaminated with sewage. Immediately wash and disinfect any wound that comes into contact with sewage. Shower and change out contaminated clothes. Launder contaminated clothes separately or discard. Seek medical assistance, if feel ill after contacting with sewage or you’vebeen exposed to sewage through the mouth, nose, eyes, or open wound.
Hand Washing Steps:1. Use soap and warm running water.2. Scrub hands for at least 20 seconds..3. Wash all surfaces including between fingers; under fingernails; back of hands;
and wrists4. Rinse well and dry hands with a clean paper towel.
Original Date: September 24, 2012Revised Date: September 20, 2013
2013-14 Safe Practices Handbook - Page 46 of 49
SAFETY FEEDBACKRecognize and take advantage of opportunities to give safety feedback. Be willing to listen and respond. Give and accept feedback in a constructive manner.
Guidelines for giving positive safety feedback:1. Be positive, sincere, respectful, and open2. Describe what you’ve observed3. State the positive effect of the behavior or action (keeping safe, setting of a good example
for others).4. Listen for a reaction or ask for a response
Guidelines for constructive safety feedback:Provide feedback focused on the issue or problem, not the people or personalities involved. Be“hard on problems, soft on people.”1. Be positive, sincere, respectful, and open. (“I know you are an expert in . But I noticed
a safety issue. I’d hate to see an injury”).2. Describe what you’ve observed. Focus on the situation, don’t make it personal.3. State the effect of the behavior or action (“You could get hurt”).4. Listen actively for a reaction or ask for a response, ask questions (“That’s how I see it. What
do you think?”).5. Discuss until agreement is reached, stay calm, be persistent.6. Use objective standards whenever possible which are not personal or subjective and easier
to accept and be agreed upon.
Guidelines for accepting constructive safety feedback:1. Be willing to welcome feedback as an opportunity to learn and grow (even if you think they
are wrong, or they upset you because of their bad delivery).2. Listen and focus on the content, not the personality traits of the giver.3. Respond by acknowledging the other person’s concerns, clarify feedback if necessary.4. Avoid defending or over-explaining, discuss until agreement is reached, don’t make
excuses, focus on a solution, be calm.5. Thank the giver for working with you in a constructive manner.

2013-14 Safe Practices Handbook- Page 47 of 49
STRETCHING EXERCISES
2013-14 Safe Practices Handbook- Page 48 of 49
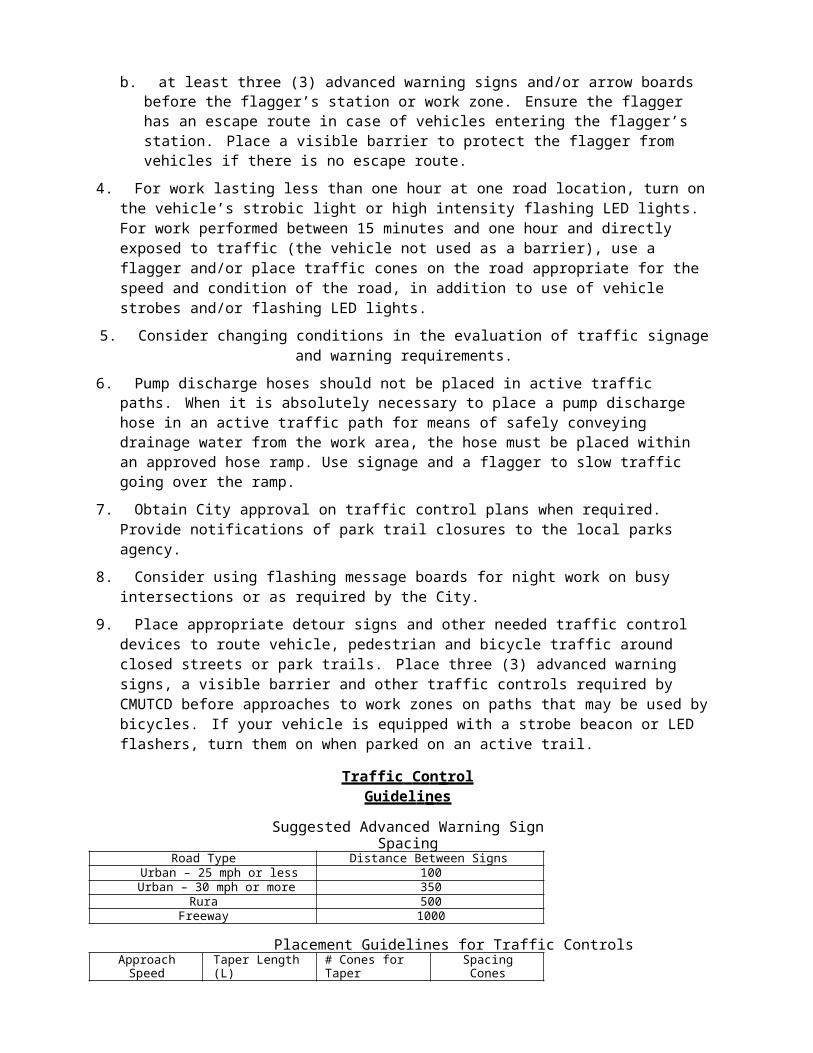
2013-14 Safe Practices Handbook - Page 49 of 49
SAFETY COMMITEESDistri c t Saf e t y Co mm ittee Luis Llamas, ChairTracy Woodard, Co-ChairWayne Hanson Shane Pinto Marco SiragusaGary MillsScott Nelson Ken Swenson Scott Weddle Sal de la Madrid Mike Lehman Matt Moses Spiro ZapantisRachel Murphy (Management Rep) Michelle Hulsey (Clerk)
Site Safet y C ommittees
Distr i ct C e nt e r and Bisso A dminis t ration Building Jeanie Linden, ChairMarie Valmores, Co-Chair(Other members: Mehria Albert, Tom Cranmer, Dino Angelosante, Desiree Castello, Andrea Jarske)
Central C o u n ty Operatio n s & Maintena n ce a n d Stor e s Tim Kirby, Chair(Other members: Tracy Woodard, Corrie Warner, Jeff Chavez, Matt Kehoe)
East Co u nty Operatio n s & Mainten a nce and Los V a q u e r os Wa ter s hed Lance Hartung, Chair(Other members: Dan Mello, Jeff Summers, Vic Smith, Tom Branch, John Parsons, Ron Gardner, JohnGonsalves, Rich Madrigal, Nicole Quesada)
Safety Improvement Task Force Steve Welch, Rachel Murphy, Pete Schoemann, Christopher Ko, Desiree Castello, Shawn Kelly, JeanieLinden, Dan Mello, Nate Porto, John Howard, Spiro Zapantis, Karen Connolly
Tear at dotted line and return the bottom portion to Spiro Zapantis at Mailstop OM5. All District employees are required to read, understand and follow the practices of this handbook.
--------------------------------------------------------------------------------------------------------------------- I have read and understood the CCWD Safety Handbook and I understand it is my responsibility to follow the safe work practices described in this handbook.
Print Name
Signature
Date: