Embed Size (px)
Citation preview
Microsoft WORD 2013 for long documents Top
Contents
1 Layout and formatting for University of Waikato Theses ............................................................. 4
University requirements .......................................................................................... 4
Order of content ...................................................................................................... 4
2 Document settings ................................................................................................................................... 4
Font and line spacing .............................................................................................. 4
2.1.1 Setting the font format ............................................................................................................... 4
2.1.2 Setting line spacing .................................................................................................................... 5
Displaying the formatting symbol ............................................................................ 5
Margins ................................................................................................................... 5
2.3.1 Setting margins ............................................................................................................................ 5
Quick Access toolbar .............................................................................................. 5
Settings for pasting into your document .................................................................. 5
3 Page and Section breaks ...................................................................................................................... 6
Page breaks............................................................................................................ 6
3.1.1 Adding a page break .................................................................................................................. 6
Section breaks ........................................................................................................ 6
3.2.1 Adding a section break .............................................................................................................. 6
Removing page or section breaks ........................................................................... 6
4 Headings ..................................................................................................................................................... 6
Formatting headings using Styles ........................................................................... 6
4.1.1 If the style you want does not appear in the gallery ......................................................... 7
4.1.2 Adding a style to the Style gallery .......................................................................................... 7
Modifying a heading style........................................................................................ 7
Adding extra heading levels .................................................................................... 7
Numbering headings ............................................................................................... 7
4.4.1 Creating the correct numbering sequence for headings ................................................. 8
4.4.2 Un-numbered headings............................................................................................................. 8
4.4.3 Starting at a number other than 1 .......................................................................................... 8
4.4.4 Adding extra headings ............................................................................................................... 8
5 Page numbers ........................................................................................................................................... 8
Formatting page numbers ....................................................................................... 8
Entering page numbers ........................................................................................... 9
Hiding the page number on the title/first page ......................................................... 9

Updated 22 May 2014
Changing page number formatting in the body of the thesis .................................... 9
5.4.1 Setting up a Next Page section break ................................................................................ 10
5.4.2 Changing the number format ................................................................................................. 10
6 Viewing your document ........................................................................................................................ 10
7 Navigation pane ...................................................................................................................................... 10
Activating the Navigation Pane ............................................................................. 10
Including Chapter headings in Navigation Pane .................................................... 10
8 Headers and footers .............................................................................................................................. 11
Creating a simple header ...................................................................................... 11
Using a Header template ...................................................................................... 11
Removing the template content from the header ................................................... 11
Inserting different headings for different sections of the document ........................ 11
9 Footnotes and cross-references ........................................................................................................ 12
Inserting footnotes ................................................................................................ 12
Cross-referencing to previous footnotes ................................................................ 12
Updating cross-references .................................................................................... 12
Tabs in footnotes .................................................................................................. 12
Disappearing footnotes ......................................................................................... 13
10 Columns .................................................................................................................................................... 13
11 Table of Contents (TOC) ..................................................................................................................... 14
Creating a Table of Contents ................................................................................ 14
Updating a Table of Contents ............................................................................... 14
Editing settings for the Table of Contents .............................................................. 14
12 Inserting Figures and Tables .............................................................................................................. 14
Figures .................................................................................................................. 14
12.1.1 Copying graphs from Excel .................................................................................................... 15
12.1.2 Multi-graphs ................................................................................................................................ 15
12.1.3 Clearer graphs ........................................................................................................................... 15
12.1.4 Tables ........................................................................................................................................... 15
13 Captions .................................................................................................................................................... 15
Adding Captions to Figures, Tables and Images ................................................... 15
13.1.1 Tips for captions ........................................................................................................................ 16
Editing the formatting of a caption ......................................................................... 16
Updating all captions ............................................................................................. 16
13.3.1 Updating captions after incorporating documents into a main document ............... 16
13.3.2 Updating the Table of Contents to reflect changes ........................................................ 16

Updated 22 May 2014
Keeping figures/tables and captions together........................................................ 17
14 List of Figures and List of Tables ...................................................................................................... 17
Creating a List of Figures ...................................................................................... 17
Creating a List of Tables ....................................................................................... 17
Updating a List of Figures/Tables .......................................................................... 17
15 Cross-referencing................................................................................................................................... 17
Cross-referencing to figures/tables ....................................................................... 17
15.1.1 Updating cross-references ..................................................................................................... 18
Cross-referencing to page numbers ...................................................................... 18
Cross-referencing to parts of pages ...................................................................... 18
15.3.1 Cross-referencing to a portion of text ................................................................................ 18
15.3.2 Cross-referencing to a page number on which particular text appears .................. 18
15.3.3 Updating cross-references to page numbers ................................................................... 19
“Soft” cross-references: above n x ...................................................................... 19
15.4.1 Updating “soft” cross-references in footnotes ................................................................. 19
16 Inserting landscape pages .................................................................................................................. 19
Modifying the position of page numbers on landscaped pages ............................. 20
16.1.1 Disconnecting landscape pages........................................................................................... 20
16.1.2 Checking the margins .............................................................................................................. 20
16.1.3 Checking the margins .............................................................................................................. 21
16.1.4 Page numbers on landscape pages ................................................................................... 21
Moving the header to the right hand margin of a landscape page ......................... 22
17 Manual formatting of lists (not a Table of Contents) ................................................................... 22
Setting up a list ..................................................................................................... 22
To create indents in a list that has been formatted ................................................ 23
18 Creating your Dissertation/Thesis from many small documents ............................................. 23
Incorporating smaller documents into main document .......................................... 23
18.1.1 Updating caption numbers ..................................................................................................... 23
18.1.2 Chapters ...................................................................................................................................... 23
19 Word Count .............................................................................................................................................. 24
20 Shortcut Keys for common tasks in Word 2014 ........................................................................... 24

Updated 22 May 2014
1 Layout and formatting for University of Waikato Theses
University requirements
This document is based on the requirements of the University of Waikato for theses, as outlined in
The University of Waikato Calendar's Guidelines for Dissertations and Theses.
Library's guide on University of Waikato Theses
Order of content
Title page: Title of thesis, degree, author, year etc. No visible page number.
Preliminary pages: Use Roman numerals ( ii, iii, iv etc) for page numbering – start at page
ii for the abstract.
- Abstract
- Acknowledgements
- Table of Contents
- Lists of tables, diagrams, figures, equations, maps, photographs etc.
Body of the thesis (chapters): From this point on use Arabic numerals (1, 2, 3 etc) for page
numbering – start at 1.
End pages
- References (or Bibliography)
- Appendices
The Faculty of Law may require other Preliminary and End pages.
2 Document settings
Font and line spacing
The text of the document should be formatted as follows:
Font: Choose a font which is easy to read - Times New Roman, Arial, etc.
Font size: 11point (pt) or 12pt depending on the font chosen.
Headings may have larger fonts, see 4. Headings
Line spacing: 1.5 or double.
2.1.1 Setting the font format
In the Home tab locate the Styles group (on the right) and right-click on Normal.
Select Modify.
In the Modify Style dialog box, select a font style and 11 or 12pt for the font size.
Stay in the Modify box for the next part.
Updated 22 May 2014
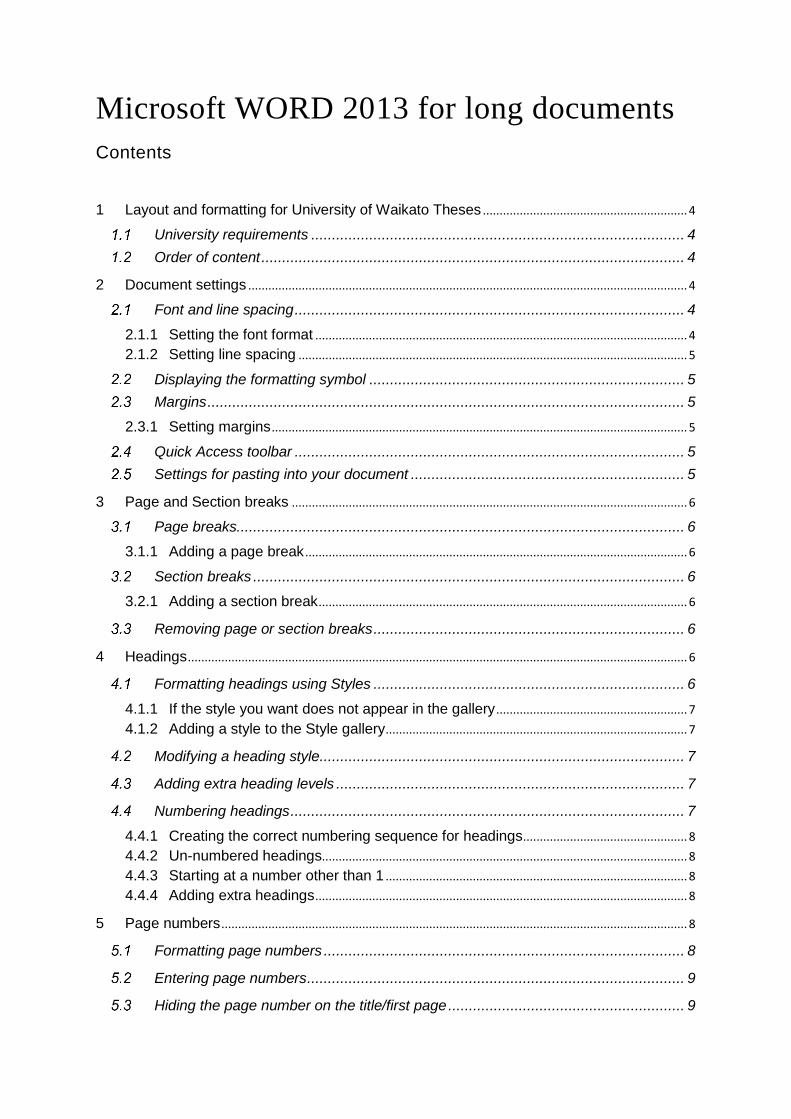
2.1.2 Setting line spacing
At the bottom left of the Modify Style box
click on Format.
On the resulting list, click on Paragraph to
open the Paragraph box.
In the Line spacing box, use the drop-down
menu and select 1.5 lines.
Click OK.
Displaying the formatting symbol
In the Home tab, click on the paragraph
symbol ¶ in the Paragraph group to display
formatting.
Click the paragraph symbol ¶ again to disable
the formatting marks display.
Margins
Margins for all pages should be
Left: 4.0 cm / 400 mm.
Right: 3.0 cm / 300 mm.
Top and bottom: between 2.0 cm / 200 mm and 25 cm / 250 mm.
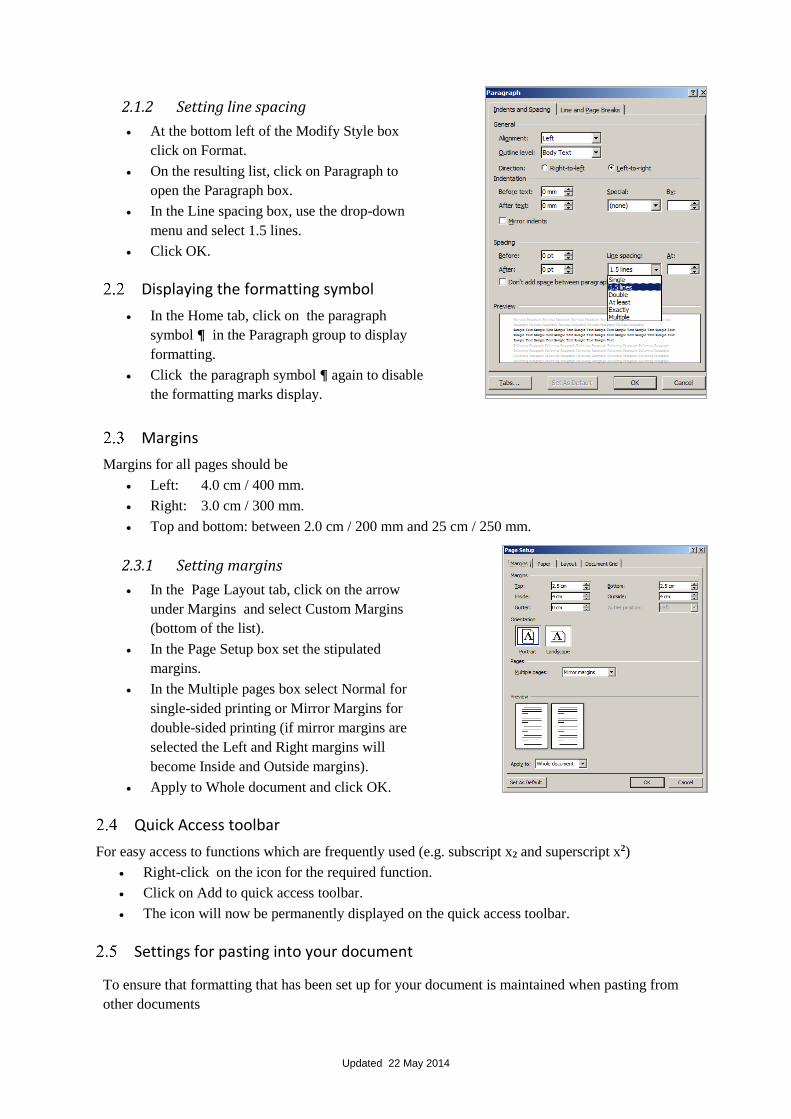
2.3.1 Setting margins
In the Page Layout tab, click on the arrow
under Margins and select Custom Margins
(bottom of the list).
In the Page Setup box set the stipulated
margins.
In the Multiple pages box select Normal for
single-sided printing or Mirror Margins for
double-sided printing (if mirror margins are
selected the Left and Right margins will
become Inside and Outside margins).
Apply to Whole document and click OK.
Quick Access toolbar
For easy access to functions which are frequently used (e.g. subscript x2 and superscript x2)
Right-click on the icon for the required function.
Click on Add to quick access toolbar.
The icon will now be permanently displayed on the quick access toolbar.
Settings for pasting into your document
To ensure that formatting that has been set up for your document is maintained when pasting from
other documents

Updated 22 May 2014
3 Page and Section breaks
Page breaks
A page break adds a new page which retains the page formatting of the previous page e.g. margins,
orientation etc).
3.1.1 Adding a page break
Place your cursor where you want the break to appear.
Press Ctrl+Enter.
Section breaks
The Next page section break adds a new page which can be formatted differently from the
previous page. e.g. different margins, different headers, different page number format etc.
The Continuous section break doesn’t add a new page, but enables different formatting of
text on the same page e.g. if you want part of the page to be formatted as columns.
Section breaks can also be used if you want one or more pages in landscape orientation – for
this you would insert two continuous section breaks and format the space between them as
landscape orientation.
3.2.1 Adding a section break
Place your cursor where you want the break to appear.
In the Page Layout tab locate the Page Setup group.
Click on Breaks and select the section break type you want to use.
To add a page break, you may also go to the Insert tab and click on Page Break in the Pages
group.
Removing page or section breaks
When a section break is removed,
formatting reverts to the previous section’s
formatting.
Ensure that the paragraph symbol ¶ is activated.
Place your cursor just before the Section or Page break as shown, and press the Delete key.
4 Headings
By using the Styles in Word for your headings, you can automatically create a table of contents which
will include all the headings for which you have used heading styles.
Formatting headings using Styles
Highlight the text in the document that you want as a heading.
Click on File (the first tab on the left) – Options – Advanced.
In the “Cut, copy and paste” group, set as shown here:
Updated 22 May 2014
On the Home tab, in the Styles group select the style you want e.g. Heading 1 (click on the
downward arrow to expand the style gallery) and the highlighted text will be formatted
according to the settings for that style.
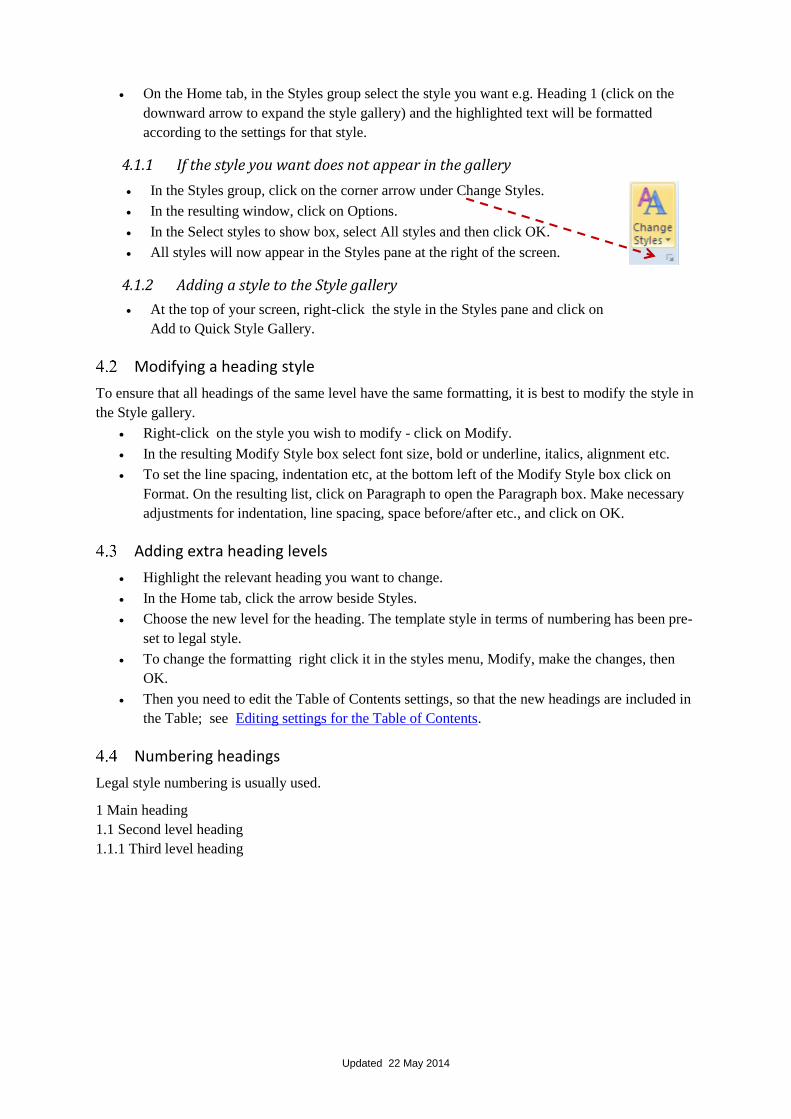
4.1.1 If the style you want does not appear in the gallery
In the Styles group, click on the corner arrow under Change Styles.
In the resulting window, click on Options.
In the Select styles to show box, select All styles and then click OK.
All styles will now appear in the Styles pane at the right of the screen.
4.1.2 Adding a style to the Style gallery
At the top of your screen, right-click the style in the Styles pane and click on
Add to Quick Style Gallery.
Modifying a heading style
To ensure that all headings of the same level have the same formatting, it is best to modify the style in
the Style gallery.
Right-click on the style you wish to modify - click on Modify.
In the resulting Modify Style box select font size, bold or underline, italics, alignment etc.
To set the line spacing, indentation etc, at the bottom left of the Modify Style box click on
Format. On the resulting list, click on Paragraph to open the Paragraph box. Make necessary
adjustments for indentation, line spacing, space before/after etc., and click on OK.
Adding extra heading levels
Highlight the relevant heading you want to change.
In the Home tab, click the arrow beside Styles.
Choose the new level for the heading. The template style in terms of numbering has been pre-
set to legal style.
To change the formatting right click it in the styles menu, Modify, make the changes, then
OK.
Then you need to edit the Table of Contents settings, so that the new headings are included in
the Table; see Editing settings for the Table of Contents.
Numbering headings
Legal style numbering is usually used.
1 Main heading
1.1 Second level heading
1.1.1 Third level heading
Updated 22 May 2014
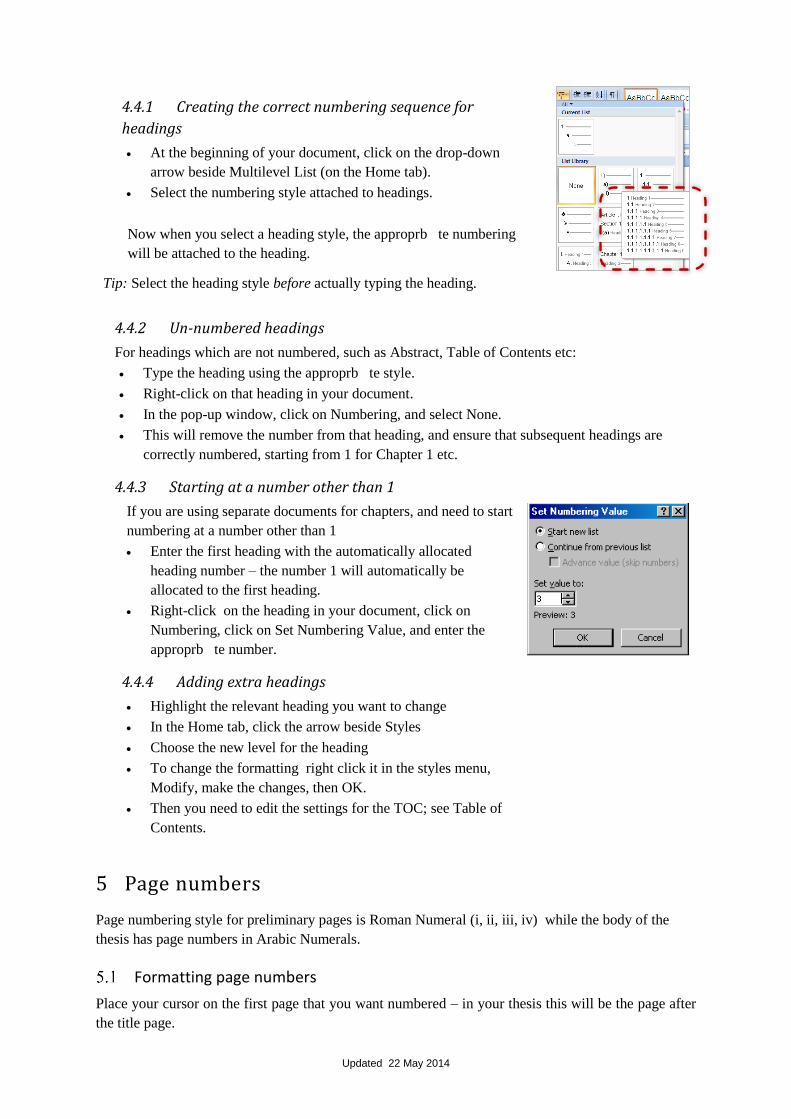
4.4.1 Creating the correct numbering sequence for
headings
At the beginning of your document, click on the drop-down
arrow beside Multilevel List (on the Home tab).
Select the numbering style attached to headings.
Now when you select a heading style, the approprb te numbering
will be attached to the heading.
Tip: Select the heading style before actually typing the heading.
4.4.2 Un-numbered headings
For headings which are not numbered, such as Abstract, Table of Contents etc:
Type the heading using the approprb te style.
Right-click on that heading in your document.
In the pop-up window, click on Numbering, and select None.
This will remove the number from that heading, and ensure that subsequent headings are
correctly numbered, starting from 1 for Chapter 1 etc.
4.4.3 Starting at a number other than 1
If you are using separate documents for chapters, and need to start
numbering at a number other than 1
Enter the first heading with the automatically allocated
heading number – the number 1 will automatically be
allocated to the first heading.
Right-click on the heading in your document, click on
Numbering, click on Set Numbering Value, and enter the
approprb te number.
4.4.4 Adding extra headings
Highlight the relevant heading you want to change
In the Home tab, click the arrow beside Styles
Choose the new level for the heading
To change the formatting right click it in the styles menu,
Modify, make the changes, then OK.
Then you need to edit the settings for the TOC; see Table of
Contents.
5 Page numbers
Page numbering style for preliminary pages is Roman Numeral (i, ii, iii, iv) while the body of the
thesis has page numbers in Arabic Numerals.
Formatting page numbers
Place your cursor on the first page that you want numbered – in your thesis this will be the page after
the title page.

Updated 22 May 2014
On the Insert tab, in the Header & Footer group click
on the arrow beside Page Number, then on the drop-
down menu click on Format Page Numbers.
In the Page Number Format dialos box, select a
number format from the Number Format menu e.g.
for preliminary pages in your report select Roman
lower case style (i, ii, iii).
Under Page Numbering activate the Start At radio
button.
For preliminary pages, set ii as the starting number.
Click OK.
Entering page numbers
Once page numbers have been formatted, they need to be entered so that they appear in your
document.
In the Insert tab, locate the Header & Footer group and click on the arrow beside Page
Number.
Select the desired position for page numbers e.g. Bottom of Page.
In the resulting box click on the exact position e.g. left, right or centre.
Page numbers will now display in the footer of each page in that section.
Click on Close Header and Footer at the top right of the screen, or double click anywhere
outside the header and footer.
Hiding the page number on the title/first page
Make sure the paragraph symbol ¶ is on.
Put your cursor under the Thesis Title frame. Delete the Page Break if there’s one showing.
In the Page Layout tab, click on the arrow beside Breaks and choose Next Page under Section
Breaks.
In the page after the Thesis Title page, double-click in Footer.
In the ribbon at the top click Link to Previous to deactivate it.
Then click anywhere in the main part of the same page to exit Footer.
Insert page numbers as per 5.1 above.
The page number will no longer appear on the title page, but will appear on all subsequent
pages.
Changing page number formatting in the body of the thesis
Because page numbers in the body of the thesis are formatted differently to those in the preliminary
pages, you need to have a Next Page section break between the preliminary pages and body then re-
format the page numbers in the body of the thesis. When you insert page numbers for preliminary
pages, page numbers will appear in the body as well, but continuing in sequence from the preliminary
pages, whereas they should start from 1.
First you will need to set up a section break.
Updated 22 May 2014
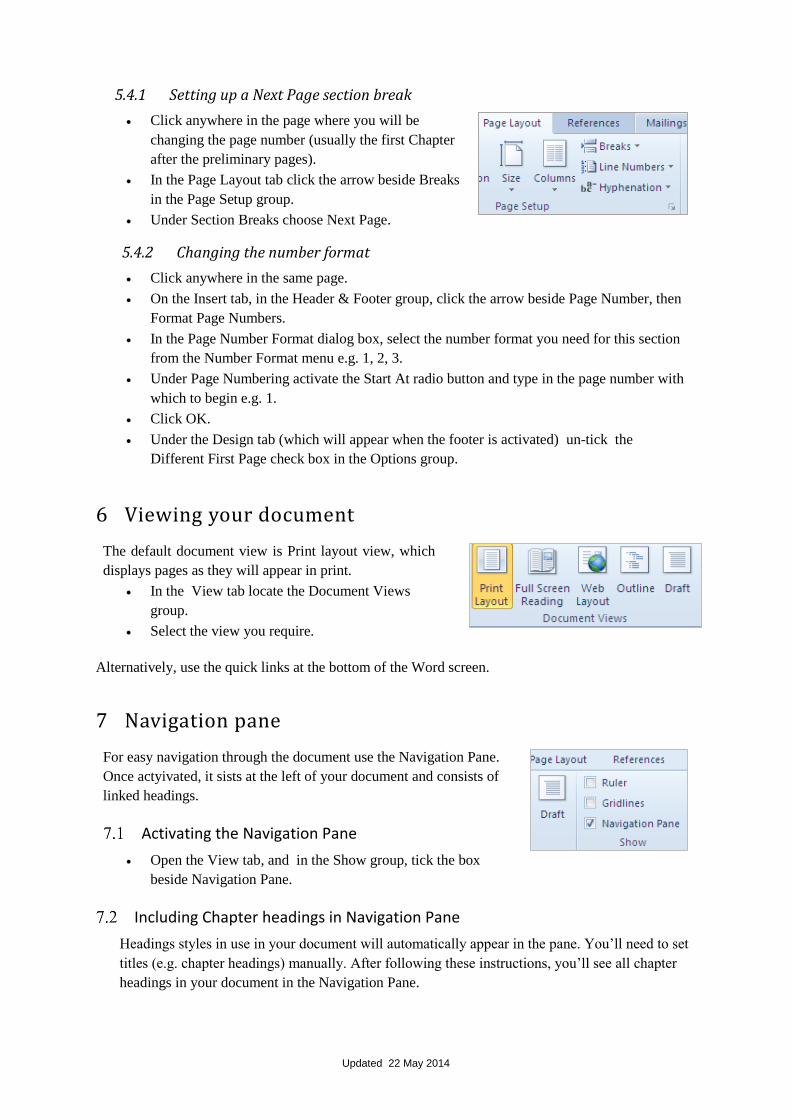
5.4.1 Setting up a Next Page section break
Click anywhere in the page where you will be
changing the page number (usually the first Chapter
after the preliminary pages).
In the Page Layout tab click the arrow beside Breaks
in the Page Setup group.
Under Section Breaks choose Next Page.
5.4.2 Changing the number format
Click anywhere in the same page.
On the Insert tab, in the Header & Footer group, click the arrow beside Page Number, then
Format Page Numbers.
In the Page Number Format dialog box, select the number format you need for this section
from the Number Format menu e.g. 1, 2, 3.
Under Page Numbering activate the Start At radio button and type in the page number with
which to begin e.g. 1.
Click OK.
Under the Design tab (which will appear when the footer is activated) un-tick the
Different First Page check box in the Options group.
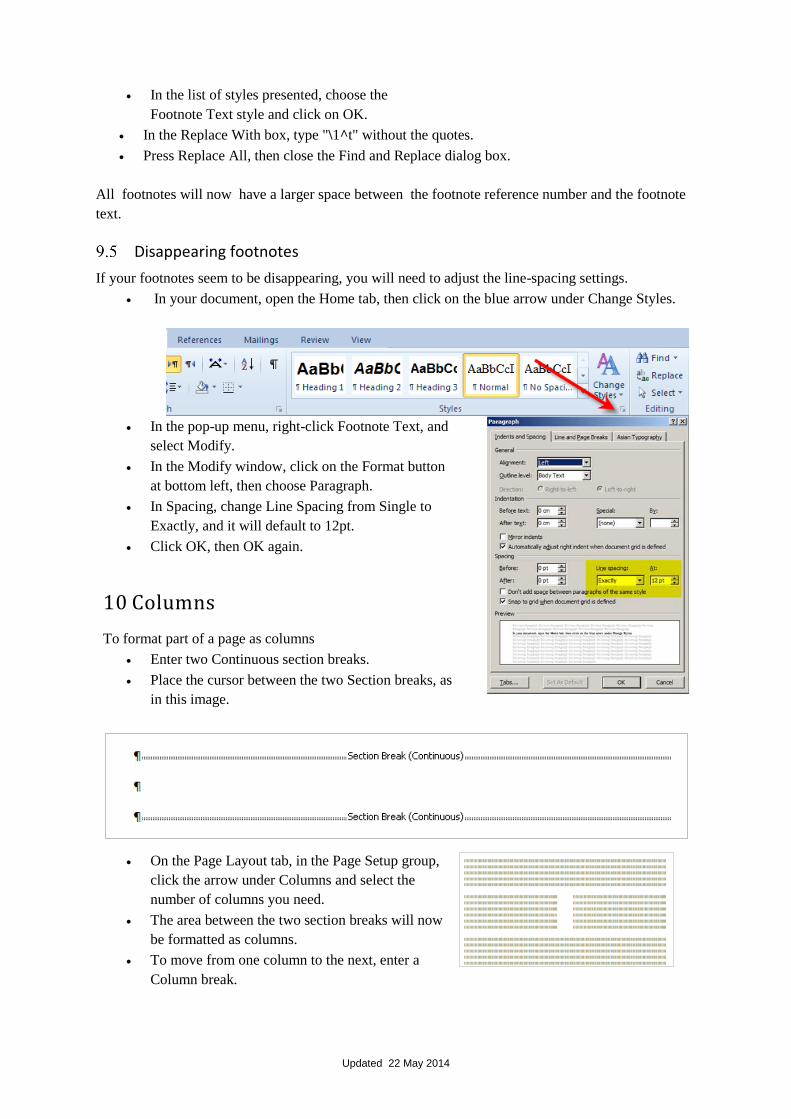
6 Viewing your document
The default document view is Print layout view, which
displays pages as they will appear in print.
In the View tab locate the Document Views
group.
Select the view you require.
Alternatively, use the quick links at the bottom of the Word screen.
7 Navigation pane
For easy navigation through the document use the Navigation Pane.
Once actyivated, it sists at the left of your document and consists of
linked headings.
Activating the Navigation Pane
Open the View tab, and in the Show group, tick the box
beside Navigation Pane.
Including Chapter headings in Navigation Pane
Headings styles in use in your document will automatically appear in the pane. You’ll need to set
titles (e.g. chapter headings) manually. After following these instructions, you’ll see all chapter
headings in your document in the Navigation Pane.

Updated 22 May 2014
On the Home tab in the Styles group, right-click the style you’re using for chapter headings
and click Modify.
Click the Format button at the bottom and select Paragraph from the drop-down menu.
In Paragraph, under General, select Outline Level 1.
8 Headers and footers
Creating a simple header
Double click at the very top of the page to open the header.
Type in in and format the text for your header, then closing the header by double-clicking
anywhere in the main part of the page.
This will insert that header into all pages of your document.
Using a Header template
On the Insert tab, in the Header & Footer group, click on
the arrow beside/below Header.
On the resulting drop-down menu, select a template – this
will now appear in your header. Type your text in the
approprb te sections of the template.
Removing the template content from the header
Right-click and select "remove contents control" - you can then adapt the header.
Inserting different headings for different sections of the document
Ensure that there is a Next Page Section Break between the sections, and then break the connection
between the sections:
On the first page of the new section, double click in the header to activate it.
Click on Link to Previous at the top of the screen to turn it off.
Click in the footer , and then on Link to Previous at the top of the screen to turn it off.
Now you can format the header of the new section without affecting the header of the
previous section.

Updated 22 May 2014
9 Footnotes and cross-references
Inserting footnotes
Place the cursor at the end of the text which requires a
footnote reference.
In the References tab, Footnotes group and click on AB1
Insert Footnote
The footnote number will be automatically inserted beside
the word and the cursor will now be located in the footnotes
field at the bottom of the page.
Cross-referencing to previous footnotes
Place the cursor in the footnotes field where you want to
insert a cross-reference, and type above n followed by a
space.
In the References tab, Captions group, click on Cross-
reference
In the box which appears Choose the Reference Type to
Footnote, and make sure Footnote Number shows in the
adjacent Insert Reference To box.
Select the correct footnote from the list of current footnotes for the document. Its number
will be inserted into the cross-reference.
Updating cross-references
Inevitably, footnote numbers may change as you progress through your document, and this will have
an effect on any cross-referencing you have already done. See 15.4 “Soft” cross-references” for
details.
Tabs in footnotes
Set up spacing between the footnote reference number and the beginning of the footnote text when
you have completed your document. This will ensure that you change all footnotes in the document.
Word doesn’t allow you to set up a default style with spacing so it has to be done after all footnotes
have been inserted. If you add more footnotes, remember to repeat the process.
Press Ctrl+H to activate the Find and
Replace dialog box.
Click on the More button and tick the
Use Wildcards check box.
In the Find What box, type "(^2) "
without the quotes. Note the space after
the last bracket.
With the cursor still in the Find box,
click on the Format button, then choose
Style; Word displays the Find Style
dialog box.
Updated 22 May 2014
In the list of styles presented, choose the
Footnote Text style and click on OK.
In the Replace With box, type "\1^t" without the quotes.
Press Replace All, then close the Find and Replace dialog box.
All footnotes will now have a larger space between the footnote reference number and the footnote
text.
Disappearing footnotes
If your footnotes seem to be disappearing, you will need to adjust the line-spacing settings.
In your document, open the Home tab, then click on the blue arrow under Change Styles.
In the pop-up menu, right-click Footnote Text, and
select Modify.
In the Modify window, click on the Format button
at bottom left, then choose Paragraph.
In Spacing, change Line Spacing from Single to
Exactly, and it will default to 12pt.
Click OK, then OK again.
10 Columns
To format part of a page as columns
Enter two Continuous section breaks.
Place the cursor between the two Section breaks, as
in this image.
On the Page Layout tab, in the Page Setup group,
click the arrow under Columns and select the
number of columns you need.
The area between the two section breaks will now
be formatted as columns.
To move from one column to the next, enter a
Column break.

Updated 22 May 2014
11 Table of Contents (TOC)
Creating a Table of Contents
If you have used heading styles, you can
automatically create a table of contents.
Place the cursor at the part of the document where
you want to insert the table of contents.
On the References tab, in the Table of Contents
group, click Table of Contents.In the resulting
drop-down menu, click on Insert Table of Contents
– this results in the Table of Contents window.
In the Show levels drop-down menu, select how
many heading levels you wish to appear in the table
of contents and click OK.
Updating a Table of Contents
The Table of Contents can be updated as more headings are added in the document.
Right-click on the table of contents, and click Update Field.
In the resulting box select Update entire table, and click OK.
Alternatively, on the References tab, in the Table of Contents group, click on Update Table
Editing settings for the Table of Contents
If you have added extra Heading levels, you’ll need to change the settings so that the additional
heading levels can be incorporated into the TOC.
Click anywhere in the current TOC and then press Alt+F9.
You’ll see a field code similar to this { TOC \lo "2-2" \h \z \t "Heading 1,2,Heading
3,2,Title,1” }.
Add extra headings as per the style in the existing code: you need to note where there’s
spacing and where there isn’t. You can add as many headings as you want; 5 headings are
included in this example: { TOC \o "2-2" \h \z \t "Heading 1,2,Heading 3,2,Heading
4,2,Heading 5,2 Title, 1” }.
The 2 after each heading number reference means that they will be formatted to align with the
left margin. You can change this if you want, e.g. Heading 4,2, Heading 5,3.
Then press Alt+F9 again (the TOC will show no changes), then right click and choose Update
Field, then Update Entire Table.
The additional headings will now show in the TOC.
12 Inserting Figures and Tables
Figures
Diagrams, pictures and graphs are labelled as figures.
To insert a figure, copy and paste the figure into your document.
Updated 22 May 2014
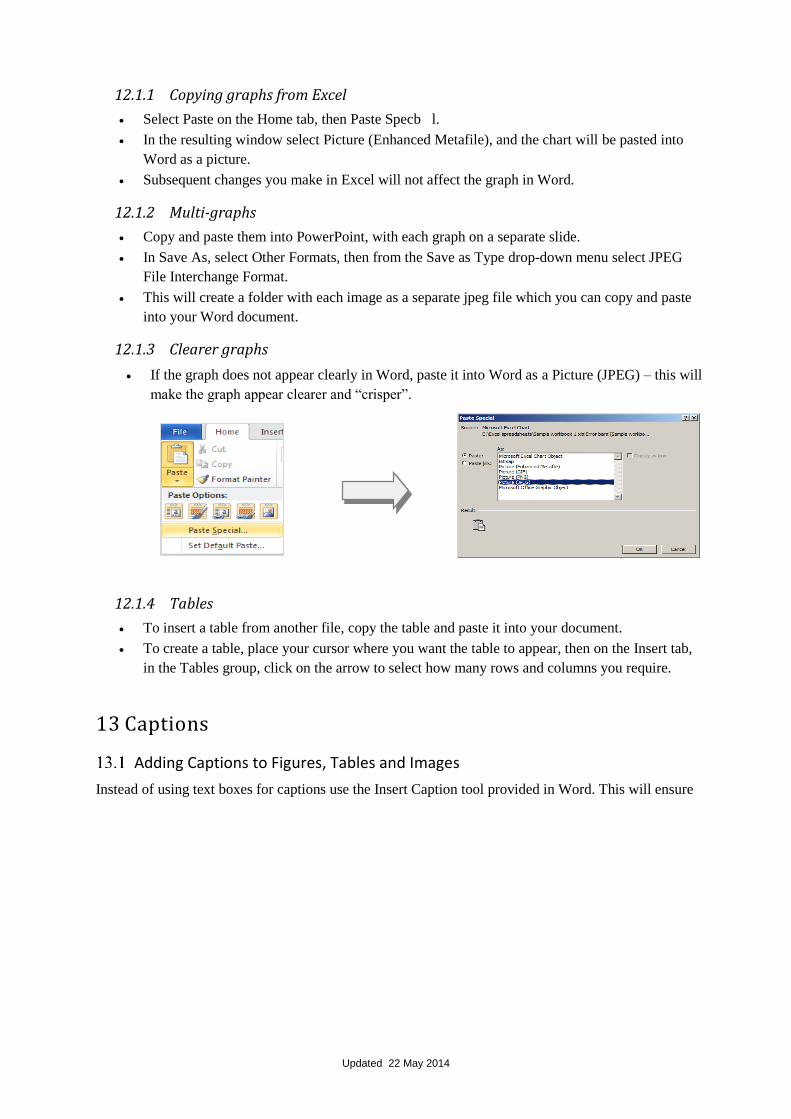
12.1.1 Copying graphs from Excel
Select Paste on the Home tab, then Paste Specb l.
In the resulting window select Picture (Enhanced Metafile), and the chart will be pasted into
Word as a picture.
Subsequent changes you make in Excel will not affect the graph in Word.
12.1.2 Multi-graphs
Copy and paste them into PowerPoint, with each graph on a separate slide.
In Save As, select Other Formats, then from the Save as Type drop-down menu select JPEG
File Interchange Format.
This will create a folder with each image as a separate jpeg file which you can copy and paste
into your Word document.
12.1.3 Clearer graphs
If the graph does not appear clearly in Word, paste it into Word as a Picture (JPEG) – this will
make the graph appear clearer and “crisper”.
12.1.4 Tables
To insert a table from another file, copy the table and paste it into your document.
To create a table, place your cursor where you want the table to appear, then on the Insert tab,
in the Tables group, click on the arrow to select how many rows and columns you require.
13 Captions
Adding Captions to Figures, Tables and Images
Instead of using text boxes for captions use the Insert Caption tool provided in Word. This will ensure
Updated 22 May 2014
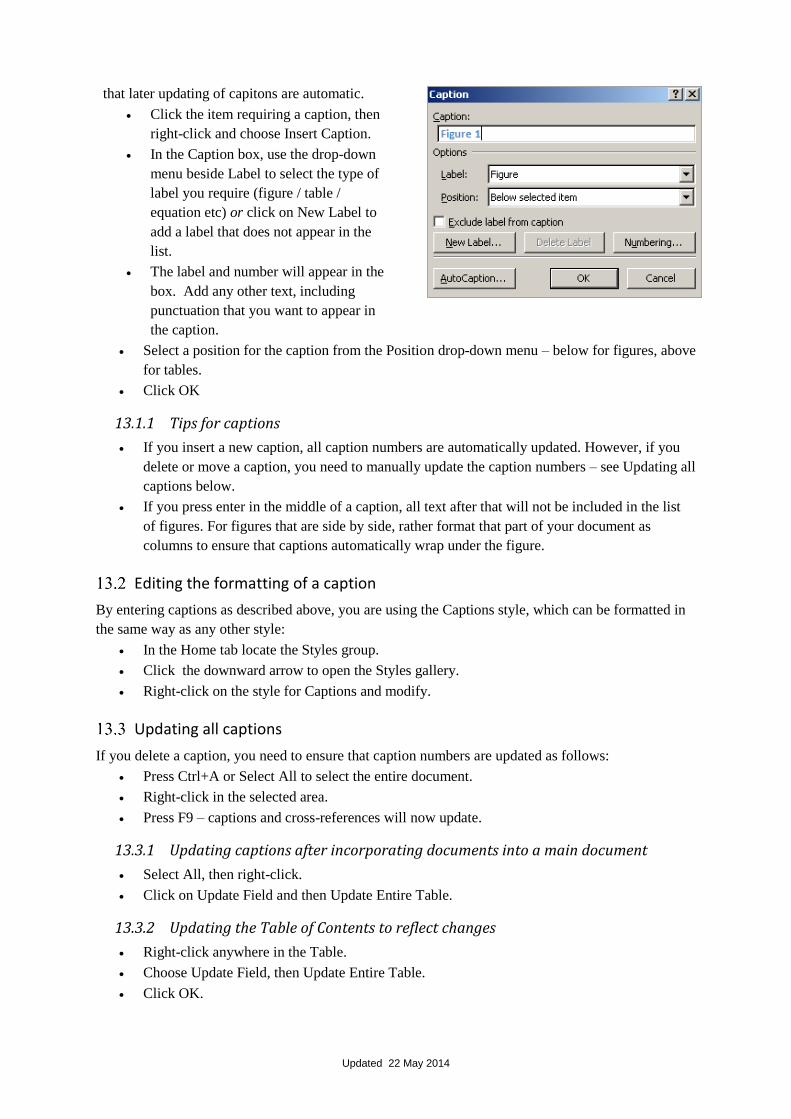
that later updating of capitons are automatic.
Click the item requiring a caption, then
right-click and choose Insert Caption.
In the Caption box, use the drop-down
menu beside Label to select the type of
label you require (figure / table /
equation etc) or click on New Label to
add a label that does not appear in the
list.
The label and number will appear in the
box. Add any other text, including
punctuation that you want to appear in
the caption.
Select a position for the caption from the Position drop-down menu – below for figures, above
for tables.
Click OK
13.1.1 Tips for captions
If you insert a new caption, all caption numbers are automatically updated. However, if you
delete or move a caption, you need to manually update the caption numbers – see Updating all
captions below.
If you press enter in the middle of a caption, all text after that will not be included in the list
of figures. For figures that are side by side, rather format that part of your document as
columns to ensure that captions automatically wrap under the figure.
Editing the formatting of a caption
By entering captions as described above, you are using the Captions style, which can be formatted in
the same way as any other style:
In the Home tab locate the Styles group.
Click the downward arrow to open the Styles gallery.
Right-click on the style for Captions and modify.
Updating all captions
If you delete a caption, you need to ensure that caption numbers are updated as follows:
Press Ctrl+A or Select All to select the entire document.
Right-click in the selected area.
Press F9 – captions and cross-references will now update.
13.3.1 Updating captions after incorporating documents into a main document
Select All, then right-click.
Click on Update Field and then Update Entire Table.
13.3.2 Updating the Table of Contents to reflect changes
Right-click anywhere in the Table.
Choose Update Field, then Update Entire Table.
Click OK.

Updated 22 May 2014
Keeping figures/tables and captions together
To ensure that the caption of a figure/table does not
move onto the next page while the figure/table remains
on the previous page:
Select both the caption and the figure/table.
Right-click in the selected area – click on
Paragraph.
In the resulting box click on the Line and Page
Breaks tab.
Tick the box beside Keep with next, then OK.
Now the figure/table and caption will remain together – if one moves onto a new page, the other will
follow.
14 List of Figures and List of Tables
If you have used the Caption style for your captions, you can automatically create a list of
figures/tables.
Creating a List of Figures
Place the cursor where you want to insert a list of
figures.
On the References tab, in the Captions group, click
on Insert Table of Figures.
In the Table of Figures dialog box, ensure that
Figure is selected in the Caption label box.
Click OK.
Creating a List of Tables
Follow the same process but select Table in the Caption label box.
Updating a List of Figures/Tables
The List of Figures can be updated as more captions are added in the document.
Right-click on the list of figures and click Update Field.
In the resulting box select Update entire table, then OK.
15 Cross-referencing
Cross-referencing to figures/tables
When referring to a figure in the text of your report, you need to ensure that the figure number in the
text always refers to the correct figure. This can be achieved by cross-referencing.

Updated 22 May 2014
In the References tab in the the Captions group,
click on Cross-reference.
Under Reference type select Figure (or
whichever reference type you are referring to).
Under Insert reference to select Only label and
number if you only want to refer to the figure
number.
All the figure numbers and captions that you
have in your document will be listed in the For
Which Caption box – select the figure you are
referring to. Click Insert, then Cancel.
The words “Figure 1” will now be inserted into the text as a hyperlink.
15.1.1 Updating cross-references
When you insert or delete figures and captions, you need to update cross-references by
selecting all then right-clicking and updating the field (see “Updating all captions”).
Cross-referencing to page numbers
When referring to a particular page number in the text of your document, it is best to cross-reference
to that page number so that if the page numbers change the numbers in the cross-references can be
automatically updated.
To cross-reference to a page number, you need to cross-reference to a particular object or
heading on that page, then you can insert the number of that page as the cross-reference.
Cross-referencing to parts of pages
You may cross-reference to a Numbered item, Heading, Bookmark, Footnote/EndNote,
Equation, Figure, Plate or Table.
15.3.1 Cross-referencing to a portion of text
If you want to refer to a particular portion of text which does not fall into one of the
categories in 15.3, you will need to format it as a heading so that it can be identified when you
insert the cross-reference.
The heading style can be formatted so that the text looks the same as normal text if you wish.
15.3.2 Cross-referencing to a page number on which particular text appears
Format the relevant text to which you will be cross-referencing as a heading (e.g. Heading 4).
Place your cursor where you want to insert the cross-reference to a page number – you will
need to type in words that will precede the page number.
On the Insert tab, click on Cross-reference.
Updated 22 May 2014
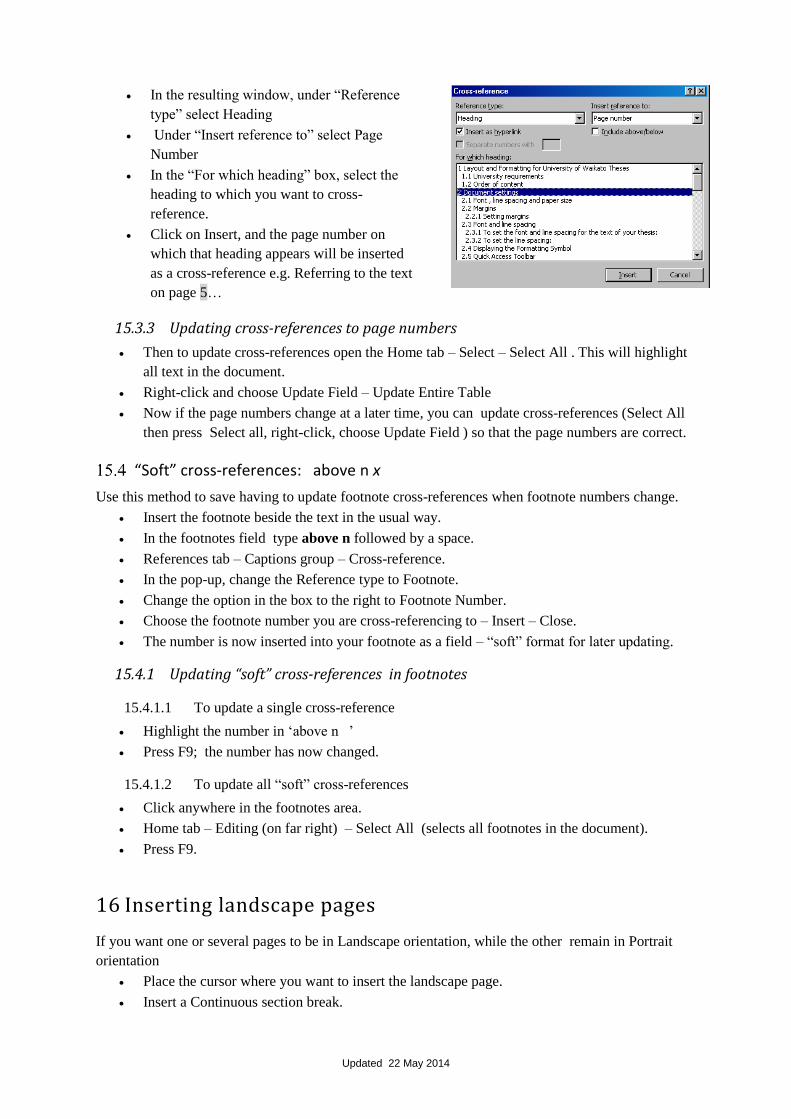
In the resulting window, under “Reference
type” select Heading
Under “Insert reference to” select Page
Number
In the “For which heading” box, select the
heading to which you want to cross-
reference.
Click on Insert, and the page number on
which that heading appears will be inserted
as a cross-reference e.g. Referring to the text
on page 5…
15.3.3 Updating cross-references to page numbers
Then to update cross-references open the Home tab – Select – Select All . This will highlight
all text in the document.
Right-click and choose Update Field – Update Entire Table
Now if the page numbers change at a later time, you can update cross-references (Select All
then press Select all, right-click, choose Update Field ) so that the page numbers are correct.
“Soft” cross-references: above n x
Use this method to save having to update footnote cross-references when footnote numbers change.
Insert the footnote beside the text in the usual way.
In the footnotes field type above n followed by a space.
References tab – Captions group – Cross-reference.
In the pop-up, change the Reference type to Footnote.
Change the option in the box to the right to Footnote Number.
Choose the footnote number you are cross-referencing to – Insert – Close.
The number is now inserted into your footnote as a field – “soft” format for later updating.
15.4.1 Updating “soft” cross-references in footnotes
15.4.1.1 To update a single cross-reference
Highlight the number in ‘above n x’
Press F9; the number has now changed.
15.4.1.2 To update all “soft” cross-references
Click anywhere in the footnotes area.
Home tab – Editing (on far right) – Select All (selects all footnotes in the document).
Press F9.
16 Inserting landscape pages
If you want one or several pages to be in Landscape orientation, while the other remain in Portrait
orientation
Place the cursor where you want to insert the landscape page.
Insert a Continuous section break.

Updated 22 May 2014
Press Enter after the section break to open up a blank line.
Insert another Continuous section break.
Place the cursor between the two section breaks.
On the Page Layout tab, in the Page Setup group, click the arrow under Orientation and select
Landscape.
A new empty landscape page is inserted while all other pages will remain in portrait mode.
Word automatically changes section breaks to Next Page breaks once orientation is changed – if you
initb lly used Next Page section breaks, extra pages would be added.
Modifying the position of page numbers on landscaped pages
Once the landscape page has been inserted, the page number will still appear at the bottom. For
consistent numbering when the document is printed, the page number needs to appear on the left of
the landscape page. To do this, you need to break the links between the headers and footers on the
landscape page and the portrait pages preceding and following it, then change the position of the page
number on the landscape page.
16.1.1 Disconnecting landscape pages
On the first landscape page, double-
click in the header to open it.
Click on Link to Previous at the top of
the screen to turn it off.
Double-click in the footer to open it.
Click on the Link to Previous at the top of the screen to turn it off.
Now the header and footer on the landscape page are disconnected from the previous portrait
page.
On the first portrait page after your landscape page/s, follow the same process so that the
header and footer on this page are disconnected from the preceding landscape page.
16.1.2 Checking the margins
Check the margins of your landscape page/s to
ensure that they are correct for binding:
Place your cursor on the first landscape page.
On the Page Layout tab, click on the arrow below
Margins.
Check that the margins are as in this image.
Updated 22 May 2014
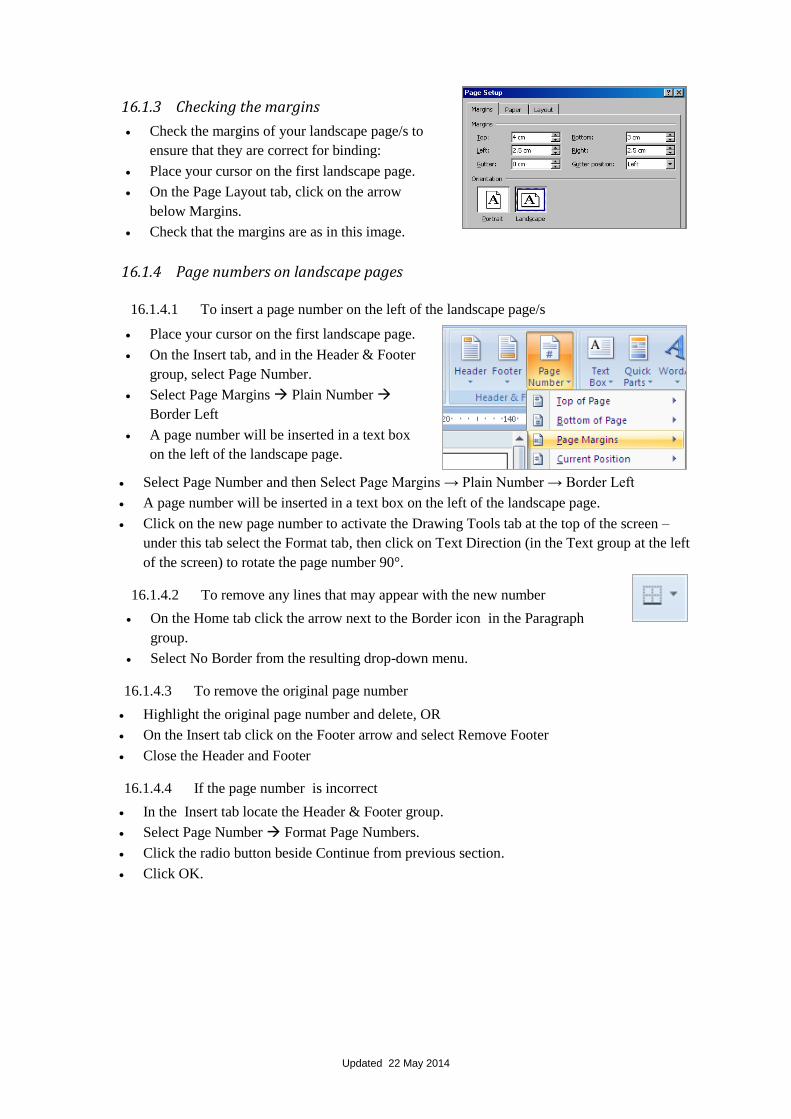
16.1.3 Checking the margins
Check the margins of your landscape page/s to
ensure that they are correct for binding:
Place your cursor on the first landscape page.
On the Page Layout tab, click on the arrow
below Margins.
Check that the margins are as in this image.
16.1.4 Page numbers on landscape pages
16.1.4.1 To insert a page number on the left of the landscape page/s
Place your cursor on the first landscape page.
On the Insert tab, and in the Header & Footer
group, select Page Number.
Select Page Margins Plain Number
Border Left
A page number will be inserted in a text box
on the left of the landscape page.
Select Page Number and then Select Page Margins → Plain Number → Border Left
A page number will be inserted in a text box on the left of the landscape page.
Click on the new page number to activate the Drawing Tools tab at the top of the screen –
under this tab select the Format tab, then click on Text Direction (in the Text group at the left
of the screen) to rotate the page number 90°.
16.1.4.2 To remove any lines that may appear with the new number
On the Home tab click the arrow next to the Border icon in the Paragraph
group.
Select No Border from the resulting drop-down menu.
16.1.4.3 To remove the original page number
Highlight the original page number and delete, OR
On the Insert tab click on the Footer arrow and select Remove Footer
Close the Header and Footer
16.1.4.4 If the page number is incorrect
In the Insert tab locate the Header & Footer group.
Select Page Number Format Page Numbers.
Click the radio button beside Continue from previous section.
Click OK.

Updated 22 May 2014
Moving the header to the right hand margin of a landscape page
Disconnect the landscape page from the portrait pages preceding and following it.
With the header and footer activated, insert a text box anywhere on the page.
Copy the header and paste it into the text box.
From the Drawing Tools – Format tab, click on Text Direction to swing the text around in the
right direction.
Adjust the size and shape of the text box and move it to the right hand margin so that it
appears as a header would on a portrait page.
Format the text box so that the lines are not visible.
Delete the original header on the landscape page.
17 Manual formatting of lists (not a Table of Contents)
It is possible to manually create lists where numbers are uniformly aligned, such as in this example.
Setting up a list
To create such a list, you need to set tabs so that
all numbers appear in the same position on the
right hand side of the page, or wherever you
choose to put them. Enter the information with a
single tab between the text and each number, as
shown here.
Select the whole list, right-click and then select
Paragraph.
In the resulting Paragraph box, click on Tabs.
In the Tabs window, set the Tab stop position
according to where you want numbers to appear in
relation to the ruler at the top of the screen.
Select the Leader you want to appear between the text
and numbers.
Click OK. All numbers will appear in line as in the
first example above.
Updated 22 May 2014
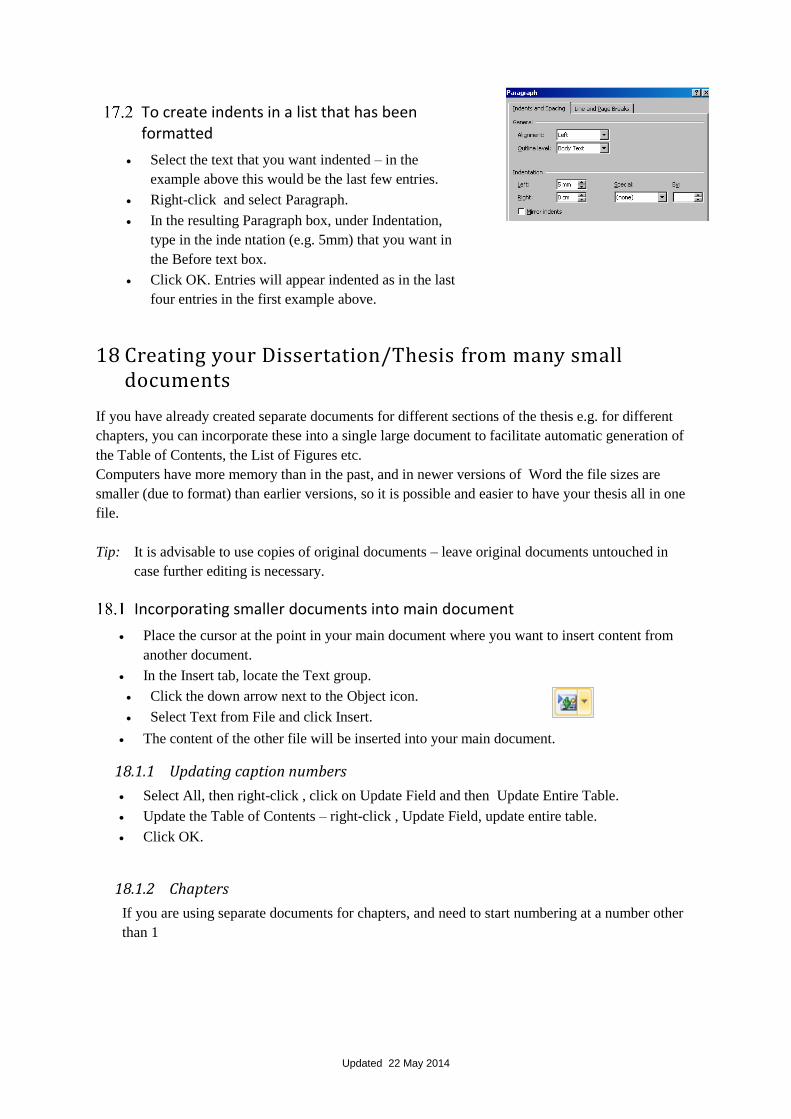
To create indents in a list that has been formatted
Select the text that you want indented – in the
example above this would be the last few entries.
Right-click and select Paragraph.
In the resulting Paragraph box, under Indentation,
type in the inde ntation (e.g. 5mm) that you want in
the Before text box.
Click OK. Entries will appear indented as in the last
four entries in the first example above.
18 Creating your Dissertation/Thesis from many small documents
If you have already created separate documents for different sections of the thesis e.g. for different
chapters, you can incorporate these into a single large document to facilitate automatic generation of
the Table of Contents, the List of Figures etc.
Computers have more memory than in the past, and in newer versions of Word the file sizes are
smaller (due to format) than earlier versions, so it is possible and easier to have your thesis all in one
file.
Tip: It is advisable to use copies of original documents – leave original documents untouched in
case further editing is necessary.
Incorporating smaller documents into main document
Place the cursor at the point in your main document where you want to insert content from
another document.
In the Insert tab, locate the Text group.
Click the down arrow next to the Object icon.
Select Text from File and click Insert.
The content of the other file will be inserted into your main document.
18.1.1 Updating caption numbers
Select All, then right-click , click on Update Field and then Update Entire Table.
Update the Table of Contents – right-click , Update Field, update entire table.
Click OK.
18.1.2 Chapters
If you are using separate documents for chapters, and need to start numbering at a number other
than 1
Updated 22 May 2014
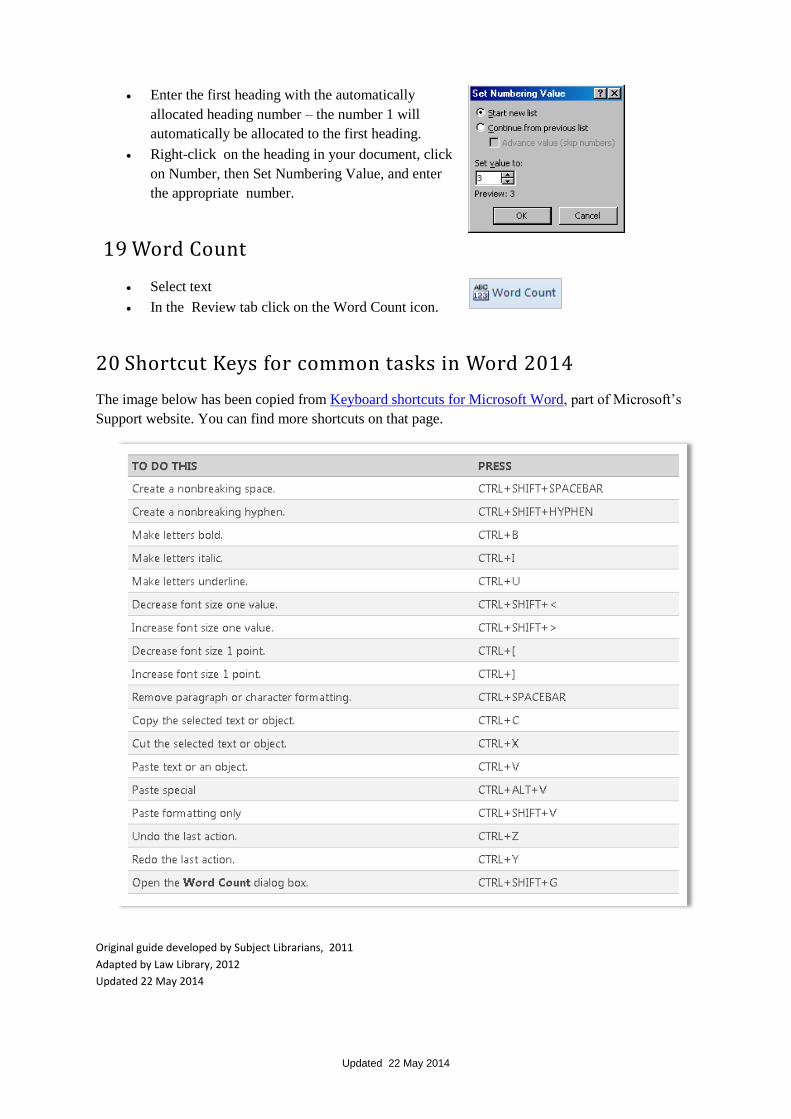
Enter the first heading with the automatically
allocated heading number – the number 1 will
automatically be allocated to the first heading.
Right-click on the heading in your document, click
on Number, then Set Numbering Value, and enter
the appropriate number.
19 Word Count
Select text
In the Review tab click on the Word Count icon.
20 Shortcut Keys for common tasks in Word 2014
The image below has been copied from Keyboard shortcuts for Microsoft Word, part of Microsoft’s
Support website. You can find more shortcuts on that page.
Original guide developed by Subject Librarians, 2011
Adapted by Law Library, 2012
Updated 22 May 2014


![[MS-OFFDI]: Microsoft Office File Format Documentation … · 2017-09-19 · Microsoft Word 97 Microsoft Word 2000 Microsoft Word 2002 Microsoft Office Word 2003 Microsoft Office](https://img.pdfslide.us/doc/110x75/5edde022ad6a402d66691993/ms-offdi-microsoft-office-file-format-documentation-2017-09-19-microsoft-word.jpg)


![[MS-OFFDI]: Microsoft Office File Format Documentation ...MS... · Microsoft PowerPoint 2010 Microsoft PowerPoint 2013 Microsoft Word 97 Microsoft Word 2000 Microsoft Word 2002 Microsoft](https://img.pdfslide.us/doc/110x75/5ea61160271e716b297d501f/ms-offdi-microsoft-office-file-format-documentation-ms-microsoft-powerpoint.jpg)