Embed Size (px)
Citation preview

Microsoft Hyper-V and Nexus 1000V Switch
C H A P T E R 2
Microsoft Private Cloud ImplementationIn this section, we explore the implementation of a Microsoft Private Cloud solution through integrating the Microsoft Cloud OS into UCS. UCS is a computing systems comprising computing hardware, compute switching fabric, and virtualization and management software. These resources are integrated into a cohesive system that can be managed as an entity.
This provides unique benefits in the data center, such as:
• Hardware virtualization for streamlined deployment
• Ease of Cabling
• Single point of management for the compute resources (including blades, chassis and compute switching fabric)
• High Availability (including 1:N redundancy if desired)
Compute resources in the System Under Test included:
• 2 Cisco UCS 5108 Chassis
• 2 Cisco UCS 2208XP IOMs per chassis
• 2 Cisco UCS B200 M2 Blade Series Serves per chassis
• 2 Cisco UCS 6248UP Fabric Interconnects
The Cloud OS involves the simultaneous operation of several enterprise technologies including:
• UCS SAN Booting
• Windows Server 2012
• SQL Server 2012
• System Center 2012
Refer to the VMWare vSphere with Operations Management website for additional details on VMWare vSphere.
Refer to the Microsoft Private Cloud-Making it Real white paper to learn more about Microsoft’s strategic and technical differentiation.
SAN ImplementationThe B200 M2 Series server blades in UCS are configured to boot from SAN. UCS has two Fibre Channel port channels that connect Fabric A and Fabric B to two MDS switches. The MDS switches connect to a NetApp storage device.
2-1 for Microsoft Hyper-V within a VMDC Architecture

Chapter 2 Microsoft Private Cloud Implementation SAN Implementation
Details on the Service Profile creation for a server Hyper-V on UCS are found Figure 29 of the Deployment Guide.
Boot from SAN ProceduresBefore starting, review the Common Errors during Windows SAN Boot Install on NetApp Storage Cisco internal document for lessons learned about the Windows SAN boot install.
Step 1 Shutdown all but one path to the boot logical unit number (LUN)
Microsoft supports only one path to the boot LUN when installing the OS. The Fibre Channel port channel (FC Po10) that connects to the MDS switches was disabled in UCS Manager (UCSM). All but one member of the second Fibre Channel port channel (FC Po20) was disabled.
Step 2 Map to fiber over Ethernet network interface card (fNIC) drivers and ISO image (Optional)
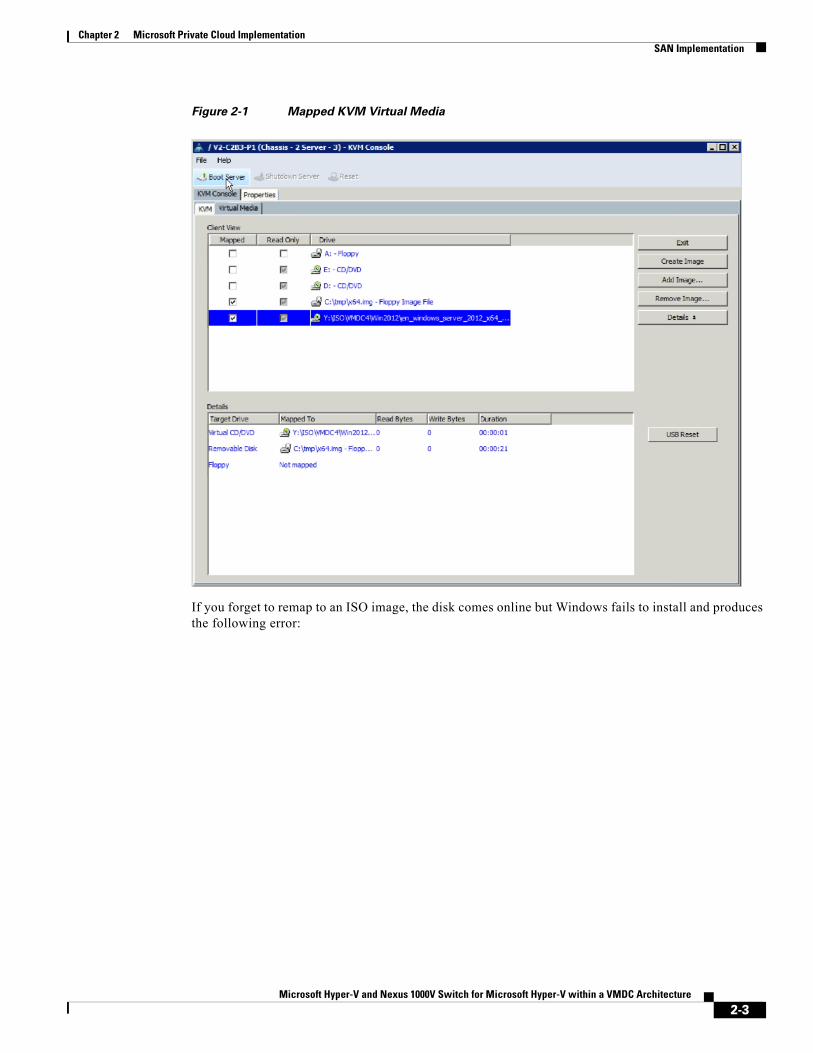
During OS installation, fNIC drivers must be installed in order to scan for the SAN boot LUN. To do this, map to the driver location using the UCS KVM console connection Virtual Media tab before starting the installation, and map to the ISO location of the OS to be installed.
As shown in Figure 2-1, in order to map to more than one image at a time, the FNIC drivers were copied locally (C:tmp in the Drive column). The ISO OS installation image was on a mapped drive to a network share.
Instead of mapping to both images at the same time, you could map and unmap as needed to go between the fNIC drivers and the OS during installation. However, mapping to multiple images supports not having to unmap and remap during installation.
Figure 2-1 shows a display from the KVM Virtual Media tab for what was mapped.
2-2Microsoft Hyper-V and Nexus 1000V Switch for Microsoft Hyper-V within a VMDC Architecture
Chapter 2 Microsoft Private Cloud Implementation SAN Implementation
Figure 2-1 Mapped KVM Virtual Media
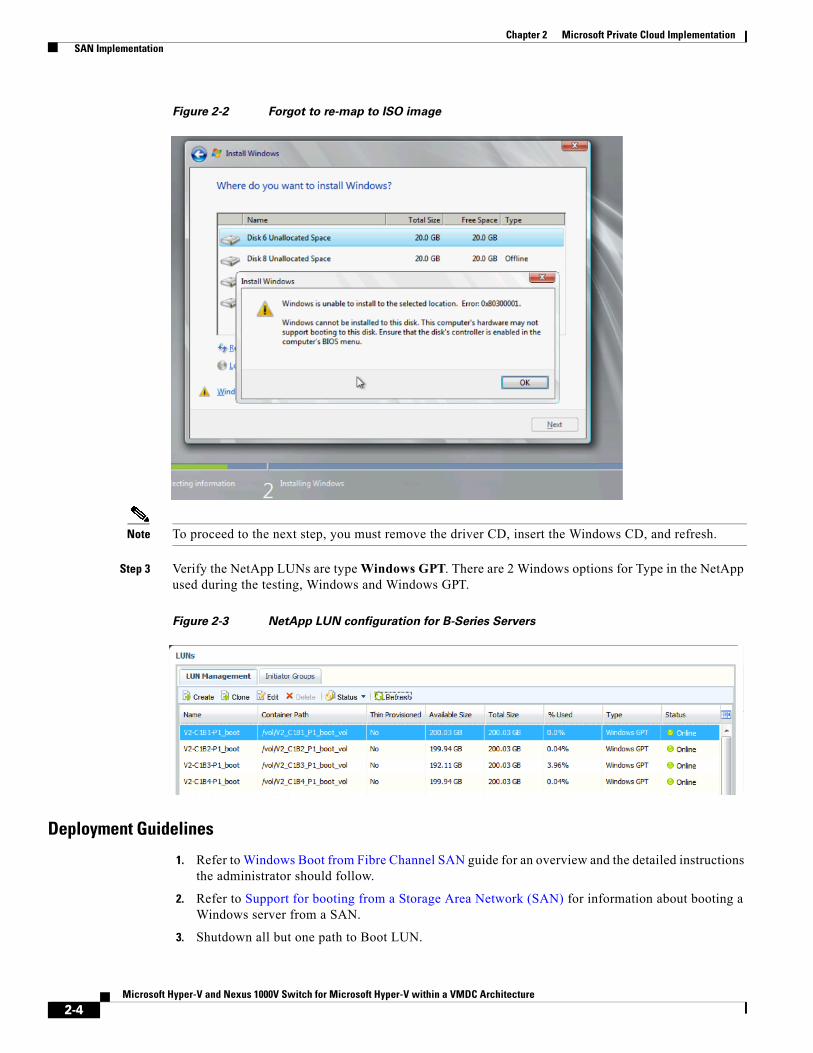
If you forget to remap to an ISO image, the disk comes online but Windows fails to install and produces the following error:
2-3Microsoft Hyper-V and Nexus 1000V Switch for Microsoft Hyper-V within a VMDC Architecture
Chapter 2 Microsoft Private Cloud Implementation SAN Implementation
Figure 2-2 Forgot to re-map to ISO image
Note To proceed to the next step, you must remove the driver CD, insert the Windows CD, and refresh.
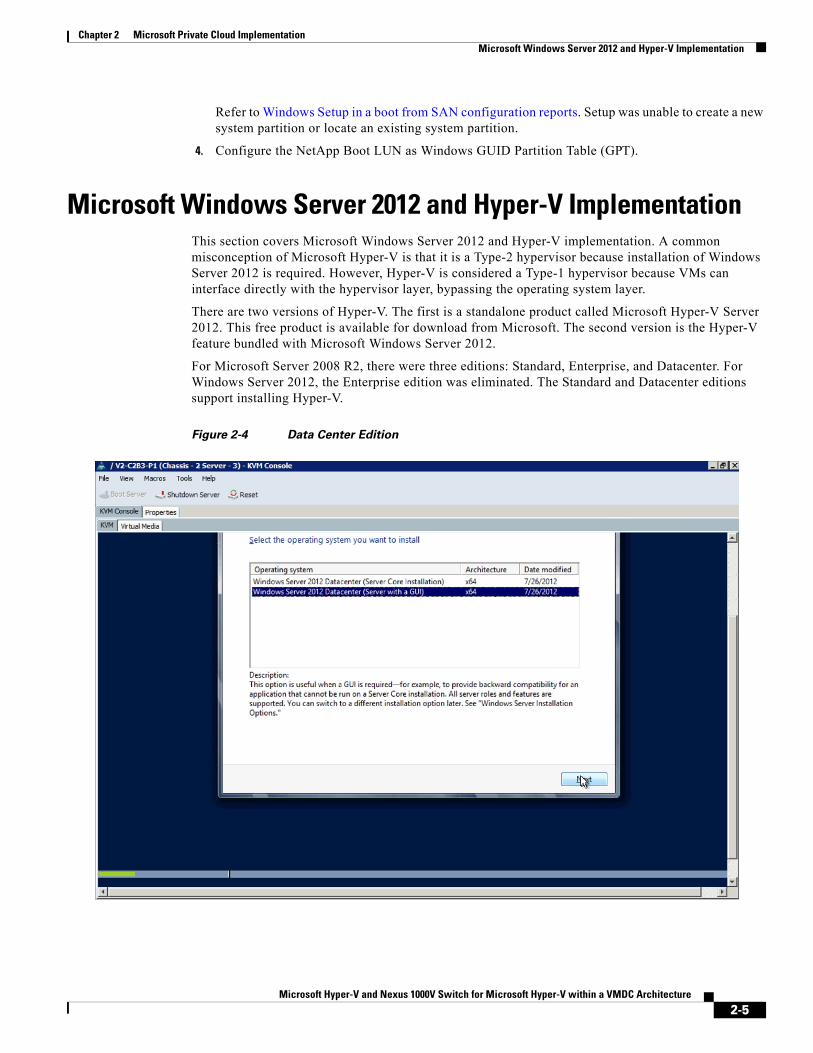
Step 3 Verify the NetApp LUNs are type Windows GPT. There are 2 Windows options for Type in the NetApp used during the testing, Windows and Windows GPT.
Figure 2-3 NetApp LUN configuration for B-Series Servers
Deployment Guidelines
1. Refer to Windows Boot from Fibre Channel SAN guide for an overview and the detailed instructions the administrator should follow.
2. Refer to Support for booting from a Storage Area Network (SAN) for information about booting a Windows server from a SAN.
3. Shutdown all but one path to Boot LUN.
2-4Microsoft Hyper-V and Nexus 1000V Switch for Microsoft Hyper-V within a VMDC Architecture
Chapter 2 Microsoft Private Cloud Implementation Microsoft Windows Server 2012 and Hyper-V Implementation
Refer to Windows Setup in a boot from SAN configuration reports. Setup was unable to create a new system partition or locate an existing system partition.
4. Configure the NetApp Boot LUN as Windows GUID Partition Table (GPT).
Microsoft Windows Server 2012 and Hyper-V ImplementationThis section covers Microsoft Windows Server 2012 and Hyper-V implementation. A common misconception of Microsoft Hyper-V is that it is a Type-2 hypervisor because installation of Windows Server 2012 is required. However, Hyper-V is considered a Type-1 hypervisor because VMs can interface directly with the hypervisor layer, bypassing the operating system layer.
There are two versions of Hyper-V. The first is a standalone product called Microsoft Hyper-V Server 2012. This free product is available for download from Microsoft. The second version is the Hyper-V feature bundled with Microsoft Windows Server 2012.
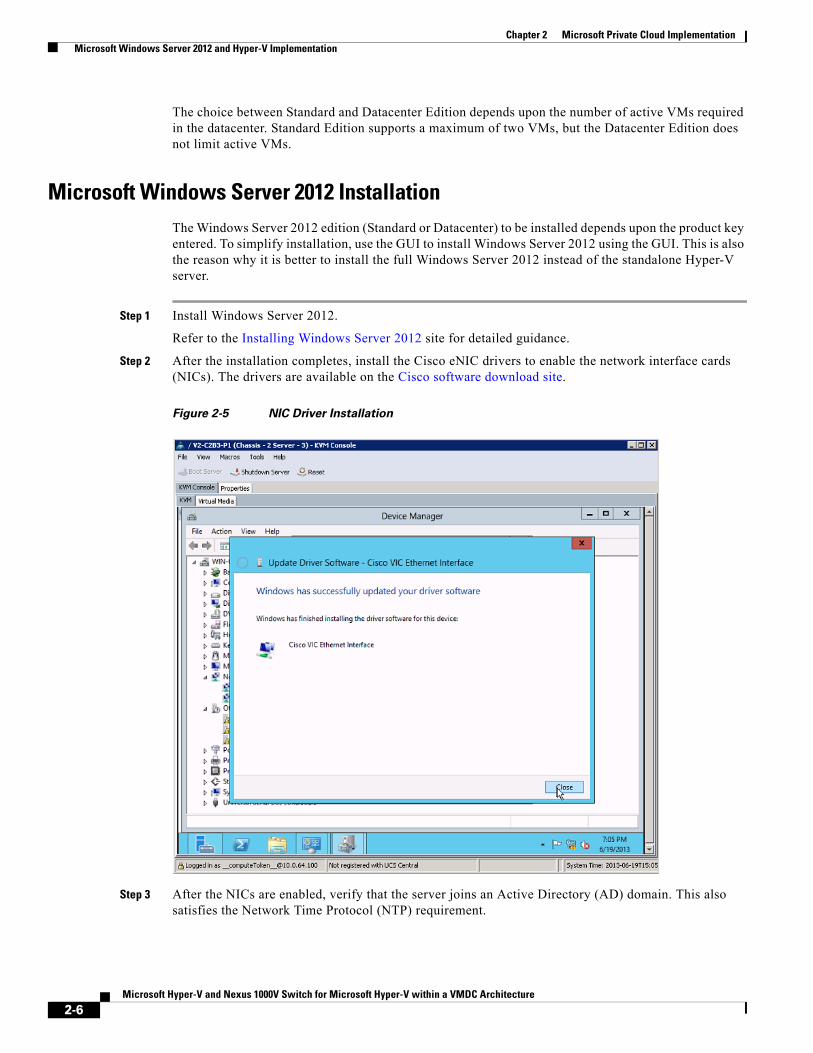
For Microsoft Server 2008 R2, there were three editions: Standard, Enterprise, and Datacenter. For Windows Server 2012, the Enterprise edition was eliminated. The Standard and Datacenter editions support installing Hyper-V.
Figure 2-4 Data Center Edition
2-5Microsoft Hyper-V and Nexus 1000V Switch for Microsoft Hyper-V within a VMDC Architecture
Chapter 2 Microsoft Private Cloud Implementation Microsoft Windows Server 2012 and Hyper-V Implementation
The choice between Standard and Datacenter Edition depends upon the number of active VMs required in the datacenter. Standard Edition supports a maximum of two VMs, but the Datacenter Edition does not limit active VMs.
Microsoft Windows Server 2012 InstallationThe Windows Server 2012 edition (Standard or Datacenter) to be installed depends upon the product key entered. To simplify installation, use the GUI to install Windows Server 2012 using the GUI. This is also the reason why it is better to install the full Windows Server 2012 instead of the standalone Hyper-V server.
Step 1 Install Windows Server 2012.
Refer to the Installing Windows Server 2012 site for detailed guidance.
Step 2 After the installation completes, install the Cisco eNIC drivers to enable the network interface cards (NICs). The drivers are available on the Cisco software download site.
Figure 2-5 NIC Driver Installation
Step 3 After the NICs are enabled, verify that the server joins an Active Directory (AD) domain. This also satisfies the Network Time Protocol (NTP) requirement.
2-6Microsoft Hyper-V and Nexus 1000V Switch for Microsoft Hyper-V within a VMDC Architecture
Chapter 2 Microsoft Private Cloud Implementation Microsoft Windows Server 2012 and Hyper-V Implementation
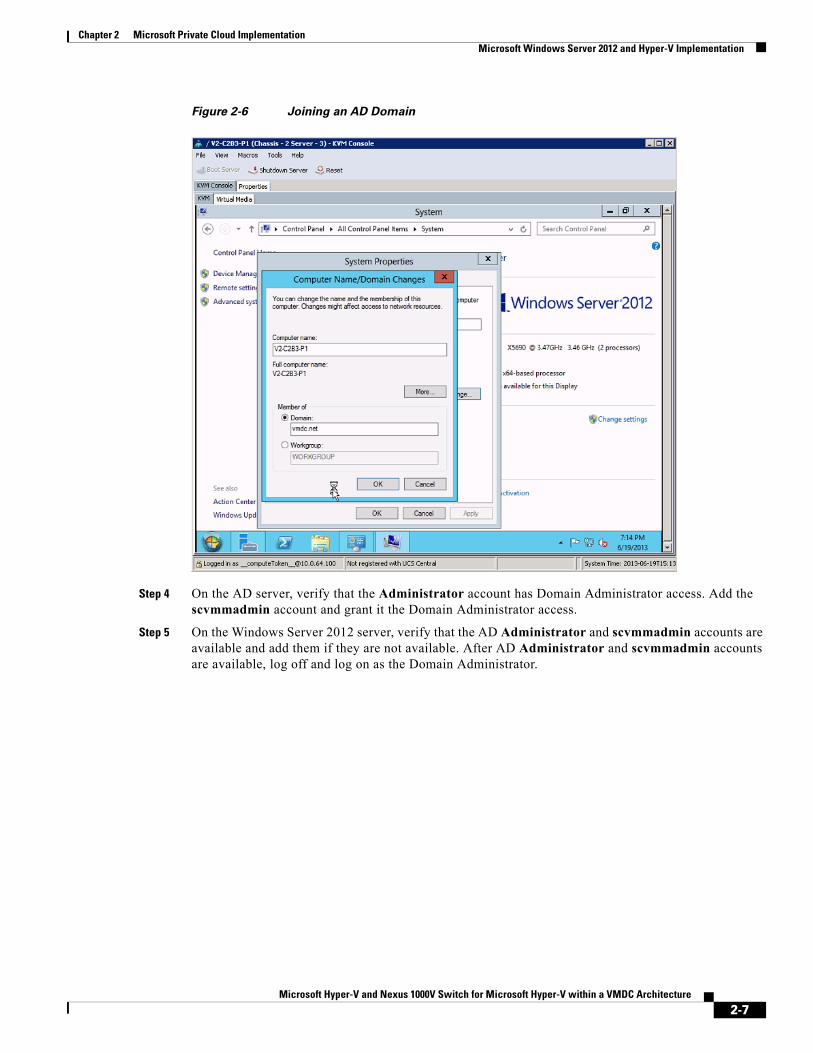
Figure 2-6 Joining an AD Domain
Step 4 On the AD server, verify that the Administrator account has Domain Administrator access. Add the scvmmadmin account and grant it the Domain Administrator access.
Step 5 On the Windows Server 2012 server, verify that the AD Administrator and scvmmadmin accounts are available and add them if they are not available. After AD Administrator and scvmmadmin accounts are available, log off and log on as the Domain Administrator.
2-7Microsoft Hyper-V and Nexus 1000V Switch for Microsoft Hyper-V within a VMDC Architecture
Chapter 2 Microsoft Private Cloud Implementation Microsoft Windows Server 2012 and Hyper-V Implementation
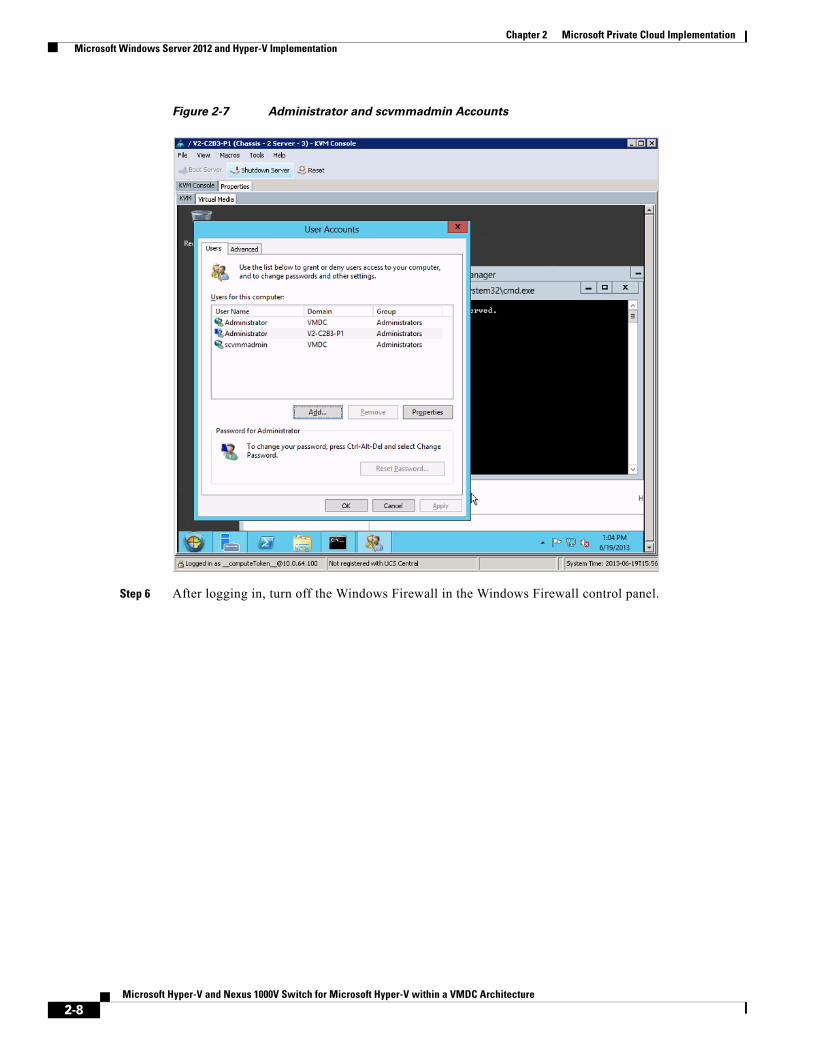
Figure 2-7 Administrator and scvmmadmin Accounts
Step 6 After logging in, turn off the Windows Firewall in the Windows Firewall control panel.
2-8Microsoft Hyper-V and Nexus 1000V Switch for Microsoft Hyper-V within a VMDC Architecture
Chapter 2 Microsoft Private Cloud Implementation Microsoft Windows Server 2012 and Hyper-V Implementation
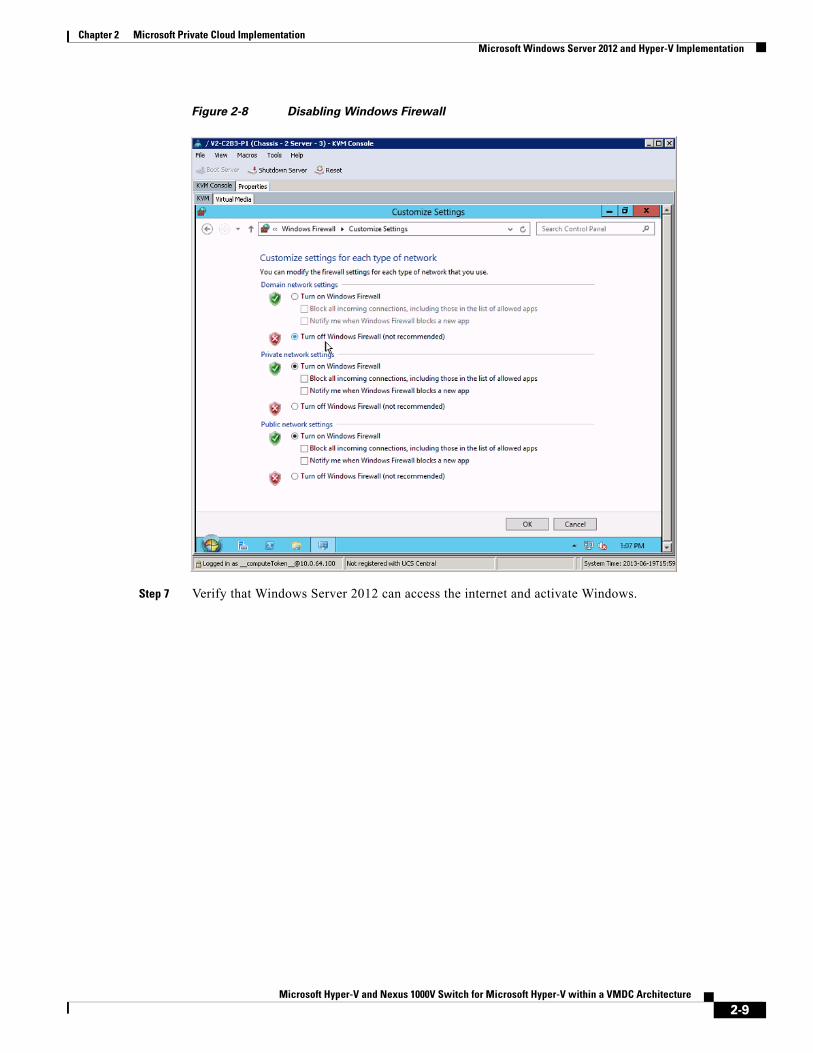
Figure 2-8 Disabling Windows Firewall
Step 7 Verify that Windows Server 2012 can access the internet and activate Windows.
2-9Microsoft Hyper-V and Nexus 1000V Switch for Microsoft Hyper-V within a VMDC Architecture
Chapter 2 Microsoft Private Cloud Implementation Microsoft Windows Server 2012 and Hyper-V Implementation
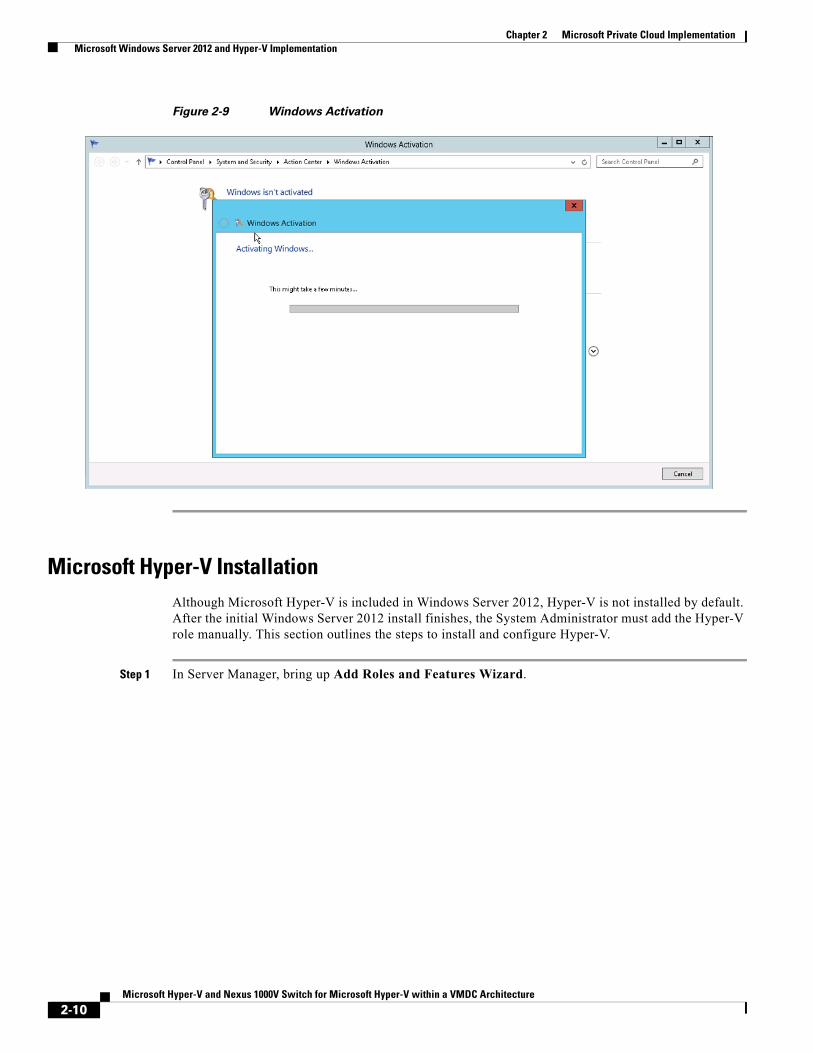
Figure 2-9 Windows Activation
Microsoft Hyper-V InstallationAlthough Microsoft Hyper-V is included in Windows Server 2012, Hyper-V is not installed by default. After the initial Windows Server 2012 install finishes, the System Administrator must add the Hyper-V role manually. This section outlines the steps to install and configure Hyper-V.
Step 1 In Server Manager, bring up Add Roles and Features Wizard.
2-10Microsoft Hyper-V and Nexus 1000V Switch for Microsoft Hyper-V within a VMDC Architecture
Chapter 2 Microsoft Private Cloud Implementation Microsoft Windows Server 2012 and Hyper-V Implementation
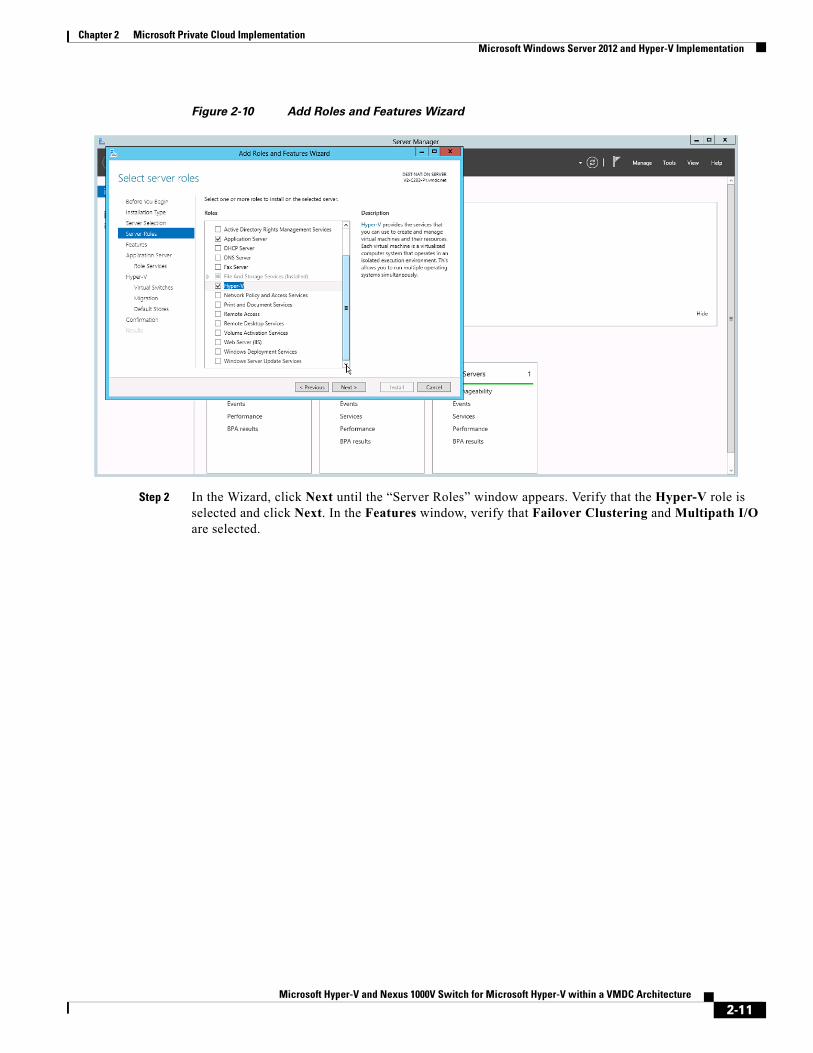
Figure 2-10 Add Roles and Features Wizard
Step 2 In the Wizard, click Next until the “Server Roles” window appears. Verify that the Hyper-V role is selected and click Next. In the Features window, verify that Failover Clustering and Multipath I/O are selected.
2-11Microsoft Hyper-V and Nexus 1000V Switch for Microsoft Hyper-V within a VMDC Architecture
Chapter 2 Microsoft Private Cloud Implementation Microsoft Windows Server 2012 and Hyper-V Implementation
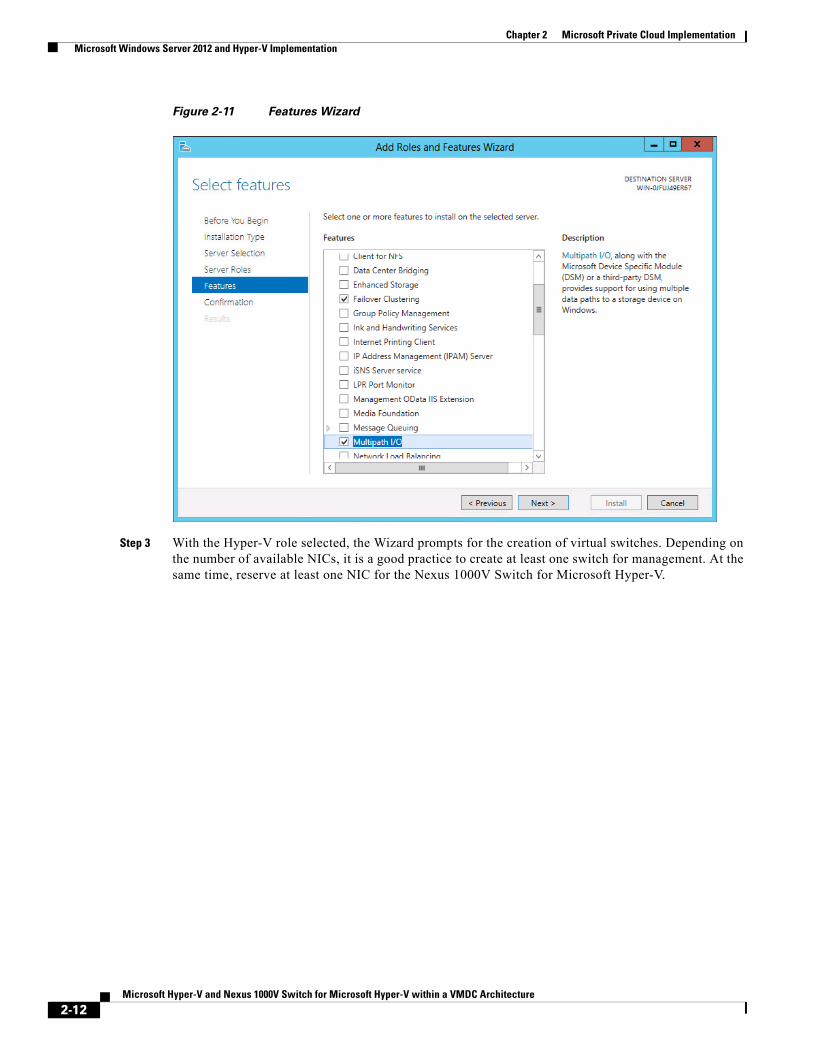
Figure 2-11 Features Wizard
Step 3 With the Hyper-V role selected, the Wizard prompts for the creation of virtual switches. Depending on the number of available NICs, it is a good practice to create at least one switch for management. At the same time, reserve at least one NIC for the Nexus 1000V Switch for Microsoft Hyper-V.
2-12Microsoft Hyper-V and Nexus 1000V Switch for Microsoft Hyper-V within a VMDC Architecture
Chapter 2 Microsoft Private Cloud Implementation Microsoft Windows Server 2012 and Hyper-V Implementation
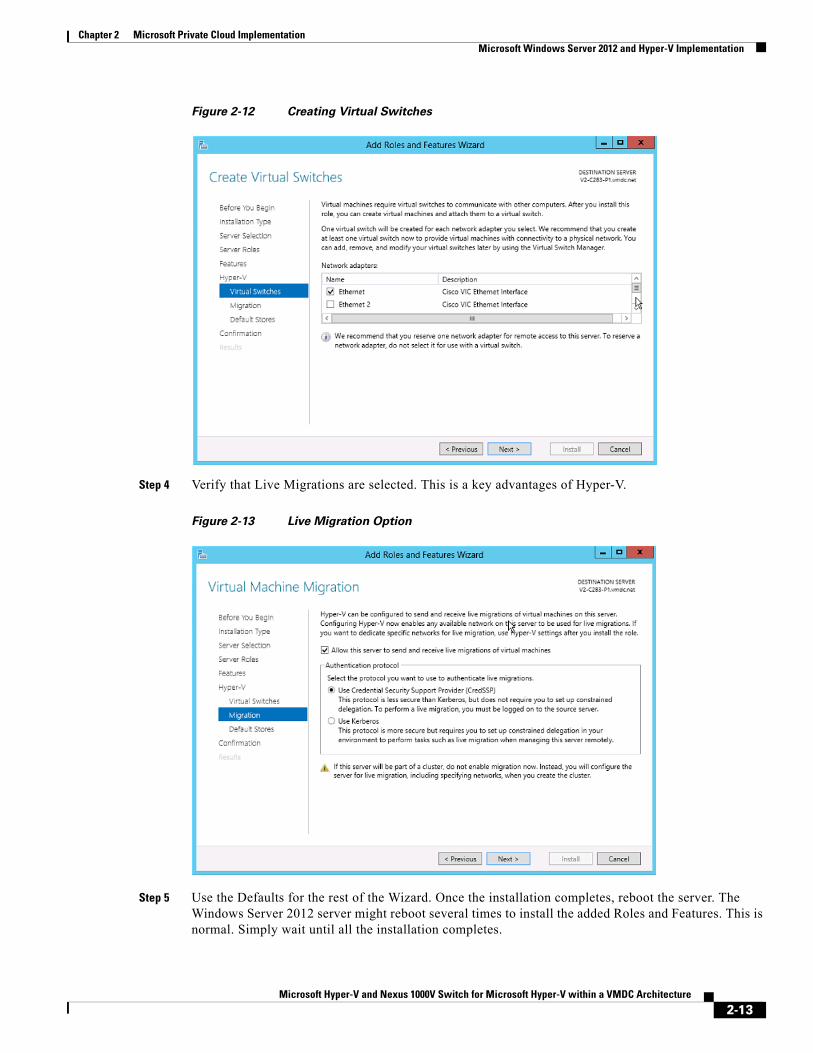
Figure 2-12 Creating Virtual Switches
Step 4 Verify that Live Migrations are selected. This is a key advantages of Hyper-V.
Figure 2-13 Live Migration Option
Step 5 Use the Defaults for the rest of the Wizard. Once the installation completes, reboot the server. The Windows Server 2012 server might reboot several times to install the added Roles and Features. This is normal. Simply wait until all the installation completes.
2-13Microsoft Hyper-V and Nexus 1000V Switch for Microsoft Hyper-V within a VMDC Architecture

Chapter 2 Microsoft Private Cloud Implementation Microsoft Windows Server 2012 and Hyper-V Implementation
Note Run Windows Update to ensure that all installed components are running the latest versions.
Figure 2-14 Windows Update
Step 6 Repeat the above procedures for all Hyper-V hosts.
SQL Server 2012 Installation Before setting up Microsoft System Center 2012, we highly recommend that the System Administrator sets up a dedicated Microsoft SQL Server 2012 instance. Although System Center can install SQL Express, it is prudent to use the full version of SQL Server because it enables users to back up the database or set up MSCS clustering, which supports easy database recovery if a disaster occurs.
Step 1 Installing the SQL Server is straightforward. Unless MSCS clustering is required, no Windows Server 2012 customization is needed. Simply install Windows Server 2012 (either Standard or Enterprise) and then install SQL Server 2012 onto Windows Server 2012. After installation finishes, run Windows Update to obtain the latest patches and updates.
Refer to Install SQL Server 2012 from the Installation Wizard guide for information on installing SQL server.
Step 2 Verify that all SQL Server services are running and bring up the SQL Server Configuration Manager.
2-14Microsoft Hyper-V and Nexus 1000V Switch for Microsoft Hyper-V within a VMDC Architecture

Chapter 2 Microsoft Private Cloud Implementation Microsoft Windows Server 2012 and Hyper-V Implementation
Figure 2-15 SQL Server Configuration Manager
Step 3 Add, view, delete, or perform maintenance on any databases using SQL Server Management Studio.
Figure 2-16 SQL Server Management Studio
Note The necessary databases are automatically created when any System Center 2012 components are installed. No user intervention is necessary.
2-15Microsoft Hyper-V and Nexus 1000V Switch for Microsoft Hyper-V within a VMDC Architecture

Chapter 2 Microsoft Private Cloud Implementation Microsoft Windows Server 2012 and Hyper-V Implementation
Deployment Guidelines
1. If a System Center 2012 component cannot communicate with SQL Server 2012, the problem might be caused by Windows Firewall. Disable Windows Firewall on all servers.
2. We highly recommend making periodic database backups to ensure effective disaster recovery. For more information about database backups, refer to Create a Full Database Backup (SQL Server).
3. Before installing System Center 2012, the System Administrator should create a test database and verify that all servers can connect to that test database.
Microsoft System Center 2012This section describes Microsoft System Center 2012 (MSC) and System Center Virtual Machine Manager 2012 (SCVMM).
Refer to Installing System Center 2010 – Virtual Machine Manager for installation guidance.
SCVMM is part of MSC. Evaluation copies of MSC can be downloaded from the Microsoft System Center 2012 website.
SCVMM can reside on a VM or a physical server. The Administrator can base the decision on preference and the availability of resources.
SCVMM requires a MS-SQL database server and an Active Directory server with the existing setup.
Step 1 Connect the Windows Server 2012 server to the AD domain where the Hyper-V servers resides on.
Step 2 The installation prompts for database information and automatically create a database instance on the server. If no database server is available, MS-SQL Express is automatically installed. After the installation finishes, the Virtual Machine Management (VMM) Console icon should appear on the Windows Server 2012 desktop.
2-16Microsoft Hyper-V and Nexus 1000V Switch for Microsoft Hyper-V within a VMDC Architecture
Chapter 2 Microsoft Private Cloud Implementation Microsoft Windows Server 2012 and Hyper-V Implementation
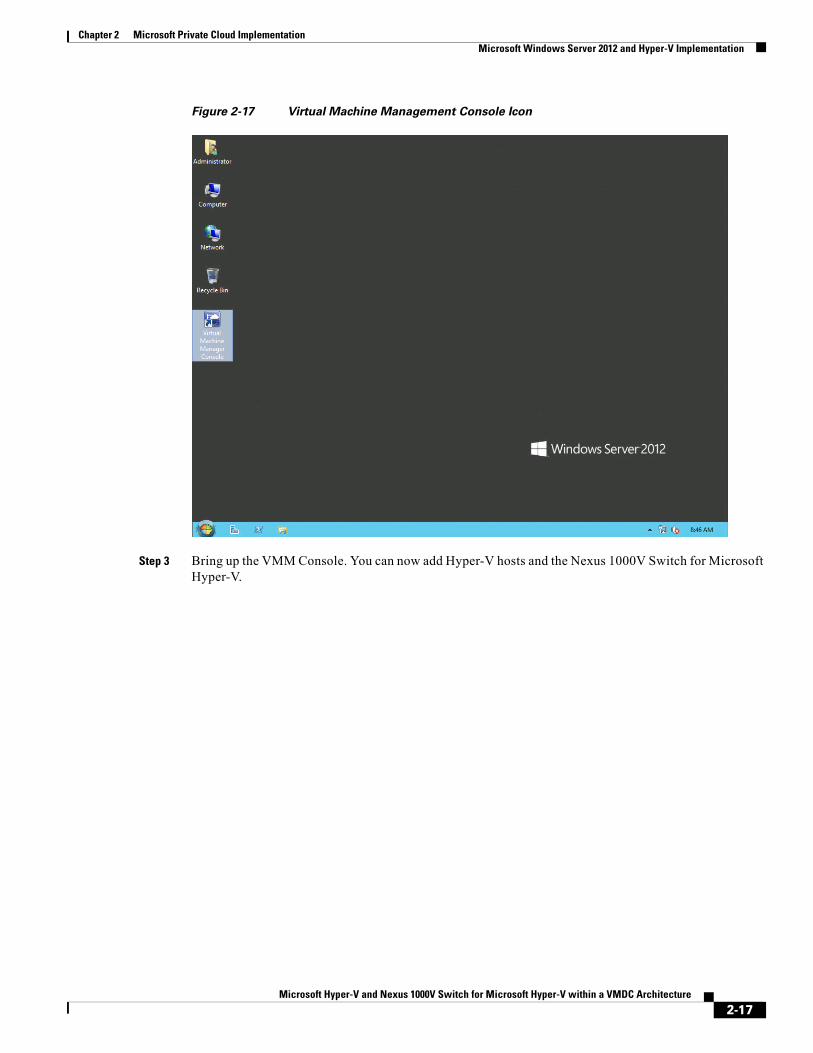
Figure 2-17 Virtual Machine Management Console Icon
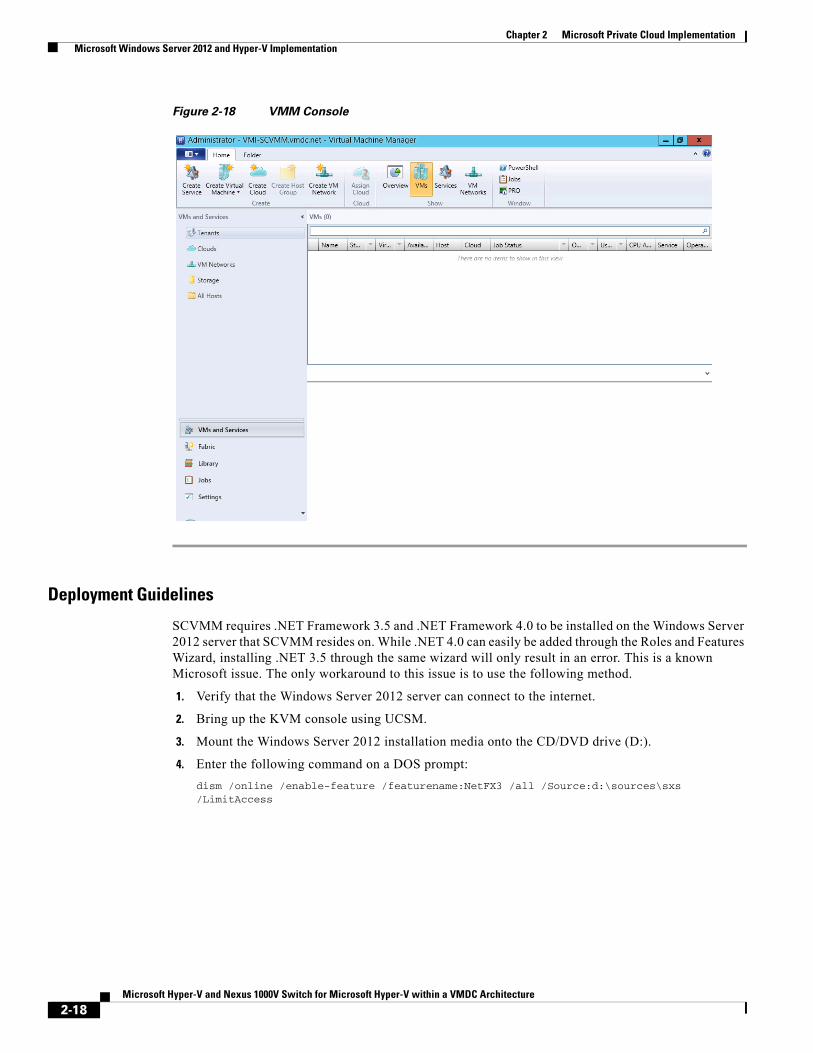
Step 3 Bring up the VMM Console. You can now add Hyper-V hosts and the Nexus 1000V Switch for Microsoft Hyper-V.
2-17Microsoft Hyper-V and Nexus 1000V Switch for Microsoft Hyper-V within a VMDC Architecture
Chapter 2 Microsoft Private Cloud Implementation Microsoft Windows Server 2012 and Hyper-V Implementation
Figure 2-18 VMM Console
Deployment Guidelines
SCVMM requires .NET Framework 3.5 and .NET Framework 4.0 to be installed on the Windows Server 2012 server that SCVMM resides on. While .NET 4.0 can easily be added through the Roles and Features Wizard, installing .NET 3.5 through the same wizard will only result in an error. This is a known Microsoft issue. The only workaround to this issue is to use the following method.
1. Verify that the Windows Server 2012 server can connect to the internet.
2. Bring up the KVM console using UCSM.
3. Mount the Windows Server 2012 installation media onto the CD/DVD drive (D:).
4. Enter the following command on a DOS prompt:
dism /online /enable-feature /featurename:NetFX3 /all /Source:d:\sources\sxs /LimitAccess
2-18Microsoft Hyper-V and Nexus 1000V Switch for Microsoft Hyper-V within a VMDC Architecture

Chapter 2 Microsoft Private Cloud Implementation Virtual Switch Module Installation on Nexus 1110
Figure 2-19 dism Output
5. Repeat the same command and procedure for “asp.net”.
dism /online /enable-feature /featurename:iis-aspnet /all /Source:d:\sources\sxs /LimitAccess
This should satisfy all the prerequisites for SCVMM.
Virtual Switch Module Installation on Nexus 1110 The Cisco Nexus 1000V Switch for Microsoft Hyper-V Distributed Virtual Switch requires a Virtual Supervisor Module (VSM) for control and management. The VSM controls multiple Virtual Ethernet Modules (VEMs) as one logical modular switch. However, while a physical switch uses linecards for Ethernet connectivity, VEMs are logical entities running in software inside physical servers.
In this test setup, VSMs were deployed in a Nexus 1110 Virtual Service Appliance (VSA), instead of in a Windows Server 2012 blade with Hyper-V enabled. From an architectural perspective, the idea is that the VSA resides in the management pod (called “VMI”), colocated with other management servers, rather than with production resources.
The deployment procedure for the Nexus 1000V Switch for Microsoft Hyper-V VSMs (VSBs) for Hyper-V is the same as for VMware deployments.
Refer to Installing VSM on Cisco Cloud Service Platform for additional guidance.
Refer to Cisco Nexus Virtual Services Appliance Release Notes, Release 4.2(1)SP1(5.1a) for more information about new features and caveats.
Deployment Guidelines 1. Use the correct ISO image for Hyper-V.
When creating the VSB, use the correct ISO for Hyper-V, as described in Step 4 of Configuring Virtual Service Blades in the Configuration guide.
2. Use a unique Domain ID in the VSM.
The Domain ID configured in the VSBs must be different than the domain ID used for the Nexus 1110 VSA. If domain IDs are not unique, the secondary VSA continuously reboots and message similar to this is seen:
2013 Jun 1 10:07:53 vsm-1 %KERN-1-SYSTEM_MSG: Dropping received frames from duplicate VSM saddr (0x1010000) - kernel
Note See CSCtq75997 more information.
2-19Microsoft Hyper-V and Nexus 1000V Switch for Microsoft Hyper-V within a VMDC Architecture

Chapter 2 Microsoft Private Cloud Implementation Virtual Switch Module Installation on Nexus 1110
2-20Microsoft Hyper-V and Nexus 1000V Switch for Microsoft Hyper-V within a VMDC Architecture


![SQL Server TSQL [Read-Only] - csuohio.educis.csuohio.edu/~sschung/IST331/SQL_Server_TSQL.pdf · Microsoft SQL Server. SQL Server 2005 Microsoft-SQL Server 2005 is a relational database](https://img.pdfslide.us/doc/110x75/5e202cff7110143c3f45a3d1/sql-server-tsql-read-only-sschungist331sqlservertsqlpdf-microsoft-sql.jpg)


![[MS-SSSO]: SQL Server System Overview...SQL Server 2008, Microsoft SQL Server 2008 R2, Microsoft SQL Server 2012, and Microsoft SQL Server 2014. The specific release is indicated when](https://img.pdfslide.us/doc/110x75/5f77a3d14379c025977fc448/ms-ssso-sql-server-system-overview-sql-server-2008-microsoft-sql-server.jpg)
![Troubleshooting SQL Server com Extended Events [EX] · 4 Considerações Extended Events Introduced in SQL Server 2008 Improved in SQL Server 2012 SQL Trace Deprecated in SQL Server](https://img.pdfslide.us/doc/110x75/5b3c057d7f8b9a5e1f8d1d07/troubleshooting-sql-server-com-extended-events-ex-4-consideracoes-extended.jpg)