Embed Size (px)
Citation preview

Microsoft Dynamics NAV 2015 Financials Certification
Courseware Version 1.0
www.firebrandtraining.com

Microsoft Dynamics NAV 2015 Finance
- 1 -
Introduction to Microsoft Dynamics NAV 2015 User Interface Source: Simplified UX - White Paper - Brian Nielsen (Principal Program Manager), Nikola Kukrika (Software Engineer), Jacob Winther (Senior UX Designer),
July 2014, Microsoft
1. Mandatory Fields Less experienced users often do not know which fields to fill in as a minimum, for example on the customer card, for the customer to be used in processes, such as invoice posting. All the help they get is an error message when they try to complete the process. To help users with this issue, the ShowMandatory property has been introduced. In this context, “mandatory” means that a field is marked with red asterisk to indicate to users that they are expected to fill the field. The user can still leave page without getting error messages if the field is not otherwise validated by business logic.
Microsoft Dynamics NAV 2015 Finance
- 2 -
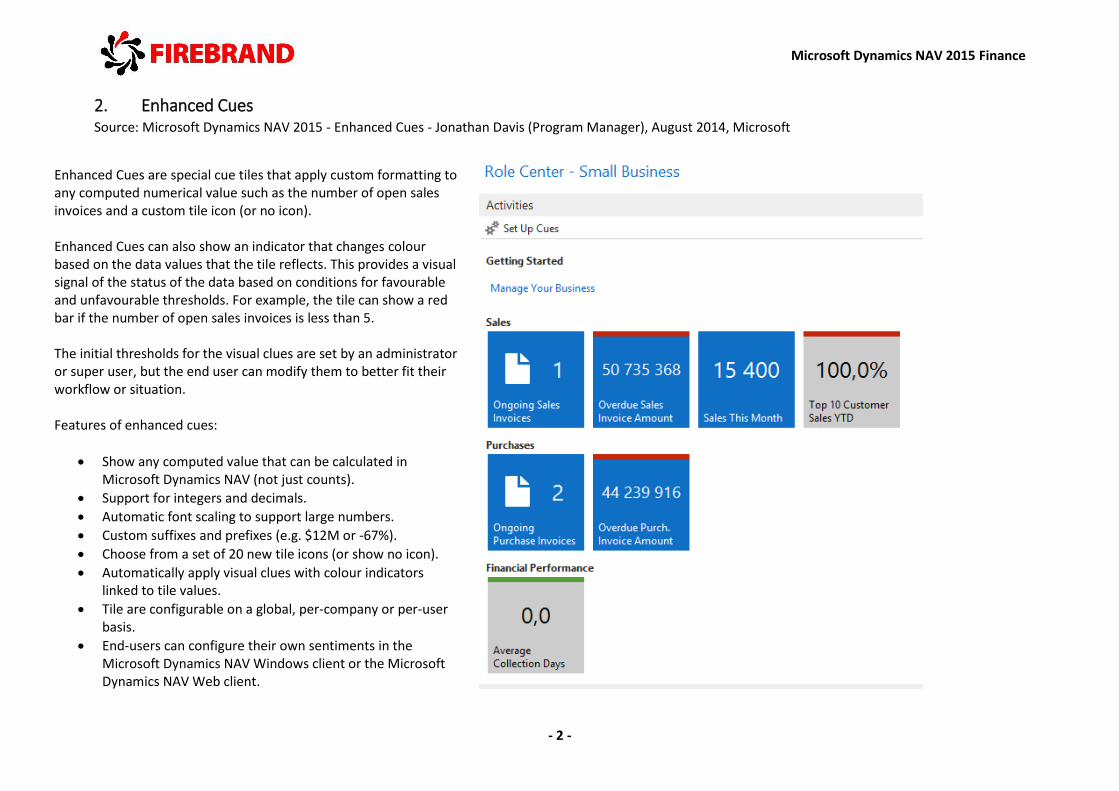
2. Enhanced Cues Source: Microsoft Dynamics NAV 2015 - Enhanced Cues - Jonathan Davis (Program Manager), August 2014, Microsoft
Enhanced Cues are special cue tiles that apply custom formatting to any computed numerical value such as the number of open sales invoices and a custom tile icon (or no icon). Enhanced Cues can also show an indicator that changes colour based on the data values that the tile reflects. This provides a visual signal of the status of the data based on conditions for favourable and unfavourable thresholds. For example, the tile can show a red bar if the number of open sales invoices is less than 5. The initial thresholds for the visual clues are set by an administrator or super user, but the end user can modify them to better fit their workflow or situation. Features of enhanced cues:
Show any computed value that can be calculated in Microsoft Dynamics NAV (not just counts).
Support for integers and decimals.
Automatic font scaling to support large numbers.
Custom suffixes and prefixes (e.g. $12M or -67%).
Choose from a set of 20 new tile icons (or show no icon).
Automatically apply visual clues with colour indicators linked to tile values.
Tile are configurable on a global, per-company or per-user basis.
End-users can configure their own sentiments in the Microsoft Dynamics NAV Windows client or the Microsoft Dynamics NAV Web client.

Microsoft Dynamics NAV 2015 Finance
- 3 -
To setup the cue stack for you as an individual user, do the following:
Open the Role Centre, Activities part.
Select the Set Up Cues item, above the Cue Stacks.
Edit Cue Setup, modify values for Threshold 1 and Threshold 2 and decide what style to use, fields Low Range Style, Middle Range Style and High Range Style.
To setup the cue stack for your company as an Administrator, go to Departments/Administration/Application Setup/General/Cue Setup or search for Cue Setup.

Microsoft Dynamics NAV 2015 Finance
- 4 -
3. Removal of UI elements Source: Microsoft Dynamics NAV 2015 - Simplified UX - Brian Nielsen (Principal Program Manager), March 2014, Microsoft
NAV 2015 remove UI Elements not in the user’s license or permissions set the UI can be made very simple, only showing the things the user have access to. Example with a sales order processor with a very restricted permission set before and after the system removes UI elements not in the user’s permissions. Before UI Elements were removed.

Microsoft Dynamics NAV 2015 Finance
- 5 -
After UI Elements were removed.

Microsoft Dynamics NAV 2015 Finance
- 6 -
4. Master Data for Sales and Purchases Source: Simplified UX - White Paper - Brian Nielsen (Principal Program Manager), Nikola Kukrika (Software Engineer), Jacob Winther (Senior UX Designer),
July 2014, Microsoft
Create Customers and Vendors on the Fly In small companies where few users cover multiple roles, the product must support the business users in creating master data records as they perform their business tasks. When no dedicated role exists to register new customers, the sales order processor must be able to register new customers on the fly as they prepare the first invoice for the customer. In the standard product, the user has to go and open a new customer card, enter all the required information, and then go back to the newly created invoice to finish registering the remaining information. With Simplified UX, the new customer card can be filled from templates with a few steps while creating the invoice. Mandatory fields on the templates can be auto-filled with predefined values so that the user only has in a few customer-specific details. New customer can be created on the fly using following steps:
Enter a non-existing customer name on a sales invoice.

Microsoft Dynamics NAV 2015 Finance
- 7 -
Select a customer template.

Microsoft Dynamics NAV 2015 Finance
- 8 -
The customer card is auto-filled with the template values.
Create Master Data Records from Templates Many new users struggle with the basic task of creating new customers or items. They have problems knowing which fields they must fill and what are the correct data combinations, for example for VAT groups and payment terms. In addition, it is tedious and error prone that users must repeatedly fill the same sets of data. To enable a simple experience for small-business users, they can create certain master data records (customer, vendor, and item cards) from templates. This simplifies the creation process and makes users more productive.

Microsoft Dynamics NAV 2015 Finance
- 9 -
Create Master Data Records from Templates When users select New in the Customers window, they are prompted to select from the following list of templates. The Blank Customer Card template opens an empty customer card where the user must can populate all the mandatory fields. All other templates open customer cards where all mandatory and other relevant fields are pre-filled, so that the user only has to provide the customer’s name and contact information. This saves a lot of time, because it is normally necessary to fill 9-12 fields on a customer card before it can be used to post a sales document.
Microsoft Dynamics NAV 2015 Finance
- 10 -
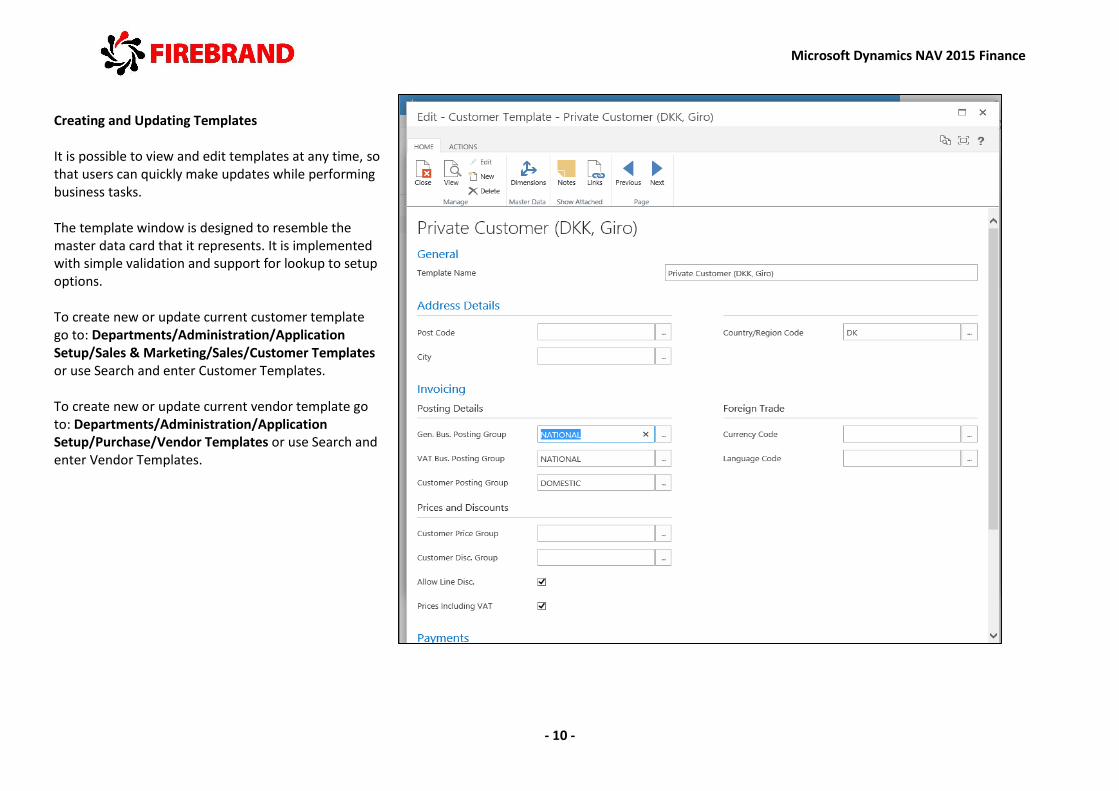
Creating and Updating Templates It is possible to view and edit templates at any time, so that users can quickly make updates while performing business tasks. The template window is designed to resemble the master data card that it represents. It is implemented with simple validation and support for lookup to setup options. To create new or update current customer template go to: Departments/Administration/Application Setup/Sales & Marketing/Sales/Customer Templates or use Search and enter Customer Templates. To create new or update current vendor template go to: Departments/Administration/Application Setup/Purchase/Vendor Templates or use Search and enter Vendor Templates.

Microsoft Dynamics NAV 2015 Finance
- 11 -
Save Existing Records as Templates User can save an existing master data record as a template. The customer, vendor, and item cards contain a Save as Template action that will create a template based on the master data record. Customer/Vendor Card/Actions/ Save as Template action.

Microsoft Dynamics NAV 2015 Finance
- 12 -
Prices and Line Discounts on Master Data Cards
While entering a price or a discount for an item (or a customer), the user should be able to view and edit the item’s sales prices and sales line discounts directly on the card. Using Small Business profile, sales prices and sales line discounts are shown together on a FastTab on item and customer cards.

Microsoft Dynamics NAV 2015 Finance
- 13 -
Toggle Financial Setup on Master Data Cards Toggle Financial Setup on Master Data Cards Users typically only need to set up financial data for a master data record once, and some of these fields must be filled to be able to post. However, a customer’s VAT registration number, payment method, and posting groups practically never change, so once the fields are filled, the user would like to hide them from the daily view of the card. When using Small Business profile, the FastTabs with financial setup fields (Invoicing and Payments) is shown until the main fields on the FastTabs are filled. When the fields are filled, the user can choose the Financial Details button to show/hide the FastTabs. Use Customer/Vendor Card/Home/Financial Details to show/hide financial details.

Microsoft Dynamics NAV 2015 Finance
- 14 -
KPIs on Master Data Cards In the standard product, all statistics information for master data records exists on separate page or in FactBoxes. For Simplified UX, selected statistics information is moved to a Statistics FastTab on the customer, vendor, and item cards, so the user has immediate access to it.

Microsoft Dynamics NAV 2015 Finance
- 15 -
Items as a Service In the standard version, the purchase and sale of goods is done using Item entity while the purchase and sale of services is done using the Resource entity. Because the Resource and Item entities are maintained in separate data structures, the following issues prevent a seamless experience for companies trading in both goods and services:
Poor usability. Users have to switch between two lists by choosing the appropriate type on document lines. From the user’s point of view, goods and services are
both products that should exist in the same list.
Different look and feel and functionality gaps. Functionality for the Item and Resource entities has evolved unevenly over time, so that the Item entity is more
advanced today. For example, the Item entity has richer price and discount functionality compared to the Resource entity.
To solve these issues, the Item entity has been extended in Simplified UX to allow defining it as either a service or as an inventory item. This is achieved by introducing the Type field on the item card to allow the user to categorize the item as an inventory item or as a service. As a consequently, the Type field on document lines is removed, so that users no longer have to select a type before selecting the product. A new option field, Type=Inventory, Service, is introduced on the Item table. When Type=Inventory, the item will have same behaviour as before this change. However, when Type=Service, the item can only participate in functionality and capabilities that are not related to physical goods.

Microsoft Dynamics NAV 2015 Finance
- 16 -
The following table outlines the functionality and capabilities that support items of type Service.
Supported Not Supported
Usage Purchasing
Sales
Service
Jobs
Production
Item Journals
Transfer
Assembly
Warehouse
Reports Purchase Analysis
Sales Analysis
Inventory
Availability
Item Tracing
Functionality Dimensions
Pricing / Discounts
Extended Texts
Variants
Multiple Locations
SKU
Revaluation
Planning
Item Tracking
Reservations
Order Tracking
Intrastat
Posting Item Ledger Entry Open=FALSE, Remaining Quantity=0. The entries are closed immediately since they have no inbound/outbound relationship.
Value Entry Inventoriable=FALSE to prevent it from affecting the Inventory account.
Item Application Entry No entries are created because they have no inbound/outbound relationship. Post Inventory To G/L No entries are created because inventory accounts will be affected. Average Cost Adjustment Point Buffer No entries are created because the cost will be tracked differently due to the lack of costing method. Item.CostIsAdjusted Adjustment will be turned off. Item.CostingMethod Only necessary for inventory Item.UnitCost
Is not affected by posting

Microsoft Dynamics NAV 2015 Finance
- 17 -
5. Process Sales and Purchases
Auto-fill and Hide the No. Field on Sales and Purchase Documents No. is not completely visible. Users still can see No. in two places, as shown. The No. field is automatically filled and hidden in the following cases:
The No. field is shown on all posted documents.
The No. field is hidden for already created documents.
When creating a document, the No. field is only hidden if all the following are true:
One number series is assigned.
No related number series exists.
The assigned number series is set as the default, and manual entry is disallowed.
The next number in the series is available (it is not the last one).
In all other cases, the No. field is shown.

Microsoft Dynamics NAV 2015 Finance
- 18 -
Total and Discount Amounts Placed on Sales and Purchase Documents Total and Discount Amounts Placed on Sales and Purchase Documents A small-business user wants to see all important information about a document directly on the document. The information must be updated when the user changes values on the document, such as quantities, prices, currencies, and discounts. The most important information that users need to see is totals and discount amounts. Therefore, all sales and purchase document pages are enhanced with information about totals, VAT, and discounts at the bottom of the page. In addition, functionality for updating this information on the fly is implemented so that any change that affects these attributes are automatically calculated and presented to the user. The layout of the information fields is made to resemble how such information is typically placed on a printed document. The currency code is included in the caption of the three Total fields to clearly indicate which currency the invoice uses. Totals are implemented on both active documents and their related posted documents.

Microsoft Dynamics NAV 2015 Finance
- 19 -
Send Documents as Email Source: Simplified email with a Report Attachment - Vlad Precup (Software Engineer), April 2014, Microsoft
In order to be able to send email via SMTP from Microsoft Dynamics NAV, the user needs to set up their email account and the SMTP server that is used to send email for that account.
This can be done by entering the requested values in the SMTP Mail Setup page:
Navigate to the Microsoft Dynamics NAV Web client address.
Choose Search for Page or Report.
Search for the SMTP Mail Setup page and open it.
Configure the email setup for your email address. In this case, an Exchange Online / Office 365 account has been configured.
The SMTP Server for Office 365 is smtp.office365.com and the SMTP Server Port is 587.
Select Basic Authentication and Ensure the Secure Connection checkbox is checked.
Ensure your configuration was successful by choosing the Test Mail Setup action from the SMTP Mail Setup page.
Once the information has been entered, the user can ensure that the setup is valid and Microsoft Dynamics NAV can send email using their address by actually sending an email to and

Microsoft Dynamics NAV 2015 Finance
- 20 -
from their address. If the check is successful, Microsoft Dynamics NAV will show a success message. Once you are in the Sales Order Processor role centre in the Microsoft Dynamics NAV Windows client, you select the Sales Quotes list page from the navigation pane. You first create a new sales quote for the customer. For practicality reasons, only one item line is added to this sales quote.

Microsoft Dynamics NAV 2015 Finance
- 21 -
Once you click this action, the Send email dialog will appear. Notice how the recipient’s email address (from the To field) is automatically filled in. The same goes for the From and the Subject fields. This enables you to perform a quick text-mode edit to the email that you would like the customer to receive along with the sales quote that you’ve created at the previous steps. You can also validate the contents of the attached document by pressing the Assist Edit button associated to the Attachment name control. Once you click the OK button from the bottom of the dialog window, the content that you add or edit in the Send email dialog is sent to specified recipient or further to Microsoft Outlook for further customization if Edit in Outlook was used.

Microsoft Dynamics NAV 2015 Finance
- 22 -
Microsoft Outlook is started and a new email item is automatically generated. Notice that the To, Subject and Attached fields are automatically populated with the data from Microsoft Dynamics NAV. Now you can personalize the email the way you would like it. Once you are done, you just need to send it to the customer. Take note that the email address which is set up in Outlook can be different from the one that you had set up in the SMTP Mail Setup page.
Microsoft Dynamics NAV 2015 Finance
- 23 -
Simplified Correction of Posted Sales and Purchase Invoices When using Small Business profile, user can use actions to cancel or correct posted sales and purchase invoices in a simple way. There are three actions:
Correct
Cancel
Create Corrective Credit Memo Correct action will reverse posted invoice and automatically create a new invoice with the same information that user can correct before posting. This posted invoice will be automatically cancelled. Cancel action will create and post a sales credit memo that reverses this posted sales invoice. This posted sales invoice will be cancelled. Create Corrective Credit Memo action will create a credit memo for this posted invoice that you complete and post manually to reverse the posted invoice.

Microsoft Dynamics NAV 2015 Finance
- 24 -
Small Business Profile Lab
Lab data preparation 1. Open the Microsoft Dynamics NAV windows client to connect to the demonstration database. 2. Set Small Business Role Centre to be the default role centre:
a. In the Search box, enter Profiles, and then choose the related link. b. Select the SMALL BUSINESS profile, and on the Home tab, in the Manage group, choose Edit. c. In the Profile Card window, select the Default Role Centre check box.
3. Close and reopen the Microsoft Dynamics NAV Windows client. The client opens showing the Small Business Role Centre.
Lab 1 — Set Sales Prices and Discounts for an Item
Lab story: In this scenario you will add prices and discounts to an existing item. You also adjust the stock level of the item and review the setup data for the
item.

Microsoft Dynamics NAV 2015 Finance
- 25 -
What to do What to say Screenshots
1. On the Role Centre, choose Items to open the list of items.
Open the list of items. Notice that the list has information about the inventory level for each item in the Inventory column.
Microsoft Dynamics NAV 2015 Finance
- 26 -
What to do What to say Screenshots
2. In the list of items, select item 1001.
3. On the Home tab, in the Manage group, choose Edit.
4. Expand the Sales Prices and Sales Line Discounts FastTab.
Open item 1001 for editing and expand the Sales Prices and Sales Line Discounts FastTab to add a discount specification for the item.

Microsoft Dynamics NAV 2015 Finance
- 27 -
What to do What to say Screenshots
5. On the Sales Prices and Sales Line Discounts FastTab, add the following new line: Line Type: Sales Price Sales Type: All Customers Type: Item Code: 1001 Unit of Measure: PCS Minimum Quantity: 10 Stating date: Jan 1, 2016 Ending date: June 30, 2016
Add the discount information needed to give all customers a 15% reduced sales price if they buy 10 or more bikes in the period of Jan-June, 2016.

Microsoft Dynamics NAV 2015 Finance
- 28 -
What to do What to say Screenshots
6. On the Home tab, in the View group, select Setup to view the Financial Details FastTab for the item.
View the setup for the Item The Setup action functions as a toggle for the Financial Details FastTab.
7. On the Actions tab, in the Item group, select Adjust Inventory.
Adjust the inventory level of the item, e.g. when you have performed a physical count. The posting of the required adjustments happens in the background.

Microsoft Dynamics NAV 2015 Finance
- 29 -
What to do What to say Screenshots
8. Choose the dropdown button in the Type field on the Item FastTab.
There are only two possible item types for an item: Inventory or Service. Service items will not result in item ledger entries.

Microsoft Dynamics NAV 2015 Finance
- 30 -
Lab 2 — Create a Sales Invoice for a new Customer
Lab story: In this scenario you will create a sales invoice for a new customer.
What to do What to say Screenshots
1. On the Role Centre, choose Ongoing Sales Invoices to open the list of ongoing sales Invoices.
2. On the Home tab, in the New group, choose New to create a new sales invoice.
Open the list of ongoing sales invoices.

Microsoft Dynamics NAV 2015 Finance
- 31 -
What to do What to say Screenshots
3. In the Customer Name field, type the name of the new customer, and then press Enter or Tab to leave the field.
Create the sales invoice for the new customer. Notice that some fields are marked with red asterisks to tell which fields must be filled.

Microsoft Dynamics NAV 2015 Finance
- 32 -
What to do What to say Screenshots
4. In the pop-up dialog, choose Yes to create the new customer.
Create the new customer.

Microsoft Dynamics NAV 2015 Finance
- 33 -
What to do What to say Screenshots
5. In the Templates window, select Customer DOMESTIC, and then choose the OK button.

Microsoft Dynamics NAV 2015 Finance
- 34 -
What to do What to say Screenshots
6. The Customer Card window opens in edit mode. Choose the OK button to close it.
7. The page closes and focus is back on the sales invoice that is now updated with the customer data.
The customer card can now be completed with the customer information, e.g. address info. Notice that by using a template, all the required fields to set up a customer are prepared by the system.

Microsoft Dynamics NAV 2015 Finance
- 35 -
What to do What to say Screenshots
8. In the Sales Invoice window, on the Lines FastTab, create a new line: Item No.: 1001 Quantity: 15
Create a sales line. Notice that the sales invoice total is shown at the bottom of the page for quick review.
9. On the Home tab, in the Posting group, choose Post.
10. Choose Yes. 11. Choose No to review
the posted sales invoice
Post the sales invoice. There is no need to review the posted sales invoice for now.

Microsoft Dynamics NAV 2015 Finance
- 36 -
What to do What to say Screenshots
12. On the Role Centre, choose Customer to open the list of customers.
13. In the Customers window, select customer 20000.
Open customer 2000 to review the information on the customer page.

Microsoft Dynamics NAV 2015 Finance
- 37 -
What to do What to say Screenshots
14. Expand the Statistics FastTab
Review the customer’s statistics. Notice that both statistics with drilldowns and charts are available on this page.

Microsoft Dynamics NAV 2015 Finance
- 38 -
Lab 3 — Correct a Posted Sales Invoice In this scenario you will correct a posted sales invoice. In previous versions of Microsoft Dynamics NAV, this required a number of steps. This scenario
demonstrates how to perform the same action in Microsoft Dynamics NAV 2015.
What to do What to say Screenshots
1. On the Role Centre, choose Posted Sales Invoices to open the list of posted sales invoices.
2. In the list of posted sales invoices, select the sales invoice that you posted in Demo 3.
3. On the Home tab, in the
Manage group, choose View.
Open a posted sales invoice.

Microsoft Dynamics NAV 2015 Finance
- 39 -
What to do What to say Screenshots
4. On the Home tab, in the Correct group, choose Correct, and then choose the Yes button.
Correct the posted sales invoice. The posted sales invoice is now cancelled with a credit memo. A new sales invoice has been created for you.
5. To open the automatically generated credit memo that was created, choose Yes.
The first sales invoice is cancelled by an automatically created sales credit memo, and a new sales invoice is created.

Microsoft Dynamics NAV 2015 Finance
- 40 -
What to do What to say Screenshots
6. On the new sales invoice on the Lines FastTab, change the quantity to 9.
7. On the Home tab, in the Posting group, choose Post to post the corrected sales invoice.
Correct the quantity of items in the invoice before you post it.

Microsoft Dynamics NAV 2015 Finance
- 41 -
6. Dynamics NAV for tablets Source: Microsoft Dynamics NAV 2015 for tablets – Business Value – Mike Borg Cardona (Program Manager), September 2014, Microsoft
Dynamics NAV for tablets (also referred as tablet client) allows users in small and midsized businesses to get access to the data they need from the device they prefer. While the Microsoft Dynamics NAV Windows Client and Dynamics NAV Web Client are designed for mouse and keyboard interaction, Dynamics NAV for tablets has a modern, fast and fluid interface built exclusively for touch. NAV Tablet client is available on 3 platforms – Microsoft Windows tablets, Apple iOS (iPads) and Android. User can also run tablet client from web browser (Internet Explorer and Chrome for Windows). Tablet client can be used only on tablets with 7’’ screen size or larger. Screen resolution has to be at least 960 x 510. Microsoft Dynamics NAV for tablets does not provide the following capabilities:
Offline reading and writing of data
The ability to directly control device hardware such as GPS

Microsoft Dynamics NAV 2015 Finance
- 42 -
Navigation pane In order to access Navigation Pane user has to click three lines icon above cues.

Microsoft Dynamics NAV 2015 Finance
- 43 -
Role Centre Action Ribbon In order to access Role Centre Action Ribbon user has to click three dots icon above cues.
Online Help User can access Online Help by going into Role Centre Action Ribbon and choosing Microsoft Dynamics NAV Help.

Microsoft Dynamics NAV 2015 Finance
- 44 -
Sorting of List Page In order to sort records in list page use can simply click on column header name for column which should be used to sort.
Filtering of List Page User can filter records by using filter field.

Microsoft Dynamics NAV 2015 Finance
- 45 -
New Record
Edit/View/Delete Record
Microsoft Dynamics NAV 2015 Finance
- 46 -
Page Action Ribbon
Microsoft Dynamics NAV 2015 Finance
- 47 -
Dynamics NAV for tablets Lab Source: Microsoft Dynamics NAV 2015 for tablets – Business Value – Mike Borg Cardona (Program Manager), September 2014, Microsoft
Lab data preparation 1. In the Microsoft Dynamics NAV Windows client, locate the Profiles list page.
2. Select and open the card page for the profile “SMALL BUSINESS - TABLET”.
3. Select the Default Role Centre checkbox.
4. Choose the OK button.
5. Sign into the Microsoft Dynamics NAV Tablet client and, on the Role Centre, tap Key Performance Indicators.
6. In the menu, select the Select Chart item. This will show a list of available charts.
7. Select the Top Ten Customers by Sales Value chart.

Microsoft Dynamics NAV 2015 Finance
- 48 -
Lab 1 — A salesperson prepares to engage with a customer
Lab story: In this short demo, we focus on how a salesperson can prepare for engaging with a customer, by quickly
looking up information, and by setting sales goals directly in the Role Centre. This demo also serves as an initial
explanation of the Role Centre.
What to do What to say Screenshots
1. On the Start screen, tap the
Dynamics NAV tile to launch
Microsoft Dynamics NAV.
Here on my Start screen I have all my favourite apps, including Dynamics NAV. If I tap that tile, the app takes me to my Role Centre.
2. Pause for a moment to
observe the Role Centre.
This is where I can get an overview of my work at a glance. On the left we have the cues which show me where I need to take action. For example, I can see the Overdue Sales Invoice amount is particularly high today.

Microsoft Dynamics NAV 2015 Finance
- 49 -
3. In the content pane, tap Key
Performance Indicators.
4. In the menu, tap on Previous
Chart, pause, then tap on
Next Chart to return to Top
10 Customers By Sales Value.
On the right, I have my chart. I can easily switch between various charts to get an overview of my data.
5. Gently scroll down the
content area until Favorited
Customers is in view.
I can have various forms of BI displayed directly on my Role Centre, such as my personal list of Favorited Customers.
6. Tap on the tile named Sales
This Month.
7. Pause on the list of sales, and
tap the back arrow.
8. Tap to show the Action Pane
and select Set Up Cues.
9. In the row with Cue Name set
to Sales This Month, tap the
cell in column Middle Range
Style and set it to
Unfavourable.
If I take a look at Sales This Month, I can see that I am close to the 100,000 mark. I can tap to drill down and see specifically which sales are included. As a salesperson, I want to make it my personal goal to reach that target. Maybe the customer I am meeting today is interested in

Microsoft Dynamics NAV 2015 Finance
- 50 -
10. Tap the Close button. purchasing some of our more expensive products which will help me reach that goal. I can personalize my cues to use colours to indicate if I have reached my goal or not. Here the upper threshold is already set to 100,000 so I just need to set which colour will be shown below that value.
11. Bring up the Navigation Pane
and tap on Items
12. Gently scroll through the
long list of items
13. In the Items list, tap in the
Search field, enter the text
“wheel” and tap the spy glass
to begin searching.
Let’s find the price for our more expensive items. As you can see, this is quite a long list but I’m looking for something specific. This customer has always purchased a stock of wheels so let us first search for that. Note, how I did not need to specify which columns to search on, and items were found regardless of where the term “wheel” was used.

Microsoft Dynamics NAV 2015 Finance
- 51 -
14. Tap in the Search field again,
and change the text to “front
wheel” and tap Enter on the
on-screen keyboard.
15. Tap on the column header
Description to sort
alphabetically.
I can refine my search further, and also sort my list. Now I can see that Front Wheels can be sold at 1,000 for a good profit.
16. Bring up the Action Pane and
tap on the Open in Excel
action.
I can also send this list to Microsoft Excel if I want to perform some quick calculations on pricing directly on my tablet.
17. Switch back to Dynamics
NAV and tap the back button
to return to the Role Centre.
As always, the Role Centre is only a tap away.

Microsoft Dynamics NAV 2015 Finance
- 52 -
Lab 2 — A salesperson updates customer information
Lab story: In this short demo, we focus on how a salesperson could easily update the details for a specific customer,
such as the phone number. Dynamics NAV is not just for reading data, but also for writing just like in any other
Dynamics NAV client.
What to do What to say Screenshots
1. In Dynamics NAV, from the
Role Centre, bring up the
Navigation Pane and tap on
Customers.
2. Tap on the row with Name set
to Selangorian Ltd.
3. Tap the Edit button in the top
right to enter Edit mode.
4. In the Phone Number field,
enter a valid phone number.
After talking with my favourite customer, Selangorian Ltd., I learn that they often use phone calls or Skype for communication. Let’s add their phone number to the customer card.
5. Tap on the AssistEdit button
for the City field.
6. Gently scroll through the list
of cities in the lookup.
The customer address is also incorrect. Let’s quickly update the city.

Microsoft Dynamics NAV 2015 Finance
- 53 -
7. Tap on Luton.
8. Tap the back button to return
to the list of customers.

Microsoft Dynamics NAV 2015 Finance
- 54 -
Lab 3 — A salesperson creates a Sales Quote for a customer
Lab story: In this short demo, we focus on creating a Sales Quote and instantly mailing this to the customer. Creating sales or purchase documents is a common task while on the go. This demo is a
continuation from Demo 2 where we will now send the quote to customer Selangorian Ltd.
What to do What to say Screenshots
1. In the Customers list page,
bring up the menu for
customer Selangorian Ltd.
2. Tap on Sales Quote.
3. Under the Lines section, in
the first empty row, tap the
AssistEdit button for Item.
No.
4. In the lookup pane, tap in the
Search field, enter “front
wheel” and then tap Enter on
the keyboard.
5. Tap on the Quantity field and
enter value 12.
6. Tap in the Line Discount %
field and set the value to 14.
Let’s quickly create a sales quote for this customer. Note, how the customer information has been prefilled in the quote. With a few taps, I can prepare the quote. Since this is one of my favourite customers, I will raise the discount to 14%. See how the total changes accordingly.

Microsoft Dynamics NAV 2015 Finance
- 55 -
7. Bring up the Action pane and,
in the Process action group,
tap the Email action.
8. In the task dialog, enter the
following message: “Thank
you for today’s meeting –
here is the quote we talked
about. I am looking forward
to hearing from you.”
9. Tap the OK button to proceed
with sending the mail.
Now let’s send the quote to the customer with a few more taps. The email is sent with the sales quote attached as a PDF document.

Microsoft Dynamics NAV 2015 Finance
1
Application Setup in Microsoft Dynamics NAV 2015 Set Up a Company Using RapidStart Services 1. Field Mapping Source: Microsoft IT Academy – 80663 - What's New Functional in Microsoft Dynamics NAV 2015 - Module 02: RapidStart Services for Microsoft Dynamics
NAV - Field Mapping, Microsoft
It can happen that data provided by a customer for a particular field doesn’t match with the values set up in NAV. With new field mapping functionality user can define value translation. It can be done in Departments/Administration/Application Setup/RapidStart Services for Microsoft Dynamics NAV/Configuration Worksheet calling Fields from Action tab for table where user want to define field mapping. Field mapping is set in Config. Field Mapping by calling Mapping action from Home tab. Here user can define Old Value and its translation in New Value field.

Microsoft Dynamics NAV 2015 Finance
2
2. Create Missing Codes Source: Microsoft IT Academy – 80663 - What's New Functional in Microsoft Dynamics NAV 2015 - Module 02: RapidStart Services for Microsoft Dynamics
NAV - Create Missing Codes, Microsoft
When user import data from Excel it can happen that he receives validation errors because of missing related data in NAV. User can define that NAV will create missing related data by selecting Create Missing Codes field in Config. Package Fields table. It can be done in Departments/Administration/Application Setup/RapidStart Services for Microsoft Dynamics NAV/Configuration Worksheet calling Fields from Action tab for table where user want to select Create Missing Codes.

Microsoft Dynamics NAV 2015 Finance
1
Finance Essentials in Microsoft Dynamics NAV 2015 Cash Management 1. Create and Manage Electronic Payments
Source: Demo Script - Create and Manage Electronic Payments - Heidi Andreasen (Program Manager), Dmytro Kryshtalov (SDE), August 2014, Microsoft
Demo data Please make the following adjustments before running the demos:
Suggest Vendor Payments – Remove Check Mark
Go to the Payment Journal window and choose the Suggest Vendor Payments action. In the Suggest Vendor Payments window, deselect Skip Exported Payments field.
Payment Journal - Adjust Columns
Adjust the header height for all columns in the Payment Journal window so that it becomes 3 instead of 2
Reorder the columns so that they are shown in the following order:
1) Has Payment Export Error
2) Posting Date
3) Applies-to Doc-Due Date
4) Document Type
5) Document No.
6) Amount
7) Exported to Payment File
8) Total Exported Amount
9) Message to Recipient
10) Applies-to-Ext. Doc.No.
11) Account Type
12) Account No.
13) Recipient Bank Account

Microsoft Dynamics NAV 2015 Finance
2
Screen shot of the adjusted columns:
Purchase Invoices – Post Documents
1) Post a purchase invoice with the following values:
Buy-from Vendor No. 33299199 (Belle et Belle)
Vendor Invoice No. 123404
Type Item
No. 1100
Quantity 10
Due Date 28-01-2016
Before posting, validate that the Total Incl. VAT (EUR) field contains 1.879,83.
2) Post a purchase invoice with the following values:
Buy-from Vendor No. 33299199 (Belle et Belle)
Vendor Invoice No. 123405
Type Item
No. 1100
Quantity 3
Due Date 28-01-2016
Before posting, validate that the Total Incl. VAT (EUR) field contains 563,95.
3) Post a purchase invoice with the following values:
Buy-from Vendor No. 33299199 (Belle et Belle)

Microsoft Dynamics NAV 2015 Finance
3
Vendor Invoice No. 123406
Type Item
No. 1100
Quantity 2
Due Date 28-01-2016
Before posting, validate that the Total Incl. VAT (EUR) field contains 375,96.
4) Post a purchase invoice with the following values:
Buy-from Vendor No. 31580305 (Beekhuysen BV)
Vendor Invoice No. INV5555
Type Item
No. 1100
Quantity 6
Due Date 28-01-2016
Before posting, validate that the Total Incl. VAT (EUR) field contains 1.127,89.
5) Post a purchase invoice with the following values:
Buy-from Vendor No. 32554455 (PURE-LOOK)
Vendor Invoice No. REF1000
Type Item
No. 1100
Quantity 5
Due Date 28-01-2016
Before posting, validate that the Total Incl. VAT (EUR) field contains 939,91.
6) Post a purchase invoice with the following values:

Microsoft Dynamics NAV 2015 Finance
4
Buy-from Vendor No. 34280789 (Transporte Roas)
Vendor Invoice No. 99999
Type Item
No. 1100
Quantity 12
Due Date 05-02-2016
Before posting, validate that the Total Incl. VAT (EUR) field contains 2.255,78.
7) Post a purchase invoice with the following values:
Buy-from Vendor No. 49454647 (VAG – Jürgensen)
Vendor Invoice No. 5555
Type Item
No. 1100
Quantity 30
Due Date 05-02-2016
Before posting, validate that the Total Incl. VAT (EUR) field contains 5.639,46.
8) Post a purchase invoice with the following values:
Buy-from Vendor No. 38458653 (IVERKA)
Vendor Invoice No. AAA-555
Type Item
No. 1100
Quantity 25
Due Date 05-02-2016
Before posting, validate that the Total Incl. VAT (EUR) field contains 4.699,55.

Microsoft Dynamics NAV 2015 Finance
5
Payment Journal – Post Payments for Purchase Invoices with Posting Dates in 2015
1) In the Search box, enter Payment Journal, and then choose the related link.
2) In the Batch Name field, choose the dropdown button.
3) In the General Journal Batches window, on the Home tab, in the New group, choose New.
4) In the Name field, enter WWB-EUR.
5) In the Description field, enter EURO PAYMENTS.
6) In the Bal. Account Type field, enter Bank Account.
7) In the Bal. Account No. field, enter WWB-EUR.
8) In the No. series field, enter GJNL-PMT.
9) Select the Copy VAT Setup to Jnl. Lines:.
10) Leave the field Allow Payment Export as selected
11) Choose the OK button.
12) In the Payment Journal window, on the Home tab, in the Prepare group, choose Suggest Vendor Payments.
13) In the Suggest Vendor Payments window, in the Last Payment Date field, enter 30-06-2015. In the Bal. Account Type field, enter Bank Account. In the Bal. Account No. field,
enter WWB-EUR.
14) Choose the OK button.
15) In the Payment Journal window, on the Home tab, in the Posting group, choose Post.
16) In the Batch Name field, choose the dropdown button.
17) In the General Journal Batches window, select WWB-EUR, and then, on the Home tab, in the Manage group, choose Delete.

Microsoft Dynamics NAV 2015 Finance
6
Demo 1 — Setup Demo story: Annie, the bookkeeper, has established a new bank account for her company, and she now wants to prepare to create electronic payments for this bank
account.
What to do What to say Screenshots
1. In the Search box,
enter Payment
Journal, and then
choose the related
link.
2. In the Batch Name
field, choose the
dropdown button.
Annie’s company has established a new bank account called WWB-EUR and Annie has set up a corresponding bank account card in the system. She now wants to create electronic payments to vendors from this bank account for the first time. To do this, she must first set up a payment journal batch.

Microsoft Dynamics NAV 2015 Finance
7
3. In the General
Journal Batches
window, on the
Home tab, in the
New group,
choose New.
4. In the Name field,
enter WWB-EUR.
5. In the Description
field, enter EUR
Payments.
6. In the Bal. Account
Type field, enter
Bank Account.
7. In the Bal. Account
No. field, enter
WWB-EUR.
8. In the No. Series
field, enter GJNL-
PMT.
9. Select the Copy
VAT Setup to Jnl.
Lines check box.
10. Leave the field
Allow Payment
Export as selected
11. Choose the OK
button.
She creates a batch for WWB-EUR. Going forward, whenever she uses this batch as basis for creating payment files, the system will automatically create payment files of the type that she defined in the Payment Export Format field when she set up the bank account card for WWB-EUR. Annie is now ready to start creating electronic payments for WWB-EUR.

Microsoft Dynamics NAV 2015 Finance
8
Demo 2 — Create Payment Proposal and Export to a Payment File Demo story: Annie, the bookkeeper, now proceeds to creating a payment proposal for WWB-EUR based on open vendor entries in the system. To make sure that
postings in her system are correct and reflect as accurately as possibly the true cash status, she does not want to post the payments until she has confirmation from
the bank that the payments have actually been executed.
What to do What to say Screenshots
1. In the Search box,
enter Payment
Journal, and then
choose the related
link.
2. In the Batch Name
field, choose
WWB-EUR.
3. On the Home tab,
in the Prepare
group, choose
Suggest Vendor
Payments.
On the 28th of January 2016, Annie opens up the batch for WWB-EUR and starts creating a payment proposal using the function Suggest Vendor Payments.

Microsoft Dynamics NAV 2015 Finance
9
4. In the Suggest
Vendor Payments
window, in the Last
Payment Date field,
enter 04-02-2016.
5. Select the Calculate
Posting Date from
Applies-to-Doc.-
Due Date check
box.
6. Choose the OK
button.
Annie wants to create payment for purchase invoices due up until the 4th of February 2016. To optimize her cash flow, she wants the payments to be executed by the bank on the due date, and she therefore select s the Calculate Posting Date from Applies-to-Doc.-Due Date field. This means that the due date is inserted in the Posting Date field when she uses the Suggest Vendor Payments function. To learn more about the Suggest Vendor Payments function, refer to the demo video, “How do I Instruct my Bank to Execute Payments Based on Due Date in Microsoft Dynamics NAV 2013 R2”.

Microsoft Dynamics NAV 2015 Finance
10
Annie chooses OK, and the system now automatically creates a payment proposal.
As you can see, the system has automatically inserted a posting date that corresponds to the date in the Applies-to-Doc. Due Date field for each document. When Annie later creates the payment file, the system will insert the date from the Posting Date field as execution date for the payment in the bank. Also, the system has proposed a text in the Message to Recipient field that refers to the external document number on the purchase invoice that is being paid. This text

Microsoft Dynamics NAV 2015 Finance
11
will be inserted in the payment file as remittance information. Finally, in the Recipient Bank Account field, the system has proposed what bank account to transfer the payment to. The proposed bank account corresponds to the preferred bank account that is set up for each vendor. If no preferred vendor bank account is set up before you create a purchase invoice for the vendor, then no bank account is proposed when you generate the payment proposal. Therefore, setting up vendor bank account details when you create new vendors helps to ensure efficiency in

Microsoft Dynamics NAV 2015 Finance
12
the payment process later on.
7. On the first line, in
the Amount field,
enter 500.
Before creating the payment file, Annie wants to adjust the amount being paid to vendor Beekhuysen BV. The goods sent from this vendor did not match expectations, so at this point in time Annie’s company only wants to make a partial payment of 500 EUR. She therefore changes the amount from 1.127,89 to 500.

Microsoft Dynamics NAV 2015 Finance
13
8. On the Home tab,
in the Bank group,
choose Export
Payments to File.
Annie is now happy with the payment proposal and proceeds to create the electronic file by using the Export Payments to File function.

Microsoft Dynamics NAV 2015 Finance
14
9. In the Export
window, in the File
name field, enter
Payments for
upload on 28-01-
2016.
10. Choose the Save
button.
Annie saves the file under the name Payments for upload on 28-01-2016. She then logs on to her web bank and uploads the file for processing in the bank.
11. Position the curser
on the first line.
12. On the Home tab,
in the Bank group,
choose Credit
Transfer Reg.
Entries.
In the payment journal, the values in the Exported to Payment File and Total Exported Amount fields have been updated to reflect the payment export that Annie just made. Annie can also investigate the payment export history for a document further by selecting the line and then use

Microsoft Dynamics NAV 2015 Finance
15
Credit Transfer Reg. Entries function.
This shows details about any payment exports that are made for this open document. In this case, we can see that only one payment export has been made for this document, namely an export of 500. We can also see that the original amount on the document was 1.127,89. In other words, the payment exports made so far only covers the invoice amount partially. In summary, the export history features help Annie keep track of the payment status for any open vendor document and provides Annie with

Microsoft Dynamics NAV 2015 Finance
16
tools to reduce the risk of errors, such as paying vendors twice or losing the overview in partial payment scenarios.
13. Select all lines in
the Payment
Journal window.
14. On the Home tab,
in the Manage
group, choose
Delete.
15. Choose Yes on the
message that
appears.
Annie is now done with the payment process. She does not want to post any payments until she has confirmation from the bank that the payments are executed. Therefore, she simply deletes the lines in the payment journal, because she wants to wait and register the payments in the Payment Reconciliation Journal window as they get executed by the bank. This way, she is sure of having accurate cash postings in her system.

Microsoft Dynamics NAV 2015 Finance
17
To learn more about how to register bank transaction data automatically in the Payment Reconciliation Journal window, refer to the demo video, “How do I Reconcile Incoming and Outgoing Bank Payments in a Payments Reconciliation Journal in Microsoft Dynamics NAV 2015”.

Microsoft Dynamics NAV 2015 Finance
18
Demo 3 — Manage Open Documents for Which Payment Exports Have Been Made Previously Demo story: A few days later, on Monday the 1st of February 2016, Annie must create electronic payments again for the WWB-EUR bank account covering invoices
that are due up until the fifth of February 2016. At this point, the payments made in Demo 2 are still not posted, and Annie therefore needs help to avoid accidently
paying vendors twice or too much.
What to do What to say Screenshots
1. In the Search box,
enter Payment
Journal, and then
choose the related
link.
2. In the Batch Name
field, choose
WWB-EUR.
3. On the Home tab,
in the Prepare
group, choose
Suggest Vendor
Payments.
4. In the Suggest
Vendor Payments
window, in the Last
Payment Date field,
enter 05-02-2016.
5. Select the Skip
Exported Payments
check box.
6. Choose the OK
button.
Annie opens the Payment Journal window and asks the system to suggest payments for invoices that are due up until the fifth of February 2016. She does not want to create payment proposals for open vendor documents for which electronic payments previously have been created, and she therefore selects the Skip Exported Payments check box.

Microsoft Dynamics NAV 2015 Finance
19
7. Select all lines in
the window.
8. On the Home tab,
in the Manage
group, choose
Delete.
9. Choose Yes on the
message that
appears.
As you can see, because we selected the Skip Exported Payments check box, the system only proposes payments for open documents for which no payment exports have been made yet. In other words, the Exported to Payment File and Total Exported Amount fields are both empty for the proposed payments, and the lines proposed in Demo 2 are not part of this payment proposal. This way Annie does not risk paying vendor documents for which payments have already been made or which still need to be registered in the system.

Microsoft Dynamics NAV 2015 Finance
20
10. On the Home tab,
in the Prepare
group, choose
Suggest Vendor
Payments.
11. In the Suggest
Vendor Payments
window, select the
Skip Exported
Payments check
box.
12. Choose the OK
button.
Another way of controlling the payment process is to manually go through which proposed payment lines to keep in the payment proposal and which to delete before creating the payment file. This is useful, for example, when Annie also has open documents that are only partially paid. In this case, she may not want to filter out all open documents for which payment exports have been made previously. Instead, she probably wants to make additional partial payments for these documents at some point.

Microsoft Dynamics NAV 2015 Finance
21
When she runs the Suggest Vendor Payments function without selecting the Skip Exported Payments check box, she will get payment proposals for all open documents, including for those where payment files are already exported. She can then manually edit the list of payment proposals, for example by changing amounts or deleting proposals for open documents where payment files are already exported. Identifying and investigating the payment history for open documents is easy, as demonstrated in Demo 2.

Microsoft Dynamics NAV 2015 Finance
22
Demo 4 — Track Payment History and Re-export Electronic Payments Demo story: Annie, or the auditor, sometimes needs to investigate previous electronic payments. Also, when Annie has misplaced an electronic payment file that she
has created, she wants to be able recreate it again.
What to do What to say Screenshots
1. In the Search box,
enter Payment
Journal, and then
choose the related
link.
2. In the Batch Name
field, enter EUR.
3. On the Home tab,
in the Bank group,
choose Credit
Transfers Registers.
Annie, or the auditor, must sometimes investigate previous electronic payments. Fortunately, the history of electronic payments is captured in a register. It is easy for Annie to navigate from the Payment Journal window to the register by using the Credit Transfer Registers action. Alternatively, she can navigate to the register by entering Credit Transfer Registers in the Search box.
Microsoft Dynamics NAV 2015 Finance
23
4. In the Credit
Transfers Registers
window, select the
line for the most
recent credit
transfer, and then,
on the Home tab,
in the Process
group, choose
Entries.
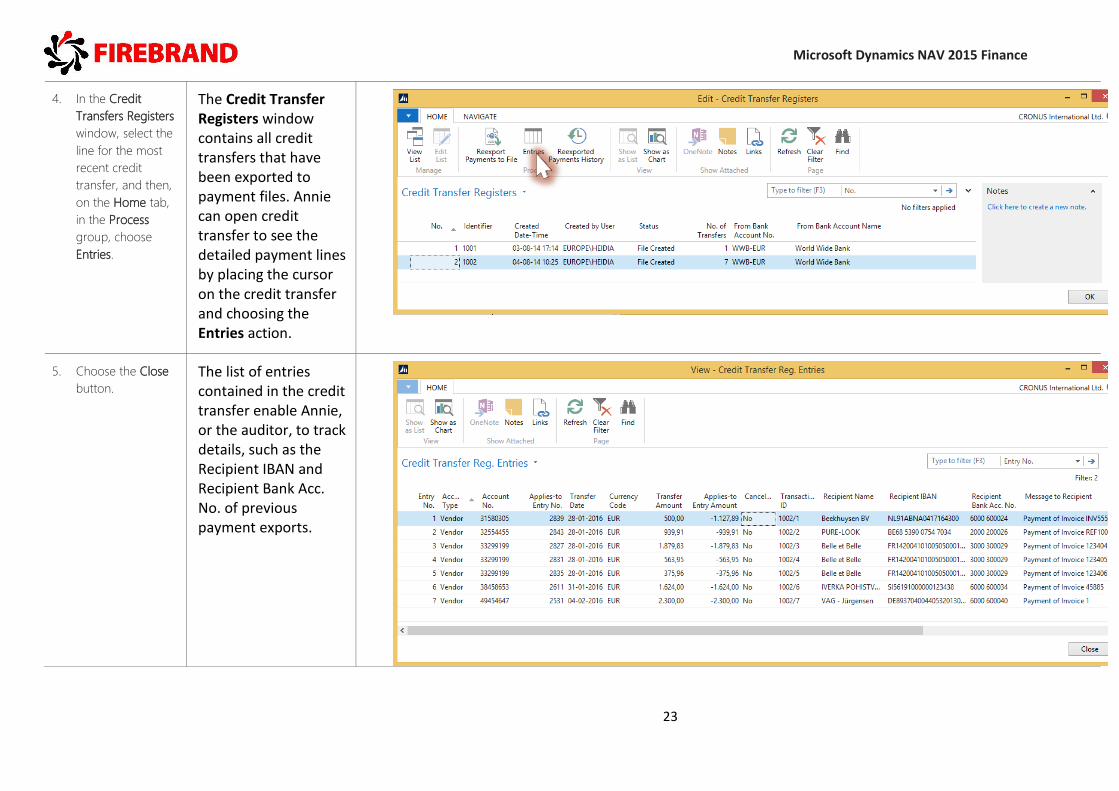
The Credit Transfer Registers window contains all credit transfers that have been exported to payment files. Annie can open credit transfer to see the detailed payment lines by placing the cursor on the credit transfer and choosing the Entries action.
5. Choose the Close
button.
The list of entries contained in the credit transfer enable Annie, or the auditor, to track details, such as the Recipient IBAN and Recipient Bank Acc. No. of previous payment exports.

Microsoft Dynamics NAV 2015 Finance
24
6. In the Credit
Transfer Registers
window, select the
line for the most
recent credit
transfer.
7. On the Home tab,
in the Process
group, choose
Reexport Payments
to File.
8. In the Save As
window, specify the
location that the
file is exported to,
and then choose
Save. You may
want to replace the
previous version of
the payment file.
The Credit Transfer Registers window also gives Annie the possibility to recreate payment files. This is useful, for example, if Annie loses a payment file or the file is corrupt, for some reason. In order to recreate a payment file, Annie simply places the cursor on the relevant credit transfer, and then select the Reexport Payments to File action. The payment file is then recreated for Annie to save to her drive and, when she is ready, upload to her web bank.

Microsoft Dynamics NAV 2015 Finance
25
As you can see, after recreating the payment file, the status of the credit transfer changes from File Created to File Re-exported. This helps Annie identify which credit transfers have been re-exported to payment files.

Microsoft Dynamics NAV 2015 Finance
26
9. On the Home tab,
in the Process
group, choose
Payment Re-export
History.
Annie can view the history of files that she or other users have re-exported by selecting the Payment Re-export History action.

27
2. Payment Reconciliation Journal Source: Demo Script - How to Handle Payments with Payment Discounts in the Payment Reconciliation Journal – Nikola Kukrika
(Software Engineer II), Heidi Andreasen (Program Manager), August 2014, Microsoft
Demo data The demonstration scenarios require demo data preparation. You must place this demo file on your computer drive before
running the demos: Demo_file_1.txt
You must prepare the following demo data in the system:
Set up a bank account:
Open the card for the WWB-EUR bank account.
In the Bank Statement Import Format field, select SEPA CAMT.
In the Match Tolerance Type field, select Amount.
In the Match Tolerance Value field, enter 0,5.
Post the following sales invoice:
Customer No= 34010602 (Helguera industrial)
Type= Item
No.=1100 (Front Wheel)
Quantity= 2
Before posting the invoice, verify that the value in the Total Incl. VAT (EUR) field is 2.464,48.
Post the following sales invoice:
Customer No= 34010602 (Helguera industrial)
Type= Item
No.=1100 (Front Wheel)
Quantity= 5
Before posting the invoice, verify that the value in the Total Incl. VAT (EUR) field is 6.161,21.

28
Post the following sales invoice:
Customer No= 34010602 (Helguera industrial)
Type= Item
No.=1000 (Bicycle)
Quantity= 2
Before posting the invoice, verify that the value in the Total Incl. VAT (EUR) field is 11.597,56.
Post the following sales invoice:
Customer No= 31505050 (Woonboulevard Kuitenbrouwer)
Type= Item
No.=1000 (Bicycle)
Quantity= 3
Before posting the invoice, verify that the value in the Total Incl. VAT (EUR) field is 17.396,35.
Post the following sales invoice:
Customer No= 31505050 (Woonboulevard Kuitenbrouwer)
Type= Item
No.=1000 (Bicycle)
Quantity= 2
Before posting the invoice, verify that the value in the Total Incl. VAT (EUR) field is 11.597,56.

29
Demo 1 – Automatically Reconcile Payments with Payment Discounts Demo story: Annie, the bookkeeper, frequently (usually daily or several times a day) reconciles incoming and outgoing bank
payments to get an updated picture of the cash situation in her company. The company offers payment discounts to customers if
they pay within a specified date discount date.
Today, Annie is going to reconcile payments for the WWB-EUR bank account by using the Payment Reconciliation Journal window.
For this purpose, she has chosen a bank statement file from her bank that contains a payment that she has decided to apply.
What to do What to say Screenshots
1. In the Search box,
enter Payment
Reconciliation
Journals, and then
choose the related
link.
2. On the Home tab, in
the New group,
choose New Journal.
3. In the Payment Bank
Account List window,
select WWB-EUR, and
then choose the OK
button.
In Microsoft Dynamics NAV 2015, it is easy for Annie to get started with the automatic payment reconciliation as she can do the necessary setup on the fly. She simply opens a new journal for the bank account that she wants to reconcile payments. In this case, the WWB-EUR bank account.

30
4. In the Payment
Reconciliation Journal
window, on the Home
tab, in the Application
group, choose Import
Bank Statement.
When she chooses the OK button, the Payment Reconciliation Journal window opens prepared for the selected bank account. She then proceeds to fill it with payments by importing the related bank statement file.
5. In the Select a file to
import window, select
the file Demo_file_1,
and then choose the
Open button.
The system now asks Annie to select the file on her computer drive that she wants to import. She selects Demo_file_1.txt.

31
6. On the Home tab, in
the Process group,
choose Apply
Automatically.
The payment data from the bank statement file is imported into the journal for the WWB-EUR bank account. In this file, there are five payments.

32
7. Choose OK on the
message that appears.
A message tells Annie that the system has all five payments to open entries, representing unpaid documents.
8. In the Payment
Reconciliation Journal
window, select the first
line.
9. On the Home tab, in
the Review group,
choose Apply
Manually.
Annie can see that two lines have been applied with high match confidence and that three lines have been applied with low match confidence. To investigate if the amounts match, Annie selects the first line

33
and then selects Apply Manually.
10. In the Payment
Application window,
on the Home tab, in
the Review group,
choose Accept
Applications.
The window closes.
In the Payment Application window, Annie can see that the correct invoice is selected for application. In the FactBox, the Amount Incl. Tolerance Match field is set to Yes - Single, meaning that only one invoice in the system with this amount exists. Annie chooses Accept Applications to mark it as reviewed.

34
11. In the Payment
Reconciliation Journal
window, select the
second line.
12. On the Home tab, in
the Review group,
choose Apply
Manually.
Annie proceeds to investigate the second payment journal line.

35
13. In the Payment
Application window,
on the Home tab, in
the Review group,
choose Accept
Applications.
14. Choose Yes on the
message that appears
to credit the customer
for the rounding
amount.
The window closes.
In the Payment Application window, Annie can see that the correct invoice is selected. In the FactBox, the Amount Incl. Tolerance Match field is set to Yes - Single, meaning that only one invoice in the system with this amount exists. System has matched the invoice based on the remaining amount including discount and the amount tolerance that is specified on the bank account card. When she chooses Accept Applications, or posts the application, the system will credit the customer account with remaining amount.

36
15. In the Payment
Reconciliation Journal
window, select the
third line.
16. On the Home tab, in
the Review group,
choose Apply
Manually.
Annie proceeds to investigate the third line.

37
17. In the Payment
Application window,
on the Home tab, in
the Review group,
choose Accept
Applications.
18. Choose Yes on the
message that appears
to credit the customer
for the overpaid
amount.
The window closes.
In the Payment Application window, Annie can see that the user has paid the full amount by mistake. The system does not consider this amount, since the payment discount should have been applied. As the invoice has been paid within the payment discount date, the system closes the invoice with an amount corresponding to value in the Remaining Amount Incl. Payment Discount field. Concerning the difference, Annie can decide if she wants to refund the customer immediately or credit the customer.

38
Demo 2 – Manually Handle Payment Discounts Demo story: In some cases, the bookkeeper, Annie, wants to update the payment discount details to close an open entry. This
demonstration shows how to manually handle cases where a user has paid the discounted amount after the payment discount due
date or has paid an insufficient amount.
What to do What to say Screenshots
1. In the Payment
Reconciliation Journal
window, select the
fourth line.
2. On the Home tab, in the
Review group, choose
Apply Manually.
For the fourth line, Annie sees that the amounts do not match. She selects a line and chooses Apply Manually to investigate.

39
3. In the Payment
Application window, in
the Remaining Pmt.
Discount Possible field,
enter 1,396.35 instead of
the existing discount
amount.
4. On the Home tab, in the
Review group, choose
Accept Applications.
The window closes.
Annie can see that the user has underpaid the invoice. User has negotiated a larger discount and the payment discount needs to be updated. Annie enters 1,396.35 instead of the existing discount amount. She can see that the remaining amount after posting has turned to zero, and that the invoice will be closed after posting. She chooses Accept Applications to mark the invoice as reviewed and proceeds with the review.

40
5. In the Payment
Reconciliation Journal
window, select the fifth
line.
6. On the Home tab, in the
Review group, choose
Apply Manually.
For the fifth line, Annie sees that the amounts do not match. She selects a line and chooses Apply Manually to investigate.
7. In the Payment
Application window, in
the Pmt. Discount Date,
change the data to
match transaction date,
02/10/2016.
Annie can see that the customer has paid the discounted amount after the payment discount date. She still decides to grant the payment discount anyway. To do this, she changes the payment discount date to equal the transaction date. She can see that the remaining amount after posting has turned to zero, and that the invoice will be closed after posting.

41
She chooses Accept Applications to mark the invoice as reviewed and proceeds with the review.
8. In the Payment
Reconciliation Journal
window, on the Home
tab, in the Process
group, choose Post.
Annie sees that all the five payments are reviewed and the differences in amounts are handled. She posts the journal to post the invoices as paid and close the open entries as applied.

42
3. Bank Data Conversion Service Source: Demo Script - Using the Bank Data Conversion Service to Export Payment Files and Import Bank Statement Files, Rikke
Lassen (Program manager), June 2014, Microsoft
Set Up the Bank Data Conversion Service In the Search box, enter Bank Data Conv. Service Setup, and then choose the related link. In the Bank Data Conv. Service Setup
window, demo data is set up to connect to the bank data conversion service with a demo account that can be used to try out
the functionality. This service allows conversion of exported payment files for a demo bank and conversion of imported bank
statement files in a predefined format. Accordingly, it does not create fully functional data files.
To set up a fully functional solution, the customer must sign up for the service and get a user name and a password. Information
on signing up to the bank data conversion service is provided as Help by AMC-Consult A/S.
Integration to the bank data conversion service requires a password, which is stored in the database. It is recommended that
you encrypt the password for security reasons. The Bank Data Conv. Service Setup window will guide you to the Data
Encryption Management window where you can encrypt the password.
Note: Data encryption is not required for this demonstration of the Bank Data Conversion Service feature, so choose No when
you are asked to open the Data Encryption Management window.
Demo Data Preparation In the demo company, the following data has been preconfigured to use with the bank data conversion service.
Bank account:
WWB-TRANSFERS is set up to handle the connection with the Demo Bank GB format and uses the predefined payment export format.
Furthermore, the import of bank statement files will use a specific demo format.
The defined definitions of fields to export and import are defined in the Data Exchange Framework with the definitions for credit
transfers BANKDATACONVSERVCT, and bank statement import format, BANKDATACONVSERVSTMT. These are also the definitions to
be used in an actual implementation.
The WWB-TRANSFERS bank account is set up to be used for demonstration purposes with IBAN GB29 RBOS 6016 1331 9268 19
It also contains the value in the Credit Transfer Msg. No. field to be used in the export of payment files.
Payment methods

43
The BNKDOMCONV and BNKINTCONV payment methods are created to enable both domestic and international payments. Adding
these codes on the vendor card that is selected for demo will prefill required fields in the Payment Journal window.
Payment Journal Batch
The BANK CONV payment journal batch is preset to enable export. The Allow Payment Export check box is selected.
Vendors
To exporting payments, you must fill the following bank information on the vendor card:
Vendor – no. 10000 (London Postmaster)
On the vendor card, the Preferred Bank Account field is set up with bank account numbers. Ensure that ECA is set as the preferred
bank.
On the vendor card, in the Payment Method Code field, enter BNKCONVDOM.
Vendor – no. 20000 (AR Day Property Management)
On the vendor card, the Preferred Bank Account field is set up with bank account numbers. Ensure that ECA is set as the preferred
bank.
On the vendor card, in the Payment Method Code field, enter BNKCONVDOM.
Purchase invoices
Post a purchase invoice with the following values:
Buy-from Vendor No. 10000
Vendor Invoice No. 1111
Type Item
No. 1110
Quantity 10
Due Date 28-01-2015
Posting Date 28-01-2015
Post a purchase invoice with the following values.

44
Buy-from Vendor No. 20000
Vendor Invoice No. 1111
Type Item
No. 1110
Quantity 10
Due Date 28-01-2015
Posting Date 28-01-2015
Note that the posting date is important to set correctly as the bank data conversion service will validate if the date is acceptable
for the bank.

45
Demo 0 — Set Up the Bank Data Conversion Service Demo Story: When banks in corporate online banking offer their customers to upload payment files with payment instructions
exported directly from the ERP system, the user can save a lot of time and reduce errors compared to manually keying in payment
instructions in the online bank. This demo will show how to set up Microsoft Dynamics NAV to export payment data and integrate to
the bank data conversion service to create an electronic bank file that can be uploaded to corporate online banks.
Payment upload requires that the electronic bank file generated by the ERP system matches the file type that the bank is able to
receive and process. You can set up the bank account in Microsoft Dynamics NAV so that payments created for the related bank can
be exported to a file of the correct type and converted to the correct bank file by using Bank Data Conversion Service.
What to do What to say Screenshots
1. In the Search box, enter
Bank Data Conversion
Service, and then choose
the related link.
2. Validate that the service is
set up.
To use the service, you must sign up at the service provider. Connecting to the provider’s sign-up page from this window allows the user to sign up for the service and create the user name and password that is required for the service to connect. This is also the place to get a quick entry to the status of the service and to see support information for the service. Sign-up is a precondition to use the service. Demo data is set up to connect with a demo user and will produce a demo file.

46
3. Reminder to turn on
encryption for the
password.
To secure your password for connecting to the service, it is recommended that you to turn on data encryption. This is enforced by showing a dialog box when you close the Bank Data Conversion Service window. If you choose Yes, you will be taken to the Data Encryption Management window for further setup. Choose No in this demonstration.

47
4. Enable data encryption To enable data encryption, select the Enable Encryption check box. This will generate an encryption key on the server. It is recommended to export the key and keep it in a secure place as a backup. This is simple to do using the Export Encryption Key action. Encryption is now turned on, and the password is stored safely.

48
Demo 1 — Set Up Payment Export for a Bank Account Demo Story: When banks in corporate online banking offer their customers to upload payment files with payment instructions
exported directly from the ERP system, the user can save a lot of time and reduce errors compared to manually keying in payment
instructions in the online bank. This demo will show how to set up Microsoft Dynamics NAV to export payment data to an electronic
bank file that can be uploaded to corporate online banks.
Payment upload requires that the electronic bank file generated by the ERP system matches the file type that the bank is able to
receive and process. You can set up the bank account in Microsoft Dynamics NAV so that payments created for the related bank can
be converted to a file of the correct type.
Note: For demonstration purposes, use the WWB-Transfer bank account, which is set up with a demo account. The Bank Conv.
Payment journal batch is preset to exporting payments

49
What to do What to say Screenshots
1. In the Search box,
enter Bank
Accounts, and then
choose the related
link.
2. Select the bank
account WWB-
TRANSFER. On the
Home tab, in the
Manage group,
choose Edit.
3. Choose the OK
button.
First, you must set the right file format for the bank account that you want to pay from. The bank that holds the account will indicate what file types are supported. On the bank account card, in the dropdown menu, select the Payment Export Format field, and then choose BANKDATACONSERVCT. For import of bank statements, the Bank Statement Import Format field must be set to BANKDATACONVSERVSTMT. The Bank Name – Data Conversion field must be set up by pointing to the selected bank from the bank data conversion service. The lookup provides a list of supported formats. The list is filtered by the country/region on the bank and on the company setup Your bank account must have either have a bank account number filled or the IBAN field filled. For some formats, it is required to fill the Bank Clearing Standard and the Bank Clearing Code fields. For demo purposes, the IBAN field has been preset with information.

50
4. In the Search box,
enter Payment
Journals, and then
choose the related
link.
5. Choose the drop-
down button in the
Batch Name field.
6. In the General
Journal Batches
window, choose
New.
7. Validate that the
BANK CONV
payment has been
set up correctly
8. Choose the OK
button.
You use a specific batch in the Payment Journal window for the bank account that you want to pay your vendors from. In this batch, you will be creating vendor payments and exporting the payment data. The payment journal must allow export which is defined in the definition of the general journal batch by selecting the Allow Payment Export check box.

51
Demo 2 — Set Payment Information on a Vendor Card Demo Story: When you expect to pay a vendor on a recurring basis, there are efficiency gains from setting up default payment
details for the vendor. Once payment details are set up in the Vendor Card window, future purchase documents will automatically
be linked to the payment information and this will automate the creation of the payment line in the Payment Journal window.
What to do What to say Screenshots
1. In the Search box, enter
Vendors, and then
choose the related link.
2. Select vendor number,
10000 London
Postmaster, and then
double-click on the line
to open the Vendor Card
window.
3. In the Vendor Card
window, on the
Payments FastTab, in the
Preferred Bank Account
field, select ECA.
4. In the Payment Method
Code field, select
BNKCONVDOM.
5. Choose the OK button.
If you buy from a vendor on a recurring basis, you can set up payment details on the vendor card so that whenever you create purchasing invoices or lines in the journal for that vendor, the payment details are automatically filled with the payment details from the vendor card. Go to the vendor card and set the payment method code and the preferred bank account.

52
6. In the Search box, enter
Purchase Invoice, and
then choose the related
link.
7. On the Home tab, in the
New group, choose New.
8. On the General FastTab,
in the Buy-from Vendor
No. field, enter 10000.
9. In the Vendor Invoice
No. field, enter 3.
10. On the Lines FastTab, in
the Type field, enter
Item.
11. In the No. field, enter
1110.
12. In the Quantity field,
enter 10.
13. On the Invoicing FastTab,
in the Due Date field,
change the date to 30-
01-2015.
14. On the Home tab, in the
Posting group, choose
Post.
Going forward, when you create purchase documents in the system for this vendor (either in the Purchase Invoice window or in a journal), the payment details on the vendor card will automatically be linked to the new purchase document. This helps automate the generation of payment lines later in the Payment Journal window. Beware that when payment details are added to a vendor card, they will NOT automatically be linked to purchase documents that are already created in the system. To illustrate how new purchase documents are automatically linked to the vendor’s payment information, we create a purchase

53
invoice for the vendor London postmaster. In the next demo where we generate a line for this document in the Payment Journal window, we will see that the payment details are automatically filled.

- 54 -
Demo 3 — Create Payment Data in the Payment Journal and Export it to a Payment File Demo Story: You will create payment data in the Payment Journal window. To create the payment lines that need to be exported, you can either use the
Posted Purchase Invoices window as a starting point or enter payments directly in the payment journal.
What to do What to say Screenshots
1. In the Search box, enter Payment Journals, and then choose the related link.
2. Choose the drop-down button in the Batch Name field.
3. In the General Journal Batches window, select BANK CONV
4. Choose the OK button.
Go to the Payment Journal window and choose the batch for the bank account that you want to create a payment proposal for, in this case, BANK CONV.

- 55 -
You are now ready to start creating a payment proposal for WWB-Transfer in the payment journal. Note the following about fields in relation to payment export: Has Payment Export Error: If the value is Yes, then one or more errors exist for the journal line, which prevents creation of the payment file. Exported to Payment File: If this check box is selected, it means that the line has already been exported to a payment file. You can choose to export it again if you want to. Posting Date: The system will insert this date in the bank file as the dispatch date, meaning the date that you want the bank to process the payment. Document Type: Must be set to Payment. Recipient Bank Account: Must be filled with a vendor bank. For demo purposes the IBAN field has been preset with information.

- 56 -
5. On the Home tab, in the Prepare group, choose Suggest Vendor Payments
6. In the Suggest Vendor Payments window, in the Last Payment Date field, enter 2801-2015. In the Bal. Account Type field, select Bank Account. In the Bal. Account No. field, select WWB-TRANSFER.
7. Choose the OK button.
You can either create payment lines by manually creating lines in the payment journal or you can use the Suggest Vendor Payments function that will propose payments for open purchase documents in the system. In this demo, we use the Suggest Vendor Payments function to find documents where the vendors must be paid on the 31st of January 2015 at the latest. Please note that as a new thing, the Suggest Vendor Payments function has a Skip Exported Payments check box. Note that setting the Bal.Account No. and Bal. Account Type fields will preset the fields in the journal correctly.

- 57 -
8. Select the first line, and then in the Message to Recipient field, enter “From Cronus, Invoice 1111.”
9. Select the three lines with the value set to 31-01-2015 in the Applies-to Doc. Due Date field.
10. On the Home tab, in the Manage group, choose Delete.
The system has found three open purchase documents and created payment lines for them in the journal. Now you need to decide which of the open documents you want to pay. Also, we add a message to the payment to vendor number 10000 telling the vendor that the payment comes from Cronus and referring to his invoice number 1111. We can see this number in the Applies-to-Ext. Doc. No. field.

- 58 -
11. On the Home tab, in the Bank group, choose Export Payments to File.
12. Choose OK on the error message that appears.
We are now satisfied with the payment proposal and we export the payment data to an electronic bank file so that we can upload this file with payment instructions to our online bank. We select the function that creates the payment file, but we get an error message. Note: The payment method must be set to either BNKDOMCONV or BNKINTCONV to get to the correct format. This can be set up as default on the vendor card as well.

- 59 -
13. Go to the first line that has Yes in the field, and then choose the link.
14. On the same line, in the Recipient Bank Account field, select UTR in the dropdown.
15. Go to the next line that has no value in the Recipient Bank Account field, and then select UTR in the dropdown.
We close the error message box, and the system indicates that two lines have errors that block the creation of the payment file. We choose the Yes value in the Has Payment Export Error field, and we can then read in the FactBox to the right what the problem is. The message says that the payment date is more than 365 days ahead and that we can adjust the posting date. When we double-click on the FactBox line, we get more information from the service provider.

- 60 -
16. On the Home tab, in the Bank group, choose Export Payments to File.
17. In the Export File window, choose Open. A window opens with bank file in the format that have been specified with bank data conversion service setup
18. Close the window with the XML-file.
We try to export again and this time there is no data missing. The system gives us the option to either view the bank file that has been created or save it. We want to check the file before saving it to a drive, so we select Open.

- 61 -
19. In the Payment Journal window, on the Home tab, in the Bank group, choose Export Payments to File.
20. In the Export File window, choose the Save button.
Back in the payment journal, we choose the Export Payments to File function again and this time we want to save the file. After saving the file on the drive, we can upload it to the online bank for processing.

- 62 -
Demo 4 – View a Register with Exported Payments Demo Story: You might want to check what payments that have been exported to an electronic bank file.
What to do What to say Screenshots
1. In the Search box,
enter Credit Transfer
Register, and then
choose the related
link.
2. Go to the last posted
line.
3. On the ribbon, choose
Entries.
If you want to view what payments have been exported previously and into which files, you can go to the Credit Transfer Register window. In the bottom of the list, you find a line for the bank file that was created in the previous demo. When you choose Entries on the Home tab, in the Process group, a new window opens to show

- 63 -
the details of the payment lines that were exported to the file.
What to do What to say Screenshots
4. In the Search box, enter Credit
Transfer Register, and then choose
the related link.
5. Go to the last posted line.
6. On the Home tab, in the Process
group, choose Entries.
If you want to view what payments have been exported previously and into which files, you can go to the Credit Transfer Register window. In the bottom of the list, you find a line for Payment Transfer file that was created in the previous demo. When you choose Entries on the Home tab, in the Process group, a new window opens to show the details of the payment lines that were exported to the file.

- 64 -
Demo 5 – Prepare for Bank Account Reconciliation by Importing Bank Statements Using the Bank Data Conversion Service Demo Story: Importing bank statements combined with automatic matching against bank ledger entries eliminates trivial, repetitive, and time-consuming
tasks and makes bank reconciliation both fast and easy to do. Once in a while, for example, biweekly, you do a periodic reconciliation of the bank account
ledger entries by matching the bank statement lines for a period to the posted bank account entries. The integration to Bank Data Conversion Service
enables you to import in the format that your bank provides without changing the data exchange setup.
Note that it is also possible to import the bank statement file to the Payment Reconciliation Journal window to prepare for application of payments to their
related business documents. For more information, see the “Reconcile Payments” demo script for Microsoft Dynamics NAV 2015.
The following file to be used for demonstration contains three statement lines that can be matched manually: Bank Conversion Demo Statement.txt
What to do What to say Screenshots
1. In the Search box, enter Bank
Account Reconciliations, and then
choose the related link.
2. On the Home tab, in the Manage
group, choose New.
3. In the Bank Account No. field,
select WBB-Transfer
4. In the Statement No. field, enter 1.
5. In the Statement Date field, enter
26-01-2015
First, you create a new bank reconciliation record for your bank account. Since WWB-transfers has not been used before, the statement ending balance is 0, and the statement number can be set to 1. The Bank Account Ledger Entries pane shows the three purchase invoice that were posted in the previous steps.

- 65 -
What to do What to say Screenshots
6. On the Home tab, in the Bank
group, choose Import Bank
Statement.
7. Select the bank statement file from
its location on the drive. Use the
file that is attached to this
document.
You import the bank statement file, and lines will now be populated in the Bank Statement Lines pane on the left side.

- 66 -
What to do What to say Screenshots
8. Match the bank statement lines to
the bank account ledger entries
9. To manually match select the two
lines that should match and select
Match Manually action.
After importing the file, it is possible to hopefully match the lines automatically or manually.

- 67 -
VAT 1. VAT Clauses
Source: Microsoft IT Academy – 80663 - What's New Functional in Microsoft Dynamics NAV 2015 - Module 05: Other Application Enhancements - VAT
Clauses, Microsoft
VAT clauses are used to provide descriptive information about VAT on sales document. VAT clause is displayed on a printed document alongside the VAT identifier or VAT rate. User can define VAT clauses in Departments/Financial Management/Setup/VAT Posting Group/VAT Clauses.
VAT clause is linked with VAT posting setup. So the combination of VAT business posting group and VAT product posting group can carry a VAT clause.
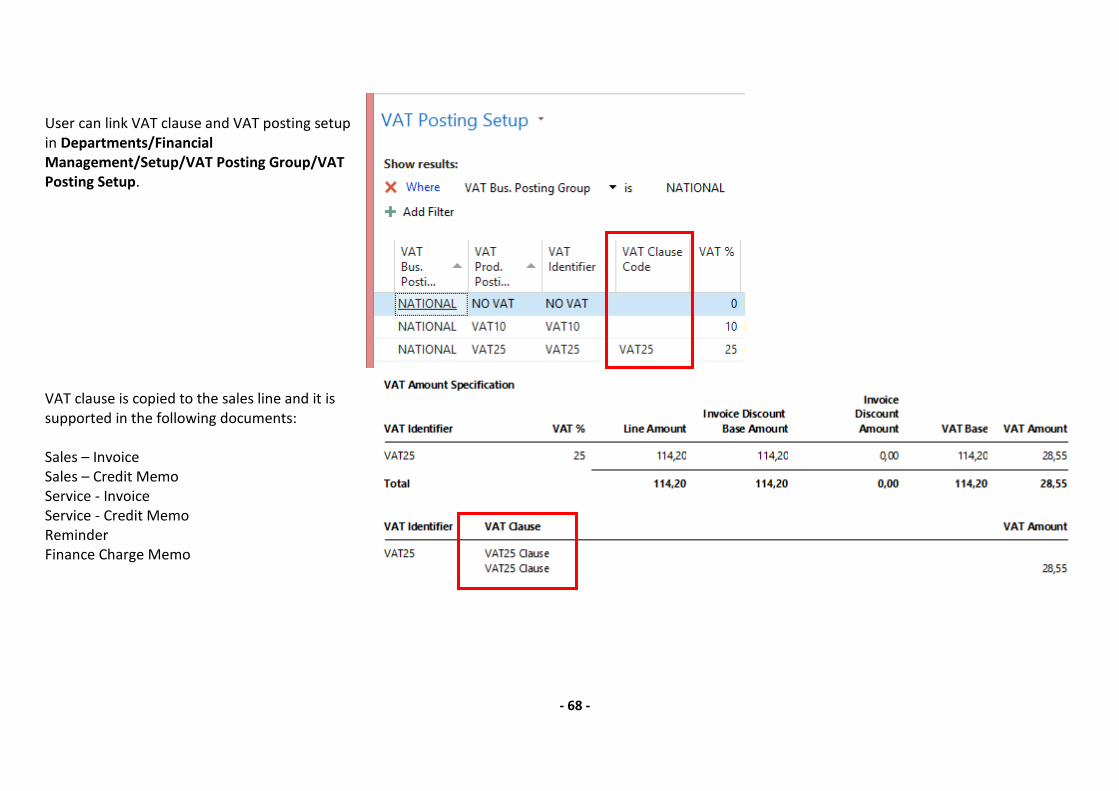
- 68 -
User can link VAT clause and VAT posting setup in Departments/Financial Management/Setup/VAT Posting Group/VAT Posting Setup.
VAT clause is copied to the sales line and it is supported in the following documents: Sales – Invoice Sales – Credit Memo Service - Invoice Service - Credit Memo Reminder Finance Charge Memo

- 69 -
2. VAT Registration No. Verification Source: Microsoft IT Academy – 80663 - What's New Functional in Microsoft Dynamics NAV 2015 - Module 05: Other Application Enhancements - VAT
Registration No. Verification, Microsoft
VAT Registration No. Verification uses EU web service to verify whether provided VAT Registration No. for Contact, Vendor or Customer is valid. EU web service URL is defined in General Ledger Setup in VAT Reg. No. Validation URL field. Valid URL is http://ec.europa.eu/taxation_customs/vies/services/checkVatService

- 70 -
It also checks formats of VAT Registration No. defined per country. To set VAT Registration No formats go to Departments/Administration/Application Setup/General/Countries/Regions, select country and run VAT Reg. No. Formats from Navigate tab.
VAR Registration No. Check can be called from customer, vendor or contact card by clicking assist-edit button next to VAT Registration No. field.

- 71 -
To run the check run Verify Registration No. action on Home tab.

Microsoft Dynamics NAV 2015 Finance
- 1 -
Microsoft Dynamics NAV 2015 Reports Enhancements
1. Word Document Reports Source: Demo Script – Word Document Reports and Custom Layout, Microsoft
Benefits:
Users are familiar with Word
Flexible layout
WYSIWYG
Limitations
Not suitable for complex layout or very large documents
Conditional formatting is not supported
Number formatting limited to built-in NAV numbers
Lab 1 — Using Report Selector to run Report 1306 Instead of Report 206
Lab story: Microsoft Dynamics NAV 2015 ships with the following a set of new and simplified sales document reports:
1304 Mini Sales – Quote
1305 Mini Sales – Confirmation
1306 Mini Sales – Invoice
1307 Mini Sales – Credit Memo
Out of the box, the customary reports 204, 205, 206, and 207 are still enabled by default. To use the new reports, you set them up by using the report
selection feature. In this lab, the required steps to use the new sales document reports are shown

Microsoft Dynamics NAV 2015 Finance
- 2 -
What to do What to say Screenshots
1. Open the Report Selection – Sales
page by doing one of the following:
• In the Search box, enter Report
Selection – Sales, and then
choose the related link.
• In the navigation pane, choose
Departments, Administration, IT
Administration, and then
Reports.
For the remaining labs, instead of running the default report “206 Sales – Invoice”, we want to run the newly designed Sales Invoice report, that is, report “1306 Mini Sales – Invoice.” To do this, we will use the Report Selection feature.
2. In the Report Selection – Sales
window, do the following:
a. Set the Usage field to Invoice.
b. In the Report ID field, replace
206 with 1306.
c. Choose the OK button.
Set up the report selection to run report 1306 instead of report 206 when printing invoices.

Microsoft Dynamics NAV 2015 Finance
- 3 -
Lab 2 — Managing Report Layouts
Lab story: Microsoft Dynamics NAV 2015 enables reports to have a single built-in RDLC and Word layout, shared among tenants, as well as any number of
customized layouts per tenant. To browse and manage which layout is currently used for a given report, a new Report Layout Selection list page has been
introduced.
In this lab, we will use the Report Layout Selection page to switch between and run the RDLC and Word layouts that are shipped as part of the new Sales
Invoice report 1306.
What to do What to say Screenshots
1. Open Report Layout Selection page
by doing one of the following:
• In the Search box, enter Report
Layout Selection, and then
choose the related link.
• In the navigation pane, choose
Departments, Administration, IT
Administration, Reports, and
then Report Layout Selection.
• In the Small Business Role
Center, on the Actions tab,
choose Setup, Company
Information, and then choose
Report Layouts.
2. Ensure that the Company Name
field is set to the correct company
because reports layouts are
company-specific.
The Report Layout Selection page lists all of the reports that are available for the company that is specified in the Company field at the top of the window. The Selected Layout field specifies the layout that is currently used for a given report. A report can be set up with more than one report layout, which you can then switch among as needed.

Microsoft Dynamics NAV 2015 Finance
- 4 -
Depending on the layouts that are available for a report, you can choose to use a built-in RDLC layout, a built-in Word layout, or a custom layout. From the Report Layout Selection page, it is also possible to manage custom layouts for reports.
3. In the list, locate the document
report 1306 Sales – Invoice by doing
one of the following:
• Scroll down through the list.
• Filter on the Report ID equal to
1306.
4. Select the row for report 1306.
5. Choose the down arrow in the
Selected Layout field to show the
options (RDLC, Word, and Custom).
First we will have a look at the new report 1306 Sales - Invoice, which has a built-in RDLC and Word layout. Out of the box, it does not have any custom layouts – we will add these in later labs.

Microsoft Dynamics NAV 2015 Finance
- 5 -
As you can see, the RDLC (built-in) is typically the layout that selected by default. This can, however, be controlled by using the Default Layout property on the specific report object in Microsoft Dynamics NAV Development Environment. Notice that the page also contains a Custom Layouts FactBox. This lists any available custom layouts for a selected report in the list. If there are no custom layouts for the report, then you will have to create one first.

Microsoft Dynamics NAV 2015 Finance
- 6 -
6. In the row for report 1306, set the
Selected Layout field to RDLC (built-
in).
7. On the Home tab, in the Report
group, choose Run Report.
8. In the resulting report request page,
use default values, and then select
the Print button and choose PDF.
9. Open and inspect the resulting PDF
file for report, which is based on the
RDLC layout.
We will now select and run the built-in RDLC layout for report 1306 Sales – Invoice from the Report Layout Selection list page.

Microsoft Dynamics NAV 2015 Finance
- 7 -
10. In the Report Layout Selection
page, select the line for report 1306,
and then set the Selected Layout
field to Word (built-in).
11. On the Home tab, in the Report
group, choose Run Report.
12. In the resulting report request page,
use default values, and the select
the Print button and choose PDF.
[Note: This might not work for all
client setups because it relies on
server-side PDF conversion. As an
alternative, use the Preview option
on the request page, which will
result in a Word document.)
13. Open and inspect the resulting PDF
file for the report, which is based on
the Word layout.
Finally, we will change the layout to the built-in Word layout and then run the report.

Microsoft Dynamics NAV 2015 Finance
- 8 -
Lab 3 — Customize Report 1306 Sales Invoice Word Layout: Simple Formatting
Lab story: Microsoft Dynamics NAV 2015 enables end users to customize RDLC and Word based report layouts. By default, a report will have a built-in
report layout, which can be either an RDLC report layout or Word report layout, or both. You cannot modify built-in layouts. However, you can create your
own custom layouts that enable you to change the appearance of a report when it is viewed, printed or saved. You can create multiple custom report
layouts for the same report, and then switch the layout that is used by a report as needed.
To create a custom layout, you can either make a copy of an existing custom layout or add a new custom layout, which in most cases is based on a built-in
layout. When you add a new custom layout, you can choose to add an RDLC report layout type, Word report layout type, or both. The new custom layout
will automatically be based on the built-in layout for the report if one is available. If there is no built-in layout for the type, then a new blank layout is a
created, which you will have to modify and design from scratch.
This lab showcases how non-technical end users, such as Annie or Stan, can customize the sales invoice document report by adding a new custom Word
layout based on the built-in Word layout, changing the formatting to the desired visual identity, and setting the new custom layout to the active layout for
the sales invoice report.

Microsoft Dynamics NAV 2015 Finance
- 9 -
What to do What to say Screenshots
1. Open Report Layout Selection
page by doing one of the
following:
• In the Search box, enter Report
Layout Selection, and then
choose the related link.
• In the navigation pane, choose
Departments, Administration, IT
Administration, Reports, and
then Report Layout Selection.
• In the Small Business Role
Center, on the Actions tab,
choose Setup, Company
Information, and then choose
Report Layouts.
2. Ensure that the Company Name
field is set to the correct company
because reports layouts are
company specific.
3. In the list, locate the document
report 1306 Sales – Invoice by
doing one of the following:
• Scroll down through the list.
• Filter on the Report ID equal to
1306.
The normal starting point for customizing a report is from the list of reports in the application, i.e., from the Report Layout Selection page. A contextual option, e.g., from the request page, is not yet supported. As we want to customize the 1306 Sales Invoice, the first step is to browse to this in the report list

Microsoft Dynamics NAV 2015 Finance
- 10 -
4. Select the row for report 1306, and
then on the Home tab, in the
Process group, choose Custom
Layouts.
The Custom Layouts page is used to create and manage custom layouts for a selected report. Out of the box, the list is empty, because there are no custom layouts. Notice that the Custom Report Layouts page can be opened by itself by searching for the page or using the Departments, or, as here, from the context of a given report. In the case of the latter, the page is filtered to the selected report ID when opened. If opened on its own, the page lists all custom layouts across all reports, which is useful when

Microsoft Dynamics NAV 2015 Finance
- 11 -
managing layouts for multiple reports. The Custom Layouts page is also accessed from the Selected Layout field on Report Layout Selection page. In this case, the Custom Layouts page works as a lookup. In this mode, it is still possible to create and modify layouts. However, when you select a layout in Custom Layouts page, and then choose the OK button to close the page, the selected layout becomes the active layout for the report.

Microsoft Dynamics NAV 2015 Finance
- 12 -
5. On the Home tab, in the New
group, choose New to insert a new
custom layout. The Insert Built-in
Layout for a Report window
appears. The ID and Name fields
are automatically filled in
6. To add a custom Word report
layout type, select the Insert Word
Layout check box, and then choose
the OK button,
7. In the Custom Report Layouts
page, in the Description field,
rename the newly created custom
layout to “My Word layout”.
The built-in layouts themselves cannot be edited, therefore we are going to create a new Word report layout based on (or in other words, a copy of) the built-in Word layout, and then customize that layout further. The new custom layout appears in the Custom Report Layouts page. If a new layout is based on a built-in layout, then it has the words Copy of Built-in Layout in the Description field. If there was no built-in layout for the report, then the new layout has the words New Layout in the Description field, which indicates that

Microsoft Dynamics NAV 2015 Finance
- 13 -
custom layout is blank. The Custom Report Layouts list includes a Type column that indicates whether the custom layout is RDLC or Word based. It also includes the Company Name column that allows you to specify whether the layout should be company specific. In this case, we have made the custom layout apply to all companies by leaving the field blank.

Microsoft Dynamics NAV 2015 Finance
- 14 -
8. On the Home tab, in the Process
group, choose Edit Layout.
With the custom layout created, we will now edit it in Word. Note that the Edit function relies on client-side automation, and therefore requires that the Microsoft Dynamics NAV 2015 Windows client and Word 2013 are installed. If you are using the Microsoft Dynamics NAV 2015 Web client or a device, the custom layout can be edited by manually exporting the layout to a Word (.docx) file, editing it in Word, and then importing the layout file back into the appropriate report.

Microsoft Dynamics NAV 2015 Finance
- 15 -
9. Look at the Word report layout
content.
A Word report layout is a Word document with content controls laid out in either free form or in table structures, which can even be repeating. The content controls themselves map to fields in the report dataset. In this lab, we will continue changing some of the formatting, and then in a later lab look at how to add content controls (fields).

Microsoft Dynamics NAV 2015 Finance
- 16 -
10. Change the fonts as follows:
a. Select all text (Ctrl+A).
b. On the Home tab, in the Font
group, change the font to
Comic Sans.
11. Change the font size and color of
document title and document no.
as follows:
a. In the header, select the
DocumentTitle_Lbl control, and
then increase font size a
couple of steps and change
the color to Blue, Accent 1 (top
row in normal colors).
b. Repeat for the DocumentNo
control.
12. Add a style to the item lines item
table as follows:
a. Select the item lines table.
b. On the Design tab under Table
Tools, expand the Table Styles
control.
c. Select Grid Table 4, accent 1
(blue, with solid header and
alternating rows).
13. Insert a glowing “Enjoy Microsoft
Dynamics NAV2015!” greeting as
follows:
a. Add text to the end of the
document.
b. Select the text, and then on
Home tab, in the Font group,
select the A in the Text Effects
and Typography field.
In Word, we are going to make some format customizations and insert a greeting.

Microsoft Dynamics NAV 2015 Finance
- 17 -
c. Choose second entry in
second row (Gradient Fill –
Blue, Accent 1, Reflection).
d. Change the font size to 12.
14. Save the changes and close the
Word document.
15. On the confirmation dialog that
appeared when the layout was
opened for editing, choose Yes to
import the revised layout in the
Microsoft Dynamics NAV client.
With the changes in place, the Word layout is saved and imported back into Microsoft Dynamics NAV 2015.
16. In the Custom Report Layouts
page, select the new custom
layout, and then on the Home tab,
in the Report group select Run
Report.
17. In the request page, use default
values, choose the Print button,
and then choose PDF.
18. Open and inspect the result file.
Validate the font, color and size
changes, the table style, and the
greeting.
Before setting the new custom layout as the active layout for the sales invoice report, we are going to test it out by running it from within the Custom Report Layouts page.

Microsoft Dynamics NAV 2015 Finance
- 18 -
19. Open Report Layout Selection
page again.
20. Locate and select the report 1306
Sales Invoice,
21. Change Selected Layout field to
Custom
Being satisfied with the new layout, we are now going to make this the default layout for the sales invoice report.

Microsoft Dynamics NAV 2015 Finance
- 19 -
22. In Custom Report Layouts page
that appears, select layout “My
Word layout” that you just created,
and then choose the OK button to
close the lookup.
23. Verify that the Selected Layout field
is now set to Custom and the
Custom Layout Description field is
set to “My Word layout” for the
report 1306.
To do this, we will set the Selected Layout field in the Report Layout Selection page to the newly created custom layout. Note that if the Selected Layout field is already set to Custom, then the actual custom layout is changed by using the lookup in the Custom Layout Description field instead.
24. Open Posted Sales Invoices by
doing one of the following:
• In the Search box, enter Posted
Sales Invoices, and then choose
the related link.
• In the navigation pane, choose
Posted Documents, and then
Posted Sales Invoices.
25. Select a sales invoice from the list,
and then on the Home tab, in the
Invoice group, choose Print.
Finally, we will run the sales invoice from a real application context, e.g., Posted Sales Invoices, to verify that the new custom layout is used.

Microsoft Dynamics NAV 2015 Finance
- 20 -
26. In the print dialog, use default
values, select the Print button, and
then choose PDF.
27. Verify that the resulting PDF file is
using the custom layout “My Word
layout” that you created previously.

Microsoft Dynamics NAV 2015 Finance
- 21 -
Lab 4 — Customize 1306 Sales Invoice Word Layout: Adding Fields and Changing Structure
Lab story: Microsoft Dynamics NAV 2015 enables end users to customize RDLC and Word based report layouts, both from a formatting point of view, as
well as changing the structure and adding new fields from the report’s dataset.
This lab showcases how power users, such as Sean, or technically experienced personas, such as Annie or Stan, can customize the Word based document
reports, like the Sales Invoice report, to include desired fields and layout structure. The lab assumes that lab 3 has been completed, and that there is already
a custom layout available for the document report 1306 Sales Invoice. If this is not the case, the lab can still be run but with the small variation that a new
custom layout based on the built-in Word layout should be used, instead of copying an existing custom layout.
What to do What to say Screenshots
1. Open Custom Report Layouts page by doing
one of the following:
• In the Search box, enter Custom Report
Layouts, and then choose the related link.
• In the navigation pane, choose
Departments, Administration, IT
Administration, and then Reports.
First, we want to make a copy of the previously created custom report and work on that. Once the layout is completed and tested, we will switch over to using the layout created in this lab. Rather than opening Custom Report Layouts from the context of a specific report in the Report Layout Selection list, we are now going to open it directly. Note that doing this will display all custom layouts unfiltered across all reports in the tenant. In this case though, we still only have a single entry from the previous lab.

Microsoft Dynamics NAV 2015 Finance
- 22 -
An alternative to opening the Custom Report Layout page on its own, is to open it for a specific report from the Report Layout Selection page, and then remove the report ID filter which has been set.
2. Select the “My Word layout” row, and on the
Home tab, in the New group, choose Copy.
3. In the Description field, rename the newly
created layout to “My advanced Word layout”.
We are going to add fields to the custom layout made in the previous lab. However, instead of modifying that layout directly, we are going to create a copy. This lets you work with and test the layout without risking impact to an actively used layout.
4. Select the “My advanced Word layout” row, and
then on the Home tab, in the Process group,
choose Export Layout.
5. In the Export File dialog, select Save, and save
the file to a preferred device location, such as
the Desktop.
6. Open the document from the saved location in
Word 2013.
With the custom layout created, we will now edit it in Word. In this lab, we will use Import Layout and Export Layout instead of Edit Layout, as you would do when using the Microsoft Dynamics NAV Web client.

Microsoft Dynamics NAV 2015 Finance
- 23 -
7. Select a table structure in the layout, such as the
sales lines.
8. In Word, on the Layout tab, in the Table group,
choose View Gridlines.
As Word report layouts often use hidden table structures to align content controls (such as field mappings), enabling gridlines in Word is quite useful to understand the structure. As can be seen, the sales invoice header fields are all arranged in tables for easier alignment in Word.

Microsoft Dynamics NAV 2015 Finance
- 24 -
9. In Word, do one of the following:
• Right click the ribbon, and then select
Customize the Ribbon.
• On the File menu, choose Options, and then
select Customize Ribbon tab in the Word
Options dialog box.
10. In the right pane, select the Developer check
box, and then choose OK.
11. Select the Developer tab that is now visible in
Word.
To insert new fields from the report dataset in the Word layout, we need to take advantage of the custom XML mapping feature in Word. This feature is available in the Developer tab in Word, which is hidden by default, so the first task is to enable it.
12. On the Developer tab, choose XML Mapping
Pane.
13. In the XML Mapping pane, in the Custom XML
Part dropdown list, choose the custom XML
part for the 1306 Sales Invoice. Typically, this is
last in the list. The name of the custom XML
part has the following format:
urn:microsoft-dynamics-
nav/reports/Mini_Sales_Invoice/1306
Word layouts in Microsoft Dynamics NAV 2015 rely on mapping content controls to dataset fields. To facilitate this, Word’s custom XML feature is used.

Microsoft Dynamics NAV 2015 Finance
- 25 -
14. The XML Mapping pane now displays the labels
and field controls that are available for the
report. Browse the structure by expanding the
tree and notice heading and different line
structures.
A Word document can contain one or more embedded XML parts with data. When Word layouts are exported or invoked for editing from Microsoft Dynamics NAV 2015, the layout will have a specific Microsoft Dynamics NAV XML ml part added, which represents the dataset structure of the report. This structure is then used when mapping the dataset to content controls. Therefore, first we need to show the XML Mapping pane in Word, and then select the proper embedded XML part that represents the report dataset. The name of the custom XML part has the following format: urn:microsoft-dynamics-nav/reports/report_name/ID Where report_name is the normalized name that is assigned to the report as specified by the report's Name Property in the

Microsoft Dynamics NAV 2015 Finance
- 26 -
Microsoft Dynamics NAV Development Environment, and ID is the identification number of the report.
15. In the document header table, locate the empty
cell in the last row and second last column.
16. Insert the text marker by clicking in the cell.
17. In the XML Mapping pane, expand the header
structure and locate ShipmentDate_Lbl.
18. Right click on ShipmentDate_Lbl, select Insert
Content Control, and then choose Plain Text.
19. Insert the text marker in the last cell in the row.
20. In the XML Mapping pane, locate
ShipmentDate.
21. Right-click on ShipmentDate, select Insert
Content Control, and then choose Plain Text.
We are going to add a Shipment date field and a corresponding Shipment data label (for the localized field) name to the document header. We will add these to the empty cells at the bottom of the header, and to the right of the ShipmentMethodDescription field. When inserting the fields from the XML Mapping pane, Word inserts a content control at the text marker in the document, and links that content control to the xpath of the field in the custom XML part that represents the dataset. The content control also gets a visible name/caption which corresponds to the field name – however, this does not determine the mapping. The

Microsoft Dynamics NAV 2015 Finance
- 27 -
name can be changed, but the mapping remains the same. To remap a content control, either delete the content control and add a new one, or highlight the content control, find the correct field in the XML Mapping pane, right click it and then select Map to Selected Content Control,

Microsoft Dynamics NAV 2015 Finance
- 28 -
22. Save the document in Word.
23. Go back to the Custom Report Layouts page in
Microsoft Dynamics NAV 2015 and make sure
the new custom layout “My advanced Word
layout” is selected.
24. On the Home tab, in the Process group, choose
Import layout
25. In the Import Word Document dialog box,
browse to the location where you exported the
layout in the beginning of the lab, select the
edited Word file, and choose OK to import the
layout.
Sean could have continued to add, delete, or move fields around, but for this lab, Sean is content, so he saves his work and imports the layout document back into the new custom Word layout in Microsoft Dynamics NAV.

Microsoft Dynamics NAV 2015 Finance
- 29 -
26. In the Custom Report Layouts page, select the
“My advanced Word layout” row, and then on
the Home tab, in the Report group, select Run
Report.
27. In the resulting request page, use default
values, select the Print button, and then choose
PDF.
28. Inspect the resulting report and validate that
Shipment Date is included.
Before setting the new custom layout as the active one, Sean runs it to validate it works as intended.
29. Open Report Layout Selection page
30. Browse to and select the report 1306 Sales
Invoice.
31. Assuming that Selected Layout field is already
set to Custom, change Custom Layout
Description field to the new “My advanced
Word layout” layout.
32. Open Posted Sales Invoices by doing one of the
following:
• In the Search box, enter Posted Sales
Invoices, and then choose the related link.
Finally, Sean switches over to use the newly created custom layout, which the ShipmentDate, as the active sales invoice Word layout.

Microsoft Dynamics NAV 2015 Finance
- 30 -
• In the navigation pane, choose Posted
Documents, and then Posted Sales Invoices.
33. Select a sales invoice from the list, and then on
the Home tab, in the Invoice group, choose
Print.
34. In the print dialog, use default values, select
Print, and then PDF.
35. Validate that the resulting PDF is using the
custom layout “My advanced Word layout” that
you created previously.

Microsoft Dynamics NAV 2015 Finance
- 31 -
Lab 5 — Creating a new Word Document Report Layout Based on an Existing Word Template
Lab story: Microsoft Word supports the creation of great looking documents. Unless a visual identity has already been defined by a designer though, it is
often much easier to start with an existing Word template, for example, from the community, than from scratch (although possible), and then tweak the
templates visual design instead.
In this lab, we will look at how a power user such as Sean can take an online Word template and add content controls that map to the Microsoft Dynamics
NAV report dataset to create a custom sales invoice to fit the desired visual identity of his company relatively easy.
What to do What to say Screenshots
1. Browse for invoice templates in Word online, by
doing one of the following:
• Open Word 2013 and search for sales
invoice.
• In an existing Word 2013 session, on the File
menu, select New, and then search for sales
invoice.
2. In the search result, look through the different
suggested templates by selecting one and
viewing the preview pane. Use left and right
arrow buttons to shift through templates that
have been found.
3. Locate the Rust template, and select Create in
the preview pane to create a document from
the template.
4. Save the document to a desired file location.
First, Sean is selecting the template he would like to work on. As Microsoft Dynamics NAV Word layouts cannot be based on Word .dotx template files directly, Sean will have to create a document using the template. Sean opens Microsoft Word 2013 and browses through available sales invoice templates using the preview capability. He ends up liking the Rust template the most, and selects Create to make a document based on this template.

Microsoft Dynamics NAV 2015 Finance
- 32 -
5. Open Report Layout Selection page by doing
one of the following:
• In the Search box, enter Report Layout
Selection, and then choose the related link.
• In the navigation pane, choose
Departments, Administration, IT
Administration, and then Reports,
• In the Small Business Role Center, on the
Actions tab, choose Setup, Company
Information, and then choose Report
Layouts.
6. Ensure that the correct company is specified in
the Company Name field, because reports
layouts are company specific.
With the Word template in a document, Sean creates a new Sales Invoice custom layout in Microsoft Dynamics NAV 2013.

Microsoft Dynamics NAV 2015 Finance
- 33 -
7. Locate the document report 1306 Sales –
Invoice in the list by doing one of the following:
• Scroll down through the list.
• Filter on the Report ID equal to 1306.
8. Select the row for report 1306, and on the
Home tab, in the Process group, choose
Custom Layouts.
9. On the Home tab, in the New group, choose
New to insert a new custom layout. The Insert
Built-in Layout for a Report window appears.
The ID and Name fields are automatically filled
in.
10. To add a custom Word report layout type,
select the Insert Word Layout check box, and
then choose OK.
11. In the list, change the Custom Layout
Description field of the newly created custom
layout to “My Rust Word layout”.
12. On the Home tab, in the Process group, select
Import layout.
13. In the Import Word Document dialog, browse
to the location where you saved the Word
document Word document that is based on the
Rust template (in the beginning of the lab),
select the document, and then choose OK to
import the layout.
As the newly created Word custom layout just contains a copy of the built-in Word layout, Sean imports his template document created in the beginning of the lab to overwrite the content.
14. On the Home tab, in the Process group, choose
Edit Layout.
With the new custom layout containing the Rust template, Sean opens the custom layout for editing to start inserting content controls that represent

Microsoft Dynamics NAV 2015 Finance
- 34 -
data from Microsoft Dynamics NAV. Note that the Edit function relies on client-side automation, and therefore requires that the Microsoft Dynamics NAV 2015 Windows client and Word 2013 are installed. If you are us the Microsoft Dynamics NAV 2015 Web client or a device, the custom layout can be edited by exporting the layout to a Word file, editing it in Word, and then importing the layout file back into the appropriate report. Also note that when you edit or export the custom layout, the required custom XML part is automatically inserted. Instead of importing the Rust template first before editing or exporting it, Sean could also have exported only the custom XML part from the Export Word XML Part in the General group on the Actions tab. Then, he could have

Microsoft Dynamics NAV 2015 Finance
- 35 -
manually inserted XML part into the template in Word, done all the content controls, and imported the custom layout into Microsoft Dynamics NAV. However, the lab steps described here are easier to understand.
15. Select a table structure in the layout, for
example, the sales lines.
16. In Word, on the Layout tab, in the Table group,
choose View Gridlines.
As Word report layouts often use hidden table structures to align content controls (such as field mappings), enabling gridlines in Word is quite useful to understand the structure. As can be seen, the sales invoice header fields are all arranged in tables for easier alignment in Word.

Microsoft Dynamics NAV 2015 Finance
- 36 -
17. In Word, do one of the following:
• Right click the ribbon, and then select
Customize the Ribbon.
• On the File menu, choose Options, and then
select Customize Ribbon tab in the Word
Options dialog box.
18. In the right pane, select the Developer check
box, and then choose OK.
19. Select the Developer tab that is now visible in
Word.
To insert new fields from the report dataset in the Word layout, we need to take advantage of the custom XML mapping feature in Word. This feature is available in the Developer tab in Word, which is hidden by default, so the first task is to enable it.
20. On the Developer tab, choose XML Mapping
Pane.
21. In the XML Mapping pane, in the Custom XML
Part dropdown list, choose the custom XML
part for the 1306 Sales Invoice. Typically this is
the last in the list. The name of the custom XML
part has the following format:
urn:microsoft-dynamics-
nav/reports/Mini_Sales_Invoice/1306
Word layouts in Microsoft Dynamics NAV 2015 rely on mapping content controls to dataset fields. To facilitate this, the Words custom XML feature is used.

Microsoft Dynamics NAV 2015 Finance
- 37 -
22. The XML Mapping pane now displays the labels
and field controls that are available for the
report. Browse the structure by expanding the
tree and notice heading and different line
structures.
A Word document can contain one or more embedded XML parts with data. When Word layouts are exported or invoked for editing from Microsoft Dynamics NAV 2015, the layout will have a specific Microsoft Dynamics NAV XML part added that represents the dataset structure of the report. This structure is then used when mapping the dataset to content controls. Therefore, first we need to show the XML Mapping pane in Word, and select the proper embedded XML part for the report dataset. The name of the custom XML part has the following format: urn:microsoft-dynamics-nav/reports/report_name/ID Where report_name is the normalized name that is assigned to the report as specified by the report's Name Property in the Microsoft Dynamics NAV

Microsoft Dynamics NAV 2015 Finance
- 38 -
Development Environment, and ID is the identification number of the report.
23. Locate and select the existing Date content
control.
24. Delete it and make sure the text cursor is still
located to the right of the Date text.
25. In the XML Mapping pane, expand the header
structure and locate DocumentData.
26. Right click on DocumentDate, select Insert
Content Control, and then choose Plain Text.
With the XML Mapping pane enabled, Sean can finally start adding content controls for the various placeholders in the Rust based custom layout. As Sean is not going to use the layout in any foreign locale, he is just going to use hardcoded text strings for captions, thus avoiding spending time on inserting content controls for labels. The Rust template already has some content controls. As we are not interested in these controls other than the placeholder, we are going to replace these with Microsoft Dynamics NAV content controls instead. First, Sean is adding the document date in the header.

Microsoft Dynamics NAV 2015 Finance
- 39 -

Microsoft Dynamics NAV 2015 Finance
- 40 -
27. Create additional header content controls by
repeatedly placing the text cursor in the Word
layout and inserting a content control for the
required field. To insert a control, find it in the
XML Mapping pane, right-click it, select Insert
Content Control, and then choose Plain Text.
Sean repeats adding header information to the layout, such as invoice date and number, company address, customer address, ship to address, sales person, shipping method, and so on. As part of this, Sean tweaks the structure a bit, for example, by adding more address lines because Microsoft Dynamics NAV supports more than those included in the generic Rust template.

Microsoft Dynamics NAV 2015 Finance
- 41 -
28. To complete the header, delete the logo place
holder from the Rust template, and then merge
the cell where it was contained with the one to
the right. Then, place the cursor in the cell, and
in the XML Mapping pane, right-click
CompanyPicture, select Insert Content Control,
and the choose Picture.
29. Right-click the inserted picture content control,
and then choose Size and Position.
30. In the Layout dialog box, on the Size tab,
specify the picture dimensions that correspond
to the logo that is used. The Cronus demo data
logo has a height of 3 cm and width of 6 cm.
Sean then inserts a logo placeholder.

Microsoft Dynamics NAV 2015 Finance
- 42 -
31. Delete all lines except the first line between the
lines header and the totals part. To do this,
select the rows, right click, and then choose
Delete Rows.
32. Select the remaining row in the lines list.
33. In the XML Mapping pane, go to the nested
Line section at the bottom.
34. Right click the Line entry, select Insert Content
Control, and then choose Repeating.
Lines and totals are just handled as a number of fixed, empty lines in the Rust template. As the number of lines are dynamic in normal sales invoices, Sean will remove all of the redundant lines and insert a repeater content control for the line structure requiring repeat capabilities.

Microsoft Dynamics NAV 2015 Finance
- 43 -

Microsoft Dynamics NAV 2015 Finance
- 44 -
35. In the cells of the repeating row, insert content
controls for quantity, item no, and so on (These
controls are nested content controls in the
repeater content control). Find the required
fields in the nested Line structure in the XML
Mapping pane.
With the repeater control in place, individual content controls for the column values in a line can be inserted. Again, Sean tweaks the Rust template a bit as needed.

Microsoft Dynamics NAV 2015 Finance
- 45 -
36. In the total cells, insert content controls for total
discount, tax, and so on. Find the required fields
in the nested Totals structure in the XML
Mapping pane.
With the line structure in place, Sean inserts totals. There are two ways totals can be inserted:
– Using individual content controls for
each total field found in the Totals
structure of the XML Mapping pane.
– Using a dynamically formatted total
repeater by using the ReportTotalsLine
structure of the XML Mapping pane.
The former has the advantage that individual total numbers can be formatted and placed as desired. The latter has the advantage that only lines with content (value), such as discount total, are shown. In this lab, Sean will insert explicit totals. For an example of using the total repeater, see the standard report 1306 Sales Invoice Word layout.

Microsoft Dynamics NAV 2015 Finance
- 46 -
37. Replace the greeting content control with a
content control that refers to CompanyAddress1
to get the company name in the greeting.
Finally, Sean updates the greeting and saves the layout
38. Save the changes and close the Word
document.
39. On the confirmation dialog box which appeared
when the layout was opened for editing, choose
Yes to accept the changes and import the
layout into Microsoft Dynamics NAV.
With the layout done, Sean saves the Word document and accepts importing the changes into Microsoft Dynamics NAV.

Microsoft Dynamics NAV 2015 Finance
- 47 -
40. In the Custom Report Layouts page, select the
new custom layout, and then on the Home tab,
in the Report group choose Run Report.
41. In the resulting request page, use default
values, select the Print button, then choose PDF.
42. Inspect the resultant PDF and validate that the
Rust-based Word layout looks good and has
correct field values.
Before enabling the new custom layout as the active layout for the sales invoice report, we are going to test it out by running it from within the Custom Report Layout page.

Microsoft Dynamics NAV 2015 Finance
- 48 -
43. Go back to the Custom Report Layouts page for
report 1306 Sales Invoice.
44. Select the new Rust-based custom layout “My
Rust Word layout”.
45. On the Home tab, in the Process group, choose
Edit Layout.
46. In Word, on the Design tab, use the left most
Themes drop down list and apply a couple of
different theme options to see the impact in the
document.
47. Apply the Berlin theme.
48. On the Design tab, use the Color drop down list
to select a couple of different color schemes to
see the impact in the document.
49. Apply the Office color scheme.
Sean likes the result, but he knows that many templates use styles and support Word themes and color schemes, so he is going to explore these options to see if there are any color and formatting combination he likes better. Applying different themes and colors, Sean likes the fonts and setup of the Berlin theme the most. However, to get a color scheme that better matches his company “green” profile, he changes the color scheme to Office.

Microsoft Dynamics NAV 2015 Finance
- 49 -
50. Save and close the Word document.
51. On the confirmation dialog box which appeared
when the layout was opened for editing, choose
Yes to accept the changes and import the
layout into Microsoft Dynamics NAV.
With the layout theme and color scheme changes, Sean saves the Word document and accepts importing the changes into Microsoft Dynamics NAV.

Microsoft Dynamics NAV 2015 Finance
- 50 -
52. In the Custom Report Layouts page select the
new custom layout, and then on the Home tab,
in the Report group select Run Report.
53. In the resulting request page, use default
values, select the Print button, and then choose
PDF.
54. Inspect the resulting PDF and validate that the
Rust-based Word layout now has a new theme
and color scheme.
As a final test, Sean reruns the layout, now with the new theme.

Microsoft Dynamics NAV 2015 Finance
- 51 -
55. Open Report Layout Selection page again.
56. Browse to and select the report 1306 Sales
Invoice.
57. Change Selected Layout field to Custom.
58. In the Custom Report Layouts page that
appears, select the layout “My Rust Word
layout” that you previously created, and choose
the OK button to close the page.
59. Validate that the Selected Layout field now is
set to Custom and that Custom Layout
Description field in the list contains “My Rust
Word layout” for the report 1306.
Being satisfied with the new layout, we are going to make this the default layout for the sales invoice. To do this, we will set the Selected Layout field in the Report Layout Selection page to the newly defined custom layout. Note that if the Selected Layout field is already set to Custom, the actual custom layout is changed by using the lookup in the Custom Layout Description field instead.
60. Open Posted Sales Invoices by doing one of the
following:
• In the Search box, enter Posted Sales
Invoices, and then choose the related link.
• In the navigation pane, choose Posted
Documents, and then Posted Sales Invoices.
61. Select a sales invoice from the list, and then on
the Home tab, in the Invoice group, choose
Print.
62. In the print dialog, use default values, select the
Print button, and then choose PDF.
63. Validate that the resulting PDF is using the
custom layout “My Rust Word layout” that you
previously created.
Finally, Sean runs the sales invoice from a real application context, for example, Posted Sales Invoices, to verify that the new custom layout is used.

Microsoft Dynamics NAV 2015 Finance
- 52 -
2. Scheduling Reports Source: Demo Script – Scheduling Reports, Microsoft
Lab 1 — Setting up the job queue to run a report
Lab story: Stan needs to run a number of long running reports and does not want to wait for them to complete. The scenario is simplified because a typical
customer setup would involve setting up a NAS instance to process the reports.
What to do What to say Screenshots
1. Open the Job Queues page.
2. On the Home tab, in the New
group, choose New to set up
a new job queue.
Usually, a job queue would have been set up and started automatically on startup. For simplicity, in this example, we will start a job queue explicitly. Job queues enable you to specify, request, and control when certain processes are run, such as running a report or executing a codeunit.

Microsoft Dynamics NAV 2015 Finance
- 53 -
The partner can modify the business logic to direct reports to a specific job queue.
3. In the Code field, type
REPORTS.
4. Fill in the Description field.
5. Leave the Job Queue
Category Filter field blank.
6. On the Home tab, in the
Process group, choose Start
Job Queue.
7. Close the Job Queue Card
A job queue with no filter runs the reports. In many customer installations, the reports will be picked up by the DEFAULT job queue

Microsoft Dynamics NAV 2015 Finance
- 54 -
Lab 2 — Adding the Report Inbox to the Role Center
Lab story: The user wants easy access to the reports that he has scheduled, so he adds the Report Inbox part to the Role Center page.
What to do What to say Screenshots
1. To open the Role Center
page that you want to
customize, in the navigation
pane, choose the Home
button, then choose the Role
Center menu item.
2. On the Application menu
, choose Customize, and
then Customize This Page.
3. In the Available Parts pane,
select Report Inbox, and then
choose the Add button.
4. To move the Report Inbox
part to top of the second
column in the Role Center
layout pane, select it and then
use the Move buttons.
By default, the Report Inbox is added to most Role Centers Role that are shipped on the DVD. If the Report Inbox is not present, it can be added by customizing the Role Center.

Microsoft Dynamics NAV 2015 Finance
- 55 -
5. (Optional) To add the My Job
Queue to the Role Center, in
the Available Parts pane,
select My Job Queue, and
then choose the Add button.
6. (Optional) To move the My
Job Queue part below the
Report Inbox in the Role
Center layout pane, select it
and then use the Move
buttons.
Optional: When the job queue is in use, it can be useful to have easy access to the state of the jobs that are currently running. The reason for having the two parts is that the job queue can be used for tasks other than running reports. Also note, that the job queue can be accessed directly from the Report Inbox by choosing the Show Queue action. So, if there is a need to preserve space on the Role Center, then you do not have to include the My Job Queue part.

Microsoft Dynamics NAV 2015 Finance
- 56 -
7. Verify that the Report Inbox
appears in the Role Center.

Microsoft Dynamics NAV 2015 Finance
- 57 -
Lab 3 — Scheduling a report and viewing the result
Lab story: The user wants to run a number of reports and view the contents later. He does not want to wait for the reports to finish running – he just wants
to continue his work. The first report he needs is the Customer Order Summary report. In other scenarios cases, he may need to run reports that require a
lot of memory. In these case, the reports can be run more efficiently on Microsoft Dynamics NAV Server.
What to do What to say Screenshots
1. On the Role Center, on the
Report tab, choose Customer
Order – Summary.
2. On the report request
window, choose the Print
button, and then choose
Schedule.
For simplicity, a simple report on the Role Center paged is selected. A good use of this feature is to schedule “long running reports” like the Detail Trial Balance report.

Microsoft Dynamics NAV 2015 Finance
- 58 -
3. In the Schedule a Report
window that appears, in the
Description field type a
different text.
4. In the Report Output Type
field, select the down arrow,
and choose PDF.
5. Choose the OK button.
The user can enter a descriptive name that makes it easier for him to remember his scheduled job. PDF is the default output format, but you can select other formats. The user has the option to run the report at a later time. This is particularly useful for long running reports that can be run after normal working hours.

Microsoft Dynamics NAV 2015 Finance
- 59 -
6. Go to the Report Inbox on the
Role Center and show that
the report appears when it is
finished running.
7. To view the report, select it in
the Report Inbox, and then
choose Show.
The Report Inbox part will update regularly. You can also force an update by pressing F5 in the Role Center. Unread reports are shown in bold You can show the generated report by double-clicking the item or selecting Show.

Microsoft Dynamics NAV 2015 Finance
- 60 -
Lab 4 — When a scheduled report fails
Lab story: Stan schedules a report to be run later, but an error occurred during execution. Stan investigates why the report did not generate an output and
realizes that the parameters that were used to run the report are invalid. He changes the parameters, and then reruns the report.
What to do What to say Screenshots
1. Open the Role Center.
2. On the Application menu
, choose Customize, and
then Customize This Page.
3. In the Available Parts pane,
select My Job Queue, and
then choose the Add button.
4. To move the My Job Queue
part below the Report Inbox
in the Role Center layout
pane, select it and then use
the Move buttons
5. In the Role Center, go to the
My Job Queue part.
When the job queue is in use, it is useful to have easy access to the state of the jobs running. The reason for having the Report Inbox and My Job Queue parts is that the job queue can be used for tasks other than running reports. Note, that the job queue can be accessed directly from the Report Inbox by choosing the Show Queue action. So, if there is a need to save space on the Role Center real estate, you do not have to include the My Job Queue part.

Microsoft Dynamics NAV 2015 Finance
- 61 -
6. On the Role Center, on the
Reports tab, choose Price
List.
7. In the Sales Type field select
Customer.
8. To schedule the report to run
later, choose the Print button,
then select Schedule.
9. In the Schedule a Report
window, leave the default
values in fields and choose
the OK button.
Some reports will generate an error when they are run. In this example, you must either specify a customer number or select All Customers in the Sales Type field.
10. When the error shows up in
the My Job Queue part, select
the error, and then choose
Show Error.
11. Read the error message, and
then choose the OK button to
close it.
The My Job Queue part will update regularly. You can also force an update by pressing F5 in the Role Center.
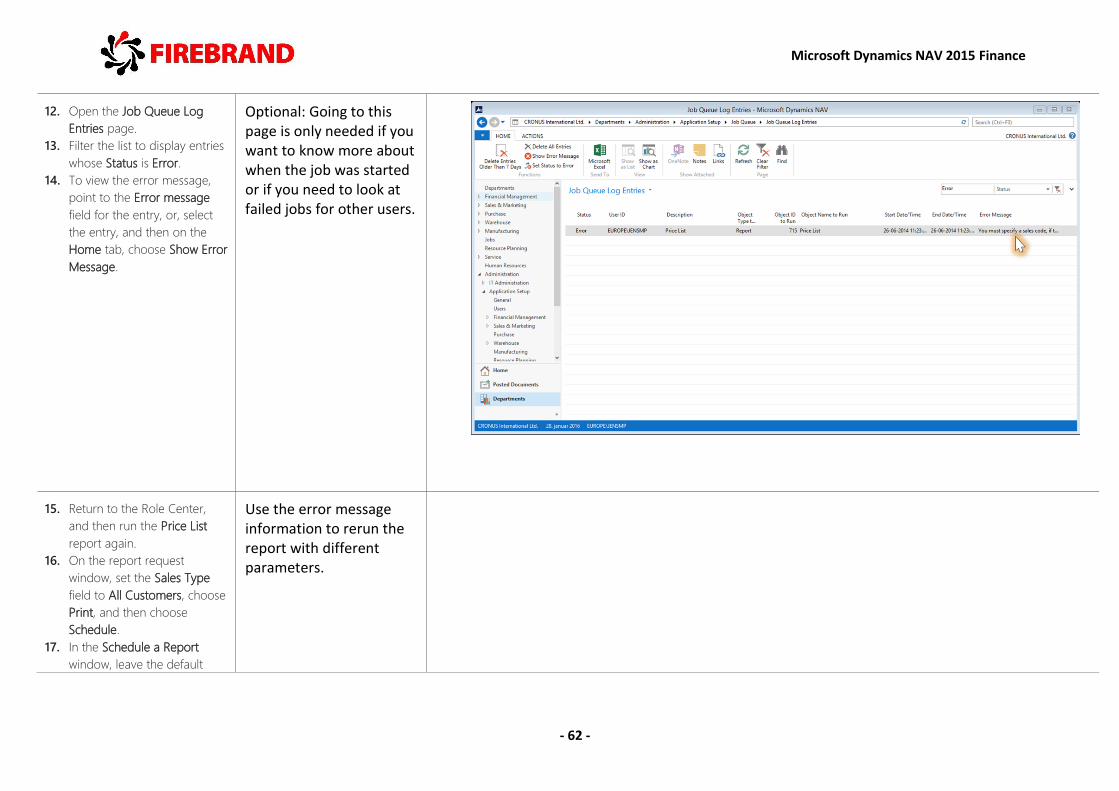
Microsoft Dynamics NAV 2015 Finance
- 62 -
12. Open the Job Queue Log
Entries page.
13. Filter the list to display entries
whose Status is Error.
14. To view the error message,
point to the Error message
field for the entry, or, select
the entry, and then on the
Home tab, choose Show Error
Message.
Optional: Going to this page is only needed if you want to know more about when the job was started or if you need to look at failed jobs for other users.
15. Return to the Role Center,
and then run the Price List
report again.
16. On the report request
window, set the Sales Type
field to All Customers, choose
Print, and then choose
Schedule.
17. In the Schedule a Report
window, leave the default
Use the error message information to rerun the report with different parameters.

Microsoft Dynamics NAV 2015 Finance
- 63 -
values in fields and choose
the OK button.
18. In the Report Inbox on the
Role Center, view the
completed report.

Microsoft Dynamics NAV 2015 Finance
- 64 -
3. Save Report as PDF/Word/Excel User can save report results as Pdf, Word or Excel file.