Embed Size (px)
Citation preview
EDITION v1.1.0
Refer changelog for the book updates and community contributions.
This guide is available as a downloadable PDF e-book.
PUBLISHED BY
Microsoft Developer Division, .NET, and Visual Studio product teams
A division of Microsoft Corporation
One Microsoft Way
Redmond, Washington 98052-6399
Copyright © 2022 by Microsoft Corporation
All rights reserved. No part of the contents of this book may be reproduced or transmitted in any
form or by any means without the written permission of the publisher.
This book is provided “as-is” and expresses the author’s views and opinions. The views, opinions, and
information expressed in this book, including URL and other Internet website references, may change
without notice.
Some examples depicted herein are provided for illustration only and are fictitious. No real association
or connection is intended or should be inferred.
Microsoft and the trademarks listed at https://www.microsoft.com on the “Trademarks” webpage are
trademarks of the Microsoft group of companies.
Mac and macOS are trademarks of Apple Inc.
The Docker whale logo is a registered trademark of Docker, Inc. Used by permission.
All other marks and logos are property of their respective owners.
Credits
Authors:
Cam Soper
Scott Addie
Colin Dembovsky
Welcome
Welcome to the Azure Development Lifecycle guide for .NET! This guide introduces the basic concepts
of building a development lifecycle around Azure using .NET tools and processes. After finishing this
guide, you’ll reap the benefits of a mature DevOps toolchain.
Who this guide is for
You should be an experienced ASP.NET Core developer (200-300 level). You don’t need to know
anything about Azure, as we’ll cover that in this introduction. This guide may also be useful for
DevOps engineers who are more focused on operations than development.
This guide targets Windows developers. However, Linux and macOS are fully supported by .NET Core.
To adapt this guide for Linux/macOS, watch for callouts for Linux/macOS differences.
What this guide doesn’t cover
This guide is focused on an end-to-end continuous deployment experience for .NET developers. It’s
not an exhaustive guide to all things Azure, and it doesn’t focus extensively on .NET APIs for Azure
services. The emphasis is all around continuous integration, deployment, monitoring, and debugging.
Near the end of the guide, recommendations for next steps are offered. Included in the suggestions
are Azure platform services that are useful to ASP.NET Core developers.
What’s in this guide
Tools and downloads
Learn where to acquire the tools used in this guide.
Deploy to App Service
Learn the various methods for deploying an ASP.NET Core app to Azure App Service.
Continuous integration and deployment with Azure DevOps
Build an end-to-end continuous integration and deployment solution for your ASP.NET Core app with
GitHub, Azure DevOps Services, and Azure.
Continuous integration and deployment with GitHub Actions
Build an end-to-end continuous integration and deployment solution for your ASP.NET Core app with
GitHub, GitHub Actions, and Azure, including code scanning for security and quality using CodeQL.
Monitor and debug
Use Azure’s tools to monitor, troubleshoot, and tune your application.
Next steps
Other learning paths for the ASP.NET Core developer learning Azure.
Additional introductory reading
If this is your first exposure to cloud computing, these articles explain the basics.
• What is Cloud Computing?
• Examples of Cloud Computing
• What is IaaS?
• What is PaaS?
i Contents
Contents Tools and downloads .............................................................................................................. 1
Prerequisites .............................................................................................................................................................................. 1
Recommended tools (Windows only).............................................................................................................................. 1
Deploy an app to App Service ................................................................................................ 2
Download and test the app ................................................................................................................................................. 2
Create the Azure App Service Web App ......................................................................................................................... 4
Deployment with Visual Studio .......................................................................................................................................... 5
Deployment slots ..................................................................................................................................................................... 8
Summary .................................................................................................................................................................................. 11
Additional reading ................................................................................................................................................................ 12
Continuous integration and deployment with Azure DevOps ......................................... 13
Publish the app’s code to GitHub .................................................................................................................................. 13
Disconnect local Git deployment ................................................................................................................................... 14
Create an Azure DevOps organization ......................................................................................................................... 15
Create a team project in Azure DevOps organization ........................................................................................... 15
Configure a self-hosted agent if necessary ................................................................................................................ 15
Configure the Azure Pipelines pipeline ........................................................................................................................ 16
Grant Azure DevOps access to the GitHub repository ...................................................................................... 16
Create the build definition ........................................................................................................................................... 18
Create the release pipeline ........................................................................................................................................... 21
Commit changes to GitHub and automatically deploy to Azure ....................................................................... 26
Examine the Azure Pipelines pipeline ........................................................................................................................... 27
Build definition .................................................................................................................................................................. 27
Release pipeline ................................................................................................................................................................ 30
Additional reading ................................................................................................................................................................ 33
Continuous integration and deployment with GitHub Actions .......................................................................... 34
GitHub Actions .................................................................................................................................................................. 34
Secure code with CodeQL ............................................................................................................................................ 34
ii Contents
Compare and contrast GitHub Actions and Azure Pipelines .......................................................................... 35
Compare and contrast GitHub Actions and Azure Pipelines ............................................................................... 35
Pipelines as code .............................................................................................................................................................. 35
Agents and runners ......................................................................................................................................................... 35
Comparison of GitHub Actions and Azure Pipelines ......................................................................................... 37
Feature comparison ........................................................................................................................................................ 37
Recommendation table for common scenarios ....................................................................................................... 39
Build a .NET web app using GitHub Actions .............................................................................................................. 39
Workflow structure .......................................................................................................................................................... 40
Create a basic build workflow ..................................................................................................................................... 40
Dissect the workflow file ............................................................................................................................................... 44
Publish the output ........................................................................................................................................................... 45
Deploy a .NET web app using GitHub Actions .......................................................................................................... 48
Environments ..................................................................................................................................................................... 48
Azure authentication....................................................................................................................................................... 49
Add environments ........................................................................................................................................................... 51
Deploy to staging............................................................................................................................................................. 53
Deploy to production ..................................................................................................................................................... 56
Add a manual queue option ........................................................................................................................................ 60
Handle environment configuration........................................................................................................................... 61
Final workflow file ............................................................................................................................................................ 64
Secure .NET Code with CodeQL and GitHub Actions ............................................................................................. 66
Create the code scanning workflow ......................................................................................................................... 67
Customize CodeQL settings ......................................................................................................................................... 70
Review the security alerts ............................................................................................................................................. 71
Monitor and debug ............................................................................................................... 74
Basic monitoring and troubleshooting ........................................................................................................................ 74
Advanced monitoring ......................................................................................................................................................... 76
Profile with Application Insights ..................................................................................................................................... 76
Logging ..................................................................................................................................................................................... 81
Log streaming ........................................................................................................................................................................ 81
Alerts .......................................................................................................................................................................................... 82
iii Contents
Live debugging ...................................................................................................................................................................... 82
Conclusion ............................................................................................................................................................................... 83
Additional reading ................................................................................................................................................................ 83
Next steps .............................................................................................................................. 84
Storage and databases ....................................................................................................................................................... 84
Identity ...................................................................................................................................................................................... 84
Mobile ....................................................................................................................................................................................... 84
Web infrastructure ................................................................................................................................................................ 85
1 CHAPTER 1 | Tools and downloads
CHAPTER 1
Tools and downloads
Azure has several interfaces for provisioning and managing resources, such as the Azure portal, Azure
CLI, Azure PowerShell, Azure Cloud Shell, and Visual Studio. This guide takes a minimalist approach
and uses the Azure Cloud Shell whenever possible to reduce the steps required. However, the Azure
portal must be used for some portions.
Prerequisites The following subscriptions are required:
• Azure — If you don’t have an account, get a free trial.
• Azure DevOps Services — your Azure DevOps subscription and organization is created in
Chapter 4.
• GitHub — If you don’t have an account, sign up for free.
The following tools are required:
• Git — A fundamental understanding of Git is recommended for this guide. Review the Git
documentation, specifically git remote and git push.
• .NET Core SDK — Version 2.1.300 or later is required to build and run the sample app. If Visual
Studio is installed with the .NET Core cross-platform development workload, the .NET Core
SDK is already installed.
Verify your .NET Core SDK installation. Open a command shell, and run the following command:
dotnet --version
Recommended tools (Windows only) • Visual Studio’s robust Azure tools provide a GUI for most of the functionality described in this
guide. Any edition of Visual Studio will work, including the free Visual Studio Community Edition.
The tutorials are written to demonstrate development, deployment, and DevOps both with and
without Visual Studio.
Confirm that Visual Studio has the following workloads installed:
– ASP.NET and web development
– Azure development
– .NET Core cross-platform development
2 CHAPTER 2 | Deploy an app to App Service
CHAPTER 2
Deploy an app to App
Service
Azure App Service is Azure’s web hosting platform. Deploying a web app to Azure App Service can be
done manually or by an automated process. This section of the guide discusses deployment methods
that can be triggered manually or by script using the command line, or triggered manually using
Visual Studio.
In this section, you’ll accomplish the following tasks:
• Download and build the sample app.
• Create an Azure App Service Web App using the Azure Cloud Shell.
• Deploy the sample app to Azure using Git.
• Deploy a change to the app using Visual Studio.
• Add a staging slot to the web app.
• Deploy an update to the staging slot.
• Swap the staging and production slots.
Download and test the app The app used in this guide is a pre-built ASP.NET Core app, Simple Feed Reader. It’s an ASP.NET Core
Razor Pages app that uses the Microsoft.SyndicationFeed.ReaderWriter API to retrieve an RSS/Atom
feed and display the news items in a list.
Feel free to review the code, but it’s important to understand that there’s nothing special about this
app. It’s just a simple ASP.NET Core app for illustrative purposes.
From a command shell, download the code, build the project, and run it as follows.
Note
Linux/macOS users should make appropriate changes for paths, e.g., using forward slash (/) rather
than back slash (\).*
1. Clone the code to a folder on your local machine.
git clone https://github.com/dotnet-architecture/simple-feed-reader/
2. Change your working folder to the simple-feed-reader folder that was created.
3 CHAPTER 2 | Deploy an app to App Service
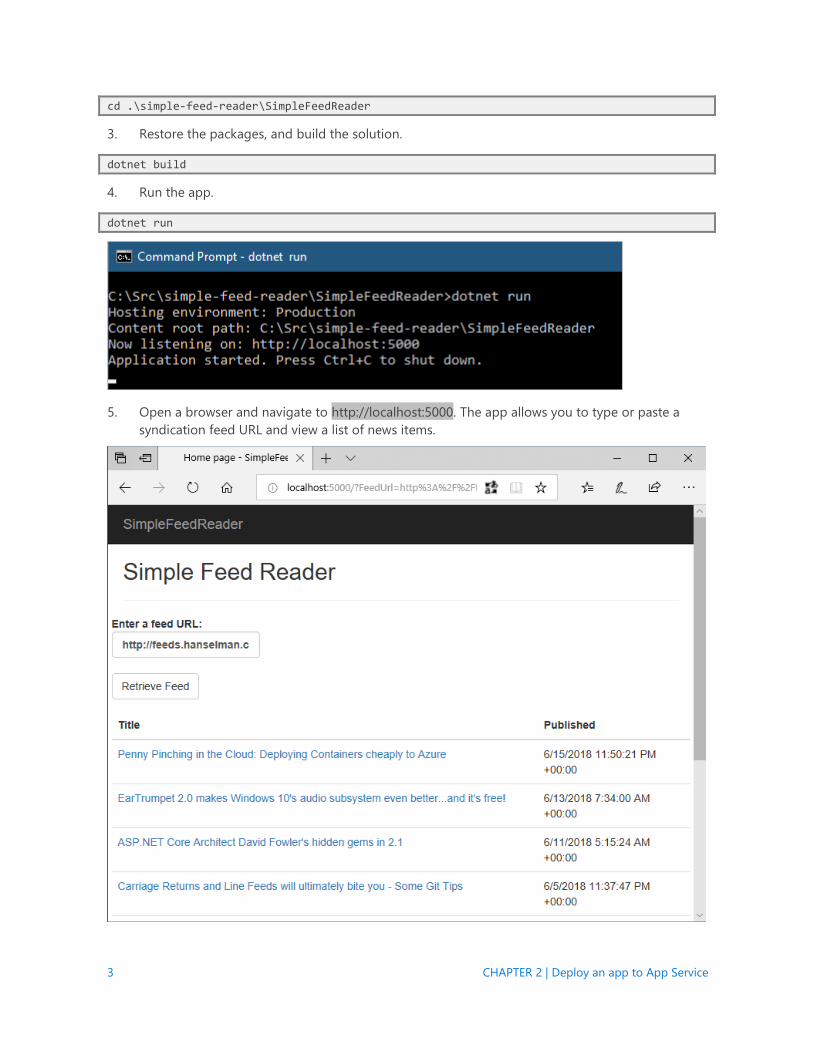
cd .\simple-feed-reader\SimpleFeedReader
3. Restore the packages, and build the solution.
dotnet build
4. Run the app.
dotnet run
5. Open a browser and navigate to http://localhost:5000. The app allows you to type or paste a
syndication feed URL and view a list of news items.
4 CHAPTER 2 | Deploy an app to App Service
6. Once you’re satisfied the app is working correctly, shut it down by pressing Ctrl+C in the
command shell.
Create the Azure App Service Web App To deploy the app, you’ll need to create an App Service Web App. After creation of the Web App,
you’ll deploy to it from your local machine using Git.
1. Sign in to the Azure Cloud Shell. Note: When you sign in for the first time, Cloud Shell prompts
to create a storage account for configuration files. Accept the defaults or provide a unique name.
2. Use the Cloud Shell for the following steps.
a. Declare a variable to store your web app’s name. The name must be unique to be used
in the default URL. Using the $RANDOM Bash function to construct the name
guarantees uniqueness and results in the format webappname99999.
webappname=mywebapp$RANDOM
b. Create a resource group. Resource groups provide a means to aggregate Azure
resources to be managed as a group.
az group create --location centralus --name AzureTutorial
The az command invokes the Azure CLI. The CLI can be run locally, but using it in the Cloud Shell
saves time and configuration.
c. Create an App Service plan in the S1 tier. An App Service plan is a grouping of web apps
that share the same pricing tier. The S1 tier isn’t free, but it’s required for the staging
slots feature.
az appservice plan create --name $webappname --resource-group AzureTutorial --sku S1
d. Create the web app resource using the App Service plan in the same resource group.
az webapp create --name $webappname --resource-group AzureTutorial --plan $webappname
e. Set the deployment branch to main in the appsettings configuration.
az webapp config appsettings set --name $webappname --resource-group AzureTutorial --settings DEPLOYMENT_BRANCH=main
f. Set the deployment credentials. These deployment credentials apply to all the web apps
in your subscription. Don’t use special characters in the user name.
az webapp deployment user set --user-name REPLACE_WITH_USER_NAME --password REPLACE_WITH_PASSWORD
g. Configure the web app to accept deployments from local Git and display the Git
deployment URL. Note this URL for reference later.
echo Git deployment URL: $(az webapp deployment source config-local-git --name $webappname --resource-group AzureTutorial --query url --output tsv)
5 CHAPTER 2 | Deploy an app to App Service
h. Display the web app URL. Browse to this URL to see the blank web app. Note this URL
for reference later.
echo Web app URL: http://$webappname.azurewebsites.net
3. Using a command shell on your local machine, navigate to the web app’s project folder (for
example, *.-feed-reader). Execute the following commands to set up Git to push to the
deployment URL:
a. Add the remote URL to the local repository.
git remote add azure-prod GIT_DEPLOYMENT_URL
b. Push the local default branch (main) to the azure-prod remote’s deployment branch
(main).
git push azure-prod main
You’ll be prompted for the deployment credentials you created earlier. Observe the output in
the command shell. Azure builds the ASP.NET Core app remotely.
4. In a browser, navigate to the Web app URL and note the app has been built and deployed.
Additional changes can be committed to the local Git repository with git commit. These changes
are pushed to Azure with the preceding git push command.
Deployment with Visual Studio
Note
This section applies to Windows only. Linux and macOS users should make the change described in
step 2 below. Save the file, and commit the change to the local repository with git commit. Finally,
push the change with git push, as in the first section.*
The app has already been deployed from the command shell. Let’s use Visual Studio’s integrated tools
to deploy an update to the app. Behind the scenes, Visual Studio accomplishes the same thing as the
command line tooling, but within Visual Studio’s familiar UI.
1. Open SimpleFeedReader.sln in Visual Studio.
2. In Solution Explorer, open Pages.cshtml. Change <h2>Simple Feed Reader</h2> to <h2>Simple
Feed Reader - V2</h2>.
3. Press Ctrl+Shift+B to build the app.
4. In Solution Explorer, right-click on the project and click Publish.
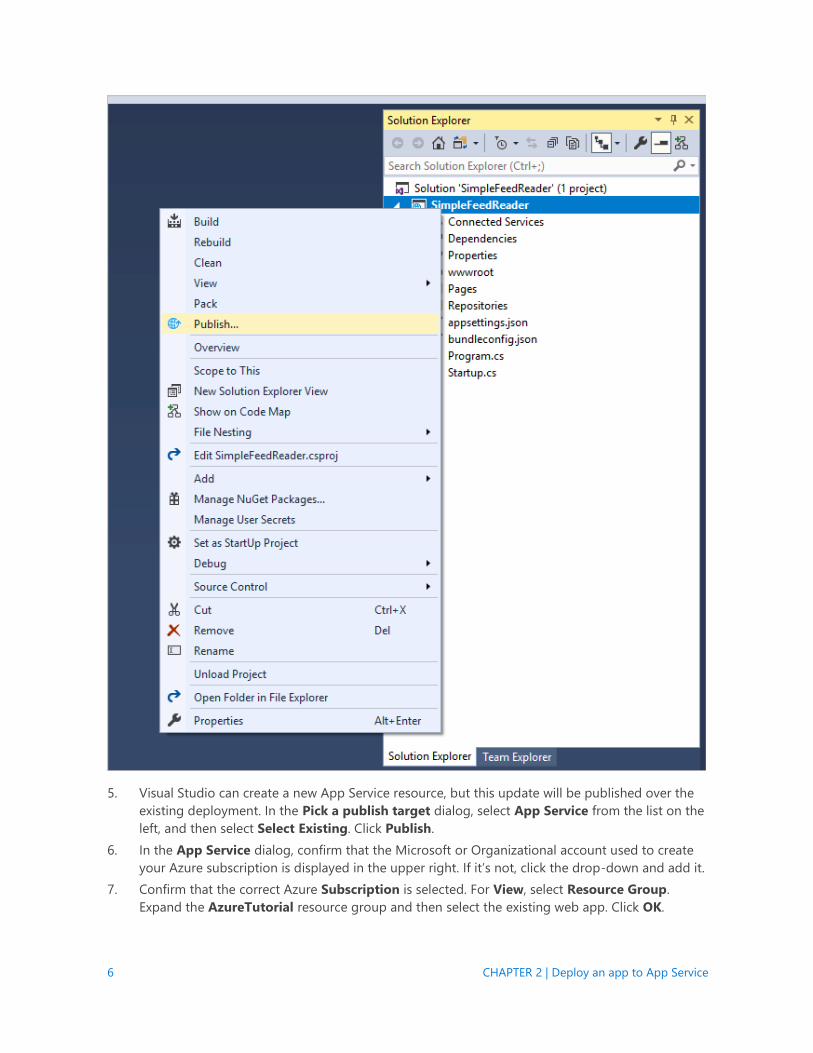
6 CHAPTER 2 | Deploy an app to App Service
5. Visual Studio can create a new App Service resource, but this update will be published over the
existing deployment. In the Pick a publish target dialog, select App Service from the list on the
left, and then select Select Existing. Click Publish.
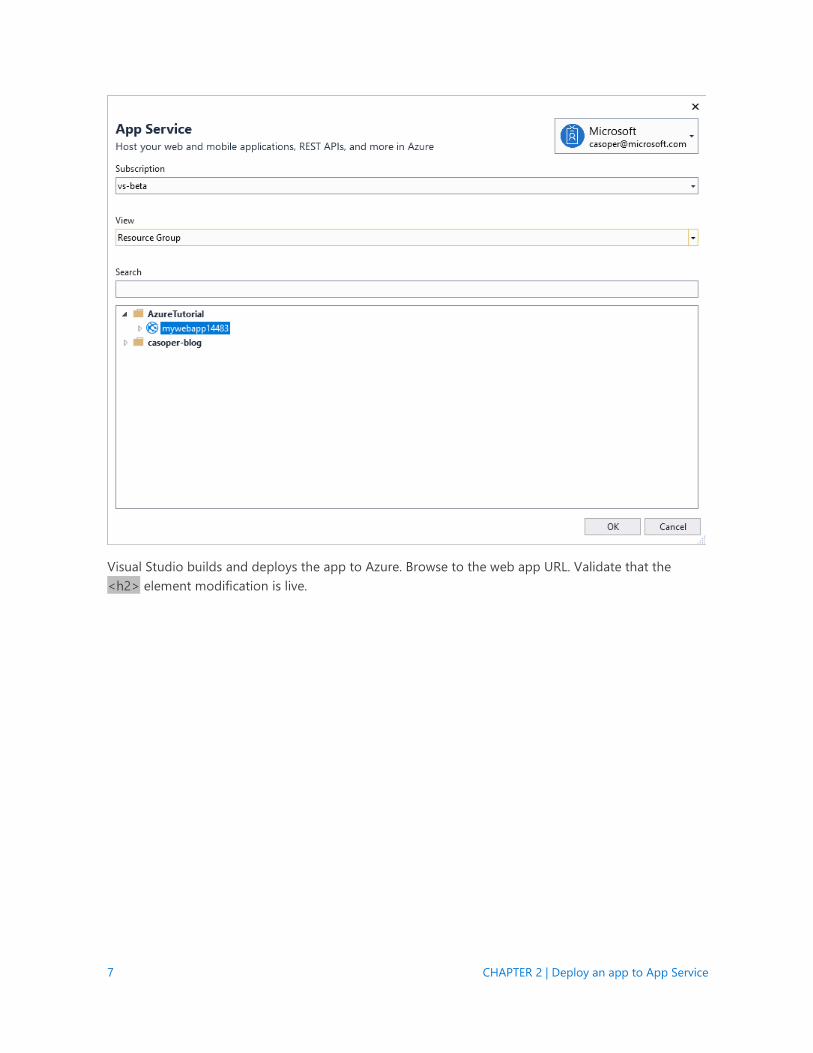
6. In the App Service dialog, confirm that the Microsoft or Organizational account used to create
your Azure subscription is displayed in the upper right. If it’s not, click the drop-down and add it.
7. Confirm that the correct Azure Subscription is selected. For View, select Resource Group.
Expand the AzureTutorial resource group and then select the existing web app. Click OK.
7 CHAPTER 2 | Deploy an app to App Service
Visual Studio builds and deploys the app to Azure. Browse to the web app URL. Validate that the
<h2> element modification is live.

8 CHAPTER 2 | Deploy an app to App Service
Deployment slots Deployment slots support the staging of changes without impacting the app running in production.
Once the staged version of the app is validated by a quality assurance team, the production and
staging slots can be swapped. The app in staging is promoted to production in this manner. The
following steps create a staging slot, deploy some changes to it, and swap the staging slot with
production after verification.
1. Sign in to the Azure Cloud Shell, if not already signed in.
2. Create the staging slot.
a. Create a deployment slot with the name staging.
az webapp deployment slot create --name $webappname --resource-group AzureTutorial --slot staging
b. Set the deployment branch to main in the appsettings configuration.
az webapp config appsettings set --name $webappname --resource-group AzureTutorial --slot staging --settings DEPLOYMENT_BRANCH=main
c. Configure the staging slot to use deployment from local Git and get the staging
deployment URL. Note this URL for reference later.
echo Git deployment URL for staging: $(az webapp deployment source config-local-git --name $webappname --resource-group AzureTutorial --slot staging --query url --output tsv)
d. Display the staging slot’s URL. Browse to the URL to see the empty staging slot. Note
this URL for reference later.
9 CHAPTER 2 | Deploy an app to App Service
echo Staging web app URL: http://$webappname-staging.azurewebsites.net
3. In a text editor or Visual Studio, modify Pages/Index.cshtml again so that the <h2> element
reads <h2>Simple Feed Reader - V3</h2> and save the file.
4. Commit the file to the local Git repository, using either the Changes page in Visual Studio’s
Team Explorer tab, or by entering the following using the local machine’s command shell:
git commit -a -m "upgraded to V3"
5. Using the local machine’s command shell, add the staging deployment URL as a Git remote and
push the committed changes:
a. Add the remote URL for staging to the local Git repository.
git remote add azure-staging <Git_staging_deployment_URL>
b. Push the local default branch (main) to the azure-staging remote’s deployment branch
(main).
git push azure-staging main
Wait while Azure builds and deploys the app.
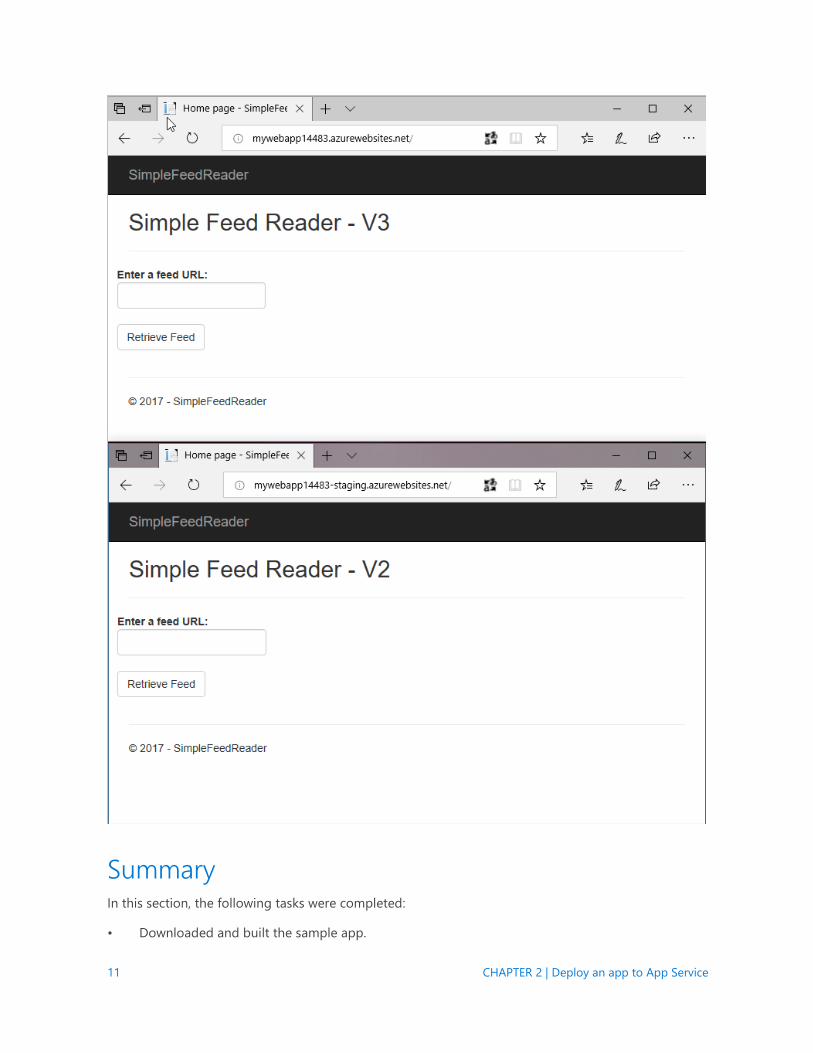
6. To verify that V3 has been deployed to the staging slot, open two browser windows. In one
window, navigate to the original web app URL. In the other window, navigate to the staging web
app URL. The production URL serves V2 of the app. The staging URL serves V3 of the app.
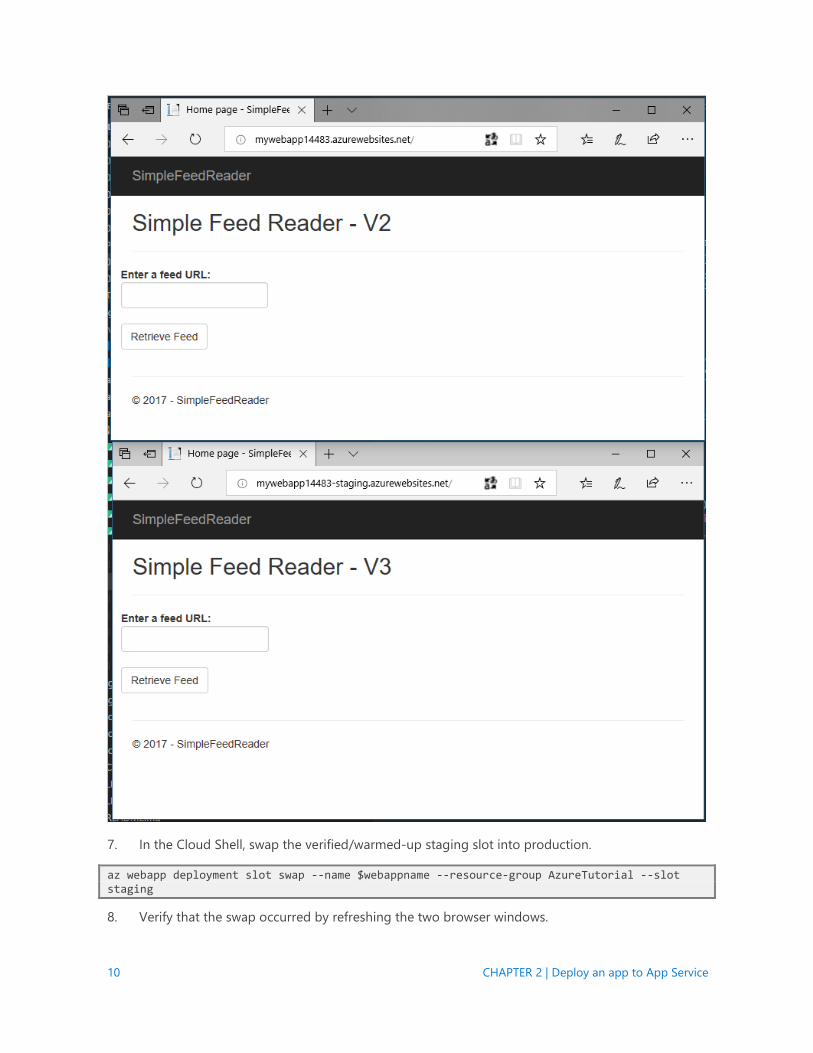
10 CHAPTER 2 | Deploy an app to App Service
7. In the Cloud Shell, swap the verified/warmed-up staging slot into production.
az webapp deployment slot swap --name $webappname --resource-group AzureTutorial --slot staging
8. Verify that the swap occurred by refreshing the two browser windows.
11 CHAPTER 2 | Deploy an app to App Service
Summary In this section, the following tasks were completed:
• Downloaded and built the sample app.
12 CHAPTER 2 | Deploy an app to App Service
• Created an Azure App Service Web App using the Azure Cloud Shell.
• Deployed the sample app to Azure using Git.
• Deployed a change to the app using Visual Studio.
• Added a staging slot to the web app.
• Deployed an update to the staging slot.
• Swapped the staging and production slots.
In the next section, you’ll learn how to build a DevOps pipeline with Azure Pipelines.
Additional reading • Web Apps overview
• Build a .NET Core and SQL Database web app in Azure App Service
• Configure deployment credentials for Azure App Service
• Set up staging environments in Azure App Service
13 CHAPTER 3 | Continuous integration and deployment with Azure DevOps
CHAPTER 3
Continuous integration
and deployment with
Azure DevOps
Note
This section details continuous integration and deployment with Azure DevOps. You can achieve that
with GitHub Actions as well. GitHub Actions is a workflow engine built into GitHub that can also be
used for continuous integration and deployment. To follow the guide for building and deploying to
Azure using GitHub, complete the Publish the app’s code to GitHub and Disconnect local Git
deployment sections below and then proceed to the GitHub Actions section.
In the previous chapter, you created a local Git repository for the Simple Feed Reader app. In this
chapter, you’ll publish that code to a GitHub repository and construct an Azure DevOps Services
pipeline using Azure Pipelines. The pipeline enables continuous builds and deployments of the app.
Any commit to the GitHub repository triggers a build and a deployment to the Azure Web App’s
staging slot.
In this section, you’ll complete the following tasks:
• Publish the app’s code to GitHub
• Disconnect local Git deployment
• Create an Azure DevOps organization
• Create a team project in Azure DevOps organization
• Configure a self-hosted agent if necessary
• Create a build definition
• Create a release pipeline
• Commit changes to GitHub and automatically deploy to Azure
• Examine the Azure Pipelines pipeline
Publish the app’s code to GitHub 1. Open a browser window, and navigate to https://github.com.
14 CHAPTER 3 | Continuous integration and deployment with Azure DevOps
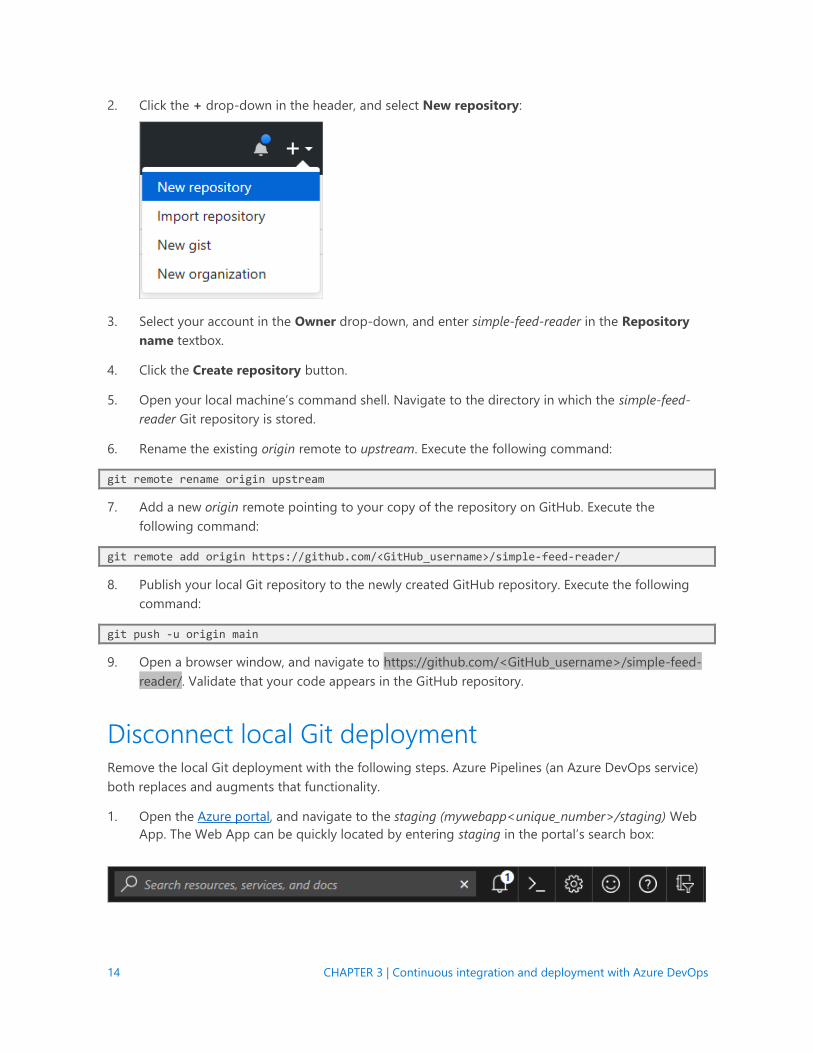
2. Click the + drop-down in the header, and select New repository:
3. Select your account in the Owner drop-down, and enter simple-feed-reader in the Repository
name textbox.
4. Click the Create repository button.
5. Open your local machine’s command shell. Navigate to the directory in which the simple-feed-
reader Git repository is stored.
6. Rename the existing origin remote to upstream. Execute the following command:
git remote rename origin upstream
7. Add a new origin remote pointing to your copy of the repository on GitHub. Execute the
following command:
git remote add origin https://github.com/<GitHub_username>/simple-feed-reader/
8. Publish your local Git repository to the newly created GitHub repository. Execute the following
command:
git push -u origin main
9. Open a browser window, and navigate to https://github.com/<GitHub_username>/simple-feed-
reader/. Validate that your code appears in the GitHub repository.
Disconnect local Git deployment Remove the local Git deployment with the following steps. Azure Pipelines (an Azure DevOps service)
both replaces and augments that functionality.
1. Open the Azure portal, and navigate to the staging (mywebapp<unique_number>/staging) Web
App. The Web App can be quickly located by entering staging in the portal’s search box:
15 CHAPTER 3 | Continuous integration and deployment with Azure DevOps
2. Click Deployment Center. A new panel appears. Click Disconnect to remove the local Git
source control configuration that was added in the previous chapter. Confirm the removal
operation by clicking the Yes button.
3. Navigate to the mywebapp App Service. As a reminder, the portal’s search box can be used to
quickly locate the App Service.
4. Click Deployment Center. A new panel appears. Click Disconnect to remove the local Git
source control configuration that was added in the previous chapter. Confirm the removal
operation by clicking the Yes button.
Create an Azure DevOps organization 1. Open a browser, and navigate to the Azure DevOps organization creation page.
2. Select New organization
3. Confirm the information, and then select Continue.
4. Sign in to your organization at any time, https://dev.azure.com/{yourorganization}
Create a team project in Azure DevOps organization 1. Choose the organization, and then select New project.
2. Enter the project name as MyFirstProject and select the Visibility as Private
3. Select Create project.
For more information, see Create a project
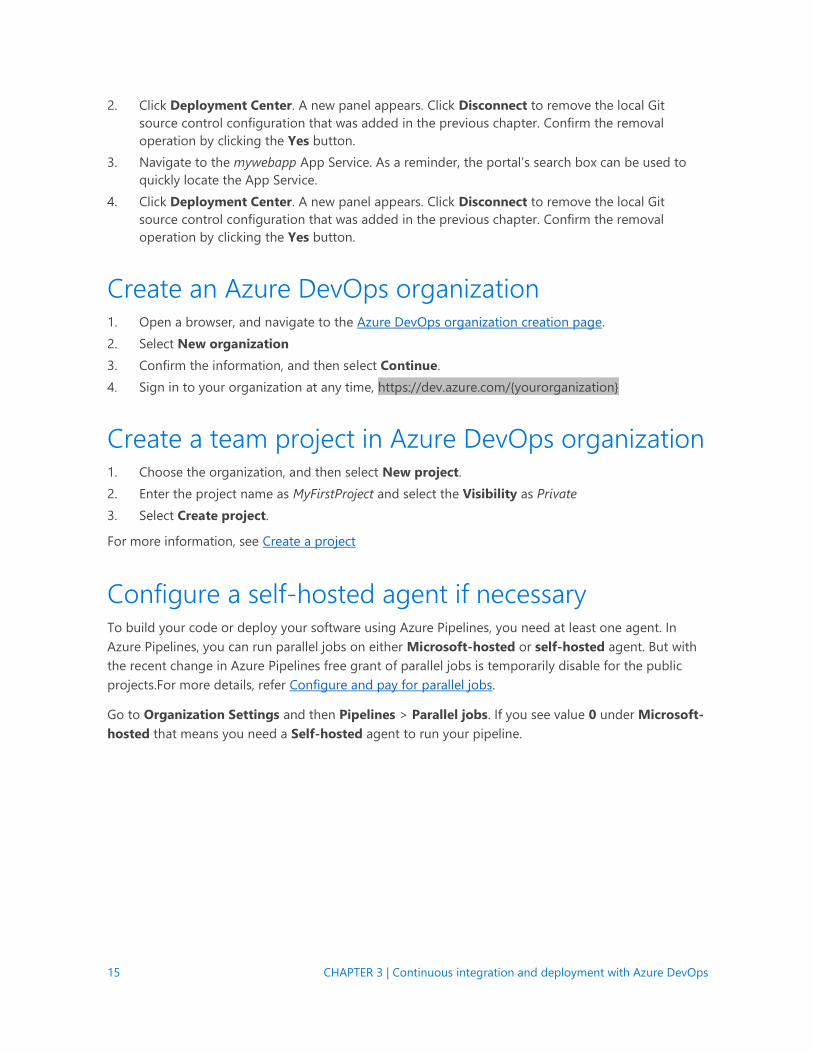
Configure a self-hosted agent if necessary To build your code or deploy your software using Azure Pipelines, you need at least one agent. In
Azure Pipelines, you can run parallel jobs on either Microsoft-hosted or self-hosted agent. But with
the recent change in Azure Pipelines free grant of parallel jobs is temporarily disable for the public
projects.For more details, refer Configure and pay for parallel jobs.
Go to Organization Settings and then Pipelines > Parallel jobs. If you see value 0 under Microsoft-
hosted that means you need a Self-hosted agent to run your pipeline.
16 CHAPTER 3 | Continuous integration and deployment with Azure DevOps
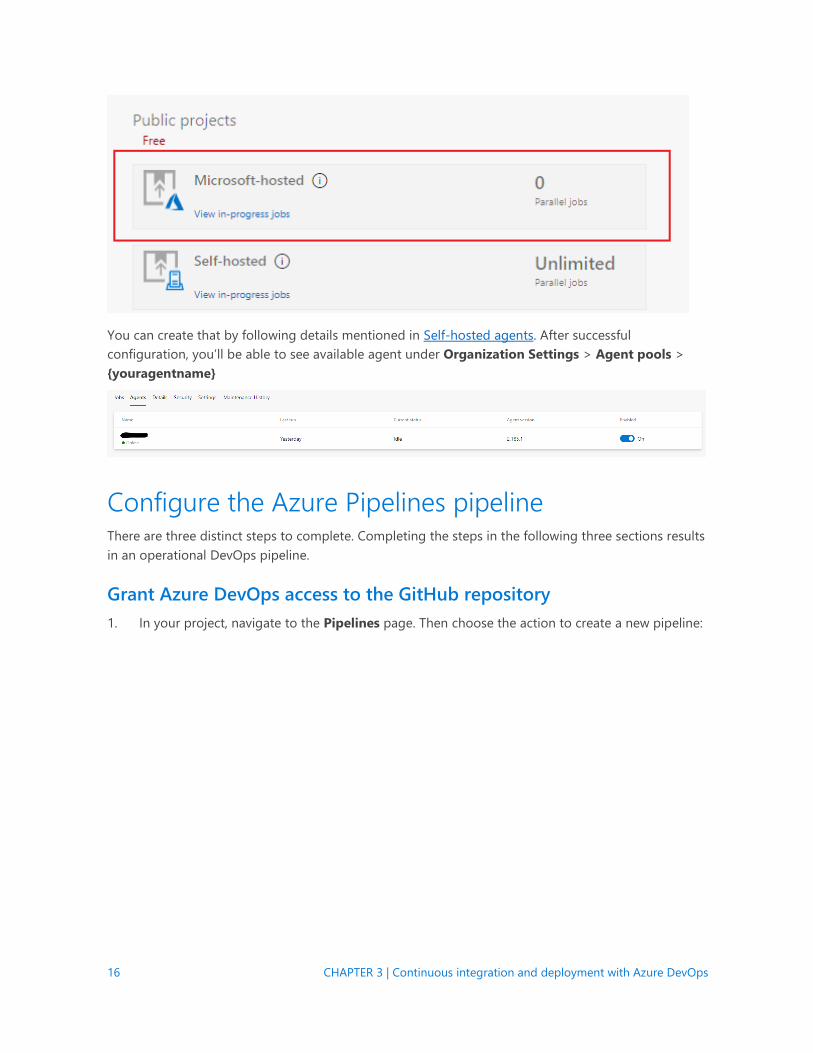
You can create that by following details mentioned in Self-hosted agents. After successful
configuration, you’ll be able to see available agent under Organization Settings > Agent pools >
{youragentname}
Configure the Azure Pipelines pipeline There are three distinct steps to complete. Completing the steps in the following three sections results
in an operational DevOps pipeline.
Grant Azure DevOps access to the GitHub repository
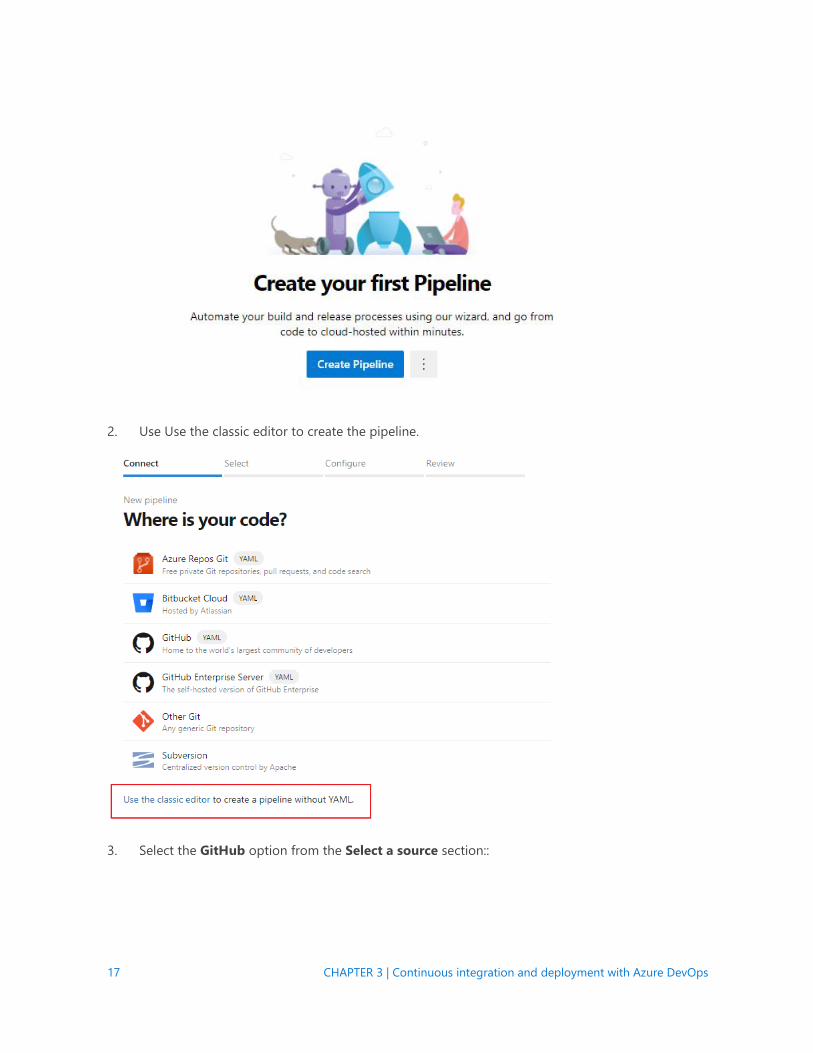
1. In your project, navigate to the Pipelines page. Then choose the action to create a new pipeline:
17 CHAPTER 3 | Continuous integration and deployment with Azure DevOps
2. Use Use the classic editor to create the pipeline.
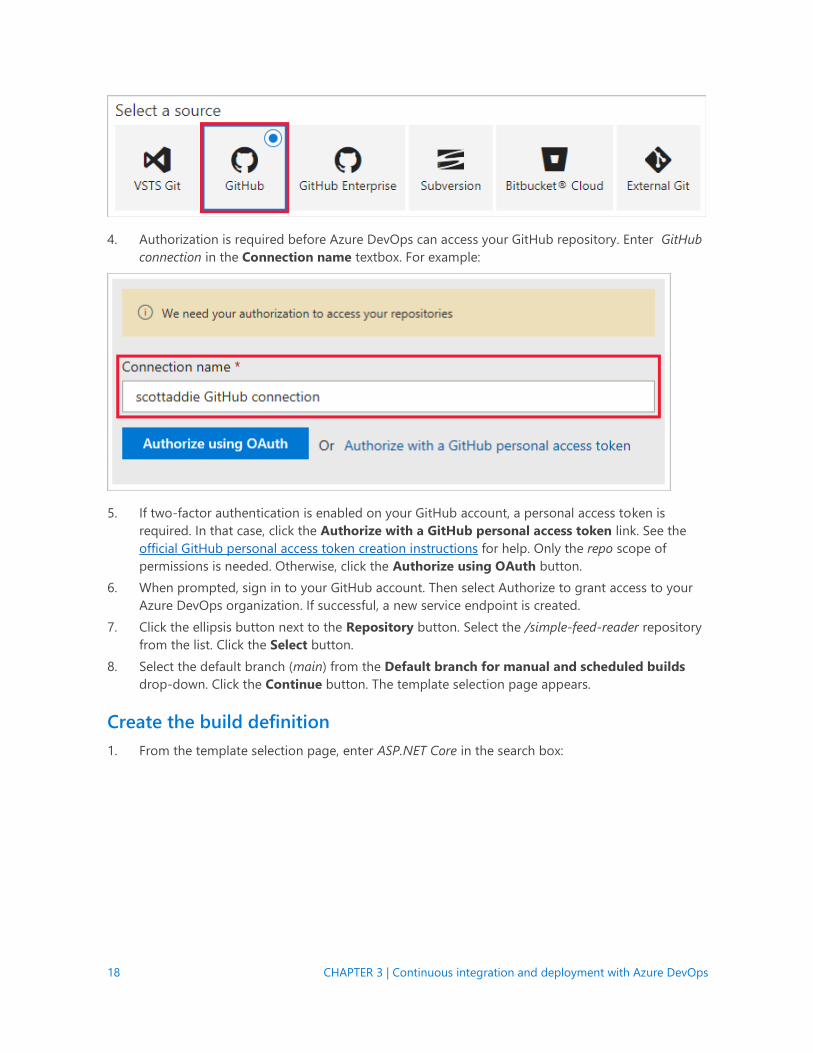
3. Select the GitHub option from the Select a source section::
18 CHAPTER 3 | Continuous integration and deployment with Azure DevOps
4. Authorization is required before Azure DevOps can access your GitHub repository. Enter GitHub
connection in the Connection name textbox. For example:
5. If two-factor authentication is enabled on your GitHub account, a personal access token is
required. In that case, click the Authorize with a GitHub personal access token link. See the
official GitHub personal access token creation instructions for help. Only the repo scope of
permissions is needed. Otherwise, click the Authorize using OAuth button.
6. When prompted, sign in to your GitHub account. Then select Authorize to grant access to your
Azure DevOps organization. If successful, a new service endpoint is created.
7. Click the ellipsis button next to the Repository button. Select the /simple-feed-reader repository
from the list. Click the Select button.
8. Select the default branch (main) from the Default branch for manual and scheduled builds
drop-down. Click the Continue button. The template selection page appears.
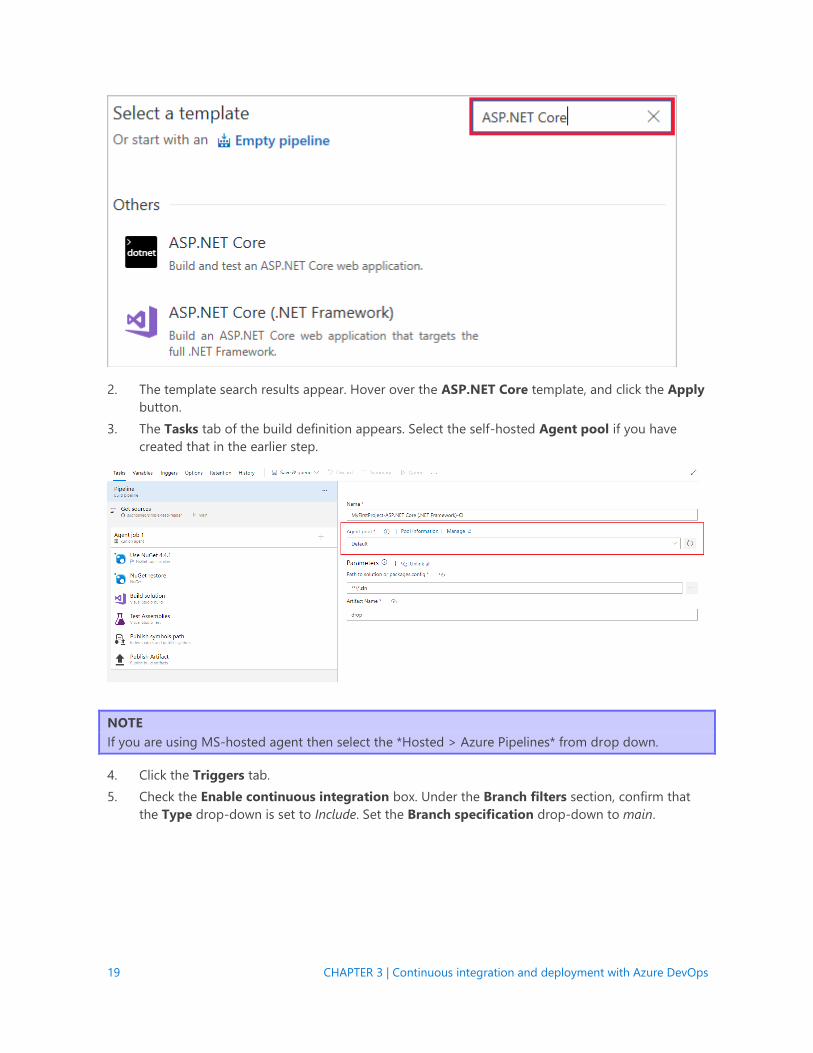
Create the build definition
1. From the template selection page, enter ASP.NET Core in the search box:
19 CHAPTER 3 | Continuous integration and deployment with Azure DevOps
2. The template search results appear. Hover over the ASP.NET Core template, and click the Apply
button.
3. The Tasks tab of the build definition appears. Select the self-hosted Agent pool if you have
created that in the earlier step.
NOTE
If you are using MS-hosted agent then select the *Hosted > Azure Pipelines* from drop down.
4. Click the Triggers tab.
5. Check the Enable continuous integration box. Under the Branch filters section, confirm that
the Type drop-down is set to Include. Set the Branch specification drop-down to main.
20 CHAPTER 3 | Continuous integration and deployment with Azure DevOps
These settings cause a build to trigger when any change is pushed to the default branch (main) of the
GitHub repository. Continuous integration is tested in the Commit changes to GitHub and
automatically deploy to Azure section.
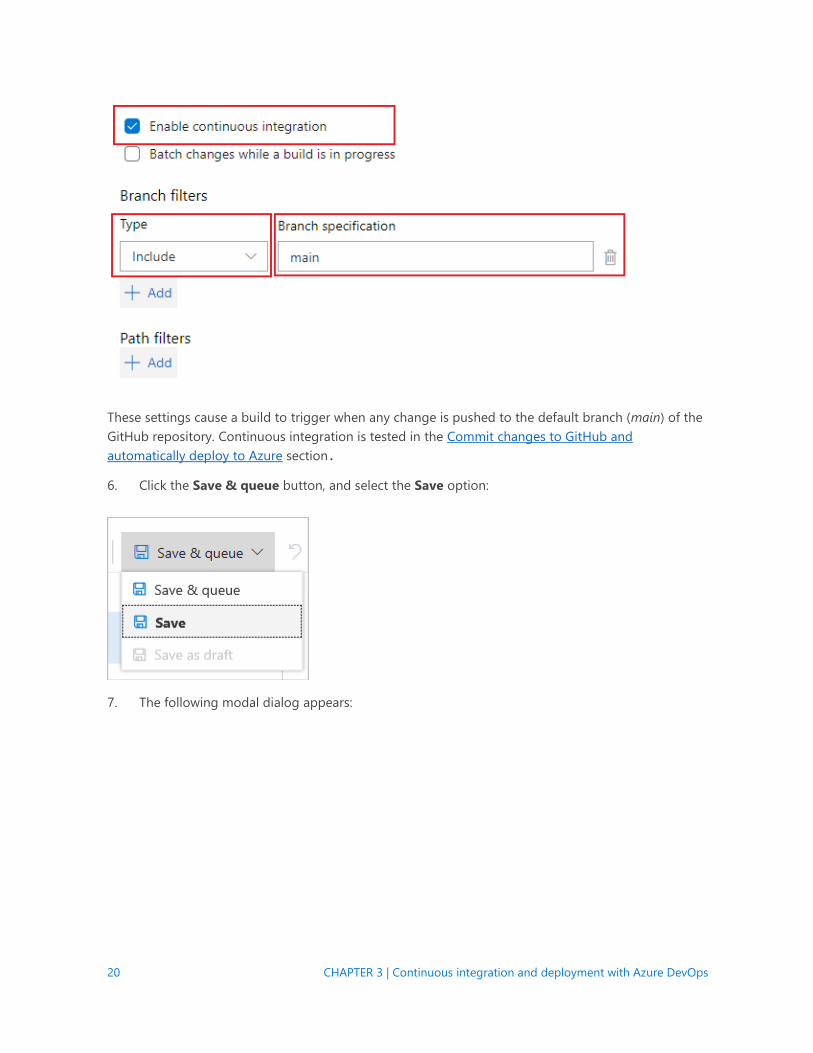
6. Click the Save & queue button, and select the Save option:
7. The following modal dialog appears:
21 CHAPTER 3 | Continuous integration and deployment with Azure DevOps
Use the default folder of \, and click the Save button.
Create the release pipeline
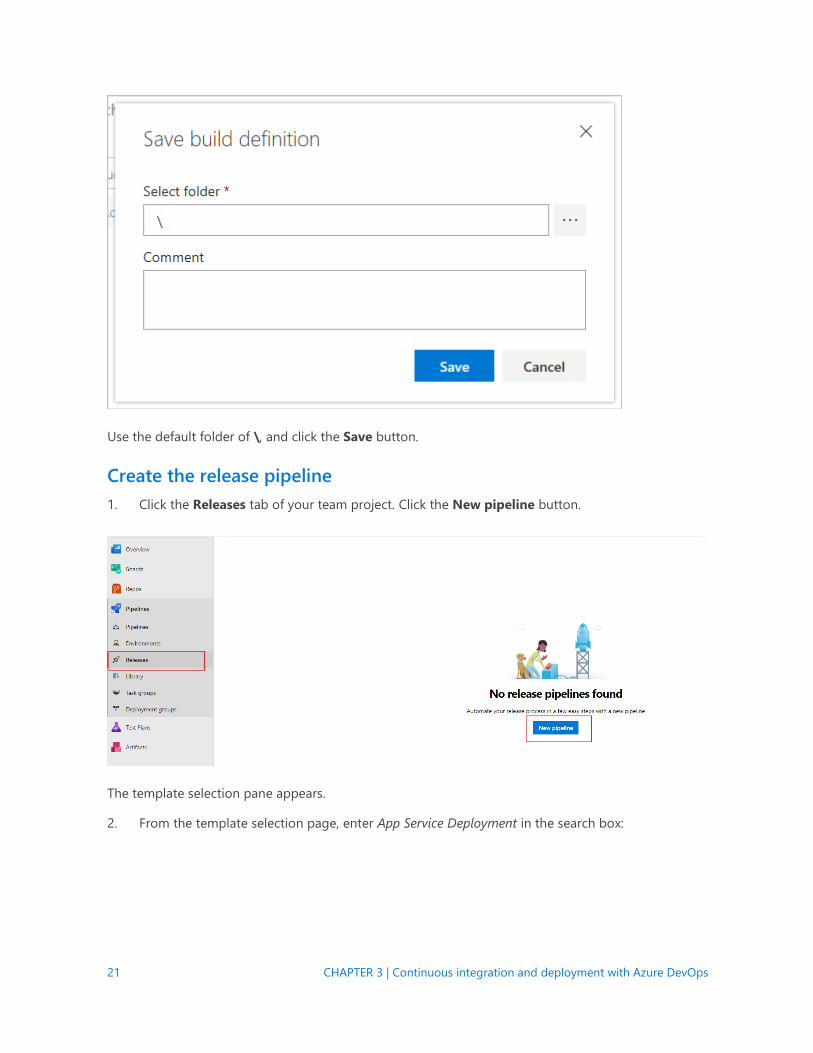
1. Click the Releases tab of your team project. Click the New pipeline button.
The template selection pane appears.
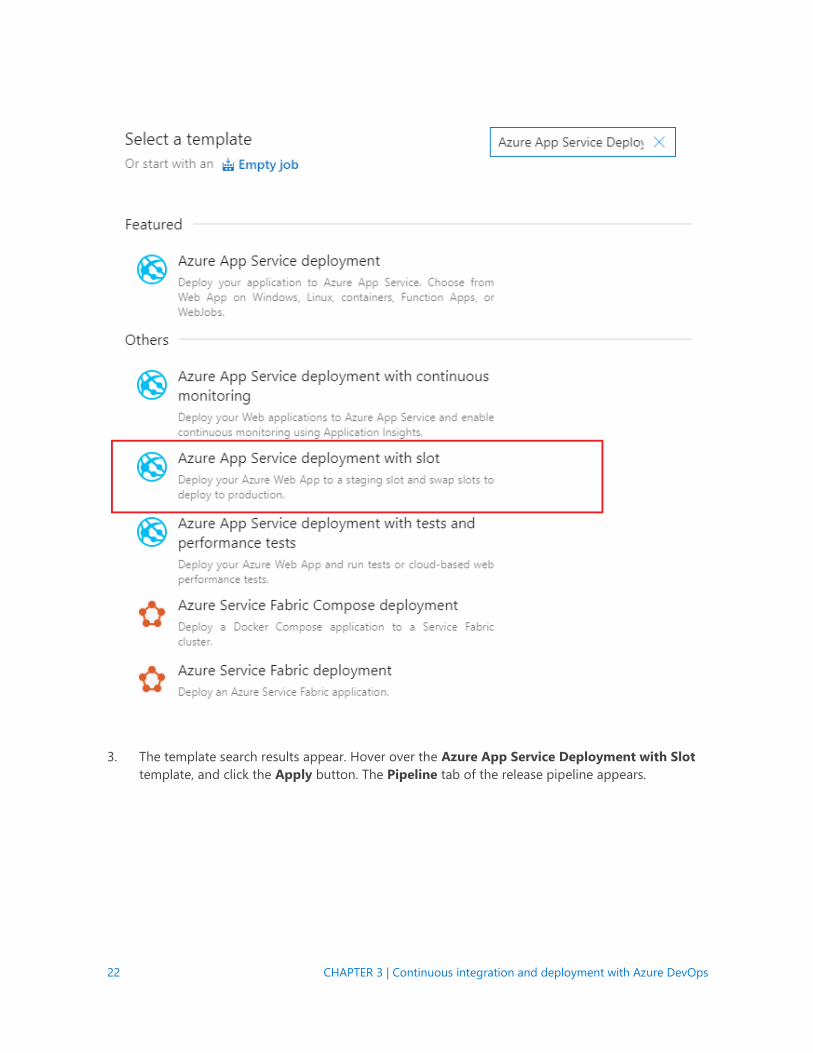
2. From the template selection page, enter App Service Deployment in the search box:
22 CHAPTER 3 | Continuous integration and deployment with Azure DevOps
3. The template search results appear. Hover over the Azure App Service Deployment with Slot
template, and click the Apply button. The Pipeline tab of the release pipeline appears.
23 CHAPTER 3 | Continuous integration and deployment with Azure DevOps
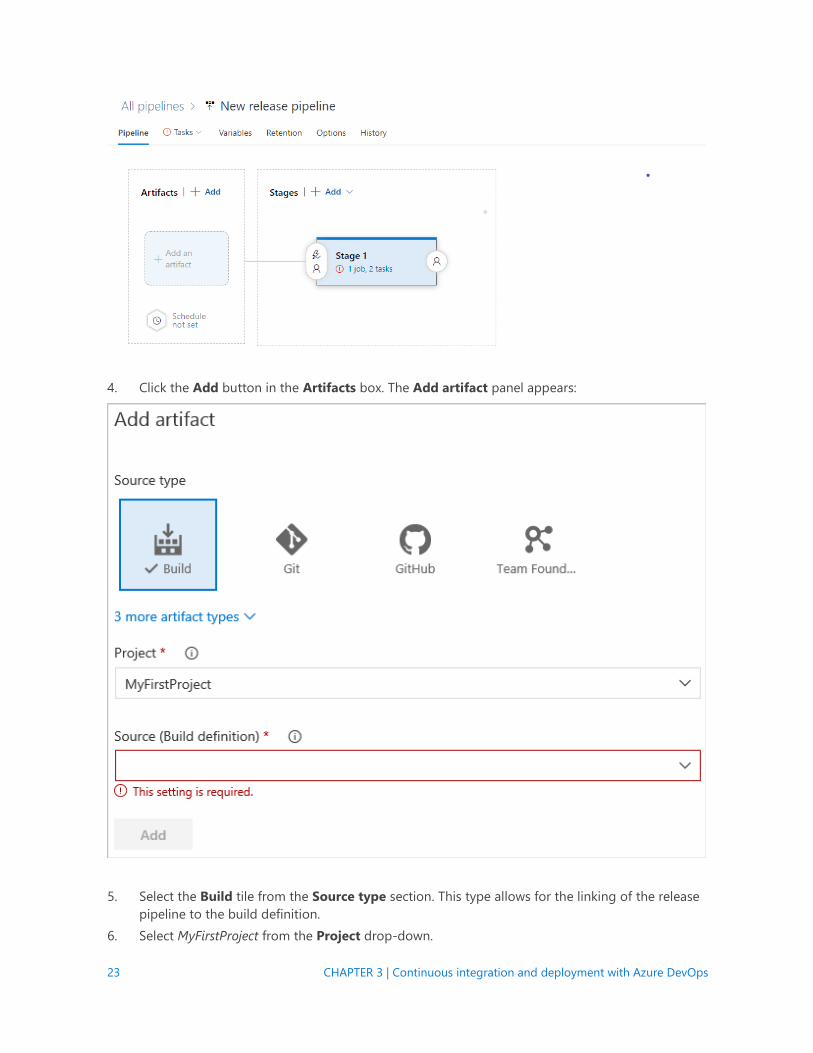
4. Click the Add button in the Artifacts box. The Add artifact panel appears:
5. Select the Build tile from the Source type section. This type allows for the linking of the release
pipeline to the build definition.
6. Select MyFirstProject from the Project drop-down.
24 CHAPTER 3 | Continuous integration and deployment with Azure DevOps
7. Select the build definition name, MyFirstProject-ASP.NET Core-CI, from the Source (Build
definition) drop-down.
8. Select Latest from the Default version drop-down. This option builds the artifacts produced by
the latest run of the build definition.
9. Replace the text in the Source alias textbox with Drop.
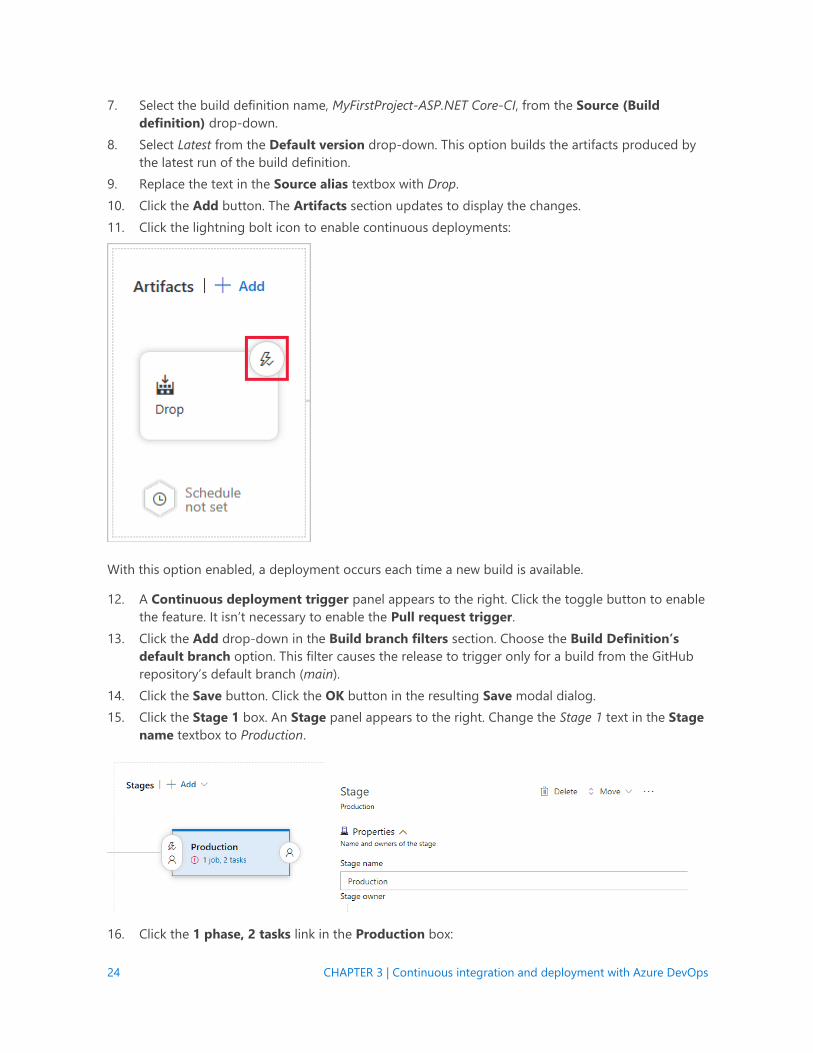
10. Click the Add button. The Artifacts section updates to display the changes.
11. Click the lightning bolt icon to enable continuous deployments:
With this option enabled, a deployment occurs each time a new build is available.
12. A Continuous deployment trigger panel appears to the right. Click the toggle button to enable
the feature. It isn’t necessary to enable the Pull request trigger.
13. Click the Add drop-down in the Build branch filters section. Choose the Build Definition’s
default branch option. This filter causes the release to trigger only for a build from the GitHub
repository’s default branch (main).
14. Click the Save button. Click the OK button in the resulting Save modal dialog.
15. Click the Stage 1 box. An Stage panel appears to the right. Change the Stage 1 text in the Stage
name textbox to Production.
16. Click the 1 phase, 2 tasks link in the Production box:
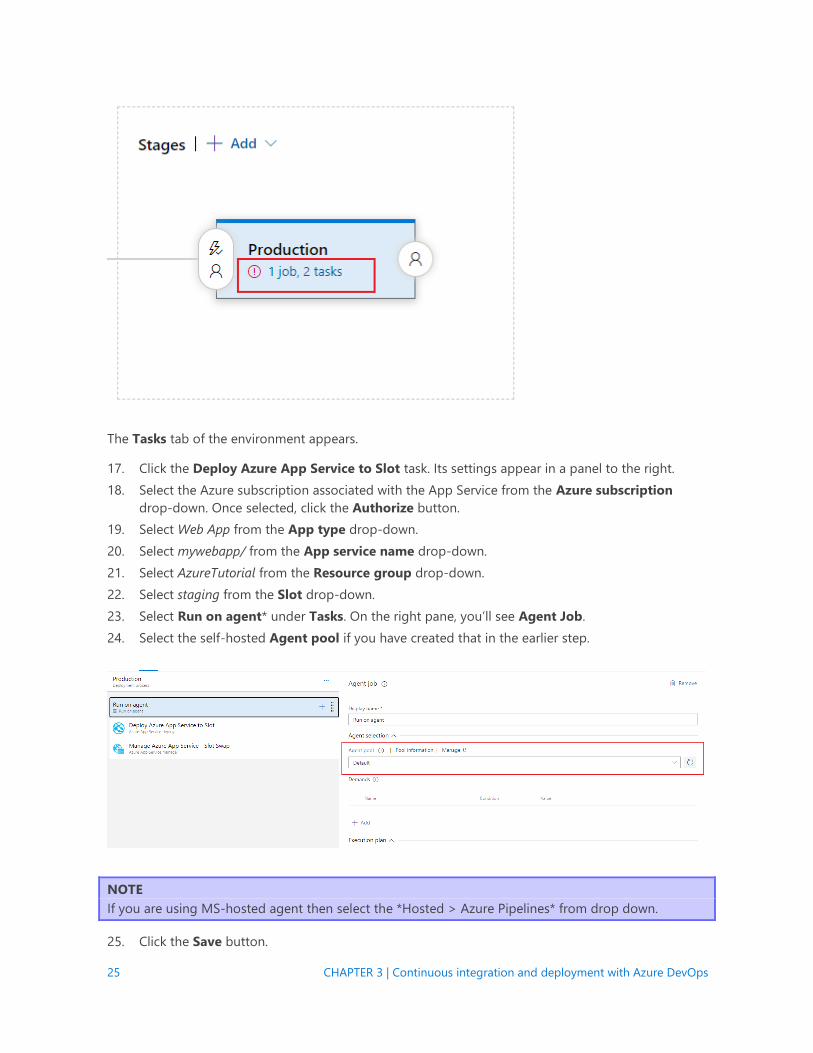
25 CHAPTER 3 | Continuous integration and deployment with Azure DevOps
The Tasks tab of the environment appears.
17. Click the Deploy Azure App Service to Slot task. Its settings appear in a panel to the right.
18. Select the Azure subscription associated with the App Service from the Azure subscription
drop-down. Once selected, click the Authorize button.
19. Select Web App from the App type drop-down.
20. Select mywebapp/ from the App service name drop-down.
21. Select AzureTutorial from the Resource group drop-down.
22. Select staging from the Slot drop-down.
23. Select Run on agent* under Tasks. On the right pane, you’ll see Agent Job.
24. Select the self-hosted Agent pool if you have created that in the earlier step.
NOTE
If you are using MS-hosted agent then select the *Hosted > Azure Pipelines* from drop down.
25. Click the Save button.
26 CHAPTER 3 | Continuous integration and deployment with Azure DevOps
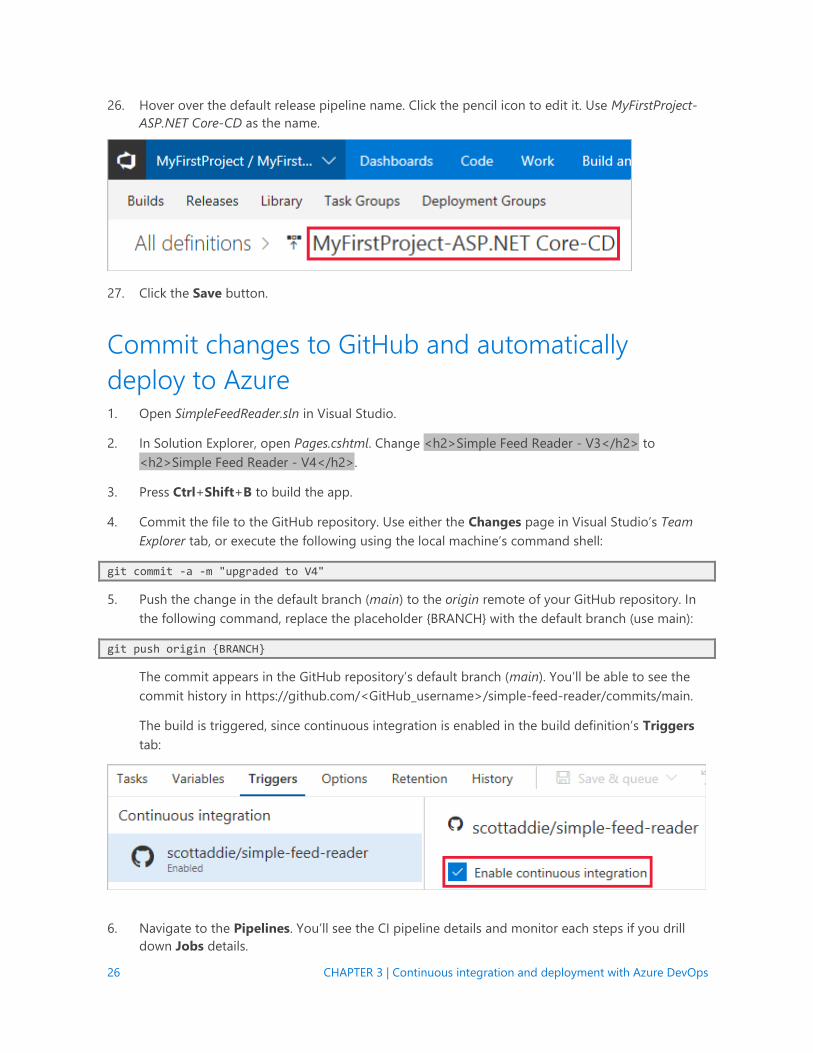
26. Hover over the default release pipeline name. Click the pencil icon to edit it. Use MyFirstProject-
ASP.NET Core-CD as the name.
27. Click the Save button.
Commit changes to GitHub and automatically
deploy to Azure 1. Open SimpleFeedReader.sln in Visual Studio.
2. In Solution Explorer, open Pages.cshtml. Change <h2>Simple Feed Reader - V3</h2> to
<h2>Simple Feed Reader - V4</h2>.
3. Press Ctrl+Shift+B to build the app.
4. Commit the file to the GitHub repository. Use either the Changes page in Visual Studio’s Team
Explorer tab, or execute the following using the local machine’s command shell:
git commit -a -m "upgraded to V4"
5. Push the change in the default branch (main) to the origin remote of your GitHub repository. In
the following command, replace the placeholder {BRANCH} with the default branch (use main):
git push origin {BRANCH}
The commit appears in the GitHub repository’s default branch (main). You’ll be able to see the
commit history in https://github.com/<GitHub_username>/simple-feed-reader/commits/main.
The build is triggered, since continuous integration is enabled in the build definition’s Triggers
tab:
6. Navigate to the Pipelines. You’ll see the CI pipeline details and monitor each steps if you drill
down Jobs details.

27 CHAPTER 3 | Continuous integration and deployment with Azure DevOps
7. Similarly, go to the Releases tab to see the details of CD pipeline. You can always drill down
further to see more details of each step.
8. Once the build succeeds, a deployment to Azure occurs. Navigate to the app in the browser.
Notice that the “V4” text appears in the heading:
Examine the Azure Pipelines pipeline
Build definition
A build definition was created with the name MyFirstProject-ASP.NET Core-CI. Upon completion, the
build produces a .zip file including the assets to be published. The release pipeline deploys those
assets to Azure.
28 CHAPTER 3 | Continuous integration and deployment with Azure DevOps
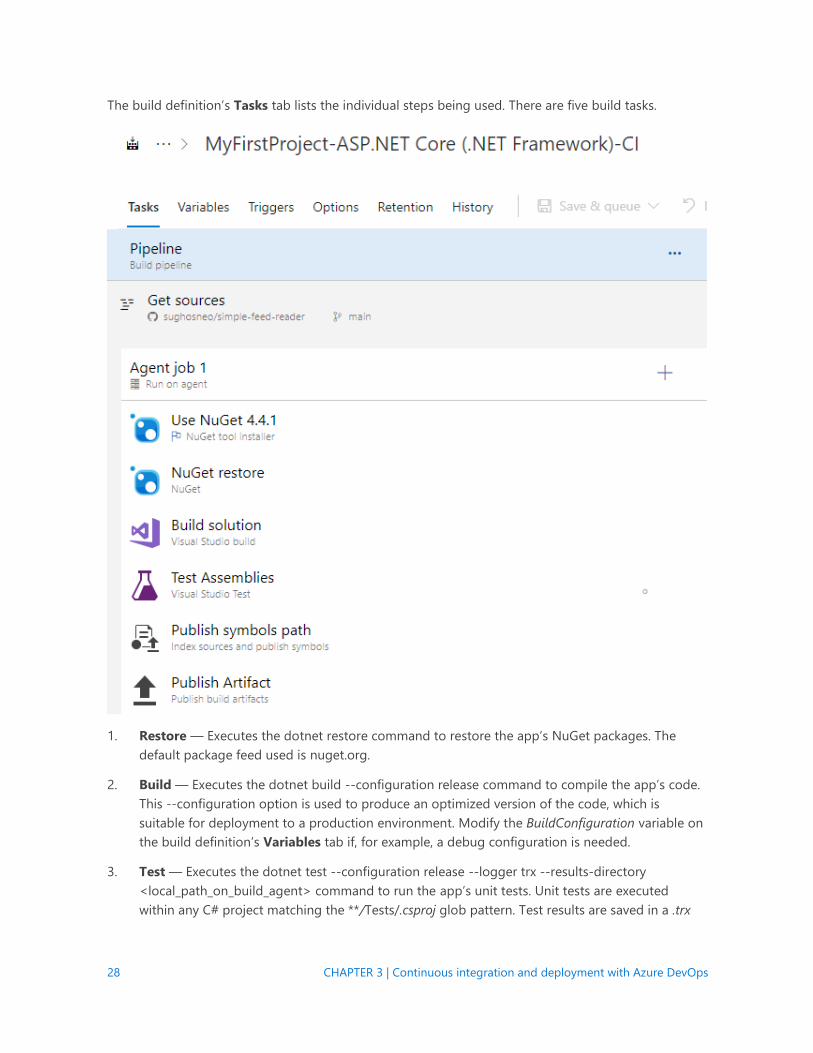
The build definition’s Tasks tab lists the individual steps being used. There are five build tasks.
1. Restore — Executes the dotnet restore command to restore the app’s NuGet packages. The
default package feed used is nuget.org.
2. Build — Executes the dotnet build --configuration release command to compile the app’s code.
This --configuration option is used to produce an optimized version of the code, which is
suitable for deployment to a production environment. Modify the BuildConfiguration variable on
the build definition’s Variables tab if, for example, a debug configuration is needed.
3. Test — Executes the dotnet test --configuration release --logger trx --results-directory
<local_path_on_build_agent> command to run the app’s unit tests. Unit tests are executed
within any C# project matching the **/Tests/.csproj glob pattern. Test results are saved in a .trx
29 CHAPTER 3 | Continuous integration and deployment with Azure DevOps
file at the location specified by the --results-directory option. If any tests fail, the build fails and
isn’t deployed.
NOTE To verify the unit tests work, modify SimpleFeedReader.Tests.cs to purposefully break one of the
tests. For example, change Assert.True(result.Count > 0); to Assert.False(result.Count > 0); in the
Returns_News_Stories_Given_Valid_Uri method. Commit and push the change to GitHub. The build is
triggered and fails. The build pipeline status changes to failed. Revert the change, commit, and push
again. The build succeeds.
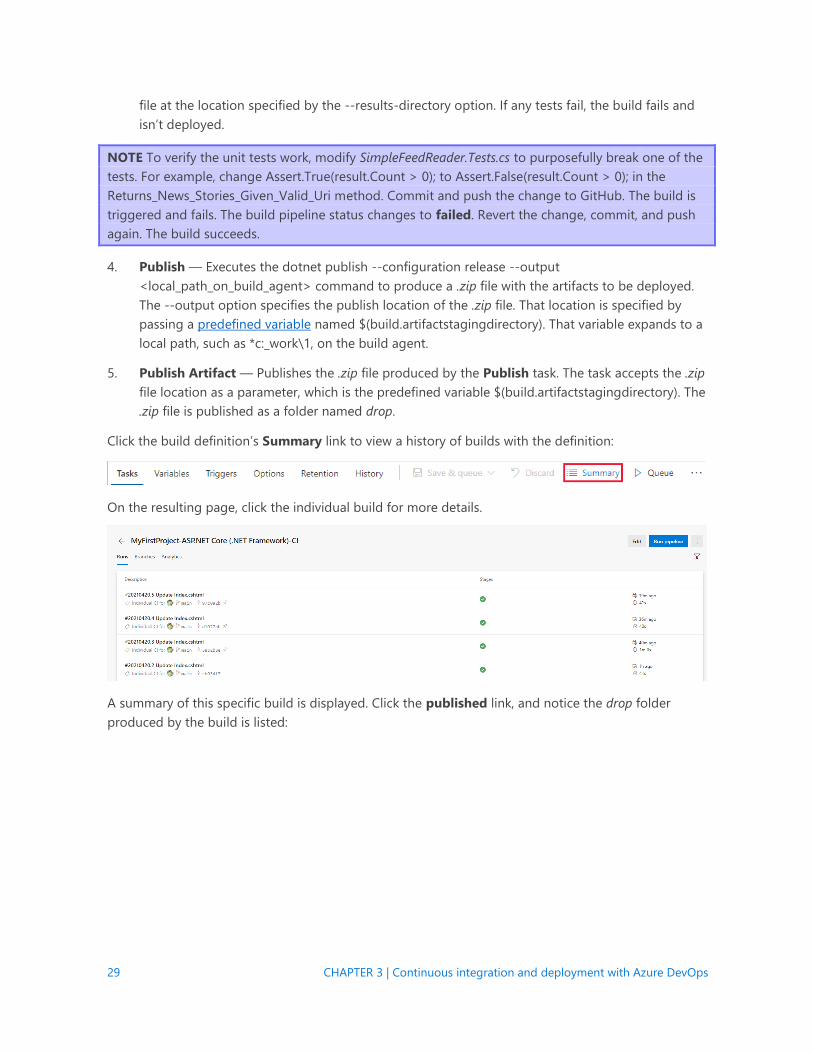
4. Publish — Executes the dotnet publish --configuration release --output
<local_path_on_build_agent> command to produce a .zip file with the artifacts to be deployed.
The --output option specifies the publish location of the .zip file. That location is specified by
passing a predefined variable named $(build.artifactstagingdirectory). That variable expands to a
local path, such as *c:_work\1, on the build agent.
5. Publish Artifact — Publishes the .zip file produced by the Publish task. The task accepts the .zip
file location as a parameter, which is the predefined variable $(build.artifactstagingdirectory). The
.zip file is published as a folder named drop.
Click the build definition’s Summary link to view a history of builds with the definition:
On the resulting page, click the individual build for more details.
A summary of this specific build is displayed. Click the published link, and notice the drop folder
produced by the build is listed:
30 CHAPTER 3 | Continuous integration and deployment with Azure DevOps
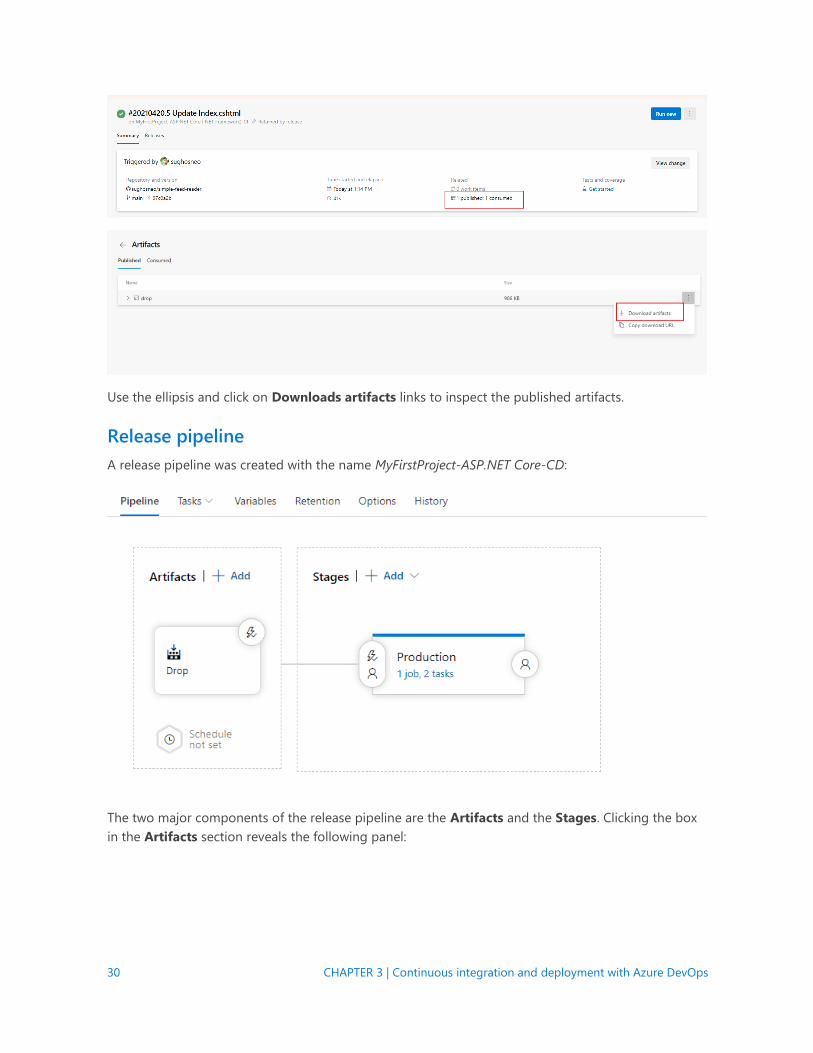
Use the ellipsis and click on Downloads artifacts links to inspect the published artifacts.
Release pipeline
A release pipeline was created with the name MyFirstProject-ASP.NET Core-CD:
The two major components of the release pipeline are the Artifacts and the Stages. Clicking the box
in the Artifacts section reveals the following panel:
31 CHAPTER 3 | Continuous integration and deployment with Azure DevOps
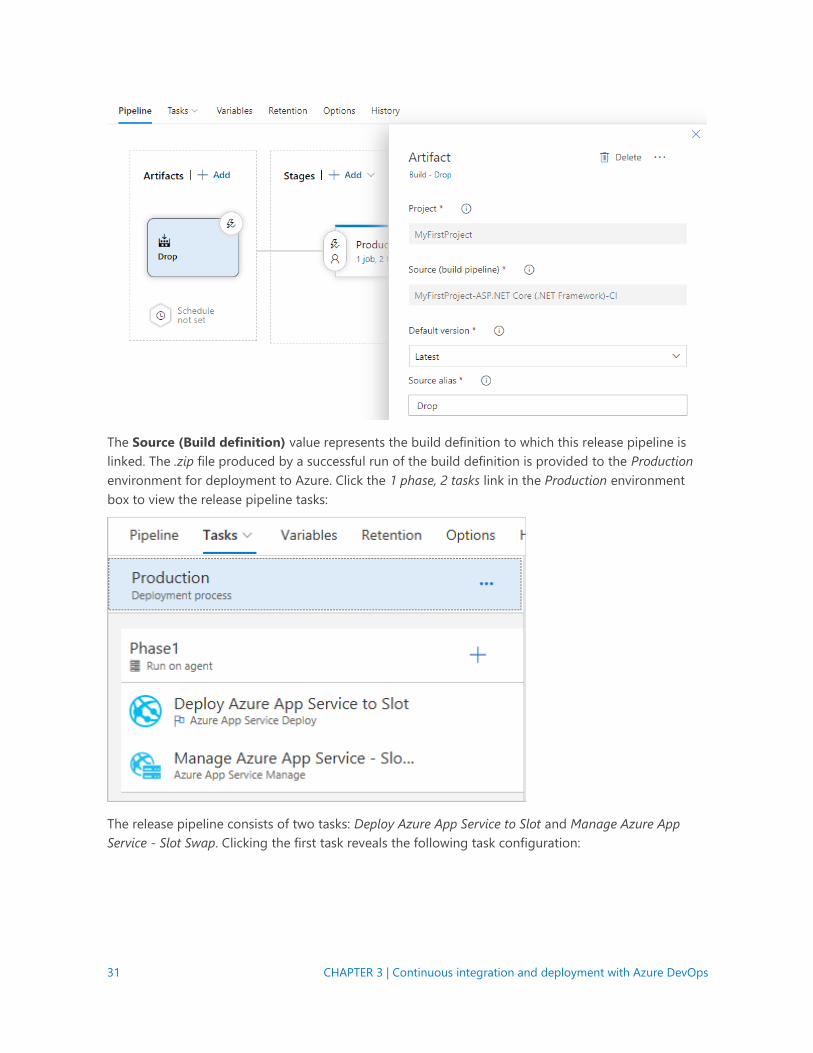
The Source (Build definition) value represents the build definition to which this release pipeline is
linked. The .zip file produced by a successful run of the build definition is provided to the Production
environment for deployment to Azure. Click the 1 phase, 2 tasks link in the Production environment
box to view the release pipeline tasks:
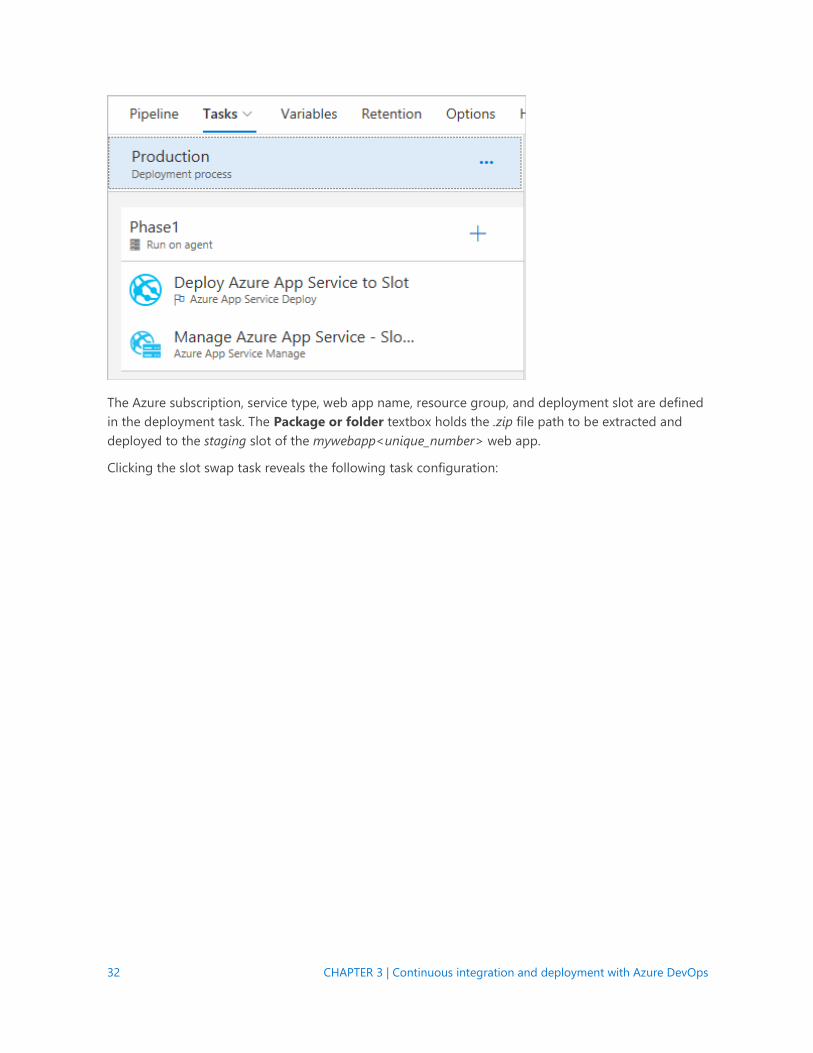
The release pipeline consists of two tasks: Deploy Azure App Service to Slot and Manage Azure App
Service - Slot Swap. Clicking the first task reveals the following task configuration:
32 CHAPTER 3 | Continuous integration and deployment with Azure DevOps
The Azure subscription, service type, web app name, resource group, and deployment slot are defined
in the deployment task. The Package or folder textbox holds the .zip file path to be extracted and
deployed to the staging slot of the mywebapp<unique_number> web app.
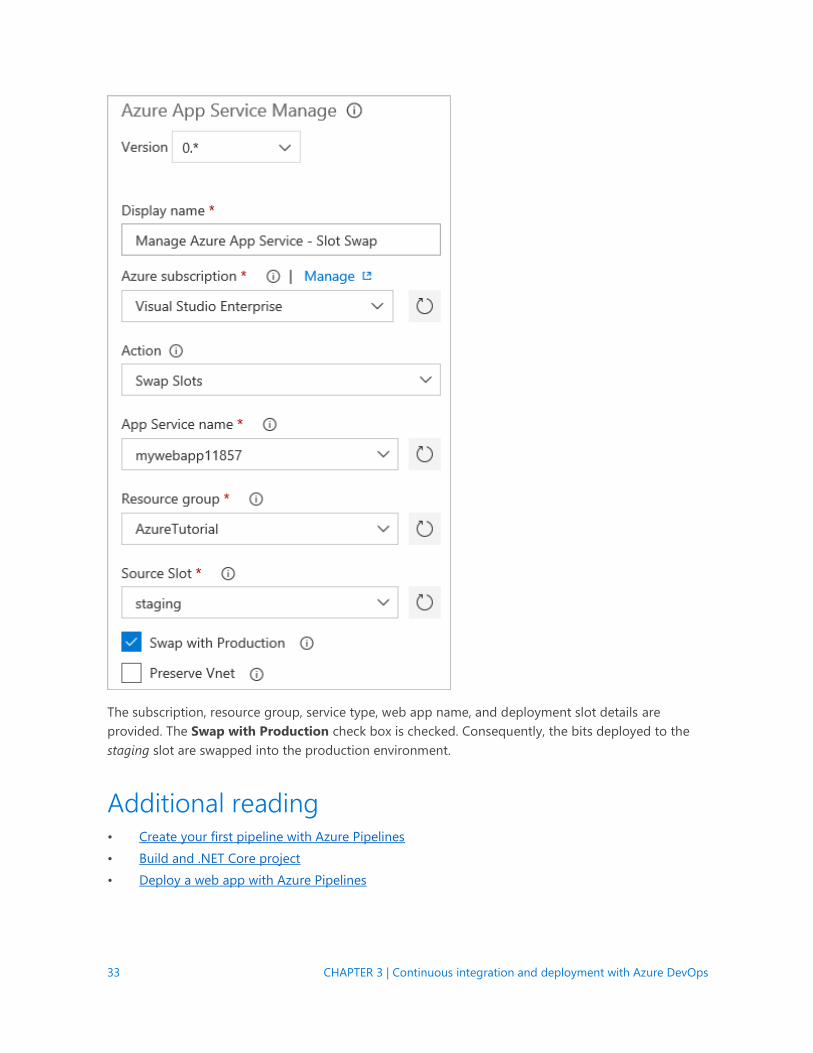
Clicking the slot swap task reveals the following task configuration:
33 CHAPTER 3 | Continuous integration and deployment with Azure DevOps
The subscription, resource group, service type, web app name, and deployment slot details are
provided. The Swap with Production check box is checked. Consequently, the bits deployed to the
staging slot are swapped into the production environment.
Additional reading • Create your first pipeline with Azure Pipelines
• Build and .NET Core project
• Deploy a web app with Azure Pipelines
34 CHAPTER 3 | Continuous integration and deployment with Azure DevOps
Continuous integration and deployment with
GitHub Actions GitHub has long been the home for millions of open-source developers around the globe. Most
developers associate source control with GitHub. However, GitHub is an evolving platform that can be
used for more than just synchronizing Git repositories.
GitHub Actions
GitHub Actions is a workflow engine that can automate workflows for nearly all events that occur on
GitHub. Actions is a great solution for Continuous Integration/Continuous Deployment (CI/CD)
pipelines.
In this section of articles, you’ll learn how to create an Actions workflow. The workflow will build, test,
and deploy a .NET web app to Azure Web Apps.
Note
Before you begin, complete the Publish the app’s code to GitHub and Disconnect local Git
deployment sections of the Continuous integration and deployment with Azure DevOps section to
publish your code to GitHub. Then proceed to the Build article.
In the Build article, you’ll create the initial workflow to build and test the .NET app. You’ll:
• Learn the basic structure of a GitHub Action workflow YAML file.
• Use a template to create a basic build workflow that builds a .NET app and executes unit tests.
• Publish the compiled app so that it’s ready for deployment.
In the Deploy article, you’ll:
• Learn about environments in GitHub Actions.
• Create two environments and specify environment protection rules.
• Create environment secrets for managing environment-specific configuration.
• Extend the workflow YAML file to add deployment steps.
• Add a manual dispatch trigger.
Secure code with CodeQL
In addition to building and deploying code, GitHub Advanced Security offers tools for “shifting left”
with security. That is, integrating security early on in the software delivery lifecycle. CodeQL is a code
scanning language that runs queries to find potential vulnerabilities or quality issues in your code.
CodeQL is run using an Actions workflow.
In the CodeQL article, you’ll:
• Create a Code Scanning Action.
• Edit the workflow file to include custom scan settings.
• See scanning results.
35 CHAPTER 3 | Continuous integration and deployment with Azure DevOps
Compare and contrast GitHub Actions and Azure Pipelines
GitHub Actions and Azure Pipelines have a common lineage and are similar in many respects.
However, you should understand the differences before selecting a platform for building, testing, and
deploying apps. In the Comparison article, you’ll deep dive into these platforms and compare and
contrast them. You’ll also learn how to select the correct platform for your CI/CD needs.
Compare and contrast GitHub Actions and Azure
Pipelines GitHub Actions and Azure Pipelines have a common history. In fact, the Actions agent is a fork of the
Pipelines agent. There are many similarities between GitHub Actions and Azure Pipelines and it’s
worth comparing and contrasting them.
Pipelines as code
Before you compare GitHub Actions and Azure Pipelines, you should consider the benefits of pipelines
as code. Pipelines as code:
• Benefit from standard source control practices (such as code reviews via pull request and
versioning).
• Can be audited for changes just like any other files in the repository.
• Don’t require accessing a separate system or UI to edit.
• Can fully codify the build, test, and deploy process for code.
• Can usually be templatized to empower teams to create standard processes across multiple
repositories.
Note
The term “pipelines” can also be referred to by several different interchangeable words: pipeline,
workflow, and build are common terms. In this article, references to Azure Pipelines are referring to
YAML Pipelines, and not the older UI-based Classic Pipelines.
Agents and runners
Before you examine pipelines themselves, you should consider how these pipelines execute. Both
GitHub Actions and Azure Pipelines are really orchestration engines. When a pipeline is triggered, the
system finds an “agent” and tells the agent to execute the jobs defined in the pipeline file.
Azure Pipelines run on agents. The agent is written in .NET, so it will run wherever .NET can run:
Windows, macOS, and Linux. Agents can even run in containers. Agents are registered to a pool in
Azure Pipelines or to a repository or organization in GitHub. Agents can be hosted or private.
GitHub Workflows execute on runners. The runner code is essentially a fork of the Azure Pipelines
code, so it’s very similar. It’s also cross-platform and you can also use hosted or self-hosted runners.
36 CHAPTER 3 | Continuous integration and deployment with Azure DevOps
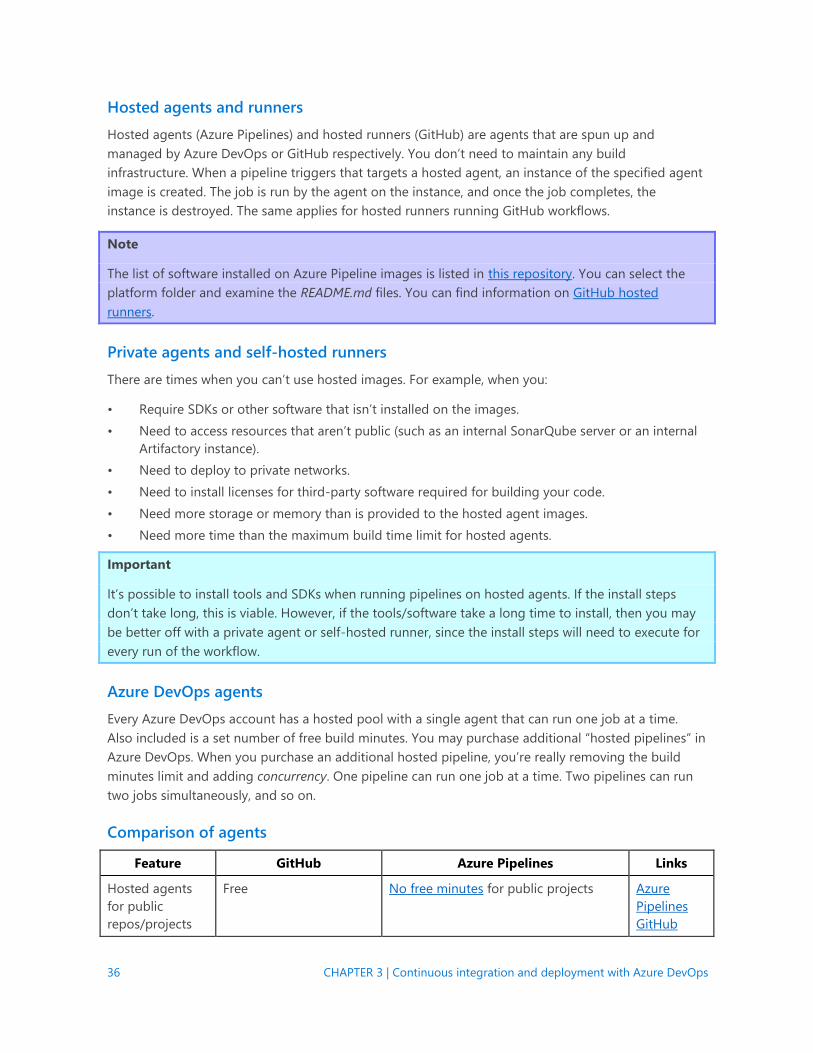
Hosted agents and runners
Hosted agents (Azure Pipelines) and hosted runners (GitHub) are agents that are spun up and
managed by Azure DevOps or GitHub respectively. You don’t need to maintain any build
infrastructure. When a pipeline triggers that targets a hosted agent, an instance of the specified agent
image is created. The job is run by the agent on the instance, and once the job completes, the
instance is destroyed. The same applies for hosted runners running GitHub workflows.
Note
The list of software installed on Azure Pipeline images is listed in this repository. You can select the
platform folder and examine the README.md files. You can find information on GitHub hosted
runners.
Private agents and self-hosted runners
There are times when you can’t use hosted images. For example, when you:
• Require SDKs or other software that isn’t installed on the images.
• Need to access resources that aren’t public (such as an internal SonarQube server or an internal
Artifactory instance).
• Need to deploy to private networks.
• Need to install licenses for third-party software required for building your code.
• Need more storage or memory than is provided to the hosted agent images.
• Need more time than the maximum build time limit for hosted agents.
Important
It’s possible to install tools and SDKs when running pipelines on hosted agents. If the install steps
don’t take long, this is viable. However, if the tools/software take a long time to install, then you may
be better off with a private agent or self-hosted runner, since the install steps will need to execute for
every run of the workflow.
Azure DevOps agents
Every Azure DevOps account has a hosted pool with a single agent that can run one job at a time.
Also included is a set number of free build minutes. You may purchase additional “hosted pipelines” in
Azure DevOps. When you purchase an additional hosted pipeline, you’re really removing the build
minutes limit and adding concurrency. One pipeline can run one job at a time. Two pipelines can run
two jobs simultaneously, and so on.
Comparison of agents
Feature GitHub Azure Pipelines Links
Hosted agents
for public
repos/projects
Free No free minutes for public projects Azure
Pipelines
GitHub
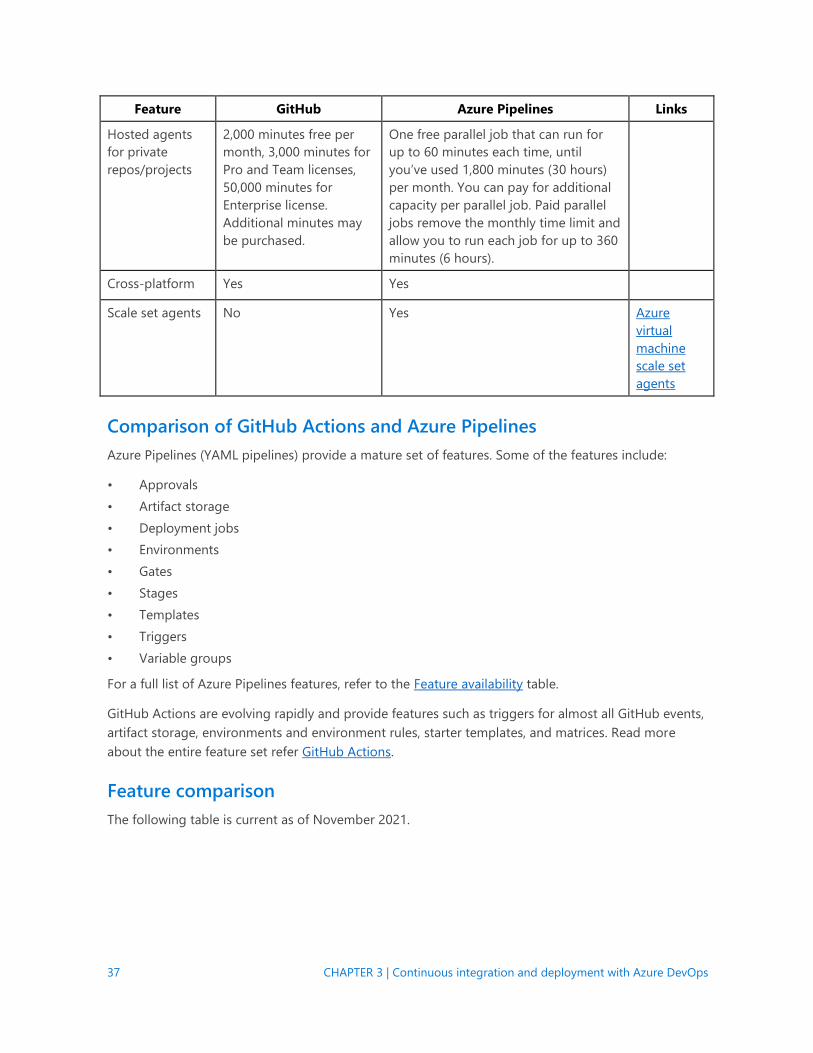
37 CHAPTER 3 | Continuous integration and deployment with Azure DevOps
Feature GitHub Azure Pipelines Links
Hosted agents
for private
repos/projects
2,000 minutes free per
month, 3,000 minutes for
Pro and Team licenses,
50,000 minutes for
Enterprise license.
Additional minutes may
be purchased.
One free parallel job that can run for
up to 60 minutes each time, until
you’ve used 1,800 minutes (30 hours)
per month. You can pay for additional
capacity per parallel job. Paid parallel
jobs remove the monthly time limit and
allow you to run each job for up to 360
minutes (6 hours).
Cross-platform Yes Yes
Scale set agents No Yes Azure
virtual
machine
scale set
agents
Comparison of GitHub Actions and Azure Pipelines
Azure Pipelines (YAML pipelines) provide a mature set of features. Some of the features include:
• Approvals
• Artifact storage
• Deployment jobs
• Environments
• Gates
• Stages
• Templates
• Triggers
• Variable groups
For a full list of Azure Pipelines features, refer to the Feature availability table.
GitHub Actions are evolving rapidly and provide features such as triggers for almost all GitHub events,
artifact storage, environments and environment rules, starter templates, and matrices. Read more
about the entire feature set refer GitHub Actions.
Feature comparison
The following table is current as of November 2021.
38 CHAPTER 3 | Continuous integration and deployment with Azure DevOps
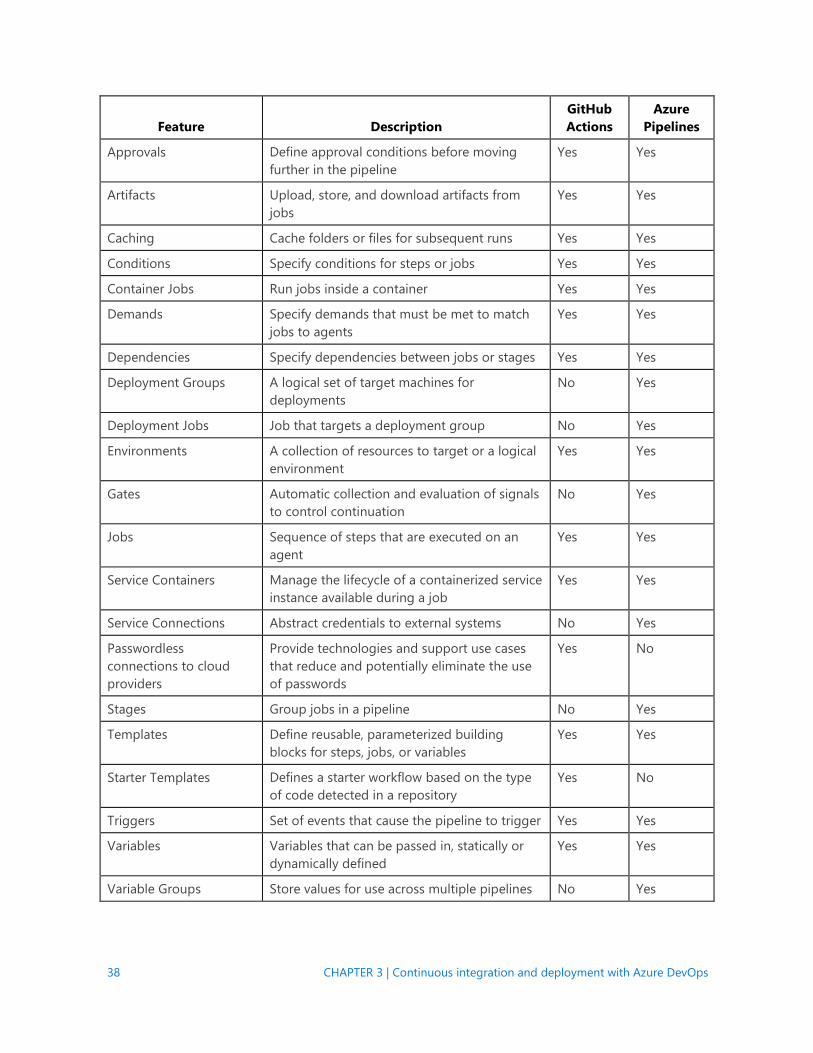
Feature Description
GitHub
Actions
Azure
Pipelines
Approvals Define approval conditions before moving
further in the pipeline
Yes Yes
Artifacts Upload, store, and download artifacts from
jobs
Yes Yes
Caching Cache folders or files for subsequent runs Yes Yes
Conditions Specify conditions for steps or jobs Yes Yes
Container Jobs Run jobs inside a container Yes Yes
Demands Specify demands that must be met to match
jobs to agents
Yes Yes
Dependencies Specify dependencies between jobs or stages Yes Yes
Deployment Groups A logical set of target machines for
deployments
No Yes
Deployment Jobs Job that targets a deployment group No Yes
Environments A collection of resources to target or a logical
environment
Yes Yes
Gates Automatic collection and evaluation of signals
to control continuation
No Yes
Jobs Sequence of steps that are executed on an
agent
Yes Yes
Service Containers Manage the lifecycle of a containerized service
instance available during a job
Yes Yes
Service Connections Abstract credentials to external systems No Yes
Passwordless
connections to cloud
providers
Provide technologies and support use cases
that reduce and potentially eliminate the use
of passwords
Yes No
Stages Group jobs in a pipeline No Yes
Templates Define reusable, parameterized building
blocks for steps, jobs, or variables
Yes Yes
Starter Templates Defines a starter workflow based on the type
of code detected in a repository
Yes No
Triggers Set of events that cause the pipeline to trigger Yes Yes
Variables Variables that can be passed in, statically or
dynamically defined
Yes Yes
Variable Groups Store values for use across multiple pipelines No Yes
39 CHAPTER 3 | Continuous integration and deployment with Azure DevOps
Important
GitHub Actions is rapidly evolving. Since the first version of the above table, GitHub Actions has
release Composite Actions and Reusable Workflows, both of which significantly improve reusability of
GitHub Actions. Passwordless deployment via OpenID Connect (OIDC) support for Azure, AWS and
Hashi have also been released to beta. Be sure to check documentation carefully before deciding
which platform is right for you.
Recommendation table for common scenarios The following table shows some common scenarios and platform recommendations for each. As
always, there will be exceptions. Consider your exact scenario carefully.
Requirement Platform
I need to create reusable templates to standardize how jobs are executed across
multiple teams
Both
I need to have automated gates control pipeline progress Azure
Pipelines
I need to define multiple stages Azure
Pipelines
I need multiple jobs to target the same environment Both
I need to model multiple, complex environments Both
I need to use the same environments across multiple projects/repos Azure
Pipelines
I have repos that aren’t in GitHub Azure
Pipelines
I need to create custom tasks that aren’t open-source Both
I need a simple workflow for building and deploying open-source repositories to a
small set of environments
GitHub
Actions
I need to model workflows for scenarios other than CI/CD. For example, custom alerts
on pull requests
GitHub
Actions
I need to create custom tasks that are open-source Both
Build a .NET web app using GitHub Actions GitHub Actions allow you to automate workflows in response to events that are triggered in GitHub. A
common workflow is Continuous Integration (CI), but Actions can automate other processes. For
example, sending welcome emails when people join a repository.
To explore moving code to the cloud, you’ll build a GitHub Actions workflow file. The workflow file will
be used for the Simple Feed Reader app you’ve already deployed to Azure App Service.
40 CHAPTER 3 | Continuous integration and deployment with Azure DevOps
In this article, you will:
• Learn the basic structure of a GitHub Action workflow YAML file.
• Use a template to create a basic build workflow that builds the .NET app and executes unit tests.
• Publish the compiled app so that it’s ready for deployment.
Workflow structure
Workflows are defined in YAML files, and contain several common nodes:
• a name
• a trigger, defined by an on section
• one or more job sections composed of one or more steps
• optional attributes such as environment variables
Jobs are run on runners. You can use hosted runners, which are spun up by GitHub during the
workflow and then thrown away. Hosted runners are great because you don’t have to maintain your
own build infrastructure. For workflows that require a specific build environment, or for running
workflows on a private network, you can also use private runners. To create a private runner, install the
runner on any machine that supports .NET.
Each job will specify what runner GitHub should use to execute the steps. You can also specify
dependencies between jobs using the needs attribute. Deployment jobs can also specify an
environment to target.
The steps node can be as easy as inline commands, or they can be actions. Most CI workflows will
have a combination of run steps (for executing scripts) and actions. Individual actions are pulled into
the workflow by referencing the GitHub Action repository (and optionally a tag or commit hash for
specific versions) and specifying any parameters using the with keyword.
Tip
For more information, see GitHub Actions YAML syntax.
Create a basic build workflow
A primary principle of effective DevOps is to “build once, and deploy many times”. You’ll start by
creating a workflow to build a basic .NET app. In the next step, you’ll publish the output to prepare for
deployment.
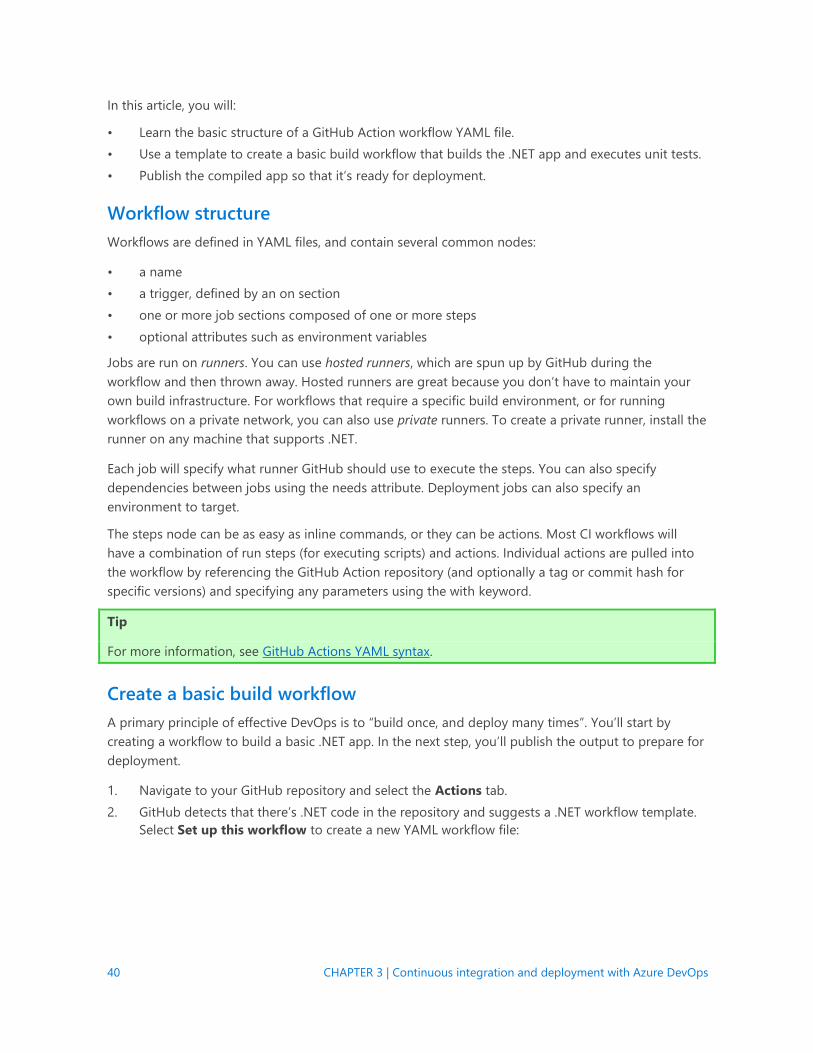
1. Navigate to your GitHub repository and select the Actions tab.
2. GitHub detects that there’s .NET code in the repository and suggests a .NET workflow template.
Select Set up this workflow to create a new YAML workflow file:
41 CHAPTER 3 | Continuous integration and deployment with Azure DevOps
Figure 1: Creating a new workflow.
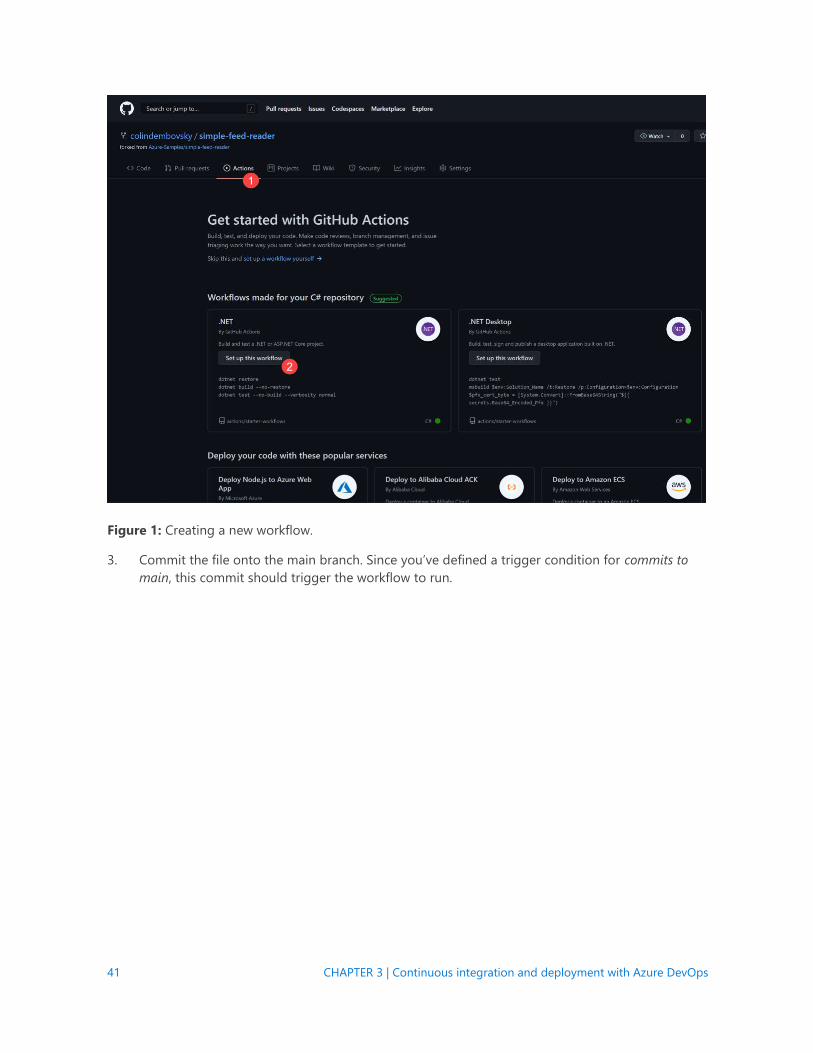
3. Commit the file onto the main branch. Since you’ve defined a trigger condition for commits to
main, this commit should trigger the workflow to run.
42 CHAPTER 3 | Continuous integration and deployment with Azure DevOps
Figure 2: Commit the YAML file.
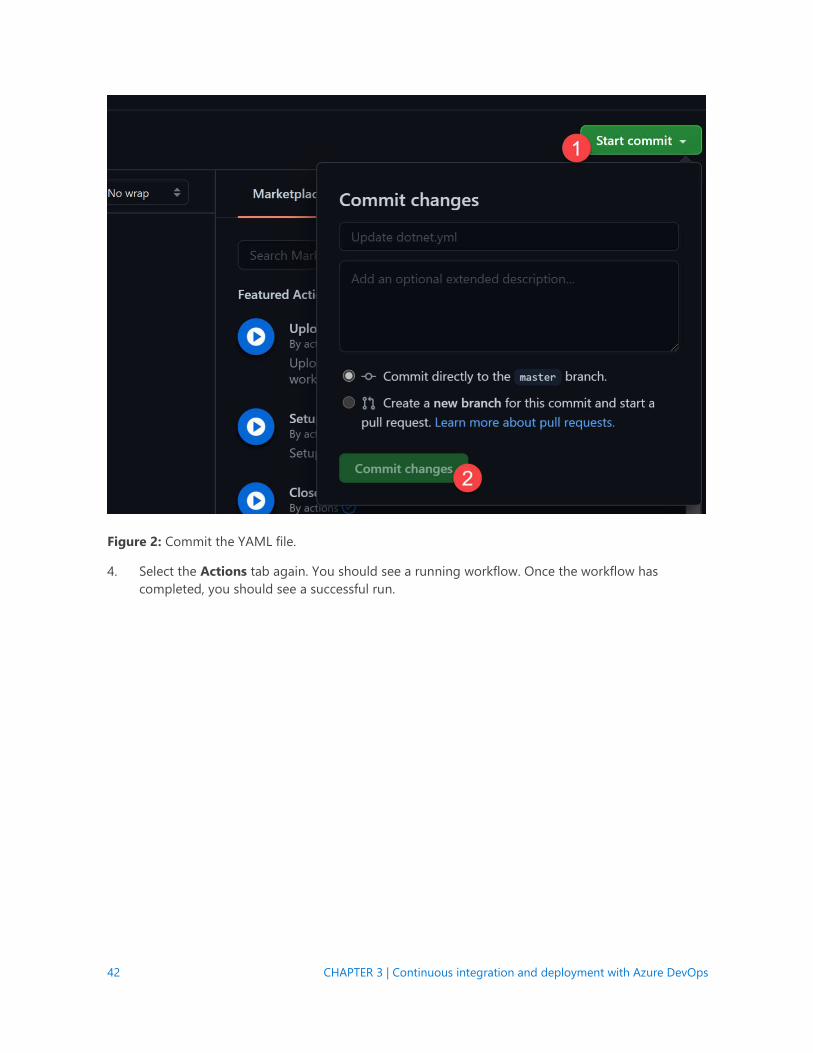
4. Select the Actions tab again. You should see a running workflow. Once the workflow has
completed, you should see a successful run.
43 CHAPTER 3 | Continuous integration and deployment with Azure DevOps
Figure 3: Successful build view.
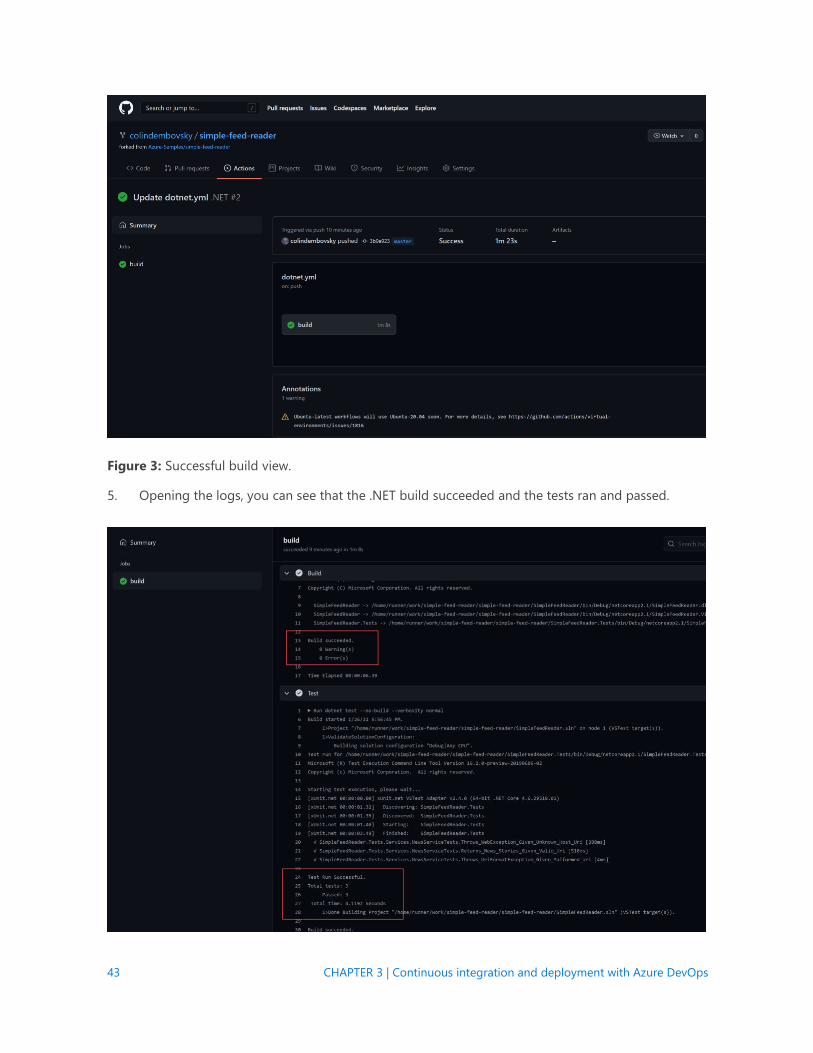
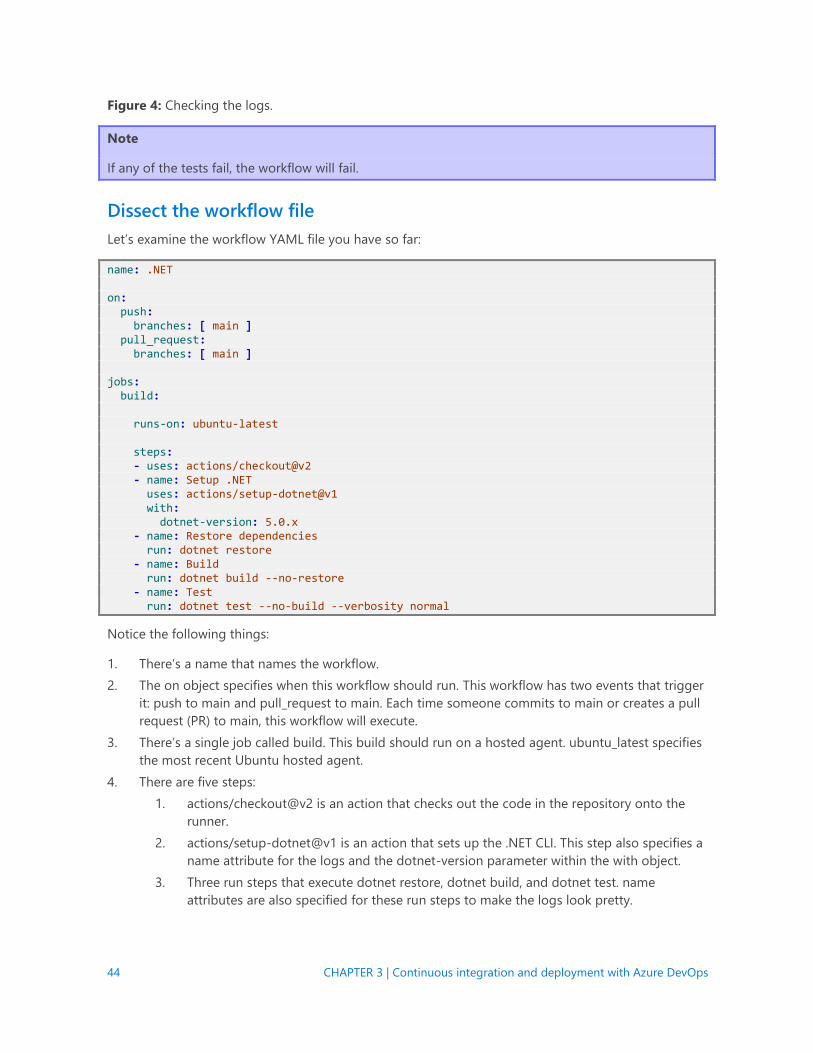
5. Opening the logs, you can see that the .NET build succeeded and the tests ran and passed.
44 CHAPTER 3 | Continuous integration and deployment with Azure DevOps
Figure 4: Checking the logs.
Note
If any of the tests fail, the workflow will fail.
Dissect the workflow file
Let’s examine the workflow YAML file you have so far:
name: .NET on: push: branches: [ main ] pull_request: branches: [ main ] jobs: build: runs-on: ubuntu-latest steps: - uses: actions/checkout@v2 - name: Setup .NET uses: actions/setup-dotnet@v1 with: dotnet-version: 5.0.x - name: Restore dependencies run: dotnet restore - name: Build run: dotnet build --no-restore - name: Test run: dotnet test --no-build --verbosity normal
Notice the following things:
1. There’s a name that names the workflow.
2. The on object specifies when this workflow should run. This workflow has two events that trigger
it: push to main and pull_request to main. Each time someone commits to main or creates a pull
request (PR) to main, this workflow will execute.
3. There’s a single job called build. This build should run on a hosted agent. ubuntu_latest specifies
the most recent Ubuntu hosted agent.
4. There are five steps:
1. actions/checkout@v2 is an action that checks out the code in the repository onto the
runner.
2. actions/setup-dotnet@v1 is an action that sets up the .NET CLI. This step also specifies a
name attribute for the logs and the dotnet-version parameter within the with object.
3. Three run steps that execute dotnet restore, dotnet build, and dotnet test. name
attributes are also specified for these run steps to make the logs look pretty.
45 CHAPTER 3 | Continuous integration and deployment with Azure DevOps
Publish the output
Now that you’ve successfully built and tested the code, add steps that publish the output so you can
deploy the web app.
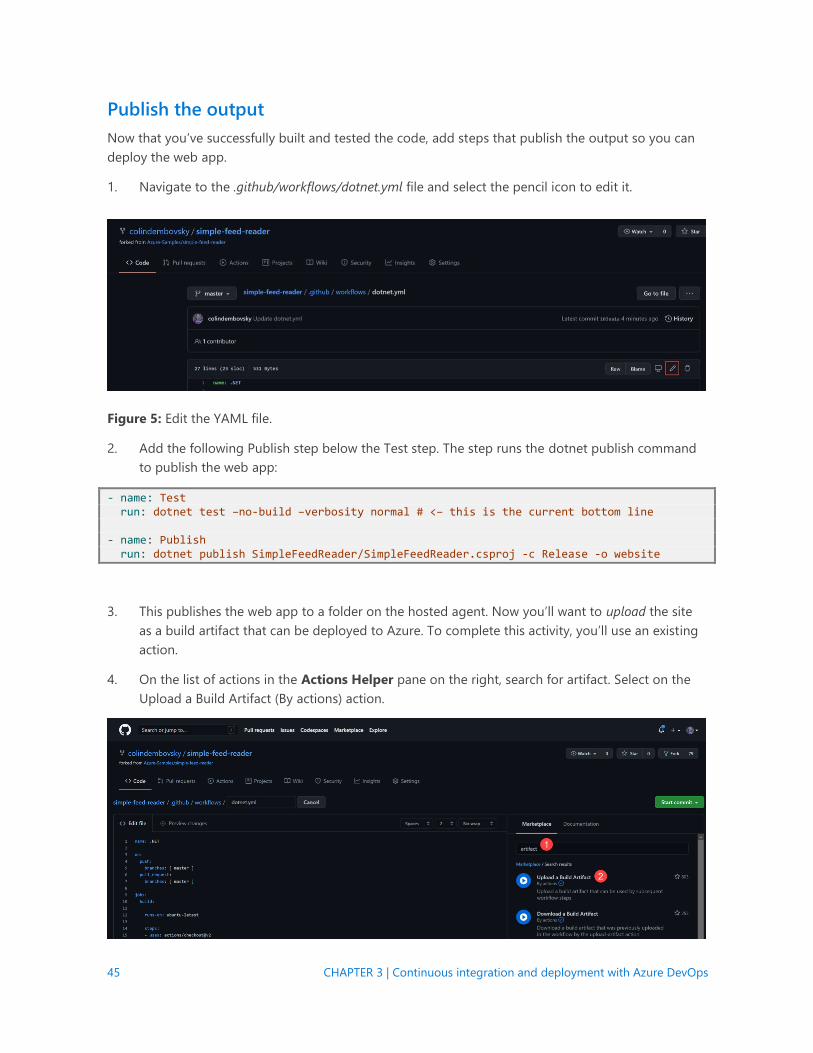
1. Navigate to the .github/workflows/dotnet.yml file and select the pencil icon to edit it.
Figure 5: Edit the YAML file.
2. Add the following Publish step below the Test step. The step runs the dotnet publish command
to publish the web app:
- name: Test run: dotnet test –no-build –verbosity normal # <– this is the current bottom line - name: Publish run: dotnet publish SimpleFeedReader/SimpleFeedReader.csproj -c Release -o website
3. This publishes the web app to a folder on the hosted agent. Now you’ll want to upload the site
as a build artifact that can be deployed to Azure. To complete this activity, you’ll use an existing
action.
4. On the list of actions in the Actions Helper pane on the right, search for artifact. Select on the
Upload a Build Artifact (By actions) action.
46 CHAPTER 3 | Continuous integration and deployment with Azure DevOps
Figure 6: Accessing the snippet helper.
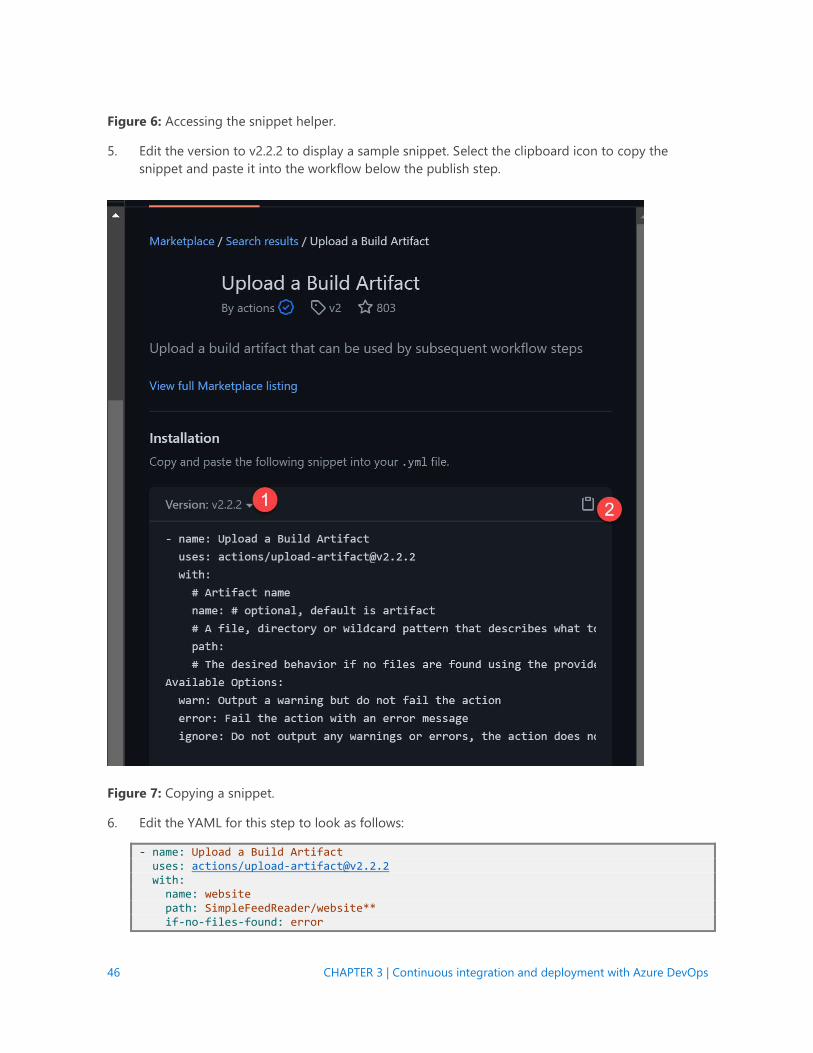
5. Edit the version to v2.2.2 to display a sample snippet. Select the clipboard icon to copy the
snippet and paste it into the workflow below the publish step.
Figure 7: Copying a snippet.
6. Edit the YAML for this step to look as follows:
- name: Upload a Build Artifact uses: actions/[email protected] with: name: website path: SimpleFeedReader/website** if-no-files-found: error
47 CHAPTER 3 | Continuous integration and deployment with Azure DevOps
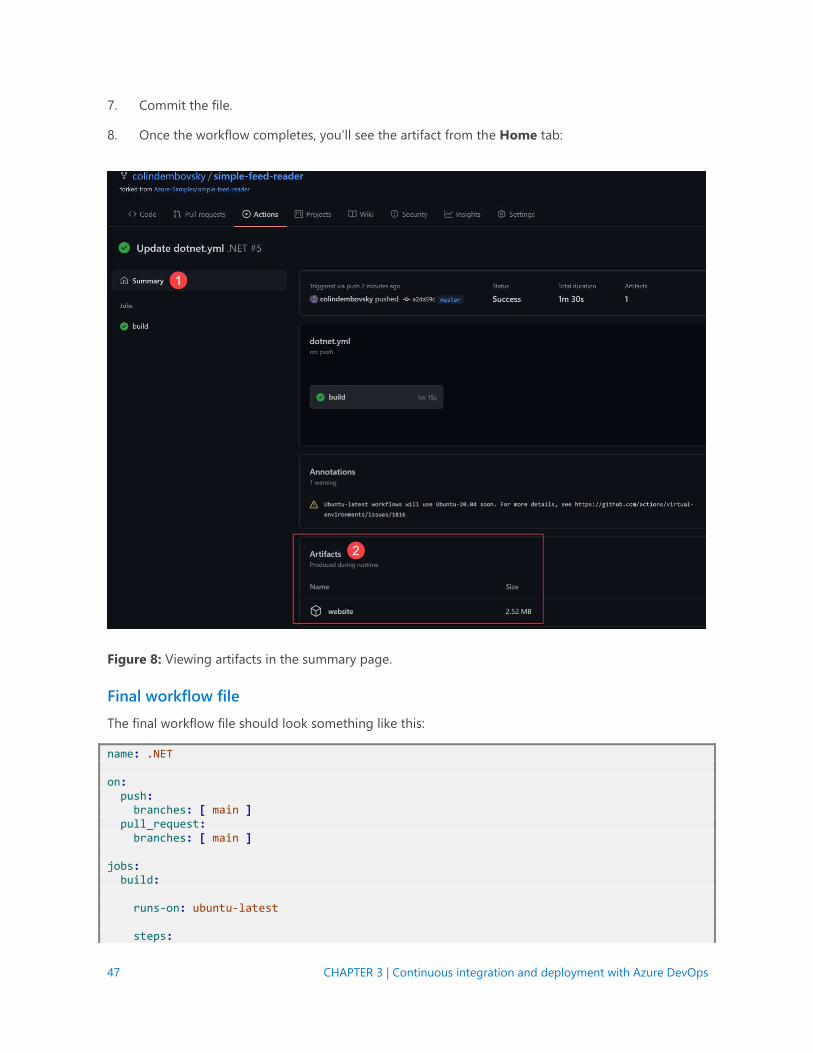
7. Commit the file.
8. Once the workflow completes, you’ll see the artifact from the Home tab:
Figure 8: Viewing artifacts in the summary page.
Final workflow file
The final workflow file should look something like this:
name: .NET on: push: branches: [ main ] pull_request: branches: [ main ] jobs: build: runs-on: ubuntu-latest steps:
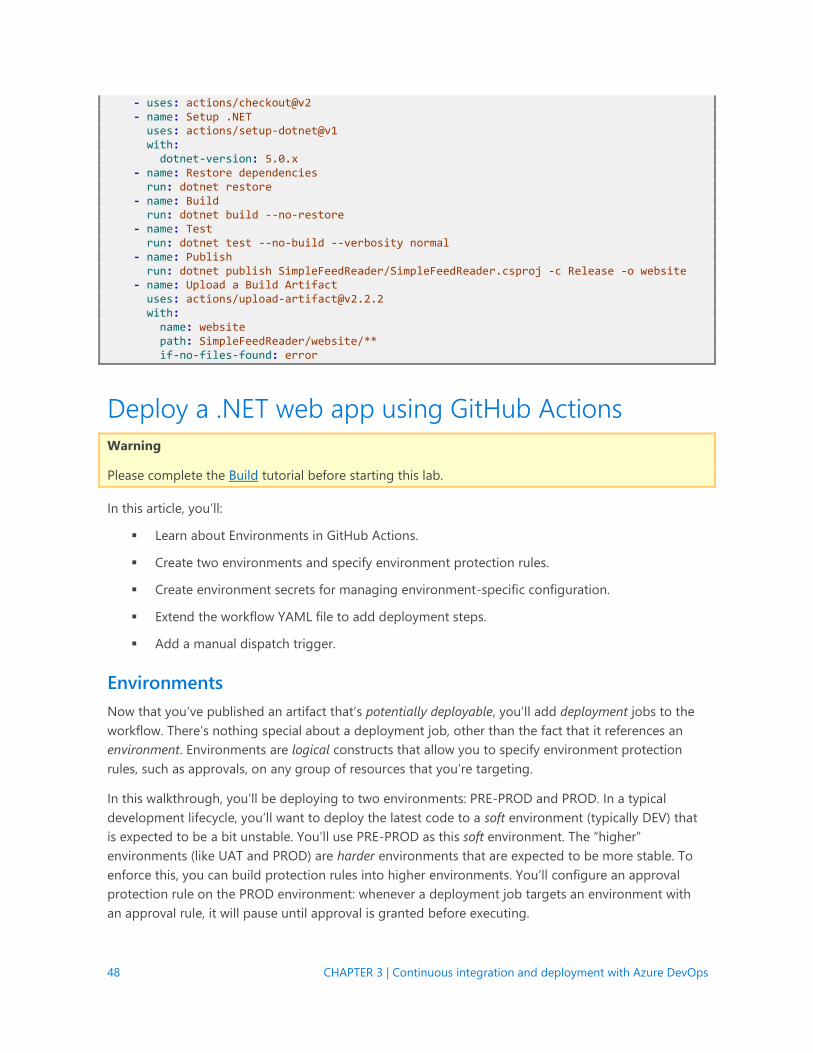
48 CHAPTER 3 | Continuous integration and deployment with Azure DevOps
- uses: actions/checkout@v2 - name: Setup .NET uses: actions/setup-dotnet@v1 with: dotnet-version: 5.0.x - name: Restore dependencies run: dotnet restore - name: Build run: dotnet build --no-restore - name: Test run: dotnet test --no-build --verbosity normal - name: Publish run: dotnet publish SimpleFeedReader/SimpleFeedReader.csproj -c Release -o website - name: Upload a Build Artifact uses: actions/[email protected] with: name: website path: SimpleFeedReader/website/** if-no-files-found: error
Deploy a .NET web app using GitHub Actions
Warning
Please complete the Build tutorial before starting this lab.
In this article, you’ll:
▪ Learn about Environments in GitHub Actions.
▪ Create two environments and specify environment protection rules.
▪ Create environment secrets for managing environment-specific configuration.
▪ Extend the workflow YAML file to add deployment steps.
▪ Add a manual dispatch trigger.
Environments
Now that you’ve published an artifact that’s potentially deployable, you’ll add deployment jobs to the
workflow. There’s nothing special about a deployment job, other than the fact that it references an
environment. Environments are logical constructs that allow you to specify environment protection
rules, such as approvals, on any group of resources that you’re targeting.
In this walkthrough, you’ll be deploying to two environments: PRE-PROD and PROD. In a typical
development lifecycle, you’ll want to deploy the latest code to a soft environment (typically DEV) that
is expected to be a bit unstable. You’ll use PRE-PROD as this soft environment. The “higher”
environments (like UAT and PROD) are harder environments that are expected to be more stable. To
enforce this, you can build protection rules into higher environments. You’ll configure an approval
protection rule on the PROD environment: whenever a deployment job targets an environment with
an approval rule, it will pause until approval is granted before executing.
49 CHAPTER 3 | Continuous integration and deployment with Azure DevOps
GitHub environments are logical. They represent the physical (or virtual) resources that you’re
deploying to. In this case, the PRE-PROD is just a deployment slot on the Azure Web App. PROD is the
production slot. The PRE-PROD deployment job will deploy the published .NET app to the staging
slot. The PROD deployment job will swap the slots.
Once you have these steps in place, you’ll update the workflow to handle environment-specific
configuration using environment secrets.
Note
For more information, see GitHub Actions - Environments.
Azure authentication
To perform actions such as deploying code to an Azure resource, you need the correct permissions.
For deployment to Azure Web Apps, you can use a publishing profile. If you want to deploy to a
staging slot, then you’ll need the publishing profile for the slot too. Instead, you can use a service
principal (SPN) and assign permission to this service principal. You can then authenticate using
credentials for the SPN before using any commands that the SPN has permissions to perform.
Once you have an SPN, you’ll create a repository secret to securely store the credentials. You can then
refer to the secret whenever you need to authenticate. The secret is encrypted and once it has been
saved, can never be viewed or edited (only deleted or re-created).
Create an SPN
1. In your terminal or Cloud Shell, run the following command to create a service principal with
contributor permissions to the web app you created earlier:
az ad sp create-for-rbac --name "{sp-name}" --sdk-auth --role contributor \ --scopes /subscriptions/{subscription-id}/resourceGroups/{resource-group}/providers/Microsoft.Web/sites/{webappname}
2. The command should output JSON that has credentials embedded:
{ "clientId": "<GUID>", "clientSecret": "<GUID>", "subscriptionId": "<GUID>", "tenantId": "<GUID>", ... }
3. Make sure to record the clientId, clientSecret, subscription, and tenantId. You can also leave the
terminal open for copy/paste later.
Create a repository secret
1. Now you’re going to create an encrypted secret to store the credentials. You’ll create this secret
at the repository level.
50 CHAPTER 3 | Continuous integration and deployment with Azure DevOps
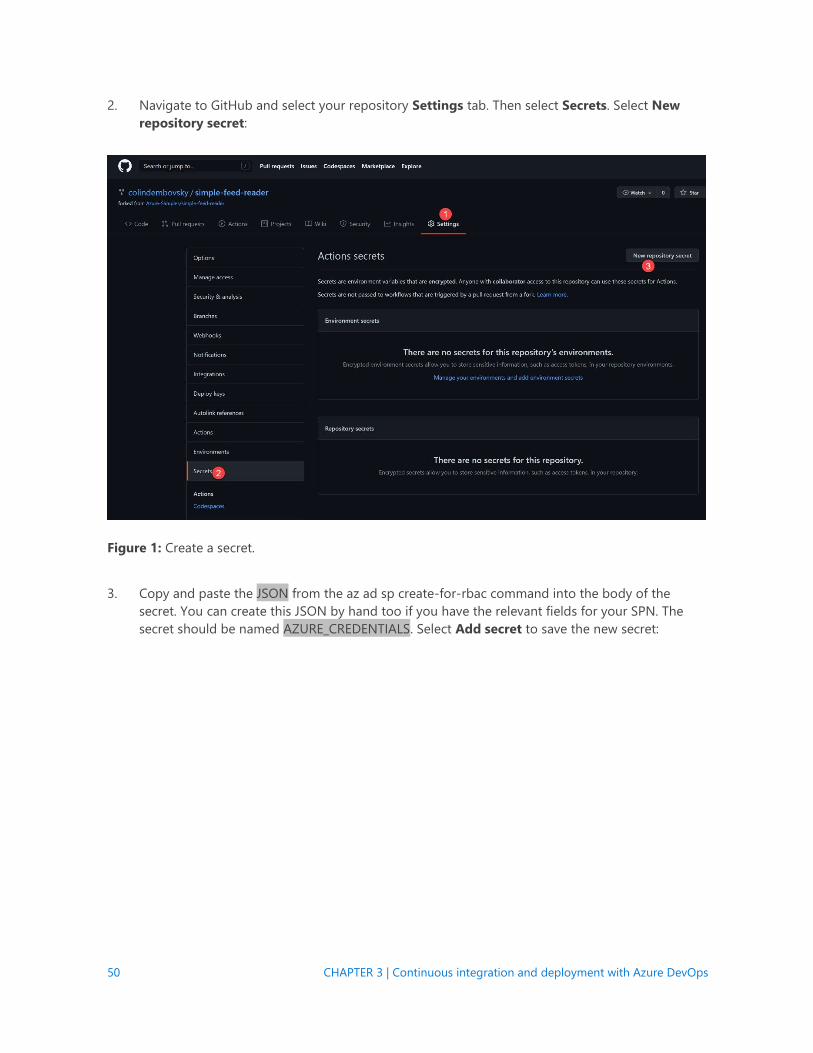
2. Navigate to GitHub and select your repository Settings tab. Then select Secrets. Select New
repository secret:
Figure 1: Create a secret.
3. Copy and paste the JSON from the az ad sp create-for-rbac command into the body of the
secret. You can create this JSON by hand too if you have the relevant fields for your SPN. The
secret should be named AZURE_CREDENTIALS. Select Add secret to save the new secret:

51 CHAPTER 3 | Continuous integration and deployment with Azure DevOps
Figure 2: Add Azure credentials.
4. You’ll consume this secret in a workflow in later steps. To access it, use the variable notation ${{}}.
In this case, ${{ AZURE_CREDENTIAL }} will be populated with the JSON you saved.
Add environments
Environments are used as a logical boundary. You can add approvals to environments to ensure
quality. You can also track deployments to environments and specify environment-specific values
(secrets) for configuration.
For this example, you’re going to split the actual Azure environment into two logical environments
called PRE-PROD and PROD. When you deploy the web app, you’ll deploy to the staging slot of the
Azure web app, represented by the PRE-PROD environment. When you’re ready to deploy to PROD,
you’ll just perform a slot swap.
In this case, the only difference between the environments is the slot that you’re deploying to. In real
life, there would typically be different web apps (and separate web app plans), separate resource
groups, and even separate subscriptions. Typically, there’s an SPN per environment. You may want to
override the AZURE_CREDENTIAL value that you saved as a repository secret by creating it as an
environment secret.
52 CHAPTER 3 | Continuous integration and deployment with Azure DevOps
Note
Precedence works from Environment to repository. If a targeted environment has a secret called
MY_SECRET, then that value is used. If not, the repository value of MY_SECRET (if any) is used.
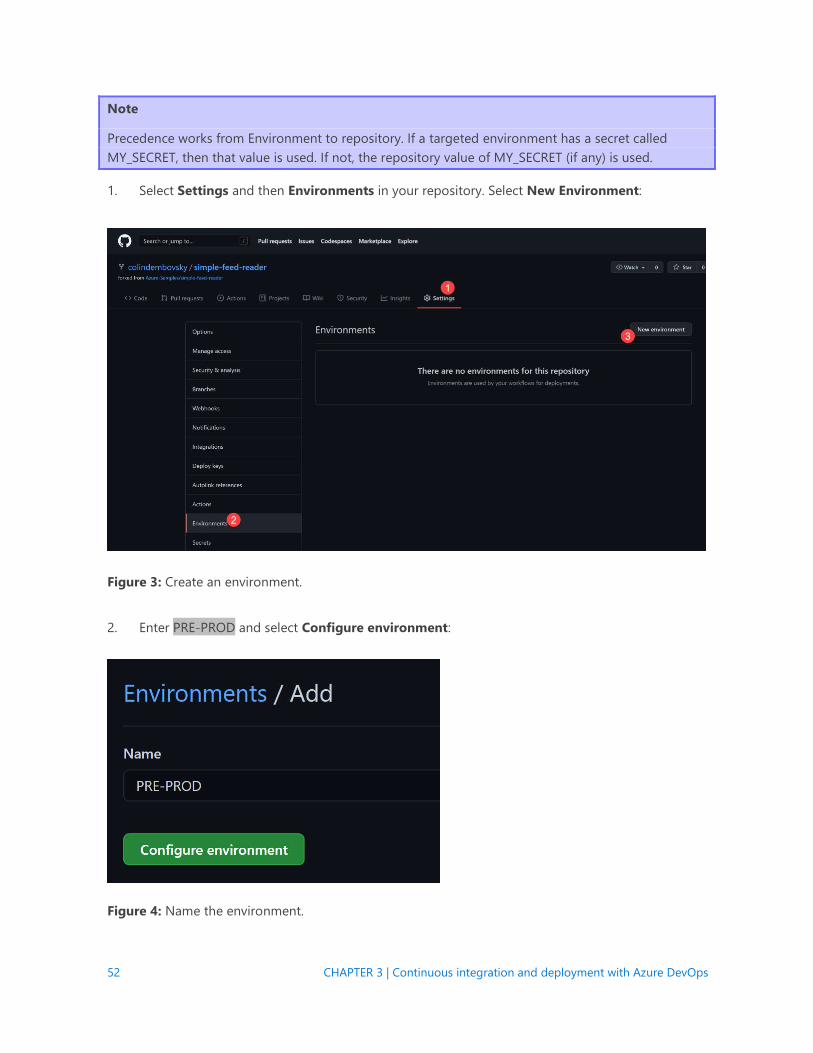
1. Select Settings and then Environments in your repository. Select New Environment:
Figure 3: Create an environment.
2. Enter PRE-PROD and select Configure environment:
Figure 4: Name the environment.
53 CHAPTER 3 | Continuous integration and deployment with Azure DevOps
3. Since deploying to a staging slot doesn’t affect the web app, you can safely deploy to the slot
without requiring an approval first. A reviewer could be added if desired. For this example, leave
the Environment protection rules empty.
NOTE If you target an environment in a workflow and it does not exist, an “empty” environment is
created automatically. The environment would look exactly the same as the PRE-PROD environment -
it would exist, but would not have any protection rules enabled.
4. Select Environments again and again select New Environment. Now enter PROD as the name
and select Configure environment.
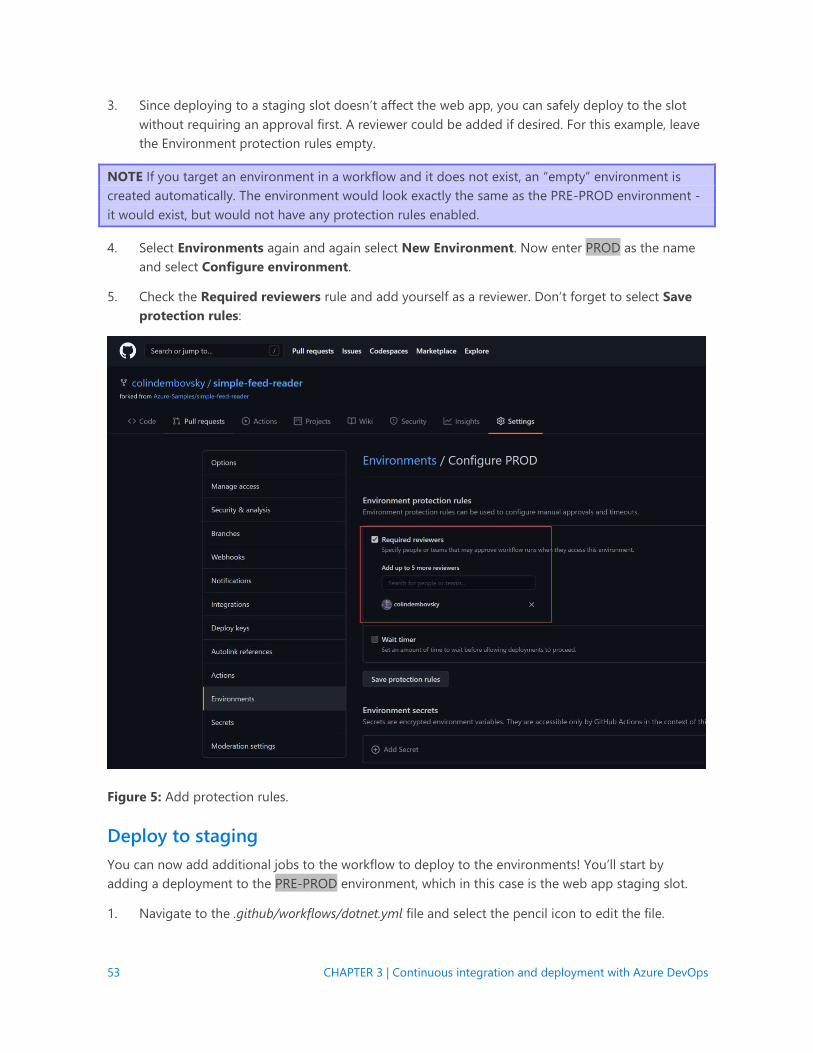
5. Check the Required reviewers rule and add yourself as a reviewer. Don’t forget to select Save
protection rules:
Figure 5: Add protection rules.
Deploy to staging
You can now add additional jobs to the workflow to deploy to the environments! You’ll start by
adding a deployment to the PRE-PROD environment, which in this case is the web app staging slot.
1. Navigate to the .github/workflows/dotnet.yml file and select the pencil icon to edit the file.
54 CHAPTER 3 | Continuous integration and deployment with Azure DevOps
2. You’re going to use the web app name a few times in this workflow, and will need the name of
the resource group too. You’ll define the app and resource group names as variables. With the
variables, you can maintain the values in one place in the workflow file.
3. Add this snippet below the on block and above the jobs block:
env: app-name: "<name of your web app>"
rg-name: "<name of your resource group>" jobs: # <-- this is the existing jobs line
WARNING
You’ll need to replace <name of your web app> with the actual name of your web app, and
<name of your resource group> with the actual name of your resource group.
4. Add a new job below the build job as follows:
if-no-files-found: error # <– last line of build job: insert below this line deploy_staging: needs: build runs-on: ubuntu-latest environment: name: PRE-PROD url: ${{ steps.deploywebapp.outputs.webapp-url }} steps: - name: Download a Build Artifact uses: actions/[email protected] with: name: website path: website - name: Login via Azure CLI uses: azure/login@v1 with: creds: ${{ secrets.AZURE_CREDENTIALS }} - name: Deploy web app id: deploywebapp uses: azure/webapps-deploy@v2 with: app-name: ${{ env.app-name }} slot-name: staging package: website - name: az cli logout run: az logout
The preceding workflow defines several steps:
1. You’re creating a new job called deploy_staging.
2. You specify a dependency using needs. This job needs the build job to complete
successfully before it starts.
55 CHAPTER 3 | Continuous integration and deployment with Azure DevOps
3. This job also runs on the latest Ubuntu hosted agent, as specified with the runs-on
attribute.
4. You specify that this job is targeting the PRE-PROD environment using the environment
object. You also specify the url property. This URL will be displayed in the workflow
diagram, giving users an easy way to navigate to the environment. The value of this
property is set as the output of the step with id deploywebapp, which is defined below.
5. You’re executing a download-artifact step to download the artifact (compiled web app)
from the build job.
6. You then login to Azure using the AZURE_CREDENTIALS secret you saved earlier. Note
the ${{ }} notation for dereferencing variables.
7. You then perform a webapp-deploy, specifying the app-name, slot-name, and path to
the downloaded artifact (package). This action also defines an output parameter that
you use to set the url of the environment above.
8. Finally, you execute a logout to log out of the Azure context.
5. Commit the file.
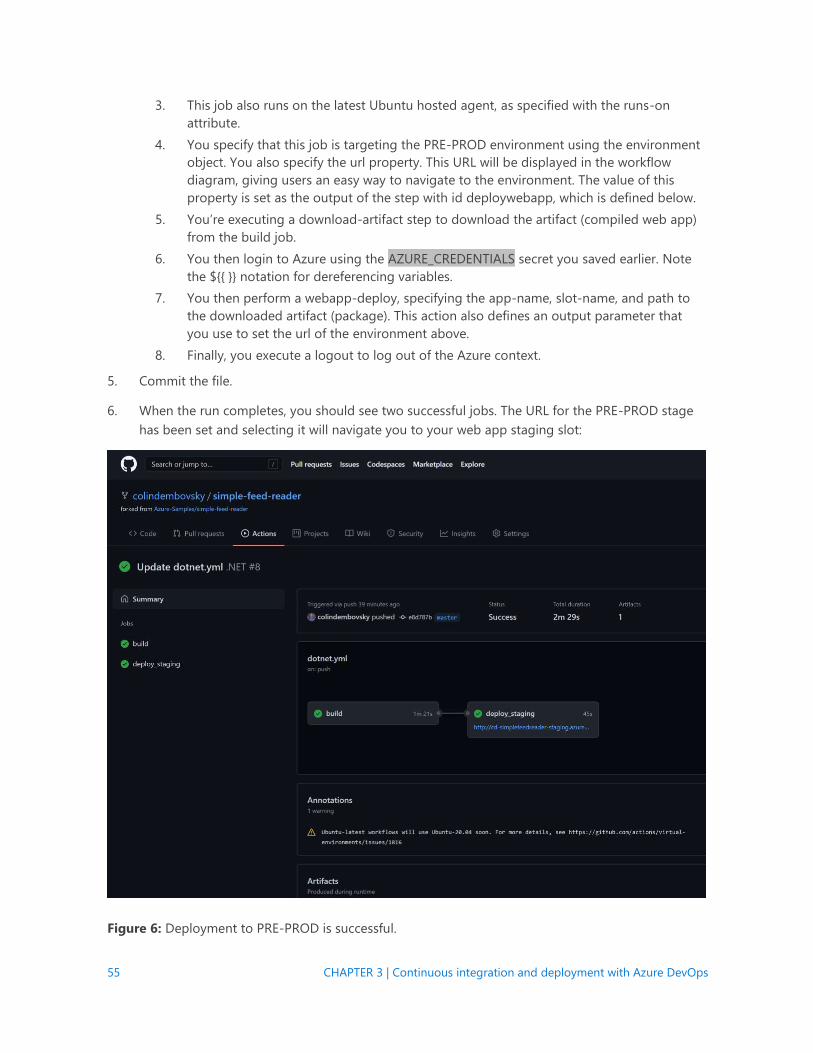
6. When the run completes, you should see two successful jobs. The URL for the PRE-PROD stage
has been set and selecting it will navigate you to your web app staging slot:
Figure 6: Deployment to PRE-PROD is successful.
56 CHAPTER 3 | Continuous integration and deployment with Azure DevOps
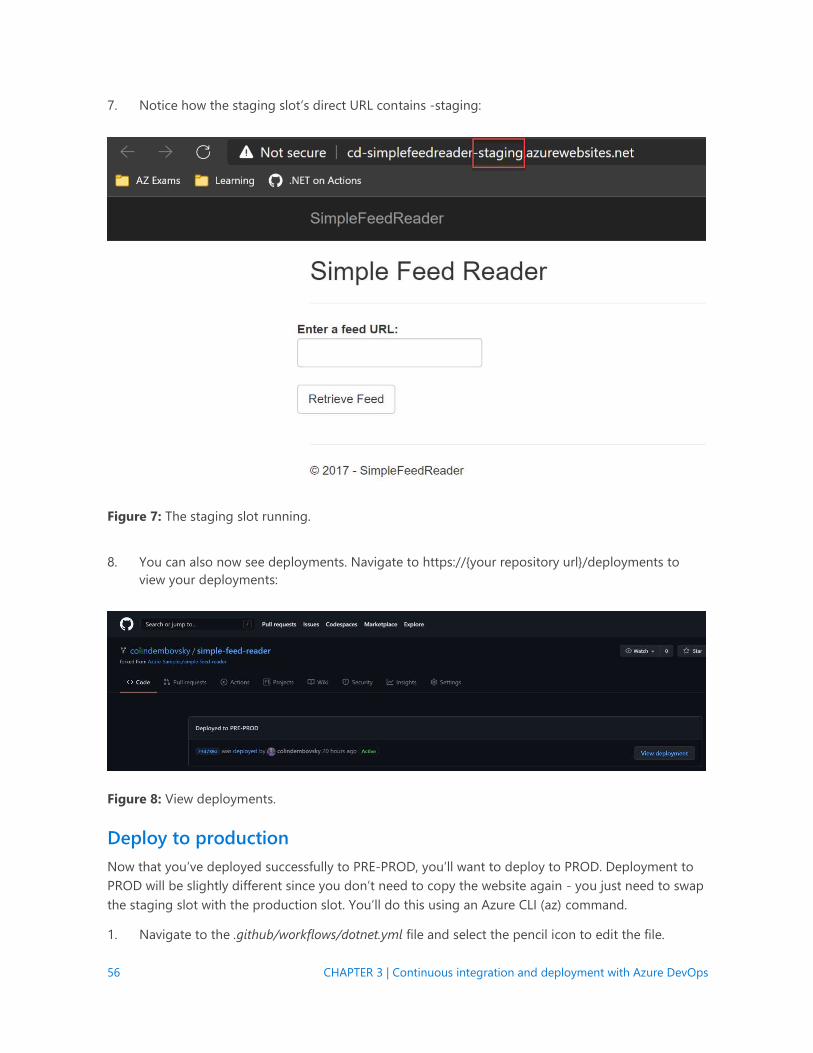
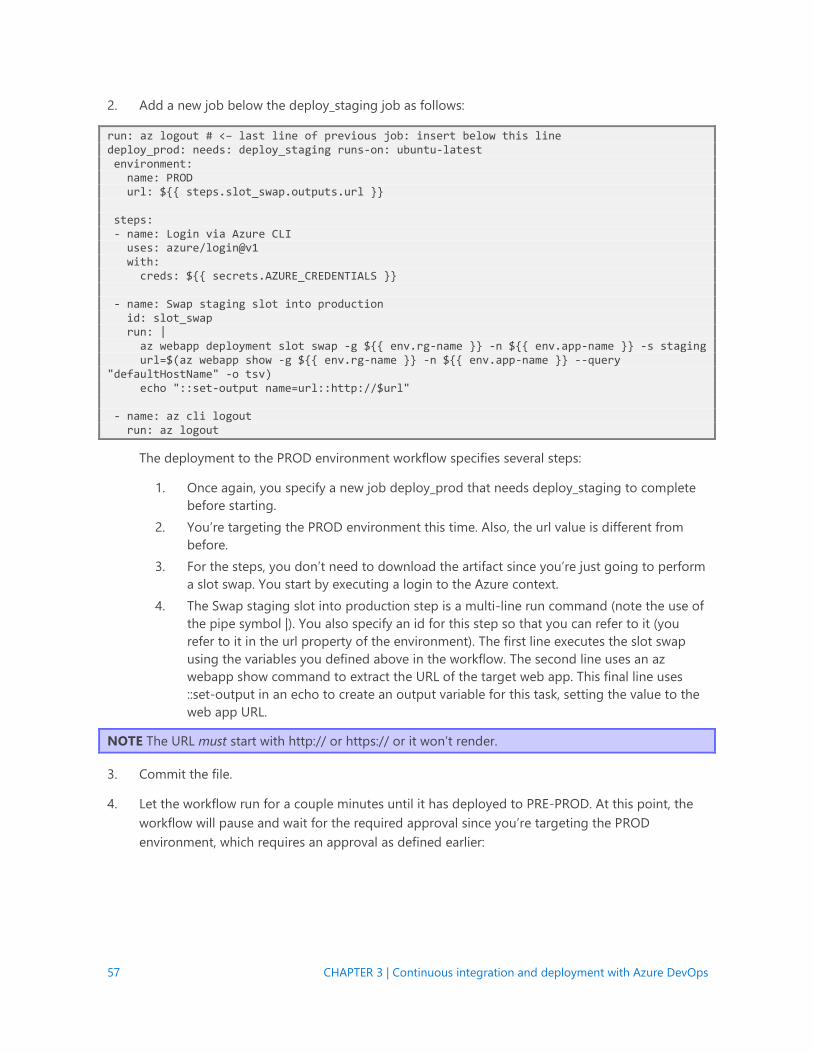
7. Notice how the staging slot’s direct URL contains -staging:
Figure 7: The staging slot running.
8. You can also now see deployments. Navigate to https://{your repository url}/deployments to
view your deployments:
Figure 8: View deployments.
Deploy to production
Now that you’ve deployed successfully to PRE-PROD, you’ll want to deploy to PROD. Deployment to
PROD will be slightly different since you don’t need to copy the website again - you just need to swap
the staging slot with the production slot. You’ll do this using an Azure CLI (az) command.
1. Navigate to the .github/workflows/dotnet.yml file and select the pencil icon to edit the file.
57 CHAPTER 3 | Continuous integration and deployment with Azure DevOps
2. Add a new job below the deploy_staging job as follows:
run: az logout # <– last line of previous job: insert below this line deploy_prod: needs: deploy_staging runs-on: ubuntu-latest environment: name: PROD url: ${{ steps.slot_swap.outputs.url }} steps: - name: Login via Azure CLI uses: azure/login@v1 with: creds: ${{ secrets.AZURE_CREDENTIALS }} - name: Swap staging slot into production id: slot_swap run: | az webapp deployment slot swap -g ${{ env.rg-name }} -n ${{ env.app-name }} -s staging url=$(az webapp show -g ${{ env.rg-name }} -n ${{ env.app-name }} --query "defaultHostName" -o tsv) echo "::set-output name=url::http://$url" - name: az cli logout run: az logout
The deployment to the PROD environment workflow specifies several steps:
1. Once again, you specify a new job deploy_prod that needs deploy_staging to complete
before starting.
2. You’re targeting the PROD environment this time. Also, the url value is different from
before.
3. For the steps, you don’t need to download the artifact since you’re just going to perform
a slot swap. You start by executing a login to the Azure context.
4. The Swap staging slot into production step is a multi-line run command (note the use of
the pipe symbol |). You also specify an id for this step so that you can refer to it (you
refer to it in the url property of the environment). The first line executes the slot swap
using the variables you defined above in the workflow. The second line uses an az
webapp show command to extract the URL of the target web app. This final line uses
::set-output in an echo to create an output variable for this task, setting the value to the
web app URL.
NOTE The URL must start with http:// or https:// or it won’t render.
3. Commit the file.
4. Let the workflow run for a couple minutes until it has deployed to PRE-PROD. At this point, the
workflow will pause and wait for the required approval since you’re targeting the PROD
environment, which requires an approval as defined earlier:
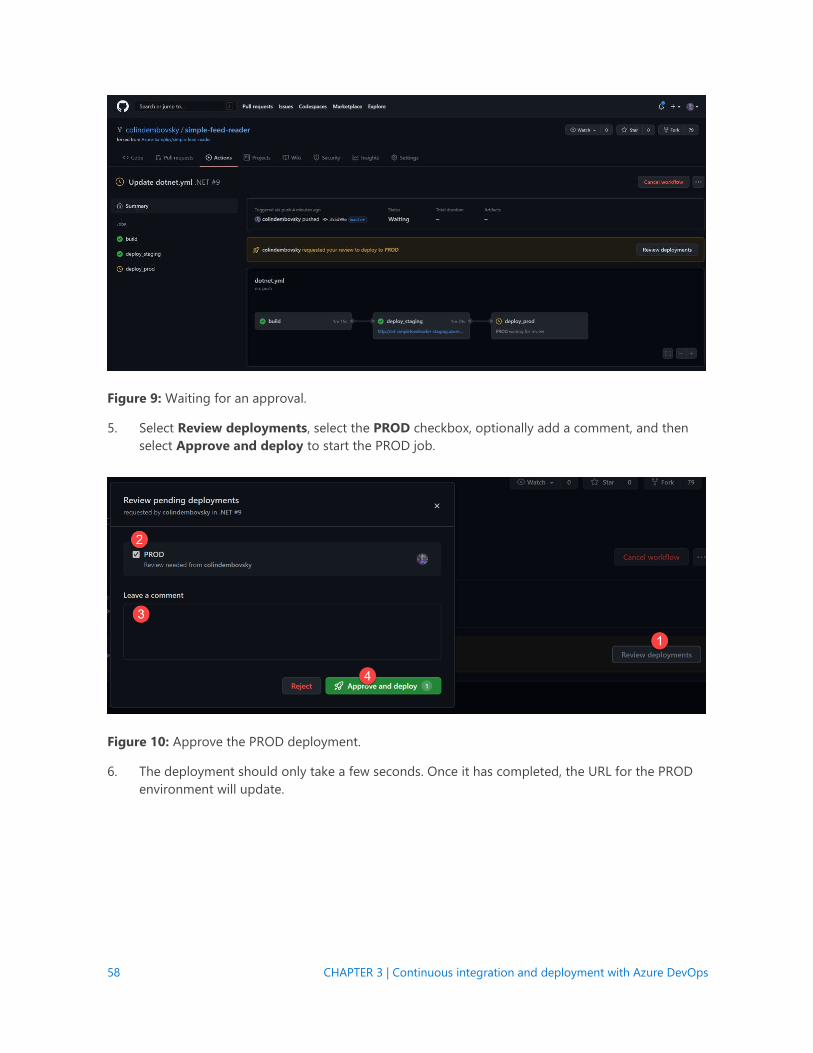
58 CHAPTER 3 | Continuous integration and deployment with Azure DevOps
Figure 9: Waiting for an approval.
5. Select Review deployments, select the PROD checkbox, optionally add a comment, and then
select Approve and deploy to start the PROD job.
Figure 10: Approve the PROD deployment.
6. The deployment should only take a few seconds. Once it has completed, the URL for the PROD
environment will update.
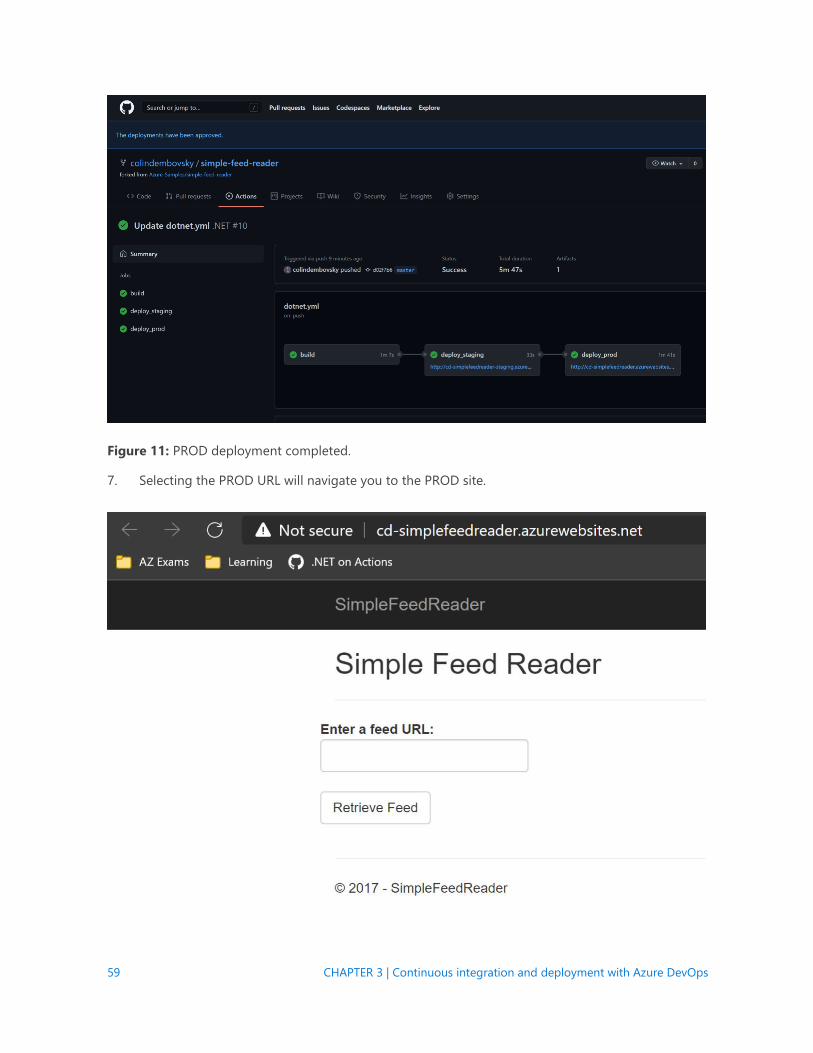
59 CHAPTER 3 | Continuous integration and deployment with Azure DevOps
Figure 11: PROD deployment completed.
7. Selecting the PROD URL will navigate you to the PROD site.
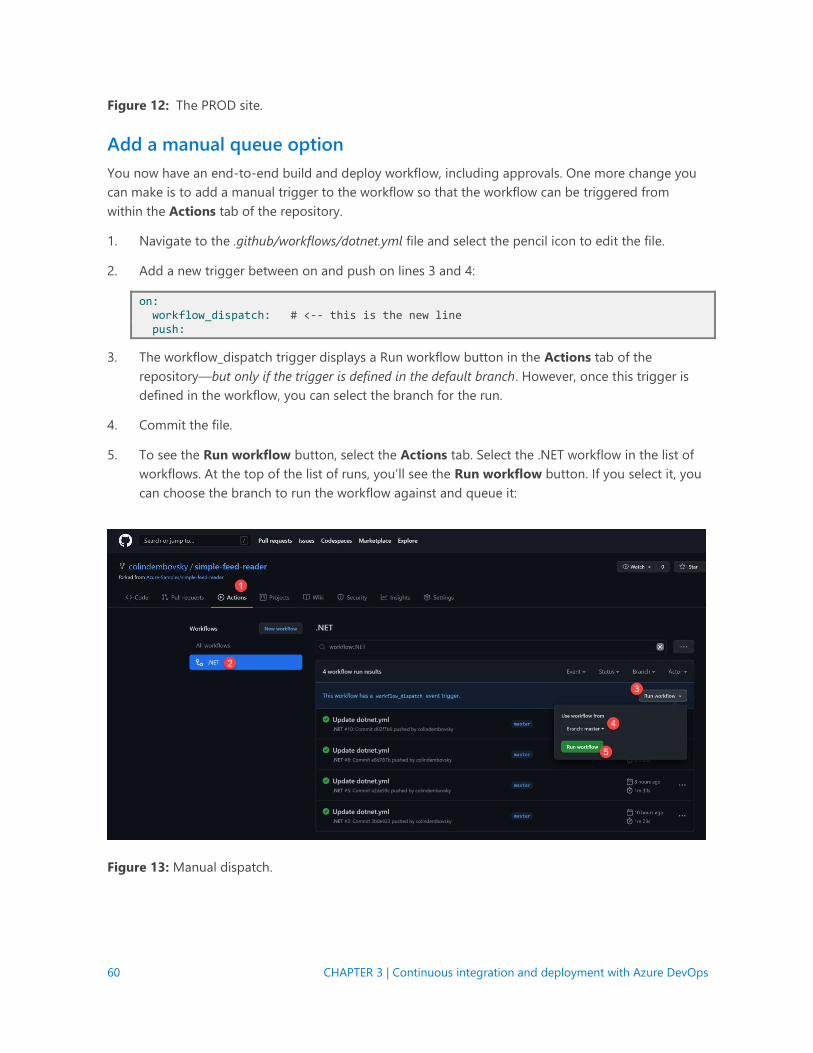
60 CHAPTER 3 | Continuous integration and deployment with Azure DevOps
Figure 12: The PROD site.
Add a manual queue option
You now have an end-to-end build and deploy workflow, including approvals. One more change you
can make is to add a manual trigger to the workflow so that the workflow can be triggered from
within the Actions tab of the repository.
1. Navigate to the .github/workflows/dotnet.yml file and select the pencil icon to edit the file.
2. Add a new trigger between on and push on lines 3 and 4:
on: workflow_dispatch: # <-- this is the new line push:
3. The workflow_dispatch trigger displays a Run workflow button in the Actions tab of the
repository—but only if the trigger is defined in the default branch. However, once this trigger is
defined in the workflow, you can select the branch for the run.
4. Commit the file.
5. To see the Run workflow button, select the Actions tab. Select the .NET workflow in the list of
workflows. At the top of the list of runs, you’ll see the Run workflow button. If you select it, you
can choose the branch to run the workflow against and queue it:
Figure 13: Manual dispatch.
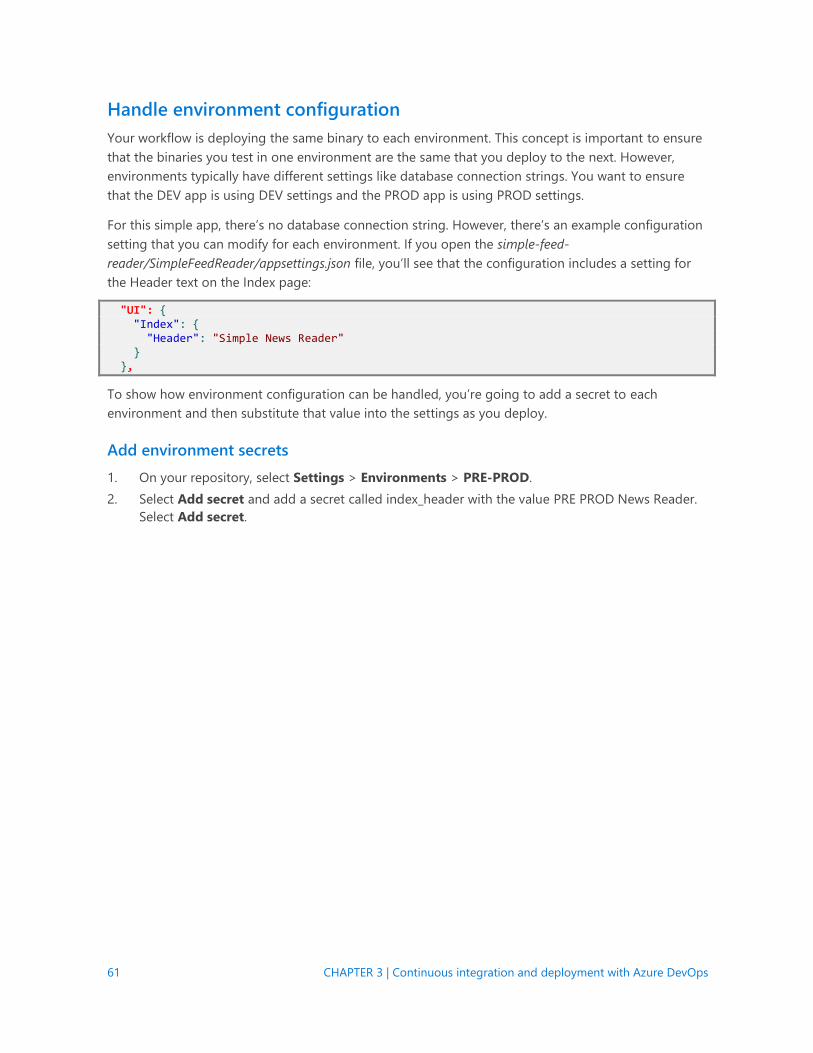
61 CHAPTER 3 | Continuous integration and deployment with Azure DevOps
Handle environment configuration
Your workflow is deploying the same binary to each environment. This concept is important to ensure
that the binaries you test in one environment are the same that you deploy to the next. However,
environments typically have different settings like database connection strings. You want to ensure
that the DEV app is using DEV settings and the PROD app is using PROD settings.
For this simple app, there’s no database connection string. However, there’s an example configuration
setting that you can modify for each environment. If you open the simple-feed-
reader/SimpleFeedReader/appsettings.json file, you’ll see that the configuration includes a setting for
the Header text on the Index page:
"UI": { "Index": { "Header": "Simple News Reader" } },
To show how environment configuration can be handled, you’re going to add a secret to each
environment and then substitute that value into the settings as you deploy.
Add environment secrets
1. On your repository, select Settings > Environments > PRE-PROD.
2. Select Add secret and add a secret called index_header with the value PRE PROD News Reader.
Select Add secret.
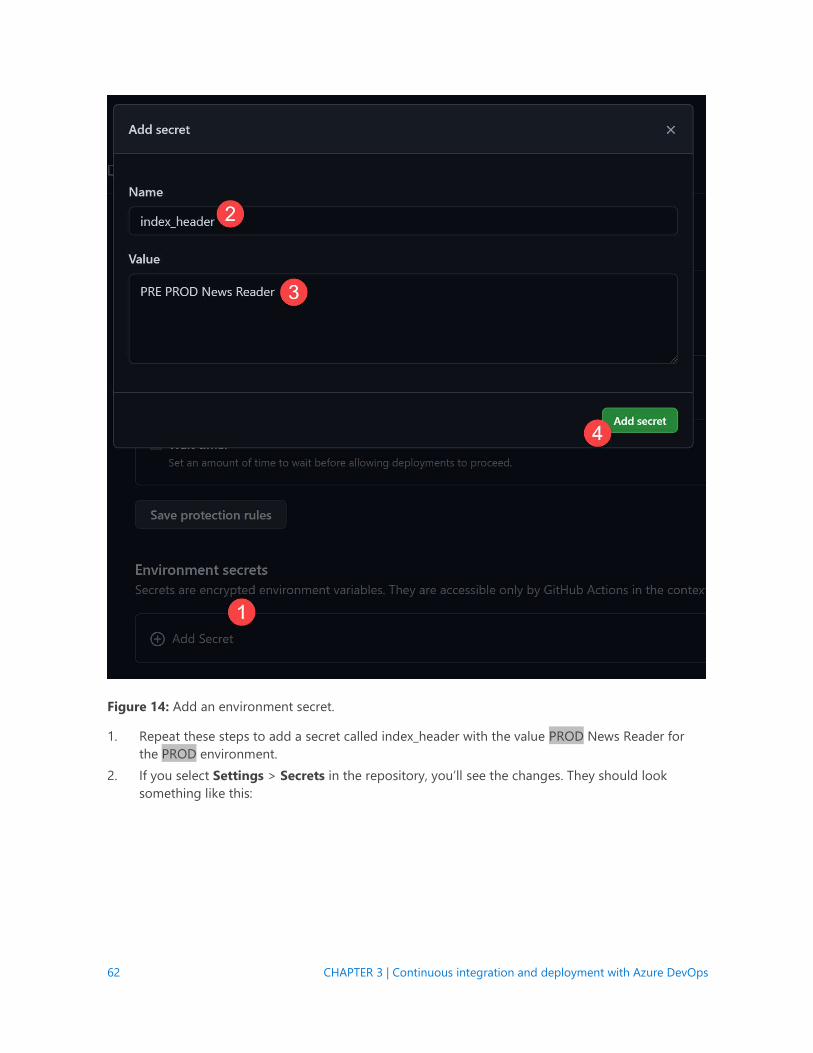
62 CHAPTER 3 | Continuous integration and deployment with Azure DevOps
Figure 14: Add an environment secret.
1. Repeat these steps to add a secret called index_header with the value PROD News Reader for
the PROD environment.
2. If you select Settings > Secrets in the repository, you’ll see the changes. They should look
something like this:
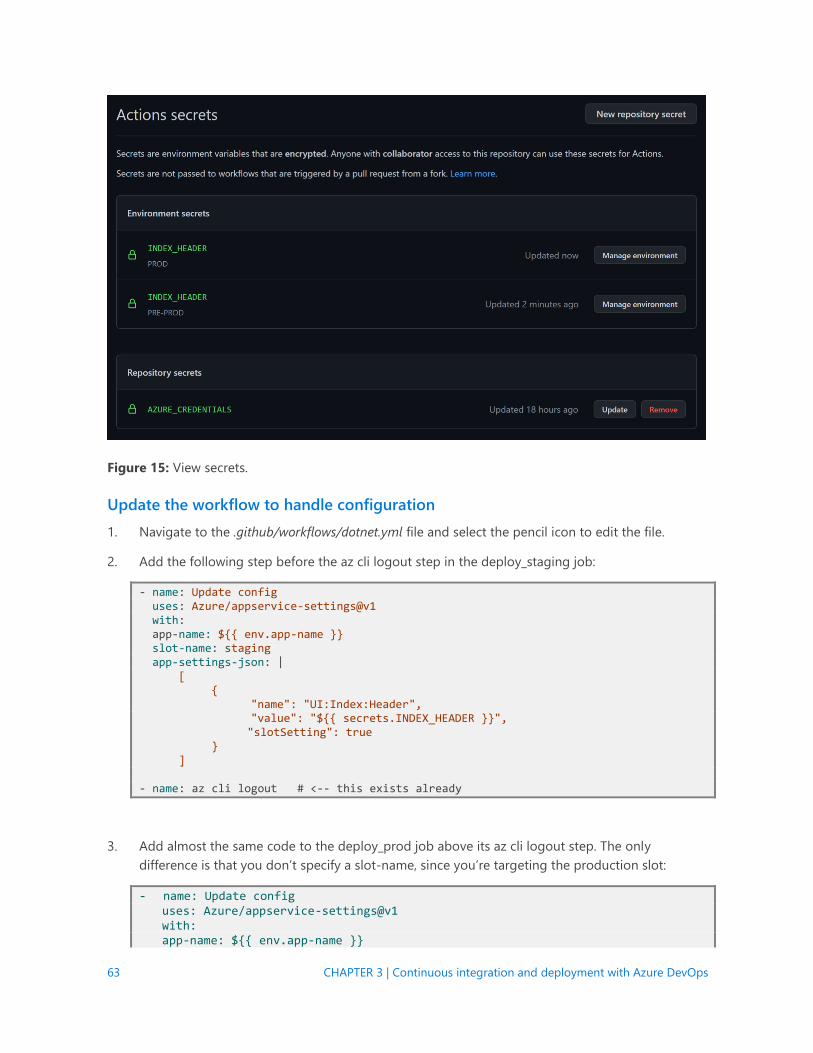
63 CHAPTER 3 | Continuous integration and deployment with Azure DevOps
Figure 15: View secrets.
Update the workflow to handle configuration
1. Navigate to the .github/workflows/dotnet.yml file and select the pencil icon to edit the file.
2. Add the following step before the az cli logout step in the deploy_staging job:
- name: Update config uses: Azure/appservice-settings@v1 with: app-name: ${{ env.app-name }} slot-name: staging app-settings-json: | [ { "name": "UI:Index:Header", "value": "${{ secrets.INDEX_HEADER }}",
"slotSetting": true } ] - name: az cli logout # <-- this exists already
3. Add almost the same code to the deploy_prod job above its az cli logout step. The only
difference is that you don’t specify a slot-name, since you’re targeting the production slot:
- name: Update config uses: Azure/appservice-settings@v1 with: app-name: ${{ env.app-name }}
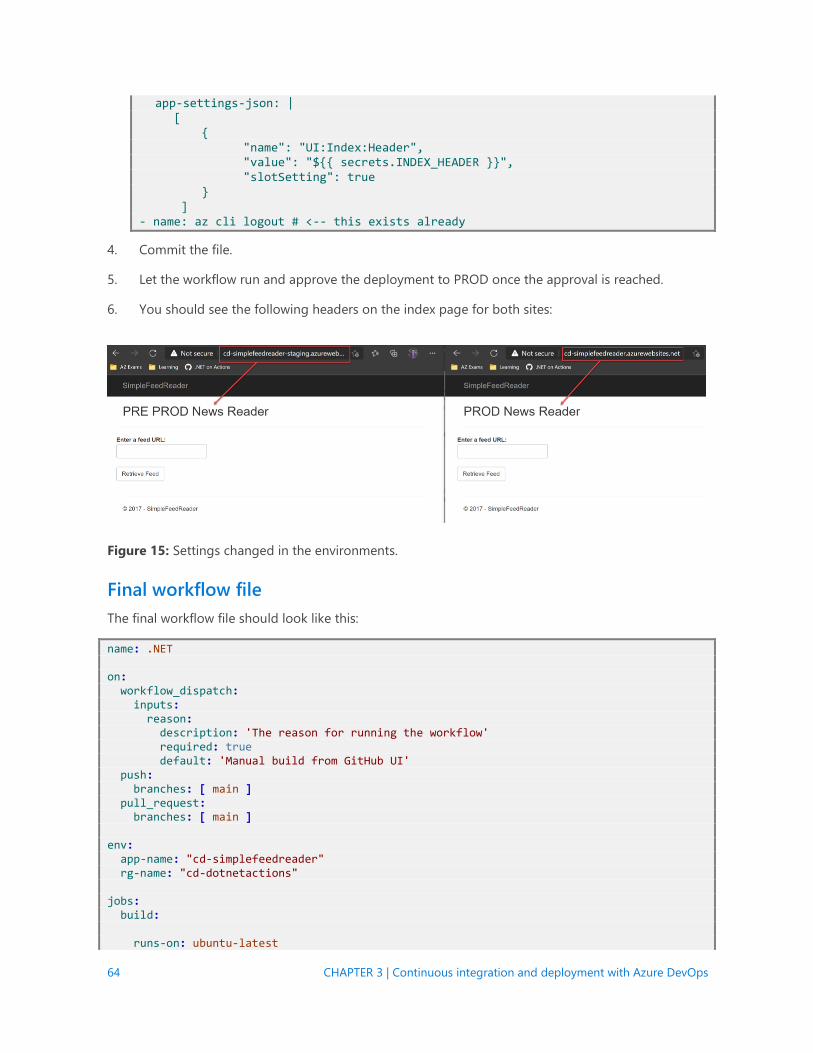
64 CHAPTER 3 | Continuous integration and deployment with Azure DevOps
app-settings-json: | [ { "name": "UI:Index:Header", "value": "${{ secrets.INDEX_HEADER }}", "slotSetting": true } ] - name: az cli logout # <-- this exists already
4. Commit the file.
5. Let the workflow run and approve the deployment to PROD once the approval is reached.
6. You should see the following headers on the index page for both sites:
Figure 15: Settings changed in the environments.
Final workflow file
The final workflow file should look like this:
name: .NET on: workflow_dispatch: inputs: reason: description: 'The reason for running the workflow' required: true default: 'Manual build from GitHub UI' push: branches: [ main ] pull_request: branches: [ main ] env: app-name: "cd-simplefeedreader" rg-name: "cd-dotnetactions" jobs: build: runs-on: ubuntu-latest
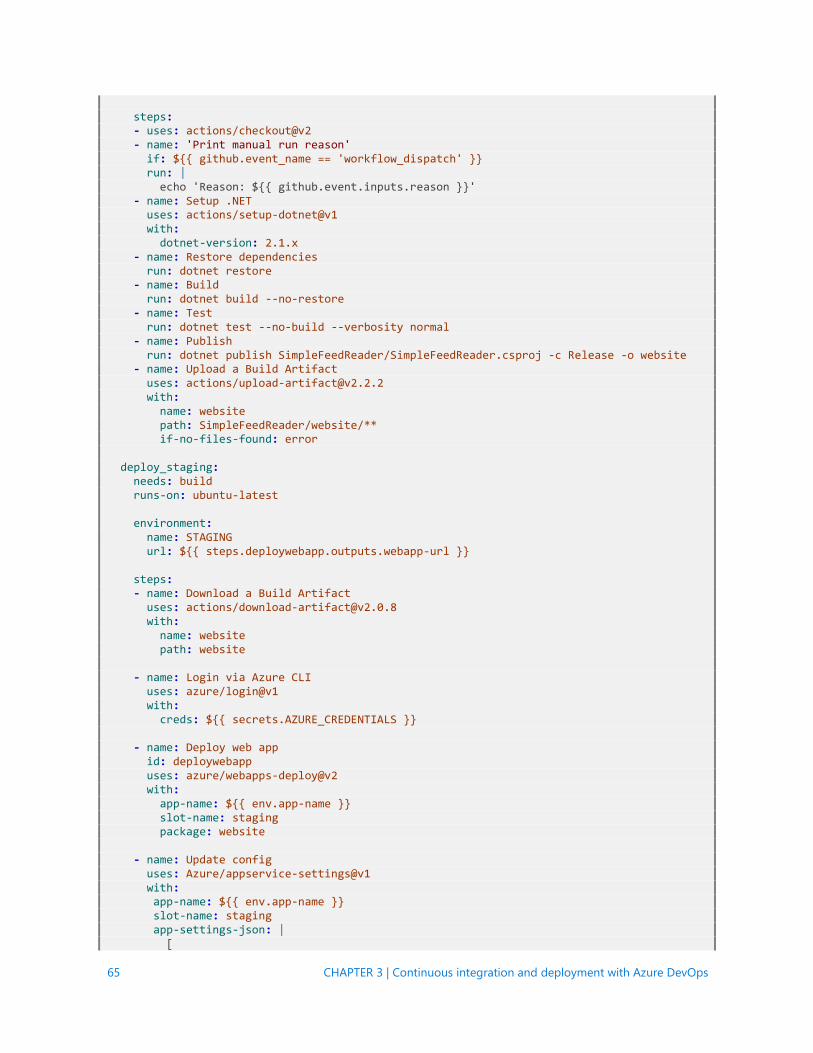
65 CHAPTER 3 | Continuous integration and deployment with Azure DevOps
steps: - uses: actions/checkout@v2 - name: 'Print manual run reason' if: ${{ github.event_name == 'workflow_dispatch' }} run: | echo 'Reason: ${{ github.event.inputs.reason }}' - name: Setup .NET uses: actions/setup-dotnet@v1 with: dotnet-version: 2.1.x - name: Restore dependencies run: dotnet restore - name: Build run: dotnet build --no-restore - name: Test run: dotnet test --no-build --verbosity normal - name: Publish run: dotnet publish SimpleFeedReader/SimpleFeedReader.csproj -c Release -o website - name: Upload a Build Artifact uses: actions/[email protected] with: name: website path: SimpleFeedReader/website/** if-no-files-found: error deploy_staging: needs: build runs-on: ubuntu-latest environment: name: STAGING url: ${{ steps.deploywebapp.outputs.webapp-url }} steps: - name: Download a Build Artifact uses: actions/[email protected] with: name: website path: website - name: Login via Azure CLI uses: azure/login@v1 with: creds: ${{ secrets.AZURE_CREDENTIALS }} - name: Deploy web app id: deploywebapp uses: azure/webapps-deploy@v2 with: app-name: ${{ env.app-name }} slot-name: staging package: website - name: Update config uses: Azure/appservice-settings@v1 with: app-name: ${{ env.app-name }} slot-name: staging app-settings-json: | [
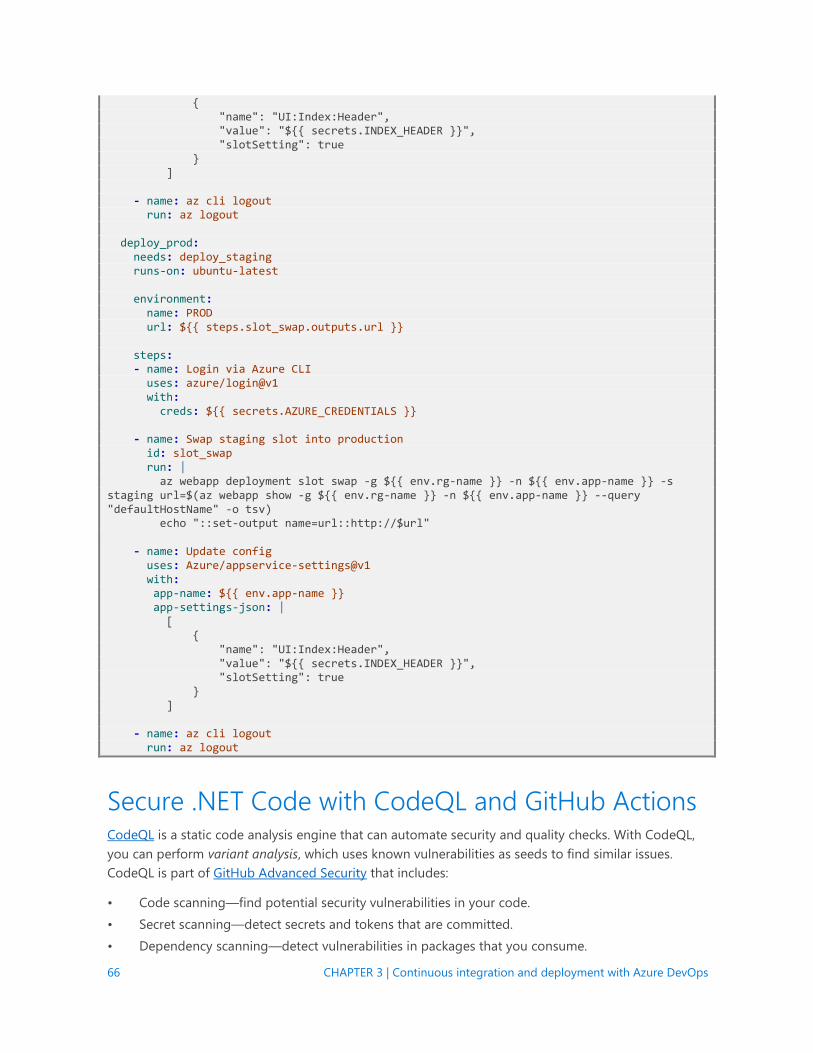
66 CHAPTER 3 | Continuous integration and deployment with Azure DevOps
{ "name": "UI:Index:Header", "value": "${{ secrets.INDEX_HEADER }}", "slotSetting": true } ] - name: az cli logout run: az logout deploy_prod: needs: deploy_staging runs-on: ubuntu-latest environment: name: PROD url: ${{ steps.slot_swap.outputs.url }} steps: - name: Login via Azure CLI uses: azure/login@v1 with: creds: ${{ secrets.AZURE_CREDENTIALS }} - name: Swap staging slot into production id: slot_swap run: | az webapp deployment slot swap -g ${{ env.rg-name }} -n ${{ env.app-name }} -s staging url=$(az webapp show -g ${{ env.rg-name }} -n ${{ env.app-name }} --query "defaultHostName" -o tsv) echo "::set-output name=url::http://$url" - name: Update config uses: Azure/appservice-settings@v1 with: app-name: ${{ env.app-name }} app-settings-json: | [ { "name": "UI:Index:Header", "value": "${{ secrets.INDEX_HEADER }}", "slotSetting": true } ] - name: az cli logout run: az logout
Secure .NET Code with CodeQL and GitHub Actions CodeQL is a static code analysis engine that can automate security and quality checks. With CodeQL,
you can perform variant analysis, which uses known vulnerabilities as seeds to find similar issues.
CodeQL is part of GitHub Advanced Security that includes:
• Code scanning—find potential security vulnerabilities in your code.
• Secret scanning—detect secrets and tokens that are committed.
• Dependency scanning—detect vulnerabilities in packages that you consume.
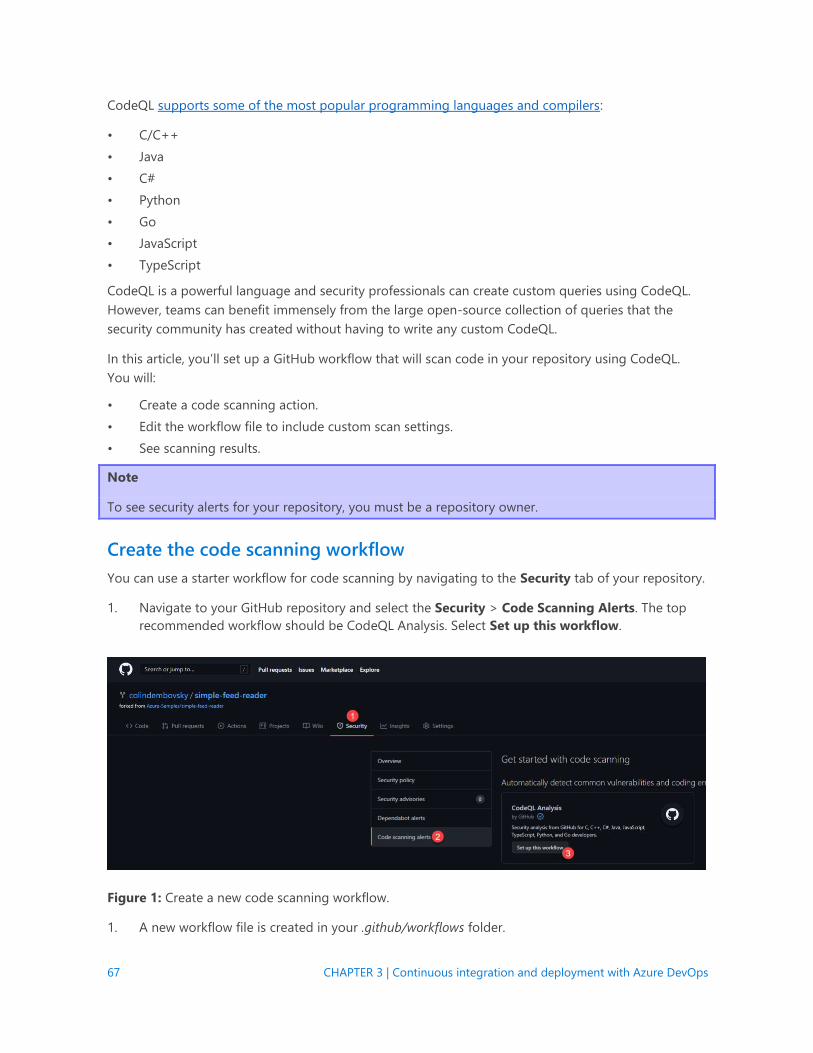
67 CHAPTER 3 | Continuous integration and deployment with Azure DevOps
CodeQL supports some of the most popular programming languages and compilers:
• C/C++
• Java
• C#
• Python
• Go
• JavaScript
• TypeScript
CodeQL is a powerful language and security professionals can create custom queries using CodeQL.
However, teams can benefit immensely from the large open-source collection of queries that the
security community has created without having to write any custom CodeQL.
In this article, you’ll set up a GitHub workflow that will scan code in your repository using CodeQL.
You will:
• Create a code scanning action.
• Edit the workflow file to include custom scan settings.
• See scanning results.
Note
To see security alerts for your repository, you must be a repository owner.
Create the code scanning workflow
You can use a starter workflow for code scanning by navigating to the Security tab of your repository.
1. Navigate to your GitHub repository and select the Security > Code Scanning Alerts. The top
recommended workflow should be CodeQL Analysis. Select Set up this workflow.
Figure 1: Create a new code scanning workflow.
1. A new workflow file is created in your .github/workflows folder.
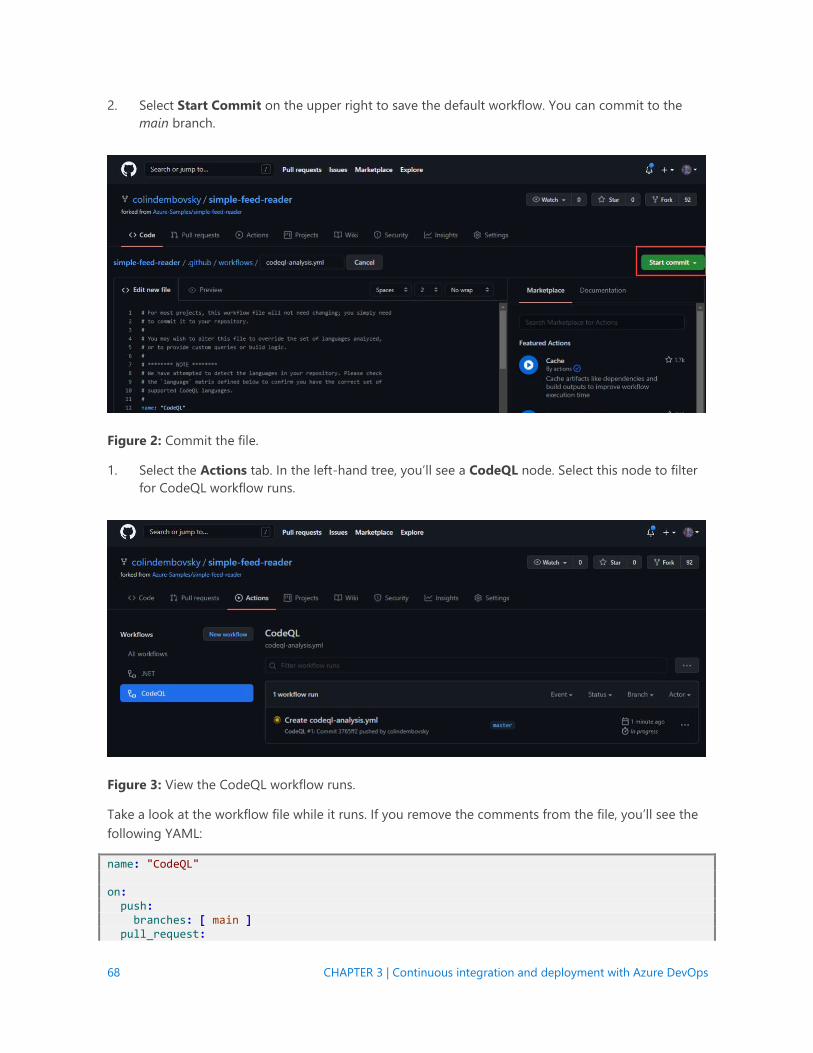
68 CHAPTER 3 | Continuous integration and deployment with Azure DevOps
2. Select Start Commit on the upper right to save the default workflow. You can commit to the
main branch.
Figure 2: Commit the file.
1. Select the Actions tab. In the left-hand tree, you’ll see a CodeQL node. Select this node to filter
for CodeQL workflow runs.
Figure 3: View the CodeQL workflow runs.
Take a look at the workflow file while it runs. If you remove the comments from the file, you’ll see the
following YAML:
name: "CodeQL" on: push: branches: [ main ] pull_request:
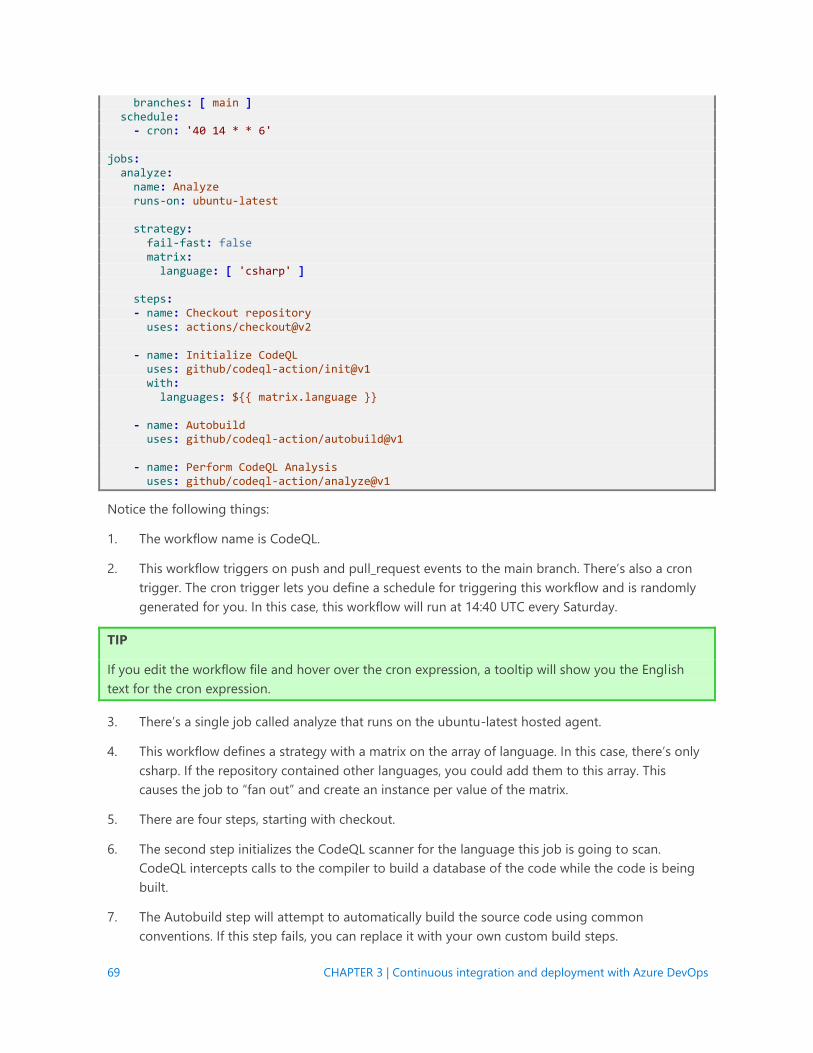
69 CHAPTER 3 | Continuous integration and deployment with Azure DevOps
branches: [ main ] schedule: - cron: '40 14 * * 6' jobs: analyze: name: Analyze runs-on: ubuntu-latest strategy: fail-fast: false matrix: language: [ 'csharp' ] steps: - name: Checkout repository uses: actions/checkout@v2 - name: Initialize CodeQL uses: github/codeql-action/init@v1 with: languages: ${{ matrix.language }} - name: Autobuild uses: github/codeql-action/autobuild@v1 - name: Perform CodeQL Analysis uses: github/codeql-action/analyze@v1
Notice the following things:
1. The workflow name is CodeQL.
2. This workflow triggers on push and pull_request events to the main branch. There’s also a cron
trigger. The cron trigger lets you define a schedule for triggering this workflow and is randomly
generated for you. In this case, this workflow will run at 14:40 UTC every Saturday.
TIP
If you edit the workflow file and hover over the cron expression, a tooltip will show you the English
text for the cron expression.
3. There’s a single job called analyze that runs on the ubuntu-latest hosted agent.
4. This workflow defines a strategy with a matrix on the array of language. In this case, there’s only
csharp. If the repository contained other languages, you could add them to this array. This
causes the job to “fan out” and create an instance per value of the matrix.
5. There are four steps, starting with checkout.
6. The second step initializes the CodeQL scanner for the language this job is going to scan.
CodeQL intercepts calls to the compiler to build a database of the code while the code is being
built.
7. The Autobuild step will attempt to automatically build the source code using common
conventions. If this step fails, you can replace it with your own custom build steps.
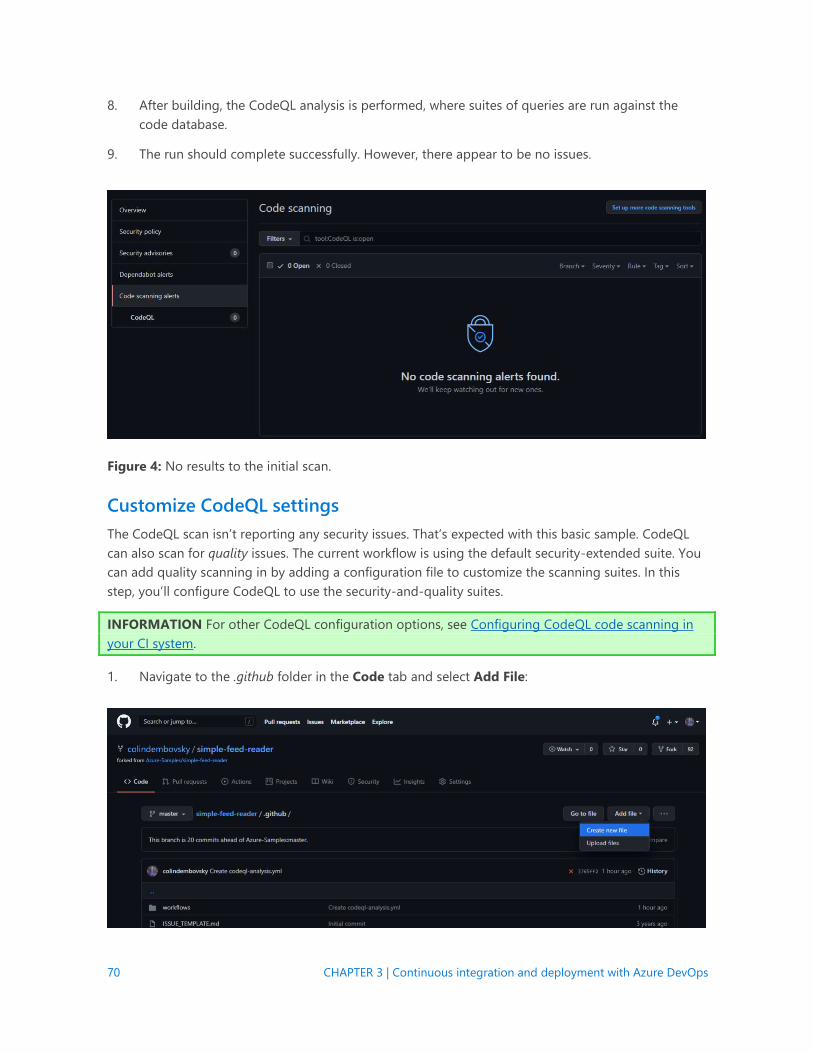
70 CHAPTER 3 | Continuous integration and deployment with Azure DevOps
8. After building, the CodeQL analysis is performed, where suites of queries are run against the
code database.
9. The run should complete successfully. However, there appear to be no issues.
Figure 4: No results to the initial scan.
Customize CodeQL settings
The CodeQL scan isn’t reporting any security issues. That’s expected with this basic sample. CodeQL
can also scan for quality issues. The current workflow is using the default security-extended suite. You
can add quality scanning in by adding a configuration file to customize the scanning suites. In this
step, you’ll configure CodeQL to use the security-and-quality suites.
INFORMATION For other CodeQL configuration options, see Configuring CodeQL code scanning in
your CI system.
1. Navigate to the .github folder in the Code tab and select Add File:
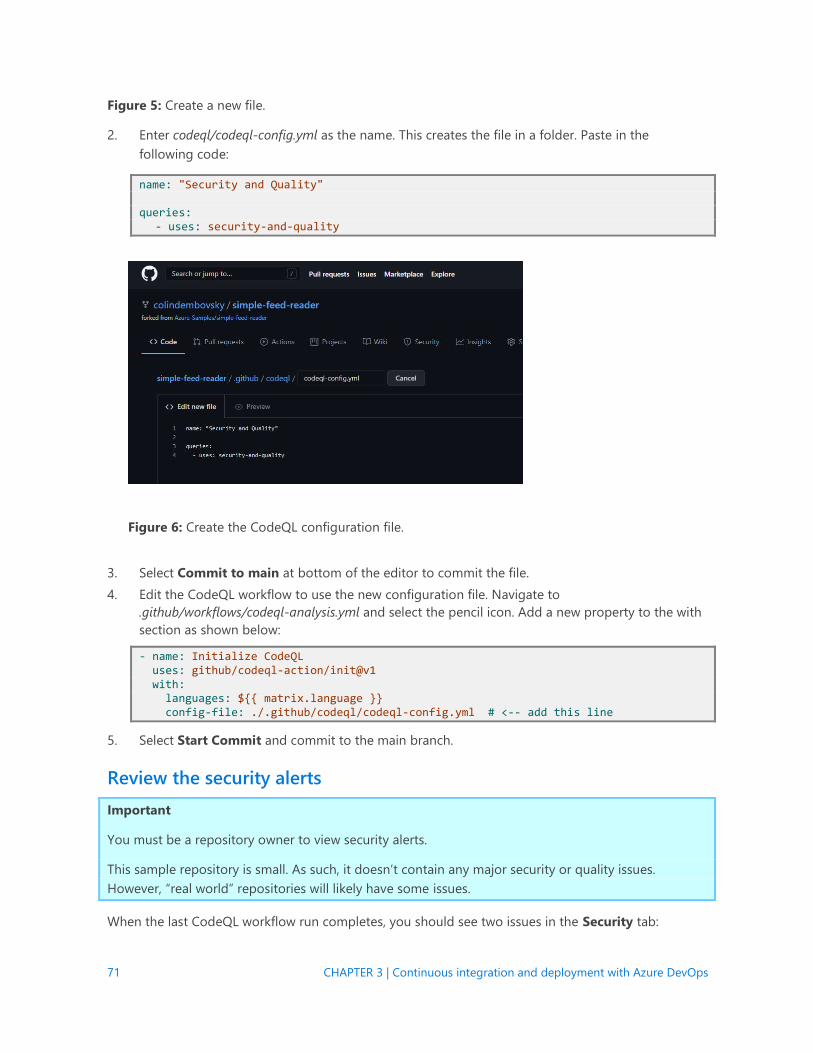
71 CHAPTER 3 | Continuous integration and deployment with Azure DevOps
Figure 5: Create a new file.
2. Enter codeql/codeql-config.yml as the name. This creates the file in a folder. Paste in the
following code:
name: "Security and Quality" queries:
- uses: security-and-quality
Figure 6: Create the CodeQL configuration file.
3. Select Commit to main at bottom of the editor to commit the file.
4. Edit the CodeQL workflow to use the new configuration file. Navigate to
.github/workflows/codeql-analysis.yml and select the pencil icon. Add a new property to the with
section as shown below:
- name: Initialize CodeQL uses: github/codeql-action/init@v1 with: languages: ${{ matrix.language }} config-file: ./.github/codeql/codeql-config.yml # <-- add this line
5. Select Start Commit and commit to the main branch.
Review the security alerts
Important
You must be a repository owner to view security alerts.
This sample repository is small. As such, it doesn’t contain any major security or quality issues.
However, “real world” repositories will likely have some issues.
When the last CodeQL workflow run completes, you should see two issues in the Security tab:
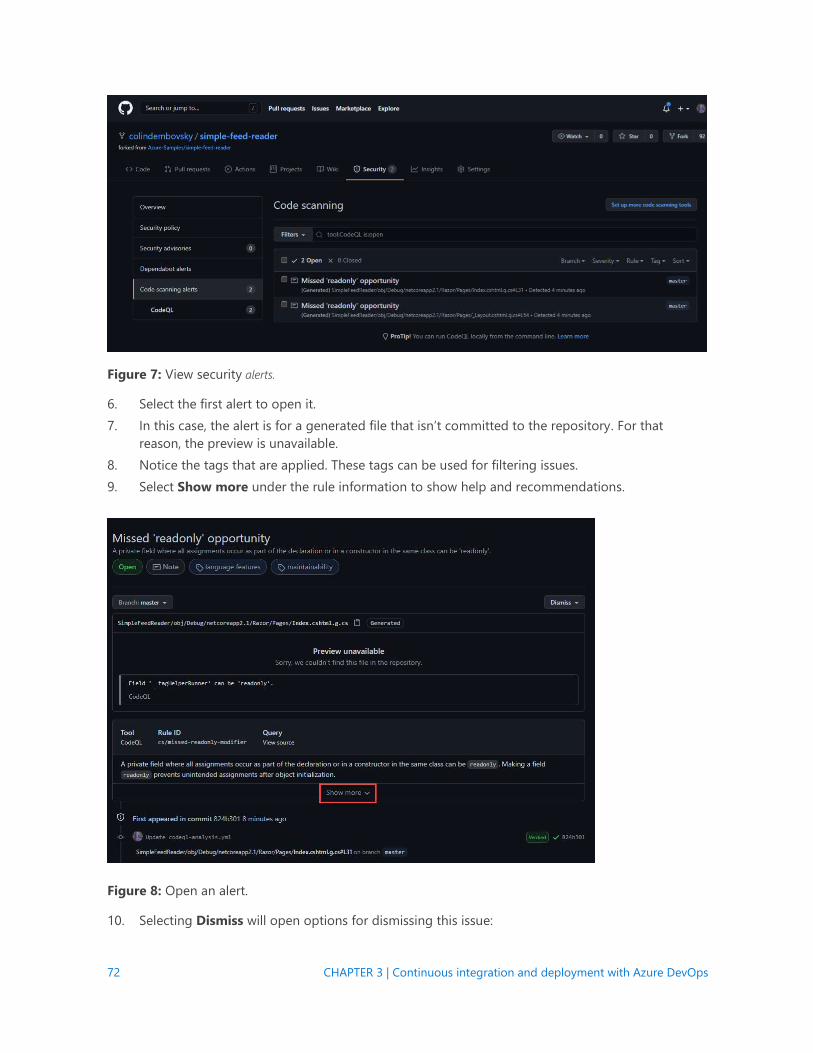
72 CHAPTER 3 | Continuous integration and deployment with Azure DevOps
Figure 7: View security alerts.
6. Select the first alert to open it.
7. In this case, the alert is for a generated file that isn’t committed to the repository. For that
reason, the preview is unavailable.
8. Notice the tags that are applied. These tags can be used for filtering issues.
9. Select Show more under the rule information to show help and recommendations.
Figure 8: Open an alert.
10. Selecting Dismiss will open options for dismissing this issue:
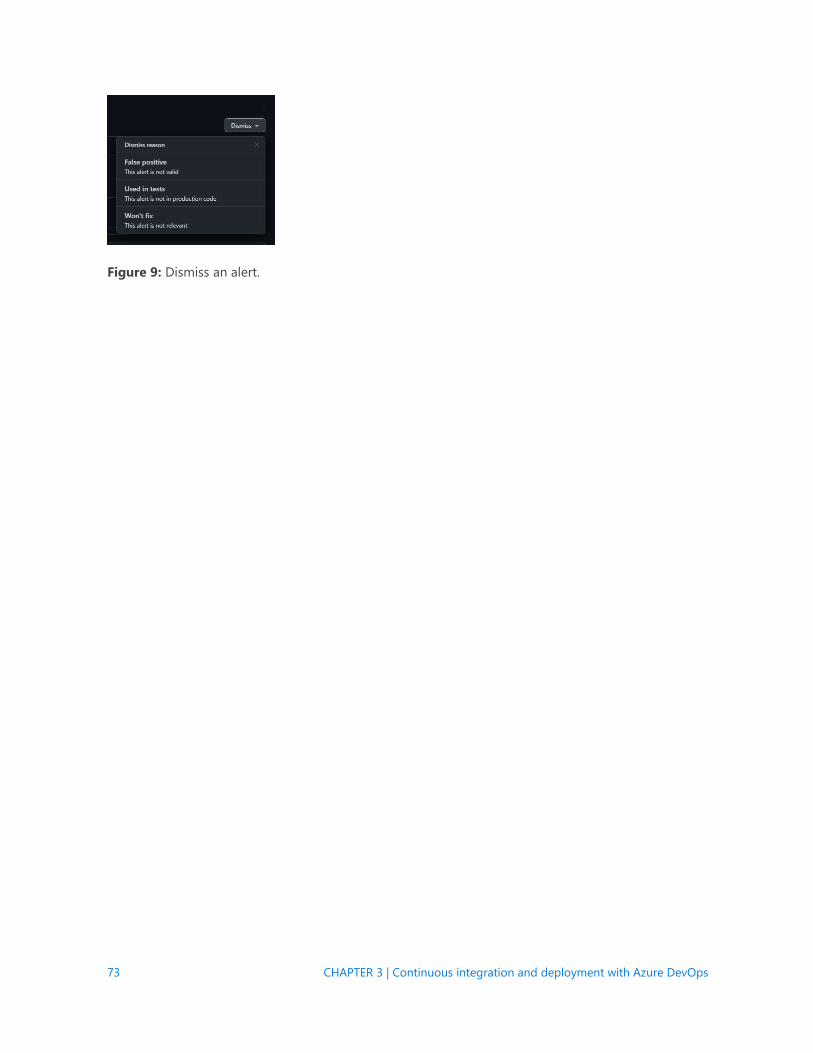
73 CHAPTER 3 | Continuous integration and deployment with Azure DevOps
Figure 9: Dismiss an alert.
74 CHAPTER 4 | Monitor and debug
CHAPTER 4
Monitor and debug
Having deployed the app and built a DevOps pipeline, it’s important to understand how to monitor
and troubleshoot the app.
In this section, you’ll complete the following tasks:
• Find basic monitoring and troubleshooting data in the Azure portal
• Learn how Azure Monitor provides a deeper look at metrics across all Azure services
• Connect the web app with Application Insights for app profiling
• Turn on logging and learn where to download logs
• Stream logs in real time
• Learn where to set up alerts
• Learn about remote debugging Azure App Service web apps.
Basic monitoring and troubleshooting App Service web apps are easily monitored in real time. The Azure portal renders metrics in easy-to-
understand charts and graphs.
1. Open the Azure portal, and then navigate to the mywebapp<unique_number> App Service.
2. The Overview tab displays useful “at-a-glance” information, including graphs displaying recent
metrics.
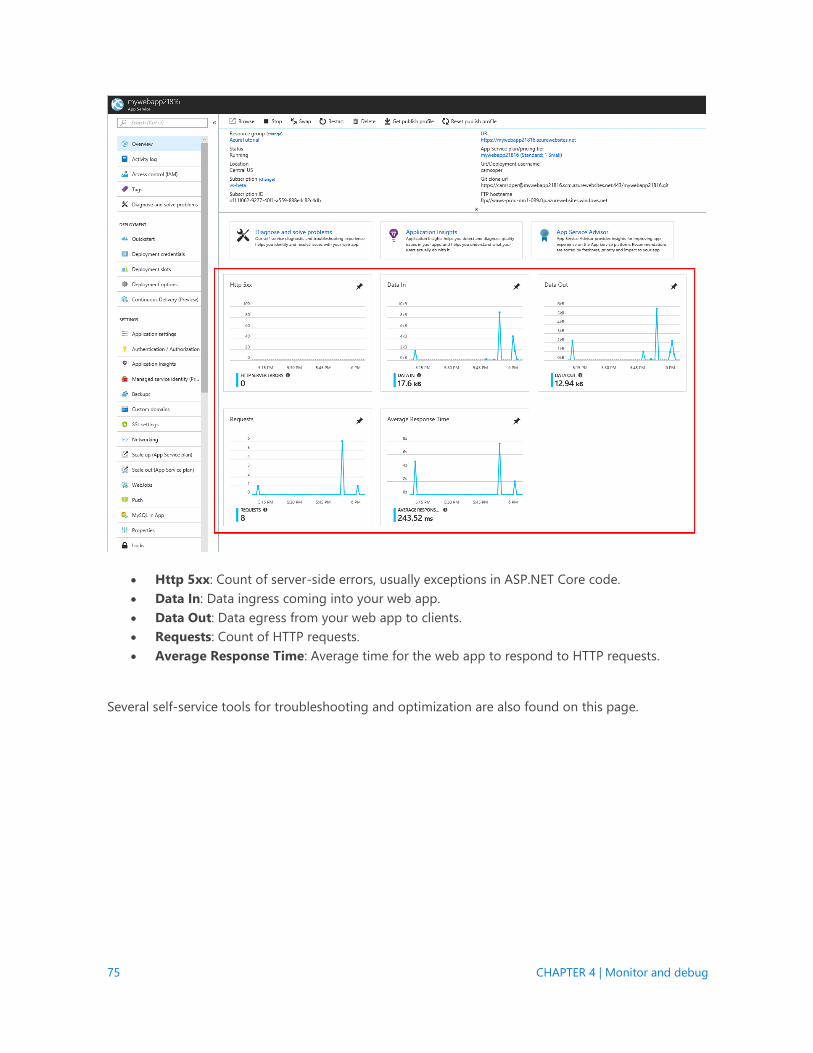
75 CHAPTER 4 | Monitor and debug
• Http 5xx: Count of server-side errors, usually exceptions in ASP.NET Core code.
• Data In: Data ingress coming into your web app.
• Data Out: Data egress from your web app to clients.
• Requests: Count of HTTP requests.
• Average Response Time: Average time for the web app to respond to HTTP requests.
Several self-service tools for troubleshooting and optimization are also found on this page.
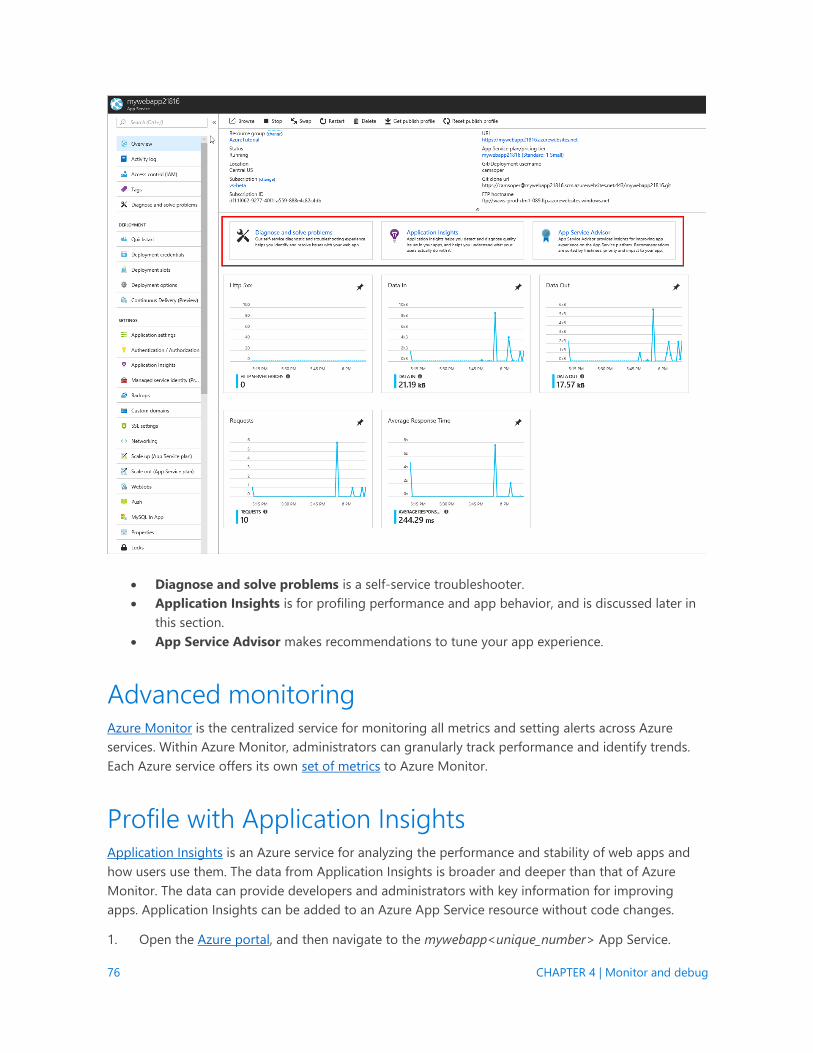
76 CHAPTER 4 | Monitor and debug
• Diagnose and solve problems is a self-service troubleshooter.
• Application Insights is for profiling performance and app behavior, and is discussed later in
this section.
• App Service Advisor makes recommendations to tune your app experience.
Advanced monitoring Azure Monitor is the centralized service for monitoring all metrics and setting alerts across Azure
services. Within Azure Monitor, administrators can granularly track performance and identify trends.
Each Azure service offers its own set of metrics to Azure Monitor.
Profile with Application Insights Application Insights is an Azure service for analyzing the performance and stability of web apps and
how users use them. The data from Application Insights is broader and deeper than that of Azure
Monitor. The data can provide developers and administrators with key information for improving
apps. Application Insights can be added to an Azure App Service resource without code changes.
1. Open the Azure portal, and then navigate to the mywebapp<unique_number> App Service.
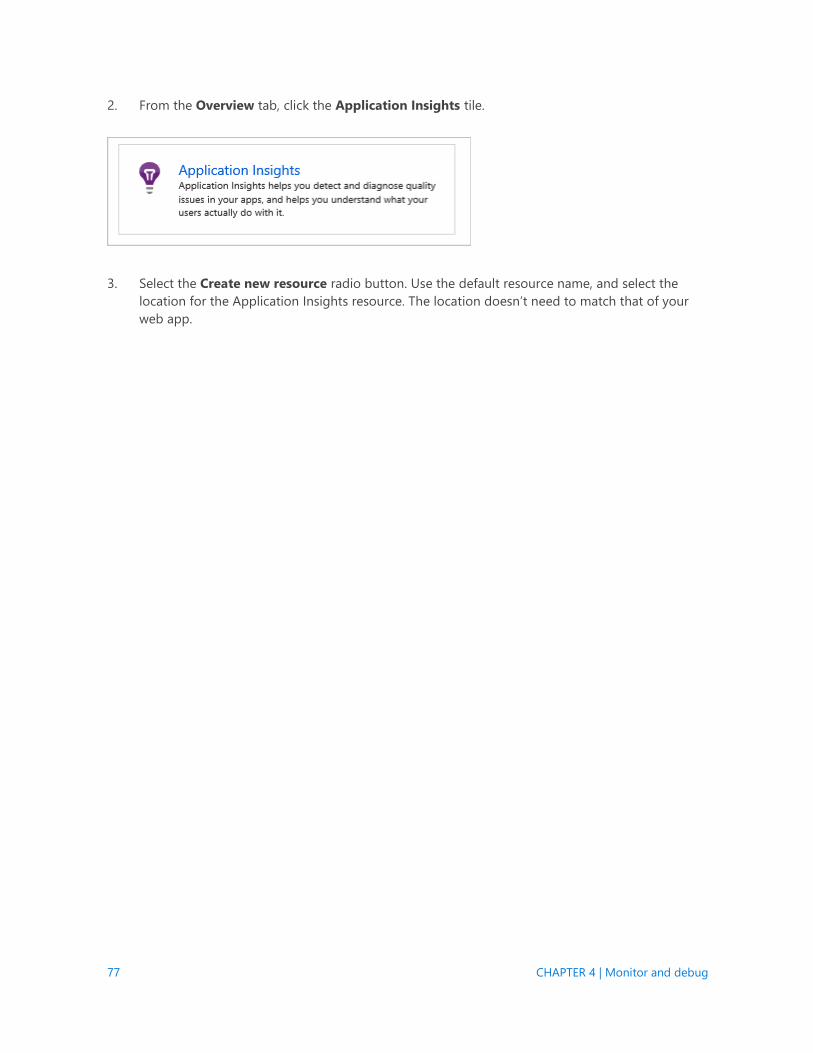
77 CHAPTER 4 | Monitor and debug
2. From the Overview tab, click the Application Insights tile.
3. Select the Create new resource radio button. Use the default resource name, and select the
location for the Application Insights resource. The location doesn’t need to match that of your
web app.
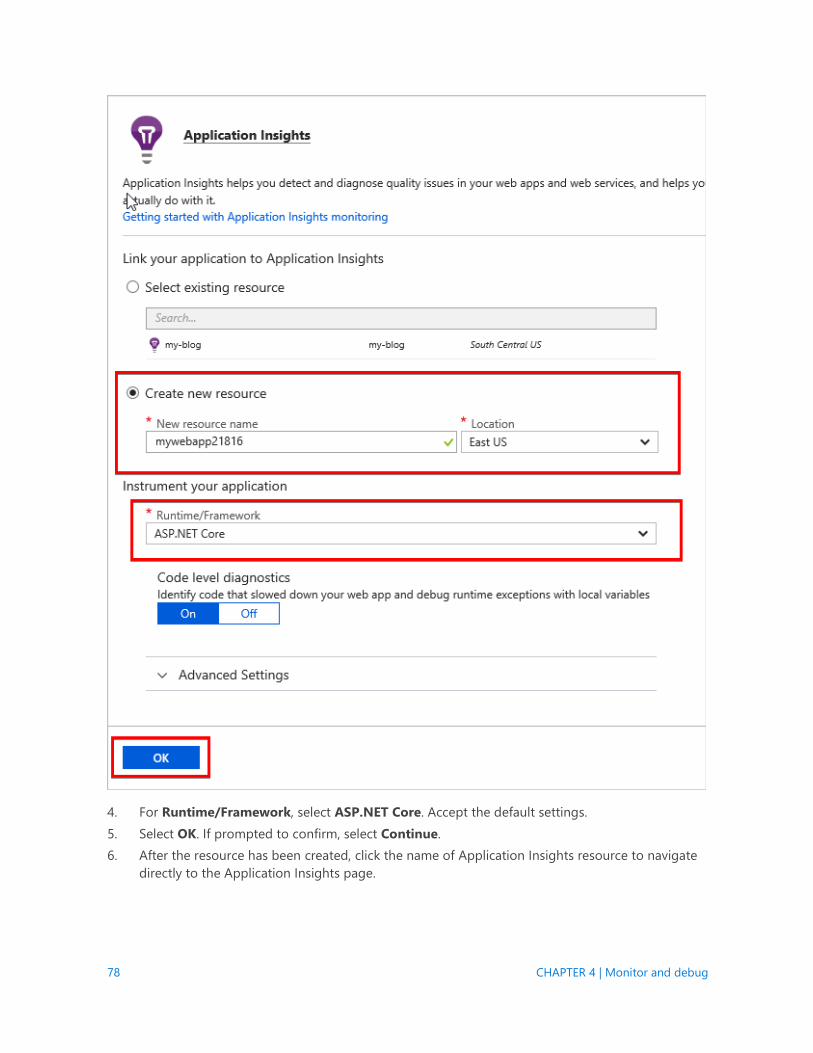
78 CHAPTER 4 | Monitor and debug
4. For Runtime/Framework, select ASP.NET Core. Accept the default settings.
5. Select OK. If prompted to confirm, select Continue.
6. After the resource has been created, click the name of Application Insights resource to navigate
directly to the Application Insights page.

79 CHAPTER 4 | Monitor and debug
As the app is used, data accumulates. Select Refresh to reload the blade with new data.
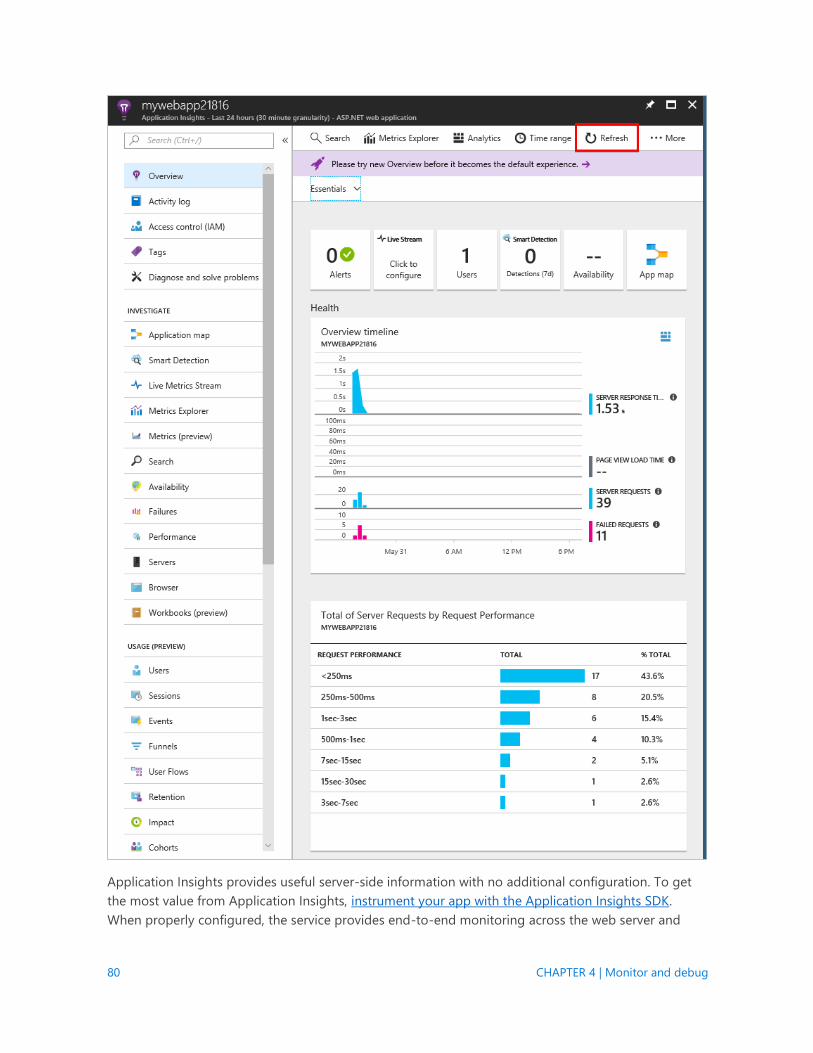
80 CHAPTER 4 | Monitor and debug
Application Insights provides useful server-side information with no additional configuration. To get
the most value from Application Insights, instrument your app with the Application Insights SDK.
When properly configured, the service provides end-to-end monitoring across the web server and
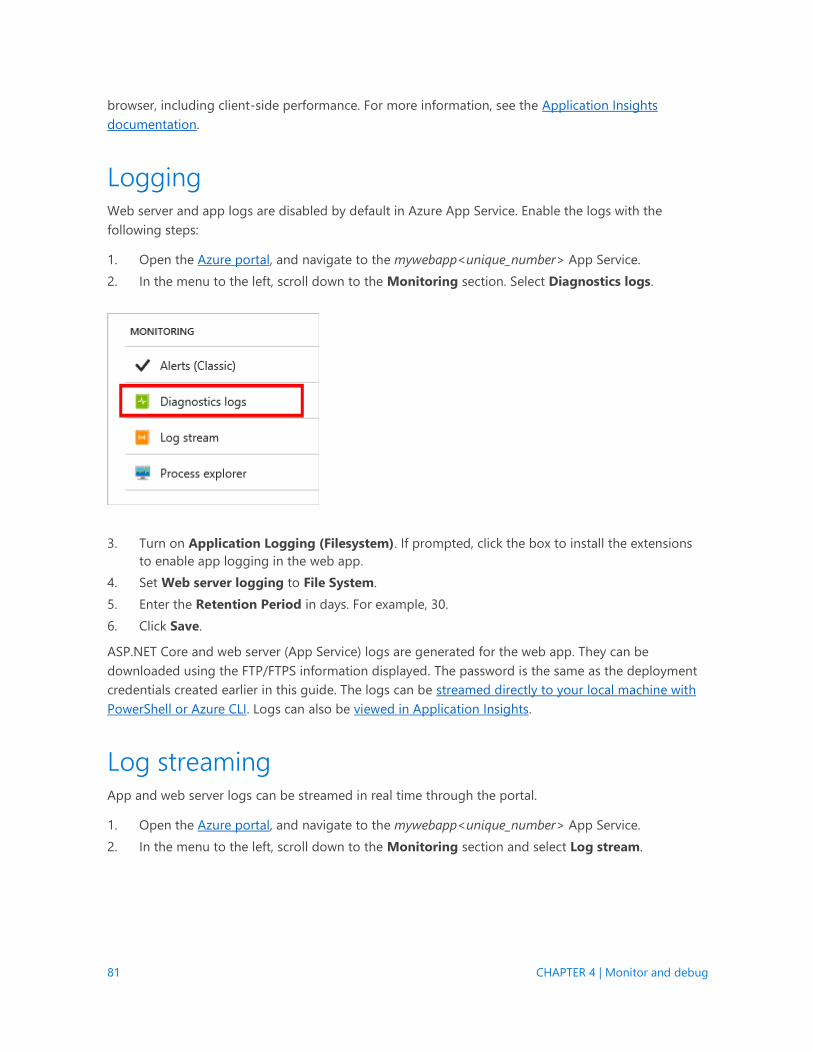
81 CHAPTER 4 | Monitor and debug
browser, including client-side performance. For more information, see the Application Insights
documentation.
Logging Web server and app logs are disabled by default in Azure App Service. Enable the logs with the
following steps:
1. Open the Azure portal, and navigate to the mywebapp<unique_number> App Service.
2. In the menu to the left, scroll down to the Monitoring section. Select Diagnostics logs.
3. Turn on Application Logging (Filesystem). If prompted, click the box to install the extensions
to enable app logging in the web app.
4. Set Web server logging to File System.
5. Enter the Retention Period in days. For example, 30.
6. Click Save.
ASP.NET Core and web server (App Service) logs are generated for the web app. They can be
downloaded using the FTP/FTPS information displayed. The password is the same as the deployment
credentials created earlier in this guide. The logs can be streamed directly to your local machine with
PowerShell or Azure CLI. Logs can also be viewed in Application Insights.
Log streaming App and web server logs can be streamed in real time through the portal.
1. Open the Azure portal, and navigate to the mywebapp<unique_number> App Service.
2. In the menu to the left, scroll down to the Monitoring section and select Log stream.
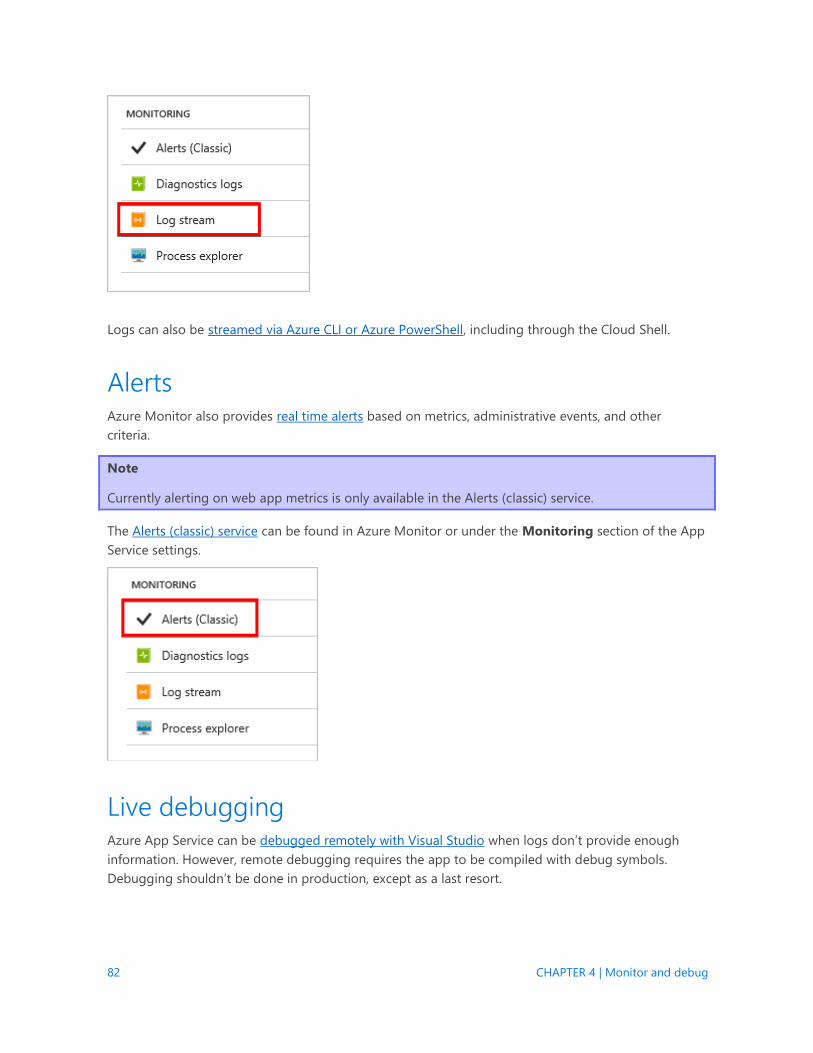
82 CHAPTER 4 | Monitor and debug
Logs can also be streamed via Azure CLI or Azure PowerShell, including through the Cloud Shell.
Alerts Azure Monitor also provides real time alerts based on metrics, administrative events, and other
criteria.
Note
Currently alerting on web app metrics is only available in the Alerts (classic) service.
The Alerts (classic) service can be found in Azure Monitor or under the Monitoring section of the App
Service settings.
Live debugging Azure App Service can be debugged remotely with Visual Studio when logs don’t provide enough
information. However, remote debugging requires the app to be compiled with debug symbols.
Debugging shouldn’t be done in production, except as a last resort.
83 CHAPTER 4 | Monitor and debug
Conclusion In this section, you completed the following tasks:
[!div class=“checklist”]
• Find basic monitoring and troubleshooting data in the Azure portal
• Learn how Azure Monitor provides a deeper look at metrics across all Azure services
• Connect the web app with Application Insights for app profiling
• Turn on logging and learn where to download logs
• Stream logs in real time
• Learn where to set up alerts
• Learn about remote debugging Azure App Service web apps.
Additional reading • Troubleshooting ASP.NET Core on Azure App Service and IIS
• Common errors reference for Azure App Service and IIS with ASP.NET Core
• Monitor Azure web app performance with Application Insights
• Enable diagnostics logging for web apps in Azure App Service
• Troubleshoot a web app in Azure App Service using Visual Studio
• Create classic metric alerts in Azure Monitor for Azure services - Azure portal
84 CHAPTER 5 | Next steps
CHAPTER 5
Next steps
In this guide, you created a DevOps pipeline for an ASP.NET Core sample app. Congratulations! We
hope you enjoyed learning to publish ASP.NET Core web apps to Azure App Service and automate the
continuous integration of changes.
Beyond web hosting and DevOps, Azure has a wide array of Platform-as-a-Service (PaaS) services
useful to ASP.NET Core developers. This section gives a brief overview of some of the most commonly
used services.
Storage and databases Redis Cache is high-throughput, low-latency data caching available as a service. It can be used for
caching page output, reducing database requests, and providing ASP.NET Core session state across
multiple instances of an app.
Azure Storage is Azure’s massively scalable cloud storage. Developers can take advantage of Queue
Storage for reliable message queuing, and Table Storage is a NoSQL key-value store designed for
rapid development using massive, semi-structured data sets.
Azure SQL Database provides familiar relational database functionality as a service using the Microsoft
SQL Server Engine.
Cosmos DB globally distributed, multi-model NoSQL database service. Multiple APIs are available,
including SQL API (formerly called DocumentDB), Cassandra, and MongoDB.
Identity Azure Active Directory and Azure Active Directory B2C are both identity services. Azure Active
Directory is designed for enterprise scenarios and enables Azure AD B2B (business-to-business)
collaboration, while Azure Active Directory B2C is intended business-to-customer scenarios, including
social network sign-in.
Mobile Notification Hubs is a multi-platform, scalable push-notification engine to quickly send millions of
messages to apps running on various types of devices.
85 CHAPTER 5 | Next steps
Web infrastructure Azure Container Service manages your hosted Kubernetes environment, making it quick and easy to
deploy and manage containerized apps without container orchestration expertise.
Azure Search is used to create an enterprise search solution over private, heterogenous content.
Service Fabric is a distributed systems platform that makes it easy to package, deploy, and manage
scalable and reliable microservices and containers.