Embed Size (px)
Citation preview

Access Lesson 03: Creating Reports
10/29/2009
Lesson
In the previous lesson the information you retrieved from a database always was in the form of a
table. This may be all you need if you are the only person using the
the tables in the first place then you won’t have much trouble working with them. Frequently you
will be writing queries for other people to use, though, in which case it is a good idea to display
the query results in an attractive form that is easy to understand. Such di
Reports.
Creating a Report Using the Report Wizard
Let’s create a report that lists each city and, under the city, lists
their phone numbers.
We generally have shied away from Wizards in these
lessons, but the Report Wizard is genuinely useful.
Open the database ExampleDB and select Reports
from the Objects list.
Double-click on Create reports by using wizard
In the next window you will specify what fields you
are using as the basis for the report.
First you need to select the table or query on which
the report will be based. Click on the arrow icon at
the right of the Tables/Queries text window, which
will display all the tables and queries created for
this database.
Choose the table tblEmployees, which contains the
information we need.
1
Microsoft Access
Lesson 3: Creating Reports
In the previous lesson the information you retrieved from a database always was in the form of a
table. This may be all you need if you are the only person using the information
e first place then you won’t have much trouble working with them. Frequently you
will be writing queries for other people to use, though, in which case it is a good idea to display
the query results in an attractive form that is easy to understand. Such displays are called
Using the Report Wizard
that lists each city and, under the city, lists employees living in this city with
We generally have shied away from Wizards in these
ons, but the Report Wizard is genuinely useful.
and select Reports
Create reports by using wizard.
In the next window you will specify what fields you
he report.
First you need to select the table or query on which
the report will be based. Click on the arrow icon at
the right of the Tables/Queries text window, which
will display all the tables and queries created for
, which contains the
In the previous lesson the information you retrieved from a database always was in the form of a
information – if you set up
e first place then you won’t have much trouble working with them. Frequently you
will be writing queries for other people to use, though, in which case it is a good idea to display
splays are called
living in this city with

Access Lesson 03: Creating Reports
10/29/2009
You now will see a list of available fields that were
included in this table. At the right of the Available
Fields list are four buttons:
> Add one field to the
>> Add all Available Fields to
Fields
< Remove one field from the Selected
Fields list
<< Remove all fields from
Fields list
For our report we want a list of employees
We will need information from the following fields to create the report:
Name, and Phone Number.
At this point it helps to give a little thought to what the report will look like. Each “City” field
name is going to be seen several times
it would be best to group the name and phone number information under each city:
City #1
Names & phone numbers
City #2
Names & phone numbers
etc.
With this in mind, let’s select the
because it appears to be the most important.
Do the same for the First Name,
Home Phone fields.
Click on Next.
2
You now will see a list of available fields that were
At the right of the Available
the Selected Fields list
l Available Fields to the Selected
< Remove one field from the Selected
<< Remove all fields from the Selected
For our report we want a list of employees and their phones number for each city in the database.
We will need information from the following fields to create the report: City, First Name, Last
At this point it helps to give a little thought to what the report will look like. Each “City” field
to be seen several times – once for each resident. To make the report easy
ame and phone number information under each city:
Names & phone numbers
Names & phone numbers
let’s select the City field first
because it appears to be the most important.
, Last Name and
ty in the database.
First Name, Last
At this point it helps to give a little thought to what the report will look like. Each “City” field
once for each resident. To make the report easy to read,
ame and phone number information under each city:

Access Lesson 03: Creating Reports
10/29/2009
Next you will be asked if you want to add any
grouping levels to the report.
As we suggested above, the report will be more
attractive and easy to read if we group the name and
phone number information under each city.
Select City as a grouping level.
You now will see City grouped above the other
fields.
Click Next.
In the next window, you will be able to
information according to the different fields. Let’s
sort the records first by Last Name
Name, both in ascending order.
Click on Next.
3
Next you will be asked if you want to add any
uggested above, the report will be more
attractive and easy to read if we group the name and
phone number information under each city.
You now will see City grouped above the other
In the next window, you will be able to sort the
information according to the different fields. Let’s
Last Name and then by First
.

Access Lesson 03: Creating Reports
10/29/2009
Next, you can choose the layout
report.
Leave the Page Orientation set to
moment. We can always change this later.
Click on Next.
Choose a style. Take your pick here.
Finally, enter a Title for the report. Use “rpt” as a
prefix for the title of reports.
You also can specify if you want to preview or
modify the report.
Click on Finish when you are ready.
4
layout of the report. A Stepped layout probably would be best for this
set to Portrait for the
moment. We can always change this later.
. Take your pick here.
r the report. Use “rpt” as a
You also can specify if you want to preview or
when you are ready.
layout probably would be best for this

Access Lesson 03: Creating Reports
10/29/2009
If you preview the report, you will
see the preview next.
Note that the report uses the
captions you chose as field
properties in the table to label the
fields in the report.
Click on Close to close the preview.
When you close the
preview you will see the
Design View of the report.
Don’t worry about this yet
– we will cover the Design
View later in this lesson.
Close the report window.
The report already has been
saved.
5
If you preview the report, you will
properties in the table to label the
to close the preview.

Access Lesson 03: Creating Reports
10/29/2009
Creating a Report from a Query
It often is preferable to create a report from a
query you already have created.
Use the query, qryEarlyHire, that
the previous lesson to create the report shown at
the right. Use “Create report by using wizard”
again, but base the report on the query
qryEarlyHire.
Save the report with the name “rptEarlyHire.”
Practice: Without creating a totalquery or report, produce the report shown at the right? (Hint: Think about modifying a criterion for the query, running the query again and saving it.)
Practice: Create a new query and use it for a report, a portion of which is shown at the right..
6
Creating a Report from a Query
It often is preferable to create a report from a
Use the query, qryEarlyHire, that you created in
the previous lesson to create the report shown at
the right. Use “Create report by using wizard”
again, but base the report on the query
Save the report with the name “rptEarlyHire.”
: Without creating a totally new produce the report
(Hint: Think about modifying a criterion for the query, running the query again
w query and use it for a report, a portion of which is shown at

Access Lesson 03: Creating Reports
10/29/2009
Design View of a Report
Before you begin customizing reports, you need to understand how the Design View of a report
relates to what you see when you print the report out.
will see a portion of the Print Preview View of the report, rptCitiesPhones, that we created
earlier. On the right is the Design View of the same report. Portions of the Design View have
been pulled away from each other to make the relationship between the two Views more
obvious.
The Report Header in the Design
View is printed once at the top of the
first page. This is the title of the
report.
The text in the Report Header is
contained in a label control.
A label control contains labels for
the data in the database. Controls
such as label controls, that are not
connected with the underlying
database are called unbound controls
7
Before you begin customizing reports, you need to understand how the Design View of a report
relates to what you see when you print the report out. On the left in the illustration below you
review View of the report, rptCitiesPhones, that we created
earlier. On the right is the Design View of the same report. Portions of the Design View have
been pulled away from each other to make the relationship between the two Views more
in the Design
View is printed once at the top of the
The text in the Report Header is
A label control contains labels for
Controls,
that are not
unbound controls.
Before you begin customizing reports, you need to understand how the Design View of a report
On the left in the illustration below you
review View of the report, rptCitiesPhones, that we created
earlier. On the right is the Design View of the same report. Portions of the Design View have
been pulled away from each other to make the relationship between the two Views more

Access Lesson 03: Creating Reports
10/29/2009
The Page Header in the Design
View is printed once at the top of
each page (below the Report Header
on the first page).
The Page Header generally contains
text that identifies fields in a table
below. The Page Header also is
made up of label controls.
The detailed information from the
database is displayed next. This is
the information that makes up the
bulk of the report.
In this case we first see a City
Header, corresponding to the
grouping we have chosen.
Below the City Header is the Detail
section.
The City Header and Detail section are made up of
connection with the table or query on which t
previewed, information from the database is fed into the text box controls.
called bound controls because they are connected with the underlying database.
The Page Footer is inserted
automatically by the Report Wizard so
that the data and page numbers are
displayed at the bottom of each page
in the report.
8
in the Design
View is printed once at the top of
each page (below the Report Header
ntains
text that identifies fields in a table
The detailed information from the
This is
the information that makes up the
Detail
The City Header and Detail section are made up of text box controls. Text box controls have a
connection with the table or query on which the report is based. When a report is printed or
information from the database is fed into the text box controls. Text box controls are
because they are connected with the underlying database.
automatically by the Report Wizard so
that the data and page numbers are
displayed at the bottom of each page
Text box controls have a
When a report is printed or
Text box controls are
because they are connected with the underlying database.

Access Lesson 03: Creating Reports
10/29/2009
Modifying a Label Control
Once you have created a report with the Report Wizard, you may wish to modify it.
that you may want to change is the Title in the Report Header. It is good programming practice
to name all reports beginning with “rpt,” but you may not want this in the title.
Open the report, rptCitiesPhones
the Label Control box that holds the title. You should see small
rectangular handles on the corners and midway along the sides of
the box. This indicates that the control has been selected.
Select the text in the box
Change the Title to “Cities and
Phones”
This has no effect on the
information pulled from the
database. Label controls merely
hold descriptive text.
9
Control
Once you have created a report with the Report Wizard, you may wish to modify it.
ay want to change is the Title in the Report Header. It is good programming practice
to name all reports beginning with “rpt,” but you may not want this in the title.
rptCitiesPhones, and go to Design View. Click on
that holds the title. You should see small
rectangular handles on the corners and midway along the sides of
the box. This indicates that the control has been selected.
Once you have created a report with the Report Wizard, you may wish to modify it. One thing
ay want to change is the Title in the Report Header. It is good programming practice

Access Lesson 03: Creating Reports
10/29/2009
You also can change the color and
Control box for the Title selected, click on the menu button to the
the A icon in the toolbar. Choose another color for the font.
You also can change the type of font or font size like
you have learned to do in Microsoft Word or Excel.
For example, change the font size to 26.
Note that the size of the Label Control box does not
expand to fit the larger font. You will need to resize the
box yourself.
You can resize of the box by grabbing it with the mouse. Move
the cursor until it is directly over the small rectangular handle
in the middle of the right edge of the box, at which point the
cursor will become a double arrow. Holding the left mouse
button down, pull the side of the box to the right until it fits the
text.
Adding and Moving a Label Control
Let’s add a descriptive label to the report
You should see the Toolbox on the screen.
Toolbox icon on the top toolbar.
10
You also can change the color and font of the text. With the Label
selected, click on the menu button to the right of
the A icon in the toolbar. Choose another color for the font.
lso can change the type of font or font size like
you have learned to do in Microsoft Word or Excel.
For example, change the font size to 26.
l Control box does not
expand to fit the larger font. You will need to resize the
size of the box by grabbing it with the mouse. Move
irectly over the small rectangular handle
dge of the box, at which point the
cursor will become a double arrow. Holding the left mouse
button down, pull the side of the box to the right until it fits the
a Label Control
label to the report showing that you are the author.
on the screen. If it is not there, click on the
.

Access Lesson 03: Creating Reports
10/29/2009
Click on the Label tool in the toolbox.
The cursor now will look
like a plus sign with the
letter A below it. Move the
cursor over to the Report
Header section of the
Design View
of the report and draw a
white label control box on
the right. Enter your name
in the box.
When you click on the Design
View away from the new label
control, the box will become
transparent.
You can move the box around with the cursor to place it where you
want within the Report Header. Position the cursor so it is over the
bottom or top edges of the box and not over a handle
cursor will look like a small hand.
move the box until it is positioned where you want.
Look at the report by clicking on the Print Preview icon.
11
in the toolbox.
move the box around with the cursor to place it where you
Position the cursor so it is over the
and not over a handle, at which point the
a small hand. Hold the left mouse button down and
move the box until it is positioned where you want.
Look at the report by clicking on the Print Preview icon.

Access Lesson 03: Creating Reports
10/29/2009
Modifying and Moving Text Box Controls
After looking at the current report, we
decide that it needs some more changes.
Here are some things we would like to do:
• Move the first and last names so the first name is shown first.
• Resize and move the Fields
• Add a Zip Code Text Box Control so t
• Include a “Zip Code” Label Control in
First, we will move the Control boxes around
“First Name” boxes are displayed before the “Last
Name” boxes. We want to move the correspondi
and Text Box Controls together so they stay aligned.
Select one of the Last Name boxes and then, holding the
shift key down, select the other.
Drag the two control boxes until
they are somewhere between the
First Name and Home Phone boxes.
Drop them there.
Next, select the two First Name
boxes and pull them to the right.
Then select the Last Name boxes
again and position them. After
this is done, the Design View
should look like the picture on
the right.
12
Text Box Controls
After looking at the current report, we
e that it needs some more changes.
Here are some things we would like to do:
Move the first and last names so the first name is shown first.
the Fields so that the information isn’t so spread out
Add a Zip Code Text Box Control so the Zip Code will be listed for each employee.
Label Control in the Page Header.
First, we will move the Control boxes around so that the
“First Name” boxes are displayed before the “Last
We want to move the corresponding Label
and Text Box Controls together so they stay aligned.
Select one of the Last Name boxes and then, holding the
Drag the two control boxes until
they are somewhere between the
First Name and Home Phone boxes.
boxes and pull them to the right.
Then select the Last Name boxes
he Zip Code will be listed for each employee.

Access Lesson 03: Creating Reports
10/29/2009
Select the two City Control boxes and
resize them so both are around 1 inch
long on the ruler at the top of then
form. Do the same for the First Name,
Last Name, and Home Phone boxes.
Select the two First Name Control
boxes and move them until they are
close to the City Boxes. Do the same
for the Last Name and Home Phone
boxes.
Check the Page Preview View of
the report. It looks a lot better
now.
Next we will add the Zip code to
the report.
Back in the Design View of the report, y
Field Names in the table or query used for the report.
If not, click on the Field Names icon
13
xes and
resize them so both are around 1 inch
long on the ruler at the top of then
form. Do the same for the First Name,
Last Name, and Home Phone boxes.
Select the two First Name Control
boxes and move them until they are
s. Do the same
for the Last Name and Home Phone
of
Next we will add the Zip code to
Back in the Design View of the report, you probably will see a list of the
in the table or query used for the report.
Field Names icon on the main menu.

Access Lesson 03: Creating Reports
10/29/2009
Select the Zip Code field. Grab it with the
mouse and drag it into the Details
When you drop it, you will see two Control
boxes appear. The box on the right is a
Box Control and the box on the left is the
corresponding Label Control.
We want the Zip Code Label Control
Controls.
Select the Zip Code Label
Control box and cut it (Edit,
Cut from the main menu).
Then Paste it in the Page
Header section. You probably
will need to move it after it has
been pasted in.
Change the sizes of the Zip Code boxes and their font (if necessary) to
match the other controls in the same section. Using the grid as a guide,
move the two boxes so their left sides coincide.
Take a look at the report. How does it look?
14
field. Grab it with the
Details section.
When you drop it, you will see two Control
The box on the right is a Text
and the box on the left is the
Label Control box to be in the Page Header section with the other Label
Change the sizes of the Zip Code boxes and their font (if necessary) to
controls in the same section. Using the grid as a guide,
move the two boxes so their left sides coincide.
Take a look at the report. How does it look?
section with the other Label

Access Lesson 03: Creating Reports
10/29/2009
Practice: Earlier in this lesson you created a report that lookone.
Modify this report so it looks like the below. Here are the changes you should make: 1. Modify the query to include the fields you need for the new report. 2. Change the text in various Label Controls as illustrated. 3. Add a Text Box Control for the Depart ID In the Dept Name Header 4. Add a Text Box Control for the Employee ID in the Details section. The Label for this control should go in the Page Header. 5. Move boxes around so the report looks like the one at the right.that the DeptName, E/N, and Employee ID columns use centered justification in both the Label and Text Box Controls.
15
Practice: Earlier in this lesson you created a report that looked like this
looks like
Here are the changes you should
Modify the query to include the fields you need for the new report.
Change the text in various Label
. Add a Text Box Control for the he Dept Name
. Add a Text Box Control for the Employee ID in the Details section. The Label for this control should
. Move boxes around so the report looks like the one at the right. Note that the DeptName, E/N, and
ee ID columns use centered justification in both the Label and

Access Lesson 03: Creating Reports
10/29/2009
Mail Merge Reports
A mail merge report is good example of the
power of a database to make our lives easier.
Suppose that you need to write a
letter to all employees that have been with your
company more than ten years.
You could type multiple copies of the letter, one
for each employee, but that would take a lot of
time. A mail merge allows you to type the letter
up once and make it part of a report that merge
in needed information (names, addresses, etc.)
from a database.
Step 1: Create a Word Document
Earlier you downloaded this letter, “Celebration
Letter,” on your H: drive.
Celebration Letter looks like the picture at the
right. Note that a series of Xs have been entered
in the position where you would place the inside
address and greeting, as well as the department
name and hire date. When we do the mail merge,
information from the database automatically will
replace the Xs in the letter.
16
A mail merge report is good example of the
power of a database to make our lives easier.
Suppose that you need to write a personalized
loyees that have been with your
You could type multiple copies of the letter, one
for each employee, but that would take a lot of
time. A mail merge allows you to type the letter
up once and make it part of a report that merges
in needed information (names, addresses, etc.)
Word Document
Earlier you downloaded this letter, “Celebration
Celebration Letter looks like the picture at the
ies of Xs have been entered
in the position where you would place the inside
address and greeting, as well as the department
name and hire date. When we do the mail merge,
information from the database automatically will

Access Lesson 03: Creating Reports
10/29/2009
Step 2: Create a Query
We will work with the EmployeesDB database. Create a query, the first three records of which
are shown below:
The criterion for this query is that the Hire Date is before January 1, 1995. Save the query as
qryTenYears.
Step 3: Mail Merge With the Word Document
Display the list of queries for
this database and choose the one
you have created for the mail
merge, in this case
qryTenYears.
Click on the Merge
Wizard icon and select
Merge It with Microsoft Office
Word.
17
We will work with the EmployeesDB database. Create a query, the first three records of which
The criterion for this query is that the Hire Date is before January 1, 1995. Save the query as
Mail Merge With the Word Document
this database and choose the one
Merge It with Microsoft Office
We will work with the EmployeesDB database. Create a query, the first three records of which
The criterion for this query is that the Hire Date is before January 1, 1995. Save the query as

Access Lesson 03: Creating Reports
10/29/2009
In the next window, check Link your data to an
existing Microsoft Word document
Click on OK.
Select the document, in this case the
Letter you downloaded earlier to
You then will see a Word document showing the
letter with the Mail Merge menu on the right, as is
illustrated below.
Look at the Mail Merge
menu on the right side of
the screen. The default
way to select recipients is
from an existing list.
In this case, we see that
the recipients are being
selected from the query
qryTenYears in the
ExampleDB database.
Click on Next: Write
your letter at the bottom.
18
Link your data to an
existing Microsoft Word document.
Select the document, in this case the Celebration
earlier to your H: drive.
You then will see a Word document showing the
the Mail Merge menu on the right, as is

Access Lesson 03: Creating Reports
10/29/2009
Select the Inside Address
Block in the letter.
Click on Address block
in the Mail Merge menu.
In the Insert Address Block window, select ho
Address to look.
The choices for this particular letter are illustrated at the right.
When you have made your choices click on
Next select the Greeting Line in the letter and click on
Greeting line in the Mail Merge menu.
Choose a greeting line and click on
19
window, select how you want the Inside
The choices for this particular letter are illustrated at the right.
When you have made your choices click on OK.
in the letter and click on
menu.
Choose a greeting line and click on OK.
Access Lesson 03: Creating Reports
10/29/2009
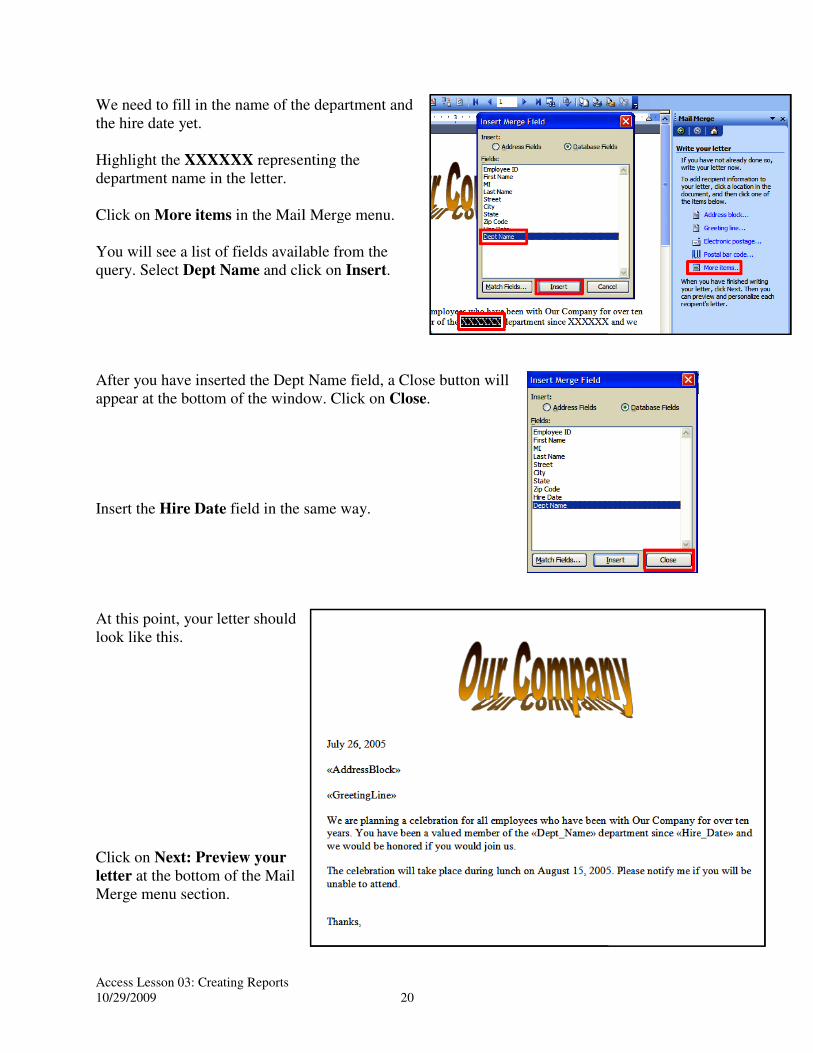
We need to fill in the name of the department and
the hire date yet.
Highlight the XXXXXX representing the
department name in the letter.
Click on More items in the Mail Merge menu.
You will see a list of fields available from the
query. Select Dept Name and click on
After you have inserted the Dept Name field, a Close button will
appear at the bottom of the window. Click on
Insert the Hire Date field in the same way.
At this point, your letter should
look like this.
Click on Next: Preview your
letter at the bottom of the Mail
Merge menu section.
20
We need to fill in the name of the department and
representing the
in the Mail Merge menu.
of fields available from the
and click on Insert.
After you have inserted the Dept Name field, a Close button will
appear at the bottom of the window. Click on Close.
field in the same way.

Access Lesson 03: Creating Reports
10/29/2009
You will see the letter as it will
appear for the first recipient in the
query.
You can preview the merged letters if you like. You also will have the
opportunity to edit the recipient list at this time.
When you are ready click on Next: Complete the merge
Save the merged Word document
The next Mail Merge menu will prompt yo
anything for this lesson. It would waste a lot of paper.
Close the Word document when you are through.
21
appear for the first recipient in the
e merged letters if you like. You also will have the
opportunity to edit the recipient list at this time.
Next: Complete the merge.
document at this point.
The next Mail Merge menu will prompt you to print the letters. Don’t print anything for this lesson. It would waste a lot of paper.
Close the Word document when you are through.
Access Lesson 03: Creating Reports
10/29/2009
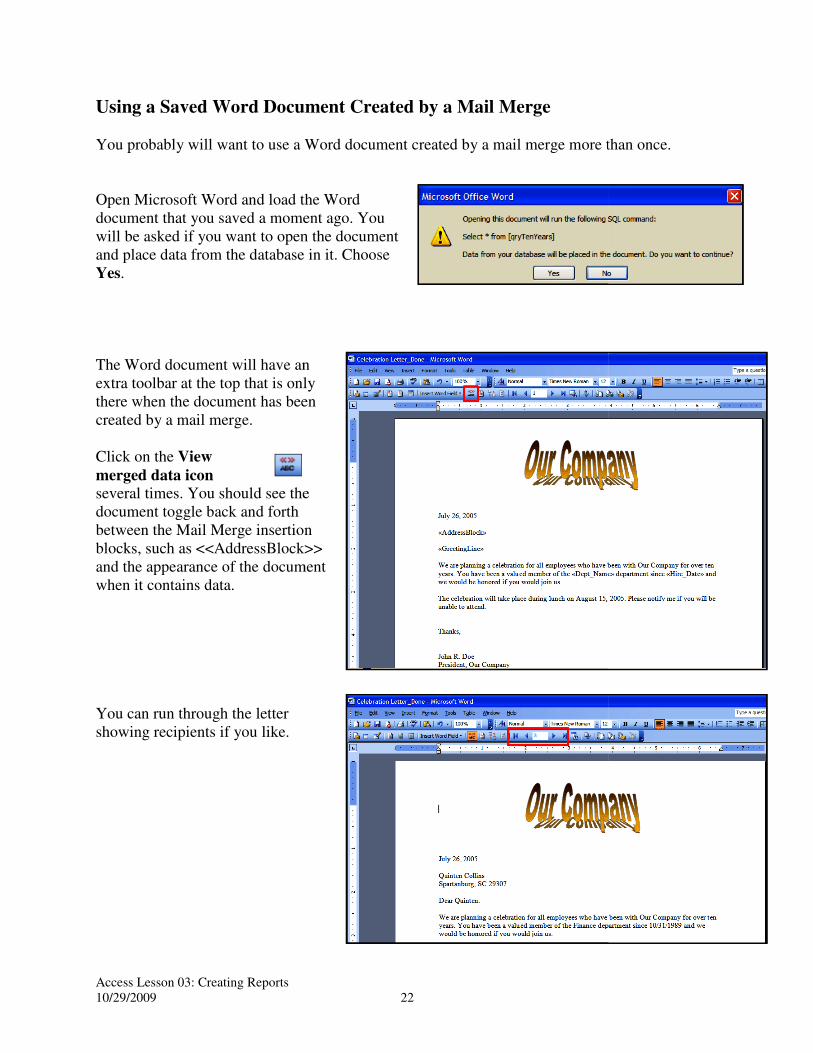
Using a Saved Word Document
You probably will want to use a Word document created by a mai
Open Microsoft Word and load the Word
document that you saved a moment ago. You
will be asked if you want to open the document
and place data from the database in it. Choose
Yes.
The Word document will have an
extra toolbar at the top that is only
there when the document has been
created by a mail merge.
Click on the View
merged data icon several times. You should see the
document toggle back and forth
between the Mail Merge insertion
blocks, such as <<AddressBlock>>
and the appearance of the document
when it contains data.
You can run through the letter
showing recipients if you like.
22
Using a Saved Word Document Created by a Mail Merge
You probably will want to use a Word document created by a mail merge more than once.
the Word
document that you saved a moment ago. You
will be asked if you want to open the document
and place data from the database in it. Choose
The Word document will have an
at the top that is only
there when the document has been
several times. You should see the
between the Mail Merge insertion
blocks, such as <<AddressBlock>>
he appearance of the document
l merge more than once.

Access Lesson 03: Creating Reports
10/29/2009
When you are ready to
print, click on the Merge
to printer icon.
You can specify what
records you want to
include in the printing.
Don’t actually print
anything for this lesson.
Practice: You are going to have records for sale at a convention and want to create a sign that you can post showing information about each record. database that your created in t 1. Create a query that will list the records by label, number, and artist showing their condition and value. List only records that are worth $10.00 or more. Sort by value in descending order. Save the query 2. Use this query to produce a report that looks like the one at the right.
• Save the report as rptTenDollars
• The date at the top is a Text Box Control containing an =now() function, like in a spreadsheet.
• Note the wide space above each artist’s name. How do you thinthis could be done? Do it in your report.
Continued on the next page.
23
You are going to have records for sale at a convention and want to create a sign that you can post showing information about each record. Open the Records database that your created in the first lesson. Do the following.
a query that will list the records by label, number, and artist showing their condition and value. List only records that are worth $10.00 or more. Sort by value in
Save the query as qryTenDollars.
2. Use this query to produce a report that looks like the one at the right.
Save the report as
The date at the top is a Text Box Control containing an =now() function, like in a spreadsheet.
Note the wide space above each ame. How do you think
this could be done? Do it in
Continued on the next page.
You are going to have records for sale at a convention and want to create a Open the Records
a query that will list the records by label, number, and artist showing their condition and value. List only records that are worth $10.00 or more. Sort by value in

Access Lesson 03: Creating Reports
10/29/2009
3. Create a Microsoft Word document that looks like this one.
• Use Word Art to create the “Records for Sale” logo at the top.
• The picture of a 45 rpm record is available for download on the Access lessons web site.
• Put a $ sign before the string of Xs in the Value line.
• Save the document
4. Do a mail merge using the qryTenDollars query you created in part 1.
• When you choose the Xs to ivalue, don’t select the $ sign.
• You may find the case of the Condition is lower case. If so, use Format, Font on the Word menu to change the font to All Caps.
24
3. Create a Microsoft Word document that looks
Use Word Art to create the “Records for Sale” logo at the top.
The picture of a 45 rpm record is available for download on the Access
Put a $ sign before the string of Xs in the
Save the document in your H: drive
Do a mail merge using the qryTenDollars query you created in part 1.
When you choose the Xs to insert the value, don’t select the $ sign.
You may find the case of the Condition is lower case. If so, use Format, Font on the Word menu to change the font to All