Embed Size (px)
Citation preview

Microsoft Access 2007 Level 2
Information Technology Services Kennesaw State University

Copyright © 2008 KSU Dept. of Information Technology Services This document may be downloaded, printed or copied for educational use without further permission of the Information Technology Services Department (ITS), provided the content is not modified and this statement is not removed. Any use not stated above requires the written consent of the ITS Department. The distribution of a copy of this document via the Internet or other electronic medium without the written permission of the KSU ‐ ITS Department is expressly prohibited. Published by Kennesaw State University – ITS 2008 The publisher makes no warranties as to the accuracy of the material contained in this document and therefore is not responsible for any damages or liabilities incurred from its use. Microsoft product screenshot(s) reprinted with permission from Microsoft Corporation. Microsoft, Microsoft Office, and Microsoft Access are trademarks of the Microsoft Corporation.
Information Technology Services
Access 2007 Level 2
Table of Contents
Objectives .....................................................................................................................1
Introduction ..................................................................................................................2
Glossary ........................................................................................................................3
Creating Forms .............................................................................................................4
Creating a Form .........................................................................................................4
Adding Fields from the Record Source to a Form ....................................................7
Using Controls on a Form .........................................................................................9
Types of Controls that can be used on a Form .......................................................9
Adding Controls to a Form .....................................................................................10
Moving and Re-sizing Controls .............................................................................10
Creating a Sub-form .....................................................................................................12
Using the Switchboard Manager ..................................................................................14
Sample Small Business Database .................................................................................17
Customer/Order/Order Details Form ........................................................................17
Product/Inventory Transactions Form .......................................................................22


1
Objectives Upon completing this classroom training workshop, the learner should be able understand the following:
• What is an Access database form?
• Why should I use Access forms?
• Form properties
• Controls that can be used on forms
• What is an Access switchboard? Upon completing this classroom training workshop, the learner should be able to perform the following tasks:
• Create forms in Access 2007 • Add controls to a form in the design view • Edit properties of forms and controls
• Create and edit switchboards

2
Introduction The Access 2007 Level 2 workshop is a continuation of the Access 2007 Level 1 workshop. In the level 1 workshop, we covered the basic building blocks of a database: tables and relations. The level 2 Access 2007 workshop will cover the creation of forms and switchboards. Forms are database objects that allow you to easily view, edit, or add data to one or more tables. A switchboard is a type of form. Forms are data‐entry tools. When a person enters data into a database he/she usually uses a form. A form is designed in a user‐friendly manner that shows only one record at a time. When a record is edited in a form, the record is actually changed in the table that is the record source for the form. A form can also have a sub‐form that displays a one‐to‐many relationship between two tables and aids in the creation of records in the table that is the record source for the sub‐form. A switchboard is a type of form that is not used for data‐entry. Switchboards are used as a point of entry for a database. A switchboard has labeled buttons, which, when clicked, will open a form, report, or perform some other function.
3
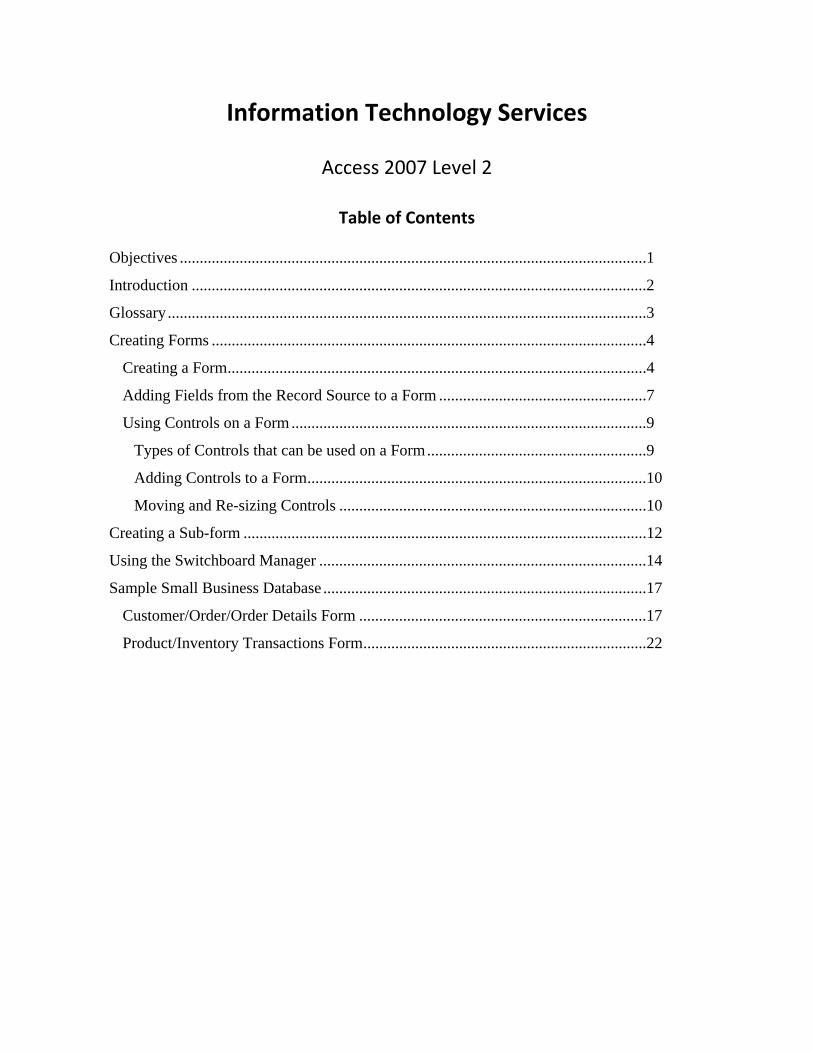
Glossary Form – A form is usually the main user interface for a database. Forms are data‐entry objects. A form is a database object that allows the user of a database to easily view, edit, or add data to one or more tables at the same time. Switchboard – A specialized form that is meant to be a starting point for a database. Switchboards have buttons that open forms or reports and are usually task oriented. Record Source – All forms and reports have a record source. The record source is the table or query from which the form or report gets its records (rows). Calculated Field – A field that is calculated at the time it is displayed using an expression. A calculated field can be calculated using information that is stored in a table. Expression – An expression is similar to a formula in Excel. It is an arithmetic statement that will give the results that you want. A formula in Excel is an arithmetic statement that allows you to include cell references. An expression in Access is an arithmetic statement that allows you to include fields from a table. Field List – Once a record source is set for a form, you can click on the “Add Existing Fields” button on the “Design” contextual tab when a form is open in the design view to see a list of all the fields from the record source that can be easily shown on the form by dragging the field from the field list and dropping the field onto the form. Toolbox – There is no toolbox in Access 2007; the controls that were in the toolbox in earlier versions of Access can be found on the “Design” contextual tab when a form is open in the design view. Control – An object that can be installed on a form or a report in the design view and can be bound to a field in a table, or can display the result of an expression or query.
4
Creating Forms Forms should be created only after the tables and relationships are created; with no tables, there is no need for a form. There are basically three methods of creating a form in Access 2007: with the form tool, with the form wizard, and with the design view. The form tool and the form wizard are pretty smart. If your tables and relationships are set up correctly, the form tool and the form wizard will see the relationships and set up subforms for you. The form tool and the form wizard are not smart enough to create calculated fields; you will have to do that yourself.
Creating a Form To create a form with the Form Tool:
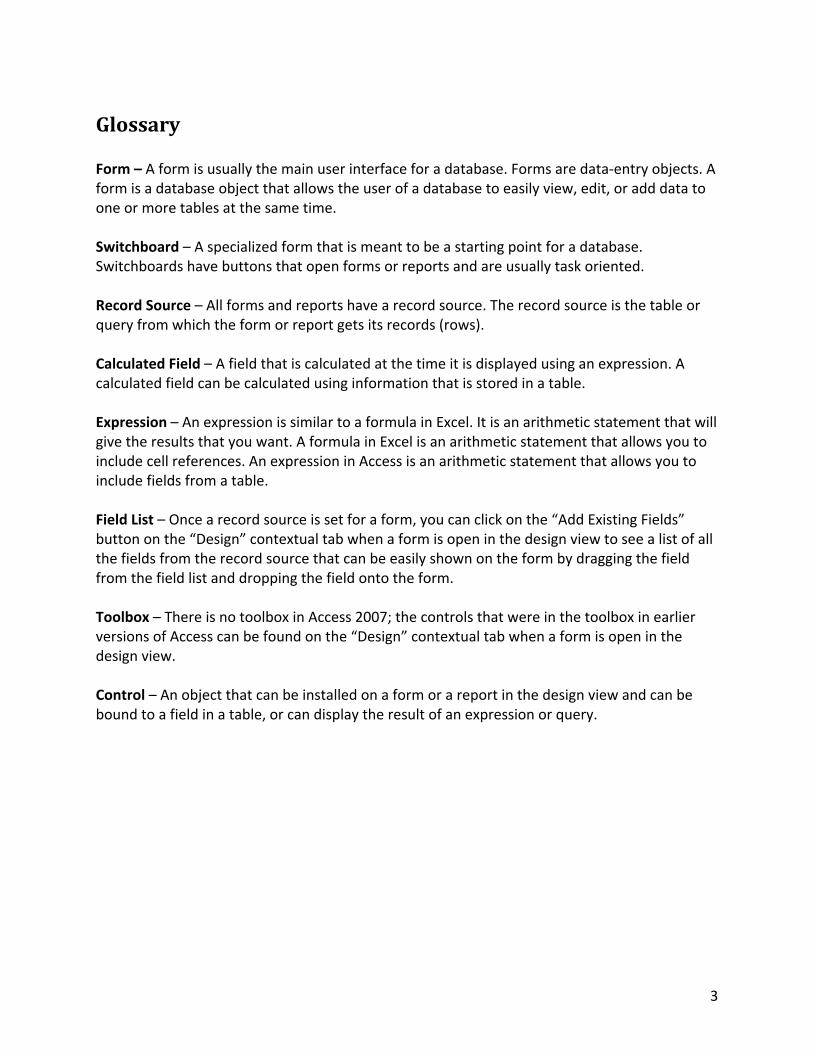
1. Select the table on which you wish your form to be based. This action will set the new form’s “Record Source” property to the table you select.
2. Click on the “Create” tab, and then the “Form” button.
Figure 1 ‐ Creating a Form with the Form Tool
Note: Any form that you create with the form tool can be switched to the design view and modified.

5
To create a form with the Form Wizard:
1. Click on the “Create” tab, and then the “More Forms” button.
2. Click on the “Form Wizard” button.
Figure 2 ‐ Creating a Form Using the Form Wizard
3. In the Tables/Queries section choose the table or query that will be the record source
for your form.
4. In the “Available Fields” section, choose the fields that you wish to use from the table or query that you selected in the previous step.
5. If you want your form to work with more than one table, go back and select the other
table in the Tables/Queries section, and then choose the fields that you want form that table.
6. Once you have all the fields from all the table or queries selected in the “Selected
Fields” section, click the “Next” button.
7. Click “Next”.
8. Click “Next”.
9. Choose a style for your form, and click “Next”.
10. Click “Finish”.
Note: Any form that you create with the form wizard can be switched to the design view and modified.
6
To create a form in the Design View:
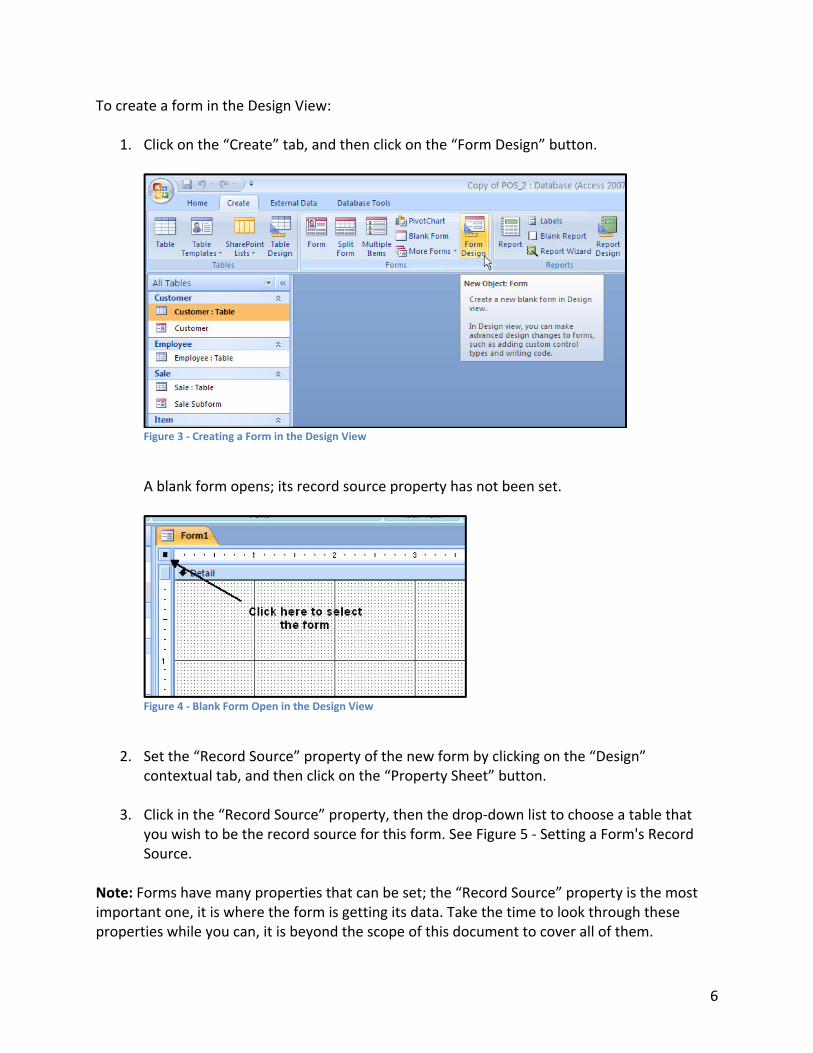
1. Click on the “Create” tab, and then click on the “Form Design” button.
Figure 3 ‐ Creating a Form in the Design View
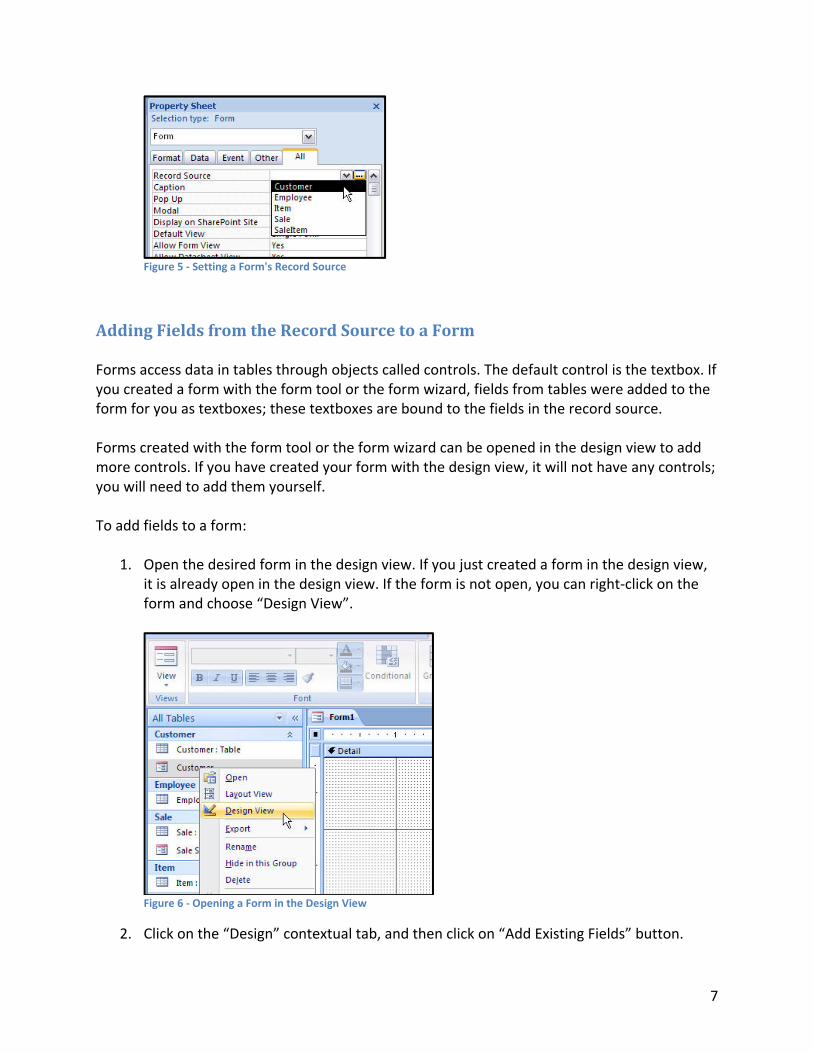
A blank form opens; its record source property has not been set.
Figure 4 ‐ Blank Form Open in the Design View
2. Set the “Record Source” property of the new form by clicking on the “Design”
contextual tab, and then click on the “Property Sheet” button.
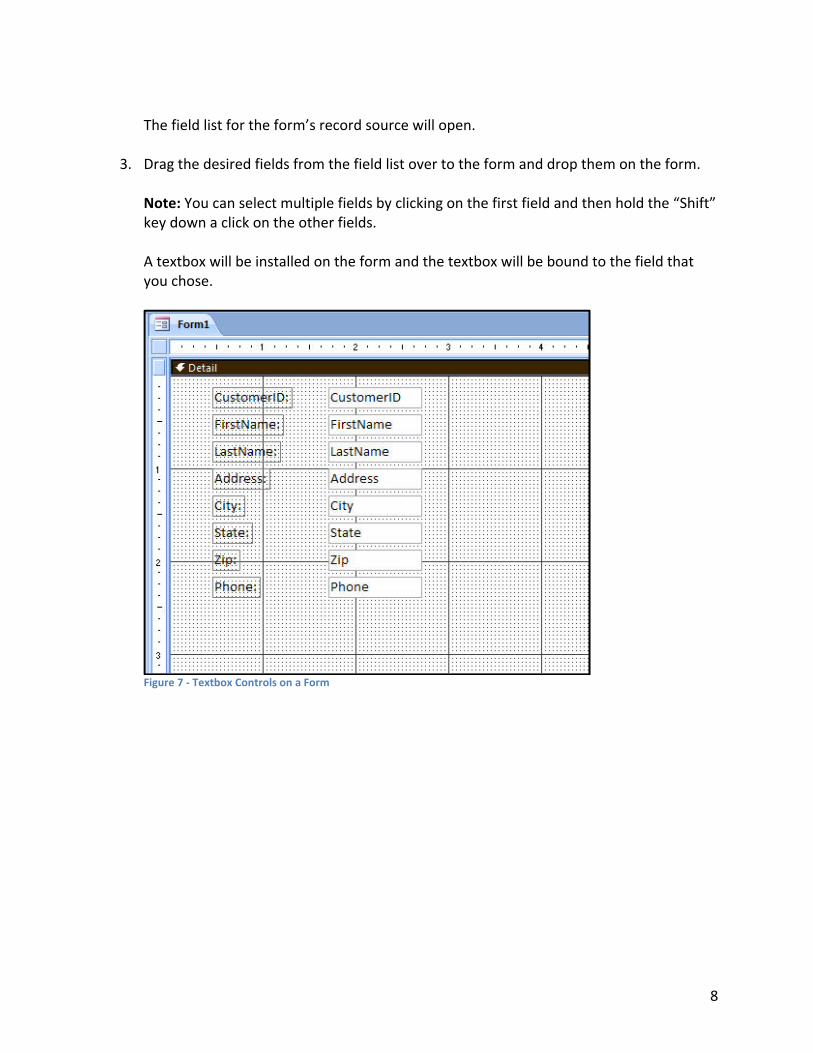
3. Click in the “Record Source” property, then the drop‐down list to choose a table that you wish to be the record source for this form. See Figure 5 ‐ Setting a Form's Record Source.
Note: Forms have many properties that can be set; the “Record Source” property is the most important one, it is where the form is getting its data. Take the time to look through these properties while you can, it is beyond the scope of this document to cover all of them.
7
Figure 5 ‐ Setting a Form's Record Source
Adding Fields from the Record Source to a Form Forms access data in tables through objects called controls. The default control is the textbox. If you created a form with the form tool or the form wizard, fields from tables were added to the form for you as textboxes; these textboxes are bound to the fields in the record source. Forms created with the form tool or the form wizard can be opened in the design view to add more controls. If you have created your form with the design view, it will not have any controls; you will need to add them yourself. To add fields to a form:
1. Open the desired form in the design view. If you just created a form in the design view, it is already open in the design view. If the form is not open, you can right‐click on the form and choose “Design View”.
Figure 6 ‐ Opening a Form in the Design View
2. Click on the “Design” contextual tab, and then click on “Add Existing Fields” button.
8
The field list for the form’s record source will open.
3. Drag the desired fields from the field list over to the form and drop them on the form.
Note: You can select multiple fields by clicking on the first field and then hold the “Shift” key down a click on the other fields.
A textbox will be installed on the form and the textbox will be bound to the field that you chose.
Figure 7 ‐ Textbox Controls on a Form
9
Using Controls on a Form The functionality of your form can be enhanced by adding controls.
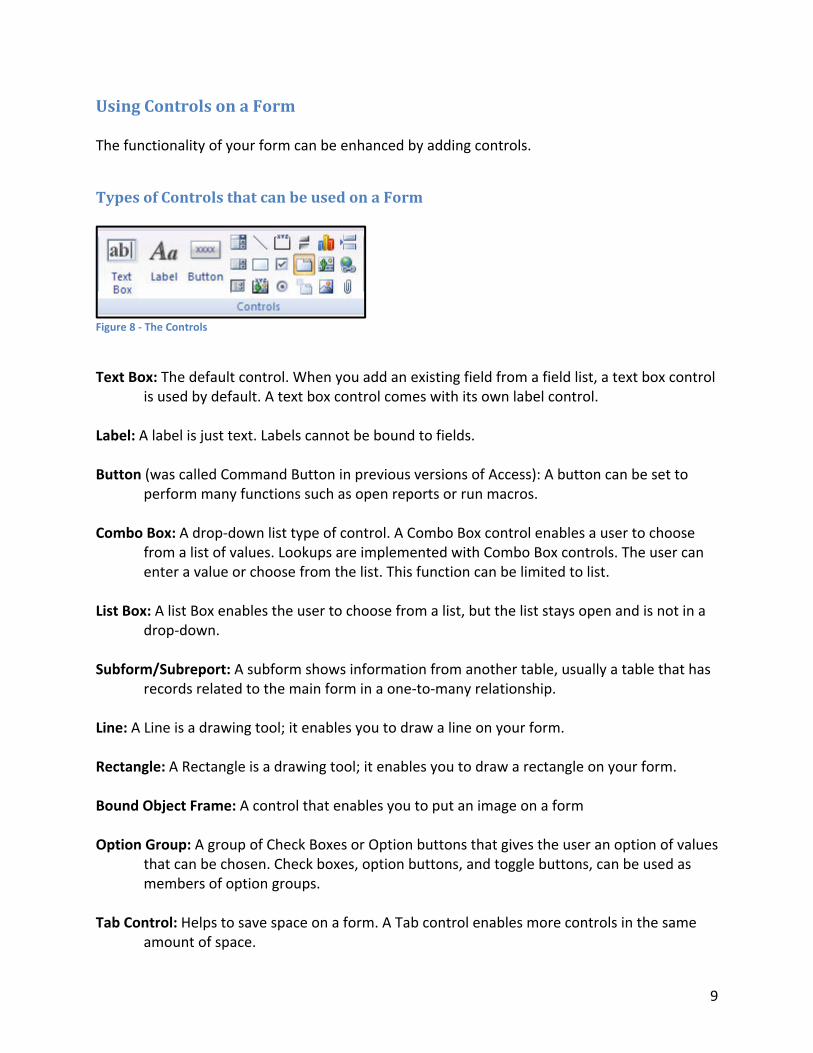
Types of Controls that can be used on a Form
Figure 8 ‐ The Controls
Text Box: The default control. When you add an existing field from a field list, a text box control
is used by default. A text box control comes with its own label control. Label: A label is just text. Labels cannot be bound to fields. Button (was called Command Button in previous versions of Access): A button can be set to
perform many functions such as open reports or run macros. Combo Box: A drop‐down list type of control. A Combo Box control enables a user to choose
from a list of values. Lookups are implemented with Combo Box controls. The user can enter a value or choose from the list. This function can be limited to list.
List Box: A list Box enables the user to choose from a list, but the list stays open and is not in a
drop‐down. Subform/Subreport: A subform shows information from another table, usually a table that has
records related to the main form in a one‐to‐many relationship. Line: A Line is a drawing tool; it enables you to draw a line on your form. Rectangle: A Rectangle is a drawing tool; it enables you to draw a rectangle on your form. Bound Object Frame: A control that enables you to put an image on a form Option Group: A group of Check Boxes or Option buttons that gives the user an option of values
that can be chosen. Check boxes, option buttons, and toggle buttons, can be used as members of option groups.
Tab Control: Helps to save space on a form. A Tab control enables more controls in the same
amount of space.
10
Adding Controls to a Form
1. Open the desired form in the design view.
2. Click on the “Design” contextual tab. You should see a “Controls” section of the “Design” ribbon.
3. Click on the desired control button.
4. Click on the form in the area in which you wish to place the new control.
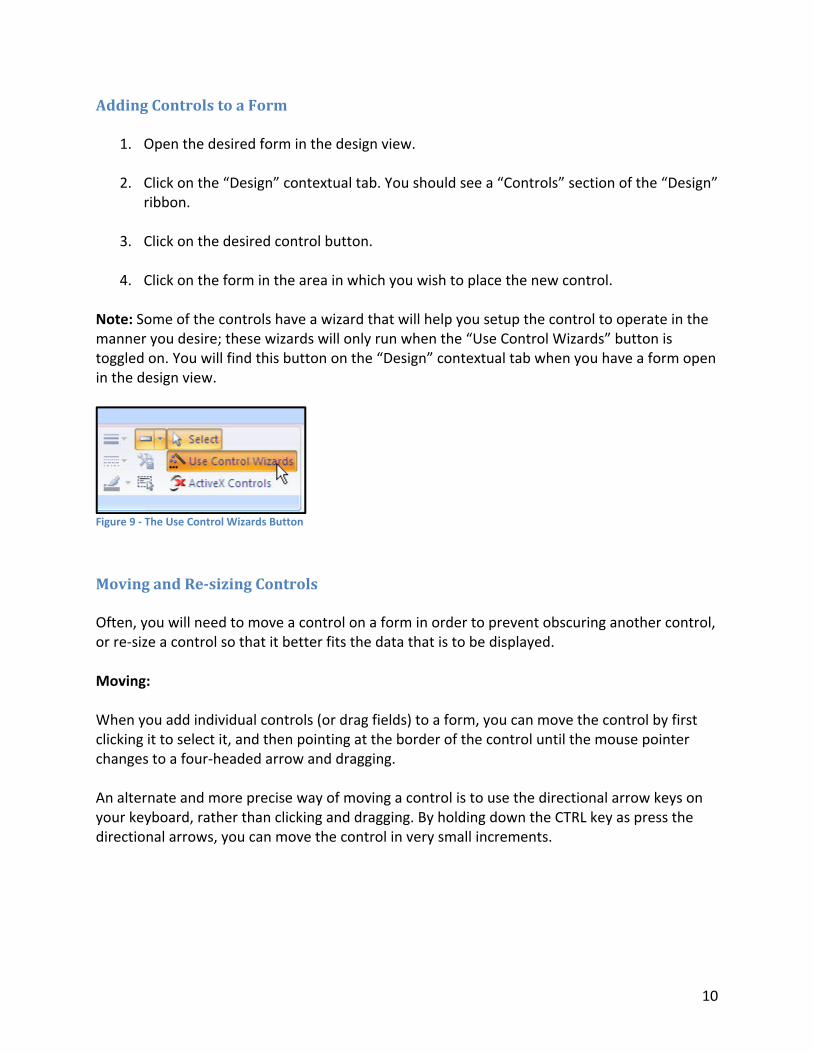
Note: Some of the controls have a wizard that will help you setup the control to operate in the manner you desire; these wizards will only run when the “Use Control Wizards” button is toggled on. You will find this button on the “Design” contextual tab when you have a form open in the design view.
Figure 9 ‐ The Use Control Wizards Button
Moving and Resizing Controls Often, you will need to move a control on a form in order to prevent obscuring another control, or re‐size a control so that it better fits the data that is to be displayed. Moving: When you add individual controls (or drag fields) to a form, you can move the control by first clicking it to select it, and then pointing at the border of the control until the mouse pointer changes to a four‐headed arrow and dragging. An alternate and more precise way of moving a control is to use the directional arrow keys on your keyboard, rather than clicking and dragging. By holding down the CTRL key as press the directional arrows, you can move the control in very small increments.

11
In the example above, when you move either the text box or its associated label, the other control moves, as well. To move either of these controls separately, place your mouse pointer over the small square at the top left corner of the control (the “move handle”), and then click and drag. If you use the Form Tool or the Form Wizard to create a form, the controls will be bound together in a “layout”. Before you can move any of the controls individually, you will have to remove the layout. To remove the layout:
1. Hold down the SHIFT key and click on each of the controls that you want to separate.
2. Click the Arrange tab on the Form Design Tools contextual tab.
3. Click the Remove button in the Control Layout Group. 4. Click outside the controls so that none of them are selected.
You will now be able to select an individual control and click and drag it to a new location. Re‐sizing:
1. Select the control that you want to re‐size. 2. Move your mouse pointer over one of the small tabs (sizing handles) around the border
of the control until the mouse pointer becomes a double‐headed arrow. 3. Click and drag until the control is the correct size.
If several controls are bound together in a layout, re‐sizing one control will re‐size all the controls. Sometimes this can be helpful. However, if you need to resize controls individually, you will first need to remove the layout as shown in the previous example on moving controls.
12
Creating a Subform A Subform can be a very useful control; it enables you to display information from another table that is related to the information on the main form in an intuitive one‐to‐many manner. A subform enables you to work with data in more than one table at once. To install a subform on a form:
1. Open the desired form in the design view.
You may need to increase the size of the form to provide space for the subform. Increase the size of the form by moving your mouse cursor over the edge of the form, click and drag the edge over as desired.
2. Click on the “Design” contextual tab, and then the “Subform/Subreport” button.
3. Move your mouse cursor over the form and you will notice that it has changed to an
image of a subform.
4. Click on the form in the area where you wish to install the subform.
• If you have the “Use Control Wizards” button toggled on, the subform wizard will start; it will help you to setup the new control.
• If you do not have the “Use Control Wizards” button toggled on, you will need to set the
record source property manually; refer to the section on creating a form in the design view for details on selecting a form/subform and setting the record source property.
13
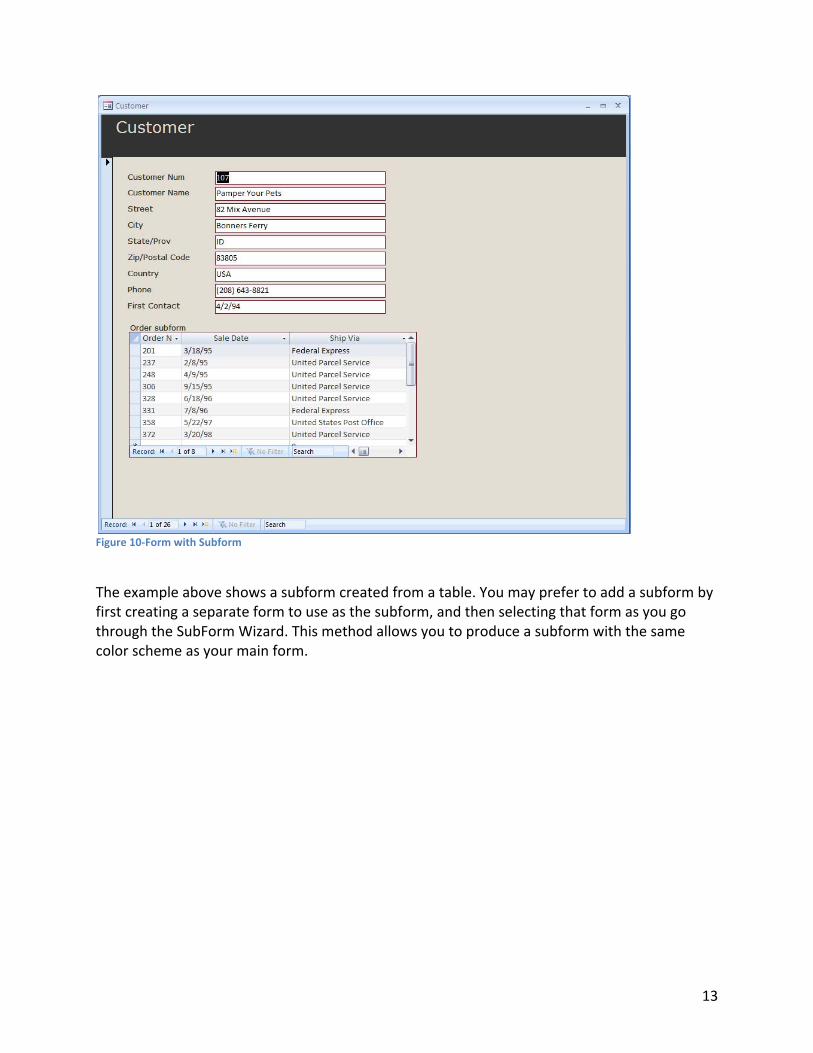
Figure 10‐Form with Subform
The example above shows a subform created from a table. You may prefer to add a subform by first creating a separate form to use as the subform, and then selecting that form as you go through the SubForm Wizard. This method allows you to produce a subform with the same color scheme as your main form.
14
Using the Switchboard Manager A switchboard is a type of form that is intended to be a starting point for the users of a database. A switchboard is a tool that enables the database designer to simplify the use of a database by only showing tasks that the user performs on a regular basis. There can be many objects in an Access database; some of these objects are never intended for use by “everyday” users of the database, the switchboard enables the designer to hide these objects and only show the ones wanted. The forms in your database are usually task‐oriented. For example, if you wanted to add a new employee to the “Employee” table, you would open the “Employee” form to enter the information. If you wanted to add a new item to the “Item” table, you would open the “Item” form to enter the information about the new item. If you want to record a sale you would open the “Record a Sale” form to enter information to the “Customer” table, the “Sale” table, and the “Sale Item” table. The switchboard gives you a one‐stop access to these tasks. When you get ready to create the switchboard, you need to have already created the data‐entry forms for your database. To create a switchboard:
1. Click on the “Database Tools” tab, and then click on “Switchboard Manager”.
2. Click “Yes” if asked to create a switchboard.
3. The “Switchboard Manager” will open, there is already one switchboard listed, we want to edit it. Click the “Edit” button.
4. Note: You can have many switchboards, if you have a large database, you will probably
have many everyday tasks. You can link to a switchboard from the main switchboard if you like. In the sample exercise we only have three main tasks for now, so we don’t need but one switchboard, the main switchboard.
The “Edit Switchboard Page” window will open.
5. Click on the “New” button to add a switchboard item.
The “Edit Switchboard Item” window will open.
6. For each item that you add to the page, there will be a button with a label, in the “Text:” section, enter the text that you wish to appear next to the button for this item. This text should describe the task, for example, “Add/View/Edit an Employee”.
15
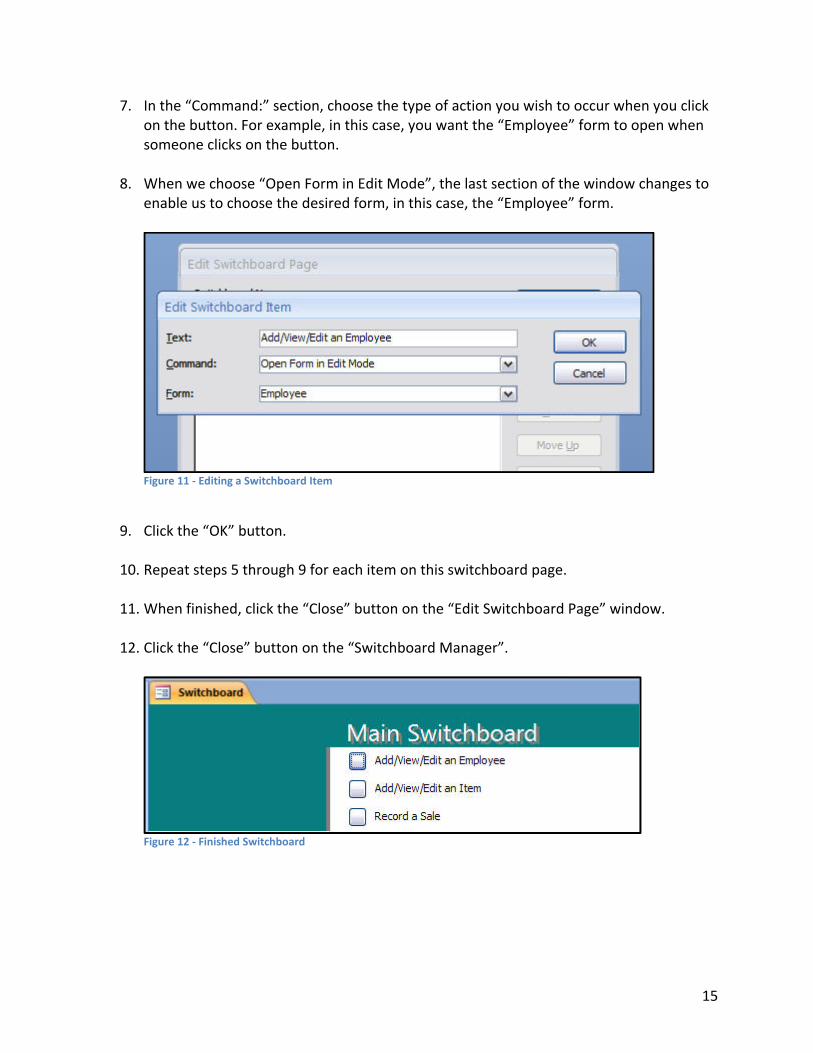
7. In the “Command:” section, choose the type of action you wish to occur when you click on the button. For example, in this case, you want the “Employee” form to open when someone clicks on the button.
8. When we choose “Open Form in Edit Mode”, the last section of the window changes to
enable us to choose the desired form, in this case, the “Employee” form.
Figure 11 ‐ Editing a Switchboard Item
9. Click the “OK” button.
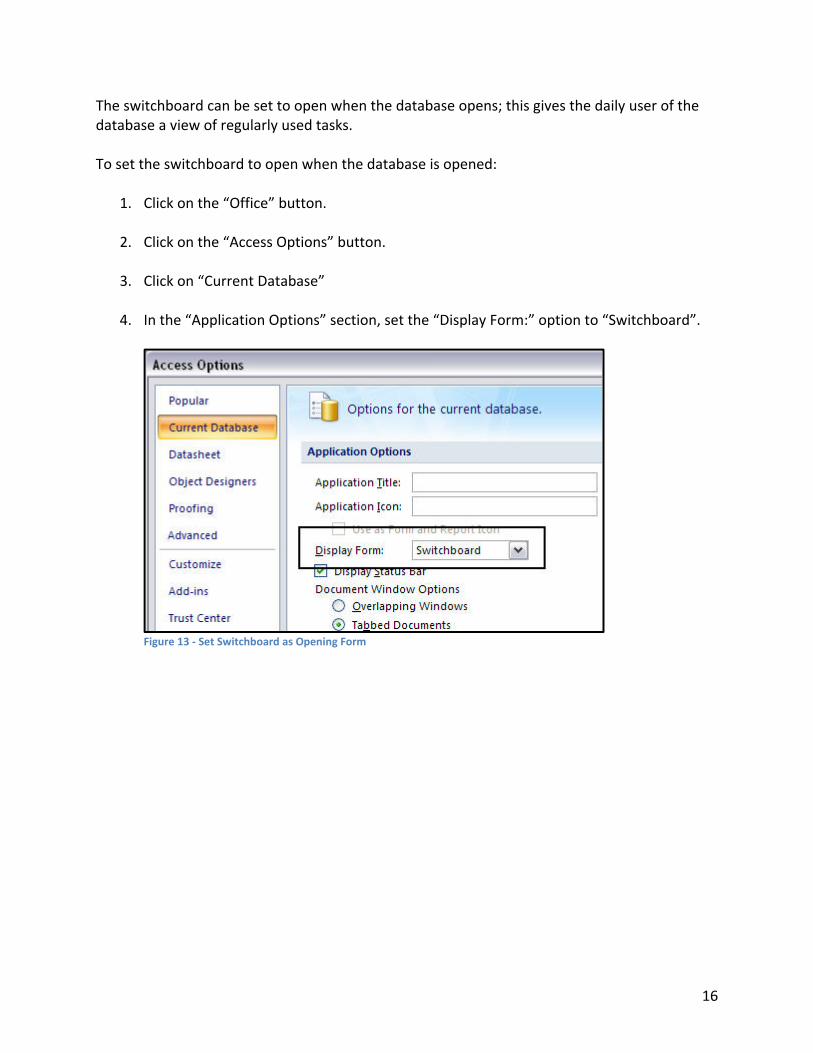
10. Repeat steps 5 through 9 for each item on this switchboard page.
11. When finished, click the “Close” button on the “Edit Switchboard Page” window.
12. Click the “Close” button on the “Switchboard Manager”.
Figure 12 ‐ Finished Switchboard
16
The switchboard can be set to open when the database opens; this gives the daily user of the database a view of regularly used tasks. To set the switchboard to open when the database is opened:
1. Click on the “Office” button.
2. Click on the “Access Options” button.
3. Click on “Current Database”
4. In the “Application Options” section, set the “Display Form:” option to “Switchboard”.
Figure 13 ‐ Set Switchboard as Opening Form
17
Sample Small Business Database Building upon the Kennesaw Garden Supply database that we began in Access 2007 Level 1, we will create several forms for the database tables.
Customer/Order/Order Details Form Using the following method, you can create a single form that will allow you to add and edit customer, order and order detail information.
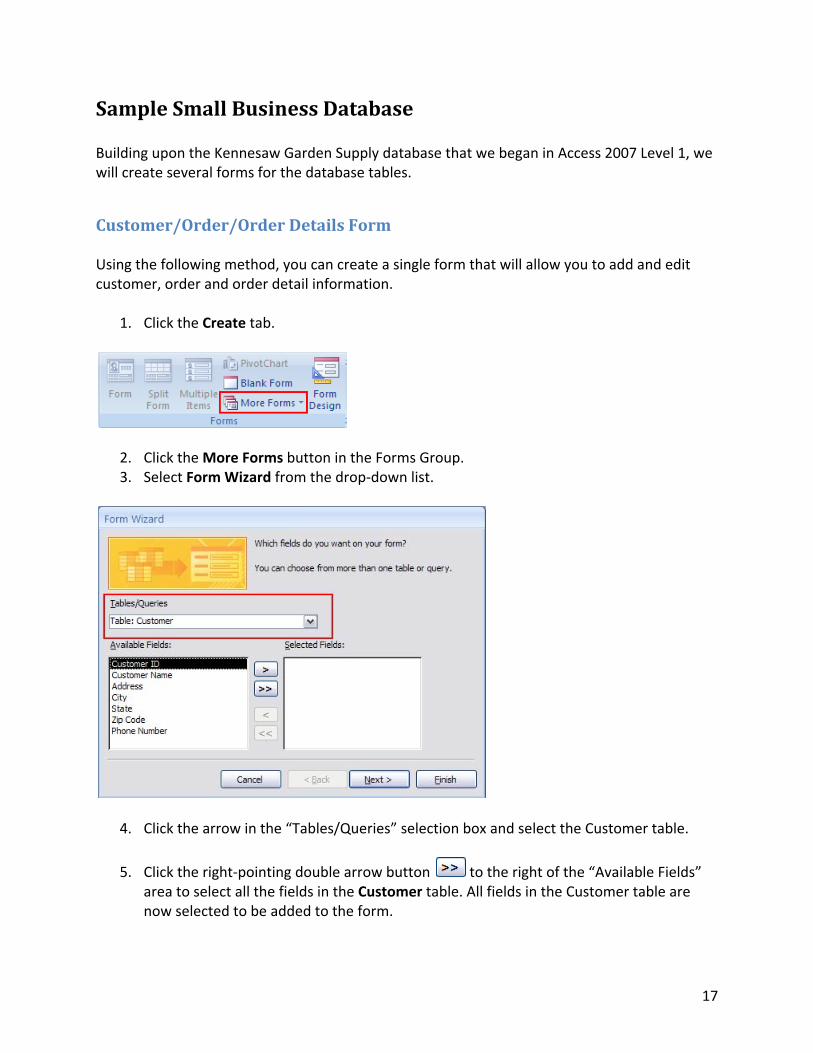
1. Click the Create tab.
2. Click the More Forms button in the Forms Group. 3. Select Form Wizard from the drop‐down list.
4. Click the arrow in the “Tables/Queries” selection box and select the Customer table.
5. Click the right‐pointing double arrow button to the right of the “Available Fields” area to select all the fields in the Customer table. All fields in the Customer table are now selected to be added to the form.
18
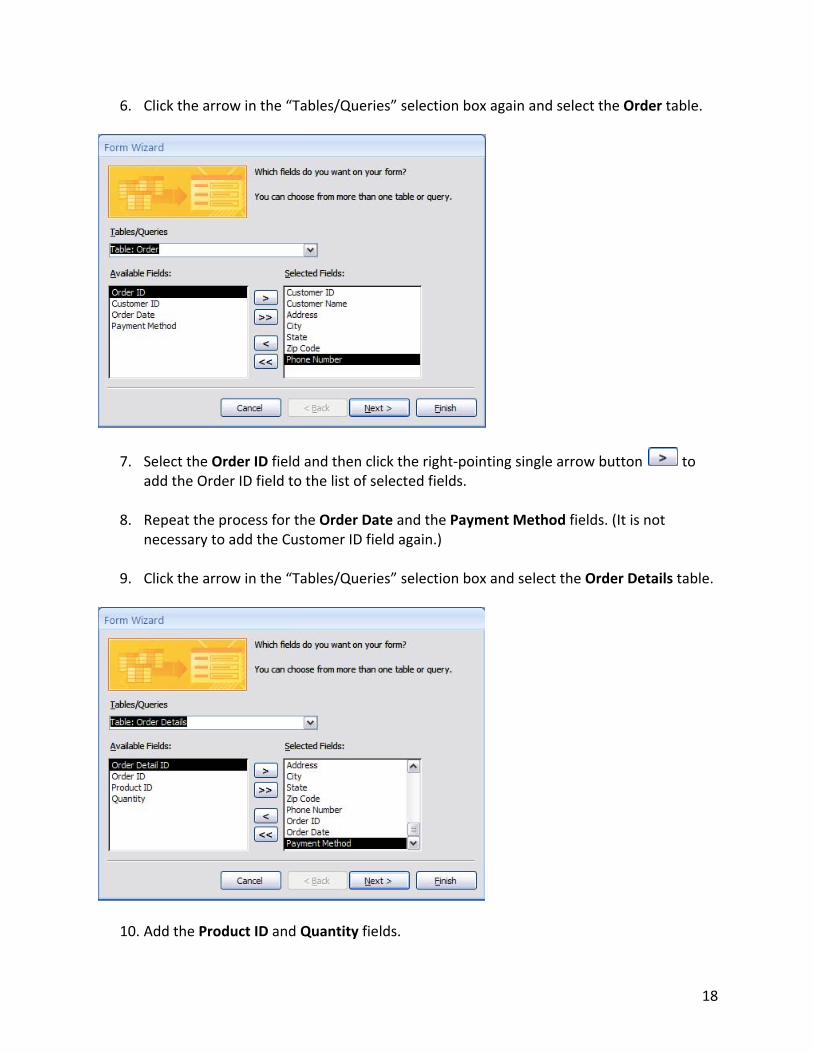
6. Click the arrow in the “Tables/Queries” selection box again and select the Order table.
7. Select the Order ID field and then click the right‐pointing single arrow button to add the Order ID field to the list of selected fields.
8. Repeat the process for the Order Date and the Payment Method fields. (It is not
necessary to add the Customer ID field again.)
9. Click the arrow in the “Tables/Queries” selection box and select the Order Details table.
10. Add the Product ID and Quantity fields.
19
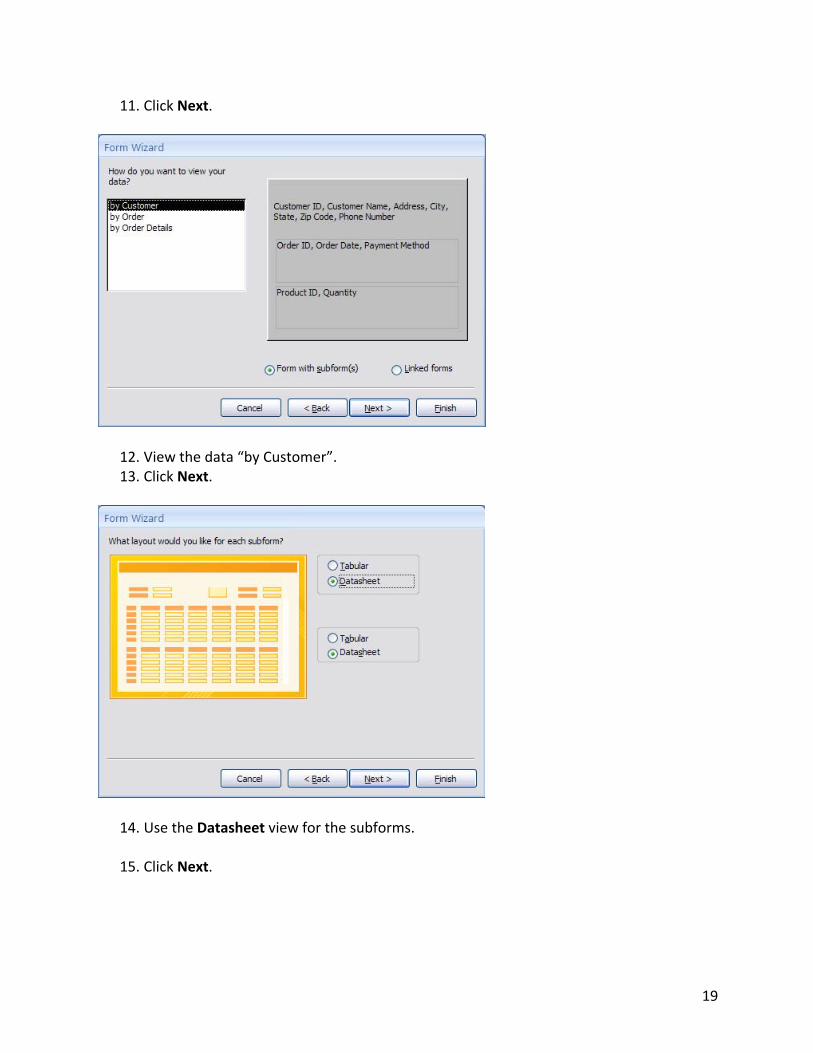
11. Click Next.
12. View the data “by Customer”. 13. Click Next.
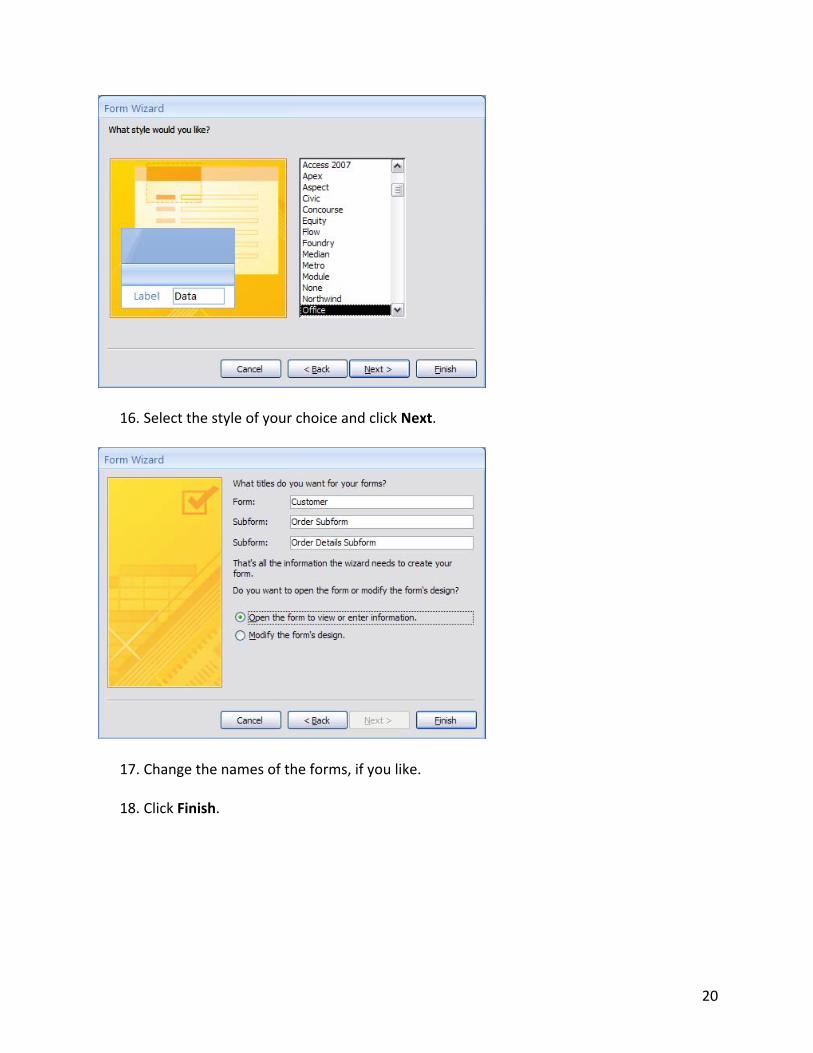
14. Use the Datasheet view for the subforms.
15. Click Next.
20
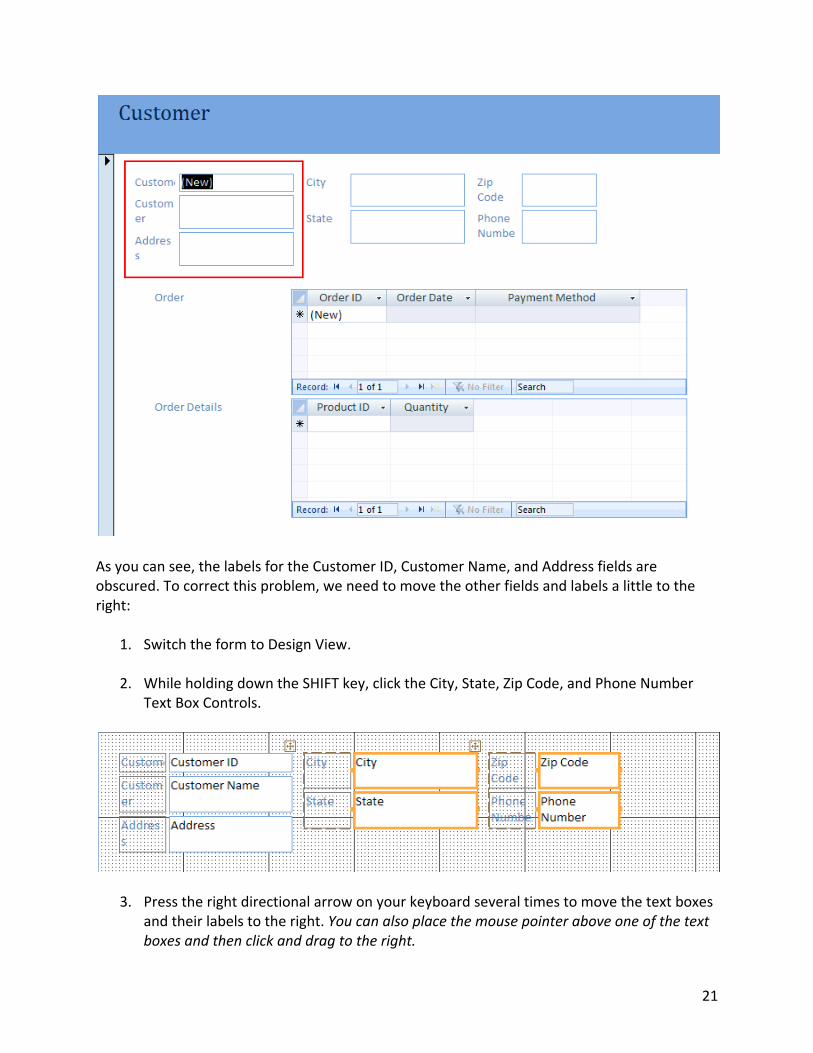
16. Select the style of your choice and click Next.
17. Change the names of the forms, if you like.
18. Click Finish.
21
As you can see, the labels for the Customer ID, Customer Name, and Address fields are obscured. To correct this problem, we need to move the other fields and labels a little to the right:
1. Switch the form to Design View.
2. While holding down the SHIFT key, click the City, State, Zip Code, and Phone Number Text Box Controls.
3. Press the right directional arrow on your keyboard several times to move the text boxes and their labels to the right. You can also place the mouse pointer above one of the text boxes and then click and drag to the right.
22
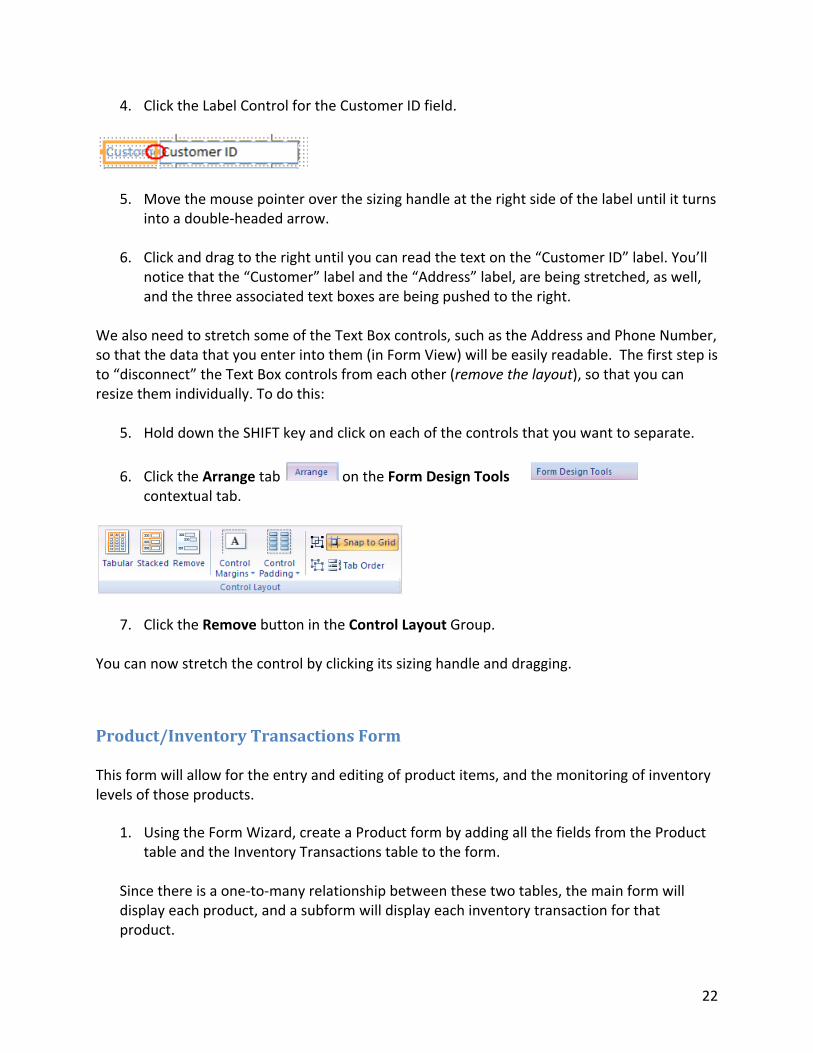
4. Click the Label Control for the Customer ID field.
5. Move the mouse pointer over the sizing handle at the right side of the label until it turns into a double‐headed arrow.
6. Click and drag to the right until you can read the text on the “Customer ID” label. You’ll notice that the “Customer” label and the “Address” label, are being stretched, as well, and the three associated text boxes are being pushed to the right.
We also need to stretch some of the Text Box controls, such as the Address and Phone Number, so that the data that you enter into them (in Form View) will be easily readable. The first step is to “disconnect” the Text Box controls from each other (remove the layout), so that you can resize them individually. To do this:
5. Hold down the SHIFT key and click on each of the controls that you want to separate.
6. Click the Arrange tab on the Form Design Tools contextual tab.
7. Click the Remove button in the Control Layout Group.
You can now stretch the control by clicking its sizing handle and dragging.
Product/Inventory Transactions Form This form will allow for the entry and editing of product items, and the monitoring of inventory levels of those products.
1. Using the Form Wizard, create a Product form by adding all the fields from the Product table and the Inventory Transactions table to the form.
Since there is a one‐to‐many relationship between these two tables, the main form will display each product, and a subform will display each inventory transaction for that product.

23
2. Switch to Design View and click on the Detail Area of main form to de‐select all the form controls.
3. Hold down the SHIFT key and click the Inventory Transactions subform and its label. 4. Move subform down and to the left. 5. Since we have the Product ID field in the main Product form, we don’t need it displayed
again in the Inventory Transactions subform. Click the Product ID text box and then press the Delete key.
Add a Calculated Field to the Form We want to add a calculated field called “Quantity on Hand” to the header area of the subform. We can then display this field on the main Product form.
1. Position the mouse pointer at the border between the Form Header and the Detail
Header and then click and drag the Form Header down enough to fit a text box control in the Form Header area.
2. Click the Text Box control and then click in the Form Header area. An unbound text box is placed in the header. “Unbound” means that the text box is not using any table field as its control source.
24
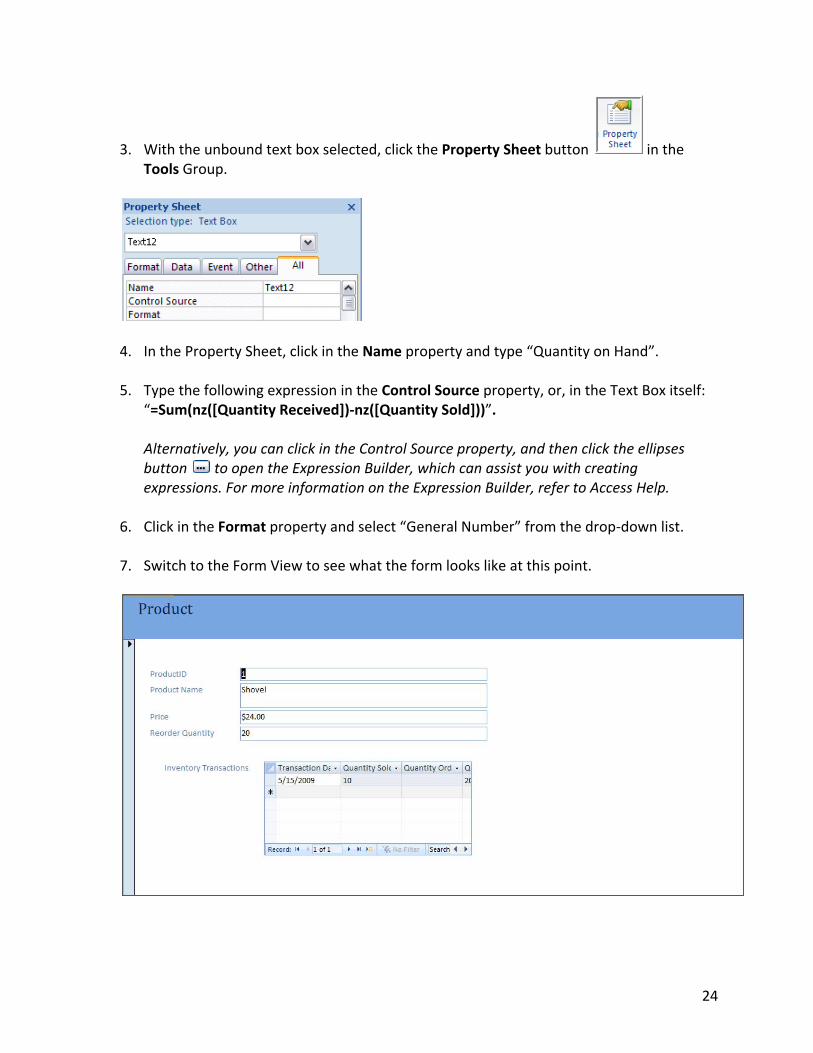
3. With the unbound text box selected, click the Property Sheet button in the Tools Group.
4. In the Property Sheet, click in the Name property and type “Quantity on Hand”. 5. Type the following expression in the Control Source property, or, in the Text Box itself:
“=Sum(nz([Quantity Received])‐nz([Quantity Sold]))”. Alternatively, you can click in the Control Source property, and then click the ellipses button to open the Expression Builder, which can assist you with creating expressions. For more information on the Expression Builder, refer to Access Help.
6. Click in the Format property and select “General Number” from the drop‐down list.
7. Switch to the Form View to see what the form looks like at this point.
25
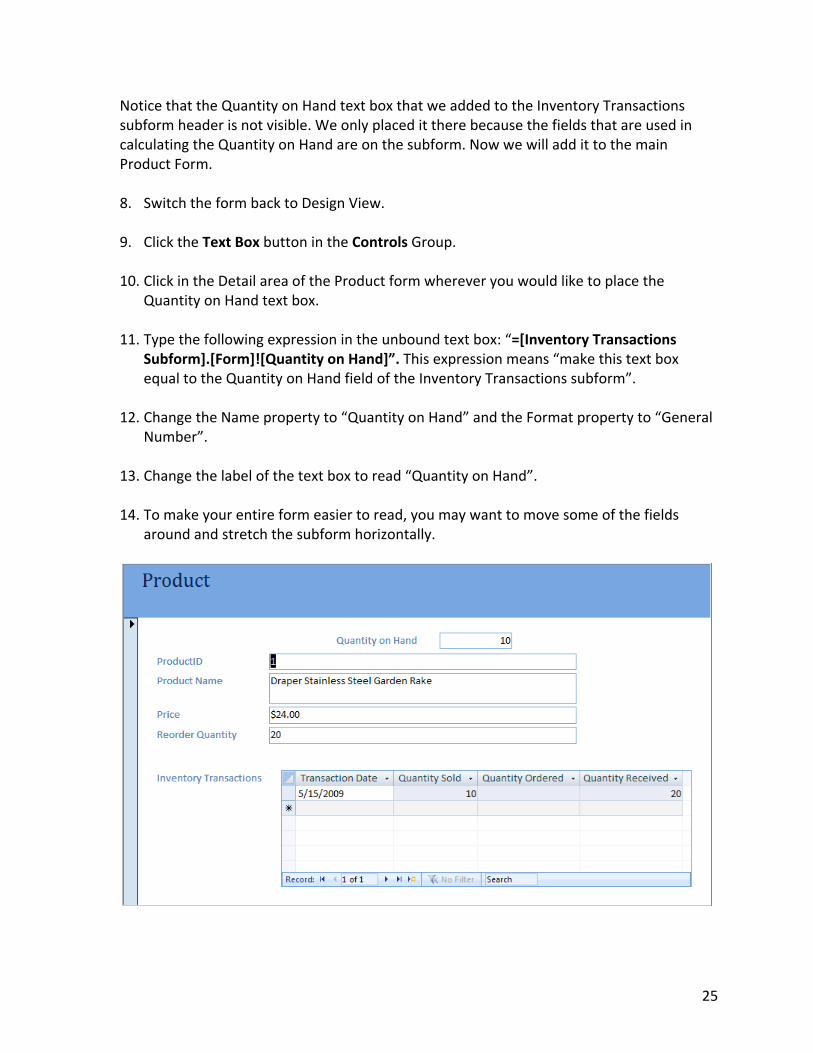
Notice that the Quantity on Hand text box that we added to the Inventory Transactions subform header is not visible. We only placed it there because the fields that are used in calculating the Quantity on Hand are on the subform. Now we will add it to the main Product Form. 8. Switch the form back to Design View. 9. Click the Text Box button in the Controls Group.
10. Click in the Detail area of the Product form wherever you would like to place the
Quantity on Hand text box.
11. Type the following expression in the unbound text box: “=[Inventory Transactions Subform].[Form]![Quantity on Hand]”. This expression means “make this text box equal to the Quantity on Hand field of the Inventory Transactions subform”.
12. Change the Name property to “Quantity on Hand” and the Format property to “General Number”.
13. Change the label of the text box to read “Quantity on Hand”.
14. To make your entire form easier to read, you may want to move some of the fields around and stretch the subform horizontally.
26
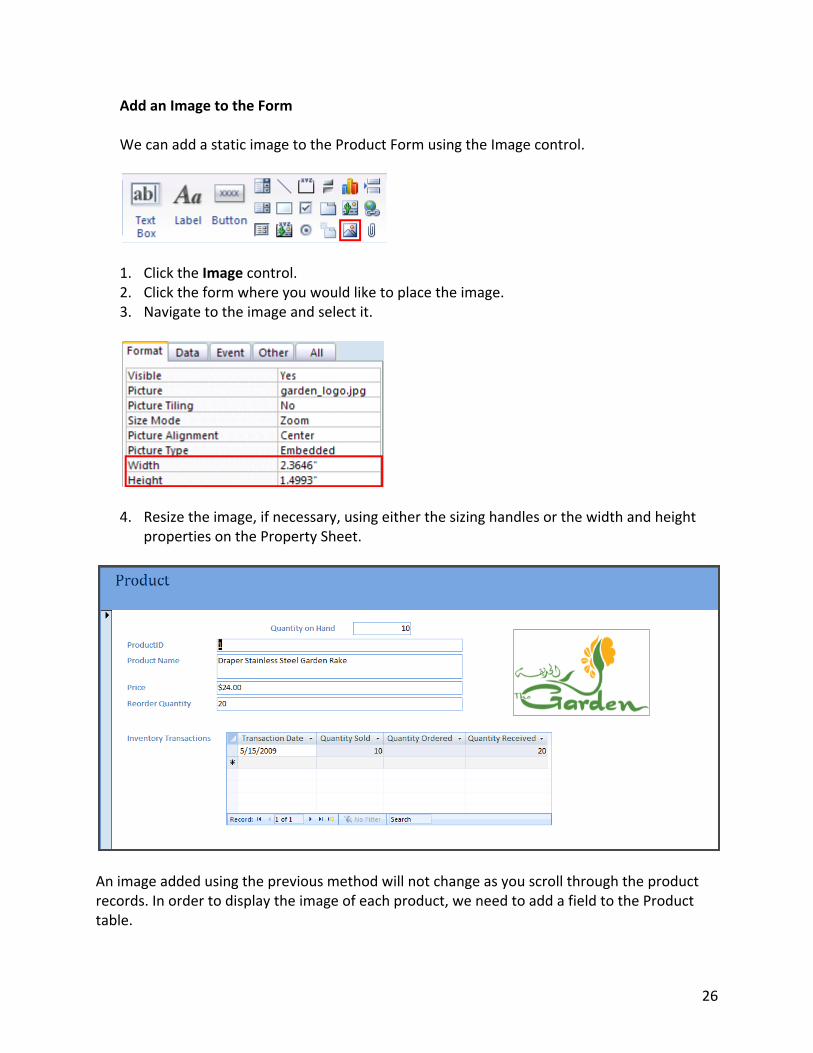
Add an Image to the Form We can add a static image to the Product Form using the Image control.
1. Click the Image control. 2. Click the form where you would like to place the image. 3. Navigate to the image and select it.
4. Resize the image, if necessary, using either the sizing handles or the width and height
properties on the Property Sheet.
An image added using the previous method will not change as you scroll through the product records. In order to display the image of each product, we need to add a field to the Product table.
27
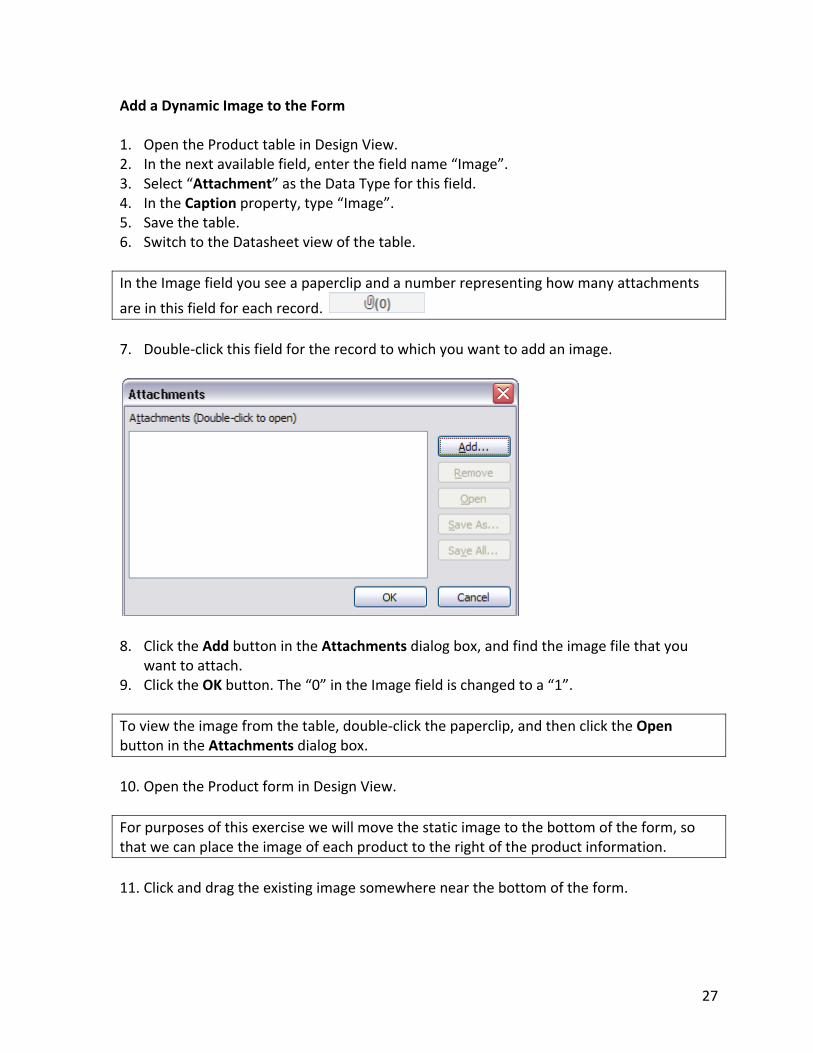
Add a Dynamic Image to the Form 1. Open the Product table in Design View. 2. In the next available field, enter the field name “Image”. 3. Select “Attachment” as the Data Type for this field. 4. In the Caption property, type “Image”. 5. Save the table. 6. Switch to the Datasheet view of the table. In the Image field you see a paperclip and a number representing how many attachments
are in this field for each record. 7. Double‐click this field for the record to which you want to add an image.
8. Click the Add button in the Attachments dialog box, and find the image file that you want to attach.
9. Click the OK button. The “0” in the Image field is changed to a “1”. To view the image from the table, double‐click the paperclip, and then click the Open button in the Attachments dialog box. 10. Open the Product form in Design View. For purposes of this exercise we will move the static image to the bottom of the form, so that we can place the image of each product to the right of the product information.
11. Click and drag the existing image somewhere near the bottom of the form.
28
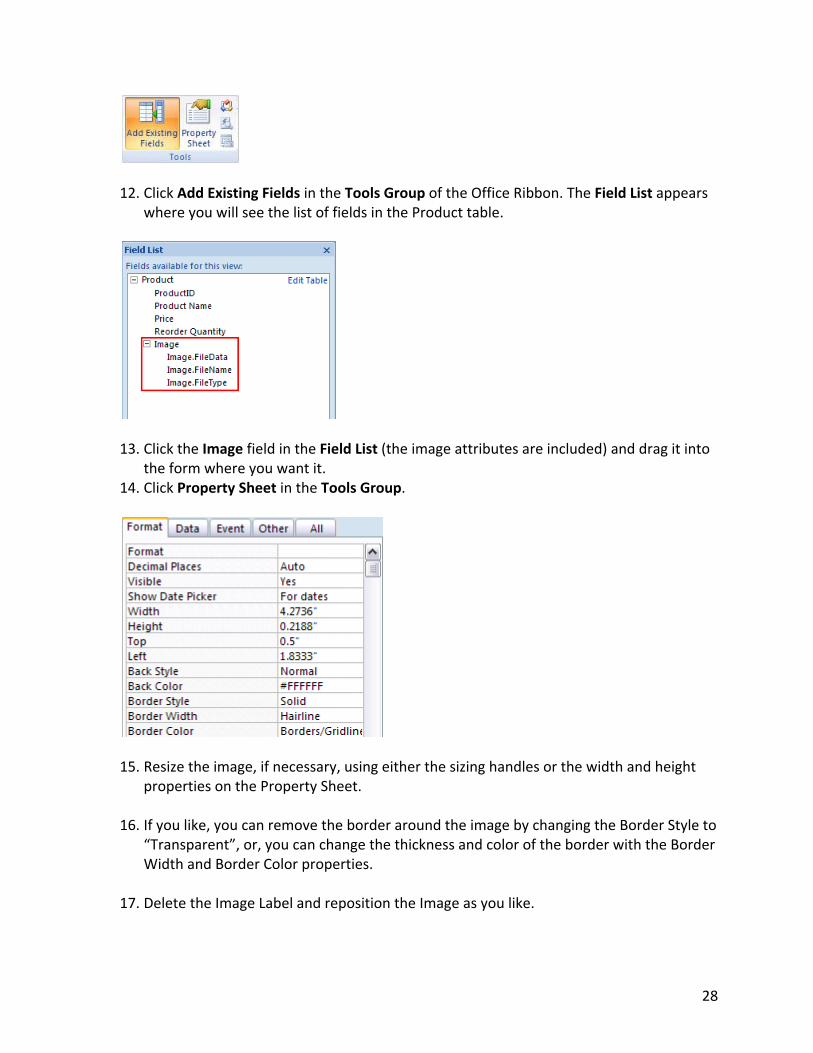
12. Click Add Existing Fields in the Tools Group of the Office Ribbon. The Field List appears where you will see the list of fields in the Product table.
13. Click the Image field in the Field List (the image attributes are included) and drag it into the form where you want it.
14. Click Property Sheet in the Tools Group.
15. Resize the image, if necessary, using either the sizing handles or the width and height properties on the Property Sheet.
16. If you like, you can remove the border around the image by changing the Border Style to
“Transparent”, or, you can change the thickness and color of the border with the Border Width and Border Color properties.
17. Delete the Image Label and reposition the Image as you like.
29
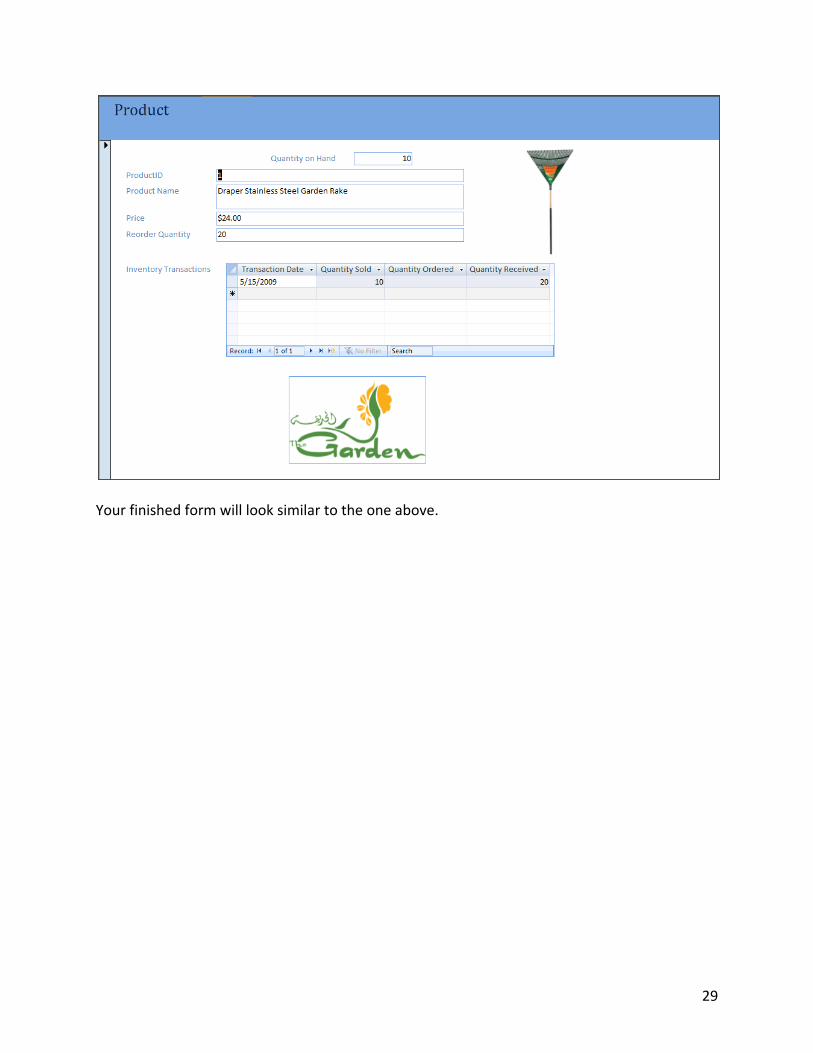
Your finished form will look similar to the one above.