Embed Size (px)
Citation preview

1
1234 Hach Hall 515-294-5805 www.cif.iastate.edu
Microcal VP-ITC Operating Instructions 10/18/2012 S.V. draft
Location: 1238 Hach Hall Contact: Steve Veysey, 1234 Hach Hall
All researchers working in 1238 Hach Hall must complete the EH&S course: “Fire Safety and Extinguisher Training”. When preparing samples in this room, please wear all appropriate personal protective equipment. Aprons, safety glasses, and rubber gloves are available in 1238A Hach Hall. All use of solvents should occur in 1238A Hach Hall.
SAFETY
Properly dispose of glass pipettes and plastic pipette tips in the containers provided. Waste solvents can be disposed of in the waste containers provided in 1238A. All of the computers in this lab have direct links from the desktop to MSDS sheets, the EH&S Laboratory Safety Manual and to the CIF Safety Manual.
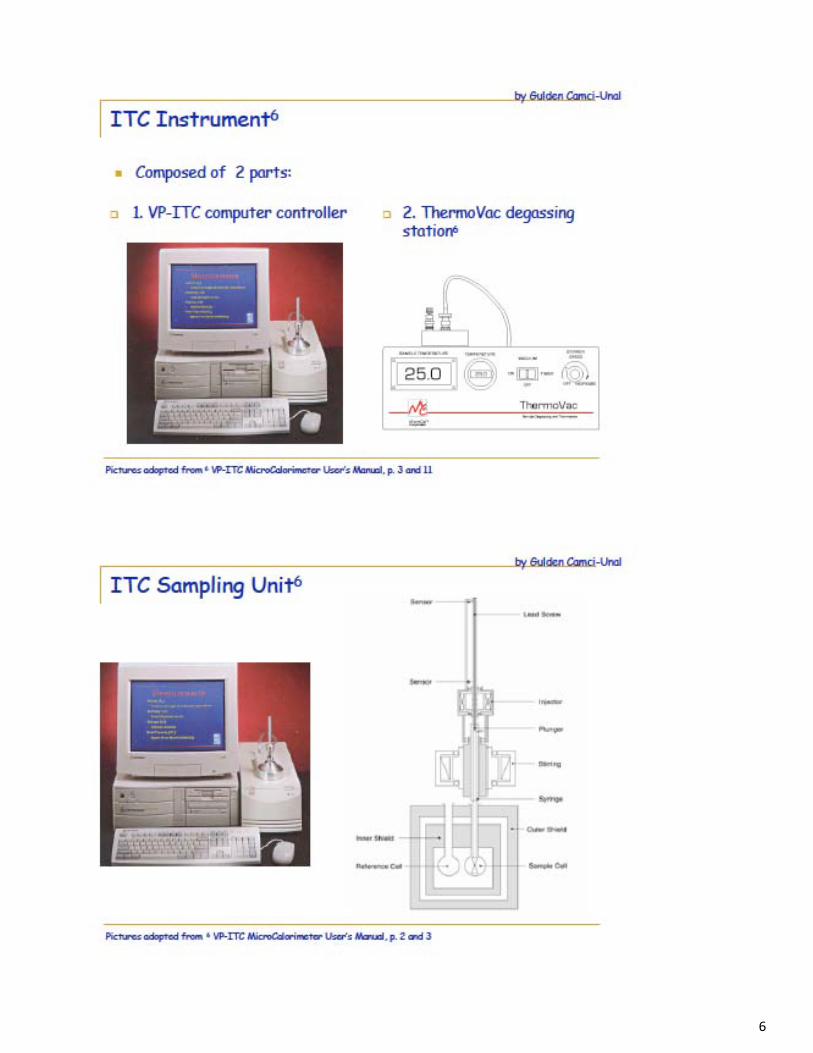
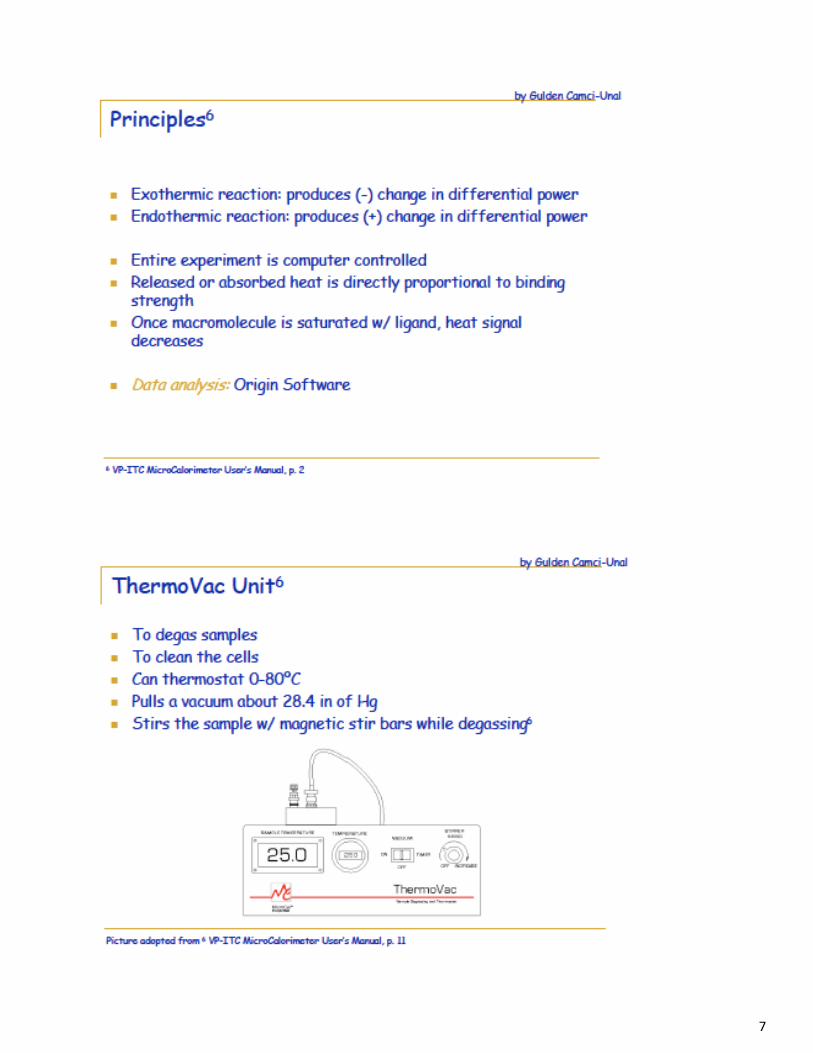
The MicroCal VP-ITC (Isothermal Titration Calorimeter) unit directly measures heat evolved or absorbed in liquid samples as a result of mixing precise amounts of reactants. A spinning syringe is utilized for injecting and mixing of reactants. The user inputs the experimental parameters (temperature, number of injections, injection volumes) and the computer carries out the experiment. Origin® software is then used to analyze the ITC data using fitting models to calculate reaction stoichiometry (n), binding constant (KD), enthalpy (ΔH) and entropy (ΔS).
INTRODUCTION
This document presents a training guide prepared in 2006 by former ISU student Dr. Gulden Camci-Unal. Minor procedural changes are annotated and summarized at the end.
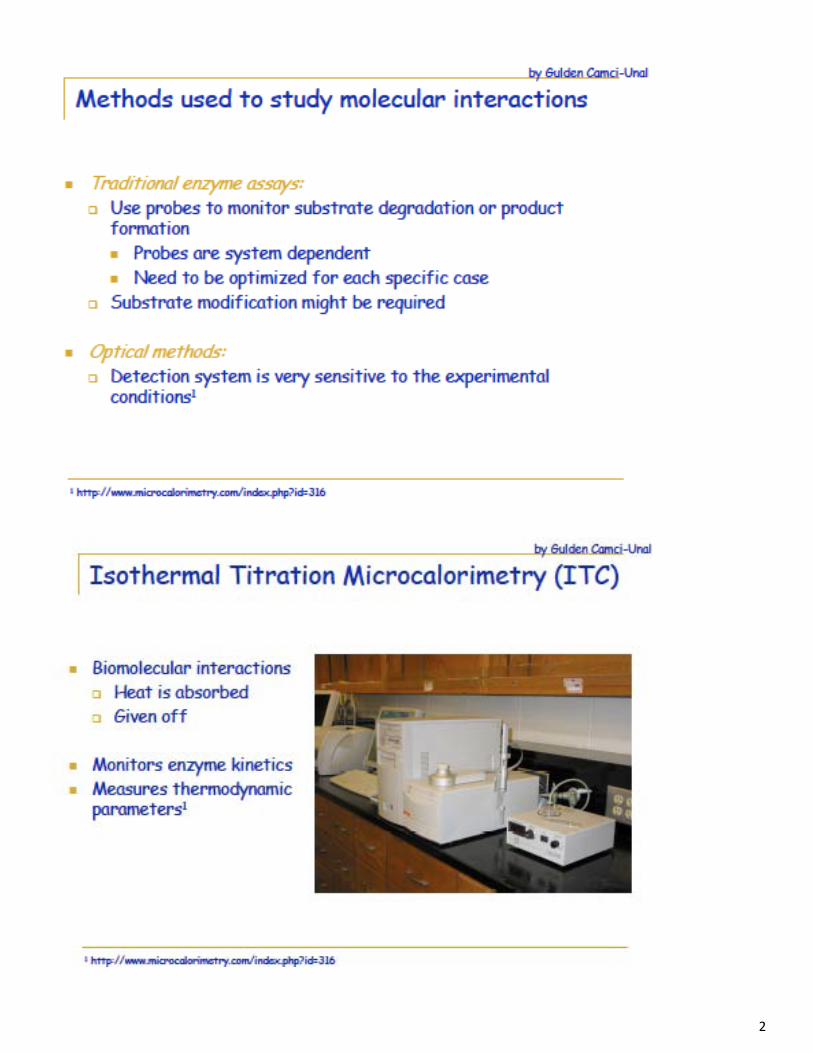
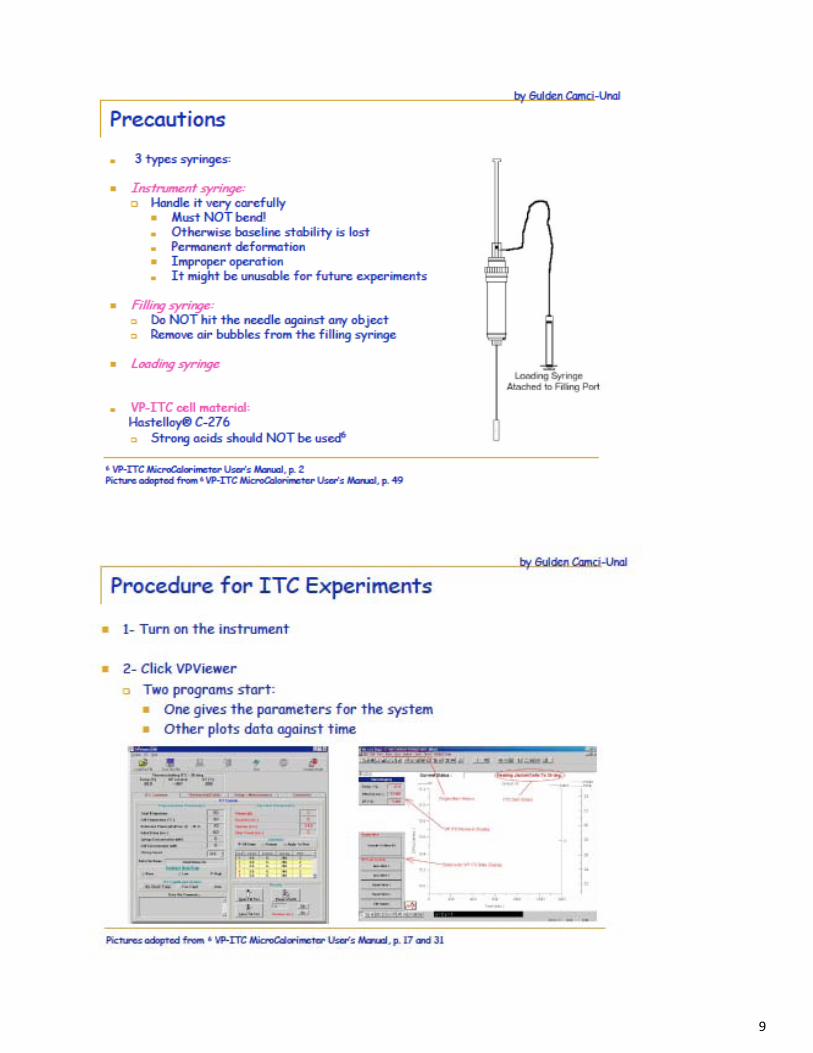
2
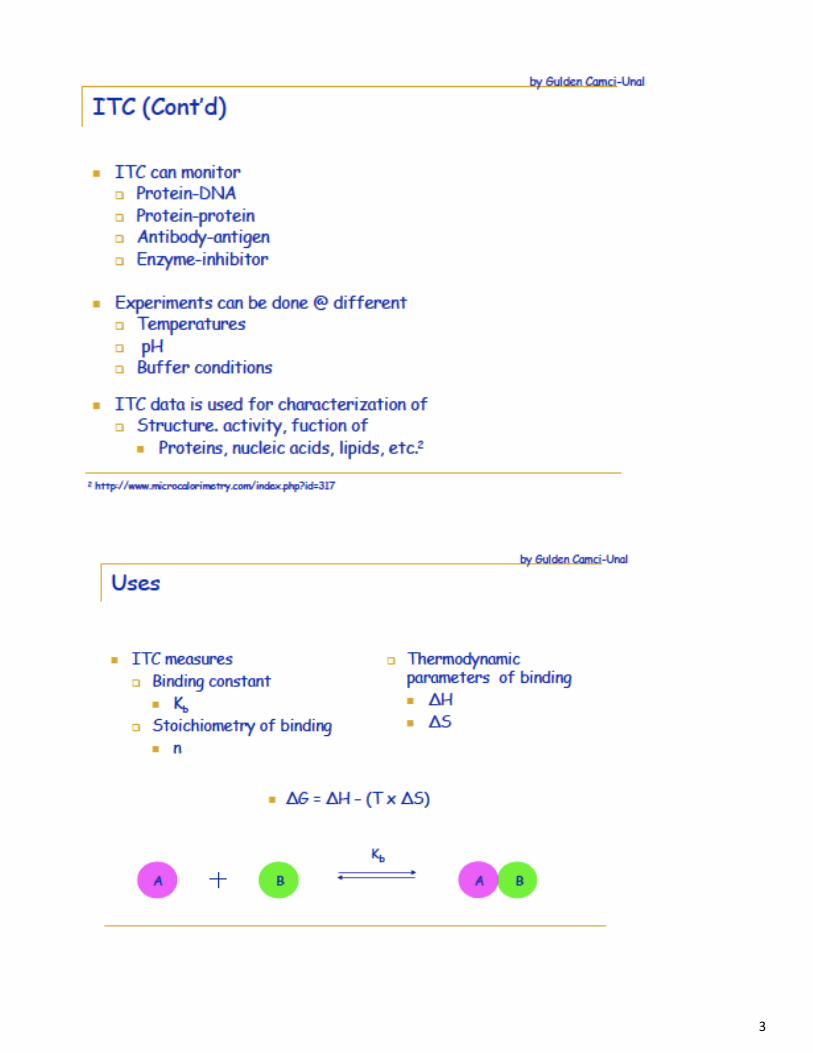
3

4

5
6
7

8
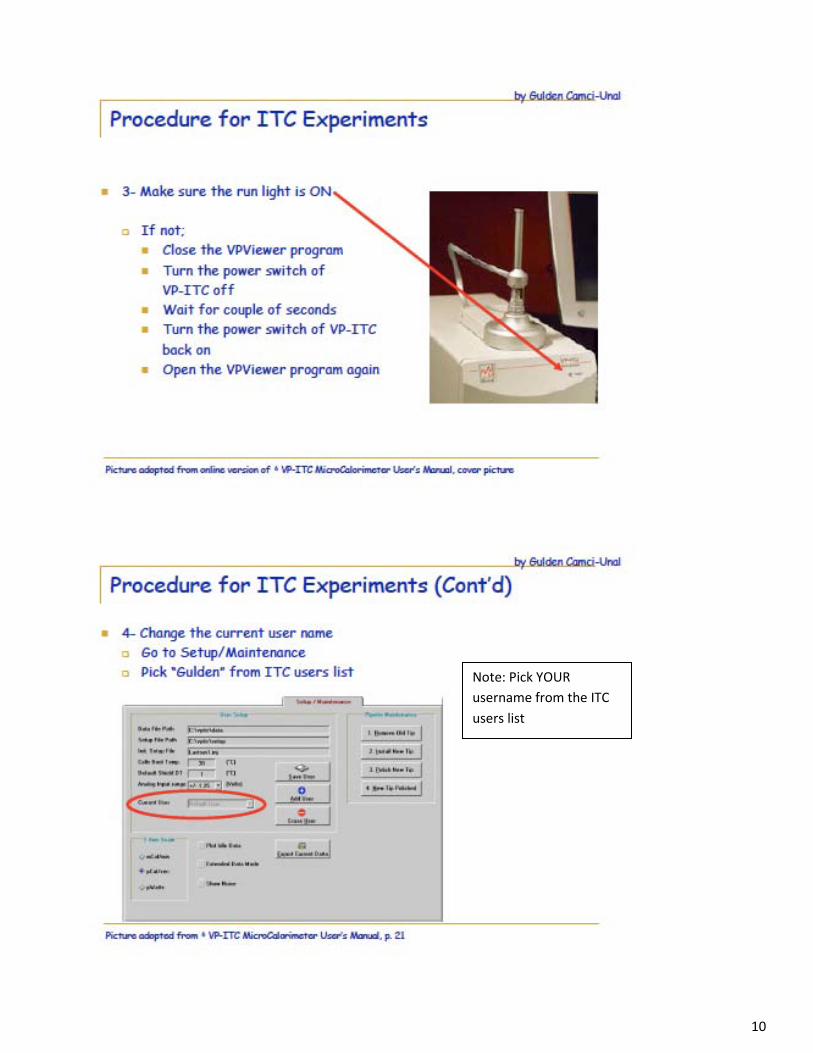
9
10
Note: Pick YOUR username from the ITC users list
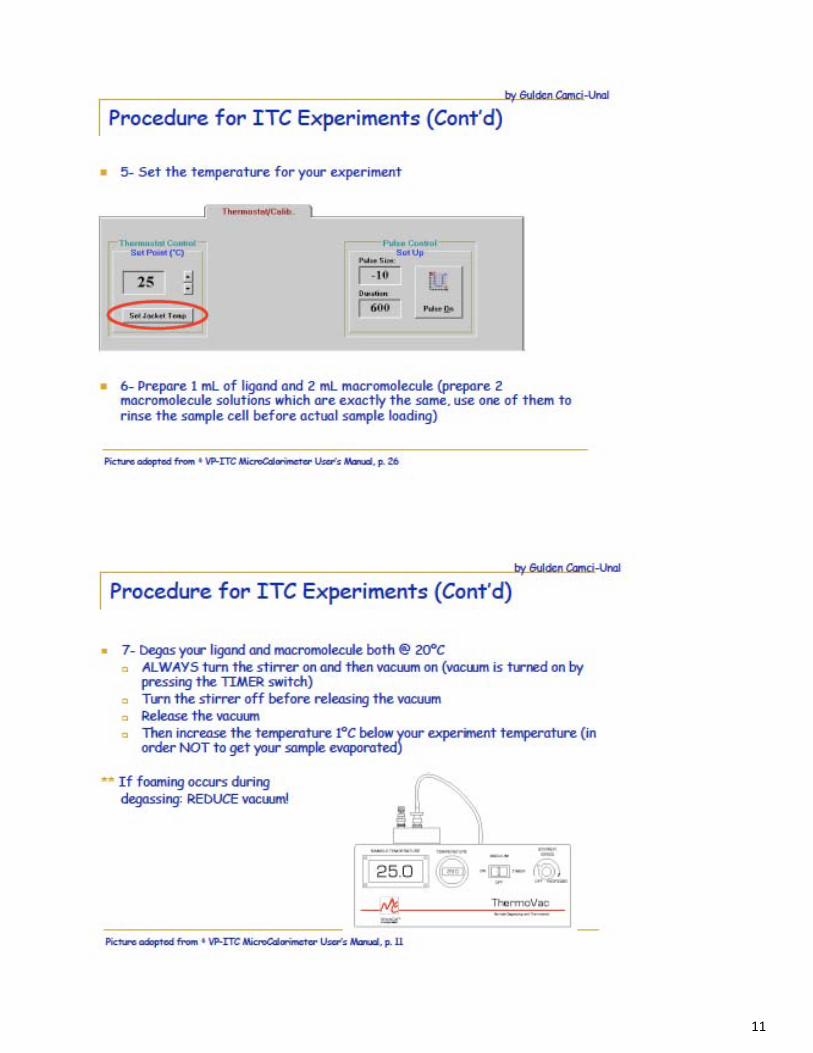
11
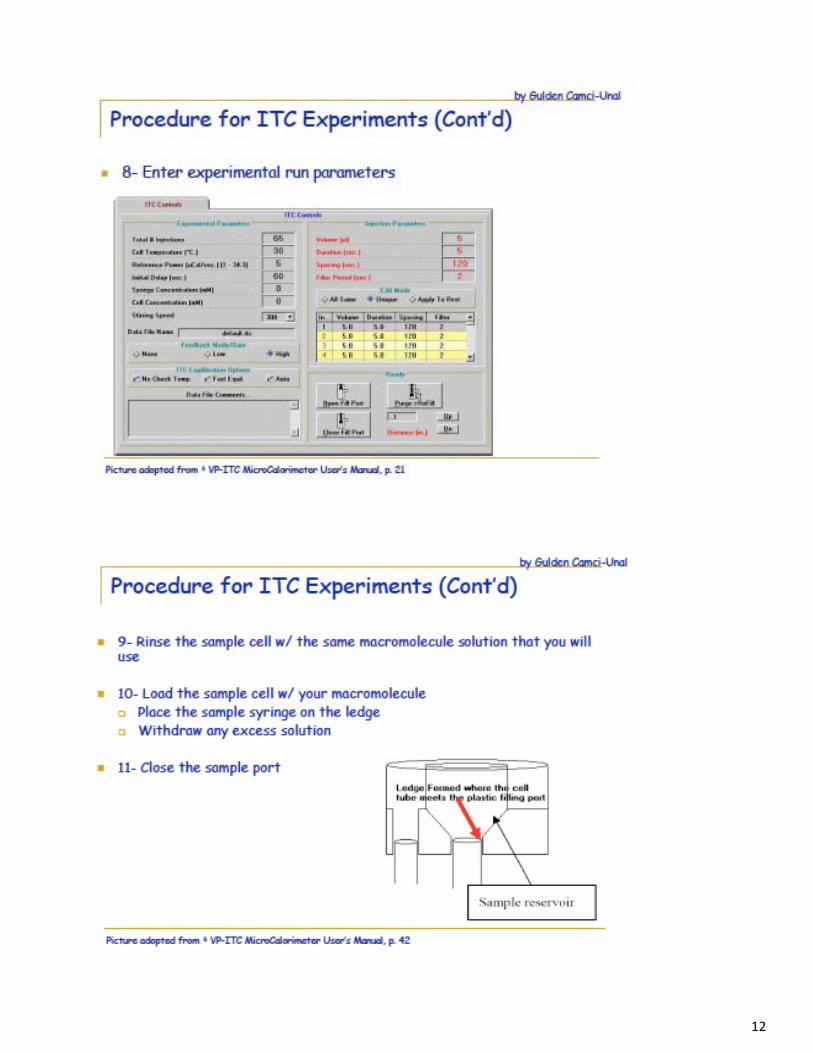
12
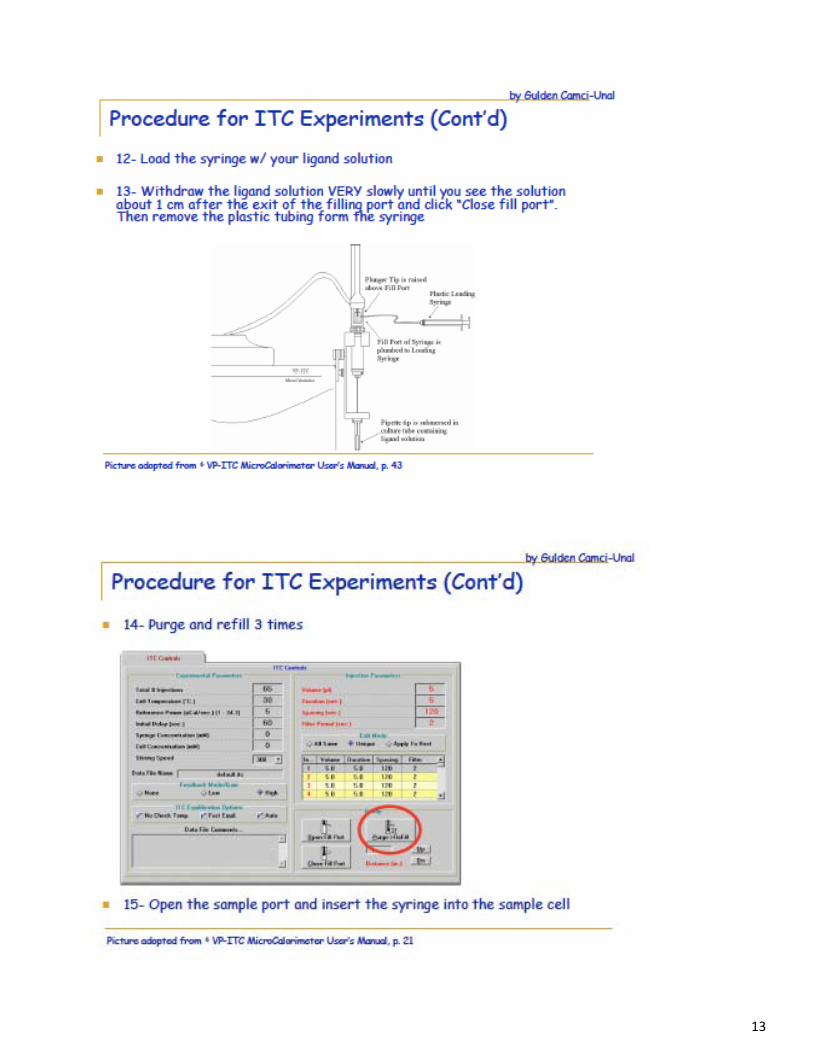
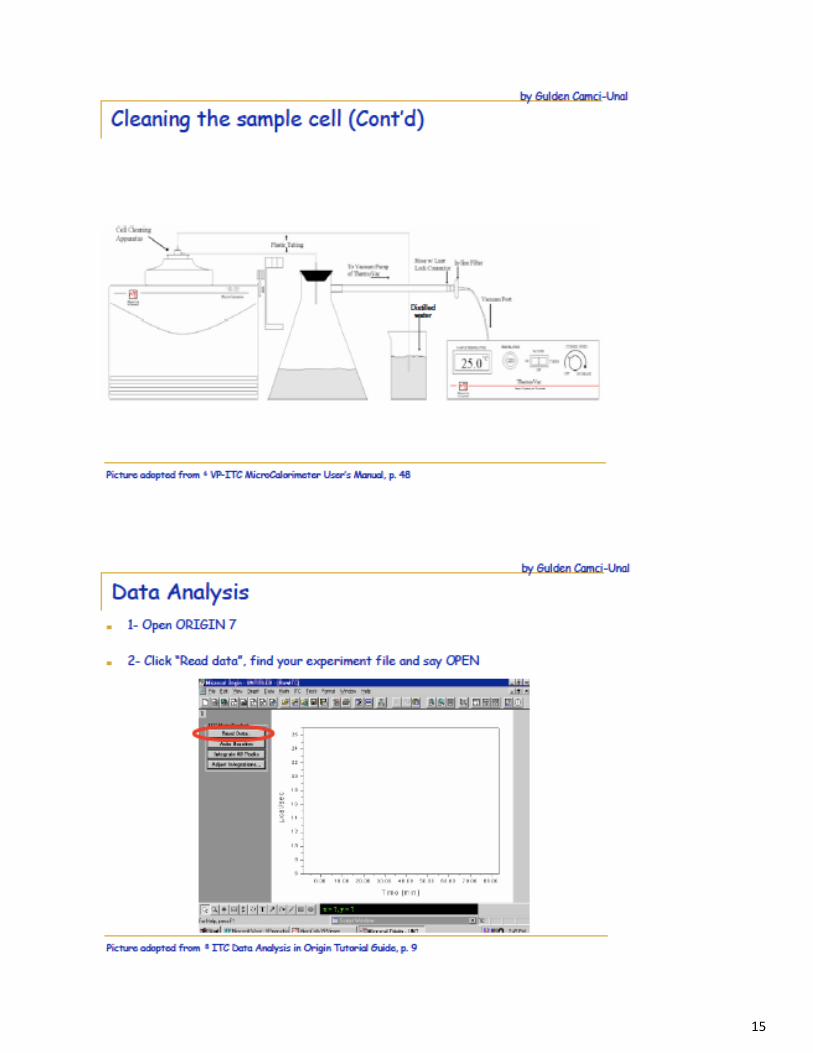
13

14
15
16
17
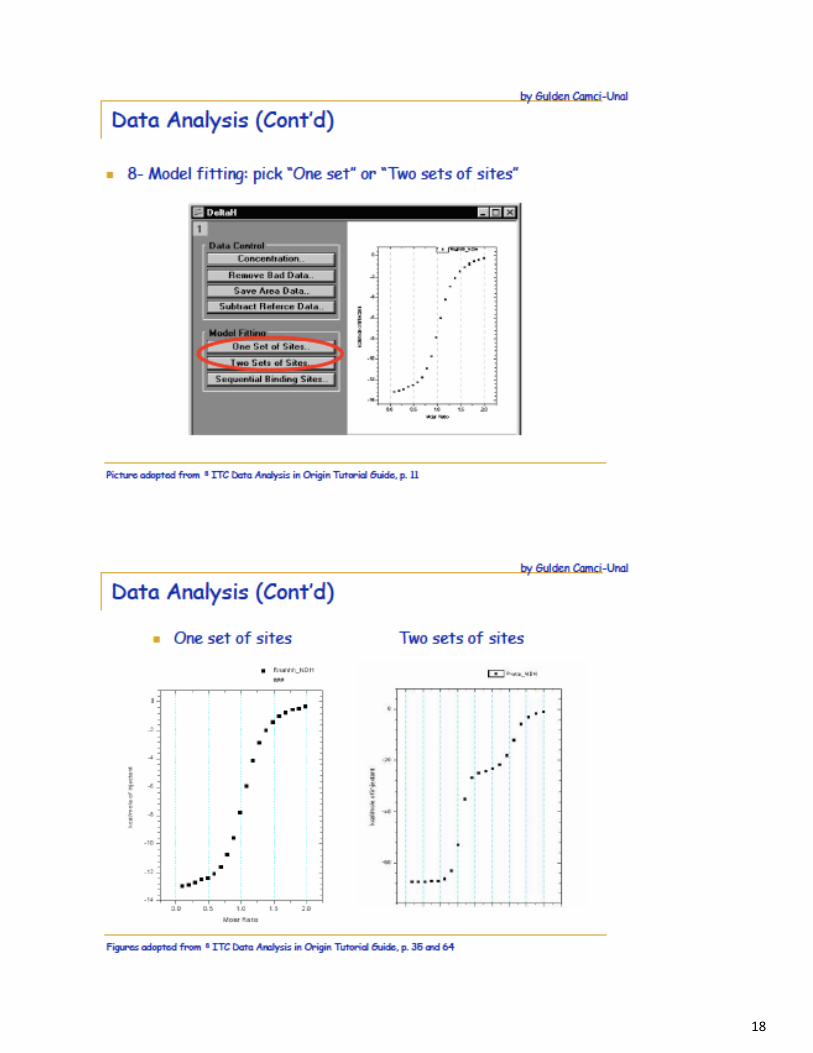
18
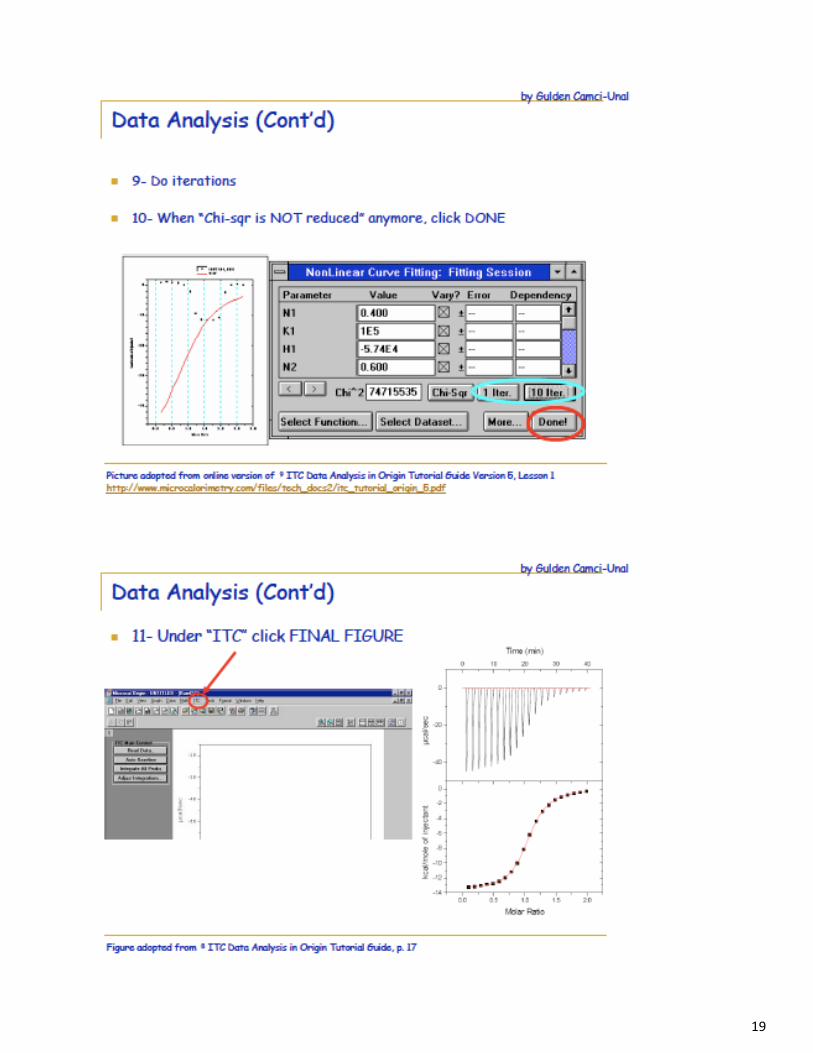
19
20
21
Reminders:
• Report all problems with the instrument to Steve. Make an entry in the logbook, but follow up with an e-mail to [email protected].
• Handle syringes carefully; be careful not to lose the small stir bars. • Updated versions of manuals, technical notes, et cetera can be found at our website
www.cif.iastate.edu. • You must properly complete an entry in the logbook each time you use the instrument. • You may reserve up to 12 usage blocks per month without approval. Additional blocks must be
approved by Steve. • Scheduling mistakes should be neatly crossed out with one line so that the original name is still legible.
Send an email to Steve explaining why you will not be using the time you have scheduled. You may be charged for scheduled but unused blocks.
22
APPENDIX A – VP-ITC TRAINING TUTORIALS
After reviewing Guldens training guide, you must successfully complete the three practical measurements described below. NOTE: You must also complete the Origin Data Processing – Lesson 1 available at our website. This will ensure that you have developed sufficient expertise to use the ITC properly without causing problems for other users.
1. Log on to the VPC-ITC control computer.
Tutorial 1. Water to Water Baseline
2. Check the logbook to see when the water in the reference cell was last replaced. If it has not been replaced
within the past month, contact Steve and arrange to have the reference cell solution refreshed.
3. Degas approximately 20 mls of distilled water for at least five minutes. This degassed water will be the solution that will go into the sample cell and the syringe.
4. Load your 2.5 ml glass-filling syringe with water. Remove air bubbles. Insert the long needle into the sample cell entry tube (center tube) and carefully slide it down until it touches the bottom. Lift it up slightly and slowly depress the plunger to so that the cell fills from the bottom up. When you see the water level reach the top of trhe narrow access tube, depress the syringe plunger quickly 1-3 times to deliver abrupt bursts of about 0.25 ml. This will dislodge small bubbles that may have attached near the bottom of the cell.
5. Slowly withdraw the syringe until it is resting on the lip at the top of the sample cell entry tube. Carefully suck up any water that is in the funnel area just above the entry tube.
6. Launch the VPViewer application. <logon as your account>
7. Call up the water-water parameter set <Load Run File; select water.inj; Open>
8. Enter a filename for the water-water data you are about to acquire. No spaces, periods or hyphens; maximum of 16 characters.
9. Verify that the VP-ITC thermostat temperature is set to the desired run temperature of 25 degrees.
10. Load the ITC pipette. Place the water titrant into the pipette filling tube, then place the filling tube into the bottom of the pipette stand. Carefully insert the auto-pipette into the pipette stand. Be very careful not to hit the long needle of the injection syringe against any object. The needle must not be bent.
11. In the software, select the ITC controls window. Click on the Open Fill Port button. The fine-thread screw controlling the syringe plunger should be observed to turn, and the plunger should move upwards until the white Teflon plunger tip is positioned just above the fill port.
12. Attach the tube of the plastic filling syringe to the filling port of the injection syringe.
13. Slowly withdraw the plunger of the plastic filling syringe to draw up the titrant solution until the solution begins to enter the filling syringe. Clicl on the Close Fill Port button. The injection syringe plunger tip should move to
23
just below the filling port orifice. Remove the hose of the plastic filling syringe from the filling port of the injection syringe.
14. Click on the Purge->Refill button. The auto pipette screw will depress the plunger filling syringe, then draw it back up again. This will help dislodge air bubbles that may be in the syringe. Repeat the Purge->Refill process two more times.
15. Carefully remove the pipette from its stand by picking it straight up until the glass barrel of the injection syringe is above the top part of the pipette stand. Carefully move the pipette so that it is directly above the center-positioned sample cell access tube. Insert the pipette into the sample cell access tube by holding the pipette vertically and slowly lowering the pipette. When the pipette is almost completely inserted you may have to push down slightly to compensate for the resistance of the rubber o-ring so that the pipette is properly seated.
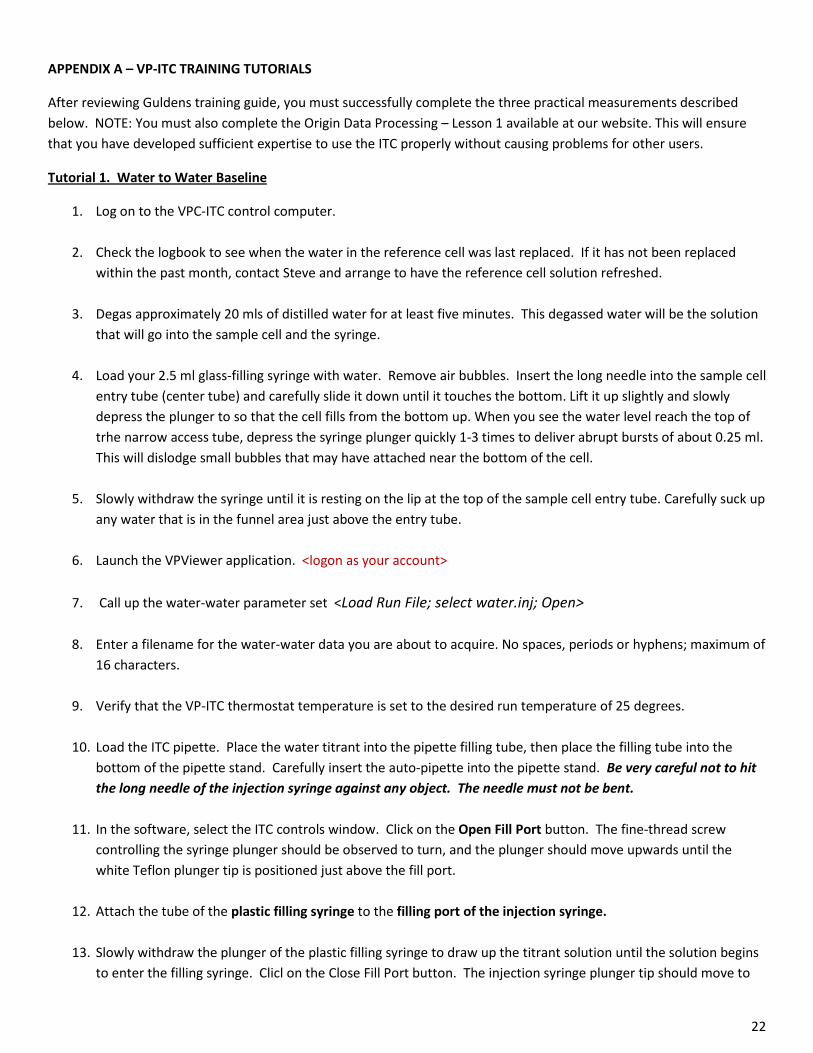
16. Select the START button to begin the experiment. You may receive a query about “Invalid Cell or Syringe Concentration”. This is irrelevant for the water-water titration. Click Yes to continue.
The entire run will take approximately 30 minutes. The results should be similar to the graph shown below.
24
A methanol injection run requires a higher level of precise preparation and operation of the VP-ITC instrument than the water-to-water- run.
Tutorial 2. Methanol to Water Titration
Follow the procedures recommended in the water-to-water tutorial for preparation of solutions, degassing, filling the cell and injection syringe, et cetera.
Sample Preparation
o Fill the sample cell with degassed water. o Prepare 20 ml of degassed water in a glass vial and add 0.5 ml of methanol to make a 2.5% methanol
solution. o Degas the methanol solution (with stirring) for 5 minutes. o Load the methanol solution into the injection syringe of he pipette.
Conducting the Experiment
o Load the parameters from the methanol.inj file. <Load Run File; select methanol.inj; Open> o Enter a filename for the methanol-water titration data. o Execute the run and allow the system to complete the experiment.
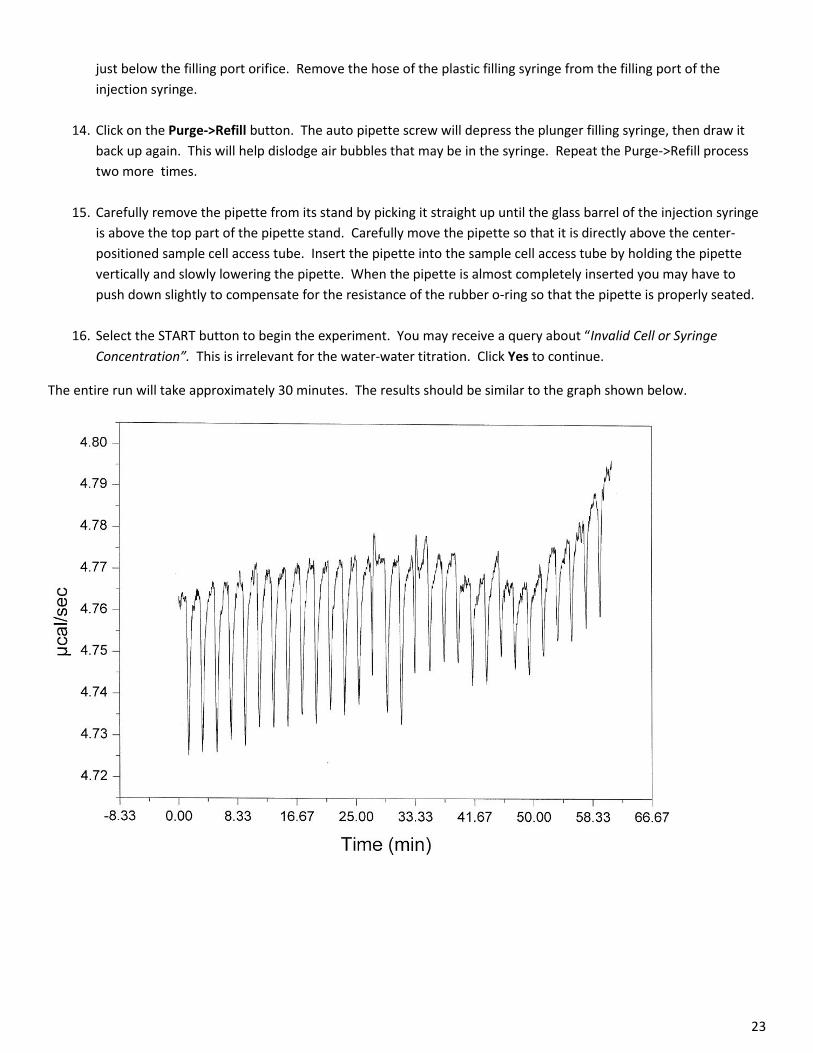
Analyzing the Data
o After the run is complete, minimize VPViewer. o Open the separate Origin 70 program for data analysis. Read in the data you have just acquired. The raw
ITC data should look like the results in the figure below. o View the data in the DeltaH window. Generate a linear regression fit; the first data point should be
excluded. The DeltaH data should look like the results in the figure below.
25
The final tutorial will require that you are familiar with the more advanced data processing techniques available in the Origin 7 software. Nine
Tutorial 3. EDTA – CaCl2 Titration
Origin Data Processing
Sample Preparation. Obtain a test kit labeled “EDTA – CaCl2 Titration” from the refrigerator. Each kit will contain
lessons are available at our website. You must complete Lesson 1 “Routine ITC Data Analysis and Fitting” before you will be able to complete this tutorial.
o A tube of EDTA solution labeled with concentration and buffer conditions o A tube of CaCl2 solution labeled with concentration and buffer conditions o A vial of 10 mM MES buffer solution for rinsing the cell prior to sample loading
IMPORTANT NOTE: The control titrations for this experiment will not be performed. The system will be going to saturation and the small, repeatable peaks at the end of a well designed experiment are a very good representation of control heats.
Setting Up the Experiment. Load the parameters from the edta.inj file. <Load Run File; select edta.inj; Open>
Note: The instrument should be thermostatted at 25o
Total # Injections 29 Volume 1
C to facilitate a faster start.
st
Cell Temperature 25 Duration 1 Injection 2 st
Reference Power 10 Volume after 1 Injection 4
st
Initial Delay 60 Duration after 1 Injection 10 st
Syringe Concentration 1 Injection Spacing 210 Injection 20
Cell Concentration 0.1 Filter Period 2 Stir Speed 307 Feedback Mode/Gain High ITC Equilibration Options Fast Equil; Auto NOTE: Cell and syringe solution concentrations need to be entered manually in all cases.
Loading Samples
1. Rinse the sample cell with 10mM MES buffer two times 2. De-gas both the EDTA as well as the CaCl2
3. Load 2ml of 0.1mM EDTA into sample cell; pipette the liquid up and down for several times and soak for at least 2 minutes
samples for 5 minutes only
4. Empty the sample cell, and reload fresh EDTA for the experiment 5. Clean the injection syringe with methanol and dry thoroughly before loading 1.0mM CaCl
2
Analyze the Data
Analyze the data in Origin and compare the results to those on the graph below. If the results are within the specifications stated below, the instrument (and the operator) is performing correctly and you are ready to run experimental samples.
The results which you obtain should be very close (i.e. N value +/- 5%; K value +/- 20 %; and Delta H value +/- 10%) to the values shown in the results at the end of this tutorial
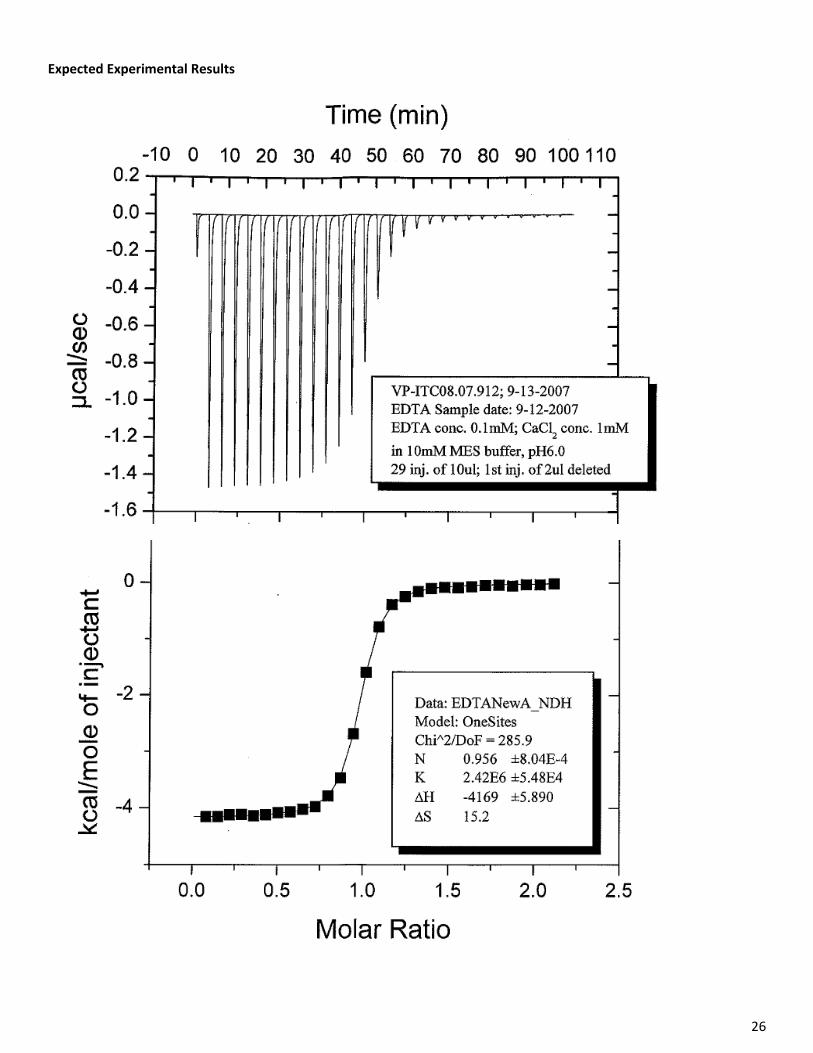
26
Expected Experimental Results
27
It should be noted that no control heats were subtracted during the analysis of the attached results and that the same procedure should be applied to your results. It should also be noted that the experimental energies for the peaks were obtained using the automated integrations within Origin, but that in some cases those automated integrations might need to be manually adjusted to get agreement of the results.
Common Problems – What to Do?
If your results do not agree with the expected results then you might want to repeat the experiment to see if your results are reproducible, or not. In repeating the experiment, consider the following possible causes of bad results:
1.) Sample dilution will affect your results and specifically will change the resulting ‘N’ value obtained from the fit of your binding isotherm. Dilution of the cell solution (EDTA) will lower the ‘N’ value and dilution of the titrant solution (CaCl2
2.) Sample contamination from the MeOH can cause for bad experimental results. Be sure to thoroughly dry the MeOH from the injection syringe prior to loading it with CaCl
) will increase the ‘N’ value. The net change in ‘N’ will be the difference in dilutions between the cell and titrant solutions. Avoid dilution factor by using completely clean and dry transfer syringes, and also by pre-soaking the cell with EDTA.
2
3.) A dirty sample cell or a dirty injection syringe can affect your results and also the quality of the data. Be sure to thoroughly clean the sample cell and injection syringe prior to carrying out the experiment with the standard sample kit.
.
4.) If problems persist then e-mail [email protected] and specify your instrument model and be sure to attach the raw data files that you generated (*.itc files). We will review your results and provide you with an assessment as well as any pertinent suggestions for improvement.
APPENDIX B ORIGIN 7 LESSONS You must complete Lesson 1 before attempting to use the VP-ITC. THe raw data files associated with the lessons can be found at: All of the lessons are posted as PDF files at our website, www.cif.iastate.edu. Lesson 1 Routine ITC Data Analysis and Fitting Lesson 2 Setting Baseline and Integration Range Lesson 3 Deleting bad data Lesson 4 Analyzing Multiple Runs and Subtracting Reference Lesson 5 ITC Data Handling Lesson 6 Modifying Templates Lesson 7 Advanced curve Fitting Lesson 8 Autosampler Data (optional accessory – we do not have it) Lesson 9 Other Useful Details Lesson 10 Equations Used for Fitting ITC Data