Embed Size (px)
Citation preview
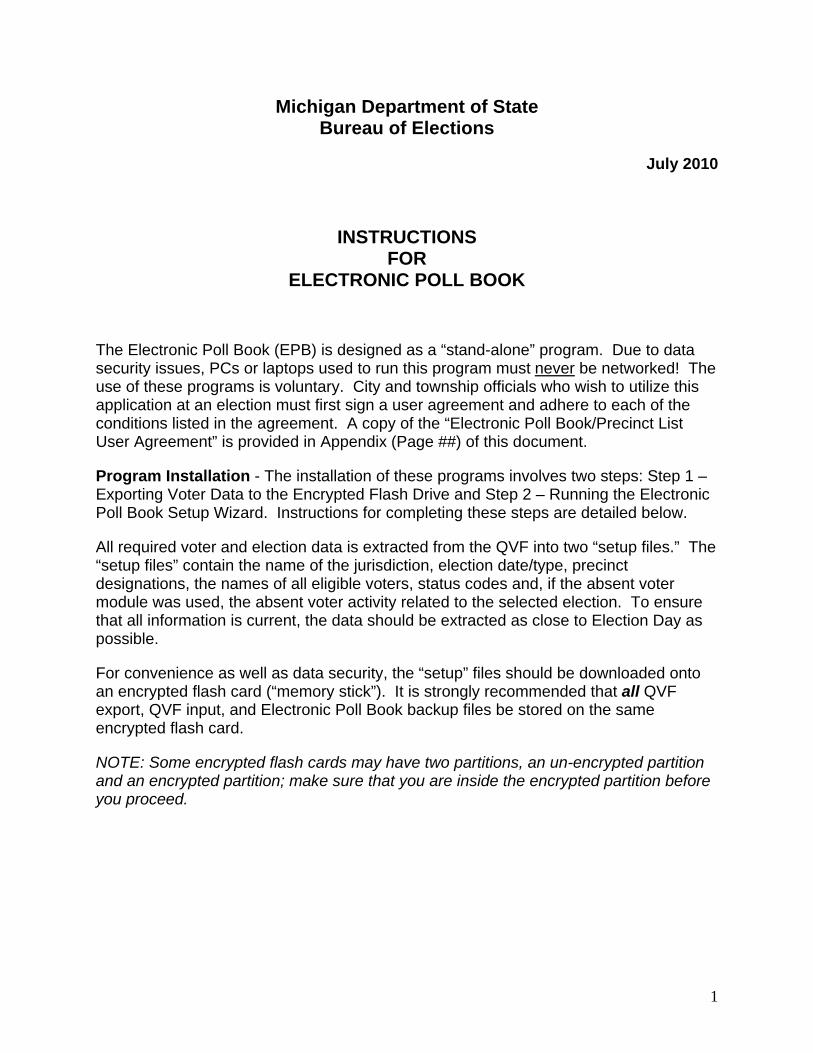
Michigan Department of State Bureau of Elections
July 2010
INSTRUCTIONS FOR
ELECTRONIC POLL BOOK
The Electronic Poll Book (EPB) is designed as a “stand-alone” program. Due to data security issues, PCs or laptops used to run this program must never be networked! The use of these programs is voluntary. City and township officials who wish to utilize this application at an election must first sign a user agreement and adhere to each of the conditions listed in the agreement. A copy of the “Electronic Poll Book/Precinct List User Agreement” is provided in Appendix (Page ##) of this document.
Program Installation - The installation of these programs involves two steps: Step 1 – Exporting Voter Data to the Encrypted Flash Drive and Step 2 – Running the Electronic Poll Book Setup Wizard. Instructions for completing these steps are detailed below.
All required voter and election data is extracted from the QVF into two “setup files.” The “setup files” contain the name of the jurisdiction, election date/type, precinct designations, the names of all eligible voters, status codes and, if the absent voter module was used, the absent voter activity related to the selected election. To ensure that all information is current, the data should be extracted as close to Election Day as possible.
For convenience as well as data security, the “setup” files should be downloaded onto an encrypted flash card (“memory stick”). It is strongly recommended that all QVF export, QVF input, and Electronic Poll Book backup files be stored on the same encrypted flash card.
NOTE: Some encrypted flash cards may have two partitions, an un-encrypted partition and an encrypted partition; make sure that you are inside the encrypted partition before you proceed.
1

Step 1 – Exporting Voter Data to the Encrypted Flash Drive
Insert your encrypted flash card into your QVF computer. In Windows Explorer, select your flash card as your active directory (highlighted directory in example below). From the pull-down menu, select File then New then Folder.
When you click on Folder, a new folder will appear in the Explorer window. Type in the name of the new folder and hit the «return» button. The new folder will now appear in the flash card directory.
(Suggestion on Folder Names: As a suggestion, you may want to use the name of the jurisdiction, ward and/or precinct and election date as your folder name, such as «Metropolis City-Precinct 7-May 2010». This way, when saving and archiving the election information, there will be no confusion about what information the folder contains.)
2

To access the Electronic Precinct List/Poll Book module, click on File and Electronic Poll Book to get the screen shown below.
From the “Export Voter Data” tab, select the Region (Mixed, Jurisdiction, School District) and the Election you will be working with.
Select the correct precinct type. This would be Ward Precinct, Village Precinct, School Precinct, or Combined Precinct.
Select an Export Type of Poll Book.
As an added security feature, the downloaded data must be encrypted. An encryption password must be set before any export of QVF data can begin. A minimum of eight characters is required. All encryption codes and passwords must be set as “strong” passwords – a combination of upper and lower case letters and numbers.
3
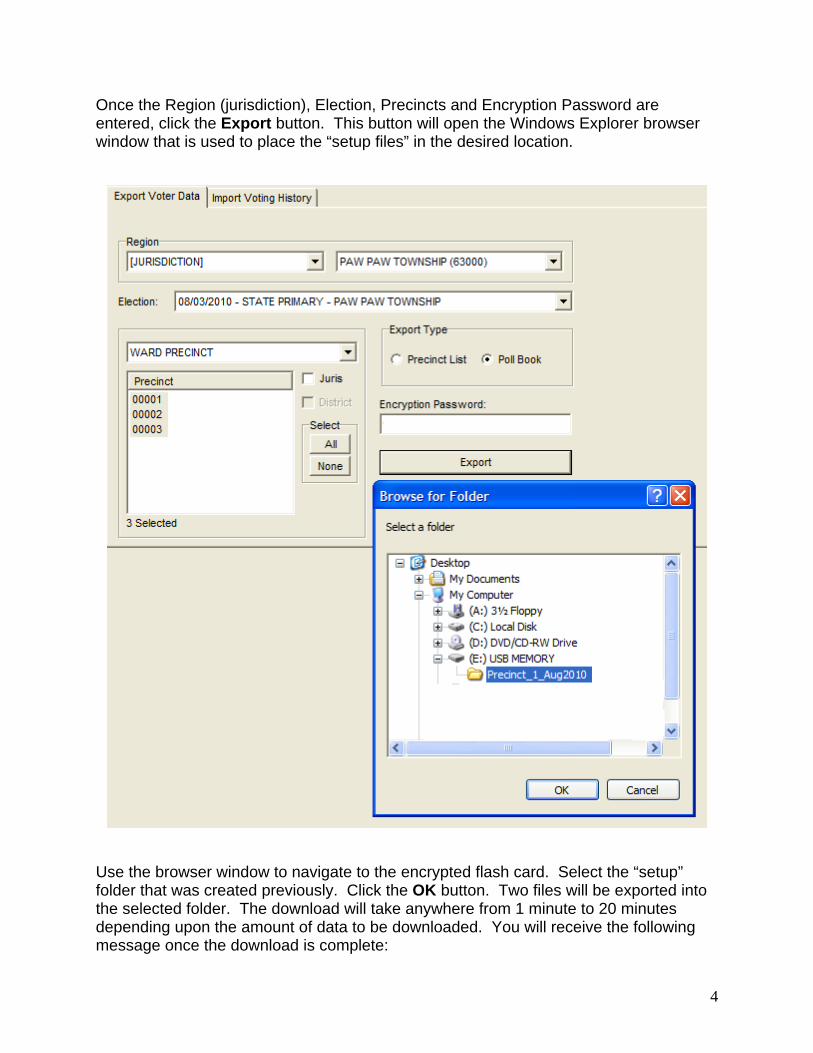
Once the Region (jurisdiction), Election, Precincts and Encryption Password are entered, click the Export button. This button will open the Windows Explorer browser window that is used to place the “setup files” in the desired location.
Use the browser window to navigate to the encrypted flash card. Select the “setup” folder that was created previously. Click the OK button. Two files will be exported into the selected folder. The download will take anywhere from 1 minute to 20 minutes depending upon the amount of data to be downloaded. You will receive the following message once the download is complete:
4

This completes Step 1, Exporting Voter Data to the Encrypted Flash Drive.
Step 2 – Running the Electronic Poll Book Setup Wizard
Insert the encrypted flash card used in step 1 into the computer that you will be installing the Electronic Poll Book on.
Open the “setup” folder on the flash card and double-click the “setup.exe” file to start the Electronic Poll Book Setup Wizard as shown below.
5

Click the Next button to continue to the next step.
Click the Install button to start the installation of the Electronic Poll Book.
6
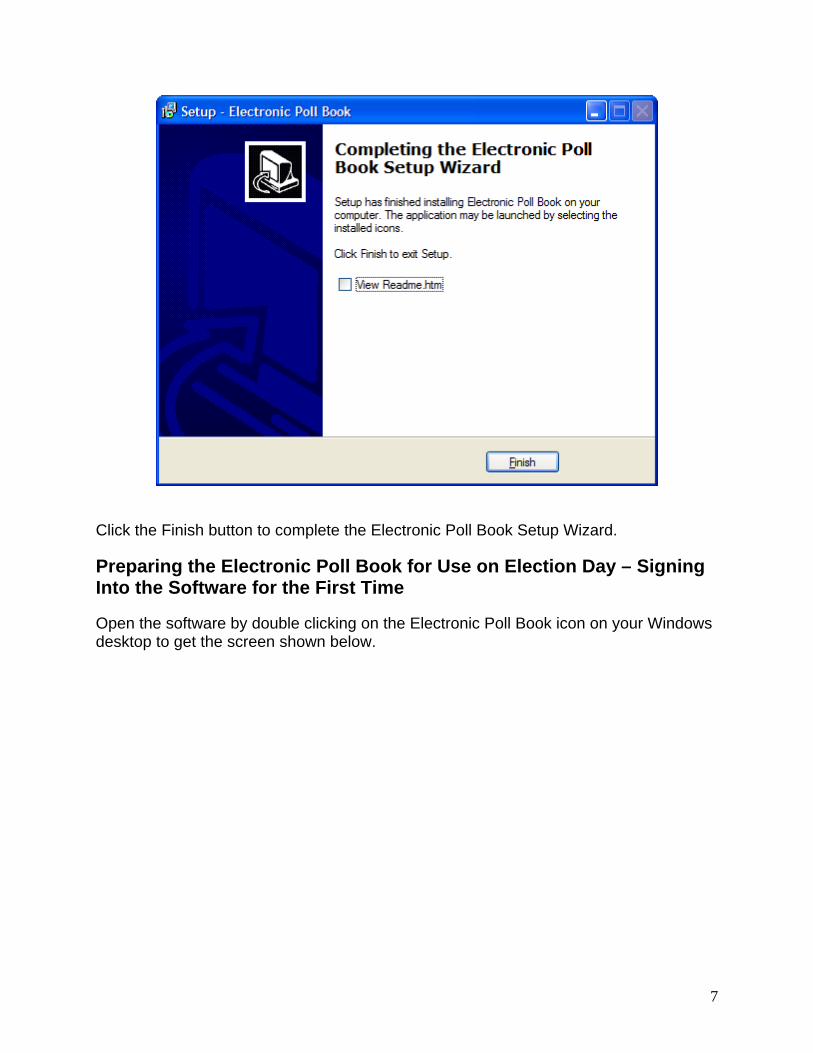
Click the Finish button to complete the Electronic Poll Book Setup Wizard.
Preparing the Electronic Poll Book for Use on Election Day – Signing Into the Software for the First Time
Open the software by double clicking on the Electronic Poll Book icon on your Windows desktop to get the screen shown below.
7

Enter the same Encryption Password you set up in “Step 1 – Exporting Voter Data to the Encrypted Flash Drive” and click the Enter button.
Enter the username and password (ADMIN) and click the Enter button.
Select the active precinct from the list provided and click OK.
8

Preparing the Electronic Poll Book for Use on Election Day – Setting Options
Select File / Options from the menu to open the Electronic Poll Book Options screen shown below.
Set Auto Advance to Yes, No, or Yes using ballot styles. Auto Advance increments the ballot number by one each time a ballot is issued. You would use “Yes using ballot styles” whenever you have a precinct that has more than one ballot style for a given election.
Set the Lockout option to No, By Precinct, or By Ballot Style. The Lockout feature is used to prevent the inspector from issuing a duplicate ballot number. You would use “By Ballot Style” whenever you have a precinct that has more than one ballot style for a given election.
Put a check in front of “Allow the recording of absentee ballots” if you plan to process your absentee ballots at the polling location.
Check “Confirm ballots issued”. This option pops up a confirmation screen every time a ballot is issued to a voter. We recommend keeping this option selected.
When you have finished setting your options, click OK to close the screen.
9

Preparing the Electronic Poll Book for Use on Election Day – Setting Up Users
One of the most important aspects of the Electronic Poll Book is assigning users and user accounts. The Electronic Poll Book must have at least one administrator. It is recommended that the precinct chairperson be assigned this authority. The administrator is also the only inspector that should be supplied with the encryption key. The encryption key is needed to activate the Electronic Poll Book.
On the Electronic Poll Book screen click on Sys Admin then User Administration. The User Administration screen opens as shown below. This is where you set up the user accounts for those inspectors that will be running the Electronic Poll Book on Election Day. It is recommended that each inspector that will be working with the Electronic Poll Book on Election Day is given their own user name.
To set up a new user go to the User Administration screen and click the New button at the bottom of the screen.
Enter a User Name. A User Name has to be at least 5 characters long and cannot contain any spaces.
10

Enter a Password. Passwords have to be at least 8 characters long and must have at least one upper case letter, one lower case letter, and one number.
Click OK to add the user.
Upon completion, your User Administration screen should contain all of the user names of the inspectors using the Electronic Poll Book for the given precinct and will look similar to the screen shown below.
To Edit a user account, click SysAdmin/User Administration to open the User Administration screen.
Highlight the user name to be edited and click the Edit button to open the Add/Edit user screen. Make the appropriate edit and click OK to accept the change.
To Delete a user account, click SysAdmin/User Administration to open the User Administration screen.
Highlight the user name to be deleted and click the Delete button at the bottom of the screen. Select Yes when the Confirm screen opens.
11

To change your Password, click on Sys Admin/Change My Password. Enter your old password and then enter your new password twice. Click the OK button to accept the change.
Using the Electronic Poll Book – Backing Up the Database
The Backup feature is used to backup your Electronic Poll Book to your encrypted flash drive. This is done in case your computer running the Electronic Poll Book suffers a hardware failure and has to be replaced on Election Day. If this should happen, the data in your Electronic Poll Book can be restored to the point of the last backup.
Select File/Backup to open the Backup screen.
When backing up for the first time, you have to show the Electronic Poll Book where your encrypted flash drive is located. You do this by clicking the square button on the far right of the Backup screen. This opens the “Select a backup image file” screen.
12
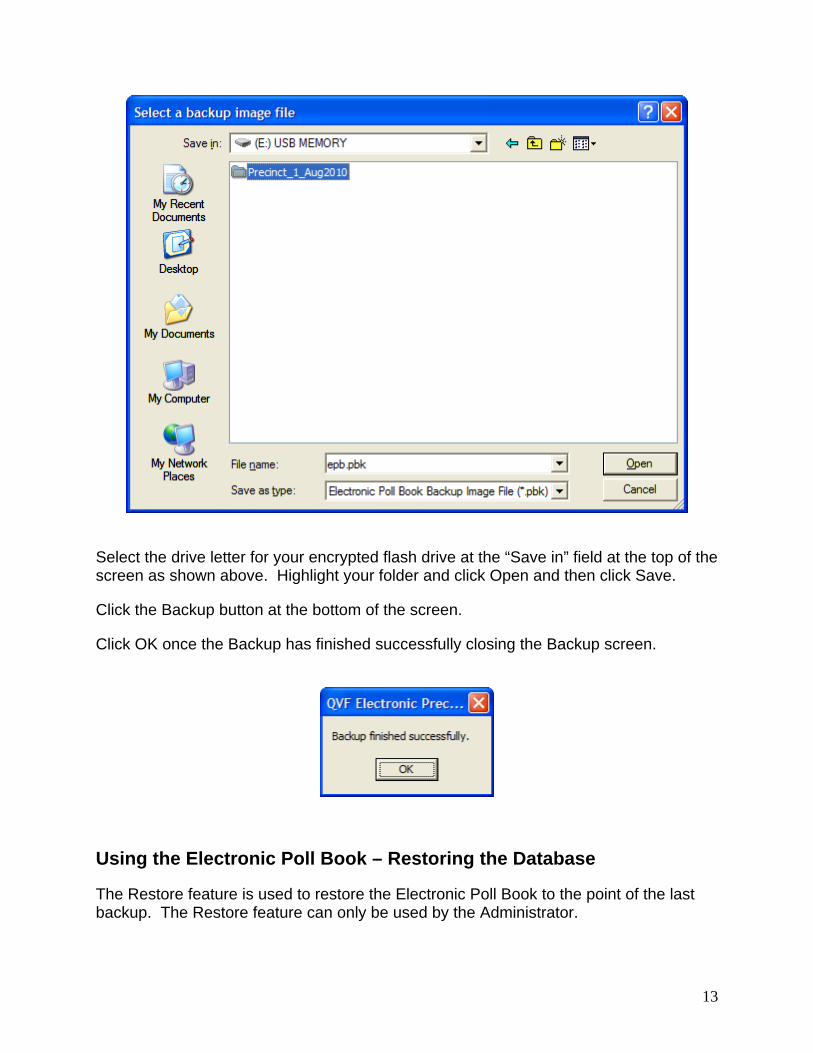
Select the drive letter for your encrypted flash drive at the “Save in” field at the top of the screen as shown above. Highlight your folder and click Open and then click Save.
Click the Backup button at the bottom of the screen.
Click OK once the Backup has finished successfully closing the Backup screen.
Using the Electronic Poll Book – Restoring the Database
The Restore feature is used to restore the Electronic Poll Book to the point of the last backup. The Restore feature can only be used by the Administrator.
13

Select File/Restore to open the Restore screen. You have to show the Electronic Poll Book where your encrypted flash drive is located. You do this by clicking the square button on the far right of the Backup screen. This opens the “Select a backup image file” screen.
14

Select the drive letter for your encrypted flash drive at the “Save in” field at the top of the screen as shown above. Highlight your folder and click Open and then Save.
Click the Restore button at the bottom of the screen.
Click Yes on the first Confirm screen.
Click Yes on the second Confirm screen.
Click OK once the Restore has successfully finished. This closes the Restore screen and opens the Login screen. The inspector can now enter their username and password and click Enter to get back into the software.
Using the Electronic Poll Book – Timeout
While logged into the Electronic Poll Book, if there is no activity for 30 minutes or more the Login screen will appear.
To return the software to an active mode, the user needs to enter their password and click the Enter button.
15

QVF Electronic Poll Book – Main Screen Windows
The Electronic Poll Book is divided up into four windows.
Voter List Window (Left) – This window contains a list of all voters within the jurisdiction. The “This Precinct” tab refers to the voters in the active precinct. The Other tab refers to those voters that live within the jurisdiction but not in the active precinct.
Voter Information Window (Upper Right) - When the name of a single voter is highlighted, detailed information regarding the voter is displayed including the voter’s address, date of birth, gender, polling location, registration date and effective date.
16

Voter Action Window (Middle Right) - This window is used to document that a ballot was issued or an AV ballot was processed. It can also be used to mark a ballot spoiled, reject a ballot, or issue a provisional or challenged ballot.
Voter Status Window (Lower Right) – This window displays the voter’s current voting status. A “?” to the left of a voter’s name is used to alert the inspector that a status code or other information regarding the voter’s qualifications must be reviewed before a ballot is issued.
Using the Electronic Poll Book – Voter Processing
Ensure the “This Precinct” tab is the active tab.
Voter Search – There are three different ways a voter can be searched for. 1. Type in the voter’s name (last name first) to reduce the voter list to that voter. 2. Swipe the magnetic strip on the back of the voter’s driver license to reduce the
voter list to that voter. 3. Scan the barcode on the voter’s driver license to reduce the voter list to that
voter.
17

Make sure “Issue a ballot” is selected in the Voter Action window.
Make sure the correct ballot number is showing in the Ballot # field.
Click the Proceed button to open the Confirm screen.
Click “Yes” on the Confirm screen to issue the ballot to the selected voter.
In the Voter List window, REG will appear next to the voter’s name and the ballot number will appear in the Voter Status window.
18

Using the Electronic Poll Book – Voter Processing – Missing Voter
If the voter’s name is not found under the “This Precinct” tab, select the “Other” tab and search for the voter there.
If the voter’s name is found under the “Other” tab, the voter is registered in a different precinct within the jurisdiction.
Highlight the voters name and then look at the Voter Information window (upper right screen) and redirect the voter to the correct polling location.
If the voter’s name is not found under the “Other” tab, the voter is currently not registered to vote within QVF.
To let the voter vote select the “Unlisted” tab at the top of the screen.
19
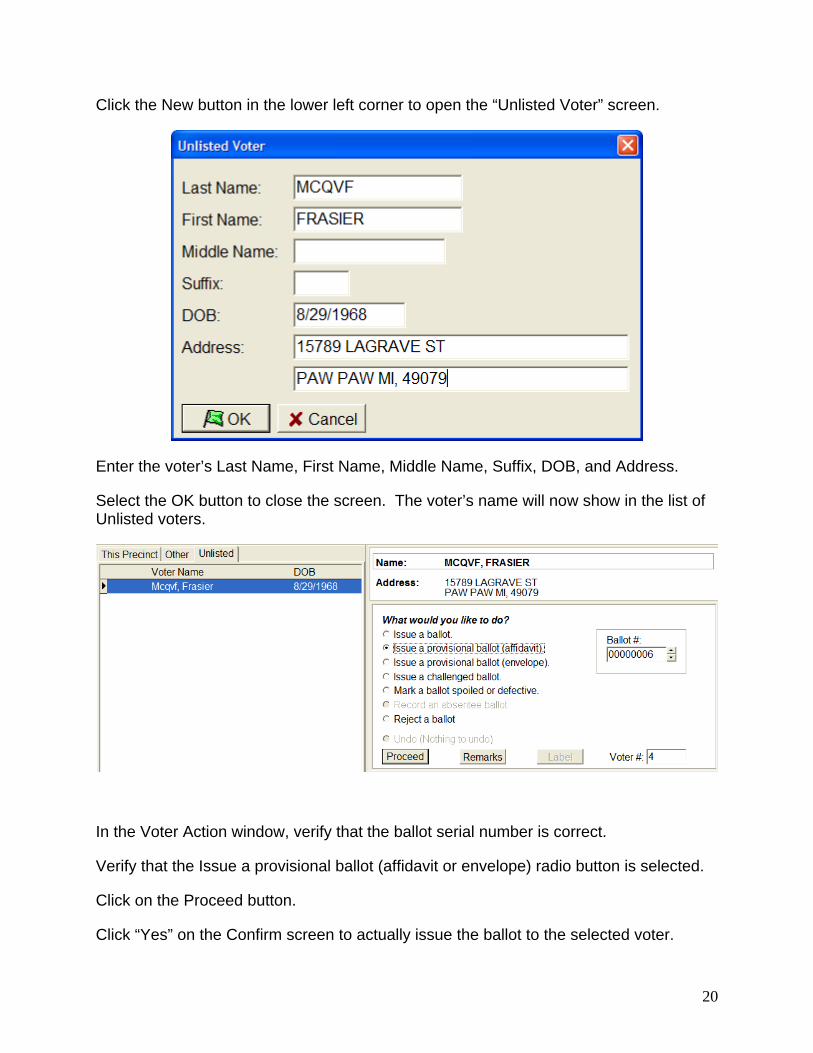
Click the New button in the lower left corner to open the “Unlisted Voter” screen.
Enter the voter’s Last Name, First Name, Middle Name, Suffix, DOB, and Address.
Select the OK button to close the screen. The voter’s name will now show in the list of Unlisted voters.
In the Voter Action window, verify that the ballot serial number is correct.
Verify that the Issue a provisional ballot (affidavit or envelope) radio button is selected.
Click on the Proceed button.
Click “Yes” on the Confirm screen to actually issue the ballot to the selected voter.
20
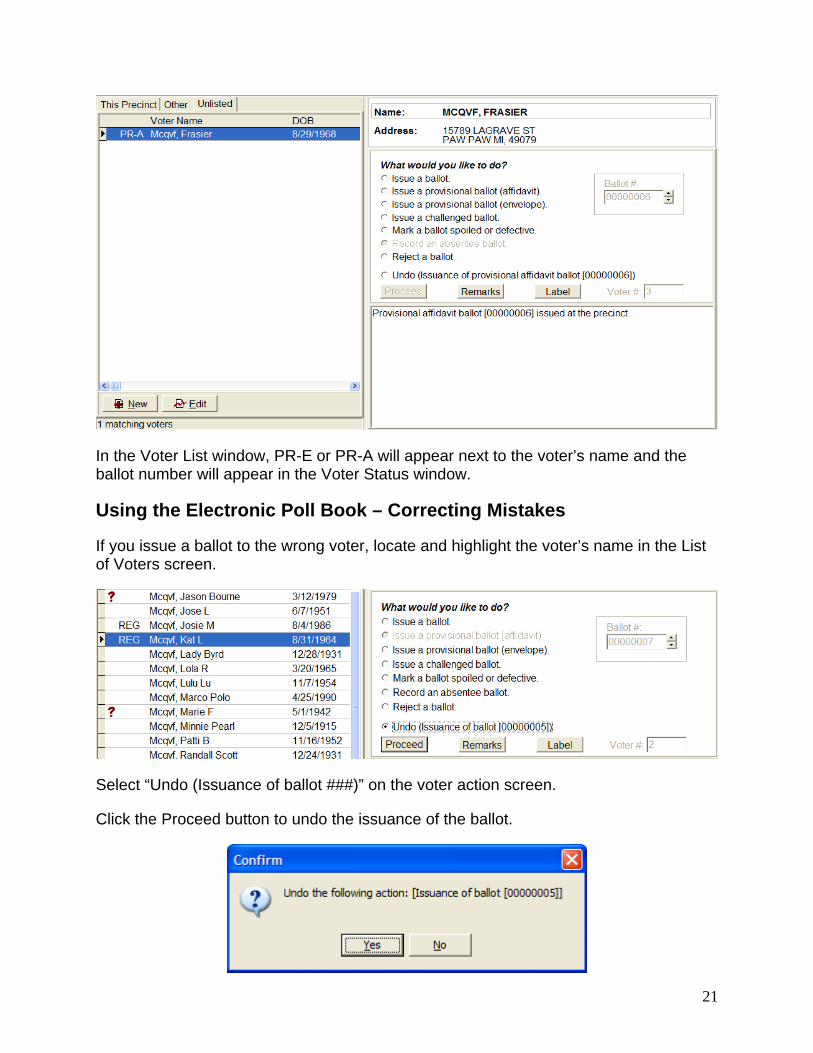
In the Voter List window, PR-E or PR-A will appear next to the voter’s name and the ballot number will appear in the Voter Status window.
Using the Electronic Poll Book – Correcting Mistakes
If you issue a ballot to the wrong voter, locate and highlight the voter’s name in the List of Voters screen.
Select “Undo (Issuance of ballot ###)” on the voter action screen.
Click the Proceed button to undo the issuance of the ballot.
21

Click Yes on the “Confirm” screen to complete the process.
Using the Electronic Poll Book – Spoiling a Ballot
To spoil a ballot using the Electronic Poll Book, locate and highlight the voter’s name in the list of voters screen.
Select “Mark a ballot spoiled or defective” in the Voter Action window and click the Proceed button.
Click the Yes button to complete the process.
Notice that the Voter Status window now shows the ballot as spoiled.
Using the Electronic Poll Book – Recording Absentee Ballots
Use of the “Recording Absentee Ballots” module in the Electronic Poll Book requires use of the Absentee Voting module in QVF.
To record your absentee ballots at the precinct, you must first turn that option on at File / Options as shown below.
22
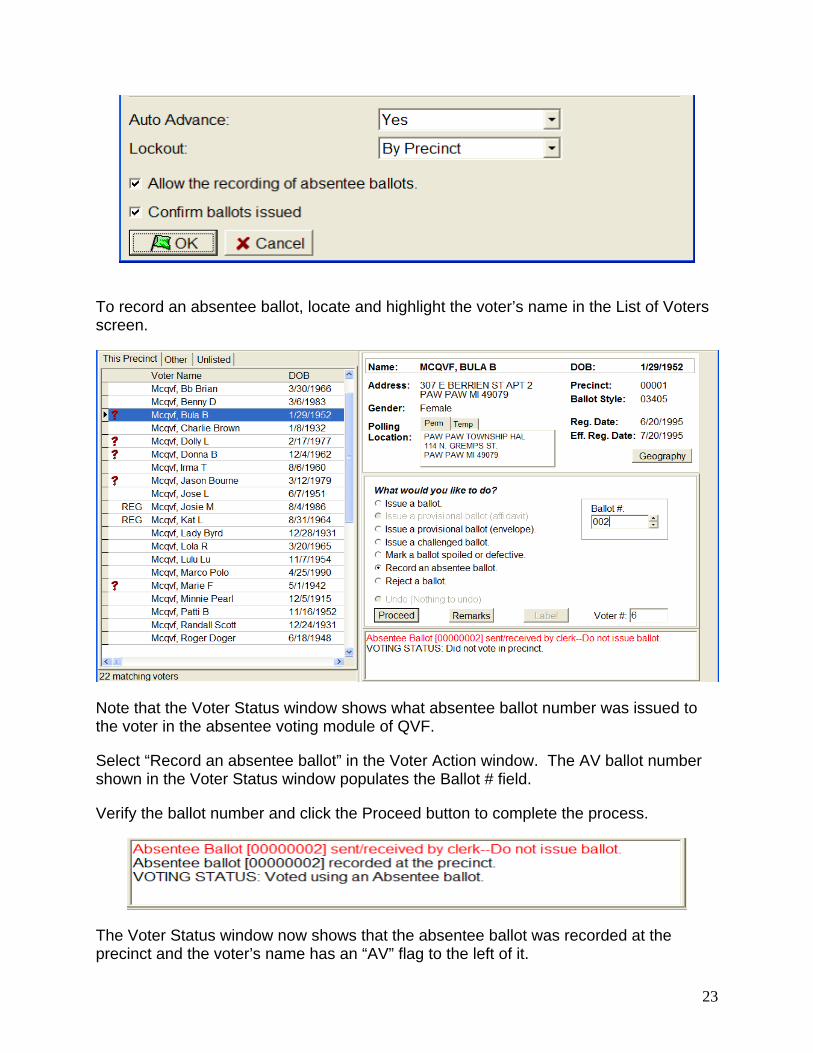
To record an absentee ballot, locate and highlight the voter’s name in the List of Voters screen.
Note that the Voter Status window shows what absentee ballot number was issued to the voter in the absentee voting module of QVF.
Select “Record an absentee ballot” in the Voter Action window. The AV ballot number shown in the Voter Status window populates the Ballot # field.
Verify the ballot number and click the Proceed button to complete the process.
The Voter Status window now shows that the absentee ballot was recorded at the precinct and the voter’s name has an “AV” flag to the left of it.
23
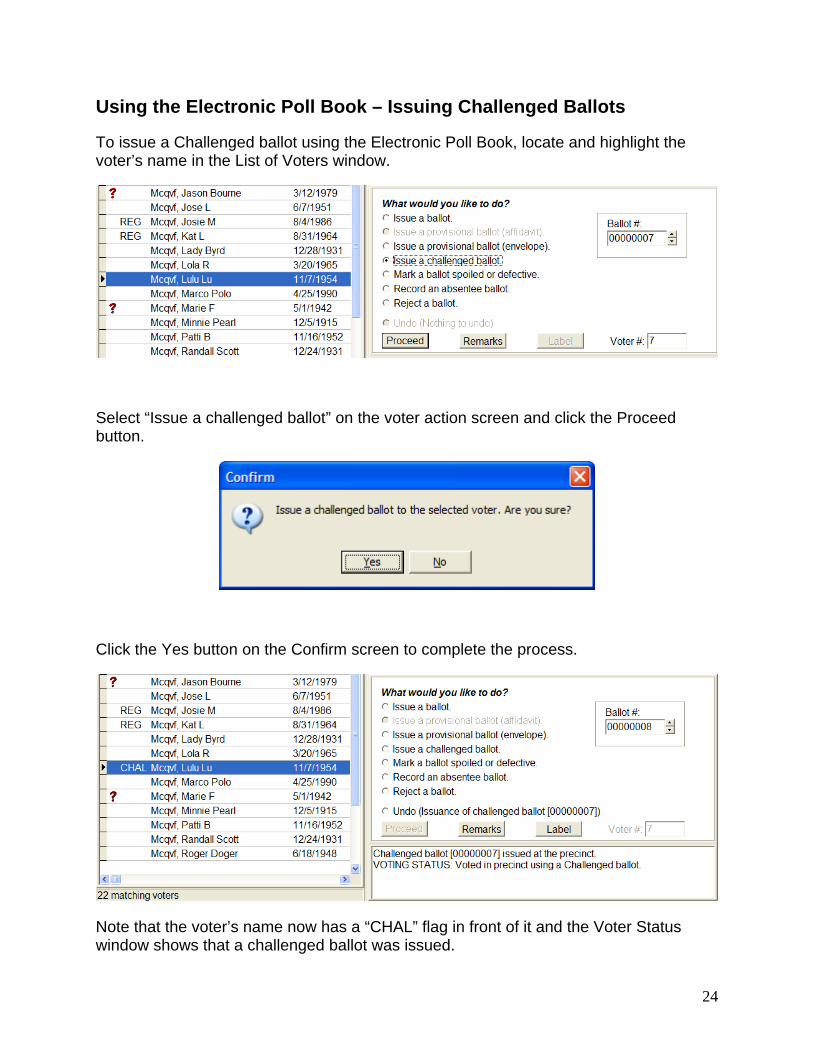
Using the Electronic Poll Book – Issuing Challenged Ballots
To issue a Challenged ballot using the Electronic Poll Book, locate and highlight the voter’s name in the List of Voters window.
Select “Issue a challenged ballot” on the voter action screen and click the Proceed button.
Click the Yes button on the Confirm screen to complete the process.
Note that the voter’s name now has a “CHAL” flag in front of it and the Voter Status window shows that a challenged ballot was issued.
24
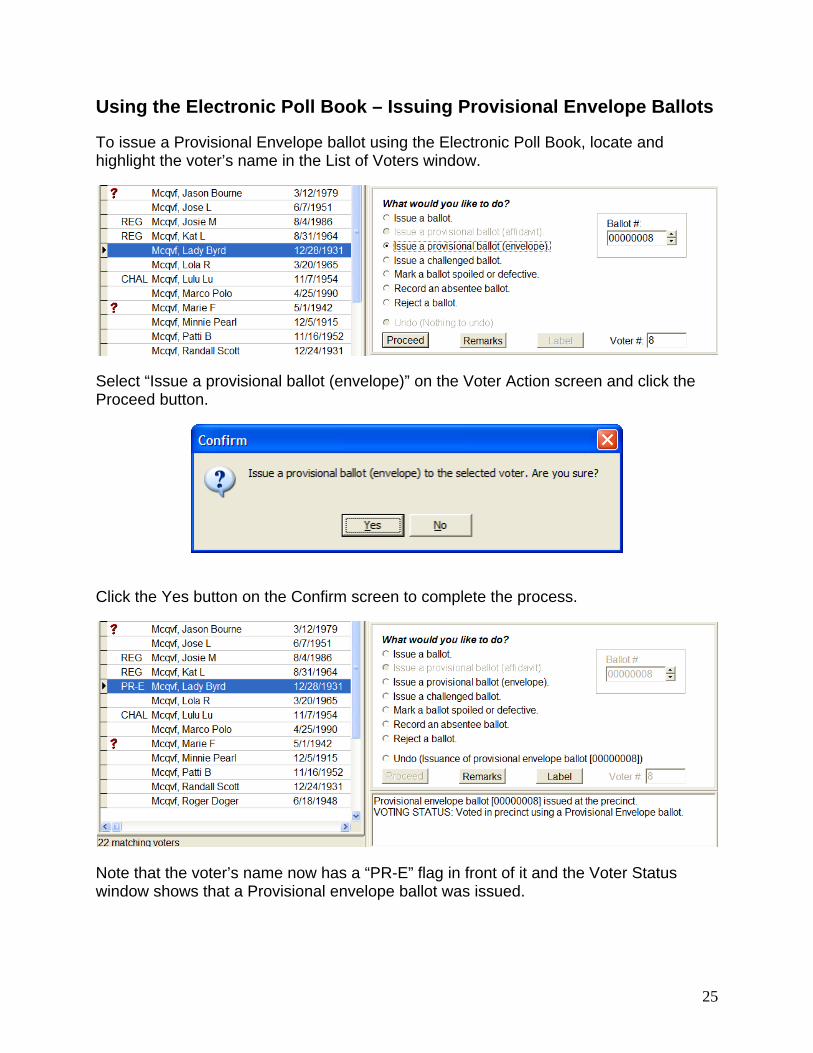
Using the Electronic Poll Book – Issuing Provisional Envelope Ballots
To issue a Provisional Envelope ballot using the Electronic Poll Book, locate and highlight the voter’s name in the List of Voters window.
Select “Issue a provisional ballot (envelope)” on the Voter Action screen and click the Proceed button.
Click the Yes button on the Confirm screen to complete the process.
Note that the voter’s name now has a “PR-E” flag in front of it and the Voter Status window shows that a Provisional envelope ballot was issued.
25

Using the Electronic Poll Book – Remarks Page
When an entry needs to be made on the Remarks page, click on the Remarks button on the Voter Action screen to open the Remarks screen.
Click on the New button on the lower left corner and type in the Remark as shown below.
26

Once you have completed keying in the Remark, click the OK button to save and close the Remark.
Note that the Remarks screen displays a list of the Date/Time, User, and Remarks made.
Once you have completed making the Remark, click on the Close button to close the Remarks screen.
Using the Electronic Poll Book – Rendering Ballots Defective
To Render Ballots Defective, select on File/Un-issued Defective Ballots from the menu to open the Un-issued Defective Ballots screen.
27
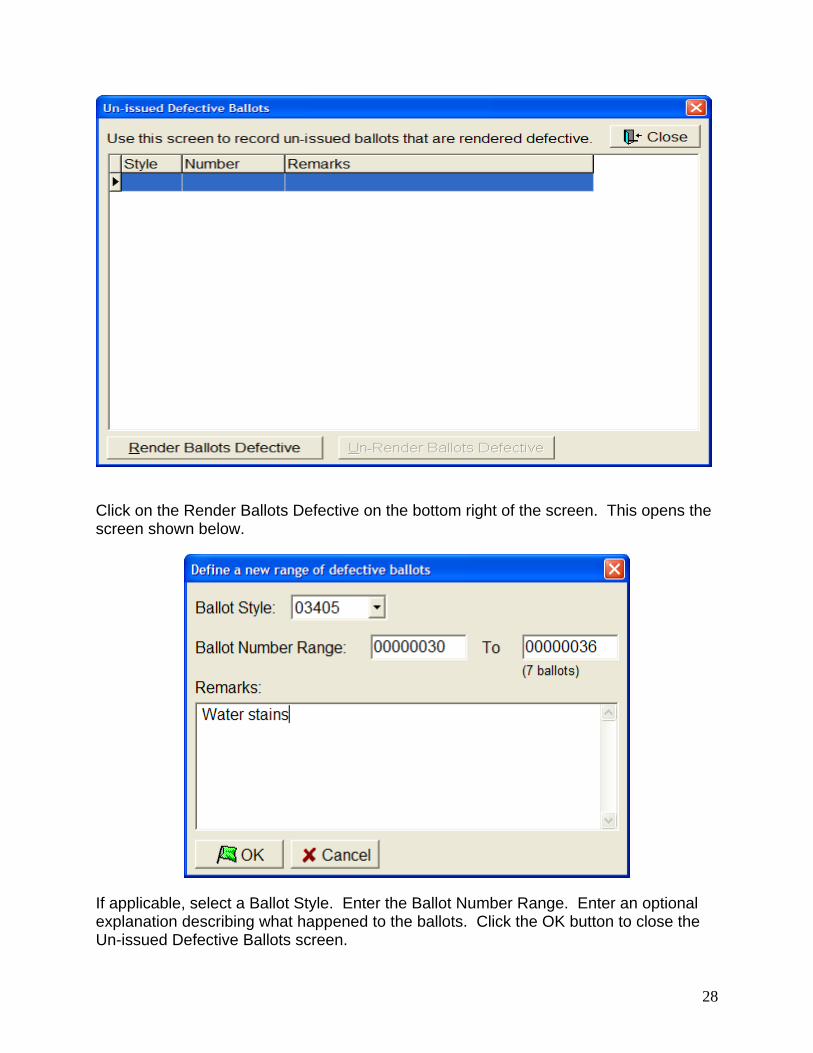
Click on the Render Ballots Defective on the bottom right of the screen. This opens the screen shown below.
If applicable, select a Ballot Style. Enter the Ballot Number Range. Enter an optional explanation describing what happened to the ballots. Click the OK button to close the Un-issued Defective Ballots screen.
28
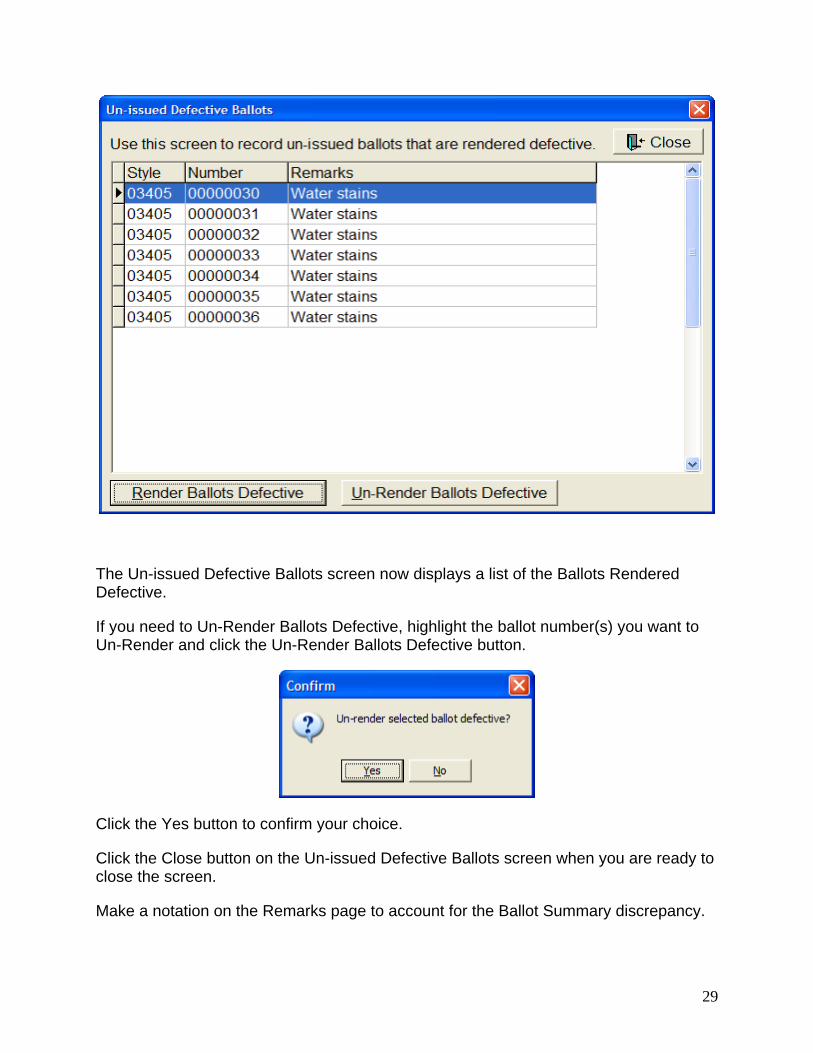
The Un-issued Defective Ballots screen now displays a list of the Ballots Rendered Defective.
If you need to Un-Render Ballots Defective, highlight the ballot number(s) you want to Un-Render and click the Un-Render Ballots Defective button.
Click the Yes button to confirm your choice.
Click the Close button on the Un-issued Defective Ballots screen when you are ready to close the screen.
Make a notation on the Remarks page to account for the Ballot Summary discrepancy.
29

Electronic Poll Book Actions After the Close of Polls – One Final Backup
Perform one final Backup of the Electronic Poll Book.
Electronic Poll Book Actions After the Close of Polls – Save Voter History
To save the Voter History to your encrypted flash drive, select File/Save History from the Electronic Poll Book menu to open the “Save history as” screen..
Select the folder on your flash drive that you are saving the Voter History file to at the “Save in:” field at the top of the screen.
Click the Save button to save the Voter History file to the flash drive and close the “Save history as” screen.
30

Electronic Poll Book Reports – Remarks Report
To preview the Remarks Report, select Reports/Remarks from the menu. From here you can print the report out and save the report to your encrypted flash drive.
To save the report to your encrypted flash drive, click on the Adobe icon which is the second icon from the left at the top of your screen.
Select the folder on your flash drive that you are saving the Remarks report to on your encrypted flash drive at the “Save in:” field at the top of the screen.
Click the Save button to actually save the report and close the “Save As” screen.
31

To print the Remarks report, click on the Printer icon which is the first icon from the left at the top of your screen.
The report prints out on the default printer set up on your computer.
Electronic Poll Book Reports – List of Voters Report
To preview the List of Voters Report, select Reports/List of Voters from the menu. From here you can print the report out and save the report to your encrypted flash drive.
To save the report to your encrypted flash drive, click on the Adobe icon which is the second icon from the left at the top of your screen.
32

Select the folder on your flash drive that you are saving the List of Voters report to on your encrypted flash drive at the “Save in:” field at the top of the screen.
Click the Save button to actually save the report and close the “Save As” screen.
To print the List of Voters report, click on the Printer icon which is the first icon from the left at the top of your screen.
The report prints out on the default printer set up on your computer.
33

Electronic Poll Book Reports – Ballot Summary Report
The Ballot Summary report documents the total number of ballots assigned to the precinct and how each ballot was used. While several of the entries are automatically calculated, some user input is required to complete the information and final calculations.
To open the Ballot Summary report, select Reports/Ballot Summary from the menu.
At letter “A”, enter the number of ballots delivered to the precinct that morning. There should be a separate line for each Ballot Style used in the election. The count for letter “A” is automatically calculated when you tab out of the “Ending No.” field.
At letter “B”, enter the number of AV return envelopes delivered to the precinct for processing.
The Total number of ballots at letter “C” is automatically calculated when you tab out of letter “B”.
34

At letter “D”, enter the number of ballots tabulated. Note that this number has to agree with the actual tabulator number.
At letter “E”, enter the number of AV ballot envelopes which did not contain a ballot or were not processed.
At letter “G”, enter the number of ballots used by Election Inspectors for ballot duplication.
At letter “I”, enter the starting and ending ballot serial numbers of the ballots left over at the end day. Each Ballot Style should have its own line. The Totals at letter “J” and the Difference at letter “K” are calculated when you tab out of the last Ending No. at letter “I”.
Once you have finished filling out the Ballot Summary and have a difference of zero at letter “K”, click the Preview button at the bottom of the screen to preview the Ballot Summary report.
35

To save the report to your encrypted flash drive, click on the Adobe icon which is the second icon from the left at the top of your screen.
36
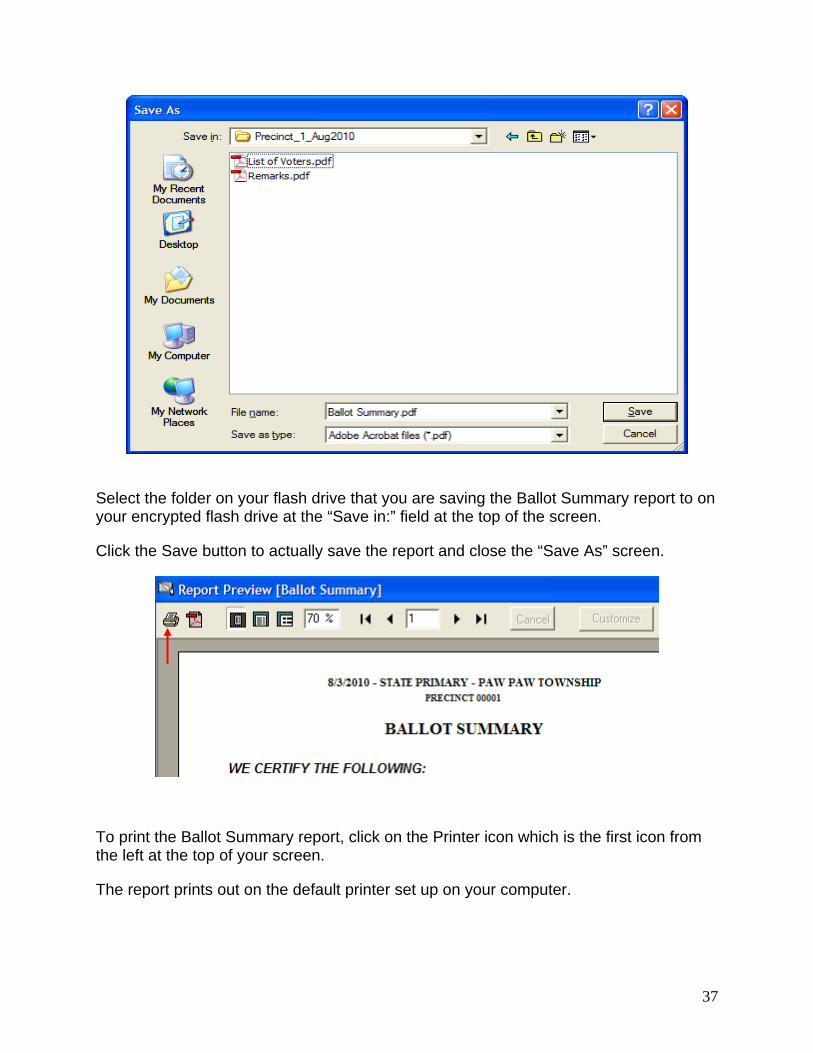
Select the folder on your flash drive that you are saving the Ballot Summary report to on your encrypted flash drive at the “Save in:” field at the top of the screen.
Click the Save button to actually save the report and close the “Save As” screen.
To print the Ballot Summary report, click on the Printer icon which is the first icon from the left at the top of your screen.
The report prints out on the default printer set up on your computer.
37

Electronic Poll Book - Uploading Voter History into QVF
To upload voter history from the Electronic Poll Book back into QVF, open QVF and select File/Electronic Poll Book from the QVF menu.
Insert the encrypted flash drive that contains the Voter History file saved on election night.
Click the small square button with 2 dots on it at the far right side of the History File field.
38

Select the folder containing the Voter History folder at the top of the screen at the “Look in” field and highlight the “epb_history.txt” file in the main window.
Click the Open button to close the screen.
Click the Import button in QVF.
Click the OK button when the upload has completed. The Voter History has now been updated in QVF.
39

Electronic Poll Book – Uninstalling the Software
To uninstall the Electronic Poll Book from your computer, click on your Windows Start button and then select Programs/Electronic Poll Book/Uninstall Electronic Poll Book as shown on the screen below. This opens the “Electronic Poll Book Uninstall” screen.
Click the Yes button to complete the uninstall of the Electronic Poll Book.
To delete the files saved to the encrypted flash drive on Election Day, insert the flash drive into your PC and open Windows Explorer.
40

In Windows Explorer, highlight the folder on your encrypted flash drive containing the Electronic Poll Book files. Click File/Delete from the Windows Explorer menu.
Click on the Yes button to confirm the deletion.
41