Embed Size (px)
Citation preview
MGB V8 Roadster restoration project – Report 80
V8 Register – MG Car Club 161014-V8-restoration-Mike-Macartney-Rebuild-Report-80 1
11th
October 2016. Unfortunately the fairies didn’t put the car together overnight!
I still don’t know where to start. I am carefully walking round the garage trying to think of my modus operandi and not damaging any of the newly painted panels. This week I have been tidying up my lower workshop which is a real mess as stuff has been just dumped in there. I need an area to overhaul and paint other bits of the MG where I am not going to damage or get overspray on the newly painted shell. Dugald is coming up to stay next week so he will be able to help me with fitting bits on the shell, and that needs two people. I am still in a dilemma about sound deadening. Is it worth it in an open car? I have taken a lot of extraneous bits of metal off the bodyshell and fitted an aluminium bonnet. Do I want to add weight back on with sound deadening? I may have to purchase another camera. I have used the camera so much with the photos of Dugald’s MGBGTV8 and this MG rebuild that the knob on the top, that adjusts for different types of photos, has lost its writing and I can’t seem to set it to the correct setting. When I went to send the last report to Victor for uploading to the website it was too big to send and I had to use Photoshop to reduce the size of all the photos.
UNUSUAL USES FOR VASELINE
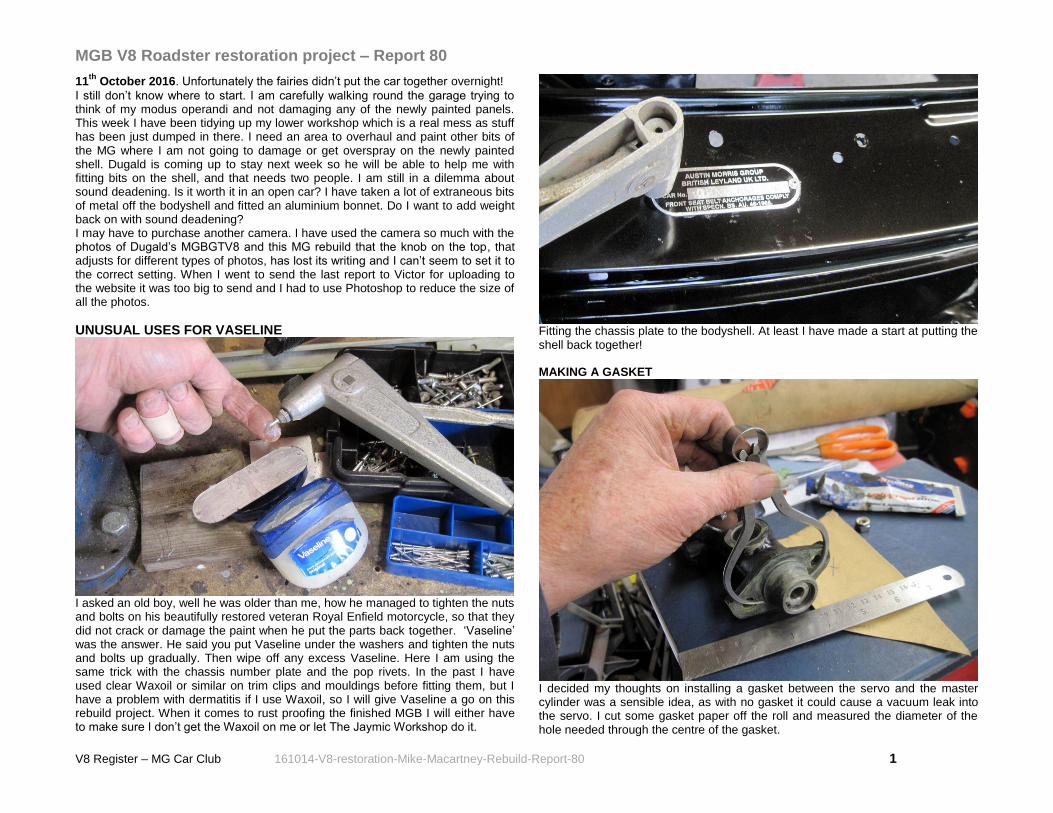
I asked an old boy, well he was older than me, how he managed to tighten the nuts and bolts on his beautifully restored veteran Royal Enfield motorcycle, so that they did not crack or damage the paint when he put the parts back together. ‘Vaseline’ was the answer. He said you put Vaseline under the washers and tighten the nuts and bolts up gradually. Then wipe off any excess Vaseline. Here I am using the same trick with the chassis number plate and the pop rivets. In the past I have used clear Waxoil or similar on trim clips and mouldings before fitting them, but I have a problem with dermatitis if I use Waxoil, so I will give Vaseline a go on this rebuild project. When it comes to rust proofing the finished MGB I will either have to make sure I don’t get the Waxoil on me or let The Jaymic Workshop do it.
Fitting the chassis plate to the bodyshell. At least I have made a start at putting the shell back together! MAKING A GASKET
I decided my thoughts on installing a gasket between the servo and the master cylinder was a sensible idea, as with no gasket it could cause a vacuum leak into the servo. I cut some gasket paper off the roll and measured the diameter of the hole needed through the centre of the gasket.
MGB V8 Roadster restoration project – Report 80
V8 Register – MG Car Club 161014-V8-restoration-Mike-Macartney-Rebuild-Report-80 2
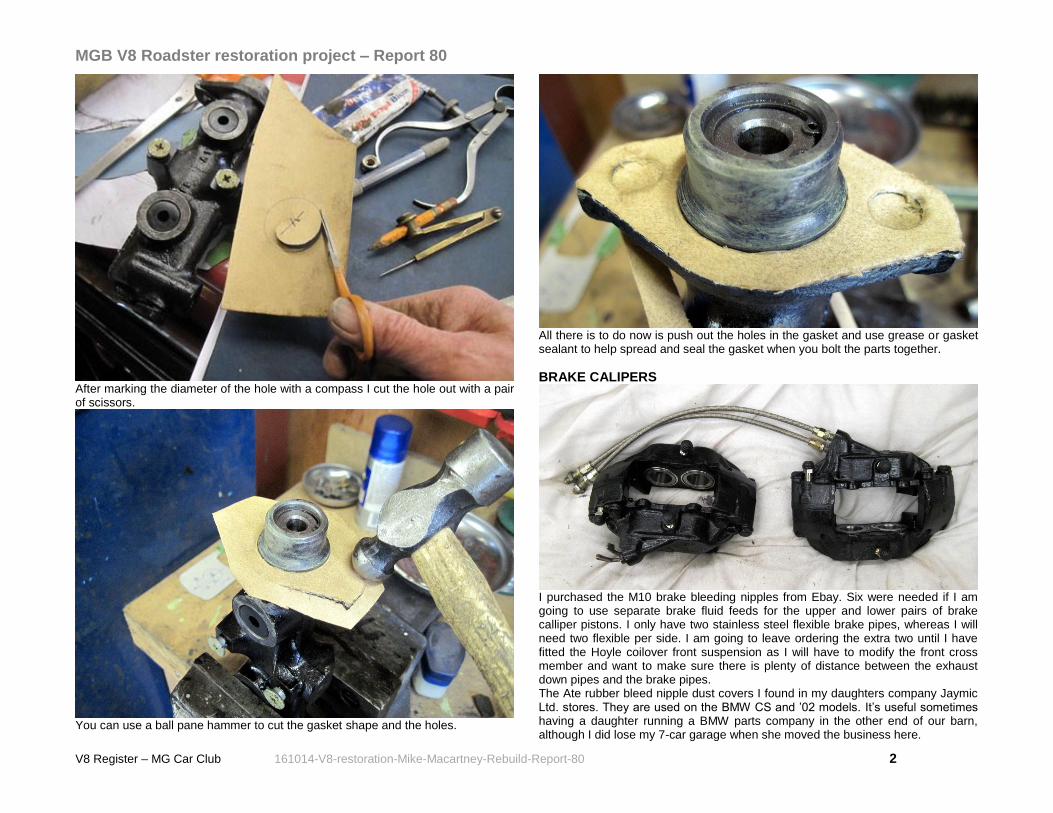
After marking the diameter of the hole with a compass I cut the hole out with a pair of scissors.
You can use a ball pane hammer to cut the gasket shape and the holes.
All there is to do now is push out the holes in the gasket and use grease or gasket sealant to help spread and seal the gasket when you bolt the parts together.
BRAKE CALIPERS
I purchased the M10 brake bleeding nipples from Ebay. Six were needed if I am going to use separate brake fluid feeds for the upper and lower pairs of brake calliper pistons. I only have two stainless steel flexible brake pipes, whereas I will need two flexible per side. I am going to leave ordering the extra two until I have fitted the Hoyle coilover front suspension as I will have to modify the front cross member and want to make sure there is plenty of distance between the exhaust down pipes and the brake pipes. The Ate rubber bleed nipple dust covers I found in my daughters company Jaymic Ltd. stores. They are used on the BMW CS and ’02 models. It’s useful sometimes having a daughter running a BMW parts company in the other end of our barn, although I did lose my 7-car garage when she moved the business here.
MGB V8 Roadster restoration project – Report 80
V8 Register – MG Car Club 161014-V8-restoration-Mike-Macartney-Rebuild-Report-80 3
FRONT CROSSMEMBER FIXINGS & CASTER ANGLE CHANGE Getting the parts out ready for fitting the cross member to the bodyshell I found the special studs, washers and nuts were a bit rusty.
One rusty stud and one just blasted.
On checking the bits that came off when I had taken off the front suspension crossmember there were two extra spacer washers in stainless steel. This must be the two spacers that reduce the caster angle. The previous owner must have bought these or had them made. The reason for changing the castor angle from the original 7 to 4 degrees on the MGB is that with modern radial tyres they make the steering heavy and also that modern radials do not need as much caster effect. It is caster angle that makes the steering return to return to the straight on position when you let go of the steering wheel, as it does with bicycle front forks.
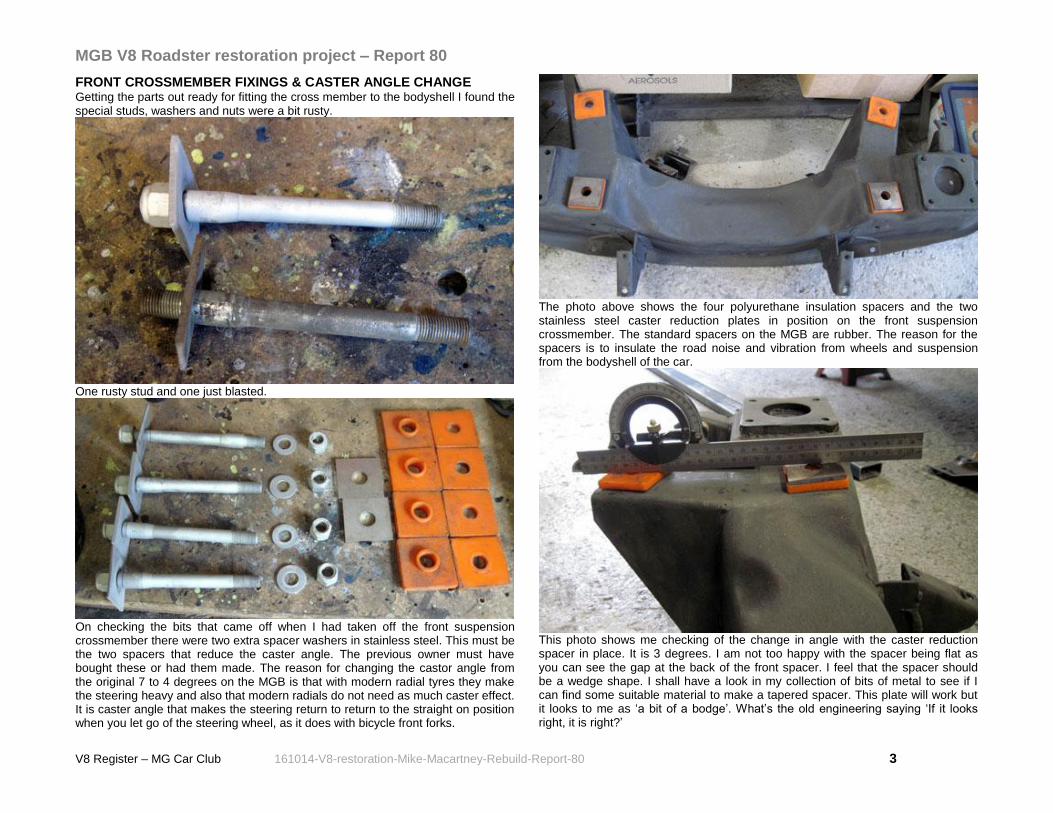
The photo above shows the four polyurethane insulation spacers and the two stainless steel caster reduction plates in position on the front suspension crossmember. The standard spacers on the MGB are rubber. The reason for the spacers is to insulate the road noise and vibration from wheels and suspension from the bodyshell of the car.
This photo shows me checking of the change in angle with the caster reduction spacer in place. It is 3 degrees. I am not too happy with the spacer being flat as you can see the gap at the back of the front spacer. I feel that the spacer should be a wedge shape. I shall have a look in my collection of bits of metal to see if I can find some suitable material to make a tapered spacer. This plate will work but it looks to me as ‘a bit of a bodge’. What’s the old engineering saying ‘If it looks right, it is right?’
MGB V8 Roadster restoration project – Report 80
V8 Register – MG Car Club 161014-V8-restoration-Mike-Macartney-Rebuild-Report-80 4
MODIFYING THE MGB FRONT GRILLE
Old college friend, Barry, marking out the stainless steel mesh grille to replace the original black plastic grille sections.
We looked at various ways of fixing the stainless mesh to the original front grille frame. This rubber section would do the job, but how to fix it in place? Looking through my ‘bits and bobs’ I found some suitable aluminium and rubber strip that was just the right size if I glued them together.
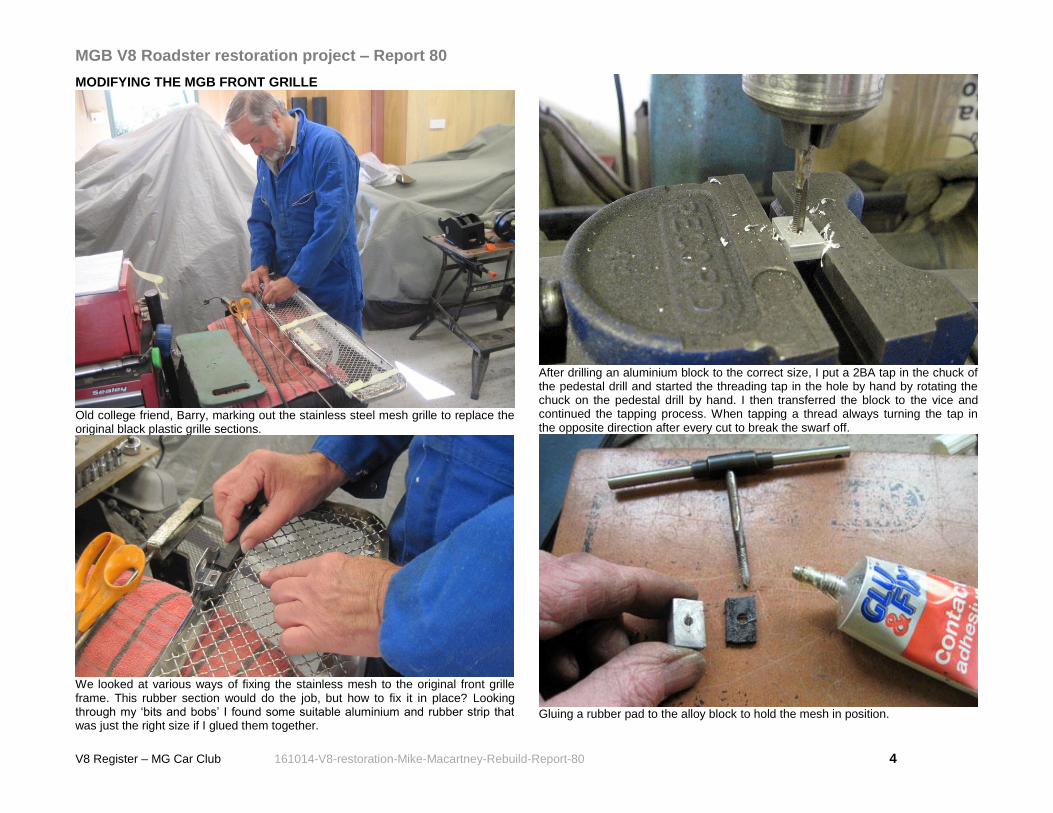
After drilling an aluminium block to the correct size, I put a 2BA tap in the chuck of the pedestal drill and started the threading tap in the hole by hand by rotating the chuck on the pedestal drill by hand. I then transferred the block to the vice and continued the tapping process. When tapping a thread always turning the tap in the opposite direction after every cut to break the swarf off.
Gluing a rubber pad to the alloy block to hold the mesh in position.

MGB V8 Roadster restoration project – Report 80
V8 Register – MG Car Club 161014-V8-restoration-Mike-Macartney-Rebuild-Report-80 5
The 2BA screw, alloy block and rubber strip in position holding the mesh in place at the bottom side of the front grille.
The centre of the grille needed a longer bit of aluminium and rubber.
Sets of taps and dies are a useful addition to a workshop. For the MGB models you need UNF and UNC taps and dies. The RV8 will have metric threads as well.
The bottom of grille mesh supports in place. Below Rivnuts for the top fixings.
MGB V8 Roadster restoration project – Report 80
V8 Register – MG Car Club 161014-V8-restoration-Mike-Macartney-Rebuild-Report-80 6
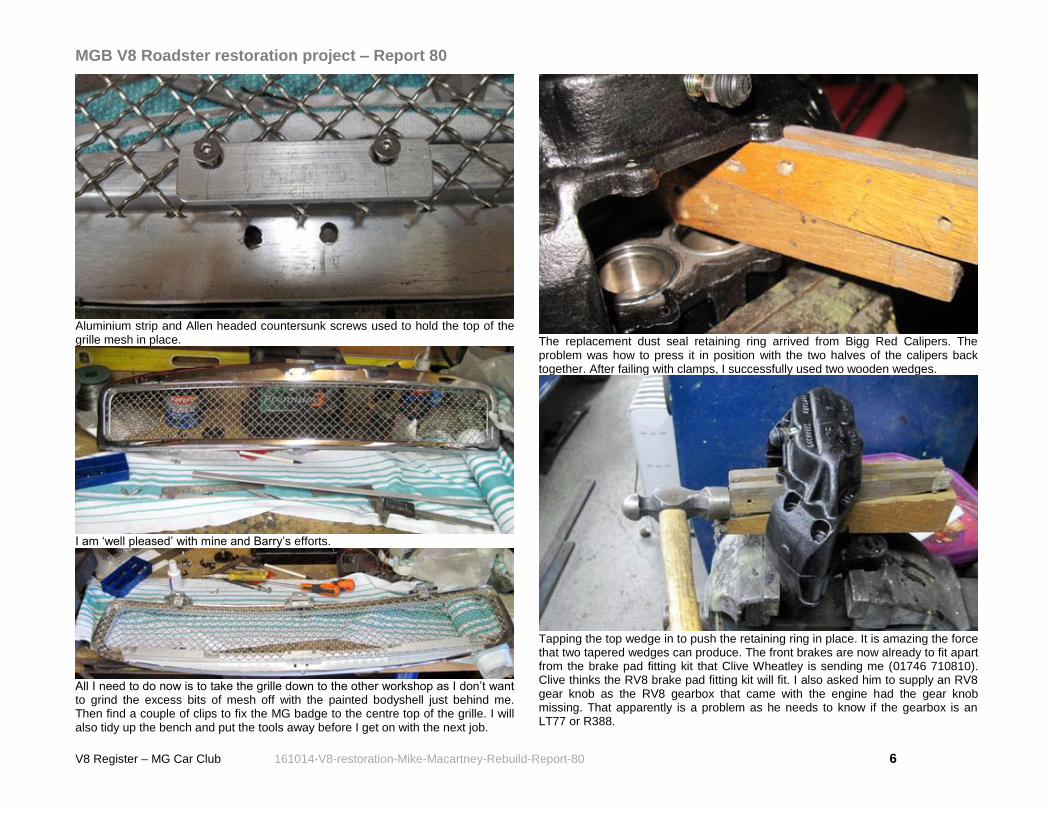
Aluminium strip and Allen headed countersunk screws used to hold the top of the grille mesh in place.
I am ‘well pleased’ with mine and Barry’s efforts.
All I need to do now is to take the grille down to the other workshop as I don’t want to grind the excess bits of mesh off with the painted bodyshell just behind me. Then find a couple of clips to fix the MG badge to the centre top of the grille. I will also tidy up the bench and put the tools away before I get on with the next job.
The replacement dust seal retaining ring arrived from Bigg Red Calipers. The problem was how to press it in position with the two halves of the calipers back together. After failing with clamps, I successfully used two wooden wedges.
Tapping the top wedge in to push the retaining ring in place. It is amazing the force that two tapered wedges can produce. The front brakes are now already to fit apart from the brake pad fitting kit that Clive Wheatley is sending me (01746 710810). Clive thinks the RV8 brake pad fitting kit will fit. I also asked him to supply an RV8 gear knob as the RV8 gearbox that came with the engine had the gear knob missing. That apparently is a problem as he needs to know if the gearbox is an LT77 or R388.
MGB V8 Roadster restoration project – Report 80
V8 Register – MG Car Club 161014-V8-restoration-Mike-Macartney-Rebuild-Report-80 7
Now I need to get to the engine and gearbox to try and find out which gearbox it is. Nothing is ever simple!
CLEANING UP THE GEARBOX CROSS MEMBERS Yes, I have two cross members the one that came with the original car and the one that came with RV8 engine and gearbox.
You can see in the photo above that they are similar, but the RV8 one will not line up with the holes in the chassis rails. I always thought that the RV8 and MGB bodyshells were basically very similar. The RV8 crossmember is half a hole too long when you try to fit it to the MGB bodyshell? I know the one that came with the car fits so I will clean that one up to use.
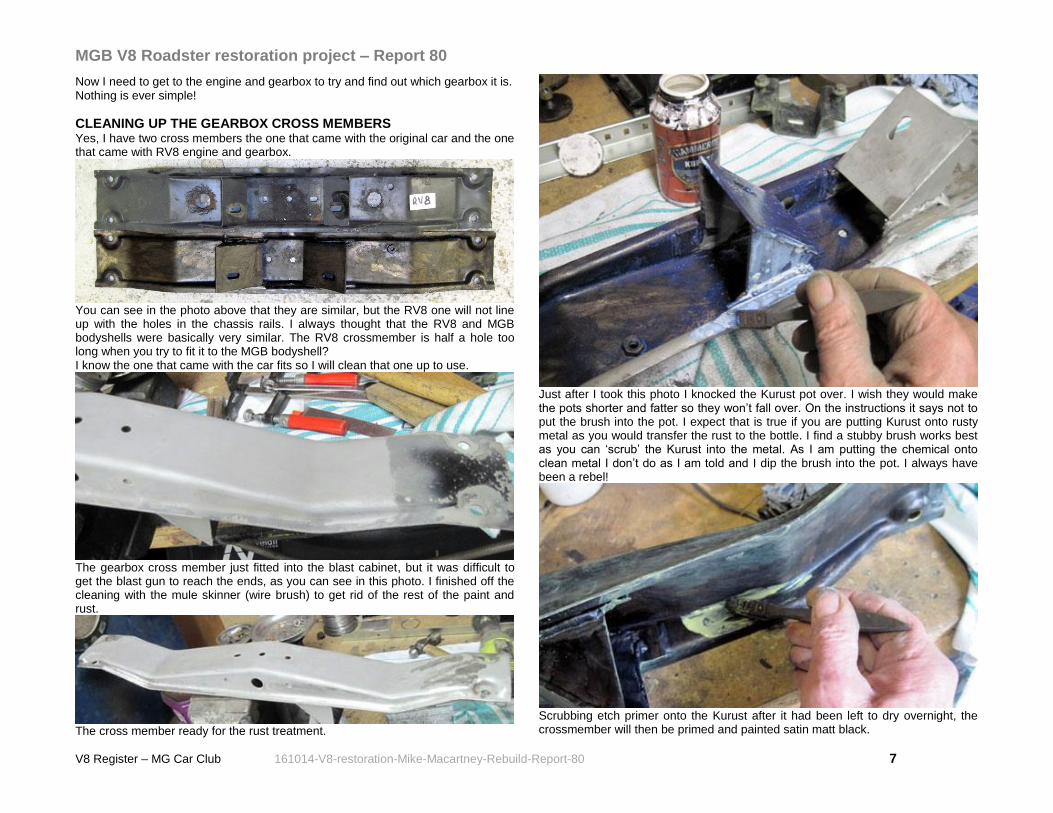
The gearbox cross member just fitted into the blast cabinet, but it was difficult to get the blast gun to reach the ends, as you can see in this photo. I finished off the cleaning with the mule skinner (wire brush) to get rid of the rest of the paint and rust.
The cross member ready for the rust treatment.
Just after I took this photo I knocked the Kurust pot over. I wish they would make the pots shorter and fatter so they won’t fall over. On the instructions it says not to put the brush into the pot. I expect that is true if you are putting Kurust onto rusty metal as you would transfer the rust to the bottle. I find a stubby brush works best as you can ‘scrub’ the Kurust into the metal. As I am putting the chemical onto clean metal I don’t do as I am told and I dip the brush into the pot. I always have been a rebel!
Scrubbing etch primer onto the Kurust after it had been left to dry overnight, the crossmember will then be primed and painted satin matt black.

MGB V8 Roadster restoration project – Report 80
V8 Register – MG Car Club 161014-V8-restoration-Mike-Macartney-Rebuild-Report-80 8
REFURBISHING THE HEADLIGHTS
As you can see the headlamp bowls were a bit of a mess. The bowls being past there ‘sell by date’.
I bought Wipac plastic bowls from Moss-Europe. No instructions came with these. You will laugh later when you see what I did!
Although the backing for the light unit is cheap to buy I decided to blast them in the cabinet.
After an hour’s work in the blast cabinet they looked fine. I ‘Kurusted’ them, I etch primed them and put them to the side for painting. When I started assembling the headlights in the Wipac plastic bowls I found the backings weren’t needed –Oh! If you have any comments, suggestions, or tips I can pass on through these reports you can email me at: [email protected] 14th October 2016.