Embed Size (px)
Citation preview
GMC Acadia/Acadia Denali Owner Manual (GMNA-Localizing-U.S./Canada/Mexico-9159268) - 2016 - CRC - 4/16/15
Contents Introduction . . . . . . . . . . . . . . . . . . . . . . 2
In Brief . . . . . . . . . . . . . . . . . . . . . . . . . . . 5
Keys, Doors, and Windows . . . . . 27
Seats and Restraints . . . . . . . . . . . 47
Storage . . . . . . . . . . . . . . . . . . . . . . . . . 97
Instruments and Controls . . . . . . 102
Lighting . . . . . . . . . . . . . . . . . . . . . . . 149
Infotainment System . . . . . . . . . . 156
Climate Controls . . . . . . . . . . . . . . 182
Driving and Operating . . . . . . . . . 193
Vehicle Care . . . . . . . . . . . . . . . . . . 242
Service and Maintenance . . . . . 322
Technical Data . . . . . . . . . . . . . . . . 335
Customer Information . . . . . . . . . 338
Reporting Safety Defects . . . . . . 349
OnStar . . . . . . . . . . . . . . . . . . . . . . . . 352
Index . . . . . . . . . . . . . . . . . . . . 362
GMC Acadia/Acadia Denali Owner Manual (GMNA-Localizing-U.S./Canada/Mexico-9159268) - 2016 - CRC - 4/16/15
2 Introduction
Introduction
The names, logos, emblems,slogans, vehicle model names, andvehicle body designs appearing inthis manual including, but not limitedto, GM, the GM logo, GMC, theGMC Truck Emblem, ACADIA, andDENALI are trademarks and/orservice marks of General MotorsLLC, its subsidiaries, affiliates,or licensors.
For vehicles first sold in Canada,substitute the name “GeneralMotors of Canada Limited” for GMCwherever it appears in this manual.
This manual describes features thatmay or may not be on the vehiclebecause of optional equipment thatwas not purchased on the vehicle,model variants, countryspecifications, features/applicationsthat may not be available in yourregion, or changes subsequent tothe printing of this owner manual.
Refer to the purchasedocumentation relating to yourspecific vehicle to confirm thefeatures.
Keep this manual in the vehicle forquick reference.
Canadian Vehicle Owners
Propriétaires Canadiens
A French language manual can beobtained from your dealer, atwww.helminc.com, or from:
On peut obtenir un exemplaire dece guide en français auprès duconcessionnaire ou à l'adressesavant:
Helm, IncorporatedAttention: Customer Service47911 Halyard DrivePlymouth, MI 48170
Using this ManualTo quickly locate information aboutthe vehicle, use the Index in theback of the manual. It is analphabetical list of what is in themanual and the page number whereit can be found.
Danger, Warning, andCautionWarning messages found on vehiclelabels and in this manual describehazards and what to do to avoid orreduce them.
{ Danger
Danger indicates a hazard with ahigh level of risk which will resultin serious injury or death.
Litho in U.S.A.Part No. 23208705 A First Printing ©2015 General Motors LLC. All Rights Reserved.
GMC Acadia/Acadia Denali Owner Manual (GMNA-Localizing-U.S./Canada/Mexico-9159268) - 2016 - CRC - 4/16/15
Introduction 3
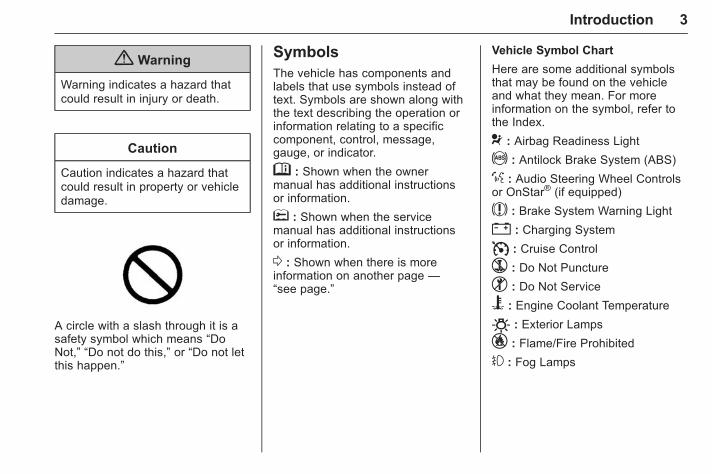
{ Warning
Warning indicates a hazard thatcould result in injury or death.
Caution
Caution indicates a hazard thatcould result in property or vehicledamage.
A circle with a slash through it is asafety symbol which means “DoNot,” “Do not do this,” or “Do not letthis happen.”
SymbolsThe vehicle has components andlabels that use symbols instead oftext. Symbols are shown along withthe text describing the operation orinformation relating to a specificcomponent, control, message,gauge, or indicator.
M : Shown when the ownermanual has additional instructionsor information.
* : Shown when the servicemanual has additional instructionsor information.
0 : Shown when there is moreinformation on another page —“see page.”
Vehicle Symbol Chart
Here are some additional symbolsthat may be found on the vehicleand what they mean. For moreinformation on the symbol, refer tothe Index.
9 : Airbag Readiness Light
! : Antilock Brake System (ABS)
% : Audio Steering Wheel Controlsor OnStar® (if equipped)
$ : Brake System Warning Light
" : Charging System
I : Cruise Control
` : Do Not Puncture
^ : Do Not Service
B : Engine Coolant Temperature
O : Exterior Lamps
_ : Flame/Fire Prohibited
# : Fog Lamps

GMC Acadia/Acadia Denali Owner Manual (GMNA-Localizing-U.S./Canada/Mexico-9159268) - 2016 - CRC - 4/16/15
4 Introduction
. : Fuel Gauge
+ : Fuses
3 : Headlamp High/Low-BeamChanger
j : LATCH System Child Restraints
* : Malfunction Indicator Lamp
: : Oil Pressure
g : Outside Power FoldawayMirrors
} : Power
/ : Remote Vehicle Start
> : Safety Belt Reminders
7 : Tire Pressure Monitor
_ : Tow/Haul Mode
t : Traction Control/StabiliTrak®
a : Under Pressure
M : Windshield Washer Fluid
GMC Acadia/Acadia Denali Owner Manual (GMNA-Localizing-U.S./Canada/Mexico-9159268) - 2016 - CRC - 4/16/15
In Brief 5
In Brief
Instrument PanelInstrument Panel . . . . . . . . . . . . . . . . 6
Initial Drive InformationInitial Drive Information . . . . . . . . . . 8Remote Keyless Entry (RKE)System . . . . . . . . . . . . . . . . . . . . . . . . 8
Remote Vehicle Start . . . . . . . . . . . 8Door Locks . . . . . . . . . . . . . . . . . . . . . 9Liftgate . . . . . . . . . . . . . . . . . . . . . . . . . . 9Windows . . . . . . . . . . . . . . . . . . . . . . . 10Seat Adjustment . . . . . . . . . . . . . . . 10Memory Features . . . . . . . . . . . . . . 11Second Row Seats . . . . . . . . . . . . 12Third Row Seats . . . . . . . . . . . . . . . 12Heated and Cooled FrontSeats . . . . . . . . . . . . . . . . . . . . . . . . . 13
Head Restraint Adjustment . . . . 13Safety Belts . . . . . . . . . . . . . . . . . . . . 13Passenger Sensing System . . . 14Mirror Adjustment . . . . . . . . . . . . . . 14Steering Wheel Adjustment . . . . 15Interior Lighting . . . . . . . . . . . . . . . . 16Exterior Lighting . . . . . . . . . . . . . . . 17Windshield Wiper/Washer . . . . . . 17Climate Controls . . . . . . . . . . . . . . . 18Transmission . . . . . . . . . . . . . . . . . . 19
Vehicle FeaturesRadio(s) . . . . . . . . . . . . . . . . . . . . . . . 20Satellite Radio . . . . . . . . . . . . . . . . . 21Portable Audio Devices . . . . . . . . 21Bluetooth® . . . . . . . . . . . . . . . . . . . . . 21Steering Wheel Controls . . . . . . . 21Cruise Control . . . . . . . . . . . . . . . . . 22Forward Collision Alert (FCA)System . . . . . . . . . . . . . . . . . . . . . . . 22
Lane DepartureWarning (LDW) . . . . . . . . . . . . . . . 22
Side Blind ZoneAlert (SBZA) . . . . . . . . . . . . . . . . . . 23
Rear Vision Camera (RVC) . . . . 23Rear Cross Traffic Alert (RCTA)System . . . . . . . . . . . . . . . . . . . . . . . 23
Parking Assist . . . . . . . . . . . . . . . . . 23Power Outlets . . . . . . . . . . . . . . . . . 23Universal Remote System . . . . . 24Sunroof . . . . . . . . . . . . . . . . . . . . . . . . 24
Performance and MaintenanceTraction Control/ElectronicStability Control . . . . . . . . . . . . . . 24
Tire Pressure Monitor . . . . . . . . . . 25Engine Oil Life System . . . . . . . . 25Driving for Better FuelEconomy . . . . . . . . . . . . . . . . . . . . . 25
Roadside AssistanceProgram . . . . . . . . . . . . . . . . . . . . . . 26
GMC Acadia/Acadia Denali Owner Manual (GMNA-Localizing-U.S./Canada/Mexico-9159268) - 2016 - CRC - 4/16/15
6 In Brief
Instrument Panel
GMC Acadia/Acadia Denali Owner Manual (GMNA-Localizing-U.S./Canada/Mexico-9159268) - 2016 - CRC - 4/16/15
In Brief 7
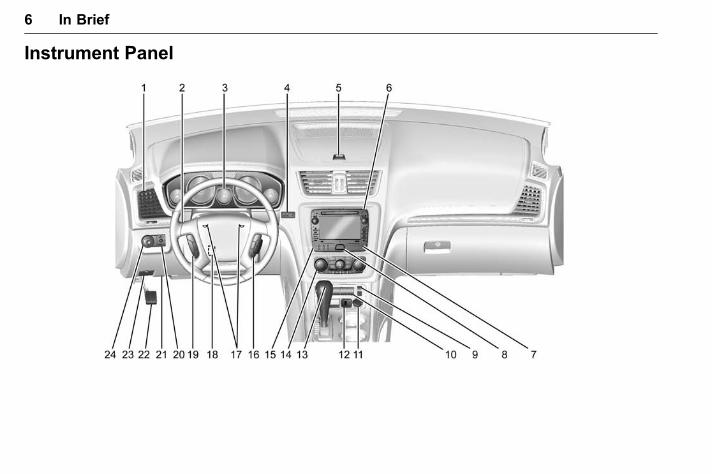
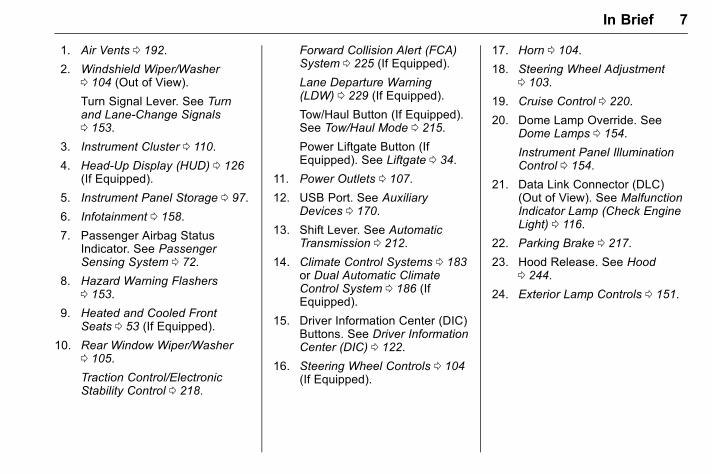
1. Air Vents 0 192.
2. Windshield Wiper/Washer0 104 (Out of View).
Turn Signal Lever. See Turnand Lane-Change Signals0 153.
3. Instrument Cluster 0 110.
4. Head-Up Display (HUD) 0 126(If Equipped).
5. Instrument Panel Storage 0 97.
6. Infotainment 0 158.
7. Passenger Airbag StatusIndicator. See PassengerSensing System 0 72.
8. Hazard Warning Flashers0 153.
9. Heated and Cooled FrontSeats 0 53 (If Equipped).
10. Rear Window Wiper/Washer0 105.
Traction Control/ElectronicStability Control 0 218.
Forward Collision Alert (FCA)System 0 225 (If Equipped).
Lane Departure Warning(LDW) 0 229 (If Equipped).
Tow/Haul Button (If Equipped).See Tow/Haul Mode 0 215.
Power Liftgate Button (IfEquipped). See Liftgate 0 34.
11. Power Outlets 0 107.
12. USB Port. See AuxiliaryDevices 0 170.
13. Shift Lever. See AutomaticTransmission 0 212.
14. Climate Control Systems 0 183or Dual Automatic ClimateControl System 0 186 (IfEquipped).
15. Driver Information Center (DIC)Buttons. See Driver InformationCenter (DIC) 0 122.
16. Steering Wheel Controls 0 104(If Equipped).
17. Horn 0 104.
18. Steering Wheel Adjustment0 103.
19. Cruise Control 0 220.
20. Dome Lamp Override. SeeDome Lamps 0 154.
Instrument Panel IlluminationControl 0 154.
21. Data Link Connector (DLC)(Out of View). See MalfunctionIndicator Lamp (Check EngineLight) 0 116.
22. Parking Brake 0 217.
23. Hood Release. See Hood0 244.
24. Exterior Lamp Controls 0 151.
GMC Acadia/Acadia Denali Owner Manual (GMNA-Localizing-U.S./Canada/Mexico-9159268) - 2016 - CRC - 4/16/15
8 In Brief
Initial DriveInformationThis section provides a briefoverview about some of theimportant features that may or maynot be on your specific vehicle.
For more detailed information, referto each of the features which can befound later in this owner manual.
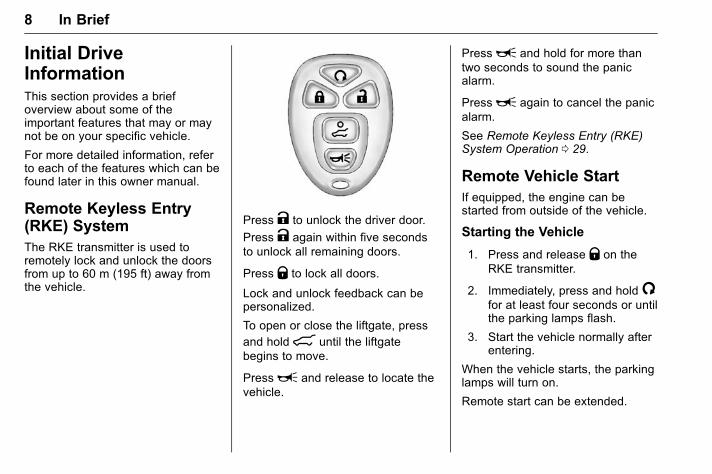
Remote Keyless Entry(RKE) SystemThe RKE transmitter is used toremotely lock and unlock the doorsfrom up to 60 m (195 ft) away fromthe vehicle.
Press K to unlock the driver door.
Press K again within five secondsto unlock all remaining doors.
Press Q to lock all doors.
Lock and unlock feedback can bepersonalized.
To open or close the liftgate, pressand hold8 until the liftgatebegins to move.
PressL and release to locate thevehicle.
PressL and hold for more thantwo seconds to sound the panicalarm.
PressL again to cancel the panicalarm.
See Remote Keyless Entry (RKE)System Operation 0 29.
Remote Vehicle StartIf equipped, the engine can bestarted from outside of the vehicle.
Starting the Vehicle
1. Press and release Q on theRKE transmitter.
2. Immediately, press and hold /for at least four seconds or untilthe parking lamps flash.
3. Start the vehicle normally afterentering.
When the vehicle starts, the parkinglamps will turn on.
Remote start can be extended.
GMC Acadia/Acadia Denali Owner Manual (GMNA-Localizing-U.S./Canada/Mexico-9159268) - 2016 - CRC - 4/16/15
In Brief 9
Canceling a Remote Start
To cancel a remote start, do one ofthe following:
. Press and hold/ until theparking lamps turn off.
. Turn on the hazard warningflashers.
. Turn the vehicle on and then off.
See Remote Vehicle Start 0 31.
Door LocksTo lock or unlock a door manually:
. From the inside use the doorlock knob on the window sill.
. From the outside turn the keytoward the front or rear of thevehicle, or press the K or Qbutton on the Remote KeylessEntry (RKE) transmitter.
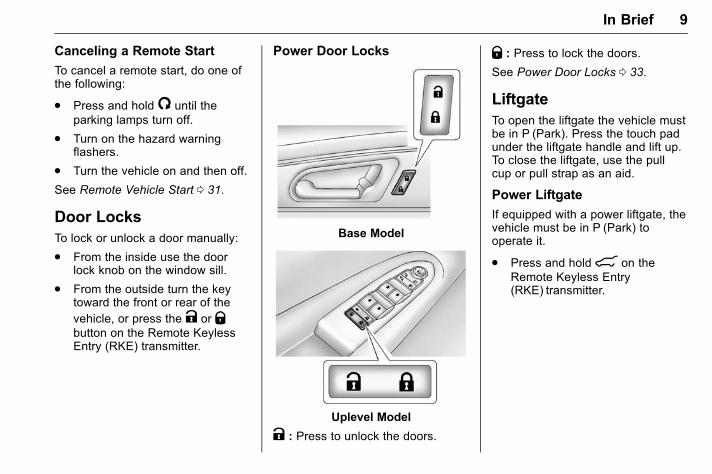
Power Door Locks
Base Model
Uplevel Model
K : Press to unlock the doors.
Q : Press to lock the doors.
See Power Door Locks 0 33.
LiftgateTo open the liftgate the vehicle mustbe in P (Park). Press the touch padunder the liftgate handle and lift up.To close the liftgate, use the pullcup or pull strap as an aid.
Power Liftgate
If equipped with a power liftgate, thevehicle must be in P (Park) tooperate it.
. Press and hold8 on theRemote Keyless Entry(RKE) transmitter.

GMC Acadia/Acadia Denali Owner Manual (GMNA-Localizing-U.S./Canada/Mexico-9159268) - 2016 - CRC - 4/16/15
10 In Brief
. Press O.
. Press the touch pad on theoutside liftgate handle.
See Liftgate 0 34.
Windows
Uplevel Shown, Base Similar
Press the switch to lower thewindow. Pull the switch up toraise it.
For more information, see PowerWindows 0 43.
Seat Adjustment
Manual Seats
1. Seat Adjustment Handle2. Driver Seat Height
Adjustment Lever3. Seatback Lever
To adjust a manual seat:
1. Lift the handle (1) under theseat to unlock it.
2. Slide the seat to the desiredposition, and then release thehandle (1).
GMC Acadia/Acadia Denali Owner Manual (GMNA-Localizing-U.S./Canada/Mexico-9159268) - 2016 - CRC - 4/16/15
In Brief 11
3. Try to move the seat back andforth to be sure it is locked inplace.
Move the lever (2) up or down toraise or lower the seat.
Use the lever (3) to adjust theseatback.
See Seat Adjustment 0 49 andReclining Seatbacks 0 51.
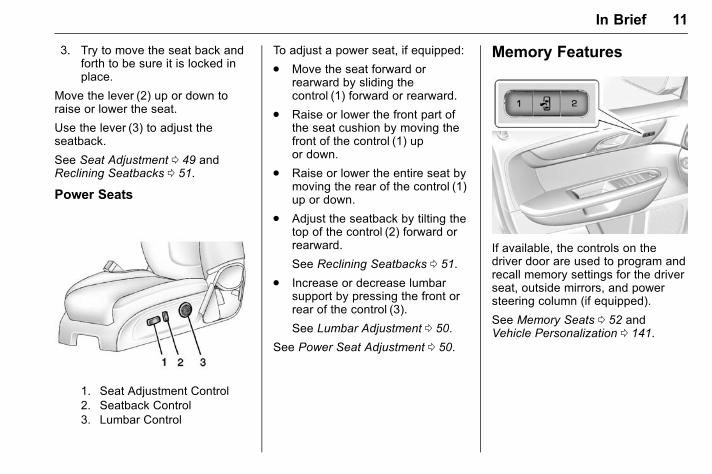
Power Seats
1. Seat Adjustment Control2. Seatback Control3. Lumbar Control
To adjust a power seat, if equipped:
. Move the seat forward orrearward by sliding thecontrol (1) forward or rearward.
. Raise or lower the front part ofthe seat cushion by moving thefront of the control (1) upor down.
. Raise or lower the entire seat bymoving the rear of the control (1)up or down.
. Adjust the seatback by tilting thetop of the control (2) forward orrearward.
See Reclining Seatbacks 0 51.
. Increase or decrease lumbarsupport by pressing the front orrear of the control (3).
See Lumbar Adjustment 0 50.
See Power Seat Adjustment 0 50.
Memory Features
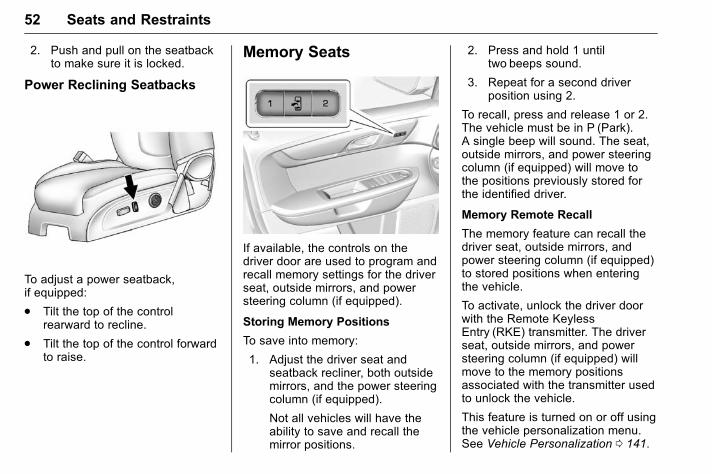
If available, the controls on thedriver door are used to program andrecall memory settings for the driverseat, outside mirrors, and powersteering column (if equipped).
See Memory Seats 0 52 andVehicle Personalization 0 141.
GMC Acadia/Acadia Denali Owner Manual (GMNA-Localizing-U.S./Canada/Mexico-9159268) - 2016 - CRC - 4/16/15
12 In Brief
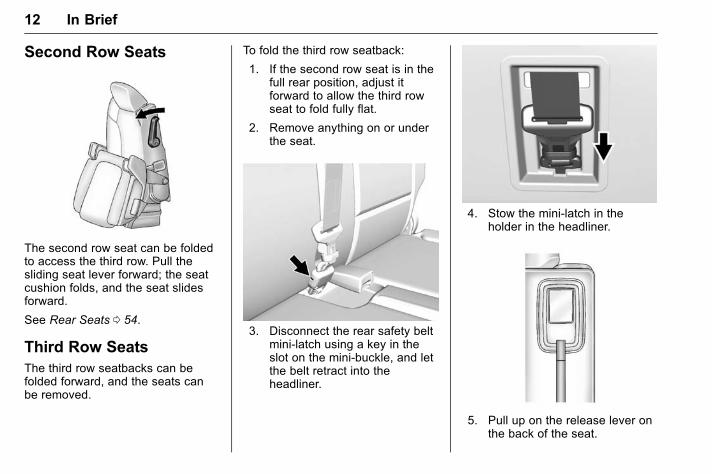
Second Row Seats
The second row seat can be foldedto access the third row. Pull thesliding seat lever forward; the seatcushion folds, and the seat slidesforward.
See Rear Seats 0 54.
Third Row SeatsThe third row seatbacks can befolded forward, and the seats canbe removed.
To fold the third row seatback:
1. If the second row seat is in thefull rear position, adjust itforward to allow the third rowseat to fold fully flat.
2. Remove anything on or underthe seat.
3. Disconnect the rear safety beltmini-latch using a key in theslot on the mini-buckle, and letthe belt retract into theheadliner.
4. Stow the mini-latch in theholder in the headliner.
5. Pull up on the release lever onthe back of the seat.
GMC Acadia/Acadia Denali Owner Manual (GMNA-Localizing-U.S./Canada/Mexico-9159268) - 2016 - CRC - 4/16/15
In Brief 13
6. Push the seatback forward tolay flat.
See Third Row Seats 0 56.
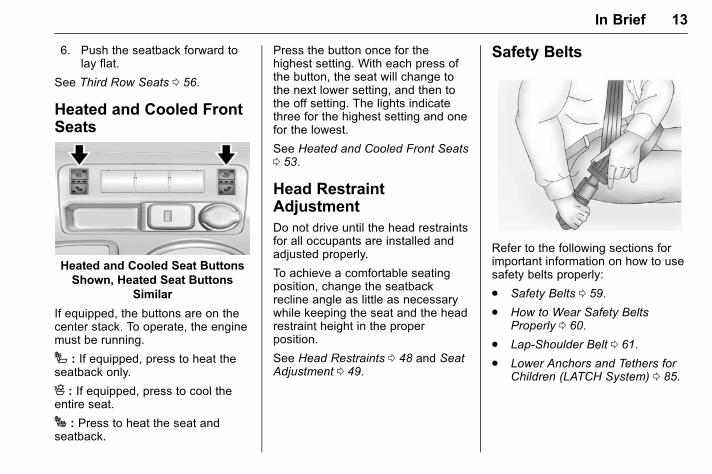
Heated and Cooled FrontSeats
Heated and Cooled Seat ButtonsShown, Heated Seat Buttons
Similar
If equipped, the buttons are on thecenter stack. To operate, the enginemust be running.
I : If equipped, press to heat theseatback only.
H : If equipped, press to cool theentire seat.
J : Press to heat the seat andseatback.
Press the button once for thehighest setting. With each press ofthe button, the seat will change tothe next lower setting, and then tothe off setting. The lights indicatethree for the highest setting and onefor the lowest.
See Heated and Cooled Front Seats0 53.
Head RestraintAdjustmentDo not drive until the head restraintsfor all occupants are installed andadjusted properly.
To achieve a comfortable seatingposition, change the seatbackrecline angle as little as necessarywhile keeping the seat and the headrestraint height in the properposition.
See Head Restraints 0 48 and SeatAdjustment 0 49.
Safety Belts
Refer to the following sections forimportant information on how to usesafety belts properly:
. Safety Belts 0 59.
. How to Wear Safety BeltsProperly 0 60.
. Lap-Shoulder Belt 0 61.
. Lower Anchors and Tethers forChildren (LATCH System) 0 85.
GMC Acadia/Acadia Denali Owner Manual (GMNA-Localizing-U.S./Canada/Mexico-9159268) - 2016 - CRC - 4/16/15
14 In Brief
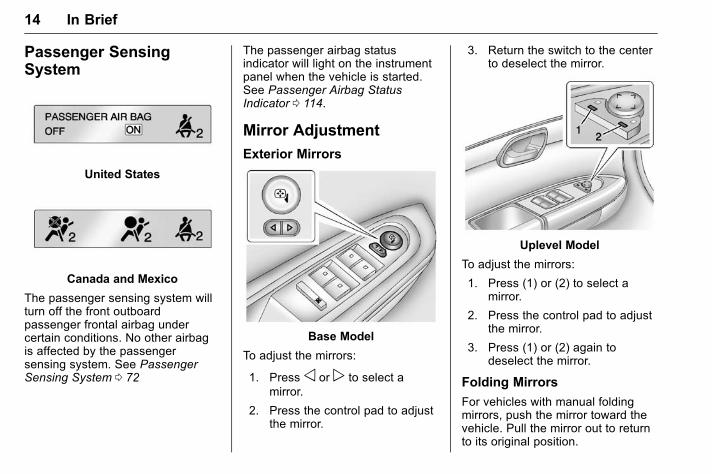
Passenger SensingSystem
United States
Canada and Mexico
The passenger sensing system willturn off the front outboardpassenger frontal airbag undercertain conditions. No other airbagis affected by the passengersensing system. See PassengerSensing System 0 72
The passenger airbag statusindicator will light on the instrumentpanel when the vehicle is started.See Passenger Airbag StatusIndicator 0 114.
Mirror Adjustment
Exterior Mirrors
Base Model
To adjust the mirrors:
1. Press o or p to select amirror.
2. Press the control pad to adjustthe mirror.
3. Return the switch to the centerto deselect the mirror.
Uplevel Model
To adjust the mirrors:
1. Press (1) or (2) to select amirror.
2. Press the control pad to adjustthe mirror.
3. Press (1) or (2) again todeselect the mirror.
Folding Mirrors
For vehicles with manual foldingmirrors, push the mirror toward thevehicle. Pull the mirror out to returnto its original position.

GMC Acadia/Acadia Denali Owner Manual (GMNA-Localizing-U.S./Canada/Mexico-9159268) - 2016 - CRC - 4/16/15
In Brief 15
For vehicles with power foldingmirrors:
1. Press (1) to fold the mirrors outto the driving position.
2. Press (2) to fold the mirrors into the folded position.
See Folding Mirrors 0 41.
Interior Mirror
Adjustment
Adjust the rearview mirror to clearlyview the area behind the vehicle.
Manual Rearview Mirror
For vehicles with a manual rearviewmirror, push the tab forward fordaytime use and pull it for nighttimeuse to avoid glare from theheadlamps from behind. SeeManual Rearview Mirror 0 42.
Automatic Dimming RearviewMirror
If equipped, the mirror willautomatically reduce the glare fromthe headlamps from behind. Thedimming feature comes on when thevehicle is started. See AutomaticDimming Rearview Mirror 0 42.
Steering WheelAdjustment
1. Pull the lever down.
2. Move the steering wheel upor down.
3. Pull or push the steering wheelcloser or away from you.
4. Push the lever up to lock thesteering wheel in place.
GMC Acadia/Acadia Denali Owner Manual (GMNA-Localizing-U.S./Canada/Mexico-9159268) - 2016 - CRC - 4/16/15
16 In Brief
Power Tilt and TelescopingSteering Wheel
If equipped, the control is on theoutboard side of the steeringcolumn.
Push the control up or down to tiltthe steering wheel up or down.
Push the control forward orrearward to move the steering wheeltoward the front or rear of thevehicle. To set the memory position,see Vehicle Personalization 0 141.
Do not adjust the steering wheelwhile driving.
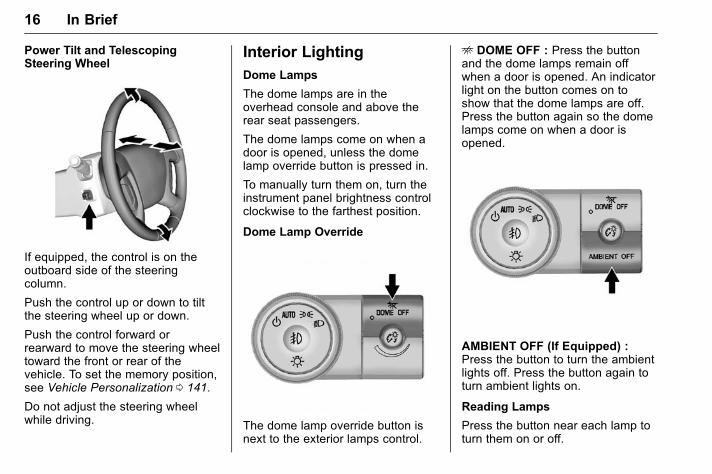
Interior LightingDome Lamps
The dome lamps are in theoverhead console and above therear seat passengers.
The dome lamps come on when adoor is opened, unless the domelamp override button is pressed in.
To manually turn them on, turn theinstrument panel brightness controlclockwise to the farthest position.
Dome Lamp Override
The dome lamp override button isnext to the exterior lamps control.
E DOME OFF : Press the buttonand the dome lamps remain offwhen a door is opened. An indicatorlight on the button comes on toshow that the dome lamps are off.Press the button again so the domelamps come on when a door isopened.
AMBIENT OFF (If Equipped) :Press the button to turn the ambientlights off. Press the button again toturn ambient lights on.
Reading Lamps
Press the button near each lamp toturn them on or off.
GMC Acadia/Acadia Denali Owner Manual (GMNA-Localizing-U.S./Canada/Mexico-9159268) - 2016 - CRC - 4/16/15
In Brief 17
For more information, see:
. Dome Lamps 0 154.
. Instrument Panel IlluminationControl 0 154.
Exterior Lighting
The exterior lamp control is on theinstrument panel, to the left of thesteering wheel.
O : Briefly turn to this position toturn the automatic light control off oron again.
AUTO : Turns the headlamps onautomatically at normal brightness,together with the other exteriorlamps and instrument panel lights.
; : Turns on the parking lampsincluding all lamps, except theheadlamps.
5 : Turns on the headlampstogether with the parking lamps andinstrument panel lights. A warningchime sounds if the driver door isopened when the ignition switch isoff and the headlamps are on.
# : If equipped, it turns the foglamps on or off.
See:
. Exterior Lamp Controls 0 151
. Fog Lamps 0 153
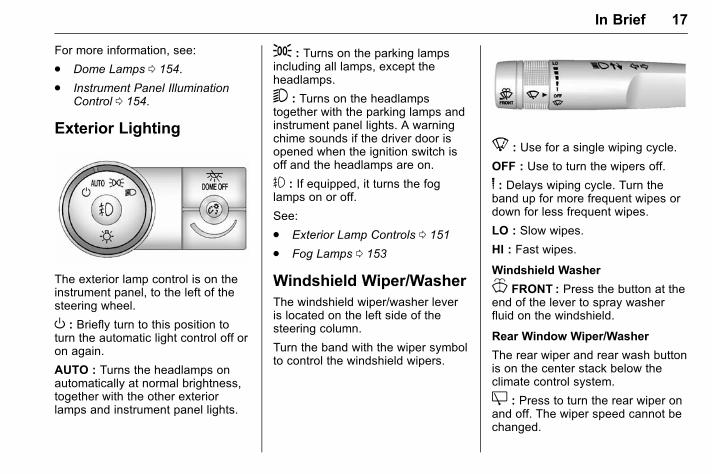
Windshield Wiper/WasherThe windshield wiper/washer leveris located on the left side of thesteering column.
Turn the band with the wiper symbolto control the windshield wipers.
8 : Use for a single wiping cycle.
OFF : Use to turn the wipers off.
6 : Delays wiping cycle. Turn theband up for more frequent wipes ordown for less frequent wipes.
LO : Slow wipes.
HI : Fast wipes.
Windshield Washer
J FRONT : Press the button at theend of the lever to spray washerfluid on the windshield.
Rear Window Wiper/Washer
The rear wiper and rear wash buttonis on the center stack below theclimate control system.
Z : Press to turn the rear wiper onand off. The wiper speed cannot bechanged.
GMC Acadia/Acadia Denali Owner Manual (GMNA-Localizing-U.S./Canada/Mexico-9159268) - 2016 - CRC - 4/16/15
18 In Brief
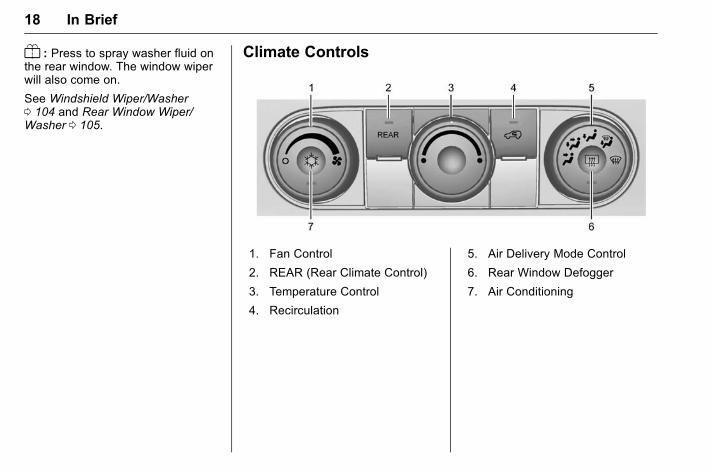
Y : Press to spray washer fluid onthe rear window. The window wiperwill also come on.
See Windshield Wiper/Washer0 104 and Rear Window Wiper/Washer 0 105.
Climate Controls
1. Fan Control
2. REAR (Rear Climate Control)
3. Temperature Control
4. Recirculation
5. Air Delivery Mode Control
6. Rear Window Defogger
7. Air Conditioning
GMC Acadia/Acadia Denali Owner Manual (GMNA-Localizing-U.S./Canada/Mexico-9159268) - 2016 - CRC - 4/16/15
In Brief 19
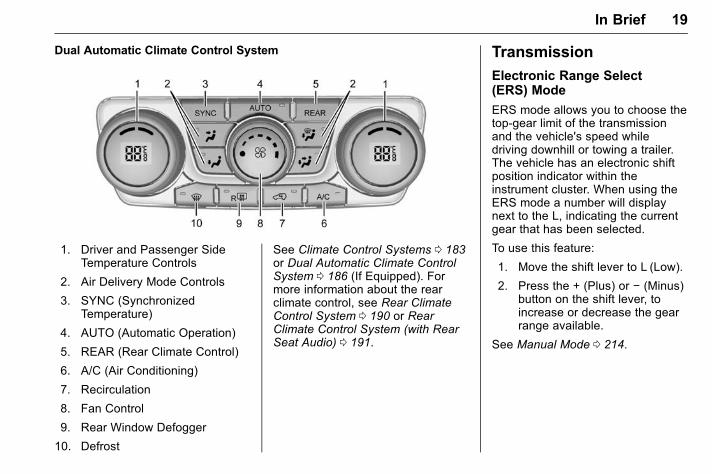
Dual Automatic Climate Control System
1. Driver and Passenger SideTemperature Controls
2. Air Delivery Mode Controls
3. SYNC (SynchronizedTemperature)
4. AUTO (Automatic Operation)
5. REAR (Rear Climate Control)
6. A/C (Air Conditioning)
7. Recirculation
8. Fan Control
9. Rear Window Defogger
10. Defrost
See Climate Control Systems 0 183or Dual Automatic Climate ControlSystem 0 186 (If Equipped). Formore information about the rearclimate control, see Rear ClimateControl System 0 190 or RearClimate Control System (with RearSeat Audio) 0 191.
Transmission
Electronic Range Select(ERS) Mode
ERS mode allows you to choose thetop-gear limit of the transmissionand the vehicle's speed whiledriving downhill or towing a trailer.The vehicle has an electronic shiftposition indicator within theinstrument cluster. When using theERS mode a number will displaynext to the L, indicating the currentgear that has been selected.
To use this feature:
1. Move the shift lever to L (Low).
2. Press the + (Plus) or − (Minus)button on the shift lever, toincrease or decrease the gearrange available.
See Manual Mode 0 214.
GMC Acadia/Acadia Denali Owner Manual (GMNA-Localizing-U.S./Canada/Mexico-9159268) - 2016 - CRC - 4/16/15
20 In Brief
Vehicle Features
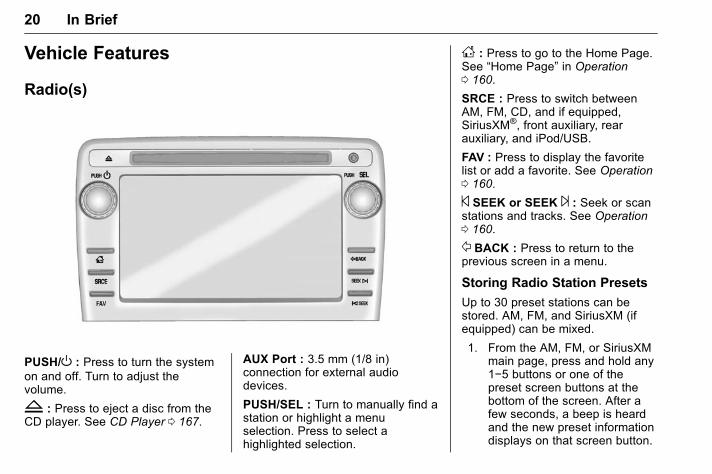
Radio(s)
PUSH/O : Press to turn the systemon and off. Turn to adjust thevolume.
Z : Press to eject a disc from theCD player. See CD Player 0 167.
AUX Port : 3.5 mm (1/8 in)connection for external audiodevices.
PUSH/SEL : Turn to manually find astation or highlight a menuselection. Press to select ahighlighted selection.
D : Press to go to the Home Page.See “Home Page” in Operation0 160.
SRCE : Press to switch betweenAM, FM, CD, and if equipped,SiriusXM®, front auxiliary, rearauxiliary, and iPod/USB.
FAV : Press to display the favoritelist or add a favorite. See Operation0 160.
© SEEK or SEEK ¨ : Seek or scanstations and tracks. See Operation0 160.
/ BACK : Press to return to theprevious screen in a menu.
Storing Radio Station Presets
Up to 30 preset stations can bestored. AM, FM, and SiriusXM (ifequipped) can be mixed.
1. From the AM, FM, or SiriusXMmain page, press and hold any1−5 buttons or one of thepreset screen buttons at thebottom of the screen. After afew seconds, a beep is heardand the new preset informationdisplays on that screen button.
GMC Acadia/Acadia Denali Owner Manual (GMNA-Localizing-U.S./Canada/Mexico-9159268) - 2016 - CRC - 4/16/15
In Brief 21
2. Repeat for each preset.
See AM-FM Radio 0 163.
Setting the Clock
See Clock 0 107.
Satellite RadioIf equipped, vehicles with aSiriusXM® satellite radio tuner and avalid SiriusXM satellite radiosubscription can receive SiriusXMprogramming.
SiriusXM Satellite RadioService
SiriusXM is a satellite radio servicebased in the 48 contiguous UnitedStates and 10 Canadian provinces.SiriusXM satellite radio has a widevariety of programming andcommercial-free music, coast tocoast, and in digital-quality sound.A fee is required to receive theSiriusXM service.
Refer to:
. www.siriusxm.com or call1-866-635-2349 (U.S.).
. www.xmradio.ca or call1-877-209-0079 (Canada).
See Satellite Radio 0 166.
Portable Audio DevicesThe vehicle has a 3.5 mm (1/8 in)auxiliary input jack on the faceplateand a USB port in the center stack.External devices such as iPods,laptop computers, MP3 players, CDchangers, USB storage devices,etc. can be connected to theauxiliary port using a 3.5 mm (1/8 in)input jack or the USB portdepending on the audio system.
If equipped, there are two USBports on the rear of the centerconsole that can be used forcharging only. They can chargedevices that draw 2.1 amps or less.See the device’s owner manual forthe specification.
See Auxiliary Devices 0 170.
Bluetooth®
The Bluetooth® system allows userswith a Bluetooth-enabled mobilephone to make and receivehands-free calls using the vehicleaudio system and controls.
The Bluetooth-enabled mobilephone must be paired with thein-vehicle Bluetooth system before itcan be used in the vehicle. Not allphones will support all functions.
See Bluetooth 0 174.
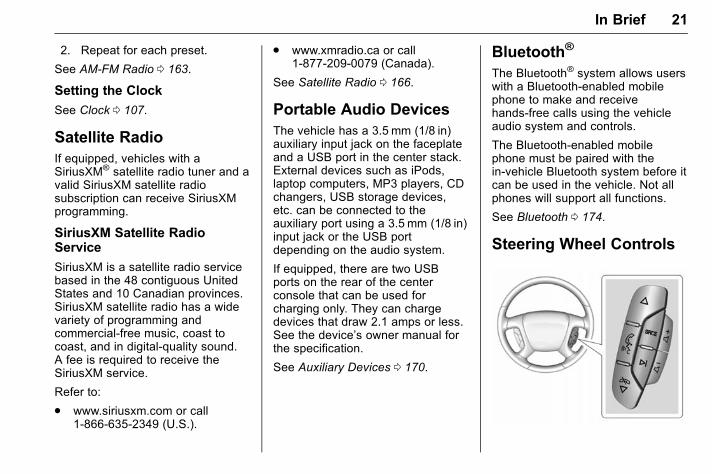
Steering Wheel Controls
GMC Acadia/Acadia Denali Owner Manual (GMNA-Localizing-U.S./Canada/Mexico-9159268) - 2016 - CRC - 4/16/15
22 In Brief
w orc/x : Press to changefavorite radio stations, select trackson a CD, or navigate tracks orfolders on an iPod or USB device.
b/g : Press to interact withBluetooth and OnStar®, if equipped.
c/x : Press to reject an incomingcall, or end a current call.
SRCE : Press to switch betweenAM, FM, CD, and if equipped,SiriusXM®, front auxiliary, rearauxiliary, and iPod/USB.
Press and hold to mute/pause thesystem.
¨ : Press to seek the next radiostation, track, or chapter whilesourced to the CD slot, or to selecttracks and folders on an iPod orUSB device.
+ e or − e : Press to increase or todecrease the volume.
See Steering Wheel Controls 0 104.
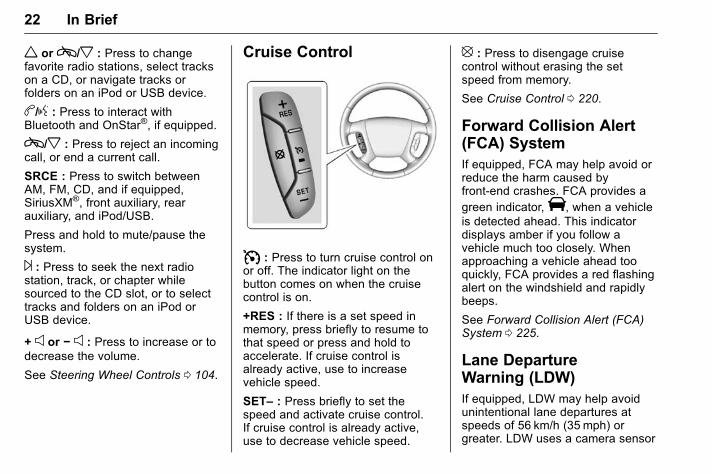
Cruise Control
I : Press to turn cruise control onor off. The indicator light on thebutton comes on when the cruisecontrol is on.
+RES : If there is a set speed inmemory, press briefly to resume tothat speed or press and hold toaccelerate. If cruise control isalready active, use to increasevehicle speed.
SET– : Press briefly to set thespeed and activate cruise control.If cruise control is already active,use to decrease vehicle speed.
[ : Press to disengage cruisecontrol without erasing the setspeed from memory.
See Cruise Control 0 220.
Forward Collision Alert(FCA) SystemIf equipped, FCA may help avoid orreduce the harm caused byfront-end crashes. FCA provides agreen indicator,V, when a vehicleis detected ahead. This indicatordisplays amber if you follow avehicle much too closely. Whenapproaching a vehicle ahead tooquickly, FCA provides a red flashingalert on the windshield and rapidlybeeps.
See Forward Collision Alert (FCA)System 0 225.
Lane DepartureWarning (LDW)If equipped, LDW may help avoidunintentional lane departures atspeeds of 56 km/h (35 mph) orgreater. LDW uses a camera sensor
GMC Acadia/Acadia Denali Owner Manual (GMNA-Localizing-U.S./Canada/Mexico-9159268) - 2016 - CRC - 4/16/15
In Brief 23
to detect the lane markings. TheLDW light, @, is green if a lanemarking is detected. If the vehicledeparts the lane without using a turnsignal in that direction, the light willchange to amber and flash. Inaddition, beeps will sound.
See Lane Departure Warning (LDW)0 229.
Side Blind ZoneAlert (SBZA)If equipped, SBZA will detectmoving vehicles in the next laneover in the vehicle's side blind zonearea. When this happens, the SBZAdisplay will light up in thecorresponding outside side mirrorand will flash if the turn signal is on.
See Side Blind Zone Alert (SBZA)0 227.
Rear VisionCamera (RVC)If equipped, RVC displays a view ofthe area behind the vehicle, on thecenter stack display, when thevehicle is shifted into R (Reverse).
See Rear Vision Camera (RVC)0 222.
Rear Cross Traffic Alert(RCTA) SystemIf equipped, the RCTA system usesa triangle with an arrow displayedon the RVC screen to warn of trafficbehind your vehicle that may crossyour vehicle's path while inR (Reverse). In addition, beeps willsound.
See “Rear Cross Traffic Alert(RCTA)” under Rear Vision Camera(RVC) 0 222.
Parking AssistIf equipped, Rear Parking Assist(RPA) uses sensors on the rearbumper to assist with parking andavoiding objects while in
R (Reverse). It operates at speedsless than 8 km/h (5 mph) and usesaudible beeps to provide distanceand system information.
Keep the sensors on the vehicle'srear bumper clean to ensure properoperation.
See Parking Assist 0 224.
Power OutletsThe vehicle has 12-volt accessorypower outlets, which can be used toplug in electrical equipment, such asa cell phone or MP3 player.
The power outlets are located:
. On the center stack below theclimate controls.
. Inside the center console.
. At the rear of the center console.
. In the rear cargo area.
To use the outlets, remove thecover.
See Power Outlets 0 107.
GMC Acadia/Acadia Denali Owner Manual (GMNA-Localizing-U.S./Canada/Mexico-9159268) - 2016 - CRC - 4/16/15
24 In Brief
Universal Remote System
If equipped, the Universal HomeRemote System allows for garagedoor openers, security systems, andhome automation devices to beprogrammed to work with thesebuttons in the vehicle.
See Universal Remote System0 147.
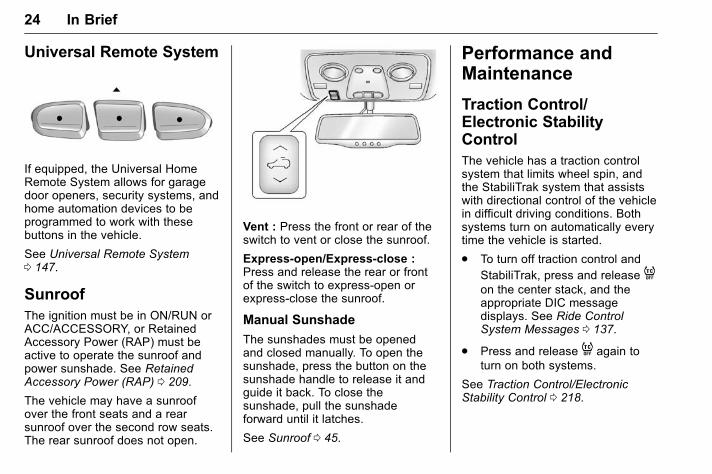
SunroofThe ignition must be in ON/RUN orACC/ACCESSORY, or RetainedAccessory Power (RAP) must beactive to operate the sunroof andpower sunshade. See RetainedAccessory Power (RAP) 0 209.
The vehicle may have a sunroofover the front seats and a rearsunroof over the second row seats.The rear sunroof does not open.
Vent : Press the front or rear of theswitch to vent or close the sunroof.
Express-open/Express-close :Press and release the rear or frontof the switch to express-open orexpress-close the sunroof.
Manual Sunshade
The sunshades must be openedand closed manually. To open thesunshade, press the button on thesunshade handle to release it andguide it back. To close thesunshade, pull the sunshadeforward until it latches.
See Sunroof 0 45.
Performance andMaintenance
Traction Control/Electronic StabilityControlThe vehicle has a traction controlsystem that limits wheel spin, andthe StabiliTrak system that assistswith directional control of the vehiclein difficult driving conditions. Bothsystems turn on automatically everytime the vehicle is started.
. To turn off traction control andStabiliTrak, press and release 4on the center stack, and theappropriate DIC messagedisplays. See Ride ControlSystem Messages 0 137.
. Press and release 4 again toturn on both systems.
See Traction Control/ElectronicStability Control 0 218.
GMC Acadia/Acadia Denali Owner Manual (GMNA-Localizing-U.S./Canada/Mexico-9159268) - 2016 - CRC - 4/16/15
In Brief 25
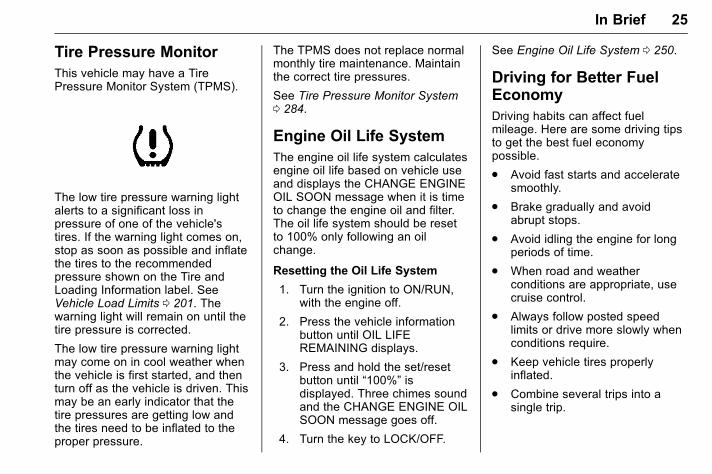
Tire Pressure MonitorThis vehicle may have a TirePressure Monitor System (TPMS).
The low tire pressure warning lightalerts to a significant loss inpressure of one of the vehicle'stires. If the warning light comes on,stop as soon as possible and inflatethe tires to the recommendedpressure shown on the Tire andLoading Information label. SeeVehicle Load Limits 0 201. Thewarning light will remain on until thetire pressure is corrected.
The low tire pressure warning lightmay come on in cool weather whenthe vehicle is first started, and thenturn off as the vehicle is driven. Thismay be an early indicator that thetire pressures are getting low andthe tires need to be inflated to theproper pressure.
The TPMS does not replace normalmonthly tire maintenance. Maintainthe correct tire pressures.
See Tire Pressure Monitor System0 284.
Engine Oil Life SystemThe engine oil life system calculatesengine oil life based on vehicle useand displays the CHANGE ENGINEOIL SOON message when it is timeto change the engine oil and filter.The oil life system should be resetto 100% only following an oilchange.
Resetting the Oil Life System
1. Turn the ignition to ON/RUN,with the engine off.
2. Press the vehicle informationbutton until OIL LIFEREMAINING displays.
3. Press and hold the set/resetbutton until “100%” isdisplayed. Three chimes soundand the CHANGE ENGINE OILSOON message goes off.
4. Turn the key to LOCK/OFF.
See Engine Oil Life System 0 250.
Driving for Better FuelEconomyDriving habits can affect fuelmileage. Here are some driving tipsto get the best fuel economypossible.
. Avoid fast starts and acceleratesmoothly.
. Brake gradually and avoidabrupt stops.
. Avoid idling the engine for longperiods of time.
. When road and weatherconditions are appropriate, usecruise control.
. Always follow posted speedlimits or drive more slowly whenconditions require.
. Keep vehicle tires properlyinflated.
. Combine several trips into asingle trip.
GMC Acadia/Acadia Denali Owner Manual (GMNA-Localizing-U.S./Canada/Mexico-9159268) - 2016 - CRC - 4/16/15
26 In Brief
. Replace the vehicle's tires withthe same TPC Spec numbermolded into the tire's sidewallnear the size.
. Follow recommended scheduledmaintenance.
Roadside AssistanceProgramU.S.: 1-888-881-3302
TTY Users (U.S. Only):1-888-889-2438
Canada: 1-800-268-6800
New GMC owners are automaticallyenrolled in the Roadside AssistanceProgram.
See Roadside Assistance Program0 342.
GMC Acadia/Acadia Denali Owner Manual (GMNA-Localizing-U.S./Canada/Mexico-9159268) - 2016 - CRC - 4/16/15
Keys, Doors, and Windows 27
Keys, Doors, andWindows
Keys and LocksKeys . . . . . . . . . . . . . . . . . . . . . . . . . . . 27Remote Keyless Entry (RKE)System . . . . . . . . . . . . . . . . . . . . . . . 28
Remote Keyless Entry (RKE)System Operation . . . . . . . . . . . . 29
Remote Vehicle Start . . . . . . . . . . 31Door Locks . . . . . . . . . . . . . . . . . . . . 32Power Door Locks . . . . . . . . . . . . . 33Delayed Locking . . . . . . . . . . . . . . . 33Automatic Door Locks . . . . . . . . . 33Lockout Protection . . . . . . . . . . . . . 34Safety Locks . . . . . . . . . . . . . . . . . . . 34
DoorsLiftgate . . . . . . . . . . . . . . . . . . . . . . . . 34
Vehicle SecurityVehicle Security . . . . . . . . . . . . . . . . 37Vehicle Alarm System . . . . . . . . . 37Immobilizer . . . . . . . . . . . . . . . . . . . . 38Immobilizer Operation . . . . . . . . . 38
Exterior MirrorsConvex Mirrors . . . . . . . . . . . . . . . . 40Power Mirrors . . . . . . . . . . . . . . . . . . 40
Folding Mirrors . . . . . . . . . . . . . . . . . 41Heated Mirrors . . . . . . . . . . . . . . . . . 41Automatic Dimming Mirror . . . . . 42Park Tilt Mirrors . . . . . . . . . . . . . . . . 42
Interior MirrorsInterior Rearview Mirrors . . . . . . . 42Manual Rearview Mirror . . . . . . . . 42Automatic Dimming RearviewMirror . . . . . . . . . . . . . . . . . . . . . . . . . 42
WindowsWindows . . . . . . . . . . . . . . . . . . . . . . . 43Power Windows . . . . . . . . . . . . . . . 43Sun Visors . . . . . . . . . . . . . . . . . . . . . 45
RoofSunroof . . . . . . . . . . . . . . . . . . . . . . . . 45
Keys and Locks
Keys
{ Warning
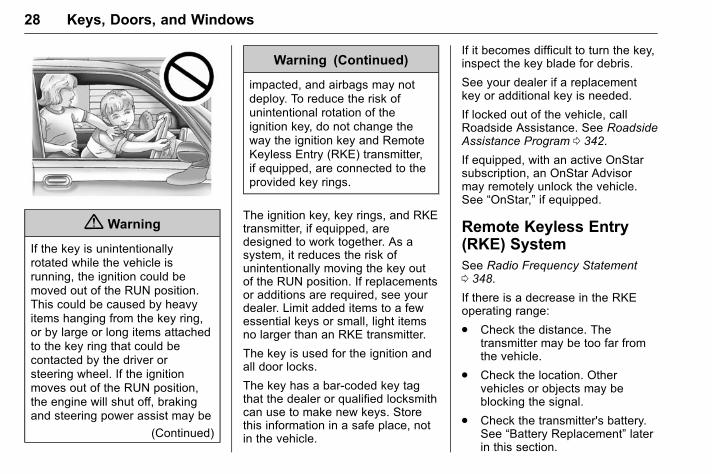
Leaving children in a vehicle withthe ignition key is dangerous andchildren or others could beseriously injured or killed. Theycould operate the power windowsor other controls or make thevehicle move. The windows willfunction with the keys in theignition, and children or otherscould be caught in the path of aclosing window. Do not leavechildren in a vehicle with theignition key.
GMC Acadia/Acadia Denali Owner Manual (GMNA-Localizing-U.S./Canada/Mexico-9159268) - 2016 - CRC - 4/16/15
28 Keys, Doors, and Windows
{ Warning
If the key is unintentionallyrotated while the vehicle isrunning, the ignition could bemoved out of the RUN position.This could be caused by heavyitems hanging from the key ring,or by large or long items attachedto the key ring that could becontacted by the driver orsteering wheel. If the ignitionmoves out of the RUN position,the engine will shut off, brakingand steering power assist may be
(Continued)
Warning (Continued)
impacted, and airbags may notdeploy. To reduce the risk ofunintentional rotation of theignition key, do not change theway the ignition key and RemoteKeyless Entry (RKE) transmitter,if equipped, are connected to theprovided key rings.
The ignition key, key rings, and RKEtransmitter, if equipped, aredesigned to work together. As asystem, it reduces the risk ofunintentionally moving the key outof the RUN position. If replacementsor additions are required, see yourdealer. Limit added items to a fewessential keys or small, light itemsno larger than an RKE transmitter.
The key is used for the ignition andall door locks.
The key has a bar-coded key tagthat the dealer or qualified locksmithcan use to make new keys. Storethis information in a safe place, notin the vehicle.
If it becomes difficult to turn the key,inspect the key blade for debris.
See your dealer if a replacementkey or additional key is needed.
If locked out of the vehicle, callRoadside Assistance. See RoadsideAssistance Program 0 342.
If equipped, with an active OnStarsubscription, an OnStar Advisormay remotely unlock the vehicle.See “OnStar,” if equipped.
Remote Keyless Entry(RKE) SystemSee Radio Frequency Statement0 348.
If there is a decrease in the RKEoperating range:
. Check the distance. Thetransmitter may be too far fromthe vehicle.
. Check the location. Othervehicles or objects may beblocking the signal.
. Check the transmitter's battery.See “Battery Replacement” laterin this section.
GMC Acadia/Acadia Denali Owner Manual (GMNA-Localizing-U.S./Canada/Mexico-9159268) - 2016 - CRC - 4/16/15
Keys, Doors, and Windows 29
. If the transmitter is still notworking correctly, see yourdealer or a qualified technicianfor service.
Remote Keyless Entry(RKE) System OperationThe RKE transmitter functions workup to 60 m (195 ft) away from thevehicle.
Other conditions can affect theperformance of the transmitter. SeeRemote Keyless Entry (RKE)System 0 28.
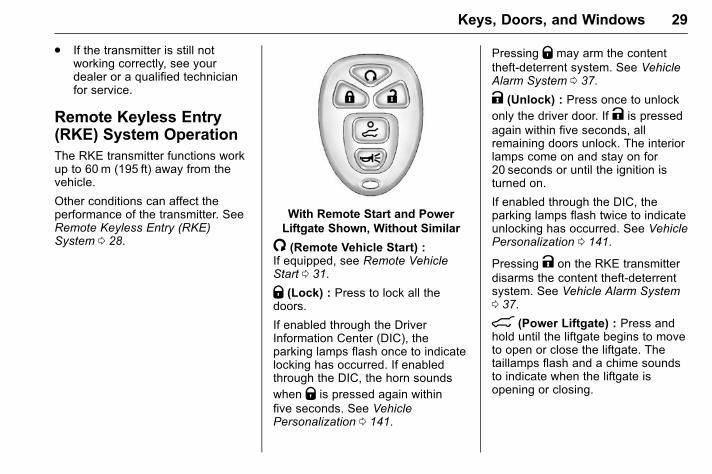
With Remote Start and PowerLiftgate Shown, Without Similar
/ (Remote Vehicle Start) :If equipped, see Remote VehicleStart 0 31.
Q (Lock) : Press to lock all thedoors.
If enabled through the DriverInformation Center (DIC), theparking lamps flash once to indicatelocking has occurred. If enabledthrough the DIC, the horn soundswhen Q is pressed again withinfive seconds. See VehiclePersonalization 0 141.
Pressing Q may arm the contenttheft-deterrent system. See VehicleAlarm System 0 37.
K (Unlock) : Press once to unlockonly the driver door. If K is pressedagain within five seconds, allremaining doors unlock. The interiorlamps come on and stay on for20 seconds or until the ignition isturned on.
If enabled through the DIC, theparking lamps flash twice to indicateunlocking has occurred. See VehiclePersonalization 0 141.
Pressing K on the RKE transmitterdisarms the content theft-deterrentsystem. See Vehicle Alarm System0 37.
8 (Power Liftgate) : Press andhold until the liftgate begins to moveto open or close the liftgate. Thetaillamps flash and a chime soundsto indicate when the liftgate isopening or closing.
GMC Acadia/Acadia Denali Owner Manual (GMNA-Localizing-U.S./Canada/Mexico-9159268) - 2016 - CRC - 4/16/15
30 Keys, Doors, and Windows
L (Vehicle Locator/PanicAlarm) : Press and release tolocate the vehicle. The parkinglamps flash and the horn soundsthree times.
Press and holdL for more thantwo seconds to activate the panicalarm. The parking lamps flash andthe horn sounds repeatedly for30 seconds. The alarm turns offwhen the ignition is moved to ON/RUN orL is pressed again. Theignition must be in LOCK/OFF forthe panic alarm to work.
Programming Transmitters tothe Vehicle
Only RKE transmitters programmedto this vehicle will work. If atransmitter is lost or stolen, areplacement can be purchased andprogrammed through your dealer.When the replacement transmitter isprogrammed to this vehicle, allremaining transmitters must also bereprogrammed. Any lost or stolentransmitters will no longer workonce the new transmitter isprogrammed. Each vehicle can
have up to eight transmittersprogrammed to it. See your dealerto program transmitters to thisvehicle.
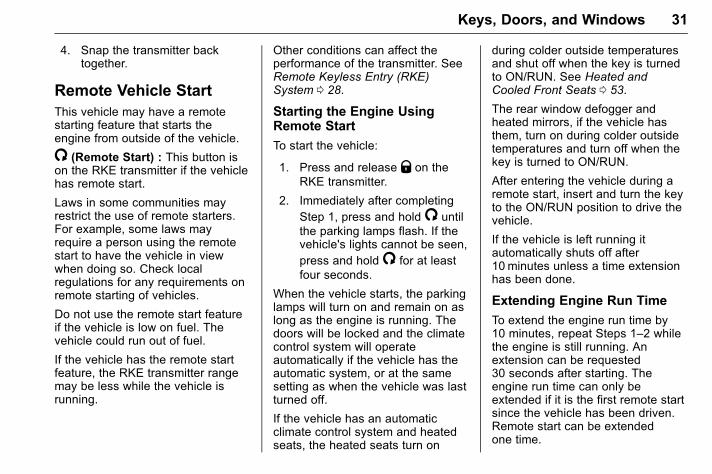
Battery Replacement
Replace the battery if the REPLACEBATTERY IN REMOTE KEYmessage displays in the DIC.
Caution
When replacing the battery, donot touch any of the circuitry onthe transmitter. Static from yourbody could damage thetransmitter.
1. Separate the transmitter with aflat, thin object, such as a flathead screwdriver.
. Carefully insert the tool intothe notch located along theparting line of thetransmitter. Do not insertthe tool too far. Stop assoon as resistance is felt.
. Twist the tool until thetransmitter is separated.
2. Remove the old battery. Do notuse a metal object.
3. Insert the new battery, positiveside facing down. Replace witha CR2032 or equivalentbattery.
GMC Acadia/Acadia Denali Owner Manual (GMNA-Localizing-U.S./Canada/Mexico-9159268) - 2016 - CRC - 4/16/15
Keys, Doors, and Windows 31
4. Snap the transmitter backtogether.
Remote Vehicle StartThis vehicle may have a remotestarting feature that starts theengine from outside of the vehicle.
/ (Remote Start) : This button ison the RKE transmitter if the vehiclehas remote start.
Laws in some communities mayrestrict the use of remote starters.For example, some laws mayrequire a person using the remotestart to have the vehicle in viewwhen doing so. Check localregulations for any requirements onremote starting of vehicles.
Do not use the remote start featureif the vehicle is low on fuel. Thevehicle could run out of fuel.
If the vehicle has the remote startfeature, the RKE transmitter rangemay be less while the vehicle isrunning.
Other conditions can affect theperformance of the transmitter. SeeRemote Keyless Entry (RKE)System 0 28.
Starting the Engine UsingRemote Start
To start the vehicle:
1. Press and release Q on theRKE transmitter.
2. Immediately after completingStep 1, press and hold/ untilthe parking lamps flash. If thevehicle's lights cannot be seen,press and hold/ for at leastfour seconds.
When the vehicle starts, the parkinglamps will turn on and remain on aslong as the engine is running. Thedoors will be locked and the climatecontrol system will operateautomatically if the vehicle has theautomatic system, or at the samesetting as when the vehicle was lastturned off.
If the vehicle has an automaticclimate control system and heatedseats, the heated seats turn on
during colder outside temperaturesand shut off when the key is turnedto ON/RUN. See Heated andCooled Front Seats 0 53.
The rear window defogger andheated mirrors, if the vehicle hasthem, turn on during colder outsidetemperatures and turn off when thekey is turned to ON/RUN.
After entering the vehicle during aremote start, insert and turn the keyto the ON/RUN position to drive thevehicle.
If the vehicle is left running itautomatically shuts off after10 minutes unless a time extensionhas been done.
Extending Engine Run Time
To extend the engine run time by10 minutes, repeat Steps 1–2 whilethe engine is still running. Anextension can be requested30 seconds after starting. Theengine run time can only beextended if it is the first remote startsince the vehicle has been driven.Remote start can be extendedone time.
GMC Acadia/Acadia Denali Owner Manual (GMNA-Localizing-U.S./Canada/Mexico-9159268) - 2016 - CRC - 4/16/15
32 Keys, Doors, and Windows
If the remote start procedure is usedagain before the first 10-minute timeframe has ended, the first10 minutes will immediately expireand the second 10-minute timeframe will start.
For example, if Q and then/ arepressed again after the vehicle hasbeen running for five minutes,10 minutes are added, allowing theengine to run for a total of15 minutes.
A maximum of two remote starts orremote start attempts are allowedbetween ignition cycles.
After the vehicle's engine has beenstarted two times using the remotestart button, the ignition must beturned on and then back off beforethe remote start procedure can beused again.
Canceling a Remote Start
To manually shut off a remote start:
. Press and hold/ until theparking lamps turn off.
. Turn on the hazard warningflashers.
. Turn the ignition switch on andthen off.
Conditions in Which theRemote Start Will Not Work
The vehicle cannot be started usingthe remote start feature if the key isin the ignition, the hood is open,or there is an emission controlsystem malfunction.
The engine turns off during a remotestart if the coolant temperature getstoo high or if the oil pressuregets low.
Door Locks
{ Warning
Unlocked doors can bedangerous.
. Passengers, especiallychildren, can easily openthe doors and fall out of amoving vehicle. When adoor is locked, the handlewill not open it. The chance
(Continued)
Warning (Continued)
of being thrown out of thevehicle in a crash isincreased if the doors arenot locked. So, allpassengers should wearsafety belts properly and thedoors should be lockedwhenever the vehicle isdriven.
. Young children who get intounlocked vehicles may beunable to get out. A childcan be overcome byextreme heat and can sufferpermanent injuries or evendeath from heat stroke.Always lock the vehiclewhenever leaving it.
. Outsiders can easily enterthrough an unlocked doorwhen you slow down or stopthe vehicle. Locking thedoors can help prevent thisfrom happening.
GMC Acadia/Acadia Denali Owner Manual (GMNA-Localizing-U.S./Canada/Mexico-9159268) - 2016 - CRC - 4/16/15
Keys, Doors, and Windows 33
To lock or unlock a door, use thekey from the outside or the doorlock from the inside.
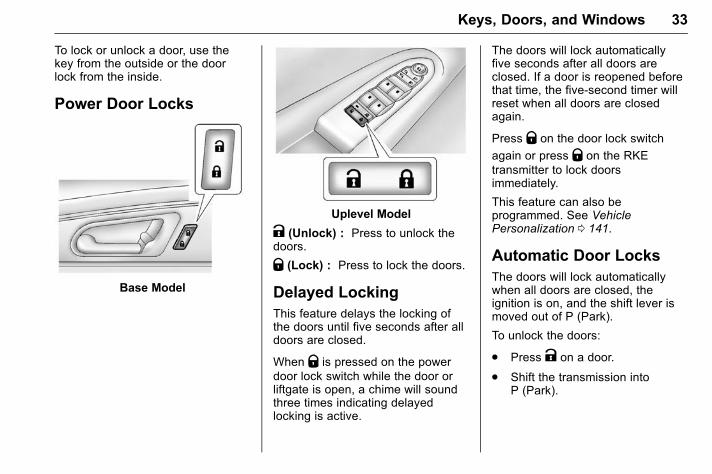
Power Door Locks
Base Model
Uplevel Model
K (Unlock) : Press to unlock thedoors.
Q (Lock) : Press to lock the doors.
Delayed LockingThis feature delays the locking ofthe doors until five seconds after alldoors are closed.
When Q is pressed on the powerdoor lock switch while the door orliftgate is open, a chime will soundthree times indicating delayedlocking is active.
The doors will lock automaticallyfive seconds after all doors areclosed. If a door is reopened beforethat time, the five-second timer willreset when all doors are closedagain.
Press Q on the door lock switch
again or press Q on the RKEtransmitter to lock doorsimmediately.
This feature can also beprogrammed. See VehiclePersonalization 0 141.
Automatic Door LocksThe doors will lock automaticallywhen all doors are closed, theignition is on, and the shift lever ismoved out of P (Park).
To unlock the doors:
. Press K on a door.
. Shift the transmission intoP (Park).
GMC Acadia/Acadia Denali Owner Manual (GMNA-Localizing-U.S./Canada/Mexico-9159268) - 2016 - CRC - 4/16/15
34 Keys, Doors, and Windows
Automatic door unlocking can beprogrammed through the DriverInformation Center (DIC). SeeVehicle Personalization 0 141.
Lockout ProtectionWhen locking is requested with thedriver door open and the key in theignition, all the doors will lock andthen the driver door will unlock.
This can be manually overridden bypressing and holding Q on thepower door lock switch.
Safety Locks
Caution
Pulling the inside door handlewhile the rear door safety locksare engaged could damage yourvehicle. Do not pull the insidedoor handle while the rear doorsafety locks are engaged.
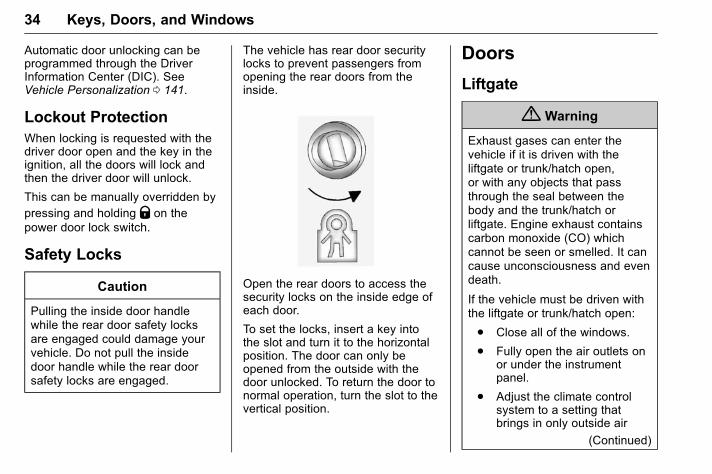
The vehicle has rear door securitylocks to prevent passengers fromopening the rear doors from theinside.
Open the rear doors to access thesecurity locks on the inside edge ofeach door.
To set the locks, insert a key intothe slot and turn it to the horizontalposition. The door can only beopened from the outside with thedoor unlocked. To return the door tonormal operation, turn the slot to thevertical position.
Doors
Liftgate
{ Warning
Exhaust gases can enter thevehicle if it is driven with theliftgate or trunk/hatch open,or with any objects that passthrough the seal between thebody and the trunk/hatch orliftgate. Engine exhaust containscarbon monoxide (CO) whichcannot be seen or smelled. It cancause unconsciousness and evendeath.
If the vehicle must be driven withthe liftgate or trunk/hatch open:
. Close all of the windows.
. Fully open the air outlets onor under the instrumentpanel.
. Adjust the climate controlsystem to a setting thatbrings in only outside air
(Continued)
GMC Acadia/Acadia Denali Owner Manual (GMNA-Localizing-U.S./Canada/Mexico-9159268) - 2016 - CRC - 4/16/15
Keys, Doors, and Windows 35
Warning (Continued)
and set the fan speed to thehighest setting. See“Climate Control Systems”in the Index.
. If the vehicle is equippedwith a power liftgate, disablethe power liftgate function.
See Engine Exhaust 0 211.
Caution
To avoid damage to the liftgate orliftgate glass, make sure the areaabove and behind the liftgate isclear before opening it.
Manual Liftgate
To unlock the liftgate, press thepower door lock switch or press Kon the Remote Keyless Entry(RKE) transmitter twice. SeeRemote Keyless Entry (RKE)System Operation 0 29.
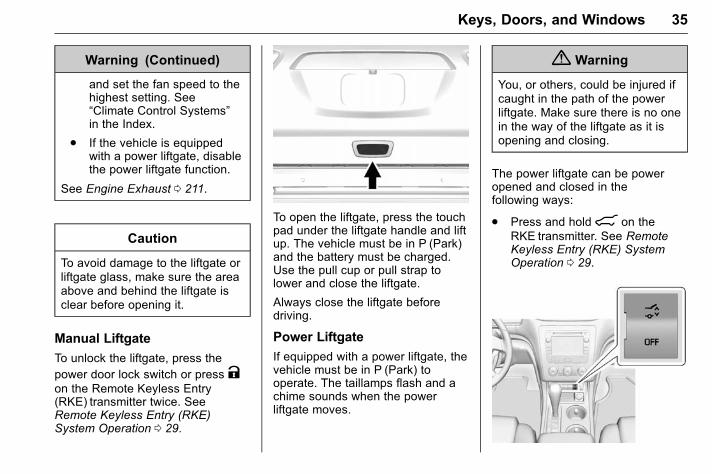
To open the liftgate, press the touchpad under the liftgate handle and liftup. The vehicle must be in P (Park)and the battery must be charged.Use the pull cup or pull strap tolower and close the liftgate.
Always close the liftgate beforedriving.
Power Liftgate
If equipped with a power liftgate, thevehicle must be in P (Park) tooperate. The taillamps flash and achime sounds when the powerliftgate moves.
{ Warning
You, or others, could be injured ifcaught in the path of the powerliftgate. Make sure there is no onein the way of the liftgate as it isopening and closing.
The power liftgate can be poweropened and closed in thefollowing ways:
. Press and hold8 on theRKE transmitter. See RemoteKeyless Entry (RKE) SystemOperation 0 29.
GMC Acadia/Acadia Denali Owner Manual (GMNA-Localizing-U.S./Canada/Mexico-9159268) - 2016 - CRC - 4/16/15
36 Keys, Doors, and Windows
. Press O.
. Press the touch pad on theoutside liftgate handle.
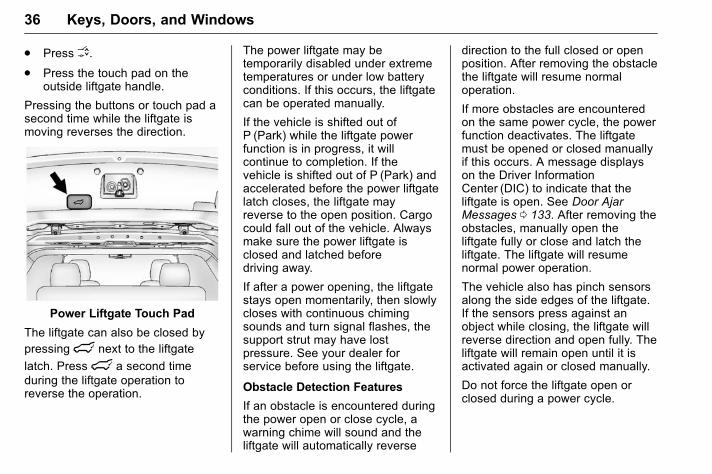
Pressing the buttons or touch pad asecond time while the liftgate ismoving reverses the direction.
Power Liftgate Touch Pad
The liftgate can also be closed bypressingl next to the liftgate
latch. Pressl a second timeduring the liftgate operation toreverse the operation.
The power liftgate may betemporarily disabled under extremetemperatures or under low batteryconditions. If this occurs, the liftgatecan be operated manually.
If the vehicle is shifted out ofP (Park) while the liftgate powerfunction is in progress, it willcontinue to completion. If thevehicle is shifted out of P (Park) andaccelerated before the power liftgatelatch closes, the liftgate mayreverse to the open position. Cargocould fall out of the vehicle. Alwaysmake sure the power liftgate isclosed and latched beforedriving away.
If after a power opening, the liftgatestays open momentarily, then slowlycloses with continuous chimingsounds and turn signal flashes, thesupport strut may have lostpressure. See your dealer forservice before using the liftgate.
Obstacle Detection Features
If an obstacle is encountered duringthe power open or close cycle, awarning chime will sound and theliftgate will automatically reverse
direction to the full closed or openposition. After removing the obstaclethe liftgate will resume normaloperation.
If more obstacles are encounteredon the same power cycle, the powerfunction deactivates. The liftgatemust be opened or closed manuallyif this occurs. A message displayson the Driver InformationCenter (DIC) to indicate that theliftgate is open. See Door AjarMessages 0 133. After removing theobstacles, manually open theliftgate fully or close and latch theliftgate. The liftgate will resumenormal power operation.
The vehicle also has pinch sensorsalong the side edges of the liftgate.If the sensors press against anobject while closing, the liftgate willreverse direction and open fully. Theliftgate will remain open until it isactivated again or closed manually.
Do not force the liftgate open orclosed during a power cycle.
GMC Acadia/Acadia Denali Owner Manual (GMNA-Localizing-U.S./Canada/Mexico-9159268) - 2016 - CRC - 4/16/15
Keys, Doors, and Windows 37
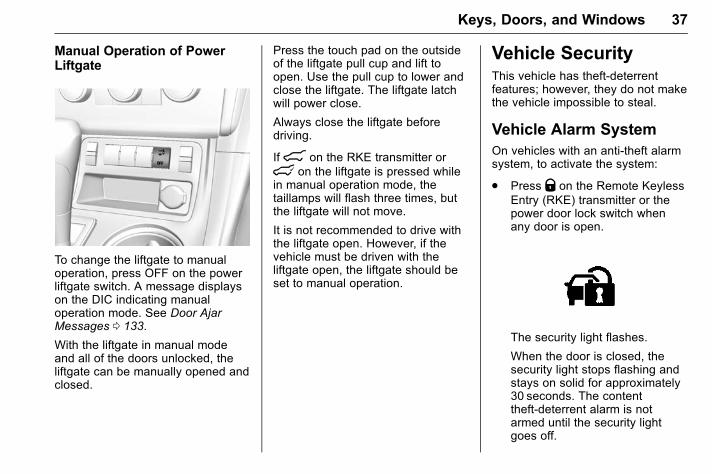
Manual Operation of PowerLiftgate
To change the liftgate to manualoperation, press OFF on the powerliftgate switch. A message displayson the DIC indicating manualoperation mode. See Door AjarMessages 0 133.
With the liftgate in manual modeand all of the doors unlocked, theliftgate can be manually opened andclosed.
Press the touch pad on the outsideof the liftgate pull cup and lift toopen. Use the pull cup to lower andclose the liftgate. The liftgate latchwill power close.
Always close the liftgate beforedriving.
If8 on the RKE transmitter orl on the liftgate is pressed whilein manual operation mode, thetaillamps will flash three times, butthe liftgate will not move.
It is not recommended to drive withthe liftgate open. However, if thevehicle must be driven with theliftgate open, the liftgate should beset to manual operation.
Vehicle SecurityThis vehicle has theft-deterrentfeatures; however, they do not makethe vehicle impossible to steal.
Vehicle Alarm SystemOn vehicles with an anti-theft alarmsystem, to activate the system:
. Press Q on the Remote KeylessEntry (RKE) transmitter or thepower door lock switch whenany door is open.
The security light flashes.
When the door is closed, thesecurity light stops flashing andstays on solid for approximately30 seconds. The contenttheft-deterrent alarm is notarmed until the security lightgoes off.
GMC Acadia/Acadia Denali Owner Manual (GMNA-Localizing-U.S./Canada/Mexico-9159268) - 2016 - CRC - 4/16/15
38 Keys, Doors, and Windows
If the delayed locking feature isactive, the alarm is not activateduntil all doors are closed and thesecurity light goes off.
. Press Q when the driver door isclosed. The security light comeson solid for approximately30 seconds and then goes off.The content theft-deterrent alarmis not armed until the securitylight goes off.
The theft-deterrent system will notactivate if the doors are locked withthe vehicle's key or the manualdoor lock.
If the driver door is opened withoutfirst unlocking with the RKEtransmitter, the horn will chirp andthe lights will flash to indicatepre-alarm. If the vehicle is notstarted, or the door is not unlockedby pressing K on the RKEtransmitter during the 10-secondpre-alarm, the alarm will beactivated.
The alarm will also be activated if apassenger door, the liftgate, or thehood is opened without first
disarming the system. When thealarm is activated, the turn signalsflash and the horn sounds for about30 seconds. The alarm system willthen re-arm to monitor for the nextunauthorized event.
The vehicle can be started with thecorrect ignition key if the alarm hasbeen set off.
To avoid setting off the alarm byaccident:
. Lock the vehicle with the doorkey after the doors are closed.
. Unlock the door with the RKEtransmitter. Unlocking a door anyother way sets off the alarm ifthe system has been armed.
Press K or place the key in theignition and turn it to START to turnoff the alarm.
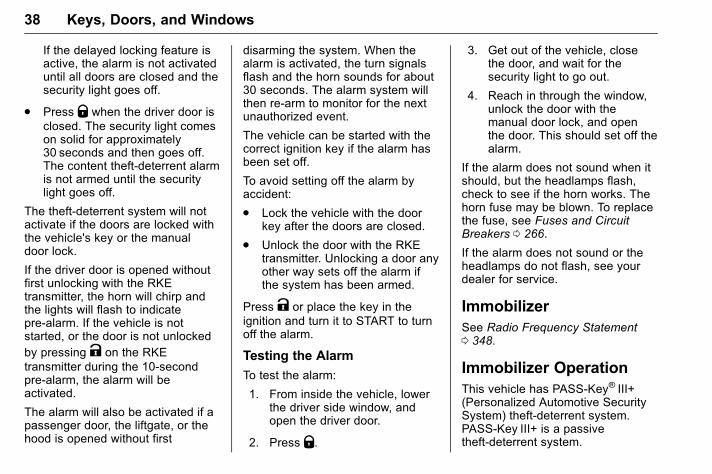
Testing the Alarm
To test the alarm:
1. From inside the vehicle, lowerthe driver side window, andopen the driver door.
2. Press Q.
3. Get out of the vehicle, closethe door, and wait for thesecurity light to go out.
4. Reach in through the window,unlock the door with themanual door lock, and openthe door. This should set off thealarm.
If the alarm does not sound when itshould, but the headlamps flash,check to see if the horn works. Thehorn fuse may be blown. To replacethe fuse, see Fuses and CircuitBreakers 0 266.
If the alarm does not sound or theheadlamps do not flash, see yourdealer for service.
ImmobilizerSee Radio Frequency Statement0 348.
Immobilizer OperationThis vehicle has PASS-Key® III+(Personalized Automotive SecuritySystem) theft-deterrent system.PASS-Key III+ is a passivetheft-deterrent system.
GMC Acadia/Acadia Denali Owner Manual (GMNA-Localizing-U.S./Canada/Mexico-9159268) - 2016 - CRC - 4/16/15
Keys, Doors, and Windows 39
The system is automatically armedwhen the key is removed from theignition.
The system is automaticallydisarmed when the key is turned toON/RUN, ACC/ACCESSORY,or START from the LOCK/OFFposition.
You do not have to manually arm ordisarm the system.
The security light comes on if thereis a problem with arming ordisarming the theft-deterrentsystem.
When the PASS-Key III+ systemsenses an incorrect key, the vehicledoes not start. Anyone using atrial-and-error method to start thevehicle will be discouraged becauseof the high number of electrical keycodes.
If the engine does not start and thesecurity light on the instrumentpanel comes on when trying to startthe vehicle, there may be a problemwith the theft-deterrent system. Turnthe ignition off and try again.
If the engine still does not start, andthe key appears to be undamaged,try another ignition key and checkthe fuses. See Fuses and CircuitBreakers 0 266 for additionalinformation. If the engine still doesnot start with the other key, thevehicle needs service. If the vehicledoes start, the first key may befaulty. See your dealer who canservice the PASS-Key III+ to have anew key made. In an emergency,contact Roadside Assistance. SeeRoadside Assistance Program0 342.
It is possible for the PASS-Key III+decoder to learn the transpondervalue of a new or replacement key.Up to 10 keys may be programmedto the vehicle. The followingprocedure is for programmingadditional keys only. If all currentlyprogrammed keys are lost or do notoperate, you must see your dealeror a locksmith who can servicePASS-Key III+ to have keys madeand programmed to the system.
See your dealer or a locksmith whocan service PASS-Key III+ to get anew key blank that is cut exactly asthe ignition key that operates thesystem.
To program the new additional key:
1. Verify that the new key has a1 stamped on it.
2. Insert the already programmedkey in the ignition and start theengine. If the engine does notstart, see your dealer forservice.
3. After the engine has started,turn the key to LOCK/OFF, andremove the key.
4. Insert the key to beprogrammed and turn it to theON/RUN position withinfive seconds of the original keybeing turned to the LOCK/OFFposition.
The security light turns off oncethe key has been programmed.
5. Repeat Steps 1–4 if additionalkeys are to be programmed.
GMC Acadia/Acadia Denali Owner Manual (GMNA-Localizing-U.S./Canada/Mexico-9159268) - 2016 - CRC - 4/16/15
40 Keys, Doors, and Windows
If the PASS-Key III+ key is lost ordamaged, see your dealer or alocksmith to have a new key made.
The SERVICE THEFTDETERRENT SYSTEM messagedisplays on the Driver InformationCenter (DIC) when there is aproblem with the theft-deterrentsystem. See Security Messages0 138 for additional information.
Do not leave the key or device thatdisarms or deactivates thetheft-deterrent system in the vehicle.
Exterior Mirrors
Convex Mirrors
{ Warning
A convex mirror can make things,like other vehicles, look fartheraway than they really are. If youcut too sharply into the right lane,you could hit a vehicle on theright. Check the inside mirror orglance over your shoulder beforechanging lanes.
The passenger side mirror is convexshaped. A convex mirror's surface iscurved so more can be seen fromthe driver seat.
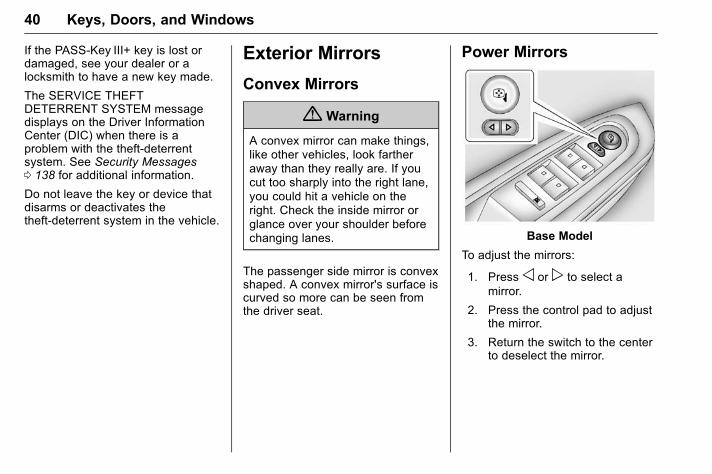
Power Mirrors
Base Model
To adjust the mirrors:
1. Press o or p to select amirror.
2. Press the control pad to adjustthe mirror.
3. Return the switch to the centerto deselect the mirror.
GMC Acadia/Acadia Denali Owner Manual (GMNA-Localizing-U.S./Canada/Mexico-9159268) - 2016 - CRC - 4/16/15
Keys, Doors, and Windows 41
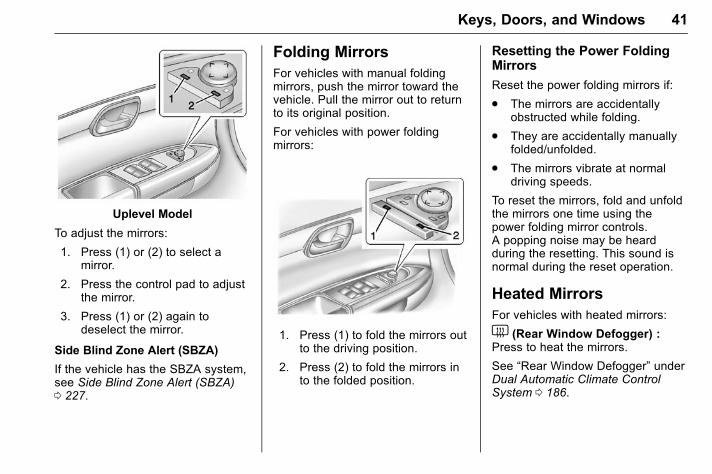
Uplevel Model
To adjust the mirrors:
1. Press (1) or (2) to select amirror.
2. Press the control pad to adjustthe mirror.
3. Press (1) or (2) again todeselect the mirror.
Side Blind Zone Alert (SBZA)
If the vehicle has the SBZA system,see Side Blind Zone Alert (SBZA)0 227.
Folding MirrorsFor vehicles with manual foldingmirrors, push the mirror toward thevehicle. Pull the mirror out to returnto its original position.
For vehicles with power foldingmirrors:
1. Press (1) to fold the mirrors outto the driving position.
2. Press (2) to fold the mirrors into the folded position.
Resetting the Power FoldingMirrors
Reset the power folding mirrors if:
. The mirrors are accidentallyobstructed while folding.
. They are accidentally manuallyfolded/unfolded.
. The mirrors vibrate at normaldriving speeds.
To reset the mirrors, fold and unfoldthe mirrors one time using thepower folding mirror controls.A popping noise may be heardduring the resetting. This sound isnormal during the reset operation.
Heated MirrorsFor vehicles with heated mirrors:
1 (Rear Window Defogger) :Press to heat the mirrors.
See “Rear Window Defogger” underDual Automatic Climate ControlSystem 0 186.
GMC Acadia/Acadia Denali Owner Manual (GMNA-Localizing-U.S./Canada/Mexico-9159268) - 2016 - CRC - 4/16/15
42 Keys, Doors, and Windows
Automatic DimmingMirrorIf equipped, the driver outside mirrorautomatically adjusts for the glare ofthe headlamps from behind. SeeAutomatic Dimming Rearview Mirror0 42.
Park Tilt MirrorsIf equipped with memory seats, thepassenger and/or driver mirror tiltsto a preselected position when thevehicle is in R (Reverse). Thisallows the curb to be seen whenparallel parking.
The mirror(s) return to the originalposition when:
. The vehicle is shifted out ofR (Reverse), or remains inR (Reverse) for about30 seconds.
. The ignition is turned off.
. The vehicle is driven inR (Reverse) above a set speed.
To turn this feature on or off, seeVehicle Personalization 0 141.
Interior Mirrors
Interior Rearview MirrorsAdjust the rearview mirror for a clearview of the area behind yourvehicle.
If equipped with OnStar, the vehiclemay have three control buttons atthe bottom of the mirror. See yourdealer for more information aboutOnStar and how to subscribe to it.See “OnStar,” if equipped.
Do not spray glass cleaner directlyon the mirror. Use a soft toweldampened with water.
Manual Rearview MirrorIf equipped, push the tab forward fordaytime use and pull it for nighttimeuse to avoid glare from theheadlamps from behind.
Automatic DimmingRearview MirrorIf equipped, automatic dimmingreduces the glare of the headlampsfrom behind. This feature comes onwhen the vehicle is started.
GMC Acadia/Acadia Denali Owner Manual (GMNA-Localizing-U.S./Canada/Mexico-9159268) - 2016 - CRC - 4/16/15
Keys, Doors, and Windows 43
Windows
{ Warning
Never leave a child, a helplessadult, or a pet alone in a vehicle,especially with the windowsclosed in warm or hot weather.They can be overcome by theextreme heat and sufferpermanent injuries or even deathfrom heat stroke.
The vehicle aerodynamics aredesigned to improve fuel economyperformance. This may result in a
pulsing sound when either rearwindow is down and the frontwindows are up. To reduce thesound, open either a front windowor the sunroof, if equipped.
Power Windows
{ Warning
Children could be seriouslyinjured or killed if caught in thepath of a closing window. Neverleave keys in a vehicle withchildren. When there are childrenin the rear seat, use the windowlockout button to preventoperation of the windows. SeeKeys 0 27.
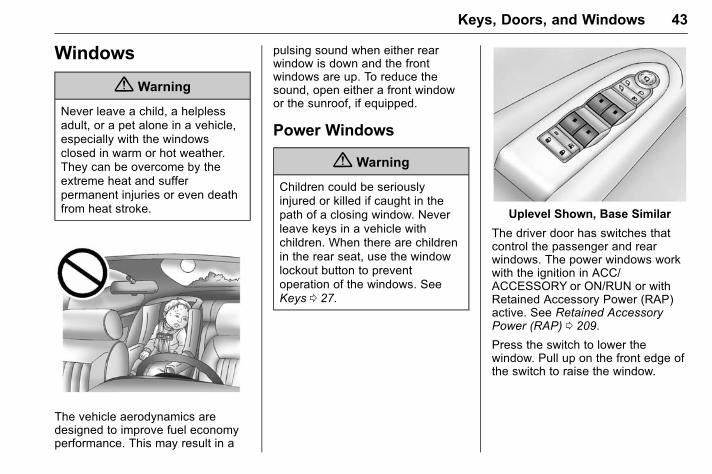
Uplevel Shown, Base Similar
The driver door has switches thatcontrol the passenger and rearwindows. The power windows workwith the ignition in ACC/ACCESSORY or ON/RUN or withRetained Accessory Power (RAP)active. See Retained AccessoryPower (RAP) 0 209.
Press the switch to lower thewindow. Pull up on the front edge ofthe switch to raise the window.
GMC Acadia/Acadia Denali Owner Manual (GMNA-Localizing-U.S./Canada/Mexico-9159268) - 2016 - CRC - 4/16/15
44 Keys, Doors, and Windows
Express-Up/Express-DownWindows
A window with the express-up/downfeature allows it to be raised orlowered without holding the switch.Press or pull the window switch fullyand release it to activate theexpress feature. The express modecan be canceled by pressing orpulling the switch.
Programming the PowerWindows
If the vehicle battery has beenrecharged, disconnected,or replaced, windows with theexpress-up feature may need to bereprogrammed for this feature towork. To program the window:
1. Close all doors with the ignitionin the ACC/ACCESSORY orON/RUN position, or withRetained AccessoryPower (RAP) active. SeeRetained Accessory Power(RAP) 0 209.
2. Press and continue to hold thewindow switch until the windowis fully open.
3. Pull up and hold the windowswitch to close the window.Continue to hold it briefly afterthe window is fully closed.
4. Repeat for each window thathas the express-up feature.
Anti-Pinch Feature
The anti-pinch feature is onwindows with the express-upfeature. If an object is in the way ofthe window as it is express-closing,or in certain weather conditions likesevere icing, the window will stopand open to a factory presetposition. The window functionsnormally once the obstruction isremoved.
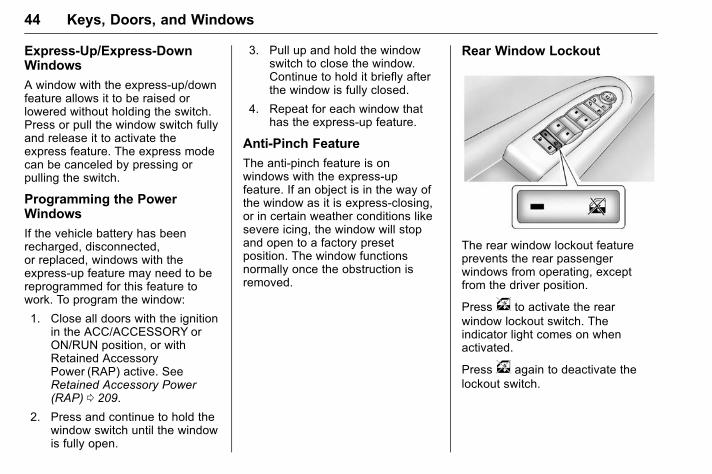
Rear Window Lockout
The rear window lockout featureprevents the rear passengerwindows from operating, exceptfrom the driver position.
Pressv to activate the rearwindow lockout switch. Theindicator light comes on whenactivated.
Pressv again to deactivate thelockout switch.
GMC Acadia/Acadia Denali Owner Manual (GMNA-Localizing-U.S./Canada/Mexico-9159268) - 2016 - CRC - 4/16/15
Keys, Doors, and Windows 45
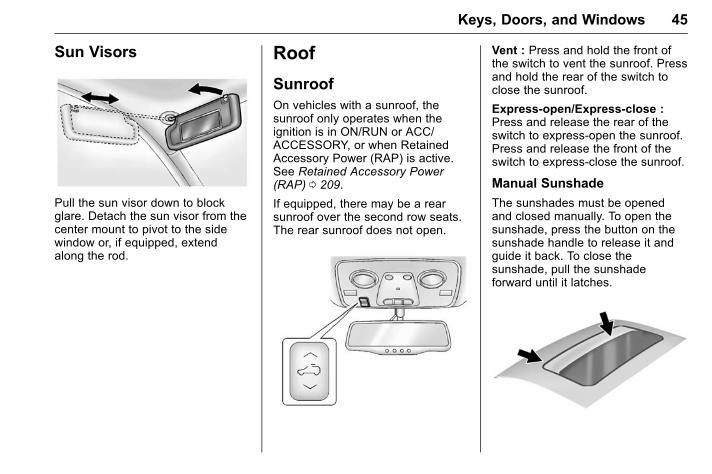
Sun Visors
Pull the sun visor down to blockglare. Detach the sun visor from thecenter mount to pivot to the sidewindow or, if equipped, extendalong the rod.
Roof
SunroofOn vehicles with a sunroof, thesunroof only operates when theignition is in ON/RUN or ACC/ACCESSORY, or when RetainedAccessory Power (RAP) is active.See Retained Accessory Power(RAP) 0 209.
If equipped, there may be a rearsunroof over the second row seats.The rear sunroof does not open.
Vent : Press and hold the front ofthe switch to vent the sunroof. Pressand hold the rear of the switch toclose the sunroof.
Express-open/Express-close :Press and release the rear of theswitch to express-open the sunroof.Press and release the front of theswitch to express-close the sunroof.
Manual Sunshade
The sunshades must be openedand closed manually. To open thesunshade, press the button on thesunshade handle to release it andguide it back. To close thesunshade, pull the sunshadeforward until it latches.
GMC Acadia/Acadia Denali Owner Manual (GMNA-Localizing-U.S./Canada/Mexico-9159268) - 2016 - CRC - 4/16/15
46 Keys, Doors, and Windows
Dirt and debris may collect on thesunroof seal or in the track. Thiscould cause an issue with sunroofoperation or noise. It could also plugthe water drainage system.Periodically open the sunroof andremove any obstacles or loosedebris. Wipe the sunroof seal androof sealing area using a cleancloth, mild soap, and water. Do notremove grease from the sunroof.
If water is seen dripping into thewater drainage system, this isnormal.

GMC Acadia/Acadia Denali Owner Manual (GMNA-Localizing-U.S./Canada/Mexico-9159268) - 2016 - CRC - 4/16/15
Seats and Restraints 47
Seats andRestraints
Head RestraintsHead Restraints . . . . . . . . . . . . . . . 48
Front SeatsSeat Adjustment . . . . . . . . . . . . . . . 49Power Seat Adjustment . . . . . . . . 50Lumbar Adjustment . . . . . . . . . . . . 50Reclining Seatbacks . . . . . . . . . . . 51Memory Seats . . . . . . . . . . . . . . . . . 52Heated and Cooled FrontSeats . . . . . . . . . . . . . . . . . . . . . . . . . 53
Rear SeatsRear Seats . . . . . . . . . . . . . . . . . . . . 54Third Row Seats . . . . . . . . . . . . . . . 56
Safety BeltsSafety Belts . . . . . . . . . . . . . . . . . . . . 59How to Wear Safety BeltsProperly . . . . . . . . . . . . . . . . . . . . . . 60
Lap-Shoulder Belt . . . . . . . . . . . . . 61Safety Belt Use DuringPregnancy . . . . . . . . . . . . . . . . . . . . 65
Safety Belt Extender . . . . . . . . . . . 65Safety System Check . . . . . . . . . . 65Safety Belt Care . . . . . . . . . . . . . . . 65
Replacing Safety Belt SystemParts after a Crash . . . . . . . . . . . 66
Airbag SystemAirbag System . . . . . . . . . . . . . . . . . 66Where Are the Airbags? . . . . . . . 68When Should an AirbagInflate? . . . . . . . . . . . . . . . . . . . . . . . 69
What Makes an AirbagInflate? . . . . . . . . . . . . . . . . . . . . . . . 71
How Does an AirbagRestrain? . . . . . . . . . . . . . . . . . . . . . 71
What Will You See after anAirbag Inflates? . . . . . . . . . . . . . . 71
Passenger Sensing System . . . 72Servicing the Airbag-EquippedVehicle . . . . . . . . . . . . . . . . . . . . . . . 77
Adding Equipment to theAirbag-Equipped Vehicle . . . . . 77
Airbag System Check . . . . . . . . . . 78Replacing Airbag System Partsafter a Crash . . . . . . . . . . . . . . . . . 78
Child RestraintsOlder Children . . . . . . . . . . . . . . . . . 79Infants and Young Children . . . . 80Child Restraint Systems . . . . . . . 83Where to Put the Restraint . . . . . 84Lower Anchors and Tethers forChildren (LATCH System) . . . . 86
Replacing LATCH System PartsAfter a Crash . . . . . . . . . . . . . . . . . 92
Securing Child Restraints(Rear Seat) . . . . . . . . . . . . . . . . . . . 92
Securing Child Restraints (FrontPassenger Seat) . . . . . . . . . . . . . 94
GMC Acadia/Acadia Denali Owner Manual (GMNA-Localizing-U.S./Canada/Mexico-9159268) - 2016 - CRC - 4/16/15
48 Seats and Restraints
Head RestraintsFront Seats
{ Warning
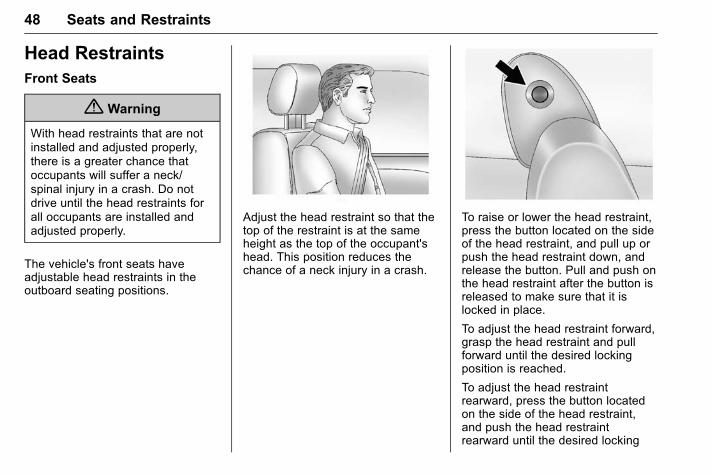
With head restraints that are notinstalled and adjusted properly,there is a greater chance thatoccupants will suffer a neck/spinal injury in a crash. Do notdrive until the head restraints forall occupants are installed andadjusted properly.
The vehicle's front seats haveadjustable head restraints in theoutboard seating positions.
Adjust the head restraint so that thetop of the restraint is at the sameheight as the top of the occupant'shead. This position reduces thechance of a neck injury in a crash.
To raise or lower the head restraint,press the button located on the sideof the head restraint, and pull up orpush the head restraint down, andrelease the button. Pull and push onthe head restraint after the button isreleased to make sure that it islocked in place.
To adjust the head restraint forward,grasp the head restraint and pullforward until the desired lockingposition is reached.
To adjust the head restraintrearward, press the button locatedon the side of the head restraint,and push the head restraintrearward until the desired locking
GMC Acadia/Acadia Denali Owner Manual (GMNA-Localizing-U.S./Canada/Mexico-9159268) - 2016 - CRC - 4/16/15
Seats and Restraints 49
position is reached. Try to move thehead restraint after the button isreleased to make sure that it islocked in place.
The front seat outboard headrestraints are not removable.
Rear Seats
The vehicle's second row seatshave head restraints in the outboardseating positions that cannot beadjusted.
The vehicle's third row seats haveheadrests in the outboard seatingpositions that cannot be adjusted.
The second row head restraints andthird row headrests are notremovable.
Front Seats
Seat Adjustment
{ Warning
You can lose control of thevehicle if you try to adjust a driverseat while the vehicle is moving.Adjust the driver seat only whenthe vehicle is not moving.
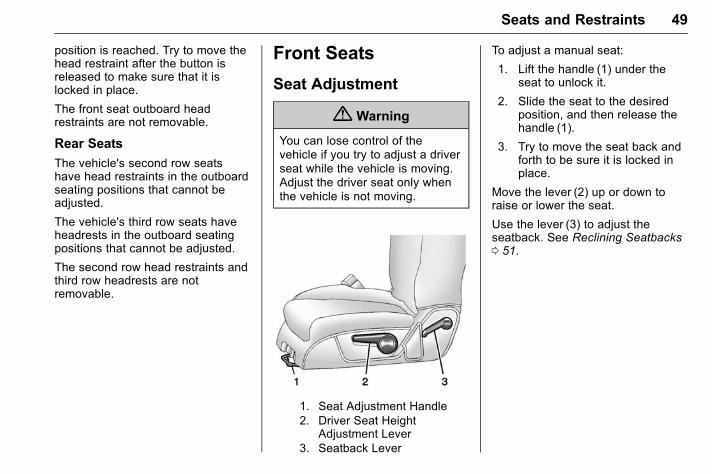
1. Seat Adjustment Handle2. Driver Seat Height
Adjustment Lever3. Seatback Lever
To adjust a manual seat:
1. Lift the handle (1) under theseat to unlock it.
2. Slide the seat to the desiredposition, and then release thehandle (1).
3. Try to move the seat back andforth to be sure it is locked inplace.
Move the lever (2) up or down toraise or lower the seat.
Use the lever (3) to adjust theseatback. See Reclining Seatbacks0 51.
GMC Acadia/Acadia Denali Owner Manual (GMNA-Localizing-U.S./Canada/Mexico-9159268) - 2016 - CRC - 4/16/15
50 Seats and Restraints
Power Seat Adjustment
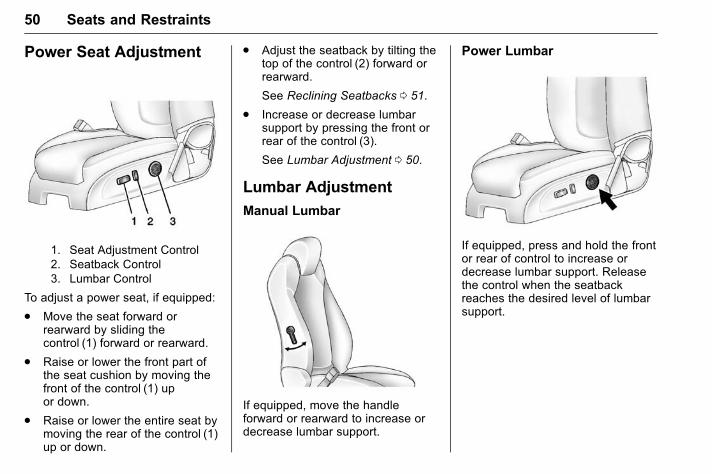
1. Seat Adjustment Control2. Seatback Control3. Lumbar Control
To adjust a power seat, if equipped:
. Move the seat forward orrearward by sliding thecontrol (1) forward or rearward.
. Raise or lower the front part ofthe seat cushion by moving thefront of the control (1) upor down.
. Raise or lower the entire seat bymoving the rear of the control (1)up or down.
. Adjust the seatback by tilting thetop of the control (2) forward orrearward.
See Reclining Seatbacks 0 51.
. Increase or decrease lumbarsupport by pressing the front orrear of the control (3).
See Lumbar Adjustment 0 50.
Lumbar Adjustment
Manual Lumbar
If equipped, move the handleforward or rearward to increase ordecrease lumbar support.
Power Lumbar
If equipped, press and hold the frontor rear of control to increase ordecrease lumbar support. Releasethe control when the seatbackreaches the desired level of lumbarsupport.

GMC Acadia/Acadia Denali Owner Manual (GMNA-Localizing-U.S./Canada/Mexico-9159268) - 2016 - CRC - 4/16/15
Seats and Restraints 51
Reclining Seatbacks
{ Warning
Sitting in a reclined position whenthe vehicle is in motion can bedangerous. Even when buckledup, the safety belts cannot dotheir job.
The shoulder belt will not beagainst your body. Instead, it willbe in front of you. In a crash, youcould go into it, receiving neck orother injuries.
The lap belt could go up overyour abdomen. The belt forceswould be there, not at your pelvicbones. This could cause seriousinternal injuries.
For proper protection when thevehicle is in motion, have theseatback upright. Then sit wellback in the seat and wear thesafety belt properly.
Do not have a seatback reclined ifthe vehicle is moving.
Manual Reclining Seatbacks
{ Warning
If either seatback is not locked, itcould move forward in a suddenstop or crash. That could causeinjury to the person sitting there.Always push and pull on theseatbacks to be sure they arelocked.
To recline the seatback:
1. Lift the lever.
2. Move the seatback to thedesired position, and thenrelease the lever to lock theseatback in place.
3. Push and pull on the seatbackto make sure it is locked.
To return the seatback to the uprightposition:
1. Lift the lever fully withoutapplying pressure to theseatback, and the seatback willreturn to the upright position.
GMC Acadia/Acadia Denali Owner Manual (GMNA-Localizing-U.S./Canada/Mexico-9159268) - 2016 - CRC - 4/16/15
52 Seats and Restraints
2. Push and pull on the seatbackto make sure it is locked.
Power Reclining Seatbacks
To adjust a power seatback,if equipped:
. Tilt the top of the controlrearward to recline.
. Tilt the top of the control forwardto raise.
Memory Seats
If available, the controls on thedriver door are used to program andrecall memory settings for the driverseat, outside mirrors, and powersteering column (if equipped).
Storing Memory Positions
To save into memory:
1. Adjust the driver seat andseatback recliner, both outsidemirrors, and the power steeringcolumn (if equipped).
Not all vehicles will have theability to save and recall themirror positions.
2. Press and hold 1 untiltwo beeps sound.
3. Repeat for a second driverposition using 2.
To recall, press and release 1 or 2.The vehicle must be in P (Park).A single beep will sound. The seat,outside mirrors, and power steeringcolumn (if equipped) will move tothe positions previously stored forthe identified driver.
Memory Remote Recall
The memory feature can recall thedriver seat, outside mirrors, andpower steering column (if equipped)to stored positions when enteringthe vehicle.
To activate, unlock the driver doorwith the Remote KeylessEntry (RKE) transmitter. The driverseat, outside mirrors, and powersteering column (if equipped) willmove to the memory positionsassociated with the transmitter usedto unlock the vehicle.
This feature is turned on or off usingthe vehicle personalization menu.See Vehicle Personalization 0 141.
GMC Acadia/Acadia Denali Owner Manual (GMNA-Localizing-U.S./Canada/Mexico-9159268) - 2016 - CRC - 4/16/15
Seats and Restraints 53
To stop recall movement, press oneof the power seat controls, memorybuttons, power mirror buttons, or thepower steering column control (ifequipped).
If something has blocked the driverseat and/or steering column whilerecalling a memory position, therecall may stop. Remove theobstruction; then press and hold theappropriate manual control for thememory item that is not recalling fortwo seconds. Try recalling thememory position again by pressingthe appropriate memory button.If the memory position is still notrecalling, see your dealer forservice.
Easy Exit Driver Seat
The easy exit feature can move thedriver seat rearward and the powersteering column (if equipped) upand forward to allow extra room toexit the vehicle.
S (Easy Exit Positions) : Press toactivate the recall. The vehicle mustbe in P (Park).
If this feature is programmed on inthe vehicle personalization menu,automatic driver seat and powersteering column movement occurwhen the ignition key is removed.
A single beep sounds. The driverseat moves back approximately8 cm (3 in) and the power steeringcolumn (if equipped) moves up andforward. To move the seat backfarther, press S again until the seatis all the way back.
If something has blocked the driverseat while recalling the exit position,the recall may stop. Remove theobstruction; then press and hold thepower seat control rearward fortwo seconds. Try recalling the exitposition again. If the exit position isstill not recalling, see your dealer forservice.
See Vehicle Personalization 0 141.
Heated and Cooled FrontSeats
{ Warning
If you cannot feel temperaturechange or pain to the skin, theseat heater may cause burns. Toreduce the risk of burns, peoplewith such a condition should usecare when using the seat heater,especially for long periods oftime. Do not place anything onthe seat that insulates againstheat, such as a blanket, cushion,cover, or similar item. This maycause the seat heater tooverheat. An overheated seatheater may cause a burn or maydamage the seat.
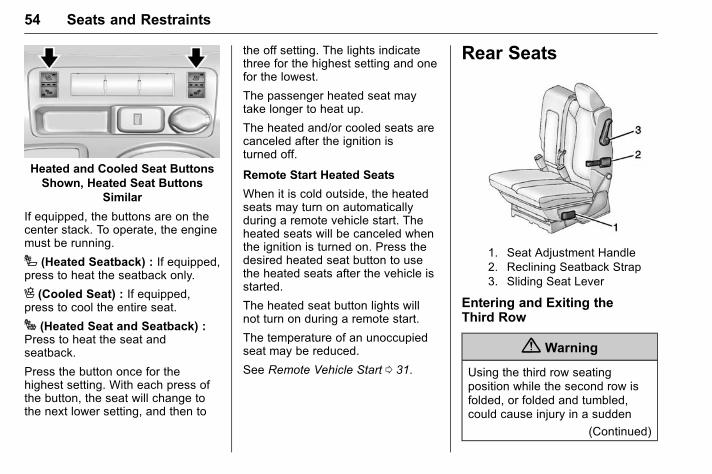
GMC Acadia/Acadia Denali Owner Manual (GMNA-Localizing-U.S./Canada/Mexico-9159268) - 2016 - CRC - 4/16/15
54 Seats and Restraints
Heated and Cooled Seat ButtonsShown, Heated Seat Buttons
Similar
If equipped, the buttons are on thecenter stack. To operate, the enginemust be running.
I (Heated Seatback) : If equipped,press to heat the seatback only.
H (Cooled Seat) : If equipped,press to cool the entire seat.
J (Heated Seat and Seatback) :Press to heat the seat andseatback.
Press the button once for thehighest setting. With each press ofthe button, the seat will change tothe next lower setting, and then to
the off setting. The lights indicatethree for the highest setting and onefor the lowest.
The passenger heated seat maytake longer to heat up.
The heated and/or cooled seats arecanceled after the ignition isturned off.
Remote Start Heated Seats
When it is cold outside, the heatedseats may turn on automaticallyduring a remote vehicle start. Theheated seats will be canceled whenthe ignition is turned on. Press thedesired heated seat button to usethe heated seats after the vehicle isstarted.
The heated seat button lights willnot turn on during a remote start.
The temperature of an unoccupiedseat may be reduced.
See Remote Vehicle Start 0 31.
Rear Seats
1. Seat Adjustment Handle2. Reclining Seatback Strap3. Sliding Seat Lever
Entering and Exiting theThird Row
{ Warning
Using the third row seatingposition while the second row isfolded, or folded and tumbled,could cause injury in a sudden
(Continued)
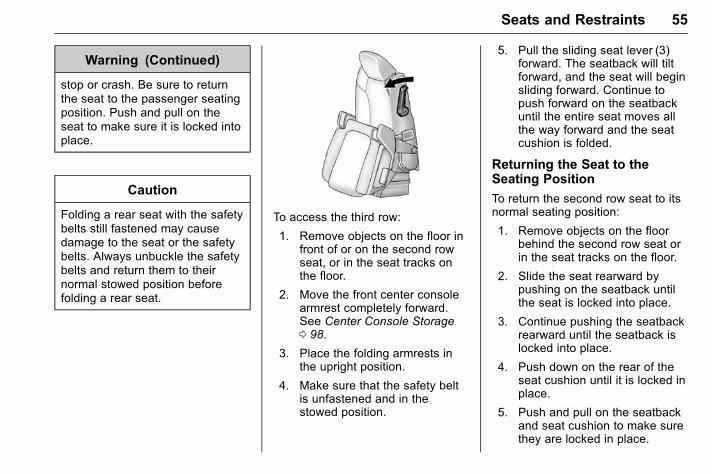
GMC Acadia/Acadia Denali Owner Manual (GMNA-Localizing-U.S./Canada/Mexico-9159268) - 2016 - CRC - 4/16/15
Seats and Restraints 55
Warning (Continued)
stop or crash. Be sure to returnthe seat to the passenger seatingposition. Push and pull on theseat to make sure it is locked intoplace.
Caution
Folding a rear seat with the safetybelts still fastened may causedamage to the seat or the safetybelts. Always unbuckle the safetybelts and return them to theirnormal stowed position beforefolding a rear seat.
To access the third row:
1. Remove objects on the floor infront of or on the second rowseat, or in the seat tracks onthe floor.
2. Move the front center consolearmrest completely forward.See Center Console Storage0 98.
3. Place the folding armrests inthe upright position.
4. Make sure that the safety beltis unfastened and in thestowed position.
5. Pull the sliding seat lever (3)forward. The seatback will tiltforward, and the seat will beginsliding forward. Continue topush forward on the seatbackuntil the entire seat moves allthe way forward and the seatcushion is folded.
Returning the Seat to theSeating Position
To return the second row seat to itsnormal seating position:
1. Remove objects on the floorbehind the second row seat orin the seat tracks on the floor.
2. Slide the seat rearward bypushing on the seatback untilthe seat is locked into place.
3. Continue pushing the seatbackrearward until the seatback islocked into place.
4. Push down on the rear of theseat cushion until it is locked inplace.
5. Push and pull on the seatbackand seat cushion to make surethey are locked in place.
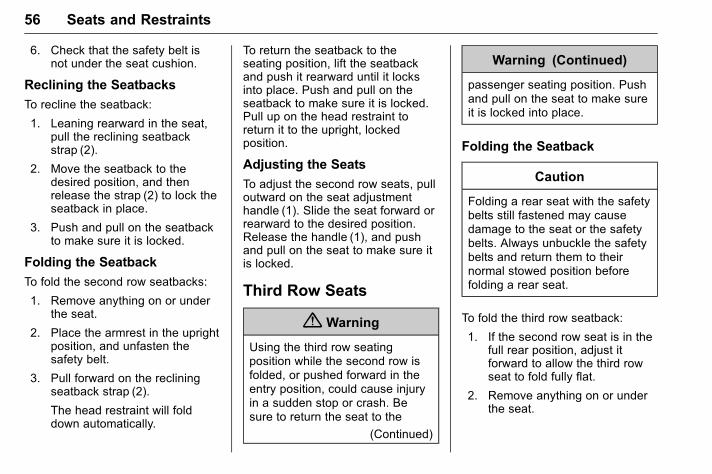
GMC Acadia/Acadia Denali Owner Manual (GMNA-Localizing-U.S./Canada/Mexico-9159268) - 2016 - CRC - 4/16/15
56 Seats and Restraints
6. Check that the safety belt isnot under the seat cushion.
Reclining the Seatbacks
To recline the seatback:
1. Leaning rearward in the seat,pull the reclining seatbackstrap (2).
2. Move the seatback to thedesired position, and thenrelease the strap (2) to lock theseatback in place.
3. Push and pull on the seatbackto make sure it is locked.
Folding the Seatback
To fold the second row seatbacks:
1. Remove anything on or underthe seat.
2. Place the armrest in the uprightposition, and unfasten thesafety belt.
3. Pull forward on the recliningseatback strap (2).
The head restraint will folddown automatically.
To return the seatback to theseating position, lift the seatbackand push it rearward until it locksinto place. Push and pull on theseatback to make sure it is locked.Pull up on the head restraint toreturn it to the upright, lockedposition.
Adjusting the Seats
To adjust the second row seats, pulloutward on the seat adjustmenthandle (1). Slide the seat forward orrearward to the desired position.Release the handle (1), and pushand pull on the seat to make sure itis locked.
Third Row Seats
{ Warning
Using the third row seatingposition while the second row isfolded, or pushed forward in theentry position, could cause injuryin a sudden stop or crash. Besure to return the seat to the
(Continued)
Warning (Continued)
passenger seating position. Pushand pull on the seat to make sureit is locked into place.
Folding the Seatback
Caution
Folding a rear seat with the safetybelts still fastened may causedamage to the seat or the safetybelts. Always unbuckle the safetybelts and return them to theirnormal stowed position beforefolding a rear seat.
To fold the third row seatback:
1. If the second row seat is in thefull rear position, adjust itforward to allow the third rowseat to fold fully flat.
2. Remove anything on or underthe seat.
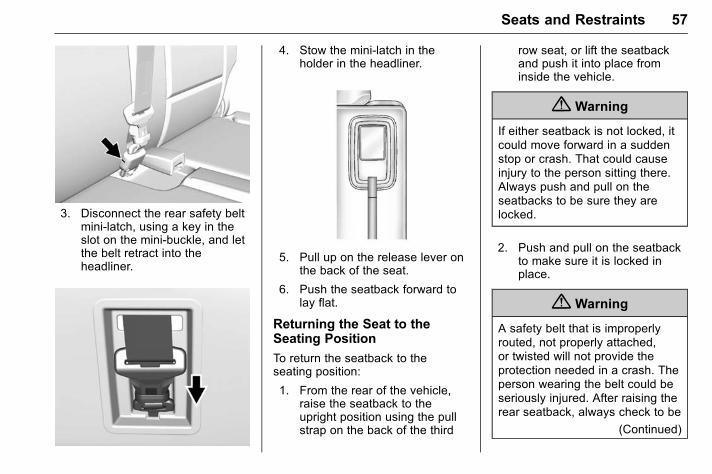
GMC Acadia/Acadia Denali Owner Manual (GMNA-Localizing-U.S./Canada/Mexico-9159268) - 2016 - CRC - 4/16/15
Seats and Restraints 57
3. Disconnect the rear safety beltmini-latch, using a key in theslot on the mini-buckle, and letthe belt retract into theheadliner.
4. Stow the mini-latch in theholder in the headliner.
5. Pull up on the release lever onthe back of the seat.
6. Push the seatback forward tolay flat.
Returning the Seat to theSeating Position
To return the seatback to theseating position:
1. From the rear of the vehicle,raise the seatback to theupright position using the pullstrap on the back of the third
row seat, or lift the seatbackand push it into place frominside the vehicle.
{ Warning
If either seatback is not locked, itcould move forward in a suddenstop or crash. That could causeinjury to the person sitting there.Always push and pull on theseatbacks to be sure they arelocked.
2. Push and pull on the seatbackto make sure it is locked inplace.
{ Warning
A safety belt that is improperlyrouted, not properly attached,or twisted will not provide theprotection needed in a crash. Theperson wearing the belt could beseriously injured. After raising therear seatback, always check to be
(Continued)
GMC Acadia/Acadia Denali Owner Manual (GMNA-Localizing-U.S./Canada/Mexico-9159268) - 2016 - CRC - 4/16/15
58 Seats and Restraints
Warning (Continued)
sure that the safety belts areproperly routed and attached, andare not twisted.
3. Reconnect the center safetybelt mini-latch to themini-buckle. Do not let it twist.
4. Pull on the safety belt to besure the mini-latch is secure.
Removing the Third Row Seats
To remove a third row seat:
1. Remove the cargomanagement system, if it isinstalled. See CargoManagement System 0 99.
2. Remove anything on or underthe seat.
Caution
Folding a rear seat with the safetybelts still fastened may causedamage to the seat or the safety
(Continued)
Caution (Continued)
belts. Always unbuckle the safetybelts and return them to theirnormal stowed position beforefolding a rear seat.
3. Fold the seatback down. See“Folding the Seatback” earlierin this section.
4. Remove the rear bolts on thefloor on each side of the seat.
5. Remove the seat by tilting itslightly upward, and thenpulling it out of the rear of thevehicle in one motion.
6. Replace the bolts in the floorholes for storage.
Installing the Third Row Seats
To reinstall a third row seat:
1. Before installing the seat, theseatback must be foldedforward. See “Folding theSeatback” earlier in thissection.
The seats must be placed inthe proper locations to attachcorrectly. The wider seat mustbe installed on the driver sideand the narrower seat on thepassenger side. Remove thebolts from the holes in the floorbefore installing the seats.
2. Place the seat on the vehiclefloor so that the front seathooks are on the vehicle bars.
3. Reinstall the bolts, and torqueto 55Y (41 lb ft). Pull up onthe seat to make sure it islocked in place.
4. Raise the seatback to itsupright position. Push and pullon the seatback to make sure itis locked into place.
5. Reconnect the center safetybelt mini-latch to themini-buckle. Do not let it twist.
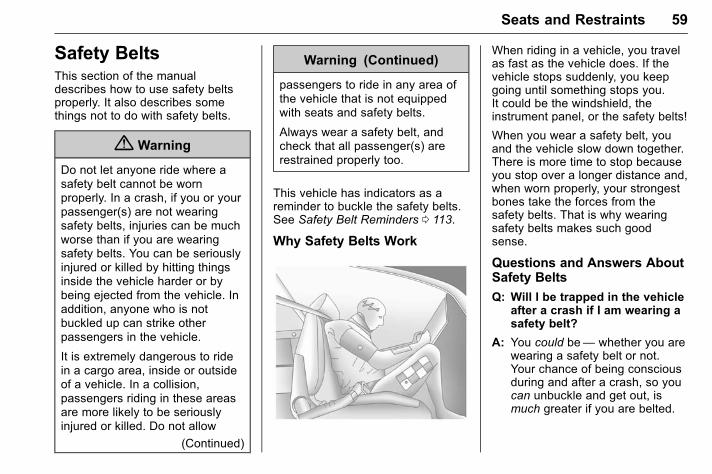
GMC Acadia/Acadia Denali Owner Manual (GMNA-Localizing-U.S./Canada/Mexico-9159268) - 2016 - CRC - 4/16/15
Seats and Restraints 59
Safety BeltsThis section of the manualdescribes how to use safety beltsproperly. It also describes somethings not to do with safety belts.
{ Warning
Do not let anyone ride where asafety belt cannot be wornproperly. In a crash, if you or yourpassenger(s) are not wearingsafety belts, injuries can be muchworse than if you are wearingsafety belts. You can be seriouslyinjured or killed by hitting thingsinside the vehicle harder or bybeing ejected from the vehicle. Inaddition, anyone who is notbuckled up can strike otherpassengers in the vehicle.
It is extremely dangerous to ridein a cargo area, inside or outsideof a vehicle. In a collision,passengers riding in these areasare more likely to be seriouslyinjured or killed. Do not allow
(Continued)
Warning (Continued)
passengers to ride in any area ofthe vehicle that is not equippedwith seats and safety belts.
Always wear a safety belt, andcheck that all passenger(s) arerestrained properly too.
This vehicle has indicators as areminder to buckle the safety belts.See Safety Belt Reminders 0 113.
Why Safety Belts Work
When riding in a vehicle, you travelas fast as the vehicle does. If thevehicle stops suddenly, you keepgoing until something stops you.It could be the windshield, theinstrument panel, or the safety belts!
When you wear a safety belt, youand the vehicle slow down together.There is more time to stop becauseyou stop over a longer distance and,when worn properly, your strongestbones take the forces from thesafety belts. That is why wearingsafety belts makes such goodsense.
Questions and Answers AboutSafety Belts
Q: Will I be trapped in the vehicleafter a crash if I am wearing asafety belt?
A: You could be— whether you arewearing a safety belt or not.Your chance of being consciousduring and after a crash, so youcan unbuckle and get out, ismuch greater if you are belted.
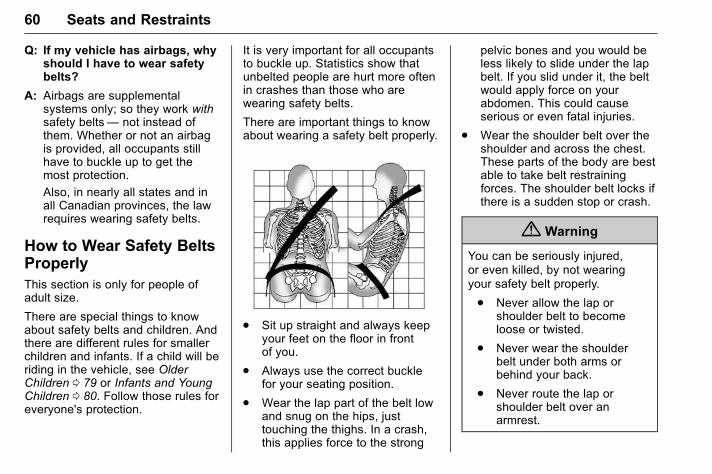
GMC Acadia/Acadia Denali Owner Manual (GMNA-Localizing-U.S./Canada/Mexico-9159268) - 2016 - CRC - 4/16/15
60 Seats and Restraints
Q: If my vehicle has airbags, whyshould I have to wear safetybelts?
A: Airbags are supplementalsystems only; so they work withsafety belts— not instead ofthem. Whether or not an airbagis provided, all occupants stillhave to buckle up to get themost protection.
Also, in nearly all states and inall Canadian provinces, the lawrequires wearing safety belts.
How to Wear Safety BeltsProperlyThis section is only for people ofadult size.
There are special things to knowabout safety belts and children. Andthere are different rules for smallerchildren and infants. If a child will beriding in the vehicle, see OlderChildren 0 79 or Infants and YoungChildren 0 80. Follow those rules foreveryone's protection.
It is very important for all occupantsto buckle up. Statistics show thatunbelted people are hurt more oftenin crashes than those who arewearing safety belts.
There are important things to knowabout wearing a safety belt properly.
. Sit up straight and always keepyour feet on the floor in frontof you.
. Always use the correct bucklefor your seating position.
. Wear the lap part of the belt lowand snug on the hips, justtouching the thighs. In a crash,this applies force to the strong
pelvic bones and you would beless likely to slide under the lapbelt. If you slid under it, the beltwould apply force on yourabdomen. This could causeserious or even fatal injuries.
. Wear the shoulder belt over theshoulder and across the chest.These parts of the body are bestable to take belt restrainingforces. The shoulder belt locks ifthere is a sudden stop or crash.
{ Warning
You can be seriously injured,or even killed, by not wearingyour safety belt properly.
. Never allow the lap orshoulder belt to becomeloose or twisted.
. Never wear the shoulderbelt under both arms orbehind your back.
. Never route the lap orshoulder belt over anarmrest.
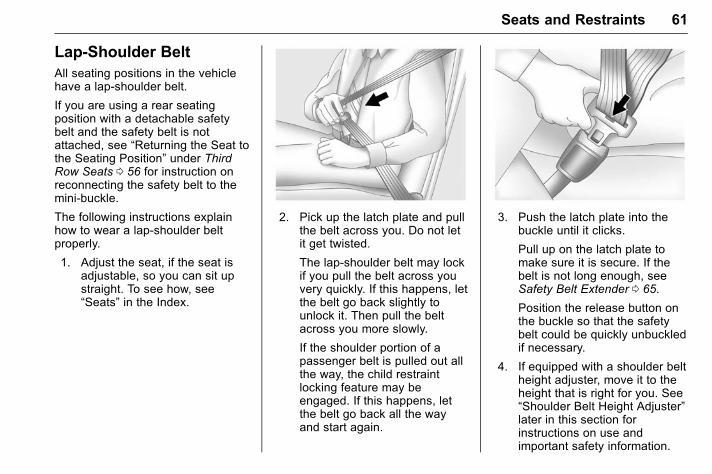
GMC Acadia/Acadia Denali Owner Manual (GMNA-Localizing-U.S./Canada/Mexico-9159268) - 2016 - CRC - 4/16/15
Seats and Restraints 61
Lap-Shoulder BeltAll seating positions in the vehiclehave a lap-shoulder belt.
If you are using a rear seatingposition with a detachable safetybelt and the safety belt is notattached, see “Returning the Seat tothe Seating Position” under ThirdRow Seats 0 56 for instruction onreconnecting the safety belt to themini-buckle.
The following instructions explainhow to wear a lap-shoulder beltproperly.
1. Adjust the seat, if the seat isadjustable, so you can sit upstraight. To see how, see“Seats” in the Index.
2. Pick up the latch plate and pullthe belt across you. Do not letit get twisted.
The lap-shoulder belt may lockif you pull the belt across youvery quickly. If this happens, letthe belt go back slightly tounlock it. Then pull the beltacross you more slowly.
If the shoulder portion of apassenger belt is pulled out allthe way, the child restraintlocking feature may beengaged. If this happens, letthe belt go back all the wayand start again.
3. Push the latch plate into thebuckle until it clicks.
Pull up on the latch plate tomake sure it is secure. If thebelt is not long enough, seeSafety Belt Extender 0 65.
Position the release button onthe buckle so that the safetybelt could be quickly unbuckledif necessary.
4. If equipped with a shoulder beltheight adjuster, move it to theheight that is right for you. See“Shoulder Belt Height Adjuster”later in this section forinstructions on use andimportant safety information.
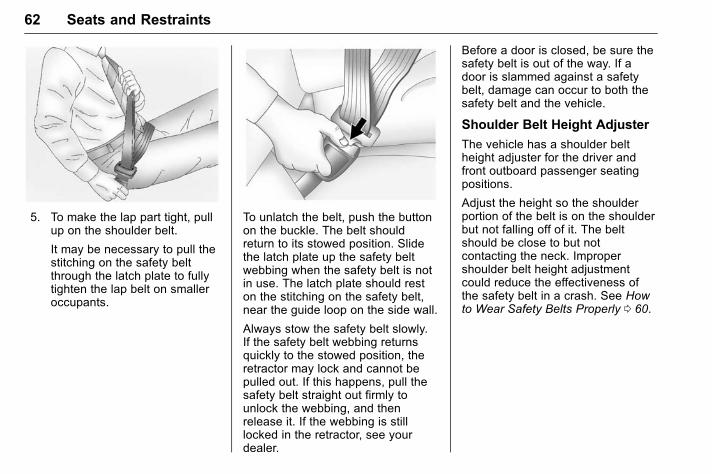
GMC Acadia/Acadia Denali Owner Manual (GMNA-Localizing-U.S./Canada/Mexico-9159268) - 2016 - CRC - 4/16/15
62 Seats and Restraints
5. To make the lap part tight, pullup on the shoulder belt.
It may be necessary to pull thestitching on the safety beltthrough the latch plate to fullytighten the lap belt on smalleroccupants.
To unlatch the belt, push the buttonon the buckle. The belt shouldreturn to its stowed position. Slidethe latch plate up the safety beltwebbing when the safety belt is notin use. The latch plate should reston the stitching on the safety belt,near the guide loop on the side wall.
Always stow the safety belt slowly.If the safety belt webbing returnsquickly to the stowed position, theretractor may lock and cannot bepulled out. If this happens, pull thesafety belt straight out firmly tounlock the webbing, and thenrelease it. If the webbing is stilllocked in the retractor, see yourdealer.
Before a door is closed, be sure thesafety belt is out of the way. If adoor is slammed against a safetybelt, damage can occur to both thesafety belt and the vehicle.
Shoulder Belt Height Adjuster
The vehicle has a shoulder beltheight adjuster for the driver andfront outboard passenger seatingpositions.
Adjust the height so the shoulderportion of the belt is on the shoulderbut not falling off of it. The beltshould be close to but notcontacting the neck. Impropershoulder belt height adjustmentcould reduce the effectiveness ofthe safety belt in a crash. See Howto Wear Safety Belts Properly 0 60.
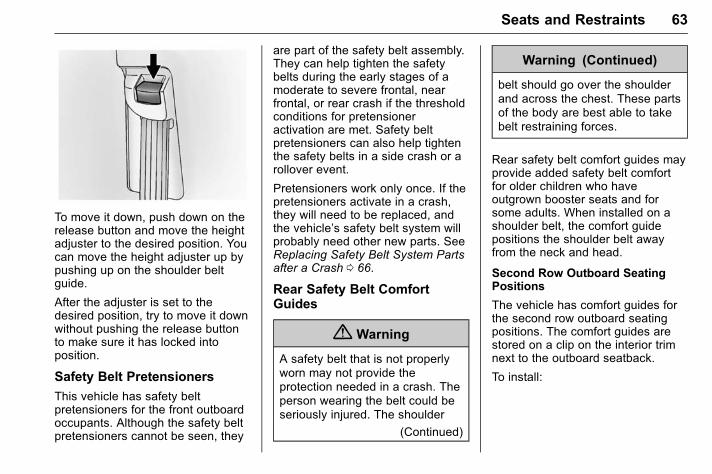
GMC Acadia/Acadia Denali Owner Manual (GMNA-Localizing-U.S./Canada/Mexico-9159268) - 2016 - CRC - 4/16/15
Seats and Restraints 63
To move it down, push down on therelease button and move the heightadjuster to the desired position. Youcan move the height adjuster up bypushing up on the shoulder beltguide.
After the adjuster is set to thedesired position, try to move it downwithout pushing the release buttonto make sure it has locked intoposition.
Safety Belt Pretensioners
This vehicle has safety beltpretensioners for the front outboardoccupants. Although the safety beltpretensioners cannot be seen, they
are part of the safety belt assembly.They can help tighten the safetybelts during the early stages of amoderate to severe frontal, nearfrontal, or rear crash if the thresholdconditions for pretensioneractivation are met. Safety beltpretensioners can also help tightenthe safety belts in a side crash or arollover event.
Pretensioners work only once. If thepretensioners activate in a crash,they will need to be replaced, andthe vehicle’s safety belt system willprobably need other new parts. SeeReplacing Safety Belt System Partsafter a Crash 0 66.
Rear Safety Belt ComfortGuides
{ Warning
A safety belt that is not properlyworn may not provide theprotection needed in a crash. Theperson wearing the belt could beseriously injured. The shoulder
(Continued)
Warning (Continued)
belt should go over the shoulderand across the chest. These partsof the body are best able to takebelt restraining forces.
Rear safety belt comfort guides mayprovide added safety belt comfortfor older children who haveoutgrown booster seats and forsome adults. When installed on ashoulder belt, the comfort guidepositions the shoulder belt awayfrom the neck and head.
Second Row Outboard SeatingPositions
The vehicle has comfort guides forthe second row outboard seatingpositions. The comfort guides arestored on a clip on the interior trimnext to the outboard seatback.
To install:
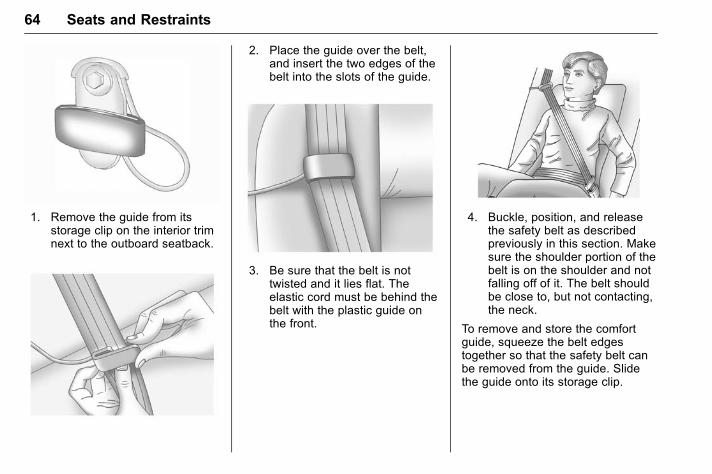
GMC Acadia/Acadia Denali Owner Manual (GMNA-Localizing-U.S./Canada/Mexico-9159268) - 2016 - CRC - 4/16/15
64 Seats and Restraints
1. Remove the guide from itsstorage clip on the interior trimnext to the outboard seatback.
2. Place the guide over the belt,and insert the two edges of thebelt into the slots of the guide.
3. Be sure that the belt is nottwisted and it lies flat. Theelastic cord must be behind thebelt with the plastic guide onthe front.
4. Buckle, position, and releasethe safety belt as describedpreviously in this section. Makesure the shoulder portion of thebelt is on the shoulder and notfalling off of it. The belt shouldbe close to, but not contacting,the neck.
To remove and store the comfortguide, squeeze the belt edgestogether so that the safety belt canbe removed from the guide. Slidethe guide onto its storage clip.
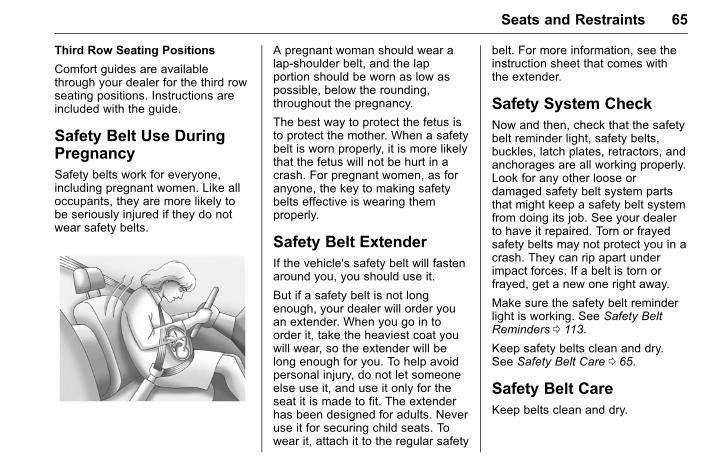
GMC Acadia/Acadia Denali Owner Manual (GMNA-Localizing-U.S./Canada/Mexico-9159268) - 2016 - CRC - 4/16/15
Seats and Restraints 65
Third Row Seating Positions
Comfort guides are availablethrough your dealer for the third rowseating positions. Instructions areincluded with the guide.
Safety Belt Use DuringPregnancySafety belts work for everyone,including pregnant women. Like alloccupants, they are more likely tobe seriously injured if they do notwear safety belts.
A pregnant woman should wear alap-shoulder belt, and the lapportion should be worn as low aspossible, below the rounding,throughout the pregnancy.
The best way to protect the fetus isto protect the mother. When a safetybelt is worn properly, it is more likelythat the fetus will not be hurt in acrash. For pregnant women, as foranyone, the key to making safetybelts effective is wearing themproperly.
Safety Belt ExtenderIf the vehicle's safety belt will fastenaround you, you should use it.
But if a safety belt is not longenough, your dealer will order youan extender. When you go in toorder it, take the heaviest coat youwill wear, so the extender will belong enough for you. To help avoidpersonal injury, do not let someoneelse use it, and use it only for theseat it is made to fit. The extenderhas been designed for adults. Neveruse it for securing child seats. Towear it, attach it to the regular safety
belt. For more information, see theinstruction sheet that comes withthe extender.
Safety System CheckNow and then, check that the safetybelt reminder light, safety belts,buckles, latch plates, retractors, andanchorages are all working properly.Look for any other loose ordamaged safety belt system partsthat might keep a safety belt systemfrom doing its job. See your dealerto have it repaired. Torn or frayedsafety belts may not protect you in acrash. They can rip apart underimpact forces. If a belt is torn orfrayed, get a new one right away.
Make sure the safety belt reminderlight is working. See Safety BeltReminders 0 113.
Keep safety belts clean and dry.See Safety Belt Care 0 65.
Safety Belt CareKeep belts clean and dry.
GMC Acadia/Acadia Denali Owner Manual (GMNA-Localizing-U.S./Canada/Mexico-9159268) - 2016 - CRC - 4/16/15
66 Seats and Restraints
{ Warning
Do not bleach or dye safety belts.It may severely weaken them. Ina crash, they might not be able toprovide adequate protection.Clean safety belts only with mildsoap and lukewarm water.
Replacing Safety BeltSystem Parts after aCrash
{ Warning
A crash can damage the safetybelt system in the vehicle.A damaged safety belt systemmay not properly protect theperson using it, resulting inserious injury or even death in acrash. To help make sure thesafety belt systems are workingproperly after a crash, have theminspected and any necessaryreplacements made as soon aspossible.
After a minor crash, replacement ofsafety belts may not be necessary.But the safety belt assemblies thatwere used during any crash mayhave been stressed or damaged.See your dealer to have the safetybelt assemblies inspected orreplaced.
New parts and repairs may benecessary even if the safety beltsystem was not being used at thetime of the crash.
Have the safety belt pretensionerschecked if the vehicle has been in acrash, or if the airbag readiness lightstays on after you start the vehicleor while you are driving. See AirbagReadiness Light 0 114.
Airbag SystemThe vehicle has the followingairbags:
. A frontal airbag for the driver.
. A frontal airbag for the frontoutboard passenger.
. A seat-mounted side impactairbag for the driver.
. A seat-mounted side impactairbag for the front outboardpassenger.
. A roof-rail airbag for the driverand for the second and third rowpassengers seated directlybehind the driver.
. A roof-rail airbag for the frontoutboard passenger and thesecond and third rowpassengers seated directlybehind the front outboardpassenger.
The vehicle may have the followingairbag:
. A front center airbag for thedriver and front outboardpassenger.
GMC Acadia/Acadia Denali Owner Manual (GMNA-Localizing-U.S./Canada/Mexico-9159268) - 2016 - CRC - 4/16/15
Seats and Restraints 67
All vehicle airbags have the wordAIRBAG on the trim or on anattached label near the deploymentopening.
For frontal airbags, the wordAIRBAG is on the center of thesteering wheel for the driver and onthe instrument panel for the frontoutboard passenger.
For the front center airbag, the wordAIRBAG is on the inboard side ofthe driver seatback.
For seat-mounted side impactairbags, the word AIRBAG is on theside of the seatback closest tothe door.
For roof-rail airbags, the wordAIRBAG is on the ceiling or trim.
Airbags are designed to supplementthe protection provided by safetybelts. Even though today's airbagsare also designed to help reducethe risk of injury from the force of aninflating bag, all airbags must inflatevery quickly to do their job.
Here are the most important thingsto know about the airbag system:
{ Warning
You can be severely injured orkilled in a crash if you are notwearing your safety belt, evenwith airbags. Airbags aredesigned to work with safetybelts, not replace them. Also,airbags are not designed to inflatein every crash. In some crashessafety belts are the only restraint.See When Should an AirbagInflate? 0 69.
Wearing your safety belt during acrash helps reduce the chance ofhitting things inside the vehicle orbeing ejected from it. Airbags are“supplemental restraints” to thesafety belts. Everyone in thevehicle should wear a safety beltproperly, whether or not there isan airbag for that person.
{ Warning
Because airbags inflate with greatforce and faster than the blink ofan eye, anyone who is upagainst, or very close to anyairbag when it inflates can beseriously injured or killed. Do notsit unnecessarily close to anyairbag, as you would be if sittingon the edge of the seat or leaningforward. Safety belts help keepyou in position before and duringa crash. Always wear a safetybelt, even with airbags. The drivershould sit as far back as possiblewhile still maintaining control ofthe vehicle. The safety belts andthe front outboard passengerairbags are most effective whenyou are sitting well back andupright in the seat with both feeton the floor.
Occupants should not lean on orsleep against the front centerarmrest or console in vehicleswith a front center airbag.
(Continued)
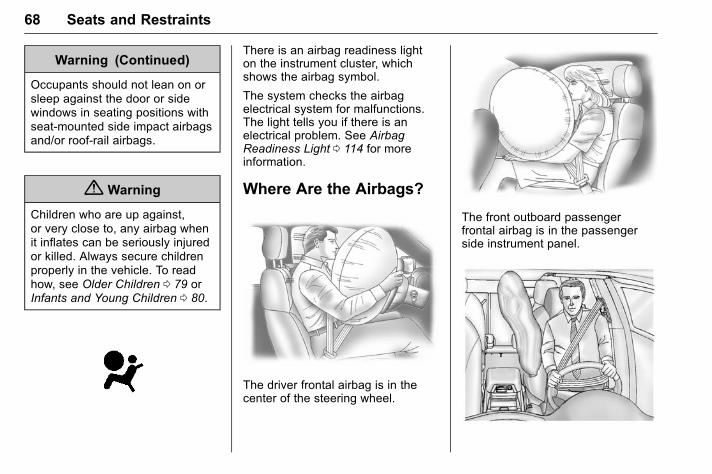
GMC Acadia/Acadia Denali Owner Manual (GMNA-Localizing-U.S./Canada/Mexico-9159268) - 2016 - CRC - 4/16/15
68 Seats and Restraints
Warning (Continued)
Occupants should not lean on orsleep against the door or sidewindows in seating positions withseat-mounted side impact airbagsand/or roof-rail airbags.
{ Warning
Children who are up against,or very close to, any airbag whenit inflates can be seriously injuredor killed. Always secure childrenproperly in the vehicle. To readhow, see Older Children 0 79 orInfants and Young Children 0 80.
There is an airbag readiness lighton the instrument cluster, whichshows the airbag symbol.
The system checks the airbagelectrical system for malfunctions.The light tells you if there is anelectrical problem. See AirbagReadiness Light 0 114 for moreinformation.
Where Are the Airbags?
The driver frontal airbag is in thecenter of the steering wheel.
The front outboard passengerfrontal airbag is in the passengerside instrument panel.
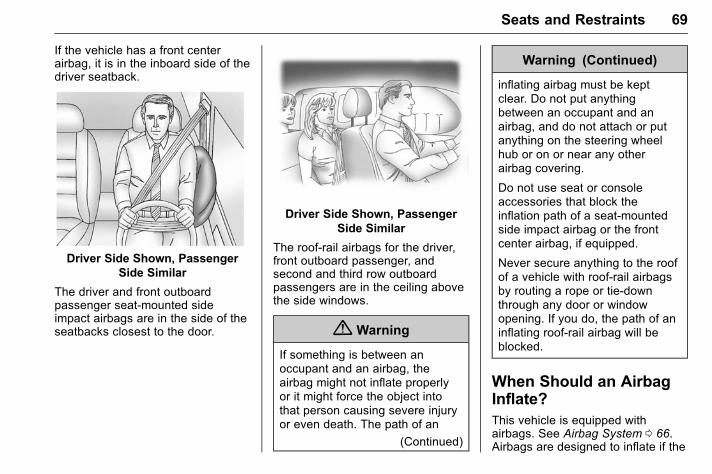
GMC Acadia/Acadia Denali Owner Manual (GMNA-Localizing-U.S./Canada/Mexico-9159268) - 2016 - CRC - 4/16/15
Seats and Restraints 69
If the vehicle has a front centerairbag, it is in the inboard side of thedriver seatback.
Driver Side Shown, PassengerSide Similar
The driver and front outboardpassenger seat-mounted sideimpact airbags are in the side of theseatbacks closest to the door.
Driver Side Shown, PassengerSide Similar
The roof-rail airbags for the driver,front outboard passenger, andsecond and third row outboardpassengers are in the ceiling abovethe side windows.
{ Warning
If something is between anoccupant and an airbag, theairbag might not inflate properlyor it might force the object intothat person causing severe injuryor even death. The path of an
(Continued)
Warning (Continued)
inflating airbag must be keptclear. Do not put anythingbetween an occupant and anairbag, and do not attach or putanything on the steering wheelhub or on or near any otherairbag covering.
Do not use seat or consoleaccessories that block theinflation path of a seat-mountedside impact airbag or the frontcenter airbag, if equipped.
Never secure anything to the roofof a vehicle with roof-rail airbagsby routing a rope or tie-downthrough any door or windowopening. If you do, the path of aninflating roof-rail airbag will beblocked.
When Should an AirbagInflate?This vehicle is equipped withairbags. See Airbag System 0 66.Airbags are designed to inflate if the

GMC Acadia/Acadia Denali Owner Manual (GMNA-Localizing-U.S./Canada/Mexico-9159268) - 2016 - CRC - 4/16/15
70 Seats and Restraints
impact exceeds the specific airbagsystem's deployment threshold.Deployment thresholds are used topredict how severe a crash is likelyto be in time for the airbags toinflate and help restrain theoccupants. The vehicle haselectronic sensors that help theairbag system determine theseverity of the impact. Deploymentthresholds can vary with specificvehicle design.
Frontal airbags are designed toinflate in moderate to severe frontalor near frontal crashes to helpreduce the potential for severeinjuries, mainly to the driver's orfront outboard passenger's headand chest.
Whether the frontal airbags will orshould inflate is not based primarilyon how fast the vehicle is traveling.It depends on what is hit, thedirection of the impact, and howquickly the vehicle slows down.
Frontal airbags may inflate atdifferent crash speeds depending onwhether the vehicle hits an objectstraight on or at an angle, and
whether the object is fixed ormoving, rigid or deformable, narrowor wide.
Frontal airbags are not intended toinflate during vehicle rollovers, rearimpacts, or many side impacts.
In addition, the vehicle hasadvanced technology frontalairbags. Advanced technologyfrontal airbags adjust the restraintaccording to crash severity.
The front center airbag, if equipped,is designed to inflate in moderate tosevere side crashes dependingupon the location of the impact,when either side of the vehicle isstruck. In addition, the front centerairbag is designed to inflate whenthe sensing system predicts that thevehicle is about to roll over on itsside. The front center airbag is notdesigned to inflate in frontalimpacts, near frontal impacts,or rear impacts.
Seat-mounted side impact airbagsare designed to inflate in moderateto severe side crashes dependingon the location of the impact.Seat-mounted side impact airbags
are not designed to inflate in frontalimpacts, near frontal impacts,rollovers, or rear impacts.A seat-mounted side impact airbagis designed to inflate on the side ofthe vehicle that is struck.
Roof-rail airbags are designed toinflate in moderate to severe sidecrashes depending on the locationof the impact. In addition, theseroof-rail airbags are designed toinflate during a rollover or in asevere frontal impact. Roof-railairbags are not designed to inflate inrear impacts. Both roof-rail airbagswill inflate when either side of thevehicle is struck, if the sensingsystem predicts that the vehicle isabout to roll over on its side, or in asevere frontal impact.
In any particular crash, no one cansay whether an airbag should haveinflated simply because of thevehicle damage or the repair costs.
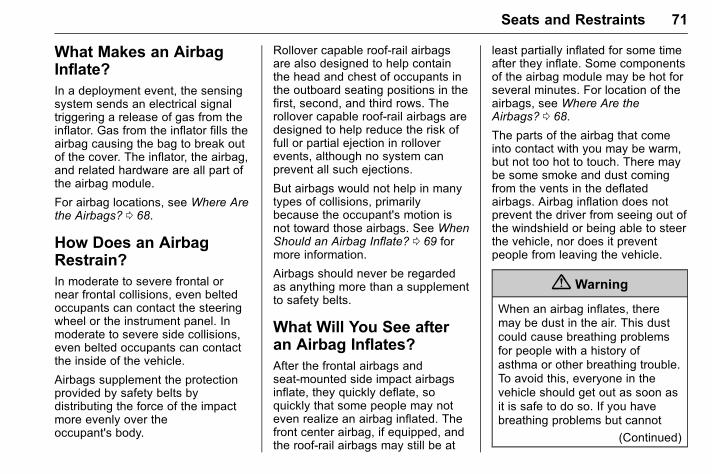
GMC Acadia/Acadia Denali Owner Manual (GMNA-Localizing-U.S./Canada/Mexico-9159268) - 2016 - CRC - 4/16/15
Seats and Restraints 71
What Makes an AirbagInflate?In a deployment event, the sensingsystem sends an electrical signaltriggering a release of gas from theinflator. Gas from the inflator fills theairbag causing the bag to break outof the cover. The inflator, the airbag,and related hardware are all part ofthe airbag module.
For airbag locations, see Where Arethe Airbags? 0 68.
How Does an AirbagRestrain?In moderate to severe frontal ornear frontal collisions, even beltedoccupants can contact the steeringwheel or the instrument panel. Inmoderate to severe side collisions,even belted occupants can contactthe inside of the vehicle.
Airbags supplement the protectionprovided by safety belts bydistributing the force of the impactmore evenly over theoccupant's body.
Rollover capable roof-rail airbagsare also designed to help containthe head and chest of occupants inthe outboard seating positions in thefirst, second, and third rows. Therollover capable roof-rail airbags aredesigned to help reduce the risk offull or partial ejection in rolloverevents, although no system canprevent all such ejections.
But airbags would not help in manytypes of collisions, primarilybecause the occupant's motion isnot toward those airbags. See WhenShould an Airbag Inflate? 0 69 formore information.
Airbags should never be regardedas anything more than a supplementto safety belts.
What Will You See afteran Airbag Inflates?After the frontal airbags andseat-mounted side impact airbagsinflate, they quickly deflate, soquickly that some people may noteven realize an airbag inflated. Thefront center airbag, if equipped, andthe roof-rail airbags may still be at
least partially inflated for some timeafter they inflate. Some componentsof the airbag module may be hot forseveral minutes. For location of theairbags, see Where Are theAirbags? 0 68.
The parts of the airbag that comeinto contact with you may be warm,but not too hot to touch. There maybe some smoke and dust comingfrom the vents in the deflatedairbags. Airbag inflation does notprevent the driver from seeing out ofthe windshield or being able to steerthe vehicle, nor does it preventpeople from leaving the vehicle.
{ Warning
When an airbag inflates, theremay be dust in the air. This dustcould cause breathing problemsfor people with a history ofasthma or other breathing trouble.To avoid this, everyone in thevehicle should get out as soon asit is safe to do so. If you havebreathing problems but cannot
(Continued)
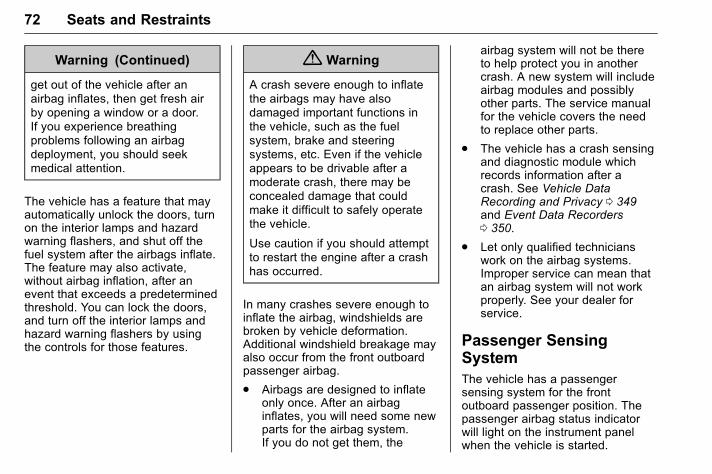
GMC Acadia/Acadia Denali Owner Manual (GMNA-Localizing-U.S./Canada/Mexico-9159268) - 2016 - CRC - 4/16/15
72 Seats and Restraints
Warning (Continued)
get out of the vehicle after anairbag inflates, then get fresh airby opening a window or a door.If you experience breathingproblems following an airbagdeployment, you should seekmedical attention.
The vehicle has a feature that mayautomatically unlock the doors, turnon the interior lamps and hazardwarning flashers, and shut off thefuel system after the airbags inflate.The feature may also activate,without airbag inflation, after anevent that exceeds a predeterminedthreshold. You can lock the doors,and turn off the interior lamps andhazard warning flashers by usingthe controls for those features.
{ Warning
A crash severe enough to inflatethe airbags may have alsodamaged important functions inthe vehicle, such as the fuelsystem, brake and steeringsystems, etc. Even if the vehicleappears to be drivable after amoderate crash, there may beconcealed damage that couldmake it difficult to safely operatethe vehicle.
Use caution if you should attemptto restart the engine after a crashhas occurred.
In many crashes severe enough toinflate the airbag, windshields arebroken by vehicle deformation.Additional windshield breakage mayalso occur from the front outboardpassenger airbag.
. Airbags are designed to inflateonly once. After an airbaginflates, you will need some newparts for the airbag system.If you do not get them, the
airbag system will not be thereto help protect you in anothercrash. A new system will includeairbag modules and possiblyother parts. The service manualfor the vehicle covers the needto replace other parts.
. The vehicle has a crash sensingand diagnostic module whichrecords information after acrash. See Vehicle DataRecording and Privacy 0 349and Event Data Recorders0 350.
. Let only qualified technicianswork on the airbag systems.Improper service can mean thatan airbag system will not workproperly. See your dealer forservice.
Passenger SensingSystemThe vehicle has a passengersensing system for the frontoutboard passenger position. Thepassenger airbag status indicatorwill light on the instrument panelwhen the vehicle is started.
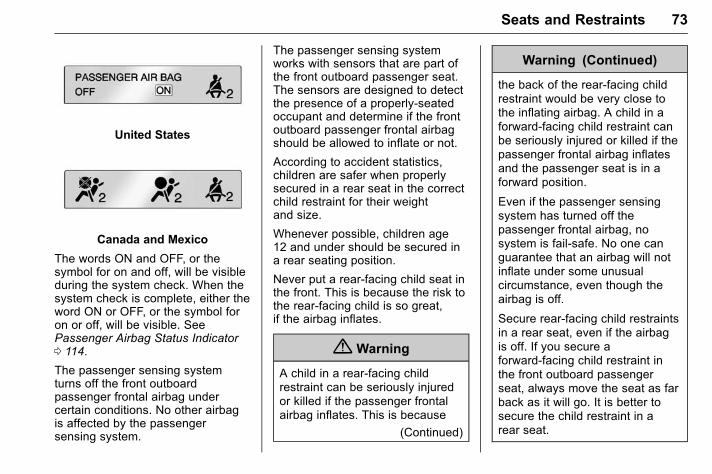
GMC Acadia/Acadia Denali Owner Manual (GMNA-Localizing-U.S./Canada/Mexico-9159268) - 2016 - CRC - 4/16/15
Seats and Restraints 73
United States
Canada and Mexico
The words ON and OFF, or thesymbol for on and off, will be visibleduring the system check. When thesystem check is complete, either theword ON or OFF, or the symbol foron or off, will be visible. SeePassenger Airbag Status Indicator0 114.
The passenger sensing systemturns off the front outboardpassenger frontal airbag undercertain conditions. No other airbagis affected by the passengersensing system.
The passenger sensing systemworks with sensors that are part ofthe front outboard passenger seat.The sensors are designed to detectthe presence of a properly-seatedoccupant and determine if the frontoutboard passenger frontal airbagshould be allowed to inflate or not.
According to accident statistics,children are safer when properlysecured in a rear seat in the correctchild restraint for their weightand size.
Whenever possible, children age12 and under should be secured ina rear seating position.
Never put a rear-facing child seat inthe front. This is because the risk tothe rear-facing child is so great,if the airbag inflates.
{ Warning
A child in a rear-facing childrestraint can be seriously injuredor killed if the passenger frontalairbag inflates. This is because
(Continued)
Warning (Continued)
the back of the rear-facing childrestraint would be very close tothe inflating airbag. A child in aforward-facing child restraint canbe seriously injured or killed if thepassenger frontal airbag inflatesand the passenger seat is in aforward position.
Even if the passenger sensingsystem has turned off thepassenger frontal airbag, nosystem is fail-safe. No one canguarantee that an airbag will notinflate under some unusualcircumstance, even though theairbag is off.
Secure rear-facing child restraintsin a rear seat, even if the airbagis off. If you secure aforward-facing child restraint inthe front outboard passengerseat, always move the seat as farback as it will go. It is better tosecure the child restraint in arear seat.
GMC Acadia/Acadia Denali Owner Manual (GMNA-Localizing-U.S./Canada/Mexico-9159268) - 2016 - CRC - 4/16/15
74 Seats and Restraints
The passenger sensing system isdesigned to turn off the frontoutboard passenger frontal airbag if:
. The front outboard passengerseat is unoccupied.
. The system determines that aninfant is present in a childrestraint.
. A front outboard passengertakes his/her weight off of theseat for a period of time.
. There is a critical problem withthe airbag system or thepassenger sensing system.
When the passenger sensingsystem has turned off the frontoutboard passenger frontal airbag,the off indicator will light and stay litas a reminder that the airbag is off.See Passenger Airbag StatusIndicator 0 114.
The passenger sensing system isdesigned to turn on the frontoutboard passenger frontal airbaganytime the system senses that aperson of adult size is sittingproperly in the front outboardpassenger seat.
When the passenger sensingsystem has allowed the airbag to beenabled, the on indicator will lightand stay lit as a reminder that theairbag is active.
For some children, includingchildren in child restraints, and forvery small adults, the passengersensing system may or may not turnoff the front outboard passengerfrontal airbag, depending upon theperson’s seating posture and bodybuild. Everyone in the vehicle whohas outgrown child restraints shouldwear a safety belt properly —whether or not there is an airbag forthat person.
{ Warning
If the airbag readiness light evercomes on and stays on, it meansthat something may be wrongwith the airbag system. To helpavoid injury to yourself or others,have the vehicle serviced rightaway. See Airbag ReadinessLight 0 114 for more information,including important safetyinformation.
If the On Indicator Is Lit for aChild Restraint
The passenger sensing system isdesigned to turn off the frontoutboard passenger frontal airbag ifthe system determines that an infantis present in a child restraint. If achild restraint has been installedand the on indicator is lit:
1. Turn the vehicle off.
2. Remove the child restraint fromthe vehicle.
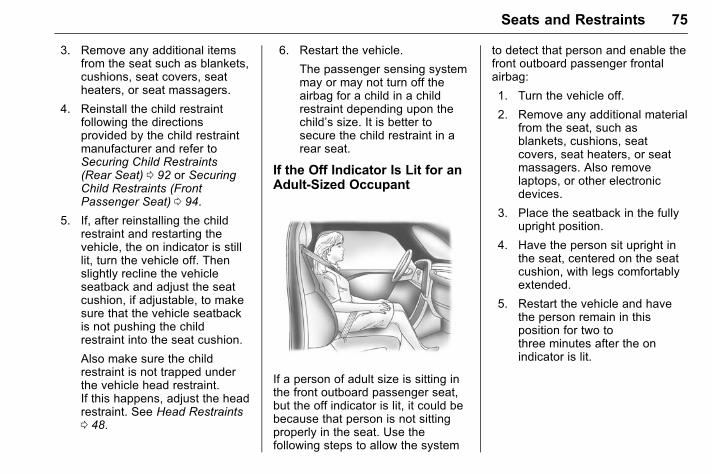
GMC Acadia/Acadia Denali Owner Manual (GMNA-Localizing-U.S./Canada/Mexico-9159268) - 2016 - CRC - 4/16/15
Seats and Restraints 75
3. Remove any additional itemsfrom the seat such as blankets,cushions, seat covers, seatheaters, or seat massagers.
4. Reinstall the child restraintfollowing the directionsprovided by the child restraintmanufacturer and refer toSecuring Child Restraints(Rear Seat) 0 92 or SecuringChild Restraints (FrontPassenger Seat) 0 94.
5. If, after reinstalling the childrestraint and restarting thevehicle, the on indicator is stilllit, turn the vehicle off. Thenslightly recline the vehicleseatback and adjust the seatcushion, if adjustable, to makesure that the vehicle seatbackis not pushing the childrestraint into the seat cushion.
Also make sure the childrestraint is not trapped underthe vehicle head restraint.If this happens, adjust the headrestraint. See Head Restraints0 48.
6. Restart the vehicle.
The passenger sensing systemmay or may not turn off theairbag for a child in a childrestraint depending upon thechild’s size. It is better tosecure the child restraint in arear seat.
If the Off Indicator Is Lit for anAdult-Sized Occupant
If a person of adult size is sitting inthe front outboard passenger seat,but the off indicator is lit, it could bebecause that person is not sittingproperly in the seat. Use thefollowing steps to allow the system
to detect that person and enable thefront outboard passenger frontalairbag:
1. Turn the vehicle off.
2. Remove any additional materialfrom the seat, such asblankets, cushions, seatcovers, seat heaters, or seatmassagers. Also removelaptops, or other electronicdevices.
3. Place the seatback in the fullyupright position.
4. Have the person sit upright inthe seat, centered on the seatcushion, with legs comfortablyextended.
5. Restart the vehicle and havethe person remain in thisposition for two tothree minutes after the onindicator is lit.
GMC Acadia/Acadia Denali Owner Manual (GMNA-Localizing-U.S./Canada/Mexico-9159268) - 2016 - CRC - 4/16/15
76 Seats and Restraints
{ Warning
If the front outboard passengerairbag is turned off for anadult-sized occupant, the airbagwill not be able to inflate and helpprotect that person in a crash,resulting in an increased risk ofserious injury or even death. Anadult-sized occupant should notride in the front outboardpassenger seat, if the passengerairbag off indicator is lit.
Additional Factors AffectingSystem Operation
Safety belts help keep thepassenger in position on the seatduring vehicle maneuvers andbraking, which helps the passengersensing system maintain thepassenger airbag status. See“Safety Belts” and “Child Restraints”in the Index for additionalinformation about the importance ofproper restraint use.
A thick layer of additional material,such as a blanket or cushion,or aftermarket equipment such asseat covers, seat heaters, and seatmassagers can affect how well thepassenger sensing systemoperates. We recommend that younot use seat covers or otheraftermarket equipment except whenapproved by GM for your specificvehicle. See Adding Equipment tothe Airbag-Equipped Vehicle 0 77for more information aboutmodifications that can affect howthe system operates.
A wet seat can affect theperformance of the passengersensing system. Here is how:
. The passenger sensing systemmay turn off the passengerairbag when liquid is soaked intothe seat. If this happens, the offindicator will be lit, and theairbag readiness light on theinstrument panel will also be lit.
. Liquid pooled on the seat thathas not soaked in may make itmore likely that the passengersensing system will turn on the
passenger airbag while a childrestraint or child occupant is onthe seat. If the passenger airbagis turned on, the on indicator willbe lit.
If the passenger seat gets wet, drythe seat immediately. If the airbagreadiness light is lit, do not install achild restraint or allow anyone tooccupy the seat. See AirbagReadiness Light 0 114 for importantsafety information.
The on indicator may be lit if anobject, such as a briefcase,handbag, grocery bag, laptop orother electronic device, is put on anunoccupied seat. If this is notdesired remove the object fromthe seat.
{ Warning
Stowing of articles under thepassenger seat or between thepassenger seat cushion andseatback may interfere with theproper operation of the passengersensing system.
GMC Acadia/Acadia Denali Owner Manual (GMNA-Localizing-U.S./Canada/Mexico-9159268) - 2016 - CRC - 4/16/15
Seats and Restraints 77
Servicing theAirbag-Equipped VehicleAirbags affect how the vehicleshould be serviced. There are partsof the airbag system in severalplaces around the vehicle. Yourdealer and the service manual haveinformation about servicing thevehicle and the airbag system. Topurchase a service manual, seeService Publications OrderingInformation 0 347.
{ Warning
For up to 10 seconds after thevehicle is turned off and thebattery is disconnected, an airbagcan still inflate during improperservice. You can be injured if youare close to an airbag when itinflates. Avoid yellow connectors.They are probably part of theairbag system. Be sure to followproper service procedures, andmake sure the person performingwork for you is qualified to do so.
Adding Equipment to theAirbag-Equipped VehicleAdding accessories that change thevehicle's frame, bumper system,height, front end, or side sheetmetal may keep the airbag systemfrom working properly.
The operation of the airbag systemcan also be affected by changingany parts of the front seats, safetybelts, airbag sensing and diagnosticmodule, steering wheel, instrumentpanel, roof-rail airbag modules,ceiling or pillar garnish trim,overhead console, front sensors,side impact sensors, airbag wiring,or the front center console if thevehicle has a front center airbag.
Your dealer and the service manualhave information about the locationof the airbag sensors, sensing anddiagnostic module, and airbagwiring.
In addition, the vehicle has apassenger sensing system thatincludes sensors as part of the frontoutboard passenger seat. Thepassenger sensing system may notoperate properly if the original seattrim is replaced with non-GMcovers, upholstery, or trim, or; withGM covers, upholstery, or trimdesigned for a different vehicle. Anyobject, such as an aftermarket seatheater or a comfort-enhancing pador device, installed under or on topof the seat fabric, could alsointerfere with the operation of thepassenger sensing system. Thiscould either prevent properdeployment of the passengerairbag(s) or prevent the passengersensing system from properlyturning off the passenger airbag(s).See Passenger Sensing System0 72.
If the vehicle has rollover roof-railairbags, see Different Size Tiresand Wheels 0 292 for additionalinformation.
GMC Acadia/Acadia Denali Owner Manual (GMNA-Localizing-U.S./Canada/Mexico-9159268) - 2016 - CRC - 4/16/15
78 Seats and Restraints
If you have to modify your vehiclebecause you have a disability andyou have questions about whetherthe modifications will affect thevehicle's airbag system, or if youhave questions about whether theairbag system will be affected if thevehicle is modified for any otherreason, call Customer Assistance.See Customer Assistance Offices0 340.
Airbag System CheckThe airbag system does not needregularly scheduled maintenance orreplacement. Make sure the airbagreadiness light is working. SeeAirbag Readiness Light 0 114.
Caution
If an airbag covering is damaged,opened, or broken, the airbagmay not work properly. Do notopen or break the airbagcoverings. If there are anyopened or broken airbagcoverings, have the airbagcovering and/or airbag modulereplaced. For the location of theairbags, see Where Are theAirbags? 0 68. See your dealerfor service.
Replacing Airbag SystemParts after a Crash
{ Warning
A crash can damage the airbagsystems in the vehicle.A damaged airbag system maynot work properly and may notprotect you and yourpassenger(s) in a crash, resulting
(Continued)
Warning (Continued)
in serious injury or even death. Tohelp make sure the airbagsystems are working properlyafter a crash, have theminspected and any necessaryreplacements made as soon aspossible.
If an airbag inflates, you will need toreplace airbag system parts. Seeyour dealer for service.
If the airbag readiness light stays onafter the vehicle is started or comeson when you are driving, the airbagsystem may not work properly. Havethe vehicle serviced right away. SeeAirbag Readiness Light 0 114.
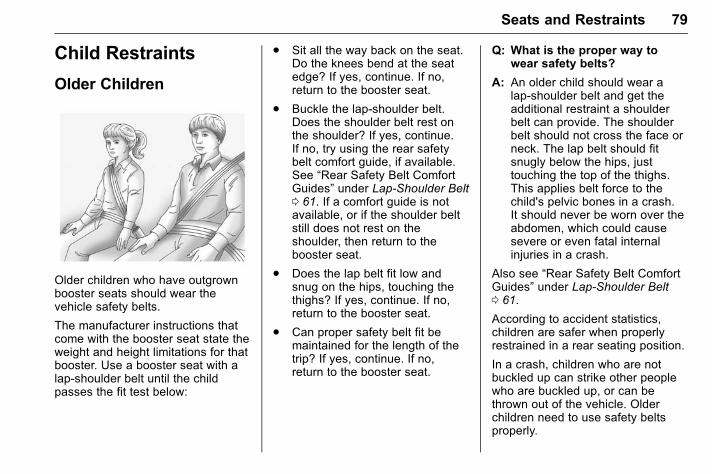
GMC Acadia/Acadia Denali Owner Manual (GMNA-Localizing-U.S./Canada/Mexico-9159268) - 2016 - CRC - 4/16/15
Seats and Restraints 79
Child Restraints
Older Children
Older children who have outgrownbooster seats should wear thevehicle safety belts.
The manufacturer instructions thatcome with the booster seat state theweight and height limitations for thatbooster. Use a booster seat with alap-shoulder belt until the childpasses the fit test below:
. Sit all the way back on the seat.Do the knees bend at the seatedge? If yes, continue. If no,return to the booster seat.
. Buckle the lap-shoulder belt.Does the shoulder belt rest onthe shoulder? If yes, continue.If no, try using the rear safetybelt comfort guide, if available.See “Rear Safety Belt ComfortGuides” under Lap-Shoulder Belt0 61. If a comfort guide is notavailable, or if the shoulder beltstill does not rest on theshoulder, then return to thebooster seat.
. Does the lap belt fit low andsnug on the hips, touching thethighs? If yes, continue. If no,return to the booster seat.
. Can proper safety belt fit bemaintained for the length of thetrip? If yes, continue. If no,return to the booster seat.
Q: What is the proper way towear safety belts?
A: An older child should wear alap-shoulder belt and get theadditional restraint a shoulderbelt can provide. The shoulderbelt should not cross the face orneck. The lap belt should fitsnugly below the hips, justtouching the top of the thighs.This applies belt force to thechild's pelvic bones in a crash.It should never be worn over theabdomen, which could causesevere or even fatal internalinjuries in a crash.
Also see “Rear Safety Belt ComfortGuides” under Lap-Shoulder Belt0 61.
According to accident statistics,children are safer when properlyrestrained in a rear seating position.
In a crash, children who are notbuckled up can strike other peoplewho are buckled up, or can bethrown out of the vehicle. Olderchildren need to use safety beltsproperly.
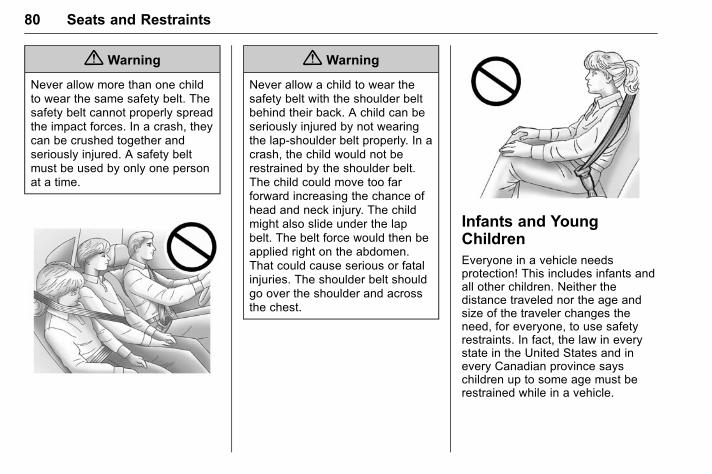
GMC Acadia/Acadia Denali Owner Manual (GMNA-Localizing-U.S./Canada/Mexico-9159268) - 2016 - CRC - 4/16/15
80 Seats and Restraints
{ Warning
Never allow more than one childto wear the same safety belt. Thesafety belt cannot properly spreadthe impact forces. In a crash, theycan be crushed together andseriously injured. A safety beltmust be used by only one personat a time.
{ Warning
Never allow a child to wear thesafety belt with the shoulder beltbehind their back. A child can beseriously injured by not wearingthe lap-shoulder belt properly. In acrash, the child would not berestrained by the shoulder belt.The child could move too farforward increasing the chance ofhead and neck injury. The childmight also slide under the lapbelt. The belt force would then beapplied right on the abdomen.That could cause serious or fatalinjuries. The shoulder belt shouldgo over the shoulder and acrossthe chest.
Infants and YoungChildrenEveryone in a vehicle needsprotection! This includes infants andall other children. Neither thedistance traveled nor the age andsize of the traveler changes theneed, for everyone, to use safetyrestraints. In fact, the law in everystate in the United States and inevery Canadian province sayschildren up to some age must berestrained while in a vehicle.

GMC Acadia/Acadia Denali Owner Manual (GMNA-Localizing-U.S./Canada/Mexico-9159268) - 2016 - CRC - 4/16/15
Seats and Restraints 81
{ Warning
Children can be seriously injuredor strangled if a shoulder belt iswrapped around their neck. Theshoulder belt can tighten butcannot be loosened if it is locked.The shoulder belt locks when it ispulled all the way out of theretractor. It unlocks when theshoulder belt is allowed to go allthe way back into the retractor,but it cannot do this if it iswrapped around a child’s neck.If the shoulder belt is locked andtightened around a child’s neck,the only way to loosen the belt isto cut it.
Never leave children unattendedin a vehicle and never allowchildren to play with the safetybelts.
Every time infants and youngchildren ride in vehicles, they shouldhave the protection provided byappropriate child restraints. Neither
the vehicle's safety belt system norits airbag system is designedfor them.
Children who are not restrainedproperly can strike other people,or can be thrown out of the vehicle.
{ Warning
Never hold an infant or a childwhile riding in a vehicle. Due tocrash forces, an infant or a childwill become so heavy it is notpossible to hold it during a crash.For example, in a crash at only40 km/h (25 mph), a 5.5 kg (12 lb)infant will suddenly become a110 kg (240 lb) force on a person'sarms. An infant should besecured in an appropriaterestraint.
{ Warning
Children who are up against,or very close to, any airbag whenit inflates can be seriously injuredor killed. Never put a rear-facingchild restraint in the frontpassenger seat. Secure arear-facing child restraint in arear seat.
It is also better to secure aforward-facing child restraint in arear seat. If a forward-facing childrestraint must be secured in the
(Continued)
GMC Acadia/Acadia Denali Owner Manual (GMNA-Localizing-U.S./Canada/Mexico-9159268) - 2016 - CRC - 4/16/15
82 Seats and Restraints
Warning (Continued)
front passenger seat, alwaysmove the front passenger seat asfar back as it will go.
If a child restraint is installed inthe second row center seat, movethe second row seat to therearward position, wheneverpossible, to minimize contact withthe front center airbag,if equipped.
Q: What are the different types ofadd-on child restraints?
A: Add-on child restraints, whichare purchased by the vehicleowner, are available in four basictypes. Selection of a particularrestraint should take intoconsideration not only the child'sweight, height, and age but alsowhether or not the restraint willbe compatible with the motorvehicle in which it will be used.
For most basic types of childrestraints, there are manydifferent models available. Whenpurchasing a child restraint, besure it is designed to be used ina motor vehicle. If it is, therestraint will have a label sayingthat it meets federal motorvehicle safety standards.
The restraint manufacturerinstructions that come with therestraint state the weight andheight limitations for a particularchild restraint. In addition, thereare many kinds of restraintsavailable for children withspecial needs.
{ Warning
To reduce the risk of neck andhead injury in a crash, infants andtoddlers should be secured in arear-facing child restraint until agetwo, or until they reach themaximum height and weight limitsof their child restraint.
{ Warning
A young child's hip bones are stillso small that the vehicle's regularsafety belt may not remain low onthe hip bones, as it should.Instead, it may settle up aroundthe child's abdomen. In a crash,the belt would apply force on abody area that is unprotected byany bony structure. This alonecould cause serious or fatalinjuries. To reduce the risk ofserious or fatal injuries during acrash, young children shouldalways be secured in appropriatechild restraints.
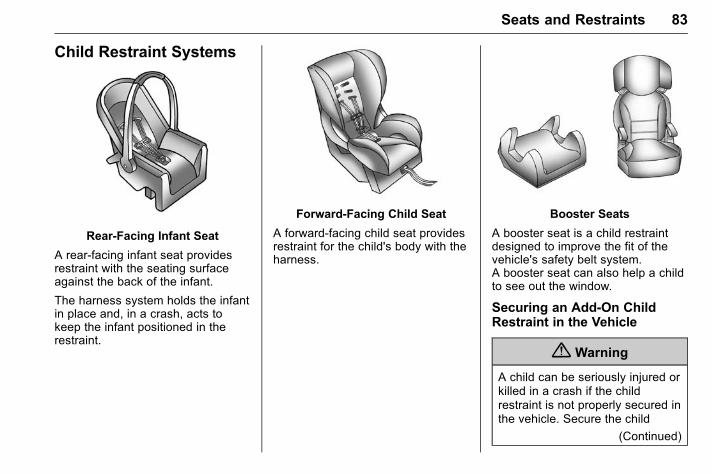
GMC Acadia/Acadia Denali Owner Manual (GMNA-Localizing-U.S./Canada/Mexico-9159268) - 2016 - CRC - 4/16/15
Seats and Restraints 83
Child Restraint Systems
Rear-Facing Infant Seat
A rear-facing infant seat providesrestraint with the seating surfaceagainst the back of the infant.
The harness system holds the infantin place and, in a crash, acts tokeep the infant positioned in therestraint.
Forward-Facing Child Seat
A forward-facing child seat providesrestraint for the child's body with theharness.
Booster Seats
A booster seat is a child restraintdesigned to improve the fit of thevehicle's safety belt system.A booster seat can also help a childto see out the window.
Securing an Add-On ChildRestraint in the Vehicle
{ Warning
A child can be seriously injured orkilled in a crash if the childrestraint is not properly secured inthe vehicle. Secure the child
(Continued)
GMC Acadia/Acadia Denali Owner Manual (GMNA-Localizing-U.S./Canada/Mexico-9159268) - 2016 - CRC - 4/16/15
84 Seats and Restraints
Warning (Continued)
restraint properly in the vehicleusing the vehicle safety belt orLATCH system, following theinstructions that came with thatchild restraint and the instructionsin this manual.
To help reduce the chance of injury,the child restraint must be securedin the vehicle. Child restraintsystems must be secured in vehicleseats by lap belts or the lap beltportion of a lap-shoulder belt, or bythe LATCH system. See LowerAnchors and Tethers for Children(LATCH System) 0 86. Children canbe endangered in a crash if the childrestraint is not properly secured inthe vehicle.
When securing an add-on childrestraint, refer to the instructionsthat come with the restraint whichmay be on the restraint itself or in abooklet, or both, and to this manual.The child restraint instructions are
important, so if they are notavailable, obtain a replacementcopy from the manufacturer.
Keep in mind that an unsecuredchild restraint can move around in acollision or sudden stop and injurepeople in the vehicle. Be sure toproperly secure any child restraint inthe vehicle— even when no child isin it.
In some areas of the United Statesand Canada, Certified ChildPassenger Safety Technicians(CPSTs) are available to inspectand demonstrate how to correctlyuse and install child restraints. Inthe U.S., refer to the NationalHighway Traffic SafetyAdministration (NHTSA) website tolocate the nearest child safety seatinspection station. For CPSTavailability in Canada, check withTransport Canada or the ProvincialMinistry of Transportation office.
Securing the Child Within theChild Restraint
{ Warning
A child can be seriously injured orkilled in a crash if the child is notproperly secured in the childrestraint. Secure the childproperly following the instructionsthat came with that child restraint.
Where to Put theRestraintAccording to accident statistics,children and infants are safer whenproperly restrained in a childrestraint system or infant restraintsystem secured in a rear seatingposition.
Whenever possible, children age12 and under should be secured ina rear seating position.
The vehicle may be equipped with afront center airbag in the inboardside of the driver seat. Even with a
GMC Acadia/Acadia Denali Owner Manual (GMNA-Localizing-U.S./Canada/Mexico-9159268) - 2016 - CRC - 4/16/15
Seats and Restraints 85
front center airbag, a child restraintcan be installed in any second rowseating position.
Never put a rear-facing child seat inthe front. This is because the risk tothe rear-facing child is so great if theairbag deploys.
{ Warning
A child in a rear-facing childrestraint can be seriously injuredor killed if the right frontpassenger airbag inflates. This isbecause the back of therear-facing child restraint wouldbe very close to the inflatingairbag. A child in a forward-facingchild restraint can be seriouslyinjured or killed if the right frontpassenger airbag inflates and thepassenger seat is in a forwardposition.
Even if the passenger sensingsystem has turned off the rightfront passenger frontal airbag, nosystem is fail-safe. No one can
(Continued)
Warning (Continued)
guarantee that an airbag will notdeploy under some unusualcircumstance, even though it isturned off. Secure rear-facingchild restraints in a rear seat,even if the front passenger frontalairbag is off.
It is also better to secure aforward-facing child restraint in arear seat. If a forward-facing childrestraint must be secured in theright front seat, always move thefront passenger seat as far backas it will go.
See Passenger Sensing System0 72 for additional information.
If a child restraint is installed in asecond row center seat, move thesecond row seat to the rearwardposition, whenever possible, tominimize contact with the frontcenter airbag, if equipped.
When securing a child restraint in arear seating position, study theinstructions that came with the childrestraint to make sure it iscompatible with this vehicle.
Child restraints and booster seatsvary considerably in size, and somemay fit in certain seating positionsbetter than others.
Depending on where you place thechild restraint and the size of thechild restraint, you may not be ableto access adjacent safety beltassemblies or LATCH anchors foradditional passengers or childrestraints. Adjacent seatingpositions should not be used if thechild restraint prevents access to orinterferes with the routing of thesafety belt.
Wherever a child restraint isinstalled, be sure to secure the childrestraint properly.
Keep in mind that an unsecuredchild restraint can move around in acollision or sudden stop and injurepeople in the vehicle. Be sure to
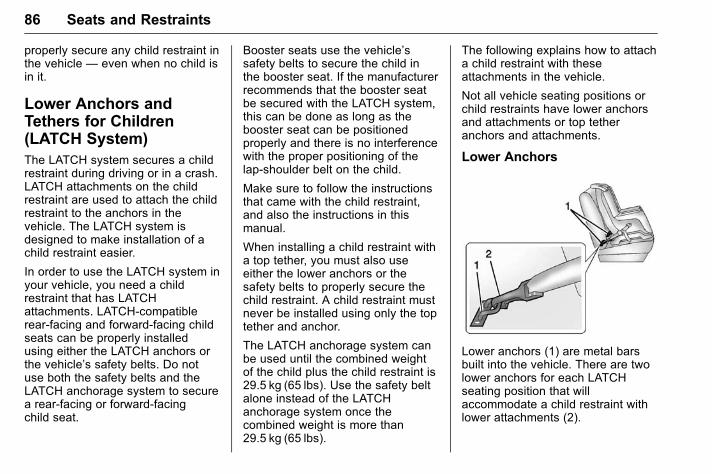
GMC Acadia/Acadia Denali Owner Manual (GMNA-Localizing-U.S./Canada/Mexico-9159268) - 2016 - CRC - 4/16/15
86 Seats and Restraints
properly secure any child restraint inthe vehicle — even when no child isin it.
Lower Anchors andTethers for Children(LATCH System)The LATCH system secures a childrestraint during driving or in a crash.LATCH attachments on the childrestraint are used to attach the childrestraint to the anchors in thevehicle. The LATCH system isdesigned to make installation of achild restraint easier.
In order to use the LATCH system inyour vehicle, you need a childrestraint that has LATCHattachments. LATCH-compatiblerear-facing and forward-facing childseats can be properly installedusing either the LATCH anchors orthe vehicle’s safety belts. Do notuse both the safety belts and theLATCH anchorage system to securea rear-facing or forward-facingchild seat.
Booster seats use the vehicle’ssafety belts to secure the child inthe booster seat. If the manufacturerrecommends that the booster seatbe secured with the LATCH system,this can be done as long as thebooster seat can be positionedproperly and there is no interferencewith the proper positioning of thelap-shoulder belt on the child.
Make sure to follow the instructionsthat came with the child restraint,and also the instructions in thismanual.
When installing a child restraint witha top tether, you must also useeither the lower anchors or thesafety belts to properly secure thechild restraint. A child restraint mustnever be installed using only the toptether and anchor.
The LATCH anchorage system canbe used until the combined weightof the child plus the child restraint is29.5 kg (65 lbs). Use the safety beltalone instead of the LATCHanchorage system once thecombined weight is more than29.5 kg (65 lbs).
The following explains how to attacha child restraint with theseattachments in the vehicle.
Not all vehicle seating positions orchild restraints have lower anchorsand attachments or top tetheranchors and attachments.
Lower Anchors
Lower anchors (1) are metal barsbuilt into the vehicle. There are twolower anchors for each LATCHseating position that willaccommodate a child restraint withlower attachments (2).
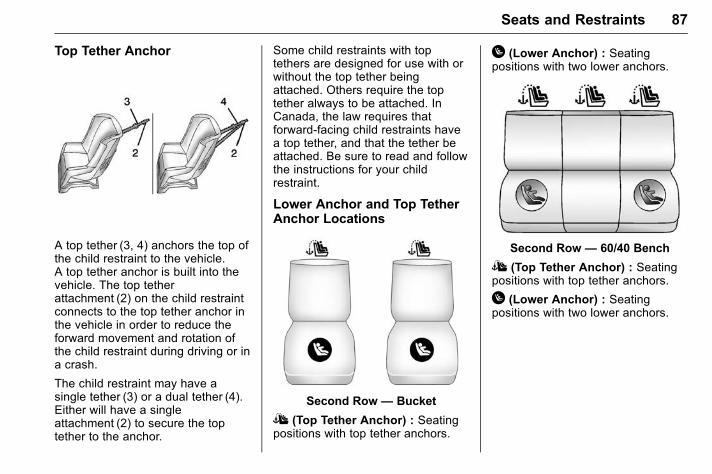
GMC Acadia/Acadia Denali Owner Manual (GMNA-Localizing-U.S./Canada/Mexico-9159268) - 2016 - CRC - 4/16/15
Seats and Restraints 87
Top Tether Anchor
A top tether (3, 4) anchors the top ofthe child restraint to the vehicle.A top tether anchor is built into thevehicle. The top tetherattachment (2) on the child restraintconnects to the top tether anchor inthe vehicle in order to reduce theforward movement and rotation ofthe child restraint during driving or ina crash.
The child restraint may have asingle tether (3) or a dual tether (4).Either will have a singleattachment (2) to secure the toptether to the anchor.
Some child restraints with toptethers are designed for use with orwithout the top tether beingattached. Others require the toptether always to be attached. InCanada, the law requires thatforward-facing child restraints havea top tether, and that the tether beattached. Be sure to read and followthe instructions for your childrestraint.
Lower Anchor and Top TetherAnchor Locations
Second Row— Bucket
I (Top Tether Anchor) : Seatingpositions with top tether anchors.
H (Lower Anchor) : Seatingpositions with two lower anchors.
Second Row— 60/40 Bench
I (Top Tether Anchor) : Seatingpositions with top tether anchors.
H (Lower Anchor) : Seatingpositions with two lower anchors.
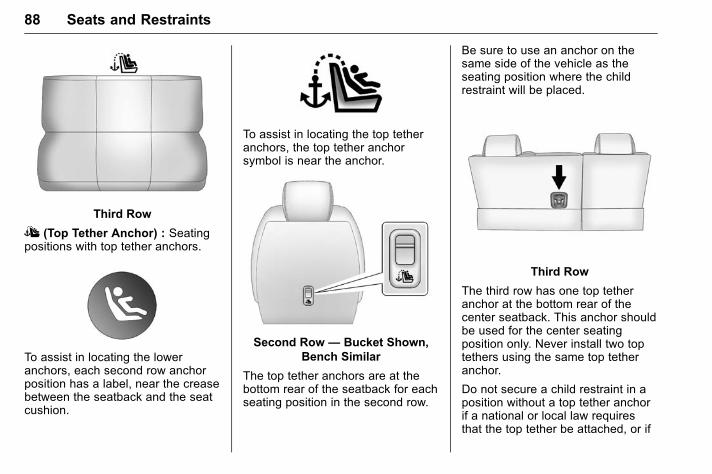
GMC Acadia/Acadia Denali Owner Manual (GMNA-Localizing-U.S./Canada/Mexico-9159268) - 2016 - CRC - 4/16/15
88 Seats and Restraints
Third Row
I (Top Tether Anchor) : Seatingpositions with top tether anchors.
To assist in locating the loweranchors, each second row anchorposition has a label, near the creasebetween the seatback and the seatcushion.
To assist in locating the top tetheranchors, the top tether anchorsymbol is near the anchor.
Second Row— Bucket Shown,Bench Similar
The top tether anchors are at thebottom rear of the seatback for eachseating position in the second row.
Be sure to use an anchor on thesame side of the vehicle as theseating position where the childrestraint will be placed.
Third Row
The third row has one top tetheranchor at the bottom rear of thecenter seatback. This anchor shouldbe used for the center seatingposition only. Never install two toptethers using the same top tetheranchor.
Do not secure a child restraint in aposition without a top tether anchorif a national or local law requiresthat the top tether be attached, or if
GMC Acadia/Acadia Denali Owner Manual (GMNA-Localizing-U.S./Canada/Mexico-9159268) - 2016 - CRC - 4/16/15
Seats and Restraints 89
the instructions that come with thechild restraint say that the top tethermust be attached.
According to accident statistics,children and infants are safer whenproperly restrained in a childrestraint system or infant restraintsystem secured in a rear seatingposition. See Where to Put theRestraint 0 84 for additionalinformation.
Securing a Child RestraintDesigned for the LATCHSystem
{ Warning
If a LATCH-type child restraint isnot attached to anchors or withthe safety belt, the child restraintwill not be able to protect the childcorrectly. In a crash, the childcould be seriously injured orkilled. Install a LATCH-type childrestraint properly using theanchors, or use the vehicle safetybelts to secure the restraint,
(Continued)
Warning (Continued)
following the instructions thatcame with the child restraint andthe instructions in this manual.
{ Warning
To reduce the risk of serious orfatal injuries during a crash, donot attach more than one childrestraint to a single anchor.Attaching more than one childrestraint to a single anchor couldcause the anchor or attachmentto come loose or even breakduring a crash. A child or otherscould be injured.
{ Warning
Children can be seriously injuredor strangled if a shoulder belt iswrapped around their neck. The
(Continued)
Warning (Continued)
shoulder belt can tighten butcannot be loosened if it is locked.The shoulder belt locks when it ispulled all the way out of theretractor. It unlocks when theshoulder belt is allowed to go allthe way back into the retractor,but it cannot do this if it iswrapped around a child’s neck.If the shoulder belt is locked andtightened around a child’s neck,the only way to loosen the belt isto cut it.
Buckle any unused safety beltsbehind the child restraint sochildren cannot reach them. Pullthe shoulder belt all the way outof the retractor to set the lock,and tighten the belt behind thechild restraint after the childrestraint has been installed.
GMC Acadia/Acadia Denali Owner Manual (GMNA-Localizing-U.S./Canada/Mexico-9159268) - 2016 - CRC - 4/16/15
90 Seats and Restraints
Caution
Do not let the LATCHattachments rub against thevehicle’s safety belts. This maydamage these parts. If necessary,move buckled safety belts toavoid rubbing the LATCHattachments.
Do not fold the empty rear seatwith a safety belt buckled. Thiscould damage the safety belt orthe seat. Unbuckle and return thesafety belt to its stowed position,before folding the seat.
The vehicle may be equipped with afront center airbag in the inboardside of the driver seat. Even with afront center airbag, a child restraintcan be installed in any second rowseating position. If a child restraint isinstalled in a second row centerseat, move the second row seat tothe rearward position, wheneverpossible, to minimize contact withthe front center airbag.
If you need to secure more than onechild restraint in the rear seat, seeWhere to Put the Restraint 0 84.
This system is designed to makeinstallation of child restraints easier.When using lower anchors, do notuse the vehicle's safety belts.Instead, use the vehicle's anchorsand child restraint attachments tosecure the restraints. Somerestraints also use another vehicleanchor to secure a top tether.
1. Attach and tighten the lowerattachments to the loweranchors. If the child restraintdoes not have lowerattachments or the desiredseating position does not havelower anchors, secure the childrestraint with the top tether andthe safety belts. Refer to yourchild restraint manufacturerinstructions and theinstructions in this manual.
1.1. Find the lower anchors forthe desired seatingposition.
1.2. To access the loweranchors in the secondrow, it may help to reclinethe seatback.
Third row seatbacks mustbe upright before placingthe child restraint onthe seat.
1.3. Put the child restraint onthe seat.
1.4. Attach and tighten thelower attachments on thechild restraint to the loweranchors.
If necessary, adjust theangle of the second rowseatback to achieve atight installation. Makesure the second rowbench seatbacks arealigned at the same angle.
2. If the child restraintmanufacturer recommends thatthe top tether be attached,attach and tighten the toptether to the top tether anchor,
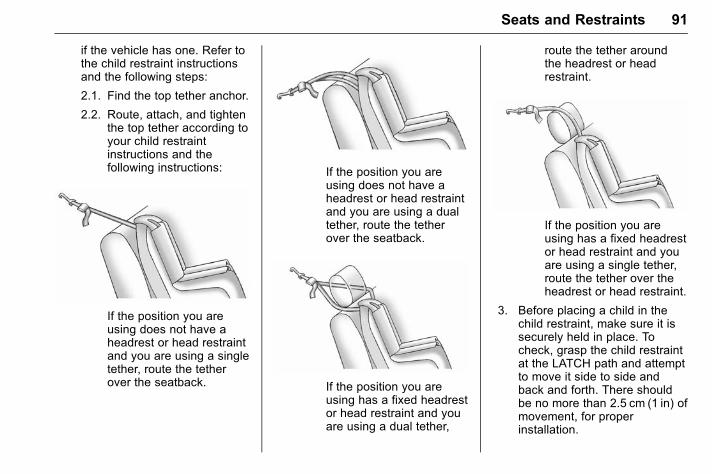
GMC Acadia/Acadia Denali Owner Manual (GMNA-Localizing-U.S./Canada/Mexico-9159268) - 2016 - CRC - 4/16/15
Seats and Restraints 91
if the vehicle has one. Refer tothe child restraint instructionsand the following steps:
2.1. Find the top tether anchor.
2.2. Route, attach, and tightenthe top tether according toyour child restraintinstructions and thefollowing instructions:
If the position you areusing does not have aheadrest or head restraintand you are using a singletether, route the tetherover the seatback.
If the position you areusing does not have aheadrest or head restraintand you are using a dualtether, route the tetherover the seatback.
If the position you areusing has a fixed headrestor head restraint and youare using a dual tether,
route the tether aroundthe headrest or headrestraint.
If the position you areusing has a fixed headrestor head restraint and youare using a single tether,route the tether over theheadrest or head restraint.
3. Before placing a child in thechild restraint, make sure it issecurely held in place. Tocheck, grasp the child restraintat the LATCH path and attemptto move it side to side andback and forth. There shouldbe no more than 2.5 cm (1 in) ofmovement, for properinstallation.
GMC Acadia/Acadia Denali Owner Manual (GMNA-Localizing-U.S./Canada/Mexico-9159268) - 2016 - CRC - 4/16/15
92 Seats and Restraints
Replacing LATCH SystemParts After a Crash
{ Warning
A crash can damage the LATCHsystem in the vehicle. A damagedLATCH system may not properlysecure the child restraint,resulting in serious injury or evendeath in a crash. To help makesure the LATCH system isworking properly after a crash,see your dealer to have thesystem inspected and anynecessary replacements made assoon as possible.
If the vehicle has the LATCH systemand it was being used during acrash, new LATCH system partsmay be needed.
New parts and repairs may benecessary even if the LATCHsystem was not being used at thetime of the crash.
Securing Child Restraints(Rear Seat)The vehicle may be equipped with afront center airbag in the inboardside of the driver seat. Even with afront center airbag, a child restraintcan be installed in any second rowseating position. If you install a childrestraint in a second row centerseat, move the second row seat tothe rearward position, wheneverpossible, to minimize contact withthe front center airbag.
When securing a child restraint in arear seating position, study theinstructions that came with the childrestraint to make sure it iscompatible with this vehicle.
If the child restraint has the LATCHsystem, see Lower Anchors andTethers for Children (LATCHSystem) 0 86 for how and where toinstall the child restraint usingLATCH. If a child restraint issecured in the vehicle using asafety belt and it uses a top tether,see Lower Anchors and Tethers forChildren (LATCH System) 0 86 fortop tether anchor locations.
Do not secure a child seat in aposition without a top tether anchorif a national or local law requiresthat the top tether be anchored, or ifthe instructions that come with thechild restraint say that the top strapmust be anchored.
In Canada, the law requires thatforward-facing child restraints havea top tether, and that the tether beattached.
If the child restraint or vehicle seatposition does not have the LATCHsystem, you will be using the safetybelt to secure the child restraint inthis position. Be sure to follow theinstructions that came with the childrestraint. Secure the child in thechild restraint when and as theinstructions say.
If more than one child restraintneeds to be installed in the rearseat, be sure to read Where to Putthe Restraint 0 84.
1. Put the child restraint onthe seat.
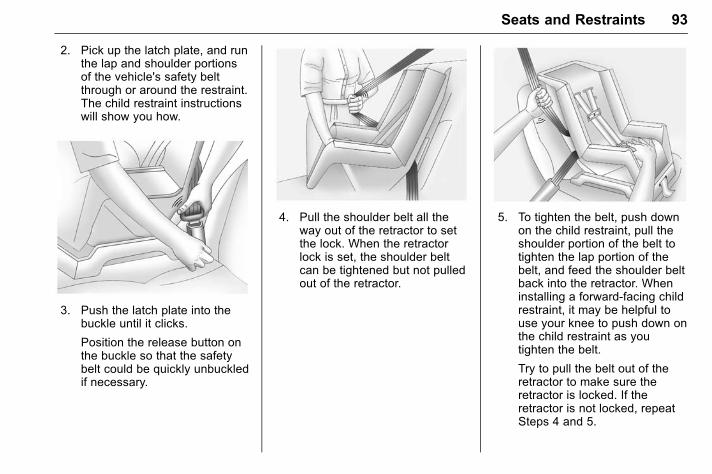
GMC Acadia/Acadia Denali Owner Manual (GMNA-Localizing-U.S./Canada/Mexico-9159268) - 2016 - CRC - 4/16/15
Seats and Restraints 93
2. Pick up the latch plate, and runthe lap and shoulder portionsof the vehicle's safety beltthrough or around the restraint.The child restraint instructionswill show you how.
3. Push the latch plate into thebuckle until it clicks.
Position the release button onthe buckle so that the safetybelt could be quickly unbuckledif necessary.
4. Pull the shoulder belt all theway out of the retractor to setthe lock. When the retractorlock is set, the shoulder beltcan be tightened but not pulledout of the retractor.
5. To tighten the belt, push downon the child restraint, pull theshoulder portion of the belt totighten the lap portion of thebelt, and feed the shoulder beltback into the retractor. Wheninstalling a forward-facing childrestraint, it may be helpful touse your knee to push down onthe child restraint as youtighten the belt.
Try to pull the belt out of theretractor to make sure theretractor is locked. If theretractor is not locked, repeatSteps 4 and 5.
GMC Acadia/Acadia Denali Owner Manual (GMNA-Localizing-U.S./Canada/Mexico-9159268) - 2016 - CRC - 4/16/15
94 Seats and Restraints
6. If the child restraint has a toptether, follow the child restraintmanufacturer's instructionsregarding the use of the toptether. See Lower Anchors andTethers for Children (LATCHSystem) 0 86 for moreinformation.
7. Before placing a child in thechild restraint, make sure it issecurely held in place. Tocheck, grasp the child restraintat the safety belt path andattempt to move it side to sideand back and forth. When thechild restraint is properlyinstalled, there should be nomore than 2.5 cm (1 in) ofmovement.
To remove the child restraint,unbuckle the vehicle safety belt andlet it return to the stowed position.If the top tether is attached to a toptether anchor, disconnect it.
Securing Child Restraints(Front Passenger Seat)The vehicle has airbags. A rear seatis a safer place to secure aforward-facing child restraint. SeeWhere to Put the Restraint 0 84.
In addition, the vehicle has apassenger sensing system which isdesigned to turn off the frontoutboard passenger frontal airbagunder certain conditions. SeePassenger Sensing System 0 72and Passenger Airbag StatusIndicator 0 114 for more information,including important safetyinformation.
Never put a rear-facing child seat inthe front. This is because the risk tothe rear-facing child is so great,if the airbag deploys.
{ Warning
A child in a rear-facing childrestraint can be seriously injuredor killed if the front outboardpassenger frontal airbag inflates.
(Continued)
Warning (Continued)
This is because the back of therear-facing child restraint wouldbe very close to the inflatingairbag. A child in a forward-facingchild restraint can be seriouslyinjured or killed if the frontoutboard passenger frontal airbaginflates and the passenger seat isin a forward position.
Even if the passenger sensingsystem has turned off the frontoutboard passenger frontalairbag, no system is fail-safe. Noone can guarantee that an airbagwill not deploy under someunusual circumstance, eventhough it is turned off.
Secure rear-facing child restraintsin a rear seat, even if the airbagis off. If you secure aforward-facing child restraint inthe front seat, always move the
(Continued)
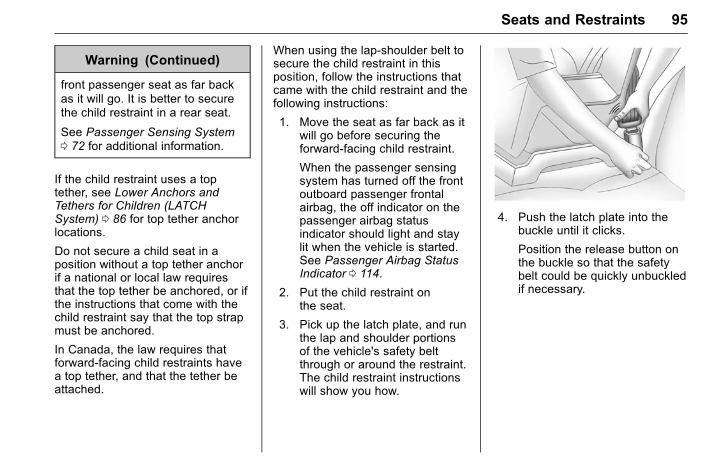
GMC Acadia/Acadia Denali Owner Manual (GMNA-Localizing-U.S./Canada/Mexico-9159268) - 2016 - CRC - 4/16/15
Seats and Restraints 95
Warning (Continued)
front passenger seat as far backas it will go. It is better to securethe child restraint in a rear seat.
See Passenger Sensing System0 72 for additional information.
If the child restraint uses a toptether, see Lower Anchors andTethers for Children (LATCHSystem) 0 86 for top tether anchorlocations.
Do not secure a child seat in aposition without a top tether anchorif a national or local law requiresthat the top tether be anchored, or ifthe instructions that come with thechild restraint say that the top strapmust be anchored.
In Canada, the law requires thatforward-facing child restraints havea top tether, and that the tether beattached.
When using the lap-shoulder belt tosecure the child restraint in thisposition, follow the instructions thatcame with the child restraint and thefollowing instructions:
1. Move the seat as far back as itwill go before securing theforward-facing child restraint.
When the passenger sensingsystem has turned off the frontoutboard passenger frontalairbag, the off indicator on thepassenger airbag statusindicator should light and staylit when the vehicle is started.See Passenger Airbag StatusIndicator 0 114.
2. Put the child restraint onthe seat.
3. Pick up the latch plate, and runthe lap and shoulder portionsof the vehicle's safety beltthrough or around the restraint.The child restraint instructionswill show you how.
4. Push the latch plate into thebuckle until it clicks.
Position the release button onthe buckle so that the safetybelt could be quickly unbuckledif necessary.
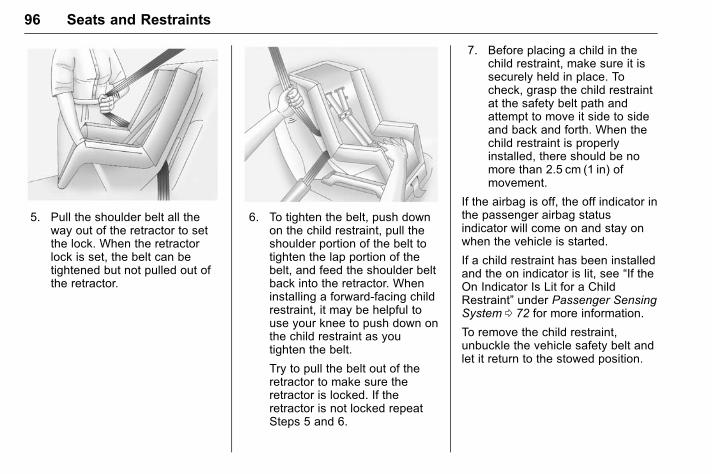
GMC Acadia/Acadia Denali Owner Manual (GMNA-Localizing-U.S./Canada/Mexico-9159268) - 2016 - CRC - 4/16/15
96 Seats and Restraints
5. Pull the shoulder belt all theway out of the retractor to setthe lock. When the retractorlock is set, the belt can betightened but not pulled out ofthe retractor.
6. To tighten the belt, push downon the child restraint, pull theshoulder portion of the belt totighten the lap portion of thebelt, and feed the shoulder beltback into the retractor. Wheninstalling a forward-facing childrestraint, it may be helpful touse your knee to push down onthe child restraint as youtighten the belt.
Try to pull the belt out of theretractor to make sure theretractor is locked. If theretractor is not locked repeatSteps 5 and 6.
7. Before placing a child in thechild restraint, make sure it issecurely held in place. Tocheck, grasp the child restraintat the safety belt path andattempt to move it side to sideand back and forth. When thechild restraint is properlyinstalled, there should be nomore than 2.5 cm (1 in) ofmovement.
If the airbag is off, the off indicator inthe passenger airbag statusindicator will come on and stay onwhen the vehicle is started.
If a child restraint has been installedand the on indicator is lit, see “If theOn Indicator Is Lit for a ChildRestraint” under Passenger SensingSystem 0 72 for more information.
To remove the child restraint,unbuckle the vehicle safety belt andlet it return to the stowed position.
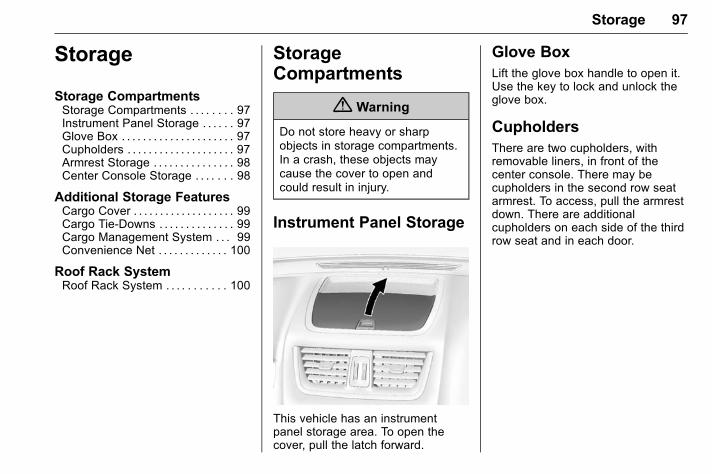
GMC Acadia/Acadia Denali Owner Manual (GMNA-Localizing-U.S./Canada/Mexico-9159268) - 2016 - CRC - 4/16/15
Storage 97
Storage
Storage CompartmentsStorage Compartments . . . . . . . . 97Instrument Panel Storage . . . . . . 97Glove Box . . . . . . . . . . . . . . . . . . . . . 97Cupholders . . . . . . . . . . . . . . . . . . . . 97Armrest Storage . . . . . . . . . . . . . . . 98Center Console Storage . . . . . . . 98
Additional Storage FeaturesCargo Cover . . . . . . . . . . . . . . . . . . . 99Cargo Tie-Downs . . . . . . . . . . . . . . 99Cargo Management System . . . 99Convenience Net . . . . . . . . . . . . . 100
Roof Rack SystemRoof Rack System . . . . . . . . . . . 100
StorageCompartments
{ Warning
Do not store heavy or sharpobjects in storage compartments.In a crash, these objects maycause the cover to open andcould result in injury.
Instrument Panel Storage
This vehicle has an instrumentpanel storage area. To open thecover, pull the latch forward.
Glove BoxLift the glove box handle to open it.Use the key to lock and unlock theglove box.
CupholdersThere are two cupholders, withremovable liners, in front of thecenter console. There may becupholders in the second row seatarmrest. To access, pull the armrestdown. There are additionalcupholders on each side of the thirdrow seat and in each door.
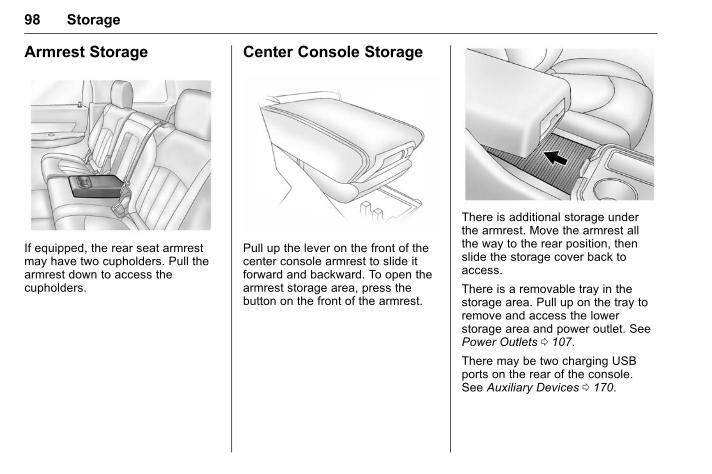
GMC Acadia/Acadia Denali Owner Manual (GMNA-Localizing-U.S./Canada/Mexico-9159268) - 2016 - CRC - 4/16/15
98 Storage
Armrest Storage
If equipped, the rear seat armrestmay have two cupholders. Pull thearmrest down to access thecupholders.
Center Console Storage
Pull up the lever on the front of thecenter console armrest to slide itforward and backward. To open thearmrest storage area, press thebutton on the front of the armrest.
There is additional storage underthe armrest. Move the armrest allthe way to the rear position, thenslide the storage cover back toaccess.
There is a removable tray in thestorage area. Pull up on the tray toremove and access the lowerstorage area and power outlet. SeePower Outlets 0 107.
There may be two charging USBports on the rear of the console.See Auxiliary Devices 0 170.
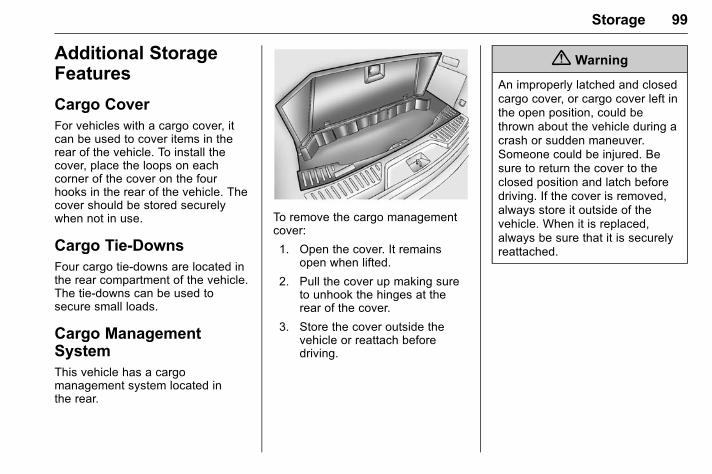
GMC Acadia/Acadia Denali Owner Manual (GMNA-Localizing-U.S./Canada/Mexico-9159268) - 2016 - CRC - 4/16/15
Storage 99
Additional StorageFeatures
Cargo CoverFor vehicles with a cargo cover, itcan be used to cover items in therear of the vehicle. To install thecover, place the loops on eachcorner of the cover on the fourhooks in the rear of the vehicle. Thecover should be stored securelywhen not in use.
Cargo Tie-DownsFour cargo tie‐downs are located inthe rear compartment of the vehicle.The tie-downs can be used tosecure small loads.
Cargo ManagementSystemThis vehicle has a cargomanagement system located inthe rear.
To remove the cargo managementcover:
1. Open the cover. It remainsopen when lifted.
2. Pull the cover up making sureto unhook the hinges at therear of the cover.
3. Store the cover outside thevehicle or reattach beforedriving.
{ Warning
An improperly latched and closedcargo cover, or cargo cover left inthe open position, could bethrown about the vehicle during acrash or sudden maneuver.Someone could be injured. Besure to return the cover to theclosed position and latch beforedriving. If the cover is removed,always store it outside of thevehicle. When it is replaced,always be sure that it is securelyreattached.
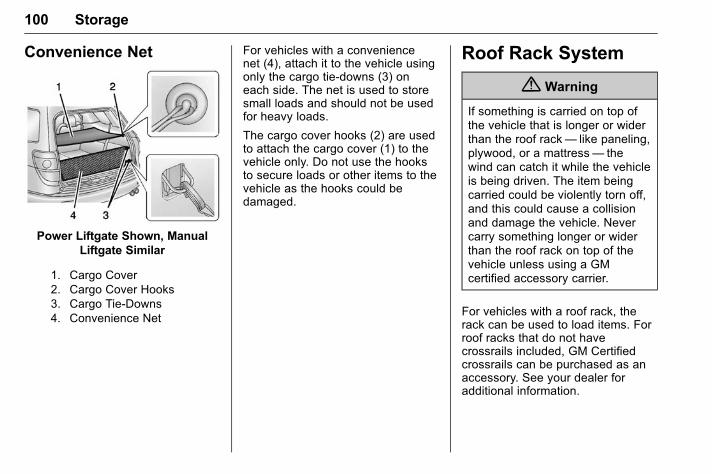
GMC Acadia/Acadia Denali Owner Manual (GMNA-Localizing-U.S./Canada/Mexico-9159268) - 2016 - CRC - 4/16/15
100 Storage
Convenience Net
Power Liftgate Shown, ManualLiftgate Similar
1. Cargo Cover2. Cargo Cover Hooks3. Cargo Tie-Downs4. Convenience Net
For vehicles with a conveniencenet (4), attach it to the vehicle usingonly the cargo tie-downs (3) oneach side. The net is used to storesmall loads and should not be usedfor heavy loads.
The cargo cover hooks (2) are usedto attach the cargo cover (1) to thevehicle only. Do not use the hooksto secure loads or other items to thevehicle as the hooks could bedamaged.
Roof Rack System
{ Warning
If something is carried on top ofthe vehicle that is longer or widerthan the roof rack— like paneling,plywood, or a mattress— thewind can catch it while the vehicleis being driven. The item beingcarried could be violently torn off,and this could cause a collisionand damage the vehicle. Nevercarry something longer or widerthan the roof rack on top of thevehicle unless using a GMcertified accessory carrier.
For vehicles with a roof rack, therack can be used to load items. Forroof racks that do not havecrossrails included, GM Certifiedcrossrails can be purchased as anaccessory. See your dealer foradditional information.
GMC Acadia/Acadia Denali Owner Manual (GMNA-Localizing-U.S./Canada/Mexico-9159268) - 2016 - CRC - 4/16/15
Storage 101
Caution
Loading cargo on the roof rackthat weighs more than 91 kg(200 lb) or hangs over the rear orsides of the vehicle may damagethe vehicle. Load cargo so that itrests evenly between thecrossrails and fasten cargosecurely.
To prevent damage or loss of cargowhen driving, check to make surecrossrails and cargo are securelyfastened. Loading cargo on the roofrack will make the vehicle’s centerof gravity higher. Avoid high speeds,sudden starts, sharp turns, suddenbraking, or abrupt maneuvers;otherwise it may result in loss ofcontrol. If driving for a long distance,on rough roads, or at high speeds,occasionally stop the vehicle tomake sure the cargo remains in itsplace. Do not exceed the maximumvehicle capacity when loading thevehicle.
See Vehicle Load Limits 0 201.

GMC Acadia/Acadia Denali Owner Manual (GMNA-Localizing-U.S./Canada/Mexico-9159268) - 2016 - CRC - 4/16/15
102 Instruments and Controls
Instruments andControls
ControlsSteering Wheel Adjustment . . . 103Steering Wheel Controls . . . . . . 104Horn . . . . . . . . . . . . . . . . . . . . . . . . . . 104Windshield Wiper/Washer . . . . 104Rear Window Wiper/Washer . . . . . . . . . . . . . . . . . . . . . 105
Compass . . . . . . . . . . . . . . . . . . . . . 105Clock . . . . . . . . . . . . . . . . . . . . . . . . . 107Power Outlets . . . . . . . . . . . . . . . . 107
Warning Lights, Gauges, andIndicatorsWarning Lights, Gauges, andIndicators . . . . . . . . . . . . . . . . . . . 109
Instrument Cluster . . . . . . . . . . . . 110Speedometer . . . . . . . . . . . . . . . . . 111Odometer . . . . . . . . . . . . . . . . . . . . . 111Tachometer . . . . . . . . . . . . . . . . . . . 111Fuel Gauge . . . . . . . . . . . . . . . . . . . 111Engine Coolant TemperatureGauge . . . . . . . . . . . . . . . . . . . . . . 112
Voltmeter Gauge . . . . . . . . . . . . . . 112Safety Belt Reminders . . . . . . . . 113
Airbag Readiness Light . . . . . . . 114Passenger Airbag StatusIndicator . . . . . . . . . . . . . . . . . . . . . 114
Charging System Light . . . . . . . 115Malfunction Indicator Lamp(Check Engine Light) . . . . . . . . 115
Brake System WarningLight . . . . . . . . . . . . . . . . . . . . . . . . 117
Antilock Brake System (ABS)Warning Light . . . . . . . . . . . . . . . 118
Tow/Haul Mode Light . . . . . . . . . 118Lane Departure Warning(LDW) Light . . . . . . . . . . . . . . . . . 119
Vehicle Ahead Indicator . . . . . . . 119StabiliTrak® Indicator Light . . . 119Engine Coolant TemperatureWarning Light . . . . . . . . . . . . . . . 119
Tire Pressure Light . . . . . . . . . . . 120Engine Oil Pressure Light . . . . 120Security Light . . . . . . . . . . . . . . . . . 121High-Beam On Light . . . . . . . . . . 121Front Fog Lamp Light . . . . . . . . . 121Cruise Control Light . . . . . . . . . . 121
Information DisplaysDriver InformationCenter (DIC) . . . . . . . . . . . . . . . . 122
Head-Up Display (HUD) . . . . . . 126
Vehicle MessagesVehicle Messages . . . . . . . . . . . . 130Battery Voltage and ChargingMessages . . . . . . . . . . . . . . . . . . . 130
Brake System Messages . . . . . 130Cruise Control Messages . . . . . 131Door Ajar Messages . . . . . . . . . . 131Engine Cooling SystemMessages . . . . . . . . . . . . . . . . . . . 131
Engine Oil Messages . . . . . . . . . 132Engine Power Messages . . . . . 132Fuel System Messages . . . . . . . 133Key and Lock Messages . . . . . 133Lamp Messages . . . . . . . . . . . . . . 133Object Detection SystemMessages . . . . . . . . . . . . . . . . . . . 134
Ride Control SystemMessages . . . . . . . . . . . . . . . . . . . 135
Airbag System Messages . . . . 136Security Messages . . . . . . . . . . . 136Service Vehicle Messages . . . . 136Tire Messages . . . . . . . . . . . . . . . . 136Transmission Messages . . . . . . 137Vehicle ReminderMessages . . . . . . . . . . . . . . . . . . . 138
Vehicle Speed Messages . . . . . 138Washer Fluid Messages . . . . . . 138
Vehicle PersonalizationVehicle Personalization . . . . . . . 139
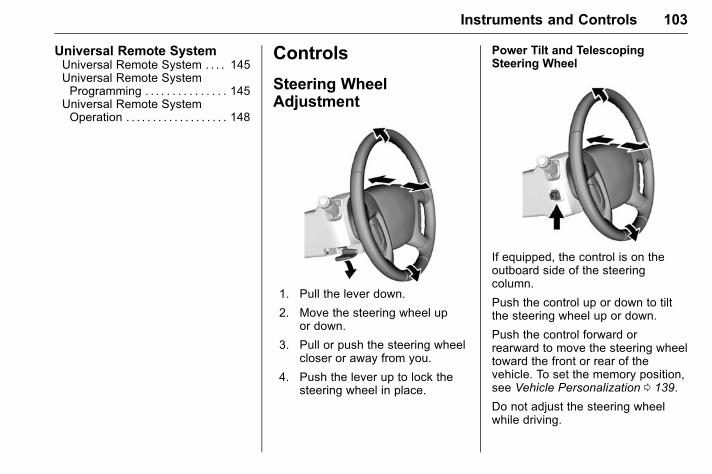
GMC Acadia/Acadia Denali Owner Manual (GMNA-Localizing-U.S./Canada/Mexico-9159268) - 2016 - CRC - 4/16/15
Instruments and Controls 103
Universal Remote SystemUniversal Remote System . . . . 145Universal Remote SystemProgramming . . . . . . . . . . . . . . . 145
Universal Remote SystemOperation . . . . . . . . . . . . . . . . . . . 148
Controls
Steering WheelAdjustment
1. Pull the lever down.
2. Move the steering wheel upor down.
3. Pull or push the steering wheelcloser or away from you.
4. Push the lever up to lock thesteering wheel in place.
Power Tilt and TelescopingSteering Wheel
If equipped, the control is on theoutboard side of the steeringcolumn.
Push the control up or down to tiltthe steering wheel up or down.
Push the control forward orrearward to move the steering wheeltoward the front or rear of thevehicle. To set the memory position,see Vehicle Personalization 0 139.
Do not adjust the steering wheelwhile driving.
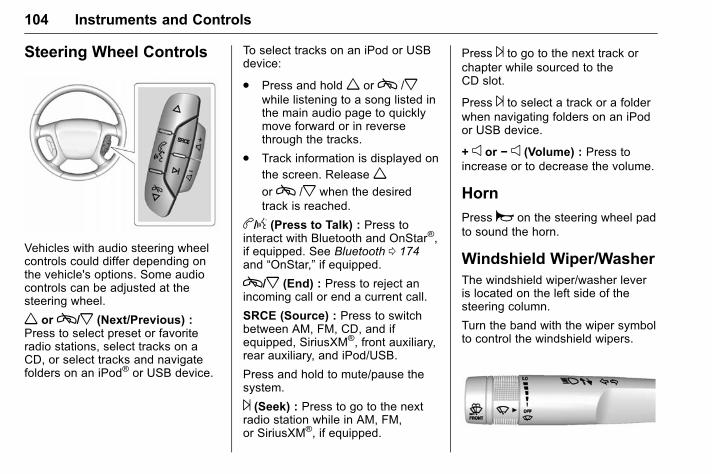
GMC Acadia/Acadia Denali Owner Manual (GMNA-Localizing-U.S./Canada/Mexico-9159268) - 2016 - CRC - 4/16/15
104 Instruments and Controls
Steering Wheel Controls
Vehicles with audio steering wheelcontrols could differ depending onthe vehicle's options. Some audiocontrols can be adjusted at thesteering wheel.
w orc/x (Next/Previous) :Press to select preset or favoriteradio stations, select tracks on aCD, or select tracks and navigatefolders on an iPod® or USB device.
To select tracks on an iPod or USBdevice:
. Press and holdw orc /xwhile listening to a song listed inthe main audio page to quicklymove forward or in reversethrough the tracks.
. Track information is displayed onthe screen. Releaseworc /x when the desiredtrack is reached.
b/g (Press to Talk) : Press tointeract with Bluetooth and OnStar®,if equipped. See Bluetooth 0 174and “OnStar,” if equipped.
c/x (End) : Press to reject anincoming call or end a current call.
SRCE (Source) : Press to switchbetween AM, FM, CD, and ifequipped, SiriusXM®, front auxiliary,rear auxiliary, and iPod/USB.
Press and hold to mute/pause thesystem.
¨ (Seek) : Press to go to the nextradio station while in AM, FM,or SiriusXM®, if equipped.
Press ¨ to go to the next track orchapter while sourced to theCD slot.
Press ¨ to select a track or a folderwhen navigating folders on an iPodor USB device.
+ e or − e (Volume) : Press toincrease or to decrease the volume.
Horn
Pressa on the steering wheel padto sound the horn.
Windshield Wiper/WasherThe windshield wiper/washer leveris located on the left side of thesteering column.
Turn the band with the wiper symbolto control the windshield wipers.
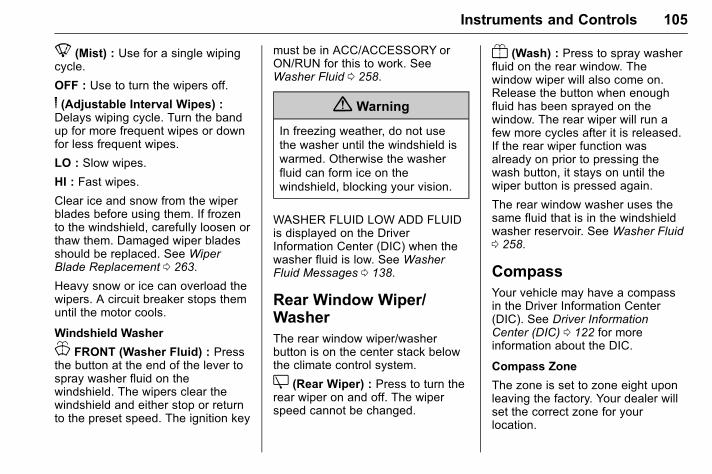
GMC Acadia/Acadia Denali Owner Manual (GMNA-Localizing-U.S./Canada/Mexico-9159268) - 2016 - CRC - 4/16/15
Instruments and Controls 105
8 (Mist) : Use for a single wipingcycle.
OFF : Use to turn the wipers off.
6 (Adjustable Interval Wipes) :Delays wiping cycle. Turn the bandup for more frequent wipes or downfor less frequent wipes.
LO : Slow wipes.
HI : Fast wipes.
Clear ice and snow from the wiperblades before using them. If frozento the windshield, carefully loosen orthaw them. Damaged wiper bladesshould be replaced. See WiperBlade Replacement 0 263.
Heavy snow or ice can overload thewipers. A circuit breaker stops themuntil the motor cools.
Windshield Washer
J FRONT (Washer Fluid) : Pressthe button at the end of the lever tospray washer fluid on thewindshield. The wipers clear thewindshield and either stop or returnto the preset speed. The ignition key
must be in ACC/ACCESSORY orON/RUN for this to work. SeeWasher Fluid 0 258.
{ Warning
In freezing weather, do not usethe washer until the windshield iswarmed. Otherwise the washerfluid can form ice on thewindshield, blocking your vision.
WASHER FLUID LOW ADD FLUIDis displayed on the DriverInformation Center (DIC) when thewasher fluid is low. See WasherFluid Messages 0 138.
Rear Window Wiper/WasherThe rear window wiper/washerbutton is on the center stack belowthe climate control system.
Z (Rear Wiper) : Press to turn therear wiper on and off. The wiperspeed cannot be changed.
Y (Wash) : Press to spray washerfluid on the rear window. Thewindow wiper will also come on.Release the button when enoughfluid has been sprayed on thewindow. The rear wiper will run afew more cycles after it is released.If the rear wiper function wasalready on prior to pressing thewash button, it stays on until thewiper button is pressed again.
The rear window washer uses thesame fluid that is in the windshieldwasher reservoir. See Washer Fluid0 258.
CompassYour vehicle may have a compassin the Driver Information Center(DIC). See Driver InformationCenter (DIC) 0 122 for moreinformation about the DIC.
Compass Zone
The zone is set to zone eight uponleaving the factory. Your dealer willset the correct zone for yourlocation.
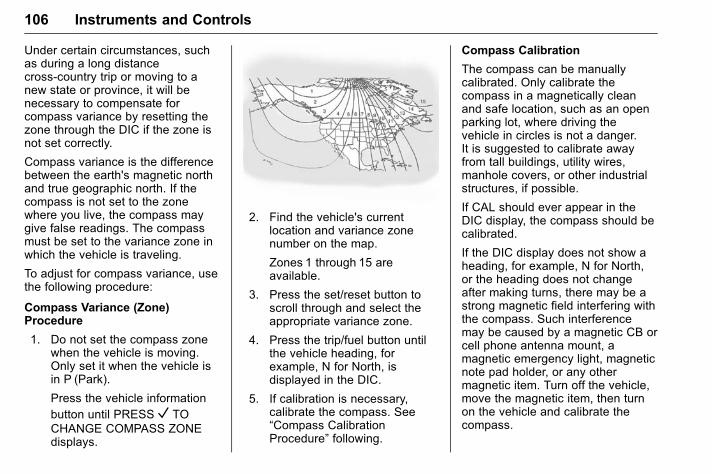
GMC Acadia/Acadia Denali Owner Manual (GMNA-Localizing-U.S./Canada/Mexico-9159268) - 2016 - CRC - 4/16/15
106 Instruments and Controls
Under certain circumstances, suchas during a long distancecross-country trip or moving to anew state or province, it will benecessary to compensate forcompass variance by resetting thezone through the DIC if the zone isnot set correctly.
Compass variance is the differencebetween the earth's magnetic northand true geographic north. If thecompass is not set to the zonewhere you live, the compass maygive false readings. The compassmust be set to the variance zone inwhich the vehicle is traveling.
To adjust for compass variance, usethe following procedure:
Compass Variance (Zone)Procedure
1. Do not set the compass zonewhen the vehicle is moving.Only set it when the vehicle isin P (Park).
Press the vehicle informationbutton until PRESS V TOCHANGE COMPASS ZONEdisplays.
2. Find the vehicle's currentlocation and variance zonenumber on the map.
Zones 1 through 15 areavailable.
3. Press the set/reset button toscroll through and select theappropriate variance zone.
4. Press the trip/fuel button untilthe vehicle heading, forexample, N for North, isdisplayed in the DIC.
5. If calibration is necessary,calibrate the compass. See“Compass CalibrationProcedure” following.
Compass Calibration
The compass can be manuallycalibrated. Only calibrate thecompass in a magnetically cleanand safe location, such as an openparking lot, where driving thevehicle in circles is not a danger.It is suggested to calibrate awayfrom tall buildings, utility wires,manhole covers, or other industrialstructures, if possible.
If CAL should ever appear in theDIC display, the compass should becalibrated.
If the DIC display does not show aheading, for example, N for North,or the heading does not changeafter making turns, there may be astrong magnetic field interfering withthe compass. Such interferencemay be caused by a magnetic CB orcell phone antenna mount, amagnetic emergency light, magneticnote pad holder, or any othermagnetic item. Turn off the vehicle,move the magnetic item, then turnon the vehicle and calibrate thecompass.
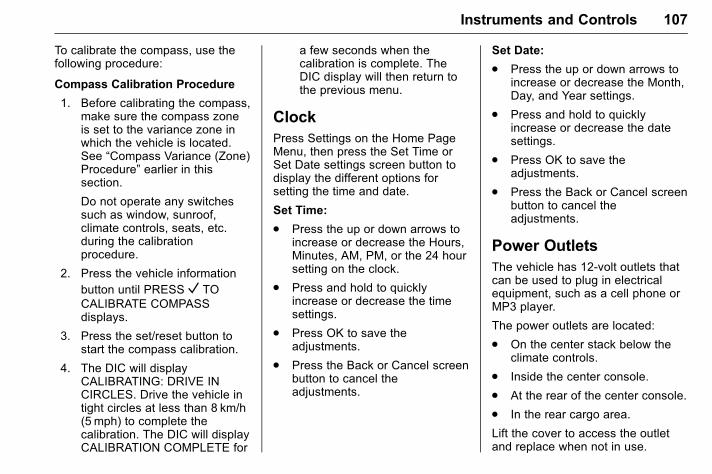
GMC Acadia/Acadia Denali Owner Manual (GMNA-Localizing-U.S./Canada/Mexico-9159268) - 2016 - CRC - 4/16/15
Instruments and Controls 107
To calibrate the compass, use thefollowing procedure:
Compass Calibration Procedure
1. Before calibrating the compass,make sure the compass zoneis set to the variance zone inwhich the vehicle is located.See “Compass Variance (Zone)Procedure” earlier in thissection.
Do not operate any switchessuch as window, sunroof,climate controls, seats, etc.during the calibrationprocedure.
2. Press the vehicle informationbutton until PRESS V TOCALIBRATE COMPASSdisplays.
3. Press the set/reset button tostart the compass calibration.
4. The DIC will displayCALIBRATING: DRIVE INCIRCLES. Drive the vehicle intight circles at less than 8 km/h(5 mph) to complete thecalibration. The DIC will displayCALIBRATION COMPLETE for
a few seconds when thecalibration is complete. TheDIC display will then return tothe previous menu.
ClockPress Settings on the Home PageMenu, then press the Set Time orSet Date settings screen button todisplay the different options forsetting the time and date.
Set Time:
. Press the up or down arrows toincrease or decrease the Hours,Minutes, AM, PM, or the 24 hoursetting on the clock.
. Press and hold to quicklyincrease or decrease the timesettings.
. Press OK to save theadjustments.
. Press the Back or Cancel screenbutton to cancel theadjustments.
Set Date:
. Press the up or down arrows toincrease or decrease the Month,Day, and Year settings.
. Press and hold to quicklyincrease or decrease the datesettings.
. Press OK to save theadjustments.
. Press the Back or Cancel screenbutton to cancel theadjustments.
Power OutletsThe vehicle has 12-volt outlets thatcan be used to plug in electricalequipment, such as a cell phone orMP3 player.
The power outlets are located:
. On the center stack below theclimate controls.
. Inside the center console.
. At the rear of the center console.
. In the rear cargo area.
Lift the cover to access the outletand replace when not in use.
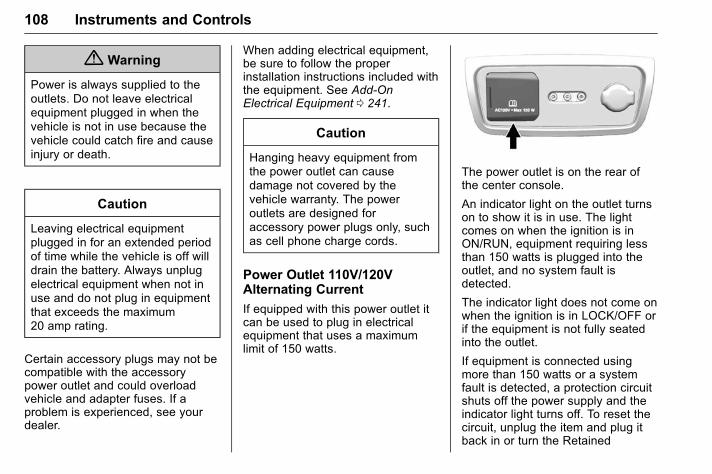
GMC Acadia/Acadia Denali Owner Manual (GMNA-Localizing-U.S./Canada/Mexico-9159268) - 2016 - CRC - 4/16/15
108 Instruments and Controls
{ Warning
Power is always supplied to theoutlets. Do not leave electricalequipment plugged in when thevehicle is not in use because thevehicle could catch fire and causeinjury or death.
Caution
Leaving electrical equipmentplugged in for an extended periodof time while the vehicle is off willdrain the battery. Always unplugelectrical equipment when not inuse and do not plug in equipmentthat exceeds the maximum20 amp rating.
Certain accessory plugs may not becompatible with the accessorypower outlet and could overloadvehicle and adapter fuses. If aproblem is experienced, see yourdealer.
When adding electrical equipment,be sure to follow the properinstallation instructions included withthe equipment. See Add-OnElectrical Equipment 0 241.
Caution
Hanging heavy equipment fromthe power outlet can causedamage not covered by thevehicle warranty. The poweroutlets are designed foraccessory power plugs only, suchas cell phone charge cords.
Power Outlet 110V/120VAlternating Current
If equipped with this power outlet itcan be used to plug in electricalequipment that uses a maximumlimit of 150 watts.
The power outlet is on the rear ofthe center console.
An indicator light on the outlet turnson to show it is in use. The lightcomes on when the ignition is inON/RUN, equipment requiring lessthan 150 watts is plugged into theoutlet, and no system fault isdetected.
The indicator light does not come onwhen the ignition is in LOCK/OFF orif the equipment is not fully seatedinto the outlet.
If equipment is connected usingmore than 150 watts or a systemfault is detected, a protection circuitshuts off the power supply and theindicator light turns off. To reset thecircuit, unplug the item and plug itback in or turn the Retained
GMC Acadia/Acadia Denali Owner Manual (GMNA-Localizing-U.S./Canada/Mexico-9159268) - 2016 - CRC - 4/16/15
Instruments and Controls 109
Accessory Power (RAP) off andthen back on. See RetainedAccessory Power (RAP) 0 209. Thepower restarts when equipmentusing 150 watts or less is pluggedinto the outlet and a system fault isnot detected.
The power outlet is not designed forand may not work properly, if thefollowing are plugged in:
. Equipment with high initial peakwattage such as:compressor-driven refrigeratorsand electric power tools.
. Other equipment requiring anextremely stable power supplysuch as:microcomputer-controlledelectric blankets, touch sensorlamps, etc.
. Medical equipment.
See High Voltage Devices andWiring 0 266.
Warning Lights,Gauges, andIndicatorsWarning lights and gauges cansignal that something is wrongbefore it becomes serious enoughto cause an expensive repair orreplacement. Paying attention to thewarning lights and gauges couldprevent injury.
Some warning lights come on brieflywhen the engine is started toindicate they are working. Whenone of the warning lights comes onand stays on while driving, or whenone of the gauges shows there maybe a problem, check the section thatexplains what to do. Waiting to dorepairs can be costly and evendangerous.
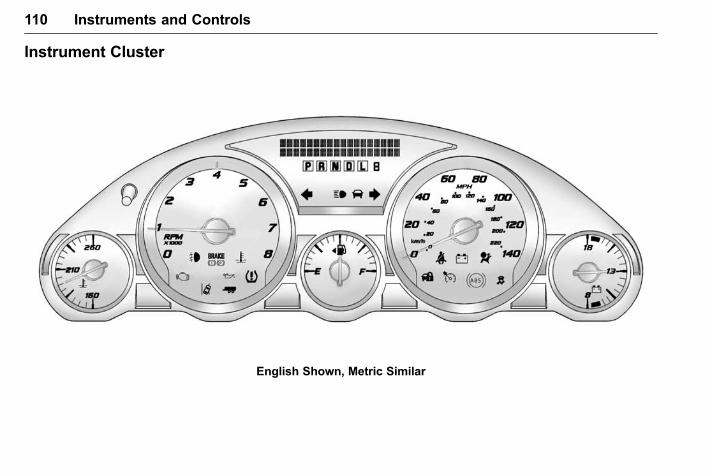
GMC Acadia/Acadia Denali Owner Manual (GMNA-Localizing-U.S./Canada/Mexico-9159268) - 2016 - CRC - 4/16/15
110 Instruments and Controls
Instrument Cluster
English Shown, Metric Similar
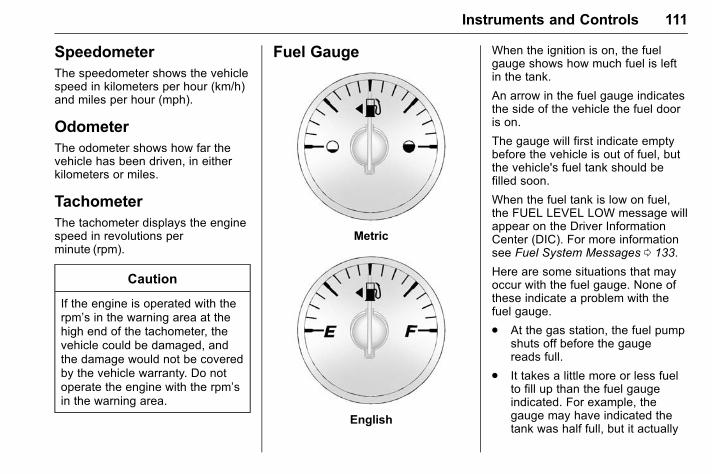
GMC Acadia/Acadia Denali Owner Manual (GMNA-Localizing-U.S./Canada/Mexico-9159268) - 2016 - CRC - 4/16/15
Instruments and Controls 111
SpeedometerThe speedometer shows the vehiclespeed in kilometers per hour (km/h)and miles per hour (mph).
OdometerThe odometer shows how far thevehicle has been driven, in eitherkilometers or miles.
TachometerThe tachometer displays the enginespeed in revolutions perminute (rpm).
Caution
If the engine is operated with therpm’s in the warning area at thehigh end of the tachometer, thevehicle could be damaged, andthe damage would not be coveredby the vehicle warranty. Do notoperate the engine with the rpm’sin the warning area.
Fuel Gauge
Metric
English
When the ignition is on, the fuelgauge shows how much fuel is leftin the tank.
An arrow in the fuel gauge indicatesthe side of the vehicle the fuel dooris on.
The gauge will first indicate emptybefore the vehicle is out of fuel, butthe vehicle's fuel tank should befilled soon.
When the fuel tank is low on fuel,the FUEL LEVEL LOW message willappear on the Driver InformationCenter (DIC). For more informationsee Fuel System Messages 0 133.
Here are some situations that mayoccur with the fuel gauge. None ofthese indicate a problem with thefuel gauge.
. At the gas station, the fuel pumpshuts off before the gaugereads full.
. It takes a little more or less fuelto fill up than the fuel gaugeindicated. For example, thegauge may have indicated thetank was half full, but it actually
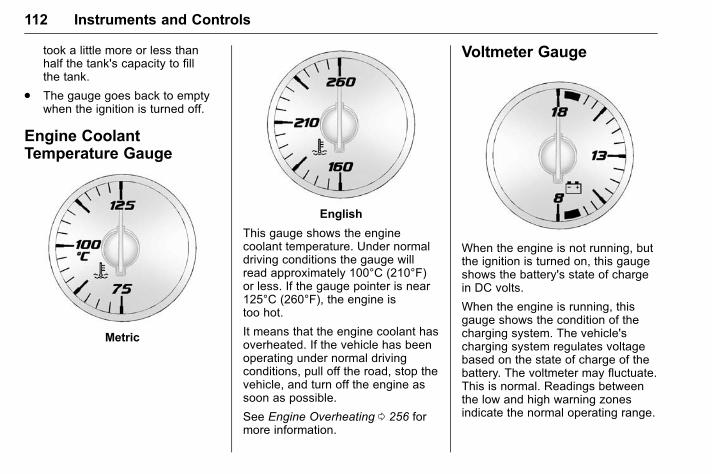
GMC Acadia/Acadia Denali Owner Manual (GMNA-Localizing-U.S./Canada/Mexico-9159268) - 2016 - CRC - 4/16/15
112 Instruments and Controls
took a little more or less thanhalf the tank's capacity to fillthe tank.
. The gauge goes back to emptywhen the ignition is turned off.
Engine CoolantTemperature Gauge
Metric
English
This gauge shows the enginecoolant temperature. Under normaldriving conditions the gauge willread approximately 100°C (210°F)or less. If the gauge pointer is near125°C (260°F), the engine istoo hot.
It means that the engine coolant hasoverheated. If the vehicle has beenoperating under normal drivingconditions, pull off the road, stop thevehicle, and turn off the engine assoon as possible.
See Engine Overheating 0 256 formore information.
Voltmeter Gauge
When the engine is not running, butthe ignition is turned on, this gaugeshows the battery's state of chargein DC volts.
When the engine is running, thisgauge shows the condition of thecharging system. The vehicle'scharging system regulates voltagebased on the state of charge of thebattery. The voltmeter may fluctuate.This is normal. Readings betweenthe low and high warning zonesindicate the normal operating range.
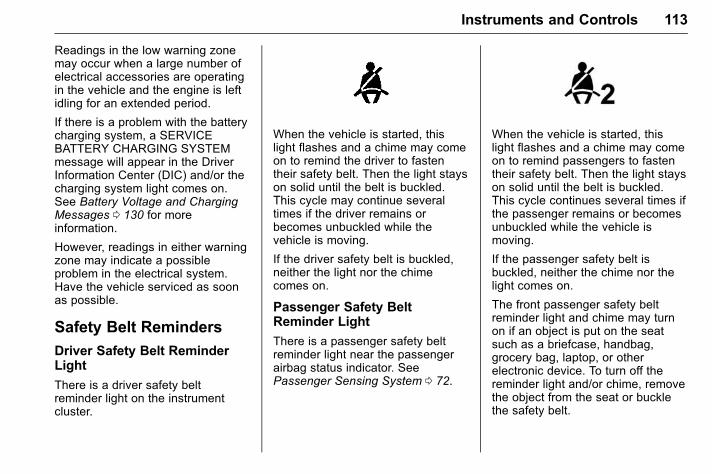
GMC Acadia/Acadia Denali Owner Manual (GMNA-Localizing-U.S./Canada/Mexico-9159268) - 2016 - CRC - 4/16/15
Instruments and Controls 113
Readings in the low warning zonemay occur when a large number ofelectrical accessories are operatingin the vehicle and the engine is leftidling for an extended period.
If there is a problem with the batterycharging system, a SERVICEBATTERY CHARGING SYSTEMmessage will appear in the DriverInformation Center (DIC) and/or thecharging system light comes on.See Battery Voltage and ChargingMessages 0 130 for moreinformation.
However, readings in either warningzone may indicate a possibleproblem in the electrical system.Have the vehicle serviced as soonas possible.
Safety Belt Reminders
Driver Safety Belt ReminderLight
There is a driver safety beltreminder light on the instrumentcluster.
When the vehicle is started, thislight flashes and a chime may comeon to remind the driver to fastentheir safety belt. Then the light stayson solid until the belt is buckled.This cycle may continue severaltimes if the driver remains orbecomes unbuckled while thevehicle is moving.
If the driver safety belt is buckled,neither the light nor the chimecomes on.
Passenger Safety BeltReminder Light
There is a passenger safety beltreminder light near the passengerairbag status indicator. SeePassenger Sensing System 0 72.
When the vehicle is started, thislight flashes and a chime may comeon to remind passengers to fastentheir safety belt. Then the light stayson solid until the belt is buckled.This cycle continues several times ifthe passenger remains or becomesunbuckled while the vehicle ismoving.
If the passenger safety belt isbuckled, neither the chime nor thelight comes on.
The front passenger safety beltreminder light and chime may turnon if an object is put on the seatsuch as a briefcase, handbag,grocery bag, laptop, or otherelectronic device. To turn off thereminder light and/or chime, removethe object from the seat or bucklethe safety belt.
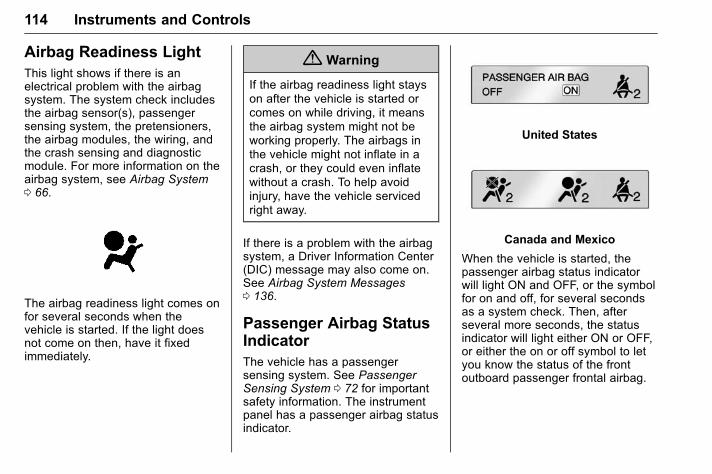
GMC Acadia/Acadia Denali Owner Manual (GMNA-Localizing-U.S./Canada/Mexico-9159268) - 2016 - CRC - 4/16/15
114 Instruments and Controls
Airbag Readiness LightThis light shows if there is anelectrical problem with the airbagsystem. The system check includesthe airbag sensor(s), passengersensing system, the pretensioners,the airbag modules, the wiring, andthe crash sensing and diagnosticmodule. For more information on theairbag system, see Airbag System0 66.
The airbag readiness light comes onfor several seconds when thevehicle is started. If the light doesnot come on then, have it fixedimmediately.
{ Warning
If the airbag readiness light stayson after the vehicle is started orcomes on while driving, it meansthe airbag system might not beworking properly. The airbags inthe vehicle might not inflate in acrash, or they could even inflatewithout a crash. To help avoidinjury, have the vehicle servicedright away.
If there is a problem with the airbagsystem, a Driver Information Center(DIC) message may also come on.See Airbag System Messages0 136.
Passenger Airbag StatusIndicatorThe vehicle has a passengersensing system. See PassengerSensing System 0 72 for importantsafety information. The instrumentpanel has a passenger airbag statusindicator.
United States
Canada and Mexico
When the vehicle is started, thepassenger airbag status indicatorwill light ON and OFF, or the symbolfor on and off, for several secondsas a system check. Then, afterseveral more seconds, the statusindicator will light either ON or OFF,or either the on or off symbol to letyou know the status of the frontoutboard passenger frontal airbag.
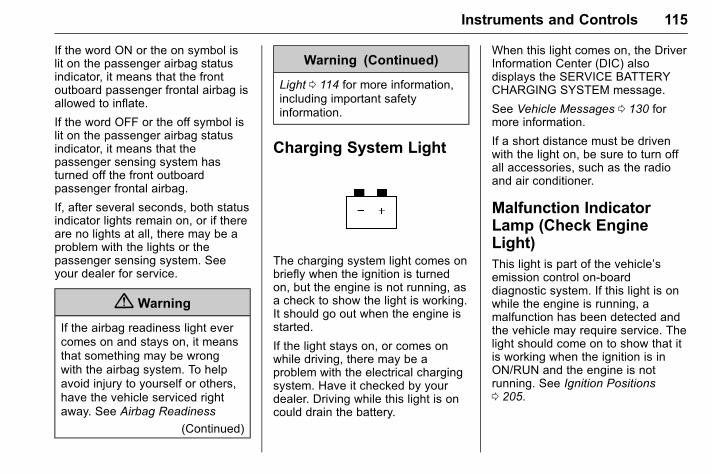
GMC Acadia/Acadia Denali Owner Manual (GMNA-Localizing-U.S./Canada/Mexico-9159268) - 2016 - CRC - 4/16/15
Instruments and Controls 115
If the word ON or the on symbol islit on the passenger airbag statusindicator, it means that the frontoutboard passenger frontal airbag isallowed to inflate.
If the word OFF or the off symbol islit on the passenger airbag statusindicator, it means that thepassenger sensing system hasturned off the front outboardpassenger frontal airbag.
If, after several seconds, both statusindicator lights remain on, or if thereare no lights at all, there may be aproblem with the lights or thepassenger sensing system. Seeyour dealer for service.
{ Warning
If the airbag readiness light evercomes on and stays on, it meansthat something may be wrongwith the airbag system. To helpavoid injury to yourself or others,have the vehicle serviced rightaway. See Airbag Readiness
(Continued)
Warning (Continued)
Light 0 114 for more information,including important safetyinformation.
Charging System Light
The charging system light comes onbriefly when the ignition is turnedon, but the engine is not running, asa check to show the light is working.It should go out when the engine isstarted.
If the light stays on, or comes onwhile driving, there may be aproblem with the electrical chargingsystem. Have it checked by yourdealer. Driving while this light is oncould drain the battery.
When this light comes on, the DriverInformation Center (DIC) alsodisplays the SERVICE BATTERYCHARGING SYSTEM message.
See Vehicle Messages 0 130 formore information.
If a short distance must be drivenwith the light on, be sure to turn offall accessories, such as the radioand air conditioner.
Malfunction IndicatorLamp (Check EngineLight)This light is part of the vehicle’semission control on-boarddiagnostic system. If this light is onwhile the engine is running, amalfunction has been detected andthe vehicle may require service. Thelight should come on to show that itis working when the ignition is inON/RUN and the engine is notrunning. See Ignition Positions0 205.
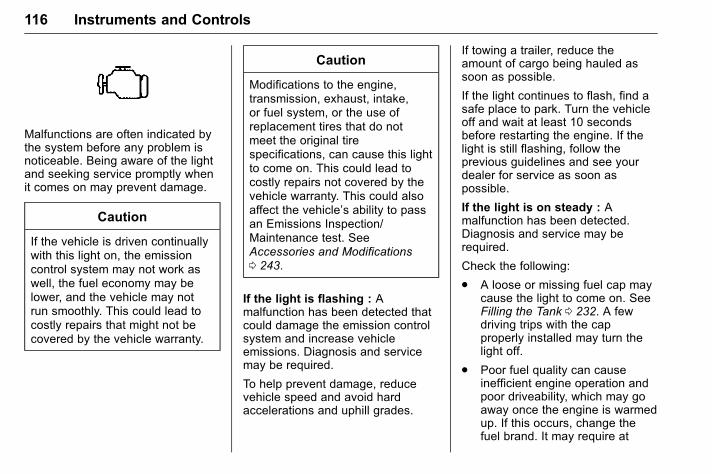
GMC Acadia/Acadia Denali Owner Manual (GMNA-Localizing-U.S./Canada/Mexico-9159268) - 2016 - CRC - 4/16/15
116 Instruments and Controls
Malfunctions are often indicated bythe system before any problem isnoticeable. Being aware of the lightand seeking service promptly whenit comes on may prevent damage.
Caution
If the vehicle is driven continuallywith this light on, the emissioncontrol system may not work aswell, the fuel economy may belower, and the vehicle may notrun smoothly. This could lead tocostly repairs that might not becovered by the vehicle warranty.
Caution
Modifications to the engine,transmission, exhaust, intake,or fuel system, or the use ofreplacement tires that do notmeet the original tirespecifications, can cause this lightto come on. This could lead tocostly repairs not covered by thevehicle warranty. This could alsoaffect the vehicle’s ability to passan Emissions Inspection/Maintenance test. SeeAccessories and Modifications0 243.
If the light is flashing : Amalfunction has been detected thatcould damage the emission controlsystem and increase vehicleemissions. Diagnosis and servicemay be required.
To help prevent damage, reducevehicle speed and avoid hardaccelerations and uphill grades.
If towing a trailer, reduce theamount of cargo being hauled assoon as possible.
If the light continues to flash, find asafe place to park. Turn the vehicleoff and wait at least 10 secondsbefore restarting the engine. If thelight is still flashing, follow theprevious guidelines and see yourdealer for service as soon aspossible.
If the light is on steady : Amalfunction has been detected.Diagnosis and service may berequired.
Check the following:
. A loose or missing fuel cap maycause the light to come on. SeeFilling the Tank 0 232. A fewdriving trips with the capproperly installed may turn thelight off.
. Poor fuel quality can causeinefficient engine operation andpoor driveability, which may goaway once the engine is warmedup. If this occurs, change thefuel brand. It may require at
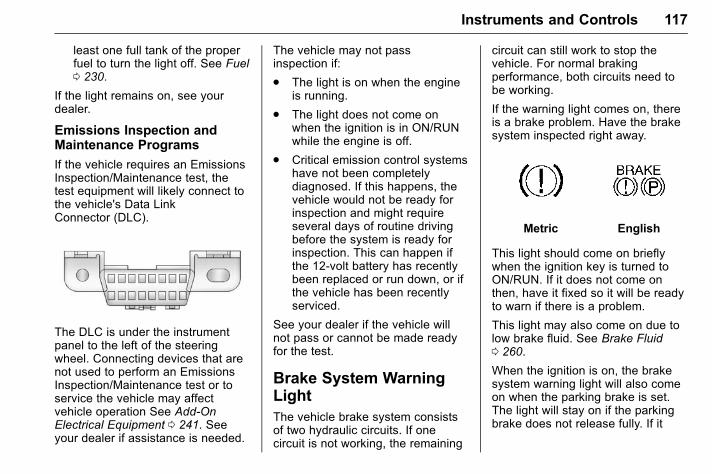
GMC Acadia/Acadia Denali Owner Manual (GMNA-Localizing-U.S./Canada/Mexico-9159268) - 2016 - CRC - 4/16/15
Instruments and Controls 117
least one full tank of the properfuel to turn the light off. See Fuel0 230.
If the light remains on, see yourdealer.
Emissions Inspection andMaintenance Programs
If the vehicle requires an EmissionsInspection/Maintenance test, thetest equipment will likely connect tothe vehicle's Data LinkConnector (DLC).
The DLC is under the instrumentpanel to the left of the steeringwheel. Connecting devices that arenot used to perform an EmissionsInspection/Maintenance test or toservice the vehicle may affectvehicle operation See Add-OnElectrical Equipment 0 241. Seeyour dealer if assistance is needed.
The vehicle may not passinspection if:
. The light is on when the engineis running.
. The light does not come onwhen the ignition is in ON/RUNwhile the engine is off.
. Critical emission control systemshave not been completelydiagnosed. If this happens, thevehicle would not be ready forinspection and might requireseveral days of routine drivingbefore the system is ready forinspection. This can happen ifthe 12-volt battery has recentlybeen replaced or run down, or ifthe vehicle has been recentlyserviced.
See your dealer if the vehicle willnot pass or cannot be made readyfor the test.
Brake System WarningLightThe vehicle brake system consistsof two hydraulic circuits. If onecircuit is not working, the remaining
circuit can still work to stop thevehicle. For normal brakingperformance, both circuits need tobe working.
If the warning light comes on, thereis a brake problem. Have the brakesystem inspected right away.
Metric English
This light should come on brieflywhen the ignition key is turned toON/RUN. If it does not come onthen, have it fixed so it will be readyto warn if there is a problem.
This light may also come on due tolow brake fluid. See Brake Fluid0 260.
When the ignition is on, the brakesystem warning light will also comeon when the parking brake is set.The light will stay on if the parkingbrake does not release fully. If it
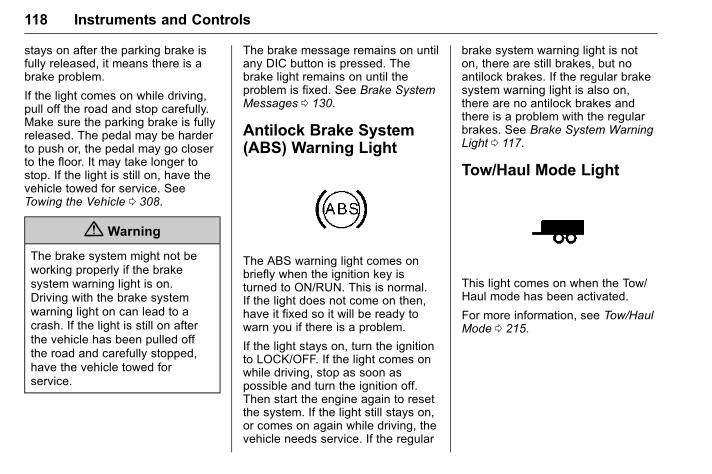
GMC Acadia/Acadia Denali Owner Manual (GMNA-Localizing-U.S./Canada/Mexico-9159268) - 2016 - CRC - 4/16/15
118 Instruments and Controls
stays on after the parking brake isfully released, it means there is abrake problem.
If the light comes on while driving,pull off the road and stop carefully.Make sure the parking brake is fullyreleased. The pedal may be harderto push or, the pedal may go closerto the floor. It may take longer tostop. If the light is still on, have thevehicle towed for service. SeeTowing the Vehicle 0 308.
{ Warning
The brake system might not beworking properly if the brakesystem warning light is on.Driving with the brake systemwarning light on can lead to acrash. If the light is still on afterthe vehicle has been pulled offthe road and carefully stopped,have the vehicle towed forservice.
The brake message remains on untilany DIC button is pressed. Thebrake light remains on until theproblem is fixed. See Brake SystemMessages 0 130.
Antilock Brake System(ABS) Warning Light
The ABS warning light comes onbriefly when the ignition key isturned to ON/RUN. This is normal.If the light does not come on then,have it fixed so it will be ready towarn you if there is a problem.
If the light stays on, turn the ignitionto LOCK/OFF. If the light comes onwhile driving, stop as soon aspossible and turn the ignition off.Then start the engine again to resetthe system. If the light still stays on,or comes on again while driving, thevehicle needs service. If the regular
brake system warning light is noton, there are still brakes, but noantilock brakes. If the regular brakesystem warning light is also on,there are no antilock brakes andthere is a problem with the regularbrakes. See Brake System WarningLight 0 117.
Tow/Haul Mode Light
This light comes on when the Tow/Haul mode has been activated.
For more information, see Tow/HaulMode 0 215.
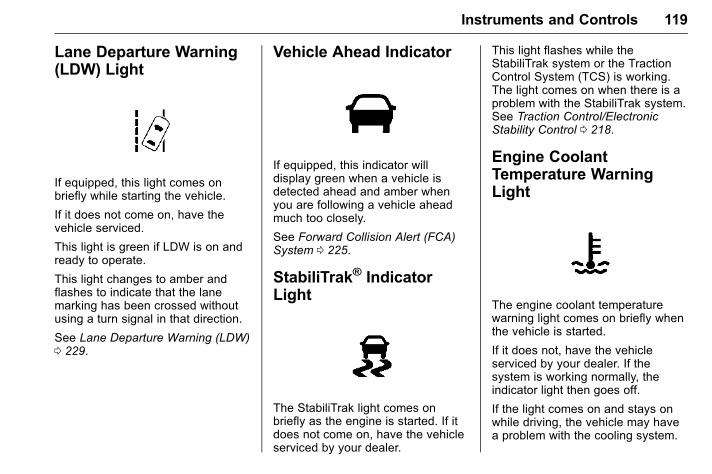
GMC Acadia/Acadia Denali Owner Manual (GMNA-Localizing-U.S./Canada/Mexico-9159268) - 2016 - CRC - 4/16/15
Instruments and Controls 119
Lane Departure Warning(LDW) Light
If equipped, this light comes onbriefly while starting the vehicle.
If it does not come on, have thevehicle serviced.
This light is green if LDW is on andready to operate.
This light changes to amber andflashes to indicate that the lanemarking has been crossed withoutusing a turn signal in that direction.
See Lane Departure Warning (LDW)0 229.
Vehicle Ahead Indicator
If equipped, this indicator willdisplay green when a vehicle isdetected ahead and amber whenyou are following a vehicle aheadmuch too closely.
See Forward Collision Alert (FCA)System 0 225.
StabiliTrak® IndicatorLight
The StabiliTrak light comes onbriefly as the engine is started. If itdoes not come on, have the vehicleserviced by your dealer.
This light flashes while theStabiliTrak system or the TractionControl System (TCS) is working.The light comes on when there is aproblem with the StabiliTrak system.See Traction Control/ElectronicStability Control 0 218.
Engine CoolantTemperature WarningLight
The engine coolant temperaturewarning light comes on briefly whenthe vehicle is started.
If it does not, have the vehicleserviced by your dealer. If thesystem is working normally, theindicator light then goes off.
If the light comes on and stays onwhile driving, the vehicle may havea problem with the cooling system.
GMC Acadia/Acadia Denali Owner Manual (GMNA-Localizing-U.S./Canada/Mexico-9159268) - 2016 - CRC - 4/16/15
120 Instruments and Controls
Stop and turn off the vehicle toavoid damage to the engine.A warning chime sounds when thislight is on.
See Engine Overheating 0 256 formore information.
Tire Pressure Light
For vehicles with the Tire PressureMonitor System (TPMS), this lightcomes on briefly when the engine isstarted. It provides informationabout tire pressures and the TPMS.
When the Light Is On Steady
This indicates that one or more ofthe tires are significantlyunderinflated.
A Driver Information Center (DIC)tire pressure message may alsodisplay. See Tire Messages 0 136.Stop as soon as possible, andinflate the tires to the pressure valueshown on the Tire and LoadingInformation label. See Tire Pressure0 283.
When the Light Flashes First andThen Is On Steady
If the light flashes for about a minuteand then stays on, there may be aproblem with the TPMS. If theproblem is not corrected, the lightwill come on at every ignition cycle.See Tire Pressure MonitorOperation 0 285.
Engine Oil Pressure Light
Caution
Lack of proper engine oilmaintenance can damage theengine. Driving with the engine oillow can also damage the engine.The repairs would not be covered
(Continued)
Caution (Continued)
by the vehicle warranty. Checkthe oil level as soon as possible.Add oil if required, but if the oillevel is within the operating rangeand the oil pressure is still low,have the vehicle serviced. Alwaysfollow the maintenance schedulefor changing engine oil.
This light should come on briefly asthe engine is started. If it does notcome on, have the vehicle servicedby your dealer.
If the light comes on and stays on, itmeans that oil is not flowing throughthe engine properly. The vehiclecould be low on oil and might havesome other system problem. Seeyour dealer.
GMC Acadia/Acadia Denali Owner Manual (GMNA-Localizing-U.S./Canada/Mexico-9159268) - 2016 - CRC - 4/16/15
Instruments and Controls 121
Security Light
The security light should come onbriefly as the engine is started. If thesystem is working normally, theindicator light turns off. If it does notcome on, have the vehicle servicedby your dealer.
If the light stays on and the enginedoes not start, there could be aproblem with the theft-deterrentsystem.
This light is also used to indicate thestatus of the anti-theft alarm systemwhen the ignition is turned off. Thelight will flash rapidly if the alarmsystem is arming and one or moreof the monitored entry points is notclosed. The light will stay on if thealarm is arming and all entry pointsare closed.
For information regarding this lightand the vehicle's security system,see Vehicle Alarm System 0 37.
High-Beam On Light
The high-beam on light comes onwhen the high-beam headlamps arein use.
See Headlamp High/Low-BeamChanger 0 151 for more information.
Front Fog Lamp Light
The front fog lamp light comes onwhen the fog lamps are in use.
The light goes out when the foglamps are turned off. See FogLamps 0 153.
Cruise Control Light
This light comes on when the cruisecontrol is set.
This light goes out when the cruisecontrol is canceled. See CruiseControl 0 220.
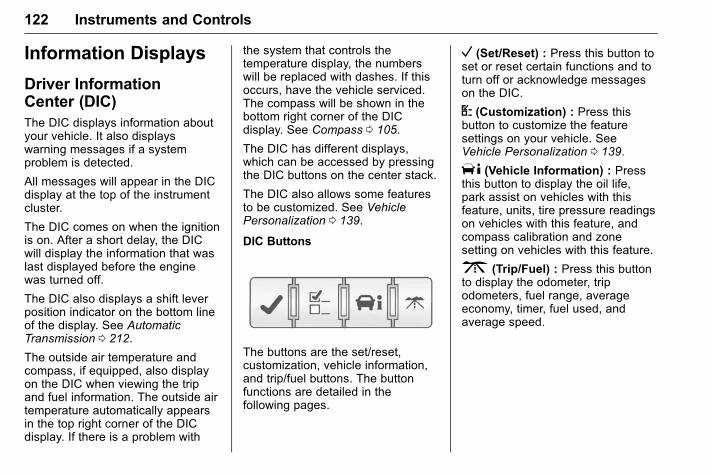
GMC Acadia/Acadia Denali Owner Manual (GMNA-Localizing-U.S./Canada/Mexico-9159268) - 2016 - CRC - 4/16/15
122 Instruments and Controls
Information Displays
Driver InformationCenter (DIC)The DIC displays information aboutyour vehicle. It also displayswarning messages if a systemproblem is detected.
All messages will appear in the DICdisplay at the top of the instrumentcluster.
The DIC comes on when the ignitionis on. After a short delay, the DICwill display the information that waslast displayed before the enginewas turned off.
The DIC also displays a shift leverposition indicator on the bottom lineof the display. See AutomaticTransmission 0 212.
The outside air temperature andcompass, if equipped, also displayon the DIC when viewing the tripand fuel information. The outside airtemperature automatically appearsin the top right corner of the DICdisplay. If there is a problem with
the system that controls thetemperature display, the numberswill be replaced with dashes. If thisoccurs, have the vehicle serviced.The compass will be shown in thebottom right corner of the DICdisplay. See Compass 0 105.
The DIC has different displays,which can be accessed by pressingthe DIC buttons on the center stack.
The DIC also allows some featuresto be customized. See VehiclePersonalization 0 139.
DIC Buttons
The buttons are the set/reset,customization, vehicle information,and trip/fuel buttons. The buttonfunctions are detailed in thefollowing pages.
V (Set/Reset) : Press this button toset or reset certain functions and toturn off or acknowledge messageson the DIC.
U (Customization) : Press thisbutton to customize the featuresettings on your vehicle. SeeVehicle Personalization 0 139.
T (Vehicle Information) : Pressthis button to display the oil life,park assist on vehicles with thisfeature, units, tire pressure readingson vehicles with this feature, andcompass calibration and zonesetting on vehicles with this feature.
3 (Trip/Fuel) : Press this buttonto display the odometer, tripodometers, fuel range, averageeconomy, timer, fuel used, andaverage speed.
GMC Acadia/Acadia Denali Owner Manual (GMNA-Localizing-U.S./Canada/Mexico-9159268) - 2016 - CRC - 4/16/15
Instruments and Controls 123
Vehicle Information MenuItems
T (Vehicle Information) : Pressthis button to scroll through thefollowing menu items:
OIL LIFE
Press the vehicle information buttonuntil OIL LIFE REMAININGdisplays. This display shows anestimate of the oil's remaining usefullife. If you see 99%OIL LIFEREMAINING on the display, thatmeans 99% of the current oil liferemains. The engine oil life systemwill alert you to change the oil on aschedule consistent with yourdriving conditions.
When the remaining oil life is low,the CHANGE ENGINE OIL SOONmessage will appear on the display.See Engine Oil Messages 0 132.Change the oil as soon as possible.See Engine Oil 0 247. In addition tothe engine oil life system monitoringthe oil life, additional maintenance isrecommended in the MaintenanceSchedule. See MaintenanceSchedule 0 322.
Remember, you must reset the OILLIFE display yourself after each oilchange. It will not reset itself. Also,be careful not to reset the OIL LIFEdisplay accidentally at any timeother than when the oil has justbeen changed. It cannot be resetaccurately until the next oil change.To reset the engine oil life system,see Engine Oil Life System 0 250.
SIDE BLIND ZONE ALERT
If the vehicle has the Side BlindZone Alert (SBZA) system, thisdisplay allows the system to beturned on or off. Once in thisdisplay, press the set/reset button toselect between ON or OFF. If youchoose ON, the system will beturned on. If you choose OFF, thesystem will be turned off. When theSBZA system is turned off, the DICwill display the SIDE BLIND ZONEALERT SYSTEM OFF message asa reminder that the system hasbeen turned off. See ObjectDetection System Messages 0 134and Side Blind Zone Alert (SBZA)0 227.
PARK ASSIST
If your vehicle has the Rear ParkingAssist (RPA) system, press thevehicle information button untilPARK ASSIST displays. Thisdisplay allows the system to beturned on or off. Once in thisdisplay, press the set/reset button toselect between ON or OFF. If youchoose ON, the system will beturned on. If you choose OFF, thesystem will be turned off. The RPAsystem automatically turns back onafter each vehicle start. When theRPA system is turned off and thevehicle is shifted out of P (Park), theDIC will display the PARK ASSISTOFF message as a reminder thatthe system has been turned off. SeeObject Detection System Messages0 134 and Parking Assist 0 224.
GMC Acadia/Acadia Denali Owner Manual (GMNA-Localizing-U.S./Canada/Mexico-9159268) - 2016 - CRC - 4/16/15
124 Instruments and Controls
REAR CROSS TRAFFIC ALERT
If the vehicle has the Rear CrossTraffic Alert (RCTA) system, thisdisplay allows the system to beturned on or off. Once in thisdisplay, press the set/reset button toselect between ON or OFF. If youchoose ON, the system will beturned on. If you choose OFF, thesystem will be turned off. When theRCTA system is turned off, the DICwill display the REAR CROSSTRAFFIC ALERT SYSTEM OFFmessage as a reminder that thesystem has been turned off. SeeObject Detection System Messages0 134 and Rear Vision Camera(RVC) 0 222.
UNITS
Press the vehicle information buttonuntil UNITS displays. This displayallows you to select between metricor English units of measurement.Once in this display, press the set/reset button to select betweenMETRIC or ENGLISH units. All ofthe vehicle information will then bedisplayed in the unit ofmeasurement selected.
FRONT TIRES or REAR TIRES
On vehicles with the Tire PressureMonitor System (TPMS), thepressure for each tire can be viewedin the DIC. The tire pressure will beshown in either kilopascals (kPa) orpounds per square inch (psi). Pressthe vehicle information button untilthe DIC displays FRONTTIRES kPa (PSI) LEFT ##RIGHT ##. Press the vehicleinformation button again until theDIC displays REAR TIRES kPa(PSI) LEFT ## RIGHT ##.
If a low tire pressure condition isdetected by the system whiledriving, a message advising you toadd air to a specific tire will appearin the display. See Tire Pressure0 283 and Tire Messages 0 136.
If the tire pressure display showsdashes instead of a value, theremay be a problem with your vehicle.If this consistently occurs, see yourdealer for service.
COMPASS ZONE SETTING
This display will be available if thevehicle has a compass. SeeCompass 0 105.
COMPASS RECALIBRATION
This display will be available if thevehicle has a compass. SeeCompass 0 105.
Blank Display
This display shows no information.
Trip/Fuel Menu Items
3 (Trip/Fuel) : Press this buttonto scroll through the following menuitems:
ODOMETER
Press the trip/fuel button untilODOMETER displays. This displayshows the distance the vehicle hasbeen driven in either kilometers (km)or miles (mi). Pressing the tripodometer reset stem will alsodisplay the odometer.
To switch between English andmetric measurements, see “UNITS”earlier in this section.
GMC Acadia/Acadia Denali Owner Manual (GMNA-Localizing-U.S./Canada/Mexico-9159268) - 2016 - CRC - 4/16/15
Instruments and Controls 125
TRIPA and TRIP B
Press the trip/fuel button untilTRIPA or TRIP B displays. Thisdisplay shows the current distancetraveled in either kilometers (km) ormiles (mi) since the last reset foreach trip odometer. Both tripodometers can be used at the sametime. Pressing the trip odometerreset stem will also display the tripodometers.
Each trip odometer can be reset tozero separately by pressing the set/reset button or the trip odometerreset stem while the desired tripodometer is displayed.
The trip odometer has a featurecalled retroactive reset. This can beused to set the trip odometer to thenumber of kilometers (miles) drivensince the ignition was last turned on.This can be used if the tripodometer is not reset at thebeginning of the trip.
To use the retroactive reset feature,press and hold the set/reset buttonfor at least four seconds. The tripodometer will display the number ofkilometers (km) or miles (mi) driven
since the ignition was last turned onand the vehicle was moving. Oncethe vehicle begins moving, the tripodometer will accumulate mileage.For example, if the vehicle wasdriven 8 km (5 mi) before it is startedagain, and then the retroactive resetfeature is activated, the display willshow 8 km (5 mi). As the vehiclebegins moving, the display will thenincrease to 8.2 km (5.1 mi), 8.4 km(5.2 mi), etc.
If the retroactive reset feature isactivated after the vehicle is started,but before it begins moving, thedisplay will show the number ofkilometers (km) or miles (mi) drivenduring the last ignition cycle.
RANGE
Press the trip/fuel button untilRANGE displays. This displayshows the approximate number ofremaining kilometers (km) ormiles (mi) the vehicle can be drivenwithout refueling. The display willshow LOW if the fuel level is low.
The fuel range estimate is based onan average of the vehicle's fueleconomy over recent driving history
and the amount of fuel remaining inthe fuel tank. This estimate willchange if driving conditions change.For example, if driving in traffic andmaking frequent stops, this displaymay read one number, but if thevehicle is driven on a freeway, thenumber may change even thoughthe same amount of fuel is in thefuel tank. This is because differentdriving conditions produce differentfuel economies. Generally, freewaydriving produces better fueleconomy than city driving. Fuelrange cannot be reset.
AVG (Average) ECONOMY
Press the trip/fuel button until AVGECONOMY displays. This displayshows the approximate averageliters per 100 kilometers (L/100 km)or miles per gallon (mpg). Thisnumber reflects only theapproximate average fuel economythat the vehicle has right now, andwill change as driving conditionschange. This number is calculatedbased on the number of L/100 km(mpg) recorded since the last time
GMC Acadia/Acadia Denali Owner Manual (GMNA-Localizing-U.S./Canada/Mexico-9159268) - 2016 - CRC - 4/16/15
126 Instruments and Controls
this menu item was reset. To resetAVG ECONOMY, press and hold theset/reset button.
TIMER
Press the trip/fuel button untilTIMER displays. This display can beused as a timer.
To start the timer, press the set/reset button while TIMER isdisplayed. The display will show theamount of time that has passedsince the timer was last reset, notincluding time the ignition is off.Time will continue to be counted aslong as the ignition is on, even ifanother display is being shown onthe DIC. The timer will record up to99 hours, 59 minutes and59 seconds (99:59:59) after whichthe display will return to zero.
To stop the timer, press the set/resetbutton briefly while TIMER isdisplayed.
To reset the timer to zero, press andhold the set/reset button whileTIMER is displayed.
FUEL USED
Press the trip/fuel button until FUELUSED displays. This display showsthe number of liters (L) orgallons (gal) of fuel used since thelast reset of this menu item. To resetthe fuel used information, press andhold the set/reset button while FUELUSED is displayed.
AVG (Average) SPEED
Press the trip/fuel button until AVGSPEED displays. This displayshows the average speed of thevehicle in kilometers per hour (km/h)or miles per hour (mph). Thisaverage is calculated based on thevarious vehicle speeds recordedsince the last reset of this value. Toreset the value to zero, press andhold the set/reset button.
Blank Display
This display shows no information.
Head-Up Display (HUD)
{ Warning
If the HUD image is too bright ortoo high in your field of view, itmay take you more time to seethings you need to see when it isdark outside. Be sure to keep theHUD image dim and placed low inyour field of view.
If equipped with the HUD, someinformation concerning theoperation of the vehicle is projectedonto the windshield. This includesthe speedometer reading, rpmreading, transmission position,outside air temperature, the manualmode gear range, and a briefdisplay of the current radio station,including SiriusXM (if equipped)information or CD track. It will alsodisplay Turn-By-Turn navigationinformation if equipped with anavigation radio. The images areprojected by the HUD lens on thedriver side of the instrument panel.
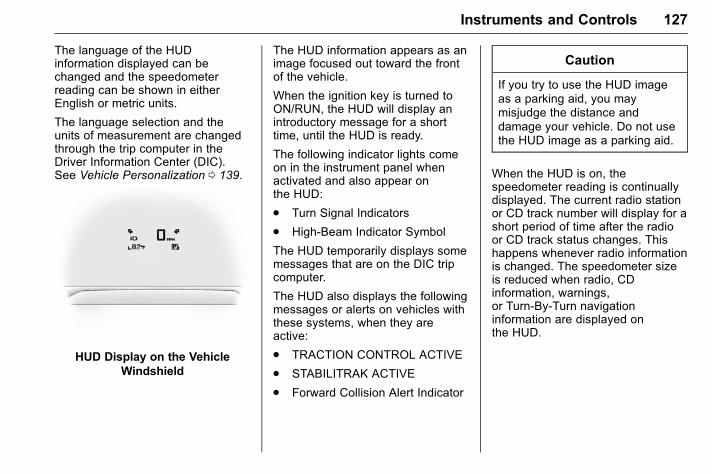
GMC Acadia/Acadia Denali Owner Manual (GMNA-Localizing-U.S./Canada/Mexico-9159268) - 2016 - CRC - 4/16/15
Instruments and Controls 127
The language of the HUDinformation displayed can bechanged and the speedometerreading can be shown in eitherEnglish or metric units.
The language selection and theunits of measurement are changedthrough the trip computer in theDriver Information Center (DIC).See Vehicle Personalization 0 139.
HUD Display on the VehicleWindshield
The HUD information appears as animage focused out toward the frontof the vehicle.
When the ignition key is turned toON/RUN, the HUD will display anintroductory message for a shorttime, until the HUD is ready.
The following indicator lights comeon in the instrument panel whenactivated and also appear onthe HUD:
. Turn Signal Indicators
. High-Beam Indicator Symbol
The HUD temporarily displays somemessages that are on the DIC tripcomputer.
The HUD also displays the followingmessages or alerts on vehicles withthese systems, when they areactive:
. TRACTION CONTROL ACTIVE
. STABILITRAK ACTIVE
. Forward Collision Alert Indicator
Caution
If you try to use the HUD imageas a parking aid, you maymisjudge the distance anddamage your vehicle. Do not usethe HUD image as a parking aid.
When the HUD is on, thespeedometer reading is continuallydisplayed. The current radio stationor CD track number will display for ashort period of time after the radioor CD track status changes. Thishappens whenever radio informationis changed. The speedometer sizeis reduced when radio, CDinformation, warnings,or Turn-By-Turn navigationinformation are displayed onthe HUD.
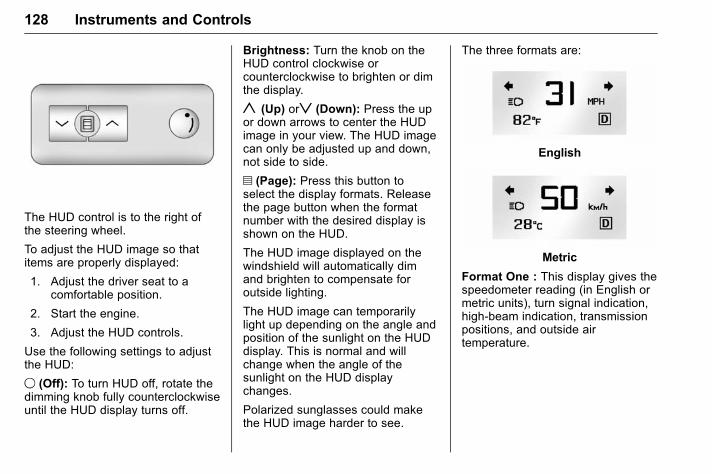
GMC Acadia/Acadia Denali Owner Manual (GMNA-Localizing-U.S./Canada/Mexico-9159268) - 2016 - CRC - 4/16/15
128 Instruments and Controls
The HUD control is to the right ofthe steering wheel.
To adjust the HUD image so thatitems are properly displayed:
1. Adjust the driver seat to acomfortable position.
2. Start the engine.
3. Adjust the HUD controls.
Use the following settings to adjustthe HUD:
9 (Off): To turn HUD off, rotate thedimming knob fully counterclockwiseuntil the HUD display turns off.
Brightness: Turn the knob on theHUD control clockwise orcounterclockwise to brighten or dimthe display.
y (Up) orz (Down): Press the upor down arrows to center the HUDimage in your view. The HUD imagecan only be adjusted up and down,not side to side.
? (Page): Press this button toselect the display formats. Releasethe page button when the formatnumber with the desired display isshown on the HUD.
The HUD image displayed on thewindshield will automatically dimand brighten to compensate foroutside lighting.
The HUD image can temporarilylight up depending on the angle andposition of the sunlight on the HUDdisplay. This is normal and willchange when the angle of thesunlight on the HUD displaychanges.
Polarized sunglasses could makethe HUD image harder to see.
The three formats are:
English
Metric
Format One : This display gives thespeedometer reading (in English ormetric units), turn signal indication,high-beam indication, transmissionpositions, and outside airtemperature.
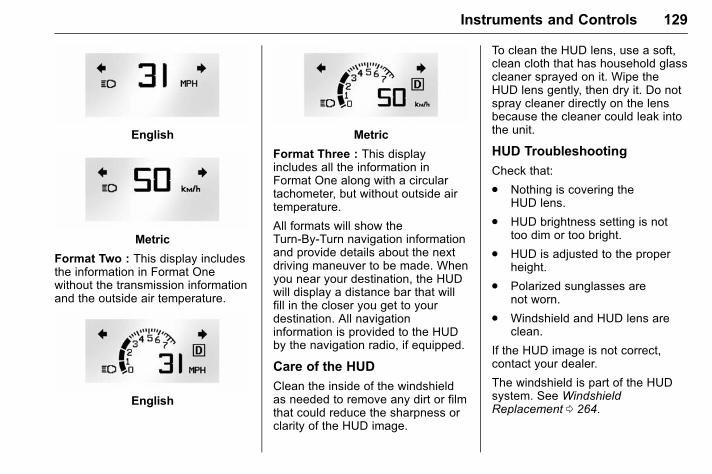
GMC Acadia/Acadia Denali Owner Manual (GMNA-Localizing-U.S./Canada/Mexico-9159268) - 2016 - CRC - 4/16/15
Instruments and Controls 129
English
Metric
Format Two : This display includesthe information in Format Onewithout the transmission informationand the outside air temperature.
English
Metric
Format Three : This displayincludes all the information inFormat One along with a circulartachometer, but without outside airtemperature.
All formats will show theTurn-By-Turn navigation informationand provide details about the nextdriving maneuver to be made. Whenyou near your destination, the HUDwill display a distance bar that willfill in the closer you get to yourdestination. All navigationinformation is provided to the HUDby the navigation radio, if equipped.
Care of the HUD
Clean the inside of the windshieldas needed to remove any dirt or filmthat could reduce the sharpness orclarity of the HUD image.
To clean the HUD lens, use a soft,clean cloth that has household glasscleaner sprayed on it. Wipe theHUD lens gently, then dry it. Do notspray cleaner directly on the lensbecause the cleaner could leak intothe unit.
HUD Troubleshooting
Check that:
. Nothing is covering theHUD lens.
. HUD brightness setting is nottoo dim or too bright.
. HUD is adjusted to the properheight.
. Polarized sunglasses arenot worn.
. Windshield and HUD lens areclean.
If the HUD image is not correct,contact your dealer.
The windshield is part of the HUDsystem. See WindshieldReplacement 0 264.
GMC Acadia/Acadia Denali Owner Manual (GMNA-Localizing-U.S./Canada/Mexico-9159268) - 2016 - CRC - 4/16/15
130 Instruments and Controls
Vehicle MessagesMessages are displayed on the DICto notify the driver that the status ofthe vehicle has changed and thatsome action may be needed by thedriver to correct the condition.Multiple messages may appear oneafter another.
Some messages may not requireimmediate action, but you can pressany of the DIC buttons on theinstrument panel to acknowledgethat you received the messages andto clear them from the display.
Some messages cannot be clearedfrom the DIC display because theyare more urgent. These messagesrequire action before they can becleared. You should take anymessages that appear on thedisplay seriously and remember thatclearing the messages will onlymake the messages disappear, notcorrect the problem.
The following are the possiblemessages that can be displayedand some information about them.
Battery Voltage andCharging Messages
BATTERY LOW STARTVEHICLE
This message displays when thesystem detects that the batteryvoltage has dropped to a criticallevel and the engine must be startedto avoid a dead battery situation.
BATTERY SAVER ACTIVE
This message displays when thesystem detects that the batteryvoltage is dropping below expectedlevels. The battery saver systemstarts reducing certain features ofthe vehicle that you may be able tonotice. At the point that the featuresare disabled, this message isdisplayed. It means that the vehicleis trying to save the charge in thebattery.
Turn off all unnecessaryaccessories to allow the battery torecharge.
The normal battery voltage range is11.5 to 15.5 volts.
SERVICE BATTERYCHARGING SYSTEM
On some vehicles, this messagedisplays if there is a problem withthe battery charging system. Undercertain conditions, the chargingsystem light may also turn on in theinstrument cluster. See ChargingSystem Light 0 115. Driving with thisproblem could drain the battery.Turn off all unnecessaryaccessories. Have the electricalsystem checked as soon aspossible. See your dealer.
Brake System Messages
SERVICE BRAKE SYSTEM
This message displays along withthe brake system warning light ifthere is a problem with the brakesystem. See Brake System WarningLight 0 117. If this messageappears, stop as soon as possibleand turn off the vehicle. Restart thevehicle and check for the messageon the DIC display. If the messageis still displayed or appears again
GMC Acadia/Acadia Denali Owner Manual (GMNA-Localizing-U.S./Canada/Mexico-9159268) - 2016 - CRC - 4/16/15
Instruments and Controls 131
when you begin driving, the brakesystem needs service as soon aspossible. See your dealer.
Cruise Control Messages
CRUISE SET TOXXX
This message displays wheneverthe cruise control is set. See CruiseControl 0 220 for more information.
Door Ajar Messages
DRIVER DOOR OPEN
This message displays and a chimesounds if the driver door is not fullyclosed and the vehicle is shifted outof P (Park). Stop and turn off thevehicle, check the door forobstructions, and close the dooragain. Check to see if the messagestill appears on the DIC.
HOOD OPEN
On some models, this messagedisplays and a chime sounds if thehood is not fully closed. Stop andturn off the vehicle, check the hood
for obstructions, and close the hoodagain. Check to see if the messagestill appears on the DIC.
LEFT REAR DOOR OPEN
This message displays and a chimesounds if the driver side rear door isnot fully closed and the vehicle isshifted out of P (Park). Stop and turnoff the vehicle, check the door forobstructions, and close the dooragain. Check to see if the messagestill appears on the DIC.
LIFTGATE OPEN
This message displays and a chimesounds if the liftgate is open whilethe ignition is in ON/RUN. Turn offthe vehicle and check the liftgate.Restart the vehicle and check forthe message on the DIC display.
PASSENGER DOOR OPEN
This message displays and a chimesounds if the passenger door is notfully closed and the vehicle isshifted out of P (Park). Stop and turnoff the vehicle, check the door for
obstructions, and close the dooragain. Check to see if the messagestill appears on the DIC.
POWER LIFTGATE OFF
This message displays when thepower liftgate has been turned offby pressing the power liftgate buttonon the center stack.
RIGHT REAR DOOR OPEN
This message displays and a chimesounds if the passenger side reardoor is not fully closed and thevehicle is shifted out of P (Park).Stop and turn off the vehicle, checkthe door for obstructions, and closethe door again. Check to see if themessage still appears on the DIC.
Engine Cooling SystemMessages
ENGINE HOT A/C (AirConditioning) OFF
This message displays when theengine coolant becomes hotter thanthe normal operating temperature.See Engine Coolant TemperatureGauge 0 112. To avoid added strain
GMC Acadia/Acadia Denali Owner Manual (GMNA-Localizing-U.S./Canada/Mexico-9159268) - 2016 - CRC - 4/16/15
132 Instruments and Controls
on a hot engine, the air conditioningcompressor automatically turns off.When the coolant temperaturereturns to normal, the airconditioning compressor turns backon. You can continue to drive yourvehicle.
If this message continues to appear,have the system repaired by yourdealer as soon as possible to avoiddamage to the engine.
ENGINE OVERHEATED IDLEENGINE
This message displays when theengine coolant temperature is toohot. Stop and allow the vehicle toidle until it cools down. See EngineCoolant Temperature Gauge 0 112.
See Overheated Engine ProtectionOperating Mode 0 257 forinformation on driving to a safeplace in an emergency.
ENGINE OVERHEATED STOPENGINE
This message displays and acontinuous chime sounds if theengine cooling system reaches
unsafe temperatures for operation.Stop and turn off the vehicle assoon as it is safe to do so to avoidsevere damage. This messageclears when the engine has cooledto a safe operating temperature.
Engine Oil Messages
CHANGE ENGINE OIL SOON
This message displays whenservice is required for the vehicle.See your dealer. See Engine Oil0 247 and Maintenance Schedule0 322.
Acknowledging the CHANGEENGINE OIL SOON message willnot reset the OIL LIFE REMAINING.See “Oil Life” under DriverInformation Center (DIC) 0 122 andEngine Oil Life System 0 250.
ENGINE OIL LOW — ADD OIL
On some vehicles, this messagedisplays when the engine oil levelmay be too low. Check the oil levelbefore filling to the recommendedlevel. If the oil is not low and this
message remains on, take thevehicle to your dealer for service.See Engine Oil 0 247.
OIL PRESSURE LOW STOPENGINE
This message displays when thevehicle's engine oil pressure is low.The oil pressure light also appearson the instrument cluster. SeeEngine Oil Pressure Light 0 120.
Stop the vehicle immediately, asengine damage can result fromdriving a vehicle with low oilpressure. Have the vehicle servicedby your dealer as soon as possiblewhen this message is displayed.
Engine Power Messages
ENGINE POWER IS REDUCED
This message displays and a chimesounds when the cooling systemtemperature gets too hot and theengine further enters the enginecoolant protection mode. SeeEngine Overheating 0 256 forfurther information.
GMC Acadia/Acadia Denali Owner Manual (GMNA-Localizing-U.S./Canada/Mexico-9159268) - 2016 - CRC - 4/16/15
Instruments and Controls 133
This message also displays whenthe vehicle's engine power isreduced. Reduced engine powercan affect the vehicle's ability toaccelerate. If this message is on,but there is no reduction inperformance, proceed to yourdestination. The performance maybe reduced the next time the vehicleis driven. The vehicle may be drivenat a reduced speed while thismessage is on, but acceleration andspeed may be reduced. Anytimethis message stays on, the vehicleshould be taken to your dealer forservice as soon as possible.
Fuel System Messages
FUEL LEVEL LOW
This message displays and a chimesounds if the fuel level is low. Refuelas soon as possible. See FuelGauge 0 111 and Fuel 0 230 formore information.
TIGHTEN GAS CAP
This message may display alongwith the check engine light on theinstrument cluster if the vehicle'sfuel cap is not tightened properly.See Malfunction Indicator Lamp(Check Engine Light) 0 115.Reinstall the fuel cap fully. SeeFilling the Tank 0 232. Thediagnostic system can determine ifthe fuel cap has been left off orimproperly installed. A loose ormissing fuel cap allows fuel toevaporate into the atmosphere.A few driving trips with the capproperly installed should turn thislight and message off.
Key and Lock Messages
REPLACE BATTERY INREMOTE KEY
This message displays if a RemoteKeyless Entry (RKE) transmitterbattery is low. The battery needs tobe replaced in the transmitter. See“Battery Replacement” underRemote Keyless Entry (RKE)System Operation 0 29.
Lamp Messages
AUTOMATIC LIGHTCONTROL OFF
This message displays when theautomatic headlamps are turned off.This message clears itself after10 seconds.
AUTOMATIC LIGHTCONTROL ON
This message displays when theautomatic headlamps are turned on.This message clears itself after10 seconds.
TURN SIGNAL ON
This message displays and a chimesounds if a turn signal is left on for1.2 km (0.75 mi). Move the turnsignal lever to the off position.
GMC Acadia/Acadia Denali Owner Manual (GMNA-Localizing-U.S./Canada/Mexico-9159268) - 2016 - CRC - 4/16/15
134 Instruments and Controls
Object Detection SystemMessages
FORWARD COLLISION ALERTUNAVAILABLE
This message displays whenattempting to activate the ForwardCollision Alert (FCA) system when itis temporarily unavailable. The FCAsystem does not need service.
This message could be due to thecamera being blocked. Cleaning theoutside of the windshield behind therearview mirror may correct theissue.
FRT CAMERA BLOCKEDCLEAN WINDSHIELD
This message displays when thecamera is blocked. Cleaning theoutside of the windshield behind therearview mirror may correct theissue. The Lane Departure Warningsystem will not operate. ForwardCollision Alert (FCA) may not workor may not work as well.
LANE DEPARTURE SYSUNAVAILABLE
This message displays whenattempting to activate the LaneDeparture Warning (LDW) systemwhen it is temporarily unavailable.The LDW system does not needservice.
This message could be due to thecamera being blocked. Cleaning theoutside of the windshield behind therearview mirror may correct theissue.
PARK ASST BLOCKED SEEOWNERS MANUAL
This message displays if there issomething interfering with the RearParking Assist (RPA) system. SeeParking Assist 0 224.
PARK ASSIST OFF
After the vehicle has been started,this message displays to remind thedriver that the RPA system hasbeen turned off. To turn the RPAsystem back on, see Parking Assist0 224.
REAR CROSS TRAFFICALERT SYSTEM OFF
If the vehicle has the Rear CrossTraffic Alert (RCTA) system, thismessage displays when the RCTAsystem has been turned off. SeeRear Vision Camera (RVC) 0 222and Driver Information Center (DIC)0 122.
SERVICE FRONT CAMERA
If this message remains on aftercontinued driving, the vehicle needsservice. Do not use the LaneDeparture Warning (LDW) andForward Collision Alert (FCA)features. Take the vehicle to yourdealer.
SERVICE PARK ASSIST
This message displays if there is aproblem with the Rear ParkingAssist (RPA) system. Do not usethis system to help you park. SeeParking Assist 0 224. See yourdealer for service.
GMC Acadia/Acadia Denali Owner Manual (GMNA-Localizing-U.S./Canada/Mexico-9159268) - 2016 - CRC - 4/16/15
Instruments and Controls 135
SERVICE SIDE DETECTIONSYSTEM
If your vehicle has the Side BlindZone Alert (SBZA) system and thismessage displays, both SBZAdisplays will remain on indicatingthere is a problem with the SBZAsystem. If these displays remain onafter continued driving, the systemneeds service. See your dealer. SeeSide Blind Zone Alert (SBZA) 0 227.
SIDE BLIND ZONE ALERTSYSTEM OFF
If your vehicle has the Side BlindZone Alert (SBZA) system, thismessage displays when the SBZAsystem has been turned off. SeeSide Blind Zone Alert (SBZA) 0 227and Driver Information Center (DIC)0 122.
SIDE DETECTION SYSTEMPORARILY OFF
If your vehicle has the Side BlindZone Alert (SBZA) system, thismessage displays when the SBZAsystem is disabled because thesensor cannot detect vehicles inyour blind zone. The sensor may beblocked by mud, dirt, snow, ice,or slush. This message may alsodisplay during heavy rain or due toroad spray. It may also come onwhen driving in isolated areas withno guardrails, trees, or road signsand light traffic. Your vehicle doesnot need service. For cleaninginstructions, see “Washing theVehicle” in Exterior Care 0 312. SeeSide Blind Zone Alert (SBZA) 0 227.
Ride Control SystemMessages
SERVICE STABILITRAK
This message displays if there is aproblem with the StabiliTrak®
system. If this message appears, tryto reset the system. Stop; turn offthe engine for at least 15 seconds;
then start the engine again. If thismessage still comes on, it meansthere is a problem. See your dealerfor service. The vehicle is safe todrive, however, you do not have thebenefit of StabiliTrak, so reduceyour speed and drive accordingly.
SERVICE TRACTIONCONTROL
This message displays when thereis a problem with the TractionControl System (TCS). When thismessage is displayed, the systemwill not limit wheel spin. Adjust yourdriving accordingly. See your dealerfor service. See Traction Control/Electronic Stability Control 0 218 formore information.
TRACTION CONTROL OFF
This message displays when theTraction Control System (TCS) isturned off. Adjust your drivingaccordingly. See Traction Control/Electronic Stability Control 0 218.
GMC Acadia/Acadia Denali Owner Manual (GMNA-Localizing-U.S./Canada/Mexico-9159268) - 2016 - CRC - 4/16/15
136 Instruments and Controls
TRACTION CONTROL ON
This message displays when theTraction Control System (TCS) isturned on. See Traction Control/Electronic Stability Control 0 218.This message clears itself after10 seconds.
Airbag System Messages
SERVICE AIR BAG
This message displays if there is aproblem with the airbag system.Have your dealer inspect thesystem for problems. See AirbagReadiness Light 0 114 and AirbagSystem 0 66 for more information.
Security Messages
SERVICE THEFT DETERRENTSYSTEM
This message displays when thereis a problem with the theft-deterrentsystem. The vehicle may or may notrestart so you may want to take thevehicle to your dealer before turningoff the engine. See ImmobilizerOperation 0 38 for more information.
THEFT ATTEMPTED
This message displays if the contenttheft-deterrent system has detecteda break-in attempt while you wereaway from your vehicle. See VehicleAlarm System 0 37 for moreinformation.
Service Vehicle Messages
SERVICE A/C (AirConditioning) SYSTEM
This message displays when theelectronic sensors that control theair conditioning and heatingsystems are no longer working.Have the climate control systemserviced by your dealer if you noticea drop in heating and airconditioning efficiency.
SERVICE POWER STEERING
This message displays and a chimemay sound when there may be aproblem with the power steeringsystem. If this message displaysand a reduction in steeringperformance or loss of powersteering assistance is noticed, seeyour dealer.
SERVICE VEHICLE SOON
This message displays when anon-emissions related malfunctionoccurs. Have the vehicle servicedby your dealer as soon as possible.
STARTING DISABLEDSERVICE THROTTLE
This message displays when yourvehicle's throttle system is notfunctioning properly. Have yourvehicle serviced by your dealer.
Tire Messages
TIRE LOW ADD AIR TO TIRE
On vehicles with the Tire PressureMonitor System (TPMS), thismessage displays when thepressure in one or more of thevehicle's tires is low.
This message also displays LEFTFRT (left front), RIGHT FRT (rightfront), LEFT RR (left rear),or RIGHT RR (right rear) to indicatethe location of the low tire.
The low tire pressure warning lightwill also come on. See TirePressure Light 0 120.
GMC Acadia/Acadia Denali Owner Manual (GMNA-Localizing-U.S./Canada/Mexico-9159268) - 2016 - CRC - 4/16/15
Instruments and Controls 137
If a tire pressure message appearson the DIC, stop as soon as youcan. Inflate the tires by adding airuntil the tire pressure is equal to thevalues shown on the Tire andLoading Information label. See Tires0 276, Vehicle Load Limits 0 201,and Tire Pressure 0 283.
The DIC also shows the tirepressure values. See DriverInformation Center (DIC) 0 122.
SERVICE TIRE MONITORSYSTEM
On vehicles with the Tire PressureMonitor System (TPMS), thismessage displays if a part on theTPMS is not working properly. Thetire pressure light also flashes andthen remains on during the sameignition cycle. See Tire PressureLight 0 120. Several conditions maycause this message to appear. SeeTire Pressure Monitor Operation0 285 for more information. If thewarning comes on and stays on,there may be a problem with theTPMS. See your dealer.
TIRE LEARNING ACTIVE
This message displays when theTire Pressure Monitor System(TPMS) is relearning the tirepositions on your vehicle. The tirepositions must be relearned afterrotating the tires or after replacing atire or sensor. See Tire Rotation0 288, Tire Pressure MonitorSystem 0 284, and Tire Pressure0 283 for more information.
Transmission Messages
ALL WHEEL DRIVE OFF
If your vehicle has the All-WheelDrive (AWD) system, this messagedisplays when there is a temporarycondition making the AWD systemunavailable. The vehicle will run in2WD. This could be caused by:
. A compact spare tire on thevehicle
. AWD system overheat
. Loss of wheel or vehicle speed
. Certain other vehicle electricalconditions
This message turns off when thecompact spare tire is replaced by afull-size tire, the differential fluidcools or the above conditions are nolonger present and the warningmessage is reset. To reset thewarning message manually, turn theignition off and then back on againafter 30 seconds. If the messagestays on, see your dealer. SeeAll-Wheel Drive 0 216.
SERVICE ALL WHEEL DRIVE
This message displays if a problemoccurs with the All-Wheel Drive(AWD) system. The vehicle will runin 2WD. This could be caused by:
. An electronics problem
. Worn out or overheated clutchplates
. Various electrical issues
If this message appears, stop assoon as possible and turn off theignition for 30 seconds. Restart thevehicle and check for the messageon the DIC display. If the messagestill displays or appears again whenyou begin driving, the system needsservice. See your dealer right away.
GMC Acadia/Acadia Denali Owner Manual (GMNA-Localizing-U.S./Canada/Mexico-9159268) - 2016 - CRC - 4/16/15
138 Instruments and Controls
SERVICE TRANSMISSION
This message displays when thereis a problem with the transmission.See your dealer for service.
TRANSMISSION HOT IDLEENGINE
Caution
Do not drive the vehicle while thetransmission fluid is overheating,or the transmission can bedamaged. This could lead tocostly repairs that would not becovered by the warranty.
This message displays and a chimesounds if the transmission fluid inthe vehicle gets hot. Driving with thetransmission fluid temperature highcan cause damage to the vehicle.Stop the vehicle and let it idle toallow the transmission to cool. Thismessage clears when the fluidtemperature reaches a safe level.
Vehicle ReminderMessages
ICE POSSIBLE DRIVEWITH CARE
This message displays when theoutside air temperature is coldenough to create icy roadconditions. Adjust your drivingaccordingly.
Vehicle Speed Messages
SPEED LIMITED TOXXXKM/H (MPH)
This message displays when yourvehicle speed is limited to 128 km/h(80 mph) because the vehicledetects a problem in the speedvariable assist steering system.Have your vehicle serviced by yourdealer.
Washer Fluid Messages
WASHER FLUID LOW ADDFLUID
This message displays when thewindshield washer fluid is low. Fillthe windshield washer fluid reservoiras soon as possible. See EngineCompartment Overview 0 246 forthe location of the windshieldwasher fluid reservoir. Also, seeWasher Fluid 0 258 for moreinformation.
GMC Acadia/Acadia Denali Owner Manual (GMNA-Localizing-U.S./Canada/Mexico-9159268) - 2016 - CRC - 4/16/15
Instruments and Controls 139
VehiclePersonalizationYour vehicle may havecustomization capabilities that allowyou to program certain features toone preferred setting. Customizationfeatures can only be programmed toone setting on the vehicle andcannot be programmed to apreferred setting for two differentdrivers.
All of the customization options maynot be available on your vehicle.Only the options available will bedisplayed on the DIC.
The default settings for thecustomization features were setwhen your vehicle left the factory,but may have been changed fromtheir default state since then.
The customization preferences areautomatically recalled.
To change customizationpreferences, use the followingprocedure.
Entering the FeatureSettings Menu
1. Turn the ignition on and placethe vehicle in P (Park).
To avoid excessive drain onthe battery, it is recommendedthat the headlamps areturned off.
2. Press the customization buttonto enter the feature settingsmenu. If the menu is notavailable, FEATURESETTINGS AVAILABLE INPARK will display. Beforeentering the menu, make surethe vehicle is in P (Park).
Feature Settings Menu Items
The following are customizationfeatures that allow you to programsettings to the vehicle:
DISPLAY IN ENGLISH
This feature will only display if alanguage other than English hasbeen set. This feature allows you tochange the language in which theDIC messages appear to English.
Press the customization button untilthe PRESS V TO DISPLAY INENGLISH screen appears on theDIC display. Press the set/resetbutton once to display all DICmessages in English.
DISPLAY LANGUAGE
This feature allows you to select thelanguage in which the DICmessages will appear.
Press the customization button untilthe DISPLAY LANGUAGE screenappears on the DIC display. Pressthe set/reset button once to accessthe settings for this feature. Thenpress the customization button toscroll through the following settings:
ENGLISH (default) : All messageswill appear in English.
FRANCAIS : All messages willappear in French.
ESPANOL : All messages willappear in Spanish.
NO CHANGE : No change will bemade to this feature. The currentsetting will remain.
GMC Acadia/Acadia Denali Owner Manual (GMNA-Localizing-U.S./Canada/Mexico-9159268) - 2016 - CRC - 4/16/15
140 Instruments and Controls
To select a setting, press the set/reset button while the desiredsetting is displayed on the DIC.
AUTO DOOR LOCK
This feature allows you to selectwhen the vehicle's doors willautomatically lock. See AutomaticDoor Locks 0 33.
Press the customization button untilAUTO DOOR LOCK appears on theDIC display. Press the set/resetbutton once to access the settingsfor this feature. Then press thecustomization button to scrollthrough the following settings:
SHIFT OUT OF PARK (default) :The doors will automatically lockwhen the vehicle is shifted out ofP (Park).
AT VEHICLE SPEED : The doorswill automatically lock when thevehicle speed is above 13 km/h(8 mph) for three seconds.
NO CHANGE : No change will bemade to this feature. The currentsetting will remain.
To select a setting, press the set/reset button while the desiredsetting is displayed on the DIC.
AUTO DOOR UNLOCK
This feature allows you to selectwhether or not to turn off theautomatic door unlocking feature.It also allows you to select whichdoors and when the doors willautomatically unlock. See AutomaticDoor Locks 0 33.
Press the customization button untilAUTO DOOR UNLOCK appears onthe DIC display. Press the set/resetbutton once to access the settingsfor this feature. Then press thecustomization button to scrollthrough the following settings:
OFF : None of the doors willautomatically unlock.
DRIVER AT KEY OUT : Only thedriver door will unlock when the keyis taken out of the ignition.
DRIVER IN PARK : Only the driverdoor will unlock when the vehicle isshifted into P (Park).
ALL AT KEY OUT : All of the doorswill unlock when the key is takenout of the ignition.
ALL IN PARK (default) : All of thedoors will unlock when the vehicle isshifted into P (Park).
NO CHANGE : No change will bemade to this feature. The currentsetting will remain.
To select a setting, press the set/reset button while the desiredsetting is displayed on the DIC.
REMOTE DOOR LOCK
This feature allows you to select thetype of feedback you will receivewhen locking the vehicle with theRemote Keyless Entry (RKE)transmitter. You will not receivefeedback when locking the vehiclewith the RKE transmitter if the doorsare open. See Remote KeylessEntry (RKE) System Operation 0 29.
Press the customization button untilREMOTE DOOR LOCK appears onthe DIC display. Press the set/resetbutton once to access the settings
GMC Acadia/Acadia Denali Owner Manual (GMNA-Localizing-U.S./Canada/Mexico-9159268) - 2016 - CRC - 4/16/15
Instruments and Controls 141
for this feature. Then press thecustomization button to scrollthrough the following settings:
OFF : There will be no feedbackwhen you press the lock button onthe RKE transmitter.
LIGHTS ONLY : The exterior lampswill flash when you press the lockbutton on the RKE transmitter.
HORN ONLY : The horn will soundon the second press of the lockbutton on the RKE transmitter.
HORN & LIGHTS (default) : Theexterior lamps will flash when youpress the lock button on the RKEtransmitter, and the horn will soundwhen the lock button is pressedagain within five seconds of theprevious command.
NO CHANGE : No change will bemade to this feature. The currentsetting will remain.
To select a setting, press the set/reset button while the desiredsetting is displayed on the DIC.
REMOTE DOOR UNLOCK
This feature allows you to select thetype of feedback you will receivewhen unlocking the vehicle with theRemote Keyless Entry (RKE)transmitter. You will not receivefeedback when unlocking thevehicle with the RKE transmitter ifthe doors are open. See RemoteKeyless Entry (RKE) SystemOperation 0 29.
Press the customization button untilREMOTE DOOR UNLOCK appearson the DIC display. Press the set/reset button once to access thesettings for this feature. Then pressthe customization button to scrollthrough the following settings:
LIGHTS OFF : The exterior lampswill not flash when you press theunlock button on the RKEtransmitter.
LIGHTS ON (default) : The exteriorlamps will flash when you press theunlock button on the RKEtransmitter.
NO CHANGE : No change will bemade to this feature. The currentsetting will remain.
To select a setting, press the set/reset button while the desiredsetting is displayed on the DIC.
DELAY DOOR LOCK
This feature allows you to selectwhether or not the locking of thevehicle's doors and liftgate will bedelayed. When locking the doorsand liftgate with the power door lockswitch and a door or the liftgate isopen, this feature will delay lockingthe doors and liftgate untilfive seconds after the last door isclosed. You will hear three chimesto signal that the delayed lockingfeature is in use. The key must beout of the ignition for this feature towork. You can temporarily overridedelayed locking by pressing thepower door lock switch twice or thelock button on the RKE transmittertwice. See Delayed Locking 0 33.
Press the customization button untilDELAY DOOR LOCK appears onthe DIC display. Press the set/resetbutton once to access the settings
GMC Acadia/Acadia Denali Owner Manual (GMNA-Localizing-U.S./Canada/Mexico-9159268) - 2016 - CRC - 4/16/15
142 Instruments and Controls
for this feature. Then press thecustomization button to scrollthrough the following settings:
OFF : There will be no delayedlocking of the vehicle's doors.
ON (default) : The doors will notlock until five seconds after the lastdoor or the liftgate is closed.
NO CHANGE : No change will bemade to this feature. The currentsetting will remain.
To select a setting, press the set/reset button while the desiredsetting is displayed on the DIC.
EXIT LIGHTING
This feature allows you to select theamount of time you want theexterior lamps to remain on when itis dark enough outside. Thishappens after the key is turned fromON/RUN to LOCK/OFF.
Press the customization button untilEXIT LIGHTING appears on the DICdisplay. Press the set/reset buttononce to access the settings for this
feature. Then press thecustomization button to scrollthrough the following settings:
OFF : The exterior lamps will notturn on.
30 SECONDS (default) : Theexterior lamps will stay on for30 seconds.
1MINUTE : The exterior lamps willstay on for one minute.
2MINUTES : The exterior lamps willstay on for two minutes.
NO CHANGE : No change will bemade to this feature. The currentsetting will remain.
To select a setting, press the set/reset button while the desiredsetting is displayed on the DIC.
APPROACH LIGHTING
This feature allows you to selectwhether or not to have the exteriorlights turn on briefly during low lightperiods after unlocking the vehicleusing the Remote Keyless Entry(RKE) transmitter.
Press the customization button untilAPPROACH LIGHTING appears onthe DIC display. Press the set/resetbutton once to access the settingsfor this feature. Then press thecustomization button to scrollthrough the following settings:
OFF : The exterior lights will notturn on when you unlock the vehiclewith the RKE transmitter.
ON (default) : If it is dark enoughoutside, the exterior lights will turnon briefly when you unlock thevehicle with the RKE transmitter.
The lights will remain on for20 seconds or until the lock buttonon the RKE transmitter is pressed,or the vehicle is no longer off. SeeRemote Keyless Entry (RKE)System Operation 0 29.
NO CHANGE : No change will bemade to this feature. The currentsetting will remain.
To select a setting, press the set/reset button while the desiredsetting is displayed on the DIC.
GMC Acadia/Acadia Denali Owner Manual (GMNA-Localizing-U.S./Canada/Mexico-9159268) - 2016 - CRC - 4/16/15
Instruments and Controls 143
CHIME VOLUME
This feature allows you to select thevolume level of the chime.
Press the customization button untilCHIME VOLUME appears on theDIC display. Press the set/resetbutton once to access the settingsfor this feature. Then press thecustomization button to scrollthrough the following settings:
NORMAL : The chime volume willbe set to a normal level.
LOUD : The chime volume will beset to a loud level.
NO CHANGE : No change will bemade to this feature. The currentsetting will remain.
There is no default for chimevolume. The volume will stay at thelast known setting.
To select a setting, press the set/reset button while the desiredsetting is displayed on the DIC.
PARK TILT MIRRORS
If your vehicle has this feature, itallows you to select whether or notthe outside mirror(s) will
automatically tilt down when thevehicle is shifted into R (Reverse).See Park Tilt Mirrors 0 42.
Press the customization button untilPARK TILT MIRRORS appears onthe DIC display. Press the set/resetbutton once to access the settingsfor this feature. Then press thecustomization button to scrollthrough the following settings:
OFF (default) : Neither outsidemirror will be tilted down when thevehicle is shifted into R (Reverse).
DRIVER MIRROR : The driveroutside mirror will be tilted downwhen the vehicle is shifted intoR (Reverse).
PASSENGER MIRROR : Thepassenger outside mirror will betilted down when the vehicle isshifted into R (Reverse).
BOTH MIRRORS : The driver andpassenger outside mirrors will betilted down when the vehicle isshifted into R (Reverse).
NO CHANGE : No change will bemade to this feature. The currentsetting will remain.
To select a setting, press the set/reset button while the desiredsetting is displayed on the DIC.
EASY EXIT SEAT
If your vehicle has this feature, itallows you to select your preferencefor the automatic easy exit seatfeature. See Memory Seats 0 52.
Press the customization button untilEASY EXIT SEAT appears on theDIC display. Press the set/resetbutton once to access the settingsfor this feature. Then press thecustomization button to scrollthrough the following settings:
OFF (default) : No automatic seatexit recall will occur.
ON : The driver seat will move backwhen the key is removed from theignition. The steering column willalso move up and forward onvehicles with the power tilt andtelescopic steering feature. SeeSteering Wheel Adjustment 0 103.
The automatic easy exit seatmovement will only occur one timeafter the key is removed from theignition. If the automatic movement
GMC Acadia/Acadia Denali Owner Manual (GMNA-Localizing-U.S./Canada/Mexico-9159268) - 2016 - CRC - 4/16/15
144 Instruments and Controls
has already occurred, and you putthe key back in the ignition andremove it again, the seat andsteering column will stay in theoriginal exit position, unless amemory recall took place prior toremoving the key again.
NO CHANGE : No change will bemade to this feature. The currentsetting will remain.
To select a setting, press the set/reset button while the desiredsetting is displayed on the DIC.
MEMORY SEAT RECALL
If your vehicle has this feature, itallows you to select your preferencefor the remote memory seat recallfeature. See Memory Seats 0 52.
Press the customization button untilMEMORY SEAT RECALL appearson the DIC display. Press the set/reset button once to access thesettings for this feature. Then pressthe customization button to scrollthrough the following settings:
OFF (default) : No remote memoryseat recall will occur.
ON : The driver seat and outsidemirrors will automatically move tothe stored driving position when theunlock button on the RemoteKeyless Entry (RKE) transmitter ispressed. The steering column willalso move on vehicles with thepower tilt and telescopic steeringfeature. See Steering WheelAdjustment 0 103. See “MemoryRemote Recall” under MemorySeats 0 52 for information onmatching transmitters to driverpositions.
NO CHANGE : No change will bemade to this feature. The currentsetting will remain.
To select a setting, press the set/reset button while the desiredsetting is displayed on the DIC.
REMOTE START
If your vehicle has this feature, itallows you to turn the remote startoff or on. The remote start featureallows you to start the engine fromoutside of the vehicle using theRemote Keyless Entry (RKE)transmitter. See Remote VehicleStart 0 31.
Press the customization button untilREMOTE START appears on theDIC display. Press the set/resetbutton once to access the settingsfor this feature. Then press thecustomization button to scrollthrough the following settings:
OFF : The remote start feature willbe disabled.
ON (default) : The remote startfeature will be enabled.
NO CHANGE : No change will bemade to this feature. The currentsetting will remain.
To select a setting, press the set/reset button while the desiredsetting is displayed on the DIC.
FACTORY SETTINGS
This feature allows you to set all ofthe customization features back totheir factory default settings.
Press the customization button untilFACTORY SETTINGS appears onthe DIC display. Press the set/resetbutton once to access the settings
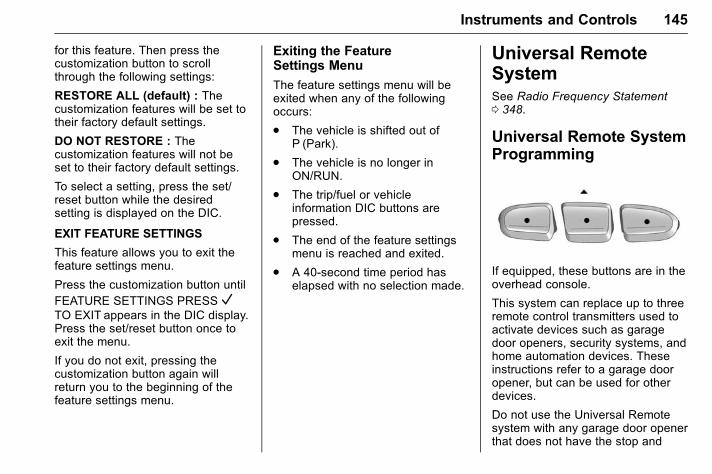
GMC Acadia/Acadia Denali Owner Manual (GMNA-Localizing-U.S./Canada/Mexico-9159268) - 2016 - CRC - 4/16/15
Instruments and Controls 145
for this feature. Then press thecustomization button to scrollthrough the following settings:
RESTORE ALL (default) : Thecustomization features will be set totheir factory default settings.
DO NOT RESTORE : Thecustomization features will not beset to their factory default settings.
To select a setting, press the set/reset button while the desiredsetting is displayed on the DIC.
EXIT FEATURE SETTINGS
This feature allows you to exit thefeature settings menu.
Press the customization button untilFEATURE SETTINGS PRESS VTO EXIT appears in the DIC display.Press the set/reset button once toexit the menu.
If you do not exit, pressing thecustomization button again willreturn you to the beginning of thefeature settings menu.
Exiting the FeatureSettings Menu
The feature settings menu will beexited when any of the followingoccurs:
. The vehicle is shifted out ofP (Park).
. The vehicle is no longer inON/RUN.
. The trip/fuel or vehicleinformation DIC buttons arepressed.
. The end of the feature settingsmenu is reached and exited.
. A 40-second time period haselapsed with no selection made.
Universal RemoteSystemSee Radio Frequency Statement0 348.
Universal Remote SystemProgramming
If equipped, these buttons are in theoverhead console.
This system can replace up to threeremote control transmitters used toactivate devices such as garagedoor openers, security systems, andhome automation devices. Theseinstructions refer to a garage dooropener, but can be used for otherdevices.
Do not use the Universal Remotesystem with any garage door openerthat does not have the stop and
GMC Acadia/Acadia Denali Owner Manual (GMNA-Localizing-U.S./Canada/Mexico-9159268) - 2016 - CRC - 4/16/15
146 Instruments and Controls
reverse feature. This includes anygarage door opener modelmanufactured before April 1, 1982.
Read these instructions completelybefore programming the UniversalRemote system. It may help to haveanother person assist with theprogramming process.
Keep the original hand-heldtransmitter for use in other vehiclesas well as for future programming.Erase the programming whenvehicle ownership is terminated.See “Erasing Universal RemoteSystem Buttons” later in thissection.
To program a garage door opener,park outside directly in line with andfacing the garage door openerreceiver. Clear all people andobjects near the garage door.
Make sure the hand-held transmitterhas a new battery for quicker andmore accurate transmission of theradio-frequency signal.
Programming the UniversalRemote System
For questions or help programmingthe Universal Remote system, call1-800-355-3515 or seewww.homelink.com.
Programming involvestime-sensitive actions, and may timeout causing the procedure to berepeated.
To program up to three devices:
1. Hold the end of the hand-heldtransmitter about 3 to 8 cm (1to 3 in) away from theUniversal Remote systembuttons with the indicator lightin view. The hand-heldtransmitter was supplied by themanufacturer of the garagedoor opener receiver.
2. At the same time, press andhold both the hand-heldtransmitter button and one ofthe three Universal Remotesystem buttons to be used tooperate the garage door. Donot release either button until
the indicator light changes froma slow to a rapid flash. Thenrelease both buttons.
Some garage door openersmay require substitution ofStep 2 with the procedureunder “Radio Signals forCanada and Some GateOperators” later in this section.
3. Press and hold the newlyprogrammed Universal Remotesystem button for five secondswhile watching the indicatorlight and garage dooractivation.
. If the indicator light stays oncontinuously or the garagedoor moves when thebutton is pressed, thenprogramming is complete.There is no need tocomplete Steps 4–6.
. If the indicator light doesnot come on or the garagedoor does not move, asecond button press maybe required. For a secondtime, press and hold thenewly programmed button

GMC Acadia/Acadia Denali Owner Manual (GMNA-Localizing-U.S./Canada/Mexico-9159268) - 2016 - CRC - 4/16/15
Instruments and Controls 147
for five seconds. If the lightstays on or the garage doormoves, programming iscomplete.
. If the indicator light blinksrapidly for two seconds,then changes to a solid lightand the garage door doesnot move, continue withprogramming Steps 4–6.
Learn or Smart Button
4. After completing Steps 1–3,locate the Learn or Smartbutton inside the garage on thegarage door opener receiver.The name and color of thebutton may vary bymanufacturer.
5. Press and release the Learn orSmart button. Step 6 must becompleted within 30 seconds ofpressing this button.
6. Inside the vehicle, press andhold the newly programmedUniversal Remote systembutton for two seconds, thenrelease it. If the garage doordoes not move or the lamp onthe garage door openerreceiver does not flash, pressand hold the same button asecond time for two seconds,then release it. Again, if thedoor does not move or thegarage door lamp does notflash, press and hold the samebutton a third time fortwo seconds, then release it.
The Universal Remote systemshould now activate thegarage door.
Repeat the process forprogramming the two remainingbuttons.
Radio Signals for Canada andSome Gate Operators
For questions or programming help,call 1-800-355-3515 or seewww.homelink.com.
Canadian radio-frequency laws andsome U.S. gate operators requiretransmitter signals to time out or quitafter several seconds oftransmission. This may not be longenough for the Universal Remotesystem to pick up the signal duringprogramming.
If the programming did not work,replace Step 2 under “Programmingthe Universal Remote System” withthe following:
Press and hold the UniversalRemote system button whilepressing and releasing thehand-held transmitter button everytwo seconds until the signal hasbeen successfully accepted by theUniversal Remote system. TheUniversal Remote system indicatorlight will flash slowly at first and thenrapidly. Proceed with Step 3 under“Programming the Universal RemoteSystem” to complete.
GMC Acadia/Acadia Denali Owner Manual (GMNA-Localizing-U.S./Canada/Mexico-9159268) - 2016 - CRC - 4/16/15
148 Instruments and Controls
Universal Remote SystemOperation
Using the Universal RemoteSystem
Press and hold the appropriateUniversal Remote system button forat least one-half second. Theindicator light will come on while thesignal is being transmitted.
Erasing Universal RemoteSystem Buttons
Erase all programmed buttons whenvehicle ownership is terminated.
To erase:
1. Press and hold the two outsidebuttons until the indicator lightbegins to flash. This shouldtake about 10 seconds.
2. Release both buttons.
Reprogramming a SingleUniversal Remote SystemButton
To reprogram any of the systembuttons:
1. Press and hold any one of thebuttons. Do not release thebutton.
2. The indicator light will begin toflash after 20 seconds. Withoutreleasing the button, proceedwith Step 1 under“Programming the UniversalRemote System.”
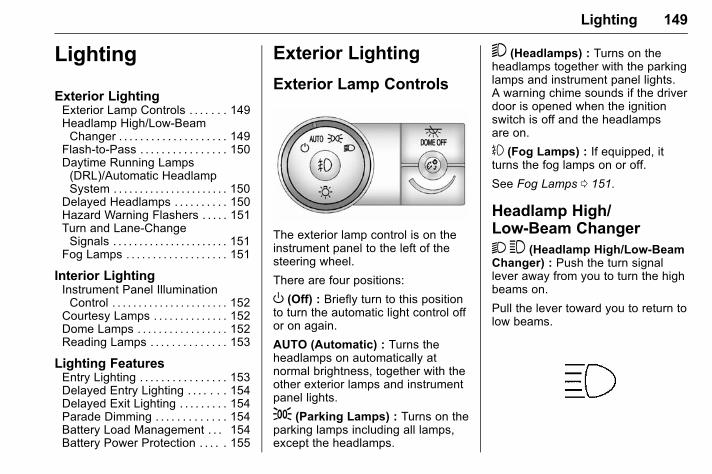
GMC Acadia/Acadia Denali Owner Manual (GMNA-Localizing-U.S./Canada/Mexico-9159268) - 2016 - CRC - 4/16/15
Lighting 149
Lighting
Exterior LightingExterior Lamp Controls . . . . . . . 149Headlamp High/Low-BeamChanger . . . . . . . . . . . . . . . . . . . . 149
Flash-to-Pass . . . . . . . . . . . . . . . . 150Daytime Running Lamps(DRL)/Automatic HeadlampSystem . . . . . . . . . . . . . . . . . . . . . . 150
Delayed Headlamps . . . . . . . . . . 150Hazard Warning Flashers . . . . . 151Turn and Lane-ChangeSignals . . . . . . . . . . . . . . . . . . . . . . 151
Fog Lamps . . . . . . . . . . . . . . . . . . . 151
Interior LightingInstrument Panel IlluminationControl . . . . . . . . . . . . . . . . . . . . . . 152
Courtesy Lamps . . . . . . . . . . . . . . 152Dome Lamps . . . . . . . . . . . . . . . . . 152Reading Lamps . . . . . . . . . . . . . . 153
Lighting FeaturesEntry Lighting . . . . . . . . . . . . . . . . 153Delayed Entry Lighting . . . . . . . 154Delayed Exit Lighting . . . . . . . . . 154Parade Dimming . . . . . . . . . . . . . 154Battery Load Management . . . 154Battery Power Protection . . . . . 155
Exterior Lighting
Exterior Lamp Controls
The exterior lamp control is on theinstrument panel to the left of thesteering wheel.
There are four positions:
O (Off) : Briefly turn to this positionto turn the automatic light control offor on again.
AUTO (Automatic) : Turns theheadlamps on automatically atnormal brightness, together with theother exterior lamps and instrumentpanel lights.
; (Parking Lamps) : Turns on theparking lamps including all lamps,except the headlamps.
5 (Headlamps) : Turns on theheadlamps together with the parkinglamps and instrument panel lights.A warning chime sounds if the driverdoor is opened when the ignitionswitch is off and the headlampsare on.
# (Fog Lamps) : If equipped, itturns the fog lamps on or off.
See Fog Lamps 0 151.
Headlamp High/Low-Beam Changer23 (Headlamp High/Low-BeamChanger) : Push the turn signallever away from you to turn the highbeams on.
Pull the lever toward you to return tolow beams.
GMC Acadia/Acadia Denali Owner Manual (GMNA-Localizing-U.S./Canada/Mexico-9159268) - 2016 - CRC - 4/16/15
150 Lighting
This indicator light turns on in theinstrument cluster when thehigh-beam headlamps are on.
Flash-to-PassThis feature is used to signal to thevehicle ahead that you wantto pass.
If the headlamps are off or in thelow-beam position, pull the turnsignal lever toward you tomomentarily switch to high beams.
Release the lever to turn thehigh-beam headlamps off.
Daytime Running Lamps(DRL)/AutomaticHeadlamp SystemDRL can make it easier for others tosee the front of your vehicle duringthe day. Fully functional DRL arerequired on all vehicles first sold inCanada.
The DRL system makes thelow-beam headlamps come on at areduced brightness when thefollowing conditions are met:
. The ignition is in the ON/RUNposition.
. The exterior lamp control isin AUTO.
. The engine is running.
When the DRL are on, the regularheadlamps, taillamps, sidemarker,and other lamps will not be on. Theinstrument cluster will not be lit.
The headlamps automaticallychange from DRL to the regularheadlamps depending on thedarkness of the surroundings. Theother lamps that come on with theheadlamps will also come on.
When it is bright enough outside,the headlamps will go off and theDRL will come on.
The regular headlamp systemshould be turned on when needed.
Do not cover the light sensor on topof the instrument panel because itworks with the DRL.
Delayed HeadlampsDelayed headlamps provide aperiod of exterior lighting as youleave the area around the vehicle.This feature is activated when theheadlamps are on due to theautomatic headlamps control featureand when the ignition is turned off.The headlamps remain on until theexterior lamp control is moved to theparking lamps position or until thepre-selected delayed headlamplighting period has ended.
If the ignition is turned off with theexterior lamp control in the;or5 position, the delayedheadlamps cycle will not occur.
To disable the delayed headlampsfeature or change the time of delay,see Vehicle Personalization 0 139.
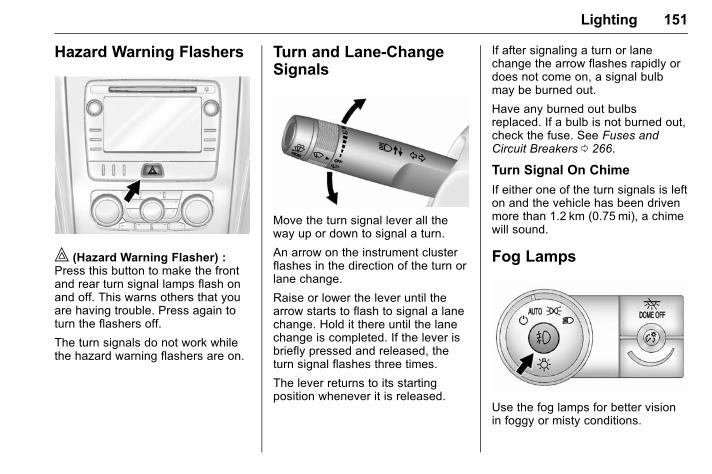
GMC Acadia/Acadia Denali Owner Manual (GMNA-Localizing-U.S./Canada/Mexico-9159268) - 2016 - CRC - 4/16/15
Lighting 151
Hazard Warning Flashers
| (Hazard Warning Flasher) :Press this button to make the frontand rear turn signal lamps flash onand off. This warns others that youare having trouble. Press again toturn the flashers off.
The turn signals do not work whilethe hazard warning flashers are on.
Turn and Lane-ChangeSignals
Move the turn signal lever all theway up or down to signal a turn.
An arrow on the instrument clusterflashes in the direction of the turn orlane change.
Raise or lower the lever until thearrow starts to flash to signal a lanechange. Hold it there until the lanechange is completed. If the lever isbriefly pressed and released, theturn signal flashes three times.
The lever returns to its startingposition whenever it is released.
If after signaling a turn or lanechange the arrow flashes rapidly ordoes not come on, a signal bulbmay be burned out.
Have any burned out bulbsreplaced. If a bulb is not burned out,check the fuse. See Fuses andCircuit Breakers 0 266.
Turn Signal On Chime
If either one of the turn signals is lefton and the vehicle has been drivenmore than 1.2 km (0.75 mi), a chimewill sound.
Fog Lamps
Use the fog lamps for better visionin foggy or misty conditions.
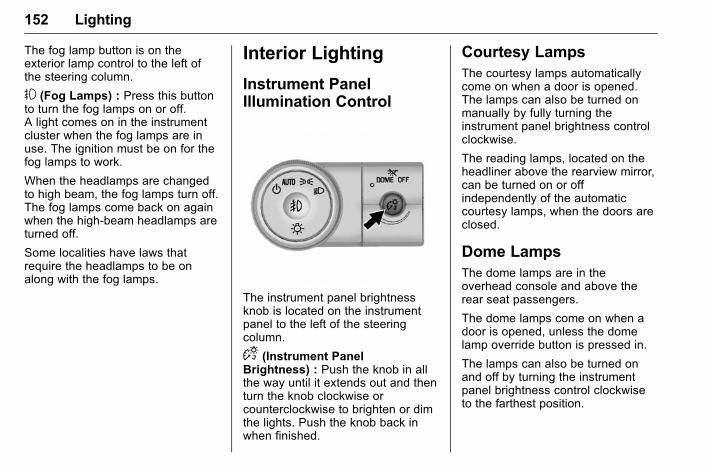
GMC Acadia/Acadia Denali Owner Manual (GMNA-Localizing-U.S./Canada/Mexico-9159268) - 2016 - CRC - 4/16/15
152 Lighting
The fog lamp button is on theexterior lamp control to the left ofthe steering column.
# (Fog Lamps) : Press this buttonto turn the fog lamps on or off.A light comes on in the instrumentcluster when the fog lamps are inuse. The ignition must be on for thefog lamps to work.
When the headlamps are changedto high beam, the fog lamps turn off.The fog lamps come back on againwhen the high-beam headlamps areturned off.
Some localities have laws thatrequire the headlamps to be onalong with the fog lamps.
Interior Lighting
Instrument PanelIllumination Control
The instrument panel brightnessknob is located on the instrumentpanel to the left of the steeringcolumn.
D (Instrument PanelBrightness) : Push the knob in allthe way until it extends out and thenturn the knob clockwise orcounterclockwise to brighten or dimthe lights. Push the knob back inwhen finished.
Courtesy LampsThe courtesy lamps automaticallycome on when a door is opened.The lamps can also be turned onmanually by fully turning theinstrument panel brightness controlclockwise.
The reading lamps, located on theheadliner above the rearview mirror,can be turned on or offindependently of the automaticcourtesy lamps, when the doors areclosed.
Dome LampsThe dome lamps are in theoverhead console and above therear seat passengers.
The dome lamps come on when adoor is opened, unless the domelamp override button is pressed in.
The lamps can also be turned onand off by turning the instrumentpanel brightness control clockwiseto the farthest position.
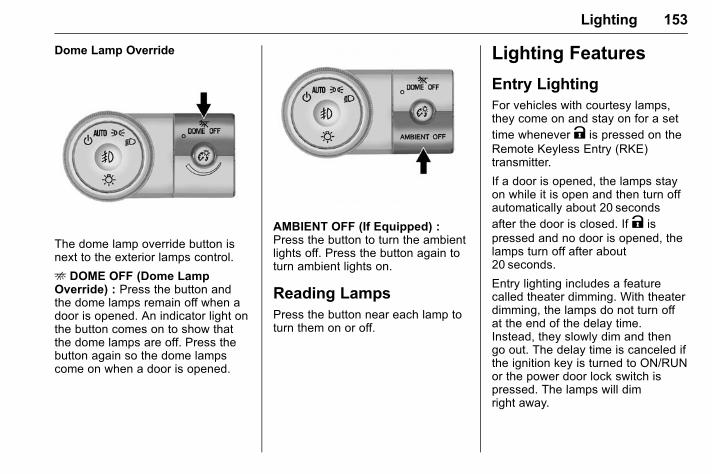
GMC Acadia/Acadia Denali Owner Manual (GMNA-Localizing-U.S./Canada/Mexico-9159268) - 2016 - CRC - 4/16/15
Lighting 153
Dome Lamp Override
The dome lamp override button isnext to the exterior lamps control.
E DOME OFF (Dome LampOverride) : Press the button andthe dome lamps remain off when adoor is opened. An indicator light onthe button comes on to show thatthe dome lamps are off. Press thebutton again so the dome lampscome on when a door is opened.
AMBIENT OFF (If Equipped) :Press the button to turn the ambientlights off. Press the button again toturn ambient lights on.
Reading LampsPress the button near each lamp toturn them on or off.
Lighting Features
Entry LightingFor vehicles with courtesy lamps,they come on and stay on for a settime whenever K is pressed on theRemote Keyless Entry (RKE)transmitter.
If a door is opened, the lamps stayon while it is open and then turn offautomatically about 20 secondsafter the door is closed. If K ispressed and no door is opened, thelamps turn off after about20 seconds.
Entry lighting includes a featurecalled theater dimming. With theaterdimming, the lamps do not turn offat the end of the delay time.Instead, they slowly dim and thengo out. The delay time is canceled ifthe ignition key is turned to ON/RUNor the power door lock switch ispressed. The lamps will dimright away.

GMC Acadia/Acadia Denali Owner Manual (GMNA-Localizing-U.S./Canada/Mexico-9159268) - 2016 - CRC - 4/16/15
154 Lighting
When the ignition is on, illuminatedentry is inactive, which means thecourtesy lamps will not come onunless a door is opened.
Delayed Entry LightingDelayed entry lighting illuminatesthe interior for a period of time afterall the doors have been closed.
The ignition must be off for delayedentry lighting to work. Immediatelyafter all the doors have been closed,the delayed entry lighting featurecontinues to work until one of thefollowing occurs:
. The ignition is in ON/RUN.
. The doors are locked.
. An illumination period of about25 seconds has elapsed.
If during the illumination period adoor is opened, the timedillumination period is canceled andthe interior lamps remain on.
Delayed Exit LightingDelayed exit lighting illuminates theinterior for a period of time after thekey is removed from the ignition.
The ignition must be off for delayedexit lighting to work. When the keyis removed, interior illuminationactivates and remains on until oneof the following occurs:
. The ignition is in ON/RUN.
. The power door locks areactivated.
. An illumination period of20 seconds has elapsed.
If during the illumination period adoor is opened, the timedillumination period will be canceledand the interior lamps will remain onbecause a door is open.
Parade DimmingThis feature automatically prohibitsthe dimming of the instrument paneldisplays in daylight while theheadlamps are on so that thedisplays are still able to be seen.
Battery LoadManagementThe vehicle has Electric PowerManagement (EPM) that estimatesthe battery's temperature and stateof charge. It then adjusts the voltagefor best performance and extendedlife of the battery.
When the battery's state of chargeis low, the voltage is raised slightlyto quickly bring the charge back up.When the state of charge is high,the voltage is lowered slightly toprevent overcharging. If the vehiclehas a voltmeter gauge or a voltagedisplay on the Driver InformationCenter (DIC), you may see thevoltage move up or down. This isnormal. If there is a problem, analert will be displayed.
The battery can be discharged atidle if the electrical loads are veryhigh. This is true for all vehicles.This is because the generator(alternator) may not be spinning fastenough at idle to produce all of thepower needed for very highelectrical loads.
GMC Acadia/Acadia Denali Owner Manual (GMNA-Localizing-U.S./Canada/Mexico-9159268) - 2016 - CRC - 4/16/15
Lighting 155
A high electrical load occurs whenseveral of the following are on, suchas: headlamps, high beams, rearwindow defogger, climate control fanat high speed, heated seats, enginecooling fans, trailer loads, and loadsplugged into accessory poweroutlets.
EPM works to prevent excessivedischarge of the battery. It does thisby balancing the generator's outputand the vehicle's electrical needs.It can increase engine idle speed togenerate more power wheneverneeded. It can temporarily reducethe power demands of someaccessories.
Normally, these actions occur insteps or levels, without beingnoticeable. In rare cases at thehighest levels of corrective action,this action may be noticeable to thedriver. If so, a DIC battery voltageand charging message displays, it isrecommended that the driver reducethe electrical loads as much aspossible. See Battery Voltage andCharging Messages 0 130andDriver Information Center (DIC)0 122.
Battery Power ProtectionThis feature helps prevent thebattery from being drained, if theinterior courtesy lamps or readinglamps are accidentally left on. If anyof these lamps are left on, theyautomatically turn off after10 minutes, if the ignition is off. Thelamps will not come back on againuntil one of the following occurs:
. The ignition is turned on.
. The exterior lamps control isturned off, then on again.
The headlamps will time out after10 minutes, if they are manuallyturned on while the ignition is onor off.
GMC Acadia/Acadia Denali Owner Manual (GMNA-Localizing-U.S./Canada/Mexico-9159268) - 2016 - CRC - 4/16/15
156 Infotainment System
InfotainmentSystem
IntroductionInfotainment . . . . . . . . . . . . . . . . . . 156Theft-Deterrent Feature . . . . . . 157Overview . . . . . . . . . . . . . . . . . . . . . 158Operation . . . . . . . . . . . . . . . . . . . . . 158
RadioAM-FM Radio . . . . . . . . . . . . . . . . 161Satellite Radio . . . . . . . . . . . . . . . . 164Radio Reception . . . . . . . . . . . . . . 164Multi-Band Antenna . . . . . . . . . . 165
Audio PlayersCD Player . . . . . . . . . . . . . . . . . . . . 165MP3 . . . . . . . . . . . . . . . . . . . . . . . . . . 167Auxiliary Devices . . . . . . . . . . . . . 168
OnStar SystemOnStar System . . . . . . . . . . . . . . . 170
Rear Seat InfotainmentRear Seat Audio (RSA)System . . . . . . . . . . . . . . . . . . . . . . 170
Rear AudioController (RAC) . . . . . . . . . . . . 172
PhoneBluetooth . . . . . . . . . . . . . . . . . . . . . 172
SettingsSettings . . . . . . . . . . . . . . . . . . . . . . 179
Trademarks and LicenseAgreementsTrademarks and LicenseAgreements . . . . . . . . . . . . . . . . . 181
Introduction
InfotainmentBase radio information is included inthis manual. See the infotainmentmanual for information on otheravailable infotainment systems.
Read the following pages tobecome familiar with these features.
{ Warning
Taking your eyes off the road fortoo long or too often while usingany infotainment feature cancause a crash. You or otherscould be injured or killed. Do notgive extended attention toinfotainment tasks while driving.Limit your glances at the vehicledisplays and focus your attentionon driving. Use voice commandswhenever possible.
GMC Acadia/Acadia Denali Owner Manual (GMNA-Localizing-U.S./Canada/Mexico-9159268) - 2016 - CRC - 4/16/15
Infotainment System 157
The infotainment system has built-infeatures intended to help avoiddistraction by disabling somefunctions when driving. Thesefunctions may gray out when theyare unavailable. Many infotainmentfeatures are also available throughthe instrument cluster and steeringwheel controls.
Before driving:
. Become familiar with theoperation, faceplate buttons, andscreen buttons.
. Set up the audio by presettingfavorite stations, setting thetone, and adjusting thespeakers.
. Set up phone numbers inadvance so they can be calledeasily by pressing a singlebutton or by using a single voicecommand if equipped withBluetooth phone capability.
See Defensive Driving 0 195.
To play the infotainment system withthe ignition off, see RetainedAccessory Power (RAP) 0 209.
Theft-Deterrent FeatureTheftLock® is designed todiscourage theft of the vehicle'sradio by learning a portion of theVehicle Identification Number (VIN).The radio does not operate if it isstolen or moved to a differentvehicle.
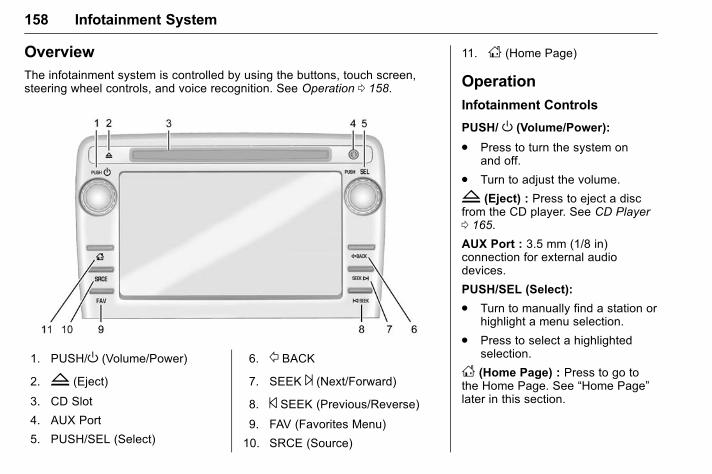
GMC Acadia/Acadia Denali Owner Manual (GMNA-Localizing-U.S./Canada/Mexico-9159268) - 2016 - CRC - 4/16/15
158 Infotainment System
OverviewThe infotainment system is controlled by using the buttons, touch screen,steering wheel controls, and voice recognition. See Operation 0 158.
1. PUSH/O (Volume/Power)
2. Z (Eject)
3. CD Slot
4. AUX Port
5. PUSH/SEL (Select)
6. / BACK
7. SEEK ¨ (Next/Forward)
8. © SEEK (Previous/Reverse)
9. FAV (Favorites Menu)
10. SRCE (Source)
11. D (Home Page)
Operation
Infotainment Controls
PUSH/ O (Volume/Power):
. Press to turn the system onand off.
. Turn to adjust the volume.
Z (Eject) : Press to eject a discfrom the CD player. See CD Player0 165.
AUX Port : 3.5 mm (1/8 in)connection for external audiodevices.
PUSH/SEL (Select):
. Turn to manually find a station orhighlight a menu selection.
. Press to select a highlightedselection.
D (Home Page) : Press to go tothe Home Page. See “Home Page”later in this section.
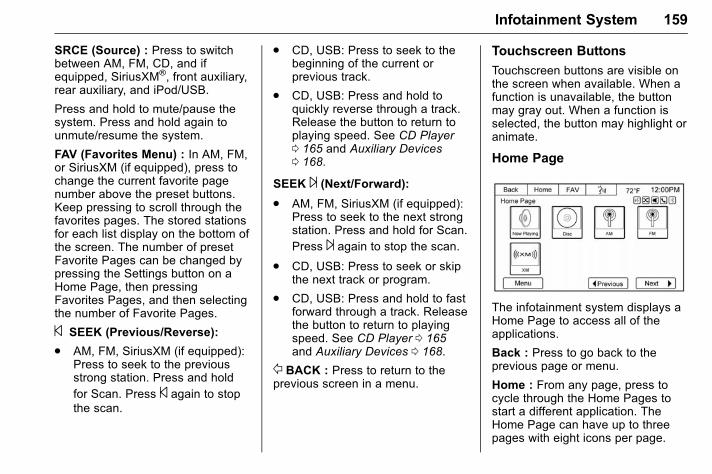
GMC Acadia/Acadia Denali Owner Manual (GMNA-Localizing-U.S./Canada/Mexico-9159268) - 2016 - CRC - 4/16/15
Infotainment System 159
SRCE (Source) : Press to switchbetween AM, FM, CD, and ifequipped, SiriusXM®, front auxiliary,rear auxiliary, and iPod/USB.
Press and hold to mute/pause thesystem. Press and hold again tounmute/resume the system.
FAV (Favorites Menu) : In AM, FM,or SiriusXM (if equipped), press tochange the current favorite pagenumber above the preset buttons.Keep pressing to scroll through thefavorites pages. The stored stationsfor each list display on the bottom ofthe screen. The number of presetFavorite Pages can be changed bypressing the Settings button on aHome Page, then pressingFavorites Pages, and then selectingthe number of Favorite Pages.
© SEEK (Previous/Reverse):
. AM, FM, SiriusXM (if equipped):Press to seek to the previousstrong station. Press and holdfor Scan. Press © again to stopthe scan.
. CD, USB: Press to seek to thebeginning of the current orprevious track.
. CD, USB: Press and hold toquickly reverse through a track.Release the button to return toplaying speed. See CD Player0 165 and Auxiliary Devices0 168.
SEEK ¨ (Next/Forward):. AM, FM, SiriusXM (if equipped):
Press to seek to the next strongstation. Press and hold for Scan.Press ¨ again to stop the scan.
. CD, USB: Press to seek or skipthe next track or program.
. CD, USB: Press and hold to fastforward through a track. Releasethe button to return to playingspeed. See CD Player 0 165and Auxiliary Devices 0 168.
/ BACK : Press to return to theprevious screen in a menu.
Touchscreen Buttons
Touchscreen buttons are visible onthe screen when available. When afunction is unavailable, the buttonmay gray out. When a function isselected, the button may highlight oranimate.
Home Page
The infotainment system displays aHome Page to access all of theapplications.
Back : Press to go back to theprevious page or menu.
Home : From any page, press tocycle through the Home Pages tostart a different application. TheHome Page can have up to threepages with eight icons per page.
GMC Acadia/Acadia Denali Owner Manual (GMNA-Localizing-U.S./Canada/Mexico-9159268) - 2016 - CRC - 4/16/15
160 Infotainment System
Each of these three pages can becustomized to contain your choiceof up to eight per screen. They mayalso be re-ordered on each screento taste.
FAV (Favorites) : Press to scrollthrough the favorites banner on thebottom of the screen. The favoritesbanner stores your favorite radioand SiriusXM stations (if equipped).To store a favorite station, press andhold the desired position on thebanner until a beep is heard.
! (Voice Recognition) : Press tobegin voice recognition. SeeBluetooth 0 172.
Menu : Press to enter the HomePage menu.
q Previous : Press to go to theprevious Home Page.
Next r : Press to go to the nextHome Page.
Home Page Features
Some features are disabled whenthe vehicle is moving and someicons may not be active.
Now Playing : Press to display theactive source page. The sourcesavailable are AM, FM, XM (ifequipped), CD, USB, Bluetooth,or AUX Input.
Settings : Press to display theSettings menu. See Settings 0 179.
Tone : Press to display the ToneSettings menu. The following maydisplay:
Tone Settings : Press to adjust thetone settings. The following maydisplay:
. EQ: Press o or p to adjust theequalizer.
. Bass: Press + or − to adjustthe bass.
. Middle: Press + or − to adjustthe middle.
. Treble: Press + or − to adjust thetreble.
. Balance: Press L to hear moresound from the left speakers orR for more sound from the rightspeakers. The middle positionbalances the sound between theleft and right speakers.
. Fade: Press F for more soundfrom the front speakers or R formore sound from the rearspeakers. The middle positionbalances the sound between thefront and rear speakers.
DSP Mode : Press o or p to adjustthe DSP mode, if equipped.
Language
To change the language of thescreens, see VehiclePersonalization 0 139.
English or Metric Units
To change the screens from Englishor metric, see Driver InformationCenter (DIC) 0 122.
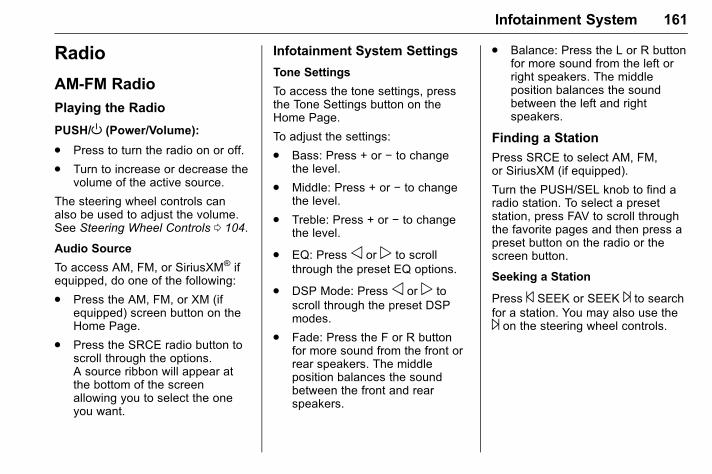
GMC Acadia/Acadia Denali Owner Manual (GMNA-Localizing-U.S./Canada/Mexico-9159268) - 2016 - CRC - 4/16/15
Infotainment System 161
Radio
AM-FM Radio
Playing the Radio
PUSH/O (Power/Volume):
. Press to turn the radio on or off.
. Turn to increase or decrease thevolume of the active source.
The steering wheel controls canalso be used to adjust the volume.See Steering Wheel Controls 0 104.
Audio Source
To access AM, FM, or SiriusXM® ifequipped, do one of the following:
. Press the AM, FM, or XM (ifequipped) screen button on theHome Page.
. Press the SRCE radio button toscroll through the options.A source ribbon will appear atthe bottom of the screenallowing you to select the oneyou want.
Infotainment System Settings
Tone Settings
To access the tone settings, pressthe Tone Settings button on theHome Page.
To adjust the settings:
. Bass: Press + or − to changethe level.
. Middle: Press + or − to changethe level.
. Treble: Press + or − to changethe level.
. EQ: Press o or p to scrollthrough the preset EQ options.
. DSP Mode: Press o or p toscroll through the preset DSPmodes.
. Fade: Press the F or R buttonfor more sound from the front orrear speakers. The middleposition balances the soundbetween the front and rearspeakers.
. Balance: Press the L or R buttonfor more sound from the left orright speakers. The middleposition balances the soundbetween the left and rightspeakers.
Finding a Station
Press SRCE to select AM, FM,or SiriusXM (if equipped).
Turn the PUSH/SEL knob to find aradio station. To select a presetstation, press FAV to scroll throughthe favorite pages and then press apreset button on the radio or thescreen button.
Seeking a Station
Press © SEEK or SEEK ¨ to searchfor a station. You may also use the¨ on the steering wheel controls.
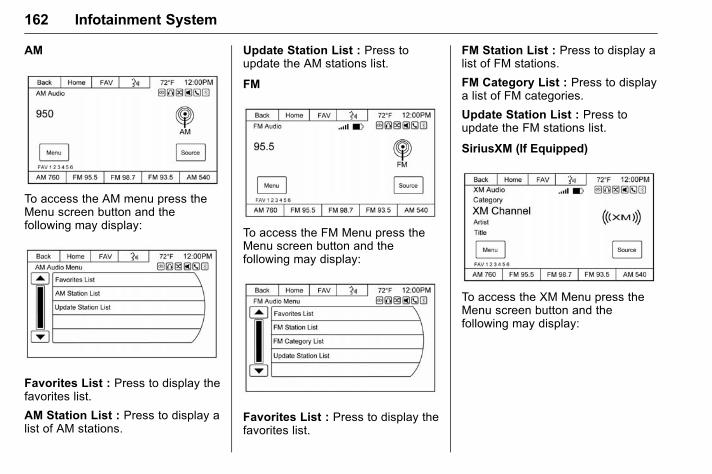
GMC Acadia/Acadia Denali Owner Manual (GMNA-Localizing-U.S./Canada/Mexico-9159268) - 2016 - CRC - 4/16/15
162 Infotainment System
AM
To access the AM menu press theMenu screen button and thefollowing may display:
Favorites List : Press to display thefavorites list.
AM Station List : Press to display alist of AM stations.
Update Station List : Press toupdate the AM stations list.
FM
To access the FM Menu press theMenu screen button and thefollowing may display:
Favorites List : Press to display thefavorites list.
FM Station List : Press to display alist of FM stations.
FM Category List : Press to displaya list of FM categories.
Update Station List : Press toupdate the FM stations list.
SiriusXM (If Equipped)
To access the XM Menu press theMenu screen button and thefollowing may display:
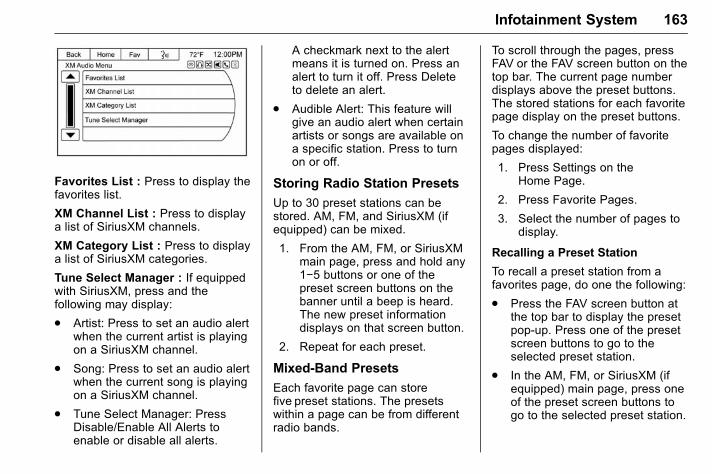
GMC Acadia/Acadia Denali Owner Manual (GMNA-Localizing-U.S./Canada/Mexico-9159268) - 2016 - CRC - 4/16/15
Infotainment System 163
Favorites List : Press to display thefavorites list.
XM Channel List : Press to displaya list of SiriusXM channels.
XM Category List : Press to displaya list of SiriusXM categories.
Tune Select Manager : If equippedwith SiriusXM, press and thefollowing may display:
. Artist: Press to set an audio alertwhen the current artist is playingon a SiriusXM channel.
. Song: Press to set an audio alertwhen the current song is playingon a SiriusXM channel.
. Tune Select Manager: PressDisable/Enable All Alerts toenable or disable all alerts.
A checkmark next to the alertmeans it is turned on. Press analert to turn it off. Press Deleteto delete an alert.
. Audible Alert: This feature willgive an audio alert when certainartists or songs are available ona specific station. Press to turnon or off.
Storing Radio Station Presets
Up to 30 preset stations can bestored. AM, FM, and SiriusXM (ifequipped) can be mixed.
1. From the AM, FM, or SiriusXMmain page, press and hold any1−5 buttons or one of thepreset screen buttons on thebanner until a beep is heard.The new preset informationdisplays on that screen button.
2. Repeat for each preset.
Mixed-Band Presets
Each favorite page can storefive preset stations. The presetswithin a page can be from differentradio bands.
To scroll through the pages, pressFAV or the FAV screen button on thetop bar. The current page numberdisplays above the preset buttons.The stored stations for each favoritepage display on the preset buttons.
To change the number of favoritepages displayed:
1. Press Settings on theHome Page.
2. Press Favorite Pages.
3. Select the number of pages todisplay.
Recalling a Preset Station
To recall a preset station from afavorites page, do one the following:
. Press the FAV screen button atthe top bar to display the presetpop-up. Press one of the presetscreen buttons to go to theselected preset station.
. In the AM, FM, or SiriusXM (ifequipped) main page, press oneof the preset screen buttons togo to the selected preset station.
GMC Acadia/Acadia Denali Owner Manual (GMNA-Localizing-U.S./Canada/Mexico-9159268) - 2016 - CRC - 4/16/15
164 Infotainment System
Satellite RadioIf equipped, vehicles with a validSiriusXM® satellite radiosubscription can receive SiriusXMprogramming.
SiriusXM satellite radio has a widevariety of programming andcommercial-free music, coast tocoast, and in digital-quality sound.For more information, seewww.siriusxm.com or call1-866-635-2349 (U.S.) andwww.xmradio.ca or call1-877-209-0079 (Canada).
When SiriusXM is active, the stationname, number, category name,song title, and artist display on thescreen. SiriusXM may update thebackground picture at any time.
SiriusXM Categories
SiriusXM stations are organized incategories.
Adding or Removing SiriusXMCategories
Using the home page:
1. Press the Settings screenbutton on the Home Page.
2. Select XM Categories.
3. Select or deselect a category.A checkmark will indicate thatthe category is selected.
Press “Show All XM Categories” torestore all SiriusXM categories.
Radio ReceptionFrequency interference and staticcan occur during normal radioreception if items such as phonechargers, vehicle convenienceaccessories, and external electronicdevices are plugged into theaccessory power outlet. If there isinterference or static, unplug theitem from the accessory poweroutlet.
FM
FM signals only reach about 16 to65 km (10 to 40 mi). Although theradio has a built-in electronic circuitthat automatically works to reduceinterference, some static can occur,especially around tall buildings orhills, causing the sound to fade inand out.
AM
The range for most AM stations isgreater than for FM, especially atnight. The longer range can causestation frequencies to interfere witheach other. Static can also occurwhen things like storms and powerlines interfere with radio reception.When this happens, try reducing thetreble on the radio.
GMC Acadia/Acadia Denali Owner Manual (GMNA-Localizing-U.S./Canada/Mexico-9159268) - 2016 - CRC - 4/16/15
Infotainment System 165
SiriusXM Satellite RadioService
If equipped, SiriusXM SatelliteRadio Service provides digital radioreception. Tall buildings or hills caninterfere with satellite radio signals,causing the sound to fade in andout. In addition, traveling or standingunder heavy foliage, bridges,garages, or tunnels may cause lossof the SiriusXM signal for a periodof time.
Cell Phone Usage
Cell phone usage, such as makingor receiving phone calls, charging,or just having the phone on maycause static interference in theradio. Unplug the phone or turn it offif this happens.
Multi-Band AntennaThe multi-band antenna is locatedon the roof of the vehicle. This typeof antenna is used with the AM/FMradio, as well as OnStar and theSiriusXM Satellite Radio ServiceSystem, if the vehicle has thesefeatures. Keep this antenna clear ofsnow and ice build up for clear radioreception. If the vehicle has asunroof, the performance of theradio system may be affected if thesunroof is open. Loading items ontothe roof of the vehicle can interferewith the performance of the radiosystem and, if the vehicle has thisfeature, OnStar. Make sure themulti-band antenna is notobstructed.
Audio Players
CD PlayerThe player can be used for CD andMP3 audio.
With the vehicle on, insert a discinto the slot, label side up. Theplayer pulls it in and begins playing.
The system is capable of playing:
. Most audio CDs
. CD-R
. CD-RW
. MP3 or unprotected WMAformats
When playing any compatiblerecordable disc, the sound qualitycan be reduced due to disc quality,the method of recording, the qualityof the music that has beenrecorded, or the way the disc hasbeen handled.
There can be increased skipping,difficulty in recording tracks,difficulty in finding tracks, and/ordifficulty in loading and ejecting.
GMC Acadia/Acadia Denali Owner Manual (GMNA-Localizing-U.S./Canada/Mexico-9159268) - 2016 - CRC - 4/16/15
166 Infotainment System
If these problems occur, check thedisc for damage or try a knowngood disc.
To avoid damage to the CD player:
. Do not use scratched ordamaged discs.
. Do not apply labels to discs. Thelabels could get caught in theplayer.
. Insert only one disc at a time.
. Keep the loading slot free offoreign materials, liquids, anddebris.
. Use a marking pen to label thetop of the disc.
Loading and Ejecting Discs
To load a disc:
1. Turn the radio on.
2. Insert a disc into the slot, labelside up. The player pulls it inthe rest of the way. If the discis damaged or improperlyloaded, there is an error andthe disc ejects.
The disc automatically plays onceloaded.
PressZ to eject a disc from theCD player. If the disc is not removedwithin a short period of time, it isautomatically pulled back into theplayer.
Playing an Audio CD
Make sure a disc is inserted in theplayer.
1. Press the Disc screen buttonon the Home Page or from theSRCE/Source banner.
2. Press the Menu screen buttonon the CD Audio screen todisplay a list of Tracks/Songs.
3. Press the desired track/song.
On the Disc main page a tracknumber displays at the beginning ofeach track. Song, Artist, ElapsedTime, and Album informationdisplays when available.
Use the following controls to playthe disc:
© SEEK:
. Press to seek to the beginning ofthe current or previous track.If the track has been playing for
less than eight seconds, it seeksto the previous track. If longerthan eight seconds, the currenttrack starts from the beginning.
. Press and hold to fast reversethrough a track. Release thebutton to return to playingspeed. Elapsed time displays.
SEEK ¨:. Press to seek to the next track.
. Press and hold to fast forwardthrough a track. Release thebutton to return to playingspeed. Elapsed time displays.
PUSH/SEL (Select) : Turn to theright or left to select the next orprevious track.
Error Messages
If Disc Error displays and/or the disccomes out, it could be for one of thefollowing reasons:
. The disc has an invalid orunknown format.
. The disc is very hot. Try the discagain when the temperaturereturns to normal.
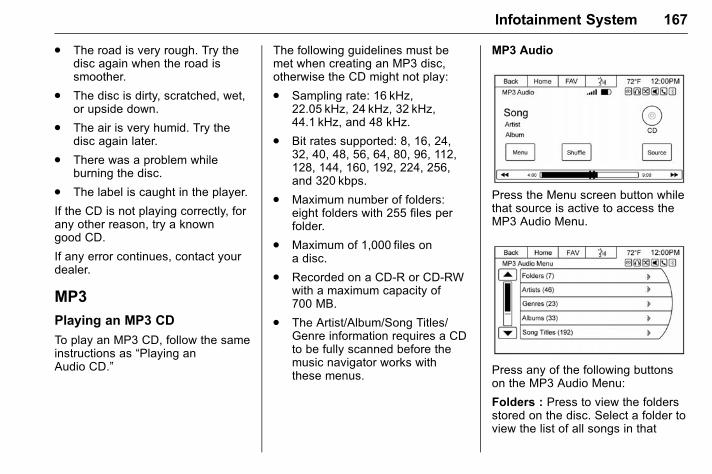
GMC Acadia/Acadia Denali Owner Manual (GMNA-Localizing-U.S./Canada/Mexico-9159268) - 2016 - CRC - 4/16/15
Infotainment System 167
. The road is very rough. Try thedisc again when the road issmoother.
. The disc is dirty, scratched, wet,or upside down.
. The air is very humid. Try thedisc again later.
. There was a problem whileburning the disc.
. The label is caught in the player.
If the CD is not playing correctly, forany other reason, try a knowngood CD.
If any error continues, contact yourdealer.
MP3
Playing an MP3 CD
To play an MP3 CD, follow the sameinstructions as “Playing anAudio CD.”
The following guidelines must bemet when creating an MP3 disc,otherwise the CD might not play:
. Sampling rate: 16 kHz,22.05 kHz, 24 kHz, 32 kHz,44.1 kHz, and 48 kHz.
. Bit rates supported: 8, 16, 24,32, 40, 48, 56, 64, 80, 96, 112,128, 144, 160, 192, 224, 256,and 320 kbps.
. Maximum number of folders:eight folders with 255 files perfolder.
. Maximum of 1,000 files ona disc.
. Recorded on a CD-R or CD-RWwith a maximum capacity of700 MB.
. The Artist/Album/Song Titles/Genre information requires a CDto be fully scanned before themusic navigator works withthese menus.
MP3 Audio
Press the Menu screen button whilethat source is active to access theMP3 Audio Menu.
Press any of the following buttonson the MP3 Audio Menu:
Folders : Press to view the foldersstored on the disc. Select a folder toview the list of all songs in that
GMC Acadia/Acadia Denali Owner Manual (GMNA-Localizing-U.S./Canada/Mexico-9159268) - 2016 - CRC - 4/16/15
168 Infotainment System
folder. There might be a delaybefore the list displays. Select asong from the list to begin playback.
Playlists : Press to view theplaylists stored on the disc. Select aplaylist to view the list of all songs inthat playlist. There might be a delaybefore the list displays. Select asong from the list to begin playback.
Artists : Press to view the list ofartists stored on the disc. Select anartist name to view a list of all songsby the artist. There might be a delaybefore the list displays. Select asong from the list to begin playback.
Genres : Press to view the genres.Select a genre to view a list of allsongs of that genre. Select a songfrom the list to begin playback.
Albums : Press to view the albumson the disc. Select the album toview a list of all songs on the album.There might be a delay before thelist displays. Select a song from thelist to begin playback.
Composers : Press to view theComposers stored on the disc.There might be a delay before the
list displays. The Composers menudisplays. Select a composer todisplay a list of albums from thecomposer.
Tracks (Song Titles) : Press todisplay a list of all songs on thedisc. Songs are displayed as storedon the disc. There might be a delaybefore the list displays. To beginplayback, select a song from the list.
Root Directory
The root directory is treated as afolder. All files contained directlyunder the root directory areaccessed prior to any root directoryfolders.
Empty Folders
If a root directory or folder is emptyor contains only folders, the playeradvances to the next folder in thefile structure that contains acompressed audio file. The emptyfolder(s) are not displayed ornumbered.
No Folder
When the CD only containscompressed audio files without anyfolders or playlists, all files areunder the root folder.
File System and Naming
The song titles, artists, albums, andgenres are taken from the file's ID3tag and are only displayed if presentin the tag. If a song title is notpresent in the ID3 tag, the radiodisplays the file name as thetrack name.
Preprogrammed Playlists
The radio recognizespreprogrammed playlists; however,there is no editing capability. Theseplaylists are treated as specialfolders containing compressedaudio song files.
Auxiliary DevicesThe vehicle has a 3.5 mm (1/8 in)auxiliary input jack on the faceplateand a USB port in the center stack.
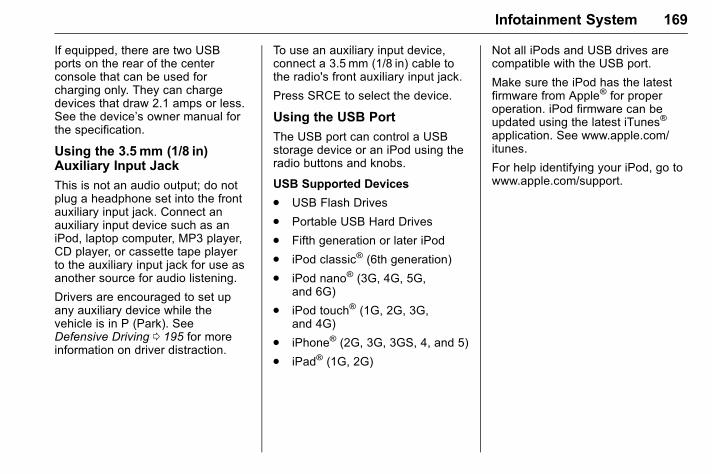
GMC Acadia/Acadia Denali Owner Manual (GMNA-Localizing-U.S./Canada/Mexico-9159268) - 2016 - CRC - 4/16/15
Infotainment System 169
If equipped, there are two USBports on the rear of the centerconsole that can be used forcharging only. They can chargedevices that draw 2.1 amps or less.See the device’s owner manual forthe specification.
Using the 3.5mm (1/8 in)Auxiliary Input Jack
This is not an audio output; do notplug a headphone set into the frontauxiliary input jack. Connect anauxiliary input device such as aniPod, laptop computer, MP3 player,CD player, or cassette tape playerto the auxiliary input jack for use asanother source for audio listening.
Drivers are encouraged to set upany auxiliary device while thevehicle is in P (Park). SeeDefensive Driving 0 195 for moreinformation on driver distraction.
To use an auxiliary input device,connect a 3.5 mm (1/8 in) cable tothe radio's front auxiliary input jack.
Press SRCE to select the device.
Using the USB Port
The USB port can control a USBstorage device or an iPod using theradio buttons and knobs.
USB Supported Devices
. USB Flash Drives
. Portable USB Hard Drives
. Fifth generation or later iPod
. iPod classic® (6th generation)
. iPod nano® (3G, 4G, 5G,and 6G)
. iPod touch® (1G, 2G, 3G,and 4G)
. iPhone® (2G, 3G, 3GS, 4, and 5)
. iPad® (1G, 2G)
Not all iPods and USB drives arecompatible with the USB port.
Make sure the iPod has the latestfirmware from Apple® for properoperation. iPod firmware can beupdated using the latest iTunes®
application. See www.apple.com/itunes.
For help identifying your iPod, go towww.apple.com/support.
GMC Acadia/Acadia Denali Owner Manual (GMNA-Localizing-U.S./Canada/Mexico-9159268) - 2016 - CRC - 4/16/15
170 Infotainment System
OnStar SystemOnStar® with 4G LTE
If equipped with OnStar 4G LTE, upto seven devices, such assmartphones, tablets, and laptops,can be connected to high-speedInternet through the vehicle’s built-inWi-Fi hotspot.
Call 1-888-4-ONSTAR(1-888-466-7827) to connect to anOnStar Advisor for assistance. Seewww.onstar.com for a detailedinstruction guide, vehicle availability,details, and system limitations.Services and apps vary by make,model, year, carrier, availability, andconditions. 4G LTE service isavailable in select markets. 4G LTEperformance is based on industryaverages and vehicle systemsdesign. Some services require adata plan.
Rear SeatInfotainment
Rear Seat Audio (RSA)SystemIf equipped with RSA, rear seatpassengers can listen to and controlany of the music sources: radio,CDs, DVDs, or other auxiliarysources. The rear seat passengerscan only control the music sourcesthe front seat passengers are notlistening to (except on some radioswhere dual control is allowed). Forexample, rear seat passengers cancontrol a CD and listen to it throughthe headphones, while the driverlistens to the radio through the frontspeakers. The rear seat passengershave control of the volume for eachset of headphones.
To turn the RSA off from the front,press and hold the radio powerbutton for more than two seconds.Press the power button on the RSAto turn it back on.
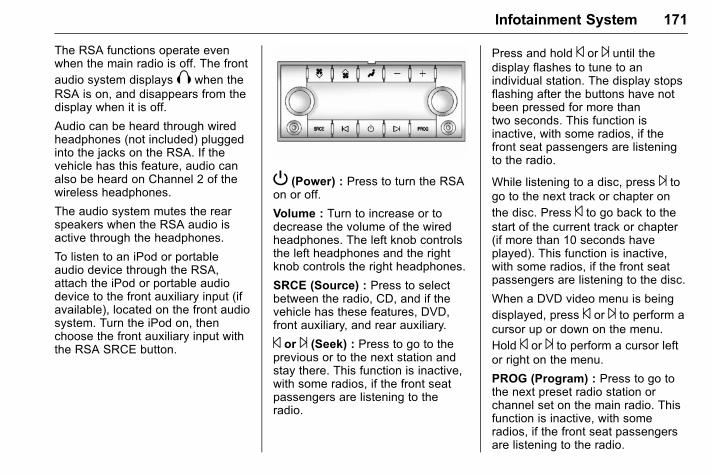
GMC Acadia/Acadia Denali Owner Manual (GMNA-Localizing-U.S./Canada/Mexico-9159268) - 2016 - CRC - 4/16/15
Infotainment System 171
The RSA functions operate evenwhen the main radio is off. The frontaudio system displaysX when theRSA is on, and disappears from thedisplay when it is off.
Audio can be heard through wiredheadphones (not included) pluggedinto the jacks on the RSA. If thevehicle has this feature, audio canalso be heard on Channel 2 of thewireless headphones.
The audio system mutes the rearspeakers when the RSA audio isactive through the headphones.
To listen to an iPod or portableaudio device through the RSA,attach the iPod or portable audiodevice to the front auxiliary input (ifavailable), located on the front audiosystem. Turn the iPod on, thenchoose the front auxiliary input withthe RSA SRCE button.
P (Power) : Press to turn the RSAon or off.
Volume : Turn to increase or todecrease the volume of the wiredheadphones. The left knob controlsthe left headphones and the rightknob controls the right headphones.
SRCE (Source) : Press to selectbetween the radio, CD, and if thevehicle has these features, DVD,front auxiliary, and rear auxiliary.
© or ¨ (Seek) : Press to go to theprevious or to the next station andstay there. This function is inactive,with some radios, if the front seatpassengers are listening to theradio.
Press and hold © or ¨ until thedisplay flashes to tune to anindividual station. The display stopsflashing after the buttons have notbeen pressed for more thantwo seconds. This function isinactive, with some radios, if thefront seat passengers are listeningto the radio.
While listening to a disc, press ¨ togo to the next track or chapter onthe disc. Press © to go back to thestart of the current track or chapter(if more than 10 seconds haveplayed). This function is inactive,with some radios, if the front seatpassengers are listening to the disc.
When a DVD video menu is beingdisplayed, press © or ¨ to perform acursor up or down on the menu.Hold © or ¨ to perform a cursor leftor right on the menu.
PROG (Program) : Press to go tothe next preset radio station orchannel set on the main radio. Thisfunction is inactive, with someradios, if the front seat passengersare listening to the radio.
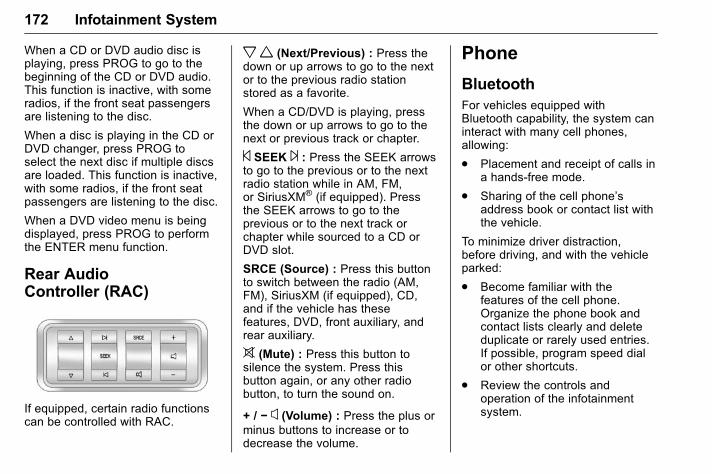
GMC Acadia/Acadia Denali Owner Manual (GMNA-Localizing-U.S./Canada/Mexico-9159268) - 2016 - CRC - 4/16/15
172 Infotainment System
When a CD or DVD audio disc isplaying, press PROG to go to thebeginning of the CD or DVD audio.This function is inactive, with someradios, if the front seat passengersare listening to the disc.
When a disc is playing in the CD orDVD changer, press PROG toselect the next disc if multiple discsare loaded. This function is inactive,with some radios, if the front seatpassengers are listening to the disc.
When a DVD video menu is beingdisplayed, press PROG to performthe ENTER menu function.
Rear AudioController (RAC)
If equipped, certain radio functionscan be controlled with RAC.
xw (Next/Previous) : Press thedown or up arrows to go to the nextor to the previous radio stationstored as a favorite.
When a CD/DVD is playing, pressthe down or up arrows to go to thenext or previous track or chapter.
© SEEK ¨ : Press the SEEK arrowsto go to the previous or to the nextradio station while in AM, FM,or SiriusXM® (if equipped). Pressthe SEEK arrows to go to theprevious or to the next track orchapter while sourced to a CD orDVD slot.
SRCE (Source) : Press this buttonto switch between the radio (AM,FM), SiriusXM (if equipped), CD,and if the vehicle has thesefeatures, DVD, front auxiliary, andrear auxiliary.
> (Mute) : Press this button tosilence the system. Press thisbutton again, or any other radiobutton, to turn the sound on.
+ / − x (Volume) : Press the plus orminus buttons to increase or todecrease the volume.
Phone
BluetoothFor vehicles equipped withBluetooth capability, the system caninteract with many cell phones,allowing:
. Placement and receipt of calls ina hands-free mode.
. Sharing of the cell phone’saddress book or contact list withthe vehicle.
To minimize driver distraction,before driving, and with the vehicleparked:
. Become familiar with thefeatures of the cell phone.Organize the phone book andcontact lists clearly and deleteduplicate or rarely used entries.If possible, program speed dialor other shortcuts.
. Review the controls andoperation of the infotainmentsystem.
GMC Acadia/Acadia Denali Owner Manual (GMNA-Localizing-U.S./Canada/Mexico-9159268) - 2016 - CRC - 4/16/15
Infotainment System 173
. Pair cell phone(s) to the vehicle.The system may not work withall cell phones. See “Pairing” inthis section.
. If the cell phone has voicedialing capability, learn to usethat feature to access theaddress book or contact list. See“Voice Pass-Thru” in thissection.
. See “Storing and Deleting PhoneNumbers” in this section.
{ Warning
When using a cell phone, it canbe distracting to look too long ortoo often at the screen of thephone or the infotainment system.Taking your eyes off the road toolong or too often could cause acrash resulting in injury or death.Focus your attention on driving.
A Bluetooth system can use aBluetooth-capable cell phone with aHands-Free Profile to make andreceive phone calls. The systemcan be used while the key is in the
ON/RUN or ACC/ACCESSORYposition. The range of the Bluetoothsystem can be up to 9.1 m (30 ft).Not all phones support all functions,and not all phones work with thein-vehicle Bluetooth system. Seewww.gm.com/bluetooth for moreinformation on compatible phones.
Voice Recognition
The Bluetooth system uses voicerecognition to interpret voicecommands to dial phone numbersand name tags.
For additional information, say“Help” while you are in a voicerecognition menu.
Noise : Keep interior noise levels toa minimum. The system may notrecognize voice commands if thereis too much background noise.
When to Speak : A short tonesounds after the system respondsindicating when it is waiting for avoice command. Wait until the toneand then speak.
How to Speak : Speak clearly in acalm and natural voice.
Audio System
When using the in-vehicle Bluetoothsystem, sound comes through thevehicle's front audio systemspeakers and overrides the audiosystem. Use the audio systemvolume knob, during a call, tochange the volume level. Theadjusted volume level remains inmemory for later calls. To preventmissed calls, a minimum volumelevel is used if the volume is turneddown too low.
Bluetooth Controls
Use the buttons located on thesteering wheel to operate thein-vehicle Bluetooth system. SeeSteering Wheel Controls 0 104.
b / g (Press To Talk) : Press toanswer incoming calls, confirmsystem information, and startspeech recognition.
c /x (End) : Press to end a call,reject a call, or cancel an operation.
GMC Acadia/Acadia Denali Owner Manual (GMNA-Localizing-U.S./Canada/Mexico-9159268) - 2016 - CRC - 4/16/15
174 Infotainment System
Pairing
A Bluetooth enabled cell phonemust be paired to the Bluetoothsystem and then connected to thevehicle before it can be used. Seethe cell phone manufacturer's userguide for Bluetooth functions beforepairing the cell phone. If a Bluetoothphone is not connected, calls will bemade using OnStar Hands-FreeCalling, if equipped. See “OnStar” ifequipped.
Pairing Information
. A Bluetooth phone with MP3capability cannot be paired tothe vehicle as a phone and anMP3 player at the same time.
. Up to five cell phones can bepaired to the Bluetooth system.
. The pairing process is disabledwhen the vehicle is moving.
. Pairing only needs to becompleted once, unless thepairing information on the cellphone changes or the cell phoneis deleted from the system.
. Only one paired cell phone canbe connected to the Bluetoothsystem at a time.
. If multiple paired cell phones arewithin range of the system, thesystem connects to the firstavailable paired cell phone in theorder that they were first pairedto the system. To connect to adifferent paired phone, see“Connecting to a DifferentPhone” later in this section.
Pairing a Phone
1. Press b / g.2. Say “Bluetooth.” This command
can be skipped.
3. Say “Pair.” The systemresponds with instructions anda four-digit PersonalIdentification Number (PIN).The PIN is used in Step 5.
4. Start the pairing process on thecell phone that you want topair. For help with this process,see the cell phonemanufacturer's user guide.
5. Locate the device named “YourVehicle” in the list on the cellphone. Follow the instructionson the cell phone to enter thePIN provided in Step 3. Afterthe PIN is successfully entered,the system prompts you toprovide a name for the pairedcell phone. This name will beused to indicate which phonesare paired and connected tothe vehicle. The systemresponds with “<phone name>has been successfully paired”after the pairing process iscomplete.
6. Repeat Steps 1–5 to pairadditional phones.
Listing All Paired and ConnectedPhones
The system can list all cell phonespaired to it. If a paired cell phone isalso connected to the vehicle, thesystem responds with “is connected”after that phone name.
1. Press b / g.2. Say “Bluetooth.”
3. Say “List.”
GMC Acadia/Acadia Denali Owner Manual (GMNA-Localizing-U.S./Canada/Mexico-9159268) - 2016 - CRC - 4/16/15
Infotainment System 175
Deleting a Paired Phone
If the phone name you want todelete is unknown, see “Listing AllPaired and Connected Phones.”
1. Press b / g.2. Say “Bluetooth.”
3. Say “Delete.” The system askswhich phone to delete.
4. Say the name of the phone youwant to delete.
Connecting to a Different Phone
To connect to a different cell phone,the Bluetooth system looks for thenext available cell phone in theorder in which all the available cellphones were paired. Depending onwhich cell phone you want toconnect to, you may have to usethis command several times.
1. Press b / g.2. Say “Bluetooth.”
3. Say “Change phone.”
. If another cell phone isfound, the response will be“<Phone name> is nowconnected.”
. If another cell phone is notfound, the original phoneremains connected.
Storing and Deleting PhoneNumbers
The system can store up to 30phone numbers as name tags in theHands-Free Directory that is sharedbetween the Bluetooth and OnStarsystems, if equipped.
The following commands are usedto delete and store phone numbers.
Store : This command will store aphone number, or a group ofnumbers as a name tag.
Digit Store : This command allowsa phone number to be stored as aname tag by entering the digits oneat a time.
Delete : This command is used todelete individual name tags.
Delete All Name Tags : Thiscommand deletes all stored nametags in the Hands-Free CallingDirectory and the OnStarTurn-by-Turn Destinations Directory,if equipped.
Using the “Store” Command
1. Press b / g.2. Say “Store.”
3. Say the phone number orgroup of numbers you want tostore all at once with nopauses, then follow thedirections given by the systemto save a name tag for thisnumber.
Using the “Digit Store” Command
If an unwanted number isrecognized by the system, say“Clear” at any time to clear the lastnumber.
To hear all of the numbersrecognized by the system, say“Verify” at any time.
1. Press b / g.2. Say “Digit Store.”
GMC Acadia/Acadia Denali Owner Manual (GMNA-Localizing-U.S./Canada/Mexico-9159268) - 2016 - CRC - 4/16/15
176 Infotainment System
3. Say each digit, one at a time,that you want to store. Aftereach digit is entered, thesystem repeats back the digit itheard followed by a tone. Afterthe last digit has been entered,say “Store,” and then follow thedirections given by the systemto save a name tag for thisnumber.
Using the “Delete” Command
1. Press b / g.2. Say “Delete.”
3. Say the name tag you want todelete.
Using the “Delete All Name Tags”Command
This command deletes all storedname tags in the Hands-FreeCalling Directory and the OnStarTurn-by-Turn Destinations Directory,if equipped.
To delete all name tags:
1. Press b / g.2. Say “Delete all name tags.”
Listing Stored Numbers
The list command will list all storednumbers and name tags.
Using the “List” Command
1. Press b / g.2. Say “Directory.”
3. Say “Hands-Free Calling.”
4. Say “List.”
Making a Call
Calls can be made using thefollowing commands.
Dial or Call : The dial or callcommand can be usedinterchangeably to dial a phonenumber or a stored name tag.
Digit Dial : This command allows aphone number to be dialed byentering the digits one at a time.
Re-dial : This command is used todial the last number used on the cellphone.
Using the “Dial” or “Call”Command
1. Press b / g.2. Say “Dial” or “Call.”
3. Say the entire number withoutpausing, or say the name tag.
Once connected, the person calledwill be heard through the audiospeakers.
Calling 911 Emergency (U.S. andCanada)
1. Press b / g.2. Say “Dial” or “Call.”
3. Say “911.”
4. Say "Dial" or "Call.”
Using the “Digit Dial” Command
The digit dial command allows aphone number to be dialed byentering the digits one at a time.After each digit is entered, thesystem repeats back the digit itheard followed by a tone.
GMC Acadia/Acadia Denali Owner Manual (GMNA-Localizing-U.S./Canada/Mexico-9159268) - 2016 - CRC - 4/16/15
Infotainment System 177
If an unwanted number isrecognized by the system, say“Clear” at any time to clear the lastnumber.
To hear all of the numbersrecognized by the system, say“Verify” at any time.
1. Press b / g.2. Say “Digit Dial.”
3. Say each digit, one at a time,that you want to dial. Aftereach digit is entered, thesystem repeats back the digit itheard followed by a tone. Afterthe last digit has been entered,say “Dial.”
Once connected, the person calledwill be heard through the audiospeakers.
Using the “Re-dial” Command
1. Press b / g.2. After the tone, say “Re-dial.”
Once connected, the person calledwill be heard through the audiospeakers.
Receiving a Call
When an incoming call is received,the audio system mutes and a ringtone is heard in the vehicle.
. Press b / g to answer the call.
. Pressc /x to ignore a call.
Call Waiting
Call waiting must be supported onthe cell phone and enabled by thewireless service carrier.
. Press b / g to answer anincoming call when another callis active. The original call isplaced on hold.
. Press b / g again to return tothe original call.
. To ignore the incoming call, noaction is required.
. Pressc /x to disconnect thecurrent call and switch to the callon hold.
Three-Way Calling
Three-way calling must besupported on the cell phone andenabled by the wireless servicecarrier.
1. While on a call, press b / g.2. Say “Three-way call.”
3. Use the dial or call commandto dial the number of the thirdparty to be called.
4. Once the call is connected,press b / g to link all callerstogether.
Ending a Call
Pressc /x to end a call.
Muting a Call
During a call, all sounds from insidethe vehicle can be muted so that theperson on the other end of the callcannot hear them.
. To mute a call, press b / g , andthen say “Mute call.”
. To cancel mute, press b / g ,and then say “Un-mute call.”
GMC Acadia/Acadia Denali Owner Manual (GMNA-Localizing-U.S./Canada/Mexico-9159268) - 2016 - CRC - 4/16/15
178 Infotainment System
Transferring a Call
Audio can be transferred betweenthe Bluetooth system and the cellphone.
The cell phone must be paired andconnected with the Bluetoothsystem before a call can betransferred. The connection processcan take up to two minutes after theignition is turned to ON/RUN.
Transferring Audio from theBluetooth System to a Cell Phone
During a call with the audio in thevehicle:
1. Press b / g.2. Say “Transfer Call.”
Transferring Audio to theBluetooth System from a CellPhone
During a call with the audio on thecell phone, press b / g. The audiotransfers to the vehicle. If the audiodoes not transfer to the vehicle, usethe audio transfer feature on the cell
phone. See your cell phonemanufacturer's user guide for moreinformation.
Voice Pass-Thru
Voice pass-thru allows access to thevoice recognition commands on thecell phone. See your cell phonemanufacturer's user guide to see ifthe cell phone supports this feature.
To access contacts stored in the cellphone:
1. Press b / g.2. Say “Bluetooth.” This command
can be skipped.
3. Say “Voice.” The systemresponds “OK, accessing<phone name>.”
The cell phone's normal promptmessages will go through their cycleaccording to the phone's operatinginstructions.
Dual Tone Multi-Frequency(DTMF) Tones
The Bluetooth system can sendnumbers and the numbers stored asname tags during a call. You canuse this feature when calling amenu-driven phone system.Account numbers can also bestored for use.
Sending a Number or Name TagDuring a Call
1. Press b / g. The systemresponds “Ready,” followed bya tone.
2. Say “Dial.”
3. Say the number or name tagto send.
GMC Acadia/Acadia Denali Owner Manual (GMNA-Localizing-U.S./Canada/Mexico-9159268) - 2016 - CRC - 4/16/15
Infotainment System 179
Clearing the System
Unless information is deleted out ofthe in-vehicle Bluetooth system, itwill be retained indefinitely. Thisincludes all saved name tags in thephone book and phone pairinginformation. For information on howto delete this information, see theprevious section “Deleting a PairedPhone” and the previous sectionson deleting name tags.
Other Information
The Bluetooth® word mark andlogos are owned by the Bluetooth®
SIG, Inc. and any use of such marksby General Motors is under license.Other trademarks and trade namesare those of their respective owners.
See Radio Frequency Statement0 348.
SettingsPress Settings on the Home Pageto adjust features and preferences,such as Favorite Pages, Display,Time, and Date, etc.
1. Press the Settings screenbutton on the Home Page.
2. Touch-tap the scroll bar untilthe desired option displays.Select the desired settings tochange.
A few of the setting options changethe way the navigation systemdisplays or reacts while in use.
Favorite Pages : Press to selectthe number of favorite pagesdisplayed on the screen. The choiceis 1–6 pages.
Display : Press to adjust the screensettings.
. Display Off: Select to turn thescreen off. Touch the screen toturn the screen back on.
. Rear Camera: Select Symbolsand/or Guidelines to have themdisplay on the rear camerascreen.
. Brightness: Select to adjust thescreen brightness.
Speed Compensated Volume :Select OFF, Low, Medium, or Highsensitivity to automatically adjustthe volume to minimize the effectsof unwanted background noise thatcan result from changing roadsurfaces, driving speeds, or openwindows. This feature works best atlower volume settings wherebackground noise is typically louderthan the sound system volume.
Audible Touch Feedback : Selectto adjust the volume of the beepthat is played after touching ascreen button.
Notification Prompt Volume :Select to adjust the volume of thenotification prompts.
Set Time:
. Press the up or down arrows tochange the Hours, Minutes, AM,PM, or 24 hour setting on theclock.
. Press and hold to quicklyincrease or decrease the timesettings.
GMC Acadia/Acadia Denali Owner Manual (GMNA-Localizing-U.S./Canada/Mexico-9159268) - 2016 - CRC - 4/16/15
180 Infotainment System
. Press OK to save theadjustments.
. Press the Back or Cancel screenbutton to cancel theadjustments.
Set Date:
. Press the up or down arrows toincrease or decrease the Month,Day, and Year settings.
. Press and hold to quicklyincrease or decrease the datesettings.
. Press OK to save theadjustments.
. Press the Back or Cancel screenbutton to cancel theadjustments.
XM Categories : If equipped, pressto customize which available XMCategories are displayed and usedin the system.
Create “AS IS” InfotainmentFile : This is used for dealertroubleshooting.
Open Source Software : Select toview software website information.
Rear Vision Camera (IfEquipped)
The rear vision camera can assistthe driver when backing up bydisplaying a view of the area behindthe vehicle.
To access the rear camera displaysettings, press Display from theHome screen, then press the RearCamera screen button. Thefollowing options are available:
Symbols : Press to enable ordisable the Rear Park Assist (RPA)symbols presented over the rearcamera video.
Guidelines : Press to enable ordisable the RPA dynamic guidelinespresented over the rear cameravideo.
See Rear Vision Camera (RVC)0 222.
Screen Brightness
To adjust the screen brightness,touch the screen, then press + or −on the brightness control.
GMC Acadia/Acadia Denali Owner Manual (GMNA-Localizing-U.S./Canada/Mexico-9159268) - 2016 - CRC - 4/16/15
Infotainment System 181
Trademarks andLicense Agreements
Manufactured under license underU.S. Patent #'s: 5,451,942;5,956,674; 5,974,380; 5,978,762;6,487,535 & other U.S. andworldwide patents issued &pending. DTS and the Symbol areregistered trademarks and DTSDigital Surround and the DTS logosare trademarks of DTS Inc. AllRights Reserved.
Manufactured under license fromDolby Laboratories. Dolby and thedouble-D symbol are trademarks ofDolby Laboratories.
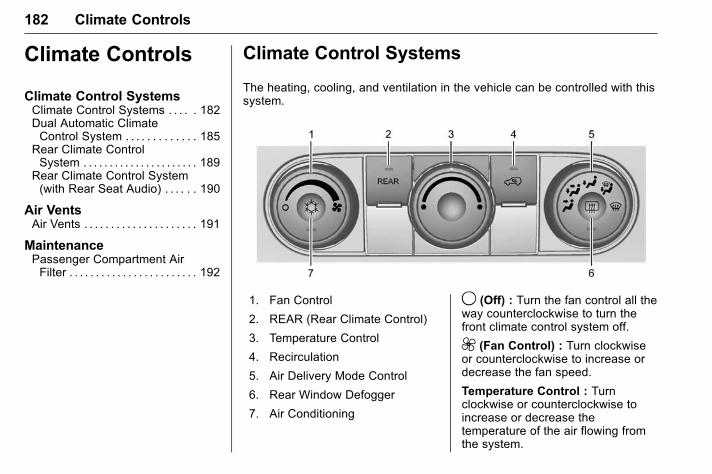
GMC Acadia/Acadia Denali Owner Manual (GMNA-Localizing-U.S./Canada/Mexico-9159268) - 2016 - CRC - 4/16/15
182 Climate Controls
Climate Controls
Climate Control SystemsClimate Control Systems . . . . . 182Dual Automatic ClimateControl System . . . . . . . . . . . . . 185
Rear Climate ControlSystem . . . . . . . . . . . . . . . . . . . . . . 189
Rear Climate Control System(with Rear Seat Audio) . . . . . . 190
Air VentsAir Vents . . . . . . . . . . . . . . . . . . . . . 191
MaintenancePassenger Compartment AirFilter . . . . . . . . . . . . . . . . . . . . . . . . 192
Climate Control Systems
The heating, cooling, and ventilation in the vehicle can be controlled with thissystem.
1. Fan Control
2. REAR (Rear Climate Control)
3. Temperature Control
4. Recirculation
5. Air Delivery Mode Control
6. Rear Window Defogger
7. Air Conditioning
9 (Off) : Turn the fan control all theway counterclockwise to turn thefront climate control system off.
9 (Fan Control) : Turn clockwiseor counterclockwise to increase ordecrease the fan speed.
Temperature Control : Turnclockwise or counterclockwise toincrease or decrease thetemperature of the air flowing fromthe system.
GMC Acadia/Acadia Denali Owner Manual (GMNA-Localizing-U.S./Canada/Mexico-9159268) - 2016 - CRC - 4/16/15
Climate Controls 183
Air Delivery Mode Control : Turnclockwise or counterclockwise tochange the current airflow mode.
By positioning the right knobbetween two modes, a combinationof those two modes is selected.
H (Vent) : Air is directed to theinstrument panel outlets.
) (Bi-Level) : Air is dividedbetween the instrument panel andfloor outlets. Some air is directedtoward the windshield and sidewindow outlets. Cooler air isdirected to the upper outlets andwarmer air to the floor outlets.
6 (Floor) : Air is directed to thefloor outlets, with some of the airdirected to the windshield, sidewindow, and second row flooroutlets. In this mode, the systemautomatically selects outside air.Recirculation cannot be selectedwhile in floor mode.
- (Defog) : This clears thewindows of fog or moisture. Air isdirected to the windshield, flooroutlets, and side window vents.When this mode is selected, the
system turns off recirculation andruns the air conditioning unless theoutside temperature is less than4 °C (40 °F). Recirculation cannotbe selected while in the defogmode. Do not drive the vehicle untilall the windows are clear.
0 (Defrost) : This clears thewindshield of fog or frost morequickly. Air is directed to thewindshield and side window vents,with some to the floor vents. In thismode, outside air is pulled insidethe vehicle. Recirculation cannot beselected while in the defrost mode.The air conditioning system runsautomatically in this setting, unlessthe outside temperature is less than4 °C (40 °F). Do not drive thevehicle until all windows are clear.
# (Air Conditioning) : Press toturn the air conditioning system onor off. An indicator light comes onwhen A/C is on. The air conditioningsystem does not operate when theoutside temperature is below 4 °C(40 °F). The indicator light flashesthree times and turns off when
outside conditions affect airconditioning operation. This isnormal.
For quicker cool down on hot days:
1. Open the windows to let hot airescape.
2. SelectH mode.
3. Select#.
4. Select the coolest temperature.
5. Select the highest fan speed.
6. Close the windows after the hotair has escaped.
7. Once the vehicle's interiortemperature is below theoutside temperature, select@ mode for faster cooling.
Using recirculation for long periodsof time could cause the air insidethe vehicle to become too dry. Toprevent this from happening, afterthe inside of the vehicle has cooled,turn the recirculation mode off.
GMC Acadia/Acadia Denali Owner Manual (GMNA-Localizing-U.S./Canada/Mexico-9159268) - 2016 - CRC - 4/16/15
184 Climate Controls
The air conditioning systemremoves moisture from the air, sowater might drip under the vehiclewhile idling or after turning off theengine. This is normal.
@ (Recirculation) : Press to turnthe recirculation mode on or off. Anindicator light comes on whenrecirculation is on. When the engineis turned off, the recirculation modeautomatically turns off and must bere-selected when the engine isturned on again.
This mode recirculates and helps toquickly cool the air inside thevehicle. It can be used to reduce theoutside air and odors that may enterthe vehicle.
The recirculation mode cannot beused with floor, defrost, or defoggingmodes. If recirculation is selected inthese modes, the indicator flashesthree times and turns off. The airconditioning also comes on whenthis mode is activated unless theoutside air temperature is less than4 °C (40 °F). While in recirculationmode the windows can fog whenthe weather is cold and damp. To
clear the fog, select either the defogor defrost mode and increase thefan speed.
REAR (Rear Climate Control) :Press to turn the rear heating andair conditioning on or off. See RearClimate Control System 0 189 orRear Climate Control System (withRear Seat Audio) 0 190.
Rear Window Defogger
The rear window defogger uses awarming grid to remove fog from therear window.
1 (Rear Window Defogger) :Press to turn the rear windowdefogger on or off. An indicator lighton the button comes on to show thatthe rear window defogger is on. Donot drive the vehicle until all thewindows are clear.
The defogger only works when thevehicle is in ON/RUN. The defoggerwill turn off if the vehicle isturned off.
If equipped with heated outsiderearview mirrors, fog or frost iscleared from the surface of themirror when1 is pressed.
Caution
Using a razor blade or sharpobject to clear the inside rearwindow can damage the rearwindow defogger. Repairs wouldnot be covered by the vehiclewarranty. Do not clear the insiderear window with sharp objects.
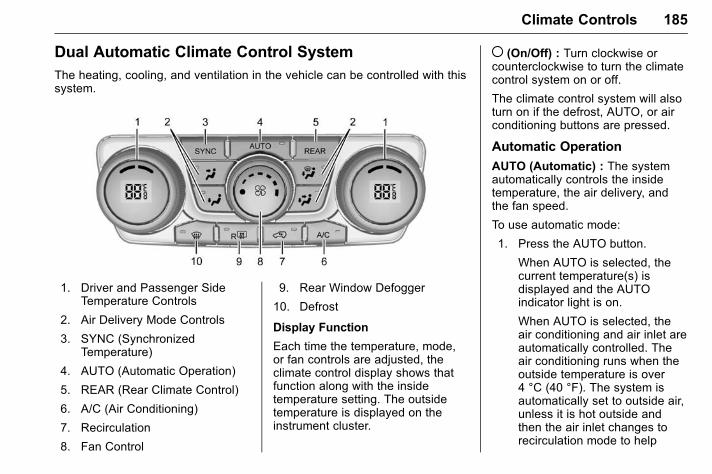
GMC Acadia/Acadia Denali Owner Manual (GMNA-Localizing-U.S./Canada/Mexico-9159268) - 2016 - CRC - 4/16/15
Climate Controls 185
Dual Automatic Climate Control SystemThe heating, cooling, and ventilation in the vehicle can be controlled with thissystem.
1. Driver and Passenger SideTemperature Controls
2. Air Delivery Mode Controls
3. SYNC (SynchronizedTemperature)
4. AUTO (Automatic Operation)
5. REAR (Rear Climate Control)
6. A/C (Air Conditioning)
7. Recirculation
8. Fan Control
9. Rear Window Defogger
10. Defrost
Display Function
Each time the temperature, mode,or fan controls are adjusted, theclimate control display shows thatfunction along with the insidetemperature setting. The outsidetemperature is displayed on theinstrument cluster.
( (On/Off) : Turn clockwise orcounterclockwise to turn the climatecontrol system on or off.
The climate control system will alsoturn on if the defrost, AUTO, or airconditioning buttons are pressed.
Automatic Operation
AUTO (Automatic) : The systemautomatically controls the insidetemperature, the air delivery, andthe fan speed.
To use automatic mode:
1. Press the AUTO button.
When AUTO is selected, thecurrent temperature(s) isdisplayed and the AUTOindicator light is on.
When AUTO is selected, theair conditioning and air inlet areautomatically controlled. Theair conditioning runs when theoutside temperature is over4 °C (40 °F). The system isautomatically set to outside air,unless it is hot outside andthen the air inlet changes torecirculation mode to help
GMC Acadia/Acadia Denali Owner Manual (GMNA-Localizing-U.S./Canada/Mexico-9159268) - 2016 - CRC - 4/16/15
186 Climate Controls
quickly cool the vehicle. Therecirculation indicator light willcome on.
2. Set the temperature for thedriver and passenger.
To find a comfortable setting,start with a 22 °C (73 °F)temperature setting and allowabout 20 minutes for thesystem to regulate. Use thedriver side or passenger sidetemperature control to adjustthe temperature setting asnecessary. The system willremain at the selected setting.Choosing the warmest orcoolest temperatures does notcause the vehicle to heat orcool more quickly.
To avoid blowing cold air incold weather, the systemdelays turning on the fan untilwarm air is available. Turn thefan knob to override this delayand select the fan speed.
Temperature Control
The driver and passenger sidetemperature controls are used toadjust the temperature of the aircoming through the system. Thetemperature can be adjusted even ifthe system is turned off sinceoutside air still enters the vehicle,unless the recirculation mode isselected. See “Recirculation” later inthis section.
Driver Side TemperatureControl : Turn clockwise orcounterclockwise to increase ordecrease the driver sidetemperature. The driver sidetemperature display will show thetemperature setting.
Passenger Side TemperatureControl : Turn clockwise orcounterclockwise to increase ordecrease the passenger sidetemperature. The passenger sidedisplay will show the temperaturesetting.
SYNC (SynchronizedTemperature) : Press to set thepassenger temperature to match thedriver temperature setting.
Manual Operation
The air delivery mode or fan speedcan be manually adjusted.
9 (Fan Control) : Turn the knobclockwise or counterclockwise toincrease or decrease the fan speed.
Turning the fan control knob while inautomatic control places the fanspeed under manual control.
The air delivery mode remains inautomatic control. The fan settingdisplays momentarily and then nolonger displays.
Air Delivery Modes : PressH,),6, or- to change the direction ofthe airflow in the vehicle. Anindicator light comes on in theselected mode button. Pressing amode button while the system is offchanges the air delivery modewithout turning the system on.Changing the air delivery modewhile in automatic control places thesystem into manual control. The airdelivery mode button indicatordisplays, and the AUTO buttonindicator light turns off.
GMC Acadia/Acadia Denali Owner Manual (GMNA-Localizing-U.S./Canada/Mexico-9159268) - 2016 - CRC - 4/16/15
Climate Controls 187
H (Vent) : Air is directed to theinstrument panel outlets.
) (Bi-Level) : Air is dividedbetween the instrument panel andfloor outlets. Some air is directedtowards the windshield and sidewindow outlets. Cooler air isdirected to the upper outlets andwarmer air to the floor outlets.
6 (Floor) : Air is directed to thefloor outlets, with some of the airdirected to the windshield, sidewindow, and second row flooroutlets. In this mode, the systemuses outside air.
- (Defog) : This mode clears thewindows of fog or moisture. Air isdirected to the windshield, flooroutlets, and side window vents.When this mode is selected, thesystem turns off recirculation andruns the air conditioning compressorunless the outside temperature isless than 4 °C (40 °F). Do not drivethe vehicle until all the windows areclear.
0 (Defrost) : Press to turn thedefrost on or off. This mode quicklyclears the windshield of fog or frost.
Air is directed to the windshield,side window, and floor vents. In thismode, outside air is pulled insidethe vehicle. The air conditioningsystem runs automatically in thissetting, unless the outsidetemperature is less than 4 °C(40 °F).
Do not drive the vehicle until all thewindows are clear.
Air Conditioning
A/C (Air Conditioning) : Press toturn the air conditioning on and off.An indicator light comes on whenA/C is on.
The A/C does not work when theoutside temperature is below 4 °C(40 °F). If A/C is pressed theindicator flashes three times andturns off to show that the A/C modeis not available. If the A/C is on andthe outside temperature dropsbelow a temperature which is toocool for air conditioning to beeffective, the A/C indicator turns offto show that the A/C mode hasbeen canceled.
On hot days, open the windowsbriefly to let hot inside air escape.This helps reduce the time it takesfor the interior of the vehicle tocool down.
The air conditioning systemremoves moisture from the air, sowater might drip under the vehiclewhile idling or after turning off theengine. This is normal.
@ (Recirculation) : Press toalternate between recirculating airinside the vehicle or pulling inoutside air. An indicator light comeson when recirculation mode isactive. With each ignition cycle, therecirculation mode is reset toautomatic. When the engine isturned on, outside air orrecirculation is automaticallyselected for better performance.
When recirculation is activated, theair conditioning compressor comeson and helps to quickly cool the airinside the vehicle. This mode alsohelps to reduce the outside air andodors that may enter the vehicle.
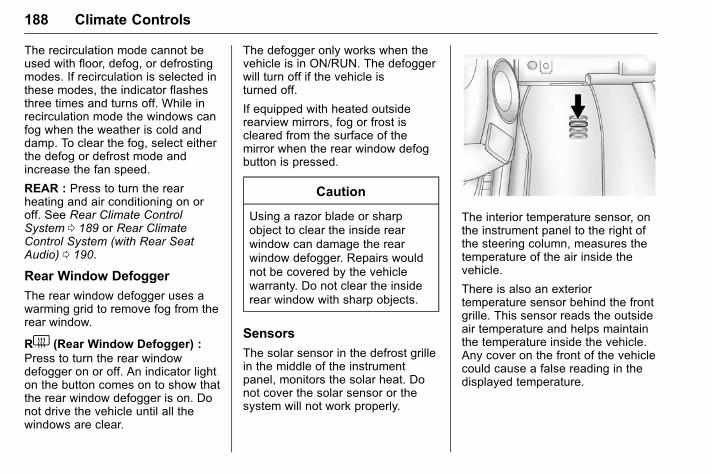
GMC Acadia/Acadia Denali Owner Manual (GMNA-Localizing-U.S./Canada/Mexico-9159268) - 2016 - CRC - 4/16/15
188 Climate Controls
The recirculation mode cannot beused with floor, defog, or defrostingmodes. If recirculation is selected inthese modes, the indicator flashesthree times and turns off. While inrecirculation mode the windows canfog when the weather is cold anddamp. To clear the fog, select eitherthe defog or defrost mode andincrease the fan speed.
REAR : Press to turn the rearheating and air conditioning on oroff. See Rear Climate ControlSystem 0 189 or Rear ClimateControl System (with Rear SeatAudio) 0 190.
Rear Window Defogger
The rear window defogger uses awarming grid to remove fog from therear window.
R1 (Rear Window Defogger) :Press to turn the rear windowdefogger on or off. An indicator lighton the button comes on to show thatthe rear window defogger is on. Donot drive the vehicle until all thewindows are clear.
The defogger only works when thevehicle is in ON/RUN. The defoggerwill turn off if the vehicle isturned off.
If equipped with heated outsiderearview mirrors, fog or frost iscleared from the surface of themirror when the rear window defogbutton is pressed.
Caution
Using a razor blade or sharpobject to clear the inside rearwindow can damage the rearwindow defogger. Repairs wouldnot be covered by the vehiclewarranty. Do not clear the insiderear window with sharp objects.
Sensors
The solar sensor in the defrost grillein the middle of the instrumentpanel, monitors the solar heat. Donot cover the solar sensor or thesystem will not work properly.
The interior temperature sensor, onthe instrument panel to the right ofthe steering column, measures thetemperature of the air inside thevehicle.
There is also an exteriortemperature sensor behind the frontgrille. This sensor reads the outsideair temperature and helps maintainthe temperature inside the vehicle.Any cover on the front of the vehiclecould cause a false reading in thedisplayed temperature.
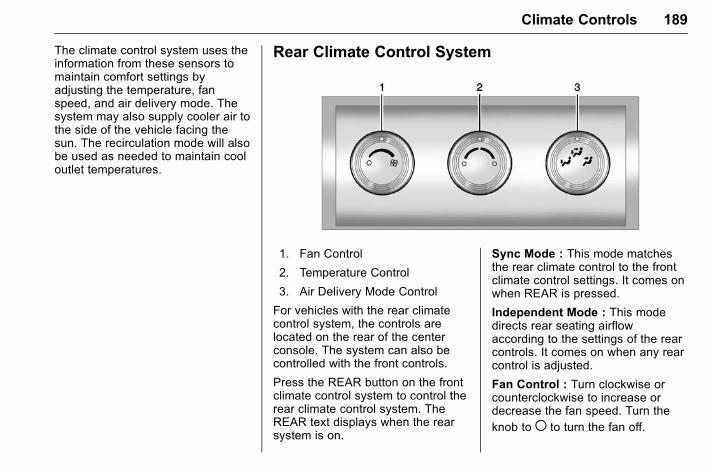
GMC Acadia/Acadia Denali Owner Manual (GMNA-Localizing-U.S./Canada/Mexico-9159268) - 2016 - CRC - 4/16/15
Climate Controls 189
The climate control system uses theinformation from these sensors tomaintain comfort settings byadjusting the temperature, fanspeed, and air delivery mode. Thesystem may also supply cooler air tothe side of the vehicle facing thesun. The recirculation mode will alsobe used as needed to maintain cooloutlet temperatures.
Rear Climate Control System
1. Fan Control
2. Temperature Control
3. Air Delivery Mode Control
For vehicles with the rear climatecontrol system, the controls arelocated on the rear of the centerconsole. The system can also becontrolled with the front controls.
Press the REAR button on the frontclimate control system to control therear climate control system. TheREAR text displays when the rearsystem is on.
Sync Mode : This mode matchesthe rear climate control to the frontclimate control settings. It comes onwhen REAR is pressed.
Independent Mode : This modedirects rear seating airflowaccording to the settings of the rearcontrols. It comes on when any rearcontrol is adjusted.
Fan Control : Turn clockwise orcounterclockwise to increase ordecrease the fan speed. Turn theknob to ( to turn the fan off.
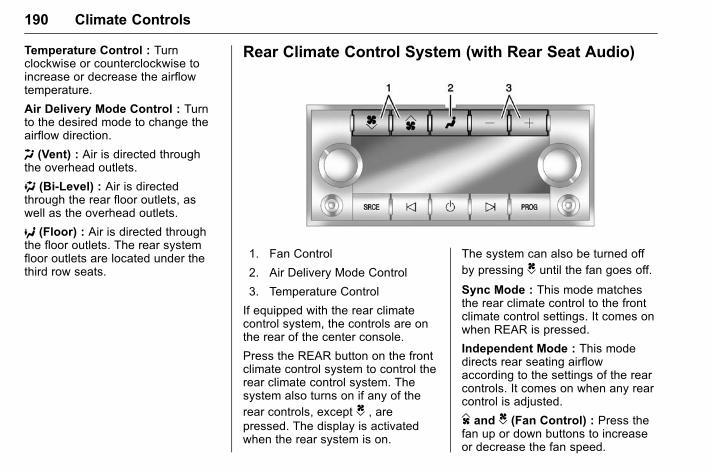
GMC Acadia/Acadia Denali Owner Manual (GMNA-Localizing-U.S./Canada/Mexico-9159268) - 2016 - CRC - 4/16/15
190 Climate Controls
Temperature Control : Turnclockwise or counterclockwise toincrease or decrease the airflowtemperature.
Air Delivery Mode Control : Turnto the desired mode to change theairflow direction.
H (Vent) : Air is directed throughthe overhead outlets.
) (Bi-Level) : Air is directedthrough the rear floor outlets, aswell as the overhead outlets.
6 (Floor) : Air is directed throughthe floor outlets. The rear systemfloor outlets are located under thethird row seats.
Rear Climate Control System (with Rear Seat Audio)
1. Fan Control
2. Air Delivery Mode Control
3. Temperature Control
If equipped with the rear climatecontrol system, the controls are onthe rear of the center console.
Press the REAR button on the frontclimate control system to control therear climate control system. Thesystem also turns on if any of therear controls, except C , arepressed. The display is activatedwhen the rear system is on.
The system can also be turned offby pressing C until the fan goes off.
Sync Mode : This mode matchesthe rear climate control to the frontclimate control settings. It comes onwhen REAR is pressed.
Independent Mode : This modedirects rear seating airflowaccording to the settings of the rearcontrols. It comes on when any rearcontrol is adjusted.
D and C (Fan Control) : Press thefan up or down buttons to increaseor decrease the fan speed.
GMC Acadia/Acadia Denali Owner Manual (GMNA-Localizing-U.S./Canada/Mexico-9159268) - 2016 - CRC - 4/16/15
Climate Controls 191
Temperature Control : Press + or− to increase or decrease the airtemperature. The temperaturesettings will display in0-12 increments, going from thecoolest (0) to the warmest (12)setting.
N (Air Delivery Mode Control) :Press to manually change thedirection of the airflow. Repeatedlypress the button until the desiredmode appears on the display.
H (Vent) : Air is directed throughthe overhead outlets.
) (Bi-Level) : Air is directedthrough the rear floor outlets, aswell as the overhead outlets.
6 (Floor) : Air is directed throughthe floor outlets. The rear systemfloor outlets are under the third rowseats.
Air VentsTo adjust the center and side airoutlets on the instrument panel:
. Use the slider switch in thecenter of the outlet, to changethe direction of the airflow.
. Use the thumbwheel near theoutlet to control the amount ofairflow or to shut off the airflow.
There are also outlets overhead inthe rear passenger area, adjust asneeded.
Keep all outlets open wheneverpossible for best systemperformance.
Operation Tips. Clear away any ice, snow,
or leaves from the air inlets atthe base of the windshield thatcan block the flow of air into thevehicle.
. Use of non-GM approved hooddeflectors can adversely affectthe performance of the system.
. Keep the path under all seatsclear of objects to help circulatethe air inside the vehicle moreeffectively.
. If fogging reoccurs while in ventor bi-level modes with mildtemperature throughout thevehicle, turn on the airconditioner to reduce windshieldfogging.
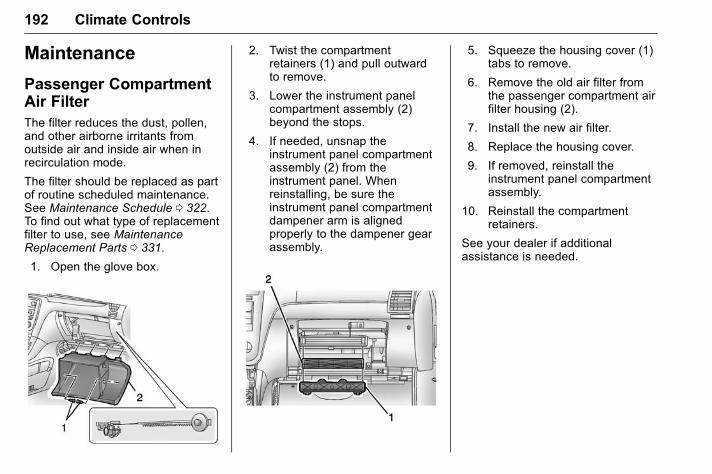
GMC Acadia/Acadia Denali Owner Manual (GMNA-Localizing-U.S./Canada/Mexico-9159268) - 2016 - CRC - 4/16/15
192 Climate Controls
Maintenance
Passenger CompartmentAir FilterThe filter reduces the dust, pollen,and other airborne irritants fromoutside air and inside air when inrecirculation mode.
The filter should be replaced as partof routine scheduled maintenance.See Maintenance Schedule 0 322.To find out what type of replacementfilter to use, see MaintenanceReplacement Parts 0 331.
1. Open the glove box.
2. Twist the compartmentretainers (1) and pull outwardto remove.
3. Lower the instrument panelcompartment assembly (2)beyond the stops.
4. If needed, unsnap theinstrument panel compartmentassembly (2) from theinstrument panel. Whenreinstalling, be sure theinstrument panel compartmentdampener arm is alignedproperly to the dampener gearassembly.
5. Squeeze the housing cover (1)tabs to remove.
6. Remove the old air filter fromthe passenger compartment airfilter housing (2).
7. Install the new air filter.
8. Replace the housing cover.
9. If removed, reinstall theinstrument panel compartmentassembly.
10. Reinstall the compartmentretainers.
See your dealer if additionalassistance is needed.
GMC Acadia/Acadia Denali Owner Manual (GMNA-Localizing-U.S./Canada/Mexico-9159268) - 2016 - CRC - 4/16/15
Driving and Operating 193
Driving andOperating
Driving InformationDistracted Driving . . . . . . . . . . . . 194Defensive Driving . . . . . . . . . . . . . 194Drunk Driving . . . . . . . . . . . . . . . . . 194Control of a Vehicle . . . . . . . . . . . 195Braking . . . . . . . . . . . . . . . . . . . . . . . 195Steering . . . . . . . . . . . . . . . . . . . . . . 195Off-Road Recovery . . . . . . . . . . . 196Loss of Control . . . . . . . . . . . . . . . 196Driving on Wet Roads . . . . . . . . 197Hill and Mountain Roads . . . . . 198Winter Driving . . . . . . . . . . . . . . . . 198If the Vehicle Is Stuck . . . . . . . . 200Vehicle Load Limits . . . . . . . . . . . 200
Starting and OperatingNew Vehicle Break-In . . . . . . . . . 204Ignition Positions . . . . . . . . . . . . . 204Starting the Engine . . . . . . . . . . . 206Engine Heater . . . . . . . . . . . . . . . . 207Retained AccessoryPower (RAP) . . . . . . . . . . . . . . . . 208
Shifting Into Park . . . . . . . . . . . . . 209Shifting out of Park . . . . . . . . . . . 210Parking over ThingsThat Burn . . . . . . . . . . . . . . . . . . . 210
Engine ExhaustEngine Exhaust . . . . . . . . . . . . . . . 211Running the Vehicle WhileParked . . . . . . . . . . . . . . . . . . . . . . 211
Automatic TransmissionAutomatic Transmission . . . . . . 212Manual Mode . . . . . . . . . . . . . . . . . 213Tow/Haul Mode . . . . . . . . . . . . . . . 214
Drive SystemsAll-Wheel Drive . . . . . . . . . . . . . . . 215
BrakesAntilock BrakeSystem (ABS) . . . . . . . . . . . . . . . 215
Parking Brake . . . . . . . . . . . . . . . . 216Brake Assist . . . . . . . . . . . . . . . . . . 217Hill Start Assist (HSA) . . . . . . . . 217
Ride Control SystemsTraction Control/ElectronicStability Control . . . . . . . . . . . . . 217
Cruise ControlCruise Control . . . . . . . . . . . . . . . . 219
Driver Assistance SystemsRear Vision Camera (RVC) . . . 221Parking Assist . . . . . . . . . . . . . . . . 223Forward Collision Alert (FCA)System . . . . . . . . . . . . . . . . . . . . . . 225
Side Blind ZoneAlert (SBZA) . . . . . . . . . . . . . . . . 226
Lane DepartureWarning (LDW) . . . . . . . . . . . . . 228
FuelFuel . . . . . . . . . . . . . . . . . . . . . . . . . . 230California FuelRequirements . . . . . . . . . . . . . . . 230
Fuels in Foreign Countries . . . 231Fuel Additives . . . . . . . . . . . . . . . . 231Filling the Tank . . . . . . . . . . . . . . . 231Filling a Portable FuelContainer . . . . . . . . . . . . . . . . . . . 233
Trailer TowingGeneral TowingInformation . . . . . . . . . . . . . . . . . . 233
Driving Characteristics andTowing Tips . . . . . . . . . . . . . . . . . 234
Trailer Towing . . . . . . . . . . . . . . . . 237Towing Equipment . . . . . . . . . . . . 239
Conversions and Add-OnsAdd-On ElectricalEquipment . . . . . . . . . . . . . . . . . . 241
GMC Acadia/Acadia Denali Owner Manual (GMNA-Localizing-U.S./Canada/Mexico-9159268) - 2016 - CRC - 4/16/15
194 Driving and Operating
Driving Information
Distracted DrivingDistraction comes in many formsand can take your focus from thetask of driving. Exercise goodjudgment and do not let otheractivities divert your attention awayfrom the road. Many localgovernments have enacted lawsregarding driver distraction. Becomefamiliar with the local laws inyour area.
To avoid distracted driving, alwayskeep your eyes on the road, handson the wheel, and mind on the drive.
. Do not use a phone indemanding driving situations.Use a hands-free method toplace or receive necessaryphone calls.
. Watch the road. Do not read,take notes, or look upinformation on phones or otherelectronic devices.
. Designate a front seatpassenger to handle potentialdistractions.
. Become familiar with vehiclefeatures before driving, such asprogramming favorite radiostations and adjusting climatecontrol and seat settings.Program all trip information intoany navigation device prior todriving.
. Wait until the vehicle is parkedto retrieve items that have fallento the floor.
. Stop or park the vehicle to tendto children.
. Keep pets in an appropriatecarrier or restraint.
. Avoid stressful conversationswhile driving, whether with apassenger or on a cell phone.
{ Warning
Taking your eyes off the road toolong or too often could cause acrash resulting in injury or death.Focus your attention on driving.
Refer to the Infotainment sectionand the infotainment manual formore information on using thatsystem, including pairing and usinga cell phone.
Defensive DrivingDefensive driving means “alwaysexpect the unexpected.” The firststep in driving defensively is to wearthe safety belt. See Safety Belts0 59.
. Assume that other road users(pedestrians, bicyclists, andother drivers) are going to becareless and make mistakes.Anticipate what they might doand be ready.
. Allow enough following distancebetween you and the driver infront of you.
. Focus on the task of driving.
Drunk DrivingDeath and injury associated withdrinking and driving is a globaltragedy.
GMC Acadia/Acadia Denali Owner Manual (GMNA-Localizing-U.S./Canada/Mexico-9159268) - 2016 - CRC - 4/16/15
Driving and Operating 195
{ Warning
Drinking and then driving is verydangerous. Your reflexes,perceptions, attentiveness, andjudgment can be affected by evena small amount of alcohol. Youcan have a serious — or evenfatal — collision if you drive afterdrinking.
Do not drink and drive or ride witha driver who has been drinking.Ride home in a cab; or if you arewith a group, designate a driverwho will not drink.
Control of a VehicleBraking, steering, and acceleratingare important factors in helping tocontrol a vehicle while driving.
BrakingBraking action involves perceptiontime and reaction time. Deciding topush the brake pedal is perceptiontime. Actually doing it isreaction time.
Average driver reaction time isabout three-quarters of a second. Inthat time, a vehicle moving at100 km/h (60 mph) travels 20 m(66 ft), which could be a lot ofdistance in an emergency.
Helpful braking tips to keep in mindinclude:
. Keep enough distance betweenyou and the vehicle in frontof you.
. Avoid needless heavy braking.
. Keep pace with traffic.
If the engine ever stops while thevehicle is being driven, brakenormally but do not pump thebrakes. Doing so could make thepedal harder to push down. If theengine stops, there will be somepower brake assist but it will beused when the brake is applied.Once the power assist is used up, itcan take longer to stop and thebrake pedal will be harder to push.
Steering
Variable Effort Steering
Some vehicles have a steeringsystem that varies the amount ofeffort required to steer the vehicle inrelation to the speed of the vehicle.
The amount of steering effortrequired is less at slower speeds tomake the vehicle moremaneuverable and easier to park. Atfaster speeds, the steering effortincreases to provide a sport-like feelto the steering. This providesmaximum control and stability.
Hydraulic Power Steering
This vehicle has hydraulic powersteering. It may requiremaintenance. See Power SteeringFluid 0 258.
If power steering assist is lostbecause the engine stops, or thereis a system malfunction, the vehiclecan be steered but may requireincreased effort. See your dealer ifthere is a problem.
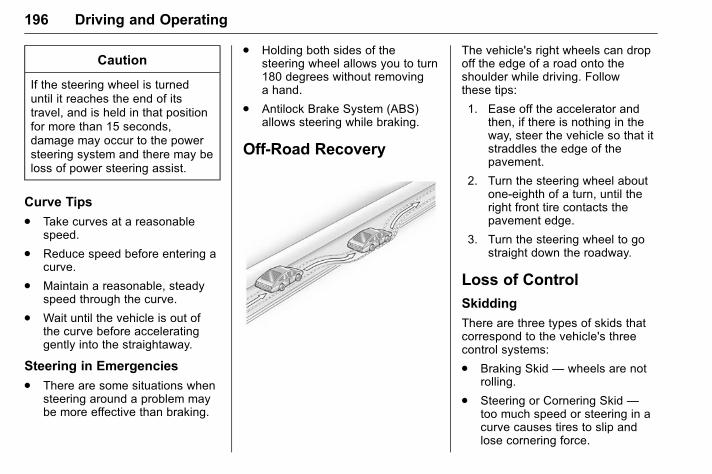
GMC Acadia/Acadia Denali Owner Manual (GMNA-Localizing-U.S./Canada/Mexico-9159268) - 2016 - CRC - 4/16/15
196 Driving and Operating
Caution
If the steering wheel is turneduntil it reaches the end of itstravel, and is held in that positionfor more than 15 seconds,damage may occur to the powersteering system and there may beloss of power steering assist.
Curve Tips. Take curves at a reasonable
speed.
. Reduce speed before entering acurve.
. Maintain a reasonable, steadyspeed through the curve.
. Wait until the vehicle is out ofthe curve before acceleratinggently into the straightaway.
Steering in Emergencies. There are some situations when
steering around a problem maybe more effective than braking.
. Holding both sides of thesteering wheel allows you to turn180 degrees without removinga hand.
. Antilock Brake System (ABS)allows steering while braking.
Off-Road Recovery
The vehicle's right wheels can dropoff the edge of a road onto theshoulder while driving. Followthese tips:
1. Ease off the accelerator andthen, if there is nothing in theway, steer the vehicle so that itstraddles the edge of thepavement.
2. Turn the steering wheel aboutone-eighth of a turn, until theright front tire contacts thepavement edge.
3. Turn the steering wheel to gostraight down the roadway.
Loss of Control
Skidding
There are three types of skids thatcorrespond to the vehicle's threecontrol systems:
. Braking Skid — wheels are notrolling.
. Steering or Cornering Skid —too much speed or steering in acurve causes tires to slip andlose cornering force.
GMC Acadia/Acadia Denali Owner Manual (GMNA-Localizing-U.S./Canada/Mexico-9159268) - 2016 - CRC - 4/16/15
Driving and Operating 197
. Acceleration Skid — too muchthrottle causes the drivingwheels to spin.
Defensive drivers avoid most skidsby taking reasonable care suited toexisting conditions, and by notoverdriving those conditions. Butskids are always possible.
If the vehicle starts to slide, followthese suggestions:
. Ease your foot off theaccelerator pedal and steer theway you want the vehicle to go.The vehicle may straighten out.Be ready for a second skid if itoccurs.
. Slow down and adjust yourdriving according to weatherconditions. Stopping distancecan be longer and vehiclecontrol can be affected whentraction is reduced by water,snow, ice, gravel, or othermaterial on the road. Learn torecognize warning clues — suchas enough water, ice, or packedsnow on the road to make amirrored surface — and slowdown when you have any doubt.
. Try to avoid sudden steering,acceleration, or braking,including reducing vehicle speedby shifting to a lower gear. Anysudden changes could causethe tires to slide.
Remember: Antilock brakes helpavoid only the braking skid.
Driving on Wet RoadsRain and wet roads can reducevehicle traction and affect yourability to stop and accelerate.Always drive slower in these typesof driving conditions and avoiddriving through large puddles anddeep-standing or flowing water.
{ Warning
Wet brakes can cause crashes.They might not work as well in aquick stop and could causepulling to one side. You couldlose control of the vehicle.
(Continued)
Warning (Continued)
After driving through a largepuddle of water or a car/vehiclewash, lightly apply the brakepedal until the brakes worknormally.
Flowing or rushing water createsstrong forces. Driving throughflowing water could cause thevehicle to be carried away. If thishappens, you and other vehicleoccupants could drown. Do notignore police warnings and bevery cautious about trying to drivethrough flowing water.
Hydroplaning
Hydroplaning is dangerous. Watercan build up under the vehicle'stires so they actually ride on thewater. This can happen if the road iswet enough and you are going fastenough. When the vehicle ishydroplaning, it has little or nocontact with the road.
GMC Acadia/Acadia Denali Owner Manual (GMNA-Localizing-U.S./Canada/Mexico-9159268) - 2016 - CRC - 4/16/15
198 Driving and Operating
There is no hard and fast rule abouthydroplaning. The best advice is toslow down when the road is wet.
Other Rainy Weather Tips
Besides slowing down, other wetweather driving tips include:
. Allow extra following distance.
. Pass with caution.
. Keep windshield wipingequipment in good shape.
. Keep the windshield washer fluidreservoir filled.
. Have good tires with propertread depth. See Tires 0 276.
. Turn off cruise control.
Hill and Mountain RoadsDriving on steep hills or throughmountains is different than drivingon flat or rolling terrain. Tips include:
. Keep the vehicle serviced and ingood shape.
. Check all fluid levels and brakes,tires, cooling system, andtransmission.
. Shift to a lower gear when goingdown steep or long hills.
{ Warning
Using the brakes to slow thevehicle on a long downhill slopecan cause brake overheating, canreduce brake performance, andcould result in a loss of braking.Shift the transmission to a lowergear to let the engine assist thebrakes on a steep downhill slope.
{ Warning
Coasting downhill in N (Neutral)or with the ignition off isdangerous. This can causeoverheating of the brakes andloss of steering. Always have theengine running and the vehiclein gear.
. Drive at speeds that keep thevehicle in its own lane. Do notswing wide or cross thecenter line.
. Be alert on top of hills;something could be in your lane(e.g., stalled car, accident).
. Pay attention to special roadsigns (e.g., falling rocks area,winding roads, long grades,passing or no-passing zones)and take appropriate action.
Winter Driving
Driving on Snow or Ice
Snow or ice between the tires andthe road creates less traction orgrip, so drive carefully. Wet ice canoccur at about 0 °C (32 °F) whenfreezing rain begins to fall. Avoiddriving on wet ice or in freezing rainuntil roads can be treated.
For Slippery Road Driving:
. Accelerate gently. Acceleratingtoo quickly causes the wheels tospin and makes the surfaceunder the tires slick.
. Turn on Traction Control. SeeTraction Control/ElectronicStability Control 0 217.
GMC Acadia/Acadia Denali Owner Manual (GMNA-Localizing-U.S./Canada/Mexico-9159268) - 2016 - CRC - 4/16/15
Driving and Operating 199
. The Antilock Brake System(ABS) improves vehicle stabilityduring hard stops, but thebrakes should be applied soonerthan when on dry pavement.See Antilock Brake System(ABS) 0 215.
. Allow greater following distanceand watch for slippery spots. Icypatches can occur on otherwiseclear roads in shaded areas.The surface of a curve or anoverpass can remain icy whenthe surrounding roads are clear.Avoid sudden steeringmaneuvers and braking whileon ice.
. Turn off cruise control.
Blizzard Conditions
Stay with the vehicle unless there ishelp nearby. If possible, useRoadside Assistance. See RoadsideAssistance Program 0 342. To gethelp and keep everyone in thevehicle safe:
. Turn on the hazard warningflashers.
. Tie a red cloth to an outsidemirror.
{ Warning
Snow can trap engine exhaustunder the vehicle. This maycause exhaust gases to getinside. Engine exhaust containscarbon monoxide (CO), whichcannot be seen or smelled. It cancause unconsciousness and evendeath.
If the vehicle is stuck in snow:
. Clear snow from the base ofthe vehicle, especially anyblocking the exhaust pipe.
. Open a window about 5 cm(2 in) on the vehicle sidethat is away from the wind,to bring in fresh air.
. Fully open the air outlets onor under the instrumentpanel.
(Continued)
Warning (Continued)
. Adjust the climate controlsystem to circulate the airinside the vehicle and setthe fan speed to the highestsetting. See “ClimateControl Systems.”
For more information about CO,see Engine Exhaust 0 211.
To save fuel, run the engine forshort periods to warm the vehicleand then shut the engine off andpartially close the window. Movingabout to keep warm also helps.
If it takes time for help to arrive,when running the engine, push theaccelerator pedal slightly so theengine runs faster than the idlespeed. This keeps the batterycharged to restart the vehicle and tosignal for help with the headlamps.Do this as little as possible, tosave fuel.
GMC Acadia/Acadia Denali Owner Manual (GMNA-Localizing-U.S./Canada/Mexico-9159268) - 2016 - CRC - 4/16/15
200 Driving and Operating
If the Vehicle Is StuckSlowly and cautiously spin thewheels to free the vehicle whenstuck in sand, mud, ice, or snow.
If stuck too severely for the tractionsystem to free the vehicle, turn thetraction system off and use therocking method. See TractionControl/Electronic Stability Control0 217.
{ Warning
If the vehicle's tires spin at highspeed, they can explode, and youor others could be injured. Thevehicle can overheat, causing anengine compartment fire or otherdamage. Spin the wheels as littleas possible and avoid goingabove 56 km/h (35 mph).
Rocking the Vehicle to Getit Out
Turn the steering wheel left andright to clear the area around thefront wheels. Turn off any tractionsystem. Shift back and forth
between R (Reverse) and a lowforward gear, spinning the wheelsas little as possible. To preventtransmission wear, wait until thewheels stop spinning before shiftinggears. Release the acceleratorpedal while shifting, and presslightly on the accelerator pedalwhen the transmission is in gear.Slowly spinning the wheels in theforward and reverse directionscauses a rocking motion that couldfree the vehicle. If that does not getthe vehicle out after a few tries, itmight need to be towed out. If thevehicle does need to be towed out,see Towing the Vehicle 0 308.
Vehicle Load LimitsIt is very important to know howmuch weight the vehicle cancarry. This weight is called thevehicle capacity weight andincludes the weight of alloccupants, cargo, and allnonfactory-installed options.Two labels on the vehicle mayshow how much weight it may
properly carry, the Tire andLoading Information label andthe Certification/Tire label.
{ Warning
Do not load the vehicle anyheavier than the GrossVehicle Weight Rating(GVWR), or either themaximum front or rear GrossAxle Weight Rating (GAWR).This can cause systems tobreak and change the way thevehicle handles. This couldcause loss of control and acrash. Overloading can alsoreduce stopping distance,damage the tires, and shortenthe life of the vehicle.
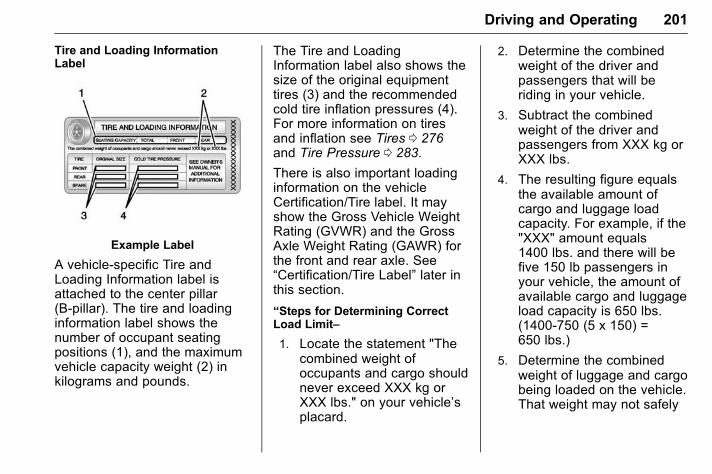
GMC Acadia/Acadia Denali Owner Manual (GMNA-Localizing-U.S./Canada/Mexico-9159268) - 2016 - CRC - 4/16/15
Driving and Operating 201
Tire and Loading InformationLabel
Example Label
A vehicle-specific Tire andLoading Information label isattached to the center pillar(B-pillar). The tire and loadinginformation label shows thenumber of occupant seatingpositions (1), and the maximumvehicle capacity weight (2) inkilograms and pounds.
The Tire and LoadingInformation label also shows thesize of the original equipmenttires (3) and the recommendedcold tire inflation pressures (4).For more information on tiresand inflation see Tires 0 276and Tire Pressure 0 283.
There is also important loadinginformation on the vehicleCertification/Tire label. It mayshow the Gross Vehicle WeightRating (GVWR) and the GrossAxle Weight Rating (GAWR) forthe front and rear axle. See“Certification/Tire Label” later inthis section.
“Steps for Determining CorrectLoad Limit–
1. Locate the statement "Thecombined weight ofoccupants and cargo shouldnever exceed XXX kg orXXX lbs." on your vehicle’splacard.
2. Determine the combinedweight of the driver andpassengers that will beriding in your vehicle.
3. Subtract the combinedweight of the driver andpassengers from XXX kg orXXX lbs.
4. The resulting figure equalsthe available amount ofcargo and luggage loadcapacity. For example, if the"XXX" amount equals1400 lbs. and there will befive 150 lb passengers inyour vehicle, the amount ofavailable cargo and luggageload capacity is 650 lbs.(1400-750 (5 x 150) =650 lbs.)
5. Determine the combinedweight of luggage and cargobeing loaded on the vehicle.That weight may not safely
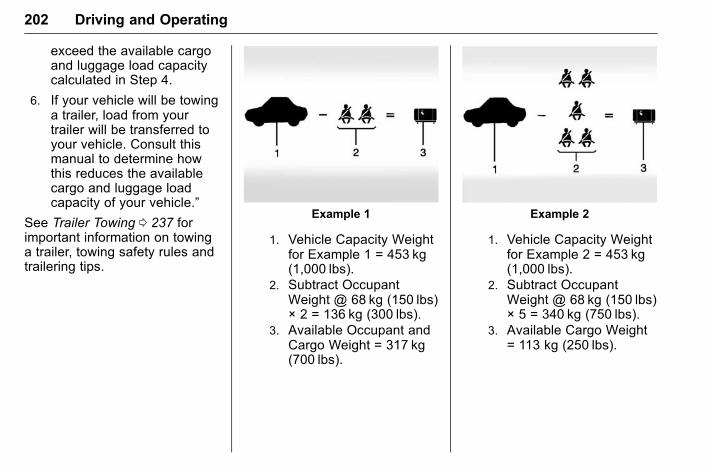
GMC Acadia/Acadia Denali Owner Manual (GMNA-Localizing-U.S./Canada/Mexico-9159268) - 2016 - CRC - 4/16/15
202 Driving and Operating
exceed the available cargoand luggage load capacitycalculated in Step 4.
6. If your vehicle will be towinga trailer, load from yourtrailer will be transferred toyour vehicle. Consult thismanual to determine howthis reduces the availablecargo and luggage loadcapacity of your vehicle.”
See Trailer Towing 0 237 forimportant information on towinga trailer, towing safety rules andtrailering tips.
Example 1
1. Vehicle Capacity Weightfor Example 1 = 453 kg(1,000 lbs).
2. Subtract OccupantWeight @ 68 kg (150 lbs)× 2 = 136 kg (300 lbs).
3. Available Occupant andCargo Weight = 317 kg(700 lbs).
Example 2
1. Vehicle Capacity Weightfor Example 2 = 453 kg(1,000 lbs).
2. Subtract OccupantWeight @ 68 kg (150 lbs)× 5 = 340 kg (750 lbs).
3. Available Cargo Weight= 113 kg (250 lbs).
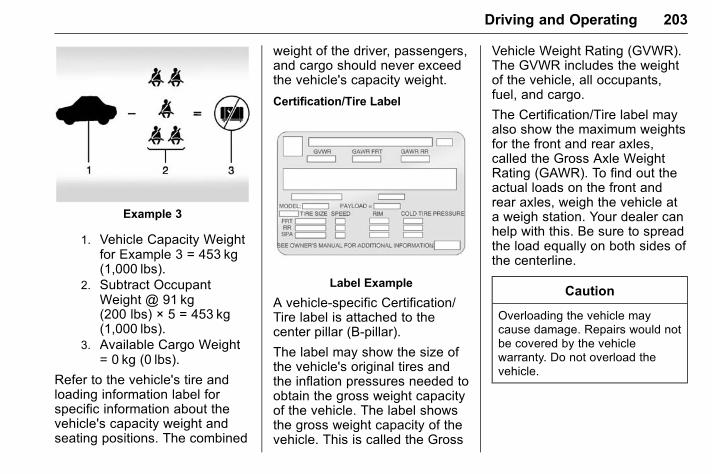
GMC Acadia/Acadia Denali Owner Manual (GMNA-Localizing-U.S./Canada/Mexico-9159268) - 2016 - CRC - 4/16/15
Driving and Operating 203
Example 3
1. Vehicle Capacity Weightfor Example 3 = 453 kg(1,000 lbs).
2. Subtract OccupantWeight @ 91 kg(200 lbs) × 5 = 453 kg(1,000 lbs).
3. Available Cargo Weight= 0 kg (0 lbs).
Refer to the vehicle's tire andloading information label forspecific information about thevehicle's capacity weight andseating positions. The combined
weight of the driver, passengers,and cargo should never exceedthe vehicle's capacity weight.
Certification/Tire Label
Label Example
A vehicle-specific Certification/Tire label is attached to thecenter pillar (B-pillar).
The label may show the size ofthe vehicle's original tires andthe inflation pressures needed toobtain the gross weight capacityof the vehicle. The label showsthe gross weight capacity of thevehicle. This is called the Gross
Vehicle Weight Rating (GVWR).The GVWR includes the weightof the vehicle, all occupants,fuel, and cargo.
The Certification/Tire label mayalso show the maximum weightsfor the front and rear axles,called the Gross Axle WeightRating (GAWR). To find out theactual loads on the front andrear axles, weigh the vehicle ata weigh station. Your dealer canhelp with this. Be sure to spreadthe load equally on both sides ofthe centerline.
Caution
Overloading the vehicle maycause damage. Repairs would notbe covered by the vehiclewarranty. Do not overload thevehicle.
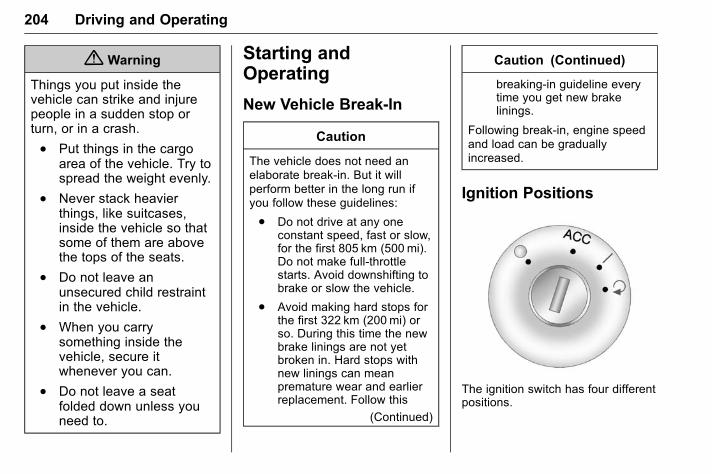
GMC Acadia/Acadia Denali Owner Manual (GMNA-Localizing-U.S./Canada/Mexico-9159268) - 2016 - CRC - 4/16/15
204 Driving and Operating
{ Warning
Things you put inside thevehicle can strike and injurepeople in a sudden stop orturn, or in a crash.
. Put things in the cargoarea of the vehicle. Try tospread the weight evenly.
. Never stack heavierthings, like suitcases,inside the vehicle so thatsome of them are abovethe tops of the seats.
. Do not leave anunsecured child restraintin the vehicle.
. When you carrysomething inside thevehicle, secure itwhenever you can.
. Do not leave a seatfolded down unless youneed to.
Starting andOperating
New Vehicle Break-In
Caution
The vehicle does not need anelaborate break-in. But it willperform better in the long run ifyou follow these guidelines:
. Do not drive at any oneconstant speed, fast or slow,for the first 805 km (500 mi).Do not make full-throttlestarts. Avoid downshifting tobrake or slow the vehicle.
. Avoid making hard stops forthe first 322 km (200mi) orso. During this time the newbrake linings are not yetbroken in. Hard stops withnew linings can meanpremature wear and earlierreplacement. Follow this
(Continued)
Caution (Continued)
breaking-in guideline everytime you get new brakelinings.
Following break-in, engine speedand load can be graduallyincreased.
Ignition Positions
The ignition switch has four differentpositions.
GMC Acadia/Acadia Denali Owner Manual (GMNA-Localizing-U.S./Canada/Mexico-9159268) - 2016 - CRC - 4/16/15
Driving and Operating 205
In order to shift out of P (Park), theignition must be in ON/RUN or ACC/ACCESSORY and the brake pedalmust be applied.
Caution
Using a tool to force the key toturn in the ignition could causedamage to the switch or break thekey. Use the correct key, makesure it is all the way in, and turn itonly with your hand. If the keycannot be turned by hand, seeyour dealer.
( (STOPPING THE ENGINE/LOCK/OFF) : When the vehicle isstopped, turn the ignition switch toLOCK/OFF to turn the engine off.Retained Accessory Power (RAP)will remain active. See RetainedAccessory Power (RAP) 0 208.
This position locks the ignition,transmission, and the steeringwheel when the key Is removedfrom the ignition. The key can beremoved in LOCK/OFF.
The steering can bind with thewheels turned off center. If thishappens, move the steering wheelfrom right to left while turning thekey to ACC/ACCESSORY. If thisdoes not work, then the vehicleneeds service.
Do not turn the engine off when thevehicle is moving. This will cause aloss of power assist in the brakeand steering systems and disablethe airbags.
If the vehicle must be shut off in anemergency:
1. Brake using a firm and steadypressure. Do not pump thebrakes repeatedly. This maydeplete power assist, requiringincreased brake pedal force.
2. Shift the vehicle to N (Neutral).This can be done while thevehicle is moving. After shiftingto N (Neutral), firmly apply thebrakes and steer the vehicle toa safe location.
3. Come to a complete stop, shiftto P (Park), and turn theignition to LOCK/OFF. On
vehicles with an automatictransmission, the shift levermust be in P (Park) to turn theignition switch to the LOCK/OFF position.
4. Set the parking brake. SeeParking Brake 0 216.
{ Warning
Turning off the vehicle whilemoving may cause loss of powerassist in the brake and steeringsystems and disable the airbags.While driving, only shut thevehicle off in an emergency.
If the vehicle cannot be pulled over,and must be shut off while driving,turn the ignition to ACC/ACCESSORY.
ACC (ACC/ACCESSORY) : This isthe position in which you canoperate the electrical accessories oritems plugged into the accessorypower outlets. This position unlocksthe ignition and steering wheel. Usethis position if the vehicle must bepushed or towed.

GMC Acadia/Acadia Denali Owner Manual (GMNA-Localizing-U.S./Canada/Mexico-9159268) - 2016 - CRC - 4/16/15
206 Driving and Operating
R (ON/RUN) : This position can beused to operate the electricalaccessories and to display someinstrument panel warning andindicator lights. This position canalso be used for service anddiagnostics, and to verify the properoperation of the malfunctionindicator lamp as may be requiredfor emission inspection purposes.The switch stays in this positionwhen the engine is running. Thetransmission is also unlocked in thisposition. If you leave the key in theACC/ACCESSORY or ON/RUNposition with the engine off, thebattery could be drained. You maynot be able to start the vehicle if thebattery is allowed to drain for anextended period of time.
/ (START) : This is the positionthat starts the engine. When theengine starts, release the key. Theignition switch will return to ON/RUNfor driving.
Key Lock Release
The vehicle has an electronic keylock release system. This system isto prevent ignition key removalunless the shift lever is in P (Park).
The key lock release will not work ifthe battery is charged less than9-volts, or uncharged. Try chargingor jump starting the battery. SeeJump Starting - North America0 305
Starting the EngineMove the shift lever to P (Park) orN (Neutral). The engine will not startin any other position. To restart theengine when the vehicle is alreadymoving, use N (Neutral) only.
Caution
Do not try to shift to P (Park) if thevehicle is moving. If you do, youcould damage the transmission.Shift to P (Park) only when thevehicle is stopped.
Caution
If you add electrical parts oraccessories, you could changethe way the engine operates. Anyresulting damage would not becovered by the vehicle warranty.See Add-On Electrical Equipment0 241.
Caution
If the steering wheel is turneduntil it reaches the end of itstravel, and is held in that positionwhile starting the vehicle, damagemay occur to the hydraulic powersteering system and there may beloss of power steering assist.
Starting Procedure
1. With your foot off theaccelerator pedal, turn theignition to START. When theengine starts, let go of the key.The idle speed will slow downas the engine warms. Do not
GMC Acadia/Acadia Denali Owner Manual (GMNA-Localizing-U.S./Canada/Mexico-9159268) - 2016 - CRC - 4/16/15
Driving and Operating 207
race the engine immediatelyafter starting it. Operate theengine and transmission gentlyto allow the oil to warm up andlubricate all moving parts.
Caution
Cranking the engine for longperiods of time, by returning theignition to the START positionimmediately after cranking hasended, can overheat and damagethe cranking motor, and drain thebattery. Wait at least 15 secondsbetween each try, to let thecranking motor cool down.
2. If the engine does not startafter five to 10 seconds,especially in very cold weather(below −18 °C or 0 °F), it couldbe flooded with too muchgasoline. Try pushing theaccelerator pedal all the way tothe floor and holding it there asyou hold the key in START forup to a maximum of15 seconds. Wait at least15 seconds between each try,
to allow the cranking motor tocool down. When the enginestarts, let go of the key andaccelerator. If the vehicle startsbriefly but then stops again,repeat these steps. This clearsthe extra gasoline from theengine. Do not race the engineimmediately after starting it.Operate the engine andtransmission gently until the oilwarms up and lubricates allmoving parts.
Engine HeaterThe engine coolant heater canprovide easier starting and betterfuel economy during enginewarm-up in cold weather conditionsat or below 0 °F (−18 °C). Vehicleswith an engine coolant heatershould be plugged in at least fourhours before starting. Some modelsmay have an internal thermostat inthe cord which will prevent enginecoolant heater operation attemperatures above 0 °F (−18 °C).
To Use the Engine CoolantHeater
1. Turn off the engine.
2. Open the hood and unwrap theelectrical cord. The bundledcord is located on the driverside of the enginecompartment, between theengine air cleaner and thewindshield washer fluidreservoir. See EngineCompartment Overview 0 246.
Check the heater cord fordamage. If it is damaged, donot use it. See your dealer fora replacement. Inspect thecord for damage yearly.
3. Plug the cord into a normal,grounded 110-volt AC outlet.
GMC Acadia/Acadia Denali Owner Manual (GMNA-Localizing-U.S./Canada/Mexico-9159268) - 2016 - CRC - 4/16/15
208 Driving and Operating
{ Warning
Improper use of the heater cordor an extension cord can damagethe cord and may result inoverheating and fire.
. Plug the cord into athree-prong electrical utilityreceptacle that is protectedby a ground fault detectionfunction. An ungroundedoutlet could cause anelectric shock.
. Use a weatherproof,heavy-duty, 15 amp-ratedextension cord if needed.Failure to use therecommended extensioncord in good operatingcondition, or using adamaged heater orextension cord, could make
(Continued)
Warning (Continued)
it overheat and cause a fire,property damage, electricshock, and injury.
. Do not operate the vehiclewith the heater cordpermanently attached to thevehicle. Possible heatercord and thermostatdamage could occur.
. While in use, do not let theheater cord touch vehicleparts or sharp edges. Neverclose the hood on theheater cord.
. Before starting the vehicle,unplug the cord, reattachthe cover to the plug, andsecurely fasten the cord.Keep the cord away fromany moving parts.
4. Before starting the engine, besure to unplug and store thecord as it was before to keep it
away from moving engineparts. If you do not, it could bedamaged.
The length of time the heater shouldremain plugged in depends onseveral factors. Ask a dealer in thearea where you will be parking thevehicle for the best advice on this.
Retained AccessoryPower (RAP)These vehicle accessories can beused for up to 10 minutes after theignition key is turned off:
. Audio System
. Power Windows
. Sunroof (if equipped)
Power to the windows and sunroofwill work up to 10 minutes or until adoor is opened.
The radio continues to work for10 minutes or until the driver door isopened.
For an additional 10 minutes ofoperation, close all the doors andturn the key to ON/RUN and thenback to LOCK/OFF.
GMC Acadia/Acadia Denali Owner Manual (GMNA-Localizing-U.S./Canada/Mexico-9159268) - 2016 - CRC - 4/16/15
Driving and Operating 209
All these features will work when thekey is in the ON/RUN or ACC/ACCESSORY positions.
Shifting Into Park1. Hold the brake pedal down and
set the parking brake. SeeParking Brake 0 216 for moreinformation.
2. Move the shift lever intoP (Park) by holding in thebutton on the shift lever andpushing the shift lever all theway toward the front of thevehicle.
3. Turn the ignition key toLOCK/OFF.
4. Remove the key and take itwith you. If you can leave thevehicle with the ignition key inyour hand, the vehicle is inP (Park).
Leaving the Vehicle with theEngine Running
{ Warning
It can be dangerous to leave thevehicle with the engine running.It could overheat and catch fire.
It is dangerous to get out of thevehicle if the shift lever is not fullyin P (Park) with the parking brakefirmly set. The vehicle can roll.
Do not leave the vehicle when theengine is running. If you have leftthe engine running, the vehiclecan move suddenly. You or otherscould be injured. To be sure thevehicle will not move, even whenyou are on fairly level ground,always set the parking brake andmove the shift lever to P (Park).See Shifting Into Park 0 209.If you are towing a trailer, seeDriving Characteristics andTowing Tips 0 234.
If you have to leave the vehicle withthe engine running, be sure thevehicle is in P (Park) and theparking brake is firmly set beforeyou leave it. After you have movedthe shift lever into P (Park), hold theregular brake pedal down. Then,see if you can move the shift leveraway from P (Park) without firstpushing the button.
If you can, it means that the shiftlever was not fully locked inP (Park).
Torque Lock
Torque lock is when the weight ofthe vehicle puts too much force onthe parking pawl in thetransmission. This happens whenparking on a hill and shifting thetransmission into P (Park) is notdone properly and then it is difficultto shift out of P (Park). To preventtorque lock, set the parking brakeand then shift into P (Park). To findout how, see “Shifting Into Park”listed previously.
GMC Acadia/Acadia Denali Owner Manual (GMNA-Localizing-U.S./Canada/Mexico-9159268) - 2016 - CRC - 4/16/15
210 Driving and Operating
If torque lock does occur, yourvehicle may need to be pusheduphill by another vehicle to relievethe parking pawl pressure, so youcan shift out of P (Park).
Shifting out of ParkThe vehicle is equipped with anelectronic shift lock release system.The shift lock release isdesigned to:
. Prevent ignition key removalunless the shift lever is inP (Park) with the shift leverbutton fully released, and
. Prevent movement of the shiftlever out of P (Park), unless theignition is in ON/RUN or ACC/ACCESSORY and the regularbrake pedal is applied.
The shift lock release is alwaysfunctional except in the case of anuncharged or low voltage (less than9-volt) battery.
If the vehicle has an unchargedbattery or a battery with low voltage,try charging or jump starting thebattery. See Jump Starting - NorthAmerica 0 305 for more information.
To shift out of P (Park):
1. Place the ignition in ON/RUN.
2. Apply the brake pedal.
3. Press the shift lever button.
4. Move the shift lever to thedesired position.
If you still are unable to shift out ofP (Park):
1. Fully release the shift leverbutton.
2. While holding down the brakepedal, press the shift leverbutton again.
3. Move the shift lever to thedesired position.
If you still cannot move the shiftlever from P (Park), see your dealer.
Parking over ThingsThat Burn
{ Warning
Things that can burn could touchhot exhaust parts under thevehicle and ignite. Do not parkover papers, leaves, dry grass,or other things that can burn.
GMC Acadia/Acadia Denali Owner Manual (GMNA-Localizing-U.S./Canada/Mexico-9159268) - 2016 - CRC - 4/16/15
Driving and Operating 211
Engine Exhaust
{ Warning
Engine exhaust contains carbonmonoxide (CO) which cannot beseen or smelled. Exposure to COcan cause unconsciousness andeven death.
Exhaust may enter the vehicle if:
. The vehicle idles in areaswith poor ventilation(parking garages, tunnels,deep snow that may blockunderbody airflow or tailpipes).
. The exhaust smells orsounds strange or different.
. The exhaust system leaksdue to corrosion or damage.
. The vehicle exhaust systemhas been modified,damaged, or improperlyrepaired.
(Continued)
Warning (Continued)
. There are holes or openingsin the vehicle body fromdamage or aftermarketmodifications that are notcompletely sealed.
If unusual fumes are detected orif it is suspected that exhaust iscoming into the vehicle:
. Drive it only with thewindows completely down.
. Have the vehicle repairedimmediately.
Never park the vehicle with theengine running in an enclosedarea such as a garage or abuilding that has no fresh airventilation.
Running the VehicleWhile ParkedIt is better not to park with theengine running.
If the vehicle is left with the enginerunning, follow the proper steps tobe sure the vehicle will not move.See Shifting Into Park 0 209 andEngine Exhaust 0 211.
If parking on a hill and pulling atrailer, see Driving Characteristicsand Towing Tips 0 234.
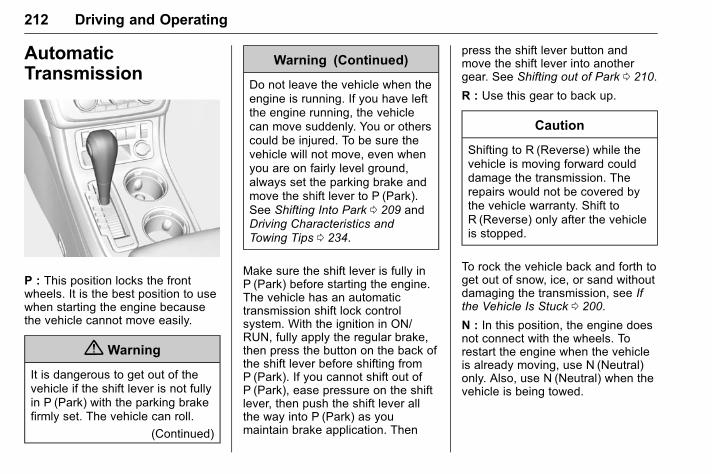
GMC Acadia/Acadia Denali Owner Manual (GMNA-Localizing-U.S./Canada/Mexico-9159268) - 2016 - CRC - 4/16/15
212 Driving and Operating
AutomaticTransmission
P : This position locks the frontwheels. It is the best position to usewhen starting the engine becausethe vehicle cannot move easily.
{ Warning
It is dangerous to get out of thevehicle if the shift lever is not fullyin P (Park) with the parking brakefirmly set. The vehicle can roll.
(Continued)
Warning (Continued)
Do not leave the vehicle when theengine is running. If you have leftthe engine running, the vehiclecan move suddenly. You or otherscould be injured. To be sure thevehicle will not move, even whenyou are on fairly level ground,always set the parking brake andmove the shift lever to P (Park).See Shifting Into Park 0 209 andDriving Characteristics andTowing Tips 0 234.
Make sure the shift lever is fully inP (Park) before starting the engine.The vehicle has an automatictransmission shift lock controlsystem. With the ignition in ON/RUN, fully apply the regular brake,then press the button on the back ofthe shift lever before shifting fromP (Park). If you cannot shift out ofP (Park), ease pressure on the shiftlever, then push the shift lever allthe way into P (Park) as youmaintain brake application. Then
press the shift lever button andmove the shift lever into anothergear. See Shifting out of Park 0 210.
R : Use this gear to back up.
Caution
Shifting to R (Reverse) while thevehicle is moving forward coulddamage the transmission. Therepairs would not be covered bythe vehicle warranty. Shift toR (Reverse) only after the vehicleis stopped.
To rock the vehicle back and forth toget out of snow, ice, or sand withoutdamaging the transmission, see Ifthe Vehicle Is Stuck 0 200.
N : In this position, the engine doesnot connect with the wheels. Torestart the engine when the vehicleis already moving, use N (Neutral)only. Also, use N (Neutral) when thevehicle is being towed.
GMC Acadia/Acadia Denali Owner Manual (GMNA-Localizing-U.S./Canada/Mexico-9159268) - 2016 - CRC - 4/16/15
Driving and Operating 213
{ Warning
Shifting into a drive gear while theengine is running at high speed isdangerous. Unless your foot isfirmly on the brake pedal, thevehicle could move very rapidly.You could lose control and hitpeople or objects. Do not shiftinto a drive gear while the engineis running at high speed.
Caution
Shifting out of P (Park) orN (Neutral) with the enginerunning at high speed maydamage the transmission. Therepairs would not be covered bythe vehicle warranty. Be sure theengine is not running at highspeed when shifting the vehicle.
D : This position is for normaldriving. It provides the best fueleconomy. If you need more powerfor passing, and you are:
. Going less than 56 km/h(35 mph), push the acceleratorpedal about halfway down.
. Going about 56 km/h (35 mph) ormore, push the accelerator allthe way down.
Caution
If the vehicle accelerates slowly,or does not shift gears, thetransmission could be damaged.Have the vehicle servicedright away.
If the vehicle is stopped on a hill,with your foot off the brake pedal,the vehicle may roll. This is normaland is due to the torque converterdesigned to improve fuel economyand performance. Use the brake tohold the vehicle on a hill. Do not usethe accelerator pedal.
L : This position gives you accessto gear ranges. This provides moreengine braking but lower fueleconomy than D (Drive). You canuse it on very steep hills, or in deepsnow or mud. See Manual Mode0 213.
Manual Mode
Electronic Range Select(ERS) Mode
ERS mode allows you to choose thetop-gear limit of the transmissionand the vehicle's speed whiledriving downhill or towing a trailer.The vehicle has an electronic shiftposition indicator within theinstrument cluster. When using theERS mode a number will displaynext to the L, indicating the currentgear that has been selected.

GMC Acadia/Acadia Denali Owner Manual (GMNA-Localizing-U.S./Canada/Mexico-9159268) - 2016 - CRC - 4/16/15
214 Driving and Operating
To use this feature:
1. Move the shift lever to L (Low).
2. Press the + (Plus)/− (Minus)button on the shift lever, toincrease or decrease the gearrange available.
When you shift from D (Drive) toL (Low), the transmission will shift toa pre-determined lower gear range.The highest gear available for thispre-determined range is displayednext to the L in the DIC. See DriverInformation Center (DIC) 0 122. Thenumber displayed in the DIC is thehighest gear that the transmissionwill be allowed to operate in. Thismeans that all gears below that
number are available. For example,when 4 (Fourth) is shown next to theL, 1 (First) through 4 (Fourth) gearsare automatically shifted by thevehicle. The transmission will notshift into 5 (Fifth) until the + (Plus)button is used or you shift back intoD (Drive).
While in L (Low), the transmissionwill prevent shifting to a lower gearrange if the engine speed is toohigh. You have a brief period of timeto slow the vehicle. If vehicle speedis not reduced within the timeallowed, the lower gear range shiftwill not be completed. You mustfurther slow the vehicle, then pressthe − (Minus) button to the desiredlower gear range.
Automatic Engine Grade Braking isnot available when the ERS isactive. It is available in D (Drive) forboth normal and Tow/Haul mode.While using the ERS, cruise controland the Tow/Haul mode can beused. See “Tow/Haul Mode”following.
Tow/Haul Mode_ (Tow/Haul) : If equipped withTow/Haul mode, the button is on thecenter stack under the climatecontrols.
Press the button to activate thesystem. Press it again to deactivatethe system. This feature can assistwhen towing or hauling aheavy load.
When Tow/Haul is activated, theTow/Haul symbol will come on in theinstrument cluster. See DrivingCharacteristics and Towing Tips0 234.
Automatic Engine GradeBraking
Automatic Engine Grade Brakingassists when driving on a downhillgrade. It maintains vehicle speed byautomatically implementing a shiftschedule that uses the engine andthe transmission to slow the vehicle.The system will automaticallycommand downshifts to reducevehicle speed, until the brake pedalis no longer being pressed.
GMC Acadia/Acadia Denali Owner Manual (GMNA-Localizing-U.S./Canada/Mexico-9159268) - 2016 - CRC - 4/16/15
Driving and Operating 215
While in the Electronic RangeSelect (ERS) mode, grade brakingis deactivated, allowing the driver toselect a range and limiting thehighest gear available. Gradebraking is available for normaldriving and in Tow/Haul mode.
See Automatic Transmission 0 212.
Drive Systems
All-Wheel DriveVehicles with this feature transferengine power, as required, to allfour wheels. It is fully automatic, andadjusts itself as needed for roadconditions.
When using a compact spare tire onan AWD vehicle, the systemautomatically detects the compactspare and reduces AWDperformance to protect the system.To restore full AWD operation andprevent excessive wear on thesystem, replace the compact sparewith a full-size tire as soon aspossible. See Compact Spare Tire0 304.
Brakes
Antilock BrakeSystem (ABS)This vehicle has ABS, an advancedelectronic braking system that helpsprevent a braking skid.
When the vehicle begins to driveaway, ABS checks itself.A momentary motor or clicking noisemight be heard while this test isgoing on, and it might even benoticed that the brake pedal movesa little. This is normal.
If there is a problem with ABS, thiswarning light stays on. See AntilockBrake System (ABS) Warning Light0 118.
If driving safely on a wet road and itbecomes necessary to slam on thebrakes and continue braking to
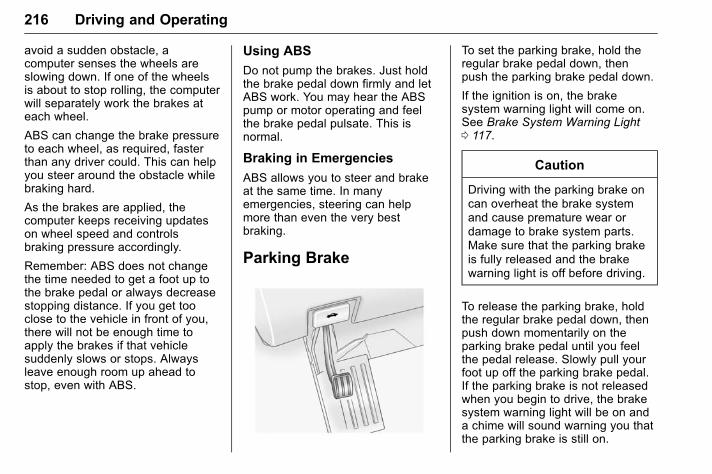
GMC Acadia/Acadia Denali Owner Manual (GMNA-Localizing-U.S./Canada/Mexico-9159268) - 2016 - CRC - 4/16/15
216 Driving and Operating
avoid a sudden obstacle, acomputer senses the wheels areslowing down. If one of the wheelsis about to stop rolling, the computerwill separately work the brakes ateach wheel.
ABS can change the brake pressureto each wheel, as required, fasterthan any driver could. This can helpyou steer around the obstacle whilebraking hard.
As the brakes are applied, thecomputer keeps receiving updateson wheel speed and controlsbraking pressure accordingly.
Remember: ABS does not changethe time needed to get a foot up tothe brake pedal or always decreasestopping distance. If you get tooclose to the vehicle in front of you,there will not be enough time toapply the brakes if that vehiclesuddenly slows or stops. Alwaysleave enough room up ahead tostop, even with ABS.
Using ABS
Do not pump the brakes. Just holdthe brake pedal down firmly and letABS work. You may hear the ABSpump or motor operating and feelthe brake pedal pulsate. This isnormal.
Braking in Emergencies
ABS allows you to steer and brakeat the same time. In manyemergencies, steering can helpmore than even the very bestbraking.
Parking Brake
To set the parking brake, hold theregular brake pedal down, thenpush the parking brake pedal down.
If the ignition is on, the brakesystem warning light will come on.See Brake System Warning Light0 117.
Caution
Driving with the parking brake oncan overheat the brake systemand cause premature wear ordamage to brake system parts.Make sure that the parking brakeis fully released and the brakewarning light is off before driving.
To release the parking brake, holdthe regular brake pedal down, thenpush down momentarily on theparking brake pedal until you feelthe pedal release. Slowly pull yourfoot up off the parking brake pedal.If the parking brake is not releasedwhen you begin to drive, the brakesystem warning light will be on anda chime will sound warning you thatthe parking brake is still on.

GMC Acadia/Acadia Denali Owner Manual (GMNA-Localizing-U.S./Canada/Mexico-9159268) - 2016 - CRC - 4/16/15
Driving and Operating 217
If you are towing a trailer and areparking on a hill, see DrivingCharacteristics and Towing Tips0 234.
Brake AssistThe Brake Assist feature isdesigned to assist the driver instopping or decreasing vehiclespeed in emergency drivingconditions. This feature uses thestability system hydraulic brakecontrol module to supplement thepower brake system underconditions where the driver hasquickly and forcefully applied thebrake pedal in an attempt to quicklystop or slow down the vehicle. Thestability system hydraulic brakecontrol module increases brakepressure at each corner of thevehicle until the ABS activates.Minor brake pedal pulsation orpedal movement during this time isnormal and the driver shouldcontinue to apply the brake pedal asthe driving situation dictates. TheBrake Assist feature willautomatically disengage when the
brake pedal is released or brakepedal pressure is quicklydecreased.
Hill Start Assist (HSA)This vehicle has an HSA feature,which may be useful when thevehicle is stopped on a gradesufficient enough to activate HSA.This feature is designed to preventthe vehicle from rolling, eitherforward or rearward, during vehicledrive off. After the driver completelystops and holds the vehicle in acomplete standstill on a grade, HSAwill be automatically activated.During the transition period betweenwhen the driver releases the brakepedal and starts to accelerate todrive off on a grade, HSA holds thebraking pressure for a maximum oftwo seconds to ensure that there isno rolling. The brakes willautomatically release when theaccelerator pedal is applied withinthe two-second window. It will notactivate if the vehicle is in a drivegear and facing downhill, or if thevehicle is facing uphill and inR (Reverse).
Ride Control Systems
Traction Control/Electronic StabilityControl
System Operation
The vehicle has a Traction ControlSystem (TCS) and StabiliTrak®, anelectronic stability control system.These systems help limit wheel slipand assist the driver in maintainingcontrol, especially on slippery roadconditions.
TCS activates if it senses that anyof the drive wheels are spinning orbeginning to lose traction. When thishappens, TCS applies the brakes tothe spinning wheels and reducesengine power to limit wheel spin.
StabiliTrak activates when thevehicle senses a difference betweenthe intended path and the directionthe vehicle is actually traveling.StabiliTrak selectively appliesbraking pressure to any one of the
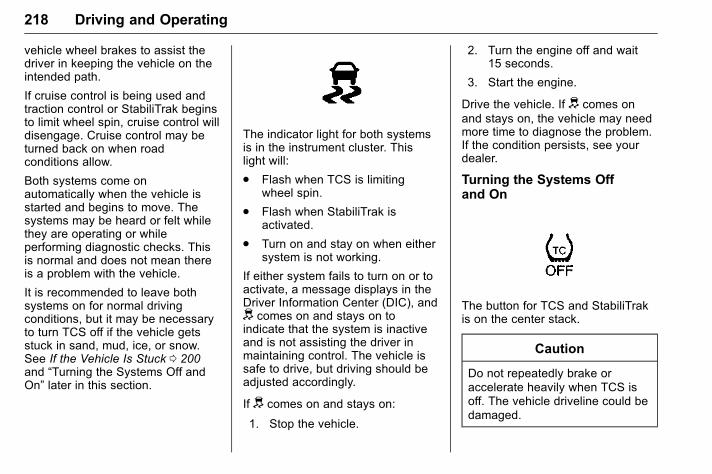
GMC Acadia/Acadia Denali Owner Manual (GMNA-Localizing-U.S./Canada/Mexico-9159268) - 2016 - CRC - 4/16/15
218 Driving and Operating
vehicle wheel brakes to assist thedriver in keeping the vehicle on theintended path.
If cruise control is being used andtraction control or StabiliTrak beginsto limit wheel spin, cruise control willdisengage. Cruise control may beturned back on when roadconditions allow.
Both systems come onautomatically when the vehicle isstarted and begins to move. Thesystems may be heard or felt whilethey are operating or whileperforming diagnostic checks. Thisis normal and does not mean thereis a problem with the vehicle.
It is recommended to leave bothsystems on for normal drivingconditions, but it may be necessaryto turn TCS off if the vehicle getsstuck in sand, mud, ice, or snow.See If the Vehicle Is Stuck 0 200and “Turning the Systems Off andOn” later in this section.
The indicator light for both systemsis in the instrument cluster. Thislight will:
. Flash when TCS is limitingwheel spin.
. Flash when StabiliTrak isactivated.
. Turn on and stay on when eithersystem is not working.
If either system fails to turn on or toactivate, a message displays in theDriver Information Center (DIC), andd comes on and stays on toindicate that the system is inactiveand is not assisting the driver inmaintaining control. The vehicle issafe to drive, but driving should beadjusted accordingly.
If d comes on and stays on:
1. Stop the vehicle.
2. Turn the engine off and wait15 seconds.
3. Start the engine.
Drive the vehicle. If d comes onand stays on, the vehicle may needmore time to diagnose the problem.If the condition persists, see yourdealer.
Turning the Systems Offand On
The button for TCS and StabiliTrakis on the center stack.
Caution
Do not repeatedly brake oraccelerate heavily when TCS isoff. The vehicle driveline could bedamaged.
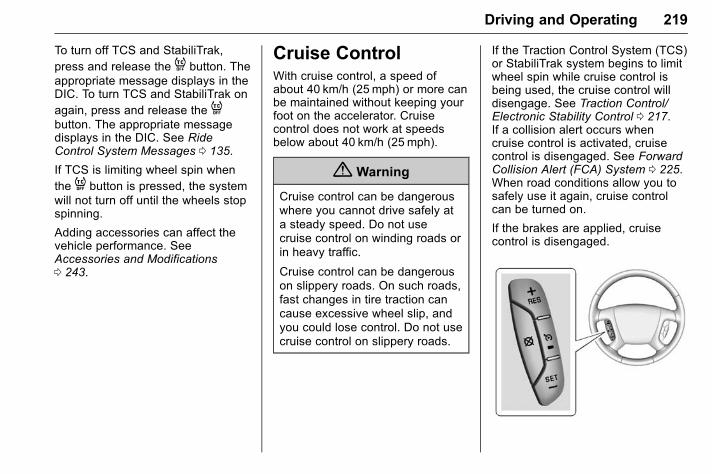
GMC Acadia/Acadia Denali Owner Manual (GMNA-Localizing-U.S./Canada/Mexico-9159268) - 2016 - CRC - 4/16/15
Driving and Operating 219
To turn off TCS and StabiliTrak,press and release the 4 button. Theappropriate message displays in theDIC. To turn TCS and StabiliTrak onagain, press and release the 4button. The appropriate messagedisplays in the DIC. See RideControl System Messages 0 135.
If TCS is limiting wheel spin whenthe 4 button is pressed, the systemwill not turn off until the wheels stopspinning.
Adding accessories can affect thevehicle performance. SeeAccessories and Modifications0 243.
Cruise ControlWith cruise control, a speed ofabout 40 km/h (25 mph) or more canbe maintained without keeping yourfoot on the accelerator. Cruisecontrol does not work at speedsbelow about 40 km/h (25 mph).
{ Warning
Cruise control can be dangerouswhere you cannot drive safely ata steady speed. Do not usecruise control on winding roads orin heavy traffic.
Cruise control can be dangerouson slippery roads. On such roads,fast changes in tire traction cancause excessive wheel slip, andyou could lose control. Do not usecruise control on slippery roads.
If the Traction Control System (TCS)or StabiliTrak system begins to limitwheel spin while cruise control isbeing used, the cruise control willdisengage. See Traction Control/Electronic Stability Control 0 217.If a collision alert occurs whencruise control is activated, cruisecontrol is disengaged. See ForwardCollision Alert (FCA) System 0 225.When road conditions allow you tosafely use it again, cruise controlcan be turned on.
If the brakes are applied, cruisecontrol is disengaged.
GMC Acadia/Acadia Denali Owner Manual (GMNA-Localizing-U.S./Canada/Mexico-9159268) - 2016 - CRC - 4/16/15
220 Driving and Operating
I (On/Off) : Press to turn cruisecontrol on or off. The indicator lighton the button comes on when thecruise control is on.
+RES (Resume/Accelerate) : Ifthere is a set speed in memory,press briefly to resume to thatspeed or press and hold toaccelerate. If cruise control isalready active, use to increasevehicle speed.
SET– : Press briefly to set thespeed and activate cruise control.If cruise control is already active,use to decrease vehicle speed.
[ (Cancel) : Press to disengagecruise control without erasing theset speed from memory.
Setting Cruise Control
IfI is on when not in use, SET–or +RES could get pressed and gointo cruise when not desired. KeepI off when cruise is notbeing used.
The cruise control light on theinstrument cluster comes on afterthe cruise control has been set tothe desired speed.
1. PressI to turn the cruisecontrol system on.
2. Get up to the desired speed.
3. Press and release SET–.
4. Remove foot from theaccelerator.
Resuming a Set Speed
If the cruise control is set at adesired speed and then the brakesare applied or [ is pressed, thecruise control is disengaged withouterasing the set speed from memory.
Once the vehicle reaches 40 km/h(25 mph) or more, press +RES. Thevehicle returns to the previously setspeed.
Increasing Speed While UsingCruise Control
If the cruise control system isalready activated:
. Press and hold +RES until thedesired speed is reached, thenrelease it.
. To increase vehicle speed insmall increments, press +RESbriefly. For each press, thevehicle goes about 1.6 km/h(1 mph) faster.
The speedometer reading can bedisplayed in either English or metricunits. See Driver Information Center(DIC) 0 122. The increment valueused depends on the unitsdisplayed.
Reducing Speed While UsingCruise Control
If the cruise control system isalready activated:
. Press and hold SET– until thedesired lower speed is reached,then release it.

GMC Acadia/Acadia Denali Owner Manual (GMNA-Localizing-U.S./Canada/Mexico-9159268) - 2016 - CRC - 4/16/15
Driving and Operating 221
. To slow down in smallincrements, press SET– briefly.For each press, the vehicle goesabout 1.6 km/h (1 mph) slower.
The speedometer reading can bedisplayed in either English or metricunits. See Driver Information Center(DIC) 0 122. The increment valueused depends on the unitsdisplayed.
Passing Another Vehicle WhileUsing Cruise Control
Use the accelerator pedal toincrease the vehicle speed. Whenyou take your foot off the pedal, thevehicle will slow down to thepreviously set cruise speed. Whilepressing the accelerator pedal orshortly following the release tooverride cruise control, brieflypressing SET– will result in cruisecontrol set to the current vehiclespeed.
Using Cruise Control on Hills
How well the cruise control will workon hills depends upon the vehiclespeed, load, and the steepness ofthe hills. When going up steep hills,
you might have to step on theaccelerator pedal to maintain yourspeed. When going downhill, youmight have to brake or shift to alower gear to keep your speeddown. If the brake pedal is appliedcruise control will disengage.
Ending Cruise Control
There are four ways to end cruisecontrol:
. Step lightly on the brake pedal.
. Press [.
. Shift the transmission toN (Neutral).
. To turn off the cruise control,pressI.
Erasing Speed Memory
The cruise control set speed iserased from memory if I ispressed or the ignition is turned off.
Driver AssistanceSystems
Rear VisionCamera (RVC)The vehicle may have an RVCsystem. Read this entire sectionbefore using it.
{ Warning
The camera(s) do not displaychildren, pedestrians, bicyclists,crossing traffic, animals, or anyother object outside of thecameras’ field of view, below thebumper, or under the vehicle.Shown distances may be differentfrom actual distances. Do notdrive or park the vehicle usingonly these camera(s). Alwayscheck behind and around thevehicle before driving. Failure touse proper care may result ininjury, death, or vehicle damage.
GMC Acadia/Acadia Denali Owner Manual (GMNA-Localizing-U.S./Canada/Mexico-9159268) - 2016 - CRC - 4/16/15
222 Driving and Operating
The RVC system is designed tohelp the driver when backing up bydisplaying a view of the area behindthe vehicle. When the driver shiftsthe vehicle into R (Reverse), thevideo image automatically appearson the infotainment screen. Oncethe driver shifts out of R (Reverse),the screen will go back to the lastscreen that had been displayed,after a delay.
The RVC display remains on aftershifting out of R (Reverse) forapproximately 10 seconds. Return tothe previous screen sooner byperforming one of the following:
. Press a hard key on theinfotainment system.
. Shift into P (Park).
. Reach a vehicle speed of8 km/h (5 mph).
Symbols and Guidelines
The RVC system may have afeature that lets the driver viewcaution symbols on the RVC screenwhile using the RVC. The Rear
Parking Assist (RPA) system mustnot be disabled to use thesesymbols. See Parking Assist 0 223.
The caution symbols appear whenan object has been detected by theRPA system. The symbol may coverthe object when viewing the RVCscreen.
The RVC system may have aguideline overlay that can help thedriver align the vehicle whenbacking into a parking spot.
To turn the symbols and guidelineson or off:
1. Shift into P (Park).
2. Press Settings on the Homescreen of the infotainmentsystem.
3. Select Display and then RearCamera.
4. Select Symbols or Guidelines.When a checkmark appearsnext to the item, it is on.
Rear Cross Traffic Alert (RCTA)
On vehicles with RCTA, a redwarning triangle with an arrow mayalso display on the RVC screen to
warn of traffic coming from eitherdirection, behind the vehicle. Whenan object is detected, three beepssound on the left or right side,depending on the direction of thedetected vehicle. This systemdetects objects coming from up to20 m (65 ft) from the left or right sidebehind the vehicle.
Use caution while backing up whentowing a trailer, as the RCTAdetection zones that extend outfrom the back of your vehicle do notmove further back when a trailer istowed.
The RCTA system can be disabledthrough the Driver InformationCenter (DIC). See DriverInformation Center (DIC) 0 122.
Rear Vision Camera Location
The camera is located above thelicense plate.
The area displayed by the camera islimited and does not display objectsthat are close to either corner orunder the bumper. The areadisplayed can vary depending onvehicle orientation or road
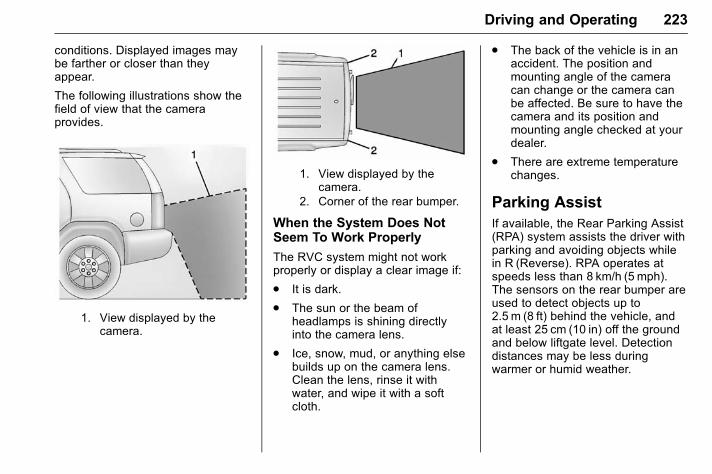
GMC Acadia/Acadia Denali Owner Manual (GMNA-Localizing-U.S./Canada/Mexico-9159268) - 2016 - CRC - 4/16/15
Driving and Operating 223
conditions. Displayed images maybe farther or closer than theyappear.
The following illustrations show thefield of view that the cameraprovides.
1. View displayed by thecamera.
1. View displayed by thecamera.
2. Corner of the rear bumper.
When the System Does NotSeem To Work Properly
The RVC system might not workproperly or display a clear image if:
. It is dark.
. The sun or the beam ofheadlamps is shining directlyinto the camera lens.
. Ice, snow, mud, or anything elsebuilds up on the camera lens.Clean the lens, rinse it withwater, and wipe it with a softcloth.
. The back of the vehicle is in anaccident. The position andmounting angle of the cameracan change or the camera canbe affected. Be sure to have thecamera and its position andmounting angle checked at yourdealer.
. There are extreme temperaturechanges.
Parking AssistIf available, the Rear Parking Assist(RPA) system assists the driver withparking and avoiding objects whilein R (Reverse). RPA operates atspeeds less than 8 km/h (5 mph).The sensors on the rear bumper areused to detect objects up to2.5 m (8 ft) behind the vehicle, andat least 25 cm (10 in) off the groundand below liftgate level. Detectiondistances may be less duringwarmer or humid weather.
GMC Acadia/Acadia Denali Owner Manual (GMNA-Localizing-U.S./Canada/Mexico-9159268) - 2016 - CRC - 4/16/15
224 Driving and Operating
{ Warning
The parking assist system doesnot detect children, pedestrians,bicyclists, animals, or objectsbelow the bumper or that are tooclose or too far from the vehicle.It is not available at speedsgreater than 8 km/h (5 mph). Toprevent injury, death, or vehicledamage, even with parking assist,always check the area around thevehicle and check all mirrorsbefore backing.
How the System Works
RPA comes on automatically whenthe shift lever is moved intoR (Reverse). A single beep soundsto indicate the system is working.
An obstacle is indicated by audiblebeeps. The interval between thebeeps becomes shorter as thevehicle gets closer to the obstacle.When the distance is less than30 cm (12 in) the beeping iscontinuous for five seconds.
Turning the System On and Off
The system can be disabled throughthe Driver Information Center (DIC).See “Park Assist” under DriverInformation Center (DIC) 0 122.
Turn off RPA when towing a trailer.
RPA defaults to the on setting eachtime the vehicle is started.
When the System Does NotSeem to Work Properly
The following messages may bedisplayed on the DIC:
SERVICE PARK ASSIST : If thismessage occurs, take the vehicle toyour dealer to repair the system.
PARK ASST BLOCKED SEEOWNERS MANUAL : Thismessage can occur under thefollowing conditions:
. The sensors are not clean. Keepthe vehicle's rear bumper free ofmud, dirt, snow, ice, and slush.For cleaning instructions, seeExterior Care 0 312.
. The sensors are covered byfrost or ice. Frost or ice can formaround and behind the sensorsand may not always be seen;this can occur after washing thevehicle in cold weather. Themessage may not clear until thefrost or ice has melted.
. A trailer was attached to thevehicle, or an object washanging out of the liftgate duringthe last drive cycle. Once theobject is removed, RPA willreturn to normal operation.
. A tow bar is attached to thevehicle.
. The bumper is damaged. Takethe vehicle to your dealer torepair the system.
. Other conditions, such asvibrations from a jackhammer orthe compression of air brakes ona very large truck, are affectingsystem performance.
GMC Acadia/Acadia Denali Owner Manual (GMNA-Localizing-U.S./Canada/Mexico-9159268) - 2016 - CRC - 4/16/15
Driving and Operating 225
Forward Collision Alert(FCA) SystemIf equipped, the FCA system mayhelp to avoid or reduce the harmcaused by front-end crashes. Whenapproaching a vehicle ahead tooquickly, FCA provides a red flashingvisual alert on the windshield andrapidly beeps. FCA also lights anamber visual alert if followinganother vehicle much too closely.
FCA detects vehicles within adistance of approximately 60 m(197 ft) and operates at speedsabove 40 km/h (25 mph).
{ Warning
FCA is a warning system anddoes not apply the brakes. Whenapproaching a slower-moving orstopped vehicle ahead too rapidly,or when following a vehicle tooclosely, FCA may not provide awarning with enough time to helpavoid a crash. FCA does not warnof pedestrians, animals, signs,
(Continued)
Warning (Continued)
guardrails, bridges, constructionbarrels, or other objects. Be readyto take action and apply thebrakes. For more information, seeDefensive Driving 0 194.
FCA can be disabled with the[button on the center stack.
Detecting the Vehicle Ahead
FCA warnings will not occur unlessthe FCA system detects a vehicleahead. When a vehicle is detected,the vehicle ahead indicator willdisplay green. Vehicles may not bedetected on curves, highway exitramps, or hills, due to poor visibility;or if a vehicle ahead is partiallyblocked by pedestrians or other
objects. FCA will not detect anothervehicle ahead until it is completelyin the driving lane.
{ Warning
FCA does not provide a warningto help avoid a crash, unless itdetects a vehicle. FCA may notdetect a vehicle ahead if the FCAsensor is blocked by dirt, snow,or ice, or if the windshield isdamaged. It may also not detect avehicle on winding or hilly roads,or in conditions that can limitvisibility such as fog, rain,or snow, or if the headlamps orwindshield are not cleaned or inproper condition. Keep thewindshield, headlamps, and FCAsensors clean and in good repair.

GMC Acadia/Acadia Denali Owner Manual (GMNA-Localizing-U.S./Canada/Mexico-9159268) - 2016 - CRC - 4/16/15
226 Driving and Operating
Collision Alert
Without HUD
With HUD
When your vehicle approachesanother detected vehicle too rapidly,the red FCA display will flash on thewindshield. Also, eight rapidhigh-pitched beeps will sound fromthe front. When this Collision Alertoccurs, the brake system mayprepare for driver braking to occurmore rapidly which can cause abrief, mild deceleration. Continue toapply the brake pedal as needed.
Tailgating Alert
The vehicle ahead indicator willdisplay amber if following a detectedvehicle ahead much too closely.
Selecting the Alert Timing
The Collision Alert button is on thecenter stack. Press[ to set thealert timing to far, medium, near,or off. The first button press showsthe current control setting on theDIC. Additional button presses willchange this setting. The chosensetting will remain until it is changedand will affect both the CollisionAlert and the Tailgating Alertfeatures. The timing of both alertswill vary based on vehicle speed.The faster the vehicle speed, thefarther away the alert will occur.Consider traffic and weatherconditions when selecting the alert
timing. The range of selectable alerttimings may not be appropriate forall drivers and driving conditions.
Unnecessary Alerts
FCA may provide unnecessaryalerts to turning vehicles, vehicles inother lanes, objects that are notvehicles, or shadows. These alertsare normal operation and thevehicle does not need service.
Cleaning the System
If the FCA system does not seem tooperate properly, cleaning theoutside of the windshield area infront of the camera sensor maycorrect the issue.
Side Blind ZoneAlert (SBZA)If equipped, the Side Blind ZoneAlert system is a lane-changing aidthat assists drivers with avoidingcrashes that occur with movingvehicles in the side blind zone (orspot) areas. The SBZA warning
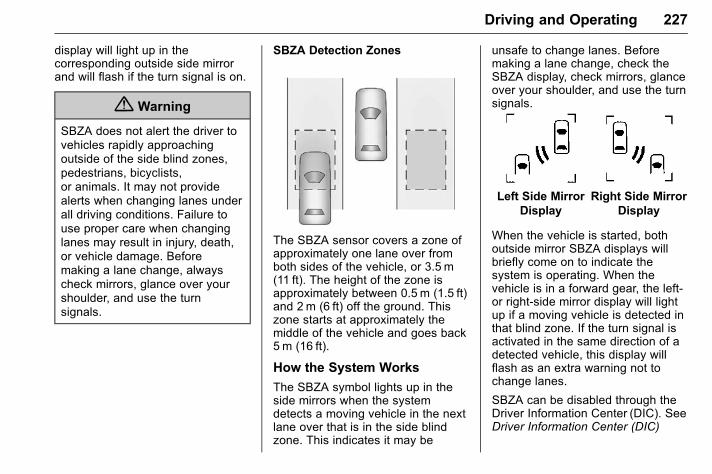
GMC Acadia/Acadia Denali Owner Manual (GMNA-Localizing-U.S./Canada/Mexico-9159268) - 2016 - CRC - 4/16/15
Driving and Operating 227
display will light up in thecorresponding outside side mirrorand will flash if the turn signal is on.
{ Warning
SBZA does not alert the driver tovehicles rapidly approachingoutside of the side blind zones,pedestrians, bicyclists,or animals. It may not providealerts when changing lanes underall driving conditions. Failure touse proper care when changinglanes may result in injury, death,or vehicle damage. Beforemaking a lane change, alwayscheck mirrors, glance over yourshoulder, and use the turnsignals.
SBZA Detection Zones
The SBZA sensor covers a zone ofapproximately one lane over fromboth sides of the vehicle, or 3.5 m(11 ft). The height of the zone isapproximately between 0.5 m (1.5 ft)and 2 m (6 ft) off the ground. Thiszone starts at approximately themiddle of the vehicle and goes back5 m (16 ft).
How the System Works
The SBZA symbol lights up in theside mirrors when the systemdetects a moving vehicle in the nextlane over that is in the side blindzone. This indicates it may be
unsafe to change lanes. Beforemaking a lane change, check theSBZA display, check mirrors, glanceover your shoulder, and use the turnsignals.
Left Side MirrorDisplay
Right Side MirrorDisplay
When the vehicle is started, bothoutside mirror SBZA displays willbriefly come on to indicate thesystem is operating. When thevehicle is in a forward gear, the left-or right-side mirror display will lightup if a moving vehicle is detected inthat blind zone. If the turn signal isactivated in the same direction of adetected vehicle, this display willflash as an extra warning not tochange lanes.
SBZA can be disabled through theDriver Information Center (DIC). SeeDriver Information Center (DIC)
GMC Acadia/Acadia Denali Owner Manual (GMNA-Localizing-U.S./Canada/Mexico-9159268) - 2016 - CRC - 4/16/15
228 Driving and Operating
0 122. If SBZA is disabled by thedriver, the SBZA mirror displays willnot light up.
When the System Does NotSeem to Work Properly
SBZA displays may not come onwhen passing a vehicle quickly, fora stopped vehicle, or when towing atrailer. Keep in mind the SBZAdetection zones that extend backfrom the side of the vehicle do notmove further back when a trailer istowed. Use extra caution whilechanging lanes when towing atrailer. SBZA may alert you toobjects attached to the vehicle, suchas a trailer, bicycle, or objectextending out to either side of thevehicle. This is normal systemoperation; the vehicle does not needservice.
SBZA may not always alert thedriver to vehicles in the side blindzone, especially in wet conditions.The system does not need to beserviced. The system may light updue to guardrails, signs, trees,shrubs, and other non-moving
objects. This is normal systemoperation; the vehicle does not needservice.
SBZA may not operate when theSBZA sensors in the left or rightcorners of the rear bumper arecovered with mud, dirt, snow, ice,or slush, or in heavy rainstorms. Forcleaning instructions, see "Washingthe Vehicle" under Exterior Care0 312. If the DIC still displays thesystem unavailable message aftercleaning both sides of the vehicletoward the rear corners of thevehicle, see your dealer.
If the SBZA displays do not light upwhen vehicles are in the blind zoneand the system is clean, the systemmay need service. Take the vehicleto your dealer.
When SBZA is disabled for anyreason other than the driver turningit off, the Side Blind Zone Alert ONoption will not be available on theDIC menu.
FCC Information
See Radio Frequency Statement0 348.
Lane DepartureWarning (LDW)If equipped, LDW may help avoidcrashes due to unintentional lanedepartures. It may provide an alert ifthe vehicle is crossing a lanewithout using a turn signal in thatdirection. LDW uses a camerasensor to detect the lane markingsat speeds of 56 km/h (35 mph) orgreater.
{ Warning
The LDW system does not steerthe vehicle. The LDW systemmay not:
. Provide enough time toavoid a crash.
. Detect lane markings underpoor weather or visibilityconditions. This can occur ifthe windshield orheadlamps are blocked bydirt, snow, or ice; if they are
(Continued)

GMC Acadia/Acadia Denali Owner Manual (GMNA-Localizing-U.S./Canada/Mexico-9159268) - 2016 - CRC - 4/16/15
Driving and Operating 229
Warning (Continued)
not in proper condition; or ifthe sun shines directly intothe camera.
. Detect road edges.
. Detect lanes on winding orhilly roads.
If LDW only detects lanemarkings on one side of the road,it will only warn you whendeparting the lane on the sidewhere it has detected a lanemarking. Always keep yourattention on the road andmaintain proper vehicle positionwithin the lane, or vehicledamage, injury, or death couldoccur. Always keep thewindshield, headlamps, andcamera sensors clean and ingood repair. Do not use LDW inbad weather conditions.
How the System Works
The LDW camera sensor is on thewindshield ahead of the rearviewmirror.
To turn LDW on and off, press @ onthe center stack, forward of the shiftlever. The control indicator will lightwhen LDW is on.
When LDW is on, @ is green ifLDW is available to warn of a lanedeparture. If the vehicle crosses adetected lane marking without usingthe turn signal in that direction, @changes to amber and flashes.Additionally, there will be threebeeps on the right or left, dependingon the lane departure direction.
When the System Does NotSeem to Work Properly
The system may not detect lanes aswell when there are:
. Close vehicles ahead.
. Sudden lighting changes, suchas when driving through tunnels.
. Banked roads.
If the LDW system is not functioningproperly when lane markings areclearly visible, cleaning thewindshield may help.
LDW alerts may occur due to tarmarks, shadows, cracks in the road,temporary or construction lanemarkings, or other roadimperfections. This is normal systemoperation; the vehicle does not needservice. Turn LDW off if theseconditions continue.
GMC Acadia/Acadia Denali Owner Manual (GMNA-Localizing-U.S./Canada/Mexico-9159268) - 2016 - CRC - 4/16/15
230 Driving and Operating
FuelUse of the recommended fuel is animportant part of the propermaintenance of this vehicle. Whendriving in the U.S. and Canada, tohelp keep the engine clean andmaintain optimum vehicleperformance, we recommend usingTOP TIER Detergent Gasolines.See www.toptiergas.com for a list ofTOP TIER Detergent Gasolines.
Use regular unleaded gasolinemeeting ASTM specification D4814with a posted octane rating of 87 orhigher. Do not use gasoline with an
octane rating below 87, as it maycause engine damage and will lowerfuel economy.
Use of Seasonal Fuels
Use summer and winter fuels in theappropriate season. The fuelsindustry automatically modifies thefuel for the appropriate season.If fuel is left in the vehicle tank forlong periods of time, driving orstarting could be affected. Drive thevehicle until the fuel is at one-halftank or less, then refuel with thecurrent seasonal fuel.
Prohibited Fuels
Gasolines containing oxygenatessuch as ethers and ethanol, as wellas reformulated gasolines, areavailable in some cities. If thesegasolines comply with thepreviously described specification,then they are acceptable to use.However, E85 (85% ethanol) andother fuels containing more than15% ethanol must be used only inFlexFuel vehicles.
Caution
Do not use fuel containingmethanol. It can corrode metalparts in the fuel system and alsodamage plastic and rubber parts.That damage would not becovered under the vehiclewarranty.
Some gasolines, mainly high octaneracing gasolines, can contain anoctane-enhancing additive calledmethylcyclopentadienyl manganesetricarbonyl (MMT). Do not usegasolines and/or fuel additives withMMT as they can reduce spark pluglife and affect emission controlsystem performance. Themalfunction indicator lamp may turnon. If this occurs, see your dealerfor service.
California FuelRequirementsIf the vehicle is certified to meetCalifornia Emissions Standards, it isdesigned to operate on fuels that
GMC Acadia/Acadia Denali Owner Manual (GMNA-Localizing-U.S./Canada/Mexico-9159268) - 2016 - CRC - 4/16/15
Driving and Operating 231
meet California specifications. Seethe underhood emission controllabel. If this fuel is not available instates adopting California EmissionsStandards, the vehicle will operatesatisfactorily on fuels meetingfederal specifications, but emissioncontrol system performance mightbe affected. The malfunctionindicator lamp could turn on and thevehicle may not pass a smog-checktest. See Malfunction IndicatorLamp (Check Engine Light) 0 115.If this occurs, return to yourauthorized dealer for diagnosis. If itis determined that the condition iscaused by the type of fuel used,repairs may not be covered by thevehicle warranty.
Fuels in ForeignCountriesIf planning to drive in countriesoutside the U.S. or Canada, theproper fuel might be hard to find.Check regional auto club or fuelretail brand websites for availabilityin the country where driving. Neveruse leaded gasoline, fuel containingmethanol, manganese, or any other
fuel not recommended. Costlyrepairs caused by use of improperfuel would not be covered by thevehicle warranty.
Fuel AdditivesTo keep fuel systems clean, TOPTIER Detergent Gasoline isrecommended. See Fuel 0 230.
If TOP TIER Detergent Gasoline isnot available, one bottle of FuelSystem Treatment PLUS added tothe fuel tank at every engine oilchange, can help. Fuel SystemTreatment PLUS is the onlygasoline additive recommended byGeneral Motors. It is available atyour dealer.
Filling the Tank
{ Warning
Fuel vapors and fuel fires burnviolently and can cause injury ordeath.
(Continued)
Warning (Continued)
. To help avoid injuries to youand others, read and followall the instructions on thefuel pump island.
. Turn off the engine whenrefueling.
. Keep sparks, flames, andsmoking materials awayfrom fuel.
. Do not leave the fuel pumpunattended.
. Do not use a cell phonewhile refueling.
. Do not reenter the vehiclewhile pumping fuel.
. Keep children away fromthe fuel pump and never letchildren pump fuel.
. Fuel can spray out if the fuelcap is opened too quickly.This spray can happen if thetank is nearly full, and ismore likely in hot weather.
(Continued)
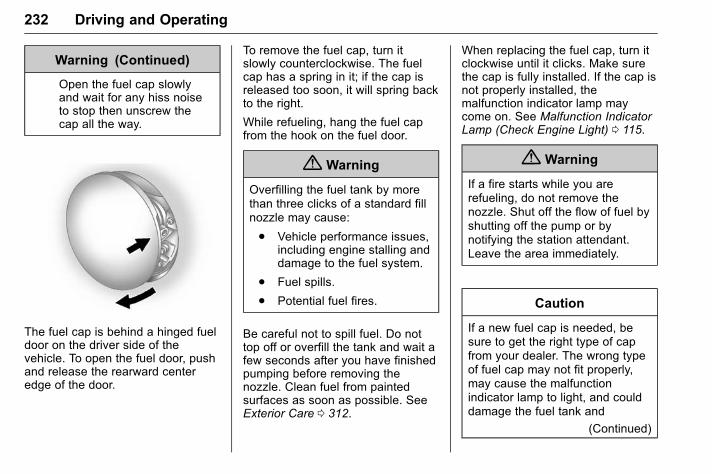
GMC Acadia/Acadia Denali Owner Manual (GMNA-Localizing-U.S./Canada/Mexico-9159268) - 2016 - CRC - 4/16/15
232 Driving and Operating
Warning (Continued)
Open the fuel cap slowlyand wait for any hiss noiseto stop then unscrew thecap all the way.
The fuel cap is behind a hinged fueldoor on the driver side of thevehicle. To open the fuel door, pushand release the rearward centeredge of the door.
To remove the fuel cap, turn itslowly counterclockwise. The fuelcap has a spring in it; if the cap isreleased too soon, it will spring backto the right.
While refueling, hang the fuel capfrom the hook on the fuel door.
{ Warning
Overfilling the fuel tank by morethan three clicks of a standard fillnozzle may cause:
. Vehicle performance issues,including engine stalling anddamage to the fuel system.
. Fuel spills.
. Potential fuel fires.
Be careful not to spill fuel. Do nottop off or overfill the tank and wait afew seconds after you have finishedpumping before removing thenozzle. Clean fuel from paintedsurfaces as soon as possible. SeeExterior Care 0 312.
When replacing the fuel cap, turn itclockwise until it clicks. Make surethe cap is fully installed. If the cap isnot properly installed, themalfunction indicator lamp maycome on. See Malfunction IndicatorLamp (Check Engine Light) 0 115.
{ Warning
If a fire starts while you arerefueling, do not remove thenozzle. Shut off the flow of fuel byshutting off the pump or bynotifying the station attendant.Leave the area immediately.
Caution
If a new fuel cap is needed, besure to get the right type of capfrom your dealer. The wrong typeof fuel cap may not fit properly,may cause the malfunctionindicator lamp to light, and coulddamage the fuel tank and
(Continued)
GMC Acadia/Acadia Denali Owner Manual (GMNA-Localizing-U.S./Canada/Mexico-9159268) - 2016 - CRC - 4/16/15
Driving and Operating 233
Caution (Continued)
emissions system. SeeMalfunction Indicator Lamp(Check Engine Light) 0 115.
Filling a Portable FuelContainer
{ Warning
Filling a portable fuel containerwhile it is in the vehicle can causefuel vapors that can ignite eitherby static electricity or othermeans. You or others could bebadly burned and the vehiclecould be damaged. Always:
. Use approved fuelcontainers.
. Remove the container fromthe vehicle, trunk, or pickupbed before filling.
. Place the container on theground.
(Continued)
Warning (Continued)
. Place the nozzle inside thefill opening of the containerbefore dispensing fuel, andkeep it in contact with the fillopening until filling iscomplete.
. Fill the container no morethan 95% full to allow forexpansion.
. Do not smoke, lightmatches, or use lighterswhile pumping fuel.
. Avoid using cell phones orother electronic devices.
Trailer Towing
General TowingInformationOnly use towing equipment that hasbeen designed for the vehicle.Contact your dealer or traileringdealer for assistance with preparingthe vehicle for towing a trailer. Readthe entire section before towing atrailer.
For towing a disabled vehicle, seeTowing the Vehicle 0 308. Fortowing the vehicle behind anothervehicle such as a motor home, seeRecreational Vehicle Towing 0 309.
GMC Acadia/Acadia Denali Owner Manual (GMNA-Localizing-U.S./Canada/Mexico-9159268) - 2016 - CRC - 4/16/15
234 Driving and Operating
Driving Characteristicsand Towing Tips
Driving with a Trailer
When towing a trailer:
. Become familiar with the stateand local laws that applyspecifically to trailer towing.
. Do not tow a trailer during thefirst 800 km (500mi), to preventdamage to the engine, axle orother parts.
. Then, during the first 800 km(500 mi) trailer towing, do notdrive over 80 km/h (50 mph) anddo not make starts at full throttle.
. The vehicle can tow in D (Drive)but M (Manual Mode) isrecommended. See ManualMode 0 213. Use a lower gear ifthe transmission shifts too often.
. Turn off Park Assist whentowing.
{ Warning
When towing a trailer, exhaustgases may collect at the rear ofthe vehicle and enter if theliftgate, trunk/hatch, or rear-mostwindow is open.
When towing a trailer:
. Do not drive with theliftgate, trunk/hatch,or rear-most window open.
. Fully open the air outlets onor under the instrumentpanel.
. Also adjust the ClimateControl system to a settingthat brings in only outsideair. See “Climate ControlSystems” in the Index.
For information about carbonmonoxide, see Engine Exhaust0 211.
Towing a trailer requires a certainamount of experience. Thecombination you are driving islonger and not as responsive as thevehicle itself. Get acquainted withthe handling and braking of the rigbefore setting out for the open road.
Before starting, check all trailer hitchparts and attachments, safetychains, electrical connectors, lamps,tires and mirrors. If the trailer haselectric brakes, start thecombination moving and then applythe trailer brake controller by handto be sure the brakes work.
During the trip, check occasionallyto be sure that the load is secureand the lamps and any trailerbrakes still work.
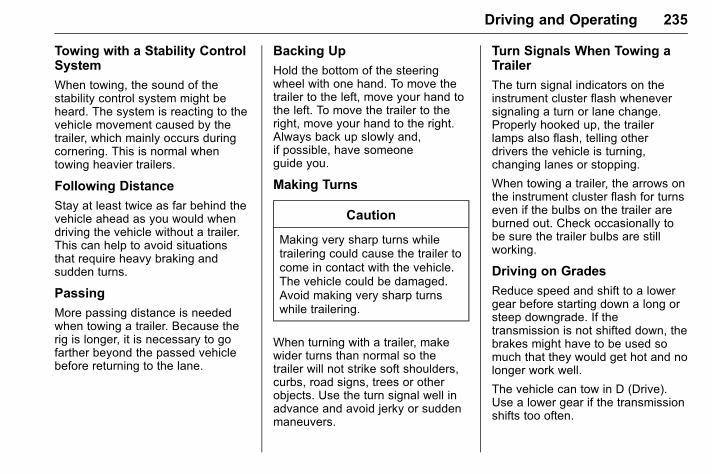
GMC Acadia/Acadia Denali Owner Manual (GMNA-Localizing-U.S./Canada/Mexico-9159268) - 2016 - CRC - 4/16/15
Driving and Operating 235
Towing with a Stability ControlSystem
When towing, the sound of thestability control system might beheard. The system is reacting to thevehicle movement caused by thetrailer, which mainly occurs duringcornering. This is normal whentowing heavier trailers.
Following Distance
Stay at least twice as far behind thevehicle ahead as you would whendriving the vehicle without a trailer.This can help to avoid situationsthat require heavy braking andsudden turns.
Passing
More passing distance is neededwhen towing a trailer. Because therig is longer, it is necessary to gofarther beyond the passed vehiclebefore returning to the lane.
Backing Up
Hold the bottom of the steeringwheel with one hand. To move thetrailer to the left, move your hand tothe left. To move the trailer to theright, move your hand to the right.Always back up slowly and,if possible, have someoneguide you.
Making Turns
Caution
Making very sharp turns whiletrailering could cause the trailer tocome in contact with the vehicle.The vehicle could be damaged.Avoid making very sharp turnswhile trailering.
When turning with a trailer, makewider turns than normal so thetrailer will not strike soft shoulders,curbs, road signs, trees or otherobjects. Use the turn signal well inadvance and avoid jerky or suddenmaneuvers.
Turn Signals When Towing aTrailer
The turn signal indicators on theinstrument cluster flash wheneversignaling a turn or lane change.Properly hooked up, the trailerlamps also flash, telling otherdrivers the vehicle is turning,changing lanes or stopping.
When towing a trailer, the arrows onthe instrument cluster flash for turnseven if the bulbs on the trailer areburned out. Check occasionally tobe sure the trailer bulbs are stillworking.
Driving on Grades
Reduce speed and shift to a lowergear before starting down a long orsteep downgrade. If thetransmission is not shifted down, thebrakes might have to be used somuch that they would get hot and nolonger work well.
The vehicle can tow in D (Drive).Use a lower gear if the transmissionshifts too often.
GMC Acadia/Acadia Denali Owner Manual (GMNA-Localizing-U.S./Canada/Mexico-9159268) - 2016 - CRC - 4/16/15
236 Driving and Operating
The Tow/Haul Mode may be used ifthe transmission shifts too often.See Tow/Haul Mode 0 214.
When towing at high altitude onsteep uphill grades, engine coolantboils at a lower temperature than atnormal altitudes. If the engine isturned off immediately after towingat high altitude on steep uphillgrades, the vehicle could showsigns similar to engine overheating.To avoid this, let the engine runwhile parked, preferably on levelground, with the transmission inP (Park) for a few minutes beforeturning the engine off. If theoverheat warning comes on, seeEngine Overheating 0 256.
Parking on Hills
{ Warning
Parking the vehicle on a hill withthe trailer attached can bedangerous. If something goeswrong, the rig could start to move.People can be injured, and boththe vehicle and the trailer can bedamaged. When possible, alwayspark the rig on a flat surface.
If parking the rig on a hill:
1. Press the brake pedal, but donot shift into P (Park) yet. Turnthe wheels into the curb iffacing downhill or into traffic iffacing uphill.
2. Have someone place chocksunder the trailer wheels.
3. When the wheel chocks are inplace, release the brake pedaluntil the chocks absorbthe load.
4. Reapply the brake pedal. Thenapply the parking brake andshift into P (Park).
5. Release the brake pedal.
Leaving After Parking on a Hill
1. Apply and hold the brake pedalwhile you:
. Start the engine.
. Shift into a gear.
. Release the parking brake.
2. Let up on the brake pedal.
3. Drive slowly until the trailer isclear of the chocks.
4. Stop and have someone pickup and store the chocks.
GMC Acadia/Acadia Denali Owner Manual (GMNA-Localizing-U.S./Canada/Mexico-9159268) - 2016 - CRC - 4/16/15
Driving and Operating 237
Maintenance When TrailerTowing
The vehicle needs service moreoften when pulling a trailer. See theMaintenance Schedule 0 322.Things that are especially importantin trailer operation are automatictransmission fluid, engine oil, axlelubricant, belts, cooling system andbrake system. Inspect these beforeand during the trip.
Check periodically to see that allhitch nuts and bolts are tight.
Engine Cooling When TrailerTowing
The cooling system may temporarilyoverheat during severe operatingconditions. See Engine Overheating0 256.
Trailer TowingThree important considerationshave to do with weight:
. The weight of the trailer.
. The weight of the trailer tongue.
. The total weight on the vehicle'stires.
Weight of the Trailer
How heavy can a trailer safely be?
Speed, altitude, road grades,outside temperature, specialequipment, and the amount oftongue weight the vehicle can carrymust be considered. See “Weight ofthe Trailer Tongue” later in thissection for more information.
Maximum trailer weight is calculatedassuming only the driver is in thetow vehicle and it has all therequired trailering equipment. Theweight of additional optionalequipment, passengers and cargo inthe tow vehicle must be subtractedfrom the maximum trailer weight.
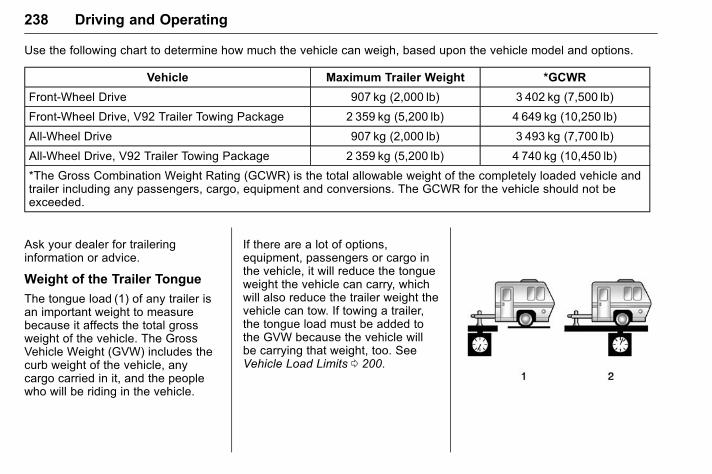
GMC Acadia/Acadia Denali Owner Manual (GMNA-Localizing-U.S./Canada/Mexico-9159268) - 2016 - CRC - 4/16/15
238 Driving and Operating
Use the following chart to determine how much the vehicle can weigh, based upon the vehicle model and options.
Vehicle Maximum Trailer Weight *GCWR
Front-Wheel Drive 907 kg (2,000 lb) 3 402 kg (7,500 lb)
Front-Wheel Drive, V92 Trailer Towing Package 2 359 kg (5,200 lb) 4 649 kg (10,250 lb)
All-Wheel Drive 907 kg (2,000 lb) 3 493 kg (7,700 lb)
All-Wheel Drive, V92 Trailer Towing Package 2 359 kg (5,200 lb) 4 740 kg (10,450 lb)
*The Gross Combination Weight Rating (GCWR) is the total allowable weight of the completely loaded vehicle andtrailer including any passengers, cargo, equipment and conversions. The GCWR for the vehicle should not beexceeded.
Ask your dealer for traileringinformation or advice.
Weight of the Trailer Tongue
The tongue load (1) of any trailer isan important weight to measurebecause it affects the total grossweight of the vehicle. The GrossVehicle Weight (GVW) includes thecurb weight of the vehicle, anycargo carried in it, and the peoplewho will be riding in the vehicle.
If there are a lot of options,equipment, passengers or cargo inthe vehicle, it will reduce the tongueweight the vehicle can carry, whichwill also reduce the trailer weight thevehicle can tow. If towing a trailer,the tongue load must be added tothe GVW because the vehicle willbe carrying that weight, too. SeeVehicle Load Limits 0 200.
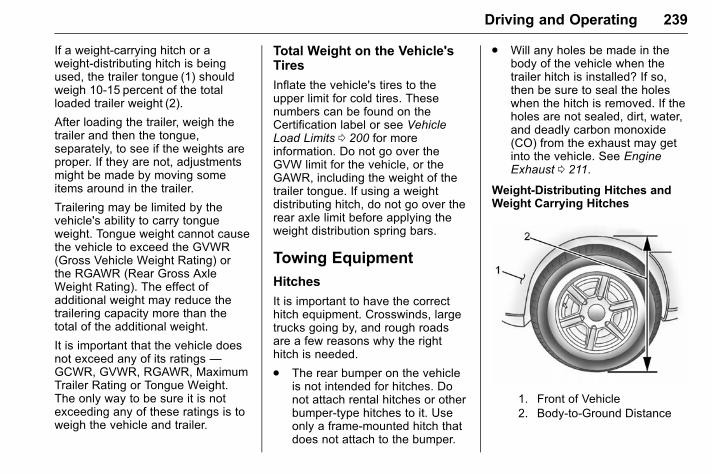
GMC Acadia/Acadia Denali Owner Manual (GMNA-Localizing-U.S./Canada/Mexico-9159268) - 2016 - CRC - 4/16/15
Driving and Operating 239
If a weight-carrying hitch or aweight-distributing hitch is beingused, the trailer tongue (1) shouldweigh 10-15 percent of the totalloaded trailer weight (2).
After loading the trailer, weigh thetrailer and then the tongue,separately, to see if the weights areproper. If they are not, adjustmentsmight be made by moving someitems around in the trailer.
Trailering may be limited by thevehicle's ability to carry tongueweight. Tongue weight cannot causethe vehicle to exceed the GVWR(Gross Vehicle Weight Rating) orthe RGAWR (Rear Gross AxleWeight Rating). The effect ofadditional weight may reduce thetrailering capacity more than thetotal of the additional weight.
It is important that the vehicle doesnot exceed any of its ratings —GCWR, GVWR, RGAWR, MaximumTrailer Rating or Tongue Weight.The only way to be sure it is notexceeding any of these ratings is toweigh the vehicle and trailer.
Total Weight on the Vehicle'sTires
Inflate the vehicle's tires to theupper limit for cold tires. Thesenumbers can be found on theCertification label or see VehicleLoad Limits 0 200 for moreinformation. Do not go over theGVW limit for the vehicle, or theGAWR, including the weight of thetrailer tongue. If using a weightdistributing hitch, do not go over therear axle limit before applying theweight distribution spring bars.
Towing Equipment
Hitches
It is important to have the correcthitch equipment. Crosswinds, largetrucks going by, and rough roadsare a few reasons why the righthitch is needed.
. The rear bumper on the vehicleis not intended for hitches. Donot attach rental hitches or otherbumper-type hitches to it. Useonly a frame-mounted hitch thatdoes not attach to the bumper.
. Will any holes be made in thebody of the vehicle when thetrailer hitch is installed? If so,then be sure to seal the holeswhen the hitch is removed. If theholes are not sealed, dirt, water,and deadly carbon monoxide(CO) from the exhaust may getinto the vehicle. See EngineExhaust 0 211.
Weight-Distributing Hitches andWeight Carrying Hitches
1. Front of Vehicle2. Body-to-Ground Distance
GMC Acadia/Acadia Denali Owner Manual (GMNA-Localizing-U.S./Canada/Mexico-9159268) - 2016 - CRC - 4/16/15
240 Driving and Operating
When using a weight-distributinghitch, the hitch must be adjusted sothat the distance (2) remains thesame both before and after couplingthe trailer to the tow vehicle.
Safety Chains
Always attach chains between thevehicle and the trailer. Cross thesafety chains under the tongue ofthe trailer to help prevent the tonguefrom contacting the road if itbecomes separated from the hitch.Always leave just enough slack sothe rig can turn. Never allow safetychains to drag on the ground.
Trailer Brakes
A loaded trailer that weighs morethan 450 kg (1,000 lb) needs to haveits own brake system that isadequate for the weight of thetrailer. Be sure to read and followthe instructions for the trailer brakesso they are installed, adjusted, andmaintained properly.
Because the vehicle has antilockbrakes, do not try to tap into thevehicle's hydraulic brake system.If you do, both brake systems willnot work well, or at all.
Trailer Wiring Harness
Basic Trailer Wiring
The trailer wiring harness, with aseven-pin connector, is located atthe rear of the vehicle and is tied tothe vehicle's frame. The harnessconnector can be plugged into aseven-pin universal heavy-dutytrailer connector available throughyour dealer.
The seven-wire harness containsthe following trailer circuits:
. Yellow: Left Stop/Turn Signal
. Dark Green: Right Stop/TurnSignal
. Brown: Taillamps
. Black: Ground
. Light Green: Back-up Lamps
. Red/Black: Battery Feed
. Dark Blue: Trailer Brake*
*The fuse for this circuit is installedin the underhood electrical center,but the wires are not connected.They should be connected by yourdealer or a qualified service center.
If the back-up lamp circuit is notfunctional, contact your dealer.
If a remote (non-vehicle) battery isbeing charged, press the Tow/Haulmode switch located on the centerconsole near the climate controls.This will boost the vehicle systemvoltage and properly charge thebattery. If the trailer is too light forTow/Haul mode, turn on theheadlamps (non-HID only) as asecond way to boost the vehiclesystem and charge the battery.
GMC Acadia/Acadia Denali Owner Manual (GMNA-Localizing-U.S./Canada/Mexico-9159268) - 2016 - CRC - 4/16/15
Driving and Operating 241
Electric Trailer Brake ControlWiring Provisions
These wiring provisions for anelectric trailer brake controller areincluded with the vehicle as part ofthe trailer wiring package. Theinstrument panel contains blunt cutwires above the parking brakeassembly for the electric trailerbrake controller. The harnesscontains the following wires:
. Red/Black: Power Supply
. White: Brake Switch Signal
. Gray: Illumination
. Dark Blue: Trailer Brake Signal
. Black: Ground
The electric trailer brake controllershould be installed by your dealer ora qualified service center.
Conversions andAdd-Ons
Add-On ElectricalEquipment
{ Warning
The Data Link Connector (DLC) isused for vehicle service andEmission Inspection/Maintenancetesting. See Malfunction IndicatorLamp (Check Engine Light) 0 115.A device connected to the DataLink Connector (DLC)—such asan aftermarket fleet ordriver-behavior tracking device—may interfere with vehiclesystems. This could affect vehicleoperation and cause a crash.Such devices may also accessinformation stored in the vehicle’ssystems.
Caution
Some electrical equipment candamage the vehicle or causecomponents to not work andwould not be covered by thewarranty. Always check with yourdealer before adding electricalequipment.
Add-on equipment can drain thevehicle's 12-volt battery, even if thevehicle is not operating.
The vehicle has an airbag system.Before attempting to add anythingelectrical to the vehicle, seeServicing the Airbag-EquippedVehicle 0 77 and Adding Equipmentto the Airbag-Equipped Vehicle0 77.
GMC Acadia/Acadia Denali Owner Manual (GMNA-Localizing-U.S./Canada/Mexico-9159268) - 2016 - CRC - 4/16/15
242 Vehicle Care
Vehicle Care
General InformationGeneral Information . . . . . . . . . . 243California Proposition65 Warning . . . . . . . . . . . . . . . . . 243
California PerchlorateMaterials Requirements . . . . . 243
Accessories andModifications . . . . . . . . . . . . . . . . 243
Vehicle ChecksDoing Your OwnService Work . . . . . . . . . . . . . . . 244
Hood . . . . . . . . . . . . . . . . . . . . . . . . . 244Engine CompartmentOverview . . . . . . . . . . . . . . . . . . . . 246
Engine Cover . . . . . . . . . . . . . . . . . 247Engine Oil . . . . . . . . . . . . . . . . . . . . 247Engine Oil Life System . . . . . . . 250Automatic TransmissionFluid . . . . . . . . . . . . . . . . . . . . . . . . 250
Engine Air Cleaner/Filter . . . . . . 251Cooling System . . . . . . . . . . . . . . 252Engine Coolant . . . . . . . . . . . . . . . 253Engine Overheating . . . . . . . . . . 256Overheated Engine ProtectionOperating Mode . . . . . . . . . . . . . 257
Power Steering Fluid . . . . . . . . . 258Washer Fluid . . . . . . . . . . . . . . . . . 259
Brakes . . . . . . . . . . . . . . . . . . . . . . . 259Brake Fluid . . . . . . . . . . . . . . . . . . . 260Battery - North America . . . . . . 261All-Wheel Drive . . . . . . . . . . . . . . . 262Starter Switch Check . . . . . . . . . 262Automatic Transmission ShiftLock Control FunctionCheck . . . . . . . . . . . . . . . . . . . . . . . 262
Ignition Transmission LockCheck . . . . . . . . . . . . . . . . . . . . . . . 263
Park Brake and P (Park)Mechanism Check . . . . . . . . . . 263
Wiper Blade Replacement . . . . 263Windshield Replacement . . . . . 264
Headlamp AimingHeadlamp Aiming . . . . . . . . . . . . 265
Bulb ReplacementBulb Replacement . . . . . . . . . . . . 265LED Lighting . . . . . . . . . . . . . . . . . 265License Plate Lamp . . . . . . . . . . 265Replacement Bulbs . . . . . . . . . . . 266
Electrical SystemHigh Voltage Devices andWiring . . . . . . . . . . . . . . . . . . . . . . . 266
Electrical System Overload . . . 266Fuses and Circuit Breakers . . . 267Engine Compartment FuseBlock . . . . . . . . . . . . . . . . . . . . . . . . 267
Instrument Panel FuseBlock . . . . . . . . . . . . . . . . . . . . . . . . 273
Wheels and TiresTires . . . . . . . . . . . . . . . . . . . . . . . . . . 276All-Season Tires . . . . . . . . . . . . . . 277Winter Tires . . . . . . . . . . . . . . . . . . 277Summer Tires . . . . . . . . . . . . . . . . 278Tire Sidewall Labeling . . . . . . . . 278Tire Designations . . . . . . . . . . . . . 280Tire Terminology andDefinitions . . . . . . . . . . . . . . . . . . 281
Tire Pressure . . . . . . . . . . . . . . . . . 283Tire Pressure MonitorSystem . . . . . . . . . . . . . . . . . . . . . . 284
Tire Pressure MonitorOperation . . . . . . . . . . . . . . . . . . . 286
Tire Inspection . . . . . . . . . . . . . . . . 288Tire Rotation . . . . . . . . . . . . . . . . . 289When It Is Time for NewTires . . . . . . . . . . . . . . . . . . . . . . . . 290
Buying New Tires . . . . . . . . . . . . . 291Different Size Tires andWheels . . . . . . . . . . . . . . . . . . . . . . 292
Uniform Tire QualityGrading . . . . . . . . . . . . . . . . . . . . . 292
Wheel Alignment and TireBalance . . . . . . . . . . . . . . . . . . . . . 294
Wheel Replacement . . . . . . . . . . 294Tire Chains . . . . . . . . . . . . . . . . . . . 295If a Tire Goes Flat . . . . . . . . . . . . 295
GMC Acadia/Acadia Denali Owner Manual (GMNA-Localizing-U.S./Canada/Mexico-9159268) - 2016 - CRC - 4/16/15
Vehicle Care 243
Tire Changing . . . . . . . . . . . . . . . . 297Compact Spare Tire . . . . . . . . . . 304
Jump StartingJump Starting - NorthAmerica . . . . . . . . . . . . . . . . . . . . . 305
Towing the VehicleTowing the Vehicle . . . . . . . . . . . 309Recreational VehicleTowing . . . . . . . . . . . . . . . . . . . . . . 309
Appearance CareExterior Care . . . . . . . . . . . . . . . . . 312Interior Care . . . . . . . . . . . . . . . . . . 316Floor Mats . . . . . . . . . . . . . . . . . . . . 319
General InformationFor service and parts needs, visityour dealer. You will receivegenuine GM parts and GM-trainedand supported service people.
Genuine GM parts have one ofthese marks:
California Proposition65 WarningWARNING: Most motor vehicles,including this one, contain and/oremit chemicals known to the Stateof California to cause cancer andbirth defects or other reproductive
harm. Engine exhaust, many partsand systems, many fluids, andsome component wear by-productscontain and/or emit thesechemicals.
See Battery - North America 0 261and Jump Starting - North America0 305.
California PerchlorateMaterials RequirementsCertain types of automotiveapplications, such as airbaginitiators, safety belt pretensioners,and lithium batteries contained inRemote Keyless Entry transmitters,may contain perchlorate materials.Special handling may be necessary.For additional information, seewww.dtsc.ca.gov/hazardouswaste/perchlorate.
Accessories andModificationsAdding non-dealer accessories ormaking modifications to the vehiclecan affect vehicle performance andsafety, including such things as
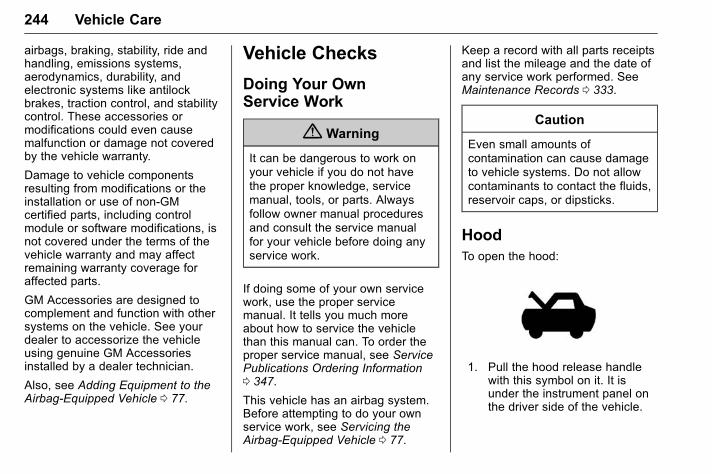
GMC Acadia/Acadia Denali Owner Manual (GMNA-Localizing-U.S./Canada/Mexico-9159268) - 2016 - CRC - 4/16/15
244 Vehicle Care
airbags, braking, stability, ride andhandling, emissions systems,aerodynamics, durability, andelectronic systems like antilockbrakes, traction control, and stabilitycontrol. These accessories ormodifications could even causemalfunction or damage not coveredby the vehicle warranty.
Damage to vehicle componentsresulting from modifications or theinstallation or use of non-GMcertified parts, including controlmodule or software modifications, isnot covered under the terms of thevehicle warranty and may affectremaining warranty coverage foraffected parts.
GM Accessories are designed tocomplement and function with othersystems on the vehicle. See yourdealer to accessorize the vehicleusing genuine GM Accessoriesinstalled by a dealer technician.
Also, see Adding Equipment to theAirbag-Equipped Vehicle 0 77.
Vehicle Checks
Doing Your OwnService Work
{ Warning
It can be dangerous to work onyour vehicle if you do not havethe proper knowledge, servicemanual, tools, or parts. Alwaysfollow owner manual proceduresand consult the service manualfor your vehicle before doing anyservice work.
If doing some of your own servicework, use the proper servicemanual. It tells you much moreabout how to service the vehiclethan this manual can. To order theproper service manual, see ServicePublications Ordering Information0 347.
This vehicle has an airbag system.Before attempting to do your ownservice work, see Servicing theAirbag-Equipped Vehicle 0 77.
Keep a record with all parts receiptsand list the mileage and the date ofany service work performed. SeeMaintenance Records 0 333.
Caution
Even small amounts ofcontamination can cause damageto vehicle systems. Do not allowcontaminants to contact the fluids,reservoir caps, or dipsticks.
HoodTo open the hood:
1. Pull the hood release handlewith this symbol on it. It isunder the instrument panel onthe driver side of the vehicle.
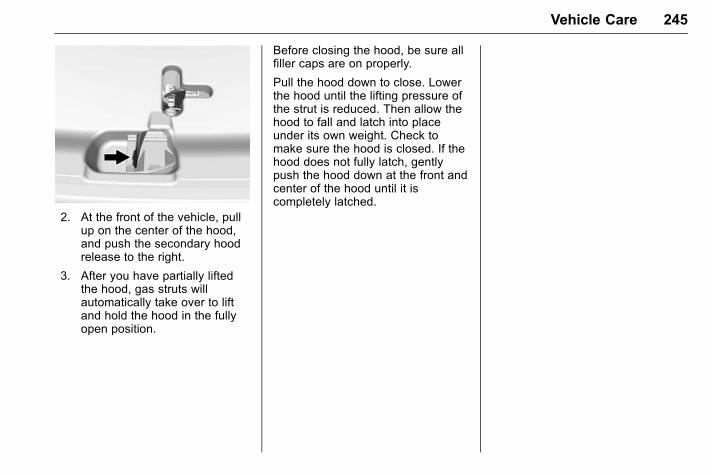
GMC Acadia/Acadia Denali Owner Manual (GMNA-Localizing-U.S./Canada/Mexico-9159268) - 2016 - CRC - 4/16/15
Vehicle Care 245
2. At the front of the vehicle, pullup on the center of the hood,and push the secondary hoodrelease to the right.
3. After you have partially liftedthe hood, gas struts willautomatically take over to liftand hold the hood in the fullyopen position.
Before closing the hood, be sure allfiller caps are on properly.
Pull the hood down to close. Lowerthe hood until the lifting pressure ofthe strut is reduced. Then allow thehood to fall and latch into placeunder its own weight. Check tomake sure the hood is closed. If thehood does not fully latch, gentlypush the hood down at the front andcenter of the hood until it iscompletely latched.
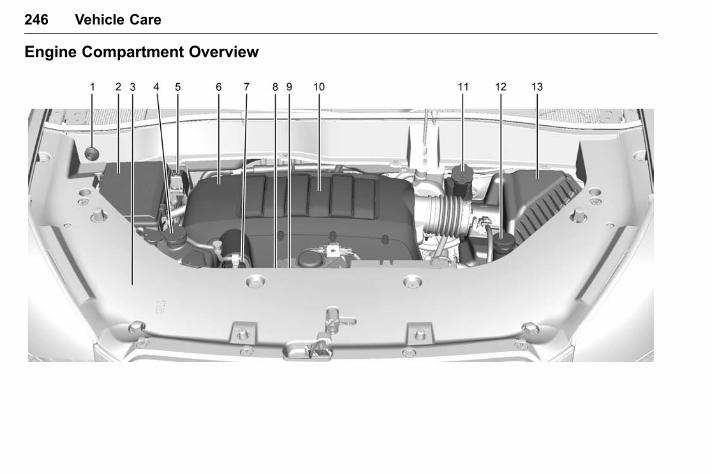
GMC Acadia/Acadia Denali Owner Manual (GMNA-Localizing-U.S./Canada/Mexico-9159268) - 2016 - CRC - 4/16/15
246 Vehicle Care
Engine Compartment Overview
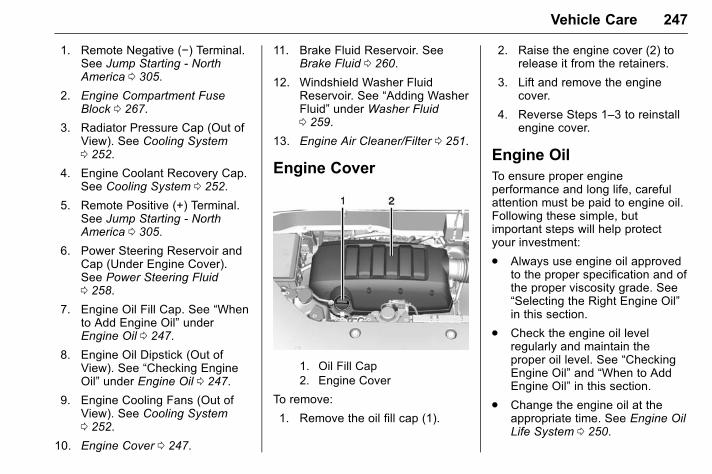
GMC Acadia/Acadia Denali Owner Manual (GMNA-Localizing-U.S./Canada/Mexico-9159268) - 2016 - CRC - 4/16/15
Vehicle Care 247
1. Remote Negative (−) Terminal.See Jump Starting - NorthAmerica 0 305.
2. Engine Compartment FuseBlock 0 267.
3. Radiator Pressure Cap (Out ofView). See Cooling System0 252.
4. Engine Coolant Recovery Cap.See Cooling System 0 252.
5. Remote Positive (+) Terminal.See Jump Starting - NorthAmerica 0 305.
6. Power Steering Reservoir andCap (Under Engine Cover).See Power Steering Fluid0 258.
7. Engine Oil Fill Cap. See “Whento Add Engine Oil” underEngine Oil 0 247.
8. Engine Oil Dipstick (Out ofView). See “Checking EngineOil” under Engine Oil 0 247.
9. Engine Cooling Fans (Out ofView). See Cooling System0 252.
10. Engine Cover 0 247.
11. Brake Fluid Reservoir. SeeBrake Fluid 0 260.
12. Windshield Washer FluidReservoir. See “Adding WasherFluid” under Washer Fluid0 259.
13. Engine Air Cleaner/Filter 0 251.
Engine Cover
1. Oil Fill Cap2. Engine Cover
To remove:
1. Remove the oil fill cap (1).
2. Raise the engine cover (2) torelease it from the retainers.
3. Lift and remove the enginecover.
4. Reverse Steps 1–3 to reinstallengine cover.
Engine OilTo ensure proper engineperformance and long life, carefulattention must be paid to engine oil.Following these simple, butimportant steps will help protectyour investment:
. Always use engine oil approvedto the proper specification and ofthe proper viscosity grade. See“Selecting the Right Engine Oil”in this section.
. Check the engine oil levelregularly and maintain theproper oil level. See “CheckingEngine Oil” and “When to AddEngine Oil” in this section.
. Change the engine oil at theappropriate time. See Engine OilLife System 0 250.
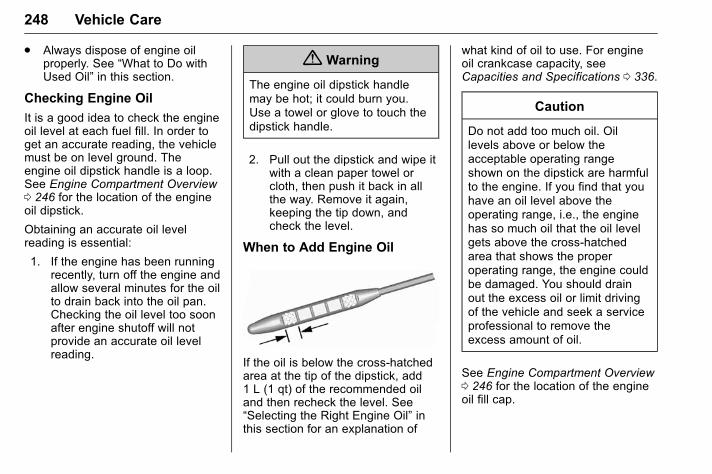
GMC Acadia/Acadia Denali Owner Manual (GMNA-Localizing-U.S./Canada/Mexico-9159268) - 2016 - CRC - 4/16/15
248 Vehicle Care
. Always dispose of engine oilproperly. See “What to Do withUsed Oil” in this section.
Checking Engine Oil
It is a good idea to check the engineoil level at each fuel fill. In order toget an accurate reading, the vehiclemust be on level ground. Theengine oil dipstick handle is a loop.See Engine Compartment Overview0 246 for the location of the engineoil dipstick.
Obtaining an accurate oil levelreading is essential:
1. If the engine has been runningrecently, turn off the engine andallow several minutes for the oilto drain back into the oil pan.Checking the oil level too soonafter engine shutoff will notprovide an accurate oil levelreading.
{ Warning
The engine oil dipstick handlemay be hot; it could burn you.Use a towel or glove to touch thedipstick handle.
2. Pull out the dipstick and wipe itwith a clean paper towel orcloth, then push it back in allthe way. Remove it again,keeping the tip down, andcheck the level.
When to Add Engine Oil
If the oil is below the cross-hatchedarea at the tip of the dipstick, add1 L (1 qt) of the recommended oiland then recheck the level. See“Selecting the Right Engine Oil” inthis section for an explanation of
what kind of oil to use. For engineoil crankcase capacity, seeCapacities and Specifications 0 336.
Caution
Do not add too much oil. Oillevels above or below theacceptable operating rangeshown on the dipstick are harmfulto the engine. If you find that youhave an oil level above theoperating range, i.e., the enginehas so much oil that the oil levelgets above the cross-hatchedarea that shows the properoperating range, the engine couldbe damaged. You should drainout the excess oil or limit drivingof the vehicle and seek a serviceprofessional to remove theexcess amount of oil.
See Engine Compartment Overview0 246 for the location of the engineoil fill cap.
GMC Acadia/Acadia Denali Owner Manual (GMNA-Localizing-U.S./Canada/Mexico-9159268) - 2016 - CRC - 4/16/15
Vehicle Care 249
Add enough oil to put the levelsomewhere in the proper operatingrange. Push the dipstick all the wayback in when through.
Selecting the Right Engine Oil
Selecting the right engine oildepends on both the proper oilspecification and viscosity grade.See Recommended Fluids andLubricants 0 330.
Specification
Ask for and use engine oils thatmeet the dexos1™ specification.Engine oils that have beenapproved by GM as meeting thedexos1 specification are markedwith the dexos1 approved logo. Seewww.gmdexos.com.
Caution
Failure to use the recommendedengine oil can result in enginedamage not covered by thevehicle warranty. Check with yourdealer or service provider onwhether the oil is approved to thedexos1 specification.
Viscosity Grade
Use SAE 5W-30 viscosity gradeengine oil.
Cold Temperature Operation: In anarea of extreme cold, where thetemperature falls below −29 °C(−20 °F), an SAE 0W-30 oil may beused. An oil of this viscosity gradewill provide easier cold starting forthe engine at extremely lowtemperatures. When selecting an oilof the appropriate viscosity grade,always select an oil of the correctspecification. See “Specification”earlier in this section for moreinformation.
Engine Oil Additives/EngineOil Flushes
Do not add anything to the oil. Therecommended oils meeting thedexos1 specification are all that isneeded for good performance andengine protection.
Engine oil system flushes are notrecommended and could causeengine damage not covered by thevehicle warranty.
What to Do with Used Oil
Used engine oil contains certainelements that can be unhealthy foryour skin and could even causecancer. Do not let used oil stay onyour skin for very long. Clean yourskin and nails with soap and water,or a good hand cleaner. Wash orproperly dispose of clothing or ragscontaining used engine oil. See themanufacturer's warnings about theuse and disposal of oil products.
Used oil can be a threat to theenvironment. If you change yourown oil, be sure to drain all the oilfrom the filter before disposal. Neverdispose of oil by putting it in the
GMC Acadia/Acadia Denali Owner Manual (GMNA-Localizing-U.S./Canada/Mexico-9159268) - 2016 - CRC - 4/16/15
250 Vehicle Care
trash or pouring it on the ground,into sewers, or into streams orbodies of water. Recycle it by takingit to a place that collects used oil.
Engine Oil Life System
When to Change Engine Oil
This vehicle has a computer systemthat indicates when to change theengine oil and filter. This is basedon a combination of factors whichinclude engine revolutions, enginetemperature, and miles driven.Based on driving conditions, themileage at which an oil change isindicated can vary considerably. Forthe oil life system to work properly,the system must be reset every timethe oil is changed.
When the system has calculatedthat oil life has been diminished, itindicates that an oil change isnecessary. A CHANGE ENGINEOIL SOON message comes on.Change the oil as soon as possiblewithin the next 1 000 km (600 mi).It is possible that, if driving underthe best conditions, the oil lifesystem might indicate that an oil
change is not necessary for up to ayear. The engine oil and filter mustbe changed at least once a yearand, at this time, the system mustbe reset. Your dealer has trainedservice people who will perform thiswork and reset the system. It is alsoimportant to check the oil regularlyover the course of an oil draininterval and keep it at the properlevel.
If the system is ever resetaccidentally, the oil must bechanged at 5 000 km (3,000 mi)since the last oil change.Remember to reset the oil lifesystem whenever the oil is changed.
How to Reset the Engine OilLife System
Reset the system whenever theengine oil is changed so that thesystem can calculate the nextengine oil change. To reset thesystem:
1. Turn the ignition to ON/RUN,with the engine off.
2. Press the vehicle informationbutton until OIL LIFEREMAINING displays.
3. Press and hold V until “100%”is displayed. Three chimessound and the CHANGEENGINE OIL SOON messagegoes off.
4. Turn the key to LOCK/OFF.
If the CHANGE ENGINE OIL SOONmessage comes back on when thevehicle is started, the engine oil lifesystem has not been reset. Repeatthe procedure.
Automatic TransmissionFluidIt is not necessary to check thetransmission fluid level.A transmission fluid leak is the onlyreason for fluid loss. If a leakoccurs, take the vehicle to thedealer and have it repaired as soonas possible.
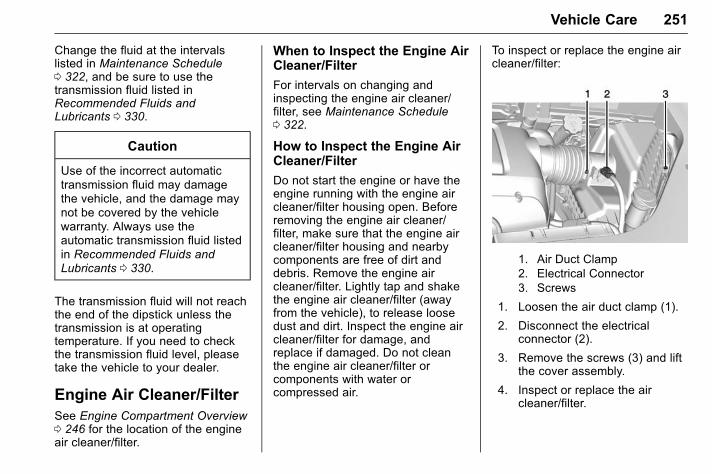
GMC Acadia/Acadia Denali Owner Manual (GMNA-Localizing-U.S./Canada/Mexico-9159268) - 2016 - CRC - 4/16/15
Vehicle Care 251
Change the fluid at the intervalslisted in Maintenance Schedule0 322, and be sure to use thetransmission fluid listed inRecommended Fluids andLubricants 0 330.
Caution
Use of the incorrect automatictransmission fluid may damagethe vehicle, and the damage maynot be covered by the vehiclewarranty. Always use theautomatic transmission fluid listedin Recommended Fluids andLubricants 0 330.
The transmission fluid will not reachthe end of the dipstick unless thetransmission is at operatingtemperature. If you need to checkthe transmission fluid level, pleasetake the vehicle to your dealer.
Engine Air Cleaner/FilterSee Engine Compartment Overview0 246 for the location of the engineair cleaner/filter.
When to Inspect the Engine AirCleaner/Filter
For intervals on changing andinspecting the engine air cleaner/filter, see Maintenance Schedule0 322.
How to Inspect the Engine AirCleaner/Filter
Do not start the engine or have theengine running with the engine aircleaner/filter housing open. Beforeremoving the engine air cleaner/filter, make sure that the engine aircleaner/filter housing and nearbycomponents are free of dirt anddebris. Remove the engine aircleaner/filter. Lightly tap and shakethe engine air cleaner/filter (awayfrom the vehicle), to release loosedust and dirt. Inspect the engine aircleaner/filter for damage, andreplace if damaged. Do not cleanthe engine air cleaner/filter orcomponents with water orcompressed air.
To inspect or replace the engine aircleaner/filter:
1. Air Duct Clamp2. Electrical Connector3. Screws
1. Loosen the air duct clamp (1).
2. Disconnect the electricalconnector (2).
3. Remove the screws (3) and liftthe cover assembly.
4. Inspect or replace the aircleaner/filter.
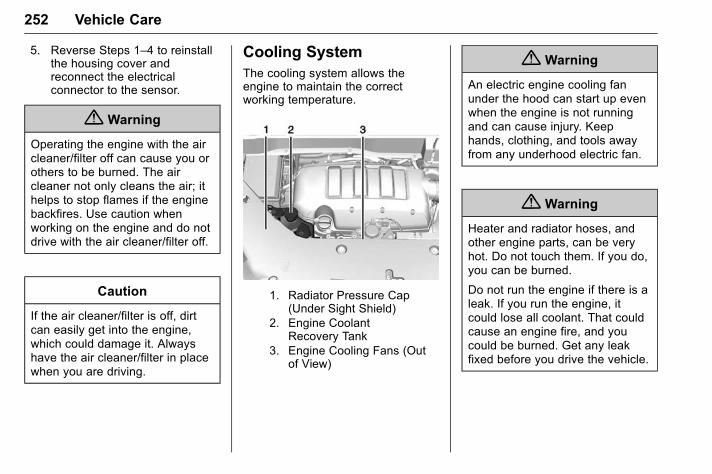
GMC Acadia/Acadia Denali Owner Manual (GMNA-Localizing-U.S./Canada/Mexico-9159268) - 2016 - CRC - 4/16/15
252 Vehicle Care
5. Reverse Steps 1–4 to reinstallthe housing cover andreconnect the electricalconnector to the sensor.
{ Warning
Operating the engine with the aircleaner/filter off can cause you orothers to be burned. The aircleaner not only cleans the air; ithelps to stop flames if the enginebackfires. Use caution whenworking on the engine and do notdrive with the air cleaner/filter off.
Caution
If the air cleaner/filter is off, dirtcan easily get into the engine,which could damage it. Alwayshave the air cleaner/filter in placewhen you are driving.
Cooling SystemThe cooling system allows theengine to maintain the correctworking temperature.
1. Radiator Pressure Cap(Under Sight Shield)
2. Engine CoolantRecovery Tank
3. Engine Cooling Fans (Outof View)
{ Warning
An electric engine cooling fanunder the hood can start up evenwhen the engine is not runningand can cause injury. Keephands, clothing, and tools awayfrom any underhood electric fan.
{ Warning
Heater and radiator hoses, andother engine parts, can be veryhot. Do not touch them. If you do,you can be burned.
Do not run the engine if there is aleak. If you run the engine, itcould lose all coolant. That couldcause an engine fire, and youcould be burned. Get any leakfixed before you drive the vehicle.
GMC Acadia/Acadia Denali Owner Manual (GMNA-Localizing-U.S./Canada/Mexico-9159268) - 2016 - CRC - 4/16/15
Vehicle Care 253
Caution
Using coolant other thanDEX-COOL® can causepremature engine, heater core,or radiator corrosion. In addition,the engine coolant could requirechanging sooner. Any repairswould not be covered by thevehicle warranty. Always useDEX-COOL (silicate-free) coolantin the vehicle.
Engine CoolantThe cooling system in the vehicle isfilled with DEX-COOL® enginecoolant. See Maintenance Schedule0 322 and Recommended Fluidsand Lubricants 0 330.
The following explains the coolingsystem and how to check and addcoolant when it is low. If there is aproblem with engine overheating,see Engine Overheating 0 256.
What to Use
{ Warning
Adding only plain water or someother liquid to the cooling systemcan be dangerous. Plain waterand other liquids, can boil beforethe proper coolant mixture will.The coolant warning system is setfor the proper coolant mixture.With plain water or the wrongmixture, the engine could get toohot but you would not get theoverheat warning. The enginecould catch fire and you or otherscould be burned. Use a 50/50 mixture of clean, drinkablewater and DEX-COOL coolant.
Use a 50/50 mixture of clean,drinkable water and DEX-COOLcoolant. If using this mixture,nothing else needs to be added.This mixture:
. Gives freezing protection downto −37 °C (−34 °F), outsidetemperature.
. Gives boiling protection up to129 °C (265 °F), enginetemperature.
. Protects against rust andcorrosion.
. Will not damage aluminum parts.
. Helps keep the proper enginetemperature.
Caution
If improper coolant mixture,inhibitors, or additives are used inthe vehicle cooling system, theengine could overheat and bedamaged. Too much water in themixture can freeze and crackengine cooling parts. The repairswould not be covered by thevehicle warranty. Use only theproper mixture of engine coolantfor the cooling system. SeeRecommended Fluids andLubricants 0 330.
Never dispose of engine coolant byputting it in the trash, pouring it onthe ground, or into sewers, streams,
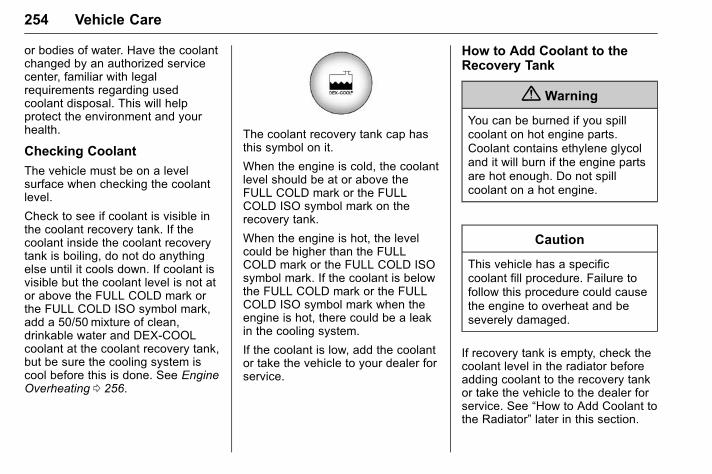
GMC Acadia/Acadia Denali Owner Manual (GMNA-Localizing-U.S./Canada/Mexico-9159268) - 2016 - CRC - 4/16/15
254 Vehicle Care
or bodies of water. Have the coolantchanged by an authorized servicecenter, familiar with legalrequirements regarding usedcoolant disposal. This will helpprotect the environment and yourhealth.
Checking Coolant
The vehicle must be on a levelsurface when checking the coolantlevel.
Check to see if coolant is visible inthe coolant recovery tank. If thecoolant inside the coolant recoverytank is boiling, do not do anythingelse until it cools down. If coolant isvisible but the coolant level is not ator above the FULL COLD mark orthe FULL COLD ISO symbol mark,add a 50/50 mixture of clean,drinkable water and DEX-COOLcoolant at the coolant recovery tank,but be sure the cooling system iscool before this is done. See EngineOverheating 0 256.
The coolant recovery tank cap hasthis symbol on it.
When the engine is cold, the coolantlevel should be at or above theFULL COLD mark or the FULLCOLD ISO symbol mark on therecovery tank.
When the engine is hot, the levelcould be higher than the FULLCOLD mark or the FULL COLD ISOsymbol mark. If the coolant is belowthe FULL COLD mark or the FULLCOLD ISO symbol mark when theengine is hot, there could be a leakin the cooling system.
If the coolant is low, add the coolantor take the vehicle to your dealer forservice.
How to Add Coolant to theRecovery Tank
{ Warning
You can be burned if you spillcoolant on hot engine parts.Coolant contains ethylene glycoland it will burn if the engine partsare hot enough. Do not spillcoolant on a hot engine.
Caution
This vehicle has a specificcoolant fill procedure. Failure tofollow this procedure could causethe engine to overheat and beseverely damaged.
If recovery tank is empty, check thecoolant level in the radiator beforeadding coolant to the recovery tankor take the vehicle to the dealer forservice. See “How to Add Coolant tothe Radiator” later in this section.
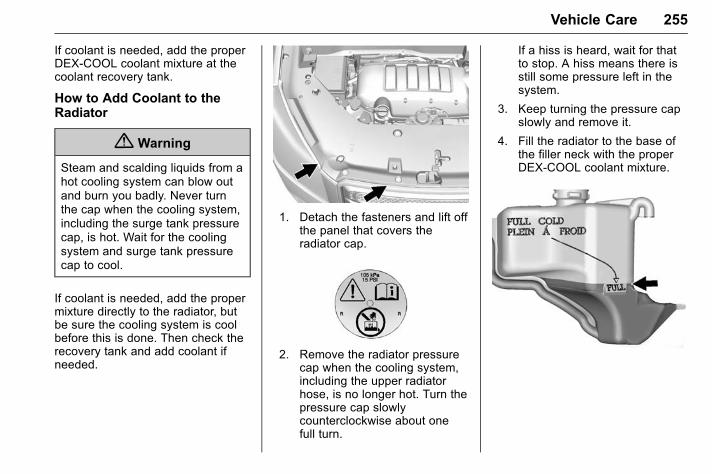
GMC Acadia/Acadia Denali Owner Manual (GMNA-Localizing-U.S./Canada/Mexico-9159268) - 2016 - CRC - 4/16/15
Vehicle Care 255
If coolant is needed, add the properDEX-COOL coolant mixture at thecoolant recovery tank.
How to Add Coolant to theRadiator
{ Warning
Steam and scalding liquids from ahot cooling system can blow outand burn you badly. Never turnthe cap when the cooling system,including the surge tank pressurecap, is hot. Wait for the coolingsystem and surge tank pressurecap to cool.
If coolant is needed, add the propermixture directly to the radiator, butbe sure the cooling system is coolbefore this is done. Then check therecovery tank and add coolant ifneeded.
1. Detach the fasteners and lift offthe panel that covers theradiator cap.
2. Remove the radiator pressurecap when the cooling system,including the upper radiatorhose, is no longer hot. Turn thepressure cap slowlycounterclockwise about onefull turn.
If a hiss is heard, wait for thatto stop. A hiss means there isstill some pressure left in thesystem.
3. Keep turning the pressure capslowly and remove it.
4. Fill the radiator to the base ofthe filler neck with the properDEX-COOL coolant mixture.
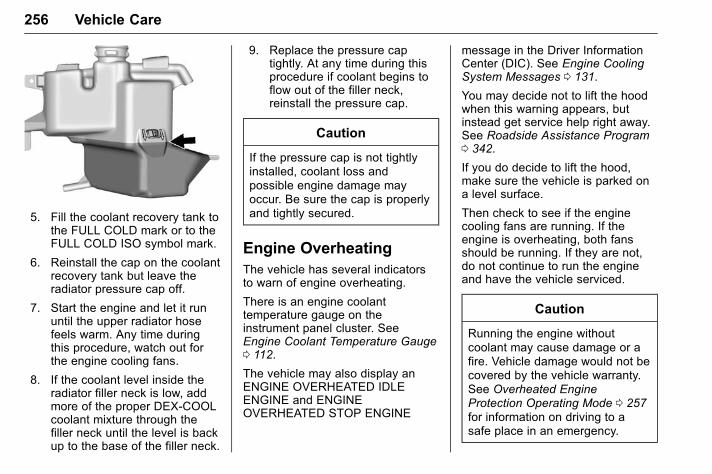
GMC Acadia/Acadia Denali Owner Manual (GMNA-Localizing-U.S./Canada/Mexico-9159268) - 2016 - CRC - 4/16/15
256 Vehicle Care
5. Fill the coolant recovery tank tothe FULL COLD mark or to theFULL COLD ISO symbol mark.
6. Reinstall the cap on the coolantrecovery tank but leave theradiator pressure cap off.
7. Start the engine and let it rununtil the upper radiator hosefeels warm. Any time duringthis procedure, watch out forthe engine cooling fans.
8. If the coolant level inside theradiator filler neck is low, addmore of the proper DEX-COOLcoolant mixture through thefiller neck until the level is backup to the base of the filler neck.
9. Replace the pressure captightly. At any time during thisprocedure if coolant begins toflow out of the filler neck,reinstall the pressure cap.
Caution
If the pressure cap is not tightlyinstalled, coolant loss andpossible engine damage mayoccur. Be sure the cap is properlyand tightly secured.
Engine OverheatingThe vehicle has several indicatorsto warn of engine overheating.
There is an engine coolanttemperature gauge on theinstrument panel cluster. SeeEngine Coolant Temperature Gauge0 112.
The vehicle may also display anENGINE OVERHEATED IDLEENGINE and ENGINEOVERHEATED STOP ENGINE
message in the Driver InformationCenter (DIC). See Engine CoolingSystem Messages 0 131.
You may decide not to lift the hoodwhen this warning appears, butinstead get service help right away.See Roadside Assistance Program0 342.
If you do decide to lift the hood,make sure the vehicle is parked ona level surface.
Then check to see if the enginecooling fans are running. If theengine is overheating, both fansshould be running. If they are not,do not continue to run the engineand have the vehicle serviced.
Caution
Running the engine withoutcoolant may cause damage or afire. Vehicle damage would not becovered by the vehicle warranty.See Overheated EngineProtection Operating Mode 0 257for information on driving to asafe place in an emergency.
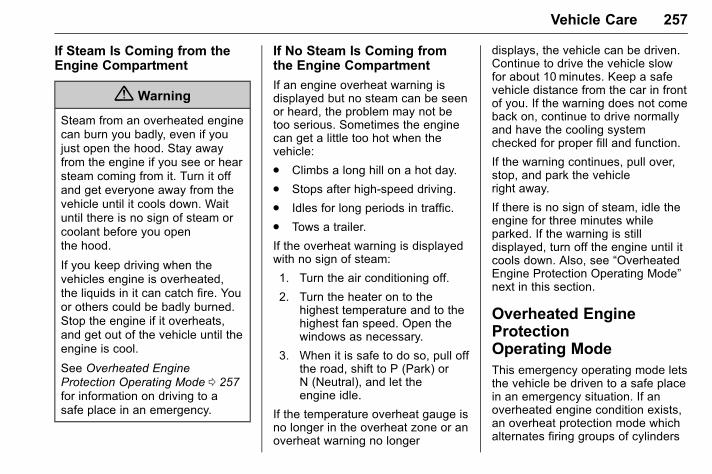
GMC Acadia/Acadia Denali Owner Manual (GMNA-Localizing-U.S./Canada/Mexico-9159268) - 2016 - CRC - 4/16/15
Vehicle Care 257
If Steam Is Coming from theEngine Compartment
{ Warning
Steam from an overheated enginecan burn you badly, even if youjust open the hood. Stay awayfrom the engine if you see or hearsteam coming from it. Turn it offand get everyone away from thevehicle until it cools down. Waituntil there is no sign of steam orcoolant before you openthe hood.
If you keep driving when thevehicles engine is overheated,the liquids in it can catch fire. Youor others could be badly burned.Stop the engine if it overheats,and get out of the vehicle until theengine is cool.
See Overheated EngineProtection Operating Mode 0 257for information on driving to asafe place in an emergency.
If No Steam Is Coming fromthe Engine Compartment
If an engine overheat warning isdisplayed but no steam can be seenor heard, the problem may not betoo serious. Sometimes the enginecan get a little too hot when thevehicle:
. Climbs a long hill on a hot day.
. Stops after high-speed driving.
. Idles for long periods in traffic.
. Tows a trailer.
If the overheat warning is displayedwith no sign of steam:
1. Turn the air conditioning off.
2. Turn the heater on to thehighest temperature and to thehighest fan speed. Open thewindows as necessary.
3. When it is safe to do so, pull offthe road, shift to P (Park) orN (Neutral), and let theengine idle.
If the temperature overheat gauge isno longer in the overheat zone or anoverheat warning no longer
displays, the vehicle can be driven.Continue to drive the vehicle slowfor about 10 minutes. Keep a safevehicle distance from the car in frontof you. If the warning does not comeback on, continue to drive normallyand have the cooling systemchecked for proper fill and function.
If the warning continues, pull over,stop, and park the vehicleright away.
If there is no sign of steam, idle theengine for three minutes whileparked. If the warning is stilldisplayed, turn off the engine until itcools down. Also, see “OverheatedEngine Protection Operating Mode”next in this section.
Overheated EngineProtectionOperating ModeThis emergency operating mode letsthe vehicle be driven to a safe placein an emergency situation. If anoverheated engine condition exists,an overheat protection mode whichalternates firing groups of cylinders
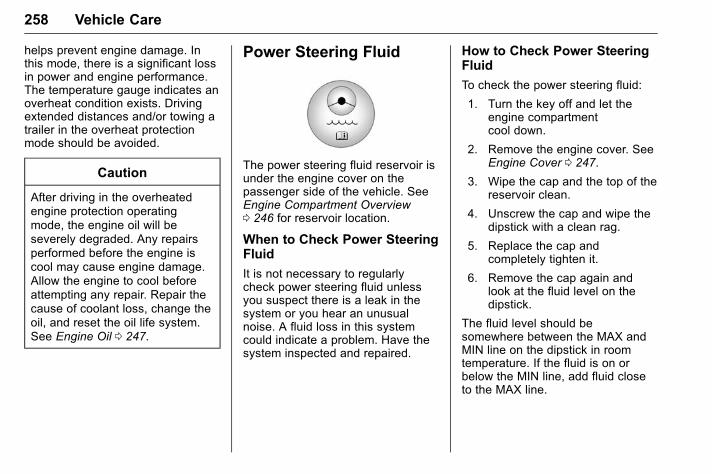
GMC Acadia/Acadia Denali Owner Manual (GMNA-Localizing-U.S./Canada/Mexico-9159268) - 2016 - CRC - 4/16/15
258 Vehicle Care
helps prevent engine damage. Inthis mode, there is a significant lossin power and engine performance.The temperature gauge indicates anoverheat condition exists. Drivingextended distances and/or towing atrailer in the overheat protectionmode should be avoided.
Caution
After driving in the overheatedengine protection operatingmode, the engine oil will beseverely degraded. Any repairsperformed before the engine iscool may cause engine damage.Allow the engine to cool beforeattempting any repair. Repair thecause of coolant loss, change theoil, and reset the oil life system.See Engine Oil 0 247.
Power Steering Fluid
The power steering fluid reservoir isunder the engine cover on thepassenger side of the vehicle. SeeEngine Compartment Overview0 246 for reservoir location.
When to Check Power SteeringFluid
It is not necessary to regularlycheck power steering fluid unlessyou suspect there is a leak in thesystem or you hear an unusualnoise. A fluid loss in this systemcould indicate a problem. Have thesystem inspected and repaired.
How to Check Power SteeringFluid
To check the power steering fluid:
1. Turn the key off and let theengine compartmentcool down.
2. Remove the engine cover. SeeEngine Cover 0 247.
3. Wipe the cap and the top of thereservoir clean.
4. Unscrew the cap and wipe thedipstick with a clean rag.
5. Replace the cap andcompletely tighten it.
6. Remove the cap again andlook at the fluid level on thedipstick.
The fluid level should besomewhere between the MAX andMIN line on the dipstick in roomtemperature. If the fluid is on orbelow the MIN line, add fluid closeto the MAX line.
GMC Acadia/Acadia Denali Owner Manual (GMNA-Localizing-U.S./Canada/Mexico-9159268) - 2016 - CRC - 4/16/15
Vehicle Care 259
What to Use
To determine what kind of fluid touse, see Recommended Fluids andLubricants 0 330. Always use theproper fluid.
Caution
Use of the incorrect fluid maydamage the vehicle and thedamages may not be covered bythe vehicle warranty. Always usethe correct fluid listed inRecommended Fluids andLubricants 0 330.
Washer Fluid
What to Use
When adding windshield washerfluid, be sure to read themanufacturer's instructions beforeuse. If the vehicle will be operatingin an area where the temperaturemay fall below freezing, use a fluidthat has sufficient protection againstfreezing.
Adding Washer Fluid
When the windshield washer fluidreservoir is low, a WASHER FLUIDLOW ADD FLUID message will bedisplayed on the Driver InformationCenter (DIC). See Washer FluidMessages 0 138.
Open the cap with the washersymbol on it. Add washer fluid untilthe tank is full. See EngineCompartment Overview 0 246 forreservoir location.
Caution
. Do not use engine coolant(antifreeze) in thewindshield washer. It candamage the windshieldwasher system and paint.
(Continued)
Caution (Continued)
. Do not mix water withready-to-use washer fluid.Water can cause thesolution to freeze anddamage the washer fluidtank and other parts of thewasher system.
. When using concentratedwasher fluid, follow themanufacturer instructions foradding water.
. Fill the washer fluid tankonly three-quarters full whenit is very cold. This allowsfor fluid expansion iffreezing occurs, which coulddamage the tank if it iscompletely full.
BrakesDisc brake pads have built-in wearindicators that make a high-pitchedwarning sound when the brake padsare worn and new pads are needed.The sound can come and go or be

GMC Acadia/Acadia Denali Owner Manual (GMNA-Localizing-U.S./Canada/Mexico-9159268) - 2016 - CRC - 4/16/15
260 Vehicle Care
heard all the time when the vehicleis moving, except when applying thebrake pedal firmly.
{ Warning
The brake wear warning soundmeans that soon the brakes willnot work well. That could lead toa crash. When the brake wearwarning sound is heard, have thevehicle serviced.
Caution
Continuing to drive with worn-outbrake pads could result in costlybrake repair.
Some driving conditions or climatescan cause a brake squeal when thebrakes are first applied or lightlyapplied. This does not meansomething is wrong with the brakes.
Properly torqued wheel nuts arenecessary to help prevent brakepulsation. When tires are rotated,inspect brake pads for wear and
evenly tighten wheel nuts in theproper sequence to torquespecifications. See Capacities andSpecifications 0 336.
Brake pads should be replaced ascomplete sets.
Brake Pedal Travel
See your dealer if the brake pedaldoes not return to normal height,or if there is a rapid increase inpedal travel. This could be a signthat brake service may be required.
Replacing Brake System Parts
Always replace brake system partswith new, approved replacementparts. If this is not done, the brakesmay not work properly. The brakingperformance expected can changein many other ways if the wrongreplacement brake parts areinstalled or parts are improperlyinstalled.
Brake Fluid
The brake master cylinder reservoiris filled with DOT 3 brake fluid asindicated on the reservoir cap. SeeEngine Compartment Overview0 246 for the location of thereservoir.
There are only two reasons why thebrake fluid level in the reservoir maygo down:
. Normal brake lining wear. Whennew linings are installed, thefluid level goes back up.
. A fluid leak in the brakehydraulic system. Have thebrake hydraulic system fixed.With a leak, the brakes will notwork well.
Always clean the brake fluidreservoir cap and the area aroundthe cap before removing it.
GMC Acadia/Acadia Denali Owner Manual (GMNA-Localizing-U.S./Canada/Mexico-9159268) - 2016 - CRC - 4/16/15
Vehicle Care 261
Do not top off the brake fluid.Adding fluid does not correct a leak.If fluid is added when the linings areworn, there will be too much fluidwhen new brake linings areinstalled. Add or remove fluid, asnecessary, only when work is doneon the brake hydraulic system.
{ Warning
If too much brake fluid is added, itcan spill on the engine and burn,if the engine is hot enough. Youor others could be burned, andthe vehicle could be damaged.Add brake fluid only when work isdone on the brake hydraulicsystem.
When the brake fluid falls to a lowlevel, the brake warning light comeson. See Brake System WarningLight 0 117.
Brake fluid absorbs water over time.Replace brake fluid at the specifiedintervals to prevent increasedstopping distance. See MaintenanceSchedule 0 322.
What to Add
Use only GM approved DOT 3brake fluid from a clean, sealedcontainer. See RecommendedFluids and Lubricants 0 330.
{ Warning
The wrong or contaminated brakefluid could result in damage to thebrake system. This could result inthe loss of braking leading to apossible injury. Always use theproper brake fluid.
Caution
If brake fluid is spilled on thevehicle's painted surfaces, thepaint finish can be damaged.Immediately wash off any paintedsurface.
Battery - North AmericaThe original equipment battery ismaintenance free. Do not removethe cap and do not add fluid.
Refer to the replacement number onthe original battery label when anew battery is needed.
{ Warning
WARNING: Battery posts,terminals, and relatedaccessories contain lead and leadcompounds, chemicals known tothe State of California to causecancer and birth defects or otherreproductive harm. Batteries alsocontain other chemicals known tothe State of California to causecancer. WASH HANDS AFTERHANDLING. See CaliforniaProposition 65 Warning 0 243.
GMC Acadia/Acadia Denali Owner Manual (GMNA-Localizing-U.S./Canada/Mexico-9159268) - 2016 - CRC - 4/16/15
262 Vehicle Care
Vehicle Storage
{ Warning
Batteries have acid that can burnyou and gas that can explode.You can be badly hurt if you arenot careful. See Jump Starting -North America 0 305 for tips onworking around a battery withoutgetting hurt.
Infrequent Usage: Remove theblack, negative (−) cable from thebattery to keep the battery fromrunning down.
Extended Storage: Remove theblack, negative (−) cable from thebattery or use a battery tricklecharger.
All-Wheel DriveTransfer case fluid does not requirechecking unless there is a fluid leakor unusual noise. If required, havethe transfer case serviced by yourdealer.
Starter Switch Check
{ Warning
When you are doing thisinspection, the vehicle couldmove suddenly. If the vehiclemoves, you or others could beinjured.
1. Before starting this check, besure there is enough roomaround the vehicle.
2. Apply both the parking brakeand the regular brake.
Do not use the acceleratorpedal, and be ready to turn offthe engine immediately if itstarts.
3. Try to start the engine in eachgear. The vehicle should startonly in P (Park) or N (Neutral).If the vehicle starts in any otherposition, contact your dealer forservice.
Automatic TransmissionShift Lock ControlFunction Check
{ Warning
When you are doing thisinspection, the vehicle couldmove suddenly. If the vehiclemoves, you or others could beinjured.
1. Before starting this check, besure there is enough roomaround the vehicle. It should beparked on a level surface.
2. Apply the parking brake. Beready to apply the regularbrake immediately if the vehiclebegins to move.
3. With the engine off, turn theignition on, but do not start theengine. Without applying theregular brake, try to move theshift lever out of P (Park) withnormal effort. If the shift levermoves out of P (Park), contactyour dealer for service.
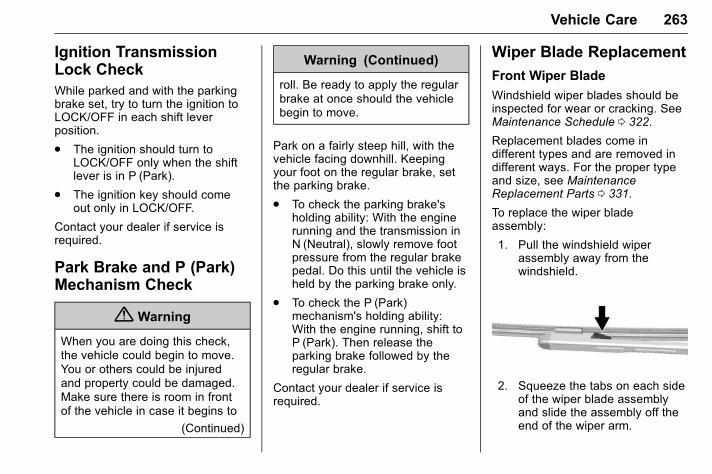
GMC Acadia/Acadia Denali Owner Manual (GMNA-Localizing-U.S./Canada/Mexico-9159268) - 2016 - CRC - 4/16/15
Vehicle Care 263
Ignition TransmissionLock CheckWhile parked and with the parkingbrake set, try to turn the ignition toLOCK/OFF in each shift leverposition.
. The ignition should turn toLOCK/OFF only when the shiftlever is in P (Park).
. The ignition key should comeout only in LOCK/OFF.
Contact your dealer if service isrequired.
Park Brake and P (Park)Mechanism Check
{ Warning
When you are doing this check,the vehicle could begin to move.You or others could be injuredand property could be damaged.Make sure there is room in frontof the vehicle in case it begins to
(Continued)
Warning (Continued)
roll. Be ready to apply the regularbrake at once should the vehiclebegin to move.
Park on a fairly steep hill, with thevehicle facing downhill. Keepingyour foot on the regular brake, setthe parking brake.
. To check the parking brake'sholding ability: With the enginerunning and the transmission inN (Neutral), slowly remove footpressure from the regular brakepedal. Do this until the vehicle isheld by the parking brake only.
. To check the P (Park)mechanism's holding ability:With the engine running, shift toP (Park). Then release theparking brake followed by theregular brake.
Contact your dealer if service isrequired.
Wiper Blade Replacement
Front Wiper Blade
Windshield wiper blades should beinspected for wear or cracking. SeeMaintenance Schedule 0 322.
Replacement blades come indifferent types and are removed indifferent ways. For the proper typeand size, see MaintenanceReplacement Parts 0 331.
To replace the wiper bladeassembly:
1. Pull the windshield wiperassembly away from thewindshield.
2. Squeeze the tabs on each sideof the wiper blade assemblyand slide the assembly off theend of the wiper arm.
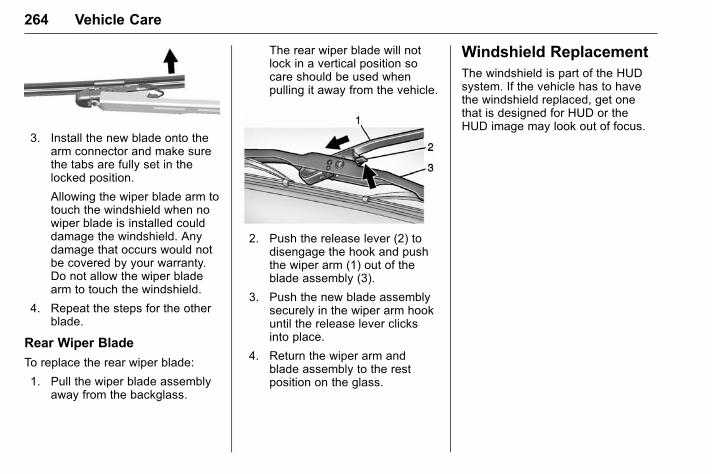
GMC Acadia/Acadia Denali Owner Manual (GMNA-Localizing-U.S./Canada/Mexico-9159268) - 2016 - CRC - 4/16/15
264 Vehicle Care
3. Install the new blade onto thearm connector and make surethe tabs are fully set in thelocked position.
Allowing the wiper blade arm totouch the windshield when nowiper blade is installed coulddamage the windshield. Anydamage that occurs would notbe covered by your warranty.Do not allow the wiper bladearm to touch the windshield.
4. Repeat the steps for the otherblade.
Rear Wiper Blade
To replace the rear wiper blade:
1. Pull the wiper blade assemblyaway from the backglass.
The rear wiper blade will notlock in a vertical position socare should be used whenpulling it away from the vehicle.
2. Push the release lever (2) todisengage the hook and pushthe wiper arm (1) out of theblade assembly (3).
3. Push the new blade assemblysecurely in the wiper arm hookuntil the release lever clicksinto place.
4. Return the wiper arm andblade assembly to the restposition on the glass.
Windshield ReplacementThe windshield is part of the HUDsystem. If the vehicle has to havethe windshield replaced, get onethat is designed for HUD or theHUD image may look out of focus.
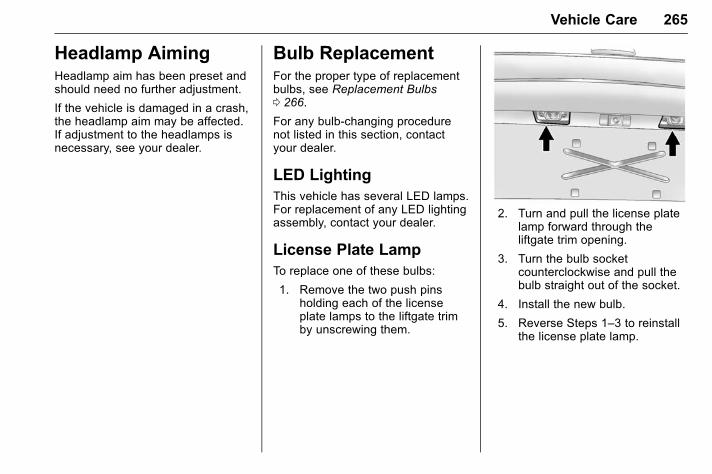
GMC Acadia/Acadia Denali Owner Manual (GMNA-Localizing-U.S./Canada/Mexico-9159268) - 2016 - CRC - 4/16/15
Vehicle Care 265
Headlamp AimingHeadlamp aim has been preset andshould need no further adjustment.
If the vehicle is damaged in a crash,the headlamp aim may be affected.If adjustment to the headlamps isnecessary, see your dealer.
Bulb ReplacementFor the proper type of replacementbulbs, see Replacement Bulbs0 266.
For any bulb-changing procedurenot listed in this section, contactyour dealer.
LED LightingThis vehicle has several LED lamps.For replacement of any LED lightingassembly, contact your dealer.
License Plate LampTo replace one of these bulbs:
1. Remove the two push pinsholding each of the licenseplate lamps to the liftgate trimby unscrewing them.
2. Turn and pull the license platelamp forward through theliftgate trim opening.
3. Turn the bulb socketcounterclockwise and pull thebulb straight out of the socket.
4. Install the new bulb.
5. Reverse Steps 1–3 to reinstallthe license plate lamp.
GMC Acadia/Acadia Denali Owner Manual (GMNA-Localizing-U.S./Canada/Mexico-9159268) - 2016 - CRC - 4/16/15
266 Vehicle Care
Replacement Bulbs
Exterior LampBulb
Number
License Plate Lamp 194LL
For replacement bulbs not listedhere, contact your dealer.
Electrical System
High Voltage Devices andWiring
{ Warning
Exposure to high voltage cancause shock, burns, and evendeath. The high voltagecomponents in the vehicle canonly be serviced by technicianswith special training.
High voltage components areidentified by labels. Do notremove, open, take apart,or modify these components.High voltage cable or wiring hasorange covering. Do not probe,tamper with, cut, or modify highvoltage cable or wiring.
Electrical SystemOverloadThe vehicle has fuses and circuitbreakers to protect against anelectrical system overload.
When the current electrical load istoo heavy, the circuit breaker opensand closes, protecting the circuituntil the current load returns tonormal or the problem is fixed. Thisgreatly reduces the chance of circuitoverload and fire caused byelectrical problems.
Fuses and circuit breakers protectpower devices in the vehicle.
Replace a bad fuse with a new oneof the identical size and rating.
If there is a problem on the road anda fuse needs to be replaced, thesame amperage fuse can beborrowed. Choose some feature ofthe vehicle that is not needed to useand replace it as soon as possible.
Headlamp Wiring
An electrical overload may causethe lamps to go on and off, or insome cases to remain off. Have theheadlamp wiring checked right awayif the lamps go on and off orremain off.
GMC Acadia/Acadia Denali Owner Manual (GMNA-Localizing-U.S./Canada/Mexico-9159268) - 2016 - CRC - 4/16/15
Vehicle Care 267
Windshield Wipers
If the wiper motor overheats due toheavy snow or ice, the windshieldwipers will stop until the motor coolsand will then restart.
Although the circuit is protectedfrom electrical overload, overloaddue to heavy snow or ice maycause wiper linkage damage.Always clear ice and heavy snowfrom the windshield before using thewindshield wipers.
If the overload is caused by anelectrical problem and not snow orice, be sure to get it fixed.
Fuses and CircuitBreakersThe wiring circuits in your vehicleare protected from short circuits bya combination of fuses, circuitbreakers and fusible thermal links.This greatly reduces the chance offires caused by electrical problems.
Look at the silver-colored bandinside the fuse. If the band is brokenor melted, replace the fuse. Be sureyou replace a bad fuse with a newone of the identical size and rating.
Fuses of the same amperage canbe temporarily borrowed fromanother fuse location, if a fuse goesout. Replace the fuse as soon asyou can.
Engine CompartmentFuse BlockThe underhood fuse block is in theengine compartment, on thepassenger side of the vehicle.
Lift the cover for access to the fuse/relay block.
Caution
Spilling liquid on any electricalcomponent on the vehicle maydamage it. Always keep thecovers on any electricalcomponent.
To remove fuses, hold the end ofthe fuse between your thumb andindex finger and pull straight out.
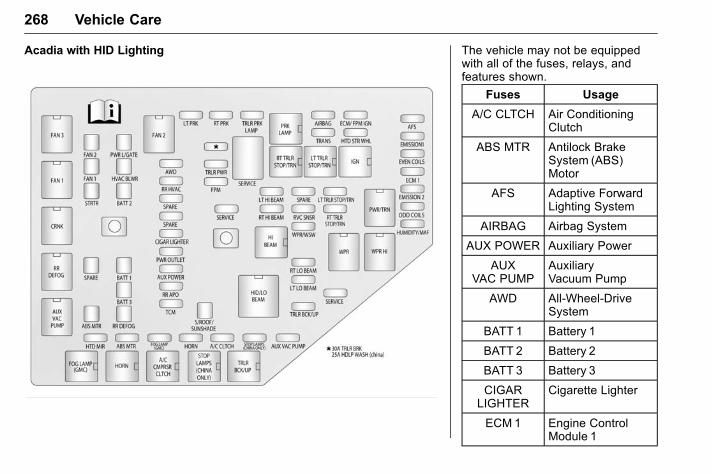
GMC Acadia/Acadia Denali Owner Manual (GMNA-Localizing-U.S./Canada/Mexico-9159268) - 2016 - CRC - 4/16/15
268 Vehicle Care
Acadia with HID Lighting The vehicle may not be equippedwith all of the fuses, relays, andfeatures shown.
Fuses Usage
A/C CLTCH Air ConditioningClutch
ABS MTR Antilock BrakeSystem (ABS)Motor
AFS Adaptive ForwardLighting System
AIRBAG Airbag System
AUX POWER Auxiliary Power
AUXVAC PUMP
AuxiliaryVacuum Pump
AWD All-Wheel-DriveSystem
BATT 1 Battery 1
BATT 2 Battery 2
BATT 3 Battery 3
CIGARLIGHTER
Cigarette Lighter
ECM 1 Engine ControlModule 1
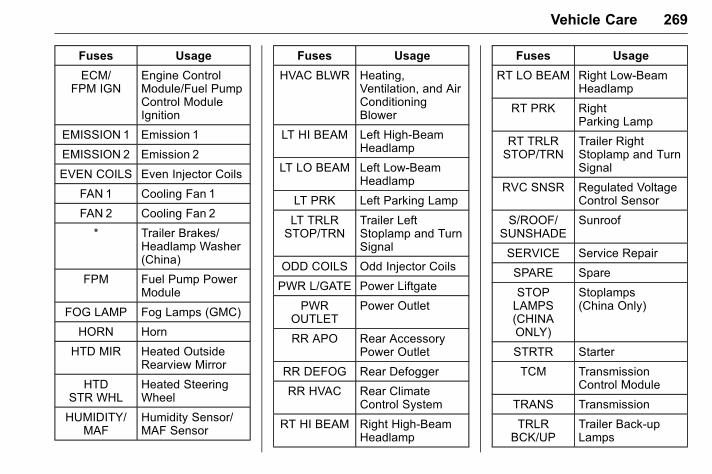
GMC Acadia/Acadia Denali Owner Manual (GMNA-Localizing-U.S./Canada/Mexico-9159268) - 2016 - CRC - 4/16/15
Vehicle Care 269
Fuses Usage
ECM/FPM IGN
Engine ControlModule/Fuel PumpControl ModuleIgnition
EMISSION 1 Emission 1
EMISSION 2 Emission 2
EVEN COILS Even Injector Coils
FAN 1 Cooling Fan 1
FAN 2 Cooling Fan 2
* Trailer Brakes/Headlamp Washer(China)
FPM Fuel Pump PowerModule
FOG LAMP Fog Lamps (GMC)
HORN Horn
HTD MIR Heated OutsideRearview Mirror
HTDSTR WHL
Heated SteeringWheel
HUMIDITY/MAF
Humidity Sensor/MAF Sensor
Fuses Usage
HVAC BLWR Heating,Ventilation, and AirConditioningBlower
LT HI BEAM Left High-BeamHeadlamp
LT LO BEAM Left Low-BeamHeadlamp
LT PRK Left Parking Lamp
LT TRLRSTOP/TRN
Trailer LeftStoplamp and TurnSignal
ODD COILS Odd Injector Coils
PWR L/GATE Power Liftgate
PWROUTLET
Power Outlet
RR APO Rear AccessoryPower Outlet
RR DEFOG Rear Defogger
RR HVAC Rear ClimateControl System
RT HI BEAM Right High-BeamHeadlamp
Fuses Usage
RT LO BEAM Right Low-BeamHeadlamp
RT PRK RightParking Lamp
RT TRLRSTOP/TRN
Trailer RightStoplamp and TurnSignal
RVC SNSR Regulated VoltageControl Sensor
S/ROOF/SUNSHADE
Sunroof
SERVICE Service Repair
SPARE Spare
STOPLAMPS(CHINAONLY)
Stoplamps(China Only)
STRTR Starter
TCM TransmissionControl Module
TRANS Transmission
TRLRBCK/UP
Trailer Back-upLamps
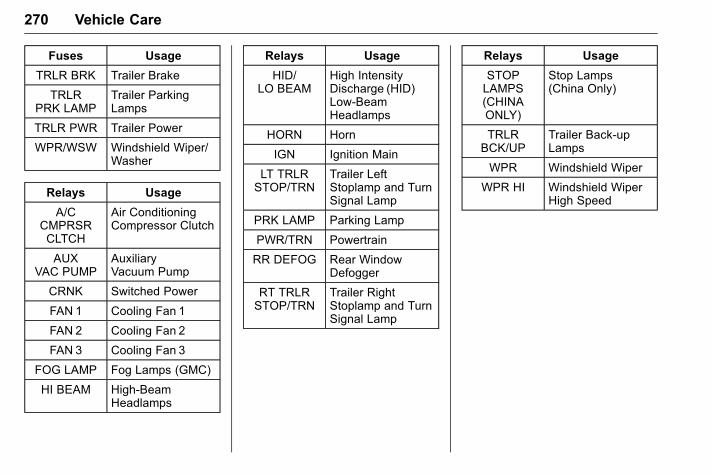
GMC Acadia/Acadia Denali Owner Manual (GMNA-Localizing-U.S./Canada/Mexico-9159268) - 2016 - CRC - 4/16/15
270 Vehicle Care
Fuses Usage
TRLR BRK Trailer Brake
TRLRPRK LAMP
Trailer ParkingLamps
TRLR PWR Trailer Power
WPR/WSW Windshield Wiper/Washer
Relays Usage
A/CCMPRSRCLTCH
Air ConditioningCompressor Clutch
AUXVAC PUMP
AuxiliaryVacuum Pump
CRNK Switched Power
FAN 1 Cooling Fan 1
FAN 2 Cooling Fan 2
FAN 3 Cooling Fan 3
FOG LAMP Fog Lamps (GMC)
HI BEAM High-BeamHeadlamps
Relays Usage
HID/LO BEAM
High IntensityDischarge (HID)Low-BeamHeadlamps
HORN Horn
IGN Ignition Main
LT TRLRSTOP/TRN
Trailer LeftStoplamp and TurnSignal Lamp
PRK LAMP Parking Lamp
PWR/TRN Powertrain
RR DEFOG Rear WindowDefogger
RT TRLRSTOP/TRN
Trailer RightStoplamp and TurnSignal Lamp
Relays Usage
STOPLAMPS(CHINAONLY)
Stop Lamps(China Only)
TRLRBCK/UP
Trailer Back-upLamps
WPR Windshield Wiper
WPR HI Windshield WiperHigh Speed

GMC Acadia/Acadia Denali Owner Manual (GMNA-Localizing-U.S./Canada/Mexico-9159268) - 2016 - CRC - 4/16/15
Vehicle Care 271
Acadia with Halogen Lighting The vehicle may not be equippedwith all of the fuses, relays, andfeatures shown.
Fuses Usage
A/C CLTCH Air ConditioningClutch
ABS MTR Antilock BrakeSystem (ABS)Motor
AIRBAG Airbag System
AUX POWER Auxiliary Power
AUXVAC PUMP
AuxiliaryVacuum Pump
AWD All-Wheel-DriveSystem
BATT 1 Battery 1
BATT 2 Battery 2
BATT 3 Battery 3
CIGARLIGHTER
Cigarette Lighter
ECM 1 Engine ControlModule 1
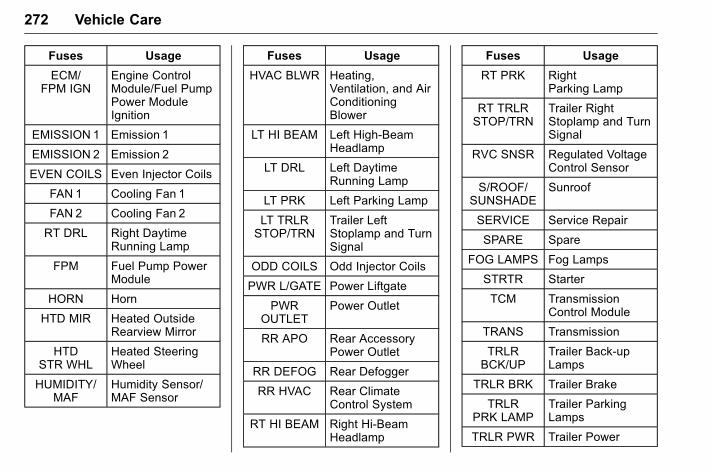
GMC Acadia/Acadia Denali Owner Manual (GMNA-Localizing-U.S./Canada/Mexico-9159268) - 2016 - CRC - 4/16/15
272 Vehicle Care
Fuses Usage
ECM/FPM IGN
Engine ControlModule/Fuel PumpPower ModuleIgnition
EMISSION 1 Emission 1
EMISSION 2 Emission 2
EVEN COILS Even Injector Coils
FAN 1 Cooling Fan 1
FAN 2 Cooling Fan 2
RT DRL Right DaytimeRunning Lamp
FPM Fuel Pump PowerModule
HORN Horn
HTD MIR Heated OutsideRearview Mirror
HTDSTR WHL
Heated SteeringWheel
HUMIDITY/MAF
Humidity Sensor/MAF Sensor
Fuses Usage
HVAC BLWR Heating,Ventilation, and AirConditioningBlower
LT HI BEAM Left High-BeamHeadlamp
LT DRL Left DaytimeRunning Lamp
LT PRK Left Parking Lamp
LT TRLRSTOP/TRN
Trailer LeftStoplamp and TurnSignal
ODD COILS Odd Injector Coils
PWR L/GATE Power Liftgate
PWROUTLET
Power Outlet
RR APO Rear AccessoryPower Outlet
RR DEFOG Rear Defogger
RR HVAC Rear ClimateControl System
RT HI BEAM Right Hi-BeamHeadlamp
Fuses Usage
RT PRK RightParking Lamp
RT TRLRSTOP/TRN
Trailer RightStoplamp and TurnSignal
RVC SNSR Regulated VoltageControl Sensor
S/ROOF/SUNSHADE
Sunroof
SERVICE Service Repair
SPARE Spare
FOG LAMPS Fog Lamps
STRTR Starter
TCM TransmissionControl Module
TRANS Transmission
TRLRBCK/UP
Trailer Back-upLamps
TRLR BRK Trailer Brake
TRLRPRK LAMP
Trailer ParkingLamps
TRLR PWR Trailer Power
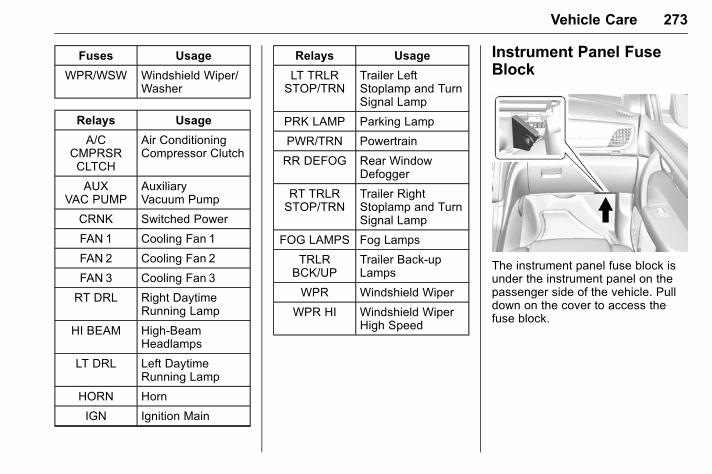
GMC Acadia/Acadia Denali Owner Manual (GMNA-Localizing-U.S./Canada/Mexico-9159268) - 2016 - CRC - 4/16/15
Vehicle Care 273
Fuses Usage
WPR/WSW Windshield Wiper/Washer
Relays Usage
A/CCMPRSRCLTCH
Air ConditioningCompressor Clutch
AUXVAC PUMP
AuxiliaryVacuum Pump
CRNK Switched Power
FAN 1 Cooling Fan 1
FAN 2 Cooling Fan 2
FAN 3 Cooling Fan 3
RT DRL Right DaytimeRunning Lamp
HI BEAM High-BeamHeadlamps
LT DRL Left DaytimeRunning Lamp
HORN Horn
IGN Ignition Main
Relays Usage
LT TRLRSTOP/TRN
Trailer LeftStoplamp and TurnSignal Lamp
PRK LAMP Parking Lamp
PWR/TRN Powertrain
RR DEFOG Rear WindowDefogger
RT TRLRSTOP/TRN
Trailer RightStoplamp and TurnSignal Lamp
FOG LAMPS Fog Lamps
TRLRBCK/UP
Trailer Back-upLamps
WPR Windshield Wiper
WPR HI Windshield WiperHigh Speed
Instrument Panel FuseBlock
The instrument panel fuse block isunder the instrument panel on thepassenger side of the vehicle. Pulldown on the cover to access thefuse block.
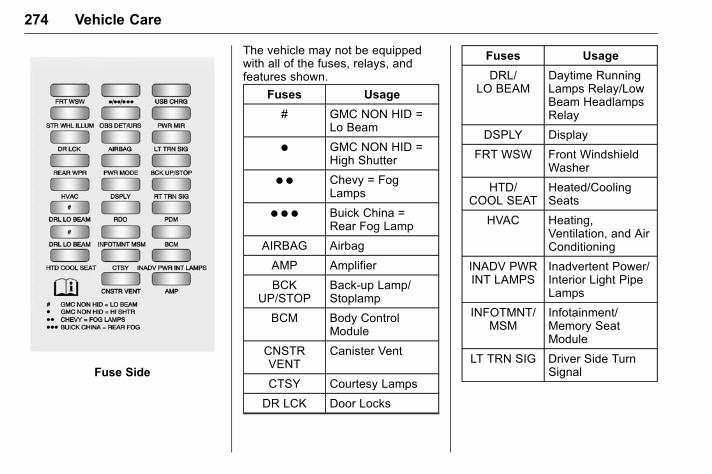
GMC Acadia/Acadia Denali Owner Manual (GMNA-Localizing-U.S./Canada/Mexico-9159268) - 2016 - CRC - 4/16/15
274 Vehicle Care
Fuse Side
The vehicle may not be equippedwith all of the fuses, relays, andfeatures shown.
Fuses Usage
# GMC NON HID =Lo Beam
) GMC NON HID =High Shutter
) ) Chevy = FogLamps
) ) ) Buick China =Rear Fog Lamp
AIRBAG Airbag
AMP Amplifier
BCKUP/STOP
Back-up Lamp/Stoplamp
BCM Body ControlModule
CNSTRVENT
Canister Vent
CTSY Courtesy Lamps
DR LCK Door Locks
Fuses Usage
DRL/LO BEAM
Daytime RunningLamps Relay/LowBeam HeadlampsRelay
DSPLY Display
FRT WSW Front WindshieldWasher
HTD/COOL SEAT
Heated/CoolingSeats
HVAC Heating,Ventilation, and AirConditioning
INADV PWRINT LAMPS
Inadvertent Power/Interior Light PipeLamps
INFOTMNT/MSM
Infotainment/Memory SeatModule
LT TRN SIG Driver Side TurnSignal
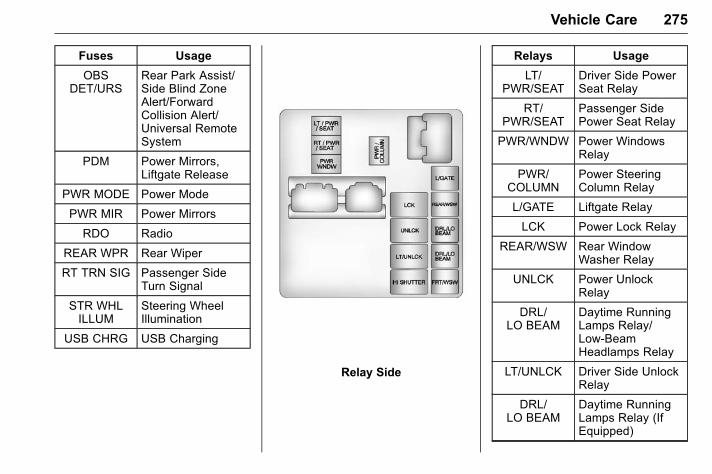
GMC Acadia/Acadia Denali Owner Manual (GMNA-Localizing-U.S./Canada/Mexico-9159268) - 2016 - CRC - 4/16/15
Vehicle Care 275
Fuses Usage
OBSDET/URS
Rear Park Assist/Side Blind ZoneAlert/ForwardCollision Alert/Universal RemoteSystem
PDM Power Mirrors,Liftgate Release
PWR MODE Power Mode
PWR MIR Power Mirrors
RDO Radio
REAR WPR Rear Wiper
RT TRN SIG Passenger SideTurn Signal
STR WHLILLUM
Steering WheelIllumination
USB CHRG USB Charging
Relay Side
Relays Usage
LT/PWR/SEAT
Driver Side PowerSeat Relay
RT/PWR/SEAT
Passenger SidePower Seat Relay
PWR/WNDW Power WindowsRelay
PWR/COLUMN
Power SteeringColumn Relay
L/GATE Liftgate Relay
LCK Power Lock Relay
REAR/WSW Rear WindowWasher Relay
UNLCK Power UnlockRelay
DRL/LO BEAM
Daytime RunningLamps Relay/Low-BeamHeadlamps Relay
LT/UNLCK Driver Side UnlockRelay
DRL/LO BEAM
Daytime RunningLamps Relay (IfEquipped)
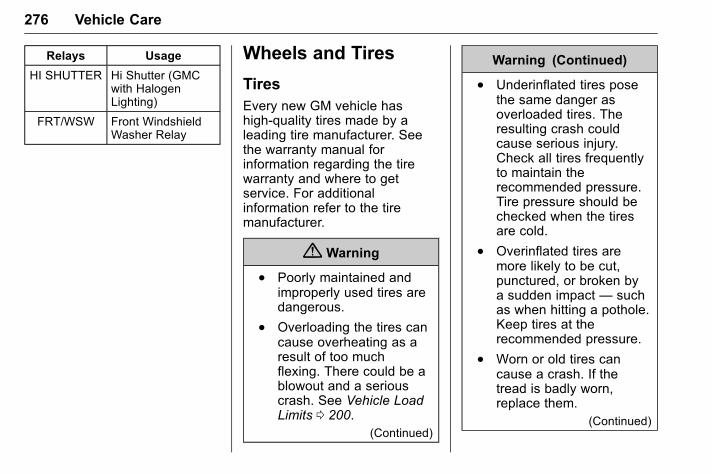
GMC Acadia/Acadia Denali Owner Manual (GMNA-Localizing-U.S./Canada/Mexico-9159268) - 2016 - CRC - 4/16/15
276 Vehicle Care
Relays Usage
HI SHUTTER Hi Shutter (GMCwith HalogenLighting)
FRT/WSW Front WindshieldWasher Relay
Wheels and Tires
TiresEvery new GM vehicle hashigh-quality tires made by aleading tire manufacturer. Seethe warranty manual forinformation regarding the tirewarranty and where to getservice. For additionalinformation refer to the tiremanufacturer.
{ Warning
. Poorly maintained andimproperly used tires aredangerous.
. Overloading the tires cancause overheating as aresult of too muchflexing. There could be ablowout and a seriouscrash. See Vehicle LoadLimits 0 200.
(Continued)
Warning (Continued)
. Underinflated tires posethe same danger asoverloaded tires. Theresulting crash couldcause serious injury.Check all tires frequentlyto maintain therecommended pressure.Tire pressure should bechecked when the tiresare cold.
. Overinflated tires aremore likely to be cut,punctured, or broken bya sudden impact — suchas when hitting a pothole.Keep tires at therecommended pressure.
. Worn or old tires cancause a crash. If thetread is badly worn,replace them.
(Continued)
GMC Acadia/Acadia Denali Owner Manual (GMNA-Localizing-U.S./Canada/Mexico-9159268) - 2016 - CRC - 4/16/15
Vehicle Care 277
Warning (Continued)
. Replace any tires thathave been damaged byimpacts with potholes,curbs, etc.
. Improperly repaired tirescan cause a crash. Onlythe dealer or anauthorized tire servicecenter should repair,replace, dismount, andmount the tires.
. Do not spin the tires inexcess of 56 km/h(35 mph) on slipperysurfaces such as snow,mud, ice, etc. Excessivespinning may cause thetires to explode.
All-Season TiresThis vehicle may come withall-season tires. These tires aredesigned to provide good overallperformance on most road surfaces
and weather conditions. Originalequipment tires designed to GM'sspecific tire performance criteriahave a TPC specification codemolded onto the sidewall. Originalequipment all-season tires can beidentified by the last two charactersof this TPC code, which willbe “MS.”
Consider installing winter tires onthe vehicle if frequent driving onsnow or ice-covered roads isexpected. All-season tires provideadequate performance for mostwinter driving conditions, but theymay not offer the same level oftraction or performance as wintertires on snow or ice-covered roads.See Winter Tires 0 277.
Winter TiresThis vehicle was not originallyequipped with winter tires. Wintertires are designed for increasedtraction on snow and ice-coveredroads. Consider installing wintertires on the vehicle if frequentdriving on ice or snow coveredroads is expected. See your dealer
for details regarding winter tireavailability and proper tire selection.Also, see Buying New Tires 0 291.
With winter tires, there may bedecreased dry road traction,increased road noise, and shortertread life. After changing to wintertires, be alert for changes in vehiclehandling and braking.
If using winter tires:
. Use tires of the same brand andtread type on all four wheelpositions.
. Use only radial ply tires of thesame size, load range, andspeed rating as the originalequipment tires.
Winter tires with the same speedrating as the original equipment tiresmay not be available for H, V, W, Y,and ZR speed rated tires. If wintertires with a lower speed rating arechosen, never exceed the tire'smaximum speed capability.
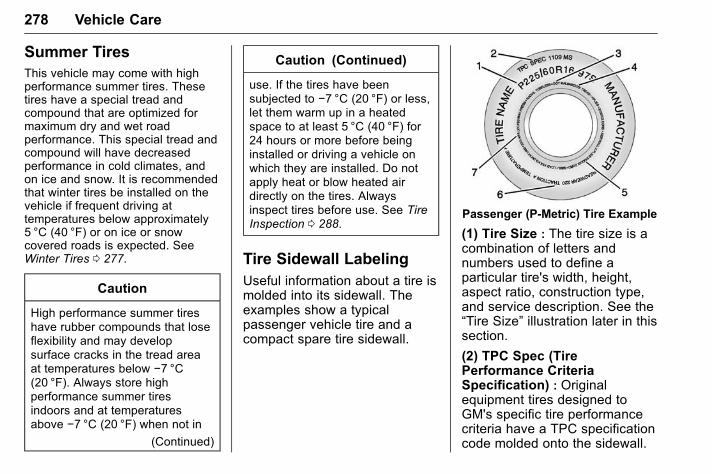
GMC Acadia/Acadia Denali Owner Manual (GMNA-Localizing-U.S./Canada/Mexico-9159268) - 2016 - CRC - 4/16/15
278 Vehicle Care
Summer TiresThis vehicle may come with highperformance summer tires. Thesetires have a special tread andcompound that are optimized formaximum dry and wet roadperformance. This special tread andcompound will have decreasedperformance in cold climates, andon ice and snow. It is recommendedthat winter tires be installed on thevehicle if frequent driving attemperatures below approximately5 °C (40 °F) or on ice or snowcovered roads is expected. SeeWinter Tires 0 277.
Caution
High performance summer tireshave rubber compounds that loseflexibility and may developsurface cracks in the tread areaat temperatures below −7 °C(20 °F). Always store highperformance summer tiresindoors and at temperaturesabove −7 °C (20 °F) when not in
(Continued)
Caution (Continued)
use. If the tires have beensubjected to −7 °C (20 °F) or less,let them warm up in a heatedspace to at least 5 °C (40 °F) for24 hours or more before beinginstalled or driving a vehicle onwhich they are installed. Do notapply heat or blow heated airdirectly on the tires. Alwaysinspect tires before use. See TireInspection 0 288.
Tire Sidewall LabelingUseful information about a tire ismolded into its sidewall. Theexamples show a typicalpassenger vehicle tire and acompact spare tire sidewall.
Passenger (P-Metric) Tire Example
(1) Tire Size : The tire size is acombination of letters andnumbers used to define aparticular tire's width, height,aspect ratio, construction type,and service description. See the“Tire Size” illustration later in thissection.
(2) TPC Spec (TirePerformance CriteriaSpecification) : Originalequipment tires designed toGM's specific tire performancecriteria have a TPC specificationcode molded onto the sidewall.
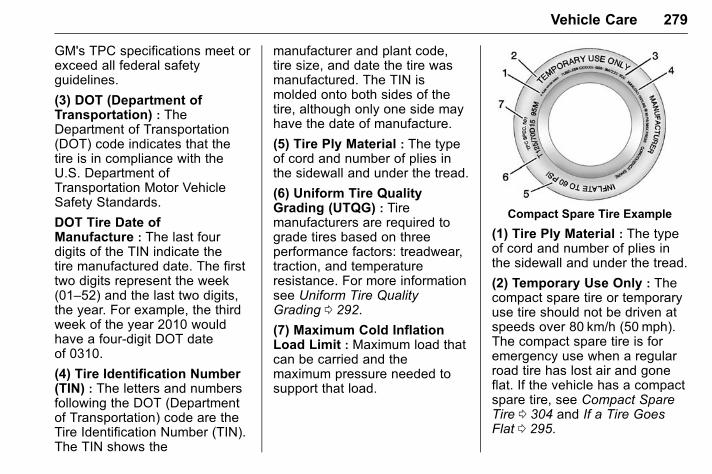
GMC Acadia/Acadia Denali Owner Manual (GMNA-Localizing-U.S./Canada/Mexico-9159268) - 2016 - CRC - 4/16/15
Vehicle Care 279
GM's TPC specifications meet orexceed all federal safetyguidelines.
(3) DOT (Department ofTransportation) : TheDepartment of Transportation(DOT) code indicates that thetire is in compliance with theU.S. Department ofTransportation Motor VehicleSafety Standards.
DOT Tire Date ofManufacture : The last fourdigits of the TIN indicate thetire manufactured date. The firsttwo digits represent the week(01–52) and the last two digits,the year. For example, the thirdweek of the year 2010 wouldhave a four-digit DOT dateof 0310.
(4) Tire Identification Number(TIN) : The letters and numbersfollowing the DOT (Departmentof Transportation) code are theTire Identification Number (TIN).The TIN shows the
manufacturer and plant code,tire size, and date the tire wasmanufactured. The TIN ismolded onto both sides of thetire, although only one side mayhave the date of manufacture.
(5) Tire Ply Material : The typeof cord and number of plies inthe sidewall and under the tread.
(6) Uniform Tire QualityGrading (UTQG) : Tiremanufacturers are required tograde tires based on threeperformance factors: treadwear,traction, and temperatureresistance. For more informationsee Uniform Tire QualityGrading 0 292.
(7) Maximum Cold InflationLoad Limit : Maximum load thatcan be carried and themaximum pressure needed tosupport that load.
Compact Spare Tire Example
(1) Tire Ply Material : The typeof cord and number of plies inthe sidewall and under the tread.
(2) Temporary Use Only : Thecompact spare tire or temporaryuse tire should not be driven atspeeds over 80 km/h (50 mph).The compact spare tire is foremergency use when a regularroad tire has lost air and goneflat. If the vehicle has a compactspare tire, see Compact SpareTire 0 304 and If a Tire GoesFlat 0 295.
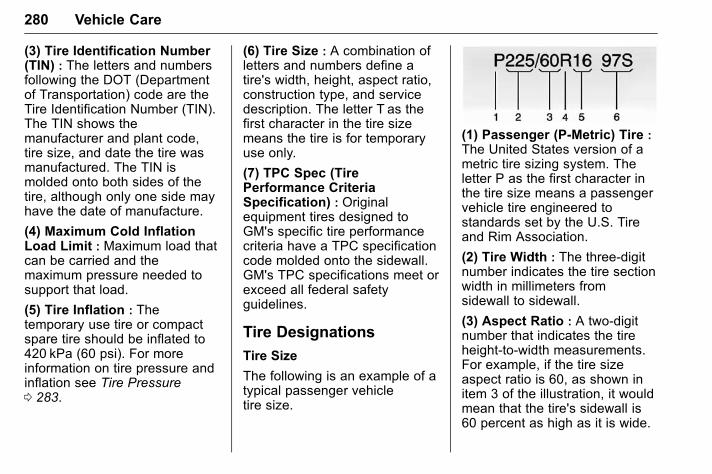
GMC Acadia/Acadia Denali Owner Manual (GMNA-Localizing-U.S./Canada/Mexico-9159268) - 2016 - CRC - 4/16/15
280 Vehicle Care
(3) Tire Identification Number(TIN) : The letters and numbersfollowing the DOT (Departmentof Transportation) code are theTire Identification Number (TIN).The TIN shows themanufacturer and plant code,tire size, and date the tire wasmanufactured. The TIN ismolded onto both sides of thetire, although only one side mayhave the date of manufacture.
(4) Maximum Cold InflationLoad Limit : Maximum load thatcan be carried and themaximum pressure needed tosupport that load.
(5) Tire Inflation : Thetemporary use tire or compactspare tire should be inflated to420 kPa (60 psi). For moreinformation on tire pressure andinflation see Tire Pressure0 283.
(6) Tire Size : A combination ofletters and numbers define atire's width, height, aspect ratio,construction type, and servicedescription. The letter T as thefirst character in the tire sizemeans the tire is for temporaryuse only.
(7) TPC Spec (TirePerformance CriteriaSpecification) : Originalequipment tires designed toGM's specific tire performancecriteria have a TPC specificationcode molded onto the sidewall.GM's TPC specifications meet orexceed all federal safetyguidelines.
Tire Designations
Tire Size
The following is an example of atypical passenger vehicletire size.
(1) Passenger (P-Metric) Tire :The United States version of ametric tire sizing system. Theletter P as the first character inthe tire size means a passengervehicle tire engineered tostandards set by the U.S. Tireand Rim Association.
(2) Tire Width : The three-digitnumber indicates the tire sectionwidth in millimeters fromsidewall to sidewall.
(3) Aspect Ratio : A two-digitnumber that indicates the tireheight-to-width measurements.For example, if the tire sizeaspect ratio is 60, as shown initem 3 of the illustration, it wouldmean that the tire's sidewall is60 percent as high as it is wide.
GMC Acadia/Acadia Denali Owner Manual (GMNA-Localizing-U.S./Canada/Mexico-9159268) - 2016 - CRC - 4/16/15
Vehicle Care 281
(4) Construction Code : A lettercode is used to indicate the typeof ply construction in the tire.The letter R means radial plyconstruction; the letter D meansdiagonal or bias plyconstruction; and the letter Bmeans belted-bias plyconstruction.
(5) Rim Diameter : Diameter ofthe wheel in inches.
(6) Service Description : Thesecharacters represent the loadindex and speed rating of thetire. The load index representsthe load carrying capacity a tireis certified to carry. The speedrating is the maximum speed atire is certified to carry a load.
Tire Terminology andDefinitionsAir Pressure : The amount ofair inside the tire pressingoutward on each square inch of
the tire. Air pressure isexpressed in kPa (kilopascal)or psi (pounds per square inch).
Accessory Weight : Thecombined weight of optionalaccessories. Some examples ofoptional accessories areautomatic transmission, powerwindows, power seats, and airconditioning.
Aspect Ratio : The relationshipof a tire's height to its width.
Belt : A rubber coated layer ofcords between the plies and thetread. Cords may be made fromsteel or other reinforcingmaterials.
Bead : The tire bead containssteel wires wrapped by steelcords that hold the tire ontothe rim.
Bias Ply Tire : A pneumatic tirein which the plies are laid atalternate angles less than90 degrees to the centerline ofthe tread.
Cold Tire Pressure : Theamount of air pressure in a tire,measured in kPa (kilopascal)or psi (pounds per square inch)before a tire has built up heatfrom driving. See Tire Pressure0 283.
Curb Weight : The weight of amotor vehicle with standard andoptional equipment including themaximum capacity of fuel, oil,and coolant, but withoutpassengers and cargo.
DOT Markings : A code moldedinto the sidewall of a tiresignifying that the tire is incompliance with the U.S.Department of Transportation(DOT) Motor Vehicle SafetyStandards. The DOT codeincludes the Tire IdentificationNumber (TIN), an alphanumericdesignator which can alsoidentify the tire manufacturer,production plant, brand, anddate of production.
GMC Acadia/Acadia Denali Owner Manual (GMNA-Localizing-U.S./Canada/Mexico-9159268) - 2016 - CRC - 4/16/15
282 Vehicle Care
GVWR : Gross Vehicle WeightRating. See Vehicle Load Limits0 200.
GAWR FRT : Gross Axle WeightRating for the front axle. SeeVehicle Load Limits 0 200.
GAWR RR : Gross Axle WeightRating for the rear axle. SeeVehicle Load Limits 0 200.
Intended Outboard Sidewall :The side of an asymmetrical tirethat must always face outwardwhen mounted on a vehicle.
Kilopascal (kPa) : The metricunit for air pressure.
Light Truck (LT-Metric) Tire : Atire used on light duty trucks andsome multipurpose passengervehicles.
Load Index : An assignednumber ranging from 1 to 279that corresponds to the loadcarrying capacity of a tire.
Maximum Inflation Pressure :The maximum air pressure towhich a cold tire can be inflated.The maximum air pressure ismolded onto the sidewall.
Maximum Load Rating : Theload rating for a tire at themaximum permissible inflationpressure for that tire.
Maximum Loaded VehicleWeight : The sum of curbweight, accessory weight,vehicle capacity weight, andproduction options weight.
Normal Occupant Weight : Thenumber of occupants a vehicleis designed to seat multiplied by68 kg (150 lb). See Vehicle LoadLimits 0 200.
Occupant Distribution :Designated seating positions.
Outward Facing Sidewall : Theside of an asymmetrical tire thathas a particular side that facesoutward when mounted on avehicle. The side of the tire that
contains a whitewall, bearswhite lettering, or bearsmanufacturer, brand, and/ormodel name molding that ishigher or deeper than the samemoldings on the other sidewallof the tire.
Passenger (P-Metric) Tire : Atire used on passenger cars andsome light duty trucks andmultipurpose vehicles.
Recommended InflationPressure : Vehiclemanufacturer's recommendedtire inflation pressure as shownon the tire placard. See TirePressure 0 283 and VehicleLoad Limits 0 200.
Radial Ply Tire : A pneumatictire in which the ply cords thatextend to the beads are laid at90 degrees to the centerline ofthe tread.
Rim : A metal support for a tireand upon which the tire beadsare seated.
GMC Acadia/Acadia Denali Owner Manual (GMNA-Localizing-U.S./Canada/Mexico-9159268) - 2016 - CRC - 4/16/15
Vehicle Care 283
Sidewall : The portion of a tirebetween the tread and the bead.
Speed Rating : Analphanumeric code assigned toa tire indicating the maximumspeed at which a tire canoperate.
Traction : The friction betweenthe tire and the road surface.The amount of grip provided.
Tread : The portion of a tire thatcomes into contact withthe road.
Treadwear Indicators : Narrowbands, sometimes called wearbars, that show across the treadof a tire when only 1.6 mm (1/16 in) of tread remains. SeeWhen It Is Time for New Tires0 290.
UTQGS (Uniform Tire QualityGrading Standards) : A tireinformation system that providesconsumers with ratings for atire's traction, temperature, andtreadwear. Ratings are
determined by tiremanufacturers usinggovernment testing procedures.The ratings are molded into thesidewall of the tire. See UniformTire Quality Grading 0 292.
Vehicle Capacity Weight : Thenumber of designated seatingpositions multiplied by68 kg (150 lb) plus the ratedcargo load. See Vehicle LoadLimits 0 200.
Vehicle Maximum Load on theTire : Load on an individual tiredue to curb weight, accessoryweight, occupant weight, andcargo weight.
Vehicle Placard : A labelpermanently attached to avehicle showing the vehiclecapacity weight and the originalequipment tire size andrecommended inflation pressure.See “Tire and LoadingInformation Label” under VehicleLoad Limits 0 200.
Tire PressureTires need the correct amount ofair pressure to operateeffectively.
Caution
Neither tire underinflation noroverinflation is good.Underinflated tires, or tiresthat do not have enough air,can result in:
. Tire overloading andoverheating which couldlead to a blowout.
. Premature orirregular wear.
. Poor handling.
. Reduced fuel economy.
Overinflated tires, or tires thathave too much air, canresult in:
. Unusual wear.(Continued)
GMC Acadia/Acadia Denali Owner Manual (GMNA-Localizing-U.S./Canada/Mexico-9159268) - 2016 - CRC - 4/16/15
284 Vehicle Care
Caution (Continued)
. Poor handling.
. Rough ride.
. Needless damage fromroad hazards.
The Tire and LoadingInformation label on the vehicleindicates the original equipmenttires and the correct cold tireinflation pressures. Therecommended pressure is theminimum air pressure needed tosupport the vehicle's maximumload carrying capacity. SeeVehicle Load Limits 0 200.
How the vehicle is loadedaffects vehicle handling and ridecomfort. Never load the vehiclewith more weight than it wasdesigned to carry.
When to Check
Check the tires once a month ormore. Do not forget the compactspare, if the vehicle has one.The cold compact spare tirepressure should be at 420 kPa(60 psi). See Compact SpareTire 0 304.
How to Check
Use a good quality pocket-typegauge to check tire pressure.Proper tire inflation cannot bedetermined by looking at the tire.Check the tire inflation pressurewhen the tires are cold, meaningthe vehicle has not been drivenfor at least three hours or nomore than 1.6 km (1 mi).
Remove the valve cap from thetire valve stem. Press the tiregauge firmly onto the valve toget a pressure measurement.If the cold tire inflation pressurematches the recommendedpressure on the Tire andLoading Information label, no
further adjustment is necessary.If the inflation pressure is low,add air until the recommendedpressure is reached. If theinflation pressure is high, presson the metal stem in the centerof the tire valve to release air.
Recheck the tire pressure withthe tire gauge.
Put the valve caps back on thevalve stems to keep out dirt andmoisture and prevent leaks. Useonly valve caps designed for thevehicle by GM. TPMS sensorscould be damaged and wouldnot be covered by the vehiclewarranty.
Tire Pressure MonitorSystemThe Tire Pressure Monitor System(TPMS) uses radio and sensortechnology to check tire pressurelevels. The TPMS sensors monitorthe air pressure in your tires andtransmit tire pressure readings to areceiver located in the vehicle.
GMC Acadia/Acadia Denali Owner Manual (GMNA-Localizing-U.S./Canada/Mexico-9159268) - 2016 - CRC - 4/16/15
Vehicle Care 285
Each tire, including the spare (ifprovided), should be checkedmonthly when cold and inflated tothe inflation pressure recommendedby the vehicle manufacturer on thevehicle placard or tire inflationpressure label. (If your vehicle hastires of a different size than the sizeindicated on the vehicle placard ortire inflation pressure label, youshould determine the proper tireinflation pressure for those tires.)
As an added safety feature, yourvehicle has been equipped with atire pressure monitoring system(TPMS) that illuminates a low tirepressure telltale when one or moreof your tires is significantlyunder-inflated.
Accordingly, when the low tirepressure telltale illuminates, youshould stop and check your tires assoon as possible, and inflate themto the proper pressure. Driving on asignificantly under-inflated tirecauses the tire to overheat and can
lead to tire failure. Under-inflationalso reduces fuel efficiency and tiretread life, and may affect thevehicle's handling and stoppingability.
Please note that the TPMS is not asubstitute for proper tiremaintenance, and it is the driver'sresponsibility to maintain correct tirepressure, even if under-inflation hasnot reached the level to triggerillumination of the TPMS low tirepressure telltale.
Your vehicle has also beenequipped with a TPMS malfunctionindicator to indicate when thesystem is not operating properly.The TPMS malfunction indicator iscombined with the low tire pressuretelltale. When the system detects amalfunction, the telltale will flash forapproximately one minute and thenremain continuously illuminated.This sequence will continue uponsubsequent vehicle start-ups aslong as the malfunction exists.
When the malfunction indicator isilluminated, the system may not beable to detect or signal low tirepressure as intended. TPMSmalfunctions may occur for a varietyof reasons, including the installationof replacement or alternate tires orwheels on the vehicle that preventthe TPMS from functioning properly.Always check the TPMS malfunctiontelltale after replacing one or moretires or wheels on your vehicle toensure that the replacement oralternate tires and wheels allow theTPMS to continue to functionproperly.
See Tire Pressure MonitorOperation 0 286.
See Radio Frequency Statement0 348.
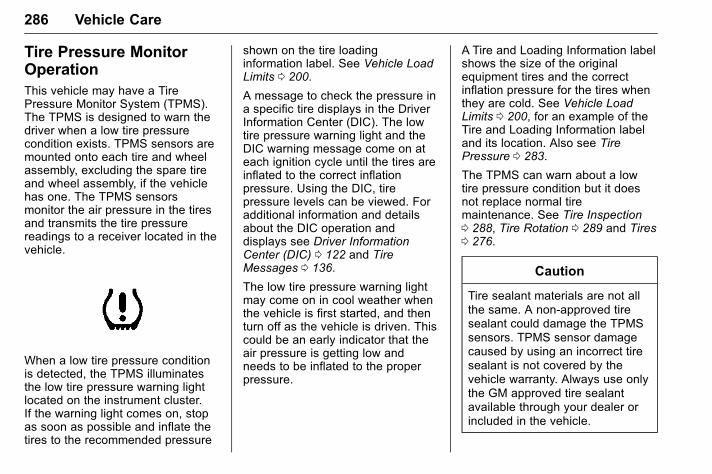
GMC Acadia/Acadia Denali Owner Manual (GMNA-Localizing-U.S./Canada/Mexico-9159268) - 2016 - CRC - 4/16/15
286 Vehicle Care
Tire Pressure MonitorOperationThis vehicle may have a TirePressure Monitor System (TPMS).The TPMS is designed to warn thedriver when a low tire pressurecondition exists. TPMS sensors aremounted onto each tire and wheelassembly, excluding the spare tireand wheel assembly, if the vehiclehas one. The TPMS sensorsmonitor the air pressure in the tiresand transmits the tire pressurereadings to a receiver located in thevehicle.
When a low tire pressure conditionis detected, the TPMS illuminatesthe low tire pressure warning lightlocated on the instrument cluster.If the warning light comes on, stopas soon as possible and inflate thetires to the recommended pressure
shown on the tire loadinginformation label. See Vehicle LoadLimits 0 200.
A message to check the pressure ina specific tire displays in the DriverInformation Center (DIC). The lowtire pressure warning light and theDIC warning message come on ateach ignition cycle until the tires areinflated to the correct inflationpressure. Using the DIC, tirepressure levels can be viewed. Foradditional information and detailsabout the DIC operation anddisplays see Driver InformationCenter (DIC) 0 122 and TireMessages 0 136.
The low tire pressure warning lightmay come on in cool weather whenthe vehicle is first started, and thenturn off as the vehicle is driven. Thiscould be an early indicator that theair pressure is getting low andneeds to be inflated to the properpressure.
A Tire and Loading Information labelshows the size of the originalequipment tires and the correctinflation pressure for the tires whenthey are cold. See Vehicle LoadLimits 0 200, for an example of theTire and Loading Information labeland its location. Also see TirePressure 0 283.
The TPMS can warn about a lowtire pressure condition but it doesnot replace normal tiremaintenance. See Tire Inspection0 288, Tire Rotation 0 289 and Tires0 276.
Caution
Tire sealant materials are not allthe same. A non-approved tiresealant could damage the TPMSsensors. TPMS sensor damagecaused by using an incorrect tiresealant is not covered by thevehicle warranty. Always use onlythe GM approved tire sealantavailable through your dealer orincluded in the vehicle.
GMC Acadia/Acadia Denali Owner Manual (GMNA-Localizing-U.S./Canada/Mexico-9159268) - 2016 - CRC - 4/16/15
Vehicle Care 287
TPMS Malfunction Light andMessage
The TPMS will not function properlyif one or more of the TPMS sensorsare missing or inoperable. When thesystem detects a malfunction, thelow tire warning light flashes forabout one minute and then stays onfor the remainder of the ignitioncycle. A DIC warning messagedisplays. The malfunction light andDIC warning message come on ateach ignition cycle until the problemis corrected. Some of the conditionsthat can cause these to comeon are:
. One of the road tires has beenreplaced with the spare tire,if your vehicle has one. Thespare tire does not have aTPMS sensor. The malfunctionlight and DIC message shouldgo off after the road tire isreplaced and the sensormatching process is performedsuccessfully. See "TPMS SensorMatching Process" later in thissection.
. The TPMS sensor matchingprocess was not done or notcompleted successfully afterrotating the tires. Themalfunction light and the DICmessage should go off aftersuccessfully completing thesensor matching process. See"TPMS Sensor MatchingProcess" later in this section.
. One or more TPMS sensors aremissing or damaged. Themalfunction light and the DICmessage should go off when theTPMS sensors are installed andthe sensor matching process isperformed successfully. Seeyour dealer for service.
. Replacement tires or wheels donot match the original equipmenttires or wheels. Tires and wheelsother than those recommendedcould prevent the TPMS fromfunctioning properly. See BuyingNew Tires 0 291.
. Operating electronic devices orbeing near facilities using radiowave frequencies similar to theTPMS could cause the TPMSsensors to malfunction.
If the TPMS is not functioningproperly, it cannot detect or signal alow tire condition. See your dealerfor service if the TPMS malfunctionlight and DIC message comes onand stays on.
TPMS Sensor MatchingProcess
Each TPMS sensor has a uniqueidentification code. The identificationcode needs to be matched to a newtire/wheel position after rotating thetires or replacing one or more of theTPMS sensors. The TPMS sensormatching process should also beperformed after replacing a sparetire with a road tire containing theTPMS sensor. The malfunction lightand the DIC message should go offat the next ignition cycle. Thesensors are matched to the tire/wheel positions, using a TPMSrelearn tool, in the following order:driver side front tire, passenger side
GMC Acadia/Acadia Denali Owner Manual (GMNA-Localizing-U.S./Canada/Mexico-9159268) - 2016 - CRC - 4/16/15
288 Vehicle Care
front tire, passenger side rear tire,and driver side rear. See yourdealer for service or to purchase arelearn tool. A TPMS relearn toolcan also be purchased. See TirePressure Monitor Sensor ActivationTool atwww.gmtoolsandequipment.com orcall 1-800-GM TOOLS(1-800-468-6657).
There are two minutes to match thefirst tire/wheel position, andfive minutes overall to match all fourtire/wheel positions. If it takeslonger, the matching process stopsand must be restarted.
The TPMS sensor matching processis outlined below:
1. Set the parking brake.
2. Turn the ignition to ON/RUNwith the engine off.
3. Press the Remote KeylessEntry (RKE) transmitter's Qand K buttons at the sametime for approximatelyfive seconds. The horn soundstwice to signal the receiver is in
relearn mode and TIRELEARNING ACTIVE messagedisplays on the DIC screen.
4. Start with the driver sidefront tire.
5. Place the relearn tool againstthe tire sidewall, near the valvestem. Then press the button toactivate the TPMS sensor.A horn chirp confirms that thesensor identification code hasbeen matched to this tire andwheel position.
6. Proceed to the passenger sidefront tire, and repeat theprocedure in Step 5.
7. Proceed to the passenger siderear tire, and repeat theprocedure in Step 5.
8. Proceed to the driver side reartire, and repeat the procedurein Step 5. The horn sounds twotimes to indicate the sensoridentification code has beenmatched to the driver side reartire, and the TPMS sensormatching process is no longer
active. The TIRE LEARNINGACTIVE message on the DICdisplay screen goes off.
9. Turn the ignition to LOCK/OFF.
10. Set all four tires to therecommended air pressurelevel as indicated on the Tireand Loading Information label.
11. Put the valve caps back on thevalve stems.
Tire InspectionWe recommend that the tires,including the spare tire, if thevehicle has one, be inspectedfor signs of wear or damage atleast once a month.
Replace the tire if:
. The indicators at three ormore places around the tirecan be seen.
. There is cord or fabricshowing through the tire'srubber.
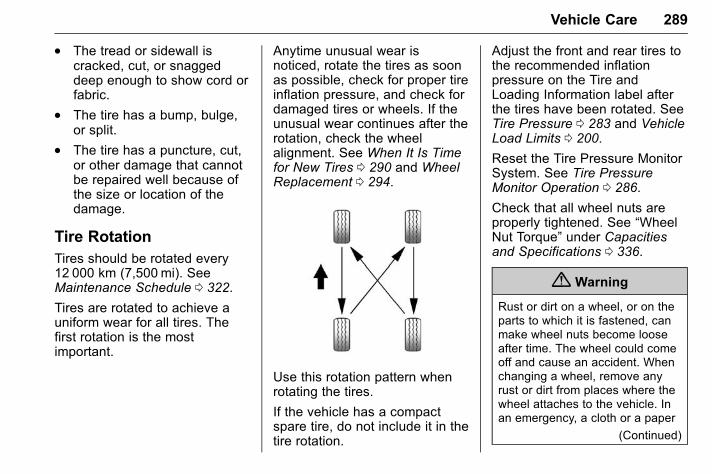
GMC Acadia/Acadia Denali Owner Manual (GMNA-Localizing-U.S./Canada/Mexico-9159268) - 2016 - CRC - 4/16/15
Vehicle Care 289
. The tread or sidewall iscracked, cut, or snaggeddeep enough to show cord orfabric.
. The tire has a bump, bulge,or split.
. The tire has a puncture, cut,or other damage that cannotbe repaired well because ofthe size or location of thedamage.
Tire RotationTires should be rotated every12 000 km (7,500 mi). SeeMaintenance Schedule 0 322.
Tires are rotated to achieve auniform wear for all tires. Thefirst rotation is the mostimportant.
Anytime unusual wear isnoticed, rotate the tires as soonas possible, check for proper tireinflation pressure, and check fordamaged tires or wheels. If theunusual wear continues after therotation, check the wheelalignment. See When It Is Timefor New Tires 0 290 and WheelReplacement 0 294.
Use this rotation pattern whenrotating the tires.
If the vehicle has a compactspare tire, do not include it in thetire rotation.
Adjust the front and rear tires tothe recommended inflationpressure on the Tire andLoading Information label afterthe tires have been rotated. SeeTire Pressure 0 283 and VehicleLoad Limits 0 200.
Reset the Tire Pressure MonitorSystem. See Tire PressureMonitor Operation 0 286.
Check that all wheel nuts areproperly tightened. See “WheelNut Torque” under Capacitiesand Specifications 0 336.
{ Warning
Rust or dirt on a wheel, or on theparts to which it is fastened, canmake wheel nuts become looseafter time. The wheel could comeoff and cause an accident. Whenchanging a wheel, remove anyrust or dirt from places where thewheel attaches to the vehicle. Inan emergency, a cloth or a paper
(Continued)
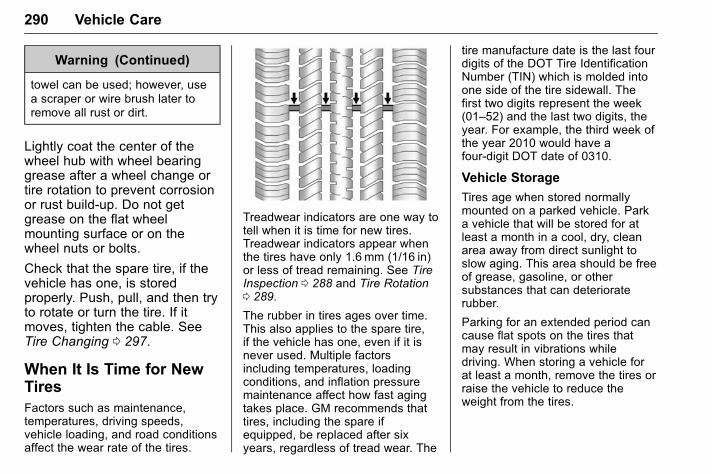
GMC Acadia/Acadia Denali Owner Manual (GMNA-Localizing-U.S./Canada/Mexico-9159268) - 2016 - CRC - 4/16/15
290 Vehicle Care
Warning (Continued)
towel can be used; however, usea scraper or wire brush later toremove all rust or dirt.
Lightly coat the center of thewheel hub with wheel bearinggrease after a wheel change ortire rotation to prevent corrosionor rust build-up. Do not getgrease on the flat wheelmounting surface or on thewheel nuts or bolts.
Check that the spare tire, if thevehicle has one, is storedproperly. Push, pull, and then tryto rotate or turn the tire. If itmoves, tighten the cable. SeeTire Changing 0 297.
When It Is Time for NewTiresFactors such as maintenance,temperatures, driving speeds,vehicle loading, and road conditionsaffect the wear rate of the tires.
Treadwear indicators are one way totell when it is time for new tires.Treadwear indicators appear whenthe tires have only 1.6 mm (1/16 in)or less of tread remaining. See TireInspection 0 288 and Tire Rotation0 289.
The rubber in tires ages over time.This also applies to the spare tire,if the vehicle has one, even if it isnever used. Multiple factorsincluding temperatures, loadingconditions, and inflation pressuremaintenance affect how fast agingtakes place. GM recommends thattires, including the spare ifequipped, be replaced after sixyears, regardless of tread wear. The
tire manufacture date is the last fourdigits of the DOT Tire IdentificationNumber (TIN) which is molded intoone side of the tire sidewall. Thefirst two digits represent the week(01–52) and the last two digits, theyear. For example, the third week ofthe year 2010 would have afour-digit DOT date of 0310.
Vehicle Storage
Tires age when stored normallymounted on a parked vehicle. Parka vehicle that will be stored for atleast a month in a cool, dry, cleanarea away from direct sunlight toslow aging. This area should be freeof grease, gasoline, or othersubstances that can deterioraterubber.
Parking for an extended period cancause flat spots on the tires thatmay result in vibrations whiledriving. When storing a vehicle forat least a month, remove the tires orraise the vehicle to reduce theweight from the tires.
GMC Acadia/Acadia Denali Owner Manual (GMNA-Localizing-U.S./Canada/Mexico-9159268) - 2016 - CRC - 4/16/15
Vehicle Care 291
Buying New TiresGM has developed and matchedspecific tires for the vehicle. Theoriginal equipment tires installedwere designed to meet GeneralMotors Tire Performance CriteriaSpecification (TPC Spec)system rating. Whenreplacement tires are needed,GM strongly recommendsbuying tires with the same TPCSpec rating.
GM's exclusive TPC Specsystem considers over a dozencritical specifications that impactthe overall performance of thevehicle, including brake systemperformance, ride and handling,traction control, and tirepressure monitoringperformance. GM's TPC Specnumber is molded onto the tire'ssidewall near the tire size. If thetires have an all-season treaddesign, the TPC Spec number
will be followed by MS for mudand snow. See Tire SidewallLabeling 0 278.
GM recommends replacing worntires in complete sets of four.Uniform tread depth on all tireswill help to maintain theperformance of the vehicle.Braking and handlingperformance may be adverselyaffected if all the tires are notreplaced at the same time.If proper rotation andmaintenance have been done,all four tires should wear out atabout the same time. See TireRotation 0 289. However, if it isnecessary to replace only oneaxle set of worn tires, place thenew tires on the rear axle.
Winter tires with the same speedrating as the original equipmenttires may not be available for H,V, W, Y and ZR speed ratedtires. Never exceed the winter
tires’ maximum speed capabilitywhen using winter tires with alower speed rating.
{ Warning
Tires could explode duringimproper service. Attemptingto mount or dismount a tirecould cause injury or death.Only your dealer or authorizedtire service center shouldmount or dismount the tires.
{ Warning
Mixing tires of different sizes,brands, or types may causeloss of control of the vehicle,resulting in a crash or othervehicle damage. Use thecorrect size, brand, and typeof tires on all wheels.
GMC Acadia/Acadia Denali Owner Manual (GMNA-Localizing-U.S./Canada/Mexico-9159268) - 2016 - CRC - 4/16/15
292 Vehicle Care
{ Warning
Using bias-ply tires on thevehicle may cause the wheelrim flanges to develop cracksafter many miles of driving.A tire and/or wheel could failsuddenly and cause a crash.Use only radial-ply tires withthe wheels on the vehicle.
If the vehicle tires must bereplaced with a tire that does nothave a TPC Spec number, makesure they are the same size,load range, speed rating, andconstruction (radial) as theoriginal tires.
Vehicles that have a tirepressure monitoring systemcould give an inaccuratelow-pressure warning if non-TPCSpec rated tires are installed.See Tire Pressure MonitorSystem 0 284.
The Tire and LoadingInformation label indicates theoriginal equipment tires on thevehicle. See Vehicle Load Limits0 200.
Different Size Tires andWheelsIf wheels or tires are installed thatare a different size than the originalequipment wheels and tires, vehicleperformance, including its braking,ride and handling characteristics,stability, and resistance to rollovermay be affected. If the vehicle haselectronic systems such as antilockbrakes, rollover airbags, tractioncontrol, electronic stability control,or All-Wheel Drive, the performanceof these systems can also beaffected.
{ Warning
If different sized wheels are used,there may not be an acceptablelevel of performance and safety if
(Continued)
Warning (Continued)
tires not recommended for thosewheels are selected. Thisincreases the chance of a crashand serious injury. Only use GMspecific wheel and tire systemsdeveloped for the vehicle, andhave them properly installed by aGM certified technician.
See Buying New Tires 0 291 andAccessories and Modifications0 243.
Uniform Tire QualityGradingThe following information relatesto the system developed by theUnited States National HighwayTraffic Safety Administration(NHTSA), which grades tires bytreadwear, traction, andtemperature performance. Thisapplies only to vehicles sold inthe United States. The gradesare molded on the sidewalls of
GMC Acadia/Acadia Denali Owner Manual (GMNA-Localizing-U.S./Canada/Mexico-9159268) - 2016 - CRC - 4/16/15
Vehicle Care 293
most passenger car tires. TheUniform Tire Quality Grading(UTQG) system does not applyto deep tread, winter tires,compact spare tires, tires withnominal rim diameters of10 to 12 inches (25 to 30 cm),or to some limited-productiontires.
While the tires available onGeneral Motors passenger carsand light trucks may vary withrespect to these grades, theymust also conform to federalsafety requirements andadditional General Motors TirePerformance Criteria (TPC)standards.
Quality grades can be foundwhere applicable on the tiresidewall between tread shoulderand maximum section width. Forexample:
Treadwear 200 Traction AATemperature A
All Passenger Car Tires MustConform to Federal SafetyRequirements In Addition ToThese Grades.
Treadwear
The treadwear grade is acomparative rating based on thewear rate of the tire when testedunder controlled conditions on aspecified government testcourse. For example, a tiregraded 150 would wear one andone-half (1½) times as well onthe government course as a tiregraded 100. The relativeperformance of tires dependsupon the actual conditions oftheir use, however, and maydepart significantly from thenorm due to variations in drivinghabits, service practices anddifferences in roadcharacteristics and climate.
Traction
The traction grades, fromhighest to lowest, are AA, A, B,and C. Those grades representthe tire's ability to stop on wetpavement as measured undercontrolled conditions onspecified government testsurfaces of asphalt andconcrete. A tire marked C mayhave poor traction performance.Warning: The traction gradeassigned to this tire is based onstraight-ahead braking tractiontests, and does not includeacceleration, cornering,hydroplaning, or peak tractioncharacteristics.
Temperature
The temperature grades are A(the highest), B, and C,representing the tire's resistanceto the generation of heat and itsability to dissipate heat whentested under controlledconditions on a specified indoor
GMC Acadia/Acadia Denali Owner Manual (GMNA-Localizing-U.S./Canada/Mexico-9159268) - 2016 - CRC - 4/16/15
294 Vehicle Care
laboratory test wheel. Sustainedhigh temperature can cause thematerial of the tire to degenerateand reduce tire life, andexcessive temperature can leadto sudden tire failure. The gradeC corresponds to a level ofperformance which allpassenger car tires must meetunder the Federal Motor SafetyStandard No. 109. Grades B andA represent higher levels ofperformance on the laboratorytest wheel than the minimumrequired by law. Warning: Thetemperature grade for this tire isestablished for a tire that isproperly inflated and notoverloaded. Excessive speed,underinflation, or excessiveloading, either separately or incombination, can cause heatbuildup and possible tire failure.
Wheel Alignment and TireBalanceThe tires and wheels were alignedand balanced at the factory toprovide the longest tire life and bestoverall performance. Adjustments towheel alignment and tire balancingare not necessary on a regularbasis. Consider an alignment checkif there is unusual tire wear or thevehicle is significantly pulling to oneside or the other. Some slight pull tothe left or right, depending on thecrown of the road and/or other roadsurface variations such as troughsor ruts, is normal. If the vehicle isvibrating when driving on a smoothroad, the tires and wheels may needto be rebalanced. See your dealerfor proper diagnosis.
Wheel ReplacementReplace any wheel that is bent,cracked, or badly rusted orcorroded. If wheel nuts keep comingloose, the wheel, wheel bolts, andwheel nuts should be replaced.If the wheel leaks air, replace it.
Some aluminum wheels can berepaired. See your dealer if any ofthese conditions exist.
Your dealer will know the kind ofwheel that is needed.
Each new wheel should have thesame load-carrying capacity,diameter, width, offset, and bemounted the same way as the one itreplaces.
Replace wheels, wheel bolts, wheelnuts, or Tire Pressure MonitorSystem (TPMS) sensors with newGM original equipment parts.
{ Warning
Using the wrong replacementwheels, wheel bolts, or wheelnuts can be dangerous. It couldaffect the braking and handling ofthe vehicle. Tires can lose air,and cause loss of control, causinga crash. Always use the correctwheel, wheel bolts, and wheelnuts for replacement.
GMC Acadia/Acadia Denali Owner Manual (GMNA-Localizing-U.S./Canada/Mexico-9159268) - 2016 - CRC - 4/16/15
Vehicle Care 295
Caution
The wrong wheel can also causeproblems with bearing life, brakecooling, speedometer orodometer calibration, headlampaim, bumper height, vehicleground clearance, and tire or tirechain clearance to the body andchassis.
Used Replacement Wheels
{ Warning
Replacing a wheel with a usedone is dangerous. How it hasbeen used or how far it has beendriven may be unknown. It couldfail suddenly and cause a crash.When replacing wheels, use anew GM original equipmentwheel.
Tire Chains
{ Warning
Do not use tire chains. There isnot enough clearance. Tire chainsused on a vehicle without theproper amount of clearance cancause damage to the brakes,suspension, or other vehicleparts. The area damaged by thetire chains could cause loss ofcontrol and a crash.
Use another type of tractiondevice only if its manufacturerrecommends it for the vehicle'stire size combination and roadconditions. Follow thatmanufacturer's instructions. Toavoid vehicle damage, drive slowand readjust or remove thetraction device if it contacts thevehicle. Do not spin the wheels.If traction devices are used, installthem on the front tires.
If a Tire Goes FlatIt is unusual for a tire to blow outwhile driving, especially if the tiresare maintained properly. See Tires0 276. If air goes out of a tire, it ismuch more likely to leak out slowly.But if there ever is a blowout, hereare a few tips about what to expectand what to do:
If a front tire fails, the flat tirecreates a drag that pulls the vehicletoward that side. Take your foot offthe accelerator pedal and grip thesteering wheel firmly. Steer tomaintain lane position, and thengently brake to a stop, well off theroad, if possible.
A rear blowout, particularly on acurve, acts much like a skid andmay require the same correction asused in a skid. Stop pressing theaccelerator pedal and steer tostraighten the vehicle. It may bevery bumpy and noisy. Gently braketo a stop, well off the road,if possible.
GMC Acadia/Acadia Denali Owner Manual (GMNA-Localizing-U.S./Canada/Mexico-9159268) - 2016 - CRC - 4/16/15
296 Vehicle Care
{ Warning
Driving on a flat tire will causepermanent damage to the tire.Re-inflating a tire after it has beendriven on while severelyunderinflated or flat may cause ablowout and a serious crash.Never attempt to re-inflate a tirethat has been driven on whileseverely underinflated or flat.Have your dealer or an authorizedtire service center repair orreplace the flat tire as soon aspossible.
{ Warning
Lifting a vehicle and getting underit to do maintenance or repairs isdangerous without theappropriate safety equipment andtraining. If a jack is provided withthe vehicle, it is designed only forchanging a flat tire. If it is used foranything else, you or others could
(Continued)
Warning (Continued)
be badly injured or killed if thevehicle slips off the jack. If a jackis provided with the vehicle, onlyuse it for changing a flat tire.
If a tire goes flat, avoid further tireand wheel damage by driving slowlyto a level place, well off the road,if possible. Turn on the hazardwarning flashers. See HazardWarning Flashers 0 151.
{ Warning
Changing a tire can bedangerous. The vehicle can slipoff the jack and roll over or fallcausing injury or death. Find alevel place to change the tire. Tohelp prevent the vehicle frommoving:
1. Set the parking brake firmly.
(Continued)
Warning (Continued)
2. Put an automatictransmission in P (Park) or amanual transmission in1 (First) or R (Reverse).
3. Turn off the engine and donot restart while the vehicleis raised.
4. Do not allow passengers toremain in the vehicle.
5. Place wheel blocks,if equipped, on both sides ofthe tire at the oppositecorner of the tire beingchanged.
When the vehicle has a flat tire (2),use the following example as aguide to assist in the placement ofthe wheel blocks (1), if equipped.
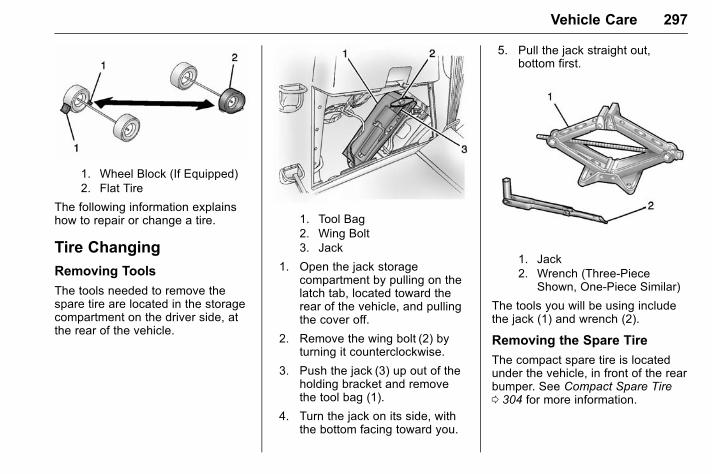
GMC Acadia/Acadia Denali Owner Manual (GMNA-Localizing-U.S./Canada/Mexico-9159268) - 2016 - CRC - 4/16/15
Vehicle Care 297
1. Wheel Block (If Equipped)2. Flat Tire
The following information explainshow to repair or change a tire.
Tire Changing
Removing Tools
The tools needed to remove thespare tire are located in the storagecompartment on the driver side, atthe rear of the vehicle.
1. Tool Bag2. Wing Bolt3. Jack
1. Open the jack storagecompartment by pulling on thelatch tab, located toward therear of the vehicle, and pullingthe cover off.
2. Remove the wing bolt (2) byturning it counterclockwise.
3. Push the jack (3) up out of theholding bracket and removethe tool bag (1).
4. Turn the jack on its side, withthe bottom facing toward you.
5. Pull the jack straight out,bottom first.
1. Jack2. Wrench (Three-Piece
Shown, One-Piece Similar)
The tools you will be using includethe jack (1) and wrench (2).
Removing the Spare Tire
The compact spare tire is locatedunder the vehicle, in front of the rearbumper. See Compact Spare Tire0 304 for more information.

GMC Acadia/Acadia Denali Owner Manual (GMNA-Localizing-U.S./Canada/Mexico-9159268) - 2016 - CRC - 4/16/15
298 Vehicle Care
1. Rear Convenience Center2. Wrench (Three-Piece
Shown, One-Piece Similar)3. Carpet Cutout4. Hoist Shaft5. Compact Spare Tire6. Retainer
1. Open the storage compartmentdoor of the conveniencecenter (1) that is nearest theliftgate.
2. Open the carpet cutout (3) thatis located through the hole ofthe storage compartment.
3. Attach the wrench (2) into thehoist shaft (4).
4. Turn the wrench (2)counterclockwise to lower thespare tire (5) to the ground.Continue turning the wrenchuntil the spare tire can bepulled out from under thevehicle.
5. Tilt the retainer and slip itthrough the wheel opening toremove the spare tire from thecable.
6. Turn the wrench clockwise toraise the cable back up afterremoving the spare tire.
Do not store a full-size or a flatroad tire under the vehicle. See“Storing the Spare Tire” and“Storing the Flat Tire” later inthis section.
Removing the Flat Tire andInstalling the Spare Tire
1. Do a safety check beforeproceeding. See If a Tire GoesFlat 0 295 for more information.
2. If the vehicle has a wheelcover, loosen the plastic nutcaps with the wheel wrench.They will not come off. Then,using the flat end of the wheelwrench, pry along the edge ofthe cover until it comes off. Becareful; the edges may besharp. Do not try to remove thecover with your bare hands.
Store the wheel cover securelyin the rear of the vehicle untilyou have the flat tire repairedor replaced.
If the vehicle has aluminumwheels, remove the wheel nutcaps using the wheel wrench.
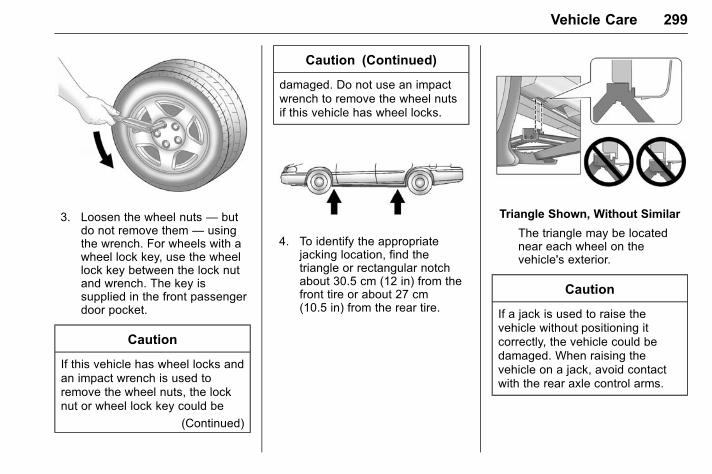
GMC Acadia/Acadia Denali Owner Manual (GMNA-Localizing-U.S./Canada/Mexico-9159268) - 2016 - CRC - 4/16/15
Vehicle Care 299
3. Loosen the wheel nuts — butdo not remove them — usingthe wrench. For wheels with awheel lock key, use the wheellock key between the lock nutand wrench. The key issupplied in the front passengerdoor pocket.
Caution
If this vehicle has wheel locks andan impact wrench is used toremove the wheel nuts, the locknut or wheel lock key could be
(Continued)
Caution (Continued)
damaged. Do not use an impactwrench to remove the wheel nutsif this vehicle has wheel locks.
4. To identify the appropriatejacking location, find thetriangle or rectangular notchabout 30.5 cm (12 in) from thefront tire or about 27 cm(10.5 in) from the rear tire.
Triangle Shown, Without Similar
The triangle may be locatednear each wheel on thevehicle's exterior.
Caution
If a jack is used to raise thevehicle without positioning itcorrectly, the vehicle could bedamaged. When raising thevehicle on a jack, avoid contactwith the rear axle control arms.
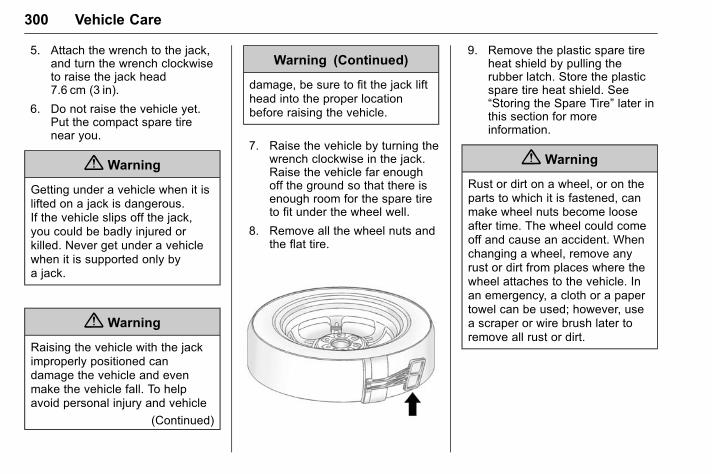
GMC Acadia/Acadia Denali Owner Manual (GMNA-Localizing-U.S./Canada/Mexico-9159268) - 2016 - CRC - 4/16/15
300 Vehicle Care
5. Attach the wrench to the jack,and turn the wrench clockwiseto raise the jack head7.6 cm (3 in).
6. Do not raise the vehicle yet.Put the compact spare tirenear you.
{ Warning
Getting under a vehicle when it islifted on a jack is dangerous.If the vehicle slips off the jack,you could be badly injured orkilled. Never get under a vehiclewhen it is supported only bya jack.
{ Warning
Raising the vehicle with the jackimproperly positioned candamage the vehicle and evenmake the vehicle fall. To helpavoid personal injury and vehicle
(Continued)
Warning (Continued)
damage, be sure to fit the jack lifthead into the proper locationbefore raising the vehicle.
7. Raise the vehicle by turning thewrench clockwise in the jack.Raise the vehicle far enoughoff the ground so that there isenough room for the spare tireto fit under the wheel well.
8. Remove all the wheel nuts andthe flat tire.
9. Remove the plastic spare tireheat shield by pulling therubber latch. Store the plasticspare tire heat shield. See“Storing the Spare Tire” later inthis section for moreinformation.
{ Warning
Rust or dirt on a wheel, or on theparts to which it is fastened, canmake wheel nuts become looseafter time. The wheel could comeoff and cause an accident. Whenchanging a wheel, remove anyrust or dirt from places where thewheel attaches to the vehicle. Inan emergency, a cloth or a papertowel can be used; however, usea scraper or wire brush later toremove all rust or dirt.

GMC Acadia/Acadia Denali Owner Manual (GMNA-Localizing-U.S./Canada/Mexico-9159268) - 2016 - CRC - 4/16/15
Vehicle Care 301
{ Warning
Never use oil or grease on boltsor nuts because the nuts mightcome loose. The vehicle's wheelcould fall off, causing a crash.
10. Remove any rust or dirt fromthe wheel bolts, mountingsurfaces, and spare wheel.
11. Place the spare tire on thewheel mounting surface.
12. Put the nuts on by hand byturning them clockwise until thewheel is held against themounting surface. Make surethe rounded end is toward thewheel.
13. Lower the vehicle by attachingthe wrench to the jack andturning the wrenchcounterclockwise. Lower thejack completely.
{ Warning
Wheel nuts that are improperly orincorrectly tightened can causethe wheels to become loose orcome off. The wheel nuts shouldbe tightened with a torque wrenchto the proper torque specificationafter replacing. Follow the torquespecification supplied by theaftermarket manufacturer whenusing accessory locking wheelnuts. See Capacities andSpecifications 0 336 for originalequipment wheel nut torquespecifications.
Caution
Improperly tightened wheel nutscan lead to brake pulsation androtor damage. To avoid expensivebrake repairs, evenly tighten thewheel nuts in the propersequence and to the propertorque specification. See
(Continued)
Caution (Continued)
Capacities and Specifications0 336 for the wheel nut torquespecification.
14. Tighten the wheel nuts firmly ina crisscross sequence, asshown.
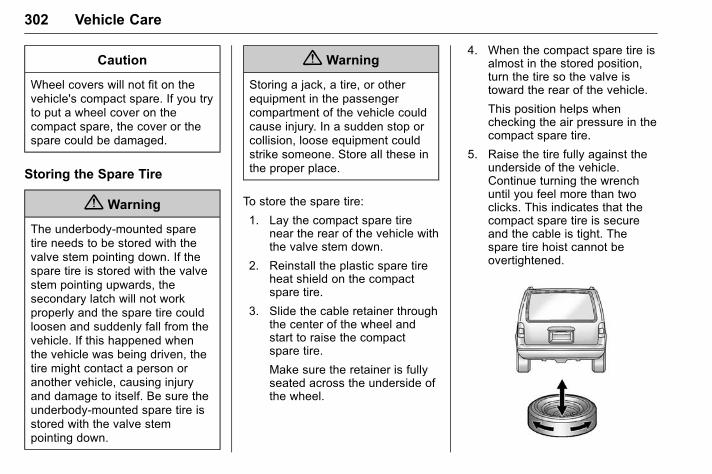
GMC Acadia/Acadia Denali Owner Manual (GMNA-Localizing-U.S./Canada/Mexico-9159268) - 2016 - CRC - 4/16/15
302 Vehicle Care
Caution
Wheel covers will not fit on thevehicle's compact spare. If you tryto put a wheel cover on thecompact spare, the cover or thespare could be damaged.
Storing the Spare Tire
{ Warning
The underbody-mounted sparetire needs to be stored with thevalve stem pointing down. If thespare tire is stored with the valvestem pointing upwards, thesecondary latch will not workproperly and the spare tire couldloosen and suddenly fall from thevehicle. If this happened whenthe vehicle was being driven, thetire might contact a person oranother vehicle, causing injuryand damage to itself. Be sure theunderbody-mounted spare tire isstored with the valve stempointing down.
{ Warning
Storing a jack, a tire, or otherequipment in the passengercompartment of the vehicle couldcause injury. In a sudden stop orcollision, loose equipment couldstrike someone. Store all these inthe proper place.
To store the spare tire:
1. Lay the compact spare tirenear the rear of the vehicle withthe valve stem down.
2. Reinstall the plastic spare tireheat shield on the compactspare tire.
3. Slide the cable retainer throughthe center of the wheel andstart to raise the compactspare tire.
Make sure the retainer is fullyseated across the underside ofthe wheel.
4. When the compact spare tire isalmost in the stored position,turn the tire so the valve istoward the rear of the vehicle.
This position helps whenchecking the air pressure in thecompact spare tire.
5. Raise the tire fully against theunderside of the vehicle.Continue turning the wrenchuntil you feel more than twoclicks. This indicates that thecompact spare tire is secureand the cable is tight. Thespare tire hoist cannot beovertightened.
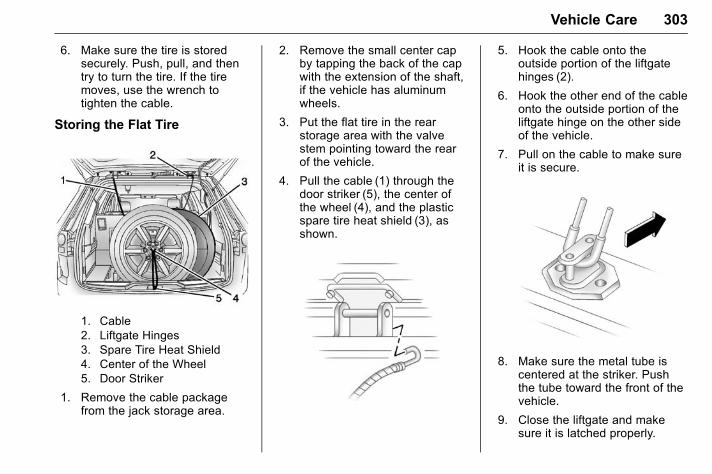
GMC Acadia/Acadia Denali Owner Manual (GMNA-Localizing-U.S./Canada/Mexico-9159268) - 2016 - CRC - 4/16/15
Vehicle Care 303
6. Make sure the tire is storedsecurely. Push, pull, and thentry to turn the tire. If the tiremoves, use the wrench totighten the cable.
Storing the Flat Tire
1. Cable2. Liftgate Hinges3. Spare Tire Heat Shield4. Center of the Wheel5. Door Striker
1. Remove the cable packagefrom the jack storage area.
2. Remove the small center capby tapping the back of the capwith the extension of the shaft,if the vehicle has aluminumwheels.
3. Put the flat tire in the rearstorage area with the valvestem pointing toward the rearof the vehicle.
4. Pull the cable (1) through thedoor striker (5), the center ofthe wheel (4), and the plasticspare tire heat shield (3), asshown.
5. Hook the cable onto theoutside portion of the liftgatehinges (2).
6. Hook the other end of the cableonto the outside portion of theliftgate hinge on the other sideof the vehicle.
7. Pull on the cable to make sureit is secure.
8. Make sure the metal tube iscentered at the striker. Pushthe tube toward the front of thevehicle.
9. Close the liftgate and makesure it is latched properly.
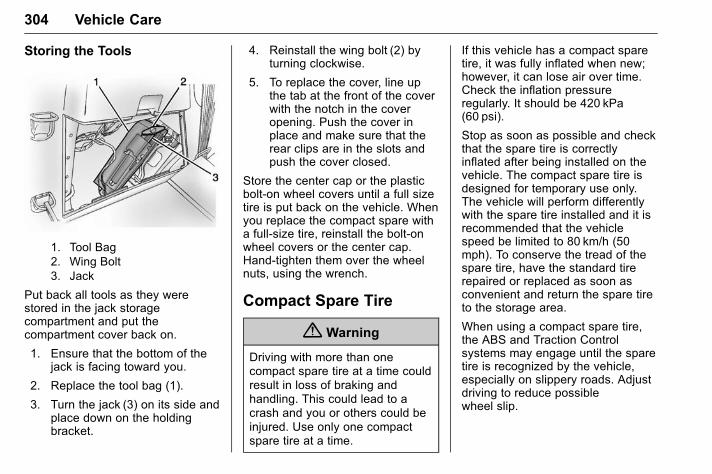
GMC Acadia/Acadia Denali Owner Manual (GMNA-Localizing-U.S./Canada/Mexico-9159268) - 2016 - CRC - 4/16/15
304 Vehicle Care
Storing the Tools
1. Tool Bag2. Wing Bolt3. Jack
Put back all tools as they werestored in the jack storagecompartment and put thecompartment cover back on.
1. Ensure that the bottom of thejack is facing toward you.
2. Replace the tool bag (1).
3. Turn the jack (3) on its side andplace down on the holdingbracket.
4. Reinstall the wing bolt (2) byturning clockwise.
5. To replace the cover, line upthe tab at the front of the coverwith the notch in the coveropening. Push the cover inplace and make sure that therear clips are in the slots andpush the cover closed.
Store the center cap or the plasticbolt-on wheel covers until a full sizetire is put back on the vehicle. Whenyou replace the compact spare witha full-size tire, reinstall the bolt-onwheel covers or the center cap.Hand-tighten them over the wheelnuts, using the wrench.
Compact Spare Tire
{ Warning
Driving with more than onecompact spare tire at a time couldresult in loss of braking andhandling. This could lead to acrash and you or others could beinjured. Use only one compactspare tire at a time.
If this vehicle has a compact sparetire, it was fully inflated when new;however, it can lose air over time.Check the inflation pressureregularly. It should be 420 kPa(60 psi).
Stop as soon as possible and checkthat the spare tire is correctlyinflated after being installed on thevehicle. The compact spare tire isdesigned for temporary use only.The vehicle will perform differentlywith the spare tire installed and it isrecommended that the vehiclespeed be limited to 80 km/h (50mph). To conserve the tread of thespare tire, have the standard tirerepaired or replaced as soon asconvenient and return the spare tireto the storage area.
When using a compact spare tire,the ABS and Traction Controlsystems may engage until the sparetire is recognized by the vehicle,especially on slippery roads. Adjustdriving to reduce possiblewheel slip.
GMC Acadia/Acadia Denali Owner Manual (GMNA-Localizing-U.S./Canada/Mexico-9159268) - 2016 - CRC - 4/16/15
Vehicle Care 305
Performance of the All-WheelDrive (AWD) system will beautomatically reduced to protect thesystem when using the compactspare. To restore the AWD andprevent excessive wear on theclutch in the AWD, replace thecompact spare tire with a full-sizetire as soon as possible.
Caution
When the compact spare isinstalled, do not take the vehiclethrough an automatic car washwith guide rails. The compactspare can get caught on the railswhich can damage the tire, wheel,and other parts of the vehicle.
Do not use the compact spare onother vehicles.
Do not mix the compact spare tire orwheel with other wheels or tires.They will not fit. Keep the spare tireand its wheel together.
Caution
Tire chains will not fit the compactspare. Using them can damagethe vehicle and the chains. Do notuse tire chains on the compactspare.
Jump Starting
Jump Starting - NorthAmericaFor more information about thevehicle battery, see Battery - NorthAmerica 0 261.
If the vehicle battery has run down,you may want to use anothervehicle and some jumper cables tostart your vehicle. Be sure to usethe following steps to do it safely.
{ Warning
WARNING: Battery posts,terminals, and relatedaccessories contain lead and leadcompounds, chemicals known tothe State of California to causecancer and birth defects or otherreproductive harm. Batteries alsocontain other chemicals known tothe State of California to causecancer. WASH HANDS AFTERHANDLING. See CaliforniaProposition 65 Warning 0 243.
GMC Acadia/Acadia Denali Owner Manual (GMNA-Localizing-U.S./Canada/Mexico-9159268) - 2016 - CRC - 4/16/15
306 Vehicle Care
{ Warning
Batteries can hurt you. They canbe dangerous because:
. They contain acid that canburn you.
. They contain gas that canexplode or ignite.
. They contain enoughelectricity to burn you.
If you do not follow these stepsexactly, some or all of thesethings can hurt you.
Caution
Ignoring these steps could resultin costly damage to the vehiclethat would not be covered by thevehicle warranty. Trying to startthe vehicle by pushing or pulling itwill not work, and it could damagethe vehicle.
1. Check the other vehicle.It must have a 12-volt batterywith a negative ground system.
Caution
If the other vehicle does not havea 12-volt system with a negativeground, both vehicles can bedamaged. Only use a vehicle thathas a 12-volt system with anegative ground for jump starting.
2. Get the vehicles close enoughso the jumper cables canreach, but be sure the vehiclesare not touching each other.If they are, it could cause aground connection you do notwant. You would not be able tostart your vehicle, and the badgrounding could damage theelectrical systems.
To avoid the possibility of thevehicles rolling, set the parkingbrake firmly on both vehiclesinvolved in the jump startprocedure. Put an automatictransmission in P (Park) or a
manual transmission in Neutralbefore setting the parkingbrake. If one of the vehicles isa four-wheel-drive vehicle, besure the transfer case is not inNeutral.
Caution
If any accessories are left on orplugged in during the jumpstarting procedure, they could bedamaged. The repairs would notbe covered by the vehiclewarranty. Whenever possible, turnoff or unplug all accessories oneither vehicle when jump starting.
3. Turn off the ignition on bothvehicles. Unplug unnecessaryaccessories plugged into thecigarette lighter or theaccessory power outlets. Turnoff the radio and all lamps thatare not needed. This will avoidsparks and help save bothbatteries. And it could save theradio!
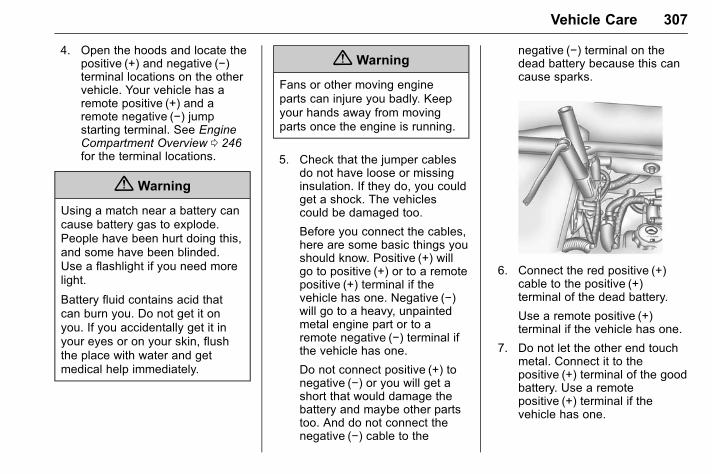
GMC Acadia/Acadia Denali Owner Manual (GMNA-Localizing-U.S./Canada/Mexico-9159268) - 2016 - CRC - 4/16/15
Vehicle Care 307
4. Open the hoods and locate thepositive (+) and negative (−)terminal locations on the othervehicle. Your vehicle has aremote positive (+) and aremote negative (−) jumpstarting terminal. See EngineCompartment Overview 0 246for the terminal locations.
{ Warning
Using a match near a battery cancause battery gas to explode.People have been hurt doing this,and some have been blinded.Use a flashlight if you need morelight.
Battery fluid contains acid thatcan burn you. Do not get it onyou. If you accidentally get it inyour eyes or on your skin, flushthe place with water and getmedical help immediately.
{ Warning
Fans or other moving engineparts can injure you badly. Keepyour hands away from movingparts once the engine is running.
5. Check that the jumper cablesdo not have loose or missinginsulation. If they do, you couldget a shock. The vehiclescould be damaged too.
Before you connect the cables,here are some basic things youshould know. Positive (+) willgo to positive (+) or to a remotepositive (+) terminal if thevehicle has one. Negative (−)will go to a heavy, unpaintedmetal engine part or to aremote negative (−) terminal ifthe vehicle has one.
Do not connect positive (+) tonegative (−) or you will get ashort that would damage thebattery and maybe other partstoo. And do not connect thenegative (−) cable to the
negative (−) terminal on thedead battery because this cancause sparks.
6. Connect the red positive (+)cable to the positive (+)terminal of the dead battery.
Use a remote positive (+)terminal if the vehicle has one.
7. Do not let the other end touchmetal. Connect it to thepositive (+) terminal of the goodbattery. Use a remotepositive (+) terminal if thevehicle has one.
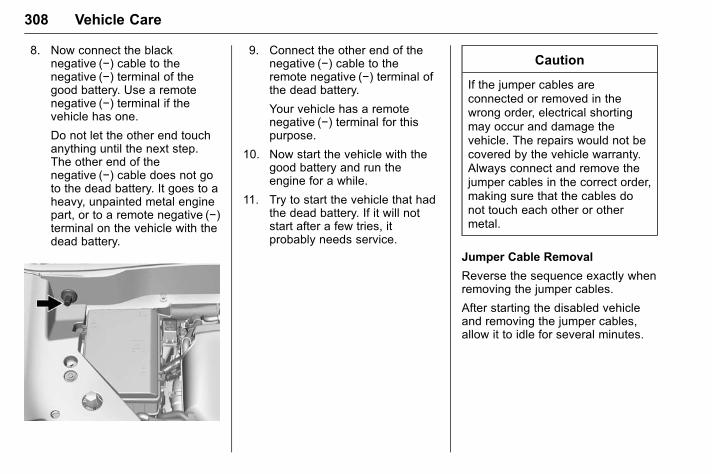
GMC Acadia/Acadia Denali Owner Manual (GMNA-Localizing-U.S./Canada/Mexico-9159268) - 2016 - CRC - 4/16/15
308 Vehicle Care
8. Now connect the blacknegative (−) cable to thenegative (−) terminal of thegood battery. Use a remotenegative (−) terminal if thevehicle has one.
Do not let the other end touchanything until the next step.The other end of thenegative (−) cable does not goto the dead battery. It goes to aheavy, unpainted metal enginepart, or to a remote negative (−)terminal on the vehicle with thedead battery.
9. Connect the other end of thenegative (−) cable to theremote negative (−) terminal ofthe dead battery.
Your vehicle has a remotenegative (−) terminal for thispurpose.
10. Now start the vehicle with thegood battery and run theengine for a while.
11. Try to start the vehicle that hadthe dead battery. If it will notstart after a few tries, itprobably needs service.
Caution
If the jumper cables areconnected or removed in thewrong order, electrical shortingmay occur and damage thevehicle. The repairs would not becovered by the vehicle warranty.Always connect and remove thejumper cables in the correct order,making sure that the cables donot touch each other or othermetal.
Jumper Cable Removal
Reverse the sequence exactly whenremoving the jumper cables.
After starting the disabled vehicleand removing the jumper cables,allow it to idle for several minutes.
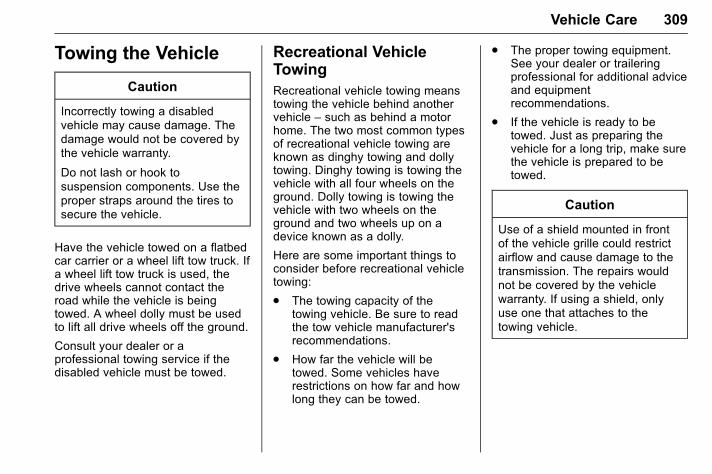
GMC Acadia/Acadia Denali Owner Manual (GMNA-Localizing-U.S./Canada/Mexico-9159268) - 2016 - CRC - 4/16/15
Vehicle Care 309
Towing the Vehicle
Caution
Incorrectly towing a disabledvehicle may cause damage. Thedamage would not be covered bythe vehicle warranty.
Do not lash or hook tosuspension components. Use theproper straps around the tires tosecure the vehicle.
Have the vehicle towed on a flatbedcar carrier or a wheel lift tow truck. Ifa wheel lift tow truck is used, thedrive wheels cannot contact theroad while the vehicle is beingtowed. A wheel dolly must be usedto lift all drive wheels off the ground.
Consult your dealer or aprofessional towing service if thedisabled vehicle must be towed.
Recreational VehicleTowingRecreational vehicle towing meanstowing the vehicle behind anothervehicle – such as behind a motorhome. The two most common typesof recreational vehicle towing areknown as dinghy towing and dollytowing. Dinghy towing is towing thevehicle with all four wheels on theground. Dolly towing is towing thevehicle with two wheels on theground and two wheels up on adevice known as a dolly.
Here are some important things toconsider before recreational vehicletowing:
. The towing capacity of thetowing vehicle. Be sure to readthe tow vehicle manufacturer'srecommendations.
. How far the vehicle will betowed. Some vehicles haverestrictions on how far and howlong they can be towed.
. The proper towing equipment.See your dealer or traileringprofessional for additional adviceand equipmentrecommendations.
. If the vehicle is ready to betowed. Just as preparing thevehicle for a long trip, make surethe vehicle is prepared to betowed.
Caution
Use of a shield mounted in frontof the vehicle grille could restrictairflow and cause damage to thetransmission. The repairs wouldnot be covered by the vehiclewarranty. If using a shield, onlyuse one that attaches to thetowing vehicle.
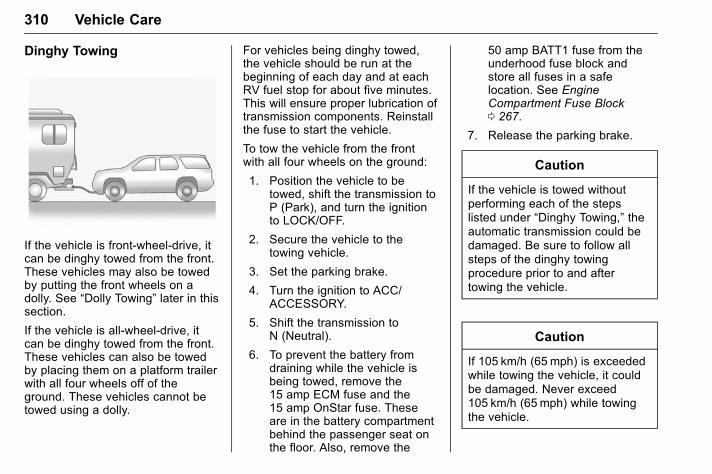
GMC Acadia/Acadia Denali Owner Manual (GMNA-Localizing-U.S./Canada/Mexico-9159268) - 2016 - CRC - 4/16/15
310 Vehicle Care
Dinghy Towing
If the vehicle is front-wheel-drive, itcan be dinghy towed from the front.These vehicles may also be towedby putting the front wheels on adolly. See “Dolly Towing” later in thissection.
If the vehicle is all-wheel-drive, itcan be dinghy towed from the front.These vehicles can also be towedby placing them on a platform trailerwith all four wheels off of theground. These vehicles cannot betowed using a dolly.
For vehicles being dinghy towed,the vehicle should be run at thebeginning of each day and at eachRV fuel stop for about five minutes.This will ensure proper lubrication oftransmission components. Reinstallthe fuse to start the vehicle.
To tow the vehicle from the frontwith all four wheels on the ground:
1. Position the vehicle to betowed, shift the transmission toP (Park), and turn the ignitionto LOCK/OFF.
2. Secure the vehicle to thetowing vehicle.
3. Set the parking brake.
4. Turn the ignition to ACC/ACCESSORY.
5. Shift the transmission toN (Neutral).
6. To prevent the battery fromdraining while the vehicle isbeing towed, remove the15 amp ECM fuse and the15 amp OnStar fuse. Theseare in the battery compartmentbehind the passenger seat onthe floor. Also, remove the
50 amp BATT1 fuse from theunderhood fuse block andstore all fuses in a safelocation. See EngineCompartment Fuse Block0 267.
7. Release the parking brake.
Caution
If the vehicle is towed withoutperforming each of the stepslisted under “Dinghy Towing,” theautomatic transmission could bedamaged. Be sure to follow allsteps of the dinghy towingprocedure prior to and aftertowing the vehicle.
Caution
If 105 km/h (65 mph) is exceededwhile towing the vehicle, it couldbe damaged. Never exceed105 km/h (65 mph) while towingthe vehicle.
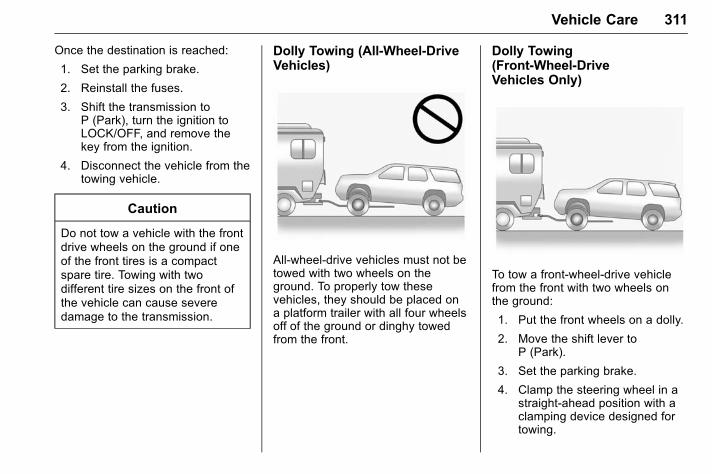
GMC Acadia/Acadia Denali Owner Manual (GMNA-Localizing-U.S./Canada/Mexico-9159268) - 2016 - CRC - 4/16/15
Vehicle Care 311
Once the destination is reached:
1. Set the parking brake.
2. Reinstall the fuses.
3. Shift the transmission toP (Park), turn the ignition toLOCK/OFF, and remove thekey from the ignition.
4. Disconnect the vehicle from thetowing vehicle.
Caution
Do not tow a vehicle with the frontdrive wheels on the ground if oneof the front tires is a compactspare tire. Towing with twodifferent tire sizes on the front ofthe vehicle can cause severedamage to the transmission.
Dolly Towing (All-Wheel-DriveVehicles)
All-wheel-drive vehicles must not betowed with two wheels on theground. To properly tow thesevehicles, they should be placed ona platform trailer with all four wheelsoff of the ground or dinghy towedfrom the front.
Dolly Towing(Front-Wheel-DriveVehicles Only)
To tow a front-wheel-drive vehiclefrom the front with two wheels onthe ground:
1. Put the front wheels on a dolly.
2. Move the shift lever toP (Park).
3. Set the parking brake.
4. Clamp the steering wheel in astraight-ahead position with aclamping device designed fortowing.
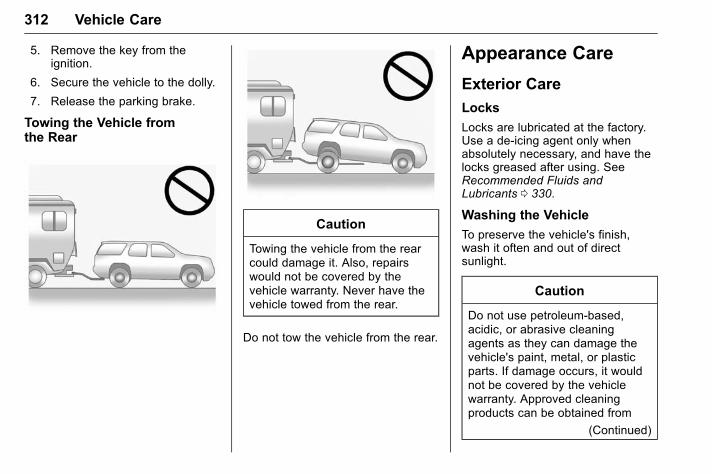
GMC Acadia/Acadia Denali Owner Manual (GMNA-Localizing-U.S./Canada/Mexico-9159268) - 2016 - CRC - 4/16/15
312 Vehicle Care
5. Remove the key from theignition.
6. Secure the vehicle to the dolly.
7. Release the parking brake.
Towing the Vehicle fromthe Rear
Caution
Towing the vehicle from the rearcould damage it. Also, repairswould not be covered by thevehicle warranty. Never have thevehicle towed from the rear.
Do not tow the vehicle from the rear.
Appearance Care
Exterior Care
Locks
Locks are lubricated at the factory.Use a de-icing agent only whenabsolutely necessary, and have thelocks greased after using. SeeRecommended Fluids andLubricants 0 330.
Washing the Vehicle
To preserve the vehicle's finish,wash it often and out of directsunlight.
Caution
Do not use petroleum-based,acidic, or abrasive cleaningagents as they can damage thevehicle's paint, metal, or plasticparts. If damage occurs, it wouldnot be covered by the vehiclewarranty. Approved cleaningproducts can be obtained from
(Continued)
GMC Acadia/Acadia Denali Owner Manual (GMNA-Localizing-U.S./Canada/Mexico-9159268) - 2016 - CRC - 4/16/15
Vehicle Care 313
Caution (Continued)
your dealer. Follow allmanufacturer directions regardingcorrect product usage, necessarysafety precautions, andappropriate disposal of anyvehicle care product.
Caution
Avoid using high-pressurewashes closer than 30 cm (12 in)to the surface of the vehicle. Useof power washers exceeding8,274 kPa (1,200 psi) can resultin damage or removal of paintand decals.
Thee symbol is on anyunderhood compartment electricalcenter that should not be powerwashed. This could cause damagethat would not be covered by thevehicle warranty.
If using an automatic car wash,follow the car wash instructions. Thewindshield wiper and rear windowwiper, if equipped, must be off.Remove any accessories that maybe damaged or interfere with the carwash equipment.
Rinse the vehicle well, beforewashing and after, to remove allcleaning agents completely. If theyare allowed to dry on the surface,they could stain.
Dry the finish with a soft, cleanchamois or an all-cotton towel toavoid surface scratches and waterspotting.
Finish Care
Application of aftermarket clearcoatsealant/wax materials is notrecommended. If painted surfacesare damaged, see your dealer tohave the damage assessed andrepaired. Foreign materials such ascalcium chloride and other salts, icemelting agents, road oil and tar, treesap, bird droppings, chemicals fromindustrial chimneys, etc., candamage the vehicle's finish if theyremain on painted surfaces. Wash
the vehicle as soon as possible.If necessary, use non-abrasivecleaners that are marked safe forpainted surfaces to remove foreignmatter.
Occasional hand waxing or mildpolishing should be done to removeresidue from the paint finish. Seeyour dealer for approved cleaningproducts.
Do not apply waxes or polishes touncoated plastic, vinyl, rubber,decals, simulated wood, or flat paintas damage can occur.
Caution
Machine compounding oraggressive polishing on abasecoat/clearcoat paint finishmay damage it. Use onlynon-abrasive waxes and polishesthat are made for a basecoat/clearcoat paint finish on thevehicle.
To keep the paint finish looking new,keep the vehicle garaged orcovered whenever possible.
GMC Acadia/Acadia Denali Owner Manual (GMNA-Localizing-U.S./Canada/Mexico-9159268) - 2016 - CRC - 4/16/15
314 Vehicle Care
Protecting Exterior Bright MetalMoldings
Caution
Failure to clean and protect thebright metal moldings can resultin a hazy white finish or pitting.This damage would not becovered by the vehicle warranty.
The bright metal moldings on thevehicle are aluminum, chrome orstainless steel. To prevent damagealways follow these cleaninginstructions:
. Be sure the molding is cool tothe touch before applying anycleaning solution.
. Use only approved cleaningsolutions for aluminum, chromeor stainless steel. Somecleaners are highly acidic orcontain alkaline substances andcan damage the moldings.
. Always dilute a concentratedcleaner according to themanufacturer’s instructions.
. Do not use cleaners that are notintended for automotive use.
. Use a nonabrasive wax on thevehicle after washing to protectand extend the molding finish.
Cleaning Exterior Lamps/Lenses, Emblems, Decals, andStripes
Use only lukewarm or cold water, asoft cloth, and a car washing soapto clean exterior lamps, lenses,emblems, decals, and stripes.Follow instructions under "Washingthe Vehicle" previously in thissection.
Lamp covers are made of plastic,and some have a UV protectivecoating. Do not clean or wipe themwhen dry.
Do not use any of the following onlamp covers:
. Abrasive or caustic agents.
. Washer fluids and other cleaningagents in higher concentrationsthan suggested by themanufacturer.
. Solvents, alcohols, fuels,or other harsh cleaners.
. Ice scrapers or other hard items.
. Aftermarket appearance caps orcovers while the lamps areilluminated, due to excessiveheat generated.
Caution
Failure to clean lamps properlycan cause damage to the lampcover that would not be coveredby the vehicle warranty.
Caution
Using wax on low gloss blackfinish stripes can increase thegloss level and create anon-uniform finish. Clean lowgloss stripes with soap andwater only.
GMC Acadia/Acadia Denali Owner Manual (GMNA-Localizing-U.S./Canada/Mexico-9159268) - 2016 - CRC - 4/16/15
Vehicle Care 315
Air Intakes
Clear debris from the air intakes,between the hood and windshieldwhen washing the vehicle.
Windshield and Wiper Blades
Clean the outside of the windshieldwith glass cleaner.
Clean rubber blades using a lint-freecloth or paper towel soaked withwindshield washer fluid or a milddetergent. Wash the windshieldthoroughly when cleaning theblades. Bugs, road grime, sap, anda buildup of vehicle wash/waxtreatments may cause wiperstreaking.
Replace the wiper blades if they areworn or damaged. Damage can becaused by extreme dustyconditions, sand, salt, heat, sun,snow, and ice.
Weatherstrips
Apply Dielectric silicone grease onweatherstrips to make them lastlonger, seal better, and not stick orsqueak. Lubricate weatherstrips atleast once a year. Hot, dry climates
may require more frequentapplication. Black marks fromrubber material on painted surfacescan be removed by rubbing with aclean cloth. See RecommendedFluids and Lubricants 0 330.
Tires
Use a stiff brush with tire cleaner toclean the tires.
Caution
Using petroleum-based tiredressing products on the vehiclemay damage the paint finish and/or tires. When applying a tiredressing, always wipe off anyoverspray from all paintedsurfaces on the vehicle.
Wheels and Trim—Aluminumor Chrome
Use a soft, clean cloth with mildsoap and water to clean the wheels.After rinsing thoroughly with cleanwater, dry with a soft, clean towel.A wax may then be applied.
Caution
Chrome wheels and other chrometrim may be damaged if thevehicle is not washed after drivingon roads that have been sprayedwith magnesium, calcium,or sodium chloride. Thesechlorides are used on roads forconditions such as ice and dust.Always wash the chrome withsoap and water after exposure.
Caution
To avoid surface damage, do notuse strong soaps, chemicals,abrasive polishes, cleaners,brushes, or cleaners that containacid on aluminum orchrome-plated wheels. Use onlyapproved cleaners. Also, neverdrive a vehicle with aluminum orchrome-plated wheels through anautomatic car wash that usessilicone carbide tire cleaning
(Continued)
GMC Acadia/Acadia Denali Owner Manual (GMNA-Localizing-U.S./Canada/Mexico-9159268) - 2016 - CRC - 4/16/15
316 Vehicle Care
Caution (Continued)
brushes. Damage could occurand the repairs would not becovered by the vehicle warranty.
Brake System
Visually inspect brake lines andhoses for proper hook-up, binding,leaks, cracks, chafing, etc. Inspectdisc brake pads for wear and rotorsfor surface condition. Inspect drumbrake linings/shoes for wear orcracks. Inspect other brake parts,including drums, wheel cylinders,calipers, parking brake, mastercylinder, brake fluid reservoir,vacuum pipes, electric vacuumpump including bracket, and venthose, if equipped.
Steering, Suspension, andChassis Components
Visually inspect steering,suspension, and chassiscomponents for damaged, loose,or missing parts or signs of wear atleast once a year.
Inspect power steering for properhook-up, binding, leaks, cracks,chafing, etc.
Visually check constant velocity jointboots and axle seals for leaks.
Body Component Lubrication
Lubricate all key lock cylinders,hood hinges, liftgate hinges, and thesteel fuel door hinges, unless thecomponents are plastic. Applyingsilicone grease on weatherstripswith a clean cloth will make themlast longer, seal better, and not stickor squeak.
Underbody Maintenance
At least twice a year, spring and fall,use plain water to flush anycorrosive materials from theunderbody. Take care to thoroughlyclean any areas where mud andother debris can collect.
Sheet Metal Damage
If the vehicle is damaged andrequires sheet metal repair orreplacement, make sure the bodyrepair shop applies anti-corrosion
material to parts repaired orreplaced to restore corrosionprotection.
Original manufacturer replacementparts will provide the corrosionprotection while maintaining thevehicle warranty.
Finish Damage
Quickly repair minor chips andscratches with touch-up materialsavailable from your dealer to avoidcorrosion. Larger areas of finishdamage can be corrected in yourdealer's body and paint shop.
Chemical Paint Spotting
Airborne pollutants can fall uponand attack painted vehicle surfacescausing blotchy, ring-shapeddiscolorations, and small, irregulardark spots etched into the paintsurface. See “Finish Care”previously in this section.
Interior CareTo prevent dirt particle abrasions,regularly clean the vehicle's interior.Immediately remove any soils.
GMC Acadia/Acadia Denali Owner Manual (GMNA-Localizing-U.S./Canada/Mexico-9159268) - 2016 - CRC - 4/16/15
Vehicle Care 317
Newspapers or dark garments cantransfer color to the vehicle’sinterior.
Use a soft bristle brush to removedust from knobs and crevices on theinstrument cluster. Using a mildsoap solution, immediately removehand lotions, sunscreen, and insectrepellent from all interior surfaces orpermanent damage may result.
Use cleaners specifically designedfor the surfaces being cleaned toprevent permanent damage. Applyall cleaners directly to the cleaningcloth. Do not spray cleaners on anyswitches or controls. Removecleaners quickly.
Before using cleaners, read andfollow all safety instructions on thelabel. While cleaning the interior,open the doors and windows to getproper ventilation.
To prevent damage, do not cleanthe interior using the followingcleaners or techniques:
. Never use a razor or any othersharp object to remove soil fromany interior surface.
. Never use a brush with stiffbristles.
. Never rub any surfaceaggressively or with too muchpressure.
. Do not use laundry detergents ordishwashing soaps withdegreasers. For liquid cleaners,use approximately 20 drops per3.8 L (1 gal) of water.A concentrated soap solution willcreate streaks and attract dirt.Do not use solutions that containstrong or caustic soap.
. Do not heavily saturate theupholstery when cleaning.
. Do not use solvents or cleanerscontaining solvents.
Interior Glass
To clean, use a terry cloth fabricdampened with water. Wipe dropletsleft behind with a clean dry cloth.If necessary, use a commercialglass cleaner after cleaning withplain water.
Caution
To prevent scratching, never useabrasive cleaners on automotiveglass. Abrasive cleaners oraggressive cleaning may damagethe rear window defogger.
Cleaning the windshield with waterduring the first three to six monthsof ownership will reduce tendencyto fog.
Speaker Covers
Vacuum around a speaker covergently, so that the speaker will notbe damaged. Clean spots with waterand mild soap.
Coated Moldings
Coated moldings should be cleaned.
. When lightly soiled, wipe with asponge or soft, lint-free clothdampened with water.
. When heavily soiled, use warmsoapy water.
GMC Acadia/Acadia Denali Owner Manual (GMNA-Localizing-U.S./Canada/Mexico-9159268) - 2016 - CRC - 4/16/15
318 Vehicle Care
Fabric/Carpet/Suede
Start by vacuuming the surfaceusing a soft brush attachment. If arotating vacuum brush attachment isbeing used, only use it on the floorcarpet. Before cleaning, gentlyremove as much of the soil aspossible:
. Gently blot liquids with a papertowel. Continue blotting until nomore soil can be removed.
. For solid soils, remove as muchas possible prior to vacuuming.
To clean:
1. Saturate a clean, lint-freecolorfast cloth with water.Microfiber cloth isrecommended to prevent linttransfer to the fabric or carpet.
2. Remove excess moisture bygently wringing until water doesnot drip from the cleaning cloth.
3. Start on the outside edge of thesoil and gently rub toward thecenter. Fold the cleaning cloth
to a clean area frequently toprevent forcing the soil in to thefabric.
4. Continue gently rubbing thesoiled area until there is nolonger any color transfer fromthe soil to the cleaning cloth.
5. If the soil is not completelyremoved, use a mild soapsolution followed only by plainwater.
If the soil is not completelyremoved, it may be necessary touse a commercial upholsterycleaner or spot lifter. Test a smallhidden area for colorfastness beforeusing a commercial upholsterycleaner or spot lifter. If ringformation occurs, clean the entirefabric or carpet.
After cleaning, use a paper towel toblot excess moisture.
Cleaning High Gloss Surfacesand Vehicle Information andRadio Displays
Use a microfiber cloth on high glosssurfaces or vehicle displays. First,use a soft bristle brush to remove
dirt that can scratch the surface.Then gently clean by rubbing with amicrofiber cloth. Never use windowcleaners or solvents. Periodicallyhand wash the microfiber clothseparately, using mild soap. Do notuse bleach or fabric softener. Rinsethoroughly and air dry beforenext use.
Caution
Do not attach a device with asuction cup to the display. Thismay cause damage and wouldnot be covered by the vehiclewarranty.
Instrument Panel, Leather,Vinyl, Other Plastic Surfaces,Low Gloss Paint Surfaces, andNatural Open Pore WoodSurfaces
Use a soft microfiber clothdampened with water to removedust and loose dirt. For a morethorough cleaning, use a softmicrofiber cloth dampened with amild soap solution.

GMC Acadia/Acadia Denali Owner Manual (GMNA-Localizing-U.S./Canada/Mexico-9159268) - 2016 - CRC - 4/16/15
Vehicle Care 319
Caution
Soaking or saturating leather,especially perforated leather, aswell as other interior surfaces,may cause permanent damage.Wipe excess moisture from thesesurfaces after cleaning and allowthem to dry naturally. Never useheat, steam, or spot removers. Donot use cleaners that containsilicone or wax-based products.Cleaners containing thesesolvents can permanently changethe appearance and feel ofleather or soft trim, and are notrecommended.
Do not use cleaners that increasegloss, especially on the instrumentpanel. Reflected glare can decreasevisibility through the windshieldunder certain conditions.
Caution
Use of air fresheners may causepermanent damage to plasticsand painted surfaces. If an airfreshener comes in contact withany plastic or painted surface inthe vehicle, blot immediately andclean with a soft cloth dampenedwith a mild soap solution.Damage caused by air freshenerswould not be covered by thevehicle warranty.
Cargo Cover andConvenience Net
Wash with warm water and milddetergent. Do not use chlorinebleach. Rinse with cold water, andthen dry completely.
Care of Safety Belts
Keep belts clean and dry.
{ Warning
Do not bleach or dye safety belts.It may severely weaken them. Ina crash, they might not be able toprovide adequate protection.Clean safety belts only with mildsoap and lukewarm water.
Floor Mats
{ Warning
If a floor mat is the wrong size oris not properly installed, it caninterfere with the pedals.Interference with the pedals cancause unintended accelerationand/or increased stoppingdistance which can cause a crashand injury. Make sure the floormat does not interfere with thepedals.
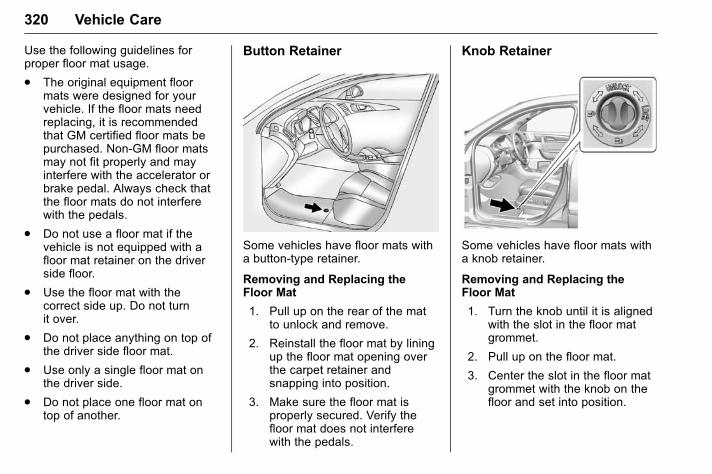
GMC Acadia/Acadia Denali Owner Manual (GMNA-Localizing-U.S./Canada/Mexico-9159268) - 2016 - CRC - 4/16/15
320 Vehicle Care
Use the following guidelines forproper floor mat usage.
. The original equipment floormats were designed for yourvehicle. If the floor mats needreplacing, it is recommendedthat GM certified floor mats bepurchased. Non-GM floor matsmay not fit properly and mayinterfere with the accelerator orbrake pedal. Always check thatthe floor mats do not interferewith the pedals.
. Do not use a floor mat if thevehicle is not equipped with afloor mat retainer on the driverside floor.
. Use the floor mat with thecorrect side up. Do not turnit over.
. Do not place anything on top ofthe driver side floor mat.
. Use only a single floor mat onthe driver side.
. Do not place one floor mat ontop of another.
Button Retainer
Some vehicles have floor mats witha button-type retainer.
Removing and Replacing theFloor Mat
1. Pull up on the rear of the matto unlock and remove.
2. Reinstall the floor mat by liningup the floor mat opening overthe carpet retainer andsnapping into position.
3. Make sure the floor mat isproperly secured. Verify thefloor mat does not interferewith the pedals.
Knob Retainer
Some vehicles have floor mats witha knob retainer.
Removing and Replacing theFloor Mat
1. Turn the knob until it is alignedwith the slot in the floor matgrommet.
2. Pull up on the floor mat.
3. Center the slot in the floor matgrommet with the knob on thefloor and set into position.
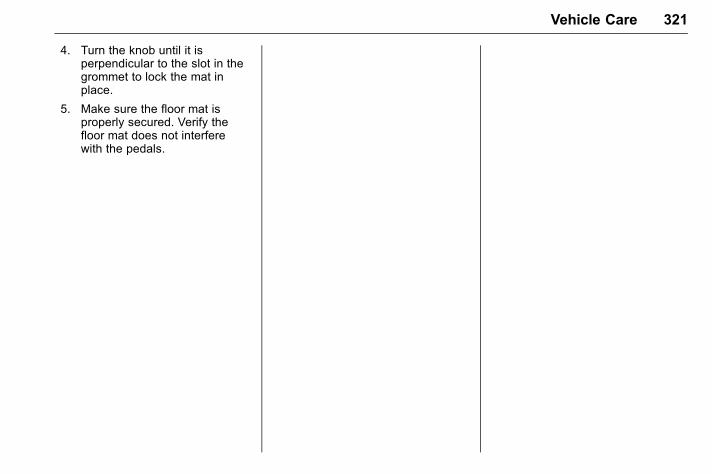
GMC Acadia/Acadia Denali Owner Manual (GMNA-Localizing-U.S./Canada/Mexico-9159268) - 2016 - CRC - 4/16/15
Vehicle Care 321
4. Turn the knob until it isperpendicular to the slot in thegrommet to lock the mat inplace.
5. Make sure the floor mat isproperly secured. Verify thefloor mat does not interferewith the pedals.
GMC Acadia/Acadia Denali Owner Manual (GMNA-Localizing-U.S./Canada/Mexico-9159268) - 2016 - CRC - 4/16/15
322 Service and Maintenance
Service andMaintenance
General InformationGeneral Information . . . . . . . . . . 322
Maintenance ScheduleMaintenance Schedule . . . . . . . 323
Special Application ServicesSpecial ApplicationServices . . . . . . . . . . . . . . . . . . . . 329
Additional Maintenanceand CareAdditional Maintenanceand Care . . . . . . . . . . . . . . . . . . . . 329
Recommended Fluids,Lubricants, and PartsRecommended Fluids andLubricants . . . . . . . . . . . . . . . . . . . 332
Maintenance ReplacementParts . . . . . . . . . . . . . . . . . . . . . . . . 333
Maintenance RecordsMaintenance Records . . . . . . . . 334
General InformationYour vehicle is an importantinvestment. This section describesthe required maintenance for thevehicle. Follow this schedule to helpprotect against major repairexpenses resulting from neglect orinadequate maintenance. It mayalso help to maintain the value ofthe vehicle if it is sold. It is theresponsibility of the owner to haveall required maintenance performed.
Your dealer has trained technicianswho can perform requiredmaintenance using genuinereplacement parts. They haveup-to-date tools and equipment forfast and accurate diagnostics. Manydealers have extended evening andSaturday hours, courtesytransportation, and onlinescheduling to assist with serviceneeds.
Your dealer recognizes theimportance of providingcompetitively priced maintenanceand repair services. With trainedtechnicians, the dealer is the placefor routine maintenance such as oil
changes and tire rotations andadditional maintenance items liketires, brakes, batteries, and wiperblades.
Caution
Damage caused by impropermaintenance can lead to costlyrepairs and may not be coveredby the vehicle warranty.Maintenance intervals, checks,inspections, recommended fluids,and lubricants are important tokeep the vehicle in good workingcondition.
The Tire Rotation and RequiredServices are the responsibility of thevehicle owner. It is recommended tohave your dealer perform theseservices every 12 000 km/7,500 mi.Proper vehicle maintenance helps tokeep the vehicle in good workingcondition, improves fuel economy,and reduces vehicle emissions.
Because of the way people usevehicles, maintenance needs vary.There may need to be more
GMC Acadia/Acadia Denali Owner Manual (GMNA-Localizing-U.S./Canada/Mexico-9159268) - 2016 - CRC - 4/16/15
Service and Maintenance 323
frequent checks and services. TheAdditional Required Services -Normal are for vehicles that:
. Carry passengers and cargowithin recommended limits onthe Tire and Loading Informationlabel. See Vehicle Load Limits0 200.
. Are driven on reasonable roadsurfaces within legal drivinglimits.
. Use the recommended fuel. SeeFuel 0 230.
Refer to the information in theMaintenance Schedule AdditionalRequired Services - Normal chart.
The Additional Required Services -Severe are for vehicles that are:
. Mainly driven in heavy city trafficin hot weather.
. Mainly driven in hilly ormountainous terrain.
. Frequently towing a trailer.
. Used for high speed orcompetitive driving.
. Used for taxi, police, or deliveryservice.
Refer to the information in theMaintenance Schedule AdditionalRequired Services - Severe chart.
{ Warning
Performing maintenance work canbe dangerous and can causeserious injury. Performmaintenance work only if therequired information, proper tools,and equipment are available.If they are not, see your dealer tohave a trained technician do thework. See Doing Your OwnService Work 0 244.
MaintenanceScheduleOwner Checks and Services
At Each Fuel Stop
. Check the engine oil level. SeeEngine Oil 0 247.
Once a Month
. Check the tire inflationpressures. See Tire Pressure0 283.
. Inspect the tires for wear. SeeTire Inspection 0 288.
. Check the windshield washerfluid level. See Washer Fluid0 259.
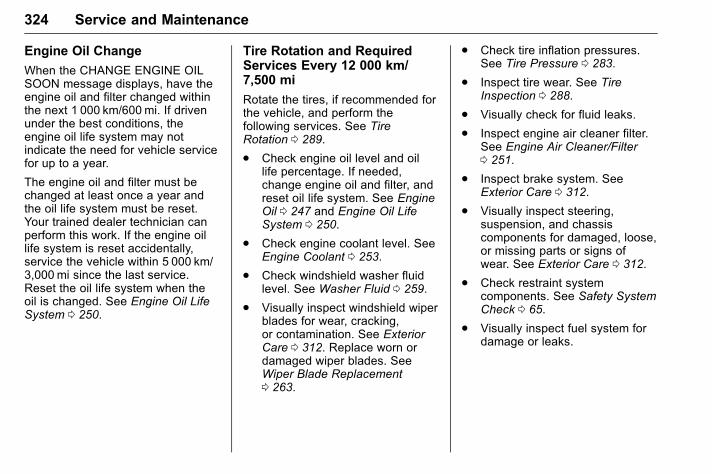
GMC Acadia/Acadia Denali Owner Manual (GMNA-Localizing-U.S./Canada/Mexico-9159268) - 2016 - CRC - 4/16/15
324 Service and Maintenance
Engine Oil Change
When the CHANGE ENGINE OILSOON message displays, have theengine oil and filter changed withinthe next 1 000 km/600 mi. If drivenunder the best conditions, theengine oil life system may notindicate the need for vehicle servicefor up to a year.
The engine oil and filter must bechanged at least once a year andthe oil life system must be reset.Your trained dealer technician canperform this work. If the engine oillife system is reset accidentally,service the vehicle within 5 000 km/3,000 mi since the last service.Reset the oil life system when theoil is changed. See Engine Oil LifeSystem 0 250.
Tire Rotation and RequiredServices Every 12 000 km/7,500 mi
Rotate the tires, if recommended forthe vehicle, and perform thefollowing services. See TireRotation 0 289.
. Check engine oil level and oillife percentage. If needed,change engine oil and filter, andreset oil life system. See EngineOil 0 247 and Engine Oil LifeSystem 0 250.
. Check engine coolant level. SeeEngine Coolant 0 253.
. Check windshield washer fluidlevel. See Washer Fluid 0 259.
. Visually inspect windshield wiperblades for wear, cracking,or contamination. See ExteriorCare 0 312. Replace worn ordamaged wiper blades. SeeWiper Blade Replacement0 263.
. Check tire inflation pressures.See Tire Pressure 0 283.
. Inspect tire wear. See TireInspection 0 288.
. Visually check for fluid leaks.
. Inspect engine air cleaner filter.See Engine Air Cleaner/Filter0 251.
. Inspect brake system. SeeExterior Care 0 312.
. Visually inspect steering,suspension, and chassiscomponents for damaged, loose,or missing parts or signs ofwear. See Exterior Care 0 312.
. Check restraint systemcomponents. See Safety SystemCheck 0 65.
. Visually inspect fuel system fordamage or leaks.

GMC Acadia/Acadia Denali Owner Manual (GMNA-Localizing-U.S./Canada/Mexico-9159268) - 2016 - CRC - 4/16/15
Service and Maintenance 325
. Visually inspect exhaust systemand nearby heat shields forloose or damaged parts.
. Lubricate body components. SeeExterior Care 0 312.
. Check starter switch. See StarterSwitch Check 0 262.
. Check automatic transmissionshift lock control function. SeeAutomatic Transmission ShiftLock Control Function Check0 262.
. Check ignition transmission lock.See Ignition Transmission LockCheck 0 263.
. Check parking brake andautomatic transmission parkmechanism. See Park Brake andP (Park) Mechanism Check0 263.
. Check accelerator pedal fordamage, high effort, or binding.Replace if needed.
. Visually inspect gas strut forsigns of wear, cracks, or otherdamage. Check the hold openability of the strut. See yourdealer if service is required.
. Inspect sunroof track and seal,if equipped. See Sunroof 0 45.
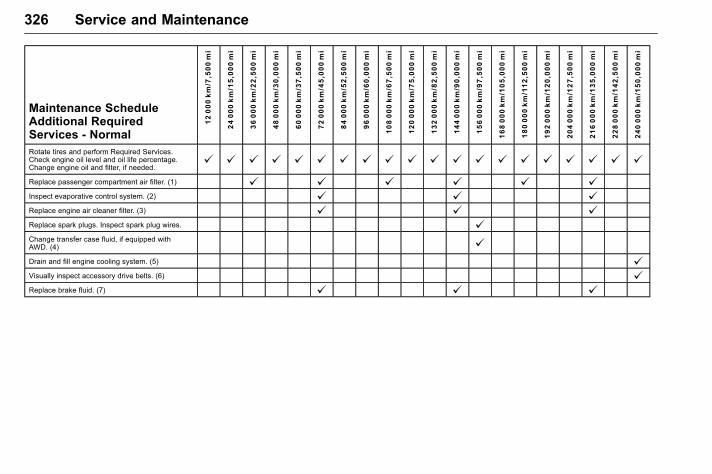
GMC Acadia/Acadia Denali Owner Manual (GMNA-Localizing-U.S./Canada/Mexico-9159268) - 2016 - CRC - 4/16/15
326 Service and Maintenance
Maintenance ScheduleAdditional RequiredServices - Normal
12000km/7,500mi
24000km/15,000mi
36000km/22,500mi
48000km/30,000mi
60000km/37,500mi
72000km/45,000mi
84000km/52,500mi
96000km/60,000mi
108000km/67,500mi
120000km/75,000mi
132000km/82,500mi
144000km/90,000mi
156000km/97,500mi
168000km/105,000mi
180000km/112,500mi
192000km/120,000mi
204000km/127,500mi
216000km/135,000mi
228000km/142,500mi
240000km/150,000mi
Rotate tires and perform Required Services.Check engine oil level and oil life percentage.Change engine oil and filter, if needed.
@ @ @ @ @ @ @ @ @ @ @ @ @ @ @ @ @ @ @ @
Replace passenger compartment air filter. (1) @ @ @ @ @ @
Inspect evaporative control system. (2) @ @ @
Replace engine air cleaner filter. (3) @ @ @
Replace spark plugs. Inspect spark plug wires. @
Change transfer case fluid, if equipped withAWD. (4) @
Drain and fill engine cooling system. (5) @
Visually inspect accessory drive belts. (6) @
Replace brake fluid. (7) @ @ @
GMC Acadia/Acadia Denali Owner Manual (GMNA-Localizing-U.S./Canada/Mexico-9159268) - 2016 - CRC - 4/16/15
Service and Maintenance 327
Footnotes — MaintenanceSchedule Additional RequiredServices - Normal
(1) Or every two years, whichevercomes first. More frequentreplacement may be needed if thevehicle is driven in areas with heavytraffic, areas with poor air quality,or areas with high dust levels.Replacement may also be needed ifthere is a reduction in air flow,excessive window fogging, or odors.
(2) Check all fuel and vapor linesand hoses for proper hook-up,routing, and condition.
(3) Or every four years, whichevercomes first. If driving in dustyconditions, inspect the filter at eachoil change or more often as needed.
(4) Do not directly power wash thetransfer case output seals. Highpressure water can overcome theseals and contaminate the transfercase fluid. Contaminated fluid willdecrease the life of the transfercase and should be replaced.
(5) Or every five years, whichevercomes first. See Cooling System0 252.
(6) Or every 10 years, whichevercomes first. Inspect for fraying,excessive cracking, or damage;replace, if needed.
(7) Or every three years, whichevercomes first.
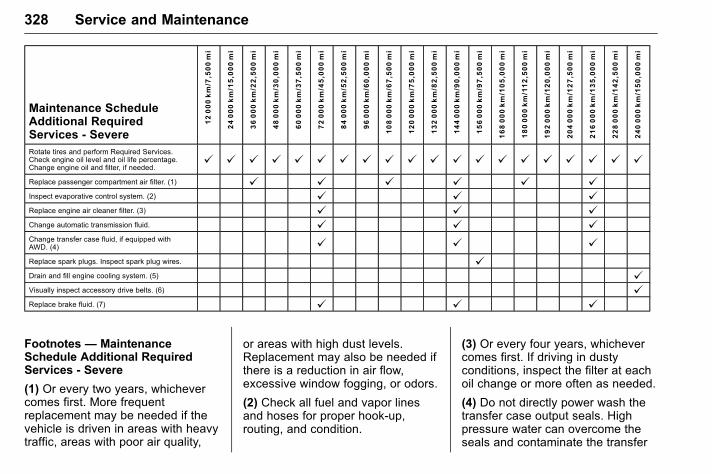
GMC Acadia/Acadia Denali Owner Manual (GMNA-Localizing-U.S./Canada/Mexico-9159268) - 2016 - CRC - 4/16/15
328 Service and Maintenance
Maintenance ScheduleAdditional RequiredServices - Severe
12000km/7,500mi
24000km/15,000mi
36000km/22,500mi
48000km/30,000mi
60000km/37,500mi
72000km/45,000mi
84000km/52,500mi
96000km/60,000mi
108000km/67,500mi
120000km/75,000mi
132000km/82,500mi
144000km/90,000mi
156000km/97,500mi
168000km/105,000mi
180000km/112,500mi
192000km/120,000mi
204000km/127,500mi
216000km/135,000mi
228000km/142,500mi
240000km/150,000mi
Rotate tires and perform Required Services.Check engine oil level and oil life percentage.Change engine oil and filter, if needed.
@ @ @ @ @ @ @ @ @ @ @ @ @ @ @ @ @ @ @ @
Replace passenger compartment air filter. (1) @ @ @ @ @ @
Inspect evaporative control system. (2) @ @ @
Replace engine air cleaner filter. (3) @ @ @
Change automatic transmission fluid. @ @ @
Change transfer case fluid, if equipped withAWD. (4) @ @ @
Replace spark plugs. Inspect spark plug wires. @
Drain and fill engine cooling system. (5) @
Visually inspect accessory drive belts. (6) @
Replace brake fluid. (7) @ @ @
Footnotes — MaintenanceSchedule Additional RequiredServices - Severe
(1) Or every two years, whichevercomes first. More frequentreplacement may be needed if thevehicle is driven in areas with heavytraffic, areas with poor air quality,
or areas with high dust levels.Replacement may also be needed ifthere is a reduction in air flow,excessive window fogging, or odors.
(2) Check all fuel and vapor linesand hoses for proper hook-up,routing, and condition.
(3) Or every four years, whichevercomes first. If driving in dustyconditions, inspect the filter at eachoil change or more often as needed.
(4) Do not directly power wash thetransfer case output seals. Highpressure water can overcome theseals and contaminate the transfer
GMC Acadia/Acadia Denali Owner Manual (GMNA-Localizing-U.S./Canada/Mexico-9159268) - 2016 - CRC - 4/16/15
Service and Maintenance 329
case fluid. Contaminated fluid willdecrease the life of the transfercase and should be replaced.
(5) Or every five years, whichevercomes first. See Cooling System0 252.
(6) Or every 10 years, whichevercomes first. Inspect for fraying,excessive cracking, or damage;replace, if needed.
(7) Or every three years, whichevercomes first.
Special ApplicationServices. Severe Commercial Use
Vehicles Only: Lubricate chassiscomponents every 5 000 km/3,000 mi.
. Have underbody flushing serviceperformed. See "UnderbodyMaintenance" in Exterior Care0 312.
AdditionalMaintenance and CareYour vehicle is an importantinvestment and caring for it properlymay help to avoid future costlyrepairs. To maintain vehicleperformance, additionalmaintenance services may berequired.
It is recommended that your dealerperform these services — theirtrained dealer technicians knowyour vehicle best. Your dealer canalso perform a thoroughassessment with a multi-pointinspection to recommend when yourvehicle may need attention.
GMC Acadia/Acadia Denali Owner Manual (GMNA-Localizing-U.S./Canada/Mexico-9159268) - 2016 - CRC - 4/16/15
330 Service and Maintenance
The following list is intended toexplain the services and conditionsto look for that may indicateservices are required.
Battery
The 12-volt battery supplies powerto start the engine and operate anyadditional electrical accessories.
. To avoid break-down or failure tostart the vehicle, maintain abattery with full cranking power.
. Trained dealer technicians havethe diagnostic equipment to testthe battery and ensure that theconnections and cables arecorrosion-free.
Belts
. Belts may need replacing if theysqueak or show signs ofcracking or splitting.
. Trained dealer technicians haveaccess to tools and equipmentto inspect the belts andrecommend adjustment orreplacement when necessary.
Brakes
Brakes stop the vehicle and arecrucial to safe driving.
. Signs of brake wear may includechirping, grinding, or squealingnoises, or difficulty stopping.
. Trained dealer technicians haveaccess to tools and equipmentto inspect the brakes andrecommend quality partsengineered for the vehicle.
Fluids
Proper fluid levels and approvedfluids protect the vehicle’s systemsand components. SeeRecommended Fluids andLubricants 0 332 for GM approvedfluids.
. Engine oil and windshieldwasher fluid levels should bechecked at every fuel fill.
. Instrument cluster lights maycome on to indicate that fluidsmay be low and need to befilled.
Hoses
Hoses transport fluids and shouldbe regularly inspected to ensurethat there are no cracks or leaks.With a multi-point inspection, yourdealer can inspect the hoses andadvise if replacement is needed.
Lamps
Properly working headlamps,taillamps, and brake lamps areimportant to see and be seen onthe road.
. Signs that the headlamps needattention include dimming, failureto light, cracking, or damage.The brake lamps need to bechecked periodically to ensurethat they light when braking.
. With a multi-point inspection,your dealer can check the lampsand note any concerns.
GMC Acadia/Acadia Denali Owner Manual (GMNA-Localizing-U.S./Canada/Mexico-9159268) - 2016 - CRC - 4/16/15
Service and Maintenance 331
Shocks and Struts
Shocks and struts help aid in controlfor a smoother ride.
. Signs of wear may includesteering wheel vibration, bounce/sway while braking, longerstopping distance, or uneventire wear.
. As part of the multi-pointinspection, trained dealertechnicians can visually inspectthe shocks and struts for signsof leaking, blown seals,or damage, and can advisewhen service is needed.
Tires
Tires need to be properly inflated,rotated, and balanced. Maintainingthe tires can save money and fuel,and can reduce the risk of tirefailure.
. Signs that the tires need to bereplaced include three or morevisible treadwear indicators; cordor fabric showing through therubber; cracks or cuts in thetread or sidewall; or a bulge orsplit in the tire.
. Trained dealer technicians caninspect and recommend the righttires. Your dealer can alsoprovide tire/wheel balancingservices to ensure smoothvehicle operation at all speeds.Your dealer sells and servicesname brand tires.
Vehicle Care
To help keep the vehicle looking likenew, vehicle care products areavailable from your dealer. Forinformation on how to clean andprotect the vehicle’s interior andexterior, see Interior Care 0 316 andExterior Care 0 312.
Wheel Alignment
Wheel alignment is critical forensuring that the tires deliveroptimal wear and performance.
. Signs that the alignment mayneed to be adjusted includepulling, improper vehiclehandling, or unusual tire wear.
. Your dealer has the requiredequipment to ensure properwheel alignment.
Windshield
For safety, appearance, and thebest viewing, keep the windshieldclean and clear.
. Signs of damage includescratches, cracks, and chips.
. Trained dealer technicians caninspect the windshield andrecommend proper replacementif needed.
Wiper Blades
Wiper blades need to be cleanedand kept in good condition toprovide a clear view.
. Signs of wear include streaking,skipping across the windshield,and worn or split rubber.
. Trained dealer technicians cancheck the wiper blades andreplace them when needed.
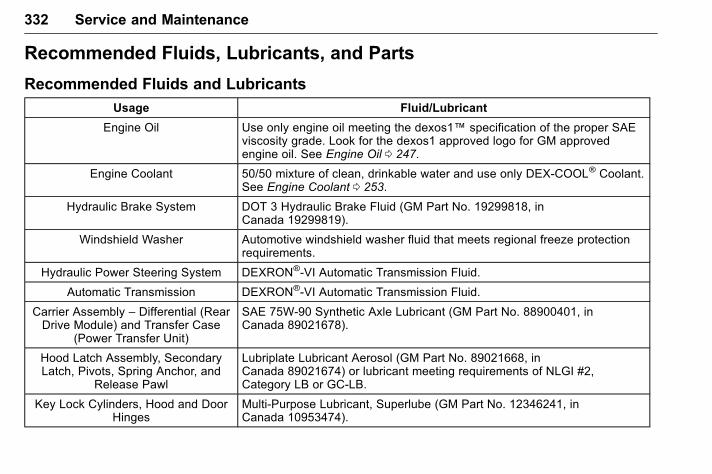
GMC Acadia/Acadia Denali Owner Manual (GMNA-Localizing-U.S./Canada/Mexico-9159268) - 2016 - CRC - 4/16/15
332 Service and Maintenance
Recommended Fluids, Lubricants, and Parts
Recommended Fluids and Lubricants
Usage Fluid/Lubricant
Engine Oil Use only engine oil meeting the dexos1™ specification of the proper SAEviscosity grade. Look for the dexos1 approved logo for GM approvedengine oil. See Engine Oil 0 247.
Engine Coolant 50/50 mixture of clean, drinkable water and use only DEX-COOL® Coolant.See Engine Coolant 0 253.
Hydraulic Brake System DOT 3 Hydraulic Brake Fluid (GM Part No. 19299818, inCanada 19299819).
Windshield Washer Automotive windshield washer fluid that meets regional freeze protectionrequirements.
Hydraulic Power Steering System DEXRON®-VI Automatic Transmission Fluid.
Automatic Transmission DEXRON®-VI Automatic Transmission Fluid.
Carrier Assembly – Differential (RearDrive Module) and Transfer Case
(Power Transfer Unit)
SAE 75W-90 Synthetic Axle Lubricant (GM Part No. 88900401, inCanada 89021678).
Hood Latch Assembly, SecondaryLatch, Pivots, Spring Anchor, and
Release Pawl
Lubriplate Lubricant Aerosol (GM Part No. 89021668, inCanada 89021674) or lubricant meeting requirements of NLGI #2,Category LB or GC-LB.
Key Lock Cylinders, Hood and DoorHinges
Multi-Purpose Lubricant, Superlube (GM Part No. 12346241, inCanada 10953474).
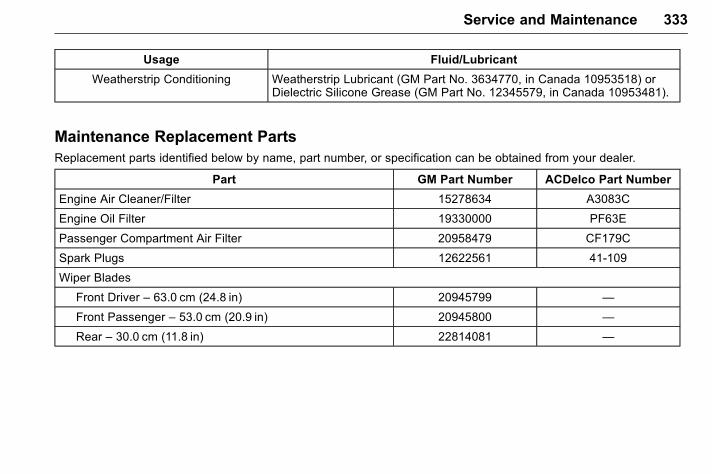
GMC Acadia/Acadia Denali Owner Manual (GMNA-Localizing-U.S./Canada/Mexico-9159268) - 2016 - CRC - 4/16/15
Service and Maintenance 333
Usage Fluid/Lubricant
Weatherstrip Conditioning Weatherstrip Lubricant (GM Part No. 3634770, in Canada 10953518) orDielectric Silicone Grease (GM Part No. 12345579, in Canada 10953481).
Maintenance Replacement PartsReplacement parts identified below by name, part number, or specification can be obtained from your dealer.
Part GM Part Number ACDelco Part Number
Engine Air Cleaner/Filter 15278634 A3083C
Engine Oil Filter 19330000 PF63E
Passenger Compartment Air Filter 20958479 CF179C
Spark Plugs 12622561 41-109
Wiper Blades
Front Driver – 63.0 cm (24.8 in) 20945799 —
Front Passenger – 53.0 cm (20.9 in) 20945800 —
Rear – 30.0 cm (11.8 in) 22814081 —
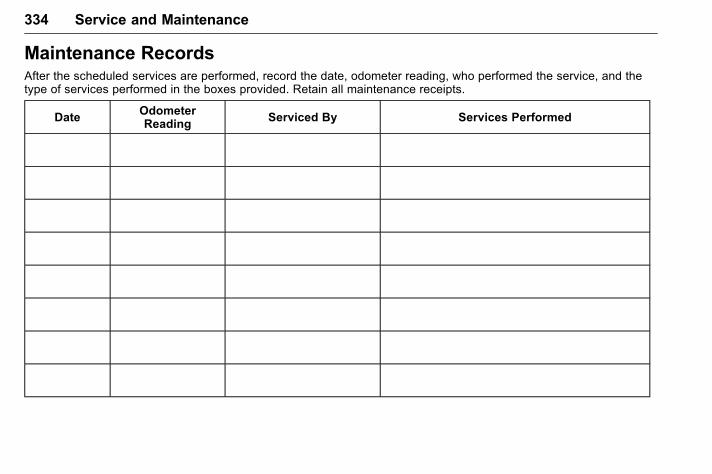
GMC Acadia/Acadia Denali Owner Manual (GMNA-Localizing-U.S./Canada/Mexico-9159268) - 2016 - CRC - 4/16/15
334 Service and Maintenance
Maintenance RecordsAfter the scheduled services are performed, record the date, odometer reading, who performed the service, and thetype of services performed in the boxes provided. Retain all maintenance receipts.
DateOdometerReading
Serviced By Services Performed
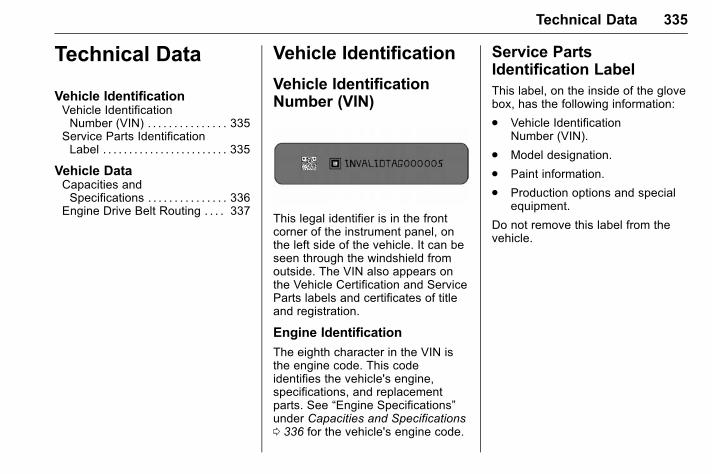
GMC Acadia/Acadia Denali Owner Manual (GMNA-Localizing-U.S./Canada/Mexico-9159268) - 2016 - CRC - 4/16/15
Technical Data 335
Technical Data
Vehicle IdentificationVehicle IdentificationNumber (VIN) . . . . . . . . . . . . . . . 335
Service Parts IdentificationLabel . . . . . . . . . . . . . . . . . . . . . . . . 335
Vehicle DataCapacities andSpecifications . . . . . . . . . . . . . . . 336
Engine Drive Belt Routing . . . . 337
Vehicle Identification
Vehicle IdentificationNumber (VIN)
This legal identifier is in the frontcorner of the instrument panel, onthe left side of the vehicle. It can beseen through the windshield fromoutside. The VIN also appears onthe Vehicle Certification and ServiceParts labels and certificates of titleand registration.
Engine Identification
The eighth character in the VIN isthe engine code. This codeidentifies the vehicle's engine,specifications, and replacementparts. See “Engine Specifications”under Capacities and Specifications0 336 for the vehicle's engine code.
Service PartsIdentification LabelThis label, on the inside of the glovebox, has the following information:
. Vehicle IdentificationNumber (VIN).
. Model designation.
. Paint information.
. Production options and specialequipment.
Do not remove this label from thevehicle.
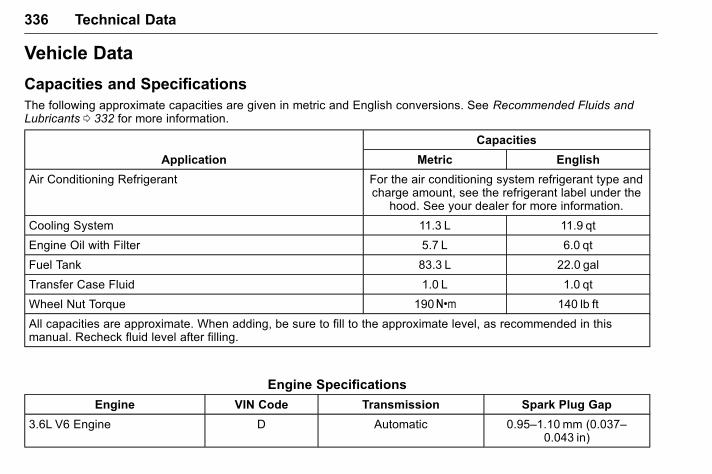
GMC Acadia/Acadia Denali Owner Manual (GMNA-Localizing-U.S./Canada/Mexico-9159268) - 2016 - CRC - 4/16/15
336 Technical Data
Vehicle Data
Capacities and SpecificationsThe following approximate capacities are given in metric and English conversions. See Recommended Fluids andLubricants 0 332 for more information.
Application
Capacities
Metric English
Air Conditioning Refrigerant For the air conditioning system refrigerant type andcharge amount, see the refrigerant label under the
hood. See your dealer for more information.
Cooling System 11.3 L 11.9 qt
Engine Oil with Filter 5.7 L 6.0 qt
Fuel Tank 83.3 L 22.0 gal
Transfer Case Fluid 1.0 L 1.0 qt
Wheel Nut Torque 190Y 140 lb ft
All capacities are approximate. When adding, be sure to fill to the approximate level, as recommended in thismanual. Recheck fluid level after filling.
Engine Specifications
Engine VIN Code Transmission Spark Plug Gap
3.6L V6 Engine D Automatic 0.95–1.10 mm (0.037–0.043 in)
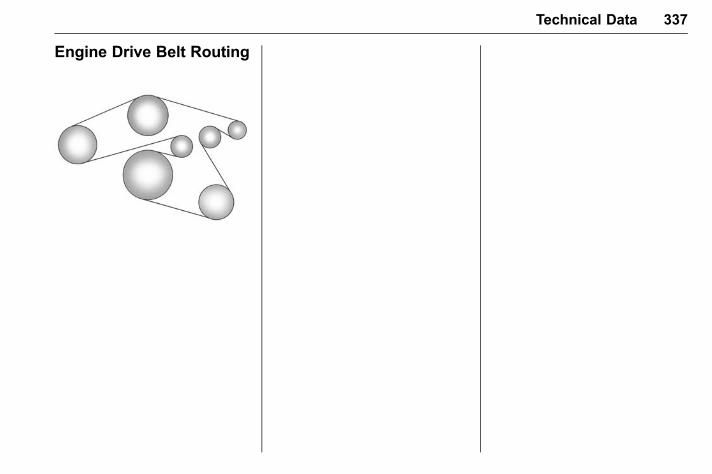
GMC Acadia/Acadia Denali Owner Manual (GMNA-Localizing-U.S./Canada/Mexico-9159268) - 2016 - CRC - 4/16/15
Technical Data 337
Engine Drive Belt Routing
GMC Acadia/Acadia Denali Owner Manual (GMNA-Localizing-U.S./Canada/Mexico-9159268) - 2016 - CRC - 4/16/15
338 Customer Information
CustomerInformation
Customer InformationCustomer SatisfactionProcedure . . . . . . . . . . . . . . . . . . . 338
Customer AssistanceOffices . . . . . . . . . . . . . . . . . . . . . . 340
Customer Assistance for TextTelephone (TTY) Users . . . . . 341
Online Owner Center . . . . . . . . . 341GM Mobility ReimbursementProgram . . . . . . . . . . . . . . . . . . . . 342
Roadside AssistanceProgram . . . . . . . . . . . . . . . . . . . . 342
Scheduling ServiceAppointments . . . . . . . . . . . . . . . 344
Courtesy TransportationProgram . . . . . . . . . . . . . . . . . . . . 344
Collision Damage Repair . . . . . 345Service Publications OrderingInformation . . . . . . . . . . . . . . . . . . 347
Radio FrequencyStatement . . . . . . . . . . . . . . . . . . . 348
Reporting Safety DefectsReporting Safety Defects tothe United StatesGovernment . . . . . . . . . . . . . . . . . 349
Reporting Safety Defects tothe CanadianGovernment . . . . . . . . . . . . . . . . . 349
Reporting Safety Defects toGeneral Motors . . . . . . . . . . . . . 349
Vehicle Data Recording andPrivacyVehicle Data Recording andPrivacy . . . . . . . . . . . . . . . . . . . . . . 350
Event Data Recorders . . . . . . . . 350OnStar® . . . . . . . . . . . . . . . . . . . . . . 351Infotainment System . . . . . . . . . . 351
Customer Information
Customer SatisfactionProcedureYour satisfaction and goodwill areimportant to your dealer and toGMC. Normally, any concerns withthe sales transaction or theoperation of the vehicle will beresolved by your dealer's sales orservice departments. Sometimes,however, despite the best intentionsof all concerned, misunderstandingscan occur. If your concern has notbeen resolved to your satisfaction,the following steps should be taken:
STEP ONE : Discuss your concernwith a member of dealershipmanagement. Normally, concernscan be quickly resolved at that level.If the matter has already beenreviewed with the sales, service,or parts manager, contact the ownerof your dealership or the generalmanager.
GMC Acadia/Acadia Denali Owner Manual (GMNA-Localizing-U.S./Canada/Mexico-9159268) - 2016 - CRC - 4/17/15
Customer Information 339
STEP TWO : If after contacting amember of dealership management,it appears your concern cannot beresolved by your dealership withoutfurther help, in the U.S., call1-800-462-8782. In Canada, callGeneral Motors of CanadaCustomer Care Centre at1-800-263-3777 (English),or 1-800-263-7854 (French).
We encourage you to call thetoll-free number in order to give yourinquiry prompt attention. Have thefollowing information available togive the Customer Assistancerepresentative:
. Vehicle IdentificationNumber (VIN). This is availablefrom the vehicle registration ortitle, or the plate at the top left ofthe instrument panel and visiblethrough the windshield.
. Dealership name and location.
. Vehicle delivery date andpresent mileage.
When contacting GMC, rememberthat your concern will likely beresolved at a dealer's facility. That iswhy we suggest following Step Onefirst.
STEP THREE — U.S. Owners :Both General Motors and yourdealer are committed to makingsure you are completely satisfiedwith your new vehicle. However,if you continue to remain unsatisfiedafter following the procedureoutlined in Steps One and Two, youcan file with the Better BusinessBureau (BBB) Auto Line® Programto enforce your rights.
The BBB Auto Line Program is anout-of-court program administeredby the Council of Better BusinessBureaus to settle automotivedisputes regarding vehicle repairs orthe interpretation of the New VehicleLimited Warranty. Although you maybe required to resort to this informaldispute resolution program prior tofiling a court action, use of theprogram is free of charge and yourcase will generally be heard within40 days. If you do not agree with thedecision given in your case, you
may reject it and proceed with anyother venue for relief availableto you.
You may contact the BBB Auto LineProgram using the toll-freetelephone number or write them atthe following address:
BBB Auto Line ProgramCouncil of Better Business Bureaus,Inc.3033 Wilson BoulevardSuite 600Arlington, VA 22201
Telephone: 1-800-955-5100http://www.bbb.org/council/programs-services/dispute-handling-and-resolution/bbb-auto-line
This program is available in all50 states and the District ofColumbia. Eligibility is limited byvehicle age, mileage, and otherfactors. General Motors reservesthe right to change eligibilitylimitations and/or discontinue itsparticipation in this program.
GMC Acadia/Acadia Denali Owner Manual (GMNA-Localizing-U.S./Canada/Mexico-9159268) - 2016 - CRC - 4/16/15
340 Customer Information
STEP THREE — CanadianOwners : In the event that you donot feel your concerns have beenaddressed after following theprocedure outlined in Steps Oneand Two, General Motors of CanadaLimited wants you to be aware of itsparticipation in a no-chargeMediation/Arbitration Program.General Motors of Canada Limitedhas committed to binding arbitrationof owner disputes involvingfactory-related vehicle serviceclaims. The program provides forthe review of the facts involved byan impartial third party arbiter, andmay include an informal hearingbefore the arbiter. The program isdesigned so that the entire disputesettlement process, from the timeyou file your complaint to the finaldecision, should be completed inabout 70 days. We believe ourimpartial program offers advantagesover courts in most jurisdictionsbecause it is informal, quick, andfree of charge.
For further information concerningeligibility in the Canadian MotorVehicle Arbitration Plan (CAMVAP),call toll-free 1-800-207-0685, or callthe General Motors Customer CareCentre, 1-800-263-3777 (English),1-800-263-7854 (French),or write to:
Mediation/Arbitration Programc/o Customer Care CentreGeneral Motors of Canada LimitedMail Code: CA1-163-0051908 Colonel Sam DriveOshawa, Ontario L1H 8P7
Your inquiry should be accompaniedby the Vehicle IdentificationNumber (VIN).
Customer AssistanceOfficesGMC encourages customers to callthe toll-free number for assistance.However, if a customer wishes towrite or e-mail GMC, the lettershould be addressed to:
United States and Puerto Rico
GMC Customer Assistance CenterP.O. Box 33172Detroit, MI 48232-5172
www.GMC.com
1-800-GMC-8782 (1-800-462-8782)1-888-889-2438 (For TextTelephone devices (TTYs))Roadside Assistance:1-888-881-3302
From U.S. Virgin Islands:
1-800-496-9994
Canada
General Motors of Canada LimitedCustomer Care Centre,Mail Code: CA1-163-0051908 Colonel Sam DriveOshawa, Ontario L1H 8P7www.gmc.ca
1-800-263-3777 (English)1-800-263-7854 (French)1-800-263-3830 (For TextTelephone Devices (TTYs))Roadside Assistance:1-800-268-6800
GMC Acadia/Acadia Denali Owner Manual (GMNA-Localizing-U.S./Canada/Mexico-9159268) - 2016 - CRC - 4/16/15
Customer Information 341
Overseas
Please contact the local GeneralMotors Business Unit.
Customer Assistance forText Telephone (TTY)UsersTo assist customers who are deaf,hard of hearing, or speech-impairedand who use Text Telephones(TTYs), GMC has TTY equipmentavailable at its Customer AssistanceCenter. Any TTY user in the U.S.can communicate with GMC bydialing: 1-888-889-2438. TTY usersin Canada can dial 1-800-263-3830.
Online Owner Center
Online Owner Experience(U.S.) my.gmc.com
The GMC online owner experienceis a one-stop resource that allowsinteraction with GMC and keepsimportant vehicle-specificinformation in one place.
Membership Benefits
E (Vehicle Information) :Download owner manuals and viewvehicle-specific how-to videos.
G (Maintenance Information) :View maintenance schedules,alerts, and OnStar onboard vehiclediagnostic information. Scheduleservice appointments.
I (Service History) : View andprint dealer-recorded servicerecords and self-recorded servicerecords.
D (Preferred DealerInformation) : Select a preferreddealer and view dealer location,maps, phone numbers, and hours.
r (Warranty TrackingInformation) : Track your vehicle’swarranty information.
J (Recall Information) : Viewactive recalls by VehicleIdentification Number (VIN). SeeVehicle Identification Number (VIN)0 335.
H (Other Account Information) :View GM Card, SiriusXM Satelliteradio (if equipped), and OnStaraccount information.
F (Live Chat Support) : Chat livewith online help representatives.
Visit my.gmc.com to register yourvehicle.
GMC Owner Centre (Canada)gmcowner.ca
Take a trip to the GMC OwnerCentre:
. Chat live with online helprepresentatives.
. Use the Vehicle Tools section.
. Access third party enthusiastsites and social media networks.
. Locate owner resources such aslease-end, financing, andwarranty information.
. Retrieve your favorite articles,quizzes, tips, and multimediagalleries organized into theFeatures and Auto CareSections.
GMC Acadia/Acadia Denali Owner Manual (GMNA-Localizing-U.S./Canada/Mexico-9159268) - 2016 - CRC - 4/16/15
342 Customer Information
. Download the owner manual foryour vehicle, quickly and easily.
. Find the GMC-recommendedmaintenance services for yourvehicle.
GM MobilityReimbursement Program
This program is available toqualified applicants for costreimbursement of eligibleaftermarket adaptive equipmentrequired for the vehicle, such ashand controls or a wheelchair/scooter lift for the vehicle.
For more information on the limitedoffer, visit www.gmmobility.com orcall the GM Mobility AssistanceCenter at 1-800-323-9935. TextTelephone (TTY) users, call1-800-833-9935.
General Motors of Canada also hasa Mobility Program. Visit www.gm.caor call 1-800-GM-DRIVE (463-7483)for details. TTY users call1-800-263-3830.
Roadside AssistanceProgramFor U.S.-purchased vehicles, call1-888-881-3302; (Text Telephone(TTY): 1-888-889-2438).
For Canadian-purchased vehicles,call 1-800-268-6800.
Service is available 24 hours a day,365 days a year.
Calling for Assistance
When calling Roadside Assistance,have the following informationready:
. Your name, home address, andhome telephone number.
. Telephone number of yourlocation.
. Location of the vehicle
. Model, year, color, and licenseplate number of the vehicle.
. Odometer reading, VehicleIdentification Number (VIN), anddelivery date of the vehicle.
. Description of the problem.
Coverage
Services are provided for theduration of the vehicle's limitedpowertrain warranty.
In the U.S., anyone driving thevehicle is covered. In Canada, aperson driving the vehicle withoutpermission from the owner is notcovered.
Roadside Assistance is not a part ofthe New Vehicle Limited Warranty.General Motors North America andGMC reserve the right to make anychanges or discontinue theRoadside Assistance program atany time without notification.
General Motors North America andGMC reserve the right to limitservices or payment to an owner ordriver if they decide the claims aremade too often, or the same type ofclaim is made many times.

GMC Acadia/Acadia Denali Owner Manual (GMNA-Localizing-U.S./Canada/Mexico-9159268) - 2016 - CRC - 4/16/15
Customer Information 343
Services Provided. Emergency Fuel Delivery:
Delivery of enough fuel for thevehicle to get to the nearestservice station.
. Lock-Out Service: Service tounlock the vehicle if you arelocked out. A remote unlock maybe available if you haveOnStar®. For security reasons,the driver must presentidentification before this serviceis given.
. Emergency Tow from a PublicRoad or Highway: Tow to thenearest GMC dealer for warrantyservice, or if the vehicle was in acrash and cannot be driven.Assistance is not given when thevehicle is stuck in the sand,mud, or snow.
. Flat Tire Change: Service tochange a flat tire with the sparetire. The spare tire, if equipped,must be in good condition andproperly inflated. It is the owner'sresponsibility for the repair orreplacement of the tire if it is notcovered by the warranty.
. Battery Jump Start: Service tojump start a dead battery.
. Trip Interruption Benefits andAssistance: If your trip isinterrupted due to a warrantyevent, incidental expenses maybe reimbursed within thePowertrain warranty period.Items considered are reasonableand customary hotel, meals,rental car, or a vehicle beingdelivered back to the customer,up to 805 km (500mi).
Services Not Included inRoadside Assistance. Impound towing caused by
violation of any laws.
. Legal fines.
. Mounting, dismounting,or changing of snow tires,chains, or other traction devices.
Service is not provided if a vehicleis in an area that is not accessibleto the service vehicle or is not aregularly traveled or maintainedpublic road, which includes ice andwinter roads. Off-road use is notcovered.
Services Specific toCanadian-Purchased Vehicles. Fuel Delivery: Reimbursement
is up to 7 liters. Diesel fueldelivery may be restricted.Propane and other fuels are notprovided through this service.
. Lock-Out Service: Vehicleregistration is required.
. Trip Interruption Benefits andAssistance: Must be over150 kilometers from where yourtrip was started to qualify.General Motors of CanadaLimited requirespre-authorization, originaldetailed receipts, and a copy ofthe repair orders. Onceauthorization has been received,the Roadside Assistance advisorwill help to make arrangementsand explain how to receivepayment.
. Alternative Service: Ifassistance cannot be providedright away, the RoadsideAssistance advisor may givepermission to get localemergency road service. You will
GMC Acadia/Acadia Denali Owner Manual (GMNA-Localizing-U.S./Canada/Mexico-9159268) - 2016 - CRC - 4/16/15
344 Customer Information
receive payment, up to $100,after sending the original receiptto Roadside Assistance.Mechanical failures may becovered, however any cost forparts and labor for repairs notcovered by the warranty are theowner responsibility.
Scheduling ServiceAppointmentsWhen the vehicle requires warrantyservice, contact your dealer andrequest an appointment. Byscheduling a service appointmentand advising the service consultantof your transportation needs, yourdealer can help minimize yourinconvenience.
If the vehicle cannot be scheduledinto the service departmentimmediately, keep driving it until itcan be scheduled for service,unless, of course, the problem issafety related. If it is, please callyour dealership, let them know this,and ask for instructions.
If your dealer requests you to bringthe vehicle for service, you areurged to do so as early in the workday as possible to allow forsame-day repair.
Courtesy TransportationProgramTo enhance your ownershipexperience, we and our participatingdealers are proud to offer CourtesyTransportation, a customer supportprogram for vehicles with theBumper-to-Bumper (Base WarrantyCoverage period in Canada),extended powertrain, and/orhybrid-specific warranties in boththe U.S. and Canada.
Several Courtesy Transportationoptions are available to assist inreducing inconvenience whenwarranty repairs are required.
Courtesy Transportation is not apart of the New Vehicle LimitedWarranty. A separate bookletentitled “Limited Warranty andOwner Assistance Information”
furnished with each new vehicleprovides detailed warranty coverageinformation.
Transportation Options
Warranty service can generally becompleted while you wait. However,if you are unable to do so, yourdealer may offer the followingtransportation options:
Shuttle Service
This includes one-way or round-tripshuttle service within reasonabletime and distance parameters ofyour dealer's area.
Public Transportation or FuelReimbursement
If overnight warranty repairs areneeded, and public transportation isused, the expense must besupported by original receipts andwithin the maximum amount allowedby GM for shuttle service. If U.S.customers arrange their owntransportation, limitedreimbursement for reasonable fuelexpenses may be available. Claimamounts should reflect actual costs
GMC Acadia/Acadia Denali Owner Manual (GMNA-Localizing-U.S./Canada/Mexico-9159268) - 2016 - CRC - 4/16/15
Customer Information 345
and be supported by originalreceipts. See your dealer forinformation.
Courtesy Rental Vehicle
For an overnight warranty repair, thedealer may provide an availablecourtesy rental vehicle or provide forreimbursement of a rental vehicle.Reimbursement is limited and mustbe supported by original receipts aswell as a signed and completedrental agreement and meet state/provincial, local, and rental vehicleprovider requirements.Requirements vary and may includeminimum age requirements,insurance coverage, credit card, etc.Additional fees such as fuel usagecharges, taxes, levies, usage fees,excessive mileage, or rental usagebeyond the completion of the repairare also your responsibility.
It may not be possible to provide alike vehicle as a courtesy rental.
Additional ProgramInformation
All program options, such as shuttleservice, may not be available atevery dealer. Contact your dealerfor specific availability.
General Motors reserves the right tounilaterally modify, change,or discontinue CourtesyTransportation at any time and toresolve all questions of claimeligibility pursuant to the terms andconditions described herein at itssole discretion.
Collision Damage RepairIf the vehicle is involved in acollision and it is damaged, have thedamage repaired by a qualifiedtechnician using the properequipment and quality replacementparts. Poorly performed collisionrepairs diminish the vehicle resalevalue, and safety performance canbe compromised in subsequentcollisions.
Collision Parts
Genuine GM Collision parts are newparts made with the same materialsand construction methods as theparts with which the vehicle wasoriginally built. Genuine GMCollision parts are the best choice toensure that the vehicle's designedappearance, durability, and safetyare preserved. The use of GenuineGM parts can help maintain the GMNew Vehicle Limited Warranty.
Recycled original equipment partsmay also be used for repair. Theseparts are typically removed fromvehicles that were total losses inprior crashes. In most cases, theparts being recycled are fromundamaged sections of the vehicle.A recycled original equipment GMpart may be an acceptable choice tomaintain the vehicle's originallydesigned appearance and safetyperformance; however, the history ofthese parts is not known. Such partsare not covered by the GM NewVehicle Limited Warranty, and anyrelated failures are not covered bythat warranty.
GMC Acadia/Acadia Denali Owner Manual (GMNA-Localizing-U.S./Canada/Mexico-9159268) - 2016 - CRC - 4/16/15
346 Customer Information
Aftermarket collision parts are alsoavailable. These are made bycompanies other than GM and maynot have been tested for the vehicle.As a result, these parts may fitpoorly, exhibit premature durability/corrosion problems, and may notperform properly in subsequentcollisions. Aftermarket parts are notcovered by the GM New VehicleLimited Warranty, and any vehiclefailure related to such parts is notcovered by that warranty.
Repair Facility
GM also recommends that youchoose a collision repair facility thatmeets your needs before you everneed collision repairs. Your dealermay have a collision repair centerwith GM-trained technicians andstate-of-the-art equipment, or beable to recommend a collision repaircenter that has GM-trainedtechnicians and comparableequipment.
Insuring the Vehicle
Protect your investment in the GMvehicle with comprehensive andcollision insurance coverage. Thereare significant differences in thequality of coverage afforded byvarious insurance policy terms.Many insurance policies providereduced protection to the GMvehicle by limiting compensation fordamage repairs through the use ofaftermarket collision parts. Someinsurance companies will notspecify aftermarket collision parts.When purchasing insurance, werecommend that you ensure that thevehicle will be repaired with GMoriginal equipment collision parts.If such insurance coverage is notavailable from your currentinsurance carrier, consider switchingto another insurance carrier.
If the vehicle is leased, the leasingcompany may require you to haveinsurance that ensures repairs withGenuine GM Original EquipmentManufacturer (OEM) parts orGenuine Manufacturer replacement
parts. Read the lease carefully, asyou may be charged at the end ofthe lease for poor quality repairs.
If a Crash Occurs
If there has been an injury, callemergency services for help. Do notleave the scene of a crash until allmatters have been taken care of.Move the vehicle only if its positionputs you in danger, or you areinstructed to move it by a policeofficer.
Give only the necessary informationto police and other parties involvedin the crash.
For emergency towing seeRoadside Assistance Program0 342.
Gather the following information:
. Driver name, address, andtelephone number.
. Driver license number.
. Owner name, address, andtelephone number.
. Vehicle license plate number.

GMC Acadia/Acadia Denali Owner Manual (GMNA-Localizing-U.S./Canada/Mexico-9159268) - 2016 - CRC - 4/16/15
Customer Information 347
. Vehicle make, model, andmodel year.
. Vehicle IdentificationNumber (VIN).
. Insurance company and policynumber.
. General description of thedamage to the other vehicle.
Choose a reputable repair facilitythat uses quality replacement parts.See “Collision Parts” earlier in thissection.
If the airbag has inflated, see WhatWill You See after an AirbagInflates? 0 71.
Managing the Vehicle DamageRepair Process
In the event that the vehicle requiresdamage repairs, GM recommendsthat you take an active role in itsrepair. If you have a pre-determinedrepair facility of choice, take thevehicle there, or have it towed there.Specify to the facility that anyrequired replacement collision partsbe original equipment parts, eithernew Genuine GM parts or recycled
original GM parts. Remember,recycled parts will not be covered bythe GM vehicle warranty.
Insurance pays the bill for the repair,but you must live with the repair.Depending on your policy limits,your insurance company mayinitially value the repair usingaftermarket parts. Discuss this withthe repair professional, and insist onGenuine GM parts. Remember,if the vehicle is leased, you may beobligated to have the vehiclerepaired with Genuine GM parts,even if your insurance coveragedoes not pay the full cost.
If another party's insurancecompany is paying for the repairs,you are not obligated to accept arepair valuation based on thatinsurance company's collision policyrepair limits, as you have nocontractual limits with that company.In such cases, you can have controlof the repair and parts choices aslong as the cost stays withinreasonable limits.
Service PublicationsOrdering Information(US and Canada Only)
Service Manuals
Service Manuals have the diagnosisand repair information on theengines, transmission, axle,suspension, brakes, electrical,steering, body, etc.
Service Bulletins
Service Bulletins give additionaltechnical service informationneeded to knowledgeably serviceGeneral Motors cars and trucks.Each bulletin contains instructionsto assist in the diagnosis andservice of the vehicle.
Owner Information
Owner publications are writtenspecifically for owners and intendedto provide basic operationalinformation about the vehicle. TheOwner Manual includes theMaintenance Schedule for allmodels.
GMC Acadia/Acadia Denali Owner Manual (GMNA-Localizing-U.S./Canada/Mexico-9159268) - 2016 - CRC - 4/16/15
348 Customer Information
In-Portfolio: Includes a Portfolio,Owner Manual, and WarrantyManual.
RETAIL SELL PRICE: $35.00 –$40.00 (U.S.) plus handling andshipping fees.
Without Pouch: Owner Manual only.
RETAIL SELL PRICE:$25.00 (U.S.) plus handling andshipping fees.
Current and Past Models
Technical Service Bulletins andManuals are available for currentand past model GM vehicles.
ORDER TOLL FREE:1-800-551-4123 Monday – Friday8:00 AM – 6:00 PM Eastern Time
For Credit Card Orders Only(VISA-MasterCard-Discover), seeHelm, Inc. at: www.helminc.com.
Or write to:
Helm, IncorporatedAttention: Customer Service47911 Halyard DrivePlymouth, MI 48170
Prices are subject to change withoutnotice and without incurringobligation. Allow ample time fordelivery.
All listed prices are quoted in U.S.funds. Make checks payable in U.S.funds.
Radio FrequencyStatementThis vehicle has systems thatoperate on a radio frequency thatcomplies with Part 15/Part 18 of theFederal CommunicationsCommission (FCC) rules and withIndustry Canada StandardsRSS-GEN/210/216/220/251/310,ICES‐001.
Operation is subject to the followingtwo conditions:
1. The device may not causeharmful interference.
2. The device must accept anyinterference received, includinginterference that may causeundesired operation of thedevice.
Changes or modifications to any ofthese systems by other than anauthorized service facility could voidauthorization to use this equipment.
GMC Acadia/Acadia Denali Owner Manual (GMNA-Localizing-U.S./Canada/Mexico-9159268) - 2016 - CRC - 4/16/15
Customer Information 349
Reporting SafetyDefects
Reporting Safety Defectsto the United StatesGovernmentIf you believe that your vehiclehas a defect which could causea crash or could cause injury ordeath, you should immediatelyinform the National HighwayTraffic Safety Administration(NHTSA) in addition to notifyingGeneral Motors.
If NHTSA receives similarcomplaints, it may open aninvestigation, and if it finds thata safety defect exists in a groupof vehicles, it may order a recalland remedy campaign.However, NHTSA cannotbecome involved in individualproblems between you, yourdealer, or General Motors.
To contact NHTSA, you may callthe Vehicle Safety Hotlinetoll-free at 1-888-327-4236(TTY: 1-800-424-9153); go tohttp://www.safercar.gov; orwrite to:
Administrator, NHTSA1200 New Jersey Avenue, S.E.Washington, D.C. 20590
You can also obtain otherinformation about motorvehicle safety fromhttp://www.safercar.gov.
Reporting Safety Defectsto the CanadianGovernmentIf you live in Canada, and youbelieve that the vehicle has a safetydefect, notify Transport Canadaimmediately, and notify GeneralMotors of Canada Limited. CallTransport Canada at1-800-333-0510 or write to:
Transport CanadaRoad Safety Branch80 rue NoelGatineau, QC J8Z 0A1
Reporting Safety Defectsto General MotorsIn addition to notifying NHTSA (orTransport Canada) in a situation likethis, notify General Motors.
Call 1-800-GMC-8782(1-800-462-8782), or write:
GMC Customer Assistance CenterP.O. Box 33172Detroit, MI 48232-5172
In Canada, call 1-800-263-3777(English) or 1-800-263-7854(French), or write:
General Motors of Canada LimitedCustomer Care Centre,Mail Code: CA1-163-0051908 Colonel Sam DriveOshawa, Ontario L1H 8P7
GMC Acadia/Acadia Denali Owner Manual (GMNA-Localizing-U.S./Canada/Mexico-9159268) - 2016 - CRC - 4/16/15
350 Customer Information
Vehicle DataRecording andPrivacyThe vehicle has a number ofcomputers that record informationabout the vehicle’s performance andhow it is driven. For example, thevehicle uses computer modules tomonitor and control engine andtransmission performance, tomonitor the conditions for airbagdeployment and deploy them in acrash, and, if equipped, to provideantilock braking to help the drivercontrol the vehicle. These modulesmay store data to help the dealertechnician service the vehicle.Some modules may also store dataabout how the vehicle is operated,such as rate of fuel consumption oraverage speed. These modules mayretain personal preferences, such asradio presets, seat positions, andtemperature settings.
Event Data RecordersThis vehicle is equipped with anevent data recorder (EDR). Themain purpose of an EDR is torecord, in certain crash or nearcrash-like situations, such as an airbag deployment or hitting a roadobstacle, data that will assist inunderstanding how a vehicle’ssystems performed. The EDR isdesigned to record data related tovehicle dynamics and safetysystems for a short period of time,typically 30 seconds or less. TheEDR in this vehicle is designed torecord such data as:
. How various systems in yourvehicle were operating;
. Whether or not the driver andpassenger safety belts werebuckled/fastened;
. How far (if at all) the driver wasdepressing the accelerator and/or brake pedal; and,
. How fast the vehicle wastraveling.
These data can help provide abetter understanding of thecircumstances in which crashes andinjuries occur.
NoteEDR data are recorded by yourvehicle only if a non-trivial crashsituation occurs; no data arerecorded by the EDR under normaldriving conditions and no personaldata (e.g., name, gender, age, andcrash location) are recorded.However, other parties, such as lawenforcement, could combine theEDR data with the type ofpersonally identifying data routinelyacquired during a crashinvestigation.
To read data recorded by an EDR,special equipment is required, andaccess to the vehicle or the EDR isneeded. In addition to the vehiclemanufacturer, other parties, such aslaw enforcement, that have thespecial equipment, can read theinformation if they have access tothe vehicle or the EDR.
GMC Acadia/Acadia Denali Owner Manual (GMNA-Localizing-U.S./Canada/Mexico-9159268) - 2016 - CRC - 4/16/15
Customer Information 351
GM will not access these data orshare it with others except: with theconsent of the vehicle owner or,if the vehicle is leased, with theconsent of the lessee; in responseto an official request by police orsimilar government office; as part ofGM's defense of litigation throughthe discovery process; or, asrequired by law. Data that GMcollects or receives may also beused for GM research needs or maybe made available to others forresearch purposes, where a need isshown and the data is not tied to aspecific vehicle or vehicle owner.
OnStar®
If the vehicle is equipped withOnStar® and has an activesubscription, additional data may becollected through the OnStarsystem. This includes informationabout the vehicle’s operation;collisions involving the vehicle; theuse of the vehicle and its features;and, in certain situations, thelocation and approximate GPSspeed of the vehicle. Refer to the
OnStar Terms and Conditions andPrivacy Statement on the OnStarwebsite.
See OnStar Additional Information0 356.
Infotainment SystemIf the vehicle is equipped with anavigation system as part of theinfotainment system, use of thesystem may result in the storage ofdestinations, addresses, telephonenumbers, and other trip information.See the infotainment manual forinformation on stored data and fordeletion instructions.
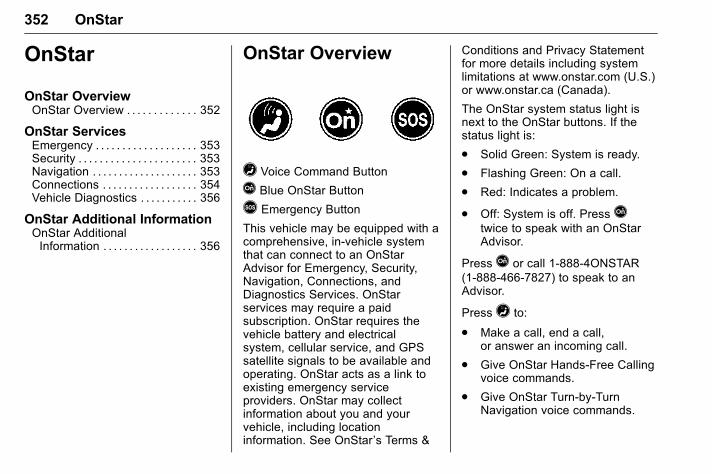
GMC Acadia/Acadia Denali Owner Manual (GMNA-Localizing-U.S./Canada/Mexico-9159268) - 2016 - CRC - 4/16/15
352 OnStar
OnStar
OnStar OverviewOnStar Overview . . . . . . . . . . . . . 352
OnStar ServicesEmergency . . . . . . . . . . . . . . . . . . . 353Security . . . . . . . . . . . . . . . . . . . . . . 353Navigation . . . . . . . . . . . . . . . . . . . . 353Connections . . . . . . . . . . . . . . . . . . 354Vehicle Diagnostics . . . . . . . . . . . 356
OnStar Additional InformationOnStar AdditionalInformation . . . . . . . . . . . . . . . . . . 356
OnStar Overview
= Voice Command Button
Q Blue OnStar Button
> Emergency Button
This vehicle may be equipped with acomprehensive, in-vehicle systemthat can connect to an OnStarAdvisor for Emergency, Security,Navigation, Connections, andDiagnostics Services. OnStarservices may require a paidsubscription. OnStar requires thevehicle battery and electricalsystem, cellular service, and GPSsatellite signals to be available andoperating. OnStar acts as a link toexisting emergency serviceproviders. OnStar may collectinformation about you and yourvehicle, including locationinformation. See OnStar’s Terms &
Conditions and Privacy Statementfor more details including systemlimitations at www.onstar.com (U.S.)or www.onstar.ca (Canada).
The OnStar system status light isnext to the OnStar buttons. If thestatus light is:
. Solid Green: System is ready.
. Flashing Green: On a call.
. Red: Indicates a problem.
. Off: System is off. Press Qtwice to speak with an OnStarAdvisor.
PressQ or call 1-888-4ONSTAR(1-888-466-7827) to speak to anAdvisor.
Press= to:
. Make a call, end a call,or answer an incoming call.
. Give OnStar Hands-Free Callingvoice commands.
. Give OnStar Turn-by-TurnNavigation voice commands.
GMC Acadia/Acadia Denali Owner Manual (GMNA-Localizing-U.S./Canada/Mexico-9159268) - 2016 - CRC - 4/16/15
OnStar 353
. Obtain the Wi-Fi® hotspot nameor SSID and password,if equipped.
PressQ to connect to anAdvisor to:
. Verify account information orupdate contact information.
. Get driving directions.
. Receive an On-DemandDiagnostics check of thevehicle’s key operating systems.
. Receive Roadside Assistance.
. Manage Wi-Fi Settings,if equipped.
Press> to get a priority connectionto an OnStar Advisor available24/7 to:
. Get help for an emergency.
. Be a Good Samaritan orrespond to an AMBER Alert.
. Get assistance in severeweather or other crisis situationsand find evacuation routes.
OnStar Services
EmergencyOnStar Emergency Services requirea specific OnStar subscription plan.With Automatic Crash Response, inmany crashes, built-in sensors canautomatically alert a speciallytrained OnStar Advisor who isimmediately connected to thevehicle to help.
Press> for a priority connection toan OnStar Advisor who can contactemergency service providers, directthem to your exact location, andrelay important information.
With OnStar Crisis Assist, speciallytrained Advisors are available24 hours a day, 7 days a week, toprovide a central point of contact,assistance, and information during acrisis.
With Roadside Assistance, Advisorscan locate a nearby service providerto help with a flat tire, a batteryjump, or an empty gas tank.
SecurityIf equipped, OnStar provides theseservices:
. With Stolen Vehicle Assistance,OnStar Advisors can use GPS topinpoint the vehicle and helpauthorities quickly recover it.
. With Remote Ignition Block,if equipped, OnStar can blockthe engine from being started.
. With Stolen Vehicle Slowdown,if equipped, OnStar can workwith law enforcement togradually slow the vehicle down.
NavigationOnStar navigation requires aspecific OnStar subscription plan.
PressQ to receive Turn-by-Turndirections or have them sent to thevehicle’s navigation screen,if equipped.
Turn-by-Turn Navigation
1. PressQ to connect to anAdvisor.
GMC Acadia/Acadia Denali Owner Manual (GMNA-Localizing-U.S./Canada/Mexico-9159268) - 2016 - CRC - 4/16/15
354 OnStar
2. Request directions to bedownloaded to the vehicle.
3. Follow the voice-guidedcommands.
Using Voice CommandsDuring a Planned Route
Cancel Route
1. Press=. System responds:“OnStar ready,” then a tone.
2. Say “Cancel route.” Systemresponds: “Do you want tocancel directions?”
3. Say “Yes.” System responds:“OK, request completed, thankyou, goodbye.”
Route Preview
1. Press=. System responds:“OnStar ready,” then a tone.
2. Say “Route preview.” Systemresponds with the next threemaneuvers.
Repeat
1. Press=. System responds:“OnStar ready,” then a tone.
2. Say “Repeat.” Systemresponds with the last directiongiven, then responds with“OnStar ready,” then a tone.
Get My Destination
1. Press=. System responds:“OnStar ready,” then a tone.
2. Say “Get my destination.”System responds with theaddress and distance to thedestination, then responds with“OnStar ready,” then a tone.
Destination Download
Subscribers can have directionssent to the vehicle’s navigationscreen, if equipped.
PressQ, then ask the Advisor todownload directions to the vehicle’snavigation system, if equipped. Afterthe call ends, press the Go buttonon the navigation screen to begindriving directions. Routes that aresent to the navigation screen canonly be canceled through thenavigation system.
See www.onstar.com (U.S.) orwww.onstar.ca (Canada).
ConnectionsThe following OnStar services helpwith staying connected.
For coverage maps, seewww.onstar.com (U.S.) orwww.onstar.ca (Canada).
OnStar Wi-Fi Hotspot (If Equipped)
The vehicle may have a built-inWi-Fi hotspot that provides accessto the Internet and web content at4G LTE speed. Up to seven mobiledevices can be connected. A dataplan is required. Use the in-vehiclecontrols only when it is safe todo so.
1. To retrieve Wi-Fi hotspotinformation, press=, wait forthe prompt, then say “Wi-Fisettings.” On some vehicles,touch Wi-Fi Settings on thescreen.
2. The Wi-Fi settings will displaythe Wi-Fi hotspot name (SSID),password, and on somevehicles, the connection type
GMC Acadia/Acadia Denali Owner Manual (GMNA-Localizing-U.S./Canada/Mexico-9159268) - 2016 - CRC - 4/16/15
OnStar 355
(no Internet connection, 3G,4G, 4G LTE), and signal quality(poor, good, excellent).
3. To change the SSID orpassword, pressQ or call1-888-4ONSTAR to connectwith an Advisor.
OnStar RemoteLink® Mobile App(If Equipped)
Download the OnStar RemoteLinkmobile app to select Apple®,Android™, BlackBerry®,or Windows® mobile devices.OnStar Subscribers can access thefollowing services from a mobiledevice:
. Remotely start/stop the vehicle,if factory-equipped.
. Lock/unlock doors, if equippedwith automatic locks.
. Activate the horn and lamps.
. Check the vehicle’s fuel level, oillife, or tire pressure,if factory-equipped with the TirePressure Monitor System.
. Send directions to the vehicle.
. Locate the vehicle on a map(U.S. market only).
. Turn the vehicle's Wi-Fi hotspoton/off, manage settings, andmonitor data consumption,if equipped.
For OnStar RemoteLink informationand compatibility, seewww.onstar.com (U.S.) orwww.onstar.ca (Canada).
Remote Services
Contact an OnStar Advisor tounlock the doors or sound the hornand flash the lamps.
At Your Service®
OnStar Advisors can providesavings offers from restaurants andretailers on your route, help locatehotels, or book a room.
OnStar Hands-Free Calling
Make and receive calls with thebuilt-in wireless calling service.
Make a Call
1. Press=. System responds:“OnStar ready.”
2. Say “Call.” System responds:“Call. Please say the name ornumber to call.”
3. Say the entire number withoutpausing, including a “1” and thearea code. System responds:“OK, calling.”
Calling 911 Emergency
1. Press=. System responds:“OnStar ready.”
2. Say “Call.” System responds:“Call. Please say the name ornumber to call.”
3. Say “911” without pausing.System responds: “911.”
4. Say “Call.” System responds:“OK, dialing 911.”
Retrieve My Number
1. Press=. System responds:“OnStar ready.”
2. Say “My number.” Systemresponds: “Your OnStarHands-Free Calling number is,”then says the number.
GMC Acadia/Acadia Denali Owner Manual (GMNA-Localizing-U.S./Canada/Mexico-9159268) - 2016 - CRC - 4/16/15
356 OnStar
End a Call
Press=. System responds: “Callended.”
Verify Minutes and Expiration
Press= and say “Minutes” then“Verify” to check how many minutesremain and their expiration date.
Vehicle DiagnosticsOnStar can perform a monthlycheck of your vehicle’s keyoperating systems, including theengine, transmission, antilockbrakes, and other major vehiclesystems. OnStar can also monitortire pressure, if the vehicle isequipped with the Tire PressureMonitor System. If an On-DemandDiagnostics check is needed,pressQ to speak to an Advisor.
OnStar AdditionalInformationIn-Vehicle Audio Messages
Audio messages state importantinformation at the following times:
. Prior to vehicle purchase.PressQ to set up an account.
. With the OnStar Basic Plan,every 60 days.
. After change in ownership andat 90 days.
Transferring Service
PressQ to request account transfereligibility information. The Advisorcan cancel or change accountinformation.
Selling/Transferring theVehicle
Call 1-888-4ONSTAR(1-888-466-7827) immediately toterminate your OnStar services ifthe vehicle is disposed of, sold,transferred, or if the lease ends.
Reactivation for SubsequentOwners
PressQ and follow the prompts tospeak to an Advisor as soon aspossible. The Advisor will updatevehicle records and explain OnStarservice options.
How OnStar Service Works
Automatic Crash Response,Emergency Services, Crisis Assist,Stolen Vehicle Assistance, VehicleDiagnostics, Remote Services,Roadside Assistance, Turn-by-TurnNavigation, and Hands-Free Callingare available on most vehicles. Notall OnStar services are availableeverywhere or on all vehicles. Formore information, a full descriptionof OnStar services, systemlimitations, and OnStar terms andconditions:
. Call 1-888-4ONSTAR(1-888-466-7827).
. See www.onstar.com (U.S.).
. See www.onstar.ca (Canada).
. Call TTY 1-877-248-2080.
GMC Acadia/Acadia Denali Owner Manual (GMNA-Localizing-U.S./Canada/Mexico-9159268) - 2016 - CRC - 4/16/15
OnStar 357
. PressQ to speak with anAdvisor.
OnStar services cannot work unlessthe vehicle is in a place whereOnStar has an agreement with awireless service provider for servicein that area. The wireless serviceprovider must also have coverage,network capacity, reception, andtechnology compatible with OnStarservices. Service involving locationinformation about the vehicle cannotwork unless GPS signals areavailable, unobstructed, andcompatible with the OnStarhardware. OnStar services may notwork if the OnStar equipment is notproperly installed or it has not beenproperly maintained. If equipment orsoftware is added, connected,or modified, OnStar services maynot work. Other problems beyondthe control of OnStar — such ashills, tall buildings, tunnels, weather,electrical system design andarchitecture of the vehicle, damageto the vehicle in a crash, or wirelessphone network congestion orjamming — may prevent service.
See Radio Frequency Statement0 348.
Services for People withDisabilities
Advisors provide services to helpSubscribers with physical disabilitiesand medical conditions.
PressQ to help:
. Locate a gas station with anattendant to pump gas.
. Find a hotel, restaurant, etc.,that meets accessibility needs.
. Provide directions to the closesthospital or pharmacy in urgentsituations.
TTY Users
OnStar has the ability tocommunicate to deaf,hard-of-hearing, or speech-impairedcustomers while in the vehicle. Theavailable dealer-installed TTYsystem can provide in-vehicleaccess to all OnStar services,except Virtual Advisor and OnStarTurn-by-Turn Navigation.
OnStar Personal IdentificationNumber (PIN)
A PIN is needed to access someOnStar services. The PIN will needto be changed the first time whenspeaking with an Advisor. Tochange the OnStar PIN, contact anOnStar Advisor by pressingQ orcalling 1-888-4ONSTAR.
Warranty
OnStar equipment may bewarranted as part of the vehiclewarranty.
Languages
The vehicle can be programmed torespond in multiple languages.PressQ and ask for an Advisor.Advisors are available in English,Spanish, and French. Availablelanguages may vary by country.
Potential Issues
OnStar cannot perform RemoteDoor Unlock or Stolen VehicleAssistance after the vehicle hasbeen off continuously for five dayswithout an ignition cycle. If the
GMC Acadia/Acadia Denali Owner Manual (GMNA-Localizing-U.S./Canada/Mexico-9159268) - 2016 - CRC - 4/16/15
358 OnStar
vehicle has not been started forfive days, OnStar can contactRoadside Assistance or a locksmithto help gain access to the vehicle.
Global PositioningSystem (GPS). Obstruction of the GPS can
occur in a large city with tallbuildings; in parking garages;around airports; in tunnels andunderpasses; or in an area withvery dense trees. If GPS signalsare not available, the OnStarsystem should still operate tocall OnStar. However, OnStarcould have difficulty identifyingthe exact location.
. In emergency situations, OnStarcan use the last stored GPSlocation to send to emergencyresponders.
A temporary loss of GPS can causeloss of the ability to send aTurn-by-Turn Navigation route. TheAdvisor may give a verbal route ormay ask for a call back after thevehicle is driven into an open area.
Cellular and GPS Antennas
Cellular reception is required forOnStar to send remote signals tothe vehicle. Do not place items overor near the antenna to preventblocking cellular and GPS signalreception.
Unable to Connect to OnStarMessage
If there is limited cellular coverageor the cellular network has reachedmaximum capacity, this messagemay come on. PressQ to try thecall again or try again after driving afew miles into another cellular area.
Vehicle and Power Issues
OnStar services require a vehicleelectrical system, wireless service,and GPS satellite technologies to beavailable and operating for featuresto function properly. These systemsmay not operate if the battery isdischarged or disconnected.
Add-on Electrical Equipment
The OnStar system is integratedinto the electrical architecture of thevehicle. Do not add any electricalequipment. See Add-On ElectricalEquipment 0 241. Added electricalequipment may interfere with theoperation of the OnStar system andcause it to not operate.
Vehicle Software Updates
OnStar or GM may remotely deliversoftware updates or changes to thevehicle without further notice orconsent. These updates or changesmay enhance or maintain safety,security, or the operation of thevehicle or the vehicle systems.Software updates or changes mayaffect or erase data or settings thatare stored in the vehicle, such asOnStar Hands-Free Calling nametags, saved navigation destinations,or pre-set radio stations. NeitherOnStar nor GM is responsible forany affected or erased data orsettings. These updates or changesmay also collect personalinformation. Such collection isdescribed in the OnStar privacy
GMC Acadia/Acadia Denali Owner Manual (GMNA-Localizing-U.S./Canada/Mexico-9159268) - 2016 - CRC - 4/16/15
OnStar 359
statement or separately disclosed atthe time of installation. Theseupdates or changes may also causea system to automaticallycommunicate with GM servers tocollect information about vehiclesystem status, identify whetherupdates or changes are available,or deliver updates or changes. Anactive OnStar agreement constitutesconsent to these software updatesor changes and agreement thateither OnStar or GM may remotelydeliver them to the vehicle.
Privacy
The complete OnStar PrivacyStatement may be found atwww.onstar.com (U.S.),or www.onstar.ca (Canada). Werecommend that you review it. If youhave any questions, call1-888-4ONSTAR (1-888-466-7827)or pressQ to speak with anAdvisor. Users of wirelesscommunications are cautioned thatthe privacy of any information sentvia wireless cellular communicationscannot be assured. Third parties
may unlawfully intercept or accesstransmissions and privatecommunications without consent.
OnStar - SoftwareAcknowledgements
Certain OnStar components includelibcurl and unzip software and otherthird party software. Below are thenotices and licenses associated withlibcurl and unzip and for other thirdparty software please see http://www.lg.com/global/support/opensource/index and https://www.onstar.com/us/en/support/getdocuments.html
libcurl:
COPYRIGHT AND PERMISSIONNOTICE
Copyright (c) 1996 - 2010, DanielStenberg, <[email protected]>.
All rights reserved.
Permission to use, copy, modify,and distribute this software for anypurpose with or without fee ishereby granted, provided that the
above copyright notice and thispermission notice appear in allcopies.
THE SOFTWARE IS PROVIDED“AS IS,” WITHOUT WARRANTY OFANY KIND, EXPRESS ORIMPLIED, INCLUDING BUT NOTLIMITED TO THE WARRANTIESOF MERCHANTABILITY, FITNESSFOR A PARTICULAR PURPOSEAND NONINFRINGEMENT OFTHIRD PARTY RIGHTS. IN NOEVENT SHALL THE AUTHORS ORCOPYRIGHT HOLDERS BELIABLE FOR ANY CLAIM,DAMAGES OR OTHER LIABILITY,WHETHER IN AN ACTION OFCONTRACT, TORT OROTHERWISE, ARISING FROM,OUT OF OR IN CONNECTIONWITH THE SOFTWARE OR THEUSE OR OTHER DEALINGS INTHE SOFTWARE.
Except as contained in this notice,the name of a copyright holder shallnot be used in advertising orotherwise to promote the sale, useor other dealings in this Softwarewithout prior written authorization ofthe copyright holder.
GMC Acadia/Acadia Denali Owner Manual (GMNA-Localizing-U.S./Canada/Mexico-9159268) - 2016 - CRC - 4/16/15
360 OnStar
unzip:
This is version 2005-Feb-10 of theInfo-ZIP copyright and license.The definitive version of thisdocument should be availableat ftp://ftp.info-zip.org/pub/infozip/license.html indefinitely.
Copyright (c) 1990-2005 Info-ZIP. Allrights reserved.
For the purposes of this copyrightand license, “Info-ZIP” is defined asthe following set of individuals:
Mark Adler, John Bush, Karl Davis,Harald Denker, Jean-Michel Dubois,Jean-loup Gailly, Hunter Goatley, EdGordon, Ian Gorman, ChrisHerborth, Dirk Haase, Greg Hartwig,Robert Heath, Jonathan Hudson,Paul Kienitz, David Kirschbaum,Johnny Lee, Onno van der Linden,Igor Mandrichenko, Steve P. Miller,Sergio Monesi, Keith Owens,George Petrov, Greg Roelofs, KaiUwe Rommel, Steve Salisbury,Dave Smith, Steven M. Schweda,Christian Spieler, Cosmin Truta,Antoine Verheijen, Paul von Behren,Rich Wales, Mike White.
This software is provided “as is,”without warranty of any kind,express or implied. In no event shallInfo-ZIP or its contributors be heldliable for any direct, indirect,incidental, special or consequentialdamages arising out of the use of orinability to use this software.
Permission is granted to anyone touse this software for any purpose,including commercial applications,and to alter it and redistribute itfreely, subject to the followingrestrictions:
1. Redistributions of source codemust retain the above copyrightnotice, definition, disclaimer,and this list of conditions.
2. Redistributions in binary form(compiled executables) mustreproduce the above copyrightnotice, definition, disclaimer,and this list of conditions indocumentation and/or othermaterials provided with thedistribution. The sole exceptionto this condition is redistributionof a standard UnZipSFX binary(including SFXWiz) as part of a
self-extracting archive; that ispermitted without inclusion ofthis license, as long as thenormal SFX banner has notbeen removed from the binaryor disabled.
3. Altered versions–including, butnot limited to, ports to newoperating systems, existingports with new graphicalinterfaces, and dynamic,shared, or static libraryversions–must be plainlymarked as such and must notbe misrepresented as beingthe original source. Suchaltered versions also must notbe misrepresented as beingInfo-ZIP releases–including,but not limited to, labeling ofthe altered versions with thenames “Info-ZIP” (or anyvariation thereof, including, butnot limited to, differentcapitalizations), “PocketUnZip,” “WiZ” or “MacZip”without the explicit permissionof Info-ZIP. Such alteredversions are further prohibitedfrom misrepresentative use of

GMC Acadia/Acadia Denali Owner Manual (GMNA-Localizing-U.S./Canada/Mexico-9159268) - 2016 - CRC - 4/16/15
OnStar 361
the Zip-Bugs or Info-ZIP e-mailaddresses or of theInfo-ZIP URL(s).
4. Info-ZIP retains the right to usethe names “Info-ZIP,” “Zip,”“UnZip,” “UnZipSFX,” “WiZ,”“Pocket UnZip,” “Pocket Zip,”and “MacZip” for its ownsource and binary releases.
GMC Acadia/Acadia Denali Owner Manual (GMNA-Localizing-U.S./Canada/Mexico-9159268) - 2016 - CRC - 4/16/15
362 Index
Index AAccessories andModifications . . . . . . . . . . . . . . . . . . 243
Accessory Power . . . . . . . . . . . . . . . 208Add-On Electrical Equipment . . . 241Additional InformationOnStar® . . . . . . . . . . . . . . . . . . . . . . 356
Additional Maintenanceand Care . . . . . . . . . . . . . . . . . . . . . . 329
AdjustmentsLumbar, Front Seats . . . . . . . . . . . .50
AgreementsTrademarks and License . . . . . 181
Air Cleaner/Filter, Engine . . . . . . . 251Air Filter, PassengerCompartment . . . . . . . . . . . . . . . . . 192
Air Vents . . . . . . . . . . . . . . . . . . . . . . . 191Airbag SystemCheck . . . . . . . . . . . . . . . . . . . . . . . . . .78How Does an AirbagRestrain? . . . . . . . . . . . . . . . . . . . . .71
Passenger Sensing System . . . .72What Makes an AirbagInflate? . . . . . . . . . . . . . . . . . . . . . . . .71
What Will You See after anAirbag Inflates? . . . . . . . . . . . . . . .71
When Should an AirbagInflate? . . . . . . . . . . . . . . . . . . . . . . . .69
Airbag System (cont'd)Where Are the Airbags? . . . . . . . .68
AirbagsAdding Equipment to theVehicle . . . . . . . . . . . . . . . . . . . . . . . .77
Passenger Status Indicator . . . .114Readiness Light . . . . . . . . . . . . . . .114Servicing Airbag-EquippedVehicles . . . . . . . . . . . . . . . . . . . . . . .77
System Check . . . . . . . . . . . . . . . . . .66AlarmVehicle Security . . . . . . . . . . . . . . . .37
AlertSide Blind Zone (SBZA) . . . . . . 226
All-Season Tires . . . . . . . . . . . . . . . . 277All-Wheel Drive . . . . . . . . . . . .215, 262AM-FM Radio . . . . . . . . . . . . . . . . . . . 161AntennaMulti-band . . . . . . . . . . . . . . . . . . . . 165
Antilock Brake System (ABS) . . . 215Warning Light . . . . . . . . . . . . . . . . . .118
Appearance CareExterior . . . . . . . . . . . . . . . . . . . . . . . 312Interior . . . . . . . . . . . . . . . . . . . . . . . . 316
Armrest Storage . . . . . . . . . . . . . . . . . 98Assistance Program,Roadside . . . . . . . . . . . . . . . . . . . . . . 342
GMC Acadia/Acadia Denali Owner Manual (GMNA-Localizing-U.S./Canada/Mexico-9159268) - 2016 - CRC - 4/16/15
Index 363
AudioTheft-Deterrent Feature . . . . . . . 157
Audio PlayersCD . . . . . . . . . . . . . . . . . . . . . . . . . . . 165MP3 . . . . . . . . . . . . . . . . . . . . . . . . . . 167
AutomaticDimming Mirrors . . . . . . . . . . . . . . . .42Door Locks . . . . . . . . . . . . . . . . . . . . .33Transmission . . . . . . . . . . . . . . . . . 212Transmission Fluid . . . . . . . . . . . 250
Automatic TransmissionManual Mode . . . . . . . . . . . . . . . . . 213Shift Lock Control FunctionCheck . . . . . . . . . . . . . . . . . . . . . . . 262
AuxiliaryDevices . . . . . . . . . . . . . . . . . . . . . . . 168
BBatteryLoad Management . . . . . . . . . . . . 154Power Protection . . . . . . . . . . . . . 155Voltage and ChargingMessages . . . . . . . . . . . . . . . . . . . 130
Battery - North America . . . .261, 305Blade Replacement, Wiper . . . . . 263BluetoothOverview . . . . . . . . . . . . . . . . . . . . . 172
BrakeSystem Warning Light . . . . . . . . .117
Brakes . . . . . . . . . . . . . . . . . . . . . . . . . . 259Antilock . . . . . . . . . . . . . . . . . . . . . . . 215Assist . . . . . . . . . . . . . . . . . . . . . . . . . 217Fluid . . . . . . . . . . . . . . . . . . . . . . . . . . 260Parking . . . . . . . . . . . . . . . . . . . . . . . 216System Messages . . . . . . . . . . . . 130
Braking . . . . . . . . . . . . . . . . . . . . . . . . . 195Break-In, New Vehicle . . . . . . . . . . 204Bulb Replacement . . . . . . . . . . . . . . 266Fog Lamps . . . . . . . . . . . . . . . . . . . 151Headlamp Aiming . . . . . . . . . . . . . 265Headlamps . . . . . . . . . . . . . . . . . . . 265License Plate Lamps . . . . . . . . . 265
Buying New Tires . . . . . . . . . . . . . . . 291
CCalibration . . . . . . . . . . . . . . . . . . . . . . 105CaliforniaFuel Requirements . . . . . . . . . . . 230Perchlorate MaterialsRequirements . . . . . . . . . . . . . . . 243
CaliforniaProposition65 Warning . . . . . . . . . .243, 261, 305
CameraRear Vision (RVC) . . . . . . . . . . . . 221
Canadian Vehicle Owners . . . . . . . . 2Capacities andSpecifications . . . . . . . . . . . . . . . . . 336
Carbon MonoxideEngine Exhaust . . . . . . . . . . . . . . . .211Liftgate . . . . . . . . . . . . . . . . . . . . . . . . .34Winter Driving . . . . . . . . . . . . . . . . 198
CargoCover . . . . . . . . . . . . . . . . . . . . . . . . . . .99Management System . . . . . . . . . . .99Tie-Downs . . . . . . . . . . . . . . . . . . . . . .99
Caution, Danger, and Warning . . . . 2CD Player . . . . . . . . . . . . . . . . . . . . . . 165Center Console Storage . . . . . . . . . 98Chains, Tire . . . . . . . . . . . . . . . . . . . . 295Charging System Light . . . . . . . . . 115CheckIgnition Transmission Lock . . . 263Malfunction IndicatorEngine Light . . . . . . . . . . . . . . . . .115
Child RestraintsInfants and Young Children . . . . .80Lower Anchors and Tethersfor Children . . . . . . . . . . . . . . . . . . .86
Older Children . . . . . . . . . . . . . . . . . .79Securing . . . . . . . . . . . . . . . . . . . . 92, 94Systems . . . . . . . . . . . . . . . . . . . . . . . .83
Circuit Breakers . . . . . . . . . . . . . . . . 267CleaningExterior Care . . . . . . . . . . . . . . . . . 312Interior Care . . . . . . . . . . . . . . . . . . 316
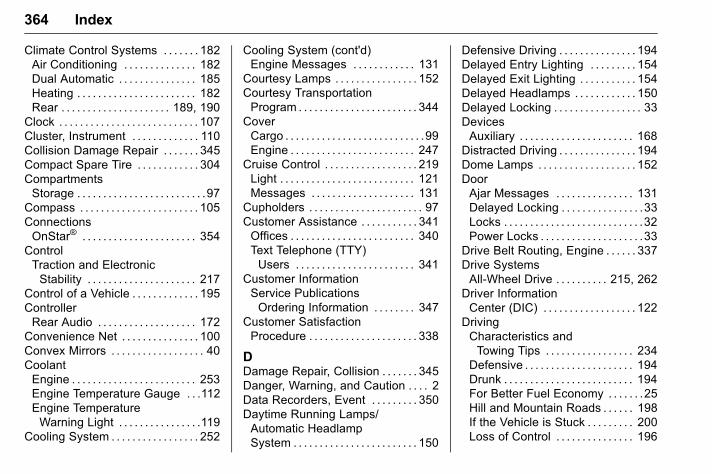
GMC Acadia/Acadia Denali Owner Manual (GMNA-Localizing-U.S./Canada/Mexico-9159268) - 2016 - CRC - 4/16/15
364 Index
Climate Control Systems . . . . . . . 182Air Conditioning . . . . . . . . . . . . . . 182Dual Automatic . . . . . . . . . . . . . . . 185Heating . . . . . . . . . . . . . . . . . . . . . . . 182Rear . . . . . . . . . . . . . . . . . . . . . 189, 190
Clock . . . . . . . . . . . . . . . . . . . . . . . . . . . 107Cluster, Instrument . . . . . . . . . . . . . 110Collision Damage Repair . . . . . . . 345Compact Spare Tire . . . . . . . . . . . . 304CompartmentsStorage . . . . . . . . . . . . . . . . . . . . . . . . .97
Compass . . . . . . . . . . . . . . . . . . . . . . . 105ConnectionsOnStar® . . . . . . . . . . . . . . . . . . . . . . 354
ControlTraction and ElectronicStability . . . . . . . . . . . . . . . . . . . . . 217
Control of a Vehicle . . . . . . . . . . . . . 195ControllerRear Audio . . . . . . . . . . . . . . . . . . . 172
Convenience Net . . . . . . . . . . . . . . . 100Convex Mirrors . . . . . . . . . . . . . . . . . . 40CoolantEngine . . . . . . . . . . . . . . . . . . . . . . . . 253Engine Temperature Gauge . . .112Engine TemperatureWarning Light . . . . . . . . . . . . . . . .119
Cooling System . . . . . . . . . . . . . . . . . 252
Cooling System (cont'd)Engine Messages . . . . . . . . . . . . 131
Courtesy Lamps . . . . . . . . . . . . . . . . 152Courtesy TransportationProgram . . . . . . . . . . . . . . . . . . . . . . . 344
CoverCargo . . . . . . . . . . . . . . . . . . . . . . . . . . .99Engine . . . . . . . . . . . . . . . . . . . . . . . . 247
Cruise Control . . . . . . . . . . . . . . . . . . 219Light . . . . . . . . . . . . . . . . . . . . . . . . . . 121Messages . . . . . . . . . . . . . . . . . . . . 131
Cupholders . . . . . . . . . . . . . . . . . . . . . . 97Customer Assistance . . . . . . . . . . . 341Offices . . . . . . . . . . . . . . . . . . . . . . . . 340Text Telephone (TTY)Users . . . . . . . . . . . . . . . . . . . . . . . 341
Customer InformationService PublicationsOrdering Information . . . . . . . . 347
Customer SatisfactionProcedure . . . . . . . . . . . . . . . . . . . . . 338
DDamage Repair, Collision . . . . . . . 345Danger, Warning, and Caution . . . . 2Data Recorders, Event . . . . . . . . . 350Daytime Running Lamps/Automatic HeadlampSystem . . . . . . . . . . . . . . . . . . . . . . . . 150
Defensive Driving . . . . . . . . . . . . . . . 194Delayed Entry Lighting . . . . . . . . . 154Delayed Exit Lighting . . . . . . . . . . . 154Delayed Headlamps . . . . . . . . . . . . 150Delayed Locking . . . . . . . . . . . . . . . . . 33DevicesAuxiliary . . . . . . . . . . . . . . . . . . . . . . 168
Distracted Driving . . . . . . . . . . . . . . . 194Dome Lamps . . . . . . . . . . . . . . . . . . . 152DoorAjar Messages . . . . . . . . . . . . . . . 131Delayed Locking . . . . . . . . . . . . . . . .33Locks . . . . . . . . . . . . . . . . . . . . . . . . . . .32Power Locks . . . . . . . . . . . . . . . . . . . .33
Drive Belt Routing, Engine . . . . . . 337Drive SystemsAll-Wheel Drive . . . . . . . . . . 215, 262
Driver InformationCenter (DIC) . . . . . . . . . . . . . . . . . . 122
DrivingCharacteristics andTowing Tips . . . . . . . . . . . . . . . . . 234
Defensive . . . . . . . . . . . . . . . . . . . . . 194Drunk . . . . . . . . . . . . . . . . . . . . . . . . . 194For Better Fuel Economy . . . . . . .25Hill and Mountain Roads . . . . . . 198If the Vehicle is Stuck . . . . . . . . . 200Loss of Control . . . . . . . . . . . . . . . 196
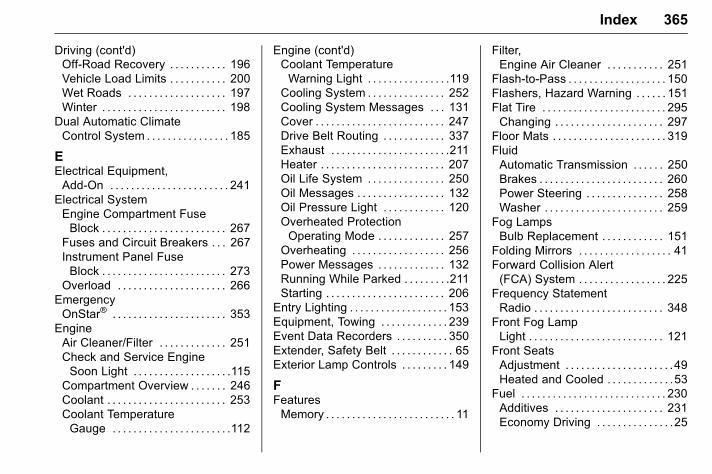
GMC Acadia/Acadia Denali Owner Manual (GMNA-Localizing-U.S./Canada/Mexico-9159268) - 2016 - CRC - 4/16/15
Index 365
Driving (cont'd)Off-Road Recovery . . . . . . . . . . . 196Vehicle Load Limits . . . . . . . . . . . 200Wet Roads . . . . . . . . . . . . . . . . . . . 197Winter . . . . . . . . . . . . . . . . . . . . . . . . 198
Dual Automatic ClimateControl System . . . . . . . . . . . . . . . . 185
EElectrical Equipment,Add-On . . . . . . . . . . . . . . . . . . . . . . . 241
Electrical SystemEngine Compartment FuseBlock . . . . . . . . . . . . . . . . . . . . . . . . 267
Fuses and Circuit Breakers . . . 267Instrument Panel FuseBlock . . . . . . . . . . . . . . . . . . . . . . . . 273
Overload . . . . . . . . . . . . . . . . . . . . . 266EmergencyOnStar® . . . . . . . . . . . . . . . . . . . . . . 353
EngineAir Cleaner/Filter . . . . . . . . . . . . . 251Check and Service EngineSoon Light . . . . . . . . . . . . . . . . . . .115
Compartment Overview . . . . . . . 246Coolant . . . . . . . . . . . . . . . . . . . . . . . 253Coolant TemperatureGauge . . . . . . . . . . . . . . . . . . . . . . .112
Engine (cont'd)Coolant TemperatureWarning Light . . . . . . . . . . . . . . . .119
Cooling System . . . . . . . . . . . . . . . 252Cooling System Messages . . . 131Cover . . . . . . . . . . . . . . . . . . . . . . . . . 247Drive Belt Routing . . . . . . . . . . . . 337Exhaust . . . . . . . . . . . . . . . . . . . . . . .211Heater . . . . . . . . . . . . . . . . . . . . . . . . 207Oil Life System . . . . . . . . . . . . . . . 250Oil Messages . . . . . . . . . . . . . . . . . 132Oil Pressure Light . . . . . . . . . . . . 120Overheated ProtectionOperating Mode . . . . . . . . . . . . . 257
Overheating . . . . . . . . . . . . . . . . . . 256Power Messages . . . . . . . . . . . . . 132Running While Parked . . . . . . . . .211Starting . . . . . . . . . . . . . . . . . . . . . . . 206
Entry Lighting . . . . . . . . . . . . . . . . . . . 153Equipment, Towing . . . . . . . . . . . . . 239Event Data Recorders . . . . . . . . . . 350Extender, Safety Belt . . . . . . . . . . . . 65Exterior Lamp Controls . . . . . . . . . 149
FFeaturesMemory . . . . . . . . . . . . . . . . . . . . . . . . . 11
Filter,Engine Air Cleaner . . . . . . . . . . . 251
Flash-to-Pass . . . . . . . . . . . . . . . . . . . 150Flashers, Hazard Warning . . . . . . 151Flat Tire . . . . . . . . . . . . . . . . . . . . . . . . 295Changing . . . . . . . . . . . . . . . . . . . . . 297
Floor Mats . . . . . . . . . . . . . . . . . . . . . . 319FluidAutomatic Transmission . . . . . . 250Brakes . . . . . . . . . . . . . . . . . . . . . . . . 260Power Steering . . . . . . . . . . . . . . . 258Washer . . . . . . . . . . . . . . . . . . . . . . . 259
Fog LampsBulb Replacement . . . . . . . . . . . . 151
Folding Mirrors . . . . . . . . . . . . . . . . . . 41Forward Collision Alert(FCA) System . . . . . . . . . . . . . . . . . 225
Frequency StatementRadio . . . . . . . . . . . . . . . . . . . . . . . . . 348
Front Fog LampLight . . . . . . . . . . . . . . . . . . . . . . . . . . 121
Front SeatsAdjustment . . . . . . . . . . . . . . . . . . . . .49Heated and Cooled . . . . . . . . . . . . .53
Fuel . . . . . . . . . . . . . . . . . . . . . . . . . . . . 230Additives . . . . . . . . . . . . . . . . . . . . . 231Economy Driving . . . . . . . . . . . . . . .25
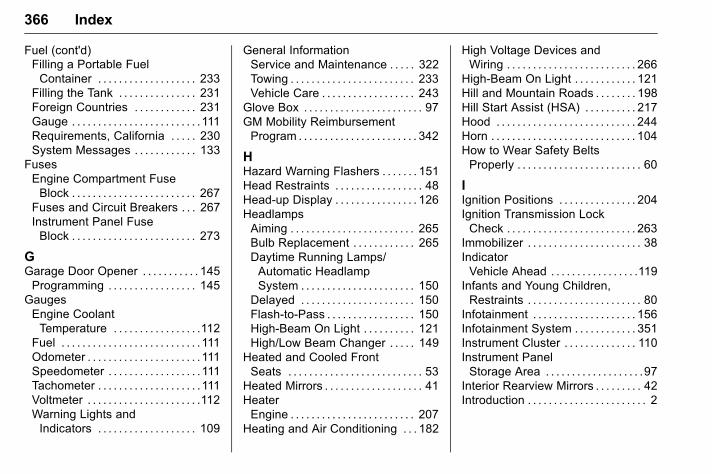
GMC Acadia/Acadia Denali Owner Manual (GMNA-Localizing-U.S./Canada/Mexico-9159268) - 2016 - CRC - 4/16/15
366 Index
Fuel (cont'd)Filling a Portable FuelContainer . . . . . . . . . . . . . . . . . . . 233
Filling the Tank . . . . . . . . . . . . . . . 231Foreign Countries . . . . . . . . . . . . 231Gauge . . . . . . . . . . . . . . . . . . . . . . . . .111Requirements, California . . . . . 230System Messages . . . . . . . . . . . . 133
FusesEngine Compartment FuseBlock . . . . . . . . . . . . . . . . . . . . . . . . 267
Fuses and Circuit Breakers . . . 267Instrument Panel FuseBlock . . . . . . . . . . . . . . . . . . . . . . . . 273
GGarage Door Opener . . . . . . . . . . . 145Programming . . . . . . . . . . . . . . . . . 145
GaugesEngine CoolantTemperature . . . . . . . . . . . . . . . . .112
Fuel . . . . . . . . . . . . . . . . . . . . . . . . . . .111Odometer . . . . . . . . . . . . . . . . . . . . . .111Speedometer . . . . . . . . . . . . . . . . . .111Tachometer . . . . . . . . . . . . . . . . . . . .111Voltmeter . . . . . . . . . . . . . . . . . . . . . .112Warning Lights andIndicators . . . . . . . . . . . . . . . . . . . 109
General InformationService and Maintenance . . . . . 322Towing . . . . . . . . . . . . . . . . . . . . . . . . 233Vehicle Care . . . . . . . . . . . . . . . . . . 243
Glove Box . . . . . . . . . . . . . . . . . . . . . . . 97GM Mobility ReimbursementProgram . . . . . . . . . . . . . . . . . . . . . . . 342
HHazard Warning Flashers . . . . . . . 151Head Restraints . . . . . . . . . . . . . . . . . 48Head-up Display . . . . . . . . . . . . . . . . 126HeadlampsAiming . . . . . . . . . . . . . . . . . . . . . . . . 265Bulb Replacement . . . . . . . . . . . . 265Daytime Running Lamps/Automatic HeadlampSystem . . . . . . . . . . . . . . . . . . . . . . 150
Delayed . . . . . . . . . . . . . . . . . . . . . . 150Flash-to-Pass . . . . . . . . . . . . . . . . . 150High-Beam On Light . . . . . . . . . . 121High/Low Beam Changer . . . . . 149
Heated and Cooled FrontSeats . . . . . . . . . . . . . . . . . . . . . . . . . . 53
Heated Mirrors . . . . . . . . . . . . . . . . . . . 41HeaterEngine . . . . . . . . . . . . . . . . . . . . . . . . 207
Heating and Air Conditioning . . . 182
High Voltage Devices andWiring . . . . . . . . . . . . . . . . . . . . . . . . . 266
High-Beam On Light . . . . . . . . . . . . 121Hill and Mountain Roads . . . . . . . . 198Hill Start Assist (HSA) . . . . . . . . . . 217Hood . . . . . . . . . . . . . . . . . . . . . . . . . . . 244Horn . . . . . . . . . . . . . . . . . . . . . . . . . . . . 104How to Wear Safety BeltsProperly . . . . . . . . . . . . . . . . . . . . . . . . 60
IIgnition Positions . . . . . . . . . . . . . . . 204Ignition Transmission LockCheck . . . . . . . . . . . . . . . . . . . . . . . . . 263
Immobilizer . . . . . . . . . . . . . . . . . . . . . . 38IndicatorVehicle Ahead . . . . . . . . . . . . . . . . .119
Infants and Young Children,Restraints . . . . . . . . . . . . . . . . . . . . . . 80
Infotainment . . . . . . . . . . . . . . . . . . . . 156Infotainment System . . . . . . . . . . . . 351Instrument Cluster . . . . . . . . . . . . . . 110Instrument PanelStorage Area . . . . . . . . . . . . . . . . . . .97
Interior Rearview Mirrors . . . . . . . . . 42Introduction . . . . . . . . . . . . . . . . . . . . . . . 2
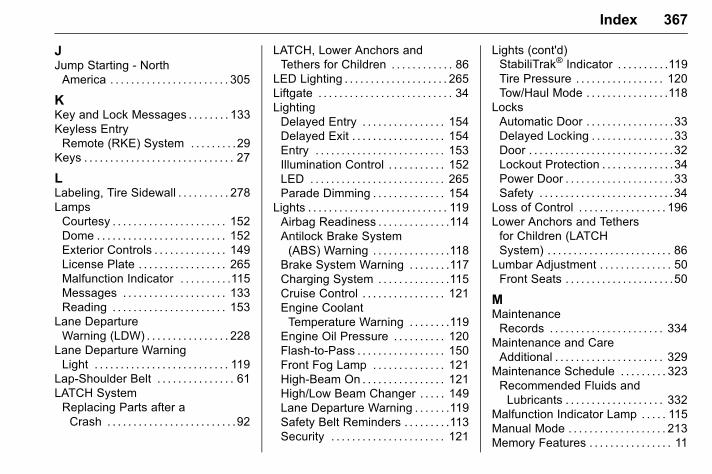
GMC Acadia/Acadia Denali Owner Manual (GMNA-Localizing-U.S./Canada/Mexico-9159268) - 2016 - CRC - 4/16/15
Index 367
JJump Starting - NorthAmerica . . . . . . . . . . . . . . . . . . . . . . . 305
KKey and Lock Messages . . . . . . . . 133Keyless EntryRemote (RKE) System . . . . . . . . .29
Keys . . . . . . . . . . . . . . . . . . . . . . . . . . . . . 27
LLabeling, Tire Sidewall . . . . . . . . . . 278LampsCourtesy . . . . . . . . . . . . . . . . . . . . . . 152Dome . . . . . . . . . . . . . . . . . . . . . . . . . 152Exterior Controls . . . . . . . . . . . . . . 149License Plate . . . . . . . . . . . . . . . . . 265Malfunction Indicator . . . . . . . . . .115Messages . . . . . . . . . . . . . . . . . . . . 133Reading . . . . . . . . . . . . . . . . . . . . . . 153
Lane DepartureWarning (LDW) . . . . . . . . . . . . . . . . 228
Lane Departure WarningLight . . . . . . . . . . . . . . . . . . . . . . . . . . 119
Lap-Shoulder Belt . . . . . . . . . . . . . . . 61LATCH SystemReplacing Parts after aCrash . . . . . . . . . . . . . . . . . . . . . . . . .92
LATCH, Lower Anchors andTethers for Children . . . . . . . . . . . . 86
LED Lighting . . . . . . . . . . . . . . . . . . . . 265Liftgate . . . . . . . . . . . . . . . . . . . . . . . . . . 34LightingDelayed Entry . . . . . . . . . . . . . . . . 154Delayed Exit . . . . . . . . . . . . . . . . . . 154Entry . . . . . . . . . . . . . . . . . . . . . . . . . 153Illumination Control . . . . . . . . . . . 152LED . . . . . . . . . . . . . . . . . . . . . . . . . . 265Parade Dimming . . . . . . . . . . . . . . 154
Lights . . . . . . . . . . . . . . . . . . . . . . . . . . . 119Airbag Readiness . . . . . . . . . . . . . .114Antilock Brake System(ABS) Warning . . . . . . . . . . . . . . .118
Brake System Warning . . . . . . . .117Charging System . . . . . . . . . . . . . .115Cruise Control . . . . . . . . . . . . . . . . 121Engine CoolantTemperature Warning . . . . . . . .119
Engine Oil Pressure . . . . . . . . . . 120Flash-to-Pass . . . . . . . . . . . . . . . . . 150Front Fog Lamp . . . . . . . . . . . . . . 121High-Beam On . . . . . . . . . . . . . . . . 121High/Low Beam Changer . . . . . 149Lane Departure Warning . . . . . . .119Safety Belt Reminders . . . . . . . . .113Security . . . . . . . . . . . . . . . . . . . . . . 121
Lights (cont'd)StabiliTrak® Indicator . . . . . . . . . .119Tire Pressure . . . . . . . . . . . . . . . . . 120Tow/Haul Mode . . . . . . . . . . . . . . . .118
LocksAutomatic Door . . . . . . . . . . . . . . . . .33Delayed Locking . . . . . . . . . . . . . . . .33Door . . . . . . . . . . . . . . . . . . . . . . . . . . . .32Lockout Protection . . . . . . . . . . . . . .34Power Door . . . . . . . . . . . . . . . . . . . . .33Safety . . . . . . . . . . . . . . . . . . . . . . . . . .34
Loss of Control . . . . . . . . . . . . . . . . . 196Lower Anchors and Tethersfor Children (LATCHSystem) . . . . . . . . . . . . . . . . . . . . . . . . 86
Lumbar Adjustment . . . . . . . . . . . . . . 50Front Seats . . . . . . . . . . . . . . . . . . . . .50
MMaintenanceRecords . . . . . . . . . . . . . . . . . . . . . . 334
Maintenance and CareAdditional . . . . . . . . . . . . . . . . . . . . . 329
Maintenance Schedule . . . . . . . . . 323Recommended Fluids andLubricants . . . . . . . . . . . . . . . . . . . 332
Malfunction Indicator Lamp . . . . . 115Manual Mode . . . . . . . . . . . . . . . . . . . 213Memory Features . . . . . . . . . . . . . . . . 11
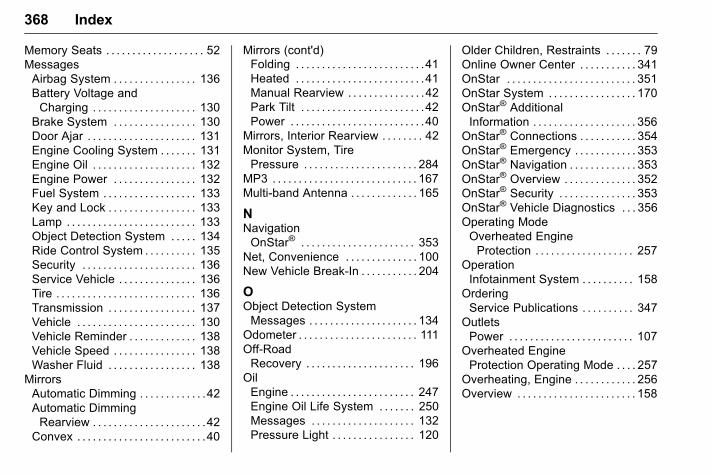
GMC Acadia/Acadia Denali Owner Manual (GMNA-Localizing-U.S./Canada/Mexico-9159268) - 2016 - CRC - 4/16/15
368 Index
Memory Seats . . . . . . . . . . . . . . . . . . . 52MessagesAirbag System . . . . . . . . . . . . . . . . 136Battery Voltage andCharging . . . . . . . . . . . . . . . . . . . . 130
Brake System . . . . . . . . . . . . . . . . 130Door Ajar . . . . . . . . . . . . . . . . . . . . . 131Engine Cooling System . . . . . . . 131Engine Oil . . . . . . . . . . . . . . . . . . . . 132Engine Power . . . . . . . . . . . . . . . . 132Fuel System . . . . . . . . . . . . . . . . . . 133Key and Lock . . . . . . . . . . . . . . . . . 133Lamp . . . . . . . . . . . . . . . . . . . . . . . . . 133Object Detection System . . . . . 134Ride Control System . . . . . . . . . . 135Security . . . . . . . . . . . . . . . . . . . . . . 136Service Vehicle . . . . . . . . . . . . . . . 136Tire . . . . . . . . . . . . . . . . . . . . . . . . . . . 136Transmission . . . . . . . . . . . . . . . . . 137Vehicle . . . . . . . . . . . . . . . . . . . . . . . 130Vehicle Reminder . . . . . . . . . . . . . 138Vehicle Speed . . . . . . . . . . . . . . . . 138Washer Fluid . . . . . . . . . . . . . . . . . 138
MirrorsAutomatic Dimming . . . . . . . . . . . . .42Automatic DimmingRearview . . . . . . . . . . . . . . . . . . . . . .42
Convex . . . . . . . . . . . . . . . . . . . . . . . . .40
Mirrors (cont'd)Folding . . . . . . . . . . . . . . . . . . . . . . . . .41Heated . . . . . . . . . . . . . . . . . . . . . . . . .41Manual Rearview . . . . . . . . . . . . . . .42Park Tilt . . . . . . . . . . . . . . . . . . . . . . . .42Power . . . . . . . . . . . . . . . . . . . . . . . . . .40
Mirrors, Interior Rearview . . . . . . . . 42Monitor System, TirePressure . . . . . . . . . . . . . . . . . . . . . . 284
MP3 . . . . . . . . . . . . . . . . . . . . . . . . . . . . 167Multi-band Antenna . . . . . . . . . . . . . 165
NNavigationOnStar® . . . . . . . . . . . . . . . . . . . . . . 353
Net, Convenience . . . . . . . . . . . . . . 100New Vehicle Break-In . . . . . . . . . . . 204
OObject Detection SystemMessages . . . . . . . . . . . . . . . . . . . . . 134
Odometer . . . . . . . . . . . . . . . . . . . . . . . 111Off-RoadRecovery . . . . . . . . . . . . . . . . . . . . . 196
OilEngine . . . . . . . . . . . . . . . . . . . . . . . . 247Engine Oil Life System . . . . . . . 250Messages . . . . . . . . . . . . . . . . . . . . 132Pressure Light . . . . . . . . . . . . . . . . 120
Older Children, Restraints . . . . . . . 79Online Owner Center . . . . . . . . . . . 341OnStar . . . . . . . . . . . . . . . . . . . . . . . . . 351OnStar System . . . . . . . . . . . . . . . . . 170OnStar® AdditionalInformation . . . . . . . . . . . . . . . . . . . . 356
OnStar® Connections . . . . . . . . . . . 354OnStar® Emergency . . . . . . . . . . . . 353OnStar® Navigation . . . . . . . . . . . . . 353OnStar® Overview . . . . . . . . . . . . . . 352OnStar® Security . . . . . . . . . . . . . . . 353OnStar® Vehicle Diagnostics . . . 356Operating ModeOverheated EngineProtection . . . . . . . . . . . . . . . . . . . 257
OperationInfotainment System . . . . . . . . . . 158
OrderingService Publications . . . . . . . . . . 347
OutletsPower . . . . . . . . . . . . . . . . . . . . . . . . 107
Overheated EngineProtection Operating Mode . . . . 257
Overheating, Engine . . . . . . . . . . . . 256Overview . . . . . . . . . . . . . . . . . . . . . . . 158
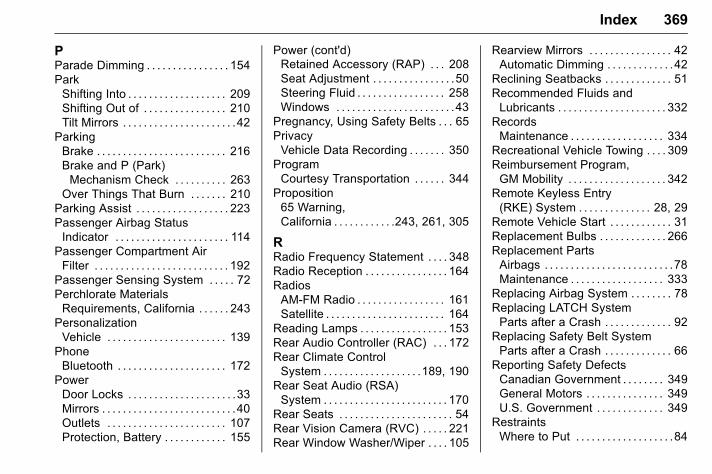
GMC Acadia/Acadia Denali Owner Manual (GMNA-Localizing-U.S./Canada/Mexico-9159268) - 2016 - CRC - 4/16/15
Index 369
PParade Dimming . . . . . . . . . . . . . . . . 154ParkShifting Into . . . . . . . . . . . . . . . . . . . 209Shifting Out of . . . . . . . . . . . . . . . . 210Tilt Mirrors . . . . . . . . . . . . . . . . . . . . . .42
ParkingBrake . . . . . . . . . . . . . . . . . . . . . . . . . 216Brake and P (Park)Mechanism Check . . . . . . . . . . 263
Over Things That Burn . . . . . . . 210Parking Assist . . . . . . . . . . . . . . . . . . 223Passenger Airbag StatusIndicator . . . . . . . . . . . . . . . . . . . . . . 114
Passenger Compartment AirFilter . . . . . . . . . . . . . . . . . . . . . . . . . . 192
Passenger Sensing System . . . . . 72Perchlorate MaterialsRequirements, California . . . . . . 243
PersonalizationVehicle . . . . . . . . . . . . . . . . . . . . . . . 139
PhoneBluetooth . . . . . . . . . . . . . . . . . . . . . 172
PowerDoor Locks . . . . . . . . . . . . . . . . . . . . .33Mirrors . . . . . . . . . . . . . . . . . . . . . . . . . .40Outlets . . . . . . . . . . . . . . . . . . . . . . . 107Protection, Battery . . . . . . . . . . . . 155
Power (cont'd)Retained Accessory (RAP) . . . 208Seat Adjustment . . . . . . . . . . . . . . . .50Steering Fluid . . . . . . . . . . . . . . . . . 258Windows . . . . . . . . . . . . . . . . . . . . . . .43
Pregnancy, Using Safety Belts . . . 65PrivacyVehicle Data Recording . . . . . . . 350
ProgramCourtesy Transportation . . . . . . 344
Proposition65 Warning,California . . . . . . . . . . . .243, 261, 305
RRadio Frequency Statement . . . . 348Radio Reception . . . . . . . . . . . . . . . . 164RadiosAM-FM Radio . . . . . . . . . . . . . . . . . 161Satellite . . . . . . . . . . . . . . . . . . . . . . . 164
Reading Lamps . . . . . . . . . . . . . . . . . 153Rear Audio Controller (RAC) . . . 172Rear Climate ControlSystem . . . . . . . . . . . . . . . . . . .189, 190
Rear Seat Audio (RSA)System . . . . . . . . . . . . . . . . . . . . . . . . 170
Rear Seats . . . . . . . . . . . . . . . . . . . . . . 54Rear Vision Camera (RVC) . . . . . 221Rear Window Washer/Wiper . . . . 105
Rearview Mirrors . . . . . . . . . . . . . . . . 42Automatic Dimming . . . . . . . . . . . . .42
Reclining Seatbacks . . . . . . . . . . . . . 51Recommended Fluids andLubricants . . . . . . . . . . . . . . . . . . . . . 332
RecordsMaintenance . . . . . . . . . . . . . . . . . . 334
Recreational Vehicle Towing . . . . 309Reimbursement Program,GM Mobility . . . . . . . . . . . . . . . . . . . 342
Remote Keyless Entry(RKE) System . . . . . . . . . . . . . . 28, 29
Remote Vehicle Start . . . . . . . . . . . . 31Replacement Bulbs . . . . . . . . . . . . . 266Replacement PartsAirbags . . . . . . . . . . . . . . . . . . . . . . . . .78Maintenance . . . . . . . . . . . . . . . . . . 333
Replacing Airbag System . . . . . . . . 78Replacing LATCH SystemParts after a Crash . . . . . . . . . . . . . 92
Replacing Safety Belt SystemParts after a Crash . . . . . . . . . . . . . 66
Reporting Safety DefectsCanadian Government . . . . . . . . 349General Motors . . . . . . . . . . . . . . . 349U.S. Government . . . . . . . . . . . . . 349
RestraintsWhere to Put . . . . . . . . . . . . . . . . . . .84
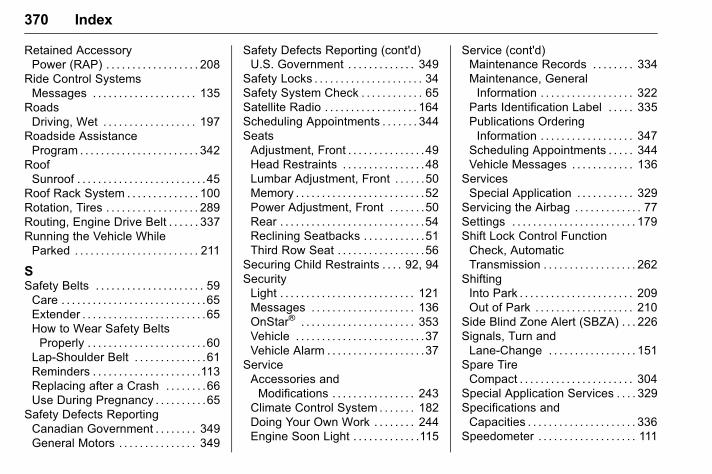
GMC Acadia/Acadia Denali Owner Manual (GMNA-Localizing-U.S./Canada/Mexico-9159268) - 2016 - CRC - 4/16/15
370 Index
Retained AccessoryPower (RAP) . . . . . . . . . . . . . . . . . . 208
Ride Control SystemsMessages . . . . . . . . . . . . . . . . . . . . 135
RoadsDriving, Wet . . . . . . . . . . . . . . . . . . 197
Roadside AssistanceProgram . . . . . . . . . . . . . . . . . . . . . . . 342
RoofSunroof . . . . . . . . . . . . . . . . . . . . . . . . .45
Roof Rack System . . . . . . . . . . . . . . 100Rotation, Tires . . . . . . . . . . . . . . . . . . 289Routing, Engine Drive Belt . . . . . . 337Running the Vehicle WhileParked . . . . . . . . . . . . . . . . . . . . . . . . 211
SSafety Belts . . . . . . . . . . . . . . . . . . . . . 59Care . . . . . . . . . . . . . . . . . . . . . . . . . . . .65Extender . . . . . . . . . . . . . . . . . . . . . . . .65How to Wear Safety BeltsProperly . . . . . . . . . . . . . . . . . . . . . . .60
Lap-Shoulder Belt . . . . . . . . . . . . . .61Reminders . . . . . . . . . . . . . . . . . . . . .113Replacing after a Crash . . . . . . . .66Use During Pregnancy . . . . . . . . . .65
Safety Defects ReportingCanadian Government . . . . . . . . 349General Motors . . . . . . . . . . . . . . . 349
Safety Defects Reporting (cont'd)U.S. Government . . . . . . . . . . . . . 349
Safety Locks . . . . . . . . . . . . . . . . . . . . . 34Safety System Check . . . . . . . . . . . . 65Satellite Radio . . . . . . . . . . . . . . . . . . 164Scheduling Appointments . . . . . . . 344SeatsAdjustment, Front . . . . . . . . . . . . . . .49Head Restraints . . . . . . . . . . . . . . . .48Lumbar Adjustment, Front . . . . . .50Memory . . . . . . . . . . . . . . . . . . . . . . . . .52Power Adjustment, Front . . . . . . .50Rear . . . . . . . . . . . . . . . . . . . . . . . . . . . .54Reclining Seatbacks . . . . . . . . . . . .51Third Row Seat . . . . . . . . . . . . . . . . .56
Securing Child Restraints . . . . 92, 94SecurityLight . . . . . . . . . . . . . . . . . . . . . . . . . . 121Messages . . . . . . . . . . . . . . . . . . . . 136OnStar® . . . . . . . . . . . . . . . . . . . . . . 353Vehicle . . . . . . . . . . . . . . . . . . . . . . . . .37Vehicle Alarm . . . . . . . . . . . . . . . . . . .37
ServiceAccessories andModifications . . . . . . . . . . . . . . . . 243
Climate Control System . . . . . . . 182Doing Your Own Work . . . . . . . . 244Engine Soon Light . . . . . . . . . . . . .115
Service (cont'd)Maintenance Records . . . . . . . . 334Maintenance, GeneralInformation . . . . . . . . . . . . . . . . . . 322
Parts Identification Label . . . . . 335Publications OrderingInformation . . . . . . . . . . . . . . . . . . 347
Scheduling Appointments . . . . . 344Vehicle Messages . . . . . . . . . . . . 136
ServicesSpecial Application . . . . . . . . . . . 329
Servicing the Airbag . . . . . . . . . . . . . 77Settings . . . . . . . . . . . . . . . . . . . . . . . . 179Shift Lock Control FunctionCheck, AutomaticTransmission . . . . . . . . . . . . . . . . . . 262
ShiftingInto Park . . . . . . . . . . . . . . . . . . . . . . 209Out of Park . . . . . . . . . . . . . . . . . . . 210
Side Blind Zone Alert (SBZA) . . . 226Signals, Turn andLane-Change . . . . . . . . . . . . . . . . . 151
Spare TireCompact . . . . . . . . . . . . . . . . . . . . . . 304
Special Application Services . . . . 329Specifications andCapacities . . . . . . . . . . . . . . . . . . . . . 336
Speedometer . . . . . . . . . . . . . . . . . . . 111
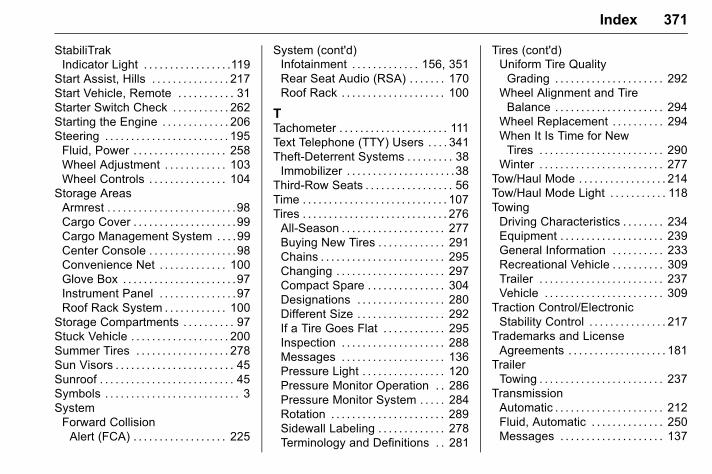
GMC Acadia/Acadia Denali Owner Manual (GMNA-Localizing-U.S./Canada/Mexico-9159268) - 2016 - CRC - 4/16/15
Index 371
StabiliTrakIndicator Light . . . . . . . . . . . . . . . . .119
Start Assist, Hills . . . . . . . . . . . . . . . 217Start Vehicle, Remote . . . . . . . . . . . 31Starter Switch Check . . . . . . . . . . . 262Starting the Engine . . . . . . . . . . . . . 206Steering . . . . . . . . . . . . . . . . . . . . . . . . 195Fluid, Power . . . . . . . . . . . . . . . . . . 258Wheel Adjustment . . . . . . . . . . . . 103Wheel Controls . . . . . . . . . . . . . . . 104
Storage AreasArmrest . . . . . . . . . . . . . . . . . . . . . . . . .98Cargo Cover . . . . . . . . . . . . . . . . . . . .99Cargo Management System . . . .99Center Console . . . . . . . . . . . . . . . . .98Convenience Net . . . . . . . . . . . . . 100Glove Box . . . . . . . . . . . . . . . . . . . . . .97Instrument Panel . . . . . . . . . . . . . . .97Roof Rack System . . . . . . . . . . . . 100
Storage Compartments . . . . . . . . . . 97Stuck Vehicle . . . . . . . . . . . . . . . . . . . 200Summer Tires . . . . . . . . . . . . . . . . . . 278Sun Visors . . . . . . . . . . . . . . . . . . . . . . . 45Sunroof . . . . . . . . . . . . . . . . . . . . . . . . . . 45Symbols . . . . . . . . . . . . . . . . . . . . . . . . . . 3SystemForward CollisionAlert (FCA) . . . . . . . . . . . . . . . . . . 225
System (cont'd)Infotainment . . . . . . . . . . . . . 156, 351Rear Seat Audio (RSA) . . . . . . . 170Roof Rack . . . . . . . . . . . . . . . . . . . . 100
TTachometer . . . . . . . . . . . . . . . . . . . . . 111Text Telephone (TTY) Users . . . . 341Theft-Deterrent Systems . . . . . . . . . 38Immobilizer . . . . . . . . . . . . . . . . . . . . .38
Third-Row Seats . . . . . . . . . . . . . . . . . 56Time . . . . . . . . . . . . . . . . . . . . . . . . . . . . 107Tires . . . . . . . . . . . . . . . . . . . . . . . . . . . . 276All-Season . . . . . . . . . . . . . . . . . . . . 277Buying New Tires . . . . . . . . . . . . . 291Chains . . . . . . . . . . . . . . . . . . . . . . . . 295Changing . . . . . . . . . . . . . . . . . . . . . 297Compact Spare . . . . . . . . . . . . . . . 304Designations . . . . . . . . . . . . . . . . . 280Different Size . . . . . . . . . . . . . . . . . 292If a Tire Goes Flat . . . . . . . . . . . . 295Inspection . . . . . . . . . . . . . . . . . . . . 288Messages . . . . . . . . . . . . . . . . . . . . 136Pressure Light . . . . . . . . . . . . . . . . 120Pressure Monitor Operation . . 286Pressure Monitor System . . . . . 284Rotation . . . . . . . . . . . . . . . . . . . . . . 289Sidewall Labeling . . . . . . . . . . . . . 278Terminology and Definitions . . 281
Tires (cont'd)Uniform Tire QualityGrading . . . . . . . . . . . . . . . . . . . . . 292
Wheel Alignment and TireBalance . . . . . . . . . . . . . . . . . . . . . 294
Wheel Replacement . . . . . . . . . . 294When It Is Time for NewTires . . . . . . . . . . . . . . . . . . . . . . . . 290
Winter . . . . . . . . . . . . . . . . . . . . . . . . 277Tow/Haul Mode . . . . . . . . . . . . . . . . . 214Tow/Haul Mode Light . . . . . . . . . . . 118TowingDriving Characteristics . . . . . . . . 234Equipment . . . . . . . . . . . . . . . . . . . . 239General Information . . . . . . . . . . 233Recreational Vehicle . . . . . . . . . . 309Trailer . . . . . . . . . . . . . . . . . . . . . . . . 237Vehicle . . . . . . . . . . . . . . . . . . . . . . . 309
Traction Control/ElectronicStability Control . . . . . . . . . . . . . . . 217
Trademarks and LicenseAgreements . . . . . . . . . . . . . . . . . . . 181
TrailerTowing . . . . . . . . . . . . . . . . . . . . . . . . 237
TransmissionAutomatic . . . . . . . . . . . . . . . . . . . . . 212Fluid, Automatic . . . . . . . . . . . . . . 250Messages . . . . . . . . . . . . . . . . . . . . 137
GMC Acadia/Acadia Denali Owner Manual (GMNA-Localizing-U.S./Canada/Mexico-9159268) - 2016 - CRC - 4/16/15
372 Index
Transportation Program,Courtesy . . . . . . . . . . . . . . . . . . . . . . 344
Turn and Lane-ChangeSignals . . . . . . . . . . . . . . . . . . . . . . . . 151
UUniform Tire Quality Grading . . . 292Universal Remote System . . . . . . 145Operation . . . . . . . . . . . . . . . . . . . . . 148Programming . . . . . . . . . . . . . . . . . 145
Using This Manual . . . . . . . . . . . . . . . . 2
VVehicleAlarm System . . . . . . . . . . . . . . . . . .37Canadian Owners . . . . . . . . . . . . . . . 2Control . . . . . . . . . . . . . . . . . . . . . . . 195Identification Number (VIN) . . . 335Load Limits . . . . . . . . . . . . . . . . . . . 200Messages . . . . . . . . . . . . . . . . . . . . 130Personalization . . . . . . . . . . . . . . . 139Reminder Messages . . . . . . . . . . 138Remote Start . . . . . . . . . . . . . . . . . . .31Security . . . . . . . . . . . . . . . . . . . . . . . .37Speed Messages . . . . . . . . . . . . . 138Towing . . . . . . . . . . . . . . . . . . . . . . . . 309
Vehicle Ahead Indicator . . . . . . . . 119
Vehicle CareTire Pressure . . . . . . . . . . . . . . . . . 283
Vehicle Data Recording andPrivacy . . . . . . . . . . . . . . . . . . . . . . . . 350
Vehicle DiagnosticsOnStar® . . . . . . . . . . . . . . . . . . . . . . 356
Ventilation, Air . . . . . . . . . . . . . . . . . . 191Visors . . . . . . . . . . . . . . . . . . . . . . . . . . . 45Voltage Devices and Wiring . . . . 266Voltmeter Gauge . . . . . . . . . . . . . . . 112
WWarningBrake System Light . . . . . . . . . . . .117Caution and Danger . . . . . . . . . . . . . 2Lane Departure (LDW) . . . . . . . 228
Warning Lights, Gauges, andIndicators . . . . . . . . . . . . . . . . . . . . . 109
WarningsHazard Flashers . . . . . . . . . . . . . . 151
Washer Fluid . . . . . . . . . . . . . . . . . . . 259Messages . . . . . . . . . . . . . . . . . . . . 138
WheelsAlignment and Tire Balance . . 294Different Size . . . . . . . . . . . . . . . . . 292Replacement . . . . . . . . . . . . . . . . . 294
When It Is Time for NewTires . . . . . . . . . . . . . . . . . . . . . . . . . . 290
Where to Put the Restraint . . . . . . 84
Windows . . . . . . . . . . . . . . . . . . . . . . . . 43Power . . . . . . . . . . . . . . . . . . . . . . . . . .43
WindshieldReplacement . . . . . . . . . . . . . . . . . 264Wiper/Washer . . . . . . . . . . . . . . . . 104
WinterDriving . . . . . . . . . . . . . . . . . . . . . . . . 198
Winter Tires . . . . . . . . . . . . . . . . . . . . 277Wiper Blade Replacement . . . . . . 263WipersRear Washer . . . . . . . . . . . . . . . . . 105
Wiring, High Voltage Devices . . . 266