Embed Size (px)
DESCRIPTION
Manual
Citation preview

1
METUS MAM
USER’S MANUAL
Version: 3.6.0.8

2
Preface
Dear Metus customer,
Thank you for purchasing our product! We would like to assure you that you have chosen the most cost
effective and versatile MAM system on the market. As always, we are trying to stay close to our customers’
needs, making sure they all receive adequate support and satisfaction. Your opinion about our product is an
exceptionally valuable source of information to us. The ease of working with the Metus products results
mainly from the suggestions and comments of our current respected customers. This manual is structured
into several sequential chapters, each aiming to ease the installation, fine tuning and use of our products.
We hope you’ll enjoy working with it, and we are anxiously looking forward to receiving your feedback.
Please send your questions, suggestions and assistance requests to [email protected]
General feedback: [email protected]
Helpdesk fax number: +90 212 320 8827

3
Legal notice
The information in this manual is furnished for informational use only. No part of this manual may be
reproduced or transmitted in any form or by any means, electronic or mechanical, for any purpose,
without the prior written permission of METUS Ltd. The software described in this manual is owned by
METUS Ltd. It is protected by the Turkish Copyright Law as well as International Copyright Treaties
and may be used or copied only in accordance with the license agreement.
METUS Ltd. provides this manual “as is” without any warranty, either express or implied. This
publication may contain typographical errors or technical inaccuracies. While every precaution has
been taken in the preparation of this document, METUS Ltd. assumes no responsibility for errors or
omissions. Nor is any liability assumed for damages resulting from the use of the information
contained herein. Changes are periodically made to the information herein; they will be incorporated
in new versions of the manual.
Please, check the Metus website regularly for User Manual updates. METUS Ltd. may introduce
changes or improvements in the products described in this manual at any time without any special
notice.
Please address your comments or questions to:
METUS Ltd. Piyalepaşa blv. Memorial Center A-Blok Kat:10, Okmeydanı Istanbul, 34384 Turkiye
Tel.: 90 212 3208825
Fax: 90 212 3208827
www.metus.com
4
Overview
Metus Mam system is designed to be easily used by everyone. A special training course or deep
knowledge in computers is not strictly required. Anyone with basic computer knowledge will find using
Metus modules as easy as 1-2-3. Moreover, all modules share the same visual and logical concept in
order to minimize mistakes and confusion. Thus, we hope to make the operator’s learning process
even easier – once acquainted with some of the modules the others should look quite familiar. In
order to fully utilize the system’s potential we recommend you to read carefully the following
subchapters. Each chapter is related to a particular module and describes its workflow and specifics in
detail.
The underlying sections will give you enough information to succeed in getting all the tasks done. In
case something is not clear enough, please examine the “FAQ” section at Metus website:
http://www.metus.com – the answers of almost all questions that might arise during operation can be
found there. Our support team will be at your disposal in case you have specific questions or a non-
typical problem.
Do not hesitate to contact us at [email protected]
NOTE: The features described below may vary from system to system, depending on the hardware
used. This user’s manual contains a description of all possible features. Please, contact your dealer and
describe your needs, so you could be advised properly

5
CHAPTER 1 - INSTALLATION
Metus Archive Server supports Microsoft Windows Server 2003 and Microsoft Windows
2008 Server operating systems. Metus Process Server supports Microsoft Windows Server 2003
and Microsoft Windows XP Pro operating system. Metus MAM Client supports Microsoft Windows
XP Pro, Microsoft Windows Server 2003 and Microsoft Vista operating systems.
It is required to have database infrastructure for running the Metus MAM Server. The
supported types of databases are Microsoft SQL Server 2000, Microsoft SQL Server 2005 and
Oracle.
NOTE! See Appendix 1 attached to this manual for hardware recommendation.
Metus MAM system is protected by a dongle (the security key plugged to a USB port). All the
licenses for running the system (number of local clients, servers’ licenses and so on) are coded on
one dongle only. The dongle is red and its type is network. The driver needed to be installed is
HASP License Manager.
1.1. Installation of the Operating System
1.1.1. For the machine where the SQL Server will be installed, minimum 100 GB of disk
space should be allocated for operating system (System disk)
1.1.2. All drivers should be installed properly.
1.1.3. For the server that MAS (Metus Archive server) will be installed, an IP address should
be given either manually or automatically.
1.2. Installation of the License Manager
1.2.1. Plug the dongle to a USB port and open the License Manager folder.
1.2.2. Execute the License Manager.exe file on PC that the dongle is plugged to.
1.2.3. On a third screen, during the installation, you will be asked to choose the working type
as Application or Service. Here you choose Service (nhsrvice.exe) and click next.
1.2.4. Ensure the option Install/Update is checked. Finish the installation without any more
changes.
1.3. Installation of the Microsoft SQL Server 2005
1.3.1. SQL Server may need Windows Installer 3.1 and DotNetFramework. Both setups are in
Requirements-folder in the CD supplied.
1.3.2. Start SQL 2005 Standard Installation by double-clicking Setup.exe file.
1.3.3. In the End-User License Agreement window, accept the agreement, proceed with Next
and then start the installation by clicking Install.
1.3.4. Proceed with Next.
1.3.5. Proceed with Next in Microsoft SQL Server Installation Wizard screen.
1.3.6. After the System Configuration Check process, proceed with Next if
check is successful.
1.3.7. Installation will go on copying some files in screen below.
1.3.8. In Registration Information screen fill the Name and Company fields, and then click
Next.

6
1.3.9. In the window where you select the components to be installed, check at least SQL
Server Database Services, Analysis Services and Workstation Components boxes and then click
Next.
1.3.10. In the next window, you can install a default instance or you can specify a named
instance. We recommend you to choose Default Instance. If you choose a named instance you will
input sql server name in Metus as computer name\instance name format. However, if you choose
default instance then you will input sql server name in Metus as computer name.
1.3.11. In Service Account selection screen, check Use the built-in System account option.
Check all the options in the Start Services at the end of setup group and proceed with Next.
1.3.12. In Authentication Mode screen, Mixed Mode must be checked. Type a password for
SA user. It is recommended to set a password you don’t forget as you will need it to create project
in Metus MAM later. Please, note that in Metus MAM you do not need to connect SQL Server
using SA user. You can use any predefined user. However, in that case that user should have at
least dbcreator permission. It is recommended to use SA user for creating projects in Metus MAM
Client.
1.3.13. You must select the language in Collation Settings screen. Select the language you
want to use Metus MAM in and uncheck all other boxes.
1.3.14. Proceed with Next and in last screen, start installation with Install button. The Setup
Progress may proceed a long time – just wait it.
1.4. Installation of the Microsoft SQL Server 2008
Followings are step by step of how to install Microsoft SQL Server on Windows 2008 Server. The
installation steps are the same for both 32-bit and 64-bit OS.
After you installed the Windows 2008 server, please make sure that you install all drivers and did
all windows update. Recommended version is Windows 2008 standard edition with latest SP.
Recommended hardware configuration
SQL Server performance is critical in Metus Mam system because all Mam operations are done on
SQL Server database. Therefore the better the SQL server configuration, the better the overall
Mam performance.
OS : Windows Server 2008 standard edition 64-bit with latest SP.
CPU : i7 CPU
RAM : At least 8GB of RAM for 1-5 Clients. 12GB of RAM for 6-10 Clients. 16 GB for 10-
20 Clients. The more the RAM the better the performance.
Disk : System disk and Database disk should be physically separate disks. Database disk
should be at least 80GB and Raid1 configured.

7
Make sure the UAC (User account control) is disabled.
1- Enable desktop experience from Server Manager-> Add Feature.
Restart the server. After restart, the installer will continue configuring this feature. You will see the
below confirmation.

8
2- Run the SQL Server 2008 setup from the DVD. Click the Installation menu from left side.
Click the first option (New SQL Server stand-alone installation or add features to an existing
installation).

9
3- Make sure that all rules are passed.

10
4- After you click Ok, Setup will start installing the setup support files. Failures must be
corrected before Setup can continue.
If you get windows firewall warning you can configure it after the installation. So, if this is only the
warning, you may continue.
Click next to continue.

11
5- In the coming Feature Selection windows, click Select All to check all features.
Click Next to continue.

12
6- Choose the Default Instance from options. For the instance root directory choose the
separate physical disk that you will use it for SQL Server database.
Click Next to continue.

13
7- From the server configuration page, click the button Use the same account for all SQL
Server services. Choose NT Authority\System account. Change start up type to Automatic
for all services.

14
8- From the collation panel choose the correct language, this is very important. Otherwise
you cannot find words with language-specific characters.
Click Ok to close the collation window.
Click Next to continue.

15
9- Choose mixed mode from the option and enter a password for sa user. Please note this
password because this password and sa user will be required when you create Metus
projects.
Add Current User for SQL Administrators.
Click Next to continue.

16
10- Choose the Install the native mode default configuration option
Click Next to continue.

17
11- You don’t need to check those options.
Click Next to continue.

18
12- Click Next if all rules are passed.

19
13- The Installer will progress a while.
After the installation performed, click Next to continue.

20
14- Click Next if all installation is succeeded.

21
15- SQL Server 2008 installation successfully finished. Click close to complete the installation
operation.

22
1.5. Installation of Metus Archive Server (MAS)
MAS setup must be installed and running for archiving files. Follow the steps below for the
installation.
1.5.1. Before the installation .Net Framework 3.5 and VC++ 2005 Runtime must be installed
on your computer. Both setups are in the Requirements-folder in the supplied CD.
1.5.2. Execute the MAS.msi installation file involved in the CD on the computer you will use
as Archive Server and follow the instructions on screen.
1.5.3. On Service Login window, if your computer is connected to a workgroup, input
computer name\username and if your computer is in a domain, input domain name\username in
username field. In the password field, you must input the password for the given username.
!!! The user entered into this field must have Administrator privileges!
1.5.4. Click OK on Service Login window to finish the installation
1.6 Installion of Metus Process Server
To make some process such as transcoding your video files to other formats and creating
proxy, MPS (Metus Process Server) must be installed on your system or on a computer connected
to the network.
1.6.1. Before the installation, .Net Framework 3.5 and VC++ 2005 Runtime must be installed
on your computer. Both setups are in Requirements-folder in the installation CD.
1.6.2. Execute Metus Process Server.msi file on the computer you will use as a Process
Server and follow the instructions on the screen.
1.6.3. In the Service Login window, if your computer is connected to a workgroup input
computer name\username and if your computer is in a domain input domain name\username in
username field. In password field, you must input the password for the given username. The user
entered in this field must have administrator privileges. Click OK to finish the installation.
1.7. Installing of Metus Image Matching Server
For using image matching feature, the relevant server and matcher services must be
installed. Also assets must be indexed. Indexing is performed by MPS, and picture searching and
matching are performed by MIMS and MIM.
1.7.1. Before starting the installation be sure that .Net Framework 3.5 and VC++ 2005
Runtime are installed on your computer. Both setups are in Requirements folder in the CD.
1.7.2. Execute Metus Image Matching Server.msi file and follow the instructions.
1.7.3. In the Service Login window, if your computer is connected to a workgroup, input
computer name\username and if your computer is in a domain input domain name\username in
username field. In password field, you must input the password for the given username. The user
entered this field must have Administrator privileges!
1.7.4. Click OK in the Service Login window to finish the installation.
1.8. Installing of Metus Image Matcher
This is the engine for making the image search. It is installed on the same machine where the
MIMS is installed. The installation is run through the Metus Image Matcher.msi file. Run it and
follow the instructions.
1.9. Installation of Metus Service Starter (MSS) – not compulsary
In case of MAS and MPS or any other Metus services stop for any reason, MSS Service must
be installed to start other services automatically.
1.9.1. Before installation, .Net Framework 3.5 must be installed on your computer.

23
1.9.2. Execute “MSS.msi” file in supplied CD on computer by double-clicking and follow the
instructions.
1.10. Installation of Metus MAM
1.10.1. DirectX 9, .NetFramework 3.5, and VC++ 2005 Runtime must be installed on your
computer. VC++ 2005 Runtime and .NetFramework 3.5 are supplied in the CD. The installation of
.Net Framework 3.5 will take a long time; just wait until it is completed.
1.10.2. Double-click “Metus MAM.msi” file and follow the instructions.
1.10.3. After the installation you will see a Metus MAM shortcut icon on your desktop. Run
Metus MAM by double-clicking the icon.
1.10.4. A window asking username and password will appear. This window shows the
Windows account which you will use Metus MAM with. Input windows log-on user name and
password and check “Remember me” check-box.
1.11. Installation of Metus Online Web Server (MOL)
1.11.1. IIS 6.0 and .NET Framework 3.5 should be installed on the machine which Metus
Online web server will be installed onto.
1.11.2. Then double-click InstallAspNet.bat file in Requirements-folder and follow the
instructions.
1.11.3. Double-click MOL.msi and follow the instructions here.
1.11.4. Right-click on MOL folder located in “C:\Inetpub\wwwroot\MOL\” and click
“Properties” to open Properties window. Remove the “Read Only” check to leave unchecked. Click
OK. Select “Apply changes to this folders, subfolders and files”.
1.11.5. Right click the MOL folder and click “Sharing and Security…” to open the sharing and
security window. On Security tab add everyone user and give full-control permissions. Installation
of MOL finishes.
1.12. Sharing a Metus Archive Project in Metus Online.
1.12.1. Open a browser and type the following into the address bar:
“http://localhost/mol/a_main.aspx”. Metus Online Administration login page will open. Type
admin for the username and admin for the password to login.
1.12.2. From the menu at the left side of the page select Shared Projects. Select Add New
Project to share any archive project. Browse to the project *.map - file. The map file must be
placed in a shared folder.
1.12.3. Open a browser and type the following into the address bar: http://localhost/mol/
(the address that must be typed in the address bar, generally is: http://<Metus Online Server
Name or IP >/mol/). A page with list of shared projects will open. Select the project you want to
log into.
NOTE! For a step-by-step installation (shortcuts included), please refer to Appendix 2 -
Installation Guider.

24
CHAPTER 2:
BASIC TERMS AND GENERAL INFORMATION
2.1 Typical System Design
2.2 Asset
This is the object created from a file. The asset doesn’t exist
physically. It is a virtual object. Different assets can be created
from one file only.
The asset is created in the Metus MAM software by adding
any media object (video file, audio file, picture file, documents,
tape cassettes, books, etc.) and some attributes such as
metadata, category, proxy and storyboard related to this object.
The asset’s appearance in Metus MAM is such as in the picture shown here.
You can play the video files within an asset (double-click the camera sign). You can create
multiple asset versions from one file, rate it, etc.
- “S” defines if the file has a storyboard or not. When the letter “S” is highlighted, it means
that the file already has a storyboard.

25
The Storyboard is a sequence of pictures (frames), taken out from the video movie file. This
can be considered as the video summary presented in pictures. The specified frame can be
recreated each time depending to time range and scene changes. The frame also shows the TC on
which it is placed in the movie-timeline.
With the storyboard’s help, the user can get a previous knowledge of the video even without
viewing it. Also, if the file is not accessible, it is possible to have a general info about its content. In
another scenario, after long time not using the material and forgetting its content, it can be
reminded just by quick overview of this sequence.
- “P” specifies if the file has a proxy or not. Logically, the highlighted “P” means that the file
has a proxy.
The Proxy is
- a lower resolution copy of the master (original) file used in the project;
- it is created by the Metus Process Server in any format wanted (transcoded to);
- logically, the resulting file takes less storage space.
The proxy is used mostly in Server/Client-based workflows. It is used in order to avoid
bandwidth problems. And because it is faster, it is often used in workflows when tape library
archiving is used.
- “I” stays for Index. Indexed files are the ones which are created indexes by the MPS.
- “C” defines if the video file is cut (a clip). A clip is the part cut between the Master In/Out
points.
- “Thumbnail” is the main picture on the screen (here, the car). The thumbnail is usually an
explanatory picture taken from the video content and put as a general preview icon of the asset.
Play On Site - In thumbnail mode, a video asset can be viewed by double clicking that asset’s
icon.
2.3. Bin
The bin can be considered as a virtual folder – in fact, it acts like a folder, as it is a container
for assets (referring to physical files) and subbins (subcontainers inside the upper ones). The
Windows operating system’s folder-logic is adopted.
We distinguish the following types of bins in Metus MAM:
- Generic Bin
Generic bin is a main container for another bins (no matter what types they are) and assets
inside. Absolutely behaving like a folder.
- Dynamic Bin
This is a bin type that monitors a folder in the network (the so called Watch folder) and
automatically creates assets (inside this bin) from the files existing in the watch folder.
From the bin’s Properties menu, the path to the Watch folder is given. Once files get inside
of it, Metus system automatically starts archiving them on the storage, viewing them in the
project as assets placed inside the dynamic bin.
The dynamic bin content is always synchronized with the watch folder content.

26
- Filter Bin
It works as a searching criterion. User can create filter bins according to his needs. Filter bins
are appropriate for automation of most used searching criterion.
In the bin’s Properties dialog you insert the criteria for filter. For example, if the criterion is
“Size>1000K”, all assets which size is over 1000 K are listed in that bin. The users can add neither
assets nor bins into this bin.
When a new project is created, some filter bins are automatically added. These are named
Search bins: Added this week, Unmodified, Large Assets, Most viewed, Most Retrieved and Long
Assets.
- Template Bin
Template bin is a holder for the user templates. The user can add templates to this bin only.
In one project only one template bin can exist. After adding a template in the template bin you
apply various metadata to this template. Further on, referring the template to a bin will result in
all assets, included into this bin, having these metadata automatically displayed.
If you don’t want to use this feature you can disable it from Project menu, Properties tab ->
Others.
- Synchronized Bin
This bin type ensures that the bin contents of projects working on different locations will be
synchronized. With settings specified within the bin properties, each of the original media, proxy
media, storyboard information and metadata info can be synchronized with the target bin fully or
partially. The synchronization is done only in one direction – from the source bin to the target bin.
- Recycle Bin
This is the bin to which all deleted assets are transferred in Metus MAM. Deleted files are
moved to the Recycle Bin before permanent deletion. The physical file in the archive is deleted
only when it is deleted from the Recycle Bin.
2.4. Project and Project File
The project is the backbone of the entire system. It consists of assets, bins, physical files
related to them, information and metadata; and all this - stored in a database. It is possible to
work with a single or multiple projects in Metus MAM.
The project is saved in a not big-sized file, saved on the HDD (no matter local or network
place) which holds the structure of the entire project in Metus MAM. The project keeps all the
relationships between the assets and bins, playlists and filter results. Each new project is empty
but it has its organized general structure imported with the Metus installation.
As the projects in Metus are two kinds: Library and Archive and depending on which one is
running on, the file kept as a project file, has extension relevantly *.mlp (Metus MAM Project) or
*.map (Metus Archive Project).
When Library project is used, the physical locations of the source files don’t change. The
user is working directly with the original files from the place he takes them from. The metadata
and categories are saved to this file via using their assets in the project.
A little bit similar (metadata creation via the asset objects) but definitely different (archiving

27
available) are the things when Archive project is used. The materials that are desired to be
archived are done so either in tape units or other storage units in specified fixed locations. This is
done with predefined Metus Archive Servers rules – before starting using the files in the project
(equal to archiving them on the storage place), the Administrator decides which disks or tape units
to use for this purpose. He creates rule for this and MAS starts archiving on the selected disks and
tape units, according to the criteria observed.
2.5. Starting Page
The names of the recently opened projects, their creation dates and number of connected
users are displayed on this page. Library projects’ names are shown in blue, while Archive
projects’ names are red-colored. You select the project in which you want to work or you can
create a new one. During the work, you can revert to this page at any time by selecting Start Page
from View menu.
2.6. Project Browser
Lists the bins existing in the project. The Project Browser window comes open as default
when a project is opened. If it is not opened, you can make it visible by choosing Project Explorer
option from View menu. In the Project Browser window all objects are displayed in tree-view.
Only bins are shown in this window. Assets are listed in the right window.
2.7. Folder Explorer
The Folder Explorer is like a classic Windows browser. This window lists any video, audio,
picture or document files in the computer or the network, which have extensions for the files
supported by Metus MAM.
Folder Explorer opens automatically as the project opens. If it does not, you can make it
visible by checking Folder Browser option from View menu. The files included in the selected
folder (or drive) are listed.

28
By default, the system drive is not displayed in the Folder Explorer because usually the
operating system installation is there. But if you want to display it, click Options from Tools menu.
Choose the Files from left. Check the box View the system drive in Folder Explorer and then click
OK. In order to hide the system drive, you have to uncheck this box.
2.8. Fields
A Field is the individual item of the metadata structure. The field is the “place” into which
the metadata are entered.
Fields can be defined on a basis of File, Bin or Asset. Depending on the language in which the
project is created, the field description, name or value can be set in this language exactly.
2.9. Metadata
This is the data which defines the objects (assets, bins etc.) in the projects, ensures them to
be managed and includes their characteristics. It is possible to define “metadata” and to input
data as much as required in Metus MAM. And later any of these data can be used as search
criterion.
With the first setup of software some default metadata fields are provided.
2.10. Category
You can assign a category for each asset. As understood from the name, it is a structure
prepared for categorizing assets which have common properties.
The category tree is provided with the system. Additional categories can be added to this
tree by the user, depending on his needs and the workflow. To apply categories to the objects
selected, the user needs to select the relevant category checks.
NOTE! Please, keep attention to the fact that these are not saved as metadata values for
some category-field. These are just for quick search by category.
Example: on Christmas you need to find Christmas programs, shows, movies and songs. So,
just check the category Christmas and all these will be filtered. Further on, you can go on with
filtering, tightening up the group with the resulting assets to exactly what you need.
2.11. Searching
In this window you see four tabs for the each different kind of the search options: Simple,
Advanced, Category and Image. It is possible to search in accordance with criterion specified
within the assets of which metadata were assigned.
2.12. Progress Status
This window shows the progress and the completion status of the processes (archiving,
cutting, deletion and proxy-creation) executed or queued by the system. The progress status
window shows the asset being processed, the process name, progress status, the server process
being running, status and message from the relevant server. In order to get rid of the full list with
tasks, right-click and select Remove All Finished Jobs or just Remove All. From this context menu
tasks can be canceled, too.

29
2.13. Preview Window
This is the tab visible in the right lower window. You can preview the selected asset in this
window and thus avoid opening the assets viewer. Hide/show this tab from the View menu.
2.14. Playlist Editor
This is a playlist organizer. A playlist can be created in order to prepare assets in the archive
for a TV broadcast (for video server). Some external events can be also included. You can transfer
this playlist together with the files included to the broadcast server.
2.15. Requests
In Metus MAM, users can only perform the processes they are privileged for. For a process
they don’t have permission to run, they make a request. …Of course, if they are given a request
permission.
2.16. Messaging Window
Metus MAM enables messaging between the users currently online in the network. For that
purpose a Messaging Server must be selected from Tools -> Options -> Messaging.
2.17. Users and Groups
In Metus MAM, the project manager can create users and groups, and give them rights for
reading, adding, editing, deletion and requests in the project. If there is a domain structure, the
users can also be imported to the project from the Active Directory, too. Thus, the security is
completed in accordance with the rights granted to users and groups. This window is accessed by
selecting Users and Groups from Project menu. There is a hierarchic security structure in Metus
MAM.
2.18. Supported Files
This screen displays the supported file formats by Metus MAM software in the basis of
video, audio, picture, documents and wrappers. It is accessed by selecting Supported Files from
Project menu.

30
2.19. Action History
It is an analyzing tool enabling the processing in Metus MAM in the basis of criterion such as
date, user name, action executed, etc. It is accessed by selecting Process History from the Project
menu. The administrator of the project is using it for tracing who, when and how made changes in
the project.
2.20. Task Administration
Some tasks can be created and these tasks can be assigned to the users in Metus MAM. All
these settings are available in the Task Administration window which is accessed from the Project
menu. You can assign various tasks to the users added in the project and later you can monitor the
completion status of these tasks. This window is only accessible by the users with administrator
privileges.
2.21. Project Summary
The project’s administrator, project type and name, location on the hard disk and statistics
are shown in that screen. It can be accessed from the Project menu.

31
CHAPTER 3: QUICK START
3.1. Creating A New Project
You need to have a SQL Server or Oracle installed in the network or on your computer in
order to add a project in Metus MAM. A new project creation can be started in two ways – either
from File -> New Project or by pressing the New Project button in the Start page. No matter which
one you choose, here are the following steps (with SQL use):
- In the window which is popping up type the name of the project in the Project Name field
and in Location browse for the target path into which the project will be saved. In multi-user
structures, it is important that the location is shared and secured.
3. Choose the project type - Archive or Library and click Next.
4. In the next dialog type the SQL Server’s name. Or you can select one from the drop-down
list.
NOTE! In some cases, your server’s name is not listed even you have SQL server installation.
Try with typing the server name or add \sqlserver (or \sqlexpress) after the PC name. (Consult
your system administrator for SQL server name details)
5. Then type “sa” for SQL username (the default one) and the password set during the
installation of SQL (installed in Mixed mode!). Click Next.
NOTE! In the SQL Server you can create another user instead of SA user and use it. (This
second option is not recommended for users who don’t have required IT knowledge. Also this user
must have DBCreator privileges.)
6. Finally, click Finish in the Summary window, showing the path of the project file and the
project name.
Your new project is ready!
3.2. Opening a Project
In case of the project file is lost, click Tools -> Open Project Without Project File option from
top menu, choose SQL Server and fill the necessary information. Then you can continue to use the
existing project. But it is mandatory to add the file extension (.map or .mlp) while naming the
project.
When you open the Metus MAM, the previously created projects don’t open automatically.
The very first window is the Starting Page and it is listing the recently opened files. You can select
and open the project you want from this list. One-click only is enough. If the project you want to
open is not listed here, you can find it by clicking Open Project from the File menu or by clicking
the Open Project button. Then browse for the relevant map/mlp file.
3.3. Users and Groups
You can create any number of users in Metus MAM and you can provide them different
privileges even on the level of bins and assets. Groups are added for convenience to gather several
people f.e. from one department. Usually, in one group you cluster the people supposed to have
equal rights. Thus, you apply permissions not for each one of them (one-by-one), but directly to
the entire group.

32
3.4. Adding New Bin
- Right-click on an empty field and choose Add New Bin from the context menu. Put some
bin name, choose the bin type and click OK.
- You can also add a folder from your computer or the network as a bin - choose the Add
Folder As Bin option from the context menu in the project you work, browse for this Windows
folder and click OK. Thus, the selected folder is added in the project as a bin and the files included
in the folder are added as assets.
- New bin can also be added via the icon from the toolbar:
3.5. Adding New Asset
Adding an asset in a project can be done in several ways:
- Adding Asset from the Folder Explorer - Open the Folder Explorer window. From its tree-
structure find in your computer or in the network files (such as video, audio, picture or document);
right-click over it and choose the Create Asset option. You can also drag the file to the project.
- Drag-and-Drop from out of the application – Just drag the file you want to create an asset
to from the Windows Explorer to the project you use in Metus MAM. Bins occur from folders,
assets occur from files.
- Adding Asset from the Project - Right-click in the current project and select Add File As
Asset option for adding an asset. From the menu, you must select the file you want to add as an
asset and click the Open button.
- Adding Asset by Toolbar - When you click the Add File button on the toolbar, from the
Windows Explorer window you can create a new asset by browsing for the file for which you want
to create an asset.
-
Archive to a project – archives assets from a library to archive projects. The metadata applied can
be transferred, also.
3.6. Adding a New Field
1. Select the Add New Field option from the menu within the
metadata window.
2. From the opening window choose the language you prefer;
from the Parent Field select the group under which you want to add
the field.
3. In the Name field specify how you want to name the
metadata field. From the Field Type, select the type of the field to
be added and its control type.
4. Finally, click Next button to switch to Field Editing Wizard
window. Set here the properties of your field and click Next button to continue.
5. Check the boxes according to the object types for which you want the created field to be
visible and click Finish to end the procedure.
6. You will see your new added field into the metadata window (in the relevant group) after
clicking on any asset in the project.

33
3.7. Show / Hide Field
With this setting you can specify which fields will
be shown or not in the metadata window in the Metus
MAM. You can open the window by clicking the
Show/Hide Field option from Menu.
You can filter the fields you didn’t want to be
shown by typing their name in the Quick Find field.
Then uncheck the boxes next to these fields and click
OK. Thus, those fields won’t be shown in the metadata
window even they are already applied for the selected
assets. This feature is project-based and changes will
apply to only active projects.
3.8. Adding a New Category
You can add categories previously defined in the Metus MAM system by checking them and
thus applying them to the objects selected in the project.
You can also create new ones.
1. From the Category window invoke the context menu and select Add New Category.
2. Chose the language you prefer and type the name and the description of the category
you want to create and then click OK. At your discretion, you can tint your categories. For this,
select the color you prefer by clicking the browsing button in the Color field and then click OK.
3. Finally click the Close button.

34
You can also edit or delete some the existing categories.
1. Right-click on the Categories window and from the drop-down menu choose Project
Categories.
2. Select a category or a group of categories and click the relevant button – Update or
Delete.
3. Click the Update button in the Categories window.
4. Finally click the Close button.

35
3.9. Preview
Except in the Asset Viewer, you can preview your
video materials in the Preview window in Metus MAM.
This window is shown/hidden from the View menu.
Only proxy files can be viewed on Preview window
as default. If you wish, you can also view the original file in the Preview window. If so, run Options
from Tools menu and from the window appearing choose Preview. Then check the option Play
Original File In The Preview Window If Proxy Does Not Exist. Click OK. Now, the original file will
be previewed there.
3.10. Adding a New Task
The project administrator can assign different tasks to the users in Metus MAM.
1. From the Project menu select Task Administration.
2. Click the Add button in the Current Tasks tab of the Task Administration window.

36
3. In the Create New Task window, set the
priority level of the task (in the Priority field). There
can be also set a day and time the task should expire
- in the Last Deadline field. Type the title and the
description of the assigned task in the Title field and
below that filed, respectively. Creating a date is
specified automatically and cannot be changed.
Click the OK button to close the Create New
Task window.
4. From the users listed below, you can select
the users to whom you want to assign the new
created task and click OK. Then the selected users are
shown in the tasks-assigned users list.

37
CHAPTER 4 – METUS MAM USAGE
4.1. The Start Page
When launching Metus MAM, the Start page opens. It is giving a possibility either to create
a New Project or to open an already existing one. The recently used projects are listed on the Start
Page interface and you just click once at the project you want to open. Another way to open a
project is to browse for its map/mlp file as already explained in Chapter 1.
4.2. Project Creation
The new project creation is invoked
either by pressing the relevant button
from the Start Page or from File menu ->
New Project. A wizard opens for specifying
the settings for the new project. On the
first window you are supposed to type a
project name, the location where the
project will be saved and its type – library
or archive. See these types explanation in
Chapter 1.
NOTE! Please, when creating archive
projects, avoid checking Public unless you are sure of this is really needed in your workflow. If this
check is on, the user can access the archived files via the operating system or via any other
application. This can result in files editing or deletion which is not going to be reported to the
project database. Thus, all the references and information kept in the database could be messed
up. Therefore, each archived file deletion must be done only through the project Recycle Bin.
Here is some more information about working with library and archive projects:
Library Project - From any video, audio, picture or document file you can create an asset on
the local computer or in the network in a library project. Source files are not deleted when created
assets are deleted! You can see the original file location by right-click on the asset and choose Go

38
to place on disk. But if you change the original file’s location, name or path, you cannot access this
file from Metus MAM anymore.
Archive Project - In the archive project, a copy of the original file is created on the archive
disk or on a defined tape cartridge. For more information about configuring the archive disks see
Archive Servers. After that, even if you delete the original file, the file in your archive disk will not
be deleted. One of the most important features of Metus MAM is that the archived files are not
accessible from any program out of Metus MAM. The system uses a tunnel created by it while
archiving the files and accesses them through that tunnel. If you want to use a file from your
archive disk on another location, right-click the asset and choose Retrieve File. As a result, a copy
of this file will be “downloaded” locally on that machine.
The second window is for choosing the database type – MS SQL or Oracle. We go on here
with choosing MS SQL.
The third dialog is a consequence
of our choice in the previous one. Here
we define the SQL settings:
- Server Name is the machine
the SQL is installed on. Take its name
from the drop-down menu which is
listing all the computers in the network
on which MS SQL is installed (add
“\sqlserver” or “\sqlexpress” after the
name, if needed);
- User Name – here we put “sa”,
which is the SQL database default name. The database must be installed in Mixed Mode with
some password specified. For username we leave the default one. Therefore, we put here the
default username (sa) and the password, already set during the installation. Logically, SQL Server
Authentication must be left as a choice (due to the way of installing it).
On the next dialog we select Finish and Metus MAM starts creation of an empty database
and the empty structure for our new project. This is the moment the system automatically installs
the metadata tree, the project categories and the bins we see when opening the project for first
time.

39
4.3. Program Interface
Here is how our new project looks like when we open it for first time:
As we see, it has a tree-structure. Automatically it is installed:
- one Generic Bin for adding here our materials
- one Template Bin to place here our templates
- one Generic Bin is installed to be a container for the six Filter Bins placed there
- a holder for the Requests which are going to be made
- and of course, the Recycle Bin, we already mentioned above.
Generally, the interface is divided in four main parts: upper-left, upper-right, down-left and
down-right part. This interface layout can be changed as per the user’s wishes by drag-n-dropping
each one from the windows and the tabs. After ordering them in the way he prefers, he can save
this as a new layout from the Layout -> Save Layout option. In the Layout menu, there are some
other layouts, already predefined that can be used as per the user convenience.

40
The upper-left part shows two tabs: the Project Explorer and the Folder Browser. The first
one displays the project structure; the second acts like a simple Windows Explorer and it is
browsing the folders on the local HDD or these, available in the network. If you select any folder,
you will see the files included into it in the right side, in the Files tab. Right-click on it and you can
archive the file to the project, you can locate its place on the HDD/network (a Windows Explorer
pops up), etc.
The upper-right part displays the content of the folder or bin, selected in the upper-left part.
The down-left part is the one for searching (four ways for search, the last one is optional – we will
discuss them in details further in that manual). The last part is the most various one as it consists
of 7 different tabs; each one of them can be closed or shown – again as per user’s wishes. These
will be explained in details.
4.4. Users and Groups
Metus MAM, can work on a server-client based architecture. It is possible to create groups
and users having different access levels in Metus MAM.
After opening the project for first time, the current user using it is the one who created it.
And as there are still no users defined, this user is automatically considered as Anonymous. Still he
is the only one working with the project; therefore he is its Administrator. The user, currently
logged in the project, can be seen at the most right-bottom of the page:
In order to increase the project security, a Project Administrator must be defined. For this
purpose, users must be listed before that.
The users list can be updated from the main Users
and Groups window, which opens from Project -> Users
and Groups. Only the Project Administrator can access this
dialog.
- Add button is for adding a new user or group;
- Remove button – press it to delete the selected
user(s) or group(s),
- Properties – changes the properties of a user or
group.
General info about users and groups is mentioned in
Chapter 1.

41
4.4.1. Adding a User
The dialog for defining a new user is
very simple and user-friendly. The fields are
self-explanatory.
In the Groups field you will see a list of
all the groups, created for the current
project. The one you check is the group to
which you make the user belong. Further on,
if the Administrator applies some rights to
the entire group, all the people belonging to
it, will automatically obtain the same rights.
4.4.2. Deleting a User
As already mentioned, from the
Remove button of the Users and Groups dialog.
4.4.3. User Properties
Invokes the dialog with the user’s settings applied during adding him. Select the user from
the users list and click on the Properties button.
4.4.4. Export - Import Users List
You can save the users list you created in .xml format by pressing the Export button. You can
import this list in other projects you created by pressing the Import button there.
4.4.5. Adding Users from Active Directory
If you work on a domain, you can add your users in
active directory to Metus MAM. For this, click the Add
from Active Dir button below in the Users and Groups
window. In the User field type the name(s) of user(s) you
want to add from active directory and click the Search
button. When you find the user you want to add mark
his name and press the Add button. Finish the procedure
with the OK button.
4.4.6. Adding a Group
After creating the user list, the Administrator can create groups and gather the users into
them. When equal rights are given to more than one user, those users are usually added to a
group and the rights are applied to the group, totally. Thus, the procedure is simplified by giving
rights to groups rather than users individually.
Groups creation is similar to the users one. Just select the second tab – for the groups.

42
4.4.7. Deleting Group
For deletion, select the group and then the Remove button.
4.4.8. Group Properties
The group’s summary is seen from the Properties button. You can change the name of the
group and you can change the users of that group, also.
4.5. Security and Authorization
4.5.1. Security Settings for the Project
You can make the security settings as project-based. Thus, these settings will be applied for
all bins and assets within that project. I.e. the settings will reflect the entire project.
NOTE! Administrator
The project administrator is usually only one person. There cannot be more than one
administrator for one project. The Project Administrator is specified from one place only: Project -
> Properties -> Security -> Project Administrator field and he is the only one privileged to browse
in the security settings and to apply changes there.
User’s rights
To make the security settings throughout the project,
click the Security option from the Project menu. Press the
Add button and start adding the users and the groups you
want to define permissions to work with the project. If a
user belongs to a group, which you are going to define
some rights, there is no need to add this user here – he will
take the rights from the group level.
The authorization levels and authorities are as
follows:
a. Read
A user authorized to read can:
���� See bins and assets and navigate around them.
���� See all metadata and categories of bins and
assets but cannot change.
���� Play asset but cannot change. (marking in/out, etc.)
���� See asset’s storyboard but cannot change.

43
b. Add
A user authorized to add can:
Add a new bin, asset or container under a bin if that bin has appropriate authorization.
���� Add any object able to be added under a container if that container is authorized for
this.
c. Edit
A user authorized to edit can:
���� Change bin properties
���� Add or delete metadata to any bin, asset or container
���� Add or delete a category to any bin, asset or container
���� Create a storyboard. Make a thumbnail from the storyboard
���� Edit the asset
���� Mark In/Out
���� Set Master In/Out
���� Set censors
���� Add markers
���� Move assets from one bin to another.
d. Delete
A user authorized to delete can
� Delete any bin, asset or container.
e. Retrieve:
A user authorized to retrieve can:
���� Take an asset from an archive project to a library project.
���� Download a source file of an asset from archive project to the local machine or
another one in the network (ex.: PlayOut system, Editing system, etc.). Retrieveing to a FTP is
possible, too.
f. Request
A user authorized to request can
���� Ask the system administrator to perform a process if the user is not authorized to run
it.
g. Full Control
This is just a quick check for all the checks below. It acts like full-rights check. Only Request is
not checked as it is logical that a person, allowed to do everything has nothing to request for.
Even though, it can be checked, too, if wanted.

44
4.5.2. Security Settings for Bins and Assets
In Metus MAM the Administrator can give different levels of access rights to bins and assets
for the different users as desired. For this: right-click over a bin or asset and choose Security; then
add the user or the users from the drop-down menu and give rights to these users as desired. If
you click Take Security Settings from Up option (in the Security window), the security settings of
the upper bin will be applied to that bin and the assets included in it. Unless something else is
specified, this option is valid by default.
4.6. Logging
When a project creation starts in Metus MAM, there is still not a user added to the user’s
list. The system automatically defines the first one creating the project and working with it as an
Anonymous user. He is the only user of the project and besides, he is its current Project
Administrator. In the low right part of the interface Metus MAM displays always who is logged in
the project so that you can see User: Anonymous written there.
After a user is defined, he can log into the project with its project account (username and
password). Anonymous becomes right-less further on.
Login is done either via closing the project and opening it again (the Start Page) or by
using the Login/Logout buttons from the toolbar. Into the popping-up dialog the user
enters his name with which his account is created in the Project -> Users and Groups dialog. After
the user is logged-in, he can execute only actions included in the permissions allowed for him.
At any time, the user may want to leave the project: he can use the Logout button and will
be logged off. The project remains open but reported as being used by Anonymous again – thus,
nothing can be done as Anonymous is right-less anymore.

45
4.7. Requests
Requests are created in cases the user wants to
execute an action he is not allowed to do. The Requests
are addressed to the project administrator. He is the
person that reads them and up to his disposal he can
approve or reject them.
To precisely explain how the Requests are working
in Metus MAM, it is better to example them.
Example: In Project -> Users and Groups we define a
user Thomas (Thomas Peterson). On next step we run
Project -> Security and for Thomas we allow only two
permissions: Read and Request.
Now using the Login button from the toolbar, we
log Thomas into the project. Let assume that he wants to
rename one asset in the project and to delete another
one. He is not allowed to execute these options (renaming
and deletion), so when he choose Delete or Rename from
the asset’s context menu, a dialog named Request pops-
up. Into this dialog the user comments what and why he
wants to do – he puts his notes here for the
Administrator to read them later. The headline of the
dialog displays for what action the request is created:
Rename, Delete, etc. In the lower part request priority
can be selected: Low, Normal or High. The check Apply
to All concerns the other requests’ priorities – if the
check is on, they all will obtain the priority we set here.
Let apply High priority in our example.
So, finally Thomas created a deletion request for
the first asset (Terminator Trailer) and for the second one
(Swan) he
created a
request to
rename the asset to Swan renamed. After the
requests are created, over the assets appears icon
as shown on the screenshot. It means that there is a
request about this asset.
When the Administrator logs on again in the
project he can see the two assets with their icons for requests. Nevertheless, if he misses to see
them, he can understand about the requests from the relevant bin in the project tree – there is a
Requests bin automatically installed with Metus MAM. Until the moment the first requests are
created, this bin is empty. After that, all the requests are gathered here for Administrator’s
convenience.

46
The Requests bin is divided
basically in three parts: Pending
(here are filtered the requests
which are still not answered by the
Administrator (neither Approved,
nor Rejected)), Approved (the
assets which the Administrator had
approved and thus, been already
executed) and Rejected (these
which running the Administrator
canceled and refuses to be ever
executed).
After the request is created,
it is listed automatically in the
Pending part. Requests there can
be grouped:
- by User - under this node are listed all the users that sent requests to the Administrator.
Select any of the users and all the requests created by him will be displayed on right. The
pencil over the first asset means that this request is about editing metadata; the X-sign
over the second one designates that it is a request for deletion.
- by Object - here are listed all the objects from the project for which requests have been
created). Select any of the objects and on right you can see what the requests have been
created about (what action they ask for);
- by Type - under this node are listed actions for which requests have been created – if
you select Metadata Edit, you will see on right all the requests asking about any
metadata change; if you select Archive Delete – on right will be listed all the requests
asking for some item deletion), etc.
And back to our example. In the by User part we see only Thomas displayed. By object we
have two requests
created – for the
asset Terminator
Trailer and for the
asset Swan. By
Type we have two
actions asking for:
Metadata Edit and
Deletion.
Summarizing:
there are two
requests pending
(created by one
and the same user
- one for deletion,
one for renaming).
Still there are no
Approved
requests, neither
Rejected ones.

47
The Administrator can select any of the requests – no matter from which filter – and in the
Request Details tab (right bottom part of the interface) he will see the details about it – see the
screenshot here.
From the Request Details tab the Administrator gets more info about:
- the name of the object the request is about (Name);
- its place in the project tree (Asset path);
- the user who had created the request (Requested by);
- what action is the request asking for – deletion, metadata editing, etc. (Request Type);
- the status of the request – is it still pending, approved or rejected (Request Type);
- the urgency of the request – is it high, normal or low Priority;
- the Comment directed to the Administrator – the explanation about the need of running
this action;
- the Date and Time at which the request had been created – this is very helpful info in
cases when there are a lot of requests and especially when the requests about assets are
overlapping (conflicting each other). From this field the Administrator can understand
which one is created earlier and which one later.
After the Administrator traces all this info, he can make his decision what to do with the
request – to Approve (Accept) it, to Reject it, to ask (request) more details about it (to the user
that created the request) or just Delete this request and forget about it. All the four options can be
seen in the request’s context menu. Usually requests are approved or rejected, therefore the
quick Approve and Reject buttons are available at the bottom. To help the Administrator makes
his decision, Metus MAM provides him possibility from here – the context menu – to Open the
object (for previewing it) or directly Go to the Object in the project area.
Let us say that the Administrator decided to reject the request about renaming and approve
the deletion one. He selects the first request – for the asset Swan Renamed and chooses Reject.
He selects then the second asset (Terminator Trailer) and Approves the request (either from the
context menu or via the quick buttons below).
In result of this choice, the Approved node is changing– it lists one
approved request: by User it is Thomas that requested it; By Object – it is a
request concerning the asset Terminator Trailer; By Type it was a request
about deletion.
In the moment of approving the deletion request, Metus MAM deletes
the object. As this request is approving
deletion, it means that the object has been
removed. And if we check we shall find out
that the Terminator Trailer asset is
automatically moved to the Recycle Bin, i.e.
deleted.
Due to the choice made by Administrator, the content of Pending and
Rejected nodes is changed, too. The Pending node gets empty and this is logical,
because the requests being listed here are not pending anymore, so they are
moved to the relevant filter node (Approved or Rejected).

48
The Rejected node structure changes, too
– it displays now the request about renaming the
Swan asset. The Administrator rejected this
request, so Metus MAM lists it automatically
here. Furthermore, the name of the asset is
reverted back to Swan only. It is not Swan
renamed anymore (as this was not approved by
the Administrator).
4.8. Archiving
Files can be archived in Metus MAM archive projects only. When the files are archived, a
copy of each file is created in the archive storage. When deleting an asset from an archive project
(if the asset is the only one using this archived file), the physical file on the storage is deleted, too.
If there are other assets using this file, then the file could not be deleted. The user will be warned
by Metus MAM so that all assets are deleted until the last one (as per the user wish).
You have to create an archive project and assign an archive server for this project to make a
real archive. And there are several ways for archiving files in Metus MAM.
Library projects create assets from files but they do not copy file to any storage. Therefore if
the physical source file is deleted or moved, the asset refers to that file cannot be played. So,
library projects do no archive.
4.8.1. Archiving from Library Project
You can archive from a library project to archive project by drag-n-dropping the assets from
the one to the other project tab. This can be done with bins, also.
Another way is to right-click on an asset in the library project and selecting the “Archive…”
or “Archive to…” option. It archives the file to one of the opened (active) archive projects – they
are listed so that the user specifies which one. Also, the archiving options can be additionally
adjusted.
4.8.2. Archiving by drag-and-Drop from Windows Explorer
You can archive folders as Bins and files as assets by dragging them from Windows Explorer
and dropping them into the project area.
4.8.3. Archiving From Archive Project Interface
- Right-click in the project area and from the context menu select Archive file or Archive
folder. A browse dialog opens. Point to where the files and the folders are placed.
- Select the relevant button (Archive File or Archive
Folder) from the toolbar to archive a file as an asset or a folder
as a bin with assets inside.
4.8.4. Archiving from the Folder Browser Tab
The Folder Browser window displays the physical files in your computer or the network. If
Folder Browser is not visible, you can make it visible from the View menu. The displayed files are
shown in the Files tab in Metus MAM.
- You can select the files or the folders you want to archive from the Folder Browser and

49
drag them to the Archive Project.
- You can make the file to be archived in any active (opened) archive project by right clicking
the file and choosing the Archive or Archive To options.
The first one is asking only to which active project to archive. The second provides an
advanced dialog for additional settings to be observed during the archiving process. It consists of
two parts – left and right. In the left part are listed all the opened archive projects and their bins
and sub bins. In the right part is displayed Archiving options dialog, which will be explained further
in this manual.
4.9. Deleting Assets in the Archive
Select the asset(s) you want to delete from the archive project and press the Delete key on
the keyboard or you can use context menu and select Delete. The deleted assets are moved to the
Recycle Bin (temporarily deleted) from where they can be deleted permanently.
NOTE! When you delete assets in the archive project, the source file on the storage is
deleted, too. Don’t forget, it may not possible to recover. Also, the database deletes all the
information about this asset and the references to the other objects, too.
4.10. Retrieve
It is not possible to access a file in the archive
project from out of Metus MAM. Therefore, it is
necessary to take the file out of the Metus MAM to use
it in another application (f.e. NLE editing). Two
scenarios are possible – retrieving directly to a
folder/FTP or retrieving the file to a library
project (which of course is making a local copy
of the archived file, too). And also if required;
only proxy file can be retrieved too by “Retrieve
Proxy…” option.
4.10.1. Retrieve to a Local Folder
To retrieve the file to the local machine
or any computer in the network or FTP, select
the asset, right-click on it and choose Retrieve.
A dialog opens for specifying the retrieval
options:
- In the first text field you set the location
to where the file will be saved. There is a
button to place the file directly on the Desktop
– no need to browse for it.
With the Browse button a folder can be
pointed – choose it either from the network

50
(Browse New) or choose any of the recently used folders.
The file can be copied on a FTP, also. In the text field you define the FTP link. In the User field
– the user name for reaching it. The Password field requires the FTP password. After all the FTP
settings are applied, the connection must be checked with the Test Connection button.
- Override Archive Server and Pull File Instantly – if the archive server cannot access the
folder to write into, Metus MAM will copy the physical file from the storage by itself.
- Retrieve Storyboard – if the asset is created a storyboard, the storyboard will be copied,
also. All the storyboard pictures will be saved in a subfolder in the folder where the local copy is
saved. All the pictures are separate files, with *.jpg extension.
- Retrieve Metadata – if some metadata values are applied to the asset in the project, they
can be copied, too. The copied metadata will be included in one file with extension *.xml in the
folder, set as retrieve location.
- Retrieve Proxy – If the asset is created a proxy, it can be copied together with the original
file being retrieved. The proxy is placed in the folder specified as a location for the retrieval.
Furthermore, you can choose the order for retrieving the file and its proxy - the proxy can be
archived before the original file (Retrieve Proxy First) and also – you can retrieve Only Proxy
- File Naming Format – the place to define the way Metus MAM should extract metadata
values from the different parts of the
filename.
- Attachments – If an asset attached
with some files, these assets can be retrieved
with all or some of their attachment files.
- Trim – you can take only a part from
the file. Generally, three scenarios are
available for retrieving a file: copy the entire
file (without the Trim check); only the part
between the Mark In/Out points and the
third option is to copy the part between the
Master In/Out points.
- Sequence Frames – If the asset you
are trying to retrieve belongs to a sequenced
file, you can retrieve it as a whole or you can
give
- Transcode – the copied file (or the
part of it) can be transcoded to a desired
format. More information about the Metus
System transcoding you can find further in
the manual.
4.10.2. Retrieve to a Library Project
The retrieving to a library project is not only taking a local copy of the archived file, but
placing a copy of its asset in an active library project. Therefore, the dialog for retrieving to a
library project requires both a folder path for the local copy to be placed and a bin from an active
library project to be selected. To make it shorter: here is needed a bin to place the asset and a
folder to copy the file. This is the dialog mentioned:

51
In the left part
are listed all the active
library projects with
their bins and subbins.
From there you must
choose to which
project and exactly
into which its bin the
asset will be placed
(the asset of the file
from the archive
project – the one being
retrieved).
In the right part
should be applied the
settings concerning the
physical file copying.
All of them are already
explained above.
4.9. Deletion in Metus MAM
Deleting an asset in the project will delete the asset and place it temporarily in the Recycle
Bin. If you delete the asset from there (permanent deletion) the system will delete its metadata,
proxy, etc.
If you want to empty a project – delete all its content.
To get free space in the database, delete the non-used metadata fields, custom-created,
categories, storyboards, etc.
To fully delete a project, you must erase all the information which the project had
generated. Here is a small guider we provide for deletion of Metus Projects and database content:
NOTE! Please, note that once the content or the database is deleted with backup files, you
cannot get back any information.
1- Get the Project GUID from Metus MAM menu Project -> Project Summary
2- Delete the content archived. You can find it in the folder named with this GUID. The
folder must be placed on some of the disks chosen in Project -> Project Properties ->
Archive Servers. Please, note that this folder is a hidden one. To show it, open any
Windows folder and choose Tools->Folder Options ->View. From the list uncheck the
option Hide protected Operating System files and choose the option Show hidden files
and folders.
3- Delete the project from the database.
3.1 - Open MS SQL Management Studio (Start -> Programs-> MS SQL 2005-> MS
SQL Management Studio)
3.2 - Connect to the SQL Server that the project database is created on.
3.3 - Select the database. It is placed under the Database node and the format of
its name is like: ARCHIVE_ + <Project Name>
3.4 – Right-click over it and choose Delete.
3.5 – In the pop-up window check both Delete backup and restore history
information for databases and Close existing connections
3.6 – Select OK.
52
4- Delete the database backup files. By default, the backup files location is C:\Program
Files\Microsoft SQL Server\MSSQL.1\MSSQL\Backup. Anyway, you can easily
understand which the database backup location is. Just right-click over the database
name and choose All Tasks -> Backup. The backup location info will be displayed.

53
4.11. Transcoding
As a great priority over the competitors MAM solution systems, Metus MAM provides a
powerful transcoding internal tool. It can be used for several purposes, usually concerned with
transcoding:
- The materials being archived on the storage (in the moment of the archiving) can be
transcoded into a specified format. Thus, the user ensures that all the files he works with will be
one and the same format.
- Any material, already archived on the storage, can be transcoded to a desired format at
any moment.
- Files, being retrieved can be transcoded into the moment of retrieval into the format
chosen by the user.
- And of course, mostly used is the proxy creation format. Proxy files are created by re-
encoding the source file with this internal transcoding tool.
The name of this re-encoding system used is Metus System. Run Tools -> Supported
Processes to obtain more information about the formats supported and procedures possible to be
run over them. This information is also available in that manual as Appendix 3 – Supported
Processes.
If you choose the Metus System to transcode any audio or video material, it opens the
Audio/Video Transcode Profiles dialog which provides the formats you can choose between.
No matter what is the source audio file you can transcode it to AAC audio format or create a
proxy into this format. For video formats you can transcode to: H264, DV, Windows Media, MPEG
and MXF. Each one of them has its levels and sub formats in Metus System.

54
H264
Main
H264.Main(4Cif)
H264.D1
H264 Blue-Ray SD
H264 DVD
High
H264.HDTV 1080i
H264 Blue-Ray HD
H264 HDTV720p
H264 High
Baseline H264.CIF
H264.Baseline
3GP 3GP
AVCHD AVCHD
Flash Flash High Res
Flash Low Res
iPOD H264 iPOD 640x480
H264 iPOD
PSP
H264 PSP 480x270
H264 PSP 640x480
H264 PSP
Quicktime
H264 Baseline QT
H264 CIF QT
H264 High QT
H264 Main QT
DV Microsoft AVI
DV
DVCPro25
DVCPro50
Windows Media
WM9
Proxy
Wmv
MPEG
MPEG-1 MPEG-1
MPEG-1 VCD
MPEG-2 HD
MPEG-2 ATSC High
MPEG-2 Blue-Ray HD
MPEG-2 HD
MPEG-2 HDV1 720p
MPEG-2 HDV2 1080i
MPEG-2 SD
MPEG-2 ATSC
MPEG-2 Blue-Ray
MPEG-2 DVB
MPEG-2 DVD
MPEG-2 I-Frame 30Mbit
MPEG-2
MPEG-2 SuperVCD
MXF
MPEG-2
MPEG-2 HD MXF
MPEG-2 SD MXF
QUICKTIME General QT Default
XDCAM XDCAM EX XDCAM EX 1080i 25Mbps

55
XDCAM EX 1080i 35Mbps
XDCAM EX 720p 35Mbps
XDCAM HD
XDCAM HD 1080i 17.5Mbps
XDCAM HD 1080i 25Mbps
XDCAM HD 1080i 35Mbps
XDCAM HD 1080i 50Mbps
XDCAM HD 540i 8.75Mbps
XDCAM HD 540i 12.5Mbps
XDCAM HD 540i 17.5Mbps
XDCAM HD 720p 50Mbps
XDCAM IMX
XDACM IMX 30Mbps
XDACM IMX 40Mbps
XDACM IMX 50Mbps
If you expand the dialog with the Show Settings button you can additionally precise some of
the formats characteristics (Interlacing, Standard, Bitrate mode, Aspect Ratio, Frame rate, etc)
and thus create your own profile you are tending to often use. Save it as your own profile with the
help of the Save As button. The profile will be listed in the left part of the dialog – below the
others, already existing. Just select it each time you need it.
In case that any of the formats provided by the Metus System is not enough, you can refer
to Carbon Coder as an external transcoding tool that can be involved into Metus MAM. Carbon
Coder is integrated fully with the Metus solution. Its use is optional; of course, the software must
be licensed.
When you want to transcode a file
already archived - right-click over its asset
and select Transcode from the appearing
menu. The following dialog opens (as shown
on the picture).
Metus MAM needs more information
about what to do during the transcoding
process running.
Create New Asset option is for making
a new asset in the project, which will refer to
the new transcoded file. If this option is
chosen, the name for this new asset must be
specified, also in the Asset Name text field
below. Choosing this option will keep the old
asset and its physical file in the project.
Bin can be selected to place
transcoded file’s asset. If a bin is not
selected, as default created asset will be
placed near the source file’s asset.
Attach option is for attaching
transcoded file to source file’s asset. A name
can be written for attached file. It’s the same
name of source file as default.
Change Source File means that you can
change the physical file the asset in the project is referring to with the new one. I.e. if you

56
transcode file A of asset A, the result will be that the asset A will remain in the project but its file
will not be file A but the new, transcoded file. If you choose this option, there is a possibility for
Metus MAM either to save both the two files on the storage (file A and the new transcoded file)
or to keep only the new file and delete the old one (fie A). In the last scenario, the option Delete
old source must be checked.
In library projects, since it does not archive files physically, a folder path should be written to
place the transcoded file physically. It can be local or network. A file name can be written for it or
leave it as default which is same with source file.
As you see from the interface, the Whole File can be transcoded as well as the parts only
between the Mark In/Out points or the Master In/Out points.
The transcoded file format must be specified in the Metus MAM Transcoding System, which
is already explained above.
4.12. Asset’s context menu options
4.12.1. Open – Opens the preview of the asset. This is
equal to double-click on it.
4.12.2. Security… - Choose this to limit the permissions of
the users for this asset exactly. If you do not apply permissions
for separate assets, they take the security settings applied for
the bin they are placed into (by default it is set like this). This is
already explained above in the part concerning the security
settings of the project bins and objects.
4.12.3. Delete – deletes the selected asset. Explained
above in the deletion-part.
4.12.4. Cut – places temporarily the asset in the computer
clipboard.
4.12.5. Copy – places a temporal copy of the asset in the
computer clipboard.
4.12.6. Paste – pastes the content from the computer
clipboard.
If the asset is cut/copied to
another project, this is acting like
retrieval – already explained above. If
you cut/copy an asset to the same
project it just pastes the asset in the
chosen bin.
4.12.7. Select All – selects all the objects in the current bin.
4.12.8. Print – prints a designed asset report on a connected printer
and/or in a *.xps file. When the option is selected, the print window opens:

57
- the Design Report invokes the
dialog into which you specify which
metadata and their values to be
printed. You insert the metadata fields
choosing them one-by-one with the
Add button. You can remove some
fields which are added but unwanted
anymore with the Remove button
(before that – select them). In the Text
Properties part you define the text
color and the font for the text the
report will be written with. The last
part is for setting the Field Column
Width, in pixels.
- Print Settings is for adjusting
the printers and xps-files the report
will be saved to. From this dialog you
define which one is the printer you will
print on, as well as whether the report
will be printed to a file or not (the
check). Pressing the Properties button
opens additional dialog to specify the
layout of the report – portrait or landscape and also – the xps setting for the current printer. There
is also Advanced menu for the paper size to be specified.
If Print to a file is
chosen, you will be asked
for an output name for this
file. Enter some name. The
file will be automatically
saved with this name + xps-
extension and the location
you will be asked for after
pressing the Print button
from the Print Asset dialog.

58
- Page Settings opens the dialog to
precisely adjust the page settings: the page size
and source, orientation (portrait or landscape),
the paper margins (in millimeters) defining the
left, right, top and bottom points.
- Print All metadata is a check to apply all
the metadata fields and their values for that
asset to be visible in the report
- Print Censor data will print the TC in/out
points for the moments the material is been
censored.
- Preview shows how the
report will look like.

59
4.12.9. Export List – Exports
in a xls-file the items from the
project depending on the user’s
choice:
- Selected items exports only the data about the selected assets
- Current page – exports the data of all the assets placed on the current page (when you
choose to preview a set numbers of assets on a page)
- All – all the assets in the Bin
4.12.10. Metadata
This menu is for working with the entire
group of the metadata values applied for this
asset.
- Copy is to temporarily place the
editable metadata values in the computer
clipboard.
- Paste – applies values, pre-buffered in
the computer clipboard to some editable metadata fields.
- Delete All – Deletes all the editable metadata values.
- Export – Exports the metadata in a *.xml file so that they can be imported by another
object later.
- Import – For the selected object it imports metadata values from a *.xml file.
- Regenerate – updates the metadata values at some time (when this option is selected).
This is very useful in some cases when details, referring to the metadata values are changing (f.e.
when the filename is parsed, when the source file is changed and so on).
4.12.11. Index
Indexing of the assets is held
by the MPS. This is not resulting in
some file that you can preview, because this is some kind of internal information for the process
server which is helping it to “browse” inside the video content bit by bit (or frame by frame).
Indexing is needed for the image search. To say it simply: image searching is done only over
indexed materials! Materials, which are not indexed, will not be searched for matches with the
image.
To index a material, you must specify a shared index folder before that. This is done from
Project -> Properties -> Other – Misc tab:

60
The folder must be shared in the network with all permissions allowed.
After that you can start indexing the materials – either from the Index menu -> Create Index
or by right-clicking the I-letter on the asset icon and selecting Create Index. The progress bar can
be watched in the Progress Status tab. After the process is completed, the I-letter is highlighted.
The indexed file is saved in the shared folder set.
Index -> Delete Index deletes the created index file in the shared folder. The I-letter will not
be highlighted anymore. The index is deleted.
If you want to index more than one asset – just make multi-selection before that and then go
to indexing. If your goal is to index all the materials included in a bin, select the bin -> context
menu -> Analyze -> Index. All assets within the will be indexed.
4.12.12. Proxy
As defined in Chapter 2:
The Proxy is
- a lower resolution copy of the master
(original) file used in the project;
- it is created by the Metus Process Server in
any format wanted (transcoded to);
- Logically, the resulting file takes less storage
space.
The proxy is used mostly in Server/Client-
based workflows. It is used in order to avoid
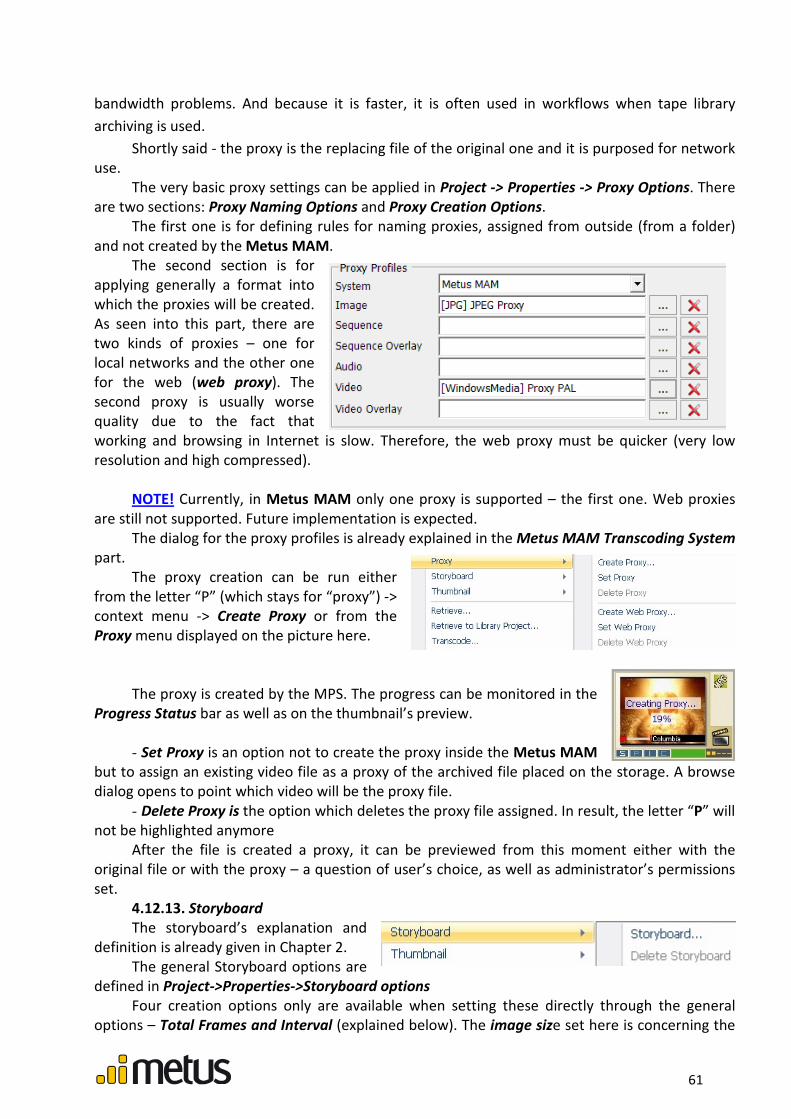
61
bandwidth problems. And because it is faster, it is often used in workflows when tape library
archiving is used.
Shortly said - the proxy is the replacing file of the original one and it is purposed for network
use.
The very basic proxy settings can be applied in Project -> Properties -> Proxy Options. There
are two sections: Proxy Naming Options and Proxy Creation Options.
The first one is for defining rules for naming proxies, assigned from outside (from a folder)
and not created by the Metus MAM.
The second section is for
applying generally a format into
which the proxies will be created.
As seen into this part, there are
two kinds of proxies – one for
local networks and the other one
for the web (web proxy). The
second proxy is usually worse
quality due to the fact that
working and browsing in Internet is slow. Therefore, the web proxy must be quicker (very low
resolution and high compressed).
NOTE! Currently, in Metus MAM only one proxy is supported – the first one. Web proxies
are still not supported. Future implementation is expected.
The dialog for the proxy profiles is already explained in the Metus MAM Transcoding System
part.
The proxy creation can be run either
from the letter “P” (which stays for “proxy”) ->
context menu -> Create Proxy or from the
Proxy menu displayed on the picture here.
The proxy is created by the MPS. The progress can be monitored in the
Progress Status bar as well as on the thumbnail’s preview.
- Set Proxy is an option not to create the proxy inside the Metus MAM
but to assign an existing video file as a proxy of the archived file placed on the storage. A browse
dialog opens to point which video will be the proxy file.
- Delete Proxy is the option which deletes the proxy file assigned. In result, the letter “P” will
not be highlighted anymore
After the file is created a proxy, it can be previewed from this moment either with the
original file or with the proxy – a question of user’s choice, as well as administrator’s permissions
set.
4.12.13. Storyboard
The storyboard’s explanation and
definition is already given in Chapter 2.
The general Storyboard options are
defined in Project->Properties->Storyboard options
Four creation options only are available when setting these directly through the general
options – Total Frames and Interval (explained below). The image size set here is concerning the

62
pictures sizes in the storyboard. It can be
additionally changed for the different
assets storyboard creation. If the Keep
aspect ratio check is on, these two controls
will be locked to each other.
The last check in this dialog is for
pictures additionally added to the
storyboard content. If the check is on,
these pictures will have the same size as
the other ones – already placed in the
storyboard by Metus MAM. Otherwise, the pictures will be imported with their original size.
- To Create a Storyboard
either right-click on the asset
icon’s letter “S’ (stands for
storyboard”) or run the creation
from the asset context menu ->
Storyboard -> Storyboard.
A dialog opens providing
four different ways to create the
storyboard.
= Total Frames – here you
set the number of the frames to
be included in the storyboard.
E.g. if you set here “8”, Metus
MAM will divide the entire video
in 8 equal parts and will place in
the Storyboard the first frame
form each part.
= Interval – if you choose
this option you must apply some
time interval, f.e. 10 seconds.
This means that Metus MAM will
take one frame on each 10th
second from the video material
and put it in the storyboard.
= Max Scene Changes – if
you set here the digit 6, Metus
MAM will find the six scene
changes which are more
effectively changing (the six
general scenes), i.e. the scenes
changes mostly visible by the eye
and will take the first frame from
each one of them and place it in
the storyboard.
= All Scenes – Will take the
first frame each time the scene is

63
changing.
= Size – the size of the pictures in the Storyboard. From the general storyboard settings can
be specified whether these two controls – the width and the height to be locked so to keep the
aspect ratio.
- Add picture - enlarges the storyboard content by adding more pictures into it. The user
selects which pictures to be additionally added via the browse dialog which opens. Pictures are
added at the end of the storyboard (after the last picture).
- Export – Exporting the storyboard content into one jpg-file in a folder, chosen by the user.
All pictures or chosen pictures can be exported by using Export All or Export Selected Frames.
Each frame in the exported storyboard is shown with its TC. The storyboard content looks like this:
In the storyboard window, a separate picture can be selected and from its context menu
these can be done:
= Set as thumbnail – sets the selected picture to be a thumbnail for the asset.
= Export – this picture can be exported as a separate jpg file.
= Delete – deletes the selected picture. This is usually applied to black frames and not
good-quality pictures.
The Storyboard can be created for a multi selection of assets by selecting them and choose
Storyboard -> Storyboard creation. This will create storyboards to the assets as defined in the
storyboard general options.
For all the assets existing into a bin, storyboards are created from the bin context menu ->
Analyze ->Storyboard.
4.12.14. Thumbnail
The thumbnail general explanation is already mentioned in Chapter 2.
Thumbnail general setting is only one – offset, and it is adjusted from Project -> Properties ->
Other -> Thumbnail:
The offset format is hh:mm:ss:fr . It presents the moment from which a frame will be
“taken” and put as a thumbnail to an asset. This is in order to avoid the black-framed-thumbnails
(most of the video materials start with a black frame).
Thumbnails can be created
in three ways:
- (Multi) select asset(s).
Context menu -> Create
thumbnail. Thumbnails are created according to
the rule, specified in Project -> Properties ->
Other -> Thumbnail Offset.
- Select an asset and open its video in the
Viewer. Move the slider over the timeline.
Choose a frame from the preview window. Set

64
this frame to be a thumbnail with the button Create thumbnail from current frame or right click
over cursor and click Thumbnail.
- Open the Storyboard of an asset. Select a frame from the storyboard and right-click over it.
Choose the Set as Thumbnail option (already described in the storyboard section).
The second and the third ways to create a thumbnail are for a separate asset and with them
you can choose more proper and explanatory thumbnail.
4.12.15. Retrieve
Already described in section 4.8 (detailed - 4.8.1).
4.12.16. Retrieve Proxy
This is basically same thing with “Retrieve”, just as a shortcut it comes out with settings to
retrieve proxy without original file. Therefore, this option can be used when onlt proxy file is
needed to retrieve.
4.12.17. Retrieve to Library Project
Already described in section 4.8.2.
4.12.18. Export Using Template
Templateler hakkında bir bilgim yok.
4.12.19. Send to Playout Server
4.12.20. Transcode…
Already described in section 4.10.
4.12.21. Prepare Asset
As already said above, an asset cannot be previewed out of Metus
MAM. The preview is done only inside the project with the help of the
Viewer. But sometimes it is needed the asset’s file to be opened with another
application. In such cases, the Prepare option must be used.
From an asset’s context menu choose Prepare. The Metus MAM client
machine starts automatically creating a temporal local copy of this file. The
process progress can be monitored in the Progress Status tab. The temporal copy of the file is
placed in a folder, predefined in Project -> Properties -> Prepare asset.
After completed, the asset automatically is put an icon named Ready. While this icon is on,
the assets can be previewed in other applications, out of Metus MAM (usually with programs
defined in Windows as default for opening the file with). Just double-click the asset and you will
see how it happens.
Until the Ready sign is on, you can open the file
from the local folder with any other application (f.e.
NLE Editing software) and make changes into it. As
soon as you select to save the changes in the other
software, Metus MAM understands this and pops up
a dialog asking you what to do with the file on the
storage. The new edited file (local one) you can
Archive as a new Version of the Asset (see Versions section explanation) or you can Replace the

65
old archive copy of the Asset with the new one. Each time you make changes in the NLE software
and you press Save – this will repeat. Finally, no matter what is your choice, you can select to
delete the local file with the option Delete the file after archiving.
At any moment you can go back to the project and use the asset again. The Ready sign is still
here to remind you that it is still referring the local copy. To go back using the archived one, just
select the asset, right-click over it and choose Delete Local Copy – thus, you start using again the
copy on the storage (if you double-click the asset, the file should be previewed in the Viewer
application).
Please, read also the Project -> Properties -> Prepare Asset explanation.
4.12.22. Change Source File
First, take a look in the Transcode section (4.10) – the latest explanations (as this is an
option from the Transcode menu, also).
Changing the source file is needed sometimes to replace the source file of an asset. The
source file is the file which is opened in the Viewer when double-clicking over the asset. This file is
placed on the storage. It is the archived file. In some workflows this file is retrieved locally to a
client’s machine and edited in a NLE program. The edited file is a new copy of the archived file. But
it is not placed on the storage – it is placed on the local client’s machine. The client can archive it
via drag-n-dropping it into the project. But this will create a new archived file (the edited one) on
the storage and a new asset in the project. The goal is not this one. The goal is to replace the first
archived video (not-edited) with the edited one and the asset must remain the same. Therefore,
the Change Source File option is available. Choose it and a browsing dialog will open to point the
new file. When you select it, the following dialog will open:
This dialog provides the
possibility to keep the first copy of the
file (not-edited) as a version of the
asset. At this version you can revert
back at any moment, if you want. (See
the Versions section further in the
manual).
If you select YES the version will
be saved.
With NO you choose to have only the new version of the source file. This will delete the old
(not-edited) copy totally from the storage.
NOTE! Please, keep in mind, that when you choose NO and later try to revert back to this
version, the source file will not exist anymore. The asset will become inaccessible and a “X” mark
will be placed over its icon.

66
4.12.23. Move to HSM Unit
This option sends the source file from the
storage to the tape drive (or library) connected to
the system. Additional dialog opens asking for any of
the options below to be run:
- Assign secondary sources as primary is
chosen in case that the file being moved to the tape
has double copy and you want to make its
secondary copy appears as primary
- Delete secondary sources will delete the secondary files in order to keep the reference
with only the files being moves to the tape.
- Archive secondary sources to tape will not only move the source file to the cartridge, but
its double copy – too.
- Archive Proxy to Tape is the last option in the dialog. It means that the already existing
proxy will be moved to the tape, together with the source file being moved.
4.12.21. Create Secondary
Copy
This is in order to make a
second copy of an archived file, for
security reasons.
When you select this option the
following window opens:
So, you can choose where to
save the secondary copy – Disk
(drives from archive server), Disk Set
(a disk from the archive storage), a
Computer in the network.
You can leave the choice to
Metus MAM by checking the Choose
best location option.
Save my selection as default will always choose the selected location to be a place for
keeping the secondary copies.
After you apply your choice, Metus MAM starts creation of the new copy – it will be named
double copy:
Once the double copy is created, the asset already has two copies of the archived file to
which it is pointing. On its icon additional sign appears – two red dots. Its metadata field “Has
double copy” is checked on and its context menu changes to the one as shown on the screenshot.
At any moment you can delete any of the two copies (either the primary or the secondary).
Activate Secondary Copy will open the doubled copy from its
location when double-clicking over the asset, i.e. the Viewer will preview
the secondary copy. This is used when the first copy is offline. If
available, Metus MAM just changes the places of the First and the
Secondary Copy – the first one becomes secondary and vice versa.

67
4.12.22. Show Versions
Versions are the separate statuses the asset and the file related go through. When a change
occurs to an asset or the related file it is count as a version. These statuses are considered as old
information and they are kept so that can be restored at any moment, if required. If versioning
option is active for an asset, “V” letter turns on its icon (same like “S”, “P” and so on).
If you choose
the Show Versions
option from the
asset’s context
menu, it will open a
window with all the
versions available
for the current asset
– it reflects all the
changes made with
the asset and the
related file. The
older is the version,
the upper it is listed.
New versions are
appended at the
end of the list. The
first line of the text
listed explains
shortly what change
generated this
version exactly.
As seen from the screenshot, you can:

68
- Delete a selected version (this process is applicable only for metadata versions and such,
related to the source file)
- Locate the asset in the project
- Revert back to this version (which will cancel the changes made after it).
- Show the differences in the metadata with the previous version.
With the All Versions check you will preview all the changes made.
If only the File Versions check is left on, it will show all the versions related to the asset’s file
only. A file version is also the change of the source file – if you choose to select the old source as a
version. This is already explained above in the manual.
Asset versions check will filter only the changes
with the asset (f.e. when copying an asset inside the
same project. The new asset performs versioning of
the old one).
If only the Metadata Versions check is applied
it will list the versions generated due to metadata
changes. To see the Metadata Versions, before that
you must “tell” Metus MAM to log them in this form,
also. Metadata Versions menu is activated from the
asset’s context menu -> Properties -> Turn on
Metadata Versioning
NOTE! The database may increase seriously
when metadata are changing. This feature is disabled
by default and should not be enabled, unless it is
necessary.
4.12.23. Show Related Assets
Opens in a separate tab all the assets related to the selected one. A related asset can be
such which is created as a copy from the current or is the one from which a copy is created (and
the current asset is that copy).
4.12.24. Properties
Opens the asset’s Properties dialog on which some detailed information is displayed. All this
info can be seen also in the Metadata tab in the relevant fields: Asset name, Source File, Asset
Age, View Count, Retrieve Count, Popularity and Status.
The Turn on Metadata Versioning is already described above in
the manual.
Protect Asset locks the asset against deletion until this check is
on. A shield sign is placed over the asset when it is protected. Only the
owner of the protection and the Administrator can unlock the asset.
4.13. Metadata in Metus
Here we come to one of the main topics in one media asset management system.
Metadata is the information describing everything about an asset or file. This information is
loaded in the relevant metadata fields. What we put as information in these fields, we call

69
metadata values.
In Metus MAM, each object has its metadata. These metadata are kept in fields. The
metadata are used to classify the objects according to their features and to reach the assets
according to certain features during the work. Each project has its metadata fields.
NOTE! Metadata fields are editable only by administrators.
The Metus MAM installation automatically provides a big tree-structured metadata base.
The client can browse into it and use the provided fields as per his needs. The fields are ordered in
groups and subgroups.
There are some metadata values which are automatically recognized by the system (system
metadata) and others that are possible to be manually inserted (describing metadata). For filling
up some describing metadata, new fields can be created in addition to the ones already installed
with Metus MAM.
And one more remark – the fields, which text is red-colored are these that cannot be
modified. The values they are loaded in are recognized automatically by Metus MAM and cannot
be changed. On the opposite, the blue-colored-text metadata fields hold values that can be edited
by the user. Such values are Name, Rating and so on.
The fields, created by the user, can be edited (according to the permissions given during the
creation) and the text in the field can be any color – the user defines this during the metadata field
creation.
4.13.1. Metadata window
In the right-down part of the Metus MAM interface, select the Metadata window. This is a
detailed dialog with a lot of options and menus provided. If the window is not active (closed) you
can open it either from the View -> Metadata or with the shortcut key F4. The dialog is divided in
separate tabs. Each tab presents a group with fields, i.e. the fields are divided in tabs as per the
groups they belong to.

70
4.13.2. Filtering the Metadata Window
There is a possibility to list all the fields in one tab only. This can be processed by pressing
the Show All Metadata in One Tab button. To revert back to the old preview – in tabs, just press
the same button again.
On the other hand, the tabs can be displayed in
different windows or in one window (as it is by default).
To display the tabs in different windows uncheck the
Order All theTabs in One Window option from the menu
popping-up from the Tab Options button.
The option Remove Empty tabs is checked by default and this is in order not to display
groups with fields that none values are loaded into.
Locate Search Values displays automatically in the metadata tab and marks in green color all the
values which answer to a search criteria.
For example, let us search in our project for all the assets which have the word “trailer”
existing in any metadata field of the assets. All the results are listed in a separate tab in the project
area. This is called Search Results tab. If we select any asset from this tab, down in the Metadata
window we shall see immediately where exactly the match is done – the relevant tab opens.
Furthermore, the fields which are containing the word “trailer” are green-colored:
The last button in the metadata toolbar offers other metadata window filtering options:
- Show Empty Fields - When you add a
new metadata field and this field is set to come
without a value, by default, the field will not be
added to the metadata window. Checking this
option will make the field appears even
without a value.
- Show Default Values – This concern the system fields installed with Metus MAM. Select
this option if you want to have these fields visible.
- Show Read-only Fields – Displays in the window the non-editable fields, too. The user is
previewing them only for getting needed information. No one can change such fields’ values.
- Show Total Values in Case of Multiple Selection – This is for values which can be summed.
When several assets are marked in the project area, fields like Duration, Age, View Count, etc. will

71
show as a value the result from the sum of the values from the separate assets.
If you select an
asset from the project all
its metadata are listed
down in the metadata
window, in the relevant
tab (group). Sometimes,
it is possible that the
metadata field you need
to look into, is not
displayed in the tab. To
quickly add it, just open
this tab and choose the Add button from the metadata toolbar. All the non-displayed fields from
that group will be listed so that you choose which one to make visible.
A new template
can be applied by “Apply
Template” button. More
information will be
explained about
templates at the
templates sections.
On the picture
shown, the Asset group is not listing the following metadata fields: Kill Date, Life Time, Mark
Points, Description and Mark GUID. If you want to see some of these fields just click on it. If all the
fields are needed to be shown, then select Add All the Fields option.
The next button from the toolbar provides two options:
- Add or Update Instantly – checked, by
default. This check makes inactive the next two
buttons on the toolbar because if it is put, any
metadata change you undertake will be applied
immediately – without questions. If the check is
not put, then you can use the next two buttons
on the toolbar.
- Delete Instantly – deletes immediately (without asking confirmation) whatever you delete
in the metadata fields or values.
- Save – This one is active only if the Add or
Update Instantly check is not put. Apply the changes
you wish in the metadata fields and values and at any
time save them by pressing this button. When you save
the last changes you cannot discard them anymore.
- Discard Changes - This one is active only if the Add or Update Instantly check is not put.
The last applied changes can be canceled from here. If you Save them, you cannot discard them
anymore.

72
4.13.3. All Fields (the metadata tree)
From the Metadata tab run the Menu and select All Fields. This will open a separate
window in which all the metadata fields are shown (can be opened also from Project –> Fields ->
All Fields).
You can Collapse All the fields to preview the main groups only and go back to the full list by
Expanding All the fields again. This is convenient for browsing in a separate group - first you
collapse all the fields and then you expand the content of this group only.
This is the list of the metadata fields installed with Metus MAM. You can create your own
fields and add them to this list. The creation wizard can be invoked with the Add button. It
becomes active after selection of the group into which the field will be created. The next button –
Edit, is for editing the characteristics of the field selected. Logically, Delete will remove a selected
metadata field from the list.
The tree is very big and if you need to find some field, you may get lost in scrolling. In order
to make this process easier, type some part from the field’s name in the Quick Find field and all
the fields which have this part in their name will be filtered immediately. As more letters you type,
as less filtered fields remain in the list.
Another way to decrease the number of the fields displayed is to put the check Show Only
Custom Fields. It will list only the fields created by the user.

73
You can load all the metadata fields existing in this tree into a *.xml file and Export them so
that they can be imported into another project via this *.xml file. The Import button is loading
such *.xml files into the project, replacing the current tree with the new one, which the *.xml file
brings.
Move Imported Fields – Imports in the current project’ metadata tree all the metadata fields
coming from outside. These are coming together with any assets from another project being
copied into the current one. If the asset has values for these metadata fields (not existing in our
project but existing in the other one), the current tree is opened to obtain these fields in its
structure, too. Thus, the asset description will not be lost.
For each metadata field added to the project metadata tree, it is obligatory to select (during
its creation) for what types of project objects this metadata should be applicable – bins, assets,
playlists. If it is purposed for assets – you can even choose for what types of assets – video, audio,
image or document. This is presented with the checks in the columns on the right.
4.13.4. New Field Creation (Adding a field)
There are three ways to invoke the Field Editing Wizard –
the one which is helping during the metadata creation
- From metadata window -> Menu -> Create New Field
- From Project -> Fields -> Create New Field
- From the metadata tree -> Add button
No matter which one you open, the wizard opens and starts guiding you.

74
The first thing to be specified is the Language into which the field will be named and values
will be entered. Metus MAM is supporting up to six languages for this purpose. I.e. you can enter
values for one metadata field in max. six languages.
You define the languages from Project -> Properties – Languages. Just
open this dialog and click over each language so to rename it to the desired
one.
NOTE! After defining the languages, you must restart Metus MAM so
that the system refreshes this information.
To have the possibility to enter values in different languages, when
creating the metadata fields, choose Project -> Properties -> Other -> Enable Multi language
content.
Example: Let assume we are going to use the following languages: English, Turkish, Russian,
French, Bulgarian and Spanish. We want to create a metadata field named “Person ID card status”.
Let say that this refers to whether the person had already obtained his ID card or still not. If he did
take his card, then the status will be “Obtained”. In English it will be “Obtained”, in Turkish –
“Kazanılmış”, in Russian – “Взял”, in French – “Reçu”, in Bulgarian – “Получил” and in Spanish –
“Entregado”.
In our project this will be entered like this:
Create the field and choose the language from the so-named drop-down menu at the
bottom of the metadata window (you must remove the Lock check next to it). Then apply its value
in the field. So that whatever language you choose, it shows the value in the relevant language.
In Spanish it will look like:
In French it will look like:
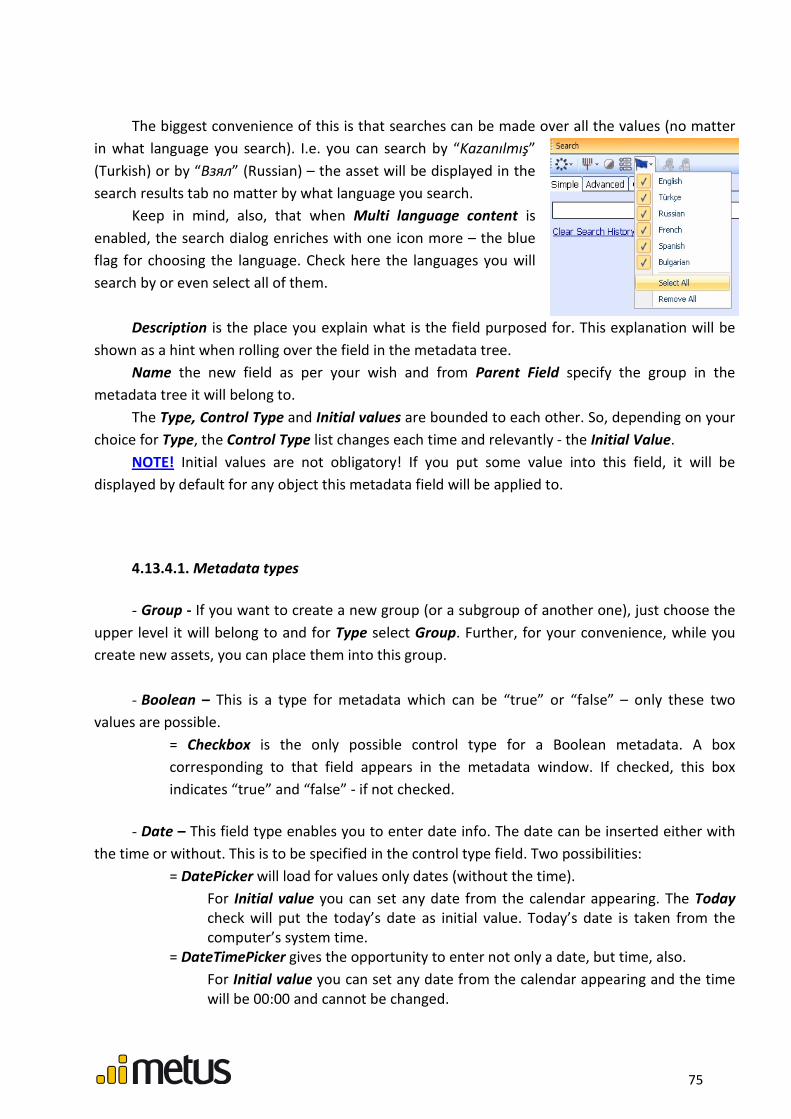
75
The biggest convenience of this is that searches can be made over all the values (no matter
in what language you search). I.e. you can search by “Kazanılmış”
(Turkish) or by “Взял” (Russian) – the asset will be displayed in the
search results tab no matter by what language you search.
Keep in mind, also, that when Multi language content is
enabled, the search dialog enriches with one icon more – the blue
flag for choosing the language. Check here the languages you will
search by or even select all of them.
Description is the place you explain what is the field purposed for. This explanation will be
shown as a hint when rolling over the field in the metadata tree.
Name the new field as per your wish and from Parent Field specify the group in the
metadata tree it will belong to.
The Type, Control Type and Initial values are bounded to each other. So, depending on your
choice for Type, the Control Type list changes each time and relevantly - the Initial Value.
NOTE! Initial values are not obligatory! If you put some value into this field, it will be
displayed by default for any object this metadata field will be applied to.
4.13.4.1. Metadata types
- Group - If you want to create a new group (or a subgroup of another one), just choose the
upper level it will belong to and for Type select Group. Further, for your convenience, while you
create new assets, you can place them into this group.
- Boolean – This is a type for metadata which can be “true” or “false” – only these two
values are possible.
= Checkbox is the only possible control type for a Boolean metadata. A box
corresponding to that field appears in the metadata window. If checked, this box
indicates “true” and “false” - if not checked.
- Date – This field type enables you to enter date info. The date can be inserted either with
the time or without. This is to be specified in the control type field. Two possibilities:
= DatePicker will load for values only dates (without the time).
For Initial value you can set any date from the calendar appearing. The Today
check will put the today’s date as initial value. Today’s date is taken from the
computer’s system time.
= DateTimePicker gives the opportunity to enter not only a date, but time, also.
For Initial value you can set any date from the calendar appearing and the time
will be 00:00 and cannot be changed.

76
- Number – A type for numeric values.
= TextBox control type is giving a possibility to put such numbers which include letters,
also. F.e. sometimes people use counting like A1, A2, A3, etc.
= NumericBox is for entering any numeric value.
The Initial value can be any digit, starting from “0”.
= CalculatorBox is for values which must be frequently updated according to some
calculations. When you select such a metadata in the metadata window, a calculator
opens and you make the calculations inside the calculator. The result of these
calculations will remain as a value. I.e. the value is calculated in its field.
= DropDown control type will open a menu to choose a predefined package with
values. You can choose only from these definition packages which are categorized to
be from number type. Definition packages will be discussed further in that manual.
Values in metadata fields with drop-down control type are loaded by choosing one of
already predefined values.
= ColorBox puts any color as a value in the metadata field. The color can be either
selected from a palette or set via its values for red, green and blue which are added
manually.
- String – In such control type any value can be added. It is a type for numeric values.
= TextBox any character (letters + digits) can be set as values for such type in the
metadata window. The value will be placed in one row only.
= MemoBox is the same as TextBox. This control type provides more rows for placing
the values. If a MemoBox is selected, the wizard is giving a possibility to define the
rows number.
= DropDown control type will open a menu to choose a predefined package with
values. You can choose only from these definition packages which are categorized to
be from string type. If you choose the package “Countries” (f.e.) for initial value you
can set one of the countries already listed in the package.
= MultiValue – if this type is applied, for that metadata field in the metadata window,
several values can be loaded. You enter the values in the metadata window, in this
metadata field, in the place values are entered in, in a form opening for this purpose.
Values are entered one-by-one. Finally, you apply them. Even that all these values are
entered in one field only, Metus MAM can make searches over these values with any
of the AND/OR logics. The idea is that some of these values will be entered as values
for another metadata field, also.
Example: if we have a field “Stars” with value: “Brad Pitt, Al Pacino, Steven
Spielberg, Mel Gibson” and we have another field “Producer” with value:
“George Lucas, Mel Gibson, Steven Spielberg”, we see that Mel Gibson and
Steven Spielberg are values which are repeating. Sometimes are needed
searches for people who are actors and producers in one and the same
movie. Metus MAM gives the opportunity to make such a search. Thanks
to the multivalue control type, we can freely add all the values in the field.
Another good example for using this control type is the cases when we
need to enter keywords.

77
= Checked List is a type for fields into which several values can be checked. You must
predetermine the content for this field in a definition package. Later, in the metadata
window, when you click on the drop-down box next to this field, your predefined
content will appear as selective boxes. You can set more than one choice for this asset
by checking more than one value from the list.
= Link –whatever you type here is observed as a web link. It is blue-colored text,
underlined. You can access that link by double clicking on the address.
= E-mail – A field for e-mails insertion. Double-clicking on this value will automatically
open the default e-mail client application in order to write and send an e-mail to this
address.
- Time – This field type enables you to enter time info.
= TimePicker will load for values only time-format values. All the control values are
observing the time-format rules.
For Initial value you can set any time you wish. For getting the current time from
the PC system clock, just put the check Time.
- Text – This field type enables you to enter characters with no limitation. Text field type can
contain any value.
= MemoBox is the only control type that can be selected.
NOTE! Digits can be inserted but even though they could not be used in advanced search in
arithmetical criteria.
- List – This is a type allowing the user to enter several describing metadata values in one
metadata field only. The control type of the field is not just row(s) but cross-reference of cells, for
convenience combined in one single table. Thus, the values are organized in a compact way.
= List is the only control type available and used.
Example: Let assume it is needed to
apply an asset several IDs, names,
creation dates for these value. In that
case, the metadata field creation will
look like:
The Add/Remove buttons are
purposed for adding a new field to the
list or delete a selected one. Each field
added, can be set a default (initial)
value, can be set to be read-only and
specified to be visible or not. This is to
be pointed with the checks in the
columns to the right.
Show Row Count defines
whether the row number will be
shown in the table or not.

78
Show Marker Out As Column option enables that marker in and marker out will be showed
in same raw but different columns. If this option is unchecked, mark in and mark out metadatas
will be showed in same columns but different raws.
In the metadata window, this metadata field content looks like:
You can enter as much rows as you need with the help of the Append/Delete buttons – down in
the toolbar.
- Image – Values, entered for such type of field are pictures. Can be used for putting here
the storyboard (let say if the metadata field is named “storyboard content”. It can be also a little
face-picture of a person answering to a field named “photo”, if the asset is related to somebody’s
data, etc.)
= Image is the only control type available and used.
- Image List – Similar to Image type. The values in that type are listed in a predefined
package from Image type (Definition packages are described further in the manual).
= Image List is the only control type available and used. The Definition Package must
be selected in the list with the lists already predefined.
Image List values can be used in different scenarios. The main idea is to have a drop-down
list with a lot of pictures to choose between, like shown on the screenshot here:

79
- RTF – Stays for “Rich Text Format”. In fields from this type you can enter any rich text
content.
= RTF Editor is the control type available and used.
When filling values in a field from that type, a simple RTF editor opens so that you can insert
text and pictures and make some formatting:
- Decimal – For fractions values insertion. On the next page of the wizard, you can set the
number of the digits after the decimal point. Can be selected one of four control types:
= TextBox - already described;
= NumericBox – described above;
= CalculatorBox - described, too.
= DropDown – described.
- Set – The user selects some fields (already existing) and shows them in one tab only. The
tab is named as per the name defined for this set. It is just like grouping metadata fields in one tab
(set).
- Autonumber – This is a read only metadata field. Starting value and increasing amount can
be adjusted from settings. The first asset added to library will be given the initial value for this
value. After that, next asset’s metadata will be last value plus increasing amount.
For example, initial value is 4 and increasing value is 3, so first asset’s metadata will be 4,
next one 7, next one 10 etc…
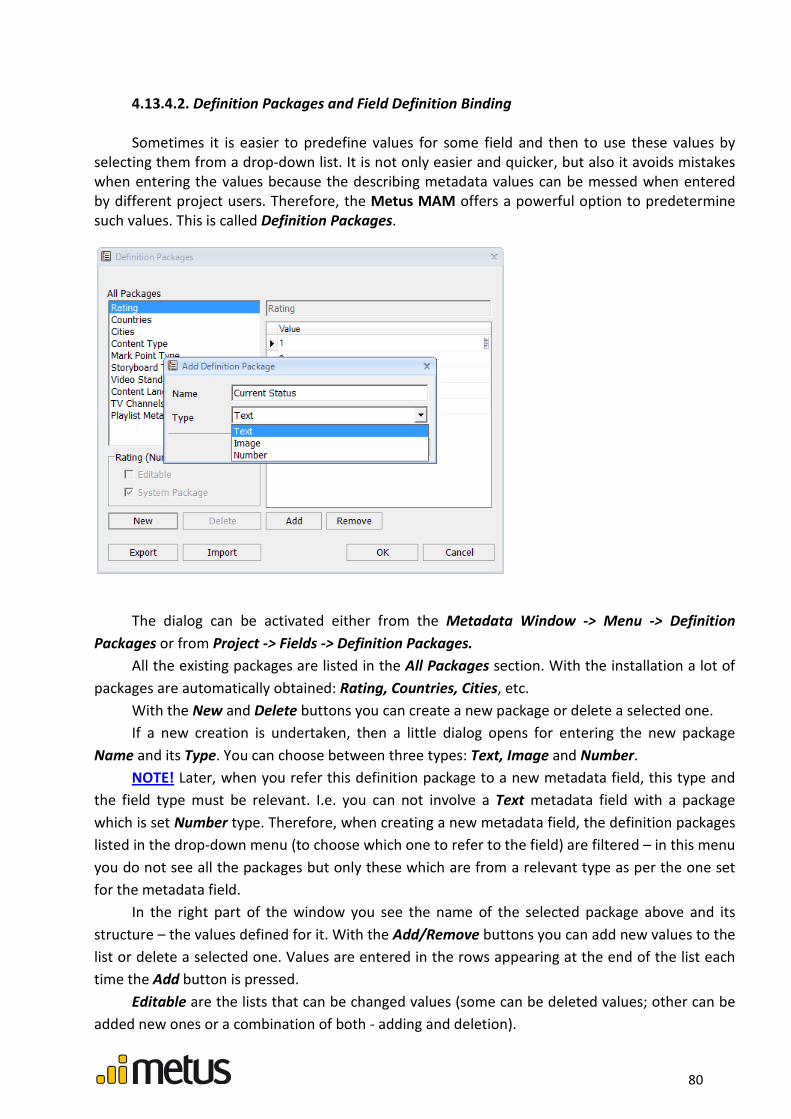
80
4.13.4.2. Definition Packages and Field Definition Binding
Sometimes it is easier to predefine values for some field and then to use these values by
selecting them from a drop-down list. It is not only easier and quicker, but also it avoids mistakes
when entering the values because the describing metadata values can be messed when entered
by different project users. Therefore, the Metus MAM offers a powerful option to predetermine
such values. This is called Definition Packages.
The dialog can be activated either from the Metadata Window -> Menu -> Definition
Packages or from Project -> Fields -> Definition Packages.
All the existing packages are listed in the All Packages section. With the installation a lot of
packages are automatically obtained: Rating, Countries, Cities, etc.
With the New and Delete buttons you can create a new package or delete a selected one.
If a new creation is undertaken, then a little dialog opens for entering the new package
Name and its Type. You can choose between three types: Text, Image and Number.
NOTE! Later, when you refer this definition package to a new metadata field, this type and
the field type must be relevant. I.e. you can not involve a Text metadata field with a package
which is set Number type. Therefore, when creating a new metadata field, the definition packages
listed in the drop-down menu (to choose which one to refer to the field) are filtered – in this menu
you do not see all the packages but only these which are from a relevant type as per the one set
for the metadata field.
In the right part of the window you see the name of the selected package above and its
structure – the values defined for it. With the Add/Remove buttons you can add new values to the
list or delete a selected one. Values are entered in the rows appearing at the end of the list each
time the Add button is pressed.
Editable are the lists that can be changed values (some can be deleted values; other can be
added new ones or a combination of both - adding and deletion).

81
All these predefined lists can be used into the current project only. If you need to use the
same packages in another project, there is no need to create them again in the other project. Just
export the list from here and import it where needed. The Export/Import is done via the
homonymous buttons and it is done through *.xml format.
Metus MAM is smart enough to get even deeper into the values predefinitions. The proof is
the Field Definition Binding option. It uses the values from the packages created, binding them
one to another.
Example: Let say you have two packages created - “Countries” and “Cities”. Once you enter
“France” as a value for country-field, only the French cities will be listed in the city-field drop-down
menu after that. I.e. the second field (in this case – city) will filter only the values true for the first
field (country).
Of course, before that you should “tell” the system which the French cities are. And this is
done via the Field Definition Binding.
Into this dialog you must select the
Metadata fields level and press the Add
button. The metadata tree opens. Select
the Country field and add it into this
form. Then select the Country from this
form and again press the Add button to
open the metadata tree and time select
and add the City field.
Thus, you will have Country as a
level and City – sublevel included into it.
If you select City, in the right part of the
window you can select the country from
the drop-down menu (the package is
predefined) and then for this country
you can start listing cities.
NOTE! For user convenience, all the cities you enter in this form will be automatically added
to the Cities-package, too.
4.13.4.3. Field Properties
RowHeight enables you to specify
the height of the row for the relevant
field types.
Decimal Digits – defines the
number of the digits after the decimal
point for values entered in a Decimal
type field.
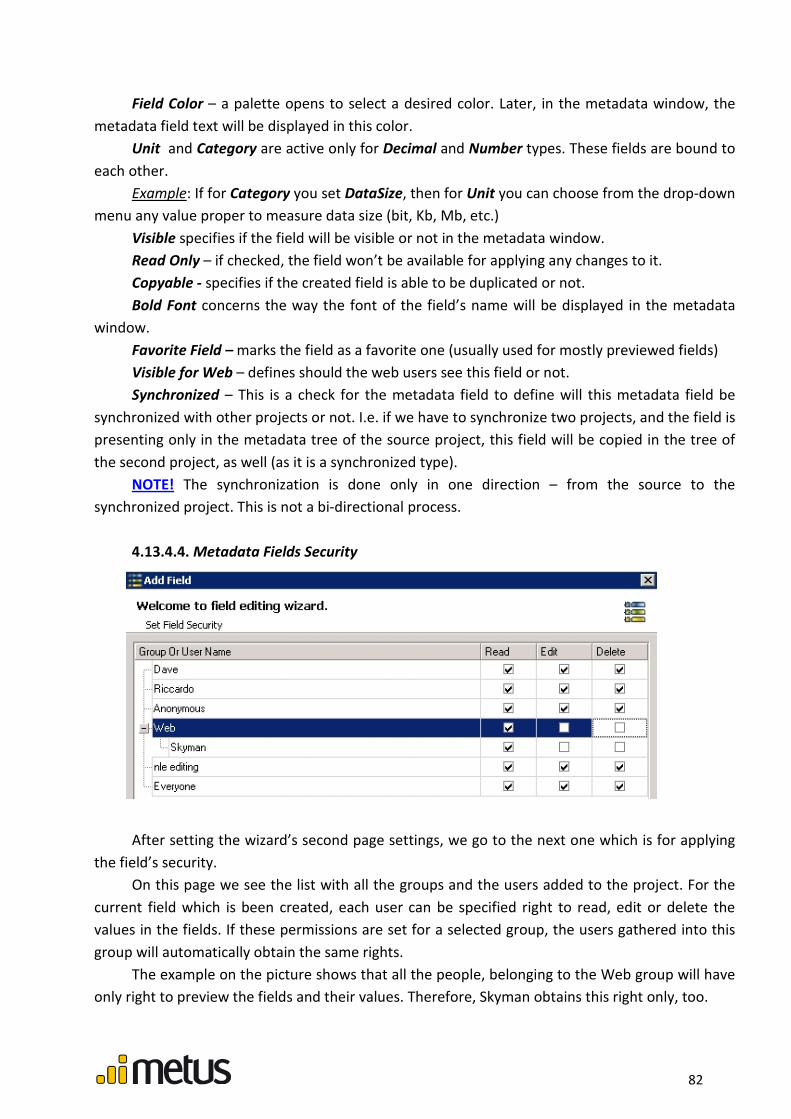
82
Field Color – a palette opens to select a desired color. Later, in the metadata window, the
metadata field text will be displayed in this color.
Unit and Category are active only for Decimal and Number types. These fields are bound to
each other.
Example: If for Category you set DataSize, then for Unit you can choose from the drop-down
menu any value proper to measure data size (bit, Kb, Mb, etc.)
Visible specifies if the field will be visible or not in the metadata window.
Read Only – if checked, the field won’t be available for applying any changes to it.
Copyable - specifies if the created field is able to be duplicated or not.
Bold Font concerns the way the font of the field’s name will be displayed in the metadata
window.
Favorite Field – marks the field as a favorite one (usually used for mostly previewed fields)
Visible for Web – defines should the web users see this field or not.
Synchronized – This is a check for the metadata field to define will this metadata field be
synchronized with other projects or not. I.e. if we have to synchronize two projects, and the field is
presenting only in the metadata tree of the source project, this field will be copied in the tree of
the second project, as well (as it is a synchronized type).
NOTE! The synchronization is done only in one direction – from the source to the
synchronized project. This is not a bi-directional process.
4.13.4.4. Metadata Fields Security
After setting the wizard’s second page settings, we go to the next one which is for applying
the field’s security.
On this page we see the list with all the groups and the users added to the project. For the
current field which is been created, each user can be specified right to read, edit or delete the
values in the fields. If these permissions are set for a selected group, the users gathered into this
group will automatically obtain the same rights.
The example on the picture shows that all the people, belonging to the Web group will have
only right to preview the fields and their values. Therefore, Skyman obtains this right only, too.

83
4.13.4.5. Completing the Metadata Field Creation
To complete the metadata field creation the last page
settings must be applied. It is concerning the object for which the
metadata field will be visible in the metadata window, by default.
Object can be a bin, an asset and/or a playlist.
If you select Bin, this field can be added to the metadata
window if a bin object is marked in the project area.
Same is for Asset. The checks following specify deeply the
kind of the asset. If just Asset is checked, then the field will be
applicable for all the asset kinds – audio, video, image, document and data.
Logically, the same rule is observed if a Playlist object is selected.
4.13.5. Metadata Window -> Menu
The Menu opens several options to choose between when needed.
- Add Group is tracing only the existing the groups in the metadata tree one by one as per
the level they are placed in, giving the possibility to open this group in the metadata window. The
groups are opened in different tabs.
Example: If you want to open the Video Information group, you select it from menu ->
Add Group -> Metus -> Asset.
- Add Field is acting in the same way listing not only the existing groups but the fields, also,
so that you can choose which field to open in the metadata window.
- Add Field from List is used in cases when you want to open a field in the metadata window,
but you do not remember where this field is placed in the tree. The metadata tree opens and then
you must use Quick Find field, described above in the manual.
- Recently Added Fields – lists the last fields added to be displayed in the grid.
- Close Group – lists all the opened tabs (groups) and you choose which one to close. The tab
can be closed also by right-click over it and selecting Close.
NOTE! This option is working only if all the groups are ordered in separate tabs. If they are
ordered in one window, the option is not working.

84
- Show Group – Lists here all the closed groups. You go to this list to open back one.
The last options are already described above: Create New Field, Definition Packages, Field
Definitions Relations (Binding), Show/Hide Fields and All Fields…
4.14. Searching We distinguish four different ways to make a search in Metus
MAM: Simple, Advanced, by Category and by Image. Each
search is presented in a different tab, and the four tabs – in one
window, which is placed in the left-bottom part of the entire
interface.
4.14.1. Search Window
The Search windows provide six buttons for précising the search process and filter the tasks
to be run.
- Search Locations - The first one is for pointing the
locations (projects and bins) to be searched into. You can
choose either to Search the Active Project (the current one) or
to Search in All Open Projects. You can Select Bins in which
you want search. You can add syb bins into research if you
want also. And with Exclude Bins option, you can narrow
down searching area.
- Apply Filters is the second button and it is filtering
the objects for which the search should be made. You can
search in video assets only or in playlist objects. It depends
on the user’s needs. The search can be made also over the
Filter Bins (search bins) and even in the Recycle Bin
(deleted assets)
- Exact/Partial match search button is to determine whether Metus MAM will search
partially or full-text (by words).
= When you choose the first option (Partial
search) it is needed to enter some part of the
word (f.e. “tra” instead of “trailer”) and the
system will list everything which includes “tra” anywhere in its fields. When you search
in thousands of assets this may take a long time.
= Full-text search is creating a catalogue with the words used in the storage. This takes
time. And this time is predefined in the SQL settings. So, whenever you search by full-
text, it will need time before showing you the right results. Even that this seems
slower, in fact this searching is much quicker because it is not seeking in each
metadata field letter-by-letter, but word-by-word.
When this button is half-black-half-white then it is searching partially. If it is full-black, it will
search the exact full match of the word seeking by.

85
Example: If we have two assets – TerminatorTrailer and Terminator Movie:
- partial search for “Term” will give out as a result both the two assets;
- Full-text search for “Terminator” will give out as a result only the second
filename as the word “Terminator” is met there. The first filename is one-
word only – TerminatorTrailer which is definitely not equal to Terminator.
AND/OR logic button is used in
advanced type of search to
specify whether all the search
criteria must be observed (AND
logic) or any of the criteria only
(OR logic).
NOTE! When working with these logics, please, keep attention to the previous button status,
too. The four combinations of these two buttons statuses can present different results each
time.
Example: In the project three of the assets are named like SWAT Trailer (with rating 4),
SWAT Movie (with rating 5) and SWAT Making (with rating 2).
= If we make an advanced search by “SW” (partial search ON) AND we search for
all the assets with rating bigger than 3, then the result will be SWAT Trailer (with
rating 4) and SWAT Movie (with rating 5) because they observe both the two
criteria: have “SW” in the file name (partial search) AND their rating is bigger
than 3.
= If we make an advanced search by the word “SW” (full-text search ON) AND we
search for all the assets with rating bigger than 3, there will be no results
because there are assets including a whole word “SW”. I.e. the search stops even
on the first criterion.
= If we make an advanced search for any asset which has the word “SW” (or
“SWAT”) in its name (partial search ON) OR assets with rating bigger than 3, then
the result will be all the three assets because all they have the word “SW”/SWAT
in the name. In this scenario here, if we assume that there was another asset in
the project, named Terminator (with rating 5), it should be listed in the results,
too, because its rating is observing the second criterion – rating is bigger than 3
and the searching is run with OR logic.
= Let still keep the new asset in our project - Terminator (with rating 5). If we
make an advanced search for any asset having the word “SWAT” in its name
(Full-text search ON) AND we search for all the assets with rating bigger than 3,
then the result will be SWAT trailer (with rating 4) and SWAT movie (with rating
5). These two assets observe both the two criteria – needed because AND logic is
used. The other two assets are not listed in the results – Terminator is not
answering the name criterion (even the rating is answered) and SWAT Making is
not answering the rating criterion (even answering the name criterion).
Search Criteria Logic Listed Results
Partial SW; rating bigger than 3 AND SWAT Trailer (with rating 4)
SWAT Movie (with rating 5)
Full-text SW; rating bigger than 3 AND -
Partial SW/SWAT; rating bigger than 3 OR
SWAT Trailer (with rating 4)
SWAT Movie (with rating 5)
SWAT Making (with rating 2)
Terminator (with rating 5)

86
Full-text SWAT; rating bigger than 3 AND SWAT trailer (with rating 4)
SWAT movie (with rating 5)
- Load/Save buttons are used when an advanced
search is processed. This way of searching is adding
criteria one after another as search conditions. In order
not to add these criteria each time you use the advanced
search, some of the search conditions can be saved as a
search profile and loaded later directly from this preset.
This is a quicker and helpful option.
For the criteria you want to include in the profile,
put checks in the most right column. Press the Save
button from the search toolbar and type a name for the
advanced search preset you will create. At any time later you can use this preset, invoking it with
the Load button – a dialog opens with all the search profiles existing. You can remove any of these
profiles by selecting it and pressing the Delete button from this dialog.
4.14.2. Simple Search
This is a text-based search over
metadata fields. The search can be
processed over all the fields so that the
result will be observing any metadata
field’s value or it can be done for
metadata fields, predetermined to be
searched over. This is specified from
Project -> Properties -> Other -> Simple Search Options. By default, the search is done in all the
fields, but if you want to limit the search results or you need to search over some fields only, just
select them from the second option: Search Over Specified Fields and Add the fields from the
metadata tree which opens. The fields will be listed in that form. Later, when you do not need to
search in some of the fields select and Remove them from the list. Save Search Criterias to Action
History option writes down these criteria to action history.
Metus MAM is making usually partial-text searches. This is most common search scenarios.
However, if you are tending to find exact matches mostly, then put the check Always Force Full
Text Search.
To search objects in the project use the text field in the search dialog and put the text (word)
you will look for. Press the Search button. The resulting objects are opened in a separate window,
called Search Results tab.
NOTE! Keep attention to the toolbar’s partial/exact match button’s status. It is important as
the results will be generated as per the way the button is set.
If the Simple Search Options dialog is left by default, then Metus MAM will search over
absolutely all the fields in all the objects in the project. Therefore, the result can give any kind of
objects. Select any asset in the Search Result tab and in the metadata window you can see where
the search match is made. The metadata window opens this metadata group where is the field
with values, answering to the search criteria. Besides, the words, matching the search one, are
marked (this is depending also on how the metadata window filtering is set).
Playlists maybe listed as results, if the search word is included in the name of the file’s path.
Some video can be included in the results, if this video is set a marker in the Viewer application
and the marker description is including the search text. Also, text documents can be listed as
results if in the content of this material, the search text is available, etc.

87
4.14.3. Advanced Search
This type of search is browsing in the metadata values for
matching more than one criterion listed in this tab. Criteria are
added with the Add Search Criteria button down in the toolbar in
this window. The metadata tree opens and the fields, over which
the search will be made, are selected one-by-one. The Advanced
search is giving a possibility to search for assets observing all the
criteria listed or for assets answering to any of the criteria
available. Logically, the second option is giving out more results.
Please, take a look at the above explanation of the Search
toolbar buttons in order to get detailed explanation and
examples about the advanced search.
As a little but helpful addition to the Advanced search, Fast
Advanced search can be executed. It is a list of presets with
criteria added.
Press the button for Special Metadata Search and a dialog
will open. If you need to find all the video assets, instead of
adding a criterion “Asset Type = Video” just select Asset Type -
> All Videos and all the video assets will be filtered in the
Result tab.
Take a look at these predefined criteria. To use them, you must know them vaguely. Once
get familiar with them, they will be of large use because of the speedy search run from there.
4.14.4. Category Search
This type of search is like filtering the objects in the project by categories. One object can be
set several categories (f.e. video, good-quality, music, jazz, love, children, etc.).
Archiving thousands of materials on the storage needs time for browsing into them when
seeking a proper material for some purpose in any moment. The Category Search is speeding this
process by several clicks for the categories needed.
When inserting the objects into the project, they must be categorized. This can be done on a
local machine, in a library project before the materials are archived. However, categories can be
applied to archived materials, too. This is to be done from the Category window available in the
right-bottom part of Metus MAM interface.
NOTE! Only the Administrator can access the category window.
Select the asset(s) and expand the category tree; then start applying the proper categories
by checking them one-by-one. That’s all about it! For more information about categories creation,
please, refer to Chapter 3 – Adding a New Category section.
As seen from this window, Metus MAM divides the categories in two general groups:
- Project Categories - This title contains the categories belonging to this project.
- Imported Categories – these are the ones coming with objects taken from another project.
These categories can be transferred to the project categories or deleted. The imported
categories can be moved to another place in the tree. For this press the button Move
Importeds.
Anyway, all the categories from any project can be exported in a *.xml file and imported into

88
another project.
NOTE! The import procedure is replacing the entire tree in the project into which the import
is done. Its old tree will be totally deleted!
To find materials from any category, just use the Category search window. Expand the tree
and check for what you need to find. As more checks you apply as fewer assets are filtered.
NOTE! Please, keep in mind that the values checked for categories are not applied to any
metadata field. These categories are only for filter search and they have nothing to do with the
metadata fields’ values.
4.14.5. Image Search (optional)
Image search is an optional feature (additionally paid). This type of search is seeking into
each frame of a video material pixel-by-pixel (bit-by-bit) to find color matches with a picture given
as a search criterion.
To seek internally in the materials (bit by bit) Metus MAM needs these materials to be able
to report information about each pixel status. For this purpose, the objects need to be indexed.
Shortly said – the system is image-searching only in indexed videos.
To index a material, first you need to create a folder on your machine (or local network) and
share it with all the permissions allowed. Later, the indexing results will be kept into this shared
folder. After the folder is created, launch the Project -> Properties -> Others menu and with the
browse button select the folder in the network:
The assets need to be indexed now – multiselect them and create index. Indexed assets can
be distinguished by the highlighted “I” on the icon.
Next step is to be sure that an Image Server is set. This is
the machine onto which the Metus Image Matching Server.msi
installation is done. (Usually, this is the MPS but can be another
PC, also). Set the image server from Project -> Properties ->
Image Matching Servers. If the server is connected, then its name
will be displayed in the Image
Search tab, below. If more than
one server is set for image search,
they will be available in the drop-
down list.
Up to now the Image Search
settings for the entire project are
applied. No more settings are
needed.
From this moment on, image searches in this project require
only one thing: a picture (image) for search criterion. Use the
Browse button to point where the picture is; select and add it into
this dialog. The picture appears replacing the title “Metus Image
Matcher”; its filename is displayed below.
Depending on the type of the search selected (Fast or Partial)
the picture can be presented relevantly entirely or in blocks with
checks. The checks are for choosing which part (block) of the picture
to be searched by. Remember, the system is seeking for color
matches. So, it’s logical - the fewer checks, the more results listed. If Fast search is required, the

89
entire image will be searched for. Fast search is equal to Partial with
all the checks applied. It executes a no detailed comparing; only exact
matching. Therefore, the success ratio is lower.
Maximum Result Count, Show Scenes and Show Separate
Asset for Each Scene are options with which to define how the
Search Results tab to display the assets.
Actually, when you double-click an asset in the results-tab, the
Viewer is opening it and puts a red mark on the frame in the timeline where the best match can be
noticed. These marks can be more than one – depends on the Maximum Result Count chosen.
Show scenes option is available only for video assets (being results). If the resulting marks
belong to different scenes from the video material, you can set the system to display the scenes in
the asset icon, i.e. the asset thumbnail will be displayed divided in up to four parts – see the
screenshot. The top left part is the asset general thumbnail. The top right part is the best match.
In addition, in the results tab Metus MAM can display each scene as a separate asset – the last
option from the dialog.
See also the Viewer’s description below in the manual – the Timeline menu explanation
includes additional options related the results of Image matching.
4.14.6. Quick Search
Even not available in the search window, there is
another way to search in Metus MAM. It is from the toolbar –
see the picture.
This one works like a simple search. Type a word in the text field here, hit the Enter key and
all the assets answering that criterion as per the metadata fields’ values will be displayed as
results.
4.14.7. Locator
This is a specific type of searching. It is used generally for
monitoring purposes. For basic search criterion it uses the
value from the metadata field Record Start Date and Time.
See it in the metadata tree -> Asset level.
Run the Locator from the Tools menu. Here is an
example of how it can be used.
Let say in some TV the monitoring records start
each day at 3.00 a.m. This means that the Record Start
Date and Time value will be the current date and the
time will be 3.00 o’clock. All the monitoring records are
saved on the storage. As time passes by, it becomes
more and more difficult to browse them file-by-file and
to timeline in their duration.
If you need to check what have been played on
(let say) 11th
of January 2008 at 16:15:00 you must use
the Locator and enter the Date and the Time offset
according to the start time, i.e. the date will be
11.1.2008 and the time (offset) will be 13:15:00. With

90
two words - you ask the system what have been recorded 13 hours and 15 minutes after the
record started. Metus MAM will list in the Search Results tab all the assets that answer to this. If
you open the asset in the Viewer it will place the slider exactly on the moment you are searching
for.
If a lot of results are listed in the tab and you don’t want to waste time in previewing them,
decrease the search results number by adding additional search criteria in the Locator dialog.
Apply the Filter check and enter metadata fields for matching (see Advanced Search above).
4.15. Bins
4.15.1. Generic Bin
There are several types of bins in Metus MAM.
The main one is the Generic Bin – the holder for subbins
and assets. You can add a Generic Bin in the project by
right-clicking in the area and select Add Bin. Enter the
name for the bin and select its Generic Bin type. In the
headline of the dialog it is displayed under which bin the new one will be placed. Inside of such bin
you can place assets and other bins – no matter of their type.
4.15.2. Dynamic Bin
This is a bin which is related to a folder in the
network. We call it Watch folder. The path to the Watch
folder is defined in the bin’s Properties menu. Metus
MAM automatically archives the content of the Watch
folder and each archived material is created asset in the
Dynamic Bin. As soon as other materials appear in the Watch folder, they immediately start being
archived on the storage, too. Shortly said - the Dynamic Bin content is always synchronized with
the Watch Folder content.
Usually the Dynamic Bin is used to monitor and archive the content of the folders into which
the ingested files are saved. Thus, once the material is captured, it will be archived on the storage
without need the user to do this manually through the system.
In this dialog we define which folder will be monitored in the Folder to Watch field.

91
The Startup Type of the process can be
Automatic, Manual or when needed –
temporarily Disabled.
Automatic mode will always archive
materials after they come into the folder.
NOTE! Be sure to press the Start button
below when starting this option for first time
even though it is Automatic mode!
Manual mode will wait for performing the
archiving until the user presses the Start button.
When the monitoring in Manual mode is
already started, it can be canceled with the Stop
button.
There are six checks below which are very
important.
- Scan the folder when the project is loaded – will automatically check the folder for new
files each time the project is loaded in Metus MAM. If there are new files they will
immediately start archiving. Logically, this check is active only if Automatic mode is
selected above.
- Delete source files after archiving is completed – concerns the deletion of the files which
are placed in the Watch folder (the source materials). After they are copied on the server,
sometimes the workflow does not need them anymore. If so, check this option so that
Metus MAM will delete them and thus – sustain some free space in that folder.
- Watch Subfolders – defines whether the folders inside of the Watch Folder will be
monitored, too and their content will be archived.
- Skip files that already archived – Be careful when this option is checked. If it is, the files
which come in the Watch folder and already exist on the storage will not be archived. This
may make you think that the option is not working. When the option is unchecked and
such files appear in the Watch Folder, Metus MAM asks about re-archiving as it usually
does in such cases.
- Import the files which are being ingested – This option enables archiving files which are
being ingested and not complete yet. Files archived while being ingested will be showed in
their assets with an “ingesting” sign.
- Use system watcher – This check enables Microsoft .Net Framework’s folder watching
system. If it’s unchecked, a folder watcher mechanism is used which is developed by
Metus.
Applying Templates for the bin is described in the next section below. Use the “+” button to
open the window for a template selection. The “x” sign will cancel using a template, already set
here.
The last part of the dialog is to select whether to use some of the Custom options or not. All
these options are described in the manual in Project Properties section -> Others and Archiving
Options. OCR options are described in the OCR section below.
The Others button into this dialog here runs the same dialog as the Advanced Options
button at the bottom of the dialog in Project Properties -> Other. See its explanation.
When dynamic bin watches a folder, it waits the copying files to finish. When the copy
operation finishes then the dynamic bin starts to archive the file. In order to “understand” that
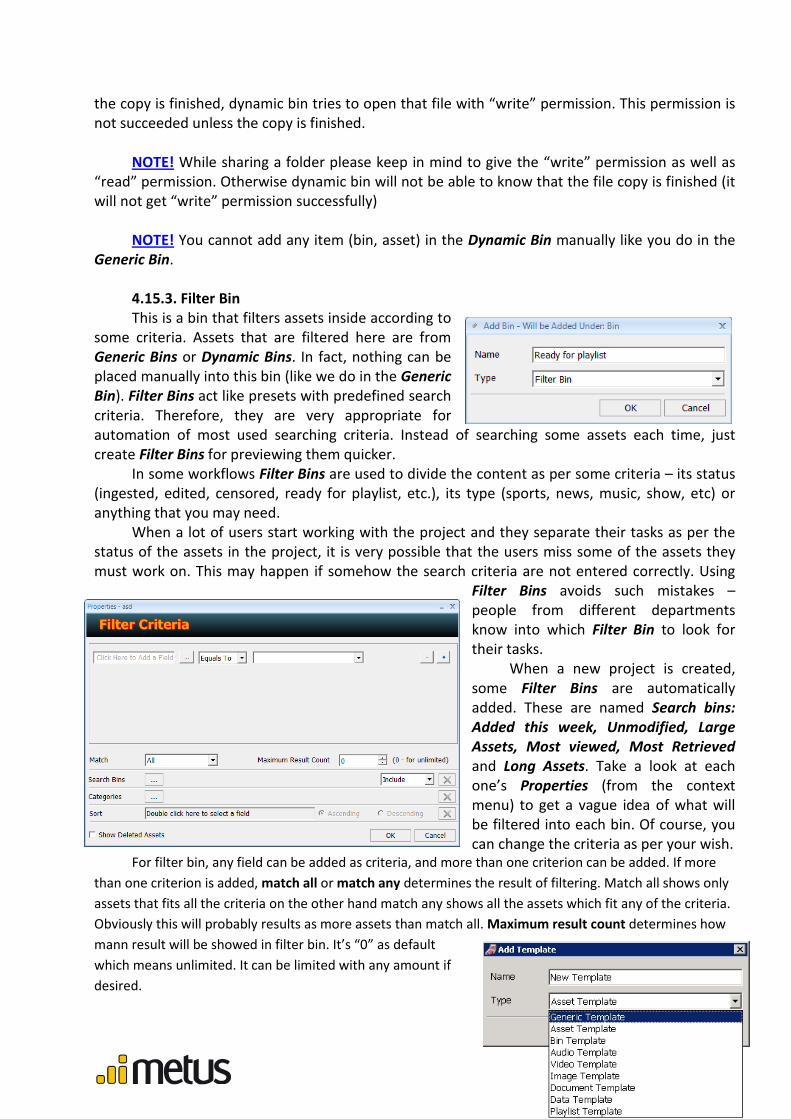
92
the copy is finished, dynamic bin tries to open that file with “write” permission. This permission is
not succeeded unless the copy is finished.
NOTE! While sharing a folder please keep in mind to give the “write” permission as well as
“read” permission. Otherwise dynamic bin will not be able to know that the file copy is finished (it
will not get “write” permission successfully)
NOTE! You cannot add any item (bin, asset) in the Dynamic Bin manually like you do in the
Generic Bin.
4.15.3. Filter Bin
This is a bin that filters assets inside according to
some criteria. Assets that are filtered here are from
Generic Bins or Dynamic Bins. In fact, nothing can be
placed manually into this bin (like we do in the Generic
Bin). Filter Bins act like presets with predefined search
criteria. Therefore, they are very appropriate for
automation of most used searching criteria. Instead of searching some assets each time, just
create Filter Bins for previewing them quicker.
In some workflows Filter Bins are used to divide the content as per some criteria – its status
(ingested, edited, censored, ready for playlist, etc.), its type (sports, news, music, show, etc) or
anything that you may need.
When a lot of users start working with the project and they separate their tasks as per the
status of the assets in the project, it is very possible that the users miss some of the assets they
must work on. This may happen if somehow the search criteria are not entered correctly. Using
Filter Bins avoids such mistakes –
people from different departments
know into which Filter Bin to look for
their tasks.
When a new project is created,
some Filter Bins are automatically
added. These are named Search bins:
Added this week, Unmodified, Large
Assets, Most viewed, Most Retrieved
and Long Assets. Take a look at each
one’s Properties (from the context
menu) to get a vague idea of what will
be filtered into each bin. Of course, you
can change the criteria as per your wish.
For filter bin, any field can be added as criteria, and more than one criterion can be added. If more
than one criterion is added, match all or match any determines the result of filtering. Match all shows only
assets that fits all the criteria on the other hand match any shows all the assets which fit any of the criteria.
Obviously this will probably results as more assets than match all. Maximum result count determines how
mann result will be showed in filter bin. It’s “0” as default
which means unlimited. It can be limited with any amount if
desired.

93
4.15.4. Template Bin and Templates
This is a container for templates only. Nothing else can be added here. Besides, in one
project only one Template Bin can exist and it is automatically added to the project tree with the
Metus MAM installation.
Templates are items purposed for quick metadata applying for different project objects. A
template can be Generic Template, Asset Template, Bin Template, Audio Template, Video
Template, Image Template, Document Template, Data Template and Playlist Template.
You can create as much templates as you need
– all of them will be saved in the Template Bin.
Later, when you apply them from the Bin Properties
dialog you can define for which type of object in the
project what type of template to be applied.
Metus MAM will affect with values only those
types of assets for which templates are set in the
Bin Properties dialog.
Example: If you have a template and you apply it for video assets, then the values which are
defined in that template will be copied only to the video assets included in the bin. Audio, data,
documents, etc. will not “take” these values in the relevant metadata fields.
At one hand we have different template types, on other hand - applying different templates
for different types of objects (in the Bin properties dialog). This is because some different-type-
assets may take different values for one and the same metadata field.
To apply metadata via the template, you must firstly set the values for the template itself.
So:
1) Create a template in the Template Bin – right-click there and select Add Template. Enter
a name for that template and choose its type from the drop-down menu.
2) Select the template and in the Metadata tab below fill the values in the descriptive fields
you need (i.e. enter the metadata values for that object).
3) Go to the bin you will apply the template and open its context menu. In the Templates
for this bin section press the “+” button and the Templates Bin will open. Select a
template from it and apply it. Close the Bin Properties dialog.
4) Start archiving objects in the bin. For the relevant descriptive fields, all the archived
objects must have values equal to the ones defined in the template. Thus, the user
avoids typing them manually each time for each object. Please, keep in mind that the
values will be applied only to those items that are archived after the template is applied
to that bin. If some objects already exist into this bin, they will not be applied values.
NOTE! To apply values via templates, be sure that this option is activated from Project
menu, Properties tab -> Others -> Use Project templates when Items are created. If you don’t
want to use this feature, disable it from here.

94
4.16. The Viewer
This is the preview application. It helps us open image, audio and video materials and
browse in their content. You can start the Viewer by double-clicking on an asset or right-click and
choose Open.
The window is divided in several sections and it provides a lot of options, some of them
related to the project menus. The Title Bar displays the asset’s name
4.16.1. Mini Browser
This is the section into which all the assets from the current bin are listed. When the
Mini Browser gets full, left and right arrows appear at its beginning and end. Press them to
browse the assets in the mini browser and seek for a special asset to preview it here. You can
also navigate between the objects by sliding the scroll bar below. The currently previewed
asset (the selected one) is marked with a white rectangle.
4.16.2. Preview Section
This is the main part as it is the one previewing the material itself.

95
4.16.3. Timeline
It works in two modes. To switch between them, check/uncheck View -> Show All Items.
- When a single item is selected and it is an audio or video object, the timeline shows Mark
In-Out, Master In-Out positions, current position (Slider), marked points (Markers) and
Audio/Video censors allowing the user changing them.
- When all the items are shown in the timeline they are displayed as different parts divided
by white lines according to their lengths. Each part’s color may be different according to the object
type. For example, the red parts indicate video objects. Also, the object’s name is displayed in the
timeline as possible as the part’s length is allowing. The position cursor on this object can be
changed by dragging the Slider.
Four cutting pointers can be set in the timeline. Two of them are cutting the inner part
(Marks) and two of them – the outer part (Masters). Marks are always inside of the Masters. The
cutting pointers are not editing the video – these are just markers which are used to select parts of
the materials to be retrieved further on – look at the retrieve section above. It is like extracting a
part of the video between the pointers.
Mark-In and Mark-Out
specify the beginning and the end
of one part (usually the shortest).
Master-In and Master-Out define another part of the video that can be retrieved. And, of course,
video can be retrieved with entire length. Thus, the user can have three options to copy the file
locally – entire one, the Masters part and the Marks part.
For the contents description the system provides Custom in-out Markers. Drag the slider to
any point in the timeline and right-click -> Add Custom in out. This creates two markers as one of
them for in and other one for out. And a string appears between them with a different color each
time. The markers appear in the timeline under the slider. Double-click over the marker - a dialog
opens. You can put here two kinds of describing text – Description and/or Extra Description.
NOTE! Whatever is entered into this field is observed as a metadata value over which Metus
MAM can make searches, later. This is already mentioned in the Simple Search section above in
this manual.
The Time Values listed below are concerning the total length of the opened material. For
longer materials higher values are displayed.
4.16.4. Timers
Indicates relevant times for video and audio objects and enables them their modification.
These are:
� Master Field: Displays the duration closed between the Masters. If you slide the
Master In/Out pointers over the timeline, the duration will become shorter and this will
be reflected here, in the Master Field values. The point to which the Master IN marker is

96
moved, will be presented in the Master Area IN Point. Logically, the OUT point is relevant
to the Master OUT pointer. This one works also vice versa, i.e. if you put manually digits in
the IN/OUT controls, the Masters will be moved automatically to these places in the
timeline. The new duration will be calculated and displayed in the Duration field.
� Marked Area: The area marked with the Mark pointers. IN defines the beginning
and OUT defines the end. Duration is the length of the range closed between the Mark IN
and OUT pointers.
� Details:
- Cursor: the position of the cursor (slider)
- Marker: the position of any selected Description Marker in the timeline
- Total Time: the total (real) duration of the material with which it is archived.
4.16.5. Speed Controls
They enable you to select the video and audio preview playback speed. If you want to
speed up the preview, just increase the speed from here. If the opposite situation is
available – thorough and detailed preview needed, choose a slower preview speed.
For further convenience, when you want to preview a sequence of image objects you
can run them in Slide Show Mode. For this purpose run View -> Show All Items and all the
objects will be placed in the timeline. From the Speed Controls part you can specify
duration (in seconds) for each picture to be displayed during the Slide Show Mode. The
excluded value Self is a predefined in the metadata fields.
Example: If you have a bin with pictures and you want to run them in Slide Show
Mode, you show all of them in the timeline and select how long each one of them to be
displayed on – click the number and each picture will stay in the preview window for these
seconds. If you want each picture to be displayed with its own duration, then this duration
must be set for that picture in the Metadata window -> Image Duration field (in seconds).
Then just select Self and press the Play button.
4.16.6. Offset Controls
Available for video and audio objects only. These controls enable a quick browsing
forward and backward in the material’s length. Concern these as steps with which to jump
over the timeline. If you select “2” – this will slide the cursor 2 seconds forward from its
current position; if you select “-5” – the cursor will go 5 seconds behind.
4.16.7. Audio Controls
This section contains the settings for the Volume to select the volume
level, Balance for adjusting the audio left-right balance and Mute button to
mute the audio of asset.
NOTE! Whatever you specify in this section is only for preview. It will not
apply the material’s content.
4.16.8. Asset Info Section
This section displays additional information about the current material
being previewed. Each time you click in this window, it changes the info
displayed.
The first time it shows the TC embedded in the file if a time code is
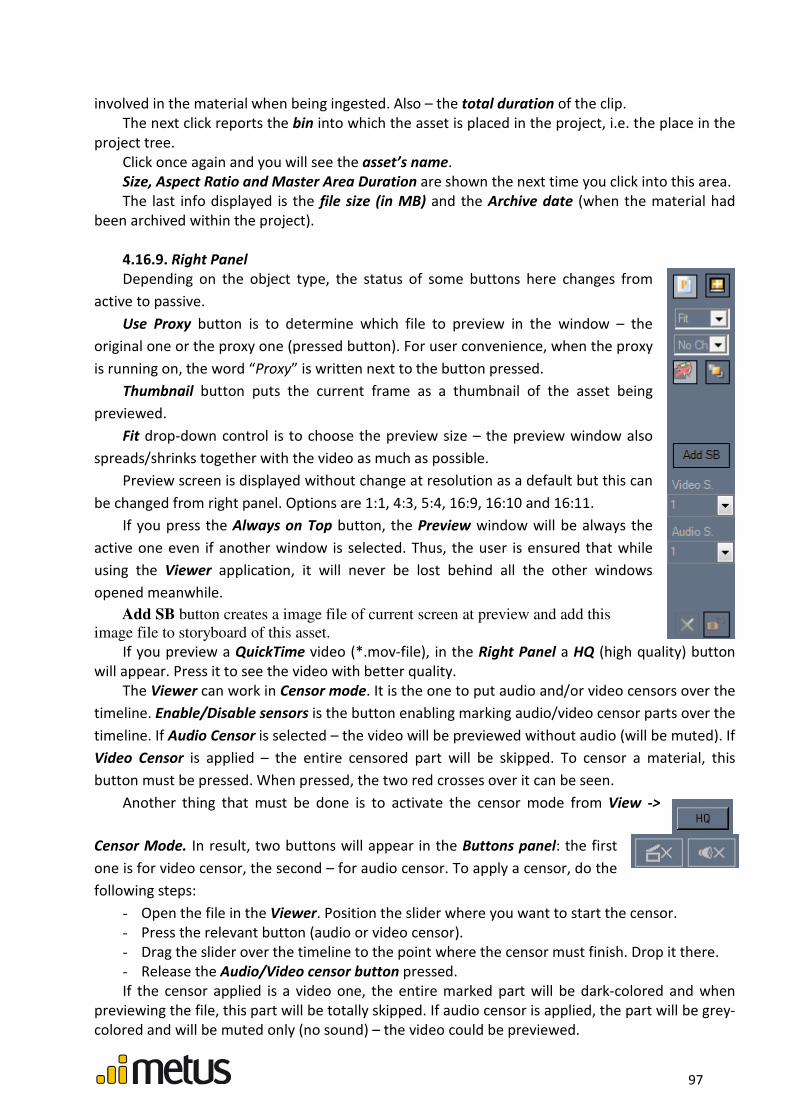
97
involved in the material when being ingested. Also – the total duration of the clip.
The next click reports the bin into which the asset is placed in the project, i.e. the place in the
project tree.
Click once again and you will see the asset’s name.
Size, Aspect Ratio and Master Area Duration are shown the next time you click into this area.
The last info displayed is the file size (in MB) and the Archive date (when the material had
been archived within the project).
4.16.9. Right Panel
Depending on the object type, the status of some buttons here changes from
active to passive.
Use Proxy button is to determine which file to preview in the window – the
original one or the proxy one (pressed button). For user convenience, when the proxy
is running on, the word “Proxy” is written next to the button pressed.
Thumbnail button puts the current frame as a thumbnail of the asset being
previewed.
Fit drop-down control is to choose the preview size – the preview window also
spreads/shrinks together with the video as much as possible.
Preview screen is displayed without change at resolution as a default but this can
be changed from right panel. Options are 1:1, 4:3, 5:4, 16:9, 16:10 and 16:11.
If you press the Always on Top button, the Preview window will be always the
active one even if another window is selected. Thus, the user is ensured that while
using the Viewer application, it will never be lost behind all the other windows
opened meanwhile.
Add SB button creates a image file of current screen at preview and add this
image file to storyboard of this asset.
If you preview a QuickTime video (*.mov-file), in the Right Panel a HQ (high quality) button
will appear. Press it to see the video with better quality.
The Viewer can work in Censor mode. It is the one to put audio and/or video censors over the
timeline. Enable/Disable sensors is the button enabling marking audio/video censor parts over the
timeline. If Audio Censor is selected – the video will be previewed without audio (will be muted). If
Video Censor is applied – the entire censored part will be skipped. To censor a material, this
button must be pressed. When pressed, the two red crosses over it can be seen.
Another thing that must be done is to activate the censor mode from View ->
Censor Mode. In result, two buttons will appear in the Buttons panel: the first
one is for video censor, the second – for audio censor. To apply a censor, do the
following steps:
- Open the file in the Viewer. Position the slider where you want to start the censor.
- Press the relevant button (audio or video censor).
- Drag the slider over the timeline to the point where the censor must finish. Drop it there.
- Release the Audio/Video censor button pressed.
If the censor applied is a video one, the entire marked part will be dark-colored and when
previewing the file, this part will be totally skipped. If audio censor is applied, the part will be grey-
colored and will be muted only (no sound) – the video could be previewed.

98
Metus MAM can make searches for censored materials. Also, the metadata fields report info
about if an object is censored or not.
Video and Audio Streams is for additional information about the file being previewed. If
multi-audio file is loaded, you can select which audio stream to preview from the drop-down
menu (f.e. if these are different languages you choose which one to hear while watching the
running video).
Any changes maden can be reverted by Discard All Changes button which has a red (gray if
no changes have maden) X symbol.
Lock the Viewer Against Changes button obviously locks the asset and prevents any changes
(e.g. marker placements or deleting them etc…). Asset is still can be watched and slider can be
moved.
4.16.10. Buttons Panel
It contains playback, editing and navigational button groups.
These buttons and their functions are as follows:
a. Navigating Buttons
- Previous Clip: Selects and previews the previous object.
- Next Clip: Selects and previews the next object.
b. Playback Buttons
- Go to start position: Places the slider at the beginning of the material. It jumps at the
very beginning of the timeline, no matter where the Master In is set. There is also
another scenario – if the In-Out button is pressed (from the Marker Buttons), then the
slider will go on the Mark-In point.
- Play/Pause: Plays the video /pauses the playback.
- Stop: Stops the playback.
- Previous frame: Goes to the previous frame.
- Next frame: Goes to the next frame.
- Go to end position: Locates the slider at the end of the timeline or at the - Mark-Out
point (if the In-Out button is pressed).
c. Marker Buttons functions are depending on the type of the selected object.
- Select Next Marker: Enables switching to the next marker on the timeline. Each time
you press the button, the next marker is selected and red-highlighted. The Master
In/Out and Mark In/Out points are considered as markers, too.
- Add Marker: Adds a new marker where the slider is at the moment.
In Censor mode, these two buttons turn into the buttons mentioned above: - Add
Video Censor, Add Audio Censor. Their functions are described above in the censor
mode description section.
- Zoom In Timeline: Enlarges the timeline. Different parts are getting bigger.

99
- Zoom Out Timeline: Reduces the timeline until everything being previewed is
gathered into the timeline length.
- Loop: Repeating the playback between the start and end points.
- In-Out: Concerns the playback looped. If this button is pressed, the loop will be
repeated between the Mark In/Out points.
4.16.11. Viewer Menu
4.16.11.1. Asset
Discard Changes – Cancels all the latest changes applied. These may be setting Mark In/Out
points, Master In/Out points, Audio/Video Censors or Add markers. Latest changes are the
ones applied after the last Save chosen.
Save Changes Now – Immediately saves the changes applied, i.e. it saves the material in the
status it is in the moment of choosing this option.
Save and Continue – Saves the material with all the latest changes applied and creates a
new asset of this material. The new asset keeps referring to the same source file. After doing
all this, the Viewer keeps on previewing the first asset (not the new one). The new one you
can find in the same bin (usually listed as last). To be sure which is the asset you currently
preview – always look in the Viewer headline – the asset’s name is written there.
Reload – This option is active for image objects. The latest changes applied will be canceled
from here.
Grab And Save Screenshot – Saves the current frame into a picture-format file. You browse
to point where the file will be saved. Metus MAM can create also a new asset for this
picture. If so, the picture will be archived on the storage (if archive project is used) so that
the asset keeps the reference to the archived picture on the storage (or tape drive).
Transcode – already described in the Transcoding section above in that manual.
Create Proxy – Proxy creation is already described, too.
Create Web Proxy – Described above.
Archive – Available for assets being previewed in Library Projects. This is just the Archive
option which had been described above in the manual.
Archive as… - Similar as the previous.
Retrieve – This is the Retrieve option, described above in the manual, in the section,
describing the asset’s context menu.
Retrieve to Library – Similar as the previous.
Save as – Saves the object being previewed as another asset in the project (together with
the latest changes applied). The new asset can be created from the material’s content
Trimmed Only between the Mark In
and Out points or just from the entire
content. You can Reload the Original
Asset After Save or you can go on with
previewing the new asset.
If the Viewer is opened via a library
project, then the Save As menu
provides one more option – to save
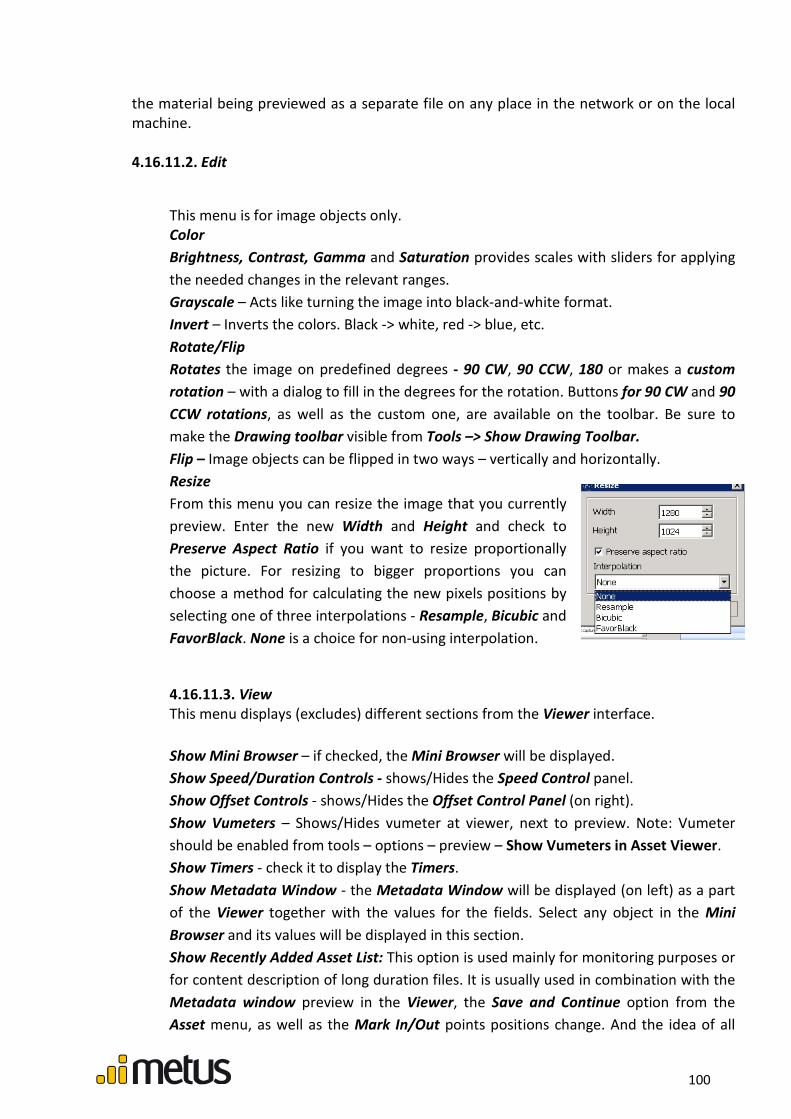
100
the material being previewed as a separate file on any place in the network or on the local
machine.
4.16.11.2. Edit
This menu is for image objects only.
Color
Brightness, Contrast, Gamma and Saturation provides scales with sliders for applying
the needed changes in the relevant ranges.
Grayscale – Acts like turning the image into black-and-white format.
Invert – Inverts the colors. Black -> white, red -> blue, etc.
Rotate/Flip
Rotates the image on predefined degrees - 90 CW, 90 CCW, 180 or makes a custom
rotation – with a dialog to fill in the degrees for the rotation. Buttons for 90 CW and 90
CCW rotations, as well as the custom one, are available on the toolbar. Be sure to
make the Drawing toolbar visible from Tools –> Show Drawing Toolbar.
Flip – Image objects can be flipped in two ways – vertically and horizontally.
Resize
From this menu you can resize the image that you currently
preview. Enter the new Width and Height and check to
Preserve Aspect Ratio if you want to resize proportionally
the picture. For resizing to bigger proportions you can
choose a method for calculating the new pixels positions by
selecting one of three interpolations - Resample, Bicubic and
FavorBlack. None is a choice for non-using interpolation.
4.16.11.3. View
This menu displays (excludes) different sections from the Viewer interface.
Show Mini Browser – if checked, the Mini Browser will be displayed.
Show Speed/Duration Controls - shows/Hides the Speed Control panel.
Show Offset Controls - shows/Hides the Offset Control Panel (on right).
Show Vumeters – Shows/Hides vumeter at viewer, next to preview. Note: Vumeter
should be enabled from tools – options – preview – Show Vumeters in Asset Viewer.
Show Timers - check it to display the Timers.
Show Metadata Window - the Metadata Window will be displayed (on left) as a part
of the Viewer together with the values for the fields. Select any object in the Mini
Browser and its values will be displayed in this section.
Show Recently Added Asset List: This option is used mainly for monitoring purposes or
for content description of long duration files. It is usually used in combination with the
Metadata window preview in the Viewer, the Save and Continue option from the
Asset menu, as well as the Mark In/Out points positions change. And the idea of all

101
this is to move the markers in the timeline so to distinguish the beginning and end of a
part of the video (a scene). In the metadata window put the proper values for the
selected scene, Save this and Continue working with the original file. Each time, for
each new scene, a separate asset will be created.
Example: Let assume that the file we shall work with presents a 24/7 ingest of a TV
channel playout (or anything recorded with a camera and being previewed). Our task
will be to describe each its parts. Let say there will be a morning block show, a song, a
science fiction, afternoon block, news, etc.
The first thing needed is to open this file in the Viewer. Run View –> Show Metadata
Window and View -> Show Recently Added List.
Place the Mark In and Out points at the beginning and end of the morning block show
and put descriptive values for this scene in the relevant metadata field. Then select
Asset -> Save and Continue. As a result of this, a new asset is created for the morning
block show and you go on working with the original file again so that you can repeat
the same step for the next scene: the song. With screenshots it will look like:
Step 1 – Set Mark In and Out for marking the scene
Step 2 – In the metadata window, the Monitoring descriptions metadata field
(created by the user) add a text describing the scene.
Step 3 – Select Asset -> Save and Continue
Repeat these steps now to “extract” all the next scenes. As a result, a lot of new assets
will be created – each one of them presenting only the scene it had been generated
from. And the values for the metadata field will be different each time.
Furthermore, in the Viewer – opened like shown on the screenshot, each time you
select the scene from the Recently Added Assets window, it shows its values for the
relevant fields in the opened metadata window above. You can make these values
displayed in the Recently Added Assets window in an additional column. Right-click in
the window (in the columns header) and select the option Add-Remove Columns. The

102
metadata tree will open. Choose the field you want to add as a column to this grid.
Finally you start using the results this option provides – select the scene and on the
timeline you see its start/end and in the metadata field you see the descriptive values
for it. Of course, searching via these values is possible.

103
Show Timeline - this one concerns the Timeline.
Show Right Panel – if unchecked, the Right panel will be excluded from the interface.
Show Metadata: This option is bound with Settings -> Configure Metadata Overlay.
After specifying the settings there, check this option so that the values are displayed
over the preview window.
Show Drawing Toolbar – available when previewing images. The Drawing Toolbar
enables some basic graphic changes to be applied.
Show All Items - all the items displayed in the Mini Browser will load in the timeline.
Same Types - if selected, only items of the same type (as the selected one) will be
shown in the Mini Browser, i.e. acts like filtering this format.
Censor Mode - switches between Censor and Normal mode.
4.16.11.4. Playback
Play: Starts the playback.
Pause: Pauses the playback.
Stop: Stops the playback.
To Start – pulls the slider to the Mark-In point
To End - pushes the slider to the Mark-Out point
Next frame - locates the slider on the next frame (when in Pause or Stop mode).
Previous frame – locates the slider on previous frame (when in Pause or Stop mode).
Next Clip - jumps on the next object (as listed in the Mini Browser)
Previous Clip - jumps on the previous object (as listed in the Mini Browser).
AutoStart - this check reflects the video and audio objects. When the check is active,
and such an object is selected, it will automatically start playing back.
Loop - plays continuously the material between its start and end point (the original
ones). If the In/Out button is pressed in the same time, then the playback will be
looped between the Mark In/Out points.
Play In-Out - if selected, only the range between the Mark In/Out points is played.
Playback Rate - enables you to select the preview-play-speed for video and audio
objects. You can choose between the predefined values: 1/8 1/6, 1/4, 1/3, 1/2, 1, 2, 3,
4, 6, 8 and 10. For quicker preview, choose values bigger than 1. For slower, detailed
preview choose the fraction numbers. Please, keep attention to the fact that the proxy
file preview is not affected by the playback rates chosen.
Offset - Locates the slider on the timeline with some seconds forward or backward,
depending on the value chosen (between predefined ones).
Audio
Mute - Mutes the volume preview.
Volume 25, 50, 75, 100 - Determines the preview-volume-level at these
predefined volume settings.
Pan Left, Right, Balanced – Accelerates the left/right channel audio preview or
makes them equal.

104
4.16.11.5. Timeline
Lock Controls – this check locks the Timeline – Descriptive Markers cannot be added
or deleted; Mark In/Out points, as well as the Master In/Out points cannot be moved;
Censor mode cannot be switched on/off, etc.
Zoom – is zooming the timeline. Zoom-In is enlarging it while the Zoom-Out is
shrinking the timeline.
Show Scenes, Show Video Motion Rate and Show Plane Frames are checks resulting in
preview changes (seen in the timeline) for objects being indexed. Usually we analyze
with these options the assets being result of Image matching search. In the Search
Results tab select the asset being a result, open it in the Viewer and check these
options from the Timeline menu. As a result of this, the timeline will change – it will
show the Video Motion Rate vector with yellow color; the Scenes into which the best
match is found (you can select this scene in the timeline, right-click over it and choose
Play Scene to preview it – usually it is very short) and markers for each Plane Frame in
the video – see the screenshot.
The Scenes are very short and most of the cases their beginning and end points are
overlapped on the timeline. To distinguish them well, use the Zoom In option/button
to enlarge the timeline preview.
Go to Mark In – locates the slider on the Mark In point.
Go to Mark Out – locates the slider on the Mark Out point.
Go to Master In – locates the slider on the Master In point.
Motion Rate
Plane Frame mark
Scene

105
Go to Master Out – locates the slider on the Master Out point.
Set Mark In - sets the current position as Mark In point.
Set Mark Out – sets the current position as Mark Out point.
Set Master In - sets the current position as Master In point.
Set Master Out - sets the current position as Master Out point.
Add Marker - adds a new marker at the point where the slider is placed.
Delete Marker - deletes the selected marker(s). The option is available also from the
Marker’s context menu.
Edit Description - Opens the Edit Description window to edit the currently selected
marker’s description. The option is available also from the Marker’s context menu.
Go to Marker - Locates the slider on the selected marker. The option is available also
from the Marker’s context menu.
Delete – Deletes a currently selected marker.
Edit marker – Opens the marker’s dialog so that you can edit the description (as well
as the extra description) of this marker.
Go to marker – Places the slider (cursor) over a selected marker.
Next Marker - Selects the next marker in the timeline.
Add Custom In - Out put on the timeline another
type of descriptive markers. Observe them as
markers which describe a part of the material. Use
these markers to describe a scene selection. Each
custom in-out markers gets a different number to help understanding which one
belongs to which.
Join Custom Areas to File – At library projects, this option creates a new file by
merging all custom in-out areas of the asset.
Join Custom Areas to Asset – At archive projects, this option creates a new asset by
merging all custom in-out areas of the asset.
Join Outside of Custom Areas to File – This option merges the only areas which are not
in any custom in-outs.
Thumbnail – for video objects - sets the current frame as a thumbnail.
Add the Marker Frames to the Storyboard – Adds all the frames where markers are to
the storyboard.
Join Uncensored Areas to File – This works just like “join outside of custom areas to
file” but instead of custom in outs, this options merges areas which are not censored
at library project.
Join Uncensored Areas to Asset – This option works same with “join uncensored areas
to file” but instead of file this merges areas in an asset for archive projects.
4.16.11.6. Settings
Use Proxy – this option “commands” the Viewer to display only the proxy files. If the
file is missing proxy, nothing will be displayed.
Use Web Proxy File if Proxy is not Present – related to the first option. If the file is

106
missing proxy, the Viewer will display the web proxy file (if available).
Use Original File if Proxy is not Present – again related to the first option. If the file is
missing proxy, the Viewer will display the original source file (i.e. in this case the proxy
file is with high-priority compared to the original file).
Clear Asset List On Close – when the Viewer is closed, all the info gathered in the Asset
List will be erased.
Configure Metadata Overlay – Metus MAM provides a possibility some metadata
values (chosen by the user) to be
previewed together with the material
in the Viewer’s window. Usually,
these values are placed over the
Preview Window. For this purpose,
some settings must be applied before
that in the General Settings tab:
Text Color – from here you choose
the color with which the text will be
displayed.
Back color – specify here the
background color (like when subtitles
are displayed). Font Type and Font
Size are to set these final text
characteristics.
The next four tabs are similar – they
are to choose which metadata fields’
values to load on the preview
window. You can choose some
Common metadata fields or such
which had been created especially for
image objects (Image Fields), videos
(Video Fields) or audio files (Audio
Fields). What you have to do is just to
add the fields pointing them in the
Metus Metadata Tree which will pop
up when clicking on the Add button.
Remove is to delete any selected
field in the list.
If we assume that the Position table presents the Viewer’s preview window, then we
can logically divide it in 9 parts. Select any of the fields that you already added in the
list on left and choose at which position on the screen you want to see its values.
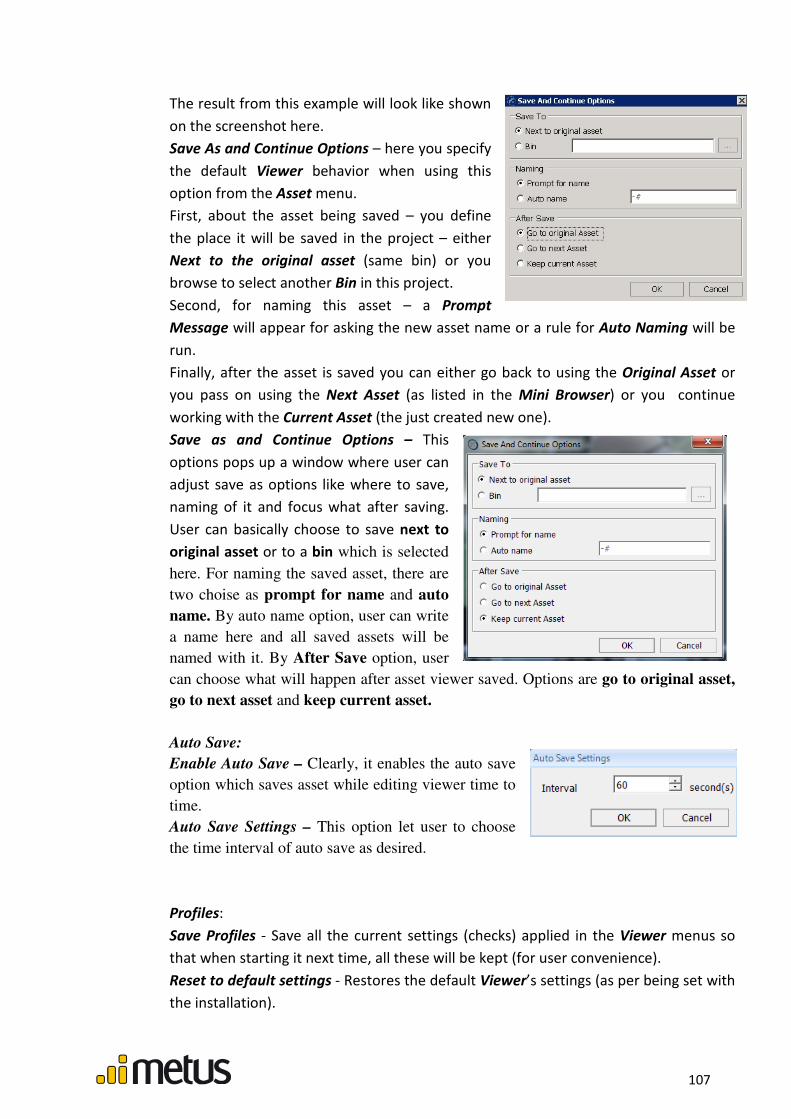
107
The result from this example will look like shown
on the screenshot here.
Save As and Continue Options – here you specify
the default Viewer behavior when using this
option from the Asset menu.
First, about the asset being saved – you define
the place it will be saved in the project – either
Next to the original asset (same bin) or you
browse to select another Bin in this project.
Second, for naming this asset – a Prompt
Message will appear for asking the new asset name or a rule for Auto Naming will be
run.
Finally, after the asset is saved you can either go back to using the Original Asset or
you pass on using the Next Asset (as listed in the Mini Browser) or you continue
working with the Current Asset (the just created new one).
Save as and Continue Options – This
options pops up a window where user can
adjust save as options like where to save,
naming of it and focus what after saving.
User can basically choose to save next to
original asset or to a bin which is selected
here. For naming the saved asset, there are
two choise as prompt for name and auto
name. By auto name option, user can write
a name here and all saved assets will be
named with it. By After Save option, user
can choose what will happen after asset viewer saved. Options are go to original asset,
go to next asset and keep current asset.
Auto Save:
Enable Auto Save – Clearly, it enables the auto save
option which saves asset while editing viewer time to
time.
Auto Save Settings – This option let user to choose
the time interval of auto save as desired.
Profiles:
Save Profiles - Save all the current settings (checks) applied in the Viewer menus so
that when starting it next time, all these will be kept (for user convenience).
Reset to default settings - Restores the default Viewer’s settings (as per being set with
the installation).

108
4.16.12. Using the Viewer
4.16.12.1. Navigating between the objects
Click on any object in the Mini browser. Click on the right arrow to see the next objects or on
the left one to see the previous objects. When you click and hold the arrows, the list starts sliding
continuously to left or right. In addition, if the number of objects increases so that the Mini
Browser gets full, a slide bar is displayed below to easily navigate in the list.
The current object can be changed by pressing Previous Clip, Next Clip buttons on the
buttons panel.
Ctrl+Right arrow keys combination switches to the next object, Ctrl+Left arrow keys
combination switches to the previous one.
4.16.12.2. Using Proxy
Press the Use Proxy button on the right panel. Also, to enable or disable only the proxy
usage you can check/uncheck Settings -> Use Proxy.
To avoid missing preview for the situations when no proxy is created, you should preview
the original file. Ensure this from Settings -> Use Original File If Proxy is not Present from main
menu.
4.16.12.3. Selecting a Thumbnail
For video assets – slide the cursor over the timeline. When the desired frame is reached,
drop the slider at that point and then press the button Create Thumbnail From Current Frame
from the Right Panel.
4.16.12.4. Locking the Timeline
You can lock the timeline against further changes by pressing Lock Viewer Against Changes
button from the Right Panel or by choosing Timeline -> Lock Controls option. By default the
timeline is unlocked. If the user doesn’t have permissions to modify, the timeline is locked
automatically and unlocking button becomes disabled. Such user cannot add/remove markers,
change the slider position and add/remove censors.

109
4.16.12.5. Adjusting the Preview Volume
The preview volume can be adjusted by dragging the Volume Slider in the Volume Controls
section in the Right Panel; by using the Page Up and Page Down keys on the keyboard or by
choosing the proper level in the Audio submenu of the Playback menu. The preview can be muted
by pressing the Mute button in the Audio Controls section; by choosing the Mute level in the
Audio submenu of the Playback menu or by pressing the M-key on the keyboard.
4.16.12.6. Adjusting the Balance
You can adjust the right and left audio channels by moving the Balance Slider in the Volume
Controls section; by pressing the Shift+UpArrow and Shift+DownArrow keys on the keyboard or
by choosing the relevant option in Playback -> Audio.
4.16.12.7. Using Time Boxes
A digit becomes active when you click in it. After that you can change its value by using the
Up/Down arrow buttons on right. You can change numbers faster by pressing and holding these
buttons. When a digit reaches the maximum value it can take, the digit on left increases with 1
unit and the digit being edited, resets. If the digit value becomes “0” and goes on decreasing, the
value on left decreases 1 unit down. You can also switch between the digits with the Left/Right
Arrow Keys.
4.17. The Progress Status window
The Progress Status window shows the status of the current process(es) running on Metus
MAM.
In the Object Name column the asset name is displayed. The Task column shows the type of
the task that must be run (archiving, transcoding, proxy creation, indexing, moving to Recycle bin,
deleting, Bins analyze, etc.). The Progress displays the level of the task completion. Server column
informs about the name of the machine (server) executing the relevant task. Whether the task is
waiting, running, finished or canceled can be seen in the Status section. When the task is running
it displays what process exactly is being done. If it is canceled there are two cases – to be canceled
by the user or when the server was not capable of running the task. This can be understood from
the last column – Message. Added is the pre-last column which shows the date and time the task
had been added to this list for execution. The newest tasks are added to the beginning of the grid.
If the processor is busy and cannot start the execution of some task, its status is been displayed as

110
Waiting. It waits until the processor finishes the currently running one. The number of the tasks
running simultaneously can be changed. It depends on the setting applied for this MPS in the
Project -> Properties -> Process Servers -> Manage MPS -> Server Settings.
You can make the Progress Status window look more précised and well-structured by
leaving visible info only about the tasks that are not finished. For this purpose right-click in the
Progress Status window and choose Remove Finished Jobs. You can also stop the execution of a
running task by selecting it and choosing Cancel. If you choose Cancel All this will stop all the tasks
currently running, as well as those, being waiting. Remove erases from the list any selected task.
Remove All pops up a dialog for asking about your choice. You can delete all the tasks with which
the processor is not going to work anymore (i.e. the past tasks – no matter if finished or canceled)
or you can delete past tasks plus the currently running ones. Both in the two cases the remaining
(still not loaded tasks) will be executed after the Remove All selection.
4.18. Project Properties
This is the most important window with optional dialogs in Metus
MAM. Here most of the project settings are applied (general, common,
etc.).
NOTE! Only users with full (administrator) rights can access the
Project Properties window.
4.18.1. Security
This is the dialog to define the upper-security-level of the project –
setting the Administrator. This must be only one person and to set his
name you have to browse with the Change button in the list with the
users already defined for the current project, i.e. you choose one person
from the already defined user list. From the moment of the project
creation until setting the Administrator here, the project administrator is
Anonymous (set as default). No password for this user.
In order to avoid misusing of any Metus MAM instance you can set
Session Expire Time. If it is 10 minutes this means that if the system has
not been used in the last 10 minutes (mouse not moved) it will ask for
username and password to log again in the
project so to keep going on working with it.
Even though, some client machines
can be allowed to connect to this one during
the system being locked. These machines
are added with their names in the Machine
Exception list (type only the name – not the
IP). Specify the PC name in the Machine
exception list field and press the “+” button.
To remove a machine from the list, use the
“-” button.

111
Users can be forced to change their passwords periodically from here to increase security
level. And this period time can be adjusted as well. It’s also possible to allow active directory users
to log in with their accounts.
4.18.2. Servers
Under this note you can configure according to your needs MAS, MPS,
MIMS, Playout Server and Prompters Server.
4.18.2.1. Archive Servers
In this section all the archive devices are listed and configured – storages, tape drives or tape
libraries.
Storages are usually FC-connected to the MAS computer and thus their units are available
for configuring by the Metus MAM system. Storage units can be presented either by disk sets or
by disks (system drives). Disk sets are usually gathered in a RAID configuration so that they can be
replaced at some moment if some of them burns or fails because of any reasons. When a disk
replacement is needed, the system can be told which disk is going to be replaced so it
“understands” and copies back the new data to the new disk after the replacement.
When the storage units are displayed as disks (system drives) Metus MAM lists them as
shown on the screenshot here.
In this case
we have three
drives listed – C, D
and E. Each one of
them is considered
as a place to which
the system can automatically copy (archive) the materials being archived in the project. Before
starting this, it is better to configure these parts in order to set some priority for them.
First – the MAS server. Its state must be Connected so that the server is running and carrying
on the tasks he has to do. In case the status becomes Disconnected it means that either the
network failed for some reasons and the connection to the MAS computer is lost or the Windows
Metus Archive Server service is not running.
The State for the system drives can be Active, Suspended or Disabled.
We disable the drives to which do not want to write anything. The best example for this is
drive C where usually the Windows installation is done. So, we always avoid using this drive for
any purposes. We do not copy to it; we do not read from it - totally ignore it.
We suspend a drive when we want to temporarily stop copying to it. But we still keep on
reading data from it. So, it becomes like a read-only device.
Active is the drive to which we both read and write (copy) to.
Disk and disk sets are labeled with priority terms like Primary and Secondary in order to tell
Metus MAM if several of disks are active, to which one to copy firstly. When the Primary disks get
full, the system goes on copying to the Secondary-labeled disks. Please, keep in mind that Primary
and Secondary are just labels. You can name the disks as per your wish when adding them to the
system. This is done via the Add disk button (adding) and from the Information Lifecycle
management section (where rules are defined) you set the name for the disk.
The columns into this “table” show information for each drive, like:
- Disk Name – as per set by the system;
- Free Space (in bytes) available on this drive;
- Total Space (in bytes) shows the full drive capacity;

112
- Temp Size (in percents) shows the space on the disk used for temporal saving purposes.
Sometimes, when a client creates an archive request, the file is not copied to the archive
folder. The file is copied to a temp folder. The temp folder is in the same disk. It is
generated automatically by the MAS.
- Unusable space (in percents) on the drive is the space which Metus MAM is not going to
use – it is reserved by the system or other applications.
There are cases in which the customer needs to enlarge the storage. He can either add
additional disks (as already mentioned) or add one more MAS server. This is an optional feature in
Metus MAM, so please refer to the Metus Price List in such cases. Adding additional MAS server is
a better option because the searching in the storage, as well as the preview and browsing will
become quicker.
To add another MAS server press the Add server button and browse in the network to point
the machine which will be the second MAS server. Select it from the opening menu. On each MAS
server machine the Metus Archive Server service must be running (Metus Archive Server.msi must
be installed there)
On later stage, if some of the Metus MAM clients have problems with reaching this machine,
you can edit it by pointing its real or alternative IP address. So, select the MAS server from the list
and press the Manage button. Enter the IPs here.
Logically, the Remove Server button will delete a selected MAS server from the list.
Move Up and Move Down are buttons to re-order the MAS servers in the list.
When the status of a MAS server is disconnected and the probable reasons (mentioned
above) are already eliminated, press the Refresh button in order to update the statuses of the
machines. Disks space can be refreshed, also, as well as any other characteristic shown here.
In cases that the MAS is disconnected (situations we already mentioned above) the files
cannot be previewed in Metus MAM – they are marked with X-sign. You can “skip” the MAS server
and access the files even though - press the Make Files Accessible button and the files can be
previewed again.
Add Remote Storage – Metus Archiving System is able to use network shares, NAS etc. as
storage units to archive to. The remote storages behave like local disks. When your local storage is
full you can add additional remote storage to have more free space. Please, keep in mind that
each additional space used must be included in the license for the storage capacity to be
supported.
When sharing storage, press the Add Remote Storage button and you will see the GUID
generated by Metus MAM – use it to name the share like this.
In the Share Path
field, in front of the GUID
enter the IP of the PC
where is the space that will
be used as additional
storage (the share).
Create a user and give him full permissions for working with this share. Enter his name as
Share User and his Password in the next field.
From the Diskset menu choose how to label the shared storage – Primary, Secondary, etc.
For more details regarding sharing and users, please, watch the video 04- 2 Defining Archive

113
Servers and Disks Advanced (Adding Remote Storage).wmv. It is included in the Metus Product
CD (Help -> Video Tutorials). If anyhow you do not have the video, please, contact
4.18.2.2. Process Servers
The processes such as transcoding, proxy creation, indexing, etc. take long time and use too
much CPU sources. They can be performed by other computers in the network. If a Process Server
is not selected, these processes must be executed by the local PC CPU. To select a Process Server,
press the Select Server button in the Process Server level. In a pop up window all the computers in
the network are listed. Browse and select the computer you will use as a Process Server and then
click the OK button.
You can add any machine in the network as a MPS server. The Metus Process Server service
must be running on it (Metus Process Server.msi must be installed there). If you need to add more
MPS servers (quicker processes as well as running simultaneously more tasks), you can add them
the same way as adding MAS servers. It is optional, so please refer to the Metus Price List.
Press the Connect button to connect to a MPS server after the network (a possible reason
for disconnection) is already available. Refresh button will inform you about the new statuses of
the servers (updates the info).
No matter how many MPS servers you have added to the system, Metus MAM always lists
the local machine as an MPS server, as well. The local MPS could never be deleted from the list.
The Local MPS is used when the global (network) MPS server cannot reach the local folder
set for the task given to the MPS server.
Example: Here is a situation into which the Local MPS use is needed. Let say a file in the
project must be retrieved locally and transcoded during the retrieval. But the global MPS is not
given a write-permission to the folder into which the resulting file must be saved (f.e. the file is
going to be saved locally on the Desktop). In this case, the Local MPS will do the task. To avoid
such situations, share the folder that you want to transcode to.
Select a MPS and press the Manage Server button. A dialog opens. Into it you can see details
about tasks proceeding or processed.
From the Server drop-down list select the MPS – here are listed all the MPS servers which
you have added to the system. For the selected server watch details about either all the projects
that the server had served or only of a separate project – select it from Project drop-down list. The

114
info displayed in this dialog can be filtered more – show either the tasks currently running (Job
Status = In Progress) or the completed tasks (Job Status = Finished). The Refresh button is used to
update the status of
the tasks as they are
running meanwhile
and the status is
changing quickly.
If the rows width is not enough to read the info, double-
click over a row and you will see the same info precisely
ordered in a separate dialog.
Press the Server Settings button to fine-tune the MPS
configuration. The name of the server will be displayed on the
first row (Server Name).
Max. Concurrent Jobs presents the number of the tasks
that may run simultaneously – as more tasks run, as slower the
processes will be.
Max. Jobs on the Queue shows the number of the tasks
that may wait for execution (queued tasks).
Max. Wait Progress can be set in Seconds and Frames. There are situations in which some
files transcoding or any process running can hang and not finish due to external reasons (not
enough permissions for writing in the folder, etc). In such situation the MPS starts doing the task
but at some level it stops and waits (checks its write permissions, etc). This waiting may last
forever or at least until the permission is allowed. That behavior can cause the MPS freeze. To
avoid this, Metus MAM applies the setting Max. Wait Progress for each processor (editable by the
user). After this time is over, MPS skips the task and starts the next one.
Reject New Job is not checked, by default. If you apply this check, each time a new job is
given to the MPS, it will check if the number of the tasks given is exceeding the number of the
tasks set above. If so, the new loaded tasks will be automatically rejected. Nothing will be queued.

115
The user will be informed about this with a proper message in the Progress Window.
Enable Log check concerns logging info in the MPS Event Viewer.
Temp Folder is the place through which the transcoded files pass. MPS does not transcode
the files to the desired folder directly - a file is firstly transcoded in the Temp Folder and after the
transcoding is completed, MPS copies the files to the desired places. The Temp Folder is a default
one, but its place can be changed as per users’ wishes.
4.18.2.3. Image Matching Servers
Similar to the other servers added to the system we can add an Image Matching Server. This
is the machine where the Metus Image Matching Server service is running (two installation files
must be run there – Metus Image Matcher.msi and Metus Image Matching Server.msi). Thus we
install not only the engine taking care for the image matching task to be run but also the server
which is providing the two-directions communication between the image engine and the project
(the client application). The dialog is similar to the other servers’ ones. Four buttons are available –
all of them described in the other server sections above: Add Server, Remove, Connect and
Refresh.
The Image Matching option is already described in the Searching section – Image Search.
4.18.2.4. Playout Servers
Playout Server is the machine on which the playout software is installed (f.e. AirBox). It is
supposed to broadcast the materials included in the playlists created in Metus MAM. These
playlists can be sent to that machine locally. Therefore, some general settings must be defined for
this Playout Server in that level of the Servers node.
Press the Add Server button and browse to point the Playout server – it should be a machine
in the same network. The status of the server immediately becomes Connected. It will be
Disconnected only when the network disappears for some reasons or the machine can not be
reached. After you apply the relevant changes in the network or the playout machine, press the
Refresh button so the status is updated.
If several Playout Servers are going to be listed, any of them can be selected and Set As
Default. This means that this server will be proposed to be used each time you create a playlist.
When a Playout Server is added, the project tree changes – the
added servers are listed in the Devices Bin container. Inside of this level,
the playlists which are created for the relevant Playout Server can be
seen (as filters).
If you do not want to use anymore any of the servers, just select it and
press the Remove button – this server will disappear from the Playout Servers
list. As a result, it “goes” to the Recycle Bin and at any moment, from the assets’
context menu it can be restored back to the servers list.
Properties button pops up the dialog for configuring the needed settings
for the Playout Server.
The first tab – General, is separated in two sections – upper and down. The first one is to
define all the folders related to the playlists creation and realization. The second one is for taking
feedback about the playout been executed.

116
In the Name field type the label of the playout instance – this is not obligatory to be the
name of the PC with the playout software. This is just what you think to be proper for naming that
instance. The real name (or IP) of the playout server is to be set in the next field – Computer
Name/IP.
Metus MAM gives the opportunity to
create playlists from there. Playlists will be
saved in the current project (somewhere in
the bins) but physically the playlist must be
saved as a file, too. So, after you create it, it
will be realized to the Playout Server machine
and could be saved in a folder on that same
machine. This is in order the playlist to be
saved locally for the playout server so that if
the network fails, the running broadcasting
program will not lose the list to execute.
Playlist Location is the place where we
save the list into. It can be any folder in the network; a local one (for the Metus client machine) or
a local folder for the Playout Server. In each case the folder must be a network sharing with all the
permissions allowed. No matter where we save it, we must know that this is just the physical place
the playlist will be saved into.
It is possible that the playlists are saved directly into the Playlist Location – listed there one
after another or each playlist can exist in a separate subfolder (this subfolder will be a part of the
Playlist Location). If you prefer the second way of organizing the playlists and the content, then
check the Create content folder for each playlist.
When the broadcasting program loads the playlist, it can access the included files in two
ways:
- The first one is to Tunnel the content. The files in the playlist will be displayed with their
network path (they will be placed on the storage and played out from here). Actually, this
is what we call a network playback.
- The second is to Push the files together with the playlist. Metus MAM checks the playlist
during its realization and all the files included in the playlist are pushed in a folder we
define in the Central Content Location field.
In other words, for each Playout Server we define two folders – one for the playlists (Playlist
Location) and the other one (Central Content Location) for the video materials included in the
playlist (if Push mode is used). Both of them are displayed with network paths so that they are
accessed from all the machines in the network (all the Metus MAM clients can write there, all the
playout instances can access the playlists and the content loaded there).
When working in Push mode, the Metus MAM system is replicating the files from the
playlist in the Central Content Location – already mentioned above, a network folder. The files,
included in the playlist, are displayed with this network path. Thus, even placed on the same
(playout machine) the broadcasting program is trying to access them through the network.

117
Therefore, this is still assumed as a network playback. But this is not recommended for most of the
playout softwares. For that reason the Local Path field is available here – type inside a folder,
which is local for the Playout Server. The files, included in the playlist, will be changed paths; they
will be displayed in the broadcast program with this folder-path exactly and further on they will be
observed as local. To summarize: Metus MAM is changing the paths internally of the playlist.
NOTE! If you use AirBox, please, keep in mind that both the two types of accessing the files
are not safety due to the broadcast characteristics. In the first scenario (Tunnel mode) if
the network fails or disappears even only for a second, the broadcasting program will
freeze without feeding contents or the playback quality will be very bad. In the second case
(Push mode) the copying on the playout server is done through the Windows system,
which is just making transfer of data directly to the system being playing out, meanwhile.
Such data replication is often causing playback disturbing or stuttering, etc. Therefore, for
achieving the best playback behavior, when using AirBox we recommend contacting
PlayBox support at www.playbox.tv -> Support section.
Very often the institutions are using more
than one playout machine. Furthermore, each
playing machine is presenting a different
playout channel. In Metus MAM you can relate
each Playout Server to a different channel. To
achieve this firstly you must select Project ->
Fields -> Definition Packages -> TV Channels
and edit the package for the TV Channels.
Example: If there will be three channels the definition package will look as shown on the
screenshot.
After the channels are set, each time when adding a Playout Server, choose with which
channel it will be bound (see the screenshot above).
The use of this is during the playlist creation. It is easier to tell for which channel the playlist
is purposed for instead of pointing out the Playout Server. Nevertheless, no matter which option
you prefer and choose, all the settings configured there, will load automatically.
Still in the upper part of the Playout
Server Properties dialog, we shall discuss here
the second tab of this window - Server
formats – the section where we configure
Specific formats for the Playout Server and
the preferable formats the system transcode
the archived files to.
Specific formats can be defined for
video content, for audio content, as well as
for images. From the drop-down list check all
the formats the Playout Server can support

118
and prefers to run – the check is multi-choice-based. Repeat the same for the audio and image
files. Depending on the type of the broadcasting software installed, these two can be skipped (if
only video is supported).
In the second part choose Metus MAM or Carbon Coder to transcode the content in any of
the formats set in the below fields. In this section only one format can be chosen - it is done via
the Browser button. Choose the most preferred format (the Playout server is running mostly).
When you create playlists in Metus MAM, add any type of file to the playlist without
checking if it is supported by the server or not. During the playlist realization, depending on the
Playout Server selected for the current playlist, Metus MAM will check the formats of the files
included in the playlist. If they are listed as Specific formats for this playback machine, then the
files are just copied to the Central Content Location (if in Push mode). If a file, included in the
playlist, is not specific-formatted, during the realization (while copying it to the Central Content
Location) Metus MAM will transcode it to the format set in the Image, Audio or Video fields.
Feedback Location is the place (folder) into
which the Playout server generates the feedback
file that Metus MAM uses further on.
The Startup Type for watching the location
can be:
- Automatic – The system always watches the folder and the logs being placed there and
updates the playlists statuses according to this information. Even the information is
watched automatically, there may be cases in which the MAM system is not accessing it –
f.e. when Metus MAM is closed and meanwhile the broadcast software is updating the log.
After Metus MAM being launched again, it will continue to listen to the log for new
changes. But it will not “understand” for the events that happened meanwhile. To make
the system check everything up to the moment (all the log files in the Feedback Location)
press the Scan button so that all the playlist information is updated.
- Manual - This is a mode in which the logs are traced only when the user says so. When
working in Manual mode, press the Watch button to start the folder observation. Metus
MAM will check any feedback update until you press the Stop button. Scan and Stop are
acting the same way like described above.
- Disabled – means that the feedback from the playout system to the Metus MAM will be
forbidden and not run.
Any information that the broadcast software is loading into the log file will be parsed by
Metus MAM and loaded in the relevant metadata fields – some of the values can be loaded in
fields, created by the user; others – in fields included in the Playlist level of the metadata tree. To
preview all this info, select the playlist asset in the project and watch the values in the metadata
window below.
NOTE! When a Playout Server and/or a Prompter Server (explained below) are added to the
system, they are automatically listed in the Devices Bin container.

119
After a playlist realization the project tree changes. In the Devices Bin container, where the
Playout Server is listed, inside of it you can find three filters that sort the playlists according to
their feedback – playlists can be Played, Waiting Playback or Playback Failed. Select any of these
statuses and it will filter all the playlists answering to them on right. Then in the right part select
any playlist and at the bottom (the metadata window) you will see separately the statuses of each
file included in that playlist.
Playlists are Played when all the files inside are played until the end.
Waiting playback are these playlists which still have not been played in the broadcast
program.
Playback Failed is the status of a playlist into which even one file only have failed playback.
Failed playback is the one which is interrupted from outside (external interaction) or skipped by
some reason (manual jump on another file, not enough time for its execution, etc).
NOTE! To get a full idea of the Playout Server configuration as well as the Playlist settings,
please, read also the Playlist Editor explanation below in the manual.
4.18.2.5. Prompters Servers
Prompter Server is not a separate machine which
needs special installations to be run like the other server
machines in Metus MAM. Usually, this is the machine to
which the prompter device is connected.
Prompting in Metus MAM had the following
general workflow-idea:
Users from different cities upload their materials in
the project. In adjacent additional file (see the supported
types) they put the text that must be sent to the
prompter device. Or they load this text in some
metadata fields. They can also not put any text for the
prompter but this text can be entered later in the project
by any other Metus MAM client. However, we assume
that somehow the asset already has a metadata field
with the text loaded into it.

120
Next step is to tell the system to take the text from this field and forward it to the prompter
device. For this purpose, first the text is copied to a file (txt, rtf or xml) and this file is saved in a
shared folder somewhere in the network, the so called Data Folder. The Prompter Server machine
is configured finally to watch the files inside the Data Folder and to pop up the text being placed in
the files there.
In the Prompter Properties dialog enter a label and the name of the machine that will be the
Prompter Server. As explained above, a location for saving the files with the text is needed –
browse and point it in the Data Folder field.
NOTE! Be sure to define all permissions checked for this folder.
For file format choose between *.txt, *.rtf and *.xml – this will be the file that contains the
prompter text and in this format it will be saved in the Data Folder so that the prompter device
take it from here.
For each realized playlist, a separate folder can be created, as well
as a separate file for each asset from which text values are taken. This is
applied with the checks for the options Create folder for playlist and
Create file for each asset. When you choose the second option, this
means that for each video material a prompter-text-file will be created
(txt/rtf/xml). This file must have a name and you have to specify its
structure in the File Naming format.
The name can “take” the value from a metadata field or several
metadata fields’ values concatenated. If you prefer this way of naming
the file, choose Add -> Field.
Variable is an option to define a naming format so that the name of
the file changes each time. The variable fields that you can enter are
predefined – see them in the Field/Variable drop-down list. According to what variable field you
select, the Step type and Data type are changing – they are coded for each variable and cannot be
edited. The idea here is not to set Step and Data type, but to choose that variable field which Step
and Data type are matching best your needs.
After the variable field selection, you can set its format – again listed in a drop-down menu
and the Max.Length (number of symbols) for that name.
A Static text is another option. If you select Static text, enter the text that will be the
filename and for each different file Metus MAM will put a number at its end.
Which fields’ values to be loaded in the prompter text file is configured in the Fields To
Export section. Basically, we assume that the prompter text is logically divided in three parts: Title
Field, Content Field and Full Text Field. This is not obligatory to specify all of them. F.e. the
TitleField can “take” the values loaded in the Title metadata field. Content Field may “take” the
text from Asset Content metadata field. Distinguish the first and the second parts by setting the
number of empty rows between them. Enter it in Distance between Title and Content.

121
4.18.3. Archiving Options
Here is the section into which we configure default archiving settings. These are settings
which will be applied to all the materials being archived on the storage (tape). Because some of
the archived materials may come from a library project, it is possible that they have existing Metus
MAM metadata, such as Storyboard, Proxy and Trim In/Out points. There are three tabs for
archiving options which are general, transcode and metadata.
In general tab, there are
storyboard, proxy, trim, HSM Unit
and index options.
Storyboard - the archiving of
any object may be done together
with its Storyboard (if it comes from
a library project). If you do not want
to archive storyboards with the
items, just leave this section
unchecked.
The first choice is to Archive
the available storyboard, which
means that the objects which still do
not have storyboards will be
archived without such. Those that
have storyboards will keep them. Shortly said – everything will be kept as it comes.
Second choice is to Archive storyboards of assets that have storyboard, otherwise create
storyboard. It is self-explanatory – the assets “coming” with storyboards will keep them; those
that “come” without storyboards will be created such immediately after being archived in the
project. Their storyboard creation will be done according to the general Storyboard Options
explained below in the Project->Properties menu.
The last option is to Recreate Storyboards. This will create storyboards of all the archived
materials (no matter whether they have such or not) according to the rule set in Storyboard
Options.
Proxy – the same as Storyboard. If the proxy check is not applied at all, then the objects
will be archived without proxies (even those that have such).
Trim – if the object is coming from a library project, it is possible to archive only a part of it.
This can be either the Only between mark In/Out section or the one Between the Master In/Out.
Options
- Automatically Archive items to HSM Unit – this option is active when a tape drive is
attached to the system. It will archive everything coming in the project directly on the tape
cartridge.
- Automatically Archive Proxies to Tape – In addition to the previous option, or separately
from it, the proxies of the items being archived can be sent directly on the tape if desired.
- Delete Files After Archiving – When archiving any file from a local folder to the project, it
will be copied on the storage that is defined for this. From this moment, we go on working with

122
this archived copy. The original file (the one being source for this replication) remains untouched
at where it is. Usually, it is not needed anymore and there is no reason to keep it because it only
takes place on the PC HDD. This option automatically gets rid of these files by deleting original
files.
Create Index – This option creates index for the asset after archiving automatically if it’s
checked.
Transcode Tab – Very powerful
and useful option supported in Metus
MAM and deeply differentiating it from
the other MAM solutions available on the
market. This check applied here is to
ensure that all the materials available on
the storage units will be of one and the
same format. Everything “coming” in the
project will be transcoded to this format.
For more details about this, please refer
to the Transcoding section above in the
manual.
Metadata Tab – Metus MAM
provides a possibility to Select file based
metadata types to save to database.
These are additional metadata grouped
by types (Video, Audio, EXIF, IPTC, MP3
and Summary). We recommend not
checking them because they unduly
enlarge the database. To see what metadata fields are listed for each group, click on the question
mark on right.
When archiving a file in the system, we take it from some folder. Sometimes, in the same
folder additional files exist – with the same filename but with different extension. These are called
adjacent files and they are bringing additional information that can be used by the Metus system
(f.e. sometimes the descriptive metadata of one video are placed in a *.xls file next to it). In such
workflows, check the option Archive Adjacent File Contents. The following types for such
additional files are supported: *.xml, *.txt, *.xls, *.doc and *.pdf. So, depending on the format of
the adjacent file “coming”, select it and Select a field into which you will load the values coming
with this file.
NOTE! The adjacent files should contain one value only, because it is supposed to be loaded only
in one metadata field. Furthermore, this metadata field could be only of String or Text type.
4.18.4. Storage Management
This section is used generally to name the new disks added to the storage. For these disks
you can define some filters concerning the content which will be saved on them.

123
Press the New Disk Set
button and a dialog will pop
up. In the Name field below
enter a name for the new disk.
Define the criteria for the
content that you want to be
filtered and copied on this
storage – with the browse
button open the metadata
tree so to select the metadata fields that which values will be used for filtering. When more
criteria are added you can apply one of the two logics – AND/OR with the help of the field Match
(All – all the criteria must be observed or Any – even only one of the criteria is observed, the filter
will be executed).
The example on the screenshot shows how the content can be archived on the storage due
to the criteria Creator – if the creator is Columbia Pictures, the files will be copied on the Primary
labeled disks. The files with creator DreamWorks will be archived on the Secondary-labeled disks.
Imagine content will be sent to the Archive disks.
The rules defined here are not run only over the content being archived (in the moment of
archival). These rules can be used so to order content even after it has been already archived –
these are content managing rules.
On later stage, if needed, a rule can be additionally changed by selecting it and press the Edit
button. It can be erased, also, with the Delete button.
After the rules are defined, you can check one of the options below for organizing priorities
for the processes that Metus MAM will run. These options are self-explanatory:
Use Storage
units simultaneously.
Always archive to
storage unit with
most empty space. –
Metus MAM will
archive to the most
empty disk without
taking in view what is
the disk order (in the list here).
Use disk sets in order. Advance to next disk set, when one is fully used. – Metus MAM will
copy on the disk sets units, in the order they are listed here. As soon as a disk set gets full, it will go
on copying on the next one as per the order in the list.
Use storage units in order. Advance to next storage unit, when one is fully used. – Same as
above, concerns the disks (system drives).
As seen from the last two options, the list order is important. Therefore, use the Move Up
and Move down buttons on right to order the rules in the list in a proper way.

124
4.18.5. Storage Status
The Storage Status
shows the entire storage as
separate units via a colorful
diagram interface. From this
section you can see all the
info seen in the Archive
Servers settings – Disks Size,
Temp Size, Free Space, etc.
and on other hand – you can
make some management of
the storage disks.
The storage units are
presented either as disks
(drives C, D, etc) or as Disk
Sets (their labels - Primary,
Secondary, etc). To switch
between these two modes
use the button Show Disk Sets/Show Disks.
All the system drives are listed here – Active, Suspended and Disabled ones. Select any of
them and for the currently opened project you can see what size of the disk the project is taking
with all the materials archived for that project on that disk – the lilac color (look below, too). You
can see also how much space another projects’ archived materials are taking – the peach-colored
info (Other Metus Projects field). In the colored lines above the info is presented in proportions
and digits (if enough place); below it is displayed with digits and explanations for what each color
is presenting.
Select any of the storage units and press the Manage button to see the additional info as
Temp Size, Unusable Space, Disk Set, Disk State and Serial Number of the disk. This Serial
Number can be saved to a metadata field so that a search by Disk Serial Number is possible.
The last check in this dialog is Used by the Tape Library not stand-alone drive and it is active when
a tape drive is attached. Applying the check means that the disk will be used for tape library cash
disk. This is automatically used by the system only in cases when the cash disk is not recognized
(some kind of hybrid configuration – manually point the disk which the system will automatically
use for this purpose, if needed).
Suspend button is active only for drives which are either Active or Disabled. Select such a
disk and Suspend it by pressing the button here. The same can be done in the Archive Servers
settings. No matter from where you apply the status, the change is always reflected in the other
dialog.
Same explanation is referred to the Disable Disk button.
Refresh is for updating the info and its preview.
Move Contents button is purposed to move files on the storage from one disk to another.
Select the disk you want to move from and press this button. A dialog appears asking to where to
move. In this dialog all the other disks (disk sets) are listed in the left half. You select the disks to
which you would like to transfer and add these disks in the right part. Some details (Name of the
disk, the MAS server name, Free Space that can be used for archiving, Archive Size – the place
already used for archiving purposes in Metus MAM) about the source disk are displayed in the
upper part of the dialog; details about the target disks are displayed at the bottom of the dialog
after you select the disk in the list.
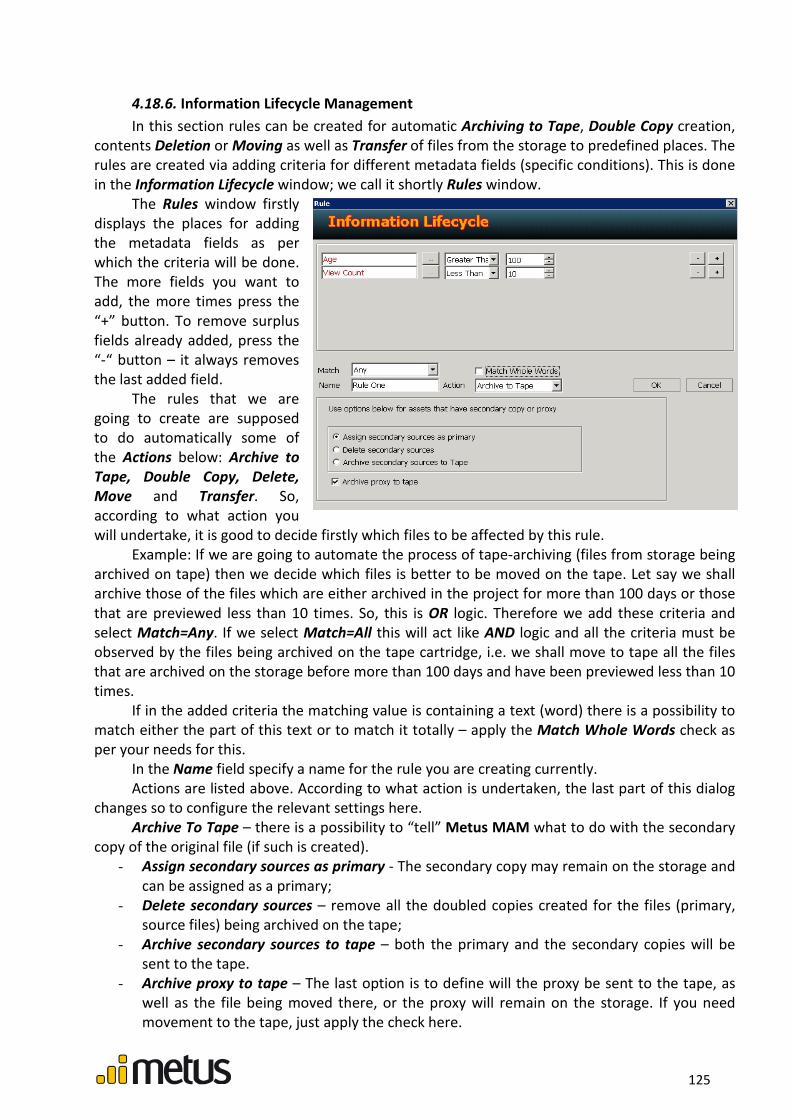
125
4.18.6. Information Lifecycle Management
In this section rules can be created for automatic Archiving to Tape, Double Copy creation,
contents Deletion or Moving as well as Transfer of files from the storage to predefined places. The
rules are created via adding criteria for different metadata fields (specific conditions). This is done
in the Information Lifecycle window; we call it shortly Rules window.
The Rules window firstly
displays the places for adding
the metadata fields as per
which the criteria will be done.
The more fields you want to
add, the more times press the
“+” button. To remove surplus
fields already added, press the
“-“ button – it always removes
the last added field.
The rules that we are
going to create are supposed
to do automatically some of
the Actions below: Archive to
Tape, Double Copy, Delete,
Move and Transfer. So,
according to what action you
will undertake, it is good to decide firstly which files to be affected by this rule.
Example: If we are going to automate the process of tape-archiving (files from storage being
archived on tape) then we decide which files is better to be moved on the tape. Let say we shall
archive those of the files which are either archived in the project for more than 100 days or those
that are previewed less than 10 times. So, this is OR logic. Therefore we add these criteria and
select Match=Any. If we select Match=All this will act like AND logic and all the criteria must be
observed by the files being archived on the tape cartridge, i.e. we shall move to tape all the files
that are archived on the storage before more than 100 days and have been previewed less than 10
times.
If in the added criteria the matching value is containing a text (word) there is a possibility to
match either the part of this text or to match it totally – apply the Match Whole Words check as
per your needs for this.
In the Name field specify a name for the rule you are creating currently.
Actions are listed above. According to what action is undertaken, the last part of this dialog
changes so to configure the relevant settings here.
Archive To Tape – there is a possibility to “tell” Metus MAM what to do with the secondary
copy of the original file (if such is created).
- Assign secondary sources as primary - The secondary copy may remain on the storage and
can be assigned as a primary;
- Delete secondary sources – remove all the doubled copies created for the files (primary,
source files) being archived on the tape;
- Archive secondary sources to tape – both the primary and the secondary copies will be
sent to the tape.
- Archive proxy to tape – The last option is to define will the proxy be sent to the tape, as
well as the file being moved there, or the proxy will remain on the storage. If you need
movement to the tape, just apply the check here.

126
Double Copy – it is reasonable to make a double copy of files being used very often. Or for
files that somehow are important for the company and for the workflow. In the first case we can
describe the assets with f.e. ViewCount>200 or whatever is your need. For the second case the
assets could be checked values for a relative metadata field.
It fully depends on you to decide which files double copy creation should be automated.
For Double Copy action, the additional settings that should be applied are concerning the
choice of the destination into which the copy to be saved. It can be:
- Disk – any of the MAS/storage system
drives with Active status;
- Disk Set – any of the labeled disk sets –
either Primary or Secondary ones.
- Computer – choose any of the machines
listed in this drop-down section. Only
machines where MAS is installed will be
listed, i.e. you choose between the MAS Servers.
Sticking to the examples above, we come to the third action – deletion. After deciding which
files should be deleted you have to enter these
criteria and choose action Delete for that rule.
No additional settings to apply. The files will be
deleted from the storage together with their proxy files, the indexing information files, as well as
the metadata from the SQL database. The files won’t be placed in the Recycle Bin – they will be
automatically deleted forever.
Next action is Move. The files filtered by the criteria set above will be moved on the place
defined here. It can be any of disks/disk set or the tape cartridge. All the storage units are listed in
the left half of the window; select these of them which you want to move to and add them to the
right half of the dialog as target locations. The last
check in the Move action section is to tell Metus
MAM After Move action to update other assets
which use the same file(s). This is to update their
status and reference to the files new locations (the
path).
The last action is Transfer.
The files filtered by the above criteria will be
transferred either in a folder (a local one – this is
like automatic retrieval) or to some ftp location.
For setting a folder press the Browse button
and select the folder from the network machines
tree.
For ftp location – enter the ftp address and
the User name and Password to access it. Press
the Test Connection button to try its availability.

127
All the checks below concern what content to be transferred to the chosen location – you
can Transfer Source, together with the metadata applied for it (Transfer Metadata), its proxy
(Transfer Proxy) and if it has a storyboard, you can choose to transfer it, too (Transfer
Storyboard).
For the files being transferred, you can define a way their names should be structured like.
Any of the metadata fields’ values can be added in the filename. Check the File Naming Format
and proceed on. The screenshot shows example with a structure like Name + ID + Creator. This
should be checked and used according to your needs and the entire workflow used. The result will
be that the transferred file will be renamed with the values from the metadata fields listed here so
that the people “taking” them from the target locations can parse the names and use them as per
their needs.
The content can be transferred with its original duration or partially. It can be trimmed
either Only between Mark In-Out points or Only between Master In-Out points.
Directory Structure Format displays the way the folder will be named – this is the folder into
which the content is moved. If you want to create subfolders inside, use the slash symbol as it is
clearly stated at the bottom of the dialog.
After the Rules window explanation, we go back to the Information Lifecycle Management
dialog.
Once the Rules creation is
done, they will be listed here. To
add a New Rule, press the
relevant button on right. To
remove any of the rules listed,
select it and press the Delete
button. To apply changes in a
rule, mark it and choose Edit –
the Rules dialog will appear so
to apply changes to this defined
rule.
Before loading any rule, it
is a good idea to test it firstly.
One of the tests can be to
ensure which files will be
affected when this rule runs. For achieving this press the Preview button. A confirmation dialog
appears, with Yes confirm your choice and watch the project. All of the files that will be affected
by this rule will be displayed in the project, in a separate Search Results tab.
Very often the workflow requires a rule’s execution to be temporarily stopped. For this,
press the Disable button. When this is done, the button toggles to Enable so that when pressing it
again it will activate back the rule’s execution.
A rule can be run on Schedule – see the last section in this dialog. It can be run on some
Period, defined in hours or at a set Time – any time in the day. F.e. if it is 17*00 o’clock then each
day at 17*00 o’clock the rule will be executed.

128
But most probably when you create the rule, you would like to test its execution. For such
purposes, the Run button is placed here – press it and the rule will be run instantly without
observing the Schedule section settings.
Use the buttons Move Up and Move Down to re-order the ILM rules in the list. Reordering
the rules in the list is not only for user perspicuity. It is related to the execution order, too. If two
(or more) rules are scheduled to be run on such time that their execution moments overlap,
Metus MAM will run them in the order they are listed here, i.e. the first listed one will be
executed firstly.
In the metadata tree that is involved in the Metus MAM installation in the Asset subgroup
are existing two editable fields which values are loaded by the user – Life Time and Kill Date.
The first one presents the number of the days the asset should exist after the moment of its
archival. Example: if Life Time = 50 it means that 50 days after the archival, the asset and its file
and all related info will be deleted.
The second field – Kill Date presents the date on which the asset and the related files plus
info must be deleted. Example: If the Kill Date is 15 Of May 2011 this means that exactly on this
date the asset (and its file and metadata) will be automatically deleted.
To have these fields activated, you must apply the check Delete Assets when Life Time is
elapsed or Kill Date has passed. This will do automatic deletion as per the set dates.
To avoid deletion of files that maybe needed later, you can configure the system to ask for
confirmation before starting the automatic deletion process. This is a really useful option, such a
workflow is much more safety. To use it, check Send request for all kinds of automatic deletion.
As a result, a request for deletion will be created. Define a period this request will be active – set it
(in days) in Request Life Time for automatic deletion. After these days are past, the request will be
automatically deleted (not waiting your approval anymore). Just before the request is deleted it
takes status either Approved or Rejected. In the first case the automatic deletion will be executed
for all the files that the request asked about. In the second case the deletion will be canceled and
the files will remain. Choose which default action to be executed for requests that you have not
answered manually and they “die” due to life time over -> in the field Request Default action for
automatic deletion – choose Approved or Rejected.
Enable storage capacity limit (delete the oldest assets when capacity limit exceeds) –
Metus MAM will delete the oldest files in the archive in order to always sustain some free space
on the storage. The free space that have to be ensured is not entered, but you have to enter the
vice versa digit – the Capacity Limit (in percents) that should be used in the archive. This limit
should not be exceeded. It can be set for the Total storage or for the Disks or Disk Sets units.
ILM Life Time – This presents (in days) the time that the rule will be executed even if the
project is closed.
Example: Let assume ILM Life Time=6. The project is opened, something is done and then it
is closed for 10 days. The first 6 days after it has been closed the rule will be active and running
(even the closed project).

129
4.18.7. Tape Units (optional)
This dialog can be managed when a tape drive is attached to the system – the parts of the
cartridges are listed in the window here. You can see the defined archiving units, and online or
offline cassettes in the Archive Units section - you can name, rename them, etc.
4.18.8. File Copy Options
Here we configure the general
options for copying processes.
Read-Write block size (KB) –It is
the buffer size of a read-write process. When you copy a file, two operations are running in fact -
first read and then write. A file cannot be copied in one step. So, this block space is acting like a
buffer.
Waiting Time between two read-write op (ms) – It is the delay time after one buffer read
and written. It depends on the size of the file – so, it is a loop.
Total waiting time for 1 GB file (seconds) – Logically, this is the result between the first
setting multiplied by the second one. It is just an example for quick calculation about 1GB size file
being copied. For 5 GB files this delay will be this time x5.
4.18.9. Prepare Asset
Read firstly the Asset’s Context menu -> Prepare Asset section.
All the Prepare asset explanation is related to the options that are set in Project ->
Properties -> Prepare Asset dialog.
Temp Directory is the local folder into
which the local copy will be saved.
Maximum Capacity is the space that
this folder should not exceed.
Watch Folder for updates on
retrieved files ensures that each time you
press Save in the NLE application, Metus
MAM will understand and pop up the dialog
asking more details (screenshot in Prepare
Asset explanation).
Lifetime (in days) presents the period for which the local copy will exist in the Temp
Directory. To make this file be automatically deleted according to that criterion, check the option
Delete files in Temp folder, whenever their age exceeds lifetime period.
If the archived file is not in a proper format for the NLE editing tool, you can transcode it
during the retrieval process using either Metus MAM System or Carbon Coder. Thus, the local
copy will be transcoded. See the last section of the dialog.

130
4.18.10. Proxy Options
4.18.10.1. Proxy Naming Options
Sometimes the files that are being archived
already have proxies. In order to save system
resources, Metus MAM can copy the ready proxies
and not create them from the very beginning. The
system “understands” which the proxy file is with
the help of a filename parsing rule (Name Format
for Proxy Assignment). In this rule we have to
specify which is the filename’s Prefix, Suffix or the proxy file Extension. When Metus MAM finds a
file with such name format, it copies it as a proxy.
Metus MAM searches for such files either in the same folder where the original file is (Get
proxy from the same folder) or in another folder (Get proxy from the specified folder). In the
second scenario you must use the Browse button to point where the folder is.
There are same options for Web proxy options for Metus Online usage.
4.18.10.2. Proxy Creation Options
These have been already described in the Proxy section above in this manual.
4.18.11. Storyboard Options
Specify the storyboard general settings – they will be
applied as default when you choose Create Storyboard
option.
For general storyboard setting you can select either
the Total Frames option or the Interval option (described
already above in the Storyboard section).
This is the only place in Metus MAM into which the
size of the storyboard pictures can be defined. Set the Image size via the Width and Height fields
and choose whether to Keep aspect ratio. For the pictures, that is possible to add manually to the
storyboards, choose whether to keep their original size or to Use Image Size settings above.
4.18.12. Playlist
In this section define the
users that will approve playlists,
as well as metadata templates.
These settings are going to be
applied later for each playlist.
Three approval groups must be selected: Technical Approvers, Administrative Approvers
and Playlist Approvers. Use the browse button next to each one and the list with users and groups
defined for this project will appear. Select the group that will have rights for the relevant
approving. Any of the users belonging to this group will obtain this right automatically. So that
when this user is logged in the project, he can approve the playlist as per his rights.

131
NOTE: Logically, the Project Administrator has all the rights for approving.
The Metadata Template is the section into which we create templates for configuring which
metadata fields’ values to be forwarded to the playout softwares. Delete a created template with
the relevant button. Apply changes to already created template with the Edit button.
With the New button start a new template
creation - a dialog opens. On left are listed the metadata
fields supposed to be supported in the playout software.
They are predefined in Project -> Fields -> Definition
Packages.
From the left drop-down list select
the playout software’s metadata field and
on right point which values to be loaded
in that field. I.e. it is relating the metadata
fields between the playout software and
Metus MAM. Do not forget to Save the
template before you Close it.
Later, these playlist templates must be involved in the playlist realization in order the
included metadata to be sent to the playout server’s playlist. See more details below in the
Playlist Editor section.
4.18.13. Thumbnail Options
Create Thumbnail – This option allows
MAM to create a thumbnail for archived
assets automatically.
Thumbnail Offset – This option
determines which frame of video will be
used as a thumbnail. It’s automatically
00:00:00:00. It can be adjusted to any
frame.
Size settings – In here, height and width
of thumbnail frame can be adjusted.
Quality – By increasing this bar, quality of thumbnail image can be increased but naturally with
more quality data size of image increase as well. It can be seen that how much size increased from
estimated data size. Pictures at bottom of this window give a hint about thumbnail’s quality
according to the original frame.

132
4.18.15. Filename Parse Options
Parsing filenames is used in cases when the names are structured according to a strictly set
rule and format. The goal of this is to extract some values from the filename and forward them in
separate metadata fields.
To start using this option in Metus MAM, choose Project -> Properties -> Filename Parse
Options and activate the check Get metadata from filename. Then list the drop-down menu and
select which Template to run in order
to extract the values from the
filename. For more detailed templates
settings, press the button next to the
drop-down list – Settings.
Another dialog opens into which the rules for parsing are defined.
If a template is already created you can preview its settings by choosing the template from
the drop-down list here. Select it and press the Load button. All the template’s fields will be
loaded in this window in the upper-left part. If a field deletion is needed, select it and press the
Remove button. If you want to change something in the field, use Edit – the field’s properties
dialog will open – Formatting Step Settings. Make here changes and press OK. After that either
Save them (the changes) or Save As the template – see the buttons below in that window.
After a template is loaded, you can test its behavior in the Test section with a Sample Text.
Enter any text here and press the Parse button. In result, the text will be divided in parts as per the
rules defined in that template and this result will be displayed in the Field and Value columns.
The created templates can be exported to another project – use the Export button so that all
the settings (of templates selected) will be saved in one file only (*.xml format). Import button is
used to import here (from xml file) other templates settings. And the Delete button – it is used to
erase any template from the list.

133
With New start a new template creation. Once you press this button, enter a name for the
template in the Template field. Metus MAM is automatically popping up name New in order to
avoid losing your information, in case you forget to specify a name.
Press the Add button to add the first field in the form. Select what will be the
type of the first part of the filename – Field, Bulk or To Start.
Field opens the metadata tree dialog to select which field to add. Double-click
the added field and the Formatting Step Settings dialog will open so that you
configure here the field – its length, format, etc.
The same dialog opens when you select the Bulk field.
To Start adds [(Return)] value and it is not working alone - it needs to add a Field after it (on
the next row). Once you select To Start, the parsing will jump on the first part of the filename and
load this part into the field placed on the next row (after To Start). With this the filename parsing
ends! Even if there are more parts in the filename, they will be ignored. Generally, To Start is
mainly used for loading one and the same value in two different fields.
The Field’s Formatting Step Settings dialog looks like
shown on the screenshot here.
Step Type, Data Type and Field/Variable sections show
the info about the Field which properties you are previewing.
Format – When a date
field is selected, this section
becomes active so that you
can select the format of the
Date-value that will be
extracted. Shortly said -
specify here what will be the format of the date that this part
of the filename will present.
Regex stays for Regular Expression and presents a
string which always is one and the same exactly into this part
of the filename. This string must include the separator after it,
too.
If the currently described part of the filename is going to
be always with one and the same number of symbols, we can
describe it as a Fixed length section. Enter the number of the symbols, including the separator
after it.
Variable length is the mostly used option as basically, the parts of the filename are changing
their lengths. If you describe a Variable Length part, you can additionally specify its Min.Length
and/or Max.Length (in symbols). Do not forget to point in the last field of the dialog which will be
the Separator as parsing will search for it in order to “understand” where the end of this filename
part is. Once the separator is met, the part can be extracted and loaded
in the metadata field.
Sometimes, however, it is needed to load in one and the same
field more than one part of the filename. To achieve this, Add a Field
and select which values to Concatenate into that field.
Let’s now explain the parsing in the best way it could be done – with an example (see the
screenshot above, also).
In a music TV they tender to name their files in one and the same way: first they put the
creator company, then the singer name, then some symbols which present a kind of internal

134
system ID, after that the album name, the year the album is released and finally – the name of the
song: Creator – Singer – System ID – Album name – Album year – Song name. From a filename
with such a structure we can extract values for several metadata fields and thus we shall save time
with applying values for these fields inside of the project.
If the filename is: Sony–Mariah_Carey–19a8sf–Emotions–1991–Make it happen.mpg we
can parse this name like this:
We have to create a template rule for this parsing:
First we add Field (Creator), Variable length, Separator “-“
Second is Field (Singer), Variable length, Separator “-“
Third is Bulk (can be fixed length if symbols are always one and the same number);
Forth is Field (Album Name), Variable length, Separator “-“
Fifth is Field (Album Year), Variable length, Separator “-“
Sixth is Field (Song Name), Variable length, Separator “-“
Seventh is Bulk (can be fixed length=3).
After all these are added the template fields will look like shown on the screenshot above:
Type/Expression columns.
Write the original filename in the Test section and Parse it to see how the text extraction
works. The result will be as displayed on the same screenshot.
Finally, when the file Sony –Mariah_Carey–19a8sf–Emotions–1991–Make it happen.mpg is
archived on the storage Metus MAM will take the values and load them in the mentioned
metadata fields.
NOTE! Do not forget to set the check Get metadata from filename
4.18.15. Versioning
Specify how many
versions of one asset to be
kept in the database.
Upon default change
source file there are three
options about saving old file as a new version or not. First one is let the user decide while changing
source, second one automatically saves all old source files as a version and the third one never
saves old files as versions.
4.18.16. Metadata Languages
You can define up to six languages that will be used later for the content
description. These are the languages in which the metadata fields values can be
entered – see the example in the Create New Metadata Field section.
To define a language click twice slowly over it – like trying to rename it.
Enter whatever language you need.

135
4.18.17. Custom Icons
Metus MAM installation provides some icons which makes the interface more graphical and
user-friendly. Some of them are:
Marks an asset which is created a temporal copy with Prepare Asset
Marks assets having double copy
Marks assets which are locked for editing
Marks QuickTime format videos
Marks MPG videos
Marks WMV format videos
You can make the Metus MAM interface more various by adding your own icons. For
example, you can add the following icons to mark:
Censored assets
Big rating assets
To achieve this, first run Project -> Properties -> Custom Icons. See here
the list with the available icons. You can enlarge it if you Add a new icon or
decrease the number of icons if you Remove a selected icon in the list. To Add a
new icon, press the relevant button here and browse in the opening dialog to
point the picture you will add to the list. Finally, the icons list is ready.
Now we have to define what the new
icon will mark. Select the Add New button
above. It will open a dialog to create a rule
for specifying which assets the icon will be
purposed for.
For the first icon we are adding we
must define a rule: “Is Censored equals to
True”. Do not forget to add the icon at the
last section of the dialog.
For the second icon the rule will be “Rating bigger
than 3”.
After all this is done, some of the assets in our
project will look like shown on the screenshot here. If
this is convinient for you, use this way to distingush the
assets in the project as per some criteria.

136
4.18.21. Other
There are for tabs as “other” settings. These are creation, view, search and misc.
Creation:
- Automatically add imported fields to
project fields – concerns the metadata fields
coming from another projects – they “come” with
the assets being copied (archived) to the current
project. If such metadata fields do not exist in the
current project’s metadata tree, they will be
added.
- Automatically add imported categories to project categories – same as above - just
concerns the category tree.
- Extract text content from document files when creating asset – this is related to the
document files - txt, doc, xls, ppt, pdf, etc. When the check is applied, the content of these files
will be loaded in the Asset Content field.
- Use project templates when items are created – check this to make your templates be
applicable for the objects they are purposed for.
- Checksum Algorithm – User can select which checksum algorithm will be used here for
creation checksum information. The options are MD5, RIPEMD160, SHA1, SHA256, SHA384 and
SHA512.
View:
- Select a field to be shown on
asset thumbnail – This option lets
user choose which metadata will be
displayed over thumbnail. User can
click over “Select a Field” and choose
any metadata field. User also can
read near this select field what metadata is currently selected to be show.
- Close archive approve form
automatically – Concerns the behavior of this
dialog:
If this check is on, Metus MAM will
countdown for 15 seconds and will
automatically close the window. The default
action that will be executed is Do Nothing.
- Enable multi-language content – must
be checked when metadata values will be
entered in more languages (already explained
in the New Field Creation (Adding a field) section)
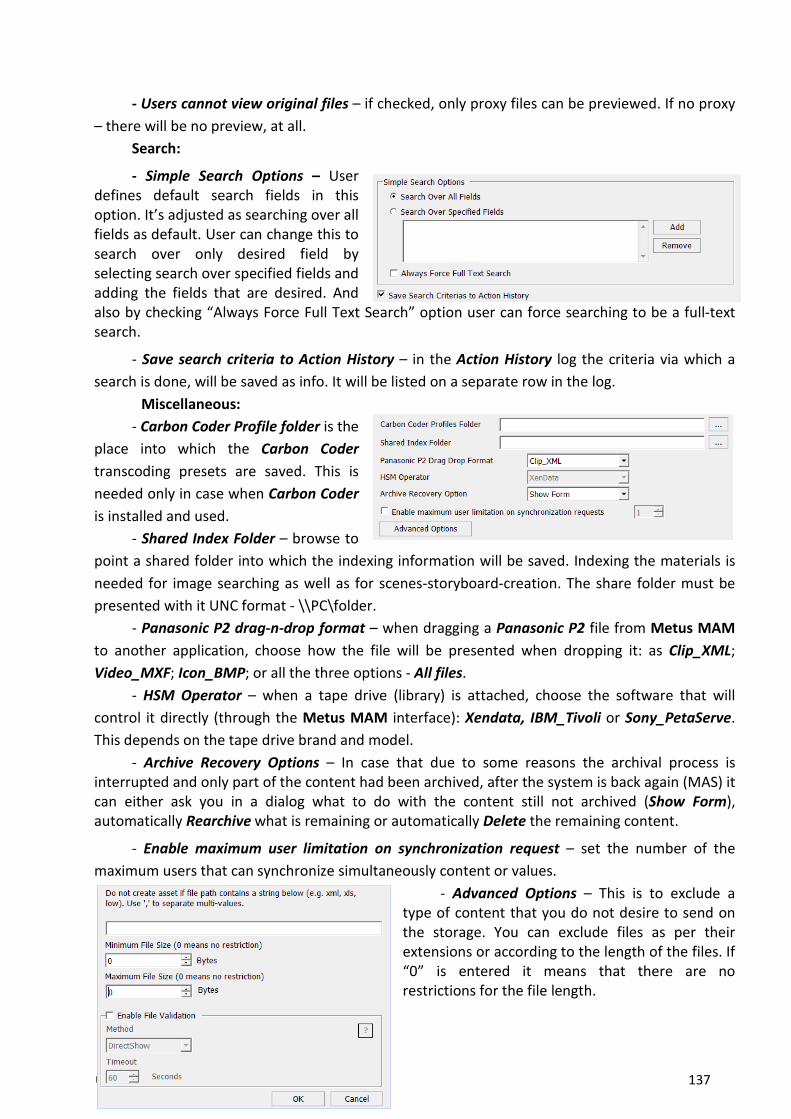
137
- Users cannot view original files – if checked, only proxy files can be previewed. If no proxy
– there will be no preview, at all.
Search:
- Simple Search Options – User
defines default search fields in this
option. It’s adjusted as searching over all
fields as default. User can change this to
search over only desired field by
selecting search over specified fields and
adding the fields that are desired. And
also by checking “Always Force Full Text Search” option user can force searching to be a full-text
search.
- Save search criteria to Action History – in the Action History log the criteria via which a
search is done, will be saved as info. It will be listed on a separate row in the log.
Miscellaneous:
- Carbon Coder Profile folder is the
place into which the Carbon Coder
transcoding presets are saved. This is
needed only in case when Carbon Coder
is installed and used.
- Shared Index Folder – browse to
point a shared folder into which the indexing information will be saved. Indexing the materials is
needed for image searching as well as for scenes-storyboard-creation. The share folder must be
presented with it UNC format - \\PC\folder.
- Panasonic P2 drag-n-drop format – when dragging a Panasonic P2 file from Metus MAM
to another application, choose how the file will be presented when dropping it: as Clip_XML;
Video_MXF; Icon_BMP; or all the three options - All files.
- HSM Operator – when a tape drive (library) is attached, choose the software that will
control it directly (through the Metus MAM interface): Xendata, IBM_Tivoli or Sony_PetaServe.
This depends on the tape drive brand and model.
- Archive Recovery Options – In case that due to some reasons the archival process is
interrupted and only part of the content had been archived, after the system is back again (MAS) it
can either ask you in a dialog what to do with the content still not archived (Show Form),
automatically Rearchive what is remaining or automatically Delete the remaining content.
- Enable maximum user limitation on synchronization request – set the number of the
maximum users that can synchronize simultaneously content or values.
- Advanced Options – This is to exclude a
type of content that you do not desire to send on
the storage. You can exclude files as per their
extensions or according to the length of the files. If
“0” is entered it means that there are no
restrictions for the file length.

138
Enable File Validation: Some files can cause Metus MAM crash. You can enable this option
to prevent that. But this makes asset creation time longer. If you are sure your files are valid you
do not need this. The invalid files can be seen on MLLog.txt (on Metus MAM Installation folder)
and progress window as tagged 'Invalid File'.
4.19. Playlist Editor
This is the next extremely powerful and optional Metus MAM feature. Playlist Editor is used
to create and edit playlists, involve metadata and export the playlists as well as the included video
files to the Playout Server.
The Playlist Editor looks like shown on the screenshot here. Select the assets in the project
and drag-n-drop them to this window. What is resulting is called playlist. It can be previewed
either in List View or in Track View – toggle the preview mode from the last button on the toolbar.
For each playlist item some basic information is displayed in the grid here – Name of the
asset, the Duration of the item, its Start Time (calculated as the Start time of the previous item
plus the Duration of the previous item). Usually, the first item in the playlist starts at 00:00:00:00.
In the gird you can see also the Format of the included files, their Status (Accessible/Not
Accessible) and Notes for some items.
In the upper section are shown more details like the time the playlist is Scheduled for (if it is
a daily playlist) and the Schedule Date, the Planned duration and the Channel the playlist is
purposed for.
The playlist Total Duration is displayed at the bottom of the window – it is a sum of all the
items’ durations. In this section, right to that message, you may see a warning message if a
Planned Duration is set and there is a difference between the real playlist duration and the
planned one – read about this in the explanations following below.
4.19. 1. Playlist Editor Toolbar

139
The Playlist Editor Toolbar buttons are as follows:
- Menu – Lists all the options that the buttons from the toolbar provide.
- New Playlist – Opens an empty grid to start a new playlist creation.
- Close Playlist – Closes the currently opened playlist.
- Save – Saves the playlist (in a bin of the project tree) and/or last applied changes.
- Save As – Saves a copy of the currently opened playlist. Once you save it you keep on
working with the second copy.
- Cancel Changes – Cancels all the changes made after the last Save.
- Edit Selected Item – Opens the Viewer application for vague item editing.
- Playlist Properties – Opens another dialog for configuring additional settings. See below
the details.
- To Top – Brings the selected clip in the beginning of the playlist (it becomes first).
- To Up – Moves the selected clip one position upper in the playlist order.
- To Down – Moves the selected clip one position down in the playlist order
- To Bottom - Brings the selected clip in the end of the playlist (it becomes last).
- Shift – Shifts a clips selection so that the order changes with one position – the “moving” is
in upper direction, i.e. the third clip will become second, the second becomes first, the first
becomes last (in the selection area only) and so on.
- Reverse – Reverses the order of clips in a selection. Reversing is mirror-like, i.e. if five items
are reversed, the first and the fifth changes their places; the second and the forth – also
and the third one remains on the same position.
- Randomize – Changes the order of clips selection in a random
manner.
- Add Event – Adds additional events to the playlist:

140
= Stop (on such event the playback stops),
= Stop Cue (the playback stops on the first frame of the selected clip in the ply or
the first frame of the next coming clip in the playlist);
= Return – used after a Jump command is executed manually. This returns the
playback to the same point in the playlist from which the Jump was executed.
= Wait – Set a time here. The playback will stop and wait until this time elapse.
After that it will be resumed again.
= Wait Until – The playback stops and waits until some hour (time) is reached.
When the time is reached, the playback resumes.
= Wait TC – The playback stops and waits until some TC is reached. When this
time code is reached, the playback resumes.
= Logo Preset – With this event you can set Logo On/Off events as well as = Logo
preset – set the number of the number of the preset. The playout software
should be loaded with the presets. Logo event execution offset can be applied
from here, too. Set it in this dialog, in milliseconds.
= GPI – Inserts a GPI event. Specify here the GPI number and the event execution
offset.
= Kramer Switch – Define here the Machine (the number of devices connected
to the COM-port of the Playout Server. If it is an AirBox platform – up to 8
devices can be connected) and Input – the number of the desired Switcher input.
Event execution offset can be applied, also.
- Add Note – Adds a row with notes.
- Add Empty Item – Adds an empty item to the playlist (Dummy clip). Enter the duration of
the empty clip so that the playlist duration can be approximately or fully accurately
calculated.
- Delete Selected item(s) – Deletes a selection of items.
- Realize – Wizard opens for guiding the realization process. See below the details.
- Export – Similar to realizing but simplified. See details below.
- Preview – Opens the Viewer application – all the videos from the playlist are loaded in one
timeline so that you can preview how the playlist will run or at least the playback between
one’s clip end and the next clip’s beginning.
- Print – If you want to have the playlist printed on a paper, use this button here. The Print
Playlist dialog opens. From here you can configure the Printer Settings, Page Settings and
Preview the playlist. When everything is already configured press the Print button to start
the process.

141
- Check Playlist – Press this button to start a check of the playlist items. The playlist check
reports the total duration of the playlist; total duration of the video files included; audio
files included; difference between the real playlist duration and the planned one (if set).
Generally, the Check Playlist is tracing durations. If assets’ limit durations are specified in
the Playlist Properties dialog, they
are also traced during the check here.
But if desired formats are specified in
the same dialog, the Check Playlist
option reports also if a clip with non-
desired format is included in the
playlist. After the check finishes, a
message Complete appears at the
end of the window.
- Change View Mode – Toggles the
preview between List View and Track
View. By default we preview the
playlists in List View. When turning
to Track View the preview changes
as the one shown on the screenshot
here – the thumbnails of the clips are
shown. Double-clicking on the
camera sign at the end of the row
you can quickly invoke the Viewer application so to preview the video there. The green
check marks the accessible files.
All the commands available through the toolbar buttons can be executed from the Menu
options.
4.19. 2. Playlist Properties
4.19. 2.1. General
From this dialog we specify very specific and
important playlist characteristics.
The Name field shows the name of the playlist as per
how you had saved it.
The playlist can be Technically and Administratively
approved. As already mentioned in Project -> Properties ->
Playlist there must be defined users (groups) that will have
rights to do this. Only users logged as a member of the
relevant groups can do the playlist approval. The status of
the approval can be Approved, Rejected or Pending. Both
the Technical and Administrative approvals must be
applied, otherwise the summarizing playlist status is
considered as Pending.
Planned duration is the time the playlist must
prolong. If the playlist should last 12 hours but its real
duration is less or more, there will be a warning message at the bottom of the Playlist Editor
window.
When the real duration is longer, the message seems like this one:

142
When the real duration is less than the planned one – the message is orange-colored:
For Frame rate you can select the most used rates defining
the PAL/NTSC format. The Frame Rate is important setting for the
Playout Server. Set the proper Frame Rate so that the playlist
duration is calculated correctly. Changing this setting is re-calculating the Duration of the clips
(Start Time is changing also, as well as some other events prolonging).
Setting a Channel is already described above in the Playout Server Settings. Choose here for
which of the channels the playlist is purposed.
Metadata Template is described in Project -> Properties -> Playlist. Here you specify which
template will be applied for the current playlist so that metadata values will be sent to the playout
software.
If a playlist is checked the Play On Schedule option, this means that the playlist will be saved
physically (in the folder specified for this) as a Daily Playlist. The filename of the playlist will be like
yyyy-mm-dd-hh-mm-ss.ply. This presents the year, month, date, hour, minutes and seconds when
the playlist must automatically start playing. Set here the Date and the Time at which the playlist
must be played and Metus MAM will do the correct Daily Playlist naming when saving the playlist
in the specified for this location.
NOTE! Playlists are saved as Daily playlists only via realization process. Exporting a playlist in
not observing the schedule information and exports the playlist with the name under which it is
saved.
The Loop Playlist check ensures that in the broadcast program the playlist will be repeated
again and again until stopped either manually or by any other automatic event. If you activate the
check here, you will see it applied in the playout software, too.
Enable Audio Tracks is a Metus MAM internal option. It is to activate using additional tracks
with audio during a video clip is running on. In result, the two audios will be mixed. To achieve
this, first enable this check and then run the playlist in Track View mode. Drag and drop the
additional audio track from the project. It is recommended the audio track to have the same
duration as the video clip. The audio file must be placed on the right of the video clip it is
supposed to be played with. Usually, when you drop an audio file here, it is placed as first audio
track in the audio part of the playlist. To offset (move) it down, use the insertion of Empty clip and
for each Empty clip set duration equal to the duration of the video clip it is being placed next to.

143
Example: If the playlist consists of 5 video files, and you want to add additional track to the
2nd
and 3rd
clip, then it will look like:
Use the arrow in the middle of the screen to switch between videos and audios playlist
sections.
Please, note that the first video clip (avidmxftest.mxf) is long 16:02. The Empty clip next to it
has the same duration.
If a channel is predefined Tunnel mode for accessing the files and this channel is selected for
the currently opened playlist, this means that the Playout Server will play remotely the videos
from the playlist. If you want for this selected channel and only for the currently opened playlist
the files to be played locally, you have to Push the files to the Playout Server. Basically, this is a
Playout Server (Channel) setting but there is a possibility in Metus MAM to Push the files for this
playlist only. If you need so, apply the check Push files in the Playlist Properties dialog.
NOTE! Push files option will reflect only the Playlist Realization process. Playlist Export is
not observing this check.

144
4.19.2.2. Item Settings
In some workflows it is required the playlist to repeat
one and the same clip after each playlist item. In such cases,
the clip that must be repeated had to be set as Interclip.
Browse in the project tree to select which clip will be the
Interclip and apply the check Use Interclip. You can avoid
displaying the Interclip between the first and the second
playlist item (No Interclip in the first gap) as well as not using
it between the last and the pre-last item (No Interclip in the
last gap). Pressing the Clear button will ask you what to do
with the Interclip included in the playlist – it can be deleted
from all the places where been pasted in the playlist or turned
to a normal clip and remains in the playlist as a normal clip
after each item. No matter what is your choice, the selected
Interclip will be removed from the field showing it (in this
dialog here) and that field will get clean (empty).
In some broadcast systems it is not allowed to play
videos shorter than some time (f.e.7 seconds). Long videos can
cause playback troubles, too. Therefore some playout
software may require not using clips longer than (let say) 2 hours. This is called video files length
limitation and it can be set in Metus MAM when creating playlists so that only proper items are
included into them. The length of the assets included in the current playlist can be limited via the
Min Asset length and/or Max Asset length. To make these settings be observed by Metus MAM
do not forget to put the check Limit Asset Length.
There is a possibility to Limit Asset Formats, also. Press the check to activate this option and
define allowable formats for video, audio and/or images.
After you configure the entire Item Settings dialog and press the Apply button, the system
will pop out messages if assets with less/longer duration that the limited is met in the playlist and
if non-desired format asset is included in the playlist. Such messages will be shown if you run the
Check Playlist option, described above.
4.19.3. Export Playlist
Exporting a playlist saves the playlist as a file in a
folder specified for this, together (or not) with the clips
which are included in that playlist.
The playlist will be saved as a file with File Name
as set in the relevant field here (see the screenshot). Its
format will be one of the supported – choose it from
the drop-down menu. Metus MAM format saves the
playlist as a file with extension *.mpl.
AirBox format saves files with
extension *.ply. For Final Cut you can
save the playlist with *.xml
extension.
The place into which the playlist file will be saved
is defined in the Folder field.

145
There are cases in which the metadata set in some language cannot be read by the
broadcast program. To avoid problems like this one, Metus MAM provides the File Encoding
option. It concerns the encoding of the playlist file. This encoding should be the same like the one
set in the Playout Server PC. Thus, the target PC can open and read correctly the content of the
playlist (clip names, clip paths, metadata, etc.). If usually one and the same encoding is used –
define it as a Default encoding. At any moment you can write into this field another encoding or
choose encoding from the drop-down list available for Use this option.
As mentioned above, pushing files is an option that copies files during the playlist realization
process. It is not concerning the playlist export. So, if you are exporting a playlist, but you need to
copy the included files, also, activate the Export files check and the videos will be copied in the
same Folder where the playlist is saved. In that same Folder you can create subfolders for each
playlist (check Create playlist directory) or just leave everything to be saved into this Folder
directly.
The Log window in the last section of the dialog shows the status of the files being exported.
While Metus MAM is proceeding with the playlist saving and files copying the Export button stays
inactive. When everything is completed it becomes active again. Playlist Export completes with a
message window about this.
4.19.4. Realize Playlist
Playlist realization is more complicated as it involves not only playlist export and files
copying, but metadata extraction, as well as observing several Playout Server predefined settings.
Playlist Filename displayed is the
one that is used to Save the playlist with.
Playout Server appears
automatically as per the channel selected
in the Playlist Properties dialog (channels
are related to broadcast servers) or as per
the Playout Server which is set as default
in Project -> Properties -> Servers ->
Playout Servers. However, you can re-
target this playlist for another Playout
Server. Use the Browse button next to that
field and choose another server from the
Playout Servers list.
The Playback time is displayed here
automatically if it is scheduled before that
in the Playlist Properties dialog. If you
want to cancel that schedule, uncheck the option from here. And vice-versa: if a playlist is not
scheduled you can do this from here – apply the check and set the Date and Time for the
playback. Finally, if the schedule is activated, the Playlist filename field will display the filename
with which this playlist will be saved, i.e. the Daily Playlist filename.
Playlist location is predefined in the Playout Server settings. Same concerns the Content
location.
Access type for contents is the one chosen for the selected Playout Server. For the opened
playlist it can be changed from the Playlist Properties dialog, as well as from the realization dialog,
here. If the access type is turned to Tunnel, the Content location field will become inactive.
You can choose which playlist’s Tracks to realize – it can be either only video or audio track
or them together. If you had already defined these two sections in the Playlist Editor, it is most

146
reasonable to realize both the two tracks – for sure the audio part is included to additionally
sound-screen the clip being broadcasted.
On the next window in the realization
wizard some already known settings have to be
defined – Playlist Format (described above)
and File Encoding (described, too).
The check Export Metadata means that
the metadata values applied in Metus MAM
will be forwarded to the playout program fields.
If you choose to Export Metadata, before that
you must create a metadata template in
Project -> Properties -> Playlist (see above how to do this) and then apply this template in this
Playlist Properties dialog (see in the relevant section above). If a metadata template is created
and involved in the Playlist Properties dialog but the check here is not applied, then nothing (no
metadata values) will be forwarded to the playout system.
The next dialog concerns Prompters. If text for prompter devices is going to be extracted,
choose the relevant Prompter Server (pre-defined before that). Prompter Servers are explained
above.
The next dialog is making analysis of the playlist – from here you can see which of the clips
are offline, online, nearline (those on tape cartridges), which clips have been transcoded during
the realization (transcoded to any of the Specific Formats for the Playout Server – if such are set).
The last window finishes the realization.
4.19.5. Clip Properties
It is possible to configure the settings of a
separate clip from its Clip Properties dialog which is
opened from the item’s context menu. Generally, the
dialog is used to fix the time for which this clip should
be played out. To specify exact time when the clip
must start to be broadcasted, apply the check Use
Fixed Start Time and enter the desired time here
(hh:mm:ss:ms). If you need the file to be played in this
time after two days then enter digit 2 in the Day offset
field. If you need the clip to be played at this time each
day, then activate the Everyday check.
In order not to stop the running of the previous
clip and if it is not fatal to play this fixed clip several
seconds later, apply the possible delay in the Start Later tolerance. Same concerns the Start
Earlier tolerance – as the previous clip may be shorter.
However, there are cases when the previous item and this one may overlap more than the
tolerance time (if such is defined). To resolve this conflict you can choose either to Skip currently
running event or Truncate currently running event. In the first case the previous item will be
ignored (skipped, not played) and during this time can be played a predefined auto-fill clip (all this
depends on the playout software features). In the second case the clip will be stopped
(interrupted) at the moment when the Start time for the current clip approaches.
To Loop Clip option is typical for the broadcast programs. Metus MAM gives you the
possibility to apply the check even here – in the very first stage of playlist creation and then the
check status will be forwarded to the playout software so that the clip is played again and again.

147
In the second tab of the Clip Properties dialog – Metadata, you can preview for the currently
selected clip which values will be sent to the playout program according to the metadata template
involved in the Playlist Properties dialog. Furthermore, you can enlarge the template definitions
for this clip exactly – add more playout grid fields and relate them to the Metus MAM metadata
fields and Get the Metadata to be sent to the Playout Server. All these changes – for this clip only.
4.19.6. A Sample Playlist Creation Workflow
1. Edit the videos in the project and ensure that this is their last status – no needs for more
changes and editing. Be sure that for each video that will be used in the playlist, the metadata
needed to be displayed in the playout system, are applied. If needed, you can fine-tune some of
the clips settings after that in the playlist via the Viewer application – select the clip and from its
context menu choose Edit Item.
2. Define the settings for the Playout Server in Project -> Properties -> Servers.
3. Select the clips in the project and drag and drop them in the Playlist Editor area.
You can quickly create a playlist from all the assets in a Bin -> select the Bin in the project
tree, right-click on it and choose either Create a playlist from this bin or Create and realize
playlist. In the first scenario, a dialog opens to name the playlist and choose where to save it in the
project tree. All the items list in the Playlist Editor and wait your next move. In the second
scenario all this happens and after that the Playlist Realize dialog opens immediately so that you
can proceed with the realization.
All the assets that are included in the playlist can be listed in the project area. If you want to
see them like that, run Menu -> Playlist -> List Used Assets.
If you have marked clips selection but you want to select the items vice-versa, choose Invert
selection from the context menu or from the Menu -> Edit.
To find the place of any clip in the project, select the clip, run the context menu and choose
Locate on Project.
To adjust additional settings for a selected clip (fix time or parse the preview its metadata
values) open its Clip Properties dialog from the item’s context menu.
To remove any object(s) – select it (them) and press the Delete button on the keyboard or
select the same command from the item’s context menu.
4. If needed, Add more Events in the playlist.
5. Save the playlist in the project tree. Define its name.
6. In Project -> Properties -> Playlist create a metadata template to forward the metadata
values.
7. In the Playlist Editor open the Playlist Properties window and approve the playlist. If
needed, configure the other settings, too. Involve the metadata template, also.
8. Go to the Playlist Realization now. Choose on which Playout Server it will be loaded. Fine-
tune the left settings, also. Run the realization and wait until it is finished.
9. Go to the Playout Server and check the files accessibility, is everything loaded correctly in
the broadcast program, are the metadata there, etc.
4.20. Action History
Launch the Action History window from the Project menu.
In this dialog some user-performed processes are displayed. This is helpful information for
the Administrator to get known with the processes the different users had been executed in the
currently opened project, i.e. this dialog reports to the Administrator what had been done by
whom and when.

148
At first time opening the Action History, Metus MAM initially shows today’s processes as
default.
The upper part of the dialog is the section to define the filter criteria.
At the bottom of the window you can see the total number of the processes performed in
the project as well as the number of the listed ones (filtered). There are arrows to navigate
between the pages when the list is too long (500 rows per page).
The middle part is listing the results. In different columns you can see the Username of the
person, the Date and Time he had run the action. This action is seen in the Group column – what
had been undertaken. And the next column – Item – displays the name of the object (playlist,
project, asset) over which the action was executed. Each column provides additional filter options
(use the column’s drop-down arrow to filter by any of the values in the column). Thus, the listed
results number will be decreased (when needed).
Search processes can also be listed in the Action History, if this is set in Project -> Properties
-> Others -> Save Search Criteria to Action History.
To list all the processes run for this project, just select No filter from the Filter field.
NOTE! In a long-term project, there may be a lot of process performed. All-processes-listing
operation may take a longer time and even cause your computer not to respond for a while.

149
In the list every row has its second row (“sub row”) with description of the action. The
Action History window can be filtered by this row, also. Select Description in the Filter field. Type
the value in the next field or only a part of the description and then press the OK button.
You can list the processes by date. To list processes for a certain date, select Date in Filter
fields and then the “=” mark. After that, select the date from the calendar provided in the next
field. If you want to preview processes run before or after some date, use the “>” and “<” signs.
Keep in mind that the processes, which are executed on the date entered in the criterion, will not
be listed.
Listed processes can be deleted by selecting them and then using the Delete from the
context menu or the same button from the keyboard.
4.21. Task Administration
In Metus MAM, a task manager can assign various tasks to other users. Users get a warning
message when tasks are assigned. The project manager can monitor if the tasks are performed or
not.
Run the Task Administration option from the Project menu.
The window is presented in two tabs – Current Tasks and User Tasks.
The upper part of the first tab displays all the tasks
being added – use the Edit button to preview and
change any selected task’s settings. The Delete button
will erase selected task(s). Use the Show filter to display
either only the Expired Tasks (deadline is past) or
Current Tasks (still running period). By default All the
tasks are shown in the list.
To create a new task, press the Add button – the
Create New Task dialog opens. Set the Priority for the
task (Low, Normal or High). Define the last date and
time for the task completion in the Deadline fields. Then
type the description of what must be done in Task.
Finally, press the OK button and this task will be added to the tasks list.
Select any of the tasks in the list and see below to which users this task is assigned.
In the left half are listed all the users. In the right part are displayed the users to which the
selected task is assigned.

150
To assign the task to some users, use the first double- arrow button in the middle of the
dialog: select the user from the left part and press the button – the user will be added in the right
part, i.e. this task is already assigned to him, too. In case you want to un-assign the task for some
person, select him from the right part and press the second double-arrow button. The person will
be not involved into this task execution anymore.
In the User Tasks tab are listed all the users – select any of them and on left will be listed all
the tasks assigned to this user. Double-click the task-row and all the Details about this task will be
displayed in a window. The most important is Status – from here the Administrator understands
how much percents of the task had been executed until this moment. This status is being updated
by the person running the task from My Task dialog.
If you want to assign more tasks to the selected user, press the Assign New task button – a
dialog opens – it shows all the tasks which are still not assigned to this person. Choose task(s) and
confirm this with OK.
To cancel somebody be responsible for any task(s), select the person from the right part –
his assigned tasks will be listed on left. Select some task(s) and press the Remove Task button
below. This person will not be involved into this task’s running anymore.
NOTE! The Task Administration dialog can be opened only by people with Full Control rights
only!
Every project user can monitor his assigned tasks from View -> My Tasks.
This dialog displays the tasks assigned only to the user who is logged currently in the project.
He can select the task and report in percents the status of the task completion. If the percent = 0,
then the Status becomes Not started. If it is =100, the Status is Completed. When the percent is
bigger than 0 and less than 100 (0<percent<100), then the task is reported as being In Progress.

151
This is the Status which the project administrator is interested about and takes info from the Task
Administration dialog, User Tasks tab.
When applying the percent, use the Update button next to that field to refresh the value in
the list.
4.22. Analyze Process and Scheduled Tasks
Storyboard, Proxy and Index creation process can be automated. They can be run during the
archival of the projects (define this in the Archiving Options dialog). But even though, in some
workflows some of the objects may miss creation of any of these. Running these processes for
each object separately is taking time and efforts and furthermore, some objects may be skipped.
To avoid this, Metus MAM provides the Analyze feature – the user defines in a dialog which
of these processes to be executed, when and for which bins.
The mentioned processes can be run for a separate bin from its context menu. Select a bin in
the project tree – the Analyze dialog opens. It is divided in three tabs – General, Proxy and
Filter/Schedule.
The General tab is defining settings for
automating the processes of Storyboard and Index
creation.
The Object field displays the bin that had been
selected – for this bin the processes will be run. You
can change it with another bin from the project tree
– use the browse button to navigate in the project
tree and choose another bin.
The Analyze dialog may be opened from the
Tools menu, also. If you open it from here (Tools ->
Add Analyze Job) the Object field will be empty (as
the dialog is not invoked from any bin’s context
menu). So, if somehow you forget to point a bin into
this field, when you start the Analyze option, Metus
MAM will give out a message that no object has
been selected. In such cases go back to that section here and define the bin to be analyzed.
Reload asset metadata from file – It is the same as an asset’s right click->Metadata-
>Regenerate. It extracts from the file such metadata as file size, video
duration, resolution, tags, etc. All of them are file-based metadata. The
user can run these functions in cases when these kinds of metadata
cannot be extracted from the file – this can be due to some reasons like
getting metadata from a file may be system-dependent; when the
machine cannot get info but the other one can get it successfully
(because of missing codec), etc.
Reapply OCR Analysis – Runs again the OCR text-extraction option
over all the assets included into this bin.
Analyze sub bin – The bins which are included in this one will also
be observing this analyzing feature – whatever is defined in the Analyze
dialog will affect these sub bins, too.

152
The second tab – Proxy – defines the settings for automating the proxy and web proxy (still
not supported) creation process.
The last tab – Filter/Schedule is the section into
which must be defined date and time for starting
execution of the armed processes.
In the Schedule part configure how the process to
be run – Start for once only (set date and time, if so) or
run the process in some intervals of time – Start
Periodically. If you select the second option you can
determine the execution period – on each 2 hours
(example); on each second day or on each 2 weeks (if
weekly is selected next to the digit 2).
Set MPS Job Expiration - It is the expiration time
of a task which cannot be executed until the end, due
to some external reasons (f.e. folder right-permissions,
etc).
Example: Let say in a company proxies are usually
created at night when the system is idle. The operators cannot estimate the exact time when all
the jobs will be finished. So, they define an expiration date or time for this, which means that if
the task is not completed until this moment it will be canceled, at all.
The Analyze option can be invoked from the Tools menu, as well. Once, it can be run from
the Add Analyze Job menu, on other hand – a list with scheduled tasks can be created in Tools ->
Scheduled Jobs. To create a new task into this dialog, you have to press the Add button, which will
open again the Analyze dialog. The difference is that from here you schedule different tasks for
different bins for different time and you can see all of them in one list in the Scheduled Jobs
window.

153
4.23. Project Information
The most important project details are
gathered into one dialog. This dialog is named
Project Information. Run it from the Project
menu.
In the upper section it is written the name
of the Project Administrator. Then the Name of
the project; its Type and Location; the Database
Type used (SQL or Oracle), the Project Version
and the GUID. The GUID is the unique name of
the folder into which this projects archives the
objects. This folder is usually hidden and secured
by Windows. It is not accessible, by default and it
is not recommended to enter it. The folder is
placed on one of the disks/drives left as Active in
the Archive Servers configuration.
Next to the Database Type an Update icon
is blinking non-stop when a Metus MAM update
is made – this requires update of the database.
Therefore, the system is reminding this from
here – update the database and its status before
you go on working with this project. For more
details see Appendix 7.
Take a look at the screenshot to get an idea of what information else can be monitored on
this window.
4.24. Options
The Options dialog can be invoked from the Tools menu. A lot of settings can be applied
from here, all of them concerning
different project issues.
4.24.1. View
From here you can define the:
- Default view mode for the
asset icons to be displayed in the
project area – choose between
Thumbnails, Tiles and Details – all they
are explained above in the manual.
- Show bin summary when mouse is hovered – if
checked, Metus MAM will display in a hint some basic bin
summary (bin size and the names of the included assets)
when sliding the mouse over the bin – this is not concerning
the bins in the project tree but the bins in the project work
area – the right part.

154
- Options -> View is the dialog from which the Search Results Page settings can be defined:
Item count that will be shown in each page (the number of the listed resulting assets per page)
and Maximum search result count – as less number you define here, as less work the servers will
have to do and quicker the results will be listed.
4.24.2. Thumbnails
In this section we configure some
settings purposed for the interface
when running in Thumbnails mode.
- Thumbnails width presents in
pixels the long side of the asset
thumbnails. The other side (the height)
is changing proportionally, i.e. this is
the place from where the thumbnails size can be changed.
- Popularity Threshold specifies the minimum value of the Popularity Index, measuring how
much the asset will be considered as popular. The less the value, the more the assets will be
considered as popular. The Popular Index is between 0-100 and is calculated by using the View
Count and the Retrieve Count properties of an asset.
4.24.3. Tiles
- In the first section set the Tile width
and Tile height – generally, this is the space
over which the Tiles info will be displayed.
This info is defined in the next setting.
– Fields - Define from here which
metadata fields’ values to be displayed
over the assets icons when they are
presented in
Tiles mode. To
choose the
metadata field, open the metadata tree
with the Select button. Use the next button – Delete – to remove a field from the list and the value
of this field will not be displayed anymore over the asset icon (when in Tile mode).
4.24.4. Details
Same like in Tile mode – define
here from which fields the values to be
taken.
NOTE! After applying settings both in Tiles and/or Details window, restart the project so that
the changes take effect!

155
4.24.5. Language
Here you select which one to be the default language
into which the interface will be displayed. Metus MAM is
translated in Turkish, Russian and Bulgarian. You can have the
software running in any of these languages. Select the relevant
language from this menu and then restart the application so
that this change takes effect.
4.24.6. Explorer
4.24.6.1. General tab
- Show Explorer windows when tab
pages are selected - When this option is
checked and you switch between several
opened projects, the upper left part of the
interface will always show the Project
Explorer tab opened, no matter which tab
was left opened there before the switching.
- Show Progress window automatically
while adding assets – When Metus MAM
starts archiving items, the interface will
automatically launch the Progress Status tab
preview, no matter which tab had been opened until this moment. This is convenient so that you
can see in a simple list the status of all the loaded and running processes.
- Style – From the drop-down menu select a preset for the interface display – colors, layout
and fonts are pre-coded there. Try the presets to see how the interface is changing.
4.24.6.2. Windows tab
- Show Bins and Containers in
Application area – If unchecked, the
project work area (the right upper part
of the interface) will display only the
assets included in the bin selected on
left (in the project tree). If the selected
bin does not include assets but only
sub bins, the application area on left
will be empty – nothing will be
displayed. If the selected bin contains
sub bins and assets – only the assets
will be shown.

156
- Show selected bin name as project tab title (otherwise, show project name) – this is a self-
explanatory feature. See the example from the screenshots, as well.
On the first picture the
option is checked and the tab
is named after the bin
selected in the project tree.
On the second picture
the option is not checked and
the tab is named always after
the project name – no matter
which bin is selected, i.e. the tab will always display the project name.
- Drag assets to ListBox and AirBox – Check the option so that drag-n-dropping assets to
ListBox/AirBox grids will be possible.
NOTE! As of now (build 34 released) drag-n-dropping from Metus MAM to AirBox is not
sending the metadata values - in the PlayBox grids only the items are dropped with their paths,
duration and filename (title). The descriptive metadata are not forwarded (this can be done via
the playlist realization, described above).
- Show Asset’s Path on Explorer – This one is a self-explanatory, too.
See the screenshots again. On the first one the option
is checked and the explorer opens a section into which
the asset’s path is displayed. On the second
screenshot the option is not checked.
If you select a bin in the project tree, its place in
the bin (the path) will be displayed here, as well.
NOTE! When toggle the status of this check, you
need to restart Metus MAM so that the change takes effect (or just close
and open the project again).
- Show paged list – When the items are too much and you do not like scrolling up and down
into one and the same page you can make the assets to be displayed in pages. If so, check this
option and define how much assets (items) to be displayed on each page – enter this into the
Items per page field.
4.24.7. Preview
- Show other assets in Viewer – if the
option is checked, when you preview an asset in
the Viewer, Metus MAM will list in the Mini
Browser the other assets from the same bin, too.
- Play original file in preview window if
proxy does not exist – this one is self-explanatory.
- Show smooth images in Viewer – this
option is smoothing the images when they are loaded for preview, trying to erase the deep color
difference and contrast between different color lines and zones. As bigger Smoothing amount you
select as smoother the image will be.
“Limitation for simultaneous playback within Explorer windows”: Sets the number of assets
to be played simultaneously during Item Play.
“One click open mode”: Enables assets of selected type to be opened by one clicking.

157
4.24.8. Files
“Show system driver in folder explorer”: System driver is not shown in folder explorer as
default. With this option, disk (system disk) the operating system is installed on is viewed in folder
explorer.
“Cache File Objects”: Enables files objects to be cached. Specified number of file objects are
cached.
4.24.9. Hotkeys
“Changing a Shortcut Assigned to an Operation”: Select a command from command list on
left. Press on desired key combination. Assign shortcut key with “Assign” button.
“Removing a Shortcut Assigned to an Operation”: Select a command from command list on
left. Shortcut keys assigned to that operation are listed in ‘Effective Keys’ list on right. Select
shortcut key combination to be deleted from ‘Effective Keys’ list. Remove shortcut key with
“Remove” button.
“Canceling Made Changes”: “Reset” button cancels all changes made and restores previous
settings.
“Resetting to Default Settings”: “Defaults” button returns the program to initial settings.
4.24.10. Taks
You can use this to set warnings of Metus MAM when a task is assigned to a user.
“Refresh Task List when Task is assigned”: When a new task is assigned to user, ‘My Tasks’
list is refreshed automatically.
“Show Warning Window when Task is assigned”: A little warning window appears on bottom
right. Appearance time is adjustable.
“Animate warning window”: Shows warning window with selected animation.
“Play Sound”: Selected sound file is played. Sound file can be selected by clicking button on
right. You can only select .wav files.
4.24.11. Messaging
Responds of program are adjustable when a message incomes.
“Show message window automatically”: With this option, when a message incomes message
window opens if closed, and bring to front if not.
“Play Sound”: With this option, selected sound file is played when message comes. Sound
file to be played can be changed with button next to file name.
Note: Only .wav files can be selected.
4.24.12. Others
4.13. OCR (Optional, please check your license)
OCR stands for Optical Character Recognition. When a picture is added to Metus as an
asset, texts parts on picture is scanned and converted to text, and these texts are added to
metadata fields by OCR feature.

158
To use OCR feature, OCR settings must be configured. When “Bin Properties” from Bin
context menu is selected, “Use Customized OCR settings” option below of window must be
checked. You can configure the settings on “OCR
settings” window by clicking [...] button next to this.
“Text Language”: defines the language of text on
picture.
“Text Type”: defines how text is written.
Probable values;
- Normal: normal text
- Gothic: figurative text
- Handprinted: manuscript
- Index:
- Dot Matrix: print out of dot matrix printer
- Type Writer: type writer text
- Magnetic Ink E13B
- Magnetic Ink CMC7
- OCR A
- OCR B
4.13.1. Metadata Field: The Metus field into which content on picture to be moved. Content
info field comes as default. Any field can be selected as desired.
Following are options to take the text faster and as desired;
- “Fast Mode”: Not for analyzing deeply. Scan text once and doesn’t analyze. Normally, OCR
scans the text and corrects errors by repeating 2 or 3 times more. This mode is 2,5 times faster.
But error ratio is higher.
- “Forbid italic text”: ignores italic text.
- “Forbid subscript”: ignores subscripts.
- “Forbid superscript”: ignores superscript.
- “Retrieve Plain Text”: retrieves whole text in
picture.
- “Determine barcodes”: retrieves barcodes.
- “Determine tables”: scans text in picture as
tables or bullets, namely as is.
- “Use Template”: a template can be selected if
any defined before. Creating Template will be
discussed on next section.
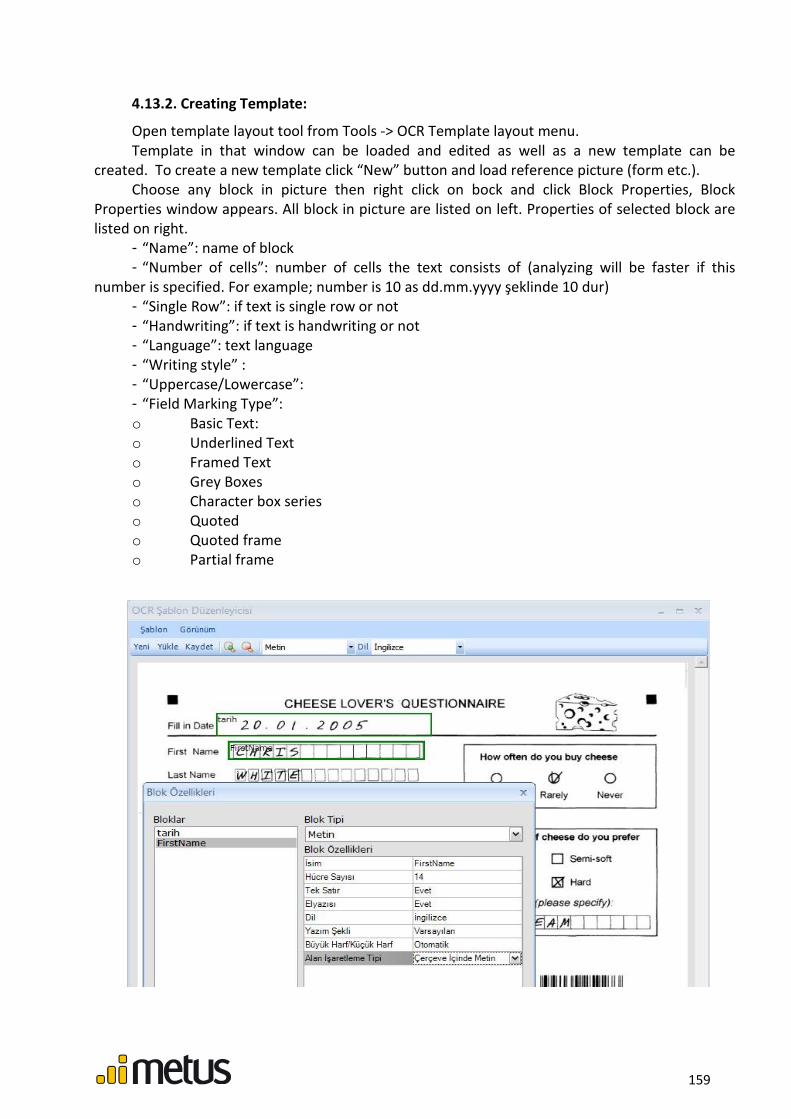
159
4.13.2. Creating Template:
Open template layout tool from Tools -> OCR Template layout menu.
Template in that window can be loaded and edited as well as a new template can be
created. To create a new template click “New” button and load reference picture (form etc.).
Choose any block in picture then right click on bock and click Block Properties, Block
Properties window appears. All block in picture are listed on left. Properties of selected block are
listed on right.
- “Name”: name of block
- “Number of cells”: number of cells the text consists of (analyzing will be faster if this
number is specified. For example; number is 10 as dd.mm.yyyy şeklinde 10 dur)
- “Single Row”: if text is single row or not
- “Handwriting”: if text is handwriting or not
- “Language”: text language
- “Writing style” :
- “Uppercase/Lowercase”:
- “Field Marking Type”:
o Basic Text:
o Underlined Text
o Framed Text
o Grey Boxes
o Character box series
o Quoted
o Quoted frame
o Partial frame
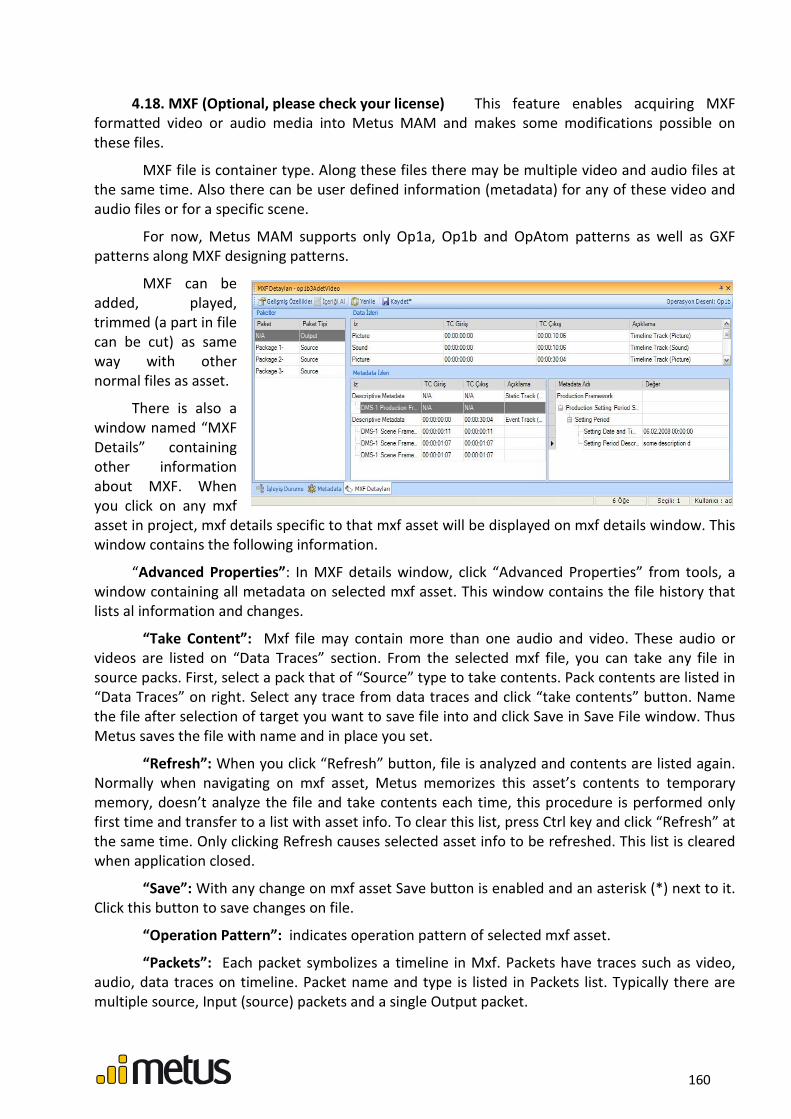
160
4.18. MXF (Optional, please check your license) This feature enables acquiring MXF
formatted video or audio media into Metus MAM and makes some modifications possible on
these files.
MXF file is container type. Along these files there may be multiple video and audio files at
the same time. Also there can be user defined information (metadata) for any of these video and
audio files or for a specific scene.
For now, Metus MAM supports only Op1a, Op1b and OpAtom patterns as well as GXF
patterns along MXF designing patterns.
MXF can be
added, played,
trimmed (a part in file
can be cut) as same
way with other
normal files as asset.
There is also a
window named “MXF
Details” containing
other information
about MXF. When
you click on any mxf
asset in project, mxf details specific to that mxf asset will be displayed on mxf details window. This
window contains the following information.
“Advanced Properties”: In MXF details window, click “Advanced Properties” from tools, a
window containing all metadata on selected mxf asset. This window contains the file history that
lists al information and changes.
“Take Content”: Mxf file may contain more than one audio and video. These audio or
videos are listed on “Data Traces” section. From the selected mxf file, you can take any file in
source packs. First, select a pack that of “Source” type to take contents. Pack contents are listed in
“Data Traces” on right. Select any trace from data traces and click “take contents” button. Name
the file after selection of target you want to save file into and click Save in Save File window. Thus
Metus saves the file with name and in place you set.
“Refresh”: When you click “Refresh” button, file is analyzed and contents are listed again.
Normally when navigating on mxf asset, Metus memorizes this asset’s contents to temporary
memory, doesn’t analyze the file and take contents each time, this procedure is performed only
first time and transfer to a list with asset info. To clear this list, press Ctrl key and click “Refresh” at
the same time. Only clicking Refresh causes selected asset info to be refreshed. This list is cleared
when application closed.
“Save”: With any change on mxf asset Save button is enabled and an asterisk (*) next to it.
Click this button to save changes on file.
“Operation Pattern”: indicates operation pattern of selected mxf asset.
“Packets”: Each packet symbolizes a timeline in Mxf. Packets have traces such as video,
audio, data traces on timeline. Packet name and type is listed in Packets list. Typically there are
multiple source, Input (source) packets and a single Output packet.

161
“Data Traces”: Traces included in packet are listed on this list. These traces represent each
file in mxf file. There are name of each permission, Timecode input and output.
“Metadata traces”: Metadata traces are used to add metadata to mxf files. Multiple
metadata traces can be added to a packet. Metadata are not added to metadata traces directly.
They are added to metadata segments on metadata traces. It is possible to add multiple metadata
segments inside a metadata trace. There are 3 types of metadata trace on Mxf; Static, Event and
Timeline. Also there are 3 types of segments; Production Framework, Clip Framework and Scene
Framework.
When clicking segments under metadata trace, metadata in that segment is listed on right.
User can add new metadata or delete the existing ones. When right clicking on metadata section,
metadata addition and deletion menus appear.
User also can add new metadata trace or segment, or delete existing.

162