Embed Size (px)
Citation preview
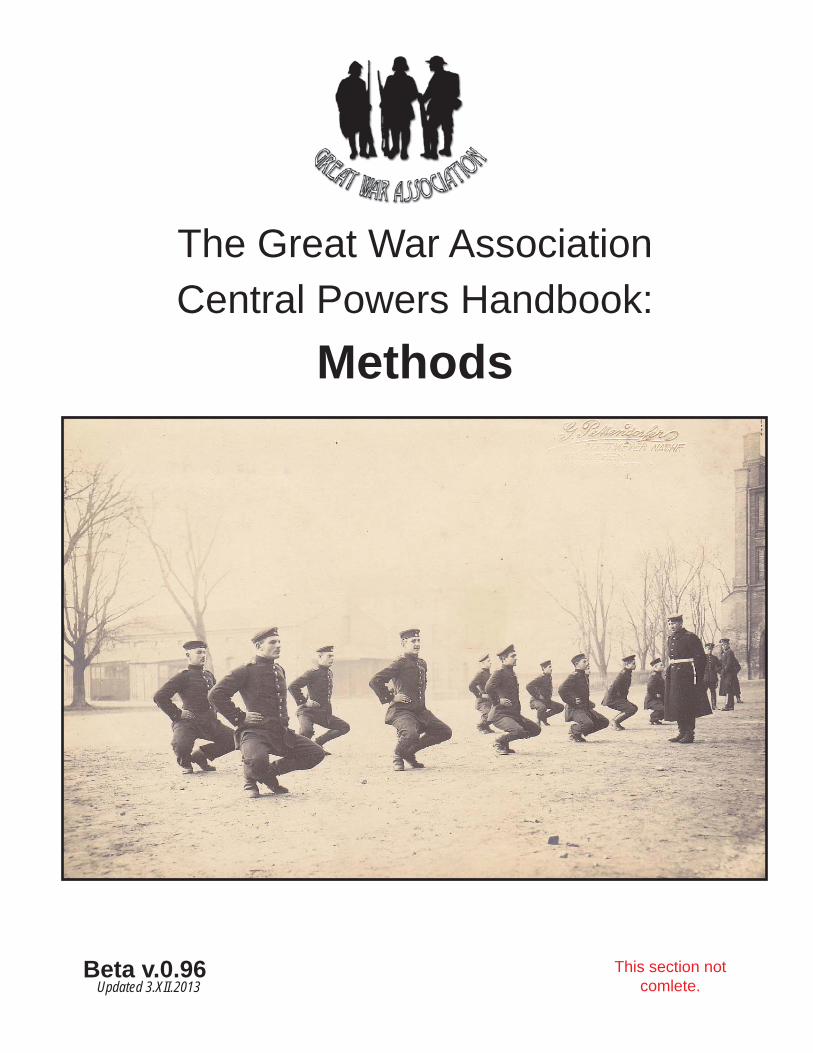
This section not comlete.
The Great War AssociationCentral Powers Handbook:
Methods
Beta v.0.96Updated 3.XII.2013
Great War Association CP Handbuch v. 0.952—Methods
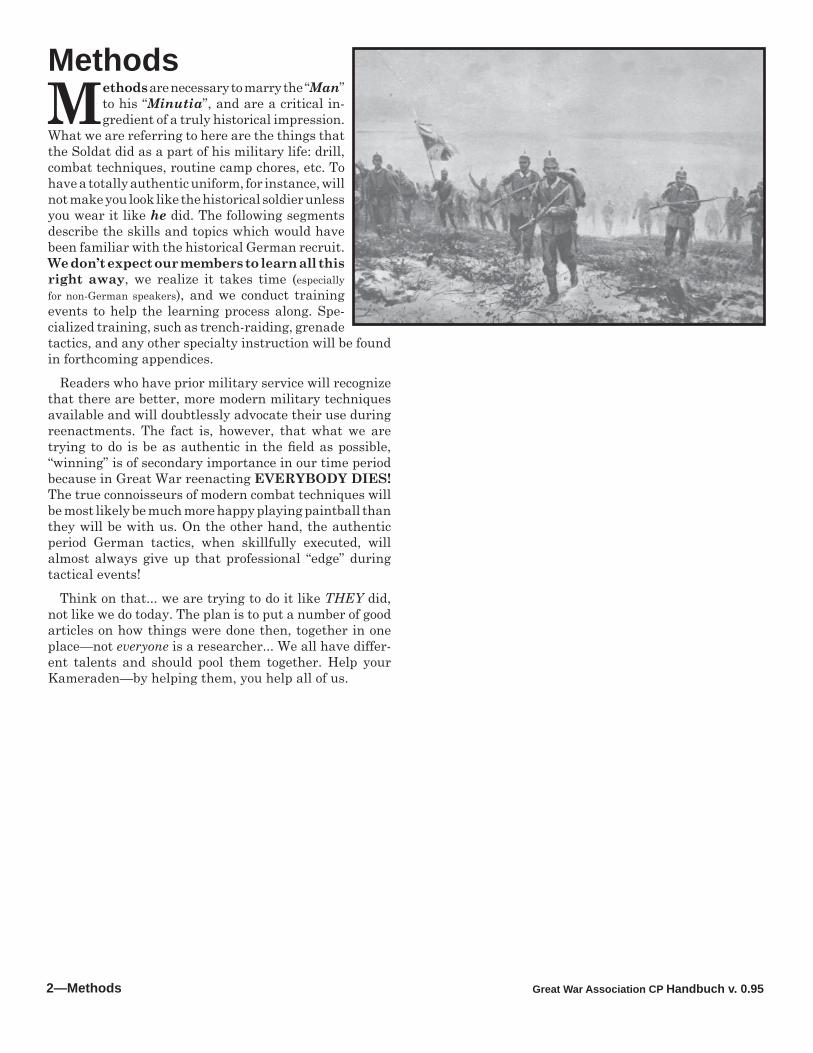
MethodsMethods are necessary to marry the “Man”
to his “Minutia”, and are a critical in-gredient of a truly historical impression.
What we are referring to here are the things that the Soldat did as a part of his military life: drill, combat techniques, routine camp chores, etc. To have a totally authentic uniform, for instance, will not make you look like the historical soldier unless you wear it like he did. The following segments describe the skills and topics which would have been familiar with the historical German recruit. We don’t expect our members to learn all this right away, we realize it takes time (especially for non-German speakers), and we conduct training events to help the learning process along. Spe-cialized training, such as trench-raiding, grenade tactics, and any other specialty instruction will be found in forthcoming appendices.
Readers who have prior military service will recognize that there are better, more modern military techniques available and will doubtlessly advocate their use during reenactments. The fact is, however, that what we are trying to do is be as authentic in the fi eld as possible, “winning” is of secondary importance in our time period because in Great War reenacting EVERYBODY DIES! The true connoisseurs of modern combat techniques will be most likely be much more happy playing paintball than they will be with us. On the other hand, the authentic period German tactics, when skillfully executed, will almost always give up that professional “edge” during tactical events!
Think on that... we are trying to do it like THEY did, not like we do today. The plan is to put a number of good articles on how things were done then, together in one place—not everyone is a researcher... We all have differ-ent talents and should pool them together. Help your Kameraden—by helping them, you help all of us.
Great War Association CP Handbuch v. 0.95 Methods—3
Hints on how to Wear the Uniform and Project a Military Bearing!
Members of the CP side possess a spirit of „Kamerad-shaft” which is passed onto new members as they become more and more involved. This spirit must be held by the individual, who strives to maintain it and leads the way for others to follow. The spirit is refl ected by the impres-sion you have when seen in the fi eld. The key to a good impression is an eye for detail in all you do as a reenac-tor. Leave behind the modern world and physically step back to the Kaiserzeit. Our goal is to look and act as a soldier of the Imperial German Army would have!
This manual lists the correct uniforms and equipment to obtain, but the little extra items to give your impres-sion depth can be found for nearly nothing, at pawn shops and local garage sales. Items which would enhance your impression can be period jewelry, (ie. watches, rings, cigarette cases, bracelets, etc.), pocket knives, German war time money, wallets, letters written in German, and photographs carried by a soldier. In most cases you can just use your imagination and refi ne your impression to the point where you’ll even feel like a true “Frontschwein.”
Your uniform dress is also important. To present a mili-tary looking impression, especially when in formation, you must remember to check yourself for the following items:
1. The helmet should be square on the wearer’s head and not pushed back, riding on the neck and exposing the forehead.2. Rank and awards worn correctly.3. ALL buttons are properly buttoned, including the top button and hook at the neck — act not like sloppy Frenchman.4. Belt buckle centered on the tunic buttons.
Things to remember when falling in or while in forma-tion which will enhance your impression, as well as that of the unit’s:
l. Unless given the order „Antreten,” always fall-in at attention.2. If you have a weapon, fall-in at order arms.3. When called to Stillgestanden (attention) while in formation, click your heels together.4. Always fall-in with a Feldmütze on your head unless you are in a combat zone or you are ordered to wear your Stahlhelm.5. When you speak, always address your superior properly, ie: Herr Leutnant, Herr Sergeant, or Herr Unteroffi zier.
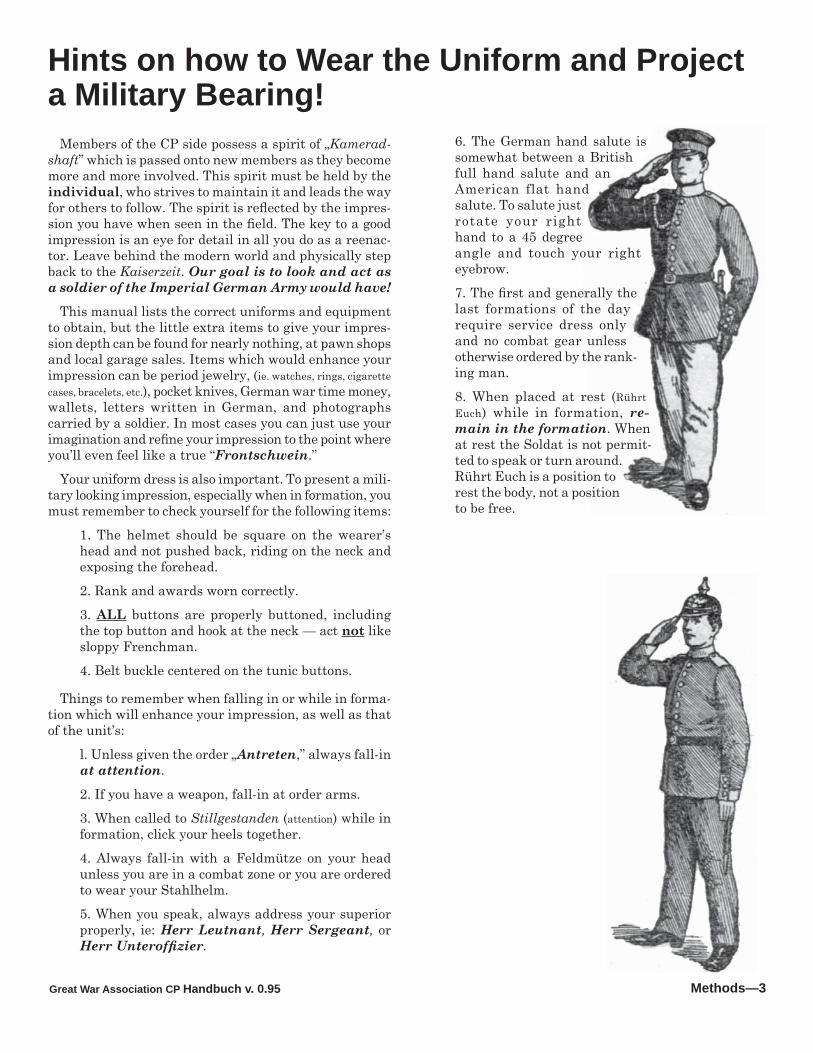
6. The German hand salute is somewhat between a British full hand salute and an American flat hand salute. To salute just rotate your right hand to a 45 degree angle and touch your right eyebrow.7. The fi rst and generally the last formations of the day require service dress only and no combat gear unless otherwise ordered by the rank-ing man.8. When placed at rest (Rührt Euch) while in formation, re-main in the formation. When at rest the Soldat is not permit-ted to speak or turn around. Rührt Euch is a position to rest the body, not a position to be free.
Great War Association CP Handbuch v. 0.954—Methods
Wear of Uniform and Equipment hereCheck w/ article on DSM site... good info
there.
Great War Association CP Handbuch v. 0.95 Methods—5
Wear of Uniform and Equipment here
Great War Association CP Handbuch v. 0.956—Methods
Rangabzeichen(Rank Insignia)
by Lou Brown8./J.R. 459
The evolution of distinctive rank insignia in armies is not as old as many suspect. Of the major com-batants of the American Revolution, e.g., only one
nation—France—had evolved a system of distinctive insignia whereby the exact rank of an individual could be discerned by looking at the uniform. As armies became more cosmopolitan following the Napoleonic wars, the need to identify individuals by rank outside their particu-lar regiment became necessary, and by the middle of the 19th Century, most European armies had adopted specifi c insignia, which designated the exact rank of the wearer. While the Germans were somewhat behind this trend (the Empire was not proclaimed until 1871, and until that time, most German states continued to use their own peculiar rank systems), by the end of the century, German rank insignia had been formalized throughout the Army.1 In any discussion of rank insignia, it is worthwhile to admit the Germans themselves were not always sure, particularly regarding the many exceptions and the perplexing array of Beam-ten (Administrative Offi cials) insignia. Though not from the Imperial period, the following anecdote is, nonetheless, illustrative of the problem.
An Example of Germaness Although this is WWII, it serves as an example of
the complexities of the German rank system. Upon retirement from the Wehrmacht in the late 1930’s (he was later recalled to active duty for wartime service), General Gerd von Rundstedt was afforded one of the Army’s most prestigious honors in being named Chef (Honorary Commander) of Infanterieregiment 18, a unit with which he had earlier served. From that point on, including his service after promotion to Generalfeldmarschall (GFM), Rundstedt habitually wore the “regimental uniform”—an infantry offi cer’s blouse in the Reichsheer pattern (most noticeable in his wear of infantry offi cers’ collar patches) with General Offi cer’s shoulder boards.
During an inspection, v.Rundstedt was introduced to a noncommissioned offi cer who, confused by the GFM’s unique insignia, addressed him as Herr Oberst (Colonel). After the NCO’s gaffe—one imagines a bevy of incensed staff offi cers descending on the unfortunate individual and soundly chewing his ass—the luckless NCO again 1 As with anything in the German Army, it is impossible to be absolute. Exceptions existed for various reasons in several very old and distinguished regiments. Most exceptions were in non-Prussian contingents to the Imperial Army, being made in deference to the military accomplishments of some of the smaller states which, after 1871 had been amalgamated into he Prussian sphere.
met the GFM. Acutely conscious of his previous error, the sergeant this time addressed Rundstedt as Herr Reichsmarschall—the term specifi c to Reichsmarschall Hermann Göring. Rundstedt—whose wry wit was well known throughout the Army—is credited with having responded that, all things considered, he would rather have been addressed as “Colonel….”
Enlisted Ranks
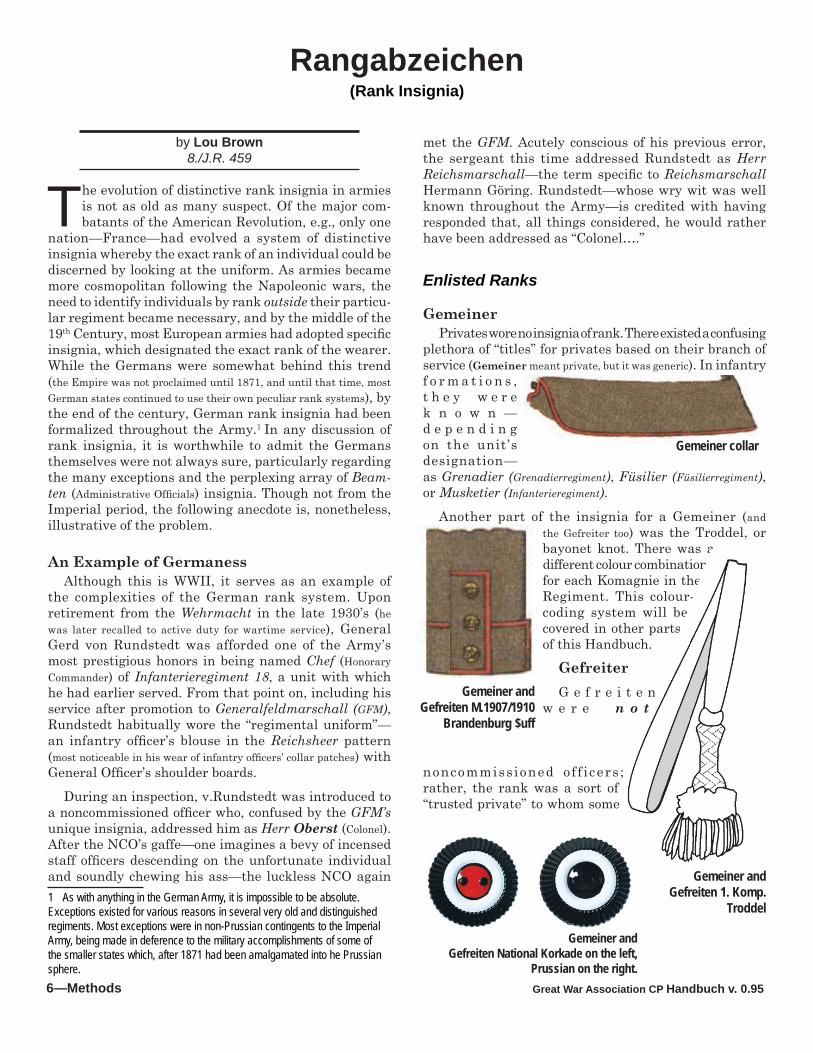
GemeinerPrivates wore no insignia of rank. There existed a confusing
plethora of “titles” for privates based on their branch of service (Gemeiner meant private, but it was generic). In infantry f o r m a t i o n s , t h e y w e r e k n o w n —d e p e n d i n g on the unit’s designation—as Grenadier (Grenadierregiment), Füsilier (Füsilierregiment), or Musketier (Infanterieregiment).
Another part of the insignia for a Gemeiner (and the Gefreiter too) was the Troddel, or bayonet knot. There was a different colour combination for each Komagnie in the Regiment. This colour-coding system will be covered in other parts of this Handbuch.
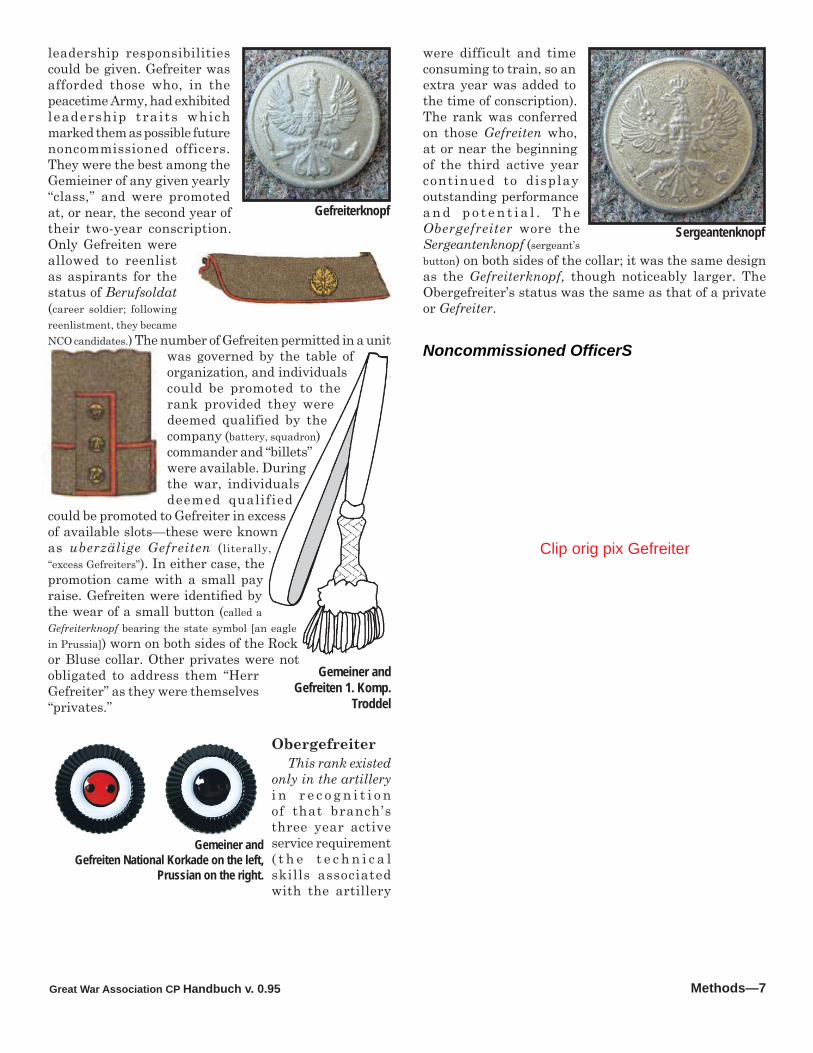
GefreiterG e f r e i t e n
w e r e n o t
noncommissioned of f icers ; rather, the rank was a sort of “trusted private” to whom some
Gemeiner collar
Gemeiner andGefreiten M.1907/1910
Brandenburg $uff
Gemeiner andGefreiten 1. Komp.
Troddel
Gemeiner andGefreiten National Korkade on the left,
Prussian on the right.
Great War Association CP Handbuch v. 0.95 Methods—7
leadership responsibilities could be given. Gefreiter was afforded those who, in the peacetime Army, had exhibited leadership traits which marked them as possible future noncommissioned officers. They were the best among the Gemieiner of any given yearly “class,” and were promoted at, or near, the second year of their two-year conscription. Only Gefreiten were allowed to reenlist as aspirants for the status of Berufsoldat (career soldier; following reenlistment, they became NCO candidates.) The number of Gefreiten permitted in a unit
was governed by the table of organization, and individuals could be promoted to the rank provided they were deemed qualified by the company (battery, squadron) commander and “billets” were available. During the war, individuals deemed qualified
could be promoted to Gefreiter in excess of available slots—these were known as uberzälige Gefreiten (literally, “excess Gefreiters”). In either case, the promotion came with a small pay raise. Gefreiten were identifi ed by the wear of a small button (called a Gefreiterknopf bearing the state symbol [an eagle in Prussia]) worn on both sides of the Rock or Bluse collar. Other privates were not obligated to address them “Herr Gefreiter” as they were themselves “privates.”
ObergefreiterThis rank existed
only in the artillery i n r e c o g n i t i o n of that branch’s three year active service requirement ( t h e t e c h n i c a l skills associated with the artillery
were difficult and time consuming to train, so an extra year was added to the time of conscription). The rank was conferred on those Gefreiten who, at or near the beginning of the third active year continued to display outstanding performance a n d p o t e n t i a l . T h e Obergefreiter wore the Sergeantenknopf (sergeant’s button) on both sides of the collar; it was the same design as the Gefreiterknopf, though noticeably larger. The Obergefreiter’s status was the same as that of a private or Gefreiter.
Noncommissioned Offi cerS
Gefreiterknopf
Gemeiner andGefreiten National Korkade on the left,
Prussian on the right.
Gemeiner andGefreiten 1. Komp.
Troddel
Clip orig pix Gefreiter
Sergeantenknopf
Great War Association CP Handbuch v. 0.958—Methods
Unteroffi zier.2This was the lowest ranking noncommissioned offi cer
in the Imperial Army. In peacetime, those Gefreiten who were deemed NCO material and re-enlisted became NCO candidates. Following selection and training in the unit, they were eventually sent to one of the Unteroffi zierschulen (NCO Academies) to complete their training as NCOs and, upon return to the unit, were promoted Unteroffi zier following a short probationary period. Though the training was spottier (and not as leisurely), the system was generally maintained during the war.3
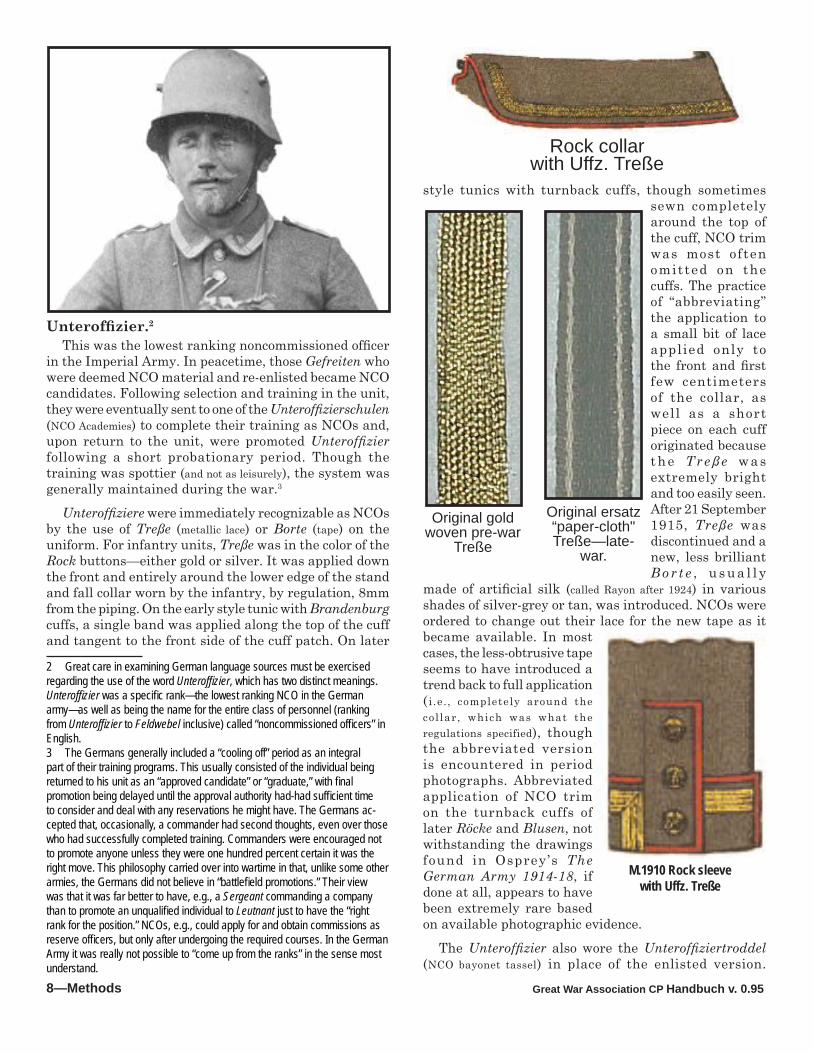
Unteroffi ziere were immediately recognizable as NCOs by the use of Treße (metallic lace) or Borte (tape) on the uniform. For infantry units, Treße was in the color of the Rock buttons—either gold or silver. It was applied down the front and entirely around the lower edge of the stand and fall collar worn by the infantry, by regulation, 8mm from the piping. On the early style tunic with Brandenburg cuffs, a single band was applied along the top of the cuff and tangent to the front side of the cuff patch. On later
2 Great care in examining German language sources must be exercised regarding the use of the word Unteroffi zier, which has two distinct meanings. Unteroffi zier was a specifi c rank—the lowest ranking NCO in the German army—as well as being the name for the entire class of personnel (ranking from Unteroffi zier to Feldwebel inclusive) called “noncommissioned offi cers” in English.3 The Germans generally included a “cooling off” period as an integral part of their training programs. This usually consisted of the individual being returned to his unit as an “approved candidate” or “graduate,” with fi nal promotion being delayed until the approval authority had-had suffi cient time to consider and deal with any reservations he might have. The Germans ac-cepted that, occasionally, a commander had second thoughts, even over those who had successfully completed training. Commanders were encouraged not to promote anyone unless they were one hundred percent certain it was the right move. This philosophy carried over into wartime in that, unlike some other armies, the Germans did not believe in “battlefi eld promotions.” Their view was that it was far better to have, e.g., a Sergeant commanding a company than to promote an unqualifi ed individual to Leutnant just to have the “right rank for the position.” NCOs, e.g., could apply for and obtain commissions as reserve offi cers, but only after undergoing the required courses. In the German Army it was really not possible to “come up from the ranks” in the sense most understand.
style tunics with turnback cuffs, though sometimes sewn completely around the top of the cuff, NCO trim was most often omitted on the cuffs. The practice of “abbreviating” the application to a small bit of lace applied only to the front and fi rst few centimeters of the collar, as well as a short piece on each cuff originated because t h e T r e ß e w a s extremely bright and too easily seen. After 21 September 1915, Treße was discontinued and a new, less brilliant B o r t e , u s u a l l y
made of artifi cial silk (called Rayon after 1924) in various shades of silver-grey or tan, was introduced. NCOs were ordered to change out their lace for the new tape as it became available. In most cases, the less-obtrusive tape seems to have introduced a trend back to full application ( i.e. , completely around the col lar, which was what the regulations specified), though the abbreviated version is encountered in period photographs. Abbreviated application of NCO trim on the turnback cuffs of later Röcke and Blusen, not withstanding the drawings found in Osprey’s The German Army 1914-18, if done at all, appears to have been extremely rare based on available photographic evidence.
The Unteroffi zier also wore the Unteroffi ziertroddel (NCO bayonet tassel) in place of the enlisted version.
Original ersatz “paper-cloth" Treße—late-
war.
Original gold woven pre-war
Treße
Rock collarwith Uffz. Treße
M.1910 Rock sleevewith Uffz. Treße
Great War Association CP Handbuch v. 0.95 Methods—9
Unlike the latter, the NCO tassel was executed in the state colors and denoted the individual’s ranks status vice his company. For Prussian Unteroffi ziere, the strap was white with three narrow black bands along either edge; the slide and stem were both covered in white material with rows of black zigzags; the “pom” was made of intermingled white and black yarn; and the tassels were white. All personnel beginning at Unteroffizier up to and including Generalmajor were addressed by subordinates as “Herr... (rank).” In Jäger formations, the special title Oberjäger was used instead of Unteroffi zier.
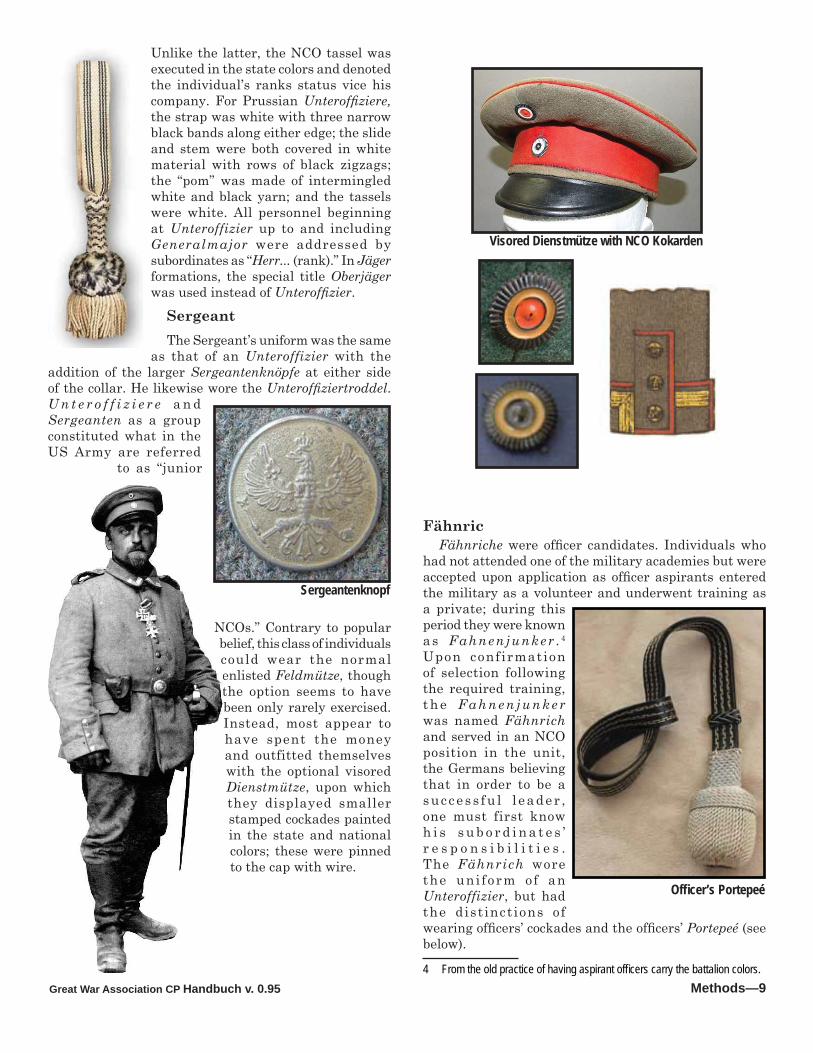
SergeantThe Sergeant’s uniform was the same
as that of an Unteroffizier with the addition of the larger Sergeantenknöpfe at either side of the collar. He likewise wore the Unteroffi ziertroddel. U n t e r o f f i z i e r e a n d Sergeanten as a group constituted what in the US Army are referred
to as “junior
NCOs.” Contrary to popular belief, this class of individuals could wear the normal enlisted Feldmütze, though the option seems to have been only rarely exercised. Instead, most appear to have spent the money and outfitted themselves with the optional visored Dienstmütze, upon which they displayed smaller stamped cockades painted in the state and national colors; these were pinned to the cap with wire.
FähnricFähnriche were offi cer candidates. Individuals who
had not attended one of the military academies but were accepted upon application as offi cer aspirants entered the military as a volunteer and underwent training as a private; during this period they were known as Fahnenjunker . 4
Upon confirmation of selection following the required training, t h e F a h n e n j u n k e r was named Fähnrich and served in an NCO position in the unit, the Germans believing that in order to be a success fu l l eader , one must first know h i s s u b o r d i n a t e s ’ r e s p o n s i b i l i t i e s . The Fähnrich wore the uni form of an Unteroffizier, but had the dist inctions of wearing offi cers’ cockades and the offi cers’ Portepeé (see below).
4 From the old practice of having aspirant offi cers carry the battalion colors.
Sergeantenknopf
Visored Dienstmütze with NCO Kokarden
Offi cer’s Portepeé
Great War Association CP Handbuch v. 0.9510—Methods
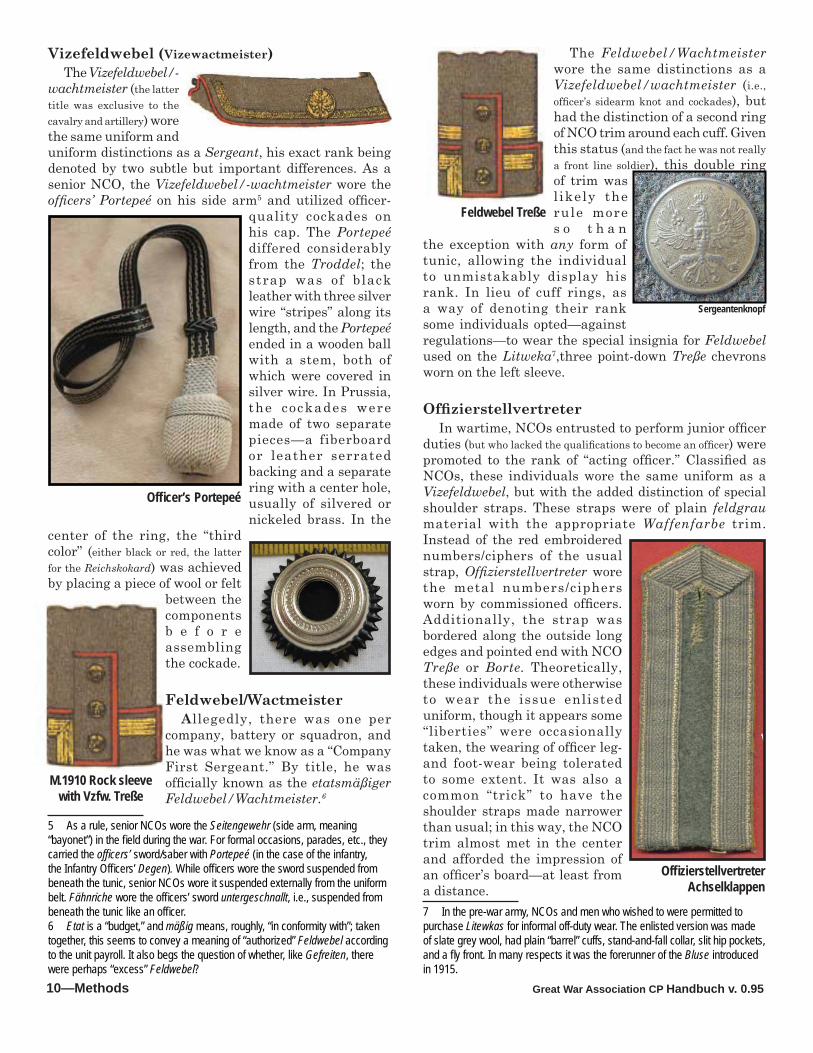
Vizefeldwebel (Vizewactmeister)The Vizefeldwebel/-
wachtmeister (the latter title was exclusive to the cavalry and artillery) wore the same uniform and uniform distinctions as a Sergeant, his exact rank being denoted by two subtle but important differences. As a senior NCO, the Vizefeldwebel/-wachtmeister wore the offi cers’ Portepeé on his side arm5 and utilized offi cer-
quality cockades on his cap. The Portepeé differed considerably from the Troddel; the strap was of black leather with three silver wire “stripes” along its length, and the Portepeé ended in a wooden ball with a stem, both of which were covered in silver wire. In Prussia, the cockades were made of two separate pieces—a fiberboard or leather serrated backing and a separate ring with a center hole, usually of silvered or nickeled brass. In the
center of the ring, the “third color” (either black or red, the latter for the Reichskokard) was achieved by placing a piece of wool or felt
between the components b e f o r e assembling the cockade.
Feldwebel/WactmeisterAllegedly, there was one per
company, battery or squadron, and he was what we know as a “Company First Sergeant.” By title, he was offi cially known as the etatsmäßiger Feldwebel/Wachtmeister.6
5 As a rule, senior NCOs wore the Seitengewehr (side arm, meaning “bayonet”) in the fi eld during the war. For formal occasions, parades, etc., they carried the offi cers’ sword/saber with Portepeé (in the case of the infantry, the Infantry Offi cers’ Degen). While offi cers wore the sword suspended from beneath the tunic, senior NCOs wore it suspended externally from the uniform belt. Fähnriche wore the offi cers’ sword untergeschnallt, i.e., suspended from beneath the tunic like an offi cer.6 Etat is a “budget,” and mäßig means, roughly, “in conformity with”; taken together, this seems to convey a meaning of “authorized” Feldwebel according to the unit payroll. It also begs the question of whether, like Gefreiten, there were perhaps “excess” Feldwebel?
The Feldwebel/Wachtmeister wore the same distinctions as a Vizefeldwebel/wachtmeister (i.e., offi cer’s sidearm knot and cockades), but had the distinction of a second ring of NCO trim around each cuff. Given this status (and the fact he was not really a front line soldier), this double ring of trim was l ikely the rule more s o t h a n
the exception with any form of tunic, allowing the individual to unmistakably display his rank. In lieu of cuff rings, as a way of denoting their rank some individuals opted—against regulations—to wear the special insignia for Feldwebel used on the Litweka7,three point-down Treße chevrons worn on the left sleeve.
Offi zierstellvertreterIn wartime, NCOs entrusted to perform junior offi cer
duties (but who lacked the qualifi cations to become an offi cer) were promoted to the rank of “acting offi cer.” Classifi ed as NCOs, these individuals wore the same uniform as a Vizefeldwebel, but with the added distinction of special shoulder straps. These straps were of plain feldgrau material with the appropriate Waffenfarbe trim. Instead of the red embroidered numbers/ciphers of the usual strap, Offi zierstellvertreter wore the metal numbers/ciphers worn by commissioned offi cers. Additionally, the strap was bordered along the outside long edges and pointed end with NCO Treße or Borte. Theoretically, these individuals were otherwise to wear the issue enlisted uniform, though it appears some “liberties” were occasionally taken, the wearing of offi cer leg- and foot-wear being tolerated to some extent. It was also a common “trick” to have the shoulder straps made narrower than usual; in this way, the NCO trim almost met in the center and afforded the impression of an offi cer’s board—at least from a distance.7 In the pre-war army, NCOs and men who wished to were permitted to purchase Litewkas for informal off-duty wear. The enlisted version was made of slate grey wool, had plain “barrel” cuffs, stand-and-fall collar, slit hip pockets, and a fl y front. In many respects it was the forerunner of the Bluse introduced in 1915.
Offi cer’s Portepeé
Feldwebel Treße
Sergeantenknopf
Offi zierstellvertreterAchselklappen
M.1910 Rock sleevewith Vzfw. Treße
Great War Association CP Handbuch v. 0.95 Methods—11
Subalternoffi ziere
Feldwebel-LeutnantAnother wartime-
only rank, these indi-viduals were retired Feldwebel8 who were recalled to active duty to perform offi cer du-ties, thereby freeing up younger officers for troop duty. Un-like the Offi zierstell-vertreter, Feldwebel-Leutnante were clas-sified as belonging to the offi cer ranks. Promotion above this rank, appointment as a regular officer, or retention after the cessation of hostili-ties were not possible. Feldwebel-Leutnantewore a mixture of the offi cer and NCO uniform. In gen-eral, they wore the same uniform styles as offi cers, but had the distinctions of a Vizefeldwebel (i.e., NCO trim and Seargeantenknöpfe) in addition to the wear of lieutenant’s shoulder boards (see below). They used offi cer-quality cock-ades and carried the offi cers’ sidearm/sword and wore the Portepeé.9 They also wore the offi ces’ belt, at fi rst made of silver brocade with (in Prussia) two black stripes and a circular buckle with Wilhelm II’s cipher in the center. After September 1915, the belt was changed to brown leather and the buckle was “subdued” to a grey or olive fi nish. Whereas most Offi zierstellvertreter performed func-tions in combat units, Feldwebel-Leutnante seem to have been employed more often in headquarters and units in the Etappe (rear zone).
8 In the peacetime German Army, an enlisted career lasted 12 years, and ended with the rank of Feldwebel. The individual received a small pension but was entitled to preferred acceptance into government service with the police, civil service, etc. One popular option was to apply back to the Army for appoint-ment as part of the Administrative Corps (Beamtenkorps) which provided ser-vices to the army (e.g., as paymasters, supply depot administrators, ordnance specialists, etc.) 9 After the fi rst few months of confl ict, offi cers were ordered to cease wearing their swords. In their place, the short bayonet—the 84/98; it was this version which was universally carried in WWII—was selected. Made in various fi nishes, offi cers often carried a nickeled version. It was theoretically supposed to be functional so that, should the offi cer need a rifl e, he could take one from a wounded soldier and would have the capability to affi x his bayonet. With the Portapeé attached, the bayonet was, however, far more a symbol of rank than a weapon. Photographs sometimes show offi cers wearing the earlier “feather bayonet”—perhaps done during the “transition period” away from the sword when the shorter version was not readily available. It also became popular to substitute a small dagger or trench knife, usually worn with the Portepeé.
LeutnantLieutenants wore multi-piece cap cockades; the
offi cers’ belt; offi cers’ sidearm/sword; and the Portepeé. Shoulder boards were constructed of two rows of silver braid laid side by side, forming an inverted “U,” and sewn to a cloth backing. State colors were i n d i c a t e d a s regularly spaced chevrons woven into the braid; in Pruss ia , s ing le b l a c k c h e v r o n s were used. After September 1915, t h e b r a i d w a s changed to matte grey, and the use of double chevrons—one white and one
black—was begun. The cloth backing, initially in the Korps color (there were exceptions), was changed after September 1915 to white for most infantry regiments (again, some exceptions remained). Initially, the numbers/ciphers10 and stars (see below) were of brass. The unit numbers or cipher were placed in the center of the board. After the 1915 regulation change, they were supposed to be “subdued” by being lacquered a dark brown, or being painted grey or olive. Often, after that date, they were made of pot metal vice the earlier brass. As with enlisted uniforms, standardization was diffi cult, and bright metal on subdued boards was not uncommon; they appear to have used whatever they had. All officers, from Lieutenant to Colonel wore the same uniform.
10 Offi cers assigned to regimental duties wore the unit numbers or cipher. Those assigned to higher level commands generally wore the regimental uniform and designations. Some assignments—specifi cally assignment to the General Staff, War Ministry, Military Cabinet, or as Aides de Camp to high ranking offi cers/offi cials—had specifi c uniforms, and unit numbers or ciphers were generally not worn with these.
A young Feldwebel-Leutnant
Prussian Offi cer’s Belt buckle
Prussian Leutnant’sshoulderboard
Great War Association CP Handbuch v. 0.9512—Methods
OberleutnantFirst Lieutenants added a single Stern (star—often called
a “pip” in English language sources) to the lieutenant’s shoulder board. It was placed at the shoulder end of the board below the numbers/cipher.
Hauptleute/RittmeisterBecause of his relative importance in the military
structure, the Hauptmann (Rittmeister in the cavalry) was categorized into a singular rank category. Captains wore the same distinctions a subalterns, but added a second Stern to each shoulder board. The fi rst star was below, and the second was added above the numbers or cipher.
Stabsoffi ziere
MajorMajors wore the same uniform as junior offi cers, but
from this grade up used a plaited shoulder board. For fi eld grade offi cers, the braid—of the same design, but slightly thinner than that used for company grade offi cers—was twisted into a pattern which displayed fi ve “bends” along the outer edges. Post September 1915 straps maintained the same form, but used two narrow braids sewn together in place of the one wider one. The straps were made in pairs, with the buttoning loop different for each shoulder; the braid coming from the top of the board was supposed to be placed at the rear. Photographic evidence shows many examples of fi eld grade boards being worn “on the wrong shoulders.” Numerals and ciphers were as for other offi cers (fi g.4).
OberstleutnantLieutenant Colonels added a single pip to the same
Shoulder Boards, from left to right, Major, post 1915, J.R.56; Leutnant, post 1915, Füs.R.86; Hauptmann, pre 1915, I.R.9; Offi zierstellvertreter,
pre 1915, GrenR.2. The latter strap displays the Treße as worn on earlier uniform pieces. The Major’s strap is for the right shoulder.
board majors used. It was placed below the number/cipher.
OberstRepeating the star pattern for company grade
officers, Colonels added a second star above the numbers or cipher.
Orig pix plus more colour clip of rank insignia
Great War Association CP Handbuch v. 0.95 Methods—13
GeneraleGeneralmajor
Brigadier Generals wore the same basic uniform as commissioned offi cers, though the details of the Rock and Blouse were distinct. Most noticeably, general offi cers’ tunics displayed breast pocket flaps. To the collar,
Prussian generals added red patches with golden stylized comets embroidered on them11. General officers also added Besatzstreifen (trim s t r i p e s — s o m e t i m e s called Lampassen) to all trousers. About 4 cm. in width and
made of ponceau red wool, one was added at each side of the trouser/breeches seam piping.12 After September 1915, the collar patches worn with the fi eld uniform were changed to feldgrau and general offi cers serving with combat formations were, theoretically, to wear breeches without the Besatzstreifen (both of these changes were probably almost universally ignored). General offi cers repeated the Stern system of the company and fi eld grade offi cers on their own shoulder straps. The latter were made of three strands of metallic braid. The central braid was silver and woven in the same “Russia braid” pattern as that used on other officer’s shoulder boards; for Prussian Generals, it had regularly spaced black chevrons. On either side of this were round gold cords. The braid was arranged similar to the shoulder boards of fi eld grade offi cers and mounted on a ponceau backing. Because of their larger size, general offi cer shoulder boards had only four vice the fi ve “bends” of the Stabsoffi ziere. Additionally, the ponceau backing was actually smaller than the plaited braids and did not show from beneath as did the Waffenfarbe of other offi cers. Like fi eld grade boards, they came in matched pairs. Generals did not wear numerals or ciphers on their boards, and the 11 Known as “Alt Larisch” embroidery, it had been the pattern with which offi cers’ buttonholes of Infantrieregiment 24 were laced during the reign of Fredrick II (the Great). Unlike the collar patches of soldiers and other offi cers, generals’ collar tabs were part of their rank insignia.12 Staff offi cers assigned to the War Ministry and General Staff wore similar stripes in karmin (carmine), while staff offi cers assigned to the Kaiser’s Military Cabinet wore the same ponceau stripes as a general.
Generalmajor had no star. A Generalmajor was addressed as “Herr Generalmajor.”13
GeneralleutnantMajor Generals added a single silver star to each board.
He, and all subsequent general offi cers, were addressed as “Eure Exzellenz” (“Your Excellency”).
General einer Waffengattung. Only three classifi cation of this rank existed: General der Infanterie; General der Kavallerie; and General der Artillerie. They wore two silver stars arranged one above the other on each board.
Generaloberst. Full Generals wore three silver stars on each board. Two were placed side by side on the lower end of the board, while the third was centered above them. There also existed a rank known as Generaloberst mit dem Range eines Feldmarschalls. This rank utilized four silver stars arranged in a rectangle. It was conferred on those Generalobristen serving as GFMs who could not legitimately be “promoted” to that rank.14
GeneralfeldmarscallGFMs wore crossed silver Marshal’s batons on
the shoulder boards; they were an accurate rep-resentation of the actual baton conferred on them by the Kaiser. In addition, they carried the baton, which constituted part of their rank insignia. For formal occasions, they employed the actual baton, which was approximately a foot and a half long. Covered in purple velvet with golden end caps, small enameled Iron Crosses and Hohernzollern Eagles were interspersed along the shaft. For other duties, an Interimstab (interim baton—also called a Reitstock (riding crop)) was carried. This was a brown wooden staff with a large metallic silver-and-gilt pommel and tip. There was a representation of the imperial crown on the top of the pommel, and a raised Garde eagle on the sides. Attached below the pommel was a silver and black twist cord lanyard which ended in a tassel.
13 German practice was similar to British custom—though both the Brigadier and Generalmajor were general offi cers, they were addressed differently from the other ranks. (In British custom, major generals and above are addressed as “General” while it is considered bad form to address a Brigadier as anything but “Brigadier.”) 14 In order to legitimately be named a GFM in the German Army (as in most others), one had actually to have won a major battle or campaign. Von Hin-denburg, e.g., was created Field Marshal for his victory at Tannenburg in 1914. Because of the number of years between the Franco-Prussian war and WWI, few met the requirement before the war broke out and most peacetime GFMs were, in fact, “acting” Generalobristen.
Great War Association CP Handbuch v. 0.9514—Methods
Military Courtesy: The German Army was very “correct”, and military
courtesy was usually strictly observed. The following are the important elements for the reenactor to learn:
Saluting: In the German army, both offi cers and Un-teroffi zier mit Portepeé (Vizefeldwebel and above) were saluted.
Hats, helmets: Remove caps while indoors unless on duty. The level of preparedness of a German soldier on duty was indicated by his headgear. If he came up to you bareheaded, he probably just wanted to talk. If he came up to you with his cap on (indoors), he is probably on of-fi cial business. If he came up to you with his helmet on, he means action; perhaps he is there to arrest you, or the outfi t is preparing for battle.
Address: NCOs are addressed as “Herr ... (Unterof-fi zier, Sergeant, etc..)” Offi cers are also addressed in the same manner.
Organization of the Military:
The prewar German military was organized into xxx branches: The Heer (Army) and the Marine (Navy).
The Army itself was further divided into two main components: The Ersatzarmee (Replace-ment Army) and the Feldarmee (Field Army). The fi rst one was the component which trained, convalesced, and processed soldiers for the second one which comprised the combat elements.
The basic sub-divisions of a German military unit were much like their US counterparts, with only the names different. The basic infantry units were as follows:
Gruppe (Squad): 9 men made up a squad, which was normally led by an Unteroffi zier.
Zug (Platoon): 3 Gruppen plus a platoon troop normally made up a Zug, normally commanded by a Leutnant (for the fi rst platoon in a company), or some grade of Feldwebel.
Kompagnie (Company): 3 Züge plus a company HQ made up a Kompanie, normally commanded by either an Oberleutnant or Hauptmann. In the Füsilier Company, there were 3 rifl e platoons, one heavy-weapons company, and an infantry howitzer platoon.
Batallion (Battalion): For the various arms, a number of companies would make up the bat-talion, normally led by a Major. Another name for these, especially amongst non-infantry units, was Abteilung. In the typical infantry battalion,
there were three rifl e companies and one heavy weapons company containing mortars and heavy machine guns.
Regiment (Regiment): Two or three battalions made up the regiment along with some specialized companies, commanded by an Oberst.
Division (Division): The various battalions and regi-ments of different arms of service were combined in the Division.
Great War Association CP Handbuch v. 0.95 Methods—15
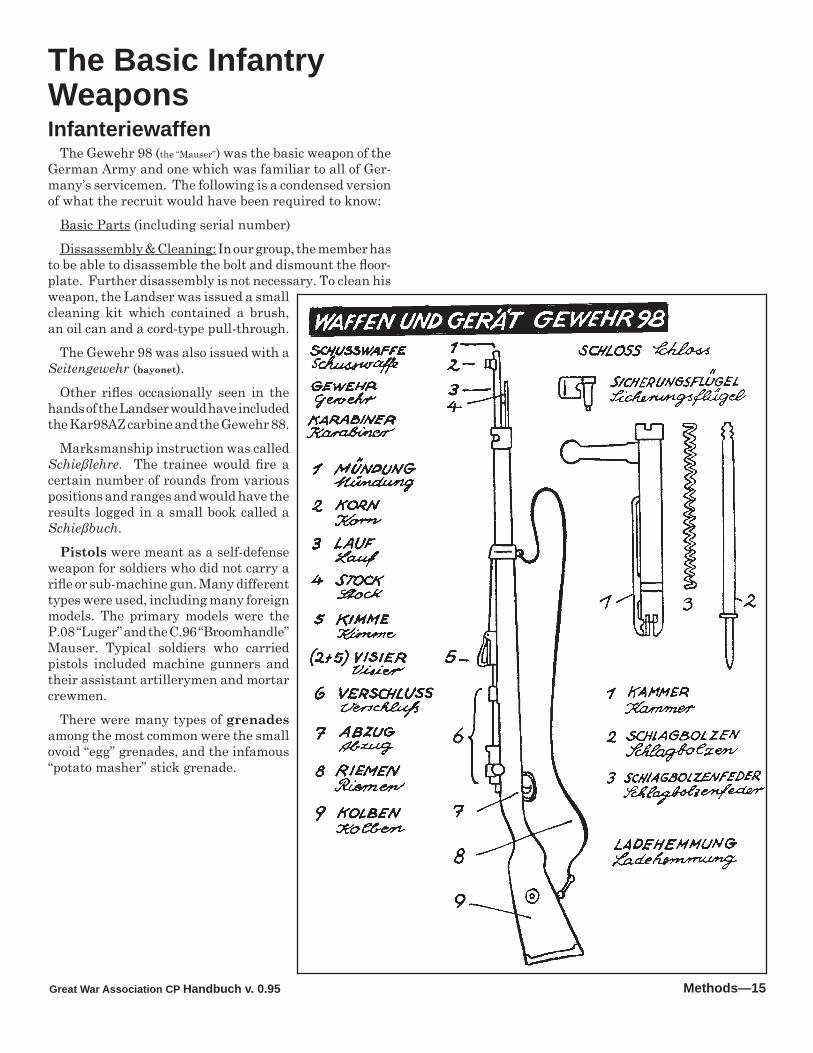
The Basic Infantry WeaponsInfanteriewaffen
The Gewehr 98 (the “Mauser”) was the basic weapon of the German Army and one which was familiar to all of Ger-many’s servicemen. The following is a condensed version of what the recruit would have been required to know:
Basic Parts (including serial number)Dissassembly & Cleaning: In our group, the member has
to be able to disassemble the bolt and dismount the fl oor-plate. Further disassembly is not necessary. To clean his weapon, the Landser was issued a small cleaning kit which contained a brush, an oil can and a cord-type pull-through.
The Gewehr 98 was also issued with a Seitengewehr (bayonet).
Other rifl es occasionally seen in the hands of the Landser would have included the Kar98AZ carbine and the Gewehr 88.
Marksmanship instruction was called Schießlehre. The trainee would fi re a certain number of rounds from various positions and ranges and would have the results logged in a small book called a Schießbuch.
Pistols were meant as a self-defense weapon for soldiers who did not carry a rifl e or sub-machine gun. Many different types were used, including many foreign models. The primary models were the P.08 “Luger” and the C.96 “Broomhandle” Mauser. Typical soldiers who carried pistols included machine gunners and their assistant artillerymen and mortar crewmen.
There were many types of grenades among the most common were the small ovoid “egg” grenades, and the infamous “potato masher” stick grenade.
Great War Association CP Handbuch v. 0.9516—Methods
Closed Order Forma-tions and MarchingGesclossene Ordnung Marsch
There were two elementary close formations: The Reihe (rye-eh), and the Linie (lin-yeh). The Reihe was a line with the men facing front-to-back, and the Linie was a line with the soldiers standing shoulder to shoulder. The interval when in Reihe was called Abstand and was 80cm, and when in Linie it was called Zwischenraum and unless otherwise ordered was with the elbows just touching on each man. In each formation the end man on the right (or front) was called the Flügelman (in open order called the Anschluß-man); the lines always formed on him.
The command to dress the ranks (to the right) is Richt Euch! (You might hear it as Nach rechts, richtet EUCH!) Everyone except the Flugelman turns his head to the right and dresses the ranks. Heads remained turned until Augen gerade-aus! is commanded.
The normal command for eyes right (or left) is Augen rechts! The head should be turned smartly. The com-mand for eyes front is Augen gerade-aus!
The German command for forwards, march, is Marsch! This may be prefi xed with a particular command such as Ohne Tritt (route step), Gleichschritt (march step), or Laufschritt (double time). The standard German marching cadence was 114 steps per minute.
The German command for right (or left) turn was Rechts (Links) schwenkt, Marsch!. The leading man or rank commences the turn on the Marsch command.
Individual Drill and the Manual of ArmsEinzelausbildung ohne Gewehr, GewehrgriffeIndividual DrillEinzelausbildung
These would be the “positions of the soldier”, or the basic commands the recruit would have to master before training in groups or with weapons.
Raustreten! (ROWS-trayten)—Everbody out! This was used to get recruits out of the classroom or barracks.
Stillgestanden! (SHTILL-guh-stahnden)—Heels togther, toes pointed out at not quite a right angle. Shoul-ders squared. Arms are thrown slightly forward, with the hands fl at, with the middle fi nger resting against the trouser seam. Eyes forward.
Rührt Euch! (ROOORT oik)—Left foot slightly forward, body at rest. Talking is still forbidden.
Links, um! (leenks OOM)—Left face.Rechts, um! (reckts OOM)—Right face.Kehrt, um! (kairt OOM)—About face. In the German
Army, this is done by turning to the left.Hinlegen! (heen-laygun)—Lie down.Auf! (OWF)—Get up.Laufen/gehen/halt (lowfen/gayun/hahlt)—run, walk,
stop.
Other Exercises:There were also a number of physical training exercises
which were common to the German trainees. One was called the Kniebeugen (k’-nee-boy-gen), or knee bends. This exercise was usually done with a rifl e in the following manner: From a standing position, the rifl e is grasped in both hands and held horizontally in front of the chest. On the fi rst count, the rifl e is pushed away from the body as the knees are bent until the soldier is squatting on his haunches and the rifl e is held at arm’s length. On the second count, the soldier rises up and pulls in the rifl e. This completes one Kniebeugen. This exercise was the German version of our push-ups, and was used in much the same manner.
Great War Association CP Handbuch v. 0.95 Methods—17
Selection@ from the
GermanDrill Regulation@
of 1906Taken from the US War Department translation
of the 1906 German Army drill regulations.
Members should study this booklet and practice the movements individually, at home, between the events. With the aid of this booklet, the member will learn the basics of German close-order drill (and really all he needs to know—just like the original Frontsoldaten, who were taught only the basics). Practice in front of a mirror!
It works best if you read through this booklet fi rst. Then, practice these movements in front of a mirror until they become “second-nature”—do this BEFORE you get to the event. All of this “mirror-study” will insure that we do not have to spend more than a minimum amount of time on the basics, but instead can simply work on our timing, details of the movements, etc. This practice will also ensure that we do not catch you unawares with some feature of the German drill.
Rudolf WeißSergeant and Training Offi cer, 1./Inf.Rgt. 23
drill clip here
Great War Association CP Handbuch v. 0.9518—Methods
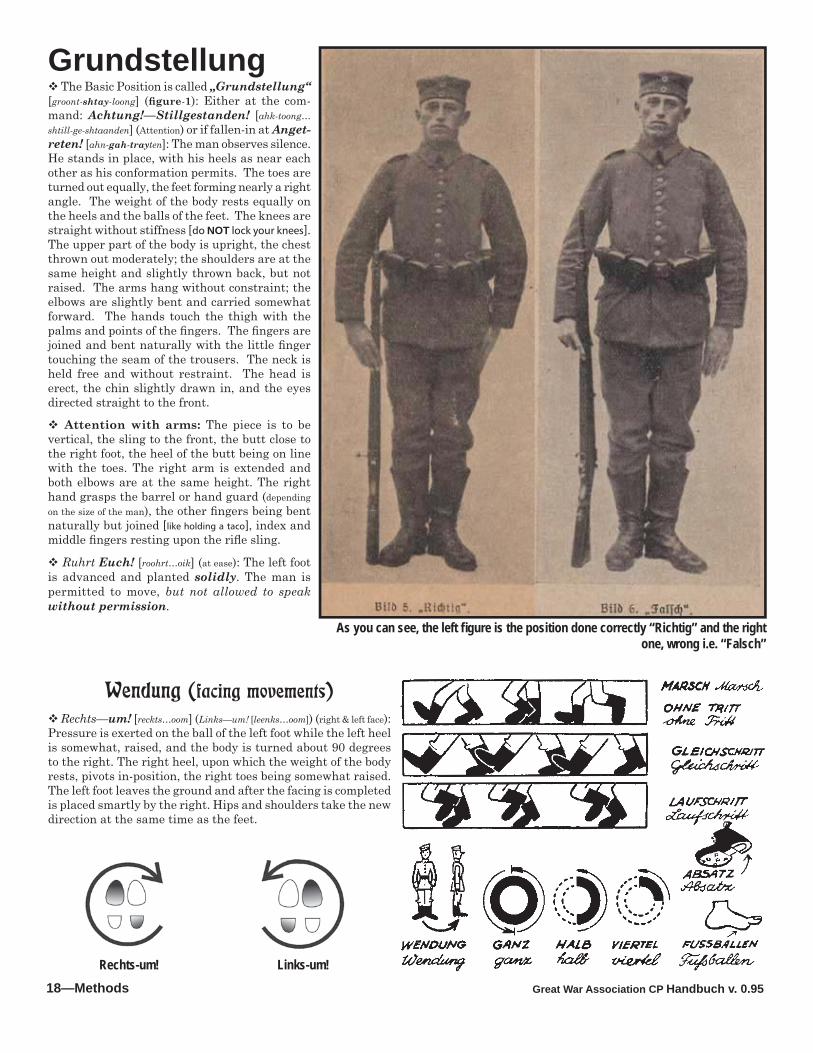
Wendung (facing movements) Rechts—um! [reckts…oom] (Links—um! [leenks…oom]) (right & left face): Pressure is exerted on the ball of the left foot while the left heel is somewhat, raised, and the body is turned about 90 degrees to the right. The right heel, upon which the weight of the body rests, pivots in-position, the right toes being somewhat raised. The left foot leaves the ground and after the facing is completed is placed smartly by the right. Hips and shoulders take the new direction at the same time as the feet.
Rechts-um! Links-um!
As you can see, the left fi gure is the position done correctly “Richtig” and the right one, wrong i.e. “Falsch”
Grundstellung The Basic Position is called „Grundstellung“ [groont-shtay-loong] (fi gure-1): Either at the com-mand: Achtung!—Stillgestanden! [ahk-toong…shtill-ge-shtaanden] (Attention) or if fallen-in at Anget-reten! [ahn-gah-trayten]: The man observes silence. He stands in place, with his heels as near each other as his conformation permits. The toes are turned out equally, the feet forming nearly a right angle. The weight of the body rests equally on the heels and the balls of the feet. The knees are straight without stiffness [do NOT lock your knees]. The upper part of the body is upright, the chest thrown out moderately; the shoulders are at the same height and slightly thrown back, but not raised. The arms hang without constraint; the elbows are slightly bent and carried somewhat forward. The hands touch the thigh with the palms and points of the fi ngers. The fi ngers are joined and bent naturally with the little fi nger touching the seam of the trousers. The neck is held free and without restraint. The head is erect, the chin slightly drawn in, and the eyes directed straight to the front.
Attention with arms: The piece is to be vertical, the sling to the front, the butt close to the right foot, the heel of the butt being on line with the toes. The right arm is extended and both elbows are at the same height. The right hand grasps the barrel or hand guard (depending on the size of the man), the other fi ngers being bent naturally but joined [like holding a taco], index and middle fi ngers resting upon the rifl e sling.
Ruhrt Euch! [roohrt…oik] (at ease): The left foot is advanced and planted solidly. The man is permitted to move, but not allowed to speak without permission.
Great War Association CP Handbuch v. 0.95 Methods—19
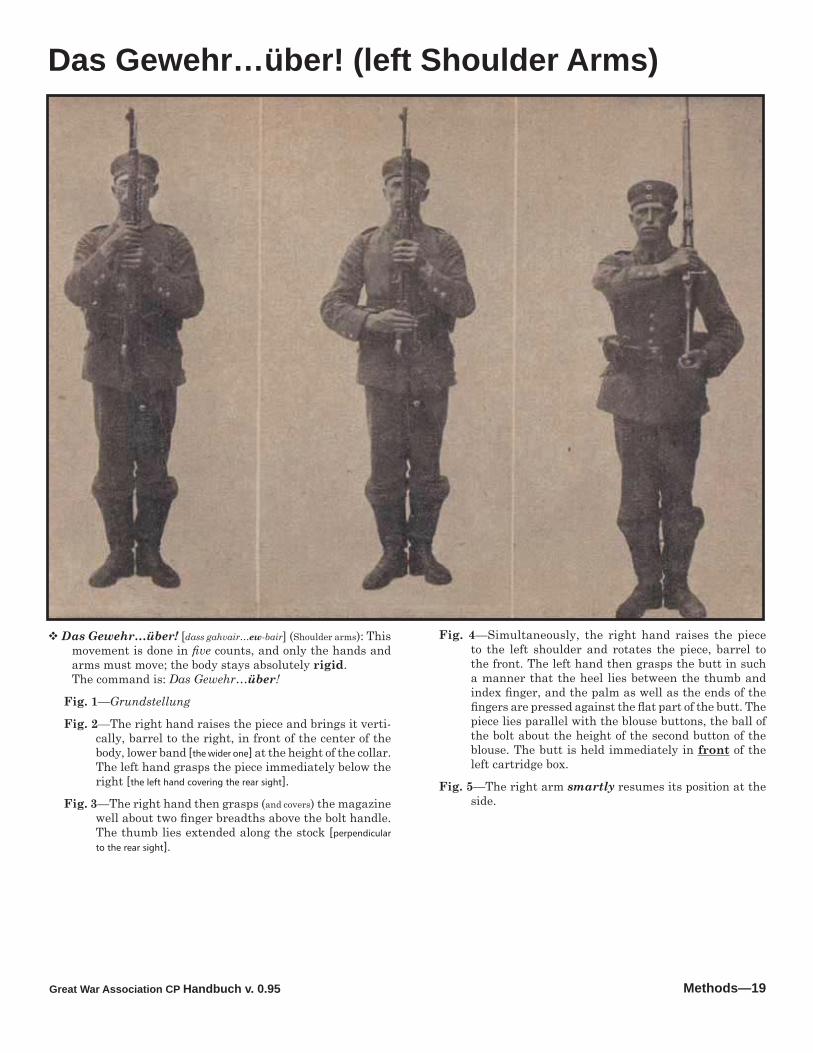
Das Gewehr…über! (left Shoulder Arms)
Das Gewehr…über! [dass gahvair…ew-bair] (Shoulder arms): This movement is done in fi ve counts, and only the hands and arms must move; the body stays absolutely rigid.The command is: Das Gewehr…über!
Fig. 1—Grundstellung
Fig. 2—The right hand raises the piece and brings it verti-cally, barrel to the right, in front of the center of the body, lower band [the wider one] at the height of the collar. The left hand grasps the piece immediately below the right [the left hand covering the rear sight].
Fig. 3—The right hand then grasps (and covers) the magazine well about two fi nger breadths above the bolt handle. The thumb lies extended along the stock [perpendicular
to the rear sight].
Fig. 4—Simultaneously, the right hand raises the piece to the left shoulder and rotates the piece, barrel to the front. The left hand then grasps the butt in such a manner that the heel lies between the thumb and index fi nger, and the palm as well as the ends of the fi ngers are pressed against the fl at part of the butt. The piece lies parallel with the blouse buttons, the ball of the bolt about the height of the second button of the blouse. The butt is held immediately in front of the left cartridge box.
Fig. 5—The right arm smartly resumes its position at the side.
Great War Association CP Handbuch v. 0.9520—Methods
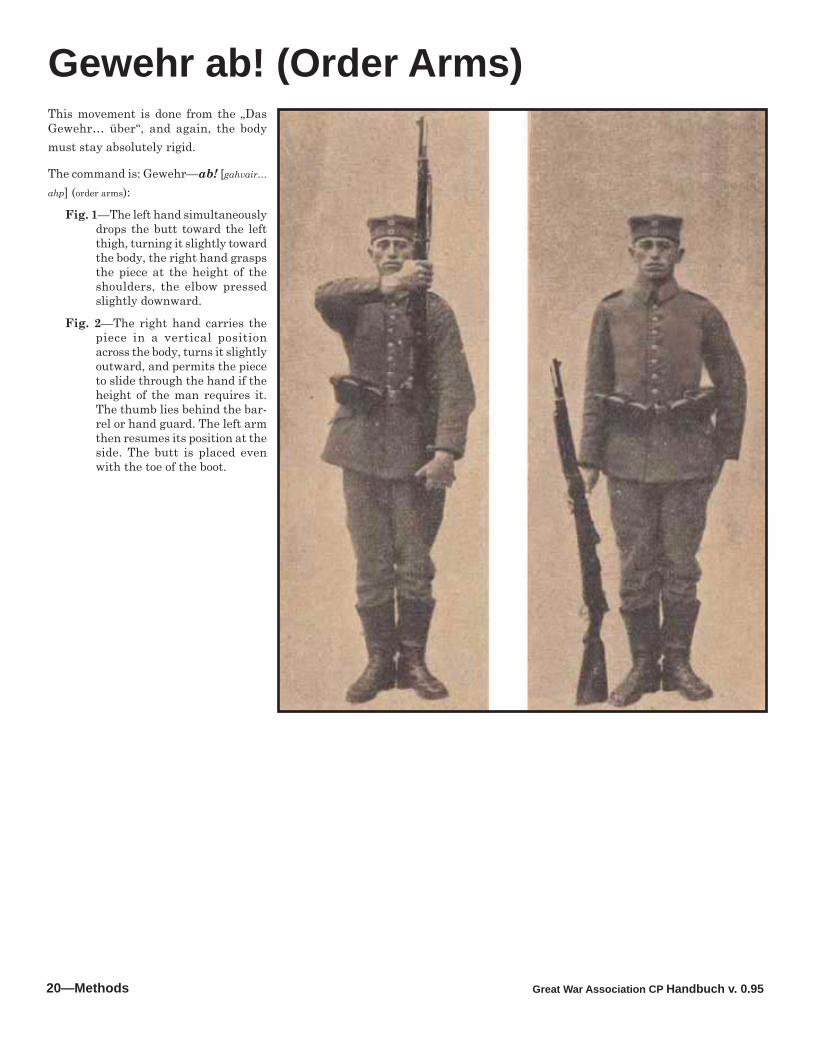
This movement is done from the „Das Gewehr… über“, and again, the body must stay absolutely rigid.
The command is: Gewehr—ab! [gahvair…
ahp] (order arms):
Fig. 1—The left hand simultaneously drops the butt toward the left thigh, turning it slightly toward the body, the right hand grasps the piece at the height of the shoulders, the elbow pressed slightly downward.
Fig. 2—The right hand carries the piece in a vertical position across the body, turns it slightly outward, and permits the piece to slide through the hand if the height of the man requires it. The thumb lies behind the bar-rel or hand guard. The left arm then resumes its position at the side. The butt is placed even with the toe of the boot.
Gewehr ab! (Order Arms)
Great War Association CP Handbuch v. 0.95 Methods—21
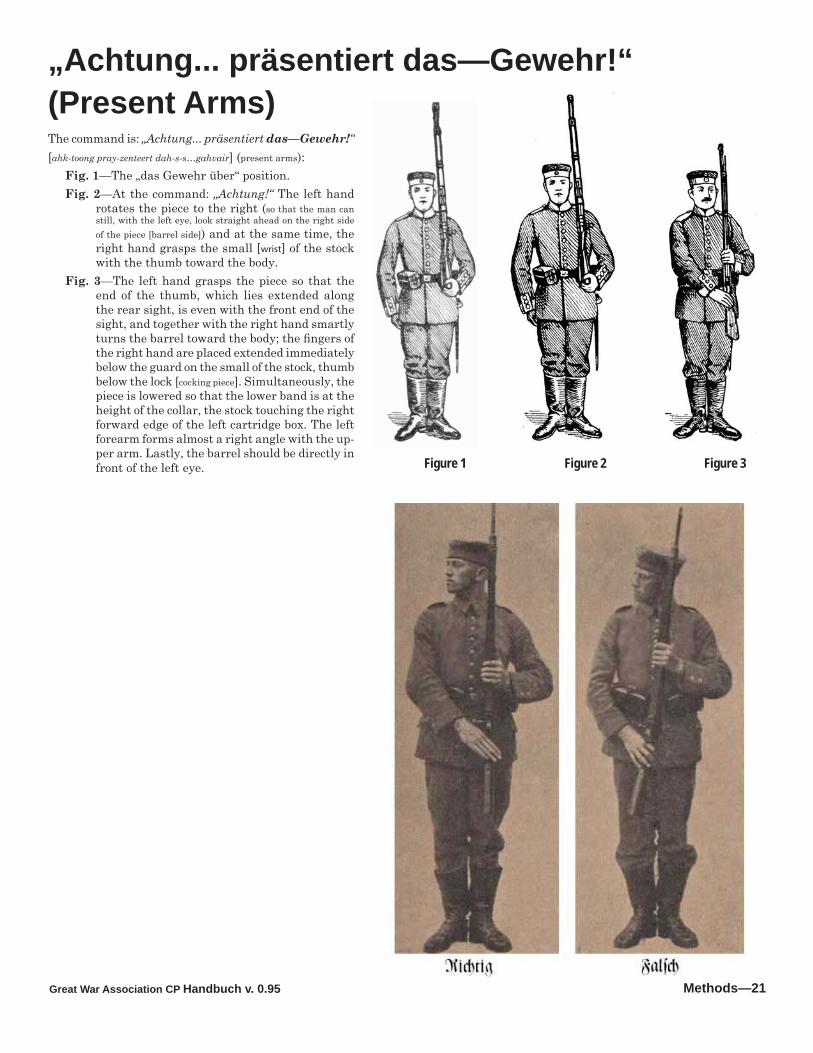
The command is: „Achtung... präsentiert das—Gewehr!“[ahk-toong pray-zenteert dah-s-s…gahvair] (present arms):
Fig. 1—The „das Gewehr über“ position.Fig. 2—At the command: „Achtung!“ The left hand
rotates the piece to the right (so that the man can still, with the left eye, look straight ahead on the right side of the piece [barrel side]) and at the same time, the right hand grasps the small [wrist] of the stock with the thumb toward the body.
Fig. 3—The left hand grasps the piece so that the end of the thumb, which lies extended along the rear sight, is even with the front end of the sight, and together with the right hand smartly turns the barrel toward the body; the fi ngers of the right hand are placed extended immediately below the guard on the small of the stock, thumb below the lock [cocking piece]. Simultaneously, the piece is lowered so that the lower band is at the height of the collar, the stock touching the right forward edge of the left cartridge box. The left forearm forms almost a right angle with the up-per arm. Lastly, the barrel should be directly in front of the left eye. Figure 3Figure 2Figure 1
„Achtung... präsentiert das—Gewehr!“ (Present Arms)
Great War Association CP Handbuch v. 0.9522—Methods
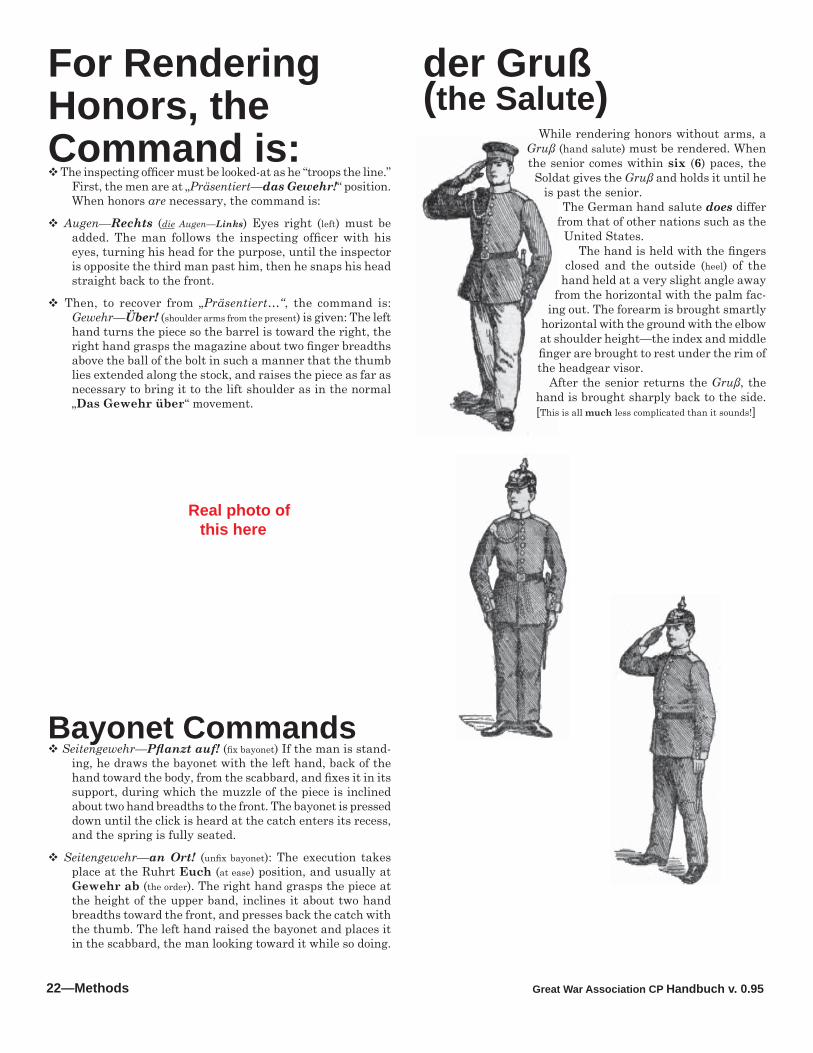
While rendering honors without arms, a Gruß (hand salute) must be rendered. When the senior comes within six (6) paces, the Soldat gives the Gruß and holds it until he
is past the senior.The German hand salute does differ
from that of other nations such as the United States.
The hand is held with the fi ngers closed and the outside (heel) of the
hand held at a very slight angle away from the horizontal with the palm fac-
ing out. The forearm is brought smartly horizontal with the ground with the elbow at shoulder height—the index and middle fi nger are brought to rest under the rim of the headgear visor.
After the senior returns the Gruß, the hand is brought sharply back to the side. [This is all much less complicated than it sounds!]
der Gruß (the Salute)
For Rendering Honors, the Command is: The inspecting offi cer must be looked-at as he “troops the line.”
First, the men are at „Präsentiert—das Gewehr!“ position. When honors are necessary, the command is:
Augen—Rechts (die Augen—Links) Eyes right (left) must be added. The man follows the inspecting offi cer with his eyes, turning his head for the purpose, until the inspector is opposite the third man past him, then he snaps his head straight back to the front.
Then, to recover from „Präsentiert…“, the command is: Gewehr—Über! (shoulder arms from the present) is given: The left hand turns the piece so the barrel is toward the right, the right hand grasps the magazine about two fi nger breadths above the ball of the bolt in such a manner that the thumb lies extended along the stock, and raises the piece as far as necessary to bring it to the lift shoulder as in the normal „Das Gewehr über“ movement.
Bayonet Commands Seitengewehr—Pfl anzt auf! (fi x bayonet) If the man is stand-
ing, he draws the bayonet with the left hand, back of the hand toward the body, from the scabbard, and fi xes it in its support, during which the muzzle of the piece is inclined about two hand breadths to the front. The bayonet is pressed down until the click is heard at the catch enters its recess, and the spring is fully seated.
Seitengewehr—an Ort! (unfi x bayonet): The execution takes place at the Ruhrt Euch (at ease) position, and usually at Gewehr ab (the order). The right hand grasps the piece at the height of the upper band, inclines it about two hand breadths toward the front, and presses back the catch with the thumb. The left hand raised the bayonet and places it in the scabbard, the man looking toward it while so doing.
Real photo of this here
Great War Association CP Handbuch v. 0.95 Methods—23
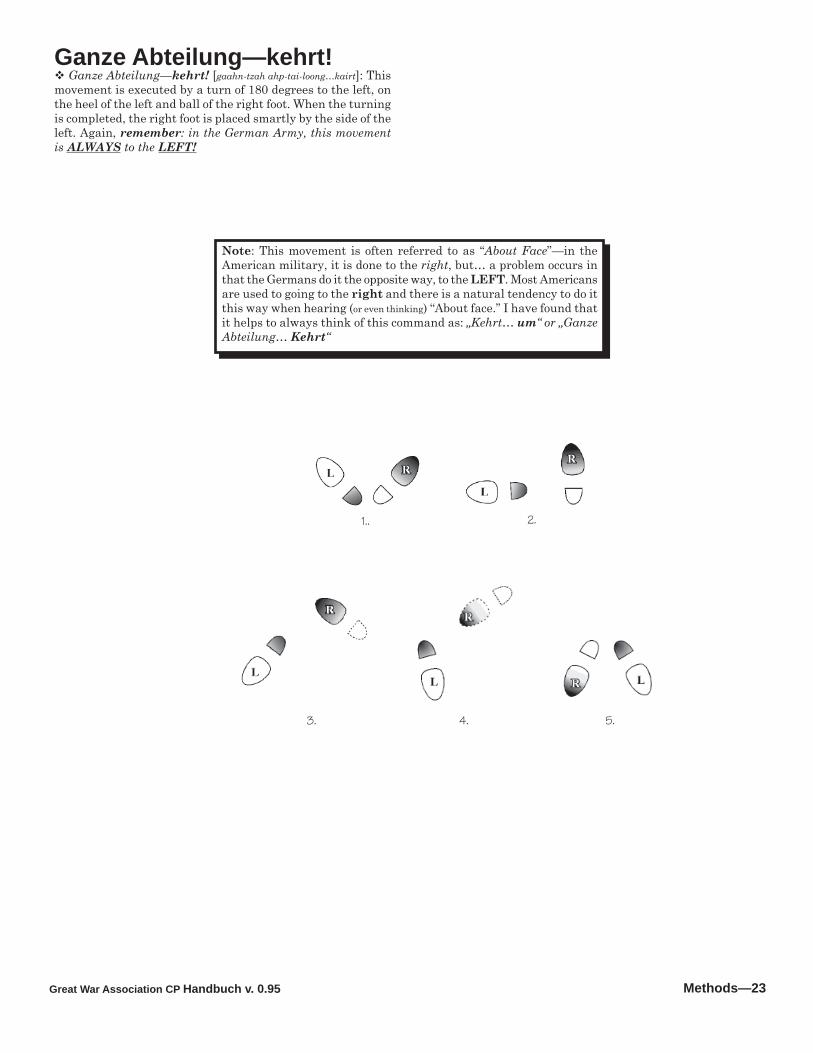
Ganze Abteilung—kehrt! Ganze Abteilung—kehrt! [gaahn-tzah ahp-tai-loong…kairt]: This movement is executed by a turn of 180 degrees to the left, on the heel of the left and ball of the right foot. When the turning is completed, the right foot is placed smartly by the side of the left. Again, remember: in the German Army, this movement is ALWAYS to the LEFT!
Note: This movement is often referred to as “About Face”—in the American military, it is done to the right, but… a problem occurs in that the Germans do it the opposite way, to the LEFT. Most Americans are used to going to the right and there is a natural tendency to do it this way when hearing (or even thinking) “About face.” I have found that it helps to always think of this command as: „Kehrt… um“ or „Ganze Abteilung… Kehrt“
1.. 2.
3. 4. 5.
Great War Association CP Handbuch v. 0.9524—Methods
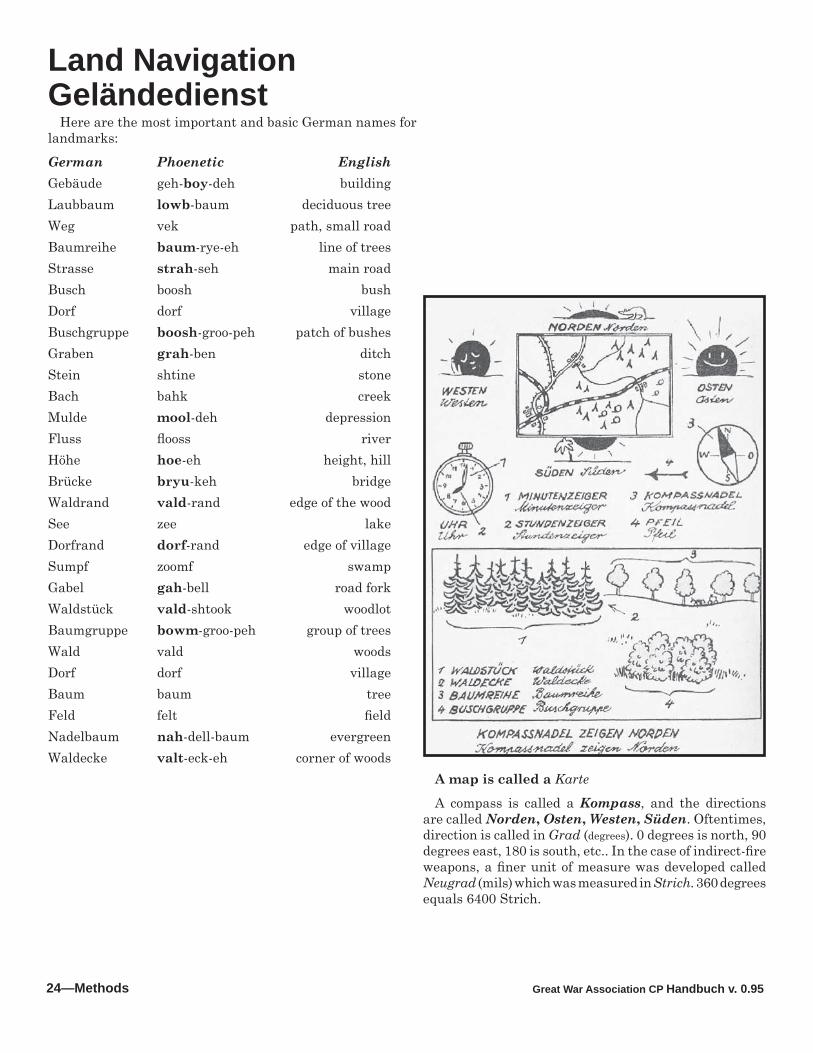
Land NavigationGeländedienst
Here are the most important and basic German names for landmarks:German Phoenetic English Gebäude geh-boy-deh buildingLaubbaum lowb-baum deciduous treeWeg vek path, small roadBaumreihe baum-rye-eh line of trees Strasse strah-seh main roadBusch boosh bush Dorf dorf villageBuschgruppe boosh-groo-peh patch of bushes Graben grah-ben ditchStein shtine stone Bach bahk creekMulde mool-deh depression Fluss fl ooss riverHöhe hoe-eh height, hill Brücke bryu-keh bridgeWaldrand vald-rand edge of the wood See zee lakeDorfrand dorf-rand edge of village Sumpf zoomf swampGabel gah-bell road forkWaldstück vald-shtook woodlotBaumgruppe bowm-groo-peh group of trees Wald vald woodsDorf dorf villageBaum baum treeFeld felt fi eldNadelbaum nah-dell-baum evergreenWaldecke valt-eck-eh corner of woods
A map is called a Karte
A compass is called a Kompass, and the directions are called Norden, Osten, Westen, Süden. Oftentimes, direction is called in Grad (degrees). 0 degrees is north, 90 degrees east, 180 is south, etc.. In the case of indirect-fi re weapons, a fi ner unit of measure was developed called Neugrad (mils) which was measured in Strich. 360 degrees equals 6400 Strich.
Great War Association CP Handbuch v. 0.95 Methods—25
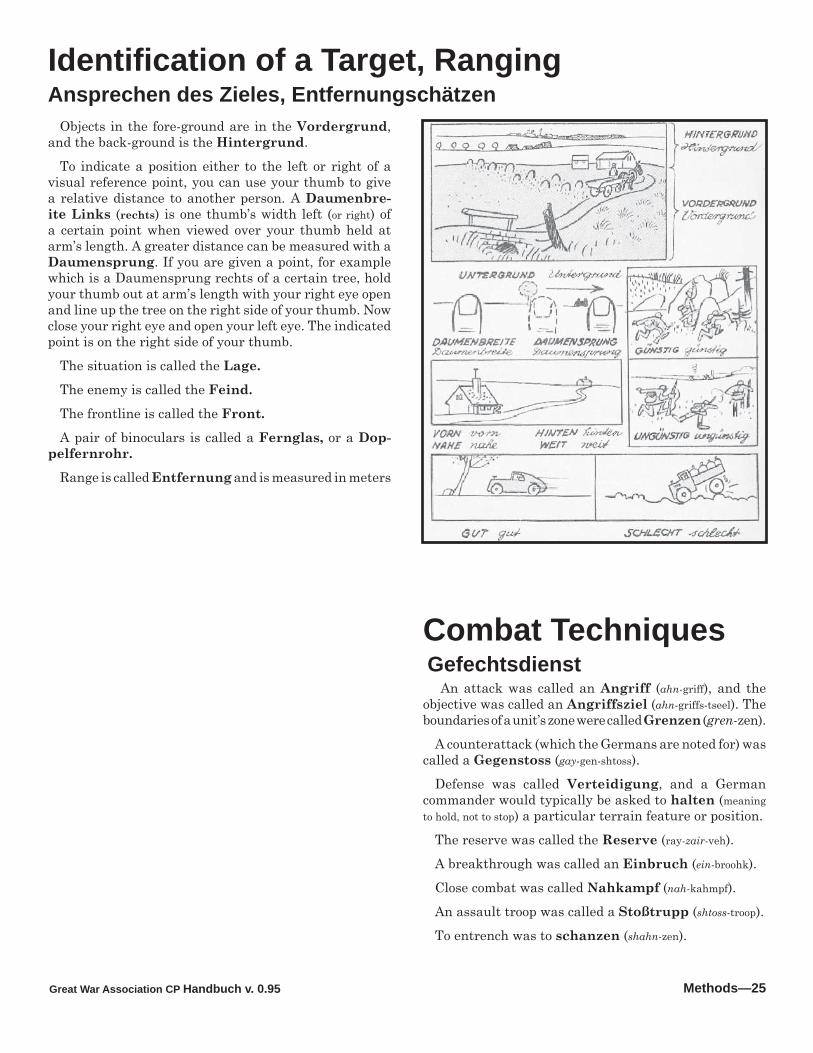
Identifi cation of a Target, RangingAnsprechen des Zieles, Entfernungschätzen
Objects in the fore-ground are in the Vordergrund, and the back-ground is the Hintergrund.
To indicate a position either to the left or right of a visual reference point, you can use your thumb to give a relative distance to another person. A Daumenbre-ite Links (rechts) is one thumb’s width left (or right) of a certain point when viewed over your thumb held at arm’s length. A greater distance can be measured with a Daumensprung. If you are given a point, for example which is a Daumensprung rechts of a certain tree, hold your thumb out at arm’s length with your right eye open and line up the tree on the right side of your thumb. Now close your right eye and open your left eye. The indicated point is on the right side of your thumb.
The situation is called the Lage.The enemy is called the Feind.The frontline is called the Front.A pair of binoculars is called a Fernglas, or a Dop-
pelfernrohr.Range is called Entfernung and is measured in meters
Combat Techniques Gefechtsdienst
An attack was called an Angriff (ahn-griff), and the objective was called an Angriffsziel (ahn-griffs-tseel). The boundaries of a unit’s zone were called Grenzen (gren-zen).
A counterattack (which the Germans are noted for) was called a Gegenstoss (gay-gen-shtoss).
Defense was called Verteidigung, and a German commander would typically be asked to halten (meaning to hold, not to stop) a particular terrain feature or position.
The reserve was called the Reserve (ray-zair-veh).A breakthrough was called an Einbruch (ein-broohk).Close combat was called Nahkampf (nah-kahmpf).An assault troop was called a Stoßtrupp (shtoss-troop).To entrench was to schanzen (shahn-zen).

Great War Association CP Handbuch v. 0.9526—Methods
Fighting in Trenchesby Louis Plack
Leutnant d. Reserve bei 4. Oberschl. Jnf. Regt. Nr. 63
Much has been written during the current confl ict regarding the issue of tactical movement on the battlefi eld. With the now-apparent demise of
open order warfare in this war, many minds continue to grapple with the inherent problems and geometries asso-ciated with the need to manoeuvre and the imperative to remain covered against the effects of enemy machine-guns and artillery. While many brilliant minds have provided thoughtful insight to the diffi cult and many-faceted as-pects of this dilemma, to my mind, the current discussion1 deals with only half the problem. As it is the task of the Infantry to close with the enemy by means of maneuver and destroy, or capture him by means of fi repower in close combat, much has been written about the former, while the latter tends totally to remain neglected. Too often, a unit successful at closing with the enemy discovers only too late their training, though admirably having prepared them to traverse No-Man’s Land with minimal damage, has left them totally ignorant of how to press the close fi ght to the same degree of success. The following discussion and examples are drawn from my own experience as an Infantry Offi cer in the Western Theatre of War since late 1914. I trust they may serve as a point of departure for those interested in the application of fi rst-hand tactical experience to real problems encountered on the battlefi eld.
In preparing for combat, unit leaders must ever remember that the desired end effect is the clearing and seizure of the enemy trenchline and, thereby, the elimination of all resistance. While the crossing of the battle area must be planned and discussed in detail (as well as thoroughly sup-ported by the fi res of artillery and machine-guns), such planning addresses only half the envisioned battle. Leaders must ensure their soldiers retain uppermost in the collective consciousness the idea that the sole purpose of crossing No-Man’s Land is to close with the enemy so that he may be decisively defeated at close quarters. The soldiers, even as they manoeuver across that deadly expanse, must be contemplating what they shall do when they reach the enemy line. An ad hoc plan, developed upon arrival by those making the traverse without becoming casualty, is bound to fail, for the business of trench clearing requires both a plan and organization.
The Schwerpunkt. The site intended for ingress into the enemy trenchline must be carefully chosen lest the undertaking begin without hope of success. In planning the manoeuver to approach the enemy, one must never 1 For a detailed discussion, see the article entitled: „Toward Restoring Battlefi eld Movement,” by Maj. d. Res. Buchrucker published in Truppen-praxis, Vol. III, Number 4, April 1917.
lose sight of the intent to arrive at a pre-selected point so as to enter the enemy trenches under conditions most favorable to the attacker. Entering long, straight expanses of enemy trench must be avoided as it places the attacker at an immediate disadvantage; one is faced, under the most diffi cult conditions, with great numbers of enemy defenders who can bring to bear their weapons against the attacker. Likewise, the entering of enemy lines at the juncture of trenches or saps is to be avoided as it presents the defender with more potential enemy avenues of advance than can adequately be covered by the forces available. The most promising point of ingress into an enemy trench is at the point where the trench forms a “fi nger” toward our own lines. Upon such a protrusion, effective fi res can be brought to allow close approach and subsequent gaining of entry against a limited number of defenders. As well, after entry has been gained, it of-fers the attacker momentary shelter against the bulk of enemy forces.
Organization and Training. Before an attack against the enemy is undertaken, the attacking force must be or-ganized to successfully clear the enemy trenchline when ingress is achieved. As well, the attacking troops must be thoroughly trained and rehearsed in executing the actions
necessary to successful trench combat.a) Organization. The basic and most adaptable unit
for fi ghting within trenches is the Gruppe. An effective method of organization fl ows from envisioning the Gruppe as analogous to a snake, which must move through the trenches. The “tongue” which guides the serpent’s move-ments is the Gruppe’s advance guard; usually the Grup-penführer and another experienced Musketier. These will move carefully, weapons at the ready, before the body of the snake, “feeling and sensing” the ability of the body to continue its movement. The teeth of the serpent—
Fig. 1. Organization of the Gruppe for combat in trenches, with the Gruppenfüh-rer leading. The arrow denotes the direction of advance.
Add some more art/white space.
Great War Association CP Handbuch v. 0.95 Methods—27
which will deal most effectively with its enemies—is the Grenadier.2 This individual is chosen upon his ability to accurately and skillfully place grenades consistently where aimed. While useful in the defense, the ability to hurl bombs great distances is of little consequence in trench fi ghting. Of far more import is the ability to accurately deliver the grenade to the point where its effects are most needed. The Grenadier travels immediately behind the advance guard with rifl e slung, so as to leave his hands free to the accomplishment of his task; he does not carry the supply of grenades himself as these might hamper his performance at throwing them. Two stout and experienced soldiers follow the Grenadier with the Gruppe’s supply of grenades. Like the poison sacks in the jaw of a serpent, these feed the venom—in this case, hand grenades—to the fangs, the Gruppe’s Grenadier. Each of these should be outfi tted with a pair of sandbags joined together by a string or band whereby they may be worn water-wing fashion about the base of the neck with the bags resting beneath the arms, their openings forward. It is in these bags the Gruppe’s supply of grenades is carried.3 These individuals travel with weapons slung across the back immediately behind the Grenadier. Their task is to supply the Grenadier as needed with grenades in such condition that he need only ignite the fuse and hurl the bomb without further preparation. The remainder of the Gruppe follows the serpent’s head, weapons at the ready, prepared and trained to make good on such losses as might occur by moving forward to take the place of fallen Kameraden.
b) Training. Such an organization will only be effective if each soldier knows by heart not only his own role, but the tasks of at least one other designated individual in the Gruppe. Losses will inevitably occur, and the successful Gruppe will possess the ability to seamlessly replace those who fall in the fi ght and continue the momentum of the attack. Such profi ciency can only be achieved by repeti-tive execution of Gruppe actions after each individual has been thoroughly drilled in both his primary and secondary tasks. During this training, it is essential that casualties be simulated so as to exercise the facility of rapidly replac-ing individuals who fall during the fi ghting. As such, it
2 The supremacy of grenades as the most effective weapon for fi ghting within trenches cannot be overstated. Just as the machine-gun rules the terrain above the trenchlines, the grenade is supreme once within the trenches. As such, hand grenades must be conserved and used where they can effect maximum infl uence on the course of battle. Profl igate expenditure of this re-source, such as the oft-encountered issue of 1 or 2 grenades to each individual (appropriate in the defense only), must be avoided at all costs in undertak-ing offensive operations. Grenades must not be wasted in being thrown by individuals incapable of achieving with them proper effect, nor frittered away in endeavours of doubtful value, such as being thrown in circumstances in which advancing troops cannot advance immediately into the momentary devastation created by the grenade’s blast. 3 In the case of the newer stick hand grenade with screw on safety cap, this later is removed before the grenades are loaded into the bags so as to avoid delays in providing a grenade, ready for immediate arming, to the Grenadier. Removed caps should be placed into the bottom of one of the bags. In the event all grenades are not exploded, the safety caps of those remaining may then be replaced to preserve the grenade for future employment.
is vitally important each member of the Gruppe knows the objective and intent of the commander’s orders so that, should leaders become casualties, the Gruppe may confi dently continue to execute the mission. Additionally, even a Gruppe which is well-trained on these routines and procedures should, in the planning time available before an attack, be removed to a practice trench so that they may rehearse them again to ensure the best possible chance of the success ensured by smooth coordination among the Gruppe during the attack.4
Ingress into the Enemy Trench. As the Gruppe ap-proaches the spot at which it has been decided to enter the enemy trench, the Grenadier shall prepare the forced entry by throwing one or two grenades into the trench atop its defenders. To this end, he should carry with him during the advance a grenade in each hand, thereby not needing to rely upon being adjacent to an assistant Grenadier and a ready supply of grenades at this critical juncture. The Gruppe members must be aware with absolute certainty how many grenades the Grenadier has thrown; this he may even consider announcing verbally, for at the detona-tion of the last grenade, the Gruppe must rise as one and, with a spirited “hurrah,” hurl themselves into the enemy’s trench. Any hesitation whatsoever in this step will most assuredly result in additional and unnecessary casualties.
In the Enemy Trench. The fi rst task upon gaining the enemy trench is to ensure an effi cient and rapid end to enemy resistance in that trench section. To this end, the vigorous employment of weapons of close combat promise the most success in eliminating remaining en-emy resistance. Having committed to the trench, under no circumstances must anyone leave the trenchline; all subsequent fi ghting will occur below ground level.
This bit of enemy “real estate” having now been secured, the Gruppe must, with lightning speed, lest the enemy have time to regroup and offer resistance, organize itself into the rehearsed formation and begin operations in the desired direction so as to take advantage of the full ef-fect of the surprise and shock imposed on the enemy by the Gruppe’s violent ingress into his trench. This is done best by placing a rear guard at the fi rst trench juncture away from the desired direction of advance. This element has the task of ensuring the enemy does not follow and
4 Two practical notes recommend additionally discussion. Every member of the Gruppe should be trained to be aware, at all times, of the whereabouts of the assistant Grenadiers and, therefore, the Gruppe’s supply of grenades. Should one of these stalwarts fall to enemy fi re, particularly during the advance across No-Man’s Land, his precious cargo of bombs must be recovered and brought forward lest the Gruppe’s potential for success be proportionately reduced. Additionally, in deciding secondary task assignments, practical expe-rience indicates that a potential replacement for the Grenadier should not be an assistant Grenadier, nor should the Grenadier nor assistants be designated replacements for the Gruppenführer or other Gruppe members. This is so because of the effort necessitated in changing the tasks of two rather than only one person. It is instead recommended as more expedient that a casualty be replaced by another trailing member of the Gruppe without the necessity of two persons undertaking to change tasks in the heat of battle.
Great War Association CP Handbuch v. 0.9528—Methods
destroy the attacking force.5 Organization of the Gruppe must take place without the necessity of orders being given. Each soldier must know his place and be aware of losses which might have occurred; substitutes must move smartly and without direction to take the place of fallen Kameraden. It cannot be overstressed that this must occur as rapidly as humanly possible, for the enemy’s attention will surely be unnaturally drawn to this section of trench now no longer his own. Strong enemy use of grenades directed toward the point of ingress should be reckoned with; the only effective prevention against this is to drive the enemy back from this location as rapidly as possible.
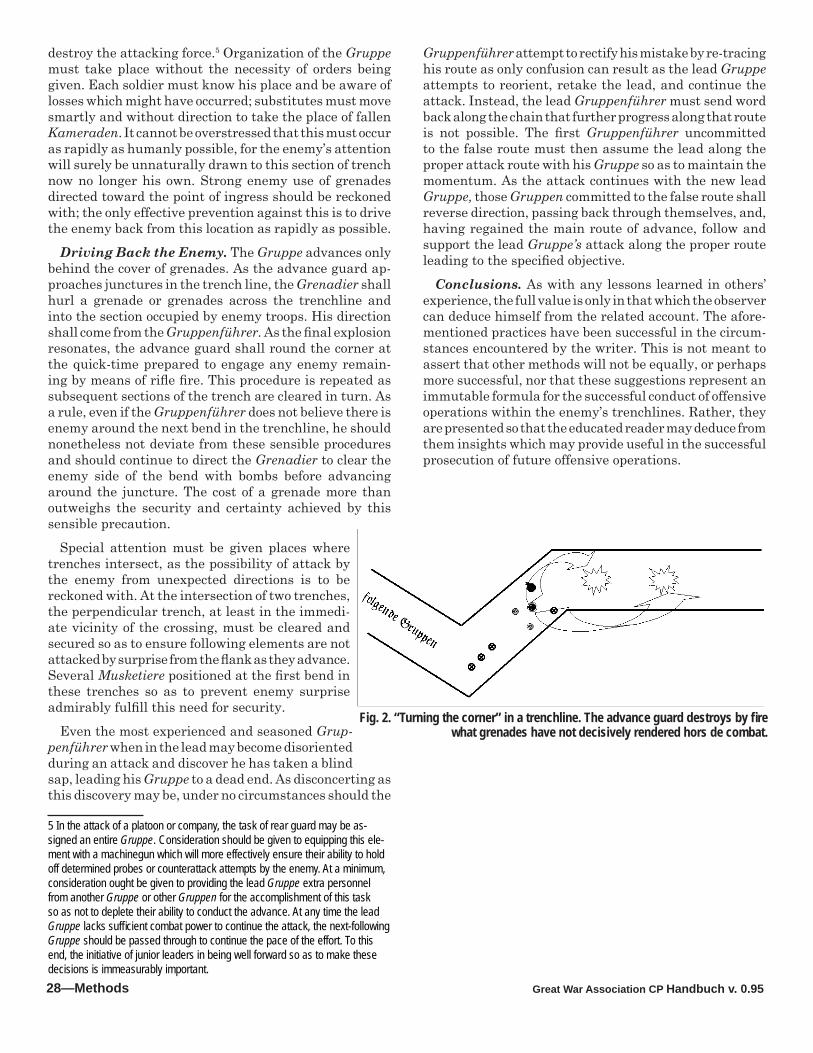
Driving Back the Enemy. The Gruppe advances only behind the cover of grenades. As the advance guard ap-proaches junctures in the trench line, the Grenadier shall hurl a grenade or grenades across the trenchline and into the section occupied by enemy troops. His direction shall come from the Gruppenführer. As the fi nal explosion resonates, the advance guard shall round the corner at the quick-time prepared to engage any enemy remain-ing by means of rifl e fi re. This procedure is repeated as subsequent sections of the trench are cleared in turn. As a rule, even if the Gruppenführer does not believe there is enemy around the next bend in the trenchline, he should nonetheless not deviate from these sensible procedures and should continue to direct the Grenadier to clear the enemy side of the bend with bombs before advancing around the juncture. The cost of a grenade more than outweighs the security and certainty achieved by this sensible precaution.
Special attention must be given places where trenches intersect, as the possibility of attack by the enemy from unexpected directions is to be reckoned with. At the intersection of two trenches, the perpendicular trench, at least in the immedi-ate vicinity of the crossing, must be cleared and secured so as to ensure following elements are not attacked by surprise from the fl ank as they advance. Several Musketiere positioned at the fi rst bend in these trenches so as to prevent enemy surprise admirably fulfi ll this need for security.
Even the most experienced and seasoned Grup-penführer when in the lead may become disoriented during an attack and discover he has taken a blind sap, leading his Gruppe to a dead end. As disconcerting as this discovery may be, under no circumstances should the
5 In the attack of a platoon or company, the task of rear guard may be as-signed an entire Gruppe. Consideration should be given to equipping this ele-ment with a machinegun which will more effectively ensure their ability to hold off determined probes or counterattack attempts by the enemy. At a minimum, consideration ought be given to providing the lead Gruppe extra personnel from another Gruppe or other Gruppen for the accomplishment of this task so as not to deplete their ability to conduct the advance. At any time the lead Gruppe lacks suffi cient combat power to continue the attack, the next-following Gruppe should be passed through to continue the pace of the effort. To this end, the initiative of junior leaders in being well forward so as to make these decisions is immeasurably important.
Gruppenführer attempt to rectify his mistake by re-tracing his route as only confusion can result as the lead Gruppe attempts to reorient, retake the lead, and continue the attack. Instead, the lead Gruppenführer must send word back along the chain that further progress along that route is not possible. The fi rst Gruppenführer uncommitted to the false route must then assume the lead along the proper attack route with his Gruppe so as to maintain the momentum. As the attack continues with the new lead Gruppe, those Gruppen committed to the false route shall reverse direction, passing back through themselves, and, having regained the main route of advance, follow and support the lead Gruppe’s attack along the proper route leading to the specifi ed objective.
Conclusions. As with any lessons learned in others’ experience, the full value is only in that which the observer can deduce himself from the related account. The afore-mentioned practices have been successful in the circum-stances encountered by the writer. This is not meant to assert that other methods will not be equally, or perhaps more successful, nor that these suggestions represent an immutable formula for the successful conduct of offensive operations within the enemy’s trenchlines. Rather, they are presented so that the educated reader may deduce from them insights which may provide useful in the successful prosecution of future offensive operations.
Fig. 2. “Turning the corner” in a trenchline. The advance guard destroys by fi re what grenades have not decisively rendered hors de combat.
Great War Association CP Handbuch v. 0.95 Methods—29
Gasmaske Stowageby Rudolf Weiß, 1./Inf.Rgt. 23
This article was taken from an original German (probably Reichswehr??) article that Herrn Kasimir Heska had put in the old Frontsoldat! The text was translated using
Alta-Vista’s Internet translation website and then corrected by Dr. Donald Crosby and his Kamerad, Wally Derickson. I’ve also included the German text instructions for your information.
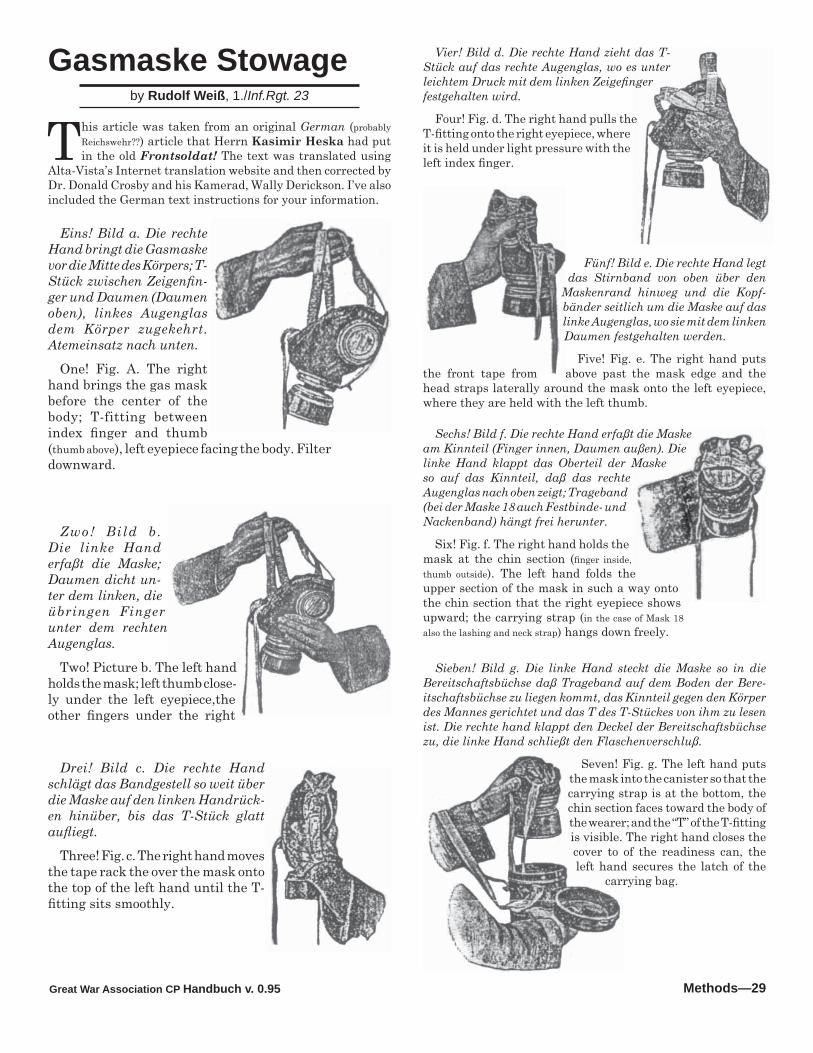
Eins! Bild a. Die rechte Hand bringt die Gasmaske vor die Mitte des Körpers; T-Stück zwischen Zeigenfi n-ger und Daumen (Daumen oben), linkes Augenglas dem Körper zugekehrt. Atemeinsatz nach unten.
One! Fig. A. The right hand brings the gas mask before the center of the body; T-fitting between index fi nger and thumb (thumb above), left eyepiece facing the body. Filter downward.
Zwo! Bild b. Die linke Hand erfaßt die Maske; Daumen dicht un-ter dem linken, die übringen Finger unter dem rechten Augenglas.
Two! Picture b. The left hand holds the mask; left thumb close-ly under the left eyepiece,the other fi ngers under the right
Drei! Bild c. Die rechte Hand schlägt das Bandgestell so weit über die Maske auf den linken Handrück-en hinüber, bis das T-Stück glatt aufl iegt.
Three! Fig. c. The right hand moves the tape rack the over the mask onto the top of the left hand until the T-fi tting sits smoothly.
Vier! Bild d. Die rechte Hand zieht das T-Stück auf das rechte Augenglas, wo es unter leichtem Druck mit dem linken Zeigefi nger festgehalten wird.
Four! Fig. d. The right hand pulls the T-fi tting onto the right eyepiece, where it is held under light pressure with the left index fi nger.
Fünf! Bild e. Die rechte Hand legt das Stirnband von oben über den
Maskenrand hinweg und die Kopf-bänder seitlich um die Maske auf das linke Augenglas, wo sie mit dem linken Daumen festgehalten werden.
Five! Fig. e. The right hand puts the front tape from above past the mask edge and the head straps laterally around the mask onto the left eyepiece, where they are held with the left thumb.
Sechs! Bild f. Die rechte Hand erfaßt die Maske am Kinnteil (Finger innen, Daumen außen). Die linke Hand klappt das Oberteil der Maske so auf das Kinnteil, daß das rechte Augenglas nach oben zeigt; Trageband (bei der Maske 18 auch Festbinde- und Nackenband) hängt frei herunter.
Six! Fig. f. The right hand holds the mask at the chin section (fi nger inside, thumb outside). The left hand folds the upper section of the mask in such a way onto the chin section that the right eyepiece shows upward; the carrying strap (in the case of Mask 18 also the lashing and neck strap) hangs down freely.
Sieben! Bild g. Die linke Hand steckt die Maske so in die Bereitschaftsbüchse daß Trageband auf dem Boden der Bere-itschaftsbüchse zu liegen kommt, das Kinnteil gegen den Körper des Mannes gerichtet und das T des T-Stückes von ihm zu lesen ist. Die rechte hand klappt den Deckel der Bereitschaftsbüchse zu, die linke Hand schließt den Flaschenverschluß.
Seven! Fig. g. The left hand puts the mask into the canister so that the carrying strap is at the bottom, the chin section faces toward the body of the wearer; and the “T” of the T-fi tting is visible. The right hand closes the cover to of the readiness can, the left hand secures the latch of the
carrying bag.
Great War Association CP Handbuch v. 0.9530—Methods
Fußlappen sindwärmer als Socken(Footwraps are warmer than socks)
by Johannes Steiner3./J.R. 124
The German Soldat in both World Wars was fre-quently issued a pair of Fußlappen or footwraps, in addition to a pair of socks. Many of you have
heard of Fußlappen but don’t know exactly what they are or how they are worn, or even what they can do for you. I hope to impart some information on Fußlappen to you in this article.
Footwraps are simple square or rectangular pieces of soft, fl annel-like wool or wool-blend cloth that are wrapped around the feet. They may be worn over socks, or less often, by themselves.
Now I know it sounds absurd to suggest that you wrap a scrap of cloth over your socks, but not only are they easy to make, they’re easy to wear, are quite comfortable, and are also quite warm. At my last WWI event, under my boots, I wore only a pair of thick Fußlappen and my feet felt wonderful! Another advantage of Fußlappen is that you can arrange folds of cloth to protect a sore spot on your ankle or heel.
A U.S. Army Quartermaster report form WWII states that among German prisoners, men who wore Fußlappen in leather boots seldom had trench foot, and that men who wore only shoes and Fußlappen seemed to be able to keep their feet warm and dry in any weather.
You can make your Fußlappen out of any sort of fi ne fl annel material; just cut out two squares about 16-18” square. You need not hem the edges, just let them fray out a little.
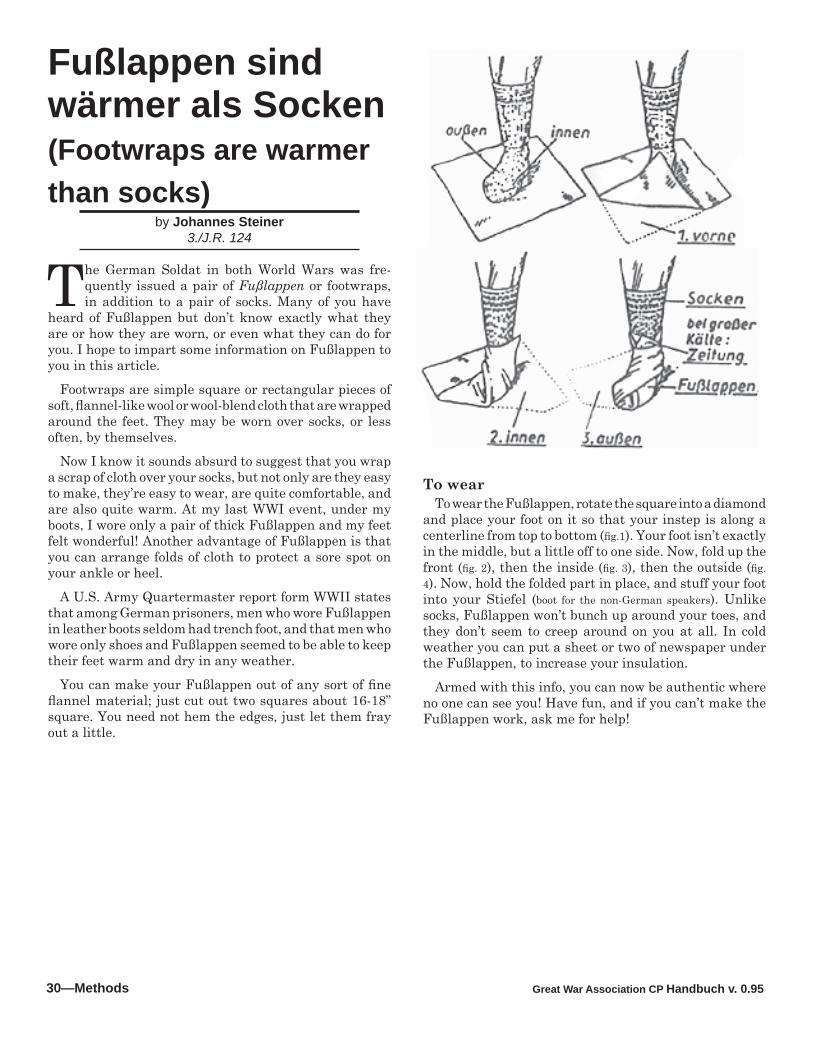
To wearTo wear the Fußlappen, rotate the square into a diamond
and place your foot on it so that your instep is along a centerline from top to bottom (fi g.1). Your foot isn’t exactly in the middle, but a little off to one side. Now, fold up the front (fi g. 2), then the inside (fi g. 3), then the outside (fi g. 4). Now, hold the folded part in place, and stuff your foot into your Stiefel (boot for the non-German speakers). Unlike socks, Fußlappen won’t bunch up around your toes, and they don’t seem to creep around on you at all. In cold weather you can put a sheet or two of newspaper under the Fußlappen, to increase your insulation.
Armed with this info, you can now be authentic where no one can see you! Have fun, and if you can’t make the Fußlappen work, ask me for help!
Great War Association CP Handbuch v. 0.95 Methods—31
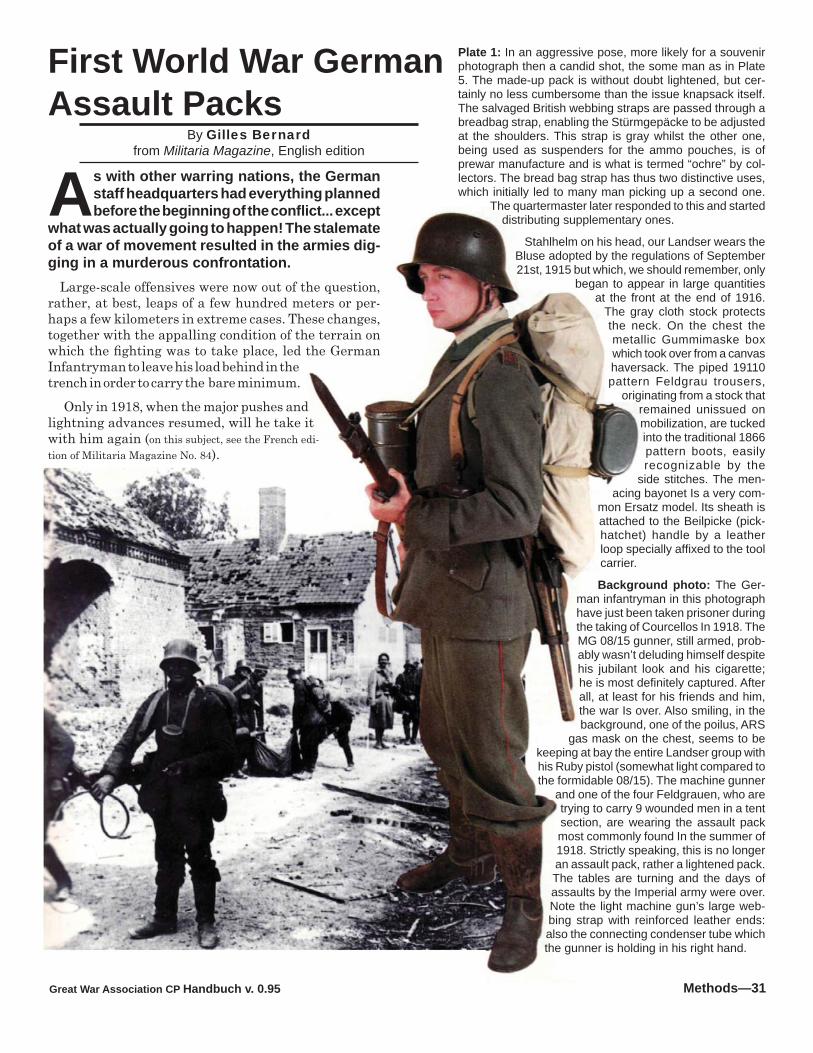
First World War German Assault Packs
By Gilles Bernardfrom Militaria Magazine, English edition
As with other warring nations, the German staff headquarters had everything planned before the beginning of the confl ict... except
what was actually going to happen! The stalemate of a war of movement resulted in the armies dig-ging in a murderous confrontation.
Large-scale offensives were now out of the question, rather, at best, leaps of a few hundred meters or per-haps a few kilometers in extreme cases. These changes, together with the appalling condition of the terrain on which the fi ghting was to take place, led the German Infantryman to leave his load behind in the trench in order to carry the bare minimum.
Only in 1918, when the major pushes and lightning advances resumed, will he take it with him again (on this subject, see the French edi-tion of Militaria Magazine No. 84).
Plate 1: In an aggressive pose, more likely for a souvenir photograph then a candid shot, the some man as in Plate 5. The made-up pack is without doubt lightened, but cer-tainly no less cumbersome than the issue knapsack itself. The salvaged British webbing straps are passed through a breadbag strap, enabling the Stürmgepäcke to be adjusted at the shoulders. This strap is gray whilst the other one, being used as suspenders for the ammo pouches, is of prewar manufacture and is what is termed “ochre” by col-lectors. The bread bag strap has thus two distinctive uses, which initially led to many man picking up a second one.
The quartermaster later responded to this and started distributing supplementary ones.
Stahlhelm on his head, our Landser wears the Bluse adopted by the regulations of September 21st, 1915 but which, we should remember, only
began to appear in large quantities at the front at the end of 1916.
The gray cloth stock protects the neck. On the chest the metallic Gummimaske box which took over from a canvas haversack. The piped 19110 pattern Feldgrau trousers,
originating from a stock that remained unissued on mobilization, are tucked into the traditional 1866 pattern boots, easily recognizable by the
side stitches. The men-acing bayonet Is a very com-
mon Ersatz model. Its sheath is attached to the Beilpicke (pick-hatchet) handle by a leather loop specially affi xed to the tool carrier.
Background photo: The Ger-man infantryman in this photograph have just been taken prisoner during the taking of Courcellos In 1918. The MG 08/15 gunner, still armed, prob-ably wasn’t deluding himself despite his jubilant look and his cigarette; he is most defi nitely captured. After all, at least for his friends and him, the war Is over. Also smiling, in the background, one of the poilus, ARS
gas mask on the chest, seems to be keeping at bay the entire Landser group with his Ruby pistol (somewhat light compared to the formidable 08/15). The machine gunner
and one of the four Feldgrauen, who are trying to carry 9 wounded men in a tent section, are wearing the assault pack most commonly found In the summer of 1918. Strictly speaking, this is no longer an assault pack, rather a lightened pack. The tables are turning and the days of assaults by the Imperial army were over. Note the light machine gun’s large web-bing strap with reinforced leather ends: also the connecting condenser tube which the gunner is holding in his right hand.
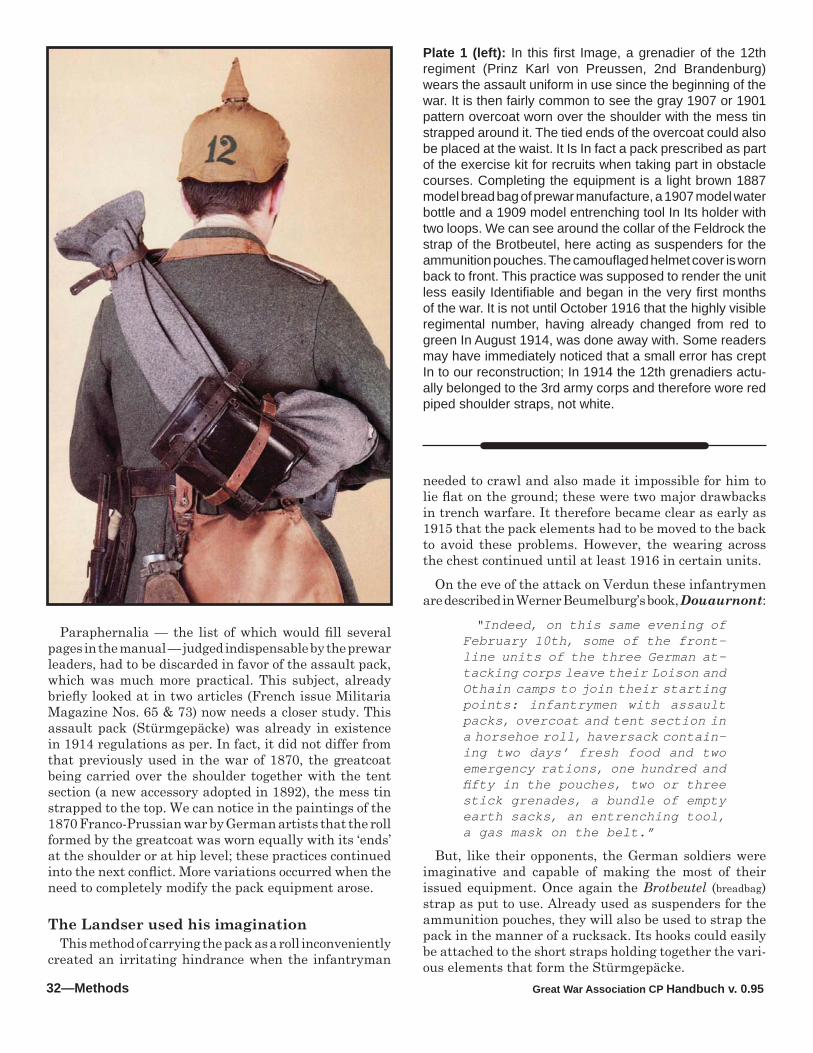
Great War Association CP Handbuch v. 0.9532—Methods
Paraphernalia — the list of which would fi ll several pages in the manual — judged indispensable by the prewar leaders, had to be discarded in favor of the assault pack, which was much more practical. This subject, already briefl y looked at in two articles (French issue Militaria Magazine Nos. 65 & 73) now needs a closer study. This assault pack (Stürmgepäcke) was already in existence in 1914 regulations as per. In fact, it did not differ from that previously used in the war of 1870, the greatcoat being carried over the shoulder together with the tent section (a new accessory adopted in 1892), the mess tin strapped to the top. We can notice in the paintings of the 1870 Franco-Prussian war by German artists that the roll formed by the greatcoat was worn equally with its ‘ends’ at the shoulder or at hip level; these practices continued into the next confl ict. More variations occurred when the need to completely modify the pack equipment arose.
The Landser used his imagination This method of carrying the pack as a roll inconveniently
created an irritating hindrance when the infantryman
Plate 1 (left): In this fi rst Image, a grenadier of the 12th regiment (Prinz Karl von Preussen, 2nd Brandenburg) wears the assault uniform in use since the beginning of the war. It is then fairly common to see the gray 1907 or 1901 pattern overcoat worn over the shoulder with the mess tin strapped around it. The tied ends of the overcoat could also be placed at the waist. It Is In fact a pack prescribed as part of the exercise kit for recruits when taking part in obstacle courses. Completing the equipment is a light brown 1887 model bread bag of prewar manufacture, a 1907 model water bottle and a 1909 model entrenching tool In Its holder with two loops. We can see around the collar of the Feldrock the strap of the Brotbeutel, here acting as suspenders for the ammunition pouches. The camoufl aged helmet cover is worn back to front. This practice was supposed to render the unit less easily Identifi able and began in the very fi rst months of the war. It is not until October 1916 that the highly visible regimental number, having already changed from red to green In August 1914, was done away with. Some readers may have immediately noticed that a small error has crept In to our reconstruction; In 1914 the 12th grenadiers actu-ally belonged to the 3rd army corps and therefore wore red piped shoulder straps, not white.
needed to crawl and also made it impossible for him to lie fl at on the ground; these were two major drawbacks in trench warfare. It therefore became clear as early as 1915 that the pack elements had to be moved to the back to avoid these problems. However, the wearing across the chest continued until at least 1916 in certain units.
On the eve of the attack on Verdun these infantrymen are described in Werner Beumelburg’s book, Douaurnont:
“Indeed, on this same evening of February 10th, some of the front-line units of the three German at-tacking corps leave their Loison and Othain camps to join their starting points: infantrymen with assault packs, overcoat and tent section in a horsehoe roll, haversack contain-ing two days’ fresh food and two emergency rations, one hundred and fi fty in the pouches, two or three stick grenades, a bundle of empty earth sacks, an entrenching tool, a gas mask on the belt.”
But, like their opponents, the German soldiers were imaginative and capable of making the most of their issued equipment. Once again the Brotbeutel (breadbag) strap as put to use. Already used as suspenders for the ammunition pouches, they will also be used to strap the pack in the manner of a rucksack. Its hooks could easily be attached to the short straps holding together the vari-ous elements that form the Stürmgepäcke.
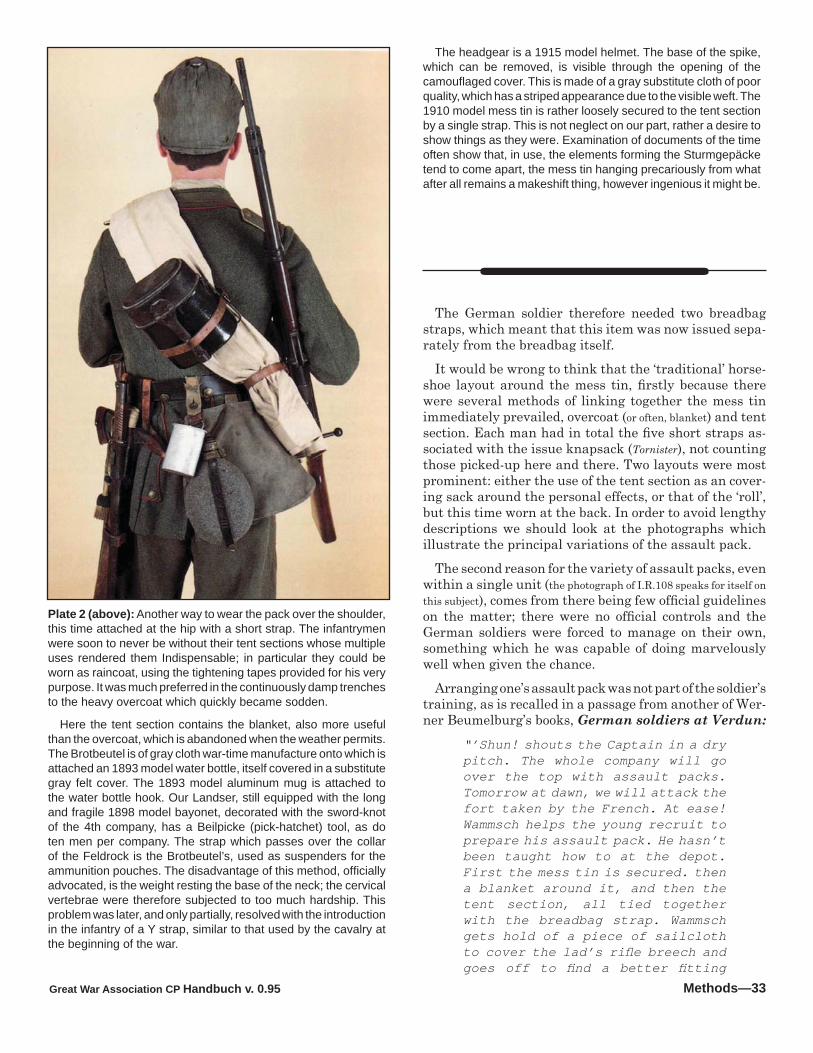
Great War Association CP Handbuch v. 0.95 Methods—33
The German soldier therefore needed two breadbag straps, which meant that this item was now issued sepa-rately from the breadbag itself.
It would be wrong to think that the ‘traditional’ horse-shoe layout around the mess tin, fi rstly because there were several methods of linking together the mess tin immediately prevailed, overcoat (or often, blanket) and tent section. Each man had in total the fi ve short straps as-sociated with the issue knapsack (Tornister), not counting those picked-up here and there. Two layouts were most prominent: either the use of the tent section as an cover-ing sack around the personal effects, or that of the ‘roll’, but this time worn at the back. In order to avoid lengthy descriptions we should look at the photographs which illustrate the principal variations of the assault pack.
The second reason for the variety of assault packs, even within a single unit (the photograph of I.R.108 speaks for itself on this subject), comes from there being few offi cial guidelines on the matter; there were no offi cial controls and the German soldiers were forced to manage on their own, something which he was capable of doing marvelously well when given the chance.
Arranging one’s assault pack was not part of the soldier’s training, as is recalled in a passage from another of Wer-ner Beumelburg’s books, German soldiers at Verdun:
“’Shun! shouts the Captain in a dry pitch. The whole company will go over the top with assault packs. Tomorrow at dawn, we will attack the fort taken by the French. At ease! Wammsch helps the young recruit to prepare his assault pack. He hasn’t been taught how to at the depot. First the mess tin is secured. then a blanket around it, and then the tent section, all tied together with the breadbag strap. Wammsch gets hold of a piece of sailcloth to cover the lad’s rifl e breech and goes off to fi nd a better fi tting
Plate 2 (above): Another way to wear the pack over the shoulder, this time attached at the hip with a short strap. The infantrymen were soon to never be without their tent sections whose multiple uses rendered them Indispensable; in particular they could be worn as raincoat, using the tightening tapes provided for his very purpose. It was much preferred in the continuously damp trenches to the heavy overcoat which quickly became sodden.
Here the tent section contains the blanket, also more useful than the overcoat, which is abandoned when the weather permits. The Brotbeutel is of gray cloth war-time manufacture onto which is attached an 1893 model water bottle, itself covered in a substitute gray felt cover. The 1893 model aluminum mug is attached to the water bottle hook. Our Landser, still equipped with the long and fragile 1898 model bayonet, decorated with the sword-knot of the 4th company, has a Beilpicke (pick-hatchet) tool, as do ten men per company. The strap which passes over the collar of the Feldrock is the Brotbeutel’s, used as suspenders for the ammunition pouches. The disadvantage of this method, offi cially advocated, is the weight resting the base of the neck; the cervical vertebrae were therefore subjected to too much hardship. This problem was later, and only partially, resolved with the introduction in the infantry of a Y strap, similar to that used by the cavalry at the beginning of the war.
The headgear is a 1915 model helmet. The base of the spike, which can be removed, is visible through the opening of the camoufl aged cover. This is made of a gray substitute cloth of poor quality, which has a striped appearance due to the visible weft. The 1910 model mess tin is rather loosely secured to the tent section by a single strap. This is not neglect on our part, rather a desire to show things as they were. Examination of documents of the time often show that, in use, the elements forming the Sturmgepäcke tend to come apart, the mess tin hanging precariously from what after all remains a makeshift thing, however ingenious it might be.
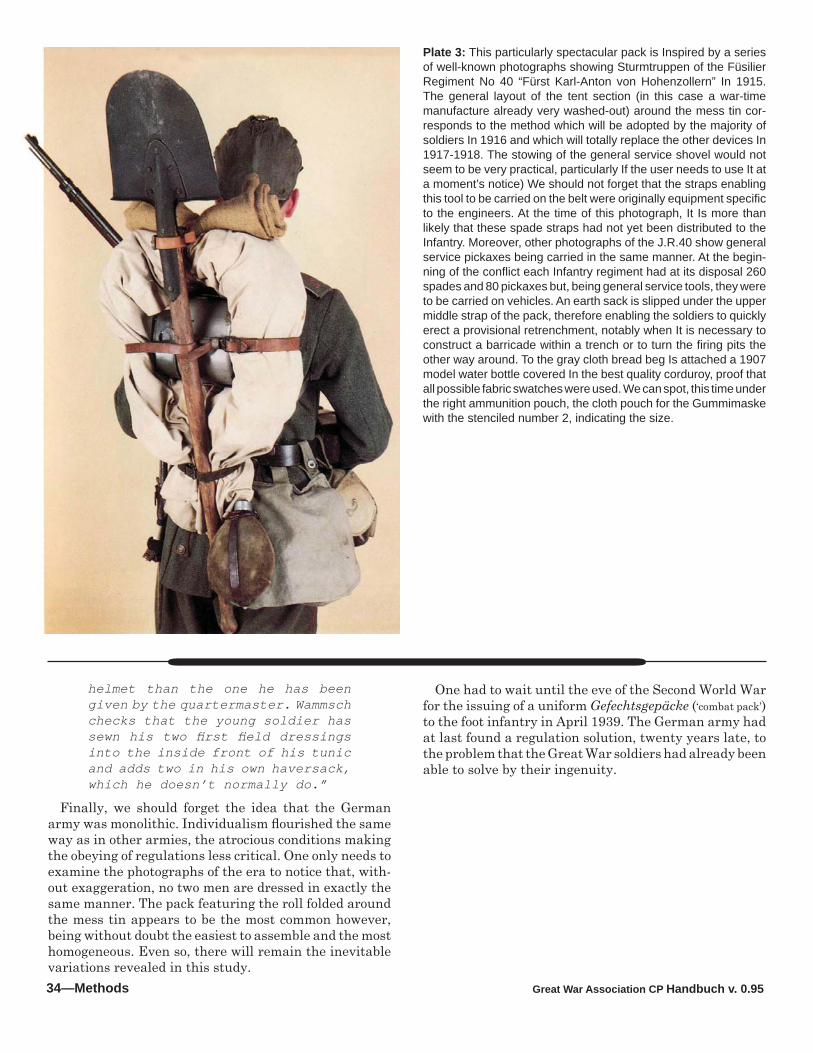
Great War Association CP Handbuch v. 0.9534—Methods
Plate 3: This particularly spectacular pack is Inspired by a series of well-known photographs showing Sturmtruppen of the Füsilier Regiment No 40 “Fürst Karl-Anton von Hohenzollern” In 1915. The general layout of the tent section (in this case a war-time manufacture already very washed-out) around the mess tin cor-responds to the method which will be adopted by the majority of soldiers In 1916 and which will totally replace the other devices In 1917-1918. The stowing of the general service shovel would not seem to be very practical, particularly If the user needs to use It at a moment’s notice) We should not forget that the straps enabling this tool to be carried on the belt were originally equipment specifi c to the engineers. At the time of this photograph, It Is more than likely that these spade straps had not yet been distributed to the Infantry. Moreover, other photographs of the J.R.40 show general service pickaxes being carried in the same manner. At the begin-ning of the confl ict each Infantry regiment had at its disposal 260 spades and 80 pickaxes but, being general service tools, they were to be carried on vehicles. An earth sack is slipped under the upper middle strap of the pack, therefore enabling the soldiers to quickly erect a provisional retrenchment, notably when It is necessary to construct a barricade within a trench or to turn the fi ring pits the other way around. To the gray cloth bread beg Is attached a 1907 model water bottle covered In the best quality corduroy, proof that all possible fabric swatches were used. We can spot, this time under the right ammunition pouch, the cloth pouch for the Gummimaske with the stenciled number 2, indicating the size.
helmet than the one he has been given by the quartermaster. Wammsch checks that the young soldier has sewn his two fi rst fi eld dressings into the inside front of his tunic and adds two in his own haversack, which he doesn’t normally do.”
Finally, we should forget the idea that the German army was monolithic. Individualism fl ourished the same way as in other armies, the atrocious conditions making the obeying of regulations less critical. One only needs to examine the photographs of the era to notice that, with-out exaggeration, no two men are dressed in exactly the same manner. The pack featuring the roll folded around the mess tin appears to be the most common however, being without doubt the easiest to assemble and the most homogeneous. Even so, there will remain the inevitable variations revealed in this study.
One had to wait until the eve of the Second World War for the issuing of a uniform Gefechtsgepäcke (‘combat pack’) to the foot infantry in April 1939. The German army had at last found a regulation solution, twenty years late, to the problem that the Great War soldiers had already been able to solve by their ingenuity.
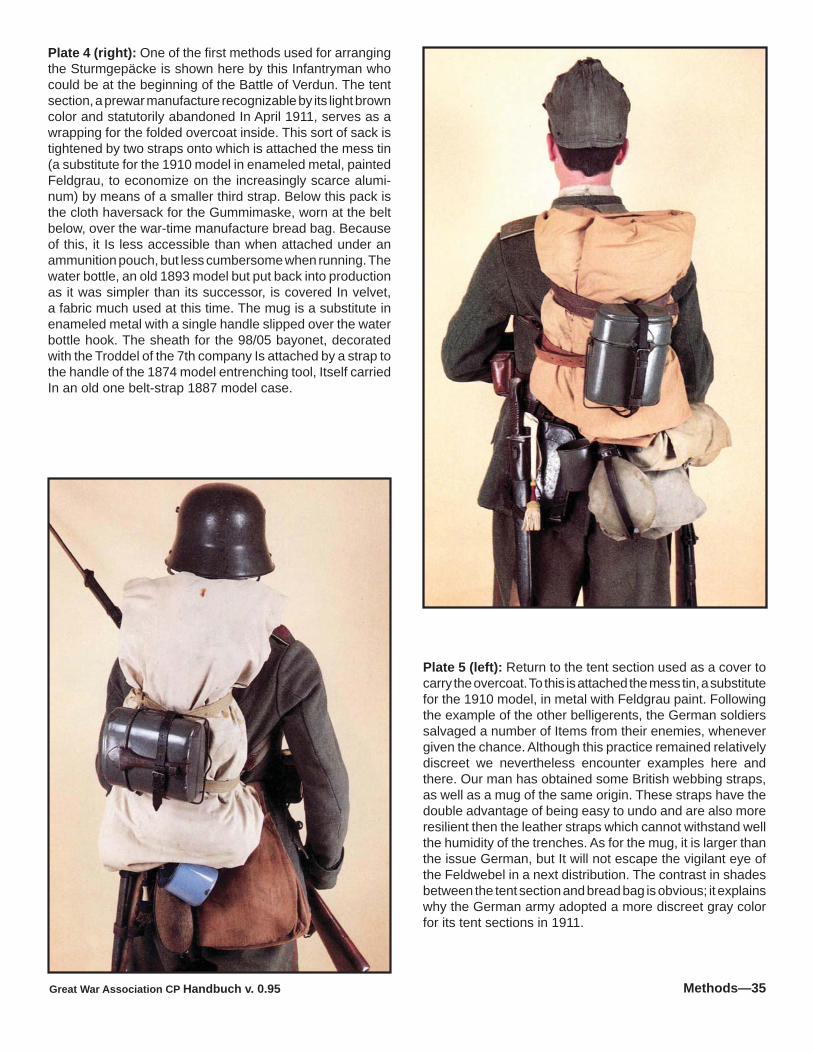
Great War Association CP Handbuch v. 0.95 Methods—35
Plate 4 (right): One of the fi rst methods used for arranging the Sturmgepäcke is shown here by this Infantryman who could be at the beginning of the Battle of Verdun. The tent section, a prewar manufacture recognizable by its light brown color and statutorily abandoned In April 1911, serves as a wrapping for the folded overcoat inside. This sort of sack is tightened by two straps onto which is attached the mess tin (a substitute for the 1910 model in enameled metal, painted Feldgrau, to economize on the increasingly scarce alumi-num) by means of a smaller third strap. Below this pack is the cloth haversack for the Gummimaske, worn at the belt below, over the war-time manufacture bread bag. Because of this, it Is less accessible than when attached under an ammunition pouch, but less cumbersome when running. The water bottle, an old 1893 model but put back into production as it was simpler than its successor, is covered In velvet, a fabric much used at this time. The mug is a substitute in enameled metal with a single handle slipped over the water bottle hook. The sheath for the 98/05 bayonet, decorated with the Troddel of the 7th company Is attached by a strap to the handle of the 1874 model entrenching tool, Itself carried In an old one belt-strap 1887 model case.
Plate 5 (left): Return to the tent section used as a cover to carry the overcoat. To this is attached the mess tin, a substitute for the 1910 model, in metal with Feldgrau paint. Following the example of the other belligerents, the German soldiers salvaged a number of Items from their enemies, whenever given the chance. Although this practice remained relatively discreet we nevertheless encounter examples here and there. Our man has obtained some British webbing straps, as well as a mug of the same origin. These straps have the double advantage of being easy to undo and are also more resilient then the leather straps which cannot withstand well the humidity of the trenches. As for the mug, it is larger than the issue German, but It will not escape the vigilant eye of the Feldwebel in a next distribution. The contrast in shades between the tent section and bread bag is obvious; it explains why the German army adopted a more discreet gray color for its tent sections in 1911.
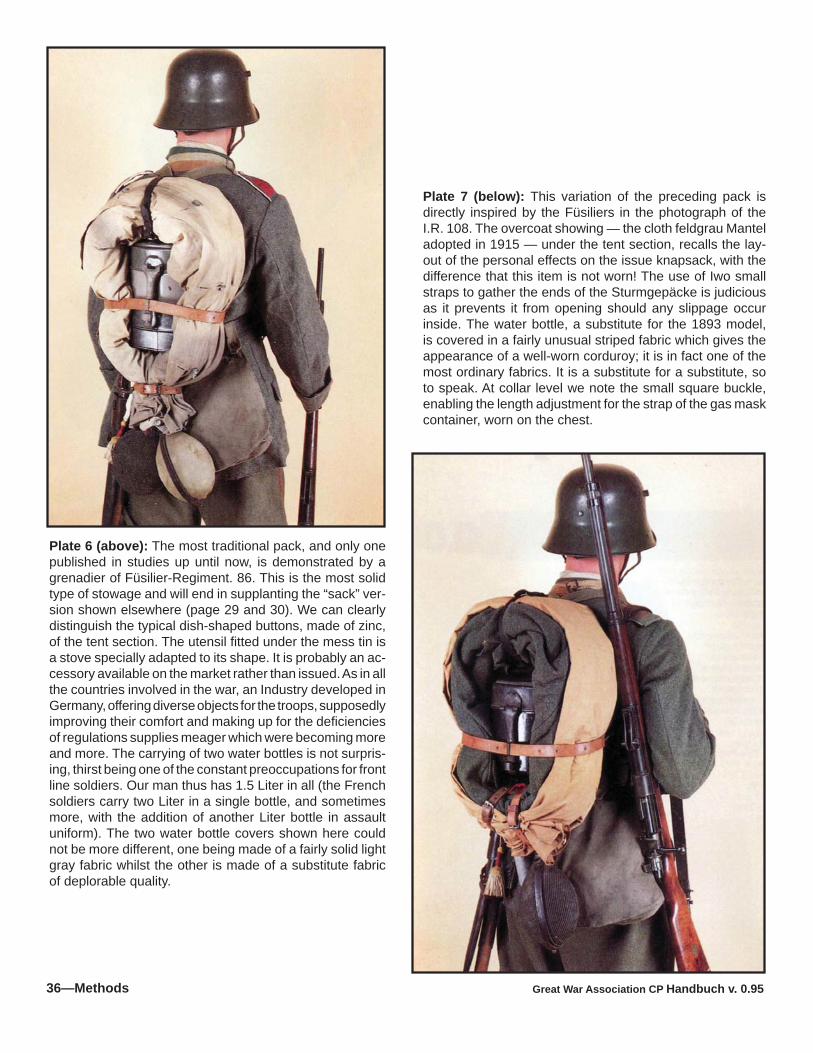
Great War Association CP Handbuch v. 0.9536—Methods
Plate 6 (above): The most traditional pack, and only one published in studies up until now, is demonstrated by a grenadier of Füsilier-Regiment. 86. This is the most solid type of stowage and will end in supplanting the “sack” ver-sion shown elsewhere (page 29 and 30). We can clearly distinguish the typical dish-shaped buttons, made of zinc, of the tent section. The utensil fi tted under the mess tin is a stove specially adapted to its shape. It is probably an ac-cessory available on the market rather than issued. As in all the countries involved in the war, an Industry developed in Germany, offering diverse objects for the troops, supposedly improving their comfort and making up for the defi ciencies of regulations supplies meager which were becoming more and more. The carrying of two water bottles is not surpris-ing, thirst being one of the constant preoccupations for front line soldiers. Our man thus has 1.5 Liter in all (the French soldiers carry two Liter in a single bottle, and sometimes more, with the addition of another Liter bottle in assault uniform). The two water bottle covers shown here could not be more different, one being made of a fairly solid light gray fabric whilst the other is made of a substitute fabric of deplorable quality.
Plate 7 (below): This variation of the preceding pack is directly inspired by the Füsiliers in the photograph of the I.R. 108. The overcoat showing — the cloth feldgrau Mantel adopted in 1915 — under the tent section, recalls the lay-out of the personal effects on the issue knapsack, with the difference that this item is not worn! The use of Iwo small straps to gather the ends of the Sturmgepäcke is judicious as it prevents it from opening should any slippage occur inside. The water bottle, a substitute for the 1893 model, is covered in a fairly unusual striped fabric which gives the appearance of a well-worn corduroy; it is in fact one of the most ordinary fabrics. It is a substitute for a substitute, so to speak. At collar level we note the small square buckle, enabling the length adjustment for the strap of the gas mask container, worn on the chest.
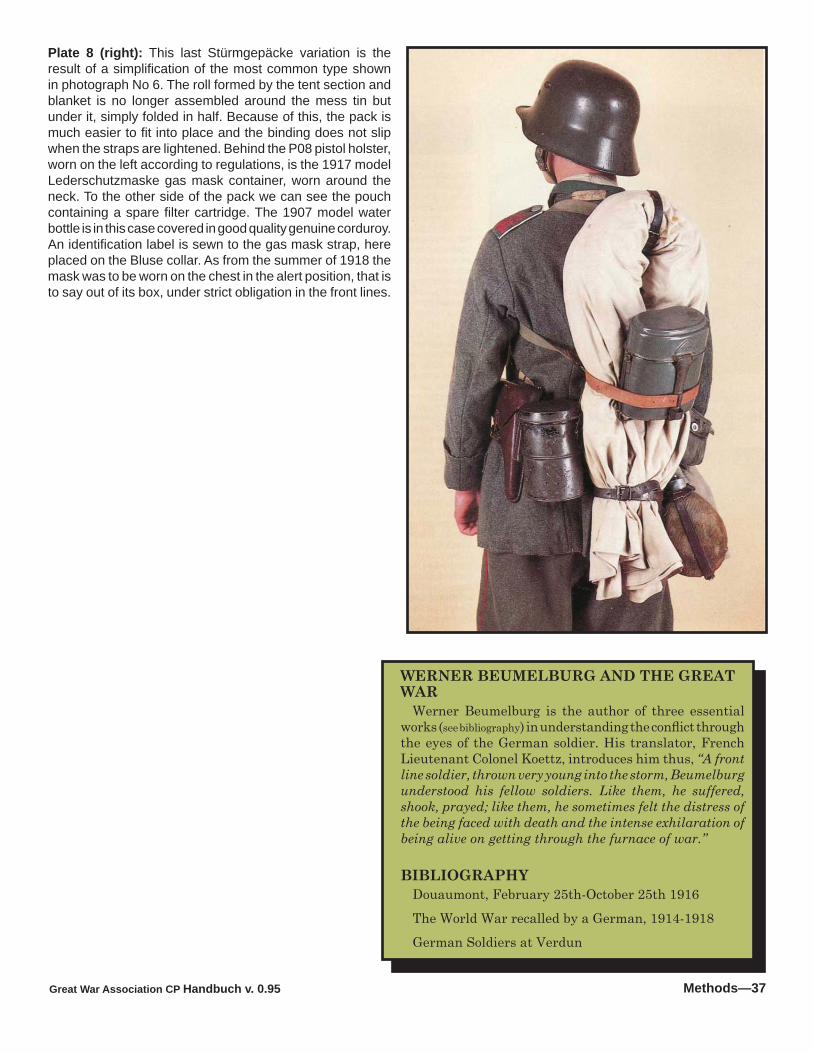
Great War Association CP Handbuch v. 0.95 Methods—37
WERNER BEUMELBURG AND THE GREAT WAR
Werner Beumelburg is the author of three essential works (see bibliography) in understanding the confl ict through the eyes of the German soldier. His translator, French Lieutenant Colonel Koettz, introduces him thus, “A front line soldier, thrown very young into the storm, Beumelburg understood his fellow soldiers. Like them, he suffered, shook, prayed; like them, he sometimes felt the distress of the being faced with death and the intense exhilaration of being alive on getting through the furnace of war.”
BIBLIOGRAPHYDouaumont, February 25th-October 25th 1916The World War recalled by a German, 1914-1918German Soldiers at Verdun
Plate 8 (right): This last Stürmgepäcke variation is the result of a simplifi cation of the most common type shown in photograph No 6. The roll formed by the tent section and blanket is no longer assembled around the mess tin but under it, simply folded in half. Because of this, the pack is much easier to fi t into place and the binding does not slip when the straps are lightened. Behind the P08 pistol holster, worn on the left according to regulations, is the 1917 model Lederschutzmaske gas mask container, worn around the neck. To the other side of the pack we can see the pouch containing a spare fi lter cartridge. The 1907 model water bottle is in this case covered in good quality genuine corduroy. An identifi cation label is sewn to the gas mask strap, here placed on the Bluse collar. As from the summer of 1918 the mask was to be worn on the chest in the alert position, that is to say out of its box, under strict obligation in the front lines.
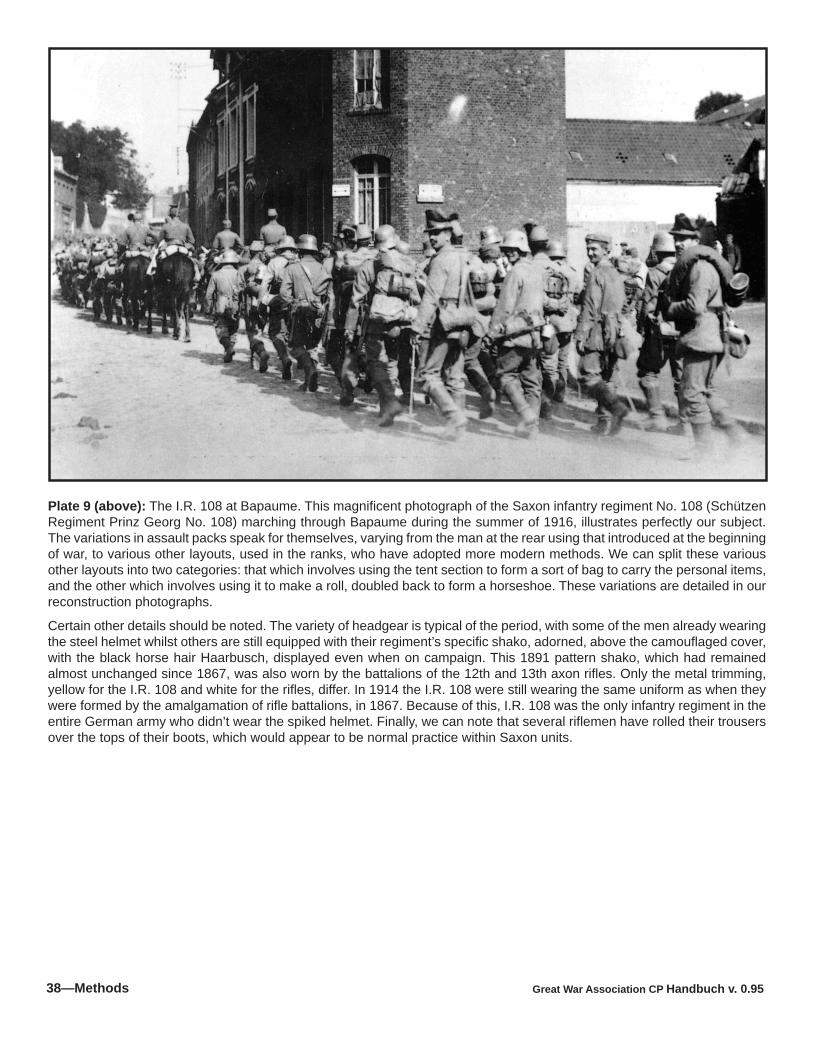
Great War Association CP Handbuch v. 0.9538—Methods
Plate 9 (above): The I.R. 108 at Bapaume. This magnifi cent photograph of the Saxon infantry regiment No. 108 (Schützen Regiment Prinz Georg No. 108) marching through Bapaume during the summer of 1916, illustrates perfectly our subject. The variations in assault packs speak for themselves, varying from the man at the rear using that introduced at the beginning of war, to various other layouts, used in the ranks, who have adopted more modern methods. We can split these various other layouts into two categories: that which involves using the tent section to form a sort of bag to carry the personal items, and the other which involves using it to make a roll, doubled back to form a horseshoe. These variations are detailed in our reconstruction photographs.
Certain other details should be noted. The variety of headgear is typical of the period, with some of the men already wearing the steel helmet whilst others are still equipped with their regiment’s specifi c shako, adorned, above the camoufl aged cover, with the black horse hair Haarbusch, displayed even when on campaign. This 1891 pattern shako, which had remained almost unchanged since 1867, was also worn by the battalions of the 12th and 13th axon rifl es. Only the metal trimming, yellow for the I.R. 108 and white for the rifl es, differ. In 1914 the I.R. 108 were still wearing the same uniform as when they were formed by the amalgamation of rifl e battalions, in 1867. Because of this, I.R. 108 was the only infantry regiment in the entire German army who didn’t wear the spiked helmet. Finally, we can note that several rifl emen have rolled their trousers over the tops of their boots, which would appear to be normal practice within Saxon units.
Great War Association CP Handbuch v. 0.95 Methods—39
©1997 by Steve Fisher, 2./J.R.111illustrations ©1997 by Bill Marsh, 2./J.R.111
Note: this article was discussed with Rick Keller of Great War Militaria and has his blessing. The uniform improvements detailed in this article (if GWM were to do the work) would add substantially to the cost of a basic uniform.
So, you’ve bought yourself a German WWI tunic, trou- sers, and overcoat from GWM. They are, in my opin ion, the best quality product of their kind available;
but… you can make them just a little better. If you are a perfectionist like me, you may want to make it a little closer to the real thing, and after all, that’s what this hobby is all about—doing it right, being just as authentic as possible, and (dare I say it?) having fun. Sometimes that last part gets forgotten. The steps described in this article are generally applicable to all German uniforms that have the particular features referred to. The fi rst two steps are required by J.R. 111 [and J.R. 23 too!] and the rest are highly recommended.
1. Brass buttons, side and rear hooksUnless these buttons have been painted as on the
m.1915 or some simplifi ed M.1910 tunics, you will need to do something about the bright yellow color. Option #1 is to replace them with original tombak buttons (highly expensive). Option #2 involves chemically subduing the color. Use Birchwood Casey’s “Super Blue” gun bluing solution on a cotton ball and wipe down all of the hooks and buttons until they turn black. Use a piece of cardboard with a “V” cut into it for a button board to avoid getting bluing on the cloth. Then rinse off the buttons and buff them with a dish-scrubbing pad or furniture re-
fi nishing pad (steel wool will work too, if you don’t rub too hard) to bring out the highlights. The effect is very close to that of original buttons. Last, the original buttons were issued with a goldish laquer and that works and the German regulations called for buttons not to be shined while in the fi eld—on the other hand, the buttons should not be black, crusty and look 80 years old.
2. Replace all of the plastic buttonsReplace all of the plastic cuff, collar tab, overcoat skirt,
and inside pocket buttons with either original horn, bakelite, celluloid, or hard rubber buttons in brown or black. Many antique shops have jars of antique but-tons for cheap or… you can use modern, period-looking buttons—I recommend “LaPetite” #325 in size 5/8” from your local fabric store. Sew them on using an “X” pat-tern stitch, not the modern machine “||” stitch. Trouser buttons, with the general exception of the suspender buttons, were often of horn.
3. Replace the collar hooks and overcoat front hooks
Replace the collar hooks and overcoat front hooks with larger and longer ones. These are hard to fi nd, but look more like the originals. The long ones won’t slip out of the loops like the short ones will. Amish dry-goods stores sometimes carry these. Be sure to sew them on using heavy hand-sewing thread in tan or grey.
4. The reinforcement barThe reinforcement bar was a very common feature on
all German uniforms and some fabric equipment. These were used anywhere the garment may be subjected to stress, such as the ends of the pocket slits or cuff slits. They were also used on overcoats to hook the large front fl ap closed. If you wear the Iron Cross First Class or oth-er awards, you can sew these bars on the uniform to hold the heavy pins so you don’t have to put them through the cloth itself. These bars are made by taking a piece of doubled thread and making three or four stitches over the spot to be reinforced. The length of these stitches will determine the length of the bar. The stitches should be just a little shorter than you want the bar to be, as they will stretch a bit. Then, without cutting the thread,
Fine-Tuning Your WWI German Uniform
Long collar hooks: Good!Short collar hooks: bad!
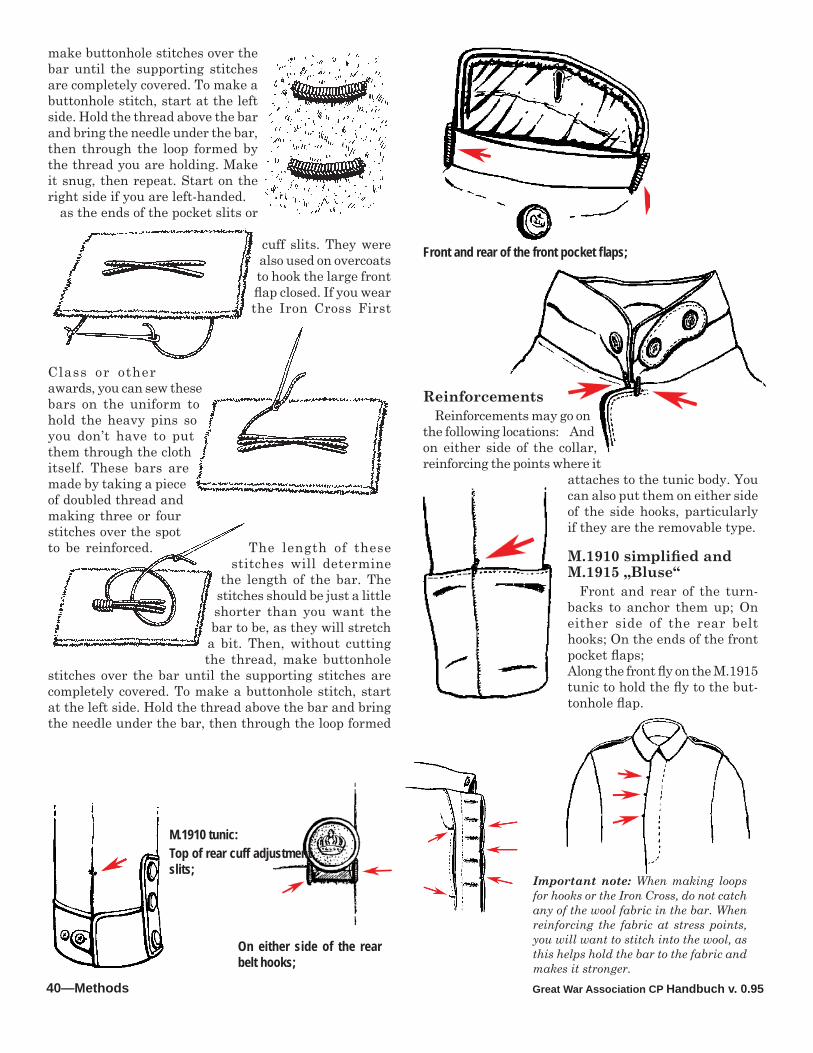
Great War Association CP Handbuch v. 0.9540—Methods
M.1910 tunic:Top of rear cuff adjustment slits;
On either side of the rear belt hooks;
ReinforcementsReinforcements may go on
the following locations: And on either side of the collar, reinforcing the points where it
attaches to the tunic body. You can also put them on either side of the side hooks, particularly if they are the removable type.
M.1910 simplifi ed and M.1915 „Bluse“
Front and rear of the turn-backs to anchor them up; On either side of the rear belt hooks; On the ends of the front pocket fl aps; Along the front fl y on the M.1915 tunic to hold the fl y to the but-tonhole fl ap.
Front and rear of the front pocket fl aps;
Important note: When making loops for hooks or the Iron Cross, do not catch any of the wool fabric in the bar. When reinforcing the fabric at stress points, you will want to stitch into the wool, as this helps hold the bar to the fabric and makes it stronger.
make buttonhole stitches over the bar until the supporting stitches are completely covered. To make a buttonhole stitch, start at the left side. Hold the thread above the bar and bring the needle under the bar, then through the loop formed by the thread you are holding. Make it snug, then repeat. Start on the right side if you are left-handed.
as the ends of the pocket slits or
cuff slits. They were also used on overcoats to hook the large front fl ap closed. If you wear the Iron Cross First
Class or other awards, you can sew these bars on the uniform to hold the heavy pins so you don’t have to put them through the cloth itself. These bars are made by taking a piece of doubled thread and making three or four stitches over the spot to be reinforced. The length of these
stitches will determine the length of the bar. The
stitches should be just a little shorter than you want the bar to be, as they will stretch
a bit. Then, without cutting the thread, make buttonhole
stitches over the bar until the supporting stitches are completely covered. To make a buttonhole stitch, start at the left side. Hold the thread above the bar and bring the needle under the bar, then through the loop formed
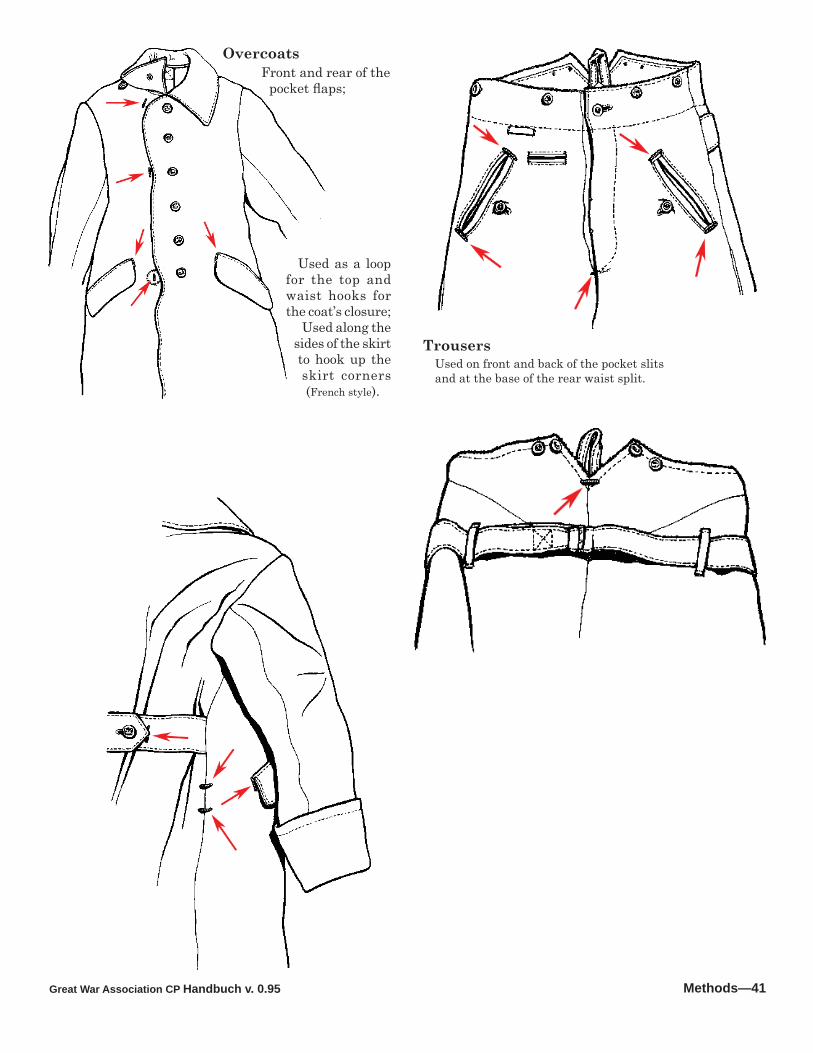
Great War Association CP Handbuch v. 0.95 Methods—41
Used as a loop for the top and waist hooks for the coat’s closure;
Used along the sides of the skirt to hook up the skirt corners (French style).
TrousersUsed on front and back of the pocket slitsand at the base of the rear waist split.
OvercoatsFront and rear of the
pocket fl aps;
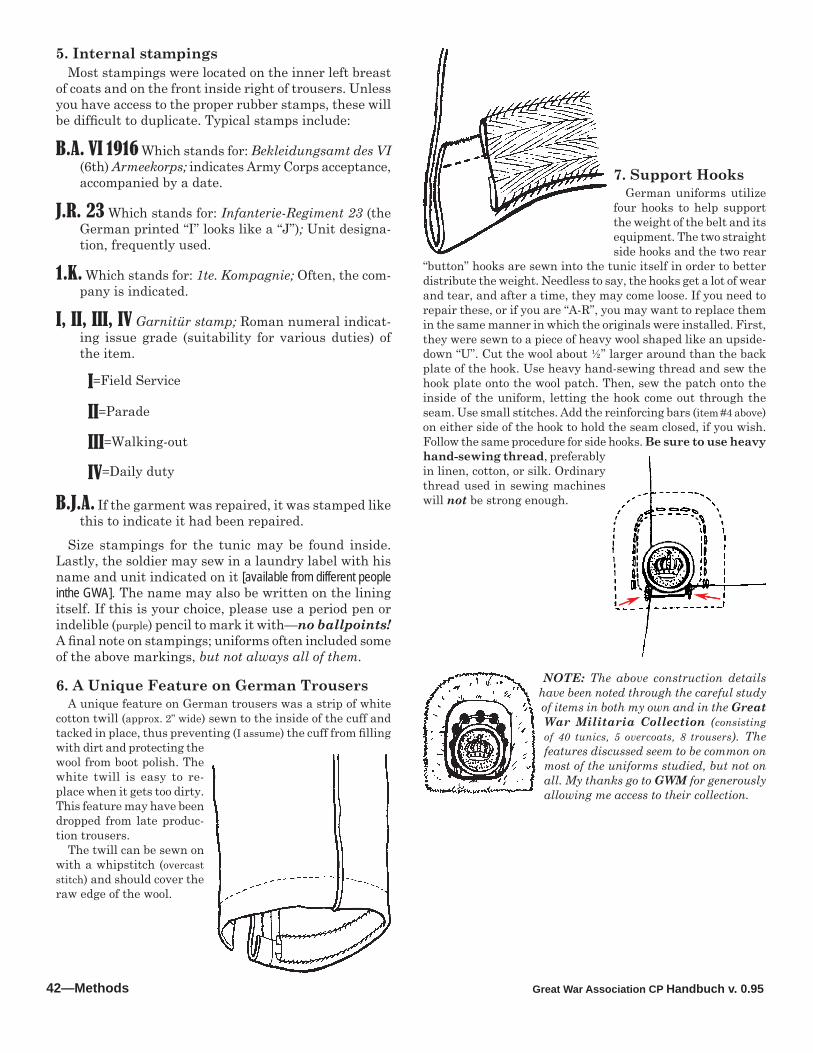
Great War Association CP Handbuch v. 0.9542—Methods
5. Internal stampingsMost stampings were located on the inner left breast
of coats and on the front inside right of trousers. Unless you have access to the proper rubber stamps, these will be diffi cult to duplicate. Typical stamps include:
B.A. VI 1916 Which stands for: Bekleidungsamt des VI (6th) Armeekorps; indicates Army Corps acceptance, accompanied by a date.
J.R. 23 Which stands for: Infanterie-Regiment 23 (the German printed “I” looks like a “J”); Unit designa-tion, frequently used.
1.K. Which stands for: 1te. Kompagnie; Often, the com-pany is indicated.
I, II, III, IV Garnitür stamp; Roman numeral indicat-ing issue grade (suitability for various duties) of the item.
I=Field Service
II=Parade
III=Walking-out
IV=Daily duty
B.J.A. If the garment was repaired, it was stamped like this to indicate it had been repaired.
Size stampings for the tunic may be found inside. Lastly, the soldier may sew in a laundry label with his name and unit indicated on it [available from different people inthe GWA]. The name may also be written on the lining itself. If this is your choice, please use a period pen or indelible (purple) pencil to mark it with—no ballpoints! A fi nal note on stampings; uniforms often included some of the above markings, but not always all of them.
6. A Unique Feature on German TrousersA unique feature on German trousers was a strip of white
cotton twill (approx. 2” wide) sewn to the inside of the cuff and tacked in place, thus preventing (I assume) the cuff from fi lling with dirt and protecting the wool from boot polish. The white twill is easy to re-place when it gets too dirty. This feature may have been dropped from late produc-tion trousers.
The twill can be sewn on with a whipstitch (overcast stitch) and should cover the raw edge of the wool.
7. Support HooksGerman uniforms utilize
four hooks to help support the weight of the belt and its equipment. The two straight side hooks and the two rear
“button” hooks are sewn into the tunic itself in order to better distribute the weight. Needless to say, the hooks get a lot of wear and tear, and after a time, they may come loose. If you need to repair these, or if you are “A-R”, you may want to replace them in the same manner in which the originals were installed. First, they were sewn to a piece of heavy wool shaped like an upside-down “U”. Cut the wool about ½” larger around than the back plate of the hook. Use heavy hand-sewing thread and sew the hook plate onto the wool patch. Then, sew the patch onto the inside of the uniform, letting the hook come out through the seam. Use small stitches. Add the reinforcing bars (item #4 above) on either side of the hook to hold the seam closed, if you wish. Follow the same procedure for side hooks. Be sure to use heavy hand-sewing thread, preferably in linen, cotton, or silk. Ordinary thread used in sewing machines will not be strong enough.
NOTE: The above construction details have been noted through the careful study of items in both my own and in the Great War Militaria Collection (consisting of 40 tunics, 5 overcoats, 8 trousers). The features discussed seem to be common on most of the uniforms studied, but not on all. My thanks go to GWM for generously allowing me access to their collection.

Great War Association CP Handbuch v. 0.95 Methods—43
Contributed by Marc Benedict and Erich TobeyForeword by Marsh Wise
At many events it seems, there is always an enemy attack that succeeds because one of our (usually not the 23rd’s) outposts failed in its duty. Of course,
this also happened during the real war and the following lessons come from a book called Kriegskunst in Wort und Bild, published in Berlin, in August 1927. I believe that you will fi nd this info very useful for your training.
One of the fi rst things you will notice, when you look at the pictures, is that the „Falsch“ series always has French soldiers screwing-up. Later German training manuals used drawings of guys from a fi cticious army for the „Falsch“ lessons; I guess that since this book came out so close to the end of the war, things were still quite clear as to just who the real enemy was (is?).
Anyway, I hope this will help you in your quest to dis-cover the Frontsoldat. Perhaps someday, WWI reenacting will go to a total 24 hour scenario and then for sure, we will need to really study this kind of stuff. Of course, it can’t hurt you to commit this to heart now, so as to be ready when the „Schangel“ try to sneak-up on us.
Verhalten auf PostenConduct at Outposts
Observation Posts and SentriesFeldposten und Feldwache
Feldwache was the equivalent of an “outpost” or the Civil War “pickets”. They were set up forward of the main body, of course, and were often located near road forks or crossroads. The actual 3-man outposts were called Feldposten. They consisted, according to regulations, of a leader and 2 men. The actual challenge to someone trying to come through the outpost line was:
Halt! Wer da? (halt vair da?)If the challanged party did not answer after the third
halt, the outpost was to open fi re. A password in the Ger-man Army was known as a Kennwort (ken-vort).
A messenger in the German Army was called a Melder (mell-der), and care was usually taken to provide the Melder with a protected route (called a Meldeweg) over which to carry his messages. Messengers could originate from Feldwache or from a Spähtrupp (shpay-troop) scouting party. Scouts and messengers who were bringing their commanders back observation reports were expected to answer the following questions:
Wann (vahn) when was the observation made, Wer (vair) who made the observation, Was (vass) what was observed, Wie (vee) how were they observed, Wo (voh) where was the observation made.
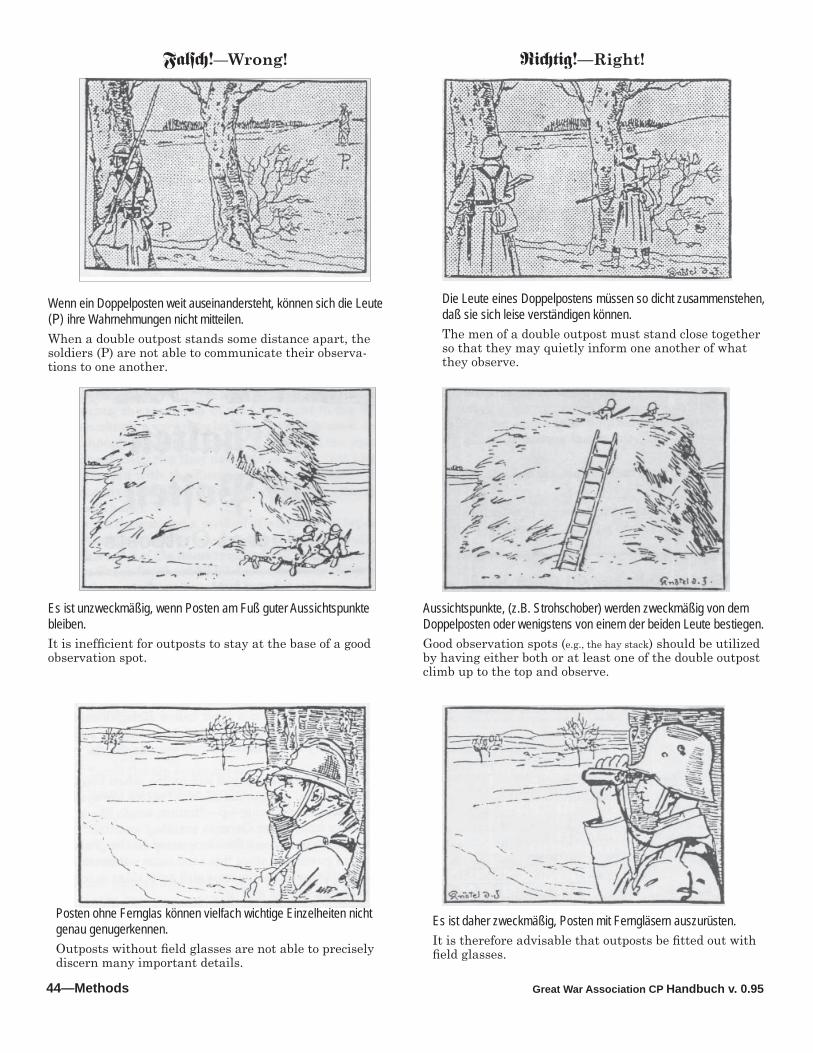
Great War Association CP Handbuch v. 0.9544—Methods
Fals<!—Wrong! Ri<tig!—Right!
Wenn ein Doppelposten weit auseinandersteht, können sich die Leute (P) ihre Wahrnehmungen nicht mitteilen.When a double outpost stands some distance apart, the soldiers (P) are not able to communicate their observa-tions to one another.
Die Leute eines Doppelpostens müssen so dicht zusammenstehen, daß sie sich leise verständigen können.The men of a double outpost must stand close together so that they may quietly inform one another of what they observe.
Aussichtspunkte, (z.B. Strohschober) werden zweckmäßig von dem Doppelposten oder wenigstens von einem der beiden Leute bestiegen.Good observation spots (e.g., the hay stack) should be utilized by having either both or at least one of the double outpost climb up to the top and observe.
Es ist unzweckmäßig, wenn Posten am Fuß guter Aussichtspunkte bleiben.It is ineffi cient for outposts to stay at the base of a good observation spot.
Posten ohne Fernglas können vielfach wichtige Einzelheiten nicht genau genugerkennen.Outposts without fi eld glasses are not able to precisely discern many important details.
Es ist daher zweckmäßig, Posten mit Ferngläsern auszurüsten.It is therefore advisable that outposts be fi tted out with fi eld glasses.
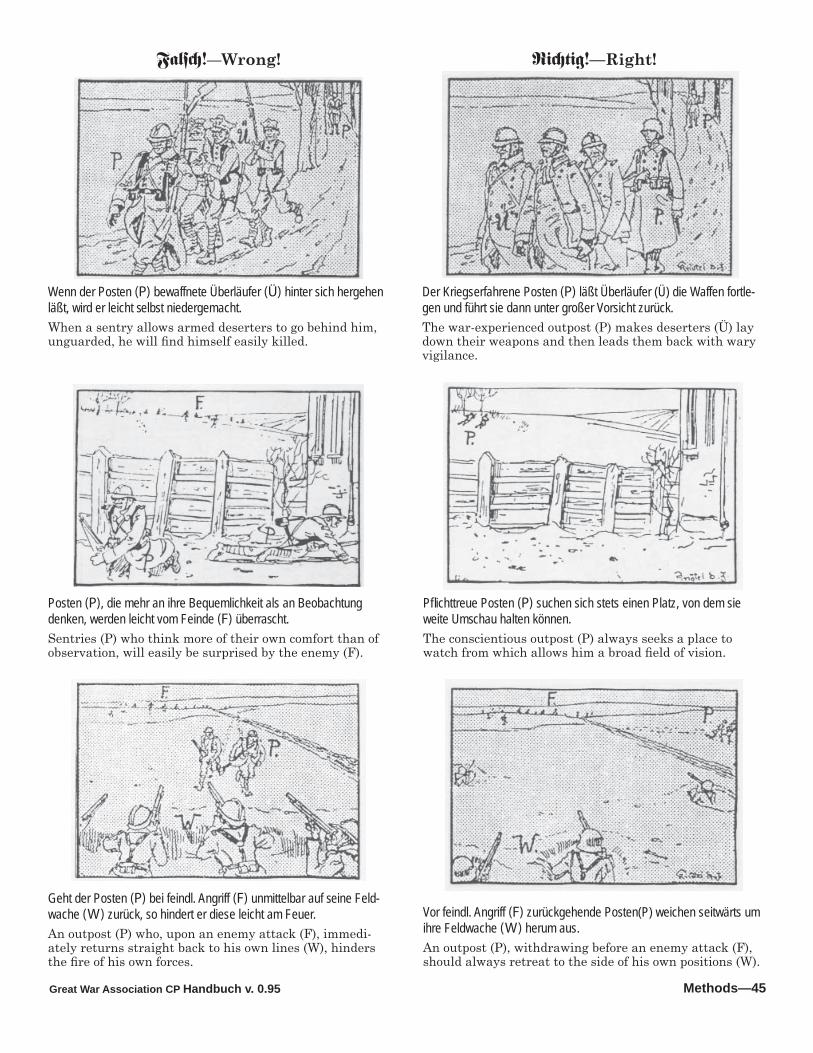
Great War Association CP Handbuch v. 0.95 Methods—45
Der Kriegserfahrene Posten (P) läßt Überläufer (Ü) die Waffen fortle-gen und führt sie dann unter großer Vorsicht zurück.The war-experienced outpost (P) makes deserters (Ü) lay down their weapons and then leads them back with wary vigilance.
Wenn der Posten (P) bewaffnete Überläufer (Ü) hinter sich hergehen läßt, wird er leicht selbst niedergemacht.When a sentry allows armed deserters to go behind him, unguarded, he will fi nd himself easily killed.
Posten (P), die mehr an ihre Bequemlichkeit als an Beobachtung denken, werden leicht vom Feinde (F) überrascht.Sentries (P) who think more of their own comfort than of observation, will easily be surprised by the enemy (F).
Geht der Posten (P) bei feindl. Angriff (F) unmittelbar auf seine Feld-wache (W) zurück, so hindert er diese leicht am Feuer.An outpost (P) who, upon an enemy attack (F), immedi-ately returns straight back to his own lines (W), hinders the fi re of his own forces.
Pfl ichttreue Posten (P) suchen sich stets einen Platz, von dem sie weite Umschau halten können.The conscientious outpost (P) always seeks a place to watch from which allows him a broad fi eld of vision.
Vor feindl. Angriff (F) zurückgehende Posten(P) weichen seitwärts um ihre Feldwache (W) herum aus.An outpost (P), withdrawing before an enemy attack (F), should always retreat to the side of his own positions (W).
Fals<!—Wrong! Ri<tig!—Right!
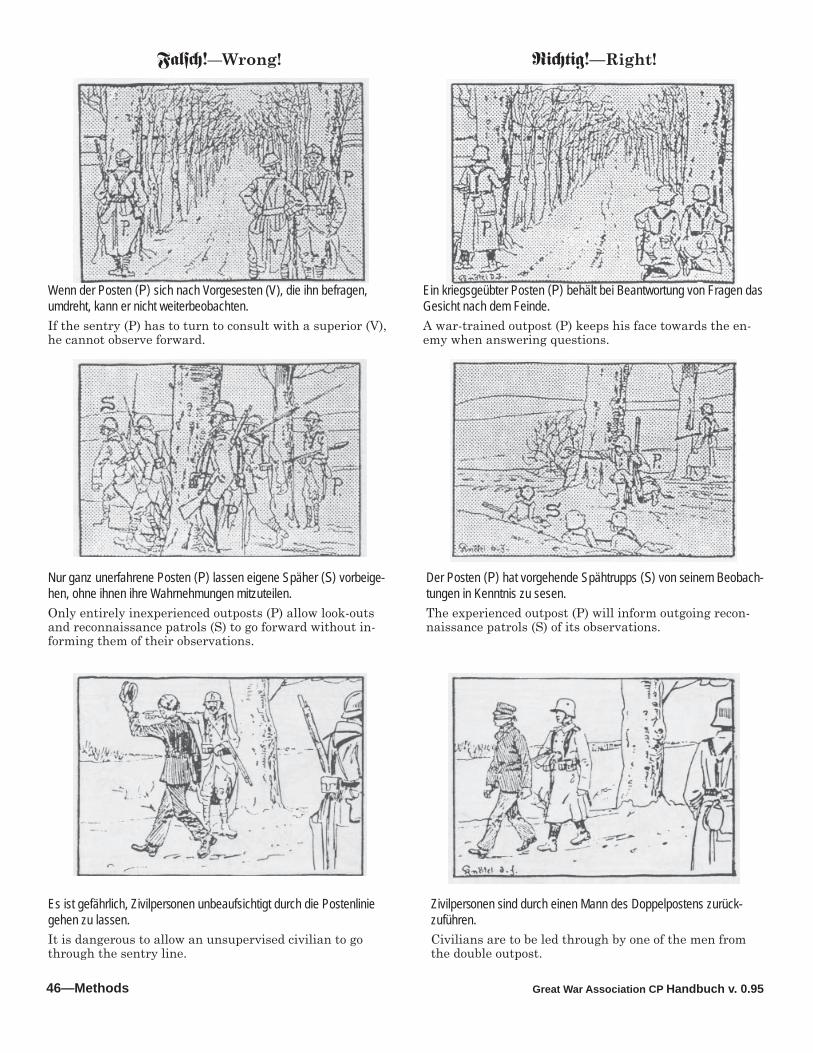
Great War Association CP Handbuch v. 0.9546—Methods
Wenn der Posten (P) sich nach Vorgesesten (V), die ihn befragen, umdreht, kann er nicht weiterbeobachten.If the sentry (P) has to turn to consult with a superior (V), he cannot observe forward.
Nur ganz unerfahrene Posten (P) lassen eigene Späher (S) vorbeige-hen, ohne ihnen ihre Wahrnehmungen mitzuteilen.Only entirely inexperienced outposts (P) allow look-outs and reconnaissance patrols (S) to go forward without in-forming them of their observations.
Es ist gefährlich, Zivilpersonen unbeaufsichtigt durch die Postenlinie gehen zu lassen.It is dangerous to allow an unsupervised civilian to go through the sentry line.
Ein kriegsgeübter Posten (P) behält bei Beantwortung von Fragen das Gesicht nach dem Feinde.A war-trained outpost (P) keeps his face towards the en-emy when answering questions.
Der Posten (P) hat vorgehende Spähtrupps (S) von seinem Beobach-tungen in Kenntnis zu sesen.The experienced outpost (P) will inform outgoing recon-naissance patrols (S) of its observations.
Zivilpersonen sind durch einen Mann des Doppelpostens zurück-zuführen.Civilians are to be led through by one of the men from the double outpost.
Fals<!—Wrong! Ri<tig!—Right!
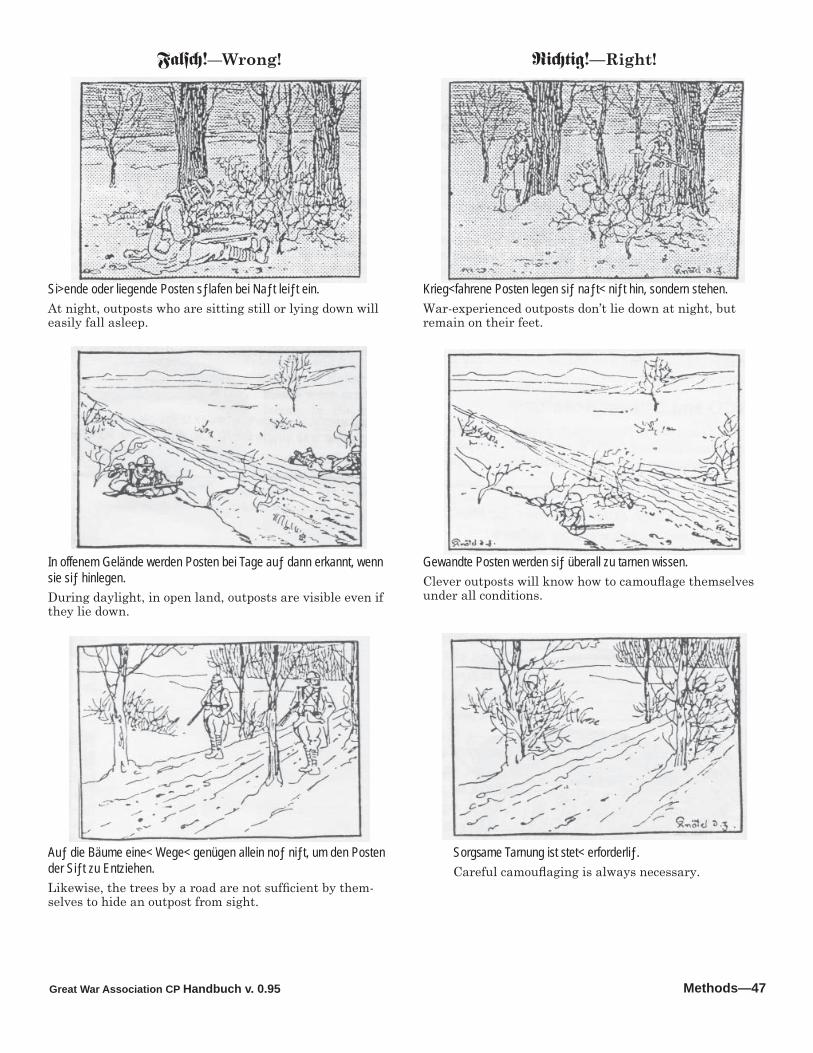
Great War Association CP Handbuch v. 0.95 Methods—47
Si>ende oder liegende Posten sƒlafen bei Naƒt leiƒt ein.At night, outposts who are sitting still or lying down will easily fall asleep.
In offenem Gelände werden Posten bei Tage auƒ dann erkannt, wenn sie siƒ hinlegen.During daylight, in open land, outposts are visible even if they lie down.
Auƒ die Bäume eine< Wege< genügen allein noƒ niƒt, um den Posten der Siƒt zu Entziehen.Likewise, the trees by a road are not suffi cient by them-selves to hide an outpost from sight.
Krieg<fahrene Posten legen siƒ naƒt< niƒt hin, sondern stehen.War-experienced outposts don’t lie down at night, but remain on their feet.
Gewandte Posten werden siƒ überall zu tarnen wissen.Clever outposts will know how to camoufl age themselves under all conditions.
Sorgsame Tarnung ist stet< erforderliƒ.Careful camoufl aging is always necessary.
Fals<!—Wrong! Ri<tig!—Right!
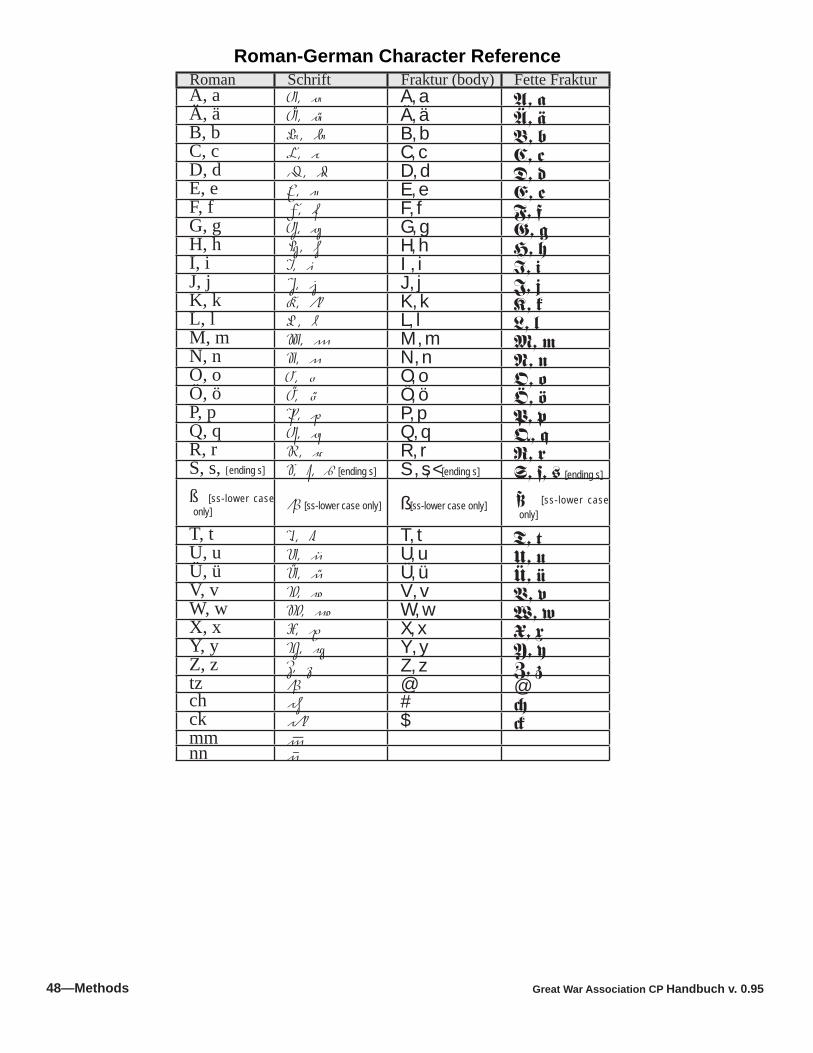
Great War Association CP Handbuch v. 0.9548—Methods
Roman-German Character ReferenceRoman Schrift Fraktur (body) Fette FrakturA, a A, a A, a A, aÄ, ä Ä, ä Ä, ä Ä, äB, b B, b B, b B, bC, c C, c C, c C, cD, d D, d D, d D, dE, e E, e E, e E, eF, f F, f F, f F, fG, g G, g G, g G, gH, h H, h H, h H, hI, i I, i I, i I, iJ, j J, j J, j J, jK, k K, k K, k K, kL, l L, l L, l L, lM, m M, m M, m M, mN, n N, n N, n N, nO, o O, o O, o O, oÖ, ö Ö, ö Ö, ö Ö, öP, p P, p P, p P, pQ, q Q, q Q, q Q, qR, r R, r R, r R, rS, s, [ending s] S, s, [ [ending s] S, s, < [ending s] S, s, @ [ending s]
ß [ss-lower case only] ß [ss-lower case only] ß [ss-lower case only] ß [ss-lower case
only]
T, t T, t T, t T, tU, u U, u U, u U, uÜ, ü Ü, ü Ü, ü Ü, üV, v V, v V, v V, vW, w W, w W, w W, wX, x X, x X, x X, xY, y Y, y Y, y Y, yZ, z Z, z Z, z Z, ztz < @ @ch ch # <ck ck $ >mm \nn ]


![Minutia Texture Cylinder Codes for fingerprint matchingKplet-BFS [8] matching uses a K-plet graph matching technique to match minutiae where each minutia is checked for a neighborhood](https://img.pdfslide.us/doc/110x75/60bcaecfd641b7368c767eb3/minutia-texture-cylinder-codes-for-ingerprint-matching-kplet-bfs-8-matching.jpg)