Embed Size (px)
Citation preview
MERMAID CONDENSATOR™
INSTALLATION MAINTENANCE &
TROUBLESHOOTING GUIDELINES
Mermaid Manufacturing of Southwest Florida, Inc. 2651 Park Windsor Drive, Suite 203
Fort Myers, Fl 33901 Phone: 800 330-3553
Fax: 239 418-0538 E-mail: [email protected]
Web Site: http://www.mmair.com
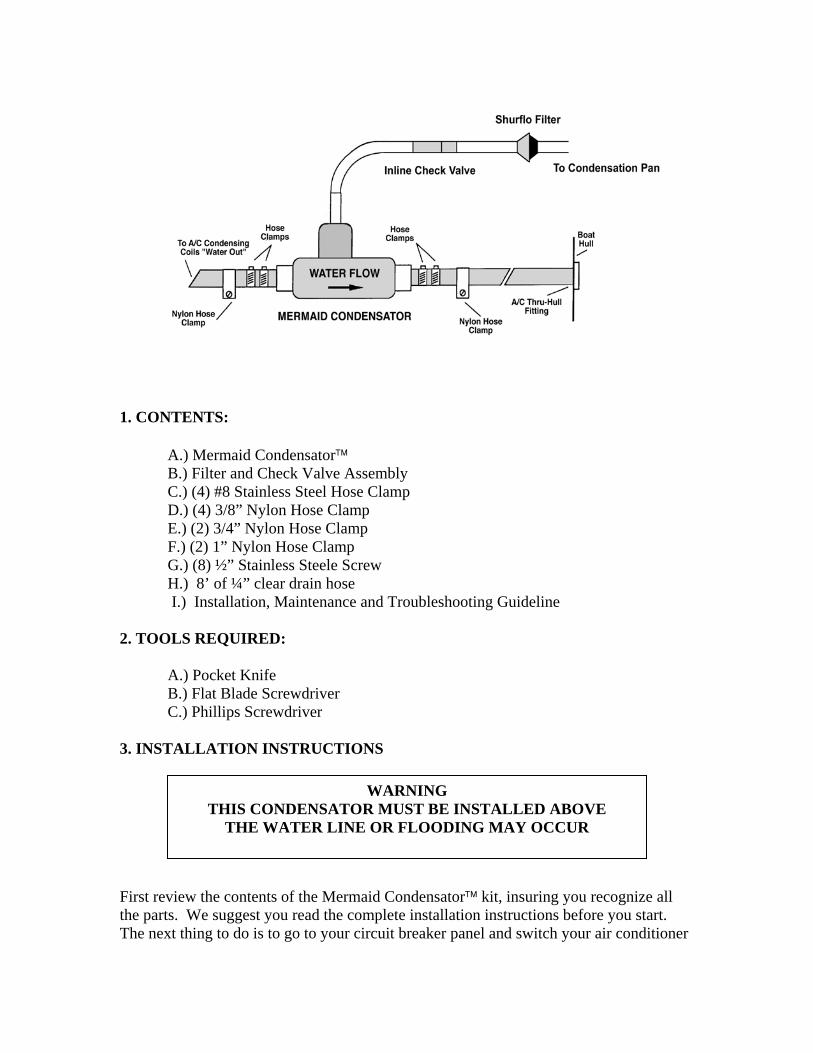
1. CONTENTS: A.) Mermaid Condensator™ B.) Filter and Check Valve Assembly C.) (4) #8 Stainless Steel Hose Clamp D.) (4) 3/8” Nylon Hose Clamp E.) (2) 3/4” Nylon Hose Clamp F.) (2) 1” Nylon Hose Clamp G.) (8) ½” Stainless Steele Screw H.) 8’ of ¼” clear drain hose I.) Installation, Maintenance and Troubleshooting Guideline 2. TOOLS REQUIRED: A.) Pocket Knife B.) Flat Blade Screwdriver C.) Phillips Screwdriver 3. INSTALLATION INSTRUCTIONS
THIS CONDENSATO THE WATER LINE
First review the contents of the Mermthe parts. We suggest you read the coThe next thing to do is to go to your c
WARNING R MUST BE INSTALLED ABOVE OR FLOODING MAY OCCUR
aid Condensator™ kit, insuring you recognize all mplete installation instructions before you start. ircuit breaker panel and switch your air conditioner
circuit breaker to the off position. You do not want the air conditioner to come on during installation, with the hoses disassembled, you could inadvertently flood the boat. At this time, close the seacock to prevent any water flow into the boat while you have the water hoses disconnected.
WARNING
1. FAILURE TO CLOSE THE SEA COCK BEFORE REMOVING THE WATER HOSES MAY RESULT IN FLOODING. THIS COULD CAUSE SIGNIFICANT WATER DAMAGE OR SINK THE BOAT.
2. FAILURE TO TURN THE CIRCUIT BREAKER OFF MAY ALLOW THE AIR
CONDITIONER TO TURN ON. IF THIS HAPPENS, THE WATER PUMP WILL OPERATE WITH NO SOURCE OF WATER AND IT WILL OVERHEAT AND FAIL.
Go to the air conditioner and trace the water-out line from the air conditioner to the thru-hull discharge. Determine where in the water-out line you are planning to put the Condensator. Insure that you will have a mounting surface to secure the Condensator so that it can't move while the boat is underway. Remember, you will need to have access to the Shurflo filter to clean it, so check your placement position carefully. As always, a few minutes of planning may save hours of labor.
A.) Cut the 5/8" water-out hose between the air conditioner and the thru-hull water discharge. B.) On the body of the Condensator, you will note an arrow. This arrow designates the water flow direction thru the Condensator. Water flow must be towards the thru-hull discharge. Slide two of the large stainless steel hose clamps onto each side of the cut hose ends. The Condensator will not work if installed with the arrow in the direction back to the air conditioning unit.
C.) Slide the two ends of the hose over the barbs on the Condensator body. Insure that you have positioned the Condensator with the correct water flow direction.
D.) Secure each side of the Condensator to the hose using the two stainless steel hose clamps.
E.) Using the two 1” nylon hose clips and two of the 1/2" #8 screws, secure the Condensator to a bulkhead. Insure that you are not screwing the Condensator to the hull of the boat. If no bulkhead is available, it may be necessary to "glass in" a shelf to mount the Condensator onto. The Condensator must not be able to move. If not properly secured, the weight of the Condensator could loosen the "water-out" hose and cause flooding.
F.) Connect the ½” clear hose on the end of the filter/check valve assembly to the ½” nipple on the unit’s condensation pan.
G.) Secure one end of the ¼” hose to the ¼” hose barb on the filter/check valve assembly and the other end of the ¼” clear hose to the brown nipple on the Condensator.
H.) As needed secure the clear drain hoses with the clamps provided. I) Recheck all of your stainless steel hose clamps and insure you have them
properly positioned and tightened. J) Turn the circuit breaker back on. L.) Open the seacock. M.) Using the thermostat, adjust the temperature so the air conditioner comes on. N.) Now that you have water flowing, recheck all of your stainless steel hose
clamps again and insure you have them properly positioned and tightened. O.) With the air conditioner running, pour a glass of clean water into the
evaporator tray. The Condensator will immediately begin removing the water. You should be able to observe this through the clear hose. Inline with the hose is a small white valve. This valve is the check valve for the device. It is located between the Condensator and the Shurflo filter. This device needs to be kept in line. This is a backflow preventative device and should not be tampered with.
P.) Insure you have noted on your regular maintenance schedule that you now need to check the Shurflo filter every time you check your water strainer filter.
INSTALLATI INSTALLA
4.) MAINTENANC Your Condensator™ regularly checking anCondensator and theconditioning unit. Ffunctioning. Whenmay enter your boarather a result of im Should the Condensafilter between the coTo clear the filter, twthe screen in place, rthe air conditioner unthis point. Establishair filter on your air cCondensator, make stravel into the filter amaintain a clean airdoing so could meanyour boat. Also eacchecked for tightness
REMEMBER, PLAN BEFORE YOU START THIS ON. IF YOU ARE UNSURE ABOUT ANY PART OF THISTION, JUST CONTACT ONE OF OUR INSTALLATION
TECHNICIANS AT 800 330-3553
E & TROUBLESHOOTING
is not a maintenance-free device. It is assumed that you are d cleaning your water strainer, the inline filter between your
condensation pan, and the air filter attached to the front of your air rom time to time, it is possible for the Condensator to cease this happens, your condensation pan may overflow and water t. This is not necessarily the “fault” of the Condensator, but proper maintenance. Maintenance is the owner’s responsibility.
tor “fail”, the first thing to check is the filter screen located in the ndensation pan and the condensator. ist the bottom of the body to open and then clean the screen. With econnect the filter bottom to the top. Clean the condensation pan in it with a vacuum hose. The Condensator should start “working” at
a regular cycle to check the cleanliness of your condensator filter & onditioner. After installation of your air conditioner and ure the work area has been thoroughly cleared of debris, which can nd block it. It cannot be stressed enough how important it is to filter and clean condensation pan on the air conditioner. Not damage to the Condensator, the air conditioner, and possibly
h joint on the condensator between a hose and a barb should be . The addition of stainless steel hose clamps may become necessary.

If you continue to have problems with the Condensator, then it is likely a result of a blockage in the water line. The first item to check is your water strainer. Inspect the mesh screen to insure that it is in tact and seated properly. It is assumed you are cleaning your water strainer on a regular basis. If you are not, you must start now if you are going to use the condensator and expect it to work properly. The next thing to do is to close the seacock on your water supply and turn the circuit breaker to your air conditioner off. You do not want the thermostat to inadvertently turn your air conditioner on while you have the water system disassembled.
WARNING
3. FAILURE TO CLOSE THE SEA COCK BEFORE REMOVING THE WATER HOSES MAY RESULT IN FLOODING. THIS COULD CAUSE SIGNIFICANT WATER DAMAGE OR SINK THE BOAT.
4. FAILURE TO TURN THE CIRCUIT BREAKER OFF MAY ALLOW THE AIR
CONDITIONER TO TURN ON. IF THIS HAPPENS THE WATER PUMP WILL OPERATE WITH NO SOURCE OF WATER AND IT WILL OVERHEAT AND FAIL.
The next step is to remove the Condensator from your water-out hose. Be careful not to lose or discard the s/s clamps, they will be used again for re-inserting the condensator. At this point insert a hose to hose barb to connect the two ends of the 5/8” water-out lines together. This is for safety purposes so that water will not leak into the boat while the condensator is being cleaned. If you do not have a hose-to-hose barb, insure that the hose ends are placed or tied so that water will not leak out. Now look down the hose barb on the Condensator and visually check for any blockage. If a blockage is detected clear the obstruction with a small wire such as an unfolded paperclip. To inspect the nipple body for obstructions remove the four screws that hold the nipple body to the Condensator. Per the diagram, carefully remove the nipple body, O-ring, the core and the second O-ring. Inspect the nipple body and core for any obstructions and remove any that exist. There are no replacement parts for the nipple body assembly; therefore be extremely careful not to loose any parts. Clear any debris and clean all the components. Review the above diagram, and then reassemble. Insure you have reassembled the components in the exact sequence that you disassembled them. Should you lose a part or reassemble in the improper order, your condensator will not work. Reinstall the Condensator, verifying that the arrow stamped on the side of the body of the Condensator is pointing to the thru-hull discharge. Make certain that you have tightened the double s/s clamps on the hoses on each side and have repositioned the Condensator to the original location.
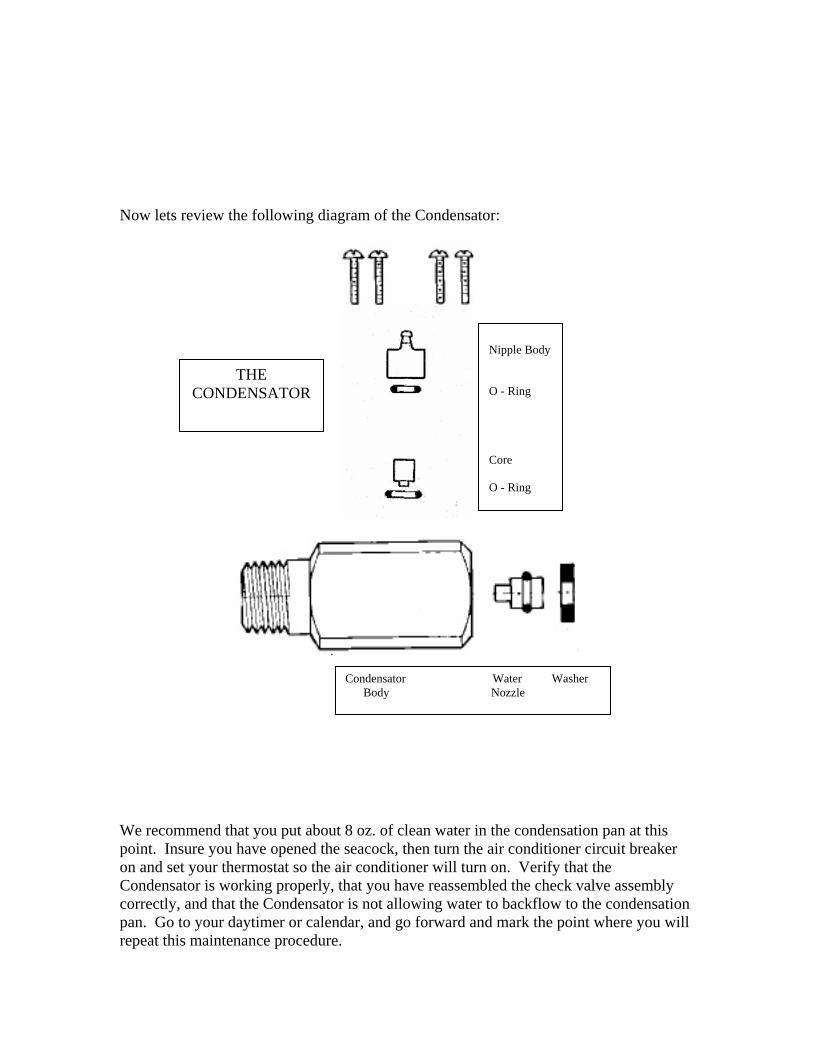
Now lets review the following diagram of the Condensator:
THE CONDENSATOR
Condensator Body
We recommend that you put about 8 oz. of clean water inpoint. Insure you have opened the seacock, then turn theon and set your thermostat so the air conditioner will turnCondensator is working properly, that you have reassembcorrectly, and that the Condensator is not allowing waterpan. Go to your daytimer or calendar, and go forward anrepeat this maintenance procedure.
Nipple Body O - Ring Core O - Ring
Water Washer Nozzle
the condensation pan at this air conditioner circuit breaker on. Verify that the led the check valve assembly
to backflow to the condensation d mark the point where you will
NOTE: During operation of the air conditioner with the Condensator installed, the water exiting the boat may appear milky at times. This is due to air being drawn by the Condensator from the drip pan along with the condensate. This is a normal occurrence and should not raise concern. OTHER SUGGESTIONS - Sailboats In certain situations where the possible water damage due to overflowing of the condensation tray could be a problem, or on sailboats that could heel at an extreme angle, we would suggest the following. Place a covered container below the air conditioner in the bilge. Drill 2 holes thru the cover of the container. Drain the condensation from the air conditioner's condensation tray to the container in the bilge. Draw from the container with the Condensator, rather than from the air conditioner's condensation tray. Seal the two hoses through the top of the container and mount the container in such a way that it won't move in the bilge. The condensator works off the flow of water through the air conditioner. When the air conditioner is turned off, this flow stops and condensation is not drained from the tray. Depending upon conditions, there could be some water still on the evaporator fins that drains down to the tray after the unit is turned off. When a sailboat heels, this water could overflow the pan depending upon the heel angle. By draining from the tray to a second container, this precludes that "late" condensation water from causing an issue.