Embed Size (px)
Citation preview

AT&T 999-507-149
MERLIN ® IICOMMUNICATIONS SYSTEM
Feature Module 2System Manual

©1988 AT&T Issue 1All Rights Reserved May, 1988Printed in USA
NOTICEThe information in this document is subject to change without notice. AT&T assumes no responsibilityfor any errors that may appear in this document.
MERLIN is a registered trademark of AT&T
To order copies of this document, call the AT&T Customer Information Center, 1-800-432-6600 andinclude the document number 999-507-149 with your order.

Contents
Section 1: Introduction
About the MERLIN II Communications System 1-1
Section 2: Reference
OverviewMERLIN II System FeaturesAccessory Equipment
2-12-22-169
Section 3: Quick Reference Guides
Introduction 3-1Button Code Administration Procedures 3-2Administration Button Codes 3-17
Menu-Driven Administration Procedures 3-21Voice Terminal Features and Programming Codes 3-38

About the MERLIN II Communications System
EASY TO USE
EFFICIENT
COST EFFECTIVE
The MERLIN® II Communications System with Feature Module 2 offersfeatures and options available until recently only on much larger systems.You can choose from among more than 100 system wide options andprogrammable features to customize your system to your specific businessneeds.
Some system features are designed to make call handling easier and calltraffic more manageable, whether you have a stand-alone system or one thatoperates behind another system such as PBX or Centrex. Other MERLIN 11system features can help reduce communications costs. And to accommodateyour growing communications needs, the system can expand to support up to56 outside telephone lines and 72 telephones.
Contacting clients across the country or co-workersand easy with such features as:
● System and Personal Speed Dial
● Saved Number and Last Number Redial
● Notify
● Intercom
● Group Page
in the next office is quick
Heavy call traffic becomes easily manageable with such features as:
● Line Pools
● Group Call Distribution
● Call Forwarding
● Call Transfer
● Transfer Return Identification
● Call Pickup and Group Call Pickup
● Conference Calling
● Call Coverage
And the system administrator can combine some or all of the followingoptions to control costs without placing unreasonable constraints on thepeople in your business:
●
●
●
●
●
●
●
Customized Line Assignments
Automatic Route Selection
Call Restriction
Allowed Lists
Enhanced Night Service
Call Report (SMDR)
Direct Inward System Access
About the MERLIN II Communications System 1-1

● Account Number Entry
These and the many other features and options available with the MERLIN IIsystem are explained in detail in this manual.
About the System Documentation
WHAT’S IN THIS MANUAL The information in this MERLIN II Communications System Manual is dividedinto three sections, as described below.
Section 1: IntroductionThis section tells you what’s in the manual, what other documentation isprovided for the system, and how to use it.
Section 2: ReferenceThis section contains detailed discussions of each component, option, andfeature in the MERLIN II system. The entries are organized alphabetically tohelp you find the information you need quickly. Administrators and userscan read through the appropriate entries to familiarize themselves with thesystem and its features.
Section 3: Quick Reference GuidesThe guides in this section give you quick access to streamlined administrationand programming procedures. Use them if you’re familiar with the systemand want to find a particular procedure
OTHER MERLIN II SYSTEM Several types of guides are packaged inDOCUMENTATION
System GuidesYou’ll find copies of user and attendant
fast.
the binder with this system manual.
guides in the back of this binder.
Distribute those guides as soon as possible so people can learn how thesystem works and how they can make the most of its optional features.
You’ll also find a MERLIN II Communications System Data Communications Guidein the back of the binder. Refer to that guide only if your system includesdigital data equipment.
Installation and Administration ManualThe MERLIN II Communications System Installation and Administration Manual ispackaged with your system. It contains instructions for installing the system,a process that includes planning the system, installing hardware, andperforming initial system administration. Section 5 of that manual,“Troubleshooting,” contains procedures for isolating and correcting anyproblems with the system.
1-2 About the MERLIN II Communicatlons System

HOW TO USE THE How you use this manual and the user and attendant guides at any particularSYSTEM MANUAL AND time depends on what you want to do, as the following information suggests.GUIDES
Making Changes to a Running System?Change the planning forms to reflect the changes you want to make. Thensee the relevant entries in Section 2, “Reference” or in the appropriate guidein Section 3, “Quick Reference Guides. ”
Managing Incoming Call Traffic as a System Attendant?See the MERLIN II System Atendant’s Guide for a description of your consoleand instructions for handling calls. If you want more detailed information,consult the appropriate entries in Section 2, “Reference,” in this manual.
Using a Voice Terminal for the First Time?See the appropriate MERLIN II System User’s Guide for the type of telephoneyou have. (There are separate guides for analog and digital voice terminalsand basic telephones.) The guide describes the voice terminal or telephoneand explains how to use it. If you want more information about particularsystem features, consult the entries for those features in Section 2,“Reference,” in this manual.
About the MERLIN II Communicatlons System 1-3

Overview
This section of the manual provides the information you need to program,administer, and use the many MERLIN II system features and to use theaccessory equipment available for the system.
The information in this section is divided into two parts:
● MERLIN II System Features. Includes fixed features of the MERLIN IIsystem, optional system features that the administrator can assign, andprogrammable features that individual users can program onto their voiceterminals.
● Accessory Equipment. Includes the additional hardware that can be usedwith the MERLIN II system.
The individual features and the accessories are listed alphabetically so you canfind the entry you need quickly.
Overview 2-1

MERLIN II System Features
TYPES OF VOICETERMINALS
HOW ENTRIES AREORGANIZED
Your MERLIN II system offers features that provide effective telephoneservice or both a business-wide and a personal basis. In order to meetcompany priorities and needs, the system administrator can assign lines andadd features that will benefit the whole system.
The system can support the voice terminals (telephones with programmablebuttons) listed below as well as any standard Touch-Tone or rotary telephone.The voice terminals in the MERLIN II system come ready to use with manyfixed features, such as Transfer and Hold. Users can also add features totheir voice terminals, such as Privacy or Saved Number Redial, that will helpthem handle calls easily and efficiently.
There are two basic types of voice terminals, analog and digital. You mayhave either or both types in your system. Voice terminals come in differentsizes, with various special features and accessories.
The following analog voice terminals are available with the MERLIN IIsystem:
5-Button Voice Terminal
10-Button Voice Terminal
10-Button Hands-Free Answer on Intercom (HFAI-10) Voice Terminal
BIS-10 Voice Terminal
BIS-22 Voice Terminal
34-Button Deluxe Voice Terminal
34-Button (SP-34) Voice Terminal with Speakerphone
34-Button (SP-34D) Voice Terminal with Speakerphone
BIS-34 Voice Terminal
BIS-34D Voice Terminal with Display
MERLIN 11 System Display Console
Digital voice terminals are also available:
● 7406 Voice Terminal
● 7406D Voice Terminal with Display
and Display Unit
The information included in each feature description is divided into fivecategories:
Description The description of the feature tells what it does and explainsits advantages for those people using it.
Considerations Special considerations include any qualifications theperson using the feature should know, ways in which the feature can beused, or other features it can or cannot be used with.
Administration Administration procedures tell the system administratorhow to administer the features at the administrator/attendant console.
Programming Programming involves customizing a voice terminal to suitthe needs of the person using it. Brief programming instructions areincluded for both the analog and the digital voice terminals, andprogramming codes are specified for each programmable feature. Since
2-2 MERLIN 1 I System Features

the procedure for entering and leaving programming mode depends onthe type of voice terminal you are using, be sure that you follow thegeneral programming directions carefully.
● How To Use Step-by-step procedures are provided for using each feature.
General instructions for entering and leaving administration andprogramming mode appear below. Only the specific steps for a particularprocedure appear in each feature entry. Programming, administration, andusing information are provided only when applicable.
General Procedures for Administration and Programming
To perform system administration or to program a voice terminal, you musttake the administrator/attendant console or the voice terminal out of regularcall-handling mode. The console or voice terminal can’t be used to place orreceive calls while in administration or programming mode.
The procedures for putting the administrator/attendant console into and outof administration mode and for putting a voice terminal into and out ofprogramming mode appear below.
NOTE: The planning forms for the system show line and featureassignments. If you are administering a new feature, keep theappropriate planning form handy as a guide. If you’re changing anexisting feature, be sure to change the form as well.
ENTERING AND LEAVING If you have a MERLIN II System Display Console, you place an overlay onADMINISTRATION MODE the console when you are performing administration. This overlay, packaged
with the console, shows the functions of the buttons when the console is inadministration mode.
NOTE: The overlay may have been placed in the specially-madelabeled pocket folder of the MERLIN II lnstallation and AdministrationManual when the system was unpacked and installed.
Place the overlay on the console before you enter administration mode andremove it when you leave administration mode.
To enter administration mode:
1
2
To
1
Slide the T/P switch to P.
Touch Conference twice. If you‘re using a MERLIN II System Display Console, the administration menu appears.you‘re using a BIS-34D Console, lights flash next to Adm Pool, Adm Tel, Message,and Speaker.
leave administration mode:
Slide the T/P switch to the center position.
If
MERLIN II System Features 2-3

ENTERING ANDPROGRAMMING
LEAVING To program a feature at a voice terminal, you label an available button withMODE the name of the feature, such as “Last Number Redial, ” or a person’s name,
then put the voice terminal into programming mode, as shown below. Howyou enter and leave programming mode depends on whether the voiceterminal is an analog model such as the 5-button, 10-button, 22-button, or34-button voice terminal or a digital model such as the 7406 and 7406D voiceterminal. If the voice terminal has a display, it shows you the features andoptions you have selected.
AtTo
1
To
1
AtTo
1
To
1
NOTE: Voice terminals in programming mode ring every five secondsto remind you that you’re programming and that you can’t place orreceive calls. Remember not to lift the handset while you areprogramming.
an Analog Voice Terminalput an analog voice terminal into programming mode:
Slide the T/P switch to P.
return to regular call-handling mode:
Slide the T/P switch to the center position.
a Digital Voice Terminalput a digital voice terminal into programming mode:
Dial # 33.
return to regular call-handling mode:
Dial #00
INTERPRETING FORCED In order for you to perform certain basic administration procedures, theIDLE SIGNALS system must be idle, that is, have no calls in progress. If you get the message
“System Busy, ” you must wait until the system is idle or try the procedureagain later.
GETTING PRINTOUTS If you have a printer, you can get printouts that show how certain featureshave been administered. You order printouts by entering a code or touchinga button at the administrator/attendant console while you’re in administrationmode. Instructions for getting printouts are included in the administrationprocedures.
NOTE: Be sure to wait until the printout is completed before leavingadministration mode. Don’t remove the printout until you’ve leftadministration mode, or your page alignments will be affected.
2-4 MERLIN II System Features

Abbreviated Ringing
See “Ringing Options. ”
Account Code Entry
DESCRIPTION If your system uses the Call Report feature, you can include account numbersin the printed report (see “Call Report”). You can use these account numbersto identify the department, project, or client to whom the call should becharged.
CONSIDERATIONS
PROGRAMMING
● If you use some account numbers often, you can assign a dialing code tothe number (see “Personal Speed Dial”) or program the number onto anOutside Auto Dial button (see “Outside Auto Dial”).
● You can use this feature to enter account numbers for both incoming andoutgoing calls.
To program an Account Code Entry button, label a button that has lights,enter programming mode, and follow these steps:
1 Touch the button you want to program.
2 Dial *82.
3 Program another feature, or leave programming mode.
HOW TO USE To associate an account code with a call you are making:
1 With the call in progress, touch Account Code.The green light next to the Account Code button flashes.
2 Dial the account code. (You can also dial a Personal Speed Dial code ortouch an Outside Auto Dial button that you have assigned to this accountcode. )
3 Touch Account Code again.The green light next to the button becomes steady.
If you make a mistake as you enter an account code, just perform these stepsagain.
MERLIN II System Features 2-5

Allowed Lists
DESCRIPTION When the MERLIN II system is first set up, all voice terminals can be used forall types of calls. However, the administrator can restrict selected voiceterminals so that people can use them to place only intercom or local calls (see“Call Restriction” ) If that is too limiting, the administrator can allow peoplewith restricted voice terminals to call particular area codes and/or exchangesby assigning lists of these permitted numbers (allowed lists) to the viceterminals.
● Only the system administrator can establish allowed lists.CONSIDERATIONS
● A system can have up to eight allowed lists, each with as many as tenentries. Each entry can contain a leading 1, if required, plus a maximumof six characters. These can be an area code, an exchange code, an areacode plus an exchange code, or an emergency number such as 911.
ADMINISTRATION Get the Allowed–Lists Form for the system. Follow the appropriate steps,below, to set up allowed lists, assign voice terminals access to lists, and get aprintout showing how you’ve administered this feature.
With a MERLIN II System Display Console
To Administer an Allowed List
1
2
3
4
5
6
7
8
9
From the administration menu, touch [More], [Tables], [More], [AlwList] .
Dial the allowed list number (0 through 7).
Dial the entry number (0 through 9).
Touch [Enter] .
Take the appropriate action:
If you find that you are going to keep the existing entry, touch [Enter]
again to leave this menu. To repeat the procedure, press [AlwList], andbegin again at step 2.
If you are going to dial a new entry, touch [Drop] to delete the existingentry.
Dial the new entry. It can be an area code and/or exchange (6 digitsmaximum), plus a leading 1 if required, or an emergency number suchas 911.
For each additional entry on this list, touch [Next] and dial
When the list is complete, touch [Enter] .
To create additional lists, touch [AlwList] and repeat steps 2
10 Take the appropriate action:
the number.
through 7.
If you want to give voice terminals access to allowed lists, touch[AllowTo], and go on to step 2 of the procedure below.
Touch Conference to return to the administration menu, or leaveadministration mode.
2-6 MERLIN II System Features

To
1
2
3
4
5
6
To
1
2
3
Give Voice Terminals Access to Allowed Lists
From the administration menu, touch [More], [Tables], [More], [AllowTo] .
Dial the list number (0 through 7).
Touch [Enter] .
Touch the Auto Intercom button(s) until the appropriate code shows:
Steady green on = voice terminal has access to the numbers on the listGreen off = voice terminal doesn‘t have access to the numbers on the list
Touch [AllowTo] and repeat steps 2 and 3 to give voice terminals access toother lists.
Touch Conference to return to the administration menu, or leaveadministration mode.
Get Printouts
From the administration menu, touch [More], [More], [Print], [More] .
Take the appropriate action:
Touch [AlwList] if you want a printout of allowed lists. You must thenselect which list (0-7) and touch [Enter] .
Touch [AllowTo] if you want a printout of voice terminal access toallowed lists.
Touch the button for a different print procedure or touch Conference toreturn to the administration menu.
With a BIS-34D Console
To
1
2
3
4
5
6
To
1
2
3
Administer an Allowed List
Touch Message.
Dial #5.
Dial the list number (0 through 7), then the entry number (0 through 9).
Dial the entry.
Take the appropriate action:
To add more entries to thelist, repeat steps 2 through
To remove an entry from aDrop.
same list or to add entries to a different4.
list, perform steps 2 and 3, then touch
Go on to step 2 of the procedure below, if you want to assign voiceterminals access to allowed lists, or leave administration mode.
Give Voice Terminals Access to Allowed Lists
Touch Message.
Dial #4.
Dial the number of the list (0 through 7).Green lights come on next to the Auto Intercom buttons for all voice terminals that canaccess the allowed list.
MERLIN II System Features 2-7

4 Touch the Auto Intercom button for each voice terminal whose status youwant to change until the correct code is showing.
Green light on = voice terminal can access numbers in the listGreen light off = voice terminal cannot access numbers in the list
5 Repeat steps 2 through 4 for each allowed list that you want to assign tovoice terminals in your system.
6 Go to step 2 of the procedure below to get printouts, or leaveadministration mode.
To Get Printouts If you have a printer connected to your system, you canget a printout of any of your allowed lists and the voice terminals that canaccess them.
1 Touch Message.
2 Dial the appropriate code:
To get a printout of an allowed list, dial #5, the list number (0through 7), and 0 #900.
To get a printout of the voice terminals that can access allowed lists,dial # 904.
3 Touch Message to go on to another procedure, or leave administrationmode.
Attendant Barge-In
DESCRIPTION Attendants who must contact a person whose voice terminal is busy or hasDo Not Disturb activated can use Attendant Barge-In to bridge onto the call oroverride DO Not Disturb.
CONSIDERATIONS
PROGRAMMING
● Only attendant positions can use this feature.
● This feature must be programmed on a button.
● You cannot use Attendant Barge-In for a Call Distribution Group.
● If the target voice terminal is in programming mode, you will hear a busysignal if you try to use Attendant Barge-In.
● Attendant Barge-In cannot override Privacy at the target voice terminaland cannot be used to bridge onto conference calls involving three voiceterminals.
● An Attendant Barge-In call will not be directed to another voiceCall Coverage, Call Forwarding, or Follow Me is in effect.
To program an Attendant Barge-In button at an attendant position,available button, enter programming mode, and follow these steps:
1 Touch the button you want to program.
terminal if
label an
2-8 MERLIN II System Features

HOW TO USE
2 Dial *25.
3 Program another feature, or leave programming mode.
1 Place a ringing intercom call.
2 If you hear a busy signal or the person doesn’t answer touch Barge-In.If a call is in progress, the people hear a tone, then you are bridged onto their call, If DoNot Disturb is in effect, the person you are calling hears ringing.
Attendant Postion Setting
DESCRIPTION The system administrator must identify the stations that will be attendantpositions.
CONSIDERATIONS
ADMINISTRATION
●
●
●
●
The system always recognizes the console that is plugged into defaultstation jack 01 (intercom 10) as an attendant position.
Every fourth analog station jack can be used for an attendant position andno more than two stations on a single analog voice terminal module canbe designated as attendant positions.
A MERLIN II system can have a maximum of eight attendants.
If the administrator changes a standard voice terminal to an attendantposition or voice versa, he or she must reassign lines and features to thevoice terminal or console.
Get the Master Planning Form or the Station Configuration Forms, whichshow the stations to be used as attendant positions. Enter administrationmode, and follow the appropriate procedure, below, to designate attendantpositions.
With a MERLIN II System Display Console
1 From the administration menu, touch these buttons: [System], [Attendants],
[Position].A steady or a flashing green light will appear next to each button for each station thateither is or can be an attendant position (see Step 2 below). No light goes on next to thebutton for a station that cannot be an attendant position.
NOTE: If you see the message, “System busy—please wait, ” wait for aprompt or try this procedure again later.
2 To change an attendant position setting, touch the Auto Intercom buttonfor the station until the green light next to the button shows the settingyou want:
Green light on = this station is an attendant position.Green light flashing = this station can be but is not now an attendant position.
3 Touch [Store] .You see the message,“System is Re-starting” and then the administration menu reappears.
MERLIN II System Features 2-9

4 Go on to another procedure, or leave administration mode.
With a BIS-34D Console
1 Touch Message.
2 Dial # 203.
NOTE: If you see the message “Wait: System Busy, ” wait for the promptor try this procedure again later.
3 Check the lights next to the Auto Intercom buttons. A green light goeson next to the button for each station already designated as anattendant position. A flashing green light goes on next to the button foreach station that can be used as an attendant position. No lights go onnext to the buttons for stations that cannot be attendant positions.
4 Touch the Auto Intercom buttons until the green light next to the buttonshows the setting you want:
Green light on = this station is an attendant position.Green light flashing = this station can be but is not now an attendant position.
5 Dial #.
6 After several seconds, the lights next to Adm Pool, Adm Tel, Message,and Speaker begin to flash. At this signal, go on to another procedure orleave administration mode.
Auto Answer-All
DESCRIPTION If you want calls to be answeredanswering machine connected toAuto Answer-All button.
automatically by an optional modem or anyour voice terminal, you need to program an
CONSIDERATIONS ● YOU can have both Auto Answer-All and Auto Answer-Intercomprogrammed for your voice terminal; however, the two buttons cannot beturned on at your voice terminal at the same time.
● If you want an answering machine to answer intercom calls, use the AutoAnswer-All rather than the Auto Answer-Intercom feature. If you try touse an answering machine with the Auto Answer-Intercom feature, it maycause intercom calls to be dropped.
● If you want an answering machine to answer only intercom calls, notoutside calls, program all your lines for no ring. (See “Ringing Options.”)
● In order to use a modem or answering machine with your analog voiceterminal, you must have a General Purpose Adapter. (See “GeneralPurpose Adapter” under “Accessory Equipment. ” )
● If you have an Hands Free Unit, see “Auto Answer-Intercom, ” below.
2-10 MERLIN II System Features

PROGRAMMING To program an Auto Answer-All button, label a button that has lights, enterprogramming mode, and follow these steps:
1 Touch the button you want to program.
2 Dial *75.
3 Program another feature, or leave programming mode.
HOW TO USE To have a modem or an answering machine answer calls automatically:
1 Touch Auto Answer-All.The green light next to the button goes on.
To stop automatic answering:
1 Touch Auto Answer-All again,The green light next to the button goes off.
Auto Answer-Intercom
DESCRIPTION You may have an optional Hands-Free Unit connected to your voice terminal.If you want it to go on automatically when you receive intercom calls so youcan answer them without lifting your handset, you need to program an AutoAnswer-Intercom button.
CONSIDERATIONS ● You should use the Auto Answer-Intercom feature instead of AutoAnswer-All to activate a Hands-Free Unit when intercom calls come in.
● If you want an answering machine to answer intercom calls, use the AutoAnswer-All feature instead of Auto Answer-Intercom. (See “AutoAnswer-All.”)
● You can have both Auto Answer-All and Auto Answer-Intercomprogrammed for your voice terminal; however, the two buttons cannot beturned on at your voice terminal at the same time.
● If you have a built-in speakerphone or Hands-Free Answer on Intercom,you don‘t need to program the Auto Answer-Intercom feature.
To program an Auto Answer-Intercom button, label a button that has lights,enter programming mode, and follow these steps:
1 Touch the button you want to program.
2 Dial *70.
3 Program another feature, or leave programming mode.
MERLIN II System Features 2-11

HOW TO USE To have your Hands-Free Unit go on automatically when you receiveintercom calls:
1 Touch Auto Answer-Intercom.The green light next to the button goes on.
To return to answering calls yourself:
1 Touch Auto Answer-Intercom again.The green light next to the button goes off.
Auto Intercom
DESCRIPTION You can use an Auto Intercom button for one-touch dialing of intercomnumbers. Program any intercom number onto an Auto Intercom button anduse the button instead of dialing the intercom number.
CONSIDERATIONS
PROGRAMMING
HOW TO USE
● You cannot have both an Auto Intercom button and a Manual Signalingbutton for the same person. If you try to program both, you deactivatethe one that you programmed earlier.
1
2
3
To
1
2
To
1
2
3
2-12 MERLIN II System Features
● If you program this feature onto a button with lights, the green light nextto the button goes on when the person at that intercom number uses thevoice terminal or uses the Do Not Disturb feature. When the person callsyou, the light next to the person’s Auto Intercom button flashes.
To program an Auto Intercom button, label an available button (one withlights is recommended, though not required), enter programming mode, andfollow these steps:
Touch the button you want to program.
Dial *91 plus an intercom number.
Program another feature or leave programming
place a ringing intercom call with one touch:
mode.
Touch the Auto Intercom button for the intercom number you want toreach.Your voice terminal speaker goes on and you hear ringing.
If the other person answers, lift your handset. If not, touch Speaker orSpeakerphone to cancel the call.
place announced intercom calls:
If the red light next to it is not already on, touch Intercom-Voice.
Touch the Auto Intercom button for the intercom number you want todial.Your speaker goes on and you hear a beep.
Lift your handset and begin speaking.
Automatic Line Selection
DESCRIPTION You can program the order in which your system makes lines available to youfor outside calls. For example, if you usually make long distance calls, youmight specify a WATS line as the first line in your Automatic Line Selection.Whenever you lift your handset or touch Speakerphone, the system connectsyou to the WATS line, unless you select another line manually. If the firstline in your Automatic Line Selection sequence is busy, the system connectsyou to your second choice line, and so forth.
● You can place up to eight lines in an Automatic Line Selection sequence.CONSIDERATIONS
● You can include either outside lines or intercom lines in the sequence, butyou should not mix the two types of lines.
● If your system is set for Dial Access for Line Pools or for Automatic RouteSelection, you probably won’t need Automatic Line Selection, unless youhave a private line.
● If you plan to program other features when you program Automatic LineSelection, you must program Automatic Line Selection first. If you’realready in the middle of a programming session, leave and reenterprogramming mode before you program Automatic Line Selection.
PROGRAMMING
HOW TO USE
To program an Automatic Line Selection sequence, enter programming modeand follow these steps:
1 Dial **
2 Touch the buttons in the order you prefer.
3 To program other features, dial ** again. Otherwise, leave programmingmode.
When you want to place an outside call:
1 Lift your handset or touch Speakerphone.The MERLIN II system connects you to the first free line in your Automatic Line Selectionsequence.
MERLIN II System Features 2-13

Automatic Route Selection
DESCRIPTION
CONSIDERATIONS
ADMINISTRATION
The Automatic Route Selection (ARS) feature allows the administrator tospecify how the system can route toll and local calls to minimize costs for thebusiness. Routing calls efficiently is especially important if the system:
● Has several different line pools, such as local, WATS, foreign exchange, ortie lines.
● Uses an alternate long distance company.
The system administrator determines the most efficient routes for calls todifferent area codes and exchanges and enters that information in the system.With ARS in place, people simply touch the Pool Access button and dial thetelephone numbers they want to reach, without selecting particular line poolsor dialing special routing digits. The MERLIN II system directs the call to theline pool that the administrator has designated as the best one for that type ofcall. If all the lines in the first-choice line pool are busy, the system routesthe call to the second-choice line pool and so on.
Only systems administered as pooled systems with ARS can use thisfeature. See “System Type. ”
In order to administer ARS, the administrator must have a completed setof Forms for Automatic Route Selection. These forms are provided inSection 2, “Planning the System, ” in the MERLIN II System Installation andAdministration Manual.
Valid digit entries for “Other Digits” (listed under the “Other Digits”heading on the “Form for Automatic Route Selection Table”) are: 0-9, *,Hold (Pause), Recall, and Transfer (Touch-Tone Enable). The # entry isnot valid.
Get the planning forms for ARS. Enter administration mode and follow theappropriate procedure below to administer ARS:
With a MERLIN II System Display Console
1 From the administration menu, touch [More], [Tables] to reach the ARSTables screens.
2 To specify how many tables are 6-digit tables:
a Touch [ARS-6dgt] .
b Dial the number of 6-digit tables (0 through 8) and touch [Enter] .
3 To add an area code or exchange to the Area Code/Exchange section of atable:
a On the Tables screen, touch [ARS-Inp] .
b Dial the table number (0 through 7) and touch [Enter] .
c Dial the entry number (00 through 99) and touch [Enter] .
d Dial the entry (an area code or an exchange).
e For each additional entry, touch [Next] and dial the entry.
f Touch [Enter] .
2-14 MERLIN II System Features

4 To delete an area code or exchange from the Area Code/Exchange sectionof a table:
a On the Tables screen, touch [ARS-Inp] .
b Dial the table number (0 through 7) and touch [Enter] .
c Dial the entry number (00 through 99) and touch [Enter].
d Touch Drop.
e Touch [Enter] .
5 To add pool number, other digits, and absorption codes, if required, tothe Pool, Absorb, and Other Digits section of a table:
a On the Tables screen, touch [ARS-Pool].
b Dial the table number (0 through 9), dial the entry number (0 through5), and touch [Enter].
WARNINGIn order to add pool number, other digits, and absorption codes, theexisting digits and codes as well as the entry pool number you areabout to dial have to be cleared out. The next step clears other digitsas well as the absorption code.
c Dial the entry (pool number) and touch [Enter].
d Dial any other digits required.
e Perform the appropriate step:
➤ To add an absorption code to this entry, touch [Enter] and go on tostep f.
To enter the pool number for the next entry on this table, touch[Next] and go back to step c.
f Dial an absorption code (0 through 5).
● 0 = none
● 1 = leading 1
● 2 = area code
● 3 = 1 + area code
● 4 = 1 + exchange
● 5 = 1 + area code + exchange
g Perform the appropriate step:
To administer the next entry for this table, touch [Next] and goback to step c.
To administer entries for another table, touch [Enter] and go backto step a.
6 To delete a pool number (action also deletes any other digits andabsorption type):
a From the Tables screen, touch [ARS-Pool] .
b Dial the table number (0 through 9).
MERLIN 11 System Features 2-15

c
d
e
f
7 To
a
b
c
Dial the entry number (0 through 5) and touch [Enter] .
Touch Drop.This clears out any entry already there.
Perform the appropriate step:
Dial a new pool number and touch [Enter] to enter a new poolnumber, or
Touch [Enter] to insert a blank entry.
Touch [Exit] to return to the Tables screen.
add or delete other digits in the Special Number Table:
From the Tables screen, touch [Spc/Nm] .
Dial the other digits or touch Drop to remove digits.
Touch [Enter] .
8 When you’ve entered all the information from the Forms for ARS Tables,touch Conference.
9 If you want a printout of the ARS tables, follow these steps:
a
b
c
From the administration menu, touch [More], [More], [Print], [More] .
Touch [ARS] to begin printing.
Touch Conference to return to the administration menu, or leaveadministration mode.
With a BIS-34D Console
Administering the Area Code/Exchange Sections
1 Touch Message.
2 If you are setting Up a new system and don’t need any 6-digit tables, goon to step 3, If you have 6-digit tables, perform this step:
To specify how many of your ARS tables should be 6-digit rather than 3-digit tables, dial #305, then the number of tables (0 through 8) that shouldbe 6-digit tables.
If you enter: These tables are 6-digit:
# 3050 None# 3051 Table 0 only# 3052 Tables 0 and 1# 3053 Tables 0, 1, and 2# 3054 Tables 0 through 3# 3055 Tables 0 through 4# 3056 Tables 0 through 5# 3057 Tables 0 through 6# 3058 Tables 0 through 7
3 Dial #6.
4 Dial the table number (0 through 7).
2-16 MERLIN II System Features

5 Dial the number (00 through 99) of the entry you want to record in thetable.
For 6-digit tables, entry 00 is the area code and entries 01 through 99 areexchanges within that area code. For 3-digit tables, all the entries are areacodes or exchanges.
6 If you want to remove an entry, touch Drop.
7 Dial the area code or exchange you want to record.
8 Repeat steps 3 through 7 for each table entry you want to administer.
9 If you need to administer the Pool, Absorb, and Other Digits sections ofyour tables, go on to step 2 of the next procedure. If not, go on to step 10below.
10 If you have a printer connected to your system, dial #902 to get a printoutof the complete set of ARS tables.
11 Touch Message and go on to another procedure, or leave administrationmode.
Administering the Pool, Absorb, and Other Digits Sections:
1 Touch Message.
2 Dial #7.
3 Dial the table number (0 through 9)
4 Dial the number (0 through 5) of the entry you want to record.
5 To remove this entry, touch Drop, to add or change this entry, go on tostep 6.
6 Dial the pool number you want to record.
7 Dial any other digits needed, such as an access code and an account codefor an alternate long distance company, after the pool number. Yourecorded these numbers on the form labeled “Form for Automatic RouteSelection Table, ” under the heading, “Other Digits. ”
NOTE: Make sure to enter the required number of pauses between theaccess code and the account code for an alternate long distance company.The average number of pauses is four, but some systems may work betterwith either fewer or more pauses. Be sure to add one pause after theaccount code as well.
8 After you have administered a pool number and any other digits required,you can associate an absorption type with the line pool. Follow thesesteps to add, change, or remove an absorption code:
a Dial #7, then dial the table number (0 through 9), then dial thenumber (0 through 5) of the entry you want to record.
b The system is factory-set not to absorb any digits that callers dial. If aline pool requires absorption, enter the appropriate code to tell the
MERLIN II System Features 2-17

HOW TO USE
system how many digits to drop if the user dials an unnecessary tollprefix, area code, or exchange for this type of line pool:
● 0 = No absorption
● 1 = Absorb leading 1
● 2 = Absorb area code
● 3 = Absorb 1 I- area code
● 4 = Absorb 1 + exchange
● 5 = Absorb 1 + area code + exchange
Check to be sure the entry shown on the display is correct. If necessary,repeat the procedure.
NOTE: If you change the pool number or other digits for an entry that hasabsorption type 1 through 5 associated with it, the system changes theabsorption type to 0 (no absorption). You must perform this step again ifyou want to restore an absorption type to an entry that you have changed.
9 Repeat steps 2 through 8 for each table entry you want to administer.You must perform these steps in order to add a new entry or change thepool number, other digits, or absorption type of an existing entry.
10 If you want to add, change, or remove an access code that must be dialedto reach the numbers on the Special Numbers table, dial #800 andperform one of the following operations:
T o
To
Checkrepeat
add or change an access code, perform step 7.
remove an access code, touch Drop.
to be sure the entry shown on the display is correct. If necessary,the procedure.
11 If you have a printer connected to your system, you can get a printout ofthe complete set of ARS tables. Otherwise you can activate the ARSfeature at this time by going on to the next procedure. To order aprintout, dial #902.
12 Touch Message and go on to another procedure, or leave administrationmode.
To place a outside call using ARS:
1 Touch one of the Pool Access buttons, unless a red light next to thebutton is already on.
2 Lift your handset or touch Speakerphone.
3 Dial the outside telephone number you want.You hear beeps instead of Touch-Tones or rotary clicks as you dial.
4 Wait a few moments for the call to be completed.
If you hear a busy signal that is faster than normal:
1 Touch the same Pool Access button you used to begin your call.
If you hear a fast busy signal again:
1 Disconnect and try your call again
2-18 MERLIN II System Features
later.

Basic Telephones
DESCRIPTION
CONSIDERATIONS
ADMINISTRATION
HOW TO USE
On-premises basic Touch-Tone telephones can be connected to station jackson a 12-Basic Telephone (012) Module with Touch-Tone Receivers. Peoplewith these basic telephones can use many of the features of the MERLIN IIsystem by using dial codes and switchhook flashes.
●
●
●
NOTE: The information in this entry applies only to basic telephonesconnected to Basic Telephone Modules. For information on using abasic telephone connected to an Off-Premises Telephone Interface(OPTI) or a Basic Telephone and Modem Interface (BTMI), see “BasicTelephones with OPTI and BTMI” in “Accessory Equipment” at theend of this section.
When the system administrator assigns lines or line pools to basictelephones, he or she must provide users with a list of codes for accessingthem.
If Night Service with outward Restriction is in effect, people with basictelephones cannot enter a Password to make calls. To allow them to makeafter-hours calls, the administrator must assign these basicthe Night Service Exclusion list. (See “Night Service.”)
Basic telephones can receive ringing intercom calls, but notwith voice announcement.
telephones to
intercom calls
You use the same general procedures for administering basic telephones thatyou use for administering standard voice terminals. G-et the completed BasicTelephone Station Configuration Forms for the telephones. Then follow theinstructions under the appropriate entries in this section of the manual toassign lines or line pools and to assign Call Restriction, Forced Account CodeEntry, and Night Service Exclusion, if applicable.
You can use Centralized Programming to assign features to basic telephones.
Follow the procedures in the appropriate entries in this section of the manualto assign features to basic telephones.
Follow these directions to place calls on a basic telephone connected to a BasicTelephone Module:
●
●
●
●
If you have a square system, dial 88 to access an outside line. The systemautomatically connects you to the first available line assigned to yourtelephone.
If your system has Button Access to Line Pools, dial 9 to access the mainpool. You can dial 88 to access another available line or line pool, if one isassigned to your telephone.
If your system has Dial Access to Line Pools, dial 9 and then dial the codefor a particular line pool. You can dial 88 to access an additional line ordedicated line pool, if one is assigned to your telephone.
If your system has Automatic Route Selection, dial 9 and then dial theoutside number. If the administrator assigns an individual line or linepool, you dial 88 to access it.
MERLIN II System Features 2-19

Ask your administrator whether you can use dial codes to access particularlines or line pools. If so, he or she can give you a list of codes.
For more information on using a basic telephone connected to a BasicTelephone Module, see the User’s Guide: Basic Touch-Tone and Rotary Telephonesfor the MERLIN II Communications System with Feature Module 2.
Behind-Switch Operation
DESCRIPTION The MERLIN II system can be sent to operate behind another system, such asa PBX or Centrex system. This operating module lets MERLIN II systemusers take advantage of the features provided by both systems.
A system administered for behind-switch operation has several characteristicsthat distinguish it from other system types, as shown below.
LinesWhen a behind-switch system is first set up, the system assigns lines asfollows:
● At all nonattendant stations, the system assigns a single prime line. Theprime line is the user’s line in the host system and rings immediately forincoming calls. The user always gets connected to this line (even when itis busy), unless the user manually selects a different line. Theadministrator can assign additional, secondary lines to the voice terminal.Secondary lines are initially set for delayed ring.
● At attendant consoles, the system assigns all the outside lines to theconsole. The first line is the prime line, and the rest are secondary lines.These lines are assigned to buttons in the same order as lines assigned toattendant consoles in other types of systems. By default, the prime line isset for immediate ring and the secondary lines for delayed ring.
The default line assignments and ringing options can be changed. Forexample, if there are two or more standard attendant consoles, the additionalconsoles must be readministered so that each has a unique prime line. Formore information, see “Line Assignments in Behind-Switch Systems ‘r and“Ringing Options” in this section.
Fixed FeaturesTouching Conference, Drop, or Transfer sends an administered signal to thehost switch to perform the function in the host system. To use the MERLINII system Conference, Drop, and Transfer features, you can program localfixed feature buttons, as described in “Programming,” below. See “CampOn” for instructions on programming and using the Camp On feature.
NOTE: The Hold button works the same way in both systems, sothere is no need to program it for local use.
Ringing PatternsIn most cases, the ringing patterns for incoming calls are different for thehost system that for the MERLIN 11 system. In behind-switch mode, voice
2-20 MERLIN II System Features

terminals and basic telephones take on the ringing patterns of the hostsystem.
CONSIDERATIONS
ADMINISTRATION
● Behind-switch operation is a system type, equivalent to square, pooled,and pooled with Automatic Route Selection. Therefore, a system set forbehind-switch operation cannot have line pools and cannot use AutomaticRoute Selection.
● In the MERLIN 11 system, “ #” is the first character in the dual codes usedto access various features. In behind-switch mode, however, users touch# to signal the host switch while they are active on a call. If a user in abehind-switch system needs to enter feature codes while active on a call,he or she must program a Speed Dial Access button (see “Programming,”below). He or she touches the button instead of touching #, then dialsthe code.
● In systems set for behind-switch operation, there is no One-TouchTransfer feature. People with MERLIN II system voice terminals can usethe Transfer with Voice Announcement and Call Park features, however,if they program local Transfer and Camp On buttons, as shown below.
● Speed dial numbers programmed on the host switch appear on MERLIN IIsystem Call Reports (SMDR records as the code for the speed dial “ # “),but aren’t subject to MERLIN II system Call Restriction.
● People using basic telephones in behind-switch systems can only accesstheir primary lines. They can receive but cannot make intercom calls, andthey cannot use any MERLIN II system features.
To set your system for behind-switch operation, enter administration modeand follow the appropriate procedure below.
With a MERLIN II System Display Console
1 From the administration menu, touch these
[More], [BehindSw].You see the message “System is Re-starting,” and the
buttons [System], [Type],
administration menu reappears.
2 To
a
b
c
d
assign host system codes to fixed feature buttons, follow these steps:
Touch these buttons: [More], [Options], [More], [BehindSw] .
Touch the appropriate button ( [Transfer], [Drop], or [Conference]).
Dial the host system code for the fixed feature,
To assign a host system access code to the button, dial the appropriatecode (up to 6 characters, including 0 through 9, *, #, Hold [pause],and Recall). If you don’t dial a code, the button keeps the defaultfeature, Recall.
Touch [Enter].
3 Touch Conference to return to the administration menu, or leaveadministration mode.
To configure lines see “Line Assignments in Behind-Switch Systems, ” in thissection.
MERLIN II System Features 2-21

With a BIS-34D Console
PROGRAMMING
1
2
3
4
5
6
Touch Message.
Dial # 202.If the system can be administered, the green light next to Message is steady.
When you hear a 2-beep signal to begin, dial 4.After several seconds, the lights next to Adm Pool, Adm Tel, Message, and Speakerbegin to /lash.
Touch Message,
You can assign dial codes of up to six digits to the Conference, Drop, andTransfer buttons to access these features in the host system. To assigncodes:
a Dial #328.
b Touch Conference, Drop, or Transfer.
c To assign a host system access code to the button, dial the appropriatecode (up to 6 characters, including O through 9, *, #, Hold [pause],and Recall). If you don’t dial a code, the button keeps the defaultfeature, Recall.
Touch Message and go on to another procedure, or leave administrationmode.
In systems set for behind-switch operation, you can program buttons that letyou:
● Use dial codes to access features while you’re on a call
● Use the MERLIN II system Conference, Transfer, and Drop featuresinstead of the equivalent features of the host system
Speed Dial Access ButtonTo program a Speed Dial Access button, label an available button, enterprogramming mode, and follow these steps:
1 Touch the button you want to program.
2 Dial *20.
3 Leave programming mode.
Local Conference, Drop, and Transfer ButtonsTo program fixed feature buttons for use with the MERLIN II system only,label the button(s), enter programming mode, and follow these steps:
1 Touch the button you want to program.
2 Dial the appropriate code:
Dial *96 for Local Conference
Dial *97 for Local Drop
Dial *99 for Local Transfer
3 Program another feature, or leave programming mode.
2-22 MERLIN II System Features

BIS/HFAI Terminal
B r i d g i n g
HOW TO USE Some features operate differently if a MERLIN II system is behind anothersystem. Note these differences in the “Considerations” subsection of eachfeature entry in this section of the manual. For information on how to usethe speed dial access button in behind-switch systems, see “ PBX, Centrex,or Custom Calling Features” in this section.
NOTE: To use the fixed button features of the host system, use theinstructions that came with that system.
Generally, the Local, Conference, Hold, and Drop buttons function asdescribed in this section for each feature where the use of these buttons isapplicable.
See “Voice Terminal Type. ”
DESCRIPTION If you have a line with another person in a square or behind-switch system,you can easily join (or “bridge” onto) a call in progress on that line. In thisway YOU can also join a conference call by just touching a line button and
CONSIDERATIONS
HOW TO USE
lifting your handset. (See “Conference.” )
●
●
●
To
1
2
A maximum of three people connectedincluding the originator of the call, can
to the MERLIN II system,bridge
If any of the people on the call have activatednot be able to bridge onto the call.
Under extremely heavy use of the Conference
onto a call at one time.
the Privacy feature, you will
feature, other people in the
system may not be able to initiate a conference call or add moreparticipants to a conference in progress by bridging.
bridge onto a call in progress:
Touch the line button associated with the call.
Lift your handset.
MERLIN II System Features 2-23

Call Coverage
DESCRIPTION
CONSIDERATIONS
PROGRAMMING
The Call Coverage feature allows you to cover calls, including intercom calls,for people in your MERLIN II system, even if their lines do not appear onyour voice terminal. You can program Cover buttons for as many a six voiceterminals, depending on how many programmable buttons with lights youhave available.
A Cover button may be programmed for primary or secondary coverage.
● Primary coverage is appropriate for someone who usually answers a co-worker’s calls. For example, a secretary who screens calls for a managershould have primary coverage for the manager.
Cover buttons for primary coverage may be programmed for immediatering or delayed ring, depending upon the situation and personalpreferences. If you program a primary coverage button for delayed ring,the call rings twice at the voice terminal of the person whose calls arebeing covered, then begins to ring at the voice terminal of the person whois covering the calls.
● Secondary coverage is appropriate for a backup person who answers calls ifthe person providing primary coverage isn’t available. For example, asecretary who screens a manager’s calls can designate someone else toanswer those calls when he or she isn’t available. After a call has rungfour times at the voice terminal of the person whose calls are beingcovered, it begins to ring at the voice terminal for the person providingsecondary coverage.
When Call Coverage is in effect, calls ring both at the voice terminal of theperson whose calls are being covered and the voice terminal of the personproviding coverage.
● You can use the Ringing Options feature as well as Call Coverage to covershared lines (See “Ringing Options. ” )
● Cover buttons are set initially for no ring, but you can program them forimmediate or delayed ring.
● Up to six people in the system can have Cover buttons for an individualvoice terminal.
● Only the person who is covering someone else’s calls needs to program aCover button. No programming is required to have your calls covered.Someone whose calls are being covered may want to program a CoverageInhibit button, however. Pressing this button deactivates the CallCoverage feature at the voice terminal of the person providing coverage.(See “Coverage Inhibit.”)
To program Call Coverage, label a button with lights, enter programmingmode, and follow these steps:
1 Touch the button you want to program.
2 Dial *40 to assign primary coverage or *50 to assign a secondary coverage.
3 Touch the Auto Intercom button or dial the intercom number of theperson you are covering.
4 To assign a Ringing Option, touch the Cover button, then dial theappropriate code for the type of ringing you prefer:
2-24 MERLIN II System Features

Dial *35 for no ring.The red light next to the button goes off.
HOW TO USE
Dial *36 for delayed ring.The red light next to the line button flashes.
Dial *37 for immediate ring.The red light next to the line button goes on steady.
5 Program another feature or leave programming mode.
When you receive a call for the person you are covering, your voice terminalrings unless you have programmed the Cover button for no ring. The greenlight next to the Cover button flashes. The red light moves to the Coverbutton, unless you are on another call.
To answer a call for a person whose calls you are covering:
1 Touch Cover, if the red light isn’t already on next to this button.
2 Lift your handset or touch Speakerphone.
Call Forwarding and Follow Me
DESCRIPTION With the Call Forwarding and Follow Me features, you can have your callsring at a voice terminal in another location, such as a lab, conference room, orcolleague’s office. Outside, intercom, and transferred calls are forwarded tothe destination voice terminal, where they appear as ringing intercom calls. Ifboth Intercom buttons on the destination voice terminal are in use, the callwaits in a queue until a button becomes available or the caller abandons thecall.
CONSIDERATIONS
You activate Call Forwarding at the originating voice terminal (your own voiceterminal), specifying the voice terminal to which calls should be forwarded.You activate Follow Me at the destination voice terminal, the one to whichyour calls should be forwarded.
Calls can’t be forwarded to voice terminals that have Do Not Disturbactivated.
Voice announcements can’t be forwarded.
Forwarded calls can be answered using Call Pickup or Auto Answer-All.
A call can only be forwarded once. For example, if voice terminal A’scalls are forwarded to voice terminal B and voice terminal B‘s calls areforwarded to voice terminal C, a call that comes into A is forwarded to B,but not on to C.
Call Forwarding and Follow Me can’t be in effect at the same time at avoice terminal. Activating one feature removes the other automatically.
An originating voice terminal can have only one destination voiceterminal. However, a voice terminal can serve as the destination for morethan one originator.
MERLIN II System Features 2-25

PROGRAMMING To program a Call Forwarding button, label a button with lights, enterprogramming mode, and follow these steps:
HOW TO USE
1 Touch the button you want to program.
2 Dial *33.
3 Program another feature or leave programming mode.
Follow the appropriate steps below to activate or cancel Call Forwarding orFollow Me.
Activating Call Forwarding
1 Take one of these actions:
Touch Call Forwarding.
Touch Intercom-Ring, lift the handset, and dial *89.
2 Touch the Auto Intercom button or dial the intercom number of the voiceterminal to which calls should be forwarded (the destination voiceterminal).The green light next to Call Forwarding goes on.
If the light remains off, repeat the procedure.
Canceling Call Forwarding
1 Take one of these actions:
Touch Call Forwarding.
Touch Intercom-Ring, lift the handset, and dial *89.
2 Dial your intercom number.The green light next to Call Forwarding goes off.
Activating Follow Me
1 At the destination voice terminal, touch Intercom-Ring.
2 Lift the handset.
3 Dial ’80.
4 Touch the Auto Intercom button or dial the intercom number of yourvoice terminal.
Canceling Follow Me
1 At your voice terminal, take one of these actions:
Touch Call Forwarding.
Touch Intercom-Ring, lift the handset, and dial *80.
2 Dial your intercom number.The green light next to Call Fowarding goes off.
2-26 MERLIN II System Features

Call Park
DESCRIPTION
“
CONSIDERATIONS
PROGRAMMING
HOW TO USE
You can use the Call Park feature to put an outside or intercom call on holdtemporarily, that is, to park the call at your own voice terminal. Thenanother person can pick the call up from any voice terminal in the system.
The Call Park feature is especially useful in a pooled system. The attendantcan park a call and then tell the person for whom the call is intended whichline to pick up.
To access this feature you can use a programmed Call Park button or youcan touch Transfer and dial your own intercom number.
When used with the Loudspeaker Page feature (see “Loudspeaker Page”),the Call Park feature can be particularly helpful to attendants. If theattendant needs to transfer a call to someone who may be in one ofseveral locations, he or she can park the call and the use the loudspeakersystem to announce the call. The person for whom the call is intendedcan use the Call Pickup feature (see “Call Pickup” ) to answer the call.
An attendant in a square system can use Call Park to transfer a call tosomeone who doesn’t have a button for the line on which the call camein. The attendant parks the call and announces it through the person’svoice terminal speaker. The person can use Call Pickup to answerthe call.
To program a Call Park button, label a button,follow these steps:
enter programming mode, and
1
2
3
To
1
2
Touch the button you want to program.
Dial *86.
Program another feature or leave programming mode.
park a call:
Take the appropriate action:
Touch Call Park.
Touch Transfer, then dial your own intercom number.
If you have a loudspeaker page system and want to page the person forwhom the call is intended, follow these steps:
a Touch Loudspeaker Page or touch Intercom-Voice, dial *99, and dialthe Loudspeaker Page line number.
b If you have a multizone paging system, wait for the dial tone, thendial the number for the appropriate zone.
c Announce the call and tell the person youPickup to answer it.
d Hang up.
If the call is not picked up within 3 minutes, your
are paging to use Call
voice terminal beeps toremind you that ‘the call is still parked.
MERLIN II System Features 2-27

Call Pickup
DESCRIPTION
CONSIDERATIONS
PROGRAMMING
HOW TO USE
You can use the Call Pickup feature to answer a call that is ringing, parked,or on hold anywhere in the MERLIN II system.
You can access this feature by dialing the Call Pickup code. If you prefer,you can program a general Call Pickup button that you touch instead ofdialing the code. You can also program individual Call Pickup buttons to pickup calls at specific voice terminals or on specific lines.
●
●
●
Unless you have a button programmed to pick up calls at a specific voiceterminal or on a specific line, you must know the line number or theintercom number of the voice terminal where the call came in order to useCall Pickup.
When used with the Loudspeaker Page or Group Page features, CallPickup can be particularly helpful to attendants. If the person for whomthe call is intended may be in any of several location, the attendant canpage the person and tell him or her to use Call Pickup to answer the call.
In a square system, the attendant can transfer a call to someone whodoesn’t have a call button for that line by announcing the call andinstructing the person to use Call Pickup.
To program a Call Pickup button, label a button, enter programming mode,and follow these steps:
1 Touch the button you want to program.
2 Dial *84.
3 If you want to make this an individual Call Pickup button, dial theintercom number or line number.
4 Program another feature or leave programming mode.
You can use a dial code or a programmed button to pick up a call at any voiceterminal in the system.
To
1
2
3
4
To
1
2
3
pick up a call using a dial code:
Touch Intercom-Ring or Intercom-Voice.
Lift your handset.
Dial *9.
Dial the line number or dial the intercom number of the voice terminalwhere the call is ringing or on hold.
pick up a call using a button:
Touch Intercom-Ring or Intercom-Voice.
Lift your handset.
Take the appropriate action:
Touch the Call Pickup button for the particular line or intercomnumber.
Touch Call Pickup, then dial the line number or the intercom numberof the voice terminal where the call is ringing or on hold.
2-28 MERLIN II System Features

Call Pickup Groups
DESCRIPTION A member of a Call Pickup Group can answer a call that is ringing at anyother group member’s voice terminal by just dialing a code or touching abutton. The group member picking up the call doesn’t need to know theintercom number of the ringing voice terminal. The system connects him orher to the ringing voice terminal automatically.
Group members can pick up intercom, outside, transferred, and covered callsat each other’s voice terminals. They can transfer outside calls to other voiceterminals in the system,
CONSIDERATIONS
ADMINISTRATION
● A system can have up to 30 Call Pickup groups, each containing as manyas 15 members. A voice terminal can be assigned to only one group.
● If a member of the group has activated the Coverage Inhibit feature, a callringing at that voice terminal can’t be picked up by other group members.
Check the Call Pickup Groups Form to see which voice terminals should beassigned to each group. To set up or change Call Pickup Groups, enteradministration mode and follow the appropriate procedure below.
With a MERLIN II System Display Console
1 From the administration menu, touch [Stations], [More], [More], [PickUp] .
2 Dial a group number (01 through 30).
3 Touch [Enter].
4 Touch the Auto Intercom button of each voice terminal until the light nextto the button shows the appropriate code:
Green on = voice terminal included in Call Pickup groupGreen off = voice terminal not included in Call Pickup group
5 Touch [PickUp] and repeat steps 2 through 4 to create other groups.
6 Touch Conference to return to the administration menu, or leaveadministration mode.
With a BIS-34D Console
1 Touch Message.
2 Dial # 327.
3 Dial the number (01 through 30) of the Call Pickup group that you wantto set up or change. .
4 Touch the Auto Intercom button of each voice terminal you want to addto or remove from this group until the light next to the button showsthe appropriate code.
Green light on = voice terminal is in the Call Pickup groupGreen light off = voice terminal is not included in the Call Pickup group
5 Repeat steps 2 through 4 for each Call Pickup group you want to set upor change.
6 Touch Message and go on to another procedure, or leave administrationmode.
MERLIN II System Features 2-29

PROGRAMMING To program a Call Pickup Group button, label a button, enter programmingmode, and follow these steps:
1 Touch the button you want to program.
2 Dial *32.
3 Program another feature or leave programming mode.
HOW TO USE To pick up a call at another group member’s voice terminal:
1 Take the appropriate action:
Touch the Call Pickup Group button.
Touch Intercom-Voice or Intercom-Ring, lift your handset, and dial*88.
2 When you hear a beep or when someone answers, speak into yourhandset.
Call Report
DESCRIPTION The Call Report feature enables a business to keep records of incoming andoutgoing calls. (In some communications systems, this feature is calledStation Message Detail Recording, or SMDR.)
NOTE: This feature requires a printer to be connected to the top porton the Processor Module.
This feature provides the following type of information in a printed report foreach incoming and outgoing call:
CONSIDERATIONS
● T h e
● The
● T h e
● T h e
date and time of each call
call’s duration
line and voice terminal on which the call was made or received
dialed numbers of the outgoing call, and, if appropriate, the accountcode
Call reports are printed automatically as tails go out or come in. Thisinformation helps a business identify abuses in telephone privileges. CallReport also documents telephone traffic patterns that can be analyzed toimprove efficiency.
If an account code is entered when the call is made, the call report includesthat information. Account codes are helpful in billing customers and differentdepartments of the company for telephone calls that should be charged tothem. (See “Account Code Entry.”)
● When the system administrator administers the system for the Call Reportfeature, he or she can set certain options:
The administrator must set the initial time and date, so that thesedetails appear correctly on the call report.
2-30 MERLIN II System Features

ADMINISTRATION
Although the system is factory-set to record incoming as well asoutgoing calls, the administrator can set the system not to recordthem.
The system is factory-set to record only outgoing calls that last at least1 minute. However, the system administrator can change that settingfor a longer (up to 99 minutes) or shorter (as little as 10 seconds)minimum duration.
If the administrator has assigned a System Speed Dial code to anoutside number, he or she can specify which of these numbers shouldbe printed on call reports and which should remain private. When theadministrator designates a System Speed Dial code as private or“marked,” the 3-digit code (#60 through #99) is printed on the callreport in place of the telephone number. (See “System Speed Dial.”)
● A call report includes only the first 15 digits of a telephone number oraccount code. If the number contains more than 15 digits, a “?” is printedon the sixteenth position.
For both Call Report and Night Service, the administrator must set the initialtime and the date, and reset the time as needed, such as when daylightsaving times goes into effect. For Call Report, the administrator has theoption of setting the type of calls and the minimum duration of a call that willbe reported.
Enter administration mode and follow the appropriate procedures belowset the time and date, if necessary, and to specify Call Report options.
Setting the System Time and Date with a MERLIN II System DisplayConsole
to
1
2
3
4
5
6
7
From the administration menu, touch [System], [Mode], [Time] .
Dial two digits for the hour (00 through 23) and two digits for the minute(00 through 59).
Touch [Enter] .
Touch [Date] .
Dial two digits for the month (01 through 12), two digits for the day (00through 31), and two digits for the year (00 through 99).
Touch [Enter] .
Touch Conference to return to the administration menu.
Setting the System Time and Date with a BIS-34D Console
1 Touch Message.
2 To set the current time, dial #300.
3 Dial two digits for the hour (00 through 23).
4 Dial two digits for the minute (00 through 59).
For example, if the time is 9:16 a.m., dial #300 09 16; if the time is1:16 p.m., dial #300 1416.
Check the time shown on the display. If itinformation again.
isn’t correct, enter the
MERLIN II System Features 2-31

5
6
7
8
9
10
Touch Enter.
To set the current date, dial # 301.
Dial two digits for the month (01 through 12).
Dial two digits for the day (01 through 31).
Dial two digits for the year (00 through 99).
For example, if the date is August 24, 1988, dial #301 082488.
Check the date shown on the display. If it isn’t correct, enter theinformation again.
Touch Message and go to another procedure or leave administrationmode.
Specifying Call Report Options with a MERLIN II System Display Console
1
2
3
4
5
6
7
8
9
10
From the administration menu, touch [More], [Options], [More], [SMDR] .
Touch [CallLen] .
Dial the minimum call duration in minutes (00 through 99).
Touch
Touch
Touch
[In/Out]
[Enter].
[CallRep].
the appropriate key for the types of calls you want recorded:
= record incoming and outgoing calls
[OutOnly] = record outgoing calls only
Touch Conference to return to the administration menu.
To get a printout of your Call Report options, touch [More], [More], [Print],
[More], [More] .
Touch [SMDR] to begin printing.
Touch Conference to return to the administration menu, or leaveadministration mode.
Specifying Call Report Options with a BIS-34D Console
1
2
3
4
5
Touch Message.
Dial #391, then perform the appropriate step:
Dial 0 if you want only outgoing calls reported.
Dial 1 if you want outgoing and incoming calls reported.
To specify a minimum call duration other than 1 minute for call reporting,dial # 390, then dial the number of minutes (00 through 99). If you dialCO, the minimum call duration will be 10 seconds.
For example, to specify a minimum duration of two minutes, dial #390 02.
To get a printout of your Call Report options, dial #905 and wait for thebeep.
Touch Message and go on to another procedure, or leave administrationmode.
2-32 MERLIN II System Features

Resetting the Printer with a MERLIN II System Display ConsoleFollow the procedure below if the printer doesn’t form feed automatically andthe report heading appears anyplace but at the top of the page.
1 From the administration menu, touch [Options], [Record], [New Page] .
2 Touch Conference to return to the administration menu, or leaveadministration mode.
Resetting the Printer with a BIS-34D ConsoleFollow the procedure below if the printer doesn’t form feed automatically andthe report heading appears anyplace but at the top of the page.
1 Touch Message.
2 Dial #399.
3 Touch Message and go on to another procedure, or leavemode.
administration
Call Restriction
DESCRIPTION When the system is first installed, people can use their voice terminals toplace intercom, local, and toll calls. However, the administrator can assigneither of two types of call restrictions for selected voice terminals:
● Outward Call Restriction. Restricts voice terminals sointercom calls.
● Toll Call Restriction. Restricts voice terminals so theyintercom and local calls.
they can place only
can place only
CONSIDERATIONS
ADMINISTRATION
● If the call restrictions are too limiting, the administrator can set up one ormore allowed list, lists of numbers that individuals may call beyond theestablished restrictions. (See “Allowed Lists. ” )
● Even though a voice terminal is restricted in placing calls, the user can stillreceive all types of incoming calls. Someone with a restricted voiceterminal can bridge onto any call or conference call in progress.
To restrict voice terminals to local calls only, the system must be able toidentify toll calls as people dial them. The System Configuration Form showswhich lines in your system, if any, do not require a toll prefix (0 or 1) for longdistance calls. If you have lines on which it is not necessary to dial a tollprefix, you need to identify those lines before you assign Call Restrictions.
Enter administration mode and follow the appropriate procedure(s) below toset up or change Call Restriction.
MERLIN II System Features 2-33

With a MERLIN II System Display Console
NOTE: If a toll prefix is required on all your lines, skip the procedurebelow and go on to “Administering Call Restrictions. ”
Identifying Toll Types for Selected Lines
1 From the administration menu, touch [Lines], [TollType] .
2 Touch the line buttons until the lights show the appropriate code:
Steady green on = toll calls detected by toll prefix onlyGreen off = toll calls detected by area code or toll prefix
3 Touch Conference to return to the administration menu and go on to thenext procedure.
Administering Call Restrictions
1 From the administration menu, touch [Stations], [Restrct].
2 Touch the Auto Intercom button for the voice terminal that you want torestrict.
3 Touch [Enter] .
4 Touch the appropriate key for the restriction you want on this voiceterminal:
[NoRestr] = unrestricted
[Local] = toll call restriction
[Intercom] = outward call restriction
As you touch the appropriate key, the Speaker button shows one of thesecodes:
Steady green on = all calls permitted (unrestricted)Flashing green = local and intercom calls and calls to numbers on assigned lists permitted
(toll call restriction)Green off = intercom calls and calls to numbers on assigned lists permitted
(outward call restriction)
5 Repeat steps 2 through 4 for each voice terminal you want to restrict.
6 Touch Conference to return to the administration menu, or leaveadministration mode.
Copying Line and Call Restriction Assignments
1
2
3
4
5
6
7
2-34 MERLIN II System Features
If you want to copy line assignments and Call Restriction assignmentsfrom one voice terminal to another, touch [Stations], [Copy] .
Touch the Auto Intercom button for the voice terminal you copy to copyfrom.
Touch [Enter] .
Touch the Auto Intercom button for the voice terminal that you want tocopy to.
Touch [Next] to select another voice terminal to copy to.
Touch [Enter] to choose a new voice terminal to copy from.
Touch Conference to return to the administration menu, or leaveadministration mode.
With a BIS-34D Console
NOTE: If you must dial 0 or 1 before dialing a long distance call,begin the following procedure with step 5. If you do not dial 0 or 1before dialing a long distance call, begin with step 1.
1 Touch Speaker.
2 Check the lights next to your line buttons. Green lights indicate that thesystem uses a toll prefix to detect a long distance call placed on this line.If you don’t dial toll prefixes in your area, no green lights should be on.
3 Touch each line button until the light next to it shows the appropriatecode:
Steady green on = system uses toll prefixes to defect long distance callsGreen light off = system detects long distance calls by urea code only
4 Touch Speaker.
5 Touch Adm Tel.
6 Touch the Auto Intercom button of the voice terminal you want to restrict.
7 Touch Speaker until the green light beside it shows the kind of callrestriction you want the voice terminal to have.
Steady green light on = Unrestricted (all calls permitted)Flashing green light = Toll restricted (local and intercom calls only)
Green light off = Outward restricted (intercom calls only).
8 Repeats steps 6 and 7 for each voice terminal you want to restrict.
9 If there are voice terminals in the system that will have the same callrestrictions, use the following shortcut to give another voice terminal thesame call restrictions as one you have already set up. However, be awarethat when you copy call restrictions, you also copy line and line poolassignments and Dial Access to Line Pools from the original voiceterminal.
a Touch the Auto Intercom button of the new voice terminal.
b Touch Recall.The red light next to Adm Tel flashes.
c Touch the Auto Intercom button of the original voice terminal.The red light stops flashing when the copy is complete.
10 Touch Adm Tel and go on to another procedure, or leave administrationmode.
Camp On
DESCRIPTION You can use the Camp On feature to transfer an outside call to a busy voiceterminal. The call stays on hold until the voice terminal becomes available,then rings through automatically. Camp On makes it unnecessary to placethe call on hold, recheck the busy voice terminal until it becomes available,and then transfer the call.
MERLIN II System Features 2-35

CONSIDERATIONS
ADMINISTRATION
PROGRAMMING
Calls can stay “camped” for up to five minutes without any attention from theperson who originated the Camp On procedure. However, if the busy voiceterminal doesn’t become available within the preset Camp On return interval,the call rings again at the originating console or voice terminal.
●
●
●
●
●
In order to receive a Camp On call on a particular line, the person musthave that line administered to his or voice terminal.
Camp On calls function like transferred calls at the receiving voiceterminal. To the caller and to other system users, Camp On calls appearto be on hold. The caller hears music while he or she is waiting, if thesystem has the Music-on-Hold feature.
If the voice terminal has Do Not Disturb activated, a Camp On call doesnot ring but the green light next to the line button flashes.
Only one Camp On call can be assigned to a particular button on a voiceterminal. This is true of Pool Access buttons as well as buttons forindividual lines and line pools.
The administrator can set the Camp On return interval from one to fiveminutes.
Enter administration mode and follow the appropriate steps below.
With a MERLIN II System Display Console
1 From the administration menu, touch [More], [Options], [CampOn] .
2 Enter the number of minutes (1 through 5) that calls should remaincamped.
3 Touch [Enter]
4 Touch Conference to return to the administration menu, or leaveadministration mode.
With a BIS-34D Console
1 Touch Message.
2 Dial #326.
3 Dial the number of minutes (1 through 5) that calls should remain campedbefore returning to the originating console or voice terminal.
4 Touch Message and go on to another procedure, or leave administrationmode.
To program a Camp On button, label a button,and follow these steps:
1 Touch the button you want to program.
2 Dial *29.
enter programming mode,
3 Program another feature, or leave programming mode.
2-34 MERLIN II System Features

HOW TO USE Follow these steps to use the Camp On feature:
1
2
If the voice terminal to which you are transferring a call is busy and thecaller is willing to wait, touch Camp On or dial #57.
Touch the Auto Intercom button or dial the intercom number of the voiceterminal to which you are transferring the call.
NOTE: You must enter this information within your system’s transferreturn interval or Camp On will be denied.
How are you notified of a Camp On call depends on what kind of telephoneyou have.
● If you have a MERLIN II system voice terminal, an abbreviated ring tellsyou that a Camp On call is waiting,
● If you have a basic telephone, you won’t be notified that a Camp On callis waiting. The Camp On call rings through automatically, however, assoon as your telephone becomes available.
Centralized Programming
DESCRIPTION The Centralized Programming feature lets administrators program featuresonto individual voice terminals directly from the administrator/attendant
CONSIDERATIONS
ADMINISTRATION
console. Thisprogramming,voice terminal
means you don’t have to go to each voice terminal to do thealthough you do needare labeled correctly.
to make sure the feature buttons on the
● If you use Centralized Programming to assign optional features to a7406 voice terminal, keep in mind that buttons on this type of voiceterminal are in different positions than they are on the analog voiceterminals. Figures 2-1 and 2-2 are diagrams of the buttons on the analogadministrator/attendant console and the corresponding buttons on thedigital 7406 voice terminal.
● The voice terminal that you are programming must be idle. If thevoice terminal is busy or in program mode, you hear a beep at theadministrator/attendant console. You cannot program the voice terminaluntil it becomes idle.
● Once you have begun Centralized Programming, the voice terminal thatyou are programming beeps every five seconds to remind the user that heor she cannot use the terminal until you have completed the programmingfrom your console. Any callers get a busy signal.
To program features onto a voice terminal the administrator/attendantconsole, enter administration mode and follow the appropriate procedurebelow.
MERLIN II System Features 2-37

With a MERLIN II System Display Console
1 From the administration menu, touch [More], [More], [CntrPrg] .
2 Touch the Auto Intercom button for the voice terminal to be programmed.
3 Touch [Enter] .
4 If the red light next to Adm Tel goes off and the console rings every 5seconds, go on to step 4. If not, wait for the light to go off or try againlater.
5 Perform the steps shown in the programming procedure for the feature,except for entering and leaving programming mode.
6 Touch Conference to return to the administration menu, or leaveadministration mode.
With a BIS-34D Console
1
2
3
4
5
When you see lights flash next to Adm Pool, Adm Tel, Message,Speaker, indicating that you are in administration mode, touchConference.The red light next to Adm Tel goes on.
and
Dial the intercom number for the voice terminal you want to program.The red light next to Adm Tel goes on.
NOTE: If the voice terminal you want to program is busy, the red lightnext to Adm Tel and the green light next to the Auto Intercom buttonflash alternately. You must wait for the voice terminal to become idlebefore going on. If you prefer not to wait, you can touch Conferenceagain and select another voice terminal to program, or touch Conferencetwice to stop programming.
When you hear two beeps, you can begin Centralized Programming.Follow the programming procedures described under the individualfeatures.
To program another voice terminal, repeat steps 1 through 3.
Touch Conference twice to go on to another administration procedure orleave administration mode.
2-38 MERLIN II System Features

FIGURE 2-1 Button location codes for analog voice terminals.
❑ #13
❑
❑
❑
#12
❑ #14
❑
❑ #15
❑
❑❑
#10
❑ #16
❑
❑ #09
❑
❑ #17
❑
❑❑
#08
❑ #18
❑
❑ # 19
❑
❑ #20
❑
❑ #21
❑
❑ #22
❑
❑ #23
❑
❑ #03
❑
❑ #24
❑
MERLIN II System Features 2-39

FIGURE 2-2 Button location codes for digital 7406 voice terminals.
oo #42
o lntercom-Voiceo #41
o lntercom-
o Ring#40
Message
oo #44
oo #43
Io Shift
o #15
o #16
o #17
Speaker
2-40 MERLIN II System Features

Conference
DESCRIPTION
CONSIDERATIONS
HOW TO USE
When you want other people to join a call in progress, you can use theConference feature. You can set up intercom conference calls among peopleconnected to the MERLIN II system, outside conference calls involving onlyyourself and people outside the system, or a combination of the two. Aconference call can include up to two people from outside the MERLIN IIsystem, up to two people who are connected to the MERLIN II system, andyourself, a total of five people.
●
●
●
●
●
●
To
1
2
3
4
People connected to the MERLIN II system can bridge onto an outsidethat is active in the conference call, unless one of the participants hasactivated Privacy.
line
You cannot bridge onto a call that already includes three people connectedto the MERLIN II system.
If all participants within the MERLIN 11 system place the call on hold,people on outside lines participating in the conference call can still confer.
If everyone in a conference call composed of only people connected to theMERLIN II system places the call on hold, the call is automaticallyterminated.
If you drop a line that has other people bridged onto it, those people arealso disconnected from the conference.
Under extremely heavy system use of the Conference feature, otherpeople in the system may not be able to initiate a conference call or addmore participants to a conference in progress.
set up a conference call when one of the participants is already on the line.
Touch Conference.
Touch a free line button.
Dial the number.
Announce the conference call.
If you don’t want the person already connected to the conference to listenwhile you connect the second person to the call:
1
2
3
4
5
6
To
1
To
1
Touch Hold.
Touch a free line button.
Dial the number.
Announce the conference call.
Touch Conference.
Touch the line button for the call you put on hold.
remove yourself from a conference without ending the call:
Touch Hold.
rejoin the call:
Touch a line button associated with the call.
MERLIN II System Features 2-41

To disconnect a participant in the conference call:
1 Touch Drop.
2 Touch the line button of the person you want to disconnect from theconference.
Coverage Inhibit
DESCRIPTION With a Coverage Inhibit button, you can temporarily deactivate the CallCoverage feature at the voice terminal of someone who has been coveringyour calls. Calls to your voice terminal do not ring at that voice terminal untilyou deactivate Coverage Inhibit. (See “Call Coverage. ” )
CONSIDERATIONS
PROGRAMMING
HOW TO USE
● This feature is very useful in a system with more than one attendant.When one attendant is away from his or her desk, the other attendant canuse the Call Coverage feature to answer all calls that would ordinarily ringonly at the first attendant’s console. When the first attendant returns, heor she can use the Coverage Inhibit feature to turn off Call Coverage sothat calls ring only at his or her console again.
To program aprogramming
1
2
3
To
1
To
1
Touch the
Dial *77.
Coverage Inhibit button, labelmode, and follow these steps:
button you want to program.
a button with lights, enter
Program another feature or leave programming mode.
stop Call Coverage:
Touch Coverage Inhibit.The green light next to the button goes on.
restore Call Coverage:
Touch Coverage Inhibit.The green light goes off.
2-42 MERLIN II System Features

Dialing Timeout Interval For Rotary Lines
DESCRIPTION When a person places an outside call on rotary lines, your system is
CONSIDERATIONS
ADMINISTRATION
factory-set to wait 12 seconds before connecting the call. This DialingTimeout Interval ensures that the caller hears Touch-Tones rather than clicks.As a result of this interval, people in your business may find they are beingconnected to calls after the person they are calling has already answered.
The system administrator can shorten the length of time that elapses beforethese calls are connected by decreasing the Dialing Timeout Interval to 8seconds. If that setting is also too long, the administrator can lower thesetting to 4 seconds, and then, if necessary, down to 0 seconds (no delay).
● If the administrator sets the Dialing Timeout Internal for 0 seconds(no delay), the person placing the call will hear clicks as he or she dialsthe outside number.
● When a person dials an outside number on a rotary line, he or she hearsthe MERLIN II system intercom dialing tone, not the usual outside dialingtone.
To set or change the Dialing Timeout Interval for rotary lines, enteradministration mode and follow the appropriate procedure, below.
With a MERLIN II System Display Console
1 From the administration menu touch these buttons: [More],
[More] , [More] , [Rotary] .
2 Dial the appropriate number to specify the timeout interval:
● 0 = 0 seconds
● 1 = 4 seconds
● 2 = 8 seconds
● 3 = 12 seconds
3 Touch [Enter] .
[Options]
4 Touch Conference to return to the administration menu, or leaveadministration mode.
With a BIS-34D Console
1 Touch Message.
2 Dial the appropriate code for the delay interval you prefer:
● #3170 for 0 seconds
● #3171 for 4 seconds
● #3172 for 8 seconds
● #3173 for 12 seconds
3 If you have a printer connected to your system, you can verify that thedelay is set the way you want it by checking your System Feature Report.To get
4 T o u c hmode.
a printout, dial # 905 and wait for the beep.
Message and go on to another procedure, or leave administration
MERLIN II System Features 2-43

Direct Inward System Access
DESCRIPTION
CONSIDERATIONS
ADMINISTRATION
The Direct InwardMERLIN 11 system
System Access (DISA) feature allows remote access tovoice terminals and lines. By placing calls on lines
administered for DISA, callers outside the system can do the following:
Place calls to a particular intercom number in the MERLIN II systemwithout going through an attendant
For example, a person working off site can call a co-worker directly, evenif the system is pooled and all incoming calls normally ring at anattendant’s console.
Access a line that is administered to the MERLIN II system and place acall on that line.
For example, a sales representative who is on the road can use thecompany’s WATS line to call prospects.
For security reasons, the administrator can set up this feature so that callersmust enter a password before placing a call. The administrator can also allowcallers to dial intercom numbers from outside the MERLIN II system butprevent them from accessing other system lines.
●
●
●
●
●
●
●
DISA lines must appear on buttons at the administrator/attendant console.
To take advantage of DISA, the caller must use a Touch-Tone telephone.The MERLIN II control unit must contain one or more modules withTouch-Tone receivers, such as the 4-Line Module with Touch-ToneReceivers or the 12-Basic Telephone (012) Module.
Callers using the DISA feature cannot make announcements using theLoudspeaker Page or Group Page feature, use Automatic Route Selection,nor enter an account code.
The system treats DISA calls to intercom numbers as transfer calls.Therefore, in square and behind-switch systems, the voice terminal towhich the call is directed must have a button for the line on which the callcame in. After the connection is made, the call becomes a standardoutside call.
DISA calls cannot be placed on rotary lines.
If the system has the Call Report feature, it generates records of outgoingcalls placed through DISA by remote access callers.
Calls that are misdialed or not dialed within a certain amount of time willbe transferred to the primary attendant.
Check the DISA information on the System Configuration Form. To identifyDISA lines and, if required, create a password and set up outward restriction,follow the appropriate procedure below.
With a MERLIN II System Display Console
1 From the administration menu touch these buttons: [Lines], [DISA]
2 If callers must dial a password to make DISA calls, dial a four-digitpassword. (If you don’t want to administer a password, go onto step 3.)
3 Touch [Enter] .
2-44 MERLIN II System Features
HOW TO USE
4 Touch [NoRestr] for no restriction, or touch [InwdOnly] for inward restriction.
5 Touch the line buttons until the lights next to them show the appropriatecode:
Green light on = line or line pool can be used for DISAGreen light off = line or line pool cannot be used for DISA
6 Touch Conference to return to the administration menu, or leaveadministration mode.
With a BIS-34D Console
1 Touch Message.
2 Dial #323.
3 Check the lights next to the buttons for the individual or pooled lineswhose status you want to change. Green lights show next to any linesthat are assigned as DISA lines.
4 Touch each line button until the light next to the button shows theappropriate code.
Green light on = line or line pool can be used for DISAGreen light off = line or line pool cannot be used for DISA
5 Follow these steps to specify operation with or without a password:
To set up a password, dial #324, then any four digits (0 through 9).
If a password isn’t required, dial #324, then touch Drop.
6 Follow these steps to allow or prevent DISA calls to points outside theMERLIN II system:
To restrict DISA callers to intercom calls, dial #3250.
To allow DISA callers access to MERLIN II system lines, dial #3251.
7 If you have a printer, you can request a System Information printout tomake sure DISA security features are set up the way you want them.To get a printout, dial #905 and wait for the beep.
8 Touch Message and go on to another procedure, or leave administrationmode.
To place a call using DISA:
1 From a Touch-Tone telephone outside the MERLIN II system, dial thenumber of a line administered for DISA.If the line is available, you hear ringing, then a dial tone.
2 Dial the DISA password, if required.You hear a dial tone.
3 Take the appropriate action:
For an intercom call, dial the intercom number or Call Distributiongroup code.
For a call outside the system, dial the line or line pool number. Whenyou hear a dial tone, dial the telephone number.
MERLIN II System Features 2-45

D i s p l a y
DESCRIPTION Display units come with the BIS-34D, the SP-34D, and the 7406D voiceterminals and with the MERLIN II System Display Console. Displays can alsobe purchased separately and added later to the BIS-34 and 7406 voiceterminals.
The display provides information that can help you handle calls and messagesand program your voice terminal more easily. For example, when you dial atelephone number, or account number, or touch an Auto Intercom button, orwhen you receive an intercom call, a returned transfer call, or a call on a voiceterminal that you are covering, the number associated with the call appearson the display screen. When you are programming a button the displayshows you whether the button has a feature already programmed onto it. Ifyou are away from your desk you can use the display unit when you returnto retrieve messages that people in your system have left for you.
You can also use the display unit to provide an alarm, time calls that youplace or receive, and display the time, day, and the date.
FIGURE 2-3 The BIS-34D Voice Terminal with Display.
Display unitI
I ITime-keeping features Display screen
I I I
Timer
Start StopTime/Timer
❑ ❑ ❑ ❑ . .Set Fwd Rev Exit Contrast
C o n t Transfer
D r o pS t o p
H o l dP a u s e
R e c a l l M e s s a g e H F A I M i c r o p h n S p e a k e r p h o n e V o l u m e
2-46 MERLIN II System Features
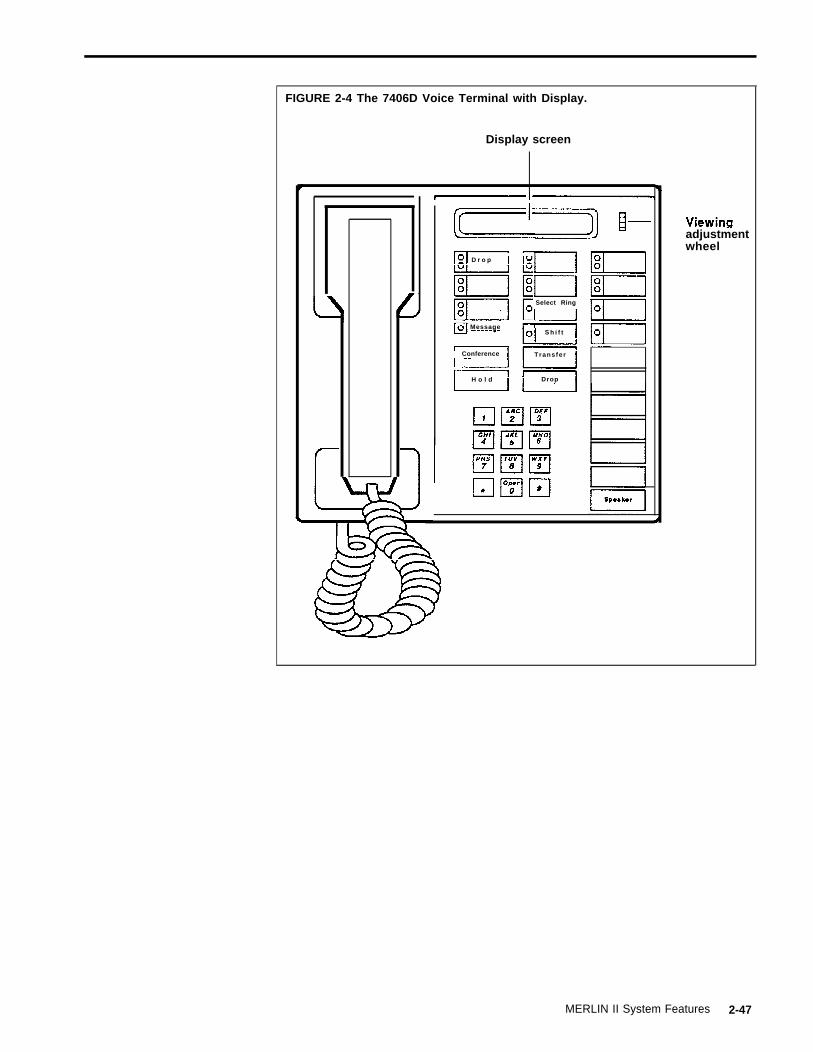
FIGURE 2-4 The 7406D Voice Terminal with Display.
Display screen
adjustmentwheel
D r o p
Select Ring
MessageS h i f t
Conference Transfer
H o l d Drop
MERLIN II System Features 2-47

FIGURE 2-5 The MERLIN II System Display Console
2-48 MERLIN II System Features

CONSIDERATIONS ● The 7406 display voice terminal and the display console screen canaccommodate two lines of information. The 7406 voice terminaldisplay line can have a maximum of 16 characters. Each line of theadministrator/attendant console display can hold 40 characters; however,as you dial numbers on the first line, the console display shows only 23characters at a time.
● When a person at a 7406 voice terminal is not using a display feature, thedisplay screen is blank. When the display of a BIS-34D voice terminal, a34-button BIS voice terminal, or an administrator/attendant console is notbeing used, the screen shows the time, day, and date.
● To adjust the clarity of the display screen characters, turn the Contrastthumbwheel (Viewing Adjustment Wheel on the 7406 display voiceterminal) until the numbers and letters are clear.
● Only the numbers for incoming intercom calls are displayed on the screen;the display unit does not show the identification of calls coming in fromoutside the system.
● The information appears on the screen for a maximum of 15 seconds. Ifyou hang up the handset or begin another voice terminal operation before15 seconds have elapsed, the display disappears.
● If you call someone in your MERLIN II system who has a display voiceterminal, but the line is busy or the person does not answer, you can usethe Deliver Message feature to leave a message that you have called. Youcan check messages on your display and have the MERLIN II systemautomatically return calls by using other Leave Word Calling features.For more information about these features, see “Leave Word Calling. ”
● Before you use the Timer feature on your display, you must lift yourhandset.
ADMINISTRATION
PROGRAMMING
HOW TO USE
As you administer the system at a display console, you can check the displayscreen to verify the button you have touched or the number that you havedialed. Follow the directions listed below under “Administration Mode, ”
To program a Stopwatch button for your 7406 display voice terminal, see theprogramming directions under “Stopwatch.”
You can also program buttons for the Leave Word Calling features. (See“Leave Word Calling. ” )
To use the features associated with the display unit, follow the instructionsbelow.
NOTE: The display messages that you see on your voice terminal maybe slightly different from the ones printed here, according to the typeof display voice terminal that you are using.
MERLIN II System Features 2-49

Account Code EntryWhen you use the Account Code Entry feature by touching the Account CodeEntry button, the display prompts you to enter the account code.
A c c t ?
As you dial an account code or when you touch a button that contains anaccount code, such as an Outside Auto Dial button, the digits are printed onthe display screen, as shown in the example below.
Acct? 1574483
Administration ModeWhen the administrator uses the display console, he or she can view thebuttons as he or she follows the directions for the administration procedure.
NOTE: The following examples show the displays associated withadministration on a BIS-34D Console. Display-based administrationwith a MERLIN II Display Console is discussed in “Menu-DrivenAdministration” a separate entry in this section of the manual.
When you enter administration mode by touching the Conference buttontwice, this display appears on the screen:
When you touch the Message button during administration, you see thisdisplay:
Administer M i s c :
As you enter codes for the administration procedure, you see the numbers onthe screen as you dial them.
2-50 MERLIN II System Features

Call CoverageIf you have a Call Coverage button programmed for another person’s voiceterminal, calls ring at your voice terminal when that person is away from hisor her desk. The display screen shows you the intercom number of theperson whose calls you are covering.
> 1 6 r
Caller IDWhen you receive an intercom call, the caller’s intercom number or anadministered station label, such as the person’s name, appears on the screen.
2 3 - I c o m
Clock/Date, Timer, and Alarm (The BIS-34D and Sp-34D Voice Terminals)The time-keeping features of the display unit allow you to set an alarm aswell as the clock and date.
To set the time, day, and date on the display screen of a BIS-34D or SP-34Dvoice terminal:
1 Touch Set until the item you want to change flashes.
2 Touch Fwd or Rev to advance or reverse the time, day or date.
3 When you are finished, touch Exit.
To set the alarm on the display of a BIS-34D or SP-34D voice terminal(for example, when you want a reminder that you have a meeting in fiveminutes) and permit timer operation:
1 Touch Set until the item you want to change flashes.
2 Touch Fwd or Rev to advance or reverse the time until the display showsthe time you want the alarm to sound.
3 When you are finished, touch Exit.
( ALARM: Off 12:00 p )
If you wvant to return to the Time/Timer display (see the procedures for usingthe Time/Timer display below),
1 Touch Time/Timer.
MERLIN II System Features 2-51

To
1
2
3
start the timer for calls you need to time:
Touch Time/Timer.
Touch Start to reset the Timer to 00:00 and start the Timer.
When you are finished using the Timer, touch Stop.
When you want to return to the Clock/Calendar display, which shows thetime, day, and date:
1 Touch Time/Timer.
Clock/Date, Timer, and Alarm (The MERLIN II System Display Console)The time-keeping features on the display console allow you to set the clockand date, an alarm, and a timer. To help you do this, there are five buttonsbelow the display screen. You press Clock Functions to get into this mode.
As you follow the procedures for setting the time-keeping features, thesecond line of the display will show you the function of each button. Touchthe button below the label you want to use for the procedure. In the exampleshown below, you would touch the button below the label, Start, if you wantto start the timer, or touch the button below the label, Stop, when you wantto stop the timer.
Timer Functions 9:30a 00:00Start stop Reset EXIT
❑ ❑ ❑ ❑ ❑
Setting the Clock and Date When you are not using your display to helpyou with programming or administration, or testing your console, the displayshows the time and date on the first line. (This is the screen that you willusually see. )
9 : 1 4 a T u e 1 1 - 0 4
❑ ❑ ❑ ❑ ❑
You can reset the time, day, and date on your display by following theseprocedures.
1 Touch Clock Functions.
You see the following Clock Functions display:
Clock Functions 9:30a Tue 11-04Timer Alarm Set
❑ ❑ ❑ ❑ ❑
2-52 MERLIN II System Features

The labels, Timer,display.
Alarm, and Set, correspond to the keys below the
2 Touch Set to set the time.
You see the following Clock Set Functions display:
Clock Set Functions 9:30a Tue 11-04Time Day Date EXIT
❑ ❑ ❑ ❑ ❑
3 Touch Day to set the day of the week.
4 Touch Time.
You see the following display:
Time Set Functions 9:30a Tues 11-04Hour Hour Min Min EXIT
❑ ❑ ❑ ❑ ❑
5 Use the Hour and Min arrow keys toup raise the numbers, such as 9:30 to
set the time. (The arrows pointing10:30 or 9:30 to 9:31; the arrows
pointing down lower the numbers, such as 9:30 to 8:30 or 9:30 to 9:29.)
6 Touch EXIT to return to the Clock Set Functions display.
7 Touch D a t e
You see the
to set the date.
following Date Set Functions display:
Set Date and Month 9:30a Tue 11-04
Month Month Date Date EXIT
❑ ❑ ❑ ❑ ❑
MERLIN II System Features 2-53

8 Use the Month and Date arrow keys to set the date. (The arrows pointingup raise the numbers, such as 11-04 to 12-04 or 11-04 to 11-05; the arrowspointing down lower the numbers, such as 11-04 to 10-04 or 11-04to 11-03.)
9 Touch EXIT to return to the Clock Set Functions display.
10 Touch EXIT again to return to the Clock Functions display.
11 If you want to leave the Clock Functions display and return to the normalcall-handling display, touch Clock Functions.
Using the Timer When you need to time the length of an individual call,use the Timer feature on your console to display a running 10-hourstopwatch.
1 At the Clock Functions display, touch Timer.
You see the following Timer Functions display:
Timer Functions 9:30a 00:00Start stop Reset EXIT
❑ ❑ ❑ ❑ ❑
2 To start the timer from 00:00, touch Start.
3 To return the timer to 00:00 and start the timer again, touch Reset.
4 Touch Stop to stop the timer.
5 Touch EXIT to return to the Clock Functions display.
6 If you want to leave the Clock Functions display and return to the normalcall-handling display, touch Clock Functions.
Setting the Alarm You may need to use an alarm to remind you, forinstance, that you have a meeting at a specified time. In order to use thealarm feature on your console, you must set the alarm and then activate it.
1 At the Clock Functions display, touch Alarm.
You see the following Alarm Functions display:
Alarm Functions 9:30a A> 10:30a Alrm On Alrm O f f A l r m S e t E X I T
❑ ❑ ❑ ❑ ❑
2 To set the alarm, touch Alrm Set.
You see the following Alarm Set Functions display:
Alarm Set FunctionsHour Hour Min Min EXIT
❑ ❑ ❑ ❑ ❑
2-54 MERLIN II System Features

3 Use the Hour and Min arrow keys to set the time at which you want thealarm to sound. (The arrows pointing up raise the numbers, such as 10:30to 11:30 or 10:30 to 10:31; the arrows pointing down lower the numbers,such as 10:30 to 9:30 or 10:30 to 10:29.)
4 Touch EXIT to return to the Alarm Functions display.
Activating the Alarm To set the alarm to go off at the time you havespecified:
1 At the Alarm Functions display, touch Alrm On to activate the alarm.(A bell will appear to the right of the time.)
2 Touch Alrm Off to deactivate the alarm.
3 Touch EXIT to return to the Clock Functions display.
4 If you want to leave the Clock Functions display and return to the normalcall-handling display, touch Clock Functions.
Leave Word CallingIf you have programmed a Deliver Message button on your voice terminal,you can send a message to someone with a display voice terminal that youhave called when the other person is away. If you are using a display voiceterminal, you can use the other Leave Word Calling features to check theidentity of the callers and to have your voice terminal automatically return thecalls. If you have a display voice terminal, the following displays will helpyou handle messages quickly and efficiently. If you are trying to send amessage to someone whose messagebox is already full, you see this message.
Message Box Full
If you have a BIS-34D, an SP-34D, or a 7406D voice terminal and yourMessage light is on,number from which
touch Message. The display unit shows the intercomyou have received a call.
Call 17
You can return the call by using the Return Call feature, read the nextmessage by using the Next Message feature, delete the message from yourmessage box by using the Delete Message feature, and, if you have a 7406display voice terminal, use the Scroll feature to read the second line of themessage.
For more information about using the Scroll, Next Message, Return Call(Reply), Delete Message, see “Leave Word Calling. ”.
MERLIN II System Features 2-55

If you touch the Message button and there are no messages waiting for you,this display appears on your screen.
If you try to return a call to someone who has not left a message at your voiceterminal, you see this message on your display screen:
Cannot Send
Number DialedWhen you dial outside, intercom, or account numbers, such as in the AccountNumber Entry feature, or touch a button that contains numbers, such asOutside Auto Dial, Auto Intercom, Last Number Redial, or Saved NumberRedial buttons, the digits are printed on the display screen.
9 2 0 1 s 5 5 5 6 7 8 9 4 6 5 6
When you include special characters in a dialing sequence, you must touchone of the following fixed feature buttons. Each of these buttons prints adifferent symbol on the display screen:
● Drop = “s” (Stop)
● Hold = “p” (Pause)
● Recall = “r“ (Switchhook Flash)
● Transfer = “t” (Touch-Tone Enable)
If the display includes more than 16 characters, the following occurs:
● If you have a BIS-34D or SP-34D voice terminal or a MERLIN II SystemDisplay Console, a “ <" appears as the first character on the second line ofnumbers to remind you that the characters on the next line are part of thesame telephone number. (On the 7406 display voice terminal, thenumbers in the second line appear without a “ < “.)
● The seventeenth character and any additional digits then appear on thesecond screen or second line of the screen as you dial them.
The combined display screens in the Display Number Dialed feature cancontain up to 31 digits. The display console can contain up to 40 digits.
2-56 MERLIN II System Features

Program ModeWhen you begin programming, the display tells you that you are in theprogram mode and the intercom number of the voice terminal you areprogramming.
As you dial characters for the programming procedures, the characters appearon your screen.
* 9 0 9 2 0 1 5 5 5 6 7 8 9
If you touch a button that has already been programmed, the displayidentifies the name of the feature on that button. The screen below showsthat you have programmed the Last Number Redial feature on this voiceterminal button.
If the button has not been programmed, this message appears on the displayscreen:
Blank
If you touch a fixed feature, or nonprogrammable button, such as Conference,the following message appears on the display screen: (Note that you can usenonprogrammable buttons, such as Hold or Recall, to enter a specialcharacter, such as a pause or a stop, into a dialing sequence. Also, pressingHold will cause “ERROR” to be displayed.)
Not Programmable
MERLIN II System Features 2-57

If you dial incorrect numbers or characters, you will see this message:
Timer (The 61 S-340 and SP-34D Voice Terminal)For directions on using the Timer, see “Clock/Date, Timer, and Alarm (TheBIS-34D and SP-34D Voice Terminal).
Timer (The 7406D Voice Terminal)By touching a programmed Stopwatch button on your voice terminal, you cantime a call. (Seeand will count to
“Stopwatch.”) The Stopwatch feature starts the clock at :00a maximum of 9:59:59 (hours: minutes: seconds).
:006 / 2 5
Timer (The MERLIN II System Display Console)For directions on using the Timer on the display console, see the proceduresunder “Clock/Date, Timer, and Alarm (The MERLIN II System DisplayConsole)” just described.
Transfer Return IdentificationWhen you transfer a call to another voice terminal and the call is unanswered,the call returns to your voice terminal. The intercom number or label of thevoice terminal from which the call is returning appears on the screen.
2-58 MERLIN II System Features

Do Not Disturb
DESCRIPTION When you are busy and do not want to be bothered by ringing calls, you canuse the Do Not Disturb feature. When you receive outside calls, the greenlight next to the line button flashes, but your voice terminal does not ring.
When other people in the MERLIN II system call you, they get a busy signal.When they transfer a call to you, the green light next to the line buttonflashes, but your voice terminal does not ring. If they transfer a call toyou using a voice announcement, they hear a busy signal, but the call istransferred (the green light flashes, but the voice terminal does not ring).
When you activate the Do Not Disturb at your voice terminal, the green lightgoes on next to your Auto Intercom button at other people’s voice terminals.
CONSIDERATIONS
PROGRAMMING
HOW TO USE
●
●
●
Calls from people within the MERLIN II system who have primary Coverbuttons programmed for your voice terminal ring even if you haveactivated the Do Not Disturb feature. This allows an attendant to notifyyou when you receive an important call.
If you activate the Do Not Disturb feature while someone is announcing acall through your voice terminal speaker, the call is dropped.
If you transfer a call, but no one answers, you will still hear the transferreturn ring, even if you have activated the Do Not Disturb feature.
The Do Not Disturb feature requires a button with lights.
To program a Do Not Disturb button for your voice terminal, label a button,enter programming mode, and follow these steps:
1
2
3
To
1
Touch the button you want to program.
Dial *71.
Program another feature, or leave programming mode.
prevent calls from ringing at your voice terminal:
Touch Do Not Disturb.The green light next to the button goes on.
This feature remains active until you:
1 Touch Do Not Disturb again.The green light next to the button goes off.
MERLIN II System Features 2-59

D r o p
DESCRIPTION If you get a busy signal or no answer as you set up a conference call, or ifyou want to disconnect a person or line you added to the conference call, youcan use the Drop feature. For more information about using this feature, see“Conference.”
CONSIDERATIONS
HOW TO USE
● Only the originator of the conference call can drop people from theconference.
● If you press the switchhook, you cut off everyone on the call.
● If you drop a line that has other people bridged onto it, those people arealso disconnected from the conference call.
To disconnect a person or line now in the conference call:
1 Touch Drop.
2 Touch the line button of the person you want to disconnect from theconference.
Extended Station Status
DESCRIPTION When the Extended Station Status (ESS) feature is activated, lights on voiceterminals indicate operating states other than the standard call-handling statesof available, busy, and Do Not Disturb. The system can be administered forESS in either of two modes, Hotel/Motel mode or Call Management System(CMS) mode. Lights at voice terminals and attendant consoles show:
CONSIDERATIONS
● ESS status, if the system is administered for ESS in Hotel/Motel mode
● After Call Work State status for agents, if the system is administered forESS in CMS mode
NOTE: This entry describes the Hotel/Motel mode of the ESS feature.For information on the CMS mode of the feature, see thedocumentation provided with that system.
If ESS is administered in Hotel/Motel mode, the attendant can put any voiceterminal into either ESS1 or ESS2 state. Typically, this shows whether or nota room is ready for occupancy, but it can be used for any purpose.
With the attendant console in ESS Display mode, the attendant can see whatstate each voice terminal is in by checking the green lights next to the AutoIntercom buttons. By touching the appropriate buttons, the attendant can putindividual voice terminals into ESS1, ESS2, or regular call-handling state.People can also put their own voice terminals into ESS1 or ESS2 state butcan’t change them from ESS to regular call-handling state.
● When the console is inMessage Status buttonterminals.
ESS Display mode, attendants can still use theto see whether message lights are on at voice
2-60 MERLIN II System Features

ADMINISTRATION
● The administrator must use Centralized Programming to assign the ESSfeature to basic Touch-Tone telephones. The user can then access thefeature by dialing a code representing the programmed button. ESScannot be assigned to rotary telephones.
● Voice terminal users can put their voice terminals into ESS1 or ESS2 state,but only attendants can return voice terminals to the call-handling state.
● All voice terminals become outward restricted when they enter an ESSstate. If the administrator wants these voice terminals to be able to dialselected numbers, such as emergency numbers, he or she should assignthese voice terminals access to allowed lists. (See “Allowed Lists.”)Returning a voice terminal to regular call-handling state removes the ESSrestrictions and reinstates any restrictions that the administrator assigned.
To specify the ESS mode of operation and to put attendant consoles into andout of ESS Display mode, enter administration mode and follow theappropriate procedures below.
With a MERLIN II System Display Console
Specifying ESS Mode of Operation
1 From the administration menu touch these buttons: [More], [Options]
[More] , [Status] .
2 Select [Hotel] or [CMS] as appropriate.
3 Touch Conference to return to the administration menu.
Putting Attendant Consoles into ESS Display Mode
1
2
3
From the administration menu touch these buttons: [Stations], [More],
[More] , [Xtnd Sta] .Green lights flash next to the Auto Icom buttons for all candidate attendant consoles.
Touch the Auto Intercom button for each attendant console until the lightnext to the button shows the appropriate code.
Green light steady = console is in ESS Display modeGreen light flashing= console is not in ESS Display mode
Touch Conference to return to the administration menu, or leaveadministration mode.
With a BIS-34D Console
Specifying the ESS Mode of Operation
1 Touch Message.
2 The default operation is CMS mode. To change the mode of ESSoperation, dial the appropriate code:
For Hotel/Motel mode, dial #3290.
For CMS mode, dial #3291.
MERLIN II System Features 2-61

PROGRAMMING
3 Touch Message and go on to another procedure or leave administrationmode.
Putting Attendant Consoles into ESS Display Mode
1 Touch Message.
2 Dial #330.Green lights flash next to the Auto Intercom buttons for all candidate attendant consoles.
3 Touch the Auto Intercom button of each attendant console whose statusyou want to change until theappropriate code.
Green light steadyGreen light /lashing
light next to the button shows the
= console is in ESS Display mode= console is not in ESS Display mode
4 Touch # to confirm these settings.
5 Touch Message and go on to another procedure, or leave administrationmode.
This feature requires programming ESS buttons at voice terminals andattendant consoles. The buttons at a voice terminal are used to put that voiceterminal in ESS1 or ESS2 state. Attendant consoles can have buttons that putother stations in ESS states or in regular call-handling state.
To program ESS buttons, label the button(s), such as ESS2 State, enterprogramming mode, and follow these steps:
1 Perform the appropriate procedure:
If you’re programming a button on a voice terminal, touch the buttonand dial one of the following codes:
— To get into the ESS1 state, dial ‘301.
— To get into the ESS2 state, dial ‘302.
If you’re programming a button on an attendant console that willchange states at voice terminals, touch the button and dial one of thefollowing codes:
— To put a voice terminal into regular call-handling state, dial *210.
— To put a voice terminal into the ESS1 state, dial *211.
— To put a voice terminal into the ESS2 state, dial *212.
2 Repeat step 1 for each button you want to program.
3 Program another feature, or leave programming mode.
To program ESS States on all your basic telephones in Hotel/Motel mode, useCentralized Programming and dial the following codes:
● For ESS1, dial # 01*301.
● For ESS2, dial # 02*302.
2-62 MERLIN II System Features

HOW TO USE To monitor and change ESS status from an attendant console:
1 Check the green light next to the voice terminal’s Auto Intercom button.
Green light off = voice terminal is not in either ESS state.Green light flashing = voice terminal is in ESS1 state
Green light steady = voice terminal is in ESS2 state
2 If you have buttons programmed to put voice terminals in ESS1, ESS2 andstandard call-handling states, touch the appropriate button. Otherwise,dial the appropriate code, as follows:
To remove a voice terminal from either ESS state, dial #35.
To put a voice terminal in the ESS1 state, dial #36.
To put a voice terminal in the ESS2 state, dial #37.
3 Touch the Auto Intercom button for the voice terminal whose status youwant to change.
To change an ESS state at a voice terminal or telephone:
For ATL/DCP sets:
1 Touch the appropriate button, ESS1 or ESS2.
For Basic Touch-Tone sets:
1 Dial #01 to put the telephone in ESS1 state; #02 to put it in ESS2 state,or notify the attendant to change the ESS state.
Flexible Numbering
DESCRIPTION Default dialing codes are used during the initial administration of stations,lines, line pools, and the Call Distribution and Group Page features. Theadministrator can use the Flexible Numbering feature to change these defaultdialing codes.
The default dialing codes are as follows:
Stations - Intercom numbers 10 through 69 and 700 through 727.(A system can have only 72 responding stations. However, somevoice terminals may have two intercom numbers associated with thembecause of the Voice Announcement to Busy Voice Terminal feature.)
Lines - Line codes 801 through 856.
Line pools -9 and 890 through 899.
Call Distribution groups -870 through 875.
Group Page groups -881 through 887.
The Flexible Numbering feature lets administrators change these codes toother l-digit to 4-digit numbers that are more meaningful for their particular
MERLIN II System Features 2-63

CONSIDERATIONS
ADMINISTRATION
business or more convenient for users. For example, the intercom numbersfor the telephones in hotel rooms can be the same as the room numbers, e.g.,401, 402, etc. Call Distribution groups can have their department numbers orproject numbers as their dial codes.
The system begins to operate according to the new dialing codes as soon asthe administrator assigns them. Therefore, the administrator needs toprovide the new dial plan to users right away. If a printer is available, theadministrator can order a printout of the current dial plan from the MERLINII system. For stations, lines, line pools, and groups in the system, theprintout shows:
The logical ID number, which is the order or position within the group,beginning with the lowest number. For example, if there are three CallDistribution groups with Flexible Numbering codes 510, 511, and 512,group 510 is #1, 511. is #2, and 512 is #3.
The current dial code, which is either the default code or the most recentlyassigned Flexible Numbering code.
The label assigned to lines and stations, such as “IN-WATS” or “SAM.”
Flexible Numbering can only be administered from the MERLIN II SystemDisplay Console.
Flexible Numbering dial codes can contain the digits 0 through 9 in anycombination except that no code can begin with 0. The dial code 0 is afixed code representing the administration console connected to the firststation jack in the system.
A Flexible Numbering dial code cannot have the digits of a shorter dialcode as its leading digits. For example, if you assigned the number 40 toa paging group, you could not assign any longer numbers beginningwith 40, such as 400 or 4000, to other endpoints. (See “Planning,” inthe MERLIN II System Installation and Administration Manual for moreinformation on how to select Flexible Numbering codes. )
Systems that include basic telephones connected to a Basic TelephoneModule, Basic Telephone and Modem Interfaces, or Off-PremisesTelephone Interfaces should not have 9 or 88 as Flexible Numbering dialcodes. People with this equipment use those fixed codes to accessMERLIN II system lines. People with basic telephones connected to thesystem with a BTMI or OPTI cannot dial intercom numbers longer thantwo digits.
If you have Call Distribution groups with data hunt groups set up andyou change the numbering (i.e. perform flexible numbering) for the calldistribution groups, the system will assign the Group Call Distributionflexible numbers (preceded by *) to the data hunt groups.
IMPORTANT Before you establish or change Flexible Numbering codes,get the completed Flexible Numbering Form. If you do not have one,read the entry for Flexible Numbering in “Planning,” in the MERLINII Installation and Administration Manual and fill out the form beforeyou try to administer this feature. The “Planning” entry includes anexample showing how a small hotel uses Flexible Numbering.
2-64 MERLIN II System Features

There are two types of administration, as follows:
● In single renumbering, you assign a specific dial code to a station, line,line pool, Call Distribution group, or Group Page group.
● In block renumbering, which applies only to groups of stations and lines,you identify a “start” and an “end” station or line. You then assign a newdial code to the first station or line and instruct the system to renumberthe other stations or lines in the group accordingly.
Administration steps for both types of renumbering appear below.
NOTE: You hear a beep if you enter a number that is invalid or thatconflicts with. another code in the dialing plan. If you have a printer,you may want to get a printout of the dial plan to help you pinpointthe problem. From the administration menu touch [More], [More],
[Print], [DialPlan] to get a printout.
Initializing (Changing Intercom Numbers to Make Space in the Dial Plan)When the MERLIN II system is first set up, it assigns default dialing codes tostations, lines, line pools, and Call Distribution and Group Page groups.Because the default intercom numbers for the first 60 stations are 10 through69, this leaves few numbers available for use as Flexible Numbering codes.To make space available in the dial plan, you need to perform the Initializeprocedure,
This procedure renumbers the stations in the system so that they are all in the7000 range by placing 70 or 7 before their default intercom numbers, e.g.,7010 through 7069 and 7700 through 7727. This saves you time and makesFlexible Numbering codes 1000 through 6999 available for use.
NOTE: If any lines, line pools, Call Distribution groups, and GroupPage groups in the system have Flexible Numbering codes, thisprocedure reassigns their default dialing codes. Therefore, it is usefulas a first step if you are changing from one Flexible Numbering planto another.
Follow these steps to assign intercom numbers in the 7000 range to allstations and assign default codes to lines, line pools, and groups:
1 From the administration menu touch
2 Touch [InitSp] .
3 To assign Flexible Numbering codes,appropriate procedure, below.
Block RenumberingTo assign sequential Flexible Numbering
1
2
3
4
From the administration menu touch
[FlexNum] , [Block] .
touch [Exit] and go to step 2 of the
codes to a group of stations, or lines:
[ FlexNum] .
Touch [Block] .
NOTE: If you get a “System busy - please wait ‘I message, you can’tperform this procedure right now. Wait for the prompt or try again later.
Touch [Stations] or [Lines] to select the screen for the type of code you arechanging.
Touch the Auto Intercom button or the line button for the first stationline on the console, i.e., the one with the lowest-numbered station or
MERLIN II System Features
orline
2-65

5
6
7
8
9
jack. This is the first line or station to be renumbered in the string of linesor stations.
Touch [Enter] .The system displays the lowest-numbered code and prompts you to enter the code for thelast station or line, i.e., the one with the highest-numbered jack.
Touch the Auto Intercom button or line button of the last (highest-numbered) station or line in the string of lines or stations.
Touch [Enter] .The system prompts you to type in the first new Flexible Numbering code.
Type in the first (lowest-numbered) new dial code.
Touch [Enter] .I J
The system renumbers the entire string of stations or lines sequentially, then returns you tothe Block Renumber screen.
10 Continue with Flexible Numbering, touch Conference to return to theadministration menu and administer another feature, or leaveadministration mode.
Single RenumberingTo assign a Flexible Numbering code to a particulargroup, do the following:
1 From the administration menu, touch [FlexNum] .
2 Touch [Single] .
NOTE: If you get a “System busy - please wait”
station, line, line pool, or
message, you can’tperform this procedure right now. Wait for the prompt or try again later.
3 Touch the appropriate key for the type of code you want to change, suchas [Pools] to assign a new code to a line pool.
4 Take one of the actions below to indicate the “old” dial code. Note thatthird method can only be used for lines or stations.
Type in the existing dial code.
Type in the logical ID number. Be sure to type the pound sign ( # )before the number.
NOTE: Logical ID numbers run from lowest to highest, with thelowest numbered code being #1. For example, to specify line pool 9,you would type “ # 1.” Pool 890 is #2, Pool 891 is #3, etc.
If you’re identifying a line or station, touch the line button or AutoIntercom button.The light next to the line goes on.
2-66 MERLIN II System Features

HOW TO USE
5
6
7
8
Touch [Enter] .The display Shows the old dial code and prompts you to enter the new dial code
Type in the new dial code.
Touch [Enter] .The system returns you to the Single Renumber screen.
Continue withadministrationadministration
Flexible Numbering, touch Conference to return to themenu and administer another feature, or leavemenu.
You don’t need to reprogram any features assigned to buttons on your voiceterminal if the dialing plan changes. The system does that automatically.However, be sure to use any new codes for dial access to features.
Follow Me
See “Call Forwarding and Follow Me”
Forced Account Code Entry
DESCRIPTION If the administrator assigns the Forced Account Code Entry feature to a voiceterminal, the user must enter a account code (1 to 16 digits) before placing anoutside call. This feature assures that all outgoing calls on selected voiceterminals are associated with the appropriate account for billing or otherpurposes.
MERLIN II system voice terminal users program an Account Code Entrybutton to use when entering account numbers for outside calls. Forconvenience, they can program frequently-used account codes onto available
CONSIDERATIONS
buttons or assign Personal Speed Dial codes to
● Forced Account Code Entry applies only to
account numbers.
outside calls that the useroriginates. The user can answer outside calls, add outside lines to aconference call he or she has originated, bridge onto an in-progress call,generate a switchhook flash, or select an alternate ARS routing patternwithout entering an account code.
● People whose voice terminals are administered for Forced Account CodeEntry can also use the standard Account Code Entry feature. The sameprogrammable button, the Account Code Entry button, is used for bothfeatures.
MERLIN II System Features 2-67

ADMINISTRATION
PROGRAMMING
●
●
The Forced Account Code Entry feature applies to outgoing calls only.You may use the standard Account Code Entry feature to associate anaccount code with an incoming call.
Forced Account Code Entry can be administered for basic Touch-Tonetelephones in all systems except systems administered for- behind-switchoperation. People who have basic telephones administered for ForcedAccount Code Entry follow a different procedure for placing outside callsthan do people with MERLIN II system voice terminals. The featurecannot be used with rotary telephones.
To assign the Forced Account Code Entry feature to voice terminals, enteradministration mode and follow the appropriate procedure below:
With a MERLIN II System Display Console
1 From the administration menu, touch these buttons: [Stations], [More],
[Account] .2 Touch the Auto Intercom button of each voice terminal for which you
want to assign or remove this feature until the light next to the buttonshows the appropriate code.
Green light on = voice terminal has Forced Account Code EntryGreen light off = voice terminal doesn‘t have Forced Account Code Entry
3 Touch Conference to return to the administration menu, or leaveadministration mode.
With a BIS-34D ConsoleTo
1
2
3
4
To
assign the Forced Account Code Entry feature to voice terminals:
Touch Message.
Dial #319.
Touch the Auto Intercom button of each voice terminal for which youwant to assign or remove this feature until the light next to the buttonshows the appropriate code.
Green light on = voice terminal has Forced Account Code EntryGreen light off = voice terminal doesn‘t have Forced Account Code Entry
Touch Message and go on to another procedure, or leave administrationmode.
program an Account Code Entry button, label a button with lights, enterprogramming mode, and follow these steps:
1 Touch the button you want to program.
2 Dial *82.
3 Program another feature, or leave programming mode.
2-68 MERLIN II System Features

HOW TO USE With the Forced Account Code Entry feature in place, you must enter anon-null account code in order to make an outside call.
NOTE: If you want to erase or replace the account code you enteredwhen you placed the call, you can do so while the call is in progress.Just follow the standard Account Code Entry procedure(see “Account Code Entry”).
There are two procedures for placing calls, one for MERLIN II voice terminalsand the other for Touch-Tone telephones.
To place an outside call on a MERLIN 11 system voice terminal administeredfor Forced Account Code Entry:
1 Lift the handset.The green light next to the programmed Account Code Entry button begins flashing. Youhear no dial tone and no lights appear next to the line or pool button.
2 Dial the appropriate account code (maximum of 16 digits) or touch thebutton programmed with that account code.
3 Touch the Account Code Entry button.The green light next to the Account Code Entry button becomes steady.
NOTE: Touching the Account Code Entry button stores the account codeyou just entered. If you perform another action before you touch theAccount Code Entry button, such as selecting a different line or answeringan incoming call, the account code you entered is erased. If that happens,just repeat steps 2 and 3.
4 Touch the appropriate line, pool, or Pool Access button and dial thenumber. If your system has ARS and you get a busy signal on theoutside line, touch the Pool Access button again. This connects you to aline in the backup line pool, if one has been administered. It isn’tnecessary to reenter the account code.
To place a call on a basic telephone administered for Forced Account CodeEntry:
1 Lift the handset.You hear the intercom dial tone
2 Dial # 22, the code for the Account Code entry feature.
3 Dial the appropriate account code (maximum of 16 digits).
4 Dial #22 to terminate the Account Code entry.
NOTE: You must finish dialing the codes within 15 seconds of lifting thehandset, or the feature will be canceled. If that happens, just repeat theprocedure.
5 Dial 9 or 88, then the appropriate Pool Access code, where required.You hear the outside line dial tone.
6 Dial the number.
MERLIN II System Features 2-69

Group Call Distribution
DESCRIPTION The system administrator can assign voice terminals to Call Distributiongroups. These groups are usually made up of people who provide a similarservice to co-workers or outside callers, such as sales representatives or orderentry clerks.
Once the administrator has assigned voice terminals to a Call Distributiongroup, any intercom call to the group rings at the next available voiceterminal, in round-robin order. If the administrator also assigns lines and/or
line pools to a Call Distribution group, any call that comes in on one of thoselines rings at the voice terminal of the person whose turn it is to take the nextcall. If a call is not answered before the third ring, it will begin to ring at allthe voice terminals assigned to the Call Distribution group.
CONSIDERATIONS
ADMINISTRATION
There can be up to six Call Distribution groups, each containing asmany as 15 voice terminals. There can be up to 56 outside lines and up to11 line pools assigned to each group.
A voice terminal can belong to more than one group.
A line or line pool can be assigned to only one group. Before theadministrator assigns lines and line pools to a group, he or she must makesure each voice terminal in the group has access to those lines or linepools.
If a person within a group is not free to take calls, he or she can turn onthe Do Not Disturb feature. The system does not direct any calls to theperson’s voice terminal until that person turns off Do Not Disturb.
You cannot transfer a call with voice announcement to a Call Distributiongroup. The call is transferred successfully, but the person at the othervoice terminal cannot hear your voice announcement.
Get the completed Group Call Distribution Forms. Enter administrationmode and follow the appropriate procedure below to set up or change CallDistribution groups.
With a MERLIN II System Display Console
1 From the administration menu, touch these buttons: [Stations], [More],
[GrpCall] .
2 Dial the number of the Call Distribution group. This can be the defaultcode (870 through 875), a code assigned through Flexible Numbering, orthe group’s logical ID number ( # 1 through #6).
3 Touch [Enter] .
4 Touch the Auto Intercom button of each voice terminal until the light nextto the button shows the appropriate code:
Green light on = voice terminal is in the groupGreen light off = voice terminal isn‘t in the group
2-70 MERLIN II System Features

PROGRAMMING
HOW TO USE
5 To associate line or line pools with this group, touch the line buttons untilthe lights show the appropriate code:
6 T o u c hgroup
7 T o u c h
Green light on = line is assigned to the groupGreen light off = line isn‘t assigned to the group
[GrpCall] and repeat steps 2 through 5 for each Call Distributionyou want to administer.
Conference to return to the administration menu.
8 To get a printout of the Call Distribution groups, touch [More], [More],
[Print] , [More] , [More] , [GrpCall] .
9 Touch Conference to return to the administration menu, or leaveadministration mode.
With a BIS-34D ConsoleFollow these steps to set up Call Distribution groups:
1 Touch Message.
2 Dial #87.
3 Dial the number of the Call Distribution group (0 through 5).
4 To
5 To
6 To
assign voice terminals to the group, touch the Auto Intercom button(s):
Steady green on = voice terminal is in groupGreen off = voice terminal is not in group
associate lines with the group, touch line button(s):
Steady green on = line is assigned to groupGreen off = line is not assigned to group
get a printout, dial #906 and wait for the beep.
7 Touch Message.
8 Go on to another procedure or leave administration mode.
TO program a button for a Call Distribution group, label a button, enterprogramming mode, and follow these steps:
1 Touch the button you want to program.
2 Dial *91 plus a Group Call Distribution code (870 through 875 or a codeassigned through Flexible Numbering).
3 Program another feature, or leave programming mode.
To place an intercom call to a Call Distribution group:
1 Touch Intercom-Voice or Intercom-Ring.
2 Lift your handset or touch S p e a k e r p h o n e .
3 Touch the button for the group or dial the appropriate code.
4 When you hear a beep or when someone answers, begin speaking.
MERLIN II System Features 2-71

To transfer an outside call to a Call Distribution group:
1 Touch Transfer.
2 Touch the button for the group or dial the appropriate code.
3 Hang up.
Group Listening
See “Speakerphone and Speaker. ”
Group Page
DESCRIPTION The system administrator can set up Group Page groups so anyone in thesystem can use the Group Page feature to page up to 10 people at a timedirectly through the voice terminal speakers. You do not need an externalpaging system for this feature.
CONSIDERATIONS
ADMINISTRATION
● YOU can have up to seven paging groups, each with a maximum of 10voice terminals. If necessary, one voice terminal can be assigned to morethan one paging group.
● You cannot page someone who has a digital voice terminal.
● If a person has activated the Voice Announcement Disable feature, thatvoice terminal cannot receive your Group Page announcement.
● People can program buttons for the groups they want to page or they cansave available feature buttons for other uses and dial a code to use thisfeature.
To assign voice terminals to paging groups, enter administration mode andfollow the appropriate procedure below.
With a MERLIN II System Display Console
1 From the administration menu, touch these buttons: [Stations], [More],[PageZn] .
2 Dial the number of the paging group in which you want to add or removevoice terminals. This canassigned through Flexible(#1 through # 7).
3 Touch [Enter] .
be the default code (881 through 887), a codeNumbering, or the group’s logical ID number
2-72 MERLIN II System Features

PROGRAMMING
4 Touch Auto Intercom buttons until they show the paging groupassignment you prefer.
Steady green light on = voice terminal is assigned to the groupGreen light off = voice terminal is not assigned to the group
5 Touch [PageZn] and repeat steps 2 through 4 to add group page zones.
6 Touch Conference to return to the administration menu.
7 To get a printout of paging groups, touch these buttons: [More], [More],
[Print] , [More] , [More] .
8 Touch [PgZone] to begin printing.
9 Touch Conference to return to the administration menu, or leaveadministration mode.
With a BIS-34D ConsoleTo assign voice terminals to paging groups:
1
2
3
4
5
6
7
Touch Message.The lights next to the administration mode buttons stop flashing. The green light next toMessage remains on.
Dial #88.
Dial the number of the paging group in which you want to add or removevoice terminals (1 through 7).A green light comes on next to the Auto Intercom button of any voice terminal alreadyassigned to that paging group.
Touch Auto Intercom buttons until they show the paging groupassignment you prefer.
Steady green light on = voice terminal is assigned to the groupGreen light off = voice terminal is not assigned to the group
Repeat steps 3 through 5 for each paging group in which you want toassign or remove voice terminals.
If you have a printer, you can get a printout to make sure your paginggroups are set up the way you want them. To get a printout, dial #903.The green light next to Message flashes. When the printout is completed, you hear a beepand the green light next to Message becomes steady.
Touch Message and go on to another procedure, or leave administrationmode.
To program a button for a paging group, label the button Group Page plusthe group number, enter programming mode, and follow these steps:
1 Touch the button you want to program.
2 Dial ’91 plus the Group Page code (881 through 887) or a code assignedthrough Flexible Numbering.
3 Program another feature, or leave programming mode.
MERLIN II System Features 2-73

HOW TO USE You can use a programmed button or use a dial code to access the GroupPage feature. To use a Group Page button to make an announcementthrough a group of voice terminal speakers:
1 Touch the Group Page button for the group you want to page.
2 When you hear a beep, lift your handset and make the announcement
To page a group using a dial code:
1 Touch Intercom-Voice.
2 Lift your handset.
3 Dial the code for the group you want to page.
4 When you hear a beep, speak into your handset.
Hold
DESCRIPTION When you need to put someone on hold, use the Hold feature.
CONSIDERATIONS ● When you leave a call on hold for more than a minute, your voiceterminal rings to remind you the call is still on hold.
HOW TO USE
● If you are having problems with callers on hold being disconnected, or ifthe light next to the held call continues to flash after a person outside thesystem has disconnected the call, inform your system administrator. Ifnecessary, the administrator can reset the disconnect interval for yoursystem. (See “Hold Disconnect Interval. ” j
● If everyone in a conference call composed of people connected to theMERLIN II system, places the call on hold, the call is automaticallyterminated.
To place a call on hold:
1 Touch Hold.
When you put a call on hold, the green light next to the call’s line buttonflashes rapidly. If someone else puts a call on hold from another voice terminal,the green light flashes slowly next to the call’s line button on your voicet e r m i n a l .
To take a call off hold:
1 Touch the call’s line button while off-hook.The green light becomes steady.
2-74 MERLIN II System Features

Hold Disconnect Interval
DESCRIPTION Telephone company central offices use either a “short” (50 millisecond) or a“long” (450 millisecond) disconnect interval. Because most switching systemsuse a long interval, your MERLIN II system is factory-set for a long interval.If your telephone company uses a short interval or if your MERLIN II systemhas been reprogrammed, the disconnect intervals for your system may causeproblems with held calls.
CONSIDERATIONS
ADMINISTRATION
If your system has either of the following problems, the system administratormust change the Hold Disconnect Interval.
● If a caller waiting on hold is disconnected, the disconnect interval settingof your MERLIN II system is shorter than the setting at your localtelephone company’s central office.
● If a caller waiting on hold hangs up, but the light next to that line buttonon voice terminals in your system continues to flash as if the call were stillon hold, the disconnect interval setting of your MERLIN II system islonger than the setting at your local telephone company’s central office.
To change the disconnect interval:appropriate procedure below.
With a MERLIN II System Display
enter administration mode and follow the
Console
1 From the administration menu touch these buttons: [Lines], [More],
[HidAband] .
2 Touch line buttons:
Steady green on = line drops held call on long (450 millisecond) signal (default)Green off = line drops held call on short (.50 millisecond) signal
3 Touch Conference to return to the administration menu.
With a BIS-34D Console
1 Touch Message.The lights next to the administration mode buttons stop flashing. The green light next toMessage remains on.
2 Dial #303.
3 Touch each line button to change its disconnect interval. Each touch ofthe button gives you one of the following codes:
Steady green light on = line has long disconnect internalGreen light off = line has short disconnect interval
4 Touch Message and go on to another procedure, or leave administrationmode.
MERLIN II System Features 2-75

Intercom
DESCRIPTION Each voice terminal connected to the MERLIN II system has a uniqueintercom number. You can dial intercom numbers to place calls to peopleconnected to the system.
On all voice terminals in the MERLIN II system you can place two types ofintercom calls:
● Ringing Intercom Calls. You can place ringing intercom calls when youwant to have a two-way conversation with people connected to yourMERLIN 11 system. Your calls ring at their voice terminals, and your co-workers lift their handsets to hear you and to talk with you.
● Announced Intercom Calls. When you place an announced intercom call,your co-worker hears your voice through the voice terminal speaker.
CONSIDERATIONS
HOW TO USE
● If you program an Auto Intercom button for the intercom number youwant to call, you can dial the number with one touch. (See “AutoIntercom.”)
● If the person you are calling has activated the Voice AnnouncementDisable feature, any intercom call you place with Intercom-Voice ringsrather than beeps at the person’s voice terminal, and you cannot give yourvoice announcement.
● If you have a digital voice terminal, you can place both ringing andannounced intercom calls, but you can receive only ringing intercom calls.
● The system administrator can assign two station jacks to a single voiceterminal so that people at these voice terminals can receive voiceannouncements while they are busy on another call. (See “VoiceAnnouncement To Busy Voice Terminal.”)
To place a ringing intercom call:
1 Touch Intercom-Ring.
2 Lift your handset or touch Speakerphone.
3 Dial an intercom number for the voice terminal you want to call.
4 When the person answers, you can begin the conversation.
To place an intercom call with a voice announcement:
1 Touch Intercom-Voice.
2 Lift your handset or touch Speakerphone.
3 Dial the intercom number for the voice terminal you want to call.
4 When you hear a beep, make your announcement.
2-76 MERLIN II System Features
Intercom Dial Tone
DESCRIPTION There are two types of dial tones: The MERLIN system internal dial tone andthe CO line dial tone. Some modems and software applications (Voice MailService, for example) will not recognize the internal dial tone of the MERLINsystem. When a MERLIN system station is off-hook, the dial tone mayprevent some of these services from entering the system. The Intercom DialTone feature allows you to change the internal MERLIN system dial tone tomatch the CO line dial tone.
If any software applications or moderns used by the system do not recognizethe MERLIN II system internal dial tone, you will have to administer thesystem so that the CO line dial tone will be detected.
CONSIDERATIONS
ADMINISTRATION If you are running software applications or using modems that do notrecognize the internal MERLIN system dial tone, follow the appropriateprocedure below.
With a MERLIN II System Display ConsoleTo change the dial tone using a MERLIN II System Display Console:
1 From the system menu, touch [More], [Options], [More], [More], [More] .
2 Touch [ ICMdial] .
3 Take the appropriate action:
Touch [Internl] to provide the MERLIN II intercom dial tone, or
Touch [Externl] to provide the CO line dial tone.
With a BIS-34D ConsoleTo set the dial tone using a BIS-34D Console:
1 Touch Message.
2 Dial # 335
3 Take the appropriate action:
Touch 0 to provide the MERLIN intercom dial tone, or
Touch 1 to provide the CO line dial tone.
MERLIN II System Features 2-77

Labels for Stations
DESCRIPTION When the system is first set up,Page calls, transfer returns, and
display messages for intercom calls, GroupLeave Word Calling identify stations by their
intercom numbers. For example, a display might read:
Tfr Ret 18.
The system administrator can associate alphanumeric labels such as people’snames or telephone numbers with station numbers so that the displays aremore meaningful. If the administrator assigns an alphanumeric label to avoice terminal, that label appears on people’s displays in place of theintercom number. For example, a display might read:
CONSIDERATIONS
ADMINISTRATION
Tfr Ret L. Zorn.
Only administrators using the MERLIN II system display console canassociate labels with station numbers.
Any display set will show a station label when the intercom call comesinto the console and when the attendant uses the Hold, Transfer, CampOn, and Call Park features.
Labels can contain up to 7 characters, including letters, numbers, and thespecial characters listed under “Administration,” below.
To assign labels to stations: enter administration mode and follow theprocedure below.
1 From the administration menu, touch these buttons: [More], [More],
[Lable] .The system prompts you to designate the type of labels you are assigning.
2 Touch [Stations] .The system prompts you to enter the station number.
3 Enter the station (intercom) number.
4 Correct the entry, if necessary, by using the backspace, then touch [Enter] .The display show the station or line number and prompts you to enter the label.
5 Enter the label for the station. This can be up to seven characters,including all 26 capital letters, the numbers O through 9, and theampersand (&), dash (-), space ( ), colon (:), asterisk (*), and pound sign(#). Figure 2-6 shows which buttons on the console represent the lettersand special characters.
6 Correct the entry, if necessary, then touch [Enter] .
7 Repeat steps 3 through 7 to assign labels to the remaining stations and/orlines.
8 Touch Conference to return to the administration menu or leaveadministration mode.
2-78 MERLIN II System Features

FIGURE 2-6 MERLIN II Display Console in Administration Mode
❑ ❑ ❑ ❑❑ ❑ ❑ ❑❑ ❑ ❑ ❑
MERLIN II System Features 2-79

Last Number Redial
DESCRIPTION With a Last Number Redial button, you can redial with one touch the numberyou dialed most recently. You do not need to do anything to save thenumber.
CONSIDERATIONS
PROGRAMMING
HOW TO USE
● The Last Number Redial button saves manually dialed outside telephonenumbers and numbers dialed with an Outside Auto Dial button.
● If you try to program a second Last Number Redial button, the first one isautomatically removed.
To program the Last Number Redial feature for your voice terminal, label abutton and proceed as follows:
1
2
3
4
To
1
2
Enter programming mode.
Touch the button you want to program.
Dial *73 (you do not need to dial an outside number).
Leave programming mode.
redial the last number you dialed:
Without lifting your handset, touch Last Number.Your voice terminal speaker goes on and you hear dialing
When you hear the other person answer, lift your handset and begintalking.
If the line is busy, or if no one answers:
1 Touch Speaker to cancel the call.
2-80 MERLIN II System Features

Leave Word Calling
DESCRIPTION
CONSIDERATIONS
If you call someone in your MERLIN II system who has a display voiceterminal, but the line is busy or the person does not answer, you can use theDeliver Message feature to leave a message that you have called. By touchinga programmed Deliver Message button at your voice terminal before you hangup, you can turn on the Message light at the other person’s display voiceterminal.
If you have a display voice terminal, you can view the messages that youreceived while you were away by touching the Message button. Messagesfrom people in the system who have called you appear on your display unitscreen. There are also Leave Word Calling features that you can use to checkmessages on the display unit and to have the MERLIN 11 system automaticallyreturn calls. (See also “Display Unit. ” ) Below is a fuller description of thesefeatures.
● Return Call. If you want to return the call to someone from whom youhave received a message, you can automatically dial the caller’s intercomnumber by touching a programmed Return Call button.
● Delete Message. When you are finished with the message, cancel it fromthe message files by touching a programmed Delete Message button.
● Next Message. When you are ready to read another message on thedisplay screen, touch the Next Message button.
● Scroll. If you are using a BIS-34D with display voice terminal, a 34-buttonBuilt-In Speakerphone (BIS) voice terminal or a display console, you canview the second line of the message by touching a programmed Scrollbutton. When you are finished reading the second line, use the Scrollfeature to return to the first line of the message.
New messages are labeled with a “*. ”
Messages from the system attendant are designated by an “A” so that youcan differentiate between a message from an attendant and one from someoneelse in the system.
If a voice terminal sends a second message to a display voice terminal, thesecond message overwrites the first message from that voice terminal.
To turn off the Message light, you must either delete or respond to all of themessages in the mailbox.
● The person to whom you are sending a message must have a displayvoice terminal. However, you do not need a display voice terminal inorder to send a message.
● YOU cannot use the Leave Word Calling feature with a MERLIN 11 SystemDisplay Console.
● For the Return Call, Delete Message, Next Message, and Scroll features,you can use a dial code instead of programming a button.
● Each display voice terminal can store up to 10 messages. Once a displayvoice terminal has stored the maximum 10 messages, no other messagescan be stored in the message files. If the receiving display voice terminalhas a full mailbox, the person sending the message is alerted in one oftwo ways that the message has been denied.
A person who is sending a message from a voice terminal without adisplay hears a denial tone.
MERLIN II System Features 2-81

PROGRAMMING
HOW TO USE
●
To
A person who is sending a message from a display voice terminal seeson the display, “Message Box Full. ”
If the administrator shuts down the system for a moment (force idles thesystem), you will need to touch Message again to read your messages. Ifthere is a power failure, all messages in your message files are deleted.
program the Deliver Message, Return Call, Delete Message, Next Message,and Scroll features as well as a-Message button, if you do not already haveone on your voice terminal, then label the button (see the table under step 4for button labels and programming codes) and use these procedures:
1 Enter programming mode.
2 Touch the button you want to program.
3 For each feature, use the programming code listed here.
Dial thisLabel the button: programming code:
Delete Message *78
Deliver Message *83
Message I *98
Next Message *80
Return Call *79
Scroll *81
4 Leave programming mode.
The procedures for using the Leave Word Calling features are the same forany voice terminal.
Procedures for the BIS-34D with Display, 34-Button BIS with Display Unit,and 7406 Display Voice TerminalsIf you have programmed a Deliver Message button on your voice terminal,you can leave word that you have called at a display voice terminal that isbusy or unattended.
1 Before you hang up, touch the Deliver Message button that you haveprogrammed.
If you have a display voice terminal, you can check your display screen forinformation that came in for you while you were away from your desk:(People with 7406 display voice terminals must program a Message button, or,if they prefer, they can use a dial code. See “Message.”)
1 If your Message light is on, touch Message.
2-82 MERLIN II System Features

To have your display voice terminal automatically dial the number of a personwho has left word at your display voice terminal that he or she has called:
1 Touch Return Call (or dial # 27).
To cancel the last message you read:
1 Touch Delete Message (or dial # 26),
To read the next message on your display screen:
1 Touch Next Message (or dial # 28).
If you have a BIS-34D with display voice terminal or a 34-button BIS withdisplay unit voice terminal, you can move back and forth between the firstand the second line of the display screen so you can read the time and datethe message was sent.
1 Touch Scroll (or dial #29).The display screen shows the second line of the message.
2 If you touch Scroll (or dial #29) a second time, the first part of themessage is displayed again.
Lights
DESCRIPTION The lights next to the line buttons on your voice terminal show the status ofthe lines. There are also lights next to the Speaker, Message, HFAI/Mic,Speakerphone, and Microphone buttons.
Lights Meaning of the Lights
Red light steady This is either the line you are now using or theline you will get when you lift your handset.
Green light steady The line is in use; the feature is active.
Green light off The line is not in use; feature is not active.
Green light flashing A call is coming in on this line.
Green light flashing rapidly You have put a call on hold on this line.
Green light flashing slowly Someone has put a call on hold on this line fromanother voice terminal.
Green light on next to the You have a message. If you have a display voiceMessage button (analog voice terminal, you can view the message. If not, youterminals) or green Message must get the message from the attendant.light (digital voice terminals)
MERLIN II System Features 2-83

CONSIDERATIONS
Lights
Green light on next to theSpeaker button
Green light on next to theHFAI/Mic button or the HFAIbutton.
Green light flashing next to theHFAI/Mic button while thespeakerphone is active or greenlight on next to the Microphonebutton.
Green lights on next to theSpeakerphone and Microphonebuttons.
Meaning of the Lights
The voice terminal speaker is on. See“Speaker.”
The Hands-Free Answer on Intercom feature isactivated.
The microphone is activated.
The speakerphone is on.
●
●
If you have a voice terminal without a display, only your attendant canturn on your Message light.
If you have a display voice terminal, anyone who has programmed aDeliver Message button on his or her voice terminal can also turn on yourMessage light. (See “Leave Word Calling. ”)
2-84 MERLIN II System Features

Line Assignments in Behind-Switch Systems
Line Pickup
See “Call Pickup. ”
If your responsibilities do not include system administration, skip thisinformation.
DESCRIPTION
CONSIDERATIONS
The MERLIN II system can be configured to operate behind a larger system.“Behind-Switch Operation” in this section of the manual explains how thistype of system works.
The system automatically assigns the first line, default line 801, to allattendant consoles as their prime line. It then assigns all other lines to thoseconsoles as secondary lines, with delayed ring. (If you have more than oneattendant console, you should administer the lines so that each console has adifferent prime line.)
In contrast, each voice terminal is assigned a single, different line as its primeline. The system automatically assigns the prime line to the button aboveIntercom Voice in the leftmost column of buttons.
If any lines other than the prime line are to appear on voice terminals, youmust assign them. When you assign a secondary line to a voice terminal orconsole, the system automatically assigns that line to the first button thatdoesn’t already have a line assigned to it, in the order shown in Figures 2-7and 2-8.
●
●
●
●
●
The system assigns prime lines to voice terminals in an ordercorresponding to their intercom numbers. It assigns the first line to thefirst station, second line to the second station, etc. For example, it initiallyassigns the first line (line 801) to the administrator/attendant console(intercom 10), line 802 to intercom number 11, etc.
If all lines have been assigned, but there aren’t enough lines for all thevoice terminals, the system does not assign any line to any voice terminalthat remains.
If a person in a behind-switch system does not have a particular lineassigned to his or her voice terminal, he or she can pick up a ringing orheld call on that line by using the Call Pickup feature. (See “Call Pickup.)
When you assign a line to a voice terminal, the system automaticallyassigns it to the first button that doesn’t already have a line assignedto it, in the order shown in Figures 2-7 and 2-8. You can assign lines tovoice terminals in a different pattern by touching the line buttons in theorder in which you want them to appear.
Assign lines to one voice terminal at a time. You cannot assign lines toa voice terminal unless it is idle, and the user cannot place or receivecalls while you are assigning lines.
MERLIN II System Features 2-85

FIGURE 2-7 The order in which secondary lines are assigned to buttons on attendant consoles and analog voiceterminals.
I ❑❑ 3 ❑
❑❑ 9 ❑
❑❑ 21 ❑I ❑
❑ 8 ❑
I ❑❑ 2 ❑ I ❑
❑ 7 ❑❑❑ 10 ❑ ❑
❑ 22 ❑I ❑
(Prime ❑ ❑Line)l ❑ 6 ❑
❑❑ 11 ❑ ❑
❑ 23 ❑
I ❑ lntercom-❑ V o i c e ❑ I ❑
❑ 5 ❑ ❑ ❑
❑❑ 4 ❑I ❑ lntercom-
❑ Ring ❑ ❑❑ 13 ❑
❑❑ 25 ❑
❑❑ 14 ❑ ❑
❑ 26 ❑assigns linesBy default, the system
to buttons on attendant consoles in the❑❑ 15 ❑
order Indicated by the numbers. Itassigns only a prime line to anlalog voiceterminals and basic telephones. If youassign additional lines, they appear
❑
❑❑ 16 ❑ ❑
❑ 28 ❑buttons in the order shown. The linebutton 1 is always the prime line.
onon
❑ ❑❑ 17 ❑❑❑ 18 ❑
❑❑ 30 ❑
❑❑ 19 ❑ ❑
❑❑ 32 ❑❑
❑ 20 ❑
2-86 MERLIN II System Features

FIGURE 2-8 The order in which secondary lines preassigned to buttons on digital voice terminals.
(Prime Line)1--
Intercom-Voice
l n t e r c o m -Ring
Message
By default, the system assigns only theprime line to 7406 voice terminals. if youassign additional lines, they appear onbuttons in the ordernumbers.
indicated by the
S p e a k e r
MERLIN II System Features 2-87

ADMINISTRATION Before you begin, be sure that the system is set in a behind-switchconfiguration. See “Behind-Switch Operation. ” Have the StationConfiguration Forms handy.
Be sure to label the voice terminal buttons with the telephone numbers of thelines you assign. To assign lines to buttons, enter administration mode andfollow the appropriate procedure below.
With a MERLIN II System Display Console
1 From the administration menu, touch these buttons: [Stations], [Line/Pool] .
2 Touch the Auto Intercom button for the voice terminal.
3 Touch [Enter] .A steady green light comes on next to the voice terminal’s Auto intercom button. Thesystem gives a 2-beep signal for you to begin.
NOTE: If the voice terminal is being used, the message, “station busy -please wait, ” shows on your display. You must either wait until thestation becomes available or try again later.
4 Touch the appropriate line buttons to add or remove lines from this voiceterminal. The green light next to each line button tells you the currentstatus of the line. Each successive touch of a line button gives you one ofthe following codes:
Green light on = line is assigned to voice terminalGreen light off = line is not assigned to voice terminal
The lines are assigned in the order in which you touch the line buttons.
If you want to give another voice terminal the same line assignments asone you have already set up, use the following shortcut:
NOTE: Be aware that when you copy line assignments, you also copy callrestrictions and allowed-list permissions. Be sure you want the twovoice terminals to be identical in these respects before using this Copyprocedure.
a
b
c
d
e
f
g
Touch [Copy] .
In response to the prompt, touch the Auto Intercom button of thestation you are copying from.
Touch [Enter] .
In response to the prompt, touch the Auto Intercom button of thestation you are copying to.
Touch [Enter] .— .You hear a 2-beep signal to let you know that the copy procedure is complete.
Repeat steps b through e for each voice terminal for which you want tocopy line assignments.
Touch [Exit] to return to the Stations screen.,
To make line assignments to a different voice terminal, touch [Line/Pool]
and repeat steps 2 through 5.
5 Touch Conference to return to the administration menu.
2-88 MERLIN II System Features

HOW TO USE
With a BIS-34D Console
1 Touch Adm Tel.The green light next to Adm Tel becomes steady. The other lights go off.
2 Touch the Auto Intercom button for the voice terminal to which you wantto assign lines.A steady green light comes on next to the voice terminal’s Auto Intercomn button. Thesystem gives a 2-beep signal for you to begin.
NOTE: If the voice terminal is being used, the green light next Adm Telflashes rapidly and you don’t hear the 2-beep signal. You must either waituntil the green light becomes steady or try again later. If you try to assignlines to a busy voice terminal, you’ll hear a single beep and won’t be ableto proceed.
3 Touch the appropriate line buttons to add or remove lines from this voiceterminal. The green light next to each line button tells you the currentstatus of the line. Each successive touch of a line button gives you one ofthe following codes:
Green light on = line is assigned to voice terminalGreen light off = line is not assigned to voice terminal
The order in which you touch the line buttons determines the order inwhich lines appear on the voice terminal.
If you want to give another voice terminal the same line assignments asone you have already set up, use the following procedure. However, beaware that when you copy line assignments, you also copy call restrictionsand allowed-list permissions. To copy line assignments to another voiceterminal:
a Touch the Auto Intercom button of the new voice terminal.
b Touch Recall.The red light next to Adm Tel flashes.
c Touch the Auto Intercom button of the original voice terminal.When the copy is complete, the red light stops flashing.
d Repeat steps b and c for each voice terminal for which you want tocopy line assignments.
To make line assignments to a different voice terminal, repeat steps 2and 3.
4 Touch Adm Tel and go on to another procedure, or leave administrationmode.
The guides for users and attendants explain how to place calls in behind-switch systems. Be sure that everyone in your business knows that this is abehind-switch system and understands how to use the line buttons.
MERLIN II System Features 2-89

Line Assignments in Pooled Systems
If your responsibilities do not include system administration, skip thisinformation.
DESCRIPTION
CONSIDERATIONS
To administer lines in pooled systems, you group interchangeable outsidelines into pools that people can access with a single button or a dial code ontheir voice terminals.
People within the system can place a call on a line in a line pool in one ofthree ways:
● By touching the button assigned to a particular line pool (Button AccessLine Pools) and placing the call.
● By touching a Pool Access button, dial the code of the pool best suitedthis type of call (Dial Access to Line Pools), and placing the call.
● By touching a Pool Access button and placing the call (Automatic RouteSelection). The system directs the call to the appropriate line pool.
to
for
With the Button Access option, people access the main pool (default pool 9,which usually contains local lines) by touching one of the two buttons towhich the system assigns that pool. You can assign voice terminals access toother line pools as well, such as pools of WATS lines or FX lines. You canalso assign individual lines to buttons on voice terminals,
With the Dial Access option, people can access any line pool that you assign totheir voice terminals using a dial code. The user touches one of the two PoolAccess buttons that the system assigns to each voice terminal. Then he orshe dials the access code for any of the pools that you’ve assigned to thevoice terminal. You can also assign individual lines and line pools to buttonson these voice terminals.
● The number of lines available for pooling is affected by the number oflines you must reserve for personal or special-purpose use. For example,if you have ten outside lines and two people need personal lines, there areeight lines left for pooling. If a line is assigned to a pool, it cannot beassigned to a second pool or as an individual line.
● Your system can have as many as 11 different line pools. If your businesshas special-purpose lines, such as WATS or FX lines, they should beassigned to separate pools. Do not mix types of lines in a pool, becausepeople in the system cannot control which lines they get when they accessthe pool.
● You can assign all, some, or none of the system’s lines to a single pool,but you cannot assign any line to more than one pool.
● If your system is set for the Loudspeaker Page and the Music-on-Holdfeatures, the loudspeaker paging system and the music source areconnected to line jacks. A Loudspeaker Page line cannot be assigned toline pools, but you can assign the individual line to appropriate stations,such as attendant consoles.
● On analog voice terminals, the system automatically assigns the main poolor Pool Access to the two buttons above the Intercom buttons, and youcannot change this assignment. On the 7406 voice terminal, the main poolor Pool Access is automatically assigned to buttons in the leftmost andmiddle column. Figures 2-9 and 2-10 show the order in which lines areassigned to voice terminals in pooled systems.
2-90 MERLIN II System Features

● If you aren’t using the full capacity of a line module, the control unitassigns the potential lines as well as the actual lines to buttons on yourattendant consoles. It also assigns those lines to the main pool. A linejack with nothing plugged into it is called a nonequipped line appearance,or “ghost line. ” If you have any ghost lines, follow the procedures belowto remove them from the main pool and to remove them from yourstandard attendant consoles.
● If you’re administering a new system, all your lines were initially assignedto the main pool (default pool 9). If you want to assign lines to other linepools, you must remove them from the main pool first.
● If a line appears as an individual line at a voice terminal in your system, itwill disappear from that voice terminal if you add it to a line pool. Beforeadding lines to pools, make sure they aren’t needed as individual lines.
MERLIN II System Features 2-91

FIGURE 2-9 The order in which lines and line pools are assigned to analog voice terminals.
I ❑❑ 1 ❑ I ❑❑ 6 ❑ I ❑
❑ ❑ ❑7 ❑ 19 ❑
I ❑ Main Pool orPool Access❑ I ❑
❑ 5 ❑ I ❑❑ 8 ❑
I ❑ Main Pool or001 Access❑ ❑
❑ lntercom-❑ V o i c e ❑
I ❑ lntercom-
❑ Ring ❑
I ❑❑ 2 0 ❑
I ❑❑ I ❑
❑ 9 ❑ I ❑❑ 21 ❑
❑❑ 3 ❑ I ❑ ❑ ❑
❑ 10 ❑ 2 2 ❑❑❑ 2 ❑ I ❑
❑ 11 ❑ I ❑❑ 2 3 ❑
❑By default, the system assigns the I ❑
❑ 12 ❑Main Pool or Pool Access to the firsttwo buttons on analog voice terminals.If you assign additional lines or linepools, they appear on buttons in theorder shown.
❑ I ❑❑ 2 5 ❑
I ❑ ❑ ❑❑ 14 ❑ 2 6 ❑❑❑ 15 ❑ ❑❑❑ 16 ❑ ❑
❑ 2 8 ❑❑ ❑ ❑❑ 17 ❑ 2 9 ❑❑❑ 18 ❑ ❑
❑ 30 ❑
2-92 MERLIN II System Features

S p e a k e r
FIGURE 2-10 The order in which lines and line pools are assigned to digital voice terminals.
Message
By default, the system assigns Main Poolor Pool Access to the first two line buttons.If you assign a line or line pool, it appearson the top button in the second column.
b
MERLIN II System Features 2-93

ADMINISTRATION Before you assign lines, be sure that your system is set for the appropriatetype of pool access (see “System Type” ). Have your Station ConfigurationForms handy. Be sure that line buttons for the lines you’re assigning havebeen labeled at the voice terminals.
With a MERLIN II System Display ConsoleTo set up line pools and assign line pools and lines to stations, enteradministration mode and follow the appropriate procedure below.
Assigning Lines to Line Pools
1 To assign lines to line pools, touch these buttons from the administrationmenu: [Lines] , [Pools] .
2 Dial the pool code (default codes are 9 and 890 through 899).
3 Touch [Enter] .
4 Touch the line buttons until the correct code shows:
Steady red on = line is in the poolRed off = line not is in the pool
5 Touch [Exit] and repeat steps 2 through 4 to administer additional pools.
6 Touch Conference to return to the administration menu, or leaveadministration mode.
Assigning Line Pools and Lines to Buttons at Voice Terminals
1 To assign lines and line pools to voice terminals, touch these buttons fromthe administration menu: [Stations], [Line/Pool].
2 Touch the Auto Intercom button for the voice terminal.
3 Touch [Enter] .
NOTE: If the voice terminal is being used, the message, “station busy -please wait, ” shows on your display. You must either wait until thestation becomes available or try again later.
4 Touch the line buttons until the correct code shows:
Steady green on = line or line pool is assigned to the voice terminalGreen off = line or line pool is not assigned to the voice terminal
If you want to duplicate the line pools and lines to buttons assignmentson another voice terminal, use the following shortcut:
NOTE: Be aware that when you copy line assignments, you also copy callrestrictions and allowed-list permissions. Be sure you want the twovoice terminals to be identical in these respects before using this Copyprocedure.
a
b
c
d
Touch [Copy].
In response to the prompt, touch the Auto Intercom button of thestation you are copying from.
Touch [Enter] .
In response to the prompt, touch the Auto Intercom button of thestation you are copying to.
2-94 MERLIN II System Features

e Touch [Enter].
You hear a 2-beep signal to let you know that the copy procedure is complete.
f Repeat steps b through e for each voice terminal for which you want tocopy line assignments.
g Touch [Exit] to return to the Stations screen.
5 Touch [LinePool] and repeat steps 2 through 4 to assign additional lines orpools to buttons.
6 Touch Conference to return to the administration menu, or leaveadministration mode.
Assigning Voice Terminals Dial Access to Line Pools
1
2
3
4
5
6
To assign Dial Access to Line Pools to voice terminals, touch these buttonsfrom the administration menu: [Stations] , [DailAcc] .
Touch the Auto Intercom button for the voice terminal.
Touch [Enter] .
NOTE: If the voice terminal is being used, the message, “station busy -please wait, ” shows on your display. You must either wait until thestation becomes available or try again later.
Touch the line buttons until the correct code shows:
Steady green on = voice terminal has Dial Access to the pool containing the lineGreen off = voice terminal doesn‘t have Dial Access to the pool containing the line
If you want to duplicate the Dial Access to Line Pool assignments onanother voice terminal, use the following shortcut:
NOTE: Be aware that when you copy line assignments, you also copy callrestrictions and allowed-list permissions. Be sure you want the two voiceterminals to be identical in these respects before using this Copyprocedure.
a Touch [Copy] .
b In response to the prompt, touch the Auto Intercom button of thestation you are copying from.
C Touch [Enter] .
d In response to the prompt, touch the Auto Intercom button of thestation you are copying to.
e Touch [Enter].
You hear a 2-beep signal to let you know that the copy procedure is complete.
f Repeat steps b through e for each voice terminal for which youcopy line assignments.
g Touch [Exit] to return to the Stations screen.
want to
Touch [DialAcc] and repeat steps 2 through 4 to assign Dial Access toadditional voice terminals.
Touch Conference to return to the administration menu, or leaveadministration mode.
MERLIN II System Features 2-95

With a BIS-34D ConsoleTo set up line pools and assign line pools and lines to stations, enteradministration mode and follow the appropriate procedure below.
Assigning Lines to Line Pools
1
2
3
4
5
6
Touch Adm Pool.
NOTE: If the green light next to Adm Pool flashes instead of remainingsteady and you don’t hear a 2-beep signal, your lines are in use. Youcannot set up line pools unless all the voice terminals in your system are idle.Wait until you hear the 2-beep signal or leave administration mode and tryagain later.
When you entered administration mode and touched Adm Pool, thesystem put you in the main pool (default pool 9). If you want toadminister any other line pool, you must dial the pool’s access code(default codes are 890 through 899).
Steady red lights appear beside each line that is assigned to this pool.Touch the button of any line whose pool assignment you want to change.Each touch of the button gives you one of the following codes:
Red light on = line is assigned to the poolRed light off = line is not assigned to the pool
If you hear a beep when you touch a line button, the line is already inanother pool or assigned to Music-on-Hold or Loudspeaker Page. Youmust remove the line from its current pool by dialing that pool’s accesscode and touching the line button before you can assign the line to thepool you are administering.
To administer another pool, dial the appropriate access code and repeatstep 3.
To make sure that your line pools are set up as you want them, dial theaccess code of each line pool in turn and verify that the steady red lightsare on next to the correct line buttons.
Touch Adm Pool and go on to another procedure or leave administrationmode.
Assigning Line Pools or Lines to Buttons Follow the procedure below toassign or remove lines or line pools from voice terminals. If you’re assigninglines, be sure to touch the buttons in the order in which they appear on theStation Configuration Form.
It’s advisable to keep line buttons together on a voice terminal. If youremove a line in the middle of a column of line buttons, it’s best to reassignthe remaining lines so that the lines appear on an unbroken sequence ofbuttons.
1 Touch Adm Tel.
2 Touch the Auto Intercom button for the voiceto assign line pools or lines.A steady green light comes on next to its Auto Intercom2-beep signal to begin.
terminal to which you want
button. The system gives you a
2-96 MERLIN II System Features

3
4
5
NOTE: If the light next to Adm Tel flashes, you can’t perform thisprocedure now. Take one of these actions:
Wait for the light to become steady, then go to step 3.
Leave administration mode and try this procedure again later.
Refer to the Station Configuration Form to see which line pools orindividual lines should be assigned to buttons on this voice terminal.Steady green lights show next to any lines now assigned to the voiceterminal, either as individual lines or as part of a line pool. Steady redlights show next to all lines contained in any system pool.
Touch the button for any line pool or line you want to add to or removefrom this voice terminal. Each touch of the line button gives you one ofthe following codes:
Green light on = line is assigned to the voice terminalGwen light off = line isn‘t assigned to the voice terminal
NOTE: Lines in a line pool always change as a group. When you touchthe button for any line in a line pool, you change the status of all the linesin that line pool.
Repeat steps 2 through 4 or use the Copy procedure, below, for each voiceterminal in your system.
If you want to give a voice terminal the same line pool and line assignmentsas one that’s already set up, use this shortcut:
NOTE: When you copy line assignments, you also copy any callrestrictions, Dial Access to Line Pools, and allowed-list permissionsassigned to the original voice terminal. Be sure you want the twovoice terminals to be identical in these respects before using this CopyProcedure.
a T o u c h
b T o u c hThe red
c Touch
the Auto Intercom button of the
Recall.light next to Adm Tel flashes.
the Auto Intercom button of the
new voice terminal.
original voice terminal.When the copy procedure is complete, the red light stops flashing.
d Repeat steps a through c for each voice terminal for which you want tocopy line pool and line assignments.
6 Touch Adm Tel and go on to another procedure, or leave administrationmode.
Assigning Dial Access to Linehave already set the system forType. ”
Pools Before you begin,Dial Access to Line Pools.
be sure that youSee “System
To assign voice terminals Dial Access to particular line pools, enteradministration mode and follow the procedure below.
1 Touch Adm Tel.
2 Touch the Auto Intercom button for the voice terminal to which you wantto assign Dial Access to selected line pools.If the voice terminal is idle, a steady green light goes on next to its Auto intercom button,and the system gives you a 2-beep signal to begin.
MERLIN II System Features 2-97

HOW TO USE
3
4
5
6
7
NOTE: If the voice terminal is being used, the green light next to Adm Telflashes rapidly. You must wait until the green light become steadyand you hear the 2-beep signal or leave administration mode and tryagain later.
Steady green lights show next to the buttons of the lines assigned tobuttons on this voice terminal. Steady red lights show next to the buttonsof each line assigned to one of the system pools.
Touch the same Auto Intercom button.A steady red light comes on next to the green light beside Adm Tel.
If you are trying to assign Dial Access to a line pool to an attendant’sconsole or to a busy voice terminal, the red light will not come on and thesystem will beep.
Touch the button next to one of the lines in each of the pools whosestatus you want to change. The green light beside the button for the linetells you whether the voice terminal has Dial Access to the pool thatcontains this line. Each successive touch of a line button gives you one ofthe following codes:
Green light on = voice terminal has Dial Access to this poolGreen light off = voice terminal does not have Dial Access to this pool
Keep in mind that the lines in a pool always change as a group. Touchingany button representing a line in a pool affects all the lines in that pool.
Repeat steps 2 through 4 for each voice terminal whose Dial Access toLine Pools you want to change.
If you want to give a different voice terminal the same Dial Access to LinePools as a voice terminal that has already been set up, use the followingshortcut. Note that when you copy the Dial Access assignments, you alsocopy all call restrictions, allowed-list permissions, and line and poolassignments from the original voice terminal.
a Touch the Auto Intercom button of the new voice terminal.
b Touch RecallThe red light next to Adm Tel goes on.
c Touch the Auto Intercom button of the original voice terminal.When the red light goes off, the copy procedure is complete.
Touch Adm Tel and go on to another procedure, ormode,
Be sure that the line pools and any individual lines thaton buttons at the voice terminals.
leave administration
you assign are labeled
The guides for users and attendants explain how to place calls in differenttypes of pooled systems. Be sure that everyone in your business knows whattype of system yours is and understands how to use the line pools.
2-98 MERLIN II System Features
Line Assignments in Square Systems
If your responsibilities do not include system administration, skip thisinformation.
DESCRIPTION
CONSIDERATIONS
In square systems, each line appears on a separate button at the voiceterminal. How you assign lines in a square system depends on the type ofsquare configuration your system has. There are two types: standard squareline configuration and customized square line configuration.
● In a standard square line configuration, every outside line is represented bya separate button in the same position on every voice terminal in thesystem. A square arrangement simplifies call handling because people canbridge onto calls or pick up calls on hold just by touching the appropriateline button at any voice terminal.
● In a customized square line configuration, the administrator assigns selectedlines to buttons on voice terminals with similar requirements for placingand receiving calls. For example, people within a particular departmentmay need the same line assignments as each other, but different lineassignments than people in other departments. This configuration alsoallows you to vary the order in which you assign individual lines tobuttons on voice terminals. You can also assign a personal line tosomeone in the office who needs to be sure of getting of an open line atall times.
If the system has fewer than eight lines and you decide on a standardsquare system, you don’t need to assign lines. The system automaticallyassigns the lines plugged into the corresponding control unit jacks to theeight line buttons above the dial pad on each voice terminal. If the systemhas more than eight lines, however, you must follow the proceduredescribed below to assign the rest of the lines to each voice terminal inthe system.
If you are setting up a customized square system for the first time, beginby removing all existing lines from each voice terminal in the system.Then follow the procedure below to assign the individual lines to eachvoice terminal in turn.
When you assign a line to a voice terminal, the system automaticallyassigns it to the first button that doesn’t already have a line assigned to it,in the order shown in Figures 2-11 and 2-12. You can assign lines to voiceterminals in a different pattern by touching the line buttons in the order inwhich you want them to appear.
A ghost line is any line jack with no line cord plugged into it. You mustremove any ghost lines from the administrator/attendant console and fromthe voice terminals to which you are assigning lines.
Assign lines to one voice terminal at a time. You cannot assign lines to avoice terminal unless it is idle, and the user cannot place or receive callswhile you are assigning lines.
If a loudspeaker paging system is connected to your system and thesystem is administered for Loudspeaker Paging, you can assignLoudspeaker Page to line buttons on stations such as attendant consoles.
Be sure to label the voice terminal buttons with the telephone numbers ofthe lines you assign.
MERLIN II System Features 2-99

FIGURE 2-11 The order in which lines are assigned to buttons on analog voice terminals in a squareconfiguration.
I ❑❑ 3 ❑ I ❑
❑ 8 ❑❑❑ 9 ❑ ❑
❑ ❑ ❑ ❑❑ 10 ❑ 22 ❑I ❑
❑ 2 ❑❑ ❑ ❑
1 ❑ 6 ❑❑❑ 11 ❑ ❑
I ❑ lntercom- ❑ ❑❑ V o i c e ❑
❑ ❑ ❑❑ 12 ❑ 24 ❑5 ❑
I ❑ lntercom-
❑ Ring ❑ I ❑❑ 4 ❑ ❑
❑❑ 2 5❑
❑ ❑ ❑❑ 14 ❑ 26 ❑
— By default, the system assigns all linesto buttons on attendant consoles in the
❑❑ 15 ❑ I ❑
❑ 27 ❑order Indicated by the numbers. Itassigns only the first eight lines toanalog voice terminals. If you assignadditional lines, they appear on buttonsIn the order shown. ❑
❑ 16 ❑ ❑❑❑ 17 ❑ ❑❑❑ 18 ❑ ❑
I ❑❑ 31 ❑❑
❑ 19 ❑❑
20 ❑❑ ❑
2-100 MERLIN II System Features

S p e a k e r
FIGURE 2-12 The order in which lines are assigned to buttons on digital voice terminals in a squareconfiguration.
MessageShift
By default, the system assigns the first threelines to 7406 voice terminals in the orderindicated by the numbers. If you removethose lines and assign others to the 7406voice terminal, the new lines are assignedto buttons In the order shown.
MERLIN II System Features 2-101

ADMINISTRATION Before you begin, be sure your system is set for square configuration. See“System Type. ” Have the Station Configuration Forms handy. To assignlines to buttons in a square system, enter administration mode and follow theappropriate procedure below.
With a MERLIN II System Display Console
1 From the administration menu, touch these buttons: [Stations], [Line/Pool] .
2 Touch the Auto Intercom button for the voice terminal.
3 Touch [Enter].
NOTE: If the voice terminal is being used, the message, “station busy -please wait, ” shows on your display. You must either wait until thestation becomes available or try again later.
4 Touch the line buttons until the correct code shows:
Green light on = line is assigned to the voice terminalGreen light off = line is not assigned to the voice terminal
If you want to give another voice terminal the same line assignments asone you have already set up, use the following shortcut:
NOTE: Be aware that when you copy line assignments, you also copycall restrictions and allowed-list permissions. Be sure you want the twovoice terminals to be identical in these respects before using this Copyprocedure.
a Touch [Copy] .
b In response to the prompt, touch the Auto Intercom button of thestation you are copying from.
C Touch [Enter] .
d In response to the prompt, touch the Auto Intercom button of thestation you are copying to.
e Touch [Enter] .You hear a 2-beep signal to let you know that the copy procedure is complete.
f Repeat steps b through e for each voice terminal for which you want tocopy line assignments.
g Touch [Exit] to return to the Stations screen.
5 To make line assignments to a different voice terminal, repeat steps 2through 4.
6 Touch Conference to return to the administrationadministration mode.
With a BIS-34D Console
1 Touch Adm Tel.
menu, or leave
2 Touch the Auto Intercom button for the voice terminal to which you wantto assign lines.A steady green light comes on next to the voice terminal’s Auto Intercom button. Thesystem gives a 2-beep signal for you to begin.
2-102 MERLIN II System Features

HOW TO USE
3
4
Be
NOTE: If the voice terminal is being used, the green light next Adm Telflashes rapidly and you don’t hear the 2-beep signal. You must either waituntil the green light becomes steady or try again later. If you try to assignlines to a busy voice terminal, you’ll hear a single beep and won’t be ableto proceed.
Touch the appropriate line buttons to add or remove lines from this voiceterminal. The green light next to each line button tells you the currentstatus of the line. Each successive touch of a line button gives you one ofthe following codes:
Green light on = line is assigned to the voice terminalGreen light off = line is not assigned to the voice terminal
The order in which you touch the line buttons determines the order inwhich lines appear on the voice terminal.
If you want to give another voice terminal the same line assignments asone you have already set up, use the following procedure. However, beaware that when you copy line assignments, you also copy call restrictionsand allowed-list permissions. To copy line assignments to another voiceterminal:
a Touch the Auto Intercom button of the new voice terminal.
b Touch Recall.The red light next to Adm Tel flashes.
c Touch the Auto Intercom button of the original voice terminal.When the copy is complete, the red light stops flashing.
Touch Adm Tel and go on to another procedure, or leave administrationmode.
sure that the individual lines that you assign to stations are labeled atpeople’s voice terminals.
The guides for users and attendants explain how to place calls in squaresystems. Be sure that everyone in your business knows what type of systemyours is and understands how to use the line buttons.
MERLIN II System Features 2-103

Line Representation
See “System Type.”
Line Request
DESCRIPTION
CONS
If the line on which you want to
DERATIONS ●
●
●
Request to base the system alert
HOW TO USE
The Line Request feature can
place a call is busy, you can use Lineyou when the line becomes idle.
be used with lines or line pools that appearon buttons. lt cannot be used with Pool Access buttons.
If you touch another line button or if you place or receive a call after youhave touched the line button, your line request is canceled.
When you use the Line Request feature, you are selecting a specific lineor line pool. The system alerts you only when that line or line poolbecomes idle.
To request a line that is presently busy:
1 Touch the line button of the line you want to use.The MERLIN II system signals you with a beep when the line is free.
2-104 MERLIN II System Features

Loudspeaker Page
DESCRIPTION When you have an optional loudspeaker paging system attached to thecontrol unit of the MERLIN II system, you can page people and makeannouncements over the system from your console or voice terminal.
CONSIDERATIONS
ADMINISTRATION
The system administrator must identify the line jack to which the loudspeakerpaging system is connected. Then the administrator can assign that line toattendant consoles and appropriate voice terminals.
● There can be only one Loudspeaker Page system jack.
● The system administrator can designate any line jack as the LoudspeakerPaging System Jack except the line jack of:
A line that is contained in a line pool
A line to which the Music-on-Hold source is connected
● The Loudspeaker Page feature can be especially helpful to the attendant.If the person for whom a call is intended may be in one of severallocations, the attendant can park the call (see “Call Park”) and then useLoudspeaker Page to announce the call. The person can then go to thenearest voice terminal and use Call Pickup (see “Call Pickup” ) or LinePickup (see “Line Pickup”) to answer the call.
● Only one person at a time can use the paging system.
● People without Loudspeaker Page buttons can access the LoudspeakerPage feature by using Line Pickup. (See “Line Pickup.”)
Enter administration mode and follow the appropriate procedure below toidentify the line jack to which the loudspeaker system is connected.
With a MERLIN II System Display Console
1 From the administration menu, touch these buttons: [More], [Options],
[XtrnPg] .
2 Touch line button:
Green light on = Loudspeaker Page jackGreen light off = standard line or Music-on-Hold jack
3 Touch Conference to return to the administration menu.
With a BIS-34D Console
1 Touch Message.
2 Dial #205.
3 Wait until the system beeps twice. If you do not hear two beeps, dial#205 again.A green light goes on next to the line corresponding to the Loudspeaker Page system jack.
4 To designate a line jack to which the loudspeaker system will beconnected or to change the jack assignment, touch the line button untilthe green light shows the setting you want:
Green light on = the loudspeaker paging system is connected to the jackGreen light off = the jack is used for a line or for Music-on-Hold
MERLIN II System Features 2-105
HOW TO USE
5 Touch Message and go on to another procedure, or leave administrationmode.
Next, you assign the Loudspeaker Page feature to a line button at individualconsoles or voice terminals. Label the button(s) and follow the procedure forassigning lines in a square, behind-switch, or pooled system. (See the “LineAssignments” entry for your system type.)
If the system administrator has assigned your voice terminal a LoudspeakerPage button, you can use the feature to page people or to makeannouncements.
1 Touch Loudspeaker Page.
2 If you have a multizoned paging system, wait for the dial tone, then dialthe number for the page zone you want. (These zone numbers are afunction of the paging system, not the MERLIN II system.)
3 Lift your handset and make your announcement.
4 Hang up.
The loudspeaker turns off automatically.
Manual Signaling
DESCRIPTION You can use a Manual Signaling button to generate a beep at a co-worker’svoice terminal. Program a Manual Signaling button for each person you wantto signal.
CONSIDERATIONS
PROGRAMMING
● You can signalan outside call
someone with a Manual Signaling button while you havein progress.
● The beep sounds at your co-worker’s voice terminal even if it is busy.
● If you program this feature on a button with lights, the green light next tothe button goes on when your co-workeruses the Do Not Disturb feature.
● You cannot have both a Manual Signalingbutton for the same person. If you try tothe feature that you programmed earlier.
To program a Manual Signaling button, labelthese steps:
1 Enter programming mode.
2 Touch the button you want to program.
3 Dial *60 plus the intercom number of the
4 Leave programming mode.
uses his or her voice terminal or
button and an Auto Intercomprogram both, you deactivate
an available button and follow
person you are signaling.
2-106 MERLIN II System Features
HOW TO USE To signal a co-worker:
1 Without lifting your handset, touch the Manual Signaling button.
To place an intercom call using a Manual Signaling button:
1 Touch Intercom-Voice or Intercom-Ring.
2 Lift the handset or touch Speakerphone.
3 Touch the Manual Signaling button.
Menu-Driven Administration
DESCRIPTION The MERLIN II System Display Console has a 2-line, 40-character display andfive “soft keys, ” whose current functions are shown by labels on the screenabove the buttons.
If you have this console as your administrator/attendant console, you use adisplay-based method called menu-driven administration to administer yoursystem. In menu-driven administration, you touch one of the five keys justbelow the display to select an administration option rather than touching anadministration mode button and then typing in an administration code.
The overlay provided with your console shows the function of the buttons inadministration mode. Use this overlay whenever you perform administration.
NOTE: The overlay may have been placed in the pocket folder of theMERLIN II Installation and Administration Manual during unpacking andinstallation. The pocket folder is labeled, “Menu-DrivenAdministration Overlay. ”
A menu map, provided in Section 3, “Quick Reference Guides,” shows theMenu-Driven Administration menus and the paths they follow.
Figure 2-13 shows the display console in administration mode.
A typical menu-driven administration screen appears below:
I Line/Pool: Select Station for assignment I
For each feature, a prompt instructs you to enter data at the dialpad, touchline or station buttons, or touch one of the keys just below the display toselect an administration option. Menu-driven administration procedures are,for the most part, self-explanatory.
MERLIN II System Features 2-107

FIGURE 2-13 The MERLIN II System Display Console in Administration Mode
❑ ❑
❑
❑
❑ ❑ ❑ ❑❑ ❑ ❑ ❑❑ ❑ ❑ ❑
2-108 MERLIN II System Features

CONSIDERATIONS
HOW TO USE
Line Shift ButtonsIn menu-driven administration, lines are represented by buttons in the fourleftmost columns on the console. As Figure 2-13 shows, there are two pagesof 30 lines each, to accommodate the maximum number of lines (56).
In systems with more than 30 lines, a button can represent more than oneline. For example, the third button from the top in the leftmost columnwould represent default lines 801 and 831. When you touch Line Shift 1, theline buttons represent default lines 801 through 830; when you touch LineShift 2, they represent lines 831 through 856.
Station Shift ButtonsIn menu-driven administration, stations are represented by the buttons in thefour rightmost columns on the console. Some analog voice terminals mayrequire two station jacks for the Voice Announcement to Busy Voice Terminalor Simultaneous Voice and Data feature and therefore have two intercomnumbers associated with them. This means there can be up to 88 stationjacks and intercom numbers, although no more than 72 responding stations.
There are three pages of stations, to accommodate the maximum number ofintercom numbers. In systems using more than 40 station jacks, a button canrepresent more than one station. For example, the top button in the fifthcolumn from the left can represent station jacks 1, 41, and 81. When youtouch Station Shift 1, the station buttons represent the first 40 station jacks(default intercom numbers 10 through 49). When you touch Station Shift 2,the buttons represent the next 40 station jacks (default intercom numbers 50through 69 and 700 through 719. ) When you touch Station Shift 3, thebuttons represent the remaining station jacks (default intercom numbers 720through 727).
“How to Use, ” below, describes typical MERLIN II system administrationscreens and lists abbreviations used on those screens. Once you becomefamiliar with the various screens, you probably won’t have to refer to thismanual in order to administer the system.
● Menu-driven administration can only be performed on a MERLIN IIsystem display console.
● You can identify a line or station by touching its line or station button,dialing its line number or intercom number, or dialing its logical IDpreceded by a pound sign, e.g., #1 for station 01, #2 for station 02, etc.
General instructions for performing menu-driven administration follow.Keep in mind that you can return to the highest level screen at any timeby pressing Conference once.
To perform menu-driven administration:
1 Place the administration overlay over the console.
MERLIN II System Features 2-109

2 Enter administration mode by sliding the T/P switch to P and touchingConference twice.The administration menu appears on the display:
Administration: Please make a selection
System FlexNum Lines Stations More
3 Touch the key for one of the administration options shown on the screenor touch [More] to see the rest of the options available.
4 Follow the screen prompts and the labels under the keys to change basicsystem settings or administer options, as explained below. To return tothe administration menu at any time, touch Conference once.
There are two basic types of screens, menu selection and data entry screens.The other screens give you information, such as “System is Re-starting . . .”General instructions for using the two basic types of screens follow.
Menu Selection ScreensOn menu screens like the second Stations screen, below, you touch keys toselect a particular option.
Stations: Please make a selection
IAccount BIS/HAFl Pagezn GrpCall More
The screen prompts you to make a selection by touching the appropriate key.In some cases, this brings up a new screen. In others, like the screen shownabove, a light goes on next to the key you touched. The lights next to AutoIntercom buttons and line buttons show the status of the feature that the keyrepresents.
You can perform the following procedures on this screen:
Designate stations for Forced Account Code Entry
Identify voice terminals as BIS/HFAI or membrane button models
Establish or update Group Page groups
Establish or update Call Distribution groups
Data Entry ScreensOn data entry screens like the Flexible Numbering screen, below, you use thedialpad to record data such as the new station number.
Line 801 Enter new line number I38
2-110 MERLIN II System Features

You use the keys beneath the display for editing, as follows:
● If you make a mistake, touch [Bksp] to erase one characterredial the entry.
● Touch [Enter] to send the data on the screen to the controlto the previous screen.
at a time. Then
unit and return
● Touch [Next] to send the data on the screen to the control unit and get thenext data entry screen (for features with multiple data-entry screens only).
● Touch [Exit] to leave the screen without entering data.
● Touch [Drop] to clear the field.
NOTE: If you enter invalid data at any point, you hear a beep and theline of data clears.
Screen AbbreviationsThe following abbreviations appear on the display during menu-drivenadministration.
Account
Admin
All
AllowTo
AlwList
Attendnts
ARS
ARS-6dgt
ARS-Abs
ARS-Inp
ARS-Pool
BehindSw
BIS/HFAI
Bksp
Block
ButnAcc
CallLen
CallRep
CampOn
Confrnce
CMS
CMSsplit
Forced Account Code Entry
Administration
Print all
Assign stations access to allowed lists
Set up allowed list entries
Designate stations as answering positions (attendant stations)
Prints ARS tables
Identify ARS tables as 6-digit tables
Specify absorption types for line pools in ARS tables
Enter data in Area Code/Exchange sections of ARS tables(input tables)
Enter data in Pool, Absorb, and Other Digits sections of ARStables (output tables)
Identify system as a behind-switch system and assignbehind-switch capabilities
Identifies stations as BIS/HFAI type
Backspace
Block renumbering of lines and/or stations
Button-accessed line pool (DPT)
Specify minimum call length for Call Report (SMDR)
Set up Call Report (SMDR)
Specify return interval for Camp On calls
For Behind-Switch operation
Call Management System
To administer Call Management System splits
MERLIN II System Features 2-111

Cntr-Prg
Data
Date
DayofWk
DialAcc
DialPlan
Drop
DISA
Emerg
Exclude
Feedback
FlexNum
Group
GrpCall
HldAbdn
HldAband
HuntGrp
ICMdial
InitSp
In/Out
Intercom
Label
Line/Pool
Lines
LocHost
Local
MdmPool
MdmType
Music
NewPg
Night
NoRestr
OneTouch
Options
To administer Centralized Programming
Administer data features
Set current date
Specify current day of the week for Night Service
Dial-accessed line pool (ESA)
Print current dial plan for system
For Behind-Switch operation
Designate outside lines for use in Direct Inward SystemAccess
Enter data in Night Service emergency numbers list
Assign Exclusion from Night Service
For Ringing-on-Transfer
Assign dial codes using Flexible Numbering
Set up Night Service groups
Set up Call Distribution groups
Set Hold Disconnect Interval (Hold Abandon)
Hold Abandon (Hold Disconnect Interval)
For assigning data hunt groups
For assigning internal/external intercom dial tones
Initialize space for Flexible Numbering by reestablishingdefault dial plans.
Specify Call Report (SMDR) for both incoming and outgoingcalls
Allow intercom calls only (Call Restriction)
Assign art alphanumeric label to a station or line
Assign lines or line pools to a station
Administer lines
Set up Local Host Interface
Allow local and intercom calls only (Call Restriction)
Set up modern pools
Identify type of modem in modem pool
Music-on-Hold (MOH)
Call Report (SMDR) new page
Administer Night Service
No Call Restriction, all calls allowed
One Touch hold with call announcement
Administer miscellaneous options
2-112 MERLIN II System Features

OutOnly
OutRstr
PageZone
PageZn
PickUp
Position
Recall
SMDR
RmdrSvc
Renumbr
Restart
Restrct
Rotary
Single
Size
SpclNm
SpdDial
Start
Stations
Status
Stop
Store
SysConf
System
Tables
TchTone
Transfer
TfrRet
Time
TollType
Type
Vce/Data
VceSgnl
XtndSta
XtrnPg
Specify that Call Report (SMDR) records outgoing calls only
Night Service outward restriction
Print page groups
Set up Group Page groups
Assign Call Pickup groups
Attendant positions
Print system features/setup/options
For administering Recall Timer
Station Message Detail Recording (Call Record)
For administering Reminder Service
Perform a board renumber
Cold start
Station Call Restriction
Dialing timeout for rotary lines
Single Flexible Numbering (individual code changes)
Specify system size
Assign special number for ARS
System Speed Dial
Specify Night Service start time
Administer stations
Sets Extended Station Status Mode
Specify Night Service stop time
Assignment completed, data entered
System configuration
Administer system features
Administer ARS tables
Designate line as Touch-Tone or rotary
For Behind-Switch operation
Specify Transfer Return Interval
Set system time
Assign toll type (dial prefix needed)
Specify system type
Assign Simultaneous Voice and Data (SVD)
Assign Voice Announcement to Busy Voice Terminal
Assigns attendants to display Extended Station Status modes
Identify Loudspeaker Page line
MERLIN II System Features 2-113

Message
CONSIDERATIONS
PROGRAMMING
HOW TO USE
How you respond to a Message light depends on the type of voice terminalyou have.
● When the light next to the Message button is lit on a voice terminalwithout a display, your system attendant has one or more messages foryou. You must get your message(s) from him or her.
● When the Message light is lit on a display voice terminal, someone in thesystem has left you a message. You can use your Message button to helpyou check your display for messages that people have left for you. (See“Leave Word Calling.”)
The 7406 voice terminal has a Message light, but not a Message button.The 5-buttom analog voice terminal does not have a Message button nor aMessage light. On these voice terminals, you can program the Messagefeature on a button.
On a 7406 voice terminal without an attached display, you must programboth a Message button and a Delete Message button. (For informationabout programming a Delete Message button, see “Leave Word Calling.”)When your Message light is on, touch one of these buttons and then theother until your Message light goes off. Then call a system attendant tosee if he or she has a message for you.
If you have a 5-button analog voice terminal or a 7406 display voice terminal,you may want to program a Message button. If you need a Message buttonwith a light next to it, program it on an appropriate button.
To program a Message button for your voice terminal, label the button andproceed as follows:
1 Enter programming mode.
2 Touch the button you want to program.
3 Dial *98.
4 Leave programming mode.
To turn off the light next to Message (for voice terminals without a display):
For voice terminals with a Message button:
1 Touch Message.The Message light goes off.
For voice terminals or basic telephones without a Message button:
1 Dial #54.The Message light goes off.
2-114 MERLIN II System Features

Monitor-on-Hold
See “Speakerphone and Speaker.”
Music-on-Hold
DESCRIPTION When you have Music-on-Hold, you can provide background music for callerswhom you have placed on hold, or you can provide music for selected areasof your building through the loudspeaker paging system. You can use aradio, tape player, or stereo system as a music source for this feature.
CONSIDERATIONS
ADMINISTRATION
This feature requires a Music Coupler.
The system administrator must designate the line jack to which the musiccoupler will be connected,
There can be only one jack assigned as the Music-on-Hold jack.
The system administrator can designate any jack as the Music-on-HoldJack except a line jack used for:
A line that is contained in a line pool
A line that appears as a line or line pool button
A line to which the loudspeaker paging system is connected
When someone within the MERLIN II system transfers a call, the caller isautomatically connected to Music-on-Hold, if the system has the feature.The system administrator may choose to administer the Ringing-on-Transfer feature so the caller hears ringing instead. (See “Ringing-on-Transfer. ” )
To designate the line jack to which the music source will be connected enteradministration mode and follow the appropriate procedure below.
With a MERLIN II System Display Console
1 From the administration menu, touch these buttons: [More], [Options],
[Music] .2 Touch line button:
Green light on = Music-on-Hold jackGreen light off = standard line or Loudspeaker Page jack
3 Touch Conference to return to the administration menu.
With a BIS-34D Console
1 Touch Message.
2 Dial # 204.
3 Wait until the system beeps twice.A green light comes on next to the line designated as the Music-on-Hold jack, if any.
MERLIN II System Features 2-115
Green light on = the Music-on-Hold source is connected to this line jack
G r e e n l i g h t o f f = t h i s l i n e j a c k i s u s e d i n a n o t h e r w a y .
HOW TO USE
4 To designate a line jack to which the music source will be connected, or tochange the Music-on-Hold jack assignment, touch the line button until thegreen light shows the setting you want:.
5 Touch Message and go on to another procedure, or leave administrationmode.
If your system has Music-on-Hold, a caller that you have put on hold hearsbackground music.
Night Service
DESCRIPTION The MERLIN II system allows several options for after-hours telephoneoperation. The administrator can administer these features in any combinationto meet the current needs of the office. When the attendant goes off duty, heor she can activate the Night Service options that the administrator hasadministered.
The three Night Service options are:
CONSIDERATIONS
●
●
●
●
●
●
Night Service with Group Assignment. The administrator can specifywhich voice terminals should ring when calls come in to an attendantconsole with which these voice terminals share lines.
Night Service with Outward Restriction. The administrator can set thesystem so that people must dial a password to place calls after hours. Heor she can also create a list of emergency numbers that people can dialeven if they don’t know the password. If a voice terminal shouldn’t berestricted at all, even after hours, the administrator can assign it to anExclusion list.
Night Service with Time Set. The administrator can set the systemto turn Night Service on and off automatically, at preset times. If theadministrator sets on and off times only, the system will automaticallyturn on and off Night Service with Group Assignment at those times. Ifthe administrator sets on and off times and a 4-digit password, the systemwill automatically turn on and off Night Service with Group Assignmentand Outward Restriction at those times.
If the administrator sets the system for Night Service with GroupAssignment, he or she can assign a voice terminal to more than one NightService group and can put as many voice terminals as needed into eachgroup.
Voice terminals on the Night Service Exclusion list retain the callrestrictions, if any, placed on them during normal working hours.
Because people with basic telephones cannot enter a password, they willnot be able to place after-hours calls when Night Service with OutwardRestriction is in place, unless the administrator assigns the basic
2-116 MERLIN II System Features

ADMINISTRATION
telephone(s) to the Exclusion list. These users will be able to dial thenumbers on the emergency number list, however.
● Attendants can override Night Service with Time Set and turn NightService on or off manually at any time, but the automatic operation willresume the next day. Night Service with Time Set can also be suspendedtemporarily, such as when there is a midweek holiday or an unexpectedfacility closing, then reactivated. While it is deactivated, attendants mustturn Night Service on and off manually each day.
● If an attendant does not have a Night Service button, he or she can use adial code to turn Night Service on and off.
Get the Night Service planning forms, enter administration mode, and followthese procedures to administer the three Night Service options.
With a MERLIN II System Display ConsolePerform the appropriate procedures, below, to administer your system’sNight Service options.
Night Service with Group Assignment To add voice terminals to or removethem from Night Service groups:
1
2
3
4
5
6
From the administration menu, touch these buttons: [More], [Night] .
Touch [Group].
Dial the intercom number of the attendant for whom you are setting up orchanging a Night Service group and touch [Enter] .
Touch the Auto Intercom button of each voice terminal you want to add toor remove from this attendant’s group until the light beside the buttonshows the appropriate code.
Green light on = voice terminal is included in the Night Service groupGreen light off = voice terminal is not included in the Night Service group
To administer other groups, touch [Group] and repeat steps 3 through 5.
Take the appropriate step:
TO administer Night Service with Outward Restriction, touch [OutRstr]
and go to step 2 of the following procedure.
Touch Conference to return to the administration menu or leaveadministration mode.
Night Service with Outward Restriction The following procedure describeshow to set up or change your password, list of emergency numbers, orExclusion list.
1 From the administration menu, touch these buttons: [More], [Night],
[OutRstr] .
2 Take one of these actions:
To create a new password or replace an existing password, dial anyfour digits (0 through 9).
To remove an existing password, touch Drop.
MERLIN II System Features 2-117

3 Touch [Enter] .
NOTE: Removing the password deactivates the Outward Restrictionfeature. To restore Outward Restriction, you need to create a newpassword.
4 To administer emergency telephone numbers, touch [Emerg] .
5 Dial the entry number (0 through 9) of the telephone number on theallowed list and touch [Enter] .
6 Take the appropriate action:
➤ To add or change an entry, dial the telephone number (maximum of12 digits) and touch [Enter] .
To remove an existing number, touch [Drop], and touch [Enter] .
7 To assign voice terminals to the Night Service Exclusion list or removethem from this list, touch [Exculde] .
8 Touch the Auto Intercom button of each voice terminal until the light nextto the button shows the appropriate code.
Green light on = voice terminal is on the Exclusion ListGreen light off = voice terminal isn't on the Exclusion List
9 Take the appropriate action:
To administer Night Service with Time Set, touch [More] and go tostep 2 of the following procedure.
If you’re finished administering Night Service, touch Conference toadminister another feature or leave administration mode.
Night Service with Time Set Follow the steps below to administer NightService with Time Set. If you want Night Service to stay on for a full day(a Sunday, for example), don‘t set a start time or a stop time for that day.
NOTE: If you have not set the MERLIN II system clock, follow theprocedures in “Call Report” to set the time and date before you beginto administer Night Service with Time Set. Follow those stepswhenever you need to reset the system clock (when Daylight SavingsTime goes into effect, for example).
1 From the administration menu, touch these buttons: [More], [Night],
[More] .
2 To set the time at which Night Service should go on, touch [Start] .
3 Dial the number for the day of the week for which you are setting a time.(Sunday =0, Saturday =6).
4 Perform one of the following operations:
To remove the existing automatic start time for this day, touch [Enter] .
To set or change the start time, dial two digits for the hour and twodigits for the minute, in the 24-hour format, then touch [Enter] . (Forexample, if you want Night Service to go on at 5:30 p.m., dial 1730).
2-118 MERLIN II System Features

5 To set the time when Night Service should go off, touch [Stop] .. -
6 Dial the number of the day of the week for which you are setting a time(Sunday =0, Saturday =6).
7 Perform one of the following operations:
To remove the existing automatic stop time for this day, touch [Enter] .
To set or change the stop time, dial two digits for the hour and twodigits for the minute, in the 24-hour format, then touch [Enter] (Forexample, if you want Night Service to go off at 8:00 a.m., dial 0800. )
8 To activate or deactivate Night Service with Time Set, touch [DayofWk] .
9 Perform the appropriate action:
To activate timer-controlled operation of Night Service, dial the codefor the current day of the week (O= Sunday, 6= Saturday) .
To suspend timer-controlled operation of Night Service, dial 9.
10 Touch Conference to return to the administration menu or leaveadministration mode.
Night Service Iformation Report If you have a printer attached to yoursystem for the Call Report (SMDR) feature, you can get a Night ServiceInformation Report. It shows group assignments, the password, the allowedlistfor
1
2
3
of emergency telephone numbers, the Exclusion list, and on and off timesNight Service with Time Set.
From the administration menu, touch these buttons: [More], [More],
[Print], [More], [More], [More].
Touch [NiteSrv] to begin printing.
Touch Conference to return to the administration menu or leaveadministration mode.
With a BIS-34D ConsoleFollow the appropriate procedures below to administer your system’s NightService options.
Night Service with Group Assignment To add voice terminals to or removethem from Night Service groups:
1
2
3
4
5
6
Touch Message.
Dial # 307.
Dial the intercom number of the attendant for whom you are setting up orchanging a Night Service group.
Touch the Auto Intercom button of each voice terminal you want to add toor remove from this attendant’s group until the light beside the buttonshows the appropriate code.
Green light on = voice terminal is included in the Night Service groupGreen light off = volce terminal is not included in the Night Service group
Repeat steps 3 and 4 for each Night Service with Group Assignmentgroup you want to set up or change.
Go to step 2 of another Night Service administration procedure for theBIS-34D console, or leave administration mode.
MERLIN II System Features 2-119

Night Service with Outward Restriction The following procedure describeshow to set up or change your password, list of emergency numbers, orExclusion list.
1
2
3
4
5
Touch Message.
To administer a password, dial # 309, then take one
➤ To create a new password or replace an existingfour digits (0 through 9).
To remove an existing password, touch Drop.
of these actions:
password, dial any
NOTE: Removing the password deactivates the Outward Restrictionfeature. To restore Outward Restriction, you need to create a newpassword.
To administer emergency telephone numbers, dial #310, then take one ofthese actions for each number you want to add, change, or remove:
To add or change an emergency telephone number, dial the entrynumber (0 through 9) of the telephone number on the allowed list,then dial the number itself (maximum of 12 digits).
To remove an existing number, dial the entry number (0 through 9) ofthe telephone number on the allowed list, touch Drop, and touchEnter.
To assign voice terminals to the Night Service Exclusion list or removethem from this list, dial # 308, then touch the Auto Intercom button ofeach voice terminal until the light next to the button shows theappropriate code.
Green light on = voice terminal is assigned to the Exclusion listGreen light off = voice terminal is not assignd to the Exclusion list
Go on to step 2 of another procedure or leave administration mode.
Night Service with Time Set Follow the steps below to administer NightService with Time Set. If you want Night Service to stay on for a full day(a Sunday, for example), don‘t set a start time or a stop time for that day.
NOTE: If you have not set the MERLIN II system clock, follow theprocedures in “Call Report” to set the time and date before you beginto administer Night Service with Time Set. FOllOW those stepswhenever you need to reset the system clock, when the time changes,for example.
1 Touch Message.
2 For each day of the week in turn, set the time of day when you wantNight Service to go on automatically. You must perform both steps a andb for each day.
a Dial the code for the
Sunday = # 3110Monday = # 3111Tuesday = #3112
day of the week for which you are setting a time.
Wednesday = # 3113 Friday = #3115Thursday = #3114 Saturday = #3116
2-120 MERLIN II System Features

PROGRAMMING
b Perform one of the following operations:
To remove the existing automatic start time for this day, touchDrop.
To set or change the start time, dial two digits for the hour andtwo digits for the minute, in the 24-hour format. For example, ifyou want Night Service to go on at 5:30 p.m., dial 1730.
3 For each day of the week in turn, set the time of day when you wantNight Service to go off automatically. You must perform both steps a andb for each day.
a Dial the code of the day of the week for which you are setting a time.
Sunday = #3120 Wednesday = # 3123 Friday = # 3125Monday = # 3121 Thursday = # 3124 Saturday = #3126Tuesday = # 3122
b Perform one of the following operations:
To remove the existing automatic stop time for this day, touchDrop,
To set or change the stop time, dial two digits for the hour andtwo digits for the minute, in the 24-hour format. For example, ifyou want Night Service to go off at 8:00 a,m., dial 0800.
4 Perform the appropriate step to activate or deactivate Night Service withTime Set:
To activate timer-controlled operation of Night Service,for the current day of the week:
Sunday = #3130 Wednesday = #3133 Friday =Monday = # 3131 Thursday = # 3134 SaturdayTuesday = #3132
dial the code
# 3135= # 3136
To suspend timer-controlled operation of Night Service, dial # 3139.
5 Go to step 2 of another procedure for the BIS-34D console, or leaveadministration mode.
Night Service /formation Report If you have a printer, you can get aNight Service Information Report. It shows group assignments, the password,the allowed list of emergency telephone numbers, the Exclusion list, and onand off times for Night Service with Time Set.
1 Touch Conference twice.
2 Touch Message.
3 Dial #907 and wait for the beep.
4 Leave administration mode.
The system attendant can program a Night Service button on his or herconsole by entering programming mode, touching an available button, anddialing *39.
MERLIN II System Features 2-121

HOW TO USE Turning Night Service without Outward Restriction On and OffA green light next to the Night Service button is on whenever Night Serviceis in effect. To turn Night Service on or off:
1 Touch Night Service (or dial #39).
Turning Night Service with Outward Restriction On and OffIf the system is administered with the Outward Restriction option, theattendant must use the password to turn Night Service on and off. The greenlight next to Night Service flashes to remind the attendant to enter thepassword and stays on while Night Service is in effect.
To
1
2
turn Night Service on or off:
Touch Night Service (or dial #39).
Dial the password.
If you don’terror, Nightprocedure.
enter the password within 60 seconds or if you make a dialingService status doesn’t change. If this happens, just repeat the
Making a Call Using the PasswordTo place an outside call when Night Serviceeffect:
1 Before you lift your handset, touch Recallwithout a Recall button, dial #50).
2 Dial the password.
with Outward Restriction is in
(for digital voice terminals
3 Lift your handset and dial the outside number.
If your system has ARS and you are making successive calls, you must dialthe password before each call (steps 2 and 3, above). If you don’t have ARS,touch Recall (for digital voice terminals without a Recall button, dial #50)between calls, without hanging up (steps 1 through 3, above).
2-122 MERLIN II System Features

Notify
DESCRIPTION
CONSIDERATIONS
PROGRAMMING
The Notify feature is a way for people in the MERLIN II system, other thanthe attendant, to alert someone that a message is waiting. With this featurepeople can program Send buttons for others to whom they often sendmessages or Receive buttons for receiving messages from others, such as aboss to his or her secretary, or vice versa.
You can use the Notify feature in addition to the Message feature.
In order to receive a message from a person with a Send button, theperson receiving the message must have programmed a Receive button onhis or her voice terminal labeled with “Receive” and the name of theperson sending the message.
You can have as many Send or Receive buttons on your voice terminal asyou want and as you have available programmable buttons.
If you try to program a second Notify button for the same voice terminal,you deactivate the one you programmed earlier.
To program a Send button, label a button that has lights, and proceed asfollows:
1 Enter programming mode.
2 Touch the button you want to program.
3 Dial *87 + the intercom number for the person you want to notify.
4 Leave programming mode.
To program a Receive button, label a button that has lights and proceedas follows:
1 Enter programming mode.
2 Touch the button you want to program.
3 Dial *88 + the intercom number of the person notifying you.
4 Leave programming mode.
MERLIN II System Features 2-123

HOW TO USE To turn on the green light next to the Receive button at another voiceterminal:
1 Touch the Send button for that voice terminal.T h e g r e e n l i g h t n e x t t o t h e S e n d b u t t o n g o e s o n .The green light next to the Receive button on the other voice terminal goes on.
To turn off the green light next to the Send button:
1 Touch th Send buttonThe green light next to the Send button on your voice terminal goes off.The green light net to the Receive button on the other terminal goes off.
If you have programmed the Receive feature, a green light next to the Receivebutton indicates there is a message waiting for you.
To turn off the green light next to your Receive button:
1 Touch the Receive button.The green light next to the Receive button goes off.The green light next to the Send button on the other voice terminal goes off.
2-124 MERLIN II System Features

On-Hook Dialing
See “Speakerphone and Speaker.”
One-Touch Hold with Call Annoucement
DESCRIPTION If the administrator has administered One-Touch Hold with CallAnnouncement, you can put an outside call on hold and place an intercomcall, all with one touch. For instance, while on an outside call, you may needinformation from a person within your system. You can do this by touching
CONSIDERATIONS
ADMINISTRATION
the Auto Intercom button for your co-worker.
● This feature is useful for screening calls before passingsomeone else in the office.
● One-Touch Hold with Call Announcement is the most
them cm to
suitable option forsquare systems, unless everyone in the system has a button for each line.
● Behind-switch systems are factory-set for One-Touch Hold with CallAnnouncement, and this cannot be changed.
● Square and pooled systems are factory-set for One-Touch Transfer (One-Touch Transfer allows you to transfer an outside call without anannouncement to someone within the system by touching the co-worker’sAuto Intercom button.) They can be readministered for One-Touch Holdwith Call Announcement.
To administer One-Touch Hold with Call Announcement or change to One-Touch Transfer, enter administration mode and follow the appropriateprocedure below.
With a MERLIN II System Display Console
1 To set the system for One-Touch Transfer, touch these buttons from theadministration menu: [Menu], [Options], [More], [More], [OneTouch] .
2 Touch the button for the option you prefer.
3 Touch Conference to return to the administration menu, or leaveadministration mode.
MERLIN II System Features 2-125

HOW TO USE
With a BIS-34D ConsoleTo administer One-Touch Hold or change from One-Touch Hold toOne-Touch Transfer:
1
2
3
4
To
1
2
Touch Message.
Dial the 4-character code #315, then perform one of the followingoperations:
If you want One-Touch Transfer, dial 0.
If you want One-Touch Hold with Call Announcement, dial 1.
If you have a printer connected to your system, you can make sure thatyou have selected the option you want by having the system print aSystem Feature Report. To order a report, dial #905.The green light next to Message flashes. When the printout is completed, you hear a beepand the green next to Message remains on.
Touch Message and go on to another procedure, or leave administrationmode.
use One-Touch Hold with Call Announcement:
While on a call, touch the button for the voice terminal or Call Distributiongroup to whom you are placing an intercom call.
Return to the call by touching the line button, or tell your co-workeranswer the call, using Call Pickup if he or she doesn’t have a buttonthat line.
tofor
2-126 MERLIN II System Features

Outside Auto Dial
DESCRIPTION You can use the Outside Auto Dial feature to dial frequently used numbersand codes with one touch. These numbers and codes can include telephonenumbers, account numbers, and PBX, Centrex, or Custom Calling featurecodes.
CONSIDERATIONS
PROGRAMMING
Whenever instructions tell you to dial an outside number, you can touch anOutside Auto Dial button instead.
● If your system uses account numbers on printed call reports, you canprogram frequently dialed account numbers on Outside Auto Dial buttons.Then while you have a call in progress for which you need to dial anaccount code, you can dial the code with one touch.
● You can include up to 16 digits and special characters in an Outside AutoDial number.
● You may need to program a pause, stop, or switchhook flash into anOutside Auto Dial sequence, or you may need to switch from rotary toTouch-Tone signals in the middle of a programmed dialing sequence. Todo so, you must enter the following special characters when you programthe sequence. (For more information about using special characters in adialing sequence, see “Special Characters in Programmed DialingSequences. ” )
To program a pause, touch Hold.
To program a stop, touch Drop.
To program a switchhook flash at the beginning of a programmeddialing sequence, touch Recall and then touch Hold.
To program Touch-Tone Enable, touch Transfer.
● If your system is set up for Dial Access to Line Pools, a programmedOutside Auto Dial button number must include a Pool Access code andtwo pauses before the telephone number. For example, to program anOutside Auto Dial button in a system in which you usually dial the accesscode 891 before you dial an in-state telephone number, you would dial thePool Access code, 891, touch Hold twice, and then dial the 7-digittelephone number.
To program an Outside Auto Dial button for your voice terminal, label abutton and proceed as follows:
1 Enter programming mode.
2 Touch the button you want to program.
3 Dial *90 and, if required, a Pool Access number and two pauses (touchHold twice) plus a telephone number or a PBX or Centrex code (if youneed to include one or more special characters in the dialing sequence, usethe directions under “Considerations” )
4 Leave programming mode.
MERLIN II System Features 2-127
HOW TO USE To dial an outside number with one touch:
1 Without lifting your handset, touch the Outside Auto Dial button for thenumber you want to dial.Your voice terminal speaker goes on and you hear dialing.
2 When you hear the other person answer, lift your handset or speak intoyour speakerphone.
If the line is busy or if no one answers.
1 Touch Speaker to cancel the call.
You can also lift your handset and then touch an Outside Auto Dial.
PBX, Centrex, or Custom Calling Features
DESCRIPTION
PROGRAMMING
Your MERLIN II system may work behind a PBX or a Centrex system and beconfigured for behind-switch operation. You may also use non-MERLINCustom Calling features. If you are operating behind a host system or usingnon-MERLIN Custom Calling features, keep these points in mind:
When PBX, Centrex, or Custom Callingswitchhook flash, touch Recall instead.disconnect your call.
instructions tell you to include aIf you touch the switchhook, you
If your system is administered for behind-switch operation, you use PBX,Centrex, or Custom Calling feature codes that begin with a pound sign( # ) as described in their documentation. To use MERLIN II systemfeature codes that begin with # while you are off hook (you hear a dialtone or you are on a call), you must program a Speed Dial Access button,as shown below. You touch Speed Dial Access instead of touching #,then dial the rest of the code.
If your system is not administered for behind-switch operation, you useMERLIN II system feature codes that begin with # as described in thismanual. To use PBX, Centrex, or Custompound signs instead of one. For example,dial # # 1234.
For programming procedures for Recall,
To program a Speed Dial Access button,mode, and follow these steps:
Calling codes, you dial twoif the PBX code is # 1234, you
see “Recall. ”
label a button, enter programming
1 Touch the button you want to program.
2 Dial ’20.
3 Program another feature, or leave programming mode.
2-128 MERLIN II System Features

Personal
DESCRIPTION
Speed Dial
You can use the programming instructions below to assign a 3-characterPersonal Speed Dial code (from #01 through # 24) to telephone numbers,PBX, Centrex, or Custom Calling feature codes, or account codes youfrequently dial. This feature is especially useful for people who have 5-buttonor 10-button analog voice terminals and don’t have many available buttons onwhich to program the Outside Auto Dial feature.
You can assign a Personal Speed Dial code to a sequence containing up to 16numbers and special characters.
CONSIDERATIONS
PROGRAMMING
Personal Speed Dial uses a dialing code. You do not place these codes ona voice terminal button.
This feature should be used only on 5-button or 10-button voice terminals.If you try to use this feature on a larger voice terminal, you could corruptthe features you have programmed on buttons to the right of the dial pad.
You may need to program a pause, stop, or switchhook flash into aPersonal Speed Dial sequence, or you may need to switch from rotary toTouch-Tone signals in the middle of a programmed dialing sequence. Todo so, you must enter the following special characters when you programthe sequence. (For more information about using special characters in adialing sequence, see “Special Characters in Programmed DialingSequences. ” )
. To program a pause, touch Hold.
● TO program a stop, touch Drop.
● TO program a switchhook flash, touch Recall and then touch Hold.
● TO program Touch-Tone Enable into a dialing sequence, touchTransfer.
If your system uses account numbers on printed call reports, you canassign a Personal Speed Dial code to frequently dialed account numbers.Then while you have a call in progress for which you need to dial anaccount code, you can dial the 3-digit speed dial code instead.
If your system is set up for Dial Access to Line Pools, a Personal SpeedDial code must include a Pool Access code and two pauses before thetelephone number. For example, to set up a Personal Speed Dial code ina system in which you usually dial the access code 891 before you dial anin-state telephone number, you would dial the Pool Access code, 891,touch Hold twice, and then dial the 7-digit telephone number.
The Personal Speed Dial feature is not associated with a voice terminal button.
To program a Personal Speed Dial code for a number you frequently dial:
1 Enter programming mode.
2 Dial a Personal Speed Dial code ( #01 through # 24).
3 Dial ’90 and, if required, a Pool Access number and two pauses (touchHold twice) plus a telephone number or a PBX, Centrex, or CustomCalling feature code.
4 Leave programming mode.
MERLIN II System Features 2-129

HOW TO USE To place a call using a Personal Speed Dial code:
1 Lift your handset, or press the Speakerphone button (for on-hook dialing).
2 Dial a Personal Speed Dial code (#01 through #24).
You may also choose not to lift your handset. When you dial the speed dialcode, your voice terminal speaker goes on. You can lift your handset whenthe person answers.
Personalized Ringing
DESCRIPTION If you often confuse the ringing sound of nearby voice terminals with theringing sound of your own, you may want to program your voice terminalwith a ringing pattern that is earier for you to identify
CONSIDERATIONS
PROGRAMMING
● There are eight different ringing patterns available.
● With some features, such as Transfer, in which there are multiple rings,only the last part of the ring has the Personalized Ringing pattern that youhave selected.
If you have an analog voice terminals, use this procedure to choose a ringingpattern that you like.
1 Enter programming mode,You hear the ringing sound your voice terminal makes.
2 Touch Speaker.You hear another ringing pattern.
3 Touch Speaker repeatedly until you hear a ringing pattern you like.
4 Leave programming mode.
If you have a 7406 voice terminal, use one of these procedures to select aringing pattern for your voice terminal. You can select a personalized ringingsound by using two buttons on your voice terminal or by using a dial code.
To use the Shift button and the Select Ring button to program thePersonalized Ringing feature:
1 Touch Shift.The light next to the Shift button goes on.
2 Touch Select Ring.The light next to the Shift button flashes. The display unit shows the message,“Personalized Ring #x.” You hear the current ringing sound your voice terminal makes.
3 Touch Select Ring again.You hear another ringing pattern. The display unit shows the message, “Personalized Ring# x“ for the next ringing sound.
4 Touch Select Ring repeatedly until you hear a ringing pattern you like.
5 To save the ringing sound you have selected, touch Shift again.The green light next to the Shift button goes off.
2-130 MERLIN II System Features

HOW TO USE
To use a dial code to select the ringing sound you prefer: (Use this procedureonly with a 7406 voice terminal. )
1 Enter programming mode.
2 Dial #56.You hear the ringing sound your terminal makes.
3 Dial #56 again.You hear another ringing pattern.
4 Dial #56 repeatedly until you hear a ringing pattern you like.
5 Leave programming mode.
After you have programmed your Personalized Ringing preference, you don’tneed to do anything else to use the feature. When a call rings at your voiceterminal, you will hear the ringing pattern you have chosen.
Pooled System
See “Line Assignments in Pooled Systems. ”
MERLIN II System Features 2-131

Privacy
DESCRIPTION
CONSIDERATIONS.
PROGRAMMING
HOW TO USE
If you share an outside line with other people, you may choose to program aPrivacy button that allows you to prevent others from accidentally joiningyour telephone conversations.
● To turn the Privacy feature on and off, you can use a dial code instead ofprogramming a button. However, if you use a dial code to turn on thisfeature, you will not have a light to remind you that the feature is active.
● You can activate the Privacy feature during a call in progress. Forexample, you may want someone to bridge onto a call and then make thecall private.
To program a Privacy button, label a button that has lights and follow thesesteps:
1
2
3
4
To
1
Enter programming mode.
Touch the button You want to program.
Dial “72.
Leave programming mode.
prevent others from joining your calls:
Before placing or receiving a private call, touch Privacy (or dial #31).If the feature is programmed on a button, the green light next to the button goes on.
This feature reamins active until you:
1 Touch Privacy again (or dial #30).If the feature is programmed on a button, the green light next to the button goes off.
2-132 MERLIN II System Features

Programming
Recall
DESCRIPTION
CONSIDERATIONS
PROGRAMMING
See “Voice Terminal Features and Programming Codes” in Section 3, “QuickReference Guides. ”
You can use Recall to disconnect and then begin another intercom callwithout hanging up. If you are on a PBX or Centrex system, you must usethe Recall feature when directions tell you to include a switchhook flash.
If you have PBX, Centrex, or Custom Calling features on your voiceterminal, you must touch Recall (or for digital voice terminals without aRecall button, dial #50) any time instructions call for a switchhook flash.By using the Recall button, you automatically place a specially timedpause into the system. If you press the switchhook instead, youdisconnect your call.
The display console has both a Recall button and a Disconnect button. Usethe Recall button to put a switchhook flash in a dialing sequence. You cantouch the Disconnect button to disconnect an outside call without hangingup the handset. Then you can dial a new outside telephone number.
When you use the Recall feature, your MERLIN II system is factory-set tokeep the outside line open for 450 milliseconds, the Recall Timer Interval,before the system accepts the first digit of the next telephone number youdial. If necessary, the system administrator can change the length of thistimed interval. (See “Recall Timer Interval. ” ) If the interval is set too long,it may cause the system to disconnect outside calls.
If you have a digital voice terminal, you do not have a Recall button. Inorder to use the Recall feature, you must program a Recall button or use adial code.
You cannot use the Recall button with outside calls if your system hasAutomatic Route Selection.
If you touch Recall while on a conference call in which all participants areconnected to the MERLIN II system, the conference is ended, and you areconnected to the intercom line that you last added to the conference. Youwill hear a dial tone, and you can place a new call.
For digital voice terminals, label the button and use the following procedurefor programming a Recall button.
1 Enter programming mode.
2 Touch the button you want to program.
3 Dial *89.
4 Leave programming mode.
MERLIN II System Features 2-133

HOW TO USE If you have a Recall button, you can use the button to disconnect an intercomcall without hanging up your handset:
1 Touch Recall.
You can use the Recall button to generate a switchhook flash for a dialingsequence that you want to store in the system.
1 Touch Recall.
2 Touch Hold (Pause).
If you have a digital voice terminal and choose to use a dial code to access theRecall feature:
1 Whenever you need to use Recall, dial #50.
If you try to use the Recall feature and nothing happens or you aredisconnected, inform your system administrator.
Recall Time Interval
DESCRIPTION When people use the Recall feature, your MERLIN II system is factory-set tokeep the outside line open for 450 milliseconds, the Recall Timer Interval,before it accepts the first digit of the next telephone number dialed. If peoplein your system are having difficulty using the Recall feature, the Recall TimerInterval may be incorrectly set. If necessary, you can change the interval tomake it longer or shorter.
CONSIDERATIONS
ADMINISTRATION
● If your system has either of the following problems, you should reset theRecall Timer Interval.
If people try to use the Recall feature and nothing happens, theinterval is too short. Change the setting to 650 milliseconds.
If you have a behind-switch system and people are being disconnectedwhen they try to use the Recall feature, the interval is too long.Change the setting to 350 milliseconds.
● The Recall feature cannot be used with outside calls if your system hasAutomatic Route Selection.
To change the Recall Timer Interval, enter administration mode and followthe appropriate procedure below.
With a MERLIN II System Display Console
1 From the administration menu, touch these buttons: [More], [Options] ,[More] , [More] [Recall] .
2-134 MERLIN II System Features

2 Dial number to specify timer interval:
● 0 = 350 milliseconds
● 1 = 450 milliseconds
● 2 = 650 milliseconds
● 3 = 1 second
3 Touch [Enter] .
4 Touch Conference to return to the administration menu or leaveadministration mode.
With a BIS-34D Console
1 Touch Message.
2 Dial the 5-character code for the Recall Timer Interval you prefer:
● #3180 for 350 milliseconds
● # 3181 for 450 milliseconds
● # 3182 for 650 milliseconds
● # 3183 for 1 second
3 If you have a printer, you can verify that the delay is set correctly bychecking your System Information Report. To get a printout, dial #905and wait for the beep.
4 Touch Message and go on to another procedure, or leave administrationmode.
Reminder Service
DESCRIPTION With Remindera preset times.
Service activated, the system places calls to voice terminals atThis feature is useful for attendants and others in the system
who want the system to alert several voice terminals at preset times, such asjust before meetings. And people whose voice terminals don’t have displayscan use Reminder Service as a substitute for the local alarm clock feature.
When Reminder Service is in effect for a voice terminal, the system places anintercom call to the voice terminal at or close to a preset time. The call ringsfor 30 seconds or until the user answers. At that point, the reminder iscanceled. When the user answers, he or she hears a series of Touch-Tones.
Users can set their voice terminals to ring at particular times and can canceltheir own reminders. Attendants can set a reminder time for any voiceterminal in the system and can cancel any reminders. People can use dialcodes or program buttons for Reminder Set and Reminder Cancel.
The administrator can set a single reminder Cancel-All time, such as the endof the business day. With this feature in place, all reminders are canceled atthat time every day.
MERLIN II System Features 2-135

CONSIDERATIONS ● To use Reminder Service, the MERLIN II system clock must be set.
● Reminder Service must be reset each time it is used. It doesn’t carry overfrom one day to the next.
● At any given time, only one remindervoice terminal.
● If the voice terminal is busy when thereminder is cancelled.
time can be in effect for a particular
system sends the reminder, the
● Reminders override the Do Not Disturb feature. They cannot be pickedup and aren’t sent to covering voice terminals.
ADMINISTRATION
PROGRAMMING
To administer a reminder Cancel-All time, enter administration mode andfollow the appropriate procedure below.
With a MERLIN II System Display Console
1 From the administration menu, touch these buttons: [More], [Options] ,[More], [More], [More], [RmdrSvc].
2 Take the appropriate action:
To set a time, dial a 4-digit Cancel-All reminder time using the 24-hourformat (0000 through 2359)
To remove an existing time, touch Drop.
3 Touch [Enter] .
4 Touch Conference to return to theadministration mode.
With a BIS-34D Console
1 Touch Message.
2 Dial # 333.
administration
3 To set or change a time for Cancel-All, take
To set a time, dial the 4-digit Cancel-All24-hour format (0000 through 2359).
menu, or leave
the appropriate action:
reminder time using the
To remove a time administered previously, touch Drop.
4 Touch Message and go on to another procedure, or leave administrationmode.
Users and attendants can program Reminder Set and Reminder Cancelbuttons.
To program Reminder buttons, label them appropriately and do as follows:
1 Enter programming mode.
2 Touch the button you want to program.
3 Dial *28 for Reminder Set or *27 for Reminder Cancel.
4 Leave programming mode.
2-136 MERLIN II System Features
HOW TO USE Procedures for setting and canceling Reminder Service calls from attendantconsoles and from individual voice terminals are somewhat different. Followthe appropriate procedure below.
NOTE: If your console or voice terminal has a display, it shows:
● the feature status when you enter a feature code or press a featurebutton
● new settings as you dial them
You can check an existing setting by touching Reminder Set, verifyingthat the time shown on the display is correct, then touchingReminder Set again.
Setting Personal Reminder Times
1 Take the appropriate action:
Touch Reminder Set.
Touch Intercom Ring or Intercom Voice.
Lift your handset.
Dial *81.
2 Dial the 4-digit reminder time in a 12-hour format (1200 through 1159).
3 Dial 2 (A) for a.m. or 7 (P) for p.m.
4 If the light next to Reminder Set goes off, indicating an invalid entry,repeat steps 1 through 3.
Canceling Personal Reminder TimesTo cancel a reminder that you have set for your voice terminal, touchReminder Cancel or follow these steps:
1 Touch Intercom-Ring or Intercom-Voice.
2 Lift your handset.
3 Dial *82.
Setting Reminder Times from Attendant Consoles
1 Touch Reminder Set or lift your handset and dial *81.
2 Touch the Auto Intercom button of the voice terminal for which you’resetting a time. (This can be your own console. )
3 Dial the 4-digit reminder time in a 12-hour format (1200 through 1159).
4 Dial 2 (A) for a.m. or 7 (P) for p.m.
5 Repeat steps 2 through 4 for each voice terminal.
6 If the light next to Reminder Set goes off, indicating an invalid entry,repeat steps 1 through 4.
7 Touch Reminder Set or hang up.
You can check these settings by touching Reminder Set, then touching eachAuto Intercom button in turn. When you’re finished, touch Reminder Setagain.
MERLIN II System Features 2-137

Ringing/Idle Line Preference
DESCRIPTION
CONSIDERATIONS
If you have Reminder Set buttons, they show the status of the feature. Thelight next to Reminder Set on your console is off, unless you set a reminderfor yourself. The lights next to Reminder Set buttons are on, however, at anyvoice terminals for which you set reminder times.
Canceling Individual Reminders from Attendant ConsolesTo cancel a reminder at a particular voice terminal, follow these steps:
1 Take the appropriate action:
Touch Reminder Cancel.
➤ Touch Intercom-Ring or Intercom-Voice, lift your handset, and dial*82.
2 Touch the Auto Intercom button for the voice terminal whose ReminderService you want to cancel.
NOTE: If the administrator sets a Cancel-All time, the systemautomatically cancels all reminders each day at that time.
Receiving a Reminder
1 When your voice terminal rings, lift your handset. You hear the Reminder Service Touch-Tones.
When the MERLIN II system is first set up, all voice terminals have theRinging/Idle Line Preference feature. When you lift your handset or touchSpeakerphone, the system automatically connects you to a line. And whenyou receive an outside call, the system automatically connects you to theringing line when you lift your handset or touch Speakerphone.
If you prefer, you can disable this feature. If you do, you must touch a linebutton to answer an incoming call and select a line for outgoing calls.
For related information, see also “Automatic Line Selection” and “RingingOptions” in this section.
●
●
If you receive many calls, the disable option prevents you fromaccidentally disconnecting an incoming call by touching the button for adifferent line.
If you want to place an outside call while one of the lines on your voiceterminal is ringing, touch the line button of the line you want to use.When you lift the handset or touch Speakerphone, the MERLIN II systemconnects you to the line you have selected.
2-138 MERLIN II System Features

PROGRAMMING To disable or enable Ringing/Idle Line Preference, enter programming modeand follow these steps:
1 Touch a line button.
2 Dial *343 to enable Ringing/Idle Line Preference or *344 to disable it-
HOW TO USE
3 Leave programming mode.
When you receive an outside call:
1 Lift your handset or touch Speakerphone.If you have Ringing/Idle Line Preference, the MERLIN II system connects you to theringing line.
2 If you have dialed this feature, touch the line button for the incoming call.
Ringing-on-Transfer
DESCRIPTION When someone within the MERLIN II system transfers a call, the person isautomatically connected to Music-on-Hold, if the system has the feature.However, the system administrator may choose to administer the Ringing-on-Transfer feature so that the caller hears ringing instead,
CONSIDERATIONS
ADMINISTRATION
The system is factory-set to connect a person to Music-on-Hold when theperson’s call is transferred.
To administer Ringing-on-Transfer or change from Music-on-Hold to Ringing-on-Transfer, enter administration mode and follow the appropriate proceduresbelow.
With a MERLIN II System Display Console
1 From the administration menu, touch these buttons: [More], [Options],
[More] , [Feedback] .
2 Touch [Music] , or [Ringback]
3 Touch Conference to return to the administrationadministration mode.
menu, or leave
With a BIS-34D Console
1 Touch Message.
2 Dial #314, then perform one of the following operations:
If you want Music-on-Hold, dial 0.
If you want Ringing-on-Transfer, dial 1.
MERLIN II System Features 2-139

HOW TO USE
3 If you have a printer connected to your system, you can make sure thatyou have selected the option you want by having the system print aSystem Feature Report. To order a report, dial #905 and wait for thebeep.
4 Touch Message and go on to another procedure, or leave administrationmode.
Check with your system administrator whether your system has the Ringing-on-Transfer or the Music-on-Hold feature.
Ringing Options
DESCRIPTION When a square or behind-switch system is installed, the lines at each voiceterminal ring immediately when a call comes in on them. In pooled systems,the two pool buttons above Intercom-Voice are initially set for no ring. Youcan change these default ringing options to suit your needs, selecting theringing options you prefer for individual lines or for all your lines. You canset lines so that incoming calls ring immediately, after a delay, or not at all.
You can also decide whether you want to keep the Abbreviated Ringingfeature (the default) or remove it. With Abbreviated Ringing, if you are on acall and another call comes in, the new call rings only once. The green lightnext to the button continues to flash as a reminder, but the incoming call doesnot interrupt the call in progress. If you prefer, you can remove AbbreviatedRinging. In that case, the new call continues to ring until it is answered or thecaller hangs up.
NOTE: Abbreviated Ringing applies to incoming calls only. Returningtransferred calls ring repeatedly.
CONSIDERATIONS The following tips are useful for deciding how and when voice terminals inyour MERLIN II system should ring.
Immediate Ring People responsible for answering incoming calls, such asthe system attendant, should have the lines on their telephones programmedfor immediate ring. You can also use this option for private lines that don’tneed to be screened or for people who answer their own calls.
Delayed Ring You can provide backup coverage on a shared line byhaving that line ring at a second voice terminal only after it has rung twicesomewhere else. Then, when calls come in for a person who is away fromhis or her desk, that person’s calls will ring at the voice terminal of a backupperson. Delayed ring is often useful for a secretary who picks up calls forsomeone on a private line.
No Ring People who do not normally answer incoming calls should havetheir lines programmed for no ring. If the system attendant answers all thecalls that come into the office, all other voice terminals in the office can beset for no ring. You might also prefer to program telephones in public
2-140 MERLIN II System Features

PROGRAMMING. .
HOW TO USE
places, such as lobbies or conference rooms, not to ring. A line programmedfor no ring does not ring on outside calls, but does ring for transferred andintercom calls.
YOU can assign immediate, delayed, or no ring to individual lines or linepools on your voice terminal or you can program the same option for all yourlines and line pools. You assign Abbreviated or Repeated Ringing to all yourlines or line pools.
To program line ringing options, enter programming mode and follow thesesteps:
1 Take the appropriate action:
To assign immediate, delayed, or no ringing to an individual line orline pool button, touch the button and dial the appropriate code:
— Dial *35 for No Ring.The red light next to the line button goes off.
— Dial ’36 for Delayed Ring.The red light next to the line button flashes.
— Dial *37 for Immediate Ring.The red light next to the line button goes on steady.
To assign immediate, delayed, or no ring to all the lines and line poolsat your voice terminal, touch any line button and dial the code for thetype of ringing you prefer:
– Dial *345 for No Ring.The red lights next to all the line buttons go off.
— Dial *346 for Delayed Ring.The red lights next to all the line buttons flash.
– Dial *347 for Immediate Ring.The red lights next to all the line buttons go on steady.
2 To select Abbreviated or Repeated Ringing for incoming calls to a busyvoice terminal, touch one of your line or line pool buttons and dial theappropriate code:
Dial *341 for Abbreviated Ringing.
Dial *342 for Repeated Ringing.
3 Program another feature, or leave programming mode.
Even if you program the lines on your voice terminal not to ring, you can tellif a call comes in for you because the green light next to the line button stillflashes. To answer the call:
1 Touch the line button next to the flashing green light.
2 Lift your handset or touch Speakerphone.
MERLIN II System Features 2-141

Saved Number Redial
DESCRIPTION If you have programmed a Saved Number Redial button, you can use thebutton to save an important number for later one-touch dialing. If thenumber you call is busy or no one answers, or if you need to call the personback, you can save that number by touching Saved Number before you hangup. Later, when you touch Saved Number again, your voice terminalautomatically redials the number you have saved.
CONSIDERATIONS
PROGRAMMING
HOW TO USE
● You can program more than one Saved Number Redial button for yourvoice terminal, so that, if necessary, you can save several calls during theday. Be sure to write on a separate sheet of paper the identity of eachcaller and/or telephone number for each Saved Number button.
● A Saved Number Redial button saves manually dialed numbers andnumbers dialed with an Outside Auto Dial button.
To program the Saved Number Redial feature for your voice terminal, label abutton and proceed as follows:
1
2
3
4
To
1
2
Enter programming mode.
Touch the button you want to program.
Dial *74 (you do not need to dial an outside number).
Leave programming mode.
use a button to save a number for redialing:
Before you hang up your handset from a call in progress, touchSaved Number.
Hang up your handset.
The MERLIN II system saves this number until you repeat this procedure tosave another number.
To redial the number later:
1 Without lifting your handset, touch Saved Number.Your voice terminal speaker goes on, and you hear dialing.
2 When you hear the other person answer, lift yourtalking.
If the line is busy, or if no one answers:
1 Touch Speaker to cancel the call.
For using basic telephones, see the User’s Guide: BasicTelephone for the MERLIN II Communications System
handset and begin
Touch-Tone and Rotarywith feature Module II.
2-142 MERLIN II System Features

Send Message
DESCRIPTION
CONSIDERATIONS
PROGRAMMING
HOW TO USE
A system attendant can turn on the Message light at the voice terminals ofpeople in the MERLIN II system in order to alert them that they have amessage.
There are different procedures for turning on the Message light from aBIS-34D console and a MERLIN II System Display Console.
●
●
●
Only the attendant at an attendant console can turn on the Message lightat a voice terminal without a display. For a voice terminal with a display,the attendant and people in the system who have a Deliver Messagebutton can turn on the Message light. (See “Leave Word Calling.”)
Note that 5-button analog voice terminals do not have a Message button.Therefore, people with 5-button voice terminals must program Messagebuttons in order to have a Message light. (See “Message.”)
A person using a 7406 voice terminal without an attached display unitmust program both a Message button and a Delete Message button for hisor her voice terminal. (For information about programming a DeleteMessage button, see “Leave Word Calling. ” ) When the Message light ison, he or she must touch one of these buttons and then the other until theMessage light goes off. Then the person can call a system attendant to seeif he or she has a message waiting.
An attendant can program a Send Message buttonconsole, if necessary. To do so, label a button and
1 Enter programming mode.
2 Touch the button you want to program.
3 Dial *38.
4 Leave programming mode.
for a MERLIN II attendantproceed as follows:
Attendants with both types of consoles can send messages by following theappropriate procedure below.
NOTE: Display voice terminals can store up to 10 messages fromattendants and other people in the system. If a person doesn’t have adisplay, however, only the attendant can turn his or her Messagelight on and off. If you use Send Message when the person’sMessage light is already on, it turns the light off. Therefore, youmust check on the status of the light before sending a message tovoice terminal without a display.
Sending Messages From a BIS-34D
a
If the person does not have a display voice terminal, check the red light nextto the Auto Intercom button for his or her voice terminal. If the light is on,the person’s Message light is already on. You do not need to do anythingfurther; just save the message. If the person does have a display voiceterminal, send the message regardless of whether or not his or her Messagelight is on.
MERLIN II System Features 2-143

To send a message to a display or to turn someone’s Message light on:
1 Touch Send Message.
2 Touch the Auto Intercom button for the person’s voice terminal.The red light next to the Auto Intercom button goes on, indicating that the person'sMessage light is on.
People with display consoles must retrieve their messages to turn theMessage light off. To turn off the Message light at a voice terminal without adisplay:
1 Touch Send Message.
2 Touch the Auto Intercom button for the person’s voice terminal.The red light next to the Auto intercom buttom goes off.
Sending a Message from a MERLIN II System Display ConsoleFollow the procedure below to turn on someone’s Message light.
If the person for whom you took the message does not have a display voiceterminal, first make sure that his or her Message light is not already on:
1
2
3
4
To
1
2
3
Touch Message Status.The red light next to the button flashes.
Touch Station Shift 1, Station Shift 2, or Station Shift 3. (For informationon the Shift buttons, see “Shift.”)The red light next to the button goes on steady.
Check the light next to the person’s Auto Intercom button.
If the green light is on beside an Auto Intercom button, the person’sMessage light is already on.
Take the appropriate action:
If the light is on, touch Message Status again and save the message.
If the light is off, follow the steps below to send a message.
send a message:
Touch Send Message.
Touch the Auto Intercom button for the person’s voice terminal.The green light beside the button goes on, telling the attendant that the person’s Messagelight is on.
Touch Message Status.The red light goes off, telling you that the green lights beside that group of Auto intercombuttons show voice terminal status, not message status.
People with display voice terminals must retrieve their messages to turn theirMessage lights off. To turn off the Message light at a voice terminal withouta display:
1 Touch Send Message.
2 Touch the Auto Intercom button for the person’s voice terminal.
2-144 MERLIN II System Features
Shift
DESCRIPTION
CONSIDERATIONS
PROGRAMMING
HOW TO USE
There are three typesand two types on the
of Shift buttons, one type on the 7406 voice terminalMERLIN 11 System Display Console :
The 7406 Voice Terminal Shift ButtonIf you have a 7406 voice terminal, you can use the Shift button to use asecond feature that you have programmed on a single button.
When the Shift button is in use, the light next to it goes on. When you touchthe programmable feature button, you activate the feature programmed onthe upper band.
For example, if you have an Outside Auto Dial programmed for your homephone number on the upper part of a button, and a Manual Signaling for theoffice secretary programmed on the lower part of the same button, you wouldtouch the Shift button on the voice terminal before you touch the OutsideAuto Dial button to call your home telephone number.
The Shift Button on the MERLIN II System Display ConsoleThe MERLIN II System Display Console has Station Shift and Line Shiftbuttons.
The Station Shift buttons allow the attendant or administrator to select thegroup of stations that the Auto Intercom buttons represent. Station Shift 1represents default intercom numbers 10 through 49. Station Shift 2represents 50 through 69 and 700 through 719. Station Shift 3 representsdefault intercom numbers 720 through 727.
When the attendant wants to place an intercom call or transfer a call to avoice terminal, he or she touches one of the Shift buttons and then touchesone of the Auto Intercom buttons in the last four columns of buttons on theconsole. When the attendant touches a Shift button, the red light beside itgoes on.
The console also has two Line Shift buttons for use in administration. WithLine Shift 1, the line buttons represent lines 1 through 30. With Line Shift 2,the buttons represent lines 31 through 56.
You must label the feature buttons on the 7406 voice terminal accurately sothat you will know which feature you have programmedthe button.
Program a feature on the upper band of a feature buttonterminal by first touching Shift.
To use any one of the three typesprocedure.
on the upper part
on a 7406 voice
The 7406 Voice Terminal Shift Button
of Shift buttons, follow the appropriate
of
To use the Shift button on the 7406 voice terminal to access the feature in thetop band of a programmable button:
1 Touch Shift.The light next to Shift goes on.
MERLIN II System Features 2-145

2 Touch the programmable feature button.
When you are finished using the programmable feature button, the light goesoff next to the feature button and the Shift button.
The Shift Button on the Display ConsoleTo use a Shift button on the display console:
1 Touch the appropriate Shift button for the voice terminal or line you wantto access.The red light next to the Shift button goes on steady.
Simultaneous Voice and Data Calls
DESCRIPTION The Simultaneous Voice and Data feature allows you to set up a connectionbetween your own computer terminal and a local or remote host computer.You can continue to place or receive calls without interrupting your data callto the computer.
For information about using digital data with the MERLIN II system, see theData Communications Guide for the MERLIN II System.
CONSIDERATIONS
ADMINISTRATION
●
●
●
●
●
To
In order to use this feature, you must have a General Purpose Adapterand a modem connected to your analog voice terminal.
In order for a voice terminal to use this feature, the system administratormust assign the voice terminal two consecutive station jacks on the controlunit. This requires special wiring. (See “Installation” in the MERLIN IISystem Installation and Administration Manual. )
The system administrator can assign either the Voice Terminal To BusyVoice Terminal feature or the Simultaneous Voice and Data feature to avoice terminal. Since both features require two consecutive station jacks,a voice terminal cannot have both features. (See “Voice Announcement ToBusy Voice Terminal. ” )
The administrator should assign the voice/data station pair to an odd-numbered analog station jack and the next higher (even) numbered analogstation jack. The intercom number of the voice terminal connected tothese jacks is the same as the odd-numbered intercom station jack.
You cannot use your Hands-Free Unit when the Simultaneous Voice andData feature has been administered.
allow someone to conduct voice and data calls at the same time, enteradministration mode and follow the appropriate procedure below.
With a MERLIN II System Display Console
1 From the administration menu, touch these buttons: [More], [More],
[Data], [Vce Data] .
2-146 MERLIN II System Features
HOW TO USE
2 Touch either of two adjacent Auto Intercom buttons:
Green light on = station jack part of voice/data pairGreen light off = station jack not paired
3 Touch Conference to return to the administration menu or leaveadministration mode.
With a BIS-34D Console
1 Touch Message.
2 Dial #211.
3 Wait until the system beeps twice.The green light next to Message becomes steady.
4 Touch either of two adjacent Auto Intercom buttons:
Green light on = station jack is part of the voice and data pairGreen light off = station jack is not paired
5 Touch Message and go on to another procedure, or leave administrationmode.
To make a data call:
1 Touch Speaker.
2 Dial the outside telephone number or intercom number for your hostcomputer.
3 When the computer signals you that you have made a successfulconnection, turn on your modem.The green light next to the line or intercom button you used to call the computer goes onand stays on until you end the data call.The speaker goes off when you turn on the modem.
4 Log on from your terminal keyboard.
To end a data call:
1 Log off from your terminal keyboard.
2 Turn off your modem.The green light next to the line or intercom button you used to call the computer goes off.
MERLIN II System Features 2-147

SMDR (Station
Speakerphone
DESCRIPTION
CONSIDERATIONS
HOW TO USE
Message Detail Recording)
See “Call Report. ”
If your voice terminal is equipped with a speakerphone, you can conductconversations without lifting your handset. Anyone with you can hear bothsides of the conversation.
If you have a speaker, you can place a call (On-Hook Dialing) or monitor a callif you have been put on hold (Monitor-on-Hold) without lifting your handset.In order for the person at the other end to hear you, however, you mustspeak into your handset. With a call in progress, you can turn on yourspeaker to let others in your office hear the call (Group Listening).
If you have a speaker, keep these points in mind:
● When you use the Monitor-on-Hold or the Group Listening feature, yourspeaker makes a squealing noise when the handset comes close to it. Toprevent this, touch Speaker before hanging up your handset.
● If you have a 7406 voice terminal, you can use the Group Listening andthe On-Hook Dialing feature, but not Monitor-on-Hold.
● If you have a Hands-Free Unit connected to your voice terminal, the HFUgoes on when you touch an Outside Auto Dial button.
If you have a speakerphone, keep in mind that room acoustics andbackground noise can affect speakerphone operation. To get the best results,follow these suggestions:
●
●
●
●
●
●
place your voice terminal at least 6 inches from the edge of your desk.
Avoid placing your voice terminal in areas with high background noisesuch as those caused by loud voices, radios, typewriters, or other officeequipment.
Avoid blocking the microphone by putting books or papers under or nextto your voice terminal.
Always face your voice terminal when you are talking.
Avoid talking until the other person is done. When you both speak at thesame time, transmission may be broken.
If you have trouble hearing the other person, try increasing the volumelevel of the speaker.
If you have a speakerphone, just touch Speakerphone to turn it on and off.The light next to the button shows whether the speakerphone is activated.
If you have a speaker, follow the procedures below to place and monitorcalls on hold and to let other people with you hear the other side of theconversation.
2-148 MERLIN II System Features

Special Characters in Programmed Dialing Sequences
Using On-Hook Dialing
1 Without lifting your handset, touch Speaker.
2 Dial the number.
3 When you hear the other person answer, lift your handset to speak.
If the line is busy, or if you get no answer:
1 Touch Speaker to cancel the call.
Using Monitor-on-Hold
1 Touch Speaker.
2 Hang up.
3 When you hear the other person return to the call, lift your handset andcontinue the call.
Using Group Listening
1 While a call is in progress, touch Speaker and continue your conversation.
DESCRIPTION You may need to program a pause, stop, or switchhook flash into an Outside“ -Auto Dial, a Personal Speed Dial, or a System Speed Dial sequence, or youmay need to switch from rotary to Touch-Tone signals in the middle of aprogrammed dialing sequence. To do so, you must enter special characterswhen you program the sequence.
In a behind-switch system, you enter host system codes beginning with thepound sign ( # ) as described in the documentation for the host system. Touse a MERLIN II system code beginning with the pound sign, you mustprogram a Speed Dial Access button. You touch that button instead oftouching #, then dial the digits of the code.
PROGRAMMING
HOW TO USE
To program a Speed Dial Access button, label a button, enter programmingmode and follow these steps:
1 Touch the button you want to program.
2 Dial *20.
3 Program another feature, or leave programming mode.
Use the following procedures to enter special characters into a programmeddialing sequence.
MERLIN II System Features 2-149
PauseProgram a pause (1.5 seconds) into a dialing sequence. For example, youmay need to place a pause between a pool access code, such as a 9, and anoutside telephone number in an Outside Auto Dial sequence.
1 Dial the pool access code.
2 Touch Hold (Pause).
3 Dial the outside telephone number
StopProgram a stop into a dialing sequence to allow you to wait for a second dialtone. For example, you may need to program a stop between a localtelephone number and an alternate long distance authorization code,
1 Dial the local telephone number (seven digits)
2 Touch Drop (Stop).
3 Dial the authorization code (five or six digits).
Switchhook FlashProgram a switchhook flash at the beginning of a dialing sequence. Forexample, you may need to program a button with a PBX, Centrex, or CustomCalling feature code that calls for a switchhook flash.
1 Touch Recall.
2 Touch Hold (Pause).
3 Dial the PBX or Centrex dial code sequence that accesses the feature youwant to program.
Touch-Tone EnableProgram Touch-Tone Enable into a dialing sequence. For example, you mayneed to include Touch-Tone Enable to use a credit card authorization service.
1 Dial the telephone number.
2 Touch Transfer.
3 Dial the credit card authorization code.
2-150 MERLIN II System Features

Square Line Configuration
See “Line Assignments in Square Systems”
Stopwatch
DESCRIPTION If you want to start and stop the timer on your 7406D voice terminal—to timehow long you spend on a call, for example- you can use your display andthe Stopwatch feature. When you touch a programmed Stopwatch button,the Stopwatch activates the timer on your display screen.
CONSIDERATIONS
PROGRAMMING
HOW TO USE
● This feature can be used only with the 7406 display voice terminal.
● The Stopwatch feature starts the clock at :00 on the display and will countto a maximum of 9:59:59 (hours: minutes: seconds). When you touch theStopwatch button on your voice terminal to stop the timer, the displaydisappears immediately.
To program a Stopwatch button for your display voice terminal, label abutton, enter programming mode, and follow these steps:
1 Touch the button you want to program.
2 Dial *92.
3 Program another feature, or leave programming mode.
When you want to start the timer on your display:
1 Touch Stopwatch.The timer on your display starts.
2 When you are finished, note the elapsed time and record it, if necessary.
3 Touch Stopwatch to turn off the display.
MERLIN II System Features 2-151
System Renumbering
DESCRIPTION At some point, you may need to change modules in the control unit. If youreplace a module with one of a different type, you must readminister thesystem to reassign numbers to lines and stations. Changing station modulesmay also require readministration of features that are related to analogstations only, such as attendant positions and the Voice Announcement toBusy Voice Terminal feature.
For more information about different types of modules, see “Control UnitModules” in “Accessory Equipment. ”
CONSIDERATIONS
ADMINISTRATION
If you add a line or station module in the control unit, renumbering is notnecessary. However, you will need to assign the additional lines and stationsto individual voice terminals.
To renumber the system, enter administration mode and follow these steps:
With a MERLIN II System Display Console
1 From the administration menu, touch [System], [More] .
2 Touch [Renumber] .You see a message showing that the system is performing renumbering.
3 When the administration menu appears, go on to another procedure, orleave administration mode.
With a BIS-34D Console
1 Touch Message.
2 Dial #299.
3 Wait for the lights next to Adm Pool, Adm Tel, Message, and Speaker tobegin flashing, which indicates that the renumbering process is complete.
4 Go on to another procedure, or leave administration mode.
2-152 MERLIN II System Features

System
DESCRIPTION
Size
The MERLIN II system can be set for two different sizes: small and large.
CONSIDERATIONS
ADMINISTRATION
The small setting is for systems administered for eight or fewer lines and20 or fewer voice terminals. With small systems, the administrator andattendants typically use a BIS-34D voice terminal with display as aconsole.
The large setting is for systems administered for more than eight lines ormore than 20 voice terminals. This size system can accommodate up to56 lines and 72 voice terminals. The administrator and attendants use aMERLIN II System Display Console.
If the administrator changes the system size designation from small to large,or vice versa, on a running system, the line and feature assignments changeon all attendant consoles.
To specify system size, enter administration mode and follow theappropriate procedure, below.
With a MERLIN II System Display
1 From the administration menu,
Console
touch [System] , [Size] .
2 Touch [Small] or [Large] as appropriate for your system.
3 Touch Conference to return to the administration menu, or leaveadministration mode.
With a BIS-34D Console
1 Touch Message.
2 Dial #201 and wait for the 2-beep signal to begin.
3 Dial the appropriate code:
For a small system, dial 0.
For a large system, dial 1.
4 Wait for the lights next to Adm Pool, Adm Tel, Message, and Speaker toflash. At this signal, go on to another procedure or leave administrationmode.
MERLIN II System Features 2-153

System
DESCRIPTION
Speed Dial
CONSIDERATIONS
ADMINISTRATION
The administrator can assign System Speed Dial codesnumbers, such as warehouse or branch office numbers
to frequently dialedor the numbers of
clients or vendors. The administrator then distributes the list of codes topeople in the office. People can place a call to one of those numbers quickly,by dialing the code ( #60 through #99) or touching the button on which theyhave programmed the code.
●
●
System Speed Dial codes may be unmarked or marked. Marked codes areparticularly useful when the administrator wants to give users access to aparticular number such as an authorization code for an alternate long-distance service but does not want to divulge the number.
When a person uses an unmarked System Speed code to make a call,the Call Report (SMDR) feature prints the telephone numberrepresented by the System Speed Dial code, not the code itself, in thecall report. (See “Call Report. ” )
If a person uses a marked System Speed code to place a call, thetelephone number dialed is not recorded by the Call Report feature.Instead, the System Speed Dial code (for example, #65) is printed,which preserves the confidentiality of access codes and accountnumbers. In order to mark a speed dial code as private, theadministrator enters a * before the telephone number when he or sheadministers the code.
It is sometimes necessary to include a pause, stop, or switchhook flashwithin a dialing sequence, or it may be necessary to switch from rotary toTouch-Tone signals. To do so, the administrator must enter the followingspecial characters into the dialing sequence. (For more information aboutusing special characters in a dialing sequence, see “Special Characters inProgrammed Dialing Sequences. ” )
To program a pause, touch Hold.
To program a stop, touch Drop.
To program Touch-Tone Enable, touch Transfer.
To program a switchhook flash, touch Recall and then touch Hold.
To assign codes to numbers, enterappropriate procedure below.
With a MERLIN II System Display
1 From the administration menu,
administration mode and follow the
Console
touch [More], [SpdDial] .
2 Dial the System Speed Dial code (60 through 99), then dial * if it is amarked code.
3 Touch [Enter] .
4 Dial the telephone number.
5 Take the appropriate action:
To assign a number to the next highest-numbered code, touch [Next]
and repeat step 4.
2-154 MERLIN II System Features

PROGRAMMING
To assign a consequential System Speed Dial code, touch [Enter] andrepeat steps 2 through 4.
6 Touch Conference to return to the administration menu, or leaveadministration mode.
With a BIS-34D Console
1
2
3
4
5
6
7
8
9
Touch Conference.The red light next to Adm Tel goes on.
Dial 0.
Dial a System Speed Dial code ( #60 to # 99).
If you are storing a marked Speed Dial code, dial * after dialing theSystem Speed Dial code.
Dial the telephone number, including a leading 1 where required. If yoursystem is pooled with Dial Access, include the pool number on which thecall should be placed in the Speed Dial code.
NOTE: A number for a marked Speed Dial code can have up to 39characters; a number for an unmarked Speed Dial code can have up to 40characters. These characters can include a pause, a stop, a switchhookflash, or Touch-Tone enable, mentioned above. It is best to include apause between the pool number and the telephone number (touch Hold)when you administer a Speed Dial code that includes a pool number.
The display shows the telephone number, including any specialcharacters, as you dial it. If the number is not correct, perform the stepagain.
Repeat steps 3 through 5 for each telephone number or account number towhich you are assigning a System Speed Dial code.
Touch Conference twice.
If you have a printer connected to your system, you can get a printoutof your System Speed Dial code numbers by touching Message anddialing # 901.
All 40 codes (#60 through # 99) are printed out, even if some are not yetassigned to telephone numbers, If a number includes special characters,they will appear as t for Touch-Tone enable, s for stop, p for pause, or rfor recall.
Touch Message and go on to another procedure, or leave administrationmode.
To program a System Speed Dial code, label a button, enter programmingmode, and follow these steps:
1 Touch the button you want to program.
2 Dial *95 plus a 2-digit System Speed Dial code (60 through 99—do notenter the “ # “)
3 Program another feature, or leave programming mode.
MERLIN II System Features 2-155

HOW TO USE You can program a button or use a dial code to access this feature.
To dial an outside number:
1 Lift your handset.
2 Touch the System Speed Dial button or dial the appropriate code(#60 through # 99)..
System Type
DESCRIPTION As part of basic administration, you must specify whether the system issquare, behind-switch, or pooled.
If the system is pooled, you must specify the method used to access linepools: Button Access, Dial Access, or Automatic Route Selection (ARS).
CONSIDERATIONS
ADMINISTRATION
If the system has Button Access to Line Pools, people touch a button to get aline in a pool.
If the system has Dial Access to Line Pools, people touch a Pool Accessbutton and then dial the appropriate line pool code to get a line in a pool.
If the system has Automatic Route Selection (ARS), the systemautomatically selects an administered route for each outside call thatpeople make using a Pool Access button.
If you change the system type at a later time, you erase all system lineadministration and voice terminal programming. You will then have toreassign all lines and reprogram all voice terminals.
If you change the system from Button Access to Dial Access to Line Pools,or vice versa, the system automatically assigns a different function to thetwo buttons above Intercom-Voice. If you change the system to ButtonAccess, the main pool (default Pool 9) is automatically assigned to the twobuttons above the Intercom buttons. If the main pool was previouslyassigned to any other button on that voice terminal, it is automaticallyremoved.
To specify the system type, enter administration mode and follow theappropriate procedure, below.
With a MERLIN II System Display Console
1 From the administration menu, touch [System], [Type].
2 Touch the appropriate button for the preferred type of system:
For a square or pooled system, touch the button for that system( [Square], ButnAcc], [ARS], [DialAcc] )
For a behind switch system, touch [More], [BehindSw].
message “System is Re-starting” appears, then the administration menu.
2-156 MERLIN II System Features

3 Go on to another procedure, or leave administration mode.
With a BIS-34D Console
1 Touch Message.
2 Dial #202 and wait for the 2-beep
3 Dial one of the following digits to
signal to begin.
specify the system type:
● 0 = square system.
● 1 = pooled system with
● 2 = pooled system with
● 3 = pooled system with
Button Access to Line Pools.
Dial Access to Line Pools.
Automatic Route Selection.
● 4 = behind-switch system.
4 After several seconds, the lights next to Adm Pool, Adm Tel, Message,and Speaker begin to flash. At this signal, go on to another procedure,leave administration mode.
or
Tes t
DESCRIPTION When you need to test the lights and the ringing on your voice terminal, or ifyou need to verify that your voice terminal has been installed correctly, youcan use the following operations.
● For analog voice terminals, use the Test/Program (T/P) switch on the leftside of your analog voice terminal.
● For digital voice terminals, place a test call on your voice terminal.
If you have an analog voice terminal, follow these steps:HOW TO USE
1 Slide the T/P switch to T.The red and green lights next to your voice terminalvoice terminal rings.
2 Slide the T/P switch to the center position.
If your voice terminal does not respond when
buttons flash alternately, and your
you slide the T/P switch to T,notify your system administrator and check Section 5, “Troubleshooting,” inthe MERLIN II System Installation and Administration Manual.
If you have a digital voice terminal, follow these steps:
1 Lift your handset.
2 Listen for a dial tone. (If this is a newly installed system, it may take afew moments to recognize your voice terminal and supply a dial tone.)
3 Place a test call to another voice terminal.
4 Place a test call to your voice terminal from another voice terminal.
If any of these tests are unsuccessful, notify your administrator.
MERLIN II System Features 2-157

Tones
DESCRIPTION Your MERLIN II systemyou of the progress of afeedback discussed here
voice terminal provides the following tortes to informcall that you are placing or about to place. Theis generated by the MERLIN II system. In many
cases it is the same tones generated by the outside telephone system.
Feedback Sound Meaning of the Feedback
Intercom dial tone Steady tone You can begin dialing whenyou are ready.
Intercom busy tone A slow pulsed tone The line is busy.
Voice signal tone A beep You can announce the callthrough the other person’svoice terminal speaker.
Intercom ringing tone A ringing sound The call is ringing at the otherperson’s voice terminal.
Fast busy tone Medium pulsed tone You have made an error or nolines in a pool are available.
Incorrect dialing tone Alternating high and You have dialed a numberlow tone incorrectly.
Forced idle tone Two beeps The system is beingadministered.
Error tone A beep You have entered an illegalnumber or character in anadministration sequence.
Hold reminder A beep You have had a call on holdfor at least 60 seconds.
Call Park reminder A beep A call has been parked atyour voice terminal for atleast one minute (Your voiceterminal beeps after a call hasbeen parked for one minuteand then again after twominutes. )
Line Request tone A beep The line you have requestedis available.
2-158 MERLIN II System Features

CONSIDERATIONS
The MERLIN II system also provides you with the following tones on yourvoice terminal, unless you have a behind-switch system, so that you know.immediately what kind of call you are receiving. If your system is behind aswitch, your tones will be different.
If you hear this type of tone:
One short and one long ring
A beep and then a voice announcementthrough your voice terminal speaker
A beep and then a voice announcementthrough your voice terminal before youreceive a transferred call
A beep (The 7406 voice terminal has atimed beep; on the analog voiceterminals the beep lasts for as long asyou hold down the Manual Signalingbutton)
Two short and one long ring
One long ring
You are receiving this kind of call:
Transferred Call
Intercom Call with VoiceAnnouncement
Transfer Call with Voice Announcement
Manual Signaling
Ringing Intercom Call
Outside Call
● You can program your voice terminal with a ringing pattern that isdifferent from the ringing sound of nearby voice terminals. (See“Personalized Ringing. ” )
● People with the 7406 voice terminal can place both ringing and announcedintercom calls, but can receive only ringing intercom calls. When someonein the MERLIN II system places an announced intercom call to a 7406voice terminal, the call automatically becomes a ringing intercom call.
MERLIN II System Features 2-159

Touch-Tone or Rotary Signaling
DESCRIPTION When the MERLIN II system is installed, it is set to send or generate Touch-Tone signals. If some of the system’s lines generate rotary pulses, you needto identify each of those lines to the system,
If you are not sure whether lines are Touch-Tone m rotary, perform this testat the administrator/attendant console:
1 Make sure the T/P switch is in the center position.
2 Touch each line button and dial out.If the line is Touch-Tone, you hear tones and the dial tone stops. If the line is rotary, youhear tones, but the dial tone is not interrupted.
ADMINISTRATION If there are rotary lines in the system, enter administration mode and followthe appropriate procedure below to identify them.
With a MERLIN II System Display Console
1 From the administration menu, touch [Lines], [More], [TchTone] .
2 Touch each line button until the light next to it shows the appropriatecode:
Steady green on = Touch-ToneGreen off = rotary
3 Touch Conference to return to the administration menu, or leaveadministration mode.
With a BIS-34D Console
1 Touch Message.
2 Dial # 302.
3 Touch each line button until the light next to it shows the appropriatecode:
Green light on = Touch-Tone dialingGreen light off = rotary dialing
4 Touch Message and go on to another procedure, or leave administrationmode.
2-160 MERLIN II System Features

Touch-Tone Enable
DESCRIPTION
CONSIDERATIONS
PROGRAMMING
HOW TO USE
If you have telephone lines that carry rotary signals, use the Touch-ToneEnable feature to switch to Touch-Tone signals midway through a dialingsequence. This lets you take advantage of bank-by-phone, credit cardauthorization, and alternate long distance services,
NOTE: This
Once you touch the
feature is for rotary lines only.
Touch-Tone Enable button, all remaining digits of thenumber generate Touch-Tone signals. However, if you touch Recall duringthis sequence, the line will return to rotary pulses.
To program a Touch-Tone Enable for your voice terminal, label a button,enter programming mode, and follow these steps:
1
2
3
To
1
2
3
4
Touch the button you want to program.
Dial *76.
Program another feature,
switch from rotary pulses
Lift your handset.
or
to
leave programming
Touch-Tone signals
Dial the first part of the number.
Touch Touch-Tone Enable.
Dial the remaining numbers.
mode.
as you dial a number:
When you hang up your handset, the Touch-Tone feature automaticallyturns off,
MERLIN II System Features 2-161

Transfer
DESCRIPTION
CONSIDERATIONS
ADMINISTRATION
PROGRAMMING
HOW TO USE
You can use your voice terminal Transfer button to transfer intercom andoutside calls to someone else in your MERLIN II system.
There are four ways to transfer calls:
● Option A. If you have an Auto Intercom button for the person to whomyou want to transfer a call, and if your administrator has set your systemfor One-Touch Transfer, you can transfer a call with one touch.
● Option B. You can transfer a call by dialing the intercom number.
● Option C. You can announce the call before you transfer it.
● Option D. You can use the Transfer feature to screen calls.
Pooled and square systems are factory-set for One-Touch Transfer, butthey can be administered for One-Touch Hold with Call Announcementinstead. (Systems cannot have both options. ) One-Touch Transfer is therecommended option for pooled systems, and One-Touch Hold with CallAnnouncement is the recommended option for square systems.
Behind-switch systems are factory-set for One-Touch Hold with CallAnnouncement and must keep this setting.
In a square system, the person to whom you are transferring a call musthave a button for that line in order to receive the transferred call. If not,he or she can use the Call Pickup feature to answer the call.
If no one answers the transferred call, the call returns to the sender aftera specified number of rings set by the system administrator. Theadministrator may also choose to set the system not to return calls.(See “Transfer Return Interval. ” )
You cannot transfer with voice announcement to a Call Distribution groupor 7406 voice terminal. The call is transferred successfully, but the personat the other voice terminal cannot hear your voice.
When you transfer a call, the person is automatically connected to theMusic-on-Hold source, if your system has this feature. However, thesystem administrator may choose to administer the Ringing-on-Transferfeature so the caller hears ringing instead.
To administer One-Touch Hold or change from One-Touch Hold toOne-Touch Transfer, see the procedure under “One-Touch Hold with CallAnnouncement. ”
If you want to program an Auto Intercom button for a voice terminal to whichyou often transfer calls, see “Auto Intercom. ”
To transfer a call using Option A (in systems administered for One-TouchTransfer only):
1 With the call in progress, touch the Auto Intercom button for the intercomnumber to which you want to transfer the call.
2 Hang up.
2-162 MERLIN II System Features

To transfer a call using Option B:
1 Touch Transfer.
2 Dial the intercom number of the person to whom you are transferring thecall.
3 Hang up.
To transfer a call using Option C:
1 Touch Transfer.
2 Touch Intercom-Voice.
3 Dial the intercom number of the voice terminal to which you want totransfer the call.
4 Announce the call through your handset.
5 Hang up.
To screen a call using Option D:
1
2
3
4
5
6
Touch Hold.
Touch Intercom-Ring.
Dial the person’s intercom number.
Announce the call when the person answers, and ask if it will beaccepted.
Touch the call’s line button.
Advise the caller that the person isn’t available or transfer the call asshown above.
Transfer Return Identification
DESCRIPTION
CONSIDERATIONS
HOW TO USE
With the Transfer Return Identification feature, the attendant can identifywhich transferred calls have not been answered and are returning to theattendant console.
● Attendants can use the display to see from which voice terminal the call isbeing returned.
● If a transferred call returns to an attendant console while the attendant isbusy on another call, the attendant cannot identify the returning call. Thecall rings at the console until the attendant answers it or the person forwhom the transferred call was intended answers the call.
When a transferred call returns to your attendant console, and you are notbusy on a call, you can identify the returning call by checking the lights onthe console:The red light next to the line button flashes rapidly.The green light next to the Auto Intercom button for the voice terminal from which the call isreturning flashes slowly.
MERLIN II System Features 2-163

To answer the call:
1 Lift your handset.
ca l l i s answered :The red light moves to the line button of the second call and flashes rapidly.The green light next to the Auto Intercom button for the voice termianl from which the secondcall is retuning flashes slowly.
1 Without ligting the handset, touch the line button of the first call:The red light moves back to the line bytton of the first call. If the red light flashed, the callhas not been answered; if the red light is steady, the call has been answered.
a n s w e r t h e c a l l :To
1
If a second transferred call returns to your attendant console before the first
If you want to check the status of the first returning transfer call:
Lift your handset.
Transfer Return Interval
DESCRIPTION When someone in the MERLIN II system transfers a call and it is notanswered, the call returns to the sender, When the system is first installed,it is set to return calls after four rings. You can change that setting so thatcalls ring as many as nine times before they return to the person who hastransferred it. You can also choose to set the system not to return transferredcalls at all.
ADMINISTRATION To set a Transfer Return Interval, enter administration mode and follow theappropriate procedure below.
With a MERLIN II System Display Console
1 From the administration menu, touch [More] [Options], [TrRet] .
2 Dial number of rings (1 through 9) preferred before calls returnvoice terminal. Dial 0 if transferred calls should not return.
3 Touch [Enter] .—
4 Touch Conference to return to the administration menu, oradministration mode.
With a BIS-34D Console
1 Touch Message.
2 Dial #306.
to original
leave
3 Dial a code from 1 through 9 to indicate how many rings you want tooccur before the transferred call returns. If you do not want transferredcalls to return, dial 0.
4 If you have a printer, you can get a System Information Report that showsthe number of times a transferred call rings before it returns to the originalvoice terminal. To get a printout, dial # 905 and wait for the beep.
2-164 MERLIN II System Features

5 Touch Message and go on to another procedure, or leave administrationmode.
Voice Announcement Enable/Disable
DESCRIPTION Ordinarily, people can use the MERLIN II system intercom feature toannounce calls through your voice terminal speaker. However, if you do notwant a voice announcement to interrupt your work, you can use the VoiceAnnouncement Disable feature to have intercom calls at your voice terminalring instead.
CONSIDERATIONS
PROGRAMMING
If you use the Voice Announcement Disable feature on a 10-ButtonHands-Free Answer on Intercom (HFAI) voice terminal or on any voiceterminal with a speakerphone, you deactivate the automatic answeringfeature. However, the Voice Announcement Disable feature does notaffect voice terminals with connected Hands-Free Units.
If you have a 7406 voice terminal, you can place both ringing andannounced intercom calls, but you can receive only ringing intercom calls.Therefore, you do not need to program the Voice Announcement Disablefeature.
When you use the Voice AnnouncementGroup Page feature.
To prevent or allow voice announcements atprogramming mode and follow these steps:
1 Touch Intercom-Voice.
2 Dial one of the following codes:
Disable feature, you disable the
your voice terminal, enter
To allow voice announcements, dial *37.The green light beside Intercom-Voice is on.
To prevent voice announcements, dial *35.The green light beside Intercom-Voice is off.
3 Program another feature, or leave programming mode.
MERLIN II System Features 2-165

Voice Announcement To Busy Voice Terminal
DESCRIPTION
CONSIDERATIONS
ADMINISTRATION
The system administrator can assign some voice terminals two consecutivestation jacks on the control unit so that people at these voice terminals canreceive voice announcements while they are busy on a call.
The system administrator must assign the voice terminal two consecutivestation jacks on the control unit. This requires special wiring. (See Section3, “Installation” in the MERLIN II lnstallation and Administration Manual.)The jacks must be an odd-numbered analog station jack and the nexthigher even-numbered analog station jack. The odd-numbered station jackprovides the station’s intercom number.
The system administrator can assign either the Voice Announcement ToBusy Voice Terminal feature or the Simultaneous Voice and Data feature toa voice terminal. A voice terminal cannot have both features.
To identify any station jacks in voice/voice pairs, enter administration modeand follow one of the procedures below.
With a MERLIN II System Display Console
1 From the administration menu, touch [Stations], [More], [More] [VceSgnl] .
2 Touch either of two adjacent Auto Intercom buttons until the green lightsnext to both buttons show the appropriate code:
Green light on = station jack is part of voice/voice pairGreen light off = station jack is not paired
3 Touch Conference to return to the administration menu, or leaveadministration mode.
With a BIS-34D Console
1 Touch Message.
2 Dial # 210.
3 Touch either Auto Intercom button for the voice/voice pair until the greenlights next to both buttons show the appropriate code:
Steady green light on = station jack in voice/voice pairGreen ligh off = station jack not in voice/voice pair
4 Touch Message and go on to another procedure, or leave administrationmode.
2-166 MERLIN II System Features

Voice Terminal Type
DESCRIPTION
ADMINISTRATION
When the system is first set up, the system recognizes all analog stationsexcept the administrator/attendant console as BIS/HFAI voice terminals,that is, voice terminals with raised plastic buttons. As part of basicadministration, you must identify for the system any analog station jacks usedfor non-BIS/HFAI voice terminals, which have flat membrane buttons.
● Voice terminals with flat membrane buttons (non-BIS/HFAI models)include the 5-button, 10-button, 34-button, and 34-button deluxe voiceterminals.
● Voice terminals with raised plastic buttons (BIS/HFAI models) include theHFAI-10, BIS-10, BIS-22, BIS-34, BIS-34D, SP-34, and SP-34D voiceterminals.
To specify which station jacks are connected to voice terminals with flatmembrane button voice terminals and which station jacks are connected tovoice terminals with raised plastic buttons, enter administration mode andfollow the appropriate procedure below.
With a MERLIN II System Display Console
1 From the administration mode, touch [Stations], [More], [BIS/HFAI] .
2 Touch the Auto Intercom buttons until the green lights show theappropriate code:
Green light on = raised plastic button voice terminalGreen light off = flat membrane button voice terminal
3 Touch Conference to return to the administration menu, or leaveadministration mode.
With a BIS-34D Console
1
2
3
4
Touch Message.
Dial # 320.
Touch the Auto Intercom button until the green light shows theappropriate code:
Green light on = a BIS/HFAI (raised plastic button) voice terminal is connectedto this voice terminal jack
Green light off = a flat membrane button voice terminal is connectedto this voice terminal jack
Touch Message and go on to another procedure, or leave administrationmode.
MERLIN II System Features 2-167

Volume Control
DESCRIPTION
HOW TO USE
You can adjust the volume control lever on the left side of your voice terminalto increase or decrease the loudness of the ringing sound on the speaker. Ifyou have a speakerphone, adjust the speakerphone volume using the volumecontrol setting on the front of the voice terminal.
Slide the volume control switch in the direction indicated on the voiceterminal to raise or lower the volume of the speaker or speakerphone.
2-168 MERLIN II System Features

Accessory Equipment
The following information is included in “Accessory Equipment”:
1 Description
The description of the accessory tells what it does and its advantages forthe user.
2 Drawings and Diagrams
Drawings of the accessory and its parts are included for each piece ofequipment, along with, if applicable, diagrams showing how theequipment is connected to the MERLIN II system and accessories.
3 Considerations
Special considerations include any qualifications the user should be awareof, ways in which the equipment can be used, or other hardware orfeatures it can or cannot be used with.
4 Administration
If applicable, administration procedures are given for setting options at theadministrator/attendant console so that people in the MERLIN II systemcan use the accessory equipment.
5 How to Use
If applicable, procedures describe how a person can use the equipmentwith his or her voice terminal.
Accessory Equipment 2-169
Auxiliary
DESCRIPTION
CONSIDERATIONS
Power Unit
You must add an auxiliary power unit (Figure 2-14) to any control unit carrierif the total number of voice terminals and voice terminal accessories (including
HOW TO USE
hands-free units and headset adapters) is greater than the carrier’s capacity.Each carrier of your system control unit supports up to 45 units, and eachauxiliary power unit adds 20 unit loads to your system. (For information onunits and unit loads, see the MERLIN II System Installation and AdministrationManual.)
FIGURE 2-14 The auxiliary power unit.
The Auxiliary Power Unit can be mounted on the wall beside the control unit.The power unitcord. The cordModule.
and the control unit are connected with an auxiliary powercan be plugged into the auxiliary power jack on the Power
Be sure that your system administrator knows what accessory equipment youhave attached to your voice terminal so that the administrator knows howmuch auxiliary power the system needs.
Instructions for installing and using the auxiliary power unit are providedwith the unit.
2-170 Accessory Equipment

Basic Telephones with OPTI and BTMI
DESCRIPTION To provide service to people at a remote location, off-premises basic Touch-Tone telephones can be connected to the MERLIN II system through outsidelines with the Off-Premises Telephone Interface (OPTI). The OPTI permitsyou to use an off-premises telephone to access many of the features of youron-premises communication system using dial codes and switchhook flashes.See Figure 2-15.
On-premises basic Touch-Tone telephones can be connected to the systemwith a Basic Telephone and Modem Interface (BTMI). See Figures 2-16and 2-17. The BTMI also makes it possible to connect most other types oftelephones and data devices to analog station jacks on the MERLIN II controlunit.
FIGURE 2-15 A basic telephone connected to an OPTI.
Control unit To voiceterminal module
To voice terminal jack
Modular terminalcord
Jack panel I
box
IOff-premises Telephone Interface
Off-premises line input
Modular line cord
Outside
telephone
Networkinter face
Remote
jack b a s i c
I Touch-Tone
telephone
Accessory Equipment 2-171

CONSIDERATIONS
FIGURE 2-16 A Basic Telephone and Modem Interface (BTMI).
TEL. DEVICETIMER JACK
RINGING MODE
NORMAL TIMED
FIGURE 2-17 A basic telephone connected to a BTMI.
Line jackT e l .
d e v i c e j a c k
4 - P a i r 2-Pair
modular cord modular cord
When the system administrator assigns lines to a basic telephone, theadministrator must provide the user with a list of codes for the linesand/or line pools he or she can access.
While Night Service with Outward Restriction is in effect, people withbasic telephones cannot enter a password to make calls. To allow themto make after-hours calls, the administrator must assign these basictelephones to the Exclusion list. (See “Night Service.”)
Basic telephones can receive ringing intercom calls, but not intercom callswith voice announcement.
2-172 Accessory Equipment

ADMINISTRATION You use the same procedures for administering basic telephones connected toBTMIs and OPTIs that you use for administering standard voice terminals,Get the completed Station Configuration Forms for the telephones. Thenfollow the instructions under the appropriate entries to assign lines or linepools and to assign Call Restriction, if desired.
PROGRAMMING
HOW TO USE
The Station Configuration Forms show what lines and features should beassigned to each telephone in the system. Use the following guidelines tohelp you assign lines or line pools and features to basic telephones connectedto OPTIs and BTMIs.
1 To assign lines or line pools, use the intercom number assigned to theOPTI or BTMI. Follow the procedures in the “Line Assignments” entryfor the type of system you have.
2 If you want the basic telephone to have call restrictions, follow theprocedures in the “Call Restriction” entry.
3 To program the following features for your basic telephone(s), you can useCentralized Programming or, before you connect the OPTI or BTMI,connect a MERLIN II system voice terminal directly to the station jack towhich you plan to connect the BTMI, and program from there.
a If you don’t want the basic telephone to ring on every line, you canspecify which lines ring when a call comes in by programming RingingOptions for the telephone. (See “Ringing Options. ” )
b To specify the order in which the system makes lines available,program an Automatic Line Selection sequence for the basic telephone.(See “Automatic Line Selection. ”) Be sure to program Automatic LineSelection only for those lines to be used by the basic telephone.
c Basic telephones can receive ringing intercom calls, but not intercomcalls with voice announcement. Therefore, be sure to program VoiceAnnouncement Disable for the telephone. (See “Voice AnnouncementEnable/Disable. ” )
4 When you are finished programming, leave Centralized Programming ordisconnect the voice terminal.
5 Connect the BTMI or OPTI to the same station jack.
6 Connect the basic telephone to the BTMI or OPTI.
Follow these instructions to use a basic telephone connected to a BTMI orOPTI:
● To place a ringing intercom call, lift the handset and dial the intercomnumber.
● To place a voice-announced intercom call, lift the handset and dial 881,then the intercom number.
● To access particular lines or line pools assigned to buttons, as shown onthe Station Configuration Form, lift the handset and dial the codes shownin Figure 2-18. (On a basic telephone connected to an OPTI or a BTMI,dialing the code associated with a button has the same effect as touchingthe button on a MERLIN II system voice terminal.)
Accessory Equipment 2-173

FIGURE 2-18 Dial codes for basic telephones connected to BTMIs and OPTIs.
I 8 8 4 I 8 8 9
8 8 3 I 8 8 8
8 8 2 I 8 8 7
I 8 8 1Intercom-Voice
I 8 8 0Intercom-Ring
Square
I 8 8 6
I 8 8 5
systems
8 8 4
I 8 8 3Pool Access
I 8 8 2Pool Access
I 8 8 1Intercom-Voice
I 8 8 0Intercom-Ring
Pooled systems with
I 8 8 3Default I 8 8 8
Main Pool
8 8 2Default 8 8 7
Main Pool
I 8 8 9
8 8 7
8 8 6
8 8 5
Dial Access to
I 8 8 1Intercom-Voice I 8 8 6
I 8 8 0Intercom-Ring 8 8 5
Pooled systems with Button Access to line pools
line pools
2-174 Accessory Equipment

Control Unit
DESCRIPTION
Modules
The basic carrier contains slots for up to seven modules, which supply power,direct system operation, and provide jack connections for telephone lines,voice terminals, and other equipment, such as a tape player for the Music-on-Hold feature. See Figure 2-19. You can also add to your system oneexpansion carrier which provides more power and additional connections forlines and equipment. Your MERLIN II system may include up to 56 outsidelines and as many as 88 connections for voice terminals or other equipment,depending on the combination of modules installed. However, you can haveonly 82 responding stations.
FIGURE 2-19 The MERLIN II system control unit with installed modules.
The following modules are used in the MERLIN II system:
● Power Supply Module. A Power Supply Module, which supplies powerto the other modules in the unit, always occupies the leftmost slot on thebasic carrier and the expansion carrier. There is an Off/On switch at thebottom of the module. When the power is on, a green light is on next tothe switch.
Accessory Equipment 2-175
CONSIDERATIONS
● Processor Module. The Processor Module, which contains themicroprocessor that controls the system’s programs and features, alwaysoccupies the next slot (slot 0) on the control unit. This module may alsocontain jacks for optional equipment. A red light on this module goes onwhen the system is powered up. If the light goes on at any other time, itindicates a problem with the system.
● Circuit Pack Modules. The Circuit Pack Modules can occupy slots 1through 5 on the basic carrier and slots 6 through 11 on an expansioncarrier. The modules are interchangeable during installation, except forslot 1 on the basic carrier, which must have either a 4-Line/8-Analog VoiceTerminal (408) Module or an 8-Analog Voice Terminal (008) Module.
There are four types of Circuit Pack Modules.
A 4-Line/8-Analog Voice Terminal {408) Module has jacks for fouroutside lines and eight analog voice terminals.
An 8-Analog Voice Terminal (008) Module has jacks for eight analogvoice terminals.
An 8-Digital Station (008D) Module has jacks for eight digital voiceterminals.
A 4-Line (400 with TTR) Module with Touch-Tone Receivers hasjacks for four lines and four Touch-Tone receivers.
An 8-Line (800) Module has jacks for eight lines.
A 12-Basic Telephone (012) Module has jacks for 12 basic telephones.(For more information about this type of module, see “Basic TelephoneModule. ” )
Labels on the Circuit Pack Modules identify the station jacks by intercomnumber and the line jacks by line number. Each jack is accessed through acutout in the front of the housing.
●
●
●
At some point, you may need to change modules in the control unit. Ifyou replace a module with one of a different type, you must readministerthe system to reassign numbers to lines and stations. (For the proceduresee “System Renumbering. ” ) Keep in mind that changing station modulesmay require readministration of features that are unique to analog ordigital voice terminals.
On each Circuit Pack Module is a Power Failure Telephone Jack to whichthe administrator can connect a basic telephone. When there is a powerfailure, the Power Failure Telephone automatically turns on and connectsto the first line on the module. (See “Power Failure Telephone.”)
If you have a 12-Basic-Telephone (012) Module in either type of carrier,you must connect a frequency generator to the Power Module located inthe first slot. For more information, see “Frequency Generator. ”
If you replace a module in your control unit with one of a different type, youneed to renumber the lines and stations in your system. Follow theprocedure under “System Renumbering. ”
2-176 Accessory Equipment

Frequency
DESCRIPTION
CONSIDERATIONS
HOW TO USE
Generator
If your basic carrier or expansion carrier has a 12-Basic Telephone (012)Module, you must connect a Frequency Generator to the Power Module,located in the first slot of each carrier containing basic telephone modules.See Figure 2-20.
The frequency generator converts 117-volt, 60-Hz input power to 105-volt,30-Hz ringing voltage for basic telephones connected to the 12-BasicTelephone Module.
FIGURE 2-20 A frequency generator.
Frequency generator
.
00
You must remove each Power Module that has a 12-Basic Telephone (012)Module from its carrier before you insert the frequency generator. However,before inserting or removing the Power Module, be sure to turn off its powerswitch. If your system has an expansion unit, turn the power switch off onthe basic unit’s Power Module first, then turn off the power switch on theexpansion unit’s Power Module.
The frequency generator provides ringing power to the basic telephones inyour system. If you are using a basic telephone and it does not ring, contactyour system administrator.
Accessory Equipment 2-177

General Purpose Adapter
DESCRIPTION With the General Purpose Adapter (GPA) you can connect to your analogvoice terminal Touch-Tone (not rotary) equipment such as modems,autodialers, facsimile (FAX) machines, and telephone extensions (includingcordless telephones). An example is shown in Figure 2-21.
CONSIDERATIONS
HOW TO USE
FIGURE 2-21 A voice terminal and a computer/modem connected to a General
Purpose Adapter (back view).
BASIC V.T.
J O I N A U T OTEL. EQUIP.
GENERAL PURPOSE ADAPTER
Modular cord
I I Modular cord
Data device
Voice terminal
● The GPA may be used with all voice terminal models except the 5-Buttonand HFAI-10 voice terminals.
● If you have a GPA connected to your voice terminal, and you want youranswering machine or modem to go on automatically when you receive acall, program an Auto Answer-All button for your voice terminal. Whenyou use the Auto Answer-All feature, the GPA option switch must be setto Auto. (See “Auto Answer-All.”)
You can select the switch position, labeled Join, Basic, or Auto on theadapter, required for operating the telephone or data equipment connected toyour voice terminal.
Using Join ModeSet the switch to Join when you want to join a call already in progress onyour voice terminal. You can attach an extension phone or a speakerphoneand have someone join the conversation. You can attach a recording deviceto record the conversation (with the participants’ permission) or play a tapefor the listener. In join mode, ringing comes from the voice terminal, notfrom the attached device.
Using Basic ModeSet the switch to Basic to originate and receive calls at the attachedequipment, such as an extension phone. This device can be located awayfrom the voice terminal. When you lift the handset, the extension functions
2-178 Accessory Equipment

like a voice terminal. Note that incoming calls ring only at the voice terminal,not at the attached device.
Using Auto ModeSet the switch to Auto to connect a modem, answering machine, or otherautomatic answering device. Program an Auto Answer-All feature button andactivate it so the device answers incoming calls automatically. If an extensionis attached, it will ring.
Hands-Free Unit
DESCRIPTION The Hands-Free Unit (HFU) shown in Figure 2-22 is a speakerphone thatallows you to place and answer outside and intercom calls without using thehandset.
FIGURE 2-22 The front panel of the Hands-Free Unit.
Speakerphonelight
Microphonelight
IVolume control
Accessory Equipment 2-179

CONSIDERATIONS ●
HOW TO USE
●
●
To
1
2
3
Be sure you are using the correct model for the voice terminal, as shownbelow.
Model S101A (silver) is used with digital voice terminals only.
Model S102A (black) is used with analog voice terminals only.
The HFU can be used with the 10-button, BIS-10, BIS-22, 34-button,34-button deluxe, SP-34, SP-34D, BIS-34, and BIS-34D analog voiceterminals. When you use the HFU with a 7406 digital voice terminal,you must use a local power unit.
If you program an Auto Answer-Intercom button, you can have theHands-Free Unit go on automatically when you receive intercom calls.(See “Auto Answer-Intercom.”)
use your Hands-Free Unit to place a call:
Without lifting your handset, touch Speakerphone.The speakerphone and microphone lights come on, and you hear the dial tone.
Dial the number.
When the person answers, begin the conversation.
You can slide the volume control lever on the front oflower or raise the volume of the other person’s voice.
To
1
2
To
1
answer an outside call using a Hands-Free Unit:
Touch Speakerphone.The speakerphone and microphone lights go on,
Begin the conversation.
disconnect a call:
the Hands-Free Unit to
When you are finished with the call, touch Speakerphone.The speakerphone and microphone lights go off.
If you want to prevent the other person on the call from listening while youspeak with someone in your office:
1 Touch Microphone.The microphone light goes off.
When you are ready to speak again with the person:
1 Touch Microphone again.The microphone light goes on.
2-180 MERLIN II System Features

Headset
DESCRIPTION
and Headset Adapter
CONSIDERATIONS
HOW TO USE
A headset connectedallows you to handle
to your voice terminal by way of the headset adaptercalls more easily. See Figure 2-23.
FIGURE 2-23 A headset connected to a headset adapter with an enlargementof the headset adapter.
●
●
●
To
1
2
A headset can be used with the 10-button, BIS-10, BIS-22, 34-button, 34-button deluxe, SP-34, SP-34D, BIS-34, and BIS-34D with display analogvoice terminals and with the 7406 digital voice terminal.
There are two types of headset adapters, according to the type of voiceterminal you are using.
Model 500A is used with digital voice terminals.
Model 502A is used with analog voice terminals.
The attendant may use a headset with the display console. The consolehas a Disconnect button that allows the attendant with one touch todisconnect an outside call without lifting the handset, or turning off theheadset, and then dial another telephone number.
The cord on the headset is plugged into the headset adapter, and thevoice terminal and the adapter are connected by way of a modular cordwhich comes with the adapter.
place a call using your headset:
Touch On/Quiet on the headset adapter.The green light next to the button goes on.
Dial the outside number.
MERLIN II System Features 2-181

To answer a call:
1 Touch On/Quiet on the headset adapter.
To mute the microphone:
1 Hold down On/Quiet on the headset adapter.
To hang up:
1 Touch Off on the headset adapter.The green light next to On/Quiet goes off.
In-Range, Out-of-Building Voice Termianl and Protectors
DESCRIPTION You can place a voice terminal in another location, outside of the mainbuilding, but within 1000 feet of the MERLIN 11 system control unit. In orderto protect both this In-Range, Out-of-Building (IROB) voice terminal and thecontrol unit from exposure to lightning, contact with power lines, or powercurrents induced by nearby power lines, you must also install two Model TII341 IROB protectors. See the example in Figure 2-24. Install one of the IROBprotectors where the cable from the control unit leaves the building, and theother where the cable enters the building in which the IROB voice terminalis located.
CONSIDERATIONS
FIGURE 2-24 Basic IROB voice terminal and protector configuration.
IROB IROBprotector protector
Interbuildingwiring
I
- - - - -
Approved ground
● These protectors must be mounted indoors,
● An approved electrical ground, such as a ground installed by the powerservice company, grounded building steel, or concrete-encased ground,is required for proper operation of the IROB protector. (For moreinformation about approved ground, see the instructions that come withyour IROB protectors.)
2-182 MERLIN II System Features

Loudspeaker Paging System
See “Loudspeaker
Music Coupler
Page” in “MERLIN II System Features.”
DESCRIPTION If your system has the Music-on-Hold feature, you must connect the musicsource, such as a tape player, to the MERLIN II system with a music coupler.The music coupler shown in Figure 2-25 provides a secondary bridgedconnection so that the music source can also be connected to a loudspeakerpaging system to provide background music in sections of your building inwhich paging speakers are located.
CONSIDERATIONS
ADMINISTRATION
FIGURE 2-25 A music coupler.
To paging system To line jack
(Front view) (Back view)
You can use a radio, tape player, cassette player, or stereo system as a musicsource for the Music-on-Hold feature. For more information about thisfeature, see “Music-on-Hold.’' If you need to know the procedures for usingyour loudspeaker paging system and the Loudspeaker Page feature, see“Loudspeaker Page. ”
To avoid music distortion, be sure that the output level of the music sourcebelow 10 volts (i.e. approximately 12.5 watts across an 8 OHM speaker).
NOTICE:Users of equipment that rebroadcast copyrighted music or othermaterial may be required to obtain a license from a third party suchASCAP or BMI.
For directions on administering the Music-on-Hold feature for your system,see “Music-on-Hold. ”
is
as
MERLIN II System Features 2-183

Power Failure Telephones
DESCRIPTION In case of a power failure, a basic Touch-Tone or rotary telephone connectedto a Power Failure Telephone jack in a control unit module has access toanother line on the same module. (See Figure 2-26 to identify the PFT jack ondifferent line modules.)
When there is a power failure, all of the system except for power failuretelephones, shuts off. If you have plugged a Power Failure Telephoneinto the PFT jack, the basic telephone automatically goes on when a poweroutage occurs. You can use the power failure telephone to place and receiveoutside calls.
CONSIDERATIONS
HOW TO USE
FIGURE 2-26 A Power Failure Telephone Jack on a 408, 800, and 400 module.
Bridgesto lowestposition
_ Power failuretelephone jack
Bridgesto lowestposition
4 0 8 4 0 0w/TTR
Bridgesto lowest
P o w e rfailuretelephonej a c k
P o w e rfailuretelephonej a c k s
800
You cannot use a MERLIN II system voice terminal as a power failuretelephone.
Plug the basic telephone into the power failure telephone jack on a controlunit module. When there is a power failure, the power failure telephoneconnects to the first line on the module.
2-184 MERLIN II System Features

Supplemental Alert Adapter
DESCRIPTION
N o t m o r ethan 7 feet(unless youhave a longermodular cord)
Not morethan 25 feet(unless youhave a longermodular cord)
HOW TO USE
You can connect Extra Alert Devices, such as a horn, bell, strobe, or chime, toyour system through a Supplemental Alert Adapter (SAA) so that peopleworking in noisy or remote areas of a building can be alerted when a callrings (Figure 2-27). The SAA does, not connect directly to the control unit;instead, a voice terminal connected to the control unit also connects to theSAA. When you activate the SAA and the voice terminal rings, the adapterautomatically activates the connected extra alert device, which gives a visualor audible signal that a call has come in.
FIGURE 2-27 An extra alert bell and a voice terminal connected to the SAA(back view).
Power switch(Back view)
Not morethan 14 feet(unless youhave a longermodular cord)
Voiceterminal
Modular Alertingwall jack device
An Extra Alert Switch allows you to turn an extra alert device on and off andalternately select between two different connected alerting devices, such as astrobe during business hours and a horn during off-hours. You may alsoalternate between two extra alert devices installed in different locations. Inaddition, an extra alert switch allows you to use two extra alert devicessimultaneously. The extra alert switch is compatible with MERLIN II extraalert devices (-48V).
If you want the SAA to automatically turn on the extra alert devicesconnected to the extra alert switch, plug the extra alert switch into the Alerterjack of the SAA.
If you want to use extra-alerting devices simultaneously, you need to plugthe modular cord for each device into a Line Bridging Adapter which you canconnect to either position (1) or position (2) onalert switch.
For more information, contact your equipment
To set up your SAA:
the bottom of the extra
dealer.
1 Unplug the appropriate voice terminal from its modular wall jack, andplug into the jack labeled V.T. on your SAA.
MERLIN II System Features 2-185

2
3
To
Plug one end of the modular cord into the jack labeled C.U. # on theSAA and the other end into the voice terminal’s modular wall jack.
Plug the modular cord from the extra alert device into the jack labeledAlerter on the SAA.
have the extra alert device turn on when a call rings at the appropriatevoice terminal, turn the SAA to the On position.
If you want to use more than one extra alert device alternately:
1 Turn the extra alert switch’s knob to the appropriate On position labeled(1) or (2). For example, if you connect a bell to position (1) and a strobe toposition (2), turn the control switch to position (1) to operate theto position (2) to operate the strobe.
If you want to use more than one extra alert device simultaneously:
bell and
1 Turn the extra alert switch knob to the appropriate On position labeled (1)or (2). For example, if you connect a bell and a strobe to a line bridgingadapter and the adapter to position (1) on the SAA, turn the controlswitch to this position.
2-186 MERLIN II System Features

Introduction
This guide summarizes the administrative procedures described in Section 2,“Reference.” For more information about a particular procedure, refer to theentry for that feature. Separate procedures are provided for the BIS-34Dconsole and the MERLIN II System Display Console.
Before you perform any of these procedures, be sure to record the change oraddition you’re making on your planning forms. These may include yourMaster Planning Form, System Configuration Form, Station ConfigurationForms, and forms for optional system features such as Group Page.
If you have a BIS-34D console, some of the buttons take on different functionswhen you’re in administration mode. For example, you touch Recall to copyassignments from one voice terminal to another and Message to designateattendant consoles. If you have a MERLIN II System Display Console, placethe administration overlay over the console whenever you administer thesystem. The overlay shows the buttons’ functions.
ENTER AND LEAVE To perform any of the proceduresADMINISTRATION MODE mode by following these steps:
1 Slide the T/P switch on the left
listed in this guide, enter administration
side of the console to P.
2 Touch Conference twice to enter administration mode.
When you finish administering your system, leave administration mode bysliding the T/P switch to the center position.
Introduction 3-1

Button Code Administration Procedures
Button code administration procedures are divided into two categories: basicand optional procedures.
Basic Administration Procedures
Administration Procedure Do This
System size 1 Touch Message.
2 Dial #201.
3 If green light next to Message is steady and you hear two beeps, goon to step 4. If not, wait for 2-beep signal or try again later.
4 Dial number to designate system size:
o = small system1 = large system
5 Wait for lights next to Adm Tel, Adm Pool, Message, and Speakerto flash. At this signal, go to another procedure or leaveadministration mode.
System type 1 Touch Message.
2 Dial #202.
3 If green light next to Message is steady and you hear two beeps, goon to step 4. If not, wait for Z-beep signal or try again later.
4 Dial number to designate system type:
0 = square1 = pooled with Button Access to Line Pools2 = pooled with Dial Access to Line Pools3 = pooled with Automatic Route Selection (ARS)4 = behind-switch
5 Wait for lights next to Adm Tel, Adm Pool, Message, and Speakerto flash. At this signal, go to another procedure or leaveadministration mode.
System Renumbering Procedure 1 Touch Message.
2 Dial #299.
If the light next to Message flashes by itself, one or more calls are inprogress and the procedure is not executed–wait for the light tobecome steady, then go on to the next step.
3 When the lights next to Adm Tel, Adm Pool, Message, and Speakerbegin to flash, go to another procedure or leave administrationmode,
3-2 Button Code Administration Procedures

Administration Procedure Do This
Attendant console position 1 Touch Message.
2 Dial # 203,
3 If green light next to Message is steady and you hear two beeps, goon to step 4. If not, wait for 2-beep signal or try again later.
4 Touch Auto Intercom button(s):
Steady green = attendant positionFlashing green = potential attendant position used as nonattendant
position
5 Touch # .
6 Wait for lights next to Adm Tel, Adm Pool, Message, and Speakerto flash. At this signal, go to another procedure or leaveadministration mode.
Music-on-Hold jack 1 Touch Message.
2 Dial #204.
3 If green light next to Message is steady and you hear two beeps, goon to step 4. If not, wait for 2-beep signal or try again later.
4 Touch line button:
Green light on = Music-on-.Hold jackGreen light off = standard line or Loudspeaker Page jack
5 Touch Message.
Loudspeaker Page jack 1 Touch Message.
2 Dial #205.
3 If green light next to Message is steady and you hear two beeps, goon to step 4. If not, wait for 2-beep signal or try again later.
4 Touch line button:
Green light on = Loudspeaker Page jackGreen light off = standard line or Music-on-Hold jack
5 Touch Message.
Simultaneous Voice and Data 1 Touch Message.
2 Dial #211.
3 If green light next to Message is steady and you hear two beeps, goon to step 4. If not, wait for 2-beep signal or try again later.
4 Touch either of two adjacent Auto Intercom buttons:
Green light on = station jack part of voice/data pairGreen light off = station jack not paired
5 Touch Message.
Button Code Administration Procedures 3-3

Administration Procedure Do This
Touch-Tone or rotary signaling 1 Touch Message.
2 Dial #302.
3 Touch line buttons:
Steady green on = Touch-ToneGreen off= rotary
4 Touch Message.
Voice Terminal Type Setting (raised plastic 1 Touch Message.or flat membrane button) 2 Dial #320.
3 Touch Auto Intercom button(s):
Green light on = raised plastic button voice terminalGreen light off = flat membrane button voice terminal
4 Touch Message.
Voice Announcement to Busy Voice 1 Touch Message.Terminal 2 Dial #210.
3 If green light next to Message is steady and you hear two beeps, goon to step 4. If not, wait for 2-beep signal or try again later.
4 Touch either of two adjacent Auto Intercom buttons:
Green light on = station jack part of voice/voice pairGreen light off = station jack not paired
5 Touch Message.
Voice terminal line assignments in square 1 Touch Adm Tel.systems and behind switch systems 2 Touch Auto Intercom button for voice terminal.
3 If steady green light shows next to Adm Tel and you hear twobeeps, go on to step 4. If not, wait for 2-beep signal or try againlater.
4 Touch line buttons:
Steady green on = line assigned to voice terminalGreen off = fine not assigned to voice terminal
5 Touch Adm Tel.
3-4 Button Code Administration Procedures

Administration Procedure Do This
Voice terminal hne/line pool assignmentsin pooled systems:
To assign lines to line pools 1 Touch Adm Pool.
2 If green light next to Adm Pool is steady and you hear two beeps,go on to step 3. If not, wait for 2-beep signal or try again later.
3 Dial pool code.
4 Touch line buttons:
Steady red on = line in poolRed off = line not in pool
5 Touch Adm Pool.
To assign lines and line pools to voice 1 Touch Adm Tel.terminals 2 Touch Auto Intercom buttons for voice terminal.
3 If steady green light shows next to Adm Tel and you hear twobeeps, go on to step 4. If not, wait for 2-beep signal or try againlater.
4 Touch line buttons:
Steady green on = line or pool assigned to voice terminalGreen off = line or pool not assigned to voice terminal
5 Touch Adm Tel.
To assign Dial Access to Line Pools to 1 Touch Adm Tel.voice terminals 2 Touch Auto Intercom button for voice terminal.
3 If steady green light shows next to Adm Tel and you hear twobeeps, go on to step 4. If not, wait for 2-beep signal or try againlater.
4 Touch same Auto Intercom button again.
5 Touch line buttons:
Steady green on = voice terminal has Dial Access to pool containingline
Green off = voice terminal doesn‘t have Dial Access to poolcontaining line
6 Touch Adm Tel.
Button Code Administration Procedures 3-5

Optional Systemwide Features
Administration Procedure Do This
Automatic Route Selection (ARS):
To specify how many tables are 6-digit 1 Touch Message.tables 2 Dial #305.
3 Dial number of 6-digit tables (0 through 8).
4 Touch Message.
To add an area code or exchange 1 Touch Message.
2 Dial #6.
3 Dial table number (0 through 7).
4 Dial entry number (00 through 99).5 Dial entry (area code or exchange).
6 Touch Message.
To delete an area code or exchange 1 Touch Message.
2 Dial #6.
3 Dial table number (0 through 7).
4 Dial entry number (00 through 99).
5 Touch Drop.
6 Touch Message.
To add a pool number plus other 1 Touch Message.digits, if required 2 Dial #7.
3 Dial table number (0 through 9).
4 Dial entry number (0 through 5).
5 Dial entry (pool number plus access and/or account code, ifrequired).
6 Touch Message.
To associate an absorption type with a 1 Touch Message.pool number after adding the pool 2 Dial #7.number
3 Dial table number (0 through 9).
4 Dial entry number (0 through 5).
5 Dial absorption type:
o = none1 = leading 12 = area code3 = 1 + area code4 = 1 + exchange5 = 1 + area code + exchange
6 Touch Message.
3-6 Button Code Administration Procedures

Administration Procedure
Automatic Route Selection (ARS):continued)
To delete a pool number (action alsodeletes any other digits and absorptiontype)
To add other digits in the SpecialNumber Table
To delete other digits in the SpecialNumber Table
To get a printout of ARS tables
Behind-Switch OperationFixed Button Codes:
To assign a code or Recall to a fixedbutton
To get a printout of fixed buttonassignments
Do This
1
2
3
4
5
6
1
2
3
4
1
2
3
4
Touch Message.
Dial #7.Dial table number (0 through 9).
Dial entry number (0 through 5).
Touch Drop.
Touch Message.
Touch Message.
Dial #800.
Dial entry (access and/or account code).
Touch Message.
Touch Message.
Dial #800.Touch Drop.
Touch Message.
1 Touch Message.
2 Dial # 902 and wait for beep.
3 Touch Message.
1 Touch Message.
2 Dial # 328.
3 Touch the fixed button (Conference, Transfer, or Drop).
4 Dial a 6-character code or touch the button again to assignRecall to it.
5 Touch Message.
1 Touch Message.
2 Dial #905 and wait for beep.
3 Touch Message.
Button Code Administration Procedures 3-7

Administration Procedure Do This
Call Pickup Groups:
To assign voice terminals to groups 1 Touch Message.
2 Dial # 327.
3 Dial number of Call Pickup group (01 through 30).
4 Touch Auto Intercom button(s):
Steady green on = voice terminal in groupGreen off = voice terminal not in group
5 Touch Message.
Call Report:
To set time and date and administer 1 Touch Message.Call Report options(may be required for Night Service and
2 Dial #300, then dial current time (2 digits for hour, 2 digits for
Reminder Service)minute in 24-hour format).
3 Dial #301, then dial current date (2 digits for month, 2 digits forday, 2 digits for year).
4 Dial #390, then dial minimum call duration (2 digits for minutes).5 Dial # 3910 to record outgoing calls only
orDial #3911 to record outgoing and incoming tails.
6 Touch Message.
To get a printout of Call Report 1 Touch Message.options 2 Dial #390 # 900 and wait for beep.
3 Touch Message.
To set printer to scroll to top of page 1 Touch Message.automatically. Printer must be off and 2 Dial #399.scrolled to top of next page
3 Touch Message.
3-8 Button Code Administration Procedures

Administration Procedure
Call restrictions and allowed lists:
To assign outward and toll callrestrictions to voice terminals:
NOTE: If you do not need to dial a tollprefix (0 or 1) to place a long distancecall, perform steps 1 and 2 below. Ifyou use a toll prefix, just performstep 2 below.
1 To set lines to identify longdistance calls by area code only
2 To assign call restrictions to voiceterminals
To copy line assignments and callrestriction assignments from one voiceterminal to another
To set up allowed lists
Do This
1
2
3
1
2
3
4
5
6
1
2
3
4
5
6
1
2
3
4
5
6
Touch Speaker.
Touch line buttons:
Steady green on = toll calls detected by toll prefix onlyGreen off = toll calls detected by area code or toll prefix
Touch Speaker.
Touch Adm Tel.
Touch Auto Intercom button for voice terminal.
If steady green light shows next to Adm Tel and you hear twobeeps, go on to step 4. If not, wait for 2-beep signal or tryagain later ,Touch Speaker.
Steady green on = all calls permitted (unrestricted)Flashing green = local and intercom calls and calls to numbers on
assigned lists permitted (toll call restriction)Green off = intercom calls and calls to numbers on assigned lists
permitted (outward call restriction)
Touch Speaker.
Touch Adm Tel.
Touch Adm Tel.
Touch Auto Intercom button for new voice terminal.
If a steady green light goes on next to the Auto Intercom button andyou hear two beeps, go on to step 4. If not, wait for 2-beep signalor try again later.
Touch Recall.
Touch Auto Intercom button for voice terminal whose assignmentsyou want to copy.
When red light next to Adm Tel stops flashing, touch Adm Tel.
Touch Message.
Dial #5.
Dial list number (0 through 7).
Dial entry number (0 through 9).
Dial entry (area code and/or exchange or emergency number), ortouch Drop.
Touch Message.
Button Code Administration Procedures 3-9
Administration Procedure Do This
Call restrictions and allowed lists 1 Touch Message.continued): 2 Dial #4.
To assign access to allowed lists to 3 Dial list number (0 through 7).voice terminals 4 Touch Auto Intercom button for voice terminal:
Steady green on = voice terminal has access to numbers on listGreen off = voice terminal doesn‘t have access to numbers on list
5 Touch Message.
To get a printout of an allowed list 1 Touch Message.
2 Dial #5.
3 Dial list number (0 through 7).
4 Dial 0 #900 and wait for beep.5 Touch Message.
To get a printout of voice terminal 1 Touch Message.access to allowed lists 2 Dial #904 and wait for beep.
3 Touch Message.
Camp On return interval 1 Touch Message.
2 Dial # 326.
3 Dial number of minutes (1 through 5) preferred before callsreturn to originator.
4 Touch Message.
Centralized Programming 1 Touch Conference.
2 Touch Auto Intercom button for voice terminal to be programmed.
3 If red light next to Adm Tel goes off and console rings every 5seconds, go on to step 4. If not, wait for light to go off or tryagain later.
4 Perform programming steps, except for entering and leavingprogramming mode.
5 Touch Conference twice.
Dialing Timeout for rotary lines 1 Touch Message.
2 Dial # 317.
3 Dial number to specify timeout interval:
0 = 0 seconds1 = 4 seconds2 = 8 seconds3 = 12 seconds
4 Touch Message.
3-10 Button Code Administration Procedures

Administration Procedure
Direct Inward System Access:
To assign lines for DISA
To specify a password for DISA users
To set up DISA outward restriction
To get a printout of DISA options
Disconnect interval for held calls
Extended Station Status:
To specify the ESS mode
To put consoles in and out of ESSDisplay mode
Do This
1 Touch Message.
2 Dial # 323.
3 Touch line button:Steady green on = line used for DISAGreen off = line not used for DISA
4 Touch Message.
1 Touch Message.
2 Dial #324.
3 Dial a 4-digit password or touch Drop.
4 Touch Message.
1 Touch Message.
2 Dial #325.
3 Dial 0 for outward restriction or 1 for no restriction.
4 Touch Message.
1 Touch Message.
2 Dial #905 and wait for beep.
3 Touch Message.
1 Touch Message.
2 Dial # 303.
3 Touch line buttons:Steady green on = line drops held call on long (450 millisecond)
signal (default)Green off = line drops held call on short (50 millisecond) signal
4 Touch Message.
1 Touch Message.
2 Dial #329.
3 Dial 0 for Hotel/Motel or 1 for CMS mode.
4 Touch Message.
1 Touch Message.
2 Dial #330.
3 Touch Auto Intercom button(s):
Steady green on = console in display modeGreen light flashing = console not in display mode
4 Touch Message.
Button Code Administration Procedures 3-11

Administration Procedure Do This
Forced Account Code Entry 1 Touch Message.
2 Dial # 319.
3 Touch Auto Intercom button(s):Steady green on = voice terminal has Forced Account Code EntryGreen off = voice terminal doesn‘t have Forced Account Code Entry
4 Touch Message.
Group Call Distribution:
To assign voice terminals to groups for 1 Touch Message.Group Call Distribution 2 Dial # .
3 Dial default number of Call Distribution group (870 through 875).4 Touch Auto Intercom button(s):
Steady green on = voice terminal in groupGreen off = voice terminal not in group
5 Touch Message.
To associate lines with groups for 1 Touch Message.Group Call Distribution 2 Dial #.
3 Dial default number of Call Distribution group (870 through 875).
4 Touch line button:Steady green on = line assigned to groupGreen off = line not assigned to group
5 Touch Message.
To get a printout of Call Distribution 1 Touch Message.groups 2 Dial #906 and wait for beep.
3 Touch Message.
Group Paging:
To assign voice terminals to groups for 1 Touch Message.Group Page 2 Dial #.
3 Dial default Group Page group number (881 through 887).
4 Touch Auto Intercom button(s):
Steady green on = voice terminal in paging groupGreen off = voice terminal not in paging group
5 Touch Message.
3-12 Button Code Administration Procedures

Administration Procedure Do This
Group Paging: (continued)
To get a printout of paging groups 1 Touch Message.
2 Dial #903 and wait for beep.
3 Touch Message.
Intercom Dial Tone
To change the intercom dial tone 1 Touch Message.
2 Dial #335.
3 Touch 0 to provide MERLIN II system intercom dial tone.
Touch 1 to provide CO line dial tone.
Night Service, Enhanced:
To assign voice terminals to 1 Touch Message.attendant’s Night Service group 2 Dial # 307.
3 Dial attendant’s intercom number.
4 Touch Auto Intercom button(s):
Steady green on = voice terminal in groupGreen off = voice terminal not in group
5 Touch Message.
To set up Outward Restriction by 1 Touch Message.creating a password 2 Dial # 309.
3 Dial a 4-digit password.
4 Touch Message.
To remove Outward Restriction 1 Touch Message.
2 Dial #309.
3 Touch Drop.
4 Touch Message.
To set up an allowed list of emergency 1 Touch Message.numbers 2 Dial # 310.
3 Dial entry number (0 through 9).
4 Dial telephone number (12 digit maximum), or touch Drop toremove entry.
5 Touch Message.
To set up a Night Service Exclusion list 1 Touch Message.
2 Dial # 308.
3 Touch Auto Intercom button for voice terminal:
Steady green on= voice terminal on listGreen off =voice terminal not on list
4 Touch Message.
Button Code Administration Procedures 3-13

Administration Procedure Do This
Night Service, Enhanced (continued):
To set times for Night Service to go on 1 Touch Message.and off automatically 2 Dial #311.
3 Dial number of day of week (0 = Sunday, 6 = Saturday).4 Dial “on” time (2 digits for hour, 2 digits for minute in 24-hour
format), or touch Drop to remove entry.
5 Dial # 312.
6 Dial number of day of week (0 = Sunday, 6 = Saturday).
7 Dial “off” time (2 digits for hour, 2 digits for minute in 24-hourformat), or touch Drop to remove entry.
8 Repeat steps 2 through 7 for each day of week. (Don’t set on or offtime if Night Service should stay on for entire 24 hours. )
9 Touch Message.
To record current day for Night 1 Touch Message.Service with Time Set 2 Dial # 313.
3 Dial number of current day of week (0 = Sunday, 6 = Saturday)-
4 Touch Message.
To suspend Night Service with 1 Touch Message.Time Set 2 Dial #313.
3 Dial 9.
4 Touch Message.
To get a printout of Enhanced Night 1 Touch Message.Service Information 2 Dial #907 and wait for beep.
3 Touch Message.
One-Touch Call Handling Option:
To set system for One-Touch Transfer 1 Touch Message.(default) 2 Dial # 3150.
3 Touch Message.
or
To set system for One-Touch Hold 1 Touch Message.with Call Announcement 2 Dial #3151.
3 Touch Message.
Printouts, All 1 Touch Message.
2 Dial #999 and wait for beep.
3 Touch Message.
3-14 Button Code Administration Procedures
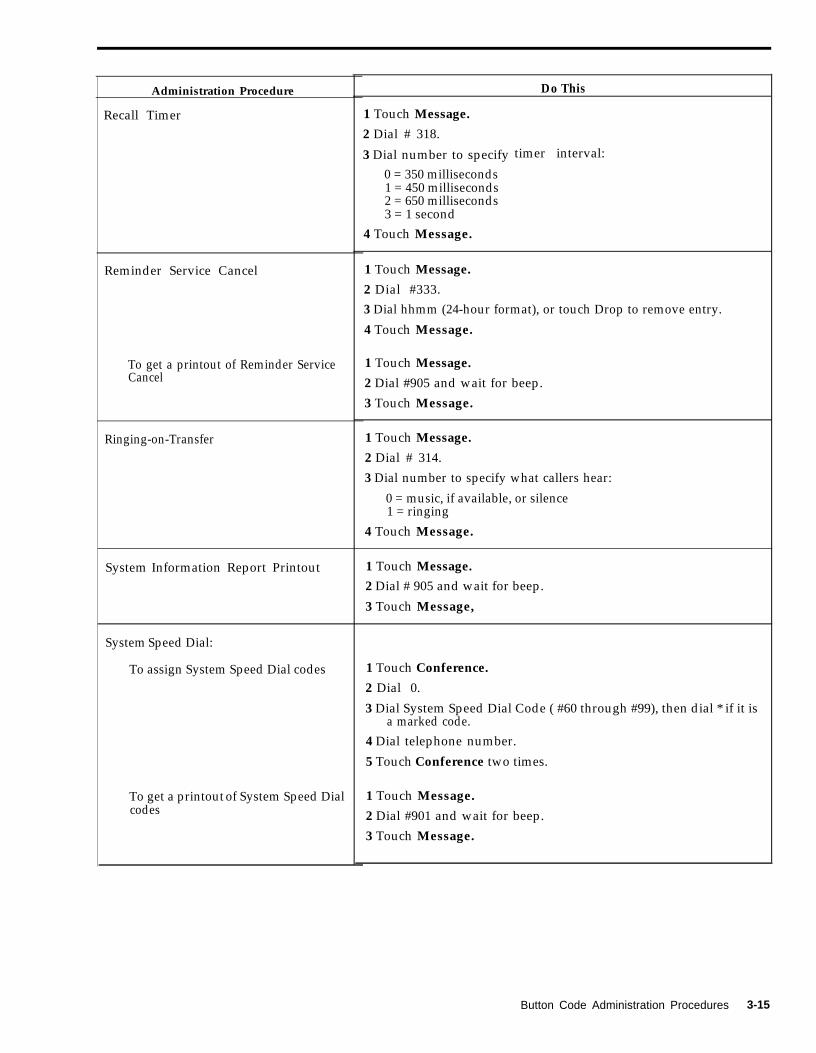
Administration Procedure
Recall Timer
Reminder Service Cancel
To get a printout of Reminder ServiceCancel
Ringing-on-Transfer
System Information Report Printout
System Speed Dial:
To assign System Speed Dial codes
To get a printout of System Speed Dialcodes
Do This
1 Touch Message.
2 Dial # 318.
3 Dial number to specify0 = 350 milliseconds1 = 450 milliseconds2 = 650 milliseconds3 = 1 second
4 Touch Message.
timer interval:
1 Touch Message.
2 Dial #333.
3 Dial hhmm (24-hour format), or touch Drop to remove entry.
4 Touch Message.
1 Touch Message.
2 Dial #905 and wait for beep.
3 Touch Message.
1 Touch Message.
2 Dial # 314.
3 Dial number to specify what callers hear:
0 = music, if available, or silence1 = ringing
4 Touch Message.
1 Touch Message.
2 Dial # 905 and wait for beep.
3 Touch Message,
1 Touch Conference.
2 Dial 0.
3 Dial System Speed Dial Code ( #60 through #99), then dial * if it isa marked code.
4 Dial telephone number.
5 Touch Conference two times.
1 Touch Message.
2 Dial #901 and wait for beep.
3 Touch Message.
Button Code Administration Procedures 3-15

Administration Procedure Do This
Transfer Return Interval 1 Touch Message.
2 Dial #306.
3 Dial number of rings (1 through 9) preferred before calls return tooriginal voice terminal. Dial 0 if transferred calls should not return.
4 Touch Message.
3-16 Button Code Administration Procedures

Administration Button Codes
Administration Code Other Number(s) Button(s) Feature
# 201 0 = small Set system size.
1 = large
# 202 0 = square Set system line representation type.. .
1 = pooled with ButtonAccess
2 = pooled with DialAccess
3 = pooled with ARS
4 = behind-switch
# 203 Auto Intercom Designate attendant positions.
# 204 Line Designate Music-on-Hold line jack.
# 205 Line Designate Loudspeaker Page line jack.
# 210 Auto Intercom Permit Voice Announcement to Busy VoiceTerminal.
# 211 Auto Intercom Permit Simultaneous Voice and Data Calls.
# 299 Renumber lines and/or stations afterreplacing a module with one of a differenttype.
# 300 a 2-digit hour, a 2-digit Set the current time for Call Report, Nightminute of the hour (24-hour Service, or Reminder Service.format)
# 301 a 2-digit month, a 2-digit day Set the current date for Call Report.of the month, and a 2-digityear
# 302 Line Specify Touch-Tone or rotary dialing.
# 303 Line Set the disconnect interval for held calls.
# 305 0 through 8 Identify the number of ARS tables that are6-digit tables.
# 306 0 through 9 Specify the number of times transferredcalls ring before ringing again at theoriginal voice terminal (0 = no return).
# 307 intercom number of the Auto Intercom Assign voice terminals to an attendant’sattendant console Night Service group.
# 308 Auto Intercom Assign voice terminals to the Night ServiceExclusion list.
# 309 4-digit password Enable Night Service with OutwardRestriction.
Drop Disable Night Service with OutwardRestriction.
Administration Button Codes 3-17

Administration Code Other Number(s) Button(s) Feature
# 310 Number of entry on list Set up a Night Service allowed list of(0 through 9) plus the emergency numbers.telephone number Drop
Remove Entry.
#311 Day of the week (0 through Set the time of day that Night Service goes6; on automatically.0 = Sunday), a 2-digit hour(24-hour format), a 2-digit Drop Remove entry.minute
# 312 Day of the week (0 through Set the time of day that Night Service goes6; off automatically.0 = Sunday), a 2-digit hour(24-hour format,) a 2-digit Drop Remove entry.minute
# 313 Current day (0 through 6) Record the current day for Night Servicewith Time Set.
9 Disable Night Service with Time Set.
# 314 0 = music, if available Specify what callers will hear when calls
1 = ringing are being transferred.
# 315 0 = One-Touch Transfer Select one of two one-touch call handling
1 = One-Touch Hold withoptions.
Call Announcement
# 317 0 = 0 seconds Specify dialing timeout interval for rotary
= 4 secondslines.
1
2 = 8 seconds
3 = 12 seconds
# 318 0 = 350 milliseconds Set the recall timer.
1 = 450 milliseconds
2 = 650 milliseconds
3 = 1 second
# 319 Auto Intercom Assign Forced Code Account Entry to avoice terminal.
# 320 Auto Intercom Identify an analog voice terminal as havingflat membrane or raised plastic buttons.
# 323 Line Assign a line for use in Direct InwardSystem Access (DISA).
# 324 4-digit number Specify a password for DISA callsDrop Remove the DISA password.
# 325 0 = DISA calls outward Specify call restriction status for DISArestricted calls.
1 = DISA calls not restricted
3-18 Administration Button Codes

Administration Code Other Number(s) Button(s) Feature
# 326 1 = 1 minute Set the Camp On return interval.2 = 2 minutes3 = 3 minutes4 = 4 minutes5 = 5 minutes
# 327 01 through 30 Auto Intercom Assign a voice terminal to a Call Pickup(Call Pickup group number) group.
# 328 Conference, Associate host system dial code withDrop, or button.Transfer, then 6-character code orsame button
# 329 0 = hotel/motel mode Specify the operating mode for Extended1 = CMS mode Station Status (ESS).
# 330 Auto Intercom Put attendant consoles into and out of ESSdisplay mode.
# 333 A 2-digit hour (24-hour To set Reminder Cancel time.format), a 2-digit minute Drop To remove Reminder Cancel.
# 335 0 To provide MERLIN II intercom dial tone.
1 To provide CO line dial tone.
# 390 00 through 99 Specify minimum length, in minutes, ofcalls recorded for the Call Report feature.
# 900 Get a printout of Call Reports options.
# 391 0 = outgoing calls Specify types of calls recorded for the Call
1 = incoming andReport feature.
outgoing calls
# 399 Set the printer to scroll to the top of thepage automatically.
#4 0 through 7 (list number) Auto Intercom Give a voice terminal access to thenumbers on an allowed list.
#5 0 through 7 (list number) Add an entry (area code and/or exchange)plus 0 through 9 (entry to an allowed list.number) plus an entry
Drop To remove entry.
0 through 7 (list number) Get a printout of an allowed list.plus o # 900
Administration Button Codes 3-19

Administration Code Other Number(s) Button(s) Feature
#6 0 through 7 (table number) Add an area code or exchange to an ARSplus 00 through 99 (entry table.number) plus an entry
0 through 7 (table number) Drop Remove an area code or exchange from anplus 00 through 99 (entry ARS table.number)
#7 0 through 9 (table number) Add a pool number plus other digits, ifplus 0 through 5 {entry required, to an ARS table.number) plus entry
0 through 9 (table number) Associate a digit absorption type with aplus 0 through 5 (entry pool number.number) plus 0 through 5(absorption type)
0through 9 (table number) Drop Delete a pool number, other digits, andplus 0 through 5 (entry absorption type from an ARS table.number)
# 800 digits Add other digits in the ARS SpecialNumber Table.
Drop To remove all entries.
#87 0 through 5 (Call Distribution Auto Intercom Assign a voice terminal to a Callgroup number) Distribution group.
0 through 5 Line Assign a line to a Call Distribution group.
#88 1 through 7 (paging group Auto Intercom Assign a voice terminal to a Group Pagenumber) group.
# 901 Get a printout of System Speed DialCodes.
# 902 Get a printout of ARS tables.
# 903 Get a printout of paging groups.
# 904 Get a printout of access to allowed lists.
# 905 Get a printout of the System InformationReport.
# 906 Get a printout of Call Distribution groups.
# 907 Get a printout of the Night Service Report.
# 908 Get a printout of Call Pickup groups.
# 909 Get a printout of the current dial plan.
# 999 Get a complete set of printouts.
3-20 Administration Button Codes

Menu-Driven Administration Procedures
The following table shows procedures for menu-driven administration. Thisdisplay-based method is used only with the MERLIN 11 System displayconsole. The console makes administering your system easy because eachbutton below the display aligns with its corresponding entry on the display.
You may also want to refer to Figure 3-1, the menu map, which shows thedisplay for each of the administration features as well as their positions in themenu-driven administration hierarchy. By referring to the menu map, youwill always know where you are in the system and be able to keepadministration time to a minimum.
Each administering procedure is designed to be completed and, if necessary,repeated with a minimum of effort. For example, once you have enteredadministration mode, the menu displays the first four major features of thesystem (System, FlexNm, Lines, Stations) and leaves a fifth spot open (More)for accessing the other features. Pressing the button under the positionwhere More is displayed will reveal four more major features of the system,and so on until the first four are displayed again. In the tables, proceduresfor accessing subsequent features are clearly described.
When you are in a menu and have administered a feature, you don’t have togo back to the system menu to access other features. In most cases, eachlevel of administration provides for a way to move around within that levelby pressing the button under the position where More is displayed. Forexample, if you have just administered PageZn, you can move toadministering allowed lists by pressing More.
Menu-Driven Administration Procedures 3-21

Menu-Driven Administration Map
FIGURE 3-1 Menu-Driven Administration Map
3-22 Menu-Driven Administration Procedures
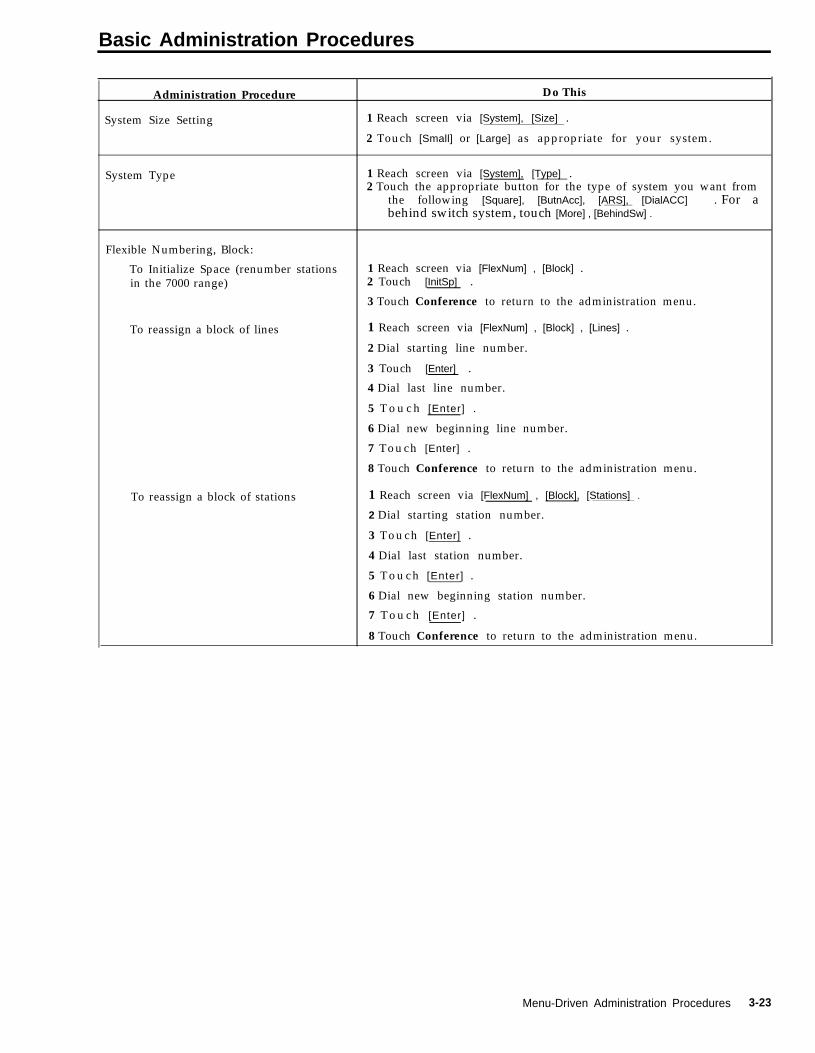
Basic Administration Procedures
Administration Procedure Do This
System Size Setting 1 Reach screen via [System], [Size] .
2 Touch [Small] or [Large] as appropriate for your system.
System Type 1 Reach screen via [System], [Type] .2 Touch the appropriate button for the type of system you want from
the following [Square], [ButnAcc], [ARS], [DialACC] . For abehind switch system, touch [More] , [BehindSw] .
Flexible Numbering, Block:
To Initialize Space (renumber stations 1 Reach screen via [FlexNum] , [Block] .in the 7000 range) 2 Touch [InitSp] .
3 Touch Conference to return to the administration menu.
To reassign a block of lines 1 Reach screen via [FlexNum] , [Block] , [Lines] .
2 Dial starting line number.
3 Touch [Enter] .
4 Dial last line number.
5 T o u c h [Enter] .
6 Dial new beginning line number.
7 Touch [Enter] .
8 Touch Conference to return to the administration menu.
To reassign a block of stations 1 Reach screen via [FlexNum] , [Block], [Stations] .
2 Dial starting station number.
3 Touch [Enter] .
4 Dial last station number.
5 T o u c h [Enter] .
6 Dial new beginning station number.
7 T o u c h [Enter] .
8 Touch Conference to return to the administration menu.
Menu-Driven Administration Procedures 3-23

Administration Procedure Do This
Flexible Numbering, Single:To renumber lines 1 Reach screen via [FlexNum] , [Single] , [Lines] .
2 Dial the old line number.
3 Touch [Enter] .
4 Dial the new line number.
5 Touch [Next] to change more line numbers in sequence.
6 Touch [Enter] to change more line numbers that are not in sequenceor to continue with other Flexible Numbering operations.
7 Touch Conference to return to the administration menu.
To renumber stations 1 Reach screen via [FlexNum], [Single], [Stations] .
2 Dial the old station number.
3 Touch [Enter] .
4 Dial the new station number.
5 Touch [Next] to change more station numbers in sequence.
6 Touch [Enter] to change more station numbers that are not insequence or to continue with other Flexible Numbering operations.
7 Touch Conference to return to the administration menu.
To reassign line pools 1 Reach screen via [FlexNum] , [Single] , [Pools] .
2 Dial the old line pool number.
3 Touch [Enter] .
4 Dial the new line pool number.
5 Touch [Next] to change more line pool numbers in sequence.
6 Touch [Enter] to change more line pool numbers that are not insequence or to continue with other Flexible Numbering operations.
7 Touch Conference to return to the administration menu.
To reassign groups for Group Page 1 Reach screen via [FlexNum], [Single], [PageZns] ,
2 Dial the old page group number.
3 Touch [Enter] .
4 Dial the new page group number.
5 Touch [Next] to change more page group numbers in sequence.
6 Touch [Enter] to change more page numbers that are not insequence or to continue with other Flexible Numbering operations.
7 Touch Conference to return to the administration menu.
To reassign groups for Group Call 1 Reach screen via [FlexNum], [Single], [More], [GrpCall]Distribution 2 Dial the old Call Distribution group number.
3 Touch [Enter] .
4 Dial the new Call Distribution group number.
5 Touch [Next] to change more Call Distribution group numbers insequence.
6 Touch [Enter] to change more Call Distribution group numbers thatare not in sequence or to continue with other Flexible Numberingoperations.
7 Touch Conference to return to the administration menu.
3-24 Menu-Driven Administration Procedures

Administration Procedure Do This
Attendant Position Setting 1 Reach screen via [System], [Attendants], [Position] .
2 Touch Auto Intercom button(s):
Green light on = attendant positionGreen light flashing = not now an attendant position
3 Touch [Store] .
Loudspeaker Page jack 1 Reach screen via [More], [Options] , [XtrnPg] .
2 Touch line button:
Green light on = Loudspeaker Page jackGreen light off = standard line or Music-on-Hold jack
3 Touch Conference to return to the administration menu.
Music-on-Hold jack 1 Reach screen via [More], [Options], [Music] .
2 Touch line button:
Green light on = Music-on-Hold jackGreen light off = standard line or Loudspeaker Page jack
3 Touch Conference to return to the administration menu.
Simultaneous Voice and Data 1 Reach screen via [More], [More], [Data], [Vce/Data].
2 Touch either of two adjacent Auto Intercom buttons:
Green light on = station jack part of voice/data pairGreen light off = station jack not paired
3 Touch Conference to return to the administration menu.
Touch-Tone or rotary signaling 1 Reach screen via [Lines], [More], [TchTone] .
2 Touch line buttons:
Steady green on = Touch-ToneGreen off = rotary
3 Touch Conference to return to the administration menu.
Voice Terminal Type Setting (raised plastic 1 Reach screen via [Stations], [More], [BIS/HFAI] .or flat membrane button) 2 Touch Auto Intercom button(s):
Green light on = raised plastic button voice terminalGreen light off = flat membrane button voice terminal
3 Touch Conference to return to the administration menu.
Voice Announcement to Busy Voice 1 Reach screen via [Stations], [More], [More], [VceSgnl] .Terminal 2 Touch either of two adjacent Auto Intercom buttons:
Green light on = station jack part of voice/voice pairGreen light off = station jack not paired
3 Touch Conference to return to the administration menu.
Menu-Driven Administration Procedures 3-25

Administration Procedure Do This
Voice terminal line assignments in square 1 Reach screen via [Stations], [Line/Pool] .and behind switch systems 2 Touch Auto Intercom button for voice terminal.
3 Touch [Enter] .
4 Touch line buttons:
Steady green on = line assigned to voice terminalGreen off = line not assigned to voice terminal
5 Touch Conference to return to the administration menu.
Voice terminal line/line pool assignmentsin pooled systems:
To assign lines to line pools 1 Reach screen via [Lines], [Pools] .
2 Dial pool code.
3 Touch [Enter] .
4 Touch line buttons:
Steady red on = line in poolRed off = line not in pool
5 Touch Conference to return to the administration menu.
To assign lines and line pools to voice 1 Reach screen via [Stations], [Line/Pool].terminals 2 Touch Auto Intercom button for voice terminal.
3 Touch [Enter] .
4 Touch line buttons:
Steady green on = line or pool assigned to voice terminalGreen off = line or pool not assigned to voice terminal
5 Touch Conference to return to the administration menu.
To assign Dial Access to Line Pools to 1 Reach screen via [Stations], [DialAcc] .voice terminals 2 Touch Auto Intercom button for voice terminal.
3 Touch [Enter].
4 Touch line buttons:
Steady green on = voice terminal has Dial Access to poolcontaining line
Green off = voice terminal doesn‘t have Dial Access to poolcontaining line
5 Touch Conference to return to the administration menu.
3-26 Menu-Driven Administration Procedures

Optional Systemwide Features
Administration Procedure
Automatic Route Selection (ARS):
To specify how many tables are 6-digittables
To add an area code or exchange
Touch [Enter].
To delete an area code or exchange
To addand an
a pool number, other digits,absorption code, if required
Do This
1
2
3
4
1
2
3
4
5
6
7
8
9
1
2
3
4
5
6
7
1
2
3
4
5
6
7
8
9
10
11
Reach screen via [More] , [Tables] , [ARS-6dgt] .
Dial number of 6-digit tables (0 through 8).
Touch [Enter] .
Touch Conference to return to the administration menu.
Reach screen via [More], [Tables], [ARS-Inp] .
Dial table number (0 through 7).
Touch [Enter] .
Dial entry number (00 through 99).
Touch [Enter] .
Dial entry (an area code or exchange).
Touch [Next] to add more entries in the table.
Touch Conference to return to the administration menu.
Reach screen via [More], [Tables], [ARS-Inp] .
Dial table number (0 through 7),
Touch [Enter] .
Dial entry number (00 through 99).
Touch Drop.
Touch [Enter] .
Touch Conference to return to the administration menu.
Reach screen via [More], [Tables], [ARS-Pool]
Dial table number (0 through 9).
Dial entry number (0 through 5).
Touch [Enter] .
Dial entry (pool number).
Touch [Enter] .
Dial other digits (access and/or account code, if required).
Touch [Enter] .
Dial Absorption code (0 through 5).
0 = none1 = leading 12 = area code3 = 1 + area code4 = 1 + exchange5 = 1 + area code + exchange
Touch [Next] to add more entries, other digits, and absorptioncodes in the table.
Touch Conference to return to the administration menu.
Menu-Driven Administration Procedures 3-27

Administration Procedure
Automatic Route Selection (continued):
To associate an absorption type with apool number after adding the poolnumber
. .
To delete a pool number (action alsodeletes any other digits and absorptiontype)
Touch screen via [More], [Tables], [ARS-Pool] .
To add other digits in the SpecialNumber Table
To delete otherNumber Table
digits in the Special
Touch [Enter] .
To get a printout of ARS tables
Do This
1
2
3
4
5
6
1
2
3
4
5
6
7
8
9
10
11
1
2
3
4
1
2
3
4
1
2
3
Reach screen via [More], [Tables], [More], [ARS-Abs] .
Dial table number (0 through 9).
Dial entry number (0 through 5).
Touch [Enter] .
Dial Absorption code (0 through 5).
0 = none1 = leading 12 = area code3 = 1 + area code4 = 1 + exchange5 = 1 + area code + exchange
Touch Conference to return to the administration menu.
Dial table number (0 through 9).
Dial entry number (0 through 5).
Touch Drop.
Touch [Enter] .
Dial entry (pool number).
Touch [Enter] .
Dial other digits (access and/or account code, if required).
Touch [Enter] .
Dial Absorption code (0 through 5).
0 = none1 = leading 12 = area code3 = 1 + area code4 = 1 + exchange5 = 1 + area code + exchange
Touch Conference to return to the administration menu.
Reach screen via [More], [Tables], [SpclNm] .
Dial other digits entry (access and/or account code).
Touch [Enter] .
Touch Conference to return to the
Reach screen via [More], [Tables] ,
Touch Drop.
Touch Conference to return to the
administration
[SpclNm] .
administration
Reach screen via [More], [More], [Print], [More] .
Touch [ARS] to begin printing.
Touch Conference to return to the administration
menu.
menu.
menu.
3-28 Menu-Driven Administration Procedures

Administration Procedure Do This
Behind Switch Operation
To specify system type 1 Reach screen via [System], [Type], [More] .
2 Touch [BehindSw] .
To administer fixed features for thehost system.
1 Reach screen via [More] , [Options] , [More] , [BehindSw] .
2 Touch the appropriate button, [Transfer] , [Drop] , or [Conference] .
3 Dial host system code or touch button again for Recall.
4 T o u c h [Enter] .
5 Touch Conference to return to the administration menu.
Call Pickup Groups 1 Reach screen via [Stations], [More], [More], [PickUp] .
2 Dial a group number (01 through 30).
3 T o u c h [Enter] .
4 Touch Auto Intercom buttons of voice terminals to be included orremoved from group.
Green on = voice terminal included in Call Pickup groupGreen off = voice terminal not included in Call Pickup group
5 Touch [PickUp] to repeat steps 2 through 4 to create other groups.
6 Touch Conference to return to the administration menu.
Call Report:
To administer Call Report options 1 Reach screen via [More] , [Options] , [More] , [Record] .
2 Touch [CallLen] .
3 Dial the minimum call duration in minutes (00 through 12).
4 T o u c h [Enter ] .
5 Touch [CallRep] .
6 Touch the appropriate button for the calls you want recorded:
[ I n / O u t ] = record incoming and outgoing calls
[OutOnly] = record outgoing calls only
7 Touch Conference to return to the administration menu.
To get a printout of Call Report 1 Reach screen via [More] , [More] , [Prat] , [More] , [More] .options
2 Touch [SMDR] to begin printing.
3 Touch Conference to return to the administration menu.
Menu-Driven Administration Procedures3-29

Administration Procedure
Call restrictions and allowed lists:
To assign outward and toll callrestrictions to voice terminals:
NOTE: If you do not need to dial a tollprefix (0 or 1) to place a long distancecall, perform steps 1 and 2 below.If you use a toll prefix, just performstep 2 below.
1 To set lines to identify longdistance calls by area code only
2 To assign call restrictions to voiceterminals
To copy line assignments and callrestriction assignments from one voiceterminal to another
Do This
1
2
3
1
2
3
4
5
6
1
2
3
4
5
6
7
Reach screen via [Lines], [TollType] .
Touch line buttons:
Steady green on = toll calls detected by toll prefix onlyGreen off = toll calls detected by area code or toll prefix
Touch Conference to return to the administration menu.
Reach screen via [Stations], [Restrct] .
Touch Auto Intercom button for voice terminal.
Touch [Enter] . The Speaker button lights as follows:
Steady green on = all calls permitted (unrestricted)Flashing green = local and intercom calls and calls to numbers on
assigned lists permitted (toll call restriction)Green off = intercom calls and calls to numbers on assigned lists
permitted (outward call restriction)
Touch the appropriate button for the restriction you want on thisvoice terminal:
[NoRestr] = unrestricted
[Local] = toll call restriction
[Intercom] = outward call restriction
Repeat steps 2 through 4 for as many voice terminals you wantto restrict.
Touch Conference to return to the administration menu.
Reach screen via [Stations], [Copy] .
Touch Auto Intercom button for voice terminal you want tocopy from .
Touch [Enter].
Touch Auto Intercom button for voice terminal that you want tocopy to.
Touch [Next] to select another voice terminal to copy to.
Touch [Enter] to choose a new voice terminal to copy from.
Touch Conference to return to the administration menu.
3-30 Menu-Driven Administration Procedures

Administration Procedure
Call restrictions and allowed lists(continued):
To set up allowed lists
To assign accessvoice terminals
to allowed lists to
To get a printout of an allowed list
To get a printout of voice terminalaccess to allowed lists
Do This
1
2
3
4
5
6
7
8
1
2
3
4
5
6
1
2
3
4
1
2
Reach screen via [More], [Tables], [More], [AlwList] .
Dial list number (0 through 7).
Dial entry number (0 through 9).
Touch [Enter] .
Dial the new entry up to 6 digits (area code and/or exchange) plusleading 1 if required, or emergency number (e.g. 911).
For each additional entry, touch [Next] and dial the entry forthis list.
Touch [Enter], [AlwList] and follow steps 2 through 6 to createa new list.
Touch Conference to return to the administration menu.
Reach screen via [More], [Tables], [More], [AllowTo] .
Dial list number (0 through 7).
Touch [Enter].
Touch Auto Intercom button for voice terminal:
Steady green on –– voice terminal has access to numbers on listGreen off = voice terminal doesn ‘t have access to numbers on list
Touch [AllowTo] and repeat steps 2 through 4 for additional lists.
Touch Conference to return to the administration menu.
Reach screen via [More], [More], [Print], [More], [AlwList].
Dial list number (0 through 7).
Touch [Enter] .
Touch Conference to return to the administration menu.
Reach screen via [More], [More], [Print], [More], [AllowTo] .
Touch Conference to return to the administration menu.
I
Menu-Driven Admlnlstration Procedures 3-31

Administration Procedure
Camp On:
To set the Camp On return interval
Centralized Programming
Dialing Timeout for rotary lines
Direct Inward System Access
Do This
1 Reach screen via [More], [Options] [CampOn] .
2 Enter the number of minutes (1 through 5) that calls shouldcamped.
3 T o u c h [Enter] .
4 Touch Conference to return to the administration menu.
remain
1 Reach screen via [More], [More], [Cntr-Prg].
2 Touch Auto Intercom button for voice terminal to be programmed.
3 T o u c h [Enter] .
4 If red light next to Adm Tel goes off and console rings every5 seconds, go on to step 5. If not, wait for light to go off or tryagain later.
5 perform programming steps, except for entering and leavingprogramming mode.
6 Touch Conference to return to the administration menu.
1 Reach screen via [More], [Options], [More], [More], [Rotary] .
2 Dial number to specify timeout interval:
0 = 0 seconds1 = 4 seconds2 = 8 seconds3 = 12 seconds
3 Touch Conference to return to the administration menu.
1 Reach screen via [Lines], [DISA] .
2 Dial a four digit password, or touch Drop to remove entry.
3 Touch [Enter] .
4 Touch [NoRestr] for no restriction, or touch [InwdOnly] forinward only.
5 Touch line button:
Green light on = line or line pool can be used for DISAGreen light off = line or line pool cannot be used for DISA
6 Touch Conference to return to the administration menu.
. . .
3-32 Menu-Driven Administration Procedures

Administration Procedure Do This
Disconnect interval for held calls 1 Reach screen via [Lines], [More] , [HldAband] .
2 Touch line buttons:
Steady green on = line drops held call on long (450 millisecond)signal (default)
Green off = line drops held call on short (50 millisecond) signal
3 Touch Conference to return to the administration menu.
Extended Station Status:
To change the mode of ESS operation 1 Reach screen via [More], [Options] [More], [Status] .
2 Select [Hotel] or [CMS] as appropriate.
3 Touch Conference to return to the administration menu.
To put consoles into ESS Display 1 Reach screen via [Stations], [More], [More], [XtndSta] .Mode 2 Touch the Auto Intercom button for each attendant console until the
light next to the button shows the appropriate code.
Green light steady = console is in ESS Display modeGreen light flashing = console is not in ESS Display mode
3 Touch Conference to return to the administration menu.
Forced Account Code Entry 1 Reach screen via [Stations], [More], [Account] .
2 Touch Auto Intercom button(s):
Steady green on = voice terminal has Forced Account Code EntryGreen off = voice terminal doesn‘t have Forced Account Code Entry
3 Touch Conference to return to the administration menu.
Group Call Distribution:
To assign lines and voice terminals to 1 Reach screen via [Stations] , [More] , [GrpCall] .groups for Group Call Distribution 2 Dial code (default 870 through 875), or logical ID number of Call
Distribution group.
3 Touch [Enter] .
4 For assigning lines, touch line button(s):
Steady green on = line assigned to groupGreen off = line not assigned to group
5 For assigning stations, touch Auto Intercom button(s):
Steady green on = voice terminal in groupGreen off = voice terminal not in group
6 Touch Conference to return to the administration menu.
To get a printout of Call Distribution 1 Reach screen via [More], [More], [Print], [More], [More] .groups 2 Touch [GrpCall] to begin printing.
3 Touch Conference to return to the administration menu.
Menu-Driven Administration Procedures 3-33

Administration Procedure
Group Paging:
To assign voice terminals to groups forGroup Page
To get a printout of paging groups
Intercom Dial Tone
To set the intercom dial tone
Night Service, Enhanced:
To assign voice terminals toattendant’s Night Service group
To set up Outward Restriction bycreating a password
To remove Outward Restriction
Do This
1
2
3
4
5
1
2
3
Reach screen via [Stations], [More], [PageZn] .
Dial code (default 881 through 887) or logical ID number of GroupPage group.
Touch [Enter] .
Touch Auto Intercom button(s):
Steady green on = voice terminal in paging groupGreen off = voice terminal not in paging group
Touch Conference to return to the administration menu.
Reach screen via [More], [More], [Print], [More] , [More] .
Touch [PgZone] to begin printing.
Touch Conference to return to the administration menu.
1 Reach screen via [More], [Options], [More], [More], [More],
[ICMdial] .2 Touch either [Internl] to provide MERLIN II intercom dial tone, or
[Externl] to provide CO line dial tone.
3 Touch Conference to return to the administration menu.
1
2
3
4
5
1
2
3
4
1
2
3
4
Reach screen via [More], [Night], [Group] .
Dial attendant’s intercom number.
Touch [Enter] .
Touch Auto Intercom button(s):
Steady green on = voice terminal in groupGreen off = voice terminal not in group
Touch Conference to return to the administration menu.
Reach screen via [More], [Night] , [OutRstr] .
Dial a 4-digit password.
Touch [Enter] .
Touch Conference to return to the administration menu.
Reach screen via [More], [Night], [OutRstr] .
Touch [Drop] .
Touch [Enter] .
Touch Conference to return to the administration menu.
3-34 Menu-Driven Administration Procedures

Reach screen via [More], [Night], [Exclude] .
Administration Procedure
Night Service, Enhanced: (continued)
To set up an allowed list of emergencynumbers
To set up a Night Service Exclusion list
To set times for Nightand off automatically
To record current dayService with Time Set
Service to go on
for Night
To suspend Night Service withTime Set
To get a printout of Enhanced NightService Information
Do This
1
2
3
4
5
6
7
1
2
3
1
2
3
4
5
6
7
8
9
10
1
2
3
1
2
3
1
2
3
Reach screen via [More], [Night], [Emerg] .
Dial entry number (0 through 9).
Touch [Enter].
Dial telephone number (12 digit maximum).
Touch [Next] and repeat steps 4 and 5 for up to 10 numbers.
Touch [Enter] .
Touch Conference to return to the administration menu,
Touch Auto Intercom button for voice terminal:
Steady green on = voice terminal on listGreen off = voice terminal not on list
Touch Conference to return to the administration menu.
Reach screen via [More], [Night], [More] .
Touch [Start] .
Dial number of day of week (0 = Sunday, 6 = Saturday).
Dial “on” time (2 digits for hour, 2 digits for minute in 24-hourformat).
Touch [Enter] .
Touch [Stop] .
Dial number of day of week (0 = Sunday, 6 = Saturday).
Dial “off” time (2 digits for hour, 2 digits for minute in 24-hourformat).
Touch [Enter] and repeat steps 2 through 9 for each day of week.(Don’t set on or off time if Night Service should stay on for entire24 hours.)
Touch Conference to return to the administration menu.
Reach screen via [More], [Night], [More], [DayofWk] .
Dial number of current day of week (0 = Sunday, 6 = Saturday).
Touch Conference to return to the administration menu.
Reach screen via [More], [Night], [More], [DayofWk].
Dial 9.
Touch Conference to return to the administration menu.
Reach screen via [More], [More], [Print], [More], [More], [More] .
Touch [NiteSrv] to begin printing.
Touch Conference to return to the administration menu.
Menu-Driven Administration Procedures 3-35

Administration Procedure Do This
One-Touch Call Handling Option:
To set system for One-Touch Transfer 1 Reach screen via [More], [Options] , [More], [More] , [OneTouch] .(default) 2 Touch [Transfer] .
3 Touch Conference to return to the administration menu.
or
To set system for One-Touch Hold 1 Reach screen via [More], [Options], [More], [More], [OneTouch] .with Call Announcement 2 T o u c h [Hold] .
3 Touch Conference to return to the administration menu.
Printouts, All 1 Reach screen via [More], [More], [Print] .
2 Touch [All] to begin printing.
3 Touch Conference to return to the administration menu.
Recall Timer 1 Reach screen via [More], [Options], [More], [More], [Recall] .
2 Dial number to specify timer interval:
0 = 350 milliseconds1 = 450 milliseconds2 = 650 milliseconds3 = 1 second
3 Touch [Enter].
4 Touch Conference to return to the administration menu.
Reminder Service: 1 Reach screen via [More], [Options], [More], [More], [More],
[RmdrSvc] .To administer a Cancel All remindertime
2 Dial 4-digit Cancel All reminder time using 24-hour format (0000through 2359).
3 Touch [Enter] .
4 Touch Conference to return to the administration menu.
1 Reach screen via [More], [Options], [More], [More], [More],
[RmdrSvc] .2 Touch Drop.
3 Touch [Enter] .
4 Touch Conference to return to the administration menu,
Ringing-on-Transfer 1 Reach screen via [More], [Options], [More], [Feedback] .
2 T o u c h :
[Music] for music, if available, or silence
[Ringback] for ringing3 Touch Conference to return to the administration menu.
System Information Report Printout 1 Reach screen via [More], [More], [Print] .
2 Touch [SysConf]] to begin printing.
3 Touch Conference to return to the administration menu.
To cancel the Cancel All feature
3-36 Menu-Driven Administration Procedures

Administration Procedure
System Speed
To assign
Dial:
System Speed Dial codes Reach screen via [More], [SpdDial] .
Transfer Return Interval
Do This
1
2
3
4
5
6
7
Dial System Speed Dial Number (60
Touch [Enter] .
Dial * if it is a marked
Dial number.
through
Touch [Next] for next highest code or touch [Enter] and follow2 through to assign nonsequential System Speed Dial codes.
Touch Conference to return to the administration menu.
steps
1 Reach screen via [More], [Options], [TfrRet] .
2 Dial number of rings (1original voice terminal.
3 Touch [Enter].
through 9) preferred before calls return toDial 0 if transferred calls should not return.
4 Touch Conference to return to the administration menu.
Menu-Driven Administration Procedures 3-37

Voice Terminal Features and Programming Codes
The table below acquaints you with the fixed features that come with theMERLIN II system voice terminal and the programmable features that you canprogram onto your voice terminal. Some features can also be accessed byusing a dial code; those features are identified with a “†.” For yourconvenience, the features are grouped by function, and a brief description ofeach feature is provided. For more information about each feature, read theindividual feature entries in Section 2, “Reference. ”
Voice Terminal Features
Fixed orFeature Name Description Programmable Programming Code
PLACING CALLS
Line Request Request the use of a busy line Fixed
Line Select Select a line other than the line Fixedthe system automatically selectsfor you
Touch-Tone Enable Change from rotary to Touch-Tone Programmable Dial *76signals during a dialing sequence
ANSWERING CALLS
Auto Answer-All Have optional equipment such as Programmable Dial *75an answering machine or modemgo on when you receive a call
Auto Answer-Intercom Have an optional Hands-Free Unit Programmable Dial *70go on when you receive anintercom call
MERLIN II System Know by the ring or FixedTones announcement the kind of call
that is coming in
Ringing/Idle Line Lift the handset and be instantly Programmable Dial *343 for RLP/ILP enabledPreference connected to the ringing line Dial *344 for RLP/ILP disabled
CALL HANDLING
Call Coverage Cover calls for others within your Programmable Dial *40 for primary coverageMERLIN II system when they are (dial *50 for secondary coverage)away from their voice terminals + the intercom number of the(see also “Ringing Options” ) person whose calls you want to
cover
Call Forwarding Have your calls ring at a voice Programmable Dial *33terminal in another location.
Call Park Put a call on hold for someone to Programmable Dial *86pick up (an unanswered callreturns to your voice terminalafter 3 minutes)
3-38 Voice Terminal Features and Programming Codes

Fixed orFeature Name Description Programmable Programming Code
CALL HANDLING (continued)
Call Pickup Pick up a parked, held, or ringing Programmable Dial *84 (or *84 + line code orcall at another voice terminal or on † intercom number)a line you don’t have.
Call Pickup Groups As a member of a Call Pickup Programmable Dial *32group, answer a call at any othergroup member’s voice terminal.
Camp On Transfer a call to a busy voice Programmable Dial *32terminal without constantlychecking to see if the voiceterminal is available.
Conference Have a telephone conference with Fixed or Dial *96several people at one time Programmable
Coverage Inhibit Deactivate the Call Coverage Programmable Dial *77feature so that your calls ring atyour own voice terminal instead ofat the voice terminal of the personcovering you.
Drop Disconnect a person from a Fixes or Dial *97conference call Programmable
Hold Put a call on hold Fixed
Night Service Turn on and off the Night Service Programmable Dial *39feature (Night Service changes on attendantringing options and call consoles (ifrestrictions) not assigned
by default) †
Recall Includes a switchhook flash in a Fixed on Dial *89dialing sequence or disconnect an analog voiceintercom call terminals;
people withdigital voiceterminals canprogram aRecall Button†
Send Message Send a message from an attendant Programmable Dial *38console (if not
assigned bydefault)
Transfer Transfer a call to another voice Fixed or Dial *99terminal Programmable
† You can also use a dial code to access this feature,
Voice Terminal Features and Programming Codes 3-39

Fixed orFeature Name Description Programmable Programming Code
CALL REPORTING
Account Number Enter an account number on a Programmable Dial *82Entry printed call report
Forced Account Code Require a user to enter a code in Programmable Dial *82Entry order to place an outside call.
QUICK DIALING
Auto Intercom Dial an intercom number with one Programmable Dial *91 + an intercom numbertouch
Last Number Redial Dial the number that you last Programmable Dial *73dialed
Outside Auto Dial Dial an outside number with one Programmable Dial *90 + a pool code, iftouch required, + an outside number
Personal Speed Dial Dial a number quickly by dialing a Programmable Dial a Personal Speed Dial code(use with 5-button or code as dial code (#01 through #24) + *90 + an10-button analog voice only outside number, or a PBX,terminal) Centrex, or Custom Calling
feature code
Saved Number Redial Save a number and dial it later Programmable Dial *74
Speed Dial Access Use instead of the “ #” button to Programmable Dial *20enter a dial code
System Speed Dial Dial a number quickly by dialing You can use a Dial *95 + a System Speed Dialan administered code dial code ( #60 code (60 through 99)
through #99)or programthe speed dialcodes ontoindividualbuttons
PAGING
Group Page Page a group of people through Programmable Dial *91 + a Group Page grouptheir voice terminal speakers † code
Loudspeaker Page Page someone through a Assigned byloudspeaker system the system
administrator
† You can also use a dial code to access this feature.
3-40 Voice Terminal Features and Programming Codes

Fixed orFeature Name Description Programmable Programming Code
PRIVACY
Do Not Disturb Prevent calls from ringing while Programmable Dial *71you are busy
Privacy Prevent others from accidentally Programmable Dial *72joining your calls †
LINE OPTIONS
Automatic Line Choose the order of the lines you Programmable Dial **
Selection will get when you pick up the Touch the line buttons in thehandset order you prefer
Dial ** again to program otherfeatures, or leave programmingmode.
RINGING OPTIONS
Abbreviated Ringing Hear only one ring when a call Programmable Dial one of the following codes:comes in while you have another *341 for Abbreviated Ringingone in progress on all lines on your voice terminal
*342 if you do not want theAbbreviated Ringing feature
Personalized Ringing Choose a ringing sound you like Programmable No programming code necessary;for your voice terminal for programming information, see
Section 2, “Reference.”
Ringing Options Have lines ring immediately, ring Programmable Touch a line, line pool, or Coverafter a delay, or not ring at all button and dial:
for individual lines*35 for No Ring*36 for Delayed Ring*37 for Immediate Ring
for all lines/line pools*345 for No Ring*346 for Delayed Ring*347 for Immediate Ring
Voice Announcement Allow intercom calls placed with Programmable Touch Intercom-Voice and dial:Enable/Disable Intercom-Voice to be announced *37 for Voice Announcement
or have them ring at your voice Enableterminal (7406 Voice terminals *35 for Voice Announcementreceive only ringing intercom Disablecalls. )
INTEROFFICE COMMUNICATIONS
Attendant Barge-In An attendant can bridge onto a Programmable Dial *25call of a busy voice terminal oroverride Do Not Disturb to relayan important message.
Group Call Call someone within an Programmable Dial *91 + a Group CallDistribution administrative-assigned Call † Distribution code
Distribution group
† You can also use a dial code to access this feature.
Voice Terminal Features and Programming Codes 3-41
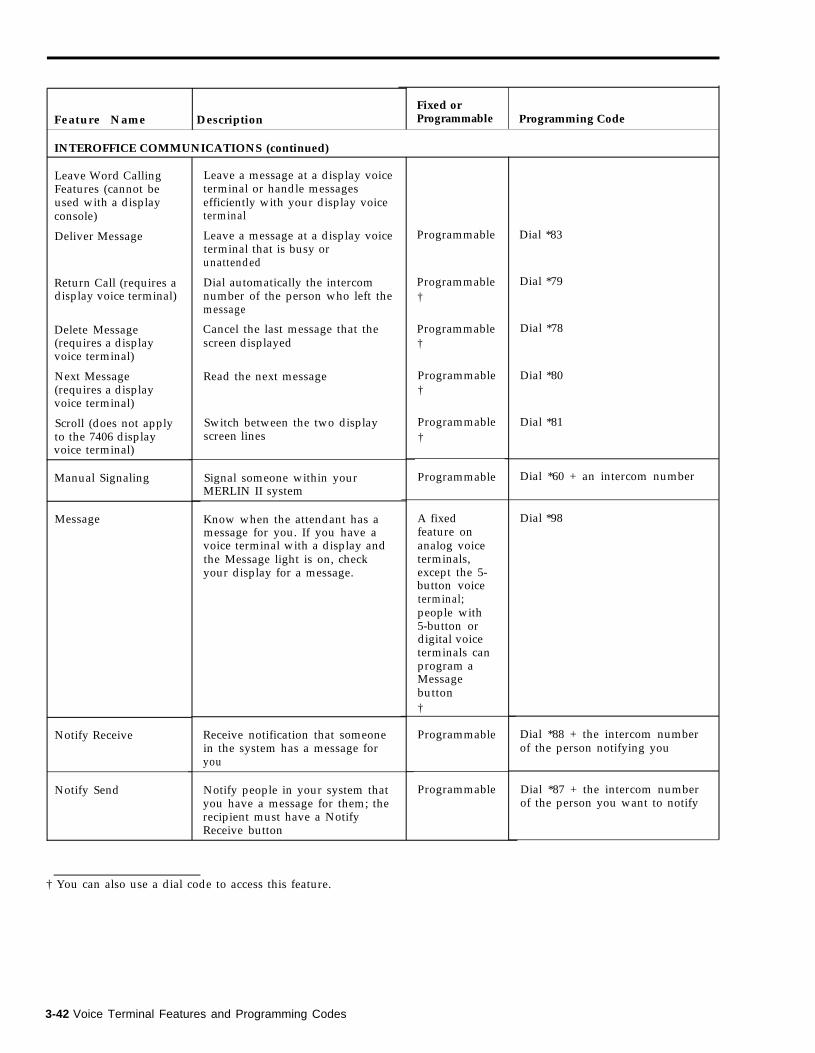
Feature Name Description
INTEROFFICE COMMUNICATIONS (continued)
Leave Word CallingFeatures (cannot beused with a displayconsole)
Deliver Message
Return Call (requires adisplay voice terminal)
Delete Message(requires a displayvoice terminal)
Next Message(requires a displayvoice terminal)
Scroll (does not applyto the 7406 displayvoice terminal)
Manual Signaling
Message
Notify Receive
Notify Send
Leave a message at a display voiceterminal or handle messagesefficiently with your display voiceterminal
Leave a message at a display voiceterminal that is busy orunattended
Dial automatically the intercomnumber of the person who left themessage
Cancel the last message that thescreen displayed
Read the next message
Switch between the two displayscreen lines
Signal someone within yourMERLIN II system
Know when the attendant has amessage for you. If you have avoice terminal with a display andthe Message light is on, checkyour display for a message.
Receive notification that someonein the system has a message foryou
Notify people in your system thatyou have a message for them; therecipient must have a NotifyReceive button
† You can also use a dial code to access this feature.
Fixed orProgrammable
Programmable
Programmable†
Programmable†
Programmable†
Programmable†
Programmable
A fixedfeature onanalog voiceterminals,except the 5-button voiceterminal;people with5-button ordigital voiceterminals canprogram aMessagebutton†
Programmable
Programmable
Programming Code
Dial *83
Dial *79
Dial *78
Dial *80
Dial *81
Dial *60 + an intercom number
Dial *98
Dial *88 + the intercom numberof the person notifying you
Dial *87 + the intercom numberof the person you want to notify
3-42 Voice Terminal Features and Programming Codes
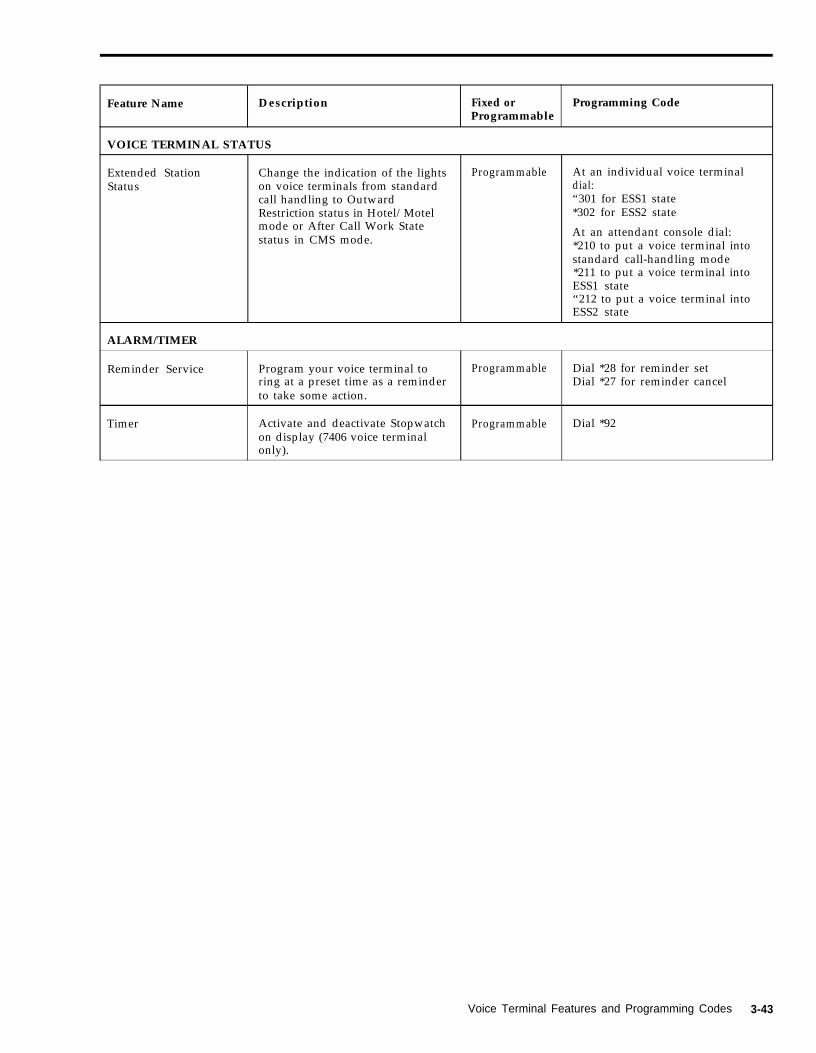
Feature Name Description Fixed or Programming CodeProgrammable
VOICE TERMINAL STATUS
Extended Station Change the indication of the lights Programmable At an individual voice terminalStatus on voice terminals from standard dial:
call handling to Outward “301 for ESS1 stateRestriction status in Hotel/Motel *302 for ESS2 statemode or After Call Work State At an attendant console dial:status in CMS mode. *210 to put a voice terminal into
standard call-handling mode*211 to put a voice terminal intoESS1 state“212 to put a voice terminal intoESS2 state
ALARM/TIMER
Reminder Service Program your voice terminal to Programmable Dial *28 for reminder setring at a preset time as a reminder Dial *27 for reminder cancelto take some action.
Timer Activate and deactivate Stopwatch Programmable Dial *92on display (7406 voice terminalonly).
Voice Terminal Features and Programming Codes 3-43

Voice Terminal Programming Codes
Programming Codes
*20
*25
*27
*28
*29
I *32
*33
*35
*36
*37
*38
*39
*40
*50
*60
*70
*71
* 7 2
*73
*74
Other Numbers
an intercom number
an intercom number
an intercom number
Feature
Programmable a speed dial access that replaces the“ #” button to access MERLIN features
Attendant Barge-In
Reminder cancel
Reminder set
Camp On
Call Pickup Groups
Call Forwarding
Ringing Options (No Ring) or Voice AnnouncementDisable
Ringing Options (Delayed Ring)
Ringing Options (Immediate Ring) or VoiceAnnouncement Enable
Send Message
Night Service
Primary Coverage
Secondary Coverage
Manual Signaling
Auto Answer-Intercom
Do Not Disturb
Privacy
Last Number Redial
Saved Number Redial
3-44 Voice Terminal Features and Programming Codes

Programming Codes Other Numbers Feature
Auto Answer-All
Touch-Tone Enable
*75
*76
*77 Coverage Inhibit
Delete Message*78
*79 Return Call
Next MessageI *80
*81 Scroll
Forced Account Code Entry (outgoing calls)I *82
Account Number Entry (incoming and outgoingcalls)
*82
*83 Deliver Message
Call Pickup*84 for a specific line, dial *84 + linecode or station intercom code
*86 Call Park
Notify Send*87 an intercom number
an intercom number Notify ReceiveI *88
*89 Recall
Outside Auto Diala pool code, if required, + anoutside number
an intercom number
group code
group code
*90
*91 Auto Intercom
Group Page
Group Call Distribution
*92 Stopwatch (for the 7406 display voice terminal only)
System Speed Dial60 through 99I *95
*96 Conference
Drop
Message
*97
*98
*99 Transfer
Voice Terminal Features and Programming Codes 3-45

Programming Codes Other Numbers Feature
*210 Extended Station Status to put a voice terminal intostandard call-handling mode from an attendantconsole
*211 Extended Station Status to put a vice terminal intoESS1 from an attendant console
*212 Extended Station Status to put a voice terminal intoESS2 from an attendant console
*301 Extended Station Status to put a voice terminal intoESS1 at the station
*302 Extended Station Status to put a voice terminal intoESS2 at the station
*341 Abbreviated Ringing
*342 No Abbreviated Ringing
*343 Enables RLP/ILP(Ringing Line Preference/Idle Line Preference)
*344 Disables RLP/ILP
*345 Ringing Options (No Ring) for all lines and linepools on a voice terminal
Ringing Options (Delayed Ring) for all lines andline pools on a voice terminal
*347 Ringing Options (Immediate Ring) for all lines andline pools on a voice terminal
*346
3-46 Voice Terminal Features and Programming Codes

Index
AAbbreviated Ringing, 2-142 – 2-143, 3-41, 3-46
See also Ringing OptionsAccount Code Entry, 2-5, 2-50Account Number Entry, 3-40, 3-45Administration
error tone, 2-158forced idle tone, 2-158general procedures for, 2-3
Administration modeinstructions for entering, 2-3, 3-1instructions for leaving, 2-3, 3-1
Administrator/Attendant Console with Display, 2-46,2-49, 2-181
Allowed Lists, 2-6 – 2-8assign access to voice terminals, method of, 3-9, 3-29printout, 3-9, 3-29setting up, 3-9, 3-13, 3-29, 3-34voice terminal access to, 3-9, 3-29
Announced Intercom Calls, 2-76, 2-158, 2-159Answering machines, 2-178Attendant Barge-In, 2-8 – 2-9Attendant console position, identification of, 3-2Attendant position setting, 2-9 – 2-10Auto Answer-All, 2-10-2-11, 2-178, 3-38, 3-45Auto Answer-Intercom, 2-11 – 2-12, 2-180, 3-38, 3-44Auto Intercom, 2-12 – 2-13, 2-76, 3-40, 3-45Autodialers, 2-178Automatic Line Selection, 2-13, 3-41Automatic Route Selection, 2-14 – 2-19, 2-133, 2-134
procedures for, 3-6 –3-7, 3-27 – 3-28Auxiliary Power Unit, 2-170, 2-180
BBasic Telephone Module, 2-176Basic Telephones, 2-19 – 2-20
with OPTI and BTMI, 2-171 – 2-174Behind-Switch Line Configuration, Administering,
2-85 –2-89Behind-Switch Operation, 2-20 – 2-23BIS-10 voice terminal, 2-167, 2-180, 2-181BIS-22 voice terminal, 2-167, 2-180, 2-181BIS-34 voice terminal, 2-46, 2-49, 2-167, 2-180, 2-181BIS-34D voice terminal with display, 2-49, 2-153, 2-167,
2-180, 2-181BIS/HFAI Voice Terminal. See Voice Terminal TypeBridging, 2-23
CCall Coverage, 2-24 – 2-25
primary coverage, 2-59, 3-38, 3-44secondary coverage, 3-38, 3-44
Call Distribution groups, getting a printout, 3-12, 3-33Call Forwarding and Follow Me, 2-25 – 2-26Call Park, 2-27, 2-158, 3-38, 3-45Call Pickup, 2-28 – 2-29, 2-83, 3-39, 3-45Call Pickup Groups, 2-29 – 2-30Call Report, 2-30 – 2-33, 2-154Call Report options
method of administering, 3-8, 3-29printout, 3-8, 3-29
Call Restriction, 2-33 – 2-35assignments, copy to voice terminal, 3-9, 3-29
Camp On, 2-35 – 2-37Centralized Programming, 2-37 – 2-40
method of, 3-9, 3-29Circuit Pack Modules, 2-176
800 Module, 2-176400 Module, 2-176408 Module, 2-176012 Module, 2-176008 Module, 2-176008D Module, 2-176
Conference, 2-41-2-42, 2-74, 3-39, 3-45Drop, 2-60
Control unit modules, 2-175 –2-176Copying Line Pool and Line Assignments, procedures
for, 2-97Cordless telephones, 2-178Coverage Inhibit, 2-42, 3-39, 3-45
DData Calls, Simultaneous Voice and Data Calls,
2-146 – 2-147Day, setting for Night Service with Time Set, 3-14, 3-34Dial Access to Line Pools, 2-90 – 2-98, 2-127
assigning to voice terminals, 3-5, 3-26Dialing Timeout, changing, 3-10, 3-32Dialing Timeout Interval for rotary lines, 2-43 – 2-44Direct Inward System Access, 2-44 – 245Disconnect, 2-181
for the Display Console, 2-133Disconnect interval for held calls, method of changing,
3-11, 3-33Display, 2-46 – 2-58
Account Code Entry, 2-50alarm for the Administrator/Attendant Console with
Display, 2-54alarm for the MERLIN II System Display Console,
2-55Call Coverage, 2-51Caller ID, 2-51Clock/Date for the 34-button BIS voice terminal, 2-51Clock/Date for the Display Console, 2-52Leave Word Calling, 2-55 – 2-56, 2-82, 2-114number dialed, 2-56timer for the BIS-34 voice terminal, 2-58timer for the MERLIN II System Display Console,
2-54 – 2-58timer for the 7406 Voice Terminal, 2-58Transfer Return identification, 2-58
Display Console , 2-153Do Not Disturb, 2-59, 3-41, 3-44Drop, 2-60, 3-45
EExtended Station Status, 2-60 – 2-63
F5-Button voice terminal, 2-129, 2-143Flexible Numbering, 2-63 – 2-67Follow Me. See Call Forwarding and Follow MeForced Account Code Entry, 2-67 – 2-69Forced idle signals, interpreting, 2-4Frequency generator, 2-177
Index I -1

GGeneral Purpose Adapter, 2-146, 2-178–2-179Ghost Lines, 2-99Group Call Distribution, 2-70 – 2-72, 3-41, 345
assigning voice terminals to groups, method of, 3-12,3-33
associating lines with groups, method of, 3-12, 3-33Group Listening, 2-148 – 2-149. See also Speakerphone
and SpeakerGroup Page, 2-72 – 2-74, 2-165, 3-40, 3-45
assigning voice terminals to groups for, 3-12, 3-34printout, 3-13, 3-34
HHands-Free Unit, 2-146, 2-48, 2-179 – 2-180Headset Adapter, 2-181 – 2-182Headset, 2-181 – 2-182HFAI-10 voice terminal, 2-167Hold, 2-74, 2-158, 3-39Hold Disconnect Interval, 2-74, 2-75
IIdle Line Preference, 3-38, 3-46Intercom, 2-76, 2-158
dial tone, 2-77dial tone, changing, 3-13, 3-34dial tone, setting, 3-13, 3-34
IROB Protector, 2-182IROB voice terminal, 2-182
LLabels for stations and lines, 2-78 – 2-79Last Number Redial, 2-80, 3-40, 3-44Leave Word Calling, 2-55 – 2-56, 2-81 – 2-83, 3-42, 3-45
Delete Message, 2-81, 3-42, 3-45Deliver Message, 2-49, 2-81, 2-84, 2-143, 3-42, 3-45Next Message, 2-81, 3-42, 3-45Return Call, 2-81, 3-42, 3-45Scroll, 2-81, 3-42, 3-45
Lights, 2-83 – 2-84Line assignments
in Behind-Switch systems, 2-85 – 2-89, 3-4, 3-26copy to voice terminal, 3-9, 3-29in Pooled systems, 2-92 – 0-98in Square systems, 2-99 – 2-103, 3-4, 3-26
Line Labels, 2-78Line Pickup. See Call PickupLine Pools, 2-90 – 2-98
assigning Dial Access, 2-97 – 2-98assigning lines to Line Pools, 2-96assigning to voice terminals, method of, 3-5, 3-26Automatic Route Selection, 2-133, 2-134Button access to, 2-90 – 2-98Dial access to, 2-90 – 2-98, 2-127, 2-129removing from buttons, 2-99
Line Representation. See System TypeLine Request, 2-104, 2-158, 3-38Line Select, 3-38Lines
assigning to line pools, method of, 3-2, 3-23assigning to voice terminals, method of, 3-2, 3-25,
3-26Loudspeaker Page, 2-90, 2-99, 2-105 – 2-106
jack, method of designating, 3-3, 3-25system jack, 2-90, 2-105
MManual Signaling, 2-106 – 2-107, 2-159, 3-42, 3-44Master Planning Form, 3-1Menu-Driven Administration, 2-107 – 2-113
Map of, 3-22Quick Reference to, 3-21 – 3-27
Message, 2-81, 2-83, 2-114, 2-143 – 2-144, 3-42, 3-45Modem, 2-146, 2-178Monitor-on-Hold, 2-148 – 2-149. See also SpeakerphoneMusic Coupler, 2-115, 2-183Music-on-Hold, 2-90, 2-115 –2-116, 2-139
jack, method of designating, 3-3, 3-25
NNight Service, 2-116 – 2-122, 3-13 – 3-14, 3-34 – 3-35,
3-39, 3-45allowed lists, setting up, 3-13, 3-35assigning voice terminals to attendant groups, 3-13,
3-34exclusion list, setting up, 3-13, 3-35with Group Assignment, 2-116, 2-117, 2-119with Outward Restriction, 2-116, 2-117 – 2-118,
2-120 – 2-121, 2-122Outward Restriction, removing, 3-13, 3-34Outward Restriction, setting up, 3-13, 3-34printout, 3-14, 3-34procedures for, 3-13 –3-14, 3-34 – 3-35setting times for, 3-14, 3-35with Time Set, 2-116, 2-118 – 2-119, 2-120 – 2-121
Notify, 2-123 – 2-124Notify Receive, 2-123 – 2-124, 3-42, 3-45Notify Send, 2-123 – 2-124, 3-42, 3-45
OOne-Touch Hold with Call Announcement, 2-125 – 2-126
setting system for, 3-14, 3-36One-Touch Transfer, 2-126
setting system for, 3-14, 3-36On-Hook Dialing, 2-148 – 2-149. See also SpeakerphoneOutside Auto Dial, 2-127 – 2-128, 3-40, 3-45
special characters for, 2-149Outside call, 2-159Outward call restrictions, assigning to voice terminals,
method of, 3-9, 3-31Outward restriction
removing, 3-13, 3-34setting up, 3-13, 3-34
PPassword, entering for DISA, 2-44PBX, Centrex, or Custom Calling Features, 2-128Personal Speed Dial, 2-129 – 2-130, 3-40
special characters, 2-149Personalized Ringing, 2-130 – 2-131, 2-159, 3-41Pooled System. See also Line Assignments in Pooled
Systemswith Automatic Route Selection (ARS), method
of designating, 3-2, 3-23with Button Access to Line Pools, method of
designating, 3-2, 3-23with Dial Access to Line Pools, method of designating,
3-2, 3-23Power Failure Telephones, 2-184Power Supply Module, 2-175Primary attendant, handling DISA calls, 2-44
I-2 Index

Printer, set to scroll to top of page, method of, 3-8, 3-29Printout, getting, 2-4
Call Distribution groups, 3-12, 3-33Night Service, 3-14, 3-34Paging groups, 3-13, 3-34System Information Report, 3-15, 3-36System Speed Dial, 3-15, 3-37
Privacy, 2-132,3-41,3-44Processor Module, 2-176Program Mode, with MERLIN II Display Consol 2-57Programming, general procedures for, 2-3Programming mode
entering, 2-4leaving, 2-4
QQuick reference guide
administration button codes, 3-17 – 3-20administration button code procedures, 3-2 – 3-16administration menu procedures, 3-21 – 3-37answering calls, 3-38call handling, 3-38 – 3-39call reporting, 3-40interoffice communications, 3-41 – 3-42line options, 3-41paging, 3-40placing calls, 3-38privacy, 3-41programming codes, 3-44 – 3-46quick dialing, 3-40ringing options, 3-41voice terminal features, 3-38 – 3-43
RRecall, 2-133 – 134, 2-161, 3-39, 3-45Recall Timer interval, 2-133 – 2-134Recall Timer, method to specify interval, 3-15, 3-34Reminder Service, 2-135 – 2-138Reminder Service Cancel, printout, 3-15Ringing Intercom Calls, 2-76, 2-159Ringing Options, 2-140 –2-141, 3-41
Delayed Ring, 2-140 –2-141, 3-44, 3-46Immediate Ring, 2-140 – 2-141, 3-44, 3-46No Ring, 2-140 – 2-141, 3-44, 3-46
Ringing/Idle Line Preference, 2-138 – 2-139, 3-38, 3-46Ringing-on-Transfer, 2-139 – 2-40
setting, 3-15, 3-34Rotary lines, Dialing Timeout for, method of changing,
3-10, 3-32Rotary signaling, method of designating, 3-4, 3-25
SSaved Number Redial, 2-142, 3-40, 3-44Send Message, 2-143 – 2-144, 3-39, 3-447406 Voice terminal, 2-46, 2-49, 2-72, 2-76, 2-143, 2-148,
2-159, 2-165, 2-181Shift, 2-145 – 2-146
7406 Voice terminal, 2-145Display Console, 2-145
Simultaneous Voice and Data, 2-166method of designating station jacks, 3-3, 3-25
Simultaneous Voice and Data Calls, 2-146 – 2-147SMDR. See Call ReportSP-34 voice terminal, 2-167SP-34D voice terminal with display, 2-167
Speaker, 2-148 – 2-149Group Listening, 2-148 – 2-149Monitor-on-Hold, 2-148 – 2-149on-Hook Dialing, 2-148 – 2-149
Speakerphone, 2-148 – 2-149Special Characters in Programmed Dialing Sequences,
2-56, 2-80, 2-127, 2-129, 2-149 – 2-150Pause, 2-150Stop, 2-150Switchhook Flash, 2-150Touch-Tone Enable, 2-150
Speed Dial Access, 3-40, 3-44Button, 2-149
Square Line Configuration See Line Assignments inSquare Systems
Square Line Configuration, 2-99 – 2-103Customized, 2-99Standard, 2-99
Square system, method of designating, 3-2Station Labels, 2-78Stopwatch, 2-49, 2-151, 3-43, 3-45Supplemental Alert Adapter, 2-185 – 2-186System Configuration Form, 3-1System Feature Report, 2-43System Information Report, printout, 2-45, 3-15, 3-36System Renumbering, 2-152, 2-176
setting, 3-2System Size, 2-153System Speed Dial, 2-154 – 2-156, 3-40, 3-45
assigning codes, 3-15, 3-37marked codes, 2-154, 2-155printout, 3-15, 3-37special characters, 2-149
System Type, 2-156 – 2-157
T10-Button HFAI voice terminal. See HFAI-10 voice
terminal10-Button voice terminal, 2-129, 2-180, 2-181Testing the voice terminal, 2-157Test/Program Switch, 2-15734-button BIS voice terminal. See BIS-34 voice terminal34-Button BIS with Display. See BIS-34D voice terminal34-Button deluxe voice terminal, 2-153, 2-180, 2-181Time, setting for Night Service with Time Set, 3-14, 3-34Timer, 3-43. See also StopwatchToll call restrictions, assigning to voice terminals,
method of, 3-9, 3-30Tones, 2-158 – 2-159, 3-38Touch-Tone Enable, 2-161, 3-38, 3-45Touch-Tone or rotary signaling, 2-160Touch-Tone signaling, method of designating, 3-4, 3-25Transfer, 2-159, 2-162 – 2-163, 3-39, 3-45Transfer Return Identification, 2-163 – 2-164Transfer Return Internal, 2-164 – 2-165
setting, 3-16, 3-3722-Button voice terminal. See BIS-22 voice terminal
VVoice Announcement Enable/Disable, 2-72, 2-76, 2-165,
3-41, 3-44Voice Announcement to Busy Voice Terminal, 2-76,
2-146, 2-166method of designating station jacks, 3-4, 3-25
Voice terminal access to allowed lists, printout, 3-10,3-31
Index I -3

VoiceVoice
Voice
Voice
terminal configuration form, 3-1terminal line assignments in behind switch
systems, method of designating, 3-4, 3-26terminal line assignments in square systems,
method of designating, 3-4, 3-26terminal type, 2-2, 2-167
Volume Control, 2-168
WWATS line, using with DISA, 2-44
I-4 Index