Embed Size (px)
Citation preview

MEM05 Metal and Engineering
Training Package
Learner guide Version 1.1
Training and Education Support Industry Skills Unit
Meadowbank
Product code: 5791
MEM07007C Perform milling operations
SAMPLE
Developed by Training & Education Support Industry Skills Unit, Meadowbank© TAFE NSW 2011
MEM07007C Perform milling operations
AcknowledgmentsThe TAFE NSW Training and Education Support Industry Skills Unit, Meadowbank would like to acknowledge the support and assistance of the following organisations and people in the production of this learner guide.
Fitting and Machining (Ron Culley)Fitting and Machining (Stage 2) TAFE NSWISCAR AustraliaMitsubishi AustraliaHare and Forbes Machinery House
Writer:Andrew Gill
Reviewer:Mark Pollard (South Western Sydney Institute)Dallas Hanna (Northern Sydney Institute)
Project Manager:Stephen DaviesEducation Programs ManagerTAFE NSW
EnquiriesEnquiries about this and other publications can be made to:
Training and Education Support Industry Skills Unit, Meadowbank Meadowbank TAFE Level 3, Building J, See Street, MEADOWBANK NSW 2114
Tel: 02-9942 3200 Fax: 02-9942 3257
© TAFE NSW (Training and Education Support, Industry Skills Unit Meadowbank) 2011
Copyright of this material is reserved to TAFE NSW Training and Education Support, Industry Skills Unit Meadowbank. Reproduction or transmittal in whole or in part, other than for the purposes of private study or research, and subject to the provisions of the Copyright Act, is prohibited without the written authority of TAFE NSW Training and Education Support, Industry Skills Unit Meadowbank.
ISBN 978-1-74236-499-5
SAMPLE

Developed by Training & Education Support Industry Skills Unit, Meadowbank© TAFE NSW 2011
MEM07007C Perform milling operations
Table of Contents
Introduction ................................................................................... 9
1. General introduction ............................................................................. 9
2. Using this learner guide ......................................................................... 9
3. Prior knowledge and experience ........................................................... 11
4. Unit of competency overview ............................................................... 11
5. Assessment ....................................................................................... 15
Topic 1: Milling safety .................................................................. 19
Some safe work principles to follow when using a milling machine include: .... 19
Review questions ................................................................................... 22
Topic 2: Mill lubrication and maintenance .................................... 23
Milling Machine adjustments .................................................................... 25
Review questions ................................................................................... 28
Topic 3: The digital readout .......................................................... 29
Review questions ................................................................................... 33
Topic 4: Milling cutters ................................................................. 35
Types of milling cutters ........................................................................... 35
Indexable insert milling ........................................................................... 41
Facing cutter geometry ........................................................................... 43
Selecting a milling cutter ......................................................................... 46
Review questions ................................................................................... 48
Topic 5: Cutting tool materials and properties .............................. 51
Identifying carbide inserts ....................................................................... 55
Insert Clamping Systems ........................................................................ 57
Chip control mechanisms ........................................................................ 58
Carbide insert troubleshooting ................................................................. 61
Carbide insert defects and solutions .......................................................... 62
Care and maintenance of milling cutters ................................................... 63
Milling cutter storage and safety ............................................................... 64
Review questions ................................................................................... 66
SAMPLE
Developed by Training & Education Support Industry Skills Unit, Meadowbank© TAFE NSW 2011
MEM07007C Perform milling operations
Topic 6: Principles of metal chip formation ................................... 69
Factors that affect metal cutting ............................................................... 69
Effects of cutting conditions for milling ...................................................... 70
Surface finish and roughness measurement ............................................. 72
Review questions ................................................................................... 74
Topic 7: Speeds and feeds ............................................................ 75
Factors affecting cutting speed ................................................................. 75
Feeds for milling .................................................................................... 76
Review questions ................................................................................... 80
Topic 8: Mounting milling cutters ................................................. 83
Safety .................................................................................................. 83
Vertical mill mounting methods ................................................................ 84
Collet chuck types .................................................................................. 85
Horizontal mill mounting methods ............................................................ 88
Review questions ................................................................................... 94
Topic 9: Work holding methods .................................................... 97
Milling vices ........................................................................................... 97
Collet blocks .......................................................................................... 99
Direct clamping .....................................................................................100
Clamping accessories .............................................................................101
Vee Blocks ...........................................................................................102
Angle plates ........................................................................................102
Jigs and fixtures ...................................................................................103
Holding workpieces between centres ........................................................104
Holding workpieces in a dividing head chuck .............................................104
Holding workpieces on a rotary table .......................................................105
Magnetic chuck .....................................................................................105
Review questions ..................................................................................106
Topic 10: Setting the workpiece ................................................. 109
Vice stop ..............................................................................................109
SAMPLE
Developed by Training & Education Support Industry Skills Unit, Meadowbank© TAFE NSW 2011
MEM07007C Perform milling operations
Centring the cutter ................................................................................109
Review questions ..................................................................................115
Topic 11: Milling operations ....................................................... 117
Types of milling operations .....................................................................117
Review questions ..................................................................................127
Topic 12: Milling methods ........................................................... 131
Conventional and climb milling ................................................................131
Review questions ..................................................................................136
Topic 13: Milling key seats ........................................................ 137
Review questions ..................................................................................141
Topic 14: Indexing ..................................................................... 143
Parts of a universal dividing head ............................................................144
Mounting work in the dividing head .........................................................148
Types of dividing/indexing heads .............................................................150
Dividing head maintenance .....................................................................152
Methods of indexing ..............................................................................153
Using the dividing head to mill a square ..................................................159
Review questions ..................................................................................162
Topic 15: Milling machine attachments and accessories ...........165
The rotary table ....................................................................................165
Vertical milling attachments ....................................................................168
Horizontal milling attachments ................................................................169
Slotting attachment ...............................................................................169
Boring heads ........................................................................................171
Review questions ..................................................................................173
Topic 16: Suggested practical jobs ............................................. 175
Resource Evaluation Form .......................................................... 193
SAMPLE

Page 19 of 196
MEM07007C Perform milling operations
© TAFE NSW (Training & Education Support, Industry Skills Unit Meadowbank) 2011
Topic 1: Milling safety
The Work, Health and Safety Act 2011 (WHS Act) and WHS Regulations are enforced throughout all Australian States and Territories. This legislation is aimed at providing consistency, certainty and clarity across Australia making it easy to understand workplace health and safety responsibilities. Consequently this act and its regulations requires both employers and employees to take every reasonable step to work safely and responsibly in the workplace.
There are no “short cuts” to working safety, its everyone’s responsibility to manage and minimise potential risks in the workplace, report faulty equipment as well as unsafe environments. Detailed information relating to the WHS Act and regulations can be found on:
• WorkCover Authority of NSW website; www.workcover.nsw.gov.au or on
• Safe Work Australia; www.safeworkaustralia.gov.au
Some safe work principles to follow when using a milling machine include:• Wear appropriate safety glasses.
• Ensure the milling machine has a start/stop button within easy reach of the operator
• Ensure the work piece and cutter are mounted securely before taking a cut
• Check work is mounted squarely
• Mount work in a vice that is bolted or held magnetically to the table. Use proper hand tools to make adjustments
• Hold milling cutters with a cloth to avoid being cut when handling them.
• Move table as far as possible from cutter while setting up work to avoid injuring your hands
• Mill the largest surface first
• Keep hands, brushes and rags away from the revolving milling cutter.
• Use a vacuum, brush or rake to remove cuttings only after the cutters have stopped moving.
• Change cutting compounds periodically
• Keep cutters correctly sharpened and in good condition
• Keep working surface clear of scraps, tools and materials
• Keep floor around the milling machine free of oil and grease
SAMPLE
Page 20 of 196
MEM07007C Perform milling operations
© TAFE NSW (Training & Education Support, Industry Skills Unit Meadowbank) 2011
• Use lifting equipment when appropriate to move heavy work to or from milling machines
• Use the buddy system when moving heavy attachments
• When using cutting oil, prevent splashing by using appropriate splash guards Cutting oil on the floor can cause a slippery condition that could result in operator injury.
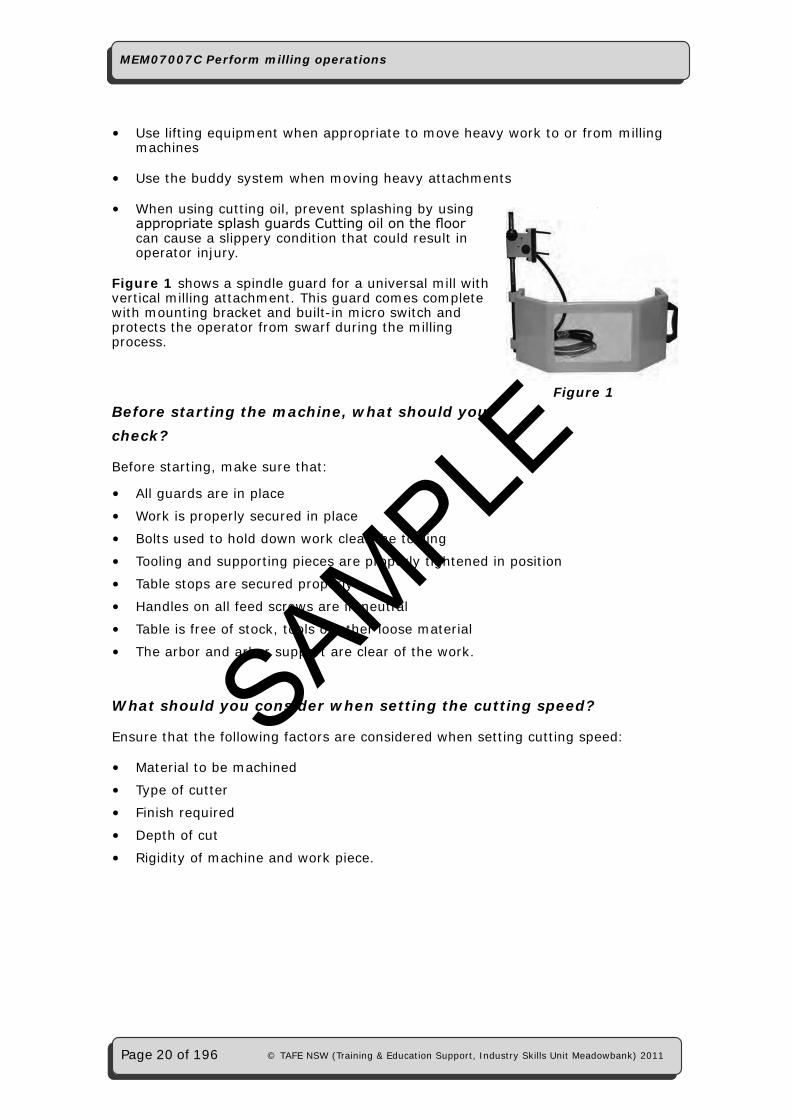
Figure 1 shows a spindle guard for a universal mill with vertical milling attachment. This guard comes complete with mounting bracket and built-in micro switch and protects the operator from swarf during the milling process.
Before starting the machine, what should you check?
Before starting, make sure that:
• All guards are in place
• Work is properly secured in place
• Bolts used to hold down work clear the tooling
• Tooling and supporting pieces are properly tightened in position
• Table stops are secured properly
• Handles on all feed screws are in neutral
• Table is free of stock, tools or other loose material
• The arbor and arbor support are clear of the work.
What should you consider when setting the cutting speed?
Ensure that the following factors are considered when setting cutting speed:
• Material to be machined
• Type of cutter
• Finish required
• Depth of cut
• Rigidity of machine and work piece.
Figure 1
SAMPLE

Page 21 of 196
MEM07007C Perform milling operations
© TAFE NSW (Training & Education Support, Industry Skills Unit Meadowbank) 2011
What are some things you should avoid doing?
• Do not wear gloves, rings, watches or loose clothing
• Do not attempt to mount measure or adjust work until cutter is completely stopped
• Do not use an excessively heavy cut or feed as it can cause the cutter to break. The flying pieces could cause serious injury
• Do not reach over or near a revolving cutter. Keep hands at least 30 cm from a revolving cutter
• Do not lean or rest hands on a moving table
• Do not make any adjustments while the machine is running
• Do not move the operating levers without knowing what they control and what action is going to take place
• Do not leave machine unattended while it is running
• Never adjust the work piece or work mounting devices when the machine is operating.
Milling revision video http://www.eartaker.net/machining/milling/setup.php
http://www.youtube.com/watch?v=RIbdYmmhPDI&feature=related
SAMPLE
Page 22 of 196
MEM07007C Perform milling operations
© TAFE NSW (Training & Education Support, Industry Skills Unit Meadowbank) 2011
Review questionsThe following questions have been included to help you revise what you have learnt in topic 1: Milling safety.
1. You must always stop the machine before making measurements or cleaning out chips. (Circle the correct answer). True False
2. Be thoroughly familiar with the placement of the machine’s “stop” switch or lever. (Circle the correct answer). True False
3. Stop the milling machine before: (a) Attempting to make adjustments or measurements (b) Trying to remove accumulated chips (c) Before opening or removing guards and covers (d) All of the above.
4. Who is responsible for removing a danger tag off a milling machine? ______________________________________________________________
5. List three (3) possible dangers associated with using a milling machine. ______________________________________________________________ ______________________________________________________________ ______________________________________________________________
6. How can injury to your back be avoided when lifting heavy items such as dividing heads onto the milling machine table? ______________________________________________________________ ______________________________________________________________
7. Explain why it is very unwise to wear gloves when working a milling machine. ______________________________________________________________ ______________________________________________________________
8. List three (3) safety checks that must be performed prior to starting a milling machine: ______________________________________________________________ ______________________________________________________________ ______________________________________________________________
SAMPLE

Page 23 of 196
MEM07007C Perform milling operations
© TAFE NSW (Training & Education Support, Industry Skills Unit Meadowbank) 2011
Topic 2: Mill lubrication and maintenance
The milling machine is a precision tool and must be treated with great care to maintain the machine’s accuracy. Regular cleaning and maintenance help to assure machine will maintain its service life and accuracy for many years. Milling machine maintenance requiring more extensive disassembly should only be done by, or under the supervision of, qualified personnel.
It is imperative to implement a preventive maintenance program on a regular basis. The milling machine is equipped with oilers and grease fittings to ensure that the ways and other contact areas are continuously lubricated.
You need to look closely for the lubrication points on the machine as they can be somewhat hidden. To lubricate the various places on the mill you will need to either use a grease gun or oil can as shown in (Figure 2) below.
It is important to keep your machine clean, see (Figure 3) and lubricated to avoid rust between the mating surfaces, to avoid wear and to ensure correct seating of cutting tools.
Figure 2 Figure 3
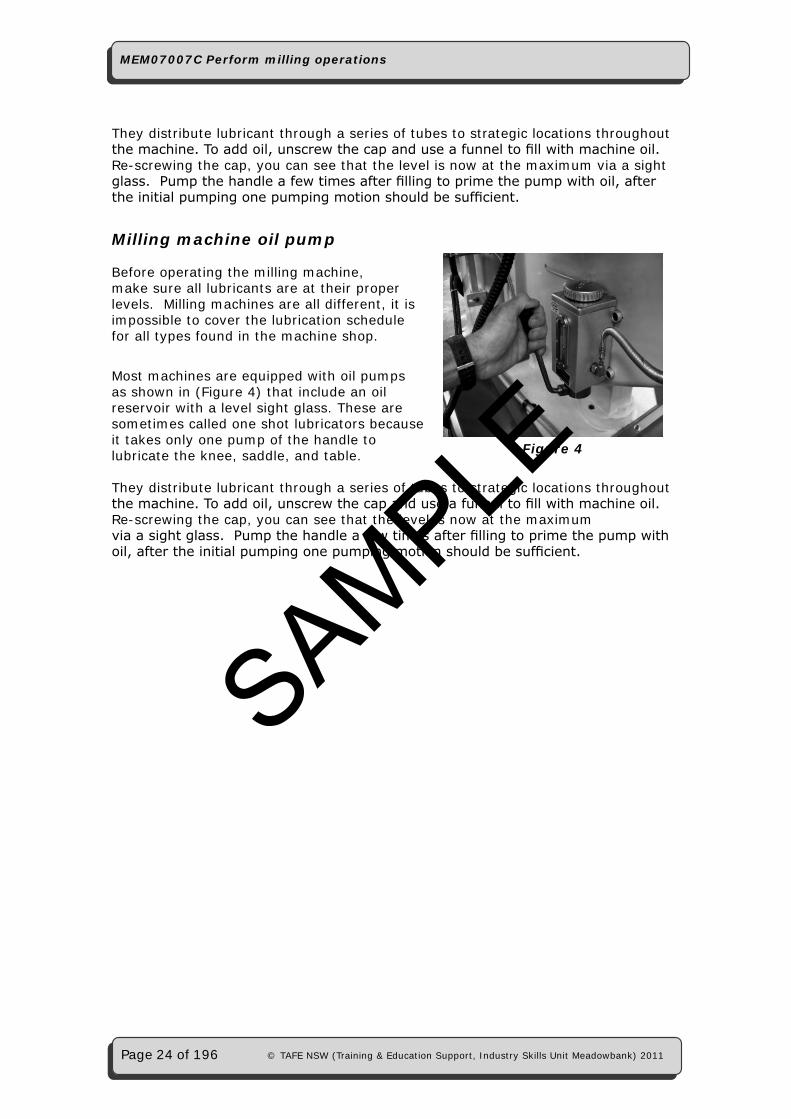
Milling machine oil pumpBefore operating the milling machine, make sure all lubricants are at their proper levels. Milling machines are all different, it is impossible to cover the lubrication schedule for all types found in the machine shop.
Most machines are equipped with oil pumps as shown in (Figure 4) that include an oil reservoir with a level sight glass. These are sometimes called one shot lubricators because it takes only one pump of the handle to lubricate the knee, saddle, and table. Figure 4
SAMPLE
Page 24 of 196
MEM07007C Perform milling operations
© TAFE NSW (Training & Education Support, Industry Skills Unit Meadowbank) 2011
They distribute lubricant through a series of tubes to strategic locations throughout the machine. To add oil, unscrew the cap and use a funnel to fill with machine oil. Re-screwing the cap, you can see that the level is now at the maximum via a sight glass. Pump the handle a few times after filling to prime the pump with oil, after the initial pumping one pumping motion should be sufficient.
Milling machine oil pump
Before operating the milling machine, make sure all lubricants are at their proper levels. Milling machines are all different, it is impossible to cover the lubrication schedule for all types found in the machine shop.
Most machines are equipped with oil pumps as shown in (Figure 4) that include an oil reservoir with a level sight glass. These are sometimes called one shot lubricators because it takes only one pump of the handle to lubricate the knee, saddle, and table.
They distribute lubricant through a series of tubes to strategic locations throughout the machine. To add oil, unscrew the cap and use a funnel to fill with machine oil. Re-screwing the cap, you can see that the level is now at the maximum via a sight glass. Pump the handle a few times after filling to prime the pump with oil, after the initial pumping one pumping motion should be sufficient.
Figure 4
SAMPLE
Page 25 of 196
MEM07007C Perform milling operations
© TAFE NSW (Training & Education Support, Industry Skills Unit Meadowbank) 2011
Milling Machine adjustments
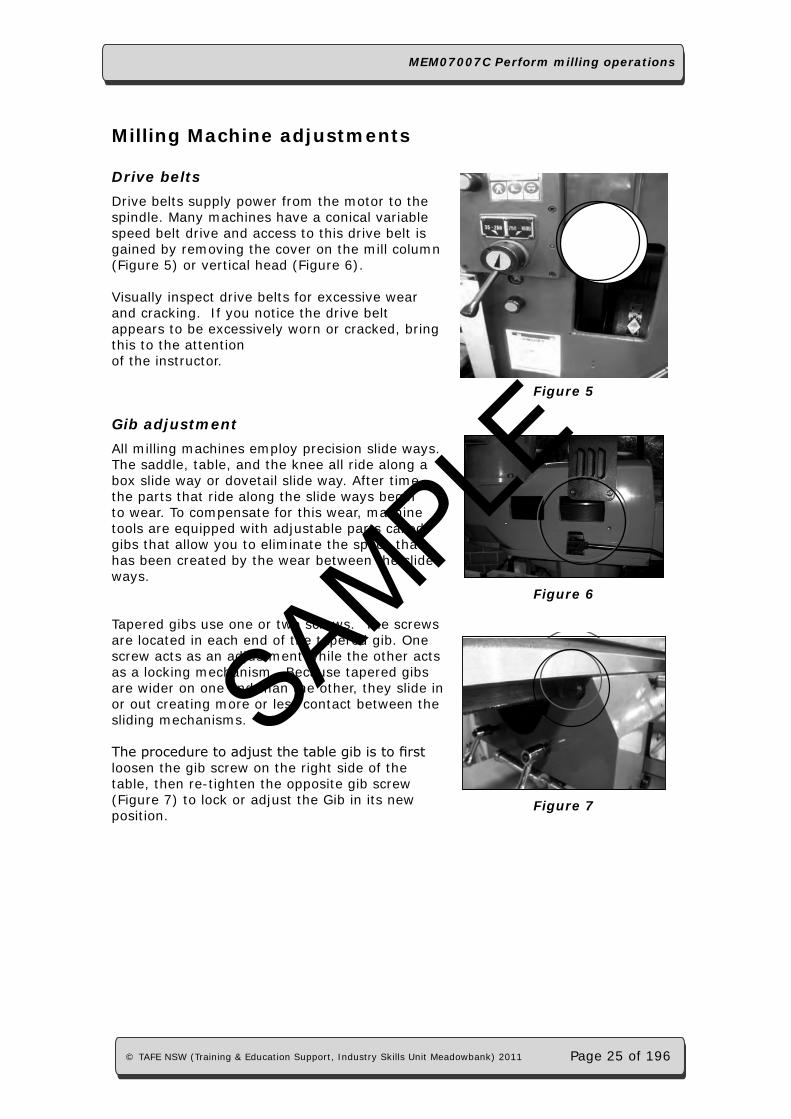
Drive beltsDrive belts supply power from the motor to the spindle. Many machines have a conical variable speed belt drive and access to this drive belt is gained by removing the cover on the mill column (Figure 5) or vertical head (Figure 6).
Visually inspect drive belts for excessive wear and cracking. If you notice the drive belt appears to be excessively worn or cracked, bring this to the attention of the instructor.
Gib adjustmentAll milling machines employ precision slide ways. The saddle, table, and the knee all ride along a box slide way or dovetail slide way. After time the parts that ride along the slide ways begin to wear. To compensate for this wear, machine tools are equipped with adjustable parts called gibs that allow you to eliminate the space that has been created by the wear between the slide ways.
Tapered gibs use one or two screws. The screws are located in each end of the tapered gib. One screw acts as an adjustment while the other acts as a locking mechanism. Because tapered gibs are wider on one end than the other, they slide in or out creating more or less contact between the sliding mechanisms.
The procedure to adjust the table gib is to first loosen the gib screw on the right side of the table, then re-tighten the opposite gib screw (Figure 7) to lock or adjust the Gib in its new position.
Figure 5
Figure 6
Figure 7
SAMPLE
Page 26 of 196
MEM07007C Perform milling operations
© TAFE NSW (Training & Education Support, Industry Skills Unit Meadowbank) 2011
Figure 8
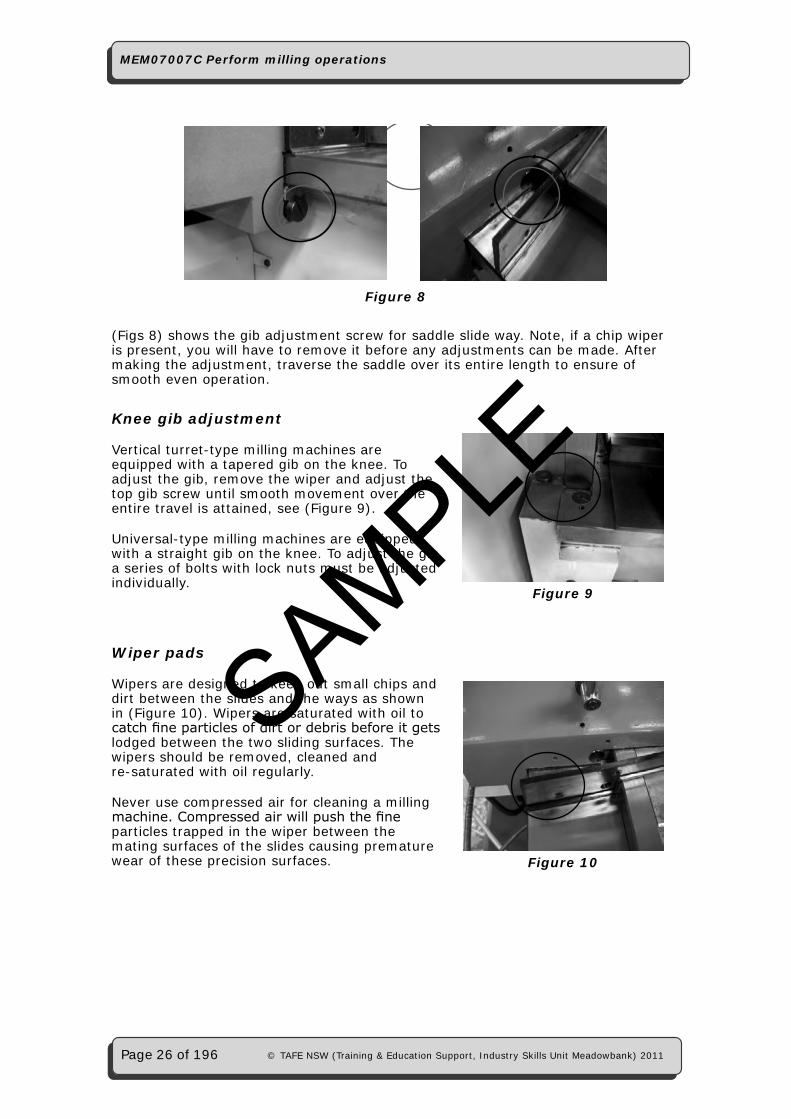
(Figs 8) shows the gib adjustment screw for saddle slide way. Note, if a chip wiper is present, you will have to remove it before any adjustments can be made. After making the adjustment, traverse the saddle over its entire length to ensure of smooth even operation.
Knee gib adjustment
Vertical turret-type milling machines are equipped with a tapered gib on the knee. To adjust the gib, remove the wiper and adjust the top gib screw until smooth movement over the entire travel is attained, see (Figure 9).
Universal-type milling machines are equipped with a straight gib on the knee. To adjust the gib a series of bolts with lock nuts must be adjusted individually.
Wiper pads
Wipers are designed to keep out small chips and dirt between the slides and the ways as shown in (Figure 10). Wipers are saturated with oil to catch fine particles of dirt or debris before it gets lodged between the two sliding surfaces. The wipers should be removed, cleaned and re-saturated with oil regularly.
Never use compressed air for cleaning a milling machine. Compressed air will push the fine particles trapped in the wiper between the mating surfaces of the slides causing premature wear of these precision surfaces.
Figure 9
Figure 10
SAMPLE
Page 27 of 196
MEM07007C Perform milling operations
© TAFE NSW (Training & Education Support, Industry Skills Unit Meadowbank) 2011
Backlash adjustment
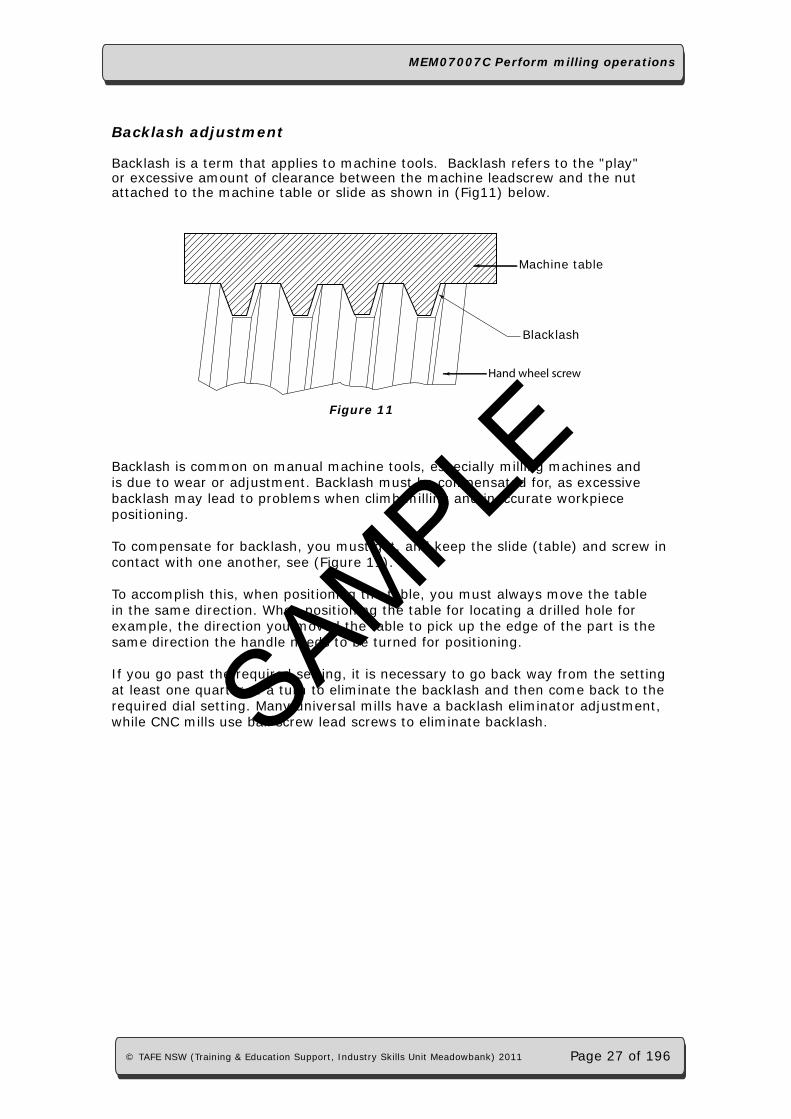
Backlash is a term that applies to machine tools. Backlash refers to the "play" or excessive amount of clearance between the machine leadscrew and the nut attached to the machine table or slide as shown in (Fig11) below.
Blacklash
Machine table
Figure 11
Hand wheel screw
Backlash is common on manual machine tools, especially milling machines and is due to wear or adjustment. Backlash must be compensated for, as excessive backlash may lead to problems when climb milling and inaccurate workpiece positioning.
To compensate for backlash, you must get, and keep the slide (table) and screw in contact with one another, see (Figure 11).
To accomplish this, when positioning the table, you must always move the table in the same direction. When positioning the table for locating a drilled hole for example, the direction you moved the table to pick up the edge of the part is the same direction the handle needs to be turned for positioning.
If you go past the required setting, it is necessary to go back way from the setting at least one quarter of a turn to eliminate the backlash and then come back to the required dial setting. Many universal mills have a backlash eliminator adjustment, while CNC mills use ball screw lead screws to eliminate backlash. SAMPLE

Page 28 of 196
MEM07007C Perform milling operations
© TAFE NSW (Training & Education Support, Industry Skills Unit Meadowbank) 2011
Review questionsThe following questions have been included to help you revise what you have learnt in Topic 2: Mill lubrication and maintenance.
1. List three (3) maintenance checks that should be performed prior to operating the mill. ______________________________________________________________ ______________________________________________________________ ______________________________________________________________
2. Explain how you would minimise backlash in a mill without a backlash eliminator. ______________________________________________________________ ______________________________________________________________ ______________________________________________________________ ______________________________________________________________
3. A milling machine has a number of lubrication points, when should these be checked? ______________________________________________________________ ______________________________________________________________ ______________________________________________________________ ______________________________________________________________
4. During the milling of a flat face, the machinist measures a taper from front to back. After checking the vice and the workpiece setupto to correc the taper, no problem is found. What could be the cause? What solution can correct this? ______________________________________________________________ ______________________________________________________________ ______________________________________________________________ ______________________________________________________________ ______________________________________________________________
SAMPLE