Embed Size (px)
Citation preview
MEGATRONICS V3.0 QUICK START GUIDEMEGATRONICS V3.0 QUICK START GUIDEThank you for purchasing the Megatronics v3.0! This small guide will answer the basic questions on how to connect the board to your 3D printer. For more information visit the Megatronics product page http://reprapworld.com/?products_details&products_id=468.
ReprapWorld.com may provide updates to the firmware, documentation and specifications. Please refer to the product page for the latest information.
Safety warningsDo not exceed the recommended voltage (24V) for the board on the power supply (high power) input. This may cause permanent damage to the board.
The 5V circuit is protected from shorts by a resettable 500mA fuse. The high power inputs are protected by a NON-resettable fuse. Shorting the high power circuit may cause the SMD fuses to burn out, requiring replacing the fuses.
Do not unplug stepper motors from the board while powered. This may cause the stepper drivers to be damaged permanently and/or damage the board permanently.
Do not modify anything while the board is powered, always remove the USB cable and power off the power supply before modifying anything.
Features
The Megatronics board is designed to be the most advanced electronics board, with many out-of-the-box functionality on-board. You can use this board in all types of 3D-printers in the consumer market today. Amongst others, these are the major features:
Atmega2560 Powerful Atmega2560 processor with 256 kB memory, running at 16Mhz
ThermocoupleOn-board support for connecting two thermo couples and two external
SD CardAutonomous printing from Micro SD card on board or an external SD card upgrade option.
Six MOSFETsThe board has 3 regular MOSFETs (25A), two small MOSFETs for fans, and one MOSFET for the heated bed (IRLS3034PBF) to support many needs.
Up to 6 stepper driversCompatible with RAMPS, 6 slots for stepper drivers (not included). Modularized to make replacement easy.
Support for many peripheralsThe board's functions can be easily extended with LCD, keypad etc. See the connectors section for more information
Megatronics v3.0 Quick Start Guide Version 1.2
Copyright 2014, Reprapworld.com - 1
Required softwareWe provide software on our website to help you out. This software is modified to support our hardware out-of-the-box. See the section 'software downloads' for the latest version of the software.
Preparing the boardThe board is supplied with a Marlin firmware. Because of the continued development and yourspecific needs, changes are you want to upload another firmware.
If you didn't download our supplied Arduino version, you need to modify it. You can use Arduino IDE to upload firmware to the Megatronics board. Under Linux select as board 'Arduino Mega 2560 or Mega ADK'. Under other operating systems the USB will not be reset correctly and you will need to adjust the boards.txt. This file is located in <Arduino directory>/hardware/arduino/boards.txt. Add the following text to the file:
megatronics.name=Megatronicsmegatronics.upload.protocol=wiringmegatronics.upload.maximum_size=258048megatronics.upload.speed=115200megatronics.bootloader.low_fuses=0xFFmegatronics.bootloader.high_fuses=0xDAmegatronics.bootloader.extended_fuses=0xF5megatronics.bootloader.path=stk500v2megatronics.bootloader.file=stk500boot_v2_mega2560.hexmegatronics.bootloader.unlock_bits=0x3Fmegatronics.bootloader.lock_bits=0x0Fmegatronics.build.mcu=atmega2560megatronics.build.f_cpu=16000000Lmegatronics.build.core=arduinomegatronics.build.variant=mega
Restart Arduino IDE and select Megatronics as board. You should be able to upload correctly now. While uploading the blue LED is lit and the RX/TX LEDs will blink fast.
Testing the board
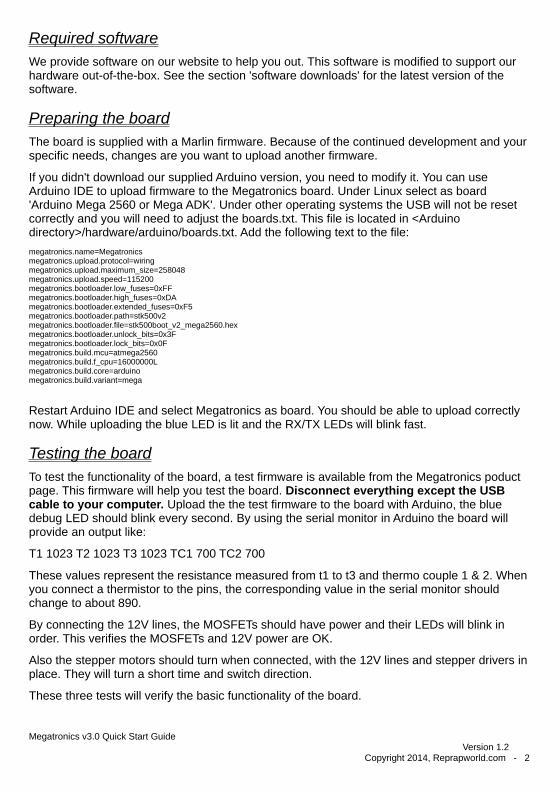
To test the functionality of the board, a test firmware is available from the Megatronics poduct page. This firmware will help you test the board. Disconnect everything except the USB cable to your computer. Upload the the test firmware to the board with Arduino, the blue debug LED should blink every second. By using the serial monitor in Arduino the board will provide an output like:
T1 1023 T2 1023 T3 1023 TC1 700 TC2 700
These values represent the resistance measured from t1 to t3 and thermo couple 1 & 2. Whenyou connect a thermistor to the pins, the corresponding value in the serial monitor should change to about 890.
By connecting the 12V lines, the MOSFETs should have power and their LEDs will blink in order. This verifies the MOSFETs and 12V power are OK.
Also the stepper motors should turn when connected, with the 12V lines and stepper drivers inplace. They will turn a short time and switch direction.
These three tests will verify the basic functionality of the board.
Megatronics v3.0 Quick Start Guide Version 1.2
Copyright 2014, Reprapworld.com - 2
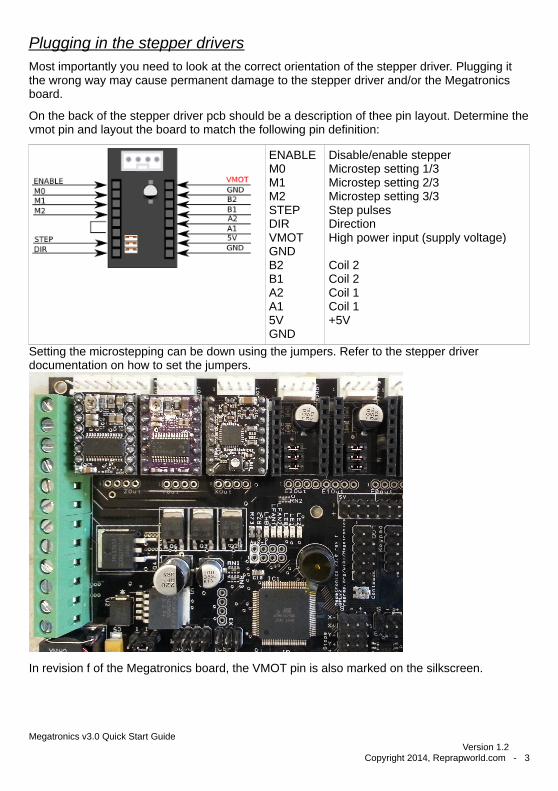
Plugging in the stepper driversMost importantly you need to look at the correct orientation of the stepper driver. Plugging it the wrong way may cause permanent damage to the stepper driver and/or the Megatronics board.
On the back of the stepper driver pcb should be a description of thee pin layout. Determine thevmot pin and layout the board to match the following pin definition:
ENABLEM0M1M2STEPDIRVMOTGNDB2B1A2A15VGND
Disable/enable stepperMicrostep setting 1/3Microstep setting 2/3Microstep setting 3/3Step pulsesDirectionHigh power input (supply voltage)
Coil 2Coil 2Coil 1Coil 1+5V
Setting the microstepping can be down using the jumpers. Refer to the stepper driver documentation on how to set the jumpers.
In revision f of the Megatronics board, the VMOT pin is also marked on the silkscreen.
Megatronics v3.0 Quick Start Guide Version 1.2
Copyright 2014, Reprapworld.com - 3
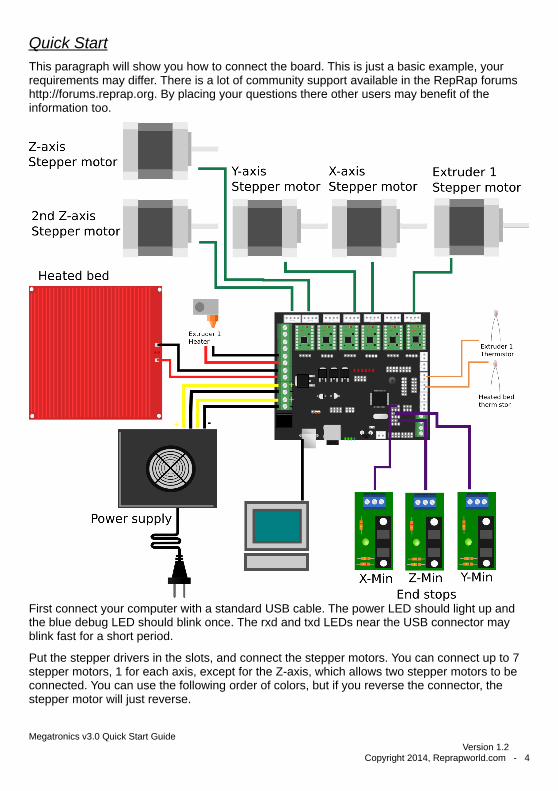
Quick StartThis paragraph will show you how to connect the board. This is just a basic example, your requirements may differ. There is a lot of community support available in the RepRap forums http://forums.reprap.org. By placing your questions there other users may benefit of the information too.
First connect your computer with a standard USB cable. The power LED should light up and the blue debug LED should blink once. The rxd and txd LEDs near the USB connector may blink fast for a short period.
Put the stepper drivers in the slots, and connect the stepper motors. You can connect up to 7 stepper motors, 1 for each axis, except for the Z-axis, which allows two stepper motors to be connected. You can use the following order of colors, but if you reverse the connector, the stepper motor will just reverse.
Megatronics v3.0 Quick Start Guide Version 1.2
Copyright 2014, Reprapworld.com - 4
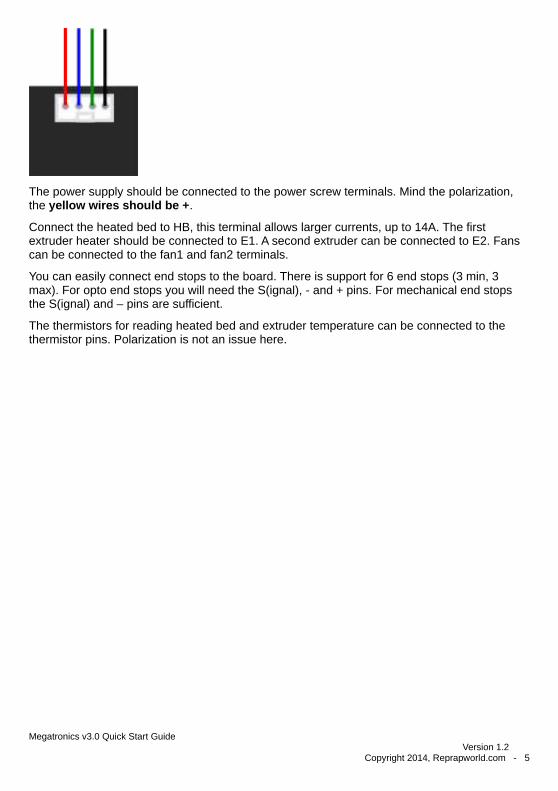
The power supply should be connected to the power screw terminals. Mind the polarization, the yellow wires should be +.
Connect the heated bed to HB, this terminal allows larger currents, up to 14A. The first extruder heater should be connected to E1. A second extruder can be connected to E2. Fans can be connected to the fan1 and fan2 terminals.
You can easily connect end stops to the board. There is support for 6 end stops (3 min, 3 max). For opto end stops you will need the S(ignal), - and + pins. For mechanical end stops the S(ignal) and – pins are sufficient.
The thermistors for reading heated bed and extruder temperature can be connected to the thermistor pins. Polarization is not an issue here.
Megatronics v3.0 Quick Start Guide Version 1.2
Copyright 2014, Reprapworld.com - 5
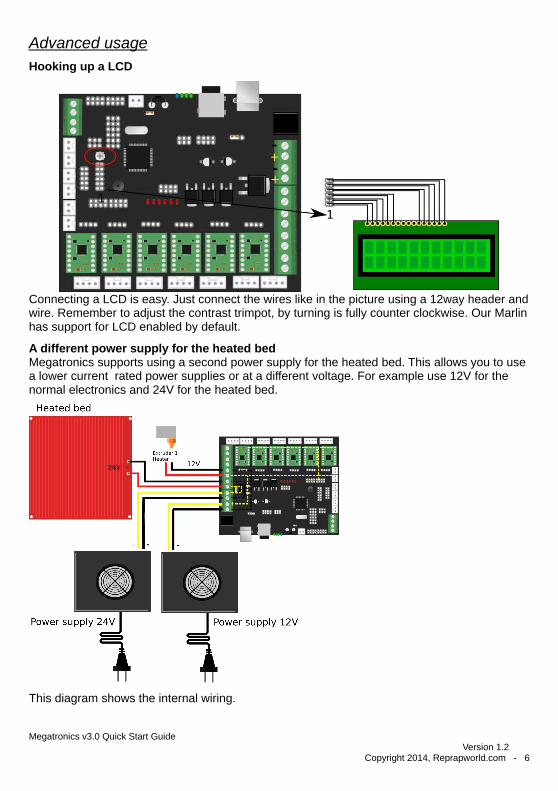
Advanced usageHooking up a LCD
Connecting a LCD is easy. Just connect the wires like in the picture using a 12way header andwire. Remember to adjust the contrast trimpot, by turning is fully counter clockwise. Our Marlinhas support for LCD enabled by default.
A different power supply for the heated bedMegatronics supports using a second power supply for the heated bed. This allows you to use a lower current rated power supplies or at a different voltage. For example use 12V for the normal electronics and 24V for the heated bed.
This diagram shows the internal wiring.
Megatronics v3.0 Quick Start Guide Version 1.2
Copyright 2014, Reprapworld.com - 6
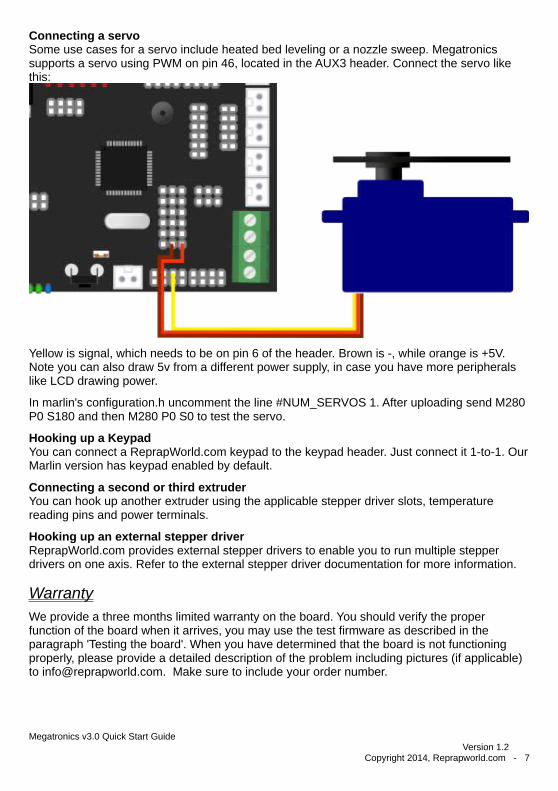
Connecting a servoSome use cases for a servo include heated bed leveling or a nozzle sweep. Megatronics supports a servo using PWM on pin 46, located in the AUX3 header. Connect the servo like this:
Yellow is signal, which needs to be on pin 6 of the header. Brown is -, while orange is +5V. Note you can also draw 5v from a different power supply, in case you have more peripherals like LCD drawing power.
In marlin's configuration.h uncomment the line #NUM_SERVOS 1. After uploading send M280 P0 S180 and then M280 P0 S0 to test the servo.
Hooking up a KeypadYou can connect a ReprapWorld.com keypad to the keypad header. Just connect it 1-to-1. OurMarlin version has keypad enabled by default.
Connecting a second or third extruderYou can hook up another extruder using the applicable stepper driver slots, temperature reading pins and power terminals.
Hooking up an external stepper driverReprapWorld.com provides external stepper drivers to enable you to run multiple stepper drivers on one axis. Refer to the external stepper driver documentation for more information.
WarrantyWe provide a three months limited warranty on the board. You should verify the proper function of the board when it arrives, you may use the test firmware as described in the paragraph 'Testing the board'. When you have determined that the board is not functioning properly, please provide a detailed description of the problem including pictures (if applicable) to [email protected]. Make sure to include your order number.
Megatronics v3.0 Quick Start Guide Version 1.2
Copyright 2014, Reprapworld.com - 7

FeedbackWe love to hear feedback from our users. This way we can keep our boards the best option forthe RepRap community. If you have ideas or comments, please feel free to drop an email to [email protected].
Megatronics v3.0 Quick Start Guide Version 1.2
Copyright 2014, Reprapworld.com - 8