Embed Size (px)
Citation preview
Medicaid Billing Workshopfor Medical Providers
Provider Relations Unit2017
1
2
Who is Provider Relations and what do we do?
Provide outreach and training for Washington Apple Health (Medicaid) providers
Specialize in the use of the ProviderOne portal
Assist with program and policy questions
3
Medicaid Overview
ProviderOne
Eligibility & Billing Processes
Resources
Topics
4
Medicaid Overview
5
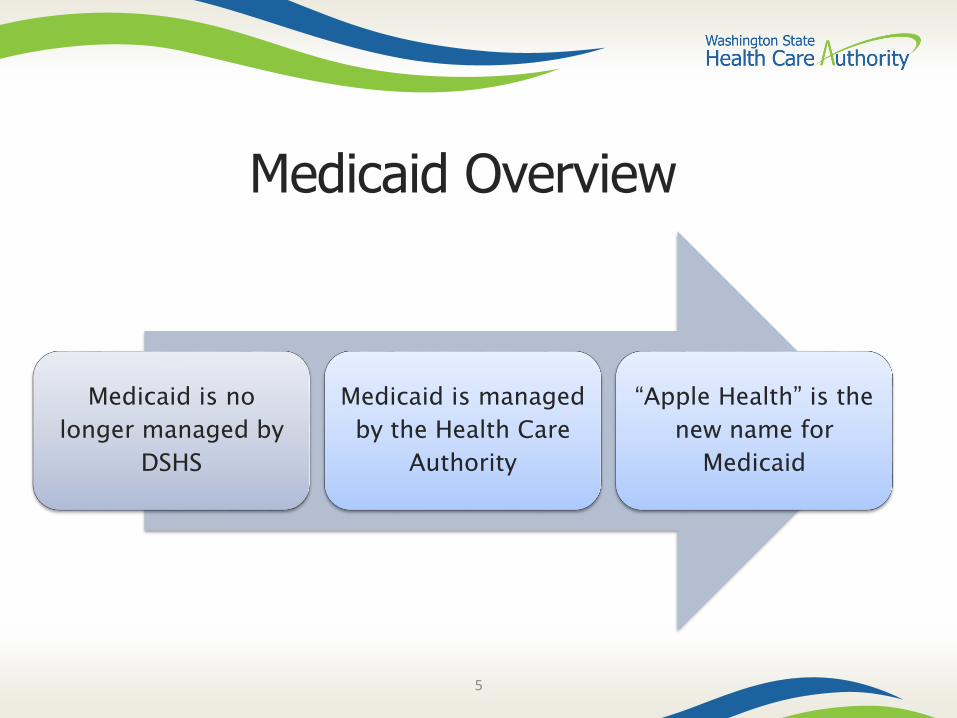
Medicaid Overview
Medicaid is no
longer managed by
DSHS
Medicaid is managed
by the Health Care
Authority
“Apple Health” is the
new name for
Medicaid
6
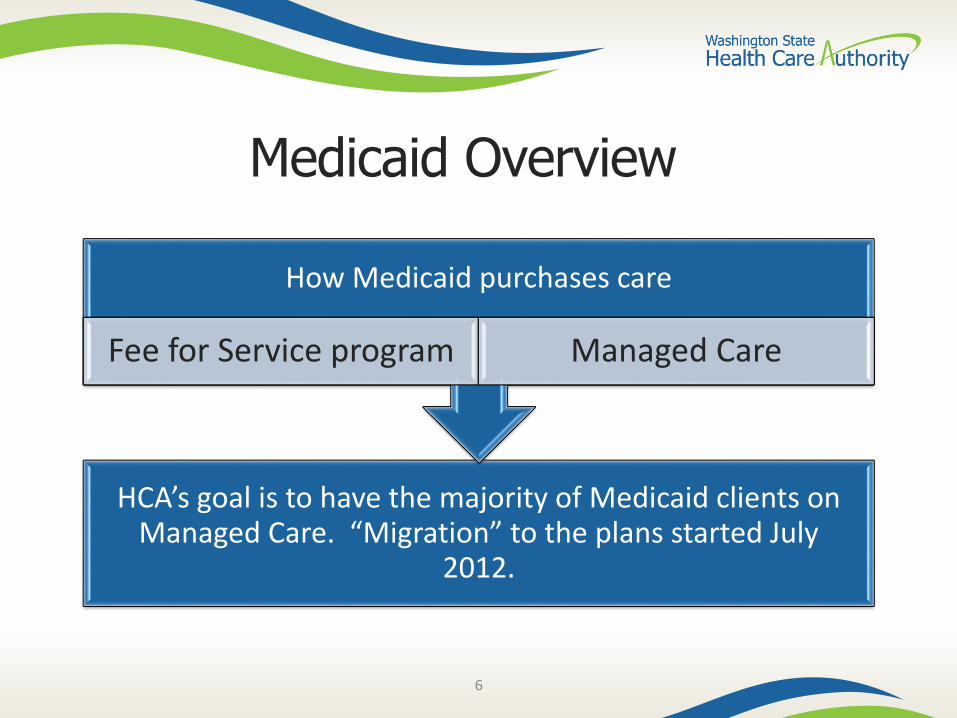
Medicaid Overview
HCA’s goal is to have the majority of Medicaid clients on Managed Care. “Migration” to the plans started July
2012.
How Medicaid purchases care
Fee for Service program Managed Care
7
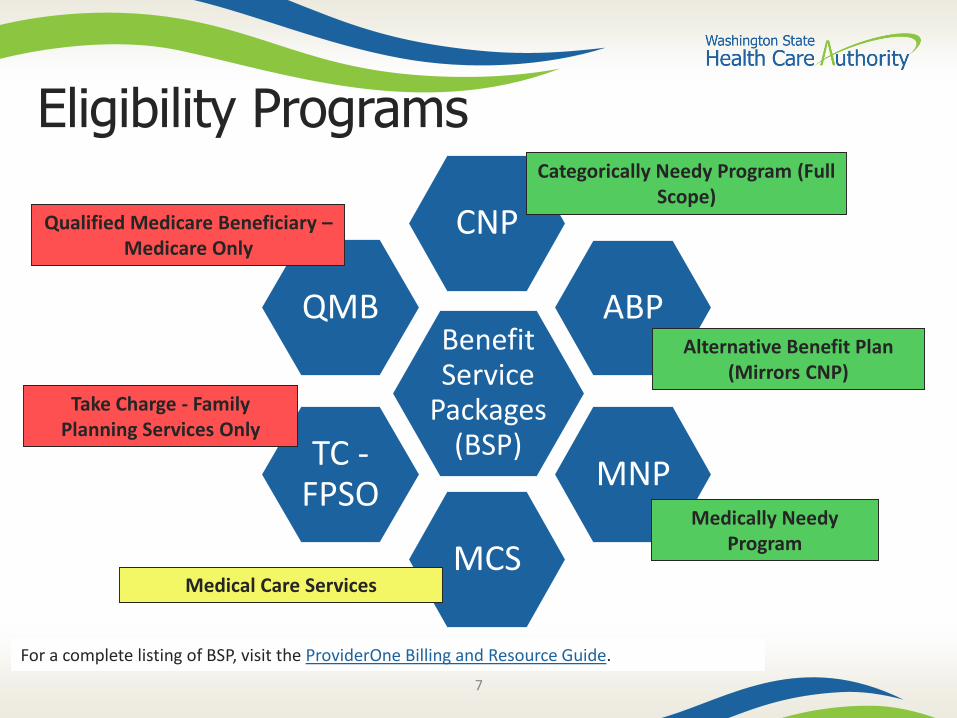
Eligibility Programs
Benefit Service
Packages (BSP)
CNP
ABP
MNP
MCS
TC -FPSO
QMB
Categorically Needy Program (Full Scope)
Medically Needy Program
Alternative Benefit Plan (Mirrors CNP)
Medical Care Services
Take Charge - Family Planning Services Only
Qualified Medicare Beneficiary –Medicare Only
For a complete listing of BSP, visit the ProviderOne Billing and Resource Guide.
8
Accessing ProviderOne
9
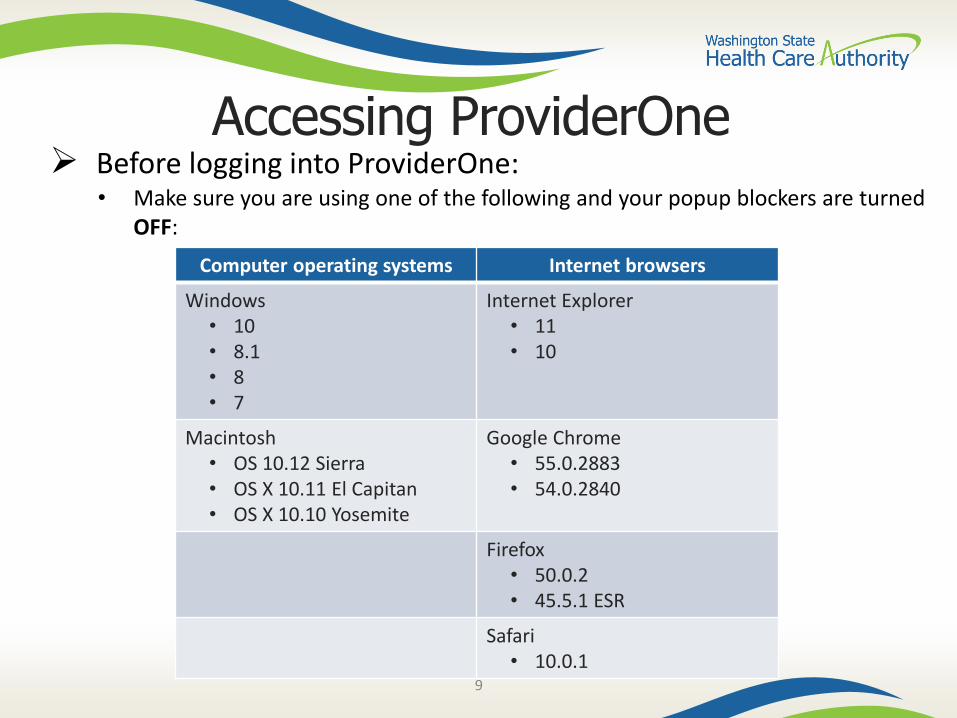
Accessing ProviderOne Before logging into ProviderOne:
• Make sure you are using one of the following and your popup blockers are turned OFF:
Computer operating systems Internet browsers
Windows• 10• 8.1• 8• 7
Internet Explorer• 11• 10
Macintosh• OS 10.12 Sierra• OS X 10.11 El Capitan• OS X 10.10 Yosemite
Google Chrome• 55.0.2883• 54.0.2840
Firefox• 50.0.2• 45.5.1 ESR
Safari• 10.0.1
10
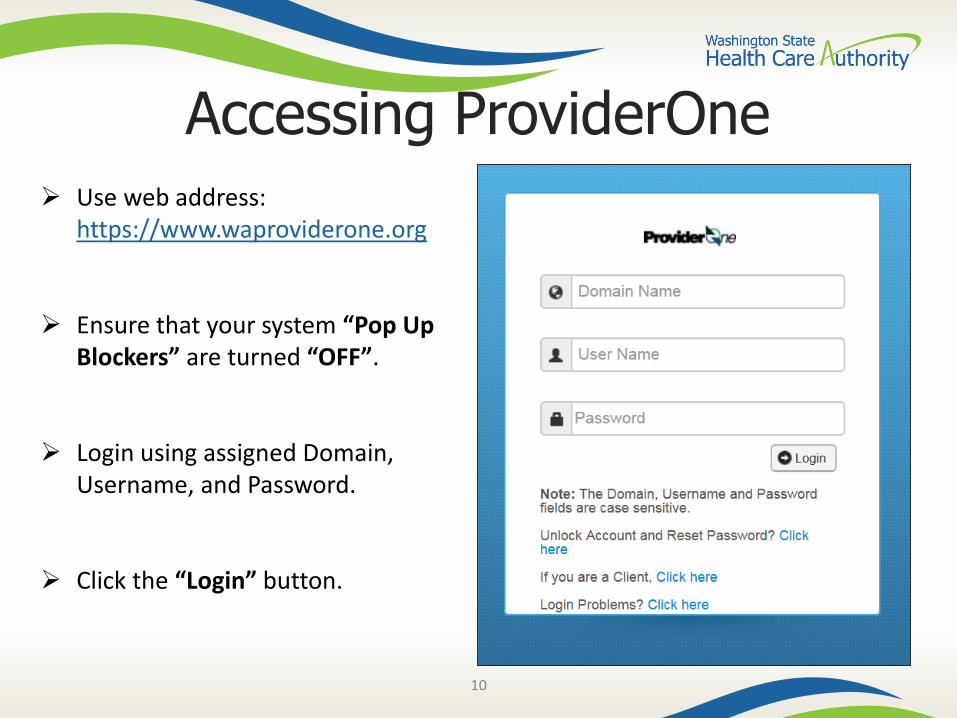
Accessing ProviderOne
Use web address: https://www.waproviderone.org
Ensure that your system “Pop Up Blockers” are turned “OFF”.
Login using assigned Domain, Username, and Password.
Click the “Login” button.
11
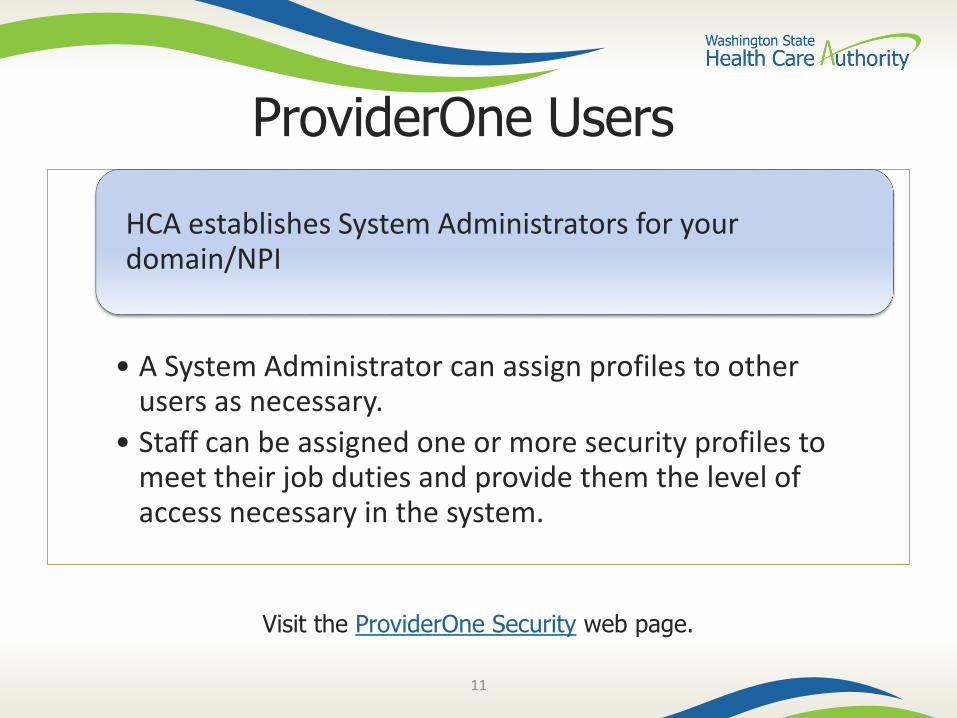
ProviderOne Users
• A System Administrator can assign profiles to other users as necessary.
• Staff can be assigned one or more security profiles to meet their job duties and provide them the level of access necessary in the system.
HCA establishes System Administrators for your domain/NPI
Visit the ProviderOne Security web page.
12
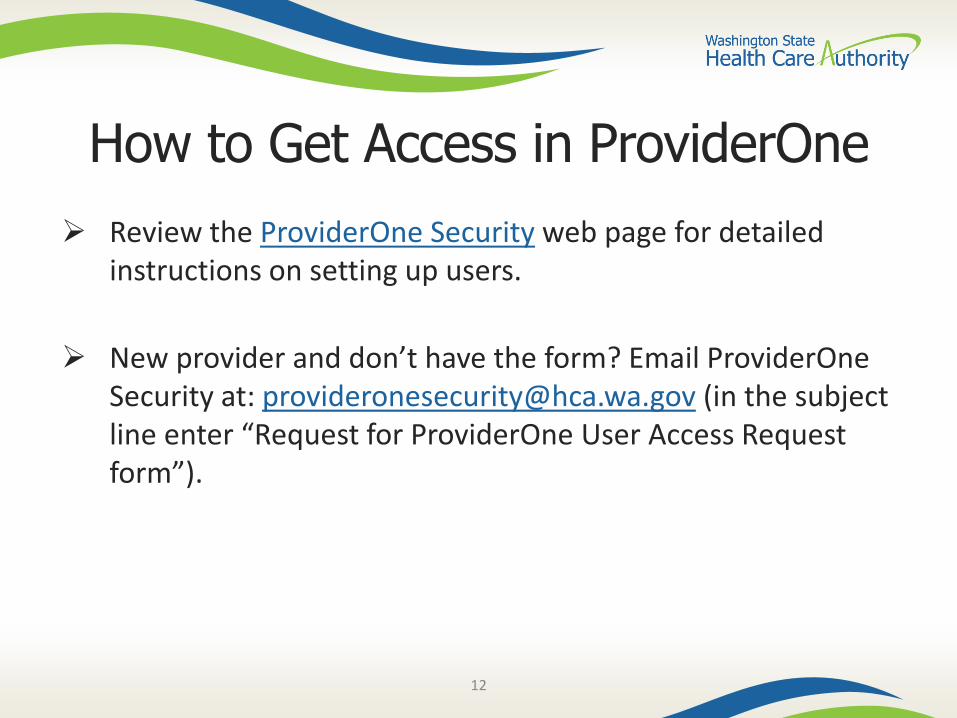
How to Get Access in ProviderOne
Review the ProviderOne Security web page for detailed instructions on setting up users.
New provider and don’t have the form? Email ProviderOne Security at: [email protected] (in the subject line enter “Request for ProviderOne User Access Request form”).
13
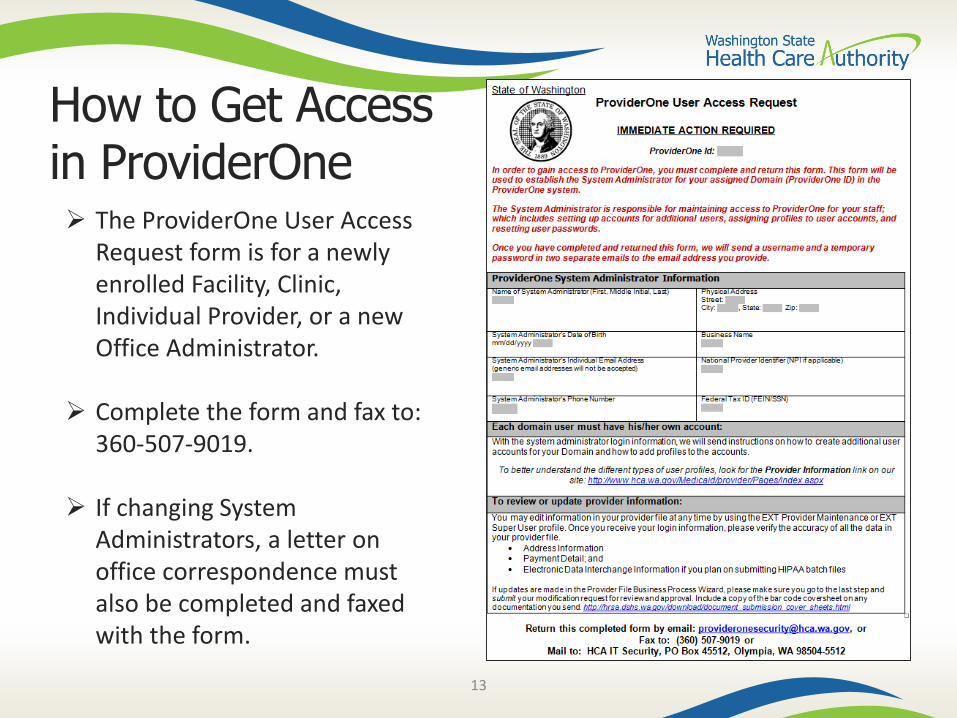
How to Get Access in ProviderOne The ProviderOne User Access
Request form is for a newly enrolled Facility, Clinic, Individual Provider, or a new Office Administrator.
Complete the form and fax to: 360-507-9019.
If changing System Administrators, a letter on office correspondence must also be completed and faxed with the form.
14
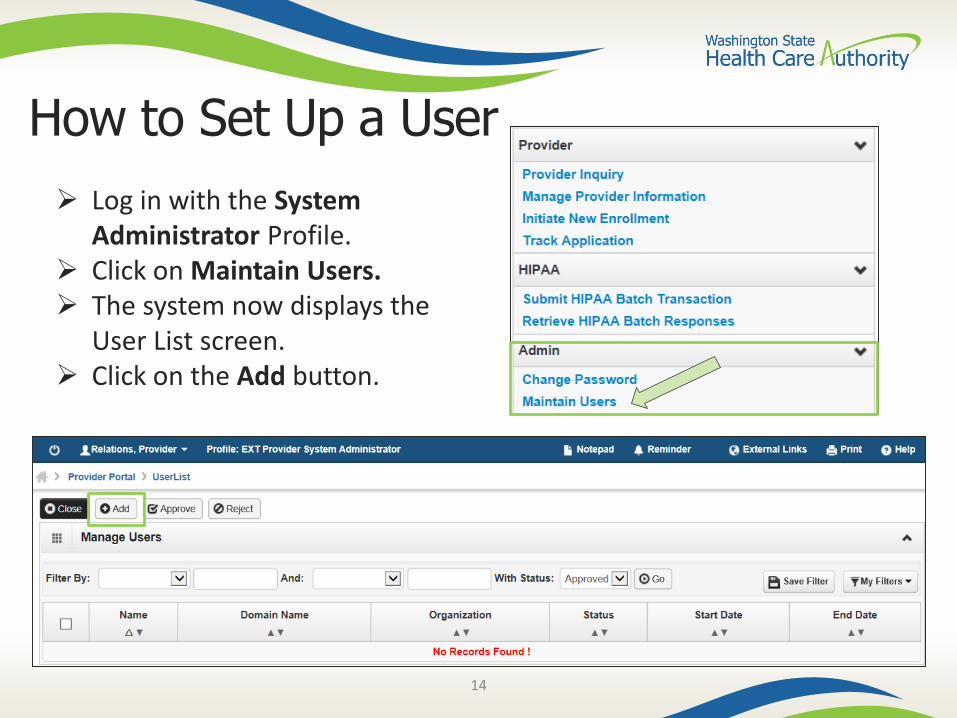
How to Set Up a User
Log in with the System Administrator Profile.
Click on Maintain Users. The system now displays the
User List screen. Click on the Add button.
15
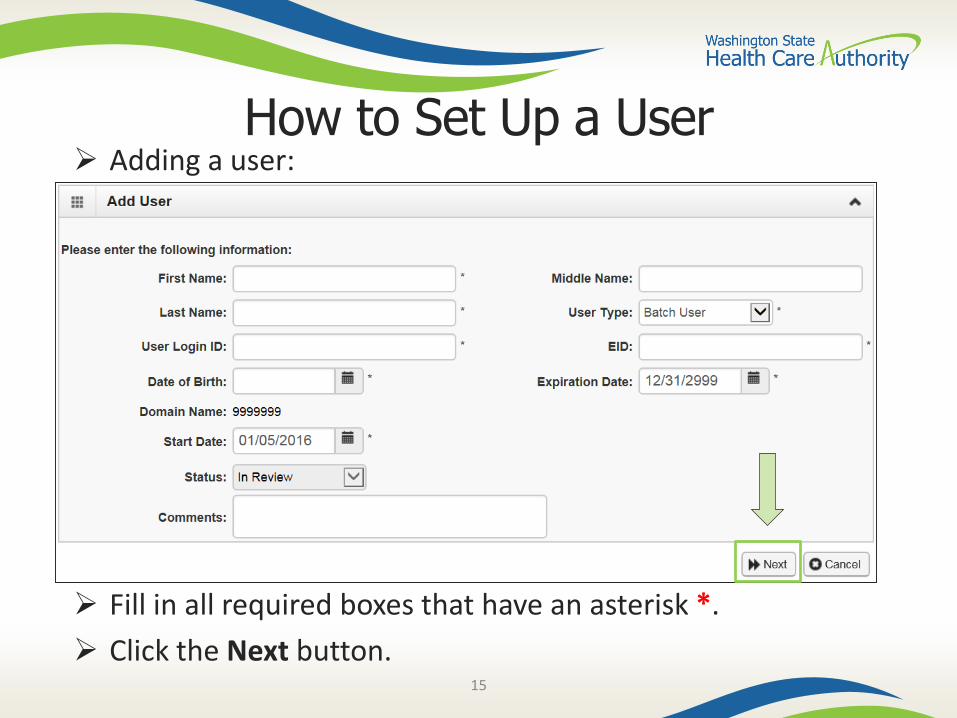
How to Set Up a User Adding a user:
Fill in all required boxes that have an asterisk *.
Click the Next button.
16
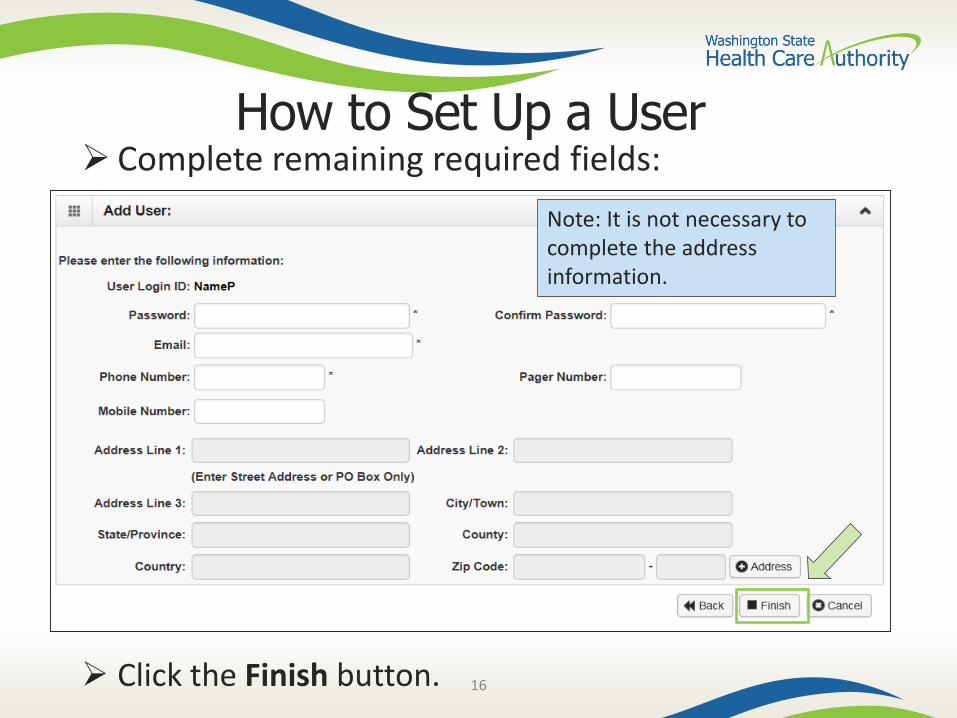
How to Set Up a User Complete remaining required fields:
Click the Finish button.
Note: It is not necessary to complete the address information.
17
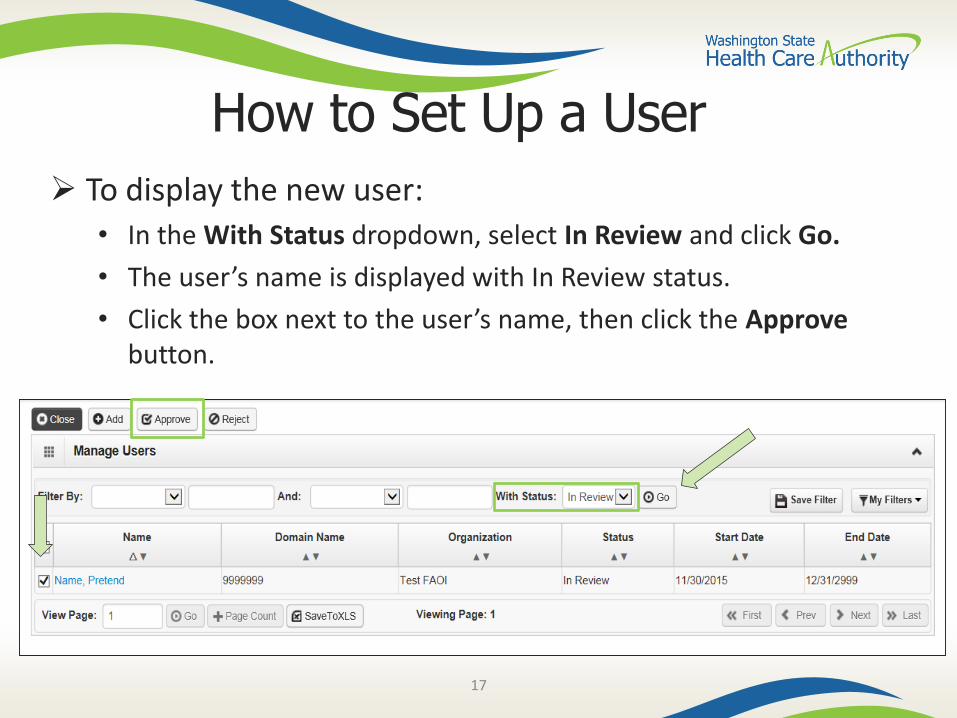
How to Set Up a User
To display the new user:
• In the With Status dropdown, select In Review and click Go.
• The user’s name is displayed with In Review status.
• Click the box next to the user’s name, then click the Approvebutton.
18
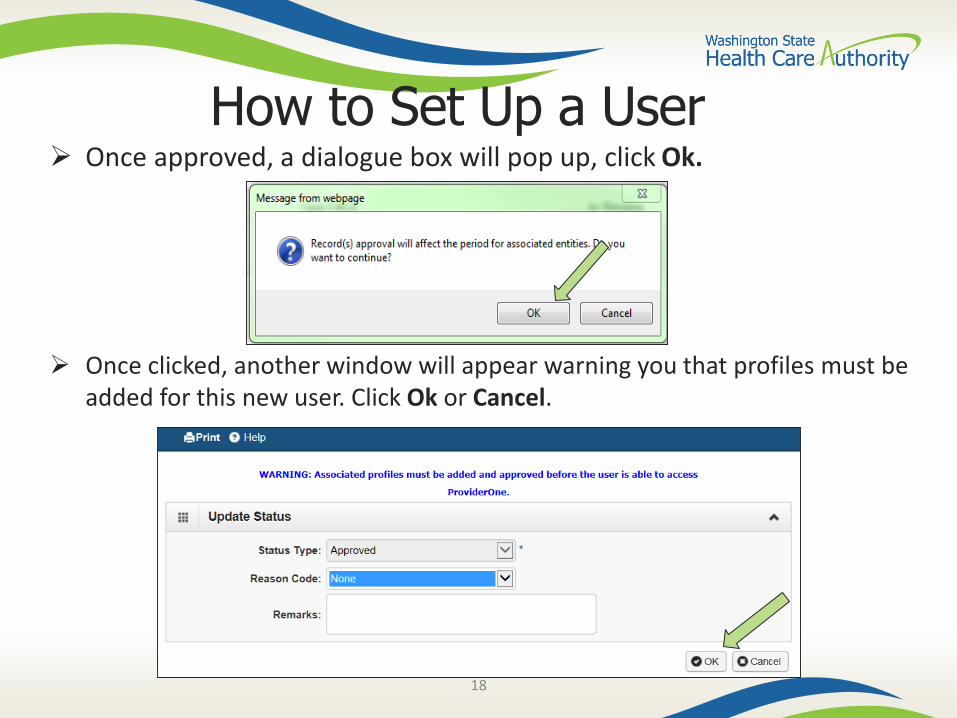
How to Set Up a User Once approved, a dialogue box will pop up, click Ok.
Once clicked, another window will appear warning you that profiles must be added for this new user. Click Ok or Cancel.
19
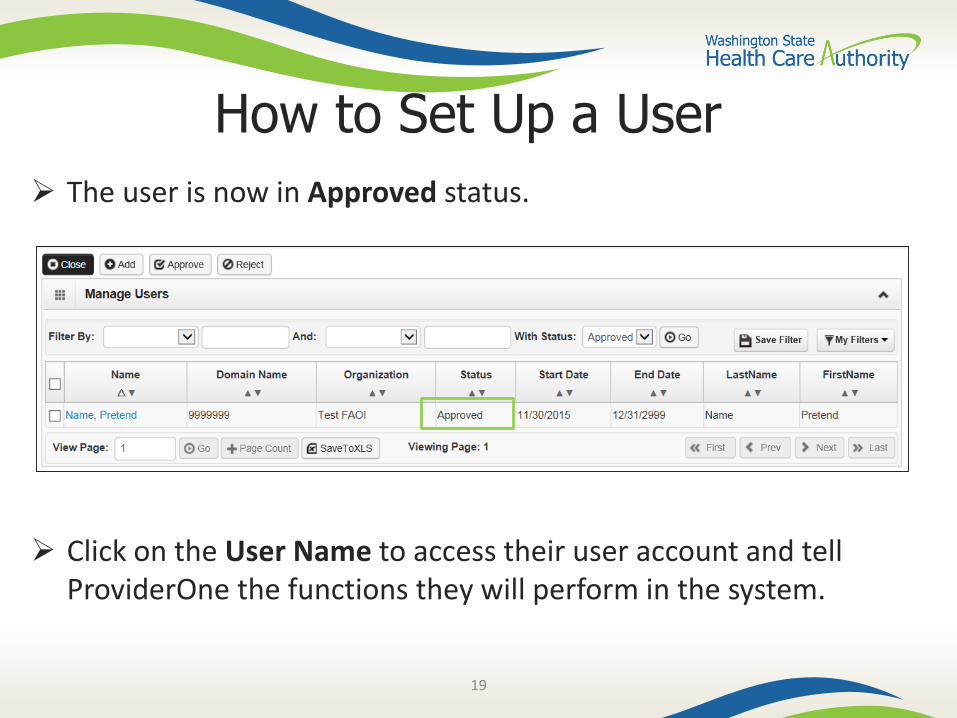
The user is now in Approved status.
Click on the User Name to access their user account and tell ProviderOne the functions they will perform in the system.
How to Set Up a User
20
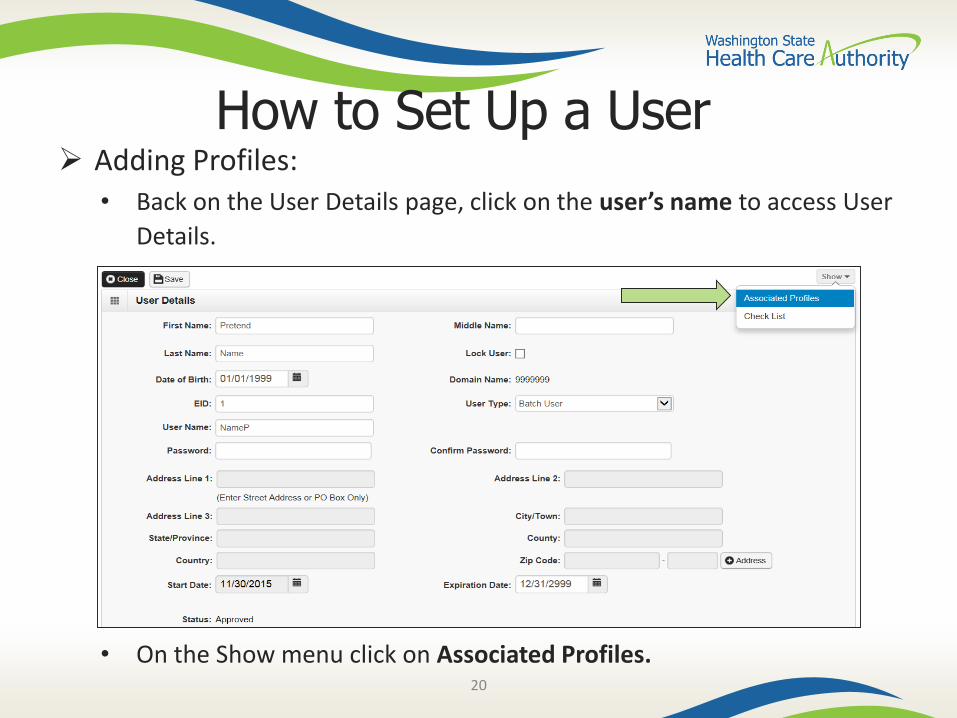
How to Set Up a User Adding Profiles:
• Back on the User Details page, click on the user’s name to access User
Details.
• On the Show menu click on Associated Profiles.
21
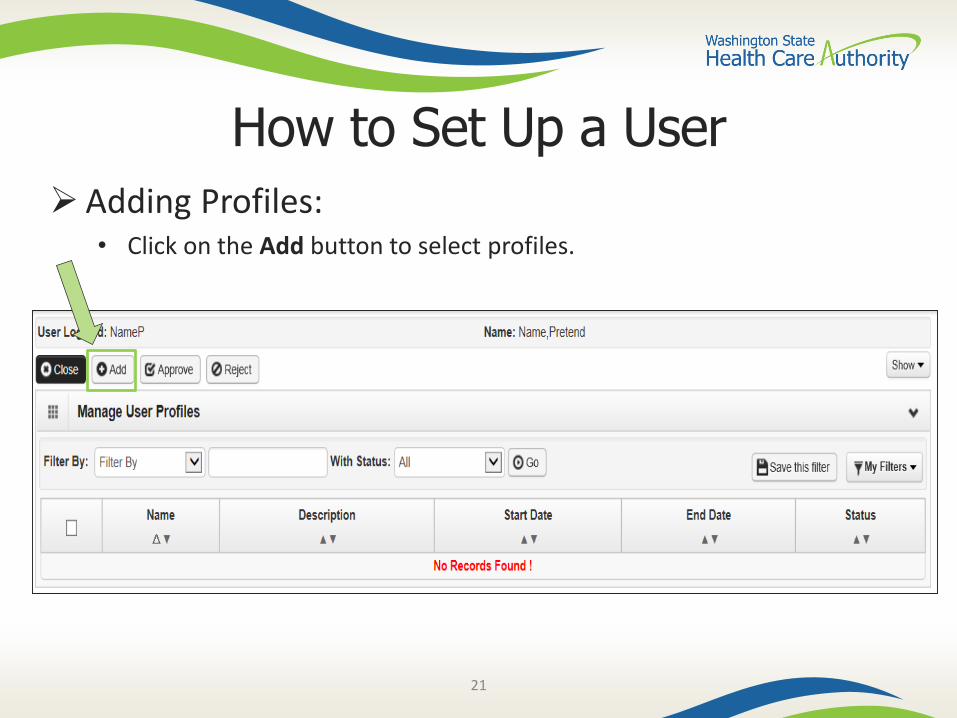
How to Set Up a User
Adding Profiles:• Click on the Add button to select profiles.
22
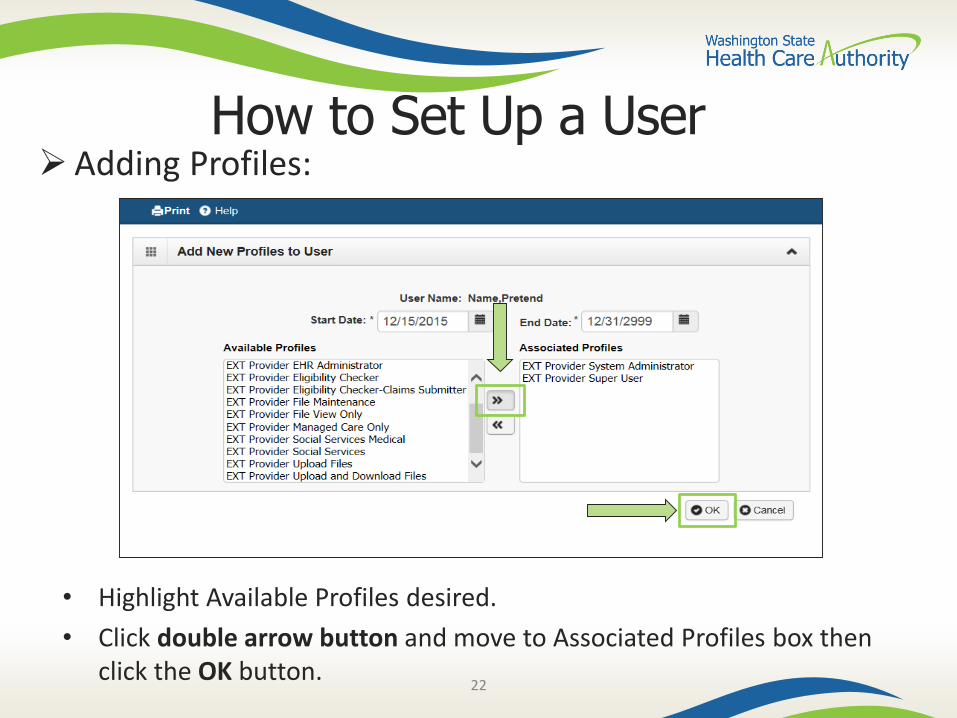
How to Set Up a UserAdding Profiles:
• Highlight Available Profiles desired.
• Click double arrow button and move to Associated Profiles box then click the OK button.

23
How to Set Up a User Adding Profiles:
To Display the new profiles:
• The With Status dropdown box should state All. Click Go.
• The profiles are displayed with In Review status.
• Click the box next to the profile name, then click the Approve button.
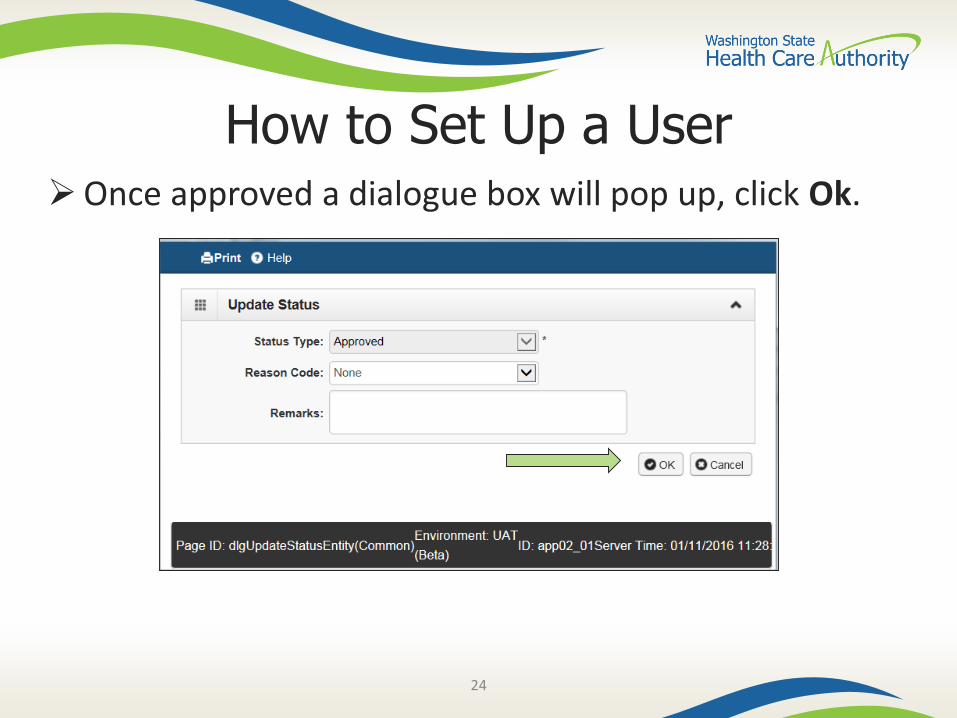
24
Once approved a dialogue box will pop up, click Ok.
How to Set Up a User
25
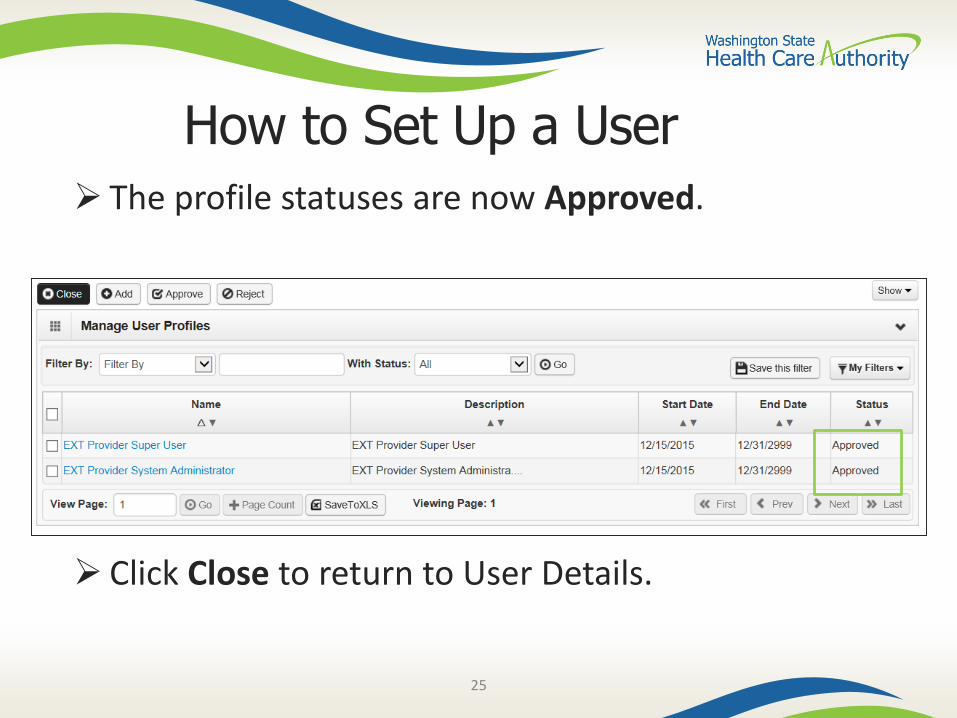
How to Set Up a User
The profile statuses are now Approved.
Click Close to return to User Details.
26
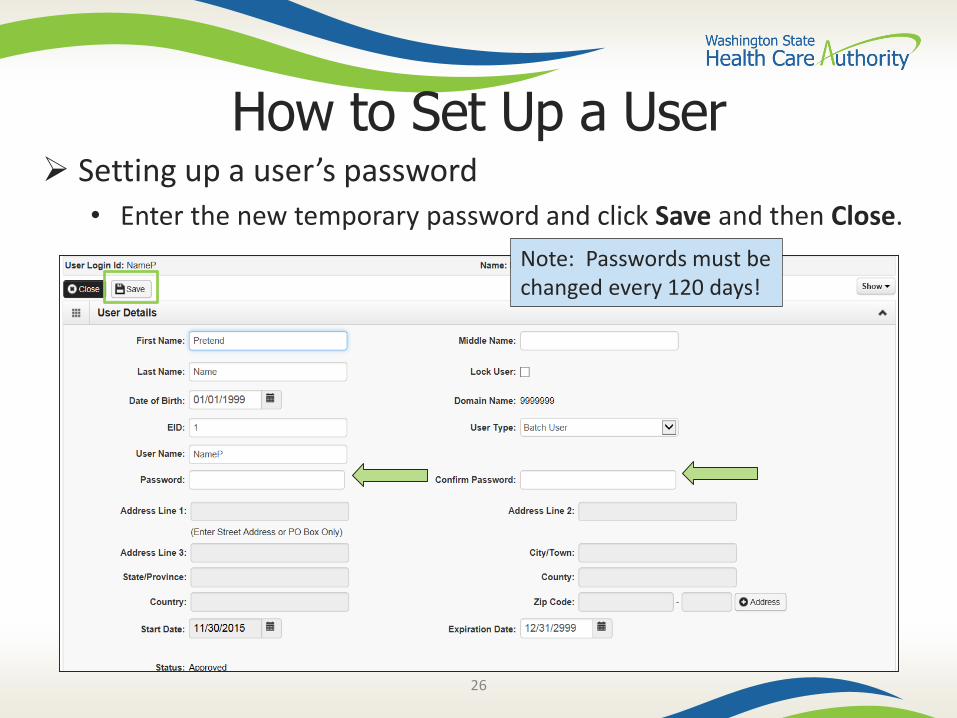
How to Set Up a User Setting up a user’s password
• Enter the new temporary password and click Save and then Close.
Note: Passwords must be changed every 120 days!
27
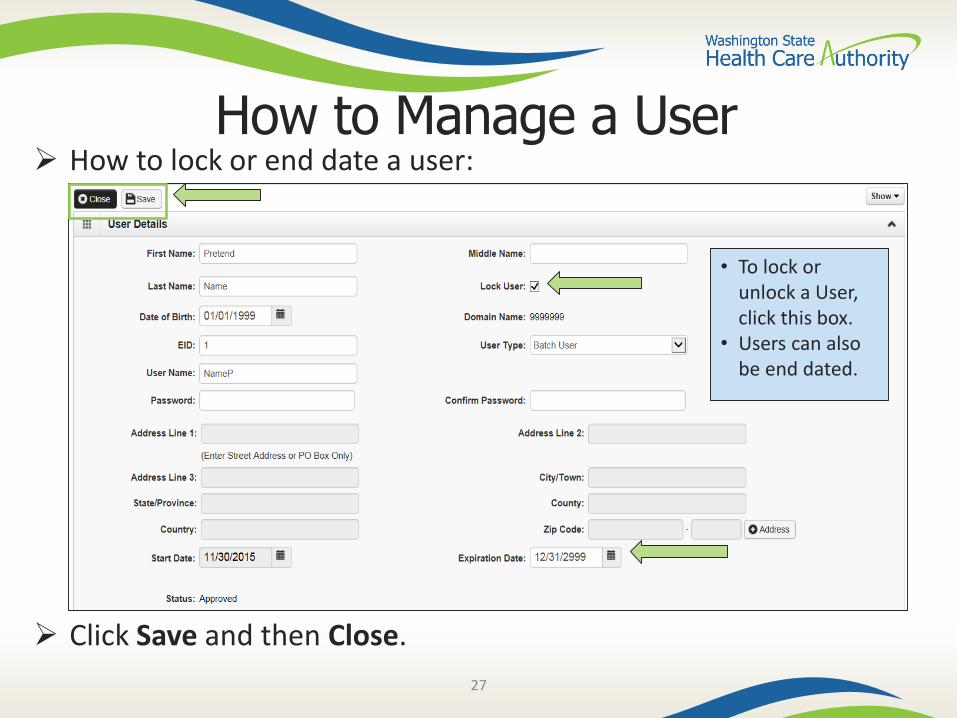
How to Manage a User How to lock or end date a user:
Click Save and then Close.
• To lock or unlock a User, click this box.
• Users can also be end dated.
28
Eligibility & Billing Processes
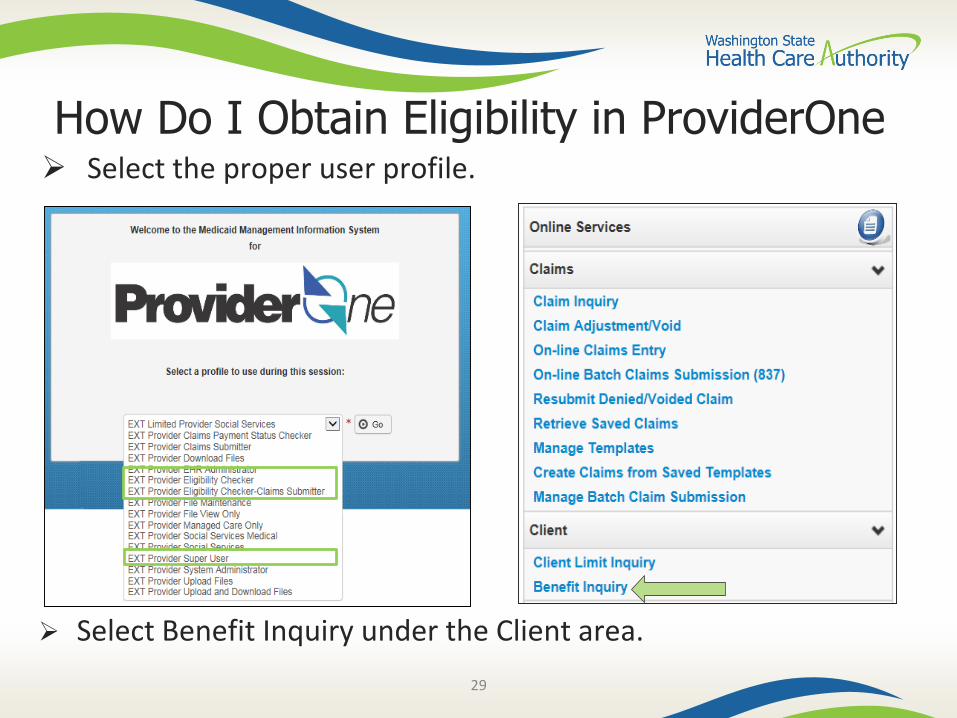
How Do I Obtain Eligibility in ProviderOne Select the proper user profile.
29
Select Benefit Inquiry under the Client area.
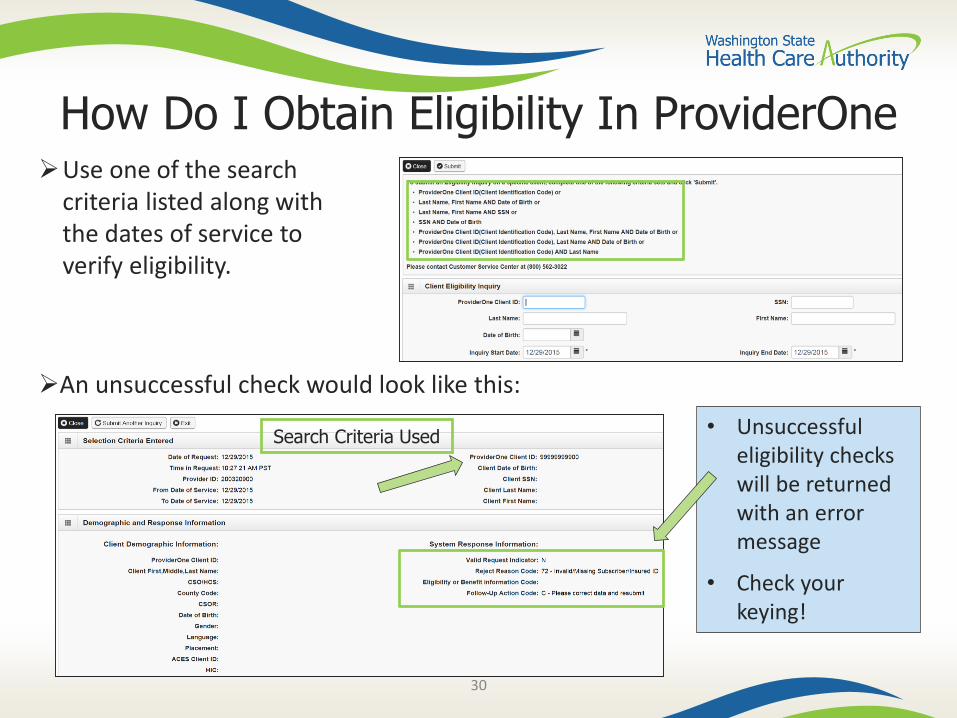
• Unsuccessful eligibility checks will be returned with an error message
• Check your keying!
How Do I Obtain Eligibility In ProviderOne
An unsuccessful check would look like this:
Use one of the search criteria listed along with the dates of service to verify eligibility.
30
Search Criteria Used
31
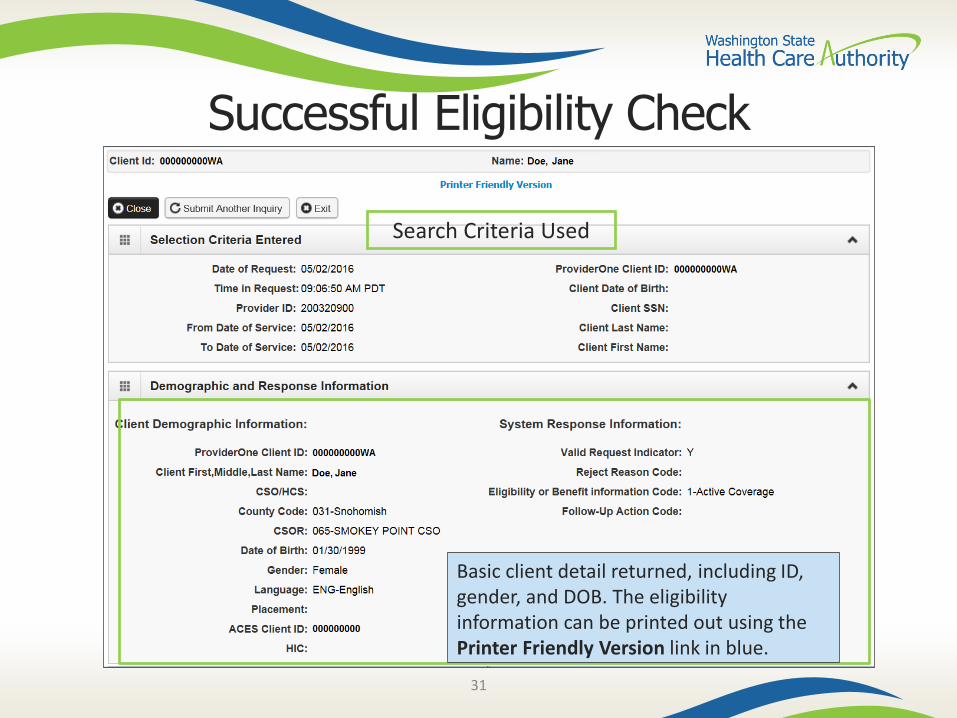
Successful Eligibility Check
Search Criteria Used
Basic client detail returned, including ID, gender, and DOB. The eligibility information can be printed out using the Printer Friendly Version link in blue.
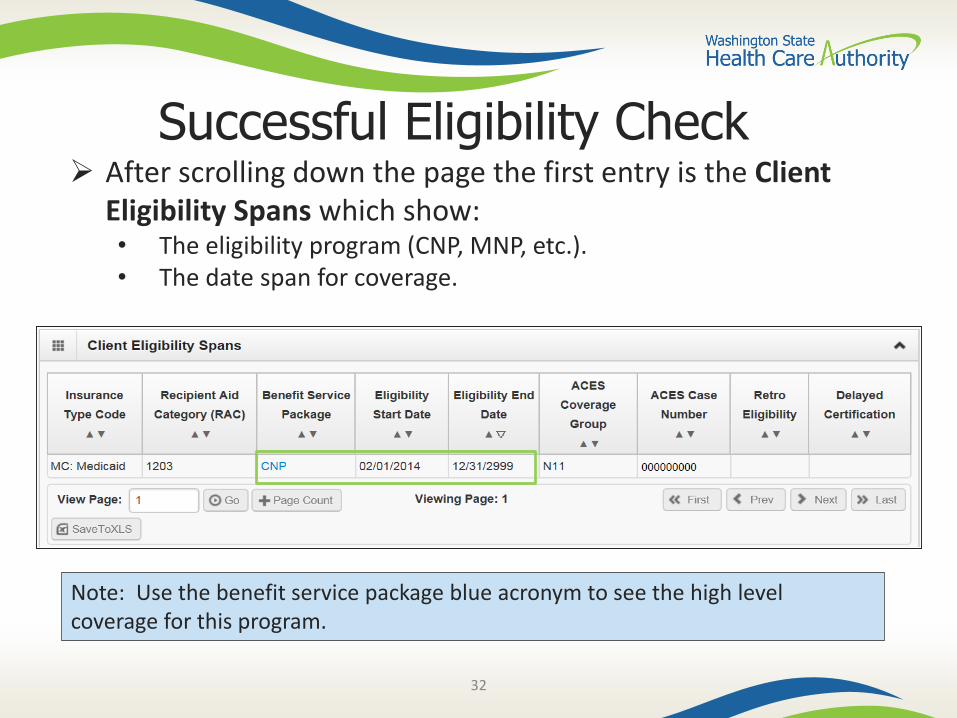
Successful Eligibility Check After scrolling down the page the first entry is the Client
Eligibility Spans which show:• The eligibility program (CNP, MNP, etc.).• The date span for coverage.
Note: Use the benefit service package blue acronym to see the high level coverage for this program.
32
Successful Eligibility Check
33
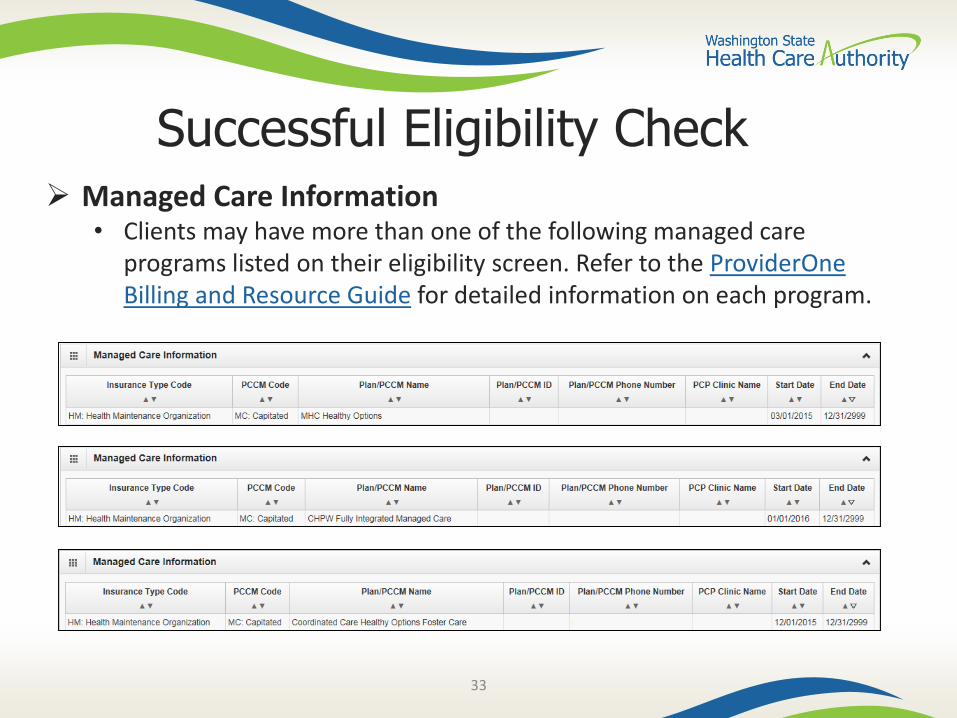
Managed Care Information• Clients may have more than one of the following managed care
programs listed on their eligibility screen. Refer to the ProviderOne Billing and Resource Guide for detailed information on each program.
Successful Eligibility Check
34
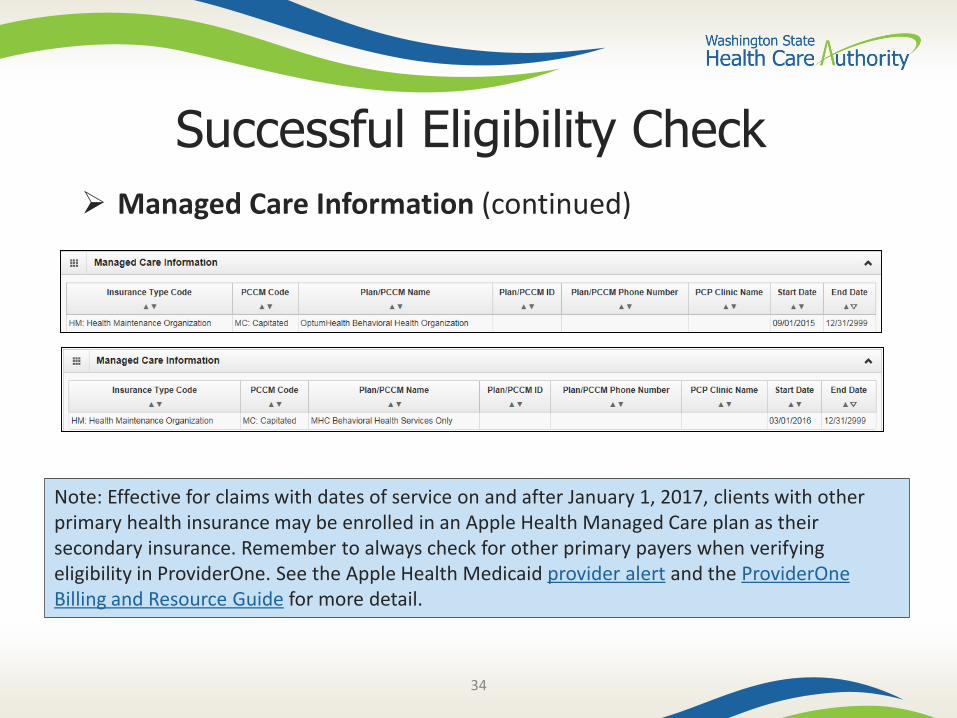
Managed Care Information (continued)
Note: Effective for claims with dates of service on and after January 1, 2017, clients with other primary health insurance may be enrolled in an Apple Health Managed Care plan as their secondary insurance. Remember to always check for other primary payers when verifying eligibility in ProviderOne. See the Apple Health Medicaid provider alert and the ProviderOne Billing and Resource Guide for more detail.
Successful Eligibility Check
35
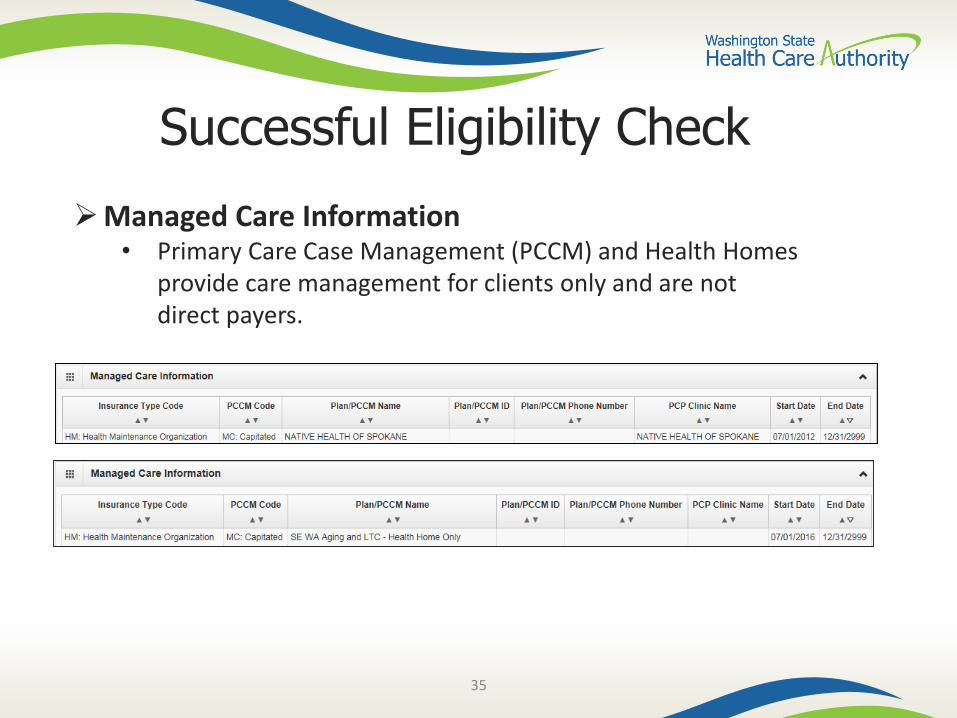
Managed Care Information• Primary Care Case Management (PCCM) and Health Homes
provide care management for clients only and are not direct payers.
36
Successful Eligibility Checks
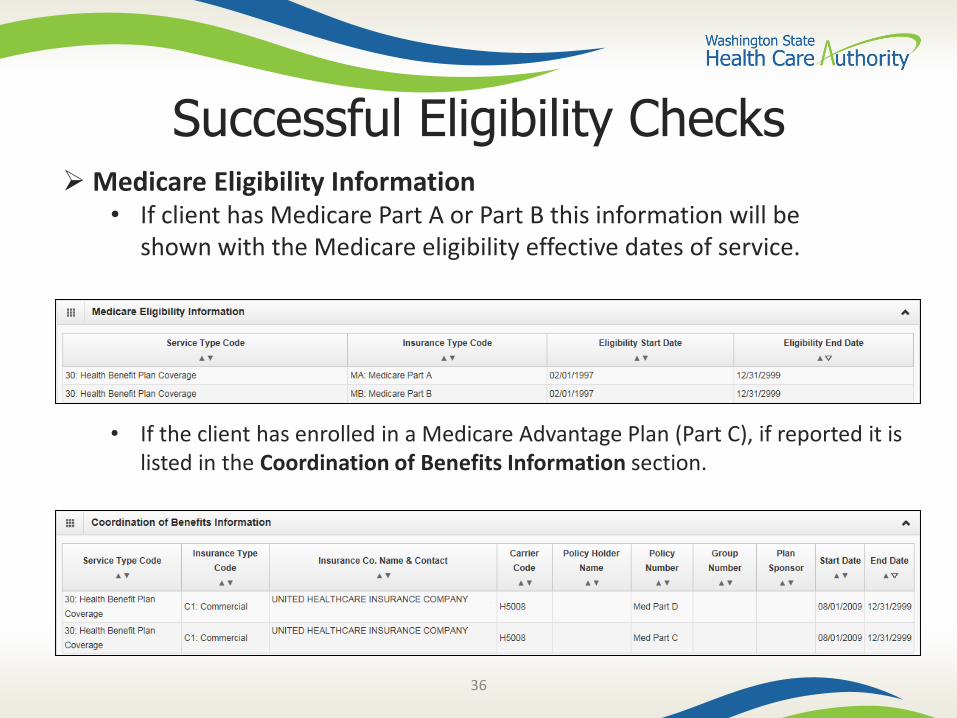
• If the client has enrolled in a Medicare Advantage Plan (Part C), if reported it is listed in the Coordination of Benefits Information section.
Medicare Eligibility Information • If client has Medicare Part A or Part B this information will be
shown with the Medicare eligibility effective dates of service.
37
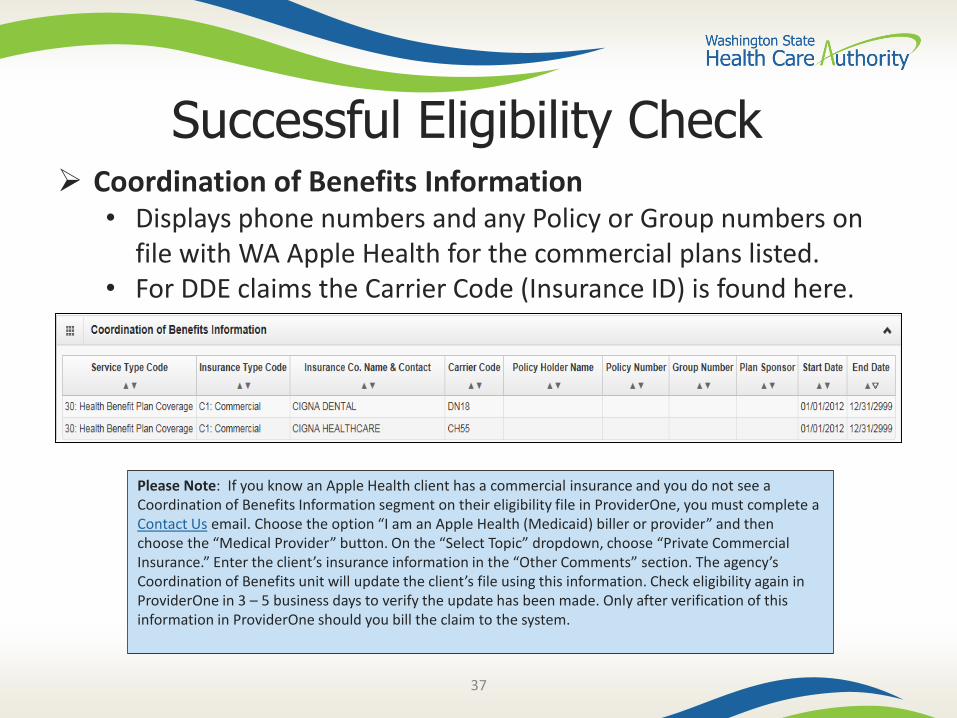
Successful Eligibility Check Coordination of Benefits Information
• Displays phone numbers and any Policy or Group numbers on file with WA Apple Health for the commercial plans listed.
• For DDE claims the Carrier Code (Insurance ID) is found here.
Please Note: If you know an Apple Health client has a commercial insurance and you do not see a Coordination of Benefits Information segment on their eligibility file in ProviderOne, you must complete a Contact Us email. Choose the option “I am an Apple Health (Medicaid) biller or provider” and then choose the “Medical Provider” button. On the “Select Topic” dropdown, choose “Private Commercial Insurance.” Enter the client’s insurance information in the “Other Comments” section. The agency’s Coordination of Benefits unit will update the client’s file using this information. Check eligibility again in ProviderOne in 3 – 5 business days to verify the update has been made. Only after verification of this information in ProviderOne should you bill the claim to the system.
38
Successful Eligibility Checks
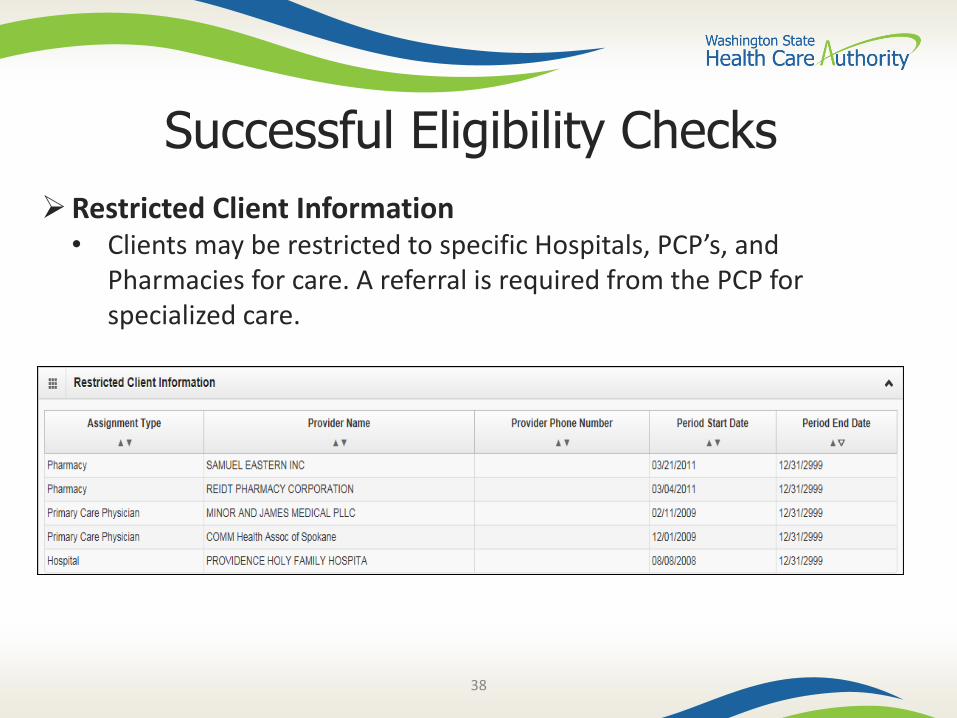
Restricted Client Information • Clients may be restricted to specific Hospitals, PCP’s, and
Pharmacies for care. A referral is required from the PCP for specialized care.
39
Successful Eligibility Checks
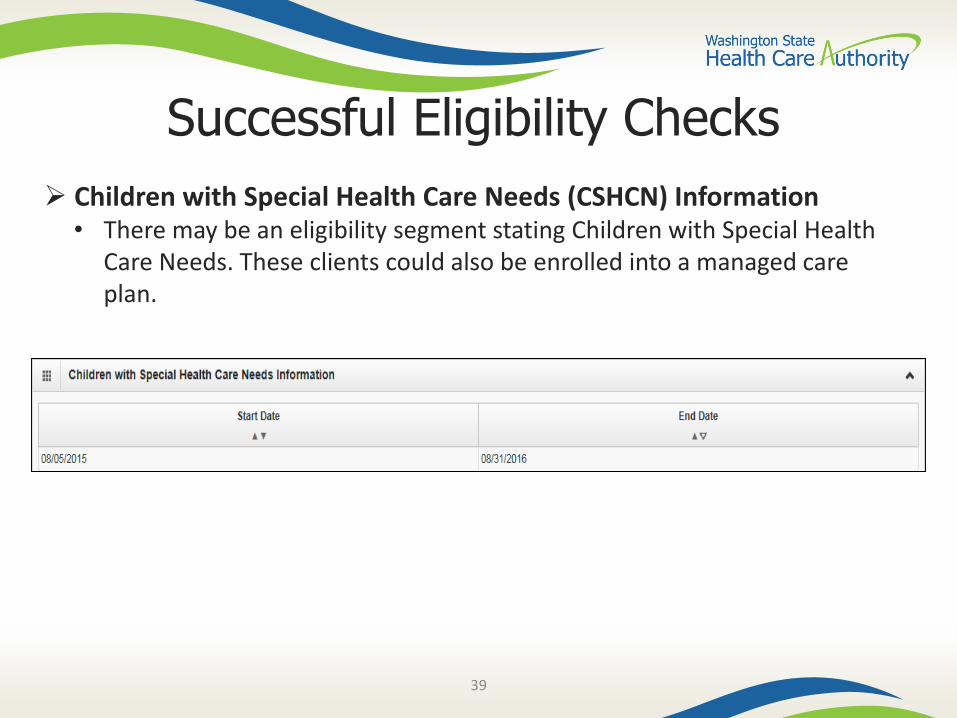
Children with Special Health Care Needs (CSHCN) Information• There may be an eligibility segment stating Children with Special Health
Care Needs. These clients could also be enrolled into a managed care plan.
Successful Eligibility Checks
40
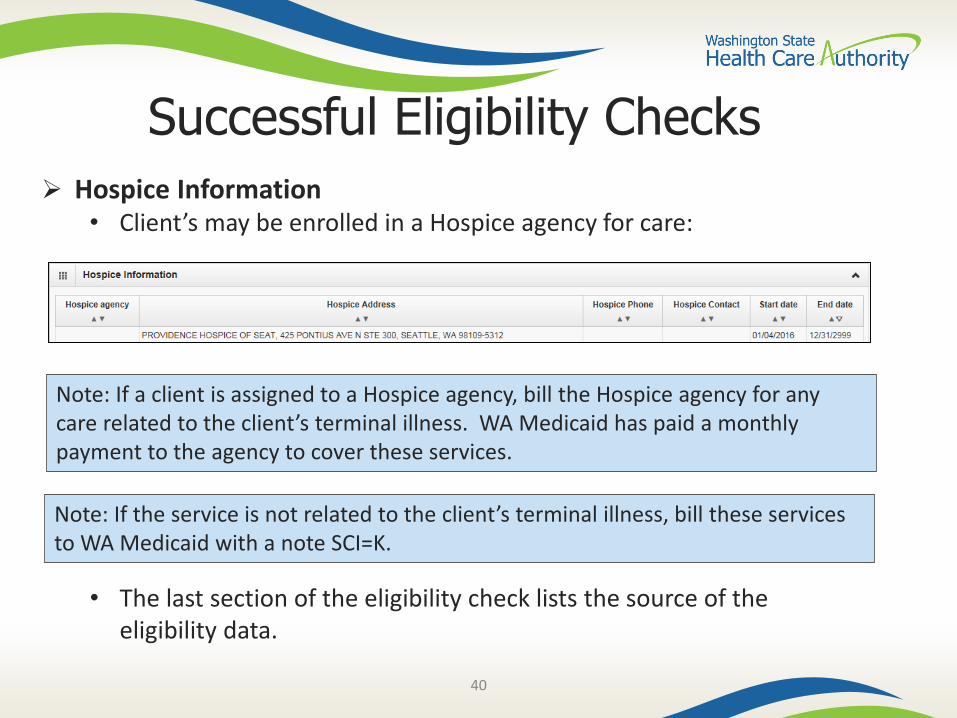
Hospice Information • Client’s may be enrolled in a Hospice agency for care:
Note: If a client is assigned to a Hospice agency, bill the Hospice agency for any care related to the client’s terminal illness. WA Medicaid has paid a monthly payment to the agency to cover these services.
Note: If the service is not related to the client’s terminal illness, bill these services to WA Medicaid with a note SCI=K.
• The last section of the eligibility check lists the source of the eligibility data.

41
Successful Eligibility Check Developmental Disability Information
• It will show the start and end date.
• If current, there will be an open-ended date with 2999 as the year.
Note: If a client has the DD indicator, they may be eligible for expanded benefits.
42
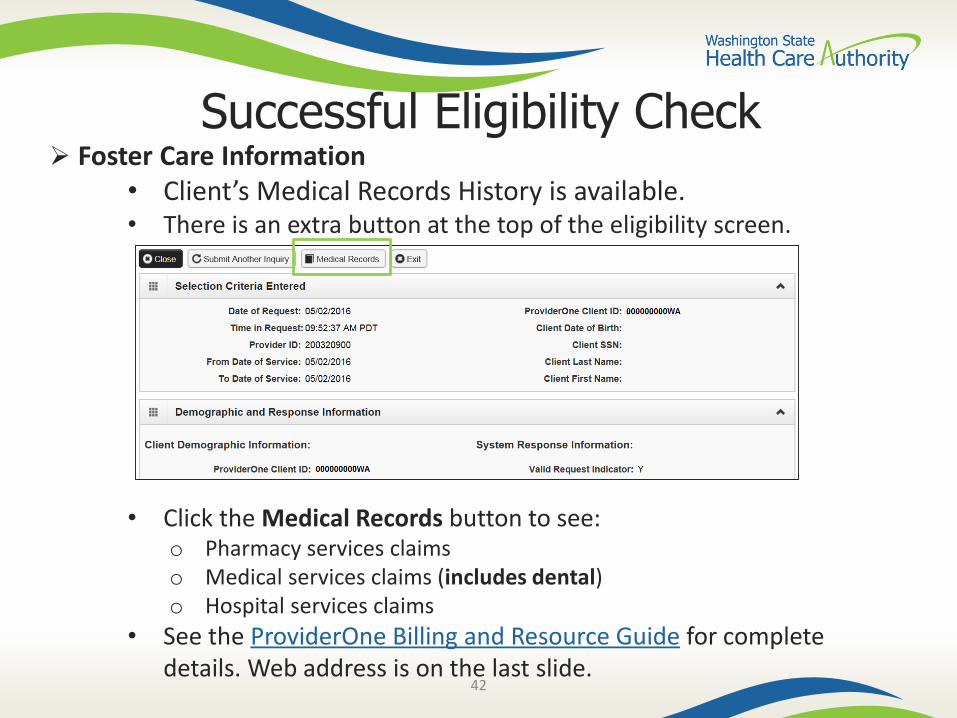
Successful Eligibility Check Foster Care Information
• Client’s Medical Records History is available.• There is an extra button at the top of the eligibility screen.
• Click the Medical Records button to see:o Pharmacy services claimso Medical services claims (includes dental)o Hospital services claims
• See the ProviderOne Billing and Resource Guide for complete details. Web address is on the last slide.
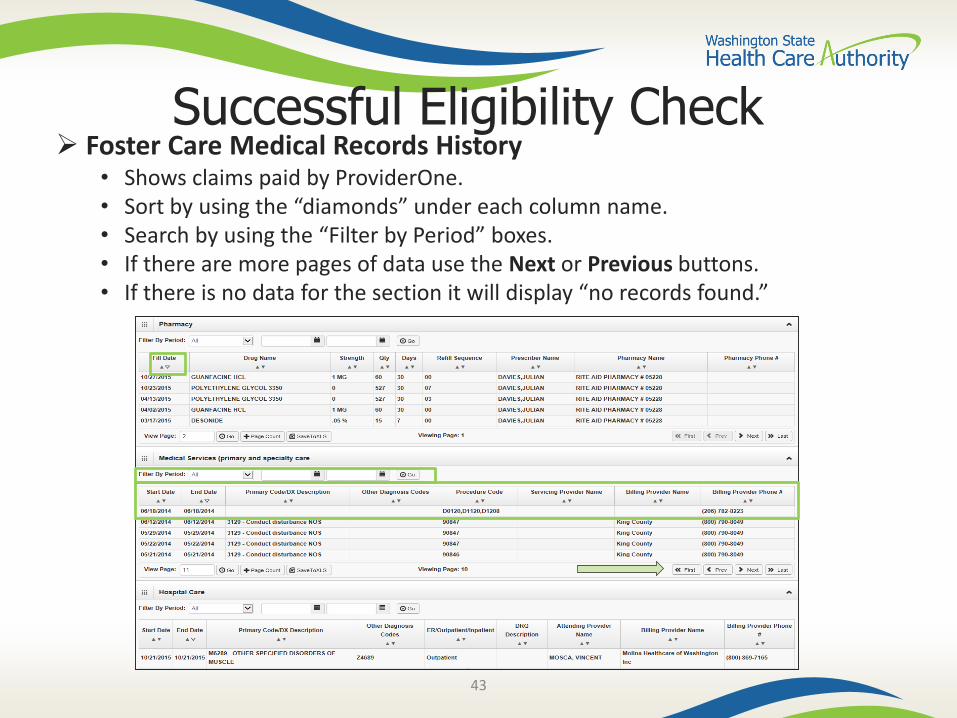
Successful Eligibility Check Foster Care Medical Records History
• Shows claims paid by ProviderOne.• Sort by using the “diamonds” under each column name. • Search by using the “Filter by Period” boxes.• If there are more pages of data use the Next or Previous buttons.• If there is no data for the section it will display “no records found.”
43
44
Gender and Date of Birth Updates
Verified with ProviderOne system staff as of 01/27/14:
• A large number of claims are denied due to a mismatch between the patient’s DOB in the provider's record and the ProviderOne's client eligibility file. Providers can send a secure email to [email protected] with the client's ProviderOne ID, name, and correct DOB. The same is true if providers find a gender mismatch; send the ProviderOne client ID, name, and correct gender to the same email address.
45
Verifying Eligibility
Coverage status can change at any time• Verify coverage for each visit.• Print the Benefit Inquiry result.• If eligibility changes after this verification, HCA will
honor the printed screen shoto Exception: Client with commercial insurance carrier that is loaded
after you verify eligibility; commercial insurance must be billed first.
46
Direct Data Entry (DDE) Claims
Fee For Service Claims andCommercial Insurance Secondary Claims
47
After this training, you can:
Submit fee for service DDE claims
Create and Submit TPL secondary claims DDE
• With backup
• Without backup
48
Direct Data Entry (DDE) Claims
ProviderOne allows providers to enter claims directly into the payment system.
All claim types can be submitted through the DDE system:• Professional (CMS 1500)• Institutional (UB-04)• Dental (ADA Form)
Providers can CORRECT and RESUBMIT denied or previously voided claims.
Providers can ADJUST or VOID previously paid claims.

49
Determine What Profile to UseWith the upgrade to 3.0, ProviderOne allows you to change your profile in more than one place.
At initial login:
And in the portal:
Note: Using My Inbox to change profiles, takes you back to the main profile screen.
50
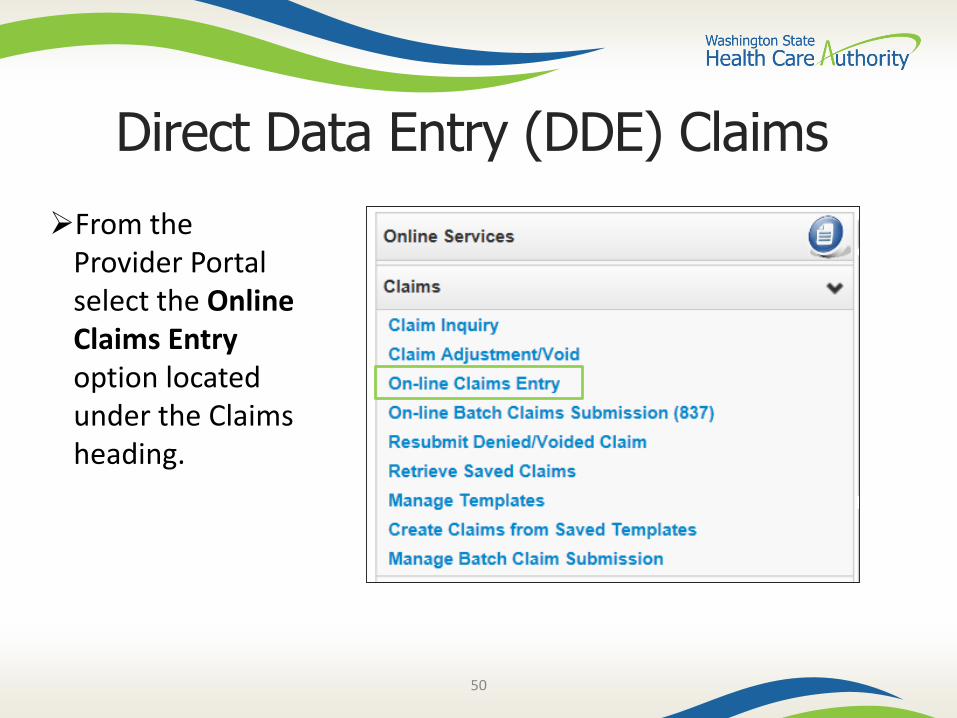
Direct Data Entry (DDE) Claims
From the Provider Portal select the Online Claims Entry option located under the Claims heading.
51
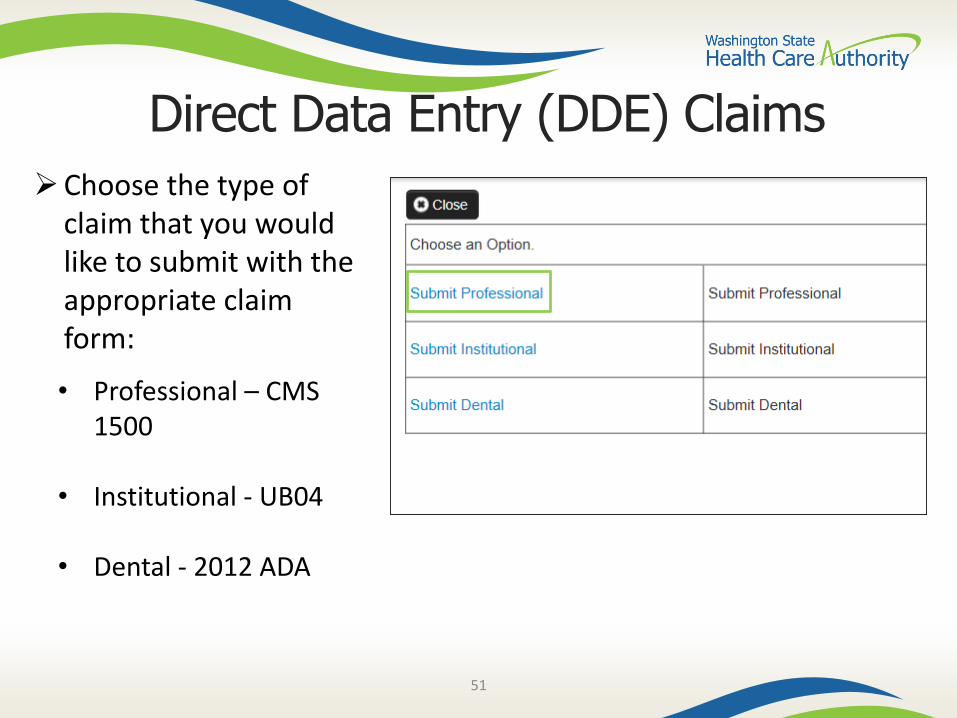
Choose the type of claim that you would like to submit with the appropriate claim form:
• Professional – CMS 1500
• Institutional - UB04
• Dental - 2012 ADA
Direct Data Entry (DDE) Claims
52
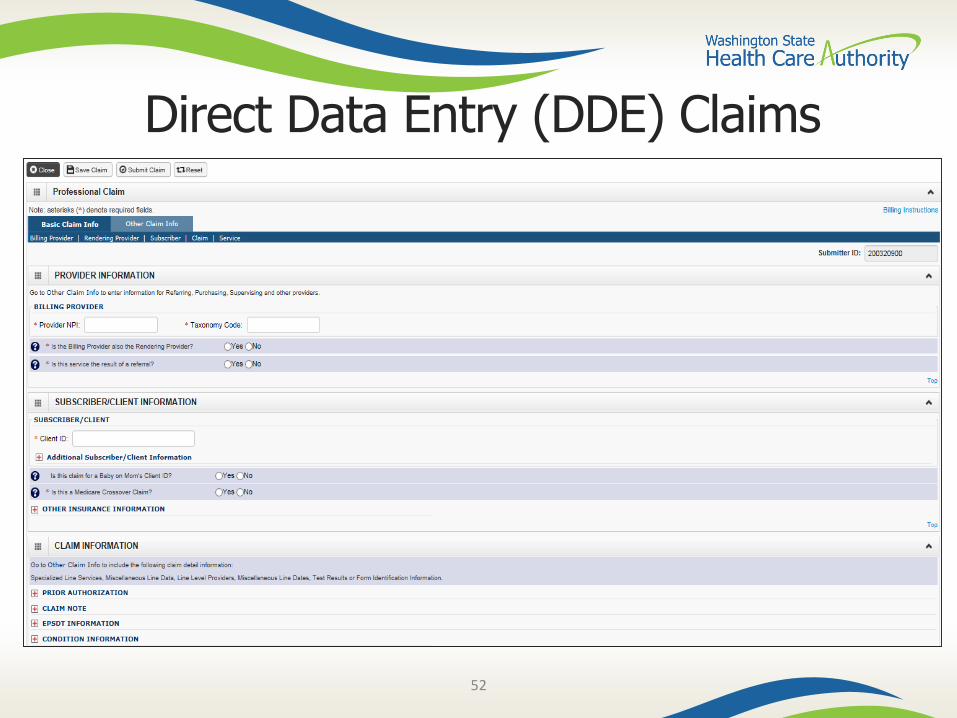
Direct Data Entry (DDE) Claims
53
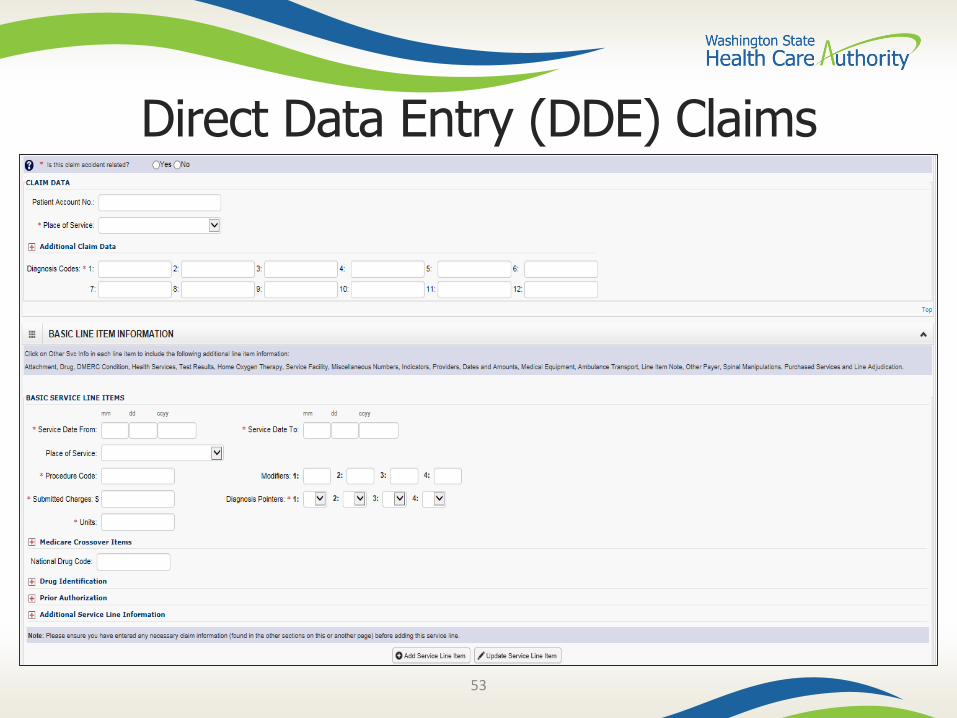
Direct Data Entry (DDE) Claims
54
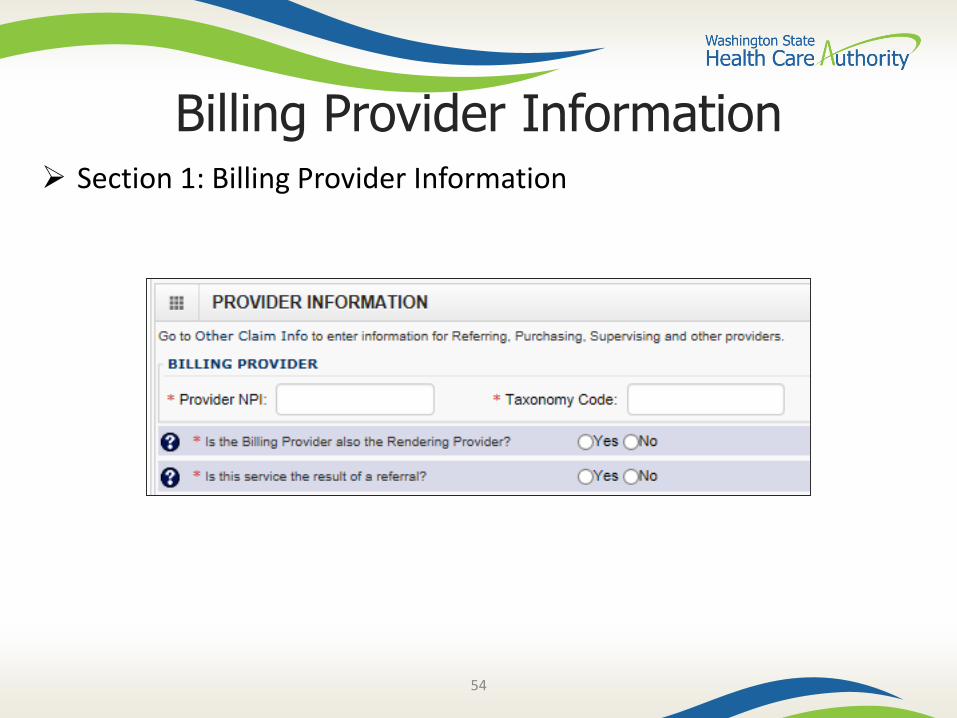
Billing Provider Information Section 1: Billing Provider Information
55
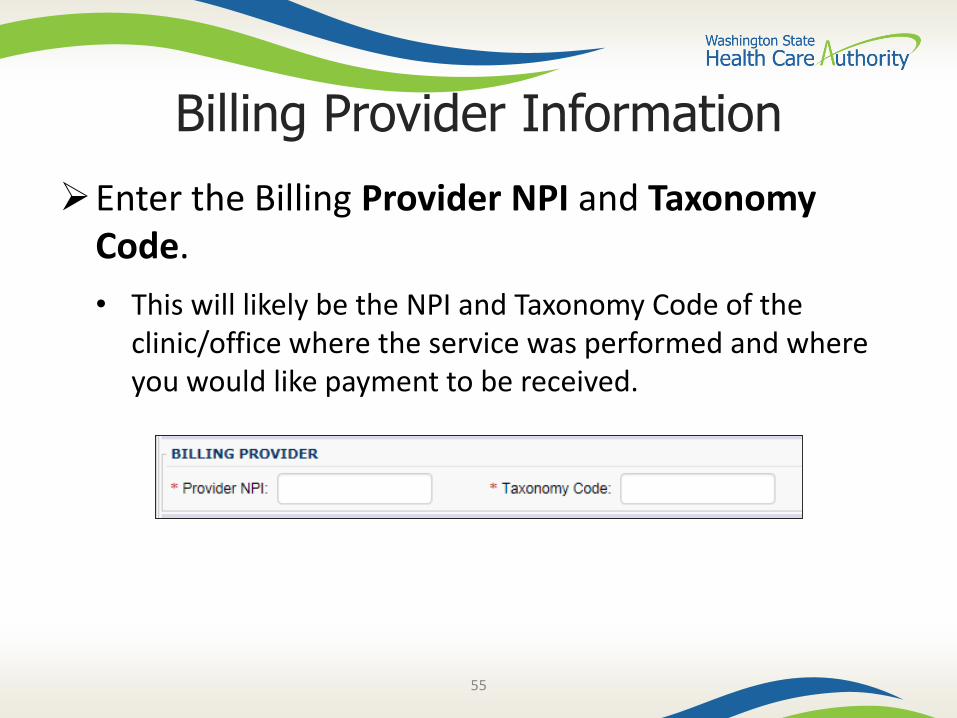
Billing Provider Information
Enter the Billing Provider NPI and Taxonomy Code.
• This will likely be the NPI and Taxonomy Code of the clinic/office where the service was performed and where you would like payment to be received.
56
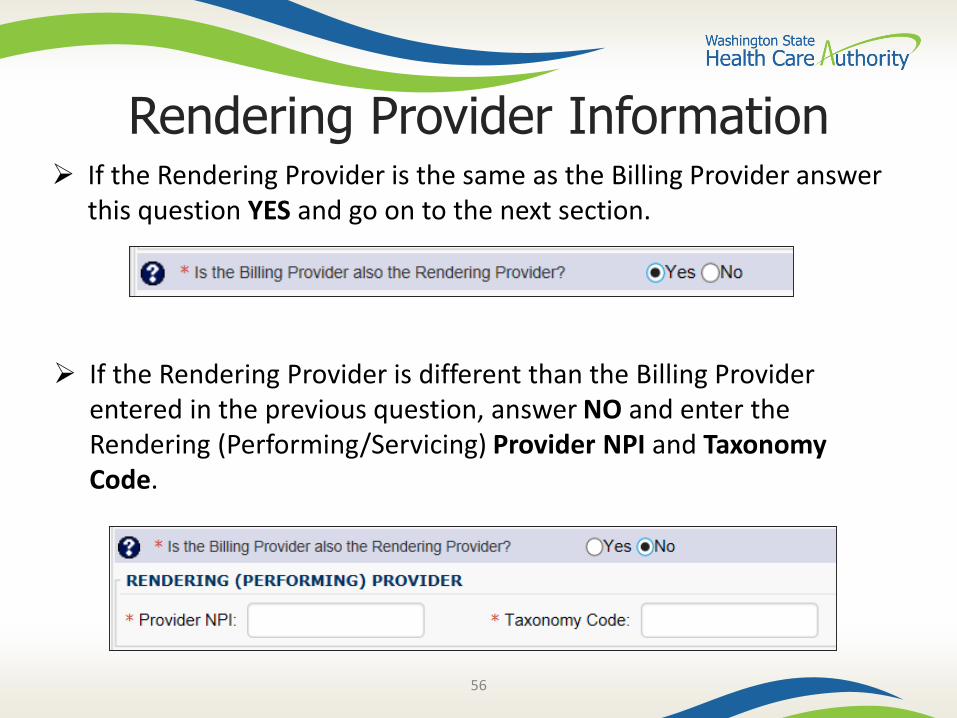
Rendering Provider Information If the Rendering Provider is the same as the Billing Provider answer
this question YES and go on to the next section.
If the Rendering Provider is different than the Billing Provider entered in the previous question, answer NO and enter the Rendering (Performing/Servicing) Provider NPI and Taxonomy Code.
57
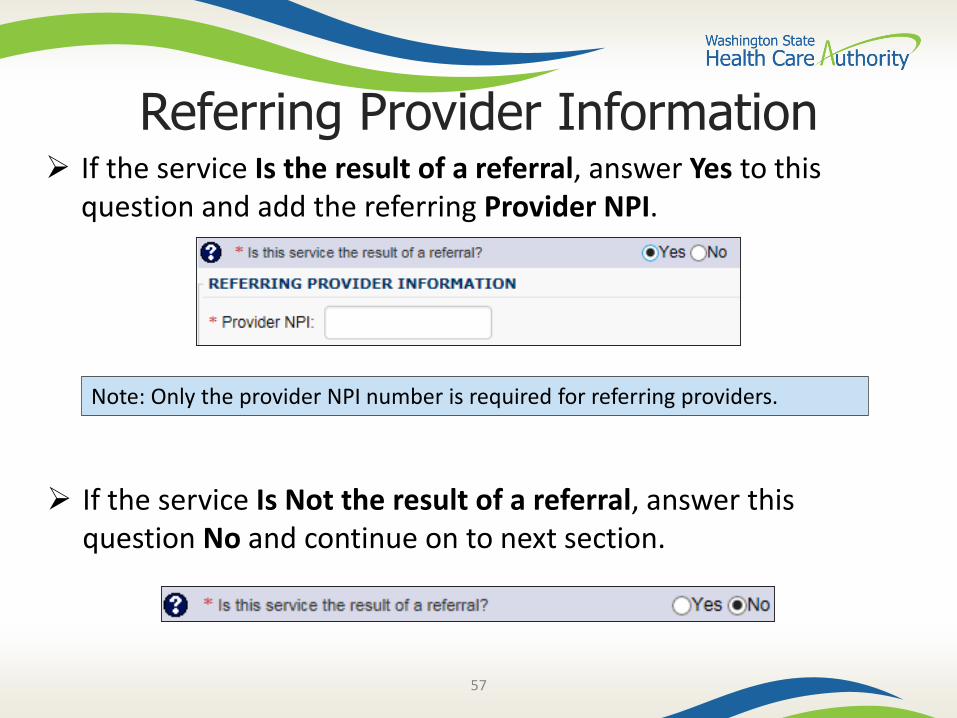
Referring Provider Information
Note: Only the provider NPI number is required for referring providers.
If the service Is the result of a referral, answer Yes to this question and add the referring Provider NPI.
If the service Is Not the result of a referral, answer this question No and continue on to next section.
58
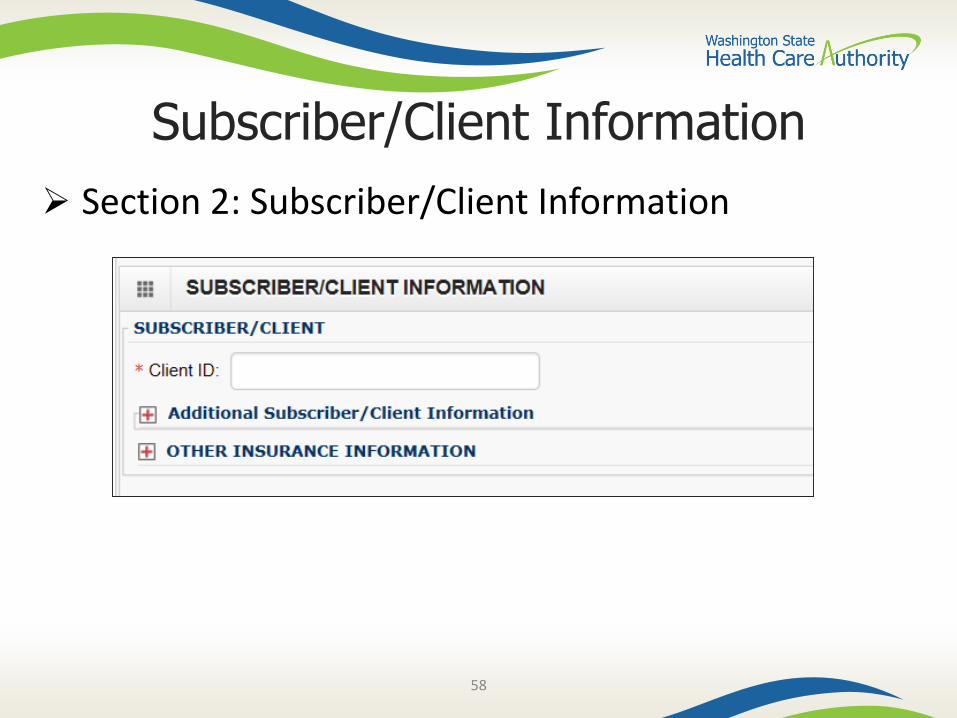
Subscriber/Client Information
Section 2: Subscriber/Client Information
59
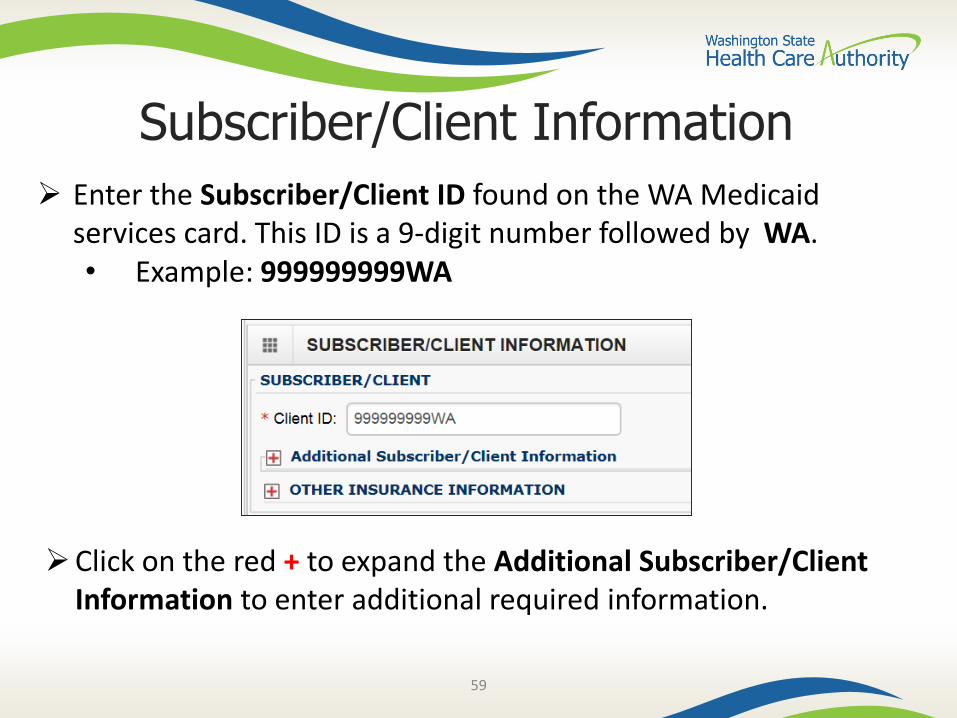
Subscriber/Client Information
Enter the Subscriber/Client ID found on the WA Medicaid services card. This ID is a 9-digit number followed by WA.• Example: 999999999WA
Click on the red + to expand the Additional Subscriber/Client Information to enter additional required information.
60
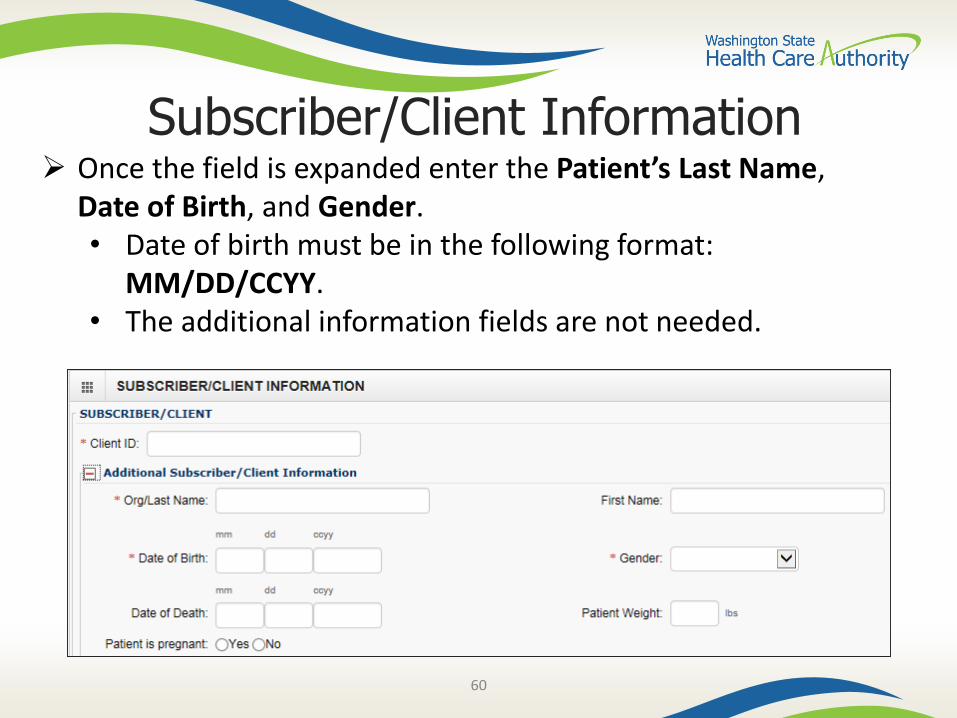
Subscriber/Client Information Once the field is expanded enter the Patient’s Last Name,
Date of Birth, and Gender.• Date of birth must be in the following format:
MM/DD/CCYY. • The additional information fields are not needed.
61
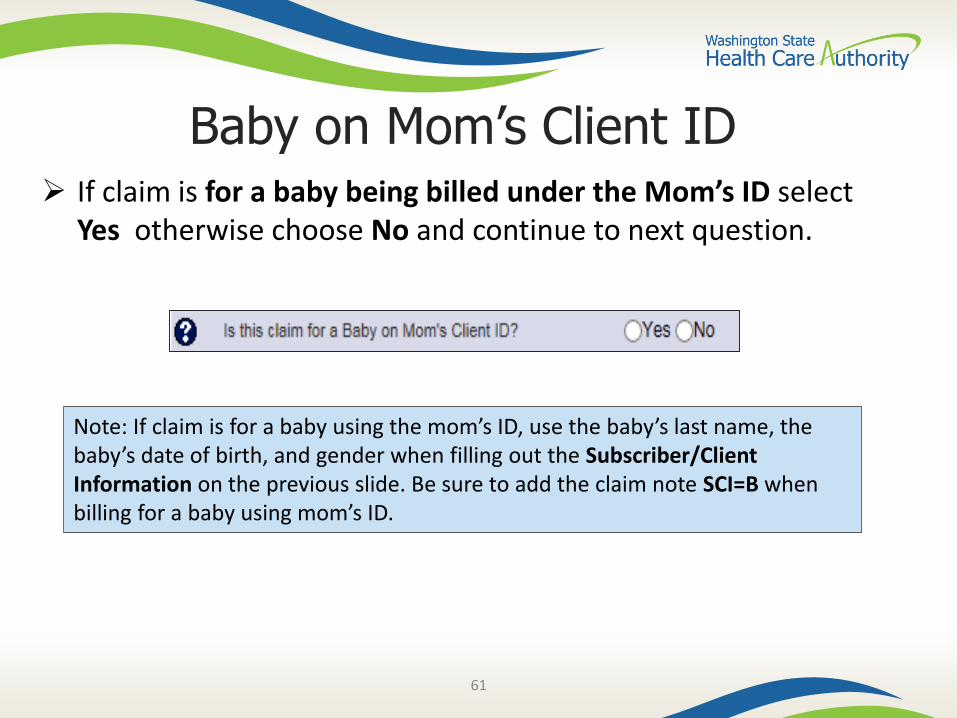
Baby on Mom’s Client ID If claim is for a baby being billed under the Mom’s ID select
Yes otherwise choose No and continue to next question.
Note: If claim is for a baby using the mom’s ID, use the baby’s last name, the baby’s date of birth, and gender when filling out the Subscriber/Client Information on the previous slide. Be sure to add the claim note SCI=B when billing for a baby using mom’s ID.
62
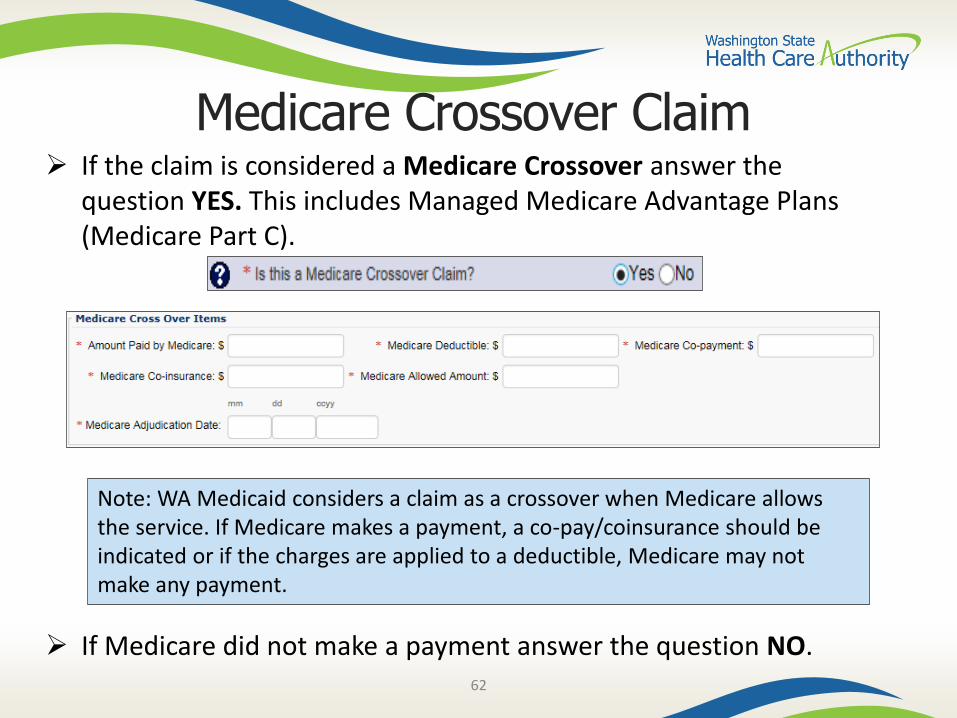
Medicare Crossover Claim If the claim is considered a Medicare Crossover answer the
question YES. This includes Managed Medicare Advantage Plans (Medicare Part C).
If Medicare did not make a payment answer the question NO.
Note: WA Medicaid considers a claim as a crossover when Medicare allows the service. If Medicare makes a payment, a co-pay/coinsurance should be indicated or if the charges are applied to a deductible, Medicare may not make any payment.

63
Insurance Other than Medicaid If the client has other commercial insurance, open the Other
Insurance Information section by clicking on the red + expander. If there is no insurance, skip over this.
Then open up the 1 Other Payer Insurance Information section by clicking on the red + expander.
Note: Bill paid and denied lines on the same claim. This will result in more efficient and quicker processing of your TPL claim.
64
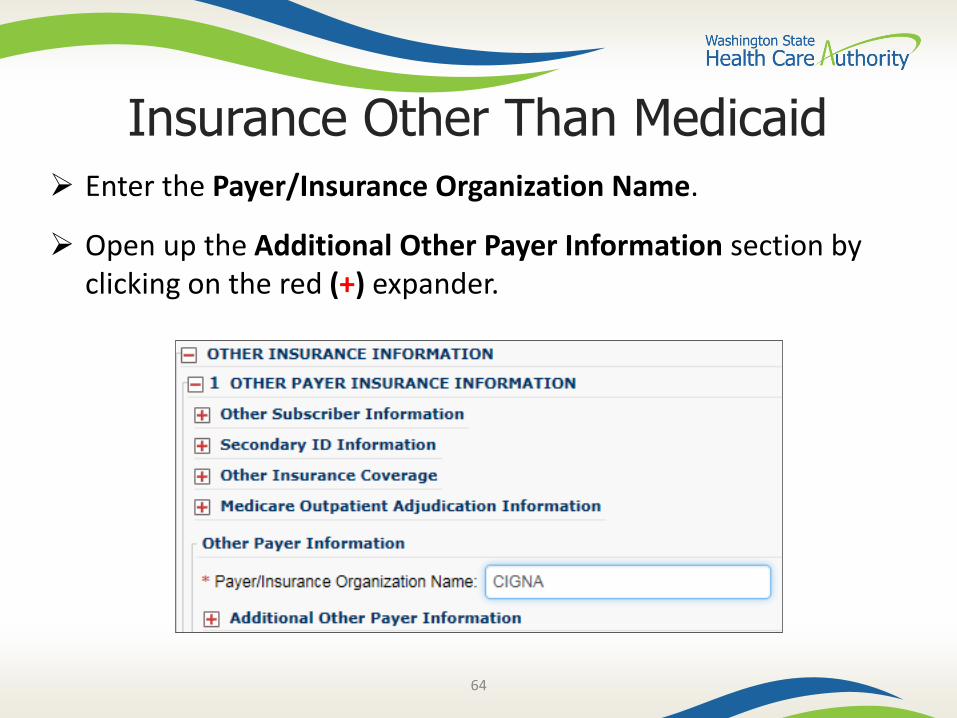
Insurance Other Than Medicaid Enter the Payer/Insurance Organization Name.
Open up the Additional Other Payer Information section by clicking on the red (+) expander.
65
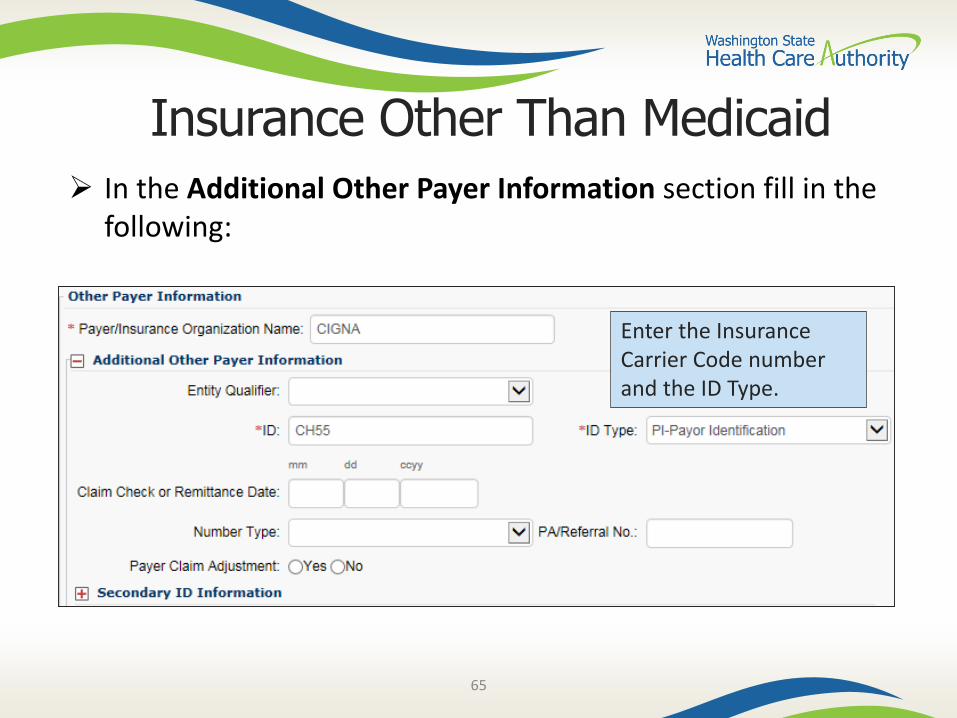
Insurance Other Than Medicaid
In the Additional Other Payer Information section fill in the following:
Enter the Insurance Carrier Code number and the ID Type.
66
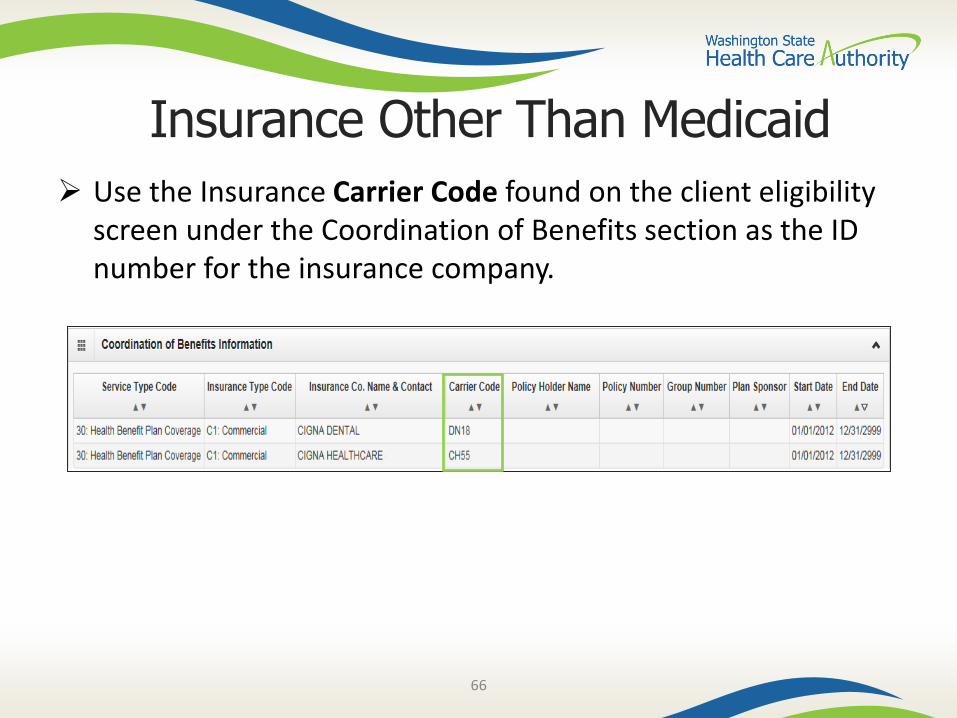
Insurance Other Than Medicaid
Use the Insurance Carrier Code found on the client eligibility screen under the Coordination of Benefits section as the ID number for the insurance company.
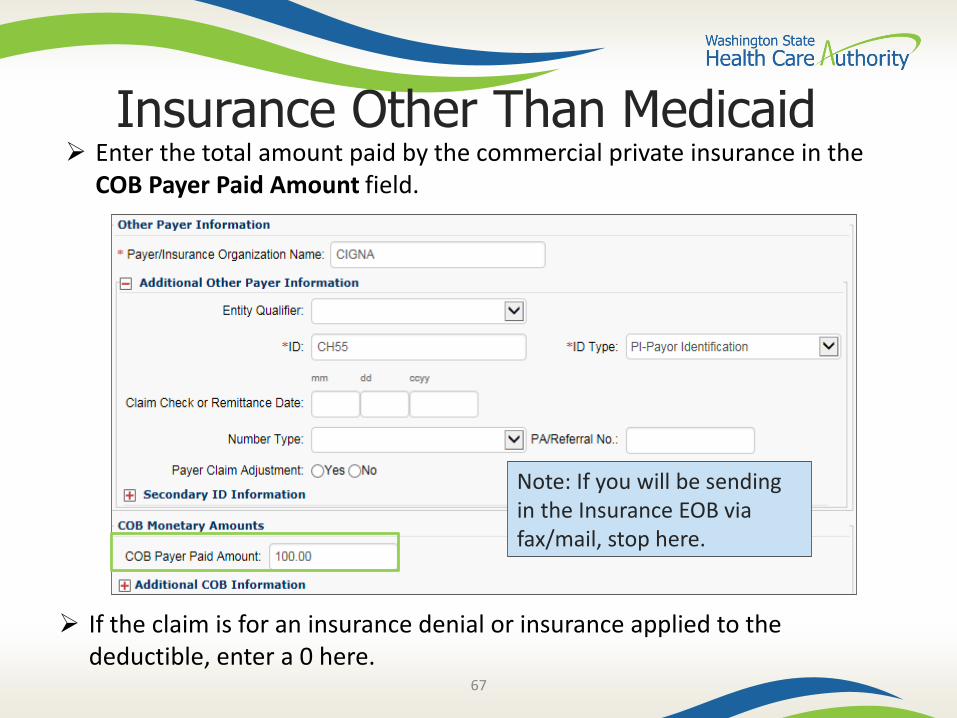
Enter the total amount paid by the commercial private insurance in the COB Payer Paid Amount field.
67
Insurance Other Than Medicaid
If the claim is for an insurance denial or insurance applied to the deductible, enter a 0 here.
Note: If you will be sending in the Insurance EOB via fax/mail, stop here.
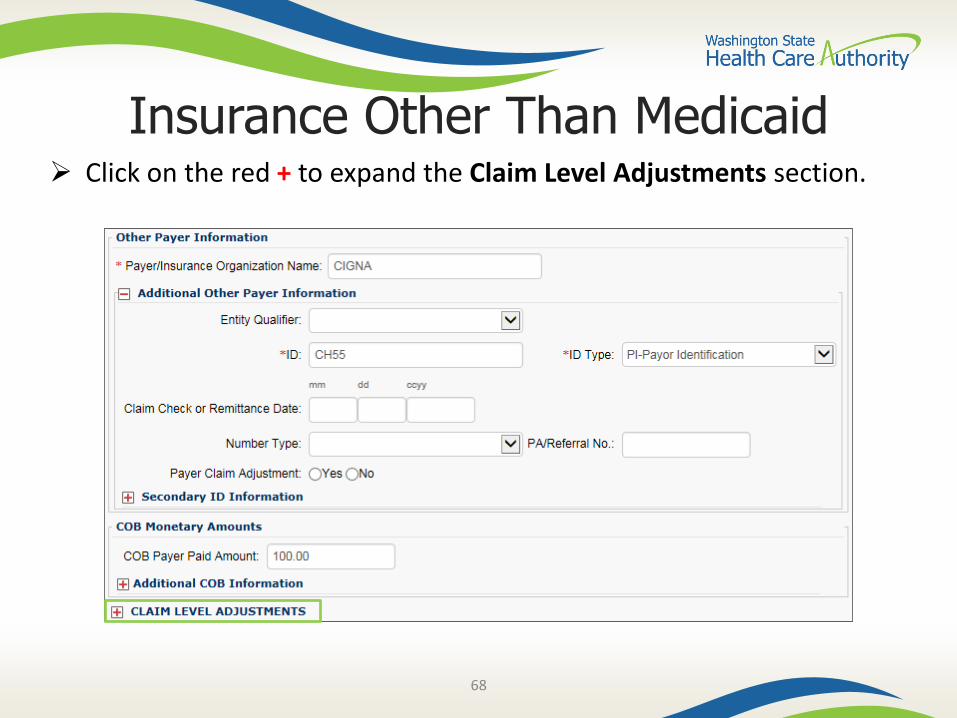
68
Insurance Other Than Medicaid Click on the red + to expand the Claim Level Adjustments section.
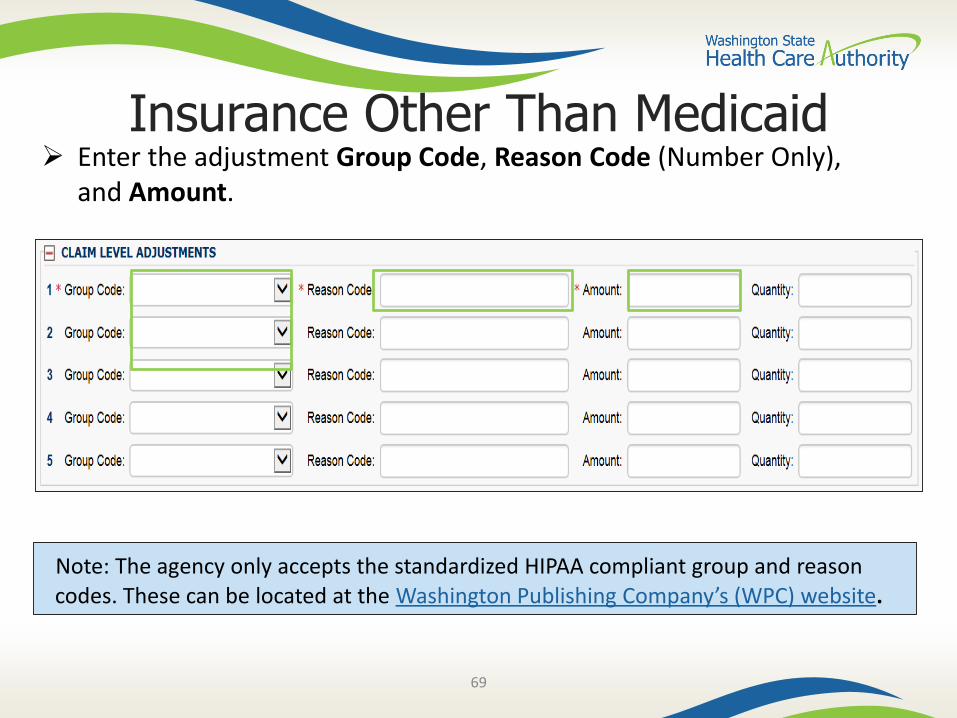
69
Insurance Other Than Medicaid Enter the adjustment Group Code, Reason Code (Number Only),
and Amount.
Note: The agency only accepts the standardized HIPAA compliant group and reason codes. These can be located at the Washington Publishing Company’s (WPC) website.
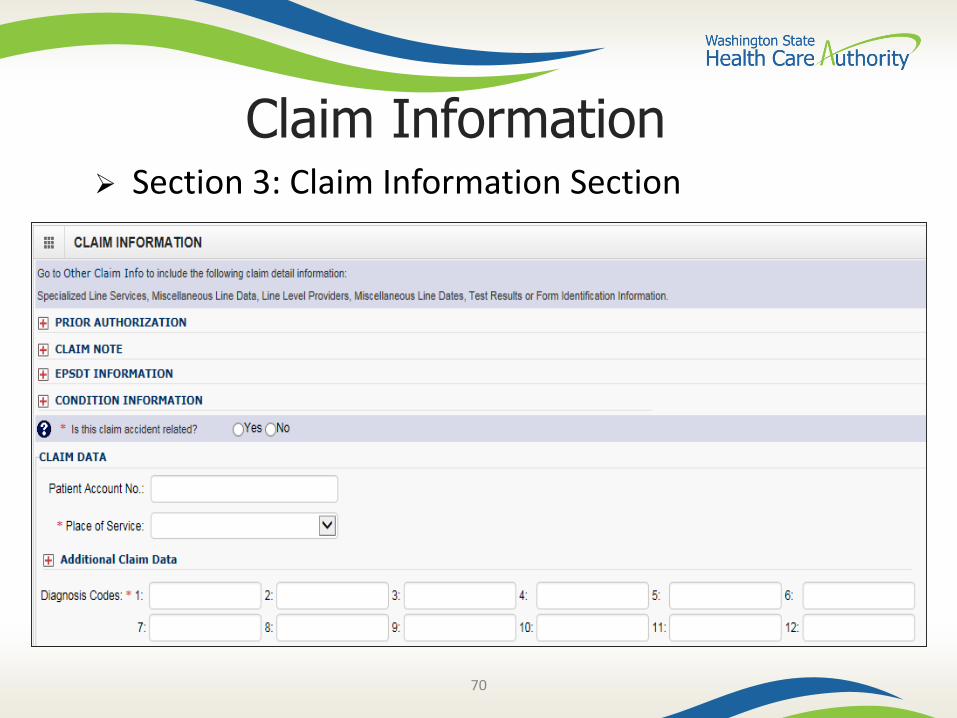
70
Claim Information Section 3: Claim Information Section
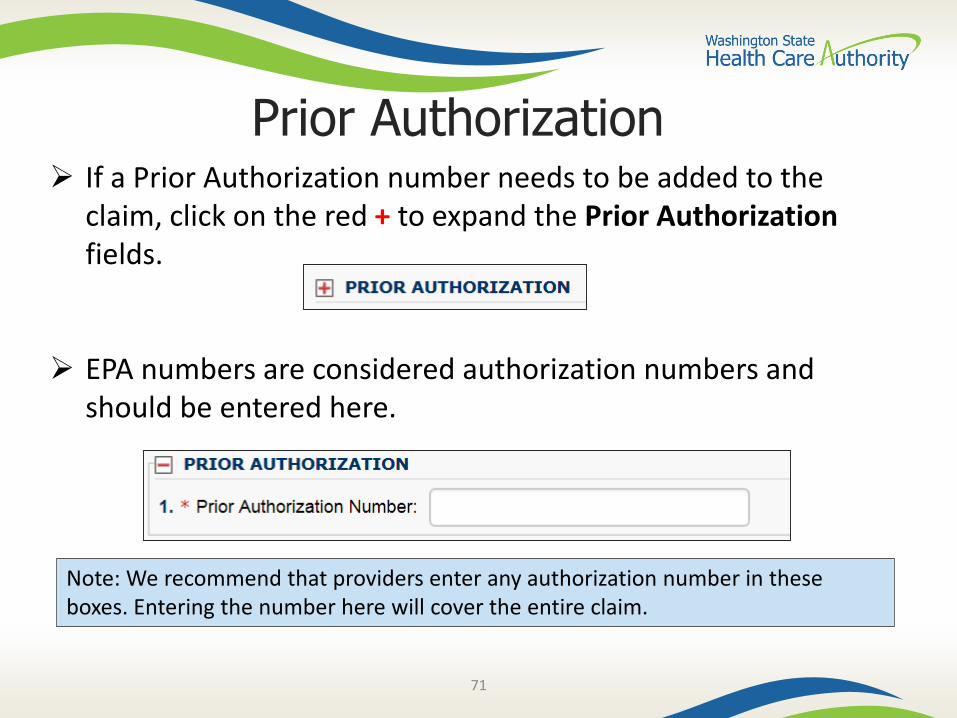
71
Prior Authorization If a Prior Authorization number needs to be added to the
claim, click on the red + to expand the Prior Authorization fields.
EPA numbers are considered authorization numbers and should be entered here.
Note: We recommend that providers enter any authorization number in these boxes. Entering the number here will cover the entire claim.
72
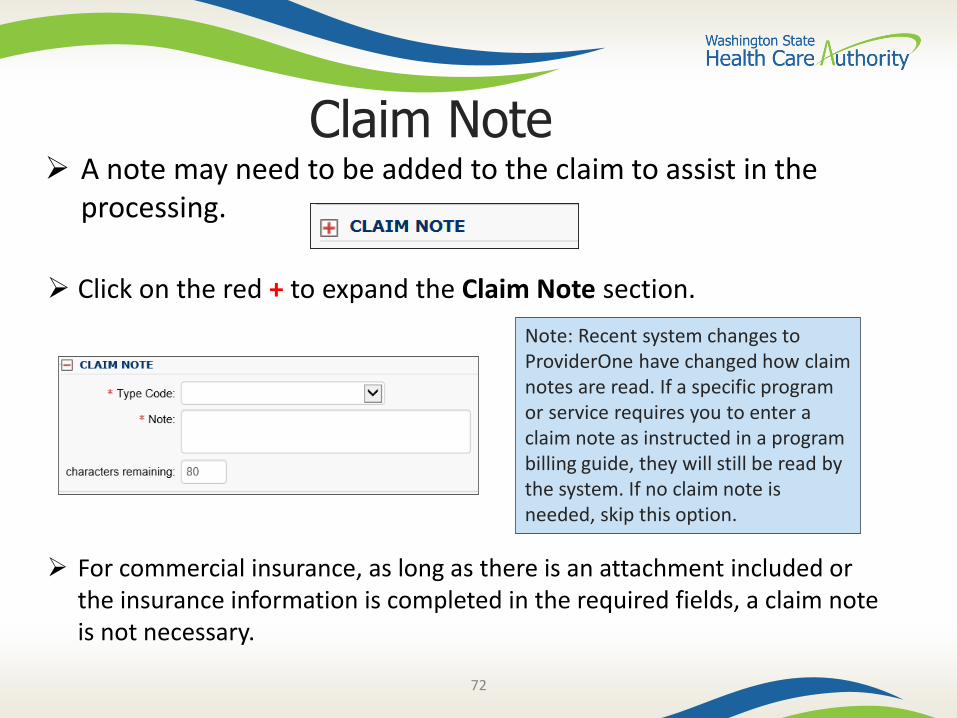
Claim Note A note may need to be added to the claim to assist in the
processing.
Click on the red + to expand the Claim Note section.
For commercial insurance, as long as there is an attachment included or the insurance information is completed in the required fields, a claim note is not necessary.
Note: Recent system changes to ProviderOne have changed how claim notes are read. If a specific program or service requires you to enter a claim note as instructed in a program billing guide, they will still be read by the system. If no claim note is needed, skip this option.
73
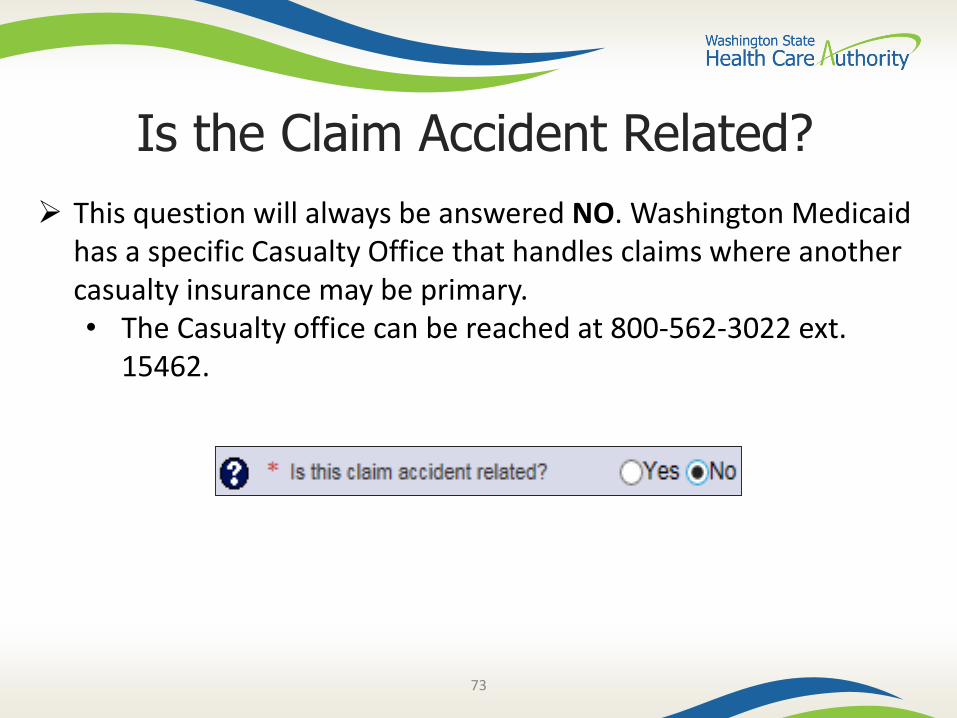
Is the Claim Accident Related?
This question will always be answered NO. Washington Medicaid has a specific Casualty Office that handles claims where another casualty insurance may be primary.• The Casualty office can be reached at 800-562-3022 ext.
15462.
74
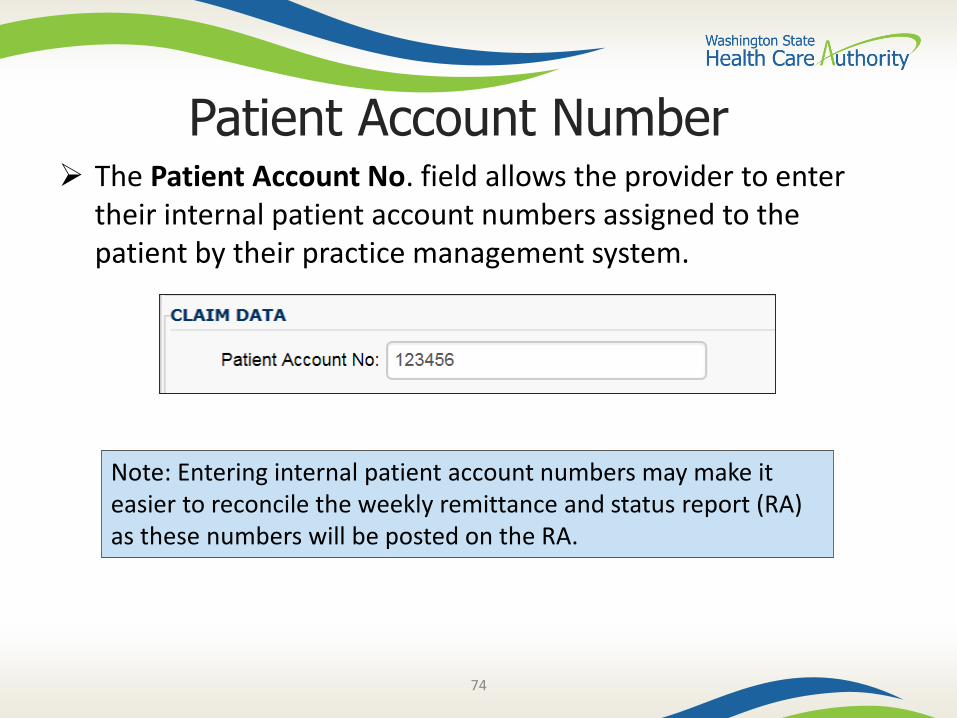
Patient Account Number The Patient Account No. field allows the provider to enter
their internal patient account numbers assigned to the patient by their practice management system.
Note: Entering internal patient account numbers may make it easier to reconcile the weekly remittance and status report (RA) as these numbers will be posted on the RA.
75
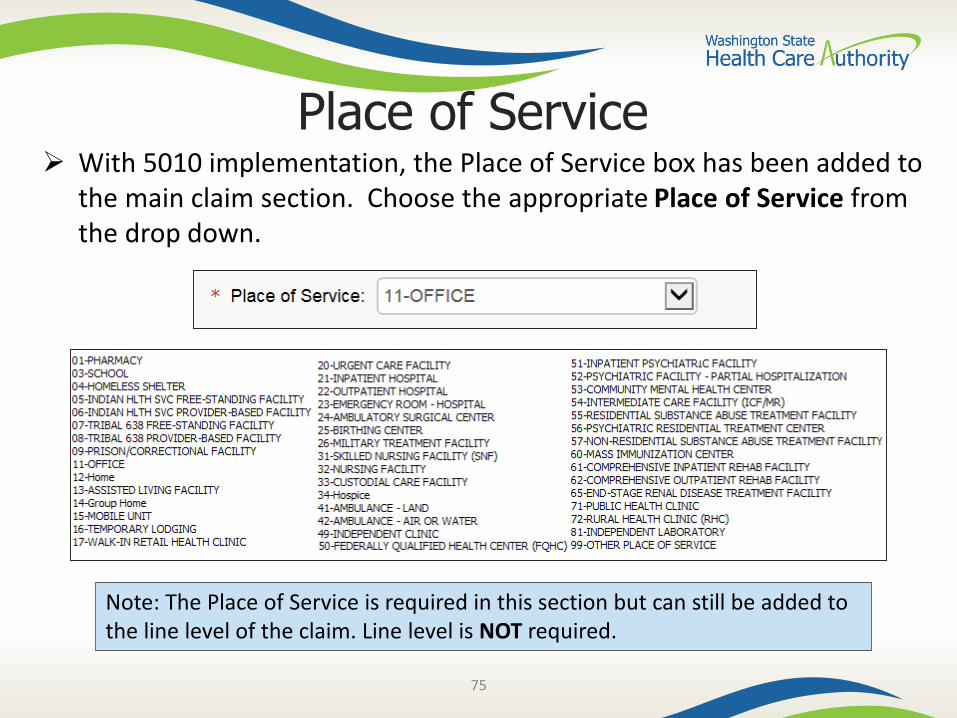
Place of Service With 5010 implementation, the Place of Service box has been added to
the main claim section. Choose the appropriate Place of Service from the drop down.
Note: The Place of Service is required in this section but can still be added to the line level of the claim. Line level is NOT required.
76
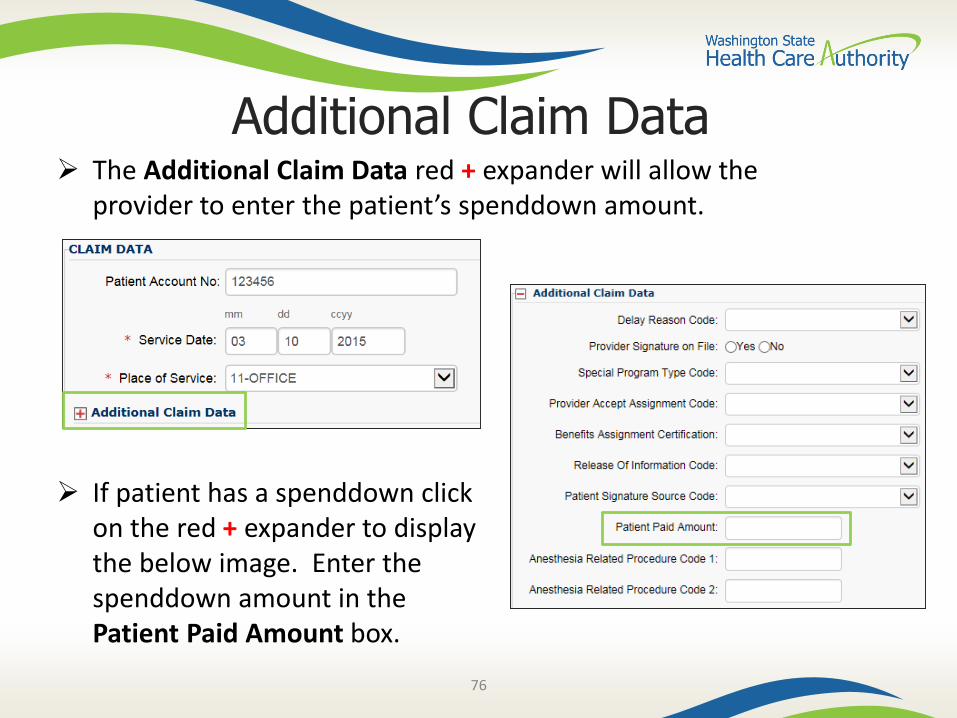
Additional Claim Data The Additional Claim Data red + expander will allow the
provider to enter the patient’s spenddown amount.
If patient has a spenddown click on the red + expander to display the below image. Enter the spenddown amount in the Patient Paid Amount box.
77
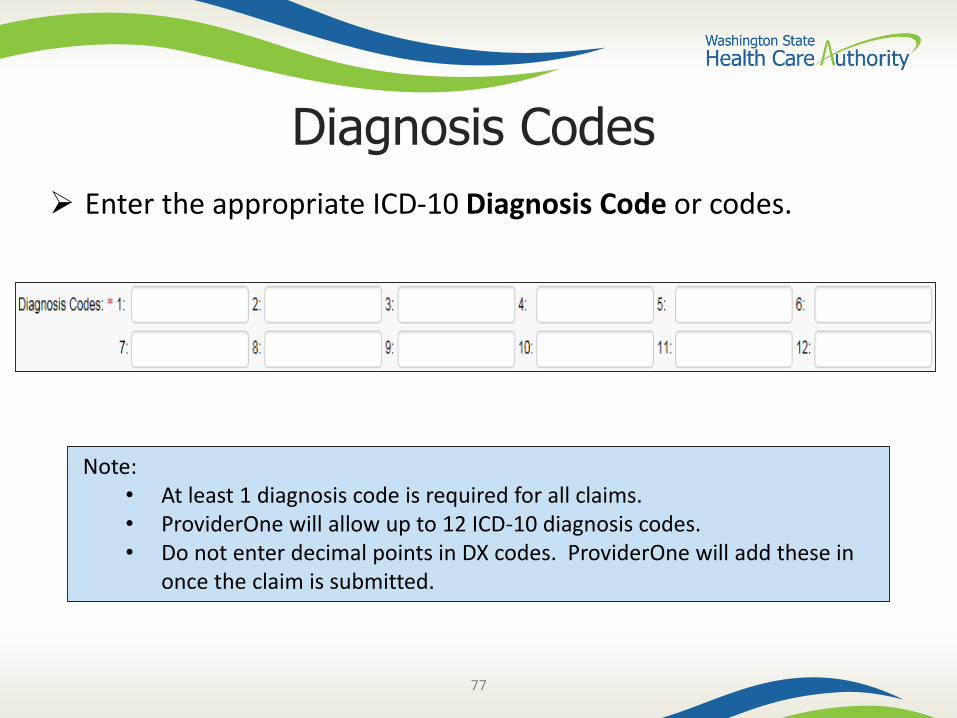
Diagnosis Codes
Enter the appropriate ICD-10 Diagnosis Code or codes.
Note:• At least 1 diagnosis code is required for all claims.• ProviderOne will allow up to 12 ICD-10 diagnosis codes.• Do not enter decimal points in DX codes. ProviderOne will add these in
once the claim is submitted.
78
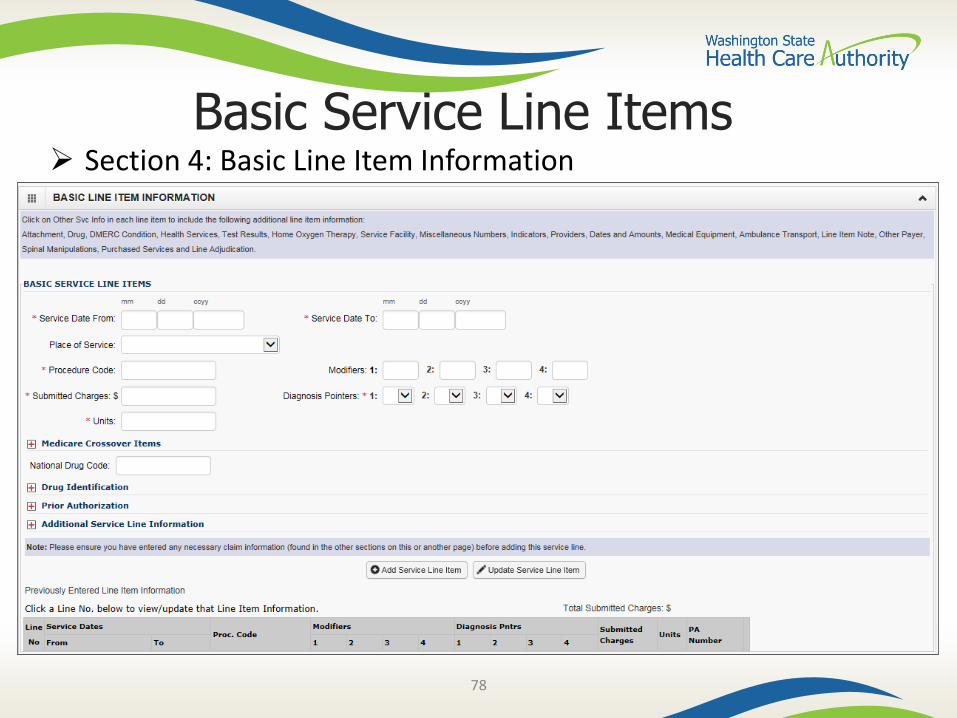
Basic Service Line Items Section 4: Basic Line Item Information
79
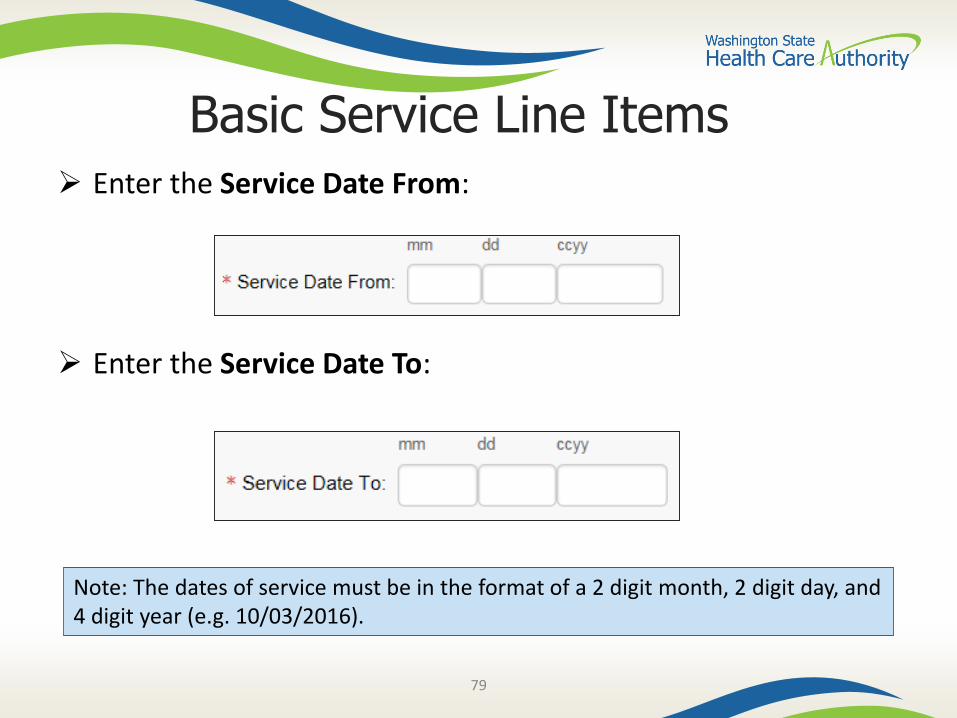
Basic Service Line Items Enter the Service Date From:
Enter the Service Date To:
Note: The dates of service must be in the format of a 2 digit month, 2 digit day, and 4 digit year (e.g. 10/03/2016).
80
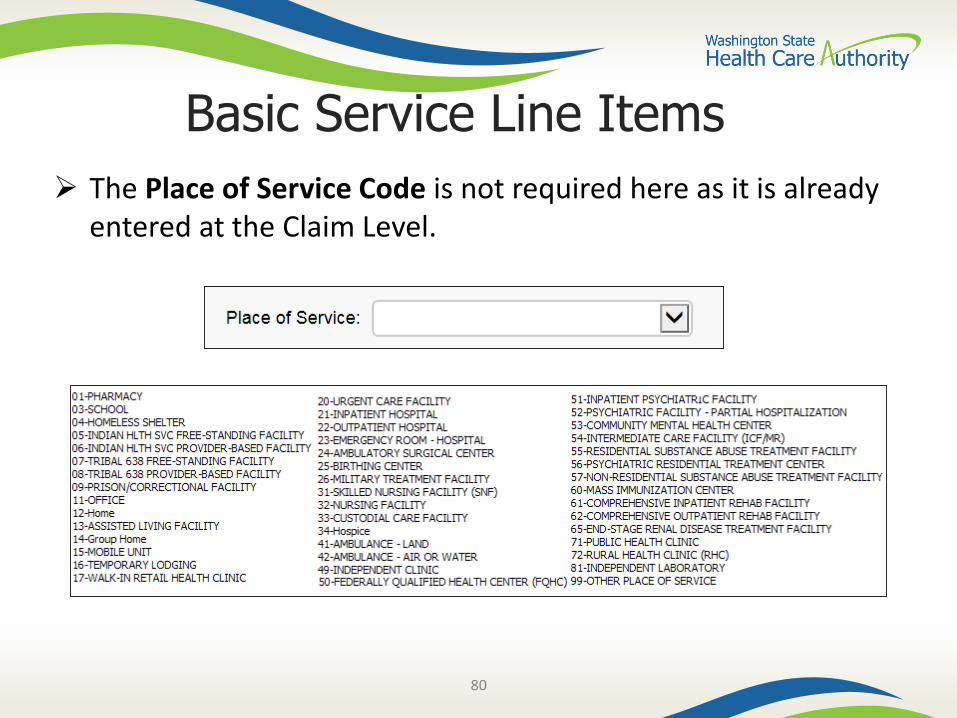
Basic Service Line Items
The Place of Service Code is not required here as it is already entered at the Claim Level.
81
Basic Service Line Items
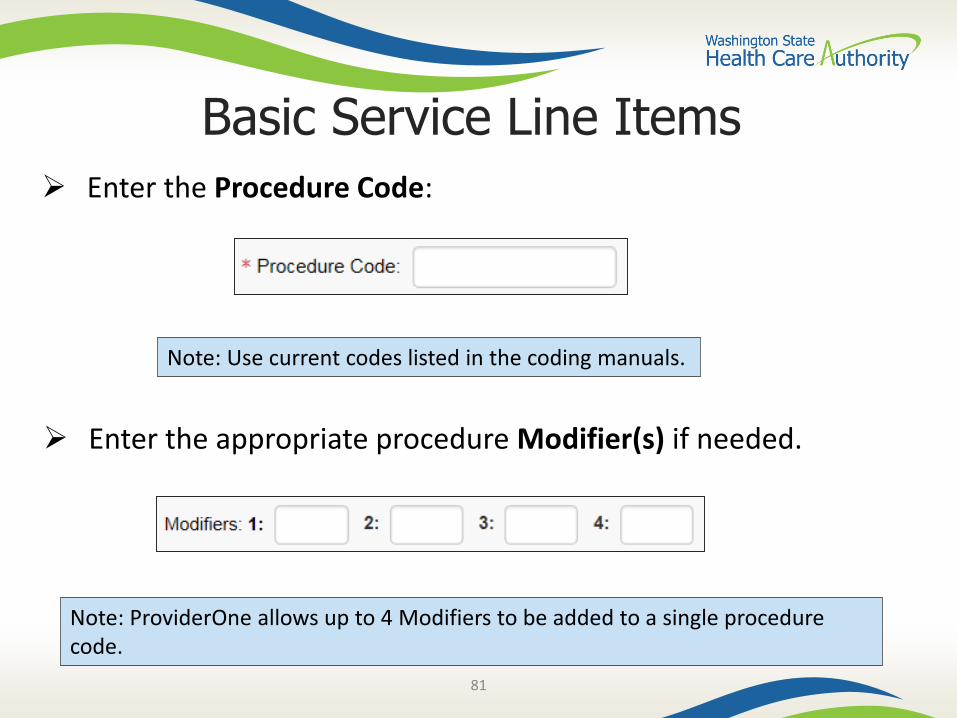
Enter the Procedure Code:
Note: Use current codes listed in the coding manuals.
Enter the appropriate procedure Modifier(s) if needed.
Note: ProviderOne allows up to 4 Modifiers to be added to a single procedure code.
82
Basic Service Line Items
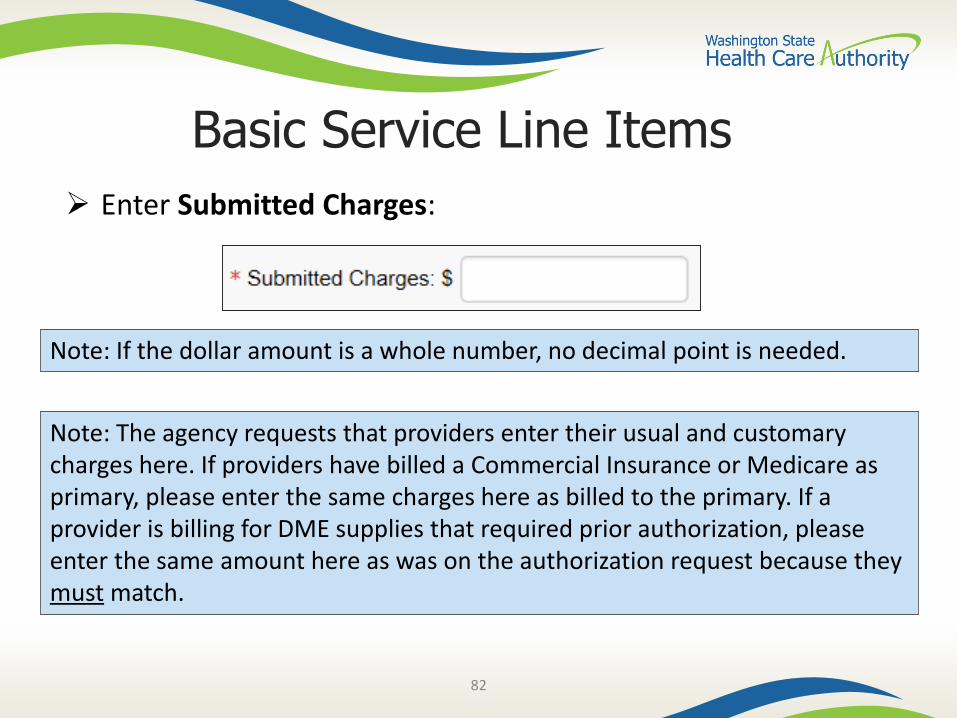
Enter Submitted Charges:
Note: If the dollar amount is a whole number, no decimal point is needed.
Note: The agency requests that providers enter their usual and customary charges here. If providers have billed a Commercial Insurance or Medicare as primary, please enter the same charges here as billed to the primary. If a provider is billing for DME supplies that required prior authorization, please enter the same amount here as was on the authorization request because they must match.
83
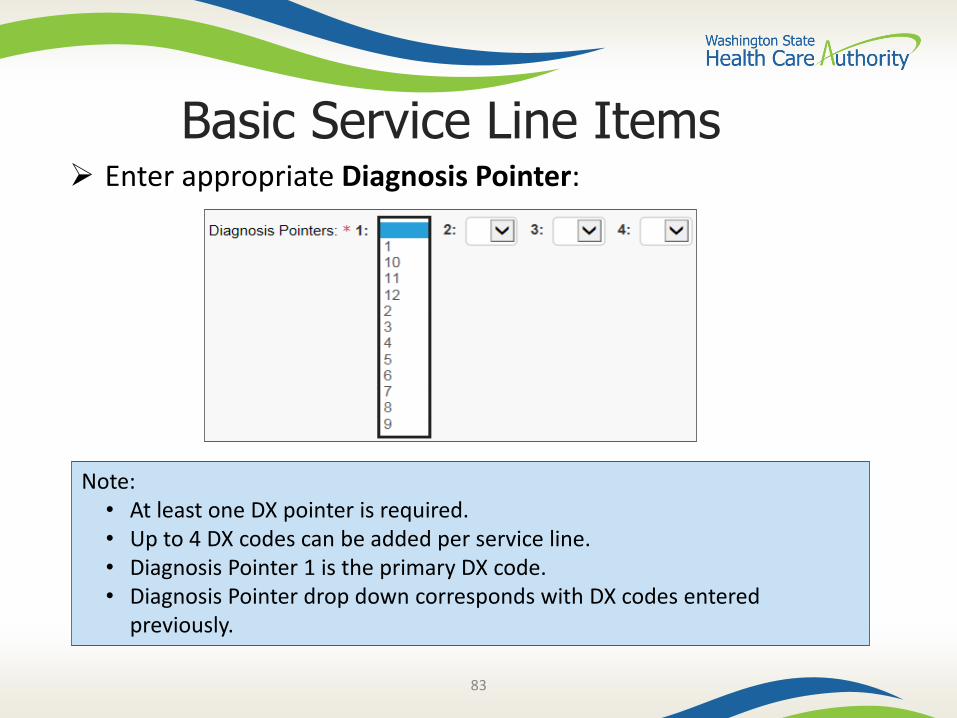
Basic Service Line Items Enter appropriate Diagnosis Pointer:
Note: • At least one DX pointer is required.• Up to 4 DX codes can be added per service line.• Diagnosis Pointer 1 is the primary DX code.• Diagnosis Pointer drop down corresponds with DX codes entered
previously.
84
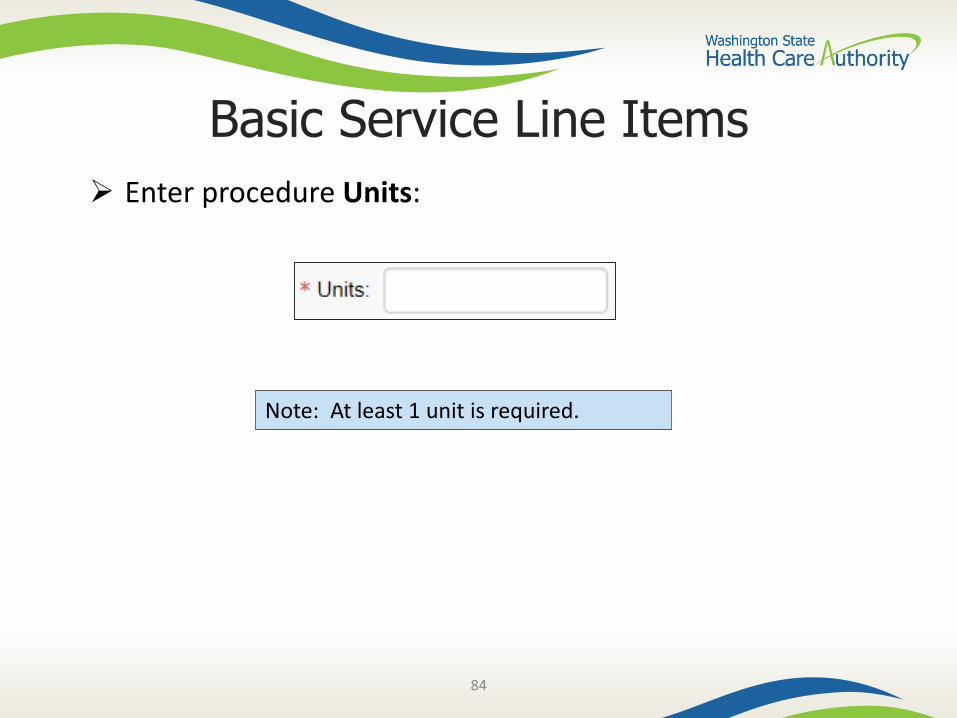
Basic Service Line Items
Enter procedure Units:
Note: At least 1 unit is required.
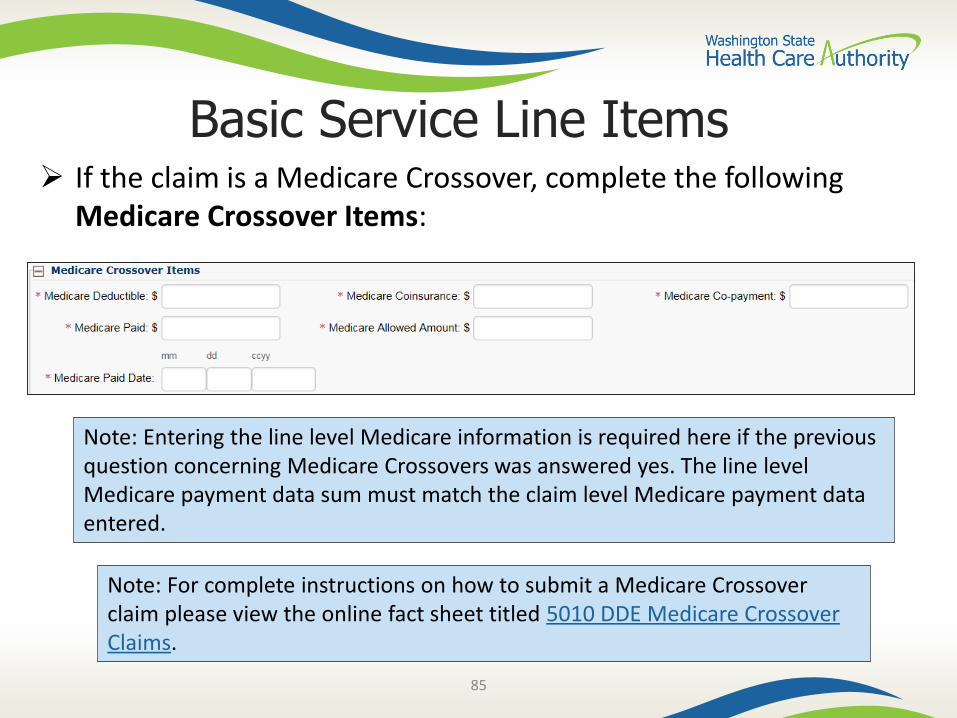
Basic Service Line Items If the claim is a Medicare Crossover, complete the following
Medicare Crossover Items:
Note: Entering the line level Medicare information is required here if the previous question concerning Medicare Crossovers was answered yes. The line level Medicare payment data sum must match the claim level Medicare payment data entered.
Note: For complete instructions on how to submit a Medicare Crossover claim please view the online fact sheet titled 5010 DDE Medicare Crossover Claims.
85
86
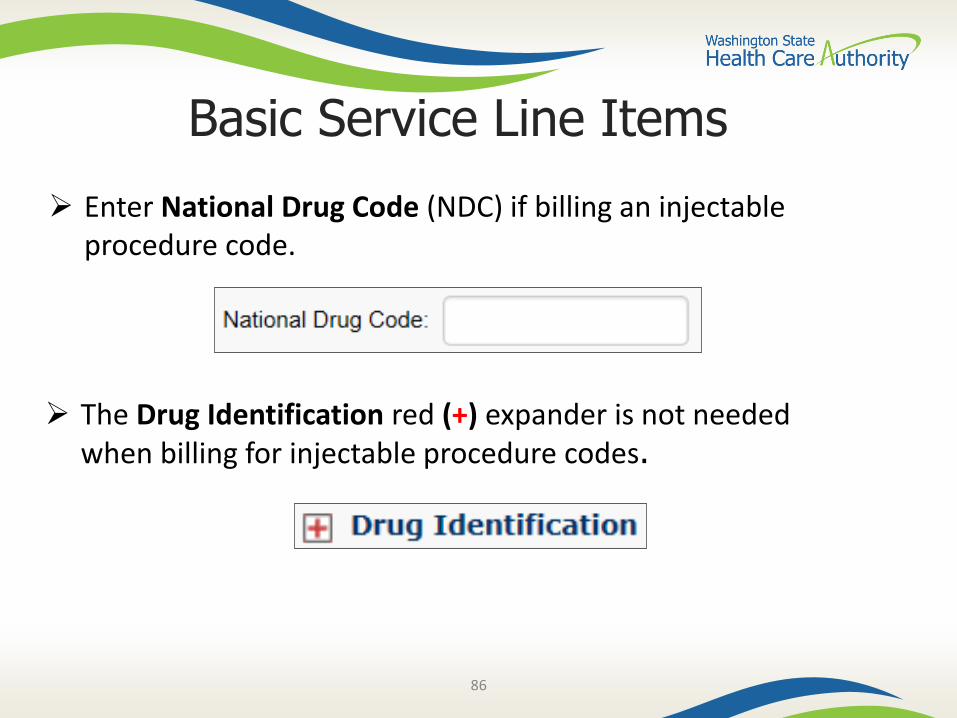
Basic Service Line Items
Enter National Drug Code (NDC) if billing an injectable procedure code.
The Drug Identification red (+) expander is not needed when billing for injectable procedure codes.
87
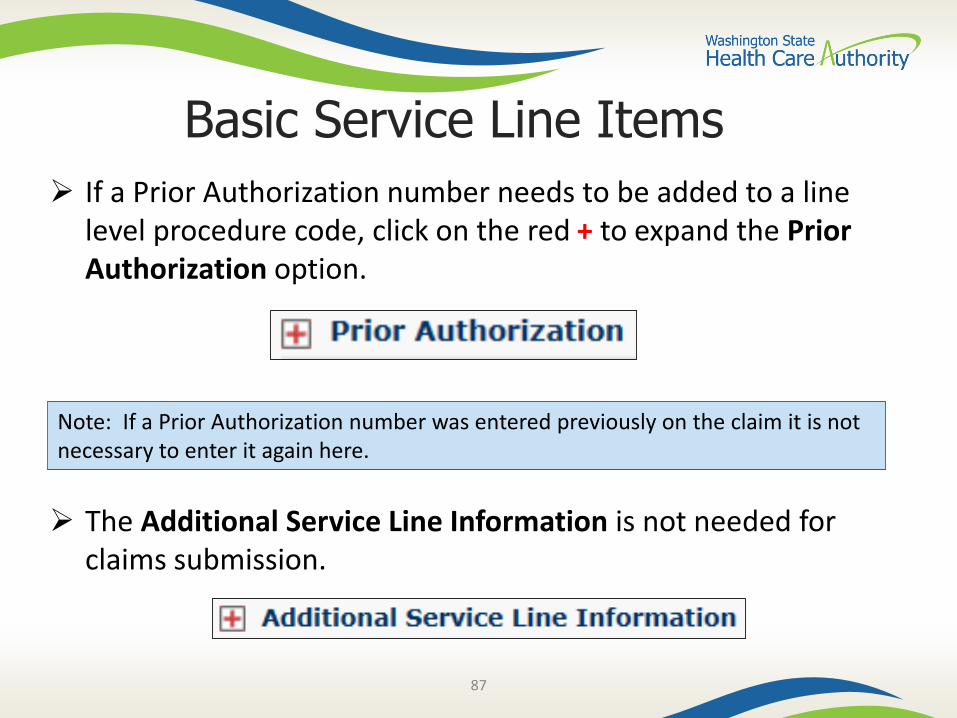
Basic Service Line Items
If a Prior Authorization number needs to be added to a line level procedure code, click on the red + to expand the Prior Authorization option.
Note: If a Prior Authorization number was entered previously on the claim it is not necessary to enter it again here.
The Additional Service Line Information is not needed for claims submission.
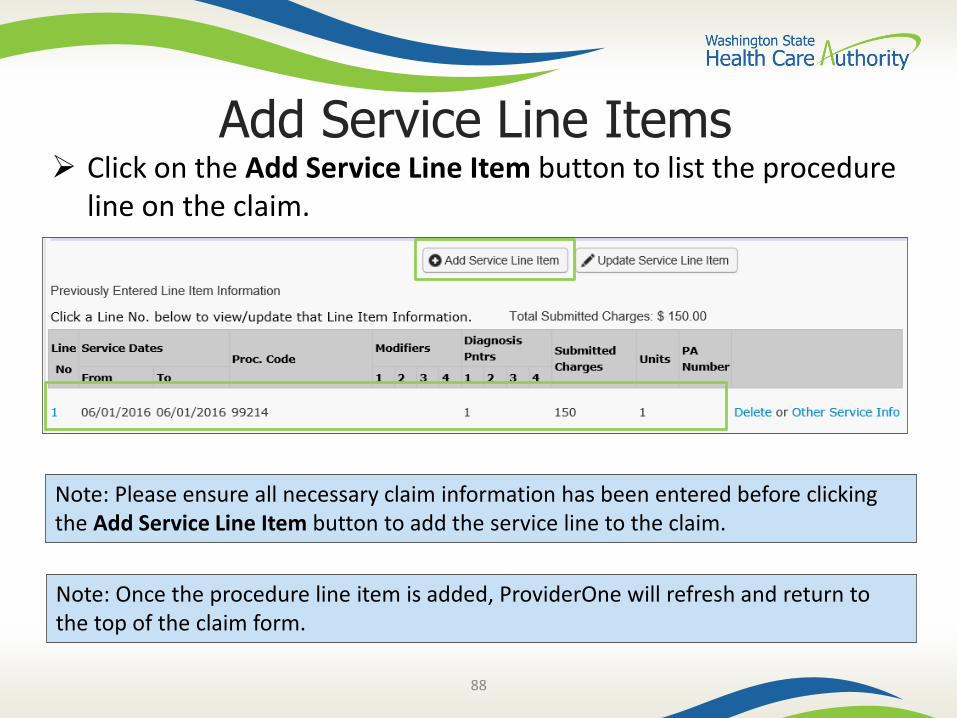
Add Service Line Items Click on the Add Service Line Item button to list the procedure
line on the claim.
Note: Once the procedure line item is added, ProviderOne will refresh and return to the top of the claim form.
Note: Please ensure all necessary claim information has been entered before clicking the Add Service Line Item button to add the service line to the claim.
88
89
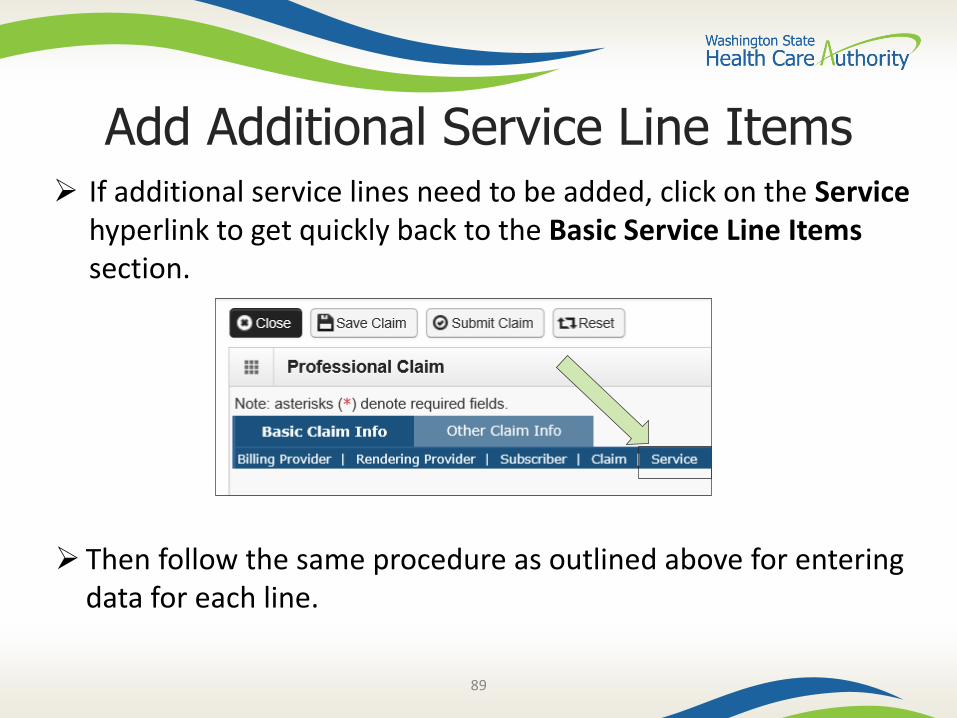
Add Additional Service Line Items If additional service lines need to be added, click on the Service
hyperlink to get quickly back to the Basic Service Line Items section.
Then follow the same procedure as outlined above for entering data for each line.
90
Update Service Line Items
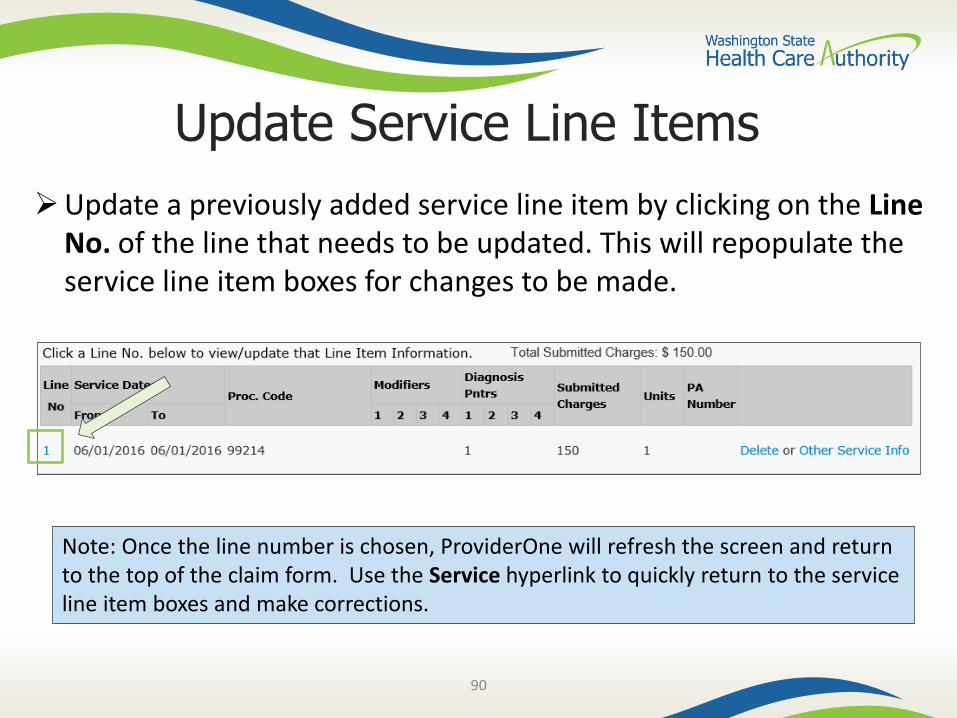
Note: Once the line number is chosen, ProviderOne will refresh the screen and return to the top of the claim form. Use the Service hyperlink to quickly return to the service line item boxes and make corrections.
Update a previously added service line item by clicking on the Line No. of the line that needs to be updated. This will repopulate the service line item boxes for changes to be made.
91
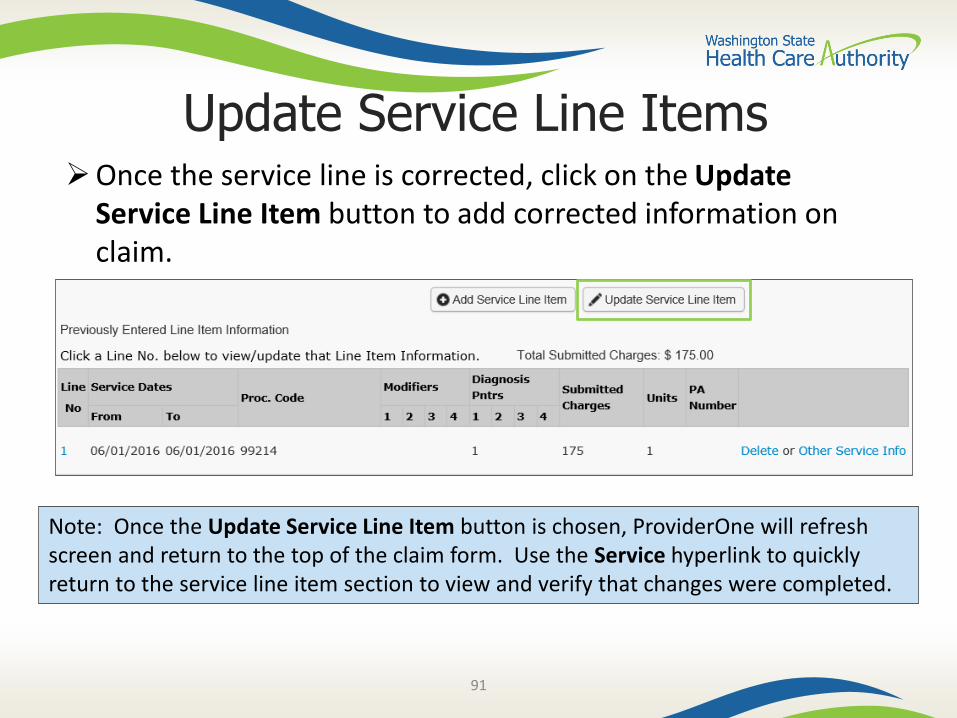
Update Service Line ItemsOnce the service line is corrected, click on the Update
Service Line Item button to add corrected information on claim.
Note: Once the Update Service Line Item button is chosen, ProviderOne will refresh screen and return to the top of the claim form. Use the Service hyperlink to quickly return to the service line item section to view and verify that changes were completed.
92
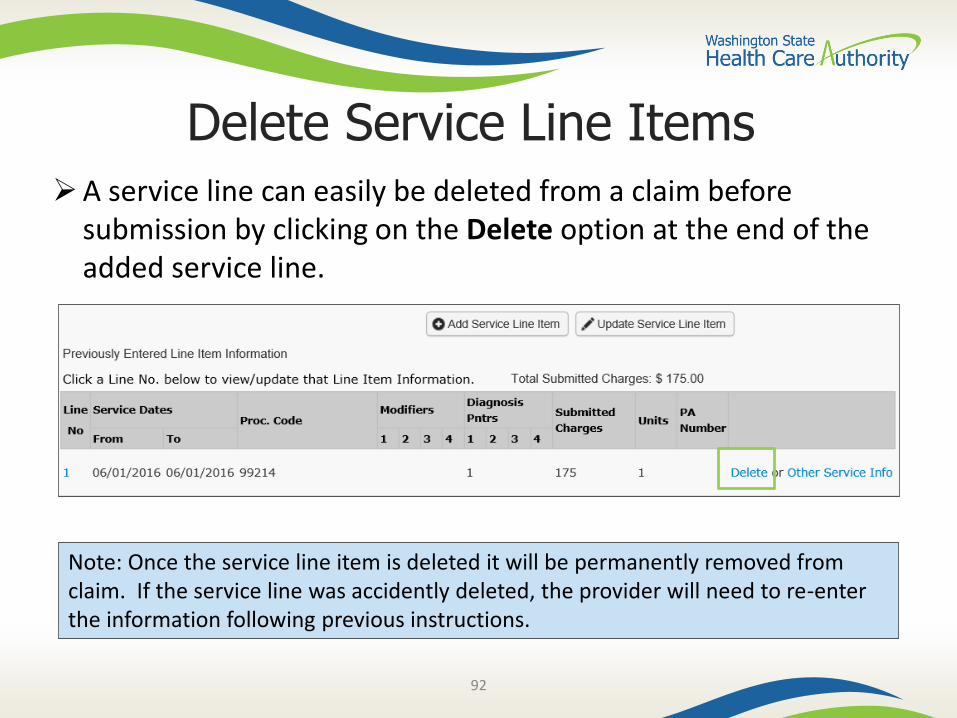
Delete Service Line ItemsA service line can easily be deleted from a claim before
submission by clicking on the Delete option at the end of the added service line.
Note: Once the service line item is deleted it will be permanently removed from claim. If the service line was accidently deleted, the provider will need to re-enter the information following previous instructions.

93
Submit Claim for Processing When the claim is ready for processing, click the Submit Claim
button at the top of the claim form.
Note: Make sure the browser Pop Up Blocker is off or your system will not allow the claim to be submitted.

94
Submit Claim for Processing Click on the Submit Claim button to submit the claim.
ProviderOne should then display this prompt:
Click on the Cancel button if no backup is to be sent. Click on the OK button if backup needs to be attached.
Note: If all insurance information has been entered on the claim, it is not necessary to send the insurance EOB with the claim.
95
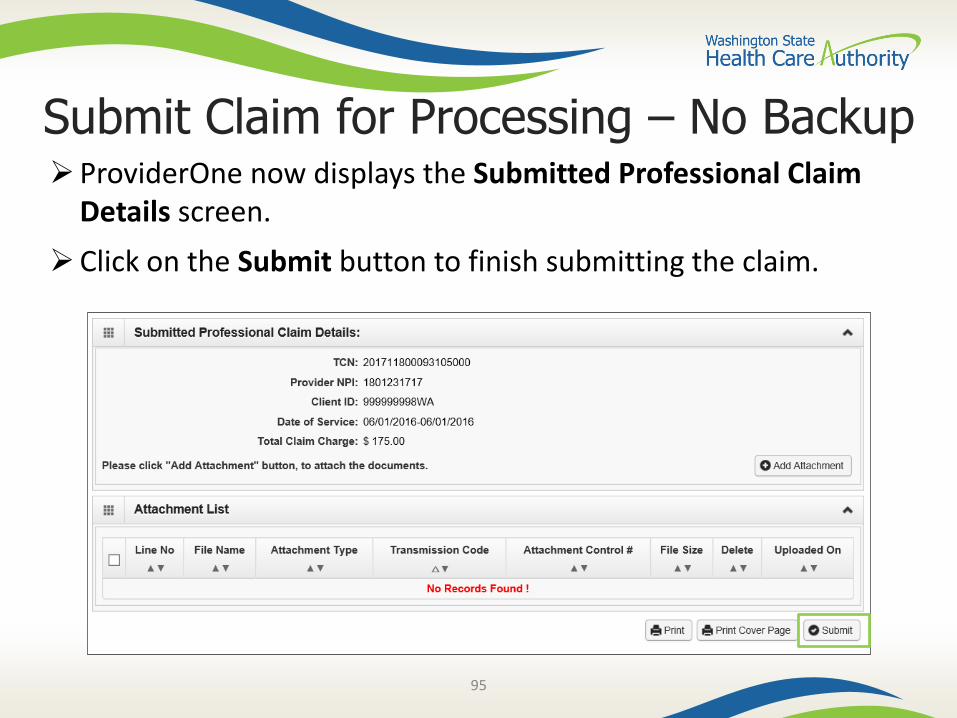
Submit Claim for Processing – No BackupProviderOne now displays the Submitted Professional Claim
Details screen.
Click on the Submit button to finish submitting the claim.

96
Submit Claim for Processing –With Backup (Electronic File Attached)
The Claim’s Backup Documentation page is displayed.
• Enter the Attachment Type. • Pick one of the following Transmission Codes:
o EL- Electronic Only or Electronic fileo Browse to find the file name
• Click the OK button.
97
Submit Claim for Processing –With Backup (Mailing or Faxing Backup)
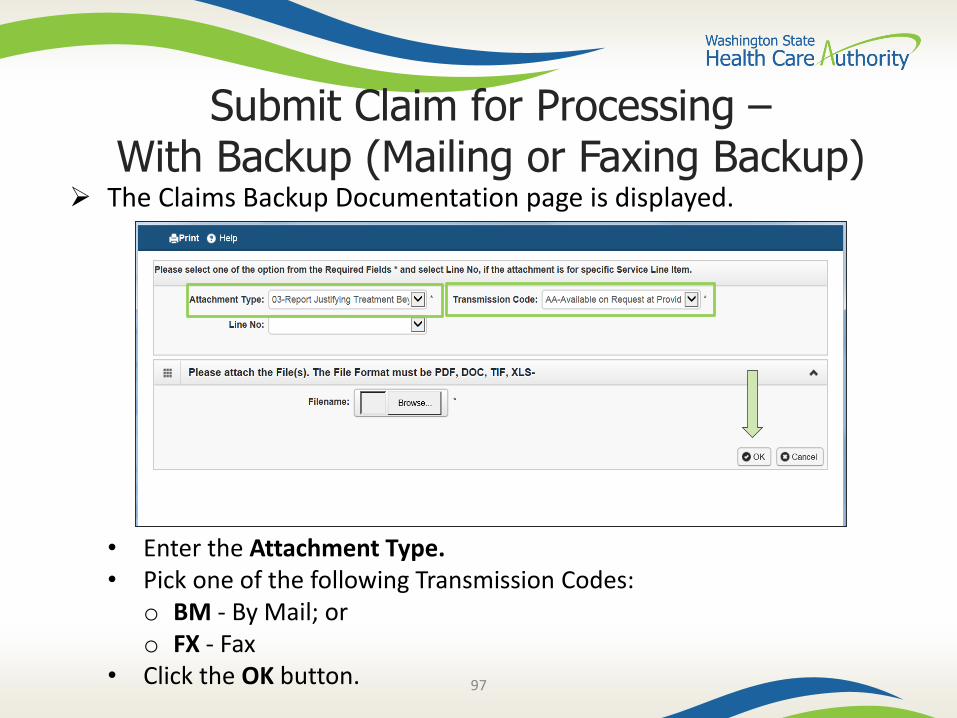
The Claims Backup Documentation page is displayed.
• Enter the Attachment Type.• Pick one of the following Transmission Codes:
o BM - By Mail; oro FX - Fax
• Click the OK button.
98
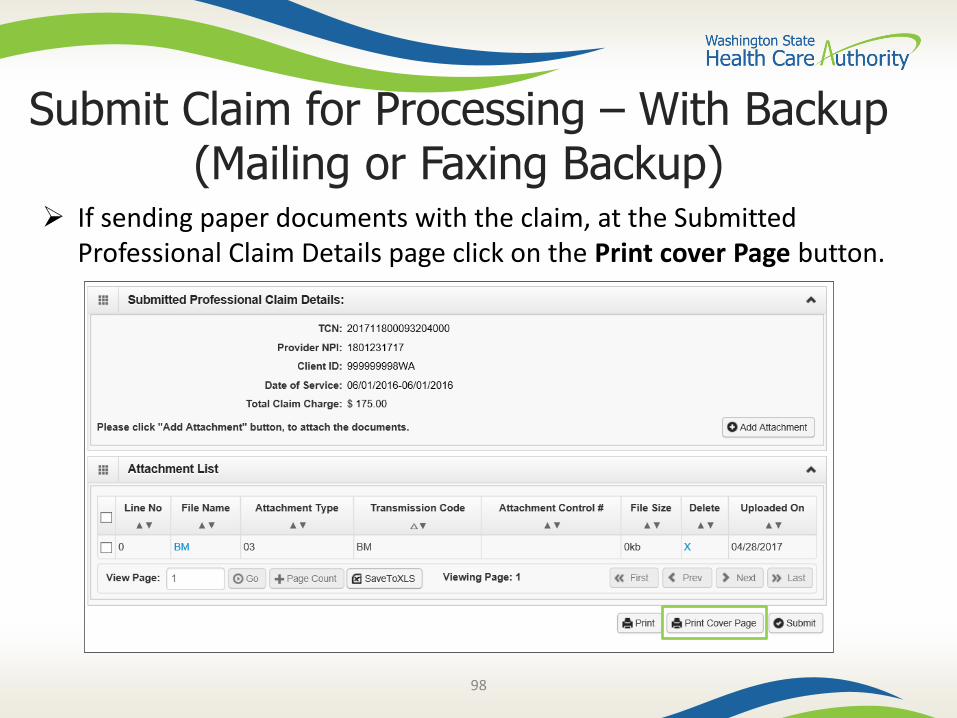
Submit Claim for Processing – With Backup (Mailing or Faxing Backup)
If sending paper documents with the claim, at the Submitted Professional Claim Details page click on the Print cover Page button.
99
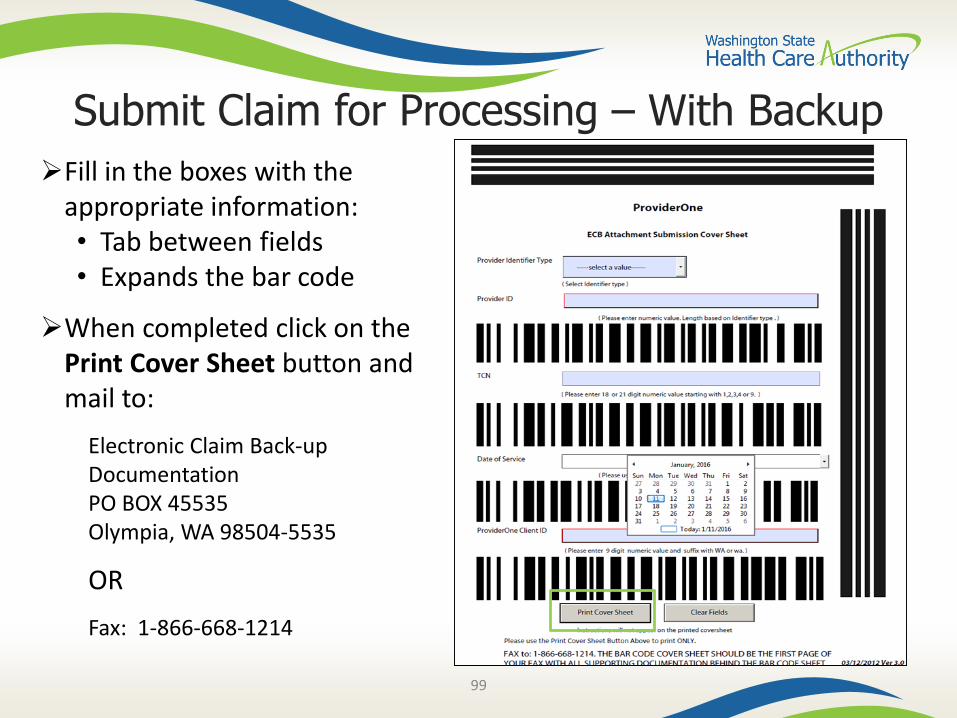
Submit Claim for Processing – With Backup
Fill in the boxes with the appropriate information:• Tab between fields• Expands the bar code
When completed click on the Print Cover Sheet button and mail to:
Electronic Claim Back-up DocumentationPO BOX 45535Olympia, WA 98504-5535
OR
Fax: 1-866-668-1214
100
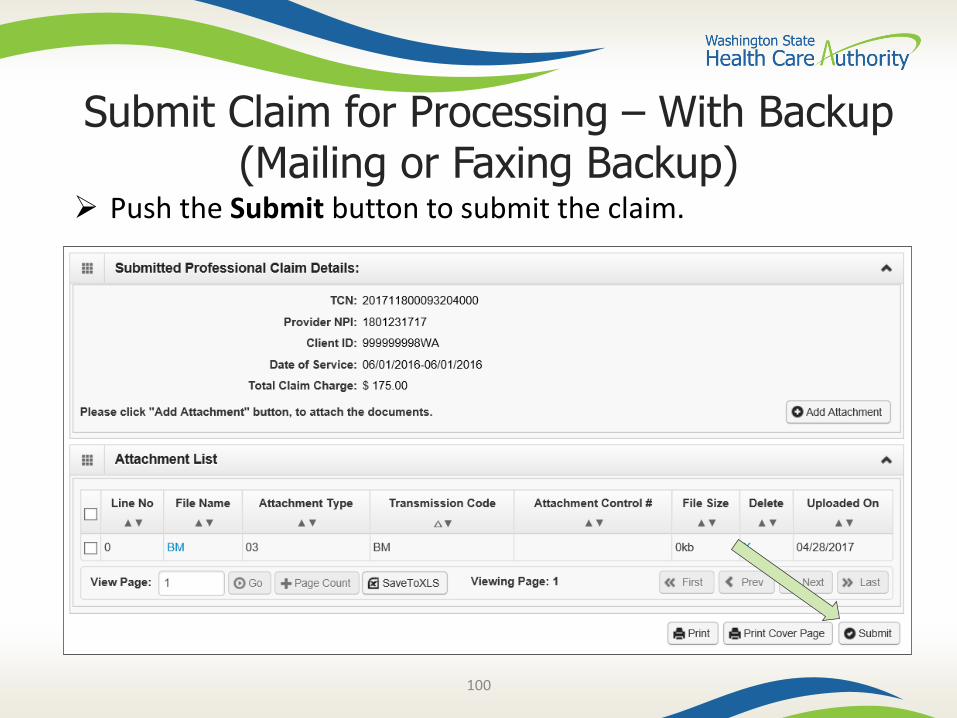
Submit Claim for Processing – With Backup (Mailing or Faxing Backup)
Push the Submit button to submit the claim.
101
Saving and Retrieving a Direct Data Entry Claim
102
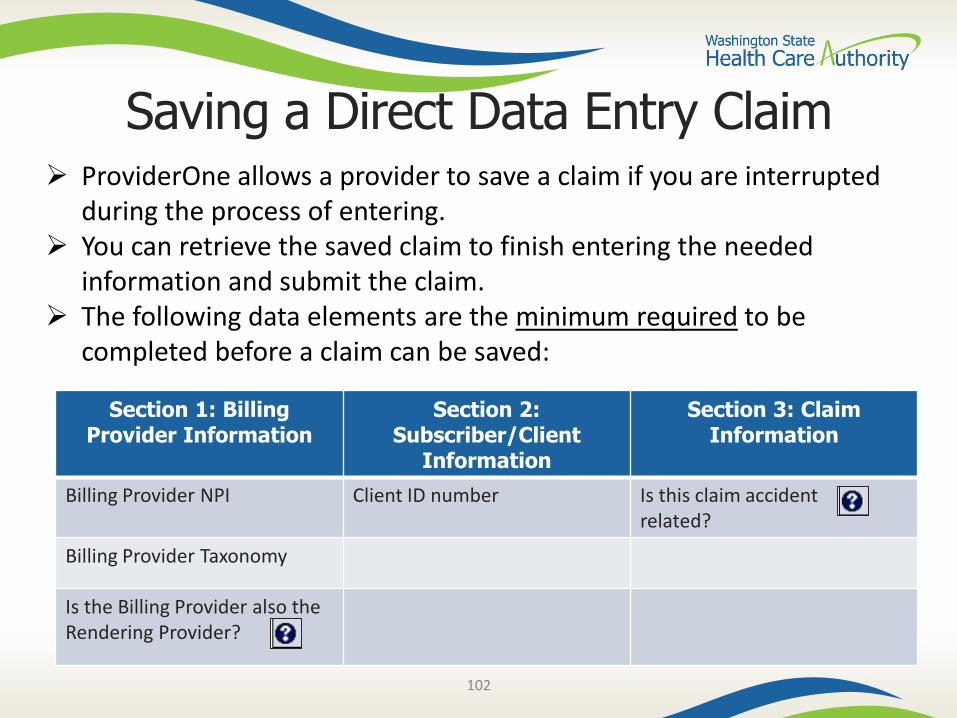
Saving a Direct Data Entry Claim ProviderOne allows a provider to save a claim if you are interrupted
during the process of entering. You can retrieve the saved claim to finish entering the needed
information and submit the claim. The following data elements are the minimum required to be
completed before a claim can be saved:
Section 1: Billing Provider Information
Section 2: Subscriber/Client
Information
Section 3: Claim Information
Billing Provider NPI Client ID number Is this claim accident related?
Billing Provider Taxonomy
Is the Billing Provider also the Rendering Provider?
103
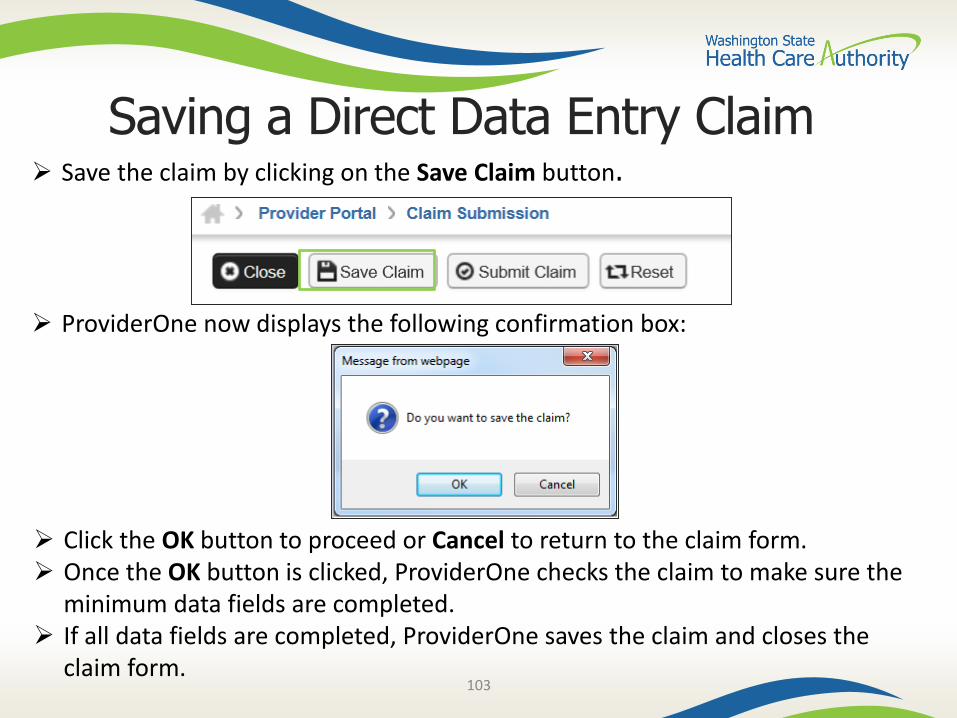
Saving a Direct Data Entry Claim Save the claim by clicking on the Save Claim button.
ProviderOne now displays the following confirmation box:
Click the OK button to proceed or Cancel to return to the claim form. Once the OK button is clicked, ProviderOne checks the claim to make sure the
minimum data fields are completed. If all data fields are completed, ProviderOne saves the claim and closes the
claim form.
104
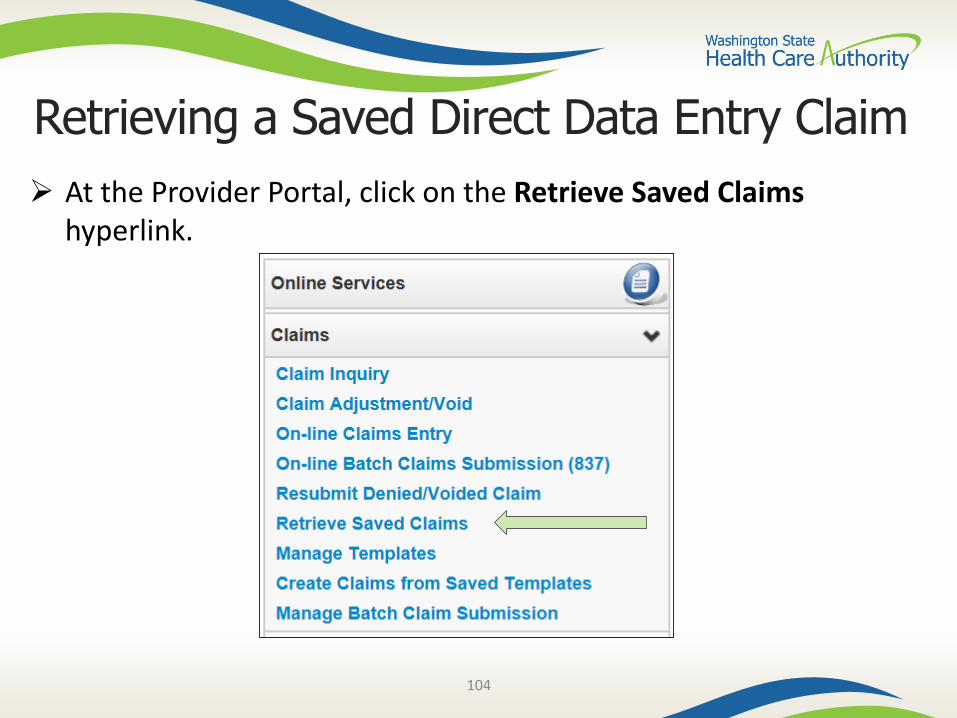
Retrieving a Saved Direct Data Entry Claim
At the Provider Portal, click on the Retrieve Saved Claims hyperlink.
105
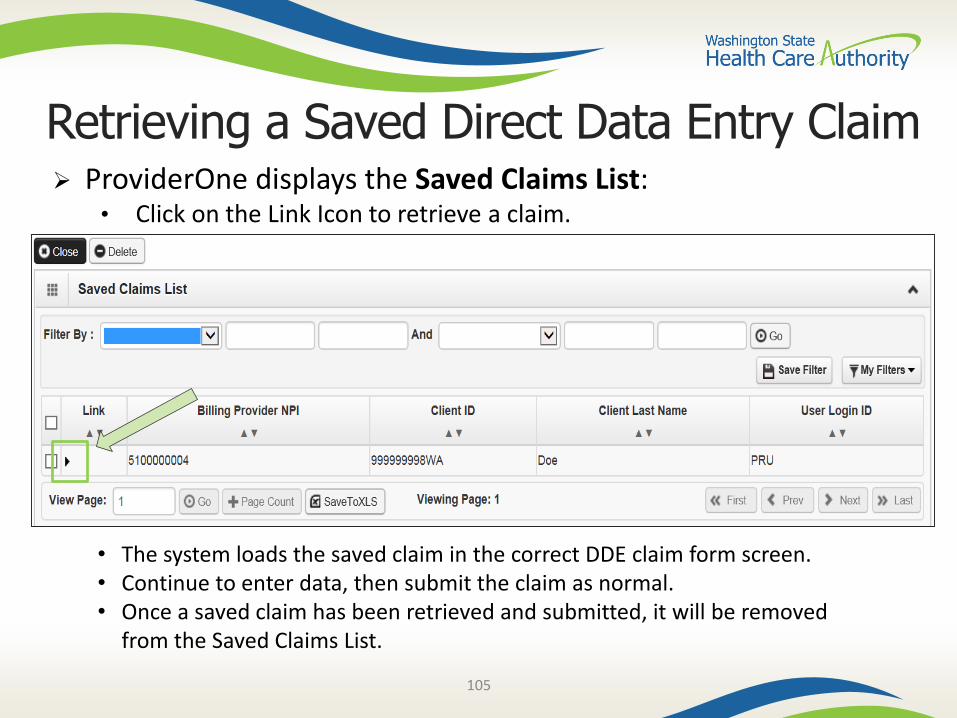
Retrieving a Saved Direct Data Entry Claim ProviderOne displays the Saved Claims List:
• Click on the Link Icon to retrieve a claim.
• The system loads the saved claim in the correct DDE claim form screen. • Continue to enter data, then submit the claim as normal. • Once a saved claim has been retrieved and submitted, it will be removed
from the Saved Claims List.
106
Medicare Crossover
107
Common Terminology Coinsurance
• An amount a Medicare client may be required to pay as their share of the cost for services.
Deductible• The amount for which a beneficiary is responsible before Medicare
starts paying.
Capitated Copayment• A predetermined set dollar amount a Medicare client may be required
to pay as their share of the cost for services.
Non-Capitated Copayment• An amount a Medicare client may be required to pay as their share of
the cost for services.
108
Overview – Medicare Crossover There are 4 types of Medicare coverage:
• Medicare Part A covers Inpatient hospital services
• Medicare Part B covers professional and vendor services
• Medicare Part C is a managed care version of Medicare, a Medicare Advantage Plan
• Medicare Part D covers prescription drugs
When is a claim a Medicare crossover claim?• If Medicare pays or applies to the deductible, the claim billed to HCA is a
crossover.
• The general rule is to bill the Agency after Medicare on the same claim form billed to Medicare.
• The Agency is not paying Part D co-pays (Part D is not covered in this presentation).
109
Overview - Medicare Crossovers
When is a claim NOT a crossover claim? • Claims (services) denied by Medicare when billed to us are not crossover
claims.
• We still require the Medicare EOB to demonstrate non-payment.
Sometimes Medicare does NOT forward claims automatically to the Agency• Can submit Direct Data Entry (DDE) or Electronically without the EOMB (if
Medicare denies the service, the EOMB IS required for electronic billing).
• The Medicare Advantage Plans do not cross claims over directly so they must be billed separately through DDE or Electronically as crossover claims.
110
Overview - Medicare Crossovers
If Medicare denies an Apple Health-covered service that requires Prior Authorization, the service still requires authorization: • You may request it after the service is provided.
• The agency waives the “prior” requirement in this circumstance.
111
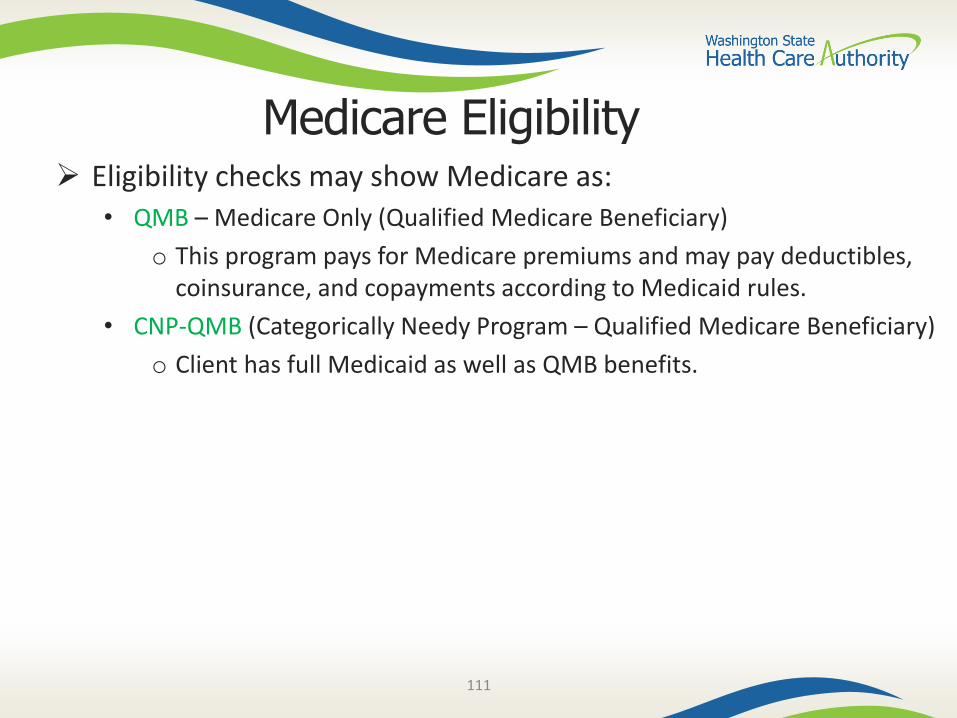
Medicare Eligibility Eligibility checks may show Medicare as:
• QMB – Medicare Only (Qualified Medicare Beneficiary)
o This program pays for Medicare premiums and may pay deductibles, coinsurance, and copayments according to Medicaid rules.
• CNP-QMB (Categorically Needy Program – Qualified Medicare Beneficiary)
o Client has full Medicaid as well as QMB benefits.
112
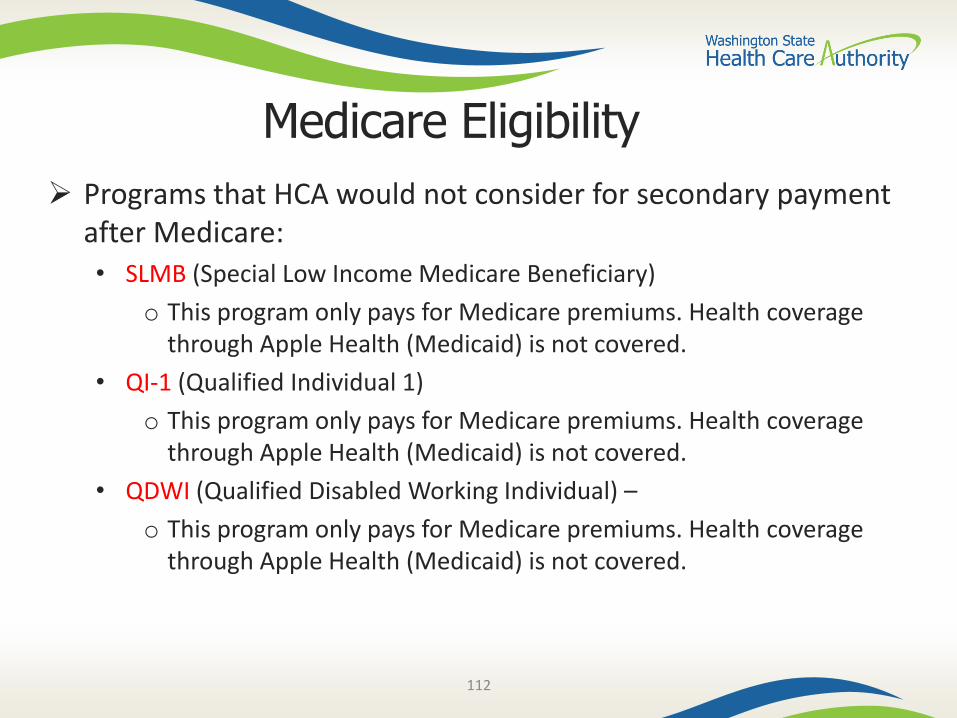
Medicare Eligibility
Programs that HCA would not consider for secondary payment after Medicare:• SLMB (Special Low Income Medicare Beneficiary)
o This program only pays for Medicare premiums. Health coverage through Apple Health (Medicaid) is not covered.
• QI-1 (Qualified Individual 1)
o This program only pays for Medicare premiums. Health coverage through Apple Health (Medicaid) is not covered.
• QDWI (Qualified Disabled Working Individual) –
o This program only pays for Medicare premiums. Health coverage through Apple Health (Medicaid) is not covered.
113
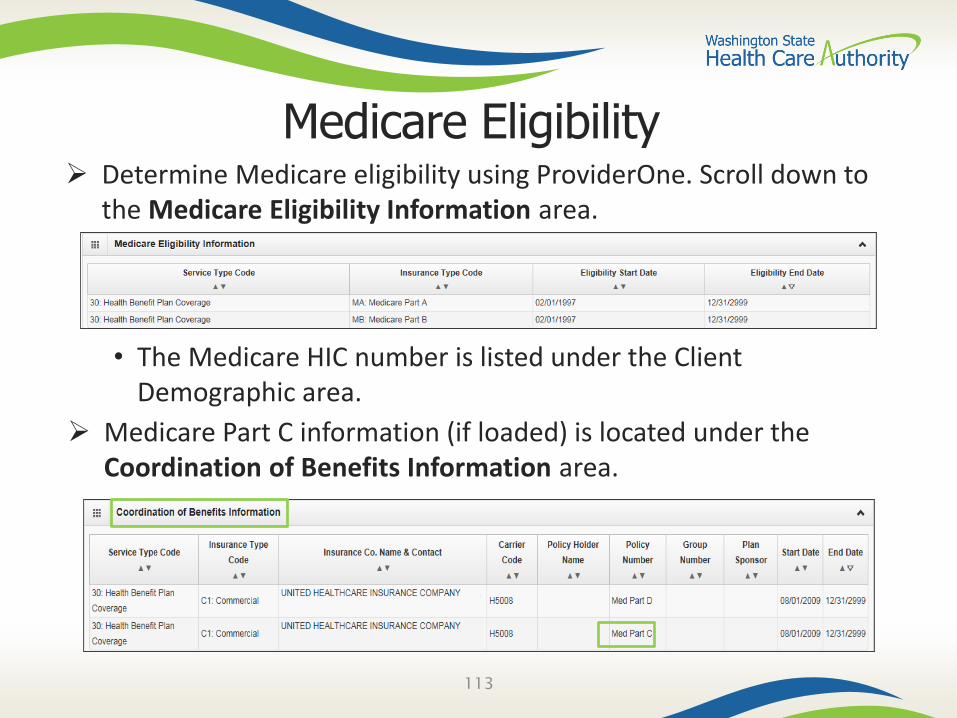
Medicare Eligibility Determine Medicare eligibility using ProviderOne. Scroll down to
the Medicare Eligibility Information area.
• The Medicare HIC number is listed under the Client Demographic area.
Medicare Part C information (if loaded) is located under the Coordination of Benefits Information area.
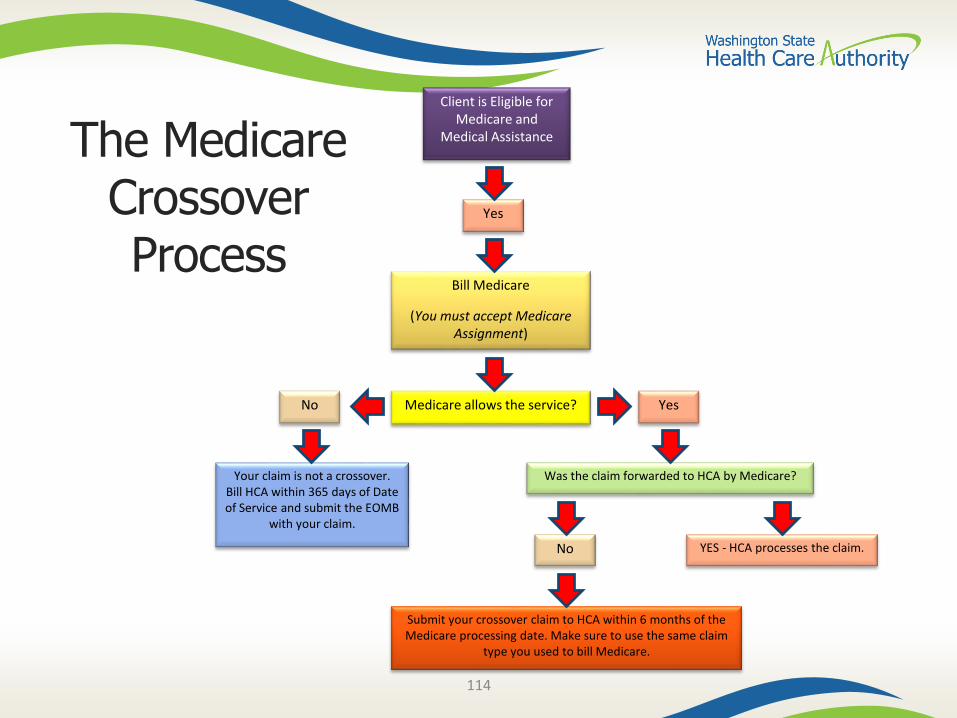
Client is Eligible for Medicare and
Medical Assistance
Yes
Bill Medicare
(You must accept Medicare Assignment)
Medicare allows the service?No Yes
Your claim is not a crossover. Bill HCA within 365 days of Date of Service and submit the EOMB
with your claim.
Was the claim forwarded to HCA by Medicare?
No YES - HCA processes the claim.
Submit your crossover claim to HCA within 6 months of the Medicare processing date. Make sure to use the same claim
type you used to bill Medicare.
114
The Medicare Crossover Process
115
Medicare Billing Part B
116
Medicare Billing – Part B
DDE Professional, 837P• If Medicare has paid all lines on your claim and did not forward the
claim to Apple Health, submit the crossover claim to the Agency.
• If Medicare has allowed and denied service lines on your claim:
o You will need to submit TWO claims to the Agency;
– One crossover claim for services Medicare paid; and
– One professional claim for services Medicare denied.
117
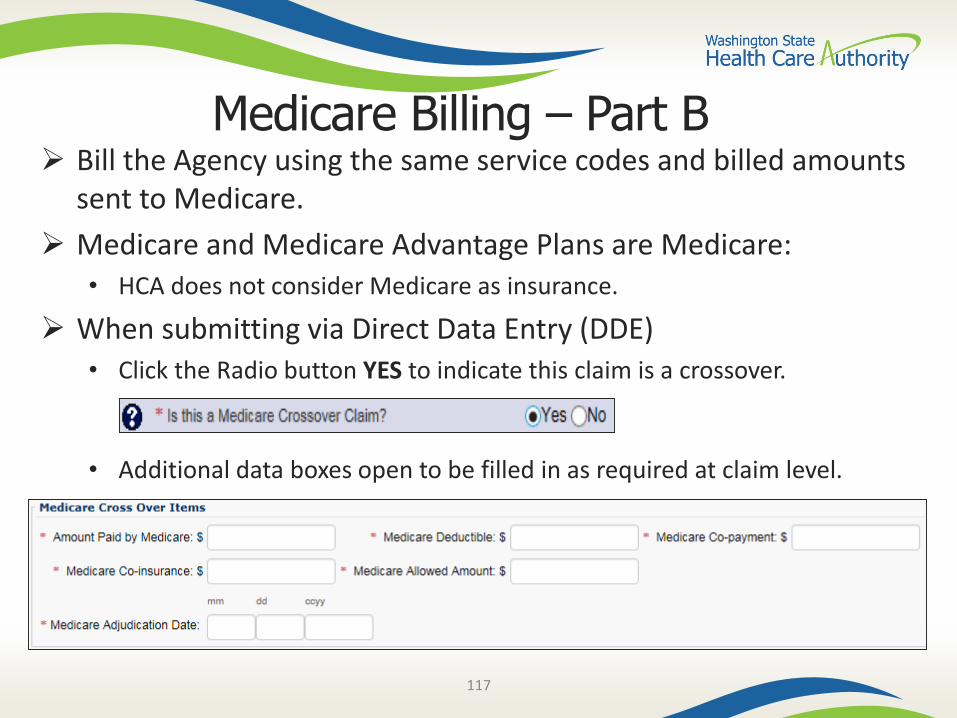
Medicare Billing – Part B Bill the Agency using the same service codes and billed amounts
sent to Medicare.
Medicare and Medicare Advantage Plans are Medicare:• HCA does not consider Medicare as insurance.
When submitting via Direct Data Entry (DDE)• Click the Radio button YES to indicate this claim is a crossover.
• Additional data boxes open to be filled in as required at claim level.

Medicare Billing – Part B The rest of the claim information is filled out as normal down to the
service line information. Expand the Medicare Crossover Items by clicking the red +.
Entering the line level Medicare information is required. The line level Medicare payment amounts must match the claim level Medicare payment total entered.
No EOB is required with the DDE crossover claim.118
119
Tips on Billing Crossovers
Bill your taxonomy code(s) to Medicare the same as you bill your taxonomy code(s) to Medicaid.
If you bill Medicare with an NPI that has not been loaded in ProviderOne, the agency will not be able to identify the provider when these claims are forwarded by Medicare.
The claim format billed to Medicare must match the claim format billed to ProviderOne.
The coding and dollar amount billed must match.
Complete all required fields on the DDE crossover screen.

120
Claim Inquiry
121
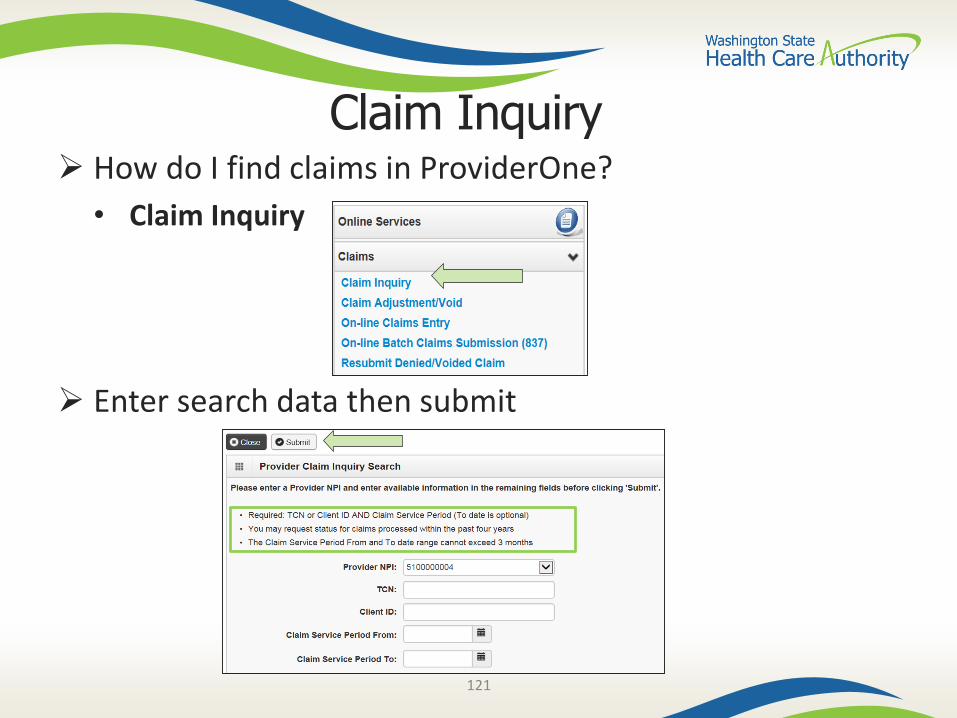
Claim Inquiry How do I find claims in ProviderOne?
• Claim Inquiry
Enter search data then submit
122
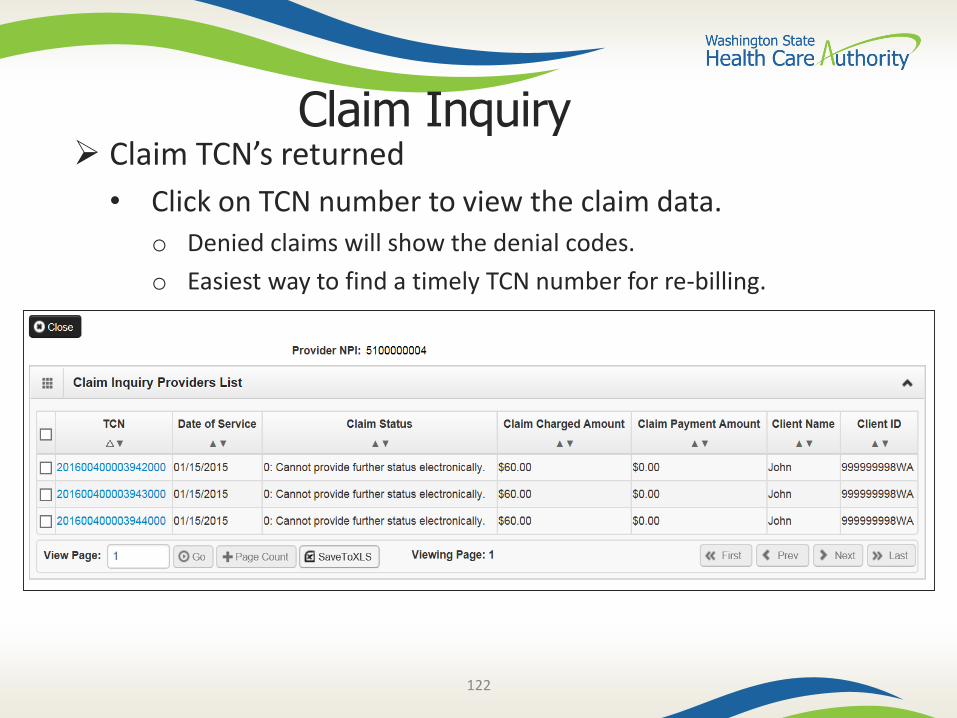
Claim Inquiry Claim TCN’s returned
• Click on TCN number to view the claim data.o Denied claims will show the denial codes.
o Easiest way to find a timely TCN number for re-billing.
123
Why can’t I pull up my claim?
There are many reasons why you might not be able to retrieve a claim (for any system functions):• It has been adjusted, you can’t retrieve a claim that has already been
adjusted.
• It has been replaced by another claim.
• It hasn’t finished processing.
• It was billed under a different domain.
• You could be using the wrong profile.
• Trying to do a resubmit on a paid claim or an adjustment on a denied claim.
• Claims you billed with an NPI not reported in ProviderOne.
• Claims you billed with an ID only rendering provider NPI number as the pay-to provider.
124
Timely Billing

125
Timely Billing
What are the agency’s timeliness guidelines?
• The initial billing must occur within 365 days from the date of service on the claim.
• Providers are allowed 2 years total to get a claim paid or adjusted.
• For Delayed Certification client eligibility the agency allows 12months from the Delayed Cert date to bill.
• Recoupments from other payer’s timeliness starts from the date of the recoupment, not the date of service.
• The agency uses the Julian calendar on claim numbers for tracking.
126
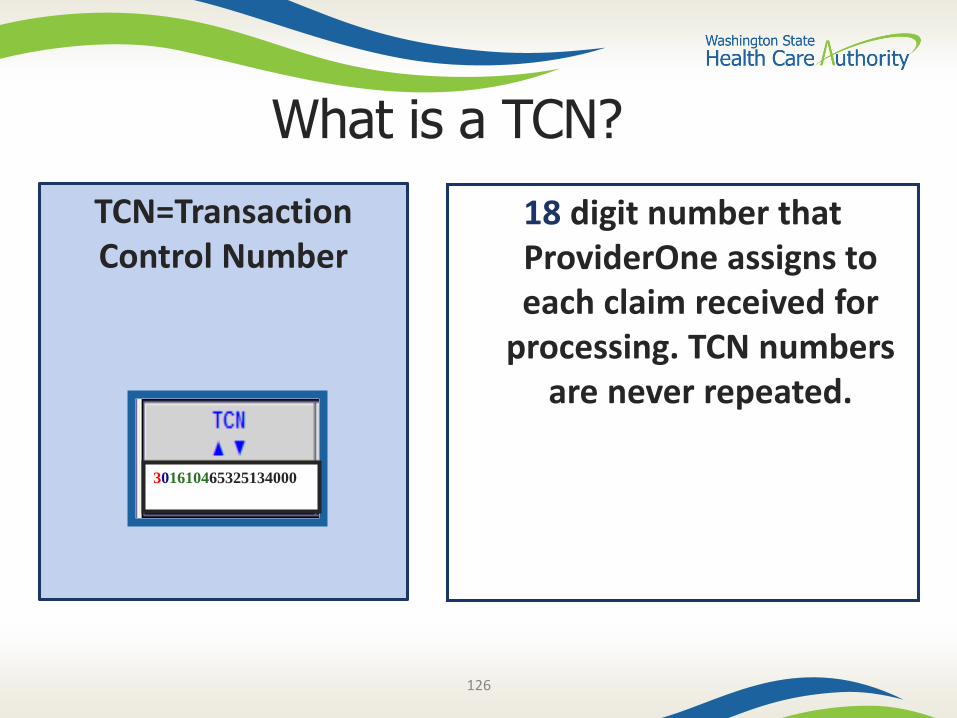
What is a TCN?
18 digit number that ProviderOne assigns to each claim received for
processing. TCN numbers are never repeated.
TCN=Transaction Control Number
301610465325134000
127
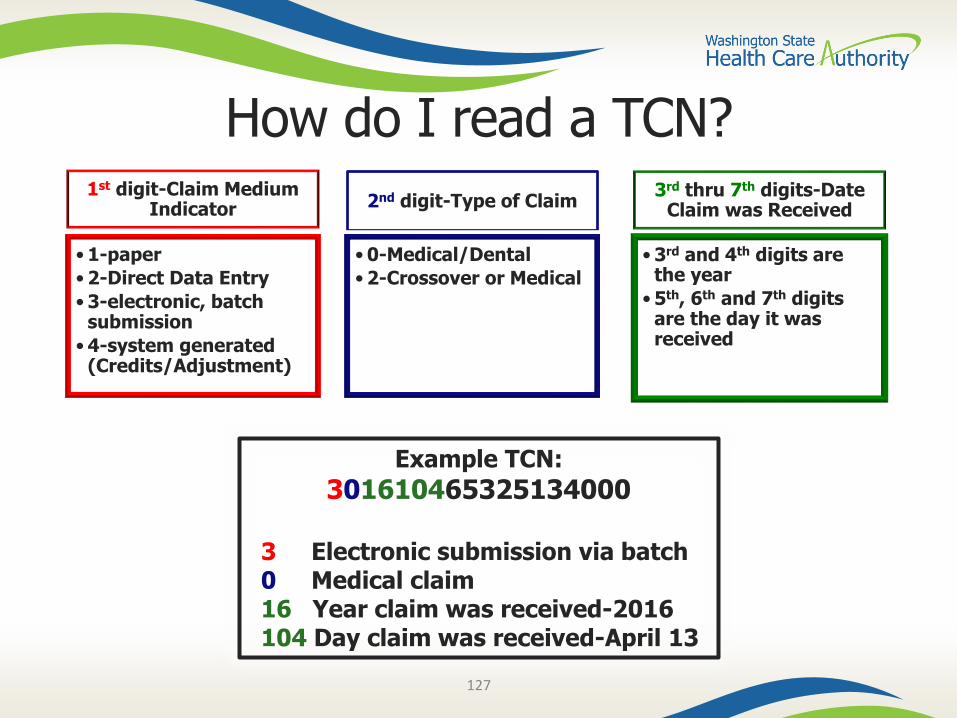
How do I read a TCN?1st digit-Claim Medium
Indicator
• 1-paper
• 2-Direct Data Entry
• 3-electronic, batch submission
• 4-system generated (Credits/Adjustment)
2nd digit-Type of Claim
• 0-Medical/Dental
• 2-Crossover or Medical
3rd thru 7th digits-Date Claim was Received
• 3rd and 4th digits are the year
• 5th, 6th and 7th digits are the day it was received
Example TCN:
301610465325134000
3 Electronic submission via batch0 Medical claim16 Year claim was received-2016104 Day claim was received-April 13
128
How do I prove timeliness? HIPAA EDI claims
• Submit a HIPAA batch transaction using a frequency 7 to adjust/replace the original claim or a frequency 8 to void the original claim.
Direct Data Entry (DDE) Claims• Resubmit Original Denied/Voided Claim• ProviderOne will automatically detect the timely
claim number as the timely TCN is now attached to the new transaction.
129
Adjust / Void a Claim
130
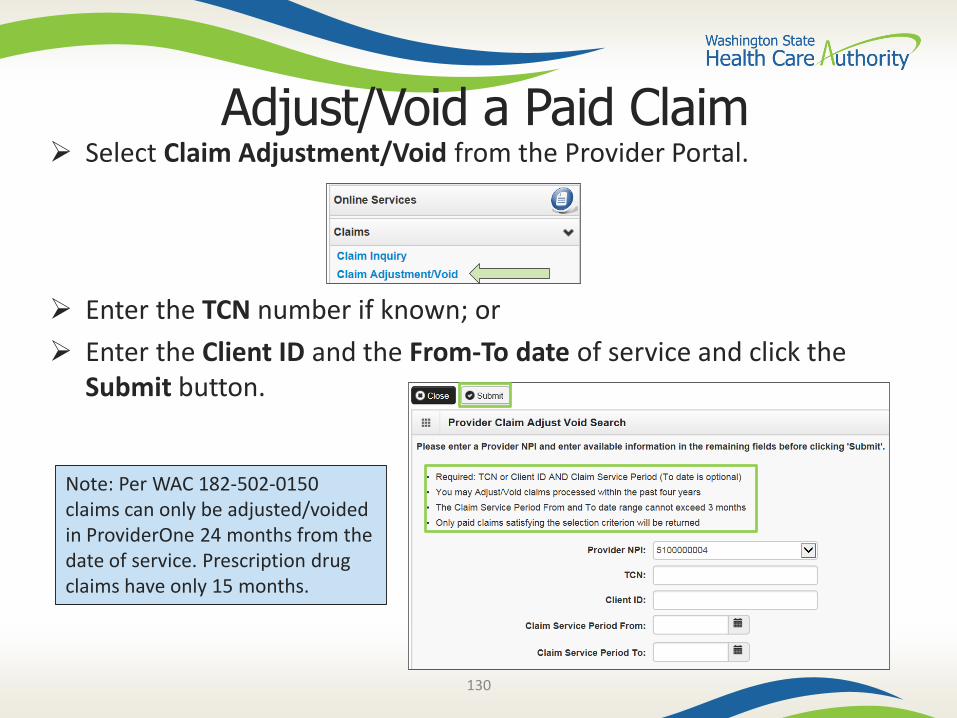
Adjust/Void a Paid Claim Select Claim Adjustment/Void from the Provider Portal.
Enter the TCN number if known; or
Enter the Client ID and the From-To date of service and click the Submit button.
Note: Per WAC 182-502-0150 claims can only be adjusted/voided in ProviderOne 24 months from the date of service. Prescription drug claims have only 15 months.
131
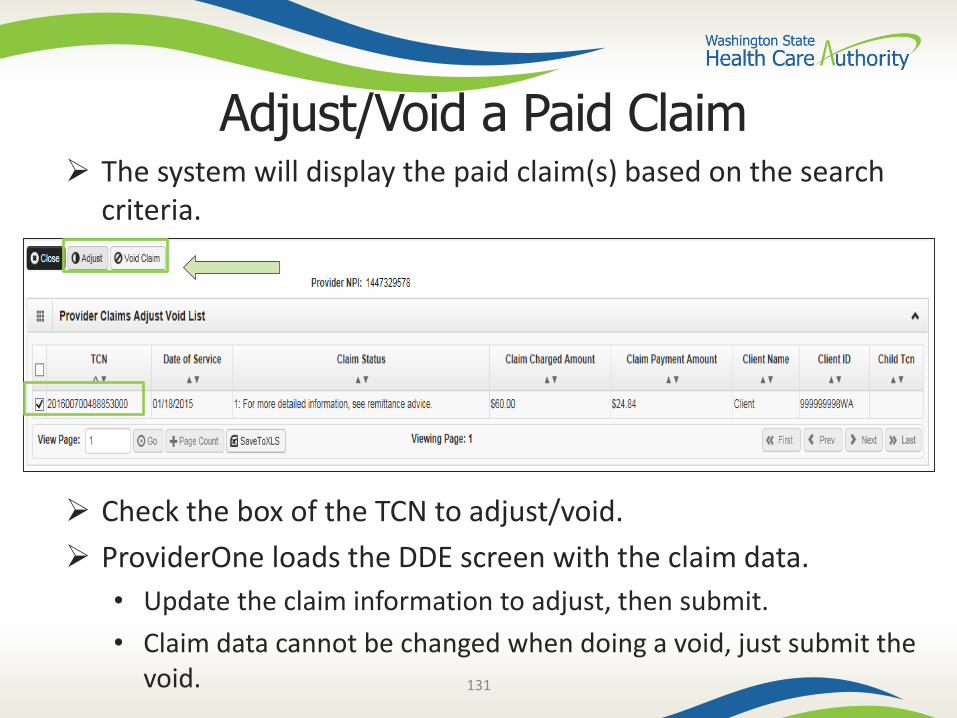
Adjust/Void a Paid Claim The system will display the paid claim(s) based on the search
criteria.
Check the box of the TCN to adjust/void.
ProviderOne loads the DDE screen with the claim data.
• Update the claim information to adjust, then submit.
• Claim data cannot be changed when doing a void, just submit the void.
132
Resubmit Denied Claims
133
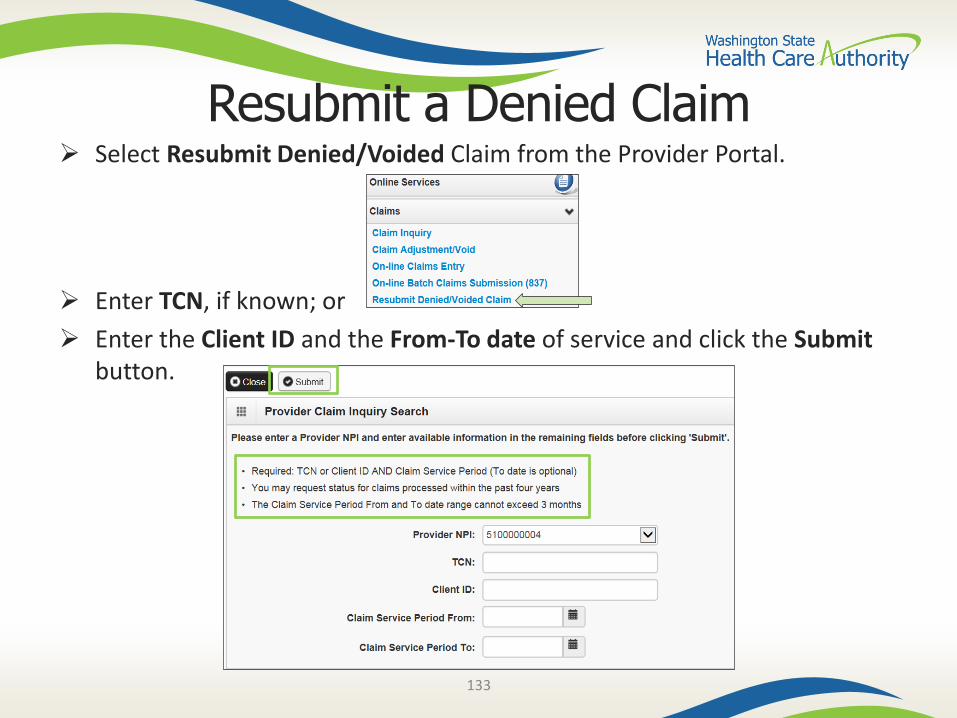
Resubmit a Denied Claim Select Resubmit Denied/Voided Claim from the Provider Portal.
Enter TCN, if known; or
Enter the Client ID and the From-To date of service and click the Submitbutton.
134
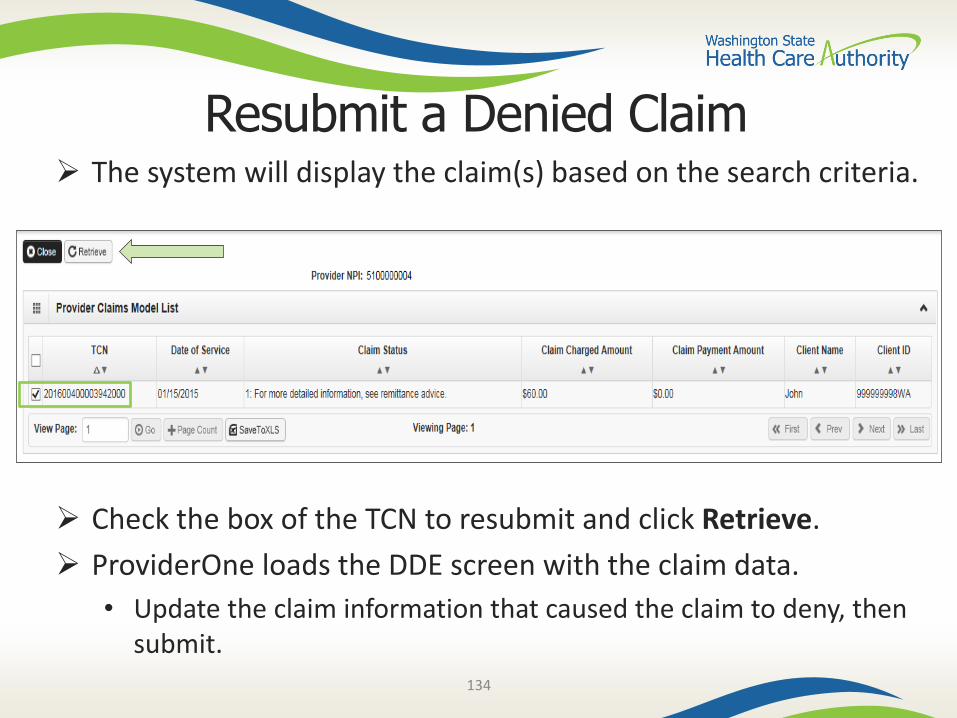
Resubmit a Denied Claim The system will display the claim(s) based on the search criteria.
Check the box of the TCN to resubmit and click Retrieve.
ProviderOne loads the DDE screen with the claim data.
• Update the claim information that caused the claim to deny, then submit.

135
Claim Templates
136
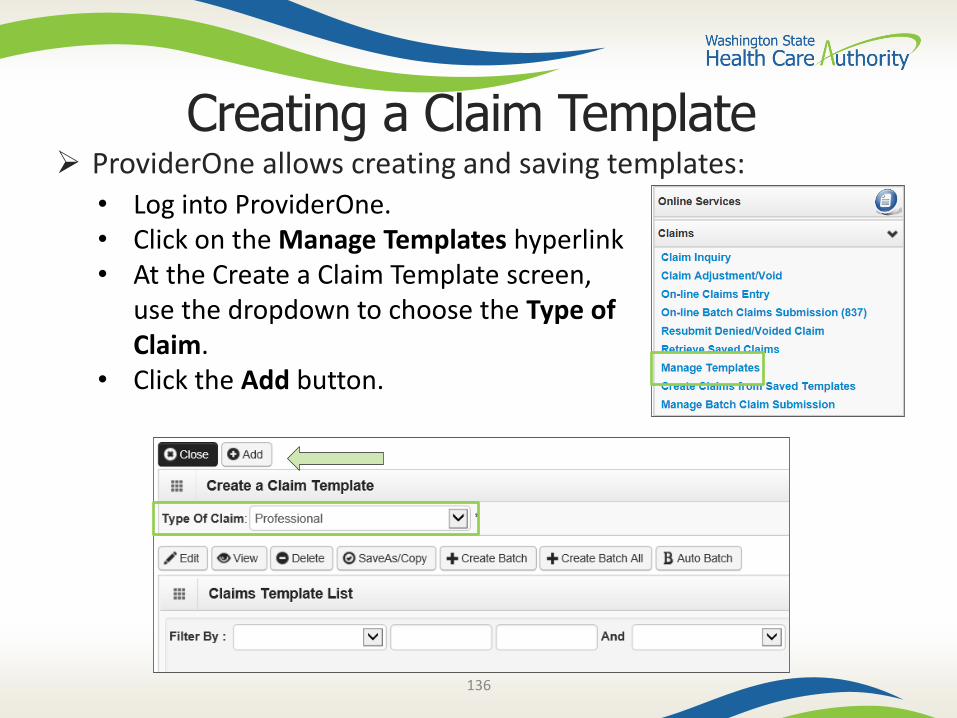
Creating a Claim Template ProviderOne allows creating and saving templates:
• Log into ProviderOne.• Click on the Manage Templates hyperlink• At the Create a Claim Template screen,
use the dropdown to choose the Type of Claim.
• Click the Add button.
137
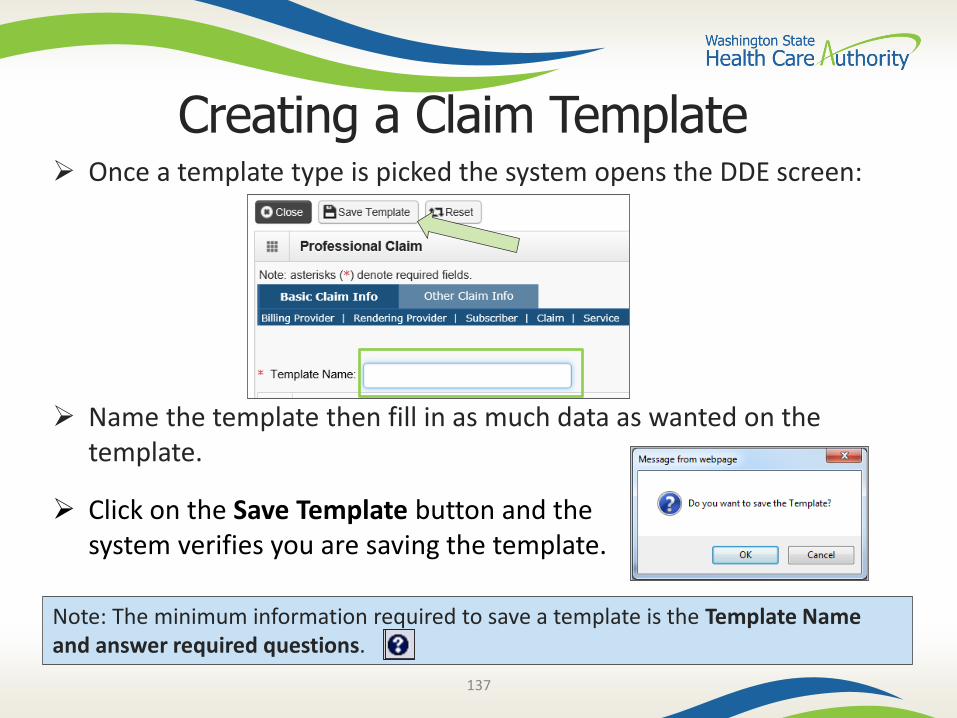
Creating a Claim Template Once a template type is picked the system opens the DDE screen:
Name the template then fill in as much data as wanted on the template.
Click on the Save Template button and the system verifies you are saving the template.
Note: The minimum information required to save a template is the Template Name and answer required questions.
138
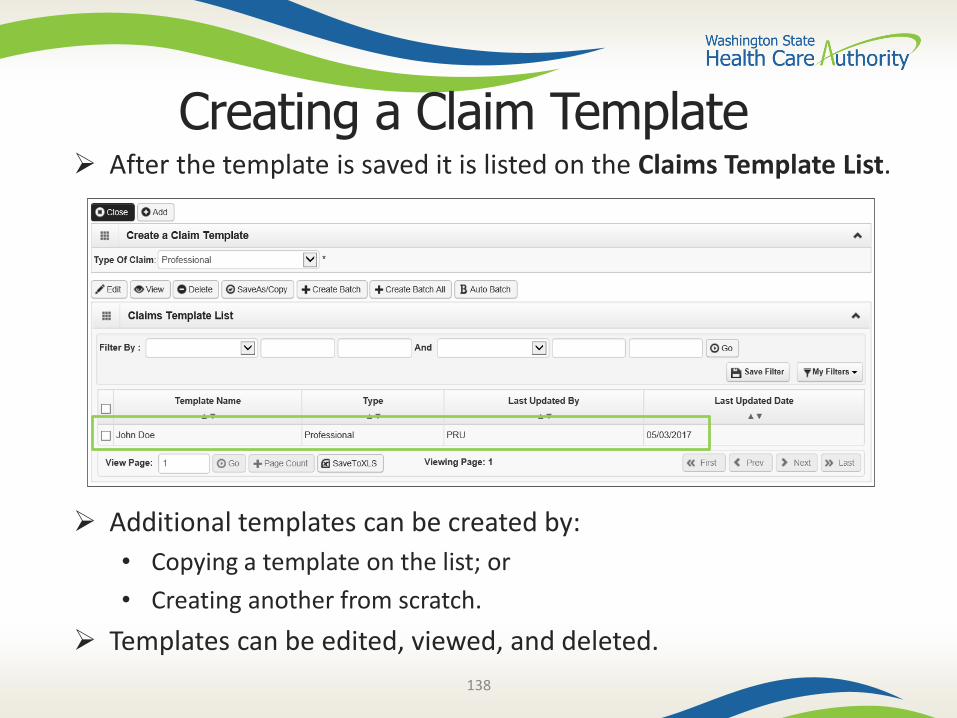
Creating a Claim Template After the template is saved it is listed on the Claims Template List.
Additional templates can be created by:
• Copying a template on the list; or
• Creating another from scratch.
Templates can be edited, viewed, and deleted.
139
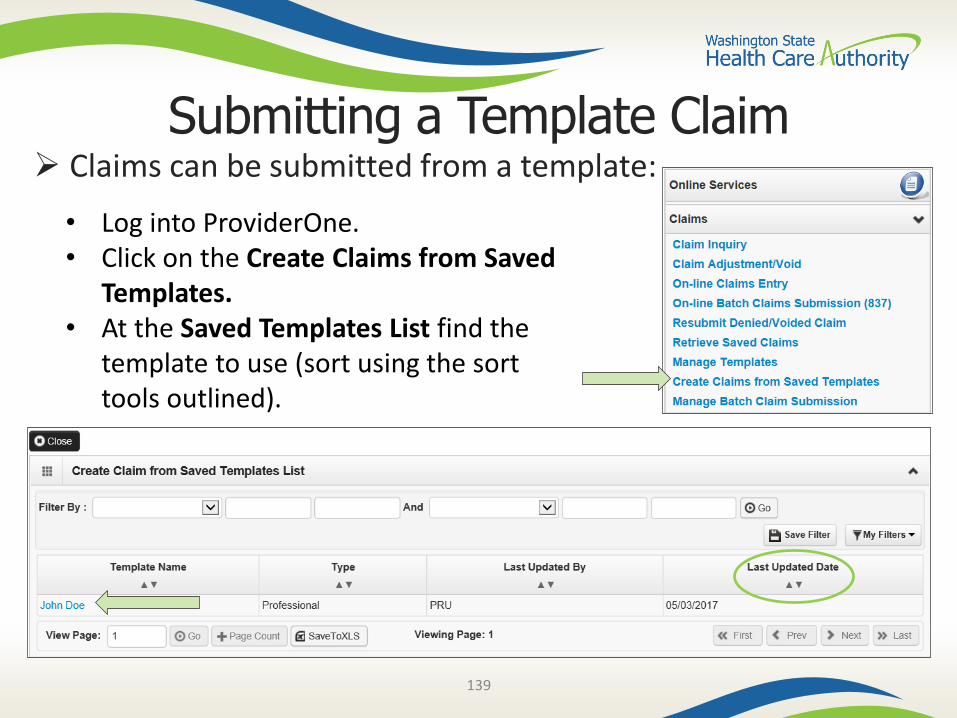
Submitting a Template Claim Claims can be submitted from a template:
• Log into ProviderOne.• Click on the Create Claims from Saved
Templates.• At the Saved Templates List find the
template to use (sort using the sort tools outlined).
140
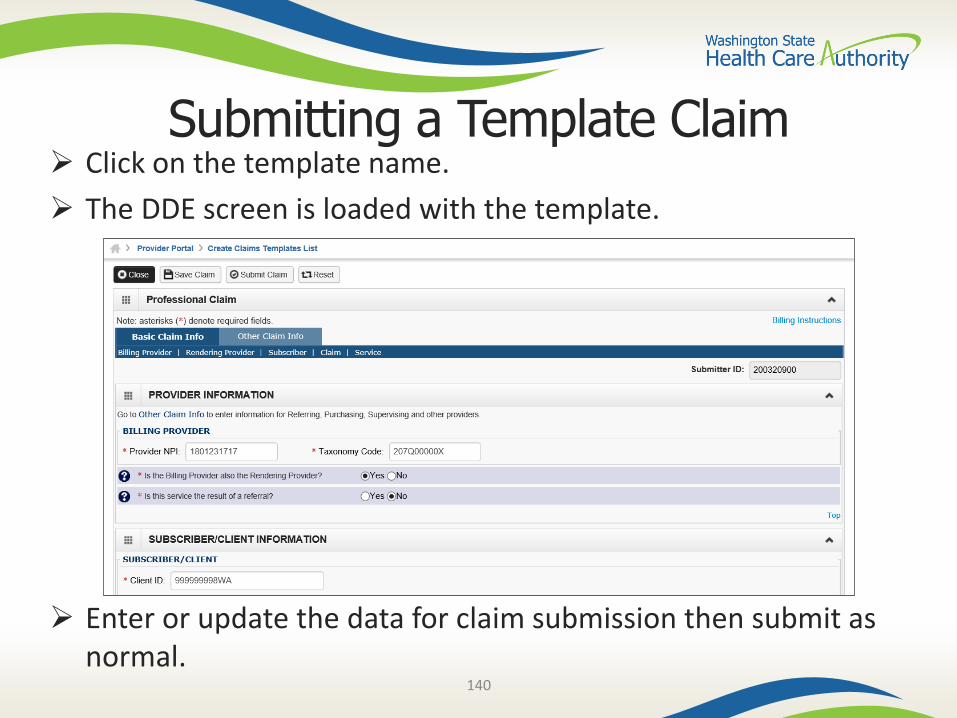
Submitting a Template Claim Click on the template name.
The DDE screen is loaded with the template.
Enter or update the data for claim submission then submit as normal.

141
Reading the Remittance Advice (RA)
142
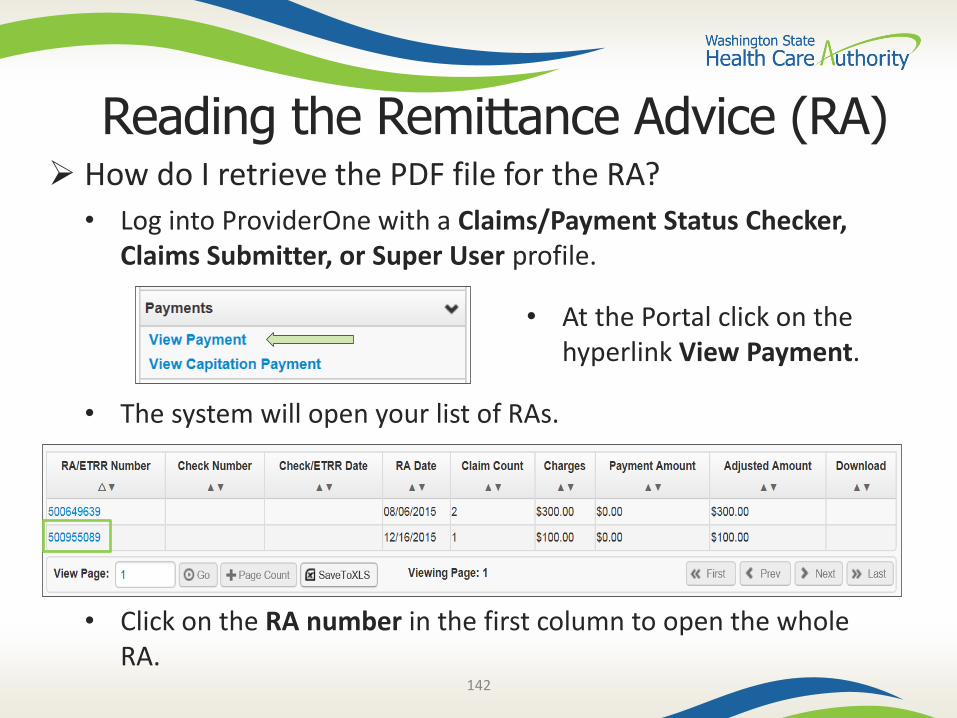
Reading the Remittance Advice (RA) How do I retrieve the PDF file for the RA?
• Log into ProviderOne with a Claims/Payment Status Checker, Claims Submitter, or Super User profile.
• The system will open your list of RAs.
• Click on the RA number in the first column to open the whole RA.
• At the Portal click on the hyperlink View Payment.
143
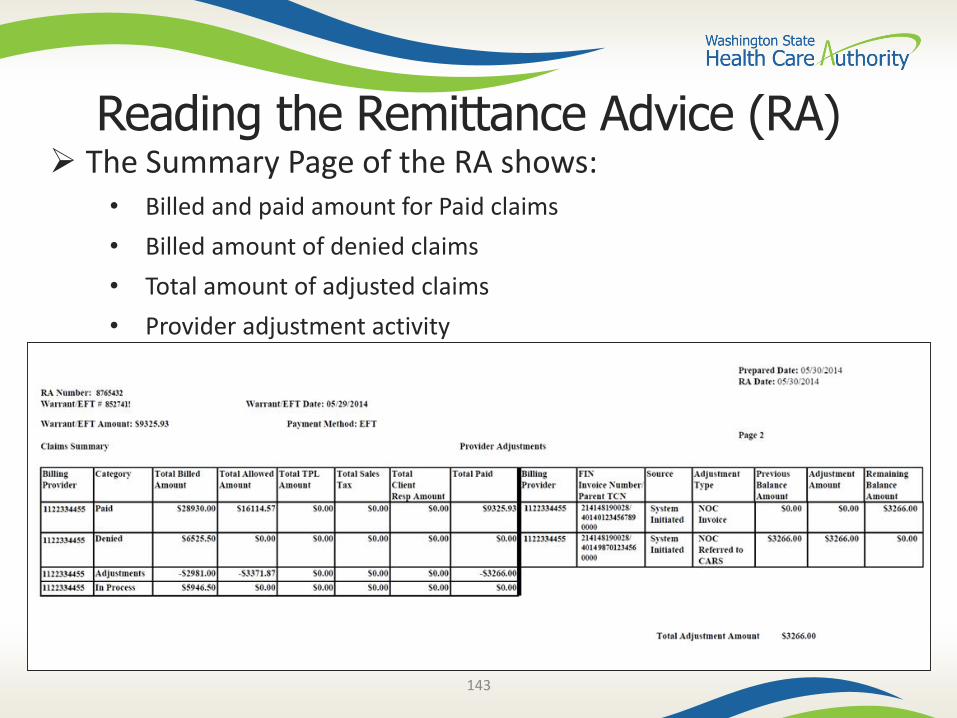
Reading the Remittance Advice (RA) The Summary Page of the RA shows:
• Billed and paid amount for Paid claims
• Billed amount of denied claims
• Total amount of adjusted claims
• Provider adjustment activity
144
Reading the Remittance Advice (RA) Adjustments:
• P1Off (offset) adjustments: These adjustment amounts can carry over on each week’s RA until the amount is paid off or reduced by the amount paid out for claims adjudicated that week.
o Claims that caused these carry over adjustment amounts can be on previous RAs.
o Updates to the RA format now provide the parent TCN under the FIN Invoice Number for reference.
• NOC (non-offset) Referred to CARS: System-generated recoveries or adjustments that are referred to OFR for collection.
o Updates to the RA format now provide the parent TCN under the FIN Invoice Number for reference.
Retention Policy:• Providers must keep RA’s on file for 7 years per Washington Administrative
Code (WAC).
145
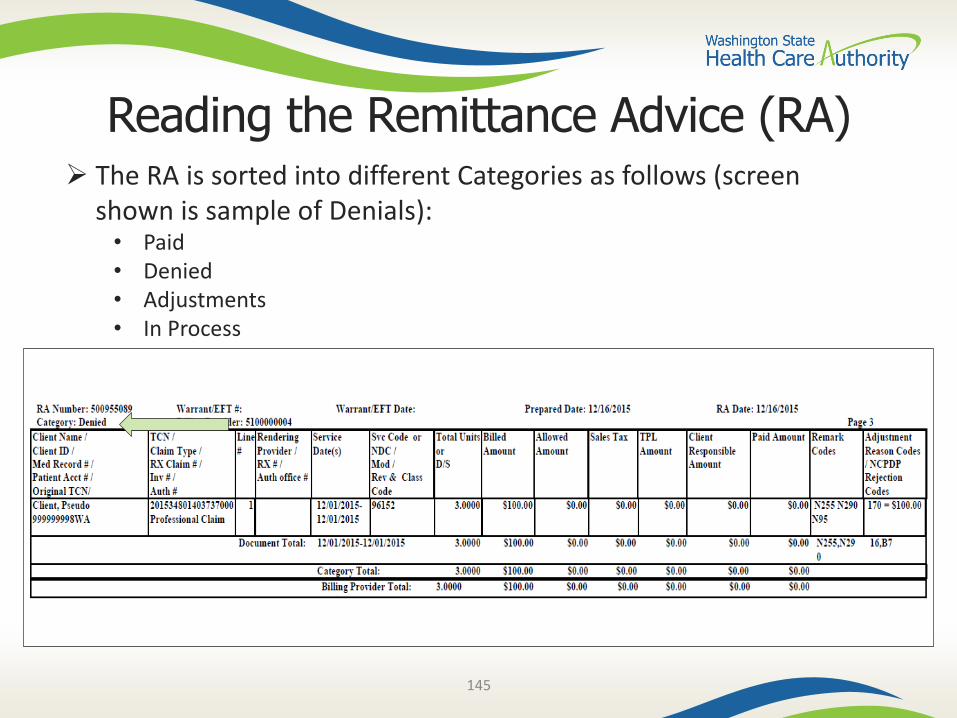
Reading the Remittance Advice (RA) The RA is sorted into different Categories as follows (screen
shown is sample of Denials):• Paid• Denied• Adjustments• In Process
146
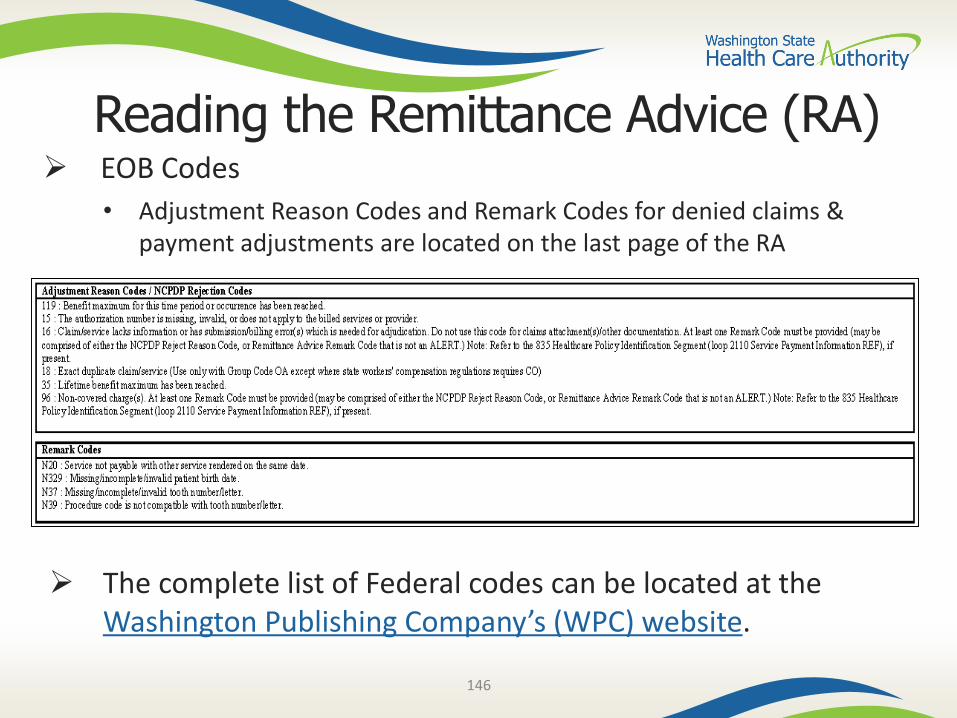
Reading the Remittance Advice (RA) EOB Codes
• Adjustment Reason Codes and Remark Codes for denied claims & payment adjustments are located on the last page of the RA
The complete list of Federal codes can be located at the Washington Publishing Company’s (WPC) website.
147
Authorization
148
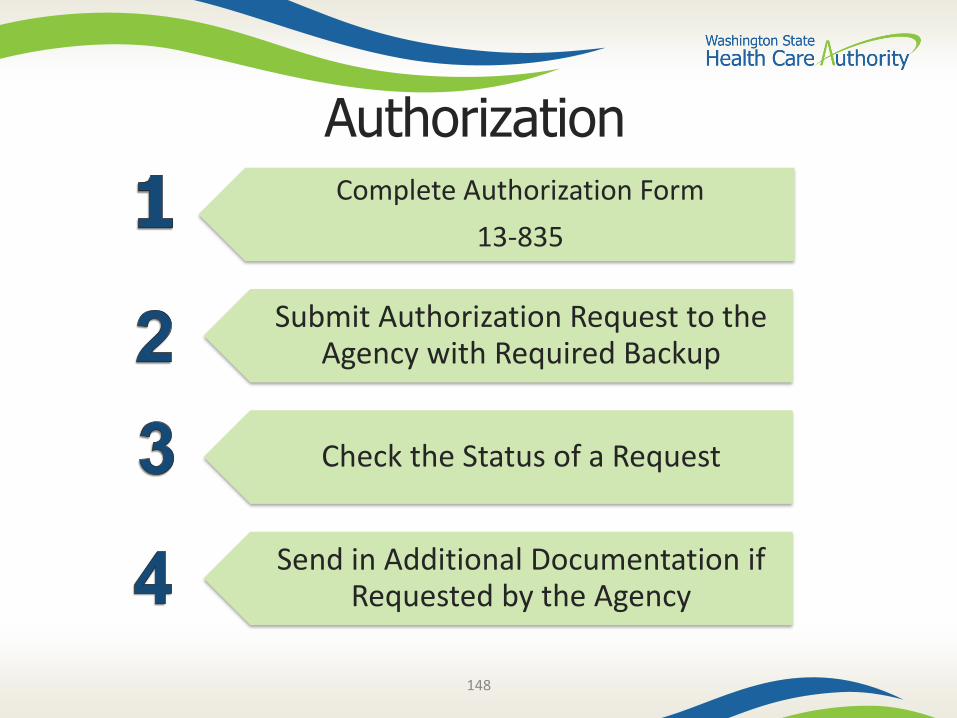
AuthorizationComplete Authorization Form
13-835
Submit Authorization Request to the Agency with Required Backup
Check the Status of a Request
Send in Additional Documentation if Requested by the Agency
149
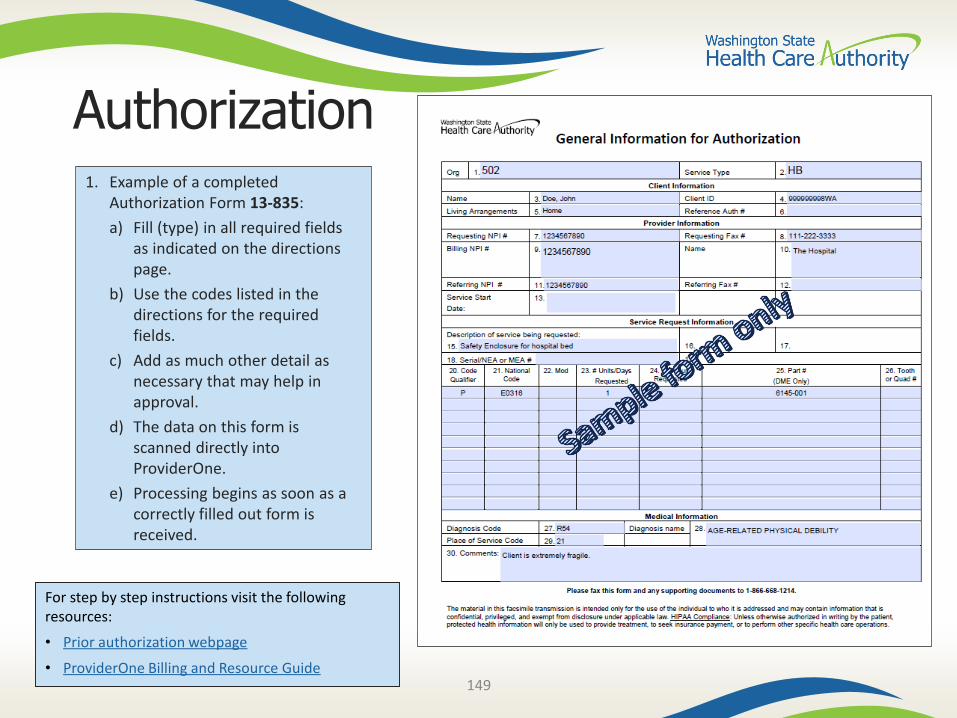
Authorization
For step by step instructions visit the following resources:
• Prior authorization webpage
• ProviderOne Billing and Resource Guide
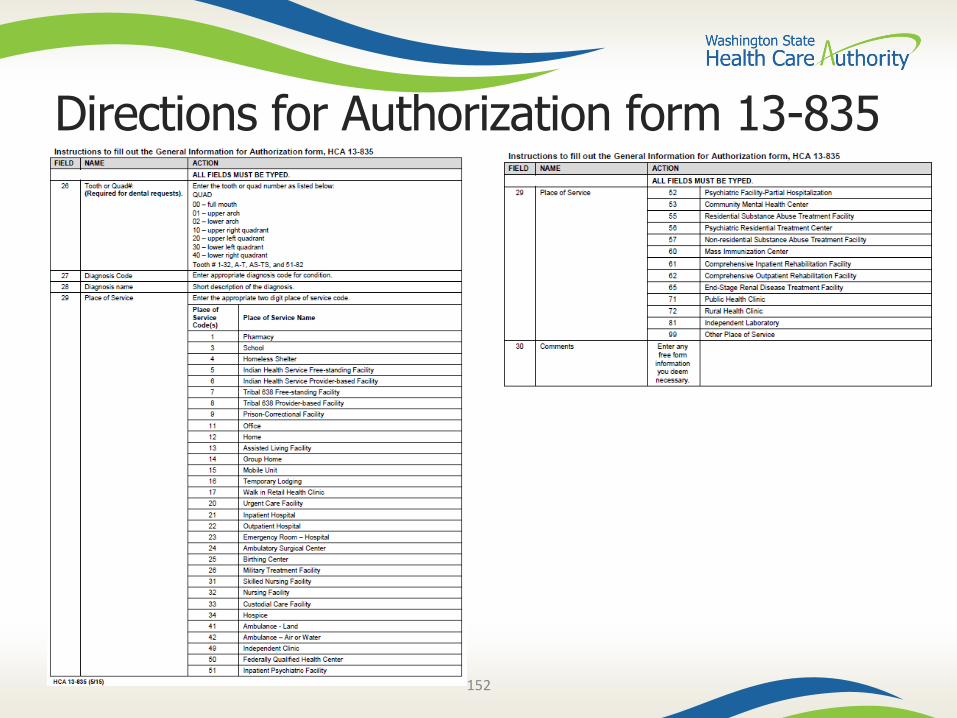
1. Example of a completed Authorization Form 13-835:
a) Fill (type) in all required fields as indicated on the directions page.
b) Use the codes listed in the directions for the required fields.
c) Add as much other detail as necessary that may help in approval.
d) The data on this form is scanned directly into ProviderOne.
e) Processing begins as soon as a correctly filled out form is received.
150
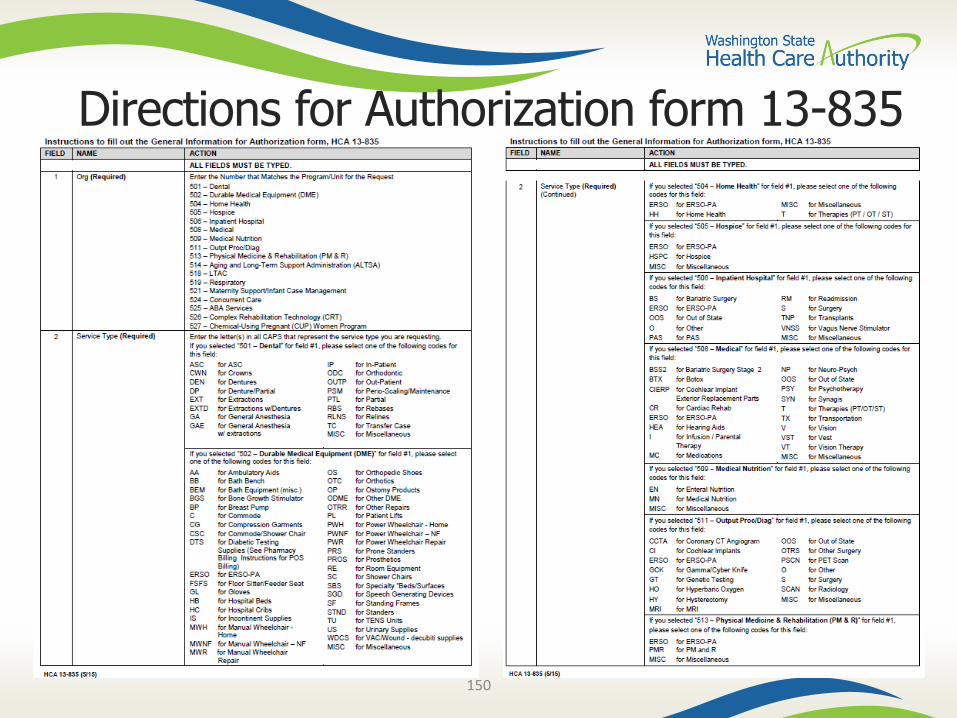
Directions for Authorization form 13-835
151
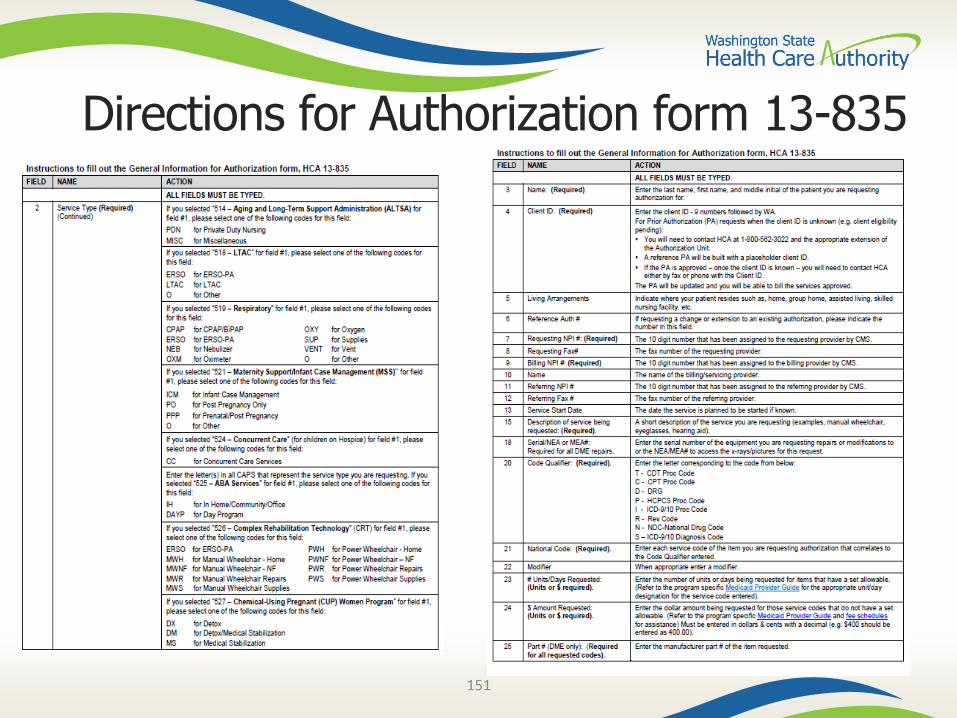
Directions for Authorization form 13-835
152
Directions for Authorization form 13-835
153
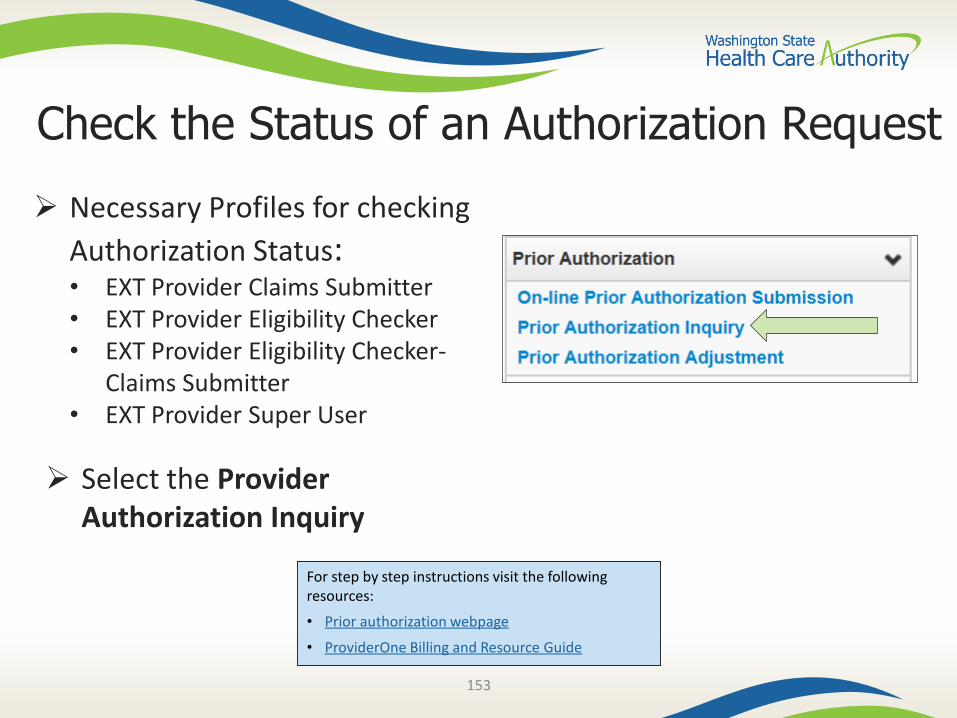
Check the Status of an Authorization Request
Necessary Profiles for checking
Authorization Status:• EXT Provider Claims Submitter• EXT Provider Eligibility Checker• EXT Provider Eligibility Checker-
Claims Submitter• EXT Provider Super User
Select the Provider Authorization Inquiry
For step by step instructions visit the following resources:
• Prior authorization webpage
• ProviderOne Billing and Resource Guide
154
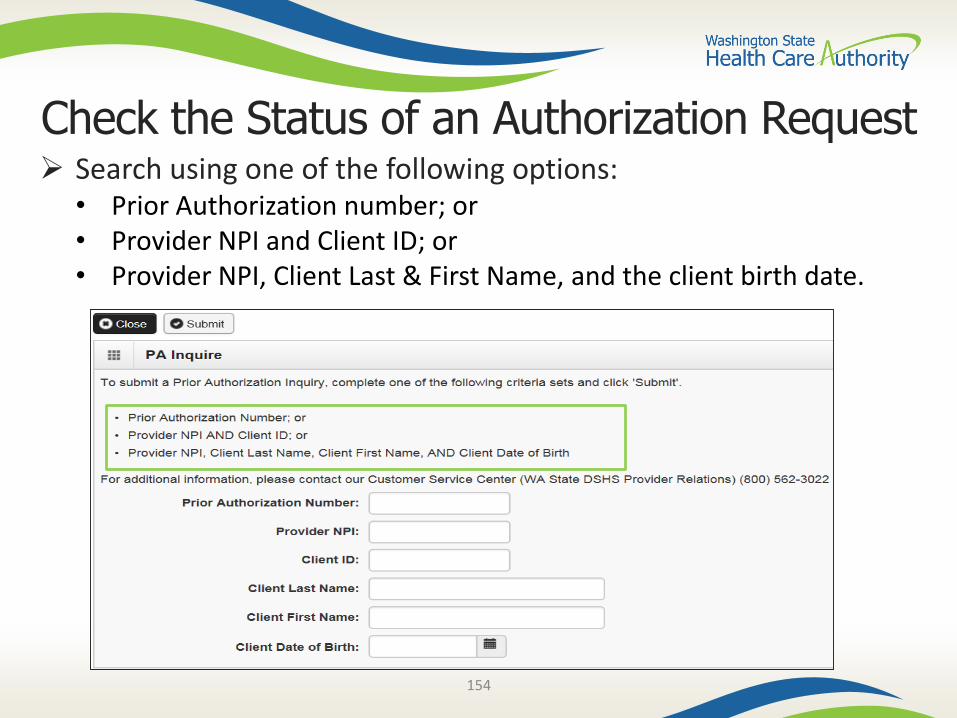
Check the Status of an Authorization Request Search using one of the following options:
• Prior Authorization number; or• Provider NPI and Client ID; or• Provider NPI, Client Last & First Name, and the client birth date.
155
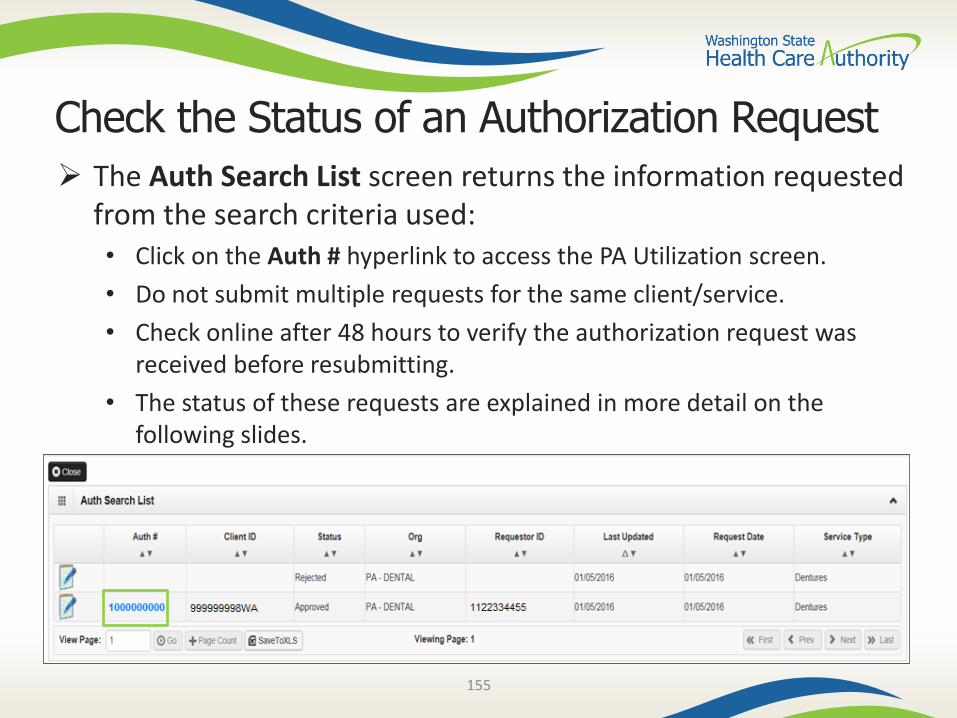
Check the Status of an Authorization Request
The Auth Search List screen returns the information requested from the search criteria used:• Click on the Auth # hyperlink to access the PA Utilization screen.
• Do not submit multiple requests for the same client/service.
• Check online after 48 hours to verify the authorization request was received before resubmitting.
• The status of these requests are explained in more detail on the following slides.
156
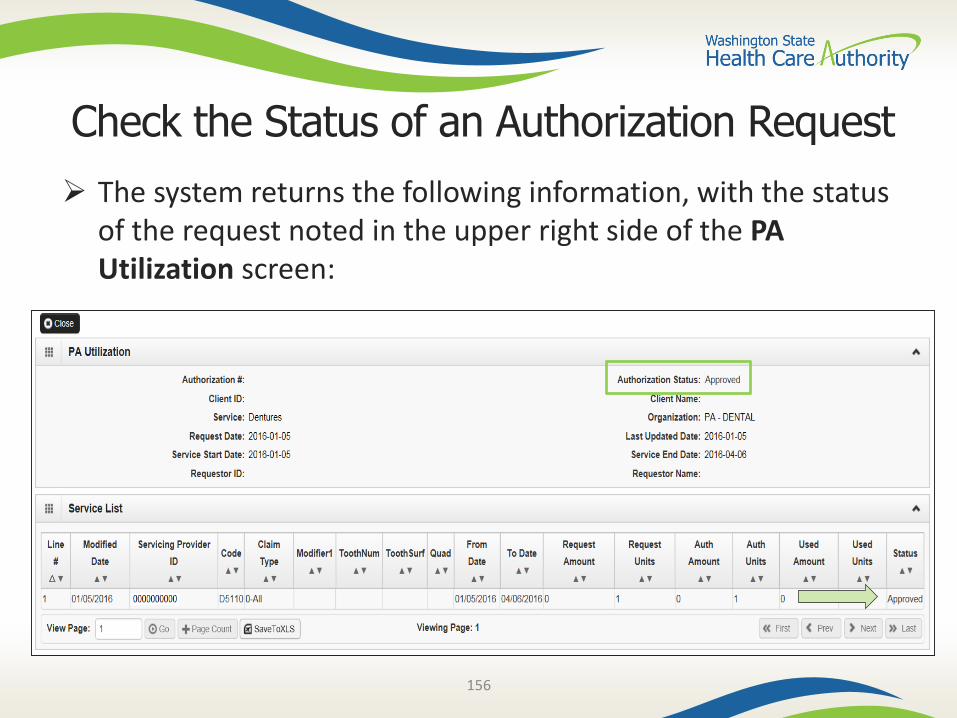
Check the Status of an Authorization Request
The system returns the following information, with the status of the request noted in the upper right side of the PA Utilization screen:
157
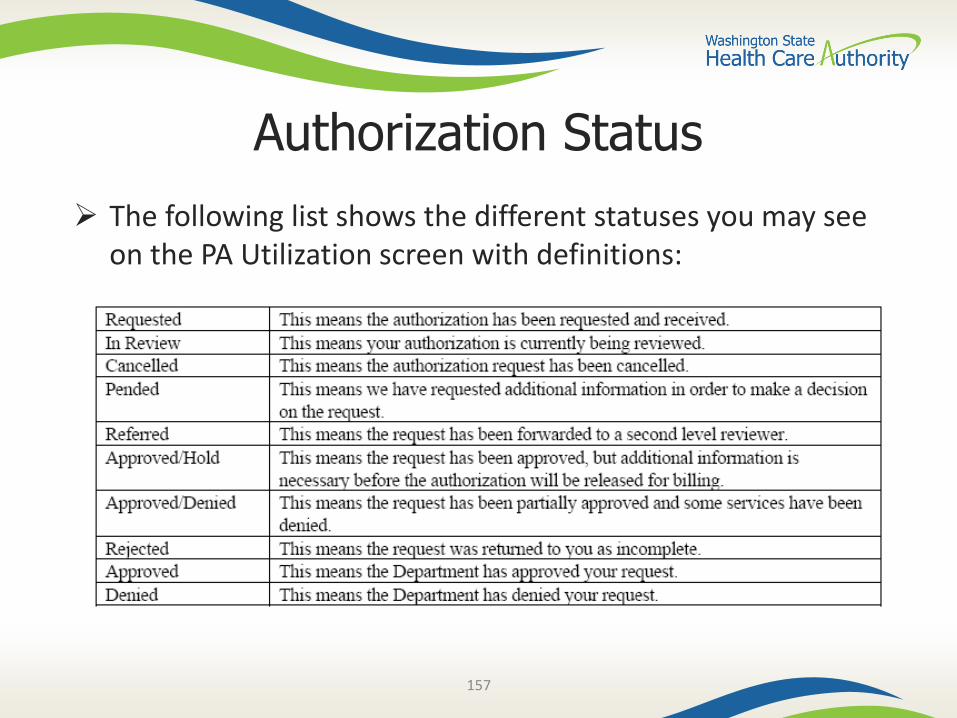
Authorization Status
The following list shows the different statuses you may see on the PA Utilization screen with definitions:
158
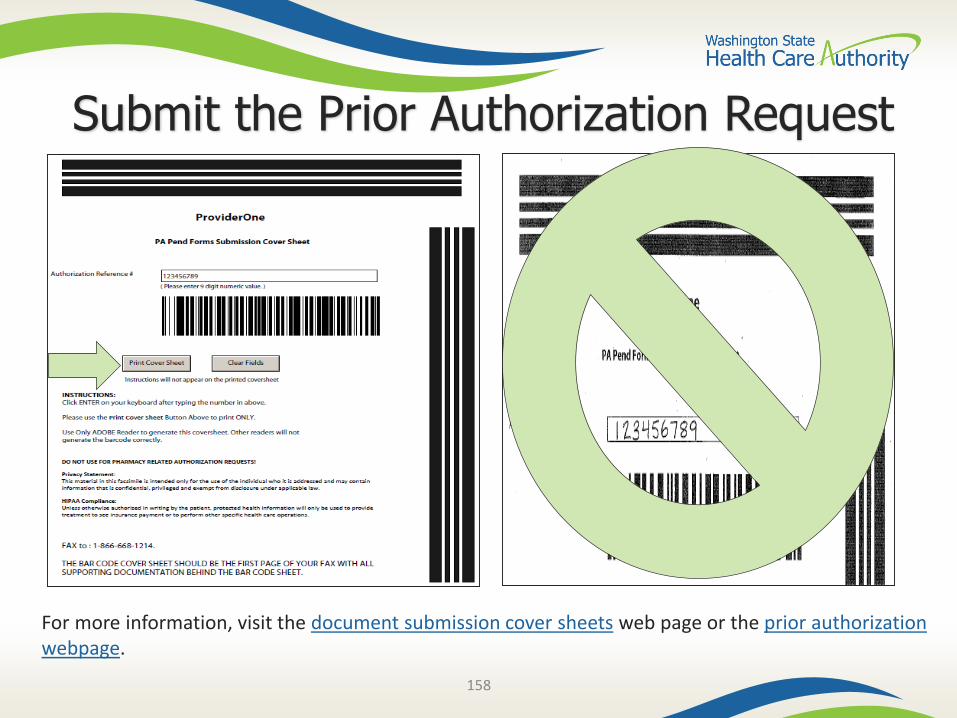
For more information, visit the document submission cover sheets web page or the prior authorization webpage.
Submit the Prior Authorization Request

159
Spenddown
160
What is a Spenddown?An expense or portion of an expense which has been
determined by the agency to be a client liability.
Expenses which have been assigned to meet a client liability are not reimbursed by the agency.
Spenddown liability is deducted from any payment due the provider.
Call the customer service line at 1-877-501-2233.
161
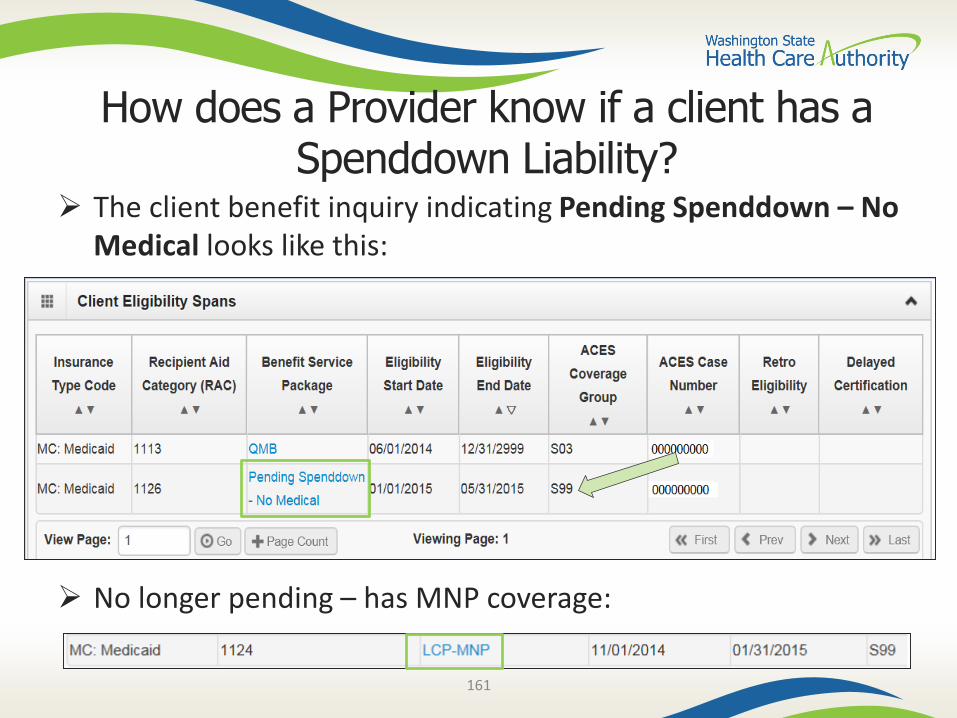
How does a Provider know if a client has a Spenddown Liability?
The client benefit inquiry indicating Pending Spenddown – No Medical looks like this:
No longer pending – has MNP coverage:
162
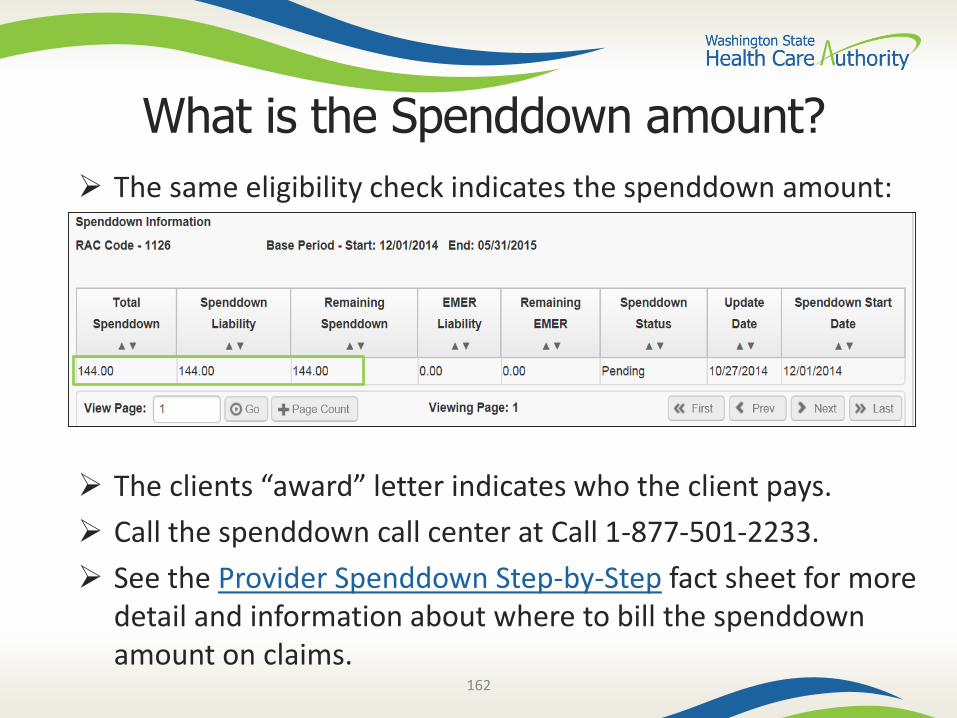
What is the Spenddown amount?
The same eligibility check indicates the spenddown amount:
The clients “award” letter indicates who the client pays.
Call the spenddown call center at Call 1-877-501-2233.
See the Provider Spenddown Step-by-Step fact sheet for more detail and information about where to bill the spenddown amount on claims.

163
Billing a Client
164
Washington Administrative Code (WAC) 182-502-0160, Billing a Client, allows providers, in limited circumstances, to bill fee-for-service or managed care clients for covered healthcare services. It also allows fee-for-service or managed care clients the option to self-pay for covered healthcare services.
Note: The full text of WAC 182-502-0160 can be found on the Apple Health (Medicaid) manual WAC index page.
Background
165
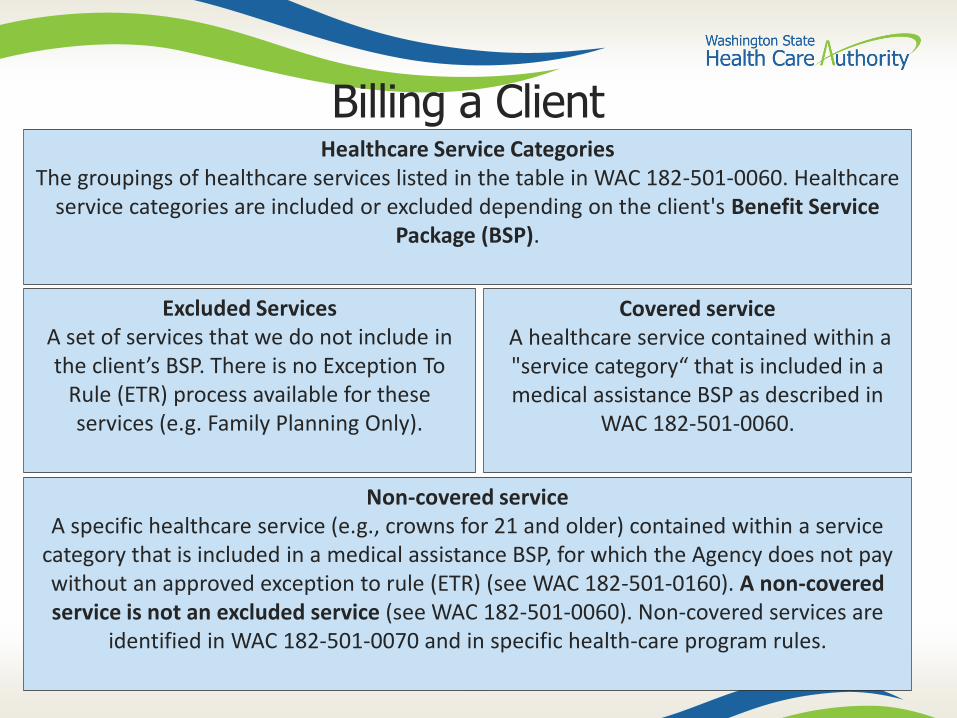
Billing a ClientHealthcare Service Categories
The groupings of healthcare services listed in the table in WAC 182-501-0060. Healthcare service categories are included or excluded depending on the client's Benefit Service
Package (BSP).
Excluded Services A set of services that we do not include in the client’s BSP. There is no Exception To
Rule (ETR) process available for these services (e.g. Family Planning Only).
Covered service A healthcare service contained within a "service category“ that is included in a medical assistance BSP as described in
WAC 182-501-0060.
Non-covered service A specific healthcare service (e.g., crowns for 21 and older) contained within a service
category that is included in a medical assistance BSP, for which the Agency does not pay without an approved exception to rule (ETR) (see WAC 182-501-0160). A non-covered service is not an excluded service (see WAC 182-501-0060). Non-covered services are
identified in WAC 182-501-0070 and in specific health-care program rules.

166
Form 13-879
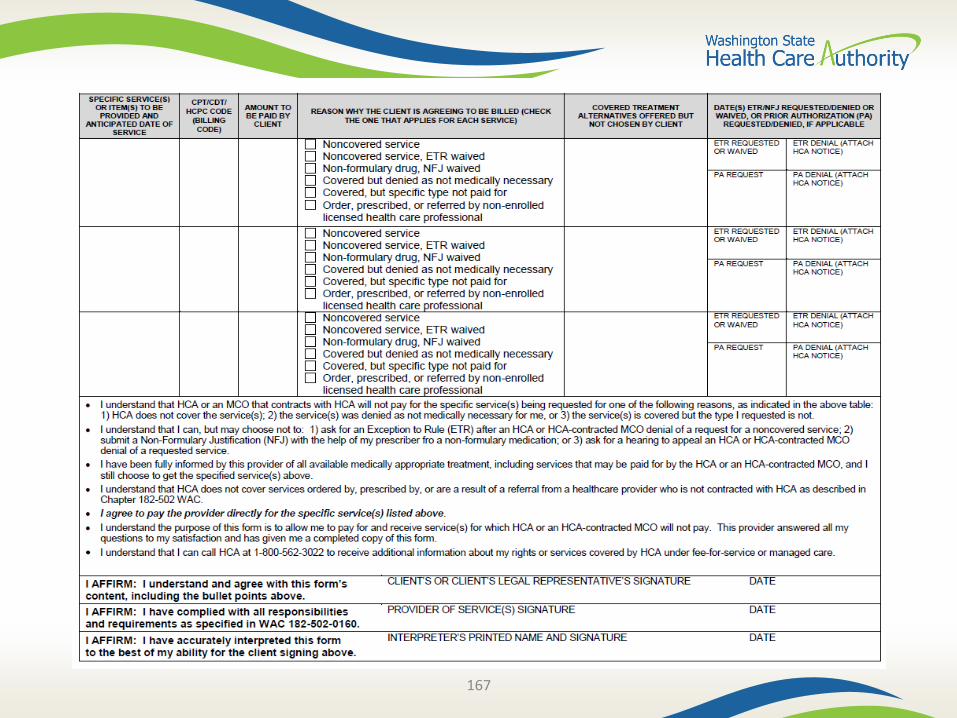
167
168
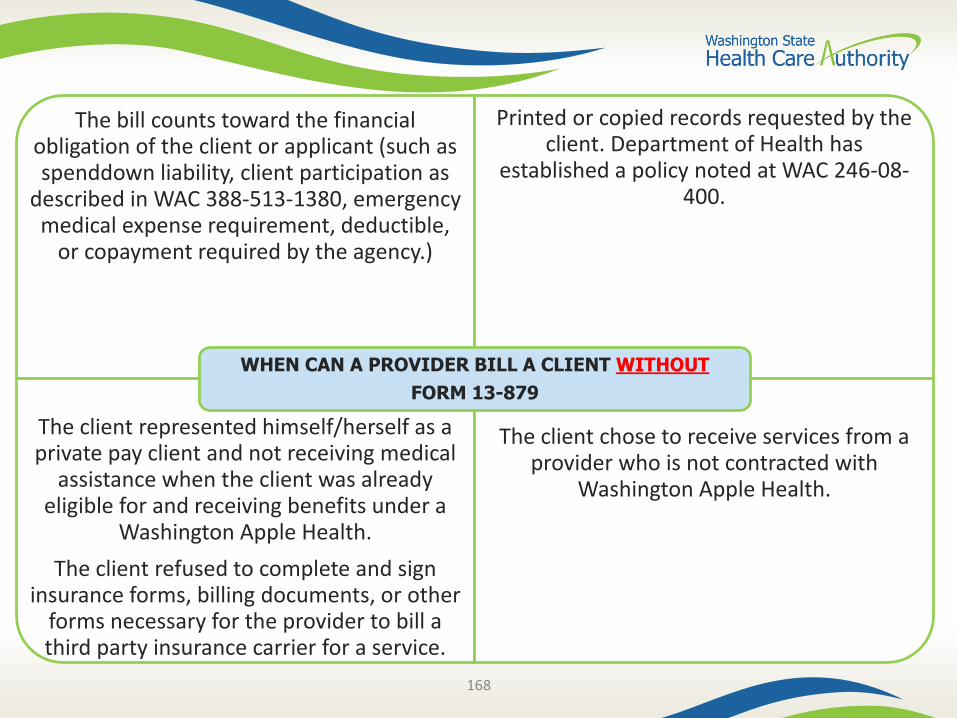
The bill counts toward the financial obligation of the client or applicant (such as spenddown liability, client participation as
described in WAC 388-513-1380, emergency medical expense requirement, deductible,
or copayment required by the agency.)
Printed or copied records requested by the client. Department of Health has
established a policy noted at WAC 246-08-400.
The client represented himself/herself as a private pay client and not receiving medical
assistance when the client was already eligible for and receiving benefits under a
Washington Apple Health.
The client refused to complete and sign insurance forms, billing documents, or other
forms necessary for the provider to bill a third party insurance carrier for a service.
The client chose to receive services from a provider who is not contracted with
Washington Apple Health.
WHEN CAN A PROVIDER BILL A CLIENT WITHOUT
FORM 13-879
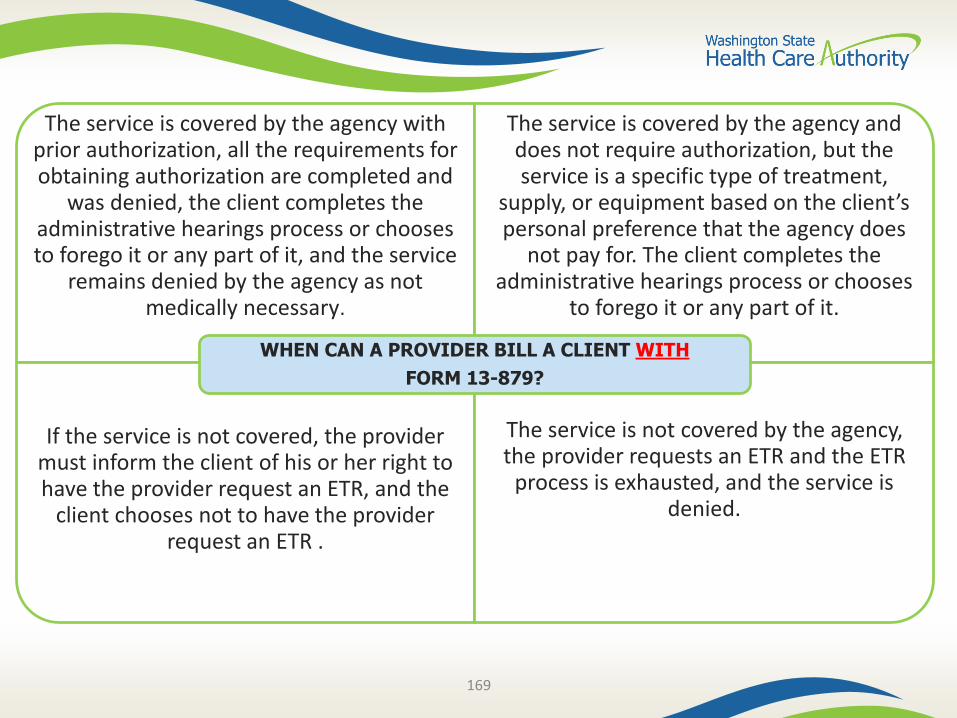
169
The service is covered by the agency with prior authorization, all the requirements for obtaining authorization are completed and
was denied, the client completes the administrative hearings process or chooses to forego it or any part of it, and the service
remains denied by the agency as not medically necessary.
The service is covered by the agency and does not require authorization, but the service is a specific type of treatment,
supply, or equipment based on the client’s personal preference that the agency does
not pay for. The client completes the administrative hearings process or chooses
to forego it or any part of it.
If the service is not covered, the provider must inform the client of his or her right to have the provider request an ETR, and the
client chooses not to have the provider request an ETR .
The service is not covered by the agency, the provider requests an ETR and the ETR
process is exhausted, and the service is denied.
WHEN CAN A PROVIDER BILL A CLIENT WITH
FORM 13-879?
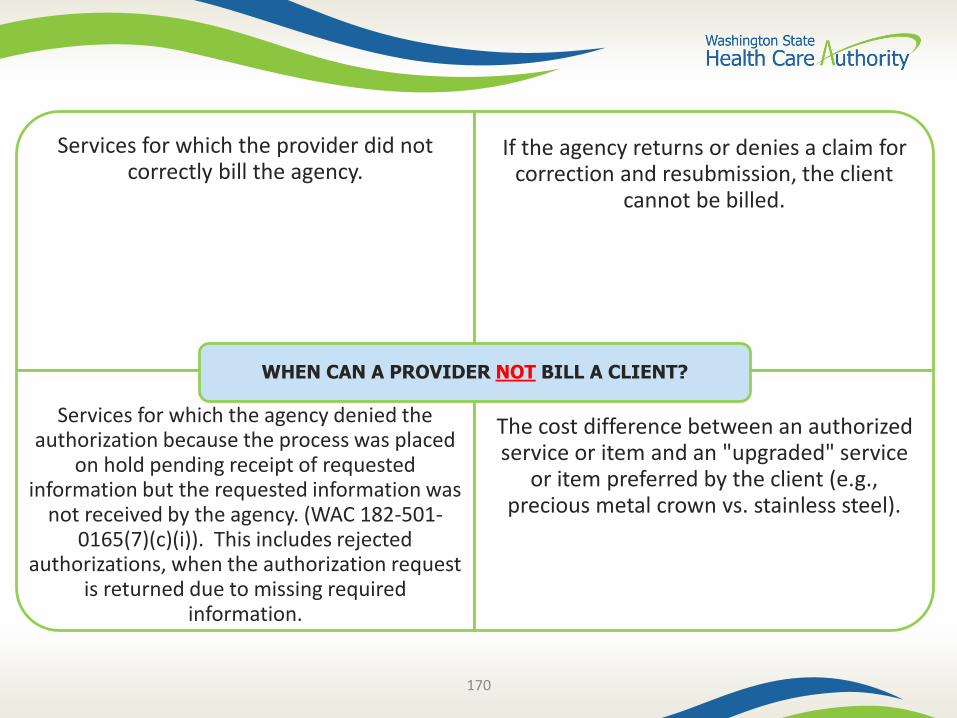
170
Services for which the provider did not correctly bill the agency.
If the agency returns or denies a claim for correction and resubmission, the client
cannot be billed.
Services for which the agency denied the authorization because the process was placed
on hold pending receipt of requested information but the requested information was
not received by the agency. (WAC 182-501-0165(7)(c)(i)). This includes rejected
authorizations, when the authorization request is returned due to missing required
information.
The cost difference between an authorized service or item and an "upgraded" service
or item preferred by the client (e.g., precious metal crown vs. stainless steel).
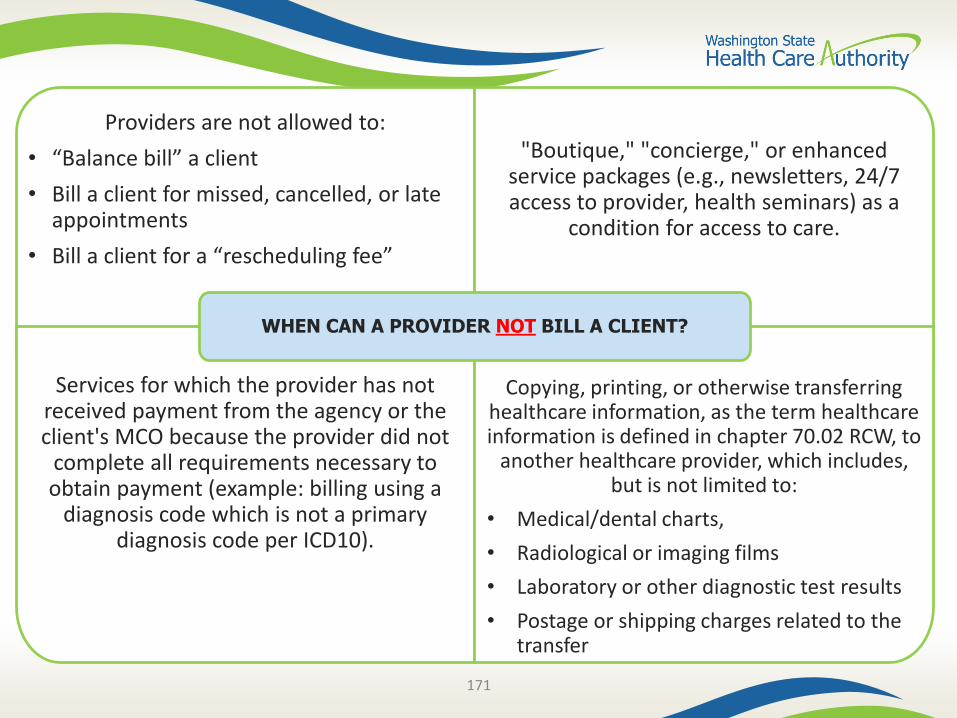
WHEN CAN A PROVIDER NOT BILL A CLIENT?
171
Providers are not allowed to:
• “Balance bill” a client
• Bill a client for missed, cancelled, or late appointments
• Bill a client for a “rescheduling fee”
"Boutique," "concierge," or enhanced service packages (e.g., newsletters, 24/7 access to provider, health seminars) as a
condition for access to care.
Services for which the provider has not received payment from the agency or the client's MCO because the provider did not
complete all requirements necessary to obtain payment (example: billing using a
diagnosis code which is not a primary diagnosis code per ICD10).
Copying, printing, or otherwise transferring healthcare information, as the term healthcare information is defined in chapter 70.02 RCW, to
another healthcare provider, which includes, but is not limited to:
• Medical/dental charts,
• Radiological or imaging films
• Laboratory or other diagnostic test results
• Postage or shipping charges related to the transfer
WHEN CAN A PROVIDER NOT BILL A CLIENT?
172
Provider File Maintenance
173
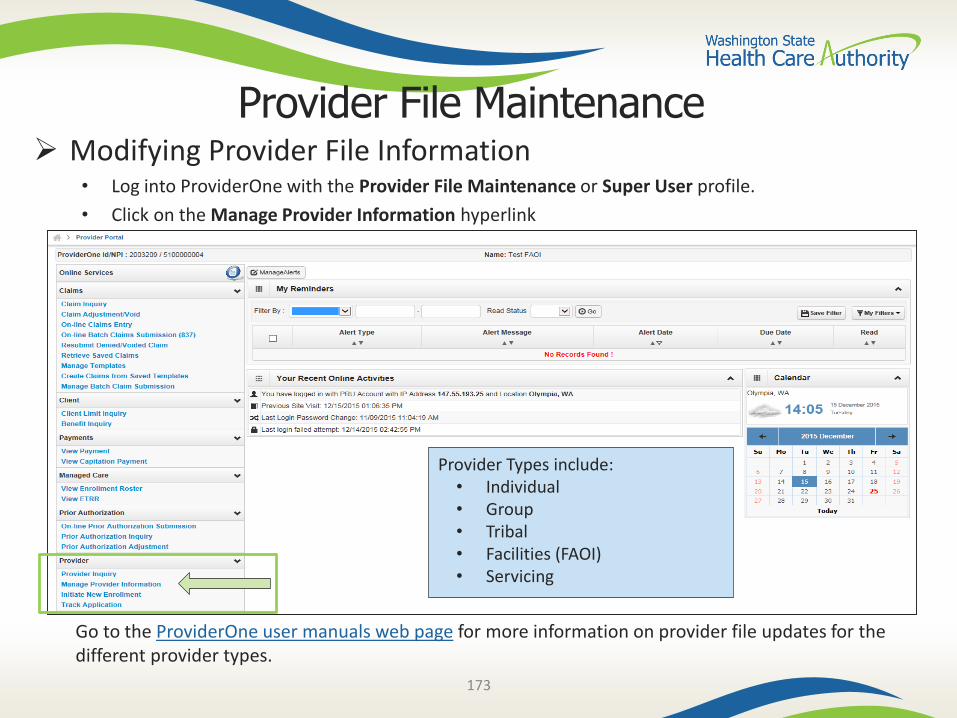
Provider File Maintenance Modifying Provider File Information
• Log into ProviderOne with the Provider File Maintenance or Super User profile.
• Click on the Manage Provider Information hyperlink
Go to the ProviderOne user manuals web page for more information on provider file updates for the different provider types.
Provider Types include:• Individual• Group• Tribal• Facilities (FAOI)• Servicing
174
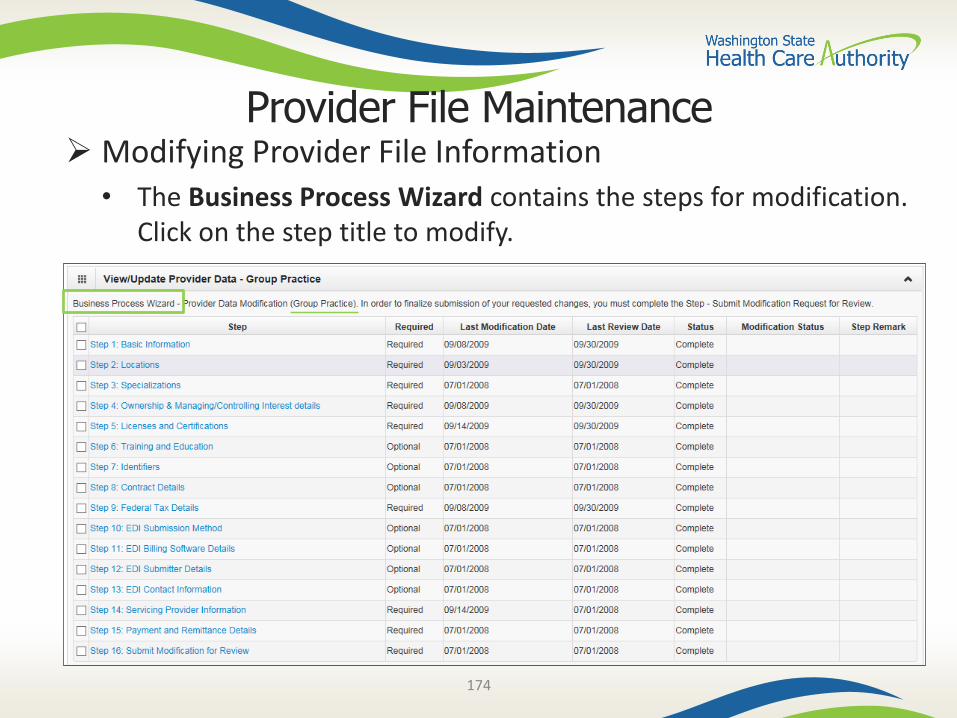
Provider File Maintenance Modifying Provider File Information
• The Business Process Wizard contains the steps for modification. Click on the step title to modify.
175
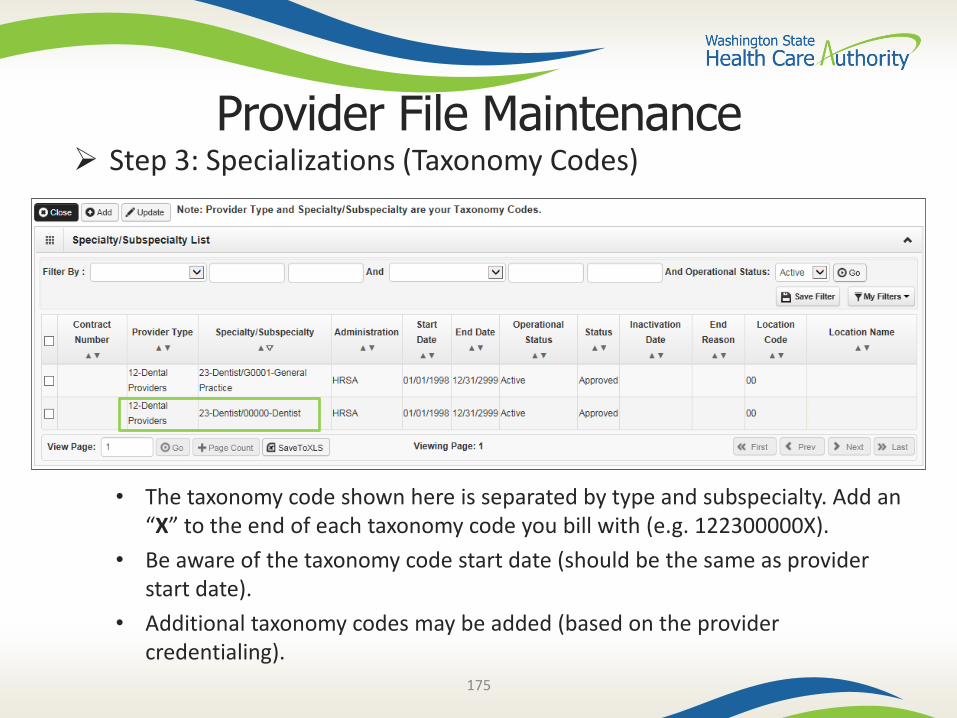
Provider File Maintenance Step 3: Specializations (Taxonomy Codes)
• The taxonomy code shown here is separated by type and subspecialty. Add an “X” to the end of each taxonomy code you bill with (e.g. 122300000X).
• Be aware of the taxonomy code start date (should be the same as provider start date).
• Additional taxonomy codes may be added (based on the provider credentialing).
176
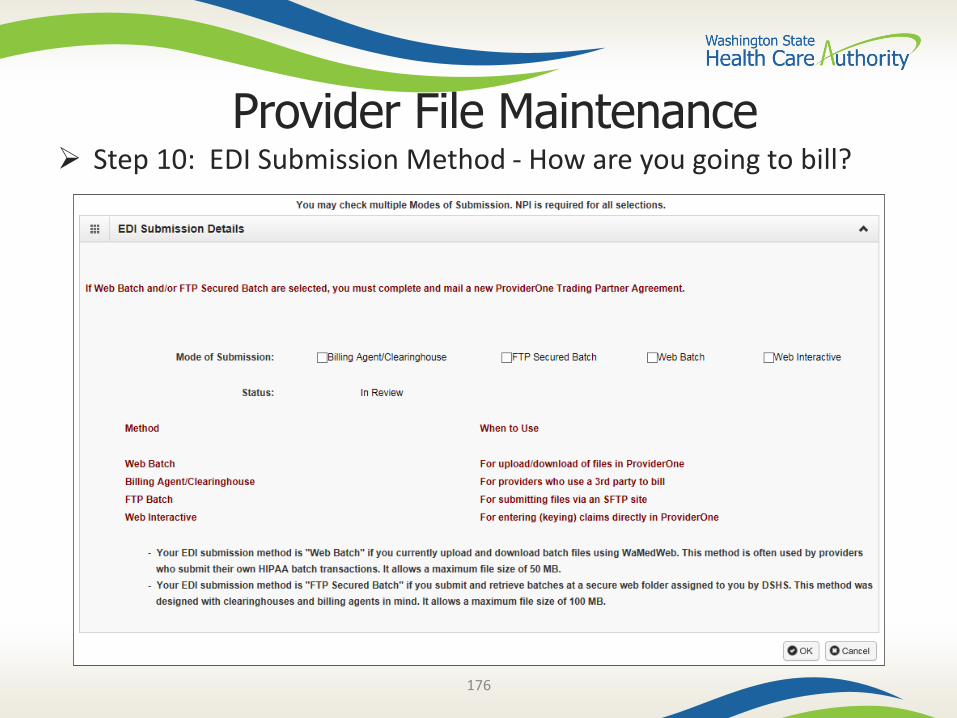
Provider File Maintenance Step 10: EDI Submission Method - How are you going to bill?
177
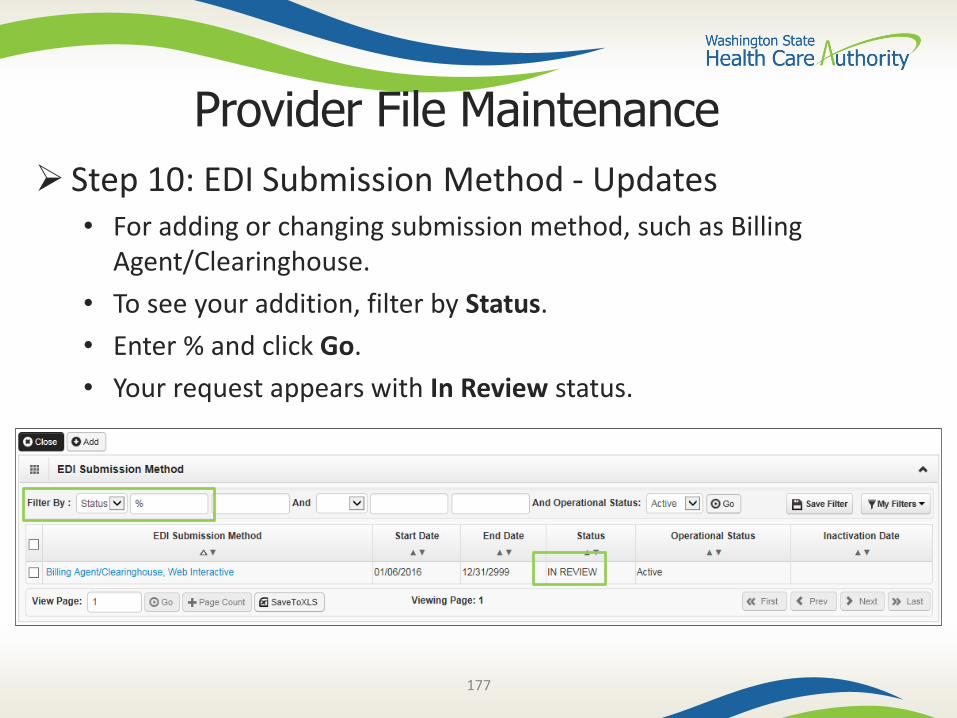
Provider File Maintenance
Step 10: EDI Submission Method - Updates• For adding or changing submission method, such as Billing
Agent/Clearinghouse.
• To see your addition, filter by Status.
• Enter % and click Go.
• Your request appears with In Review status.
178
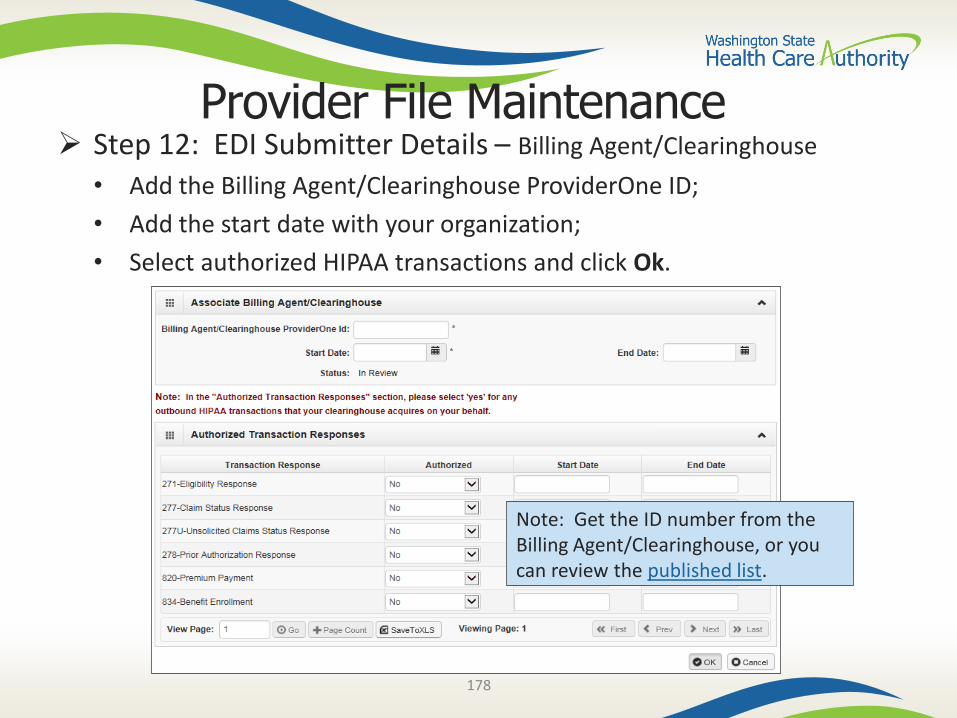
Provider File Maintenance Step 12: EDI Submitter Details – Billing Agent/Clearinghouse
• Add the Billing Agent/Clearinghouse ProviderOne ID;
• Add the start date with your organization;
• Select authorized HIPAA transactions and click Ok.
Note: Get the ID number from the Billing Agent/Clearinghouse, or you can review the published list.
179
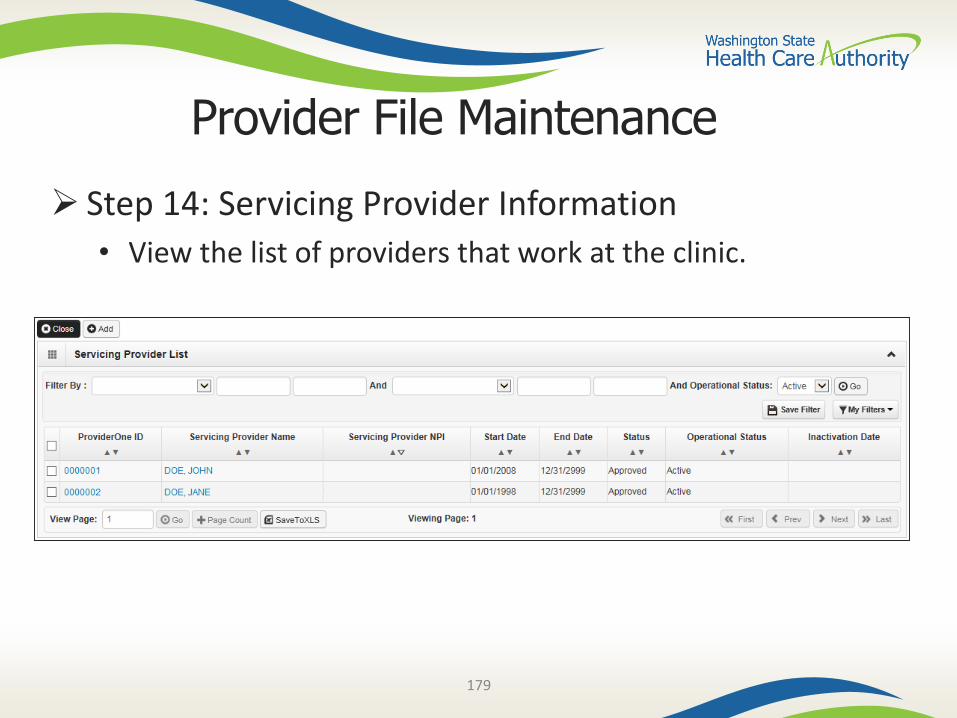
Provider File Maintenance
Step 14: Servicing Provider Information
• View the list of providers that work at the clinic.
180
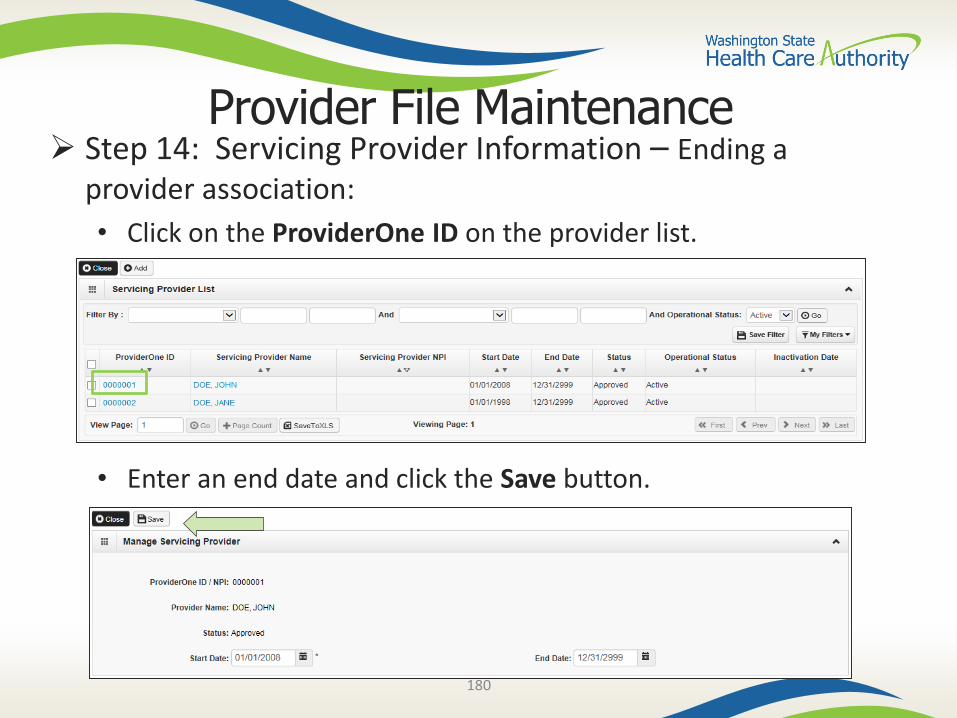
Provider File Maintenance Step 14: Servicing Provider Information – Ending a
provider association:
• Click on the ProviderOne ID on the provider list.
• Enter an end date and click the Save button.
181
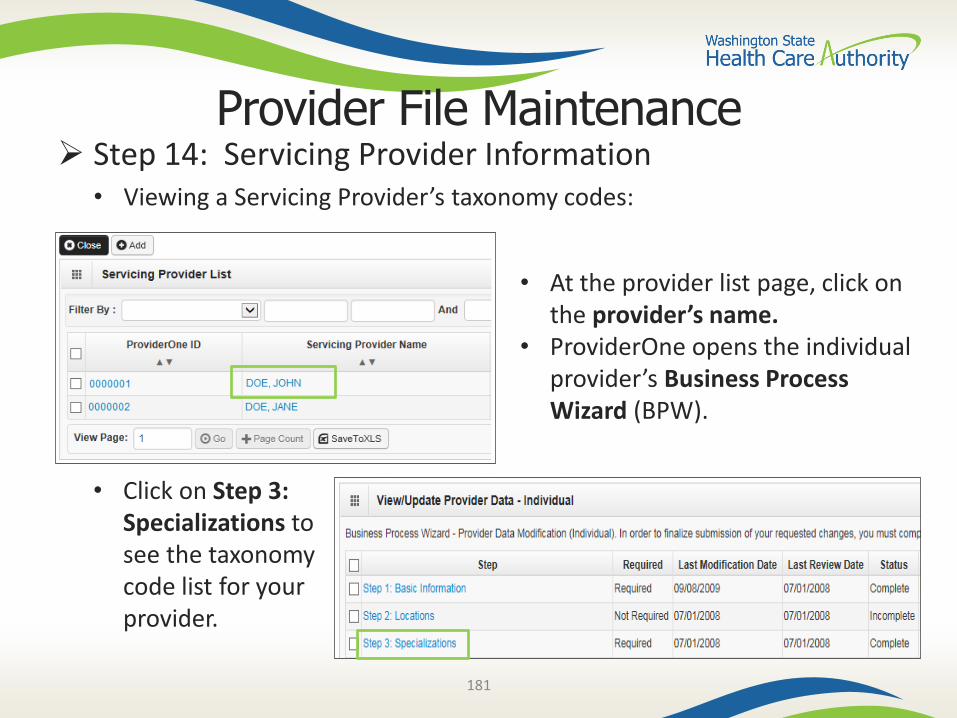
Provider File Maintenance Step 14: Servicing Provider Information
• Viewing a Servicing Provider’s taxonomy codes:
• At the provider list page, click on the provider’s name.
• ProviderOne opens the individual provider’s Business Process Wizard (BPW).
• Click on Step 3: Specializations to see the taxonomy code list for your provider.
182
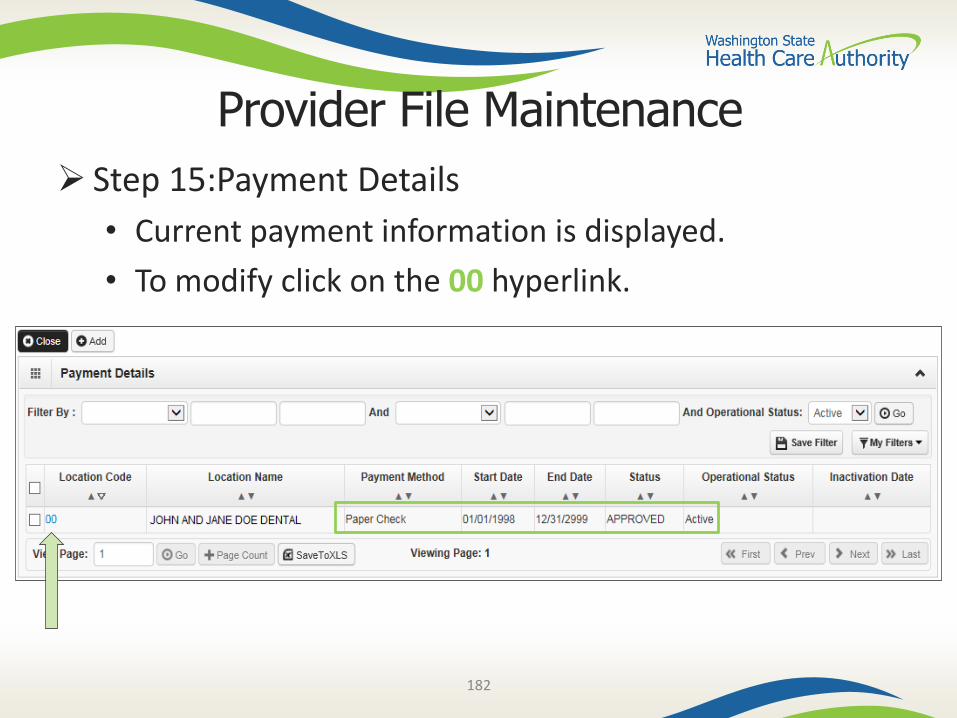
Provider File Maintenance
Step 15:Payment Details
• Current payment information is displayed.
• To modify click on the 00 hyperlink.
183
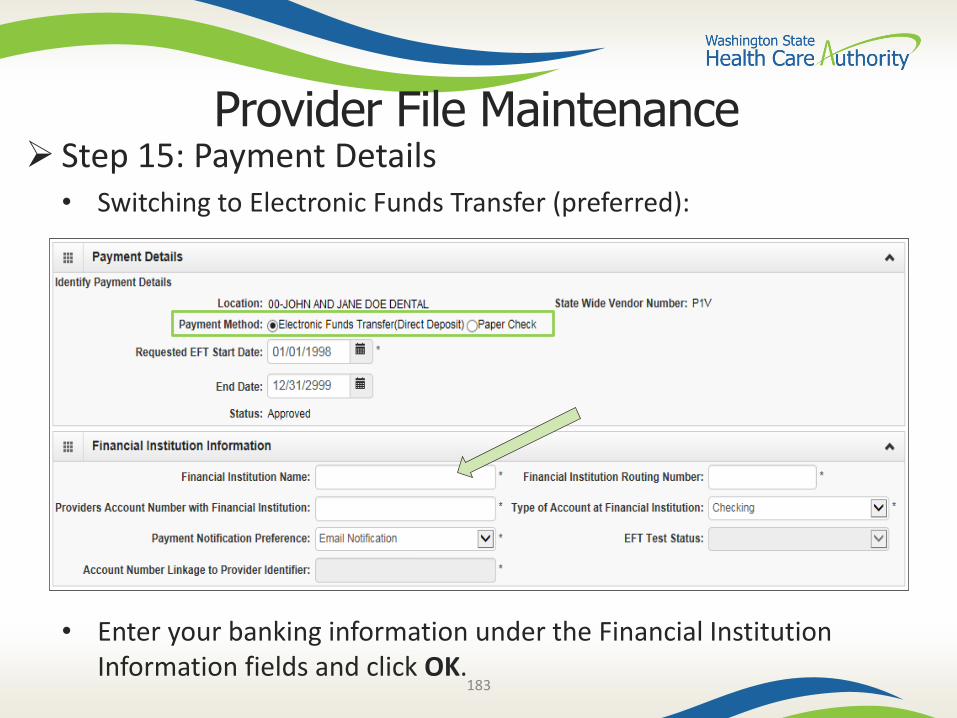
Provider File Maintenance Step 15: Payment Details
• Switching to Electronic Funds Transfer (preferred):
• Enter your banking information under the Financial Institution Information fields and click OK.
184
Provider File Maintenance Step 15: Payment Details
• Complete the Authorization Agreement for Electronic Funds Transfer form:
o Use Form 12-002 for new EFT set up.
o Check the box for change of EFT account number.
• Have the form signed.
• Fax in to 360-725-2144; or
• Mail to address on the form.
• Find the form at the Forms web page.
185
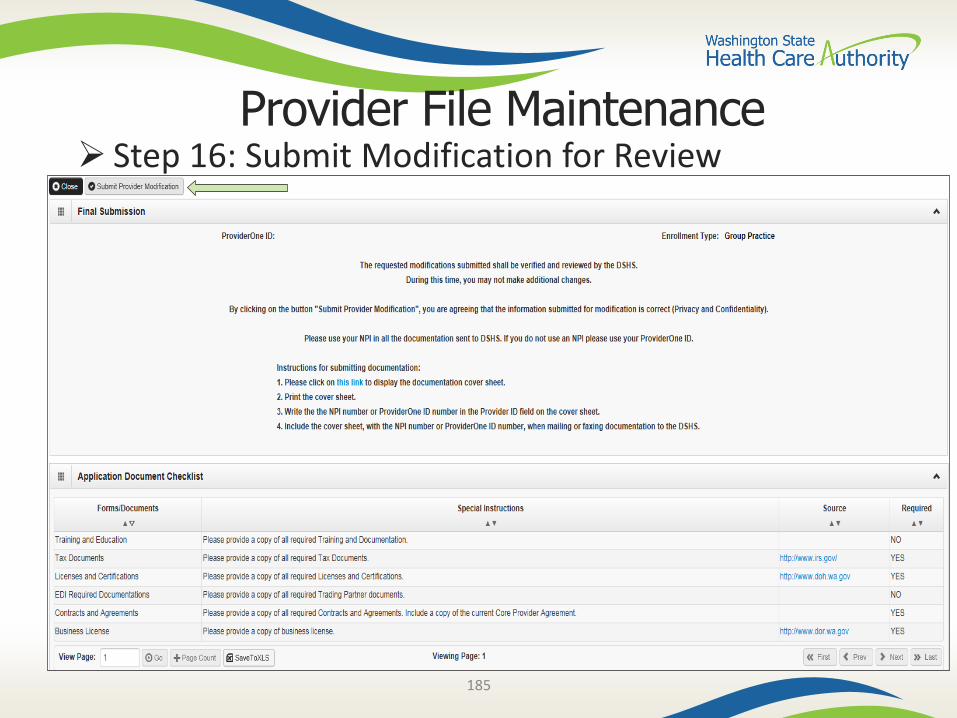
Provider File Maintenance Step 16: Submit Modification for Review
186
Provider File MaintenanceMore information on provider file maintenance, visit
the ProviderOne user manuals web page.
Find your manual to review.
187
Enroll an Existing Rendering Provider
188
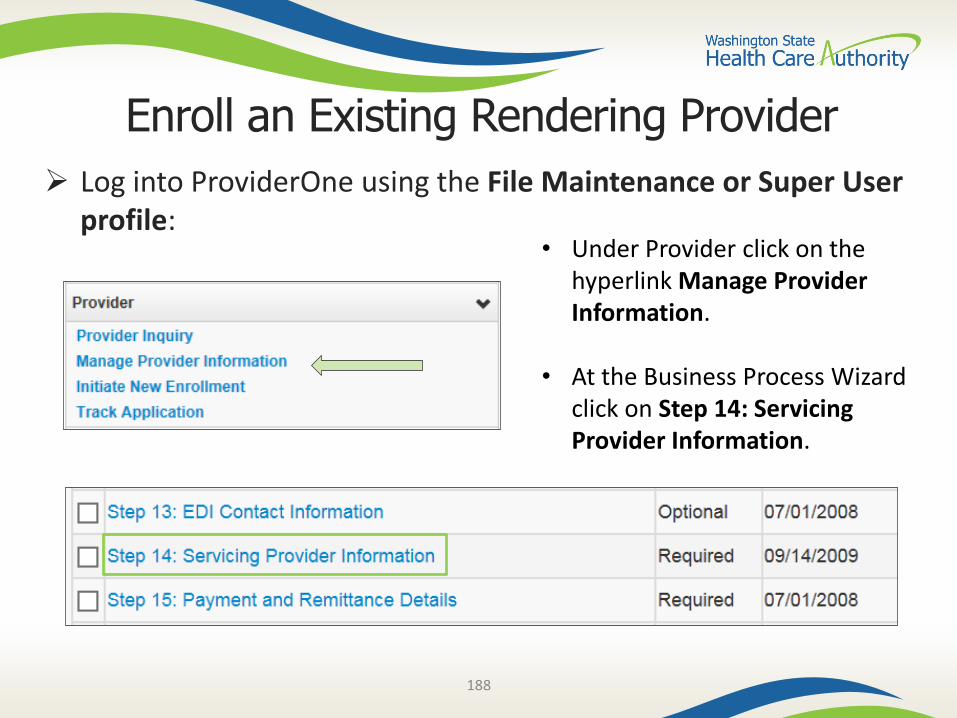
Enroll an Existing Rendering Provider
Log into ProviderOne using the File Maintenance or Super User profile:
• Under Provider click on the hyperlink Manage Provider Information.
• At the Business Process Wizard click on Step 14: Servicing Provider Information.
189
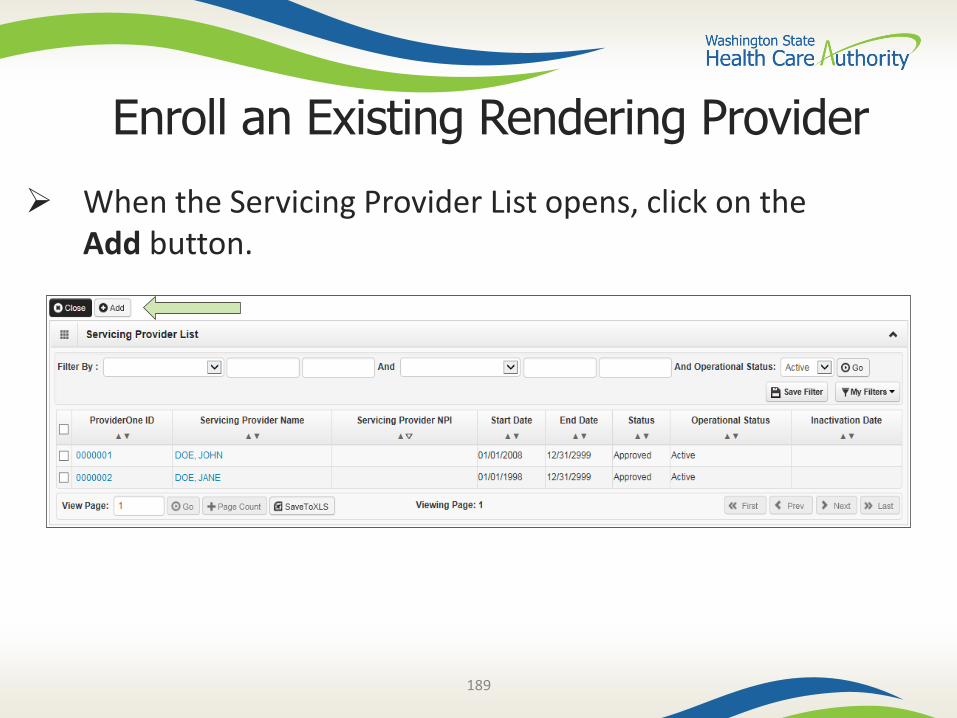
Enroll an Existing Rendering Provider
When the Servicing Provider List opens, click on the Add button.
190
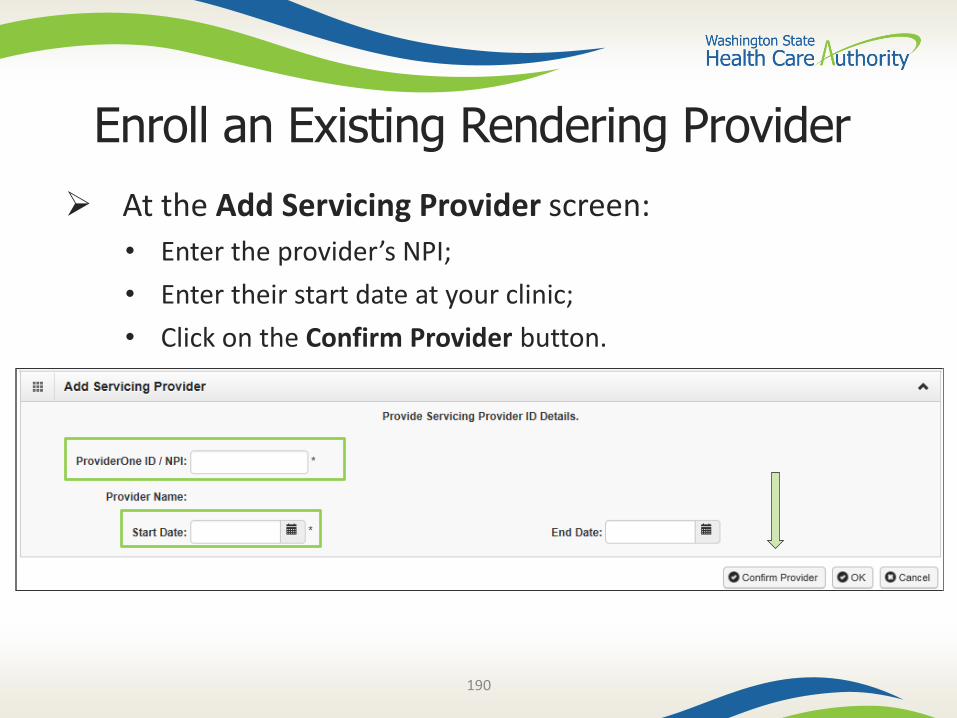
Enroll an Existing Rendering Provider
At the Add Servicing Provider screen:
• Enter the provider’s NPI;
• Enter their start date at your clinic;
• Click on the Confirm Provider button.
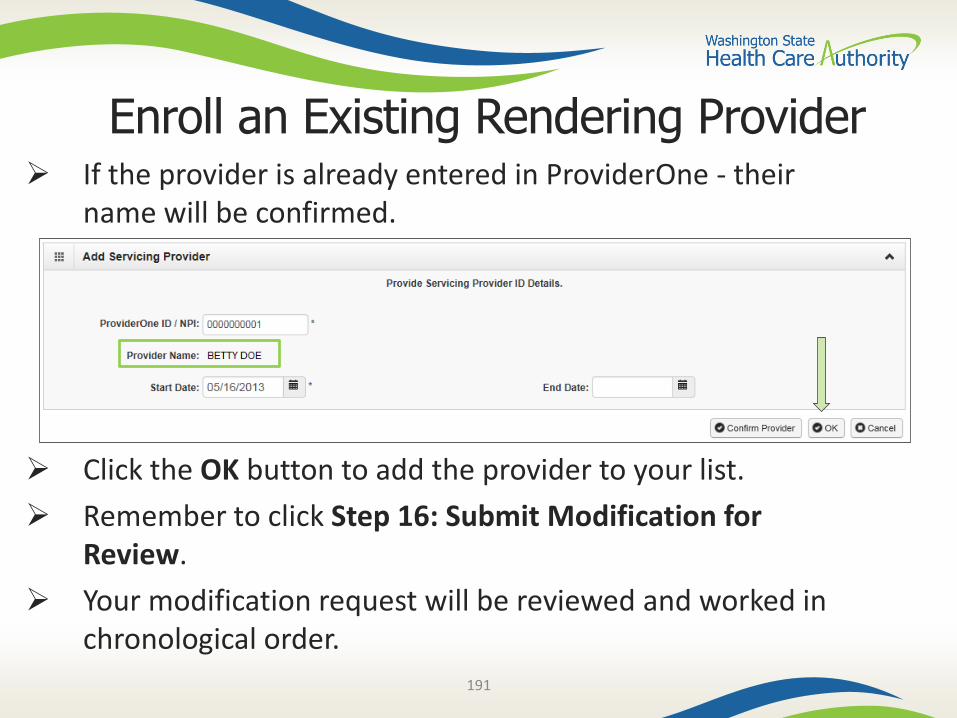
191
Enroll an Existing Rendering Provider If the provider is already entered in ProviderOne - their
name will be confirmed.
Click the OK button to add the provider to your list.
Remember to click Step 16: Submit Modification for Review.
Your modification request will be reviewed and worked in chronological order.

192
Enroll a New Rendering Provider
193
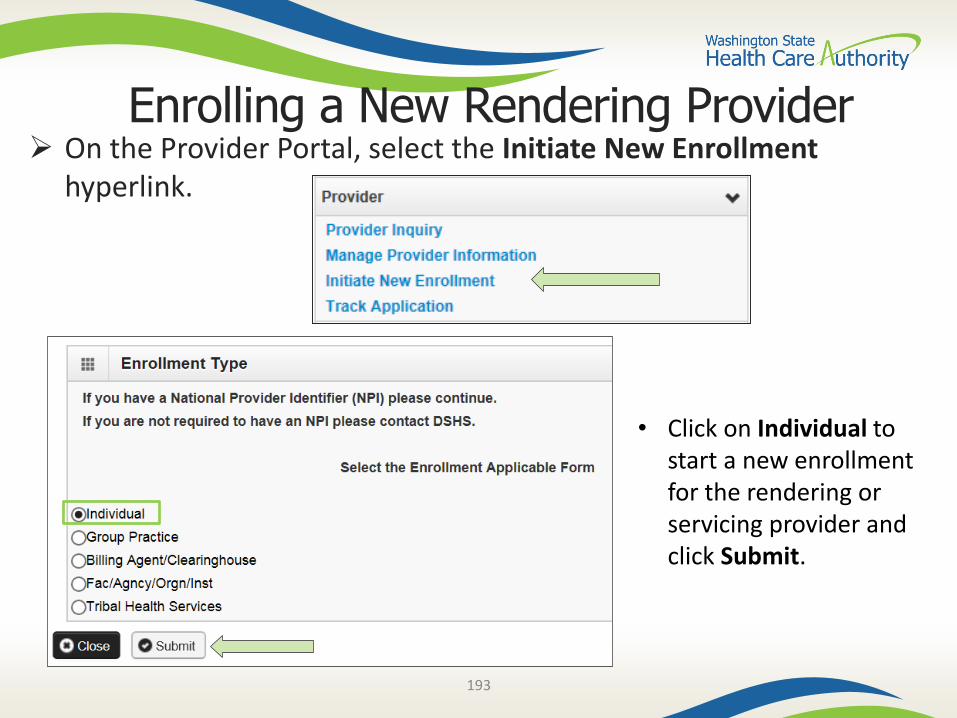
Enrolling a New Rendering Provider On the Provider Portal, select the Initiate New Enrollment
hyperlink.
• Click on Individual to start a new enrollment for the rendering or servicing provider and click Submit.
194
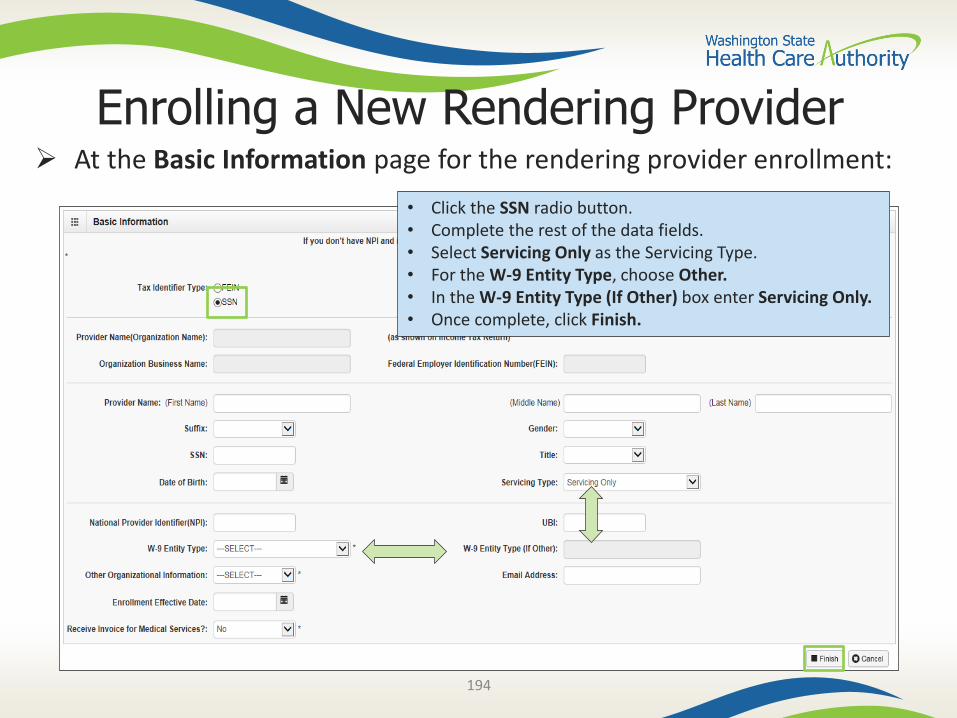
At the Basic Information page for the rendering provider enrollment:
Enrolling a New Rendering Provider
• Click the SSN radio button.• Complete the rest of the data fields.• Select Servicing Only as the Servicing Type.• For the W-9 Entity Type, choose Other.• In the W-9 Entity Type (If Other) box enter Servicing Only.• Once complete, click Finish.
195
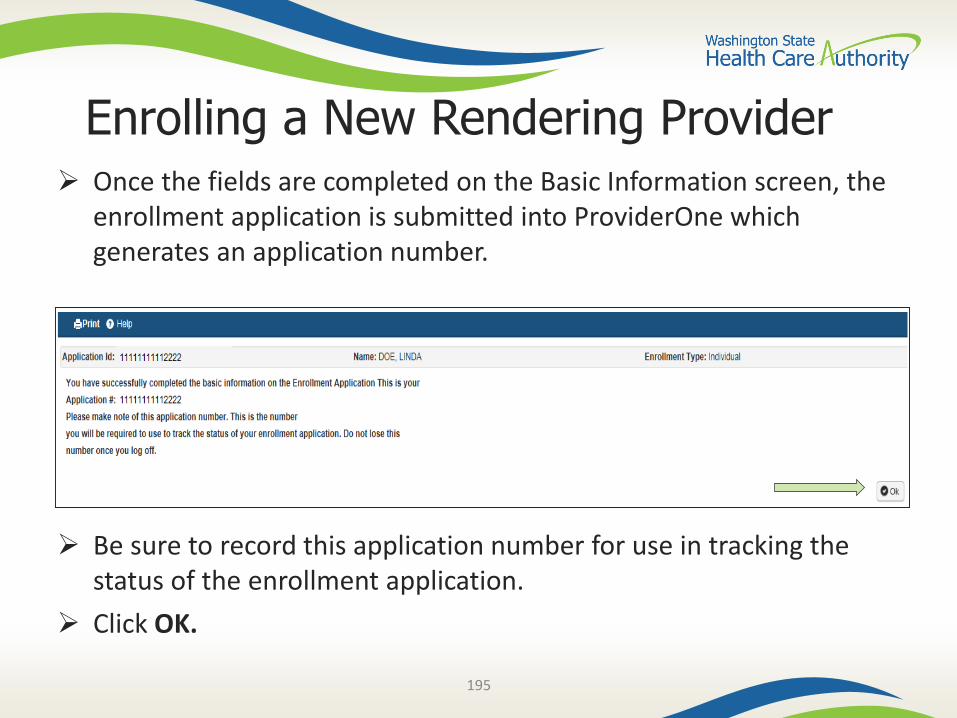
Once the fields are completed on the Basic Information screen, the enrollment application is submitted into ProviderOne which generates an application number.
Be sure to record this application number for use in tracking the status of the enrollment application.
Click OK.
Enrolling a New Rendering Provider
196
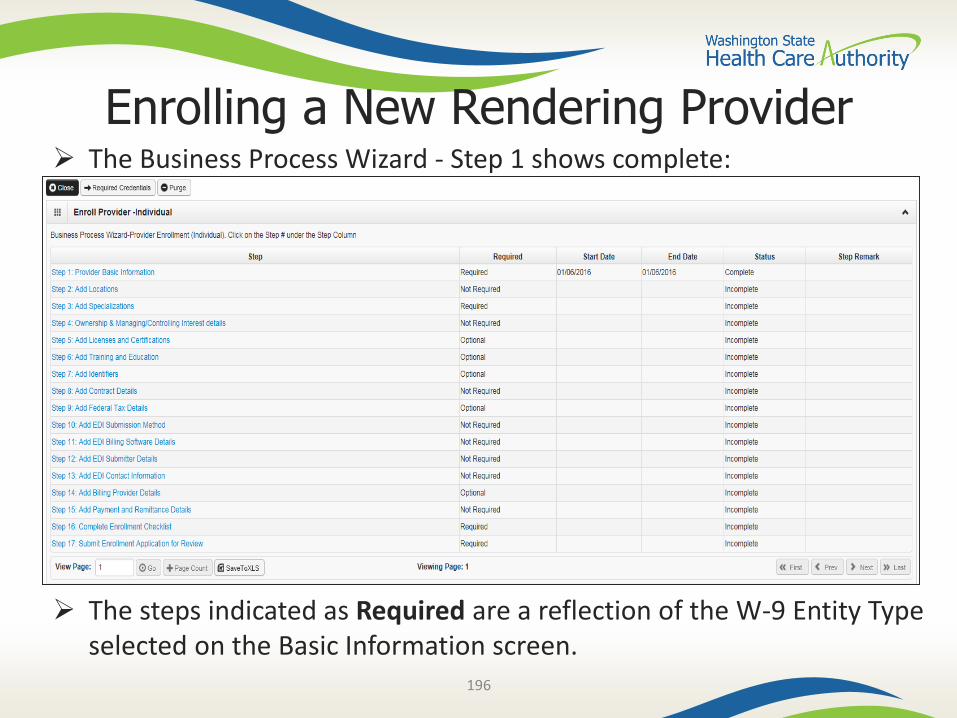
The Business Process Wizard - Step 1 shows complete:
The steps indicated as Required are a reflection of the W-9 Entity Type selected on the Basic Information screen.
Enrolling a New Rendering Provider
197
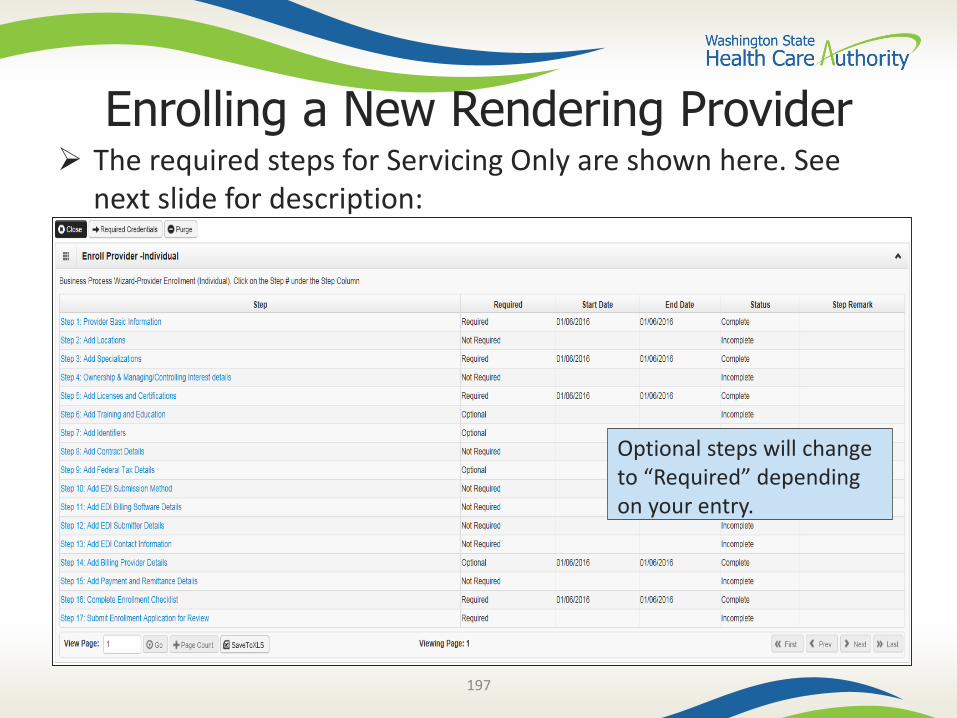
The required steps for Servicing Only are shown here. See next slide for description:
Enrolling a New Rendering Provider
Optional steps will change to “Required” depending on your entry.
198
Step 3: Specializations
• Add Taxonomy here.
Step 5: Licenses and Certifications
• Enter license/certification issued by the Department of Health.
• Add DEA number if applicable.
Step 14: Billing Provider Details
• Add the NPI and Name of clinic that will bill for this rendering provider’s services.
Step 16: Complete Enrollment Checklist
• Answer questions displayed; and
• Click Save and then Close.
Enrolling a New Rendering Provider
199
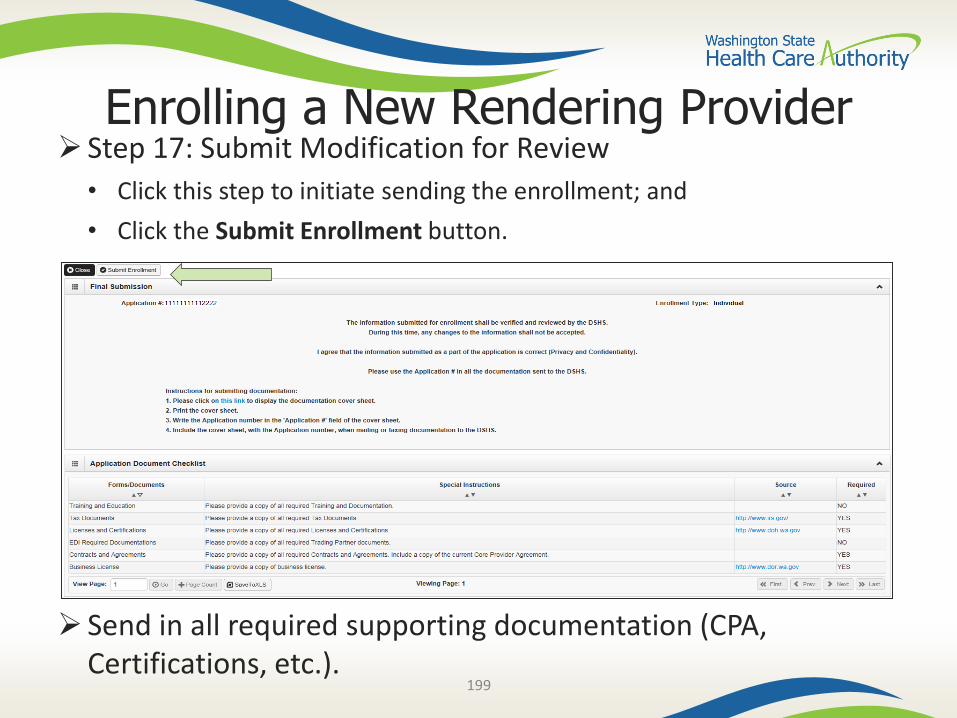
Step 17: Submit Modification for Review
• Click this step to initiate sending the enrollment; and
• Click the Submit Enrollment button.
Send in all required supporting documentation (CPA, Certifications, etc.).
Enrolling a New Rendering Provider
200
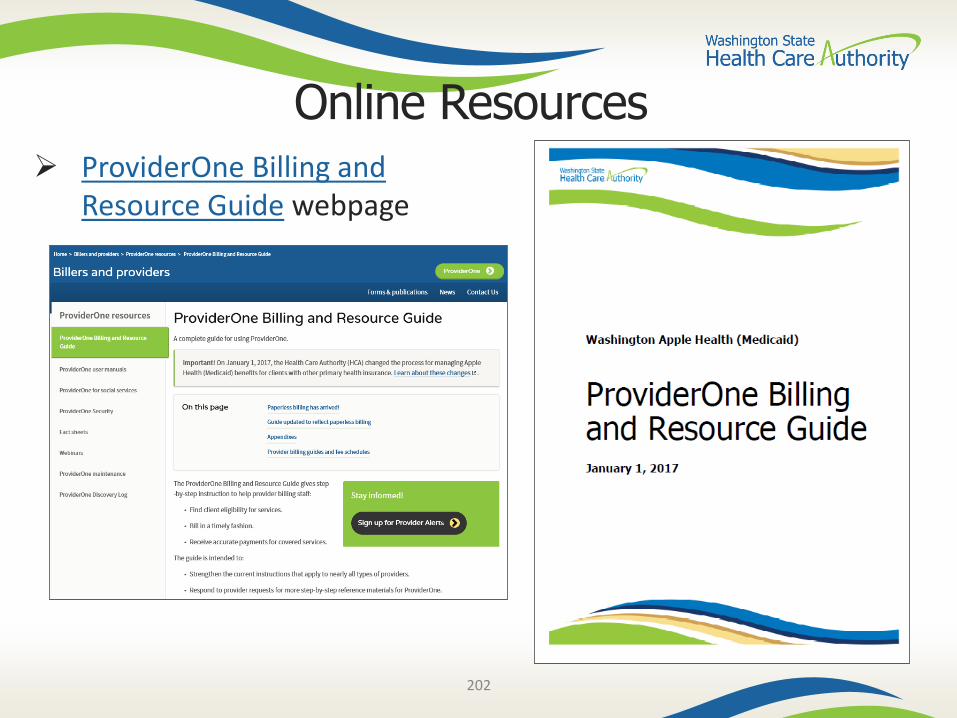
Online Resources
201
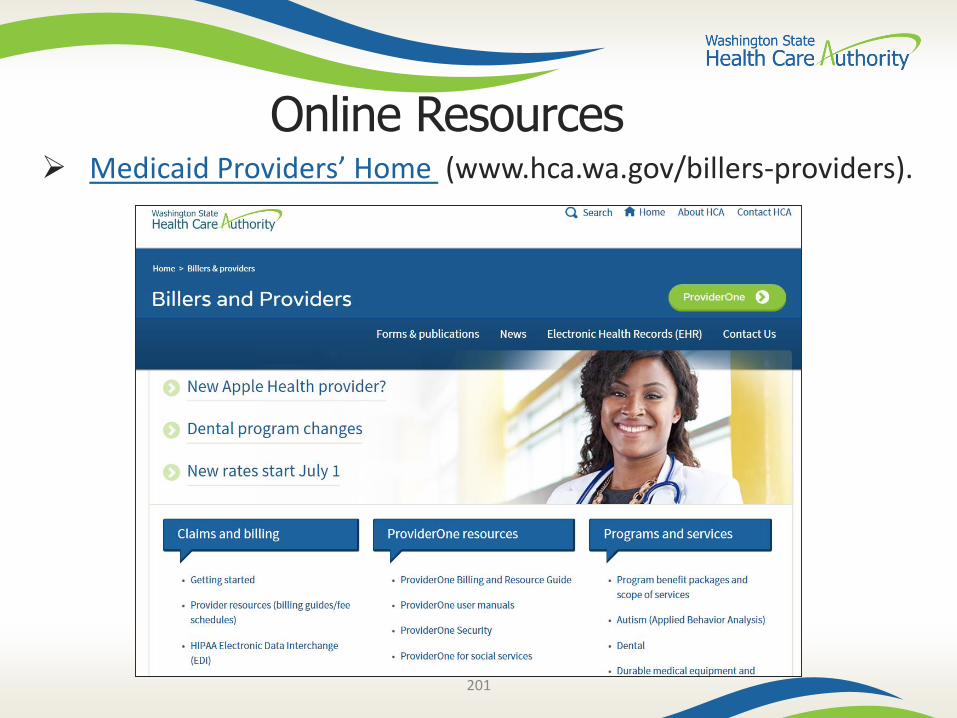
Online Resources Medicaid Providers’ Home (www.hca.wa.gov/billers-providers).
203
Online Resources
Prior authorization webpage
• Contains step by step instructions
• Links to the most commonly used billing guides for services requiring authorization
• Links to prior authorization forms
• An Expedited Prior Authorization (EPA) Inventory guide
204
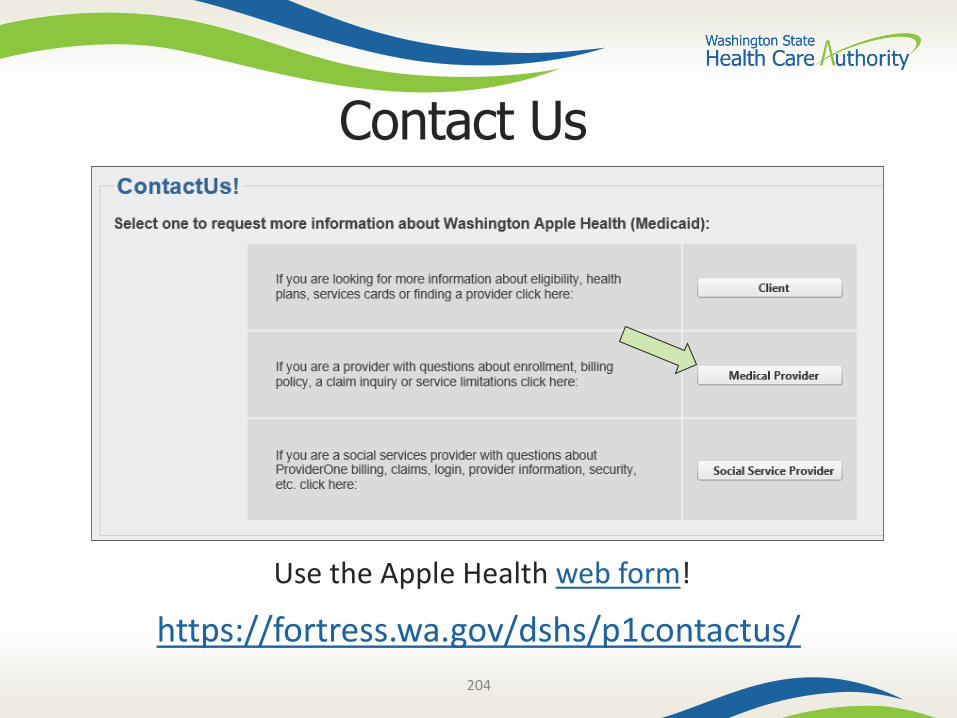
Contact Us
https://fortress.wa.gov/dshs/p1contactus/
Use the Apple Health web form!
205
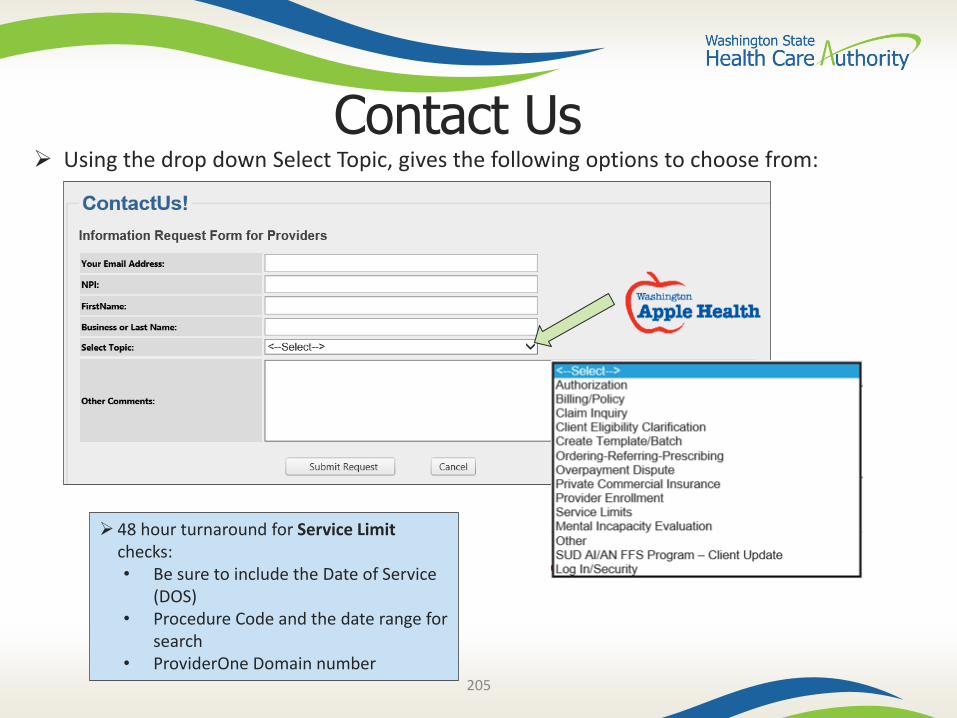
Contact Us Using the drop down Select Topic, gives the following options to choose from:
48 hour turnaround for Service Limit checks:• Be sure to include the Date of Service
(DOS)• Procedure Code and the date range for
search• ProviderOne Domain number
206
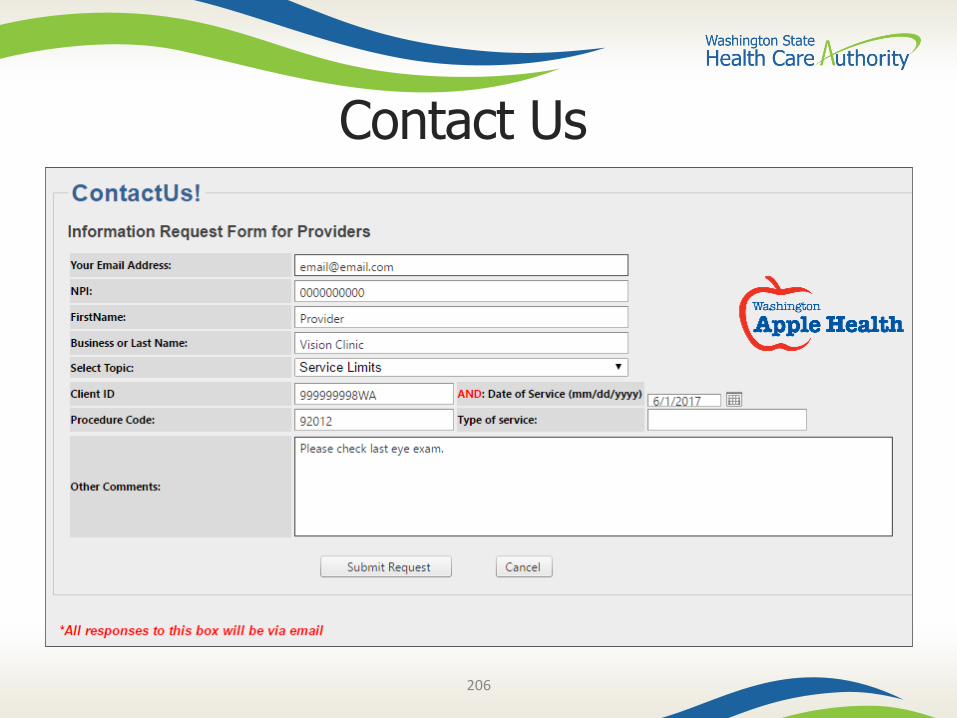
Contact Us
207
Online Resources
Programs and Services information
• Program billing guides and fee schedules
• Hospital rates
Provider Enrollment webpage and email
Provider Relations webpage and email
HCA Forms webpage

208