Embed Size (px)
Citation preview
Installation Manual
AudioCodes Mediant™ Family of Session Border Controllers (SBC)
Mediant Server Edition (SE)
Session Border Controller
Version 7.2

Installation Manual Contents
Version 7.2 3 Mediant Server Edition SBC
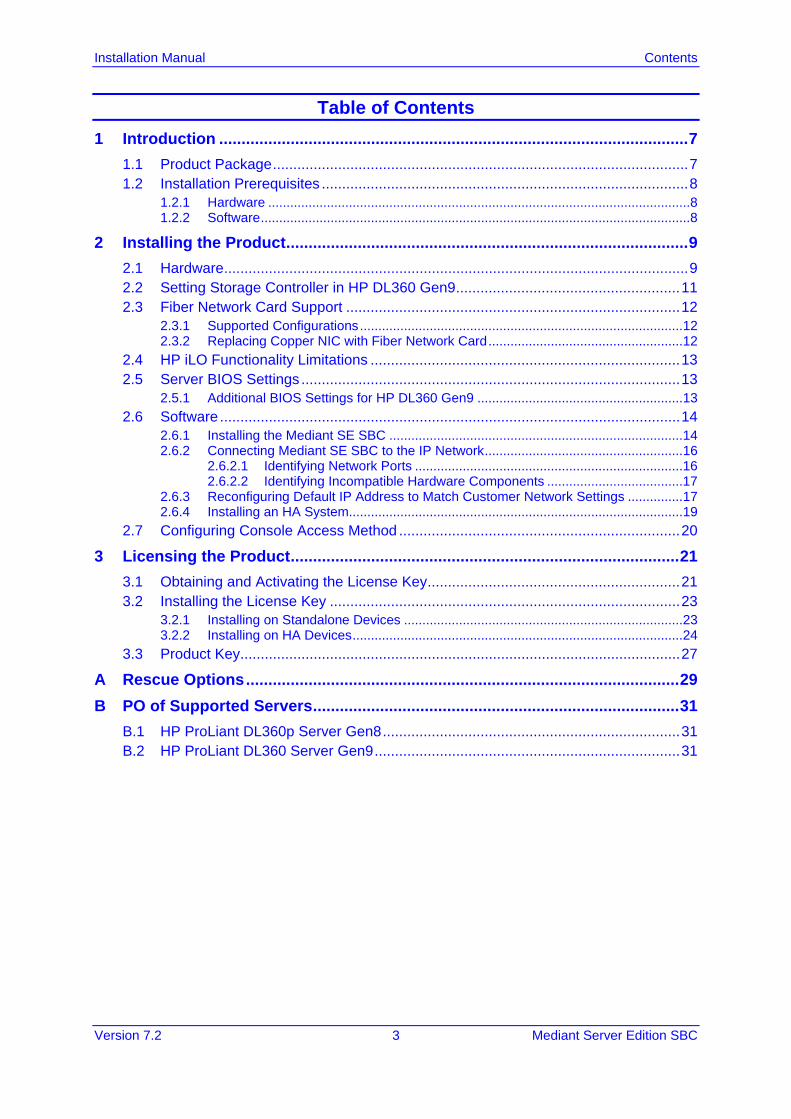
Table of Contents 1 Introduction ......................................................................................................... 7
1.1 Product Package ...................................................................................................... 7 1.2 Installation Prerequisites .......................................................................................... 8
1.2.1 Hardware ................................................................................................................... 8 1.2.2 Software ..................................................................................................................... 8
2 Installing the Product .......................................................................................... 9
2.1 Hardware .................................................................................................................. 9 2.2 Setting Storage Controller in HP DL360 Gen9 ....................................................... 11 2.3 Fiber Network Card Support .................................................................................. 12
2.3.1 Supported Configurations ........................................................................................ 12 2.3.2 Replacing Copper NIC with Fiber Network Card ..................................................... 12
2.4 HP iLO Functionality Limitations ............................................................................ 13 2.5 Server BIOS Settings ............................................................................................. 13
2.5.1 Additional BIOS Settings for HP DL360 Gen9 ........................................................ 13 2.6 Software ................................................................................................................. 14
2.6.1 Installing the Mediant SE SBC ................................................................................ 14 2.6.2 Connecting Mediant SE SBC to the IP Network ...................................................... 16
2.6.2.1 Identifying Network Ports .........................................................................16 2.6.2.2 Identifying Incompatible Hardware Components .....................................17
2.6.3 Reconfiguring Default IP Address to Match Customer Network Settings ............... 17 2.6.4 Installing an HA System ........................................................................................... 19
2.7 Configuring Console Access Method ..................................................................... 20
3 Licensing the Product ....................................................................................... 21
3.1 Obtaining and Activating the License Key .............................................................. 21 3.2 Installing the License Key ...................................................................................... 23
3.2.1 Installing on Standalone Devices ............................................................................ 23 3.2.2 Installing on HA Devices .......................................................................................... 24
3.3 Product Key ............................................................................................................ 27
A Rescue Options ................................................................................................. 29
B PO of Supported Servers .................................................................................. 31
B.1 HP ProLiant DL360p Server Gen8 ......................................................................... 31 B.2 HP ProLiant DL360 Server Gen9 ........................................................................... 31

Mediant Server Edition SBC
Installation Manual 4 Document #: LTRT-11024
List of Figures Figure 2-1: HP ProLiant DL360 Gen8e – Front Panel ............................................................................. 9 Figure 2-2: HP ProLiant DL360 Gen8 – Front Panel ............................................................................. 10 Figure 2-3: HP ProLiant DL360 Gen9 – Front Panel ............................................................................. 10 Figure 2-4: HP ProLiant Server Booting ................................................................................................. 14 Figure 2-5: Installation Start Prompt ....................................................................................................... 14 Figure 2-6: Installation in Progress ......................................................................................................... 14 Figure 2-7: Installation Complete ........................................................................................................... 15 Figure 2-8: Identifying Network Ports ..................................................................................................... 16 Figure 2-9: CLI Management Interface .................................................................................................. 18 Figure A-10: Console Access Method via GRUB Menu ......................................................................... 20 Figure 3-1: Software License Activation Tool ......................................................................................... 21 Figure 3-2: Product Key in Order Confirmation E-mail ........................................................................... 22 Figure 3-3: Apply New License Key Message........................................................................................ 23 Figure 3-4: Reset in Progress for License Key ...................................................................................... 24 Figure 3-5: Reset and Save-to-Flash Success Message ....................................................................... 24 Figure 3-6: Hitless License Key Upgrade - Progress ............................................................................. 25 Figure 3-7: Hitless License Upgrade Successfully Completed .............................................................. 26 Figure 3-8: Reset in Progress for License Key ...................................................................................... 26 Figure 3-9: Reset and Save-to-Flash Success Message ....................................................................... 26 Figure 3-10: Viewing Product Key .......................................................................................................... 27 Figure 3-11: Empty Product Key Field ................................................................................................... 27 Figure 3-12: Entering Product Key ......................................................................................................... 27
List of Tables Table 1-1: Supported Servers .................................................................................................................. 8 Table 2-1: HP ProLiant DL360 Gen8e - Front Panel ............................................................................... 9 Table 2-2: HP ProLiant DL360 Gen8 - Front Panel ............................................................................... 10 Table 2-3: HP ProLiant DL360 Gen9 - Front Panel ............................................................................... 10 Table 2-4: Supported Configurations with SFP Network Cards ............................................................. 12 Table 2-5: Default IP Address ................................................................................................................ 17 Table B-1: Sample PO for HP ProLiant DL360p Gen8 Server ............................................................... 31 Table B-2: Sample PO for HP ProLiant DL360 Gen9 Server ................................................................. 31
Installation Manual Notices
Version 7.2 5 Mediant Server Edition SBC
Notice Information contained in this document is believed to be accurate and reliable at the time of printing. However, due to ongoing product improvements and revisions, AudioCodes cannot guarantee accuracy of printed material after the Date Published nor can it accept responsibility for errors or omissions. Updates to this document can be downloaded from https://www.audiocodes.com/library/technical-documents.
This document is subject to change without notice.
Date Published: 05/09/2018
WEEE EU Directive Pursuant to the WEEE EU Directive, electronic and electrical waste must not be disposed of with unsorted waste. Please contact your local recycling authority for disposal of this product.
Customer Support Customer technical support and services are provided by AudioCodes or by an authorized AudioCodes Service Partner. For more information on how to buy technical support for AudioCodes products and for contact information, please visit our website at https://www.audiocodes.com/services-support/maintenance-and-support.
Abbreviations and Terminology Each abbreviation, unless widely used, is spelled out in full when first used.
Mediant Server Edition SBC
Installation Manual 6 Document #: LTRT-11024
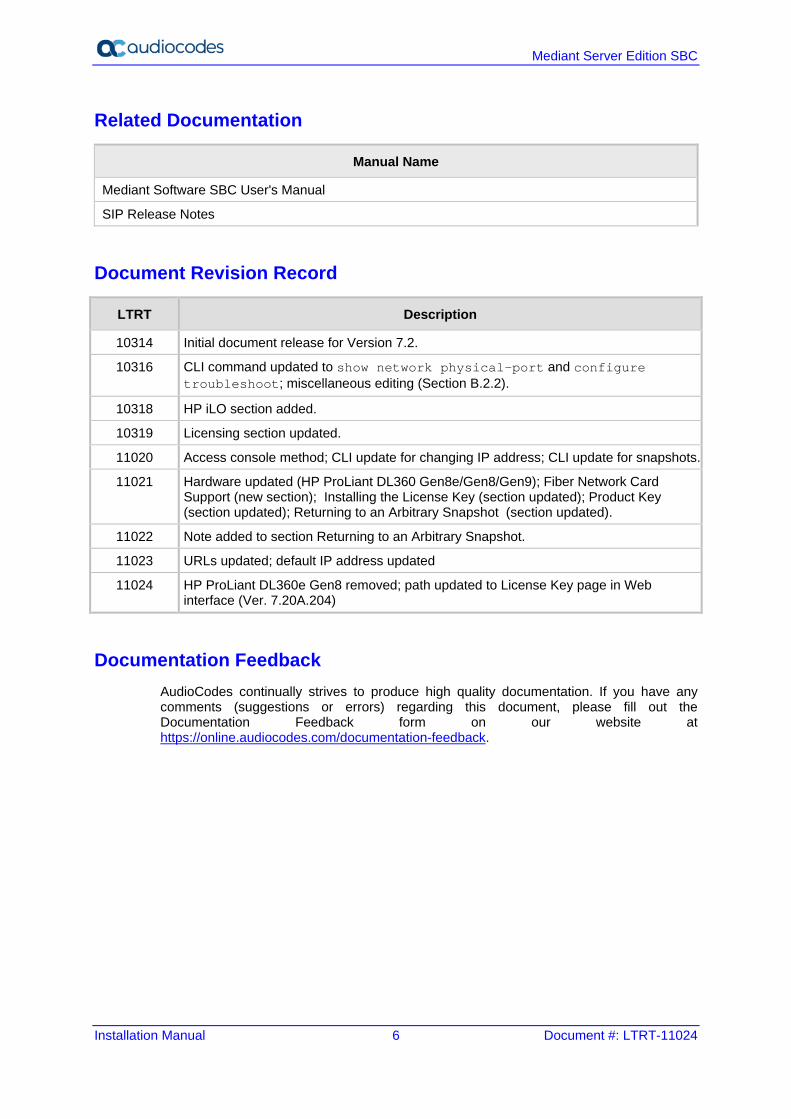
Related Documentation
Manual Name
Mediant Software SBC User's Manual
SIP Release Notes
Document Revision Record
LTRT Description
10314 Initial document release for Version 7.2.
10316 CLI command updated to show network physical-port and configure troubleshoot; miscellaneous editing (Section B.2.2).
10318 HP iLO section added.
10319 Licensing section updated.
11020 Access console method; CLI update for changing IP address; CLI update for snapshots.
11021 Hardware updated (HP ProLiant DL360 Gen8e/Gen8/Gen9); Fiber Network Card Support (new section); Installing the License Key (section updated); Product Key (section updated); Returning to an Arbitrary Snapshot (section updated).
11022 Note added to section Returning to an Arbitrary Snapshot.
11023 URLs updated; default IP address updated
11024 HP ProLiant DL360e Gen8 removed; path updated to License Key page in Web interface (Ver. 7.20A.204)
Documentation Feedback AudioCodes continually strives to produce high quality documentation. If you have any comments (suggestions or errors) regarding this document, please fill out the Documentation Feedback form on our website at https://online.audiocodes.com/documentation-feedback.
Installation Manual 1. Introduction
Version 7.2 7 Mediant Server Edition SBC
1 Introduction The Mediant Server Edition (SE) Session Border Controller (SBC) is a pure-software server-based product enabling connectivity and security between enterprises' and Service Providers’ VoIP networks. The product provides perimeter defense as a way of protecting companies from malicious VoIP attacks; voice and signaling mediation and normalization for allowing the connection of any PBX and/or IP-PBX to any Service Provider; and service assurance for service quality and manageability. The product also offers call "survivability", ensuring service continuity to enterprises served by a centralized SIP-based IP-Centrex server or branch offices of distributed enterprises. Survivability functionality enables internal office communication between SIP clients in the case of disconnection from the centralized SIP IP-Centrex server or IP-PBX. The product features full management through its HTTP/S-based Web server. This user-friendly Web interface allows remote configuration using any standard Web browser (such as Microsoft™ Internet Explorer™).
Note: The scope of this document does not fully cover security aspects for deploying the product in your environment. Security measures should be done in accordance with your organization’s security policies. For basic security guidelines, you can refer to AudioCodes Recommended Security Guidelines document.
1.1 Product Package Customers can choose how to obtain the product package according to preference. Two supply options are available: The product is supplied as a link, provided by AudioCodes, to a downloadable “disk
image” (ISO file), to be burned by customers onto a CD disk and then installed on the designated server.
To burn the downloaded "disk image” (ISO file) to a CD disk, read the instructions (applicable to Windows 7) in:
http://windows.microsoft.com/en-us/windows7/burn-a-cd-or-dvd-from-an-iso-file
Note: You can use other disk burning software as well to burn the "disk image", for example, ImgBurn (www.imgburn.com).
The product is also supplied as an installation CD disk, containing the Mediant SE
software.
Mediant Server Edition SBC
Installation Manual 8 Document #: LTRT-11024
1.2 Installation Prerequisites
1.2.1 Hardware The Mediant SE SBC software must be installed on one of the following servers: HP ProLiant DL360p Gen8 HP ProLiant DL360 Gen9 The table below shows the servers’ specifications:
Table 1-1: Supported Servers
Resource Specification
Server HP ProLiant DL360p Gen8 HP ProLiant DL360 Gen9
CPU DL360p Gen8: Intel Xeon 2 x E5-2680v2, (2 x 10 cores, 2.8 GHz, 25MB Cache)
DL360 Gen9: Intel Xeon E5-2640v3 (8 cores, 2.6 GHz, 20MB Cache)
Memory DL360p Gen8: 64GB DL360 Gen9: 32GB
Network Cards Gen8: Dual NC365T DL360 Gen9: 366FLR + 366T
Disk Mechanical hard drive, 300 GB or more, no RAID DL360 Gen9: SATA Only
Installation From CD/DVD drive
Installation Interface VGA Monitor and Keyboard
Note: See under Appendix B on page 31 for the exact Purchase Order (PO) for the HP DL360p Gen8 server and the HP DL360 Gen9 server. Other specifications have not been tested and are not supported!
1.2.2 Software All software components required for installation are provided by AudioCodes.
Installation Manual 2. Installing the Product
Version 7.2 9 Mediant Server Edition SBC
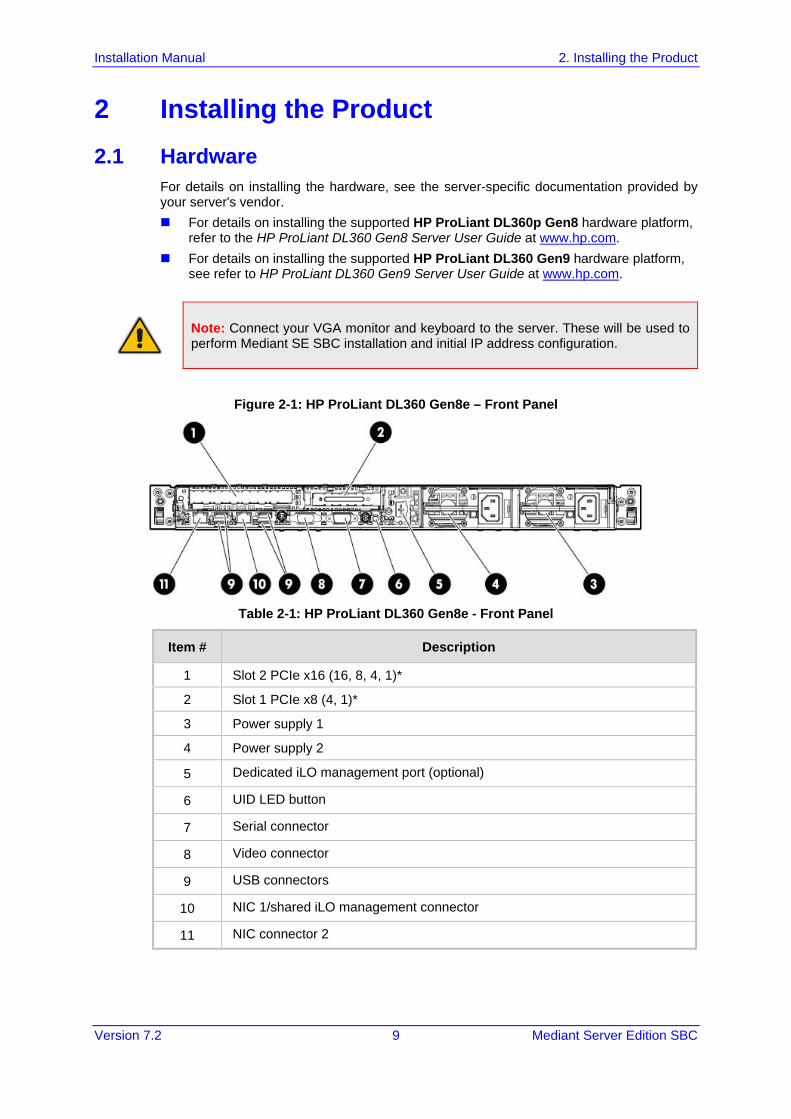
2 Installing the Product 2.1 Hardware
For details on installing the hardware, see the server-specific documentation provided by your server's vendor. For details on installing the supported HP ProLiant DL360p Gen8 hardware platform,
refer to the HP ProLiant DL360 Gen8 Server User Guide at www.hp.com. For details on installing the supported HP ProLiant DL360 Gen9 hardware platform,
see refer to HP ProLiant DL360 Gen9 Server User Guide at www.hp.com.
Note: Connect your VGA monitor and keyboard to the server. These will be used to perform Mediant SE SBC installation and initial IP address configuration.
Figure 2-1: HP ProLiant DL360 Gen8e – Front Panel
Table 2-1: HP ProLiant DL360 Gen8e - Front Panel
Item # Description
1 Slot 2 PCIe x16 (16, 8, 4, 1)*
2 Slot 1 PCIe x8 (4, 1)*
3 Power supply 1
4 Power supply 2
5 Dedicated iLO management port (optional)
6 UID LED button
7 Serial connector
8 Video connector
9 USB connectors
10 NIC 1/shared iLO management connector
11 NIC connector 2

Mediant Server Edition SBC
Installation Manual 10 Document #: LTRT-11024
Figure 2-2: HP ProLiant DL360 Gen8 – Front Panel
Table 2-2: HP ProLiant DL360 Gen8 - Front Panel
Item # Description
1 Slot 2 PCIe 3.0 x16 (full height/half length)
2 FlexibleLOM ports (Shown: 4x1Gb / Optional: 2x10Gb)
3 Video connector
4 Serial connector
5 Slot 1 PCIe 3.0 x8 (low profile)
6 iLO management port
7 USB connectors (4)
8 Power supply bay 2
9 Power supply bay 1
Figure 2-3: HP ProLiant DL360 Gen9 – Front Panel
Table 2-3: HP ProLiant DL360 Gen9 - Front Panel
Item # Description
1 Slot 1 PCIe3 x16 (16, 8, 4, 1) 2 Slot 2 PCIe 3 x8 ( 8, 4, 1) 3 Slot 3 PCIe 3 x16 ( 16, 8, 4, 1) - optional 4 Power supply 2
5 Power supply 1
6 Video connector
7 NIC connector 4
8 NIC connector 3
9 NIC connector 2
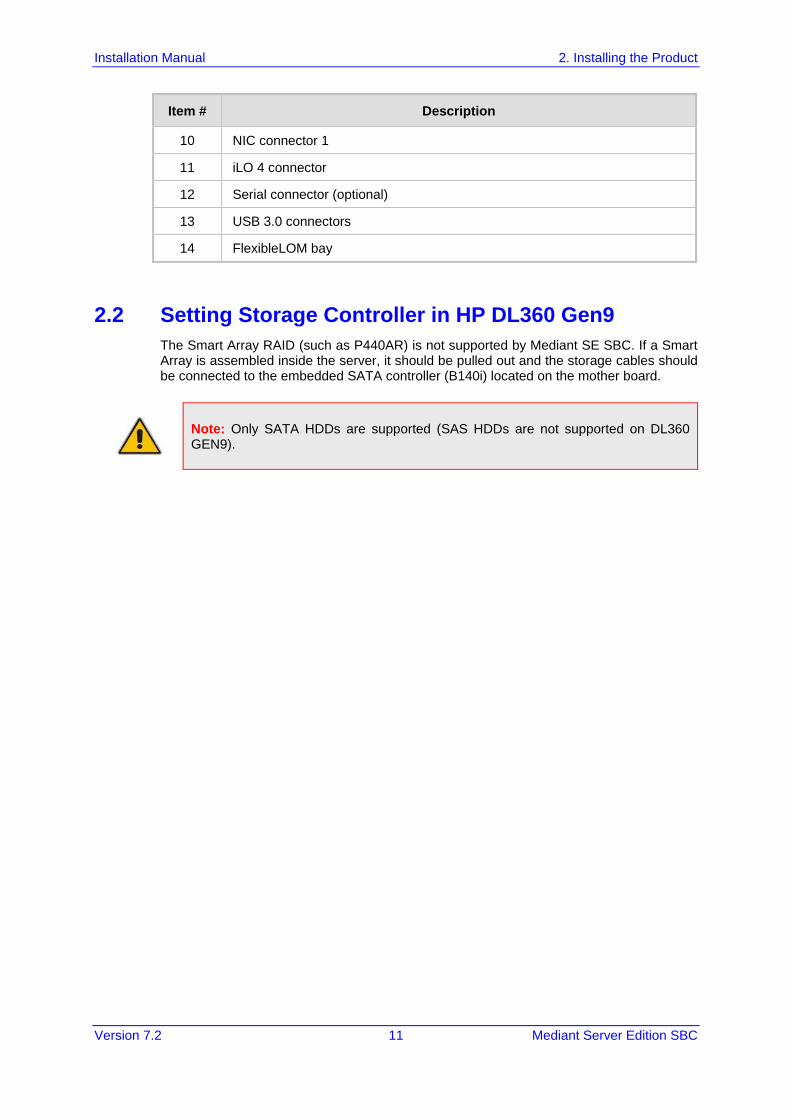
Installation Manual 2. Installing the Product
Version 7.2 11 Mediant Server Edition SBC
Item # Description
10 NIC connector 1
11 iLO 4 connector
12 Serial connector (optional)
13 USB 3.0 connectors
14 FlexibleLOM bay
2.2 Setting Storage Controller in HP DL360 Gen9 The Smart Array RAID (such as P440AR) is not supported by Mediant SE SBC. If a Smart Array is assembled inside the server, it should be pulled out and the storage cables should be connected to the embedded SATA controller (B140i) located on the mother board.
Note: Only SATA HDDs are supported (SAS HDDs are not supported on DL360 GEN9).
Mediant Server Edition SBC
Installation Manual 12 Document #: LTRT-11024
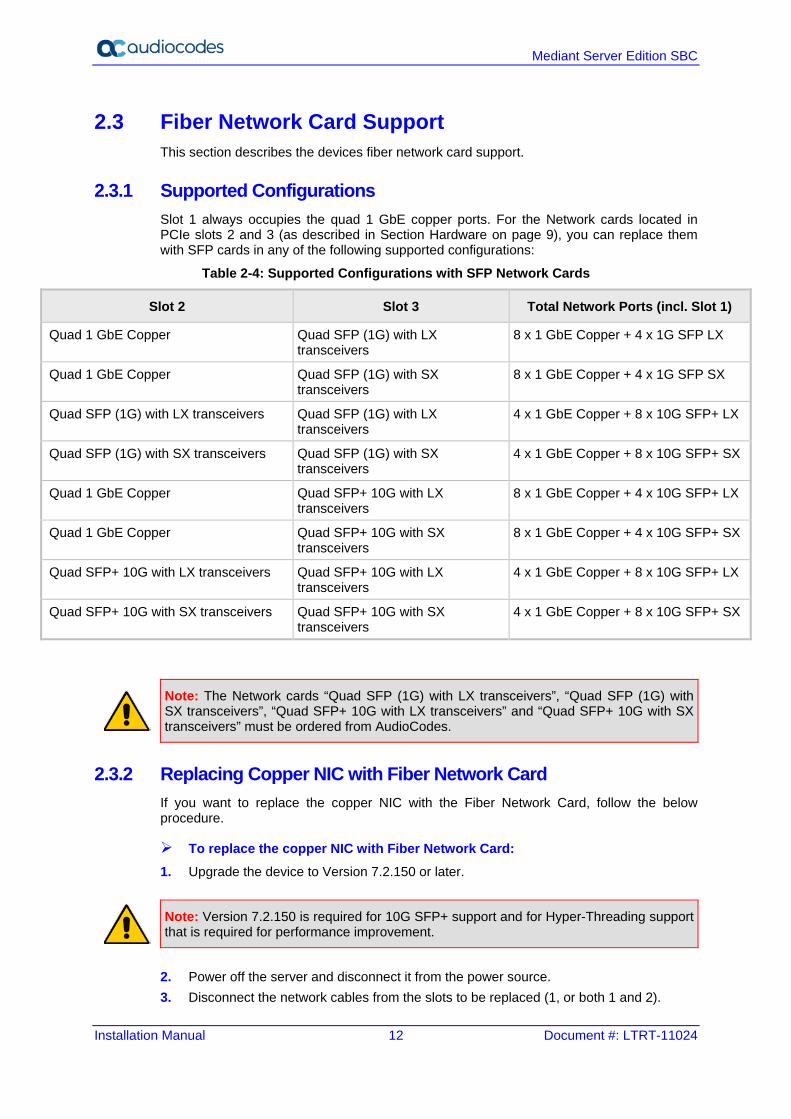
2.3 Fiber Network Card Support This section describes the devices fiber network card support.
2.3.1 Supported Configurations Slot 1 always occupies the quad 1 GbE copper ports. For the Network cards located in PCIe slots 2 and 3 (as described in Section Hardware on page 9), you can replace them with SFP cards in any of the following supported configurations:
Table 2-4: Supported Configurations with SFP Network Cards
Slot 2 Slot 3 Total Network Ports (incl. Slot 1)
Quad 1 GbE Copper Quad SFP (1G) with LX transceivers
8 x 1 GbE Copper + 4 x 1G SFP LX
Quad 1 GbE Copper Quad SFP (1G) with SX transceivers
8 x 1 GbE Copper + 4 x 1G SFP SX
Quad SFP (1G) with LX transceivers Quad SFP (1G) with LX transceivers
4 x 1 GbE Copper + 8 x 10G SFP+ LX
Quad SFP (1G) with SX transceivers Quad SFP (1G) with SX transceivers
4 x 1 GbE Copper + 8 x 10G SFP+ SX
Quad 1 GbE Copper Quad SFP+ 10G with LX transceivers
8 x 1 GbE Copper + 4 x 10G SFP+ LX
Quad 1 GbE Copper Quad SFP+ 10G with SX transceivers
8 x 1 GbE Copper + 4 x 10G SFP+ SX
Quad SFP+ 10G with LX transceivers Quad SFP+ 10G with LX transceivers
4 x 1 GbE Copper + 8 x 10G SFP+ LX
Quad SFP+ 10G with SX transceivers Quad SFP+ 10G with SX transceivers
4 x 1 GbE Copper + 8 x 10G SFP+ SX
Note: The Network cards “Quad SFP (1G) with LX transceivers”, “Quad SFP (1G) with SX transceivers”, “Quad SFP+ 10G with LX transceivers” and “Quad SFP+ 10G with SX transceivers” must be ordered from AudioCodes.
2.3.2 Replacing Copper NIC with Fiber Network Card If you want to replace the copper NIC with the Fiber Network Card, follow the below procedure.
To replace the copper NIC with Fiber Network Card: 1. Upgrade the device to Version 7.2.150 or later.
Note: Version 7.2.150 is required for 10G SFP+ support and for Hyper-Threading support that is required for performance improvement.
2. Power off the server and disconnect it from the power source. 3. Disconnect the network cables from the slots to be replaced (1, or both 1 and 2).
Installation Manual 2. Installing the Product
Version 7.2 13 Mediant Server Edition SBC
4. Extract the PCI-e Riser cards, as described in https://h20566.www2.hpe.com/hpsc/doc/public/display?docLocale=en_US&docId=emr_na-c03453781&sp4ts.oid=7252820.
5. If you are replacing one card only, replace the Copper GbE card in Slot 3 with the new fiber card. Otherwise, replace both cards.
6. Connect the optic cables. 7. Power on the server, and then enter the BIOS Setting (F9). 8. Enable 'Hyper-Threading' (under Processor options). 9. Save the BIOS changes, and then exit the BIOS; the server restarts. 10. When the device finishes loading, the new SFPs are labeled "GE_9" through to
"GE_12" if a single card was replaced, or "GE_5" through to "GE_12" if both cards were replaced.
2.4 HP iLO Functionality Limitations For installation of Mediant SE SBC using the local CD/DVD drive, as described in the chapter, if you are connected through HP Integrated Lights-Out (iLO) remote console to the server on which you are intending to install Mediant SE SBC, you must disconnect (log off) HP iLO prior to installation. Alternatively, you can install Mediant SE SBC solely from the iLO remote console (using remote CD/DVD drive / ISO.
2.5 Server BIOS Settings The server BIOS settings should be configured for optimal Mediant SE SBC performance:
To optimize server BIOS settings: 1. Enter the server BIOS (see your server’s documentation for details). 2. Restore the BIOS settings to factory defaults, and then reset the system. 3. Enter the server BIOS again. 4. Set 'Power Management' to Maximum Performance (usually under 'Power' options). 5. Enable 'Intel Turbo Boost' (usually under the 'Processor' options). 6. Disable 'Hyper-Threading' (usually under 'Processor' options). 7. Enable 'Intel Virtualization Technology VT-d' and 'VT-x' (usually under 'Processor'
options).
2.5.1 Additional BIOS Settings for HP DL360 Gen9 The default boot mode on DL360 Gen9 is UEFI, which is currently not supported by Mediant SE SBC installation. Therefore, the BOOT mode must be changed to “Legacy”. This is done in the BIOS under BIOS/Platform Configuration (RBSU) -> Boot Options -> Boot Mode -> Legacy BIOS Mode.
Mediant Server Edition SBC
Installation Manual 14 Document #: LTRT-11024
2.6 Software Mediant SE SBC installation involves: 1. Installing the Mediant SE SBC – see Section 2.6.1. 2. Connecting the Mediant SE SBC to the IP Network – see Section 2.6.2. 3. Reconfiguring the Default IP Address to Match Customer Network Settings – see
Section 2.6.3.
2.6.1 Installing the Mediant SE SBC Installing the Mediant SE SBC involves booting the server after inserting the CD and following the installation instructions.
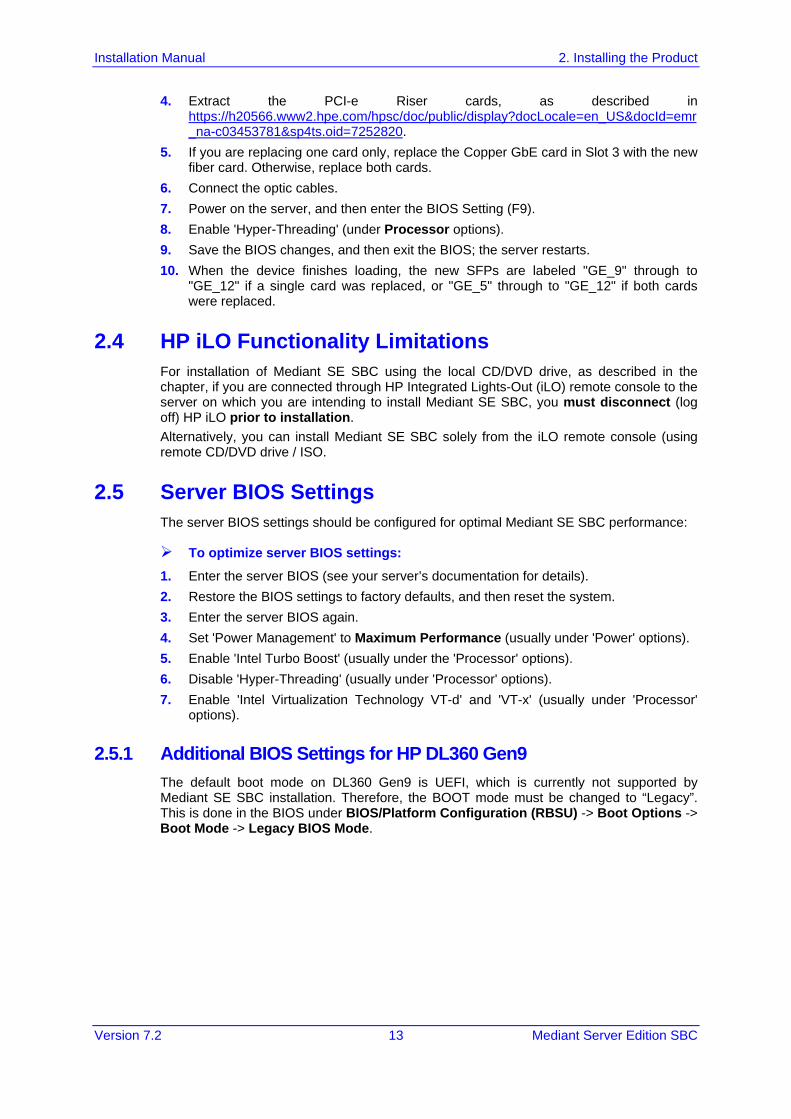
To install Mediant SE SBC: 1. Insert the installation CD into the CD/DVD drive. 2. Boot the server from the CD by using (for example) the 'Power Off' button. Some
servers may prompt users to 'Press any key' (see the server documentation for details). The server boots from the CD (see Figure 2-4) and the Mediant SE SBC Installation Menu is displayed (see Figure 2-5).
Figure 2-4: HP ProLiant Server Booting
Figure 2-5: Installation Start Prompt
3. Press the ENTER key; installation commences; a bar shows installation progress.
Figure 2-6: Installation in Progress
Installation Manual 2. Installing the Product
Version 7.2 15 Mediant Server Edition SBC
Note: If installation fails and a "no hard disc found" error is indicated, disable the RAID controller and restart the installation.
4. Wait for the 'Complete' prompt, notifying you when installation is complete, to be
displayed. Installation takes approximately 10 minutes.
Figure 2-7: Installation Complete
5. Press ENTER to reboot the server; after rebooting, the CD is ejected and the server
boots from the local disk to the newly installed Mediant SE SBC software.
Note: If, for some reason, the CD is not ejected and the server boots to the installation prompt again, eject the disk manually and reboot the server.

Mediant Server Edition SBC
Installation Manual 16 Document #: LTRT-11024
2.6.2 Connecting Mediant SE SBC to the IP Network To connect Mediant SE SBC to the IP Network, connect an Ethernet cable to the first on-board Network Port on the server's rear panel.
Note: The Mediant SE SBC orders available network ports in two groups: the first group containing on-board ports (included in basic server assembly) and the second group containing ports on the add-on PCIe cards. Ports within each group are sorted alphabetically by their MAC addresses; which typically matches corresponding labels imprinted on the server rear's panel – NIC1, NIC2. If labels are missing or duplicated, see the section below for identifying network ports.
2.6.2.1 Identifying Network Ports Use the show network physical-port CLI command to identify network ports (1, 2, 3, etc.) by their MAC address and port status (up/down).
To identify network ports: Disconnect Ethernet cables from all network ports. Connect the first port via the Ethernet cable to a switch or router. Verify that port
status is "up", typically indicated by green LEDs on the port itself and/or by the port status on the connected switch/router. Run the show network physical-port command and identify the corresponding port number, by noting the port with Link Status 'UP'.
Repeat the sequence for the rest of the ports.
Figure 2-8: Identifying Network Ports # show network physical-port Port Num Port Name MAC Address … Link Status -------- --------- ----------- ----------- 1 GE_1 00:1e:67:11:7c:29 … UP 2 GE_2 68:05:ca:03:6b:4e … DOWN 3 GE_3 68:05:ca:03:6b:98 … DOWN 4 GE_4 00:1e:67:11:7c:28 … DOWN
Installation Manual 2. Installing the Product
Version 7.2 17 Mediant Server Edition SBC
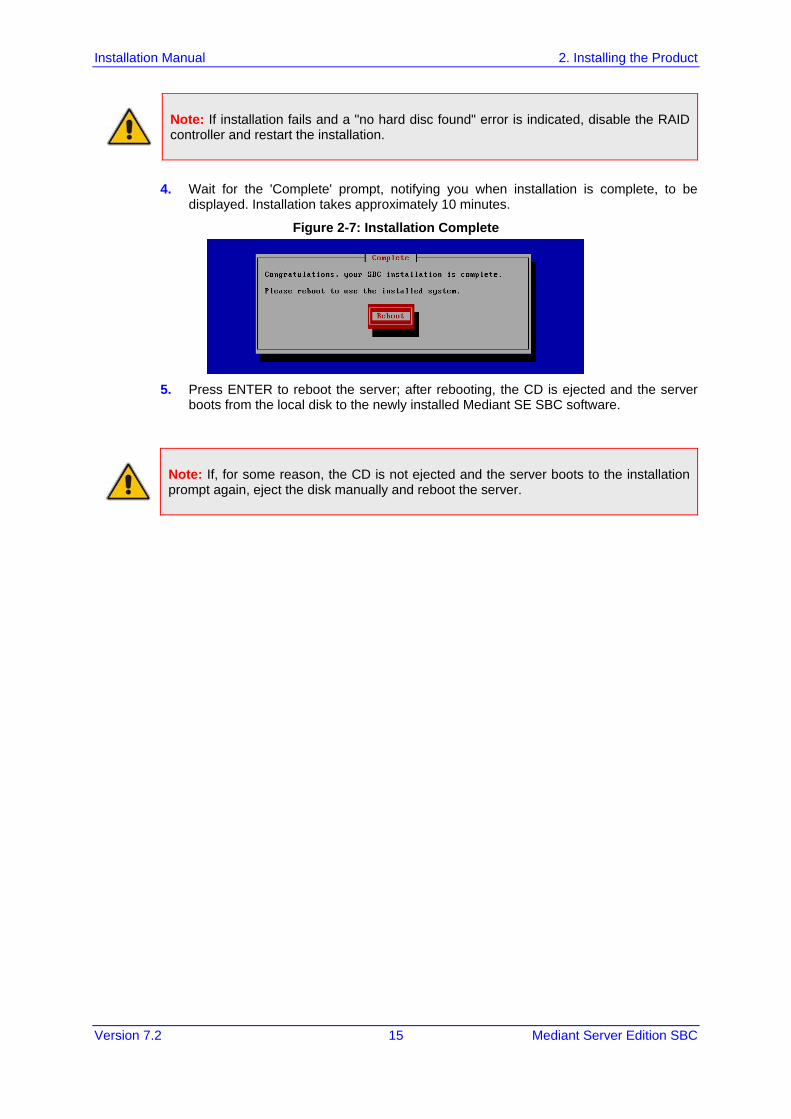
2.6.2.2 Identifying Incompatible Hardware Components During installation of the Mediant SE SBC from a CD, if an incompatible hardware component is detected (e.g., a network card), a warning message is displayed. You can abort installation or continue. After the installation is complete, you can view details of the hardware platform by using the show system hardware CLI command. Incompatible components are indicated with an asterisk (*), as shown in the example below of an incompatible NIC: # show system hardware CPU: Intel(R) Xeon(R) CPU E5-2680 v2 @ 2.80GHz, total 20 cores Memory: total RAM: 65536 MB Chassis: ProLiant DL360p Gen8 Network: Broadcom Corporation NetXtreme BCM5719 Gigabit Ethernet PCIe Broadcom Corporation NetXtreme BCM5719 Gigabit Ethernet PCIe Broadcom Corporation NetXtreme BCM5719 Gigabit Ethernet PCIe Broadcom Corporation NetXtreme BCM5719 Gigabit Ethernet PCIe Intel Corporation 82580 Gigabit Network Connection (rev 01) Intel Corporation 82580 Gigabit Network Connection (rev 01) Intel Corporation 82580 Gigabit Network Connection (rev 01) Intel Corporation 82580 Gigabit Network Connection (rev 01) *Realtek Semiconductor Co.,Ltd. RTL-8169 Gigabit Ethernet (rev 10) *Realtek Semiconductor Co.,Ltd. RTL-8169 Gigabit Ethernet (rev 10)
Notes:
• Incompatible hardware should be avoided and replaced with compatible hardware as listed in the recommended specification under Section 1.2.1 on page 8.
• It is recommended that you use the Intel® chipset for ports allocated for media. To verify which ports are using the Intel chipset, you can run the show network physical-port command in the CLI. Ports using the Intel chipset are displayed with "igb" in the 'Driver Info' field, as shown in the example below:
# show network physical-port
Port Num Port Name MAC Address Speed Duplexity Link Status Native VLAN Driver Info.
---------- ----------- ----------------- ------- --------- ----------- ----------- ------------
1 GE_1 2c:76:8a:52:9c:1c 100Mbps FULL UP 1 tg3
2 GE_2 2c:76:8a:52:9c:1d DOWN 2 tg3
3 GE_3 2c:76:8a:52:9c:1e DOWN 3 tg3
4 GE_4 2c:76:8a:52:9c:1f DOWN 4 tg3
5 GE_5 f4:ce:46:a5:24:68 DOWN 5 igb rx&tx-zc 6 GE_6 f4:ce:46:a5:24:69 DOWN 1 igb rx&tx-zc 7 GE_7 f4:ce:46:a5:24:6a DOWN 7 igb rx&tx-zc 8 GE_8 f4:ce:46:a5:24:6b DOWN 8 igb rx&tx-zc
2.6.3 Reconfiguring Default IP Address to Match Customer Network Settings After the installation, the Mediant SE SBC is assigned with a default IP address that will most likely be inaccessible from the customer's network.
Table 2-5: Default IP Address
Parameter Value
IP Address 192.168.0.2
Subnet Mask 255.255.255.0
Default Gateway 0.0.0.0
Mediant Server Edition SBC
Installation Manual 18 Document #: LTRT-11024
Reconfigure the IP address in order to connect to the Mediant SE SBC’s Web-based management tool (hereafter referred to as 'Web interface'). The procedure below describes how to change the default IP address using the CLI. The procedure uses the regular CLI commands. Alternatively, you can use the CLI Wizard utility to set up the Mediant SE SBC with the initial OAMP settings. The utility provides a fast-and-easy method for initial configuration of Mediant SE SBC through CLI. For more information, refer to the CLI Wizard User's Guide.
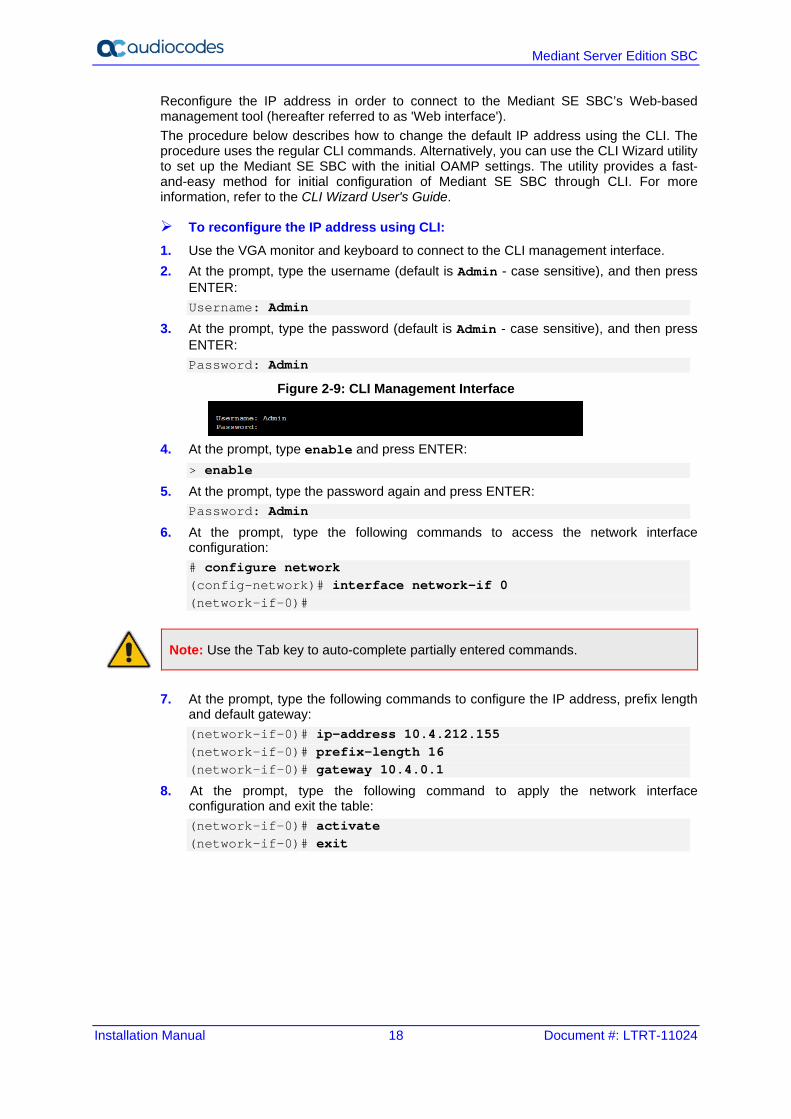
To reconfigure the IP address using CLI: 1. Use the VGA monitor and keyboard to connect to the CLI management interface. 2. At the prompt, type the username (default is Admin - case sensitive), and then press
ENTER: Username: Admin
3. At the prompt, type the password (default is Admin - case sensitive), and then press ENTER: Password: Admin
Figure 2-9: CLI Management Interface
4. At the prompt, type enable and press ENTER:
> enable
5. At the prompt, type the password again and press ENTER: Password: Admin
6. At the prompt, type the following commands to access the network interface configuration: # configure network (config-network)# interface network-if 0 (network-if-0)#
Note: Use the Tab key to auto-complete partially entered commands.
7. At the prompt, type the following commands to configure the IP address, prefix length
and default gateway: (network-if-0)# ip-address 10.4.212.155 (network-if-0)# prefix-length 16 (network-if-0)# gateway 10.4.0.1
8. At the prompt, type the following command to apply the network interface configuration and exit the table: (network-if-0)# activate (network-if-0)# exit
Installation Manual 2. Installing the Product
Version 7.2 19 Mediant Server Edition SBC
9. If Mediant SE SBC is connected to the IP network that uses VLAN ID, type the following commands to configure it (otherwise skip to step 10): (config-network)# interface network-dev 0 (network-dev-0)# vlan-id 10 (network-dev-0)# activate (network-dev-0)# exit
10. At the prompt, type exit to complete the configuration: (config-network)# exit
11. At the prompt, make sure that port #1 is connected (Link is UP) using the show network physical-port CLI command as described in Section 2.6.2.1 on page 16. Port #1 is mapped to network-if-0 by default.
12. At the prompt, type reload now to reset the product and activate the new configuration: # reload now
After the Mediant SE SBC restarts, connect to its Web interface to continue the provisioning. See the Mediant Software SBC User's Manual for details.
2.6.4 Installing an HA System Users can configure two products to work in a High Availability (HA) configuration.
To configure an HA system: 1. Reconfigure a temporary IP address for each, as described in Section 2.6.2. 2. To support HA functionality, the devices must be installed with the an HA-enabled
license. Follow the instructions described in Section 3 on page 21 for licensing each device in the HA system.
3. Follow the instructions described under the section 'High Availability System' in the Mediant Software SBC User's Manual document to set network topology correctly, and configure each accordingly using the Web interface.

Mediant Server Edition SBC
Installation Manual 20 Document #: LTRT-11024
2.7 Configuring Console Access Method The console lets you use the device's Command-Line Interface (CLI) to configure and manage the device. You can access the console through either VGA or serial RS-232 interface. By default, when the device boots up (for example after a reset), it accesses the console through VGA, which means that it can be captured by the console tools provided by the chosen Hypervisor. To change the access method, use one of the following options: GRUB Boot Loader Menu:
1. Reboot the device. 2. In the GRUB menu that's displayed during the boot-up, press the down key to
select VGA or RS232. 3. Press Enter.
Figure A-10: Console Access Method via GRUB Menu
Note: When you select the console access method through GRUB, if the device resets at a later stage, the access method reverts to VGA.
CLI:
# configure troubleshoot (config-troubleshoot)# startup-n-recovery (startup-n-recovery)# system-console-mode {vga|rs232}
Ini File: SystemConsoleMode (0 = VGA; 1 = RS232) If you want to access the device console through the serial Port (RS-232) of the host, do the following: 1. Add a virtual serial port device on the virtual machine and map it to the required serial
port of the host. 2. Change the access method of the device console to RS232, as described above.
Installation Manual 3. Licensing the Product
Version 7.2 21 Mediant Server Edition SBC
3 Licensing the Product After you have successfully completed the software installation, you need to obtain and install the License Key file to enable the call capacity and features that you ordered with the product, as described in the following subsections.
Note: For HA systems, each unit has its own Serial Number, Product Key and License Key. Therefore, the instructions in this section must be done for each unit.
3.1 Obtaining and Activating the License Key The procedure below describes how to obtain and activate your License Key from AudioCodes.
Note: License activation is intended only for first-time software activation upon product purchase (or if your License Key is "lost", due to whatever reason). For subsequent software feature upgrades, the License Key file is e-mailed to you after your Purchase Order has been processed.
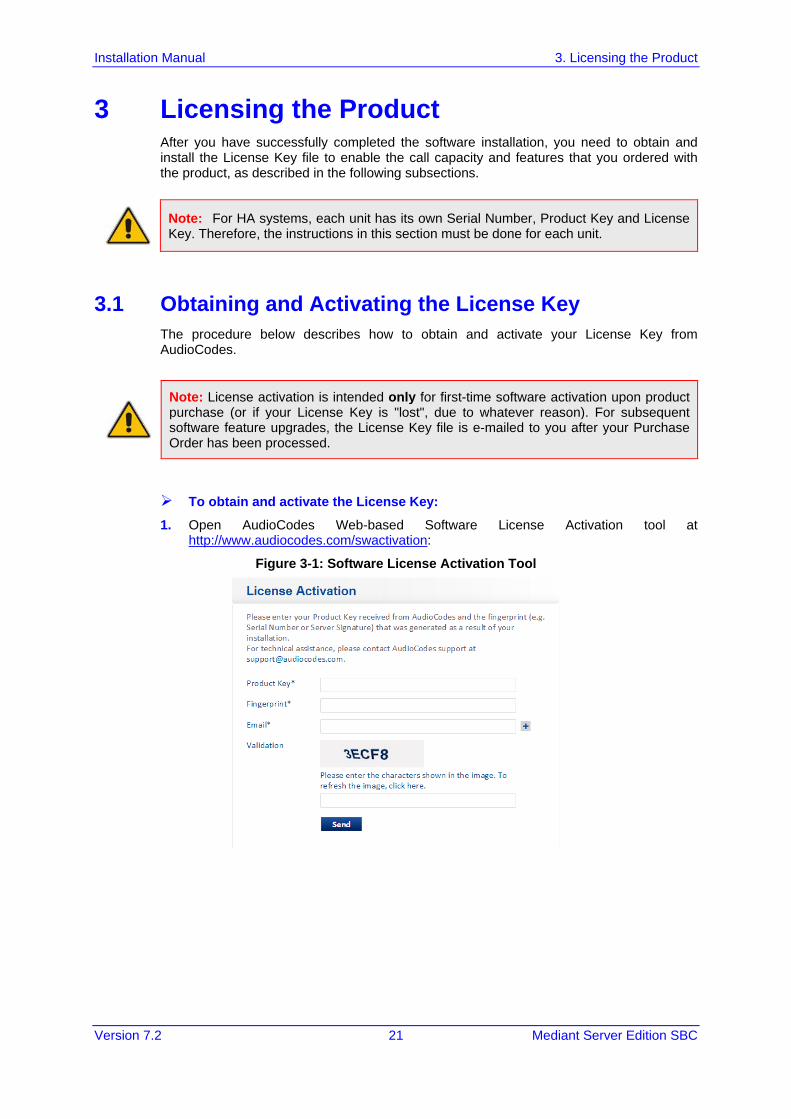
To obtain and activate the License Key: 1. Open AudioCodes Web-based Software License Activation tool at
http://www.audiocodes.com/swactivation:
Figure 3-1: Software License Activation Tool
Mediant Server Edition SBC
Installation Manual 22 Document #: LTRT-11024
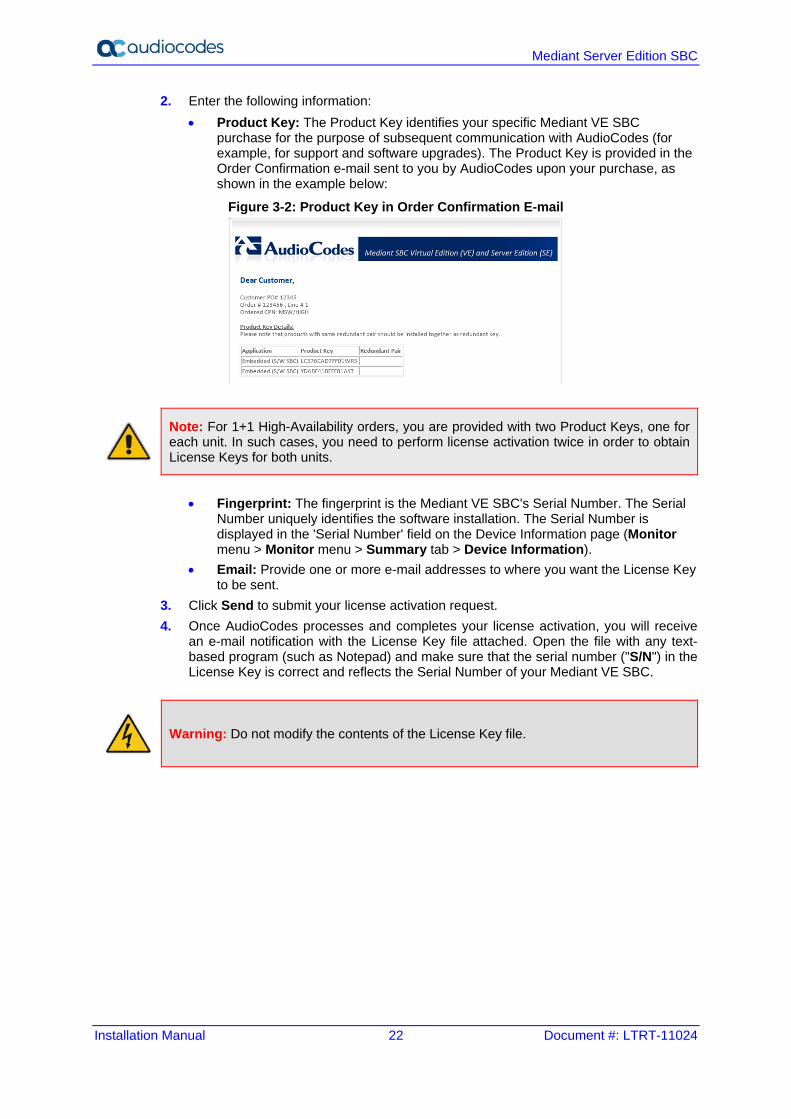
2. Enter the following information: • Product Key: The Product Key identifies your specific Mediant VE SBC
purchase for the purpose of subsequent communication with AudioCodes (for example, for support and software upgrades). The Product Key is provided in the Order Confirmation e-mail sent to you by AudioCodes upon your purchase, as shown in the example below:
Figure 3-2: Product Key in Order Confirmation E-mail
Note: For 1+1 High-Availability orders, you are provided with two Product Keys, one for each unit. In such cases, you need to perform license activation twice in order to obtain License Keys for both units.
• Fingerprint: The fingerprint is the Mediant VE SBC's Serial Number. The Serial
Number uniquely identifies the software installation. The Serial Number is displayed in the 'Serial Number' field on the Device Information page (Monitor menu > Monitor menu > Summary tab > Device Information).
• Email: Provide one or more e-mail addresses to where you want the License Key to be sent.
3. Click Send to submit your license activation request. 4. Once AudioCodes processes and completes your license activation, you will receive
an e-mail notification with the License Key file attached. Open the file with any text-based program (such as Notepad) and make sure that the serial number ("S/N") in the License Key is correct and reflects the Serial Number of your Mediant VE SBC.
Warning: Do not modify the contents of the License Key file.
Installation Manual 3. Licensing the Product
Version 7.2 23 Mediant Server Edition SBC
3.2 Installing the License Key
3.2.1 Installing on Standalone Devices When the device operates as a standalone device, the installation of a License Key can also be done from a License Key file.
Note: The License Key installation process includes a device reset and is therefore, traffic-affecting. To minimize the disruption of current calls, it is recommended to perform this procedure during periods of low traffic.
To install a License Key file for standalone devices through Web interface: 1. Open the License Key page (Setup menu > Administration tab > License folder >
License Key). 2. Back up the currently installed License Key, as a precaution. If the new License Key
does not comply with your requirements, you can re-load this backed-up License Key
to restore the device's original capabilities. To back up the License Key, click and save it as file on your PC.
3. Click the Load By File button, navigate to the License Key file on your computer, and then select the file to load to the device; the Apply New License Key button appears. The License Key page uses color-coded icons to indicate the changes between the previous License Key and the newly loaded License Key.
Note: If want to cancel installation, reset the device without a save to flash. For more information, see Resetting the Device.
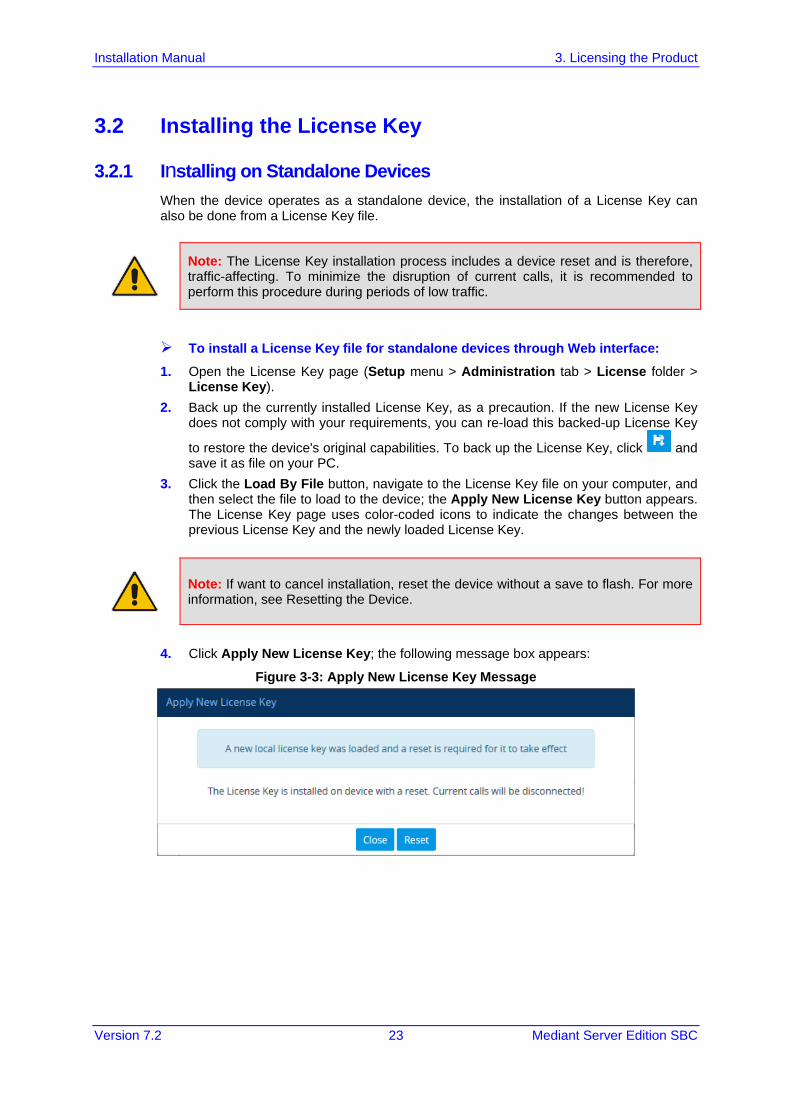
4. Click Apply New License Key; the following message box appears:
Figure 3-3: Apply New License Key Message
Mediant Server Edition SBC
Installation Manual 24 Document #: LTRT-11024
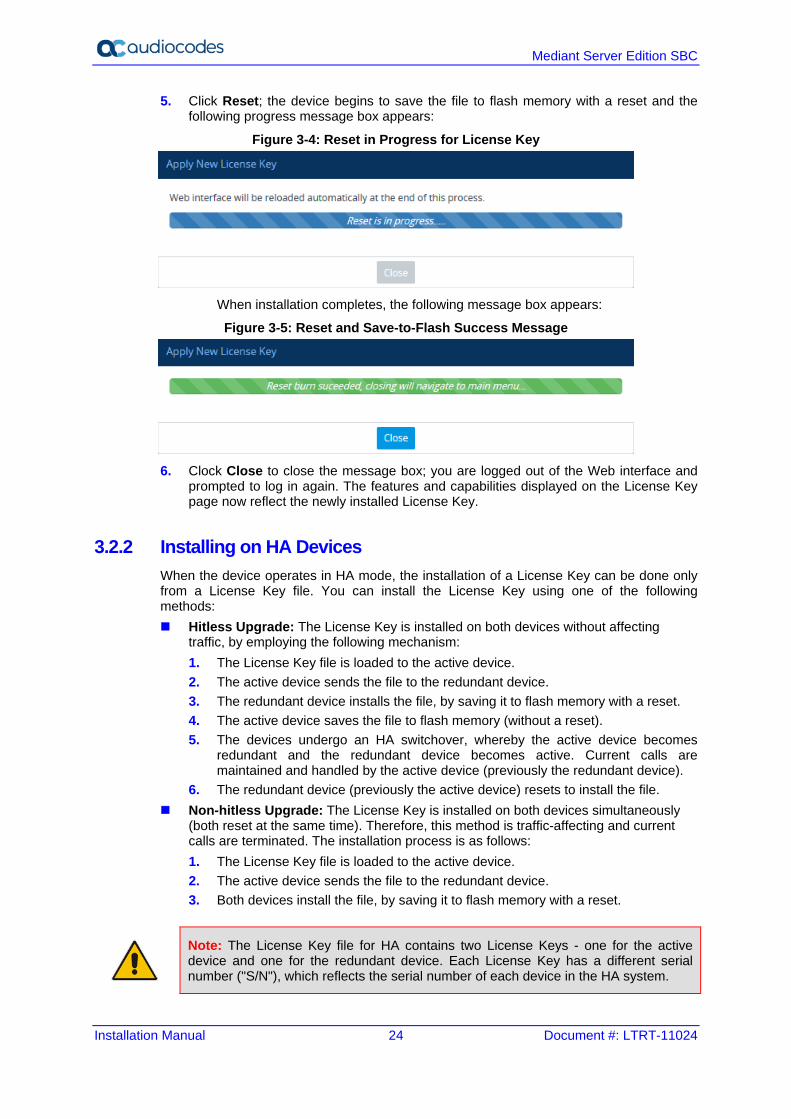
5. Click Reset; the device begins to save the file to flash memory with a reset and the following progress message box appears:
Figure 3-4: Reset in Progress for License Key
When installation completes, the following message box appears:
Figure 3-5: Reset and Save-to-Flash Success Message
6. Clock Close to close the message box; you are logged out of the Web interface and
prompted to log in again. The features and capabilities displayed on the License Key page now reflect the newly installed License Key.
3.2.2 Installing on HA Devices When the device operates in HA mode, the installation of a License Key can be done only from a License Key file. You can install the License Key using one of the following methods: Hitless Upgrade: The License Key is installed on both devices without affecting
traffic, by employing the following mechanism: 1. The License Key file is loaded to the active device. 2. The active device sends the file to the redundant device. 3. The redundant device installs the file, by saving it to flash memory with a reset. 4. The active device saves the file to flash memory (without a reset). 5. The devices undergo an HA switchover, whereby the active device becomes
redundant and the redundant device becomes active. Current calls are maintained and handled by the active device (previously the redundant device).
6. The redundant device (previously the active device) resets to install the file. Non-hitless Upgrade: The License Key is installed on both devices simultaneously
(both reset at the same time). Therefore, this method is traffic-affecting and current calls are terminated. The installation process is as follows: 1. The License Key file is loaded to the active device. 2. The active device sends the file to the redundant device. 3. Both devices install the file, by saving it to flash memory with a reset.
Note: The License Key file for HA contains two License Keys - one for the active device and one for the redundant device. Each License Key has a different serial number ("S/N"), which reflects the serial number of each device in the HA system.
Installation Manual 3. Licensing the Product
Version 7.2 25 Mediant Server Edition SBC
To install a License Key file for HA through Web interface: 1. Open the License Key page (Setup menu > Administration tab > License folder >
License Key). 2. Back up the currently installed License Key, as a precaution. If the new License Key
does not comply with your requirements, you can re-load this backed-up License Key
to restore the device's original capabilities. To back up the License Key, click and save it as file on your PC.
3. Click the Load By File button, navigate to the License Key file on your computer, and then select the file to load to the device; the Apply New License Key button appears. The License Key page uses color-coded icons to indicate the changes between the previous License Key and the newly loaded License Key.
Note: If want to cancel installation, reset the device without a save to flash.
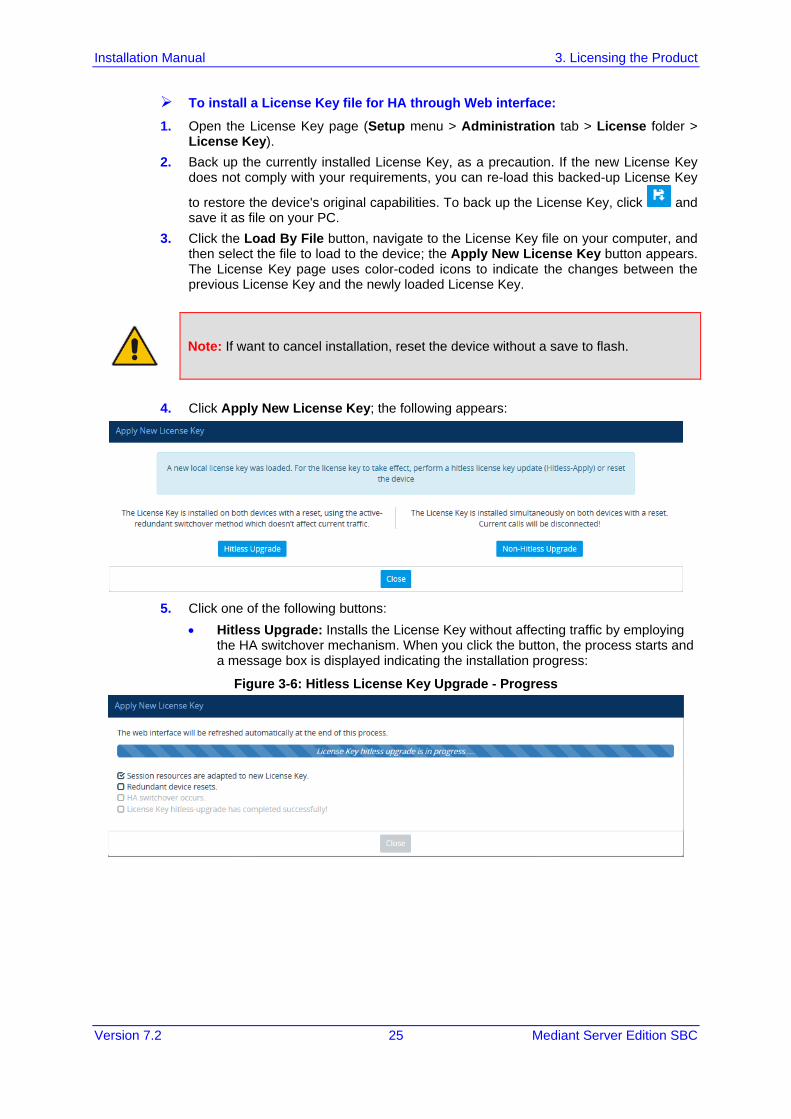
4. Click Apply New License Key; the following appears:
5. Click one of the following buttons:
• Hitless Upgrade: Installs the License Key without affecting traffic by employing the HA switchover mechanism. When you click the button, the process starts and a message box is displayed indicating the installation progress:
Figure 3-6: Hitless License Key Upgrade - Progress
Mediant Server Edition SBC
Installation Manual 26 Document #: LTRT-11024
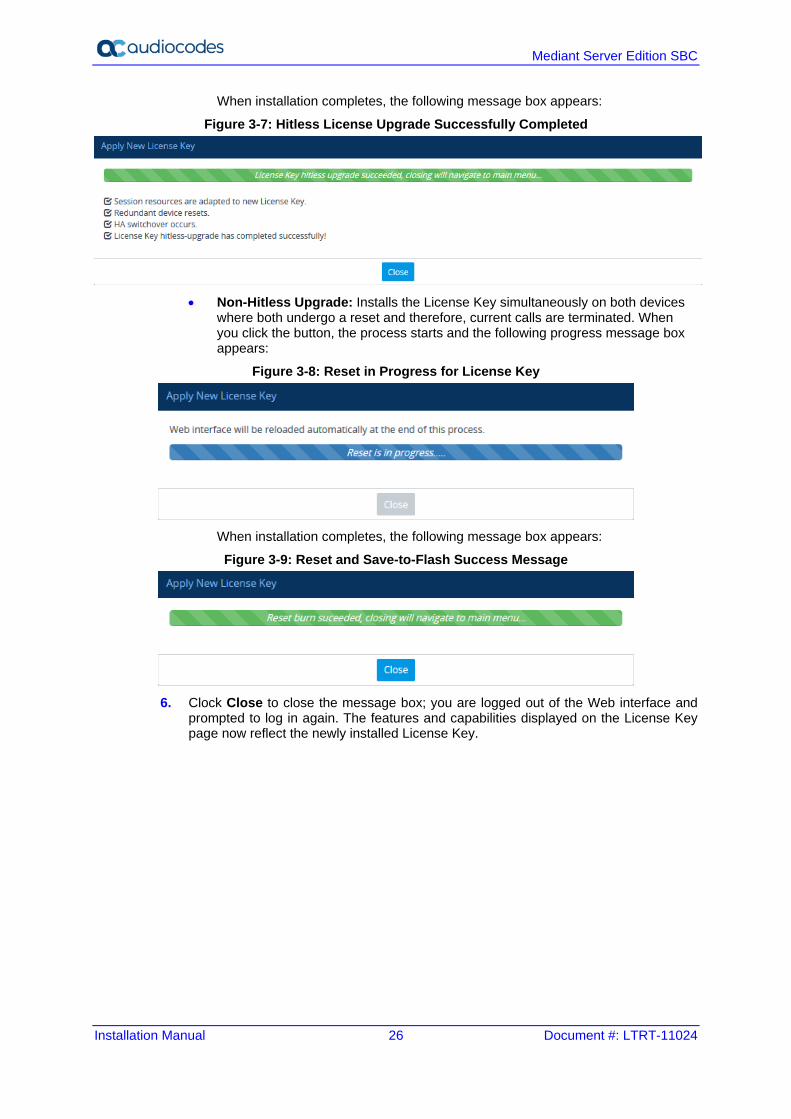
When installation completes, the following message box appears:
Figure 3-7: Hitless License Upgrade Successfully Completed
• Non-Hitless Upgrade: Installs the License Key simultaneously on both devices
where both undergo a reset and therefore, current calls are terminated. When you click the button, the process starts and the following progress message box appears:
Figure 3-8: Reset in Progress for License Key
When installation completes, the following message box appears:
Figure 3-9: Reset and Save-to-Flash Success Message
6. Clock Close to close the message box; you are logged out of the Web interface and
prompted to log in again. The features and capabilities displayed on the License Key page now reflect the newly installed License Key.
Installation Manual 3. Licensing the Product
Version 7.2 27 Mediant Server Edition SBC
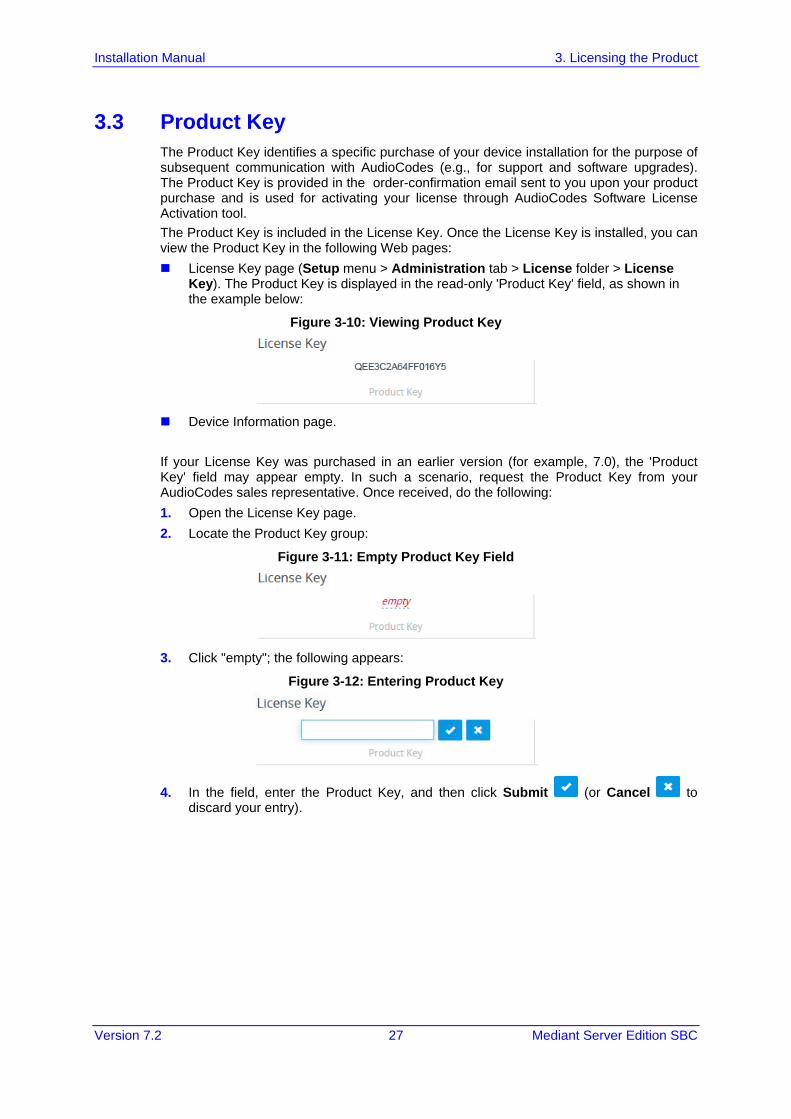
3.3 Product Key The Product Key identifies a specific purchase of your device installation for the purpose of subsequent communication with AudioCodes (e.g., for support and software upgrades). The Product Key is provided in the order-confirmation email sent to you upon your product purchase and is used for activating your license through AudioCodes Software License Activation tool. The Product Key is included in the License Key. Once the License Key is installed, you can view the Product Key in the following Web pages: License Key page (Setup menu > Administration tab > License folder > License
Key). The Product Key is displayed in the read-only 'Product Key' field, as shown in the example below:
Figure 3-10: Viewing Product Key
Device Information page. If your License Key was purchased in an earlier version (for example, 7.0), the 'Product Key' field may appear empty. In such a scenario, request the Product Key from your AudioCodes sales representative. Once received, do the following: 1. Open the License Key page. 2. Locate the Product Key group:
Figure 3-11: Empty Product Key Field
3. Click "empty"; the following appears:
Figure 3-12: Entering Product Key
4. In the field, enter the Product Key, and then click Submit (or Cancel to discard your entry).

Mediant Server Edition SBC
Installation Manual 28 Document #: LTRT-11024
This page is intentionally left blank.

Installation Manual A. Rescue Options
Version 7.2 29 Mediant Server Edition SBC
A Rescue Options The Mediant SE SBC features a System Snapshots mechanism that provides the capability of returning the system to a previous state. The mechanism may be used as a rescue option if a system malfunction occurs. For more information, refer to the Mediant Software SBC User's Manual.

Mediant Server Edition SBC
Installation Manual 30 Document #: LTRT-11024
This page is intentionally left blank.
Installation Manual B. PO of Supported Servers
Version 7.2 31 Mediant Server Edition SBC
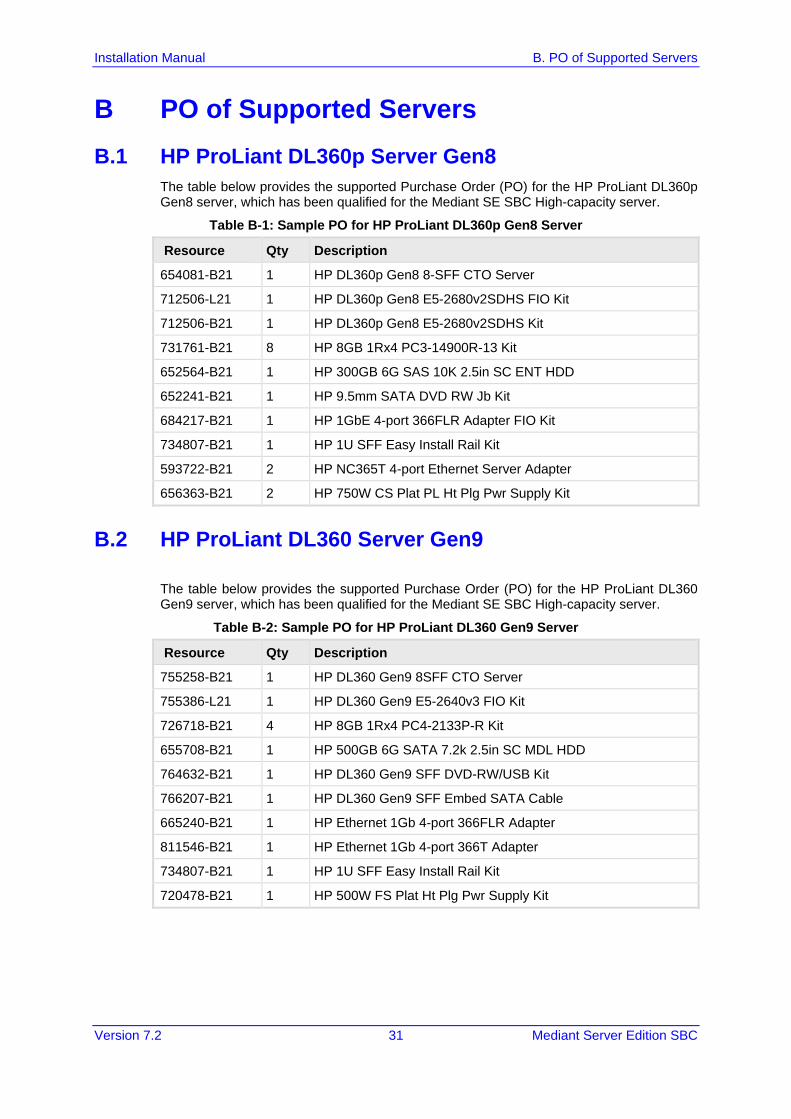
B PO of Supported Servers B.1 HP ProLiant DL360p Server Gen8
The table below provides the supported Purchase Order (PO) for the HP ProLiant DL360p Gen8 server, which has been qualified for the Mediant SE SBC High-capacity server.
Table B-1: Sample PO for HP ProLiant DL360p Gen8 Server
Resource Qty Description
654081-B21 1 HP DL360p Gen8 8-SFF CTO Server
712506-L21 1 HP DL360p Gen8 E5-2680v2SDHS FIO Kit
712506-B21 1 HP DL360p Gen8 E5-2680v2SDHS Kit
731761-B21 8 HP 8GB 1Rx4 PC3-14900R-13 Kit
652564-B21 1 HP 300GB 6G SAS 10K 2.5in SC ENT HDD
652241-B21 1 HP 9.5mm SATA DVD RW Jb Kit
684217-B21 1 HP 1GbE 4-port 366FLR Adapter FIO Kit
734807-B21 1 HP 1U SFF Easy Install Rail Kit
593722-B21 2 HP NC365T 4-port Ethernet Server Adapter
656363-B21 2 HP 750W CS Plat PL Ht Plg Pwr Supply Kit
B.2 HP ProLiant DL360 Server Gen9 The table below provides the supported Purchase Order (PO) for the HP ProLiant DL360 Gen9 server, which has been qualified for the Mediant SE SBC High-capacity server.
Table B-2: Sample PO for HP ProLiant DL360 Gen9 Server
Resource Qty Description
755258-B21 1 HP DL360 Gen9 8SFF CTO Server
755386-L21 1 HP DL360 Gen9 E5-2640v3 FIO Kit
726718-B21 4 HP 8GB 1Rx4 PC4-2133P-R Kit
655708-B21 1 HP 500GB 6G SATA 7.2k 2.5in SC MDL HDD
764632-B21 1 HP DL360 Gen9 SFF DVD-RW/USB Kit
766207-B21 1 HP DL360 Gen9 SFF Embed SATA Cable
665240-B21 1 HP Ethernet 1Gb 4-port 366FLR Adapter
811546-B21 1 HP Ethernet 1Gb 4-port 366T Adapter
734807-B21 1 HP 1U SFF Easy Install Rail Kit
720478-B21 1 HP 500W FS Plat Ht Plg Pwr Supply Kit

International Headquarters 1 Hayarden Street, Airport City Lod 7019900, Israel Tel: +972-3-976-4000 Fax: +972-3-976-4040 AudioCodes Inc. 27 World’s Fair Drive, Somerset, NJ 08873 Tel: +1-732-469-0880 Fax: +1-732-469-2298 Contact us: https://www.audiocodes.com/corporate/offices-worldwide Website: https://www.audiocodes.com/ ©2018 AudioCodes Ltd. All rights reserved. AudioCodes, AC, HD VoIP, HD VoIP Sounds Better, IPmedia, Mediant, MediaPack, What’s Inside Matters, OSN, SmartTAP, User Management Pack, VMAS, VoIPerfect, VoIPerfectHD, Your Gateway To VoIP, 3GX, VocaNom, AudioCodes One Voice and CloudBond are trademarks or registered trademarks of AudioCodes Limited. All other products or trademarks are property of their respective owners. Product specifications are subject to change without notice. Document #: LTRT-11024