Embed Size (px)
Citation preview
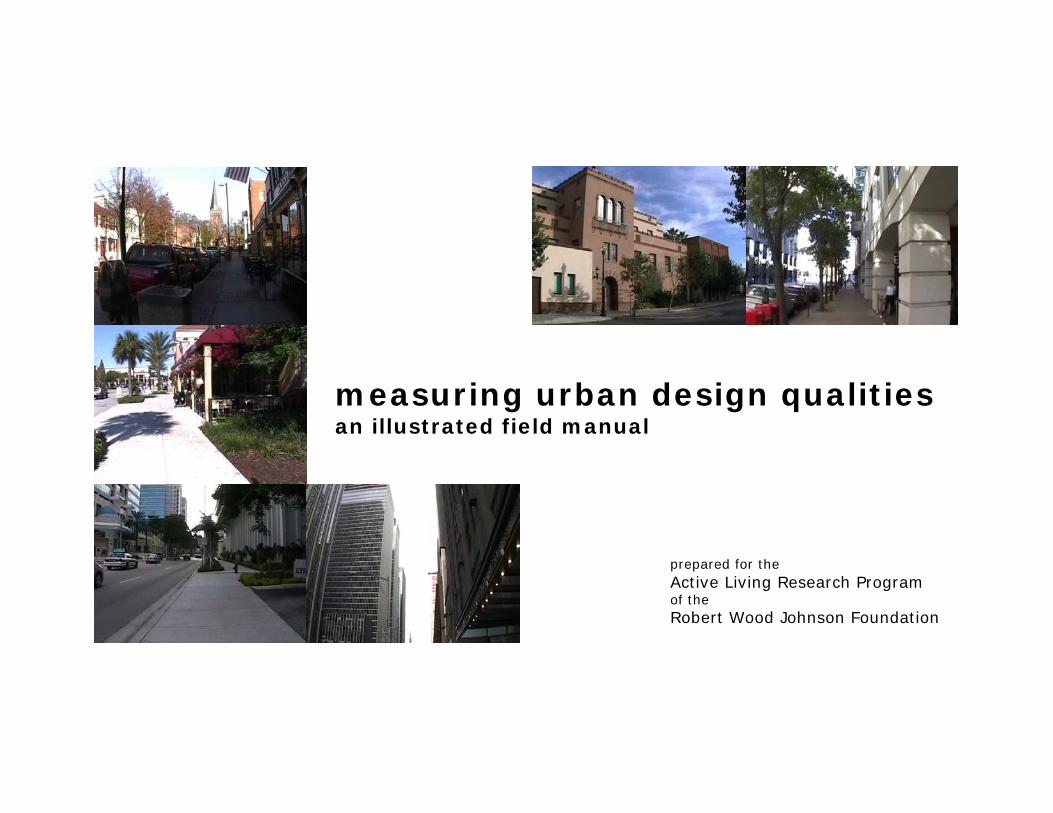
measuring urban design qualities an illustrated field manual
prepared for the Active Living Research Program of the Robert Wood Johnson Foundation
1
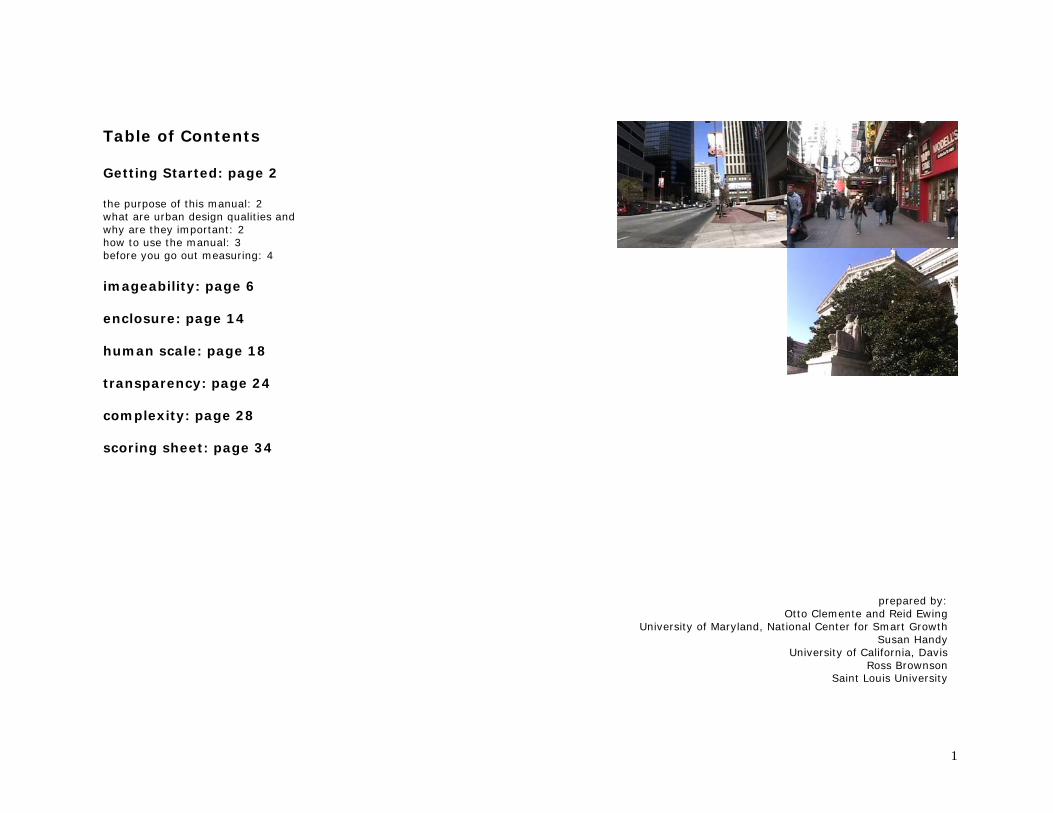
Table of Contents Getting Started: page 2 the purpose of this manual: 2 what are urban design qualities and why are they important: 2 how to use the manual: 3 before you go out measuring: 4 imageability: page 6 enclosure: page 14 human scale: page 18 transparency: page 24 complexity: page 28 scoring sheet: page 34
prepared by: Otto Clemente and Reid Ewing
University of Maryland, National Center for Smart Growth Susan Handy
University of California, Davis Ross Brownson
Saint Louis University

2
Getting Started
The purpose of this manual This manual is the product of nearly a year and a half of research on urban design qualities related to walkability. It builds on a growing body of evidence that links the built environment to active living. The measures used in previous studies to characterize the built environment have been mostly general qualities such as neighborhood density and street connectivity. What do these measures tell us about what it is like to walk down a street? Not much, that’s why this manual is important. Urban designers point to subtler qualities that may influence choices about active travel and active leisure time. These are sometimes referred to as urban design qualities. Urban designers presume that these qualities are important for active street life, but have little empirical evidence to back the claim. Until urban design qualities can be measured, and the propensity to walk can be related empirically to these measures, this presumption will remain untested.
This manual will provide a qualitative introduction to several key urban design qualities from the urban design literature, and then will provide guidance on how to objectively measure each quality for a typical street. The urban design qualities operationalized in this manual are:
• imageability • enclosure • human scale • transparency • complexity
This by no means is an exhaustive list of urban design qualities potentially related to walkability. We considered many other qualities referenced in the
literature. We tried, unsuccessfully, to operationalize others. Based on this research, the urban design qualities measured in this manual appear to have significant relationships to walkability and great potential to be measured objectively and reliably. For more information about urban design qualities and the research program that enabled us to measure them, you are referred to the final report for the Active Living Research project “Identifying and Measuring Urban Design Qualities Related to Walkability.”
What are urban design qualities and why are they important? How can urban design qualities influence your decision to walk? The figure on this page outlines the relationship between the built environment and walking behavior and illustrates where urban design qualities fall within the relationship. Urban design qualities depend on physical features but are distinct from them. They reflect the general way in which people perceive and interact with the environment. These urban design qualities are different from qualities such as sense of comfort, sense of safety, and level of interest that reflect how an individual reacts to a place—how they assess the conditions there, given their own preferences and perspectives. Perceptions are just that, perceptions. They may produce different reactions in different people. Physical features can be measured objectively. Perceptions may be assessed with a degree of objectivity by outside observers (though not with the objectivity of physical features). Reactions are purely subjective.
The built environment and walking behavior
3
All of these factors—physical features, urban design qualities, and individual reactions—influence how an individual feels about the environment as a place to walk. By measuring these intervening variables, we can better understand the way physical features of the built environment affect walking behavior.
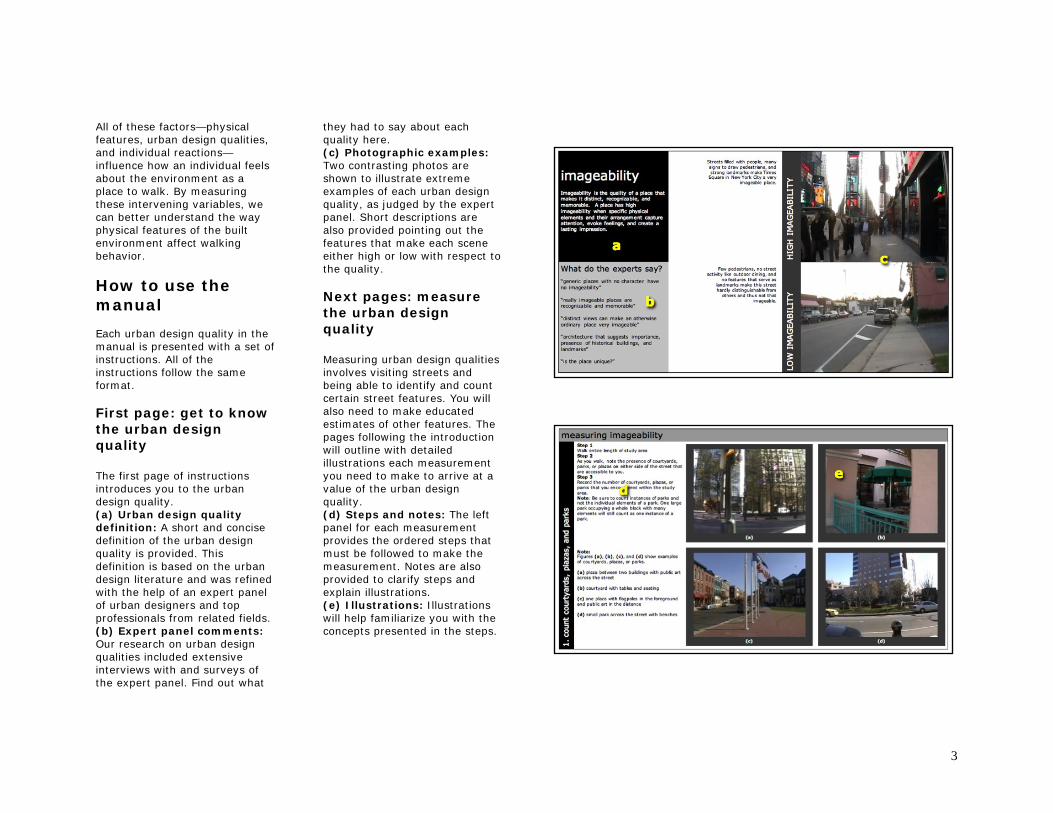
How to use the manual Each urban design quality in the manual is presented with a set of instructions. All of the instructions follow the same format. First page: get to know the urban design quality The first page of instructions introduces you to the urban design quality. (a) Urban design quality definition: A short and concise definition of the urban design quality is provided. This definition is based on the urban design literature and was refined with the help of an expert panel of urban designers and top professionals from related fields. (b) Expert panel comments: Our research on urban design qualities included extensive interviews with and surveys of the expert panel. Find out what
they had to say about each quality here. (c) Photographic examples: Two contrasting photos are shown to illustrate extreme examples of each urban design quality, as judged by the expert panel. Short descriptions are also provided pointing out the features that make each scene either high or low with respect to the quality. Next pages: measure the urban design quality Measuring urban design qualities involves visiting streets and being able to identify and count certain street features. You will also need to make educated estimates of other features. The pages following the introduction will outline with detailed illustrations each measurement you need to make to arrive at a value of the urban design quality. (d) Steps and notes: The left panel for each measurement provides the ordered steps that must be followed to make the measurement. Notes are also provided to clarify steps and explain illustrations. (e) Illustrations: Illustrations will help familiarize you with the concepts presented in the steps.
4
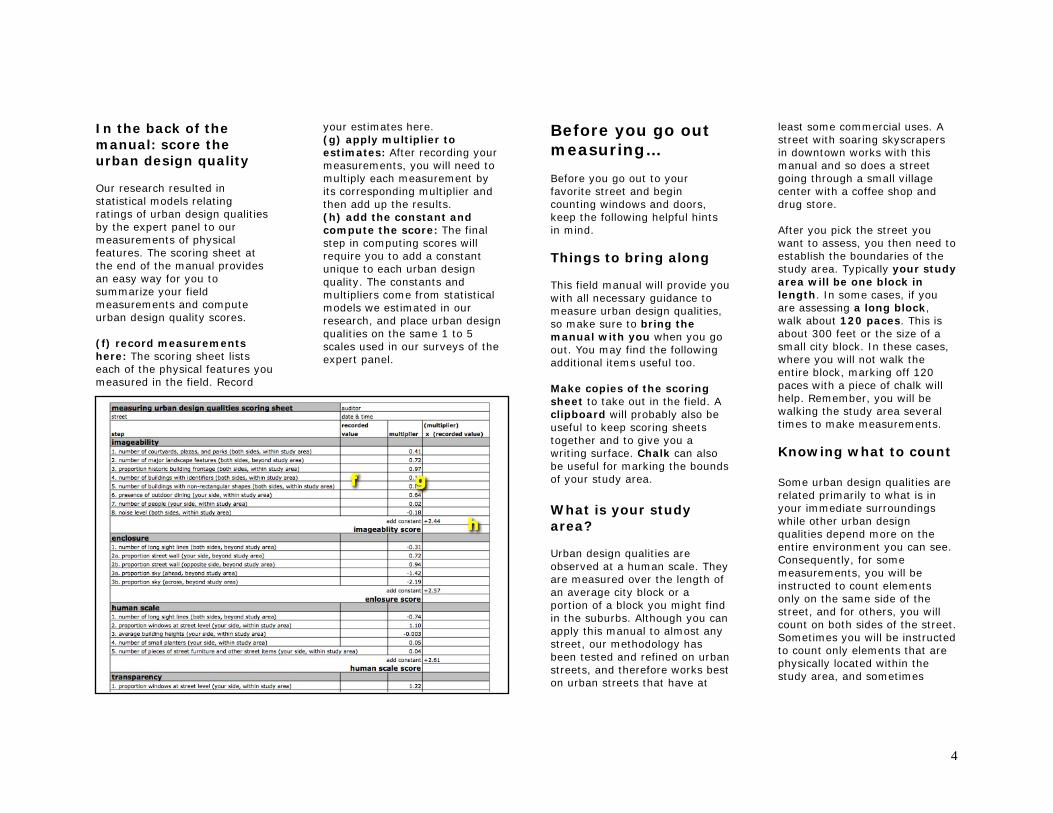
In the back of the manual: score the urban design quality Our research resulted in statistical models relating ratings of urban design qualities by the expert panel to our measurements of physical features. The scoring sheet at the end of the manual provides an easy way for you to summarize your field measurements and compute urban design quality scores. (f) record measurements here: The scoring sheet lists each of the physical features you measured in the field. Record
your estimates here. (g) apply multiplier to estimates: After recording your measurements, you will need to multiply each measurement by its corresponding multiplier and then add up the results. (h) add the constant and compute the score: The final step in computing scores will require you to add a constant unique to each urban design quality. The constants and multipliers come from statistical models we estimated in our research, and place urban design qualities on the same 1 to 5 scales used in our surveys of the expert panel.
Before you go out measuring… Before you go out to your favorite street and begin counting windows and doors, keep the following helpful hints in mind. Things to bring along This field manual will provide you with all necessary guidance to measure urban design qualities, so make sure to bring the manual with you when you go out. You may find the following additional items useful too. Make copies of the scoring sheet to take out in the field. A clipboard will probably also be useful to keep scoring sheets together and to give you a writing surface. Chalk can also be useful for marking the bounds of your study area. What is your study area? Urban design qualities are observed at a human scale. They are measured over the length of an average city block or a portion of a block you might find in the suburbs. Although you can apply this manual to almost any street, our methodology has been tested and refined on urban streets, and therefore works best on urban streets that have at
least some commercial uses. A street with soaring skyscrapers in downtown works with this manual and so does a street going through a small village center with a coffee shop and drug store. After you pick the street you want to assess, you then need to establish the boundaries of the study area. Typically your study area will be one block in length. In some cases, if you are assessing a long block, walk about 120 paces. This is about 300 feet or the size of a small city block. In these cases, where you will not walk the entire block, marking off 120 paces with a piece of chalk will help. Remember, you will be walking the study area several times to make measurements. Knowing what to count Some urban design qualities are related primarily to what is in your immediate surroundings while other urban design qualities depend more on the entire environment you can see. Consequently, for some measurements, you will be instructed to count elements only on the same side of the street, and for others, you will count on both sides of the street. Sometimes you will be instructed to count only elements that are physically located within the study area, and sometimes
5
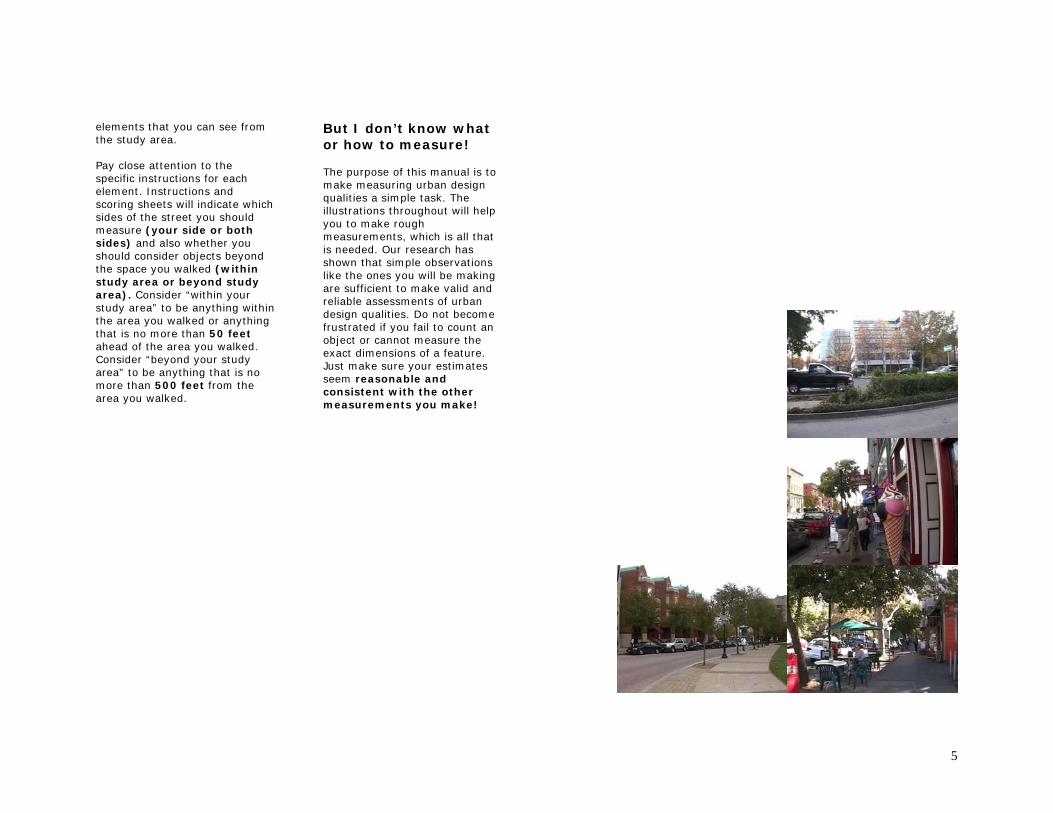
elements that you can see from the study area. Pay close attention to the specific instructions for each element. Instructions and scoring sheets will indicate which sides of the street you should measure (your side or both sides) and also whether you should consider objects beyond the space you walked (within study area or beyond study area). Consider “within your study area” to be anything within the area you walked or anything that is no more than 50 feet ahead of the area you walked. Consider “beyond your study area” to be anything that is no more than 500 feet from the area you walked.
But I don’t know what or how to measure! The purpose of this manual is to make measuring urban design qualities a simple task. The illustrations throughout will help you to make rough measurements, which is all that is needed. Our research has shown that simple observations like the ones you will be making are sufficient to make valid and reliable assessments of urban design qualities. Do not become frustrated if you fail to count an object or cannot measure the exact dimensions of a feature. Just make sure your estimates seem reasonable and consistent with the other measurements you make!

6
imageability Imageability is the quality of a place that makes it distinct, recognizable, and memorable. A place has high imageability when specific physical elements and their arrangement capture attention, evoke feelings, and create a lasting impression.
What do the experts say? “generic places with no character have no imageability” “really imageable places are recognizable and memorable” “distinct views can make an otherwise ordinary place very imageable” “architecture that suggests importance, presence of historical buildings, and landmarks” are imageable ask yourself “is the place unique?”
HIG
H I
MAG
EABIL
ITY
LOW
IM
AG
EABIL
ITY
Streets filled with people, many
signs, and strong landmarks make Times Square in New York City a very imageable
place.
Few pedestrians, no street activity like
outdoor dining, and no features that
serve as landmarks make this street
hardly distinguishable from others and thus not
imageable.

7
measuring imageability 1.
count
court
yard
s, p
laza
s, a
nd p
arks
Step 1 Walk entire length of study area (one block length or roughly 300 feet—120 steps), starting at the end of the block that puts buildings on your right. Step 2 As you walk, note the presence of courtyards, parks, or plazas on either side of the street that are accessible to you. Step 3 Record the number of courtyards, plazas, or parks that you encountered within the study area. Note: Be sure to count instances of parks and not the individual elements of a park. One large park occupying a whole block with many elements will still count as one instance of a park.
Note: Figures (a), (b), (c), and (d) show examples of courtyards, plazas, or parks. (a) plaza between two buildings with public art across the street (b) courtyard with tables and seating (c) plaza with flagpoles in the foreground and public art in the distance (d) small park across the street with benches
(a)
(b)
(c)
(d)
1. number of courtyards, plazas, and parks both sides, within study area

8
measuring imageability 2.
count
maj
or
landsc
ape
feat
ure
s
Step 1 Walk entire length of study area (one block length or roughly 300 feet—120 steps). Step 2 As you walk note if there are any prominent landscape views such as bodies of water, or man-made features that incorporate the surrounding natural environment. Note: A major landscape feature serves as a natural landmark. Therefore, when counting, consider whether the view is prominent and/or well known, such that it could be used as a reference point for orientation or for providing directions to visitors. Step 3 Record the number of distinct landscape features you encountered within the study area. Note: Figures (a) and (b) show examples of what can be considered major landscape features on the street, and (c) shows an example of what cannot. Use the figures to familiarize yourself with the scope of features that may count as major landscape features.
(a)
(b)
(c)
(a) marina - YES A marina is a man-made feature that incorporates a natural landscape feature (water) and therefore would count as a major landscape feature. (b) harbor - YES The harbor shown although mostly developed still incorporates the natural environment and would count as a major landscape feature. (c) skyline - NO A view of a city skyline may be quite prominent. However since it does not incorporate natural elements, it would not count as a major landscape feature.
2. number of major landscape features both sides, beyond study area

9
measuring imageability 3.
estim
ate
pro
port
ion h
isto
ric
build
ings
Step 1 Walk entire length of study area (one block length or roughly 300 feet—120 steps). Step 2 As you walk, note the approximate age of buildings fronting along both sides of the street. Step 3 For the portion of the street with buildings fronting the sidewalk, estimate the proportion that is fronted by historic buildings—on both sides of the street. Record your estimate as a decimal. Use increments of tenths (.10). Note: Architecture that can be determined to have originated before World War II will be considered historic. Figures (a), (b), (c), and (d) show a progression of views down both sides of one street. (a) and (c): The right side of the street is entirely made up of modern glass and concrete structures. (b) and (d): The left side of the street is entirely occupied with older buildings made of brick and stone. This street has approximately 50% of its building frontage, on the two sides, occupied by historic structures.
(a)
(b)
(c)
(d)
3. proportion historic building frontage both sides, within study area

10
measuring imageability 4.
count
build
ings
with iden
tifier
s
Step 1 Walk entire length of study area (one block length or roughly 300 feet—120 steps). Step 2 As you walk, note buildings whose uses can be identified by building features. Note: For example, a church can be identified by a steeple. Stores can be identified by signs that can be easily read. Step 3 Record the number of buildings that have identifying features within the study area. If a single building appears to have several occupants at street level, only count the building as identifiable if a majority of the occupants can be determined by building features. Note: Figures (a), (b), and (c) show different examples of buildings with identifiers.
(a)
(b)
(c)
(a) large building with several occupants with identifiable uses The building in this figure will count as one building with identifiers since it is one building with many uses that can be identified by business signs. (b) three buildings with identifiers The three buildings across the street are all identified by storefront signs that can be read. (c) church steeple in distance The steeple in the distance indicates the presence of a church therefore the church can count as a building with an identifier if it is within the study area.
4. number of buildings with identifiers both sides, within study area
11
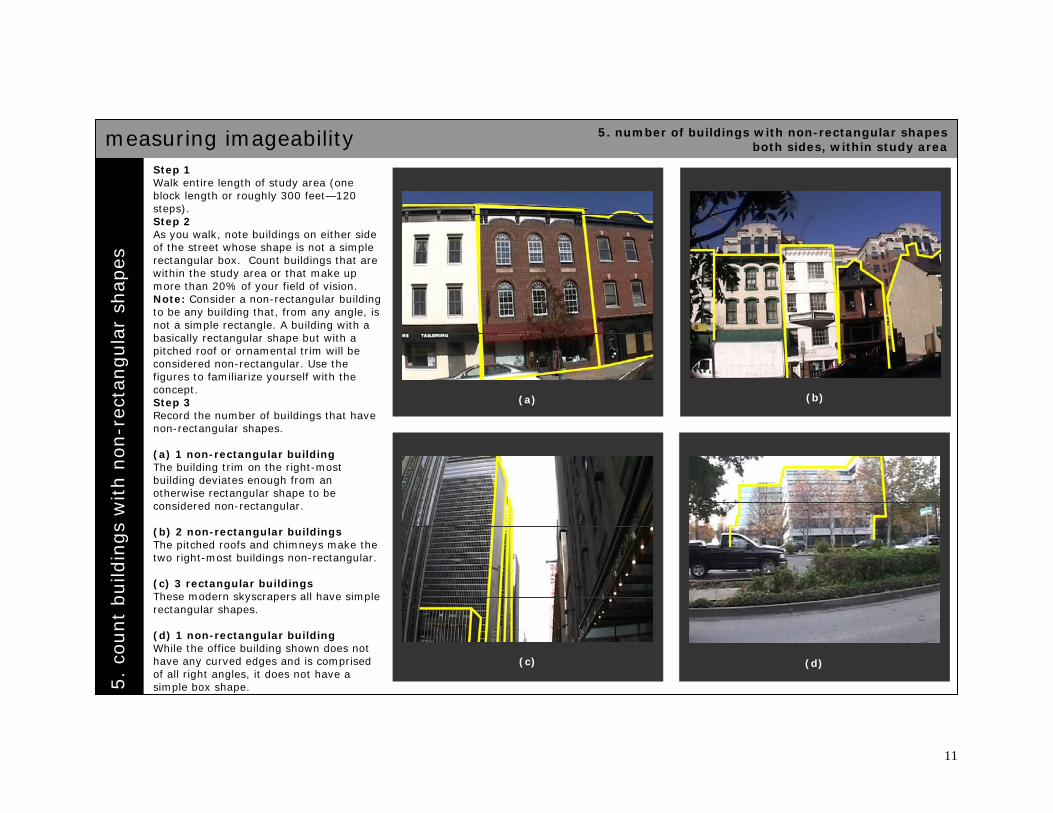
measuring imageability 5.
count
build
ings
with n
on-r
ecta
ngula
r sh
apes
Step 1 Walk entire length of study area (one block length or roughly 300 feet—120 steps). Step 2 As you walk, note buildings on either side of the street whose shape is not a simple rectangular box. Count buildings that are within the study area or that make up more than 20% of your field of vision. Note: Consider a non-rectangular building to be any building that, from any angle, is not a simple rectangle. A building with a basically rectangular shape but with a pitched roof or ornamental trim will be considered non-rectangular. Use the figures to familiarize yourself with the concept. Step 3 Record the number of buildings that have non-rectangular shapes. (a) 1 non-rectangular building The building trim on the right-most building deviates enough from an otherwise rectangular shape to be considered non-rectangular. (b) 2 non-rectangular buildings The pitched roofs and chimneys make the two right-most buildings non-rectangular. (c) 3 rectangular buildings These modern skyscrapers all have simple rectangular shapes. (d) 1 non-rectangular building While the office building shown does not have any curved edges and is comprised of all right angles, it does not have a simple box shape.
(a)
(b)
(c)
(d)
5. number of buildings with non-rectangular shapes both sides, within study area

12
measuring imageability 6.
regis
ter
outd
oor
din
ing
Step 1 Walk entire length of study area (one block length or roughly 300 feet—120 steps). Step 2 As you walk, note on your side of the street instances where outdoor dining is provided. Note: Consider a place as having outdoor dining even if there are no people currently utilizing it. However, if a place has outdoor dining but appears to be closed (folded chairs and umbrellas), do not consider it an instance of outdoor dining. The outdoor dining must appear to be open to be counted. Step 3 Record the presence of outdoor dining—1 for yes, 0 for no. Note: Figures (a), (b), (c), and (d) show examples of what can and cannot be considered outdoor dining. (a) open outdoor dining with no patrons - YES Although the tables are not being utilized, this place would be considered outdoor dining. (b) closed outdoor dining - NO The outdoor dining shown here has closed umbrellas and chairs on top of tables. This would not be considered outdoor dining. (c) and (d) open outdoor dining with patrons - YES These two places have outdoor dining with patrons. Count each even though one is partially enclosed.
(a)
(b)
(c)
(d)
6. presence of outdoor dining your side, within study area
13
7.
count
peo
ple
Step 1 Walk entire length of study area (one block length or roughly 300 feet—120 steps). Step 2 As you walk, note on your side of the street when you encounter walking, standing, or sitting pedestrians; do not include people sitting at outdoor eating areas. Note: Count pedestrians that you pass and any pedestrian that is no more than 50 feet ahead of you. Step 3 Record the number of walking, standing, or sitting pedestrians you encountered on one walk through the study area. Step 4 Repeat steps 1-3 another 3 times recording the number of people each time. Step 5 Compute the average number of people encountered from the four instances of walking the study area.
measuring imageability
8.
estim
ate
nois
e le
vel
Step 1 Walk entire length of study area (one block length or roughly 300 feet—120 steps). Step 2 As you walk, note the amount of noise made by traffic, pedestrians, and any other ambient sources. Step 3 Rate the noise level using the following scale: (1) very quiet (2) quiet (3) normal (4) loud (5) very loud Step 4 Repeat steps 1-3 another 3 times making a noise level rating each time. Step 5 Compute the average noise level from the four instances of walking the study area.
7. number of people: your side, within study area 8. noise level: both sides, within study area
14
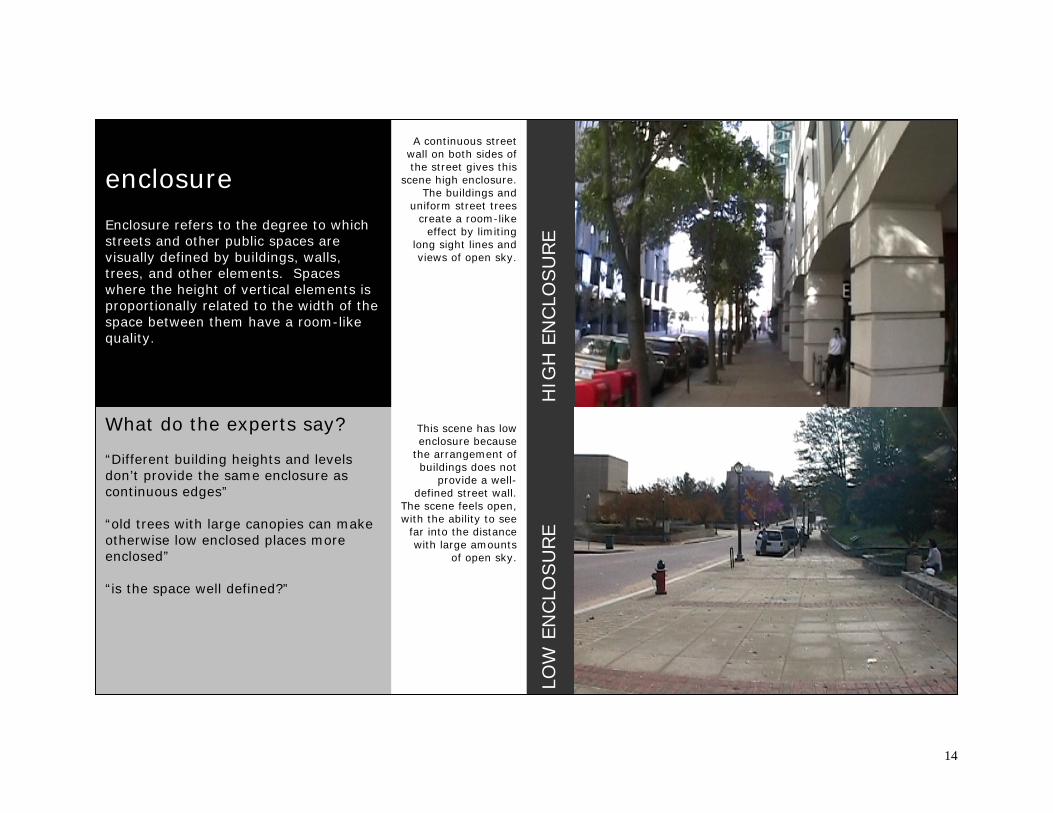
enclosure Enclosure refers to the degree to which streets and other public spaces are visually defined by buildings, walls, trees, and other elements. Spaces where the height of vertical elements is proportionally related to the width of the space between them have a room-like quality.
What do the experts say? “Different building heights and levels don’t provide the same enclosure as continuous edges” “old trees with large canopies can make otherwise low enclosed places more enclosed” “is the space well defined?”
HIG
H E
NCLO
SU
RE
LOW
EN
CLO
SU
RE
A continuous street wall on both sides of the street gives this
scene high enclosure. The buildings and
uniform street trees create a room-like
effect by limiting long sight lines and views of open sky.
This scene has low enclosure because
the arrangement of buildings does not
provide a well-defined street wall.
The scene feels open, with the ability to see
far into the distance with large amounts
of open sky.
15
measuring enclosure 1.
count
long s
ight
lines
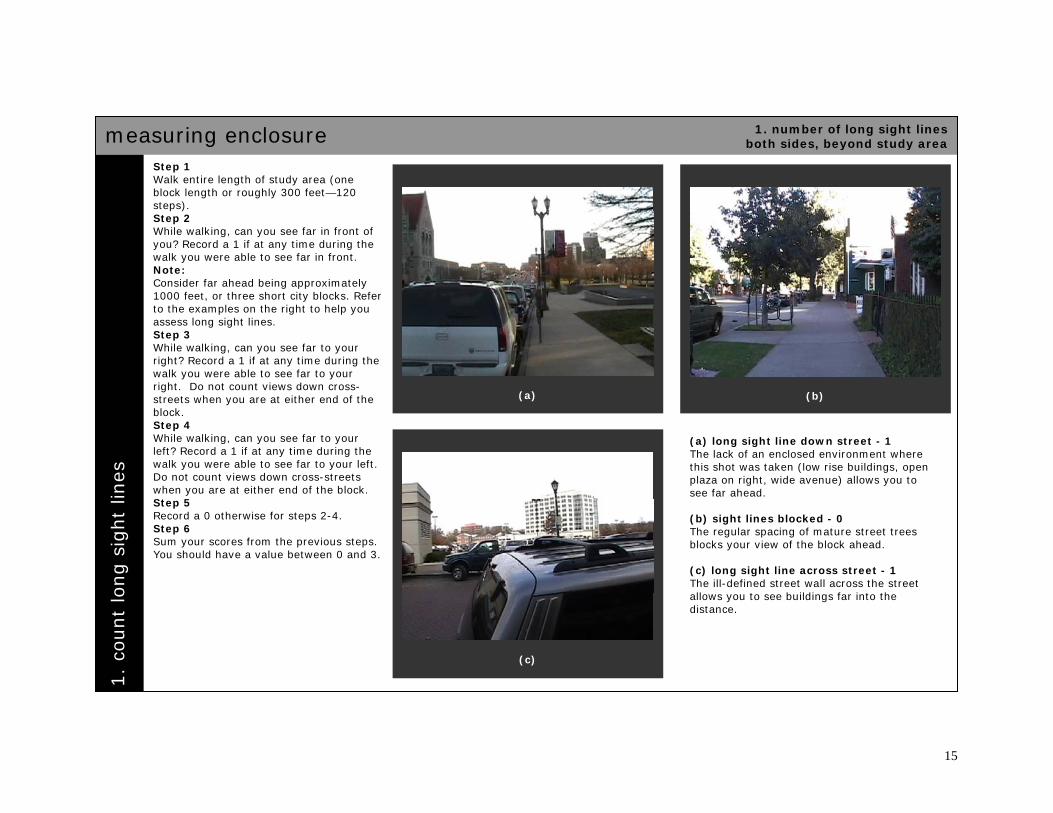
Step 1 Walk entire length of study area (one block length or roughly 300 feet—120 steps). Step 2 While walking, can you see far in front of you? Record a 1 if at any time during the walk you were able to see far in front. Note: Consider far ahead being approximately 1000 feet, or three short city blocks. Refer to the examples on the right to help you assess long sight lines. Step 3 While walking, can you see far to your right? Record a 1 if at any time during the walk you were able to see far to your right. Do not count views down cross-streets when you are at either end of the block. Step 4 While walking, can you see far to your left? Record a 1 if at any time during the walk you were able to see far to your left. Do not count views down cross-streets when you are at either end of the block. Step 5 Record a 0 otherwise for steps 2-4. Step 6 Sum your scores from the previous steps. You should have a value between 0 and 3.
(a)
(b)
(c)
(a) long sight line down street - 1 The lack of an enclosed environment where this shot was taken (low rise buildings, open plaza on right, wide avenue) allows you to see far ahead. (b) sight lines blocked - 0 The regular spacing of mature street trees blocks your view of the block ahead. (c) long sight line across street - 1 The ill-defined street wall across the street allows you to see buildings far into the distance.
1. number of long sight lines both sides, beyond study area
16
measuring enclosure 2.
estim
ate
pro
port
ion s
tree
t w
all
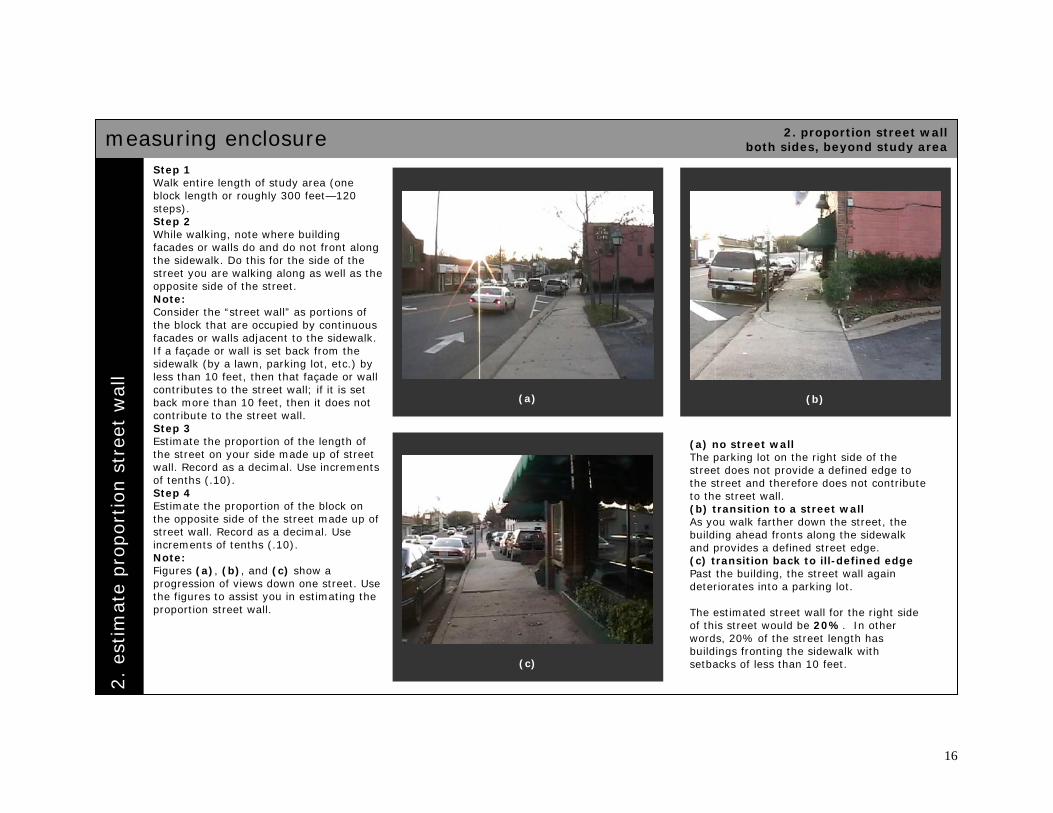
Step 1 Walk entire length of study area (one block length or roughly 300 feet—120 steps). Step 2 While walking, note where building facades or walls do and do not front along the sidewalk. Do this for the side of the street you are walking along as well as the opposite side of the street. Note: Consider the “street wall” as portions of the block that are occupied by continuous facades or walls adjacent to the sidewalk. If a façade or wall is set back from the sidewalk (by a lawn, parking lot, etc.) by less than 10 feet, then that façade or wall contributes to the street wall; if it is set back more than 10 feet, then it does not contribute to the street wall. Step 3 Estimate the proportion of the length of the street on your side made up of street wall. Record as a decimal. Use increments of tenths (.10). Step 4 Estimate the proportion of the block on the opposite side of the street made up of street wall. Record as a decimal. Use increments of tenths (.10). Note: Figures (a), (b), and (c) show a progression of views down one street. Use the figures to assist you in estimating the proportion street wall.
(a)
(b)
(c)
(a) no street wall The parking lot on the right side of the street does not provide a defined edge to the street and therefore does not contribute to the street wall. (b) transition to a street wall As you walk farther down the street, the building ahead fronts along the sidewalk and provides a defined street edge. (c) transition back to ill-defined edge Past the building, the street wall again deteriorates into a parking lot. The estimated street wall for the right side of this street would be 20%. In other words, 20% of the street length has buildings fronting the sidewalk with setbacks of less than 10 feet.
2. proportion street wall both sides, beyond study area
17
measuring enclosure 3.
estim
ate
pro
port
ion s
ky
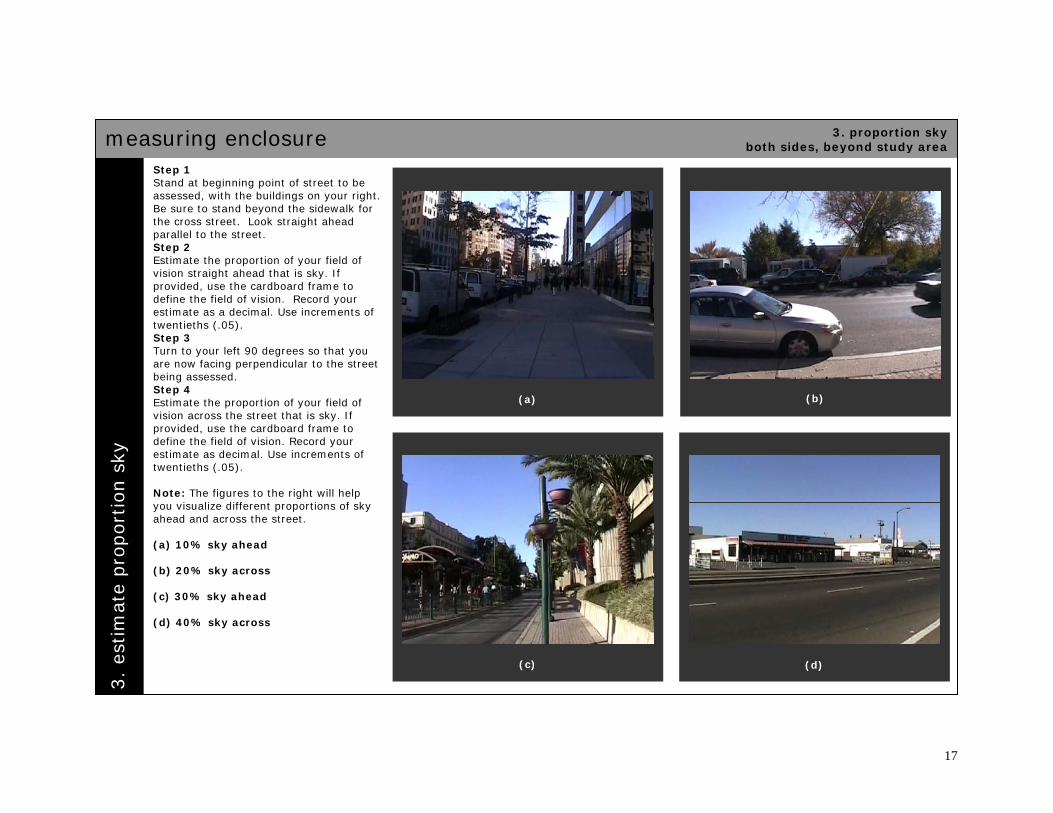
Step 1 Stand at beginning point of street to be assessed, with the buildings on your right. Be sure to stand beyond the sidewalk for the cross street. Look straight ahead parallel to the street. Step 2 Estimate the proportion of your field of vision straight ahead that is sky. If provided, use the cardboard frame to define the field of vision. Record your estimate as a decimal. Use increments of twentieths (.05). Step 3 Turn to your left 90 degrees so that you are now facing perpendicular to the street being assessed. Step 4 Estimate the proportion of your field of vision across the street that is sky. If provided, use the cardboard frame to define the field of vision. Record your estimate as decimal. Use increments of twentieths (.05). Note: The figures to the right will help you visualize different proportions of sky ahead and across the street. (a) 10% sky ahead (b) 20% sky across (c) 30% sky ahead (d) 40% sky across
(a)
(b)
(c)
(d)
3. proportion sky both sides, beyond study area
18
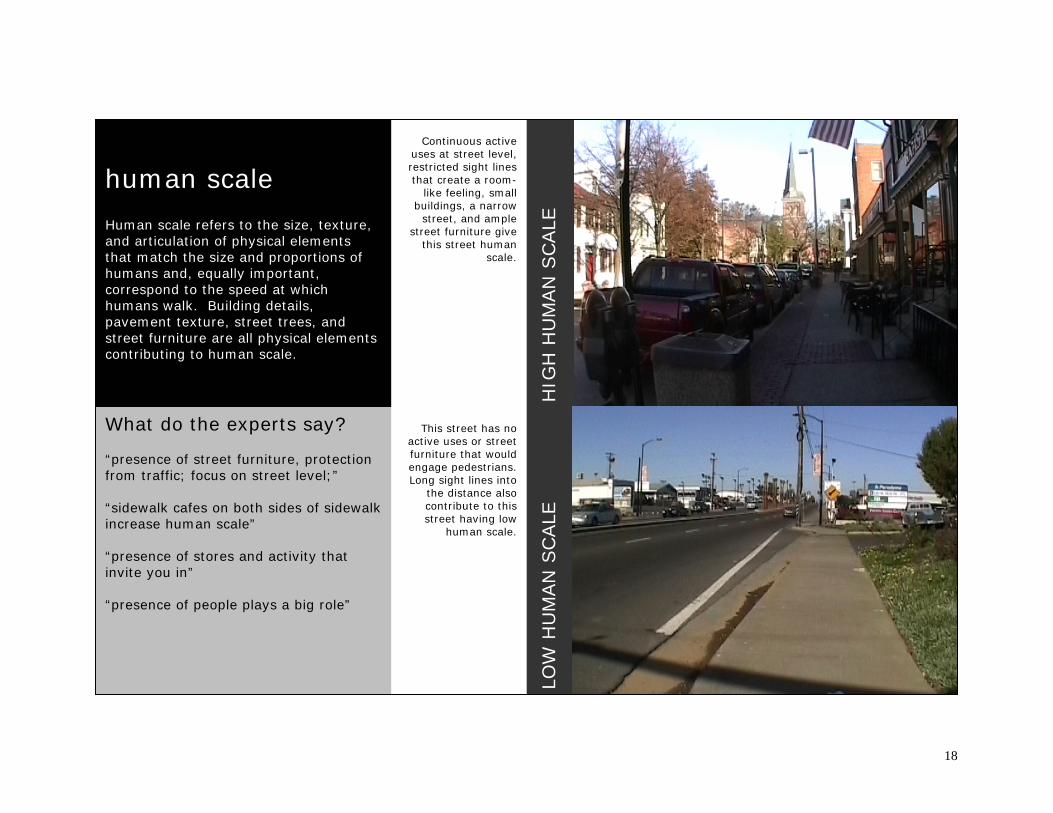
human scale Human scale refers to the size, texture, and articulation of physical elements that match the size and proportions of humans and, equally important, correspond to the speed at which humans walk. Building details, pavement texture, street trees, and street furniture are all physical elements contributing to human scale.
What do the experts say? “presence of street furniture, protection from traffic; focus on street level;” “sidewalk cafes on both sides of sidewalk increase human scale” “presence of stores and activity that invite you in” “presence of people plays a big role”
HIG
H H
UM
AN
SCALE
LO
W H
UM
AN
SCALE
Continuous active uses at street level, restricted sight lines that create a room-
like feeling, small buildings, a narrow
street, and ample street furniture give
this street human scale.
This street has no active uses or street furniture that would engage pedestrians. Long sight lines into
the distance also contribute to this street having low
human scale.

19
measuring human scale 1.
iden
tify
long s
ight
lines
Step 1 Walk entire length of study area (one block length or roughly 300 feet—120 steps). Step 2 While walking, can you see far in front of you? Record a 1 if at any time during the walk you were able to see far in front. Note: Consider far ahead being approximately 1000 feet, or three short city blocks. Refer to the examples on the right to help you assess long sight lines. Step 3 While walking, can you see far to your right? Record a 1 if at any time during the walk you were able to see far to your right. Do not count views down cross-streets when you are at either end of the block. Step 4 While walking, can you see far to your left? Record a 1 if at any time during the walk you were able to see far to your left. Do not count views down cross-streets when you are at either end of the block. Step 5 Record a 0 otherwise for steps 2-4. Step 6 Sum your scores from the previous steps. You should have a value between 0 and 3.
(a)
(b)
(c)
(a) long sight line down street - 1 The lack of an enclosed environment where this shot was taken (low rise buildings, open plaza on right, wide avenue) allows you to see far ahead. (b) sight lines blocked - 0 The regular spacing of mature street trees blocks your view of the block ahead. (c) long sight line across street - 1 The ill-defined street wall across the street allows you to see buildings far into the distance.
1. number of long sight lines both sides, beyond study area

20
measuring human scale 2.
estim
ate
pro
port
ion w
indow
s at
stre
et lev
el
Step 1 Walk entire length of study area (one block length or roughly 300 feet—120 steps). Step 2 As you walk, note on your side of the street where buildings front along the sidewalk. Step 3 Of those buildings that front along the sidewalk note where there are windows at street level. Step 4 Estimate the proportion of the surface area of the first floor (street level) of buildings that front along the sidewalk made up of windows. Record as a decimal. Use increments of tenths (.10). Note: Figures (a), (b), (c), and (d) show a progression of views down one street. Blue highlighted areas indicate where windows are present. Grey highlighted areas indicate portions of buildings that are not at street level. Overall, this street has an estimated 70% of street level building surface area made up of windows.
(a)
(b)
(c)
(d)
2. proportion windows at street level your side, within study area
21
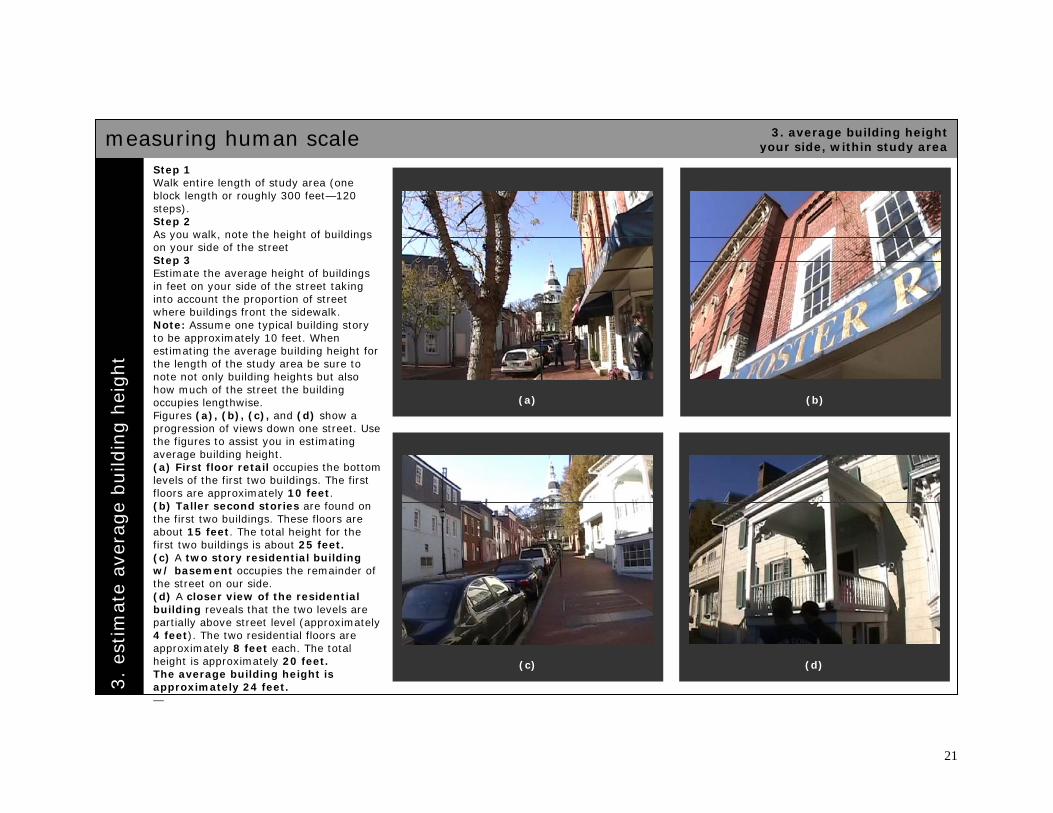
measuring human scale 3.
estim
ate
aver
age
build
ing h
eight
Step 1 Walk entire length of study area (one block length or roughly 300 feet—120 steps). Step 2 As you walk, note the height of buildings on your side of the street Step 3 Estimate the average height of buildings in feet on your side of the street taking into account the proportion of street where buildings front the sidewalk. Note: Assume one typical building story to be approximately 10 feet. When estimating the average building height for the length of the study area be sure to note not only building heights but also how much of the street the building occupies lengthwise. Figures (a), (b), (c), and (d) show a progression of views down one street. Use the figures to assist you in estimating average building height. (a) First floor retail occupies the bottom levels of the first two buildings. The first floors are approximately 10 feet. (b) Taller second stories are found on the first two buildings. These floors are about 15 feet. The total height for the first two buildings is about 25 feet. (c) A two story residential building w/ basement occupies the remainder of the street on our side. (d) A closer view of the residential building reveals that the two levels are partially above street level (approximately 4 feet). The two residential floors are approximately 8 feet each. The total height is approximately 20 feet. The average building height is approximately 24 feet. —
(a)
(b)
(c)
(d)
3. average building height your side, within study area

22
measuring human scale 4.
count
smal
l pla
nte
rs
Step 1 Walk entire length of study area (one block length or roughly 300 feet—120 steps). Step 2 As you walk, note on your side of the street any small planters. Note: Consider a small planter to be any potted arrangement of shrubs or flowers that is less than 10 square feet at the base. The planter should be a permanent fixture of the streetscape and not a potted plant that is easily taken indoors at the end of the day. Do not count in-ground planters or trees. Step 3 Record the number of small planters encountered within the study area. Note: Figures (a), (b), (c), and (d) show examples of what can and cannot be considered small planters. (a) small flowerbed next to window A small planter can be a part of the buildings so long as the flowerbed appears to be less than 10 square feet. (b) two small planters by a large planting bed The two small planters are large enough that they are permanent aspects of the streetscape. The planting bed in the background is too large to be considered. (c) small planter behind a streetlight This small planter appears just large enough that it is probably a permanent fixture of the streetscape. (d) flower pots are too small The pots along the storefront can be easily taken indoors anytime, therefore, they will not be considered small planters.
(a)
(b)
(c)
(d)
4. number of small planters your side, within study area

23
measuring human scale 5.
count
stre
et f
urn
iture
and o
ther
str
eet
item
s
Step 1 Walk entire length of study area (one block length or roughly 300 feet—120 steps). Step 2 As you walk, note on your side of the street the presence of street furniture (benches, lamp posts, etc…) and other street items (newspaper boxes, parking meters, etc…). Note: Use the list and figures on this page to see what types of items will count. Do not count items at the corner that are also in the path of the sidewalk for the cross-street. Step 3 Record the number of pieces of street furniture and other street items encountered within the study area.
(a)
5. number of pieces of street furniture and other street items your side, within study area
Examples of items that can count as street furniture or other street items: tables ATM’s chairs hanging plants benches flower pots parking meters umbrellas trash cans newspaper boxes mail boxes bike racks bollards hydrants flags banners merchandise stands street vendors pedestrian-scale street lights other street lights
(b)
Figures (a), (b), and (c) show examples of what can be considered as street furniture and other street items. (a) 14 street items 1-8: chairs 9-11: tables 12: balloons 13. grouping of small flowerpots that are too small to be counted as small planters. 14. trash can (b) 7 street items 1: ATM 2: lantern attached to building 3: trash can 4: pedestrian scale street light 5-7: parking meters (c) 4 street items 1: street banner 2: pedestrian scale street light 3: bench 4: antique lantern attached to building
(c)

24
transparency Transparency refers to the degree to which people can see or perceive what lies beyond the edge of a street or other public space and, more specifically, the degree to which people can see or perceive human activity beyond the edge of a street or other public space. Physical elements that influence transparency include walls, windows, doors, fences, landscaping, and openings into midblock spaces.
What do the experts say? “it's more than just glass but the sense of what's going on” “can’t have transparency if buildings are so far back from street edge” “continuous exposure to uses that are clear and accessible”
HIG
H T
RAN
SPA
REN
CY
LOW
TRAN
SPA
REN
CY
A continuous street wall with active uses
and many windows at street level make
this scene very transparent.
Transparency is low in this scene since
there are few windows at street
level, much reflective glass and concrete,
and no active building uses that are
inviting to pedestrians.
25
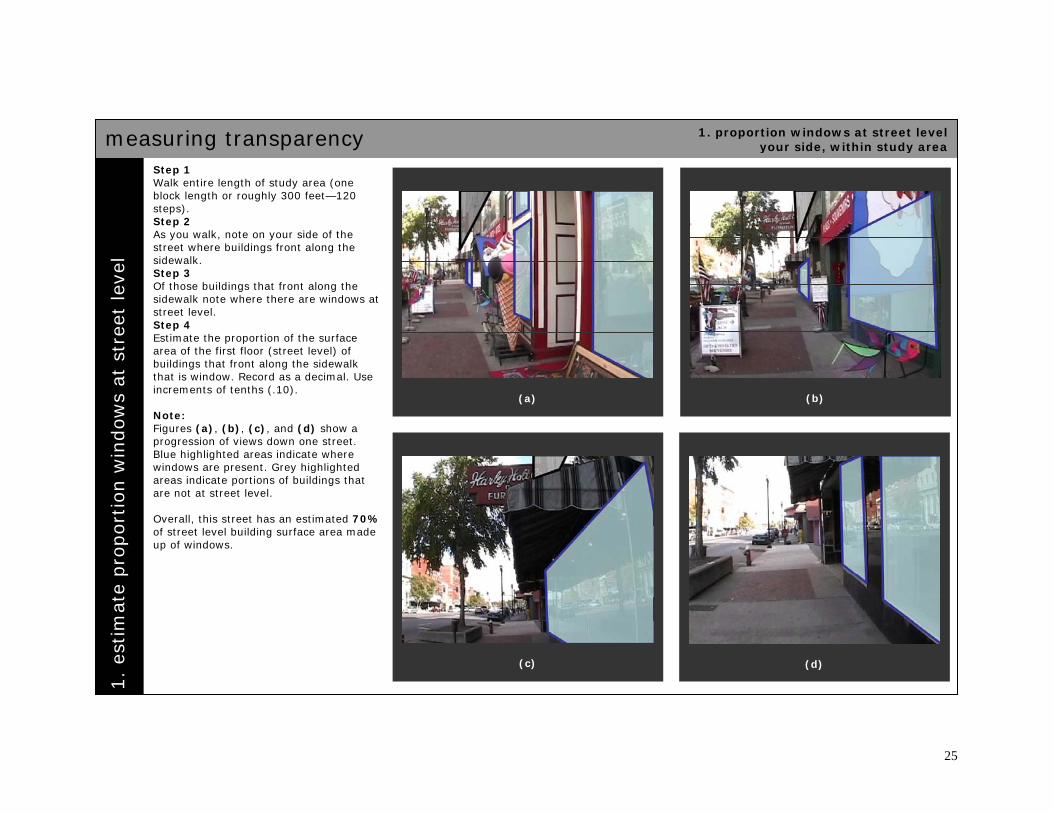
measuring transparency 1.
estim
ate
pro
port
ion w
indow
s at
stre
et lev
el
Step 1 Walk entire length of study area (one block length or roughly 300 feet—120 steps). Step 2 As you walk, note on your side of the street where buildings front along the sidewalk. Step 3 Of those buildings that front along the sidewalk note where there are windows at street level. Step 4 Estimate the proportion of the surface area of the first floor (street level) of buildings that front along the sidewalk that is window. Record as a decimal. Use increments of tenths (.10). Note: Figures (a), (b), (c), and (d) show a progression of views down one street. Blue highlighted areas indicate where windows are present. Grey highlighted areas indicate portions of buildings that are not at street level. Overall, this street has an estimated 70% of street level building surface area made up of windows.
(a)
(b)
(c)
(d)
1. proportion windows at street level your side, within study area

26
measuring transparency 2.
estim
ate
pro
port
ion s
tree
t w
all
Step 1 Walk entire length of study area (one block length or roughly 300 feet—120 steps). Step 2 While walking, note where building facades or walls do and do not front along the sidewalk. Do this for the side of the street you are walking along. Note: Consider the “street wall” as portions of the block that are occupied by continuous facades or walls adjacent to the sidewalk. If a façade or wall is set back from the sidewalk (by a lawn, driveway, parking lot, etc.) by less than 10 feet, then that façade or wall contributes to the street wall; if it is set back more than 10 feet, then it does not contribute to the street wall. Step 3 Estimate the proportion of the length of the street on your side made up of street wall. Record as a decimal. Use increments of tenths (.10). Note: Figures (a), (b), and (c) show a progression of views down one street. Use the figures to assist you in estimating street wall.
(a)
(b)
(c)
(a) no street wall The parking lot on the right side of the street does not provide a defined edge to the street and therefore does not contribute to the street wall. (b) transition to a street wall As you walk farther down the street, the building ahead fronts along the sidewalk and provides a defined street edge. (c) transition back to ill-defined edge Past the building, the street wall again deteriorates into a parking lot. The estimated street wall for the right side of this street would be 20%. In other words, 20% of the street length has buildings fronting the sidewalk with setbacks of less than 10 feet.
2. proportion street wall your side, beyond study area

27
measuring transparency 3.
estim
ate
pro
port
ion a
ctiv
e use
s
Step 1 Walk entire length of study area (one block length or roughly 300 feet—120 steps). Step 2 As you walk, note on your side of the street where buildings front along the sidewalk. Step 3 Of those buildings that front along the sidewalk note which buildings have active uses on the ground floor. Step 4 Estimate the proportion of the street with buildings fronting the sidewalk that have active uses. Record as a decimal. Use increments of tenths (.10). Note: Active uses are defined as shops, restaurants, public parks, and other uses that generate significant pedestrian traffic. Inactive uses include blank walls, parking lots, vacant lots, abandoned buildings, and offices with no foot traffic. For residential uses, assume apartments and attached housing units (town homes, row homes, etc.) to be active. Figures (a), (b), (c), and (d) show a progression views down one street. Green highlighted areas indicate active uses while red highlighted areas indicate inactive uses. (1) inactive use – office with no apparent activity, (2) active use – restaurant with on street dining, (3) active use – street oriented retail. This street has approximately 60% of its street frontage devoted to active uses.
(a)
(b)
(c)
(d)
3. proportion active uses your side, within study area
28
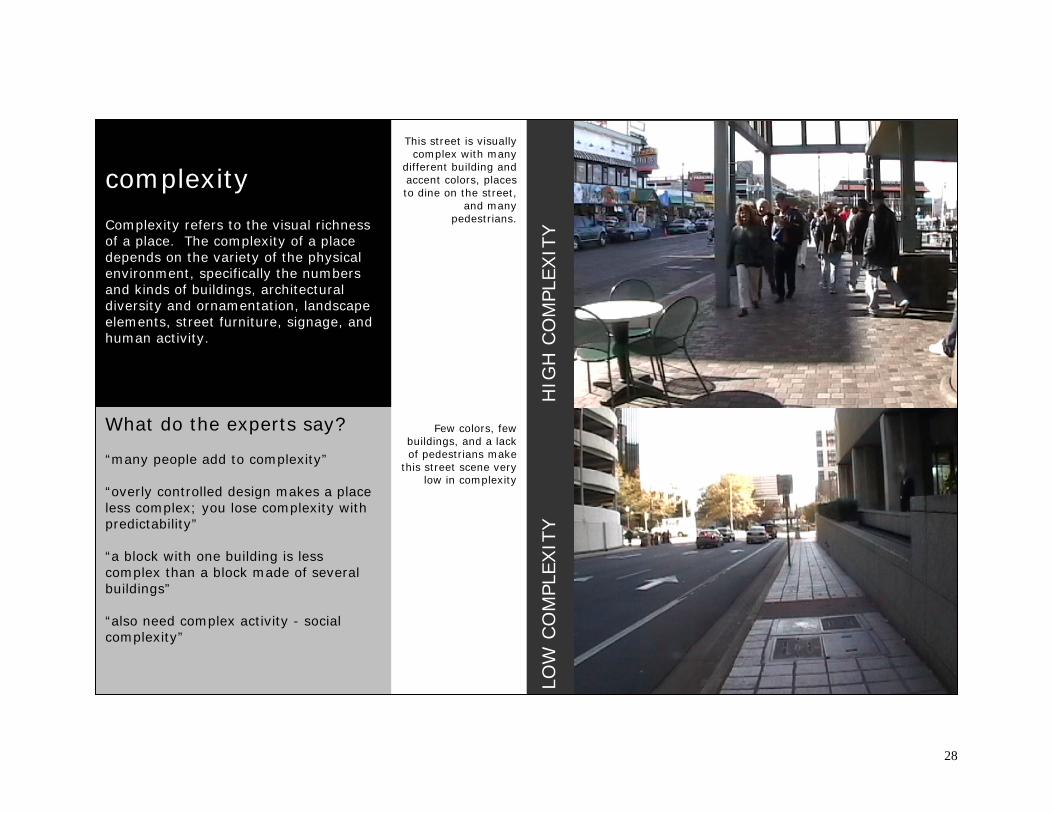
complexity Complexity refers to the visual richness of a place. The complexity of a place depends on the variety of the physical environment, specifically the numbers and kinds of buildings, architectural diversity and ornamentation, landscape elements, street furniture, signage, and human activity.
What do the experts say? “many people add to complexity” “overly controlled design makes a place less complex; you lose complexity with predictability” “a block with one building is less complex than a block made of several buildings” “also need complex activity - social complexity”
HIG
H C
OM
PLEXIT
Y
LOW
CO
MPL
EXIT
Y
This street is visually complex with many
different building and accent colors, places to dine on the street,
and many pedestrians.
Few colors, few buildings, and a lack of pedestrians make
this street scene very low in complexity

29
measuring complexity 1.
count
build
ings
(a)
(b)
(d)
(e)
(c)
Step 1 Walk entire length of study area (one block length or roughly 300 feet—120 steps), starting at the end of the block that puts buildings on your right. Step 2 While walking, count the number of buildings in the study area or that are in the distance but still prominent.
Note: Count buildings that are either on the street within your study area or buildings that are outside the study area but occupy at least 20% of the height of your field of vision as you walk with the buildings on your right.
Figures (a), (b), (c), (d), and (e) show a progression of views down one street. Use the figures to help you determine which buildings are within your immediate area or are prominent enough to be counted.
1. number of buildings both sides, beyond study area

30
measuring complexity 2.
count
colo
rs
Step 1 Walk entire length of study area (one block length or roughly 300 feet—120 steps). Step 2 As you walk, note on both sides of the street the different colors present on buildings and other street items. Step 3 Group the colors you observe into two types: basic building colors and accent colors. Note: Basic building colors are the primary colors of buildings that have been counted in the previous step. Accent colors contrast with basic building colors and can be used on building trim, street furniture, awnings, and signs. When counting colors, do not distinguish between several shades of the same color. Try to count only basic colors. Step 4 Record the number of unique basic building colors present on counted buildings. Step 5 Record the number of unique accent colors present within the study area. Note: Figures (a), (b), (c), and (d) show street scenes with different numbers of accent and building colors. (a) basic building colors: 2 (tan, red brick); accent colors: 2 (red, green) (b) basic building colors: 1 (off-white); no accent colors (c) basic building colors: 1 (orange); accent colors: 2 (tan, green) (d) basic building colors: 3 (brown, white, red brick); accent colors: 2 (green, brown)
(a)
(b)
(c)
(d)
2. number of colors both sides, beyond study area

31
measuring complexity 3.
reco
rd o
utd
oor
din
ing
Step 1 Walk entire length of study area (one block length or roughly 300 feet—120 steps). Step 2 As you walk, note on your side of the street instances where outdoor dining is provided. Note: Consider a place as having outdoor dining even if there are no people currently utilizing it. However, if a place has outdoor dining but appears to be closed (folded chairs and umbrellas), do not consider it an instance of outdoor dining. The outdoor dining must appear to be open to be counted. Step 3 Record the presence of outdoor dining – 1 for yes, 0 for no. Note: Figures (a), (b), (c), and (d) show examples of what can and cannot be considered outdoor dining. (a) open outdoor dining with no patrons - YES Although the tables are not being utilized, this place would be considered outdoor dining. (b) closed outdoor dining - NO The outdoor dining shown here has closed umbrellas and chairs on top of tables. This would not be considered outdoor dining. (c) and (d) open outdoor dining with patrons - YES These two places have outdoor dining with patrons. Count each even though one is partially enclosed.
(a)
(b)
(c)
(d)
3. presence of outdoor dining your side, within study area
32
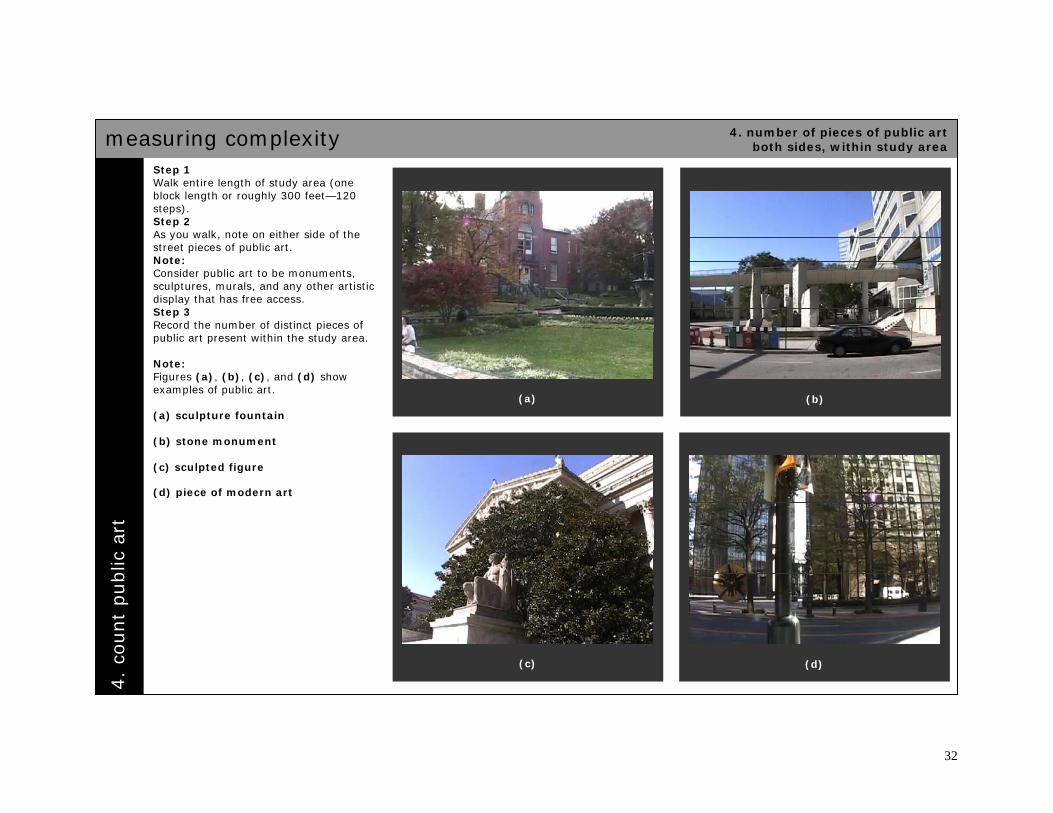
measuring complexity 4.
count
public
art
Step 1 Walk entire length of study area (one block length or roughly 300 feet—120 steps). Step 2 As you walk, note on either side of the street pieces of public art. Note: Consider public art to be monuments, sculptures, murals, and any other artistic display that has free access. Step 3 Record the number of distinct pieces of public art present within the study area. Note: Figures (a), (b), (c), and (d) show examples of public art. (a) sculpture fountain (b) stone monument (c) sculpted figure (d) piece of modern art
(a)
(b)
(c)
(d)
4. number of pieces of public art both sides, within study area
33
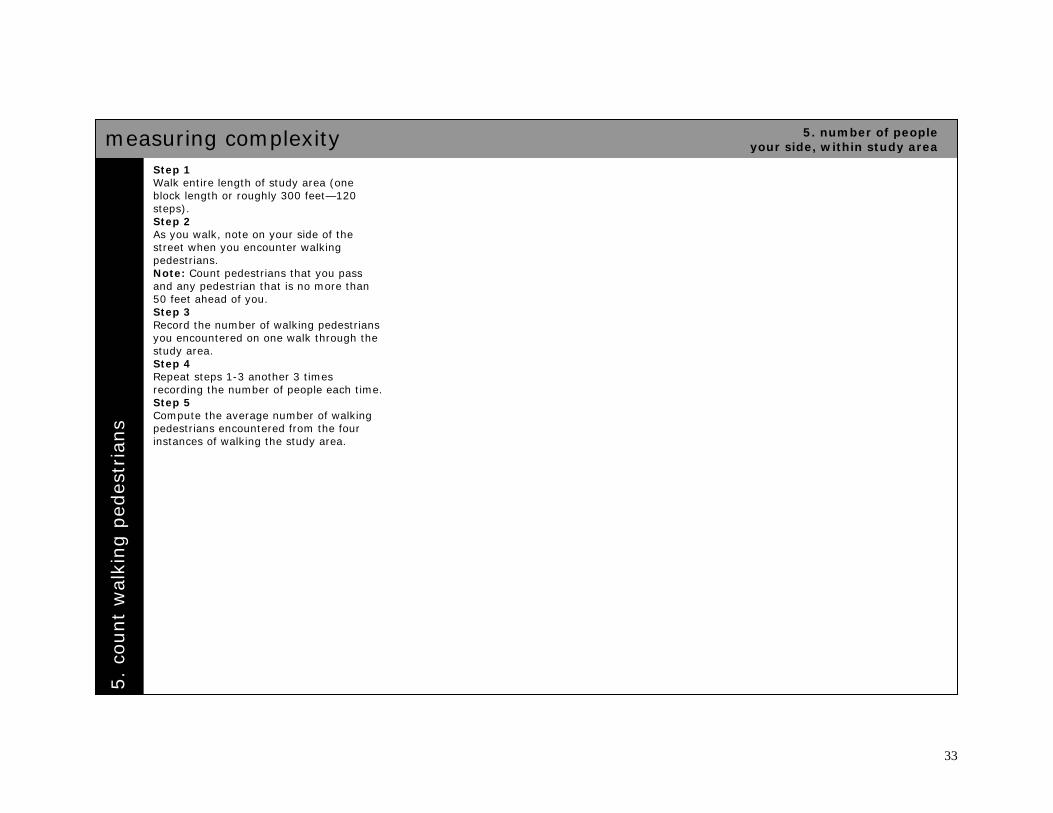
5.
count
wal
king p
edes
tria
ns
Step 1 Walk entire length of study area (one block length or roughly 300 feet—120 steps). Step 2 As you walk, note on your side of the street when you encounter walking pedestrians. Note: Count pedestrians that you pass and any pedestrian that is no more than 50 feet ahead of you. Step 3 Record the number of walking pedestrians you encountered on one walk through the study area. Step 4 Repeat steps 1-3 another 3 times recording the number of people each time. Step 5 Compute the average number of walking pedestrians encountered from the four instances of walking the study area.
measuring complexity 5. number of people your side, within study area
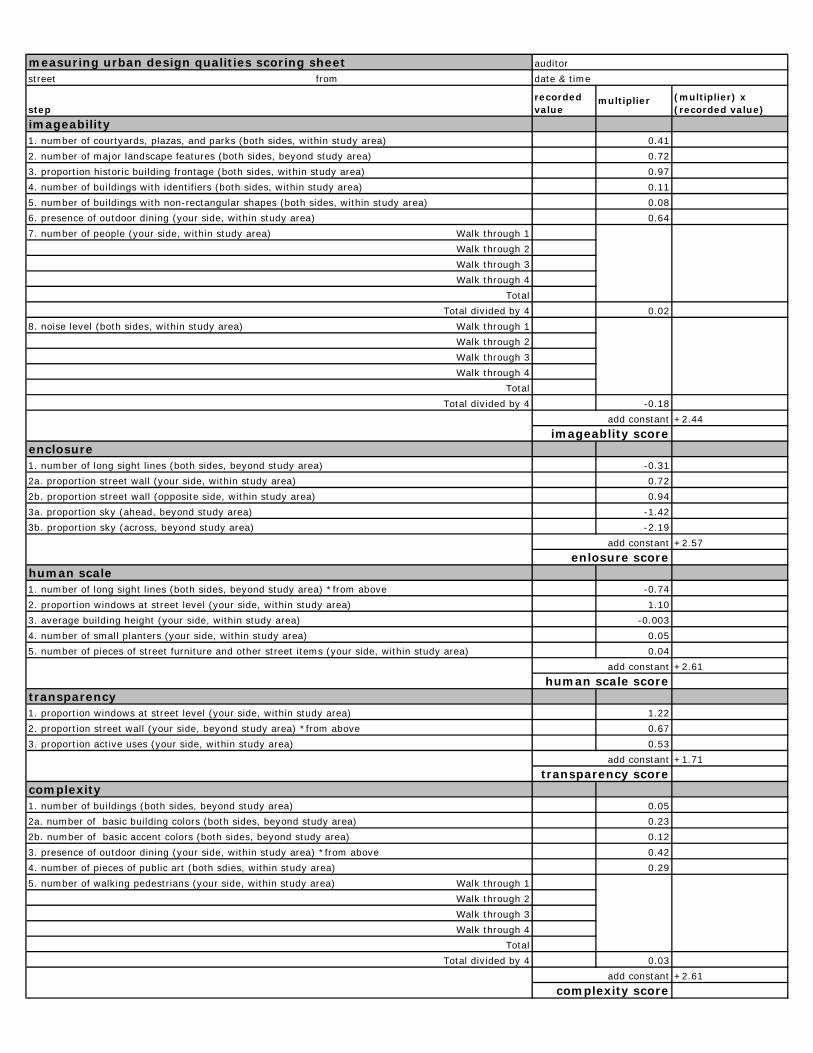
imageability0.41
0.72
0.97
0.11
0.08
0.64
Walk through 1
Walk through 2
Walk through 3
Walk through 4
Total
Total divided by 4 0.02
Walk through 1
Walk through 2
Walk through 3
Walk through 4
Total
Total divided by 4 -0.18
+2.44
-0.31
0.72
0.94
-1.42
-2.19
+2.57
human scale-0.74
1.10
-0.003
0.05
0.04
+2.61
1.22
0.67
0.53
+1.71
0.05
0.23
0.12
0.42
0.29
Walk through 1
Walk through 2
Walk through 3
Walk through 4
Total
Total divided by 4 0.03
+2.61
measuring urban design qualities scoring sheet auditor
date & time
recorded value
multiplier (multiplier) x (recorded value)step
street from
4. number of buildings with identifiers (both sides, within study area)
3. proportion historic building frontage (both sides, within study area)
2. number of major landscape features (both sides, beyond study area)
1. number of courtyards, plazas, and parks (both sides, within study area)
7. number of people (your side, within study area)
5. number of buildings with non-rectangular shapes (both sides, within study area)
6. presence of outdoor dining (your side, within study area)
8. noise level (both sides, within study area)
add constant
1. number of long sight lines (both sides, beyond study area) *from above
imageablity score
enlosure score
complexity
transparency
enclosure
3b. proportion sky (across, beyond study area)
3a. proportion sky (ahead, beyond study area)
2b. proportion street wall (opposite side, within study area)
2a. proportion street wall (your side, within study area)
1. number of long sight lines (both sides, beyond study area)
5. number of pieces of street furniture and other street items (your side, within study area)
4. number of small planters (your side, within study area)
3. average building height (your side, within study area)
2. proportion windows at street level (your side, within study area)
3. proportion active uses (your side, within study area)
2. proportion street wall (your side, beyond study area) *from above
1. proportion windows at street level (your side, within study area)
add constant
1. number of buildings (both sides, beyond study area)
2a. number of basic building colors (both sides, beyond study area)
2b. number of basic accent colors (both sides, beyond study area)
3. presence of outdoor dining (your side, within study area) *from above
4. number of pieces of public art (both sdies, within study area)
add constant
complexity score
5. number of walking pedestrians (your side, within study area)
human scale score
transparency score
add constant
add constant